Motorola Mobility P56KB1 Portable Cellular/ PCS CDMA Transceiver with Bluetooth User Manual Exhibit 8 Users Manual

Motorola Mobility LLC Portable Cellular/ PCS CDMA Transceiver with Bluetooth Exhibit 8 Users Manual
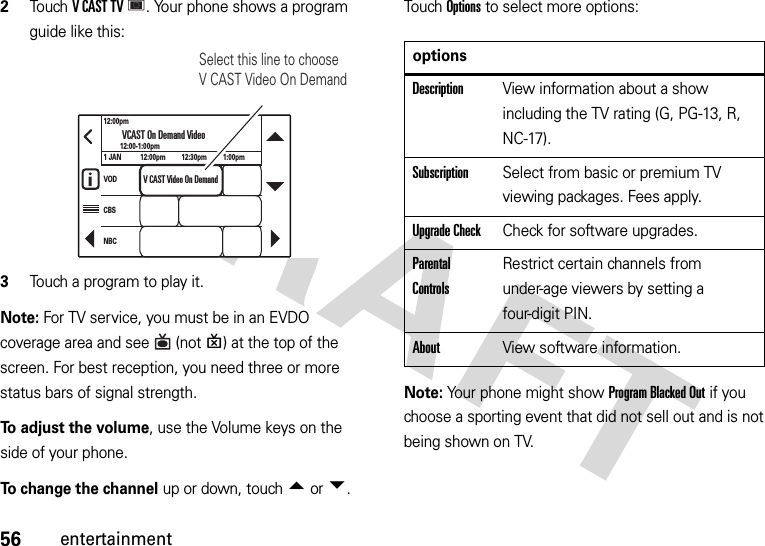
Exhibit 8 Users Manual

APPLICANT MOTOROLA INC.                                              FCC ID: IHDP56KB1   INSTRUCTION MANUAL  A representative version of the user's manual follows: Exhibit 8
motorola CRUSH™User’s Guide
1HELLOMOTOIntroducing your new MotorolaCRUSH™ CDMA wireless phone!Touch Screen Ease of Use – Just touch the large, high-resolution display to open all of your phone's features, including music, pictures, navigation, or incoming messages.Connect on So Many Levels – Whether it’s with work or friends, connect in all kinds of ways—voice (page 12), messaging (page 50), downloads (page 74), or swapping an optional memory card (page 23)—you’ll be on top of all the latest news and views to share! Rich Multimedia Experience – Use the robust music player to listen to your tunes (page 63). Slip a microSD card into the removable memory slot (page 23) to save many more songs! Your phone’s 2.0 megapixel camera lets you take great quality pictures you can save or send (page 72). You can even make a mini-movie with your phone’s camcorder (page 70).Handsfree Convenience – Use your phone with Bluetooth® wireless headsets (page 86) to answer and make calls or listen to music.
2Here’s a quick anatomy lesson.Power KeyTurn your phone on & off, end calls.To u ch ScreenVoice KeymicroSD Memory Card SlotCamera KeySpeaker (on back)3.5 mm Headset JackVolume KeysMicro USB PortMicrophoneLock KeyLock the touch screen & phone keys.
3 Motorola, Inc.Consumer Advocacy Office600 N US Hwy 45Libertyville, IL 60048www.hellomoto.comNote: Do not ship your phone to the above address. If you need to return your phone for repairs, replacement, or warranty service, please contact the Motorola Customer Support Center at:1-800-331-6456 (United States)1-888-390-6456 (TTY/TDD United States for hearing impaired)1-800-461-4575 (Canada)Certain mobile phone features are dependent on the capabilities and settings of your service provider’s network. Additionally, certain features may not be activated by your service provider, and/or the provider’s network settings may limit the feature’s functionality. Always contact your service provider about feature availability and functionality. All features, functionality, and other product specifications, as well as the information contained in this guide, are based upon the latest available information and believed to be accurate at the time of printing. Motorola reserves the right to change or modify any information or specifications without notice or obligation.MOTOROLA and the Stylized M Logo are registered in the US Patent & Trademark Office. All other product or service names are the property of their respective owners. The Bluetooth trademarks are owned by their proprietor and used by Motorola, Inc. under license. Microsoft, Windows, Windows Me, and Windows Vista are registered trademarks of Microsoft Corporation in the United States and other countries. © 2009 Motorola, Inc. All rights reserved.Caution: Changes or modifications made in the radio phone, not expressly approved by Motorola, will void the user’s authority to operate the equipment.Software Copyright NoticeThe Motorola products described in this manual may include copyrighted Motorola and third-party software stored in semiconductor memories or other media. Laws in the United States and other countries preserve for Motorola and third-party software providers certain exclusive rights for copyrighted software, such as the exclusive rights to distribute or reproduce the copyrighted software. Accordingly, any copyrighted software contained in the Motorola products may not be modified, reverse-engineered, distributed, or reproduced in any manner to the extent allowed by law. Furthermore, the purchase of the Motorola products shall not be deemed to grant either directly or by implication, estoppel, or otherwise, any license under the copyrights, patents, or patent applications of Motorola or any third-party software provider, except for the normal, non-exclusive, royalty-free license to use that arises by operation of law in the sale of a product.Manual Number: TBD-A
4contentscontentsmenu map . . . . . . . . . . . . . . . . . 6Use and Care . . . . . . . . . . . . . . . 7get started . . . . . . . . . . . . . . . . . 8about this guide  . . . . . . . . . . . 8battery  . . . . . . . . . . . . . . . . . . 8Battery Use & Safety  . . . . . . . .  8turn it on & off  . . . . . . . . . . .  12make a call . . . . . . . . . . . . . .  12answer a call. . . . . . . . . . . . .  12end a call. . . . . . . . . . . . . . . .  13store a phone number  . . . . .  13call a stored phone number  .  14see your phone number . . . .  14basics . . . . . . . . . . . . . . . . . . . . 15main screen  . . . . . . . . . . . . .  15touch cover . . . . . . . . . . . . . .  18adjust volume . . . . . . . . . . . .  19handsfree. . . . . . . . . . . . . . .  19airplane mode  . . . . . . . . . . .  20lock & unlock phone. . . . . . .  21manage memory . . . . . . . . .  23TTY operation. . . . . . . . . . . .  25voice privacy  . . . . . . . . . . . .  27personalize . . . . . . . . . . . . . . .  28sounds . . . . . . . . . . . . . . . . .  28talking phone . . . . . . . . . . . .  30voice recognition . . . . . . . . .  31answer options  . . . . . . . . . .  35flip open display . . . . . . . . . .  36wallpaper . . . . . . . . . . . . . . .  36clock format . . . . . . . . . . . . .  36banner . . . . . . . . . . . . . . . . .  37backlight. . . . . . . . . . . . . . . .  37brightness . . . . . . . . . . . . . .   38languages . . . . . . . . . . . . . .   38calls. . . . . . . . . . . . . . . . . . . . .   39redial a number . . . . . . . . . .   39automatic redial. . . . . . . . . .   39Visual Voice Mail . . . . . . . . .   40recent calls  . . . . . . . . . . . . .   40return missed calls  . . . . . . .   41restrict calls . . . . . . . . . . . . .   41insert special characters . . .   423-way calls. . . . . . . . . . . . . .   42in-call options  . . . . . . . . . . .   42emergency calls  . . . . . . . . .   43call times & data volumes . .   45DTMF tones  . . . . . . . . . . . .   46hearing aid. . . . . . . . . . . . . .   47
5contentstext entry . . . . . . . . . . . . . . . .   48change your text entry mode  49ABC mode. . . . . . . . . . . . . .   50iTAP® mode . . . . . . . . . . . .   50messages . . . . . . . . . . . . . . . .   51send a picture, video, or sound message . . . . . . . . . . . . . . .   51send a text message. . . . . .   52receive a message  . . . . . . .   52view sent messages . . . . . .   53view drafts. . . . . . . . . . . . . .   53erase messages . . . . . . . . .   53access your email . . . . . . . .   54use mobile IM. . . . . . . . . . .   54chat . . . . . . . . . . . . . . . . . . .   55entertainment . . . . . . . . . . . .   56V CAST Mobile TV . . . . . . . .   56music  . . . . . . . . . . . . . . . . .   59sound clips  . . . . . . . . . . . . .   70video clips . . . . . . . . . . . . . .   71photos  . . . . . . . . . . . . . . . . .  73fun & games. . . . . . . . . . . . .  75Web access  . . . . . . . . . . . . .  76tools . . . . . . . . . . . . . . . . . . . . .  78contacts . . . . . . . . . . . . . . . .  78calendar . . . . . . . . . . . . . . . .  82alarm. . . . . . . . . . . . . . . . . . .  83world clock . . . . . . . . . . . . . .  84notepad  . . . . . . . . . . . . . . . .  84calculators  . . . . . . . . . . . . . .  84connections. . . . . . . . . . . . . . .  85Bluetooth® connections. . . .  85network  . . . . . . . . . . . . . . . .  92service & repairs . . . . . . . . . . .  94SAR (IEEE) . . . . . . . . . . . . . . . .  95Safety Information . . . . . . . . .  98Industry Canada Notice . . . .  101FCC Notice. . . . . . . . . . . . . . .  101Warranty  . . . . . . . . . . . . . . . .  102Hearing Aids . . . . . . . . . . . . .   105WHO Information. . . . . . . . .   106Registration  . . . . . . . . . . . . .   106Export Law . . . . . . . . . . . . . .   106Recycling Information . . . . .   107Perchlorate Label . . . . . . . . .   107Privacy & Data Security . . . .   108Driving Safety. . . . . . . . . . . .   108index . . . . . . . . . . . . . . . . . . .   110
6menu mapmenu mapTo open the menu, open your phone and touchMenu at the top of your main screen.Visual Voice MailBluetoothCallsMusicMedia CenterSettings•My Verizon• Sounds•Display• Phone•Call• Messaging• Security• MemoryTo o l s• Calendar•Alarm Clock•Calculator• Tip Calculator• Notepad• Voice Commands• World ClockBrowserVCAST TVVZ NavV CAST VideosEmailTo return to the main screen at any point, press the Home keyB.Note: When you touch icons or menu items, your touch screen might send out small vibrations (also called haptics). Touch screen tips:Your touch screen goes dark when your phone is inactive, to conserve battery life. To reactivate the screen, pressB. To select menu items, touch the screen. To highlight an item, like a message in your inbox, drag across the item from left to right. To unhighlight, drag right to left.To move a long list, touch the bottom item in your screen and drag upward, just like pushing a piece of paper. If you accidentally open an item rather than moving the menu, go back and try touching the display in one corner and sliding to the opposite corner.For best results:•Touch the screen with your fingertip, not your fingernail or other object.•Touch the screen lightly.•Do not touch the screen with wet or dirty fingers.
7Use and CareUse and CareUse and CareTo care for your Motorola phone, please keep it away from:liquids of any kind dust and dirtDon’t expose your phone to water, rain, extreme humidity, sweat, or other moisture. If it does get wet, don’t try to accelerate drying with the use of an oven or dryer, as this may damage the phone.Don’t expose your phone to dust, dirt, sand, food, or other inappropriate materials.extreme heat or cold cleaning solutionsAvoid temperatures below 0°C/32°F or above 45°C/113°F.To clean your phone, use only a dry soft cloth. Don’t use alcohol or other cleaning solutions.microwaves the groundDon’t try to dry your phone in a microwave oven. Don’t drop your phone.
8get startedget startedabout this guidebatteryBattery Use & SafetyBattery Use & Safet yImportant: Handle and store batteries properly to avoid injury or damage. Most battery issues arise from improper handling of batteries, and particularly from the continued use of damaged batteries.DON’Ts• Don’t disassemble, crush, puncture, shred, or otherwise attempt to change the form of your battery.symbolsThis means a feature depends on your network, SIM card, or subscription, and may not be available everywhere. Contact your service provider for more information.CAUTION: Before using the phone for the first time, read the Important Safety and Legal Information included in the gray-edged pages at the back of this guide.This means a feature requires an optional accessory.symbols
9get started• Don’t let the phone or battery come in contact with water. Water can get into the phone’s circuits, leading to corrosion. If the phone and/or battery get wet, have them checked by your carrier or contact Motorola, even if they appear to be working properly.• Don’t allow the battery to touch metal objects. If metal objects, such as jewelry, stay in prolonged contact with the battery contact points, the battery could become very hot.• Don’t place your battery near a heat source. Excessive heat can damage the phone or the battery. High temperatures can cause the battery to swell, leak, or malfunction. Therefore:•Do not dry a wet or damp battery with an appliance or heat source, such as a hair dryer or microwave oven.•Avoid leaving your phone in your car in high temperatures.DOs• Do avoid dropping the battery or phone. Dropping these items, especially on a hard surface, can potentially cause damage.• Do contact your service provider or Motorola if your phone or battery has been damaged from dropping or high temperatures.Important: Use Motorola Original products for quality assurance and safeguards. To aid consumers in identifying authentic Motorola batteries from non-original or counterfeit batteries (that may not have adequate safety protection), Motorola provides holograms on its batteries. Consumers should confirm that any battery they purchase has a “Motorola Original” hologram.Motorola recommends you always use Motorola-branded batteries and chargers. Motorola mobile devices are designed to work with Motorola
10get startedbatteries. If you see a message on your display such as Invalid Battery or Unable to Charge, take the following steps:•Remove the battery and inspect it to confirm that it has a “Motorola Original” hologram;•If there is no hologram, the battery is not a Motorola battery;•If there is a hologram, replace the battery and retry charging it;•If the message remains, contact a Motorola authorized service center.Important: Motorola’s warranty does not cover damage to the phone caused by non-Motorola batteries and/or chargers.Warning: Use of a non-Motorola battery or charger may present a risk of fire, explosion, leakage, or other hazard.Proper and safe battery disposal and recycling: Proper battery disposal is not only important for safety, it benefits the environment. Consumers may recycle their used batteries in many retail or service provider locations. Additional information on proper disposal and recycling may be found on the Web:•www.motorola.com/recycling•www.rbrc.org/call2recycle/ (inEnglishonly)Disposal: Promptly dispose of used batteries in accordance with local regulations. Contact your local recycling center or national recycling organizations for more information on how to dispose of batteries.Warning: Never dispose of batteries in a fire because they may explode.032375o
11get startedinstall the battery  1Remove the battery door.2Insert the battery by aligning the metal contacts and then gently pressing it into place.3Replace the battery door.charge the batteryNotes for charging your phone’s battery:•When charging your battery, keep it near room temperature. Never expose batteries to temperatures below 0°C (32°F) or above 45°C (113°F) when charging.•New batteries are not fully charged.•New batteries or batteries stored for a long time may take more time to charge.•Motorola batteries and charging systems have circuitry that protects the battery from damage from overcharging.Plug the wall charger into your phone and an electrical outlet. Your phone may take several seconds to start charging the battery. When the battery is fully charged, your phone displays N.
12get startedYou can also charge your battery by connecting a cable from your phone’s micro USB port to a USB port on a computer. Both your phone and the computer must be turned on, and your computer must have the correct software drivers installed. conserve battery chargeUsing certain features can quickly deplete your battery’s charge. These features can include downloading music, using the camera, replaying video clips, watching streaming video or TV, and using Bluetooth® wireless connections.To conserve your battery’s charge:•Turn Bluetooth power off when not in use (see page 85).•Set the backlight to a short duration (see page 36).•Keep the touch cover lock on when your phone is not in use (see page 2).turn it on & off To turn on your phone, press and hold the Power key% until the display turns on.The phone will take several seconds to turn on. If prompted, enter your four-digit unlock code to unlock the phone.To turn off your phone, press and hold the Power key%.make a call  1With the flip open, touchDialpad.2Enter a phone number.3Touch Call.Messages Dialpad Menu Contacts
13get startedTip: To prevent accidental touches, your touch screen might go dark during a call. To reactivate it, pressB. answer a callWhen your phone rings and/or vibrates, open the phone to answer.If your phone is closed when you receive a call, unlock the Touch Key Lock (see page 18) and touchAnswer to answer the call with the handsfree speaker. end a callTo hang up, touch End Call.You can also end a call by closing the phone if you are not connected to a headset or a handsfree car kit and are not using the speakerphone. Closing the phone does not end these activities:•a data connection using a USB cable to connect the phone to a computer•wallpapers, screen savers, banners, and other similar applications•active BREW® download sessions, such as downloading music or ringtonesstore a phone number  1With the flip open, from the main screen, touchContacts.2TouchAdd New Contact to create a new contact, or touch a contact in your list to add or edit information.3Touch the contact’s details (such as Name) to enter or edit information. To move through the list of details, touch the bottom of your screen and drag upward, just like pushing a piece of paper. For help with entering text, see page 47.
14get startedcall a stored phone number  1With the flip open, from the main screen, touchContacts.2Touch the icon next to the name to call the contact.Note: If you store more than one phone number for a contact, you can open the list of numbers by touching the name. To edit a contact or set its default phone number, see page 78.see your phone number  1With the flip open, touchMenu to open the menu.2To u chSettings.3Touch Phone. Your phone number is at the top of the screen.
15basicsbasicsSee page 2 for a basic phone diagram.main screenThe main screen appears when you turn on the phone.Note: When the phone is closed, the main screen shows different feature shortcuts. You can unlock them by sliding down the Touch Key Lock on the right side of your phone (see page 18).To dial a number, touchDialpad. To return to the main screen at any point, press the Home keyB.To open the main menu, touchMenu:new message new voicemail new missed call11 1Thu, Mar 13 4:27pmMenu ContactsMessages DialpadVCast VideosVZ Nav EmailBrowserTools VCast TVMedia CenterMusic SettingsBluetoothVisual Vmail CallsBack ContactsMessages DialpadTo open an option, touch it.To close the menu, touch Back
16basicsNote: Your touch screen goes dark when your phone is inactive, to conserve battery life. To reactivate the screen, pressB. Your phone shows system status indicators across the top of the display (to see a glossary of icons, touchMenu, then touchSettings, touchPhone, and touchIcon Glossary):alert/indicator0Signal StrengthIndicates when the phone is in an EVDO coverage area (necessary for V CAST services). 1X indicates when the phone is in a 1x-RTT coverage area. The number of bars shows the strength of each signal, from 1 (weak) to 4 (strong).EV1X2RoamingIndicates when the phone is roaming off your home network. If you make a call while roaming, additional charges may apply.5SSLIndicates that application verification is via SSL during a download session.LData Call, Tethered, or Embedded WAP/BREW ApplicationShows during data calls, tethered mode, or WAP/BREW application.MDormantIndicates that the phone is dormant and the Internet connection is active.alert/indicator
17basics9No ServiceIndicates that the phone is in area with no service coverage.8TTYIndicates that the phone is in TTY mode.tVoice CallShows during an active voice call.VCAST TVShows when V CAST TV is available  or notP.To u ch  C o v e r  L o c kWhen your phone is closed, this shows that the main screen shortcuts are locked. You can unlock them by sliding down the Touch Key Lock on the right side of your phone (see page 18).alert/indicatorPE911Indicates that E911 is On.OLocation OnIndicates that Location is set to On.NBattery LevelShows battery strength. The more bars, the greater the charge.All Sounds OffIndicates that Master Volume is set to Off.Alarm OnlyIndicates that Master Volume is set to Alarm Only. rVibrate OnIndicates that Master Volume is set to Vibrate On.alert/indicator
18basicsadjust volumeTo decrease your phone’s main ringer volume, open your phone and press down on the Volume keys. The volume screen appears, and your phone switches to Vibrate Only, then Alarm Only, and, finally, All Sounds Off (to quickly switch to All Sounds Off, hold down on the Volume keys).To increase your phone’s main ringer volume, open your phone and press up on the Volume keys. The sMissed CallIndicates that a call was missed. gMessageShows when you receive a new message.xCalendar EventShows that you have calendar appointments.yNew VoicemailShows when a voicemail message is received.AAlarm OnShows when an alarm has been set.EBluetooth Power OnIndicates that Bluetooth® power is on. To conserve battery charge, turn off Bluetooth power when not in use (see page 85).alert/indicatorIBluetooth Connection ActiveIndicates that your phone is paired with another Bluetooth device.alert/indicatorMessages Dialpad Menu Contacts
19basicsvolume screen appears, and the volume setting increases.Tip: When you press the Volume keys and open the volume screen, you can touch the screen to choose a volume level.You can also press the Volume keys to:•turn off an incoming call alert with the phone closed.•change the earpiece or Bluetooth® device volume during calls with the phone open.handsfreeNote: The use of wireless phones while driving may cause distraction. Discontinue a call if you can’t concentrate on driving. Additionally, the use of wireless devices and their accessories may be prohibited or restricted in certain areas. Always obey the laws and regulations on the use of these products.handsfree speakerYou can use your phone’s handsfree speaker to make calls without holding the phone to your ear.Note: The handsfree speaker won’t work when your phone is connected to a handsfree car kit or headset.To turn on the speakerphone during a call, touch Speaker. Your phone plays an audio alert and shows SPEAKER ON. When the speakerphone is on, you can close your phone without ending the call.To turn off the speakerphone with your phone open, touch Speaker.If your phone is closed when you receive a call, unlock the Touch Key Lock (see page 18) and touchAnswer to answer the call with the handsfree speaker.
20basicsvolume settings for car kits or headsetsTo adjust volume of Bluetooth® wireless headsets or car kit accessories, press up or down on the Volume keys during an active call.airplane modeNote: Consult airline staff about the use of Airplane Mode in flight. Turn off your phone whenever instructed to do so by airline staff.Use airplane mode to turn off your phone’s calling features in locations where wireless phone use is prohibited. You cannot make or receive calls or use Bluetooth® devices in airplane mode, but you can use your phone’s other non-calling features.  1With the flip open, touchMenu to open the menu.2To u chSettings.3Touch Phone.4Drag the button below Airplane Mode to the right to turn it On (calling is blocked) or to the left to turn it Off (calling is active).Your phone shows a9 status icon to indicate that Airplane Mode is On.Tip: When you turn Airplane Mode to Off so that you can make calls again, your phone might take a few minutes to look for a network. To turn off Airplane Mode and look for a network right away, turn your phone off and back on again.lock & unlock phoneYou can lock your phone to keep others from using it. To lock or unlock your phone, you need the four-digit lock code (which is originally set to the last four digits of your phone number).
21basicsNote: You can make emergency calls on a locked phone (see page 42). A locked phone still rings or vibrates for incoming calls or messages, but you need to unlock it to answer.To manually lock your phone:   1With the flip open, touchMenu to open the menu.2TouchSettings.3Touch Security.4Enter your four-digit lock code.Tip: This code is originally set to the last four digits of your phone number.5Touch Done.6Touch Lock Phone Now.7Touch Yes to confirm.To unlock the phone, open the phone and touchUnlock. Then, enter your four-digit lock code and touchDone.To automatically lock your phone whenever you turn it off:  1With the flip open, touchMenu to open the menu.2TouchSettings.3Touch Security.4Enter the four-digit lock code.Tip: This code is originally set to the last four digits of your phone number.5Touch Done.6Drag the button below Power Up Lock to the right to turn it Onor to the left to turn it Off.
22basicschange lock codeYour phone’s four-digit lock code is originally set to the last four digits of your phone number. To keep your phone secure, you should change the code.  1With the flip open, touchMenu to open the menu.2To u chSettings.3Touch Security.4Enter the current four-digit lock code.5Touch Done.6Touch Change Passcode.7Enter a new four-digit lock code.8Touch Done.9Re-enter the new four-digit lock code.10Touch Done.how to use your phone while you’re on a call with the flip openDuring calls, your phone’s display locks to prevent accidental touches. Your display also becomes dim, then dark, to save power.• To unlock the display during a call, drag across the DRAG TO UNLOCK message, from left to right.• To reactivate a dim display, just touch the screen. If the display is completely dark, press a side key,B,or%. Then, to end a call, press%. manage memoryYou can store multimedia content, such as songs and photos, on your phone’s internal memory or on a removable microSD memory card. Memory cards are sold separately.1-888-390-6456DRAG TOUNLOCKEnd CallSwitchBluetoothMute Speaker
23basicsNote: If you download a copyrighted file to your phone and store it on your memory card, you can use the file only when your memory card is inserted in your phone. You cannot send, copy, or change copyrighted files.insert or remove a memory card  1Open the memory card slot cover on the side of your phone.2To insert the card: Slide it in, with the gold contacts facing down, until you feel it click into place. Your display should show MMC Inserted.To remove the card: Press it in until you feel it click, then release it. You should be able to drag it the rest of the way out.3Replace the slot cover.set memory for multimedia contentYou can set whether multimedia content that you download or create with your phone’s camera is stored in phone memory or on the memory card.  1With the flip open, touchMenu to open the menu.2TouchSettings.3Touch Memory.4Touch Pictures, Videos, or Audios.5Touch Automatic, Phone Memory, orCard Memory.Note: Automatic saves files to the memory card when one is inserted. If a memory card is not inserted, Card Memory is not available.view memory information  1With the flip open, touchMenu to open the menu.
24basics2To u chSettings.3Touch Memory.4Touch Phone Memory or Card Memory.Note: If you do not have a memory card in your phone, Card Memory is not available.5Under Phone Memory or Card Memory, touch My Pictures, My Videos, My Music, or My Sounds.Note: To erase all of the files on your memory card and reformat it, touch Format Card.move files between phone and memory cardYou can move files (such as pictures, video clips, sounds, and music files) to your memory card to free up phone memory.Caution: Moving a file to the memory card deletes it from the phone.To move photos, videos, or sound clips:  1With the flip open, touchMenu to open the menu.2TouchMedia Center.3Touch Tones & Sounds or Pictures & Videos.4Touch My Pictures, My Videos, or My Sounds.Files with a memory card icon are stored on the memory card. Files without a memory card icon are stored on the phone. Files with a0 are protected, and cannot be moved.5Touch the file you want to move.6Touch Send and then touch Memory Card or Phone Memory.7Touch Yes to confirm.
25basicsTTY operationYou can use an optional teletypewriter (TTY) device with your phone to send and receive calls. You must plug the TTY device into the phone’s micro USB port and set the phone to operate in one of three TTY modes.Notes:•A TTY is a communication device used by people who are hard of hearing or have a speech impairment. TTY does not work from mobile phone to mobile phone.•Use a TSB-121 compliant cable (provided by the TTY manufacturer) to connect the TTY device to your phone. •Set the phone to Medium volume level for proper operation. If you experience a high number of incorrect characters, adjust the volume as needed to minimize the error rate.•For optimal performance, your phone should be at least 12 inches (30 centimeters) from the TTY device. Placing the phone too close to the TTY device may cause high error rates.set TTY modeù When you set your phone to a TTY mode, it operates in that mode whenever a TTY device is connected.  1With the flip open, touchMenu to open the menu.2TouchSettings.3Touch Call.4Touch TTY Mode.TTY Mode can include these options:optionTTY FullTransmit and receive TTY characters.TTY + Talk (VCO)Receive TTY characters but transmit by speaking into microphone.
26basics5Touch a mode to select it.In a TTY mode, your phone displays the international TTY symbol and mode setting during a TTY call.return to voice modeTo return to standard voice mode, select TTY Off from the TTY Mode menu.voice privacyEncrypt outgoing voice calls and use secure channels when available:  1With the flip open, touchMenu to open the menu.2TouchSettings.3Touch Call.4Drag the button below Voice Privacy to the right to turn it Onor to the left to turn it Off.TTY + Hear (HCO)Transmit TTY characters but receive by listening to earpiece.TTY OffAll TTY modes are turned off.option
27personalizepersonalizesoundsTo set your phone’s master volume, see page 18.To set alerts for dropped calls or other network changes, see page 91.call, event, & alert soundsNote: You will not hear ringtones if the master volume is set to Vibrate Only, Alarm Only, or All Sounds Off.  1With the flip open, touchMenu to open the menu.2TouchSettings.3Touch Sounds.4Touch RingTones & Alerts.5Move to and touch the tone you want to change, such as Call Alerts or TXT Message.6Touch a ringtone sound.get ringtones  1With the flip open, touchMenu to open the menu.2TouchSettings.3Touch Sounds.4Touch RingTones & Alerts.5Move to and touch the tone you want to change, such as Call Alerts or TXT Message.6Touch Tone.7Touch Get New Ringtone.
28personalizeYour phone connects to the ringtone collections site. Follow the prompts on the screen to browse ringtone lists and to select and download a ringtone.Note: Normal airtime and/or carrier usage charges may apply.power on/off soundsSet whether your phone plays a tone when you turn the power on or off.Note: You will not hear these sounds if the master volume is set to Vibrate Only, Alarm Only, or All Sounds Off.  1With the flip open, touchMenu to open the menu.2To u chSettings.3Touch Sounds.4Touch Power On/Off.5Drag the button below Power On/Off to the right to turn it Onor to the left to turn it Off.keypad volumeNote: You will not hear these sounds if the master volume is set to Vibrate Only, Alarm Only, or All Sounds Off.  1With the flip open, touchMenu to open the menu.2TouchSettings.3Touch Sounds.4Touch Keypad Volume.5Drag the volume level or touch the volume bar to select Off, Low, Medium Low, Medium, Medium High, or High.
29personalizecall drop tone and other service alertsYour phone can beep to let you know when network conditions change.  1With the flip open, touchMenu to open the menu.2TouchSettings.3Touch Sounds.4Touch Service Alerts. You can turn on:•ERIto beep if your phone switches to a network that is not your home network.•Minute Beepto beep every 60 seconds during a call.•Call Connectto beep when an outgoing call connects.•Network Lost Toneto beep if your phone loses the network.talking phoneYou can set your phone to speak aloud when you touch keys, receive a call with caller ID available, or move through recent calls or contacts:  1With the flip open, touchMenu to open the menu.2TouchSettings.3Touch Sounds.4Touch Voice Readout.5To change whether your phone speaks Keypad Digits, Contact List Entries, Main Menu Entries,or Calls List Entries, drag the button below each option to the right to turn it Onor to the left to turn it Off.To change whether your phone speaks a name (for Contacts) or phone number when you receive a call,
30personalizetouchCaller ID Alert, and choose Ring Only, Caller ID Then Ring, or Caller ID Repeat.Note: If your phone is set to Vibrate Only, Alarm Only, or All Sounds Off, it does not speak when you receive a call.voice recognitionYour phone’s voice recognition feature lets you make calls and complete other actions by speaking commands to your phone.voice recognition tips•When speaking the name of a Contacts entry, say the name exactly as it is listed. For example, to call the mobile number for an entry named Bill Smith, say “Call Bill Smith mobile.” If you only have one number for Bill Smith, say “Call Bill Smith.”•Speak numbers at a normal speed and volume, and pronounce each digit distinctly. Avoid pausing between digits.•When you press the Voice key with your phone open, your phone says voice command prompts through the speakerphone. To change this, see page 33.voice commands  1With your phone open, press the Voice key on the right side of the phone (if your phone is closed, hold the Voice key).Your phone opens a list of voice commands and says Please say a command.2Say a voice command (If your phone is closed and unlocked, you can only say Call <Name or #> or Play <Playlist>):voice commandsCall <Name or #>For example, say “Call Bill Smith mobile” or “Call 8475551212.”
31personalizeSend <MSG Ty p e >Say “Send text” or “Send picture,” then:•the name of a Contacts entryor•a phone numberFor instructions on sending messages, see page 50.Go To <Shortcut>Open one of the following features by saying it after “Go To:” Contacts, Recent Calls, Messages, Media Center, Settings, Tools, Browser, V CAST Videos, My Music, or Redial. Note: If you don’t have any content (music, recent calls, and so on), the phone returns to the main screen.voice commandsCheck <Item>Show phone details by saying them after “Check:” Status, Voicemail, Messages, Missed Calls, Time, Signal Strength, Battery, or Volume.Contact <Name>Look up a Contacts entry by saying the contact’s name.Play <Playlist>Say the name of one of your playlists to play it.Note: If you don’t have any music, the phone returns to the main screen.My VerizonLaunch the Browser and open your account options.voice commands
32personalizevoice recognition settingsTo modify voice recognition settings:  1With the phone open, press and release the Voice key on the right side of the phone.2To u chSettings.3Touch the desired option:HelpShow help information for the voice recognition feature.voice recognition settingsDigit Dial ReadoutSet your phone to say numbers aloud as you touch them on the dialpad.voice commandsConfirmationIf your phone is not sure that it has correctly identified a name or number that you speak, it can display up to three choices and prompt you to confirm the correct one.You can control when choice lists appear:Automatic—Display a list of choices from multiple alternatives.Always Confirm—Always display a list of choices when there are multiple alternatives.Never Confirm—Never display a choice list. The phone chooses from the best alternatives.voice recognition settings
33personalizeTip: To see a brief description of a setting, touch the setting, then touchInfo.SensitivityYou can fine tune your phone’s ability to recognize voice commands. Select Most Sensitive, Recommended, or Least Sensitive.If sensitivity is too strict, your phone often rejects voice commands and displays “Please repeat ...” or “No match found.” Select Most Sensitive.If sensitivity is too forgiving, you experience false activations (indicating that the phone detects a wrong match). Select Least Sensitive.AdaptationFollow the prompts on your screen to improve recognition of spoken words. Adaptation takes about sixty seconds and requires you to be in a quiet place (no background noise).voice recognition settingsPromptsMode—Set whether your phone says Prompts, Readout (to read every word on the screen), or Tones Only.Audio Playback—Set how you want to hear prompts: Automaticdetection,Speakerphone, or through your Earpiece.Call AlertFor an incoming call, set whether you hear a Ring Only, Caller ID + Ring, or Name Repeat (repeat the name until you answer or the call goes to voicemail).voice recognition settings
34personalizeanswer optionsYou can use different ways to answer an incoming call.  1With the flip open, touchMenu to open the menu.2To u chSettings.3Touch Call.4Touch Answer Option.flip open displayYou can choose whether your phone shows the Main Menu or Home Screen when you open the flip:  1With the flip open, from the main screen, touchMenu.2TouchSettings.3TouchDisplay.4Touch Screen Upon Flip Open.5TouchMain Menu or Home Screen.wallpaperSet a picture or animation as a wallpaper (background) image on your main screen and your phone’s external display.  1With the flip open, touchMenu to open the menu.optionsFlip OpenAnswer by opening the phone.Auto w/ HandsfreeAutomatically answer an incoming call (works with headset, Bluetooth® connections, and when the phone is operating in handsfree mode).
35personalize2TouchSettings.3Touch Display.4Touch the button below Wallpaper.5Touch Picturesor Animations.Note: If your phone does not list any animations, you can download an animated wallpaper application as described on page 74.6Move to an image and touch it.7Touch Insert.clock formatSet how your phone shows the current time on the main screen (as shown on page 15):  1With the flip open, touchMenu to open the menu.2TouchSettings.3Touch Display.4Touch Clock Format.5Select the clock format including whether you want a 12-hour clock or a 24-hour clock.bannerCreate a heading to display on your phone’s main screen:  1With the flip open, touchMenu to open the menu.2TouchSettings.3Touch Display.4To enter text you want to show on your main screen, touch the blank space under Personal Banner.or
36personalizeTo show your service provider’s name on your main screen, drag the button below ERI Banner to the right to turn it On(show) or to the left to turn it Off(hide).backlightYour phone’s backlight turns on for a new button press, call, or other event. You can adjust how long the backlight stays on:  1With the flip open, touchMenu to open the menu.2To u chSettings.3Touch Display.4Touch Backlight.5Select how long you want the backlight to stay on.Tip:  To extend battery life, set the backlight to a short duration.brightnessSet the brightness of your phone display:  1With the flip open, touchMenu to open the menu.2TouchSettings.3Touch Display.4Touch Brightness.•Manual lets you set your phone’s brightness using a scroll bar.•Auto tells your phone to adjust automatically based on the brightness of your environment.
37personalizelanguages  1With the flip open, touchMenu to open the menu.2TouchSettings.3Touch Phone.4Touch Phone Settings.5Touch Language.6Touch English or Español.
38callscallsTo make and answer calls, see page 12.redial a number  1With the flip open, touchMenu to open the menu.2To u chCalls.3Move to the entry you want to call.4Touch the phone icon to the right of the entry.automatic redialWhen you receive a busy signal, your phone displays Call Failed, Number Busy. If you turn on Auto Retry, your phone redials the number for four minutes. If the call goes through, your phone rings or vibrates once, displays Redial Successful, and connects the call. To turn on Auto Retry:  1With the flip open, touchMenu to open the menu.2TouchSettings.3Touch Call.4Drag the button belowAuto Retry to the right to turn itOn.When automatic redial is turned off, you can manually activate it to redial a number. When you hear a fast busy signal and see Call Failed, touchRetry to automatically redial.
39callsVisual Voice MailNote: Your service provider may include additional information about using this feature.Your network stores the voicemail messages you receive. When you receive a voicemail message and your phone shows the voicemail message indicator:To  h e a r the voicemail message, touch Call Voicemail. You might need to enter your password, originally set to your 10-digit phone number (including your area code).To  d i s m i s s the voicemail alert, touch Dismiss. To check voicemail messages later, touch the voicemail message indicator in your home screen (shown on page 15), then touchCall Voicemail. You might need to enter your password, originally set to your 10-digit phone number (including your area code).To  s e e your voicemail list at any time, you can use Visual Voice Mail. Just touchMenu, then touchVisual Voice Mail to open a list of your voicemail messages. You can use this list to hear, erase, or manage your voicemail messages.recent callsYour phone keeps a list of the calls you received or dialed, even if the calls didn’t connect. When your phone adds a new call to the top of the list, it deletes an old call from the bottom of the list.  1With the flip open, touchMenu to open the menu.2TouchCalls.3Touch the icon to the left of an entry to choose Call, Send Message, View Contact Details, Save to Contacts, Lock, or Remove.Touch the icon to the right of an entry to call it.
40callsTo send or erase multiple contacts, highlight them by sliding across each one, from left to right. Highlighted contacts have a light background on the left side of the screen. To unhighlight a contact, drag across it from right to left. After you highlight the contacts you want, touchOptions.Tip: Want to clean up? To delete calls, select one or more by sliding across each one from left to right, then touch Remove.return missed callsYour phone keeps a record of your missed calls, and displays [Number] Missed Calls. When you see the missed call alert:To  r e t u r n the call, touch View Now, then touch the phone icon next to the call.To  d i s m i s s the missed call alert, touch View Later. If you want to see the call details later, touchMenu, thenCalls. Missed calls have a red x next to them.restrict callsYou can tell your phone to allow all calls, no calls, or only calls from numbers in your Contacts.  1With the flip open, touchMenu to open the menu.2TouchSettings.3TouchSecurity.4Enter your four-digit lock code (originally set to the last four digits of your phone number as described on page 22).Tip: Your call restrictions use a restriction code that is different from your lock code. To change your restriction code, touchChange Code under Restrictions in the Security menu. Enter your current restriction code (originally set to the last four digits of your phone number), then enter and confirm a new four-digit code.
41calls5Under Restrictions, touchUpdate Settings.6Enter the four-digit restriction code (originally set to the last four digits of your phone number).7TouchDone.8Under Calls, touch Incoming Calls or Outgoing Calls.9Touch Allow All, Block All, or Contacts Only.insert special charactersWhile entering a number, touch Options to select:Insert Pause—Tells your phone to pause for two seconds before it dials the next digit.Insert Wait—Tells your phone to prompt you for confirmation before it dials the next digit. 3-way callsYou can make conference calls.   1During a call, add another caller by touching Dialpad.2Dial the second person’s number and touch Call.3When the second person answers, touch Switch to connect the calls together.To disconnect the second person, touch Switch.To end both calls at once, touch End Call.in-call optionsDuring a call, you can touch shortcuts to open your Messages, Dialpad, Calls,or Contacts. You can also touch shortcuts to switch the call to Mute, the Speaker,or Bluetooth (Bluetooth device).
42callsNote: When you have a Bluetooth® device connected during a call, you also see Audio to Phone and Disconnect Bluetooth options. When you have TTY Mode on, you also see a TTY Setup option.emergency callsYour service provider programs emergency phone numbers, such as 911, that you can call under any circumstances, even when your phone is locked.  1With the flip open, touchDialpad.2Enter the emergency number.3Touch Call.Note: Emergency numbers vary by country. Your phone’s preprogrammed emergency number(s) may not work in all locations, and sometimes an emergency call cannot be placed due to network, environmental, or interference issues.AGPS & emergency callsWhen you make an emergency call, your phone can use Assisted Global Positioning System (AGPS) satellite signals to tell the emergency response center your approximate location.The AGPS feature has limitations, so always tell the emergency response center your best knowledge of your location. Remain on the phone for as long as the emergency response center instructs you.AGPS might not work for emergency calls if your local emergency response center does not process AGPS location information. For details, contact your local authorities.If your phone cannot find strong AGPS satellite signals, the location of the nearest cell tower in contact with your phone is automatically provided to the emergency response center.
43callsAGPS limitations & tipsTo improve AGPS accuracy:•Go outside and away from underground locations, covered vehicles, structures with metal or concrete roofs, tall buildings, and foliage. Indoor performance might improve if you move closer to a window, but some window sun-shielding films can block satellite signals.•Move away from radios, entertainment equipment, and other electronic devices that might interfere with or block AGPS satellite signals.AGPS uses satellites controlled by the U.S. government and is subject to changes implemented in accordance with the Department of Defense AGPS user policy and the Federal Radio Navigation Plan. These changes might affect AGPS performance. hiding your locationYour phone can use the automatic location information (ALI) feature, along with Assisted Global Positioning System (AGPS) satellite signals, to tell the network where you are physically located.When ALI is set to Location On, your phone displaysO. Services may use your known location to provide useful information (for example, driving directions, or the location of the nearest bank). Your phone prompts you when the network or a service asks for your location. You can refuse at this point.When ALI is set to E911 Only, your phone displaysP. The phone does not send location information unless you call an emergency phone number (such as 911).  1With the flip open, touchMenu to open the menu.2TouchSettings.3Touch Phone.4Touch Phone Settings.5Touch Location.
44calls6Touch Location On or E911 Only.call times & data volumesNetwork connection time is the elapsed time from the moment you connect to your service provider's network to the moment you end the call. This time includes busy signals and ringing.The amount of network connection time you track on your resettable timer may not equal the amount of time for which you are billed by your service provider. For billing information, contact your service provider.view and reset call timers & data volumes  1With the flip open, touchMenu to open the menu.2TouchCalls.3Touch the list title,ALL CALLS, to open the list of call options.4Touch CALL TIMERSor DATA COUNTER.5Move to a category to view details. To reset a timer or counter, touchReset.6Touch Yes to confirm.ALL CALLSMISSED CALLSRECEIVED CALLSDIALED CALLSCALL TIMERSDATA COUNTERTouch an option to select it.Touch ALL CALLS to open or close the options.
45callsset an in-call timer alertYou can set your phone to beep every minute that you are on a call. The person you are talking to does not hear the minute beep.  1With the flip open, touchMenu to open the menu.2TouchSettings.3Touch Sounds.4Touch Service Alerts.5Drag the button belowMinute Beep to the right to turn it On.DTMF tones Your phone sends Dual-tone multi-frequency (DTMF) tones for calling card calls or to navigate automated systems (such as banking by phone).If you know you need to change your phone’s DTMF tones:  1With the flip open, touchMenu to open the menu.2TouchSettings.3TouchCall.4Touch DTMF.5Touch Normal or Long.
46callshearing aidIf you use a hearing aid, set your phone to be compatible with your hearing aid.  1With the flip open, touchMenu to open the menu.2To u chSettings.3To u chCall.4Drag the button belowHearing Aid to the to the right to turn it On.Note: For more information about hearing aid compatibility, see “Hearing Aid Compatibility with Mobile Phones” on page 105.
47text entrytext entrySome features let you enter text, like this text message screen:Use the keypad that appears on your screen to type.Tip: To move the cursor back, just touch where you want the cursor to appear. You can also move the cursor by using the Volume keys or touching the on-screen arrows.If you turn the phone sideways (toward the left) while you are entering text, your phone shows a text keypad:Touch the text entry area for on-screen navigation arrows (9:). Resume typing to bring back the counter and text entry mode indicator.Text entry tips:•Try to touch the screen in only one place at a time. More than one touch at once may cause your phone to incorrectly interpret what you want.•Make each touch distinct and try not to hover over the screen. If you are too close to the screen after 21/1000I am going home soonAbc defAbc DoneCLR.,?1abc2def3ghi4jhl5mno6pqrs7tuv8wxyz90Enter up to 1000 characters.Enter a space f, change to uppercase 0, or delete characters CLR.Change your text entry mode.Move the cursor left or right.21/1000AbcqawsedxrftgyhujikolX 123!/ Space Donep!?zcvbnm,.I am going home soonCLRChange to uppercase.Start a new line.Delete.Cancel the message.
48text entrytouching it, your phone might detect it as more touches.change your text entry modeMultiple entry modes make it easy for you to enter names, numbers, and messages. The default mode is Abc.To change the entry mode when you are entering text, touch the key in the lower left corner. You can choose:To use uppercase letters when you are entering text in the Predictive or ABC modes, touch0. A symbol at the top of your screen indicates whether your phone will use no uppercase letters (abc), one uppercase letter at the beginning of each sentence (Abc), or all uppercase letters (ABC).entry modesiTAPTouch a key once for each letter and let the phone predict the word you are entering.ABCTouch a key multiple times for each letter, to cycle through the letters and the number shown on the key.123Touch a number key to enter the number.SymbolsTouch a symbol key to enter a symbol. To show more symbols, touch the arrows at the bottom of the dialpad.entry modes
49text entryABC modeABC is the standard text entry mode.To enter letters, touch a key once to insert the first letter on the key, twice for the second letter, and so on. If you pause briefly, your phone moves on to the next letter.To enter a space, touchf.To enter punctuation, touch1. Touch it multiple times to cycle through your options.To  d e l e t e the character to the left of the cursor, touchCLR. To keep deleting, holdCLR.exampleTo enter “home” you would touch4 twice (for “h”), touch6 three times (for “o”), then pause, touch6 once (for “m”), and touch3 twice (for “e”).Tip: When you enter three or more letters in a row, your phone might guess the rest of your word (it shows red letters after your cursor). To accept the guess, touch the screen. To enter a space instead, touchf.iTAP® modeThe iTAP text entry mode combines your key touches into common words.To enter letters, touch a key once for each letter.To enter a space, touchf.To enter punctuation, touch1.To delete the character to the left of the cursor, touchCLR. To keep deleting, holdCLR.exampleTo enter “home” you would touch 4 663. If the word in your display is not “home,” touchMore to show other word options for that key combination. Touch the one you want.Tip: When you enter three or more letters in a row, your phone might guess the rest of your word (it shows red letters after your cursor). To accept the guess, touchComplete. To remove the guess, touch it.
50messagesmessagessend a picture, video, or sound messageYou can insert pictures, videos, sounds, or Contacts entries in multimedia messages that you can send to email addresses or other compatible phones.  1With the flip open, from the main screen, touchMessages.2Touch New Message.3Touch Pic-Voice Message or Video Message.4To u chTO: to enter recipients.Touch a Contacts entry and then touch Add Number, or touchDial Pad, enter a new phone number, then touchDone.Note: You can repeat this step to add up to ten recipients.5TouchText, then enter the message text.6Touch Insert to add a subject, prewritten text, picture, video, or other object.Enter the text you want to insert and touchDone, or touch the item you want to insert and touchInsert.7Touch Send to send the message.
51messagessend a text message  1With the flip open, from the main screen, touchMessages.2Touch New Message.3Touch New TXT Message.4TouchTO: to enter recipients.Touch a Contacts entry and then touch Add Number, or touchDial Pad, enter a new phone number, then touchDone.Note: You can repeat this step to add up to ten recipients.5TouchText, then enter the message text.6Touch Insert Quick Text to insert prewritten text.Touch the text you want to insert.7Touch Send to send the message.receive a messageWhen you receive a message, your phone shows< and a New Message notification.To read the message now, touch View Now, then touch the message.To  d i s mi s s the new message alert, touch View Later. Your phone stores the message in your inbox and shows< with the number of unread messages.To open your inbox:  1With the flip open, from the main screen, touchMessages.2Touch Messages.3Touch a message to open it.When you open a message, your phone shows or plays any pictures, sounds, or videos inserted in it. You can use the Volume keys to adjust sound volume.
52messagesview sent messages  1With the flip open, from the main screen, touchMessages.2Touch Messages to open the Inbox.3Touch the list title, INBOX, to open your folder list.4Touch Sent.5Touch the message you want to view. view drafts  1With the flip open, from the main screen, touchMessages.2Touch Messages to open the Inbox.3Touch the list title, INBOX, to open your folder list.4Touch Drafts (this option only appears if you have saved draft messages).5Touch the message you want to view. erase messages  1With the flip open, from the main screen, touchMessages.2Touch Messages to open the Inbox.To open your Sent or Drafts folders, touch the list title, INBOX, then touchSent or Drafts.3 Highlight a message by sliding across it, from left to right. Highlighted messages have a light background on the left side of the screen. You can highlight more than one message.INBOXSENTLOCKEDTouch an option to select it.Touch INBOX to open or close the options.
53messagesTo unhighlight a message, drag across it, from right to left.4Touch Erase.5Touch Yes to confirm your choice.access your emailYou can access your Internet email account to read and send email from your phone.  1With the flip open, from the main screen, touchMessages.2TouchEmail.3Touch Mobile Emailor Mobile Web Email.4Follow the on-screen prompts to log into your account.use mobile IMAccess your Internet Instant Messaging account to exchange messages in real time with family and friends.  1With the flip open, from the main screen, touchMessages.2Touch Mobile IM.3Touch the name of your IM community.4Follow the on-screen prompts to log into your account.Note: If this procedure does not work for you, you can use the browser to open the URL (Web address) for your IM community. With the flip open, from the main screen, touchMenu, then touchBrowser to open the browser. TouchMenu, then touch Go to URL and enter the URL.
54messageschatAccess your Internet chat account to keep in touch with friends and family in real time.  1With the flip open, from the main screen, touchMessages.2Touch Chat.3Follow the on-screen prompts to log into your account.
55entertainmententertainmentHave fun with your phone!V CAST Mobile TVYour phone can deliver full-length programs from some of the most popular TV channels. During a program, you can still take calls and messages—when you hang up, go right back to enjoying your program. Get unlimited access to entertainment when you use V CAST Mobile TV. Visitwww.verizonwireless.com/vcast for more information. Sign up for V CAST Mobile TV by calling 1-800-2 JOIN IN, visit a Verizon Wireless Communications store, or subscribe directly from your phone.Note: V CAST Mobile TV is available only in the V CAST Mobile TV coverage area. See coverage area maps at www.verizonwireless.com. Additional fees may apply.manage your subscription  1With the flip open, touchMenu to open the menu.2TouchVCASTTV.3Touch Options.4Touch Subscription.Note: Normal airtime and/or carrier usage charges apply.watch live TV Shortcut: If your phone is closed and unlocked, just touchVCASTTV. 1With the flip open, touchMenu to open the menu.
56entertainment2To u chVCASTTV. Your phone shows a program guide like this:3Touch a program to play it.Note: For TV service, you must be in an EVDO coverage area and see  (notP) at the top of the screen. For best reception, you need three or more status bars of signal strength.To adjust the volume, use the Volume keys on the side of your phone.To change the channel up or down, touch Âor Ã.Touch Options to select more options:Note: Your phone might showProgram Blacked Out if you choose a sporting event that did not sell out and is not being shown on TV.12:00pm1 JANVODCBSNBC12:00pm 12:30pm 1:00pm12:00-1:00pmVCAST On Demand VideoV CAST Video On DemandSelect this line to choose V CAST Video On DemandoptionsDescriptionView information about a show including the TV rating (G, PG-13, R, NC-17).SubscriptionSelect from basic or premium TV viewing packages. Fees apply.Upgrade CheckCheck for software upgrades.Parental ControlsRestrict certain channels from under-age viewers by setting a four-digit PIN.AboutView software information.
57entertainmentrestrict channel accessTo control access to some channels based on what they are rated by the MPAA (such as NC-17 or R ratings), you can specify a PIN:  1With the flip open, touchMenu to open the menu.2TouchVCASTTV.3Touch Parental Controls to turn them On.4When prompted, enter your four-digit PIN.5Touch Parental Control Ratings.6When prompted, enter your PIN to start setting controls for TV, movies, or audio files.Note: If you forget your PIN, contact your service provider for help.download V CAST videos  1With the flip open, touchMenu to open the menu.2TouchVCASTVideos.3Touch a video category.4Touch a video program (selection) to watch or download it.Note: Normal airtime and/or carrier usage charges apply.Tip: To get the best reception for V CAST Videos, keep your phone open.
58entertainmentmusicV CAST Music with RhapsodyV CAST Music with Rhapsody is a digital music service that lets you listen to millions of songs from thousands of artists for one low monthly price. Discover new and old favorites in an extensive music catalog. Download V CAST Music with Rhapsody software to your Windows PC to sync tracks, albums, and playlists to your new compatible phone, while managing your existing PC music library all in one place.For more information about this service, visitwww.verizonwireless.com/music.download V CAST music directly to your phoneNote: Your phone must be in an EVDO coverage area to download music. If you are in an EVDO coverage area, your phone displays the EV symbol ( ) with at least one signal strength bar in the status area of the screen (see page 16).When you purchase music using your V CAST Music with Rhapsody-capable phone*, you receive a second copy of the music that you can download to your PC using V CAST Music with Rhapsody on your PC.  1With the flip open, touchMenu to open the menu.2TouchMusic.3Touch VCASTMusic.4Browse or search the catalog to find the songs you want.To preview a song, highlight the song and then touch Preview.5To buy a song, highlight the song and touch Buy.EV1X* Per-song charges apply.
59entertainmentAfter you touch Buy, your phone shows song details and price.6Touch Buy to confirm your selection.7When you see a confirmation that your purchase was successful and your music is available for download, touch OK to continue, or touch Later.8When prompted to select a storage location, touch Phone Memory or Memory Card to start downloading.Your phone displays a status indicator. After downloading, you must wait for the phone to acquire the content license.9Touch Play to play the downloaded song immediately.download music to your PC  Note: V CAST Music Manager works only with Microsoft® Windows® XP™ and Windows Vista™ with Windows Media Player 10 or later. Mac OS is not supported.1On your PC, open V CAST Music Manager. Tip: Don’t have V CAST Music Manager? Download it for free at http://www.vzam.net/vcastmusic/2Follow the prompts to log in and download the music your purchased.sync music between your PC and phoneYou can use V CAST Music with Rhapsody to transfer songs from a computer to your phone through a USB cable connection. You can purchase these songs using V CAST Music with Rhapsody or import them from your CD collection.
60entertainmentcomputer system requirementsTo transfer music from a computer to your phone, you need the Windows XP® or Windows Vista® operating system and an active internet connection.Note: You need a USB cable for syncing. Motorola Original USB data cables and supporting software may be sold separately. Check your computer or hand-held device to determine the type of cable you need.To download V CAST Music with Rhapsody for free:   1From your computer’s web browser, go to http://www.verizonwireless.com/music.2Follow the on-screen instructions to select, download, and install V CAST Music with Rhapsody for your phone.downloading and purchasing music using V CAST Music with RhapsodyTo download copies of music purchased using your phone:  1On your computer, launch V CAST Music with Rhapsody.2Click on the “Log In” button, then log in by entering your mobile phone number and password.For each V CAST Music with Rhapsody track you’ve downloaded to your phone, you can download a copy to your computer at no additional charge. Song tracks available for free download will pop up when you complete the login process. 3Check the boxes beside the songs you wish to download.4Select “Download Tracks.”Downloading can take several minutes.
61entertainment5When downloading is complete, click on the “My Library” tab in the V CAST Music with Rhapsody” window to find and play the song(s) you downloaded.To buy music from the V CAST Music Store:  1On your computer, launch V CAST Music with Rhapsody.2In the V CAST Music with Rhapsody window, click on the “BUY MUSIC” tab.3Click on the “Log In” button, then log in by entering your mobile phone number and password.If you have not registered yet, click on the “Register” button, then follow the instructions to register and get your password.4Browse or search the store to find the songs you want.To preview a song, click on the headset icon next to the song title.5To buy a song, click on the “Purchase” or “Buy” button next to the song title.6Repeat steps 4 and 5 to add more songs to your shopping cart.7When you finish shopping, click on “MY PURCHASES,” follow the on-screen instructions to complete your purchase(s) and download the song(s) you have purchased.Downloading can take several minutes. 8When downloading is complete, click on the “My Library” tab in the V CAST Music with Rhapsody” window to find and play the song(s) you downloaded.To transfer the songs to your phone, see “sync music from your PC to your V CAST Music with Rhapsody phone” on page 62.
62entertainmentimport songs from an audio CD  1On your computer, launch V CAST Music with Rhapsody.2Insert an audio CD into your computer’s CD ROM drive.3If the “Music on My CD” window is not already open in V CAST Music with Rhapsody, click on the “MUSIC ON MY CD” tab.The names of all the tracks on the CD are listed in the window. (You may need to enter artist name and other information for the tracks.)4Select the tracks you want to import or “Rip” by clicking the check box next to them.Select all tracks by checking the “Title” check box at above the list of tracks.5Click on the “Rip CD” button.The songs you selected are imported to the V CAST Music Manager.To transfer the songs to your phone, see “sync music from your PC to your V CAST Music with Rhapsody phone” on page 62.sync music from your PC to your V CAST Music with Rhapsody phone  1 On your computer, launch V CAST Music with Rhapsody.2Connect the USB cable (purchased separately) to your phone and to an available USB port on your computer.If this is the first time you have connected the phone to a computer with a USB cable, additional software drivers may be installed.
63entertainmentThe SYNC MUSIC V CAST MOBILE PHONE screen appears on your phone. Your phone should display Connected.3 On your computer, click on the “Sync List” button to open an empty sync list.4 On your computer, drag each song you want to sync “My Library” and drop it on the Rhapsody mobile phone, listed under the “Sources” tab.5 On your computer, click “Sync now.”You computer syncs the songs from the sync list with your phone.6 On your phone, when synchronization is complete, press the Power key%.7Disconnect the cable from the phone and the computer.You can now use your phone’s music player to play the songs you transferred from your computer.play music Shortcut: If your phone is closed and unlocked, just touchMusic. 1With the flip open, touchMenu to open the menu.2TouchMusic.3Touch My Music.The Search, Shop, and Help options appear on all screens in the Music Library.The Music Library includes these categories:optionGenresFind & play music from a specific genre (type of music) such as rock, jazz, or blues.ArtistsFind & play music by a specific artist.
64entertainment•Press the Home keyB from any Music Library screen to return to the main screen.•On screens that show a list of items (such as album titles), enter letters in the Go To area to jump directly to items beginning with those letters.play an album  1With the flip open, touchMenu to open the menu.2TouchMusic.3Touch My Music.4Touch Genres, Artists, or Albums.From the GENRES screen:  1Touch the genre you want.2Touch artist you want.3Touch album you want to play.4Touch Play album.From the ARTISTS screen:  1Touch the artist.AlbumsFind & play music from a specific album.Note: Even if you have only one song from an album, you will see a listing for that album.SongsFind & play specific songs.PlaylistsPlay songs from personalized playlists that you create.InboxView alert notifications received when new music from a selected artist is available for download.Play AllPlay all songs in the Music Library in list order.ShufflePlay songs in the Music Library in random order.option
65entertainment2Touch the album you want to play.3Touch Play album.From the ALBUMS screen:  1TouchÑ to the right of an album to select from these options:2Touch Play album.play a song  1With the flip open, touchMenu to open the menu.2TouchMusic.3Touch My Music.4Touch Genres, Artists, Albums. or Songs.optionPlay albumPlay the selected album, beginning with the first song.Listeners also likedFor music that you’ve downloaded, see music recommendations.Lock albumLock album so you do not accidentally delete it.Erase albumRemove the selected album from the Music Library.Album infoSee more info about the album.Rebuild Library DatabaseUnder normal conditions, the Music Library is maintained automatically. If the library behaves unexpectedly, use this option to re-initialize it. This option deletes the existing library and creates a new one that contains all currently installed music.option
66entertainmentFrom the GENRES screen:  1Touch the genre you want.2Touch artist you want.3Touch album you want to play.4Touch Play album.From the ARTISTS screen:  1Touch the artist.2Touch the album you want to play.3Touch Play album.From the ALBUMS screen:  1Touch the album.2Touch the song you want to play. The song plays only once, followed by the next song in the list.orTo u chÑ to select other options (see page 67).From the SONGS screen:Touch the song you want to play. (The song plays only once, followed by the next song in the list.)orTouchÑ to select other options (see page 67).play all songs on phone  1With the flip open, touchMenu to open the menu.2TouchMusic.3Touch My Music.4Touch Play All.
67entertainmentmusic library options menusWhen you touchÑ to the right of a song, your phone displays these options:When you touchÑ while a song is playing, your phone displays these options:Note: The song is paused when you touchÑ.optionAdd to playlistAdd the selected song to a playlist.Listeners also likedFor music that you’ve downloaded, see music recommendations.Lock SongLock a song so you do not accidentally delete it.Erase songRemove the selected song from the Music Library.Erase all songsRemove the selected songs from the Music Library.Song InfoView the following information for the song: title, artist, album title, genre, copyright year, duration, and track number (if available).Rebuild Music DatabaseUnder normal conditions, the Music Library is maintained automatically. If the library behaves unexpectedly, use this option to re-initialize it. This option deletes the existing library and creates a new one that contains all currently installed music.optionPlay AllPlay all songs in the Music Library in list order.ShufflePlay songs in the Music Library in random order.option
68entertainmentcreate a playlist  1With the flip open, touchMenu to open the menu.2To u chMusic.3Touch My Music.4Touch Playlists.If playlists already exist, touchÑ to the right of a playlist, then move down the options to touchCreate Playlist.5Enter a title for the playlist.6Touch the songs you want to add to the playlist.7When finished adding songs to the playlist, touch Done.play music from a playlist  1With the flip open, touchMenu to open the menu.2TouchMusic.3Touch My Music.4Touch Playlists.To play an entire playlist, touch the playlist to start the first song. The music player plays all songs in that playlist.To play a song from a playlist, touch the playlist, then move to the song you want and touch Play.My MusicGo back to your Music Library.ShopConnect to the V CAST Music catalog to download more songs.Listeners also likedFor music that you’ve downloaded, see music recommendations.HelpGet help with your media player.option
69entertainmentNote: The first song in the playlist starts playing while you move through the playlist to select the song you want.edit a playlist  1With the flip open, touchMenu to open the menu.2TouchMusic.3Touch My Music.4Touch Playlists.5Touch the playlist you want to edit.6Touch Edit.7Edit the playlist as desired.To change the order of songs in your playlist, drag the songs into the order you want.To delete a song, touch the song and then touch Remove.8Press the Home keyB to return to the main screen.listening tipsWhen you’re on the go, you can listen to your music through a wired headset or Bluetooth® stereo headphones (see page 86).When you are not using a wired or wireless headset, music is played through the phone’s speaker.sound clipsYou can create a sound clip that you can play back later.record a sound clip Shortcut: To create a sound clip quickly, flip open the phone, press and hold the Voice key (on the right side of the phone), then touch OK to start recording. Touch Stop to stop recording.
70entertainment 1With the flip open, touchMenu to open the menu.2To u chMedia Center.3Touch Tones & Sounds.4Touch My Sounds.5Touch Record New.6To start recording, touch OK.7To stop recording, touch Stop. The sound clip is saved in your My Sounds list, and is named after the date and time you recorded it.8To record another clip, touchOK. To exit, press the Home keyB.play a sound clip  1With the flip open, touchMenu to open the menu.2To u chMedia Center.3Touch Tones & Sounds.4Touch My Sounds.5Touch the sound clip to play it. Sound clips are named after the date and time you recorded them.video clipsYou can record a video clip and send it in a multimedia message.Your camera lens is on the back of your phone. To  g e t  the clearest video clips, wipe the lens clean with a soft, dry cloth before you capture a video clip.record & send a video clip Shortcut: To quickly open the video viewfinder, press and hold the Camera keye on the right side of your phone. 1With the flip open, touchMenu to open the menu.
71entertainment2TouchMedia Center.3Touch Pictures & Video.4Touch Record Video.Your phone shows the video viewfinder.5Point the camera lens at the subject.6To start recording, press the Camera keye on the right side of your phone.7To stop recording, press the Camera keye again. The video clip is saved in your My Videos list, and is named after the date and time you recorded it.Your phone shows two buttons (Sendand Erase) for a moment, then returns to the video viewfinder. Your video clip appears in a red box next to the viewfinder.8With your flip open, touch your video clip (in the red box next to the viewfinder). The video clip plays, and you can touch it to show these buttons:•Send opens a message with the video clip inserted.•Info shows details about the video clip file.•Erase deletes the video clip.Tip: To return to the viewfinder, touch the red box next to your video clip. To record a new video clip, just press the Camera keye. Each new video clip you record appears in a new red box next to the viewfinder.play a video clipTo play a video clip stored on your phone:  1With the flip open, touchMenu to open the menu.2TouchMedia Center.
72entertainment3Touch Pictures & Video.4Touch My Videos.5Touch the clip you want to play. While the clip is playing, you can touch these options (files with a0 are protected, and cannot be sent or erased):•Send opens a message with the video clip inserted.•Mute silences the video clip sound.•Info shows details about the video clip file.•Erase deletes the video clip.photosYour phone has a 2.0 megapixel digital camera that takes photos at 1280 x 1600 pixels resolution. You can take a photo and send it in a multimedia message.Your camera lens is on the back of your phone. To  g e t  the clearest photos, wipe the lens clean with a soft, dry cloth before you capture a photo.take & send a photo Shortcut: To quickly open the photo viewfinder, press and release the Camera keye on the right side of your phone. 1With the flip open, touchMenu to open the menu.2TouchMedia Center.3Touch Pictures & Video.4Touch Take Picture.Your phone shows the photo viewfinder.5Point the camera lens at the subject.6To take the photo, press the Camera keye on the right side of your phone. The photo is saved in your My Pictures list, and is named after the date and time you took it.Your phone shows two buttons (Sendand Erase) for a moment, then returns to the photo viewfinder.
73entertainmentYour photo appears in a red box next to the viewfinder.7With your phone open, touch your photo (in the red box next to the viewfinder). The photo opens, and you can touch it to show these buttons:•Send opens a message with the photo inserted.•Set As lets you set the photo as your wallpaper or as a picture ID for a Contact.•Info shows details about the photo file.•Erase deletes the photo.Tip: To return to the viewfinder, touch the red box next to your photo. To take a new photo, just press the Camera keye. Each new photo you take appears in a new red box next to the viewfinder.open a photo Shortcut: If your phone is closed and unlocked, just touchMy Pics. 1With the flip open, touchMenu to open the menu.2TouchMedia Center.3Touch Pictures & Video.4Touch My Pictures.5Touch the picture you want to open. With a photo open, you can:• touch Á to play your photos as a slide show.• drag right to left to open the next photo.•touchSend to open a message with the photo inserted (files with a0 are protected, and cannot be sent or erased).•touchSet to set the photo as your wallpaper or as a picture ID for a Contact.•touchInfo shows details about the photo file.•touchErase to delete the photo (files with a0 are protected, and cannot be sent or erased).
74entertainmentdownload a picture  1With the flip open, touchMenu to open the menu.2To u chMedia Center.3Touch Pictures & Video.4Touch Get New Pictures.5Touch Get New Application to connect to the picture catalog.Note: Normal airtime and/or carrier usage charges apply.Tip: You can view pictures by sliding across the screen or by touchingPlay for a slide show. fun & gameslaunch a game or application  1With the flip open, touchMenu to open the menu.2TouchMedia Center.3Touch Games.4Touch the game or application you want to launch or touch Get New Application to connect to the catalog.download a ringtone, game, or application  1With the flip open, touchMenu to open the menu.2TouchMedia Center.3You can download different types of files:
75entertainment•To download ringtones, touchTones & Sounds, then touchGet New Ringtones.•To download games, touchGames.•To download other applications, touchBrowse & Download.4Touch Get New Application.5Select an application and pricing option. Note: Normal airtime and/or carrier usage charges apply.Web accessNote: Web access is a subscription service. Contact your service provider for more information.To open the Web browser:  1With the flip open, touchMenu to open the menu.2TouchBrowser.Note: Your browser supports these types of Web pages: W3C HTML 4.01 Spec, W3C XHTML Basic, OMA XHTML Mobile Profile 1.2, and WAP 2.0.To go to a Web site:In the browser, touchwww, then enter the site’s URL address using the text entry screen.Tip: How do you move around on a Web page? Some sites are not made to be viewed on a mobile device and may be bigger than your screen, so you have to scroll around on a page. Touch and slide across the screen. The screen image scrolls in the direction that you slide.
76entertainmentHere’s how your browser looks when you hold your phone upright:To see the browser’s landscape view instead, turn your phone sideways.MenuwwwHeadlinesWeatherSportsNational NewsTo open a link, slide the pointer to it, then touch the pointer.Go back one page.Go to your home page.Enter a Web page address.Open your favorite links and history.www MenuHeadlinesWeatherSportsNational NewsTo open a link, slide the pointer to it, then touch the pointer.Go back one page.Go to your home page.Open your history.Refresh the page.Open your favorites.Enter a Web page address.Open the browser menu.
77toolstoolscontactsTo store or call a contact, see page 13.create emergency contacts & informationIf you are injured, emergency workers might check your phone for emergency contact information. Store the phone numbers for relatives or friends as emergency contacts.Note: Before you assign emergency contacts, create standard Contacts entries for the emergency contacts.  1With the flip open, from the main screen, touchContacts.2Touch In Case of Emergency.3Touch Assign ICE Contact 1.4Touch a Contacts entry to assign it as your primary contact.To assign contacts to call if this contact is unavailable, touch Assign ICE Contact 2 and Assign ICE Contact 3.To add personal information that may assist emergency workers, touchPersonal Info 1, Personal Info 2, or Personal Info 3.add and call favorite contacts  1With the flip open, from the main screen, touchContacts.2Touch the name of the contact you want.3Touch Set as favorite.
78tools4Touch Yes to confirm.Tip: To open your favorite contacts, touchContacts, then touch the list title, CONTACT LIST, and touchFAVORITES LIST. To call a favorite, touch the icon next to it.speed dial contactsTo  set a speed dial number for a contact:  1With the flip open, from the main screen, touchContacts.2Touch the list title, CONTACT LIST, to open options.3Touch SPEED DIAL to open your speed dial list.4Touch the speed dial number you want to set.5Touch the contact for the speed dial number.To call a speed dial contact:   1With the flip open, from the main screen, touchDialpad.2To call speed dial 1-9, touch and hold the number. To call speed dial 10-99, touch the first number, then touch and hold the second number.Tip: To turn off speed dial, touchMenu to open the menu. TouchSettings, then touch Calls. Drag the button below OneTouchDial to the left to turn it Off.edit a contact  1With the flip open, from the main screen, touchContacts.2Touch the entry to open it.3TouchEdit.4Edit the contact information.CONTACT LISTFAVORITES LISTSPEED DIALTouch FAVORITES LIST to select it.Touch CONTACT LIST to open or close the options.
79toolsTip: If you store more than one number in a contact, you can set the default number by touching the circle to the right of a number.5Touch Save.send or erase a contact  1With the flip open, from the main screen, touchContacts.2To send or erase one contact, open it by touching it.To send or erase multiple contacts, highlight them by sliding across each one, from left to right. Highlighted contacts have a light background on the left side of the screen. To unhighlight a contact, drag across it from right to left. After you highlight the contacts you want, touchOptions.3To erase the contacts, touch Erase. Then, touch Yes to confirm.To send the contacts, touch Send vCard. Then, touch Send Via Bluetooth and add or choose a Bluetooth® device (for more details, see page 84).set the default number for a contactSet the default number for a contact that has more than one phone number:  1With the flip open, from the main screen, touchContacts.2Touch the entry to open it.3TouchEdit.4Touch the circle to the right of the default number. The circle next to the default number is green.5Touch Save.
80toolsassign or download a ringtone for a contactYou can assign a ringtone for your phone to use when you receive calls from a contact.  1With the flip open, from the main screen, touchContacts.2Touch the entry to open it.3To u chEdit.4Touch Ringtone.5Touch Add Ringtone.6Touch the ringtone.To download a new ringtone, touchGet New Ringtone, then touchGet New App and follow the prompts.7Touch Save.Note: You will not hear the ringtone if the Master Volume is set to Vibrate Only, Alarm Only, or All Sounds Off.(see page 27).assign a picture for a contactYou can assign a picture for your phone to show when you receive calls from a contact.  1With the flip open, from the main screen, touchContacts.2Touch the entry to open it.3TouchEdit.4Touch the picture area to select a picture.5TouchAdd Picture.6Touch a picture.7TouchInsert.8TouchSave.
81toolscalendaradd a calendar appointment  1With the flip open, touchMenu to open the menu.2TouchTools.3Touch Calendar.4Touch the date for the appointment.5Touch New Event.6Enter the appointment name and details. To change the time, recurrence, or alert type, touch the detail.7Touch Save.see calendar appointment  1With the flip open, touchMenu to open the menu.2TouchTools.3Touch Calendar.Tip: When a day includes one or more appointments, it has a red line at the top.4Touch the date for the appointment.5Drag the calendar up to show the list of appointments for the selected day. Touch an appointment in the list to see its details.
82toolsalarmset alarm  1With the flip open, touchMenu to open the menu.2To u chTools.3To u chAlarm Clock.4Touch Add Alarm 1, Add Alarm 2, or Add Alarm 3.5Drag the button below Set Alarm to the to the right to turn it On.6Set the alarm time, tone, and recurrence by touching the details.7Touch Done.turn off alarmWhen an alarm rings, touch Dismiss.To disable an alarm that has not rung yet:  1With the flip open, touchMenu to open the menu.2TouchTools.3TouchAlarm Clock.4Touch Add Alarm 1, Add Alarm 2, or Add Alarm 3.5Touch Set Alarm to turn it Off.6Touch Save.
83toolsworld clockView current time in cities around the world:  1With the flip open, touchMenu to open the menu.2TouchTools.3TouchWorld Clock.4TouchAdd Clock.5Touch a global region.6Touch the city that matches the time you want.notepad  1With the flip open, touchMenu to open the menu.2TouchTools.3TouchNotepad.4Touch Add Note.5Enter text and touch SAVE.6Touch Done to confirm.calculators  1With the flip open, touchMenu to open the menu.2TouchTools.3TouchCalculator for basic math functions, or Tip Calculator for figuring gratuities.Use the keypad to enter numbers and mathematical functions.
84connectionsconnectionsBluetooth® connectionsYour phone supports Bluetooth 2.0 wireless connections. You can connect your phone with a Bluetooth headset or car kit to make handsfree calls or to listen to music.Note: The use of wireless phones while driving may cause distraction. Discontinue a call if you can’t concentrate on driving. Additionally, the use of wireless devices and their accessories may be prohibited or restricted in certain areas. Always obey the laws and regulations on the use of these products. Your phone currently supports these profiles:• Headset (HSP v1.1): Supports use of a compatible Bluetooth headset for mono voice.• Handsfree (HFP v1.5): Supports Bluetooth headsets, and may also support other installed compatible Bluetooth devices with speakerphone capabilities, such as car kits or a conference room device. For Handsfree Car Kit compatibility, refer to www.verizonwireless.com/bluetoothchart on the Verizon Wireless Website.• Dial Up Networking (DUN v1.1): Allows the phone to be used as a data modem with a compatible Bluetooth device, such as a laptop or PDA, over the VZW NationalAccess and/or VZW BroadbandAccess systems.• Stereo (A2DP v1.0 and AVRCP v1.0): Supports delivery of stereo audio to a compatible Bluetooth device.• Phonebook Access (PBAP v1.0): Allows sharing of your name card, phonebook entries, and calendar files with a compatible Bluetooth device.
85connections• Basic Printing (BPP v1.2): Allows printing of JPEG files to a Bluetooth enabled printer.• Basic Imaging (BIP v1.0): Allows sending and receiving of non-protected images for storing and printing.•Object Push (OPP v1.1): Allows sending and receiving of contact name cards and other nonprotected data between devices.• File Transfer (FTP v1.1): Allows the capability to send or receive non-protected data files to a compatible Bluetooth device.• Basic Imaging (BIP v1.0): Allows sending and receiving of non-protected images for storing and printing.To show descriptions of the profiles your phone supports:  1With the flip open, touchMenu to open the menu.2TouchBluetooth.3Touch My Supported Profiles.For more information about Bluetooth wireless connections supported by this device, go to FAQ www.verizonwireless.com/bluetooth.For information about vehicle compatibility, go to www.verizonwireless.com/bluetoothchart.Note: All multimedia (video player, audio player, shutter tone, V CAST) play from the speakerphone when your phone is connected to a mono Bluetooth device.For maximum Bluetooth security, you should always connect Bluetooth devices in a safe, private environment. turn Bluetooth power on or off  1With the flip open, touchMenu to open the menu.2TouchBluetooth. 3Drag the button next toBluetooth Power to the to the right to turn it Onor to the left to turn it Off.
86connectionsNote: To extend battery life, set Bluetooth power to Off when not in use. Your phone does not automatically turn off Bluetooth power when it closes a connection.connect a new deviceNote: If you use your Motorola Bluetooth headset with both an audio device and your phone, use your phone’s Bluetooth menus to connect the phone with the headset. If you establish the connection by pressing a button on the headset, or if you allow the headset to connect automatically by turning it on, you may experience unexpected results.Before you try to connect your phone with another Bluetooth device, make sure the other device is in pairing, bonding, or discoverable mode (see the user’s guide for the device). Your phone can connect with only one Bluetooth device at a time.  1With the flip open, touchMenu to open the menu.2TouchBluetooth.3Touch DeviceList/NewDevice.4Touch Add New.Note: If your Bluetooth power is not turned on, your phone prompts you to turn it on.5Make sure the other device is in discoverable mode, then touchOK on your phone.Your phone lists the devices it finds within range.6Touch Pair next to the device you want to connect. Your phone tries to pair with the device.If your phone prompts you to ENTER PASSKEY, touch the passkey field to show a dialpad. Enter the passkey or PIN code for the device (usually set to
87connections0000), then touchDone and touchOK. The other device might ask you to enter the same passkey.Note: See the instructions that came with your device for the device PIN code and other information about the device.7Touch Yes to confirm the connection.When the connection is made, your phone shows the the Bluetooth connection active status indicatorI.Tip: When your phone’s Bluetooth power is on, it shows the Bluetooth power on status indicatorO and it can automatically connect to a handsfree device you have used before. Just turn on the device or move it near the phone.reconnect a deviceNote: Make sure the other device has Bluetooth power on. Your phone can connect with only one Bluetooth device at a time.  1With the flip open, touchMenu to open the menu.2TouchBluetooth.3Touch DeviceList/NewDevice to show the devices your phone has connected before.4Touch Connect next to the device name.Note: Your phone will prompt you to turn on its Bluetooth power if it is off.5If prompted, enter the passkey (usually set to 0000).If the connection fails, try using Add New Device to find and add the device as if it is new.reconnect a handsfree device during a callDuring a call, you can connect a handsfree device if the device is on and your phone has used it before.
88connectionsNote: Your phone can connect with only one Bluetooth device at a time.  1During a call, touchBluetooth Menu.If your phone has only connected one handsfree device before, and that device is on and nearby, your phone connects it automatically.2If necessary, touch Add New Device or select the name of a handsfree device you have used before.3Place the handsfree device in discoverable mode, then touch OK on your phone.4When your phone finds the handsfree device, touch Pair next to the device name.send files to a computer or another phoneYou can use a Bluetooth connection to send a contact or media file to a computer or another phone that you have connected before (to connect a new device, see page 86).To send a contact (vCard file):Note: Not all Bluetooth phones can receive vCards. Make sure the other phone’s Bluetooth power is on and ready in discoverable mode (see the user’s guide for the phone). Also, make sure the phone is not busy with another similar Bluetooth connection.  1With the flip open, from the main screen, touchContacts.2To send one contact, open it by touching it.To send multiple contacts, highlight them by sliding across each one, from left to right. Highlighted contacts have a light background on the left side of the screen. To unhighlight a contact, drag across it from right to left. After you highlight the contacts you want to send, touchOptions.
89connections3Touch Send Name Cardor Send vCard.4Touch Send Via Bluetooth.Note: If your phone does not already have Bluetooth power turned on, it prompts you to turn it on.5Touch Send next to the receiving phone or computer to send the vCard. If the receiving phone or computer is not listed, touch Add New to find it.6If prompted, enter the PIN code (usually set to 0000) or accept the transfer.To send a media file:Note: Make sure the other phone’s Bluetooth power is on and ready in discoverable mode (see the user’s guide for the phone). Also, make sure the phone is not busy with another similar Bluetooth connection.  1On your phone, touch the file (such as a picture, video, or sound) you want to transfer and touch Send.2Touch Send.3TouchBluetooth.Note: If your phone does not already have Bluetooth power turned on, it prompts you to turn it on.4Touch Send next to the receiving phone or computer to send the file. If the receiving phone or computer is not listed, touch Add New to find it.5If prompted, enter the PIN code (usually set to 0000) or accept the transfer.receive files from another phoneNote: Make sure your phone’s Bluetooth power is on and ready in discoverable mode (touchMenu, thenBluetooth, and confirm that both Bluetooth Power and Discovery Mode are On).  1Place your phone near the other phone, then send the file from the other phone.
90connections2Touch Accept on your phone to accept the file from the other device.Your phone notifies you when file transfer is complete. If necessary, touch Save to save the file.receive files from a computerYou can use a Bluetooth connection to transfer some media files between your computer and phone.Note: Your computer’s Bluetooth interface may be different.  1Pair your phone and computer (see “connect a new device” on page 86).2 On your computer, right-click the Bluetooth icon in your System Tray to open the Bluetooth menu.On Windows® Vista™:•Select “Send a File.”•Click “Browse” to locate your phone name, and then click “Next.”•Click “Browse” to locate the file you want to transfer, and then click “Next.”On Windows® XP™:•Select “Wireless File Transfer.”•Click the checkmark next to your phone in the “Transfer-enabled device” list.•Click “Add” to locate the file you want to transfer.•Click “Send” to send the file.3 On your phone, when prompted, touch Yes to accept the file transfer.make your phone discoverable for other Bluetooth devicesNote: For the best Bluetooth connection, connect with Bluetooth devices using your phone’s menus rather than making your device discoverable.
91connectionsTo let other Bluetooth devices discover your phone:  1With the flip open, touchMenu to open the menu.2TouchBluetooth.3Drag the button next toDiscovery Mode to the to the right to turn it On.disconnect a device Shortcut: Turn off the other device. 1With the flip open, touchMenu to open the menu.2TouchBluetooth.3TouchDevice List/New Device.4TouchDisconnect next to the name of the connected device.5Touch Yes to confirm.networkadjust network settings  1With the flip open, touchMenu to open the menu.2TouchSettings.3Touch Phone.4Touch Phone Settings.5Touch the button belowSystem Select to choose Home Only or Automatic (these options may vary).set call drop alertsSet the phone to beep whenever the network drops a call. (Because digital networks are so quiet, the call drop alert may be the only sign that a call dropped.)  1With the flip open, touchMenu to open the menu.2TouchSettings.3TouchSounds.
92connections4Touch Service Alerts.5Drag the button below Network Lost Tone to the right to turn it On.set call connect alertsSet the phone to beep when an outgoing call connects.  1With the flip open, touchMenu to open the menu.2To u chSettings.3To u chSounds.4Touch Service Alerts.5Drag the button below Call Connect to the to the right to turn it On.set roaming alerts  1With the flip open, touchMenu to open the menu.2To u chSettings.3To u chSounds.4Touch Service Alerts.5Drag the button below ERI to the to the right to turn it On.
93service & repairsservice & repairsIf you have questions or need assistance, we're here to help.Go to www.motorola.com/support, where you can select from a number of customer care options. You can also contact the Motorola Customer Support Center at 1-800-331-6456 (United States), 1-888-390-6456 (TTY/TDD United States for hearing impaired), or 1-800-461-4575 (Canada).
94service & repairsSpecific Absorption Rate DataSAR DataThis model wireless phone meets the government’s requirements for exposure to radio waves.Your wireless phone is a radio transmitter and receiver. It is designed and manufactured not to exceed limits for exposure to radio frequency (RF) energy set by the Federal Communications Commission (FCC) of the U.S. Government and by the Canadian regulatory authorities. These limits are part of comprehensive guidelines and establish permitted levels of RF energy for the general population. The guidelines are based on standards that were developed by independent scientific organizations through periodic and thorough evaluation of scientific studies. The standards include a substantial safety margin designed to assure the safety of all persons, regardless of age or health.The exposure standard for wireless mobile phones employs a unit of measurement known as the Specific Absorption Rate, or SAR. The SAR limit set by the FCC and by the Canadian regulatory authorities is 1.6 W/kg.1 Tests for SAR are conducted using standard operating positions accepted by the FCC and by Industry Canada with the phone transmitting at its highest certified power level in all tested frequency bands. Although the SAR is determined at the highest certified power level, the actual SAR level of the phone while operating can be well below the maximum value. This is because the phone is designed to operate at multiple power levels so as to use only the power required to reach the network. In general, the closer you are to a wireless base station, the lower the power output.Before a phone model is available for sale to the public in the U.S. and Canada, it must be tested and certified to the FCC and Industry Canada that it does not exceed the limit established by each government for safe exposure. The tests are performed in positions and locations (e.g., at the ear and worn on the body) reported to the FCC and available for review by Industry Canada. The highest SAR value for this model phone when tested for use at the ear is 1.53W/kg, and when worn on the body, as described in this user guide, is 1.43 W/kg. (Body-worn measurements differ among phone models, depending upon available accessories and regulatory requirements).2While there may be differences between the SAR levels of various phones and at various positions, they all meet the governmental requirements for safe exposure. Please note that improvements to this product model could cause differences in the SAR value for later products; in all cases, products are designed to be within the guidelines.
95SAR Additional information on SAR can be found on the Cellular Telecommunications & Internet Association (CTIA) Web site:http://www.phonefacts.netor the Canadian Wireless Telecommunications Association (CWTA) Web site:http://www.cwta.ca
96SAR
97Important Safety and Legal Information
98Safety InformationSafety & General InformationSafety InformationThis section contains important information on the safe and efficient operation of your mobile device. Read this information before using your mobile device.Exposure to Radio Frequency (RF) EnergyYour mobile device contains a transmitter and receiver. When it is ON, it receives and transmits RF energy. When you communicate with your mobile device, the system handling your call controls the power level at which your mobile device transmits.Your mobile device is designed to comply with local regulatory requirements in your country concerning exposure of human beings to RF energy.Operational PrecautionsFor optimal mobile device performance, and to be sure that human exposure to RF energy does not exceed the guidelines set forth in the relevant standards, always follow these instructions and precautions.Product OperationWhen placing or receiving a phone call, hold your mobile device just like you would a landline phone.If you wear the mobile device on your body, always place the mobile device in a Motorola-supplied or approved clip, holder, holster, case, or body harness. If you do not use a body-worn accessory supplied or approved by Motorola, keep the mobile device and its antenna at least 2.5 centimeters (1 inch) from your body when transmitting.Using accessories not supplied or approved by Motorola may cause your mobile device to exceed RF energy exposure guidelines. For a list of Motorola-supplied or approved accessories, visit our Web site at: www.motorola.com.RF Energy Interference/CompatibilityNearly every electronic device is subject to RF energy interference from external sources if inadequately shielded, designed, or otherwise configured for RF energy compatibility. In some circumstances, your mobile device may cause interference with other devices.Follow Instructions to Avoid Interference ProblemsTurn off your mobile device in any location where posted notices instruct you to do so.In an aircraft, turn off your mobile device whenever instructed to do so by airline staff. If your mobile device offers an airplane mode or similar feature, consult airline staff about using it in flight.Implantable Medical DevicesIf you have an implantable medical device, such as a pacemaker or defibrillator, consult your physician before using this mobile device.Persons with implantable medical devices should observe the following precautions:
99Safety Information•ALWAYS keep the mobile device more than 20 centimeters (8 inches) from the implantable medical device when the mobile device is turned ON.•DO NOT carry the mobile device in the breast pocket.•Use the ear opposite the implantable medical device to minimize the potential for interference.•Turn OFF the mobile device immediately if you have any reason to suspect that interference is taking place.Read and follow the directions from the manufacturer of your implantable medical device. If you have any questions about using your mobile device with your implantable medical device, consult your healthcare provider.Driving PrecautionsThe use of wireless phones while driving may cause distraction. Discontinue a call if you can’t concentrate on driving.Additionally, the use of wireless devices and their accessories may be prohibited or restricted in certain areas. Always obey the laws and regulations on the use of these products.For more information, see “Smart Practices While Driving.”Operational WarningsObey all posted signs when using mobile devices in public areas.Potentially Explosive AtmospheresAreas with potentially explosive atmospheres are often, but not always, posted and can include fueling areas, such as below decks on boats, fuel or chemical transfer or storage facilities, or areas where the air contains chemicals or particles, such as grain dust, or metal powders.When you are in such an area, turn off your mobile device, and do not remove, install, or charge batteries. In such areas, sparks can occur and cause an explosion or fire.Symbol KeyYour battery, charger, or mobile device may contain symbols, defined as follows:Symbol DefinitionImportant safety information follows.Do not dispose of your battery or mobile device in a fire.Your battery or mobile device may require recycling in accordance with local laws. Contact your local regulatory authorities for more information.Do not throw your battery or mobile device in the trash.032374o032376o032375o
100Safety InformationBatteries & ChargersCaution: Improper treatment or use of batteries may present a danger of fire, explosion, leakage, or other hazard. For more information, see “Battery Use & Safety.”Keep Your Mobile Device & Its Accessories Away From Small ChildrenThese products are not toys and may be hazardous to small children. For example:•A choking hazard may exist for small, detachable parts.•Improper use could result in loud sounds, possibly causing hearing injury.•Improperly handled batteries could overheat and cause a burn.Glass PartsSome parts of your mobile device may be made of glass. This glass could break if the product is dropped on a hard surface or receives a substantial impact. If glass breaks, do not touch or attempt to remove. Stop using your mobile device until the glass is replaced by a qualified service center.Seizures/BlackoutsSome people may be susceptible to epileptic seizures or blackouts when exposed to flashing lights, such as when playing video games. These may occur even if a person has never had a previous seizure or blackout.If you have experienced seizures or blackouts, or if you have a family history of such occurrences, please consult with your physician before playing video games or enabling a flashing-lights feature (if available) on your mobile device.Discontinue use and consult a physician if any of the following symptoms occur: convulsion, eye or muscle twitching, loss of awareness, involuntary movements, or disorientation. It is always a good idea to hold the screen away from your eyes, leave the lights on in the room, take a 15-minute break every hour, and stop use if you are tired.Caution About High Volume UsageWarning: Exposure to loud noise from any source for extended periods of time may affect your hearing. The louder the volume sound level, the less time is required before your hearing could be affected. To protect your hearing:•Limit the amount of time you use headsets or headphones at high volume.•Avoid turning up the volume to block out noisy surroundings.Do not let your battery, charger, or mobile device get wet.Listening at full volume to music or voice through a headset may damage your hearing.Symbol Definition
101Industry Canada Notice•Turn the volume down if you can’t hear people speaking near you.If you experience hearing discomfort, including the sensation of pressure or fullness in your ears, ringing in your ears, or muffled speech, you should stop listening to the device through your headset or headphones and have your hearing checked.For more information about hearing, see our Web site at direct.motorola.com/hellomoto/nss/AcousticSafety.asp (in English only).Repetitive MotionWhen you repetitively perform actions such as pressing keys or entering finger-written characters, you may experience occasional discomfort in your hands, arms, shoulders, neck, or other parts of your body. If you continue to have discomfort during or after such use, stop use and see a physician.[Apr0109]Industry Canada Notice to UsersIndust ry Cana da NoticeOperation is subject to the following two conditions: (1) This device may not cause interference and (2) This device must accept any interference, including interference that may cause undesired operation of the device. See RSS-GEN 7.1.5.FCC Notice to UsersFCC NoticeThe following statement applies to all products that have received FCC approval. Applicable products bear the FCC logo, and/or an FCC ID in the format FCC-ID:xxxxxx on the product label.Motorola has not approved any changes or modifications to this device by the user. Any changes or modifications could void the user’s authority to operate the equipment. See 47 CFR Sec. 15.21.This device complies with part 15 of the FCC Rules. Operation is subject to the following two conditions: (1) This device may not cause harmful interference, and (2) this device must accept any interference received, including interference that may cause undesired operation. See 47 CFR Sec. 15.19(3).This equipment has been tested and found to comply with the limits for a Class B digital device, pursuant to part 15 of the FCC Rules. These limits are designed to provide reasonable protection against harmful interference in a residential installation. This equipment generates, uses and can radiate radio frequency energy and, if not installed and used in accordance with the instructions, may cause harmful interference to radio communications. However, there is no guarantee that interference will not occur in a particular installation. If this
102Warrantyequipment does cause harmful interference to radio or television reception, which can be determined by turning the equipment off and on, the user is encouraged to try to correct the interference by one or more of the following measures:•Reorient or relocate the receiving antenna.•Increase the separation between the equipment and the receiver.•Connect the equipment to an outlet on a circuit different from that to which the receiver is connected.•Consult the dealer or an experienced radio/TV technician for help.Motorola Limited Warranty for the United States and CanadaWa rr a n t yWhat Does this Warranty Cover?Subject to the exclusions contained below, Motorola, Inc. warrants its telephones, pagers, messaging devices, and consumer and professional two-way radios (excluding commercial, government or industrial radios) that operate via Family Radio Service or General Mobile Radio Service, Motorola-branded or certified accessories sold for use with these Products (“Accessories”) and Motorola software contained on CD-ROMs or other tangible media and sold for use with these Products (“Software”) to be free from defects in materials and workmanship under normal consumer usage for the period(s) outlined below. This limited warranty is a consumer's exclusive remedy, and applies as follows to new Motorola Products, Accessories, and Software purchased by consumers in the United States or Canada, which are accompanied by this written warranty:Products and AccessoriesProducts Covered Length of CoverageProducts and Accessories as defined above, unless otherwise provided for below.One (1) year from the date of purchase by the first consumer purchaser of the product unless otherwise provided for below.Decorative Accessories and Cases. Decorative covers, bezels, PhoneWrap™ covers and cases.Limited lifetime warranty for the lifetime of ownership by the first consumer purchaser of the product.Monaural Headsets. Ear buds and boom headsets that transmit mono sound through a wired connection.Limited lifetime warranty for the lifetime of ownership by the first consumer purchaser of the product.
103WarrantyExclusions (Products and Accessories)Normal Wear and Tear. Periodic maintenance, repair and replacement of parts due to normal wear and tear are excluded from coverage.Batteries. Only batteries whose fully charged capacity falls below 80% of their rated capacity and batteries that leak are covered by this limited warranty.Abuse & Misuse. Defects or damage that result from: (a) improper operation, storage, misuse or abuse, accident or neglect, such as physical damage (cracks, scratches, etc.) to the surface of the product resulting from misuse; (b) contact with liquid, water, rain, extreme humidity or heavy perspiration, sand, dirt or the like, extreme heat, or food; (c) use of the Products or Accessories for commercial purposes or subjecting the Product or Accessory to abnormal usage or conditions; or (d) other acts which are not the fault of Motorola, are excluded from coverage.Use of Non-Motorola Products and Accessories. Defects or damage that result from the use of non-Motorola branded or certified Products, Accessories, Software or other peripheral equipment are excluded from coverage.Unauthorized Service or Modification. Defects or damages resulting from service, testing, adjustment, installation, maintenance, alteration, or modification in any way by someone other than Motorola, or its authorized service centers, are excluded from coverage.Altered Products. Products or Accessories with (a) serial numbers or date tags that have been removed, altered or obliterated; (b) broken seals or that show evidence of tampering; (c) mismatched board serial numbers; or (d) nonconforming or non-Motorola housings, or parts, are excluded from coverage.Communication Services. Defects, damages, or the failure of Products, Accessories or Software due to any communication service or signal you may subscribe to or use with the Products Accessories or Software is excluded from coverage.SoftwareExclusions (Software)Software Embodied in Physical Media. No warranty is made that the software will meet your requirements or will work in combination Consumer and Professional Two-Way Radio Accessories.Ninety (90) days from the date of purchase by the first consumer purchaser of the product.Products and Accessories that are Repaired or Replaced.The balance of the original warranty or for ninety (90) days from the date returned to the consumer, whichever is longer.Products Covered Length of CoverageProducts Covered Length of CoverageSoftware. Applies only to physical defects in the media that embodies the copy of the software (e.g. CD-ROM, or floppy disk).Ninety (90) days from the date of purchase.
104Warrantywith any hardware or software applications provided by third parties, that the operation of the software products will be uninterrupted or error free, or that all defects in the software products will be corrected.Software NOT Embodied in Physical Media. Software that is not embodied in physical media (e.g. software that is downloaded from the Internet), is provided “as is” and without warranty.Who is Covered?This warranty extends only to the first consumer purchaser, and is not transferable.What Will Motorola Do?Motorola, at its option, will at no charge repair, replace or refund the purchase price of any Products, Accessories or Software that does not conform to this warranty. We may use functionally equivalent reconditioned/refurbished/pre-owned or new Products, Accessories or parts. No data, software or applications added to your Product, Accessory or Software, including but not limited to personal contacts, games and ringer tones, will be reinstalled. To avoid losing such data, software and applications please create a back up prior to requesting service.How to Obtain Warranty Service or Other InformationYou will receive instructions on how to ship the Products, Accessories or Software, at your expense, to a Motorola Authorized Repair Center. To obtain service, you must include: (a) a copy of your receipt, bill of sale or other comparable proof of purchase; (b) a written description of the problem; (c) the name of your service provider, if applicable; (d) the name and location of the installation facility (if applicable) and, most importantly; (e) your address and telephone number.What Other Limitations are There?ANY IMPLIED WARRANTIES, INCLUDING WITHOUT LIMITATION THE IMPLIED WARRANTIES OF MERCHANTABILITY AND FITNESS FOR A PARTICULAR PURPOSE, SHALL BE LIMITED TO THE DURATION OF THIS LIMITED WARRANTY, OTHERWISE THE REPAIR, REPLACEMENT, OR USA Phones: 1-800-331-6456Pagers: 1-800-548-9954Two-Way Radios and Messaging Devices: 1-800-353-2729Canada All Products: 1-800-461-4575TTY1-888-390-6456For Accessories and Software, please call the telephone number designated above for the product with which they are used.
105Hearing AidsREFUND AS PROVIDED UNDER THIS EXPRESS LIMITED WARRANTY IS THE EXCLUSIVE REMEDY OF THE CONSUMER, AND IS PROVIDED IN LIEU OF ALL OTHER WARRANTIES, EXPRESS OR IMPLIED. IN NO EVENT SHALL MOTOROLA BE LIABLE, WHETHER IN CONTRACT OR TORT (INCLUDING NEGLIGENCE) FOR DAMAGES IN EXCESS OF THE PURCHASE PRICE OF THE PRODUCT, ACCESSORY OR SOFTWARE, OR FOR ANY INDIRECT, INCIDENTAL, SPECIAL OR CONSEQUENTIAL DAMAGES OF ANY KIND, OR LOSS OF REVENUE OR PROFITS, LOSS OF BUSINESS, LOSS OF INFORMATION OR DATA, SOFTWARE OR APPLICATIONS OR OTHER FINANCIAL LOSS ARISING OUT OF OR IN CONNECTION WITH THE ABILITY OR INABILITY TO USE THE PRODUCTS, ACCESSORIES OR SOFTWARE TO THE FULL EXTENT THESE DAMAGES MAY BE DISCLAIMED BY LAW.Some states and jurisdictions do not allow the limitation or exclusion of incidental or consequential damages, or limitation on the length of an implied warranty, so the above limitations or exclusions may not apply to you. This warranty gives you specific legal rights, and you may also have other rights that vary from state to state or from one jurisdiction to another.Hearing Aid Compatibility with Mobile PhonesHeari ng AidsSome Motorola phones are measured for compatibility with hearing aids. If the box for your particular model has “Rated for Hearing Aids” printed on it, the following explanation applies.When some mobile phones are used near some hearing devices (hearing aids and cochlear implants), users may detect a buzzing, humming, or whining noise. Some hearing devices are more immune than others to this interference noise, and phones also vary in the amount of interference they generate.The wireless telephone industry has developed ratings for some of their mobile phones, to assist hearing device users in finding phones that may be compatible with their hearing devices. Not all phones have been rated. Phones that are rated have the rating on their box or a label on the box. To maintain the published Hearing Aid Compatibility (HAC) rating for this mobile phone, use only the original equipment battery model.The ratings are not guarantees. Results will vary depending on the user’s hearing device and hearing loss. If your hearing device happens to be vulnerable to interference, you may not be able to use a rated phone successfully. Trying out the phone with your hearing device is the best way to evaluate it for your personal needs.M-Ratings: Phones rated M3 or M4 meet FCC requirements and are likely to generate less interference to hearing devices than phones that are not labeled. M4 is the better/higher of the two ratings.T-Ratings: Phones rated T3 or T4 meet FCC requirements and are likely to be more usable with a hearing device’s telecoil (“T Switch” or “Telephone Switch”) than unrated phones. T4 is the better/higher of the two ratings. (Note that not all hearing devices have telecoils in them.)
106WHO InformationHearing devices may also be measured for immunity to this type of interference. Your hearing device manufacturer or hearing health professional may help you find results for your hearing device. The more immune your hearing aid is, the less likely you are to experience interference noise from mobile phones.Information from the World Health OrganizationWHO InformationPresent scientific information does not indicate the need for any special precautions for the use of mobile phones. If you are concerned, you may want to limit your own or your children’s RF exposure by limiting the length of calls or by using handsfree devices to keep mobile phones away from your head and body.Source: WHO Fact Sheet 193Further information: http://www.who.int/peh-emfProduct RegistrationRegistrationOnline Product Registration:www.motorola.com/us/productregistrationProduct registration is an important step toward enjoying your new Motorola product. Registering permits us to contact you for product or software updates and allows you to subscribe to updates on new products or special promotions. Registration is not required for warranty coverage.Please retain your original dated sales receipt for your records. For warranty service of your Motorola Personal Communications Product you will need to provide a copy of your dated sales receipt to confirm warranty status.Thank you for choosing a Motorola product.Export Law AssurancesExport LawThis product is controlled under the export regulations of the United States of America and Canada. The Governments of the United States of America and Canada may restrict the exportation or re-exportation of this product to certain destinations. For further information contact the
107Recycling InformationU.S. Department of Commerce or the Canadian Department of Foreign Affairs and International Trade.Caring for the Environment by RecyclingRecycli ng Informat ionThis symbol on a Motorola product means the product should not be disposed of with household waste.Disposal of your Mobile Device & AccessoriesPlease do not dispose of mobile devices or electrical accessories (such as chargers, headsets, or batteries) with your household waste. Do not dispose of your battery or mobile device in a fire. These items should be disposed of in accordance with the national collection and recycling schemes operated by your local or regional authority. Alternatively, you may return unwanted mobile devices and electrical accessories to any Motorola Approved Service Center in your region. Details of Motorola approved national recycling schemes, and further information on Motorola recycling activities can be found at: www.motorola.com/recyclingDisposal of your Mobile Device Packaging & Product GuideProduct packaging and product guides should only be disposed of in accordance with national collection and recycling requirements. Please contact your regional authorities for more details.California Perchlorate LabelPerchlorat e LabelSome mobile phones use an internal, permanent backup battery on the printed circuit board that may contain very small amounts of perchlorate. In such cases, California law requires the following label:Perchlorate Material – special handling may apply. See www.dtsc.ca.gov/hazardouswaste/perchlorateThere is no special handling required by consumers.032376o
108Privacy & Data SecurityPrivacy & Data SecurityPriva cy & Data Secu rityMotorola understands that privacy and data security are important to everyone. Because some features of your mobile device may affect your privacy or data security, please follow these recommendations to enhance protection of your information:• Monitor access—Keep your mobile device with you and do not leave it where others may have unmonitored access. Lock your device’s keypad where this feature is available.• Keep software up to date—If Motorola or a software/application vendor releases a patch or software fix for your mobile device that updates the device’s security, install it as soon as possible.• Erase before recycling—Delete personal information or data from your mobile device prior to disposing of it or turning it in for recycling. For instructions on how to delete all personal information from your device, see your product guide.Note: For information on backing up your mobile device data before erasing it, go to www.motorola.com and navigate to the “downloads” section of the consumer Web page for “Motorola Backup” or “Motorola Phone Tools.”• Understanding AGPS—To provide location information for emergency calls, certain Motorola mobile devices incorporate Assisted Global Positioning System (AGPS) technology. AGPS technology also can be used in non-emergency applications to track and monitor a user’s location—for example, to provide driving directions. Users who prefer not to permit such tracking and monitoring should avoid using such applications.If you have further questions regarding how the use of your mobile device may impact your privacy or data security, please contact Motorola at privacy@motorola.com, or contact your service provider.Smart Practices While DrivingDrivi ng SafetyDrive Safe, Call SmartCheck the laws and regulations on the use of mobile devices and their accessories in the areas where you drive. Always obey them. The use of these devices may be prohibited or restricted in certain areas—for example, handsfree use only. Go to www.motorola.com/callsmart (in English only) for more information.Your mobile device lets you communicate by voice and data—almost anywhere, anytime, wherever wireless service is available and safe conditions allow. When driving a car, driving is your first responsibility.
109Driving SafetyIf you choose to use your mobile device while driving, remember the following tips:• Get to know your Motorola mobile device and its features such as speed dial and redial. If available, these features help you to place your call without taking your attention off the road.• When available, use a handsfree device. If possible, add an additional layer of convenience to your mobile device with one of the many Motorola Original handsfree accessories available today.• Position your mobile device within easy reach. Be able to access your mobile device without removing your eyes from the road. If you receive an incoming call at an inconvenient time, if possible, let your voicemail answer it for you.• Let the person you are speaking with know you are driving; if necessary, suspend the call in heavy traffic or hazardous weather conditions. Rain, sleet, snow, ice, and even heavy traffic can be hazardous.• Do not take notes or look up phone numbers while driving. Jotting down a “to do” list or going through your address book takes attention away from your primary responsibility—driving safely.• Dial sensibly and assess the traffic; if possible, place calls when your car is not moving or before pulling into traffic. If you must make a call while moving, dial only a few numbers, check the road and your mirrors, then continue.• Do not engage in stressful or emotional conversations that may be distracting. Make people you are talking with aware you are driving and suspend conversations that can divert your attention away from the road.• Use your mobile device to call for help. Dial 911 or other local emergency number in the case of fire, traffic accident, or medical emergencies (wherever wireless phone service is available).• Use your mobile device to help others in emergencies. If you see an auto accident, crime in progress, or other serious emergency where lives are in danger, call 911 or other local emergency number (wherever wireless phone service is available), as you would want others to do for you.• Call roadside assistance or a special non-emergency wireless assistance number when necessary. If you see a broken-down vehicle posing no serious hazard, a broken traffic signal, a minor traffic accident where no one appears injured, or a vehicle you know to be stolen, call roadside assistance or other special non-emergency wireless number (wherever wireless phone service is available).
110indexindexAABC text entry mode  50accessories  20Alarm On indicator  18Alarm Only indicator  17alarm, set  83alertsounds  28turn off  19All Sounds Off indicator  17answer a call  12applications, download  75auto retry  39Bbacklight  37banner  37battery  10charging  11conserving  11, 87Battery Level indicator  17Bluetooth connection  85Bluetooth Connection Active indicator  18Bluetooth Power On indicator  18brightness  38browser  76Ccable  61calculator  84calendar  82call3-way  42answer  12end  13make  12missed  41restrict  41call connect alert  93call connect tone  30call drop alerts  92call drop tone  30call sounds  28call timers  45, 46camera  73car kit  20chat  55
111indexclockalarm, set  83alarm, turn off  83world  84codes  21, 22, 41conference calls  42conserve battery  11Contactsassign picture  81assign ringtone  81edit entry  79emergency  78erase entry  80favorite  78send entry  80set default number  80speed dial  79Ddark touch screen  12, 16Data Call indicator  16data volume  45dial a phone number  12dialed calls  40display  15Dormant indicator  16downloadapplications  75copyrighted files  23games  75memory  24music  59music to your PC  59, 60pictures  75ringtone  81ringtones  75videos  58draft message  53DTMF tones  46EE911 indicator  17earpiece volume  19email  54emergency number  43end a call  13erase messages  53event sounds  28Ffavorite contacts  78Ggames, download  75glossary of icons  16
112indexHhandsfree speaker  19, 20haptics. See touch screen vibrations.headset  20hearing aids  47IICE contact  78icon glossary  16in case of emergency  78Internet browser  76iTAP text entry mode  50Kkeypad volume  29Llanguage  36, 38lens, cleaning  73linking. See Bluetooth connectionLocation On indicator  17lockcode  22phone  21Mmain screen  15make a call  12megapixels  73message  51chat  55draft  53email  54erase  53Mobile IM  54sent  53Message indicator  18micro-USB cable  61minute beep  30Missed Call indicator  18missed calls  41Mobile IM  54musicdownload  59, 60playing  64Nnetwork lost tone  30network settings  92New Voicemail indicator  18No Service indicator  17notepad  84number. See phone numberOoptional accessory  8Ppairing. See Bluetooth connectionphone number  14phonebook  78
113indexphoto  74pictures, download  75power key  12Power/End key  13Rreceived calls  40recent calls  40recording  70redial  39redial, automatic  39reset timer  45restrict calls  41restriction code  41ringtones, download  75, 81roaming alert  93Roaming indicator  16Ssent message  53service alerts  30service tones  93setcall connect alert  93call drop alert  92roaming alert  93set alarm  83Signal Strength indicator  16soft keys  15sound clips  70sound settings  28sounds, turn off  29speak keypad digits  30speakerphone  20speed dial  79SSL indicator  16standalone mode  20status icon glossary  16status indicators  16store your number  14Ttake notes  84talking phone  30telephone number. See phone numberTethered indicator  16text entry  48text message  513-way calls  42timers  45, 46touch cover  18touch screenreactivating  12, 16tips  6vibrations  6TTY indicator  17turn off alarm clock  83
114indexturn off sounds  29turn phone on/off  12TVcontrols  56ratings  56shows, watching  56Uunanswered calls  41unlockcode  21phone  21USB cable  61VV CASTTV  56videos  58Vibrate On indicator  17videos, download  58Visual Voice Mail  40Voice Call indicator  17voice privacy  27voice readout  30voice recognition  31voicemail  40voicemail message indicator  40volume  19, 29Wwallpaper  36WAP/BREW Application indicator  16Web access  76world clock  84Yyour phone number  14U.S. patent Re. 34,976
www.motorola.com

Navigation menu