Motorola Mobility P56LM1 i786/i786w-SERIES iDEN MOTOTALK PHONE W/BLUETOOTH User Manual Exhibit 12
Motorola Mobility LLC i786/i786w-SERIES iDEN MOTOTALK PHONE W/BLUETOOTH Exhibit 12
Contents
- 1. User Guide
- 2. Users Guide 1
- 3. Users Guide 2
Users Guide 2
15Push-to-Talk
Push-to-Talk
one or more, talk to them all
Private calls
Private calls are push-to-talk calls between two people.
Make and answer private calls
To make a private call:
•Enter the recipient’s PTT
number.
•Press Menu / >
FContacts, and select a
contact that has a PTT number.
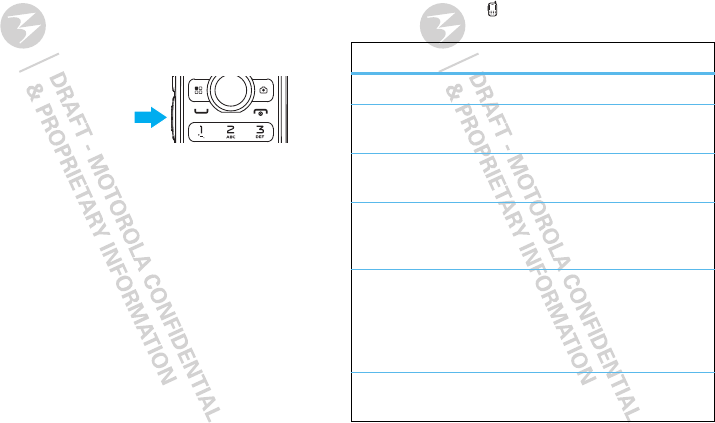
To talk, press and hold the PTT Button. To listen,
release the PTT Button.
To answer a private call, press the PTT Button after the
caller has stopped talking.
To end a private call, press End/Power @ or do
nothing. The call will end after a few seconds.
Set push-to-talk speaker
You can listen to push-to-talk calls through your
phone’s speaker or earpiece. Press Speaker ) to turn
the speaker on or off.
One touch PTT
You can customize the PTT Button for quick access to
push-to-talk functions from the home screen.
Find it: Menu / > Push To Talk > PT Manager >
Configure > One Touch PTT
options
Off Tu r n o ff One Touch PTT.
Quick PTT Go to Quick PTT. See “Quick
PTT” on page 16.
Last Call Call the most recent Private ID or
SDG list on the Recent Calls list.
PTT Contacts Launch the PTT Contacts list
from the home screen by
pressing the PTT Button.
Assigned No. Call a Private ID you assigned.
Enter the number using your
keypad, or press Search and
select from Contacts, Recent
Calls, or Memo.
PT Manager Go to the PT Manager. See “PT
manager” on page 16.
16 Push-to-Talk
Quick PTT
With Quick PTT, you can quickly make a PTT call,
create an SDG list, or make an SDG call when
accessing any Private ID on your phone.
Find it: Menu / > Push To Talk > Quick PTT
Press the Navigation Key right or left to move between
Contacts, Recent Calls, or Memo.
To make a PTT call or SDG call:
1Select the entries you want to call.
Send Message See “Send messages” on
page 17
Send Picture See “Send pictures” on page 18.
Send Event See “Send a datebook event” on
page 19
Send My Info See “Send my info” on page 19
Send Contact See “Send contact information”
on page 20
Send Location See “Send location information”
on page 20
options 2Press Done.
3Press the PTT Button.
To save your selections as an SDG list, press Menu /
> Save SDG. For more information about SDG lists,
see “SDG calls” on page 21.
PT manager
The PT Manager lets you quickly access PTT features,
and other PTT call features, from the main menu.
Find it: Menu / > Push To Talk > PT Manager
•Select Quick PTT, Send Message, Send Picture,
Send Event, Send My Info, Send Contact, or
Configure. After choosing what PTT item you’re
sending, select a contact and press the PTT Button
to send.
•Select configure to configure your PTT Quick
Notes, PTT My Info, PTT Location, One Touch
PTT, or On/Off PTT.
Call alerts
Use call alerts to tell someone you want to speak to
them.
To send a call alert:
•Enter a Private ID, and press Alert. When
prompted, press the PTT Button.

17Push-to-Talk
•Press Contacts, and select a contact containing a
Private ID. Press Alert, and press the PTT Button
when prompted.
When you receive a call alert, you can:
•Answer: Press the PTT Button to begin a private call
with the sender.
• Queue: Press Queue to store the call alert to the
call alert queue.
•Clear: Press Clear to dismiss and delete the call
alert.
Note: Call alerts will automatically be moved to the
queue after a few minutes of inactivity. You won’t be
able to make phone calls or private calls until the call
alert is moved, or you’ve chosen one of these
options.
Turn off a call alert
You can press the volume keys to turn off a call alert
before answering the call.
Switch from a PTT call to a phone call
For longer calls, you can switch from a PTT call to a
phone call if the other caller has a phone number
stored in Contacts.
During a PTT call press Talk `. When prompted, press
Yes to begin the phone call.
Push to send
During a private call, you can send short text
messages, contacts, photos, events, or your contact
info.
When you make or receive a PTT call, your phone
automatically determines if the phone you’re calling is
able to receive push to send items. Your phone saves
this information for Private IDs on your Recent Calls
list or stored in Contacts. Your phone updates the
saved information each time it’s on a PTT call to that
Private ID.
Note: You can’t send PTT feature items during
Talkgroup calls or SDG calls.
Send messages
You can send short messages through a PTT call.
Note: Availability of this feature is dependent on your
service provider.
You can begin a message during a PTT call, from the
Contacts list, the Recent Calls list, or from the PT
Manager.
•To send a message during a PTT call, press
Menu / > Use PTT Feature > Send Message.
Write your message and press the PTT Button to
send it.

18 Push-to-Talk
•To begin a message from Contacts or the Recent
Calls list, select the entry containing the Private ID
you want to send the message to and press
Menu / > Use PTT Feature > Send Message.
Write your message, and press the PTT Button to
send it.
•To begin a message from the PT Manager, press
Menu / > Push To Talk > PT Manager >
Send Message. Select A Contact or A Recent Call
to see a list of entries from Contacts or the Recent
Calls list that can receive messages. Select an
entry, write your message, and press the PTT
Button to send it.
Note: The first time you send a message, Messaging
Fees May Apply Continue? appears. Press Yes to
continue and send your message.
Receive messages
When you receive a message, a message notification
appears on the display.
To view the message, press Read.
To dismiss the message, press Dismiss.
Reply to a message
1View the message.
2Press Reply.
3Create the message and press the PTT Button to
send it.
Send pictures
You can send pictures stored in the Media Center
through private calls.
Note: The first time you send a picture, Picture Fees
May Apply Continue? appears. Press Yes to send
your picture.
To send a picture during a PTT call:
1Press Picture, or press Menu / > Use PTT
Feature > Send Pictures.
2Select the picture you want to send.
3Press the PTT Button to send the picture. When
prompted, press the PTT Button to resume the PTT
call.
To send a picture from the media center:
1Scroll left or right to Media: Pictures.
2Select a picture and press Menu / > Send Via... >
Send Via PTT.
3Choose A Contact or select a recipient from A
Recent Call.
4Press the PTT Button to send the picture. When
prompted, press the PTT Button to resume the call.
19Push-to-Talk
To send a picture from the PT Manager:
1Press Menu / > Push To Talk > PT Manager
> Send Picture.
2Choose A Contact or select a recipient from A
Recent Call.
3Select Browse Picture, and choose a picture to
send.
4Press the PTT Button to send the picture. When
prompted, press the PTT Button to resume the PTT
call.
Receive a picture
When someone sends you a picture, you hear a tone
or your phone vibrates and a message appears asking
if you want to accept the picture.
Pictures you receive are saved to your phone’s
memory. To see them press, Menu / > KMedia
Center. See “View pictures” on page 46.
When you see a message asking if you want to accept
the picture, press Yes to accept or No to decline.
Clear a picture from the display
If you want to clear a picture from your phone’s display
while still on a call, press Menu / > Clear Screen.
Send a datebook event
You can also send a Datebook event during a PTT call.
1Press Menu / > Use PTT Feature > Send Event.
Note: If this option doesn’t appear, the Private ID
you’re engaged in a PTT call with is not able to
receive Datebook events.
2Choose an existing event, or press New to create a
new event.
3If the event is a recurring event, select This Event
Only to send only the event selected. Select
Repeat Events to send all occurrences of the
event.
4Press the PTT Button to send the event.
Send my info
To send your phone’s contact information through a
PTT call:
•While in a PTT call, press Menu / > Send Via PTT
> Send My Info, and press the PTT Button to send.
•From the home screen, press Menu / > Tools
> My Info > Menu / > Send My Info via PTT.
Enter a Private ID or press Browse to chose a
recipient from Contacts, Recent Calls, or Memo.
Press the PTT Button to send.
20 Push-to-Talk
Configure my info
You can control what portion of the information in My
Info is sent and whether it is sent automatically in
every PTT call or only when you choose to send it.
Find it: Menu / > Push To Talk > PT Manager >
Configure > PTT My Info > Info to Send
1Select or remove the fields you want to send.
2Press Done.
The information your phone always sends includes My
Name, and Private. You may also send Mobile,
Other, IP, Private2, Work1, Work2, Home, Email1,
Email2, Fax, and Pager.
To control whether My Info automatically sends your
information, press Menu / > Push To Talk > PT
Manager > Configure > PTT My Info > Auto Send.
Select On or Off.
Send contact information
You can send contact information through PTT calls.
•To send contact information during a PTT call, press
Menu / > Use PTT Feature. Select Send Contact
and select the contact you want to send. Press the
PTT Button to send the information.
•To send a contact from the home screen, press
Menu / > Push To Talk > PT Manager >
Send Contact. Enter the Private ID number of the
recipient or press Browse and select a Private ID
from Recent Calls, Contacts, or Memo. Select the
contact information you want to send and press the
PTT Button to send it.
Send location information
Using your phone’s GPS feature, the following can be
shared through PTT calls:
•Time stamped latitude/longitude
•Relative location or direction and distance from the
sender in miles or kilometers
Find it: Menu / > Push To Talk > PT Manager >
Send Location
1Select A Contact or A Recent Call, and select a
recipient.
Note: Only contacts and recent calls able to receive
your location information will be shown.
2Press the PTT Button.
Turn PTT features on and off
You can turn on and off your phone’s ability to send and
receive messages, pictures, and Datebook events
through PTT calls.
You can’t turn off your phone’s ability to send and
receive My Info and contact information.
21SDG calls
To turn PTT features on and off, press Menu / >
Push To Talk > PT Manager > Configure >
On/Off PTT Features. PTT features with a check mark
next to them are turned on. To turn a feature off, select
it. The check mark next to it will disappear. Select the
feature again to turn it back on.
Unanswered calls
If you receive a PTT call and dismiss it, or make a PTT
call that isn’t answered, you can send an automatic
text message to the other caller.
Find it: Menu / > Push To Talk > PTT Options >
Busy Text Response > Incoming PTT or Outgoing
PTT
options
Off Turn feature off.
Soft Key Press Send Msg to send text
message.
Automatic Send message automatically
without being prompted.
SDG calls
Need to talk to more than one person at a time? With
SDG (Selective Dynamic Group) calls you can talk to up
to 20 people at a time.
Note: To store groups on your phone you need a
group-call-capable SIM card. Contact your service
provider for more information.
Create SDG lists in contacts
Find it: Menu / > FContacts
1Select [New SDG List].
2If you want to assign a name to the SDG list, enter
the name.
Note: If you do not assign a name, the SDG list is
named “SDG” followed by the number of members
in the SDG list. For example, “SDG (8)” for an SDG
list with eight members.
3Add Private IDs.
4Press Save.
Add Private IDs
You can add Private IDs to an SDG list by selecting
them from Contacts, the Recent Calls list, or Memo.
You can add all members in an existing SDG list by
selecting the list. You can select more than one
22 SDG calls
member from Contacts and the Recent Calls list. A
check mark appears next to each selected item.
1While creating an SDG list, select [Add Member] or
select [Add Number] and press Browse.
If you choose [Add Number] in step one, you can
enter a Private ID from the keypad.
2Scroll to the members you want from Contacts, the
Recent Calls list, or Memo and press r. A check
mark appears next to each selected member.
3Press Done.
Remove members or SDG lists
Remove one member from an SDG list
1From Contacts, scroll to the SDG list you want to
delete the member from.
2Press Edit.
3Scroll to the number you want to remove.
4Press Menu / > Remove Member.
5Press Save.
Remove all members from an SDG list
1From Contacts, scroll to the SDG list you want to
delete the member from.
2Press Edit.
3Press Menu / > Remove All Members.
4Press Yes to confirm.
Delete an SDG list from contacts
1Scroll to the SDG list you want to delete.
2Press Menu / > Delete SDG List.
Make SDG calls
1From Contacts or the Recent Calls list, scroll to or
select the SDG list you want.
2Press the PTT Button.
Start an SDG call with a Private ID
1From the home screen, enter the Private ID, or from
the Contacts list or the Recent Calls list, scroll to
an entry containing the Private ID.
2Press Menu / > Call SDG.
3Add more Private IDs. See “Add Private IDs” on
page 21.
If you want to save the SDG list you have created,
press Menu / > Save SDG, or if you do not want to
save the SDG list, press Done.
4Press the PTT Button to make the call.
23SDG calls
SDG call information
While you are in an SDG call, the following appears on
the screen:
•The name of the SDG list.
•The name or the Private ID of the person speaking.
•The number of participants in the SDG call.
SDG call details
During an SDG call, you can view details about the
other SDG list members, such as their name or Private
ID, and their status on the call. To view SDG call
details, press Details.
In the SDG call details view, these icons appear next to
member names or Private IDs:
icon
FThe member of the SDG list who is
speaking.
EA member of the SDG list who is active
on the SDG call, but not speaking.
DA member of the SDG list who has
exited the call.
HA member of the SDG list who could not
be reached on the SDG call.
GA member of the SDG list whose status
is unknown.
icon
24 MOTOtalk™
MOTOtalk™
Note: Availability of this feature is determined by your
service provider.
Make off-network calls between MOTOtalk enabled
phones and Family Radio Service products.
Note: Range will vary based on terrain, man-made
structures and atmospheric conditions.
With MOTOtalk, you don’t need your carrier’s network
to stay in touch with friends and family. You can:
•Use code or private mode operation
•Use up to 10 channels and 15 codes
•Communicate with standalone MOTOtalk radios
While in MOTOtalk, you’re not using your carrier’s
network. Some features are unavailable:
•On-network phone or PTT calls
•Data transmission
•Incoming message notification
•Datebook
•Call forwarding
•Call timers
•Call alerts
Note: You can’t use MOTOtalk with older Family Radio
Service products.
Switch to MOTOtalk
1Press Menu / > Push To Talk > MOTOtalk.
2Select Go to MOTOtalk.
When you see MT Ready, you can begin using
MOTOtalk.
While in MOTOtalk, this icon 4 is displayed on the
status bar.
Exit MOTOtalk
To switch to network mode:
1While in MOTOtalk, press Menu / > Push To
Talk > MT Options.
2Select Exit MOTOtalk.
Talk range
While in MOTOtalk mode, phones should be a
minimum of 6 feet apart.
Channels and codes
Note: When making a code call, all parties that are on
your code and channel can hear your conversation.
Set channels and codes
To set a channel:
1From the MOTOtalk home screen, press Edit.

25MOTOtalk™
2Select the channel field, scroll to a channel and
press r to select it.
3Press Back.
To set a code:
1From the MOTOtalk home screen, press Edit.
2Select the code field, scroll to a code and press r
to select it.
3Press Back.
Make code calls
To make a code call:
1Press and hold the PTT Button. You’ll see Transmit
appear on the display. Begin speaking after you hear
the MOTOtalk tone.
2Release the PTT Button to listen.
If you receive an error message, it may mean:
•No one is on your channel or code.
•You are out of range.
Receive code calls
When you receive a code call, you'll see Receive. After
hearing the MOTOtalk tone, you have 6 seconds to
reply before the call times out.
To reply to the call, press the PTT Button.
Note: A MOTOtalk call can be ended at any time by
pressing End/Power @.
Receive all MOTOtalk calls
If you set the code to Receive All, your phone can
receive MOTOtalk transmissions from any phone that
is set to the same channel, regardless of the code
(1-15). When you receive transmissions with the code
set to Receive All, the code that the transmission was
received on will replace Receive All on the display.
Note: You cannot initiate a code call when the code is
set to Receive All.
To set the code to Receive All:
1From the MOTOtalk home screen, press Edit.
2Select the code field, scroll to Receive All and press
r to select it.
3Press Back to return to the MOTOtalk home screen.
Press the PTT Button to reply to the call.
Private MOTOtalk calls
If you want to have a private conversation without
other parties listening in, you can make a private
MOTOtalk call. The person you are calling must be in
MOTOtalk and set to the same channel to receive your
call.

26 MOTOtalk™
Private only
To set MOTOtalk to ignore code calls, so that you only
make or receive private MOTOtalk calls, set your code
to Pvt Only.
To set the code to Pvt Only:
1From the MOTOtalk home screen, press Edit.
2Select the code field, scroll to Pvt Only and press
r to select it.
3Press Back to return to the MOTOtalk home screen.
Make a private MOTOtalk call
1Enter the Personal Telephone Number (PTN) of the
person you want to call on your channel. If the PTN
is more than 10-digits, enter the last 10-digits of the
PTN, or scroll to a number or name in Contacts or
the Recent Calls list.
2Press and hold the PTT Button. Begin speaking after
your phone emits the MOTOtalk tone.
3Release the PTT Button to listen.
The number or name of the person you are calling will
appear in the display.
If you receive an error message:
•The PTN you entered is invalid.
•The person that you are trying to reach is in network
mode.
•The person that you are trying to reach is set to a
different channel.
•The person that you are trying to reach is out of
range.
Receive a private MOTOtalk call
The number or name of the person who is calling
appears in the display.
To reply, press the PTT Button.
End code calls and private MOTOtalk calls
Code calls and private MOTOtalk calls will end
automatically after 6 seconds of inactivity.
The MOTOtalk home screen will display.
Note: A private or code MOTOtalk call can be
interrupted during the 6 second idle time by another
code call or private call.
make emergency calls while in MOTOtalk
If you attempt to make an Emergency 911 call while in
MOTOtalk mode, your phone will automatically exit
MOTOtalk mode and attempt to find a network signal.
If you are out of network coverage your phone will not
be able to make an emergency 911 cellular call until
you go back into the network coverage area.
27MOTOtalk™
You must wait until the phone reconnects to the
network before attempting to make an emergency 911
cellular call.
Setup options
You can set up MOTOtalk options on the MT Options
screen. You can access this screen in both network
and MOTOtalk modes.
To access setup options:
1Press Menu / > Push To Talk > MOTOtalk or
MT Options.
2Select Setup.
You can set the following MOTOtalk options:
options
Direct Launch Launch directly into MOTOtalk
when you select MOTOtalk from
the main menu.
State Tone Have an alert sound notify you
that you have used MOTOtalk for
a specified interval.
Direct launch
To set your phone to launch MOTOtalk when you
select MOTOtalk from the main menu:
1From the Setup screen, scroll to Direct Launch and
press r.
2Select On.
Note: If Direct Launch is set to On, the MOTOtalk
setup options will be unavailable from the main menu.
However, you can still access setup options while in
MOTOtalk by pressing Menu / > Push To Talk >
MT Options > Setup.
To turn off Direct Launch:
1From the Setup screen, scroll to Direct Launch and
press r.
2Select Off.
MT Options will now display when you select
MOTOtalk from the main menu.
State Tone
To set your phone to alert you after you have used
MOTOtalk for a specified interval:
1From the Setup screen, scroll to State Tone and
press r.
2Select the interval after which you want the tone to
sound.

28 Talkgroups
For example, if you select 1 hour, you will be notified
every hour that you are in MOTOtalk.
To turn off State Tone:
1From the Setup screen, scroll to State Tone and
press r.
2Select Off.
Talkgroups
Have a larger audience than 20 people? Talkgroups are
the solution.
Note: Availability of Talkgroups, and the maximum
number of Talkgroup members, is dependent on your
service provider. Contact your service provider to
establish a Talkgroup.
Join a Talkgroup
Before you can make a Talkgroup call, you’ll need to
join the Talkgroup.
1Press Menu / > FContacts.
2Select the Talkgroup.
3Tou ch Join.
Make a Talkgroup call
•Enter the Talkgroup number and press the PTT
Button.
Tip: Talkgroup numbers begin with a #. For example
#155.
•Press Menu / > FContacts, select the Talkgroup
and press the PTT Button.
29Text entry
Tex t en t ry
Your phone provides convenient ways to enter words,
letters, punctuation, and numbers whenever you are
prompted to enter text (for example, when adding a
Contacts entry or when sending a message).
Change character input mode
1When you see a screen where you can enter text,
press Menu / to change the character input mode.
2Select one of the following options:
options
Alpha Press a key one or more times to
cycle through the letters and
numbers of that key. When you
see the character you want, just
press another key or wait a
second or two to move on.
Tip: When entering text, press and hold # to change
letter capitalization (Abc > ABC > abc).
Word Predictive text – predicts the word
you want, with just one keypress
per letter. If the prediction is
correct, press the Navigation Key
right to accept the word. If the
prediction is not correct, press
and hold the Navigation Key down
to see other options. Highlight the
correct word and press r to
select.
Symbols Enter symbols.
Numeric Enter numbers.
Text Input
Settings
Select the desired entry language
and Word Prediction features.
Insert Select an item to be inserted,
such a picture, an audio clip or a
voice recording.
Note: Only available when using
MMS messaging.
options

30 Contacts
Contacts
Store a phone number or Private ID
Find it: Menu / > FContacts > [New Contact]
1Enter a name for the new entry. Each entry’s name
can contain 20 characters.
2Select a ring tone.
3Select a type for the entry (Mobile, Private1,
Private2, Work1, Work2, Home, Email, Email2,
Fax, Pager, Talkgroup, SDG, Msg Group, IP, or
Other). Choose Private1 or Private2 to store a
Private ID.
4Enter the number for the entry and press Save.
Call a stored phone number or Private ID
Find it: Menu / > FContacts
1Scroll to the Contacts entry.
2If the Contacts entry contains more than one
number, scroll left or right until the type of number
you want to call is displayed (such as Mobile,
Private1, Private2, Work1, Work2, Home).
3If you chose a phone number, press Talk ` to begin
a call. If you chose a Private ID, Talkgroup ID, or SDG
list, press and hold the PTT Button to start a call.
Messaging
Find it: Menu / > PMessages
Your phone can use SMS and Multimedia Messaging
service messaging. The type of messaging your phone
uses is determined by your service provider.
Create & send messages
Find it: Menu / > PMessages > [Create Message]
1Enter the phone number of the person you want to
send the message to and press r, or press Search
to select a contact or recent call.
2Enter your message in the Message field.
3Insert (embed) or attach a picture, sound, or quick
note.
•Quick notes are short, pre-written phrases.
Press QNotes to enter a quick note.
•To insert pictures, sounds, (audio files), or voice
recordings into the body of your message,
press Menu / > Insert > Insert QNotes,
Insert Picture, Insert Audio, Insert Video,
Capture Video, Capture Picture, or Record
Voice.
Note: You can insert one item at a time. To
remove an item from a message, highlight it
and press Delete.
31Messaging
•To attach a file to the end of your message,
select ....MORE.... > Attach > [New Attach] >
Browse Pictures, Capture Pictures, Browse
Audio, Record Voice, Browse Video, or
Record Video.
Note: You can only attach pictures and audio
files if they’re not forward locked and if
they’re not DRM-protected.
Tip: To remove an attachment, select Attach.
Select the attachment to remove, and press
Menu / >Unattach.
Note: You cannot attach or insert pictures, sounds
(audio files), or voice records in SMS messages.
These features are only available with MMS
messaging.
4When finished writing your message, press r.
5To send the message, press Send.
Receive messages
When you receive a message, your phone plays an
alert and shows a notification.
•To view the message, press Read.
•To dismiss the message notification, press Exit.
To read your messages later, press Menu / >
PMessages > Inbox.
Tip: While viewing a message, press the Navigation
Key left or right to scroll through your messages.
Manage received messages
features
forward a message
Highlight the message and press Menu / >
Forward.
Embedded objects and attachments are also
forwarded.
reply to a message
Open the message and press Reply to reply to the
sender only.
For MMS messages you can also reply to all
recipients: Press Menu / and select Reply All.
Select [Create Reply] to create your message, or
select a short phrase from the list.
view, play, or open an embedded object or
attachment
Highlight the embedded picture or audio file to view
or play it.
For attachments, press r.
Note: Attachments of an unknown type cannot be
opened, but can be deleted.

32 Messaging
Multimedia message options
Multimedia messages (MMS) can contain text,
pictures, and audio files. When you create an MMS
message you have more options than for a simple text
message.
save an embedded object
Highlight the picture or audio file and press
Menu / > Save Picture or Save Audio.
save an attachment
Highlight the attachment and press Menu / > Save
Attachment.
delete an embedded object or attachment
Highlight the embedded picture, audio file, or
attachment and press Menu / > Delete Picture,
or Delete Audio, or Delete Attachment.
delete a message
Highlight the message and press Delete and then
Yes to confirm.
features When creating the message, select ....MORE.... for
these options:
Manage your messages
Cleanup messages
Set how long and/or how many messages are stored
in the inbox and sent items folders. This feature
deletes only read messages, unlocked messages, and
sent messages.
options
Subject Create or edit the subject line.
Attach Attach a picture, audio file, or voice
record.
Cc Send a copy of the message to
someone else.
Auto Replies Create a list of short answers for
the recipient to choose when
replying to your message.
Priority Set priority Normal or High.
Valid Until Set the date after which attempts
to deliver the message end, or
press No Date.
33Messaging
Find it: Menu / > PMessages, press Menu / >
Setup > Cleanup
1Select Inbox or Sent Items.
2Chose a cleanup option from the following list:
options
Off Messages are never automatically
deleted.
5 Messages Messages are deleted in the order
they were received, starting with
the oldest, until five are left.
10 Messages Messages are deleted in the order
they were received, starting with
the oldest, until 10 are left.
1 Day Messages are deleted if they’re
older than one day.
3 Days Messages are deleted if they are
older than three days.
FirstIn
FirstOut
Messages are deleted as
necessary on a first-in first-out
basis.
3Press Yes to automatically delete messages now, or
press No to delete messages later.
Message threads
If message threads are supported by your service
provider, you can organize your messages by subject
or sender.
Find it: Menu / > PMessages, press Menu / >
Threading > None, Subject, or Sender
Note: Threading by subject is only available with
Multimedia messages.
Edit & send drafts
Save unsent messages are stored in the drafts folder.
Find it: Menu / > PMessages > Drafts
1To edit a draft, select it to open it. You can change or
add recipients, and edit the message.
Custom Specify cleanup settings of up to
199 messages or 99 days for the
inbox and sent items.
options