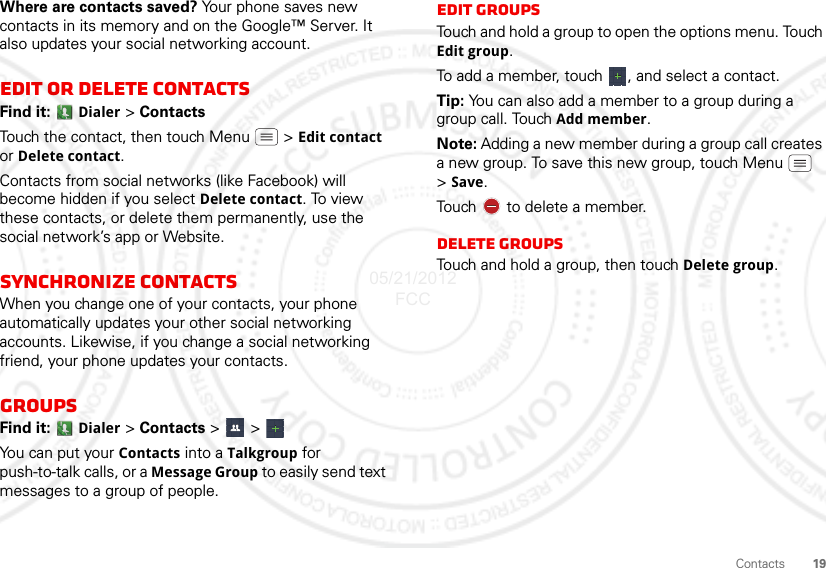
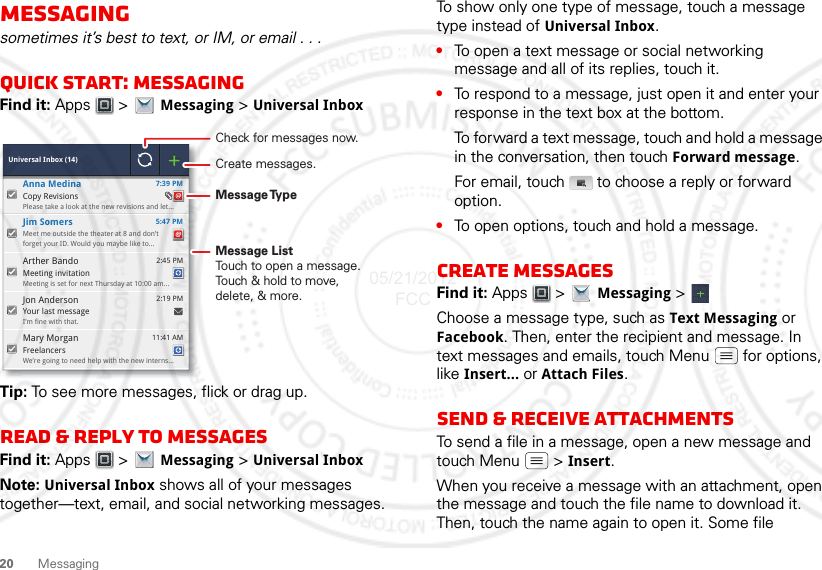
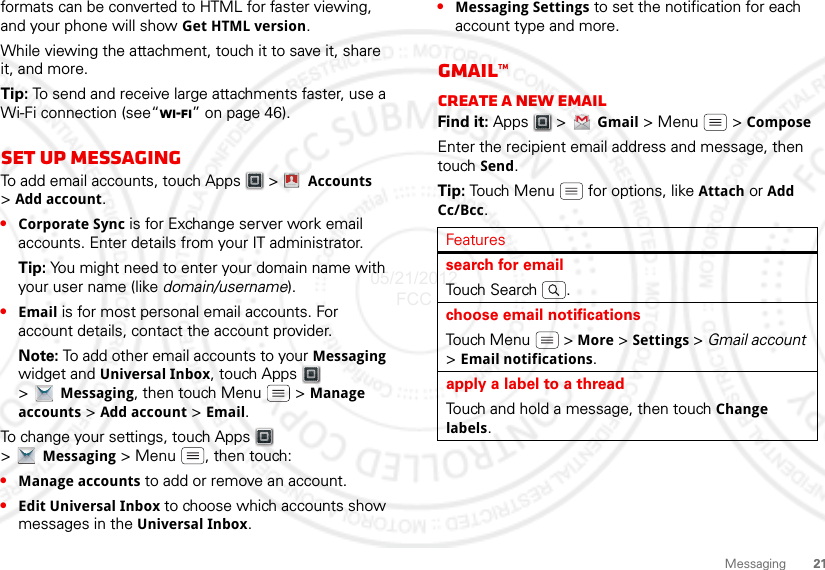
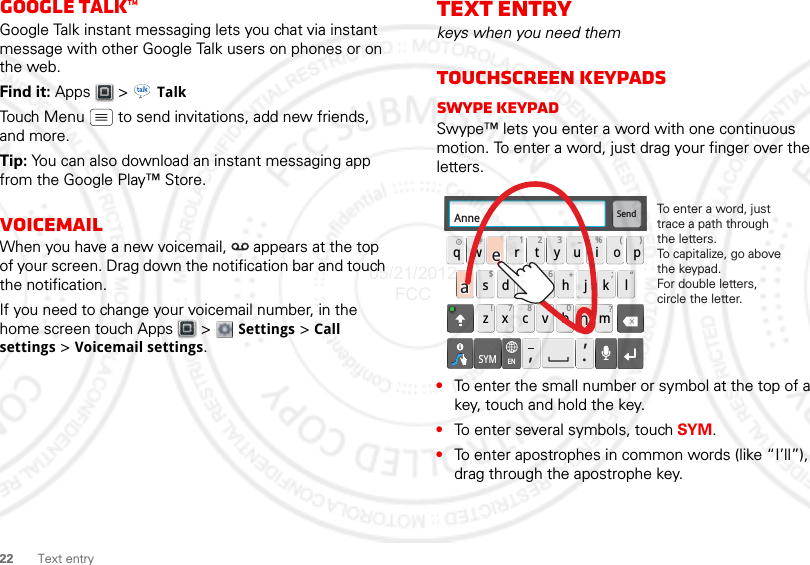
Motorola Mobility T56NQ2 MODEL XT626 UMTS/IDEN TRANSCEIVER WITH BT & WLAN User Manual User Guide

Motorola Mobility LLC MODEL XT626 UMTS/IDEN TRANSCEIVER WITH BT & WLAN User Guide
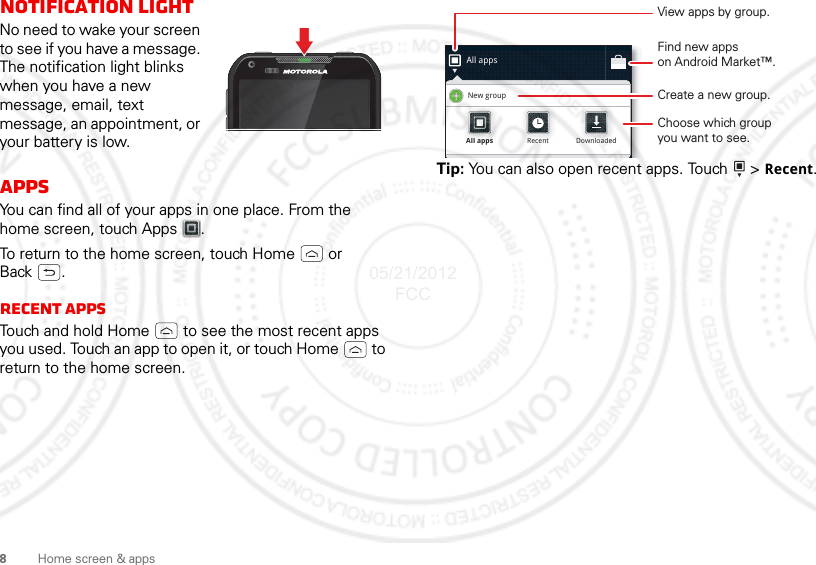
USER GUIDE 1

MOTOROLA XT626  EN05/21/2012 FCC
05/21/2012 FCC
1CongratulationsCongratulationsMOTOROLA XT626Stay connected, organize your life, and absolutely own the web with the MOTOROLA XT626.• Dual mode. Never worry about network coverage. With GSM/UMTS and iDEN network support, you’ll always be connected in your carrier’s service area.• Push-to-talk calls. Keep in touch with your family, friends, and colleagues with the touch of a button.• Organization. Check your email, calendar, and contacts wherever you are.•Browsing. Get more from the web with a huge screen. Search, browse, everything you want to do, all made easier.• Maps, entertainment, and more. The latest technology and apps. Google Maps™ to find your way. YouTube™ to stay entertained. Easy access to Google™ and thousands of Android™ apps.Note: Certain apps and features may not be available in all countries.Caution: Before assembling, charging, or using your phone for the first time, please read the important legal and safety information packaged with your product. This product meets the applicable SAR limits of 1.6 W/kg (FCC & IC) and 2.0 W/kg (ICNIRP). The limits and guidelines include a substantial safety margin designed to assure the safety of all persons, regardless of age and health. The highest SAR values measured for this device are listed in the regulatory information packaged with your product.More•Answers: Tou ch    >   Help Center.• Updates: Smartphone updates, computer software, user guides, online help, and more at www.motorola.com/myxt626.• Accessories: Find accessories for your smartphone at www.motorola.com/products.05/21/2012 FCC
2Your phoneYour phonethe important keys & connectorsNote: Your phone might look a little different.Press=Sleep/Wake. Hold=Turn on/off.Speaker KeyHome KeyBack KeyMenu KeyMicro USB ConnectorCharge or connect to PC.Volume KeysSearch KeyDirect Connect ButtonPower/Screen LockKey3.5mm Headset JackHDMI ConnectorFront CameraContentsLet’s go  . . . . . . . . . . . . . . . . . . . . . . . . . . . . . . . . . . . . . . . . . . . . . . . . . .  3Touchscreen & keys . . . . . . . . . . . . . . . . . . . . . . . . . . . . . . . . . . . . . .  4Home screen & apps . . . . . . . . . . . . . . . . . . . . . . . . . . . . . . . . . . . . . .  6Calls. . . . . . . . . . . . . . . . . . . . . . . . . . . . . . . . . . . . . . . . . . . . . . . . . . . . .  9Push-to-talk (PTT). . . . . . . . . . . . . . . . . . . . . . . . . . . . . . . . . . . . . . .  12Contacts . . . . . . . . . . . . . . . . . . . . . . . . . . . . . . . . . . . . . . . . . . . . . . . .  16Messaging. . . . . . . . . . . . . . . . . . . . . . . . . . . . . . . . . . . . . . . . . . . . . . . 20Text entry . . . . . . . . . . . . . . . . . . . . . . . . . . . . . . . . . . . . . . . . . . . . . .  22Tips & tricks. . . . . . . . . . . . . . . . . . . . . . . . . . . . . . . . . . . . . . . . . . . . . 24Photos & videos . . . . . . . . . . . . . . . . . . . . . . . . . . . . . . . . . . . . . . . . .  25Music  . . . . . . . . . . . . . . . . . . . . . . . . . . . . . . . . . . . . . . . . . . . . . . . . . . .  30Social networking. . . . . . . . . . . . . . . . . . . . . . . . . . . . . . . . . . . . . .  36Web . . . . . . . . . . . . . . . . . . . . . . . . . . . . . . . . . . . . . . . . . . . . . . . . . . . . .  37Personalize. . . . . . . . . . . . . . . . . . . . . . . . . . . . . . . . . . . . . . . . . . . . .  39Location . . . . . . . . . . . . . . . . . . . . . . . . . . . . . . . . . . . . . . . . . . . . . . . .  41Apps for all. . . . . . . . . . . . . . . . . . . . . . . . . . . . . . . . . . . . . . . . . . . . . 43Bluetooth™ wireless. . . . . . . . . . . . . . . . . . . . . . . . . . . . . . . . . . . . 44Wi-Fi  . . . . . . . . . . . . . . . . . . . . . . . . . . . . . . . . . . . . . . . . . . . . . . . . . . . . 46Memory card & file management . . . . . . . . . . . . . . . . . . . . . . . . 48Tools  . . . . . . . . . . . . . . . . . . . . . . . . . . . . . . . . . . . . . . . . . . . . . . . . . . .  51Management . . . . . . . . . . . . . . . . . . . . . . . . . . . . . . . . . . . . . . . . . . . .  56Security  . . . . . . . . . . . . . . . . . . . . . . . . . . . . . . . . . . . . . . . . . . . . . . . .  57Troubleshooting  . . . . . . . . . . . . . . . . . . . . . . . . . . . . . . . . . . . . . . . 60Safety, Regulatory & Legal. . . . . . . . . . . . . . . . . . . . . . . . . . . . . .  6105/21/2012 FCC
3Let’s goLet’s golet’s get you up and runningAssemble & chargeCaution: Please read “Battery Use & Safety” on page 61.6Charge1Cover off2microSD in3SIM in5Cover onBattery inB43HSIM microSIM microSIM+ Adapter iDEN SIM3G SIMTip: To save battery life, see “Battery tips” on page 25.Set up & goNote: This phone supports apps and services that use a lot of data, so make sure your data plan meets your needs. Contact your service provider for details.Note: If you have a Gmail™ account, your contacts from that account are synced to your phone.1Turn on. 2Select a language.3Create account,or log in.Kim VoneshWelcomeTouch the android to begin.Emergency dial Change languageSet up your Google Account 4Add accounts.Don’t have a Google Account?Already have a Google Account?Want to set up an account later?CreateSign inSkipIf you use any of the services below, tap the icon to set it up.Visual Voice MailEmail AccountsGoogleBackup Assistant+ContactsMotoCast IDCorporate SyncSet Up Accounts05/21/2012 FCC
4Touchscreen & keysWi-Fi connectIf you want to use a Wi-Fi network for even faster Internet access, touch Apps  >  Settings >Wireless & networks > Wi-Fi settings. Touch Wi-Fi to search for and connect to wireless networks. There’s more in “Wi-Fi” on page 46.Cool content & moreBrowse and download thousands of the coolest apps on the planet from Google Play™ Store. See “Browse & install apps” on page 43.Your phone can use a microSD memory card (sold separately)—you can load it up with photos, videos, and music from your computer (see “Memory card” on page 48).Touchscreen & keysa few essentialsTouchIt’s all in the touch:•Touch: Choose an icon or option.• Touch & Hold: Move items in the home screen.• Drag or flick: Scroll slowly (drag) or quickly (flick).• Pinch or double-touch: Zoom in and out on websites, photos, and maps.Touchscreen on/offYour touchscreen is on when you need it and off when you don’t.•To make your touchscreen sleep or wake up, just press Power/Lock .lark StWacker DrMborn StN MiciganW Lake St W Lake StE Wacker PlState/LakeLake Randolph/WabashMMME Randolph StSlide two fingersapart or togetherto zoom in or out.Drag or flick to scroll.05/21/2012 FCC
5Touchscreen & keys•When you hold the phone to your ear during calls, your touchscreen sleeps to prevent accidental touches.•To change how long your phone waits before the screen goes to sleep, touch Apps  >  Settings >Display > Screen timeout.•To make the screen lock when it goes to sleep, use “Screen lock” on page 58. To unlock the screen, press Power/Lock . Then, drag   to the right.Note: Your touchscreen might stay dark if the sensor just above it is covered. Don't use covers or screen protectors (even clear ones) that cover this sensor.KeysMenu, home, back, & searchTouch Home  to close any menu or app and return to the home screen. In the home screen, touch and hold Menu KeyBack KeyHomeKeySearch KeyHome  to show the last eight apps you used, then touch an app to open it.Touch Search  for text search, or touch and hold for voice search.Touch Menu  to open menu options, or touch Back  to go back.Power key menuPress and hold Power/Lock  to turn off your phone (Power off), or turn Airplane mode or Silent mode on or off.VolumePress the volume keys to change the ring volume (in the home screen) or the earpiece volume (during a call).When playing music or video files, press the volume keys to adjust media volume.Rotate the screenIn many apps, the touchscreen can rotate to stay right-side up when you turn your phone sideways:Find it: Apps  >  Settings > Display > Auto-rotate screen05/21/2012 FCC
6Home screen & appsHome screen & appsquick access to the things you need mostQuick start: Home screenThe home screen gives you all your latest information in one place. It’s what you see when you turn on the phone or touch Home  from a menu. It’s basically like this:Note: Your home screen might look a little different.SCREEN NOT YET AVAILABLEUse & change your home screenOn your home screen, shortcuts are icons that open your favorite apps, bookmarks, contacts, mail labels, or music playlists. Widgets show you news, weather, messages, and other updates right on your homescreen without having to open a separate app or web page.•To  open something, touch it. Touch Home  to return to the home screen.Tip: When you open a widget, touch Menu  to see any options or settings (you can choose accounts for Messages, Social Networking, or Calendar widgets).There’s more about social networking widgets in “Your social networking account” on page 36.•To resize Motorola widgets, touch and hold a corner until you feel a vibration, then drag.•To  add something or change your wallpaper, touch and hold an empty spot until you see the Add to Home screen menu.Tip: You can add a folder to organize your shortcuts.•To change the shortcuts in the dock at the bottom of the home screen (except Apps ), touch and hold a 83pmBudget MeetingTHUJUL3pmBudget MeetingTHUJUL05/21/2012 FCC
7Home screen & appsshortcut, and select an app from the Add to Dock menu.•To  move or delete something, touch and hold it until you feel a vibration, then drag it to another spot, another panel, or the trash  at the top of the screen.SearchTouch Search , or use a Search widget on your home screen.SCREEN NOT YET AVAILABLETouch here to enter text.Touch     to searchby voice.Phone status & notificationsThe status bar at the top of the screen has icons that tell you about messages and phone status. To view your notifications, touch the status bar and drag it down. Touch a notification to select it.Tip: To see today’s date, touch the status bar at the top of the screen.Bluetooth active  iDEN networkGPS activeGSM/UMTS networkWi-Fi active airplane modedownloading sync activevibrate alarm setsilent battery (charging)mute call battery (full charge)PTT speaker active Wi-Fi PTT offlinePTT speaker off Wi-Fi PTT onactive PTT call alerttalkgroup call missed phone callMotorola ClearClearPriorityNotificationsNew Business Presentation(2 more reminders) 11:24 amTaylor Malloy (Facebook)Dinner Party Invite 11:16 am11:35Missed callRohan Grant 10:47 am05/21/2012 FCC
8Home screen & appsNotification lightNo need to wake your screen to see if you have a message. The notification light blinks when you have a new message, email, text message, an appointment, or your battery is low.AppsYou can find all of your apps in one place. From the home screen, touch Apps .To return to the home screen, touch Home  or Back .Recent appsTouch and hold Home  to see the most recent apps you used. Touch an app to open it, or touch Home  to return to the home screen.Tip: You can also open recent apps. Touch   > Recent.All appsNew groupAll appsAll appsRecentRecentDownloadedDownloadedView apps by group.Choose which groupyou want to see.Create a new group.Find new appson Android Market™.05/21/2012 FCC
9CallsCallsit’s good to talkDialing optionsFrom the home screen, touch Dialer.Dialer Call log Contacts FavoritesMost RecentArturo RomanMobile +1-555-555-5555 4 days agoRecent Calls ListTouch to open, then touch an entry to call.BackspaceTouch to delete digitsyou entered.Call using iDEN networkReturn CallVoice CallCall using GSM/UMTS networkIn-call optionsTo use a Bluetooth™ device, touch Bluetooth. (Be sure the device is turned on and paired—see “Connect new devices” on page 45.) Note: Using a mobile device or accessory while driving may cause distraction and may be illegal. Always obey the laws and drive safely.Tip: You can touch Home  or Back  to leave the active call display. To reopen it, touch Home  MMobibilele555555-5-55555-2-254411JJeeennn UUUUrrriiiieeeggggaaassMobile 555-555-2541Jen UriegasAdd call DialpadEnd callMuteBluetooth SpeakeriDEN networkActive call 00:11 Call TimerEnd Call Speakerphone Turn the speakerphoneon or off.DialpadEnter numbers during a call.MuteMute or unmute the call.05/21/2012 FCC
10 Calls>Dialer, or flick down the Notifications bar and touch the Current Call notification.Make & answer callsTo make a call, touch Dialer, enter a number, then touch   to make a call on the iDEN network, or  to make a call on the GSM/UMTS network.Tip: If the screen is locked, drag   to the right.To answer a call while the display is active, touch   Answer. When the display is not active, answer by dragging   to the right.Note: When you hold the phone to your ear, the display goes dark to prevent accidental touches. When you move your phone away from your ear, the display lights up again.To ignore a call, touch   when the display is active. Touch   if the display is not active.If you ignore a call, your phone gives you the option to send a text message to the caller. Select a message and touch Ok to send it or touch Cancel to exit without sending a message.AnswerCreate new message”Sorry I was unable toanswer your call””Please call me againin a few minutes”Turn off text messagereplyOk Cancel”I will call you back ina few minutes”Text Message ReplyIgnoreYou can enable or disable text message reply for ignored calls, touch Apps  >  Settings> Call settings > Text message reply and check or uncheck the check mark next to Text message reply.To create or edit a preset text message reply, touch Edit messages.End callsTou ch   End Call.Missed phone callIf you receive a phone call during a push-to-talk call, and don’t answer it, you’ll receive a missed call notification. To return the phone call, touch End PTT Call, and then Return call when prompted. To continue the push-to-talk call, touch Dismiss.Recent callsFind it:  Dialer > Call log•To call a number, touch  .•To send a text message, create a contact, view a contact, or other options, touch and hold an entry.•To clear the list, touch Menu  > Clear list.Tip: If screen lock isn’t turned on, you can get to the Call log by pressing the PTT Button twice.End call05/21/2012 FCC
11CallsFrequent callsFind it:  Dialer > Favorites•To call a number, touch  .•To send a text message, view a contact, or other options, touch and hold an entry.•To add a contact to Favorites, select the contact, and touch the star in the upper right corner. The star turns green.Three way callsTo start a conference call, call the first number. After the call connects, touch Add Call. Dial the next number, or select it from contacts or favorites. When the next number answers, touch Merge.Your phone numberFind it: Apps  >  Settings > About phone > Status >My Phone numberEmergency callsNote: Your service provider programs one or more emergency phone numbers that you can call under any circumstances, even when your phone is locked. Emergency numbers vary by country. Your pre-programmed emergency number(s) may not work in all locations, and sometimes an emergency call cannot be placed due to network, environmental, or interference issues.  1Tou ch   Dialer (if your phone is locked, touch Emergency Call at the bottom of the screen).2Enter the emergency number.3Touch   or   to call the emergency number.Note: Your phone can use location based services (GPS and AGPS) to help emergency services find you. See “Location Services” on page 66.Cool downIn very limited circumstances, such as where your phone has been exposed to extreme heat, you may see “Cool Down” messages. To avoid possible damage to your battery and phone, you should follow these instructions until the phone is within its recommended temperature range. When your phone is in “Cool Down” mode, only emergency calls can be made.05/21/2012 FCC
12 Push-to-talk (PTT)Push-to-talk (PTT)one or more, talk to them allPTT CallsPush-to-talk calls are calls between two people.iDEN PTTMake and answer push-to-talk callsTo  make a push-to-talk call:•Touch Dialer, and enter the recipient’s PTT (push-to-talk) number. •Touch  Dialer > Contacts, Call log or Favorites, and select an entry that has a PTT number.To  talk, press and hold the PTT Button. To listen, release the PTT Button.To answer a push-to-talk call, press the PTT Button after the caller has stopped talking.To  add a person to a call, touch Add member.To  end a push-to-talk call, touch End.Resume PTTYou can extend the automatic timeout of a PTT call by about 30 seconds.Find it: Apps  > Settings > Call settings > Push to Talk settings > Resume PTTOne touch PTTYou can customize the PTT Button for quick access to push-to-talk functions.Find it: Apps  > Settings > Call settings > Push to Talk > One Touch PTTTip: If screen lock isn’t turned on, you can initiate One Touch PTT functions from the lock screen by pressing and holding the PTT Button.OptionsOff Turn off One Touch PTT.Launch PTT Contacts listOpen a list of push-to-talk contacts on your phone.Launch PTT Call log listOpen the push-to-talk Call log list.PTT selected contactStart a push-to-talk call with the selected contact.05/21/2012 FCC
13Push-to-talk (PTT)Tip: To add a widget for One Touch PTT, touch and hold a blank spot on your home screen, then touch Widgets > One Touch PTT.AlertsUse alerts to tell someone you want to speak to them.To  send a call alert:•Touch  Dialer, enter a PTT number, and press Menu  > Send Alert. When prompted, press the PTT Button.•Touch  Dialer > Contacts, Call log, or Favorites, and select a contact containing a PTT number. Touch , and press the PTT Button when prompted.When you receive a call alert, you can:•Answer: Press the PTT Button to begin a push-to-talk call with the sender.•Later: Store the call alert to Notifications.•Dismiss: Ignore the call alert.PTT most recent numberStart a push-to-talk call with the most recent PTT number in the Call log.OptionsOne touch PTT:OFFNote: Alerts are moved to Notifications after a few minutes of inactivity. You won’t be able to make phone calls or push-to-talk calls until the call alert is moved, or you’ve chosen an option.Switch from a push-to-talk call to a phone callFor longer calls, you can switch from a push-to-talk call to a phone call if the push-to-talk call recipient has a phone number stored in Contacts.During a push-to-talk call, Touch Call.TalkgroupsNote: Availability of Talkgroups, and the maximum number of Talkgroup members, is dependent on your service provider. Contact your service provider to establish a Talkgroup.Join a TalkgroupBefore you can make a Talkgroup call, you’ll need to join the Talkgroup.  1Tou ch   Dialer > Contacts >   > Talkgroup, and press Menu  > Enter Talkgroup. Name the Talkgroup and enter the Talkgroup number. Press Menu  > Save.Tip: Talkgroup numbers begin with a #. For example #155.2Select the Talkgroup in your contacts.05/21/2012 FCC
14Push-to-talk (PTT)3Touch Join.Make a Talkgroup call•Touch  Dialer, enter the Talkgroup number and press the PTT Button.Tip: To add a widget for Talkgroups, touch and hold a blank spot on your home screen, then touch Widgets > TalkGroupWidget.•Touch  Dialer > Contacts >  , select the Talkgroup and touch Push to Talk (or press the PTT Button).Tip: To silence incoming Talkgroup calls, press Menu  > Settings > Call settings > Push to Talk Settings > Talkgroups > Silence Talkgroups.iDEN ModeWhen you’re out of iDEN network coverage, you can adjust how your phone operates in iDEN mode to conserve battery life.Find it: Apps  >  Settings > Dual SIM SettingsOptionsNormal Your phone connects quickly to the iDEN network.No TalkGroupJoinedlocal areaTip: To add a widget for iDEN Mode, touch and hold a blank spot on your home screen, then touch Widgets > iDEN mode.Wi-Fi push-to-talkpush-to-talk calls are calls between two people.Find it: Apps  >  Wi-Fi PTTSetupThe first time you open Wi-Fi PTT, you’ll be prompted to sign in to your account. Enter your user ID and password, and touch Sign in.Wi-Fi PTT ContactsWi-Fi PTT will import all of your PTT contacts the first time you open it.To create a contact, touch  .To view talkgroups, touch  .Save Reduces battery consumption, but takes longer to connect to the iDEN network.Off Turns off iDEN PTT.OptionsiDEN modeNormal05/21/2012 FCC
15Push-to-talk (PTT)To add a talkgroup, touch   >  .To edit a contact, touch and hold it, and then touch Edit contact.Make and answer push-to-talk callsTo  make a push-to-talk call:•Touch  Wi-Fi PTT > Recent > Dialer, and enter the recipient’s PTT number. •Touch  Wi-Fi PTT > Recent or Contacts, and select an entry that has a PTT number.To  talk, press and hold the PTT Button. To listen, release the PTT Button.To answer a push-to-talk call, press the PTT Button after the caller has stopped talking.To  end a push-to-talk call, touch End Call.Note: Use of Wi-Fi PTT requires a Wi-Fi connection. See “Wi-Fi search & connect” on page 46AlertsUse alerts to tell someone you want to speak to them.To  send a call alert:•Touch  Wi-Fi PTT > Recent >, enter a PTT number, and press Menu  > Alert. When prompted, press the PTT Button.•Tou ch   Wi-Fi PTT> Recent or Contacts, and select a contact containing a PTT number. Touch  , and press the PTT Button when prompted.Tip: You can also touch and hold a contact or recent call entry, and then touch Wi-Fi Alert.When you receive a call alert, you can:•Answer: Press the PTT Button to begin a push-to-talk call with the sender.•Later: Store the call alert to Notifications.• Dismiss: Dismiss the call alert.Note: Alerts are moved to Notifications after a few minutes of inactivity. You won’t be able to make phone calls or push-to-talk calls until the call alert is moved, or you’ve chosen an option.Wi-Fi talkgroupsNote: Availability of Talkgroups, and the maximum number of Talkgroup members, is dependent on your service provider. Contact your service provider to establish a Talkgroup.Join a TalkgroupBefore you can make a Talkgroup call, you’ll need to join the Talkgroup.  1Tou ch   Wi-Fi PTT > Contacts >   > Talkgroup, and press Menu  > Enter Talkgroup. Name the 05/21/2012 FCC
16 ContactsTalkgroup and enter the Talkgroup number. Press Menu  > Save.2Select the Talkgroup in your contacts.3Touch Join.Make a Talkgroup call•Touch  Wi-Fi PTT > Recent >  Dialer, enter the Talkgroup number and press the PTT Button.Tip: Talkgroup numbers begin with a #. For example #155.•Touch  Wi-Fi PTT > Contacts >  , select the Talkgroup and touch Push to Talk (or press the PTT Button).Your Wi-Fi PTT numberFind it: Apps  >  Wi-Fi PTT > Menu  > My InfoSet push-to-talk speakerYou can listen to push-to-talk calls through your phone’s speaker or earpiece. Press Speaker  to turn the speaker on or off.Contactscontacts like you’ve never had beforeQuick start: ContactsFind it:  Dialer > ContactsTip: You can also get to Contacts by touching Apps  >Contacts.Dialer Call log FavoritesContactsDisplaying 41 contactsAlexander BrownAmit MingAl’s Cake ShopAngel WangBen MillerCasidy AmbersContacts  ListTouch to view contact information. Touch & hold to edit, delete, and more.Press        to create, filter, and sync contacts.Add a new contact.Search contacts.Add a new group.05/21/2012 FCC
17ContactsTransfer contactsGet all your contacts, all in one place. Here’s a few helpful hints:•Use Gmail™All your Gmail contacts will automatically get synced to your phone. Various computer apps for mobile phones and email accounts allow you to export your contacts as a “.CSV” file. You can then use Gmail to import the file. For more details, go to www.motorola.com/transfercontacts or log in to your Gmail account on your computer and select ”Help”.•Use a microSD cardYou can transfer contacts from your old phone to your new Motorola phone using your microSD card.•Use a SIM cardYou can transfer contacts from your old phone to your new Motorola phone using your SIM card.•MoreThere are other methods and tools to help you at www.motorola.com/transfercontacts.Transfer contacts using your microSD card  1On your old phone, copy all the contacts you want to transfer to your microSD card.Tip: For Motorola Android™ phones,  Dialer > Contacts > Menu  > Manage Contacts > Export contacts to: SD card.2Insert your microSD card in your new phone, see “Assemble & charge” on page 3.3Import the contacts from your microSD card, touch Dialer > Contacts >Menu  > Manage Contacts > Import contacts from: SD card.Note: You might have done this during “Set up & go” on page 3.Transfer contacts using your SIM card  1On your old phone, copy all the contacts you want to transfer to your SIM card.Tip: For Motorola Android phones, touch  Dialer > Contacts > Menu  > Manage Contacts > Export contacts to: SIM card.2Insert your SIM card in your new phone, see “Assemble & charge” on page 3.3Import the contacts from your SIM card, touch Dialer > Contacts >Menu  > Manage Contacts > Import contacts from: SIM card.Note: You might have done this during “Set up & go” on page 3.05/21/2012 FCC
18 ContactsCall or email contactsFind it:  Dialer > ContactsFor View contact, Call contact, Text contact, or other options, touch and hold the contact.View & use contactsWhen you set up a social networking account, you’ll know what everybody’s up to and when (see “Social networking” on page 36). Every time you pick up a call, check a message, or look up a friend’s contact info, sure, you’ll see their name and number, but you can see their social network status and smiling face, too.Find it:  Dialer > ContactsTouch a contact to open its details. While viewing details, you can start a call or message by touching a phone number or other info. SORT contactsTo sort contacts or set display options, touch Menu  >Display options and touch:•Filter by: Choose which types of contacts you want to see. Select All contacts, Contacts with PTT numbers, or Contacts with phone numbers.•Sort list by: Sort by first or last name.•View contact names as: View contacts as first name or last name first.•Choose contacts to display: Select which accounts will display contacts.Create contactsFind it:  Dialer > Contacts > Touch any entry area to open the touchscreen keypad.When you’re finished, touch Save.First nameLast namePhonePush to TalkMobile PhonePTTPTTEmailfrom moto@motorola.comGoogle contactEmailHomeSave CancelAdd contactAdd another entry.Remove this entry.Open label options.Add a picture.05/21/2012 FCC
19ContactsWhere are contacts saved? Your phone saves new contacts in its memory and on the Google™ Server. It also updates your social networking account.Edit or delete contactsFind it:  Dialer > ContactsTouch the contact, then touch Menu  > Edit contact or Delete contact. Contacts from social networks (like Facebook) will become hidden if you select Delete contact. To view these contacts, or delete them permanently, use the social network’s app or Website.Synchronize contactsWhen you change one of your contacts, your phone automatically updates your other social networking accounts. Likewise, if you change a social networking friend, your phone updates your contacts.GroupsFind it:  Dialer > Contacts > > You can put your Contacts into a Talkgroup for push-to-talk calls, or a Message Group to easily send text messages to a group of people.Edit GroupsTouch and hold a group to open the options menu. Touch Edit group.To add a member, touch  , and select a contact.Tip: You can also add a member to a group during a group call. Touch Add member.Note: Adding a new member during a group call creates a new group. To save this new group, touch Menu  >Save.Touch   to delete a member.Delete GroupsTouch and hold a group, then touch Delete group.05/21/2012 FCC
20 MessagingMessagingsometimes it’s best to text, or IM, or email . . .Quick start: MessagingFind it: Apps  > Messaging > Universal InboxTip: To see more messages, flick or drag up.Read & reply to messagesFind it: Apps  > Messaging > Universal InboxNote: Universal Inbox shows all of your messages together—text, email, and social networking messages.  Universal Inbox (14)Your last messageI’m fine with that. 2:19 PMJon AndersonFreelancersWe’re going to need help with the new interns... 11:41 AMMary MorganMeet me outside the theater at 8 and don’tforget your ID. Would you maybe like to... 5:47 PMJim SomersMeeting invitationMeeting is set for next Thursday at 10:00 am... 2:45 PMArther Bando 7:39 PMCopy RevisionsPlease take a look at the new revisions and let...Anna MedinaCheck for messages now.Message TypeMessage ListTouch to open a message. Touch & hold to move, delete, & more.Create messages.To show only one type of message, touch a message type instead of Universal Inbox.•To open a text message or social networking message and all of its replies, touch it.•To respond to a message, just open it and enter your response in the text box at the bottom.To forward a text message, touch and hold a message in the conversation, then touch Forward message.For email, touch  to choose a reply or forward option.•To open options, touch and hold a message.Create messagesFind it: Apps  > Messaging >Choose a message type, such as Text Messaging or Facebook. Then, enter the recipient and message. In text messages and emails, touch Menu  for options, like Insert... or Attach Files.Send & receive attachmentsTo send a file in a message, open a new message and touch Menu  > Insert.When you receive a message with an attachment, open the message and touch the file name to download it. Then, touch the name again to open it. Some file 05/21/2012 FCC
21Messagingformats can be converted to HTML for faster viewing, and your phone will show Get HTML version.While viewing the attachment, touch it to save it, share it, and more.Tip: To send and receive large attachments faster, use a Wi-Fi connection (see“Wi-Fi” on page 46).Set up messagingTo add email accounts, touch Apps  >  Accounts >Add account.•Corporate Sync is for Exchange server work email accounts. Enter details from your IT administrator.Tip: You might need to enter your domain name with your user name (like domain/username).•Email is for most personal email accounts. For account details, contact the account provider.Note: To add other email accounts to your Messaging widget and Universal Inbox, touch Apps  >Messaging, then touch Menu  > Manage accounts > Add account > Email.To change your settings, touch Apps  >Messaging > Menu , then touch:•Manage accounts to add or remove an account.•Edit Universal Inbox to choose which accounts show messages in the Universal Inbox.Account  Manager•Messaging Settings to set the notification for each account type and more.Gmail™Create a new emailFind it: Apps  >Gmail > Menu  > ComposeEnter the recipient email address and message, then touch Send. Tip: Touch Menu  for options, like Attach or Add Cc/Bcc.Featuressearch for emailTou ch  S e a r ch .choose email notificationsTouch Menu  > More > Settings > Gmail account >Email notifications.apply a label to a threadTouch and hold a message, then touch Change labels.05/21/2012 FCC
22 Text entryGoogle Talk™Google Talk instant messaging lets you chat via instant message with other Google Talk users on phones or on the web.Find it: Apps  > TalkTouch Menu  to send invitations, add new friends, and more.Tip: You can also download an instant messaging app from the Google Play™ Store.VoicemailWhen you have a new voicemail,  appears at the top of your screen. Drag down the notification bar and touch the notification.If you need to change your voicemail number, in the home screen touch Apps  >  Settings > Call settings > Voicemail settings.Text entrykeys when you need themTouchscreen keypadsSwype keypadSwype™ lets you enter a word with one continuous motion. To enter a word, just drag your finger over the letters.•To enter the small number or symbol at the top of a key, touch and hold the key.•To enter several symbols, touch SYM.•To enter apostrophes in common words (like “I’ll”), drag through the apostrophe key.Send:-)asdfghj k lqwe r t y u i opzxcvbnm@#12 3_%()!7890 /?&$456+:;“,,.SYMENAnneAnneAnneaenaenTo enter a word, just trace a path through the letters.To capitalize, go above the keypad.For double letters, circle the letter.05/21/2012 FCC
23Text entry•To correct a word, double-tap it. Swype shows a small menu of other word options. Swype might also show a menu if it can’t guess your word.•If Swype doesn’t know a word, touch individual letters to enter it. Swype remembers, so next time you can just drag over the letters.Multi-touch keypadYou can open a keypad on your screen by touching a text field, or touching and holding Menu . To close the keypad, touch Back .Compose messageSend using iDEN Send using UMTS ?123DeleteReturnSpaceSymbols/NumbersShiftText EntryTouch to open touchscreenkeyboard.Multi-touch Typing tipsTo...Enter alternate charactersFrom the number keypad, touch Alternate . Touch again to return to numbers.Enter one capital letterTouch Shift .Enter only capital letters, until you touch Shift Lock  againTouch Shift Lock  twice. Touch again to revert to lowercase.Select text Touch and hold text to select it.Cut or Copy selected textTouch and hold text, then touch Cut or Copy.Paste cut or copied textTouch and hold location to paste then touch Paste.Move the cursor Touch the location you want to go to.Delete a character (hold to delete more)Touch Delete .ALTx05/21/2012 FCC
24Tips & tricksText input settingsFind it: Apps  >  Settings > Language & keyboard•To edit your dictionary, touch User dictionary.•To change the language and the style for your touchscreen keypad, touch Select locale.•To change input method and settings, touch Swype, Multi-touch keyboard, or KOR/ENG keyboard.Tips & tricksa few handy hintsGeneral tipsTo...Return to home screenTouch Home .See recently dialed numbersTouch  Dialer > Call log.Sleep/wake your phonePress Power/Lock .Set screen timeout Touch Apps  > Settings > Display >Screen timeout.Search Touch Search .Use voice search Touch and hold Search  .See recently opened appsTouch and hold Home .05/21/2012 FCC
25Photos & videosBattery tipsWant to extend your battery life? Try these:•To select a battery profile that suits your phone use, touch Apps  >  Settings > Battery & data manager > Battery mode.•To turn off automatic applications sync, touch Apps  >  Settings > Battery & data manager >Data Saver.•To turn off Bluetooth power, touch Apps  > Settings > Wireless & networks > Bluetooth.•To turn off Wi-Fi, touch Apps  >  Settings >Wireless & networks > Wi-Fi.Choose apps for Quick Launch AreaTouch and hold an app icon in the Quick Launch Area. Then, select an app from the Add to Dock menu.Tu r n   sound on/off Press and hold Power/Lock  >Silent mode.Tu r n   airplane mode on/offPress and hold Power/Lock  >Airplane mode.To . . .Photos & videossee it, capture it, share it!PhotosTake & share photosTake that family photo, and post it online for everyone to see.Find it: Apps  >   Camera10241024    Breckenridge, COBreckenridge, COSwitch between front& back cameras.Zoomin/out.Take  photo.Shots RemainingSee yourlast photo.Adjust camera settings.Autofocus BoxTouch screen tochange focus location.Switch to camcorder.05/21/2012 FCC
26 Photos & videosNote: To get the clearest photos, wipe the lens clean with a soft, dry cloth before you take a photo.To take the photo, touch  .Note: Photos are stored on your phone’s internal memory unless you switch it to a microSD memory card (sold separately). Picture Resolution is Large or 8MP, unless you change it.Open your gallery and touch and hold a photo to view options.OptionsSet as To  set the photo as a wallpaper, contact photo, or social network photo.Add to album To  upload the photo to an online photo album.Share To  send the photo in a message or post it online. For more info on sharing your photos, see “Share photos & videos” on page 29.Delete To  delete the photo.Camera SettingsYou can make adjustments to optimize your shot. Touch Menu  to see these options.OptionsSettings Set Picture Resolution and Geo-tag setting.Effects Change photo look: Normal, Black and White, Negative, and more.Scenes Adjust in different environments: Auto, Portrait, Landscape, Sport, and more. Touch the screen when finished to return to the viewfinder.Modes Choose from Single shot, or Panorama to take multiple shots of wide scenes and join them together to make one large image.Tip: When using Panorama mode, use Capture Direction to specify how shots will be joined: Move up, Move right, Move left, Move down.05/21/2012 FCC
27Photos & videosTag photosTag your photos with location information.Touch Menu  > Settings > Geo-tag.Brightness Set Brightness.Flash Set Flash On, Flash Off, or Auto Flash.Switch to CamcorderFlick the switch below   to toggle between photo and camcorder.OptionsVideosRecord & share videosFind it: Apps  >CamcorderNote: To get the clearest videos, wipe the lens clean with a soft, dry cloth before you record a video.To  r e c o r d  a video, touch  . Touch   again to stop the recording.Note: Videos are stored on your phone’s internal memory unless you switch it to a microSD memory card ww5544000666-7-222220000000888882244455544555HDHD  01:13:12  Los Angeles, CA01:13:12  Los Angeles, CASwitch between front& back cameras.Record video.Watch yourlast video.Adjust camcorder settings.Time RemainingZoomin/out.Switch to camera.05/21/2012 FCC
28 Photos & videos(sold separately). Video Resolution is High Definition (720p) unless you change it.Open your gallery and touch and hold a video to view options.HD videosYou can capture HD-quality videos to watch on an HDTV or monitor.To record an HD quality video, be sure to select the correct Video resolution. From the active camcorder viewfinder, touch Menu  > Settings > Video resolution, and make sure it’s set to High Definition (720p).OptionsPlay To  play the video, touch  .Upload To  upload the video to an online album, touch  .Share To  send the video in a message or post it online, touch  . For more info on sharing your video, see “Share photos & videos” on page 29.Delete To  delete the video, touch Menu  > Delete.To enhance the video quality, touch Menu  > Scenes or Effects.Video SettingsYou can make adjustments to optimize your video. Touch Menu  to see these options. OptionsSettings Set Video Resolution.Effects Change video look: Normal, Black and White, Negative, and more.Scenes Adjust for better audio capture in different environments: Auto and Night.Modes Choose from Normal video, Video Message, Fast motion, or Slow motion.Brightness Set Brightness.Light Turn a light on or off to adjust for the lighting where you are recording.05/21/2012 FCC
29Photos & videosView photos & videosFind it: Apps  > GallerySwitch to CameraFlick the switch below   to toggle between photo and camcorder.OptionsrichieUploadYesterdrichieUploaded a photoYesterdayiieeeeeeaaddddeeddddaaaa ppphhheerddaaaayyyrichieUploaded a photoYesterday3My library OnlineCamera rollFriendsDLNA serversSee your online albums (like Picasa, Flikr, or Facebook).Backup yourphotos & videos.Stream media from yourcomputer with MotoCast.See your capturedphotos & videos.Sort your photos & videos.Share photos & videosFind it: Apps  >Gallery  1Touch a photo or video, then touch .2Choose how you want to share—like Bluetooth, Email, Text Messaging, or an online album.Manage photos & videosFind it: Apps  > GalleryTouch a thumbnail image from your camera roll or library, then:•To delete the photo or video, touch Menu  >Delete.•To set the photo as a contact picture, social network profile picture, or wallpaper, touch Menu  > Set as.Tip: To copy photos to/from a computer, go to “View & transfer files with Motorola phone portal” on page 48.Edit photos & videosFind it: Apps  > Gallery> Camera roll, select a picture, and touch Menu  > EditYou can choose advanced editing features to resize, crop, or change the color.05/21/2012 FCC
30 MusicDLNAShare your photos, videos, and songs with friends and family easily.Find it: Apps  >   DLNANote: Connect to a Wi-Fi network or use your own Wi-Fi hotspot (see “Wi-Fi” on page 46). You’ll need to allow access to other devices to download media from your smartphone and to share your files. If you want to access media files on other devices, they must allow access.•Play media—Select media for playback on another device in a Wi-Fi network.•Copy media to server—Sync the media files on your smartphone with other devices.•Copy media to phone—Copy a picture from one smartphone to another.•Share media—Allow other devices to access media files on your smartphone. Without downloading any media from your smartphone, other people can view your pictures or videos, or play your songs, on their own devices.DLNAPlay media Copy media  to serverShare mediaCopy media  to phoneMusicwhen music is what you need...Quick start: MusicFind it: Apps  > MusicTouch a category, then touch the song or playlist you want to play. Touch Menu  > More >   to randomly play all your songs, or touch Search to find a song.Recommended songabout two minutes agoThe Downtown FictionMakes Me BetterNow playingMy library PodcastsFMradioInternet radioDownload &listen to podcasts.Listen to Internet radio.Go to the current song.Go to your music library.Listen to FM radio.05/21/2012 FCC
31MusicTip: When a song is playing, you can add it to a playlist by touching Menu  > Add to playlist.Tip: To listen to music during a flight, turn off all your network and wireless connections: Press and hold Power/Lock  then touch Airplane mode.Set up musicWhat music transfer tools do I need?To put music on your computer and then load it on your phone, you need:•Microsoft™ Windows™ computer or Apple™ Macintosh™.•USB data cable (included with your phone).•Optional microSD memory card (sold separately).Your phone supports removable microSD memory cards up to 32GB capacity. To make sure your memory card is installed, go to “Assemble & charge” on page 3.Tip: To see the available memory on your memory card, touch Apps  > Settings > Storage.What audio file formats can I play?Your phone can play many types of files: AAC, AMR, MP3, WAV, WMA, AAC+, and MIDI.What headphones can I use?Your phone has a 3.5mm headset jack for wired stereo listening (required for FM radio). You can also go wireless with Bluetooth™ stereo headphones or speakers (see “Bluetooth™ wireless” on page 44).Get musicTransfer music from your computer to your phone using a USB cable connection. Music files can be transferred to your phone by syncing with Windows Media® Player or using Motorola Media Link.Note: Copyright—do you have the right? Always follow the rules. See “Content Copyright” on page 69.Sync with Windows Media Player  1Using a USB cable, connect your phone to an available USB port on your computer.2Flick the status bar down and touch USB Connection > Windows Media Sync.3Open Windows Media Player and drag and drop your music into the sync list.4Click on Start Sync.Transfer music with Motorola Media LinkMotorola Media Link lets you transfer music files from Windows Media Player or iTunes®. Before you can 05/21/2012 FCC
32 Musictransfer music, you’ll need to create playlists with the music you wish to transfer.The first time you use the music player, you’ll be prompted to install Media Link from your phone. You can also download Media link from www.motorola.com/medialink.To transfer music:  1Use a USB cable to connect your device to an available USB port on your computer. Once the correct Motorola Drivers have been installed on your computer, Media Link will start.PhotosLast Sync06/14/2011MusicLast Sync06/14/2011Device Tools HelpSync toDeviceAll PlaylistsWindows Media PlayerSelectted Playlists:XT626(3)3 SongsRefreshSyncCapacity: 1 GBFree8.5 GBOther454.7 MBPodcasts0.0BVideosPhotosXT626  - Internal StorageMusic0.0B0.0B 12.4 MBSync fromDeviceSync Music from:VideosLast SyncNeverPodcastsLast SyncNeverContactsLast SyncNeverSync to or from your device.Select Music.Start the sync.Choose music player to sync with.2Make sure the Sync to Device tab is selected, and Music has a check mark next to it.3In the Sync to Device tab, make sure Sync Music from is selected, and select either Windows Media Player or iTunes from the drop down box to the right.4You can select to sync all playlists, or selected playlists. If you choose to sync selected playlists, choose the playlists from the list.5Click on Sync to transfer the music to your phone.05/21/2012 FCC
33MusicPlay musicTouch a song or playlist to start playing music.Max Keppler and AnnaLee ScottWhen You're AroundRunning RoughshodSong Lyrics—Current LineSong Lyrics—Next LinePlaylistMusic ControlsCreate PlaylistArtist InformationSong lyrics scroll upas the song plays.Album ArtworkArtist & Song T itleMusic player controlsTo...Play/pause Tou ch / .Select previous/next songTou ch  / .Fast forward/rewind Touch and hold  / .Create playlist Tou ch  .View playlist Tou ch  .Shuffle Tou ch   > .Repeat To u ch  > .Adjust volume Press side volume keys.Add to playlist Touch Menu  > More >Add to playlist.Set as ringtone Touch Menu  > More >Use as ringtone.Delete Touch Menu  > More >Delete.05/21/2012 FCC

Navigation menu