Motorola Mobility T5EL1 Portable Cellular Transceiver (AMPS/TDMA) User Manual UG C330 GSM
Motorola Mobility LLC Portable Cellular Transceiver (AMPS/TDMA) UG C330 GSM
Exhibit 8 Users Manual

APPLICANT: MOTOROLA, INC. FCC ID: IHDT5EL1
EXHIBIT 8
INSTRUCTION MANUAL
A preliminary draft copy of the Users Manual follows:

1
DIGITAL WIRELESS TELEPHONE
Model C340
User’s Guide >
Version 1.4
03/28/2004
2
Welcome
Welcome to the world of Motorola digital wireless communications! We are pleased that you
have chosen the Motorola C340 wireless phone.
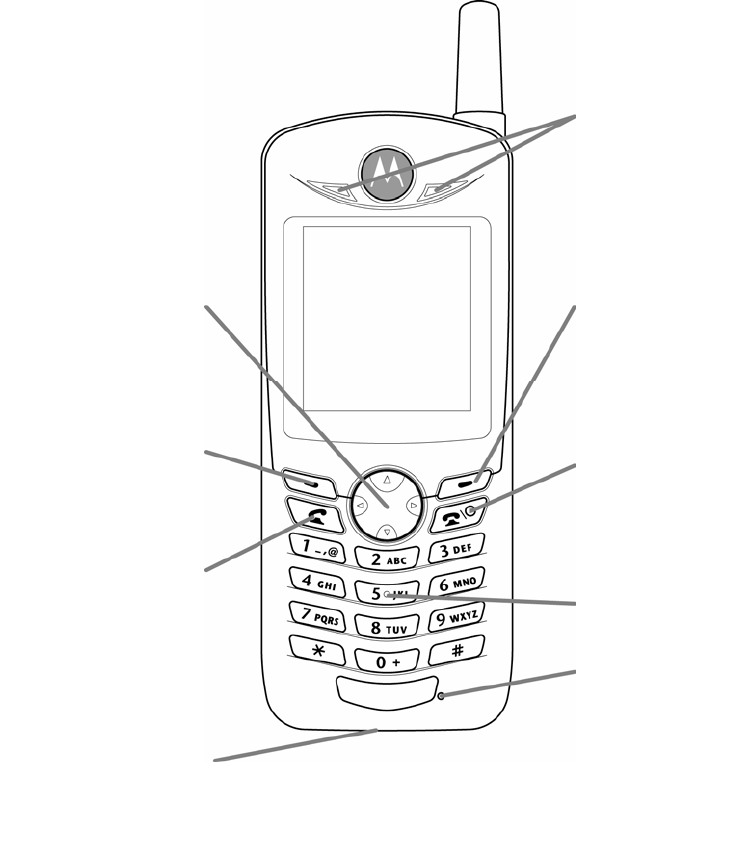
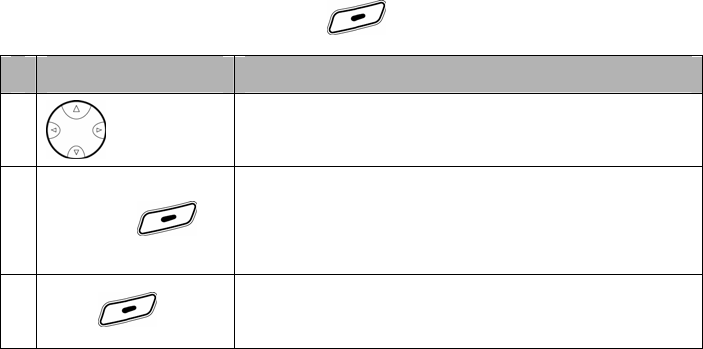
Right Soft Key
Perform functions
identified by right
display prompt.
Navigation Key
Scroll through lists,
set volume. Press
and hold for
continuous scrolling.
Power / End key
Press & hold to
power phone on &
off, end phone
calls, exit menus.
Left Soft Key
Perform functions
identified by left
display prompt.
Key Pad
Send Key
Send and answer
calls, view recent
dialed calls list.
Micro Phone
Accessor
y
Connector Port
Insert charger,
headset and
phone
accessories.
Ear Piece
3
Menu Map
Main Menu
z Phonebook
New
Edit
Delete
Delete Name
Send Msg
Ph Book Capacity
Delete All
Sort By
z Recent Calls
Missed Calls
Received Calls
Dialed Calls
Notepad
Call Times
Delete All Call Log
z Messages
Create Message
Voicemail
Inbox
Quick Notes
Outbox
Drafts
Memory Meter
Message Setup
z Ring Styles
Style
Style Details
My Tones
z Games
Tower of Hanoi
Shopping Mall
Settings Menu
z Personalize
Home Screen
Greeting Text
Color Styles
WallPaper
Screen Saver
Shortcuts
z In Call Setup
In Call Timer
Answer Settings
Speaker Phone
Easy Prefix
z Initial Setup
Time and Date
Backlight
Display Timeout
TTY
Language
Contrast
DTMF
Master Reset
Master Clear
z Phone Status
My Phone Number
Active Line
(*This is carrier dependent.)
Battery Meter
Other Information
(*This is carrier dependent.)
z Headset
Auto Answer
z Car Settings
4
Bubble Shooter
Blackjack
z Office Tools
Datebook
Calculator
Unit Converter
Currency Converter
z Alarm
Enable or Disable
New
Edit
Delete
Delete All
z Media Center
My Tones
Picture Viewer
z Settings (See next column)
Auto Answer
Auto Hands Free
z Network Setup
Current Network
Service Tone
Call Drop Tone
Network Scan
(*This is carrier dependent.)
Network Services
(*This is carrier dependent.)
z Security
Phone Lock
Talk Secure
Restrict Calls
New Passwords
5
Contents
Welcome............................................................................................................ 2
Menu Map.......................................................................................................... 3
Contents............................................................................................................ 5
Safety and General Information .................................................................... 10
Getting Started ............................................................................................... 16
What’s in the Box? ................................................................................... 16
About This Guide ..................................................................................... 16
Installing the Battery................................................................................ 16
Charging the Battery................................................................................ 17
Battery Use ............................................................................................... 18
1. The Basics About Your Phone......................................................... 19
1.1 Turning Your Phone On.................................................................... 19
1.2 Turning Your Phone Off ................................................................... 20
1.3 Using the Idle Display....................................................................... 20
1.4 Using the MENU (RSK) ..................................................................... 21
1.5 Using the Speaker Phone (LSK) ...................................................... 23
1.6 Making a Call ..................................................................................... 23
1.7 Other Functions During In-Call........................................................ 24
1.7.1 MUTE...................................................................................... 24
1.7.2 Other Options........................................................................ 24
1.8 Answering a Call ............................................................................... 25
1.9 How to Enter Information in Your Phone ........................................ 26
1.9.1 How to Enter Text.................................................................. 26
1.9.2 Character Chart..................................................................... 26
1.9.3 Deleting Letters and Words ................................................. 27
1.9.4 How to Enter Punctuation and Special Characters............ 27
1.9.5 How to Enter Numbers ......................................................... 27
1.10 Adjusting Volume ............................................................................. 28
2. Phonebook ........................................................................................ 29
2.1 Phonebook Option Menus................................................................ 29
2.2 Creating a Phonebook Entry............................................................ 30
2.2.1 Entering Information............................................................. 30
2.2.2 Complete Phonebook Entry ................................................. 31
2.3 Dialing a Phonebook Entry .............................................................. 31
6
2.4 Editing a Phonebook Entry .............................................................. 32
2.5 Deleting a Phonebook Entry ............................................................ 33
2.6 Deleting selected Name of Phonebook Entry................................. 33
2.7 Deleting All Phonebook Entries....................................................... 34
2.8 Monitoring Phonebook Capacity ..................................................... 35
2.9 Sorting Entries .................................................................................. 35
3. Recent Calls ...................................................................................... 37
3.1 Viewing the Recent Calls.................................................................. 37
3.2 Viewing the Notepad......................................................................... 38
3.3 Viewing Call Times ........................................................................... 39
3.4 Deleting All Call Log ......................................................................... 41
4. Settings.............................................................................................. 42
4.1 Personalize ........................................................................................ 42
4.1.1 Setting Home Screen ............................................................ 42
4.1.2 Changing Greeting Text ....................................................... 43
4.1.3 Changing Color Styles.......................................................... 43
4.1.4 Changing Wallpaper ............................................................. 44
4.1.5 Changing Screen Saver........................................................ 44
4.1.6 Changing Shortcuts.............................................................. 45
4.2 In Call Setup ...................................................................................... 46
4.2.1 Setting In Call Timer ............................................................. 46
4.2.2 Setting Answer Options ....................................................... 47
4.2.3 Using the Speaker Phone..................................................... 47
4.2.4 Setting the Easy Prefix ......................................................... 47
4.3 Initial Setup........................................................................................ 47
4.3.1 Setting Time and Date .......................................................... 50
4.3.2 Setting Backlight................................................................... 51
4.3.3 Setting the Display Timeout................................................. 52
4.3.4 Setting the TTY Operation.................................................... 53
4.3.5 Setting the Menu Languages ............................................... 53
4.3.6 Setting the Contrast.............................................................. 54
4.3.7 Using the DTMF Tones ......................................................... 54
4.3.8 Resetting All Options............................................................ 55
4.3.9 Clear All Stored Information ................................................ 55
4.4 Phone status ..................................................................................... 56
4.4.1 Viewing Your Phone Number............................................... 56
7
4.4.2 Changing the Active Line ..................................................... 56
4.4.3 Monitoring Battery Charge................................................... 57
4.4.4 Viewing the Phone Specifications....................................... 57
4.5 Headset .............................................................................................. 58
4.5.1 Setting Automatic Answer ................................................... 58
4.6 Car Settings....................................................................................... 58
4.6.1 Setting Automatic Answer ................................................... 59
4.6.2 Setting Automatic Hands Free............................................. 59
4.7 Network Setup................................................................................... 59
4.7.1 Viewing Currently Registered Network ............................... 60
4.7.2 Setting the Service Tones .................................................... 60
4.7.3 Setting the Call Drop Alert ................................................... 60
4.7.4 Setting the Network Scan..................................................... 61
4.7.5 Setting the Network Services............................................... 61
4.8 Security.............................................................................................. 64
4.8.1 Locking and Unlocking Your Phone.................................... 64
4.8.2 Activating Talk Security (Voice Privacy)............................. 66
4.8.3 Restricting Calls.................................................................... 66
4.8.4 Changing a Password........................................................... 67
5. Messages........................................................................................... 69
5.1 Sending a Text Message .................................................................. 69
5.2 Setting a Quick Note Text Message ................................................ 72
5.3 Receiving a Text Message................................................................ 73
5.4 Using the Voicemail.......................................................................... 74
5.4.1 Receiving a Voicemail Message .......................................... 74
5.4.2 Listening to a Voicemail Message....................................... 75
5.5 Using the Outbox .............................................................................. 75
5.5.1 Outbox Messages ................................................................. 75
5.6 Using the Drafts ................................................................................ 76
5.7 Cleanup Messages............................................................................ 77
Cleanup Messages............................................................................ 77
5.8 Monitoring Memory Meter ................................................................ 78
5.9 Setting Up the Message.................................................................... 78
5.9.1 Setting Inbox Setup .............................................................. 79
5.9.2 Storing Your Voicemail Number .......................................... 79
6. Games................................................................................................ 81
8
6.1 Launching a Game............................................................................ 81
6.1.1 Tower of Hanoi ...................................................................... 82
6.1.2 Shopping Mall ....................................................................... 82
6.1.3 Bubble Shooter ..................................................................... 82
6.1.4 Blackjack ............................................................................... 83
7. Media Center ..................................................................................... 84
7.1 My Tones ........................................................................................... 84
7.1.1 Downloading a Ring Tone .................................................... 84
7.1.2 Renaming a Tone .................................................................. 85
7.1.3 Playing a Tone....................................................................... 85
7.1.4 Changing Instruments .......................................................... 86
7.1.5 Deleting a Tone ..................................................................... 87
7.2 Picture Viewer ................................................................................... 87
8. Ring Styles ........................................................................................ 89
8.1 Changing Style.................................................................................. 89
8.2 Setting Style Details ......................................................................... 90
8.2.1 Setting Ringer & Keypad Volume ........................................ 90
8.2.2 Setting Number Callout ........................................................ 91
8.2.3 Setting Calls, Text Messages, Voicemail and Alarms Alert91
8.2.4 Activating Ringer ID’s........................................................... 92
8.2.5 Setting Reminders ................................................................ 92
8.2.6 Setting Haptics...................................................................... 93
9. Office Tools ....................................................................................... 94
9.1 Using the Datebook .......................................................................... 94
9.1.1 Viewing the Datebook........................................................... 94
9.1.2 Adding a Datebook Event..................................................... 95
9.1.3 Changing a Event Information ............................................. 96
9.1.4 Deleting a Datebook Event................................................... 97
9.2 Using the Calculator ......................................................................... 98
9.3 Using the Unit Converter.................................................................. 99
9.4 Using the Currency Converter ....................................................... 100
10. Alarm................................................................................................ 101
10.1 Setting the Alarm ............................................................................ 101
10.2 Editing, Enabling, or Deleting an Alarm........................................ 102
10.3 Responding To an Alarm................................................................ 102
11. Troubleshooting.............................................................................. 104
9
11.1 No Service ....................................................................................... 104
11.2 What If the Call Doesn’t Go Through? .......................................... 104
Specific Absorption Rate Data .................................................................... 105
Wireless Phone Safety Tip........................................................................... 106
10
Safety and General Information
IMPORTANT INFORMATION ON SAFE AND EFFICIENT OPERATION. READ THIS
INFORMATION BEFORE USING YOUR PHONE.
Exposure To Radio Frequency (RF)
Energy
Your phone contains a transmitter and a receiver. When it is ON, it receives and transmits
RF energy. When you communicate with your phone, the system handling your call controls
the power level at which your phone transmits.
Your Motorola phone is designed to comply with local regulatory requirements in your
country concerning exposure of human beings to RF energy.
Operational Precautions
To assure optimal phone performance and make sure human exposure to RF energy is
within the guidelines set forth in the relevant standards, always adhere to the following
procedures.
External Antenna Care
Use only the supplied or Motorola-approved replacement antenna. Unauthorized
antennas, modifications, or attachments could damage the phone.
Do NOT hold the external antenna when the phone is IN USE. Holding the external
antenna affects call quality and may cause the phone to operate at a higher power level
than needed. In addition, use of unauthorized antennas may result in non-compliance
with the local regulatory requirements in your country.
Phone Operation
When placing or receiving a phone call, hold your phone as you would a wireline
telephone.
Body-Worn Operation
11
To maintain compliance with RF energy exposure guidelines, if you wear a phone on
your body when transmitting, always place the phone in a Motorola-supplied or
approved clip, holder, holster, case, or body harness for this phone, where available.
Use of accessories not approved by Motorola may exceed RF energy exposure
guidelines. If you do not use one of the body-worn accessories approved or supplied by
Motorola, and are not using the phone held in the normal use position, ensure the
phone and its antenna are at least 1 inch (2.5 centimeters) from your body when
transmitting.
Data Operation
When using any data feature of the phone, with or without an accessory cable, position
the phone and its antenna at least 1 inch (2.5 centimeters) from your body.
Approved Accessories
Use of accessories not approved by Motorola, including but not limited to batteries and
antenna, may cause your phone to exceed RF energy exposure guidelines. For a list of
approved Motorola accessories, visit our website at www.Motorola.com.
RF Energy Interference/Compatibility
Note: Nearly every electronic device is susceptible to RF energy interference from external
sources if inadequately shielded, designed, or otherwise configured for RF energy
compatibility. In some circumstances your phone may cause interference.
Facilities
Turn off your phone in any facility where posted notices instruct you to do so. These
facilities may include hospitals or health care facilities that may be using equipment that
is sensitive to external RF energy.
Aircraft
When instructed to do so, turn off your phone when on board an aircraft. Any use of a
phone must be in accordance with applicable regulations per airline crew instructions.
Medical Devices
12
Pacemakers
Pacemaker manufacturers recommend that a minimum separation of
6 inches (15 centimeters) be maintained between a handheld wireless phone and a
pacemaker.
Persons with pacemakers should:
• ALWAYS keep the phone more than 6 inches (15 centimeters) from your
pacemaker when the phone is turned ON.
• NOT carry the phone in the breast pocket.
• Use the ear opposite the pacemaker to minimize the potential for interference.
• Turn OFF the phone immediately if you have any reason to suspect that
interference is taking place.
Hearing Aids
Some digital wireless phones may interfere with some hearing aids. In the event of such
interference, you may want to consult your hearing aid manufacturer to discuss
alternatives.
Other Medical Devices
If you use any other personal medical device, consult the manufacturer of your device
to determine if it is adequately shielded from RF energy. Your physician may be able to
assist you in obtaining this information.
Use While Driving
Check the laws and regulations on the use of phones in the area where you drive. Always
obey them.
When using your phone while driving, please:
• Give full attention to driving and to the road.
• Use hands-free operation, if available.
• Pull off the road and park before making or answering a call if driving conditions so
require.
Responsible driving best practices may be found in the “Wireless Phone Safety Tips” at the
end of this manual and at the Motorola website: www.Motorola.com/callsmart.
Operational Warnings

13
For Vehicles with an Air Bag
Do not place a phone in the area over an air bag or in the air bag deployment area. Air
bags inflate with great force. If a phone is placed in the air bag deployment area and the
air bag inflates, the phone may be propelled with great force and cause serious injury to
occupants of the vehicle.
Potentially Explosive Atmospheres
Turn off your phone prior to entering any area with a potentially explosive atmosphere,
unless it is a phone type especially qualified for use in such areas and certified as
“Intrinsically Safe.” Do not remove, install, or charge batteries in such areas. Sparks in a
potentially explosive atmosphere can cause an explosion or fire resulting in bodily injury
or even death.
Note: The areas with potentially explosive atmospheres referred to above include
fueling areas such as below decks on boats, fuel or chemical transfer or storage
facilities, areas where the air contains chemicals or particles, such as grain, dust,
or metal powders. Areas with potentially explosive atmospheres are often but not
always posted.
Blasting Caps and Areas
To avoid possible interference with blasting operations, turn OFF your phone when you
are near electrical blasting caps, in a blasting area, or in
areas posted “Turn off electronic devices.” Obey all signs and instructions.
Batteries
Batteries can cause property damage and/or bodily injury such as burns if a conductive
material such as jewelry, keys, or beaded chains touch exposed terminals. The
conductive material may complete an electrical circuit (short circuit) and become quite
hot. Exercise care in handling any charged battery, particularly when placing it inside a
pocket, purse, or other container with metal objects. Use only Motorola original
batteries and chargers.
Your battery or phone may contain symbols, defined as follows:
Symbol Definition

14
Important safety information will follow.
Your battery or phone should not be disposed of in a fire.
Your battery or phone may require recycling in accordance with local
laws. Contact your local regulatory authorities for more information.
Your battery or phone should not be thrown in the trash
Your phone contains an internal lithium ion battery.
Seizures/Blackouts
Some people may be susceptible to epileptic seizures or blackouts when exposed to
blinking lights, such as when watching television or playing video games. These seizures or
blackouts may occur even if a person never had a previous seizure or blackout.
If you have experienced seizures or blackouts, or if you have a family history of such
occurrences, please consult with your doctor before
playing video games on your phone or enabling a blinking-lights feature on your phone.
(The blinking-light feature is not available on all products.) Parents should monitor their
children's use of video game or other features that incorporate blinking lights on the phones.
All persons should discontinue use and consult a doctor if any of the following symptoms
occur: convulsion, eye or muscle twitching, loss of awareness, involuntary movements, or
disorientation.
To limit the likelihood of such symptoms, please take the following safety precautions:
• Do not play or use a blinking-lights feature if you are tired or need sleep.
• Take a minimum of a 15-minute break hourly.
• Play in a room in which all lights are on.
• Play at the farthest distance possible from the screen.
Repetitive Motion Injuries
When you play games on your phone, you may experience occasional discomfort in your
hands, arms, shoulders, neck, or other parts of your body. Follow these instructions to avoid
problems such as tendonitis, carpal tunnel syndrome, or other musculoskeletal disorders:
• Take a minimum 15-minute break every hour of game playing.
15
• If your hands, wrists, or arms become tired or sore while playing, stop and rest for
several hours before playing again.
• If you continue to have sore hands, wrists, or arms during or after play, stop playing
and see a doctor.

16
Getting Started
What’s in the Box?
Your digital wireless phone comes with a battery and a charger. You can
purchase other accessories to customize your phone for maximum performance
and portability.
About This Guide
This user guide describes how to use your Motorola wireless phone.
Optional Features
This label identifies an optional network, SIM card, or subscription-dependent
feature that may not be offered by all service providers in all geographical areas.
Contact your service provider for more information.
Optional Accessories
This label identifies a feature that requires an optional Motorola Original™
accessory.
Installing the Battery
You must install and charge the battery to use your phone.
Your phone is designed for use only with Motorola Original batteries and
accessories. We recommend that you store batteries in their protective cases
when not in use.
Action
1 Remove the battery from its protective plastic case.
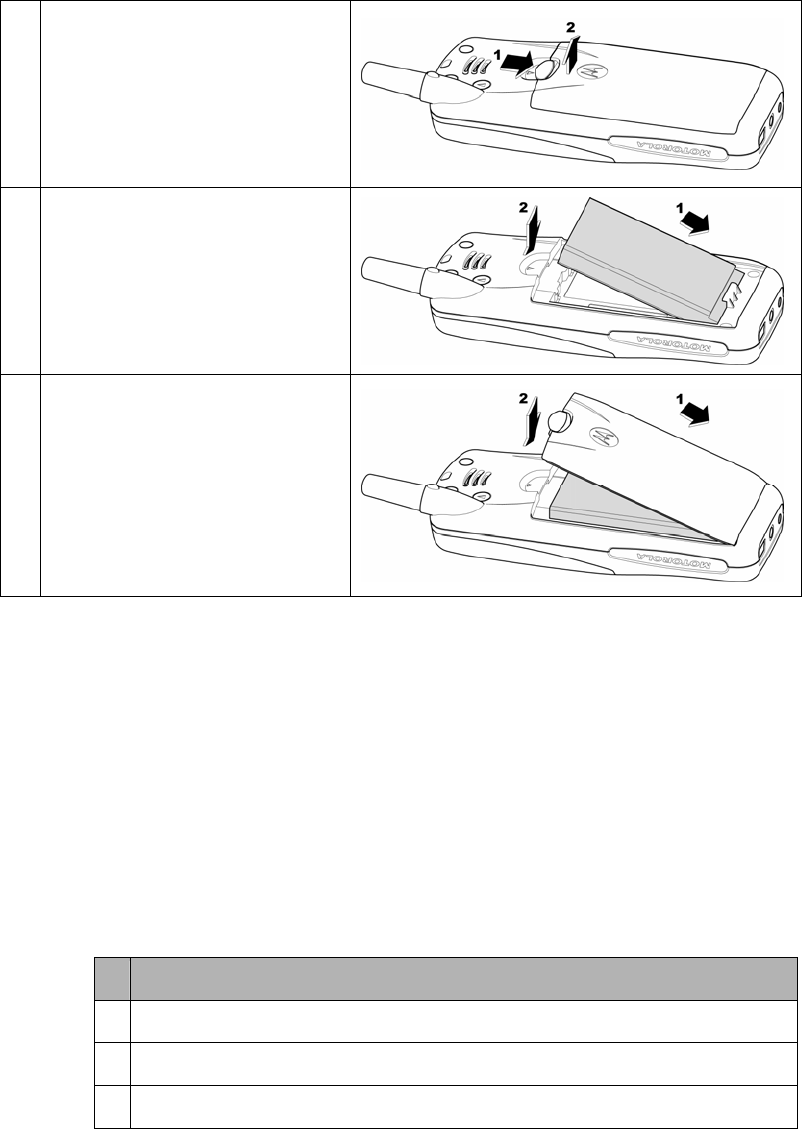
17
2
If necessary, slide the battery
door latch down, and lift the
battery door off the phone.
3
Insert the battery, printed arrows
first, into the top of the battery
compartment, and push down.
4 Replace the battery door.
Charging the Battery
New batteries are partially charged. Before you can use your phone, install and
charge the battery as described below. Some batteries perform best after
several full charge/discharge cycles.
Information must say that when the battery is "deeply discharged" the
phone will not display anything during the 5 first minutes that the charger
is connected.
Action
1 Plug the travel charger into your phone.
2 Plug the other end into the appropriate electrical outlet.
3 When your phone displays Charge Complete, remove the charger.
When you charge the battery, the battery level indicator in the upper right corner
of the display shows how much of the charging process is complete. At least
one segment of the battery level indicator must be visible to ensure full phone
functionality while charging.
18
If the battery charge falls too low, your phone may power off during a call, even
with the charge connected. To avoid this possibility, do not make calls while
charging the battery.
Battery Use
To maximize your battery’s performance:
• Always use Motorola Original™ batteries and battery chargers. The phone
warranty does not cover damage caused from using non-Motorola batteries
and/or battery chargers.
• New batteries or batteries that have been stored for a long time may require a
longer charge time.
• Maintain the battery at or near room temperature when charging.
• Do not expose batteries to temperatures below - 10°C (14°F) or above 45°C
(113°F). Always take your phone with you when you leave your vehicle.
• When you do not intend to use a battery for a while, store it uncharged in a
cool, dark, dry place, such as a refrigerator.
• Over time, batteries gradually wear down and require longer charging times.
This is normal. If you charge your battery regularly and notice a decrease in
talk time or an increase in charging time, then it is probably time to buy a new
battery.
The rechargeable batteries that power this product must be disposed of
properly and may need to be recycled. Contact your local recycling center for
proper disposal methods. Never dispose of batteries in a fire because they may
explode. Refer to your battery’s label for battery type.
19
1. The Basics About Your Phone
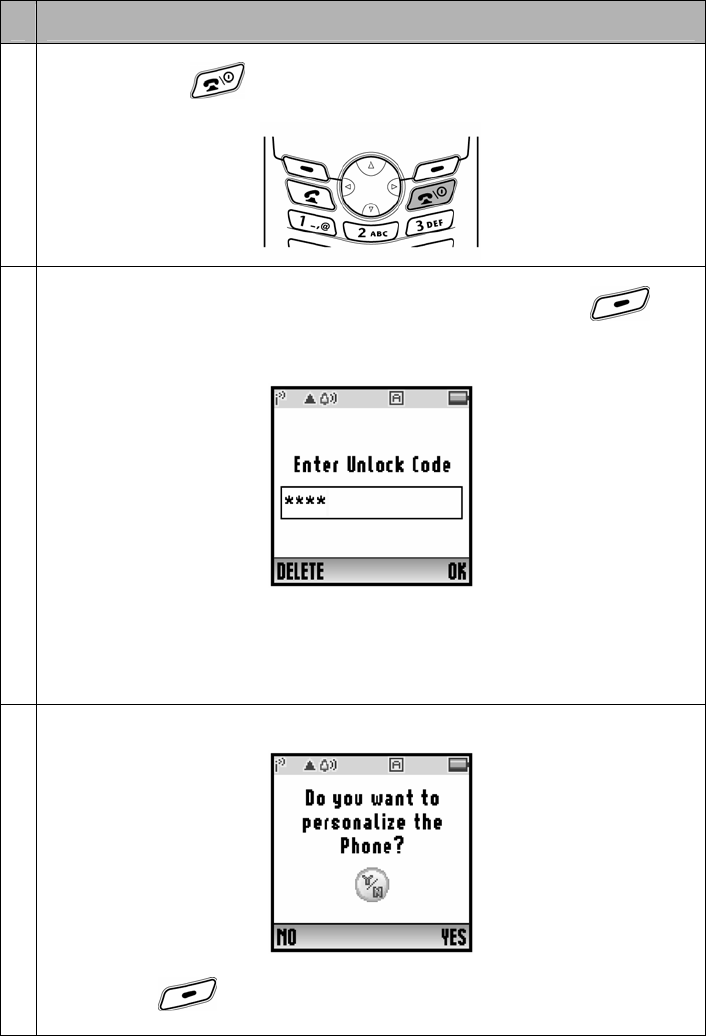
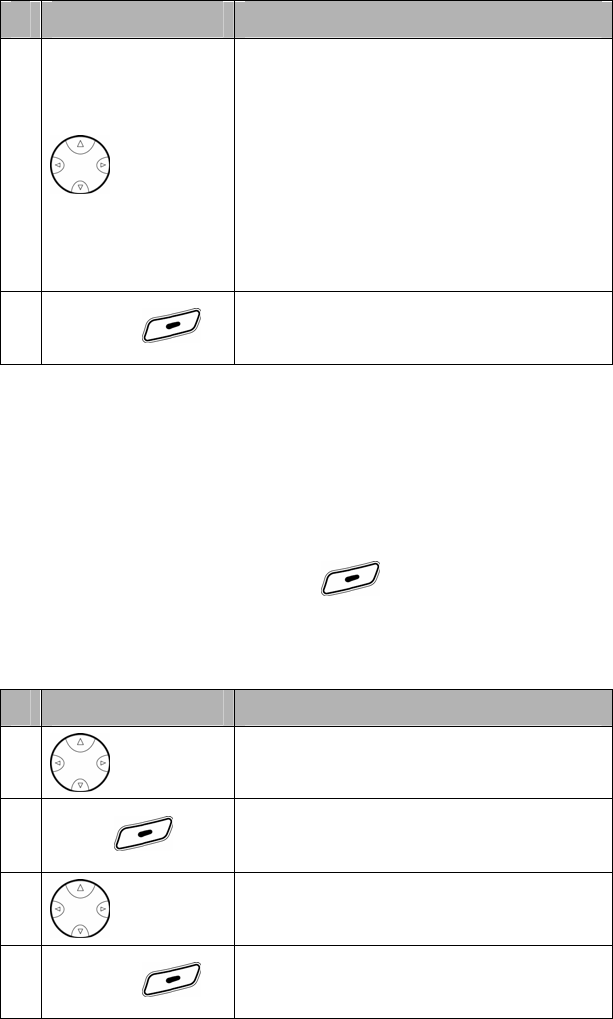
1.1 Turning Your Phone On
Action
1
Press and hold for 2 seconds to turn on the phone
2
If necessary, enter your four-digit unlock code and press OK ( ) to
unlock your phone.
Note: The unlock code is originally set to “1234”.
For more information, see “Locking and Unlocking Your Phone” on
Chapter 4.8.1.
3
At startup, you are given the option to personalize your phone.
Select YES ( ) to set personal phone options.
20
Select NO ( ) to proceed to the idle display.
For more information, see “Personalize” on Chapter 4.1.
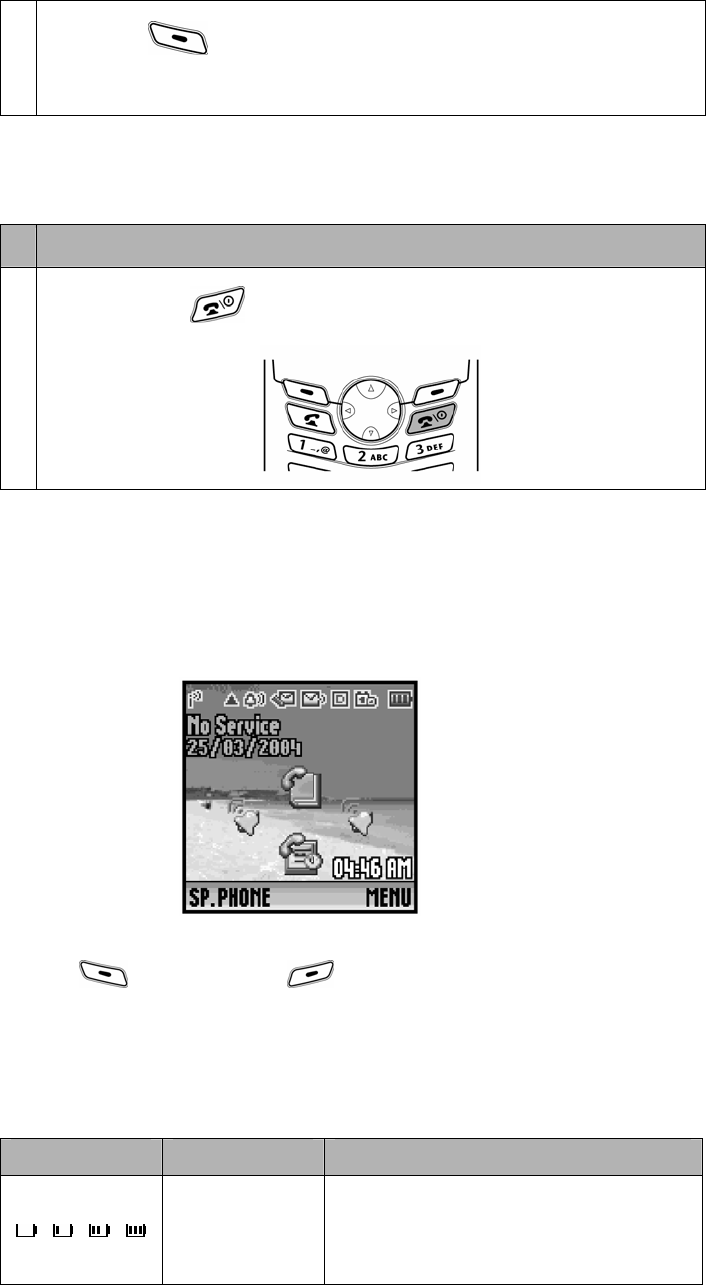
1.2 Turning Your Phone Off
Action
1
Press and hold for 2 seconds to turn off the phone
1.3 Using the Idle Display
The idle display is the standard display that you see when you are not on a call
or using the menu.
Labels at the bottom corners show the current soft key functions. Press the left
soft key ( ) or right soft key ( ) to perform the function indicated by the
left or right soft key label.
At the top of the display are status indicators, including network signal, ring tone,
and battery.
Indicators are grouped at the top of the display:
Icon Description Detail Description
/ / /
Battery Status
Indicator (BS)
Shows the amount of charge left in your
battery.
The battery level shows three bars 1 to

21
3 and empty battery.
/ /
/ /
Signal Strength
Indicator (SS)
Shows the strength of your phone’s
connection with the network.
Signal strength ranges from 1 to 5.
Roaming
Indicator
Appears when your phone uses another
network system outside your home
network. When you leave your home
network area, your phone roams or
seeks another network.
Call Indicator Appears when a call is in progress.
Unread SMS /
Message
Box Full
Indicator
Appears when your phone receives a
text message.
Also if message box is full then this icon
starts blinking.
Voicemail
Indicator
Appears when you receive a voicemail
message.
/
Service Style
Indicator
Shows whether you are receiving a
digital or analog signal.
=Digital signal / =Analog signal
Alarm Activated
Indicator Appears when alarm is set.
//
/ /
Ring Style
Indicator
Shows the current selected alert.
=Load ring / =Soft ring
=Vibrate / =Vibrate and ring
=Silent
Missed Call
Indicator Shows if there is a missed call.
1.4 Using the MENU (RSK)
From the idle display, press MENU ( ) to go to the main menu.
• Press to scroll up or down to select the item you want, then press
OK( ).
22
or
• Press the number key that matches the menu selection you want.
This guide shows you how to select a menu feature as follows, starting from the
idle display:
Find the Feature MENU( ) > Messages
> Inbox
For example, from the idle display, press MENU ( ), scroll to and select
Messages from the main menu, then scroll to and select Inbox. Use to
scroll, and the left/right soft keys to select the soft key functions listed in the
bottom left and right corners of the display.
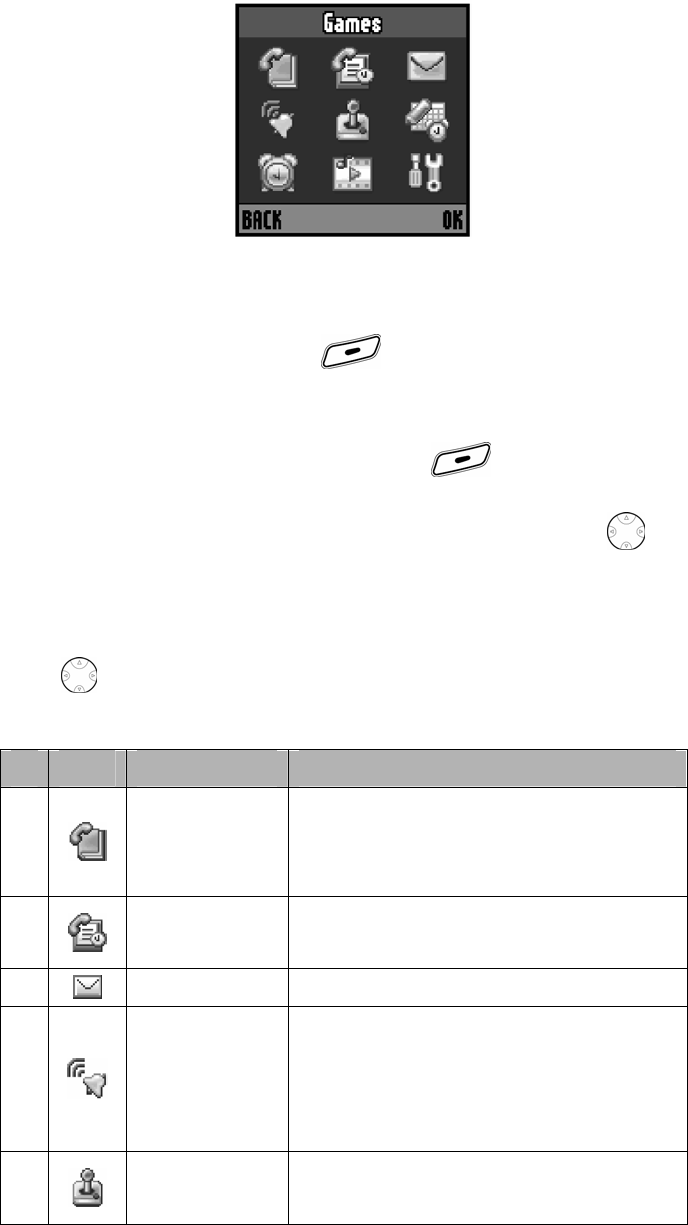
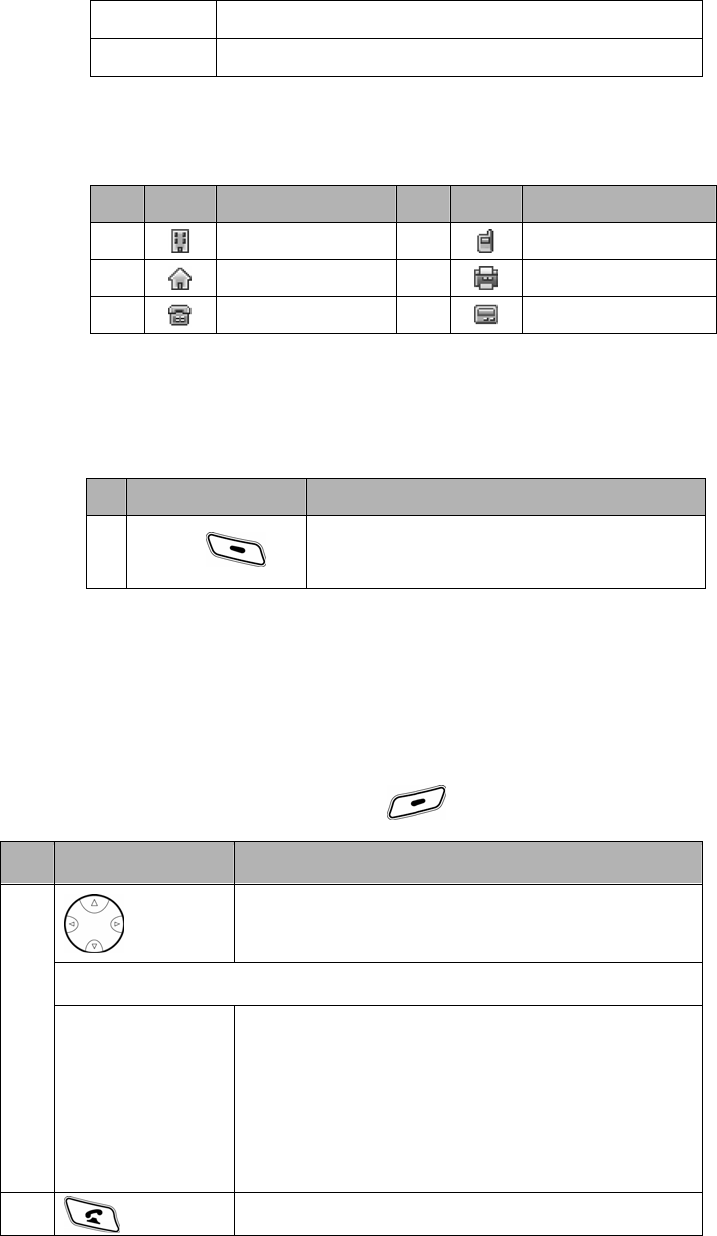
Press to scroll to and highlight a menu icon & feature in the main menu.
The following icons represent features that may appear in main menu.
No Icon Feature Description
1 Phonebook
You can store up to 500 names and
associated phone numbers and e-mail
addresses.
2 Recent Calls Your phone keeps lists of the calls you
recently received, dialed and missed.
3 Messages You can send and receive text messages.
4 Ring Styles
You can change the alerts that notify you
of incoming calls, text messages,
voicemail messages, data calls, fax calls,
alarms, and reminders.
5 Games Your phone contains several games that
you can play.
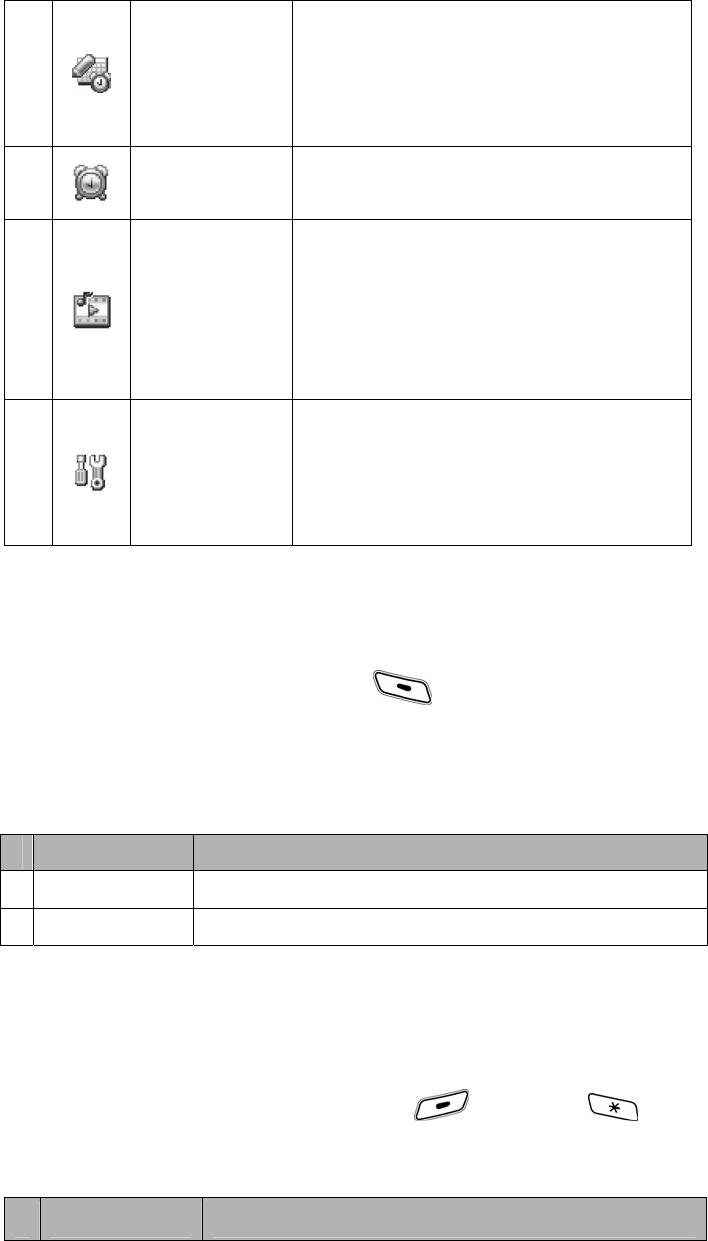
23
6 Office Tools
Your phone can be your personal
assistant. It contains the Datebook,
Calculator, shortcut, unit converter and
currency converter applications.
7 Alarm Your phone includes an alarm clock which
you can set up according your own need.
8 Media Center
Your phone provides the facility to view all
the pictures, play all the tones stored in
the mobile hand set. Apart from this, you
can display and alter various attributes of
the pictures and tones.
9 Settings
You can customize setting of your phone.
It includes personalize, In-Call Setup,
Initial Setup, Phone Status Headset, Car
Settings, Network, and Security.
1.5 Using the Speaker Phone (LSK)
From the idle display, press SP. PHONE ( ) to go to the main menu.
If this function is switched on, you can use speakerphone while in a call.
Note: User will be able to customize the LSK. For more information, see
“Personalize” on Chapter 4.1.
Press To
1 ON Turn Speaker Phone ON (if set to OFF).
2 OFF Turn Speaker Phone OFF (if set to ON).
1.6 Making a Call
Note: You must dial the phone number from the idle display.
Note: If the phone is locked, select UNLOCK ( ), then press to
unlock the phone.
Press To
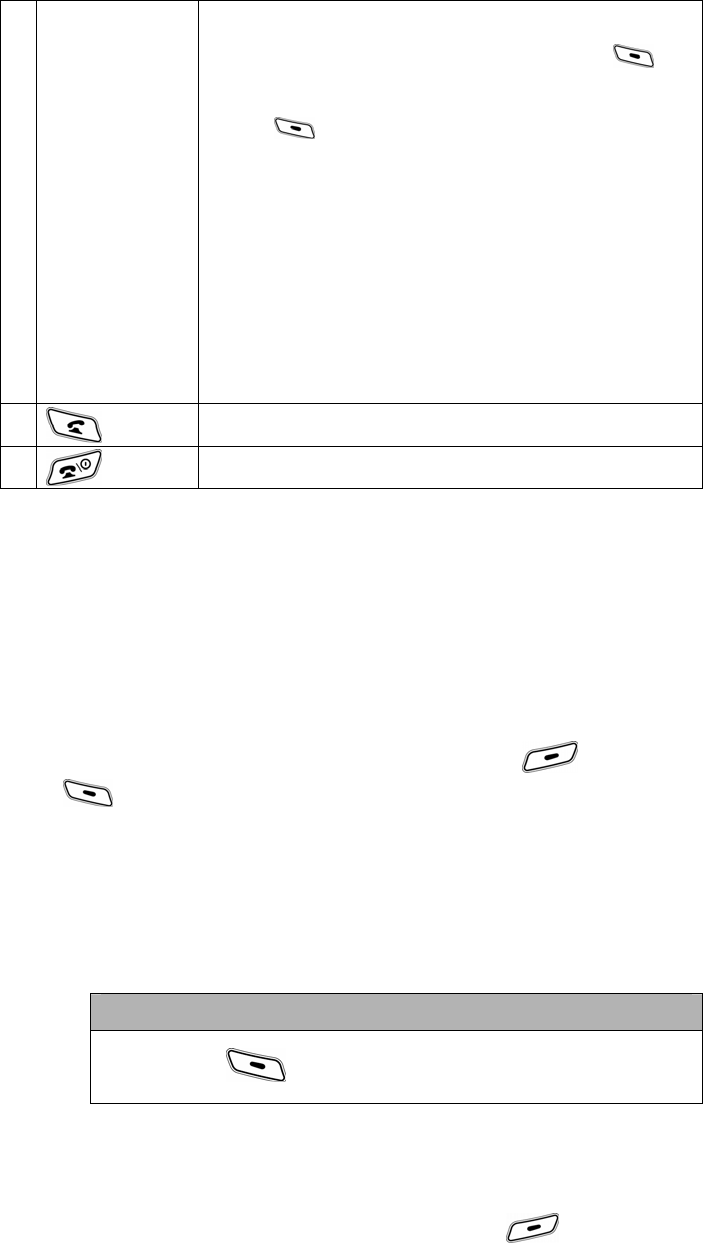
24
1 Keypad keys
Dial the phone number.
Tip1: If you make a mistake, press DELETE ( ) to
delete the last digit, or press and hold DELETE
() to clear all digits.
Tip2: The legal characters in this input box include:
‘0’-‘9’, ‘*’, ‘#’, ‘+’, ‘p’, ‘w’ and ‘n’. ‘p’, ‘w’ and ‘n’
can only occur after the first digit. The
maximum length of the input dial string is 40
characters. For more information about ‘p’, ‘w’
and ‘n’, see “Viewing Notepad” on Chapter
3.2.
2 Make the call.
3 End the call and “hang up” the phone.
Note:
Making a Call from Number List - You can choose to dial a number from any
of the number list in the menu tree which can be used for dialing. The Number
List can be Phonebook, Dialed Calls list, Received Calls list, Missed calls list.
1.7 Other Functions During In-Call
During a call, your phone’s soft keys change to OPTIONS ( ) and
MUTE( ).
1.7.1 MUTE
You can mute and unmute your phone’s microphone while a call is in
progress.
Action
Press MUTE ( ), you can mute or unmute the call.
1.7.2 Other Options
While in a call, you may notice the OPTIONS ( ) soft key.
Pressing this will access you to the in-call menu, and you may notice
the following choices:
25
Action
Press OPTIONS ( ). You can choose options menu.
y Speaker Phone
y Talk Secure
y Phonebook
y My Telephone Number
y TTY
y Recent Calls
y Messages
y Datebook
y Media Center
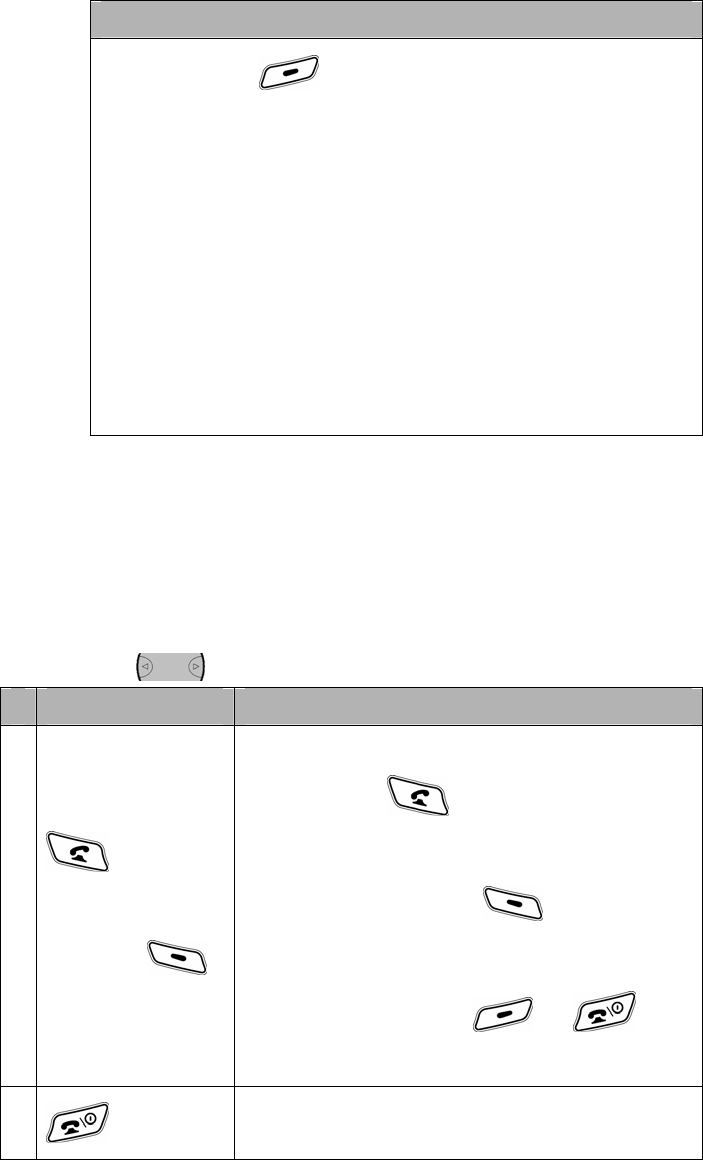
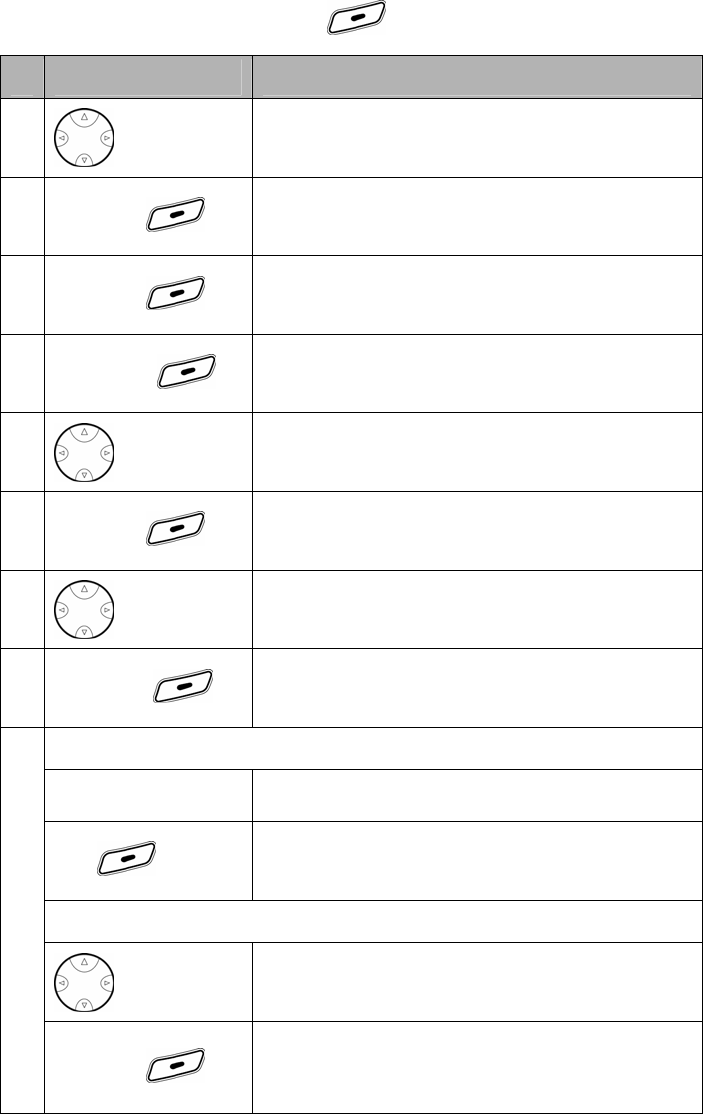
1.8 Answering a Call
When you receive a call, your phone rings and/or vibrates and displays an
incoming call message.
Note: If you want change the ring style and volume, press the right or left
navigation key .
Press To
1
or
ANSWER ( )
Answer the call
TIP1: Pressing key shall directly answer
the call.
TIP2: Pressing ANSWER ( ) shall answer
the call.
TIP3: Pressing IGNORE ( ) or key
shall reject the call.
2
End the call and “hang up” the phone when you
are finished.

26
1.9 How to Enter Information in Your
Phone
1.9.1 How to Enter Text
When you want to add new names or view names in the phonebook,
your phone automatically switches to “ABC” mode (indicated by
in the upper left corner of the display).
• Enter text with the keypad.
• Press a key as many times as necessary to enter a letter. With
each press, the next letter on the key appears in the display. (See
the character chart below.)
• Press to switch between uppercase letters, lowercase letters
and numbers. (When lowercase is selected, appears in the
display.)
1.9.2 Character Chart
When or is displayed, you can enter these characters:
27
1.9.3 Deleting Letters and Words
Place the cursor to the right of the text you want to delete, and then
do the following:
Action To
Press DELETE ( ) Delete one letter at a time.
Press and hold DELETE ( ) Delete the entire message.
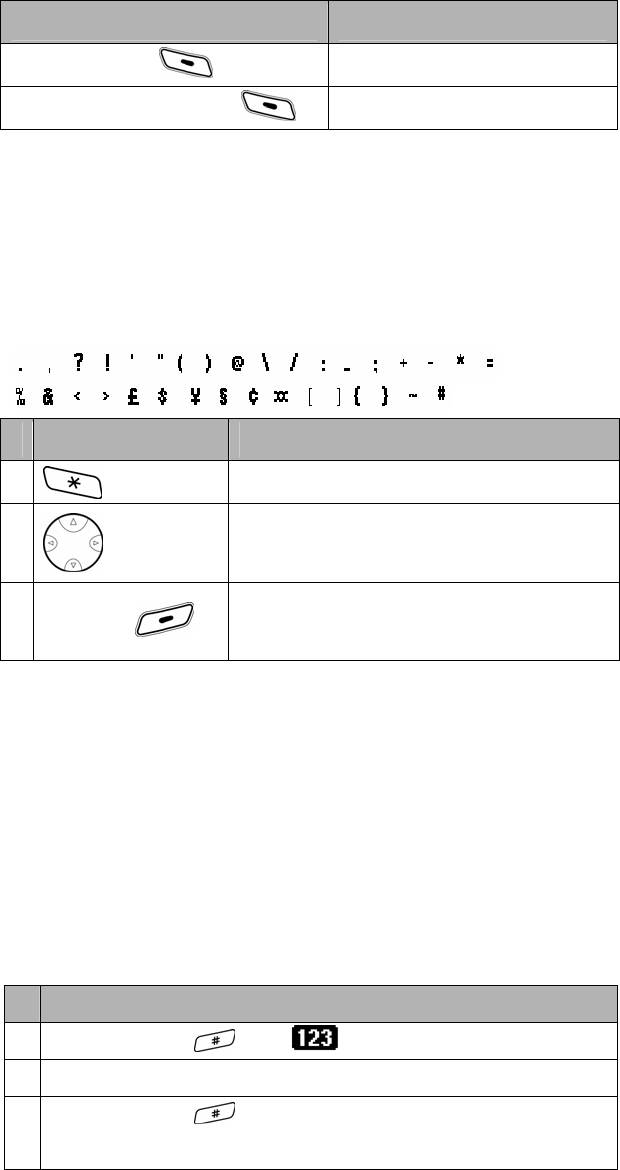
1.9.4 How to Enter Punctuation and
Special Characters
While in “ABC” or “abc” mode, you can enter special characters:
space
Press To
1 Display the available special characters.
2
Highlight the symbol you want.
3 SELECT ( ) Select the character for entry.
1.9.5 How to Enter Numbers
When storing names to the phonebook, you can enter a number
within a name at any time. Simply press that particular number key a
few times until it appears.
However, you can do this more quickly by accessing the “123” mode,
without having to scroll through each letter to access the number you
wish to enter.
Action
1 Press and hold until appears.
2 Press number keys to enter digits.
3 Press and hold to exit “123” mode and return to “ABC”
mode.
28
Notes:
y You cannot enter special characters in “123” mode.
y This chart may not reflect the exact character set available
on your phone.
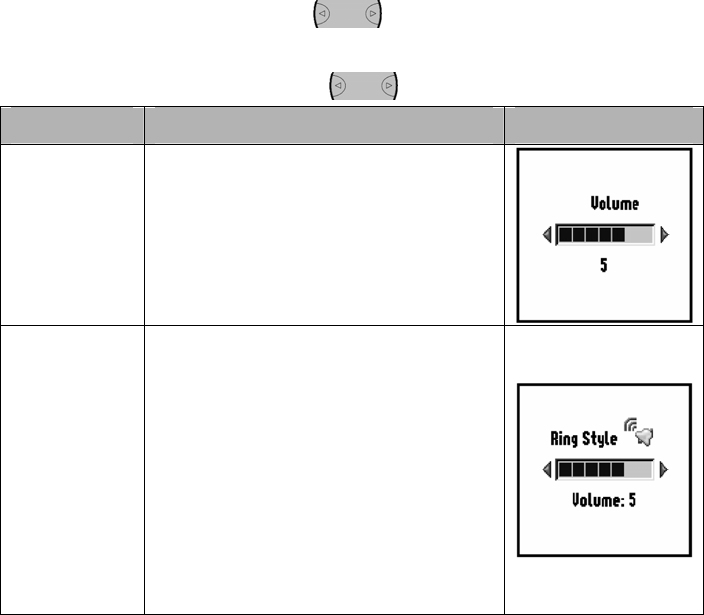
1.10 Adjusting Volume
Use the right or left navigation key to adjust your phone’s earpiece
and ringer volume.
Press the right or left navigation key to:
When Description Screen
During a call Increase or decrease earpiece
volume.
From the idle
display
Increase or decrease the ringer
volume setting.
Tip: At the lowest volume setting,
press the left navigation key once to
switch to vibrate alert. Press it again
to switch to silent alert. Press the up
volume key to cycle back to vibrate
alert, then ring alert.
29
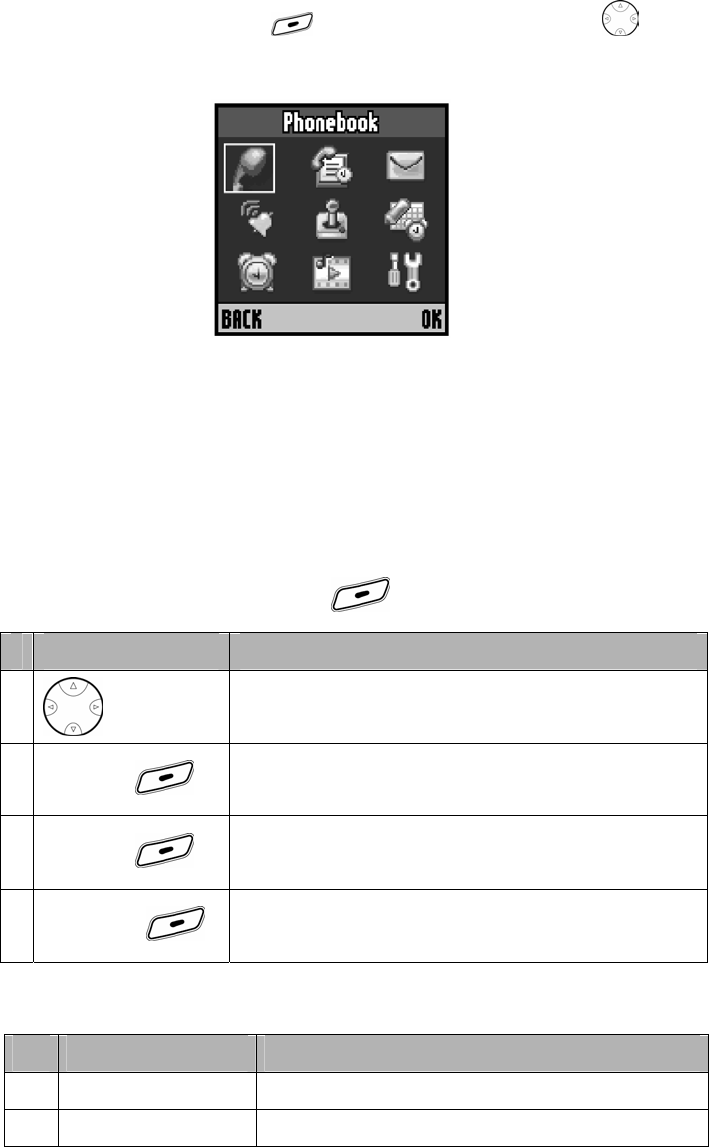
2. Phonebook
You can store up to 500 names with up to 6 entries each. And you can sort the
entries of phonebook by name or speed dial number.
From the idle display, press MENU ( ) to enter the main menu. Press to
scroll to and highlight Phonebook icon in the main menu.
2.1 Phonebook Option Menus
The phonebook has several menus to choose from. You can access these
menus only if your phonebook already includes one or more entries.
To access your phonebook menus:
Find the Feature MENU ( ) > Phonebook
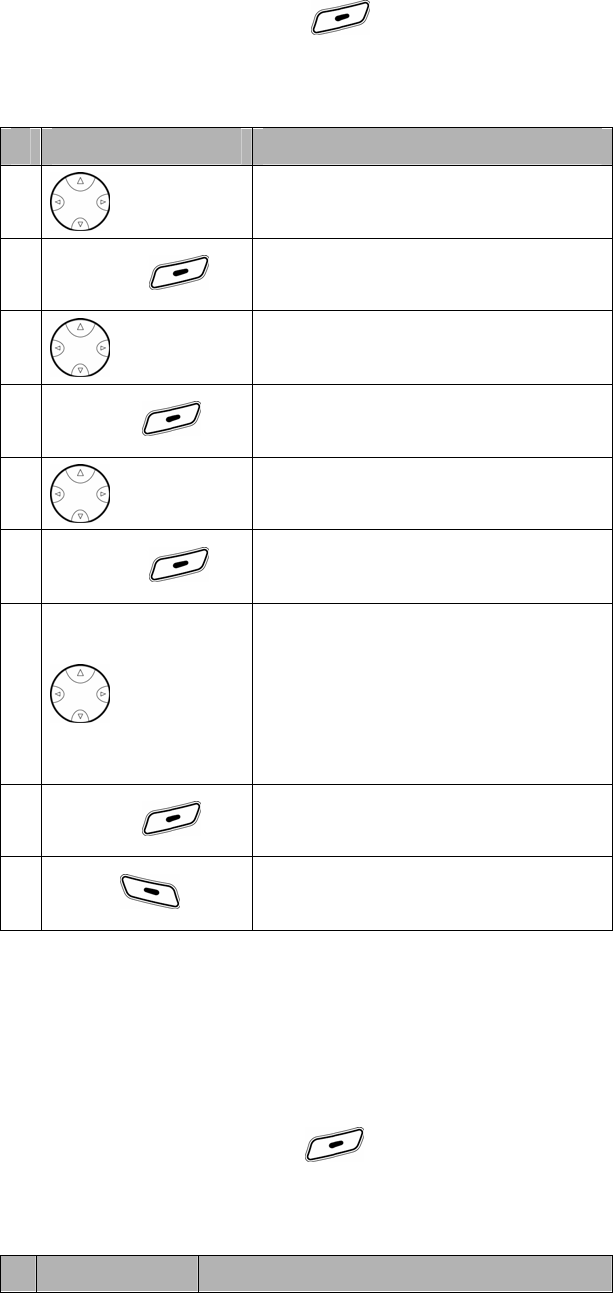
Press To
1
Scroll to desired phonebook entry.
2 SELECT ( ) View the type of number (i.e. Work, Home etc.).
3 SELECT ( ) View the e-mail, phone number and speed dial.
4 OPTIONS ( ) View the options menu.
Select one of the following options menus:
No Menu Description
1 New Enter new name, e-mail and number.
2 Edit Edit an entry.
30
3 Delete Delete single entry.
4 Delete Name Delete the complete entry of the selected name.
5 Send Msg Send a SMS message.
6 Ph Book Capacity Show the memory meter which fills up as entries
are made.
7 Delete All Delete all phone book entries.
8 Sort By Sort entries by name or speed dial number.
2.2 Creating a Phonebook Entry
2.2.1 Entering Information
To create a phonebook entry:
Find the Feature MENU ( ) > Phonebook
Action
If you have no existing phonebook entry, press SELECT on [New
Entry].
or
If your phonebook already includes entries:
1. Use the 4 steps in chapter 2.1.
2. Scroll to New.
3. Press SELECT ( ).
You can enter the following information for a phonebook entry.
Item Description
Name Entry’s name (Maximum 32 characters).
Email Entry’s e-mail address (Maximum 48 characters).
No. Entry’s phone number (Maximum 40 characters).
Type Work / Home / Main / Mobile / Fax / Pager
Speed No Entry’s default speed dial number.
Ringer ID
Select to set a distinctive ringer alert for the phone
number.
Your phone uses the alert to notify you when you
31
receive a call from this phone number.
…More… Same entry’s other information.
The following icons represent Type items that may appear in
Phonebook list.
No Icon Feature No Icon Feature
1 Work 4
Mobile
2 Home 5
Fax
3 Main 6
Pager
2.2.2 Complete Phonebook Entry
When you finish entering information for a phonebook entry:
Press To
1 DONE ( ) Store the entry.
2.3 Dialing a Phonebook Entry
You can also retrieve the access number from your phonebook if it has already
been stored.
Find the Feature MENU ( ) > Phonebook
Press To
Scroll to the name you want.
or
1
Keypad keys
Begin typing the name of the entry you want to
call.
The phone will display names that match the
letters you are typing (In case user has sorted the
phonebook list with ”Sort by Name”.).
2 Make the call.
32
2.4 Editing a Phonebook Entry
You can edit the phonebook entries of your phonebook.
Find the Feature MENU ( ) > Phonebook
Press To
1
Scroll to the name you want.
2 SELECT ( ) View the type of number (i.e. Work, Home etc.).
3 SELECT ( ) View the e-mail, phone number and speed dial.
4 OPTIONS ( ) View the phonebook Options menu screen.
5
Scroll to Edit.
6 SELECT ( ) View Entry Details screen.
7
Scroll to the field to be changed.
Name, Email, No., Type, Speed No, Ringer ID
8 CHANGE ( ) Select the item.
If Name, Email, No., Speed No are selected,
Keypad keys Fill the selected field.
OK ( ) Change the item.
If Type, Ringer ID are selected,
Scroll to items menu you want.
9
SELECT ( ) Select the item.

33
10 DONE ( ) Save the phonebook entry.
2.5 Deleting a Phonebook Entry
You can erase the name and associated number of currently selected
phonebook entry.
Find the Feature MENU ( ) > Phonebook
Press To
1
Scroll to the name you want.
2 SELECT ( ) View the type of number (i.e. Work, Home etc.).
3 SELECT ( ) View the e-mail, phone number and speed dial.
4 OPTIONS ( ) View the phonebook Options menu screen.
5
Scroll to Delete.
6 SELECT ( ) View the confirmation message “Delete?”.
7 YES ( ) Erase the number and associated fields.
2.6 Deleting selected Name of
Phonebook Entry
You can erase the complete entry of the selected name.
Find the Feature MENU ( ) > Phonebook
Press To
1
Scroll to the name you want.
34
2 SELECT ( ) View the type of number (i.e. Work, Home etc.).
3 SELECT ( ) View the e-mail, phone number and speed dial.
4 OPTIONS ( ) View the phonebook Options menu screen.
5
Scroll to Delete Name.
6 SELECT ( ) View the confirmation message “Delete <Name>?”
7 YES ( ) Erase the name and associated fields.
2.7 Deleting All Phonebook Entries
You can erase the contents of your phonebook. Note that this action cannot be
reversed! Once you have performed this procedure, all the stored information in
your phonebook is erased.
Warning: This feature will erase your entire phonebook, which can’t be
undone!
Find the Feature MENU ( ) > Phonebook
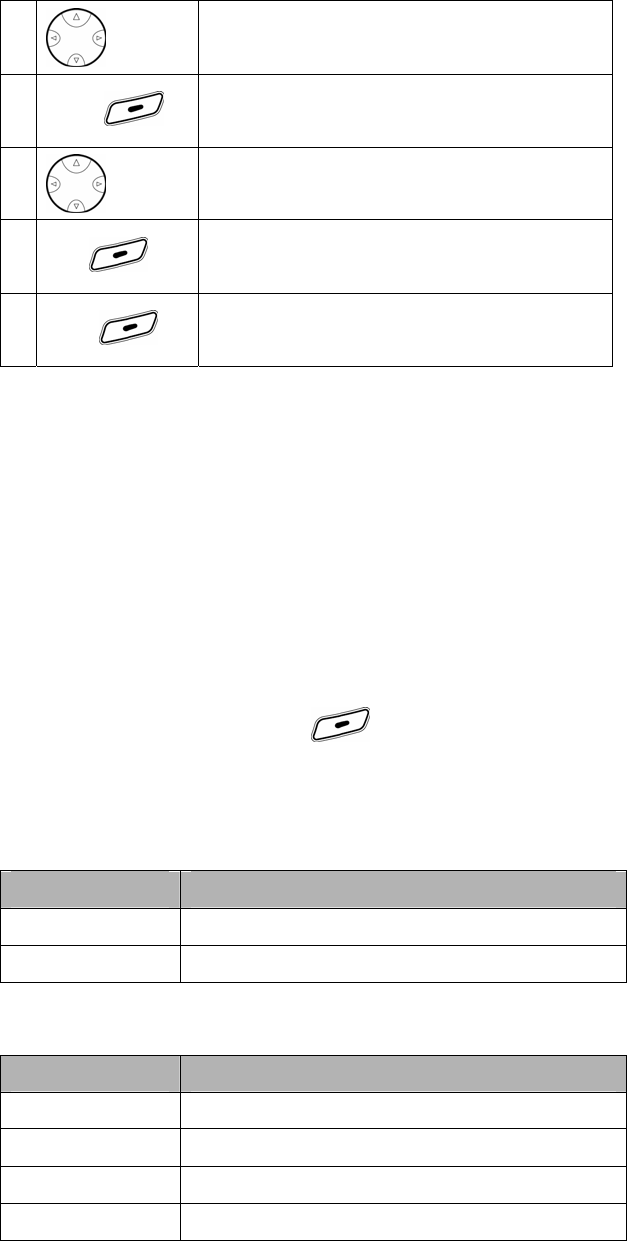
Press To
Scroll to [Delete All].
or
Scroll to the name you want.
SELECT ( ) View the type of number (i.e. Work, Home etc.).
SELECT ( ) View the e-mail, phone number and speed dial.
OPTIONS ( ) View the phonebook Options menu screen.
1
Scroll to Delete All.
35
2 SELECT ( ) Select to Delete All.
3 Keypad keys Enter your 6-digit security code.
4 OK ( ) View the confirmation message “Delete All?”
5 YES ( )
Erase all names and associated fields in the
phonebook.
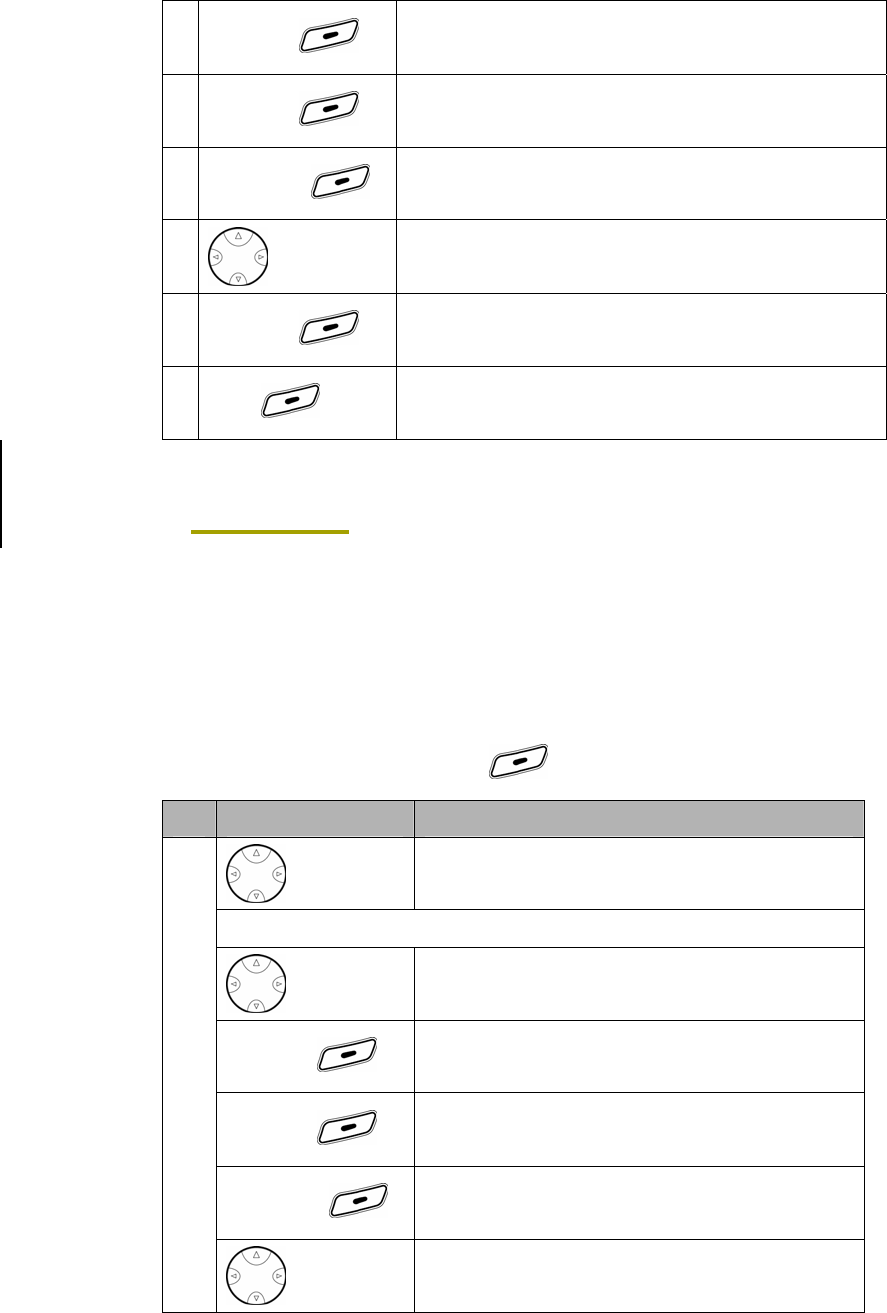
2.8 Monitoring Phonebook Capacity
Memory meter hint you about total number of phonebook entries already stored
in phonebook. When the memory meter is full, you are not able to store any
new information.
Find the Feature MENU ( ) > Phonebook
> Memory Meter
You can find the screen that displaying the memory meter bar.
2.9 Sorting Entries
You can sort the contents of your phonebook. The phonebook entry is sorted by
name or speed dial.
Find the Feature MENU ( ) > Phonebook
Press To
1
Scroll to the name you want.
2 SELECT ( ) View the type of number (i.e. Work, Home etc.).

36
3 SELECT ( ) View the e-mail, phone number and speed dial.
4 OPTIONS ( ) View the phonebook Options menu screen.
5
Scroll to Sort By.
6 SELECT ( ) View Sort By menu screen.
7
Scroll to Name or Speed No..
8 SELECT ( ) Sort by name or speed dial number.
37
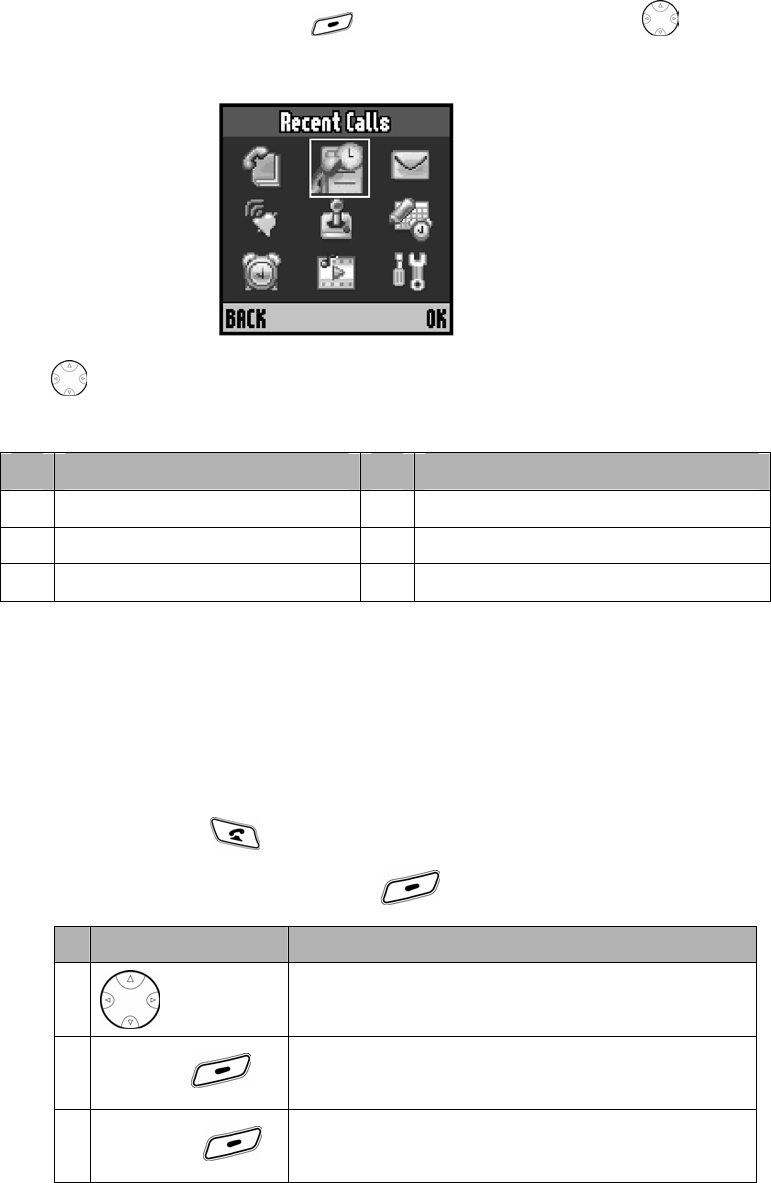
3. Recent Calls
Form the idle display, press MENU ( ) to enter the main menu. Press to scroll
to and highlight Recent Calls icon in the main menu.
Press to scroll to and highlight a menu feature in Recent Calls menu. The
following features may appear in Recent Calls menu.
No Feature No Feature
1 Missed Calls 4 Notepad
2 Received Calls 5 Call Times
3 Dialed Calls 6 Delete All Call Log
3.1 Viewing the Recent Calls
Your phone keeps lists of the calls you recently received and dialed, even if the
calls did not connect. The lists are sorted from newest to oldest entries. The
oldest entries are deleted as new ones are added.
Shortcut: Press to go directly to the dialed calls list from the idle display.
Find the Feature MENU ( ) > Recent Calls
Press To
1
Scroll to Missed calls, Received Calls, or Dialed
Calls.
2 SELECT ( ) Select the Missed calls list.
3 OPTIONS ( ) View the Options screen.
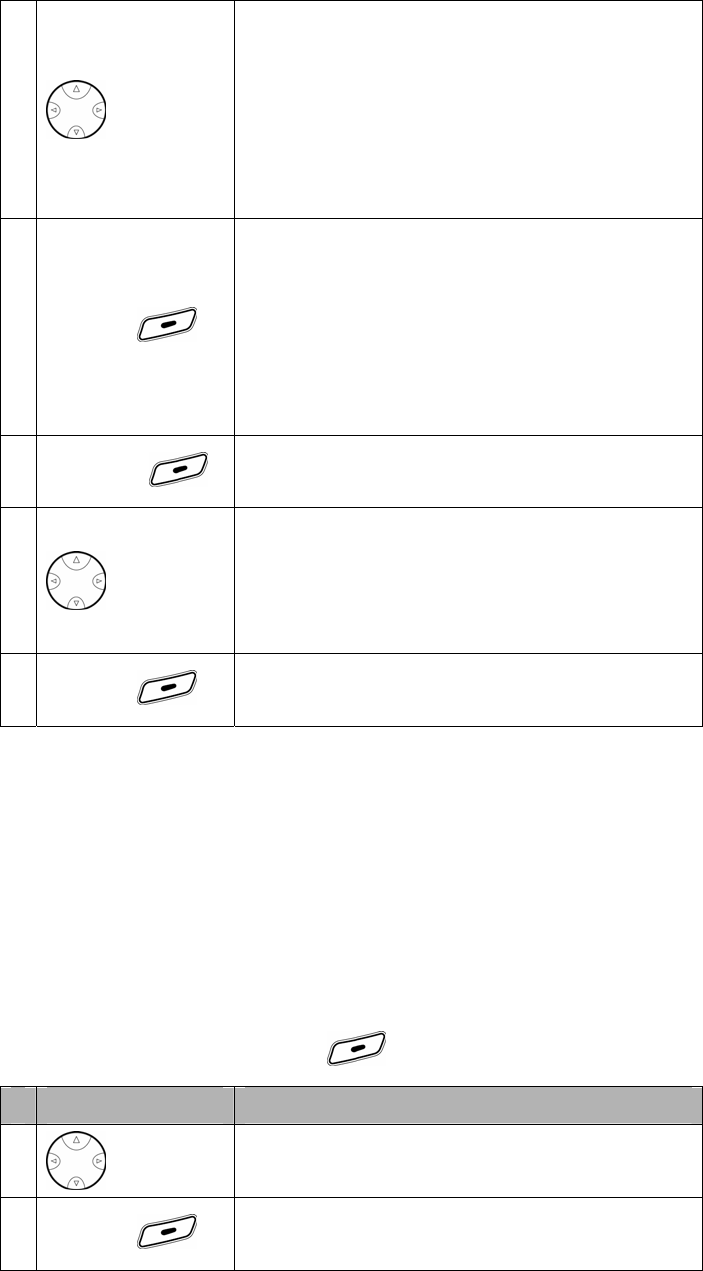
38
4
Scroll to one of options:
y View
y Save
y Delete
y Delete All
y Send Message
5 SELECT ( )
When View option is selected, following call info is
displayed.
1. Display the date and time of call.
2. Display the name of the caller if exist in
phonebook else doesn’t display name for this
entry.
6 OPTIONS ( )
When OPTIONS is selected, the Call Info
Options screen is displayed.
7
Scroll to the options menu you want:
y Delete
y Save
y Send Message
8 SELECT ( ) Select the item.
3.2 Viewing the Notepad
Your phone stores the most recent string of digits entered on the keypad in a
temporary memory location called the notepad. This can be a phone number
that you called, or a number that you entered but did not call. To retrieve the
number stored in the notepad:
Find the Feature MENU ( ) > Recent Calls
Press To
1
Scroll to Notepad.
2 SELECT ( )
View the most recent string of digits entered on
the keypad.
39
3 OPTIONS ( ) View the Calling Status screen.
4
Scroll to the item you want:
y Save
y Insert Wait
y Insert Pause
y Insert ‘n’
y Send message
5 SELECT ( ) Select the item.
The Calling Status items are as follow:
Menu Description
Insert Wait
Insert a ‘w’ (wait) character.
Your phone dials the preceding digits, waits for the
call to connect, then prompts you for confirmation
before it sends the remaining digit(s).
Insert Pause
Insert a ‘p’ (pause) character.
Your phone dials the preceding digits, waits for the
call to connect, then sends the remaining digit(s).
Insert ‘n’
Insert an ‘n’ (number) character.
Your phone prompts you for a number before dialing
the call. The number you enter is inserted into the
dialing sequence in place of the n character.
3.3 Viewing Call Times
Network connection time is the elapsed time from the moment you connect to
your service provider's network to the moment you end the call by pressing
. This time includes busy signals and ringing.
The amount of network connection time you track on your resettable timer
may not be equal to the amount of time for which you are billed by your
service provider. For billing information, please contact your service
provider directly.
To view a call timer:
40
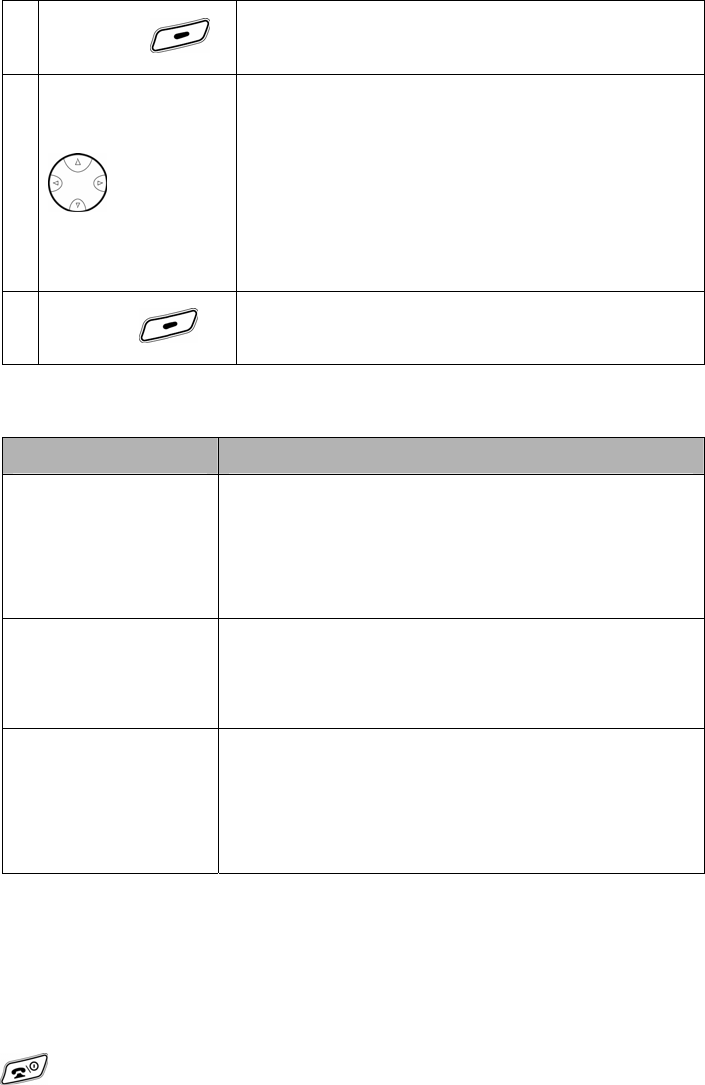
Find the Feature MENU ( ) > Recent Calls
Press To
1
Scroll to Call Times.
2 SELECT ( ) Select Call Times.
3
Scroll to the item you want:
y Last Call
y Dialed Calls
y Received Calls
y All Calls
y Life Time
See the time spent for each call type in a pop up
screen.
4 RESET ( )
Reset Dialed Calls, Received Calls or All Calls
timers if desired.
View the confirmation message “RESET”.
5 YES ( ) Reset the time spent for each call type.
The option menus are as follow:
Menu Description
Last CaIl Approximate time spent on the last dialed or
received call. You cannot reset this timer.
Dialed Calls Approximate total time spent on dialed calls since
the last time you reset this timer.
Received Calls Approximate total time spent on calls received since
the last time you reset this timer.
All Calls Approximate total time spent on dialed and received
calls since the last time you reset this timer.
Life Time Approximate total time spent on all calls on this
phone. You cannot reset this timer.
Note: If time is nonzero and we highlighted on “Dialed Calls”, “Received Calls”,
“All Calls”, will be RESET.
41
3.4 Deleting All Call Log
This feature will clear all dialed numbers, as well as numbers of answered calls
and missed calls. You can not undo this operation, so be careful.
Find the Feature MENU ( ) > Recent Calls
Press To
1
Scroll to Delete All Call Log.
2 SELECT ( )
Select Delete All Call Log.
View the confirmation message “Delete All Call
Logs?”.
3 YES ( ) Clear all call lists.

42
4. Settings
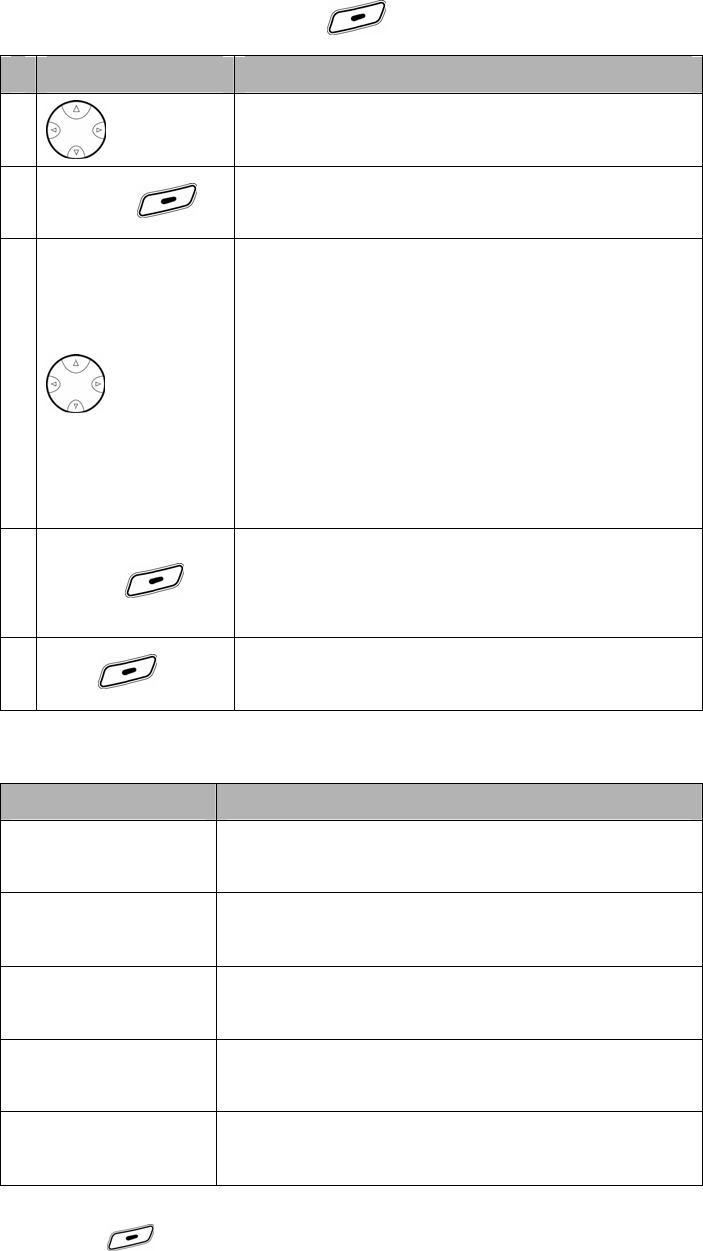
Form the idle display, press MENU ( ) to enter the main menu. Press to
scroll to and highlight Settings icon in the main menu.
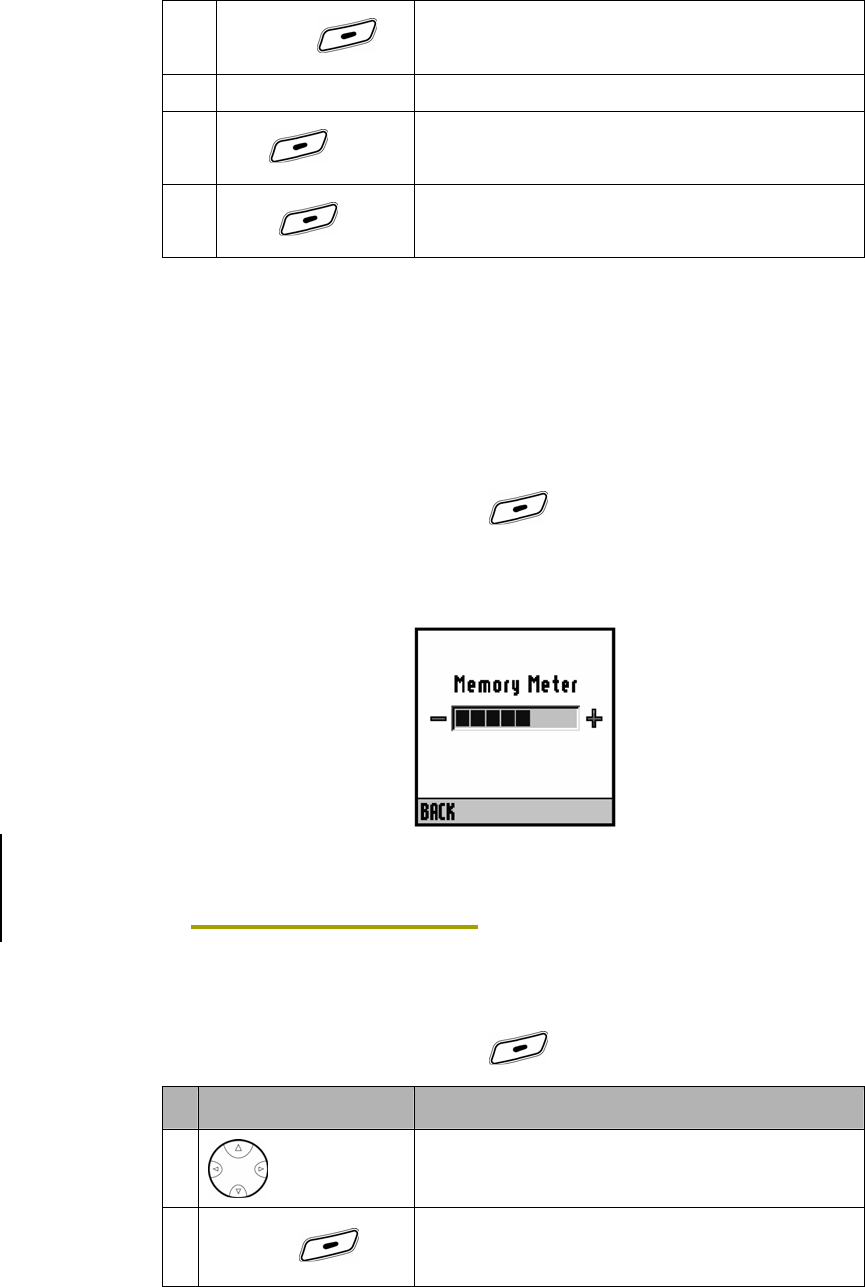
Press to scroll to and highlight a menu icon & feature in Settings menu. The
following icons represent features that may appear in Settings menu.
No Icon Feature No Icon Feature
1 Personalize 5
Headset
2 In Call Setup 6 Car Settings
3 Initial Setup 7 Network Setup
4 Phone Status 8 Security
4.1 Personalize
The Default settings of the personalize menu when the phone is used for the
first time.
It has six menus that Home Screen, Greetings Text, Color Styles, Wallpaper,
Screen Saver and Shortcuts.
4.1.1 Setting Home Screen
You will select to display icons of applications mapped on navigation
keys or not.
Find the Feature MENU ( ) > Settings
> Personalize
> Home Screen

43
Feature Description
Show or Hide
Menu Icons
Show or hide application icons in the idle
display.
MENU ( ) > Settings > Personalize >
Home Screen > Icons
Menu Screen
View
Display icons of the application mapped on
up/down navigation keys in the idle display.
MENU ( ) > Settings > Personalize >
Home Screen > (Up / Down) Key
Change Left
Soft Key
Change soft key labels in the idle display.
MENU ( ) > Settings > Personalize >
Home Screen > Left Soft Key
4.1.2 Changing Greeting Text
To change the greeting that appears when you turn on your phone.
The length of the text will be 40characters.
Find the Feature MENU ( ) > Settings
> Personalize
> Greeting Text
Press To
1 Keypad keys Enter the text of the greeting text note.
2 DONE ( ) Complete the greeting text note.
4.1.3 Changing Color Styles
You can select phone screen color.
Find the Feature MENU ( ) > Settings
> Personalize
> Color Style
44
Press To
1
Scroll to the color style menu you want:
y Moto
y Silver
y Midnight
y Jade
y Tangy
y Solar
2 SELECT ( ) Change the color style.
4.1.4 Changing Wallpaper
You can set a picture or animation as a wallpaper (background)
image in your phone’s home screen.
Find the Feature MENU ( ) > Settings
> Personalize
> Wallpaper
Press To
1
Scroll to Wallpaper picture items.
2 VIEW ( ) View the selected image.
3
Scroll to the image.
4 SELECT ( ) Select the image.
4.1.5 Changing Screen Saver
The screen saver image displays when the flip is open and no activity
is detected for a period of time.
45
Find the Feature MENU ( ) > Settings
> Personalize
> Screen Saver
Press To
1
Scroll to Picture items.
2 CHANGE ( ) Open the picture viewer.
3
Scroll to the image you want.
4 SELECT ( ) Select the image.
5
Scroll to Delay.
6 CHANGE ( ) Open the delay viewer.
7
Scroll to delay time you want.
y 1 minute
y 2 minutes
y 5 minutes
y 10 minutes
8 SELECT ( ) Select the delay time.
9 DONE ( ) Save screen saver settings.
4.1.6 Changing Shortcuts
Your phone includes several standard shortcuts. You can change
custom shortcuts to frequently-used menu items.
Find the Feature MENU ( ) > Settings
> Personalize
> Shortcuts
Press To
46
1
Scroll to the shortcut item you want.
2 EDIT ( ) Select the shortcut.
3
Scroll to the shortcut list.
4 OK ( )
View the confirmation message “Replace
Shortcut: <old item> - > <new item> ?”.
5 YES ( ) Change the shortcut.
4.2 In Call Setup
The In Call Setup contains info for the settings when the user is in call.
4.2.1 Setting In Call Timer
You can set a timer to beep at selected intervals and display the
elapsed time during a call.
Find the Feature MENU ( ) > Settings
> In Call Setup
> In Call Timer
Select one of the following Display option:
Option Description
ON Display in call timer.
OFF Do not display in call timer.
Select one of the following Beep option:
Option Description
Off Do not beep during a call.
1 Minute Beep at 1-minute intervals during a call.
2 Minutes Beep at 2-minute intervals during a call.
5 Minutes Beep at 5-minute intervals during a call.
47
4.2.2 Setting Answer Options
You can answer incoming calls by pressing any key.
Find the Feature MENU ( ) > Settings
> In Call Setup
> Answer Settings
> Multikey
Select one of the following Multikey option:
Option Description
ON Activate the Multikey.
OFF Do not activate the Multikey.
4.2.3 Using the Speaker Phone
To use an internal speaker with your phone, connect the speaker and,
during an active call:
Find the Feature MENU ( ) > Settings
> In Call Setup
> Speaker Phone
Select one of the following Speak Phone option:
Option Description
ON Activate the connected Speak Phone.
OFF Do not activate the connected Speak Phone.
4.2.4 Setting the Easy Prefix
You can choose your operator for long distance calls using easy
prefix feature. Easy prefix feature sets your operator for long-distance
calls automatically whenever you dial a long distance call.
4.2.4.1. Auto Change
Your phone can be automatically inserted the operator code in the
dial number (only when you dial a long-distance call).
48
Find the Feature MENU ( ) > Settings
> In Call Setup
> Easy Prefix
> Auto Change
Press To
1
Scroll to Enabled or Disable.
2 SELECT ( )Select the item.
4.2.4.2. Pref. Opr. (Preferred Operator)
You can view and choose a particular operator as your preferred
operator for long distance calls.
Find the Feature MENU ( ) > Settings
> In Call Setup
> Easy Prefix
> Pref. Opr.
Press To
1
Scroll to operator list for long distance
calls you want.
2 OPTIONS ( ) View the Operator Options screen.
3.
Scroll to the option items you want:
y Select
y New
y Edit
y Delete
4 SELECT ( ) Select the item.
The Operator Options menu is as follow:
Menu Description
Select Select a particular operator.
New Add a particular operator.
49
Edit Edit operator information.
Delete Delete a particular operator.
4.2.4.3. Override
Your phone can be automatically replaced the operator code (if
entered by you) with the set operator code (preferred operator).
Find the Feature MENU ( ) > Settings
> In Call Setup
> Easy Prefix
> Override
Press To
1
Scroll to Enabled or Disable.
2 SELECT ( )Select the item.
4.3 Initial Setup
Use the Initial Setup menu to view or adjust personal options, the initial setup of
your phone, the way your phone connects to your service provider’s network,
and the setup of optional equipment needed for hands-free use.
Find the Feature MENU ( ) > Settings
> Initial Setup
Menu To
Time and Date Set the phone’s time and date.
Backlight
Set the amount of time that the display backlight
remains on, or turn off the backlight to conserve battery
power.
Display Timeout Set the display timeout.
TTY Set the TTY option.
Language Set the language for phone menus.
Contrast Adjust the contrast setting for your display.
DTMF Switch DTMF tones to be long, short, or off.
Master Reset Reset all options back to their original factory settings
50
except for the unlock code, security code, and lifetime
timer.
Master Clear
Reset all options back to their original factory settings
except for the unlock code, security code, and lifetime
timer, and clear all user settings and entries.
Note: This option erases all user-entered information
stored in your phone’s memory, including phonebook
entries. Once you erase the information, it cannot be
recovered.
4.3.1 Setting Time and Date
You must set the correct time and date on your phone to use the
datebook application.
Find the Feature MENU ( ) > Settings
> Initial Setup
> Time and Date
4.3.1.1. Setting Time
Press To
1
Scroll to time item.
2 CHANGE ( ) View the Format screen.
3
Scroll to time format you want.
y AM
y PM
y 24 Hrs
4 SELECT ( ) Select the time format.
5 Keypad keys Enter the time using HH:MM format.
6 OK ( ) Save the time.
4.3.1.2. Setting Date
51
Press To
1
Scroll to date item.
2 CHANGE ( )Select the date item.
3
Scroll to Date.
4 CHANGE ( )Select the Date.
5 Keypad keys Enter the time using DD:MM:YYYY
format.
6 OK ( ) Save the date.
7
Scroll to Format.
8 CHANGE ( )Select the Format.
9
Scroll to one of these date format:
y DD/MM/YYYY
y MM/DD/YYYY
y DD-Mon-YYYY
10 SELECT ( ) Save the format.
4.3.1.3. Autoupdate
If you set on the Autoupdate menu, time and date informs will be
updated automatically by network.
Note: This menu item will not be available for some phones.
Select one of the following Autoupdate option:
Option Description
ON Activate Autoupdate.
OFF Do not activate Autoupdate.
4.3.2 Setting the Backlight
52
Set the amount of time that the display backlight remains on, or turn
off the backlight to conserve battery power. If you set backlight time
to 5 seconds, the backlight will be off after 5 seconds from you don’t
do anything with phone.
Find the Feature MENU ( ) > Settings
> Initial Setup
> Backlight
Press To
1
Scroll to one of these:
y Off
y 5 seconds
y 10 seconds
y 20 seconds
2 SELECT ( ) Confirm the selection.
4.3.3 Setting the Display Timeout
You can save energy of your phone with this function. And you can
set time out duration. If you set duration to 2 minutes, your phone will
be displayed nothing on the screen after 2 minutes.
Find the Feature MENU ( ) > Settings
> Initial Setup
> Display Timeout
Press To
1
Scroll to one of these:
y 1 minute
y 2 minutes
y 5 minutes
y Always On
2 SELECT ( ) Confirm the selection.
53
4.3.4 Setting the TTY Operation
You can use an optional TTY device with your phone to send and
receive calls. You must plug the TTY device into the phone’s
headset jack and set the phone to operate in one of three TTY
modes.
Notes:
• Use a TSB-121 compliant cable (provided by the TTY
manufacturer) to connect the TTY device to your phone.
• For optimal performance, your phone should be at least 12 inches
(30 centimeters) away from the TTY device. Placing the phone too
close to the TTY device may cause high error rates.
Find the Feature MENU ( ) > Settings
> Initial Setup
> TTY
Select one of the following TTY option:
Option Description
ON Activate TTY.
OFF Do not activate TTY.
4.3.5 Setting the Menu Languages
Set the language in which your phone displays menu. The phone
has three languages that English, Español, and Portugues. If you
select Portugues, all of character will be changed to Portugues and
you can use menu with Portugues.
Find the Feature MENU ( ) > Settings
> Initial Setup
> Language
Press To
1
Scroll to the language you want:
y English
y Español
y Portugues
54
2 SELECT ( )Select the display language.
4.3.6 Setting the Contrast
You can adjust the backlight level with this function. When you want
a brighter contrast on display, you should press the up button in the
keypad. And if you want a darker contrast, press the down button in
the keypad. Further, even if the value is zero, this should be visible.
Find the Feature MENU ( ) > Settings
> Initial Setup
> Contrast
Press To
1
Scroll to the desired setting.
2 OK ( ) Confirm the setting.
4.3.7 Using the DTMF Tones
Switch DTMF tones to be long, short, or off. This function is being for
notification of number inform in network. So if you set off the tone, it
will be changed to silent.
Find the Feature MENU ( ) > Settings
> Initial Setup
> DTMF
Press To
1
Scroll to the desired setting.
y Short
y Long
y Off
2 SELECT ( ) Select the setting.
55
4.3.8 Resetting All Options
Reset all options to their original factory settings, except the unlock
code, security code, and lifetime timer.
Find the Feature MENU ( ) > Settings
> Initial Setup
> Master Reset
Press To
1 Keypad keys Enter the security code.
2 OK ( )
View the confirmation message “Reset
All Phone Settings ?”.
3 YES ( ) Execute the master reset.
4.3.9 Clear All Stored Information
To reset all options to their original factory settings except the unlock
code, security code, and lifetime timer, and clear all user settings
and entries.
Caution: Master Clear erases all user-downloaded content and
user-entered information stored in your phone’s memory,
including phonebook and datebook entries. Once you
erase the information, it cannot be recovered.
Find the Feature MENU ( ) > Settings
> Initial Setup
> Master Clear
Press To
1 Keypad keys Enter the security code.
2 OK ( )
View the confirmation message “Call All
Phone Data ?”.
3 YES ( ) Execute the master clear.
56
4.4 Phone status
4.4.1 Viewing Your Phone Number
You can view the name/number of currently active NAM. If the name is
not entered in the subsequent menus then number will be displayed.
If there is no name set, you can edit the name. But, you can only view
the number, number is not editable.
Find the Feature MENU ( ) > Settings
> Phone Status
> My Phone Number
Press To
1 VIEW ( ) View the name and phone number.
If you want to change the name,
2 EDIT ( )
View the Details screen of which items
can be selected.
3 CHANGE ( ) View the editable Name screen.
4 Keypad keys Enter the number’s name.
(Maximum of 40 characters)
5 DONE ( ) Confirm the changing name.
4.4.2 Changing the Active Line
Change the active phone line to make and receive calls from your
other phone number. The active line indicator shows the current
active phone line.
Note: This menu item will not be available for some phones.
57
Find the Feature MENU ( ) > Settings
> Phone Status
> Active Line
Press To
1
Scroll to the active line numbers.
2 SELECT ( ) Select the active line number.
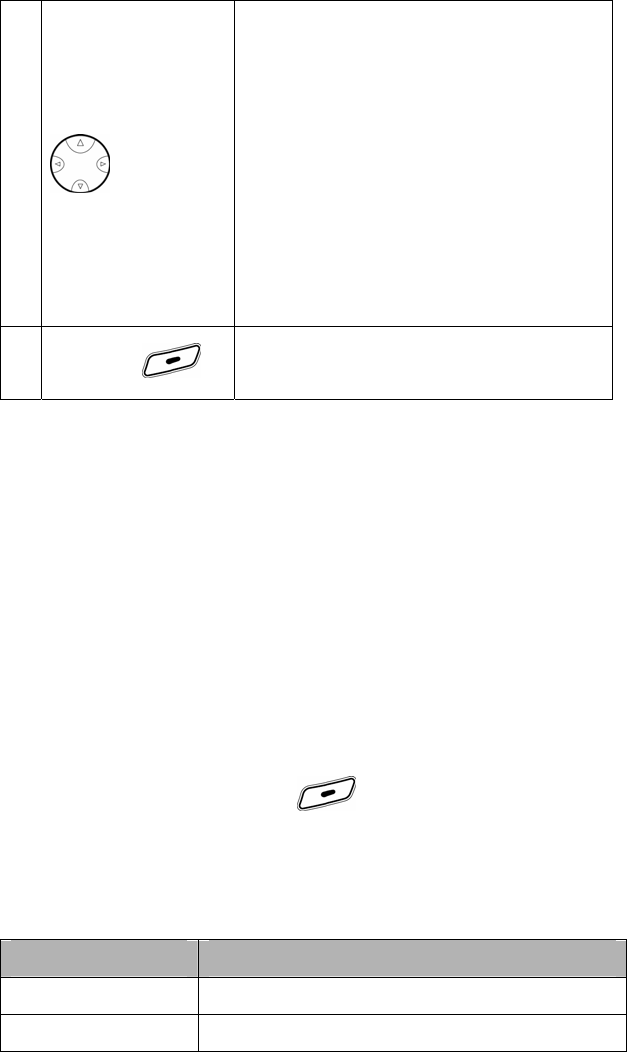
4.4.3 Monitoring Battery Charge
You can show the current battery status. The battery status is
calibrated with six boxes, two boxes for one level of charge. The
charge level is from 0 to 3.
Find the Feature MENU ( ) > Settings
> Phone Status
> Battery Meter
4.4.4 Viewing the Phone Specifications
To view your phone’s feature specifications (if available from the
service provider):
Find the Feature MENU ( ) > Settings
> Phone Status
> Other Information
Press To
58
1
Scroll to the other information menu you
want.
y MMI Dev Build
y Flex Version
y Technology
y ESN
y H/W Version
y S/W Version
y IRDB Version
2 SELECT ( )
When one of menus is selected,
following information is displayed.
4.5 Headset
Set your phone to automatically answer calls after four seconds when
connected to a headset.
4.5.1 Setting Automatic Answer
You can set your phone to automatically answer calls after four
seconds when connected to a car kit or headset.
Find the Feature MENU ( ) > Settings
> Headset
> Auto Answer
Select one of the following Auto Answer option:
Option Description
ON Activate Auto Answer.
OFF Do not activate Auto Answer.
4.6 Car Settings
Adjust hands-free car kit settings. You can set your phone to route calls directly
to the car kit when it detects a connection, and automatically answer calls after
4 seconds.
59
Note: The use of wireless devices and their accessories may be prohibited or
restricted in certain areas. Always obey the laws and regulations on the
use of these products.
Menu To
Auto Answer Automatic Answer.
Auto Hands Free Automatic Hands-Free.
4.6.1 Setting Automatic Answer
You can set your phone to automatically answer calls after four
seconds when connected to a car kit or headset
Find the Feature MENU ( ) > Settings
> Car Settings
> Auto Answer
Select one of the following Auto Answer option:
Option Description
ON Activate Auto Answer.
OFF Do not activate Auto Answer.
4.6.2 Setting Automatic Hands Free
You can set your phone to automatically route calls to a car kit when
it detects a connection.
Find the Feature MENU ( ) > Settings
> Car Settings
> Auto Hands Free
Select one of the following Auto Hands Free option:
Option Description
ON Activate Auto Hands Free.
OFF Do not activate Auto Hands Free.
4.7 Network Setup
60
Your service provider registers your phone to a network. You can view
information about the current network, change how your phone searches for a
network, specify your preferred networks, and activate alerts that indicate when
a call is dropped or network registration changes.
4.7.1 Viewing Currently Registered
Network
Current network menu will show you current band which your phone is
supporting.
Find the Feature MENU ( ) > Settings
> Network Setup
> Current Network
Your phone displays the network ID.
4.7.2 Setting the Service Tones
You can set your phone to beep each time the network registration status
changes.
Find the Feature MENU ( ) > Settings
> Network Setup
> Service Tone
Select one of the following Service Tone option:
Option Description
ON Activate Service Tone.
OFF Do not activate Service Tone.
4.7.3 Setting the Call Drop Alert
You can set your phone to sound an alert tone whenever the network drops
a call. Because digital networks are so quiet, the call drop alert may be your
only indication that a call has been dropped.
61
Find the Feature MENU ( ) > Settings
> Network Setup
> Call Drop Tone
Select one of the following Call Drop Tone option:
Option Description
ON Activate Call Drop Tone.
OFF Do not activate Call Drop Tone.
4.7.4 Setting the Network Scan
You may decide to switch to another network to improve the calling
conditions, because of network coverage or roaming conditions.
To view your phone’s feature specifications (if available from the service
provider):
Note: This menu item will not be available for some phones.
Find the Feature MENU ( ) > Settings
> Network Setup
> Network Scan
Press To
1
Scroll to the network option you want.
y IRDB
y Home Only
y Standard
y Reverse
y A Systems Only
y B Systems Only
2 SELECT ( )Confirm the entry.
4.7.5 Setting the Network Services
Call forwarding, Call waiting and Caller id are network services available
through your service provider or dealer.
62
When you subscribe to any of these services, your service provider or
dealer gives you a separate feature code to activate each service.
Deactivation codes are used to deactivate each service.
Once you store the appropriate code in your phone, the service appears as
a menu item. You can then use the menu to activate and deactivate these
services.
Each time you use a feature that requires a feature code, that code is sent
to the network to verify you’re using the correct feature code.
Note: This menu item will not be available for some phones.
4.7.5.1. Storing the Feature Code
Find the Feature MENU ( ) > Settings
> Network Setup
> Network Service
> Feature Code Set
Press To
1 Keypad keys Enter the feature code your service provider
gave you.
2 OK ( ) Confirm the entry.
4.7.5.2. Activating Call Forwarding
Call forwarding sends your phone’s incoming calls directly to another
phone number.
Warning: You must first store a feature code (supplied by your service
provider) before you can activate the call forwarding feature.
Find the Feature MENU ( ) > Settings
> Network Setup
> Network Service
> (Feature Code Set)
> Call Forwarding
Press To
1
Scroll to the desired call forwarding option.
y All Calls
63
y If Busy
y If Not Answered
y If Out of Reach
y Cancel All Fwd
2 SELECT ( )Select the option.
3
Scroll to Activate.
4 SELECT ( )Confirm the selection.
5 Keypad keys Enter the number to which you want calls
forwarding.
6 OK ( ) Complete the entry.
The call forwarding options are:
Option Description
All Calls Forward all incoming calls.
If Busy Forward calls if your phone is busy and you do
not have voicemail.
If Not Answered Forward calls if you do not answer them.
If Out of Reach Forward calls if you are out of the home
wireless network or the phone is turned off.
Cancel All Fwd Cancel all forwarding options currently active.
Your phone calls the network to confirm the feature code you entered.
After the network confirms the code, call forwarding is activated.
4.7.5.3. Activating Call Waiting
When you are on a call, an alert tone sounds to indicate that you have
received a second call.
Warning: You must first store a feature code (supplied by your service
provider) before you can activate the call waiting feature.
Find the Feature MENU ( ) > Settings
> Network Setup
> Network Service
64
> (Feature Code Set)
> Call Waiting
Press To
1
Scroll to Activate.
2 SELECT ( )Confirm the entry.
The phone calls the network to confirm the feature code you entered.
After the network confirms the feature code, call waiting is activated.
4.7.5.4. Activating Caller Id
Calling line identification (caller ID) displays the phone number for
incoming calls.
The phone displays the caller’s name when the name matches one
stored in your phonebook, or Incoming Call when caller ID information
is not available.
Warning: You must first store a feature code (supplied by your service
provider) before you can activate the caller id feature.
Find the Feature MENU ( ) > Settings
> Network Setup
> Network Service
> (Feature Code Set)
> Caller Id
Press To
1
Scroll to Activate.
2 SELECT ( )Confirm the entry.
4.8 Security
4.8.1 Locking and Unlocking Your Phone
65
You can lock your phone manually or set the phone to lock
automatically whenever you turn it off.
To use a locked phone, you must enter the unlock code. A locked
phone still rings or vibrates for incoming calls or messages, but you
must unlock it to answer.
You can make emergency calls on your phone even when it is locked.
4.8.1.1. Locking Your Phone Manually
Find the Feature MENU ( ) > Settings
> Security
> Phone Lock
> Lock Now
At the Verify Unlock Code prompt:
Press To
1 Keypad keys Enter your unlock code.
2 OK ( ) Lock the phone.
4.8.1.2. Unlocking Your Phone
At the Enter Unlock Code prompt:
Press To
1 Keypad keys Enter your unlock code.
2 OK ( ) Unlock the phone.
4.8.1.3. Set Your Phone to Lock Automatically
You can set your phone to lock every time you turn it on:
Find the Feature MENU ( ) > Settings
> Security
> Phone Lock
> Automatic Lock
Select one of the following Automatic Lock option:
Option Description
ON Activate Automatic Lock.
66
OFF Do not activate Automatic Lock.
4.8.2 Activating Talk Security (Voice
Privacy)
Your phone can attempt to send your calls using a high-security
connection, to prevent others from intercepting them.
Find the Feature MENU ( ) > Settings
> Security
> Talk Secure
Select one of the following Talk Secure option:
Option Description
ON Activate Talk Secure.
OFF Do not activate Talk Secure.
4.8.3 Restricting Calls
You can stop all incoming and/or outgoing calls, or you can restrict
incoming/outgoing calls to the numbers stored in your phonebook.
Notes:
• You can make emergency calls when outgoing calls are restricted.
• Your phone still receives incoming text messages when incoming
calls are restricted.
• When you restrict incoming calls to numbers in the phonebook, a
valid incoming call may be restricted if caller ID information is not
available from the network.
Find the Feature MENU ( ) > Settings
> Security
> Restrict Calls
Press To
1 Keypad keys Enter your unlock code.
2 OK ( ) Open the restrict calls menu.
67
3
Scroll to Outgoing or Incoming.
4 CHANGE ( ) Select the option.
5
Scroll to the restrict calls menu you want.
y All - Restrict All.
y None - Restrict no call.
y Phonebook
- Restrict on phonebook.
6 SELECT ( ) Select the allowed calls.
4.8.4 Changing a Password
Your phone’s four-digit unlock code is originally set to 1234, and the
six-digit security code is originally set to 000000 at the factory. Your
service provider may reset these numbers before you receive your
phone.
If your service provider has not reset these numbers, we recommend
that you change them to prevent other users from accessing your
personal information. The unlock code must contain four digits, and
the security code must contain six digits.
Find the Feature MENU ( ) > Settings
> Security
> New Passwords
Press To
1
Scroll to Unlock Code or Security Code.
2 CHANGE ( ) Select Unlock Code or Security Code.
3 Keypad keys Enter your old code.
4 OK ( ) Submit your old code.
5 Keypad keys Enter the new code.

68
6 OK ( ) Assign the new code.
7 Keypad keys Re-enter the new code.
8 OK ( ) Confirm the new code.
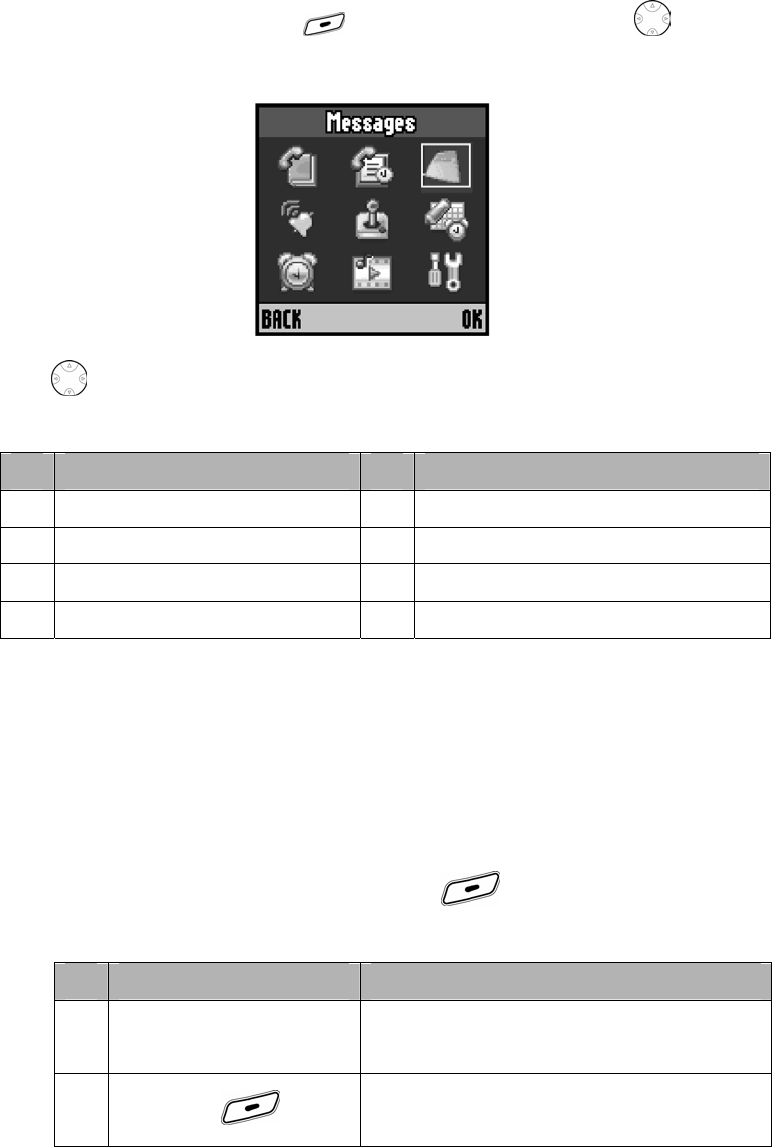
69
5. Messages
You can send and receive text messages with your wireless phone. Text messages that
you receive can contain ring tones that you can store on your phone.
Form the idle display, press MENU ( ) to enter the main menu. Press to scroll
to and highlight Messages icon in the main menu.
Press to scroll to and highlight a menu feature in Messages menu. The following
features may appear in Messages menu.
No Feature No Feature
1 Create Message 5 Outbox
2 Voicemail 6 Drafts
3 Inbox 7 Memory Meter
4 Quick Notes 8 Message Setup
5.1 Sending a Text Message
You can send a text message to one or more recipients. You can manually
enter each recipient’s phone number or email address, or select numbers from
the phonebook or recent calls lists.
Find the Feature MENU ( ) > Messages
> Create Message
Press To
1 keypad keys Enter the message (Maximum 160
characters including Subject field)
2 OPTIONS ( ) View the Message Options.
70
3
Scroll to one of message options:
y Done - Finish the message.
y Quick Notes - Prewritten
messages.
y Numeric - Enter numbers only.
y Alpha - Enter texts/numbers.
4 SELECT ( )
If Done is selected - Store the Message.
If else Quick Notes is selected - View the
prewritten messages, and then return Step
1.
Else Numeric or Alpha is selected -
Change the mode, and then return Step 1.
5
Scroll to one of these:
y Phone Number
y E-Mail Address
6 SELECT ( )
Select the Phone Number or E-Mail
Address.
1) If you select Phone Number
7-1 SELECT ( ) Select One Time Entry.
7-2 keypad keys
Enter one or more phone numbers
(Maximum 40 characters).
Tip: Press to insert a space between
each number you enter manually.
or
7-1 SELECT ( ) Select One Time Entry.
7-2 INSERT ( ) View the Browse screen.
7-3
Scroll to Browse menu you want:
y Phonebook
y Received Calls
y Diale Calls
y Missed Calls
7
7-4 SELECT ( ) Select the item.
71
7-5
Scroll to the numbers from the phonebook
or recent calls.
7-6 ADD ( ) Add the entry.
7-7 DONE ( ) Return to the PhoneNo screen.
2) If you select E-Mail Address
7-1 keypad keys
Enter one or more e-mail addresses
(Maximum 40 characters).
Tip: Press or to insert a space
between each address you enter manually.
or
7-1 PHBOOK ( ) View stored entries from the phonebook.
7-2
Scroll to the phonebook entries.
7-3 ADD ( ) Add the entry.
7-4 DONE ( ) Return to the E-Mail Address screen.
8 OPTIONS ( ) View the Options screen.
9
Scroll to Done.
10 SELECT ( ) View the Create Message screen.
11
Scroll to Subject.
12 CHANGE ( ) View the Message Subject screen.
13 keypad keys Enter the subject (Maximum 160 characters
including Message field)
14 OPTIONS ( ) Return the Message Options.
15
Scroll to one of message options:
y Done - Finish the message.
72
y Quick Notes - Prewritten
messages.
y Numeric - Enter numbers only.
y Alpha - Enter texts/numbers.
16 SELECT ( )
If Done is selected - Store the Message.
If else Quick Notes is selected - View the
prewritten messages, and then return Step
13.
Else Numeric or Alpha is selected -
Change the mode, and then return Step 13.
17
Scroll to Priority. (Only Phone Number is
selected)
18 CHANGE ( )
View the Priority screen. (Only Phone
Number is selected)
19
Scroll to Normal or Urgent. (Only Phone
Number is selected)
20 SELECT ( )
Return the Create Message screen. (Only
Phone Number is selected)
21 OPTIONS ( ) Open the Message Options.
22
Scroll to one of these.
y Send Message
y Save to Draft
y Cancel Message
23 SELECT ( ) Select the options.
5.2 Setting a Quick Note Text Message
Quick notes are prewritten messages that you can insert into a message and
send quickly (for example, Call me at ...). You can also create maximum 15
quick notes.
Find the Feature MENU ( ) > Messages
> Quick Notes
Press To
73
1
Scroll to the Quick Notes Item.
2 SELECT ( ) Select the Quick Notes item.
3 OPTIONS ( ) View the Options menu screen.
4
Scroll to Options menu to perform other
procedures.
y New
y Edit
y Delete
y Send
5 SELECT ( ) Select the item
The Options menu is as follow:
Option Description
New Create a new quick note.
Edit Edit the quick note.
Delete Delete the quick note.
Send Open a new message with the quick note.
5.3 Receiving a Text Message
When you receive a text message, your phone displays the (message
waiting) indicator and a “New Message“ notification, and plays an alert.
Press To
1 READ () Open the message.
2 OPTIONS ( ) Display a list of options.
3
Scroll to the option menu you want.
y Create Message
y Delete
y Callback

74
y Reply
y Forward
y Lock
y Store Number
y Cleanup Messages
y Inbox Setup
4 SELECT ( ) Select the option.
If reminders are turned on, your phone sends a reminder at regular intervals
until you close the new message notification, read the message, or turn off your
phone.
The text message option menus are as explain:
Option Description
Create Message Open the Create Message screen.
Delete Delete the message.
Callback Call the number in the message header or
embedded in the message.
Reply Open a new text message, with the sender’s
number or email address in the To field.
Forward Open a copy of the text message, with an empty To
field.
Lock Lock or unlock the message.
Store Number Display a list of items that can be stored, including
the sender’s number.
Cleanup Messages Erase the contents of your messages.
Inbox Setup Open the text message inbox setup menu.
5.4 Using the Voicemail
You can listen to your voicemail messages by calling your network voicemail
phone number.
Voicemail messages are stored on the network -not on your phone.
5.4.1 Receiving a Voicemail Message
75
When you receive a voicemail message, your phone displays the
(voice message waiting) indicator and a “New Voicemail”
notification.
Press To
1 CALL ( ) Listen to the message.
5.4.2 Listening to a Voicemail Message
The phone calls your voicemail number. If no voicemail number is
stored, your phone prompts you to store one.
Shortcut: If your voicemail number is also stored as phonebook
entry number 1, you can press and hold to listen to your
voicemail message(s).
Find the Feature MENU ( ) > Messages
> Voicemail
Your service provider additionally may store your voicemail number
as phonebook entry number 1, so you can use one-touch dial to
listen to your voicemail messages.
5.5 Using the Outbox
5.5.1 Outbox Messages
The outbox is consisted of mobile originated SMS messages (both
sent and unsent) stored in phone, sorted in descending time order.
Find the Feature MENU ( ) > Messages
> Outbox
Press To
1
Scroll to the message.
2 SELECT ( ) Open the message.
76
3 OPTIONS ( )
View the Outbox Options to perform
other procedures.
4
Scroll to the option you want.
y Create Message
y Delete
y Re-send
y Forward
y Message Status
y Cleanup Messages
5 SELECT ( ) Select the option.
The Outbox options are as follows:
Option Description
Create Message Create a new message.
Delete Delete the message.
Re-send Resend the message to the same
destination address.
Forward Forward the message to the other
destination address.
Message Status Shows the particular message number
along with the error number.
Cleanup Messages Erase the contents of your messages.
5.6 Using the Drafts
This provides the capability to store the unsent messages.
Selecting the already saved message and pressing SELECT ( ) displays
the contents of the message. If you done to write message to draft, select save
to draft menu if then the message will be saved in draft menu.
Find the Feature MENU ( ) > Messages
> Drafts
Press To
77
1
Scroll to the message.
2 SELECT ( ) Open the message.
3 OPTIONS ( )
Open the Drafts Options to perform other
procedures.
Display a list of options:
y Delete - Erase the draft message.
y Send -Send the draft message.
y Cleanup Messages - Erase all the
stored information in your messages.
4
Scroll to the option you want.
5 SELECT ( ) Select the option.
5.7 Cleanup Messages
Cleanup Messages
You can erase the contents of your message folder. Note that this
action cannot be reversed! Once you have performed this procedure,
all the stored information in your messages is erased.
Warning: This feature will erase your entire messages, which
can not be undone!
Find the Feature MENU ( ) > Messages
> Inbox or Outbox
or Drafts
> Cleanup Messages
Press To
1
Scroll to the Cleanup Messages you want.
y All
y Inbox
y Outbox
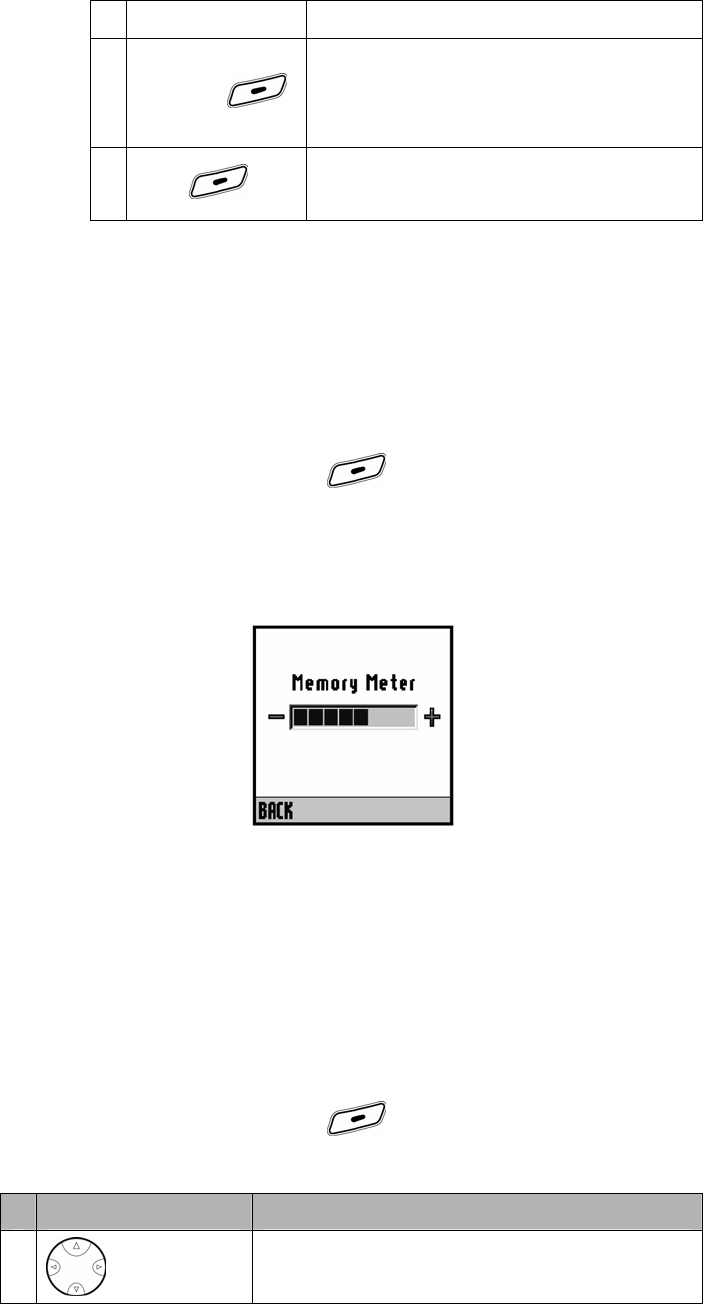
78
y Draft
2 SELECT ( )
View the confirmation message “Delete
All <All / Inbox / Outbox / Draft>
Messages”.
3 YES ( ) Erase the associated fields.
5.8 Monitoring Memory Meter
Memory meter hint you about total number of messages already stored in the
inbox, outbox and drafts folder. When the memory meter is full user is not able
to compose any new SMS.
Find the Feature MENU ( ) > Messages
> Memory Meter
You can find the screen that displaying the memory meter bar.
5.9 Setting Up the Message
Message Setup is used to configure Inbox and Voicemail. The case of Inbox set
up, you can set message alert duration. In other words, this is message
reminder function. If you set 5 seconds, it will alert every 5 minutes duration.
The case of voicemail setup, you can save here voicemail number.
Find the Feature MENU ( ) > Messages
> Message Setup
Press To
1
Scroll to the Message Setup you want.
y Inbox Setup
79
y Voicemail Setup
2 SELECT ( ) Save message setup setting.
5.9.1 Setting Inbox Setup
You must set up your message inbox if you want incoming message
alerts while you are on a voice call
Find the Feature MENU ( ) > Messages
> Message Setup
> Inbox Setup
Press To
1
Scroll to SMS Alert.
2 CHANGE ( ) Open the SMS Alert option.
3
Scroll to the SMS Alert option you want.
y OFF
y 5 Minutes
y 10 Minutes
4 SELECT ( ) Select the option.
5.9.2 Storing Your Voicemail Number
Storing your voicemail number on your phone makes it easy for you
to listen to new voicemail messages. In many cases, your service
provider has already done this for you.
Find the Feature MENU ( ) > Messages
> Message Setup
> Voicemail Setup
To enter the voicemail number:
Press To
1 Keypad keys Enter your voicemail number.

80
Tip: You can store your PIN code with the
voicemail number.
2 OK ( ) Store the number.
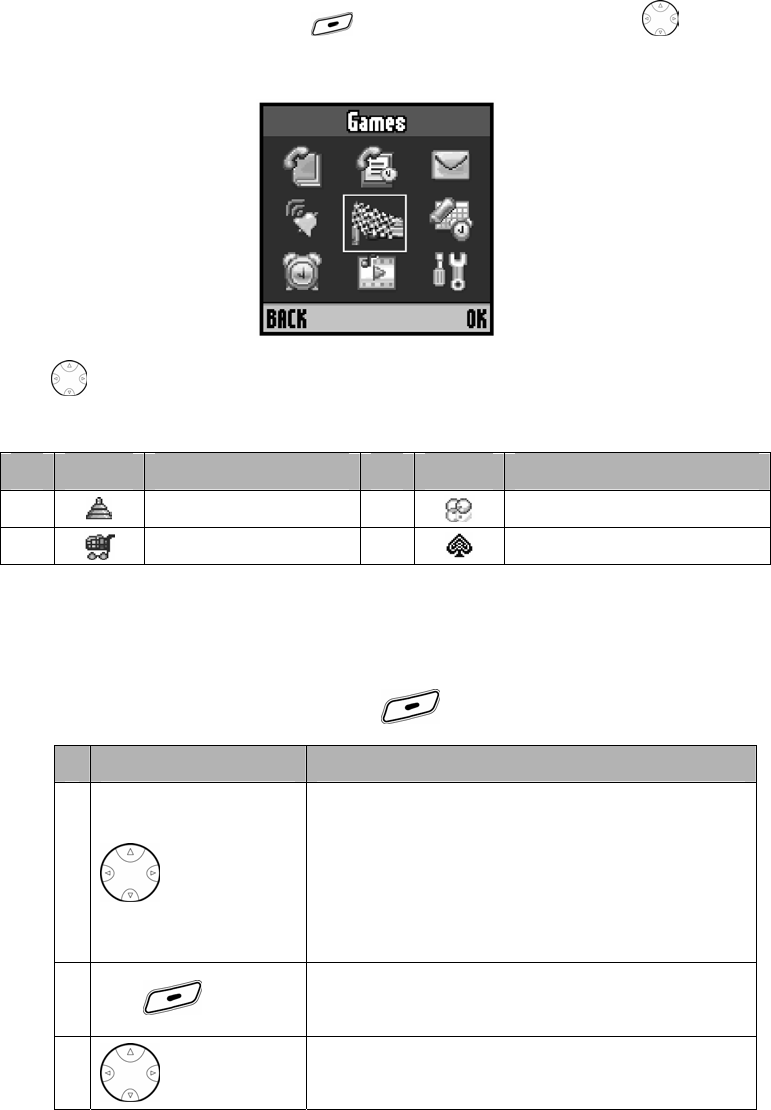
81
6. Games
Your phone contains several games that you can play between calls. Each game
includes online playing instructions.
Form the idle display, press MENU ( ) to enter the main menu. Press to scroll
to and highlight Games icon in the main menu.
Press to scroll to and highlight a menu icon & feature in Games menu. The
following icons represent features that may appear in Games menu.
No Icon Feature No Icon Feature
1 Tower of Hanoi 3 Bubble Shooter
2 Shopping Mall 4 Blackjack
6.1 Launching a Game
Find the Feature MENU ( ) > Games
Press To
1
Scroll to a game menu you want.
y Tower of Hanoi
y Shopping Mall
y Bubble Shooter
y Blackjack
2 OK ( ) Select the game.
3
Scroll to Start Game.
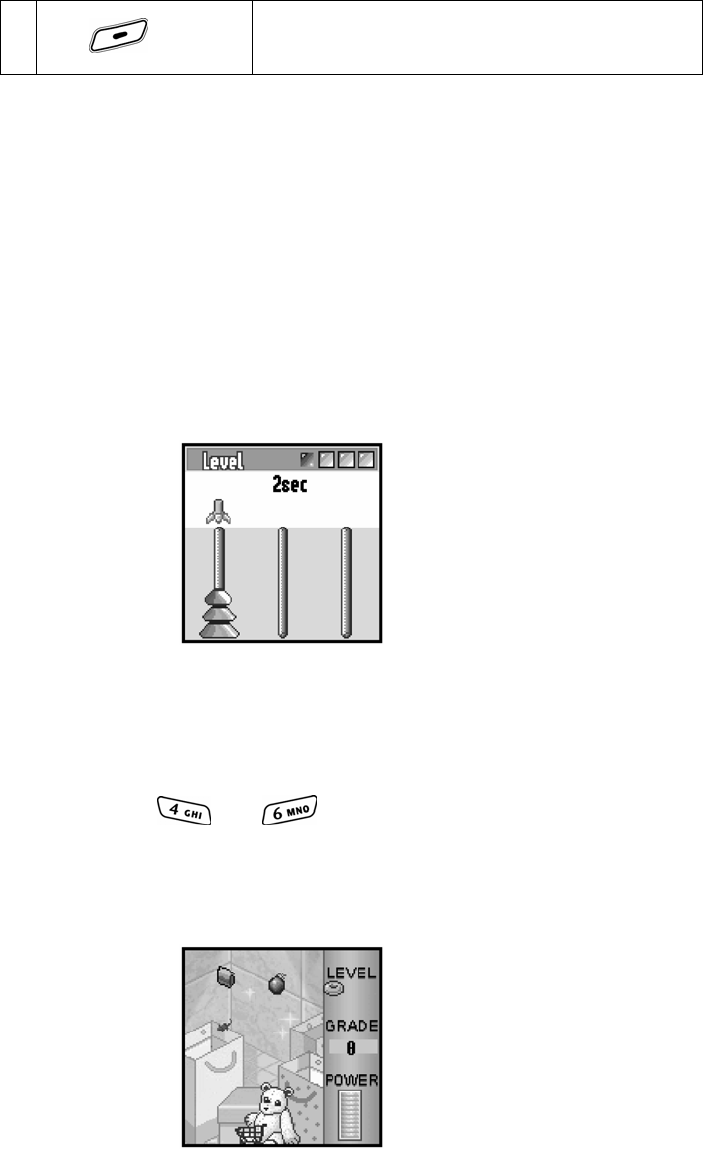
82
4 OK ( ) Launch the game.
6.1.1 Tower of Hanoi
Game mission is to move all the brick from first tower to third tower
with the following rules:
Small brick shall be put on the big brick.
You can only move one brick per time.
And you can only move the upper one brick.
Use up navigation key to lift the brick and down navigation key to
drop the brick, left and right navigation keys to move brick.
6.1.2 Shopping Mall
Game mission is to catch the falling objects in shopping cart.
Press and (or left and right navigation keys) to move
the shopping cart left and right.
Beware of speculative objects.
Score as much as you can.
6.1.3 Bubble Shooter
You have to hit the falling bubbles using bullet on the launcher.
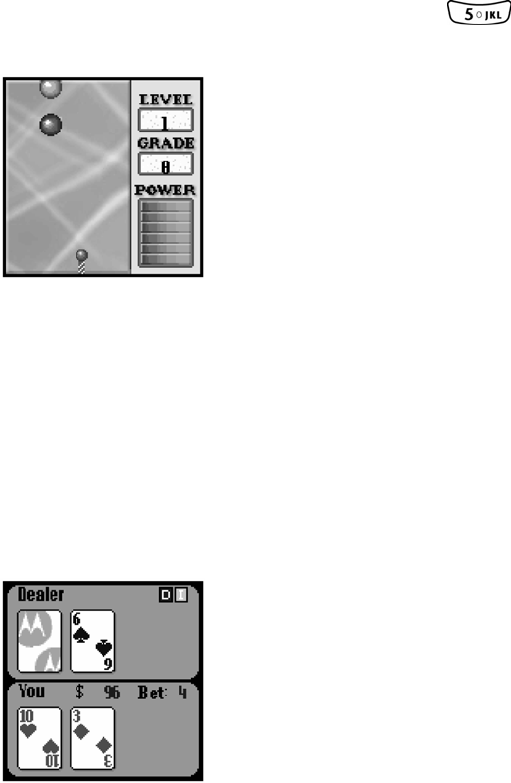
83
Hitting similar bubbles increase the grades.
You will lose energy on wrong bubble hit and bubble you missed.
Use left and right navigation keys to move launcher.
Up navigation key to fire the bullet and down navigation (or )
to change the color of the bullet.
6.1.4 Blackjack
The objective of the game is to obtain a card total sum as close to 21
as possible without exceeding it, while still beating the dealer’s hand.
This execution follows basic Las Vegas rules.
Use the left navigation key to STAY and the Right arrow key to HIT or
DEAL.
You can change the settings of Blackjack game for Double Down,
Insurance and Changing Deck.
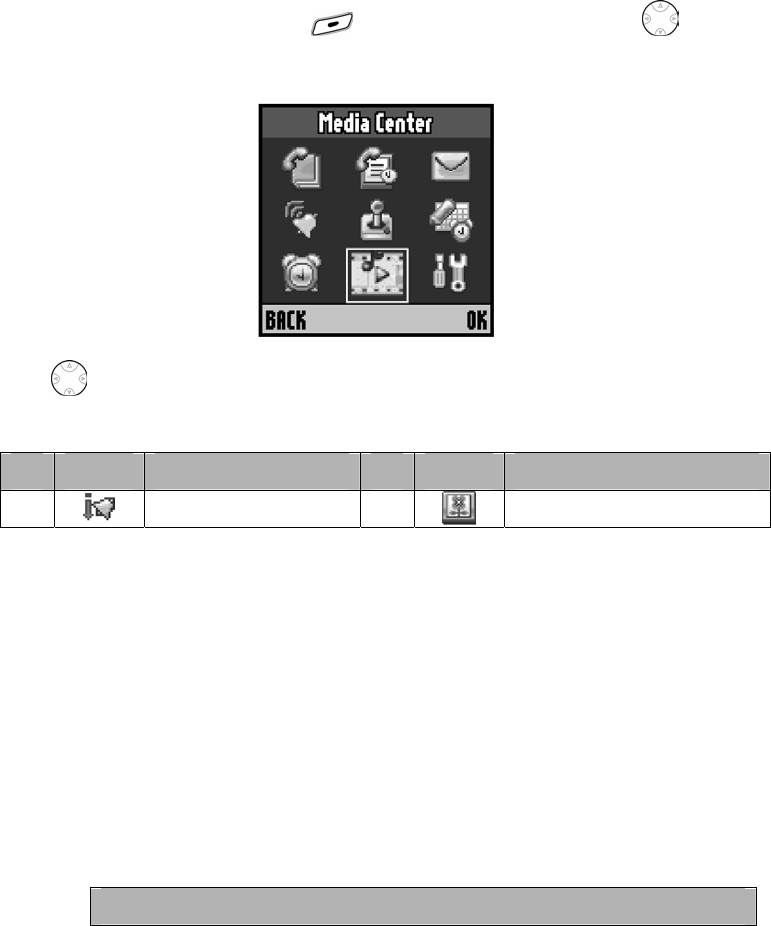
84
7. Media Center
Media center has two menus: My Tones and Picture Viewer. My tones menu provides
facility to display and alter various attributes associated to these stored ring tones in
the mobile phone. Picture viewer menu provides the facility to display stored pictures
and various attributes associated with them.
Form the idle display, press MENU ( ) to enter the main menu. Press to scroll
to and highlight a Media Center icon in the main menu.
Press to scroll to and highlight a menu icon & feature in Media Center menu.
The following icons represent features that may appear in Media Center menu.
No Icon Feature No Icon Feature
1 My Tones 2 Picture Viewer
7.1 My Tones
You can store downloaded ring tones on your phone. The ring tones display in
the list of available alerts.
7.1.1 Downloading a Ring Tone
You can receive a text message that contains a ring tone. You can store
the ring tone and use it as an event alert.
Action
85
If you want to download new ring tones from service provider’s Internet
site, steps are as follows:
1. You can download ring tones from service provider’s Internet
site.
2. All received tones are automatically stored in my tones until
maximum 10 ring tones. If ring tone is saved maximum10 and
you want new ring tone, you should delete older one.
3. If you press END key on any screen, phone goes back to Idle.
(If you are during play, stop the ring tone play)
7.1.2 Renaming a Tone
You can change the ring tone name included with your phone.
Note: The tone can contain maximum of 32 characters.
Find the Feature MENU ( ) > Media Center
> My Tones
Press To
1
Scroll to a ring tone you want.
2 OPTIONS ( ) Open the Options screen.
3
Scroll to Rename.
4 SELECT ( ) Select the Rename.
5 Keypad keys Enter new text.
6 OK ( ) Save your changed name.
7.1.3 Playing a Tone
Find the Feature MENU ( ) > Media Center
> My Tones
86
Press To
1
Scroll to a ring tone you want.
2 OPTIONS ( ) Open the Options screen.
3
Scroll to Play.
4 SELECT ( ) Select the Play.
5 PLAY ( ) Play the ring tone.
7.1.4 Changing Instruments
Change Instrument screen shall display the entire instrument list which can
be associated while playing the tones. User can scroll the list through up
and down arrow keys .Out of the various instruments displayed only one
can be selected.
Find the Feature MENU ( ) > Media Center
> My Tones
Press To
1
Scroll to a ring tone you want.
2 OPTIONS ( ) Open the Options screen.
3
Scroll to Change Instruments.
4 SELECT ( ) Select the Change Instruments.
5
Scroll to the instrument list:
y MUSICBOX
y HARMONICA
y MARIMBA
y STEELDRUM
y VIBRAPHON
87
y VIOLIN
y GRDPIANO
y XYLOPHONE
y JAZZGTR
y CHRCHORG
y STRINGS
y TRUMPET
6 SELECT ( ) Change the instrument item.
7.1.5 Deleting a Tone
Find the Feature MENU ( ) > Media Center
> My Tones
Press To
1
Scroll to a ring tone you want.
2 OPTIONS ( ) Open the Options screen.
3
Scroll to Delete.
4 SELECT ( ) View the confirmation message “DELETE”.
5 YES ( ) Delete the ring tone.
7.2 Picture Viewer
Your phone contains pictures and animations that you can use as wallpaper
and screen saver images.
Find the Feature MENU ( ) > Media Center
> Picture Viewer
Press To
88
1
Scroll to the picture or animation name.
2 VIEW ( ) View the picture or animation.
up or down
View the previous/next picture.
or
3
OPTIONS ( )
Open the Picture Viewer menu to perform other
procedures as described in following list
The Picture Viewer menu can include the following options:
Menu Description
Details View picture information, which is name, type and
size.
Set as wallpaper Set the picture as your wallpaper image.
Set as screensaver Set the picture as your screen saver image.
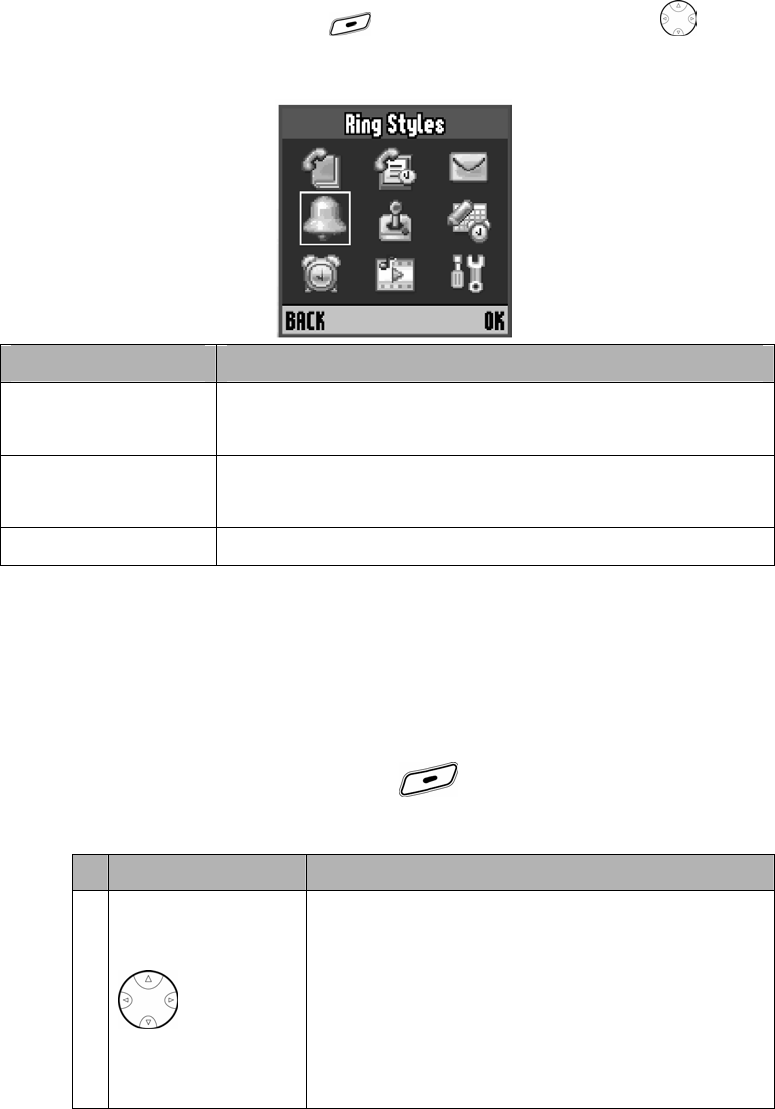
89
8. Ring Styles
You can change the alerts that notify you of incoming calls, text messages, voicemail
messages, data calls, alarms, and reminders. Any changes you make are saved to the
current ring style.
Form the idle display, press MENU ( ) to enter the main menu. Press to scroll
to and highlight Ring Styles icon in the main menu.
Menu Description
Style Which shows the current setting of the ring style and it will
appear as hint of the style caption.
Style Details Which provides the facility to mobile user to display the
various current settings of the ring style.
My Tones Which displays downloaded ring tones in the mobile phone.
8.1 Changing Style
Style provides the facility of changing the mode of playing of ring style. There
would be five modes loud, soft, vibrate, vib & ring and silent.
Find the Feature MENU ( ) > Ring Styles
> Style
Press To
1
Scroll through options until you hear the one you
want:
y Loud
y Soft
y Vibrate
y Vib & Ring
90
y Silent
2 SELECT ( ) Save the selected ring style.
8.2 Setting Style Details
This screen have the various ring styles attributes Ring Volume, Calls ,Text
Messages, Voicemail, Alarms, Ringer ID’s, Keypad, Reminders and
Haptics.
Menu Description
Ring Volume Ring Volume can have value from 0 to 7.
Calls List of tones for call shall be displayed including the
downloaded tones.
Text
Messages
List of tones for text messages shall be displayed including
the downloaded tones.
Voicemail List of tones for voicemail shall be displayed including the
downloaded tones.
Alarms List of tones for alarms shall be displayed including the
downloaded tones.
Ringer ID’s Ringer ID’s can have only two values On or Off.
Keypad
Keypad Volume can have value from 0 to 7. Default value
shall be 4 for ring volume.
You can hear the Number Callout synchronized with each
number keypad press.
Reminders Reminders can take three values Off, beep & vibrate.
Haptics Haptics can alert with vibrate and light.
8.2.1 Setting Ringer & Keypad Volume
Maximum value for the volume can be set as 0 to 7 through left and
right arrow keys. Pressing right arrow key would increase the volume
and left can be used for decreasing the volume.
Find the Feature MENU ( ) > Ring Styles
> Style Details
Press To
91
Scroll to Ring Volume.
or
Scroll to Keypad.
CHANGE ( ) Select the Keypad.
1
Scroll to Volume.
2 CHANGE ( ) Select the item.
3
Change the desired volume.
4 OK ( ) Confirm the entry.
8.2.2 Setting Number Callout
You can hear the Number Callout synchronized with each number
keypad press.
Find the Feature MENU ( ) > Ring Styles
> Style Details
> Keypad
> Number Callout
Select one of the following Number Callout option:
Option Description
ON Activate Number Callout.
OFF Do not activate Number Callout.
8.2.3 Setting Calls, Text Messages,
Voicemail and Alarms Alert
Find the Feature MENU ( ) > Ring Styles
92
> Style Details
Press To
1
Scroll to Calls, Text Messages,
Voicemail, or Alarms.
2 CHANGE ( ) Select the item.
3
Scroll to the style for which you want to
select a tone.
4 SELECT ( ) Save the selected ring style.
8.2.4 Activating Ringer ID’s
When ringer IDs are turned on, your phone uses distinctive ringer
tones to notify you of incoming calls or messages from specific
entries in your phonebook.
Find the Feature MENU ( ) > Ring Styles
> Style Details
> Ringer ID’s
Select one of the following Ringer ID’s option:
Option Description
ON Activate Ringer ID’s.
OFF Do not activate Ringer ID’s.
8.2.5 Setting Reminders
A reminder is an alert that rings or vibrates at regular intervals to
notify you about a voicemail or text message that you have received.
Find the Feature MENU ( ) > Ring Styles
> Style Details
> Reminders
PRESS TO
1
Scroll to Beep or Vibrate to set the
reminder alert type, or Off to turn off all
93
reminders.
2 SELECT ( )Select the reminder alert.
8.2.6 Setting Haptics
When haptics options are turned on, your phone uses ringer tones
with vibrate/light or both.
Find the Feature MENU ( ) > Ring Styles
> Style Details
> Haptics
Turn the following haptics options ON or OFF:
Option Description
Vibrate Alert with vibrate.
Light Sync Alert with light.
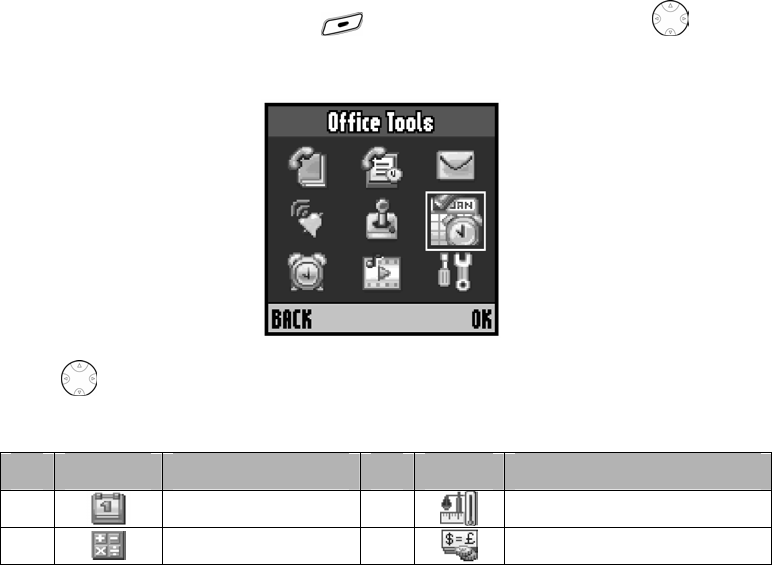
94
9. Office Tools
Your phone can be your personal assistant. It can wake you up in the morning and
remind you of meetings, birthdays, and tasks. You can check the current time,
calculate a tip at dinner, and convert currencies.
With a Datebook, clock, alarm clock, and phonebook, you have everything you need
to keep track of your life.
Form the idle display, press MENU ( ) to enter the main menu. Press to
scroll to and highlight Office Tools icon in the main menu.
Press to scroll to and highlight a menu icon & feature in the Office Tools menu.
The following icons represent features that may appear in Office Tools menu.
No Icon Feature No Icon Feature
1 Datebook 3
Unit Converter
2 Calculator 4
Currency Converter
9.1 Using the Datebook
The datebook is a calendar that lets you schedule and organize events such as
appointments and meetings. You can set the datebook to send a reminder
alarm for specific events.
Note: You must set the correct time and date on your phone to use the
datebook.
9.1.1 Viewing the Datebook
95
You can look into saved data list, edit, delete and save new data.
This function can support alarm and schedule managing etc. You
can set alarm with same way as setting’s alarm set.
Find the Feature MENU ( ) > Office Tools
> Datebook
Action
1
When today’s day and date appear, press OPTIONS ( ).
Note: Use to scroll up to an earlier date or down to a
later date.
2
Select Event List to view the notes of the day currently on
display.
or
Select All Events to view the notes of the entire datebook.
9.1.2 Adding a Datebook Event
You can add a datebook event.
Find the Feature MENU ( ) > Office Tools
> Datebook
Press To
1
Scroll to the date you want.
2 OPTIONS ( ) Select the date.
3
Scroll to [New Event] .
4 SELECT ( ) View the Event Details screen..
5 CHANGE ( ) Edit the information.
Keypad keys Enter a title for the event. 6
or
96
BROWSE ( ) View Quick Title screen.
Scroll to Quick Title message.
SELECT ( ) Select the message you want.
7 DONE ( ) Store the event title.
8
Scroll to other fields and enter
information as necessary.
You can set Date, Start Time,
Duration, Repeat, and Alarm.
9 DONE ( ) Store the event.
The Event Details menu can include the following options:
Menu Description
Title View event title information (Maximum 20
characters).
Date Set the start date of event.
Enter the date using DD/MM/YYYY format.
Start Time Set the start time of event.
Enter the start time using HH:MM 24H format.
Duration
Set the duration time from start to end of event.
Enter the duration time using HH:MM 24H
format.
Repeat Set the repeat number of same event.
Once / Daily / Weekly / Monthly / Yearly
Alarm Set the alarm at the event start time.
9.1.3 Changing a Event Information
You can change event information you’ve written for certain days.
Find the Feature MENU ( ) > Office Tools
> Datebook
97
Press To
1
Scroll to the date you want.
2 OPTIONS ( ) Select the date.
3
Scroll to Event List.
4 SELECT ( ) Display the day event list.
5
Scroll to the event you want to
change.
6 SELECT ( ) View the Event Details screen.
7 OPTIONS ( ) View the Event Options screen.
8
Scroll to Edit.
9 SELECT ( ) Select the option.
10
Scroll to the event detail you want to
change.
You can edit Title, Date, Start Time,
Duration, Repeat, and Alarm.
11 DONE ( ) Store the changed information.
9.1.4 Deleting a Datebook Event
You can delete notes you’ve written for certain days.
Find the Feature MENU ( ) > Office Tools
> Datebook
Press To
1
Scroll to the date you want.
98
2 OPTIONS ( ) Select the date.
3
Scroll to Event List.
4 SELECT ( ) View the day event list.
5
Scroll to the event you want to delete.
6 SELECT ( ) View the Event Details screen.
7 OPTIONS ( ) View the Event Options screen.
8
Scroll to Delete or Delete All.
9 SELECT ( ) Select the option.
9.2 Using the Calculator
You can use your phone as a calculator. Your phone’s calculator adds,
subtracts, multiplies, and divides.
Find the Feature MENU ( ) >Office Tool
>Calculator
Press To
1 Number keys Enter the first number in the calculation.
Tip: press to insert decimal point.
2
Up
or
Down
or
Left
Scroll to highlight a calculator.
To add (enters + symbol)
To subtract (enters – symbol)
To multiply (enters * symbol)
99
or
Right
To divide (enters / symbol)
3 Keypad keys Enter the second number in the calculation
4 = ( ) Perform the function
The calculator can perform the following functions
Function Description
1 = Calculate the result.
2 + Add
3 - Subtract
4 X Multiply
5 / Divide
6 MC Clear the value stored in memory
7 MR Replace the displayed value with the value stored in
memory.
8 M+ Add the displayed in the value stored in memory.
9 M- Subtract the displayed in the value stored in memory.
9.3 Using the Unit Converter
The unit converter is an application that helps the user to convert English units
into metric units and vice versa.
Find the Feature MENU ( ) >Office Tools
> Unit Converter
Press To
1
Scroll to Weight or Length.
2 OK ( ) Select the item.
3
Scroll the units of converter.
4 Number keys Enter the amount to convert.
100
5 OK ( ) Perform the conversion.
9.4 Using the Currency Converter
The currency converter allows user to convert local currency to foreign
according to the rate input.
It works just like the calculator, but uses the dollar (currency) function. So you
can get the value of other currency.
Find the Feature MENU( ) >Office Tool
> Currency Converter
Press To
1 Number keys Enter the exchange rate.
2 OK ( ) Store the exchange rate.
3 Number keys Enter the amount to convert.
(Amount to divide by the exchange rate.)
4 OK ( ) Perform the conversion.
Note: User is not allowed to enter zero currency rate.
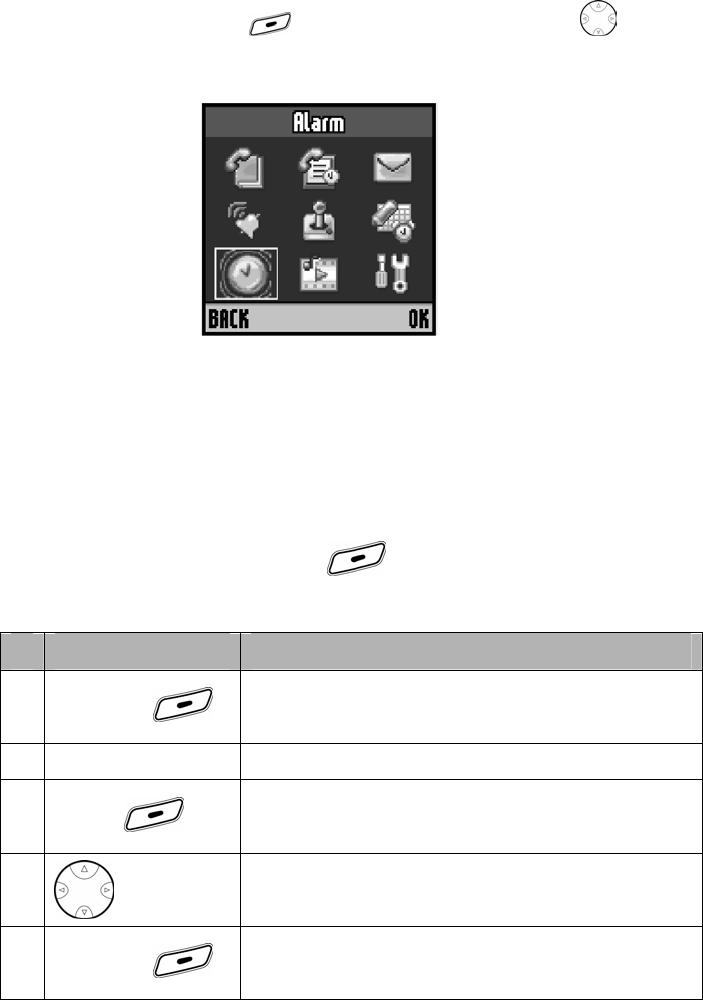
101
10. Alarm
Your phone includes an alarm clock, which you can set up according your own need.
Your phone can store up to 5 alarms.
Notes:
y The alarm clock setting does not display in the datebook day view, and is not
synchronized with datebook settings.
y Your phone must be turned on to use the alarm.
Form the idle display, press MENU ( ) to enter the main menu. Press to scroll
to and highlight Alarm icon in the main menu.
10.1 Setting the Alarm
The Alarm clock icon will appear on the idle display to indicate that an alarm is
set.
Find the Feature MENU ( ) > Alarm
> [New Alarm]
Press To
1 CHANGE ( ) Select Name.
2 Keypad keys Enter the alarm name.
3 DONE ( ) Store the name.
4
Scroll to Time.
5 CHANGE ( ) Select Time.
102
6 Keypad keys Enter the time when you want the alarm to sound
(using HH:MM 24H format) .
7 DONE ( ) Store the time.
8
Scroll to Alert / Volume and enter information as
necessary.
You can set the alert tone and volume.
9 DONE ( ) Store the alarm setting.
10.2 Editing, Enabling, or Deleting an
Alarm
Find the Feature MENU ( ) > Alarm
Press To
1
Scroll to the stored alarm.
2 SELECT ( ) View the Details screen.
3 OPTIONS ( ) Open the alarm Options menu screen.
4
Scroll to Disable/Enable, New, Edit, Delete, or
Delete All.
TIP: If the Options menu is Enable, the alarm is
not active. Press SELECT ( ) to activate it. If
the Options menu is Disable, the alarm is active.
5 SELECT ( )
Select the option.
Follow the display prompts.
10.3 Responding To an Alarm
When the alarm is activated, your phone rings or vibrates (depending on the
alarm ring alert setting), and displays the time and alarm title.

103
The alarm is programmed to ring for 3 minutes, or until you perform one of the
following operations. This cycle continues till maximum 90 minutes.
Press To
DISABLE ( ) or Turn off the alarm.
SNOOZE ( )
Turn off the alarm for 8 minutes.
The alarm reactivates after 8 minutes.
104
11. Troubleshooting
Check these questions first if your phone does not seem to work properly. If you need
additional help, contact the Motorola Customer Call Center at 1-800-331-6456 (USA)
or 1-800-461-4575 (Canada).
11.1 No Service
If you’re outside the wireless service area, No Service will display on your
phone. No calls can be made or received, however, emergency 911 calls may
still be possible.
11.2 What If the Call Doesn’t Go
Through?
Your phone can make and receive calls only when it’s switched on and in the
wireless network’s service area. No service means that you’re probably outside
the wireless service area. No calls can be made or received. This number is
restricted. means calls to the phone number you tried to call are restricted (see
Restrict calls).
105
Specific Absorption Rate Data
This model phone meets the international standards for exposure to radio waves.
Your mobile phone is a radio transmitter and receiver. It is designed and manufactured not to
exceed limits for exposure to radio frequency (RF) energy. These limits are part of
comprehensive guidelines and establish permitted levels of RF energy for the general
population. The guidelines are based on standards that were developed by independent
scientific organizations through periodic and thorough evaluation of scientific studies. The
guidelines include a substantial safety margin designed to assure the safety of all persons,
regardless of age and health.
The exposure standard for mobile phones employs a unit of measurement known as the
Specific Absorption Rate, or SAR. Under the guidelines for your phone model, the SAR limit is
2.0 1
/kgW . Tests for SAR are conducted in accordance with CENELEC 2 testing procedures
using standard operating positions with the phone transmitting at its highest certified power level
in all tested frequency bands. Although the SAR is determined at the highest certified power
level, the actual SAR of the phone while operating can be well below the maximum value. This
is because the phone is designed to operate at multiple power levels so as to use only the
power required to reach the network. In general, the closer you are to a base station, the lower
the power output of the phone. Before a phone model is available for sale to the public, it is
tested to confirm compliance with the guidelines. The tests are performed in positions that
conform to a uniform testing methodology determined by an expert standards body. The highest
SAR value for this model phone when tested for use at the ear is ____ 3
/kgW (Not test)
While there may be differences between the SAR levels of various phones and at various
positions, they all meet the governmental requirements for safe exposure. Please note that
improvements to this product model could cause differences in the SAR value for later products;
in all cases, products are designed to be within the guidelines.
1. The SAR limit recommended by international guidelines (ICNIRP) for mobile phones
used by the public is 2.0 watts/kilogram (W/kg) averaged over ten grams of tissue. The
limit incorporates a substantial margin for safety to give additional protection for the
public and to account for any variations in measurements.
2. CENELEC is a European Union standards body.
3. Additional related information includes the Motorola testing protocol, assessment
procedure, and measurement uncertainty range for this product.
106
Wireless Phone Safety Tip
“Safety is your most important call!”
Your Motorola wireless telephone gives you the powerful ability to communicate by
voice— almost anywhere, anytime, wherever wireless
phone service is available and safe conditions allow. But an important responsibility
accompanies the benefits of wireless phones, one that every user must uphold.
When driving a car, driving is your first responsibility. If you find it necessary to use your
wireless phone while behind the wheel of a car, practice good common sense and
remember the following tips:
1 Get to know your Motorola wireless phone and its features such as speed dial
and redial. If available, these features help you to place your call without taking
your attention off the road.
2 When available, use a hands-free device. If possible, add an additional layer of
convenience to your wireless phone with one of the many Motorola Original™
hands- free accessories available today.
3 Position your wireless phone within easy reach. Be able to access your wireless
phone without removing your eyes from the road. If you receive an incoming call at
an inconvenient time, if possible, let your voicemail answer it for you.
4 Let the person you are speaking with know you are driving; if necessary,
suspend the call in heavy traffic or hazardous weather conditions. Rain, sleet,
snow, ice, and even heavy traffic can be hazardous.
5 If you receive an incoming call at an inconvenient time do not take notes or
look up phone numbers while driving. Jotting down a “to do” list or going through
your address book takes attention away from your primary responsibility—driving
safely.
6 Dial sensibly and assess the traffic; if possible, place calls when you are not
moving or before pulling into traffic. Try to plan calls when your car will be
stationary. If you need to make a call while moving, dial only a few numbers, check
the road and your mirrors, then continue.
7 Do not engage in stressful or emotional conversations that may be distracting.
Make people you are talking with aware you are driving and suspend conversations
which have the potential to divert your attention away from the road.
107
8 Use your wireless phone to call for help. Dial 9-1-1 or other local emergency
number in the case of fire, traffic accident or medical emergencies.*
9 Use your wireless phone to help others in emergencies. If you see an auto
accident, crime in progress or other serious emergency where lives are in danger,
call 9-1-1 or other local emergency number, as you would want others to do for
you.*
10 Call roadside assistance or a special non-emergency wireless assistance
number when necessary. If you see a broken-down vehicle posing no serious
hazard, a broken traffic signal, a minor traffic accident where no one appears
injured, or a vehicle you know to be stolen, call roadside assistance or other special
non-emergency wireless number.*
Check the laws and regulations on the use of wireless telephones and their
accessories in the areas where you drive. Always obey them. The use of these
devices may be prohibited or restricted in certain areas.