Motorola Mobility T5HD1 Portable Cellular CDMA Transceiver with Bluetooth User Manual Exhibit 8 Users Manual
Motorola Mobility LLC Portable Cellular CDMA Transceiver with Bluetooth Exhibit 8 Users Manual
UserManual.wiki
>
Motorola Mobility
>
T5HD1 User Manual
Exhibit 8 Users Manual
Navigation menu
Upload a User Manual
Namespaces
Wiki Guide
HTML
PDF
Info
Views
User Manual
Discussion / Help
Navigation
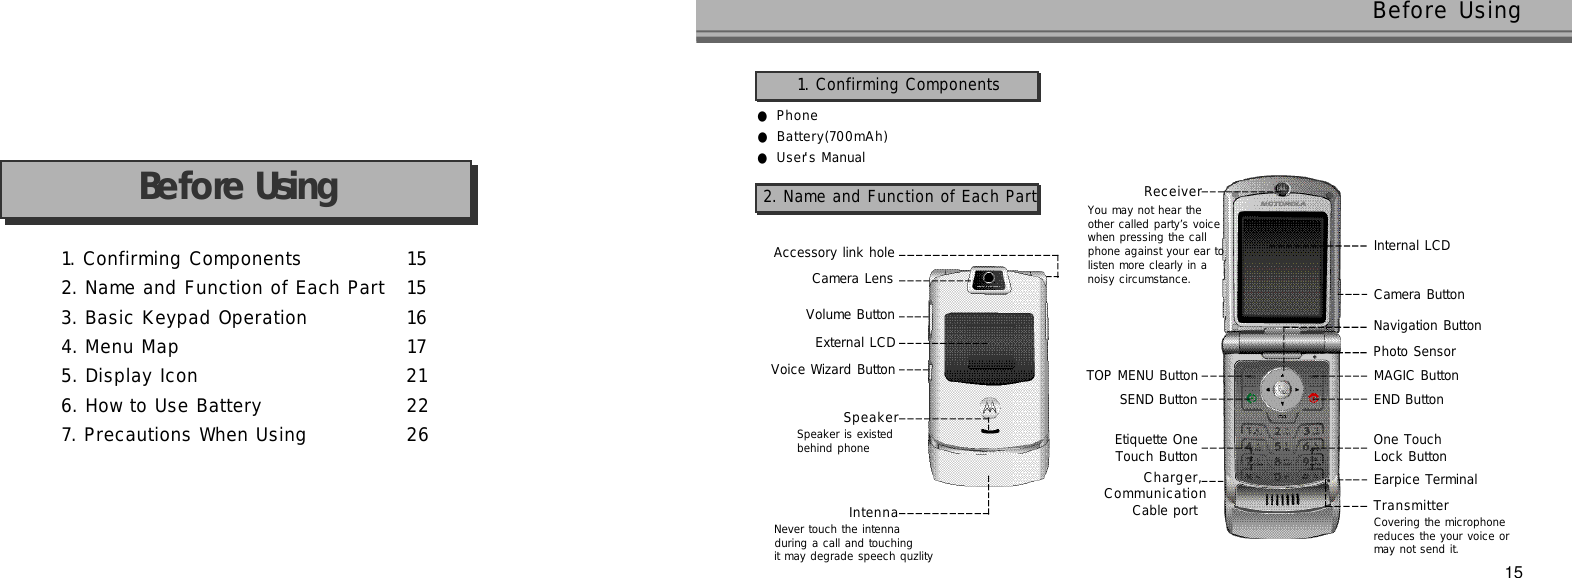
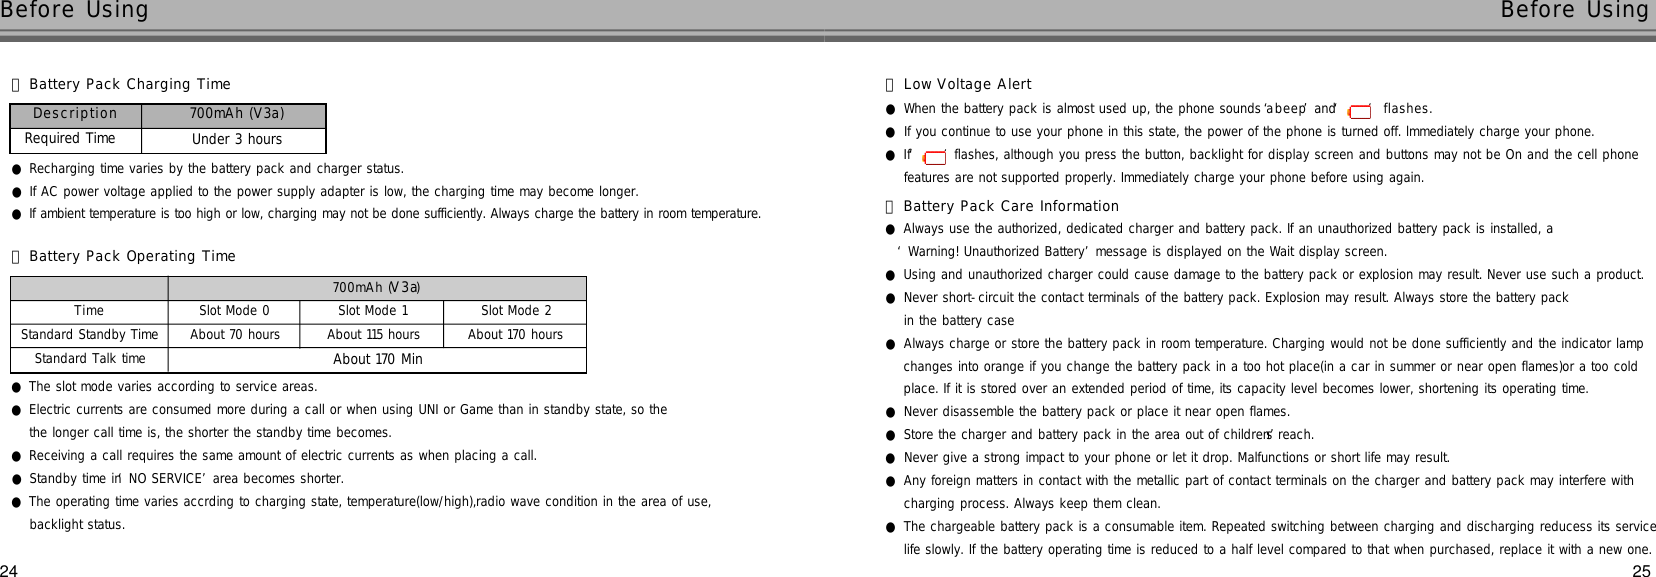
![12Adjusting Tone Volume During a Call 1 2 2Taking Note During a Call 1 2 2Using Phone Book During a Call 1 2 2Sending My Number 1 2 3Using Muting 1 2 3Using Speaker Phone 1 2 3Checking Message Text Message 1 2 5Voice Message 1 2 7Sending Message Sending a New Message 1 2 8Sending a Stored Message 1 2 9Move to Stored Message 1 3 0O u t b o x 1 3 0Setting Message Receive Function 1 3 1Alert Frequency 1 3 1View Msg 1 3 1Msg Sound 1 3 2Save To 1 3 2Storing a Number Storing a Number from a Menu 1 0 5Storing a Number on idle Mode 1 0 5Correcting Phone BookCorrecting Phone Book 1 1 0Correcting Name and E-mail Adds1 1 1Correcting Group 1 1 1Deleting Phone Book Deleting the whole Phone Book 1 1 3Deleting Stored List 1 1 3Deleting Individual Items 1 1 4Deleting Group 1 1 4Xl. Using Phone BookXll.Using Functions During a CallXllI. Using SMS FeaturesSending E-mail New e-mail 1 3 6Sending stored e-mails 1 3 9Checking New E-mail 1 4 0Using the folder menu 1 4 1Using the e-mail menu 1 4 2Replying/Forwarding e-mails 1 4 4Managing Data Folder 1 4 4Data Folder 1 4 5E-mail Setting Receiving & View Setting 1 4 6Send & New Mail Setting 1 4 7Register Account Setting 1 4 7O t h e r s 1 4 8View Mail Settings 1 4 8Mail Config Setting 1 4 9XlV. Using E-mailViewing Call history information 1 0 0View Unans Call list 1 0 0View Call to list 1 0 1View CLI list 1 0 1Delete Unans Call, Call to, CLI List 1 0 2Clear All 1 0 2Delete individual number 1 0 2Viewing Call Timer 1 0 2I n d i v i d u a l 1 0 3O u t g o i n g 1 0 3Roam Timer 1 0 3C u m u l a t i v e 1 0 3X. Using Call HistorySearching Phone BookView All 1 1 5Recall By Loc 1 1 6Recall By Group 1 1 6Recall By Name 1 1 7Using [OPTIONS] 1 1 8Memory Status 1 1 9View my Num 1 1 9Copy Entries 1 2 0Xl. Using Phone BookUsing Data Folder Display All 1 5 1User Folder 1 5 4My Data 1 5 6P i c t u r e 1 5 8R i n g 1 5 9v C a r d 1 5 9O t h e r s 1 6 0XV. Using Data FolderT r o u b l e s h o o t i n g 1 6 8Specific Absorption Rate data 1 6 9Specification and Characteristics 1 7 1XVlI. Appendix13Voice Memo R e c o r d i n g 9 7Ending Recording 9 7Play of Recording 9 8Deleting Recorded Content 9 8VI. 타이머기능사용하기IX. Using Voice WizardMemory Status 1 3 3Deleting Message Delete received message 1 3 3Deleting saved message 1 3 4XllI. Using SMS FeaturesAccessing UNI Accessing UNI 1 6 2UNI MENU 1 6 2Accessing Magic Accessing Magic 1 6 3Magic MENU 1 6 3Key usage in Magic 1 6 4Download Magic applications 1 6 4Execute Magic applications 1 6 5Accessing U-Map Accessing U-Map 1 6 6U-Map Menu 1 6 6XVI. Using UNI](https://usermanual.wiki/Motorola-Mobility/T5HD1/User-Guide-774662-Page-10.png)
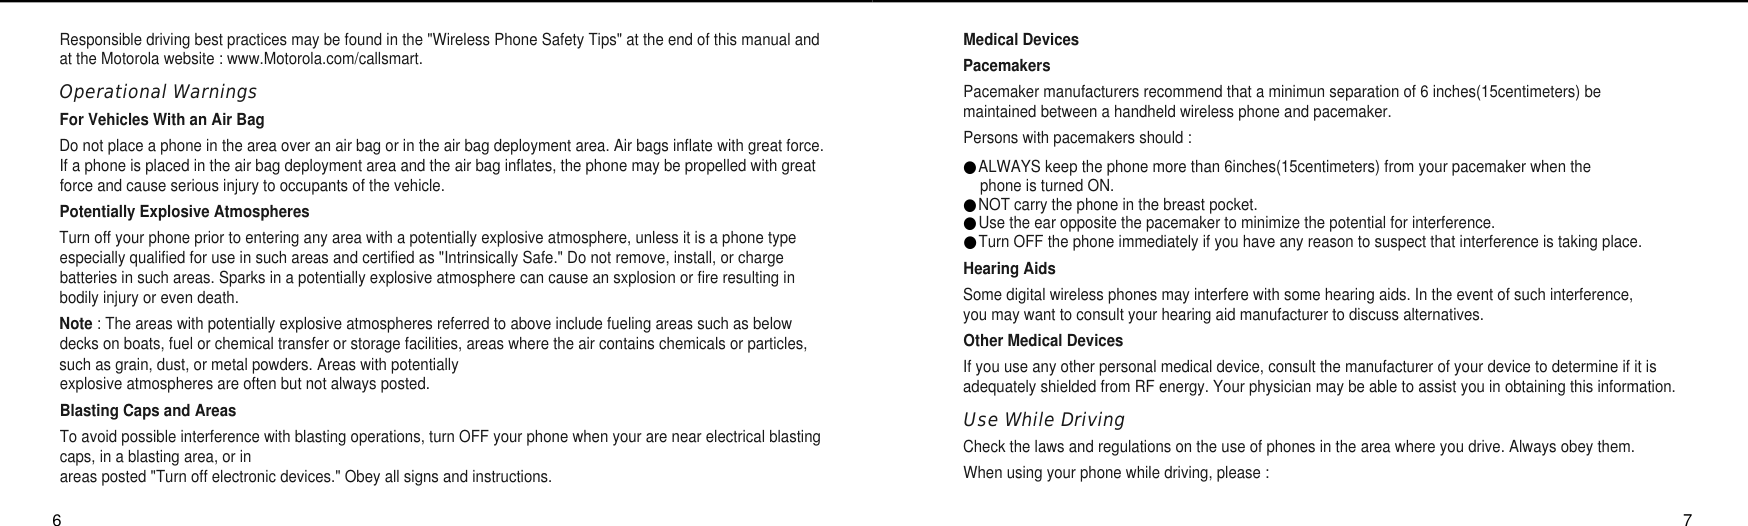
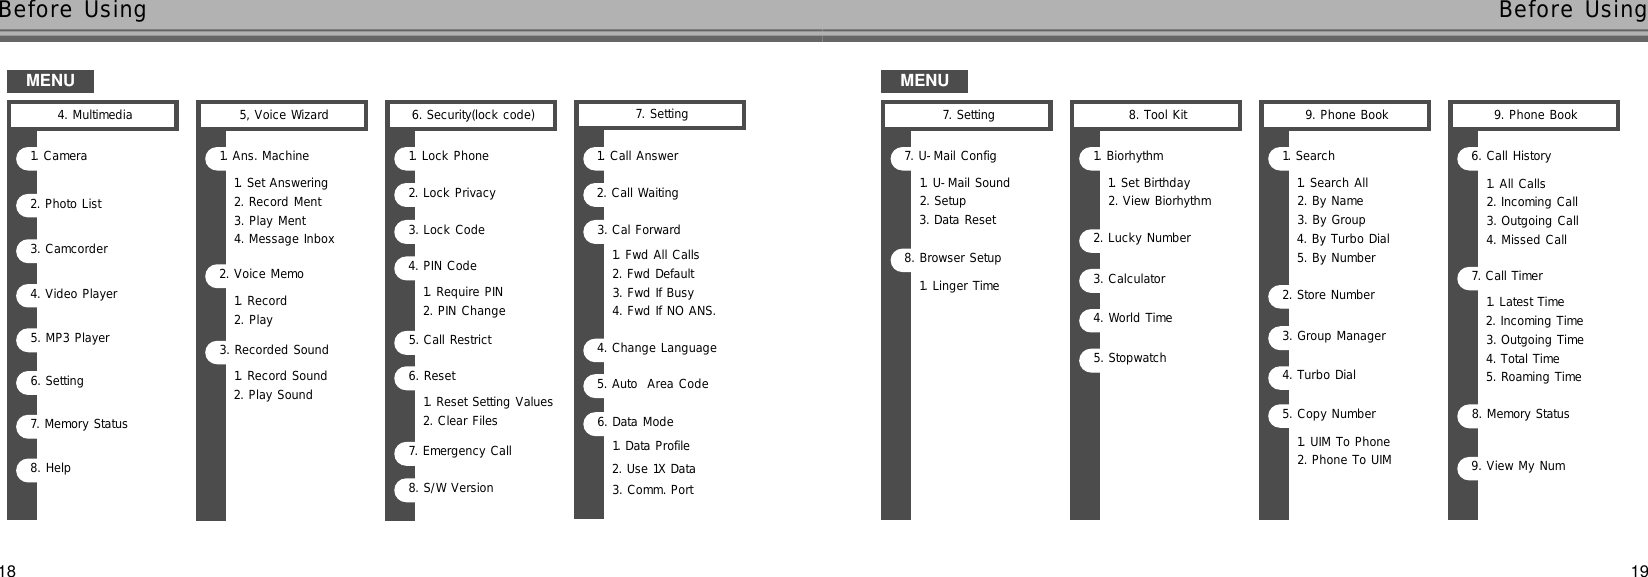
![1716●To search lists and control volume during a call●To move to the ‘TOP MENU’in idle mode●To use menu and message features - [OPTIONS] features●To move to the top ‘M a g i c’in idle mode●To use menu and message features - [BACK] or[CANCEL] features●To delete characters or number while entering themShort press : To delete characters one by oneLong press : To delete the whole characters ●To move to the upper menu or previous display screen●One-touch for UNI accesing.●To use menu and message features - [OK] feature●To Place or receive a call.●Short press : To dispaly a calling number list●To turn the power ON/OFF and end a call●To end a selected feature to return to the initial screen●To use idle mode featureLeft : One-touch for ‘P B’Search modeRight : One-touch for ‘M e s s a g e’m e n uUp : One-touch for ‘M a i l’M e n uDown : One-touch for ‘Data Folder’●To use menu feature - Menu search feature●Dial buttons - To enter numbers and characters●Quick dialing for an international call●To set/reset Etiquette featureTo set/reset One-touch lock feature●One-touch for voice wizard menuBefore Using Before Using●Short press : One-touch for Camera Preview modeLong press : One-touch for Multimedia menu 3. Basic Keypad OperationMENU1. Ringer Style2. Ringer/Vib3. Volume4. Group Bell5. Effect Sound6. Alert Sound7. System Alert5. Menu Style4. Menu Map2. Display1. Sound8. Backlight7. Dial Number6. Display Style1. Idle2. Incoming Call3. Outgoing Call4. Power On5. Power Off1. Main LCD Graphic2. Display2. Sub LCD Graphic3. MainLCD Idle4. SubLCD Idle1. Idle2. Incoming Call3. Outgoing Call4. Power On5. Power Off1. Easy Alarm2. My Alarm3. Morning Call3. Scheduler1, Schedule3. Memo4. D-day2. Alarm](https://usermanual.wiki/Motorola-Mobility/T5HD1/User-Guide-774662-Page-12.png)
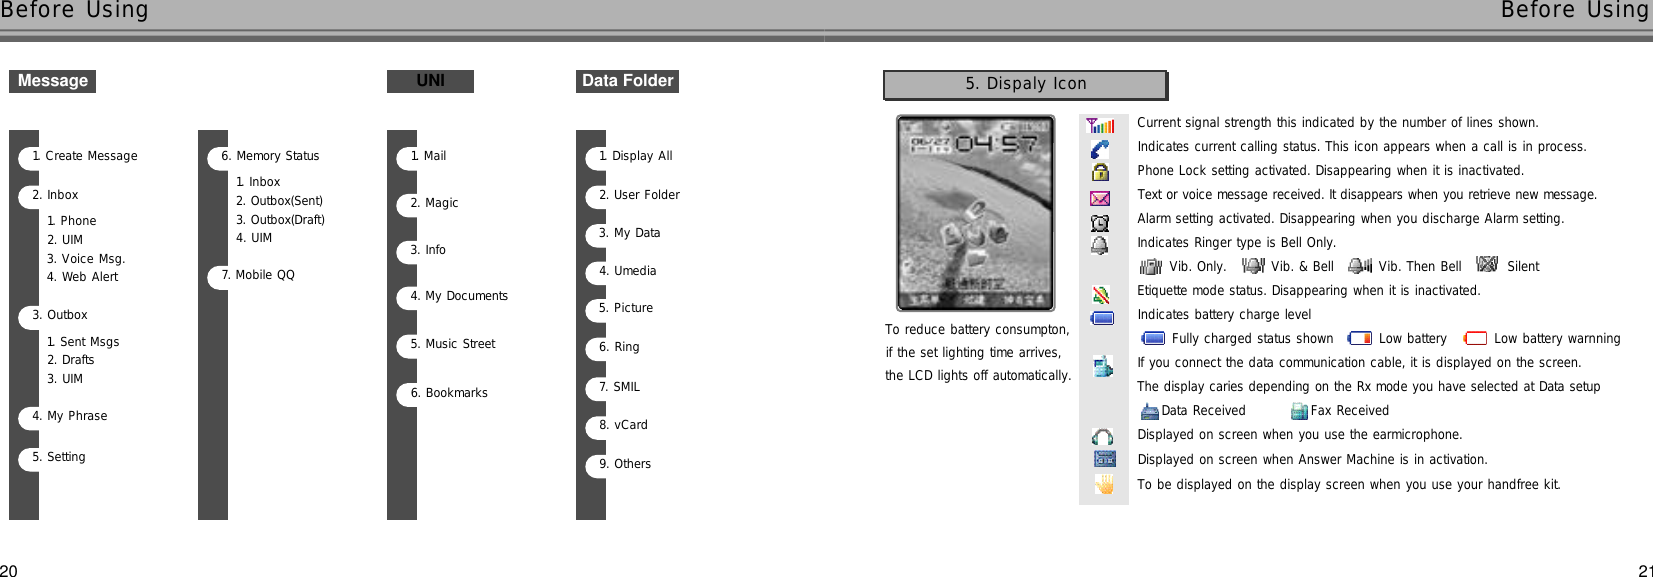
![1. Power ON and OFF 2 82. Placing a Call 2 83. Receiving a Call 3 04. Unanswered Call 3 15. Using the [OPTIONS] functions while entering letter 3 16. Using My Menu 3 326●If the lamp flickers while you are charging your phone and battery, charging operation fails. If you leave it in such a state,the charger may malfunction.●Always use authorized, dedicated battery pack and charger. Using an unauthorized battery pack or charger rejects the services offered by Motorola.●Do not use the charger to charge phones and batteries of different models. Problems may result.●Never use them in a humid, hot atmosphere. If your phone becomes damp, malfunction may result. If submerged, it maybe beyond repair. Never turn the power ON with your phone wet. Instead, remove the battery pack and contact the nearest service center for repair.●Never disassemble or alter your phone. Unauthorzed disassembly may reject free service offered by Motorola.●If you sit down with your phone stored in a hip pocket, use care not to give a strong impact to it. It may be broken.●Avoid cleaning your phone with chemical solutions such as solvent or thinner.●Use care not to give an impact or vibration to your phone. When not in use, it should be stored in a safe place.●Use the authorized handsfree kit. Otherwise, malfunction may result. Especially, products having strong magnetism may be adirect cause for malfunction of cell phone, which will reject the free service offered by Motorola.●In order to prevent any harm to human body, do not hold the battery in the mouth and do not use the damaged battery.●Keep the handset away from any magetic product such as credit card, phone card that may be damaged by the electro magneticfield of the handset.●Keep the handset away from any heating facility such as stove, microwave or oven.●Do not apply excessive force to the handset to protect appearance and internal parts of the handset.●Do not hold the strap and turn the handset round not to hurt anyone.●Be sure that the handset is not held between the automatic doors of a bus or subway train.Before UsingBasic Operation7. Precautions When Using](https://usermanual.wiki/Motorola-Mobility/T5HD1/User-Guide-774662-Page-17.png)
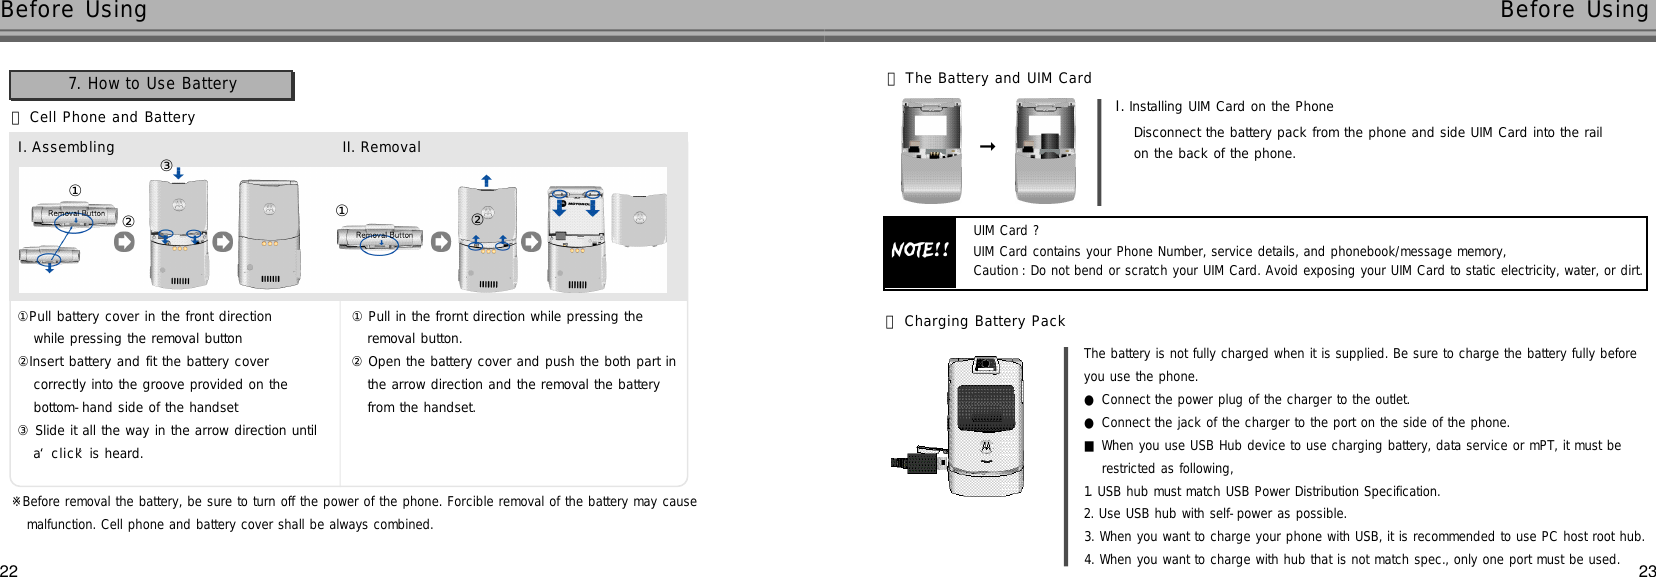
![2928●Pressing with a person to call selected connects the call to the number set to ‘Main Number’among the items with phone numbers stored.●Press on the idle mode. You can search phone numgers with ‘N a m e’, ‘G r o u p’or ‘T u r b o’in the Phonebook.Select a person to call ▶Select an item to call ▶●The displaying China Unicom and user-set graphic. And then, the initial screen is displayed.Power ONPower OFFPress and hold Press and hold ●The graphic disappears and the power is turned off.●A graphic can be downloaded from UNI and changed in ‘MainLCD Graphic or SubLCD Graphic’Display Graphic may bedisplayed late depending upon the capacity of the downloaded graphic.Enter a desired area code and phone number ▶Basic Operation Basic Operation●The phone automatically redials if the call is not connected. If you press an incorrect number, you can correct the number with .●If the phone is locked, you should enter the password to make a call.●Call Time is automatically displayed on the LCD. The call charge is calculated from the time the calledparty receives your call.1. Power ON and OFF2. Placing a CallUse search to select a desired person to call. (see P.115~117 Searching Phone Number)Placing a call from Phone BookIf a number is registered in ‘Turbo Dial’, press and hold ‘Turbo Dial’on the main screen to make a call to the number.(location number is 17, Press the dial button and press and hold ) Turbo Diali n gEnter Phone Number▶E n t e r‘P’or ‘T’and then a number to be dialed electronically ▶Input keyPTOperating MethodThe numbers after‘P’can be sent only if the[TAP] is pressed.The numbers after‘T’are sent shortly afterYou can use this function conveniently by entering a few numbers in advance according to the audio announcement when usingARS(for telebanking service or voice message confirmation). To cancel electronic dial, press [ C A N C E L ] .Electronic Dialing](https://usermanual.wiki/Motorola-Mobility/T5HD1/User-Guide-774662-Page-18.png)
![3130●These numbers were copied and saved from UIM card.Basic Operation Basic OperationEnter an Emergency Number ▶If a call is received, open the folder3. Receiving a CallEven when the handset is in Lock, you can still make a call using the emergency number stored on the phone.Emergency Dialing●Press and hold or to suppress the ringer or vibrates for incoming call.●Receiving a call graphic can be downloaded from UNI and changed in ‘Incoming Call’under ‘D i s p l a y’. Graphic may be displayed late depending upon the capacity of the downloaded graphic.●You can change ringer style, call receive mode, reception status.●The graphic appearing when a call is received can be download from ‘U N I’and changed in ’MainLCD Graphic or SubLCDG r a p h i c’. under‘D i s p l a y’. If you set graphic to a download graphic, when a call is received, the selected ringer tone or graphicmay be displayed late depending on the capacity of the downloaded graphic. Receiveing a call Using EarmicrophoneWhen the folder is shut, press the earicrophone button to receive an incoming call. After finishing the call, press the earmicrophone button to release the call.When the earmicrophone is connected, press or the earmicrophone button to receive an incoming call.If the user fails to receive a call, the following image is displayed on the display screen.4. Unanswered Call●Pressing keypad button moves the phone to Idle Mode.●Shortly press from Standby display to view ‘M i s s e d’.●However, the caller is restricted for call origination, ‘Restricted Num’will be displayed on ‘Missed Call’list. Press [OK] to view the call date and time.Available to use all text input modes on a mobile device. (etc : Banner, Picture/Video name, Create Message)5. Using the [OPTIONS] functions while entering letter●It is an easier way to input texts with pressing [OPTIONS] in a text input mode.Select entering letter mode and [OPTIONS] ▶ Select a desired menu](https://usermanual.wiki/Motorola-Mobility/T5HD1/User-Guide-774662-Page-19.png)
![3332Basic Operation Basic OperationSelect SYMBOL ▶ Select the symbol and press keypad buttonIn a text input mode, you are able to select any symbol mark.(SYMBOL, SPECIAL, NET SYM)Using SYMBOL●You enable to save ‘P A R A S E’to ‘My Phrase’on the ‘M e s s a g e’m e n u .●Regarding ‘P H R A S E’, you can input maximum Chinese 40 characters or English 80 characters.Select PHRASE ▶ Select a desired phrase list and [ S E L E C T ]After saving your favorite sentences, it is available to recall saved sentences.Using PHRASEUsing EDITUsers enable to copy, cut or delete what users inputted in a text input mode.[START] ▶ Select the text you want by pressing , and press [STOP] ▶ Select a desired menuSelect EDIT ▶ Select the first few words of the text you want by pressing , and press COPY : You can copy the selected text to ‘P A S T E’.CUT : You can cut the selected text and save the text in ‘P A S T E’.DELETE : You can delete the selected text.●Up to 5 texts can be saved in ‘P A S T E’. The oldest one will be deleted automatically, and the new one will be saved.●When ‘P A S T E’is popped out, you can delete PASTE lists with pressing [Delete All].Select PASTE ▶ Select a desired paste list and [ O K ]Using a ‘E D I T’menu, copied and cut sentences would be saved automatically therefore users are able to recall these sentences.Using PASTESelect UNDO ▶ Select a desired paste list and [ O K ]If you press [OPTIONS] after executing Cut or Delete function, ‘U N D O’function will be displayed. Select ‘U N D O’to go back to the input mode before the execution of ‘C U T’or ‘D E L E T E’.Using UNDOSelect REVERT ▶ Select a desired paste list and [ O K ]Using REVERT](https://usermanual.wiki/Motorola-Mobility/T5HD1/User-Guide-774662-Page-20.png)
![34Basic Operation6. Using My MenuYou can copy frequently-used means to ‘My Menu’and edit them. If ‘MY MENU’is displayed while you searching menu features, press [MY MENU] to move it to My Menu.●Even if a menu is moved to My Menu, menus in the existing folder is not erased. Up to 8 items can be added to My Menu.●To delete menus copied to My Menu, select a menu to delete, press [DELETE], and then select a value.●P r e s s in the idle mode to display the My Menu.Select a desired Menu and press [MY MENU] ▶ Select ‘Y e s’to set up ▶ Select a desired icon 1. Changing Ringer 3 52. Changing Receive Mode 3 63. Changing Ring Volume 3 84. Selecting Group Bell 3 95. Setting Effect Sound 4 06. Setting Alert Sound 4 17. Setting System Alert 4 2Using Sounds](https://usermanual.wiki/Motorola-Mobility/T5HD1/User-Guide-774662-Page-21.png)
![37Using SoundsUser can change the ringer which is used to alert call incoming Except the ringers saved in the mobile phone, user can downloadthe melody using uni and can set to the ringer. Also user can set recorded sound to the ringer.1. Changing Ringer[TOP MENU] ▶ Select Sound ▶ Select Ringer Style ▶ Select Ringer Tone and [ O K ]●You can adjust volume with during the bell setting. (5 steps)●The menu of Recorded Sound is displayed only when there is any recorded sound. (See P.00)You can set the ring with the downloaded melody.Press in idle mode ▶ Select Display All ▶Select a ringer data and [OK] ▶ Press [OPTIONS] ▶Select ADD BELL ▶Select a valueSetting Downloaded36Basic OperationYou can set a desired receive tone sounded when a call or message is received.2. Changing Receive Mode[TOP MENU] ▶Select Sound ▶Select Ringer/Vib ▶ Select Receive mode and press [ O K ]Bell Only : Vib. Only : Vib. & Bell : Vib. Then Bell : Silent : ●Receive Mode icon●A message ‘Etiquette Mode is On.’is displayed and then the phone generates vibration and moves to Mode.●In Etiquette mode, the ringer will be replaced by vibration.●Even if you turn OFF then ON your phone, it will remain in Etiquette mode.You can switch the ringer or alarm tone sound into vibration or mute not to damage others during the conference, class, or inpublic place. If the earmic is connected, even in the etiquette mode, you can hear the ring on the earmic.●If you select Etiquette mode ‘’is displayed on the idle mode.Setting Etiquette Mode1. How to setPress and hold Melody : 1~23 Unique Sound : 1~16 Simple Bell : 1~9My Bell / MP3 : 1~10 Recorded Sound : 1~10Downloaded : 1~10 MP3 : 1~100●Ringer Style](https://usermanual.wiki/Motorola-Mobility/T5HD1/User-Guide-774662-Page-22.png)
![39Using SoundsUsing Sounds382. How to reset●A message ‘Etiquette Mode is Off.’is displayed and then the phone moves to Wait Mode.Press and hold●Power Off : Muted ●Power On : Vibration●Key Pressed : Muted ●Notice Popup : Muted●Folder : Muted ●Missed Call Frequency : Muted●Schedule Sound : Muted ●Anniversary Sound : Muted●D-day Sound : Muted ●Alarm : Muted●Ringer : Vibration ●Msg Sound : Muted●Camera Pre-Shutter : Muted ●Camera Shutter Sound : Sounded●If Etiquette Mode is setYou can adjust the Volume.(Bell, Voice, Key Tone, Message Alert, Missed call alert, Camera Shutter, Camera Preshutter)3. Changing Ring Volume[TOP MENU] ▶ Select Sound ▶Select Volume ▶ Select a desired menu ▶ Set the Volume ▶Press [ S T O R E ]Bell : You can adjust the volume of the ring. (1~5 Steps)Voice : You can adjust the volume of the earpiece. (1~5 Steps) Key Tone : You can adjust the volume of the key tone. (0~5 Steps)Message Alert : You can adjust the volume of the incoming SMS alarm. (1~5 Steps)Missed call alert : You can adjust the volume of the ‘Missed Call’alarm. (1~5 Steps)Camera Shutter : You can adjust the volume of the camera shutter tone. (1~5 Steps)Camera Preshutter : You can adjust the volume of the camera pre-shutter tone. (0~5 Steps)](https://usermanual.wiki/Motorola-Mobility/T5HD1/User-Guide-774662-Page-23.png)
![4140Using Sounds Using SoundsYou can select the ring and the graphic for incoming call by group.4. Setting Group Bell[TOP MENU] ▶ Select Sound ▶ Select Group Bell ▶Select desired group ▶ Setting Bell/Image ▶[OK] ▶ Select a desired Bell/Image and ▶[OK] ▶ Press [ S T O R E ]Setting BellSelect ‘’and Press [LIST] ▶ Select Ringer Tone and Press [ O K ]Setting ImageSelect ‘’and Press [OK] ▶ Select Image and Press [ O K ]●If graphic is not selected for a phone number, the graphic selected for the group is displayed. If no specific graphic isselected either for the phone number or the group, the ‘Incoming Call’graphic selected in ‘MainLCD Graphic or Sub LCD Graphic’in ‘D i s p l a y’is displayed.●If no ringer is selected by phone number, the ringer selected for the group is applied. If no specific ringer is selected eitherfor the phone number or the group, the ringer selected in ‘R i n g e r’in ‘S o u n d’is applied.5. Setting Effect SoundPower On/Off : You can set the tone muted or sounded when turning the power On or Off. (Off, Sound 1, Sound 2)If you select ‘O f f’in this field, the initial screen is displayed without sound after the vibration.Key Pressed : You can enable/disable the key tone. (Off, Doremi, Dew Drop, Synthesizer, Voice(Chinese), Voice(English))You can adjust the key tone volume with in the Idle mode. (5 Steps)Notice Popup : You can enable/disable the tone for the message box(popup menu) as it is displayed on the screen.The message box tone(popup menu) varies by the situation. (Off, On)Folder : You can set or clear a tone for opening and closing your folder. (Off, Folder(1~3))the effect and [OK] ▶ Press [STORE] [TOP MENU] ▶ Select Sound ▶Select Effect Sound ▶ Select a desired menu and [OK] ▶ S e t](https://usermanual.wiki/Motorola-Mobility/T5HD1/User-Guide-774662-Page-24.png)
![42 43Using Sounds Using SoundsMissed Call Frequency : You can set the frequency of the ‘Missed Call’alarm. (Off, Once, Every 2Min)Missed call sound : You can select the sound for the ‘Missed Call’alarm. (Off, Missed call sound 1~3)Schedule Sound : You can select the sound for the ‘S c h e d u l e’alarm in the ‘S c h e d u l e r’menu. (Off, Sound 1~10)Anniversary Sound : You can select the sound for the ‘A n n i v e r s a r y’alarm in the ‘S c h e d u l e r’menu. (Off, Sound 1~10)D-day Sound : You can select the sound for the ‘D - d a y’alarm in the ‘S c h e d u l e r’menu. (Off, Sound 1~10)Easy Alarm Sound : You can select the sound for the ‘Set Easy’alarm in the ‘A l a r m’m e n u .(Melody 1~23, Unique Sound 1~16, Simple Bell 1~10, Downloaded 1~10 MP3 1~100, Recorded Sound 1~10)the Alert and [OK] ▶ Press [STORE] [TOP MENU] ▶ Select Sound ▶ Select Alert Sound ▶ Select a desired menu and [OK] ▶ Set 6. Setting Alert Sound 7. Setting System AlertConnect / Disconnect : You feature notifies you of call connecting when you place a call. (On, Off)1 Minute : This function displays call time during a call and sounds an alert 10 seconds in advance at every 1 minute lapse from the start of call connection. (On, Off)Out of Service : You can set the alert tone made when the handset is out of the service area. (On, Off)Low Battery : You can switch on/off the battery low alarm. (On, Off)the effect and [OK] ▶ Press [STORE] [TOP MENU] ▶ Select Sound ▶Select System Alert ▶ Select a desired menu and [OK] ▶ Set](https://usermanual.wiki/Motorola-Mobility/T5HD1/User-Guide-774662-Page-25.png)
![1. Setting Main/Sub LCD Graphic 4 42. Setting Main/Sub LCD Idle 4 53. Setting Menu Style 4 84. Setting Display Style 4 85. Setting Menu Background 5 26. Back Light Time 5 27. Setting Dial Number 5 06. Setting Backlight 5 0Using Display45Using DisplayYou can change graphics to be displayed according to the phone status.●You can set the ‘Idle, Incoming Call, Outgoing Call, Power On, PowerO f f’screen on Main LCD and Sub LCD with the photos taken with the built-in camera or the graphic files downloaded from UNI.1. Setting Main/Sub LCD Graphicdesired graphic ▶Press [OK] [TOP MENU] ▶ Select Display ▶Select Main/Sub LCD Graphic ▶Select a desired mode ▶ Setting a You can set the ‘Idle, Incoming Call, Outgoing Call, Power On, Power Off’screen on Main LCD and Sub LCD with the graphic files downloaded from UNI and stored in the ‘Data Folder’.Press in idle mode ▶Select Picture ▶ Select a desired data and [OK] ▶ Press [OPTIONS] Copying downloaded graphics to ‘Downloaded Image’▶Select ADD ONE and Press [ADD] ●You can copy up to 10 graphics to ‘Download Image’.●Select the downloaded graphic and press [ D E L E T E ] .](https://usermanual.wiki/Motorola-Mobility/T5HD1/User-Guide-774662-Page-26.png)
![4746Using Display Using Display●In the ‘MainLCD Idle’setting mode, pres [PREVIEW] to check the screen for Main LCD or Sub LCD before setting and saving the screen. 2. Setting MainLCD Idle[TOP MENU] ▶ Select Display ▶Select MainLCD Idle ▶ Setting Main LCD Idle ▶Press [STORE] Clock : You can select the clock to be displayed in the MainLCD idle. (Small(Top), Small(Center), Digital(Up), Digital(Center), Analog)Wolrd Time : You can select whether the World Time should be displayed in the MainLCD idle. If you have selected ‘O n’for ‘World Time’, you can select a country of which time is to be displayed in the MainLCD idle.Calendar : You can determine whether a calendar is to be displayed in the MainLCD idle.Navigator Menu : You can select the method of displaying the navigator menu icons to be displayed in the MainLCD idle. (Off, Only Softkey, Small(Bottom), LAGE)Banner : You can set and enter the banner to be displayed in the MainLCD idle.Banner Text Color : You can select the text color of the banner to be displayed in the MainLCD idle.3. Setting SubLCD Idle[TOP MENU] ▶ Select Display ▶Select SubLCD Idle ▶ Setting Sub LCD Idle ▶Press [STORE] 4. Setting Menu Style[TOP MENU] ▶ Select Display ▶Select Menu Style ▶Setting Menu Style ▶Press [ S T O R E ]Menu Style : You can select the type of menu displayed on the LCD. (Tree Menu, Icon Menu)Wallpaper : You can select the background of the screen. (Wallpaper 1~13)Transparency : You can select the level of transparency of the wallpaper. In the ‘Menu Style’setting mode, Press [PREVIEW] to check the screen for menu style before setting and saving the screen.](https://usermanual.wiki/Motorola-Mobility/T5HD1/User-Guide-774662-Page-27.png)
![4948Using Display Using DisplayYou can select the screen display of the phone.5. Setting Display Style[TOP MENU] ▶ Select Display ▶Select Display Style ▶ Setting display ▶Press [STORE] Theme : You can select the theme of the menu bar or the pop-up window displayed on the phone. (Theme 1~3)Wallpaper : You can select the background of the screen. (Off, Wallpaper 1~11)Transparency : You can select the level of transparency of the wallpaper.You can set backlight status of the phone.7. Setting Backlight[TOP MENU] ▶ Select Display ▶Select Backlight ▶ Setting Backlight ▶Press [STORE] LCD Maintenance : You can open the folder to set Back light Time. (Ultra Save(5sec), Power Save(10sec), Normal(30sec))MainLCD Brightness : You can adjust brightness of main LCD. (1~5 stpes)SubLCD Contrast : You can adjust Contrast of Sub LCD. (1~5 stpes)Keypad Maintenace : You can set key back light time. (Always Off, Off In 2sec, Off In 5sec, Off In 10sec)You can select the type of dial displayed when you press a number key in the Idle mode. (Normal, Color, Calligraphy, Razr)6. Setting Dial Number[TOP MENU] ▶Select Display ▶Select Dial Number ▶ Select a desired type ▶Press [OK] ●To enhance battery efficiency, photo sensor function is included.●If you do not use the phone within the configured lighting time afteropening folder, the screen goes to the screen saver mode and thelights are turned off.](https://usermanual.wiki/Motorola-Mobility/T5HD1/User-Guide-774662-Page-28.png)
![1. Schedule 5 22. Setting Alarm 5 43. Using Memo 5 74. Using D-day 5 85. World Time 6 5Using Scheduler51Using SchedulerIf you store schedule(Sched, ToDo, Anniv.), the phone sounds alarm on the appropriate date and displays the stored content.1. Schedule[TOP MENU] ▶ Select Scheduler ▶Select Schedule ▶ Select date and [OK] ▶ Select a desired menuEntering Scheduleswitched in thesequence of ‘DAY ▶MONTH ▶ Y E A R’. Press to enter the appropriate date,year and month.●To enter date, press to switch the enter mode. Enter mode is Select Sched/ToDo/Anniv. ▶ [OPTIONS] ▶ Select ADD ▶ Input Schedule/TO DO/Anniversary ▶ [STORE] ●You can set the schedule alarm and the anniversary alarm.●Up to 50 Chinese letters or 100 English letters for the content of schedule can be entered.●When you set the clock and alarm, press [OK] in the concerned mode, and then press .](https://usermanual.wiki/Motorola-Mobility/T5HD1/User-Guide-774662-Page-29.png)
![53Using Scheduler52Using SchedulerUsing [OPTIONS] Checking Schedule●If numbers of items are stored for each category (Schedule, To Do, Anniversary) on the same date, select the item to dispalywith , and then, press [ O K ] .Select date and [OK] ▶ Select Sched/ToDo/Anniv. ▶Selcect Check list and [OK] ▶View contentSelect date and [OK] ▶ Select Sched/ToDo/Anniv.▶Press [OPTIONS] ▶ Select a desired menuADD : You can save numbers of Daily on a day. To save Dailys, select acategory (Schedule, To Do, Anniversary), press [OPTIONS] and then, press ‘A D D’.MONTHLY LIST : To check a monthly list of ‘Schedule, To Do, Anniversary’. TOTAL LIST : You can view the list of the selecteed item(Schedule, To Do, Anniversary).DELETE ONE : You can delete the selected list.DELETE ALL : You can delete all the lists of the selected item (Schedule, To Do, Anniversary) regardless of the date.▶Select Schedule ▶ Select On and Press [STORE] ▶ Select Yes and Press [OK] [TOP MENU] ▶ Select Security ▶Select Reset ▶ Select Clear Files and Enter Lock Code Clearing Schedule●All items in ‘S c h e d u l e’are deleted from ‘S c h e d u l e r’.2. Setting Alarm[TOP MENU] ▶ Select Scheduler ▶Select Alarm ▶Select Alarm Setting Menu●Once Alarm is set, ‘’is displayed on Wait display screen.●You can stop alarm ringing by opening/closing the floder or press [Voice Wizard], , [Camera], , or [ O K ] .](https://usermanual.wiki/Motorola-Mobility/T5HD1/User-Guide-774662-Page-30.png)
![55Using Scheduler54Using SchedulerSetting Set EasySelect Set Easy ▶ Select a desired time and Press [OK] ●You can enter the desired time in the Easy Alarm setting.●You can select a bell for Easy Alarm in the ‘Easy Alarm Sound’setting in ‘Alert Sound’in the ‘S o u n d’menu. ●You can deactivate the ‘Easy Alarm’setting by selecting ‘O f f’in the Easy Alarm setting mode.This mode enables you to make the alarm sound at an approximate time with no need to set a specific time.Setting My AlarmSelect My Alarm ▶ Select Alarm 1~3 ▶ Setting Alarm and Press [STORE] You can select up to three specific times and period for alarm.●You can set different sound and frequency for 3 alarms.●To deactivate an alarm, select the alarm and check ‘O f f’for ‘Alarm Frequency’.●Alarm cycle Off : You can deactivate the selected alarm. Once : Alarm sounds only once at the set time.Daily : Alarm sounds at the set time everyday.Mon To Fri : Alarm rings at the specific time from Mon to Fri.Mon To Sat : Alarm rings at the specific time from Mon to Sat.Setting Morning CallSelect Morning Call ▶ Select Frequency ▶ Setting Alarm Time and [OK] ▶ Select Repeat ▶Select Interval ▶ Setting Ringer and [OK] ▶ [STORE] You can set morning call sounded repetitively by setting repetitive number and time interval. Even though the receive mode is set to ‘V i b’or the cell phone is set to ‘Etiquette Mode’, as for morning call, alarm is sounded.●To deactivate a morning call, select ‘O f f’for ‘F r e q u e n c y’in the Morning Call setting mode.you configured. If you close after opening the folder or press [OK] or [Voice Wizard], , [Camera] while alarm rings, the morning call rings as many repetiton numbers as you configured.●If you press [OFF] when the morning call rings, the morning call of the date is canceled regardless of the repetition numbersFrequency : Off, Once, Daily, Mon To Fri, Mon To SatRepeat : Once, Twice, 3Times, 4Times, 5TimesInterval : Every 5Min, Every 10Min, Every 15Min, Every 20Min, Every 30MinAlarm ▶ Select ‘O n’▶Press [STORE] ▶ Select ‘Y e s’and Press [OK] [TOP MENU] ▶ Select Security ▶Select Reset ▶ Select Clear Files and Enter Lock Code ▶ Select All Alarm Off](https://usermanual.wiki/Motorola-Mobility/T5HD1/User-Guide-774662-Page-31.png)
![Title : You can enter a title of the D-day. The title can be made with up to 10 Chinese letters or 20 English letters.Date : You can set the date for D-day. ●In the Date setting mode, press [OK] and select the date from the calendar.Time : You can set the alarm time for D-day.Alarm : You can turn On/Off the D-day alarm.●The alarm is deactivated if you select ‘O f f’in the ‘A l a r m’setting, or activated if you select other than ‘O f f’.Select Icon : You can select the icons for the D-days.Display On Idle : You can display or hide D-day on the LCD in the ‘Idle mode’.●You can select the sound for D-day in ‘D-day Sound’in ‘Alert Sound’in the ‘S o u n d’m e n u .Unknown : You can select the color of ‘D - d a y’displayed on the LCD in the ‘Idle mode’.56 57Using Scheduler Using SchedulerYou can store the content of the work to do and manage your schedule for it.3. Using Memo●In order to edit a memo, display the memo list, press [ E D I T ]and then, type the memo.●In order to delete a to do, press [MENU] in the to do list and select the delete to do(DELETE ONE/DELETE ALL).●Up to 40 Chinese letters or 80 English letters can be entered for the content of memo.Enter the content and Press [ O K ][TOP MENU] ▶ Select Scheduler ▶Select Memo ▶Select a desired list and Press [EDIT] ▶[TOP MENU] ▶ Select Scheduler ▶Select D-day Setting D-day and press [STORE] You can set the D-day function for important anniversaries or schedules.4. Using D-day●If the D-day list is empty, press [OK] to go to the input mode. If there is an item in the D-day list, select [MENU] and ‘A D D’to go to the D-day input mode.●To delete a D-day, press [OPTIONS] in D-day list, and select the delete menu(Delete One, Delete All).●To enter date, press to switch the enter mode. Enter mode is switched in thesequence of ‘DAY ▶MONTH ▶Y E A R’. Press toenter the appropriate date,year and month.Clearing D-dayD-day ▶ Select ‘O n’▶ Press [STORE] ▶ Select ‘Y e s’and Press [OK] [TOP MENU] ▶ Select Security ▶Select Reset ▶ Select Clear Files and Enter Lock Code ▶ Select](https://usermanual.wiki/Motorola-Mobility/T5HD1/User-Guide-774662-Page-32.png)
![59Using MultimediaUsing the built-in camera, you can take photos.●Press and hold [Camera] in the idle LCD to activate the ‘P r e v i e w’mode and Press [Camera] in the idle LCD to display the Camera menu.1. Using Camera 6 12. Using Photo List 6 43. Using Camdorder 6 64. Using Video Player 6 95. Using MP3 Player 7 16. Setting 7 3Using Multimedia1. Using Camera[TOP MENU] ▶ Select Multimedia ▶Select Camera ▶Camera Preview modeCamera Preview mode ▶P r e s s [OK] or [Camera] picture-taking ▶ [STORE] ▶ File Manager input and [STORE] Taking a photo●If you don’t select [ S T O R E ]for a photo, this will not be stored. The stored photos will be maintained in ‘Photo List’.●You can control zoom using a .●You can enter name or memo of the photo, or select Protect or Lock in the File Manager input mode.●You can enter up to 12 Chinese letters or 24 English letters for the title of a photo.●You don’t need enter title and memo for every photo to save. The title of the photo is automatically entered.●P r e s s [CAMERA] to switch the phone from the camcorder mode to the camera mode.](https://usermanual.wiki/Motorola-Mobility/T5HD1/User-Guide-774662-Page-33.png)
![Size : It enables you to set picture size. You can see the resolution in the top of screen. (For Idle, 1280×960, 640×480, 320×240, 176×144) ●Select ‘For Idle’to take the photo of the phone LCD size.Quality : Pictures taken using a cellular camera phone look the same on the phone, but they are different when sent via e-mail or download to PC. (Best, Good, Normal)Situation : You can set the status of photo-taking.Day Time : Select this item when you are taking photos during the day or in the light.Night : Select this item when you are taking photos in the evening or in the dark.Multi Shot : With this function, numbers of photos are taken in series with a shot. (Off, 3 frame, 6 frame, 9 frame)Timer : A photo is taken after the designated seconds since you press the shutter button. (Normal, 3sec, 5sec, 10sec)Memory : You can check the memory status of the phone.60Using Multimedia Using MultimediaTaking self-photoYou can take the photo of yourself while viewing the sub-LCD.●If the phone is locked, the ‘Camera Menu’is not displayed even if you press and hold [ C a m e r a ] .●You can control zoom using a .●If you take a self-photo with the folder closed, the photo is automatically saved in the ‘Photo List’, not needing to press the Save button.●Size of the photo taken with the phone is not fixed. The photo size is depending on the color of the photo.●You can receive a call incoming in the camera mode. However, the phone will not return to the camera mode when the call is finished.●The ‘Camera Shutter’sounds even if the phone is in the Etiquette mode.Hold down the press [Camera] while the folder is closed ▶ Select Camera and [ C a m e r a ]▶Press [Camera] picture-taking Using [OPTIONS] Camera Preview mode ▶Press [OPTIONS] ▶ Select a desired menu ▶ Select a value and press [OK] Using MenuCamera Preview mode ▶ Select a desired menu ▶ Select a value](https://usermanual.wiki/Motorola-Mobility/T5HD1/User-Guide-774662-Page-34.png)
![SEND E-MAIL : You can attach the selected photo to an E-mail message. PHOTO EDITOR : You can modify the selected photo.Resize : You can resize the selected photo. However, you can only downsize the photos.Rotate : You can rotate the selected photo. Frame : You can modify the selected photo with the selected frame. Flip : It allows you to change the picture display of top/bottom, left/right.Effect : You can use the various display effects for the selected photo.MOVE : You can change location of the selected photo. (Favorite, General, User Folder)FILE MANAGER : You can modify ‘Name, Protect, Lock, Memo’of the selected photo with ‘File Manager’.Name : You can edit the name of a selected photo.Protect : You can protect a selected photo not to delete. Lock : You can set a selected photo to lock. PREVIEW STYLE : You can select the display mode of the ‘Photo List’. (List, 2×2 Image, 3×3 Image, Image List)62Using Multimedia63Using MultimediaZoom : You can zoom in the scene to take a photo. However 1280×960 size, zoom setting is not available.Bright. : You can adjust brightness of the photo. (10 step : 10~100)Cont. : You can adjust contrast of the photo. (10 step : 10~100)Effect : You can select the effect of the photo. (Off, Negative, Solarize, Sepia, Mono)Flip : It allows you to change the picture display of top/bottom.Frame : It allows you to set the perfect frame for your picture. Be mindful that the function is available onlyfor the size of 176×144. If you use the frame function, the size of the photo is automatically fixed to 176x144.●8 frame images are supported. (Off, Frame 1~8)You can view pictures stored after taking them with a cellular camera phone.2. Using Photo List[TOP MENU] ▶ Select Multimedia ▶Select Photo List ▶Select General/Favorite ▶Select Photo and [VIEW] General : The photos taken with the phone camera are automatically saved.Favorite : The photos moved to ‘F a v o r i t e’from ‘G e n e r a l’are displayed. Using [OPTIONS] ▶Select a desired menu and press [OK] Select General/Favorite ▶Select Photo list and Press [OPTIONS] pressing [ L A R G E ] .●If you press [VIEW] in the photo list, the data (time, size) on the selected photo are displayed. You can enlarge the photo by](https://usermanual.wiki/Motorola-Mobility/T5HD1/User-Guide-774662-Page-35.png)
![64Using Multimedia65Using MultimediaARRANGE : You can re-sort the photo list. (Time, Name, Resolution, Memory Size)SELECT ALL : You can select all photos in a folder(General, Favorite).SLIDE SHOW : You can view the selected photos in slide.MOVE : You can move the selected photos to another folder(General, Favorite) at a time.PROTECT/LOCK : You can set ‘P r o t e c t / L o c k’for the selected photos at a time.RELEASE ALL : You can deselect the photos.SELECT ALL : You can select all photos in a folder(General, Favorite) at a time.DELETE : You can delete the selected photos at a time.DELETE ALL : You can delete all photos in a folder(General, Favorite) at a time.DELETE : You can delete the selected photo.DELETE ALL : You can delete all photos in the folder(General, Favorite) of the selected photo.Using the built-in camcorder, you can record videos.●P r e s s [CAMCORDER] to switch the phone from the camera mode to the camcorder mode.3. Using Camcorder[TOP MENU] ▶ Select Multimedia ▶Select Camcorder ▶Camcorder Preview moderecording ▶ Press [STORE] ▶ File Manager input and Press [STORE] Camcorder Preview mode ▶Press [OK] or [Camera] Start the recording ▶Press or [Camera] stop the Recording Video●Select [CANCEL] or to cancel the recording.●When recording video, sound is also recorded.●You can enter up to 12 Chinese letters or 24 English letters for title of a video.●In the file manager input mode, you can enter name or memo for video, or set Protect or Lock.●Press [CAMERA] to switch the phone from the camcorder mode to the camera mode.●You don’t need enter title and memo for every video to save. The title of the video is automatically entered.Recording self-videoYou can take the video of yourself while viewing the sub-LCD.●If the phone is locked, the ‘Camera Menu’is not displayed even if you press and hold [Camera] .●If you take a self-video with the folder closed, the file is automatically saved in the ‘Video Player’, not needing to press the Save button.●The phone stops taking video if you open the folder, and moves to Main-Lcd preview. ▶Press [Camera] start the recording ▶Press [Camera] stop the recording Hold down the press [Camera] while the folder is closed ▶ Select Camcorder and [ C a m e r a ]](https://usermanual.wiki/Motorola-Mobility/T5HD1/User-Guide-774662-Page-36.png)
![66Using Multimedia67Using MultimediaUsing [OPTIONS] Camcorder Preview mode ▶Press [OPTIONS] ▶ Select a desired menu ▶ Select a value and press [OK] Size : You can check the video size.(176×1 4 4 )Quality : Videos Recorden using a cellular camera phone look the same on the phone, but they are different when sent via e-mail or download to PC. (Best, Good, Normal)Memory : You can check the memory status of the phone.Using MenuCamcorder Preview mode ▶ Select a desired menu ▶ Select a value Zoom : You can zoom in the scene to rdcord a video. (5 step : 1~5)Bright. : You can adjust brightness of the photo. (10 step : 10~100)Cont. : You can adjust contrast of the photo. (10 step : 10~100)Effect : You can select the effect of the photo. (Off, Negative, Solarize, Sepia, Mono)You can view video stored after taking them with a cellular camera phone.4. Using Video Player[TOP MENU] ▶ Select Multimedia ▶Select Video Player ▶Select General/Favorite ▶Select video and [PLAY] General : The videos recorden with the phone camera are automatically saved.Favorite : The videos recorden to ‘F a v o r i t e’from ‘G e n e r a l’are displayed. ●You can adjust the volume by pressing while playing the video.●If you play a video file in the Etiquette mode, the dialog box asking ‘Off etiquette?’is displayed on the screen.●You can receive a call incoming during video playing. However, the phone will not return to the video play mode when the call is finished.●Description on the buttons used for video play You can pause video playing. You can resume video playing.You can play a video repeatedly. You can stop the video playing.The phone returns to the previous mode after playing the video once. Press this button once to rewind the video by 10 seconds.Press this button once to fast forward the video by 10 seconds.](https://usermanual.wiki/Motorola-Mobility/T5HD1/User-Guide-774662-Page-37.png)
![68Using Multimedia69Using MultimediaUsing [OPTIONS] Select General/Favorite ▶Select Video list and Press [OPTIONS] ▶ Select a desired menuDELETE : You can delete the selected video.DELETE ALL : You can delete all videos in the folder(General, Favorite) of the selected video.FILE MANAGER : You can modify ‘Name, Protect, Lock, Memo’of the selected video with ‘File Manager’.Name : You can edit the name of a selected video.Protect : You can protect a selected video not to delete. Lock : You can set a selected video to lock. MOVE : You can change location of the selected photo. (Favorite, General, User Folder)ARRANGE : You can re-sort the photo list. (Time, Name, Memory Size)SELECT ALL : You can select all videos in a folder (General, Favorite). PLAY SELECTED : You can view the selected videos.MOVE : You can move the selected videos to another folder(General, Favorite) at a time.PROTECT/LOCK : You can set ‘P r o t e c t / L o c k’for the selected videos at a time.SELECT ALL : You can select all videos in a folder(General, Favorite) at a time.RELEEASE ALL : You can deselect the videos.DELETE : You can delete the selected videos at a time.DELETE ALL : You can delete all videos in a folder(General, Favorite) at a time.You can play and manage the mp3 files stored in the phone.5. Using MP3 Player[TOP MENU] ▶ Select Multimedia ▶Select MP3 Player ▶Select General/Favorite ▶Select MP3 file and [PLAY] General : The downloaded mp3 files are automatically saved.Favorite : The downloaded mp3 files to ‘F a v o r i t e’from ‘G e n e r a l’are displayed. ●You can send the mp3 files from the PC to the phone via the MPT tool. You cannot, however, send the files from the phone to the PC.●If the etiquette mode is activated, you cannot hear the sound when playing an mp3 file.●More power is consumed when playing mp3 files one after another.●You can download mp3 files unlimitedly depending on the capacity of the memory.](https://usermanual.wiki/Motorola-Mobility/T5HD1/User-Guide-774662-Page-38.png)
![70Using Multimedia71Using MultimediaUsing [OPTIONS] ▶Select a desired menu and press [OK] Select General/Favorite ▶Select MP3 list and Press [OPTIONS] FILE MANAGER : You can modify ‘Name, Protect, Lock, Memo’of the selected mp3 file with ‘File Manager’.Name : You can edit the name of a selected mp3 file.Protect : You can protect a selected mp3 file not to delete. Lock : You can set a selected mp3 file to lock. MOVE : You can change location of the selected mp3 file. (Favorite, General, User Folder)ARRANGE : You can re-sort the mp3 file list. (Time, Name, Memory Size)SELECT ALL : You can select all mp3 files in a folder(General, Favorite). PLAY SELECTED : MOVE : You can move the selected photos to another folder(General, Favorite) at a time.PROTECT/LOCK : You can set ‘P r o t e c t / L o c k’for the selected mp3 files at a time.SELECT ALL : You can select all mp3 files in a folder(General, Favorite) at a time.RELEASE ALL : You can deselect the mp3 files.DELETE : You can delete the selected mp3 files at a time.DELETE ALL : You can delete all mp3 files in a folder(General, Favorite) at a time.You can set the multimedia environment.6. Setting[TOP MENU] ▶ Select Multimedia ▶Select Setting ▶ Select a desired menu ▶ Select a value and ▶ Press [STORE] Camera Pre-Shutter : You can select the pre-shutter tone. If you have selected ‘O f f’or if the phone is in the Etiquette mode, the pre-shutter is deactivated.(Off, Pre-Shutter 1~6)Camera Shutter : You can select the shutter tone. However, the shutter tone is not deactivated even if the phone is in the Etiquette mode.(Shutter 1~3)MP3 Continuance : You can select whether to continue playing mp3 files when you close the folder during playing mp3 files.(Play on closing, Off on closing)MP3 Music Skin : You can select the skin for ‘Mp3 Player’.(Type 1~4)DELETE : You can delete the selected mp3 files.DELETE ALL : You can delete all videos in the folder(General, Favorite) of the selected mp3 files.](https://usermanual.wiki/Motorola-Mobility/T5HD1/User-Guide-774662-Page-39.png)
![You can check the camera/camcorder data such as total memory, camera used, camcorder used and remain memory.7. Vewing Memory Information[TOP MENU] ▶ Select Multimedia ▶Select Memory Info ▶View InformationYou can check the description on the buttons for the camera/camcorder/MP3 Player function.8. Vewing Help Information[TOP MENU] ▶ Select Multimedia ▶Select Help ▶ View Information●In the help mode, pressing will display the previous menu.72Using Multimedia1. Ans. Machine 7 62. Using Voice Memo 7 83. Recorded Sound 7 9Using Voice Wizard](https://usermanual.wiki/Motorola-Mobility/T5HD1/User-Guide-774662-Page-40.png)
![75Using Voice Wizard74Using Voice WizardIf you cannot receive a call, this mode switches the call to Ans. Machine.●Press [voice wizard] in the idle LCD to display the voice wizard menu.1. Ans. Machine[TOP MENU] ▶ Select Voice Wizard ▶Select Ans. Machine ▶Select a desired menu●The content recorded in the Ans. Machine can be played back using ‘Message Inbox’.●When a call is received, if you press and hold [voice wizard], you can set the answer machine.Select Set Answering ▶ Select a desired menu ▶ Select a value and Press [STORE] Ans. Machine : You can activate or deactivate the ‘Answer Machine’. Answer Ment Sel : If you activate the ‘Answer Machine’, you can select the announcement.(Customized Ment, Normal Ment, Dirving Ment, Meeting Ment, Class Ment)Speaker : You can set the caller’s message which is recorded in the Answer Machine either to be heard or not on the speaker.Set Answering●You can replay the record by selecting ‘Customized Ment’of ‘Play Ment’.●When new comment is recored, existed comment is deleted.Select Record Ment ▶Press [RECORD] ▶ Ment Recording and [STOP] ▶ press [STORE] Record MentYou can hear the Answer Machine announcement recorded in the phone. (Customized Ment, Normal Ment, Dirving Ment, Meeting Ment, Class Ment)Select Play Ment ▶ Select a ment and [PLAY] Play Ment●To delete a message, press [OPTIONS] in the message menu, and select Delete menu(DELETE, DELETE ALL).You can hear the message recorded in the Answer Machine.Select Message Inbox ▶ Select a message and [PLAY] Message InboxYou can record and use answer ment. And you can set comment to ‘Customized Ment’in ‘Answer Ment Sel’.](https://usermanual.wiki/Motorola-Mobility/T5HD1/User-Guide-774662-Page-41.png)
![77Using Voice Wizard76Using Voice WizardVoice Record is a function to recorded voice in idle mode.You can check the recorded voices via ‘R e c o r d’.●Press [voice wizard] in the idle LCD to display the voice wizard menu.2. Using Voice Memo[TOP MENU] ▶ Select Voice Wizard ▶Select Voice Memo ▶Select a desired menuRecord voice memo●Pressing [CANCEL] or to cancel the recording.●If a call is received while recording the voices before receiving are only recorded. You can check the recorded voices in ‘P L A Y’.Select Record ▶Press [RECORD] ▶Voice memo Recording and [STOP] ▶ Press [STORE] ▶Name input and Press [ S T O R E ]Play voice memo●To delete a message, press [OPTIONS] in the message menu, and select Delete menu(DELETE, DELETE ALL).Select Play ▶ Select a voice memo and Press [PLAY] You can record the sound you want and use it as ring sound.●Press [voice wizard] in the idle LCD to display the voice wizard menu.3. Recorded Sound[TOP MENU] ▶ Select Voice Wizard ▶Select Recorded Sound ▶Select a desired menuRecorded Sound●Pressing [CANCEL] or to cancel the recording.Select Record Sound ▶Press [RECORD] ▶Record sound and [STOP] ▶ Press [STORE] ▶Name input and Press [ S T O R E ]Play Sound●You can lock the selected functions of the phone. Select Play Sound ▶ Select a sound and [PLAY]](https://usermanual.wiki/Motorola-Mobility/T5HD1/User-Guide-774662-Page-42.png)
![1. Using Lock Phone 8 12. Using Lock Privacy 8 23. Lock Code 8 34. PIN Set 8 35. Call Restrict 8 46. Using Reset 8 57. Viewing Emergency number 8 68. Viewing S/W Version 8 6Using Security79Using SecurityIt is a function to lock the entire phone so that the others can’t use it.●The factory-set default Lock code is ‘0 0 0 0’to change the password, it can be changed in ‘Lock Code’.●Press and hold on the initial screen and then set the lock. You can answer a received call, even though your phone is locked.●Even if you turn off the phone and then turn it on, it is still in lock mode.●If you unlock the phone to use it, it is a temporary meansure. The refore, the phone returns to Lock Mode after you use it. To reset the Lock mode completely, press hold. and then enter your lock Code or set the setting value to ‘N o’in Auto Lock mode.1. Lock Phone[TOP MENU] ▶ Select Security ▶Select a Lock Phone and enter Lock Code ▶ Select a value and [STORE]](https://usermanual.wiki/Motorola-Mobility/T5HD1/User-Guide-774662-Page-43.png)
![8180Using Security Using SecuritySelect a desired function to lock your phone partially so that the others can’t use it.2. Lock Privacy[TOP MENU] ▶ Select Security ▶Select a Lock Privacy and enter Lock Code ▶ Setting LockPrivacy and Press [STORE] Require PIN : You can set On/Off of input of PIN number.PIN Change : You can change PIN number[TOP MENU] ▶ Select Security ▶Select a PIN Code ▶Select desired menu and enter Lock Code You can set Yes/No of input of PIN number when you change PIN number or turn the power on.4. PIN Code●If you select a locked function, the password screen is displayed. You can use the selected function only when you have entered the correct password.You can change your lock code. The factory-set default Lock code is ‘0 0 0 0’.3. Lock Code●The phone manufacturer is not responsible for any damages caused by outflow of your lock code.▶Enter again and [ O K ][TOP MENU] ▶ Select Security ▶Select a Lock Code and enter Lock Code ▶Enter New Code and [ O K ]You can restrict origination of a specific number. (Int’l Call, Int’l Call input, Outgo. Call)5. Call Restrict[TOP MENU] ▶ Select Security ▶Select a Call Restrict and enter Lock Code ▶ Select a desired m e n u▶Select a value and press [STORE]](https://usermanual.wiki/Motorola-Mobility/T5HD1/User-Guide-774662-Page-44.png)
![8382Using Security Using Security●You can use an easy key to display an international phone number when placing an international call.●When entering an international phone number, if you press and hold in idle mode, the entered number is displayed.●If you have selected ‘O n’for Int’l Call setup, enter the int’l call code in the int’l call input mode.Select Int’l Call ▶ Select a value ▶Press [STORE] I n t’l CallUse of an international call is restricted.Select Outgo. Call ▶ Select a value ▶ Press [STORE] Outgo. CallUse of an outgoing call is restricted.6. Using Reset[TOP MENU] ▶ Select Security ▶Select a Reset ▶Select a desired menu and enter Lock Code Select Reset Setting Value and enter Lock Code ▶ Select a value and Press [OK] Reset setting ValueYou can initialize the information stored in your phone such as information on basic display, ringer setting to the factory-set default.Select Clear Files and enter Lock Code ▶ Select a menu to deleting ▶ Select a value and [STORE] ▶ Select a value and Press [OK] Clear FilesYou can delete the files selectively from the phone.(Phone Book, Call History, Message, Schedule, D-day, Alarm, Photo, Video, MP3)7. Emergency CallEven when the handset is in Lock, you can still make a call using the emergency number stored on the phone.[TOP MENU] ▶ Select Security ▶Select a Emergency Call and enter Lock Code▶Display the number●4 emergency numbers are stored in the phone. The emergency numbers by the UIM Card.](https://usermanual.wiki/Motorola-Mobility/T5HD1/User-Guide-774662-Page-45.png)
![84This feature displays the software version of your phone.Using Security8. S/W Version[TOP MENU] ▶ Select Security ▶Select a S/W Version and enter Lock Code ▶Information is displayed1. Call Answer 8 62. Call Waiting 8 73. Call Forward 8 74. Change Language 9 15. Setting Auto Area Code 9 16. Data Mode 9 27. U-Mail Config 9 38. Browser Setup 9 4Using Settings](https://usermanual.wiki/Motorola-Mobility/T5HD1/User-Guide-774662-Page-46.png)
![87Using Settings86Using SettingsAny Key : Open the folder and press any keypad button except to receive a call.Folder : Open the folder to receive a call.If the folder is open or the earmicrophone is connected, connect tone is sounded for a given period of time and then the call isconnected automatically. When the folder is close, if the earmicrophone is not connected, you cannot use Auto Answer function.●Off, In 3 sec, In 6 sec, In 9 sec1. Call AnswerA n s w e rAuto Answer[TOP MENU] ▶ Select Setting ▶Select Call Answer ▶ Select a desired menu ▶ Select a value andPress [STORE] This function is to hold on the format call, and connect to later call, when user is on the telephone and, another call is being received.2. Call Waiting3. Call Forward[TOP MENU] ▶ Select Setting ▶Select Call Waiting ▶Select a Value ▶Call Connecting & Call End●In order to disable Call waiting, select ‘N o’in the setup mode.[TOP MENU] ▶ Select Setting ▶Select Call Forward ▶Select a desired menu](https://usermanual.wiki/Motorola-Mobility/T5HD1/User-Guide-774662-Page-47.png)
![8988Using Settings Using SettingsFwd DefaultWhen power off, connect a calling with set number.Select Fwd Default ▶Select ‘Y e s’to set up ▶ Enter the phone number ▶Call Connecting & Call End●In order to disable Fwd Default, select ‘N o’in the setup mode.Fwd If BusyWhen call connecting, connect a calling with set number.Select Fwd If Busy ▶Select ‘Y e s’to set up ▶ Enter the phone number ▶Call Connecting & Call End●In order to disable Fwd if busy, select ‘N o’in the setup mode.Fwd If NO ANS.When user can not take a calling, if receving a calling, connect with set number.Select Fwd If NO ANS. ▶Select ‘Y e s’to set up ▶ Enter the phone number ▶Call Connecting & Call End●In order to disable Fwd if no ans, select ‘N o’in the setup mode.You can set a desired language to be displayed on your phone. (Chinese, English)4. Change Language[TOP MENU] ▶ Select Setting ▶Select Language ▶ Select a desired language and [OK] [TOP MENU] ▶ Select Setting ▶Select Auto Area Code ▶ Select a value and Press [STORE] If you set frequently-used area codes on the phone, they are inserted into a calling number automatically whenever you place a call.●P r e s s i n g in the idle mode displays an area code. When this area code is displayed, enter a desired phone number.●In other to disable Auto Area Code, select ‘N o’in the setup mode.●If area code has been set, opening the folder displays it. Pressing or moves you to the idle mode.●If you enter a number beginning with ‘0’, the area code is not displayed, but only the number you entered is displayed.(ex : cellular phone number, interational number, or other area code)●You can enter the ‘Area Code’only when you have selected ‘Y e s’for ‘Auto Area Code’.5. Setting Auto Area CodeFwd All CallsAll calls(call connecting, power off, power on)connect a calling with set number.Select Fwd All Calls ▶Select ‘Y e s’to set up ▶ Enter the phone number ▶Call Connecting & Call End●In order to disable Fwd All Calls, select ‘N o’in the setup mode.](https://usermanual.wiki/Motorola-Mobility/T5HD1/User-Guide-774662-Page-48.png)
![9190Using Settings Using SettingsYou can use internet on the phone without additional modem, if you can connect your phone to a notebook or PC overthe wireless data cable.Data ProfileThe data profile is menu for dial number setting when using UNI. (Wap, U-Magic, U-Mail, Mobile QQ, Porfile 5)Use 1X DataFunction to use data server.Yes : Can use 1x data. (In case of network which support 1x data)No : Can use QNC data. (In case of network which don’t support 1x data)●Should use different connection type because SVC which the network of each region support is different.Comm. PortYou can select the communication port for incoming data, If you change the communication port, the power gets On/Off. If the handset is not rebooted automatically, press . (USB, UART)6. Data Mode[TOP MENU] ▶ Select Setting ▶Select Data Mode ▶Select a desired menu 7. U-Mail Config[TOP MENU] ▶ Select Setting ▶Select U-Mail Config ▶Select a desired menu U-Mail SoundSet the arrival sound for U-Mail. (U-Mail Sound 1~7)S e t u pEnters frequently used e-mail address.Data ResetYou can reset Inbox & Outbox, Mail Setting and Reset Mail.Inbox & Outbox : Reset inbox and outbox. Mail Setting : Resets Mail setting.Reset U-mail : Resets memory as well as mail setting.When you connect your phone to PC using data cable, an icon on your PC monitoridentifying data cable Connection status may disappear if the signal strength of link in between the phone and a PC falls under a threshold value. This phenomenon mayhappen if you use some of Dell PC models with a particular serial port.●Cable connection](https://usermanual.wiki/Motorola-Mobility/T5HD1/User-Guide-774662-Page-49.png)
![92Using Settings●If the phone fails to receive any action from you during the setting time while you are browsing, the uni cal lis disconnected andthe browser screen is maintained.(1~5 Min Later)[TOP MENU] ▶ Select Setting ▶Select Browser Setup ▶Select Linger Time ▶ Select a value and [OK] 8. Browser Setup1. Using Biorhythm 9 62. Using Lucky Number 9 73. Using Calculator 9 74. World Time 9 85. Stopwatch 9 8Using Tool Kit](https://usermanual.wiki/Motorola-Mobility/T5HD1/User-Guide-774662-Page-50.png)
![95Using Tool kit94Using Tool kit1. Using Biorhythm[TOP MENU] ▶ Select Tool Kit ▶Select Biorhythm▶Select a desired menuIf you enter your date of birth, you can check your bio-rhythm on a specific date.Set BiorhythmYou must enter the correct date of birth. You cannot get the correct biorhythm if you don’t enter your date of birth.Select Set Biorhythm ▶ Setting User Birthday and [STORE] ●In the Date setting mode, press [OK] to select a date from the calendar.●To enter date, press to switch the enter mode. Enter mode is switched in thesequence of ‘DAY ▶MONTH ▶ Y E A R’.Press toenter the appropriate date,year and month.View BiorhythmThe phone shows your biorhythm of the day based on your date of birth.Select View Biorhythm ▶U s e r’s Biorhythm is displayed●You can check by weekly or by monthly by Pressing [WEEKLY/MONTHLY] while checking biorhythm.●Press [OK] in the biorhythm screen to road description on the biorhythm of the day.2. Using Lucky Number[TOP MENU] ▶ Select Tool Kit ▶Select Lucky Number ▶Press [SELECT] and check Lucky Number[TOP MENU] ▶ Select Tool Kit ▶Select Calculator ▶Enter thecalculation formula using [Dial] ▶Press [OK] to check the resultYou can have the phone to select 6 random numbers between 1 and 49 whenever you want.●To reset the phone after you finish the calculation, press . ●To enter a decimal point, press . 3. Usign Calculator](https://usermanual.wiki/Motorola-Mobility/T5HD1/User-Guide-774662-Page-51.png)
![97Using Tool kit96Using Tool kit●To return to the previous display screen, press [CANCEL] or .SET DST : You can set the ‘Summer Time’of the selected city.DISPLAY : You can select a country and set the time of the country as the idle mode display.●You can view other information if you press [OK] in the worldtime mode.4. World Time[TOP MENU] ▶ Select Tool Kit ▶Select World Time[TOP MENU] ▶ Select Tool Kit ▶Select World Time ▶Search World Time using and press [OK] Using [OPTIONS] Information is display ▶Press [OPTIONS] ▶ Select a desired menu[TOP MENU] ▶ Select Tool Kit ▶Select World Time[TOP MENU] ▶ Select Tool Kit ▶Select Stopwatch ▶ [START] to start calculating time ▶ [ S T O P ]to stop calculating time●If you press [CONTINUE] when the stopwatch stops, you can keep measuring the time.●All the records stored in the stopwatch are cleared and the stopwatch is ready to measure again, if you press [ R E S E T ]on the standby screen.●The stopwatch stops, if a call is received while the stopwatch is in opertation.●It continues in external LCD when you close the folder during stopwatch opertaion.●You can store up to 20 records by pressing [LAP], if the record is required with the stopwatch in operation. To storethe middle record on the folder close, Press [ L A P ] .You can measure the time to your phone.5. Stopwatch](https://usermanual.wiki/Motorola-Mobility/T5HD1/User-Guide-774662-Page-52.png)
![1. Storing a Number 1 0 52. Correcting Phone Book 1 1 03. Deleting phone Book 1 1 34. Searching Phone Book 1 1 5Using Phone Book99Using Phone Book Storing a Number from a Menu1. Storing a Number[TOP MENU] ▶ Select Phone Book ▶Select Store Number ▶Select memory location where the number will be saved Storing a Number on idle ModeEnter phone number in idle mode ▶Press [STORE] ▶ Select memory location where the number will be saved ▶Select save modeNew Name : You can add entries to the Phonebook.Add to Name : You can add a number to the existing entry in the Phonebook, or can modify the entry.](https://usermanual.wiki/Motorola-Mobility/T5HD1/User-Guide-774662-Page-53.png)
![101Using Phone Book 100Using Phone Book ●Phone Book IconName Group Phone Home Office Others Fax Ringer Image E-mail Homepage Anniversary memo Anniversary date Memo ●You can store up to 14 items and store them continuously by storing content in one item and then selecting other items. To end storing, press [ S T O R E ] .●Entering content to be stored with an item selected switches you to input mode.●You can save up to 500 names on the phone. ●To cancel storing, press or during storing to switch to idle Mode.1. Select PhoneSelect Phone ▶ Press [STORE] after completing input information[Entering Name and Memo]You can store up to 8 chinese letter and 16 English letters for a name, and enter p to 64 chinese letter and 120 English letters for a memo.[Setting Group]Select the icon‘ ’in the phone number store mode enables you to specify a group. The 5 default items such as Family, General, Friend, Company, and Undefined are displayed. [Entering Phone Number]You can enter up to 32 digits phone number, and up to 15 digits are displayed on the screen. Up to 32 digits of phone number can be input and the display screen displays up to 15 digits. This feature enables you to set a main number when storing numbers(Mobile, home, office and others).[Setting Ringer tone]Select the icon‘ ’in the phone number store mode to set a desired ringer. If no ringer is selected by phone number, the ringer selected for the group is applied. If no specific ringer is selected either for the phone number or the group, the ringer selected in ‘R i n g e r’in ‘S o u n d’is applied.[Setting Graphic]Select the icon‘ ’in the phone number store mode to set a desired graphic. If graphic is not selected for a phone number, the graphic selected for the group is displayed. If no specific graphic is selected either for the phone number or the group, the ‘Incoming Call’graphic selected in ‘D i s p l a y’is displayed.[Entering E-mail Address]50 letters including E-mail symbols such as ‘@’and ‘.’can be inputted for an E-mail address. Press [OPTIONS] during input, select ‘S y m b o l’, and then you can choose symbols for E-mail add input. In the English input mode, press once to enter ‘@’, twice to enter ‘.’, and three times enter ‘( s p a c e )’.[Entering Anniversary]You can enter up to 10 Chinese or 20 English letters for the description of the anniversary. In the Date setting mode, press [OK] and select the date from the calendar. To enter date, press to switch the enter mode. Enter mode is switched in thesequence of ‘DAY](https://usermanual.wiki/Motorola-Mobility/T5HD1/User-Guide-774662-Page-54.png)
![102 103Using Phone Book Using Phone Book 2. Select UIM●You can save a number per name on the UIM Card.●The number of names saved in a UIM Card varies by the card.●To cancel storing, press or during storing to switch to Wait Mode.Select UIM ▶ Select Turbo Dial table ▶Press [STORE] after completing input information2. Searching Phone Book[TOP MENU] ▶ Select Phone Book ▶Select Search ▶Select a desired search mode●You can search the ‘Phone Book’with Search All, By Name, By Group, By Turbo Dial or By Number.●When the ‘Phone Book’list is displayed, the image of the selected ‘Phone Book’entry and the ‘Main Number’is displayed onthe bottom of the LCD.●If you press on the idle mode, ‘By Name’, ‘By Group’, ‘By Turbo Dial’list is displayed.Select By Name ▶ Enter a name ▶ Select a list to search ▶The stored information is displayedBy Name You can search a person by entering the name that you want to search.●When a location is not entered, click [OK] to display the phone number list in order of location.●If you enter the name to search in search window, all lists including entered name are displayed.Select Search All ▶Select a list to search ▶The stored information is displayedSearch AllThis enables you to simply scroll numbers listed up in order of the phone number.Select By Group ▶Select a group to search ▶Select a list to search ▶The stored information is displayedBy GroupGroups are displayed in sequence of group and you can move to d desired group and search its phone number.Select Turbo Dial ▶Select a list to search ▶The stored information is displayedBy Turbo DialIf there are numbers registered in ‘Turbo Dial’, the numbers are displayed in the order of the ‘Turbo Dial' number.●You can save up to 200 numbers in ‘Turbo Dial’.●If you enter the location number in search window, all location number lists entered are displayed automatically.Select By Number ▶Enter a number ▶Select a list to search ▶The stored information is displayedBy NumberIf you press the number to search, you can search the phone number in which the entered number is inserted.●When a location is not entered, click [OK] to display the phone number list in order of location.●If you enter the initial consonant of the name that you want to search on the initial screen, the names that begin with the enteredconsonant are displayed.](https://usermanual.wiki/Motorola-Mobility/T5HD1/User-Guide-774662-Page-55.png)
![105104Using Phone Book Using Phone Book Using the [OPTIONS] functions while searching numberlist is displayed.●If you Press on the idle mode. ‘By Name’, ‘By Group’‘By Turbo Dial’Stored number list display ▶Press [OPTIONS] ▶ Select a desired menu●You can select more than one phone number on the ‘Phone Book’list with the [S E L E C T ] .You can manage the group stored in cell phone.SEND SMS : If a mobile phone number is stored in the selected ‘Phone Book’entry, you can go to the text mode on the menu.TURBO DIAL : You can select a phone number in the ‘Phone Book’and register the number in ‘Turbo Dial’.MAIN NUMBER : You can change the ‘MAIN NUMBER’of the selected ‘Phone Book’e n t r y .EXPORT : The selected phone number list is saved as ‘v C a r d’in ‘Data Folder’.DELETE ONE : Only selected phone numbers can be deleted.DELETE MULTI : A list you want to delete can be selected or released with [ S E L E C T ]. Multiple phone numbers can be deleted all at once.DELETE RANGE : To delete multiple numbers, do not select the numbers one by one but select the range of the list you want to delete. Then the numbers within the range can be deleted all at once.DELETE ALL : The phone book can be deleted at once. Phone : All numbers saved in the phone can be deleted. UIM : All numbers saved in the UIM card can be deleted.All : All numbers saved in the phone and the UIM card can be deleted.3. Group Managerand [OPTIONS] ▶ Select a desired menu[TOP MENU] ▶ Select Phone Book ▶Select Group Manager ▶Select a desired group ▶Select a desired list MOVE : You can change the group of the selected ‘Phone Book’e n t r y .SELECT ALL : You can select all the ‘Phone Book’entries of a group.DELETE : You can delete the selected ‘Phone Book’e n t r y .DELETE ALL : You can delete all the ‘Phone Book’entries of a group.](https://usermanual.wiki/Motorola-Mobility/T5HD1/User-Guide-774662-Page-56.png)
![107106Using Phone Book Using Phone Book NEW GROUP : You can add a group in the ‘Phone Book’. ‘G r o u p’can register up to 30 new name including existing group. EDIT GROUP : You can modify setting of the selected group.Name : You can change name of the selected group, if the group has been added by yourself.To change the existing name and enter a new name, press to delete it and then enter the new name.The default group names of Family, General, Friend, Company, Undefined are not changed.Up to 8 Chinese letters and 16 English letters can be input for a group name.Ringer : The selected melody rings for the incoming calls if you have not downloaded a specific bell you have selected in ringer style rings.Image : The selected graphic is displayed for the incoming calls. When incomming call, Downloaded image, photo,data folder image are available for a display.DELETE ONE : You can deleted of the selected group, if the group has been added by yourself.If group is deleted, the information stored in that group is moved to the Undefined group.DELETE ALL : You can delete all the groups you have added. If group is deleted, the information stored in that group is moved to the Undefined group.You can view and manage the ‘Turbo Dial’n u m b e r s .●Press and hold the ‘Turbo Dial’number on the main LCD to make a call.Select [OPTIONS] in the ‘Turbo Dial’list to use various option menus.4. Turbo Dial[TOP MENU] ▶ Select Phone Book ▶Select Turbo Dial ▶Viewing turbo dial listSelect a desired list and [OPTIONS] ▶ Select a desired menuUsing [OPTIONS] ADD NEW : You can add a number to ‘Turbo Dial’.MOVE TURBO : You can change the ‘Turbo Dial’number of the selected ‘Phone Book’e n t r y .CHANGE NUMBER : You can change the phone number registered in the ‘Turbo Dial’.DELETE : You can delete the selected phone number from ‘Turbo Dial’. However, the number is not deleted from the ‘Phone Book’.DELETE ALL : You can delete all the phone numbers from ‘Turbo Dial’. Select a desired group and [OPTIONS] ▶ Select a desired menu●The 5 default items such as Family, General, Friend, Company, and Undefined are displayed.Using [OPTIONS] functions while searching grouop](https://usermanual.wiki/Motorola-Mobility/T5HD1/User-Guide-774662-Page-57.png)
![109108Using Phone Book Using Phone Book 6. Call HistoryYou can copy and save the phone numbers stored in your phone and the UIM Card vis-a-vis.5. Copy Number[TOP MENU] ▶ Select Phone Book ▶Select Copy Number ▶Select a desired menuAll : You can copy all the number from UIM card to the phone.Select Copy : You can copy and save many phone number lists at a time. Multi-Select : You can copy numbers of phone numbers at a time.Save phone number lists stored in UIM Card into the phone.UIM To PhoneSelect UIM To Phone ▶Select a desired menuAll : You can copy all the number from phone to the UIM card.Range : You can copy and save many phone number lists at a time. Multi-Select : You can copy numbers of phone numbers at a time.Save phone number lists stored in the phone into UIM Card.Phone To UIMSelect UIM To Phone ▶Select a desired menu[TOP MENU] ▶ Select Phone Book ▶Select Call History ▶Select a desired menu●If you press short ‘Call History’list is displayed. To return to the previous screen from the call list, press [CANCLE] or .●In the ‘Call History’list, the name is displayed instead of the phone number if the phone number is in the ‘Phone Book’. The same number of name isdisplayed only once to avoid repetition. ●If you press [OK] on a phone number, the call history list of up to 10 recent calls is displayed. Press to dial the number.You can check the list stored in cell phone.All CallsInformation on the received call is displayed. Up to 50 received calls are stored in the phone.Incoming CallInformation on the calling party is displayed. Up to 50 calling parties are stored in the phone.Outgoing CallInformation on the received call is displayed. Up to 50 received calls are stored in the phone.Incoming Call](https://usermanual.wiki/Motorola-Mobility/T5HD1/User-Guide-774662-Page-58.png)
![111110Using Phone Book Using Phone Book Total TimeThis mode displays the total call time from the start of service up to the present time. This total call time cannot be reset.Roaming TimeThis mode displays roaming call time placed by using other service provider’s base station.Using [OPTIONS] Select a desired list and [OPTIONS] ▶ Select a desired menuSEND SMS : You can go to the text mode, and send a message to the selected phone number.STORE NUMBER : This menu is displayed if the selected phone number is not in the ‘Phone Book’. You can save the phone number in the ‘Phone Book’.VIEW PBOOK : This menu is displayed if the selected phone number is in the ‘Phone B o o k’. You can view the ‘Phone Book’entry of the selected number.D E L E T E / D E L E T EALL : You can delete selected number or all the numbers in the list. Outgoing TimeThe outgoing call time from service start to date is displayed.7. Call Timer[TOP MENU] ▶ Select Phone Book ▶Select Call Timer ▶Select a desired menuLatest TimeYou can view the air time of the last call.Incoming TimeThis mode displays the most recent call time.●The call time displayed on your phone is not consistent with real call time and fee. The fee is applied after the call isreally connected.●You can initialize time information when you press [RESET] while you are checking the information of total call time.However, total call time cannot be reset.●N o t e](https://usermanual.wiki/Motorola-Mobility/T5HD1/User-Guide-774662-Page-59.png)
![112Using Phone Book 8. Memory Status[TOP MENU] ▶ Select Phone Book ▶Select Memory Status ▶View informationYou check available memory and used memory in Phone Book.9. View My Num[TOP MENU] ▶ Select Phone Book ▶Select View My Num ▶View informationThis mode enables you to confirm your own phone number.1. Adjusting Tone Volume During a call 1 2 22. Taking Note During a call 1 2 23. Using Phone Book During a Call 1 2 24. Sending My number 1 2 35. Using Muting 1 2 36. Using Speaker Phone 1 2 3Using Functions During a Call](https://usermanual.wiki/Motorola-Mobility/T5HD1/User-Guide-774662-Page-60.png)
![115Using Functions During a callP r e s s during a call You can adjust the tone volume of a called party.●The phone number entered during a call is stored in‘Outgoing Call’.1. Adjusting Tone Volume During A CallEnter a phone number during a call and then [ O K ]You can enter a new phone number during a call and store it.2. Taking Note During A CallPress [PBOOK] during a callUsing Phone BookUsing M e s s a g e3. Using Phone Book During A CallPress during a call You can search the phone book during a call. You can search the ‘M e s s a g e’menu during a call.114Using Functions During a callP r e s s [MUTE] during a callYou can enjoy a private conversation during a call so that the called party cannot hear you.●To dear silence mode press [ M U T E ] .Press [SpkPhone] during a callYou can receive, make calls without having to hold the phone to your ear.●When the mic faces you, it works at a distance of up to 30cm.●Press [SpkPhone] to disable the function.5. Using Speaker phone4. Using Muting](https://usermanual.wiki/Motorola-Mobility/T5HD1/User-Guide-774662-Page-61.png)
![1. Checking Message 1 2 52. Sending Message 1 2 83. Setting Message Receive Function 1 3 14. Memory Status 1 3 35. Deleting Message 1 3 3Using SMS Features117Using SMS FeaturesCheck received message ▶Press in idle mode ▶ Select Inbox ▶Select Phone/UIM/Web Alert ▶Select Received text message and then press [OK] ▶ Check the messageText Message1. Checking a message●If a text message is received, the phone alerts you. (See p.131 Setting Message Receive Function)●Pressing to check a message enables you to check the next message.●When the receiver number is displayed, pressing connects a call.●Basically, 100 unit Numbers can be stored. For more, it depends on UIM Card Capacity.●Getting ‘Web Alert message’, ‘ ‘sign be displayed. And for SMS message, ‘’be displayed. After accessing the message, then will be away.●For message icon ‘’or ‘‘. It depends on the latest receiving message.●‘Web Alert message’is available throuhgh uni. Read msgs mode, choosing web alert, be access to uni automatically.1. Checking Message](https://usermanual.wiki/Motorola-Mobility/T5HD1/User-Guide-774662-Page-62.png)
![119Using SMS Features118Using SMS FeaturesCheck a received message ▶Press in idle mode ▶Select Inbox ▶ Select Voice Msg. ▶Check the Msg.Voice Message●In order to delete a voice message, select the voice message and then, press [ D E L E T E ] .●If multiple voice messages have been received, the latest received voice messsage is displayed.REPLY : You can send a reply to the person who sent you a message.FORWARD : You can deliver a received message to other persons.MOVE to UIM/PHONE : You can move the received message between the phone and the UIM.SAVE ADDRESS : You can save the phone number of the message sender in Phone Book.PROTECT : Protects selected messsages, which cannot be deleted.WHOLD COPY : You can copy contents of the selected message to ‘P A S T E’.SELECT COPY : You can copy part of the selecte message to ‘P A S T E’.DELETE ONE : You can delete th seleted message only.DELETE MULTI : You can delete numbers of messages at a time.DELETE ALL : You can delete all the messages in the selected Inbox/UIM.2. Using [ O P T I O N S ]Select message and [OPTIONS] ▶ Select a desired menuSending a New MessagePress in idle mode ▶Select Create Message ▶Enter a Receiver number, content ▶Save messageSelect setting ▶Select Transfer mode and then press [SEND] 2. Sending Message](https://usermanual.wiki/Motorola-Mobility/T5HD1/User-Guide-774662-Page-63.png)
![120 121Using SMS Features Using SMS FeaturesYou can send the save message as it is or after editing the message.Press in idle mode ▶ Select Outbox ▶Select Drafts/UIM ▶Select a message to send ▶Editor message▶Press [SEND] Sending a Stored MessageSelect message and [OPTIONS] ▶ Select a desired menu1. Using [ O P T I O N S ]MOVE to UIM/PHONE : You can move the received message between the phone and the UIM.DELETE ONE : You can delete th seleted message only.DELETE MULTI : You can delete numbers of messages at a time.DELETE ALL : You can delete all the messages in the selected Inbox/UIM.Press in idle mode ▶Select Outbox ▶ Select Sent Msgs ▶Select a message●Select a message, select [OPTIONS] and press ‘S E N D’to resend the selected message.The sent messages are stored.●You can send a message to numbers of receivers by entering numbers of the receivers. After entering a number, press to move the cursor, and then enter the next number. After finish entering the number, press [OK]. You can send a message to up to 10 receivers.●If press [FIND], you can select the mobile number in the Phone Book or Call History.●If you have saved a message, you can select and send the saved message.●Send fail list is created for the called number to which message are not sent.●You can enter up to 70 Chinese letters or 160 English letters for a message.Using Sent Message](https://usermanual.wiki/Motorola-Mobility/T5HD1/User-Guide-774662-Page-64.png)
![123122Using SMS Features Using SMS Features4. Setting Message Receive Function3. My PhraseAfter saving your favorite sentences, it is available to recall saved sentences.Press in idle mode ▶ Select My Phrase ▶Select a desired list and [EDIT] ▶ Enter the content and [ O K ] Press in idle mode ▶ Select Setting ▶ Select a desired setting menu ▶ Set the receive function ▶Press [ S T O R E ]●Regarding ‘P H R A S E’, you can input maximum Chinese 40 characters or English 80 characters.Select list and [OPTIONS] ▶ Select a desired menuUsing [ O P T I O N S ]SMS : You can go to the text mode on the selected phone number in the list.DELETE ONE : You can delete th seleted message only.DELETE ALL : You can delete all the messages in the selected Inbox/UIM.Preview : You can set a method of displaying a message when it is received.Caller Number : The kind of message and callback number are displayed.Full Message : The received text message is displayed on the initial display screen.Off : Once a message is received, only the message received icon‘ ’is displayed.Alert Frequency : You can set a desired reminder tone.Once : If a message is received, ‘b e e p’is sounded once.Every 2Min : Alarm sounds every 2 minutes until the message is confirmed.Off : The reminder tone is not heard any more, but only the lamp flashes.Receiving Sound : You can select a desired receive tone to be sounded when a message is received.(SMS Sound 1~5) Save To : You can save the message either in UIM or Phone.(Phone, UIM)You can set the alert method when a message is received.](https://usermanual.wiki/Motorola-Mobility/T5HD1/User-Guide-774662-Page-65.png)
![124 125Using SMS Features Using SMS FeaturesAfter registration of user ID and password for the QQ messenger service, you can exchange messages with other cell phone or PC userswho have subscribed to QQ service.6. Using Mobile QQPress in idle mode ▶ Select Mobile QQ ▶Enter ID and Password ▶Select whether to save the ID andPassword ▶ press [LOGIN] ▶ Check ‘My Friends’stored in mobile QQ●Up to 50 IDs can be displayed in ‘My Friends’of mobile QQ.●‘ ’is displayed for the off-line user, and ‘’for the on-line user.●If there is any new message, the sender’s icon ‘’blinks. Using [ M E N U ]Current Buddy : Send/Read Msg : You can read the message from a user, or send a message to the user.Buddy Data : You can view profile of a user. Chat Record : You can view the communication log with a user.Del Buddy : You can delete a specific ID from ‘My Friends’.Buddy List : You can select a ‘My Friends’icon displayed when you access the mobile QQ.All Buddy : All IDs stored in ‘My Friends’are displayed.Online Buddy : Only the on-line IDs are displayed. Find Buddy : You can search ‘QQ service’users of a specific condition (Province, Age, Gender) and save in ‘My Friends’.Select ID and Press [ M E N U ]▶Select desired menu5. Memory StatusThe phone displays the free memory of Inbox, Outbox(Sent), Outbox(Draft) or UIM.Press in idle mode ▶ Select Memory Status ▶Select a desired setting ▶The stored information is displayed](https://usermanual.wiki/Motorola-Mobility/T5HD1/User-Guide-774662-Page-66.png)
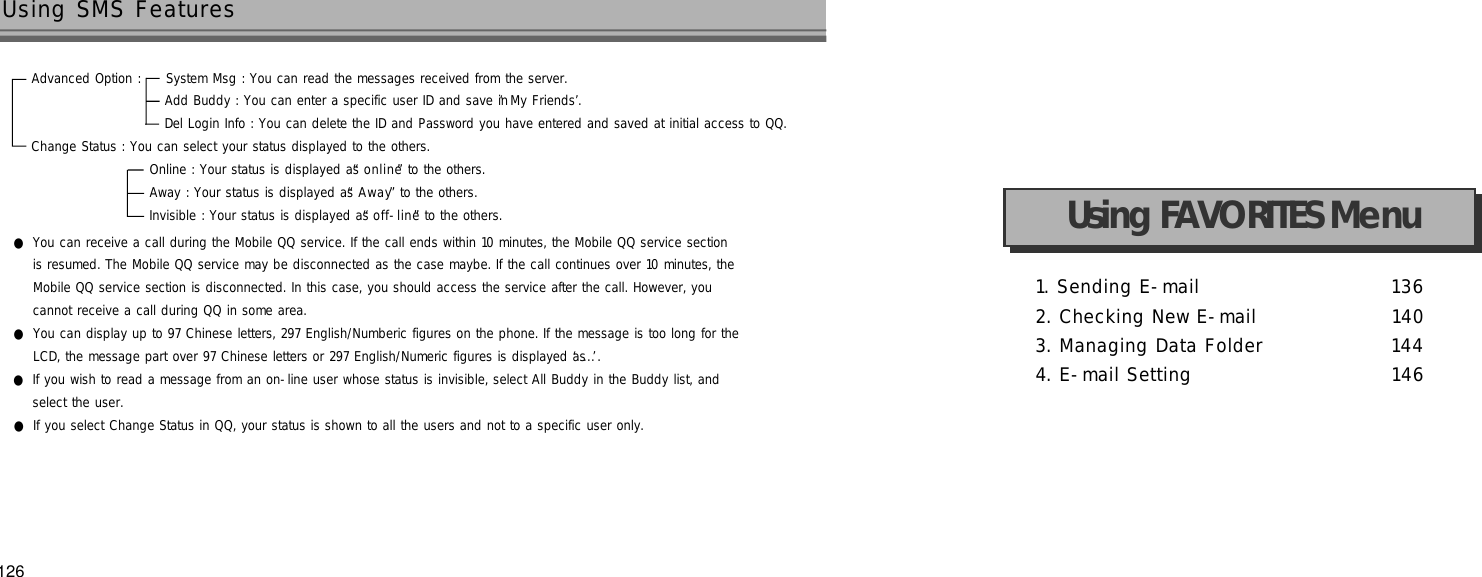
![129128Using FAVORITES Using FAVORITESSending New MailSelect New Mail ▶Enter a recipient ▶Enter a title ▶Attach a file ▶ Enter e-mail contents and [ S E N D ][TOP MENU] ▶ [FAVORITES] ▶ Select Mail ▶Select a desired menu1. Using Mail●P r e s s [OPTIONS] to enter the optional information on e-mail address.●You may enter lots of e-mail addresses within 640 characters including ‘@’, ‘.’e t c .●You can check the remaining number of characters at the top of the LCD monitor.Addr Book : Displays the address book allowing you to select a recipient.Sent History : Displays the sent history allowing you to select a recipient.Addr Group : Displays the address group allowing you to select each recipient group.Profiles : Add your e-mail address entered for Server Setup.Move to Cc : Changes to Cc.Move to Bcc : Changes to Bcc.Select To and press [MENU] ▶ Select Menu1. Entering a recipientSelect Subj ▶ Enter Subject ▶Display Subject2. Entering E-mail title●P r e s s [OPTIONS] to enter e-mail title using SYMBOL or PASTE.●For subject input you can use a maximum of 50 Chinese characters and 100 English characters.Select Attach ▶Select Folder▶ Select an attached file ▶ [OPTIONS] ▶ Select ATTACH ▶ Select set value▶Press [OPTIONS] ▶ Select Done3. Attaching a file](https://usermanual.wiki/Motorola-Mobility/T5HD1/User-Guide-774662-Page-68.png)
![131130Using FAVORITES Using FAVORITES●Choose Select from [OPTIONS] to check attached files.●Up to five files within 100Kbyte can be attached at a time.●The moving image file within look byte can be afttached to the mail.●If you press [OK] when selecting a file, you can preview the selected file.●P r e s s [OPTIONS] to enter e-mail contents using SYMBOL or PASTE.●For e-mail contents input, you can use a maximum of 5000 Chinese Characters and 10000 English characters.●Those e-mails already sent or fail to get sent are stored in ‘Send Box’.Select Body ▶ Enter e-mail contents ▶Display e-mail contents4. Entering e-mail contentsSending stored e-mailsPress in idle mode ▶Select Send Box ▶ Select Send E-mail ▶ [DISPLAY] ▶ [ S E N D ]Edit : Enables you to edit e-mail before sending.Protect ON/OFF : Enables you to select lots of e-mails simultaneously for protection.Delete : Sort : Show Full Addr : Allows you to check all addresses of senders, receivers, Cc, Bcc, etc.Copy Mail Body : Enables you to use e-mail contents stored in Quick Note using [ O P T I O N S ] .1-In/3-In View : Allows you to set display method of e-mail stored in Send E-mail.1-In View displays e-mails within a line, and 3-In View within three lines.Select e-mail ▶ [MENU] ▶ Select desired menu1. Using send Box menusDelete 1 : Removes the only selected e-mail.Delete Selected :Removes lots of selected e-mails at a time using .Delete All : Removes all e-mails from Send E-mail.Date/Time : The latest e-mails stored in Send Box appear first.Not Sent : E-mails not sent have a priority.Recipient : Sort by recipient.Title : Sort by title.Protect : Protected e-mails have a priority.Select e-mail ▶ [MENU] ▶ Select desired menu1. Using send Box menus](https://usermanual.wiki/Motorola-Mobility/T5HD1/User-Guide-774662-Page-69.png)
![133132Using FAVORITES Using FAVORITESSelect Check New Mail ▶Select Inbox ▶ Select folder▶ Select e-mail and [DISPLAY] ▶ Check new e-mailAdd Filter : If you receive e-mail of which address is stored in a specific address folder in advance, the e-mail isstored in a specific folder not in MainBox. Maximum of 5 e-mail addresses can be stored in a folder.However, it is impossible to store e-mail address in MainBox.Edit Folder Name : Modifies folder name.Re-Filter : Applies the filter from Add Filter.Delete All : Removes all received e-mailsReset Folder : Resets the folder.Select a desired folder and [MENU] ▶ Select desired menuUsing Sent Message1. Using the folder menuSelect e-mail and [MENU] ▶ Select desired menuRcv Selected : If you receive e-mail of which title and sender only are selected, you may receive the entire e-mail again.Protect ON/OFF : Enables you to select lots of e-mails simultaneously for protection.Sort : Delete : Sort : Move To Folder : Moves the selected e-mail to other folder.Show Full Addr : Allows you to check all addresses of senders, receivers, Cc, Bcc, etc.1-In/3-In View : Allows you to set display method of e-mail stored in Inbox.1-In View displays e-mails within a line, and 3-In View within three lines.Copy Mail Body : Enables you to use e-mail contents stored in Quick Note using [ O P T I O NS] .Delete 1 : Removes the only selected e-mail.Delete Selected : Removes lots of selected e-mails at a time using .Delete All : Removes all e-mails from received E-mail.Rcvd At : The latest received e-mails appear first.Unread/Unreceived : Unread, unreceived e-mails have a priority.Sender : Sort by sender.Title : Sort by title.Protect : Protected e-mails have a priority.2. Using the e-mail menu[Using E-mail menu]](https://usermanual.wiki/Motorola-Mobility/T5HD1/User-Guide-774662-Page-70.png)
![135134Using FAVORITES Using FAVORITESCheck new e-mail ▶ Select e-mail address ▶ [SELECT] ▶Select menuNew Mail : Sends new e-mail to the selected e-mail address.Add to Addr Book : Adds the selected e-mail address to address book.Add Filter : Adds the selected e-mail address to folder filter you want.Add to Reject List : Adds the selected e-mail address to the reject list.Copy Mail Addr : Not support function.Reply : Replies to a sender.Reply All : Replies to a sender and other Cc.Forward : Forwards the received e-mail to others.Check new e-mail ▶ [MENU] ▶ Select Reply/Reply All/Forward ▶Enter e-mail ▶ [ S E N D ]Select SMIL Editor ▶Select desired menu[E-mail address menu]3. Replying/Forwarding e-mailsSMIL Editor1. New SMIL●Up to 5 slides can be created in an MMS file. However, only one image, text and audio data can be inserted per slide.An MMS file to be attached to E-mail can be created.Select New SMIL ▶Select Add New SLIDE and [EDIT] ▶Select desired menu[Insert Image]The selected image can be inserted.Select please Insert Image and [EDIT] ▶ Select Image data ▶ [OPTIONS] ▶ Select ATTACH ▶Select ‘Y e s’and press [OPTIONS] ▶ Select DONE ▶ [OK]](https://usermanual.wiki/Motorola-Mobility/T5HD1/User-Guide-774662-Page-71.png)
![137136Using FAVORITES Using FAVORITESSelect please Edit Text and [EDIT] ▶ Enter SMIL Text and press [OK] ▶ [OK] Input mms text.●You can use ‘E D I T’and ’P A S T E’if you select [OPTIONS] while entering SMIL. (See P.53~54)Select please Insert Audio and [EDIT] ▶ Select Audio data ▶ [OPTIONS] ▶ Select ATTACH ▶Insert audio(mmf, mid etc)Select ‘Y e s’and press [OPTIONS] ▶ Select DONE and [OK] Select Open SMIL ▶ Select desired Slide and [OK] ▶ Check the data and edit it ▶ [OK] ▶ [OK] The saved MMS data can be opened and edited.Auto-Rcving : Sets auto e-mail check without using check new e-mail.Rcving Type : Set e-mail receiving type.Receive Atchmnt : Set receiving enviroment for attachment. Press [DETAIL] to set receiving capacity for‘Image, Melody, Voice, Animation, vCard’attachment. Note that the each size of the attached file does not exceed 137Kbyte.Play Atchmnt : Previews attachment every 2 second, if it is set to ‘O n’.Show Folders : You can display/hide the user folder when you retrieving mails in ‘I n b o x’.Font Size : Change e-mail font size.Select Receiving & View ▶Select menuSelect Mail Settings ▶Select desired menu[Edit Text][Insert Audio]2. Open SMILE-mail Setting1. Receiving & View Setting](https://usermanual.wiki/Motorola-Mobility/T5HD1/User-Guide-774662-Page-72.png)
![138 139Using FAVORITES Using FAVORITESSelect Send & New Mail ▶Select menuQuote Original : Sets whether to display the existing e-mail in using e-mail reply function.Addr Group : Modifies address groups.Encoding Type : Set e-mail character encoding method.Del Sent History : Deletes sent history.Select Register Account ▶Select menuRegister : Registers e-mail account entered for server setup.Cancel Account : Cancels the registered e-mail account through wqp.2. Send & New Mail Setting3. Register Account Setting4. Others5. View Mail Settings6. AboutSelect Others ▶U-Info connect●Cannect Mail uni administrations site.Select View Mail Settings ▶Information is displayedSelect About ▶Information is displayed●The version and other information for Mail can be confirmed.Your device allows you to download applications from the internet written in Magic(J2ME) and allow you to install and execute them on your device. These applications could be messaging, animations, productivity tools or games.[TOP MENU] ▶ [FAVORITES] ▶ Select Magic ▶ Accessing MagicAccessing MagicSelect the Magic ▶ [MENU] ▶ Select a desired menuMagic MENU2. Accessing MagicMake Folder : You can create a new folder.System Info : You can view information on the Magic program.Registry : Sending registration message completed.](https://usermanual.wiki/Motorola-Mobility/T5HD1/User-Guide-774662-Page-73.png)
![140 141Using FAVORITES Using FAVORITESDownload Magic applications1. Enter Java by selecting Magic in UNI menu.2. Press Menu softkey. (You can do it by presssing [MENU] )3. Select ‘5. Download’from the menu by pressing Select softkey.( [Select] again)4. Select whichever server you want to connect from the server list. First, You should highlight the server you want to connect by u s i n g .5. Press [UNI] softkey. Then the phone tries to connect the server.6. The phone displays the applications(applets) and the folders of the server. If you want to download an application, you shouldhighlight if first by using , And then you can start the download sequence by pressing [ U N I ] .7. If the download start successfully, the phone will display information of the application. In the information screen, you shouldpress Download softkey. Then the phone downloads the application and displays ‘Installation Successful’when it is successful.8. If you want to go into a directory, you can do it by highlighting and pressing . similar to the case of applications.Key usage in MagicThe key usage in Java is similar to normal user interface of the phone. The followings are the key usage in Java.and : You can press the softkeys located at the bottom of the screen in Java by pressing a n d . If the softkeyyou want to press is located on the left side, you should press . If theSoftkey you want to press is located on the right side, you should press .: You can execute the application you want by pressing . You can also download an application or go into a directorywhile being connected to the download server. It might be used as fire key in game applications.: keys are used as direction keys.●For connecting to the download server. both Data Profile of the phone’s main menu and the Profile(s) in U-magic’s Wireless Setup menushould be set up properly. For setting Data Profile, you should enter ‘Setting →Data Mode →Data Profile’from the phone’s Main Menu andfill in appropriate values for Profile Name, Dial in number, user name and password. Only profile 5 is editable by user. For selecting Dataprofile used in U-magic you should enter ‘U-magic Menu →Wireless Setup →Select ISP’and select one data profile you want to use.For setting Profile(s) in U-magic’s Wireless Setup, you should enter ‘U-magic Menu →Wireless Setup →Profile →Profile x’and fill in appropriate values for Profile name, Host name, Port, Default path and so on.●When using the network and accidentally downloaded a virus intected software which leads to the malfunctioning of your V3a, Motorolawill not be responsible for any damage or loss due to this kind of incident.●If there is an incoming call during sound play in U-magic application such as Karaoke, the sound might not resume after hanging up, Inthis case, you might have to end restart the application.Execute Magic applications1. Enter Java by selecting ‘M a g i c’from the Shortcut menu.2. Highlight the application you want to execute by using .3. Press . Then the application starts. You can also do it by pressing Menu softkey and selecting ‘2. Execute applet’.3. Using Info[TOP MENU] ▶ [FAVORITES] ▶ Select Info ▶Select a desired menu](https://usermanual.wiki/Motorola-Mobility/T5HD1/User-Guide-774662-Page-74.png)
![Data Folder provides users with the efficient functions that manage the contents downloaded by uni, attached to Mail or thecontents are made from camera and recorded. Data Folder have several folders are based on different categories Display All, User Folder, My Data, Umedia, Picture, Ringtone, SMIL, vCard, Others.Display AllDisplay All shows the total list of files that contained in User Folder, My Data, Picture, Ring, UMedia, vCard and Others.4. Using My DocumentsSelect Display All ▶Select a data ▶ [OPTIONS] ▶ Select a desired menu142 143Using FAVORITES Using FAVORITESFILE INFO : You can view Name, Path, Type, Size, Data and copyright of the selected file. ATTACH : You can attach files to Mail.RENAME : You can change the data name. You can enter up to 12 Chinese letters or 24 English letters as the data neme.DELETE ONE/DELETE ALL : Deleted selected data.MOVE : You can move files between the folders. MAKE FOLDER : You can create up to 10 folders inside User Folder. Up to 2 0 English characters or numeral digits can be used as a folder name.[TOP MENU] ▶ [FAVORITES] ▶ Select My Documents and Enter LOck Code ▶Select a desired folderUser FolderUser Folder offers user to make folder and manage the files moved from other folder.Select User Folder ▶Select Folder or Data ▶ [OPTIONS] ▶ Select a desired menu](https://usermanual.wiki/Motorola-Mobility/T5HD1/User-Guide-774662-Page-75.png)
![144 145Using FAVORITES Using FAVORITESSelect My Data ▶Select My Photo/ My Video/ My Audio/ My RecordMy DataMy Photo : In My Photo folder, user can manage all photo files taken by phone camera.My Video : In My Video folder, user can menage all video files that taken by phone camera.My Audio : You can check the mp3 files downloaded via the phone from ‘My Audio’in the ‘My Data’menu of the ‘Data folder’.My Record : In My Record folder, there are all Recorded Sound, Recording Note. User also can manage Recorded Sound and Recording Note.Select Picture ▶Select a Data and press [OK] ▶ Press [OPTIONS] ▶ Select a desired menuP i c t u r eUser can manage picture files from Mail, UNI.1 Pixel/ 5 Pixel/ 10 Pixel : Move the area of picture with that unmbers of pixel.Add One : You can copy a file to Graphic Mode in Display, and set the graphic display for Idle Mode, Power Off or In Calling with the file.Full Edit : Operation for files JPG, BMP, PNG types except small range sized file, in this case pop up window willappear ‘Image size is not full’.Edit : Edit is also wallpaper operation for picture file but you can choose the displayed part for wallpaper will operate to select the wallpaper area.●You can full edit or edit the still pictures but not the moving pictures. ●You can save animations, games, karaokes and video files downloaded from UNI.●You can copy the selected animation or video file Graphic Mode by selecting ‘Add One’.U m e d i aSelect Media ▶ Select a Data and [OK] ▶ [OPTIONS] ▶ Select a desired menu](https://usermanual.wiki/Motorola-Mobility/T5HD1/User-Guide-774662-Page-76.png)
![146 147Using FAVORITES Using FAVORITESS M I LThe MMS data saved in the phone can be managed.●Add Bell : You can copy a file to Music Bell in Ringer Style, and set the ringer with the file.R i n gUser can manage sound files from Mail or UNI.Select Ring ▶ Select a Data and [ O K ]▶[OPTIONS] ▶ Select a desired menuSelect SMIL ▶ Select a data ▶ [OPTIONS] ▶ Select a desired menu●If you press [OPTIONS] in the Phone Book list and select ‘E X P O R T’, the selected phone number list is saved as ‘v C a r d’in ‘Data Folder’v C a r dUser can manage vcard files that exported from phone book.Select vCard ▶Select a Data and [ O K ]▶[OPTIONS] ▶ Select IMPORTO t h e rUser also can message undefined files that not supported by phone.](https://usermanual.wiki/Motorola-Mobility/T5HD1/User-Guide-774662-Page-77.png)
![148 149Using FAVORITES Using FAVORITES6. Using Bookmarks[TOP MENU] ▶ [FAVORITES] ▶ Select Bookmarks ▶View information 5. Using Music Street[TOP MENU] ▶ [FAVORITES] ▶ Select Music Street ▶Select a desired menuThe corrensponding number of ‘Order Music’, ‘SMS Cart’, ‘Music companion’shall be preset in the MS by manufactures. The numberof ‘Order Music’is 10155; The number of ‘SMS Cart’is 10158; The number of ‘Music companion’is 10159.View information of Bookmarks.You can access and navigate the internet through the uni browser.Press [UNI] in idle mode Accessing UNI●‘ ’displayed on the LCD while you are connected to UNI.Accessing UNI7. Accessing UNIYou can set UNI environment for convenient. (On-line UNI menu)Accessing UNI ▶ [MENU] ▶ Select desired menuUNI MENUHomepage : enables you to go to the top site.History : allows you to check the site recently accessed.Bookmarks : allows you to access your favorite sites.Push Message : UNI browser version info.Refresh : Setup or modify the browser configuration.Save Page : Stored Page (Maxi 3).Save Item : Stored Image (Maxi 3).Go To URL : allows you to go to the site you want to access via direct input of URL.Advanced : enables you to go to the top site.](https://usermanual.wiki/Motorola-Mobility/T5HD1/User-Guide-774662-Page-78.png)