Motorola Solutions 89FT4926 Portable 2-way Radio User Manual User Guide
Motorola Solutions, Inc. Portable 2-way Radio User Guide
UserManual.wiki
>
Motorola Solutions
>
89FT4926 User Manual
>
User Guide
Contents
1.
RF Energy Exposure Safety Manual
2.
User Guide
User Guide
Navigation menu
Upload a User Manual
Namespaces
Wiki Guide
HTML
PDF
Info
Views
User Manual
Discussion / Help
Navigation


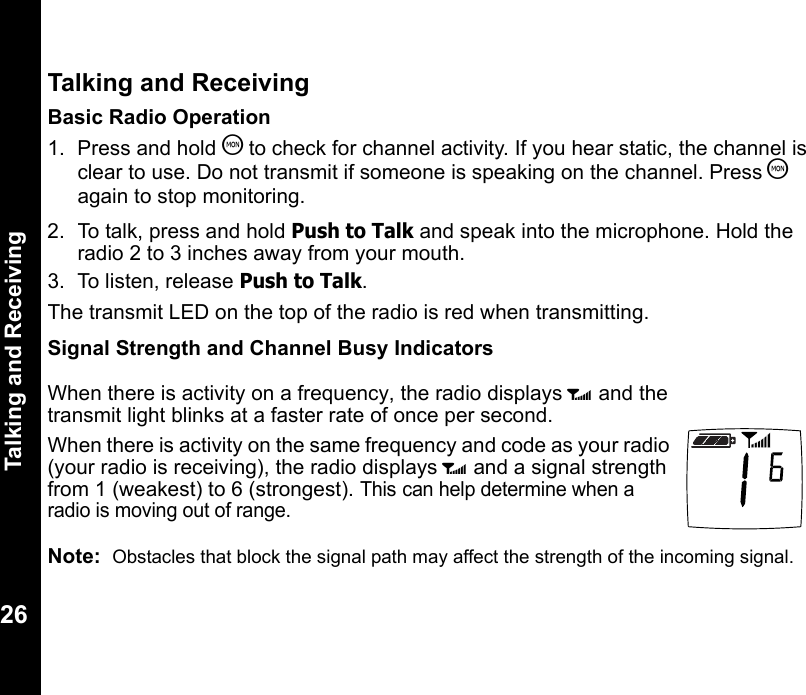
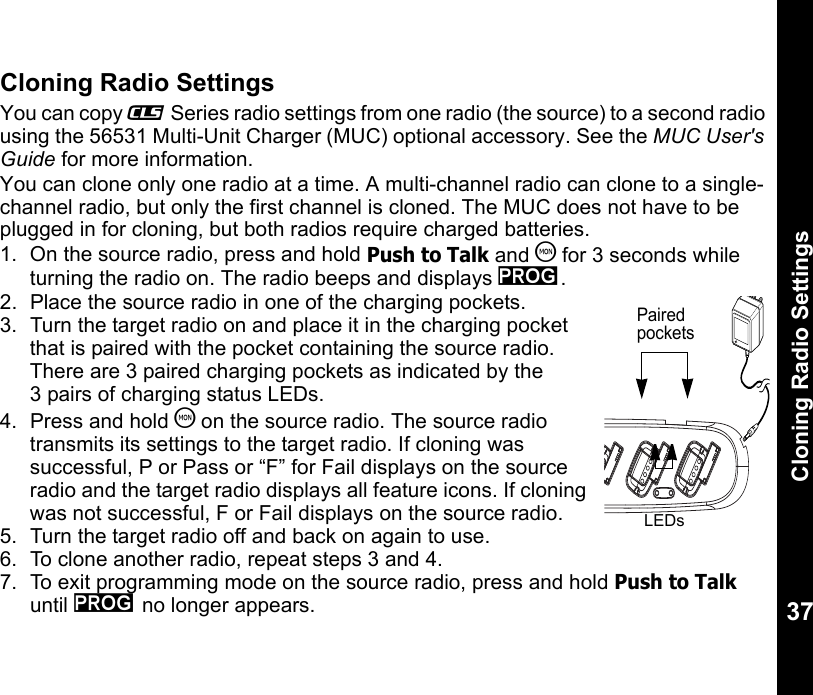
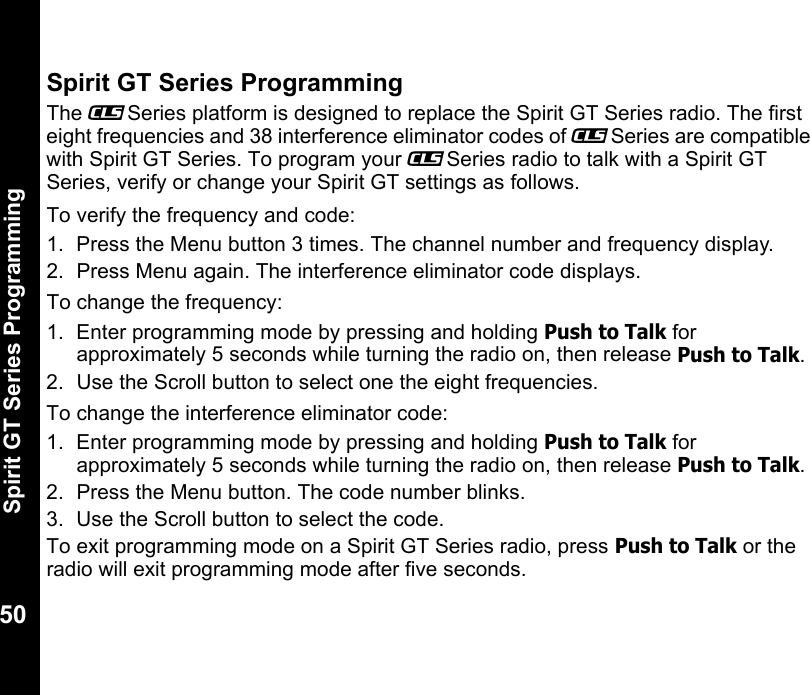
![Radio Controls18Radio Controls020976oUse P to:Turn radio on/offAdjust radio volumeUse B to:Transmit call toneUse Push to Talk to:TalkExit a menuUse S to:Lock the keypadScroll through menusUse T to:Monitor the frequencyScan channels (CLS1410 only)MicrophoneAccessory JackSpeakerUse [ and ] to:Change channels (CLS1410 only)Change menu settings](https://usermanual.wiki/Motorola-Solutions/89FT4926.User-Guide/User-Guide-2670208-Page-22.png)

![Talking and Receiving286. To transmit, speak into the accessory microphone. To receive, stop talking.To disable VOX operation, press Push to Talk or remove the audio accessory. Note: To order accessories, visit www.motorolasolutions.com/CLS, call 1-800-448-6686, or contact your point of purchase.Setting the VOX SensitivityYou can adjust the sensitivity of your radio’s accessory or microphone during VOX operation to suit different operating environments. These menus appear only when the VOX feature is in use, which is indicated by g.1. Press S until g displays. The radio displays H when you are setting the external VOX (with audio accessory).2. Press [ or ] to select the sensitivity level:Locking the KeypadYou can lock the keypad to avoid accidentally changing your radio settings.1. Press and hold S for 3 seconds.2. To unlock, press and hold S for 3 seconds.0 = Off 1 = Low 2 = Medium 3 = High020995oExternal VOX](https://usermanual.wiki/Motorola-Solutions/89FT4926.User-Guide/User-Guide-2670208-Page-32.png)

![Talking and Receiving30Skipping and Removing Channels While ScanningScan has two temporary features to make it easier to use.• Scan advanceIf the radio stops scanning on a channel you do not want to listen to, press ] to resume scanning for the next active channel.• Nuisance deletePress and hold [ to temporarily remove a channel from the scan list. The channel return the next time you use the scan feature.](https://usermanual.wiki/Motorola-Solutions/89FT4926.User-Guide/User-Guide-2670208-Page-34.png)
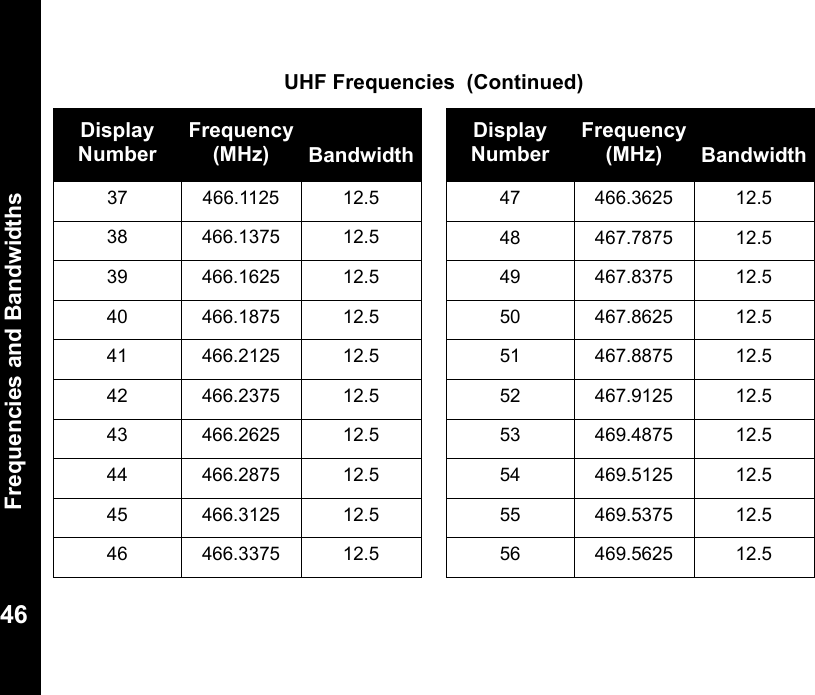
![Programming Mode33Entering Programming ModePress and hold Push to Talk and T for 3 seconds while turning the radio on. The radio beeps and displays k , the channel number blinks, and the frequency (indicated by l) and code (indicated by y) display alternately.Note: If you press and release the Push to Talk button when programming CSL1410 models, you will return to the front of the Programming Mode.Selecting a Channel (CLS1410 Only)1. In programming mode, press S until the channel number blinks and the frequency and code display alternately (this is the first setting after you enter programming mode).2. Press [or ] to select the channel.3. Press and hold Push to Talk to exit programming mode, or press S to continue programming.Configuring the Operating Frequency from a Pre-programmed Frequency List1. In programming mode, press S until l displays and the frequency number blinks.2. Press [ or ] to select the frequency.3. Press and hold Push to Talk to exit programming mode, or press S to continue programming.Note: See page 44 for information on frequencies for communicating with other business radios. If you are matching your _ Series radio to an existing Spirit GT radio, see page 50.](https://usermanual.wiki/Motorola-Solutions/89FT4926.User-Guide/User-Guide-2670208-Page-37.png)
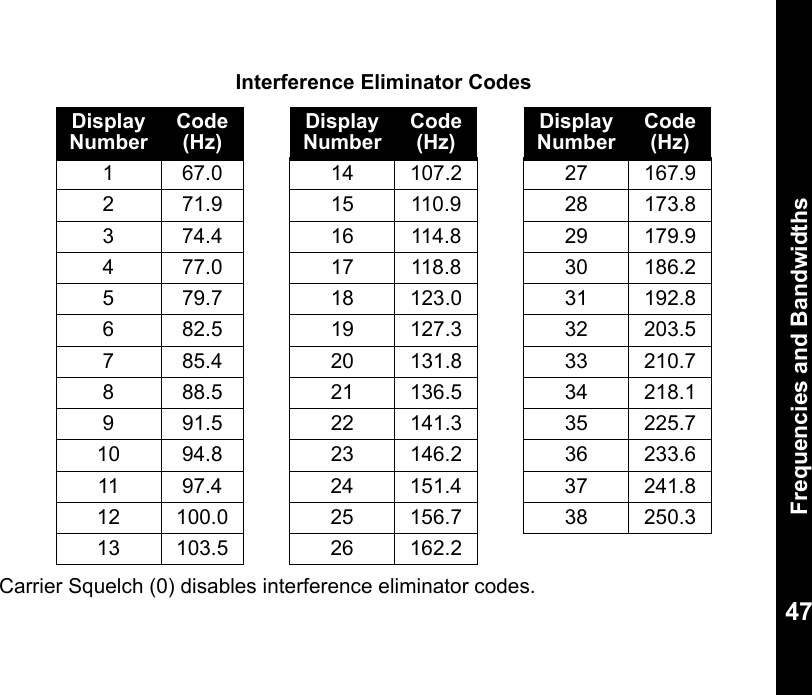
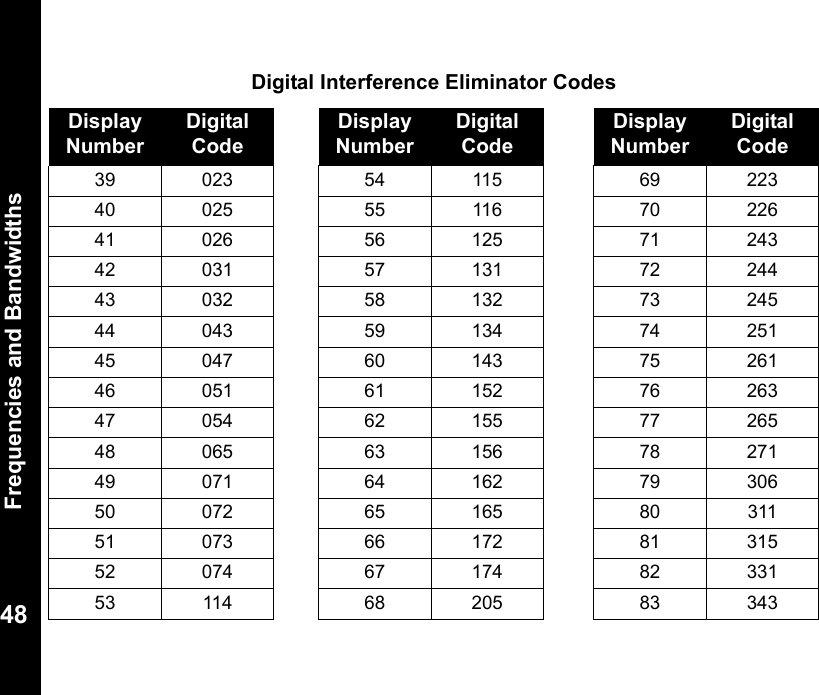
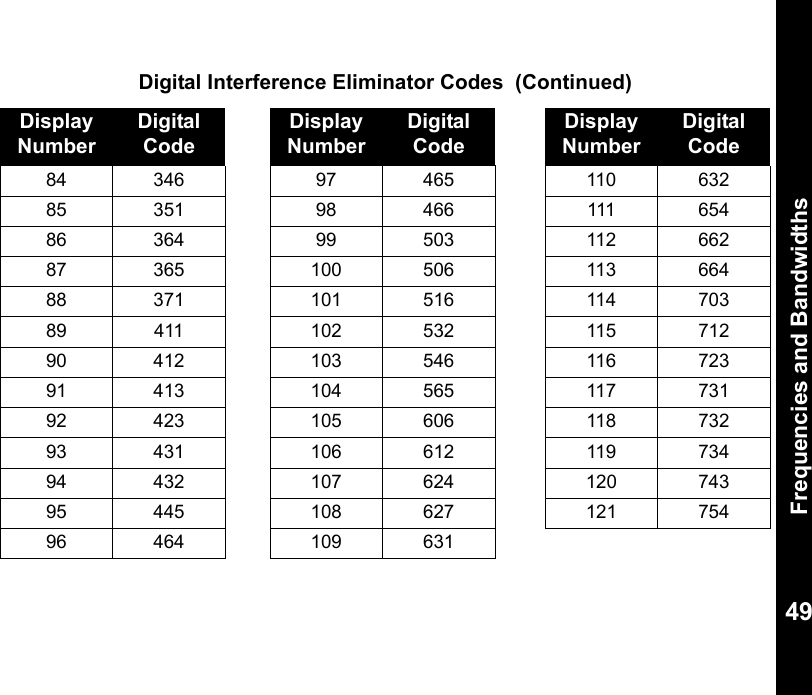
![Programming Mode34Programming the Interference Eliminator CodeThe interference eliminator code helps minimize interference by providing code combinations that filter out static, noise, and unwanted messages.1. In programming mode, press S until y displays and the code number blinks.2. Press [or ] to select the code (see page 47).3. Press and hold Push to Talk to exit programming mode, or press S to continue programming.Programming the Available Channels (CLS1410 only)If you need fewer channels, you can reduce the number of available channels.1. In programming mode, press S until = displays and the channel number blinks.2. Press [or ] to select the number of channels you want available.3. Press and hold Push to Talk to exit programming mode, or press S to continue programming.Note: The radio retains settings for channels made unavailable.](https://usermanual.wiki/Motorola-Solutions/89FT4926.User-Guide/User-Guide-2670208-Page-38.png)
![Programming Mode35Programming Call Tones and VibraCall® (CLS1410 only)Your radio can transmit call tones to other radios in your group so you can alert them that you are about to talk. Your radio is programmed at the factory with call tones turned off (set to 0), but you can change this setting to choose a distinctive call tone.The VibraCall® feature is an additional call tone option that makes the CLS1410 radio vibrate briefly when it receives if you have not transmitted or received in the last 30 seconds. Select call tone 4 to turn VibraCall® on. i displays on the radio when VibraCall® is on.1. In programming mode, press S until Edisplays.2. Press [or ] to hear and select the call tone. Select call tone 4 for VibraCall® (CLS1410 only).3. Press and hold Push to Talk to exit programming mode, or press S to continue programming.To transmit your call tone, press B on the side of the radio.](https://usermanual.wiki/Motorola-Solutions/89FT4926.User-Guide/User-Guide-2670208-Page-39.png)
![Programming Mode36Programming Microphone GainYou can adjust the microphone sensitivity to suit different users or operating environments.1. In programming mode, press S until g and ? display.2. Press [ or ] to select the sensitivity level:3 = High sensitivity, for quiet environments2= Medium sensitivity (default)1= Low sensitivity, for loud environments3. Press and hold Push to Talk to exit programming mode, or press S to continue programming.Editing the Scan List (CLS1410 Only)For faster scanning and to avoid hearing unwanted transmissions, you can edit the scan list to skip channels.1. In programming mode, press S until h displays and the channel number and Y or n blink.2. Press [ or ] to select the channel you want to remove from the scan list.3. Press T to display either Y to include the channel or n to exclude the channel.4. Press and hold Push to Talk to exit programming mode, or press S to continue programming.](https://usermanual.wiki/Motorola-Solutions/89FT4926.User-Guide/User-Guide-2670208-Page-40.png)
![Advanced Features38Advanced FeaturesYou can set the following features by pressing and holding additional buttons while turning the radio on. To Do ThisPress This Button While Turning the Radio On Default SettingTurn Keypad Tones On/OffTurns keypad beeps off for silent keypad operation. [OnTurn End-of-Transmission Tone On/OffIf enabled, your two-way radio transmits a tone when you finish transmitting (like saying Roger or Over).If keypad tones are off and end-of-transmission tone is on, you will not hear the end-of-transmission tone, but it is transmitted.]Off](https://usermanual.wiki/Motorola-Solutions/89FT4926.User-Guide/User-Guide-2670208-Page-42.png)

![_Series Programming Quick Reference To enter programming mode, press and hold Push to Talk and T for 3 seconds while turning the radio on. The radio beeps and displays k, the channel number blinks, and the frequency (indicated by l) and code (indicated by y) display alternately.Set the Channel* Press [ or ].Set the FrequencyPress S until l displays. Press [ or ] to change the frequency.Set the Interference Eliminator CodePress S until ydisplays. Press [ or ] to change the code.Set Available Channels*Press S until = displays.Press [ or ] to select number of available channels.* CLS1410 Only](https://usermanual.wiki/Motorola-Solutions/89FT4926.User-Guide/User-Guide-2670208-Page-62.png)
![_Series Programming Quick ReferenceSet a Call TonePress S until E displays. Press [ or ] to select 1 , 2 , or 3 for audible call tones, 4 for VibraCall, or 0 for off (default).Set the Microphone GainPress S until g and ? display. Press [ or ] to select: 1 Low sensitivity 2 Medium sensitivity 3 High sensitivityEdit the Scan List*Press S until h displays and the channel number and Y or n blink. Press [ or ] to select the channel, then press T to select Y(include channel) or n (exclude channel).](https://usermanual.wiki/Motorola-Solutions/89FT4926.User-Guide/User-Guide-2670208-Page-63.png)