Motorola Solutions 89FT5829 Dual-Band GSM Phone User Manual Rainier2UG
Motorola Solutions, Inc. Dual-Band GSM Phone Rainier2UG
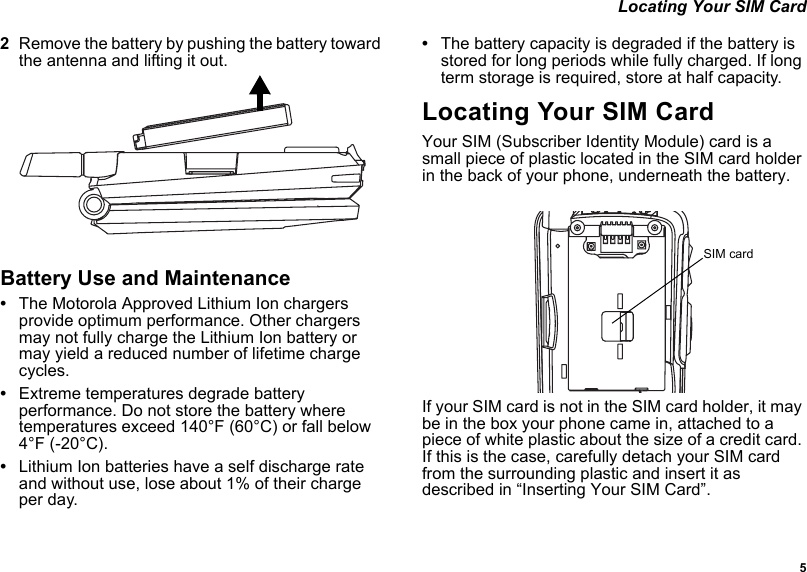
UserManual.wiki
>
Motorola Solutions
>
89FT5829 User Manual
Users Manual
Navigation menu
Upload a User Manual
Namespaces
Wiki Guide
HTML
PDF
Info
Views
User Manual
Discussion / Help
Navigation


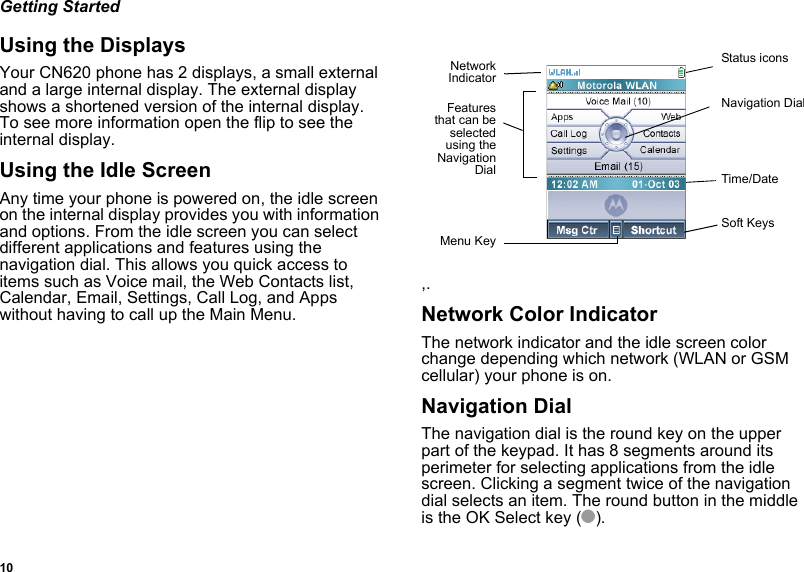
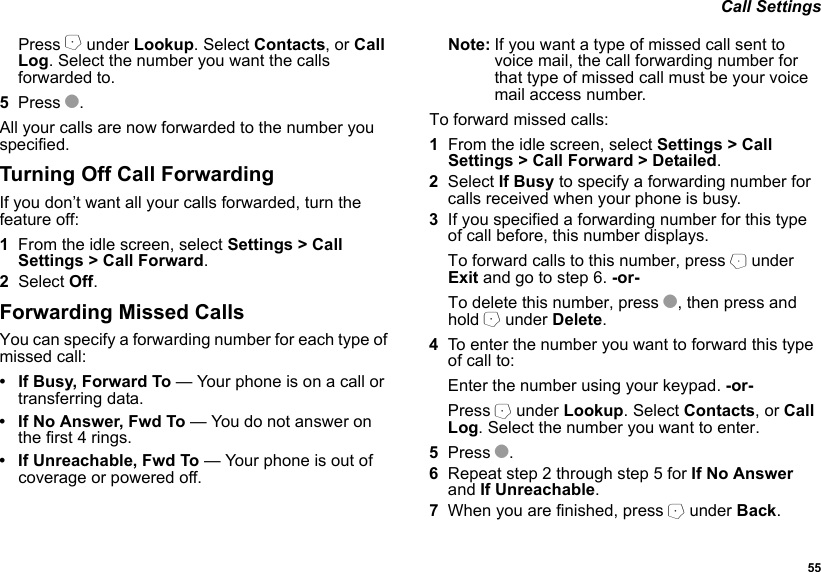
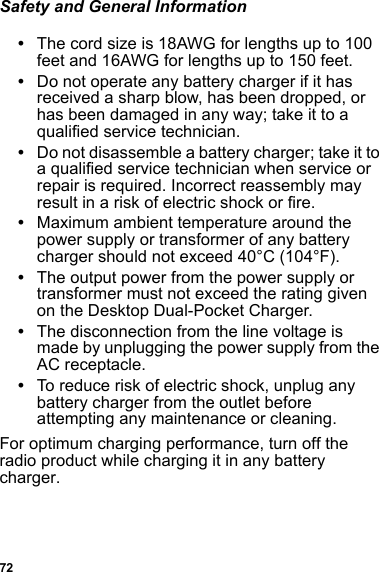
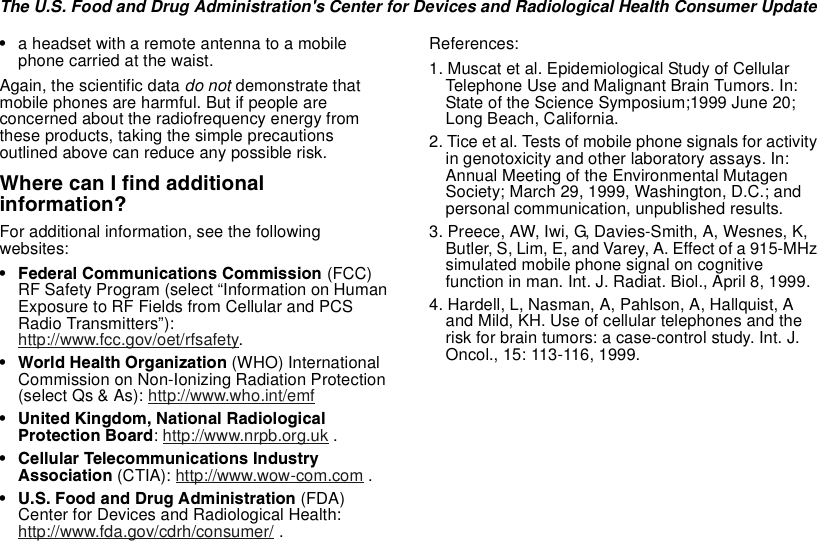
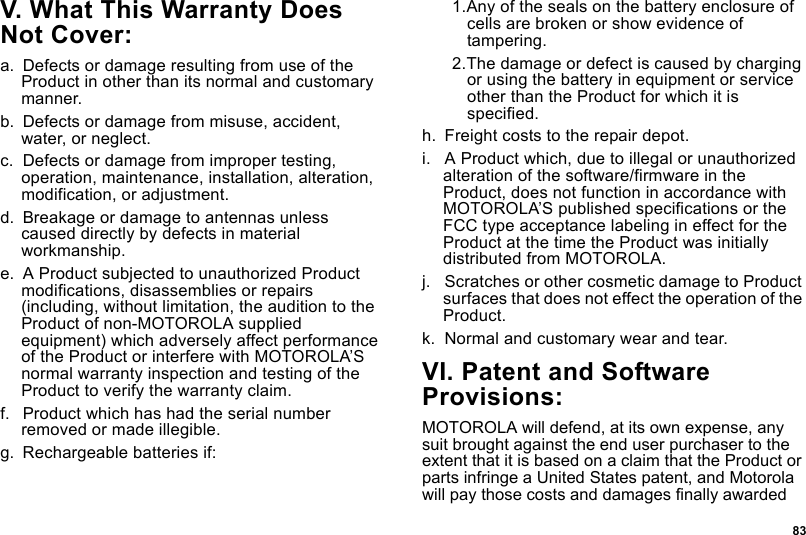
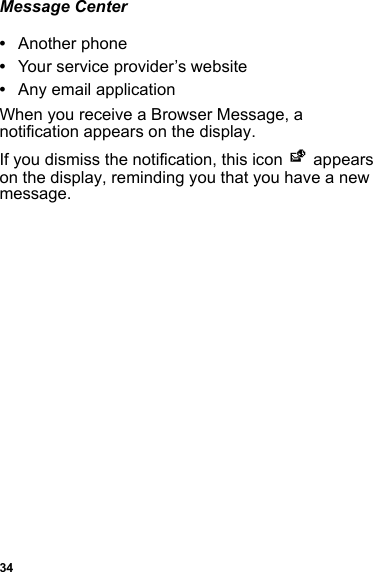
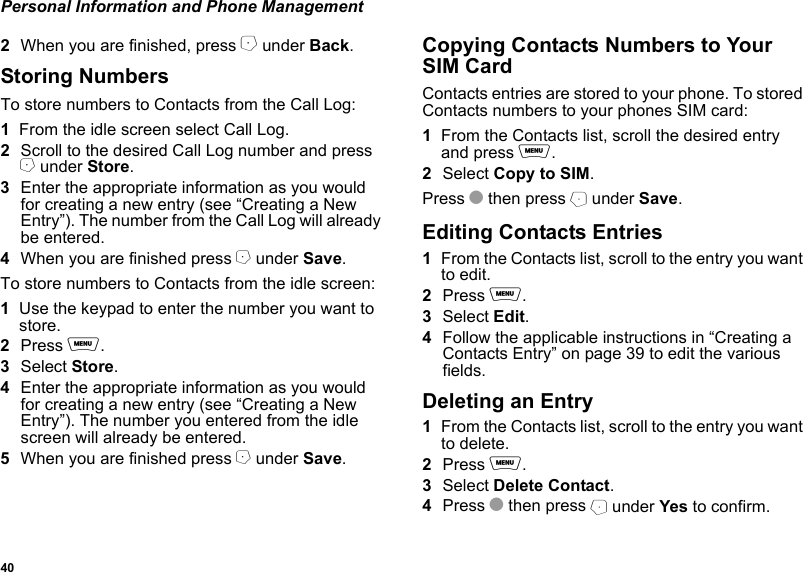
![12Getting StartedMain MenuAll your phone’s features can be accessed through the main menu. From the idle screen, press m. This displays the Main Menu items (shown in bold). Select a Main Menu item and press O to display the the submenu items. Tasks[New Task]List of “To Do’s”bMessage CenterShort MsgsCreate MessageVoicemailEmailBrowser MsgsInfo SrvcsQuick Notes OutboxDraftsAccess and send messages.mShortcuts Allows quick access to screens. See page 45.cWeb Browse the Web.jContacts[New Entry]View, store, edit contacts. See page 39.lCalendarnew event formlist of eventsSchedule appointments. See page 41.SettingsSoundsPhone StatusSecurityHeadset SettingsCar SettingsInitial SetupNetwork SettingsTimers and MetersCall SettingsExtended ServicesCustomize your phone. See page 63.Call Log View recent calls. eApps Access applications.fOther](https://usermanual.wiki/Motorola-Solutions/89FT5829/User-Guide-417459-Page-22.png)


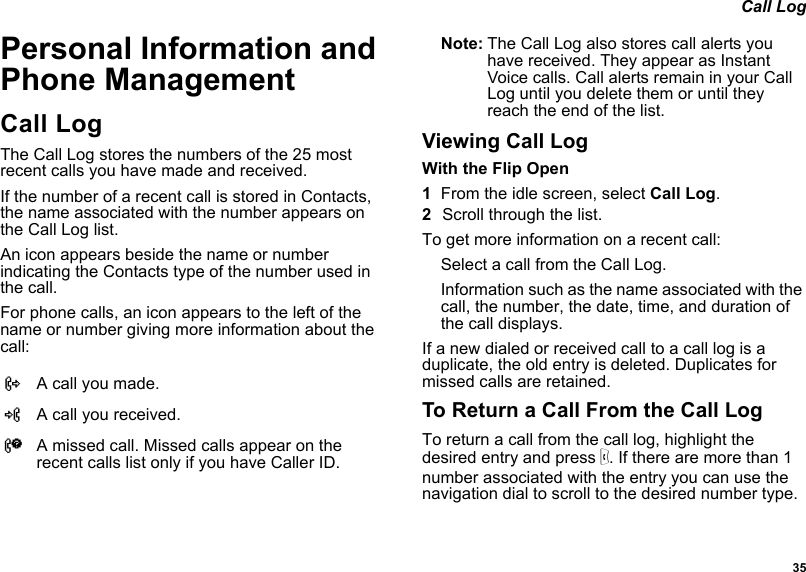
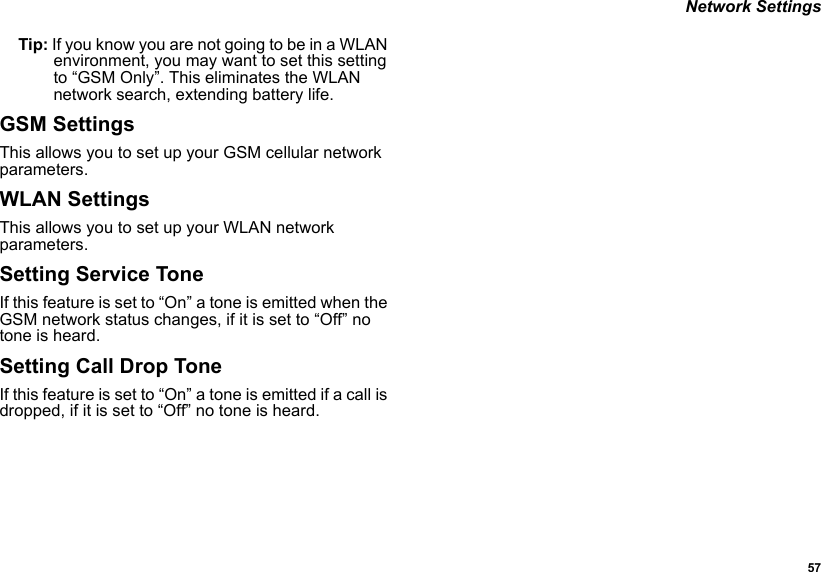
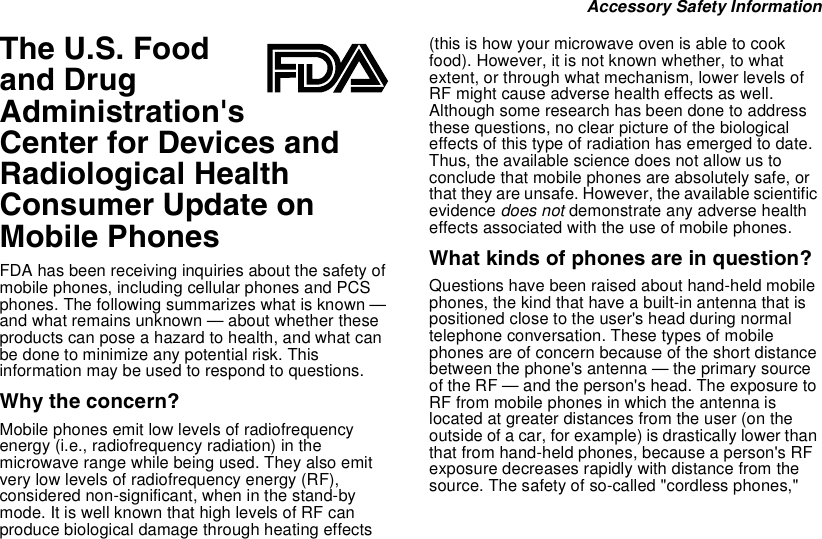
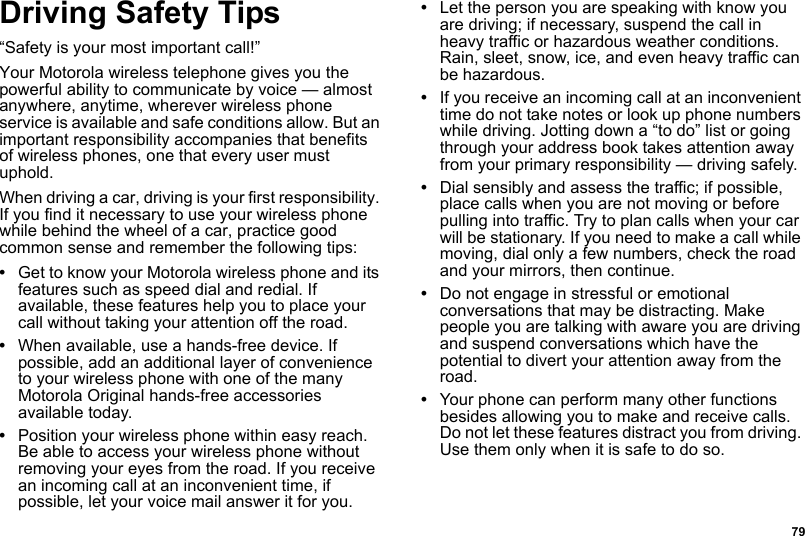
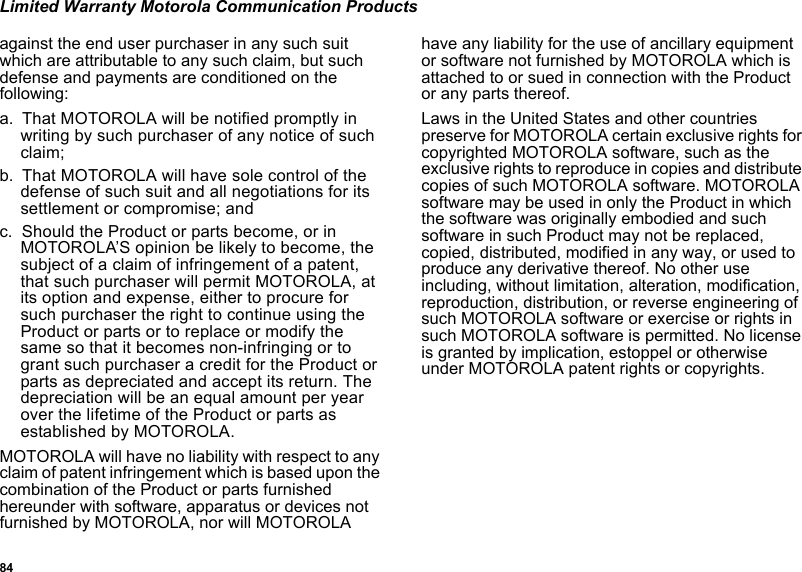
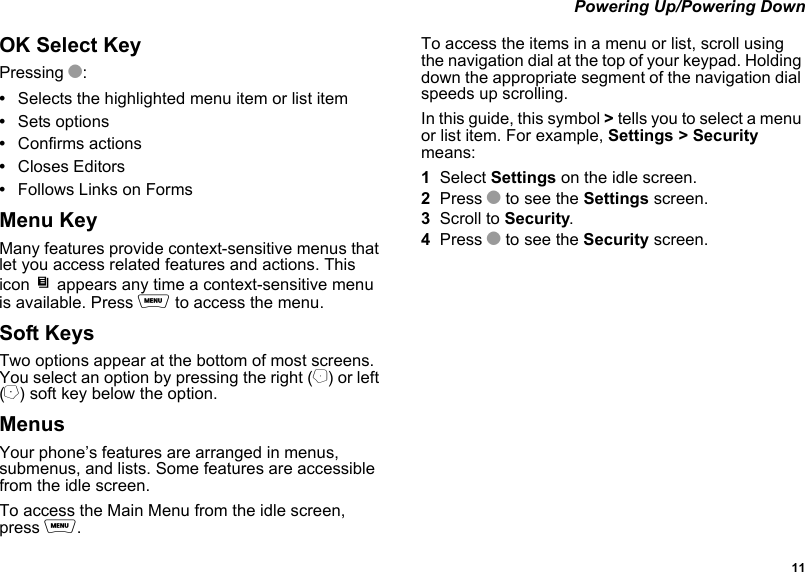
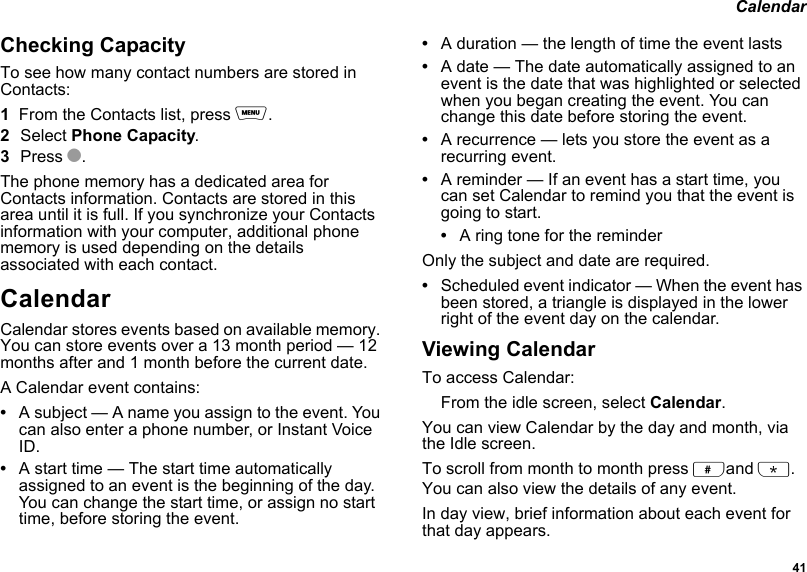
![36Personal Information and Phone ManagementViewing Date and Time and Other Call DetailsTo view the date and time a call was received and other call related details (such as duration, name, number type):1From the idle screen, press s, or select Call Log.2Highlight the desired entry.3Press O for details.Missed Phone CallsWhen you miss a call, this icon V and the number of phone calls you have missed appear briefly.With the Flip OpenIf you want to dismiss the missed call message, press A under Exit. -or-If you want to view the missed call on the call log list, press O.With the Flip ClosedIf you want to dismiss the missed call message, press the Instant Voice button.Deleting EntriesTo delete a call:1From the Call Log, scroll to the call you want to delete.2Press m under Remove.3Press O or press A under Yes to confirm.To delete all calls:1From the Call Log, press m.2Select Clear Log.3Press O or press A under Yes to confirm.Storing Calls From the Call Log to Contacts1From the Call Log, scroll to the number you want to store.2Press A under Store. -or-Tip: If Store is not on this menu, the number is already stored in Contacts.3To store the number as a new entry, select [New Entry]. -or-To store the number to an existing entry, select the entry.4With the Contacts type field highlighted, scroll left or right to display the Contacts type you want to](https://usermanual.wiki/Motorola-Solutions/89FT5829/User-Guide-417459-Page-45.png)
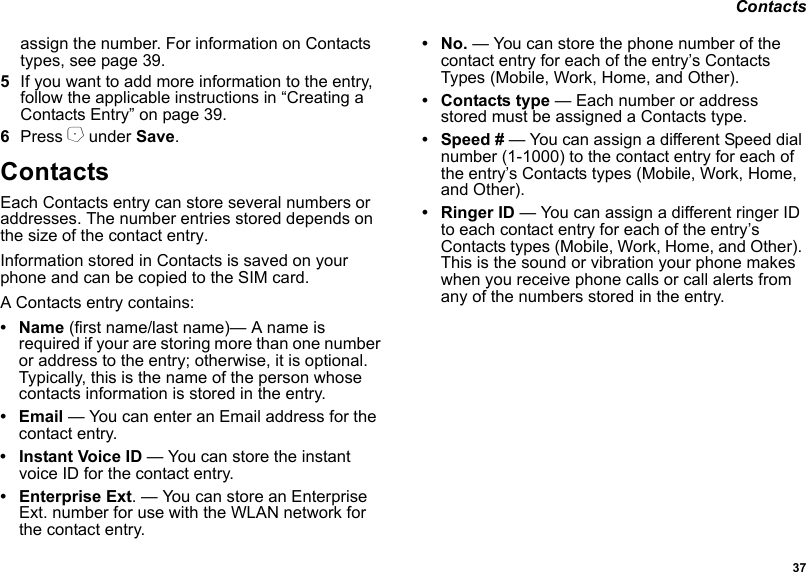
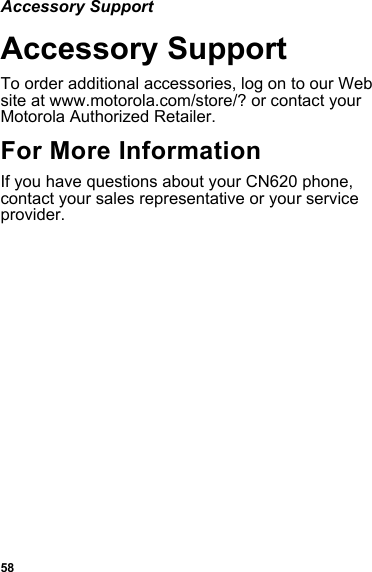
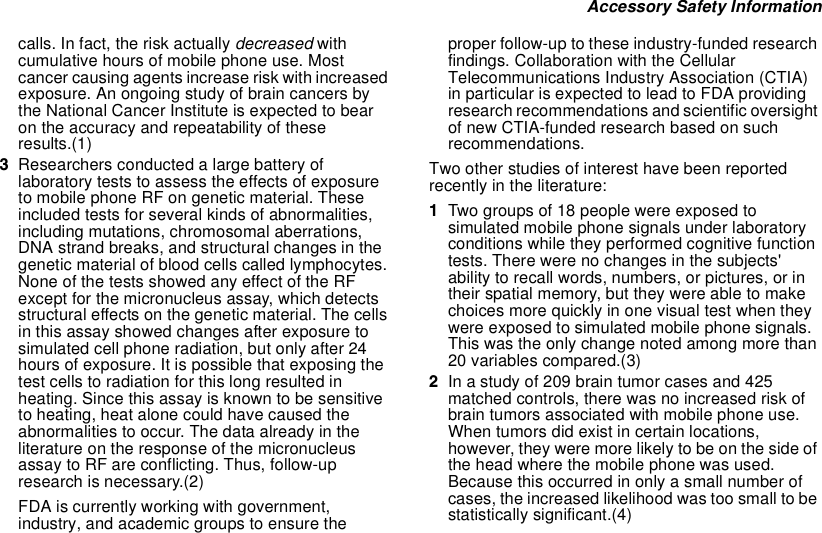
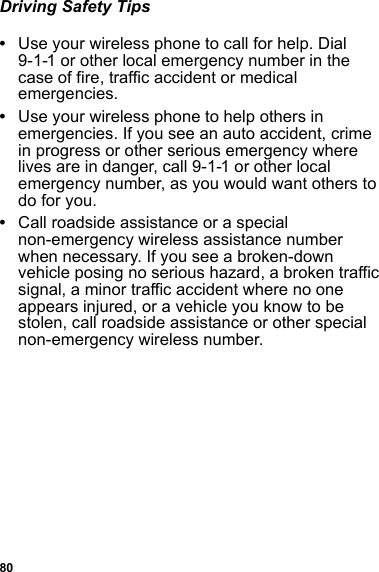
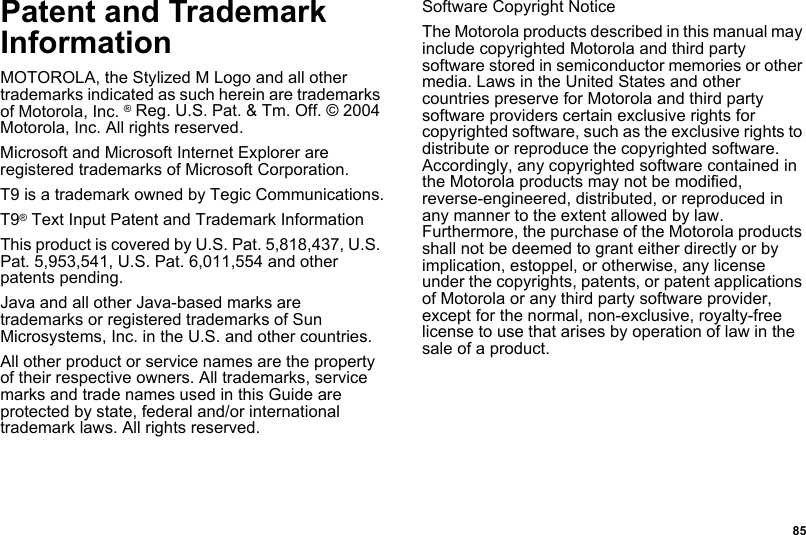
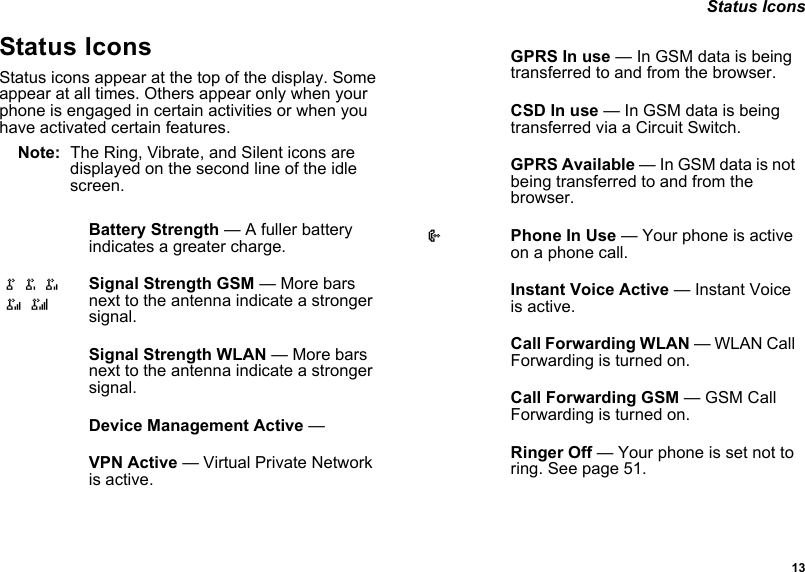
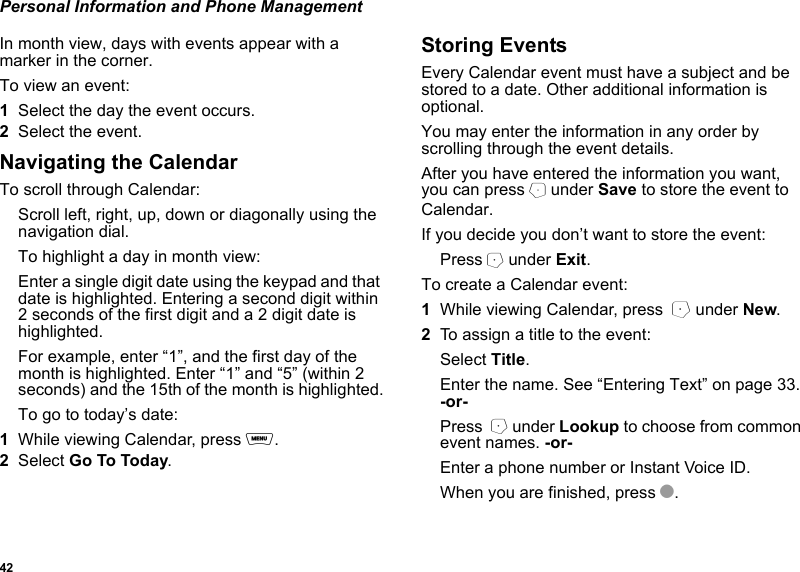
![39 ContactsCreating a Contacts EntryA number or address and a Contacts type are required for all Contacts entries. Other information is optional. You may enter the information in any order by scrolling through the entry form.To create a Contacts entry:1From the Idle screen, select Contacts and press O.2Select Contacts > [New Entry] and press O.3Press m to select a text entry method and press O.4Enter the first/last name of the contact.To backspace a character press A under Delete.5If you want to store the entry’s Email address, scroll to Email enter the address.6If you want to store the entry’s Instant Voice ID, scroll to Instant Voice ID enter the ID.7To store the entry’s enterprise extension, scroll to Enterprise Ext. enter the extension.Note: The enterprise extension should only be used on your campus and not other campuses or companies.8To store the entry’s phone number, scroll to No. and enter the phone number.Enter the number. For phone numbers, use the 10-digit format. For email addresses, see “Entering Text”. 9To assign a contacts type of the number being stored, scroll to Type and use the left/right segments of the navigation dial to select the type (Work, Home, Mobile, or Other).10To assign a speed dial number, number being stored, scroll to Speed # and the next available number can be assigned or you can enter the desired speed dial number 1-1000) if it is available.11 If you want to assign a ring ID to the entry, scroll to Ringer ID and use the left/right segments of the navigation dial to select the desire ringer ID.You can continue entering more numbers for different Contacts Type (Work, Home, Mobile, or Other) for this entry.12When you are finished entering all the information needed for this entry, press B under Save.Voice Tags1If you want to create a voice tag for a phone number, select Voice Tag.As directed by the screen prompts, say and repeat the name you want to assign to the number. Speak clearly into the microphone.](https://usermanual.wiki/Motorola-Solutions/89FT5829/User-Guide-417459-Page-48.png)
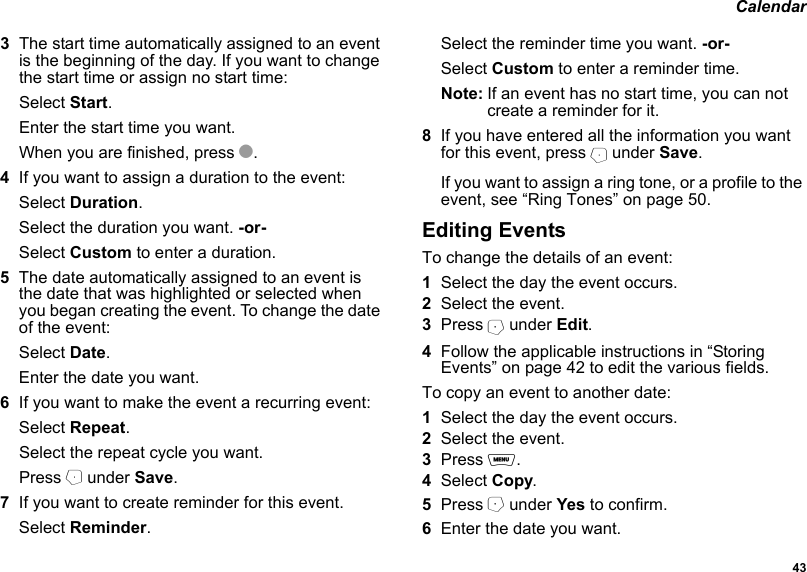
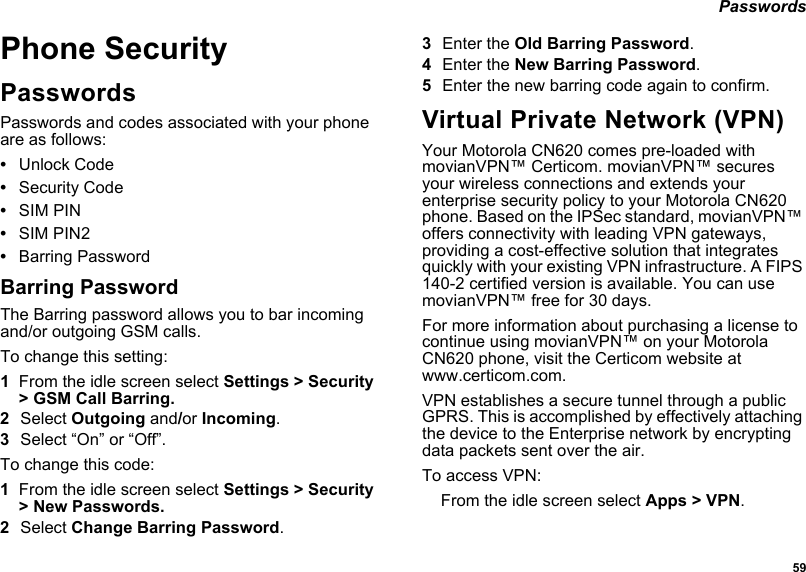
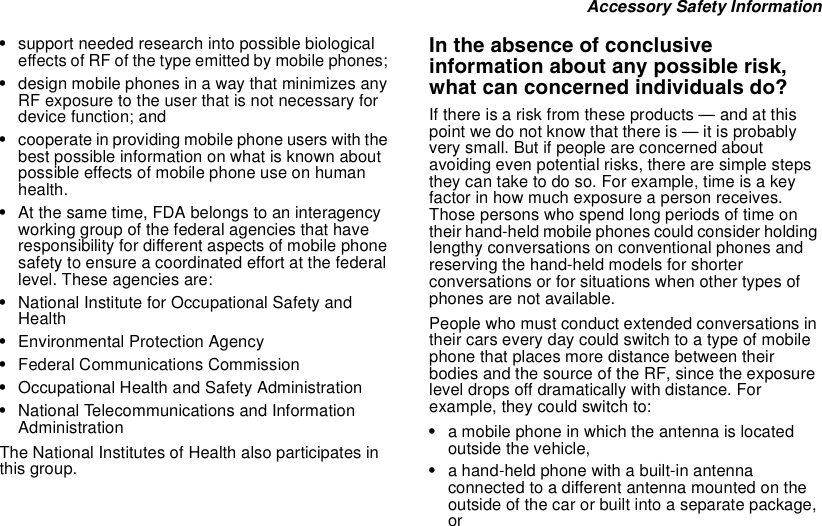
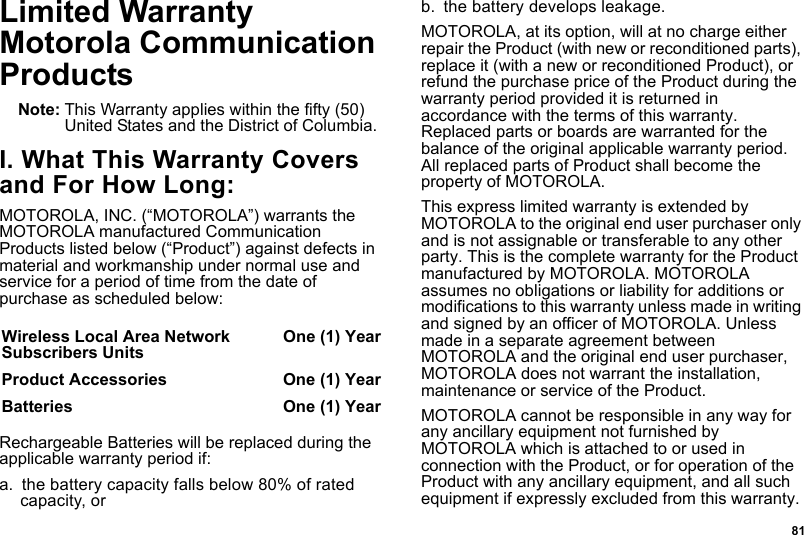
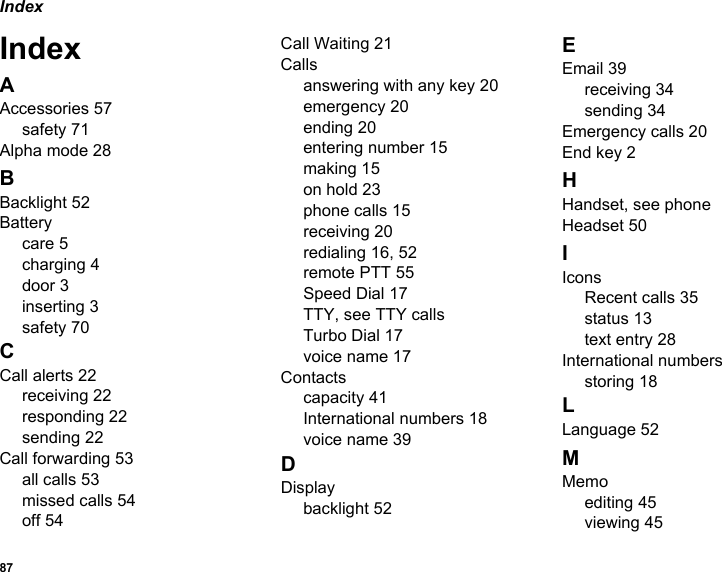
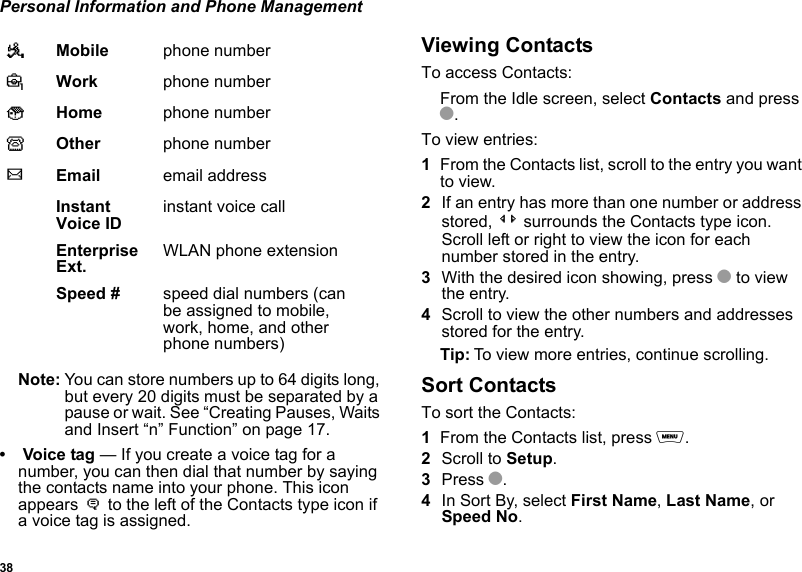
![45 TasksTasksTasks allows the user to schedule, prioritize, and organize a list of “To Do’s”.To create a task:1From the idle screen, select Tasks.2Select [New Task].3Press O.4Enter the appropriate information for your new task.To view the task later:1From the idle screen, select Tasks.2Select the desired task and press O.To delete the task:1From the idle screen, select Tasks.2Press and hold A under Delete.To edit the task:1From the idle screen, select Tasks.2Select the task you want to edit.3A under Edit.4Press O.To delete a task:1From the idle screen, select Task.2Select the desired task.3Press m and select Delete.Task RemindersSee “Assigning Ring Tones” for setting up Task Reminders.Synchronizing InformationWith Microsoft ActiveSync software you can sync your phone’s information to your personal computer. Your phone can synchronize with Microsoft Outlook and uses a tethered USB connection. The following items can be synchronized from your phone to your computer:•Calendar•Tas k s•ContactsShortcutsShortcuts lets you access most menu options by pressing a number on your keypad or saying the voice name of the shortcut. Your phone has a preset numbered list of shortcuts.1Shortcuts2My Info](https://usermanual.wiki/Motorola-Solutions/89FT5829/User-Guide-417459-Page-54.png)