Motorola Solutions 89FT5832 iDEN i315 with MOTOtalk User Manual i315ConchPlusMot

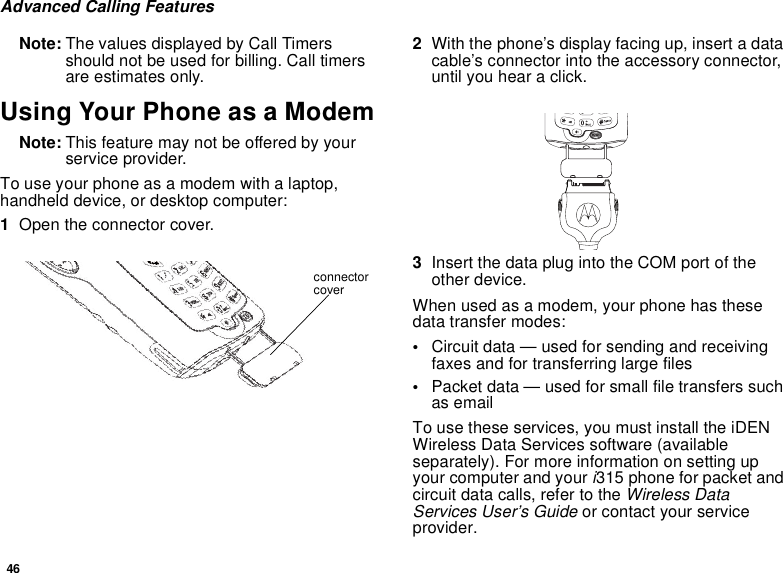
Motorola Solutions, Inc. iDEN i315 with MOTOtalk i315ConchPlusMot
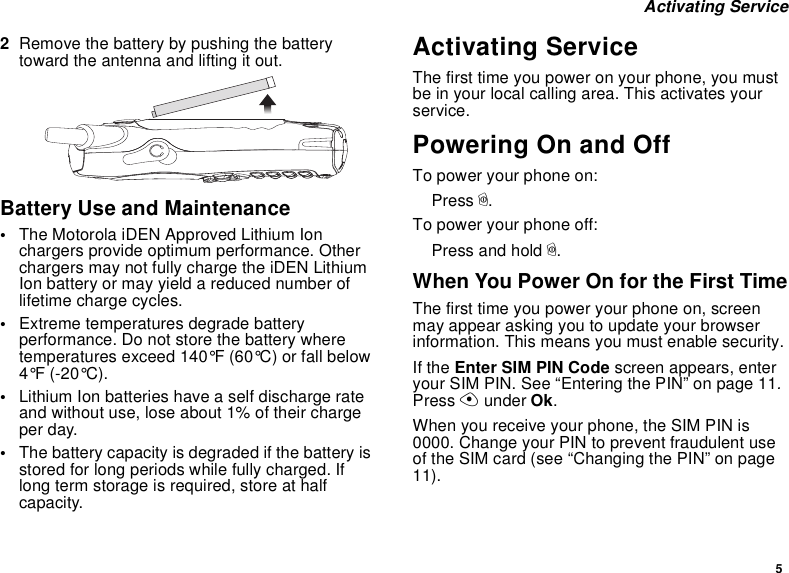
User Manual

MotorolaiDENDigital Multi-service Data-capable Phonei315 Phone User’s GuideBETA DRAFT@NNTN5504A@NNTN5504A
IMPORTANT NOTICE: PLEASE READ PRIOR TO USING YOUR PHONEThe SIM card provided in this kit is intended for use with the phone provided in this package. Loss of certain features will result when using a SIM card from one of the following models: i30sx, i35s, i50sx, i55sr, i58sr, i60c, i80s, i85s, i88s, i90c, i95cl series, and the i2000 series.For more information on SIM card compatibility, go to www.motorola.com/iden/support.Defects or damage to your Motorola phone that result from the use of non-Motorola branded or certified Accessories, including but not limited to replacement housings and or other peripheral accessories, are excluded from warranty coverage. Please refer to the text of Motorola's Limited One Year warranty in this user’s guide for complete details.
iContentsGetting Started........................................... 1Locating Your SIM Card....................................2Activating Service..............................................5Powering On and Off.........................................5Enabling Over-the-Air Security..........................6Phone Programming .........................................6Finding Your Phone Number.............................7Phone Basics ....................................................7SIM Card Security ...........................................11Locking the Keypad.........................................14Accessories.....................................................15For More Information.......................................15Making Calls............................................. 16Phone Calls.....................................................16Private Calls ....................................................16Receiving Calls................................................16Call Icons.........................................................17Ways to Enter Calls.........................................17Using Speakerphone.......................................19Using Mute ......................................................20Making Emergency Phone Calls .....................20MOTOtalk ..................................................21Using MOTOtalk..............................................21Switching to MOTOtalk ...................................22Setup Options .................................................22MOTOtalk Icons ..............................................23Channels and Codes.......................................23MOTOtalk Private Calls...................................25Making a MOTOtalk Call .................................26Receiving a MOTOtalk Call.............................26Assigning a MOTOtalk Number in Contacts ...26Recent Calls....................................................26Making Emergency Calls from MOTOtalk .......26Call Alerts..................................................27Sending Call Alerts..........................................27Receiving Call Alerts .......................................27Using the Call Alert Queue..............................27Recent Calls..............................................29Storing Recent Calls to Contacts ....................29
iiDeleting Recent Calls......................................30Contacts ................................................... 31Viewing Contacts.............................................32Creating Entries...............................................33Storing Numbers Faster ..................................34Editing Entries .................................................35Deleting Entries...............................................35Checking Capacity ..........................................35Creating Pauses and Waits.............................36International Numbers.....................................36Accessing Contacts with GSM Phones...........37Call Forwarding........................................ 38Forwarding All Calls ........................................38Turning Off Call Forwarding ............................39Forwarding Missed Calls.................................39Viewing Call Forwarding Settings....................40Advanced Calling Features..................... 41Call Waiting .....................................................41Call Hold..........................................................423-Way Calling..................................................42Creating Pauses and Waits While Dialing.......43Making International Calls...............................43Setting One Touch PTT ..................................43Group Calls .....................................................44Call Timers ......................................................45Using Your Phone as a Modem ......................46Making TTY Calls............................................47Memo.........................................................49Ring Tones................................................50Setting Your Phone to Vibrate.........................50Turning Ring Tones Off...................................50Ring and Vibrate .............................................51Assigning Ring Tones to Contacts ..................51Viewing Ring Tone Assignments ....................52Downloading More Ring Tones.......................52Managing Memory ..........................................52Deleting Custom Ring Tones ..........................52Entering Text ............................................54Using Alpha Mode...........................................54Using Word Mode ...........................................54
iiiSpecial Function Keys.....................................55Using Numeric Mode.......................................56Using Symbols Mode ......................................56Messages ................................................. 57Message Notifications .....................................57Message Center..............................................58Voice Mail Messages............................... 59Receiving a Message......................................59Accessing Voice Mail fromthe Message Center ...................................59Sending Unanswered Calls to Voice Mail .......59MOSMS Messages................................... 60Setting Up........................................................60Receiving a Message......................................60Reading from the Message Center .................61Creating and Sending Messages ....................61Managing Memory...........................................65GPS Enabled ............................................ 66IMPORTANT: Things to Keep in Mind ............66Making an Emergency Call .............................67Viewing Your Approximate Location ...............68Enhancing GPS Performance .........................69Updating Satellite Almanac Data ....................71Setting Privacy Options...................................71Using GPS with Map Software........................72Voice Records ..........................................75Creating Voice Records ..................................75Playing Voice Records ....................................75Labelling Voice Records .................................76Deleting Voice Records...................................76Locking Voice Records ...................................76Managing Memory ..........................................76Customizing Your Phone.........................78Setting the Volume..........................................78Setting Your Phone to Not Ring ......................78Seeing the Display Better................................79Using Settings .................................................79Using a Headset .......................................82Attaching a Headset........................................82Using a Remote PTT Button ...........................82
ivUnderstanding Status Messages........... 83Safety and General Information ............. 85RF Operational Characteristics .......................85Portable Radio Product Operation and EME Exposure.....................................................85Electro Magnetic Interference/Compatibility....88Medical Devices ..............................................88Operational Warnings......................................89Operational Cautions.......................................90Accessory Safety Information..........................91MOTOROLA LIMITED WARRANTY ........ 93Limited WarrantyMotorola Communication Products (International) ....................................... 97Patent and Trademark Information ...... 101Index ....................................................... 102Driving Safety Tips ................................ 107
 vDECLARATION OF CONFORMITYPer FCC CFR 47 Part 2 Section 2.1077(a)Responsible Party Name:   Motorola, Inc.Address:  8000 West Sunrise BoulevardPlantation, FL 33322 USAPhone Number:  1 (800) 453-0920Hereby declares that the product:Product Name:  i315Model Number:  H69XAH6RR1ANConforms to the following regulations:FCC Part 15, subpart B, section 15.107(a), 15.107(d) and section 15.109(a)Class B Digital DeviceNote: This equipment has been tested and found to comply with the limits for a Class B digital device, pursuant to part 15 of the FCC Rules. These limits are designed to provide reasonable protection against harmful interference in a residential installation. This equipment generates, uses and can radiate radio frequency energy and, if not installed and used in accordance with the instructions, may cause harmful interference to radio communications. However, there is no guarantee that interference will not occur in a particular installation. If this equipment does cause harmful interference to radio or television reception, which can be determined by turning the equipment off and on, the user is encouraged to try to correct the interference by one or more of the following measures:• Reorient or relocate the receiving antenna.• Increase the separation between the equipment and receiver.• Connect the equipment into an outlet on a circuit different from that to which the receiver is connected.• Consult the dealer or an experienced radio/TV technician for help.
1Getting Startedaudio jackaccessory connectorvolume controlsspeaker (in back)Push-To-Talk(PTT) buttonmicrophoneantennaback keyoption keyspPower button.Navigation key — press the arrows to scroll through menus and lists.mMenu key — accesses context-sensitive menus.AOption key — selects the option appearing above it on the display.Note: Throughout this User Guide, the option keys will be represented by A.sSend key — places phone calls.eEnd key — ends phone calls; returns to idle screen; in browser mode, returns to Net main menu.
2Getting StartedTo start using your i315 phone:•Make sure your SIM card is in place.•Charge the battery.•Activate your service.•Enable over-the-air security.Removing the Battery Door1Make sure the phone is powered off.2Slide the release button forward until it releases the battery door.3Remove the battery door from the back of your phone.Locating Your SIM CardYour SIM (Subscriber Identity Module) card is a small piece of plastic located in the SIM card holder in the back of your phone, underneath the battery.SIM card holderSIM card
3 Locating Your SIM CardIf your SIM card is not in the SIM card holder, it may be in the box your phone came in, attached to a piece of white plastic about the size of a credit card. If this is the case, carefully detach your SIM card from the surrounding plastic and insert it as described in “Inserting Your SIM Card” on page 13.If there is no SIM card in your phone or the box, contact your service provider.BatteryInserting the Battery1Remove the battery door. 2Insert the top of the battery into the battery area. Press the bottom of the battery to secure it.3Replace the battery door and press it gently until you hear a click.Charging the BatteryYour phone comes with a standard travel charger.1Plug the charger into an electrical outlet.2Open the connector cover.connector cover
4Getting Started3Plug the other end of the charger into the accessory connector.Charger Attached appears on the display.Tip: To remove the charger from the accessory connector: Press the buttons on the sides of the plug. Pull the plug straight out.4When charging the battery for the first time, charge for 30 minutes longer than the time shown in “Charging Times”. Charging TimesSee your battery and charger to determine the appropriate charging time.For best results, charge the batteries within the temperature range of 50°F to 104°F (10°C to 40°C).Prolonged charging is not recommended.Removing the Battery1With the phone powered off, remove the battery door.Battery ChargerRapid Mid-RateSlim 2 hours 3 hoursHigh Performance 2 hours 4 hoursExtra Capacity 2.5 hours 5.5 hoursMaximum Capacity 3.5 hours 7.5 hours
5 Activating Service2Remove the battery by pushing the battery toward the antenna and lifting it out.Battery Use and Maintenance•The Motorola iDEN Approved Lithium Ion chargers provide optimum performance. Other chargers may not fully charge the iDEN Lithium Ion battery or may yield a reduced number of lifetime charge cycles. •Extreme temperatures degrade battery performance. Do not store the battery where temperatures exceed 140°F (60°C) or fall below 4°F (-20°C).•Lithium Ion batteries have a self discharge rate and without use, lose about 1% of their charge per day.•The battery capacity is degraded if the battery is stored for long periods while fully charged. If long term storage is required, store at half capacity. Activating ServiceThe first time you power on your phone, you must be in your local calling area. This activates your service.Powering On and OffTo power your phone on:Press p.To power your phone off:Press and hold p.When You Power On for the First TimeThe first time you power your phone on, screen may appear asking you to update your browser information. This means you must enable security.If the Enter SIM PIN Code screen appears, enter your SIM PIN. See “Entering the PIN” on page 11. Press A under Ok.When you receive your phone, the SIM PIN is 0000. Change your PIN to prevent fraudulent use of the SIM card (see “Changing the PIN” on page 11).
6Getting StartedAs your phone connects to the network, you will see a connecting message. When the idle screen appears, the phone is ready to use.Enabling Over-the-Air SecurityIf you are set up to receive over-the-air programming from your service provider, you must enable security the first time you power on your phone or within 20 days of first activation of your phone:1When you power on your phone for the first time, after the idle screen appears, you will be prompted to select Ok to update your browser information.Note: If you press A under Later, you will be prompted to enable security each time you power on your phone until you press A under Ok.2Press A under Ok.3You are prompted to enable security. Press A under Yes. A series of screens appears. If you subscribe to your service provider’s plan, your home page appears.4Press e to return to the idle screen.Phone ProgrammingWithin 24 hours of enabling security, you will receive a Net alert containing your Private ID and Talkgroup lists for Private calls.To accept programming:1When you receive a Net alert saying New Browser Message - Receive Programming Info, press A under Goto.2You are prompted to accept changes to your lists. Press A under Ok.3If you are prompted again to accept changes to your lists, press A under Ok.4A confirmation screen displays. Press A under Ok.5Press e to return to the idle screen.Contcssd1S
7 Finding Your Phone NumberFinding Your Phone NumberMy Info lets you view your phone number, Private ID, and other phone information:1Press m to access the main menu.2Scroll to My Info.3Press A under Select.4Scroll to see your information:•Name — Enter your name. See “Entering Text” on page 54.•Line1 and Line 2 — your phone numbers for phone lines 1 and 2. These are filled in when you receive your first Private call after enabling over-the-air security on your phone.•Private — Your Private ID is the number that others use to contact you using Private ID calls. It is filled in when you receive your first Private call.• Group ID — the number of the Talkgroup you have joined.• Carrier IP — the IP address assigned to your service provider. It is filled in when you register for packet data services.• IP1 Address and IP2 Address — the IP addresses you use to access the Internet with your phone.•Ckt — Your circuit data number is the number you use if you want to use your phone to transfer circuit data. See “Using Your Phone as a Modem” on page 46. You receive this number from your service provider.Note: The context-sensitive menu under My Info contains information that may be used by your service provider if there is a problem with your phone.Phone BasicsAny time your phone is powered on, the display provides you with information and options.Contcssd1Sstatus iconstext areamenu icondisplay options
8Getting StartedThe screen shown above is the idle screen. The text that appears on your idle screen depends on your service provider. The idle screen appears when your phone is on, but not engaged in any activity.Text AreaThis area displays menus, messages, names, phone numbers, and other information.Display OptionsTwo display options appear at the bottom of most screens. You select a display option by pressing the option key below it.Menus and ListsYour phone’s features are arranged in menus, submenus, and lists.To access the items in a menu or list, scroll using the navigation key at the top of your keypad. This key lets you scroll up, down, left, or right. Holding down the appropriate part of the navigation key speeds up scrolling.In this guide, this symbol > tells you to select a menu or list item. For example, Settings > Security means:1Scroll to Settings on the main menu.2Press A under Select to see the Settings screen.3Scroll to Security.4Press A under Select to see the Security screen.Menu KeyMany features provide context-sensitive menus that let you access related features and actions. This S icon appears any time a context-sensitive menu is available. Press m to access the menu.Main MenuAll your phone’s features can be accessed through the main menu. When you are using a feature, the icon for that feature appears in the upper left corner of the display.aBrowser Browse the Web.MOTOtalk/MT OptionsGo to/Exit   MOTOtalkSetupHelpLaunch/Exit MOTOtalk Access MOTOtalk Setup and Help. See page 21.
9 Phone BasicsbSettingsDisplay/InfoPhone Calls2-Way RadioVolumeSecurityAdvancedCustomize your phone. See page 78.cVoiceRecord Record and play audio messages. See page 75.dContactsnew contact formlist of contactsContacts menuView, store, edit contacts. See page 31.eMessages Access messages. See page 57.fCall Forward Set call forwarding options. See page 38.gMemo Store a number to access later. See page 49.hCall Timers Phone usage information. See page 45.iRecent Callslist of callsrecent calls menuCall Setup menuLists recent calls. See page 29.jMy Info View personal phone information, including phone number and Private ID. See page 7.kCall Alertlist of call alertsCall Alerts menuLists call alerts. See page 27.lGPS Find your approximate geographical location. See page 66.mRing TonesVibrate Alllist of ring tonesRing Tones menuAssign ring tones and turn ringer off. See page 50.
10Getting StartedStatus IconsStatus icons appear in the two rows at the top of the display. Some appear at all times. Others appear only when your phone is engaged in certain activities or when you have activated certain features.a b c de f g dBattery Strength — More bars on the battery indicate a greater charge.o p q r sSignal Strength — More bars next to the antenna indicate a stronger signal.APhone In Use — Your phone is active on a phone call.BPrivate In Use — Your phone is active on a Private call.CTalkgroup In Use — Your phone is active on a group call.1 2Active Phone Line — 1 indicates phone line 1 is ready to make calls; 2 indicates phone line 2 is ready to make calls.MOTOtalk In Use — Your phone is active, on a MOTOtalk call.No Signal — You are off-network and in MOTOtalk mode.GHI J   K LCall Forward — Your phone is set to forward calls. See “Call Forwarding” on page 38.uvM Ringer Off — Your phone is set not to ring. See “Turning Ring Tones Off” on page 50.wy xMessages — You have one or more messages. See “Messages” on page 57.DInternet — You are ready to browse the internet.YZ Packet Data — You are ready to transfer packet data or are transferring packet data. See “Using Your Phone as a Modem” on page 46.PRoaming — You are using your phone outside your carrier's network.
11 SIM Card SecuritySIM Card SecurityYour SIM card protects your personal information. The SIM card stores all your Contacts information. Since this information is stored on your SIM card, not in your phone, you can remove the information by removing your SIM card.Note: Except for making emergency calls, your phone will not function without the SIM card.To prevent unauthorized use of your phone, your SIM card is protected by a PIN that you enter each time the phone is powered on. You can change the PIN or turn off the requirement that it be entered.Entering the PINYou may be required to enter a SIM PIN when you first use your phone.When you receive your phone, the SIM PIN is 0000. Change your PIN to prevent fraudulent use of the SIM card.Important:  If you enter your PIN incorrectly 3 times, your SIM card is blocked. To unblock your SIM card, you must contact your service provider. See “Unblocking the PIN”.1When the Enter SIM PIN Code screen appears, enter your SIM PIN. An asterisk appears for each character entered. 2Press A under Ok.Changing the PIN1From the main menu, select Settings > Security > Change Password > SIM PIN.2At the Enter Old SIM PIN Code screen, enter the current SIM PIN.3Press A under Ok.4At the Enter New SIM PIN Code screen, enter the new 4- to 8-digit SIM PIN.5Press A under Ok.6At the Re-enter New SIM PIN Code screen, re-enter the new SIM PIN to confirm.7Press A under Ok.
12Getting StartedTurning the PIN Requirement On and OffWhen the SIM PIN requirement is on, you are prompted to enter your PIN each time you turn on your phone.Note: If a SIM PIN is required, your phone will not function until the SIM PIN is entered, except for making emergency calls.When the PIN requirement is off, your phone can be used without entering a PIN.Important:  When the SIM PIN requirement is off, the personal data on your SIM card is not protected. Anyone can use your phone and access your personal data.1From the main menu, select Settings > Security > SIM PIN.2Select On or Off.3Enter the current SIM PIN.4Press A under Ok.Unblocking the PINIf you enter your PIN incorrectly 3 times, your SIM card is blocked. To unblock your SIM card, you must contact your service provider to get a PIN Unblock Code (PUK).Important:  If you unsuccessfully enter the PUK code 10 times, your SIM card is permanently blocked and must be replaced. If this happens, all data is lost. You will get a message to contact your service provider. Except for making emergency calls, your phone will not function with a blocked SIM card.To unblock the PIN:1Press * # m 1.2At your service provider representative’s request, provide the information needed to give you a PUK code.3Select Unblock PIN.4Enter the PUK code.5Enter a new 4- to 8-digit SIM PIN.6Re-enter your SIM PIN. If you entered the codes properly, SIM Unlocked appears on the display.
13 SIM Card SecurityInserting and Removing Your SIM CardImportant:  Do not touch the gold-colored areas of your SIM card.Switching SIM CardsMoving your SIM card from one phone to another moves all your Contacts information, but erases other information. If you remove your SIM card and use it with another phone, or use another SIM card with your phone, the following information is erased:•The recent calls list•Call forwarding settings•Net alerts•Mobile originated text messages, drafts, and quick notes•Information stored in Memo•3 most recent GPS Enabled locations•Voice records•Voice namesInserting Your SIM CardWith your phone powered off, remove the battery door and battery. See “Removing the Battery” on page 4.1Hold your SIM card as shown. Do not touch the gold-colored area.2Carefully slide your SIM card into your phone, until it lies flat in the SIM card holder.cut cornerSIM card holder
14Getting StartedRemoving Your SIM CardImportant:  To avoid loss or damage, do not remove your SIM card from your phone unless absolutely necessary.1With your phone powered off, remove the battery door and battery.2While holding the tab down, slide your SIM card out of the SIM card holder.Note: Protect your SIM card as you would any delicate object. Store it carefully.Locking the KeypadLocking the phone’s keypad prevents its buttons from being pressed. When the keypad is locked, you can only:•Power the phone on and off•Unlock the keypad•Respond to incoming calls, messages, and alertsImportant:  Emergency calls cannot be placed while the keypad is locked.To lock the keypad:1From the idle screen, press m.2Press *.If you press a key while the keypad is locked, instructions for unlocking the keypad display briefly.To unlock the keypad:1From the idle screen, press m.2Press *.While the keypad is locked, you can respond to incoming calls, messages, and alerts just as you do when the keypad is not locked. When finished, press e to return to the idle screen. The keypad remains locked.tabSIM card holder
15 AccessoriesAccessoriesTo order accessories, log on to our Web site at www.motorola.com/store/iden or contact your Motorola Authorized Retailer.For More InformationIf you have questions about your i315 phone, contact your sales representative or your service provider.
16Making CallsYour i315 phone makes two types of calls: digital cellular phone calls and Private calls. With Private calls, you use your phone as a long-range, digital walkie-talkie.Phone Calls1Enter the number you want to call.2Press s to place the call.3Press e to end the call.Private Calls1Enter the Private ID you want to call.2Press and hold the PTT button on the side of your phone. Begin talking after your phone emits a chirping sound.3Release the PTT button to listen.Tip: To let someone know you want to talk to him or her on a Private call, send a call alert. See “Call Alerts” on page 27.Receiving CallsPhone CallsWhen you receive a phone call, your phone rings, vibrates, or lights up its backlight.AnsweringPress s. -or-Press A under Yes. -or-Press any number key.To answer a call by pressing any number key, you must have the Any Key Ans feature turned on (see “Phone Calls Features” on page 84).Sending to Voice MailPress e. -or-Press A under No.EndingPress e.Private CallsWhen you receive a Private call, your phone emits a chirping sound or vibrates.Answering1Wait for the caller to finish speaking.
17 Call Icons2Press and hold the PTT button on the side of your phone. Begin talking after your phone emits a chirping sound.3Release the PTT button to listen.Call IconsWhen you make a call, call icons appear in the text area of the phone’s display.When you miss a call, this icon appears in the text area:Ways to Enter CallsTo enter the number you want to call, you can:•Use the numbers on the keypad•Select the number from the recent calls list•Select the number from Contacts•Redial the last phone number called•Use Speed Dial or Turbo Dial®•Use One Touch PTT to make a Private call•Use a TTY device — see “Making TTY Calls” on page 47From the KeypadTo enter the number you want to call, press the numbers on the keypad.If you make a mistake:•To clear a digit, press A under Delete.•To clear all digits, press and hold A under Delete.•To insert or delete a digit anywhere in the string of digits you have entered, scroll left or right.•To cancel, press e.From the Recent Calls ListThe recent calls list stores the last 20 calls you made or received.To select a number from the recent calls list as the number you want to call:1From the idle screen, scroll down. -or-XPlacing a phone call.WReceiving a phone call.YPhone call is active.ZPhone call is on hold.UPhone call ended.VYou missed a phone call.
18Making CallsFrom the main menu, select Recent Calls.2Scroll to the name or number you want to call.From ContactsIf you have numbers stored in Contacts, you can use these numbers to make calls. For information on entering numbers into Contacts, see “Creating Entries” on page 33.Calling from the Contacts List1From the main menu, select Contacts.2Scroll to the name or number you want to call.Tip: To find Contacts entries faster, use the keypad to enter the first letter of the name.3Place the call now. -or-Scroll left or right to display the Contacts type for the number you want to call.If you are making a Private call, your phone places the call to the Private ID stored in the Contacts entry, even if the Private icon is not displayed.If you are making a phone call:•Your phone places the call to the phone number assigned to the Contacts type displayed.•If the Contacts type displayed is not a phone number, your phone places the call to the phone number stored in the Contacts entry.•If the Contacts type displayed is not a phone number and you have more than one phone number stored in the Contacts entry, your phone prompts you to select the phone number you want to place the call to.Calling from a Contacts Entry1From the main menu, select Contacts.2Scroll to the name or number you want to call.3Press A under View. -or-If View is not one of your options: Press m. Select View.4Place the call now. -or-Scroll to view more numbers. When you place the call, it is made to the number displayed.Redialing the Last NumberPress and hold s to place a call to the last phone number you called.Using a Voice NameNote: This is an optional feature. Contact your service provider about its availability for purchase.
19 Using SpeakerphoneIf you have created a voice name in Contacts for the number you want to call, say the voice name into your phone to enter the number. See page 32 for information on voice names.1Press and hold t until a prompt appears telling you to say the voice name.2Speaking into the microphone, say the voice name assigned to the number you want to call.Your phone plays the name back to you.If you are making a Private call, press the PTT button to place the call.If you are making a phone call, the call is placed automatically.Tip: To stop a phone call from being completed, press e.Using Speed Dial and Turbo Dial®Each phone number stored in Contacts is assigned a Speed Dial number which you can use to enter that number.Speed Dial1From the idle screen, use the keypad to enter the Speed Dial number assigned to the phone number you want to call.2Press #.3Press s.Turbo DialFrom the idle screen, press and hold the Speed Dial number (1 through 9) assigned to the phone number you want to call.Using One Touch PTTOne Touch PTT sets your phone to call the most recent Private ID on the recent calls list, or a Private ID you choose, every time you press the PTT button. See “Setting One Touch PTT” on page 43.Using SpeakerphoneNote: This is an optional feature. Contact your service provider about its availability for purchase.Turning on speakerphone makes incoming sound come out of the phone’s speaker instead of the earpiece. Speakerphone is available whenever you are on an active phone call.To turn speakerphone on or off:Press A under Spkr. -or-Press t.
20Making CallsUsing MuteMuting calls lets you listen to incoming sound without transmitting sound. Mute is available whenever you are on an active call.To turn mute on:Press A under Mute.While mute is on, Unmute appears as a display option.To turn mute off:Press A under Unmute.Making Emergency Phone CallsYour phone supports emergency calling. Emergency phone calls can be made even when your SIM card is blocked or not in your phone.Dial 911 to be connected to an emergency response center. If you are on an active call, you must end it before calling 911. When you make an emergency call, your phone’s GPS Enabled feature can help emergency service personnel find you, if you are in a location where your phone's GPS antenna has established a clear view of the open sky and your local emergency response center has the equipment to process location information. See “GPS Enabled” on page 66, and particularly “IMPORTANT: Things to Keep in Mind” on page 66 and “Making an Emergency Call” on page 67, for more information on the limitations of this feature. Because of the limitations of this feature, always provide your best knowledge of your location to the emergency response center when you make an emergency call.Important:  Emergency calls cannot be placed while the keypad is locked.Important:  If you have not registered on the network, emergency calls cannot be placed while your SIM card is in your phone.
21MOTOtalkThe MOTOtalk feature allows direct two-way phone-to-phone communications between two or more phones equipped for MOTOtalk. You can make and receive MOTOtalk calls when network service is not available. You can talk to anyone on your code and channel within your range.MOTOtalk allows you to:•use code or private mode operation•select from 10 channels and 15 codes•communicate with standalone MOTOtalk radiosNote: MOTOtalk is a new digital service and is not compatible with older Family Radio Services products such as Talkabout radios.Using MOTOtalkTo set your phone to MOTOtalk:1From the main menu, scroll to MOTOtalk and press A under Select.2Select Go to MOTOtalk.Switching to MOTOtalk Please Wait displays.After a few seconds, the MOTOtalk idle screen appears. MT Ready appears on the first line of the display. The current code appears on the second line of the display. The current channel appears on the third line of the display.Note: When switching from network to MOTOtalk, the last Channel and Code that were set will appear on the idle screen.While in MOTOtalk, this icon             appears on the display, indicating there is not network signal and MOTOtalk is active.To make a code using MOTOtalk:ContcsdSMT Ready        Code:1           Channel:1Editstatus iconstext areamenu icondisplay options
22MOTOtalkProceed as if making  Direct Connect call. MT: Transmit appears on the first line of the display.To answer a code call using MOTOtalk:Proceed as if answering a Direct Connect call. MT: Receive appears on the first line of the display.The talk permit tone emitted from your phone when using MOTOtalk is 4 beeps and is longer than the standard tone heard with on-network Direct Connect and Group Connect calls.Note: If you receive an error message when making a call using MOTOtalk, there may be no parties on your channel and code or you are out of range.To set your phone to network mode when MOTOtalk is active:1From the main menu, scroll to MT Options and press A under Select.2Select Exit MOTOtalk.Switching to Network Please Wait displays.After a few seconds, the network idle screen appears.Switching to MOTOtalk1Scroll to MOTOtalk on the main menu.2Select Go to MOTOtalk, you’ll see on the display: Switching to MOTOtalk please wait. You’ll be on MOTOtalk screen.Setup OptionsMOTOtalk setup options are available in the MT Options screen both in network and MOTOtalk modes.To access MT Options in network:1From the main menu, select MOTOtalk.2Select Setup.To access MT Options in MOTOtalk:1From the main menu, select MT Options.2Select Setup.You can set your phone to launch directly into MOTOtalk when you select MOTOtalk from the main menu. You can also set your phone to notify you periodically with a tone that you are in MOTOtalk mode.Direct LaunchTo set your phone to launch MOTOtalk when you select MOTOtalk from the main menu:1From the MT Options screen, select Setup.
23 MOTOtalk Icons2Scroll to Direct Launch and press A under Change.3Select On.Note: If Direct Launch is set to On, you will not see the MT Options screen. In order to have access to your setup options, Direct Launch must be set to Off. Or you can access setup options while in MOTOtalk by pressing A, then DT Options.To turn off Direct LaunchSelect Off. Your phone now displays MT Options when you select MOTOtalk from the main menu.State ToneTo set your phone to notify you with a tone that you are in MOTOtalk mode:1From the main menu, select MOTOtalk.2Select Setup.3Scroll to State Tone and press A under Change.4Select the time frame during which you want to be notified that you are in MOTOtalk mode.For example, if you select 1 hour, you will be notified that you are in MOTOtalk mode.To turn off State ToneSelect Off.MOTOtalk IconsChannels and CodesYour phone has 10 channels and 15 codes. Channels and codes are divided into frequencies that allow you to make and receive phone calls. Other parties may be taking on the same channel. MOTOtalk Options (intermediate screen):-Go To MOTOtalk (launch MOTOtalk)-Setup-HelpMOTOtalk Type-Code-ChannelMOTOtalk In UseNo Signal - Indicates you are off-network and in MOTOtalk mode.
24MOTOtalkCodes help minimize interference from unwanted messages and other disturbances when you are on the same channel as others. To have a conversation, all parties must be on the same channel and code.Note: All parties who are on your code and channel can hear your conversation.To set a channel:1From the idle screen, press A under Edit.2Scroll to Channel.3Press A under Edit.4Select a Channel.To set a code:1From the idle screen, press A under Edit.2Scroll to Code.3Press A under Edit.4Select a Code.Receive All1You can also set your phone with Code set to Receive All. Your phone will receive calls from any phone that has been set to the same Channel regardless of the Code (1-15).2If you receive a call while in Receive All,  your phone display will change from Receive All to the Code on which the transmission was received.3You may reply to that code within 6 seconds after the caller finishes talking by pressing and holding PTT. After the 6 seconds expire, the code reverts back to Receive All.Note: You cannot initiate a call when the code is set to Receive All. If you press the PTT button when in Receive All it will ask you to enter a code.ContcsdSMT ReadyCode:Receive All      Channel:4Editstatus iconstext areamenu icondisplay options
25 MOTOtalk Private CallsTo set the Code to Receive All:1From the idle screen, press A under Edit.2Scroll to Code.3Press A under Edit.4Select Receive All.MOTOtalk Private CallsYou can have a private conversation with another person using MOTOtalk. When on a Private Call, no other parties can hear your conversation. In order to make a Private Call, you must use the valid 10-digit Nextel PTN of the person you are calling. The person you are calling must be in MOTOtalk mode and set to the same Channel to receive your call.Note: If you receive an error message, your may not be using a valid PTN. Or, the person you are trying to reach may not be in MOTOtalk mode, is set to a different channel or is out of range.Private OnlyIn this mode you can only make or receive Private Calls. This feature allows you to ignore other people’s code calls, keeping your phone quieter and increasing battery life.To set the code to Private Only:1From the idle screen, press A under Edit.2Scroll to Code.3Press A under Edit.4Select Private Only.Making a Private Call1Enter the 10-digit PTN of the person you want to call on your channel. -or-Scroll to a number or name in Contacts. -or-Scroll to a number in the recent calls list.2Press and hold the PTT button on the side of your phone. Begin talking after your phone emits the MOTOtalk tone.3Release the PTT button to listen.The number or name of the person you are calling will appear in the first line of the display.Receiving a Private CallProceed as if answering a Private call.The number or name of the person who initiated the call will appear in the first line of the display.
26MOTOtalkEnding a Private CallA Private Call will end if there is no communication for 6 seconds. The display will return to the idle screen.Making a MOTOtalk Call1If you want to make a Private call, enter the name or 10-digit number (for example, 9545555555) you want to call on your channel. To make a code call, enter the desired code if not already displayed. For code calls skip to step 2.2Press and hold the PTT button on the side of your phone. Begin talking after your phone emits the MOTOtalk tone.3Release the PTT button to listen.Note: If you get a bad key press tone, immediately following the talk permit tone,  it means that nobody is in MOTOtalk mode, or they are in a different channel or out-of-range.Receiving a MOTOtalk Call1When a call comes in, an incoming tone (2 beeps) play first and when the caller finishes talking a single beep plays.2Wait for the caller to finish speaking.3If you want to respond, press and hold the PTT button on the side of your phone. Begin talking after your phone emits the MOTOtalk tone.4Release the PTT button to listen.Assigning a MOTOtalk Number in ContactsFor information on assigning a MOTOtalk number to an existing entry in Contacts, see “Contacts” on page 31.Recent CallsFor information on viewing, storing or deleting recent calls, see “Recent Calls” on page 29.Making Emergency Calls from MOTOtalkYour phone supports emergency calling. Emergency phone calls can be made even when you are not connected to the network as long as there is a network to connect to.Dial 911 to be connected to an emergency response center. If you are on an active call, you must end it before calling 911.
27Call AlertsSending a call alert lets the recipient know you want to talk to him or her on a Private call.When you send a call alert, the recipient’s phone emits a series of beeps, or vibrates, and displays your name or Private ID.The recipient can:•Answer — begin a Private call with the sender•Queue — store the call alert to the call alert queue, which is a list of call alerts•Clear — dismiss and delete the call alertSending Call Alerts1Enter the Private ID you want to send to, as you would when making a Private call.2Press A under Alert. Ready to Alert appears on the display.3Press the PTT button until Alert Successful appears on the display.Note: If the alert is not successful, this may mean the person you are trying to reach is on a call or has the phone turned off.Receiving Call AlertsWhen you receive a call alert, you must answer, queue, or clear it. You cannot receive phone calls or Private calls until you do.To answer a call alert, press the PTT button to make a Private call to the sender.To queue a call alert, press A under Queue.To clear a call alert, press A under Clear.Note: The recent calls list also stores call alerts you have received. They appear as Private calls. Call alerts remain in your recent calls list until you delete them or until they reach the end of the list.Using the Call Alert QueueWhen you queue a call alert, it remains in the call alert queue until you make a Private call to the sender or delete it.Viewing Call Alerts1From the main menu, select Call Alert.2Scroll through the list.
28Call AlertsViewing Date and TimeTo view the date and time a call alert was received:1From the main menu, select Call Alert.2Scroll to the call alert you want information on.3Press m.4Select View.Responding to Call Alerts in the QueueAfter you queue a call alert, you can respond to it by making a Private call to the sender or sending a call alert to the sender.Making a Private Call to the Sender1From the main menu, select Call Alert.2Scroll to the call alert you want to respond to.3Press the PTT button to begin the call.This removes the call alert from the queue.Sending a Call Alert to the Sender1From the main menu, select Call Alert.2Scroll to the call alert you want to respond to.3Press A under Alert. Ready to Alert appears on the display.4Press the PTT button until Alert Successful appears on the display.Deleting Call AlertsTo delete a call alert from the queue:1From the call alert queue, scroll to the call alert you want to delete.2Press m.3Select Delete.4Press A under Yes to confirm.To delete all call alerts from the queue:1From the call alert queue, press m.2From the call alert menu, select Delete All.3Press A under Yes to confirm.Sorting Call AlertsTip: You must have at least one call alert in the queue to access this feature.To sort call alerts by the order they were received:1From the main menu, select Call Alert.2Press m.3Select Sort By.4Scroll to First on Top or Last on Top.5Press A under Select.
29Recent CallsThe recent calls list stores the numbers of the 20 most recent calls you have made and received.To view the recent calls list:1From the idle screen, press the down arrow on the navigation key. -or-From the main menu, select Recent Calls.2Scroll through the list.If the number of a recent call is stored in Contacts, the name associated with the number appears on the recent calls list.An icon appears beside the name or number indicating the Contacts type of the number used in the call. See “Contacts” on page 31.For phone calls, an icon appears to the left of the name or number giving more information about the call:Note: The recent calls list also stores call alerts you have received. They appear as Private calls. Call alerts remain in your recent calls list until you delete them or until they reach the end of the list.To get more information on a recent call:1From the recent calls list, scroll to the call you want information on.2Press A under View. -or-If View is not one of your options: Press m. Select View.This displays information such as the name associated with the call, the number, the date, time, and duration of the call.Storing Recent Calls to Contacts1From the recent calls list, scroll to the number you want to store.2Press A under Store. -or-If Store is not one of your options: Press m. Select Store.Tip: If Store is not on this menu, the number is already stored in Contacts.XA call you made.WA call you received.VA missed call. Missed calls appear on the recent calls list only if you have Caller ID.
30Recent Calls3To store the number as a new entry, select [New Contact]. -or-To store the number to an existing entry, select the entry.4With the Contacts type field highlighted, scroll left or right to display the Contacts type you want to assign to the number. For information on Contacts types, see page 31.5If you want to add more information to the entry, follow the applicable instructions in “Creating Entries” on page 33.6Press A under Done.Deleting Recent CallsTo delete a call:1From the recent calls list, scroll to the call you want to delete.2Press m.3Select Delete.4Press A under Yes to confirm.To delete all calls:1From the recent calls list, press m.2Select Delete All.3Press A under Yes to confirm.
31ContactsContacts stores up to 600 numbers or addresses. Each Contacts entry can store several numbers or addresses.Information stored in Contacts is saved on your SIM card.A Contacts entry contains:•A name — A name is required if you are storing more than one number or address to the entry; otherwise, it is optional. Typically, this is the name of the person whose contact information is stored in the entry.•A ring tone — You can assign a ring tone to each entry. This is the sound your phone makes when you receive phone calls or call alerts from any of the numbers stored in the entry.•A Contacts type — Each number or address stored must be assigned a Contacts type:•A number or address — Each Contacts entry must contain a number or address. This may be any type of phone number, Private ID, Talkgroup number, email address, or IP address.Note: You can store numbers up to 64 digits long, but every 20 digits must be separated by a pause or wait. See “Creating Pauses and Waits” on page 36.AMobile phone numberBPrivate Private IDCWork1 phone numberDWork2 phone numberEHome phone numberFEmail email addressGFax phone numberHPager phone numberITalkgroup Talkgroup numberJIP IP addressKOther phone number
32Contacts•A Speed Dial number — When you store a phone number, it is assigned a Speed Dial number. You can accept the default Speed Dial number or change it.•A voice name — If you create a voice name for a number, you can then dial that number by saying the voice name into your phone. This icon appears P to the left of the Contacts type icon if a voice name is assigned.Note: This is an optional feature. Contact your service provider about its availability for purchase.Viewing ContactsTo access Contacts:Press A under Contcs. -or-From the main menu, select Contacts. -or-If you are on a call: Press m. Select Contacts.To view entries:1From the Contacts list, scroll to the entry you want to view.2If an entry has more than one number or address stored, <> surrounds the Contacts type icon. Scroll left or right to view the icon for each number stored in the entry.3When the icon for the number or address you want to view is displayed, press A under View. -or-If View is not one of your options: Press m. Select View.4Scroll to view the other numbers and addresses stored for the entry.Tip: To view more entries, continue scrolling.Searching for a NameTo search for a name in Contacts:1From the Contacts list, press m.2Select Search.3Enter the name you want to see. See “Entering Text” on page 54. 4Press A under Ok.Your phone finds the name you entered or the nearest match.Showing Only Private IDs and TalkgroupsTo set Contacts to show only entries that contain Private IDs and Talkgroup entries:1From the Contacts list, press m.2Select Filter.
33 Creating Entries3With Show Prvt/Grp highlighted, press A under Select.To set Contacts to show all entries:1From the Contacts list, press m.2Select Filter.3With Show All highlighted, press A under Select.Creating EntriesA number or address and a Contacts type are required for all Contacts entries. Other information is optional. You may enter the information in any order by scrolling through the entry details.After you have entered the number or address, Contacts type, and any other information you want, you can press A under Done to save the entry to Contacts.To cancel a Contacts entry at any time press, e to return to the idle screen.Tip: In some fields that require you to enter information, you can begin entering the information from the keypad instead of pressing A under Change.To create a Contacts entry:1To access the entry details screen:Select Contacts > [New Contact]. -or-From the Contacts list, press m. Scroll to New. Press A under Select.2If you want to assign a name to the entry:With the Name field highlighted, press A under Change.Enter the name. See “Entering Text” on page 54. When you are finished, press A under Ok.3If you want to assign a ring tone to the name:With the Ringer field highlighted, press A under Change.Scroll to the ring tone you want to assign. Press A under Select.4To assign a Contacts type to the number or address being stored:With the Contacts type field highlighted, press A under Change.Scroll to the Contacts type you want to assign. Press A under Select.5To store a number or address:With the # field highlighted (or ID for an email address, or IP for an IP address), press A under Change.
34ContactsEnter the number or address. For phone numbers, use the 10-digit format. For email addresses, see “Entering Text” on page 54. Tip: Press A under Browse to select a number or address from Contacts, the recent calls list, or Memo.When you are finished, press A under Ok.6If you want to assign more options to the number, press A under Change with the [Options] field highlighted. See “Assigning Options”.7If you want to add more numbers or addresses to the entry:Scroll past the information you already entered.Enter the additional information for the entry using step 2 through step 6. You must assign a name to the entry, if you have not already.8Press A under Done.Assigning Options1If you have not already, press A under Change with the [Options] field highlighted2The default Speed Dial number assigned to a phone number is displayed in the Speed # field. This is always the next available Speed Dial location.If you want to assign the phone number to a different Speed Dial location:With the Speed # field highlighted, press A under Change.Press and hold A under Delete to delete the current Speed Dial number.Enter the new Speed Dial number using the keypad.When you are finished, press A under Ok.3When you are finished, press A under Back.Storing Numbers FasterTo store numbers to Contacts from the recent call list, see “Storing Recent Calls to Contacts” on page 29.To store numbers to Contacts from Memo, see “Memo” on page 49.To store numbers to Contacts from the idle screen:1Use the keypad to enter the number you want to store.2Press m.3Select Store Number.4To store the number as a new entry, select [New Contact]. -or-
35 Editing EntriesTo store the number to an existing entry, select the entry.5With the Contacts type field highlighted, scroll left or right to display the Contacts type you want to assign to the number.6If you want to add more information to the entry, follow the applicable instructions in “Creating Entries” on page 33.7Press A under Done.Editing Entries1From the Contacts list, scroll to the entry you want to edit.2Press m.3Select Edit. The entry details screen displays.4Follow the applicable instructions in “Creating Entries” on page 33 to edit the various fields.Deleting EntriesDelete an Entry1From the Contacts list, scroll to the entry you want to delete.2Press m.3To delete the entire entry, scroll to Delete Contact.4Press A under Select.5Press A under Yes to confirm.Delete a Number or Address1From the Contacts list, scroll to the entry that contains the number or address you want to delete.2Scroll left or right to display the Contacts type for the number you want to delete.3Press m.4Scroll to Delete Number.5Press A under Select.6Press A under Yes to confirm.Note: If an entry contains only one number or address, deleting the number or address deletes the entry.Checking CapacityTo see how many numbers are stored in Contacts:1From the Contacts list, press m.2Select Capacity.
36ContactsCreating Pauses and WaitsWhen storing a number, you can program your phone to pause or wait between digits while dialing. A pause makes your phone pause for 3 seconds before dialing further. A wait makes your phone wait for your response before dialing further.This feature is useful when using voice mail or other automated phone systems that require you to dial a phone number and then enter an access number.To program a pause:Press and hold * until the letter P appears. The P represents a 3-second pause.If you store 17035551235P1234, when you select this number and make a call, your phone dials the first 11 digits, pauses for 3 seconds, then dials the last 4 digits.If you want a pause longer than 3 seconds, press and hold * more than once. Each P represents a 3-second pause.To program a wait:Press and hold * until the letter W appears. The W means your phone waits before dialing further.If you store 17035551235W1234, when you select this number and make a call, your phone dials the first 11 digits and then waits. A message appears asking if you want to send the rest of the digits. Press A under Yes to dial the last 4 digits.Tip: You can create pauses and waits while dialing a number from the keypad. See “Creating Pauses and Waits While Dialing” on page 43.International NumbersNote: This feature may not be offered by your service provider.When storing a number that you plan to use for international calls, use Plus Dialing:1Press and hold 0 for two seconds. A “0” appears, then changes to a “+”. Note: The network translates the “+” into the appropriate international access code needed to place the call. 2Enter the country code, city code or area code, and phone number.For information about making international calls, see “Making International Calls” on page 43.
37 Accessing Contacts with GSM PhonesAccessing Contacts with GSM PhonesIf you plan to use the information stored in Contacts with an i2000, i2000plus, or any other GSM phone, download iDEN Phonebook Manager.Go to idenphones.motorola.com/iden/support for more information.You can use iDEN Phonebook Manager to make the Contacts information saved to your i315 phone’s SIM card accessible in this type of phone.
38Call ForwardingCall forwarding sends calls to the phone numbers you specify. You can forward all calls to one number or forward missed calls to different numbers depending on the reason you missed the call.You can forward phone lines 1 and 2 independently.Forwarding All CallsWhen you set your phone to forward all calls, an icon appears in the top row of the display:To forward all calls:1From the main menu, select Call Forward.2Press A under Change.3Select All Calls.4Scroll to To.5Press A under Change.6If you specified a forwarding number for all calls before, this number displays. To forward calls to this number, press A under Back. -or-To delete this number, press A under Change, then press and hold A under Delete.To enter the number you want to forward calls to:Enter the number using your keypad. -or-Press A under Search. Select Contacts, Recent Calls, or Memo. Select the number you want to enter.7Press A under Ok.All your calls are now forwarded to the number you specified.GPhone line 1 is active; calls to phone line 1 are being forwarded.HPhone line 1 is active; calls to phone line 2 are being forwarded.IPhone line 1 is active; calls to phone lines 1 and 2 are being forwarded.JPhone line 2 is active; calls to phone line 1 are being forwarded.KPhone line 2 is active; calls to phone line 2 are being forwarded.LPhone line 2 is active; calls to phone lines 1 and 2 are being forwarded.
39 Turning Off Call ForwardingTip: In some fields, you can select an option by scrolling left or right instead of pressing A under Change.Turning Off Call ForwardingIf you don’t want all your calls forwarded, turn the feature off:1From the main menu, select Call Forward.2Press A under Change.3Select All Calls.4Scroll to To.5Press A under Change.6Scroll to Off.7Press A under Select.All your calls are now sent to your phone.Calls you miss are forwarded according to the options set for missed calls. By default, missed calls are forwarded to voice mail.Forwarding Missed CallsYou can specify a forwarding number for each type of missed call:•If Busy — Your phone is on a call or transferring data.• If No Answer — You do not answer on the first 4 rings.• If Unreachable — Your phone is out of coverage or powered off.Note: If you want a type of missed call sent to voice mail, the call forwarding number for that type of missed call must be your voice mail access number. To forward missed calls:1From the main menu, select Call Forward.2Press A under Change.3Select Detailed.4Scroll to If Busy to specify a forwarding number for calls received when your phone is busy.5Press A under Change.6If you specified a forwarding number for this type of call before, this number displays. To forward calls to this number, press A under Back and go to step 9. -or-To delete this number, press A under Change, then press and hold A under Delete.7To enter the number you want to forward this type of call to:Enter the number using your keypad. -or-
40Call ForwardingPress A under Search. Select Contacts, Recent Calls, or Memo. Select the number you want to enter.8Press A under Ok.9Repeat step 4 through step 8 for If No Answer and If Unreachable.When you are finished, press A under Back.Viewing Call Forwarding Settings1From the main menu, select Call Forward.2Press A under Change.3Select All Calls.4Scroll to To.5Press m.6Select Retrieve Status.
41Advanced Calling FeaturesCall WaitingCall Waiting lets you receive a second call while on an active call. Call Waiting is always available, unless you turn it off for a specific call.If you are on a call and receive a second call, your phone emits a tone and displays a message saying you are receiving a second call.To accept the second call and put the active call on hold:Press A under Yes.To accept the second call and end the active call:1Press e.Your phone rings with the second call.2Answer the second call.To decline the second call:Press A under No. If you subscribe to voice mail, the call is forwarded to your voice mail box, unless you set Call Forward for If Busy to a different number.Switching Between CallsWhen you accept a second call, the display shows the name or number of each call, with an icon indicating which call is active:To make the call on hold active and put the active call on hold:Press A under Switch.Turn Off Call WaitingTo turn off Call Waiting during a call:1Press m.2Select In Call Setup > Call Waiting.3Press A under Change.4Scroll to Off.Tip: To turn Call Waiting back on while still on the call: Scroll to On.5Press A under Select.YPhone call is active.ZPhone call is on hold.
42Advanced Calling FeaturesTo turn off Call Waiting for the next call you make or receive:1From the main menu, select Settings > Phone Calls > Call Waiting.2Press A under Change.3Scroll to Off.4Press A under Select.Call Waiting is turned back on when you end the call.Call HoldCall Hold lets you put an active call on hold and make a second call.To put a call on hold:1While on an active call, press m.2Scroll to Hold.3Press A under Select.4If you want to make the call active again, press A under Resum.To make a second call while a call is on hold:1Enter the number you want to call.Tip: To enter the number from Contacts: Press m. Select Contacts.2Press s to place the call.To end the second call and make the call on hold active again:Press e.To make the call on hold active and put the active call on hold:Press A under Switch.3-Way CallingNote: This feature may not be offered by your service provider.3-way calling lets you combine 2 phone calls into one. All 3 people in the call can speak to and hear each other.To make a 3-way call:1Place or receive a phone call.2While the call is active, press A under 3-Way.This puts the call on hold.3Enter the second phone number you want to call.Tip: To enter the number from Contacts: Press m. Select Contacts.4Press s to place the call.5While the second call is active, press m.6Scroll to 3 Way.
43 Creating Pauses and Waits While Dialing7Press A under Select.Both calls are now active and appear on the display.Creating Pauses and Waits While DialingYou can enter a pause or wait while dialing a number. For more information on pauses and waits, see “Creating Pauses and Waits” on page 36.To create a pause while dialing a phone number:1From the keypad, enter the digits you want to occur before the pause.2Press m.3Select Insert Pause.4Enter the digits you want to occur after the pause.To create a wait while dialing a phone number:1From the keypad, enter the digits you want to occur before the wait.2Press m.3Select Insert Wait.4Enter the digits you want to occur after the wait.Making International CallsNote: This feature may not be offered by your service provider.Plus Dialing lets you place an international call to most countries without entering the local international access code. 1Press and hold 0 for two seconds. A “0” appears, then changes to a “+”. Note: The network translates the “+” into the appropriate international access code needed to place the call. 2Enter the country code, city code or area code, and phone number.Setting One Touch PTTOne Touch PTT sets your phone to call the most recent Private ID on the recent calls list, or a Private ID you choose, every time you press the PTT button.To set your phone to call the most recent Private ID on the recent calls list:1From the main menu, select Settings > 2-Way Radio > One Touch PTT.2Scroll to Last Call.3Press A under Select.
44Advanced Calling FeaturesTo set your phone to call a Private ID you choose:1From the main menu, select Settings > 2-Way Radio > One Touch PTT > Assigned Number.2To enter the Private ID you want your phone to call every time you press the PTT button:Enter the number using your keypad. -or-Press A under Search. Select Contacts, Recent Calls, or Memo. Select the number you want to enter.Tip: If you are entering a Talkgroup number, enter # before the number.3Press A under Ok.To turn off One Touch PTT:1From the main menu, select Settings > 2-Way Radio > One Touch PTT.2Scroll to Off.3Press A under Select.Group CallsA group call is a call made to all members of a Talkgroup at once. A Talkgroup is a predetermined group of up to 25 Private IDs.Before you can make or receive group calls, a Talkgroup must be established. After the Talkgroup is established, you must join the Talkgroup.Joining a TalkgroupYour sales representative or your service provider establishes Talkgroups for you and assigns each Talkgroup a Talkgroup number. You can choose a name for each of your Talkgroups when you create entries for them in Contacts.To receive group calls made to a Talkgroup, you must join the Talkgroup. You can belong to only one Talkgroup at a time. When you join a new Talkgroup, you no longer belong to your previous Talkgroup.To join a Talkgroup:1Press #. Then enter the Talkgroup number using the keypad. -or-Choose the Talkgroup name from Contacts or the recent calls list.2Press A under Join.Making Group Calls1Press #. Then enter the Talkgroup number using the keypad. -or-Choose the Talkgroup name from Contacts or recent calls list.2Proceed as if making a Private call.
45 Call TimersReceiving Group CallsTo answer a group call:Proceed as if answering a Private call. Only one person at a time may speak on a group call.The Private ID or name of the person who is speaking will appear on the display below the Talkgroup number.Turning off Group CallsTo control whether you hear group calls to your Talkgroup:1From the main menu, select Settings > 2-Way Radio > Tkgrp Silent.2Press A under Change.3Scroll to On if you don’t want to hear group calls to your Talkgroup. -or-Scroll to Off if you want to hear group calls to your Talkgroup.4Press A under Select.Call TimersCall timers measure the duration of your phone calls, Private or group calls, and circuit data use, as well as the number of Kilobytes sent and received by your phone:•Last Call — displays the duration of your most recent phone call.• Phone Reset — keeps a running total of your phone call minutes, until you reset it.• Phone Lifetime — displays the total minutes of all your phone calls.•Prvt/Grp Reset — keeps a running total of all of your Private and group call minutes, until you reset it.• Prvt/Grp Lifetime — displays the total minutes of all your Private and group calls.• Circuit Reset — keeps a running total of all of your circuit data use, until you reset it.• Circuit Lifetime — displays the total minutes of all of your circuit data use.•Kbytes Reset — keeps a running total of the number of Kilobytes sent and received by your phone, until you reset it.To view or reset a timer:1From the main menu, select Call Timers.2Select the feature you want to view or reset.3To view a feature without resetting: Press A under Done when you are finished viewing.   -or-To reset a feature: Press A under Reset. Press A under Yes to confirm.
46Advanced Calling FeaturesNote: The values displayed by Call Timers should not be used for billing. Call timers are estimates only.Using Your Phone as a ModemNote: This feature may not be offered by your service provider.To use your phone as a modem with a laptop, handheld device, or desktop computer:1Open the connector cover.2With the phone’s display facing up, insert a data cable’s connector into the accessory connector, until you hear a click.3Insert the data plug into the COM port of the other device.When used as a modem, your phone has these data transfer modes:•Circuit data — used for sending and receiving faxes and for transferring large files•Packet data — used for small file transfers such as emailTo use these services, you must install the iDEN Wireless Data Services software (available separately). For more information on setting up your computer and your i315 phone for packet and circuit data calls, refer to the Wireless Data Services User’s Guide or contact your service provider.connector cover
47 Making TTY CallsMaking TTY CallsNote: This feature may not be offered by your service provider.To use your phone to make phone calls using a teletypewriter (TTY) device:1Connect one end of a 2.5mm cable into the audio jack on your phone. Connect the other end of the cable to your TTY device.2Make sure that your phone’s TTY feature is on and select the TTY mode you want to use.3Use your phone to enter phone numbers and make calls.When you make a TTY call, these icons appear on the phone’s display: TTY device features such as Turbo-Code, High-Speed, and Interruption are not supported by your phone. These features must be turned off or disabled to use your TTY device with your phone.Turning On the TTY FeatureYour phone’s TTY feature must be on if you want to make TTY calls, set the TTY mode, or change the TTY baud rate. To make sure the TTY feature is on:From the main menu, select Settings > Phone Calls > TTY. This field must say On.Choosing a ModeYour phone supports these TTY modes:•TTY — You type and read text on your TTY device.•VCO (Voice-Carry-Over) — You speak into your phone and read text replies on your TTY device.• HCO (Hearing-Carry-Over) — You type text on your TTY device and listen to voice replies on your phone speaker.To change mode while not in a call:1From the main menu, select Settings > Phone Calls > TTY > Type.2Press A under Change.3Scroll to the TTY mode you want. 4Press A under Select.When you make a TTY call, the call begins in the TTY mode you last selected.NPhone call is active.OPhone call is on hold.
48Advanced Calling FeaturesTo change mode during a call using your phone:1Press m.2Select in Call Setup > TTY > Type.3Select the mode you want.To change mode during a call using your TTY device, issue one of the following commands:•“VCO please” — to select VCO mode•“HCO please” — to select HCO mode•“HCO off please” — to turn off HCO modeImportant:  When you are using HCO, the sound coming from your phone speaker may be uncomfortably loud. Use caution when putting the phone to your ear. (For information on setting the volume of your phone speaker, see “Setting the Volume” on page 78.)Changing the TTY Baud RateBy default, your phone’s TTY baud rate is set to 45.45, the baud rate required for TTY calls within the U.S. To make calls outside the U.S., set your TTY baud rate to 50.0.To change the TTY baud rate:1From the main menu, select Settings > Phone Calls > TTY > Baud.2Press A under Change3Scroll to the baud rate for your location. 4Press A under Select.
49MemoMemo lets you store a number, make a call to that number, and save it to Contacts.To create a memo:1From the main menu, select Memo.2Enter the number using your keypad.3Press A under Store.To view the memo later:1From the main menu, select Memo.To delete the memo:1From the main menu, select Memo.2Press and hold A under Delete.3Press A under Store.To edit the memo:1From the main menu, select Memo.2Enter the new number.3Press A under Store.To make a call to the memo number:1From the main menu, select Memo.2To make a phone call, press s. -or-To make a Private call, press the PTT button.3To store the memo number to Contacts:1From the main menu, select Memo.2Press m.3Press A under Select.4To store the number as a new entry, select [New Contact]. -or-To store the number to an existing entry, select the entry.5With the Contacts type field highlighted, scroll left or right to display the Contacts type you want to assign to the number.6If you want to add more information to the entry, follow the applicable instructions in “Creating Entries” on page 33.7Press A under Done.
50Ring TonesTo set the ring tone your phone makes when you receive phone calls, message notifications, or call alerts:1From the main menu, select Ring Tones.2Make sure Vibrate All is set to Off.3Scroll through the list of ring tones and select the one you want to assign. Vibrate sets your phone to vibrate instead of making a sound; Silent sets your phone to neither vibrate nor make a sound.Tip: Highlighting a ring tone lets you hear it.4Press A under Assign.5Scroll to the feature you want to assign the ring tone to.6Press A under Select.Tip: A checkmark next to a feature means the current ring tone has been assigned to it. To remove the assignment: Scroll to the feature. Press A under Select.7To assign the ring tone to other features, repeat step 5 through step 6.8When you are finished, press A under Done.Setting Your Phone to VibrateIf your phone includes a vibrate feature, you can set your phone to vibrate when you receive phone calls, Private calls and group calls, messages notifications, or call alerts.Note: This is an optional feature. Contact your service provider about its availability for purchase.Turning Ring Tones OffYou can set your phone to make no sound when you receive phone calls, Private calls and group calls, messages notifications, or call alerts. These icons indicate how the ringer is set.These icons may appear at the same time.Never Ring1From the main menu, select Ring Tones > SilentAll.2Scroll left or right to set SilentAll to On.uThe phone never rings.vThe phone always vibrates instead of ringing.MThe phone does not ring for phone calls.
51 Ring and VibrateAlways Vibrate Instead of RingingIf your phone includes a vibrate feature:1From the main menu, select Ring Tones > Vibrate All.2Scroll left or right to set Vibrate All to On.Tip: Pressing the volume controls to turn down the volume as far as possible sets Vibrate All to On.Do Not Ring for Some FeaturesTo set individual ring options for phone calls, messages notifications, or call alerts:1From the main menu, select Ring Tones.2Make sure Vibrate All or SilentAll is set to Off.3Scroll through the list of ring tones to Silent. -or-If your phone includes the vibrate feature, scroll through the list of ring tones to Vibrate.4Press A under Assign.5Scroll to the feature you want to set to make no sound.6Press A under Select.7To assign Vibrate or Silent to another feature, repeat step 5 through step 6.8When you are finished, press A under Done.Note: To set ring options for Private calls and group calls, see “Setting Your Phone to Not Ring” on page 78.Ring and VibrateTo set your phone to ring and vibrate when you receive phone calls or call alerts:1From the main menu, select Ring Tones.2Make sure Vibrate All is set to Off.3Scroll through the list of ring tones and select the one you want to assign.4Press m.5Select Assign w/Vibe.6Select the feature you want to set to ring and vibrate.7When you are finished, press A under Done.This icon S appears on the display.Assigning Ring Tones to ContactsYou can set the ring tone your phone makes when you receive phone calls or call alerts from someone you have stored in Contacts.1From the main menu, select Ring Tones.2Make sure Vibrate All or SilentAll is set to Off.
52Ring Tones3Scroll through the list of ring tones to the one you want to assign. Highlighting a ring tone lets you hear it.4Press A under Assign.5Select A Contact.6Scroll to the Contacts entry you want to assign the ring tone to.7Press A under Select.Viewing Ring Tone Assignments1From the main menu, select Ring Tones.2Make sure Vibrate All or SilentAll is set to Off.3Highlight any ring tone.4Press m.5Select Overview.6Scroll to view ring tones assigned to features and Contact entries.Downloading More Ring TonesIf you want to use other ring tones, you can download them into your phone for a fee. Go to www.motorola.com/idenupdate for a selection of custom ring tones and downloading instructions.Note: Ring tones may be downloaded only once. If you delete a ring tone from your phone, you must purchase it to download it again.Managing MemoryTo view the amount of memory available for custom ring tones:1From the main menu, select Ring Tones.2Make sure Vibrate All or SilentAll is set to Off.3Highlight any ring tone.4Press m.5Select Memory Usage.Deleting custom ring tones frees memory.Note: Ring tones are stored in your phone using the same memory space used to store voice records. Deleting voice records frees memory space for ring tones.Deleting Custom Ring TonesTo delete a custom ring tone:1From the main menu, select Ring Tones.2Make sure Vibrate All or SilentAll is set to Off.3Scroll to the ring tone you want to delete.4Press m.
53 Deleting Custom Ring Tones5Select Delete.6Press A under Yes to confirm.
54Entering TextYou can enter text into your phone using the traditional method of pressing a key several times for each character, or by pressing a key once for each letter while words likely to be the one you want are chosen from a database. You can also enter symbols and numbers into a text field.In screens that require you to enter text, you see the following icons near the top right corner. These icons tell you which text input mode you are using:When you access a screen that requires you to enter text, you start in Alpha mode.To choose a text input mode:1At a screen that requires you to enter text, press m.2A checkmark appears next to the current text input mode. Scroll to the text input mode you want to use.3Press A under Select.Using Alpha Mode•Press any key on the keypad to enter the letters, numbers, and symbols on that key. For example, to enter the letter Y, press 9 three times.•Type a letter then scroll up to make that letter uppercase, or type a letter then scroll down to make that letter lowercase.•See “Special Function Keys” on page 55 for more information on adding spaces, capitalization, and punctuation.Using Word ModeIn Word mode, T9 Text Input analyzes the letters on the keypad button you press and arranges them to create words. As you type, T9 Text Input matches your keystrokes to words in its database and displays the most commonly used matching word. You can add you own words to this database.Entering a Word1Select Word as your text input mode.lAlpha — Press a key several times for each character.jWord — Press a key once for each letter while words likely to be the one you want are chosen from a database.iSymbols — Enter punctuation and other symbols.kNumeric — Enter numbers.
55 Special Function Keys2Type a word by pressing one key for each letter.For example, to type “test” press 8 3 7 8.The displayed word may change as you type it. Do not try to correct the word as you go. Type to the end of the word before editing. 3If the word that appears is not the desired word, press 0 to change the word on the display to the next most likely word in the database.Repeat until the desired word appears.If the desired word does not appear, you can add it to the database.Adding Words to the Database1Select Alpha as your text input mode.2Type the word using Alpha mode.3Select Word as your text input mode.4Press #.The word you typed in Alpha text entry mode is now in the database.Note: You cannot store alphanumeric combinations, such as Y2K.Choosing a LanguageTo change the language of the database:1At a screen that requires you to enter text, press m.2Select Languages.3Scroll to the language you want for your database.4Press A under Select.Special Function KeysSome of the phone’s keys assume different functions while in Alpha or Word mode.SpacesPress # for a space.CapitalizationWhen you press and hold #, it acts as a 3-way toggle. Press and hold # to make the next letter typed uppercase (shift), to make all subsequent letters typed uppercase (caps lock), or to go back to lowercase letters.
56Entering TextThese icons appear in the top row of your display:When neither of these icons appear, letters typed are lowercase.Note: Your phone automatically makes the first letter of a sentence uppercase.PunctuationPress 1 or 0 to insert punctuation. Continue to press the key to view the list of symbols available through that key. Pause to select the symbol you want.Note: Additional punctuation symbols are available in Symbols mode.Using Numeric Mode1Select Numeric as your text input mode.2Press the number buttons on your keypad to enter numbers.Using Symbols Mode1Select Symbols as your text input mode.A row of symbols appears along the bottom of your phone’s display. Scroll right to view the complete row.2Scroll left or right to choose the symbol you want to enter.3Press A under Select.mShift is on.nCaps lock is on.
57MessagesYou can receive the following types of messages on your phone:•Voice mail messages•Short Message Service (SMS) text messages•Depending on your service provider, you may have the option to receive fax mail and Net alerts.You have 2 ways to access the messages you receive:•Respond to the message notification that appears when the message is received.•Dismiss the message notification and access the message later through the message center.You can listen to or view these messages, delete them, or continue to store them in the message center.Message NotificationsWhen you receive a message, your phone notifies you with text on the display and a notification tone or vibration. You can access the message or dismiss the notification.If you dismiss the notification, the message is not deleted. It can be accessed through the message center.If you are not on a phone call when you receive a message, your phone sounds a notification tone every 30 seconds until you access the message, dismiss the notification, or the alert time-out expires.Setting Notification OptionsTo control whether your phone sounds message notification tones while you are on phone calls:1From the main menu, select Settings > Phone Calls > Notifications.2Choose the option you want:• Receive All — Tones sound during calls for all types of messages.• Msg Mail Only — Tones sound during calls for SMS messages; tones for all other types of messages are held until you end calls.• Delay All — Tones for all types of messages are held until you end calls.3Press A under Select.Tip: To set notification options during a call: Press m. Select In Call Setup > Notifications.
58MessagesMessage CenterThe message center manages your messages.All your messages are stored in the message center. The message center shows how many messages you have of each type.To access your messages through the message center:1Press A under Mesgs. -or-From the main menu, select Messages.2Scroll to the type of message you want to access.3Press A under the display option on the left.
59Voice Mail MessagesNote: To receive voice mail messages, you must first set up a voice mail account with your service provider.Receiving a MessageWhen you receive a voice mail message, New Voice Mail Message appears on the display.To call your service provider’s voice mail system and listen to the message:Press A under Call.To dismiss the message notification:Press A under Back. This icon y appears on the display, reminding you that you have a new message.Accessing Voice Mail fromthe Message Center1From the main menu, select Messages > Voice Mail.2Press A under Call to call your service provider’s voice mail system.Sending Unanswered Calls to Voice MailTo send a phone call to voice mail instead of answering it:Press e. -or-Press A under No.If the caller leaves a message, this icon y appears on the display, reminding you that you have a new message.
60MOSMS MessagesNote: This feature may not be offered by your service provider.If your service provider offers MOSMS, your phone sends SMS messages using MOSMS and receives SMS messages from other phones that are using MOSMS.Setting UpBefore you begin using MOSMS, you may need to set up your signature, service center number, and expiration information:1From the main menu, select Messages.2Scroll to Text Inbox.3Press m.4Select Text Msg Setup.5With the Signature field highlighted, press A under Change.Enter your signature. It may be up to 11 characters long. See “Entering Text” on page 54. When you are finished, press A under Ok.6With the Srvc Cntr No field highlighted, press A under Change.Enter the phone number of your service center. If you do not know this number, contact your service provider.When you are finished, press A under Ok.7With the Expire After field highlighted, press A under Change.This is the amount of time messages you send are saved if they cannot be delivered. After this period, they are discarded.Scroll or press A under Q to change field.When you are finished, press A under Done.8Press A under Back to save the information you entered.Receiving a MessageWhen you receive a text message, New Text Message appears on the display.To view the message:1Press A under Read.2If the message fills more than one screen, scroll to read it.3To keep the message, scroll to the end of the message and press A under Save. -or-
61 Reading from the Message CenterTo delete the message, scroll to the end of the message and press A under Delete.To dismiss the message notification:Press A under Exit. This icon w appears on the display, reminding you that you have a new message.If your phone is powered off when you receive a text message, your phone notifies you the next time you power it on. If you are out of your coverage area, your phone alerts you when you return to your coverage area.Tip: While reading a text and numeric message that contains a phone number, you can press s to call that number.Reading from the Message Center1From the main menu, select Message > Text Inbox.2Scroll to the message you want to read.3Press A under Read.4If the message fills more than one screen, scroll to read it.5To keep the message, press A under Save. -or-To delete the message, scroll to the end of the message and press A under Delete.Tip: To see more choices, including replying to the message, press m.Creating and Sending Messages1From the main menu, select Messages > Text Inbox > [Create Msg]. -or-From the main menu, select Messages > Text Outbox > [Create Msg].2Press A under Create.3To address the message:Use the keypad to enter the phone number of the person you want to send the message to. -or-Press A under Browse. Select Contacts, Recent Calls, or Memo. Enter the number from Contacts, the recent calls list, or Memo, as you would when making a call.When you are finished, press A under Ok.4Enter the text of the message. See “Entering Text” on page 54. -or-To use a quick note: Press A under Browse. Scroll to the quick note you want. Press A
62MOSMS Messagesunder Select. For more information on quick notes, see “Using Quick Notes” on page 63.If you want to add your signature: Press m. Select Add Signature.When you are finished, press A under Ok.5If you want to send the message, press A under Yes. -or-If you want to request confirmation of delivery, specify the type of message you want to send, save the message as a draft, or delete the message without sending it, press A under No. 6If you want to request confirmation of delivery: With the Report field highlighted, press A under Change. Select Yes.7If you want to specify the type of message you want to send:With the Send As field highlighted, press A under Change. Scroll to the message type you want. Press A under Select.8To send the message: Press s. Press A under Yes. -or-To save the message as a draft without sending it: Press m. Scroll to Save As Draft. Press A under Select. -or-To delete the message without sending it: Press m. Scroll to Delete. Press A under Select.Tip: In some fields, you can select an option by scrolling left or right instead of pressing A under Change.Beginning Messages From the Recent Calls List1From the recent calls list, scroll to the name you want to send a message to.2If the entry has more than one phone number stored, view the phone number you want to send the message to.3Press m.4Select Compose SMS. The message is automatically addressed to the phone number you chose.5Follow step 4 through step 8 of “Creating and Sending Messages” on page 61.Beginning Messages From the Idle Screen1Using the keypad, enter the number you want to send a message to.2Press m.
63 Creating and Sending Messages3Select Compose SMS. The message is automatically addressed to the phone number you chose.4Follow step 4 through step 8 of “Creating and Sending Messages” on page 61.Using Quick NotesQuick notes are short, pre-written text messages that you can create, edit, and send. You can store up to 20 quick notes. A quick note may be up to 30 characters long.To create a quick note:1From the main menu, select Messages > Quick Notes > [New Quick Note].2Press A under Create.Enter text. See “Entering Text” on page 54. -or-To choose from pre-installed notes: Press A under Browse. Scroll to the note you want. Press A under Select.3Press A under Store.Tip: For more options, including sending the quick note, press m.Using DraftsWhen you save a message as a draft, it is saved in the drafts folder. You must have a draft saved to have a drafts folder.To edit a draft:1From the main menu, select Messages > Drafts Folder.2Press A under Change.3To edit the fields you want to change, follow step 3 through step 8 in “Creating and Sending Messages” on page 61.If you have a draft saved, you can create more drafts in the drafts folder:1From the main menu, select Messages > Drafts Folder > [Create Msg].2Press A under Create.3Follow step 3 through step 7 in “Creating and Sending Messages” on page 61.4Scroll to Save As Draft.Using the OutboxMessages you have sent are stored in the outbox.
64MOSMS MessagesThese icons appear next to messages in the outbox:Resending MessagesTo resend a message:1From the main menu, select Messages > Text Outbox.2Scroll to the message you want to resend.3Press m.4Select Re-send.5Press A under Yes to confirm.Deleting Sent MessagesTo delete a sent message:1From the main menu, select Messages > Text Outbox.2Scroll to the message you want to delete.3Press m.4Select Delete.5Press A under Yes to confirm.To delete all unlocked sent messages:1From the main menu, select Messages > Text Outbox.2Press m.3Select Delete All.4Press A under Yes to confirm.Locking Sent MessagesWhen you lock a message, it cannot be deleted until you unlock it.1From the main menu, select Messages > Text Outbox.2Scroll to the message you want to lock or unlock.3Press m.4Scroll to Lock to lock the message. -or-5Sent and confirmed.9Send attempted.0Forwarded.4Received by addressee.6Not received by addressee.8Send failed.7Re-sent.RLocked.
65 Managing MemoryScroll to Unlock to unlock the message.5Press A under Select.Managing MemoryYour text inbox, outbox, and drafts folder have a set amount of memory available for storing messages.The text inbox holds 20 messages. If the text inbox is full, you cannot receive messages until you delete some.The outbox and drafts folder share memory space. Together they can hold 30 messages. If the outbox and drafts folder memory is full, you cannot send messages or save drafts until you delete some.To view the amount of memory available in your text inbox:1From the main menu, select Messages > Text Inbox.2Press m.3Select Memory Meter.To view the amount of memory available in your outbox and drafts folder:1From the main menu, select Messages > Text Outbox.2Press m.3Select Memory Meter.
66GPS EnabledYour phone’s GPS Enabled feature uses information from Global Positioning System (GPS) satellites orbiting the Earth to determine the approximate geographical location of your phone, expressed as latitude and longitude. The availability and accuracy of this location information (and the amount of time that it takes to calculate it) will vary depending on the environment in which you are using the GPS feature. For example, GPS location fixes are often difficult to obtain indoors, in covered locations, between high buildings, or in other situations where you have not established a clear broad view of the sky. SEE: “IMPORTANT: Things to Keep in Mind”.When you make a 911 emergency call, the GPS feature of your phone can help emergency personnel locate you if your phone has adequate access to GPS satellite signals and your emergency response center is equipped to process such information.You can also use the GPS feature to view your approximate location. Location information appears on the phone’s display.If your phone is connected to a laptop computer or similar device, software running on that device can request your location. To protect your privacy, you can control whether these requests are granted.IMPORTANT: Things to Keep in MindIf you are using the GPS feature of your phone while driving, please give full attention to driving and to the road.Where adequate signals from multiple satellites are not available (usually because your GPS antenna cannot establish a view of a wide area of open sky), the GPS feature of your phone WILL NOT WORK. Such situations include but are not limited to:• In underground locations• Inside of buildings, trains, or other covered vehicles• Under any other metal or concrete roof or structure• Between tall buildings or under dense tree-cover• Near a powerful radio or television tower
67 Making an Emergency Call• When your GPS antenna is covered (for example, by your hand or other object) or facing the ground• In temperature extremes outside the operating limits of your phoneWalking or driving very slowly may also substantially reduce GPS performance.Even where location information can be calculated in such situations, it may take much longer to do so, and your location estimate may not be as accurate. Therefore, in any 911 call, always report the location to the emergency response center if you can and if you cannot, remain on your phone for as long as the emergency response center instructs you.Even where adequate signals from multiple satellites are available, your GPS feature will only provide an approximate location, often within 150 feet (45 meters) but sometimes much further from your actual location. Advice on how to improve GPS performance is provided in “Enhancing GPS Performance” on page 69.While the GPS feature of your phone can be a valuable navigational aid, it does not replace the need for careful navigating and good judgment. Never rely solely on one device for navigation. Remember that the accuracy of the location information and the time needed to obtain it will vary depending on circumstances, particularly the ability to receive signals from adequate numbers of satellites.On emergency calls, your phone uses assistance information from the phone network to improve the speed and accuracy of your phone’s location calculation: if such assistance information becomes unavailable, it may reduce the speed and accuracy of the location calculation.The satellites used by the GPS feature of your phone are controlled by the U.S. government and are subject to changes implemented in accordance with the Department of Defense GPS user policy and the Federal Radionavigation Plan. These changes may affect the performance of the GPS feature of your phone.Making an Emergency CallDial 911 to be connected to an emergency response center. If you are on an active call, you must end it before calling 911.When you make an emergency 911 call, the GPS feature of your phone begins to seek information to calculate your approximate location. It will take the GPS feature of your phone some time to determine your approximate location. Even where your phone has good access to sufficient
68GPS EnabledGPS satellite signals and network assist data, it may take 30 seconds or more to determine the approximate location. This time will increase where there is reduced access to satellite signals. When your approximate location is determined, it is made available to the appropriate emergency response center.In some cases, your local 911 emergency response center may not be equipped to receive GPS location information. For this reason, and because the GPS location information reported is only approximate or may not be available in your location (see “IMPORTANT: Things to Keep in Mind” on page 66), always report your location to the 911 operator you speak to when making an emergency call, if able, just as you would when using a phone without GPS capabilities.Note: If you are concerned about whether your local 911 emergency response center is equipped to receive GPS location information, contact your local authorities.In general, if your phone has access to signals from more GPS satellites, your location will be determined faster and more accurately than if your phone has access to signals from fewer GPS satellites.If your phone does not have adequate access to GPS satellites signals, the location of the nearest cell tower in contact with your phone is automatically made available to the emergency response center, if the center has the capability to receive such information.See “Enhancing GPS Performance” on page 69 for information on how to help your phone determine your location.Viewing Your Approximate Location1From the main menu, select GPS > Position.2Scroll to view the entire screen.This displays the following information about the last time your location was calculated:•The time (as Greenwich Mean Time) and date that the location was last calculated.•The approximate location, expressed as latitude and longitude.•The estimated accuracy of the calculated location. This estimate of accuracy is only a very rough estimate and may vary substantially from the actual accuracy of the approximate location information reported.
69 Enhancing GPS Performance•The number of satellites used to calculate the location. In general, more satellites make for better accuracy.To calculate your location again:Press A under Rfrsh.It may take your phone several minutes to complete the process of determining your location. During this time, a message usually appears on your phone’s display saying your phone is scanning for satellites. For tips on getting the best location calculation, see “Enhancing GPS Performance”.The Position screen displays the updated information.To cancel a location calculation before it is completed:Press A under Cancel to return to the Position screen. -or-Press e to return to the idle screen.Each time approximate location of your phone is calculated, the latest location information is stored in your phone and remains there even when your phone is powered off. You will see this information the next time you view the Position screen.If you received a phone call or alert while attempting to determine your location, the Position screen will disappear, but your phone will continue attempting to determine its location. If it is successful, the new location information will be displayed the next time you view the Position screen.Enhancing GPS PerformanceSometimes the GPS feature of your phone may be unable to complete a location calculation successfully. If this happens when you are making an emergency call, the location of the nearest cell tower in contact with your phone is made available to the appropriate emergency response center if the center has the capability to receive such information. If this happens when you are trying to view your location on the phone’s display, you will see a message indicating that your phone cannot access satellites.To improve accuracy and increase your chances of a successful calculation, do the following while your phone is determining your approximate location:
70GPS Enabled•Stay in the open. The GPS feature works best where there is nothing between your phone and a large amount of open sky. If possible, go outside, away from tall buildings and foliage. While performance in a building is improved by moving closer to windows, glass with certain sun shielding films may block satellite signals.•Hold your phone to enhance reception. Signals from GPS satellites are transmitted to your GPS antenna, which is inside the back of your phone, opposite the earpiece, above the label with your service provider’s name on it. Hold your phone away from your body, giving the antenna clear access to satellite signals. Do not cover the antenna area with your fingers or anything else.•Stand still. If possible, stand still until your phone is finished determining your location. Moving your phone at a walking pace while your phone is calculating your approximate location may substantially decrease GPS performance.•In a car. When using the GPS Enabled feature in a car, position your phone so that the GPS antenna has good access to GPS signals through the car’s windows. Typically, the GPS antenna has best access to GPS signals in a car when placed near a window.Note: Although moving your phone at a walking pace decreases GPS performance, moving it at the speed of a moving car does not.•Stay in network coverage. Depending on who your service provider is, the network will provide your phone with information that helps determine your location more quickly and accurately.GPS antenna area
71 Updating Satellite Almanac DataUpdating Satellite Almanac DataAnother way to keep the GPS feature of your phone working well is to keep your satellite almanac data up to date.The United States government maintains an almanac of data about where GPS satellites are as they orbit the Earth. This information is available to your phone. Keeping your satellite almanac up to date helps your phone determine your location more quickly.The almanac contains information about the location of satellites, their operational status, and other satellite information. Keeping this information updated enhances the performance of your GPS feature. In most cases, your phone will be able to get a fix in strong satellite signal conditions with outdated almanac data, but it may take longer. Note: When you make an emergency call, your phone does not rely upon the almanac to determine your location.If your satellite almanac data is out of date, your phone may prompt you to update it. Follow the instructions that appear on the phone’s display. You may be asked to go to a web site or call a customer care number.Setting Privacy OptionsYour phone’s GPS privacy options control whether software applications may view the location of your phone.You may set your phone to one of these GPS privacy options:• Restricted — No software applications may view the location of your phone. However, location information may still be available to the phone’s owner, fleet manager, or account administrator.• Unrestricted — All applications may view the location of your phone, without notifying you.• By Permission — When an application attempts to view the location of your phone, you will be prompted to give permission. However, location information may still be available to the phone’s owner, fleet manager, or account administrator.Note: Privacy options do not apply to the transmission of location information during emergency 911 calls.To set your GPS privacy options:1From the main menu, select GPS > Privacy.2If your GPS PIN security feature is enabled, enter your GPS PIN. (See “Setting the GPS PIN Security Feature” for more information.)
72GPS Enabled3Scroll to the privacy setting you want.4Press A under Select.Setting the GPS PIN Security FeatureTo prevent your GPS privacy settings from being altered without your knowledge, your GPS privacy option can be protected by a PIN.When you receive your phone, the GPS security feature is turned off, so you do not have to enter a GPS PIN to access your GPS privacy options. If you turn this feature on, you will be required to enter a GPS PIN to access your GPS privacy options.To turn the GPS Enabled security feature on or off:1From the main menu, select Settings > Security > GPS PIN.2Scroll to On or Off. 3Press A under Select.4Enter the current GPS PIN.Note: When you receive your phone, your GPS PIN is 0000.5Press A under Ok.To change your GPS PIN:1From the main menu, select Settings > Security > Change Password > GPS PIN.2Enter the current GPS PIN.Note: When you receive your phone, your GPS PIN is 0000.3Press A under Ok.4Enter the new 4- to 8-digit GPS PIN.5Press A under Ok.6Enter the new 4- to 8-digit GPS PIN to confirm.7Press A under Ok.Using GPS with Map SoftwareYou can use the GPS feature of your phone to provide approximate location data to a laptop computer or similar device that is running interactive map software such as that made by DeLorme or Microsoft. This way, if your phone has good access to GPS signals, your approximate position on a map can be made available as you travel in a vehicle.To do this, connect your phone to your laptop (or other device) with a data cable and set your phone to transmit data (see “Getting Started” on page 73). Your phone then provides your approximate location to the device running the map software, which displays your location on a map. Your phone provides an updated location every second and the map software displays your changing location on its map.
73 Using GPS with Map SoftwareSee “Enhancing GPS Performance” on page 69 for more details on obtaining good location information.Note: Because your phone is continuously determining your location, using the GPS feature of your phone with map software uses the phone’s battery power quickly.Software CompatibilityYour phone sends location information to your laptop or other device using the standard National Marine Electronics Association (NMEA) format. Your phone supports output messages in NMEA-0183 format and supports the following NMEA-0183 sentences: GGA, GLL, GSA, GSV, RMC, and VTG.The map software running on your laptop or other device must support NMEA 3.0.Getting StartedTo connect your phone to your laptop or other device:1Open the connector cover.2With the phone’s display facing up, insert the data cable’s connector into the accessory connector, until you hear a click.connector cover
74GPS Enabled3Insert the data plug into the COM port of your laptop or other device.Make sure no other application is using the COM port selected.Make sure the COM port settings of your laptop or other device are set to the following:•Bits per second: 4800•Data bits: 8•Parity: None•Stop bits: 1•Flow control: HardwareTo set your phone to send location information to your laptop or other device:1From the main menu, select GPS > Interface.2With NMEA OUT highlighted, press A under Change.3Scroll to On.4Press A under Select. Your phone is now sending location data to your laptop or other device.To stop your phone from sending location data to your laptop or other device:Set NMEA OUT to Off.Each time you power your phone on, NMEA OUT is automatically set to Off.
75Voice RecordsNote: This is an optional feature. Contact your service provider about its availability for purchase.A voice record is a recording you make with your phone and can play back. You can record notes to yourself or phone calls.Your phone can store up to 20 voice records, with a total time of 3 minutes or more, depending on available memory.Creating Voice RecordsTo record a note to yourself:1From the main menu, select VoiceRecd > [New VoiceRec].2Press A under Record. Say the message you want to record into the microphone.3When you are finished recording, press A under Stop.To add to the end of voice record:1From the main menu, select VoiceRecd.2Scroll to the voice record you want to add to.3Press m.4Scroll to Add To.5Press A under Select. Say the message you want to add into the microphone.6When you are finished recording, press A under Stop.To record a phone call:1While on an active call, press m.2Scroll to Record.3Press A under Select to start recording.4When you are finished recording, press A under Stop.Note: Recording of phone calls is subject to applicable laws regarding privacy and recording of phone conversations.Playing Voice Records1From the main menu, select VoiceRecd.2Scroll to the voice record you want to play.3Press A under Play.4To stop the voice record while it is playing, press A under Back.Tip: To fast forward, scroll right. To rewind, scroll left. To pause or resume, press any key.
76Voice RecordsLabelling Voice RecordsWhen you create a voice record, it is labeled with the time and date it was recorded. You can then rename it with a custom label.1From the main menu, select VoiceRecd.2Scroll to the voice record you want to label.3Press m.4Select Label.5Enter the label you want to assign. See “Entering Text” on page 54.6Press A under Ok.Deleting Voice RecordsTo delete a voice record:1From the main menu, select VoiceRecd.2Scroll to the voice record you want to delete.3Press m.4Select Delete.5Press A under Yes to confirm.To delete all voice records:1From the main menu, select VoiceRecd.2Press m.3Select Delete All.4Press A under Yes to confirm.Locking Voice RecordsWhen you lock a message, it cannot be deleted until you unlock it.1From the main menu, select VoiceRecd.2Scroll to the message you want to lock or unlock.3Press m.4Scroll to Lock to lock the message. -or-Scroll to Unlock to unlock the message.5Press A under Select.When a voice record is locked, this icon R appears next to it.Managing MemoryTo view the amount of memory available for voice records:1From the main menu, select VoiceRecd.2Press m.3Select Memory.To free more memory by deleting all unlocked voice records:1From the main menu, select VoiceRecd.
77 Managing Memory2Press m.3Select Memory.4Press A under Delete.5Press A under Yes to confirm.Note: Voice records are stored in your phone using the same memory space used to store ring tones. Deleting ring tones frees memory space for voice records.
78Customizing Your PhoneSetting the VolumeTo set the volume of the sound coming from the phone’s earpiece or speaker:1From the main menu, select Settings > Volume.2Scroll to Earpiece to set the earpiece volume. -or-Scroll to Speaker to set the speaker volume.3Press A under Change.4To select the volume:Scroll left or right. -or-Press the volume controls.5Press A under Ok.To set the volume of the phone’s ring:Press the volume controls.For another way to set the volume of the phone’s ring, or the volume of many other sounds your phone makes:1From the main menu, select Settings > Volume.2Scroll to the option you want and make the change. Choose Line 1 or Line 2 to set the volume of the phone’s ring when you get a call on that line.See “Volume Features” on page 80.Setting Your Phone to Not RingTo set your phone to make no sound when you receive phone calls, Private calls, group calls, message notifications, and call alerts, see “Turning Ring Tones Off” on page 50.To set your phone to vibrate instead of making a sound when you receive Private calls and group calls, even if you want your phone to ring for other features:1From the main menu, select Settings > 2-Way Radio > Alert Type.Tip: If Alert Type does not appear: From the main menu, select Ring Tones. Make sure Vibrate All or SilentAll is set to Off. Repeat step 1.2Press A under Change.3Scroll to Vibrate.4Press A under Select.Note: This is an optional feature. Contact your service provider about its availability for purchase.
79 Seeing the Display BetterIf your phone does not include a vibrate feature, you can still set your phone to make no sound. Scroll to Silent in step 3.Seeing the Display BetterTo set the contrast of the display:1From the main menu, select Settings > Display/Info > Contrast.2Press A under Change.3Scroll left or right to set the contrast.4Press A under Ok.Using SettingsSettings contains many submenus that let you customize your phone.Display/Info FeaturesThe Display/Info menu controls how the keypad and display appear:• Backlight — controls how long the backlight stays on after you make or receive a call.•Clock — controls whether the time and date appears on the idle screen, sets the format of the time and date, and sets the year.•Contrast — sets the contrast on the display. See “Seeing the Display Better”.• Language — sets the language that your phone displays.Phone Calls FeaturesThe Phone Calls menu controls how your phone handles phone calls:• Set Line — sets phone line 1 or phone line 2 as the active line for outgoing calls.• Any Key Ans — If this feature is on, you can answer calls by pressing any number key on the keypad.• Auto Redial — sets your phone to automatically redial calls you make when the system is busy.• Call Waiting — See “Call Waiting” on page 41.•Auto Ans — sets your phone to automatically answer an incoming call after a specified number of rings. When this feature is on, the phone answers by connecting you to the caller; it does not send the call to voice mail, unless you are out of coverage or on the line.• Minute Beep — causes a beep to sound every minute of an active call.•Call Duration — causes the duration of a call to appear on the phone’s display when the call ends.
80Customizing Your Phone• TTY — lets you use your phone with a TTY device. See “Making TTY Calls” on page 47.• Notifications — See “Setting Notification Options” on page 57.2-Way Radio FeaturesThe 2-Way Radio menu controls how your phone handles Private calls and group calls:• Tkgrp Silent — controls whether you hear group calls to your Talkgroup. See “Receiving Group Calls” on page 45.•Tkgrp Area — lets you define your Talkgroup area.• One Touch PTT — See “Setting One Touch PTT” on page 43.• Alert Type — controls how your phone notifies you when you receive Private calls and group calls. See “Setting Your Phone to Not Ring” on page 78.Volume FeaturesThe Volume menu sets the volume of sounds your phone makes:•Line 1 — sets ring volume for phone line 1.•Line 2 — sets ring volume for phone line 2.•Messages — sets the volume of message notifications.• Earpiece — sets the volume of sound coming out of the earpiece.• Speaker — sets the volume of sound coming out of the speaker.•Keypad — sets the volume of sound associated with pressing keys and buttons.•Data — sets the volume of sounds that notify you that you are receiving a circuit data call.Security FeaturesThe Security menu lets you turn security features on and off and change passwords:• Phone Lock — turns on a feature that locks your phone, either immediately or automatically after a set period of inactivity. An unlock code is required to enable this feature, to unlock the phone, and to set a new unlock code. Contact your service provider for your default unlock code.•Keypad Lock — locks the phone’s keypad, either immediately or automatically after a set period of inactivity. See “Locking the Keypad” on page 14 for more information on locking and unlocking the keypad.
81 Using Settings• SIM PIN — enables and disables your phone’s SIM PIN security feature. See “Turning the PIN Requirement On and Off” on page 12.• GPS PIN — enables and disables your phone’s GPS PIN security feature. See “Setting the GPS PIN Security Feature” on page 72.• Change Passwords — changes your phone unlock code, security code, SIM PIN, and GPS PIN.Advanced FeaturesThe Advanced menu contains advanced and rarely used Settings features.• Alert Timeout — controls the amount of time a tone continues to sound when you receive a message notification or call alert.• Headset/Spker — sets headset option. See “Using a Headset” on page 82.• Connectivity — Network ID sets the phone’s network IDs and their roaming options under the direction of your service provider; Master Reset lets your service provider reset your service in the event of a security or provisioning problem.• Reset Defaults — Reset Settings returns all settings to their original defaults; Reset All returns all settings to their original defaults and erases all stored lists. Use only under the direction of your service provider.•Return to Home — controls how long the recent calls list displays after calls.• Phone Only — prevents your phone from making or receiving Private calls or group calls.•Baud Rate — sets the baud rate at which your phone communicates with a laptop computer, PC, or similar device.
82Using a HeadsetIf you use a headset or similar device with your phone, you can set your phone to send incoming sound to the headset only, or to the headset and the speaker at the same time:1From the main menu, select Settings > Advanced > Headset/Spkr.2Press A under Change.3Scroll to HdsetOnly to send incoming sound to the headset only. -or-Select Hdset&Spkr to send incoming sound to the headset and ring tones to the speaker. 4Press A under Select.Note: When you are using a headset, the PTT button on your phone works the same way as when you are not using a headset. Private call and group call sounds will be heard through the headset.Attaching a Headset1Lift the audio jack cover.2Insert the headset connector firmly into the audio jack. You may have to rotate the headset jack until it fits securely into the audio jack.Using a Remote PTT ButtonIf you are using a headset or other accessory with a remote PTT button, you can use the remote PTT button for phone calls and Private calls.For phone calls, use the remote PTT button to answer calls, switch between calls, and end calls. Hold the remote PTT button for less than 2 seconds to answer calls and switch between calls. Hold the remote PTT button for more than 2 seconds to end calls.For Private calls, use the remote PTT button as you would the PTT button on your phone.
83Understanding Status MessagesYou may receive status messages under certain conditions. Before contacting Customer Care, note the message, numeric code, and the conditions under which it appeared. The following table lists and describes the status messages. Status Messages  Message DescriptionNumber Not in ServiceThe number that you entered is not valid.User Not Available The phone that you called is either busy, out of coverage, or turned off. Please try again later.User Not AuthorizedThe person that you called has not purchased this service.Please Try Later This service is temporarily not available. Please try again later.Service Restricted This service was restricted by your service provider, or this service was not purchased. Service Not AvailableYou are either out of coverage or having problems with provisioning.System Busy The system is experiencing heavy traffic. Please try again later.Please Try Again An error occurred. Please try again.Self Check Error + Number CodeA fault was detected with your phone. If this error recurs, note the error code and contact Customer Care.Self Check Fail + Number CodeAn operational fault was detected with your phone. Note the numeric code, turn your phone off, and contact Customer Care. PIN Blocked Call Your ProviderThe incorrect PIN was entered 3 consecutive times. You will be unable to place or receive calls on your phone. Contact Customer Care to have them obtain the PIN Unblocking Key (PUK) code.Insert SIM Your SIM card is not being detected. Please check to ensure that you have inserted the SIM card correctly into your phone.Check SIM Card Please check your SIM card to make sure it has been inserted properly.Wrong PIN You have entered an incorrect PIN number. Status Messages  Message Description
84Understanding Status MessagesEnter SIM PIN Please enter your 4- to 8- digit SIM PIN code.Enter Unlock Code Auto Phone Lock is activated. Enter you unlock code.New Browser Message Memory Full!Warns of low memory for Net Alerts.Scanning for SatellitesSearching for GPS satellites.Unable to Locate SatsCould not find GPS satellites.Technical Error A problem occurred in your phone’s GPS circuitry. If this error occurs, contact Customer CareStatus Messages  Message  Description
85Safety and General InformationIMPORTANT INFORMATION ON SAFE AND EFFICIENT OPERATION. READ THIS INFORMATION BEFORE USING YOUR INTEGRATED MULTI-SERVICE PORTABLE RADIO.RF Operational CharacteristicsYour radio product contains a radio frequency transmitter to convey the information you wish to send as well as occasional automatic signals used to sustain connection to the wireless network, and a receiver which enables you to receive communication and connection information from the network.This device complies with part 15 of the FCC Rules. Operation is subject to the following two conditions: (1) This device may not cause harmful interference, and (2) this device must accept any interference received, including interference that may cause undesired operation.Portable Radio Product Operation and EME ExposureYour Motorola radio product is designed to comply with the following national and international standards and guidelines regarding exposure of human beings to radio frequency electromagnetic energy (EME):•United States Federal Communications Commission, Code of Federal Regulations; 47 CFR part 2 sub-part J.•American National Standards Institute (ANSI) / Institute of Electrical and Electronics Engineers (IEEE). C95. 1-1992.•Institute of Electrical and Electronics Engineers (IEEE). C95. 1-1999 Edition.•International Commission on Non-Ionizing Radiation Protection (ICNIRP) 1998.•Ministry of Health (Canada). Safety Code 6. Limits of Human Exposure to Radiofrequency Electromagnetic Fields in the Frequency Range from 3 kHz to 300 GHz, 1999.•Australian Communications Authority Radiocommunications (Electromagnetic Radiation - Human Exposure) Standard 2003.
86Safety and General Information•ANATEL, Brasil Regulatory Authority, Resolution 256 (April 11, 2001) “additional requirements for SMR, cellular and PCS product certification.” To assure optimal radio product performance and make sure human exposure to radio frequency electromagnetic energy is within the guidelines set forth in the above standards, always adhere to the following procedures:Phone OperationWhen placing or receiving a phone call, hold your radio product as you would a wireline telephone. Speak directly into the microphone.Two-way radio operationWhen using your radio product as a traditional two-way radio, hold the radio product in a vertical position with the microphone one to two inches (2.5 to 5 cm) away from the lips.Body-worn operationTo maintain compliance with FCC RF exposure guidelines, if you wear a radio product on your body when transmitting, always place the radio product in a Motorola approved clip, holder, holster, case or body harness for this product. Use of non-Motorola-approved accessories may exceed FCC RF exposure guidelines. If you do not use a Motorola approved body-worn accessory and are not using the radio product in the intended use positions along side the head in the phone mode or in front of the face in the two-way radio mode, then ensure the antenna and the radio product are kept the following minimum distances from the body when transmitting• Phone or Two-way radio mode: one inch (2.5 cm)• Data operation using any data feature with or without an accessory cable: one inch (2.5 cm)Antenna CareUse only the supplied or an approved replacement antenna. Unauthorized antennas, modifications, or attachments could damage the radio product and may violate FCC regulations. DO NOT hold the antenna when the radio product is “IN USE”. Holding the antenna affects call quality and may cause the radio product to operate at a higher power level than needed.
87 Portable Radio Product Operation and EME ExposureApproved AccessoriesFor a list of approved Motorola accessories call 1-800-453-0920, or visit our website at www.motorola.com/iden.ALL MODELS WITH FCC ID AZ489FT5832 MEET THE GOVERNMENT’S REQUIREMENTS FOR EXPOSURE TO RADIO WAVES.Your wireless phone is a radio transmitter and receiver. It is designed and manufactured not to exceed the emission limits for exposure to radiofrequency (RF) energy set by the Federal Communications Commission of the U.S. Government. These limits are part of comprehensive guidelines and establish permitted levels of RF energy for the general population. The guidelines are based on standards that were developed by independent scientific organizations through periodic and thorough evaluation of scientific studies. The standards include a substantial safety margin designed to assure the safety of all persons, regardless of age and health.The exposure standard for wireless mobile phones employs a unit of measurement known as the Specific Absorption Rate, or SAR. The SAR limit set by the FCC is 1.6W/kg.1 Tests for SAR are conducted using standard operating positions reviewed by the FCC with the phone transmitting at its highest certified power level in all tested frequency bands. Although the SAR is determined at the highest certified power level, the actual SAR level of the phone while operating can be well below the maximum value. This is because the phone is designed to operate at multiple power levels so as to use only the power required to reach the network. In general, the closer you are to a wireless base station antenna, the lower the power output.Before a phone model is available for sale to the public, it must be tested and certified to the FCC that is does not exceed the limit established by the government-adopted requirement for safe exposure. The tests are performed in positions and locations (e.g., at the ear and worn on the body) as required by the FCC for each model. The highest SAR value for this model phone when tested for use at the ear is 1.410  W/kg and when tested on the body, as described in this user guide, is 0.779 W/kg during packet data transmission. (Body-worn measurements differ among phone models, depending upon available accessories and FCC requirements.)2 While there may be differences between the SAR levels of various phones and at various positions, they all meet the government requirement for safe exposure.The FCC has granted an Equipment Authorization for this model phone with all reported SAR levels evaluated as in compliance with the FCC RF exposure guidelines. SAR information on this model phone is on file with the FCC and can be found under the Display Grant section of http://www.fcc.gov/oet/fccid after searching on FCC ID AZ489FT5832.Additional information on Specific Absorption Rates (SAR) can be found on the Cellular Telecommunications Industry Association (CTIA) web-site at http://www.wow-com.com.1 In the United States and Canada, the SAR limit for mobile phones used by the public is 1.6 watts/kg (W/kg) averaged over one gram of tissue. The standard incorporates a substantial margin of safety to give additional protection for the public and to account for any variations in measurements.
88Safety and General Information2  The SAR information reported to the FCC includes the FCC-accepted Motorola testing protocol, assessment procedure, and measurement uncertainty range for this product.Electro Magnetic Interference/CompatibilityNote: Nearly every electronic device is susceptible to electromagnetic interference (EMI) if inadequately shielded, designed or otherwise configured for electromagnetic compatibility.FacilitiesTo avoid electromagnetic interference and/or compatibility conflicts, turn off your radio product in any facility where posted notices instruct you to do so. Hospitals or health care facilities may be using equipment that is sensitive to external RF energy.AircraftWhen instructed to do so, turn off your radio product when on board an aircraft. Any use of a radio product must be in accordance with applicable regulations per airline crew instructions.Medical DevicesPacemakersThe Advanced Medical Technology Association (AdvaMed) recommends that a minimum separation of 6 inches (15 cm) be maintained between a handheld wireless radio product and a pacemaker. These recommendations are consistent with those of the U.S. Food and Drug Administration.Persons with pacemakers should:•ALWAYS keep the radio product more than 6 inches (15 cm) from their pacemaker when the radio product is turned ON. •Not carry the radio product in a breast pocket. •Use the ear opposite the pacemaker to minimize the potential for interference. •Turn the radio product OFF immediately if you have any reason to suspect that interference is taking place. Hearing AidsSome digital wireless radio products may interfere with some hearing aids. In the event of such interference, you may want to consult your hearing aid manufacturer to discuss alternatives.
89 Operational WarningsOther Medical DevicesIf you use any other personal medical device, consult the manufacturer of your device to determine if it is adequately shielded from RF energy. Your physician may be able to assist you in obtaining this information.Use While DrivingCheck the laws and regulations on the use of radio products in the area where you drive. Always obey them.When using the radio product while driving, please:•Give full attention to driving and to the road.•Use hands-free operation, if available.•Pull off the road and park before making or answering a call if driving conditions so require.Operational WarningsFor Vehicles with an Air BagDo not place a portable radio product in the area over the air bag or in the air bag deployment area. Air bags inflate with great force. If a portable radio is placed in the air bag deployment area and the air bag inflates, the radio product may be propelled with great force and cause serious injury to occupants of the vehicle. Potentially Explosive AtmospheresTurn off your radio product prior to entering any area with a potentially explosive atmosphere, unless it is a radio product type especially qualified for use in such areas as “Intrinsically Safe” (for example, Factory Mutual, CSA, or UL approved). Do not remove, install, or charge batteries in such areas. Sparks in a potentially explosive atmosphere can cause an explosion or fire resulting in bodily injury or even death.Note: The areas with potentially explosive atmospheres referred to above include fueling areas such as below decks on boats, fuel or chemical transfer or storage facilities, areas where the air contains chemicals or particles, such !!
90Safety and General Informationas grain, dust or metal powders, and any other area where you would normally be advised to turn off your vehicle engine. Areas with potentially explosive atmospheres are often but not always posted.Blasting Caps and AreasTo avoid possible interference with blasting operations, turn off your radio product when you are near electrical blasting caps, in a blasting area, or in areas posted: “Turn off two-way radio”. Obey all signs and instructions.Operational CautionsBatteriesAll batteries can cause property damage and/or bodily injury, such as burns if a conductive material such as jewelry, keys, or beaded chains touches exposed terminals. The conductive material may complete an electrical circuit (short circuit) and become quite hot. Exercise care in handling any charged battery, particularly when placing it inside a pocket, purse, or other container with metal objects. To reduce the risk of injury, batteries should not be exposed to fire, disassembled, or crushed.Cleaning and Drying ConsiderationsUsing a leather carry case may help protect the surfaces and help prevent liquids (e.g., rain) from entering into the interior of the radio product. This product is not water proof, and exposing the unit to liquids may result in permanent damage to the unit.If your radio product interior gets wet, then do not try to accelerate drying with the use of an oven or a dryer as this will damage the radio product and void the warranty. Instead, do the following:1Immediately power off the radio product.2Remove Battery and SIM card (if so equipped) from radio product.3Shake excess liquid from radio product.4Place the radio product and battery in an area that is at room temperature and has good air flow.5Let the radio product, battery, and SIM card dry for 72 hours before reconnecting the battery and/or powering on the radio product.If the radio product does not work after following the steps listed above, contact your dealer for servicing information.!
91 Accessory Safety InformationClean the external surfaces of the radio product with a damp cloth, using a mild solution of dishwashing detergent and water. Some household cleaners may contain chemicals that could seriously damage the radio product. Avoid the use of any petroleum-based solvent cleaners. Also, avoid applying liquids directly on the radio product.Accessory Safety InformationImportant:  Save these accessory safety instructions.•Before using any battery or battery charger, read all the instructions for and cautionary markings on (1) the battery, (2) the battery charger, which may include a separate wall-mounted power supply or transformer, and (3) the radio product using the battery.•Do not expose any battery charger to water, rain, or snow as they are designed for indoor or in-vehicle use only.•To reduce the risk of damage to the cord or plug, pull by the plug rather than the cord when you disconnect the battery charger from the power source outlet. •Do not operate any battery charger with a damaged cord or plug — replace them immediately.•Battery chargers may become warm during operation, but not hot. If it becomes hot to the touch, unplug it from the power outlet immediately and discontinue its use. •Use of a non-recommended attachment to a battery charger may result in a risk of fire, electric shock, or injury to persons.•Make sure the battery charger power cord is located so that it will not be stepped on, tripped over, or subjected to damage or stress.•An extension cord should not be used with any battery charger unless absolutely necessary. Use of an improper extension cord could result in a risk of fire and electric shock. If an extension cord must be used, make sure that:•The pins on the plug of the extension cord are the same number, size, and shape as those on the plug of the charger.•The extension cord is properly wired and in good electrical condition. Warning: To reduce the risk of injury, charge only the rechargeable batteries described in “Battery” on page 3. Other types of batteries may burst, causing personal injury and damage.!!
92Safety and General Information•The cord size is 18AWG for lengths up to 100 feet and 16AWG for lengths up to 150 feet.•Do not operate any battery charger if it has received a sharp blow, has been dropped, or has been damaged in any way; take it to a qualified service technician.•Do not disassemble a battery charger; take it to a qualified service technician when service or repair is required. Incorrect reassembly may result in a risk of electric shock or fire.•Maximum ambient temperature around the power supply or transformer of any battery charger should not exceed 40°C (104°F).•The output power from the power supply or transformer must not exceed the rating given on the Desktop Dual-Pocket Charger.•The disconnection from the line voltage is made by unplugging the power supply from the AC receptacle.•To reduce risk of electric shock, unplug any battery charger from the outlet before attempting any maintenance or cleaning.For optimum charging performance, turn off the radio product while charging it in any battery charger.
93MOTOROLA LIMITED WARRANTY Note: FOR IDEN SUBSCRIBER PRODUCTS, ACCESSORIES AND SOFTWARE PURCHASED IN THE UNITED STATES OR CANADAWhat Does this Warranty Cover? Subject to the exclusions contained below, Motorola, Inc. warrants its Motorola iDEN Digital Mobile and Portable Handsets ("Products"), Motorola-branded or certified accessories sold for use with these Products ("Accessories") and Motorola software contained on CD-Roms or other tangible media and sold for use with these Products ("Software") to be free from defects in materials and workmanship under normal consumer usage for the period(s) outlined below. This limited warranty is a consumer's exclusive remedy, and applies as follows to new Products, Accessories and Software purchased by consumers in the United States or Canada, which are accompanied by this written warranty:PRODUCTS COVERED LENGTH OF COVERAGEProducts as defined above. One (1) year from the date of purchase by the first consumer purchaser of the product.Accessories as defined above. One (1) year from the date of purchase by the first consumer purchaser of the product.Products or Accessories that are Repaired or Replaced.The balance of the original warranty or for ninety (90) days from the date returned to the consumer, whichever is longer.Software as defined above. Applies only to physical defects in the media that embodies the copy of the software (e.g. CD-ROM, or floppy disk).Ninety (90) days from the date of purchase.
94MOTOROLA LIMITED WARRANTYWhat is not covered? (Exclusions)Normal Wear and Tear. Periodic maintenance, repair and replacement of parts due to normal wear and tear are excluded from coverage.Batteries. Only batteries whose fully charged capacity falls below 80% of their rated capacity and batteries that leak are covered by this limited warranty.Abuse & Misuse. Defects or damage that result from: (a) improper operation, storage, misuse or abuse, accident or neglect, such as physical damage (cracks, scratches, etc.) to the surface of the product resulting from misuse; (b) contact with liquid, water, rain, extreme humidity or heavy perspiration, sand, dirt or the like, extreme heat, or food; (c) use of the Products or Accessories for commercial purposes or subjecting the Product or Accessory to abnormal usage or conditions; or (d) other acts which are not the fault of Motorola, are excluded from coverage.Use of Non-Motorola Products and Accessories. Defects or damage that result from the use of Non-Motorola branded or certified Products, Accessories, Software or other peripheral equipment are excluded from coverage. Unauthorized Service or Modification. Defects or damages resulting from service, testing, adjustment, installation, maintenance, alteration, including without limitation, software changes, or modification in any way by someone other than Motorola, or its authorized service centers, are excluded from coverage. Altered Products. Products or Accessories with (a) serial numbers or date tags that have been removed, altered or obliterated; (b) broken seals or that show evidence of tampering; (c) mismatched board serial numbers; or (d) nonconforming or non-Motorola housings, antennas, or parts, are excluded from coverage.Communication Services. Defects, damages, or the failure of Products, Accessories or Software due to any communication service or signal you may subscribe to or use with the Products, Accessories or Software is excluded from coverage.Software Embodied in Physical Media. No warranty is made that the software will meet your requirements or will work in combination with any hardware or software applications provided by third parties, that the operation of the software products will be uninterrupted or error free, or that all defects in the software products will be corrected.
95Software NOT Embodied in Physical Media. Software that is not embodied in physical media (e.g. software that is downloaded from the internet), is provided "as is" and without warranty.Who is covered? This warranty extends only to the first consumer purchaser, and is not transferable.What will Motorola Do? Motorola, at its option, will at no charge repair, replace or refund the purchase price of any Products, Accessories or Software that does not conform to this warranty. We may use functionally equivalent reconditioned/refurbished/pre-owned or new Products, Accessories or parts. No data, software or applications added to your Product, Accessory or Software, including but not limited to personal contacts, games and ringer tones, will be reinstalled. To avoid losing such data, software and applications please create a back up prior to requesting service. How to Obtain Warranty Service or Other Information? To obtain service or information, please call:Motorola iDEN Customer Services 1-800-453-0920 or 954-723-4910TTY-877-483-2840Or visit us online at http://www.motorola.com/iden/supportYou will receive instructions on how to ship the Products, Accessories or Software, at your expense, to a Motorola Authorized Repair Center. To obtain service, you must include: (a) a copy of your receipt, bill of sale or other comparable proof of purchase; (b) a written description of the problem; (c) the name of your service provider, if applicable; (d) the name and location of the installation facility (if applicable) and, most importantly; (e) your address and telephone number. What Other Limitations Are There? ANY IMPLIED WARRANTIES, INCLUDING WITHOUT LIMITATION THE IMPLIED WARRANTIES OF MERCHANTABILITY AND FITNESS FOR A PARTICULAR PURPOSE, SHALL BE LIMITED TO THE DURATION OF THIS LIMITED WARRANTY, OTHERWISE THE REPAIR, REPLACEMENT, OR REFUND AS PROVIDED UNDER THIS EXPRESS LIMITED WARRANTY IS THE EXCLUSIVE REMEDY OF THE CONSUMER, AND IS PROVIDED IN LIEU OF ALL OTHER WARRANTIES, EXPRESS OF IMPLIED. IN NO EVENT SHALL MOTOROLA BE LIABLE, WHETHER IN CONTRACT OR TORT (INCLUDING NEGLIGENCE) FOR DAMAGES IN EXCESS OF THE PURCHASE PRICE OF THE
96MOTOROLA LIMITED WARRANTYPRODUCT, ACCESSORY OR SOFTWARE, OR FOR ANY INDIRECT, INCIDENTAL, SPECIAL OR CONSEQUENTIAL DAMAGES OF ANY KIND, OR LOSS OF REVENUE OR PROFITS, LOSS OF BUSINESS, LOSS OF INFORMATION OR DATA, SOFTWARE OR APPLICATIONS OR OTHER FINANCIAL LOSS ARISING OUT OF OR IN CONNECTION WITH THE ABILITY OR INABILITY TO USE THE PRODUCTS, ACCESSORIES OR SOFTWARE TO THE FULL EXTENT THESE DAMAGES MAY BE DISCLAIMED BY LAW.Some states and jurisdictions do not allow the limitation or exclusion of incidental or consequential damages, or limitation on the length of an implied warranty, so the above limitations or exclusions may not apply to you. This warranty gives you specific legal rights, and you may also have other rights that vary from state to state or from one jurisdiction to another.Laws in the United States and other countries preserve for Motorola certain exclusive rights for copyrighted Motorola software such as the exclusive rights to reproduce and distribute copies of the Motorola software. Motorola software may only be copied into, used in, and redistributed with, the Products associated with such Motorola software. No other use, including without limitation disassembly of such Motorola software or exercise of the exclusive rights reserved for Motorola, is permitted.
97Limited WarrantyMotorola Communication Products (International)Note: This Warranty applies in Singapore and the Philippines.I. What This Warranty Covers and For How Long:MOTOROLA warrants the MOTOROLA manufactured iDEN Communication Products listed below (“Product”) against defects in material and workmanship under normal use and service for a period of time from the date of purchase as scheduled below:Rechargeable Batteries will be replaced during the applicable warranty period if:a. the battery capacity falls below 80% of rated capacity, orb. the battery develops leakage.MOTOROLA, at its option, will at no charge either repair the Product (with new or reconditioned parts), replace it (with a new or reconditioned Product), or refund the purchase price of the Product during the warranty period provided it is returned in accordance with the terms of this warranty.  Replaced parts or boards are warranted for the balance of the original applicable warranty period.  All replaced parts of Product shall become the property of MOTOROLA.This express limited warranty is extended by MOTOROLA to the original end user purchaser only and is not assignable or transferable to any other party.  This is the complete warranty for the Product manufactured by MOTOROLA.  MOTOROLA assumes no obligations or liability for additions or modifications to this warranty unless made in writing and signed by an officer of MOTOROLA.  Unless made in a separate agreement between MOTOROLA and the original end user purchaser, MOTOROLA does not warrant the installation, maintenance or service of the Product.iDEN Subscriber Digital Mobile and Portable Units One (1) YearProduct Accessories (manufactured by or under license from MOTOROLA)One (1) YearBatteries One (1) Year
98Limited Warranty Motorola Communication Products (International)MOTOROLA cannot be responsible in any way for any ancillary equipment not furnished by MOTOROLA which is attached to or used in connection with the Product, or for operation of the Product with any ancillary equipment, and all such equipment if expressly excluded from this warranty.  Because each system which may use the Product is unique, MOTOROLA disclaims liability for range, coverage, or operation of the system as a whole, or any portion of the system not produced by MOTOROLA, under this warranty.II. General Provisions:This warranty sets forth the full extent of MOTOROLA’S responsibilities regarding the Product, Repair, replacement or refund of the purchase price, at MOTOROLA’S options, is the exclusive remedy.  THIS WARRANTY IS GIVEN IN LIEU OF ALL OTHER EXPRESS WARRANTIES.  IMPLIED WARRANTIES, INLCUDING WITHOUT LIMITATION, IMPLIED WARRANTIES OF MERCHANTABILITY AND FITNESS FOR A PARTICULAR PURPOSE, ARE LIMITED TO THE DURATION OF THIS LIMITED WARRANTY TO THE FULL EXTENT SUCH MAY BE DISCLAIMED BY LAW.  IN NO EVENT SHALL MOTOROLA BE LIABLE FOR DAMAGES IN EXCESS OF THE PURCHASE PRICE OF THE PRODUCT, FOR ANY LOSS OF USE, LOSS OF TIME, INCONVENIENCE, COMMERCIAL LOSS, LOST PROFITS OR SAVINGS OR OTHER INCIDENTAL, SPECIAL OR CONSEQUENTIAL DAMAGES ARISING OUT OF THE USE OR INABILITY TO USE SUCH PRODUCT, TO THE FULL EXTENT SUCH MAY BE DISCLAIMED BY LAW.III. How to Get Warranty Service:You must provide proof of purchase (bearing the date of purchase and Product item serial number) in order to receive warranty service and, also, deliver or send the Product item, transportation and insurance prepaid, to an authorized warranty service location.  Warranty service will be provided by MOTOROLA through one of its authorized warranty service locations.  If you first contact the company which sold you the Product (e.g., dealer or communication service provider), it can facilitate your obtaining warranty service.IV. What This Warranty Does Not Cover:a. Defects or damage resulting from use of the Product in other than its normal and customary manner.
99b. Defects or damage from misuse, accident, water, or neglect.c. Defects or damage from improper testing, operation, maintenance, installation, alteration, modification, or adjustment.d. Breakage or damage to antennas unless caused directly by defects in material workmanship.e. A Product subjected to unauthorized Product modifications, disassemblies or repairs (including, without limitation, the audition to the Product of non-MOTOROLA supplied equipment).f. Product which has had the serial number removed or made illegible.g. Rechargeable batteries if:1.Any of the seals on the battery enclosure of cells are broken or show evidence of tampering.2.The damage or defect is caused by charging or using the battery in equipment or service other than the Product for which it is specified.h. Freight costs to the repair depot.i. A Product which, due to illegal or unauthorized alteration of the software/firmware in the Product, does not function in accordance with MOTOROLA’S published specifications or the local type acceptance labeling in effect for the Product at the time the Product was initially distributed from MOTOROLA.j. Scratches or other cosmetic damage to Product surfaces that does not effect the operation of the Product.k. Normal and customary wear and tear.l. Exclusion for defects or damage arising from use of the products in connection with non-MOTOROLA equipment.VI. Patent and Software Provisions:MOTOROLA will defend, at its own expense, any suit brought against the end user purchaser to the extent that it is based on a claim that the Product or parts infringe a patent, and Motorola will pay those costs and damages finally awarded against the end user purchaser in any such suit which are attributable to any such claim, but such defense and payments are conditioned on the following:a. That MOTOROLA will be notified promptly in writing by such purchaser of any notice of such claim;b. That MOTOROLA will have sole control of the defense of such suit and all negotiations for its
100Limited Warranty Motorola Communication Products (International)settlement or compromise; andc. Should the Product or parts become, or in MOTOROLA’S opinion be likely to become, the subject of a claim of infringement of a patent, that such purchaser will permit MOTOROLA, at its option and expense, either to procure for such purchaser the right to continue using the Product or parts or to replace or modify the same so that it becomes non-infringing or to grant such purchaser a credit for the Product or parts as depreciated and accept its return.  The depreciation will be an equal amount per year over the lifetime of the Product or parts as established by MOTOROLA.MOTOROLA will have no liability with respect to any claim of patent infringement which is based upon the combination of the Product or parts furnished hereunder with software, apparatus or devices not furnished by MOTOROLA, nor will MOTOROLA have any liability for the use of ancillary equipment or software not furnished by MOTOROLA which is attached to or sued in connection with the Product or any parts thereof. In no event shall MOTOROLA be liable for any incidental, special or consequential damages arising from any claim of patent infringement or alleged infringement.Laws in the United States and other countries preserve for MOTOROLA certain exclusive rights for copyrighted MOTOROLA software, such as the exclusive rights to reproduce in copies and distribute copies of such MOTOROLA software.  MOTOROLA software may be used in only the Product in which the software was originally embodied and such software in such Product may not be replaced, copied, distributed, modified in any way, or used to produce any derivative thereof.  No other use including, without limitation, alteration, modification, reproduction, distribution, or reverse engineering of such MOTOROLA software or exercise or rights in such MOTOROLA software is permitted.  No license is granted by implication, estoppel or otherwise under MOTOROLA patent rights or copyrights.
101Patent and Trademark InformationMOTOROLA, the Stylized M Logo and all other trademarks indicated as such herein are trademarks of Motorola, Inc. ® Reg. U.S. Pat. & Tm. Off. © 2004 Motorola, Inc. All rights reserved. Microsoft and Microsoft Internet Explorer are registered trademarks of Microsoft Corporation.T9 is a trademark owned by Tegic Communications.T9® Text Input Patent and Trademark InformationThis product is covered by U.S. Pat. 5,818,437, U.S. Pat. 5,953,541, U.S. Pat. 6,011,554 and other patents pending.All other product names or services mentioned in this manual are the property of their respective trademark owners.Software Copyright NoticeThe Motorola products described in this manual may include copyrighted Motorola and third party software stored in semiconductor memories or other media. Laws in the United States and other countries preserve for Motorola and third party software providers certain exclusive rights for copyrighted software, such as the exclusive rights to distribute or reproduce the copyrighted software. Accordingly, any copyrighted software contained in the Motorola products may not be modified, reverse-engineered, distributed, or reproduced in any manner to the extent allowed by law. Furthermore, the purchase of the Motorola products shall not be deemed to grant either directly or by implication, estoppel, or otherwise, any license under the copyrights, patents, or patent applications of Motorola or any third party software provider, except for the normal, non-exclusive, royalty-free license to use that arises by operation of law in the sale of a product.
102IndexNumerics2-way radio 80see also Private calls, group calls, and call alerts3-way calling 42AAccessories 15safety 91activating 22Alpha mode 54assigning number in Contacts 26BBacklight 79Battery 2care 5charging 3, 4door 2inserting 3safety 90Baud rate 81CCall alerts 27deleting 28queue 27receiving 27responding 27, 28sending 27sorting 28viewing 27Call forwardingall calls 38missed calls 39off 39Call Hold 42Call Timers 45Call Waiting 41off 41Calls3-way 42answering automatically 79answering with any key 79emergency 20ending 16from Contacts 18from memo 49from Recent calls 17group, see Group callsicons 17international 43making 16on hold 42phone calls 16Private calls 16, 19, 80receiving 16, 26redialing 18, 79remote PTT 82Speed Dial 19TTY, see TTY callsTurbo Dial 19voice name 18Circuit data 46Clock 79code calls 23Contacts 18, 31capacity 35creating entries 33deleting 35editing entries 34
103icons 31iDEN Phonebook Manager 37International numbers 36searching 32showing all entries 33showing only Private IDs 32SIM card 31storing fast 34storing from idle screen 34storing from Memo 34, 49storing from recent calls 29, 34type 29, 31viewing 32with non-i830 phones 37DDisplaybacklight 79contrast 79options 8screen 7EEmail 31, 34, 46Emergency calls 20End key 1FFaxesreceiving 46sending 46GGPS Enabled 66almanac data 71best results 69emergency calls 20, 67map software 72privacy options 71security 72viewing location 68GPS PIN 81GPS, see GPS EnabledGroup calls 44, 80making 44off 45receiving 45HHandset, see phoneHeadset 82IIconscalls 17Contacts 31main menu 8MOSMS messages 64Recent calls 29status 10text entry 54iDEN Phonebook Manager 37Idle screen 8storing to Contacts 34International numbers 43calling 43storing 36KKeypad 1locking 14, 80LLanguage 79Lists, see menusLocating Your SIM Card 2
104IndexMmaking a call 26making emergency calls 26Memo 49calling from 49creating 49editing 49storing to Contacts 34, 49viewing 49MemoryMOSMS messages 65ring tones 52voice records 76Menu key 1, 8Menus 8context-sensitive 1, 8main menu 8Message center 58, 59see also messagesMOSMS messages 61voice mail 59Message notifications 57setting options 57Messages 57see also voice mail, MOSMS messages, and SMS messagesreceiving 57MOSMS messages 60creating 61deleting 64, 65drafts 63icons 64memory 65message center 61outbox 63quick notes 63receiving 60sending 61sent messages 64setting up 60MOTOtalk 21Mute 20NNavigation key 1Numeric mode 56OOver-the-air programming 6PPacket data 46Passwords 81Patent information 101Pausesdialing 43storing 36Phone 1, 7active line 79locking 80modem 46off 5on 5only 81setting up 2private calls 25Programming, over-the-air 6PTTOne Touch 19One Touch, setting 43PUK code 12RRadio frequency 85receiving a call 26
105Recent calls 17, 29deleting 30display time 81icons 29storing to Contacts 29, 34viewing 29Redialing 18, 79Removing the Back Cover 2Ring tones 31, 50deleting 52downloading 52memory 52off 50setting 50setting in Contacts 33, 51silent 50vibrate 50, 51viewing assigned 52Ringer 78see also Ring tonesoff 78SSafety 85accessory 91battery 90driving 107electromagnetic interference 88medical devices 88radio frequency 85Security 80Send key 1Service, activating 5Settings 79resetting 81setup option 26setup options 22SIM card 11, 13Contacts 31inserting 13removing 14with non-i830 phones 37SIM PIN 11, 81changing 11default 11entering 11requirement 12unblocking 12SMS messages 57, 60also see MOSMS messages 60Speakerphone 19Speed Dial 19, 32, 34Status messages 83Symbols mode 56TT9 Text Input, see text entryTalkgroups 44, 80Text display area 8, 17Text entry 54Alpha mode 54database 54, 55icons 54mode 54Numeric mode 56Symbols mode 56Word mode 54Trademark information 101TTY calls 47baud rate 48making 47mode 47
106Indexon 47Turbo Dial 19Uusing 21VVoice mail 57, 59receiving 59sending calls to 16setting up 59Voice name 18, 32Voice records 75creating 75deleting 76labelling 76locking 76memory 76playing 75Volume, setting 78, 80WWaitsdialing 43storing 36Warranty 97Word mode 54
107Driving Safety Tips“Safety is your most important call!”Your Motorola wireless telephone gives you the powerful ability to communicate by voice — almost anywhere, anytime, wherever wireless phone service is available and safe conditions allow. But an important responsibility accompanies that benefits of wireless phones, one that every user must uphold.When driving a car, driving is your first responsibility. If you find it necessary to use your wireless phone while behind the wheel of a car, practice good common sense and remember the following tips:•Get to know your Motorola wireless phone and its features such as speed dial and redial. If available, these features help you to place your call without taking your attention off the road.•When available, use a hands-free device. If possible, add an additional layer of convenience to your wireless phone with one of the many Motorola Original hands-free accessories available today.•Position your wireless phone within easy reach. Be able to access your wireless phone without removing your eyes from the road. If you receive an incoming call at an inconvenient time, if possible, let your voice mail answer it for you.•Let the person you are speaking with know you are driving; if necessary, suspend the call in heavy traffic or hazardous weather conditions. Rain, sleet, snow, ice, and even heavy traffic can be hazardous.•If you receive an incoming call at an inconvenient time do not take notes or look up phone numbers while driving. Jotting down a “to do” list or going through your address book takes attention away from your primary responsibility — driving safely.•Dial sensibly and assess the traffic; if possible, place calls when you are not moving or before pulling into traffic. Try to plan calls when your car will be stationary. If you need to make a call while moving, dial only a few numbers, check the road and your mirrors, then continue.•Do not engage in stressful or emotional conversations that may be distracting. Make people you are talking with aware you are driving and suspend conversations which have the potential to divert your attention away from the road.
108Driving Safety Tips•Your phone can perform many other functions besides allowing you to make and receive calls. Do not let these features distract you from driving. Use them only when it is safe to do so.•Use your wireless phone to call for help. Dial 9-1-1 or other local emergency number in the case of fire, traffic accident or medical emergencies.•Use your wireless phone to help others in emergencies. If you see an auto accident, crime in progress or other serious emergency where lives are in danger, call 9-1-1 or other local emergency number, as you would want others to do for you.•Call roadside assistance or a special non-emergency wireless assistance number when necessary. If you see a broken-down vehicle posing no serious hazard, a broken traffic signal, a minor traffic accident where no one appears injured, or a vehicle you know to be stolen, call roadside assistance or other special non-emergency wireless number.

Navigation menu