Motorola Solutions 89FT5876 2-Way Portable Radio (with Bluetooth and Bluetooth LE) User Manual MTP3500 Feature User Guide
Motorola Solutions, Inc. 2-Way Portable Radio (with Bluetooth and Bluetooth LE) MTP3500 Feature User Guide
Contents
- 1. Manual
- 2. RF Safety Manual
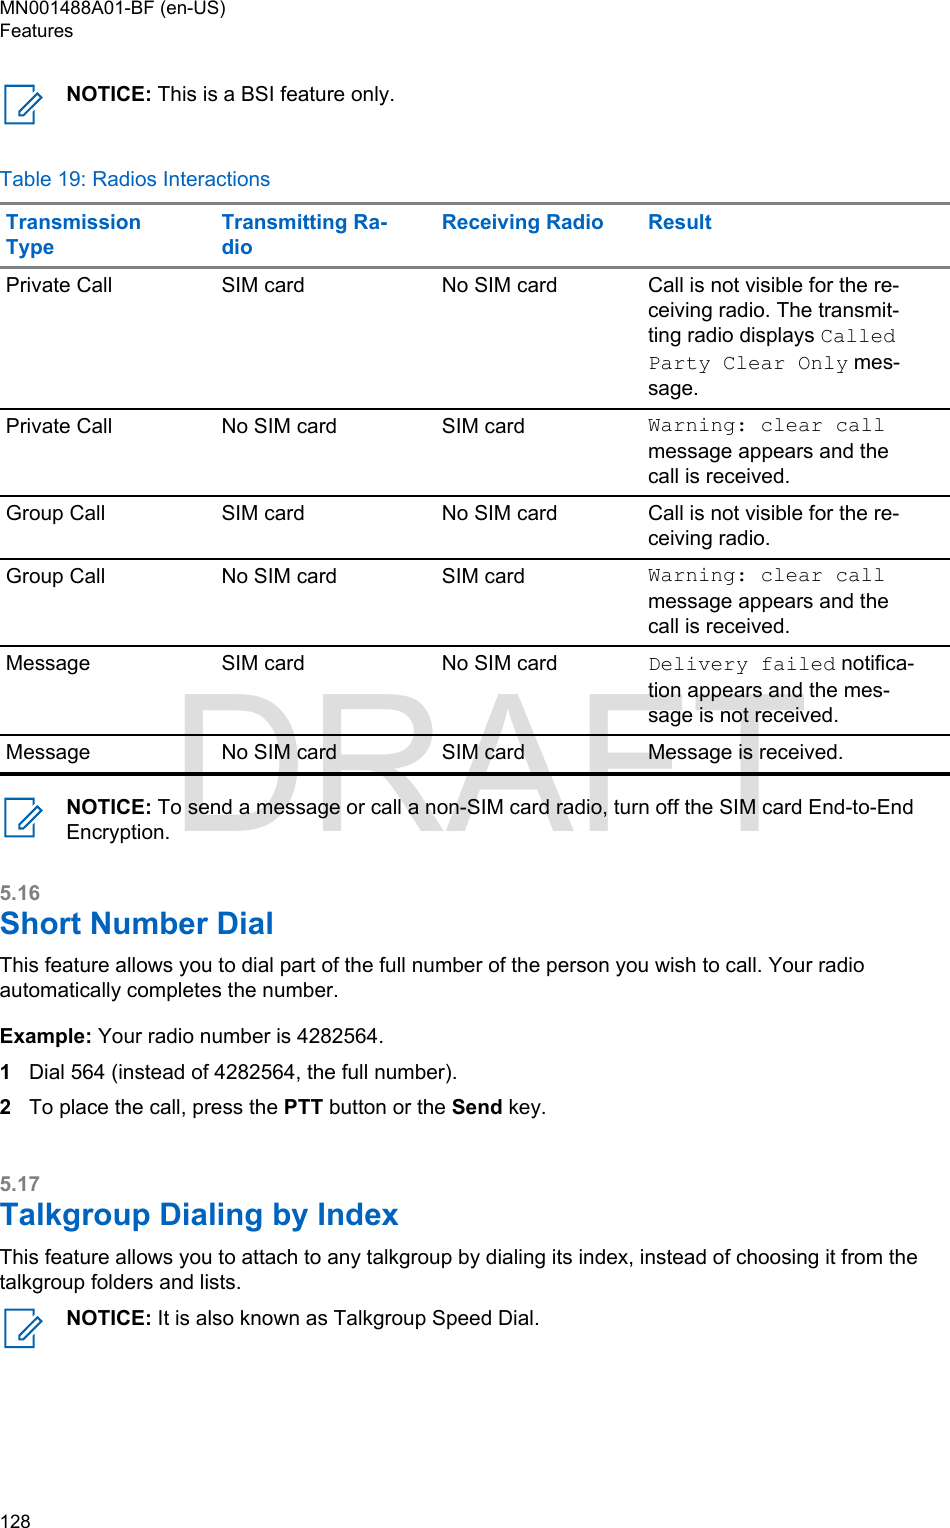
Manual


![Message protection functionality is enabled in the Inbox and Call Out Inbox. Users can onlydelete unprotected messages.4.3.2.4Embedded NumberThis feature allows you to call a number from a message or to start a group call with the messagesender talkgroup.4.3.2.5Storing Numbers from MessagesPrerequisites: Embedded Number feature is enabled by your service provider.When and where to use: You can save the number of the sender or embedded number from themessage to a new or existing contact.Procedure:1From the home screen, press the Menu key.2Select Messages → Inbox.3Highlight the required message and select Read.4Press the PTT button.5Radio displays a list of the numbers (including the senders number).6Highlight the required number and press Store.7Highlight required contact and press View.NOTICE: To store a number for a new contact, select [New Contact] and fill out therequired fields. Press Done to save it.8Select Edit.9Choose the Type of the new number and press Done.4.3.2.6Calling Numbers in MessagesPrerequisites: Embedded Number feature is enabled by your service provider.When and where to use: You can return a voice call to the sender of a message or to any numberthat is embedded in the message text.Procedure:1From the home screen, press the Menu key.2Select Messages → Inbox.3Highlight the required message and select Read.4Press the PTT button.5Radio displays a list of the numbers (including the senders number).6To call, highlight to the required number and press the PTT button or the Send key.7Select Ctype to choose the type of call (Private, Phone, or PABX).8Press the PTT button or the Send key.MN001488A01-BF (en-US)Main Menu62 DRAFT](https://usermanual.wiki/Motorola-Solutions/89FT5876.Manual/User-Guide-4112072-Page-62.png)
![•Off – to deactivate the feature4.3.10.2Selecting Additional AddressProcedure:1From the home screen, press the Menu key.2Select Messages → Additional Address → Select Address.Select Address display appears with an available list of aliases.3Scroll through the list to highlight your alias and press Select.4.3.10.3Viewing Additional AddressProcedure:1From the home screen, press the Menu key.2Select Messages → Additional Address → Select Address.3Scroll to select the alias of the Additional Address you wish view.4Press the Menu key.5Select one of the following:•Edit (for User Defined Additional Address alias)•View (for Pre-defined Additional Address alias)The display shows the Alias, the ISSI/ITSI/GSSI and the Status of the address (Pre-Defined or UserDefinded).4.3.10.4Entering New Additional AddressProcedure:1From the home screen, press the Menu key.2Select Messages → Additional Address → Select Address.3Select [New Address]4Press Change key.5Enter new values of the Alias and ISSI/ITSI/GSSI fields, press Done key.The new alias appears in the list of available aliases. There is no possibility to have two AdditionalAddress items with the same Additional Address Alias.4.3.10.5Editing Additional AddressPrerequisites: Editing Additional Address is allowed only for User-Defined positions. Pre-Definedpositions can only be Selected or Viewed.Procedure:1From the home screen, press the Menu key.2Select Messages → Additional Address → Select Address.MN001488A01-BF (en-US)Main Menu68 DRAFT](https://usermanual.wiki/Motorola-Solutions/89FT5876.Manual/User-Guide-4112072-Page-68.png)
![•Type – each contact must be assigned to one of the following types:Table 16: Contact TypesContact Icon DescriptionPrivateCannot have a speed dial number.MobileHomeWorkPABXOtherPickersIndicate more than one number in a contact.•# (number) – each contacts entry must contain a number.•Speed # – accept the default Speed Dial number or change it.4.4.1Creating ContactsProcedure:1From the home screen, press Contcs.2Select [New Contact].3Highlight Name and press Change. Enter the name of your contact and press Ok.4Highlight Type and press Change. Select the required type of your contact.NOTICE: You can use the Left and Right Navigation keys to select the type of yourcontact from the Contact Details screen.5Highlight # (number) and press Change. Enter the number of your contact and press Ok.6If needed, highlight Speed # and press Change. Enter the speed dial number (1– 1000) of yourcontact and press OK.NOTICE: If the entered number exist, the radio displays Overwrite? message. PressYes to confirm, or No to enter the speed dial number again.7Press Done.You have create a contact with one number. To add additional number repeat steps step 4 – step 6.MN001488A01-BF (en-US)Main Menu70 DRAFT](https://usermanual.wiki/Motorola-Solutions/89FT5876.Manual/User-Guide-4112072-Page-70.png)

![4Press Menu.5Select one of the following:•Delete – Erases this group from the active scan list.•Priority and select new priority to Low, Medium or High.4.10.2.3Setting Scan ListsWhen and where to use: If you want to set up any scan list.Procedure:1From the home screen, press the Menu key.2Select Group Setup → Scan → Scan Lists.3Highlight required scan list and press Menu to see additional settings:•Capacity – Displays the number of assigned and unassigned talkgroups for the scan list.•Clear – Deletes all the talkgroup assigned to that scan list.•Add Group – Adds a talkgroup to the scan list. Select one talkgroup from your talkgroupfolders and assign appropriate priority.•Edit – Changes the priority of the required talkgroup or deletes it.4.10.2.4Deleting Talkgroups from Scan ListsProcedure:1From the home screen, press the Menu key.2Select Group Setup → Scan → Scan Lists.3Highlight the required scan list and press Menu → Edit.4Highlight the required talkgroup and press Menu → Delete.4.10.3My GroupsThis sub-menu allows you to select/edit your favorite group list.4.10.3.1Adding Favorite FoldersProcedure:1From the home screen, press the Menu key.2Select Group Setup → My Groups.3Select [New Folder].4.10.3.2Adding Talkgroups to Favorite FoldersProcedure:1From the home screen, press the Menu key.MN001488A01-BF (en-US)Main Menu100 DRAFT](https://usermanual.wiki/Motorola-Solutions/89FT5876.Manual/User-Guide-4112072-Page-100.png)
![2Select Group Setup → My Groups.3Select <FolderName>.4Select [New Group].5Select the required talkgroup by Folder or by alphabetic search.4.10.3.3Deleting Favorite FoldersProcedure:1From the home screen, press the Menu key.2Select Group Setup → My Groups.3Highlight a required favorite folder.4Press the Menu key.5Select Delete Folder. Press Yes to confirm deletion.NOTICE: You cannot delete the last favorite folder.4.10.3.4Deleting Talkgroup from Favorite FoldersProcedure:1From the home screen, press the Menu key.2Select Group Setup → My Groups.3Select required favorite folder.4To delete one talkgroup, highlight it and select Delete.NOTICE: To delete all the talkgroups from the folder, press Menu and select Delete All.4.11Individual SetupThis menu item allows you to set call settings for individual calls.4.11.1Trunked ModeThis sub-menu allows you to set call waiting and call forwarding for your radio.4.11.1.1Enabling or Disabling Call WaitingWhen and where to use: To enable or disable Call Waiting for your radio.Procedure:1From the home screen, press the Menu key.2Select Individual Setup → Trunked Mode → Call Waiting.3Select On to enable Call Waiting, or Off to disable it.MN001488A01-BF (en-US)Main Menu 101DRAFT](https://usermanual.wiki/Motorola-Solutions/89FT5876.Manual/User-Guide-4112072-Page-101.png)
![4.11.1.2Setting Call ForwardingWhen and where to use: To enable or disable Call Forwarding for your radio. If radio is not in TMOmode, selecting call forwarding will results in an Invalid Keypress tone and Service Restrictedmessage.Procedure:1From the home screen, press the Menu key.2Select Individual Setup → Trunked Mode → Call Forwarding.3Select one of the following:•Config Sending – Enable or disable call forwarding. Select On to enable call forwarding.•Config – Set predefined condition messages for calling radio. You can select more than onemessages:•Always•Busy•No Answer•Not ReachableNOTICE: The settings in the Config sub-menu is only enabled when On is selected inEnable Config.•Last Result – Display the radio's response of the last sent call forwarding.4.12FavoritesFavorites contains shortcuts to frequently used talkgroups and contact numbers that are organized infavorite folders.To quickly access favorite folders, from the home screen press the Up Navigation key. To scrollthrough items inside favorite folders, you can either use the Navigation keys or the Rotary Knob.4.12.1Adding Folders to FavoritesPrerequisites: Favorites contains less than three favorite folders.Procedure:1From the home screen, press the Menu key.2Select Favorites → [New Folder]4.12.2Adding Contact Numbers to FavoritesProcedure:1From the home screen, press the Menu key.2Select Contacts3Highlight a contact that you want to add to Favorites and using the Left or Right Navigation keyselect the required number.MN001488A01-BF (en-US)Main Menu102 DRAFT](https://usermanual.wiki/Motorola-Solutions/89FT5876.Manual/User-Guide-4112072-Page-102.png)
![NOTICE: Press Down Navigation key to bypass first two steps.Call time information is only available if the time and date are set in the radio. Callduration is not available in the missed calls list.4.14.2Calling from Recent CallsProcedure:1From the home screen, press the Menu key.2Select Recent Calls.3Select one of the following:•Dialed (from the home screen press Send key to access Dialed Calls list)•Received•MissedNOTICE: From the home screen press Down Navigation key, to access Recent Callsmenu item.4Highlight the required call and press PTT button for private calls or press Send key for phonecall.NOTICE: Phone calls are only available in TMO Mode.4.14.3Storing Recent Calls to ContactsProcedure:1From the home screen, press the Menu key.2Select Recent Calls.3Select one of the following:•Dialed•Received•Missed4Press Store.NOTICE: If Store is not assigned to the Left Soft key, the number is already stored inyour contact list.5Do one of the following:•To store the number as a new entry, select [New Contact].• To store the number to an existing entry, select the entry, and press View then select Edit.6With the contact type field highlighted, scroll left or right to display the contact type you want toassign the number.7Select Done.MN001488A01-BF (en-US)Main Menu106 DRAFT](https://usermanual.wiki/Motorola-Solutions/89FT5876.Manual/User-Guide-4112072-Page-106.png)


![5.18Terminal Permanent DisableNOTICE: This feature is a paid feature.Your radio is provided with a feature that allows your service provider to disable it permanently in caseit is stolen or lost. When your radio is disabled permanently, it becomes inoperable. After a PermanentDisable your service provider cannot enable your radio. It is recommended to Permanent Disable yourradio only when you do not expect to recover it. If it is recovered then a Permanent Disable radio canbe reactivated by returning it to Motorola Solutions.5.19Terminal Temporary Disable or EnableYour radio is provided with a feature that allows your service provider to disable it temporarily in case itis stolen. When your radio is disabled or is powered up in disabled state, it looks and acts like it isturned off.If your radio is found, your service provider can enable it again over the air. After your radio is enabled,you may resume normal operation.5.20Writing TextEvery time that you see text entry screen, refer to this section.Use the Up/Down Navigation key to enter text, and the Right/Left Navigation key to go to the next/previous character.To change the text entry mode, long press the Left Navigation key.To insert a new character into an existing word, long press the Right Navigation key.5.20.1Text Entry IconsIn the text entry screen, icons tell you which text entry mode and method you are using. A charactercounter displayed on the text entry icon, indicates the amount of characters that can be entered.Press and hold the Left Navigation key to toggle through the text entry modes.Table 20: Text Entry Screen IconsIcons DescriptionA-Z – all capitalsa-z – no capitalsEnter numbers and symbols: 0-9 # § ¡ ¿ ^ ~ \ } { ] [ ¤ ¥ $ £ € > < = * × % & + ; _ : / ) ( - ” ’@ ! ? , .MN001488A01-BF (en-US)Features 129DRAFT](https://usermanual.wiki/Motorola-Solutions/89FT5876.Manual/User-Guide-4112072-Page-129.png)