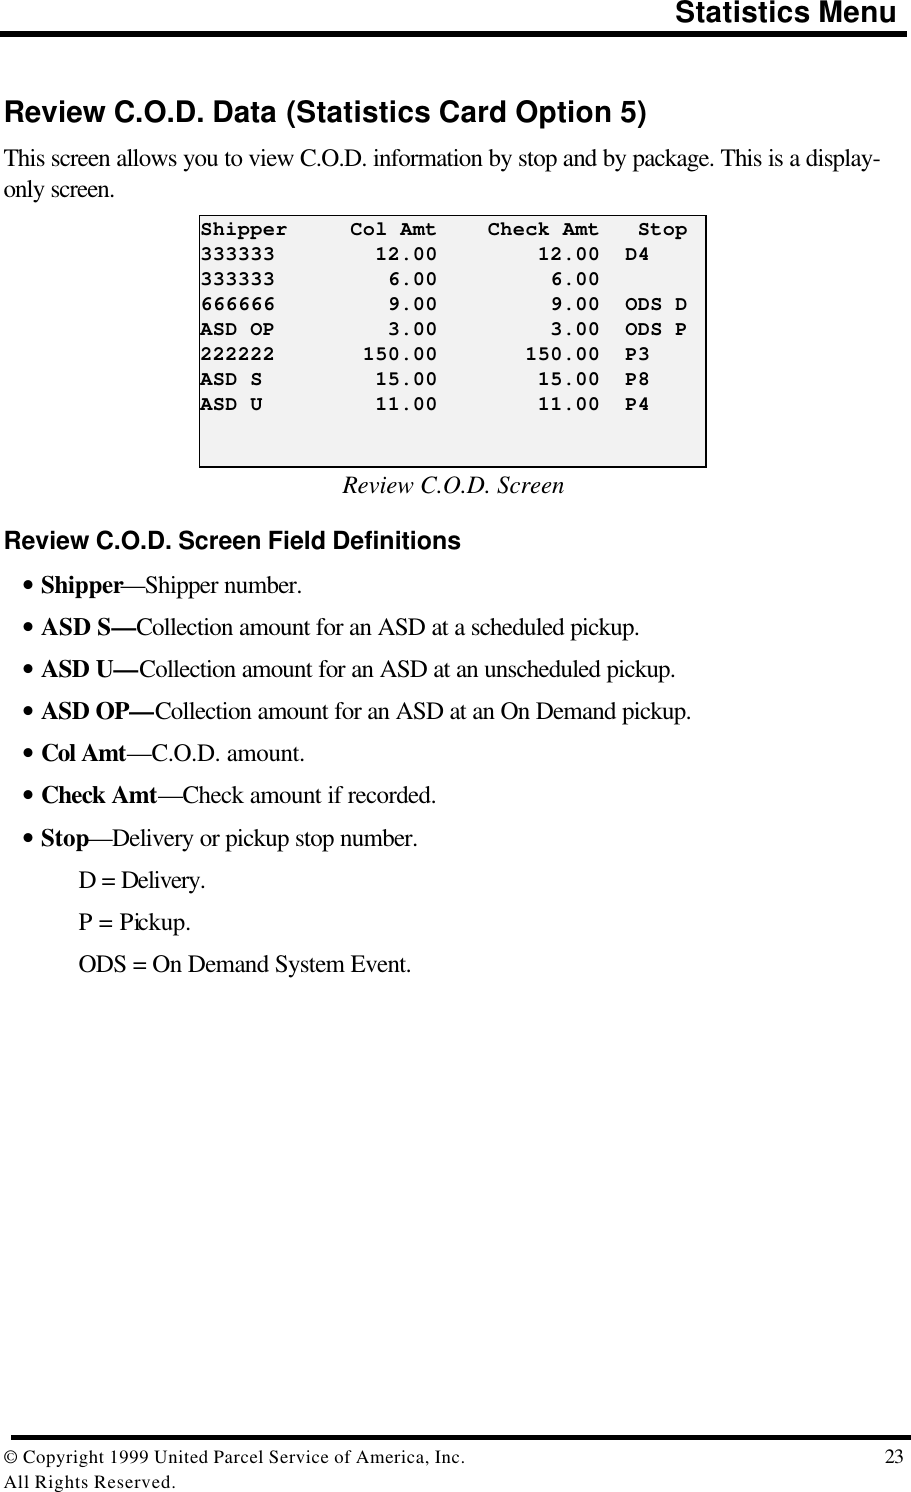
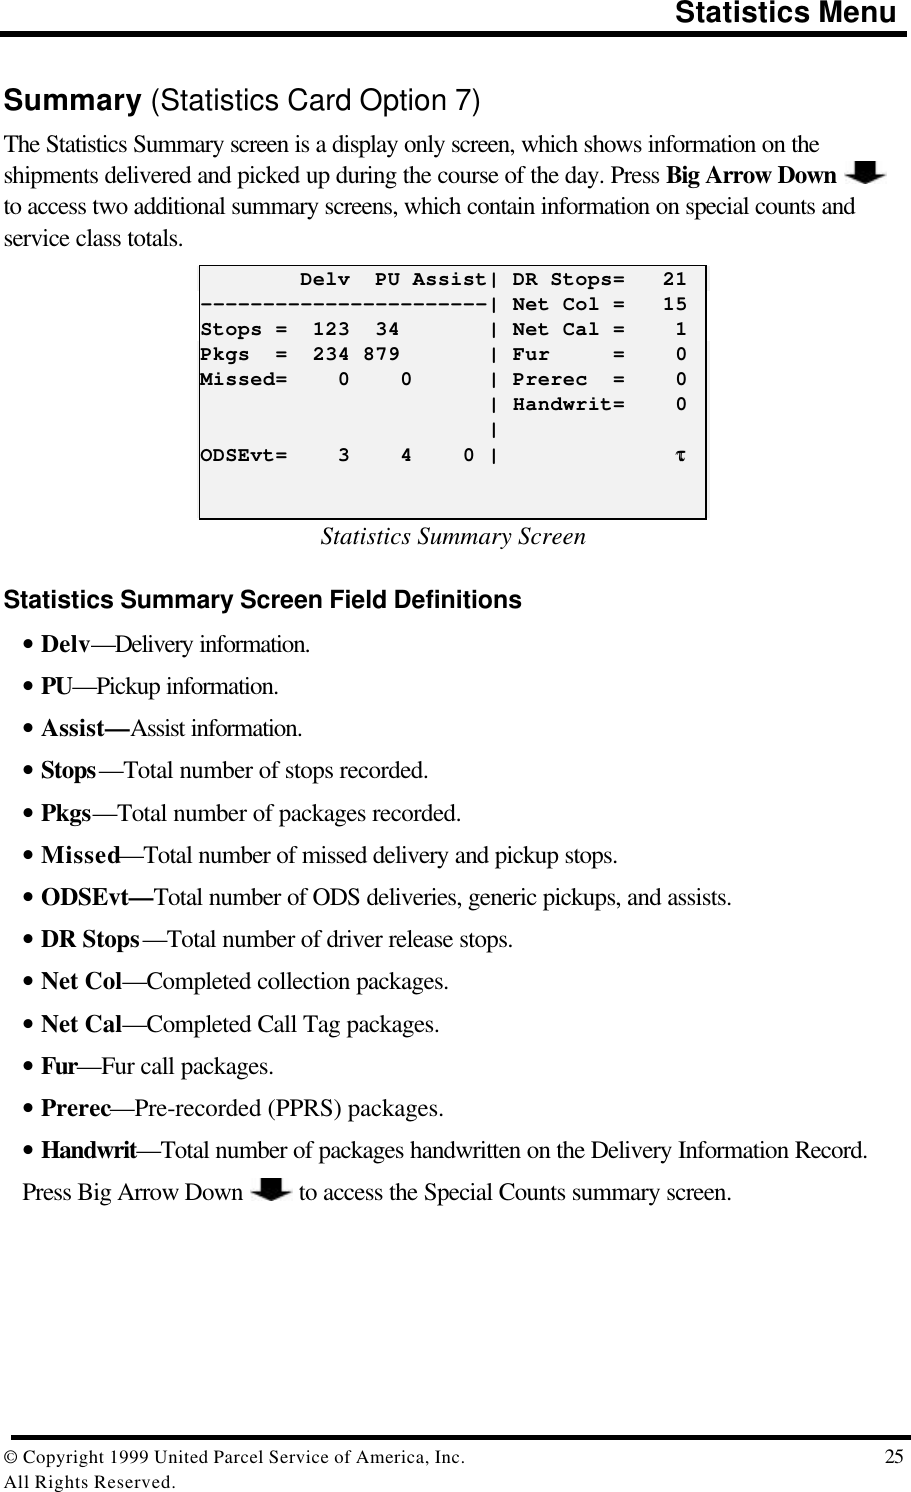
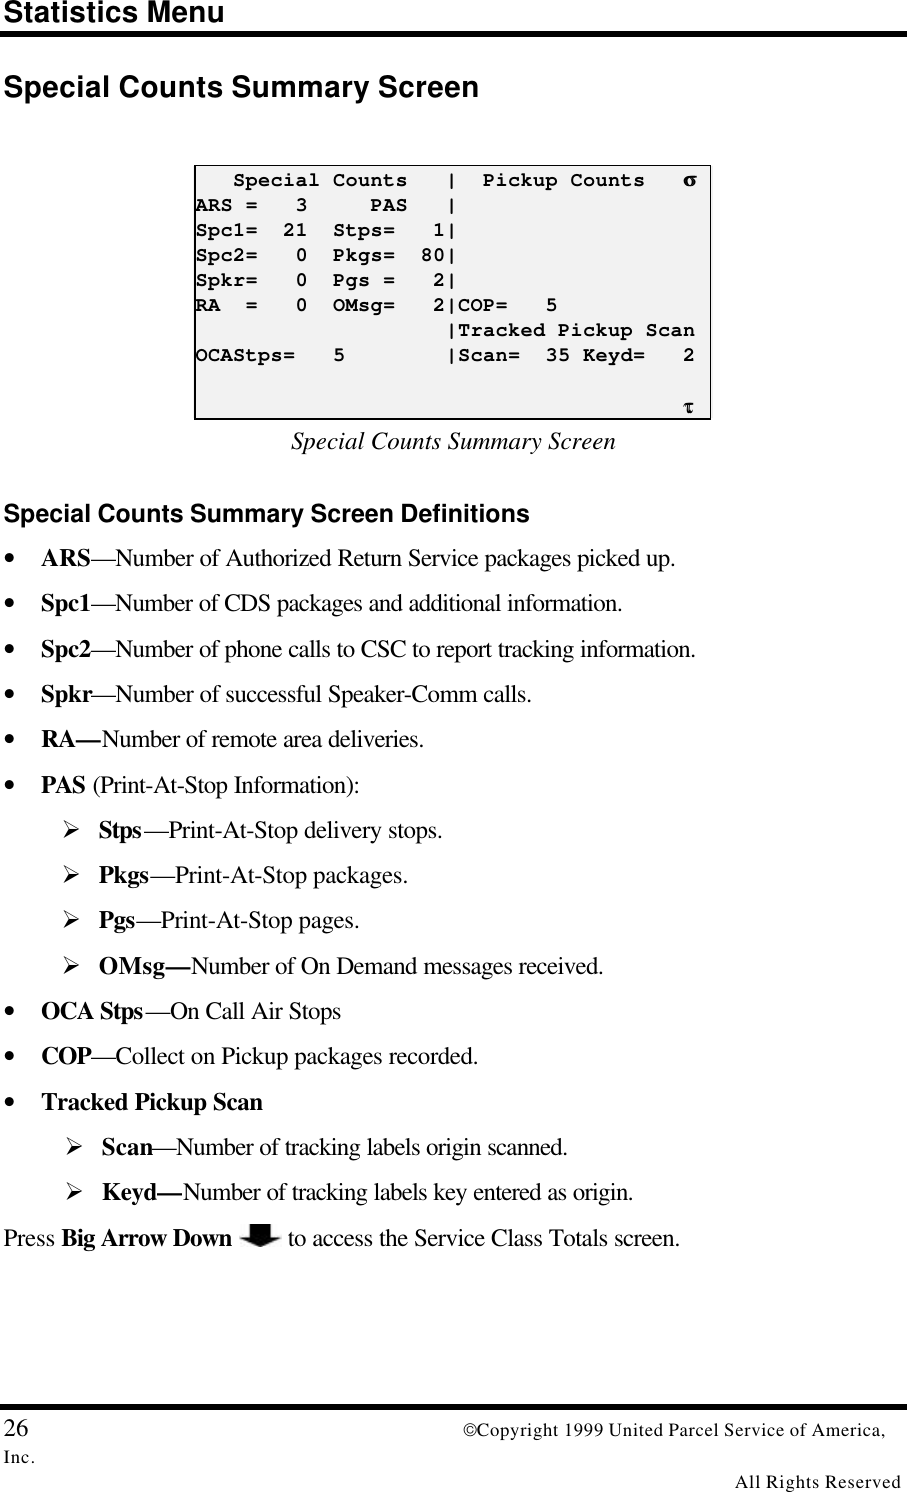
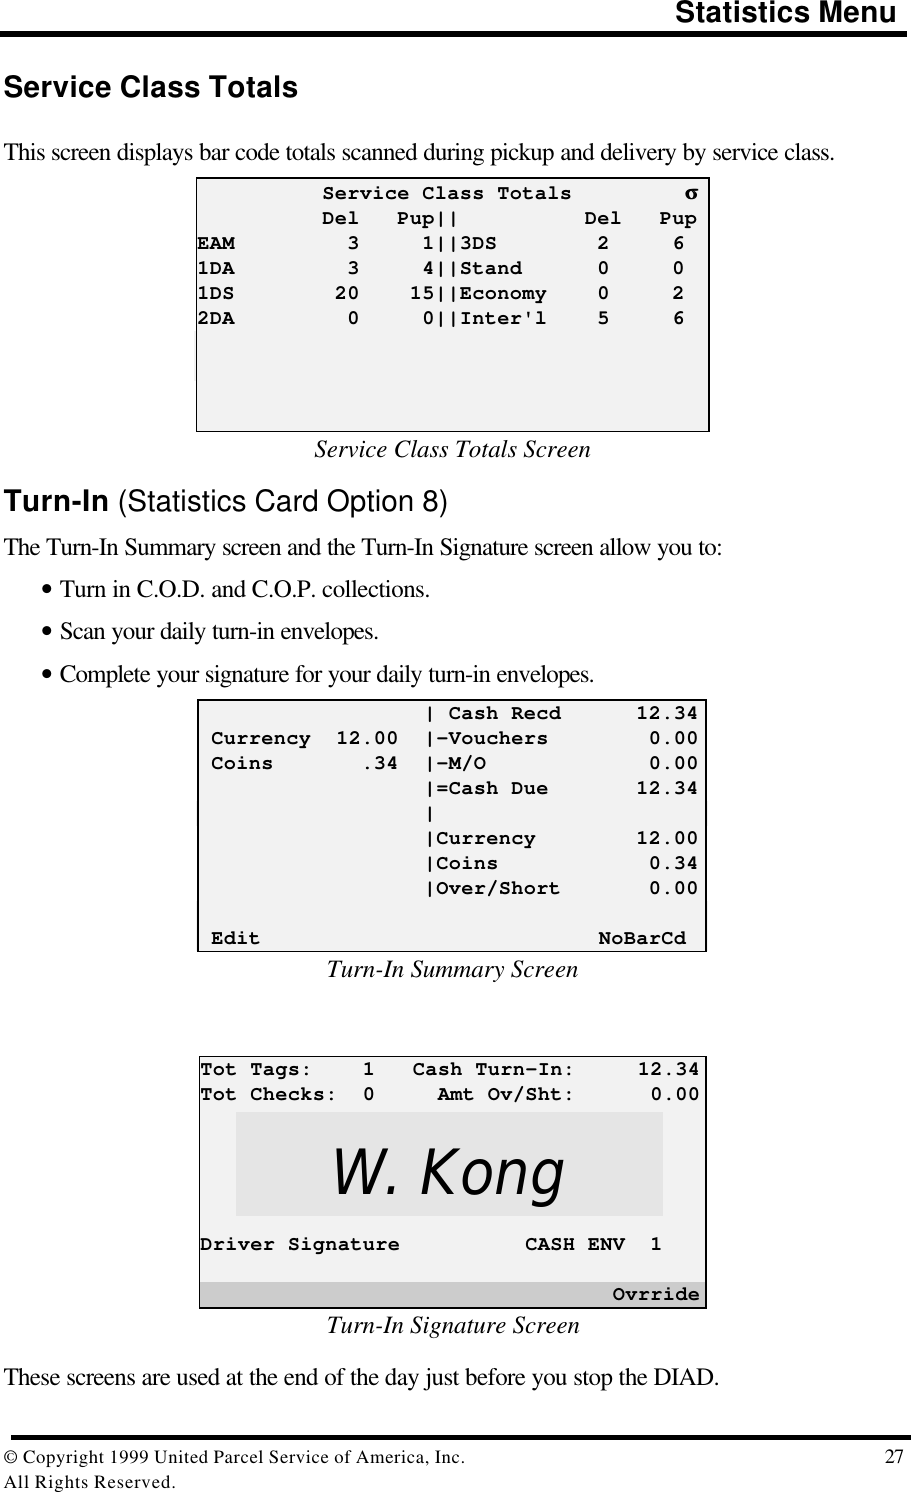
Motorola Solutions 89FT7002 Handheld or Belt mounted data terminal with two Sp User Manual DIAD III Ref Guide
Motorola Solutions, Inc. Handheld or Belt mounted data terminal with two Sp DIAD III Ref Guide
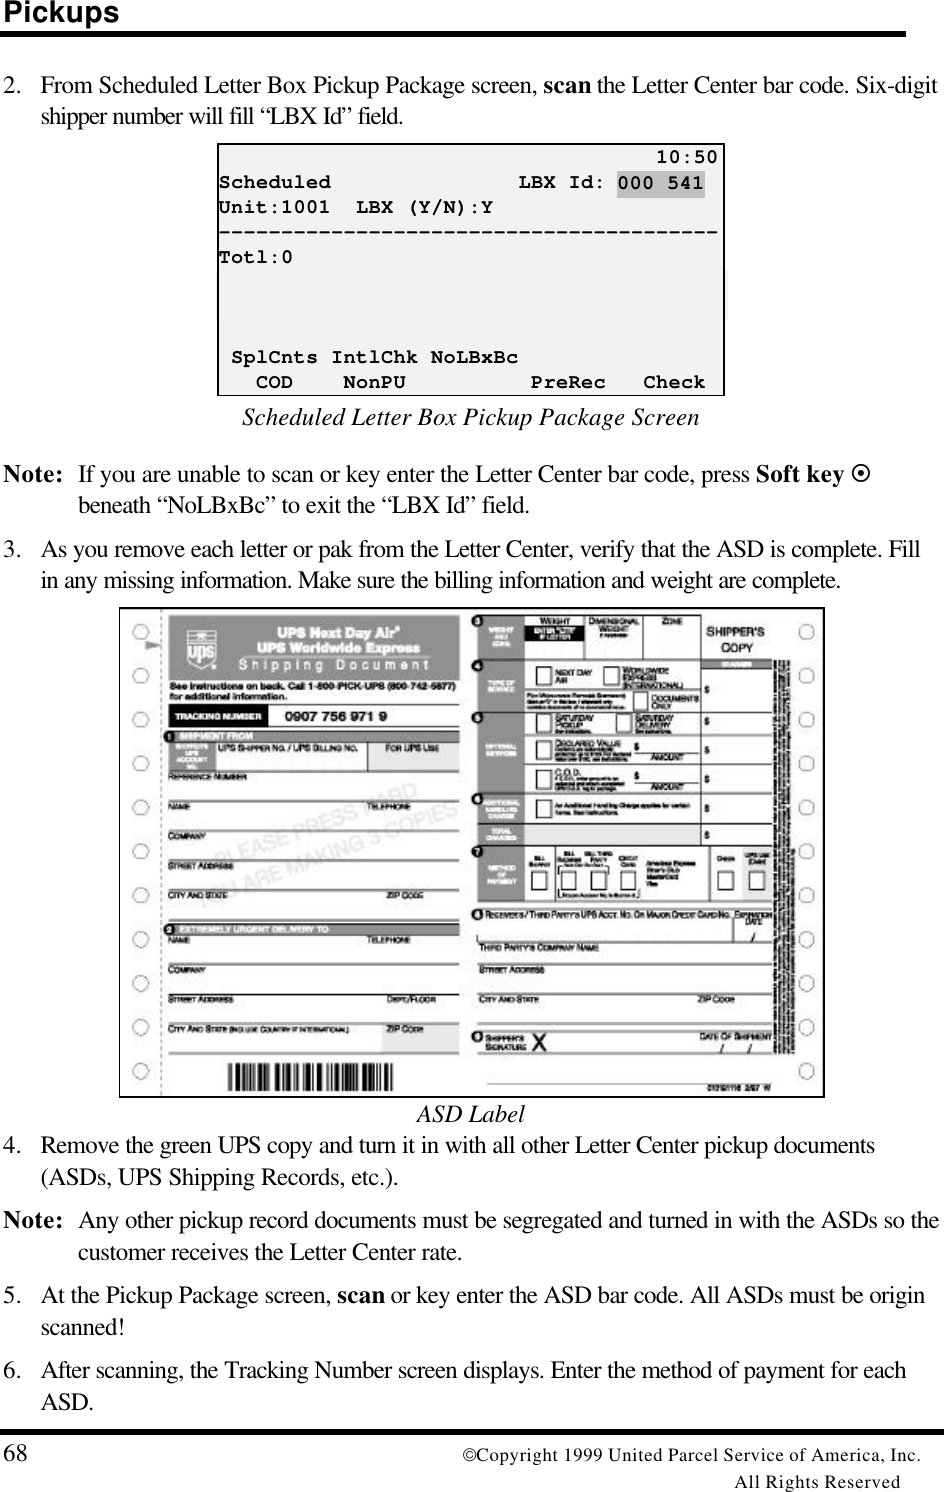
Contents
- 1. Exhibit 8 Instruction Manual
- 2. Reference original Exhibit 8 User Manual
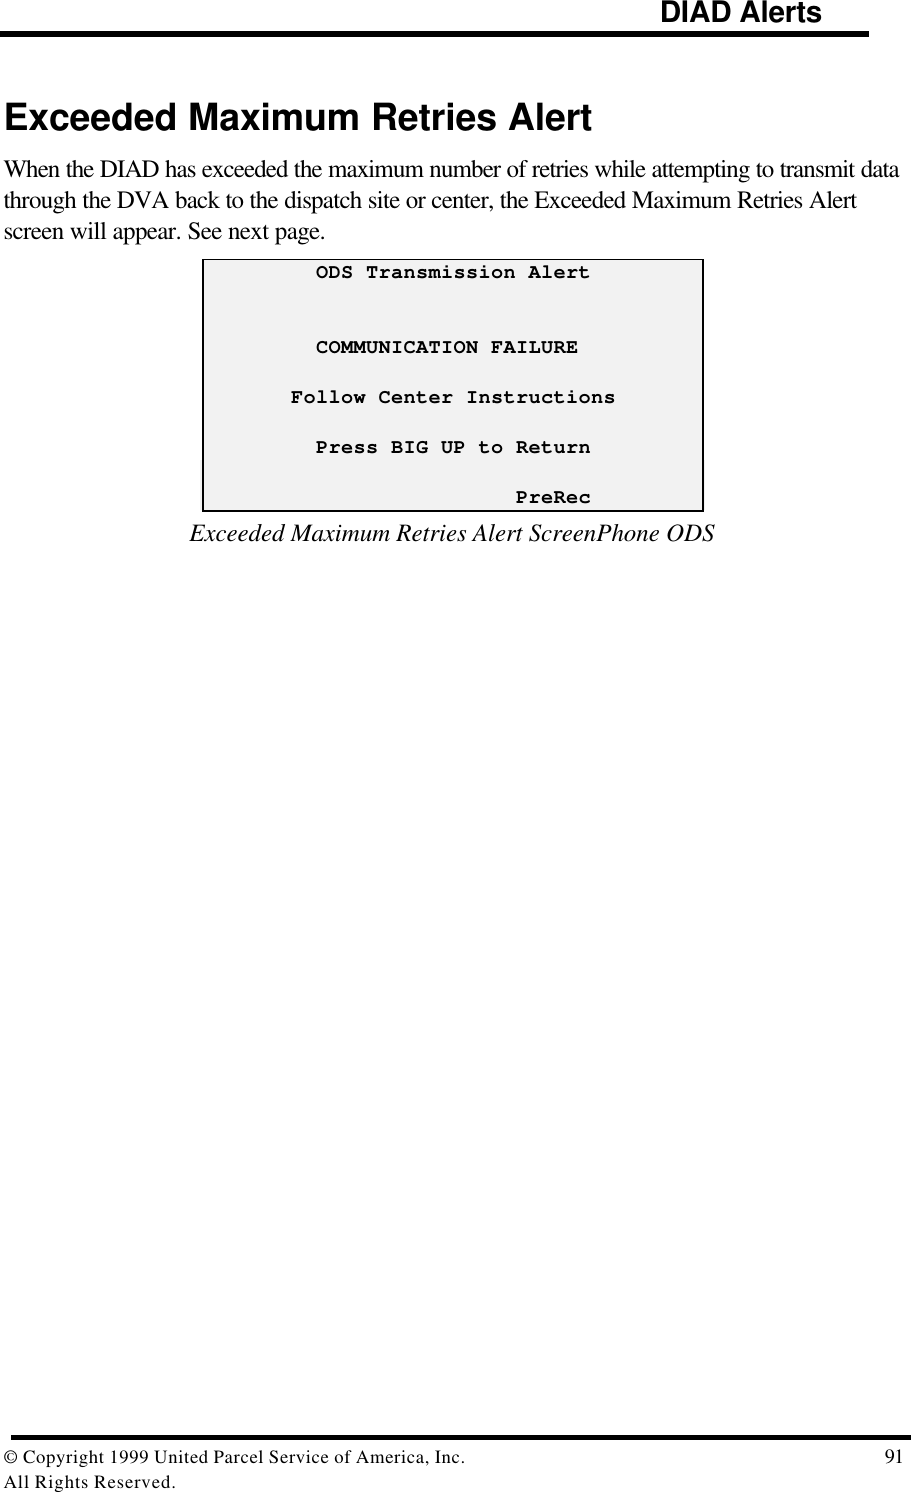
Exhibit 8 Instruction Manual
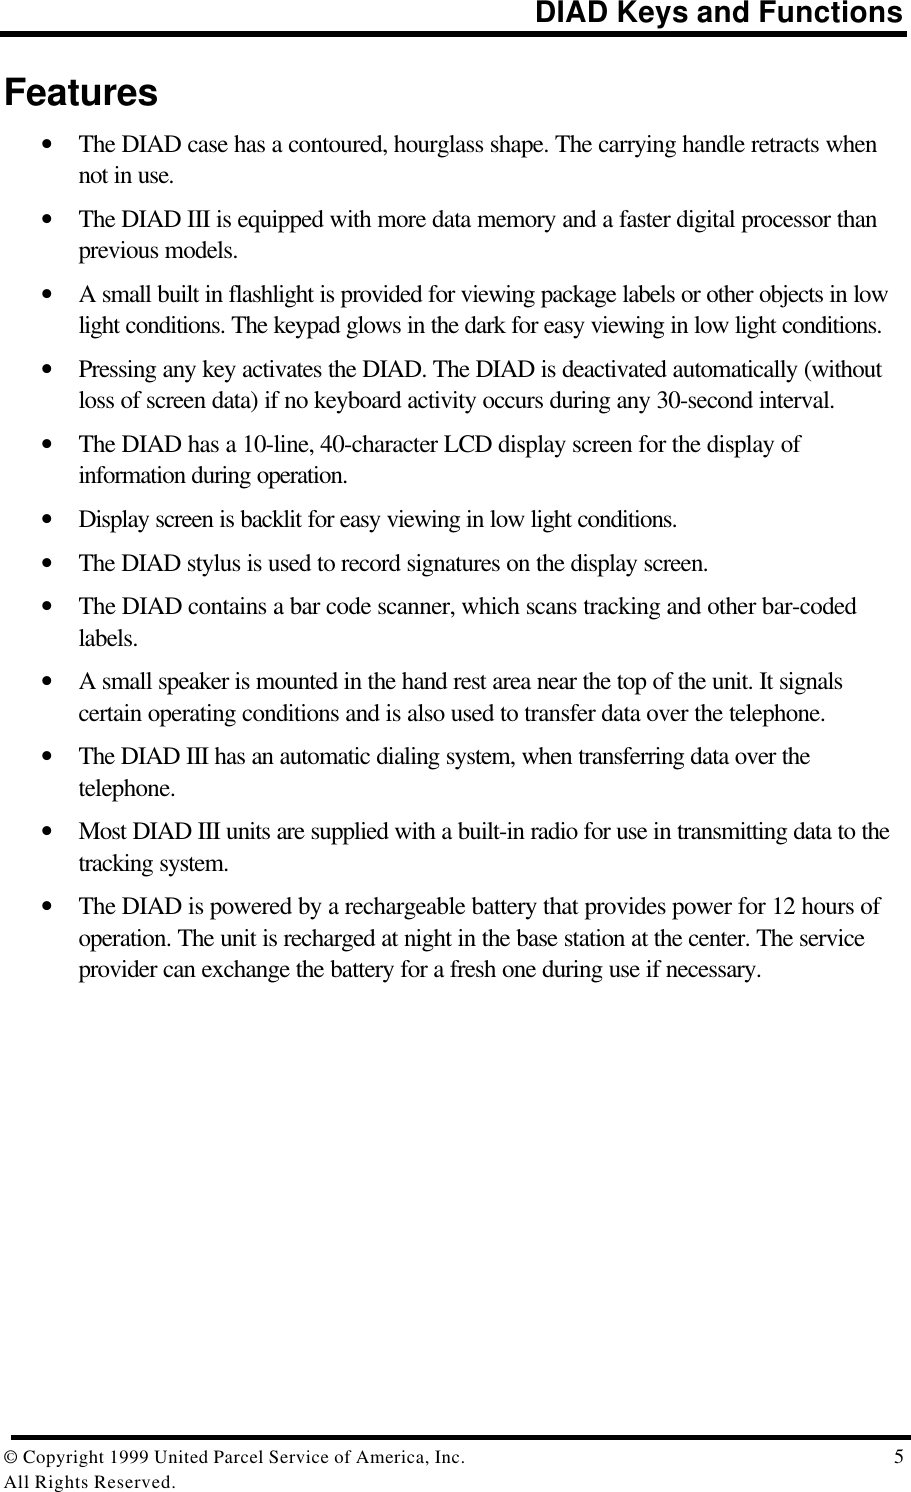
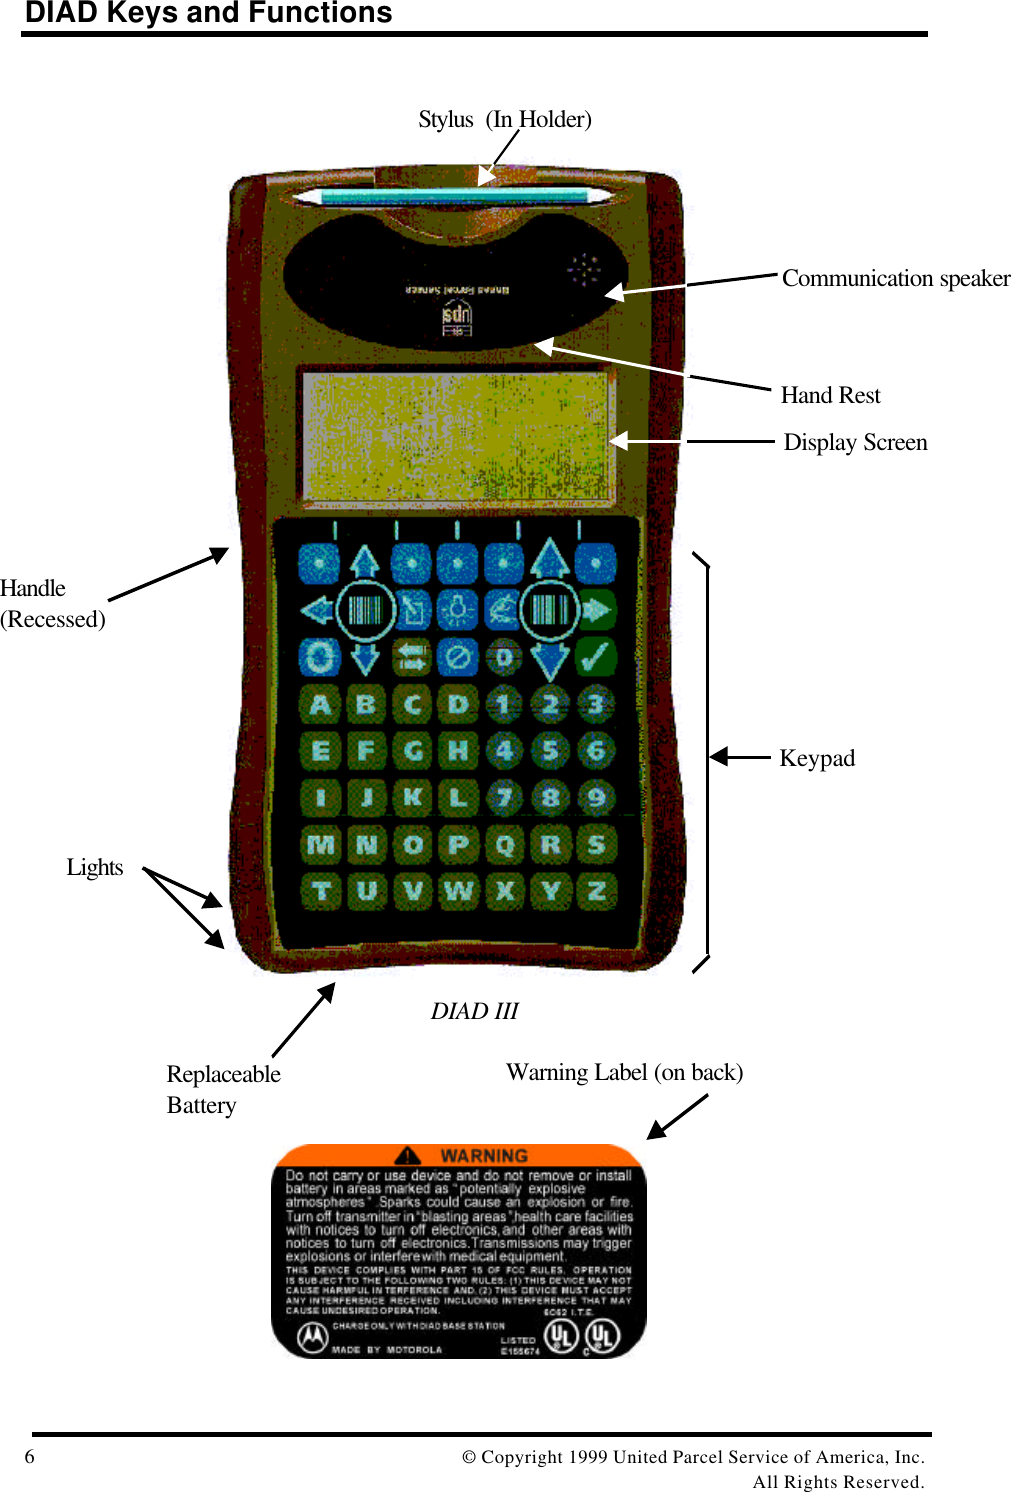
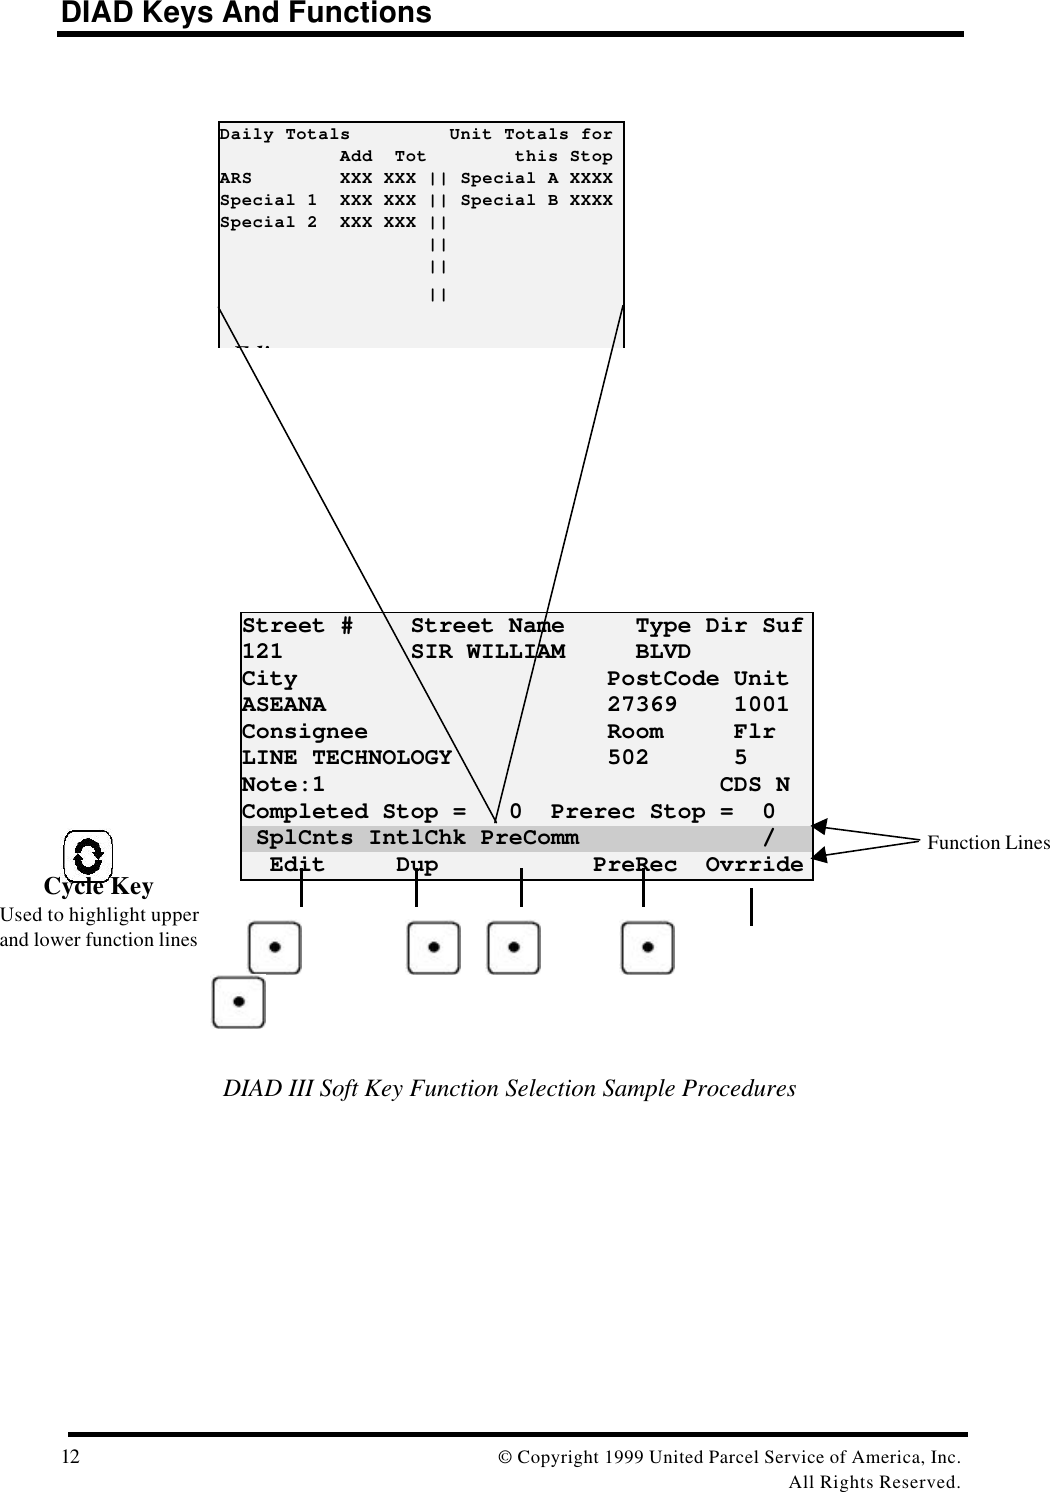
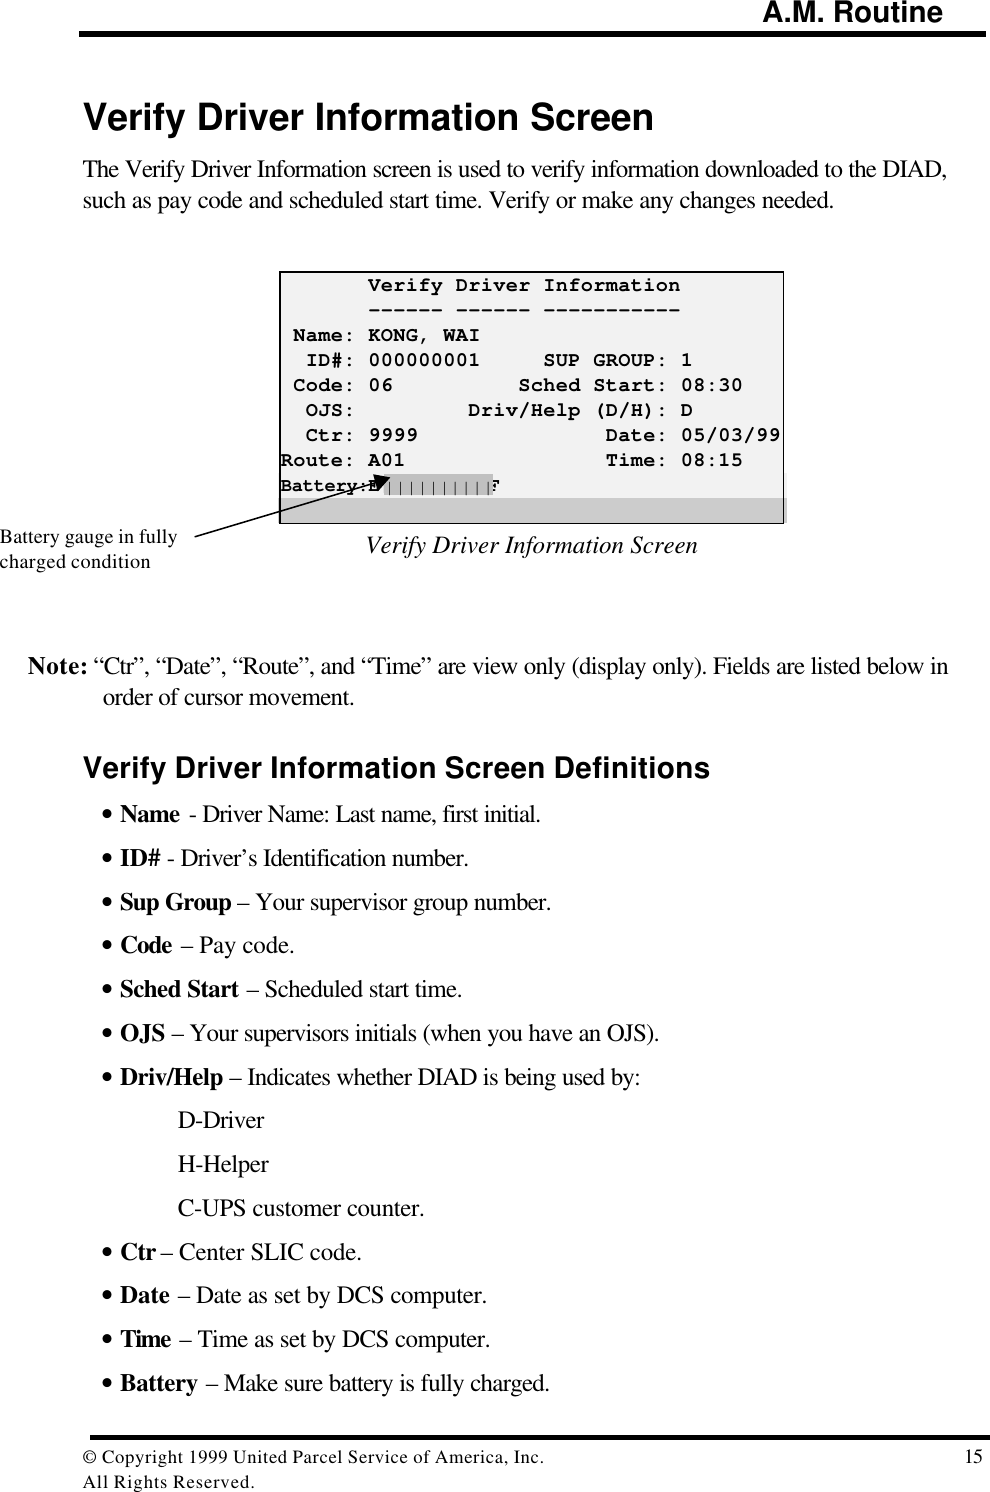
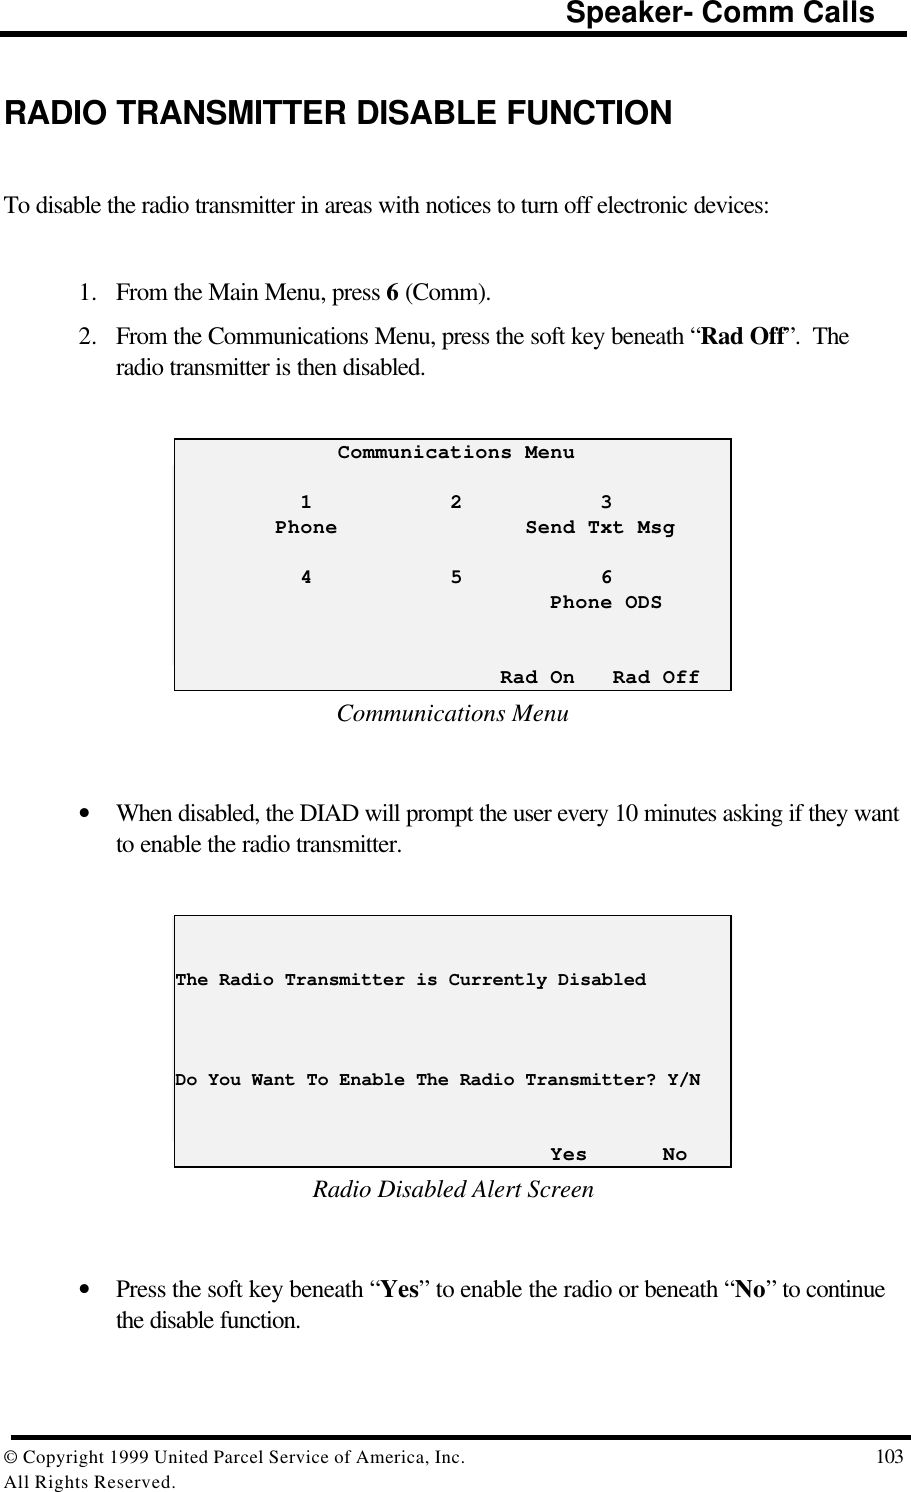
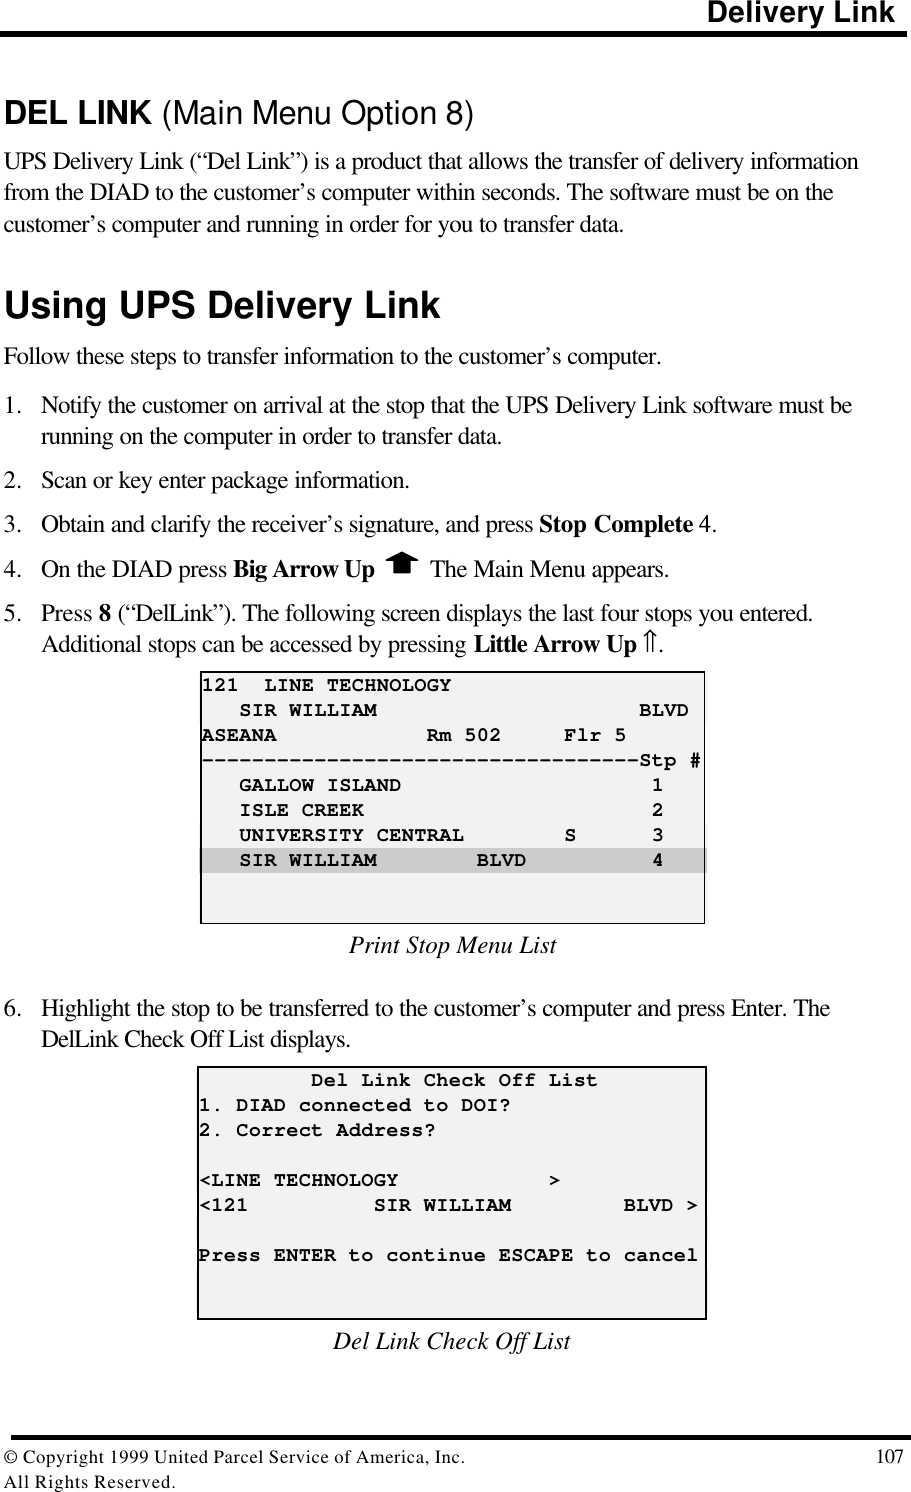
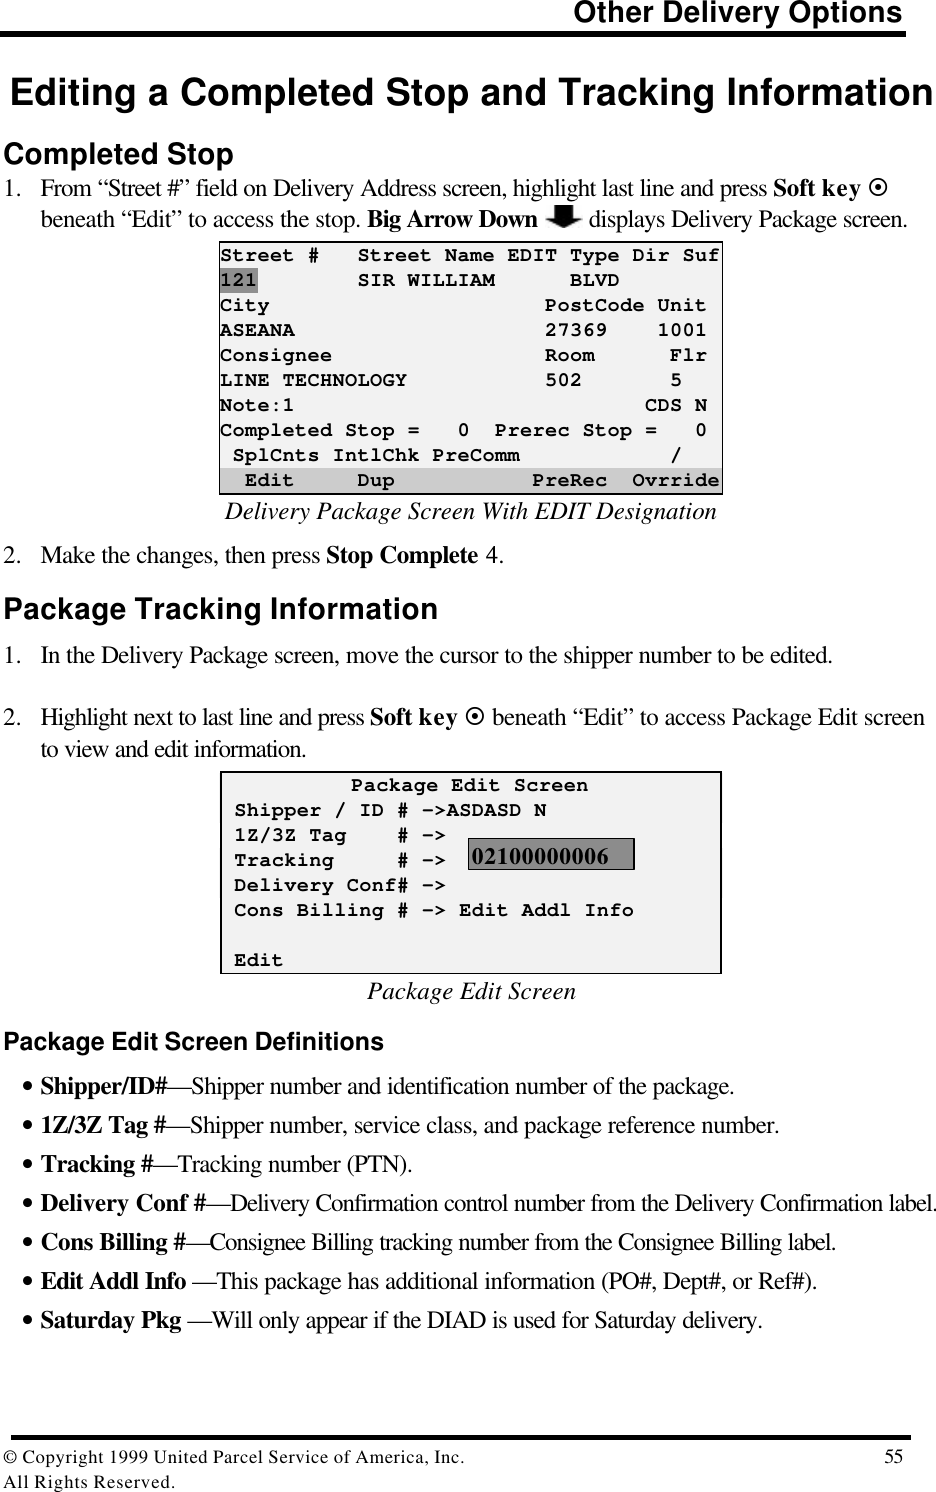
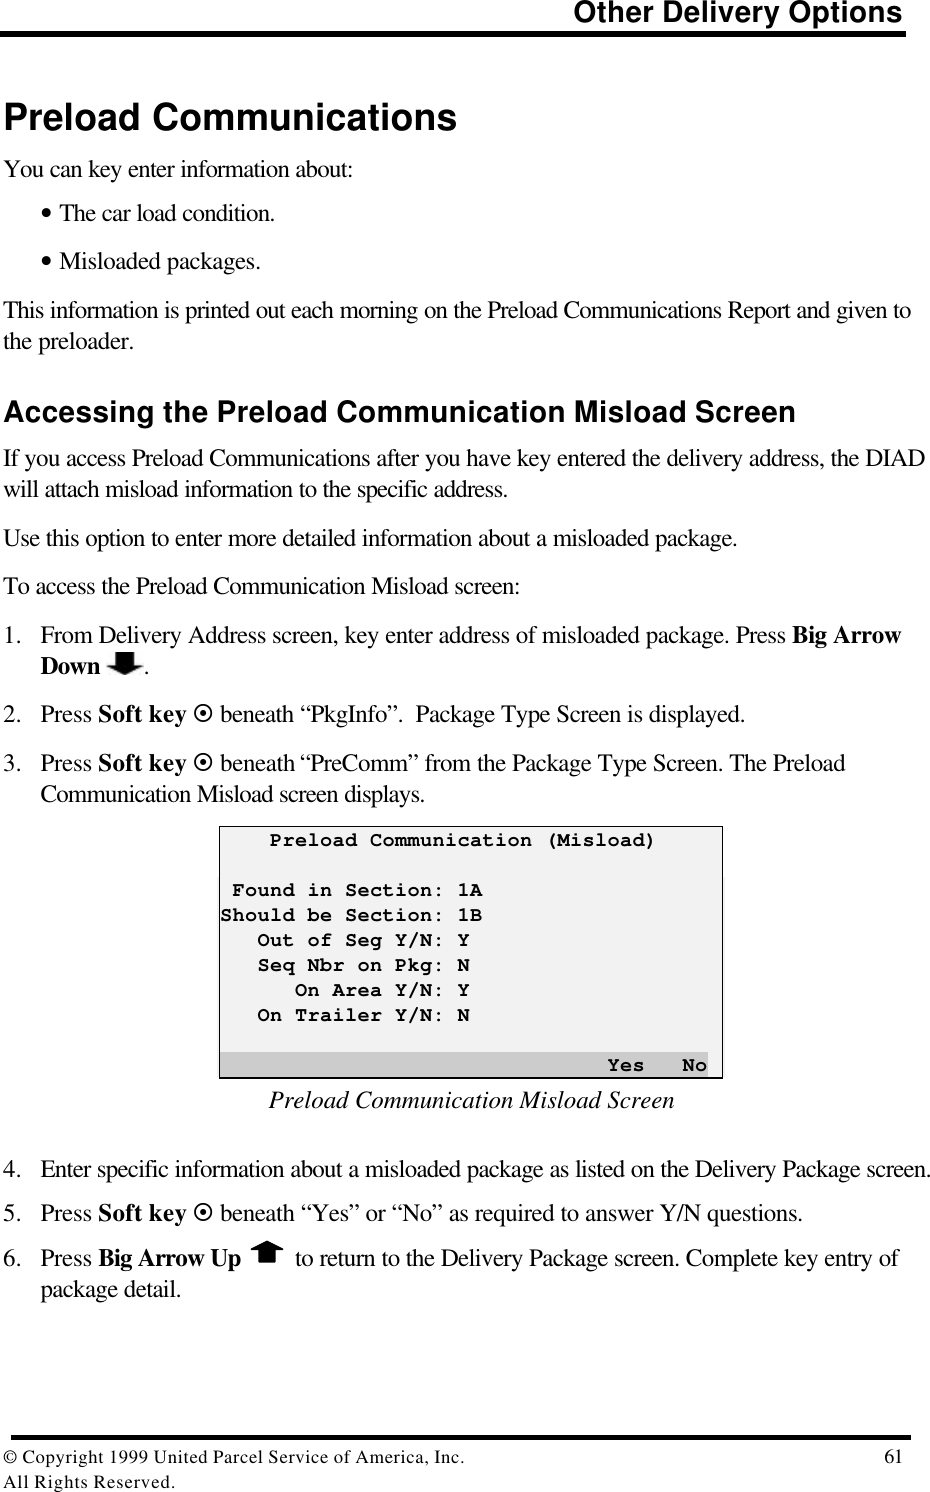
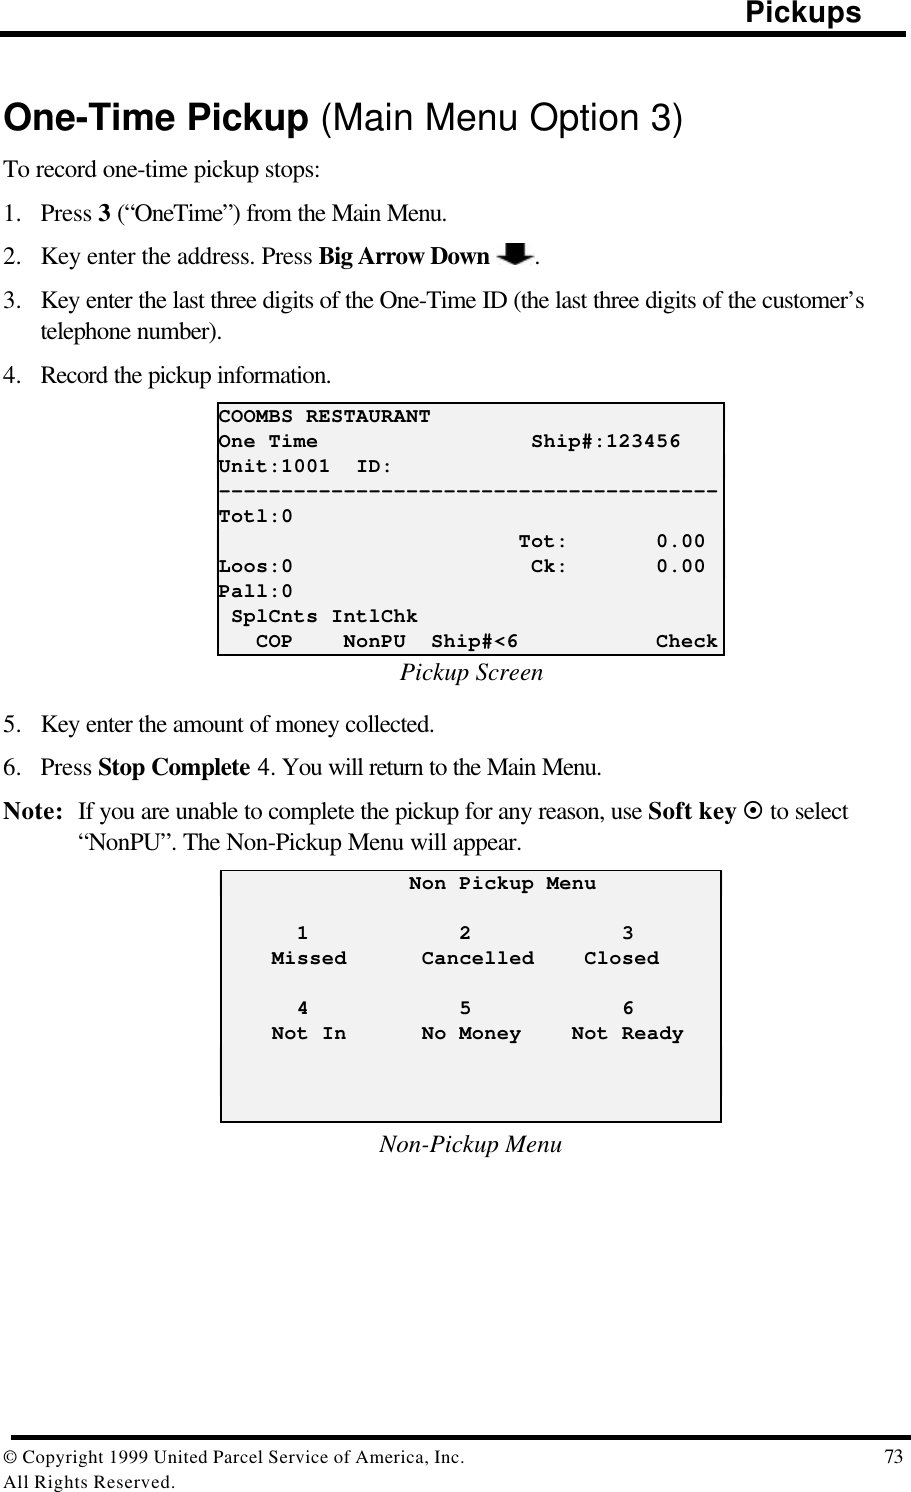
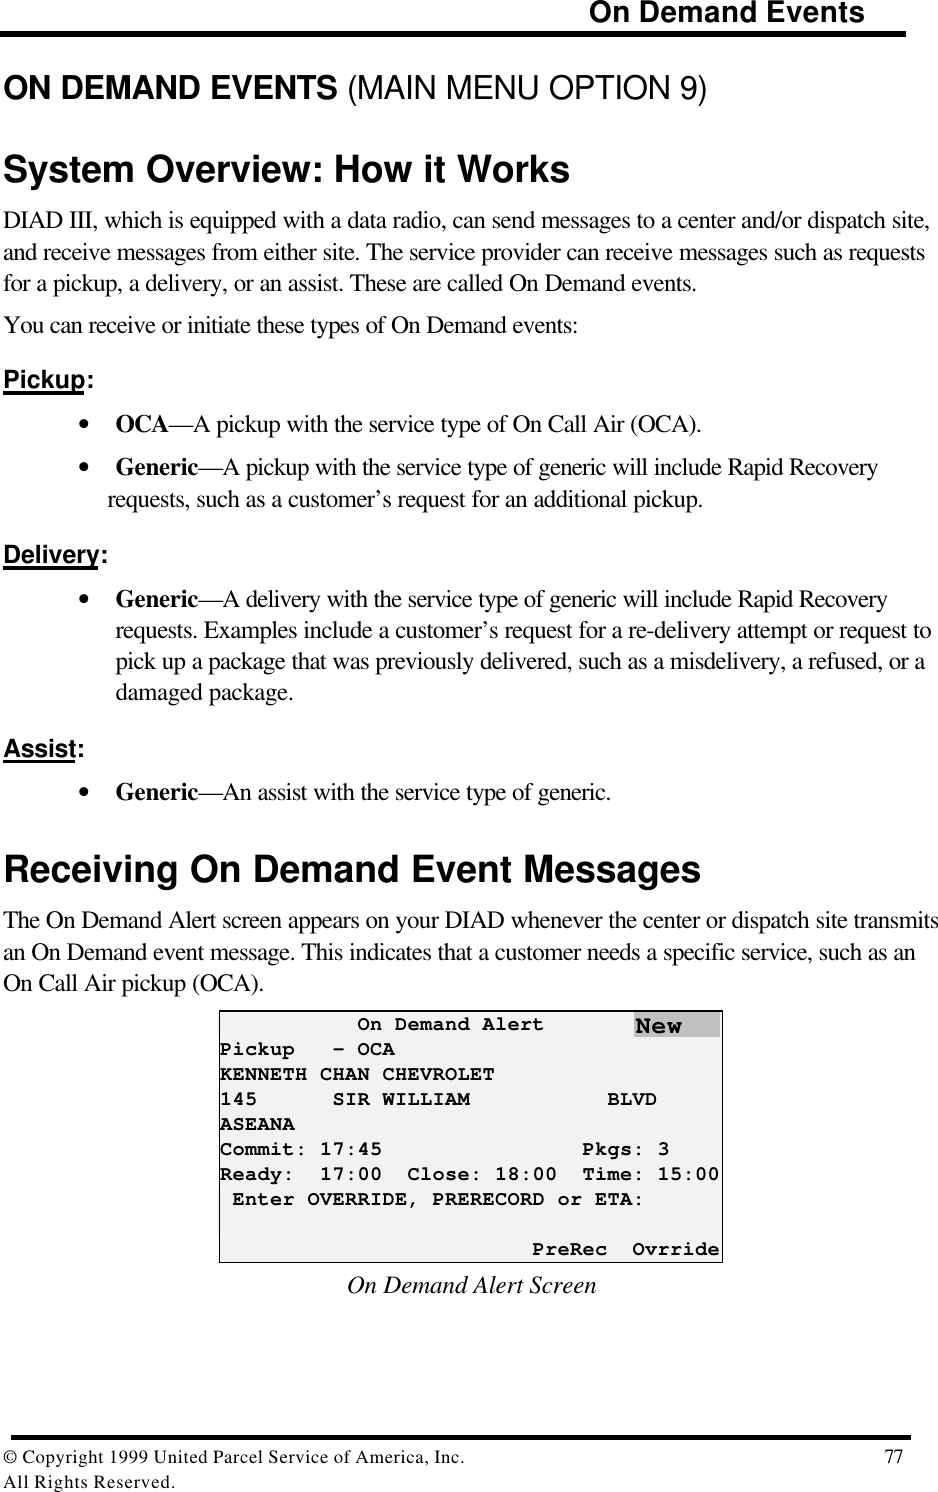
![Menu Overview© Copyright 1999 United Parcel Service of America, Inc. 17All Rights Reserved.MENU OVERVIEWDIAD III is menu driven, making it fast and easy to operate. This means you will choose anoption from a menu in order to reach another screen. Now we will explore the DIAD menus ingreater detail, beginning with the Main Menu.Main MenuThe Main Menu has nine selections, which are discussed in the following paragraphs. We willstart with Option 5, “Statistics”. DIAD Main Menu V21.32_D3 [14:42] 1 2 3 Scheduled Unscheduled OneTime 4 5 6 Delivery Statistics Comm 7 8 9 Print DelLink ODSBattery:E||||||||||F Radio SplCnts IntlChk PreComm Verify StpDIADMain MenuCurrent Time Display|||||||||](https://usermanual.wiki/Motorola-Solutions/89FT7002.Exhibit-8-Instruction-Manual/User-Guide-260550-Page-21.png)
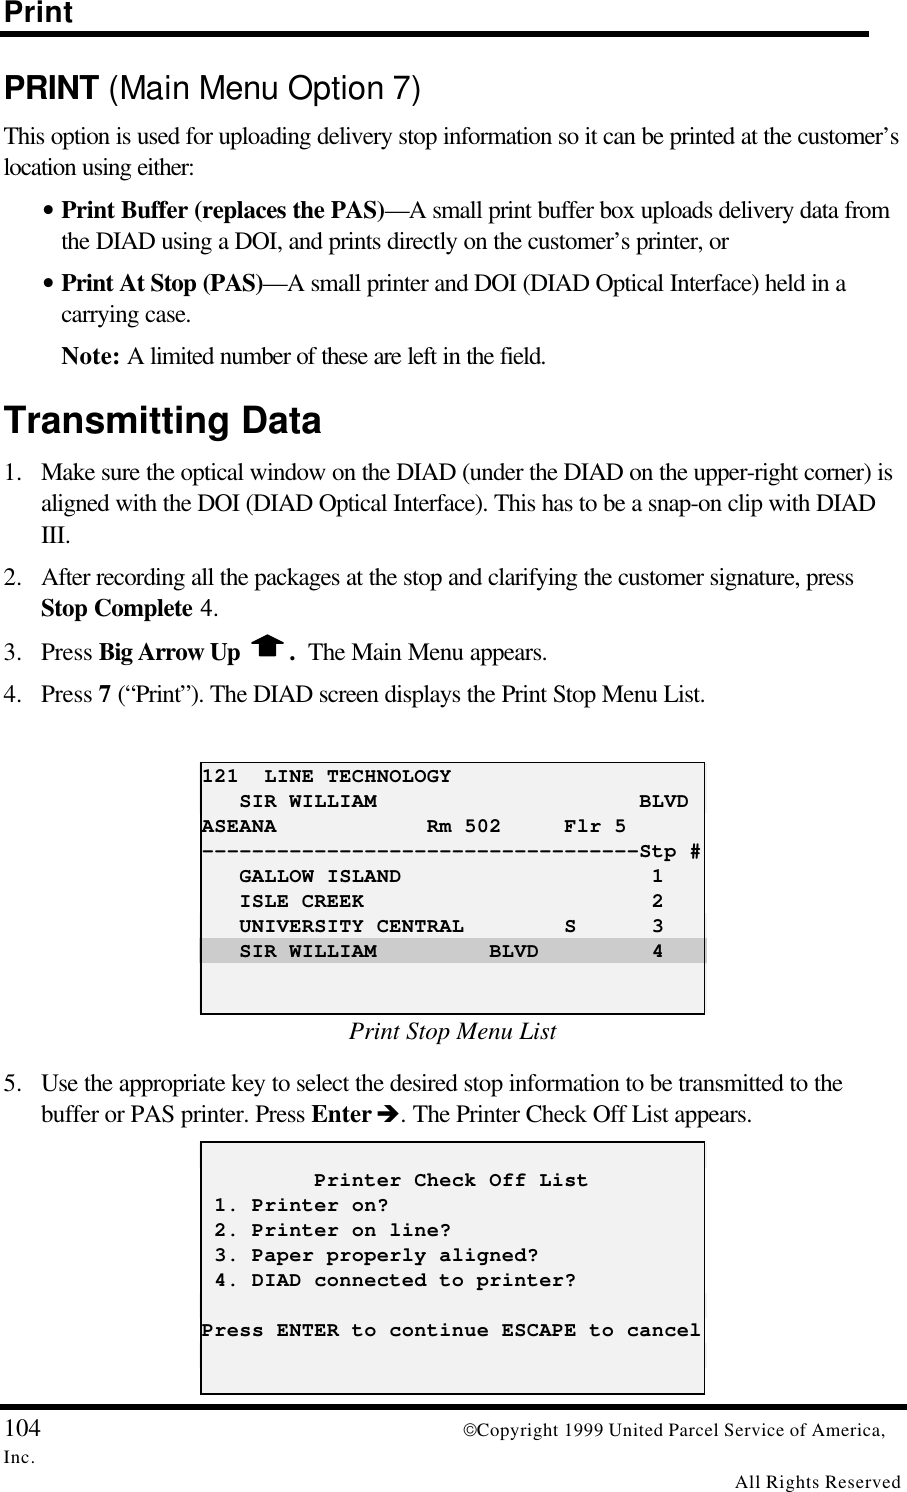
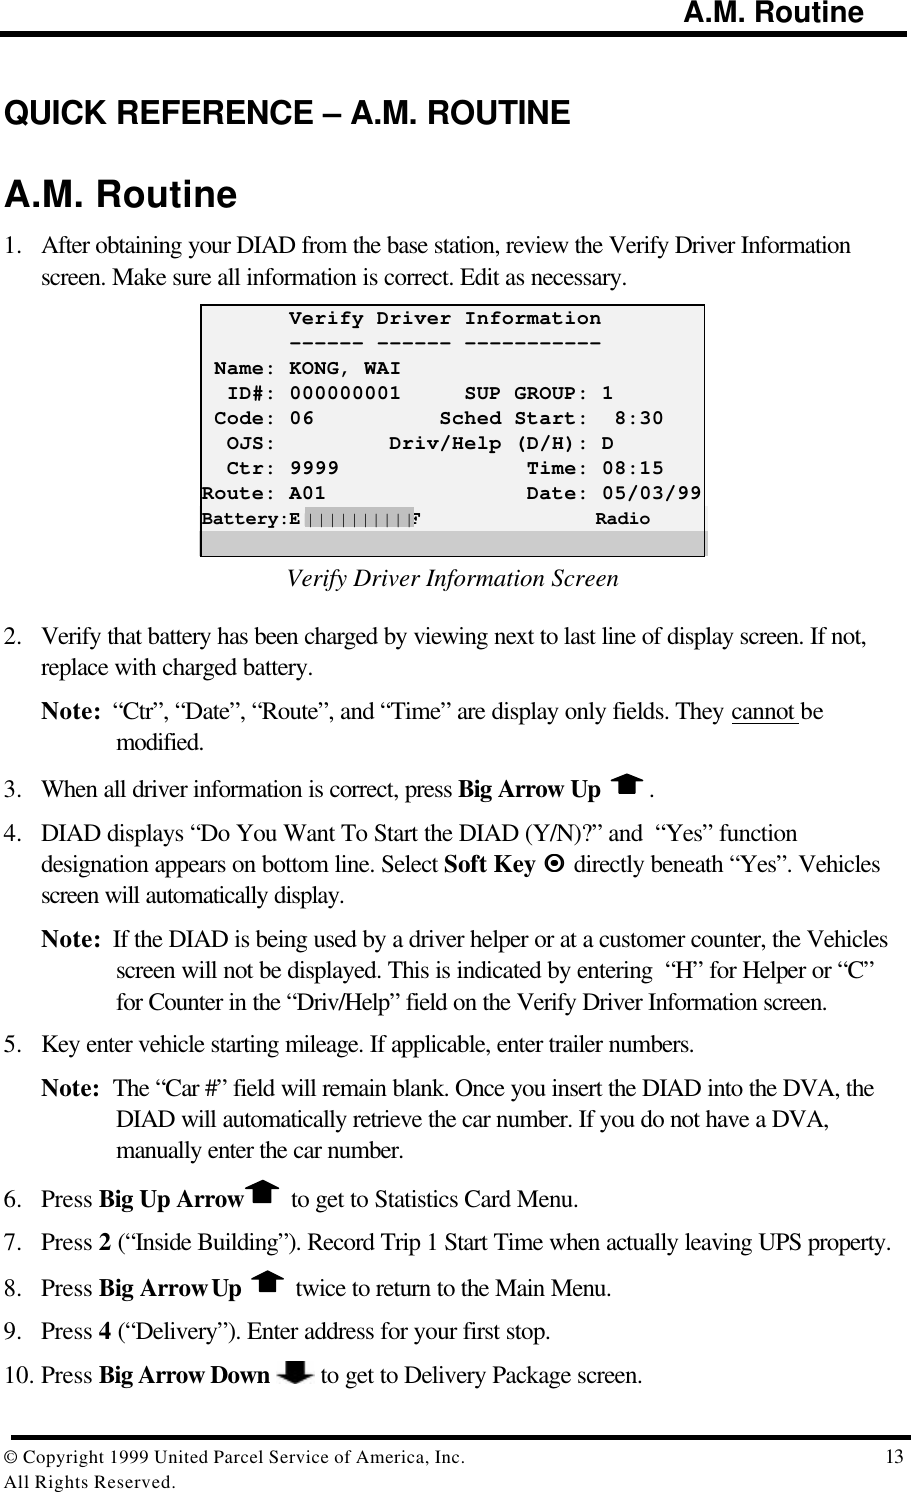
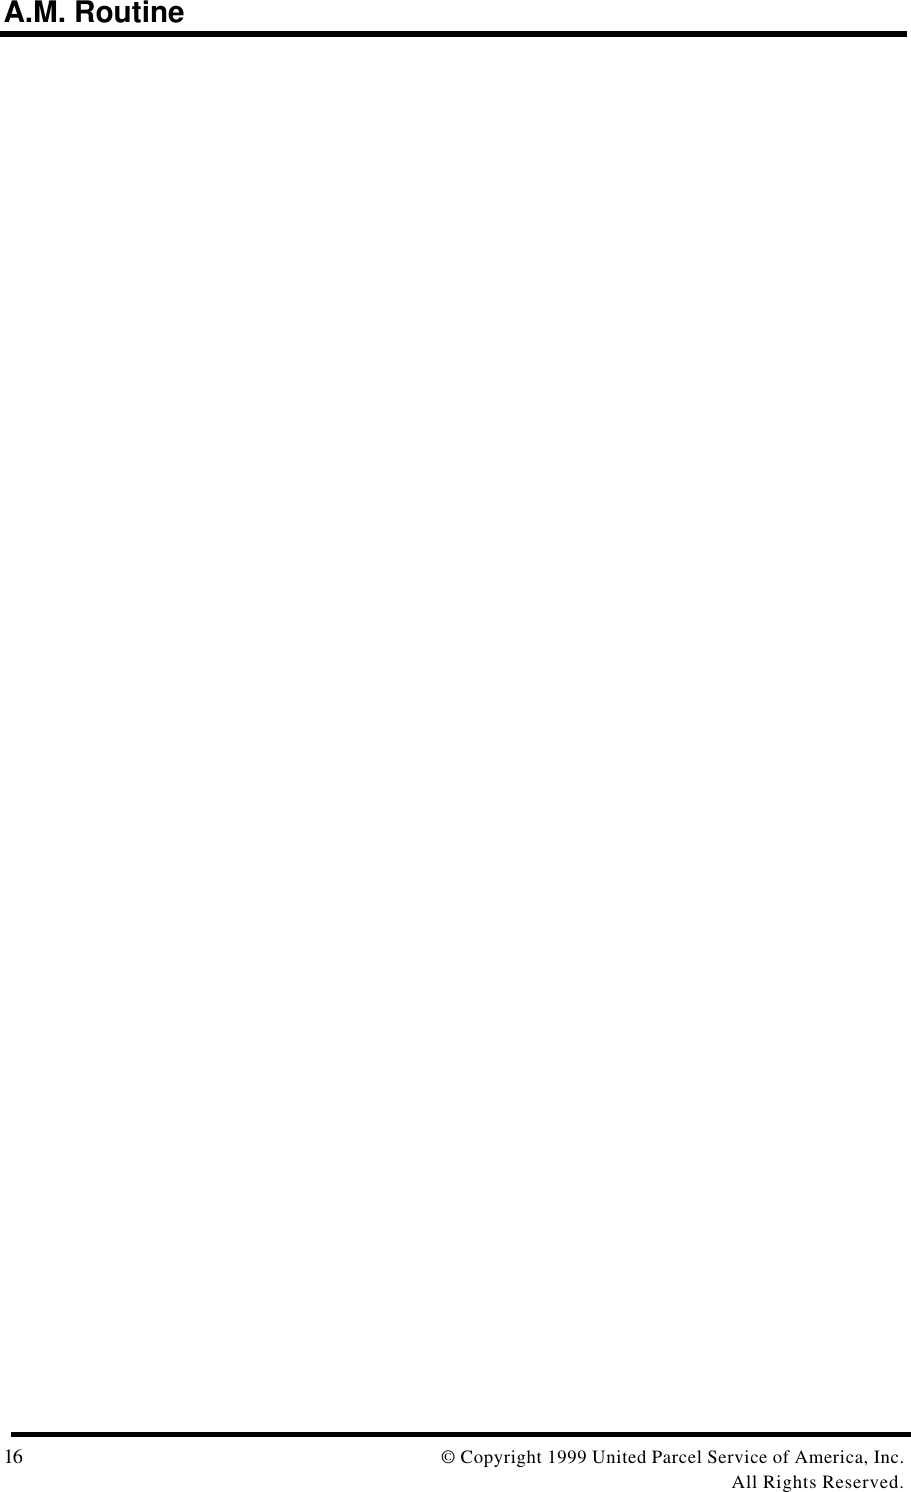
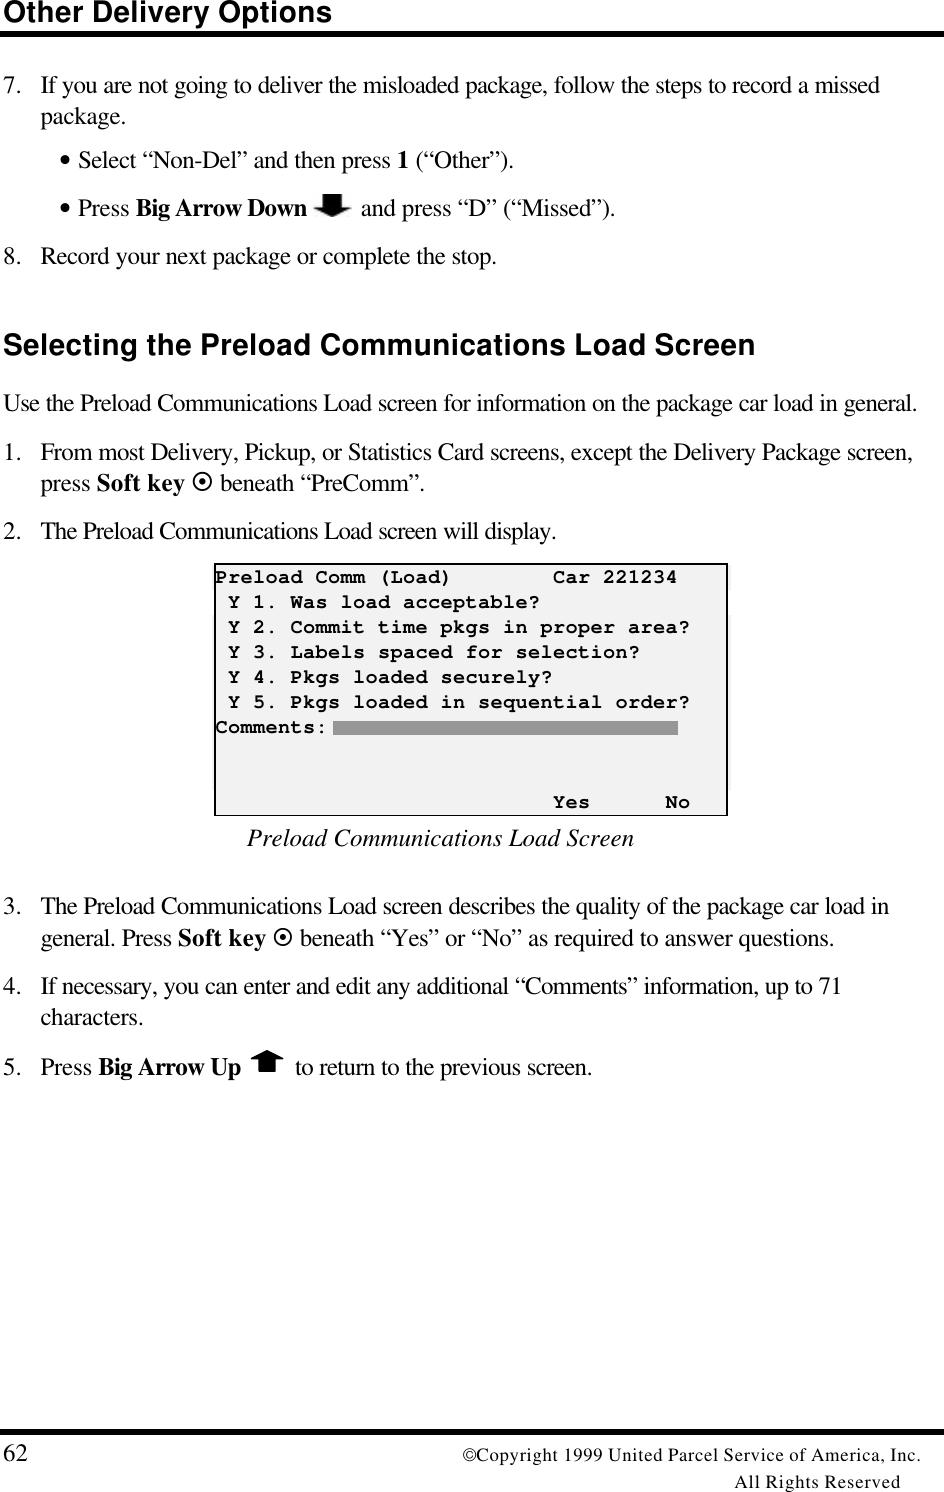
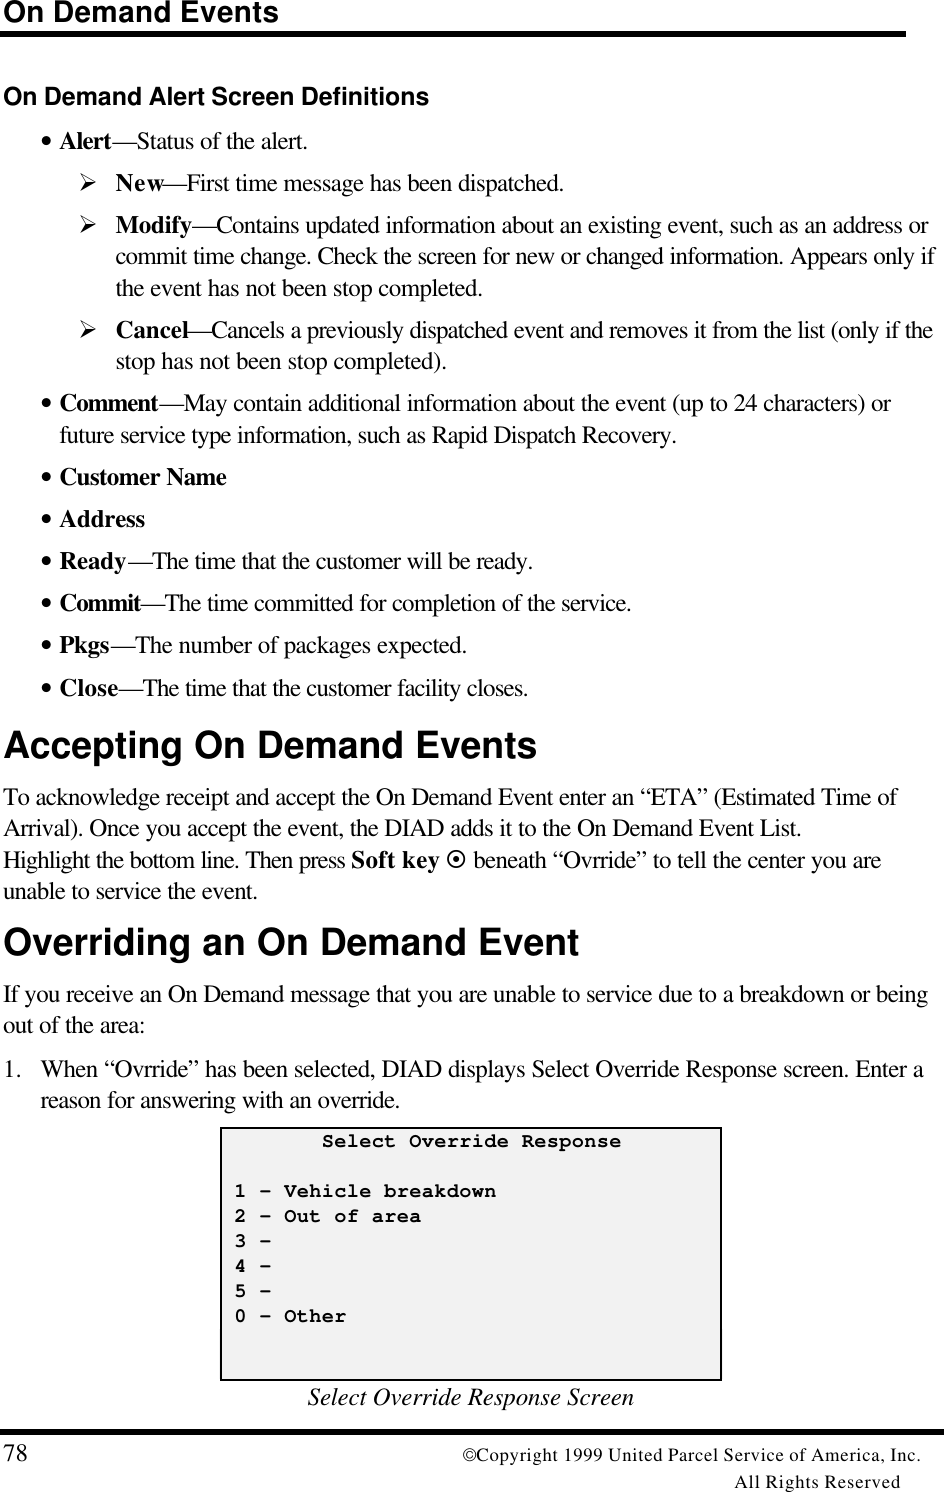
![Statistics Menu18 Copyright 1999 United Parcel Service of America,Inc.All Rights ReservedStatistics Menu (Main Menu Option 5)The Statistics Card Menu also has nine numbered selections. “StpDIAD” and “Verify”functions can also be selected by Soft Keys. Various options that can be selected in theStatistics Card Menu are shown below, and are discussed in the following pages. Statistics Card [14:42] 1 2 3 BreakLunch InsideBldg OtherWork 4 5 6 Recap ReviewCols Roadcall 7 8 9 Summary TurnIn Vehicles S=StopDIAD V=VerifyBattery:E||||||||||F Radio SplCnts IntlChk PreComm Verify StpDIADStatistics Card MenuBreak/Lunch (Statistics Card Option 1)This screen is used to record the times of your breaks and lunch.[13:00] Break Lunch Start Finish Start Finish : : : : : :Break and Lunch Screen1. From the Statistics Card Menu, press 1. Break and Lunch screen is displayed with cursor infirst empty data field. (E.g. If no data has been entered, cursor appears in “Break” “Start” fieldas shown below.)2. Enter the start and/or finish time for each period. Press Enter èto accept entered data andmove to next field or cursor will move automatically to next field when a field is full.3. Press Big Arrow Up to store entered data and return to the Statistics Card menu.||||||||| :](https://usermanual.wiki/Motorola-Solutions/89FT7002.Exhibit-8-Instruction-Manual/User-Guide-260550-Page-22.png)
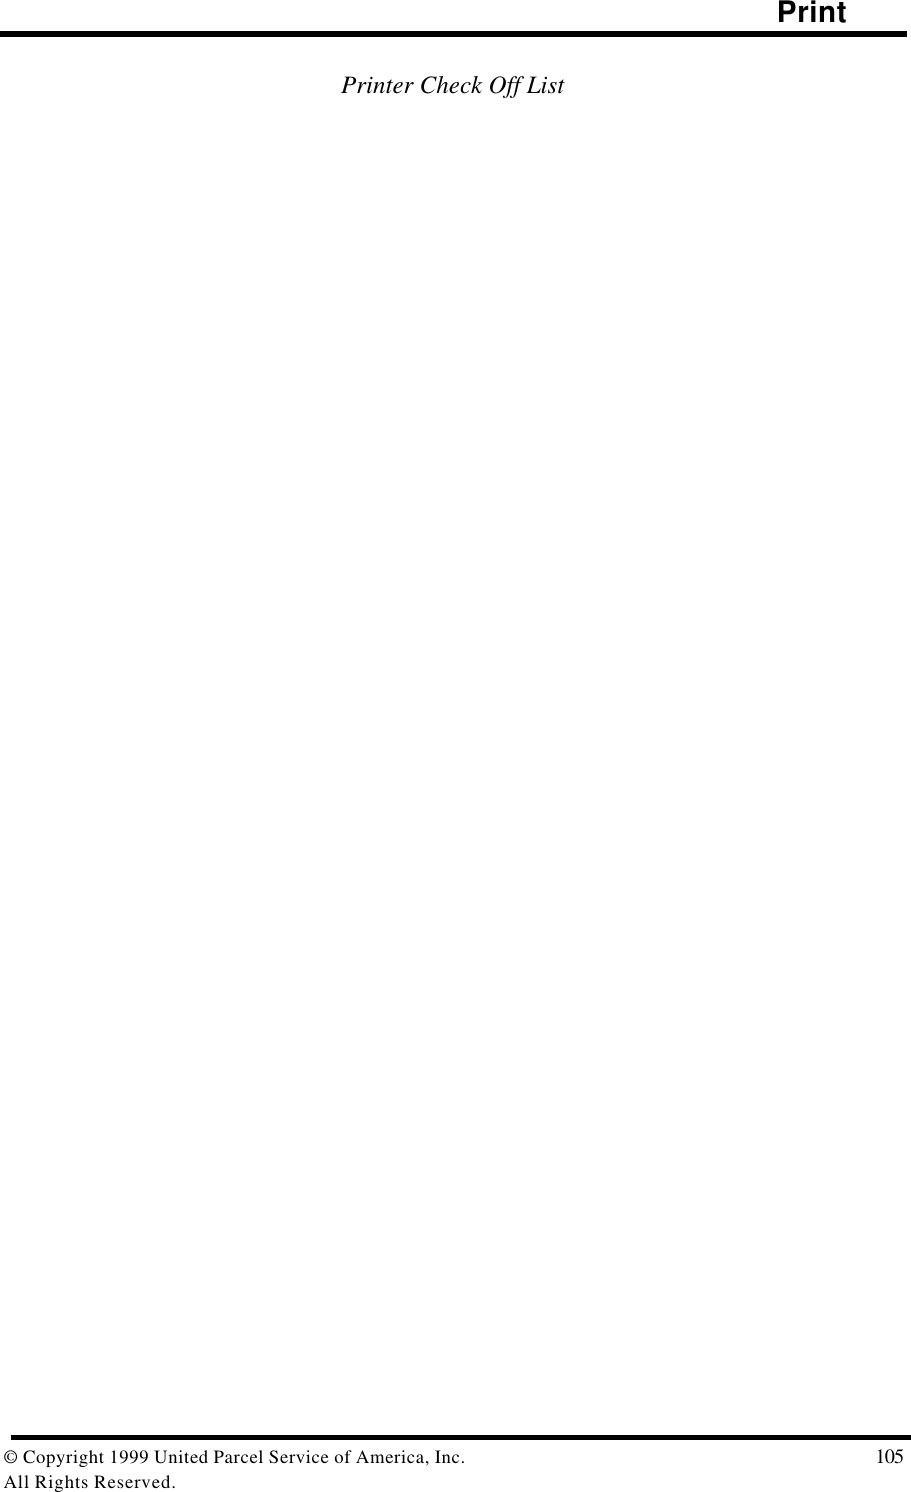
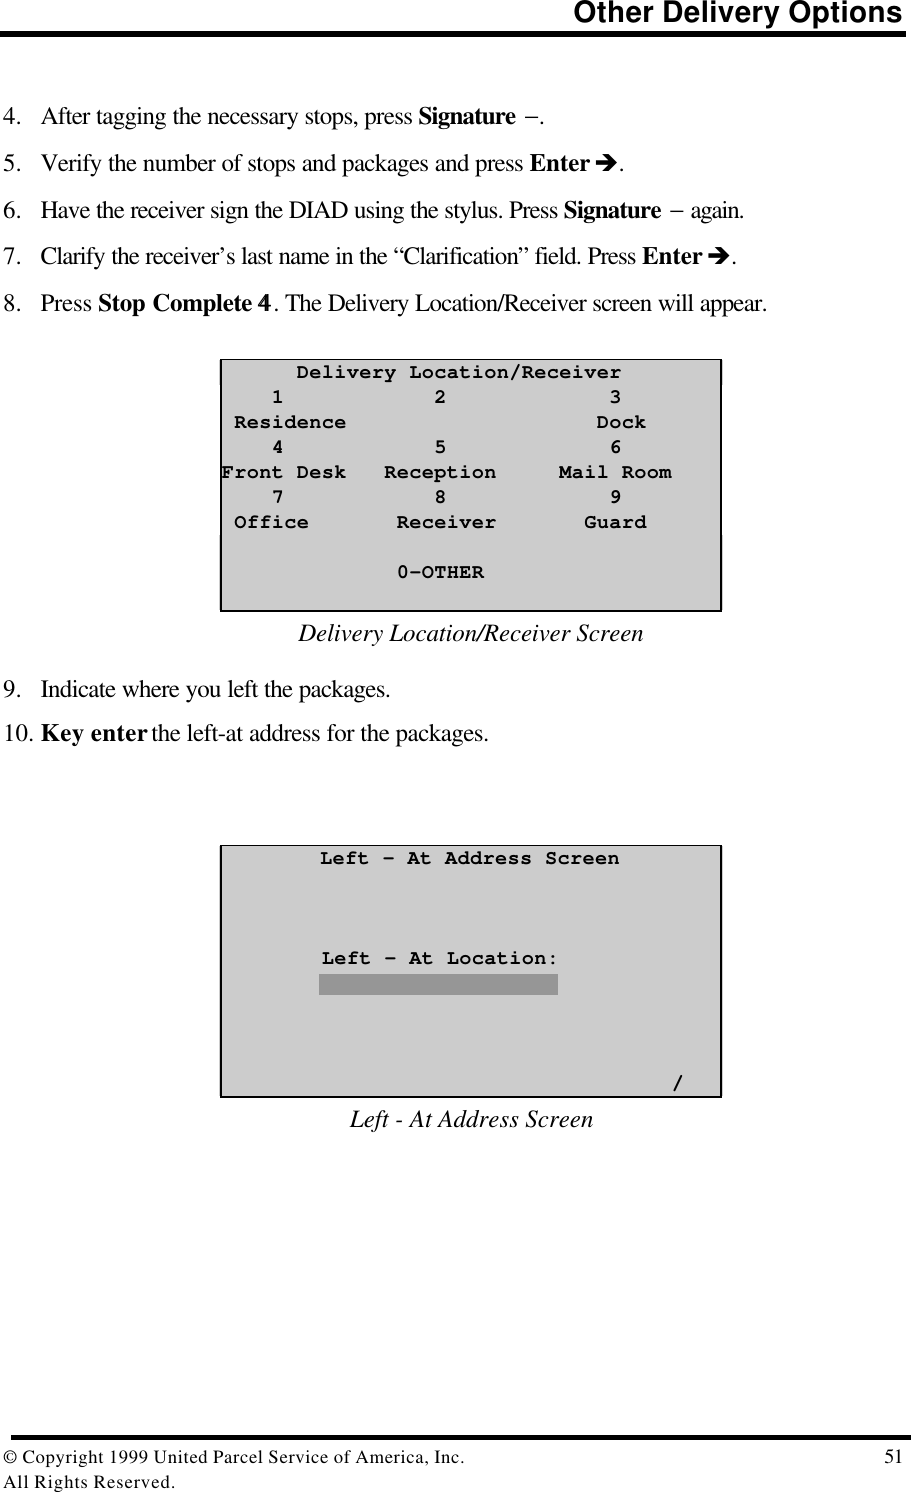
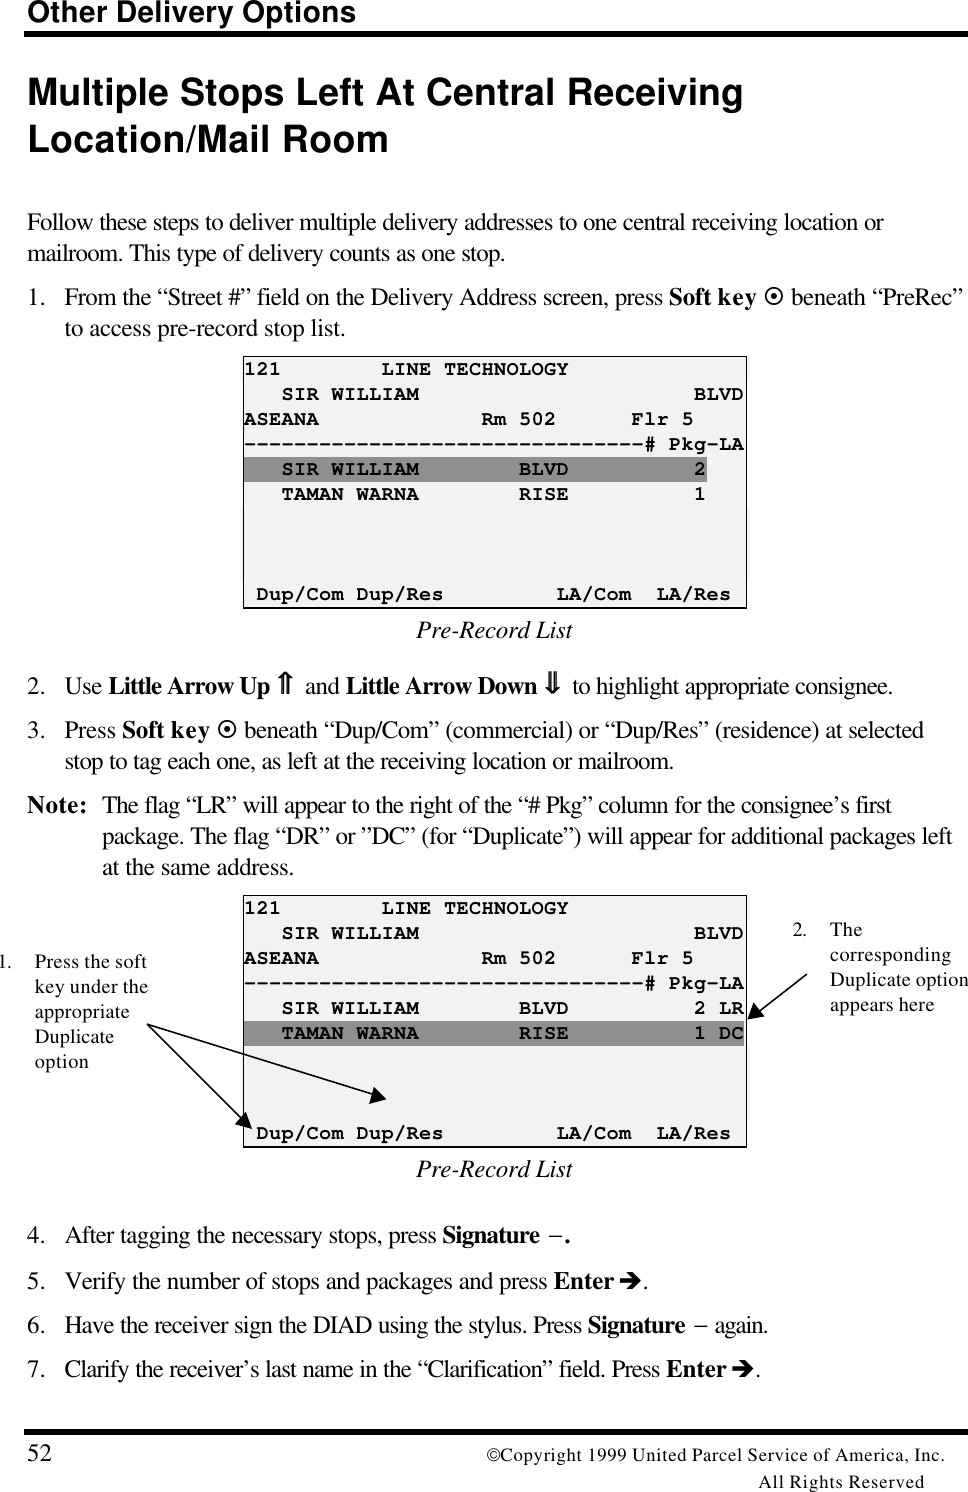
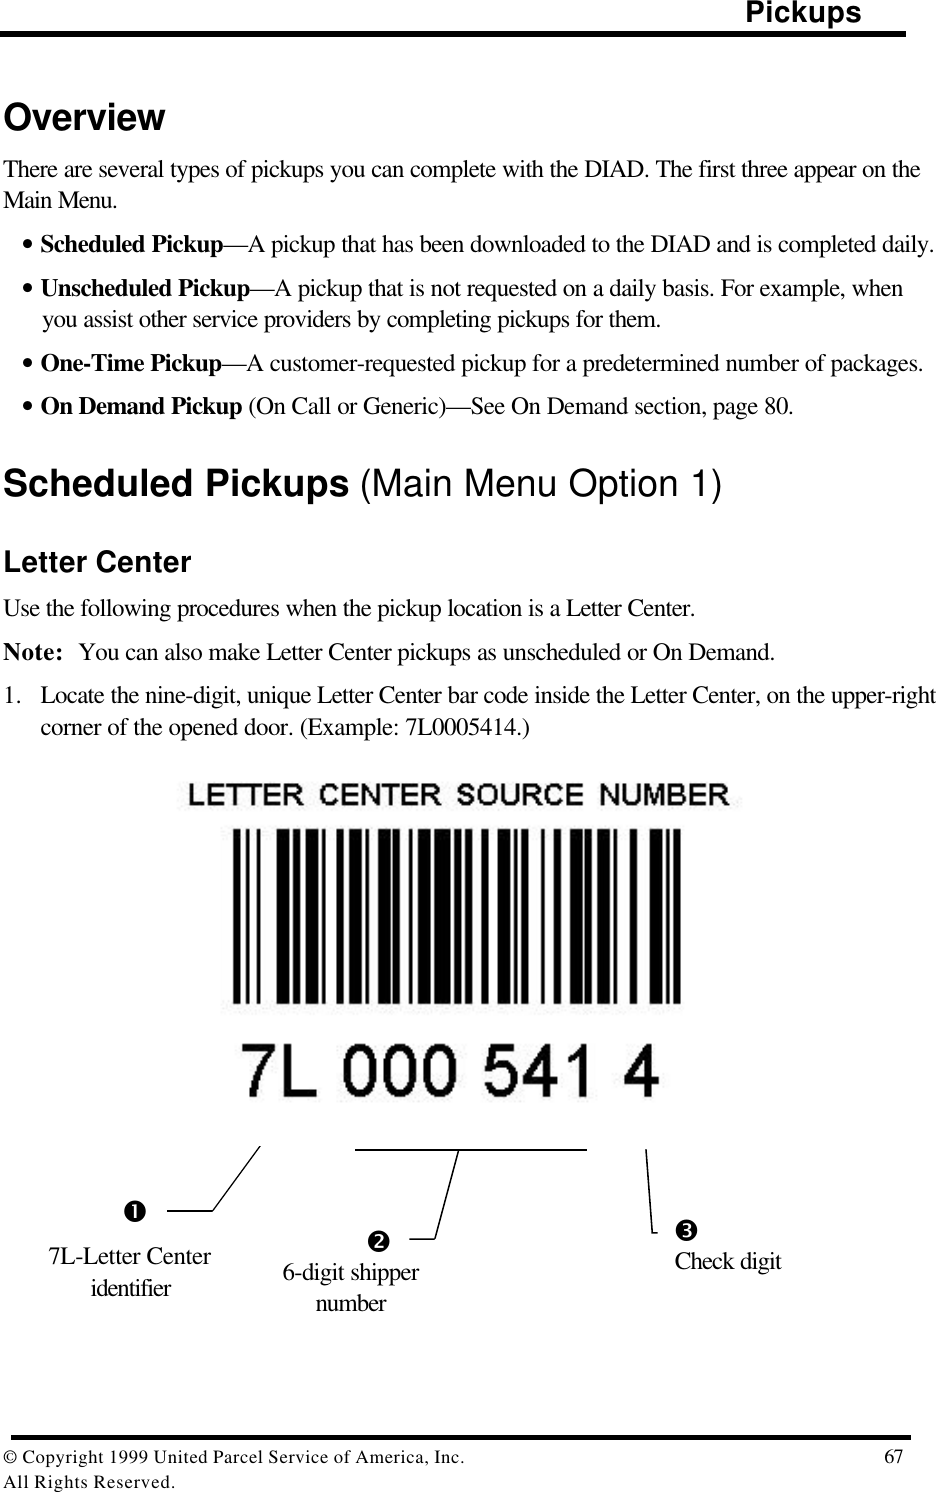
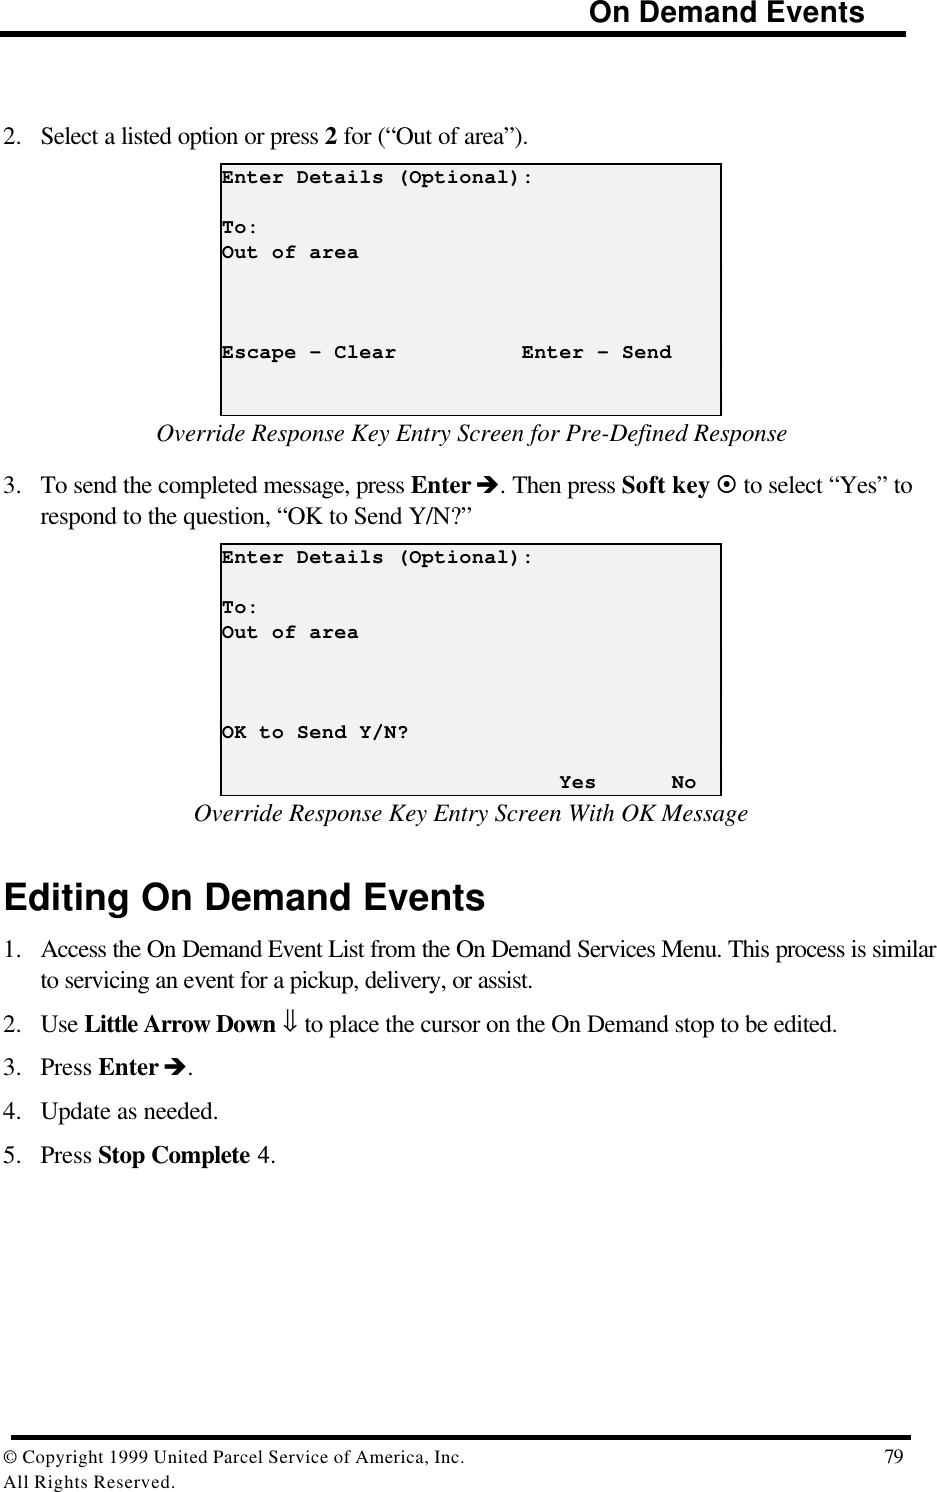
![Statistics Menu© Copyright 1999 United Parcel Service of America, Inc. 19All Rights Reserved.Inside Building (Statistics Card Option 2)This screen contains fields for entry of specific activities performed while inside the center.Inside Building Data Entry ProcedureFrom the Statistics Card Menu, press 2. Inside Building screen is displayed with cursor in firstempty field. Inside Building [08:30] Start Finish CountsSrt&Ld : : DT Unload 0LocSrt : : DT Load 0 WashTrip 1 : : N Recovery 0Trip 2 : : N High Value 0Trip 3 : : N Waybill 0 Yes NoInside Building ScreenInside Building Data Field Definitions• “Srt&Ld” (Sort and Load) – Enter times under “Start” and “Finish” for any packagesorting or vehicle loading activities before departure from the center in the morning.• “LocSrt” (Local Sort) - Enter times under “Start” and “Finish” for any unloading ofvehicles at the end of the working day.• “Trip 1”, “Trip 2”, and “Trip 3” - Enter the time you leave UPS property (under“Start”) and the time you return to UPS property (under “Finish”) for up to three separatetrips during a workday.• “Wash” – Field has a default of no (“N”). Press soft key under “Yes” if you washed thevehicle on the associated trip.• “DT Unload” (Double Trip Unload) - Enter the number of packages unloaded aftereach trip when the same vehicle is to be used for an additional trip.• “DT Load” (Double Trip Load) - Enter the number of packages loaded for anadditional trip after returning from a previous trip.• “Recovery” - Enter the number of packages unloaded at a recovery point, that are notclerk packages or send again packages.• “High Value” - Enter the number of packages that require additional processing duringthe End-of-Day routine.• “Waybill” - Enter the number of international shipments picked up.](https://usermanual.wiki/Motorola-Solutions/89FT7002.Exhibit-8-Instruction-Manual/User-Guide-260550-Page-23.png)
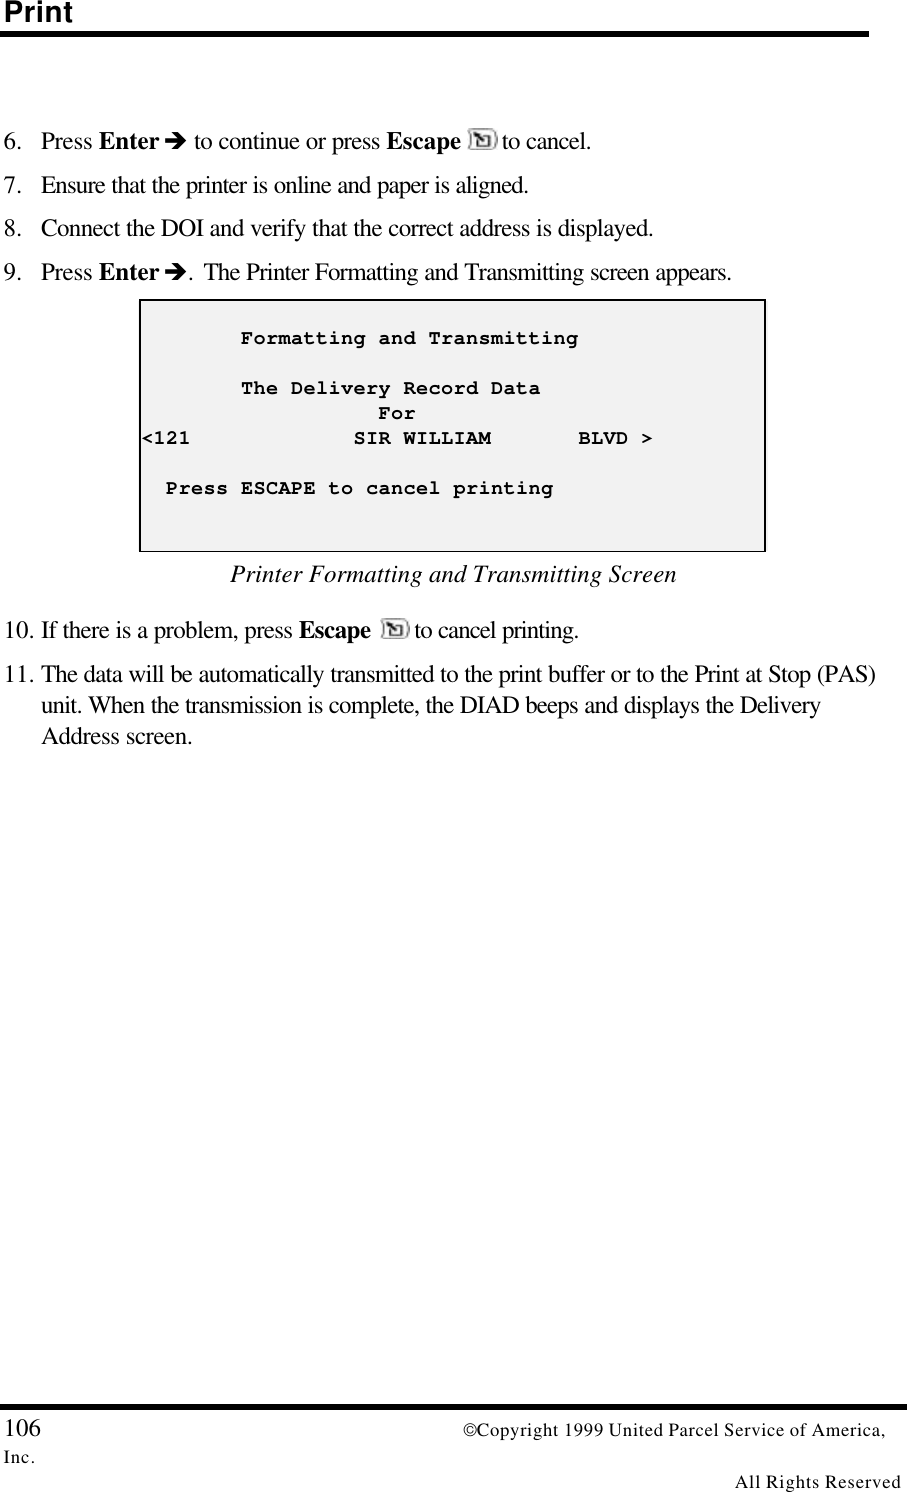
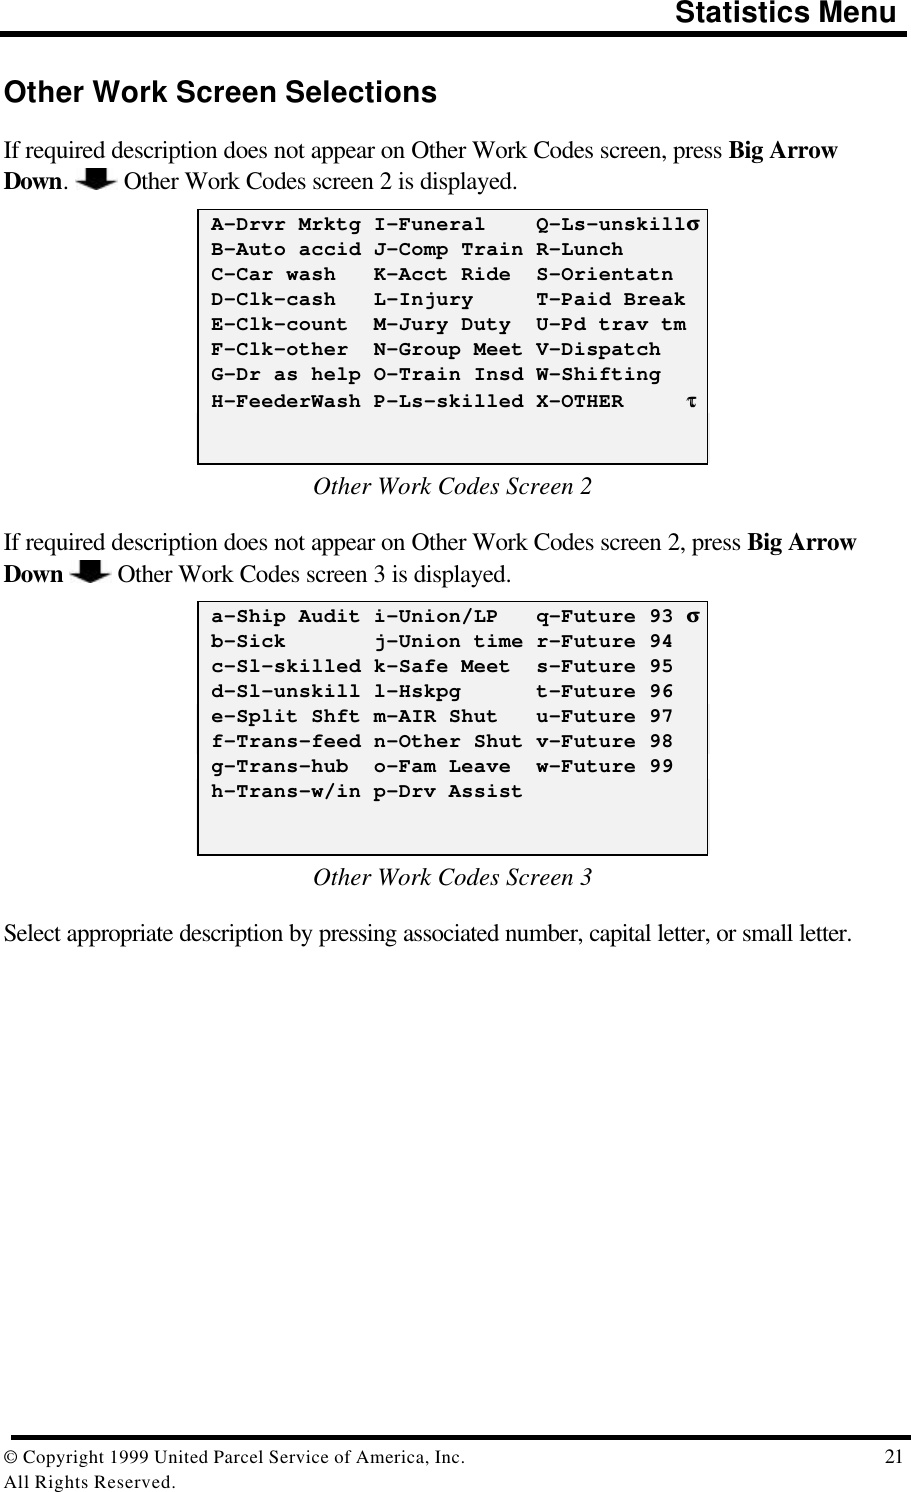
![Statistics Menu20 Copyright 1999 United Parcel Service of America,Inc.All Rights ReservedOther Work (Statistics Card Option 3)This screen is used to record other tasks performed during a workday.Other Work [ 9:00]Center Grp Description Start Finish 8491 4 Train New 8:30 9:00 : : : :Other Work ScreenOther Work Screen Definitions• Center – Enter the center’s SLIC where the work is performed.• Grp – Enter the number of the supervisory group where the work was performed.• Description – Select the description of the work performed from the menus, or press BigArrow Down for additional selections.• Start and Finish – Enter the start and finish times for each task performed.Note: Highlight cursor moves only to fields that can logically be entered. A “Finish” field, forexample, cannot be entered until a time has been entered in the associated “Start”field. Other Work Codes 1 2 3 Physical Train Area Train Recu 4 5 6 Train Oth Optional Train New 7 8 9 Serv Aware TLA/JRD APP PCM ττOther Work Codes Screen](https://usermanual.wiki/Motorola-Solutions/89FT7002.Exhibit-8-Instruction-Manual/User-Guide-260550-Page-24.png)
![Statistics Menu24 Copyright 1999 United Parcel Service of America,Inc.All Rights ReservedRoad Call (Statistics Card Option 6)This screen is used to record road call information.Road Call Menu [17:30] Start : Finish : Memo Number Mechanic's Init Bkdwn Code (Ctr/Road) R Road CenterRoad Call MenuNote: Highlight cursor moves only to fields that can logically be entered. The “Finish” field, forexample, cannot be entered until a time has been entered in the “Start” field.Key in the appropriate data, or select soft key under “Road” or “Center” to select theBreakdown Code.Road Call Menu Definitions• Start—Time breakdown began.• Finish—Time road call ended.• Memo Number—From the automotive department breakdown memo.• Mechanic’s Init—Mechanic’s initials.• Bkdwn Code C = In center. R = On road.](https://usermanual.wiki/Motorola-Solutions/89FT7002.Exhibit-8-Instruction-Manual/User-Guide-260550-Page-28.png)


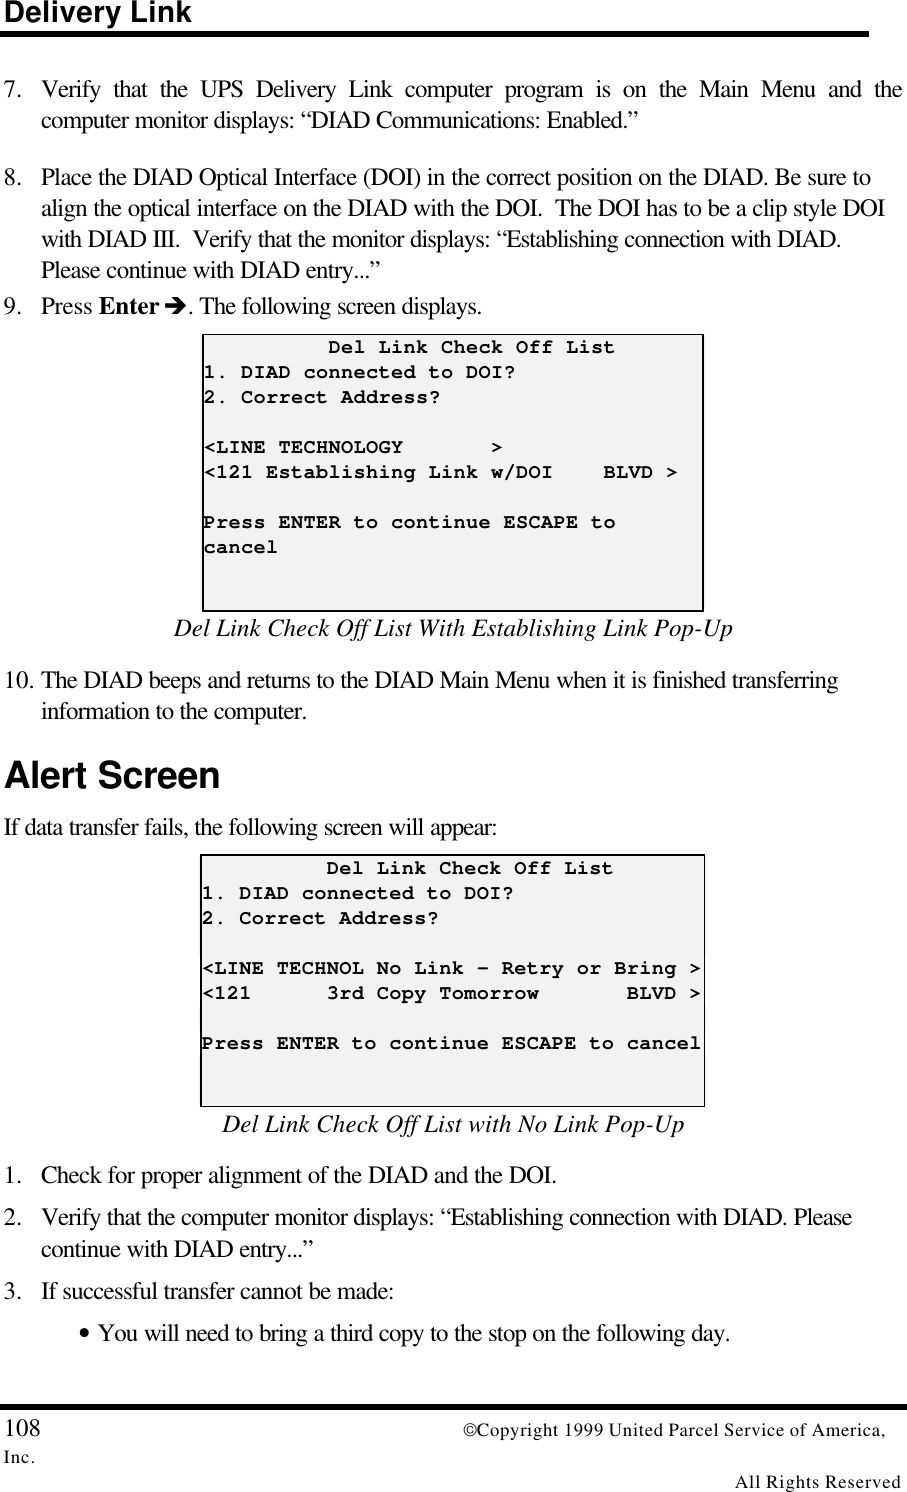
![Delivery38 Copyright 1999 United Parcel Service of America, Inc.All Rights ReservedSignature ScreenThis is where you obtain the customer’s signature on the DIAD.1. Press Signature − to display signature screen, and press Enter è to verify number ofpackages and stops.2. Present the DIAD with the top of the unit toward the customer. It does not need to be reversed.Signature screen image will be reversed so that it appears correctly for the customer.Note: Customer must sign directly on display within the boxed area. Signature appears directlybeneath tip of stylus.3. Press Signature − again. Signature screen (with signature) will be reversed so that it appearscorrectly to you. Key enter receiver’s last name in the Clarification field. Press Enter è again.121 SIR WILLIAM 502Stops: [ 1] Pkgs: [ 1] R.LeungClarification: [ MR LEUNG ] OvrrideSignature ScreenHint: The key sequence is Signature − - Enter è - Signature − - Enter è.](https://usermanual.wiki/Motorola-Solutions/89FT7002.Exhibit-8-Instruction-Manual/User-Guide-260550-Page-42.png)
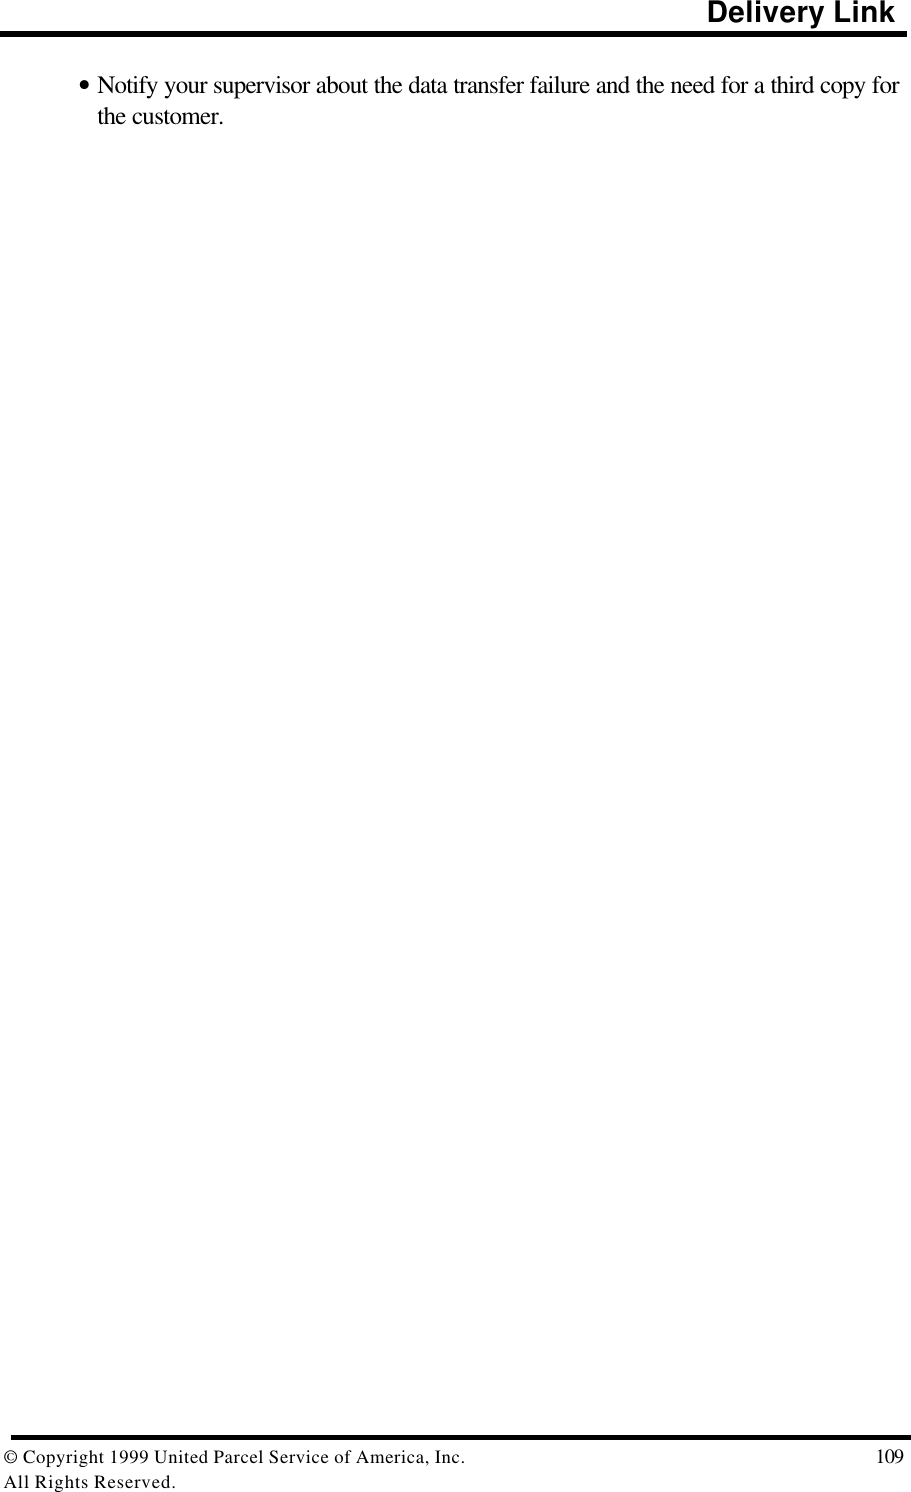
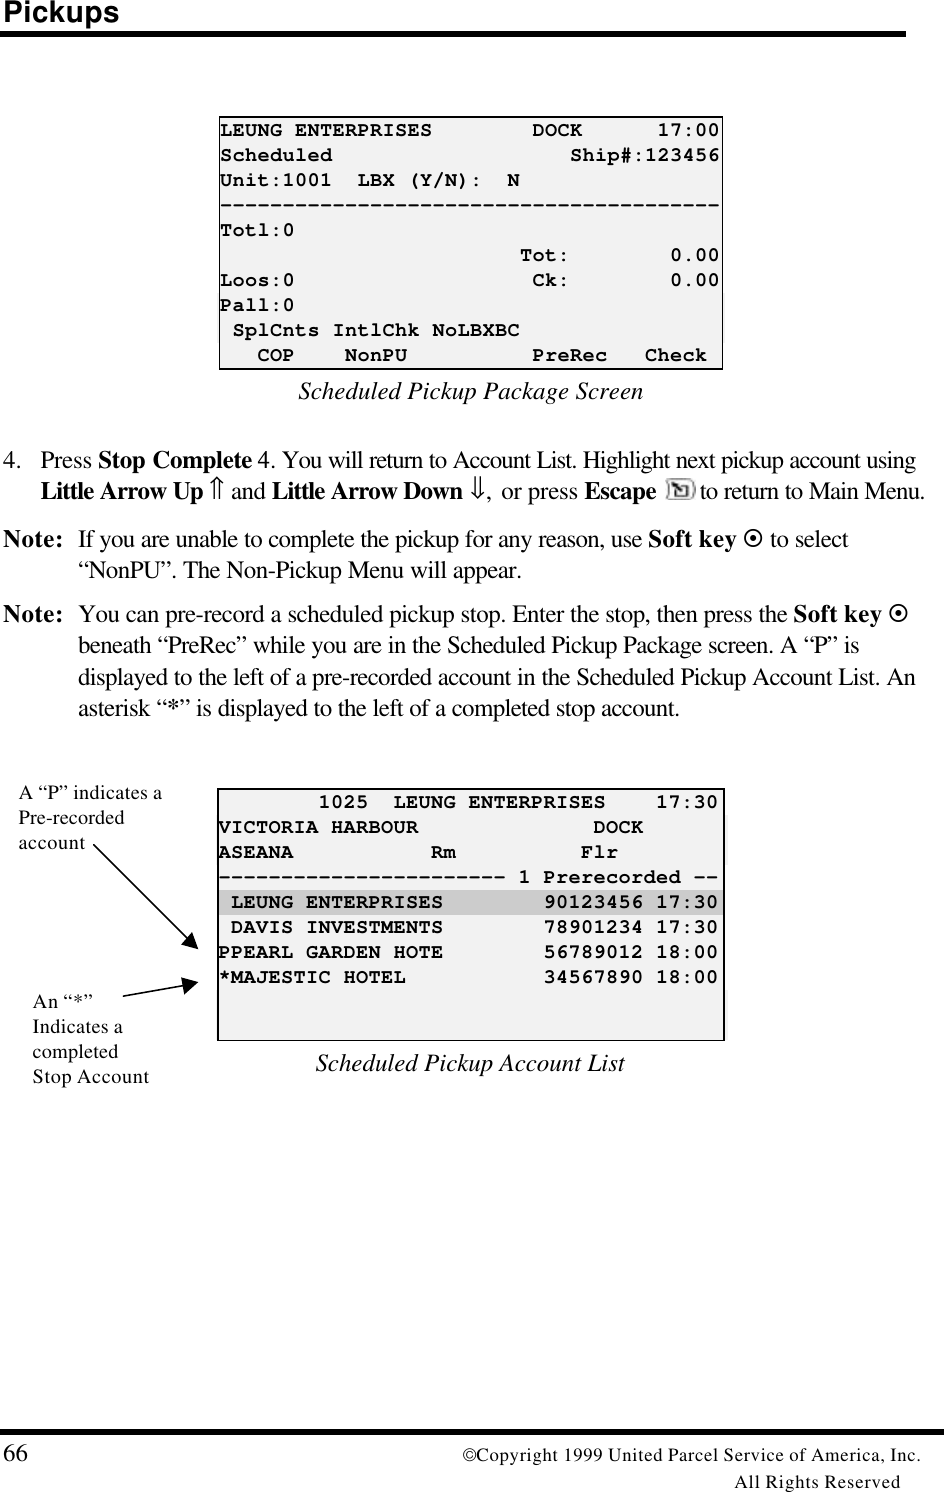
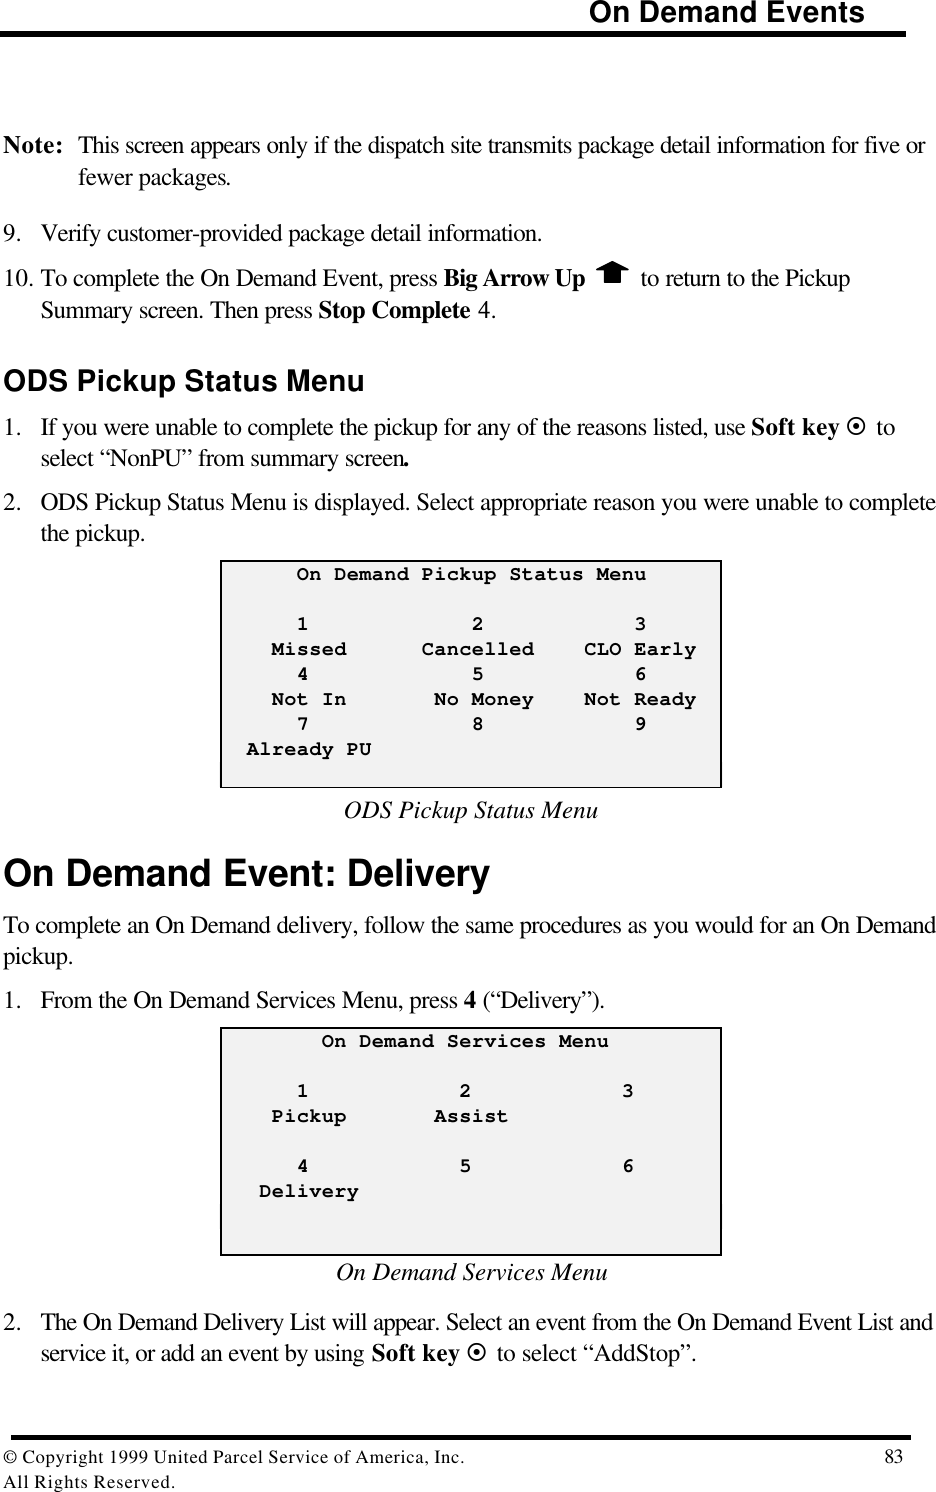
![Pickups© Copyright 1999 United Parcel Service of America, Inc. 65All Rights Reserved.QUICK REFERENCE - PICKUPSTypical ScheduledPickup Stop(Non-Letter Center)Scheduled pickups have been downloaded to the DIAD and must be picked up daily.1. Press 1 (“Scheduled”) from the Main Menu. DIAD Main Menu V21.32_D3 [12:14] 1 2 3 Scheduled Unscheduled OneTime 4 5 6 Delivery Statistics Comm 7 8 9 Print DelLink ODS SplCnts IntlChk PreCommMain Menu2. The Scheduled Pickup Account List will appear. This list shows each of your regular pickupaccounts in pickup order. Scroll through the Scheduled Pickup Account List using LittleArrows or Big Arrows. (Little Arrows advance one line at a time. Big Arrows advance fourlines at a time.) Highlight the pickup account to be edited and press Enterè. 1025 LEUNG ENTERPRISES 17:30VICTORIA HARBOUR DOCKASEANA Rm Flr----------------------- 0 Prerecorded -- LEUNG ENTERPRISES 90123456 17:30 DAVIS INVESTMENTS 78901234 17:30 PEARL GARDEN HOTE 56789012 18:00 MAJESTIC HOTEL 34567890 18:00Scheduled Pickup Account List3. The Scheduled Pickup Package screen will appear. Key enter number of packages beingpicked up and record any money collected at pickup (C.O.P.).](https://usermanual.wiki/Motorola-Solutions/89FT7002.Exhibit-8-Instruction-Manual/User-Guide-260550-Page-69.png)

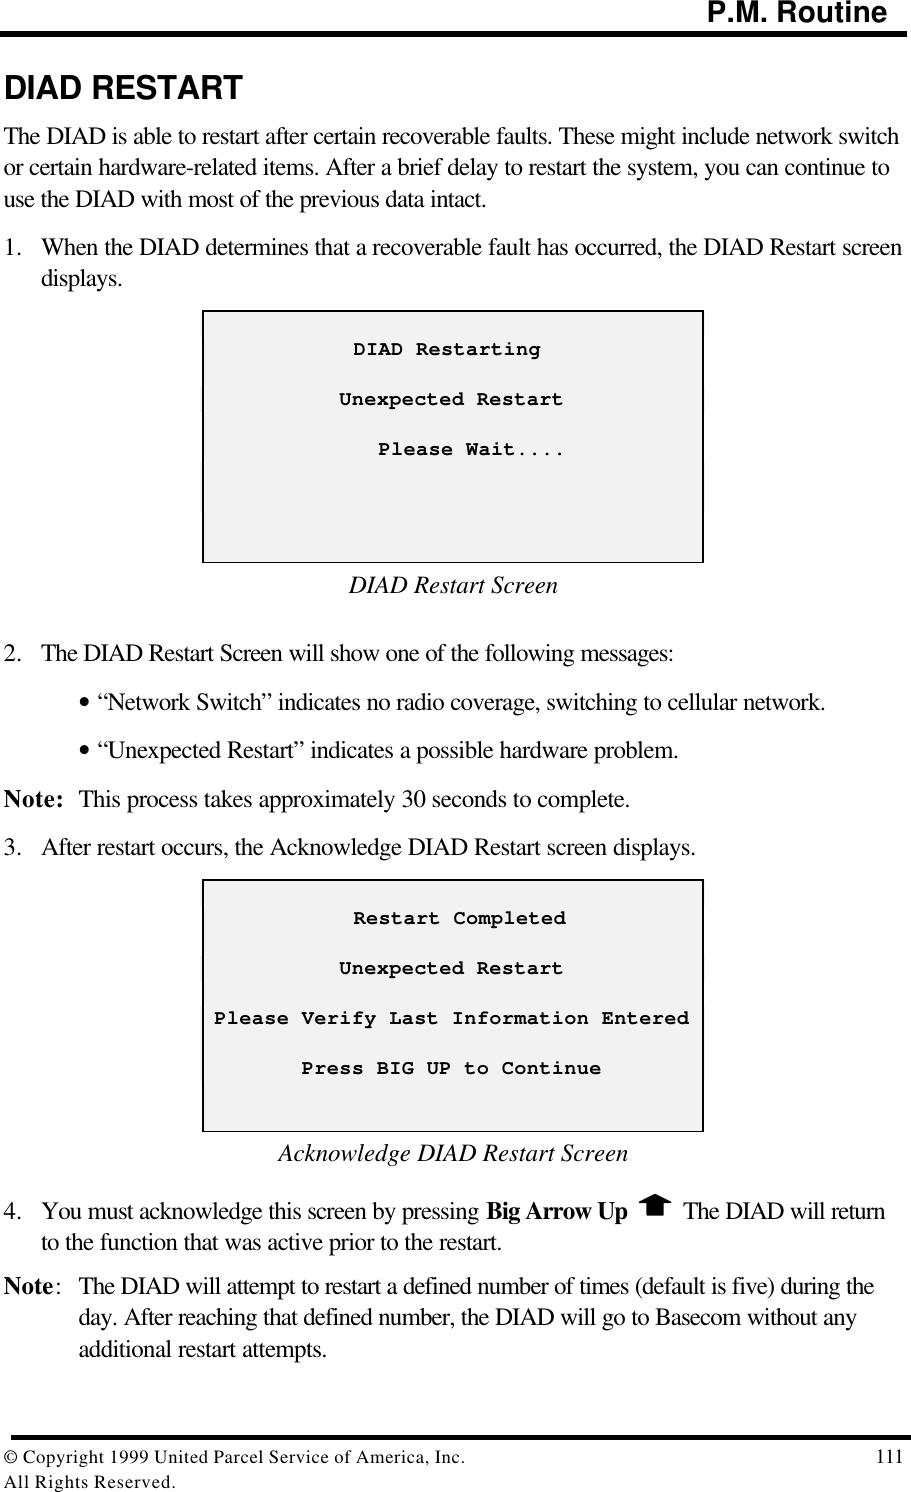
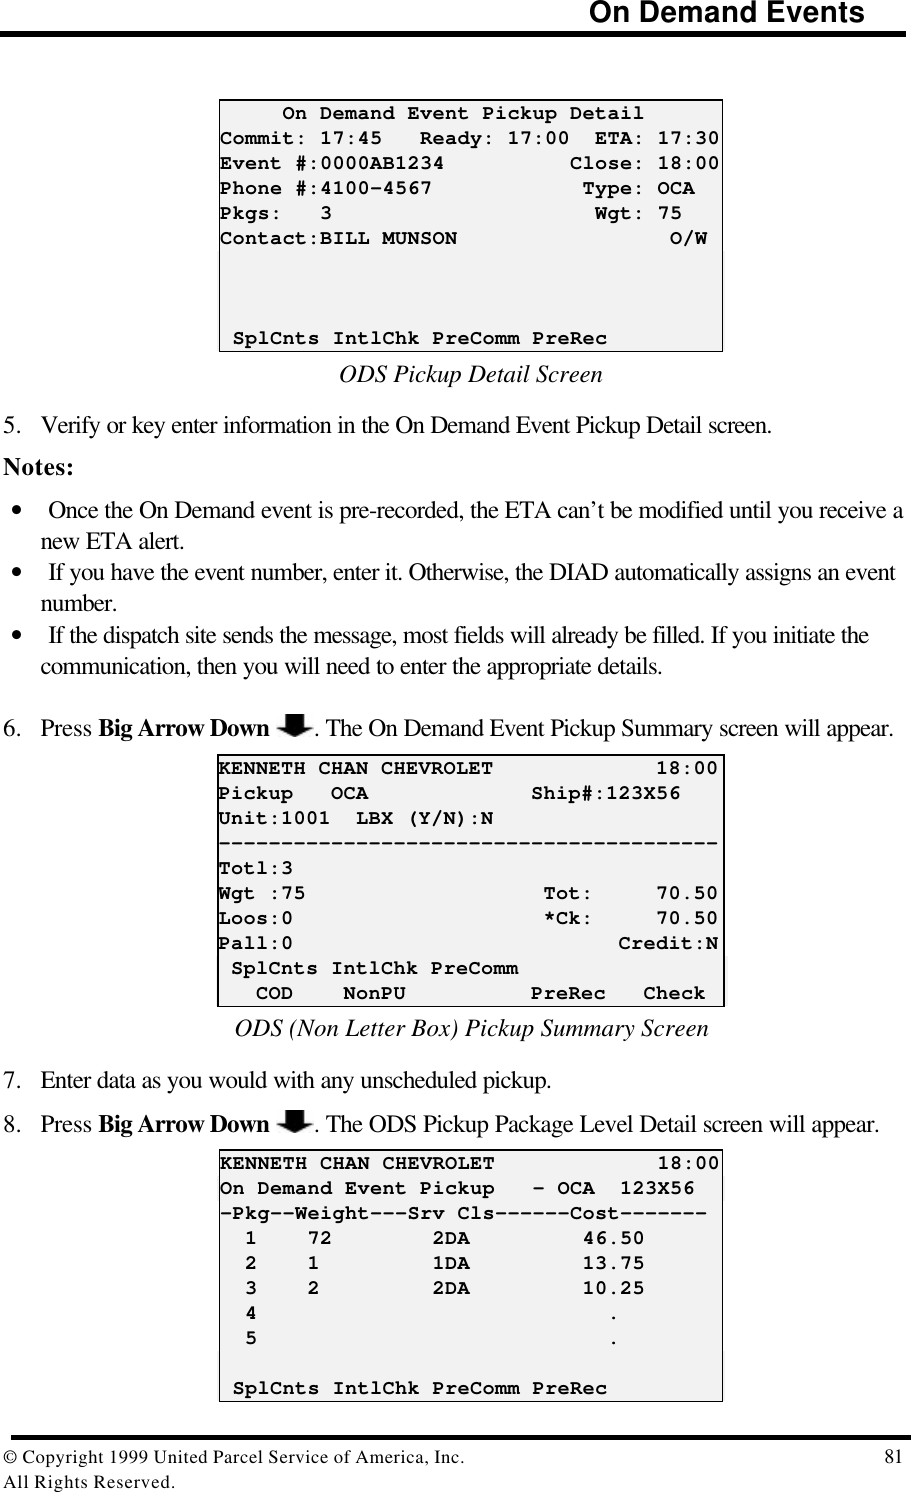
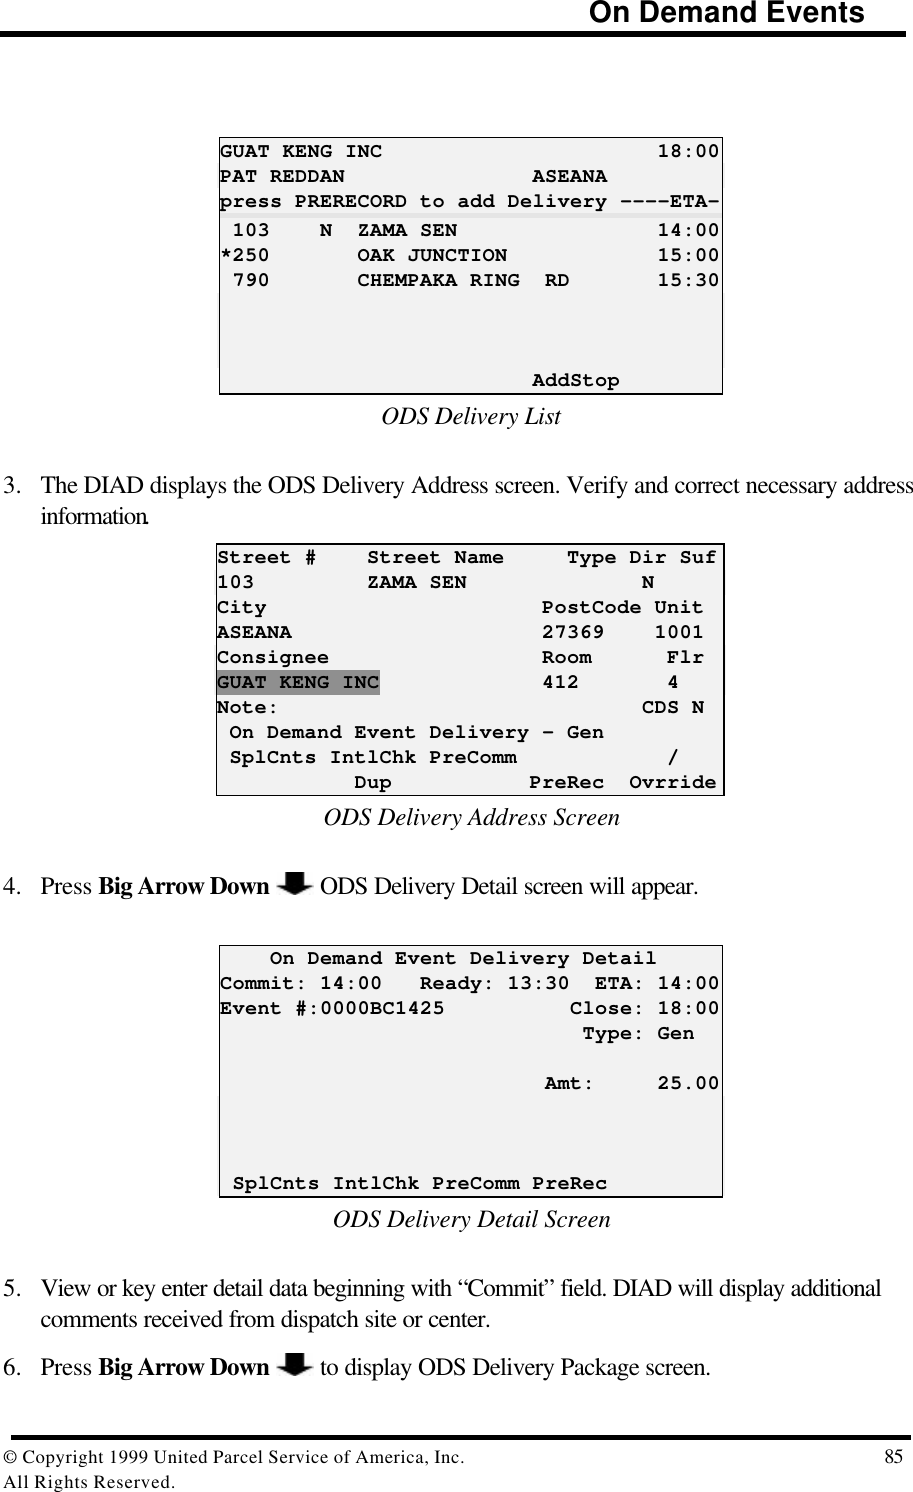
![On Demand Events80 Copyright 1999 United Parcel Service of America, Inc.All Rights ReservedOn Demand Event: Pickup1. Press 9 (“ODS”) on the Main Menu. DIAD Main Menu V21.32_D3 [12:14] 1 2 3 Scheduled Unscheduled OneTime 4 5 6 Delivery Statistics Comm 7 8 9 Print DelLink ODS SplCnts IntlChk PreCommMain Menu2. Press 1 (“Pickup”) from the On Demand Services Menu. On Demand Services Menu 1 2 3 Pickup Assist 4 5 6 DeliveryOn Demand Services Menu3. The On Demand Pickup List will appear. Select an event from the On Demand Event List andservice it, or add an event by using Soft key ¤ to select “AddStop”.Note: When adding an event, the Delivery Address screen will appear prior to the ODS PickupDetail screen.KENNETH CHAN CHEVROLET 18:00BILL MUNSON ASEANApress PRERECORD to add Pickup ----ETA- 197 AYUTHAYA LOOP 17:30*246 LONG XUYEN TERR 17:45 493 YAMAGUCHI W 18:00 505 FINNALYSON RD 18:10 AddStopODS Pickup List4. Press Enter è and the ODS Pickup Detail screen will appear.](https://usermanual.wiki/Motorola-Solutions/89FT7002.Exhibit-8-Instruction-Manual/User-Guide-260550-Page-84.png)

![Phone ODS92 Copyright 1999 United Parcel Service of America,Inc.All Rights ReservedPHONE ODS (Communications Menu Option 6)The Exceeded Maximum Retries Alert screen tells you that you need to use the telephone toverbally communicate your messages.1. To perform this function, return to the Main Menu. DIAD Main Menu V21.32_D3 [12:14] 1 2 3 Scheduled Unscheduled OneTime 4 5 6 Delivery Statistics Comm 7 8 9 Print DelLink ODS SplCnts IntlChk PreCommMain Menu2. Select 6 (“Comm”). The Communications Menu will display. Communications Menu 1 2 3 Phone DVA Send Send Txt Msg 4 5 6 Phone ODS Rad On Rad OffCommunications MenuNote: When the radio has been disabled, a prompt to enable the radio transmitter appearsevery 10 minutes. Press the soft key beneath “Yes” to enable the radio or beneath “No” tocontinue the disable function.](https://usermanual.wiki/Motorola-Solutions/89FT7002.Exhibit-8-Instruction-Manual/User-Guide-260550-Page-96.png)

![Phone ODS94 Copyright 1999 United Parcel Service of America,Inc.All Rights ReservedODS AlertsOn Demand Events Not Complete AlertThe following screen warns you that you still need to complete pre-recorded On Demandevents before stopping the DIAD. [18:30] On Demand Events Are Not Complete! Delivery – COMPLETE Pickup - COMPLETE Assist - NOT COMPLETE Press Any Key to ContinueOn Demand Events Not Completed Warning ScreenMessages Pending Communication AlertIf you attempt to stop the DIAD while On Demand messages are pending transmission to theODS System, even if all On Demand events are complete, the following screen appears. [18:30] On Demand Messages Are Pending Successful Transmission! Pending Messages Must Be Verbally Communicated! Press Any Key to ContinueOn Demand Events Messages Pending Communication Screen](https://usermanual.wiki/Motorola-Solutions/89FT7002.Exhibit-8-Instruction-Manual/User-Guide-260550-Page-98.png)