Motorola Solutions 89FT7027 Handheld Computer w/ Dual-Band GPRS, WLAN & BT User Manual Enhanced IMD Users
Motorola Solutions, Inc. Handheld Computer w/ Dual-Band GPRS, WLAN & BT Enhanced IMD Users
Contents
- 1. Exhibit 8a Supplemental Users Manual
- 2. Exhibit 8 Users Manual 1
- 3. Exhibit 8 Users Manual 2
Exhibit 8 Users Manual 2
16
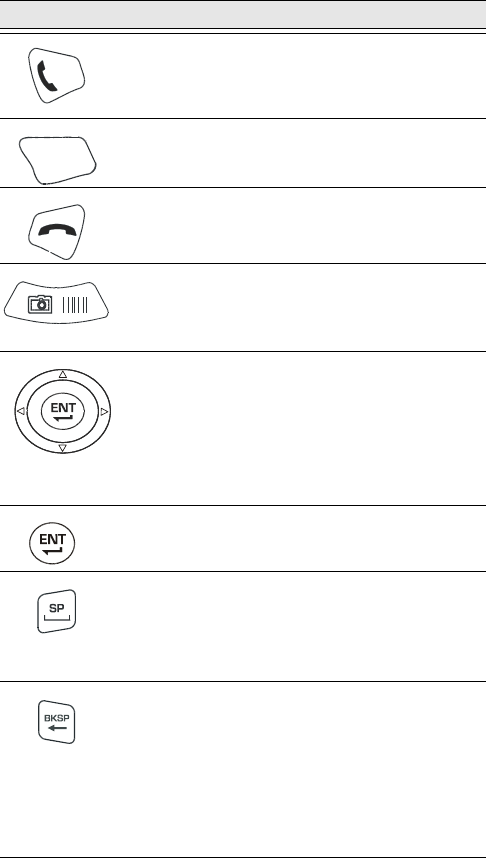
Key assignment
Table 3: HC700-G - Key Assignment
Key Function
Use the <TAB/Send> key to make & answer
phone calls. The key also serves as <TAB> key
when editing text.
Use the <Esc> key to exit from a menu or an
application.
The <End> key turns the phone off and ends a
call.
The Main Scan Button is used for scanning
barcodes (refer to “Scanning Barcodes” on
page 23).
The 4 Way Navigation key is used for screen
navigation. The <Up bump> and <Down bump>
keys are used to scroll up and down. The <Right
bump> and <Left bump> are used for horizontal
navigation between action buttons and entry
fields.
The <ENT> key is used to continue to the next
field/screen (i.e., continue processing).
The <SP> key enables entering blank space(s)
within a text field. The <SP> key is active only
on those text entry screens which contain fields
that allow spaces to be entered.
The <BKSP> key moves the cursor to the previ-
ous character in the field, and while doing so,
erases the character. Any remaining characters
to the right of the cursor are shifted to the left. If
there are no more characters to erase, the unit
beeps. The <BKSP> key is only active on data
entry screens.
TAB
ESC
Enhanced IMD Users.book Page 16 Monday, February 12, 2007 11:46 AM
17
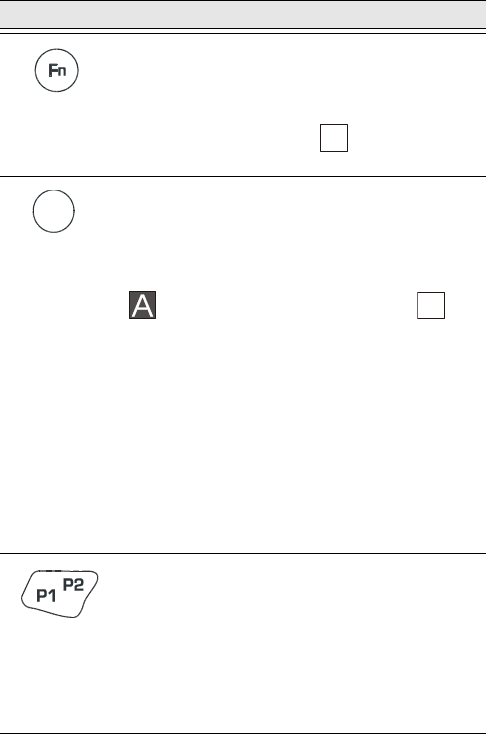
On-screen keypad
To display the on-screen keypad - hold down the <SHIFT> and
<SP> keys and toggle the Scan button to display or remove
the virtual keyboard.
The Function <Fn> key changes the alphabetic
keypad to preset function keys. For example, the
<A> key in <Fn> mode becomes <F1>. Pressing
the <Fn> key produces the function icon on
the lower Taskbar.
When pressed once, the orange <SHIFT> key
toggles between alphabetic and numeric keypad
modes, shifting between letter entry and digit
entry. Pressing the <SHIFT> key produces the
alphabetic mode or numeric mode
icon on the lower Taskbar.
For example, pressing the <SHIFT> key and then
the <P> key displays the digit “8”. Pressing the
<SHIFT> again and then the <P> key displays the
letter “P”.
Hold down the <SHIFT> key and press on any
alphabet key for uppercase letter (default mode
is lowercase letters).
The <SHIFT> is also used for screen and keypad
illumination (see page 17).
The Application <P1/P2> key functionality is set
by the software application running on the
HC700-G. Use the <SHIFT> key to toggle
between P1 and P2. To learn more about these
keys, consult the software application guide.
To set the Application key functionality, go to:
Start Menu -> Settings -> Personal -> Buttons.
Table 3: HC700-G - Key Assignment
Key Function
F
N
Enhanced IMD Users.book Page 17 Monday, February 12, 2007 11:46 AM

18
Keypad Backlight
Turning backlight on/off
Hold down the <SHIFT> key for four seconds - the keypad
backlight will turn on.
To turn off - hold down the <SHIFT> key for another two sec-
onds.
When not in use, the backlight turns off automatically. To
configure the keypad illumination duration, go to: Start Menu
-> Settings -> System -> Backlight.
Backlight adjustment
The keypad backlight can be adjusted by holding down the
<SHIFT> key and pressing the right or left arrows to
increase or decrease the keypad backlight.
Screen Backlight
Turning backlight on/off
Hold down the <SHIFT> for two seconds - the screen back-
light will turn on. To turn off - hold down for another two sec-
onds.
When not in use, the backlight turns off automatically. To
configure the screen illumination duration, go to:
Start Menu -> Settings -> System -> Backlight.
Backlight adjustment
The screen backlight can be adjusted by holding down the
<SHIFT> key and pressing the up or down arrows to
increase or decrease the screen backlight.
Calibrating the Touch Screen
To calibrate the touch screen - hold down the <SHIFT> and
<SP> and <C> keys and follow the calibrate application
instructions to complete your touch screen calibration.
Enhanced IMD Users.book Page 18 Monday, February 12, 2007 11:46 AM
19
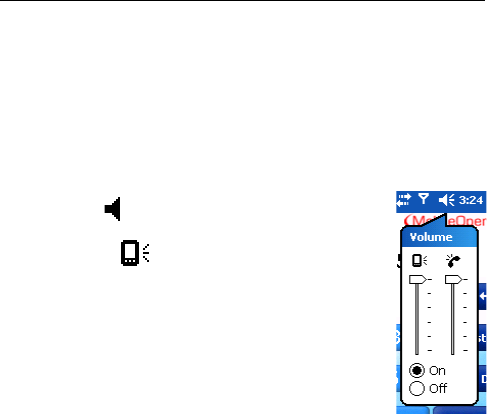
Adjusting Earpiece/Speaker Volume
You can adjust the Earpiece/Speaker volume for sounds, such
as the sound you hear when you make a phone call, replay
audio, scan barcodes or when you tap on the screen.
Important: Phone calls are routed only through the earpiece.
Earpiece/Speaker volume can be adjusted by one of the fol-
lowing methods:
1. Using the Earpiece/Speaker Volume keys (see Figure 1):
•Press the up and down keys to increase or decrease
volume during a call or when playing sound.
2. Using your stylus:
•Tap .
•Under , move the volume slider to
the desired volume level.
•Select On or Off to quickly enable/dis-
able volume.
3. Using the keypad:
•Hold down the <SHIFT> and <SP> keys
•Press the up and down arrows on the 4-Way Naviga-
tion key.
The volume may also be adjusted in Function mode as fol-
lows:
•Hold down the <Fn> key
•Use the <F6> key to increase or <F7> key to decrease
volume.
Voice Recording
To record sound, press the Voice Recording button - the
Notes application will run, enabling you to record and play
sounds.
To assign different functionality to this button, go to: Start
Menu -> Settings -> Personal -> Buttons.
Enhanced IMD Users.book Page 19 Monday, February 12, 2007 11:46 AM
20
Resetting the HC700-G
You may need to reset the HC700-G; for example, you may
need to reset due to communication cut-off, or if the operat-
ing system or the application stops responding.
If the HC700-G stops responding, perform the steps described
on the following page.
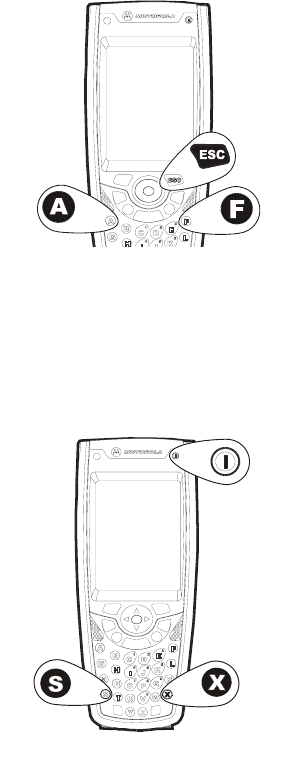
Step 1: Warm
Reset
Important Note: When
the HC700-G performs
Warm Reset, all
recorded information
remains stored in mem-
ory.
Hold down the <ESC>
and <A> and <F> keys
(see Figure 8) for at least
5 seconds - the Motorola logo will show on the screen for
about 30 seconds and then Windows Mobile desktop or
application screen will appear - the HC700-G functions again.
Warm Reset can also be performed in the following way: go
to: Start Menu -> TaskManager and tap on “Soft Reset”.
If the HC700-G still does
not respond, perform
“Step 2: Cold Reset”:
Step 2: Cold Reset
Cold Reset restarts the
HC700-G by erasing all
stored records and
entries.
Do Not perform Cold
Reset unless Warm
Reset fails to solve the
problem.
Figure 8. Warm Reset - Key Combination
Figure 9. Cold Reset - Key Combination
Enhanced IMD Users.book Page 20 Monday, February 12, 2007 11:46 AM
21
Hold down the Power Button and <S> and <X> keys for at
least 5 seconds (see Figure 9); the HC700-G will restart its
operating system. Cold Reset can also be performed in the
following way: go to: Start Menu -> TaskManager and tap on
“Cold Reset”.
Enhanced IMD Users.book Page 21 Monday, February 12, 2007 11:46 AM
22
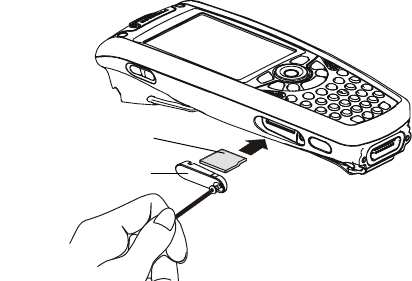
miniSD Memory Card
Installing a miniSD Card
Important: Turn off the HC700-G before removing or install-
ing the miniSD (Secure Digital) card.
1. Use Torx T-8 tool to remove the screw that secures the
access door of the miniSD card compartment (see Figure
10).
2. Insert the miniSD card as shown in the figure. Verify that
the card is fully inserted before closing the access door.
3. Close the miniSD card cover and secure the screw.
4. Tap -> Programs -> File Explorer - and verify that the
SDCard folder is shown on the root directory of the
HC700-G
miniSD Card Handling Precautions
• SanDisk are recommended miniSD cards
• Do not bend or apply force to the miniSD card
• Do not store the miniSD card in locations subjected to
high humidity or temperatures
Allocating Memory
You can allocate the HC700-G memory by setting the size of
the storage and the programs memory. You can also view the
amount of memory used by running programs or storage
space. To view and allocate the memory of the HC700, go to:
Start -> Settings -> System -> Memory.
Figure 10. miniSD Card Installation
miniSD Card
Access Door
Enhanced IMD Users.book Page 22 Monday, February 12, 2007 11:46 AM
23
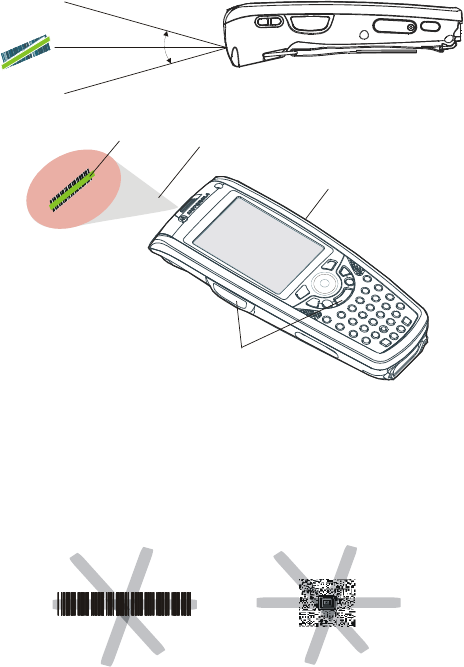
Scanning Barcodes
The HC700-G houses a digital camera (imager) that scans the
most commonly used 1D and 2D barcodes (depend on your
imager options).
The HC700-G and the HCe700-G is manufactured with the
following imager engine options:
• 5100 series with Light Emitting Diodes (LED) aiming
technology
• 5300 series with Laser aiming technology
The capture performs of both imager options are identical
with the exception of having different aiming technology.
Scanning with LED aimer imager
To scan barcode/capture image, perform the following:
1. Run the Bcr barcode reader application: Start Menu ->
Programs -> Sample Applications -> Bcr.
2. Aim and hold the HC700-G at about 7 inches from the
target.
3. Press one of the Scan/Picture keys and adjust your posi-
tion to place the emitted green bar at the target. The red
light, emitted form the imager, serves as an ambient illu-
mination.
Note: When adjusting your position, you may rotate the
wrist left or wright and pitch by dropping or lifting the
wrist. Move back or forth from the target to capture the
entire object. A successful scan is followed by a beeping
sound.
Enhanced IMD Users.book Page 23 Monday, February 12, 2007 11:46 AM
24
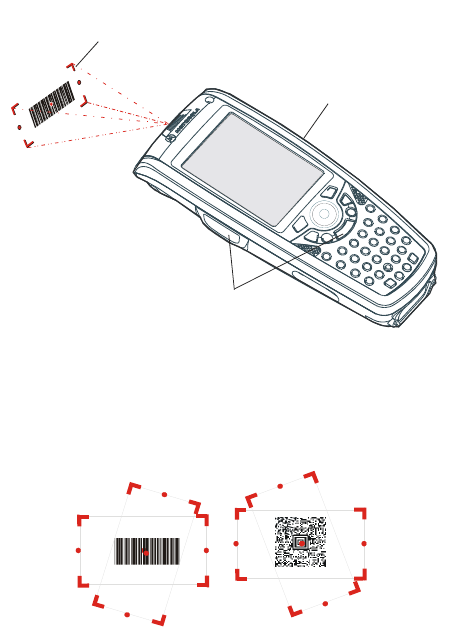
The HC700-G supports 360° omni-directional capture for easy
use in daily work. The green aiming bar can be positioned at
any angle across the barcode symbol(see Figure 12).
Scanning with Laser aimer imager
To scan a barcode or capture an image, perform the follow-
ing:
1. Run the Bcr barcode reader application: Start Menu ->
Programs -> Sample Applications -> Bcr.
2. Aim and hold the HC700-G at about 7 inches from the
target.
Press one of the Scan/Picture keys and adjust your position to
place the emitted red pattern at the target.
Red Ambient Light
Aim the green light
bar at the barcode
Scan/Picture Keys
About 7 inches from barcode
± 40 degrees
Scan/Picture Key
Figure 11. Capturing Barcodes with LED Aimer Imager
Figure 12. LED Aimer Imager - Barcode Capture Positions
2D Barcode Symbol
1D Barcode Symbol
Enhanced IMD Users.book Page 24 Monday, February 12, 2007 11:46 AM
25
Note: When adjusting your position, you may rotate the
wrist left or wright and pitch by dropping or lifting the wrist.
Move back or forth from the target to capture the entire
object. A successful scan is followed by a beeping sound
The HC700-G supports 360° omni-directional capture for easy
use in daily work. The aiming pattern can be positioned at
any angle across the barcode symbol (see Figure 14).
Aim the Laser pattern at the barcode
Scan/Picture Keys
Scan/Picture Key
Figure 13. Capturing Barcodes with the HC700-G Imager
Figure 14. Laser Aimer Imager - Barcode Capture Positions
Enhanced IMD Users.book Page 25 Monday, February 12, 2007 11:46 AM
26
Using the Phone
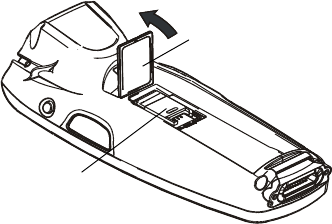
SIM Card Installation
Before using the HC700-G as a phone, make sure that your
phone is equipped with a SIM (Subscriber Identity Module)
card. SIM card is a small smart card that fits inside the
HC700-G. The SIM card holds the personalized information
about its user including the network activation and even
phone book entries.
To install or replace a SIM card, perform the following steps:
1. Turn off the HC700-G.
2. Remove the battery
3. Open the SIM card door.
4. Slide the SIM card holder forward to unlock the SIM
card.
5. Slide the new SIM card in the holder with the cut corner
on the upper right and the gold plate facing down.
6. Lower the SIM card holder and press downward to lock
the SIM card holder.
7. Close the SIM card door.
8. Install the battery.
9. Perform Cold Reset “Resetting the HC700-G” on
page 20.
Figure 15. SIM Card Installation
SIM Card Door
SIM Card Holder
Enhanced IMD Users.book Page 26 Monday, February 12, 2007 11:46 AM
27
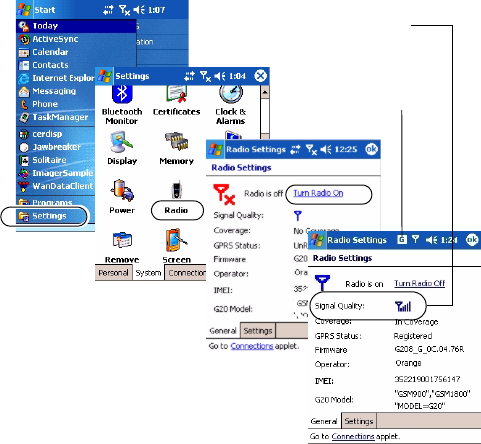
Switching on the phone
Before making a call, you should verify that the phone radio is
turned on. To turn on the phone perform the following:
1. Tap Start Menu -> Settings -> System -> Radio -> Turn
Radio On.
2. Wait until the radio demonstrates a signal quality and
register to your GPRS network
Starting the Phone Application
The Phone application can be started by one of the following
methods:
1. Pressing the <TAB> key.
Important: the <TAB> key starts the Phone application
only in Alphabetic keypad mode (use the <SHIFT> to tog-
gle Alphabetic/Numeric keypad). Once the Phone appli-
cation appears on the screen, press the <SHIFT> key to
enable the hardware keypad of the phone.
2. Tapping Start Menu -> Phone.
Quality signal
GPRS network
registration icon
Enhanced IMD Users.book Page 27 Monday, February 12, 2007 11:46 AM
28
Make a Call
There are few ways to make a call. The most direct method is
to use the on-screen Phone keypad or the HC700-G keypad.
From the Phone keypad, tap the number you want to call, and
press TALK or press the <TAB> key. To end a call, press END
or press the <End> key.
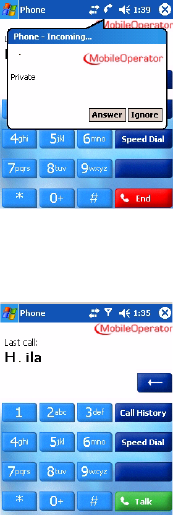
Answer a Call
1. Tap Answer.
When receiving a call, you can
ignore it. If you choose to ignore,
tap Ignore. The phone will stop ring-
ing and the caller will be directed to
your voice mail, depending on your
service provider.
Make a call using speed dial
1. From the Start menu, tap
Phone.
2. On the Phone keypad, tap the
Speed Dial button.
3. Tap the speed dial number
next to the contact you want to
call from the list.
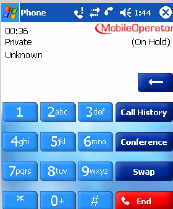
Call Waiting
If you receive a call while in a call,
tap Wait to place the new call in on hold.
Create a Contact from a Call
You can create a contact from Call History.
1. Tap Call History.
2. Tap hold your stylus on the call - a popup menu will
show.
3. Tap Save to Contacts.
Enhanced IMD Users.book Page 28 Monday, February 12, 2007 11:46 AM
29
Make a conference call
You can create a phone session
between yourself and other per-
sons.
1. From the Phone keypad, tap
the first number.
2. Tap Hold.
3. Dial the second number, and
tap Menu -> Conference.
4. To add another person, tap
Hold, dial the number, and tap Conference.
During the conference call, you can talk to one of the persons
privately by tapping Private. To join everyone in the call
again, tap Conference.
Display/hide your caller ID
To display/hide your identity when you are calling someone.
1. From the button bar of the Phone keypad, tap Tools ->
Options -> Services tab.
2. Tap Caller ID -> Get Settings.
3. Tap Everyone to display your ID. To prevent your identity
from being revealed to others, tap No one.
Block incoming/outgoing calls
Use Call Barring to block a type of incoming and/or outgoing
calls.
1. From the Phone keypad, tap Tools -> Options -> Services
tab.
2. Tap Call Barring -> Get Settings.
3. Select the type of incoming and/or outgoing calls you
want to block.
Forward calls to a different phone
Use Call Forwarding to forward all incoming calls to a differ-
ent phone number.
Enhanced IMD Users.book Page 29 Monday, February 12, 2007 11:46 AM
30
Use Call Waiting
Call Waiting notifies incoming calls when you are already in
a call session.
1. From the Phone keypad, tap Tools -> Options -> Services
tab.
2. Tap Call Waiting -> Get Settings.
3. Tap Notify me to be notified or Do not notify me to
ignore notification.
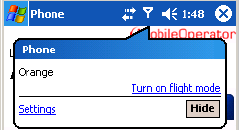
Turn the phone on and off (flight mode)
You can turn off the phone on/off while using your HC700
turned on. Your phone is turned off when it is in flight mode.
1. While using any program on your device, tap the aerial
icon on the upper tool bar.
2. Tap Turn off flight mode to turn the phone on or Turn on
flight mode to turn the phone off.
Place a call on hold
During a call, you can place a call on hold so you can call
another number or answer an incoming call. If you have more
than one call on the line, you can switch between one call
and the other.
1. To place a call on hold, tap Hold.
2. To move from one call to another, tap Swap.
Speed Dial
Create a speed dial entry
You can create speed dials for frequently-called phone num-
bers so you can dial a number with a single tap. Speed dials
can only be created for numbers stored in Contacts.
1. Tap Phone -> Speed Dial.
Enhanced IMD Users.book Page 30 Monday, February 12, 2007 11:46 AM

31
2. Tap Menu -> New.
3. Tap a contact.
4. Tap the phone number for which you want to create a
speed dial.
5. In the Location box, select an available location for the
new speed dial.
Note: The first speed dial location is reserved for your voice
mail.
To create a speed dial from Contacts, tap and hold the con-
tact name, tap Add to Speed Dial, and then select an avail-
able location for the new speed dial.
Change phone settings
You can customize phone settings, such as the ring type and
ring tone to be used for incoming calls, and the keypad tone
to be used when entering phone numbers.
1. Tap Settings -> Phone.
2. To change phone settings from the Phone keypad, tap
Menu -> Options -> Phone tab.
3. From the Phone keypad, tap Menu -> Options -> Services
tab.
4. Tap Voice Mail and Text Messages, and tap Get Set-
tings.
5. Enter the voice mail or text message phone number in
the appropriate box.
Change the ringer volume
As you move between loud and quiet surroundings through-
out your day, you may want to change the ringer volume to
suit your situation.
1. Tap the volume icon on the upper Taskbar.
2. Move the Phone slider to the desired volume level.
Enhanced IMD Users.book Page 31 Monday, February 12, 2007 11:46 AM
32
Change the ring type
You can change the way that you
are notified of incoming calls. For
example, you can choose to be
notified by using an increasing
ring or single ring tone.
1. From the Phone keypad, tap
Tools -> Options -> Phone
tab.
2. In the Ring type list, tap the
desired option.
Change the ring tone
You can select a ring tone to notify you of incoming calls.
From the Phone keypad, tap Tools -> Options -> Phone tab.
In the Ring tone list, tap the sound you want to use.
To use custom sound files as ring tones, use ActiveSync on
your PC to copy the file to the Mobile Device/My pocket PC/
Windows/Rings folder on your device. Then, select the sound
from the Ring tone list. For more information on copying files
to your device, see ActiveSync Help on your PC.
Change services settings
1. From the Start menu tap Settings.
2. Tap Phone -> Services tab.
You can access and configure settings for the phone services
you subscribed to through your wireless service provider. For
example, you may want to block certain types of incoming
and/or outgoing calls, forward incoming calls to a different
phone number based on your situation, be notified of incom-
ing calls when you're already in a call, or let others know your
identity when making calls.
Tip: To change Services settings from the Phone keypad, tap
Menu -> Options -> Services tab, tap a service, and then tap
Get Settings.
Enhanced IMD Users.book Page 32 Monday, February 12, 2007 11:46 AM
33
Internet connection using GPRS network
Internet access and surfing is available through the HC700-G
GPRS mobile phone network.
1. Tap Start Menu -> Settings -> Connections tab -> Con-
nections -> Network Cards
2. Select The Internet for Internet connection and Press OK.
To edit a connection:
Before you start, obtain the following information from your
Internet Service Provider (ISP) administrator: connection
phone number, User Name, Password and Domain.
1. Tap Start Menu -> Settings -> Connections tab -> Con-
nections
2. In My ISP, tap Add a new modem connection
3. Enter a name for the connection (for example: My Link)
4. Select a mode: Cellular Line (GPRS) and tap Next
5. Enter the phone number provided by your ISP and tap
Next
6. Enter User Name, Password and Domain provided by
your ISP and tap Finish
7. Switch to Internet Explorer Mobile and surf the Internet.
Your HC700 will connect automatically.
To view Help information for any screen in the wizard or
while changing settings, tap the question mark icon.
Enhanced IMD Users.book Page 33 Monday, February 12, 2007 11:46 AM
34
Bluetooth Connection
Turning on/off
Ensure that both Bluetooth devices are within 10 meters of
each other and that both Bluetooth-enabled devices are dis-
coverable. Note that in Flight Mode Bluetooth is turned off.
1. Tap Start Menu -> Settings -> System tab.
2. Tap Bluetooth Enable/Disable icon (note that the default
state of the Bluetooth radio is turned on).
3. Press the OK button to turn on the Bluetooth radio
Create a Bluetooth link (partnership)
You can create a link between your HC700-G and another
remote device. The link enables to transmit information
between the two devices. Ensure that the two devices are
turned on, discoverable, and within 10 meters.
1. Tap Start Menu -> Settings -> System tab.
2. Tap the Bluetooth Monitor icon.
3. Tap Device -> Find Devices. Your device searches for
other remote devices, and displays them on the screen.
4. Tap Device -> Trust this Device.
5. Passkey is used to secure your HC700-G. You can use a
passkey by entering a alphanumeric passkey between 1
Enhanced IMD Users.book Page 34 Monday, February 12, 2007 11:46 AM
35
and 16 characters, and tap Next. Otherwise, leave the
passkey blank, and tap OK.
6. If you use passkey, enter the same passkey on the other
device. You may change the name of the remote device
name. Tap OK.
Enhanced IMD Users.book Page 35 Monday, February 12, 2007 11:46 AM
36
Wireless LAN Connection
Turning on/off
Ensure that your HC700-G is within active Wireless LAN cov-
erage. Note that in Flight Mode, Wireless LAN is turned off.
1. Tap Start Menu -> Settings -> System tab.
2. Tap Wireless LAN Power icon.
3. Press the On button to turn on the Wireless LAN radio.
Connection to the Internet
When the HC700-G Wireless LAN radio is turned on, an Auto-
matic mechanism will keep looking for wireless networks.
When entering a wireless LAN coverage area, the HC700-G
will popup a message that will require you to confirm connec-
tion to a network.
LAN connection can be made to either Internet through your
ISP or to your work server.
First time Connection to the Internet
Before you connect to the Internet for the first time, perform
the following:
1. Tap Start Menu -> Settings -> Connections tab -> Con-
nections.
2. In My ISP, tap Add a new modem connection and follow
the connection wizard. You will be required to provide
your ISP phone number, domain and password.
Enhanced IMD Users.book Page 36 Monday, February 12, 2007 11:46 AM
37
3. To start surfing the net, switch to your Internet browser
(Start Menu -> Internet Explorer). Your HC700-G will
automatically connect.
Connect to work
Before you connect to the Internet for the first time, perform
the following:
1. Tap Start Menu -> Settings -> Connections tab -> Con-
nections.
2. In My Work Network, You will be required to set up a
modem, network card, wireless network, or VPN server.
To start connecting to your work, switch to your Internet
browser (Start Menu -> Internet Explorer). Your HC700-G will
automatically connect.
Switching to a different wireless LAN
There may be times when you want to manually select or
switch to a different wireless network. For example, you may
want to select a specific network out of many available in
order to control costs.
1. From the Phone keypad, tap Start Menu -> Settings ->
Connections tab.
2. Tap Network Cards.
3. From the list of networks, tap and hold your stylus on the
available network you want to use - an option list will
popup.
4. From the option list select Connect - the background of
aerial icon (next to the network name) will turn blue.
Advance wireless operations
For advanced wireless operations, use the “swluce” wireless
LAN utility, go to: Start Menu -> Programs -> Sample Applica-
tions -> swluce.
Enhanced IMD Users.book Page 37 Monday, February 12, 2007 11:46 AM
38
ActiveSync (USB) Connectivity
The ActiveSync over USB enables the user to explore and
manage the HC700-G from remote, transfer files (data
images etc.) and surf the Internet via host PC.
First Time Connection
In order to enable USB communication with your host PC,
Microsoft ActiveSync program must be installed on your PC.
The HC700-G is provided with the ActiveSync program
installed. However, the program can be obtained from
Microsoft web site. To learn more about most up-to-date ver-
sion of the ActiveSync and its operation, refer to ActiveSync
help.
Connect the USB cable between the HC700-G and PC. Your
PC will identify the new connection and will request you to
point to the HC700-G USB driver provided with this product.
The HC700 USB driver can also be downloaded from
MOTODEV web site (https://developer.motorola.com/
?path=1.870).
Routine Connection
Just hook the USB cable from the HC700-G personal desktop
cradle to your PC - the ActiveSync icon will become green
and a Partnership window will appear. Check the Guest Part-
nership and click Next to popup the ActiveSync program.
Figure 16. USB Connectivity
PC USB Port
Host PC
HC700-G Port
Enhanced IMD Users.book Page 38 Monday, February 12, 2007 11:46 AM

39
Troubleshooting
Table 4: Troubleshooting the HC700-G
Problem Cause Solution
HC700-G does
not turn on
Battery is
drained
Replace with charged bat-
tery
Battery is not
installed prop-
erly or not
charged
Ensure proper battery
installation in HC700-G.
Charge or replace the bat-
tery
Battery con-
tacts are dirty.
Remove the battery and
clean the battery contacts
as described in “Cleaning”
on page 42.
Battery does
not charge in
HC700-G Cra-
dle
HC700-G is not
locked in the
HC700-G Cra-
dle
Re-install the HC700-G in
the HC700-G Cradle. Place
the HC700-G properly in
HC700-G Cradle. (Verify
that the HC700-G Cradle
LED is On and charge for 4
hours)
HC700-G bat-
tery contacts
are not clean
Clean the battery contacts,
see “Cleaning” on page 42
Battery temper-
ature is out of
range (Status
LED flashes
amber)
Ensure that the battery
temperature is within
range. (refer to “Charging
the Battery” on page 6). If
battery remains hot,
replace battery (defective
battery).
Defective bat-
tery
Replace battery
Enhanced IMD Users.book Page 39 Monday, February 12, 2007 11:46 AM

40
HC700-G does
not detect
scan input
Aiming pattern
not directed at
the barcode
symbol
Scan again and make sure
that the green light is
aimed across the barcode
Check for readable bar-
code (not covered, or
obstructed)
Unreadable
barcode
Be sure the barcode
symbol is not covered,
damaged or obstructed.
Make sure the barcode
symbology is config-
ured. For a list of
desired symbologies
configured by default,
refer to the Specifica-
tions section.
HC700-G does
not respond
Problem in the
HC700-G oper-
ating system or
communica-
tions network
Ensure proper battery
installation in HC700-G.
Charge or replace the bat-
tery
Execute Warm Reset
“Resetting the HC700-G”
on page 20. The HC700-G
should function again
If HC700-G still does not
respond, perform Cold
Reset (see “Resetting the
HC700-G” on page 20).
The operating system will
reboot in 30 seconds
HC700-G ran-
domly
shuts off
Unclean bat-
tery contacts.
Clean the battery contacts,
see “Cleaning” on
page 42.
Table 4: Troubleshooting the HC700-G
Problem Cause Solution
Enhanced IMD Users.book Page 40 Monday, February 12, 2007 11:46 AM
41
Communica-
tion failure
between
HC700-G and
HC700-G Cra-
dle
HC700-G is not
docked prop-
erly in the cra-
dle
Make sure that the HC700-
G is properly docked in the
cradle
Communica-
tion software
was incorrectly
installed or
configured
Refer to your system
administrator for program
installation or configura-
tion
Table 4: Troubleshooting the HC700-G
Problem Cause Solution
Enhanced IMD Users.book Page 41 Monday, February 12, 2007 11:46 AM

42
Service
The HC700-G does not contain user serviceable parts. How-
ever, the following sections provide maintenance guidelines.
Maintaining the HC700-G
In order to maintain the HC700-G in good working order:
• Do not scratch the screen. Use only Motorola supplied
stylus
• Never use a pen or pencil or any sharp object on the
screen
• Protect the HC700-G from temperature extremes. Do not
leave the HC700-G on the dashboard of a car on a hot
day, and keep the HC700-G away from hot places
• Do not store or use the HC700-G in any location that is
extremely dusty, damp or wet
Cleaning
If the battery contacts, screen or surface of the HC700-G
become dirty, use a soft lint cloth moistened with solution to
remove dirt.
Cleaning Materials
To clean the HC700-G, use Chemical Pure grade (C.P) “Isopro-
pyl Alcohol (IPA)” also named “Propanol”. The IPA can be
diluted with water up to 20%.
You may use IPA manufactured by Merck, Riedel-de Haen.
It is recommended to use a soft lint free cloth such as Tex-
wipe TX512, BlueWipe cleaning rag/cloth. It is also possible
to use optic lens wiping paper such as "rice paper".
Before using any of the materials detailed
below, refer to the safety instructions shown
on the product’s label or package.
!
Caution
Enhanced IMD Users.book Page 42 Monday, February 12, 2007 11:46 AM
Index
Index 1
Numerics
4-Way Navigation Key 16
8 and 4 slot cradles 2
802.11b/g 1
A
ActiveSync 38
alphabetic/numeric icon 17
Answer 28
Application LED 14
B
Back-Light Adjustment 18
Battery Maintenance 9
battery snap 8
battery temperature 7
BKSP 16
Block calls 29
Bluetooth label 5
body-worn devices 1
C
call on hold 30
Call Waiting 28, 30
caller ID 29
Capture Position 24, 25
Cleaning 42
Cold Reset 20
conference call 29
critical off 13
D
deep sleep 11
Disposal 10
does not charge 39
does not respond 40
does not turn on 39
E
Earpiece 4
End 16
ENT 16
Esc 16
Ethernet 2
F
Fast flashing green 13
Flashing orange inside cradle
14
Flashing red/green 14
flight mode 30
Fn 17
G
GPRS 1
green aiming pattern 23, 24
GSM 1
H
Hand-strap 3
I
Imager Window 4
IrDA Window 4
K
Keypad 15
keypad backlight 18
L
Local Area Network 1
M
make a call 28
Microphone 4
Mini SD Card 22
N
Navigation Key Panel 5
P
P1/P2 17
package 3
PDA 1
Personal Digital Assistant 1
Phone Contact 28
Enhanced IMD Users.book Page 1 Monday, February 12, 2007 11:46 AM
Index 2
phone settings 31
Pocket PC® 1
Power Button 11, 12
R
red ambient light 24, 25
remaining battery power 7
Resetting 26
Routine Battery Charge 7
S
Scan Button 16
screen backlight 18
screen calibration 11
SHIFT 17
Slowly flashing green out of
cradle 13
SP 16
Speaker 4
Speed Dial 30
speed dial 28
status LED 13
Steady green inside cradle
14
Steady red 13
Steady red inside cradle 14
Storage 9
Stylus 4
Suspend 12
system failure 13
T
TAB/Send 16
TFT 2
turn on the phone 27
Turning On 12, 13
V
vehicle cradle 2
Volume Keys 4
W
Warm Reset 20
WATER 9
Wi-Fi 1
Windows Mobile screen 11
Enhanced IMD Users.book Page 2 Monday, February 12, 2007 11:46 AM

ab
Motorola, Inc.
1301 E. Algonquin Road,
Schaumburg, IL 60196 U.S.A.
For Motorola Customer Support call:
1-888-877-7023 (US domestic)
1-847-725-4150 (International)
MOTOROLA and the Stylized M Logo
are registered in the U.S. Patent and
Trademark Office. All other product or
service names are the property of their
respective owners. © Motorola, Inc.
2007.
6802981C55-D
@6802981C55@
Enhanced IMD Users.book Page 3 Monday, February 12, 2007 11:46 AM