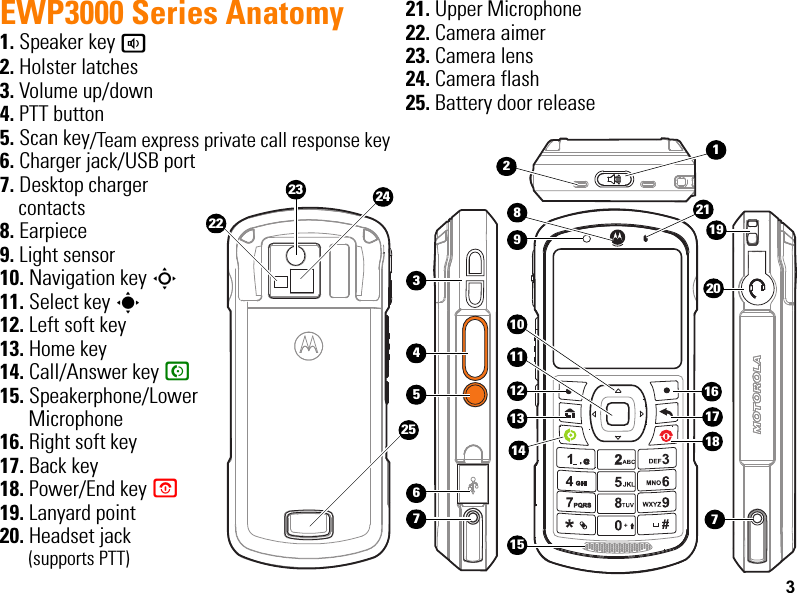
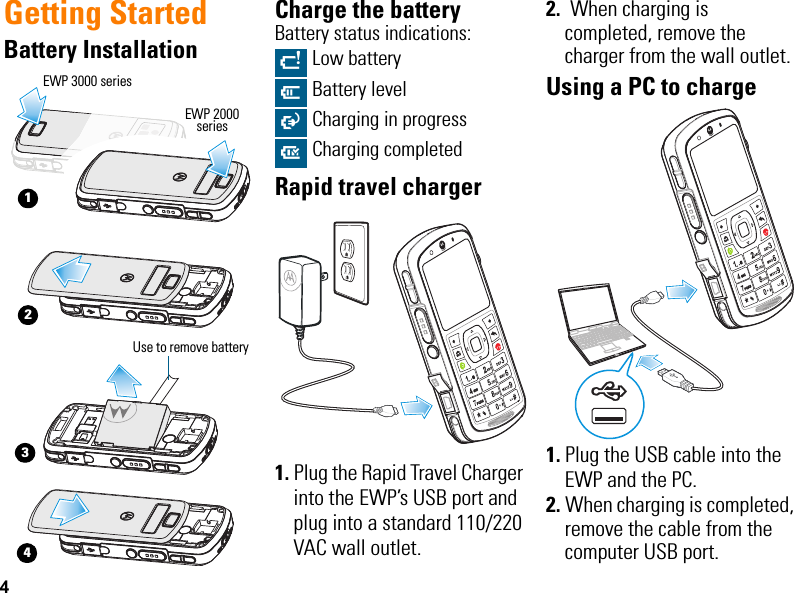
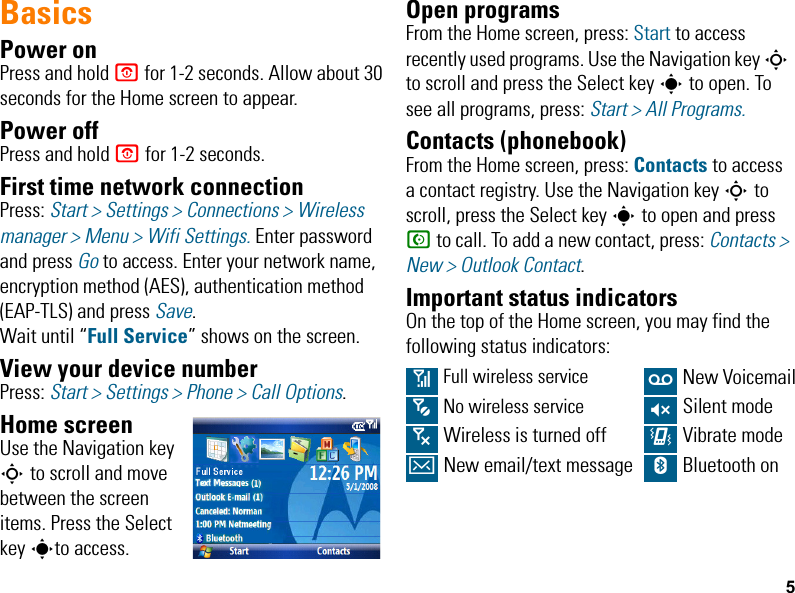
Motorola Solutions 89FT7052 Portable VoWLAN Transceiver with Bluetooth User Manual EWP2000 3000 QSG

Motorola Solutions, Inc. Portable VoWLAN Transceiver with Bluetooth EWP2000 3000 QSG

Exhibit 8 Users Manual

TOTAL ENTERPRISE ACCESS & MOBILITY (TEAM)BU S I N E S S  S MA R T P HO N E                    EWP2000 & EWP3000 SERIESQUICK START GUIDEa
No part of this publication may be reproduced or used in any form, or by any electrical or mechanical means, without permission in writing from Motorola. This includes electronic or mechanical means, such as photocopying, recording, or information storage and retrieval systems. The material in this manual is subject to change without notice.The software is provided strictly on an “as is” basis. All software, including firmware, furnished to the user is on a licensed basis. Motorola grants to the user a non-transferable and non-exclusive license to use each software or firmware program delivered hereunder (licensed program). Except as noted below, such license may not be assigned, sublicensed, or otherwise transferred by the user without prior written consent of Motorola. No right to copy a licensed program in whole or in part is granted, except as permitted under copyright law. The user shall not modify, merge, or incorporate any form or portion of a licensed program with other program material, create a derivative work from a licensed program, or use a licensed program in a network without written permission from Motorola. The user agrees to maintain Motorola’s copyright notice on the licensed programs delivered hereunder, and to include the same on any authorized copies it makes, in whole or in part. The user agrees not to decompile, disassemble, decode, or reverse engineer any licensed program delivered to the user or any portion thereof.Motorola reserves the right to make changes to any software or product to improve reliability, function, or design.Motorola does not assume any product liability arising out of, or in connection with, the application or use of any product, circuit, or application described herein.No license is granted, either expressly or by implication, estoppel, or otherwise under any Motorola, Inc., intellectual property rights. An implied license only exists for equipment, circuits, and subsystems contained in Motorola products.WarrantyFor the complete Motorola hardware product warranty statement, go to:http://www.motorola.com/enterprisemobility/warranty.
1WelcomeGreetings upon receiving your new Enterprise WiFi Phone (EWP). This state-of-the-art Windows Mobile® 6.5 based VoWLAN smartphone delivers the features and benefits of your enterprise TEAM VoWLAN solution, enabling enhanced communication on the move.Meet the EWPYour EWP is designed to operate throughout the wireless network coverage of your enterprise environment. You can use the EWP as you would any normal office phone. This means that you can dial local office phone extensions just as you could with a wired desk phone, using abbreviated extension phone numbers. The EWP also includes group and individual push-to-talk (PTT), text messaging, email, contacts, calendar, tasks, voice recognition for hands-free dialing and many other built-in tools to help you manage your busy work style. The EWP can also access server based enterprise applications, a standard mobile Internet browser, and has the ability to pair with Bluetooth® headsets and other Bluetooth devices such as personal computers.The EWP is available in two semi-rugged models; EWP2000 and EWP3000 series. Both models have identical ruggedness qualities with wipe-able keypad.The EWP3000 series adds an integrated camera that can read 1D/2D bar codes and take pictures as well as antimicrobial surface protection.For detailed information on the EWP features, refer to the EWP2000/3000 Series User’s GuideP/N 6802987C36, at: supportcentral.motorola.comBEFORE USING THIS device, READ the Product Regulatory, Safety & RF Exposure Guide (P/N 6802987C72) included with this package.
2EWP2000 Series Anatomy1. Speaker key a2. Holster latches3. Volume up/down4. PTT button5. Programmable key6. Charger jack/USB port7. Desktop charger contacts8. Earpiece/Upper microphone9. Navigation key S10. Select key s11.  Left soft key12.  Home key13. Call/Answer key N14. Speakerphone/lower microphone15. Right soft key16. Back key17. Power/End key O18. Lanyard point19. Headset jack (supports PTT)20. Battery door release21. ID label window18141534567161719 71829111012132021
3EWP3000 Series Anatomy 1. Speaker key a2. Holster latches3. Volume up/down4. PTT button5. Scan key6. Charger jack/USB port7. Desktop charger contacts8. Earpiece9. Light sensor10. Navigation key S11. Select key s12. Left soft key13. Home key14. Call/Answer key N15. Speakerphone/Lower Microphone16. Right soft key17. Back key18. Power/End key O19. Lanyard point20. Headset jack(supports PTT)21. Upper Microphone22. Camera aimer23. Camera lens 24. Camera flash25. Battery door release 1415345671617191811101213201 72589232224 212/Team express private call response key
4Getting StartedBattery InstallationCharge the batteryBattery status indications:Rapid travel charger1. Plug the Rapid Travel Charger into the EWP’s USB port and plug into a standard 110/220 VAC wall outlet.2.  When charging is completed, remove the charger from the wall outlet.Using a PC to charge 1. Plug the USB cable into the EWP and the PC.2. When charging is completed, remove the cable from the computer USB port.1342Use to remove batteryEWP 3000 seriesEWP 2000 seriesN Low batteryL Battery levelO Charging in progress^ Charging completedaR
5BasicsPower onPress and hold O for 1-2 seconds. Allow about 30 seconds for the Home screen to appear.Power offPress and hold O for 1-2 seconds. First time network connectionPress: Start > Settings > Connections > Wireless manager > Menu > Wifi Settings. Enter password and press Go to access. Enter your network name, encryption method (AES), authentication method (EAP-TLS) and press Save. Wait until “Full Service” shows on the screen.View your device numberPress: Start > Settings > Phone > Call Options.Home screenUse the Navigation key S to scroll and move between the screen items. Press the Select key sto access.Open programsFrom the Home screen, press: Start to access recently used programs. Use the Navigation key S to scroll and press the Select key s to open. To see all programs, press: Start > All Programs.Contacts (phonebook)From the Home screen, press: Contacts to access a contact registry. Use the Navigation key S to scroll, press the Select key s to open and press N to call. To add a new contact, press: Contacts > New > Outlook Contact.Important status indicatorsOn the top of the Home screen, you may find the following status indicators:0 Full wireless service w New Voicemail5  No wireless service Q Silent mode6 Wireless is turned off < Vibrate modeA New email/text message h Bluetooth on
6Basic SettingsScreen time outYour screen turns off to save battery power. To set the screen time out, press: Start > Settings > More > Power Management > Display time out.Lock & unlock keypadTo lock, press and hold X for a second. Press Lock.To unlock, press: Unlock > *.Phone BasicsSet earpiece volumeDuring a call, press the volume up/down keys.Set ring volumePress: Start > Settings > Profiles. Scroll to a profile. Select: Menu > Edit. Scroll to Ring volume to set level.SpeakerphoneDuring an active call, press the speaker key a to turn on/off the speakerphone.Normal modePress and hold X until the Quick List screen is displayed. Select: Normal.Silent modePress and hold X until the Quick List screen is displayed. Select: Silent.Vibrate modePress and hold X until the Quick List screen is displayed. Select: More > Vibrate.Phone CallsMake a callEnter phone number and press N.Answer/End a callPress: N to answer a call.Press: O to end a call.Make a call from ContactsPress: Start > Contacts. Scroll to a contact and press the Select key s. Scroll to a type of contact (mobile, home etc.) and press N.RedialPress: N to see last calls and Contacts. Highlight entry and press N.
7PTT CallsMake a PTT callEnter PTT number. Press and hold the PTT button. Begin talking after hearing a chirping sound. Release PTT to listen.Request PTT callRequesting PTT call lets the recipient know you want to talk on a PTT call. Enter phone number. Select: Menu > Request PTT Call.Receive/Answer a PTT callWhen receiving a PTT call, your EWP emits a tone or vibrates and the caller begins to talk. Wait for the caller to finish talking. To answer, press and hold the PTT button. Begin talking after hearing a chirping sound. Release the PTT button to listen.Join an active PTT groupPress: Start > Contacts. Select the talkgroup you want to join. Press: Menu > Join PTT group. Press and hold PTT and begin talking after hearing a chirping sound. Release PTT to listen.Make a PTT group callPress: Start > Contacts. Scroll to the talkgroup. Press and hold PTT and begin talking after hearing a chirping sound. Release PTT to listen.Enhanced Call FeaturesCheck VoicemailWhen w shows, you have voice message. Press and hold 1. Follow the Voicemail prompts.Conference call*During an active call, press: Menu > Conference With. Select a number from Contacts or Recent call or Phone number and press Done.Forward calls to Voicemail*To send your incoming calls to voicemail, press: Start > Settings > Phone > Call Forwarding. *This feature may not be available on your phone. Please contact your system administrator.
8Transfer a callDuring an active call, press: Menu > Transfer to > Contacts. Scroll to a contact and press the Select key s.The EWP displays “Would you like to speak to (contact number) before transferring the call?” Press: Yes to speak to the contact before transferring the call. Press: No > Transfer for direct transfer.Set Speed Dial numbersPress: Start > Contacts. Select a contact. Press: Menu > Add to Speed Dial > Keypad assignment.Voice RecognitionVoice dial1. Press and hold the Speaker key a for 2 sec-onds.2. When prompted, say “Call” followed by a number or contact name.Send messageYou may also say “Send text” or “Send email” followed by a contact name or number to send a text message. Look up a contact nameSay “Look up” and then the name or number in your contacts list.Open Windows programTo run a Windows program using your voice:1. Press and hold the Speaker key a for two seconds.2. When prompted, say “Open” and then the name of a program you want to go to.To add a program to your selection list, press: Start > Voice Recognition > Settings > Application Launcher.Adapt your voiceYou can improve the speech recognition accuracy by adapting EWP to your voice.To adapt your voice for better recognition:Press Start > All Programs > Voice Recognition > Settings > Digit Dialing > Adapt Digits.
9Text Messaging / EmailRead new messagePress: Start > Messaging > Text Messages or Outlook E-mail.Create a text message1. Press: Start > Messaging > Text Messages or Outlook E-mail > Menu > New.2. Place your cursor on the To: line and press the Select keys to add recipients from Contacts.3. When you are done creating a message, press: Send.Letter, word completion or numeric modeDefault mode is letters abc. To change modes to either word completion abc or numbers 123, press and hold * for 2 seconds and release; repeat to switch to the next mode.Uppercase, lowercase or caps lockPress and hold  ; press * to toggle between ABC, Abc and abc.Special charactersIn letters mode, repeatedly press 1 to switch between the following characters . , ? ! -_’ @ :Enter symbols1. Press and hold # for 2 seconds to view the symbols screen.2. Select a symbol or a special character. When done, the device returns to previous text mode.Enter spaceSwiftly press #.Delete textPress  . Hold   to keep deleting.Start a new linePress the Select key s.Text setup (Language, Word completion, Clear content)Press and hold # for 2 seconds > Setup.0 +
10PersonalizeAdd entry to Contacts1. From the Home screen, press: Contacts > New > Outlook Contact.2. Enter Work, Mobile, PTT, Home, and E-mail information. Also, you can assign Ring Tone and Picture Caller ID to the contact.Edit Contacts entryPress: Start > Contacts. Scroll to a Contact. Press: Menu > Edit.Change sounds 1. From the Home screen, press: Start > Settings > Sounds.2. You can change the sound of the ring tone, reminders, new e-mail, new text message, new instant message, PTT call request, exclamation, questions, warnings, keypad control, service tone, call drop tone, minute beep.Bar Code Scan (EWP3000 series only)To scan a bar code:1. Press and release the Scan key to launch the scan-enabled application. The scan-enabled application is displayed on the screen.2. Press and release the Scan key. - Position the device approximately four inches from the barcode to be read and allow the camera to focus on the image. - Aim the cross pattern shown on the screen at the center of the bar code. Make sure to show the entire bar code on the screen.Note: Your EWP may be set to project a red aimer line across the bar code. In such case, ensure that the red line crosses the entire bar code.3. The EWP beeps to indicate that the bar code has been successfully decoded.
11Headset ConnectionPTT and stereo headsetsUse your headset jack to plug in an optional PTT headset.Warning: When using a headset, you may not hear the surrounding sounds. Do not use a headset where it can endanger your safety.First time connection of Bluetooth headset• The headset must be charged prior to starting.• Bluetooth headset must be turned Off. 1. To turn on Bluetooth on the EWP: press Start > Settings > Connections > Wireless Manager, check the Enable Bluetooth box and press Done. The h indicator appears in the Home screen.2. From the Home screen, press: Start > All Programs > Bluetooth > Bluetooth Manager > Hands-free. 3. Turn the headset on and place it in pairing mode (Refer to the Bluetooth pairing instructions included with the headset.). When using a Motorola headset, press and hold the Call button of the headset for 5 seconds. The indicator light turns on and remains steady. If the indicator light is flashing or does not remain steadily lit, turn off/on the headset and repeat this step.4. On the EWP press: Add. The EWP prompts you to verify your headset is ready.5. Press: Search. The EWP starts searching for your headset and shows it on the screen.6. Press: Select to connect the headset. 7. When prompted, enter the device passkey provided with your headset (such as 0000) and press Accept.When your headset successfully pairs, the indicator light changes from steady to flashing blue. After you have successfully paired your device and headset, you do not need to repeat these steps. To pair the headset again, verify that your EWP’s Bluetooth is enabled (See step 1.) and turn on the headset.
12Synchronize with PC You can use Microsoft® ActiveSync version 4.5 and beyond or Windows® Mobile Device Center to synchronize information between your EWP and a computer. ActiveSync can synchronize your contacts, calendar, email, tasks, favorites and show the content of your EWP on your computer. You can move files between your computer and EWP, download and install applications and service your EWP (for free download, go to Microsoft web site or contact your administrator).To Synchronize with your PC:1. Turn on the EWP and PC.2. Connect your EWP to your PC using a USB cable. ActiveSync starts to synchronize automatically. 3. Follow the instructions shown on your PC screen and select the items you want to synchronize, such as email, contacts, calendar, favorites and other information.    Memory CardAB1342* Removable microSD "optional" - sold separately*
13Grant of Equipment AuthorizationFCC InterferenceNOTE: This equipment has been tested and found to comply with the limits for a Class B digital device, pursuant to Part 15 of the FCC Rules. These limits are designed to provide reasonable protection against harmful interference in a residential installation. This equipment generates, uses and can radiate radio frequency energy and, if not installed and used in accordance with the instructions, may cause harmful interference to radio communications. However, there is no guarantee that interference will not occur in a particular installation. If this equipment does cause harmful interference to radio or television reception, which can be determined by turning the equipment off and on, the user is encouraged to try to correct the interference by one or more of the following measures:• Reorient or relocate the receiving antenna.• Increase the separation between the equipment and receiver.• Connect the equipment into an outlet on a circuit different from that to which the receiver is connected.• Consult the dealer or an experienced radio/TV technician for help.This device complies with Part 15 of the FCC Rules. Operation is subject to the following two conditions: (1) This device may not cause harmful interference.(2) This device must accept any interference received, including interference that may cause undesired operation.FCC Notice: IMPORTANT: Unauthorized repairs or modifications could result in permanent damage to the equipment and void your warranty and your authority to operate this device under Part 15 of the FCC Rules. IMPORTANT: This device is capable of operating in 802.11a mode. For 802.11a devices, operating in the frequency range of 5.15 - 5.25 GHz, they are restricted for indoor operations to reduce any potential harmful interference for Mobile Satellite Services (MSS) in the US. WIFI Access Points that are capable of allowing your device to operate in 802.11a mode (5.15 - 5.25 GHz band) are optimized for indoor use only. If your WIFI network is capable of operating in this mode, please restrict your WIFI use indoors to not violate federal regulations to protect Mobile Satellite Services.Radio Frequency and Power* 802.11n is only applicable for EWP2200/EWP3200.FCC Grant of Equipment AuthorizationIndustry Canada Grant of Equipment AuthorizationThis Class B digital apparatus complies with Canadian ICES-003. Cet appreil numérique de la classe B est conforme à la norme NMB-003 du Canada:Radio Network Freq Band Rated Power802.11a (only for 2100 & 3100)WLAN 5.15-5.25 GHz5.25-5.35 GHz5.47-5.725 GHz5.725-5.825 GHz15.8mW at 54Mbps802.11a/n*WLAN 5.15-5.25 GHz5.25-5.35 GHz5.47-5.725 GHz5.725-5.850 GHz802.11a: 15.8mW at 54Mbps802.11n (5GHz): 12.59mW at MCS7802.11b WLAN 2412-2462MHz2412-2472 MHz 63mW at 11Mbps (US & Canada)25.12mW at 11Mbps (EU)802.11g/n*WLAN 2412-2462MHz2412-2472 MHz17.8mW at 54 Mbps/MCS7 (US, Canada & EU)25.12mW at 6Mbps/MCS0 (EU)Bluetooth WPAN 2402-2480MHz 1mW (for EWP2100 & 3100) 7mW (for EWP2200 & 3200)Model FCC ID Model FCC IDEWP2100 AZ489FT7032 EWP2200 AZ489FT7052EWP3100 AZ489FT7038 EWP3200 AZ489FT7051Model  IC ID Model  IC IDEWP2100 109U-89FT7032 EWP2200 109U- 89FT7052EWP3100 109U-89FT7038 EWP3200 109U- 89FT7051
14Accessories For updated list of accessories, refer to the EWP2000/3000 Series User’s Guide P/N 6802987C36 at: supportcentral.motorola.comStandard (1480mAh) Battery SNN5754A (EWP2100 only)Extra Capacity (1750mAh) Battery SNN5793A (EWP2000 & EWP3000 Series)Mini USB Data Cable SYN6371CMulti - Unit Desktop ChargerUS & Canada - DCH6000World wide - DCH6001Single Unit Desktop Charger World wide - DCH1001Travel Charger EMU Rapid Switcher PWRS-14000-270R - US, CAN, TW, MX, CO PWRS-14000-273R - AU, NZ,HK PWRS-14000-274R - AR PWRS-14000-275R – UK, FR,DE, IT, ES, SE, NE, BE, SG, TH, VN, CL PWRS-14000-276R - BR, SKCoil Cord Lanyard SYN2678A /  EWPACCLY002(The intended use of the lanyard is only to secure the device while used with the approved carry accessories)EWPACCUC001Universal Carry CaseMono over the ear headset W/MIC & PTTRMN5130APlastic Holder with ClipSYN2680AMono in the ear headset with MIC & PTTSJYN0264C
SpecificationsDimensions:• EWP2000 (Standard Battery): 4.74 in. L x 2.13 in. W .74 in. D / 120.5mm L x 54mm W x 18.7mm D.• EWP2100/EWP2200 (Expanded Capacity Battery): 4.74 in. L x 2.13 in. W .81 in. D / 120.5mm L x 54mm W x 20.6mm D. • EWP3100/EWP3200 (Expanded Capacity Battery) 4.74 in. L x 2.13 in. W .81 in. D / 120.5mm L x 54mm W x 22.6mm D.Weight:• EWP2000 5.36 oz. / 152 grams• EWP2100/EWP2200 5.71 oz. / 162 grams• EWP3100/EWP3200 5.36 oz. / 152 gramsBattery:Rechargeable Lithium Ion: Standard Battery–1480 mAh Battery (applicable for EWP2000 series only);Expanded Capacity Battery–1750 mAh Battery.Operating System:Microsoft® Windows Mobile® 6.5. Camera:3.2 Mega pixel with flash and auto focus.Camera Decode Capability:Type 1D bar codes: Code 39, UPCA, UPCE, EAN13, EAN8, Code 128, UCC/EAN128, ISBT128, Code 93, Code 11, Web Code, MSI, MSI Plessey, Discrete2 of 5, Interleaved 2 of 5, Codabar, UPCE1, Coupon Code, Trioptic code 39, RSS, RSS 14, RSS Limited, RSS Expanded. Type 2D bar codes: PDF417, Micro PDF, Composite C, Composite AB, Data Matrix, QRCode, Micro QR, Aztec, US planet, US Postnet, UK Postal, Japan Postal, Australian Postal, Dutch Postal.Operating Temperature:14° F to 122° F / -10° to 50° C.Storage Temperature:-32° F to 104° F / 0° C to 40° C.
General InformationTo obtain additional information, contact Motorola Solutions at:• North America:1-800-653-5350• International: +1-631-738-6213http://www.motorolasolutions.com/Motorola’s Enterprise Mobility Support Center If you have a problem with your equipment, contact Enterprise Mobility support for your region. Contact information is available by visiting http://www.motorolasolutions.com/support and after selecting your region, click on the appropriate link under Support for Business.When contacting Enterprise Mobility support, please provide the following information:• Serial number of the unit• Model number or product name• Software type and version numberMotorola responds to calls by email, telephone or fax within the time limits set forth in support agreements. If you purchased your Enterprise Mobility business product from a Motorola business partner, contact that business partner for support.ABMotorola Solutions, Inc.1301 E. Algonquin Rd.Schaumburg, IL 60196-1078, U.S.A.http://www.motorolasolutions.comMOTOROLA, MOTO, MOTOROLA SOLUTIONS and the Stylized M Logo are trademarks or registered trademarks of Motorola Trademark Holdings, LLC and are used under license. All other trademarks are the property of their respective owners.© 2012 Motorola Solutions, Inc. All Rights Reserved. @6802987C34@6802987C71 Revision B - February 2012

Navigation menu