Motorola Solutions 99FT3050 VHF Portable Handheld Transceiver User Manual 1096C35 O EME
Motorola Solutions, Inc. VHF Portable Handheld Transceiver 1096C35 O EME
Contents
- 1. Ex 08A Users Guide
- 2. Ex 08B RF Safety Booklet
Ex 08A Users Guide
Modern, Efficient,
With Exceptional Value
Business Portable
Two-Way Radio
ABCD
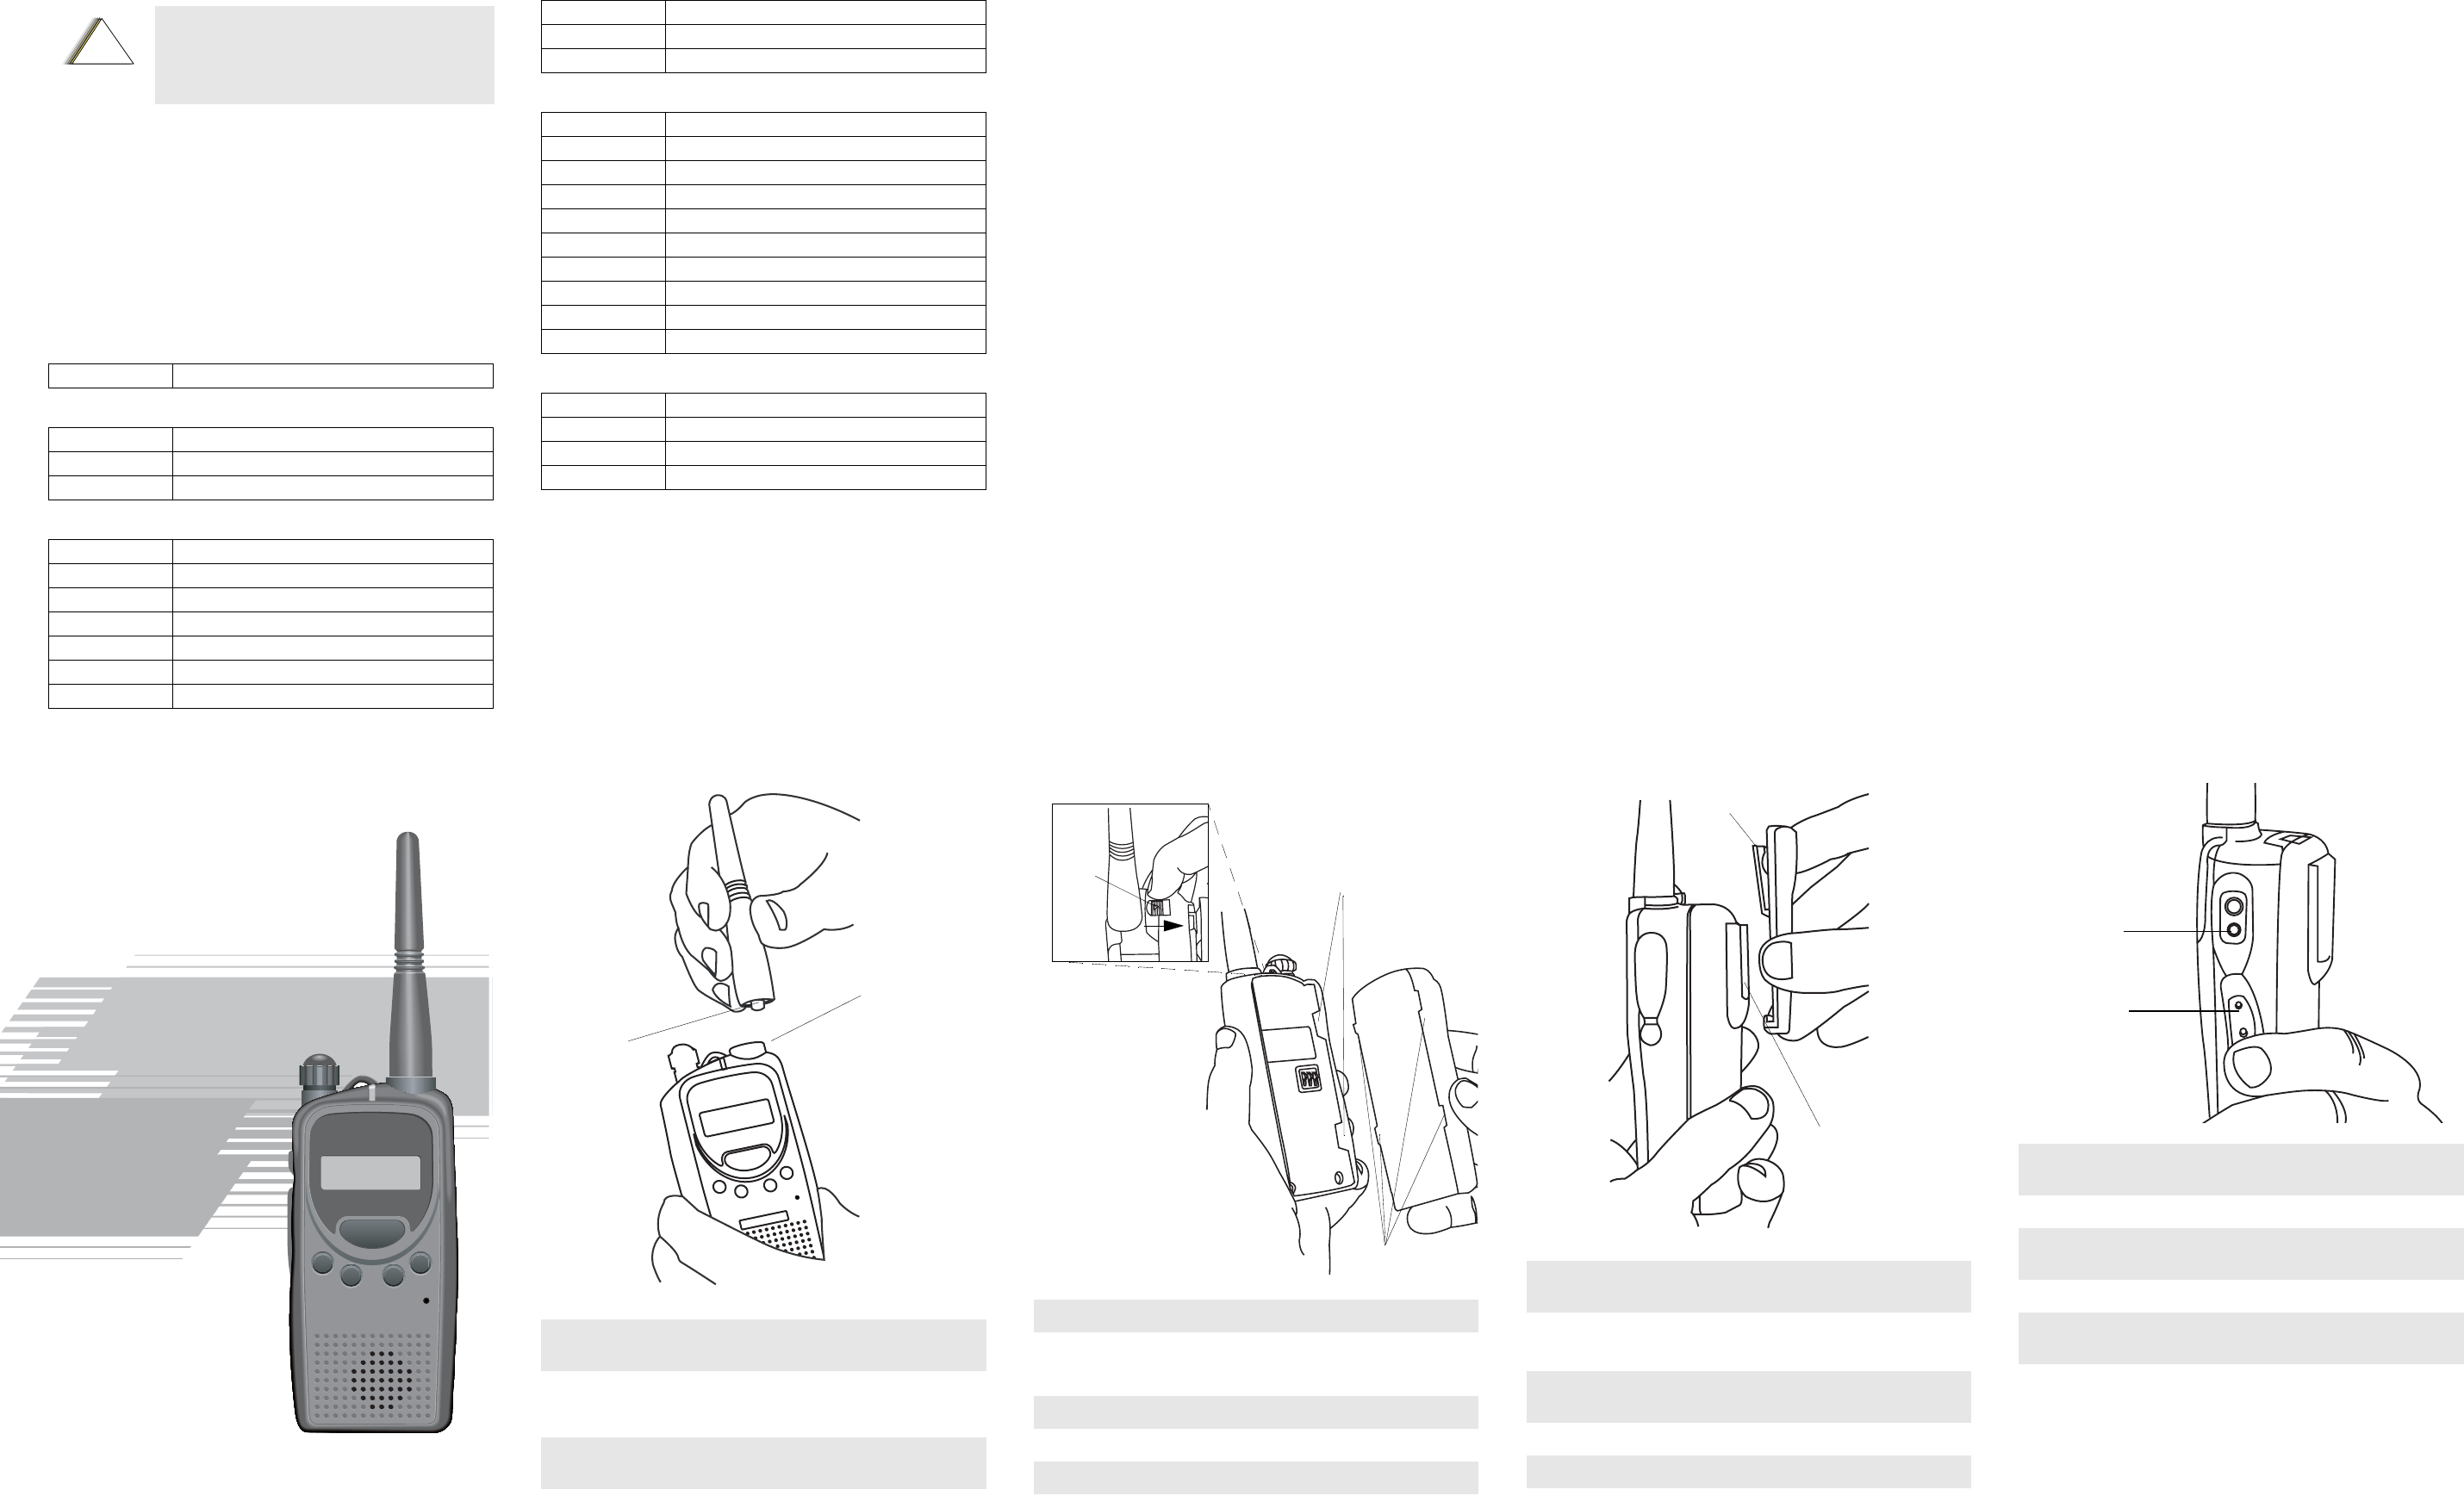
Attaching and Removing the Antenna
To Attach Antenna
To Remove Antenna
1. Fasten the antenna to the radio by placing the threaded end of
the antenna into the Antenna Connector.
2. Rotate the antenna clockwise until tight.
1. Turn the antenna in a counter-clockwise direction until it dis-
engages from the radio.
gg
Antenna Connector
Threaded End
of Antenna
Attaching and Removing the Battery
To Attach Battery
To Remove Battery
1. Fit the battery slots with the grooves on the radio.
2. Slide the battery upwards until a click is heard.
1. Slide the battery clasp away from the radio.
2. Slide the battery downwards.
3. Pull the battery away from the radio.
Battery Slots
Grooves
Battery
Clasp
Attaching and Removing the Belt Clip
To Attach Belt Clip
To Remove Belt Clip
1. Align mounting rails of the radio with the grooves of the belt
clip.
2. Slide the belt clip downwards until it clicks into place.
1. Insert the end of a key between the release tab and the back
surface of the radio.
2. Lift the release tab.
3. Slide the belt clip upwards.
Release Tab
Mounting Grooves
Charging your Radio
1. Turn off your radio, if it is turned on. It is highly
recommended that the radio be turned off while charging.
2. Lift the Dust Cover covering the Accessory Connector.
3. Insert charging connection of the charger into the Programming
Port.
4. Plug in charger to wall outlet.
5. Radio should be charged at least 16 hours initially before
decreasing charging time to 10 hours.
6. Turn on your radio, when charging is complete; you should
see all 3 bars of the Battery Level Indicator illuminated.
Programming
Port
Dust Cover
*6881096C35*
6881096C35-O
© 2003 by Motorola, Inc.
Motorola, Inc.
1301 E. Algonquin Road, Schaumburg IL 60196
Printed in Penang. All Rights Reserved.
Product Safety and RF Exposure Compliance
ATTENTION!
This radio is restricted to occupational use only to satisfy FCC RF
energy exposure requirements. Before using this product, read the RF
energy awareness information and operating instructions in the Product
Safety and RF Exposure booklet enclosed with your radio (Motorola
Publication part number 68P81095C98) to ensure compliance with RF
energy exposure limits.
Accessories
There are a number of accessories to enhance the productivity of your
two-way radio. Many of the available accessories are listed below.
Note:
Before using this product, read the operating instruc-
tions for safe usage contained in the Product Safety
and RF Exposure booklet enclosed with your radio.
Batteries
PMNN4046 NiMH, 1300 mAH
Chargers
PMTN4048 Rapid Charger, 110 V US NA w/Line Cord
PMLN4139 Transformer for PMTN4048
PMTN4073 10 Hour Charger, 120 V US NA Plug
Antennas
PMAD4012 136-155 MHz, Helical Antenna, 9cm
PMAD4013 155-174 MHz, Helical Antenna, 9cm
PMAE4011 435-480 MHz, Helical Antenna, 10cm
PMAD4014 136-155 MHz, Helical Antenna, 14cm
PMAD4027 136-155 MHz, Helical Antenna, 15cm
PMAD4028 148-174 MHz, Helical Antenna, 15cm
PMAD4015 155-174 MHz, Helical Antenna, 14cm
!
C a u t i o n
PMAE4003 430-470 MHz, Helical Antenna, 9cm
NAE6483 403-520 MHz, Whip Antenna
NAD6502 146-174 MHz, Heliflex Antnna
Carry Accessories
PMLN4467 Leather Carrying Case
PMLN4468 Carry Holster Case, Grey
PMLN4469 Carry Holster Case, Blue
4285820Z01 Shoulder Strap
HLN9844 1-1/2 inch Belt Clip
RLN4815 Fanny Pack
4280384H01 Radio Pak Replacement Retaining Strap w/Snap
4280384F89 Radio Pak Belt Lengthener for RLN4815
HLN9985 Waterproof Bag
JMZN4020 Hand Strap for Radio
Audio Accessories
PMLN4294 Ear Set Mic w/PTT
PMLN4425 Ear Set Boom Mic w/Remote Ring PTT
HMN9030 Remote Speaker Mic
HMN9013 Lightweight Handset w/Boom Mic
Antennas
ABCD
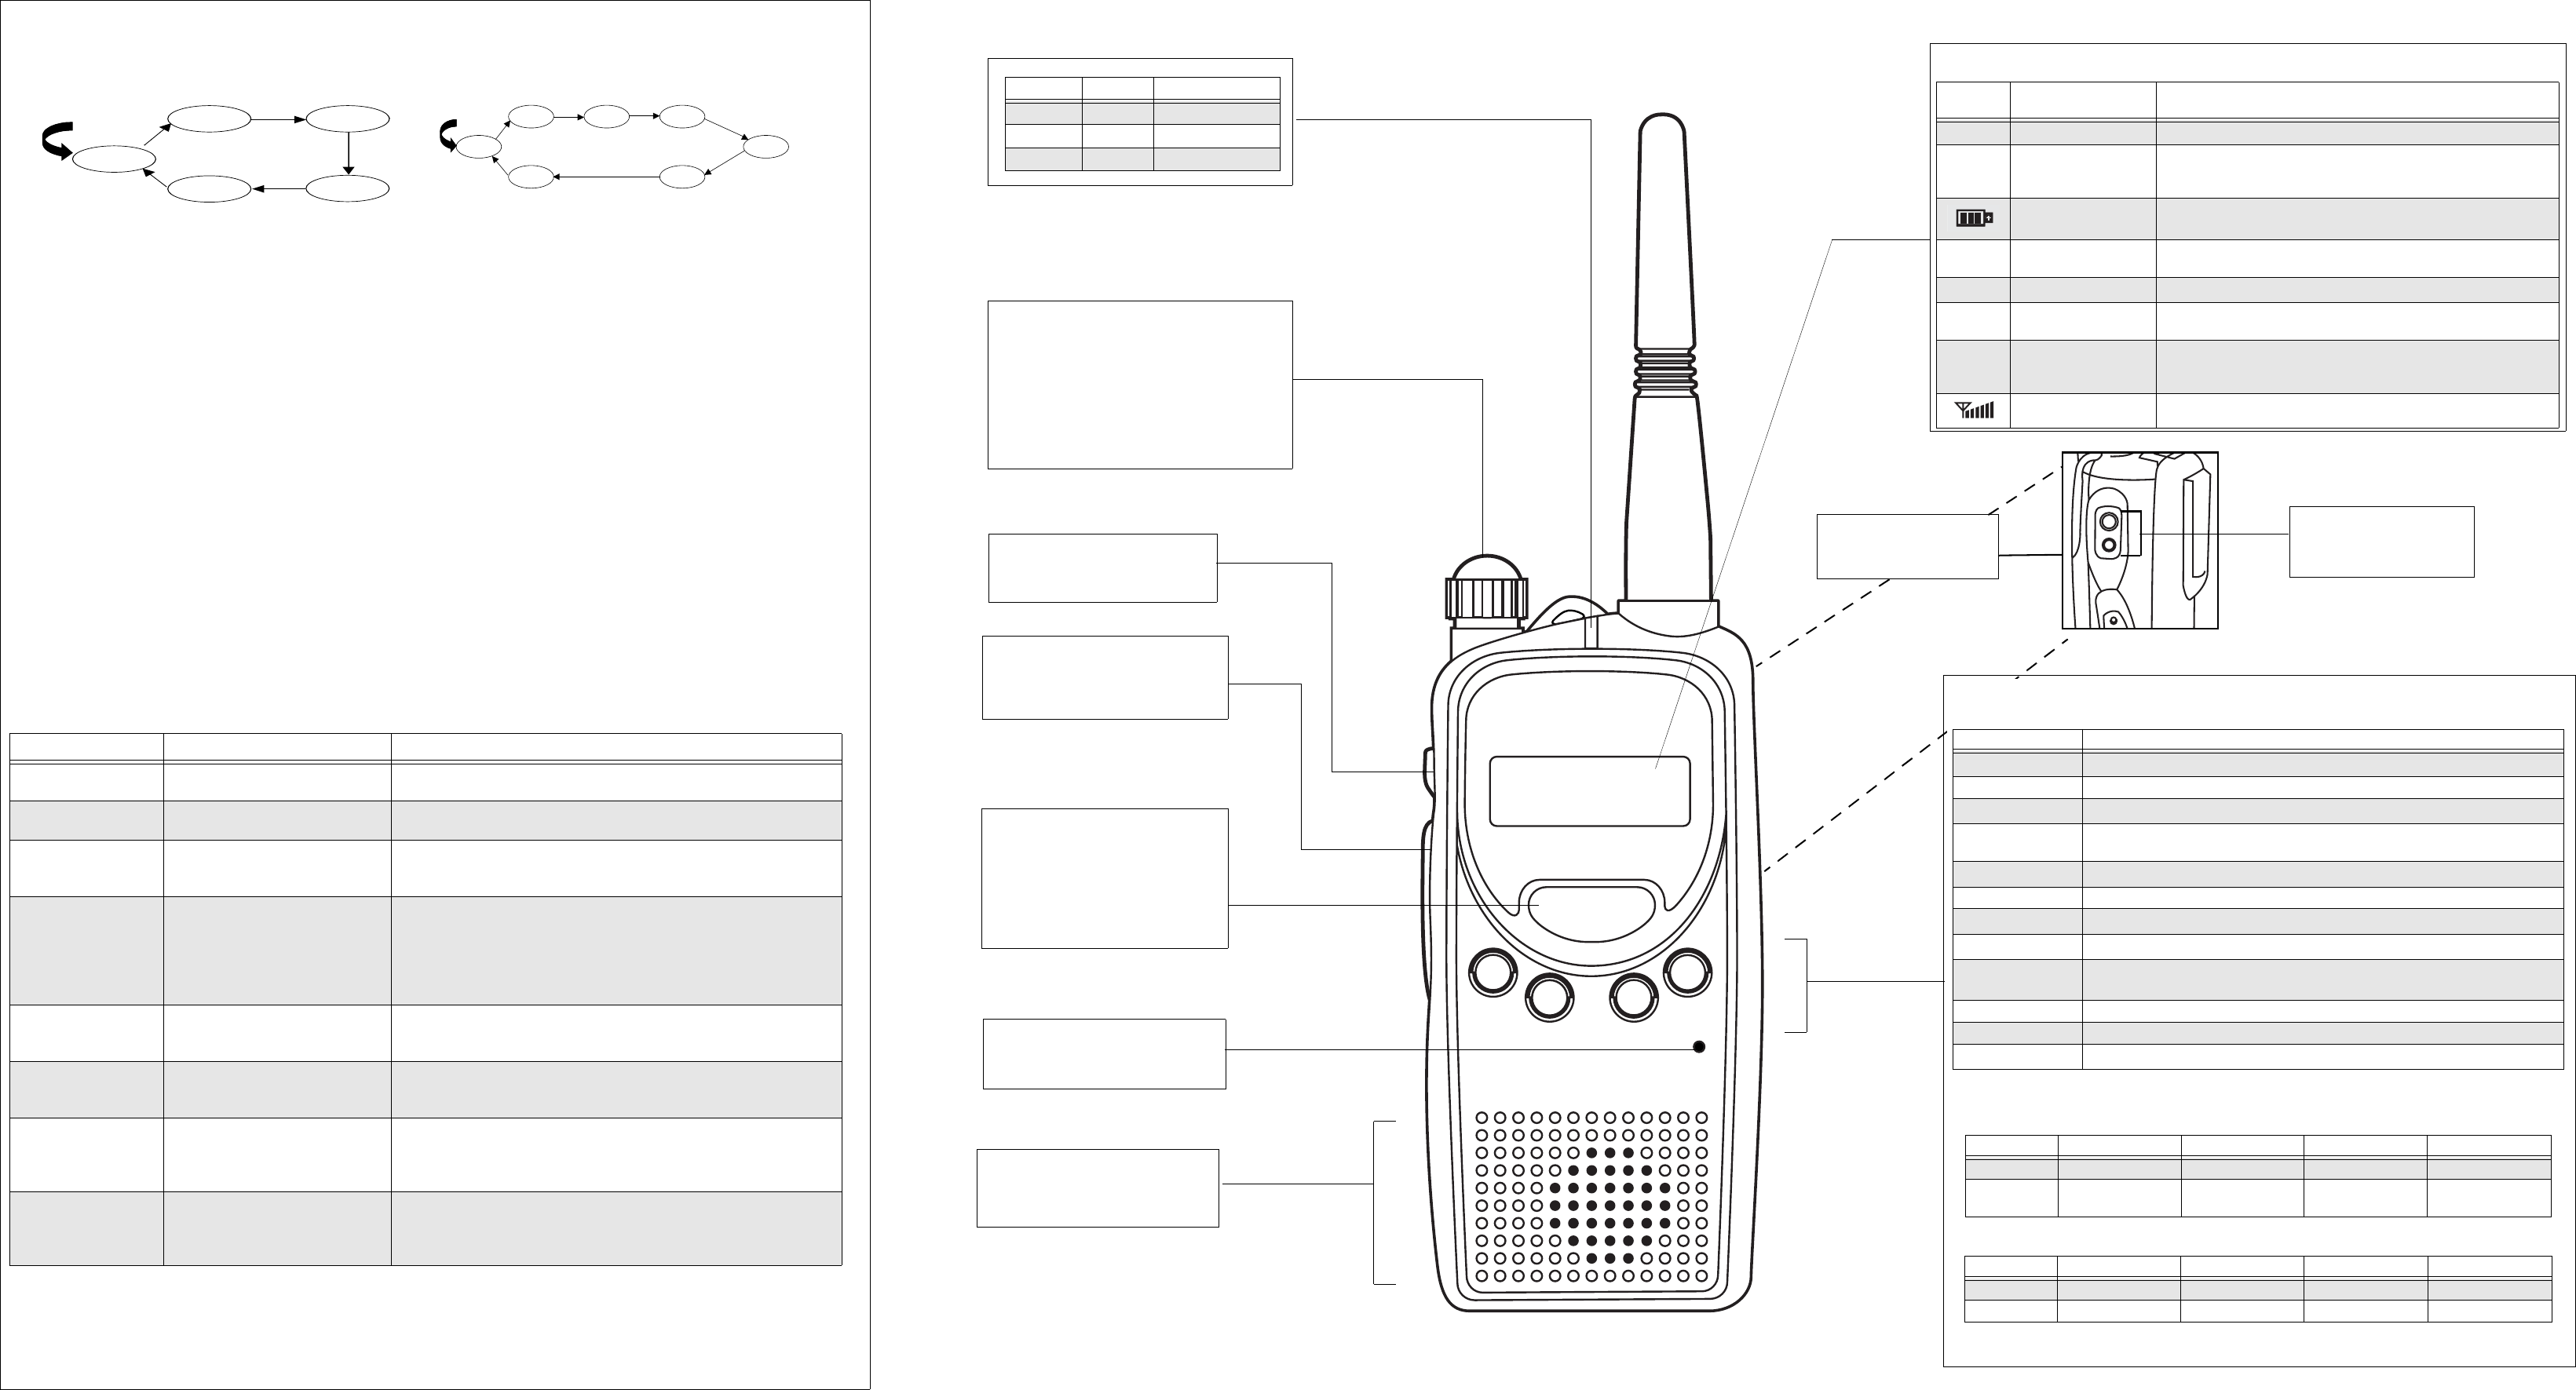
Scan
Scan allows you to monitor multiple channels and receive calls that are transmitted on them. Two types of scan are supported: Normal
Scan and Priority Scan.
Normal Scan searches all channels sequentially in the radio’s scan list, whereas Priority Scan allocates 50% of the scanning time to the
Priority Channel (the first channel in the designated scan list).
During scan, when activity is detected that meets the unsquelch condition, the radio stops scanning and switches to that channel; the
G indicator is illuminated, and the channel number is displayed. When no activity is detected for a pre-set time, the radio resumes
scanning.
If your radio has switched to a non-priority channel during priority scan, it still checks for activity on the priority channel. If activity is
detected there, the radio switches to the priority channel.
The radio transmits on the Prime Channel, if PTT is pressed during scanning. If the radio has stopped scanning, and changed to a
particular channel, all transmit and receive activity is performed on that channel.
• Press the Scan button to begin channel scanning. The G indicator blinks to indicate that the radio is scanning. The LCD Screen
shows the Prime Channel where the scan began.
• Press thebutton to scan the channels in incremental order, and thebutton to scan in the opposite order.
• Press Scan button to stop scanning.
Deleting a Nuisance Scan Channel
A channel with unwanted activity is called a Nuisance Channel. You can remove a Nuisance Channel from the scan list temporarily. To
remove a Nuisance Channel
• Press the Nuisance Channel Delete button, when your radio stops on a Nuisance Channel. A high-pitched tone is heard.
You cannot remove the Prime or Priority Channel from the scan list. If attempted, a low-pitched tone is heard, and no action is taken.
To reinstate the deleted channel(s) into the scan list, restart scan, or simply turn off your radio and turn it on again.
Programming Mode
This mode allows you to change feature parameters to enhance the use of your radio.
Entering Programming Mode
If your radio is turned on, turn it off. Press and hold the Monitor button, and turn on your radio. A ringing tone is heard, indicating that your
radio is in Programming Mode. The K indicator illuminates and RW is displayed.
Exiting Programming Mode
Turn off the radio, to exit Programming Mode.
Accessing Programming Mode Parameters
Press PTT or the Monitor button, to scroll through the features available in Programming Mode. Press the button to scroll through
the parameters for each feature.
Feature Range Remarks
Squelch Level
(SQL-XX)
SQL-00, …, SQL-15 Select low level when you need to receive very weak
signal, and select high level when the communications distance is near.
Time Out Timer
(TOT-XXX)
TOT-OFF, TOT-001, …, TOT-010 This determines the maximum duration (in minutes) that you can transmit
continuously.
Scan List 1
(SCANLST1)
1-01-XXX, …,
1-16-XXX,
XXX denotes channel number.
Up to 16 members per scan list. First member is assigned as Priority Channel,
if Priority Scan is started. When scanning is started, only these 16 members
will be scanned.
Battery Saver
(BS-XXXX)
BS-OFF,
BS-NORM,
BS-ENH
Battery Saver helps to extend your battery life. When enabled, it turns off
radio receiver circuitry periodically when no activity is detected. BS-NORM
(Normal) turns off the radio less frequently; select this if you want to save bat-
tery, but expect a Selective Call. BS-ENH (Enhanced) turns off the receiver
for a longer duration; select this if you want to maximize battery saving and
do not expect to receive any Selective Call.
Battery Type
(BT-XXXX)
BT-NIMH,
BT-NICD,
BT-ALK
Selects the type of battery that your radio uses: NIMH (Nickel Metal
Hydride), NICD (Nickel Cadmium) or ALK (Alkaline).
Alert Tone Volume
(BEEP-X)
BEEP-OFF, BEEP-1,
BEEP-2,
BEEP-3
Selects the alert tone volume needed. Select BEEP-OFF, if you require quiet
operation, or BEEP-3, if working in a noisy environment.
Prime Channel Select
(PRM-XXX)
PRM-OFF, PRM-001, ….,
PRM-XXX,
XXX denotes the highest channel
number supported by your model.
The Prime Channel is the channel that you wish to spend most of your time
monitoring. The radio will always switch back to the Prime Channel if it is
idle for more than the pre-programmed hang-time in other channel.
Backlight Select
(LGT-XXXX)
LGT-AUTO, LGT-TOGL Selecting LGT-TOGL makes the Backlight button a toggle to control the ON/
OFF status of the LCD backlight. Selecting LGT-AUTO causes the backlight
to automatically extinguish, if there is no keypress for more than 5 seconds.
Pressing the Backlight button prolongs illumination time.
Ch. 2 Ch. 1 Ch. 3
Ch. 1
Ch. 4
Ch. 1
Home
Start
Channel 1 Prioritized
Ch. 2
Ch. 3
Ch. 4
Ch. 1
Home
Start
Normal Scan
LCD Screen
• Displays selected channel, programming parameters, status messages and any error or information messages.
LCD
Indicator
Description Function
LKeypad lock indicator Illuminates when your keypad is locked.
JTalkaround indicator Illuminates when you are not transmitting through the repeater. Extinguishes
when you are transmitting using the repeater offset/user-defined transmit
frequency.
Battery level indicator Shows remaining charge in battery based on how many bars are displayed.
BPower level indicator “L” illuminates to indicate radio transmits in low power; “H” illuminates to
indicate radio transmits in high power.
CMonitor indicator Illuminates when monitoring a selected channel.
KProgramming Mode
indicator
Illuminates when in Programming Mode.
HScan indicator Blinks, without the dot, when scan is activated. Illuminates when there is
some activity on a non-priority channel. Illuminates, with dot blinking,
indicates that there is some activity on the priority channel.
Signal Strength Indicator Shows the signal strength. Six bars indicate the strongest signal.
On/Off and Volume Knob
• If the radio is off, turn this knob clockwise to turn
the radio on.
• If the radio is on, turn this knob counter-clockwise
to turn the radio off.
• Turn this knob clockwise to increase the volume.
• Turn this knob counter-clockwise to decrease the
volume.
Monitor Button
• Used to monitor the channel for any
activity; squelch is disabled.
Push-to-Talk (PTT) button
• Press and speak to microphone to send
message.
• Release and listen to receive messages.
Microphone
• Speak into the microphone when send-
ing message.
Button
• Used to select a channel in Normal
Mode.
• Used to select a parameter in Program-
ming Mode.
• Used to change the scanning direction.
Speaker
• You will hear received messages through
the speaker.
Accessory Connector
• Used to connect compatible
accessories to your radio.
LED Indicators
LED Colour State Indication
Red Illuminated Radio is transmitting.
Red Blinking Battery voltage is low.
Green Illuminated Radio is receiving.
Programming Port
• Lower port of the radio.
• Used to program your radio.
Programmable Buttons (A, B, C, D)
• Used to select various functions. These functions can be assigned as a short press (press and release) or a
long press (press and hold for 1 second).
• The default functions programmed to your radio are described in the table below.
• Although your radio is programmed with default functions, you have the ability to re-program the radio’s
programmable buttons. You may want to write down the new functions in the table below.
Button Function
Channel Alias1
1. Parameter values are preserved, even after the radio is turned off.
Toggles display between Channel Number and Channel Alias.
Backlight Toggles backlight display between On and Off.
Keypad Lock1Locks or unlocks all buttons except PTT, Monitor and On/Off/Volume Knob.
Nuisance Channel
Delete
Removes unwanted channel(s) temporarily from scan list during scan.
PL/DPL Enable2
2. Turning off the radio or changing the channel restores this setting to the default value of the active channel.
Enables or disables radio from requiring matching PL/DPL to unsquelch.
Prime Channel Quick move to the pre-programmed “Prime” channel
Power Select1Selects required power level: High or Low.
Scan1Starts or stops channel scan.
Squelch Level1Selects desired squelch level. Use the button to choose desired level (Level 0 will
unsquelch radio unconditionally, whereas Level 15 will set tightest squelch).
Talkaround Enables or disables radio to transmit in Talkaround mode.
No Operation No function is programmed to this button.
Alert Tone Volume1Selects the alert tone volume needed for quiet operations or a noisy environment.
Press Type Button A Button B Button C Button D
Short Press Prime Channel Scan On/Off Power Select Backlight On/Off
Long Press Channel Alias Nuisance Channel
Delete
Squelch Level Kepad Lock
Press Type Button A Button B Button C Button D
Short Press
Long Press