Multitone Electronics PLC 2WPAG EkoTek Pager - 2 way alphanumeric messaging device User Manual User Guides
Multitone Electronics PLC EkoTek Pager - 2 way alphanumeric messaging device User Guides
User Guides

EkoTek Pager
USER GUIDE
For
EkoTek Pager
9261-8275 (Issue 2.0)
EkoTek Pager
2
CONTENTS
Introduction 4
Compliance 5
General User Information 6
EkoTek System Schematic 7
Switching On Your EkoTek Pager 7
Switching On Your EkoTek Pager 8
Status and Warning Messages 9
Switching Off Your EkoTek Pager 10
Using the Emergency / Assist Button 11
Dead Man & Man Down Alert 12
Receiving a Message 14
Reading a Message 16
Viewing a Message Again 17
Accepting, Rejecting & Deleting Two-Way Messages 18
Deleting a Message 19
Delete All Messages 21
Archiving a Message 22
Reviewing Archived Messages 23
Deleting Archived Messages 24
EkoTek Pager
Part No. 9261-8275 Issue 2.0 3
Delete All Archived Messages 25
Set 12/24 Hour Mode 26
Power Save 27
Setting the Alert Options 28
Setting the Message Display Options 30
Setting Auto Delete 32
Changing the Battery 33

EkoTek Pager
Part No. 9261-8275 Issue 2.0 4
Introduction
Your EkoTek Pager is an alphanumeric two-way messaging device,
incorporating an emergency calling/assist facility. The EkoTek
Pager is able to receive text messages, allows basic responses and
provides the ability to store messages for later viewing. The high
contrast screen is capable of displaying up to 150 characters and all
menus are displayed in plain language text. Operation of all
functions is performed via intuitive menus using 3 tactile buttons
and the red button is used for assist or emergency applications. To
gain full benefit from this product please read this guide carefully.
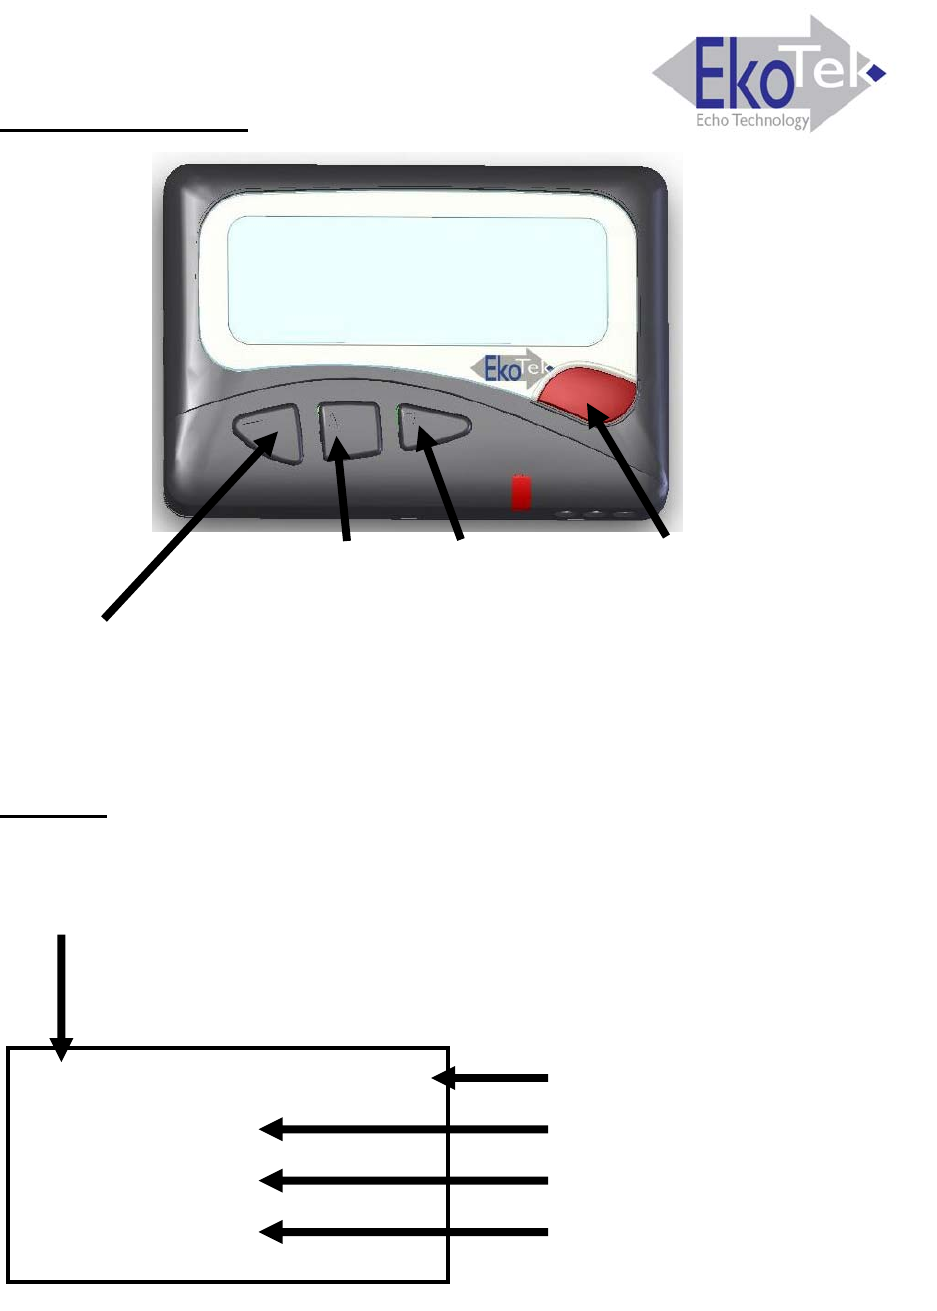
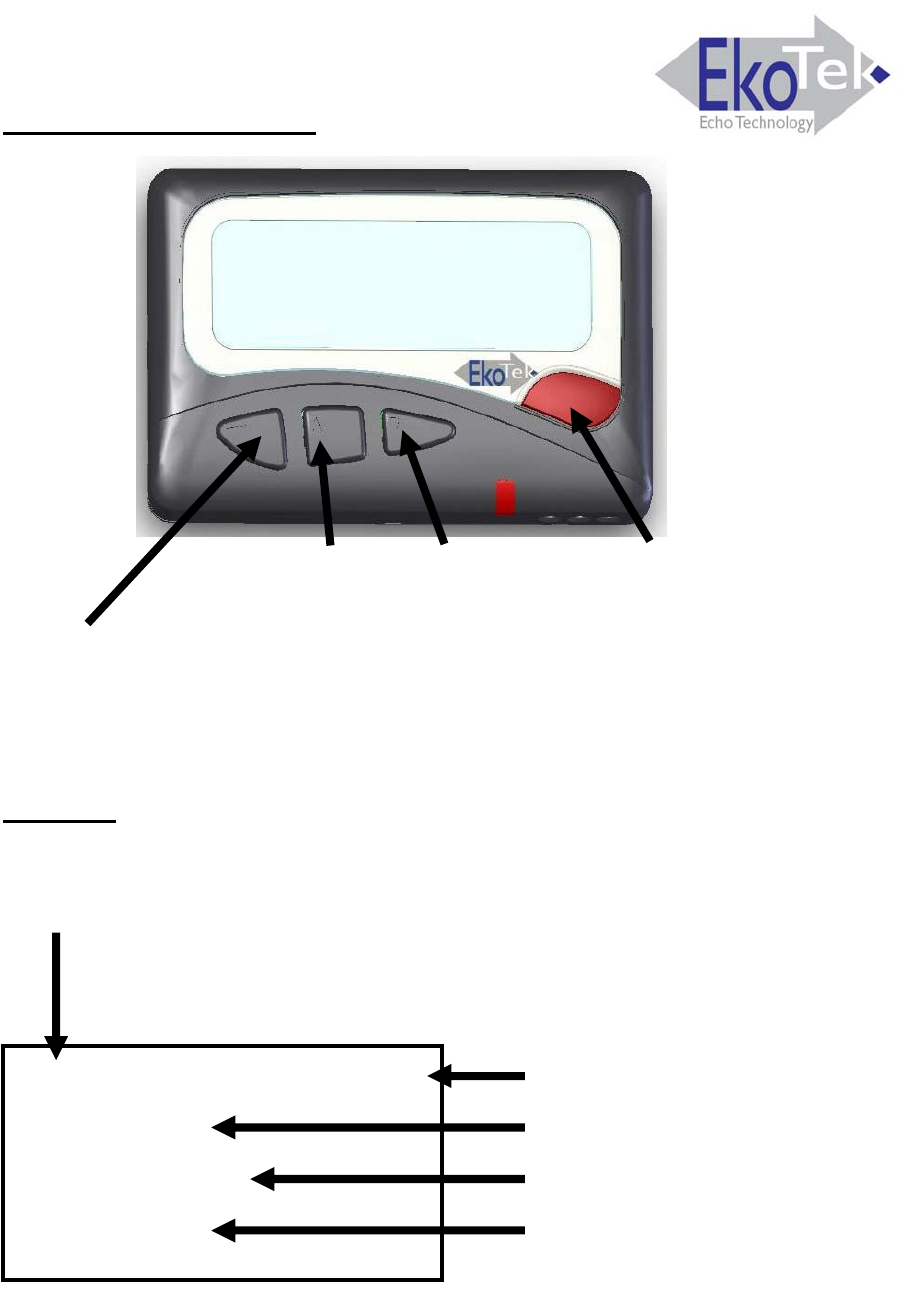
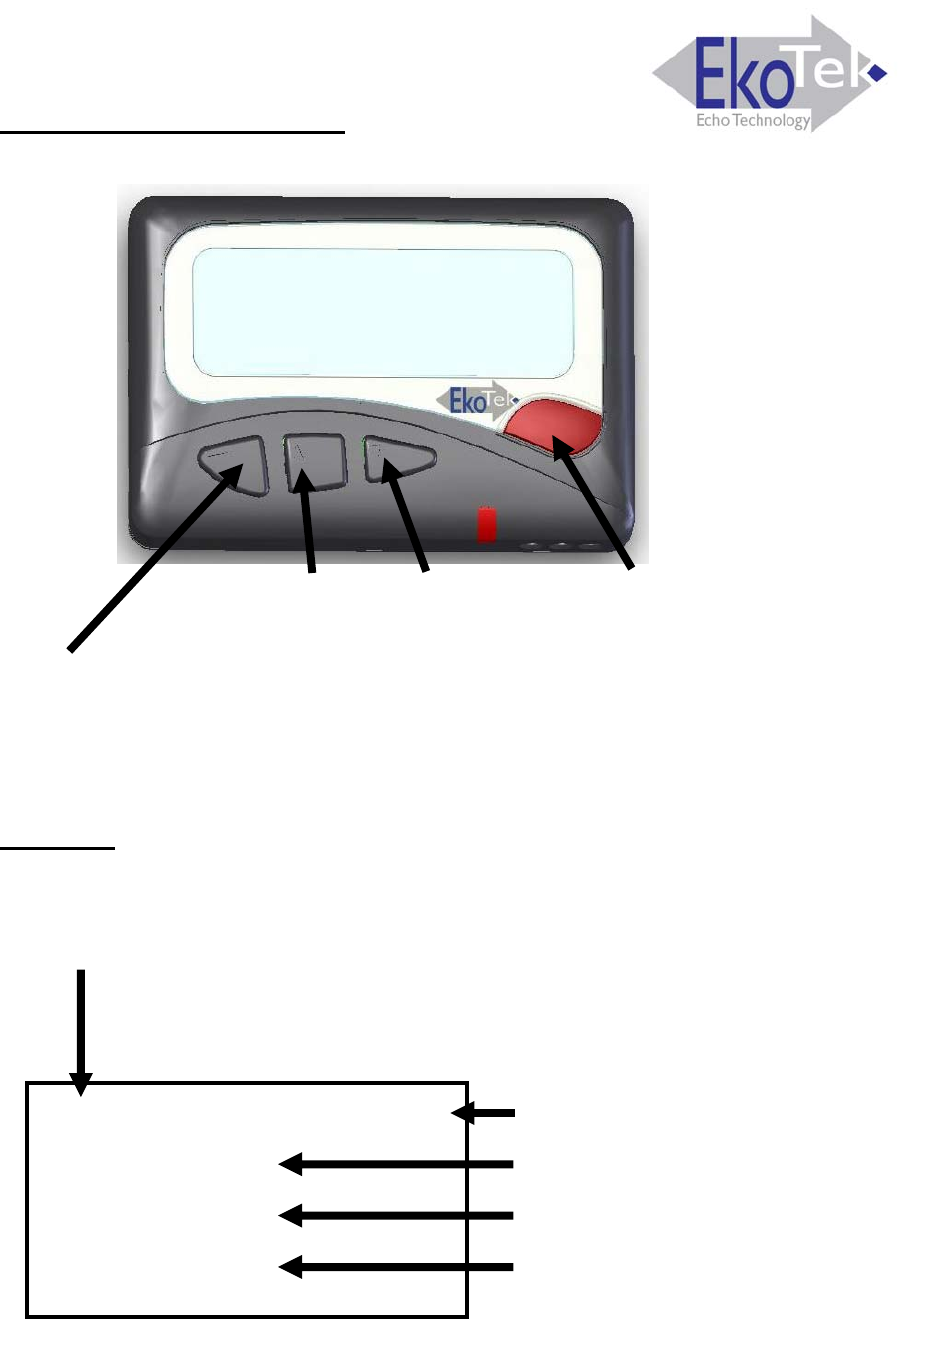
Function / Control Buttons
Select / Enter
Button Scroll Up
Button Scroll Down
Button Emergency /
Assist Button
Select & Enter Button
Denoted by the X symbol, this button is used to move to and
confirm selected options within the Menu Screens and to return to
the Standby Screen when pressed for more than 1 second.
Scroll Up/Down Buttons
Denoted by the S (Up) and T (Down) Symbols. These buttons are
used to scroll up and down the Menu Screens.
Emergency & Assist Button
Denoted by the Red button, this can be either Single or Double
press. Operation is dependent upon product configuration.

EkoTek Pager
Part No. 9261-8275 Issue 2.0 5
Compliance
This product complies with the requirements of the EU Radio &
Telecommunications Terminal Equipment Directive 99/5/EC.
FCC & Industry Canada Statement Of Compliance
This device complies with Part 15 of the FCC Rules and Industry
Canada Standard RSS 210.
Operation is subject to the following two conditions: (1) this device
may not cause harmful interference and (2) this device must accept
any interference that may cause undesired operation.
Unauthorised modification to this equipment will void the user's
authority to continue to operate the device within the scope of the
Industry Canada and FCC Part 15 Rules.
A full technical specification for this product may be obtained from
your Multitone representative.
WEEE Directive & Product Disposal
At the end of its serviceable life, this product
should not be treated as household, or
general waste. It should be handed over to
the applicable collection point for the
recycling of electrical and electronic
equipment, or returned to the supplier for
disposal.
EkoTek Pager
Part No. 9261-8275 Issue 2.0 6
General User Information
Radio Reception
Your EkoTek Pager has been designed to give optimum
performance within the coverage area of the transmitting system.
As with any radio system there may be areas of poor coverage,
where reception may be sporadic, or non-existent. If necessary,
consult your system administrator in order to familiarise yourself
with these areas.
Hazardous Areas
This pager should not be taken into areas where explosive gas, or
dust products, may be present.
Pager Care
Protect your pager from liquids, extreme temperatures and strong
magnetic fields. Do not leave your pager exposed to strong
sunlight.
Servicing
Should your EkoTeK Pager need repair, return it to the designated
service agent. Do not attempt to open or repair the product, as it
contains delicate components and requires specialised test
equipment.
EkoTek Pager
Part No. 9261-8275 Issue 2.0 7
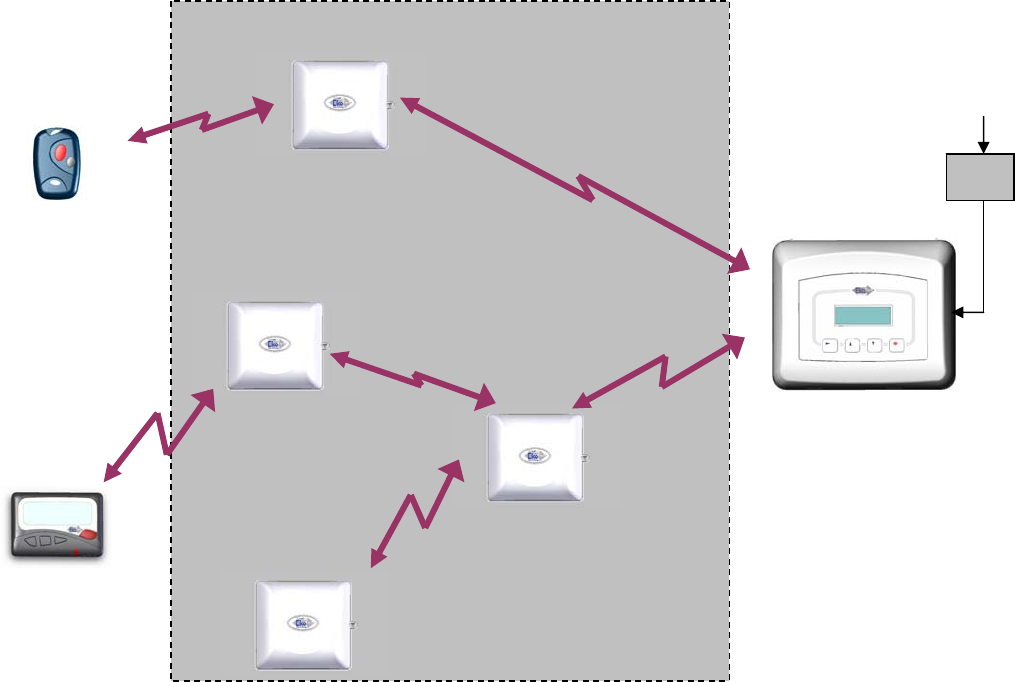
EkoTek System Schematic
EkoTek
Self Organising & Repairing Wireless Mesh Network
Hub
With Web Serve
r
Repeater
Wireless
Call Fob
Pager
Repeater
Repeater
Repeater
Batter
y
Powered
Power
Adaptor
AC
Includes Personal
Security Alarm
Repeater to Repeater
Distance Typically 10 to 15m

EkoTek Pager
Part No. 9261-8275 Issue 2.0 8
Switching On Your EkoTek Pager
To switch on, press and hold the X button for more that half a
second. A message will then be displayed for three seconds, whilst
self-checks are being performed. Finally, the Standby Screen will
be displayed:
An exclamation mark (!) will flash between the Hours and the
Minutes (11!34 AM). This indicates that the EkoTek Pager is in the
process of detecting the EkoTek wireless network. Once the
network is detected this will change to a flashing ‘colon’ or ‘period’
symbol.
If your EkoTek Pager does not switch on, check that a fresh battery
is correctly installed, see section: Changing the Battery.
The 4th line of the screen will display either ‘EkoTek’ or a location
name once the pager has received its configuration from the
network.
11!34 AM 12.03.07

EkoTek Pager
Part No. 9261-8275 Issue 2.0 9
Status and Warning Messages
When your EkoTek Pager is switched on the Standby Screen is
displayed. This consists of the time and date plus additional status
and warning messages. A typical screen is shown below:
The first line is the clock displaying the current time and date, the
time may be in either a 12 or 24-hour format. In the top right hand
corner the pager will display Day or Night this is used to indicate
the shift mode.
The second line displays The Pager Name or ‘n’ Unread Message,
showing how many messages have been received but not viewed.
The third line shows the status of the alert, Silent to warn that the
audible alert has been turned off, or No Vibrate to show that the
vibrate alert has been turned off. When both audible and vibrate
alerts are turned off, Silent and No Vibrate alternate at 2-second
intervals. If nothing is displayed, then both audible and vibrate alert
are turned on.
The fourth line normally displays the EkoTek logo or location
information, however, once the battery reaches a state where it
requires replacement, Replace Battery will be displayed.
If the EkoTek Pager is out of range from the wireless network the
Out of Range message will also be displayed. In situations where
the ‘battery requires replacement’ and the pager is ‘out of range’
only the highest priority will be displayed.
11:34 AM 12.03.07 Day
Paul Smith
Silent
EkoTeK

EkoTek Pager
Part No. 9261-8275 Issue 2.0 10
Switching Off Your EkoTek Pager
From the Standby Screen press and release the X button. The
options screen will now be displayed:
The two pointers show the item that will be selected if the X button
is pressed. Use the S or T buttons to move the pointers to Power
Off and select this item by pressing the X button. The pointers will
change to question marks showing that confirmation is required to
switch the unit off:
Press the X button again and your EkoTek Pager will switch off.
**> Options <**
Time and Date
Enable Powersave
Power Off
Options
Time and Date
Enable Powersave
??> Power Off <??

EkoTek Pager
Part No. 9261-8275 Issue 2.0 11
Using the Emergency / Assist Button
Note: This feature has to be enabled by the System Supervisor
Raising an Alarm
In the event of an Emergency or where immediate Assistance is
required press the RED button. Depending on how the EkoTek
system is configured this may require a single or a double press.
Please confirm this with your EkoTek system supervisor.
On pressing the RED button the EkoTek Pager will either beep
and/or vibrate in sequence with a flashing alert lamp. Please note
that the precise nature of this acknowledgement is subject to
configuration. The screen will display the following information
indicating that the alarm has been raised and delivered:
Cancelling an Alarm
At any stage during the initiation of an emergency / assist alarm it
can be cancelled. To cancel the alarm press and hold the X button,
the display will confirm this action with the following message:
11:34 AM 12.03.07 Day
No Unread Message
Alarm Delivered
11:34 AM 12.03.07 Day
Paul Smith
Raising Alarm
11:34 AM 12.03.07 Day
Paul Smith
Clearing Alarm

EkoTek Pager
Part No. 9261-8275 Issue 2.0 12
Dead Man & Man Down Alert
Your EkoTek Pager is equipped with a Dead Man Alert and a Man
Down Alarm facility. These features have to be enabled by the
System Supervisor.
Dead Man Alert
The Dead Man Alert operates by initiating an alert to the EkoTek
Pager at pre-set time intervals, this alert must be acknowledged by
single press on ANY of the pager buttons within a pre-set time
period. Please note that the System Supervisor configures both the
frequency of the Dead Man Alert and the required response time.
If the alert is not acknowledged within the pre-set time period the
EkoTek Pager will automatically initiate the following alarm
escalation sequence:
Please note that at any stage during the Dead Man Alert process it
is possible to cancel the alarm by pressing the X button.
11:34 AM 12.03.07 Day
Paul Smith
Press any key to cancel
11:34 AM 12.03.07 Day
Paul Smith
Raising Alarm
11:34 AM 12.03.07 Day
Paul Smith
Alarm Delivered
EkoTek Pager
Part No. 9261-8275 Issue 2.0 13
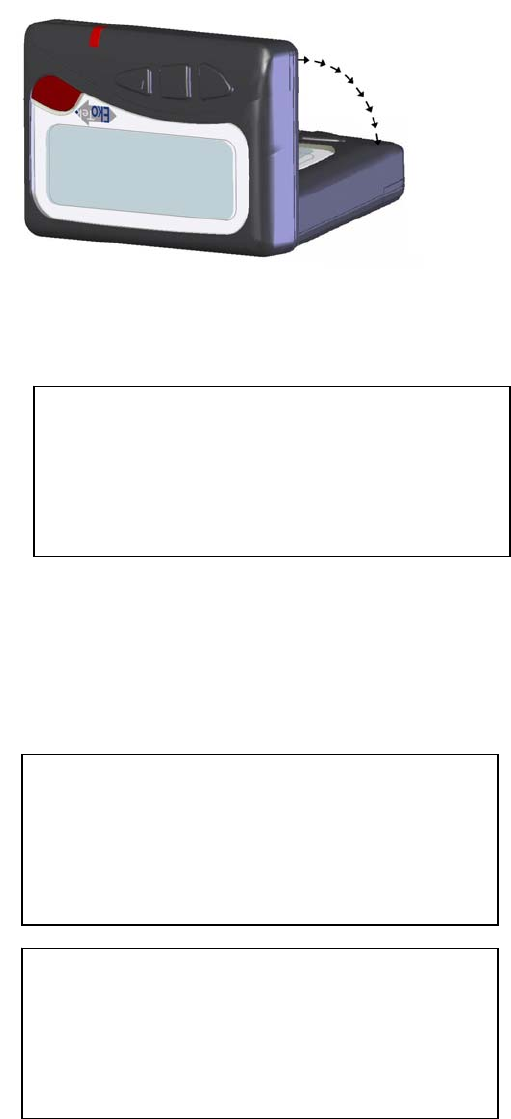
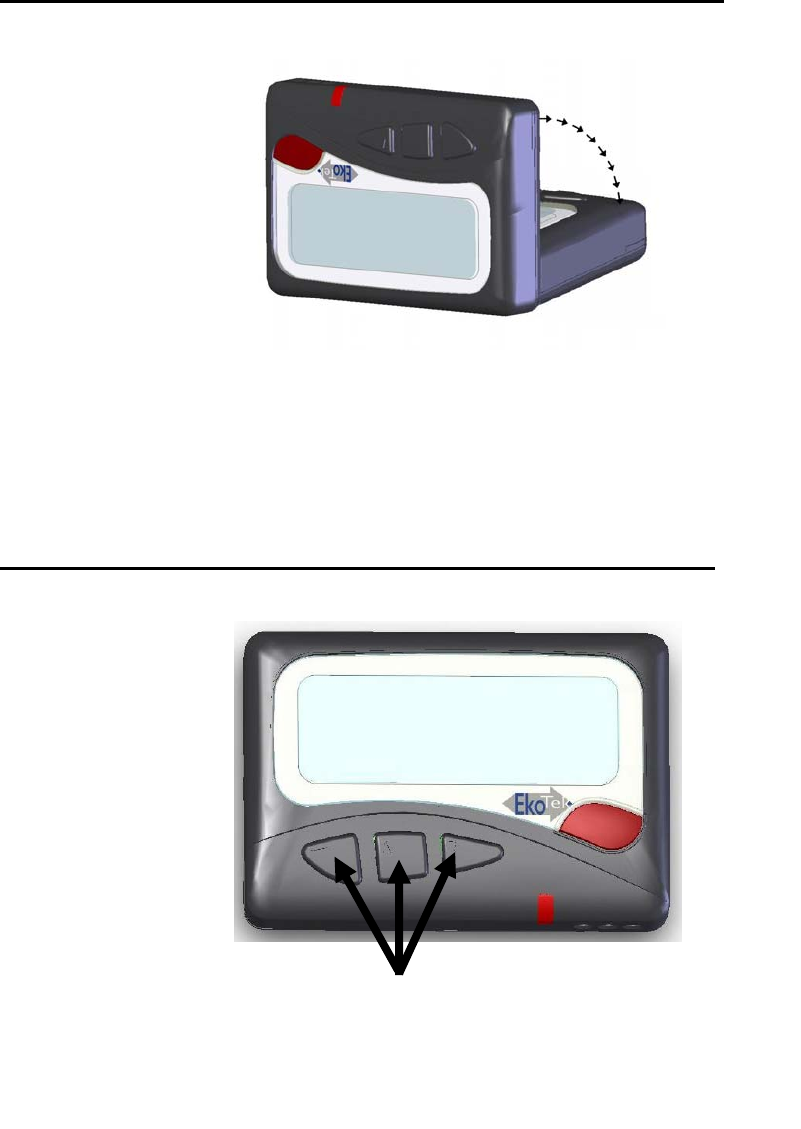
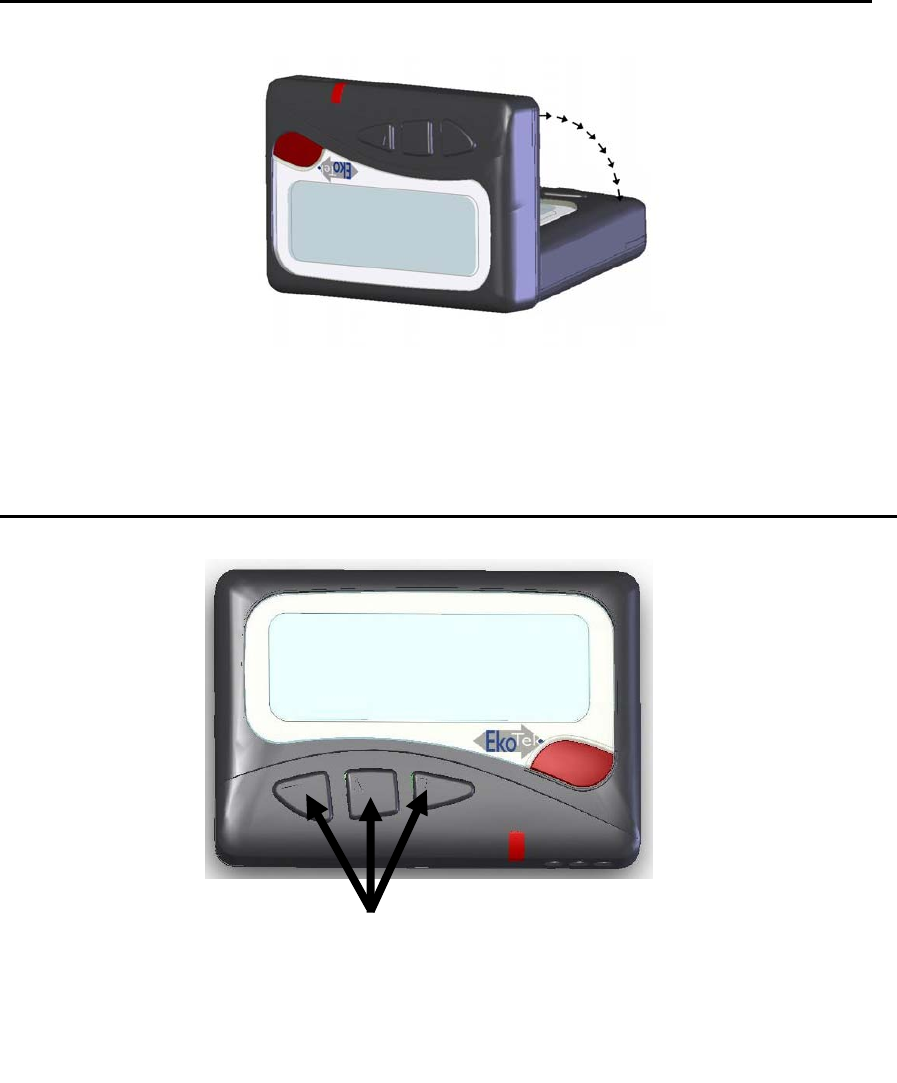
Man Down Alert
The Dead Man Alert operates by automatically initiating an alert
sequence if the EkoTek Pager is tipped over:
If the EkoTek Pager is tipped-over after a pre-set time interval the
pager will beep and will display following warning:
This allows the unit to be returned to an upright position, terminating
the alarm sequence. If the EkoTek Pager cannot be righted the
following alarm escalation sequence will be initiated:
Please note that at any stage during the Man Down Alert process it
is possible to cancel the alarm by pressing the X button.
11:34 AM 12.03.07 Day
Paul Smith
Return unit to upright
11:34 AM 12.03.07 Day
Paul Smith
Raising Alarm
11:34 AM 12.03.07 Day
Paul Smith
Alarm Delivered

EkoTek Pager
Part No. 9261-8275 Issue 2.0 14
Receiving a Message
When your EkoTek Pager receives a message, the lamp, vibrate
and the audible alert will activate, unless silent mode has been
selected or the vibrate facility has been turned off. The message
will be displayed during the alert period.
The end of the message is always shown by the character ■. If the
message is very long and cannot be fully displayed the last
character will be designated using the following symbol h. This
indicates that the message continues onto the next screen:
To see the rest of the message, simply press the X button:
If the message is not acknowledged the EkoTek Pager will return to
the Standby Screen indicating that a message has been received:
Your car will be ready for
collection next Monday
afternoon■
Contact Mr Moore of ABC
Electronics Tel: 01763-246391.
The new contract is ready for
signature can you sign thish
before Wednesday. JILL■
3:54 PM 12.03.07
1 Unread Message
EkoTek Pager
Part No. 9261-8275 Issue 2.0 15
As each new message is received it is stored. The maximum
number of messages that can be stored is 6. To make room for
new messages your EkoTek Pager will start to delete the oldest
read messages. If there are no read messages it will delete the
oldest unread message.

EkoTek Pager
Part No. 9261-8275 Issue 2.0 16
Reading a Message
To read a message, press the T button whilst your EkoTek Pager is
in the Standby Screen. The most recently received unread
message will be displayed:
The top line shows the time and the date the message was received
and to the right message status will be displayed, this will either be
Unread or Read.
Press the T button to display the next previously received unread
message, or select the S button to display the previously viewed
message.
Using the S and T buttons allow navigation of the stored
messages. Unread messages are sorted in time order and are
displayed first, followed by the read messages, also in time order.
4:38 PM 12.09.06 Unread
Your car will be ready for
collection next Monday
afternoon■
9:05 AM 12.09.06 Unread
Contact Mr Moore of ABC
Electronics Tel: 01763 - 246391.
The new contract is readyh
2:17 PM 12.09.06 Read
You are booked on Flight BA153.
Departs at 18:05 ticket
confirmed. Helen■

EkoTek Pager
Part No. 9261-8275 Issue 2.0 17
Viewing a Message Again
While a message is being displayed, press the X button and the
message option screen will be displayed. The display response will
dependent upon the message type received. If it is a single-way
message the following options will be displayed:
If it is a two-way message, the options change to allow initiation of a
response (see section on accepting, rejecting and deleting two-way
messages):
Both options allow you to view the message. Press the X button
again to select View Again the EkoTek Pager will display the last
message again, which will then remain in the memory for you to
view in future, until deleted.
If the message is in an unread state when View Again is selected,
the status will change to Read. Should the View Again option be
used on a message before it has been retrieved from the memory,
the date and time will be displayed with the message when it is
displayed again, with the status set to Read.
**> View Again <**
Delete
Delete All
Archive
9:05 AM 12.09.06 Read
Contact Mr Moore of ABC
Electronics Tel: 01763 - 246391.
The new contract is ready►
**> View Again <**
Accept
Reject
Delete

EkoTek Pager
Part No. 9261-8275 Issue 2.0 18
Accepting, Rejecting & Deleting Two-Way Messages
On receipt of a message press the ► button directly. Or
From the Standby Screen press the T button to read the message,
press the ► button to acknowledge the message. For two-way
messages the following options screen will be displayed:
To respond to the message press the T button and move the
pointers to: Accept, Reject or Delete. Select the option by
pressing the X button:
The pointers will change to question marks requesting confirmation
of the action:
To confirm the action press the X button, the EkoTek Pager will
briefly display the following depending on the action selected:
For Accept the response is: Sending Accept Response
For Accept the response is: Sending Reject Response
For Delete the response is: Deleting
**> View Again <**
Accept
Reject
Delete
View Again
**> Accept <**
Reject
Delete
View Again
??> Accept <??
Reject
Delete

EkoTek Pager
Part No. 9261-8275 Issue 2.0 19
Deleting a Message
To delete a message, press the X button when the ■ appears at the
end of the message. The message option screens will be displayed
depending on the message type received:
For 1-way
Messages:
For 2-way
Messages:
Press the T button to move the pointers to the Delete item and
select by pressing the X button:
For 1-way
Messages:
For 2-way
Messages:
The pointers will change to question marks to show that
confirmation of the delete action is required. If you do not want to
delete, press the S or T buttons. To confirm that you wish to
delete the message, press the X button again and the screen will
briefly display Deleting.
**> View Again <**
Delete
Delete All
Archive
**> View Again <**
Accept
Reject
Delete
View Again
Accept
Reject
**> Delete <**
**> View Again <**
Delete
Delete All
Archive

EkoTek Pager
Part No. 9261-8275 Issue 2.0 20
When the current message has been deleted, the previously
received message will be displayed. If you wish to delete this
message repeat the procedure above. To return to the Standby
Screen press and hold the X button for one second, if there are no
more messages, the following screen will be displayed:
No messages

EkoTek Pager
Part No. 9261-8275 Issue 2.0 21
Delete All Messages
Note: The delete all feature is available to all 1-way messages.
However, for 2-way messages the delete all feature can only be
accessed once the message has been viewed and appropriate
action taken.
To delete all the messages, press the X button when the ■ appears
at the end of the message. The message option screen will be
displayed:
Press the T button to move the pointers to the Delete All item and
select by pressing the X button:
The pointers will change to question marks, to show that
confirmation of the delete action is required. If you do not want to
delete, press the S or T buttons. To confirm that you wish to
delete the message, press the X button again and the screen will
briefly display Deleting. Having deleted all the messages the
following screen will be displayed:
**> View again <**
Delete
Delete All
Archive
No Messages
View again
Delete
??> Delete All <??
Archive

EkoTek Pager
Part No. 9261-8275 Issue 2.0 22
Archiving a Message
Note: The archive feature is available to all 1-way messages.
However, for 2-way messages the archive feature can only be
accessed once the message has been viewed and appropriate
action taken.
Messages may be stored for reference, by using the archive facility.
The EkoTek Pager cannot automatically delete archived messages
when the message memory is full, only the user can delete
messages. At the end of the message you wish to archive, press
the X button to see the message option screen. Move the pointers
to the Archive item with the S or T button:
Select Archive with the X button and the pointers will change to
question marks.
Confirm your selection by pressing the X button again. The screen
will briefly display Archiving. When the current message has been
archived, the screen will show the previously received message. If
you wish to archive this message, repeat the procedure. If there are
no other messages, you may return to the Standby Screen by
pressing and holding the X button for one second. The following
screen will be displayed:
View again
Delete
Delete All
**> Archive <**
No Messages

EkoTek Pager
Part No. 9261-8275 Issue 2.0 23
Reviewing Archived Messages
To review your archived messages, press the S button whilst your
EkoTek Pager is displaying the Standby Screen:
The first screen of the most recent archived message will be
displayed. You may select the archived message that you want to
review, by pressing the: S or T buttons until the first screen of the
message is displayed. If the archived message is several screens
long, you can view subsequent screens by pressing the X button.
The last screen of the message will contain the ■ symbol.
The top line shows the time and date that the message was
received and to the right the message status Archive is displayed.
10.50 AM 12.09.06 Archive
Bring 2 new demo models to the
meeting at 11.30 next Tuesday.
Ruth■

EkoTek Pager
Part No. 9261-8275 Issue 2.0 24
Deleting Archived Messages
To delete an archived message, press the X button when the ■
symbol appears at the end of the message. The message option
screen will be displayed:
Press the T button to move the pointers to the Delete item and
select by pressing the X button. The pointers will change to
question marks.
If you do not want to delete, press the S or T buttons. To confirm
that you wish to delete the message press the X button again and
the screen will briefly display Deleting.
When the current message has been deleted, the previously
archived message will be displayed. If you wish to delete this
message, repeat the procedure. If there are no more archived
messages, the following screen will be displayed:
To return to the Standby Screen, press and hold the X button for
one second.
**> View again <**
Delete
Delete All
View again
??> Delete <??
No Archived Messages

EkoTek Pager
Part No. 9261-8275 Issue 2.0 25
Delete All Archived Messages
To delete all of the archived messages, press the X button when
the ■ symbol appears at the end of a message. The message
option screen will be displayed:
Move the pointers to the Delete All item by pressing the T button.
Select by pressing the X button and the pointers will change to
question marks:
If you do not want to delete all the messages press the: S or T
buttons. To confirm that you wish to Delete All the messages,
press the X button again and the screen will briefly display
Deleting:
To return to the Standby Screen press and hold the X button for
one second.
**> View again <**
Delete
Delete All
View again
Delete
??> Delete All <??
No Archived Messages

EkoTek Pager
Part No. 9261-8275 Issue 2.0 26
Set 12/24 Hour Mode
The Set 12/24 Hour Mode function allows you to set 12 hour to 24-
hour mode only.
From the Standby Screen press the X button. From the Options
Screen move the pointers to Set 12/24 Hour Mode by pressing the
T button:
Select this item by pressing the X button and the pointers will
change to question marks. Depending on whether the pager is in
12-hour or 24-hour mode the following screen will be displayed:
Press the X button again to confirm the selection.
Options
**> Set 12/24 Hour Mode <**
Enable Powersave
Power Off
??> Set 12 Hour Mode <??
??> Set 24 Hour Mode <??

EkoTek Pager
Part No. 9261-8275 Issue 2.0 27
Power Save
The Power Save function allows the display to blank after a period
to extend the battery life.
From the Standby Screen press the X button. From the Options
Screen move the pointers to Enable Powersave by pressing the T
button:
Select by pressing the X button and the pointers will change to
question marks. Press the X button again to confirm the selection.
Options
Set 12/24 Hour Mode
**> Enable Powersave <**
Power Off

EkoTek Pager
Part No. 9261-8275 Issue 2.0 28
Setting the Alert Options
The EkoTek Pager allows full control of how the pager alerts when
messages are received, the audible alert and vibrate alert can be
set to ‘off’ or ‘on’. From the Standby Screen press the X button to
select the Options Screen:
Select Options and press the X button again. The following screen
will be displayed:
Select Alert by pressing the X button and the following screen will
be displayed:
You are now able to modify the alert options. The currently selected
item will flash and each press of the X button will advance the
selection to the next menu item.
**> Options <**
Set 12/24 Hour Mode
Enable Powesave
Power Off
**> Display <**
Auto-delete
Alert
Audible Alert On
Vibrate Alert On
EkoTek Pager
Part No. 9261-8275 Issue 2.0 29
When the item you wish to change is flashing, press the S and T
button to change its value:
The Audible Alert can be either enabled, or disabled.
The Vibrate Alert can be either enabled, or disabled.
Once your desired alert options have been selected, press and hold
the X button for one second and the EkoTek Pager will return to the
Standby Screen.

EkoTek Pager
Part No. 9261-8275 Issue 2.0 30
Setting the Message Display Options
Your EkoTek Pager is equipped with display options and these may
be set according to your personal requirements. To change the
message display options, press the X button from the Standby
Screen. The Options Screen will now be displayed and select
Options by pressing the X button:
Move the pointers to Display by pressing the T button and select
this item by pressing the X button:
The following screen will be displayed:
The selected item will flash. To select the next item, press the X
button. Each press of the X button will advance the selection to the
next menu item. When the item you wish to change is flashing,
press the S or T buttons to change its value.
**> Options <**
Set 12/24 Hour Mode
Enable Powersave
Power Off
**> Display <**
Auto-delete
Alert
Font 2
Backlight On
Display Timeout 16s
Contrast 16
EkoTek Pager
Part No. 9261-8275 Issue 2.0 31
The Font option can be set to 1, 2 or 3:
• Font option 1 - Corresponds to a text size allowing up to 6 lines
per screen (this text size option may be disabled via the
programming software).
• Font option 2 - Corresponds to a text size allowing up to 4 lines of
larger text per screen.
• Font option 3 - Corresponds to a text size allowing up to 4 lines
per screen of larger text, in a bold font (the date stamp can be
suppressed via the programming software, when this text size is
selected).
The Backlight can be either enabled, or disabled. When disabled,
it will help to prolong battery life.
The Display Timeout can be set to 8, 16 or 32 seconds. This
option determines the length of time that selected screen remains
on display before reverting back to the Standby screen, if no buttons
are selected.
The Display Contrast can be increased, or decreased.
When you have finished setting your display options, return to the
Standby Screen by pressing and holding the X button for 1 second.

EkoTek Pager
Part No. 9261-8275 Issue 2.0 32
Setting Auto Delete
The Auto Delete function allows you to set the maximum number of
stored messages, excluding those in the Archive memory. If the
number of messages in the memory exceeds the selected number,
then the oldest Read message is deleted. Should there be no Read
messages, then the oldest un-read message is deleted instead.
If the Auto Delete value is changed and the number of messages in
the memory exceeds the new setting, then one message will be
deleted per minute, until the memory equals the new setting. The
available options are 1 through to 6 messages. To access the Auto
Delete function, press X the button to display the Options Screen.
Press the X button to select Options. Move the pointers to Auto-
delete by pressing the T button and select using the X button:
The following screen will then be displayed:
To set up Auto-delete, press the S or T button to change the
setting and then return to the Standby Screen by pressing and
holding the X button for one second.
**> Options <**
Time and Date
Enable Powersave
Power Off
Alert
Display
**> Auto-delete <**
Auto-delete 5
EkoTek Pager
Part No. 9261-8275 Issue 2.0 33
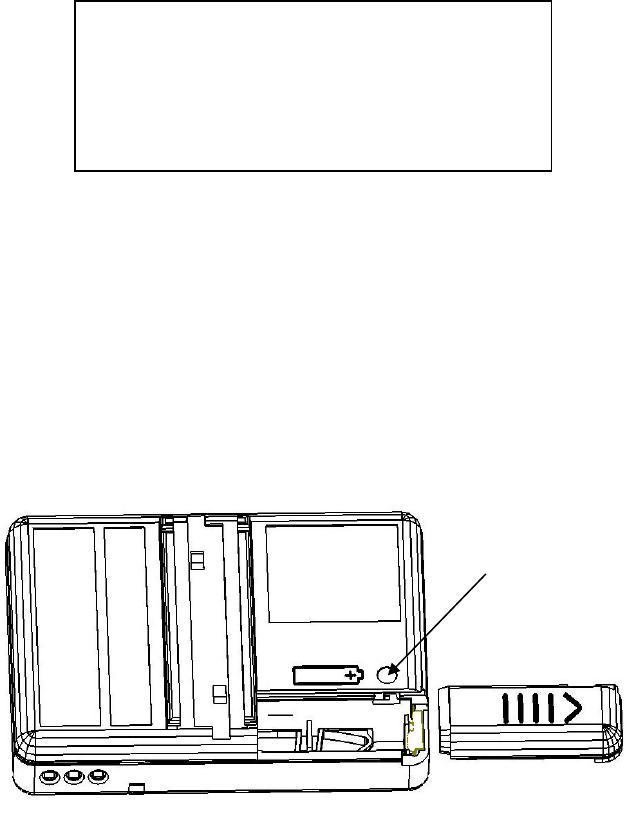
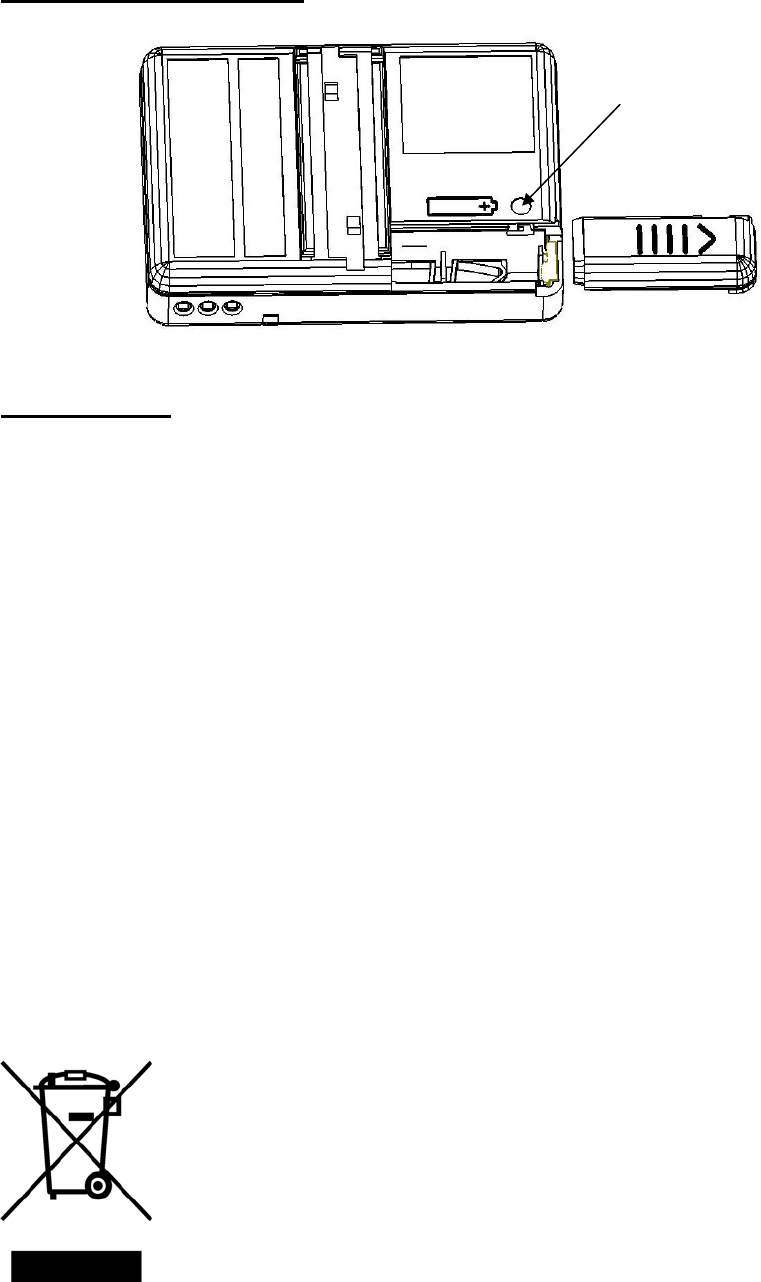
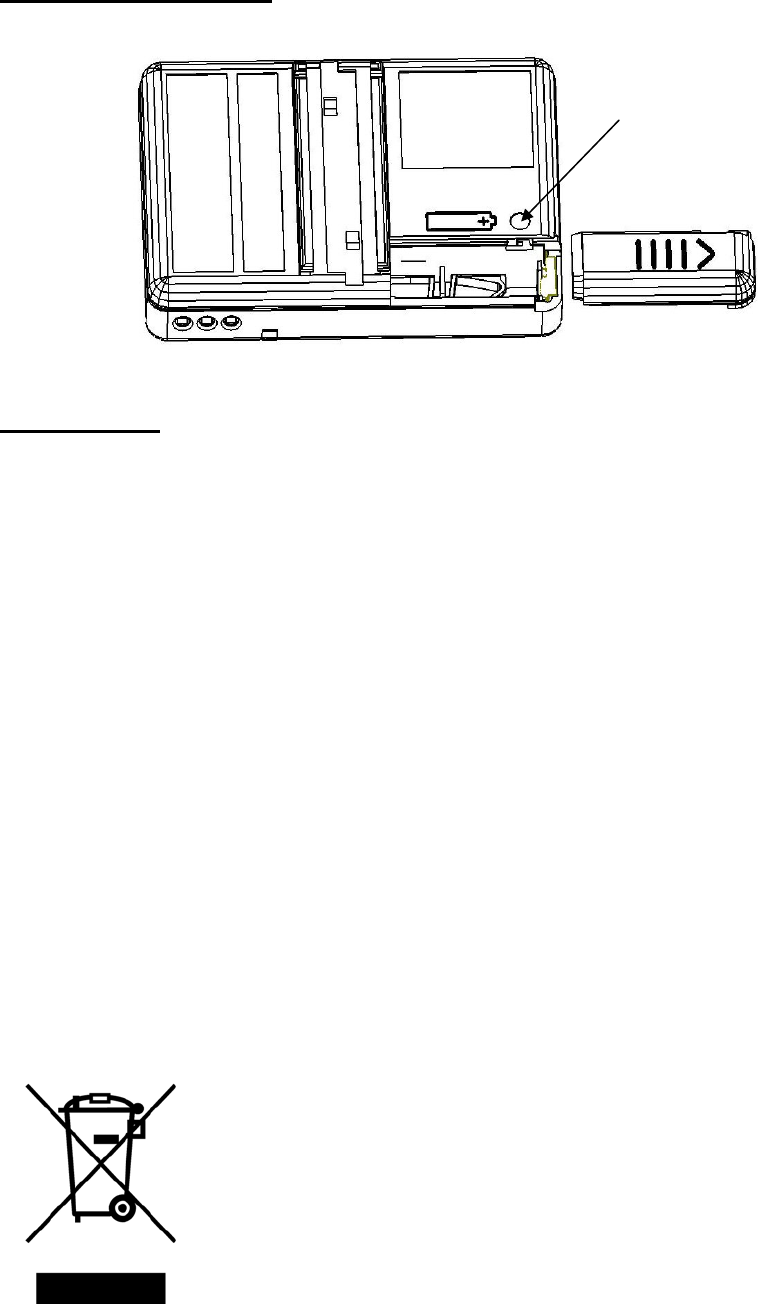
Changing the Battery
When the battery is near the end of its operating life, the EkoTek
Pager is programmed to provide a visual, audio and vibrate alert
warning. The normal audible beep alert will change to a different
tone and the Replace Battery warning will be displayed on the
Standby Screen:
The EkoTek Pager will continue to operate normally for several
days. To ensure that calls are not missed, the old battery should be
replaced with a fresh AAA sized cell as soon as possible.
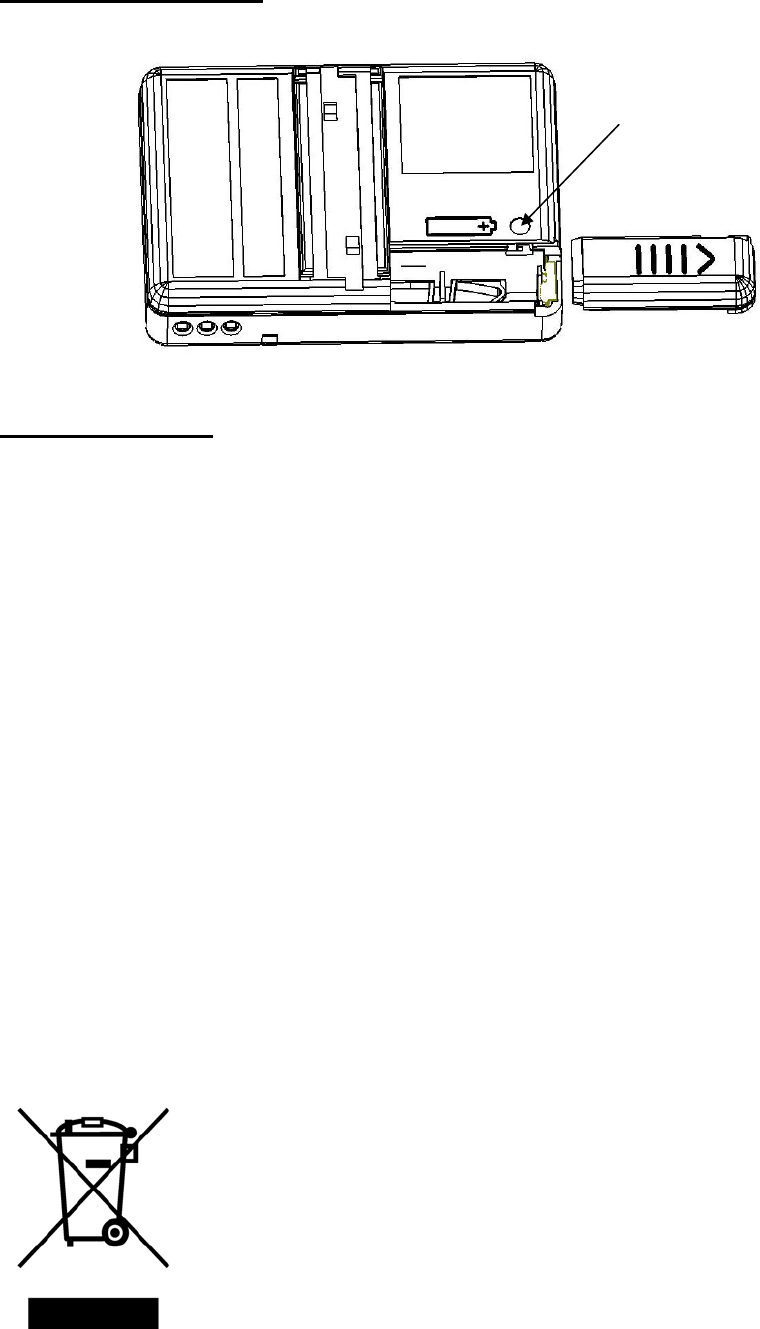
To remove the battery door, press and hold the battery door lock
"pip" on the back of your EkoTek Pager. At the same time slide the
battery door off in the direction of the arrow.
Insert the new battery in the direction as shown on the case back,
by sliding in the negative (-) end first. Slide the battery door back
into position so that it locks automatically with a click.
Dispose of the old battery carefully with consideration for the
environment and do not recharge or incinerate alkaline batteries.
4:55 PM 12.09.06
Paul Smith
Replace Battery
EkoTek
DOOR
LOCK
EkoTek Pager
Part No. 9261-8275 Issue 2.0 34
Notes:
EkoTek Pager
Part No. 9261-8275 Issue 2.0 35
EkoTek Pager
Part No. 9261-8275 Issue 2.0 36
Multitone Electronics plc
Multitone House,
Shortwood Copse Lane,
Basingstoke,
Hampshire,
England RG23 7DH
Part No. 9261-8275
EkoTek Pager – Quick Instructions
Button Functions
Display
►Menu
(long press to: Exit Menu / Cancel Assist Call / Power On)
▲Up ▼Down Send Assist Call
(if enabled)
11:34 AM 12.03.07 Day
Paul Smith
No vibrate
= Training Room
Day / Night indication
Name / Message status
Alert status
Current location / Pager
status
: or = on network
! = off network (press Menu button to search for network)
1 of 12
Part No. 9261- 8312 Issue 2.0

EkoTek Pager – Quick Instructions
Navigating Menu from Main Screen
►Options ►Display
Font - set display font size
Backlight - backlight ON or OFF (battery saving)
Display Timeout - time before display returns to main screen
Contrast - display contrast
►Options ►Display TAuto-delete ►
Sets maximum number of messages to keep in memory
►Options ►Display T T Alert ►
Sets audible & vibrate alert for received messages
(alert for red Assist button is set by Supervisor at Hub)
►Options TTime & Date ►
Sets 12/24 hour time display
►Options T TEnable/Disable Powersave
Powersave blanks display to extend battery life
►Options TTTPower Off ►►
Switches Pager off
(Long press on Menu button to switch on)
S Displays Archived messages
T Displays Received messages
Accepting an Assist Message
T (to display message if not already displayed)
► View Again TAccept ►►
Rejecting an Assist Message
T (to display message if not already displayed)
► View Again TTReject ►►
Connecting to a Network
If the Pager has been taken off-network, press any black button
when in range of a network to make the Pager quickly re-join the
network (e.g. when arriving at work in the morning).
2 of 12
Part No. 9261-8312 Issue 2.0
EkoTek Pager – Quick Instructions
Changing the Battery
DOOR
LOCK
Compliance
This product complies with the requirements of the EU Radio &
Telecommunications Terminal Equipment Directive 99/5/EC.
FCC & Industry Canada Statement of Compliance
This device complies with Part 15 of the FCC Rules and Industry
Canada Standard RSS 210.
Operation is subject to the following two conditions: (1) this device
may not cause harmful interference and (2) this device must accept
any interference that may cause undesired operation.
Unauthorised modification to this equipment will void the user's
authority to continue to operate the device within the scope of the
Industry Canada and FCC Part 15 Rules.
WEEE Directive & Product Disposal
At the end of its serviceable life, this product should not
be treated as household, or general waste. It should
be handed over to the applicable collection point for the
recycling of electrical and electronic equipment, or
returned to the supplier for disposal.
3 of 12
Part No. 9261-8312 Issue 2.0
EkoTek Pager – Quick Instructions
Man-Down Operation (if enabled by Supervisor)
To prevent the automatic man-down alarm being sent, keep the
Pager in an inverted position (normally worn in the Pager
holster on a belt)
Dead-Man Operation (if enabled by Supervisor)
Press any of the three buttons to respond to
periodic dead-man check (audible beep) and
pervert automatic alarm generation
4 of 12
Part No. 9261-8312 Issue 2.0
EkoTek Pager – Quick Instructions
Fonction des boutons
Afficher
: ou = présence de réseau
! = pas de réseau (appuyer sur touche Menu pour
rechercher un réseau)
11:34 AM 12.03.07 Jour
Paul Smith
Pas de vibreur
= Reception
Indication Jour / Nuit
Nom / Statut du message
Statut de I’alarme
Localisation actuelle /
Statut de téléavartisseur
►Menu
(un appui long permet de: Quitter le menú / Annuler l’appel
d’assistance / Allumer l’appareil)
▲Haut ▼Bas Envoyer un appel d’assistance
(si active)
5 of 12
Part No. 9261-8312 Issue 2.0

EkoTek Pager – Quick Instructions
Menu de navigation à partir de l'Écran Principal
►Options ►Afficher
Police - définit la taille de police de l'affichage
Éclairage - éclairage ON ou OFF (économie de batterie)
Durée d'affichage - temps restant avant l'affichage de l'écran principal
Contraste - contraste de l’affichage
►Options ►Afficher TEffacement Auto ►
Définit le nombre maximum de messages à conserver dans la
mémoire
►Options ►Afficher T T Alerte ►
Définit l'alarme sonore et vibrante pour les messages entrants
(l'alarme du bouton d'assistance rouge est configurée par le
superviseur dans la station centrale)
►Options THeure & Date ►
Définit l'affichage de l'heure en mode 12h/24h
►Options T TActiver mode veille
Affichage d'un écran blanc économie d'énergie pour augmenter
la durée de vie de la batterie
►Options TTTÉteindre ►►
Éteint le téléavertisseur (appui long sur la touche du Menu
permettant de l'allumer)
S Montrer les messages archivés
T Montrer les messages reçus
Accepter un message d'assistance
T (pour afficher le message si ce dernier ne l'est pas encore)
► Lire de nouveau TAccepter ►►
Rejeter un message d'assistance
T (pour afficher le message si ce dernier ne l'est pas encore)
► Lire de nouveau TTRejeter ►►
Se connecter à un réseau
Si le téléavertisseur a été mis hors réseau, appuyer sur n'importe quelle
touche noire lorsque l'appareil entre dans une zone couverte par un
réseau, pour le réactiver rapidement (par exemple, en arrivant au travail
le matin).
6 of 12
Part No. 9261-8312 Issue 2.0
EkoTek Pager – Quick Instructions
Changer la batterie
VERROUILLA
GE DE
COUVERCLE
Conformité
Ce produit est conforme aux exigences énoncées dans la Directive
européenne 99/5/EC relative aux équipements terminaux de Radio
et de Télécommunications.
Déclaration de Conformité de FCC et d'Industrie Canada
Ce dispositif est conforme à la Section 15 du règlement FCC et à la
norme RSS 210 de Industrie Canada.
Le fonctionnement est subordonné aux deux conditions suivantes :
(1) cet appareil peut ne pas causer d'interférences nuisibles et (2)
cet appareil doit accepter toute interférence pouvant être à l'origine
d'un fonctionnement non désiré.
Toute modification non autorisée effectuée sur cet équipement
annulera le droit de l'utilisateur à l'utiliser dans le cadre de la
règlementation prévue par la FCC et par la Section 15 de Industrie
Canada.
Directive WEEE et collecte du produit
A la fin de sa durée de vie, ce produit ne doit pas être
traité comme un déchet d'ordre ménager ou général.
Il doit être déposé au point de collecte correspondant
au recyclage de l'équipement électrique et
électronique, ou retourné au fournisseur, en vue de
son élimination.
7 of 12
Part No. 9261-8312 Issue 2.0
EkoTek Pager – Quick Instructions
Fonctionnement Homme mort (si autorisé par le superviseur)
Pour éviter le déclenchement de l'alarme homme mort automatique,
maintenir le téléavertisseur en position inversée (normalement porté
dans un étui, accroché à une ceinture)
Fonctionnement Homme à terre (si autorisé par le superviseur)
Appuyer sur l’une des trios touches pour
effectuer le controle periodique homme mart
(bip sonore) et eviter la declenchement
automatique de l’alarme
8 of 12
Part No. 9261-8312 Issue 2.0
EkoTek Pager – Quick Instructions
Funciones de las Teclas
Pantalla
►Menú
(pulsación larga para: Salir menú / Cancelar llamada de
Asistencia / Encender)
▲Arriba ▼Abajo Enviar llamada de Asistencia
(is está activada)
: or = conectado a la red
! = desconectado (presionar la tecla Menú para buscar la
red
)
11:34 AM 12.03.07 Día
Ricardo Castilla
Vibrador Off
= Recepción
Indicación Día / noche
Nombre / Estado del M
Estado de
ensaje
la Alerta
Estado Localización actual /
Receptor status
9 of 12
Part No. 9261-8312 Issue 2.0

EkoTek Pager – Quick Instructions
Navegar por el Menú desde la Pantalla Principal
►Opciones ►Pantalla
Fuente - tamaño de la letra de la pantalla
Luz - luz ON u OFF (ahorro de batería)
Tiempo Pantalla - tiempo antes de que el visor vuelva a la
pantalla principal
Contraste - contraste de pantalla
►Opciones ►Pantalla TAuto Borrado ►
Establece la cantidad máxima de mensajes que se guardarán en la
memoria
►Opciones ►Pantalla T T Alerta ►
Establece la alerta audible y por vibración para mensajes rx
(la alerta de la tecla roja de Asistencia está configurada por el
Supervisor en el Concentrador Central)
►Opciones T Día y Hora ►
Determina la visualización de la hora en formato de 12/24 horas
►Opciones T TAhorro Energía
Pantalla en blanco de ahorro de energía para aumentar la vida útil
de la batería
►Opciones TTTApagar ►►
Apaga el Receptor (Mantener presionada la tecla Menú para
encender el Receptor)
S Muestra mensajes Archivados
T Muestra mensajes Recibidos
Aceptar un Mensaje de Asistencia
T (para mostrar el mensaje si aún no ha sido visualizado)
► Volver a Ver TAceptar ►►
Rechazar un Mensaje de Asistencia
T (para mostrar el mensaje si aún no ha sido visualizado)
► Volver a Ver TTRechazar ►►
Conexión a una Red
Si el Receptor ha sido removido de la red, pulse cualquiera de las teclas
negras cuando se encuentre dentro del área de alcance de manera que
el Receptor se vuelva a conectar rápidamente a la red (por ejemplo al
llegar a la oficina por las mañanas)
10 of 12
Part No. 9261-8312 Issue 2.0
EkoTek Pager – Quick Instructions
Cambio de Batería
TRABA DE
LA TAPA
Cumplimiento
Este producto cumple con los requisitos de la Directiva 99/5/EC de
la UE sobre Equipos Terminales de Radio y Telecomunicaciones.
Declaración de Cumplimiento de la Comisión Federal de
Comunicaciones (FCC) y la Industry Canada
El equipo cumple con la Parte 15 de las Normas de la FCC y la
norma RSS 210 de la Industry Canada.
Su funcionamiento está sujeto a las siguientes dos condiciones: (1)
este equipo no debe causar interferencias perjudiciales y (2) este
equipo debe aceptar todas las interferencias recibidas, incluso
aquellas que puedan causar un funcionamiento no deseado.
Las modificaciones realizadas a este equipo que no hayan sido
aprobadas por el fabricante invalidarán la autorización del usuario
para continuar operando este equipo dentro del alcance de las
Normas de la Industry Canada y la Parte 15 de la FCC.
Directiva WEEE y Desecho del Producto
Al finalizar la vida útil del producto, el mismo no debe
ser desechado como residuo doméstico o general.
Debe ser entregado al punto de recolección
designado para el reciclaje de equipos eléctricos y
electrónicos, o bien devuelto al proveedor que le
suministró el producto.
11 of 12
Part No. 9261-8312 Issue 2.0

EkoTek Pager – Quick Instructions
Función Hombre-Caído (si está activada por el Supervisor)
Para evitar que se envíe la señal de alarma automática hombre-
caído, mantenga el Receptor en posición vertical (normalmente se
lo lleva en el estuche enganchado al cinturón)
Función Hombre-Muerto (si está activada por el Supervisor)
Pulsar cualquiera de las tres teclas para responder a
control periódico de hombre muerto (beep audible) y
evitar la emisión de la alarma automática
l
12 of 12
Part No. 9261-8312 Issue 2.0