Murata LB1EN Industrial Computer User Manual
Murata Manufacturing Co., Ltd. Industrial Computer Users Manual
Murata >
Contents
Users Manual

Installation and Operation Manual
Regulatory Model: N01PC
Regulatory Type: N01PC001

Notes, cautions, and warnings
NOTE: A NOTE indicates important information that helps you make better use of your computer.
CAUTION: A CAUTION indicates either potential damage to hardware or loss of data and tells you how to
avoid the problem.
WARNING: A WARNING indicates a potential for property damage, personal injury, or death.
Overview
The Dell Embedded Box PC 5000 series allows you to connect (wired or wireless) to network enabled devices and manage them remotely in your existing network ecosystem. The system can
be either mounted on the wall using the Dell approved wall mount kit or mounted into your existing rack infrastructure using the Rail mount. The system is running on Windows 10, Ubuntu,
and Wind River Linux operating systems.
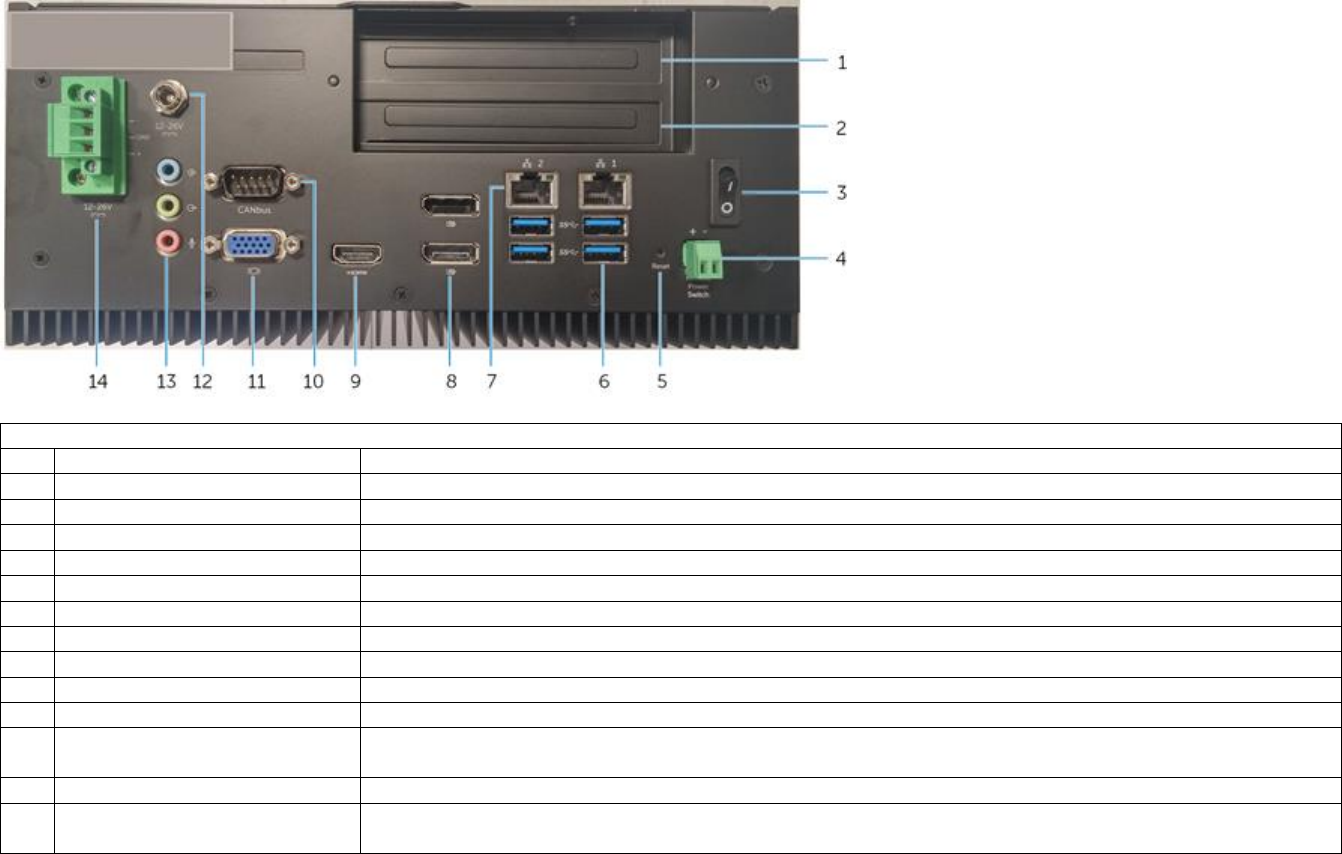
System Features
Top - View
Feature
1
Expansion-card slot 1
Supports an optional PCIe discrete graphics solution, 20-25W(12V/2A) graphics card and 10W thermal capability.
2
Expansion-card slot 2
Supports an optional PCIe discrete graphics solution, 20-25W(12V/2A) graphics card and 10W thermal capability.
3
Power button
Press and hold for 2 seconds to turn on the system if it is turned off.
4
Remote power switch
Install a remote power switch
5
Hard reset
Press and hold to hard reset the system
6
USB 3.0 port (4)
Connect peripherals such as storage devices, printers, displays and so on. Provides data transfer speeds up to 5 Gbps.
7
Network port (2)
Connect an Ethernet (RJ45) cable from a router or a broadband modem for network or internet access.
8
DisplayPort (2)
Connect a Monitor or another DisplayPort enabled device. Provides video and audio output.
9
HDMI port
Connect a Monitor or another HDMI‑in enabled device. Provides video and audio output.
10
CANbus port
Connect to a CANbus port enabled device or dongles.
11
VGA port
Connect a monitor or another VGA enabled device. Provides video output.
12
+19.5 VDC power port (barrel
connector)
Connect a +19.5 VDC power connector to provide power to your system
13
Audio ports (3)
Connect a speaker, a headphone, a microphone, or a headphone and microphone combo (headset).
14
+24V DC power Phoenix connector
Connect a +24V DC power Phoenix connector to provide power to your system
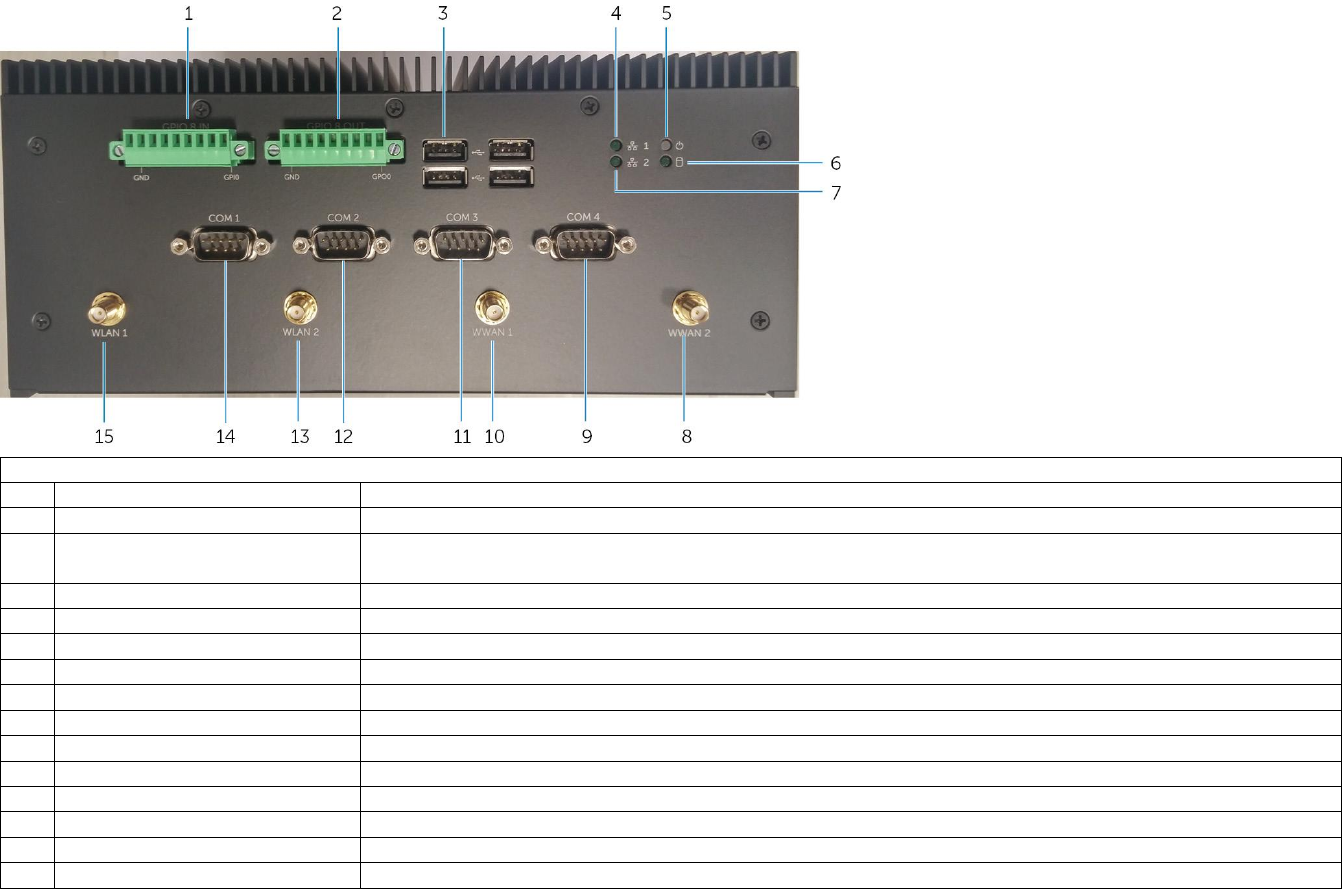
Bottom - View
Feature
1
GPIO-in 9 pin port
Connect to a GPIO-out enabled device or dongles
2
GPIO-out 9 pin port
Connect to a GPIO-in enabled device or dongles
3
USB 2.0 port (4)
Connect peripherals such as storage devices, printers, displays and so on. Provides data transfer
speeds up to 480 Mbps.
4
Network status light
Indicates the connectivity status and network activity of the network port one.
5
Power status light
Indicates the power‑state of the system.
6
Hard-drive activity light
Turns on when the system reads from or writes to the hard drive.
7
Network status light
Indicates the connectivity status and network activity of the network port two.
8
Mobile broadband antenna port 2
Connect an antenna to increase the range and strength of the mobile broadband signals.
9
RS232 port 4
Connect a RS232 cable to configure the system.
10
Mobile broadband antenna port 1
Connect an antenna to increase the range and strength of the mobile broadband signals.
11
RS232 port 3
Connect a RS232 cable to configure the system.
12
RS232 port 2
Connect a RS232 cable to configure the system.
13
Wireless antenna port 2
Connect a wireless antenna to increase the range and strength of the wireless signals.
14
RS232 port 1
Connect a RS232 cable to configure the system.
15
Wireless antenna port 1
Connect a wireless antenna to increase the range and strength of the wireless signals.

Setting up your Dell Embedded Box PC 5000
WARNING: When installing the system, the responsible party or integrator shall use the AC Adapter provided with the system, or connect to a 12-26 Vdc power source already present as
part of the clients installation If ambient temperature of the installation exceeds 40'C then use the 12-26 Vdc power available as part of the installation. Always make sure that the available
power source matches the required input power of the system, check the input power markings next to power connector(s) before making connections.
WARNING: Before you begin any of the procedures in this section, read the safety information that shipped with your system. For additional best practices information, go to
www.dell.com/regulatory_compliance.
WARNING: To ensure the protection provided by the system is not impaired, do not use or install the system in any manner other than that which is specified in this manual.
WARNING: Use cable appropriate for the load currents: 3-core cable rated 5 A at 90 °C (194 °F) minimum, which conform to either IEC 60227 or IEC 60245. The system accepts cables
from 0.8 to 2.5 mm (18 to 14 AWG).
WARNING: Use only the power adapter provided with DELL. The system should be operated only with power source of the same kind as indicated on the Power adapter rating plate.
WARNING: The symbol indicates hot surface or adjacent hot surface that can obtain temperature during normal use that can cause a burn. Allow equipment to cool off or use protective
gloves when handling to reduce risk of a burn.
Professional installation instructions
Installation personnel
This product is designed for specific applications and needs to be installed by qualified personnel with RF and regulatory related knowledge. The general user shall not attempt to install or
change the setting.
Installation location
The product shall be installed at a location where the radiating antenna is kept 20 cm from nearby persons in its normal operation condition in order to meet regulatory RF exposure
requirements.
External antenna
Use only the antenna(s) which have been approved by the applicant. Non-approved antenna(s) may produce unwanted spurious or excessive RF transmitting power which may lead to a
violation of FCC/IC limits and is prohibited.
Installation procedure
Please refer to user’s manual for the detail.
WARNING: Connect power to only one of the two power connection ports, either Phoenix Connector or the Barrel Connector. Connection of two power sources may damage equipment
and present risk of fire.
Powering on the system
WARNING: Connect power to either Phoenix Connector or the Barrel Connector only. Connecting to both power sources may damage equipment and present a fire risk.
1. Install the system on the wall mount using the Dell approved wall mounting kit.
or
Install the system on the rack infrastructure using the Dell approved DIN-rail mounting brackets.
2. Connect the network cable.
or
Install the wireless antenna to enable the wireless connections
3. Connect a display to the system.
4. Connect a keyboard and mouse if accessing the system directly.
5. Connect a SELV power source to the system
6. Press the power button to power on the computer.
If setting up the system for the first time, complete the operating system setup.
7. Connect and configure to devices using the RS422/RS485 ports.
Mounting the system on the wall
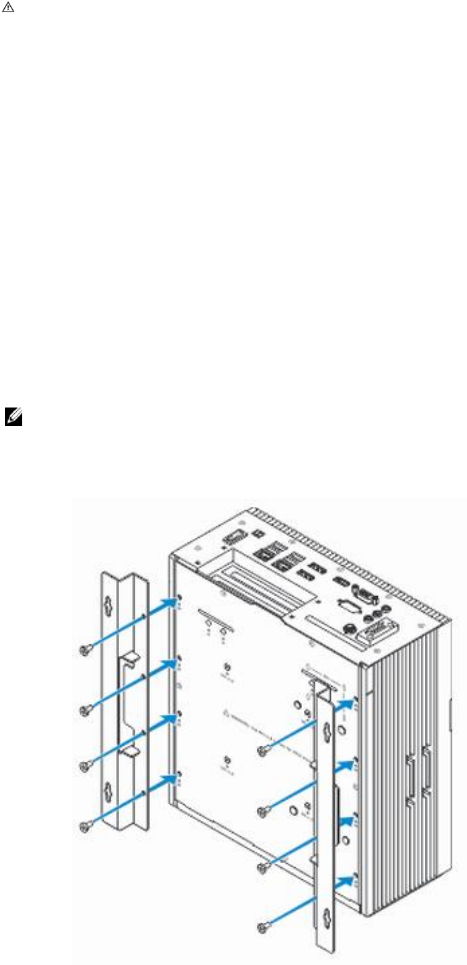
You can mount the system on a wall by using mounting brackets. The brackets secure the system to the wall.
NOTE: Images below are for illustrative purpose only.
1. Secure the two mounting brackets to the rear of the system by using eight screws.
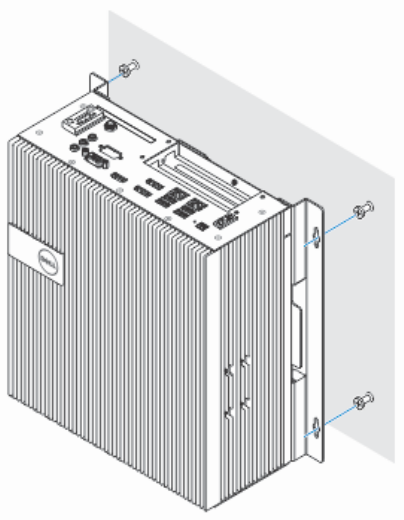
2. Drill four holes in the wall that correspond to the holes in the mounting bracket, then place the system against the wall and align the holes in the mounting brackets with the holes
in the wall.
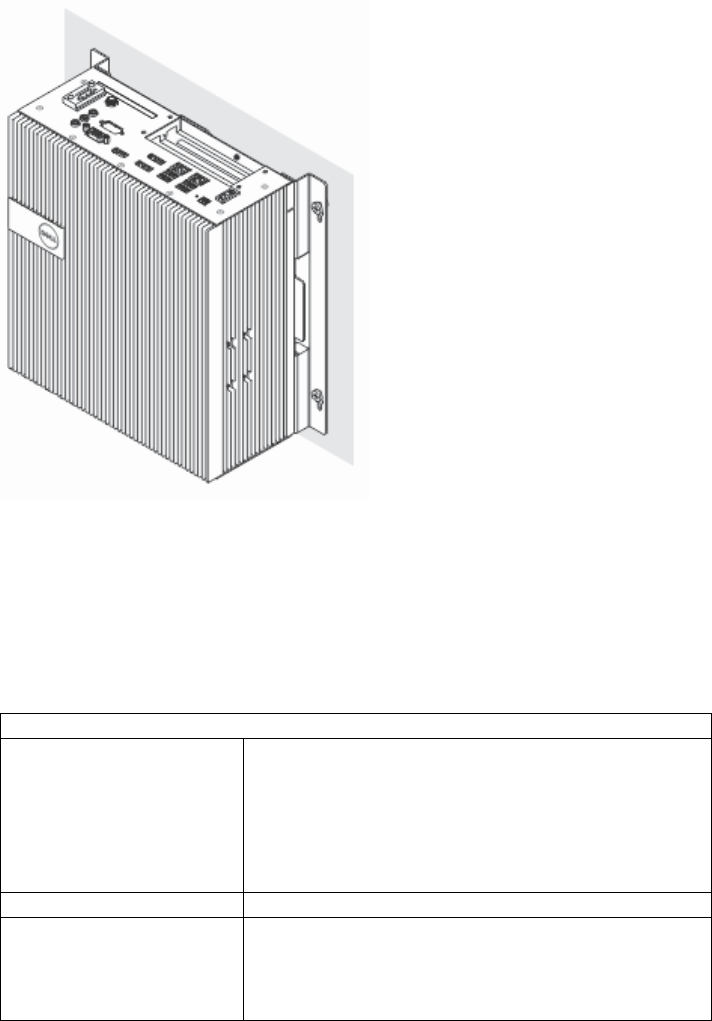
3. Tighten the screws to secure the system to the wall.
Specifications
Ports and connectors
Audio/video
One HDMI port
One VGA port
Two DisplayPort
One line-in port
One line-out port
One microphone port
microSD card
One microSD-card slot
Network
Two RJ45 ports
Two wireless antenna ports
Two mobile broadband antenna ports
One CANbus port

Four RS232 port
USB
Four USB 3.0 port
Two USB 2.0 ports
Communications
Wi-Fi
Dual-band 802.11b/g/n/ac
Bluetooth
Bluetooth 4.1 LE
Power requirements
Phoenix connector input
voltage/current
12-26V
10.8A-5A (130W)
Power input
voltage/current
12-26V
10.8A-5A (130W)
WARNING: Connect power to either Phoenix Connector or the Barrel Connector
only. Connecting to both power sources may damage equipment and present a fire
risk.
Environmental requirements
Temperature range:
Operating
0°C to 50°C (32°F to 122°F)
Non-operating
-45°C to 65°C (-49°F to 149°F)
Relative humidity (maximum):
Operating
10% to 90% (non-condensing)
Non-operating
5% to 95% (non-condensing)
Altitude (maximum, unpressurized):
Operating
-15.20 m to 5000 m (-50 ft to 16,404 ft)
Non-operating
-15.20 m to 10,668 m (-50 ft to 35,000 ft)