Muratec Mfx 2570 Users Manual 2590/2570/2550 OfficeBridge Guide
MFX-2570 to the manual 13331451-4973-46a4-90df-e1ca315cecf2
2015-02-09
: Muratec Muratec-Mfx-2570-Users-Manual-558788 muratec-mfx-2570-users-manual-558788 muratec pdf
Open the PDF directly: View PDF ![]() .
.
Page Count: 279 [warning: Documents this large are best viewed by clicking the View PDF Link!]
- How to Read This Manual
- Contents
- Chapter 1 Overview of OfficeBridge
- Chapter 2 Operating the Various Functions
- Chapter 3
OfficeBridge Administrator Settings
- Administrator settings list
- Registering Users
- Creating Address Books
- “Address Book” List Screen
- Registering New Destinations
- Registering the Sender of a Received Document to the Address Book
- Copying Existing Destination to Register a New Destination
- Registering Destination Using an LDAP Server
- Deleting Destinations
- Importing Destination From an External File
- Exporting Destination to an External File
- Grouping Multiple Destinations
- Registering Shortcuts
- Setting Templates
- Setting the Connection Environment
- Specifying Device Settings
- Specifying Default Machine Settings
- Automatically Distributing Received Documents
- Usage Management
- Displaying and Copying Machine Settings
- Specifying Document Box Settings
- Saving Transmitted Data (Archive Settings)
- Backing Up Documents
- Setting Security
- Setting ScanTag
- Chapter 4 Operating Utilities
OfficeBridge Guide
Plain-paper digital Fax/Copier/Printer/Scanner
Please read this guide before operating this machine.
After you finish reading this guide, keep it handy for easy reference.

ii How to Read This Manual
How to Read This Manual
Operational and Safety Information
In this manual, the following symbols are used with the items where important
operational and safety information must be observed.
Symbol Meaning
Warning
Describes warnings to protect yourself and others from serious or potentially
fatal injury if you handle the machine incorrectly. For safe operation, please
follow instructions carefully.
Caution
Notes a caution to protect yourself and others from personal injury or damage
to properties if you handle the machine incorrectly. For safe operation, please
follow instructions carefully.
IMPORTANT
Describes important conditions or restrictions you should carefully observe to
avoid problems caused by incorrect operations.
Note
Describes reference information and additional notes for operation.
About the screens
This manual uses the screens of the MFX-2550 standard model, unless otherwise stated.
The screens you see may differ, depending on the options installed.

1
Contents iii
Contents
How to Read This Manual .......................................................................................... ii
Operational and Safety Information .........................................................................ii
About the screens .......................................................................................................ii
Chapter 1 Overview of OfficeBridge
Introduction to OfficeBridge ...................................................................................1-2
Managing Faxes as “Digital Documents” ...............................................................1-2
Using Faxes on Computers .....................................................................................1-3
Sharing Information ...............................................................................................1-3
Checking/Changing Machine Functions ................................................................1-4
OfficeBridge Usage Environment ...........................................................................1-5
Screens Used in OfficeBridge ..................................................................................1-6
Login Screen ............................................................................................................1-6
Machine Status Screen ...........................................................................................1-7
Document List Screen .............................................................................................1-8
Chapter 2 Operating the Various Functions
Logging In / Logging Out ..........................................................................................2-2
Logging In ................................................................................................................2-2
Logging Out .............................................................................................................2-8
Transmitting Documents ..........................................................................................2-9
Transmitting Documents in a Document List .......................................................2-9
Retransmitting Documents ..................................................................................2-14
Canceling Transmission ........................................................................................2-15
Specifying Destinations ........................................................................................2-16
Forwarding Documents ..........................................................................................2-21
Forwarding Documents in a Document List ........................................................2-21
Forwarding Documents Created in Application Software ..................................2-23
Printing Documents.................................................................................................2-26
Printing Documents in a Document List .............................................................2-26
Searching for Documents .......................................................................................2-27
Simple Searching ..................................................................................................2-27
Advanced Searching ..............................................................................................2-28
Checking and Changing Document Information ..............................................2-30
Viewing the Documents in a Document List .......................................................2-30
Checking and Changing Document Information .................................................2-31
Registering Sender Distribution Conditions .......................................................2-32
Downloading Documents........................................................................................2-34
Downloading Documents in a Document List .....................................................2-34
Deleting Documents.................................................................................................2-37
Deleting Documents in a Document List .............................................................2-37
Deleting Documents in the Deleted Documents Box ..........................................2-38
Checking the Jobs or History ................................................................................2-40
Checking / Canceling a Communication Job in Progress ....................................2-40

iv Contents
Checking / Canceling Print Jobs in Progress .......................................................2-42
Checking the Communication History .................................................................2-44
Checking the Print Job History ............................................................................2-47
Forwarding Documents ..........................................................................................2-48
Forwarding Received Documents .........................................................................2-48
Specifying Forwarding Destinations ....................................................................2-49
Setting the Attachment File Format and Forwarding Period .............................2-54
Chapter 3 OfficeBridge Administrator Settings
Administrator settings list .......................................................................................3-3
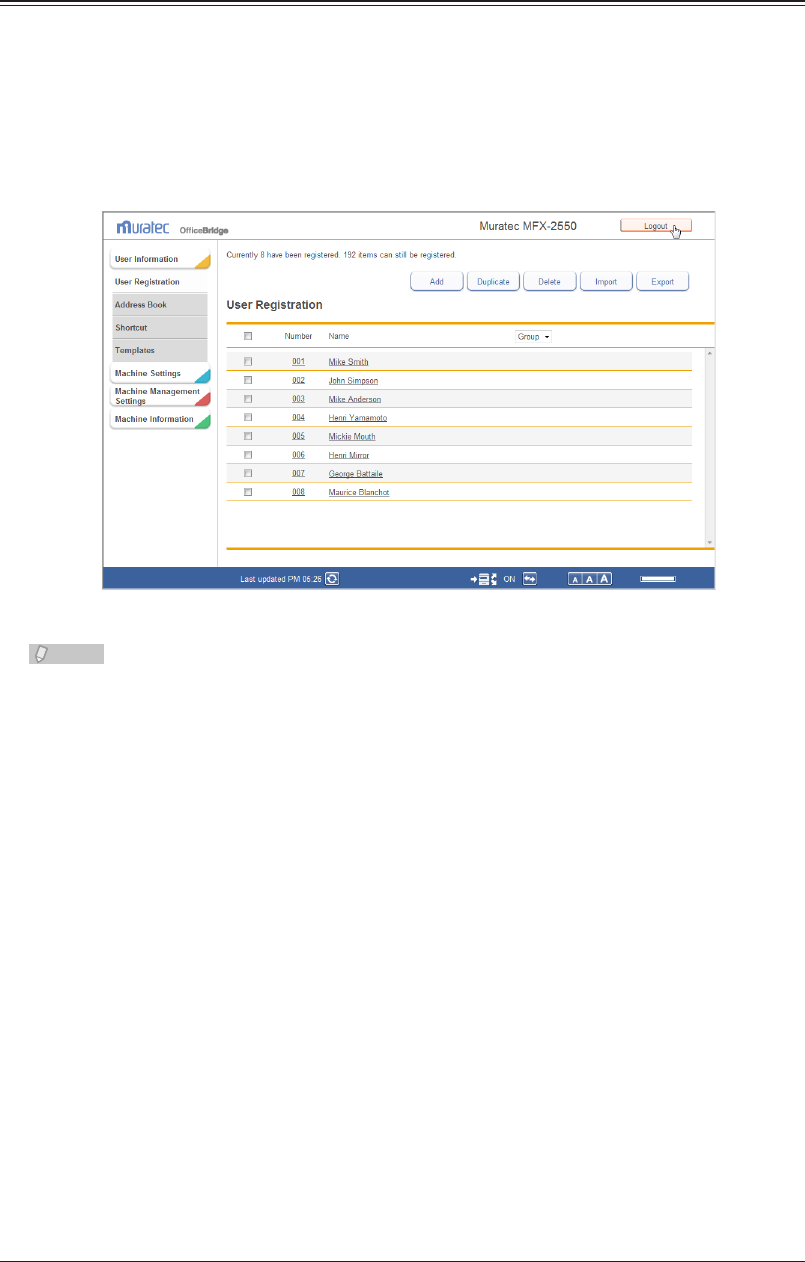
Registering Users .......................................................................................................3-5
“User Registration” Screen .....................................................................................3-5
Registering a User...................................................................................................3-6
Copying Existing User Information to Register a New User .............................3-10
Deleting User Information....................................................................................3-11
Importing User Information From an External File ...........................................3-12
Exporting User Information to an External File .................................................3-14
Creating Address Books ..........................................................................................3-15
“Address Book” List Screen ...................................................................................3-15
Registering New Destinations ..............................................................................3-17
Registering the Sender of a Received Document to the Address Book ..............3-19
Copying Existing Destination to Register a New Destination ...........................3-20
Registering Destination Using an LDAP Server .................................................3-21
Deleting Destinations ...........................................................................................3-24
Importing Destination From an External File ....................................................3-25
Exporting Destination to an External File ..........................................................3-30
Grouping Multiple Destinations...........................................................................3-31
Registering Shortcuts .............................................................................................3-38
Setting Folder Shortcuts .......................................................................................3-38
Setting FTP Shortcuts ..........................................................................................3-44
Setting Templates .....................................................................................................3-49
Setting Document Names .....................................................................................3-49
Setting Document Categories ...............................................................................3-53
Setting E-mail Templates .....................................................................................3-56
Setting the Connection Environment .................................................................3-60
Setting the Network Environment .......................................................................3-60
Setting the E-mail Transmission / Reception Environment ...............................3-63
Setting the E-mail Operating Environment ........................................................3-67
Setting the Directory Database Environment .....................................................3-70
Setting Communication Device Monitoring / Control .........................................3-75
Setting an Internet Time ......................................................................................3-77
Specifying Device Settings .....................................................................................3-79
Specifying Other Network Settings .....................................................................3-79
Specifying User Install Mode Settings .................................................................3-81
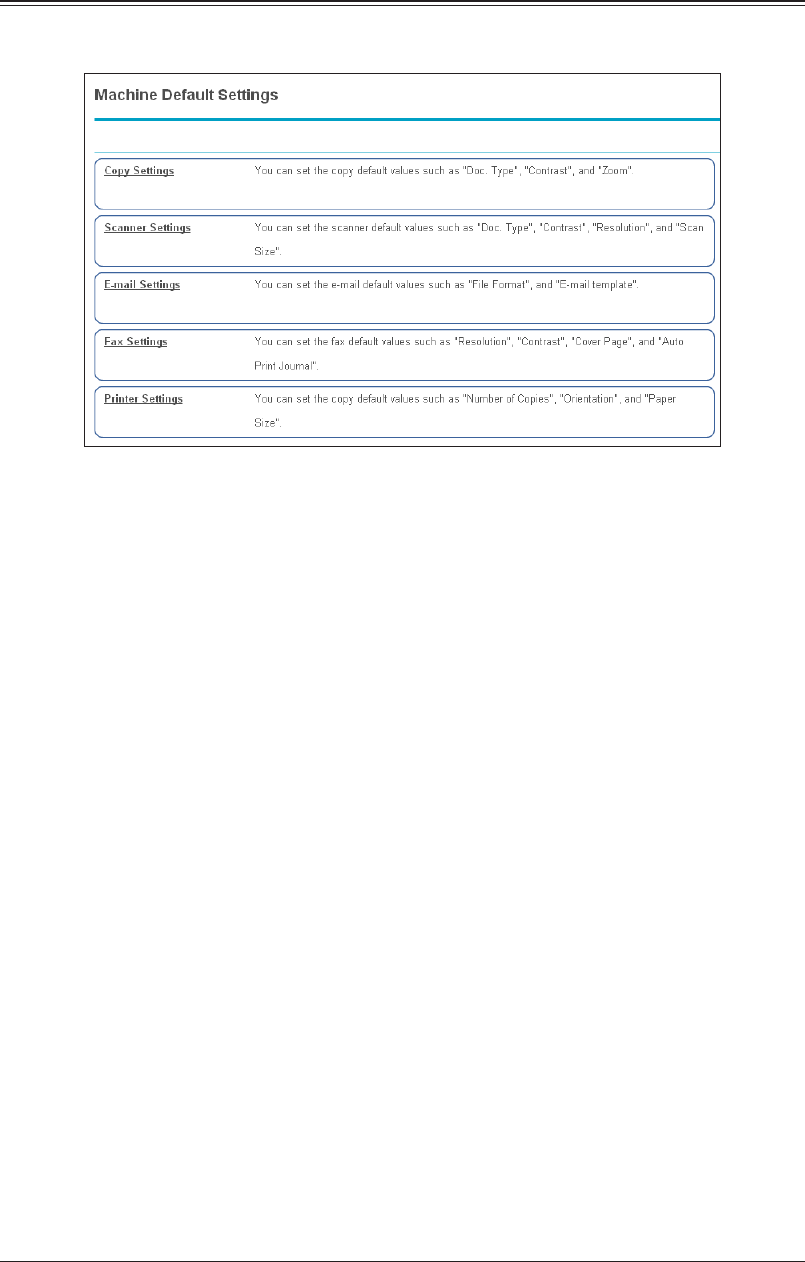
Specifying Default Machine Settings ..................................................................3-82
Settings ..................................................................................................................3-82
Regarding Settings ................................................................................................3-82
Automatically Distributing Received Documents ............................................3-83

1
Contents v
Auto Distribution Function ..................................................................................3-83
Setting Auto Distribution (General Settings) ......................................................3-84
Setting Auto Distribution (Individual Settings) ..................................................3-87
Specifying Distribution Destinations ...................................................................3-90
Performing an Auto Distribution Test..................................................................3-94
Copying Existing Auto Distribution Settings to Create New Settings ..............3-96
Deleting Auto Distribution Settings ....................................................................3-97
Usage Management ..................................................................................................3-98
Checking the Usage Status ..................................................................................3-98
Setting the Management History .......................................................................3-101
Resetting the Counters .......................................................................................3-102
Displaying and Copying Machine Settings ......................................................3-103
Setting the Machine Status ................................................................................3-103
Exporting Machine Settings ...............................................................................3-105
Importing Machine Settings ...............................................................................3-106
Specifying Document Box Settings ....................................................................3-107
Saving Transmitted Data (Archive Settings) ...................................................3-111
Specifying Archive Settings ................................................................................3-111
Specifying the Archive Destination ....................................................................3-113
Backing Up Documents .........................................................................................3-117
Specifying Backup Settings ................................................................................3-117
Specifying the Backup Document Display .........................................................3-119
Checking the Backup Log ...................................................................................3-121
Setting Security ......................................................................................................3-123
Setting User Policies ...........................................................................................3-123
Setting the Machine Policy .................................................................................3-130
Setting Access Restrictions .................................................................................3-134
Specifying SSL Certificate Settings ...................................................................3-137
Setting ScanTag ......................................................................................................3-141
“ScanTag Settings” Screen ..................................................................................3-141
ScanTag Settings .................................................................................................3-142
Chapter 4 Operating Utilities
Managing Events (InfoMonitor) .............................................................................4-2
About InfoMonitor ...................................................................................................4-2
Setting InfoMonitor .................................................................................................4-3
Using InfoMonitor .................................................................................................4-17
Creating Cover Pages (CoverPage Editor) .........................................................4-23
Starting CoverPage Editor ...................................................................................4-24
CoverPage Editor Editing Screen .........................................................................4-25
Cover Page Creation Procedure ............................................................................4-30
Specifying Object Settings ....................................................................................4-39
Editing an Object ..................................................................................................4-42
Printing a Cover Page ...........................................................................................4-45
Uploading Cover Pages to OfficeBridge ...............................................................4-47

vi Contents

Chapter 1
Overview of OfficeBridge
Introduction to OfficeBridge ...................................................................................1-2
Managing Faxes as “Digital Documents” ...............................................................1-2
Using Faxes on Computers .....................................................................................1-3
Sharing Information ...............................................................................................1-3
Checking/Changing Machine Functions ................................................................1-4
OfficeBridge Usage Environment ...........................................................................1-5
Screens Used in OfficeBridge ..................................................................................1-6
Login Screen ............................................................................................................1-6
Machine Status Screen ...........................................................................................1-7
Document List Screen .............................................................................................1-8
1-2 Introduction to OfficeBridge
Introduction to OfficeBridge
OfficeBridge is a management system that enables highly functional document
management by connecting with computers on the network.
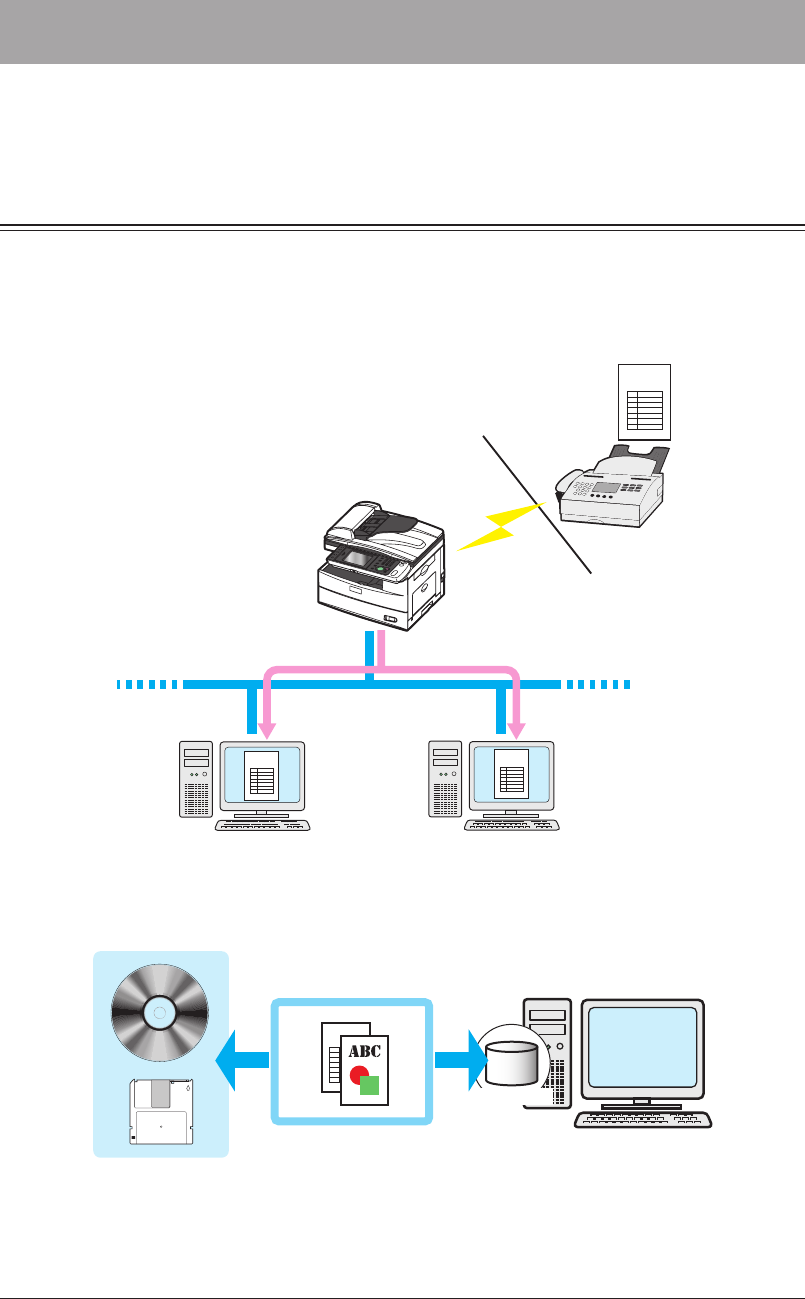
Managing Faxes as “Digital Documents”
OfficeBridge can manage received faxes as “digital documents”, in a similar manner to
e-mail.
Normally, the content of faxes is checked by printing them out to paper, but OfficeBridge
enables the content of faxes to be checked as images on a computer.
Order form
Order form Order form
Network
Fax
Destination
The content of faxes can also be saved as a PDF file.
This enables you to save storage space because the images can be saved to a hard disk or
CD-R, etc. without using a binder as with traditional paper documents.
Order form
Media
Hard disk
Save as digital document
1
Overview of OfficeBridge
Introduction to OfficeBridge 1-3
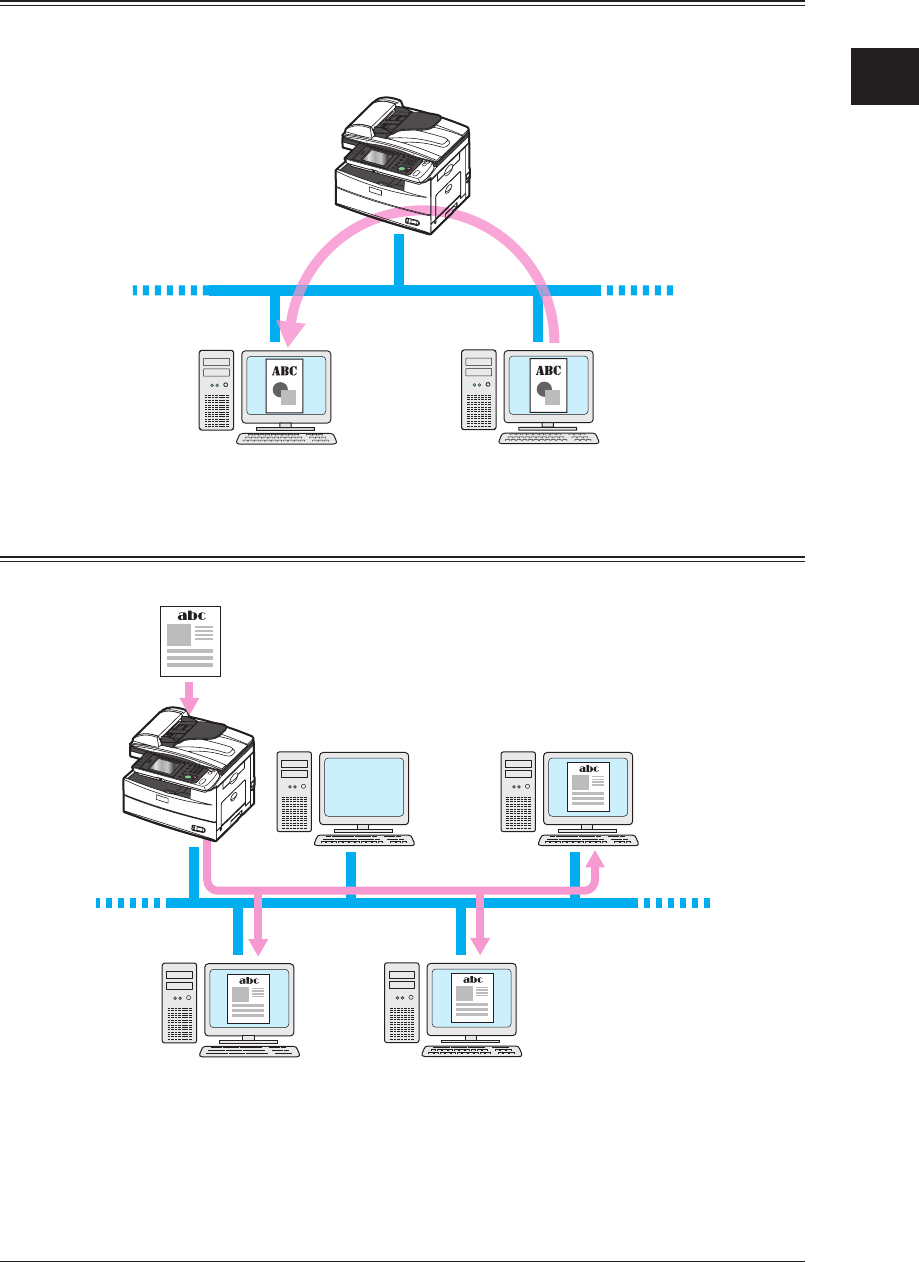
Using Faxes on Computers
Received faxes can be re-used on a computer.
For example, received order forms and invoices can be forwarded to other employees in
the same company without printing them to paper (paperless reception).
Forward received document
Network
Sharing Information
Information can be shared by distributing scanned documents to specific members.
Distribute as shared document
Network
1-4 Introduction to OfficeBridge
Checking/Changing Machine Functions
The functions of the machine can be registered and edited directly from a computer.
1
Overview of OfficeBridge
OfficeBridge Usage Environment 1-5
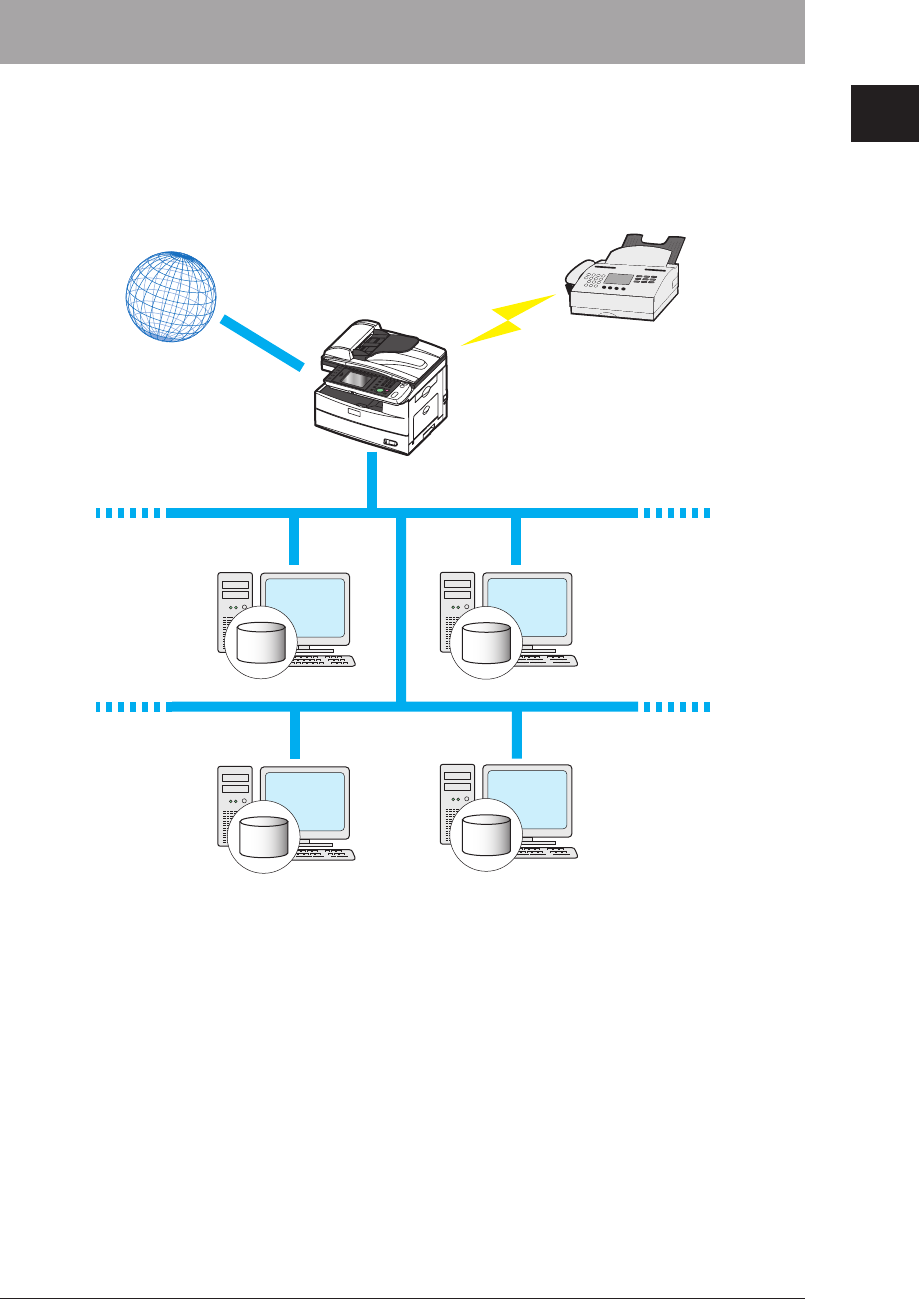
OfficeBridge Usage Environment
An environment such as the one indicated below is required to use OfficeBridge.
1) Connect the machine to a general public network
2) Connect to the internet to use e-mail, etc.
3) Connect the machine and the computer for each user to the network
4) Install browser software to the computer for each user
Network
General public network
Internet
Browser
software
Browser
software
Browser
software
Browser
software
1-6 Screens Used in OfficeBridge
Screens Used in OfficeBridge
This section describes the basic operation screens used for OfficeBridge.
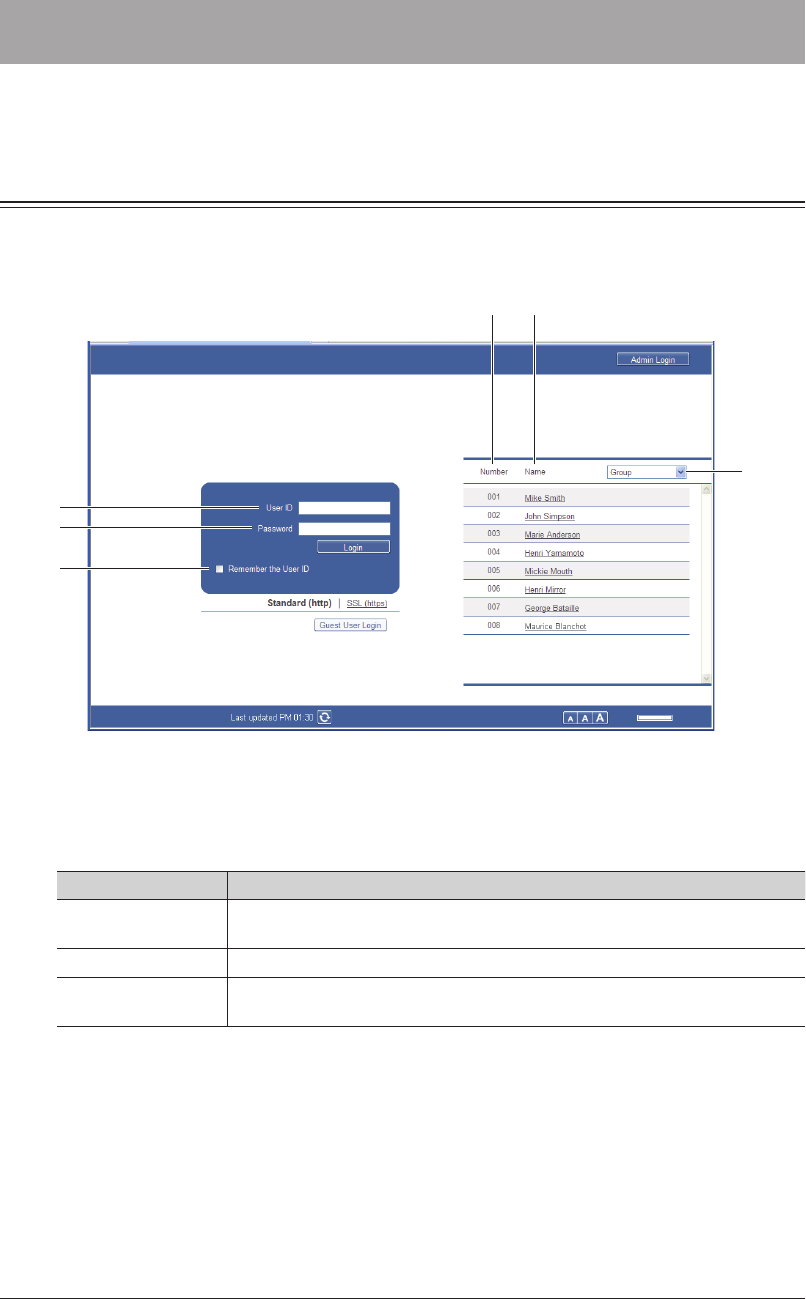
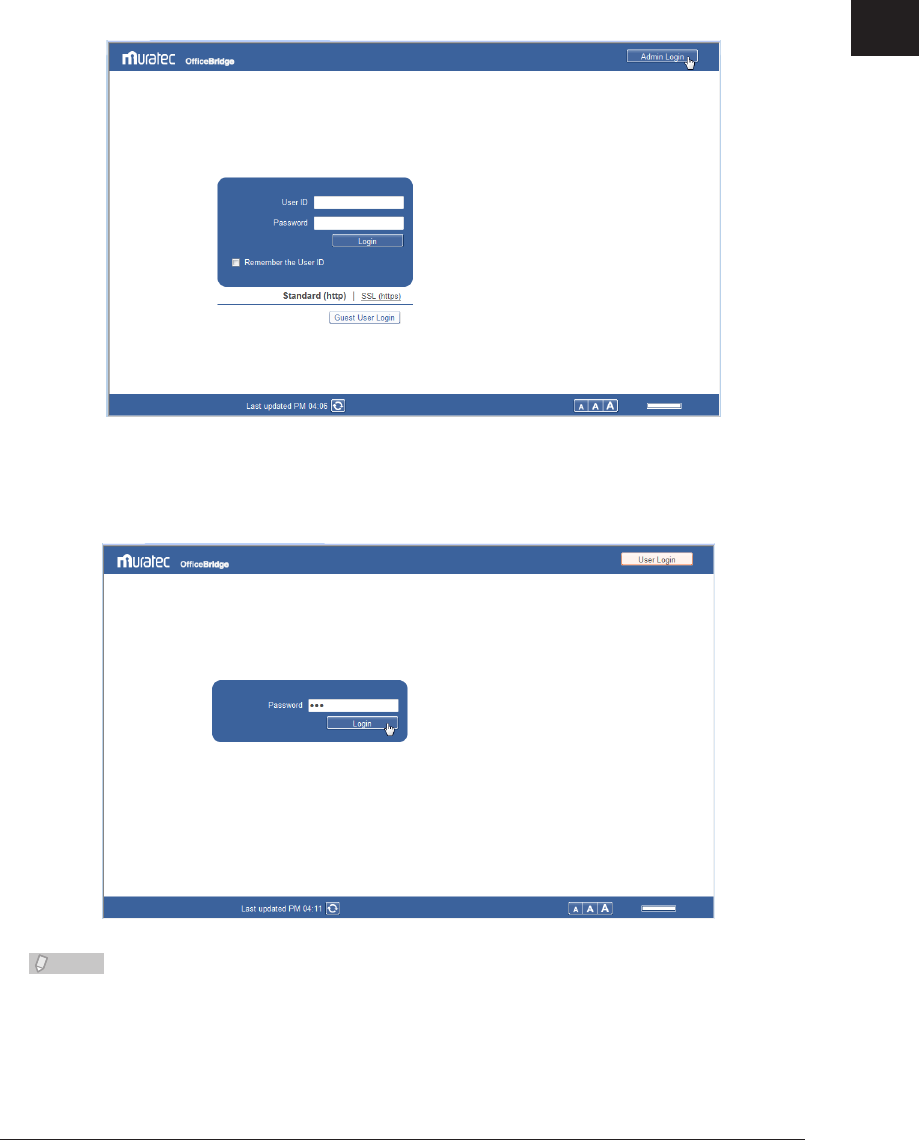
Login Screen
This screen is used for logging in to OfficeBridge. For details, refer to “Logging In /
Logging Out”. (See page 2-2.)
1
6
4 5
2
3
User ID Entry Box
Manually enter the user ID and password.
Item Description
1 User ID Enter the ID for the user to log in as. If the user ID selection is displayed,
you can automatically enter the user ID by selecting a name.
2 Password Enter the password corresponding to the user ID.
3 Remember the
User ID
Select this to remember the latest user ID that was entered.
1
Overview of OfficeBridge
Screens Used in OfficeBridge 1-7
User ID Selection
Select the user to log in as from the displayed list of users. If you select a user, the user
ID is automatically entered in the User ID entry box.
Item Description
4 Number Displays the numbers provided when users were registered.
5 Name Displays the registered user names.
If a user name has not been set, the user ID is displayed.
6 Group Displays the name of the group that the user belongs to.
You can filter users by group name.
Note
You can specify to not display the user ID selection in the machine policy settings. •
For details on machine policy settings, refer to “Setting the Machine Policy”. (See
page 3-130.)
If the authentication mode is set to the network mode, the user ID selection is not •
displayed. (See page 3-130.)
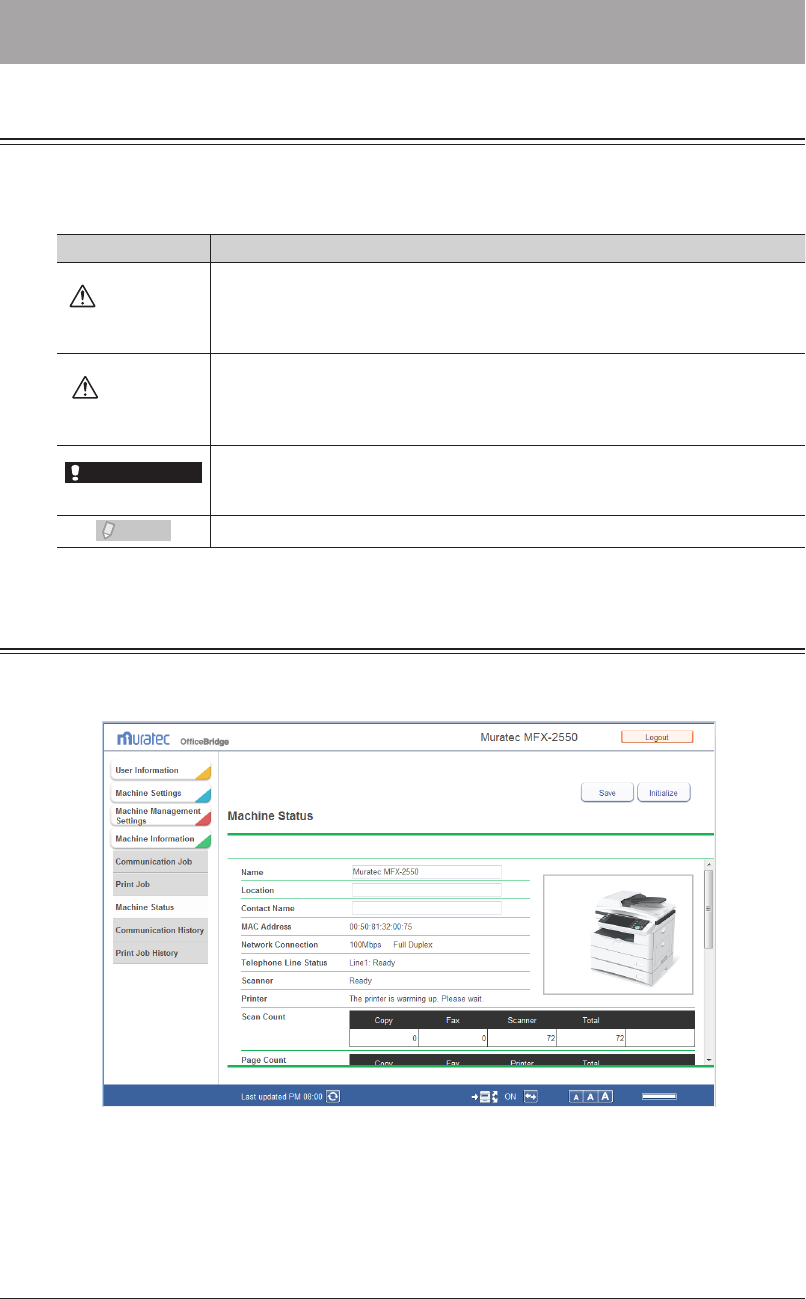
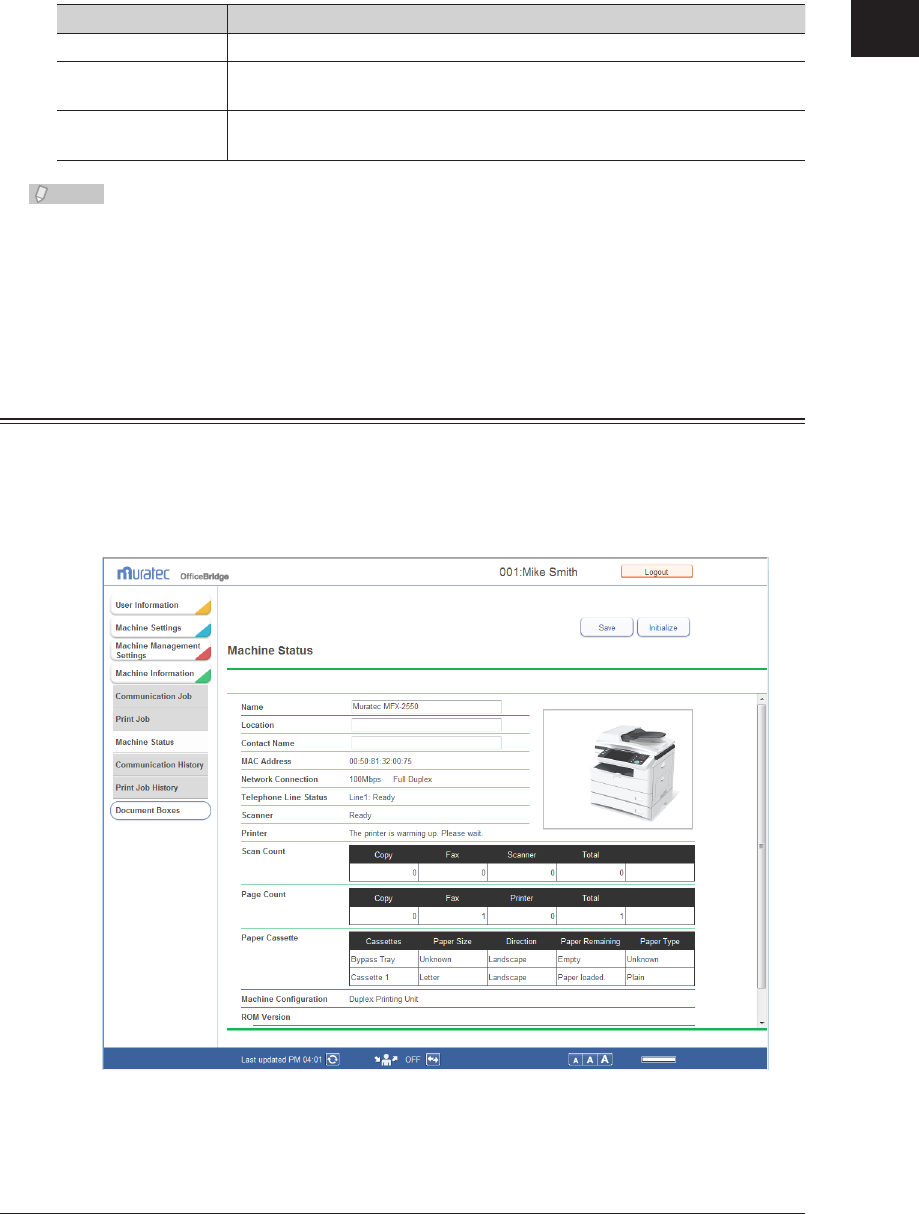
Machine Status Screen
When you enter OfficeBridge, you see the machine status. On this screen, you can set up
various functions. See “Administrator settings list” to see the list. (See page 3-3.)
When you logged in as a user or guest, click [Document Boxes] to switch to the document
list screen.
1-8 Screens Used in OfficeBridge
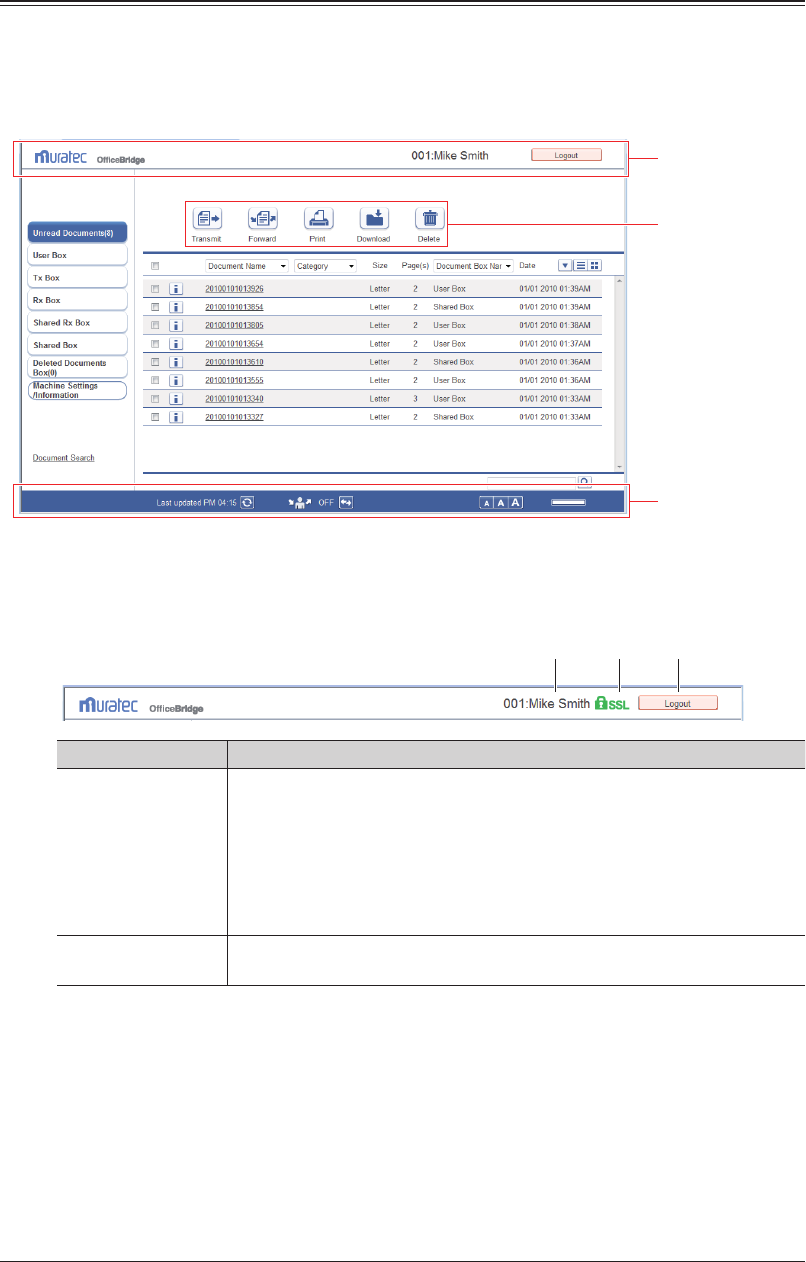
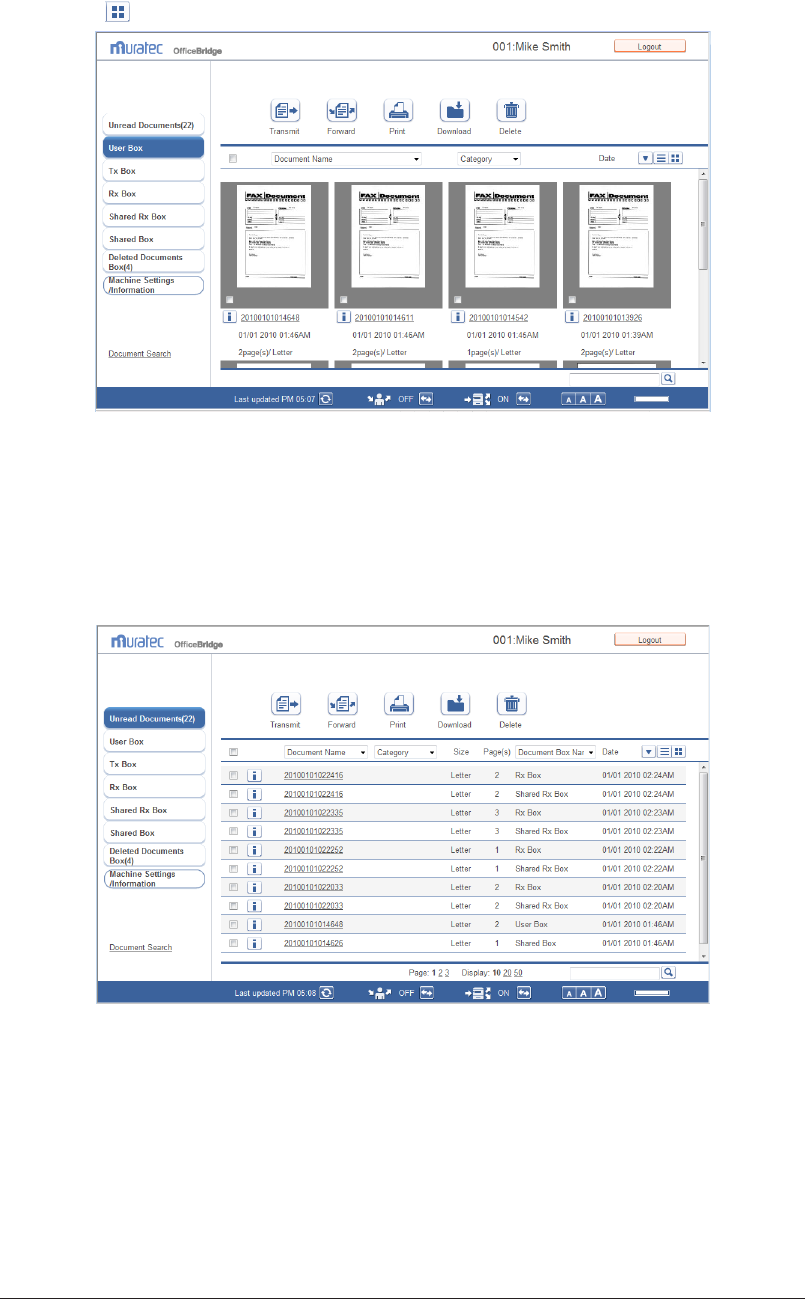
Document List Screen
Login to OfficeBridge, and press [Document Boxes] to display this screen. This screen
displays a list of documents by their type such as “Received (Rx)” and “Transmitted (Tx)”.
Operations such as transmitting, forwarding, and printing documents are also performed
on this screen.
Header
Function buttons
Footer
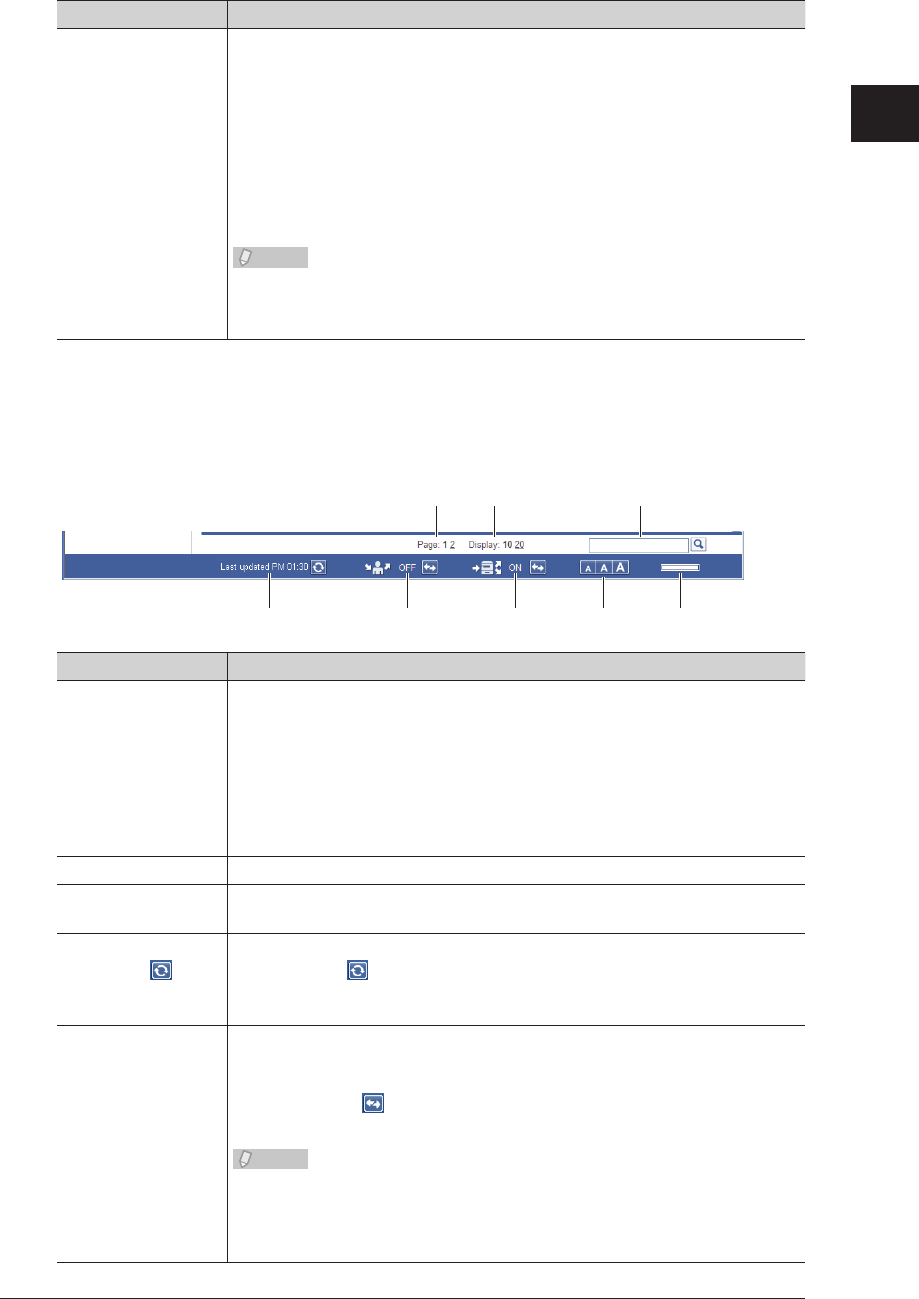
Header Names and Functions
1 2 3
Item Description
1 Login name
display
The information displayed here differs according to the screen.
Before login: Nothing is displayed.
After performing a user login: The number and name of the user who is
logged in are displayed.
After performing an administrator login
:
The name of the device being used is displayed.
After performing a guest login
: “Guest” is displayed.
2 SSL display This icon is displayed when performing SSL communication
*1
. Otherwise,
nothing is displayed.
1
Overview of OfficeBridge
Screens Used in OfficeBridge 1-9
Item Description
3 [Admin Login] or
[Logout] button
The button displayed here differs according to the screen.
If you click [Admin Login], the administrator screen is displayed. (The login
screen for the administrator screen may be displayed, depending on the
security settings.)
If you click [Logout], the logout process is performed, and the display
returns to the login screen.
Before login: [Admin Login] is displayed.
After login: [Logout] is displayed.
Note
If you perform a logout on the administrator screen when there are no
users, a guest login is performed automatically and the screen after a guest
user login is performed is displayed.
SSL (Secure Socket Layer) is a communication method that encrypts the information that is *1
transmitted and received.
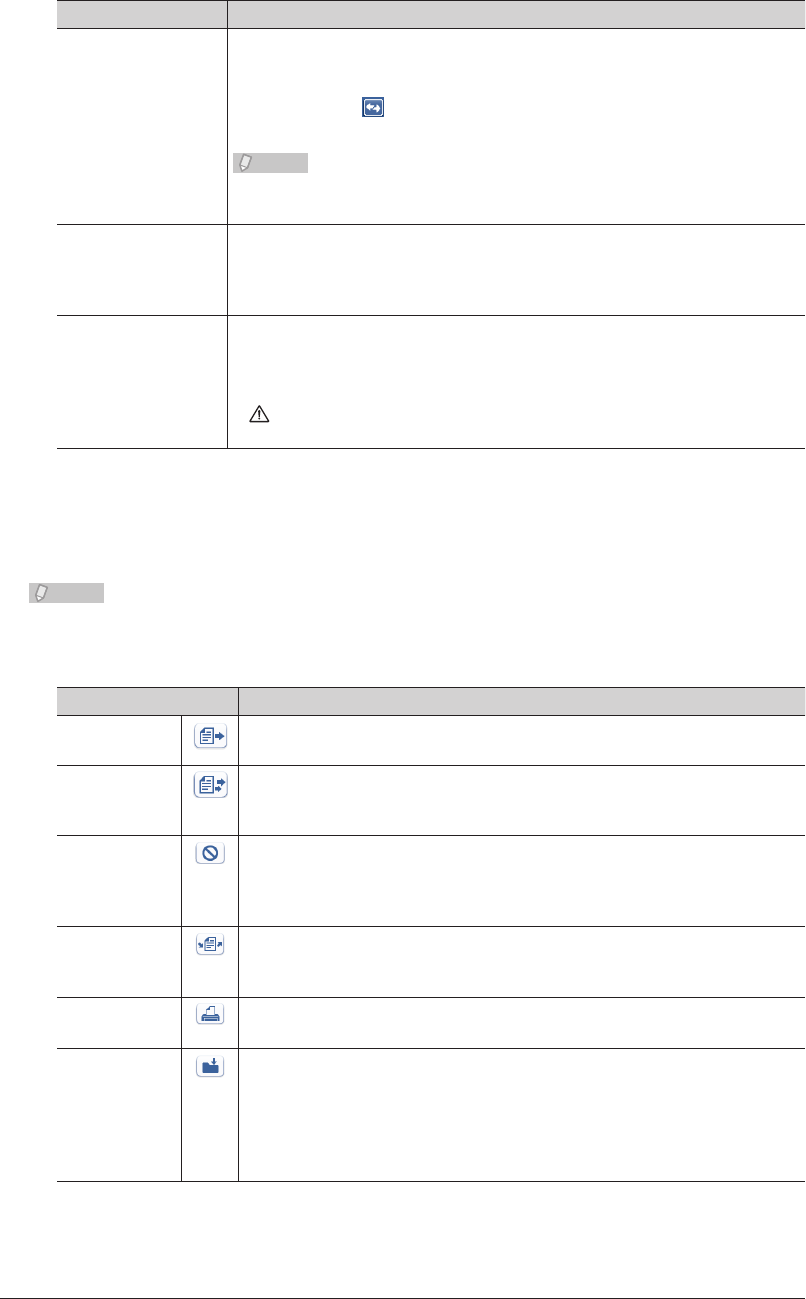
Footer Names and Functions
4
7 8 9 10 11
5 6
Item Description
4 Displayed page
and page switch
Displays the currently displayed page in bold.
Click a page number to display the corresponding page.
• Click [<] to move ve pages backward, and click [>] to move ve pages
forward.
• The number before [<] indicates the rst page. Click it to display the rst
page.
• The number before [>] indicates the last page. Click it to display the last
page.
5 Display Sets the number of items that can be displayed on a single page.
6 Search Enter the text you want to search for from the document name, document
category, or comments of the document box that is currently displayed.
7 Screen refresh
time and
(manual refresh)
button
Displays the last time when the screen was updated (hour : minute).
If you click the (manual refresh) button, the screen is refreshed.
8 Forwarding
settings status
Displays the current forwarding settings status.
If the forwarding settings are enabled, “ON” is displayed; if they are
disabled, “OFF” is displayed.
You can click the (forwarding switch) button to enable/disable the
forwarding settings.
Note
If the “User Box Forwarding Settings” is disabled in the user policy settings
when the Stand-Alone or Single Sign On mode is set or when the network
mode is set, the forwarding settings status is not displayed. (See page
3-123.)
1-10 Screens Used in OfficeBridge
Item Description
9 Auto distribution
settings switch
Displays the current auto distribution settings status.
If the auto distribution settings are enabled, “ON” is displayed; if they are
disabled, “OFF” is displayed.
You can click the (auto distribution switch) button to enable/disable the
auto distribution settings.
Note
If the “Auto Distribution” is disabled in the user policy settings, the auto
distribution settings status is not displayed. (See page 3-123.)
10 Change font size There are three font sizes; large, medium, and small. (The default font size
is medium.)
The font size setting is retained until it is changed, even after a logout is
performed.
11 Remaining disk
space
Displays a graph of the remaining space on the data disk of the machine.
The graph is displayed in four levels.
If you move the mouse cursor over the graph, you can display the current
disk space as a number.
If is displayed, increase the remaining space by downloading documents
to a computer or deleting documents.
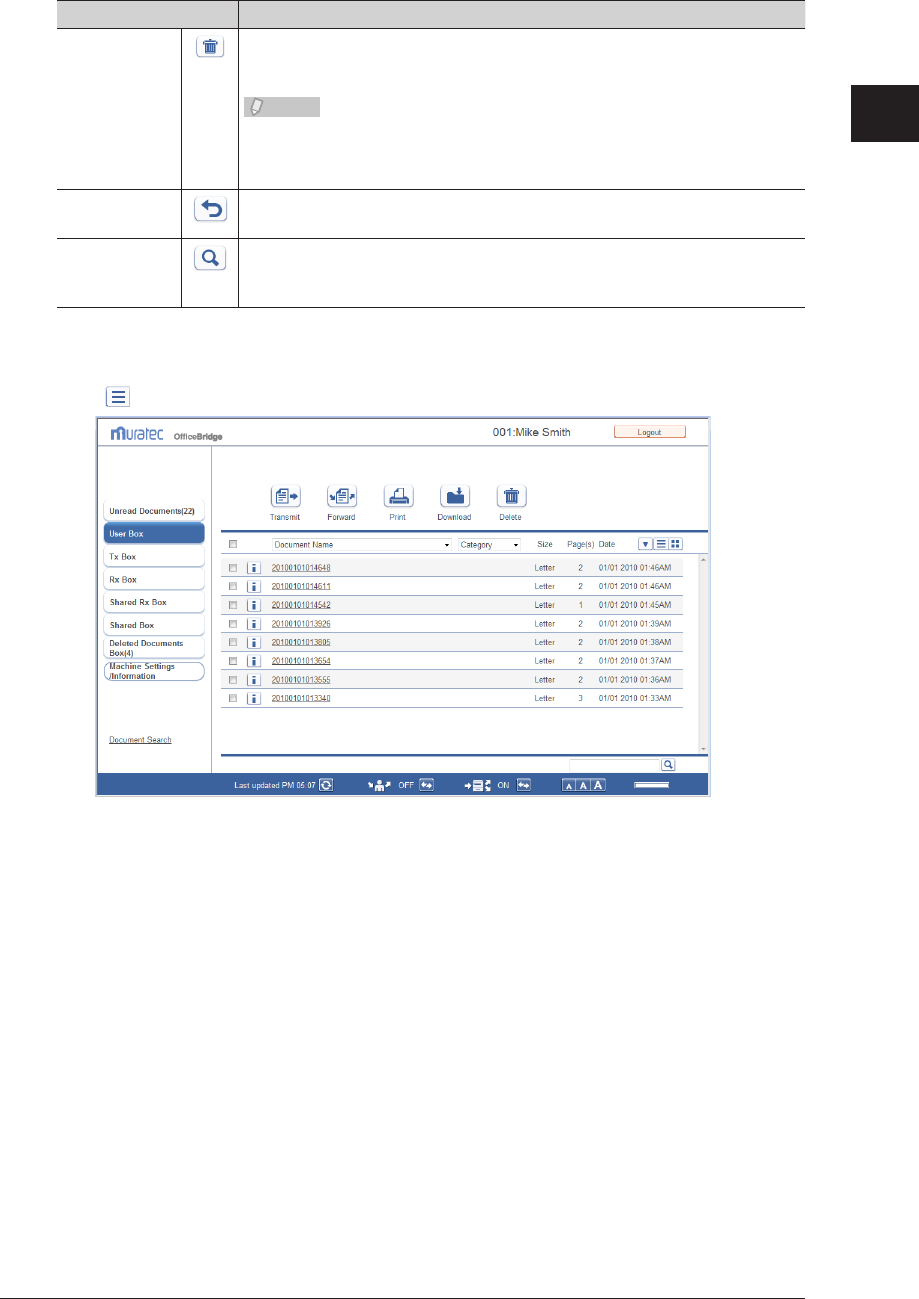
Function Buttons
Displays the functions you can use on the displayed document list screen.
Note
The displayed function buttons depend on the type of document list screen.
The types and functions of the buttons are indicated below.
Type Description
Transmit Transmits the document selected in the document list.
If you click this, the “Transmission” screen is displayed. (See page 2-9.)
Retransmit Retransmits the document selected in the “Tx Box” document list screen.
(Only displayed on the “Tx Box” document list screen.)
If you click this, the “Transmission” screen is displayed. (See page 2-14.)
Cancel Cancels the currently transmitting document selected in the “Tx Box”
document list screen.
(Only displayed on the “Tx Box” document list screen.)
If you click this, transmission of the document is canceled. (See page 2-15.)
Forward Forwards the document selected in the document list to another user or
group.
If you click this, the “Forwarding” screen is displayed. (See page 2-21.)
Print Prints the document selected in the document list. (See page 2-26.)
Download Downloads the document selected in the document list to a computer.
If you click this, the “Document Download” screen is displayed. (See page
2-34.)
The “Document Download” screen is displayed if “File Format” in
“Download Setting” in “Document Box Settings” is set to “Select when
downloading.” (See page 3-107.)
1
Overview of OfficeBridge
Screens Used in OfficeBridge 1-11
Type Description
Delete Deletes the document selected in the document list.
If you click this, a confirmation message is displayed. Deleted documents
are moved to the “Deleted Documents Box” document list. (See page 2-38.)
Note
If you click this button after selecting a document in the “Deleted
Documents Box” document list, the document is permanently deleted from
OfficeBridge.
Restore Returns a document selected in the “Deleted Documents Box” document
list to its original document list. (See page 2-39.)
Search again Displayed after executing a document search.
Click this to display the search screen again. The search conditions you
entered for the previous search are entered on the displayed search screen.
Text Display and Thumbnail Display
Click to display a document list in text format.
1-12 Screens Used in OfficeBridge
Click to display a document list in thumbnail format.
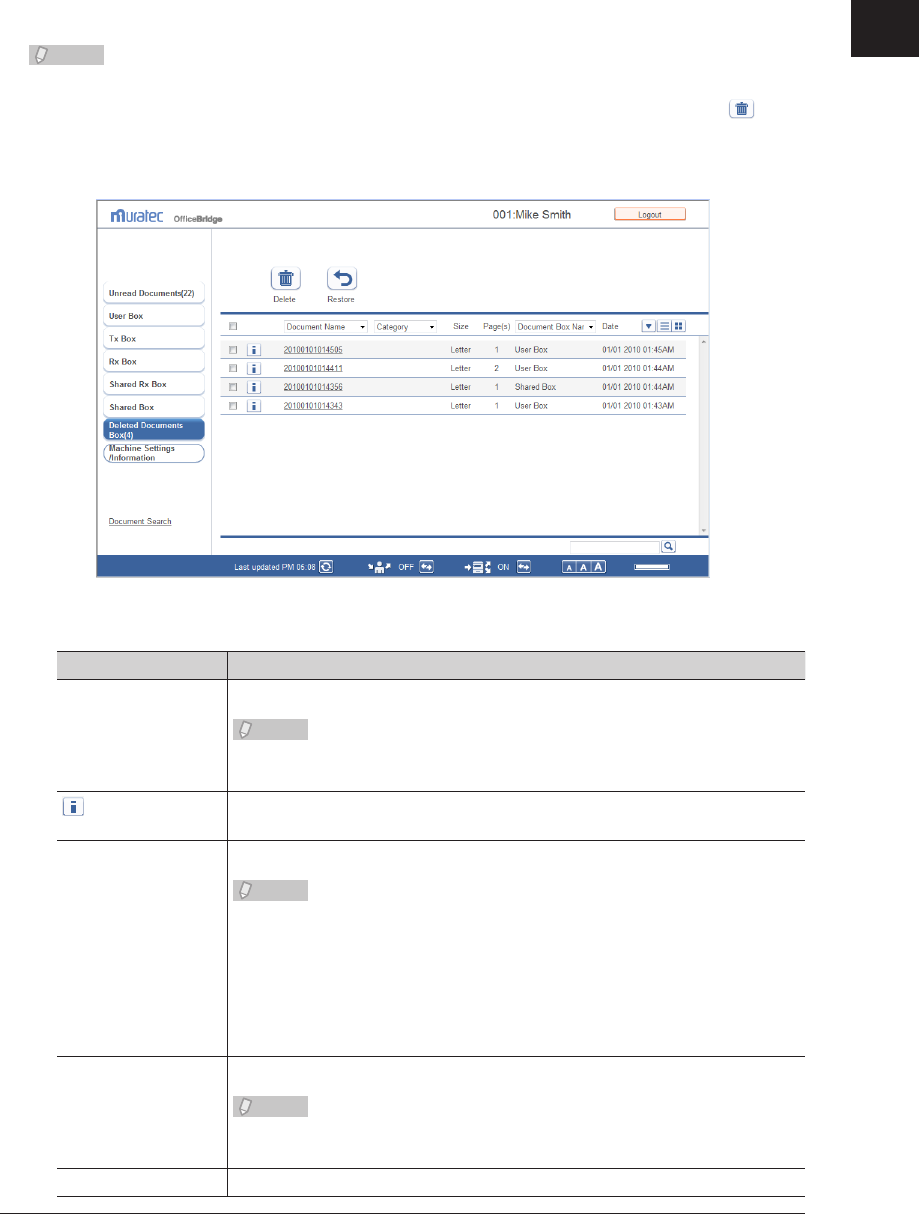
“Unread” and “Deleted Documents box” Document Lists
Unread Documents
Displays a list of all unread documents, regardless of whether they were sent to a
personal or shared destination.
Documents are removed from this document list as soon as they are read.
1
Overview of OfficeBridge
Screens Used in OfficeBridge 1-13
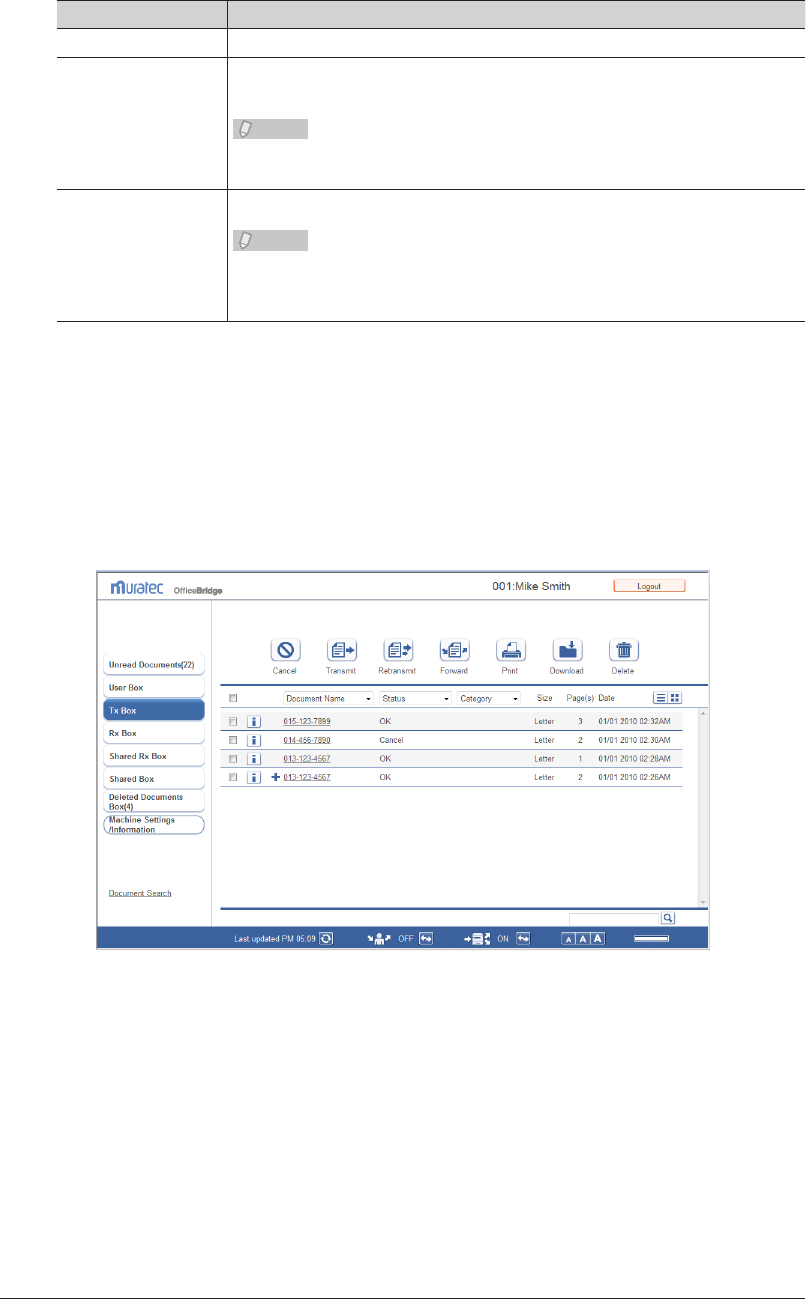
Deleted Documents Box
Displays a list of all deleted documents, regardless of whether they are personal or
shared.
This document list is shared with other registered users. The displayed documents are
the same for all users.
Note
Documents in the “Deleted Documents Box” document list have not been •
permanently deleted. To delete a document permanently, select it and click .
You can enable/disable the “Deleted Documents Box” document list in “Enable the •
deleted document box” in “Document Box Settings”. If you disable the document list,
it is not displayed.
The items displayed are indicated below.
Item Description
Checkbox To select a document, select the corresponding checkbox.
Note
• To select all the documents on the displayed page, select the top checkbox.
• Click the same checkbox to deselect the item.
icon Displays the properties of the document.
If you click this, the “Document Properties” screen is displayed.
Document Name Displays the file name of the document.
Note
• Click the document name to check a preview image of the document.
• By selecting a le name from the pull-down menu, you can lter the
displayed documents by file name.
• For scanned documents, the date and time that scanning was performed
is set as the file name if you do not set a document name when scanning.
(Example: A document scanned at 13:30:30 on January 15th, 2010 is
named “20100115133030”.)
Category Displays the set document category.
Note
If you select a document category from the pull-down menu, you can filter
the displayed documents by category.
Size Displays the paper size of the document.
1-14 Screens Used in OfficeBridge
Item Description
Page(s) Displays the total number of pages for the document.
Document Box Name Displays the name of the document box in which the document is stored or
was stored before being deleted.
Note
By selecting a document box name from the pull-down menu, you can filter
the displayed documents by document box name.
Date Displays the date and time that the document was stored or deleted.
Note
When the documents are displayed in ascending order, click [] to switch to
descending order. When the documents are displayed in descending order,
click [] to switch to ascending order.
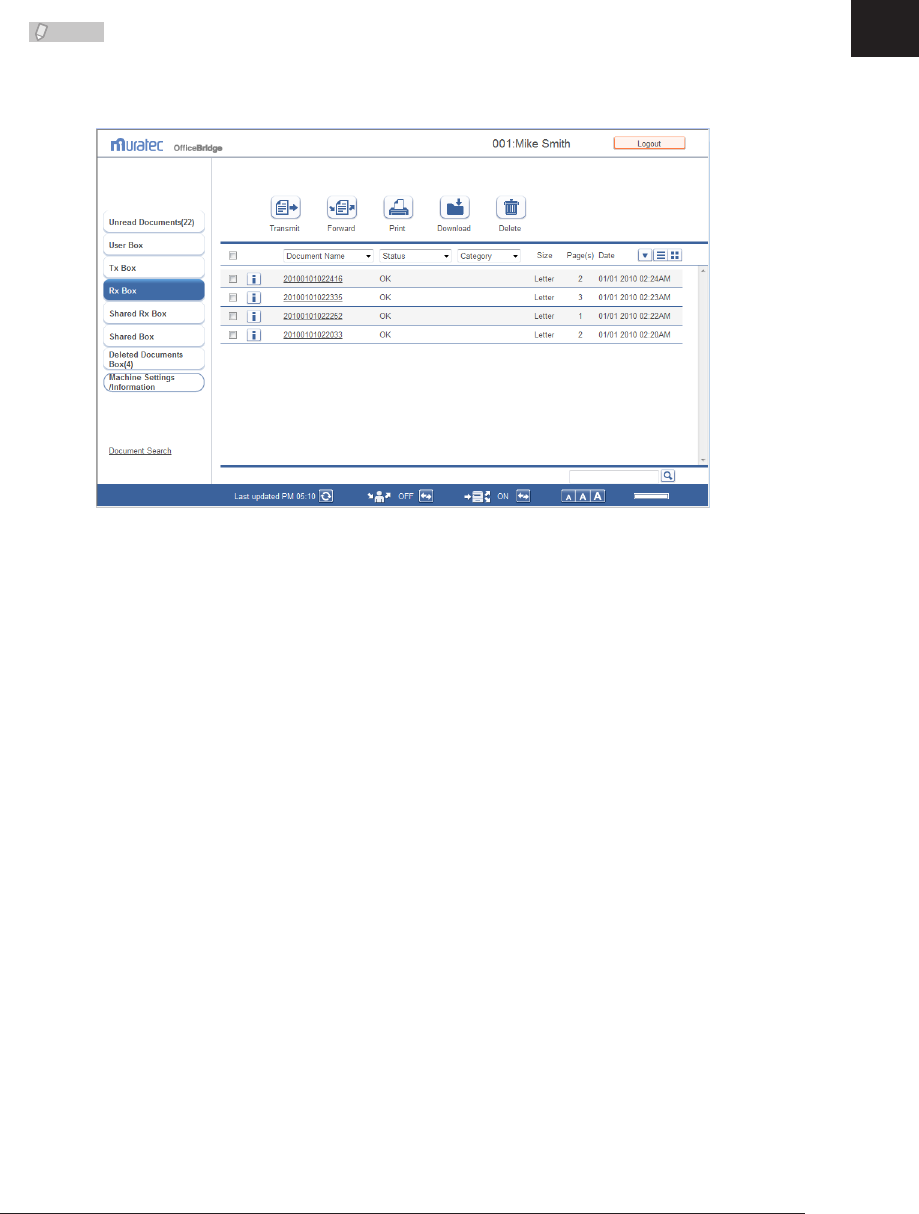
“Tx Box”, “Rx Box”, and “Shared Rx Box” Document List
Tx Box
Displays a list of the sent documents.
This document list is specific to each registered user. The displayed documents vary
according to the user.
Documents sent from the machine are listed here, if they were sent while the user logging
in to the machine.
1
Overview of OfficeBridge
Screens Used in OfficeBridge 1-15
Rx Box
Displays a list of the received documents.
This document list is specific to each registered user. The displayed documents vary
according to the user.
Note
Documents received by the machine are displayed in the “Rx Box” document list when
you have specified distribution settings to store those documents into the “Rx Box”
document list for each user. (See page 3-83.)
1-16 Screens Used in OfficeBridge
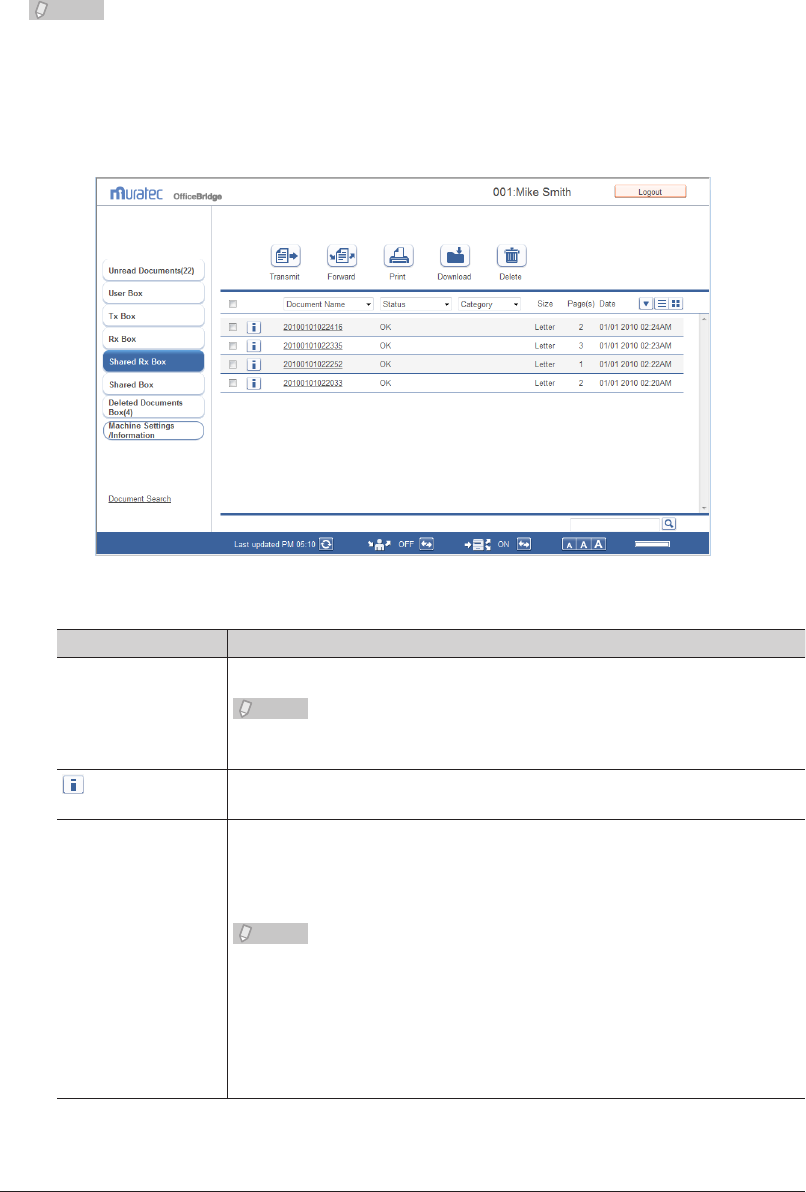
Shared Rx Box
This screen displays a list of shared documents received by users.
This document list is shared with other registered users. The displayed documents are
the same for all users.
Note
Documents received by the machine are only displayed in the “Shared Rx Box” •
document list when “Shared Rx box” is selected for “Send to Box” in “Auto
Distribution” setting. (See page 3-83.)
You can enable/disable the “Shared Rx Box” document list in “Enable the Shared •
Rx Box” in “Document Box Settings”. If you disable the document list, it is not
displayed. (See page 3-107.)
The items displayed are indicated below.
Item Description
Checkbox To select a document, select the corresponding checkbox.
Note
• To select all the documents on the displayed page, select the top checkbox.
• Click the same checkbox to deselect the item.
icon Displays the properties of the document.
If you click this, the “Document Properties” screen is displayed.
Document Name For the Tx Box, the destination (name and fax number or e-mail address) of
the document is displayed. For the Shared Rx Box and Rx Box, the sender
(name or fax number) is displayed. If the sender has not registered the
name or fax number in their machine, the reception date/time is displayed.
Note
• Click the document name to check a preview image of the document.
• If you click [+], all the destinations specied for broadcast transmission
are displayed.
• By selecting a le name from the pull-down menu, you can lter the
displayed documents by file name.
• If you have broadcast to more than one destination, fax destinations are
displayed rst. If you click [+], all the specied destinations are displayed.

1
Overview of OfficeBridge
Screens Used in OfficeBridge 1-17
Item Description
Status For the Tx Box
The transmission result is displayed.
<For normal transmission>
Reserved: The reserved transmission is accepted, and it is in a
transmission queue.
If it is delayed transmission, the document remains in standby
until the specified time is reached.
Sending: The transmission process is being executed.
Redial: The document is waiting for redialing.
OK: The transmission has been completed successfully.
Error: An error has occurred during transmission.
Canceling: The transmission is being canceled.
Cancel: The transmission has been canceled.
<For reroute transmission>
Reserved rerouted Tx: The reserved reroute transmission is accepted, and
it is in a transmission queue.
Sending rerouted Tx: The reroute transmission is being executed.
Rerouted Tx OK: The reroute transmission has been completed
successfully.
Rerouted Tx Error: An error has occurred during reroute transmission.
Canceling rerouted Tx: The reroute transmission is being canceled.
Cancel rerouted Tx: The reroute transmission has been canceled.
If you select a result from the pull-down menu, you can filter the displayed
documents by result.
Note
For reroute transmission, the address before rerouting is displayed, and the
result of the reroute transmission is displayed as the communication result.
For the Rx Box and Shared Rx Box
The reception result is displayed.
Receiving / Sending: The reception and transmission process is being
executed.
OK: The reception has been completed successfully.
Error: An error has occurred during reception.
Waiting to print: The reception is complete and the document is
waiting to be printed.
Printing received doc.: The reception is complete and the document is being
printed.
If you select a result from the pull-down menu, you can filter the displayed
documents by result.
Category Displays the set document category.
Note
If you select a document category from the pull-down menu, you can filter
the displayed documents by category.
Size Displays the paper size of the document.
Page(s) Displays the total number of pages for the document.
1-18 Screens Used in OfficeBridge
Item Description
Date Displays the date and time when the document was sent/received. When the
document is reserved, displays the date and time when the document was
reserved.
Note
When the documents are displayed in ascending order, click [] to switch to
descending order. When the documents are displayed in descending order,
click [] to switch to ascending order.
“User Box” and “Shared Box” Document Lists
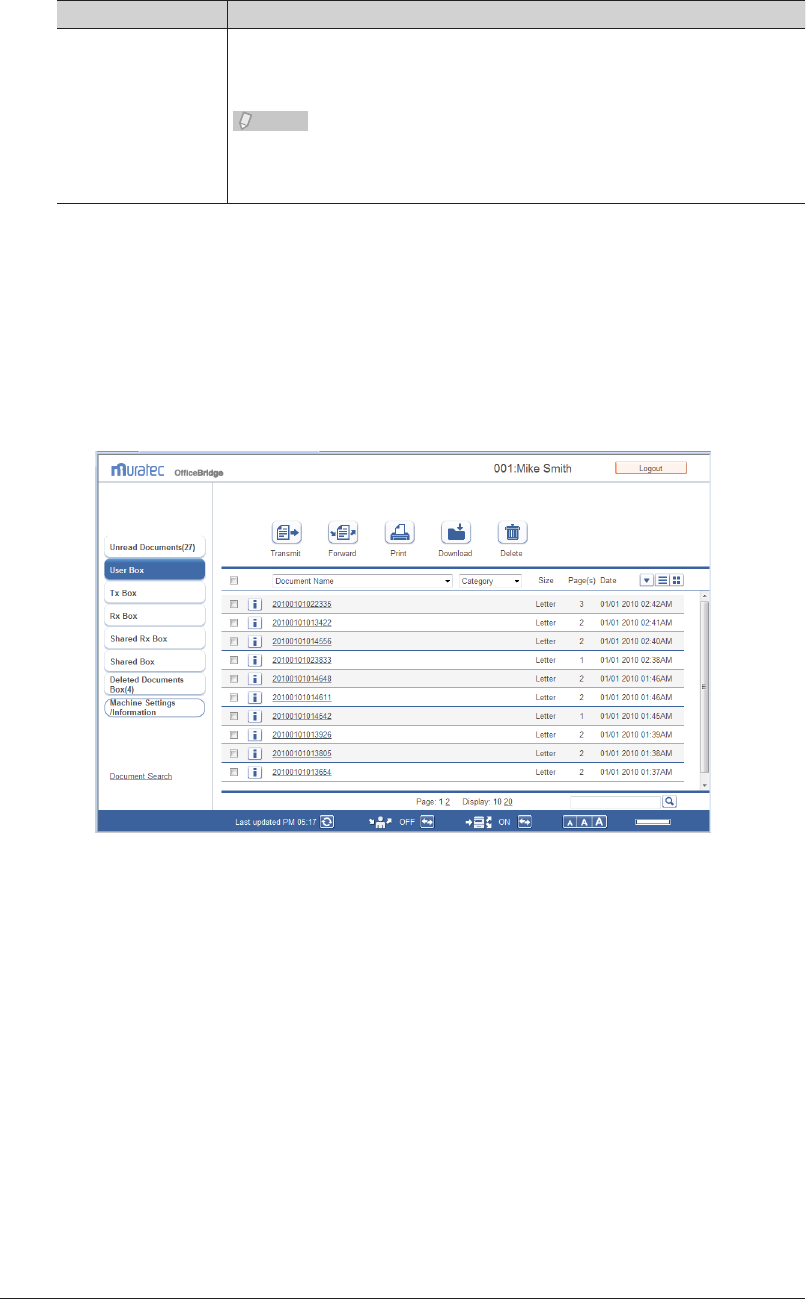
User Box
Displays a list of the documents scanned with the machine.
Documents are also stored in the user box when the user box is specified from the fax
driver.
This document list is specific to each registered user. The displayed documents vary
according to the user.
1
Overview of OfficeBridge
Screens Used in OfficeBridge 1-19
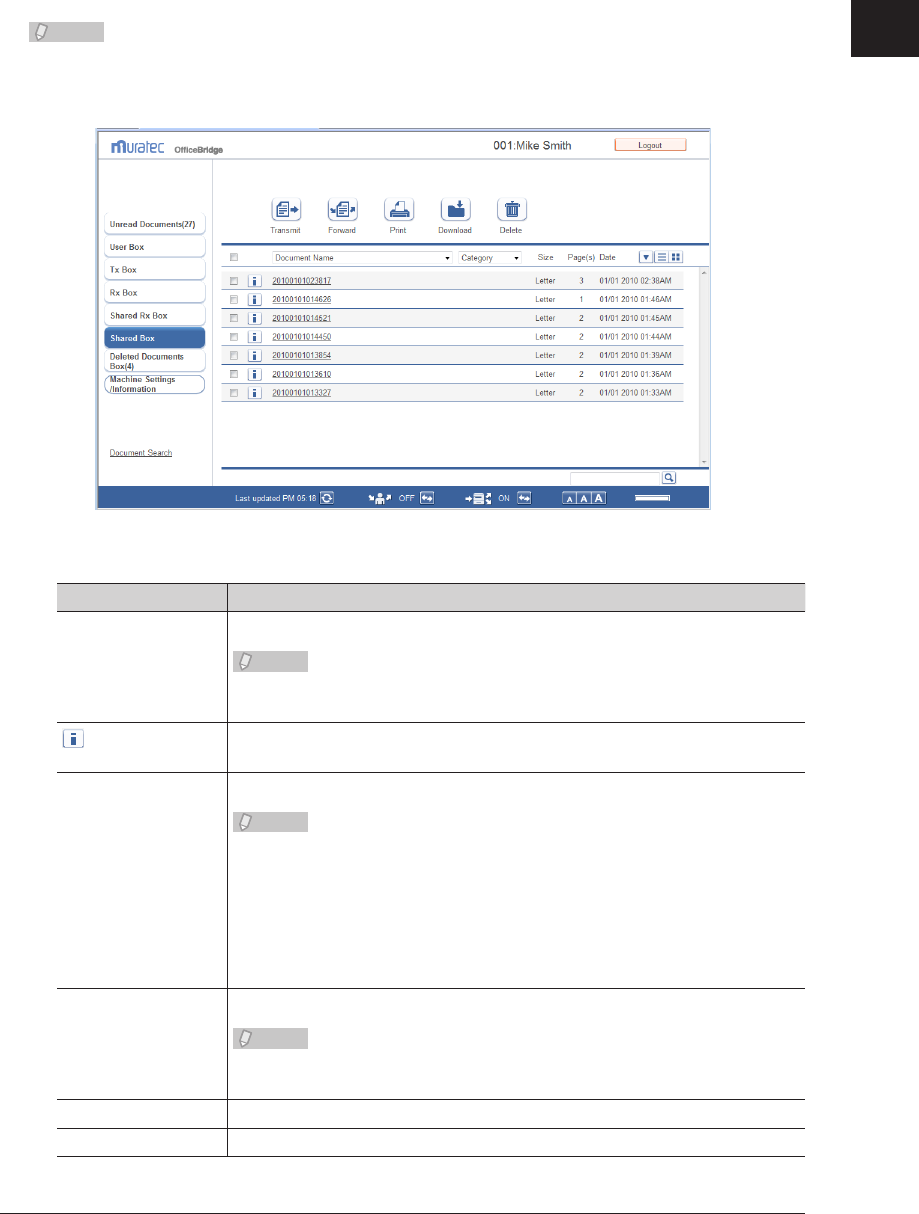
Shared Box
A list of the documents stored as shared documents is displayed.
This document list is shared with other registered users. The displayed documents are
the same for all users.
Note
You can enable/disable the “Shared Box” document list in “Enable the Shared Box”
in “Document Box Settings”. If you disable the document list, it is not displayed. (See
page 3-107.)
The items displayed are indicated below.
Item Description
Checkbox To select a document, select the corresponding checkbox.
Note
• To select all the documents on the displayed page, select the top checkbox.
• Click the same checkbox to deselect the item.
icon Displays the properties of the document.
If you click this, the “Document Properties” screen is displayed.
Document Name Displays the file name of the document.
Note
• Click the document name to check a preview image of the document.
• By selecting a le name from the pull-down menu, you can lter the
displayed documents by file name.
• If no le name has been specied at scanning, the scan date/time is
specified as the file name.
(Example: A document scanned at 13:30:30 on January 15th, 2010 is
named “20100115133030”.)
Category Displays the set document category.
Note
If you select a document category from the pull-down menu, you can filter
the displayed documents by category.
Size Displays the paper size of the document.
Page(s) Displays the total number of pages for the document.

1-20 Screens Used in OfficeBridge
Item Description
Date Displays the date and time when the document stored.
Note
When the documents are displayed in ascending order, click [] to switch to
descending order. When the documents are displayed in descending order,
click [] to switch to ascending order.

Chapter 2
Operating the Various Functions
Logging In / Logging Out ..........................................................................................2-2
Logging In ................................................................................................................2-2
Logging Out .............................................................................................................2-8
Transmitting Documents ..........................................................................................2-9
Transmitting Documents in a Document List .......................................................2-9
Retransmitting Documents ..................................................................................2-14
Canceling Transmission ........................................................................................2-15
Specifying Destinations ........................................................................................2-16
Forwarding Documents ..........................................................................................2-21
Forwarding Documents in a Document List ........................................................2-21
Forwarding Documents Created in Application Software ..................................2-23
Printing Documents.................................................................................................2-26
Printing Documents in a Document List .............................................................2-26
Searching for Documents .......................................................................................2-27
Simple Searching ..................................................................................................2-27
Advanced Searching ..............................................................................................2-28
Checking and Changing Document Information ..............................................2-30
Viewing the Documents in a Document List .......................................................2-30
Checking and Changing Document Information .................................................2-31
Registering Sender Distribution Conditions .......................................................2-32
Downloading Documents........................................................................................2-34
Downloading Documents in a Document List .....................................................2-34
Deleting Documents.................................................................................................2-37
Deleting Documents in a Document List .............................................................2-37
Deleting Documents in the Deleted Documents Box ..........................................2-38
Checking the Jobs or History ................................................................................2-40
Checking / Canceling a Communication Job in Progress ....................................2-40
Checking / Canceling Print Jobs in Progress .......................................................2-42
Checking the Communication History .................................................................2-44
Checking the Print Job History ............................................................................2-47
Forwarding Documents ..........................................................................................2-48
Forwarding Received Documents .........................................................................2-48
Specifying Forwarding Destinations ....................................................................2-49
Setting the Attachment File Format and Forwarding Period .............................2-54
2-2 Logging In / Logging Out
Logging In / Logging Out
A Web browser is used to operate OfficeBridge. For details on the supported Web
browsers, refer to Chapter 6, “Specifications” in the User's Guide. In this chapter, the
procedure for using Internet Explorer is used as an example.
Note
Perform user registration before using OfficeBridge. For details on registering new
users, refer to “Registering Users”. (See page 3-5.)
Logging In
OfficeBridge has three types of users that can log in; “administrators”, “users”, and “guest”.
User Description
Administrator Can specify all the machine settings. If you set an administrator password,
only the administrator can specify machine settings.
User Personal settings can be specified for each user by creating user information
such as a user ID and password. Scanned documents and transmitted/
received documents, etc. are treated as personal documents. Can specify
some of the machine settings.
Guest This type of user logs in without entering a password. Scanned documents
and transmitted/received documents, etc. are treated as shared documents.
Can specify some of the machine settings.
Connecting to OfficeBridge
Start the Web browser and access OfficeBridge.
Start the Web browser.
1
If there is a shortcut to OfficeBridge on the desktop, you can double click the shortcut to start
the Web browser and access OfficeBridge.
Enter the IP address of the machine in the “Address” bar of the Web browser,
2
and press the [Enter] key.
If no users are registered, you are logged in as a guest.
1
2
Operating the Various Functions
Logging In / Logging Out 2-3
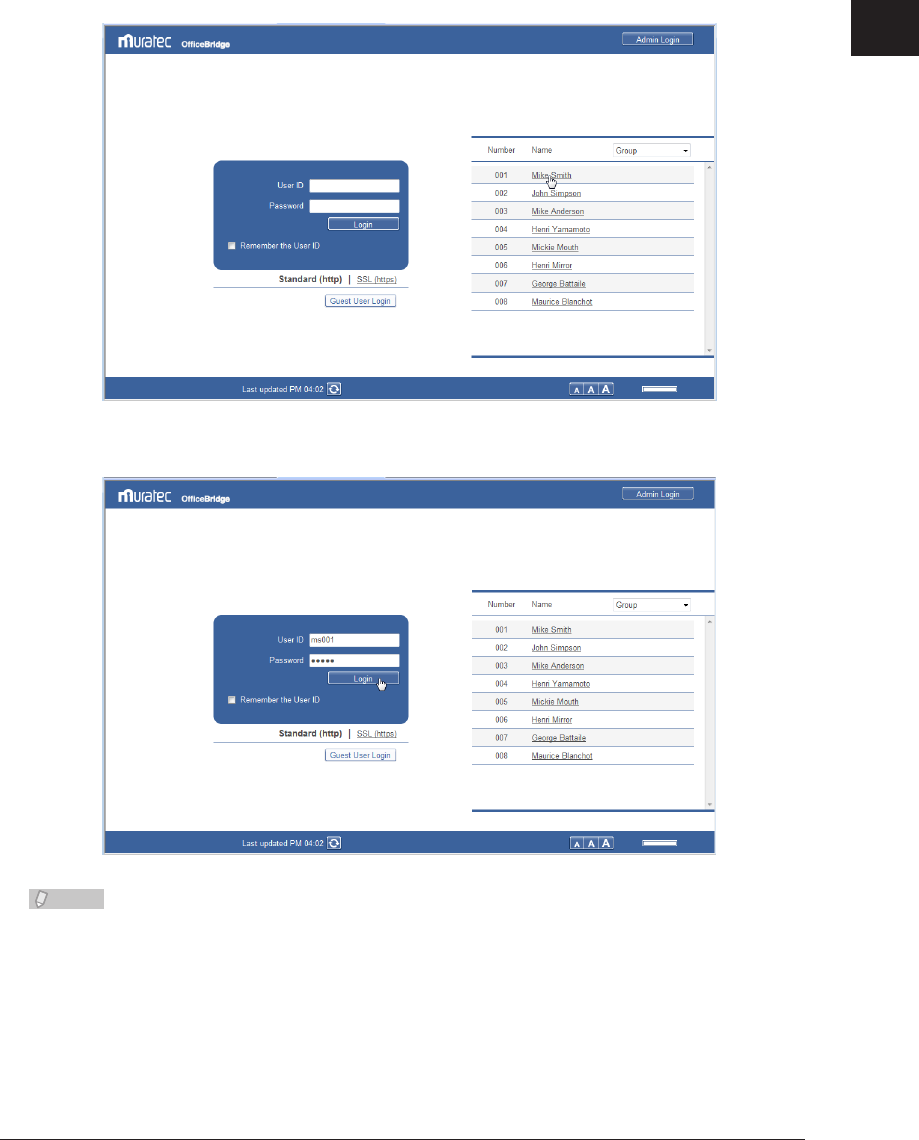
Logging In From the User List
Select the user to log in as from the list of users. If you select a user, the user ID is
entered automatically.
Click the user name in the user list.
1
The user ID of the user name you click is automatically entered in “User ID”.
Enter the “Password”, and click [Login].
2
Note
If you set the machine policy to Single Sign On, new users can be registered from •
the login screen. For details, refer to “Setting the Machine Policy.” (See page 3-130.)
For details on registering new users, refer to “• Registering Users”. (See page 3-5.)
If user registration is enabled in the guest user policy, a link to the user registration •
page (“If you do not have a User ID, click here.”) is displayed on the login screen. (See
page 3-123.) Click this link to display the user registration screen.
2-4 Logging In / Logging Out
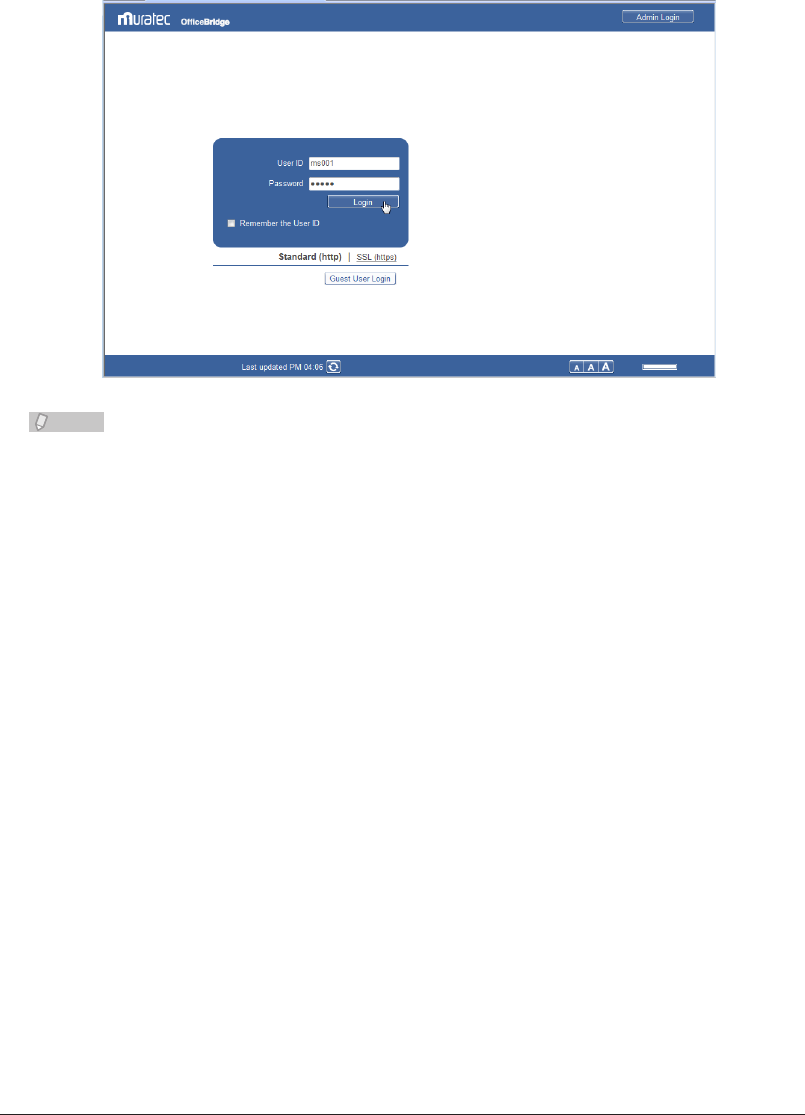
Logging In By Entering a User ID
If you do not want people to find out the user IDs of other users, set the login screen to
“User ID Input” and make the users manually enter their user ID and password. (See
page 3-130.)
Enter the “User ID” and “Password”, and click [Login].
1
Note
If you do not know your own “User ID” and “Password”, contact the administrator.•
If you select “Remember the User ID”, the account ID you enter is stored on your •
computer. The next time you access OfficeBridge, the stored user ID is automatically
entered.
If the authentication method in the machine policy is set to “Network”, the user list •
is not displayed. (See page 3-130.)
1
2
Operating the Various Functions
Logging In / Logging Out 2-5
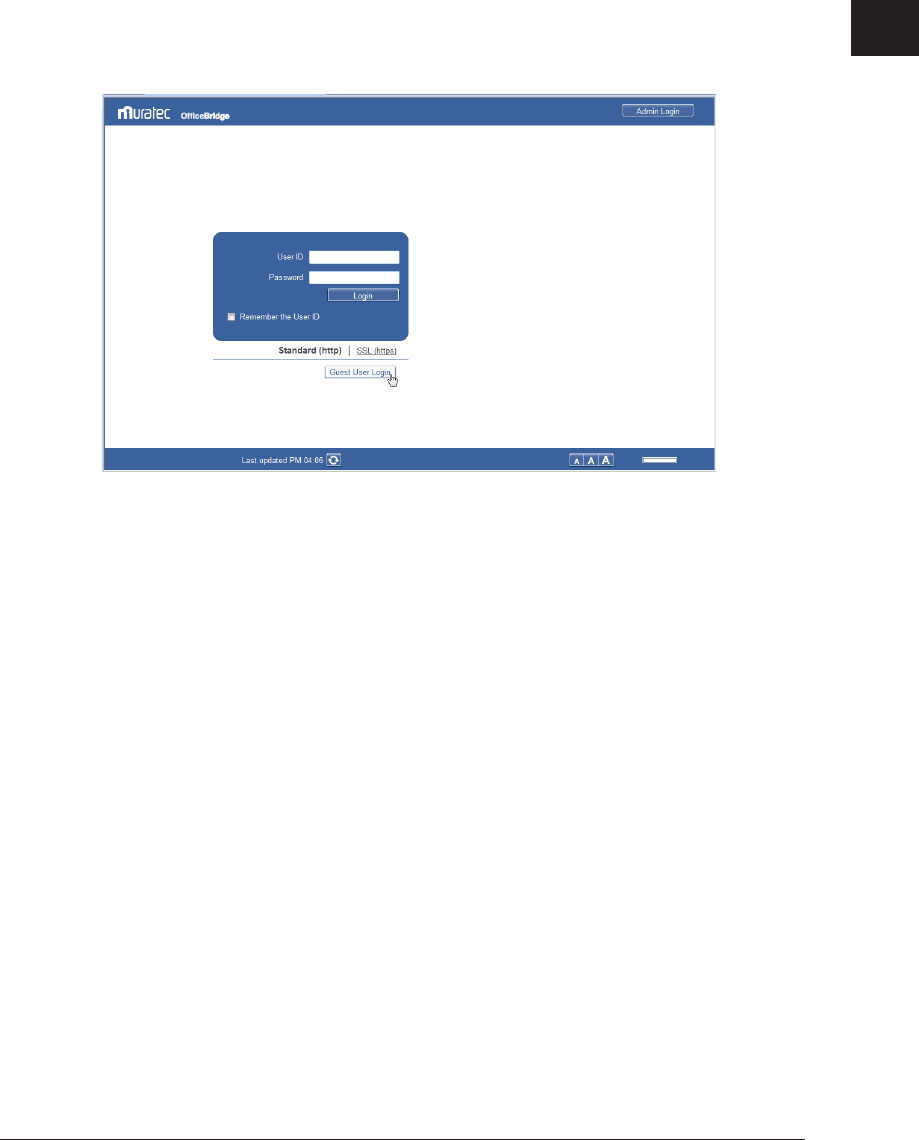
Performing a Guest User Login
You can log in to OfficeBridge without entering a user ID and password. If you disable
“Guest Account Setting” in the machine policy settings, you cannot log in with the guest
account. For details, refer to “Setting the Machine Policy”. (See page 3-130.)
There are some restrictions on transmitting/receiving e-mail and specifying machine
settings. The guest user restrictions can be changed in the machine policy. (See page
3-130.)
Click [Guest User Login].
1
2-6 Logging In / Logging Out
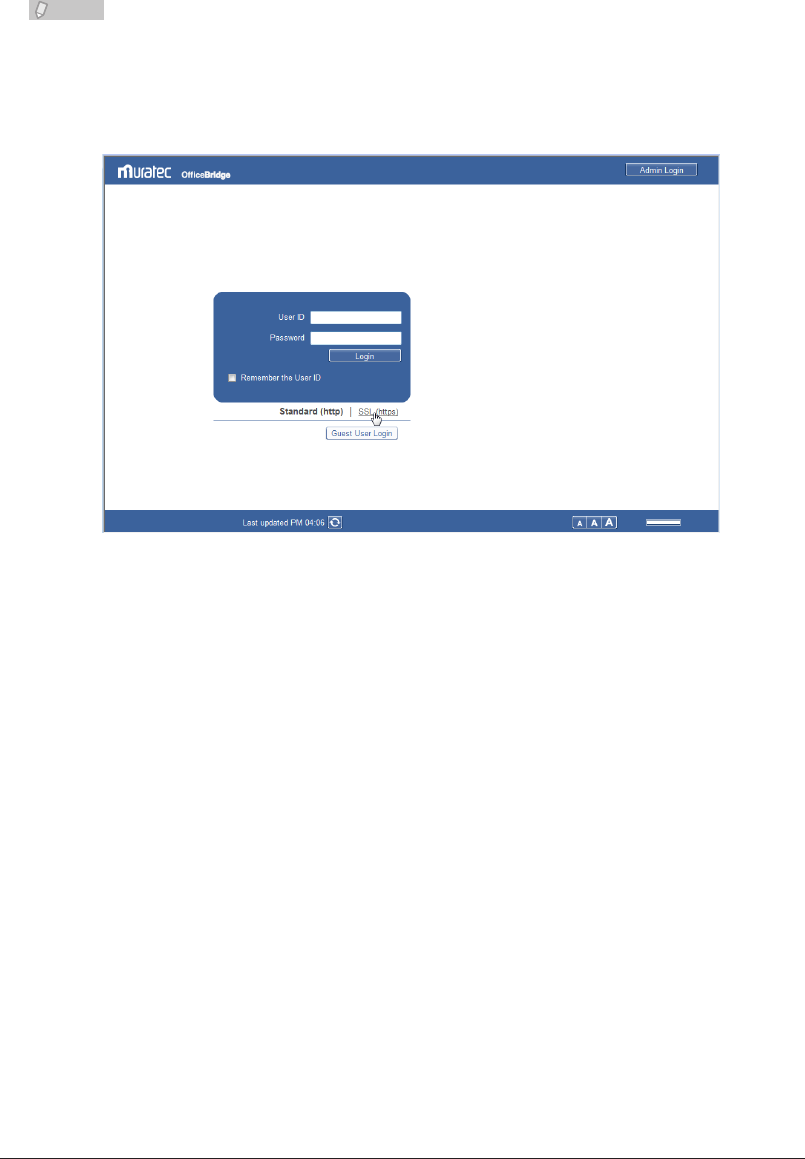
Performing an SSL Login
OfficeBridge supports SSL (Secure Socket Layer) security for data communication.
SSL communication encrypts the data communicated between the computers and
OfficeBridge to prevent the theft and modification of data by outside parties.
If you perform an SSL login, the [SSL] icon is displayed on the header.
Note
If you perform an SSL login, the response time will be slower than a regular login
because encryption and authentication are performed for the data.
Click “SSL (https)”.
1
Perform the login procedure.
2
1
2
Operating the Various Functions
Logging In / Logging Out 2-7
Performing an Administrator Screen Login
If “Administrator Password” is set in the machine policy setting, the administrator screen
login screen is displayed. For details, refer to “Setting the Machine Policy.” (See page
3-130.)
All the machine settings can be specified on the administrator screen.
Click [Admin Login].
1
If an administrator password is not set, this concludes the procedure.
Enter the administrator password, and click [Login].
2
Note
If no users are registered, press [Logout] after connecting to OfficeBridge to log in to
the administrator screen.
2-8 Logging In / Logging Out
Logging Out
Perform the logout procedure when you want to close OfficeBridge or switch users. This is
particularly important when multiple users are using the same computer, as other users
will be able to see your files if you remain logged in. Make sure to perform the logout
procedure for security purposes.
Click [Logout].
1
The display returns to the login screen.
Note
If you do not access OfficeBridge for 30 minutes, you are automatically logged out.
1
2
Operating the Various Functions
Transmitting Documents 2-9
Transmitting Documents
You can specify destinations and transmit documents scanned on the machine via fax.
You can also transmit the document as an e-mail attachment by specifying the e-mail
address of the destination.
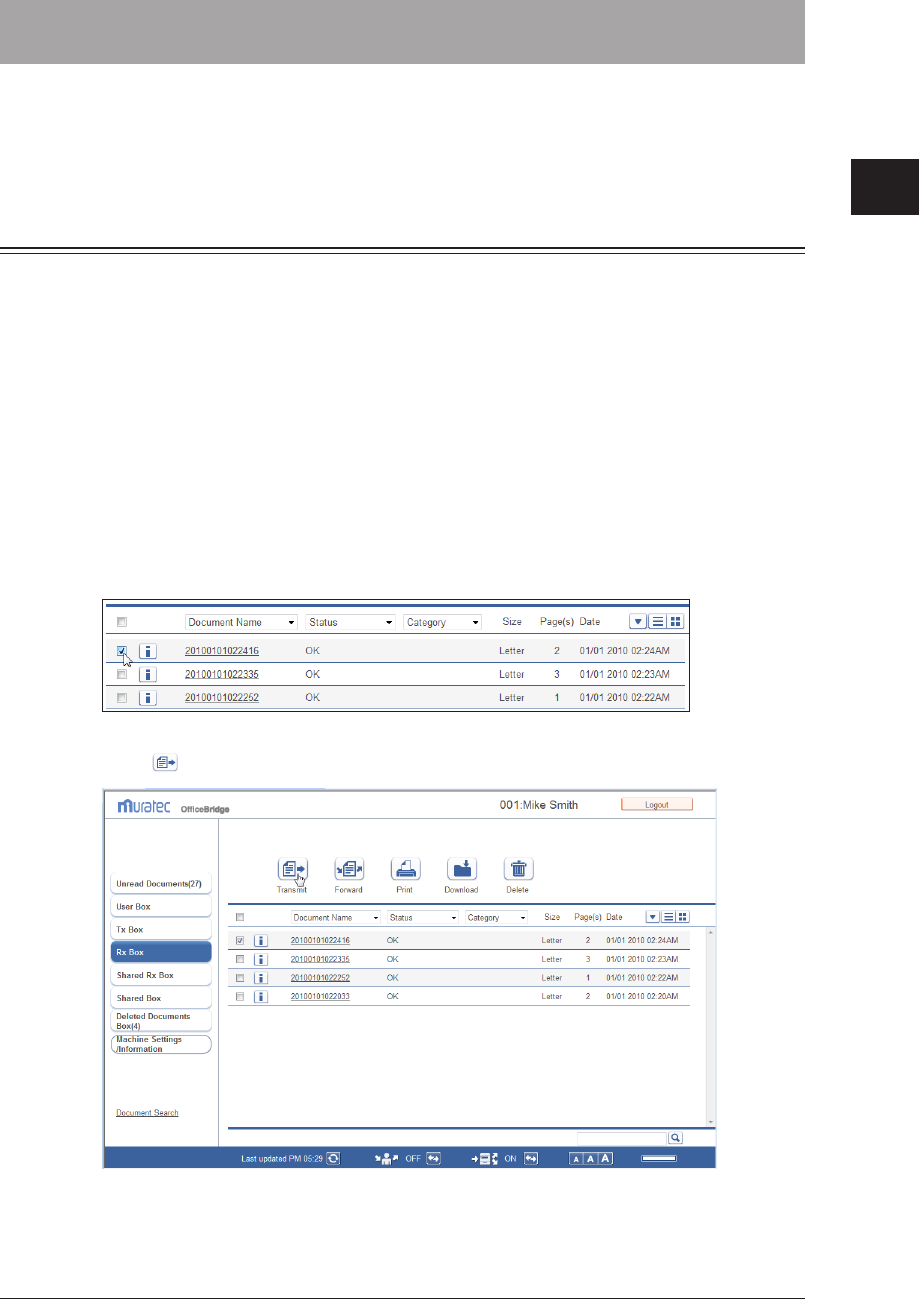
Transmitting Documents in a Document List
You can transmit the scanned documents and received documents on a document list
screen to a destination via fax or e-mail. Select the document to transmit on the document
list screen and specify the settings on the transmission settings screen.
Performing Transmission
Log in to OfficeBridge as a user or a guest.
1
(See page 2-2.)
Click [Document Boxes].
2
Select the document to transmit on the document list screen.
3
Click
4
[Transmit].
2-10 Transmitting Documents
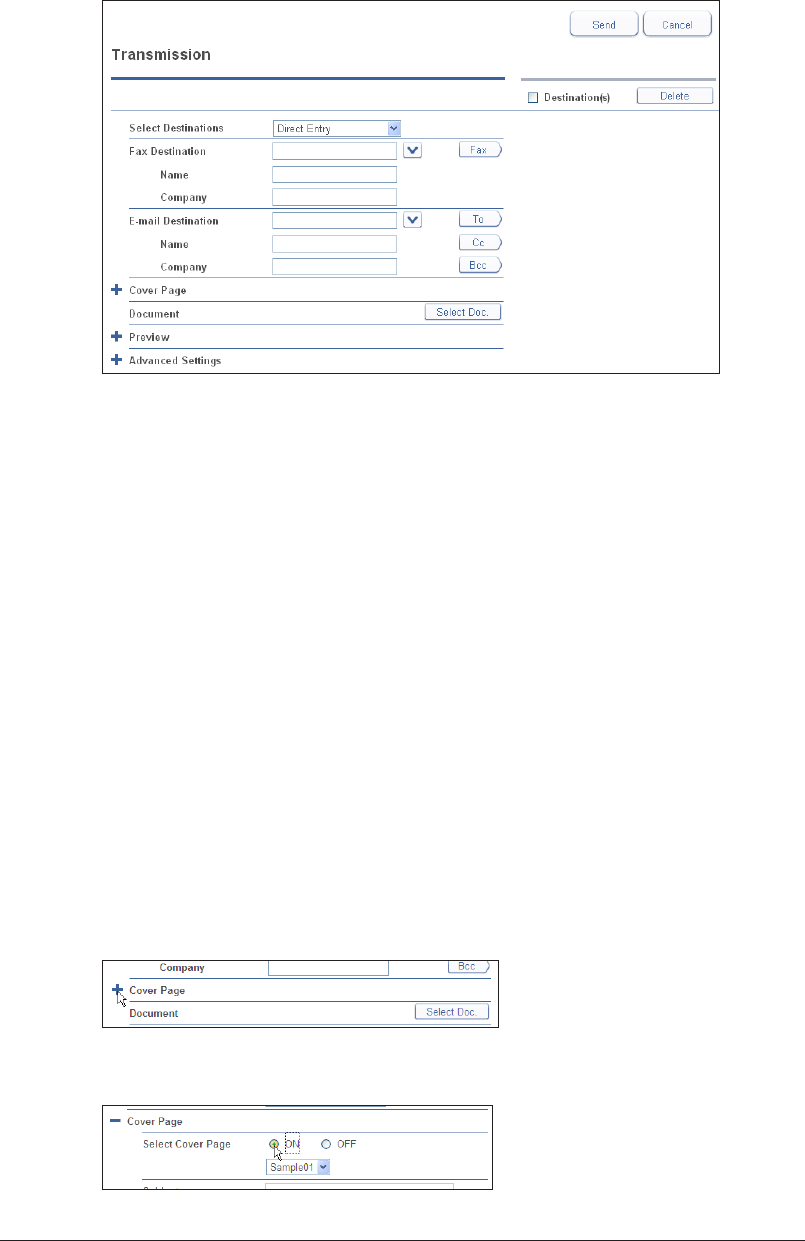
5
Specify the destination.
For details on specifying the destination, refer to “Specifying Destinations”. (See page 2-16.)
Specify the various settings as necessary.
6
You can add a cover page. • (See page 2-10.)
You can add or delete documents. • (See page 2-12.)
You can specify a transmission time and add body text for an e-mail. • (See page 2-13.)
Check the specified settings, and click [Send].
7
To check the document that will be transmitted, click the [+] to the left of the “Preview” eld. •
The document that will be sent is displayed, including the cover page.
If you click [Cancel], all the specified settings are canceled and the display returns to the •
document list.
The document to transmit is displayed on the “Transmission” document list, with “Tx Box” or •
“Reserved” displayed in the “Status” field.
Transmission is performed immediately if there are no other transmission jobs waiting. The •
document is reserved if there are other transmission jobs, and is then transmitted when the
other documents have been transmitted.
Attaching a Cover Page
Cover pages uploaded to OfficeBridge can be attached to documents for transmission.
Open the transmission screen and specify the destinations.
1
See “Performing Transmission” step 1 to 5 how to operate. (See page 2-9.)
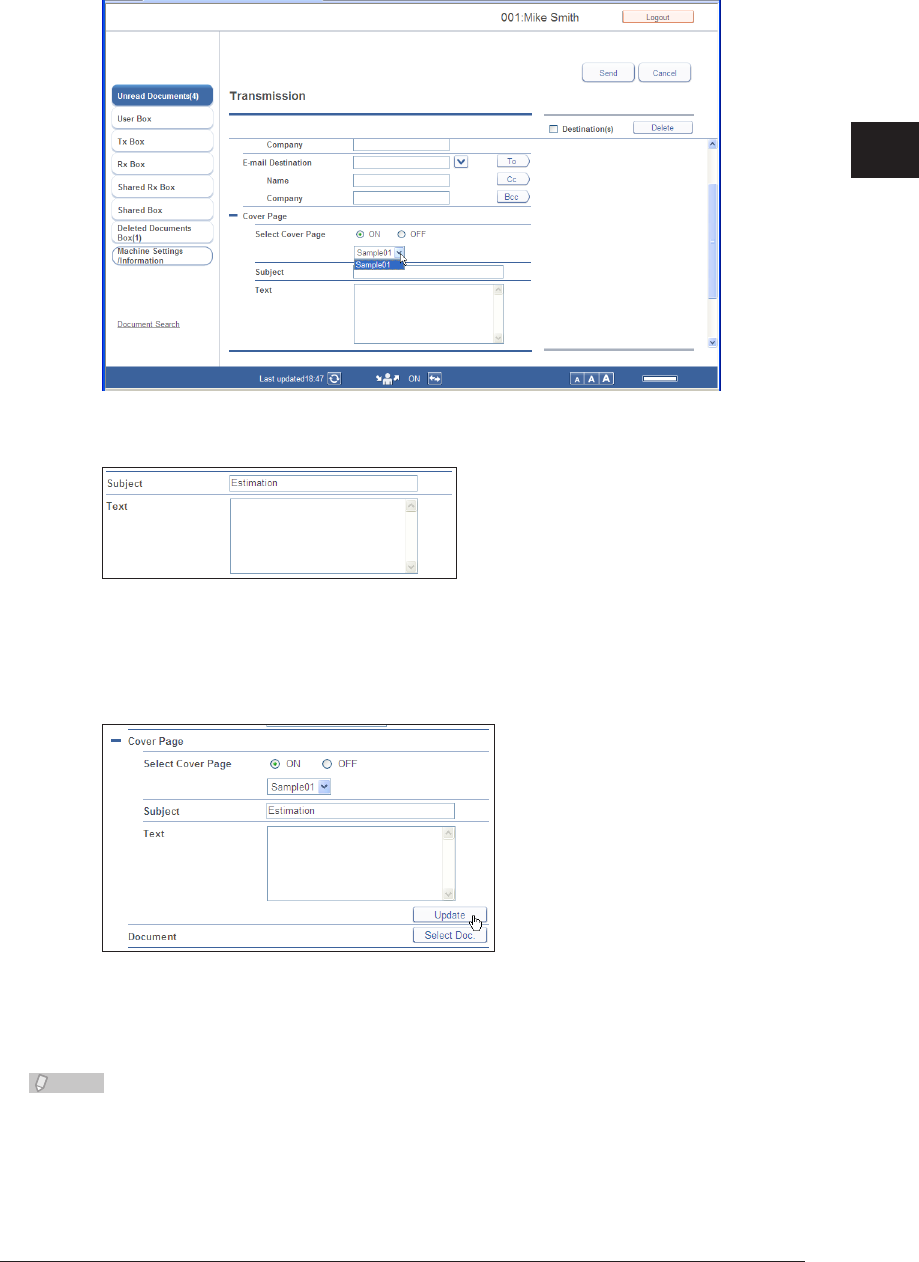
Click the [+] to the left of “Cover Page”.
2
Select “ON” for “Select Cover Page”.
3
1
2
Operating the Various Functions
Transmitting Documents 2-11
Select the cover page to attach from the pull-down menu.
4
Enter the “Subject” and “Text”.
5
The “Subject” and “Text” entered here are automatically recorded on the selected cover page.
Click [Update].
6
The cover page settings are updated.
Specify the other required settings, and click [Send].
7
Transmission is performed with the selected cover page attached to the start of the document.
Note
You can create cover pages. • (See page 4-23.)
The cover pages you create must be uploaded to OfficeBridge. • (See page 4-48.)
2-12 Transmitting Documents
Adding and Deleting Documents
You can add or delete documents after selecting documents. Documents created in an
application can be transmitted together if you add them after saving them to the shared
box or a user box using the fax driver.
Open the transmission screen and specify the destinations.
1
See “Performing Transmission” step 1 to 5 how to operate. (See page 2-9.)
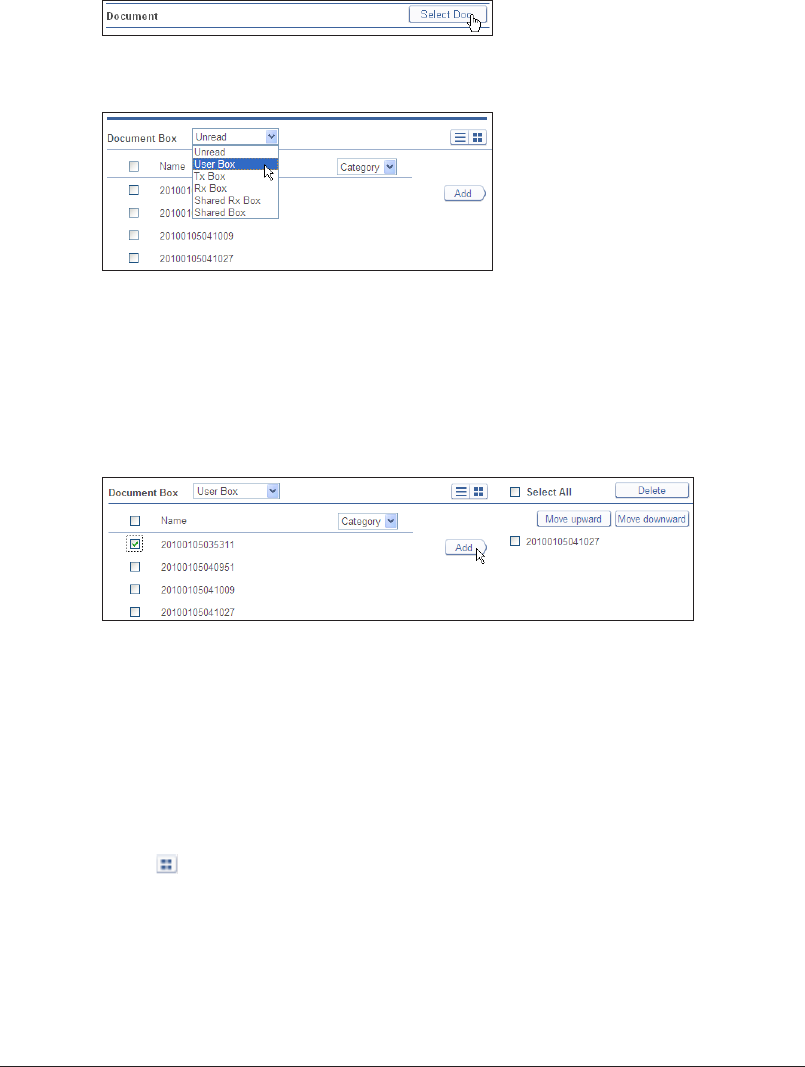
Click [Select Doc].
2
Select the box from the “Document Box” pull-down menu.
3
You can select the unread documents box, the user box, the reception box, the transmission •
box, the shared reception box, or the shared box. A list of the documents in the selected box
is displayed.
If you select a document category from the [Category] pull-down menu at the top, you can •
filter the displayed document list by category. You can also switch the number of items
displayed and the displayed page.
Select the documents to add from the document list, and click [Add].
4
To select all the displayed documents, select the top checkbox.•
Click the same checkbox to deselect the item.•
The added documents are displayed in the “Select All” list on the right of the document •
selection screen. You can delete documents by selecting the document name displayed in
this list and clicking [Delete]. To select and delete all the displayed documents, select the top
checkbox.
The documents are transmitted in the order they are displayed in the “Select All” list. To •
change the order, select the document name to move, and click [Move upward] or [Move
downward]. The selected document moves up or down one level each time you click the
button.
Click to display the selected documents in the thumbnail format.
Click [Save].
5
The display returns to the setting screen.
Specify the other required settings, and click [Send].
6
1
2
Operating the Various Functions
Transmitting Documents 2-13
Specifying Advanced Communication Settings
You can specify a transmission time and add body text for an e-mail.
Open the transmission screen and specify the destinations.
1
See “Performing Transmission” step 1 to 5 how to operate. (See page 2-9.)
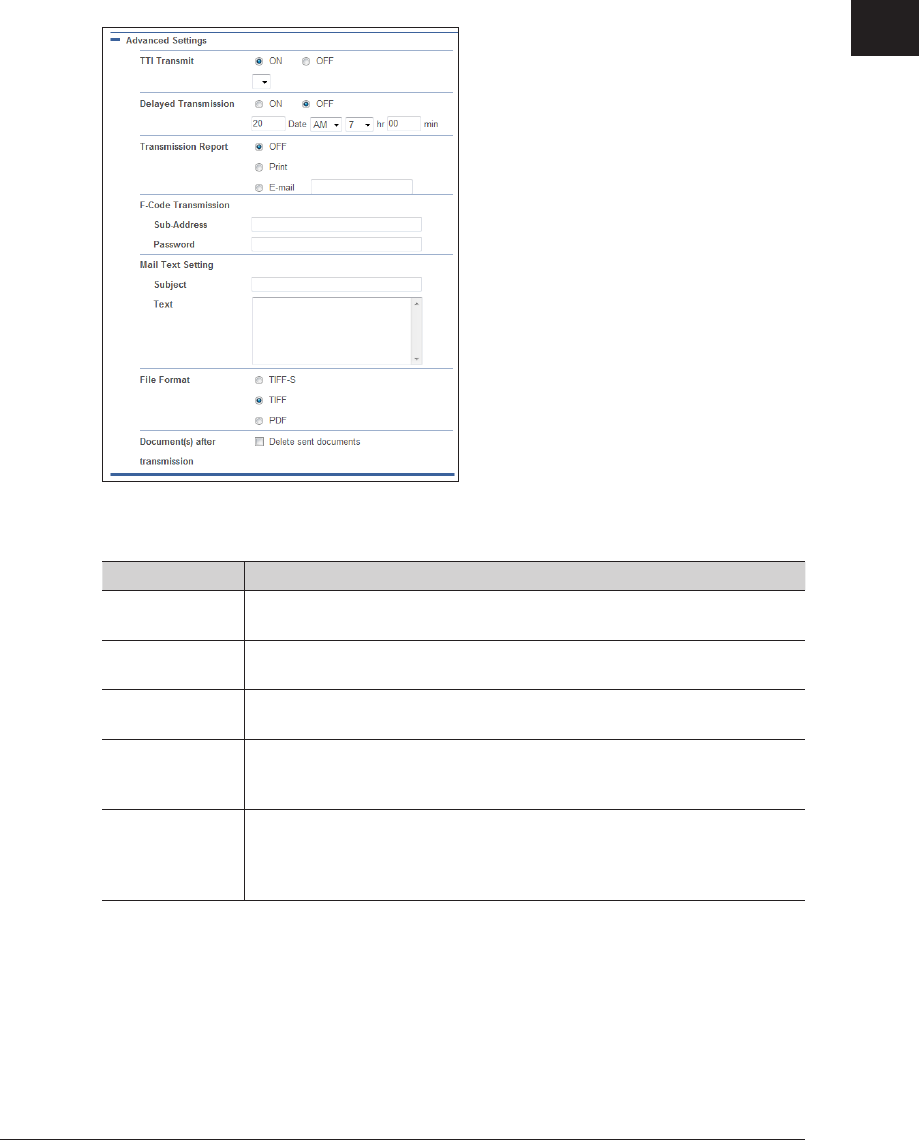
Click the [+] to the left of “Advanced Settings”.
2
Specify the required settings.
3
Setting Description
TTI Transmit Set whether to print the TTI on the document and which of the three
TTIs that can be registered to print.
Delayed
Transmission
Set this to specify the time to transmit the document. Transmissions can
be reserved up to one month in advance.
Transmission
Report
If you set the transmission report, you can print the transmission results
or send them to an e-mail address you enter.
F-Code
Transmission
To perform F-Code communication, set a sub address and passcode.
For details on F-Code communication, refer to Chapter 4, “F-Code
Communications” in the Scanner and Fax Guide.
Mail Text Setting
When transmitting to an e-mail destination, you can enter the text and subject
of the e-mail to send. If you do not enter a text and subject, they are entered
automatically according to the settings in “Insert Subject / Text (I-Fax or
E-mail)” in “Optional E-mail Settings”. (See page 3-67.)
2-14 Transmitting Documents
Setting Description
File Format When transmitting via e-mail, select the file format for the attached file.
TIFF-S: The simple mode TIFF format.
Documents are all converted to A4 size, 200 dpi for transmission.
When the destination machine cannot receive TIFF files, use this
file format.
TIFF: The full mode TIFF format.
Documents are transmitted with the document size and
resolution set when scanning.
PDF: The PDF format.
Documents can be sent in this format when the destination is a computer
or a machine of the same model using the Internet Fax function.
Document(s) after
transmission
Set whether to save the document in the transmission box after
transmission.
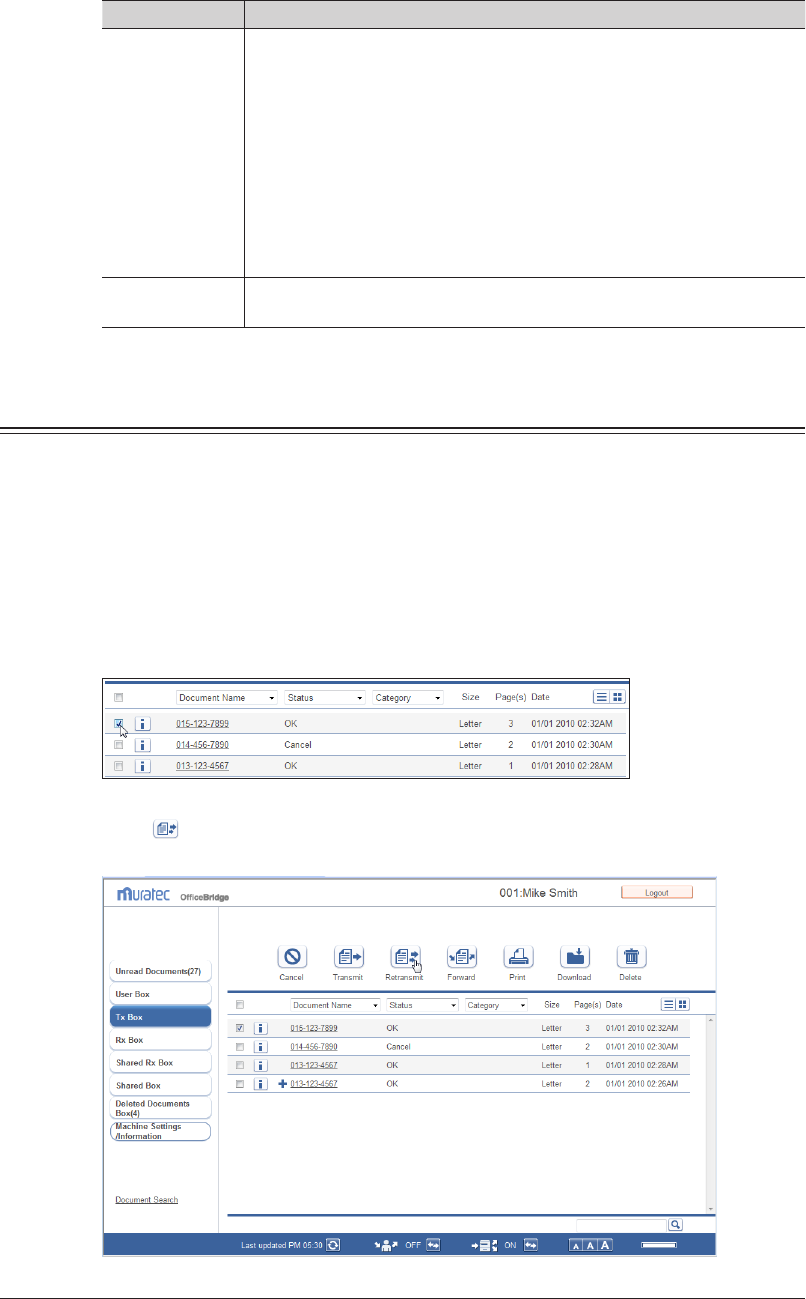
Retransmitting Documents
You can retransmit documents that have been transmitted before.
Log in to OfficeBridge as a user or a guest.
1
(See page 2-2.)
Click
2
[Document Boxes].
In the “Tx Box” document list, select the checkbox of the document you want to
3
retransmit.
Click
4
[Retransmit].
The transmission settings screen is displayed with the same settings as last time specified.
You can change each setting on the transmission settings screen.
1
2
Operating the Various Functions
Transmitting Documents 2-15
Check the specified settings, and click [Send].
5
To check the document that will be transmitted, click the [+] to the left of the “Preview” eld.•
If you click [Cancel], all the specified settings are canceled and the display returns to the •
document list.
Note
The document to transmit is displayed on the “Tx Box” document list, with “Sending” (when •
transmission is being performed) or “Reserved” (when transmission is reserved) displayed
in the “Status” field. If there are no other jobs in queue, the document is sent immediately;
if there are other jobs in queue, the document will be sent when those jobs are complete.
To send a document to a reroute destination when the reroute function is enabled, the
system automatically resends the document by fax if a communication error occurs in e-mail
transmission.
The reroute transmission function is only enabled when you select a destination with •
“Reroute Setting” set to “ON” in the address book advanced settings. For details, refer to
“Registering New Destinations”. (See page 3-17.)
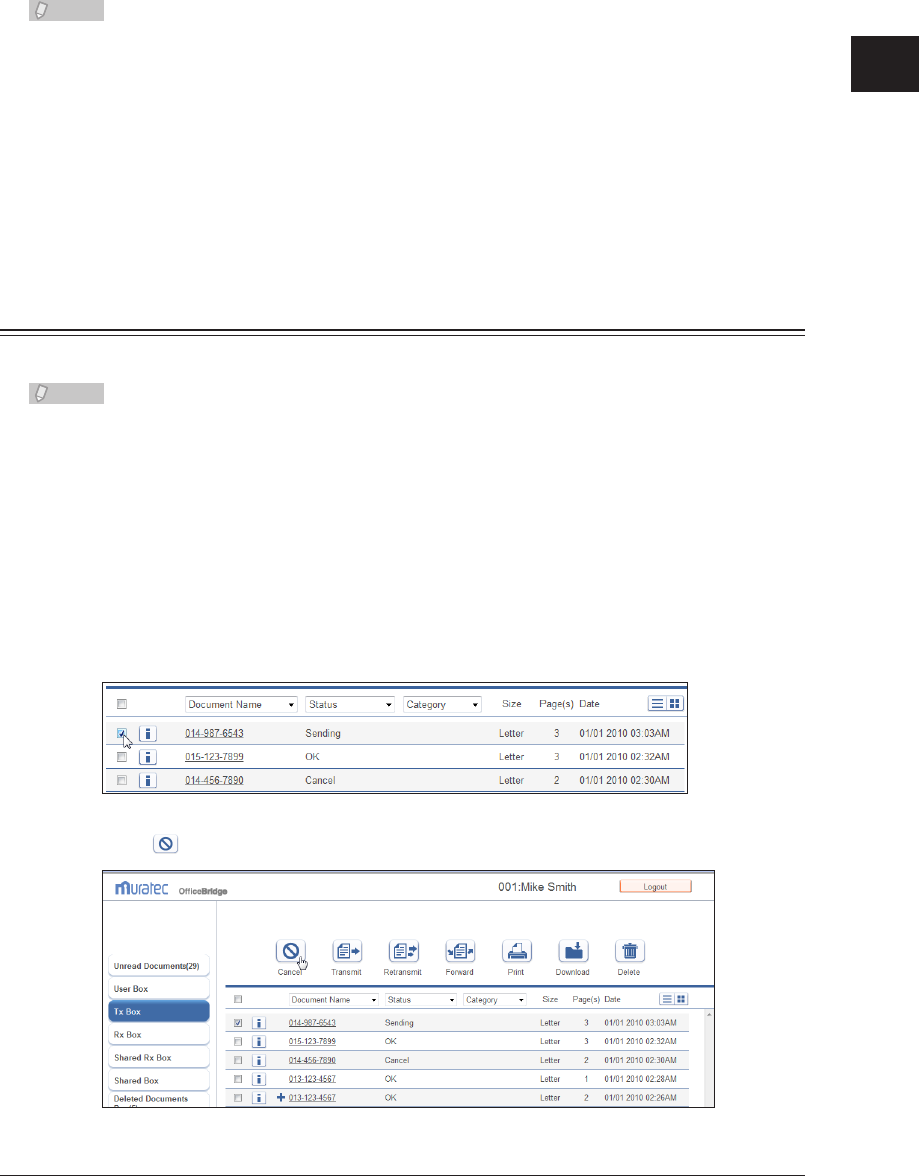
Canceling Transmission
You can cancel a document transmission job currently in progress, or in queue.
Note
Transmission can be canceled only when a document is currently being transmitted
(indicated by “Sending”) or is reserved (indicated by “Reserved”).
Log in to OfficeBridge as a user or a guest.
1
(See page 2-2.)
Click
2
[Document Boxes].
Select the document to cancel in the “Tx Box” document list.
3
Click
4
[Cancel].
2-16 Transmitting Documents
Click [OK].
5
The document transmission is canceled. If normal transmission is canceled, “Cancel” is
displayed for “Status” in the “Tx Box” document list. If reroute transmission is canceled, “Cancel
rerouted Tx” is displayed.
Specifying Destinations
The following four methods are available for specifying destinations. The methods can be
used in conjunction with each other.
Manually entering the destination•
Selecting from the address book•
Searching from an LDAP server•
Selecting a user or group in OfficeBridge•
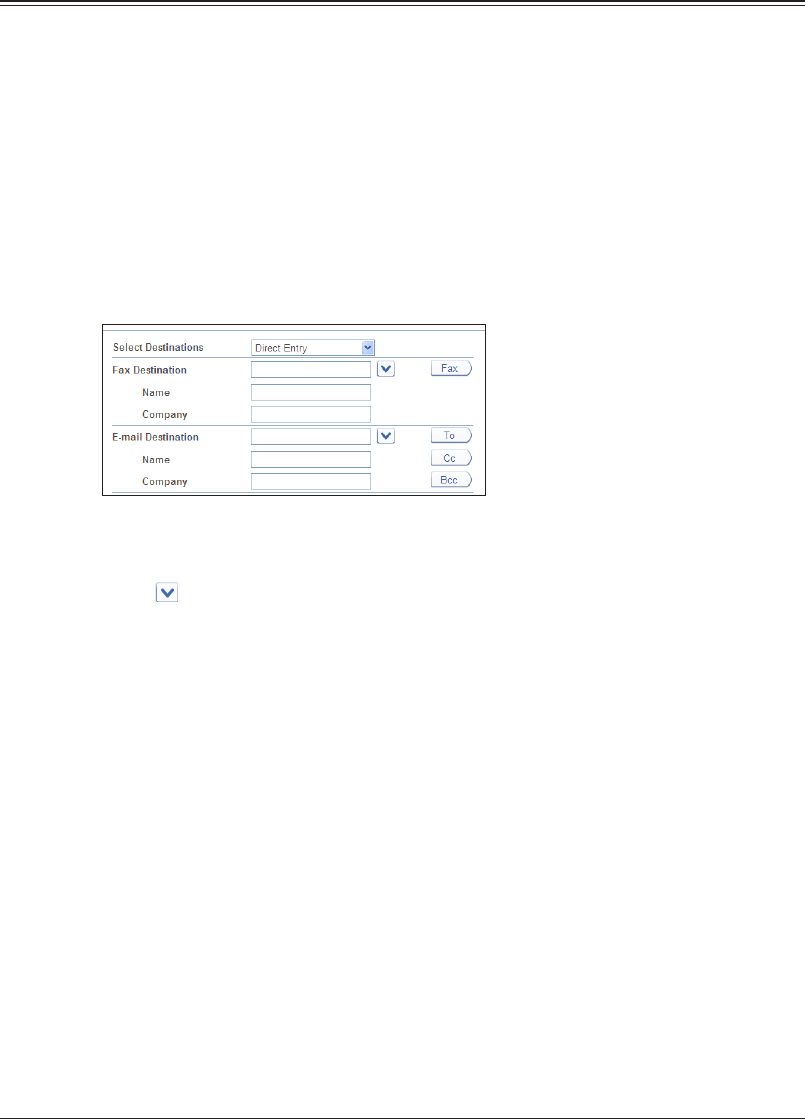
Manual Entry
Enter the destination fax number or e-mail address in the entry box on the
1
transmission settings screen. (See page 2-10.)
Enter either a fax or e-mail transmission destination. You cannot enter both at the same •
time.
You can enter destinations by selecting the transmission history from the pull-down •
menu . The name and company name will automatically be entered if they are found in
the destination history.
Up to 40 digits can be entered for a fax number. Up to 50 characters can be entered for an •
e-mail address. Up to 30 destinations can be set.
Dialing options can be inserted when entering a fax number. For details on dialing options, •
refer to Chapter 3, “Basic Faxing” in the Scanner and Fax Guide.
When you attach a cover page, enter the name and company name of the
2
destination.
Up to 30 characters can be entered for the name, and up to 50 characters can be entered for •
the company name.
The name and company name you enter are inserted in the cover page. • (See page 2-10.)
Click [Fax] if you entered a fax number, or [To], [Cc], or [Bcc] if you entered an
3
e-mail address.
The destinations you enter are displayed in the destination list on the right.•
To delete a destination, select the destination to delete from the destination list, and click •
[Delete]. If you select the checkbox to the left of “Destination(s)”, you can select all the
destinations you have entered.
1
2
Operating the Various Functions
Transmitting Documents 2-17
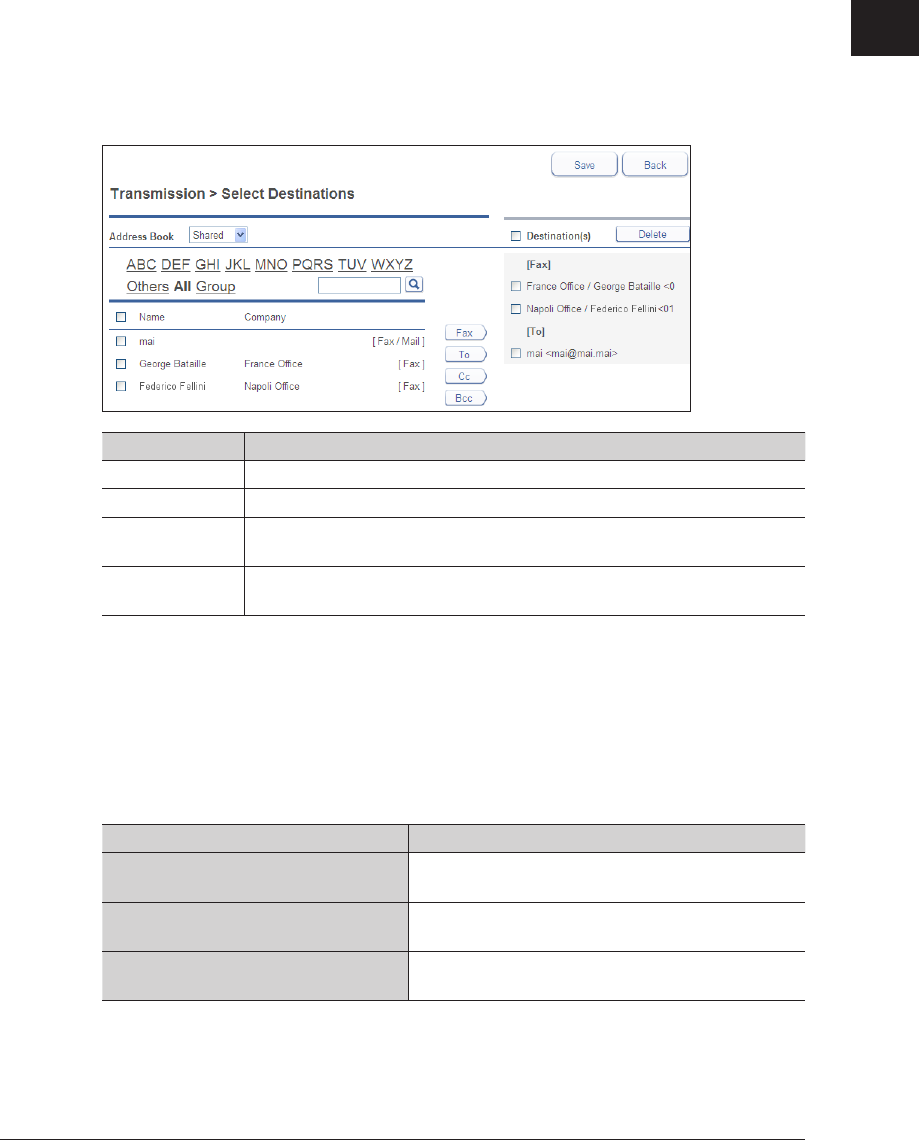
Using the Address Book
You can use the address book with destinations registered in advance.
On the transmission settings screen
1
(see page 2-10), select the address book you
want to access from the “Select Destinations” pull-down menu.
Select either [Personal Address Book] or [Shared Address Book]. If you performed a guest user
login, the personal/shared switch is not displayed.
Select a destination from the address book, and click one of the following
2
buttons to add it to the destination list.
Type Meaning
Fax Registers the destination as a fax destination.
To Registers the destination as an e-mail destination.
Cc Registers the destination as a Cc e-mail destination. The original
destination (To) is also notified of the Cc destinations.
Bcc Registers the destination as a Bcc e-mail destination. The original
destinations (To/Cc) are not notified of the Bcc destinations.
The selected items are added to the destination list on the right.•
The registered content is displayed to the right of the address book name. If only a fax •
number is registered, [Fax] is displayed. If only an e-mail address is registered, [Mail] is
displayed. If both are registered, [Fax / Mail] is displayed.
A destination cannot be registered as a fax destination unless it has a fax number registered. A •
destination cannot be registered as an e-mail destination unless it has an e-mail address registered.
The personal address book and shared address book display can also be switched on the •
destination selection screen using the pull-down menu.
You can switch the destination list display using the links above the destination list.•
Type Meaning
[ABC], [DEF], [GHI], [JKL], [MNO],
[PQRS], [TUV], [WXYZ]
Filters according to the first letter of the destination
name or company name.
[Others] Displays the destinations in the order of the
numbers registered in the address book.
[Group] Displays only the groups registered in the address
book.
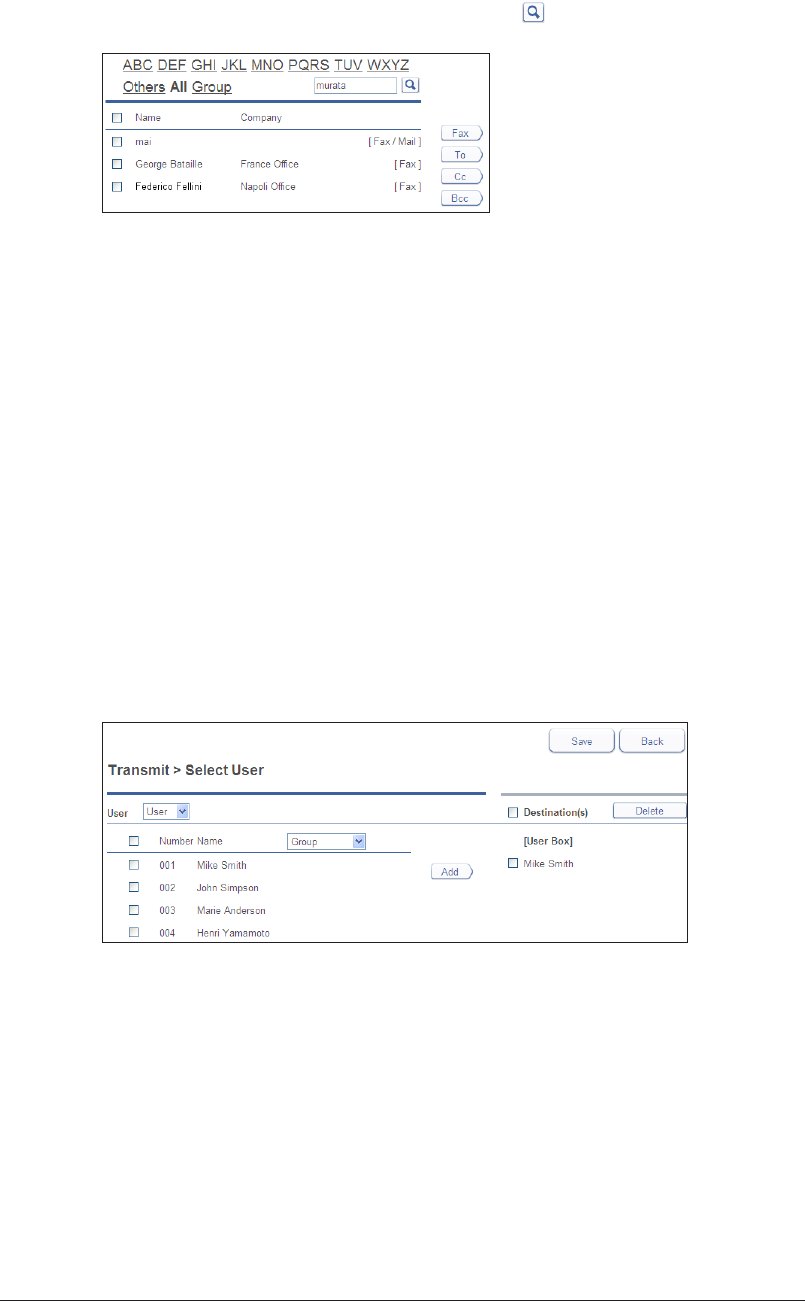
2-18 Transmitting Documents
If you enter a string in the search entry field and click • it, items containing the
corresponding string in the address book are searched for and displayed.
To select all the displayed destinations, select the top checkbox. To sort the destinations by •
name, click the [] next to “Name”. To sort the destinations by company name, click the []
next to “Company”.
Click the same checkbox to deselect the item.•
Click [Save].
3
The display returns to the transmission settings screen.
Selecting Users or Groups as Destinations
When transmitting documents to users or groups registered in OfficeBridge, you can
easily specify destinations on the user selection screen.
On the transmission settings screen
1
(see page 2-10), select “Select User” from
the “Select Destinations” pull-down menu.
Select “User” or “Group” from the “User” pull-down menu.
2
Select a user or group from the user selection list, and click [Add] to add it to
3
the destination list.
To delete a destination, select the destination to delete from the destination list, and click •
[Delete].
To select all the displayed users or groups, select the top checkbox.•
Click the same checkbox to deselect the item.•
Click [Save].
4
The display returns to the transmission settings screen.
1
2
Operating the Various Functions
Transmitting Documents 2-19
Using LDAP (
Lightweight Directory Access Protocol) Server
You can search for and select destinations from an LDAP (Lightweight Directory Access
Protocol) server.
On the transmission settings screen
1
(see page 2-10), select “LDAP Search” from
the “Select Destinations” pull-down menu.
The “LDAP Search” screen is displayed.
Select the server to search from the “LDAP Server” pull-down menu.
2
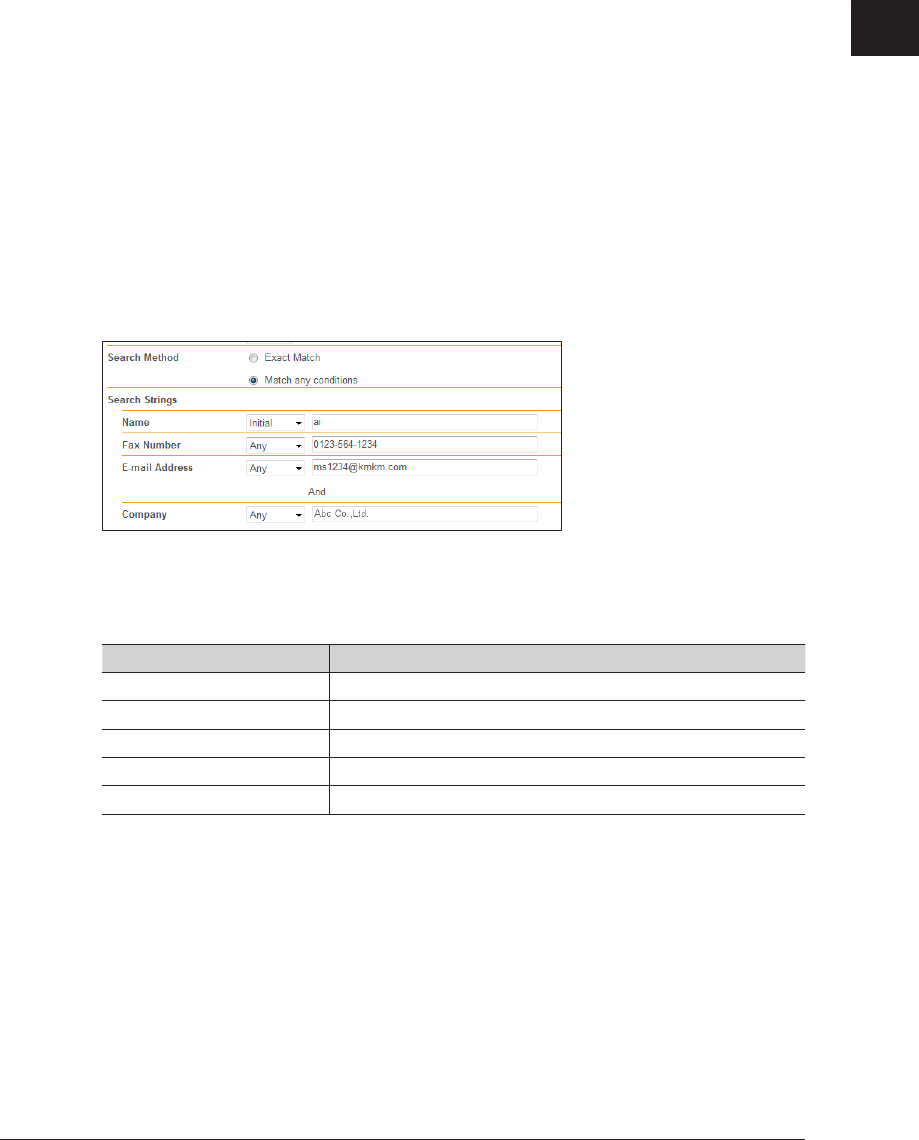
Select the search method (“Exact Match” or “Match any conditions”) in the
3
“Search Method” field.
Set the search parameters (“Name”, “Fax Number”, “E-mail Address”, or
4
“Company”) in the “Search Strings” field, and enter the search string in the
entry box.
You cannot search for a company name by itself. When searching for a company name, also
enter the name, fax number, or e-mail address.
The search parameters you can use are indicated below.
Search Parameter Description
Any Searches for items that include the specified string.
Initial Searches for items that start with the specified string.
Final Searches for items that end with the specified string.
Equal Searches for items that exactly match the specified string.
Not used The string entered in the entry box is ignored.
Click [Search].
5
If authentication is required for the LDAP server, the “LDAP Server Authentication” screen •
is displayed.
If authentication is not required, proceed to step 7.•
2-20 Transmitting Documents
Enter the account and password, and click [Login].
6
Searching starts.
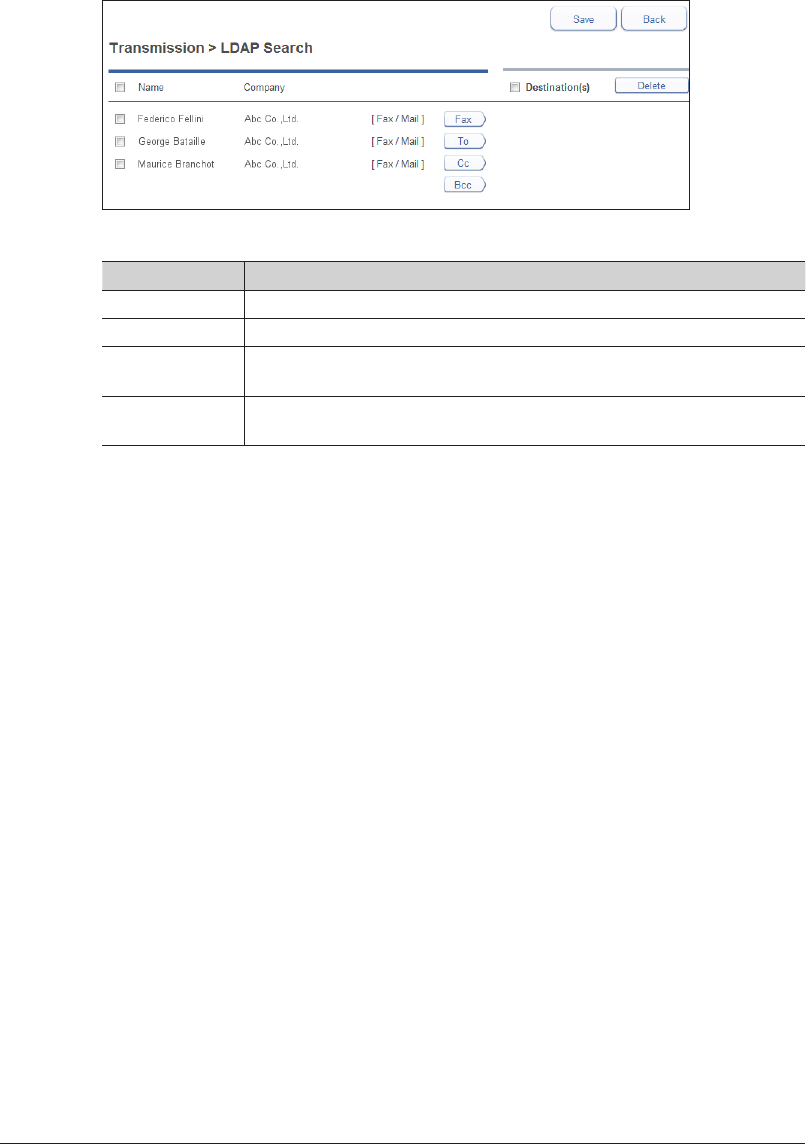
Select the destinations in the search results, and click one of the following
7
buttons to add them to the destination list.
Up to 30 fax destinations and 30 e-mail destinations can be selected.
Button name Description
Fax Registers the destination as a fax destination.
To Registers the destination as an e-mail destination.
Cc Registers the destination as a Cc e-mail destination. The original
destination (To) is also notified of the Cc destinations.
Bcc Registers the destination as a Bcc e-mail destination. The original
destinations (To/Cc) are not notified of the Bcc destinations.
A destination cannot be registered as a fax destination unless it has a fax number registered •
in the LDAP data. A destination cannot be registered as an e-mail destination unless it has
an e-mail address registered in the LDAP data.
To delete a destination, select the destination you want to delete from the destination list, •
and click [Delete].
Click [Save].
8
The display returns to the transmission settings screen.

1
2
Operating the Various Functions
Forwarding Documents 2-21
Forwarding Documents
You can forward received documents to other users or user groups.
If you forward a document to the shared box, all the registered users can view that
document.
Forwarding Documents in a Document List
You can forward the documents in a document list to the shared box, other users or user
groups.
Forwarding Documents in a Document List
Log in to OfficeBridge as a user or a guest.
1
(See page 2-2.)
Click
2
[Document Boxes].
Select the document to forward on the document list screen.
3
Click [Forward].
4
Edit the document name, category, comments, and hold time as necessary.
5
(See
page 2-22.)
Select the forwarding destination.
6
To forward to the shared box, select “Shared Box”.•
To forward to another user or user group, select “User Box”, and click [Select]. • (See page
2-22.)
You can add or delete documents.
7
(See page 2-12.)
Click [Forward].
8
When the selected document is forwarded, the display returns to the document list.•
If you click [Cancel], all the specified settings are canceled and the display returns to the •
document list.
Note
If the “Shared Box” function is disabled in the document box settings, you cannot
forward to the shared box. (See page 3-107.)
2-22 Forwarding Documents
Setting the Document Name, Category, Comments, and Hold
Time
Specify each setting as necessary.
Item Description
Document
Name
• The document name of the selected document is displayed in the entry box.
To change the name, manually change the file name in the entry box. Up to 80
characters can be entered.
• The following characters cannot be used in a document name.
\ / : * ? " < > |
• The document name can be selected from a template (see page 3-49) or the
history in the pull-down menu to the right of the “Document Name” field. The
history of the latest 10 document names and up to 20 document names registered
in the template settings is displayed.
Category • The document category of the selected document is displayed in the entry box. To
change the name, manually change the document category in the entry box. Up to
20 characters can be entered.
• You can enter a document category by selecting the history in the pull-down
menu to the right of the “Category” field. The latest 10 registered or viewable
document categories are displayed in the history.
Comment You can add a comment. Up to 1024 characters can be entered. The recipient can
check the comments in the document properties. (See page 2-31.)
Hold Time The hold time indicates the storage period for the document stored in the reception
box of the recipient. Select “No Limit” or “Document Hold Time”. If you selected
“Document Hold Time”, enter the number of days to store the document in the
entry box (between 0 and 99).
User and User Group Settings
Select “User Box” in the “Destination” field, and click [Select].
1
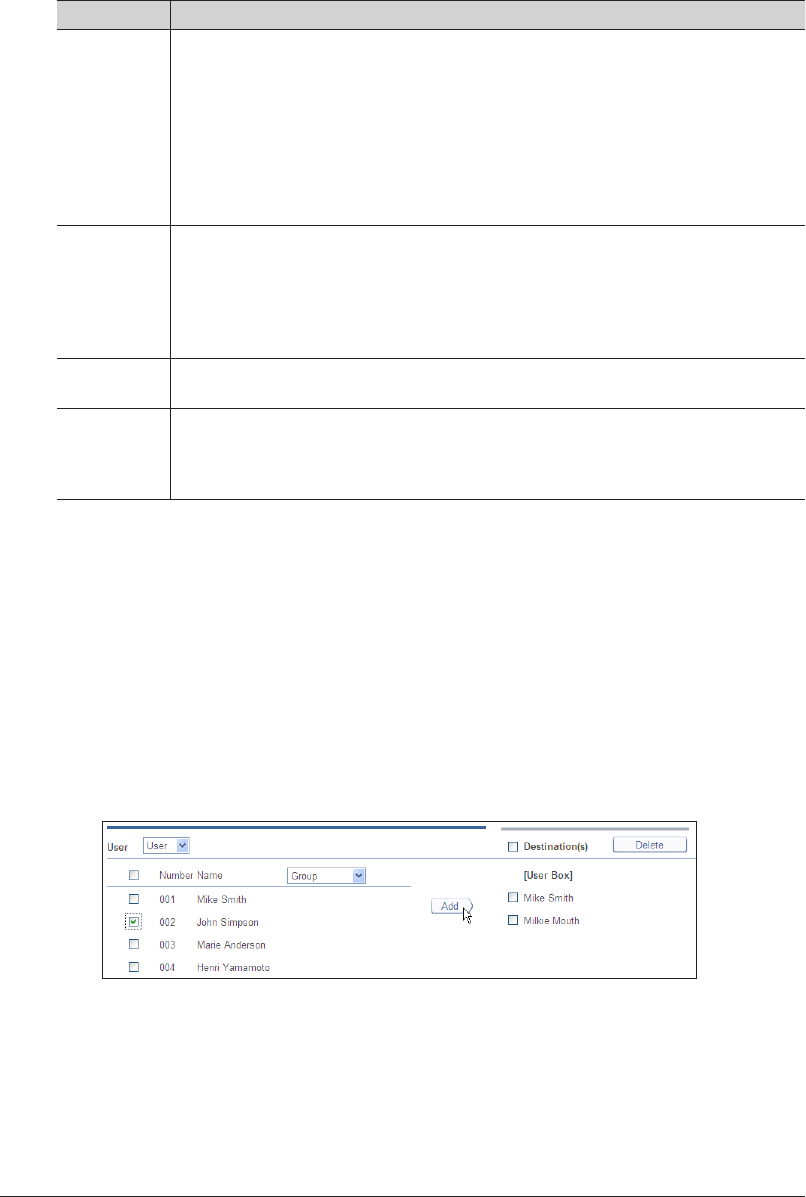
Select “User” or “Group” from the “User” pull-down menu.
2
Select a user or group from the destination list, and click [Add] to add it to the
3
destination list.
To delete a set destination, select the destination to delete, and click [Delete].•
To select all the displayed users or groups, select the top checkbox.•
Click the same checkbox to deselect the item.•
Click [Save].
4
1
2
Operating the Various Functions
Forwarding Documents 2-23
Forwarding Documents Created in Application Software
You can import documents created in application software (such as Microsoft Word) and
transmit them to the shared box where they can be viewed by all the registered users.
Note
To perform this operation, you must install the Muratec Fax driver in your computer
in advance. For details on installing the driver, refer to Chapter 2, “Installing to
Windows” in the Printer Guide.
Start the application software and create the document to transmit.
1
Microsoft Word is used here as an example.
Save the document, and select “Print” from the “File” menu.
2
Select [Muratec Fax] from the “Printer Name” pull-down menu in the displayed
3
print dialog.
Click [Properties].
4
The “Fax Printing Preferences” dialog box appears.
2-24 Forwarding Documents
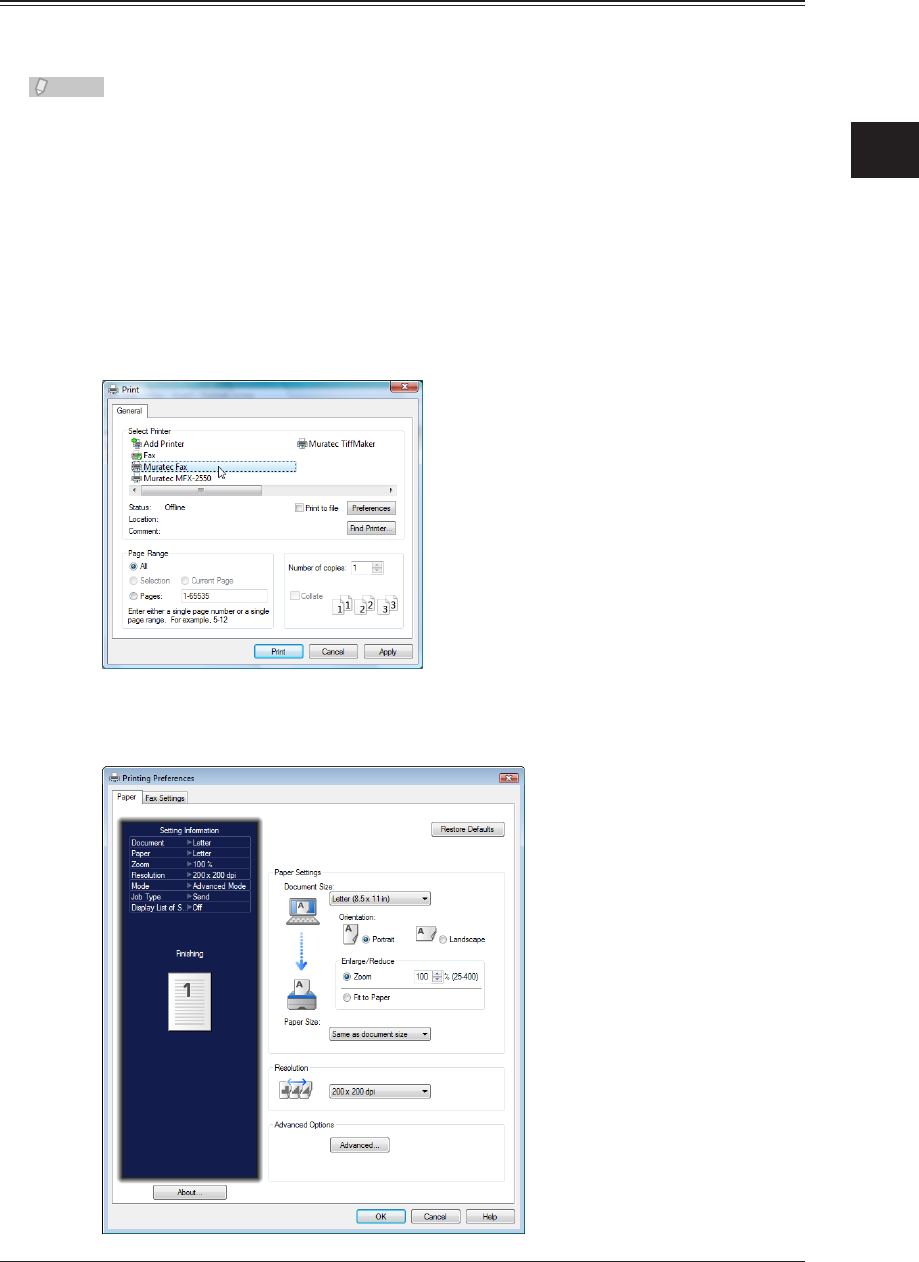
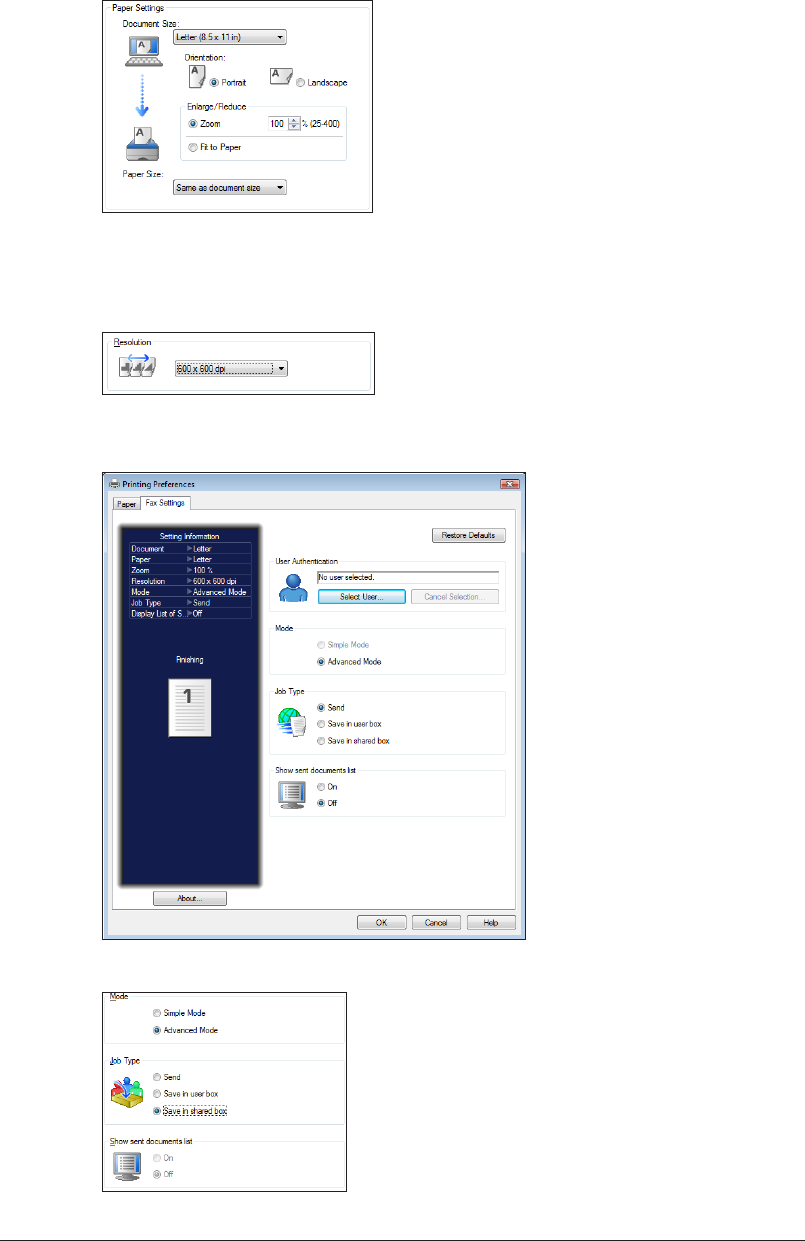
Specify the paper settings.
5
Here, “Letter (8.5 × 11in)” is selected for the size, and “Portrait” for the orientation.
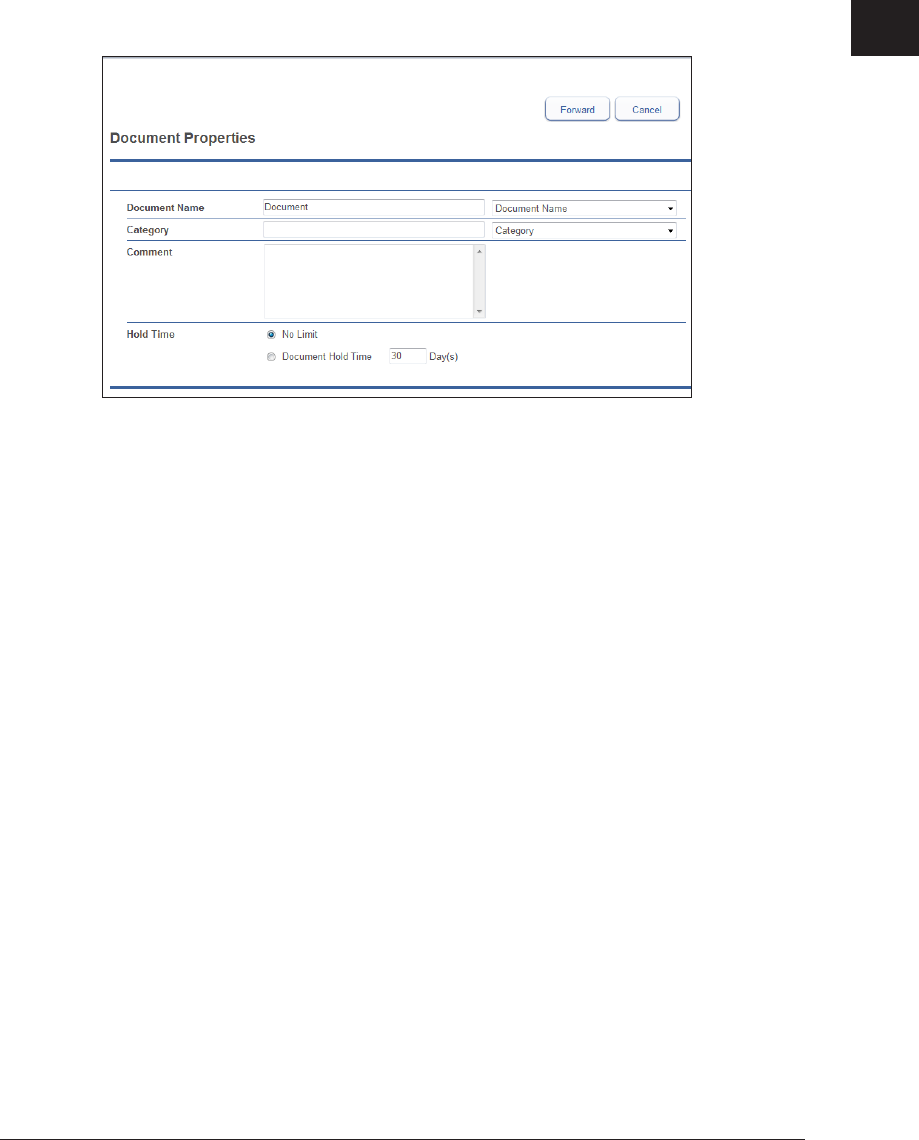
Set the resolution.
6
Select 200 × 200 dpi (Normal), 400 × 400 dpi (Fine) or 600 × 600 dpi (S-Fine) for the
resolution.
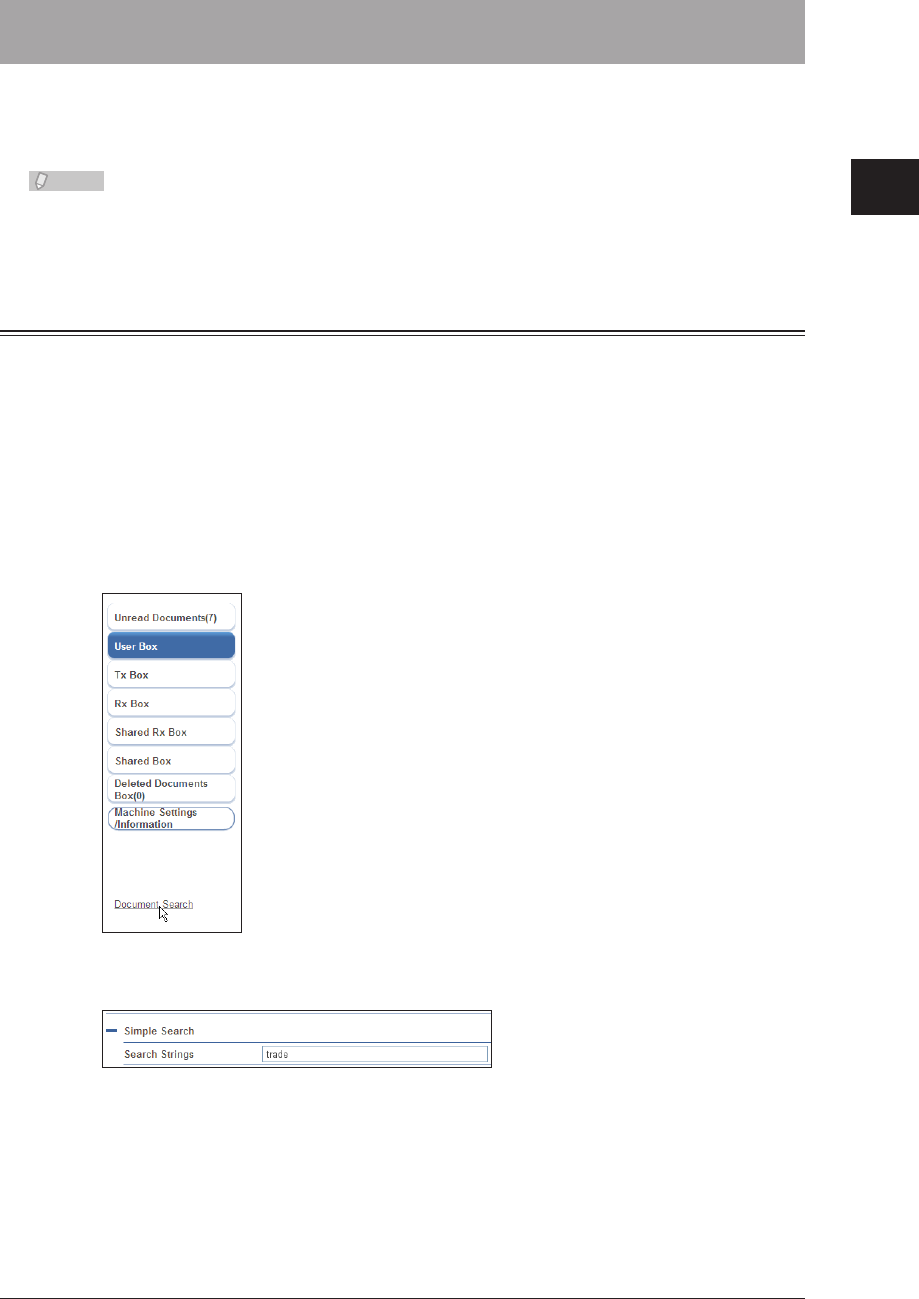
Click the “Fax Settings” tab.
7
Select “Advanced Mode” in the “Mode” field, and “Save in shared box” in the “Job Type” field.
1
2
Operating the Various Functions
Forwarding Documents 2-25
Click [OK].
8
Start printing.
9
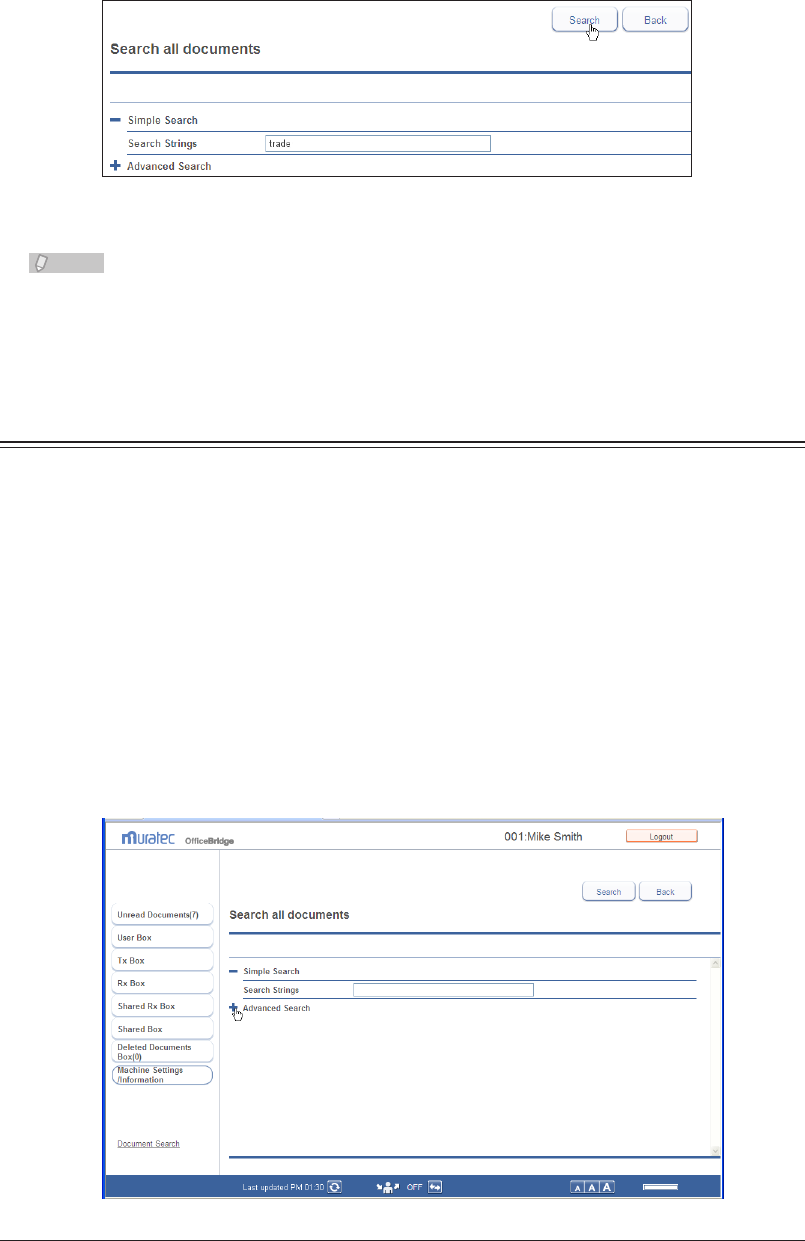
When using Microsoft Office Word 2007, click [OK].
The “Document Properties” screen is displayed. If OfficeBridge user settings are specified in
the Muratec Fax driver, OfficeBridge is automatically logged in to, and the forwarding settings
screen is displayed. If user settings are not specified or if the login fails, the login screen is
displayed.
Refer to “Setting the Document Name, Category, Comments, and Hold Time”. (See page 2-22.)
Specify the required settings on the document properties screen, and click
10
[Forward].

2-26 Printing Documents
Printing Documents
You can print scanned documents and received documents on the machine.
Printing Documents in a Document List
You can print documents in the document list on the machine.
Log in to OfficeBridge as a user or a guest.
1
(See page 2-2.)
Click
2
[Document Boxes].
Select a document to be printed from the document list screen to print it.
3
In this example, a document inside the user box is selected.
Click [Print].
4
The document is printed.
1
2
Operating the Various Functions
Searching for Documents 2-27
Searching for Documents
You can search for documents saved on OfficeBridge. There are two methods for searching;
simple search, which enables you to search by entering a search string only, and advanced
search, which enables you to search by setting detailed conditions.
Note
You can also search for documents included in a document box from the “Search” field
in the footer area. (See page 1-9.)
Simple Searching
You can enter a search string to search for documents that include that string in their
document name, category, or comments.
Log in to OfficeBridge as a user or a guest.
1
(See page 2-2.)
Click
2
[Document Boxes].
Click [Document Search] on the document list screen.
3
Enter the search string in the “Simple Search” field.
4
2-28 Searching for Documents
Click [Search].
5
The list of search results is displayed.
You can perform operations such as transmitting documents from the search results.•
Click [Search again] to perform the search again.•
Note
The date and time displayed in the search results is the date and time that the
document was created. For reserved documents, the date and time reserved for
transmission are not displayed.
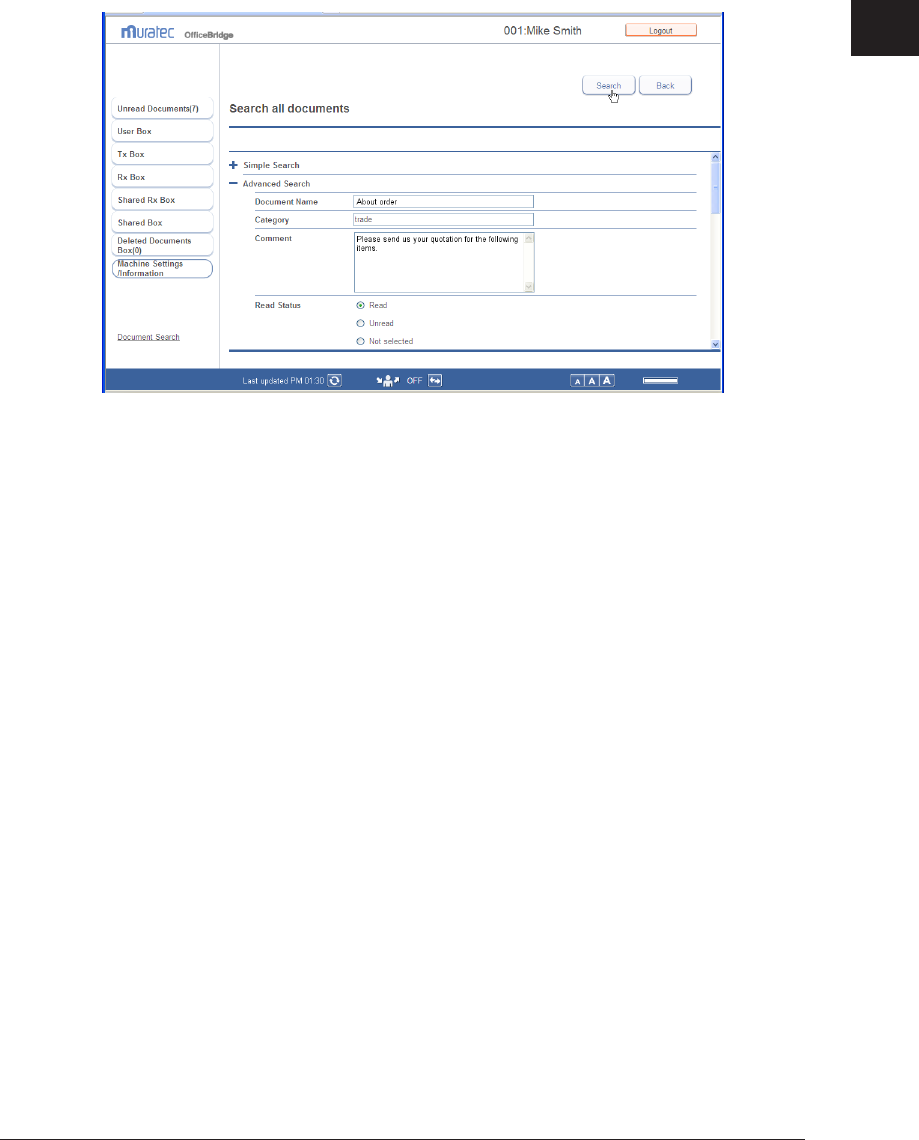
Advanced Searching
You can search for documents by setting detailed search conditions, such as the document
name, category, and sender.
Log in to OfficeBridge as a user or a guest.
1
(See page 2-2.)
Click
2
[Document Boxes].
Click [Document Search] on the document list screen.
3
The full text search screen displayed.
Click the [+] to the left of the “Advanced Search” eld.
4
1
2
Operating the Various Functions
Searching for Documents 2-29
Specify the required settings.
5
Documents that include all the specified conditions are searched for.•
When searching according to the date and time the document was created, enter the date in •
the following order: year (4 digits), month (2 digits), and day (2 digits).
Click [Search].
6
You can perform operations such as transmitting documents from the search results.•
Click [Search again] to perform the search again.•

2-30 Checking and Changing Document Information
Checking and Changing Document Information
You can confirm detailed information about documents in a document list. You can also
change set information such as the file name or category.
Note
If you set authorities for users, you can register distribution conditions from •
document information (see page 2-32) and register senders to the address book (see
page 2-17).
You can set the file format for images. • (See page 3-108.)
Viewing the Documents in a Document List
You can view the documents in a document list.
Log in to OfficeBridge as a user or a guest.
1
(See page 2-2.)
Click
2
[Document Boxes].
On the document list screen, click the name of the document you want to view.
3
An image viewer opens to display the contents of the document.
Note
OfficeBridge does not include an image viewer function. The image viewer installed on
your PC will open, allowing you to view the document.
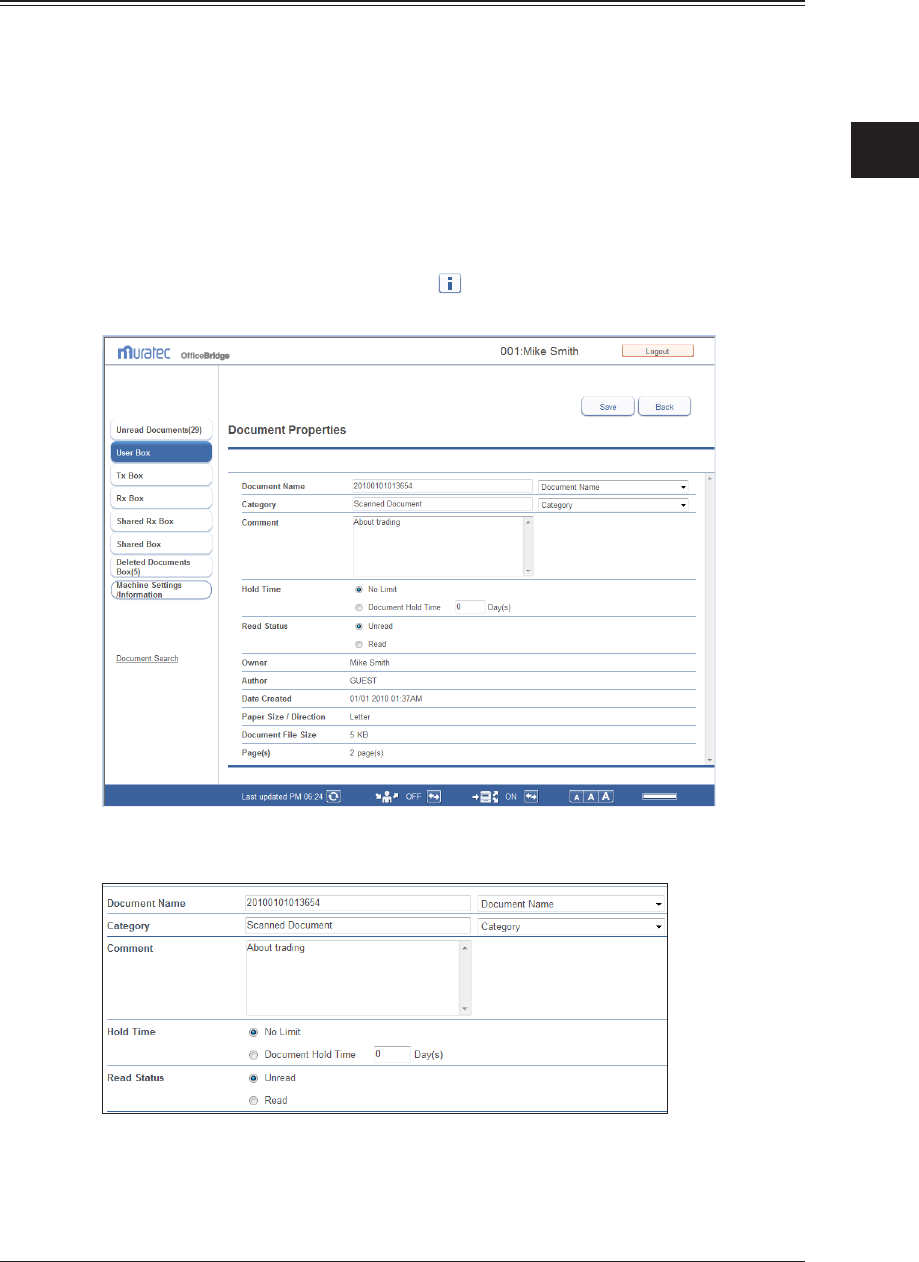
1
2
Operating the Various Functions
Checking and Changing Document Information 2-31
Checking and Changing Document Information
On the document properties screen, you can check or change the detailed information
about the scanned documents and received documents in a document list. The following
operation applies to all types of documents.
Log in to OfficeBridge as a user or a guest.
1
(See page 2-2.)
Click
2
[Document Boxes].
On the document list screen, click the
3
for document whose detailed
information you want to check or change.
Edit the detailed information for the document, as necessary.
4
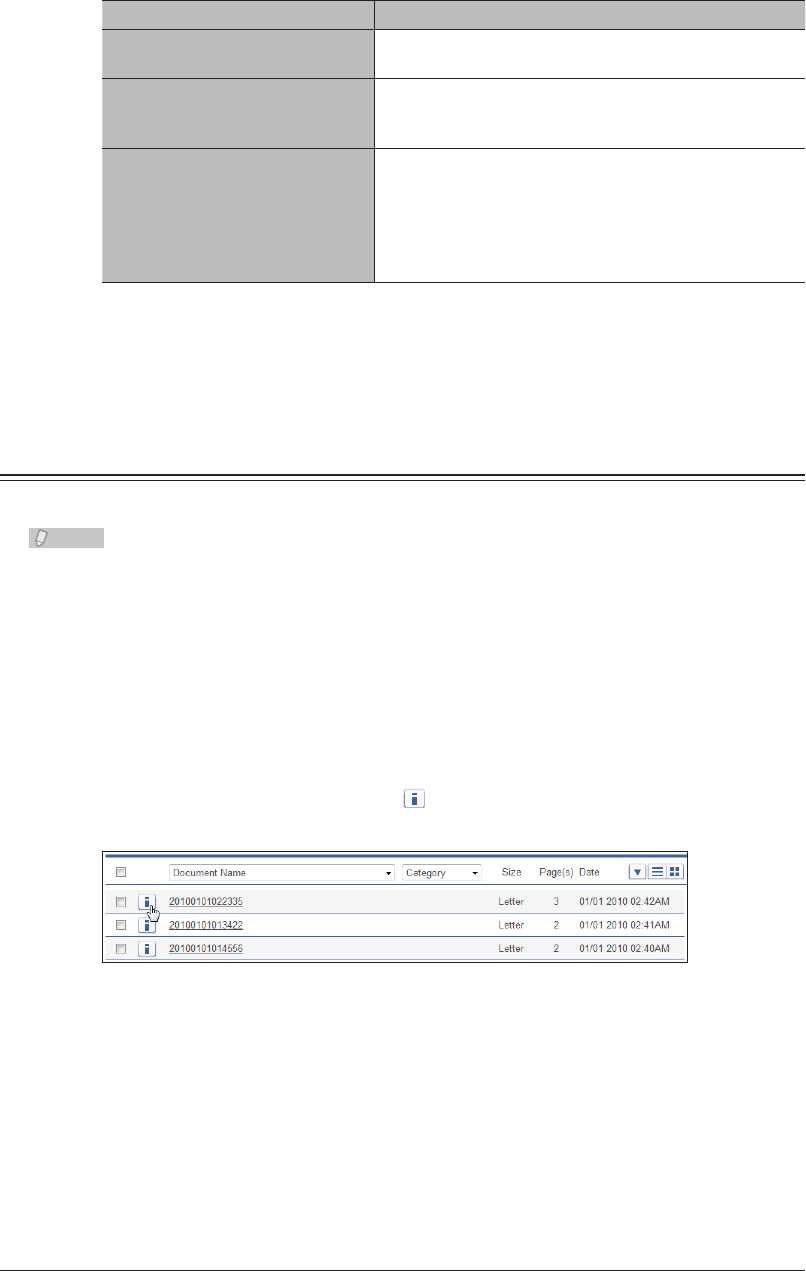
2-32 Checking and Changing Document Information
You can edit the following items in the detailed information for a document.
Item Description
“Document Name”, “Category”,
“Comment”
Enter the information in the entry box for each item.
“Hold Time”
Select “No Limit” or “Document Hold Time”. If you
selected “Document Hold Time”, enter the number of
days to store the document in the entry box.
“Read Status”
You can check whether the document has been displayed
(read) or not (unread). You can also change the read
status of the document to read or unread.
[Confirmation] is displayed for documents in the shared
reception box or shared box. Click [Confirmation] to
display the read status for each user.
Click [Save].
5
The detailed information for the document is updated.
Registering Sender Distribution Conditions
You can add document information to the distribution conditions.
Note
Distribution conditions may not be able to be registered, depending on the user
authorities.
Log in to OfficeBridge as a user or a guest.
1
(See page 2-2.)
Click
2
[Document Boxes].
On the document list screen, click
3
for the document whose information you
want to register in the distribution conditions.
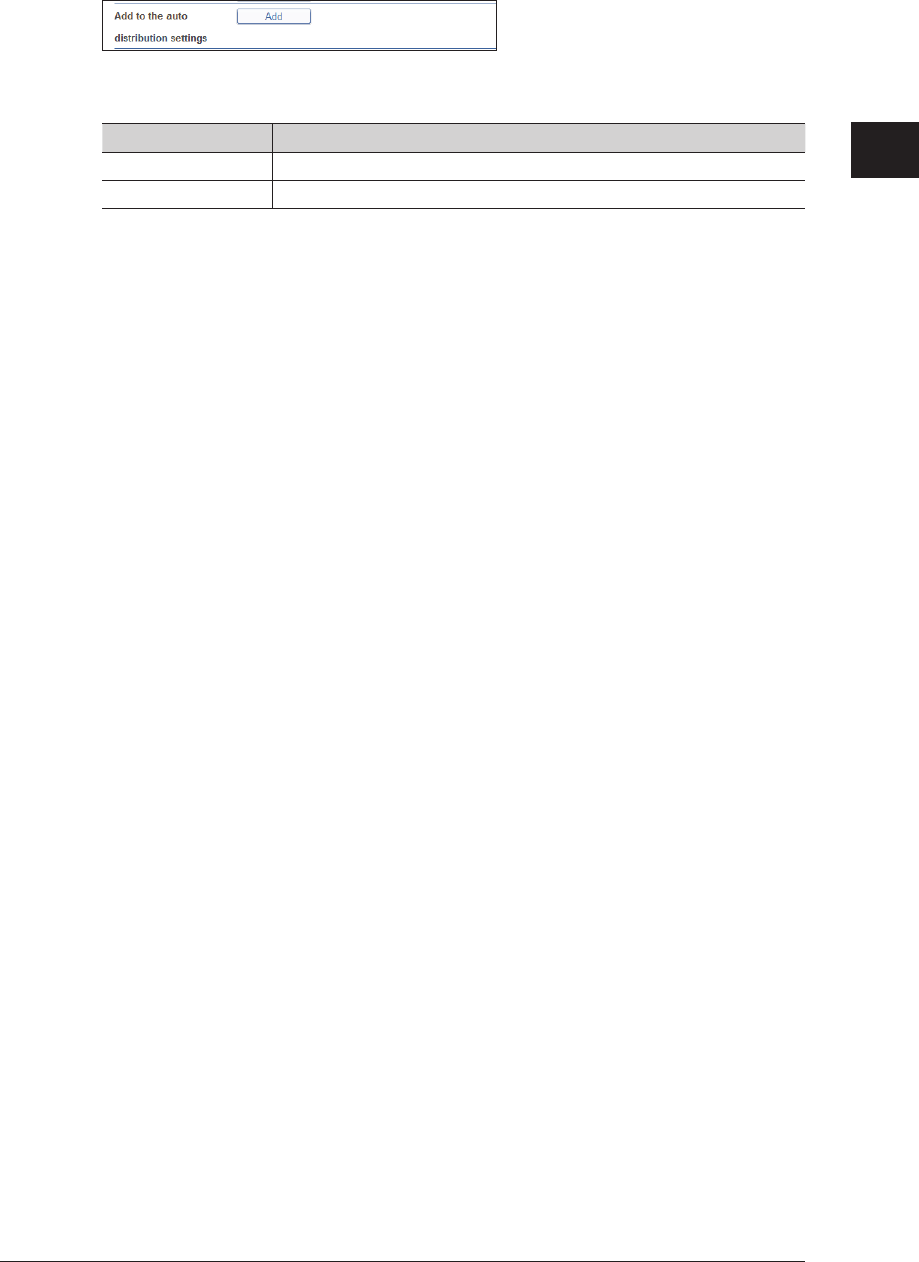
1
2
Operating the Various Functions
Checking and Changing Document Information 2-33
Click [Add] in “Add to the auto distribution settings”.
4
The auto distribution detailed settings screen is displayed with the following sender
information already entered.
Communication type Condition
Fax Fax number, F-Code number
E-mail E-mail address, subject
Set the distribution conditions on the “Fax Forwarding” screen.
5
For details, refer to “Setting Auto Distribution (Individual Settings)”. (See page 3-87.)
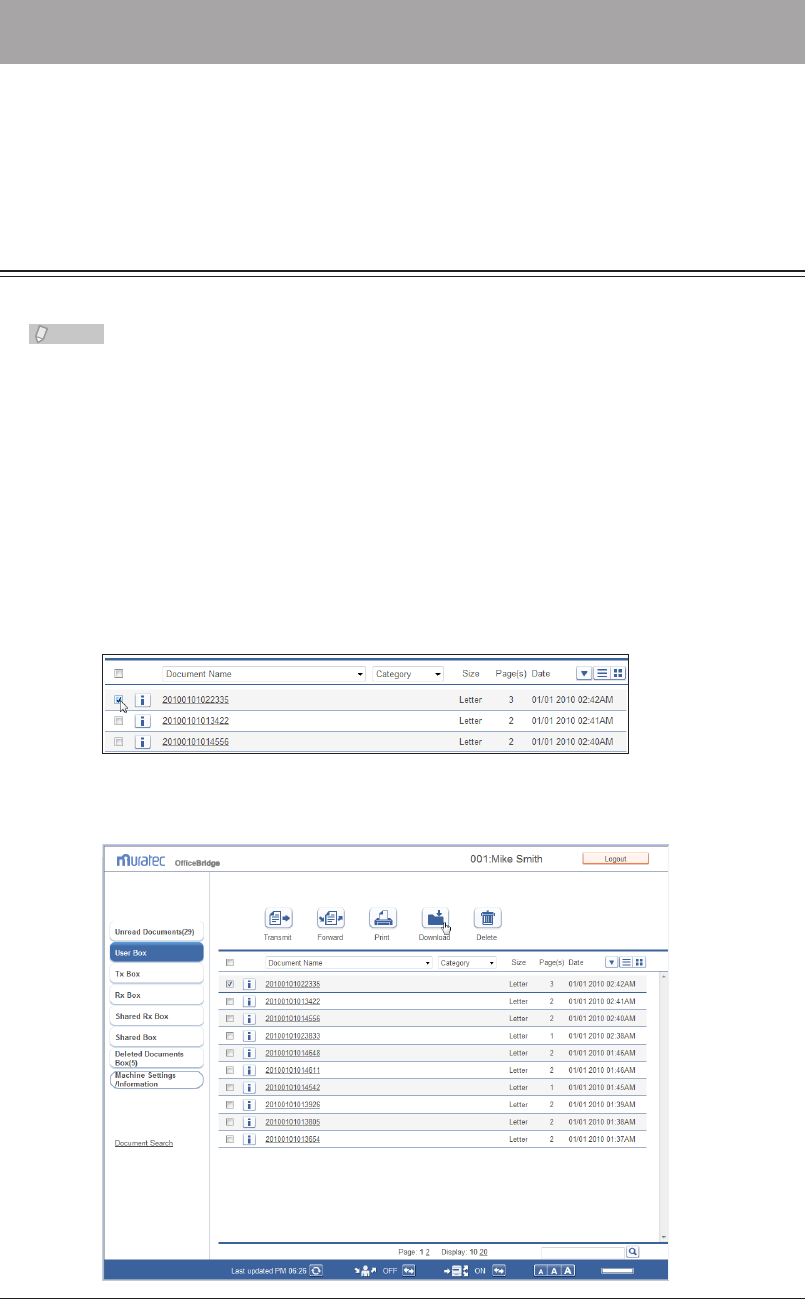
2-34 Downloading Documents
Downloading Documents
You can download documents from the document list into the desired location on a
computer. Since the data disk of the machine is limited, it is recommended that you
periodically download documents from the document list, save them to your computer,
and delete the documents from the document list.
Downloading Documents in a Document List
You can download documents on a document list screen to a location you specify.
Note
If you select several documents to download, they are downloaded as a single
compressed file (zip file). In this case, extract the downloaded files using extraction
software.
Log in to OfficeBridge as a user or a guest.
1
(See page 2-2.)
Click
2
[Document Boxes].
Select the document to download on the document list screen.
3
In this example, a document inside the shared box is selected.
You can select multiple documents and download them at the same time.
Click [Download].
4
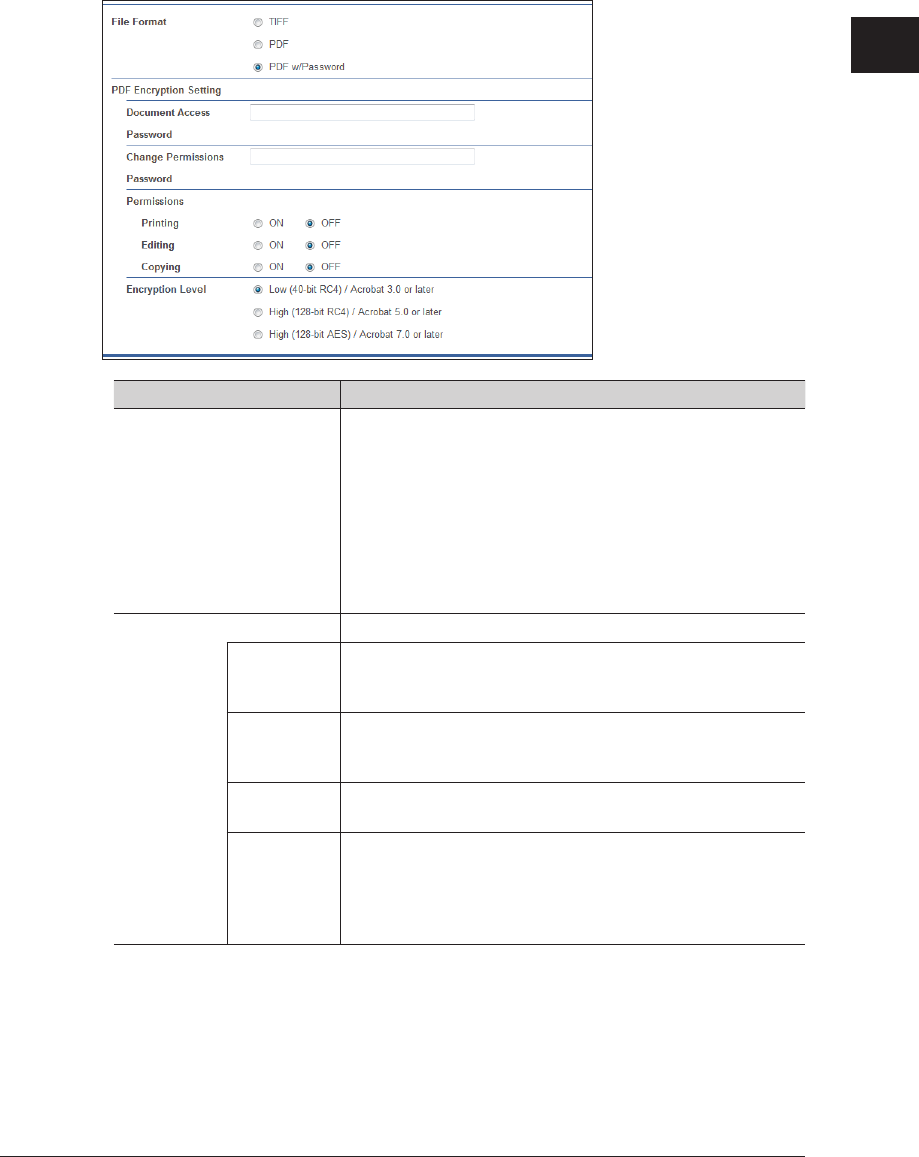
1
2
Operating the Various Functions
Downloading Documents 2-35
If something other than “Select when downloading.” is set in the download settings in “Common
Settings” in “Document Box Settings” (see page 3-108), the document download screen is not
displayed, and the dialog in step 7 is displayed instead.
Select the file format for the file to download.
5
Item Description
File Format TIFF: The full mode TIFF format. The document
is downloaded with the document size and
resolution set when it was created.
PDF: The document is downloaded in the PDF
format.
PDF w/Password
: You can set a password and the various
permissions for the PDF format. If you
select the PDF with password format,
“PDF Encryption Setting” is displayed.
PDF Encryption Setting Specify the PDF encryption settings.
Document
Access
Password
Enter the password required to open the encrypted PDF. Up
to 28 characters can be entered.
Change
Permissions
Password
Enter the password required to change the permission
settings of the encrypted PDF. Up to 28 characters can be
entered.
Permissions Set the printing, editing, and copying permissions.
Set “ON” to enable the operation, or “OFF” to disable it.
Encryption
Level
Set the security level for viewing the PDF.
The PDF may not be able to be opened, depending on the
version of Acrobat. For example, if you set the encryption
level to “High (128-bit AES) / Acrobat 7.0 or later”, the PDF
will not be able to be opened using Acrobat 6.0 or earlier.
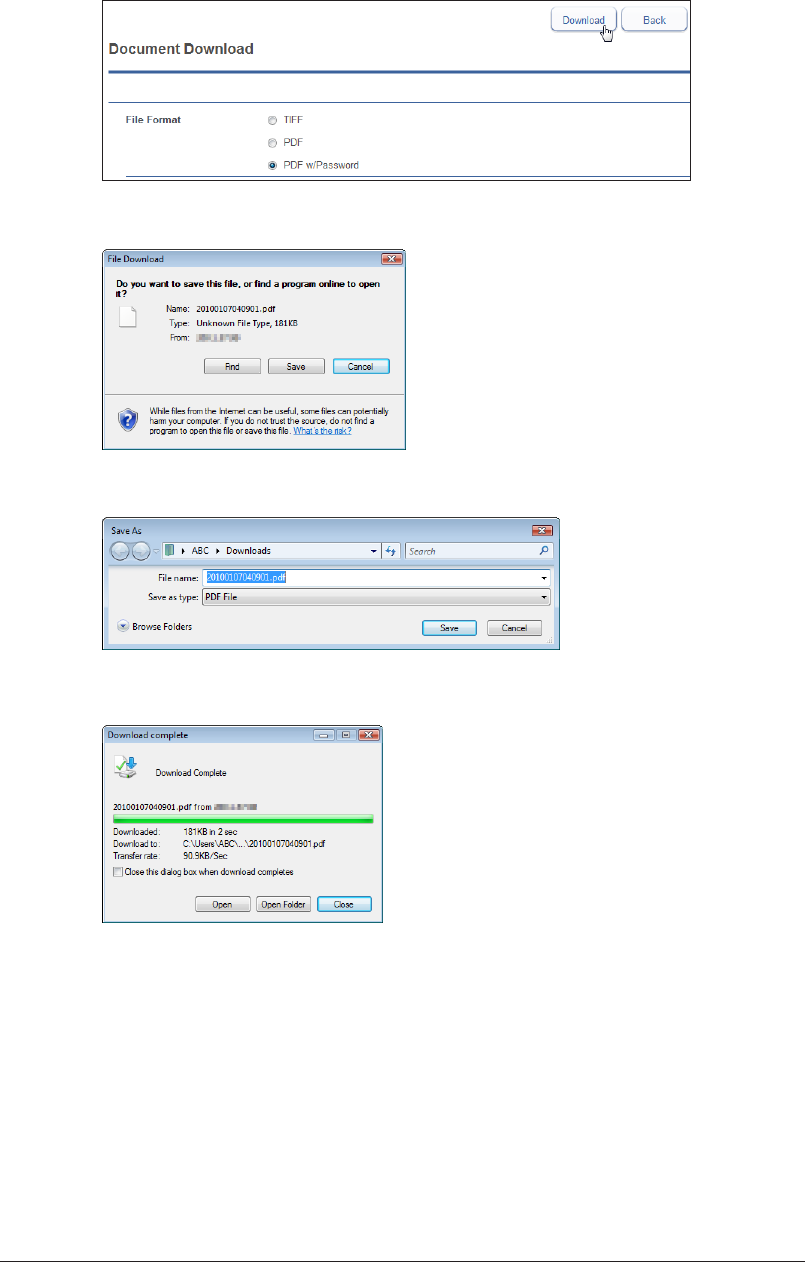
2-36 Downloading Documents
Click [Download].
6
Click [Save].
7
Specify the folder to download to, enter a file name, and click [Save].
8
Click [Close] to close the “Download Complete” dialog box.
9
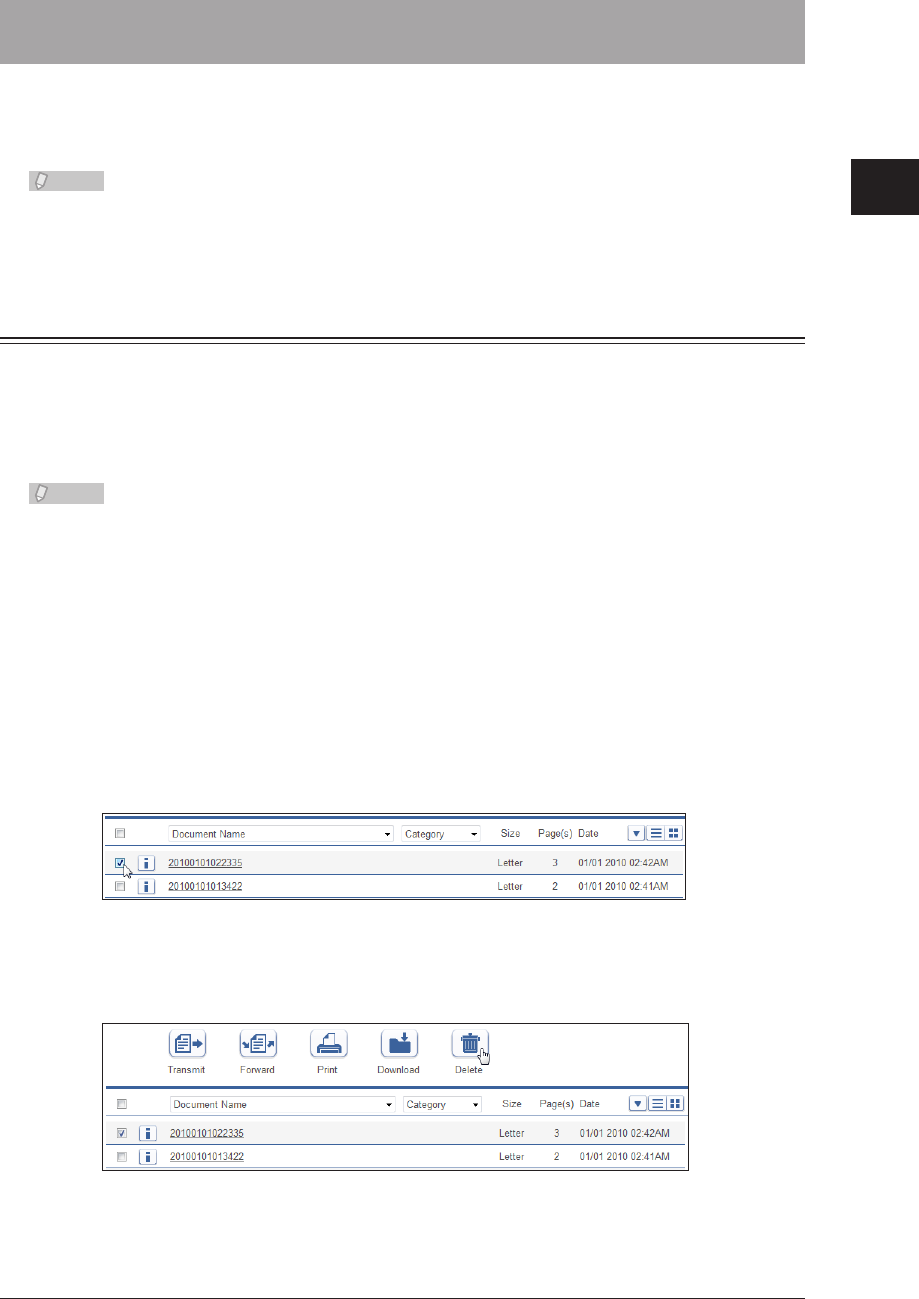
1
2
Operating the Various Functions
Deleting Documents 2-37
Deleting Documents
You can delete unnecessary documents from a document list screen. Since the data disk
of the machine is limited, it is recommended that you periodically delete unnecessary
documents.
Note
If the “Deleted Documents Box” function is disabled in the document box settings,
documents you delete are immediately deleted without being moved to the deleted
documents box. (See page 3-110.)
Deleting Documents in a Document List
You can delete documents in a document list. When you delete a document in a box
other than the “Deleted Documents Box”, the deleted document is moved to the “Deleted
Documents Box”.
To delete a document permanently, it is necessary to delete it from the “Deleted
Documents Box”. (See page 2-38.)
Note
The administrator password may be required to delete documents in the “Shared
Rx Box” or “Shared Box”, depending on the document box settings. For details on
document box settings, refer to “Specifying Document Box Settings”. (See page 3-107.)
Log in to OfficeBridge as a user or a guest.
1
(See page 2-2.)
Click
2
[Document Boxes].
Select the document to delete on the document list screen.
3
In this example, a document inside the “Rx Box” is selected.
You can also select multiple documents and delete them at the same time.
Click [Delete].
4
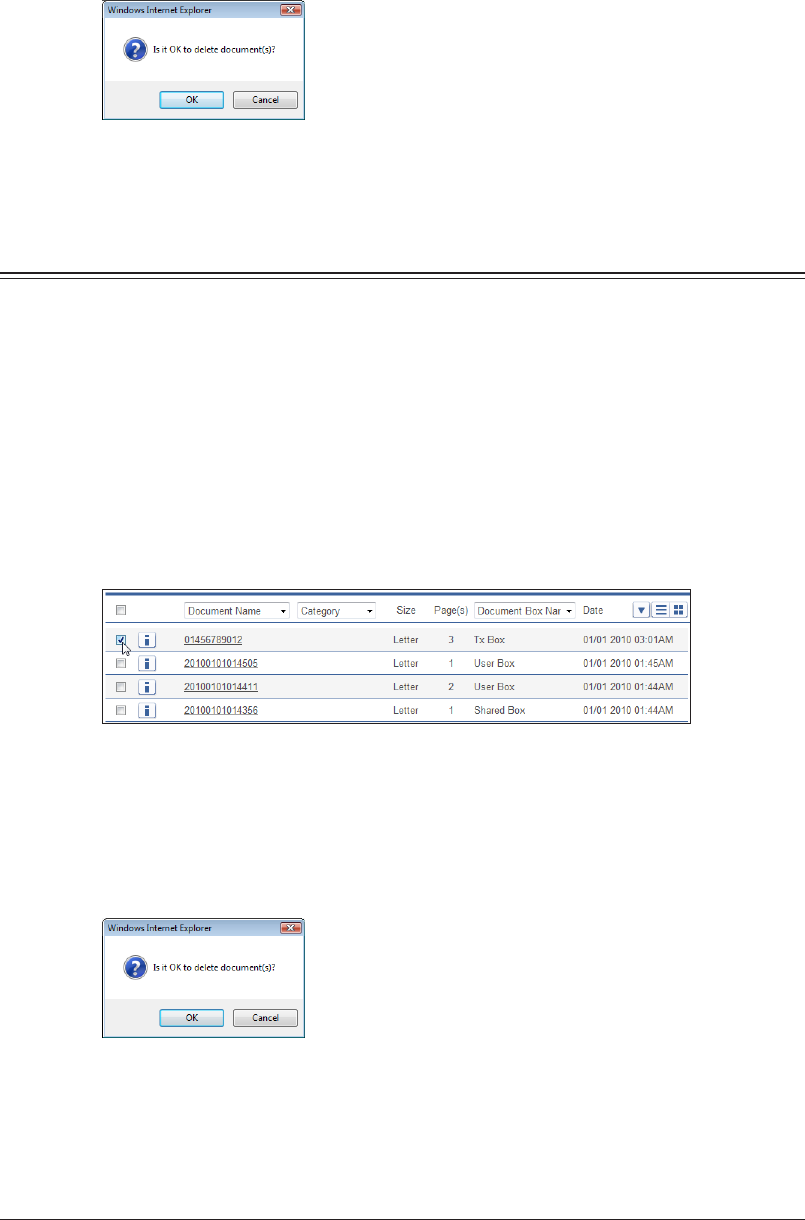
2-38 Deleting Documents
Click [OK].
5
The selected documents are deleted from the document list screen, and moved to the “Deleted
Documents Box”.
If you select several documents to delete, it may take some time to delete the documents. In
this case, wait for a while after performing the deletion procedure.
Deleting Documents in the Deleted Documents Box
You can delete documents in the “Deleted Documents Box”. Documents deleted from the
“Deleted Documents Box” are permanently deleted from the machine.
Deleting
Log in to OfficeBridge as a user or a guest.
1
(See page 2-2.)
Click
2
[Document Boxes].
Select the document to delete on the “Deleted Documents Box” screen.
3
You can select multiple documents and delete them at the same time.
Click [Delete].
4
Click [OK].
5
If you select several documents to delete, it may take some time to delete the documents.

1
2
Operating the Various Functions
Deleting Documents 2-39
Restoring Documents to their Original Box
You can restore documents in the Deleted Documents Box to their original document box.
Log in to OfficeBridge as a user or a guest.
1
(See page 2-2.)
Click
2
[Document Boxes].
Select the document to restore on the “Deleted Documents Box” screen.
3
You can also select multiple documents and restore them at the same time.
Click [Restore].
4
The selected documents are restored to their original box.
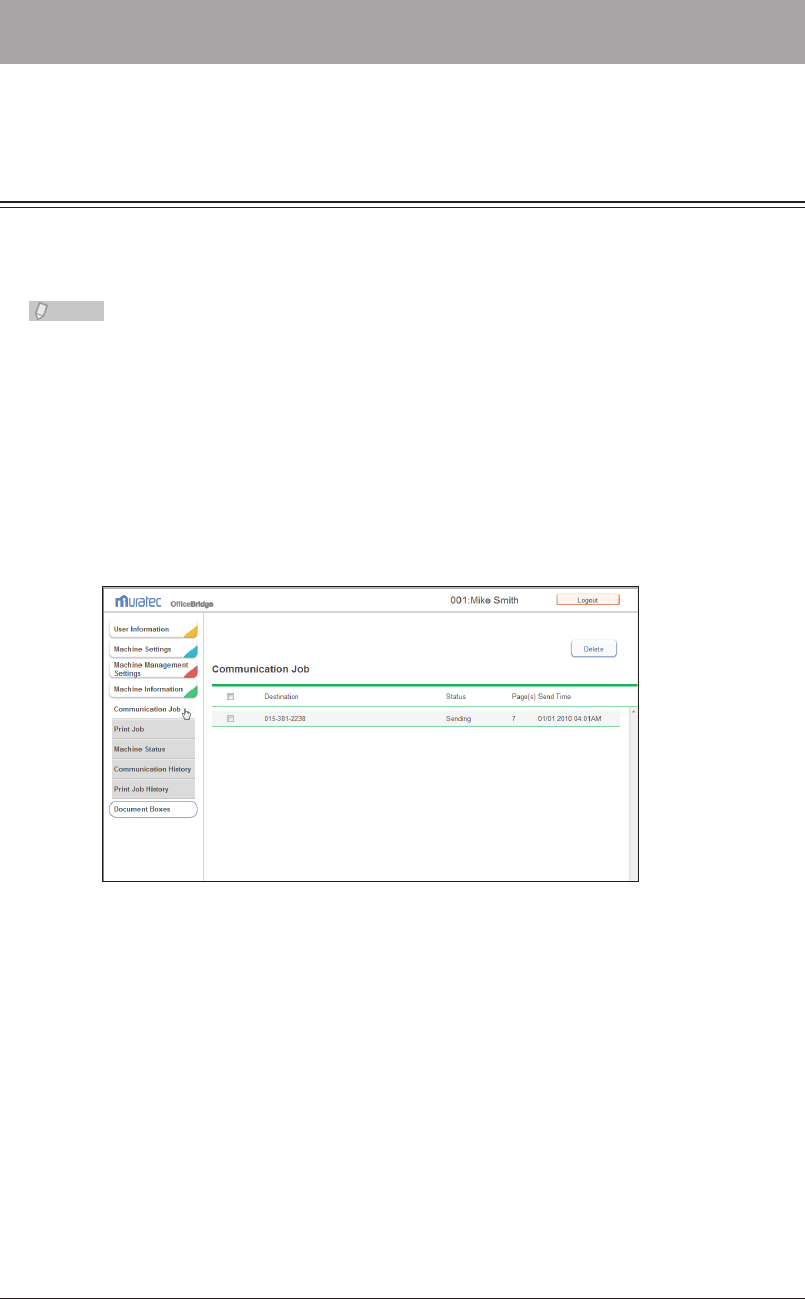
2-40 Checking the Jobs or History
Checking the Jobs or History
You can check a communication or print job in progress, and the fax and e-mail history.
Checking / Canceling a Communication Job in Progress
You can check the fax and e-mail transmission reservation status, and the progress of
the communication job being executed. You can also cancel the communication job being
executed.
Note
Up to 100 communication jobs can be displayed.•
Communication jobs can only be canceled when the user has the required privileges.•
Checking Communication Jobs
Log in to OfficeBridge as a user or a guest.
1
(See page 2-2.)
This function is also available on Administrator screen.
Click [Machine Information], and then “Communication Job”.
2
You can click [+] to check the destinations specied for broadcast transmission.
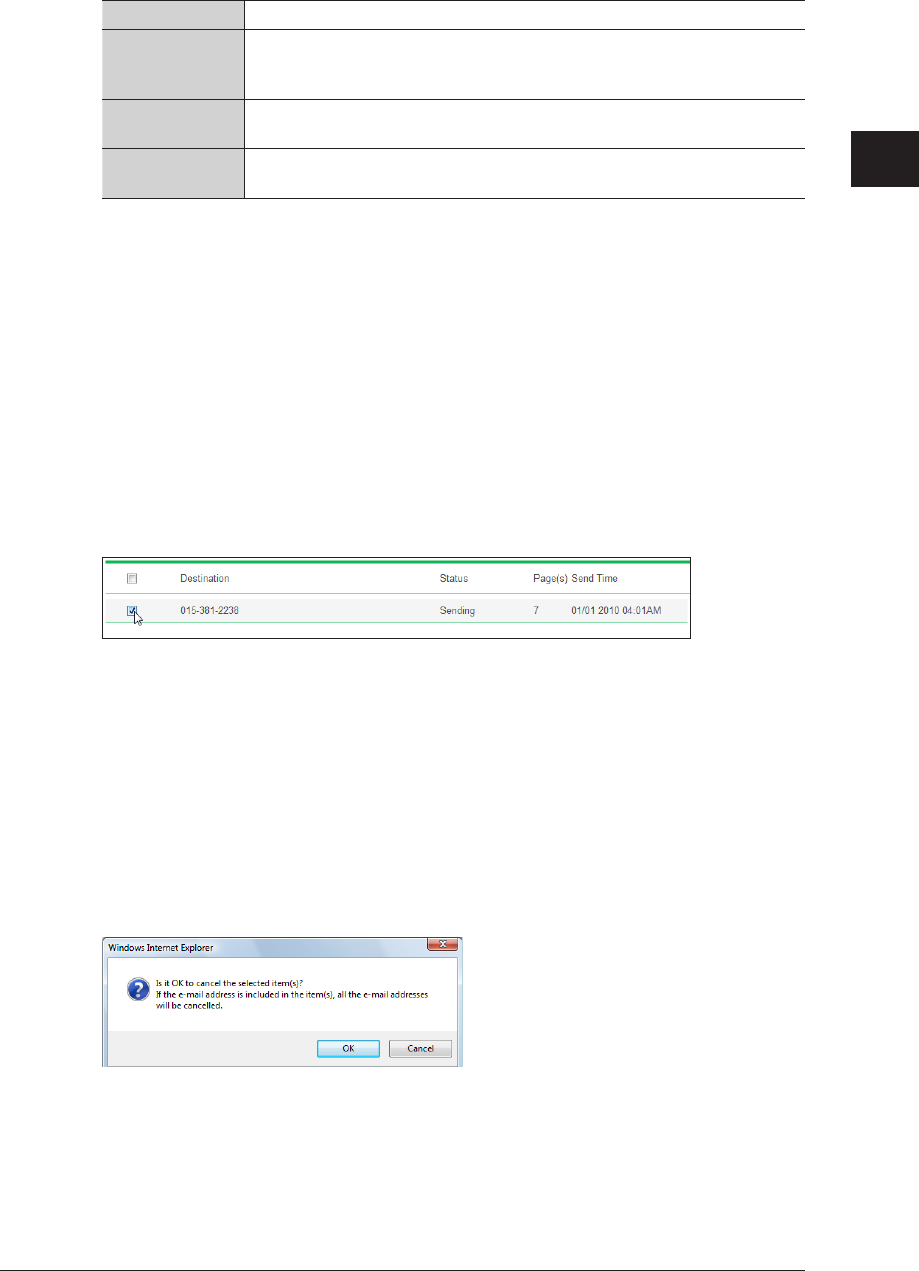
1
2
Operating the Various Functions
Checking the Jobs or History 2-41
You can check the following information on the communication job screen.
Destination Displays the destination name of the communication job.
Status
Displays the communication status. For details on the displayed items,
refer to “Status” for the “Tx Box”, “Rx Box”, and “Shared Rx Box”
document lists. (See page 1-17.)
Page(s) Displays the number of pages for the document to transmit. The cover
page is included in the number of pages.
Send Time If a transmission starting date/time has been specified, the specified date/
time is displayed in the MM/DD YYYY HH:MM AM/PM format.
Canceling Communication Jobs
You can cancel communication jobs to delete them from the “Communication Job” screen.
Log in to OfficeBridge as a user or a guest.
1
(See page 2-2.)
This function is also available on Administrator screen.
Click [Machine Information], and then “Communication Job”.
2
Select the job to cancel on the communication job screen.
3
You can select multiple jobs and delete them at the same time.•
To select all the displayed communication jobs, select the top checkbox.•
Click the same checkbox to deselect the item.•
When multiple destinations are set for a communication job, [+] is displayed next to the •
destination name.
Click [Delete].
4
Click [OK].
5
The selected jobs are canceled.
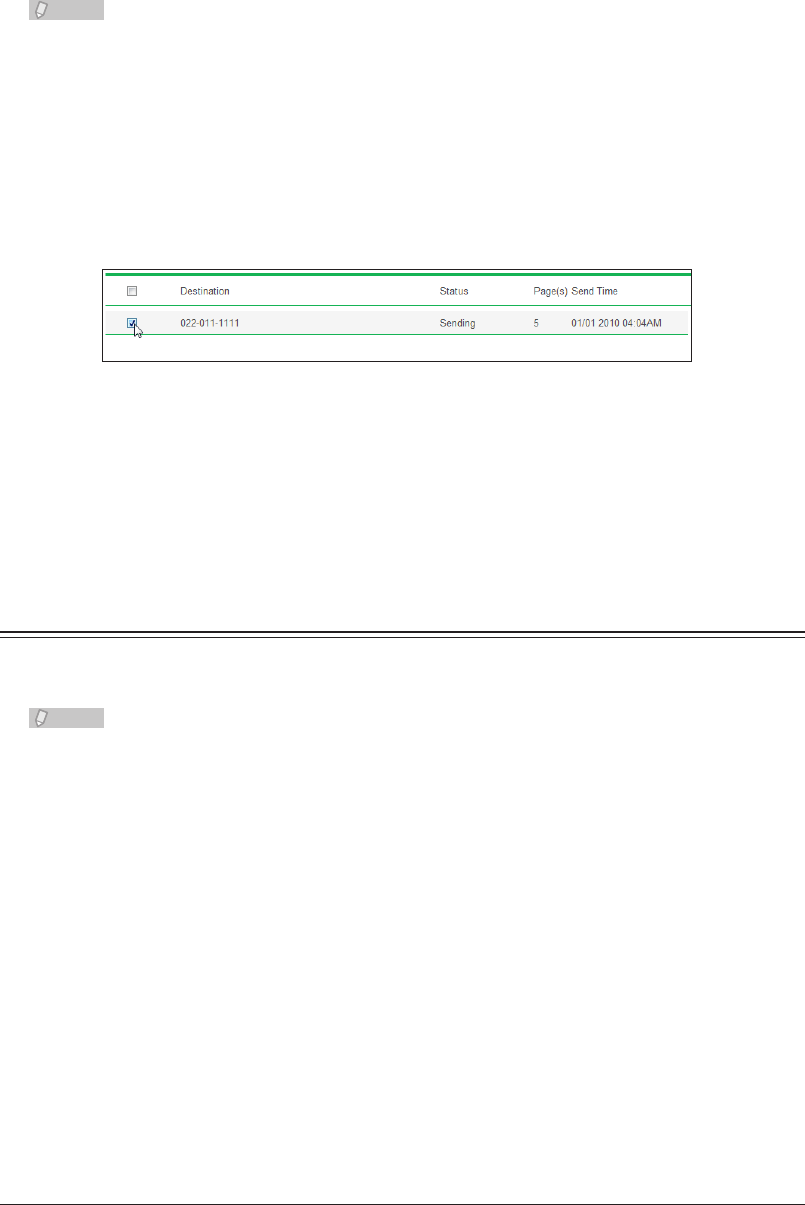
2-42 Checking the Jobs or History
Canceling Communication Jobs by Destination
When multiple destinations are set for a communication job, you can delete
communication jobs by destination.
Note
You can cancel only fax destinations individually. All e-mail destinations will be
canceled by canceling one e-mail destination.
Click the [+] next to the destination name.
1
The list of destinations is displayed. Click the [-] next to the destination name to return to the
previous display.
Select the destination name for the communication job to cancel.
2
Click [Cancel].
3
The “Is it OK to cancel the selected job(s)?” message is displayed.
Click [OK].
4
The selected jobs are canceled.
Checking / Canceling Print Jobs in Progress
You can check the progress of print jobs being printed or reserved for printing.
You can also cancel the print job being executed.
Note
Print jobs can only be canceled when the user has the required privileges.
Checking a Print Job
Log in to OfficeBridge as a user or a guest.
1
(See page 2-2.)
This function is also available on Administrator screen.
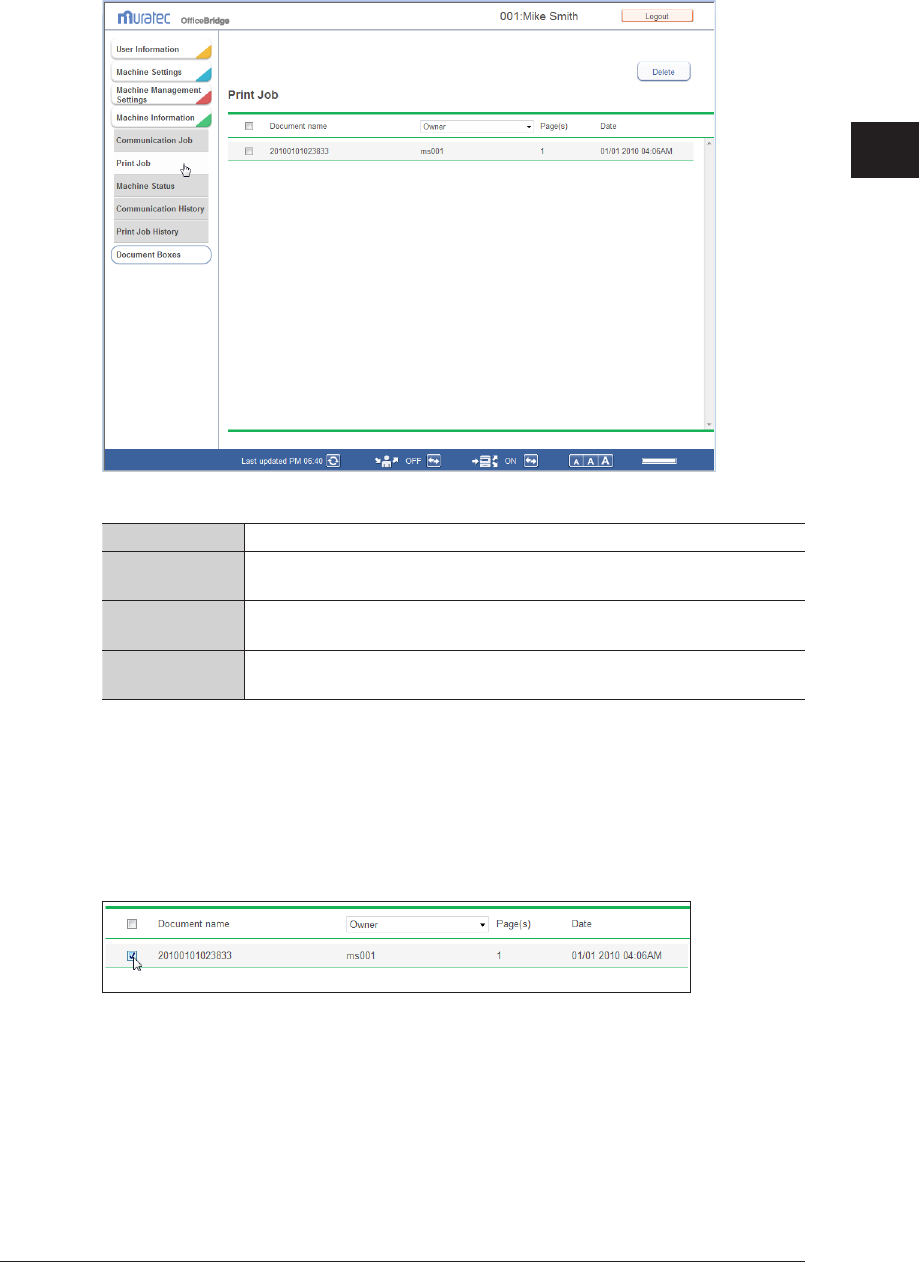
1
2
Operating the Various Functions
Checking the Jobs or History 2-43
Click [Machine Information], and then “Print Job”.
2
You can check the following information on the print job screen.
File Name The file name of the document to print is displayed.
Owner Displays the name of the user that executed the print job. With the pull-
down menu, you can filter the displayed print jobs by user.
Page(s) Displays the number of pages for the document to print. The number of
pages is not displayed for security print documents.
Send Time The date/time that the print job was received is displayed in the MM/DD
YYYY HH:MM AM/PM format.
Canceling Print Jobs
You can cancel print jobs to delete them from the print job screen.
Select the job to cancel on the print job screen.
1
You can select multiple jobs and delete them at the same time.•
To select all the displayed communication jobs, select the top checkbox.•
Click the same checkbox to deselect the item.•
Click [Delete].
2
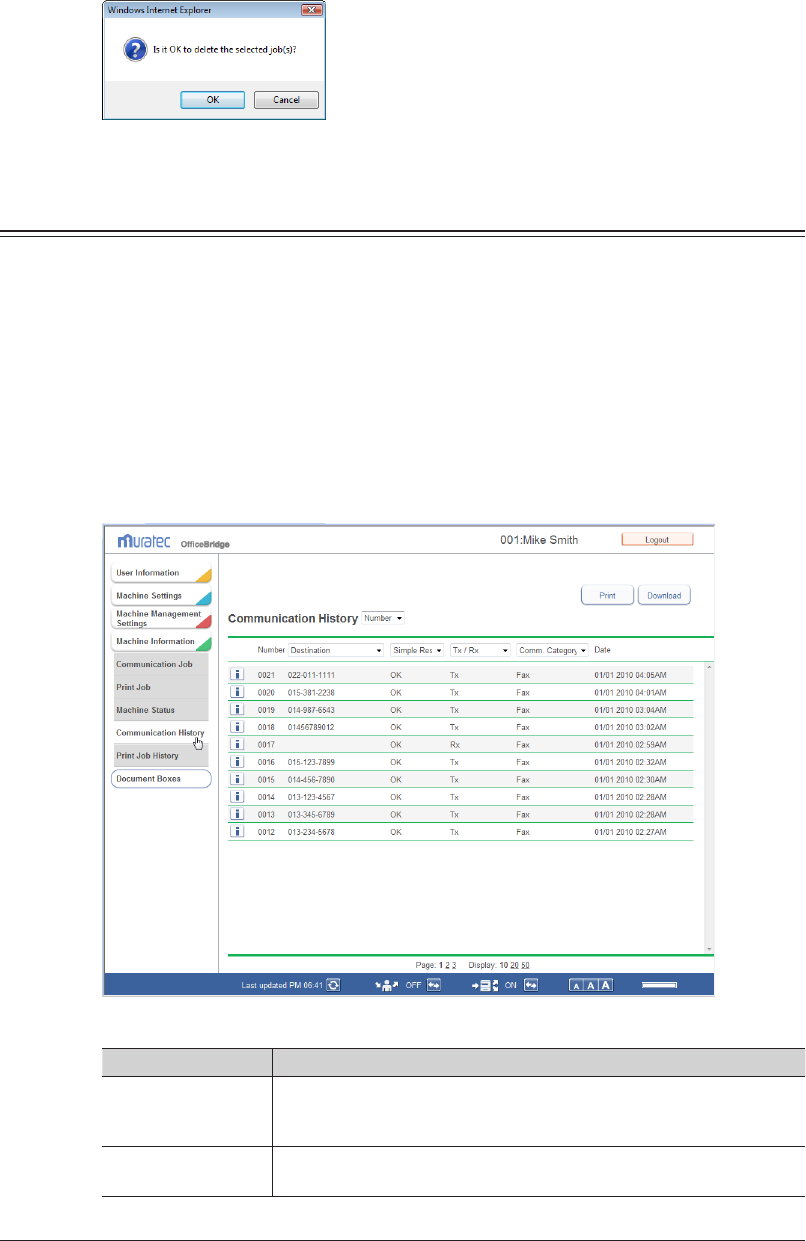
2-44 Checking the Jobs or History
Click [OK].
3
The selected jobs are canceled.
Checking the Communication History
You can check the history of transmitted and received jobs. Up to 1000 communication
histories can be displayed. You can also print or download the communication history.
Checking the Communication History
Log in to OfficeBridge as a user.
1
(See page 2-2.)
This function is also available on Administrator screen.•
This function • may also be available on Guest login screen, depending on user policy settings.
Click [Machine Information], and then “Communication History”.
2
You can check the following information on the communication history screen.
Displayed Item Description
Number Displays a serial number for all communication jobs (fax
transmission/reception, e-mail transmission/reception, shared folder
transmission, FTP transmission).
Destination Displays the destination. With the pull-down menu, you can filter the
displayed communication history by destination.
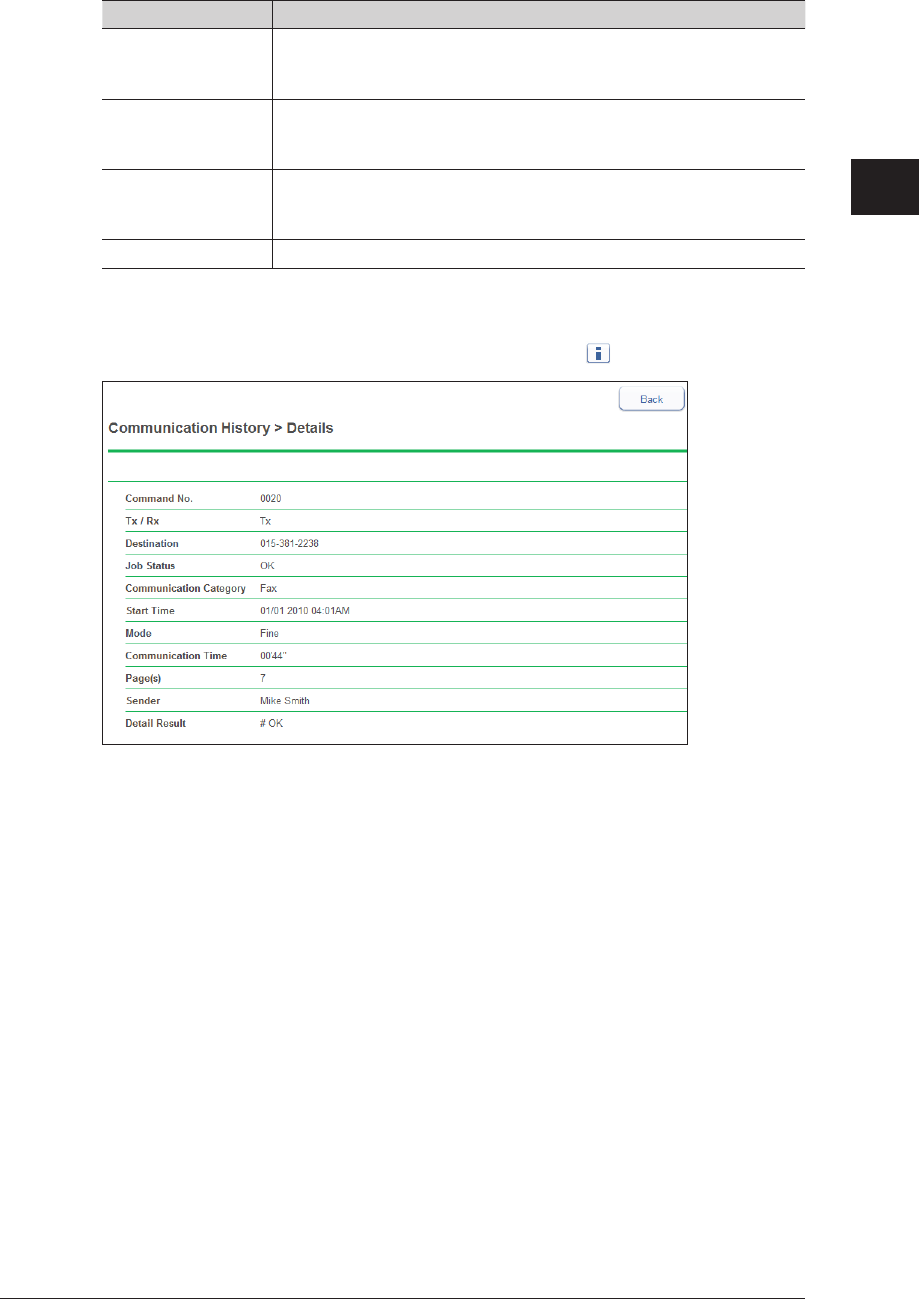
1
2
Operating the Various Functions
Checking the Jobs or History 2-45
Displayed Item Description
Simple Result Displays either “OK” or “Error” for the communication result. With
the pull-down menu, you can filter the displayed communication
history by communication result.
Tx / Rx Displays whether the communication was a transmission or
reception job. With the pull-down menu, you can filter the displayed
communication history by transmission / reception type.
Comm. Category Displays either “Fax”, “E-mail”, “Folder”, or “FTP” for the
communication type. With the pull-down menu, you can filter the
displayed communication history by communication type.
Date Displays the date and time when the communication started.
To confirm the details for the communication, click the
3
for the job.
The items displayed on the details screen differ according to the communication type.•
For details on error codes, refer to Chapter 4, “Error Messages” in the Administrator's Guide.•
Press [Back] to return to the communication history screen.
4
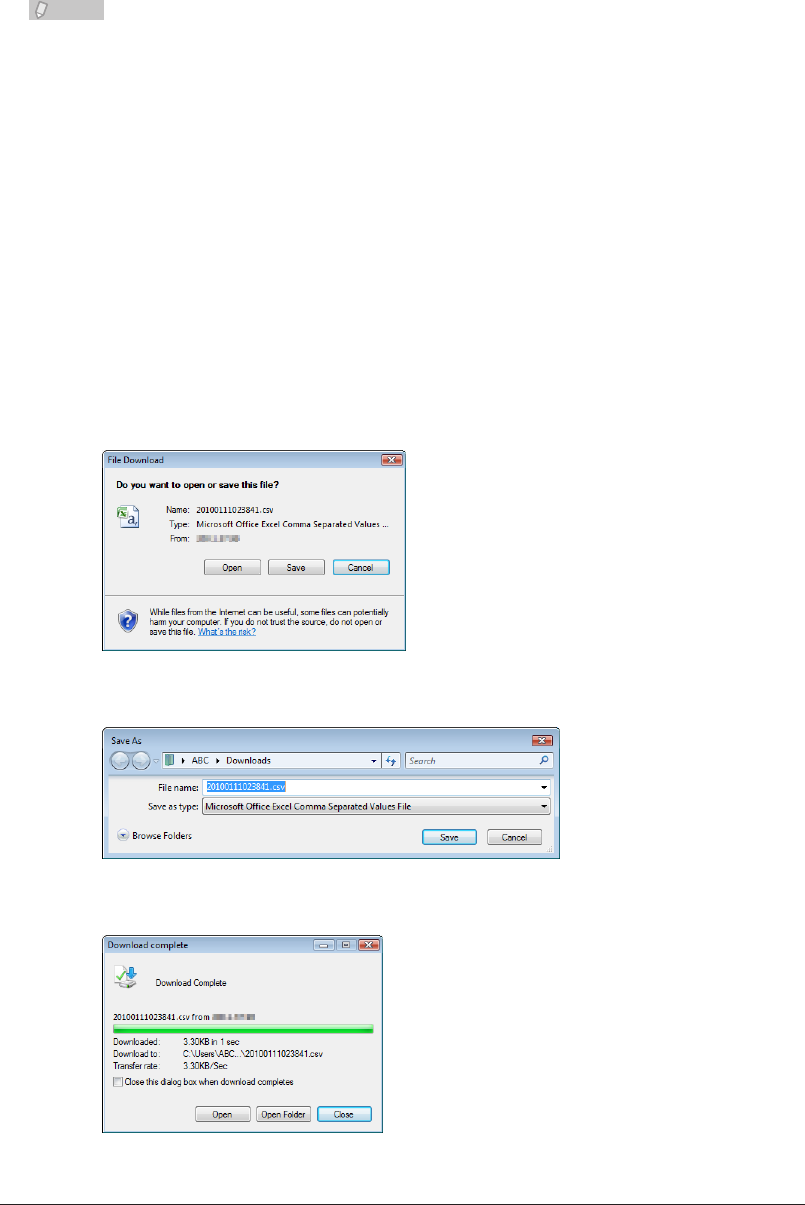
2-46 Checking the Jobs or History
Printing the Communication History
You can print the communication history. You can also filter the various items when
printing the history.
Note
The journal list can also be printed from the device settings on the control panel of the
machine. For details, refer to Chapter 6, “Managing the Communication History” in
the Scanner and Fax Guide.
Click [Print] on the communication history screen.
1
The communication history is printed.
Downloading the Communication History
You can download the communication history in the CSV format.
Click [Download] on the communication history screen.
1
The message “Do you want to open or save this file?” is displayed.
Click [Save].
2
Specify the folder to download to, enter a file name, and click [Save].
3
Click [Close] to close the “Download Complete” dialog box.
4
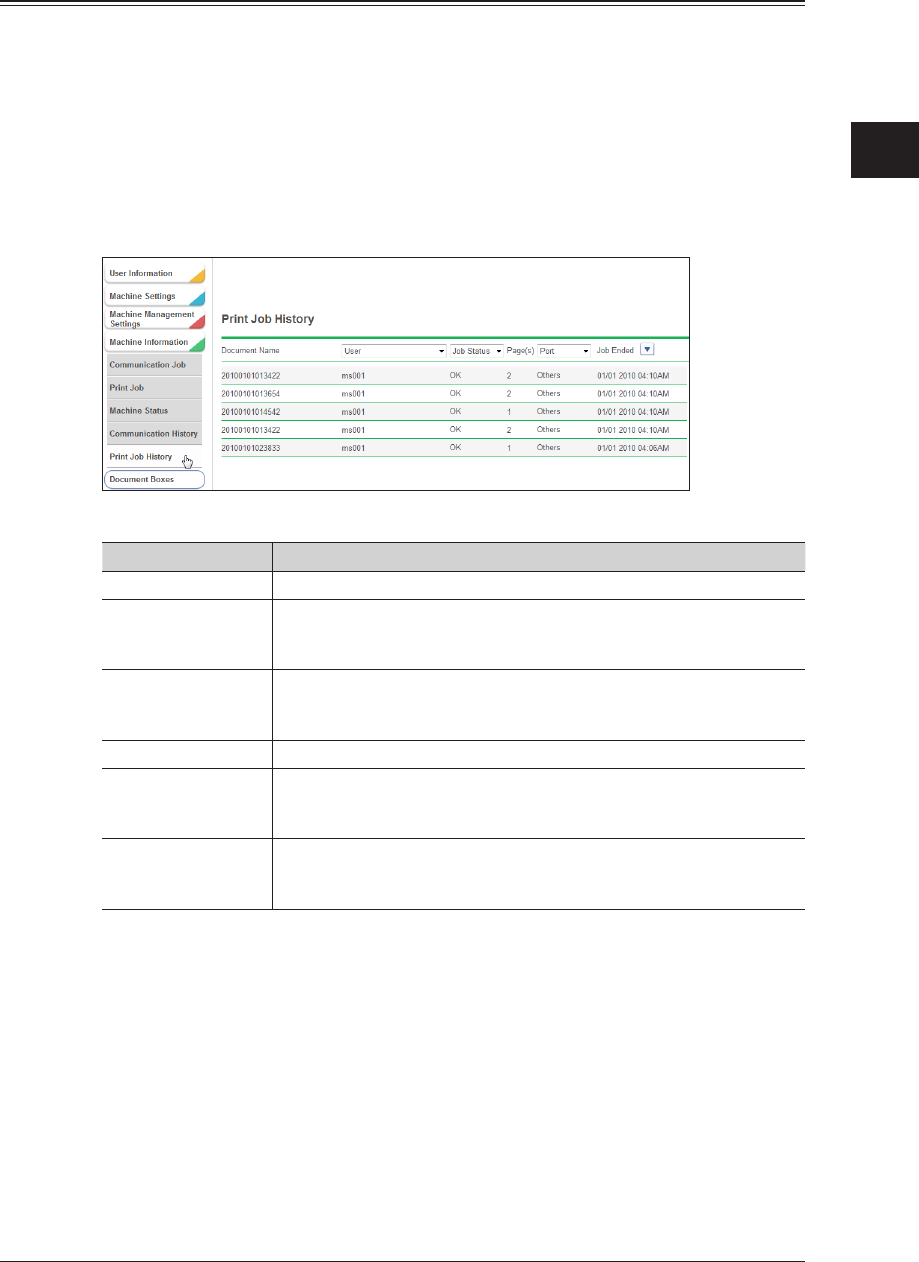
1
2
Operating the Various Functions
Checking the Jobs or History 2-47
Checking the Print Job History
You can check the document print job history. Up to 200 print job hisotries can be
displayed.
Log in to OfficeBridge as a user.
1
(See page 2-2.)
This function is also available on Administrator screen.•
This function • may also be available on Guest login screen, depending on user policy settings.
Click [Machine Information], and then “Print Job History”.
2
You can check the following information on the print job history screen.
Displayed Item Description
Document Name Displays the name of the printed document.
User Displays the name of the user that executed the print job. If this item
cannot be retrieved, “-” is displayed. With the pull-down menu, you
can filter the displayed print history by user.
Job Status Displays either “OK” or “Error” for the print result. “CANCEL” is
displayed if the print job was canceled. With the pull-down menu, you
can filter the displayed print history by result.
Page(s) Displays the number of pages generated by the printer driver.
Port Displays the port used for printing. With the pull-down menu, you can
filter the displayed print history by port.
“LPR”, “RAW”, “IPP”, “USB”, or “Others” is displayed for the port type.
Job Ended Displays the date and time when the print job was completed. You can
switch the print history to ascending order or descending order using
the [] icon.
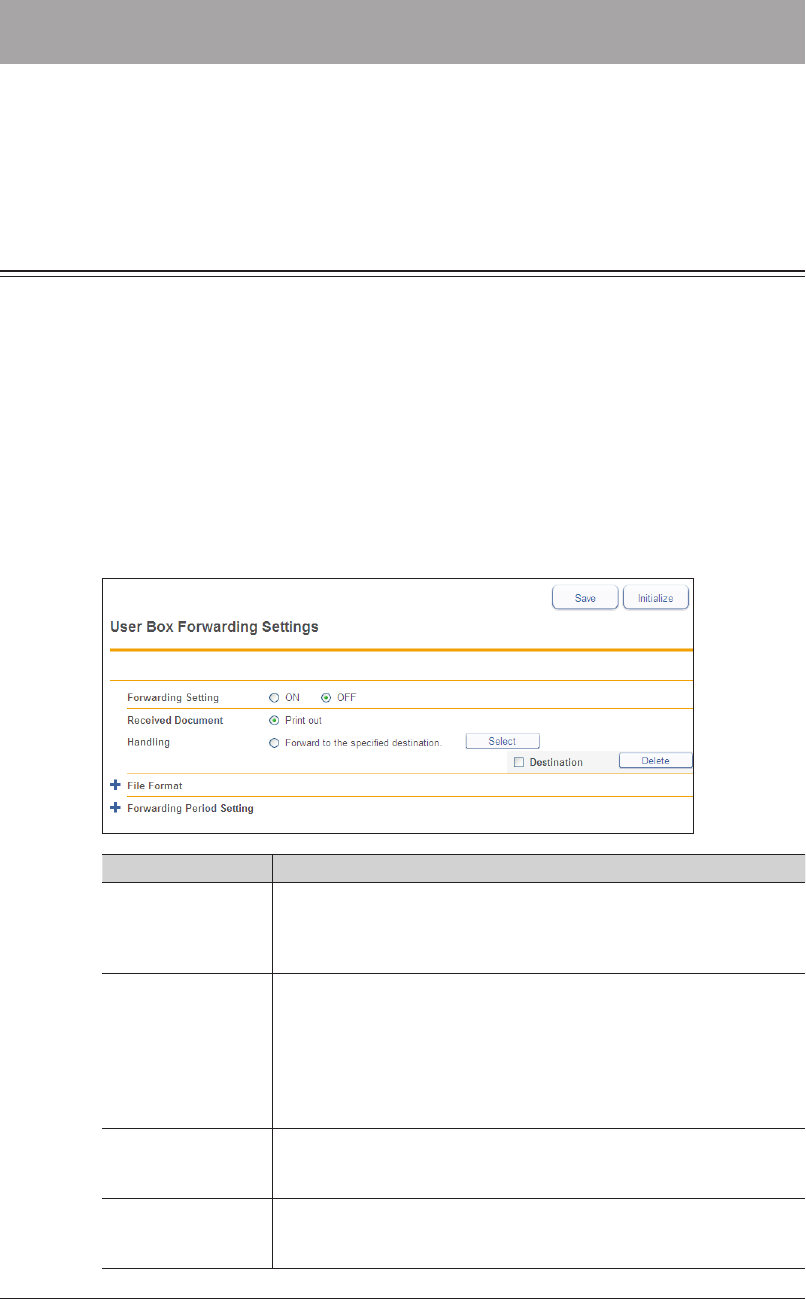
2-48 Forwarding Documents
Forwarding Documents
When you want to check documents when you are away from the office, you can set
“forwarding settings” to automatically forward received documents to a destination of
your choice via fax or e-mail. You can also set to print all the documents received while
you are away from the office.
Forwarding Received Documents
You can forward documents received while you are away from the office to a specified fax
number, e-mail address, folder, or user. You can also print the received documents.
Log in to OfficeBridge as a user.
1
(See page 2-2.)
This function may also be available on Guest login screen, depending on user policy settings.
Click [User Information], and then “User Box Forwarding Settings”.
2
Register the various user box forwarding settings.
3
Setting Description
Forwarding Setting You can set whether to enable or disable the forwarding setting.
Set “ON” to enable the function, or “OFF” to disable it. The ON/OFF
status of the forwarding setting is linked to the “forwarding switch” in
the footer area.
Received Document
Handling
You can set the method for processing received data.
To print documents received when you are away from the office, select
“Print out”. To perform forwarding, select “Forward to the specified
destination.”, click [Select], and specify the destination to forward to.
(See page 2-49.)
If you set a destination, it is displayed in the list on the right. To
delete a destination, select it and click [Delete].
File Format You can set the file format to use when forwarding documents. (See
page 2-54.)
Click the [+] to the left of “File Format” to display the settings.
Forwarding Period
Setting
You can set the period for performing forwarding. (See page 2-54.)
Click the [+] to the left of “Forwarding Period Setting” to display the
settings.
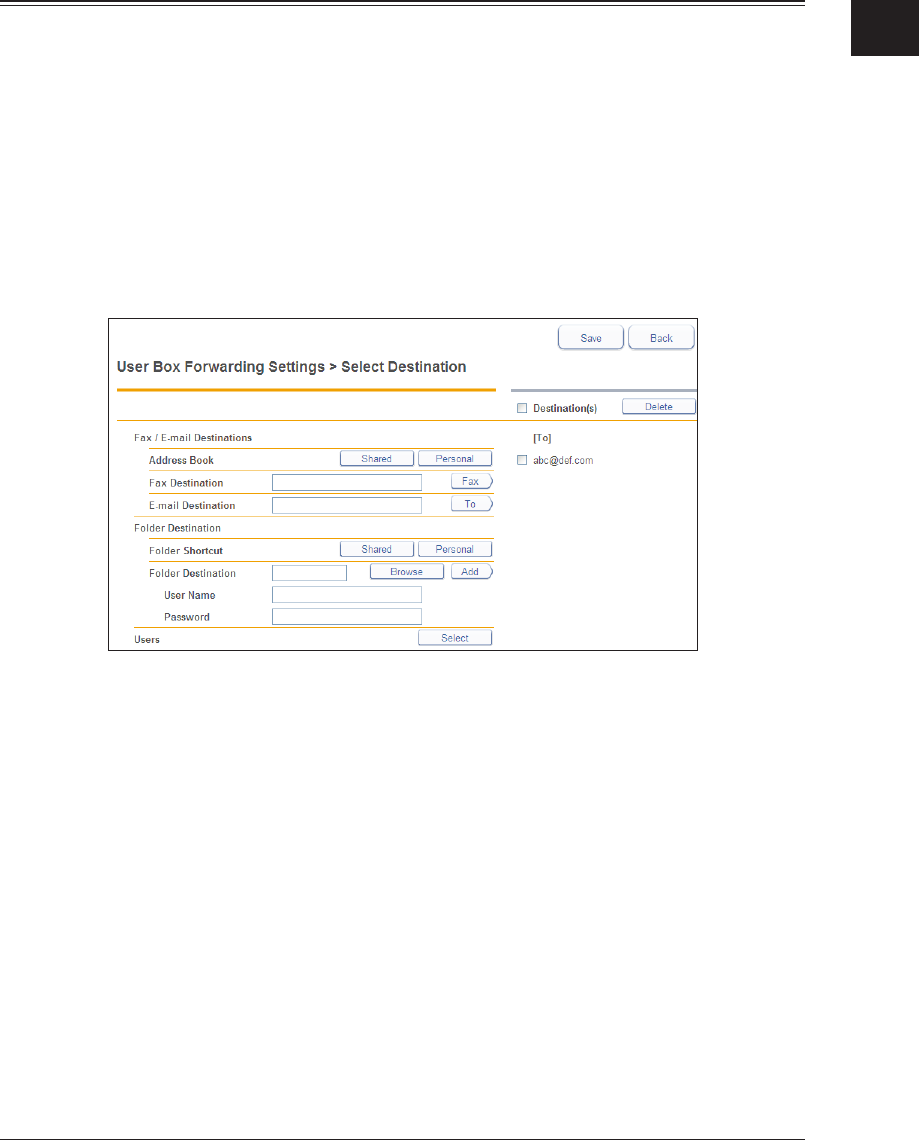
1
2
Operating the Various Functions
Forwarding Documents 2-49
Click [Save].
4
The forwarding setting is saved. You can now select [ON] or [OFF] for the forwarding setting
to forward or print received documents. (See page 1-9.)
Specifying Forwarding Destinations
You can specify forwarding destinations using various methods. You can only register a
single forwarding destination.
Opening the Destination Selection
Select “Forward to the specified destination.” for the received document
1
handling. (See page 2-48.)
Click [Select].
2
Refer to pages 2-50 to 2-54 to enter the destination.
3
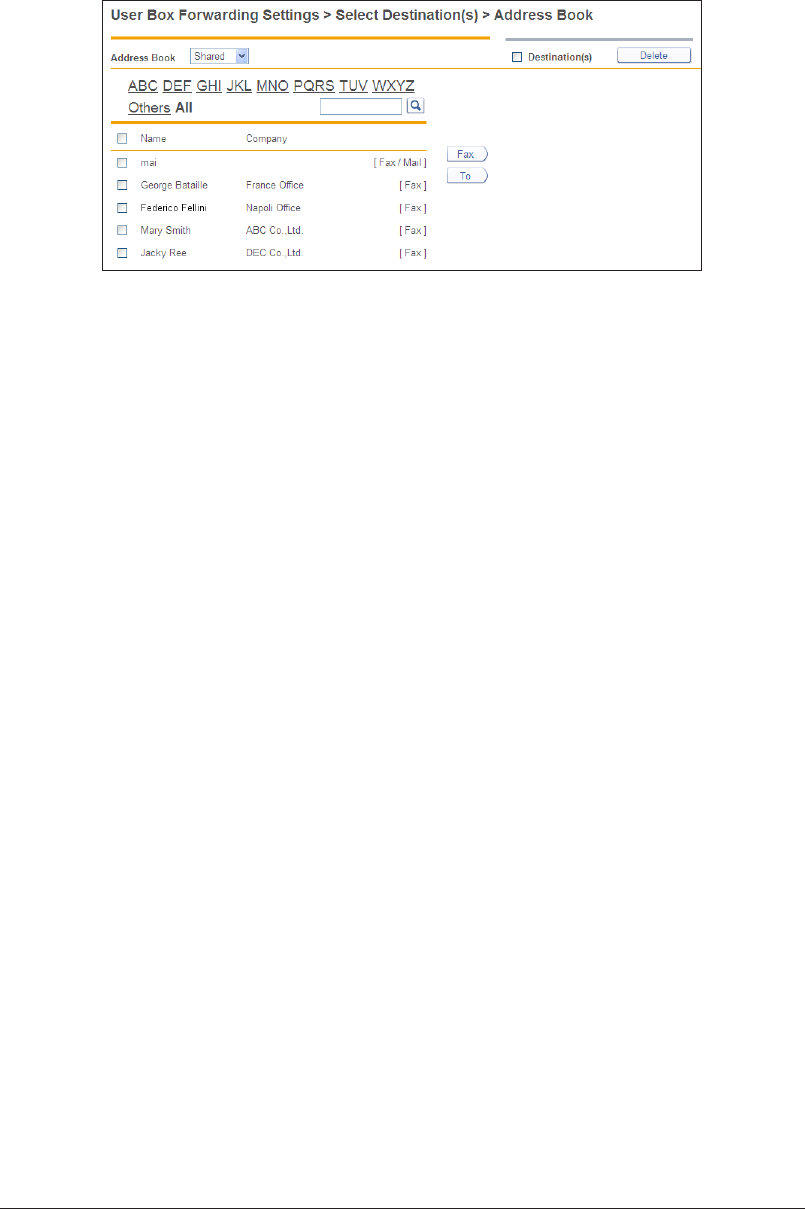
2-50 Forwarding Documents
Specifying From the Address Book
Click [Shared] or [Personal] from “Address Book” in “Fax / E-mail Destinations”.
1
Click [Shared] to open the “Shared Address Book” or [Personal] to open the “Personal Address
Book”.
Select a destination from the address book, and click [Fax] or [To].
2
When you click [Fax], the destination is selected as fax destination. When you click [To], the •
destination is selected as e-mail destination.
The registered content is displayed to the right of the address book name. If only a fax •
number is registered, [Fax] is displayed. If only an e-mail address is registered, [Mail] is
displayed. If both are registered, [Fax / Mail] is displayed.
A destination cannot be registered as a fax destination unless it has a fax number registered. •
A destination cannot be registered as an e-mail destination unless it has an e-mail address
registered.
To delete a destination, select the destination you want to delete from the destination list, •
and click [Delete].
Click [Save].
3
The display returns to the forwarding settings screen.
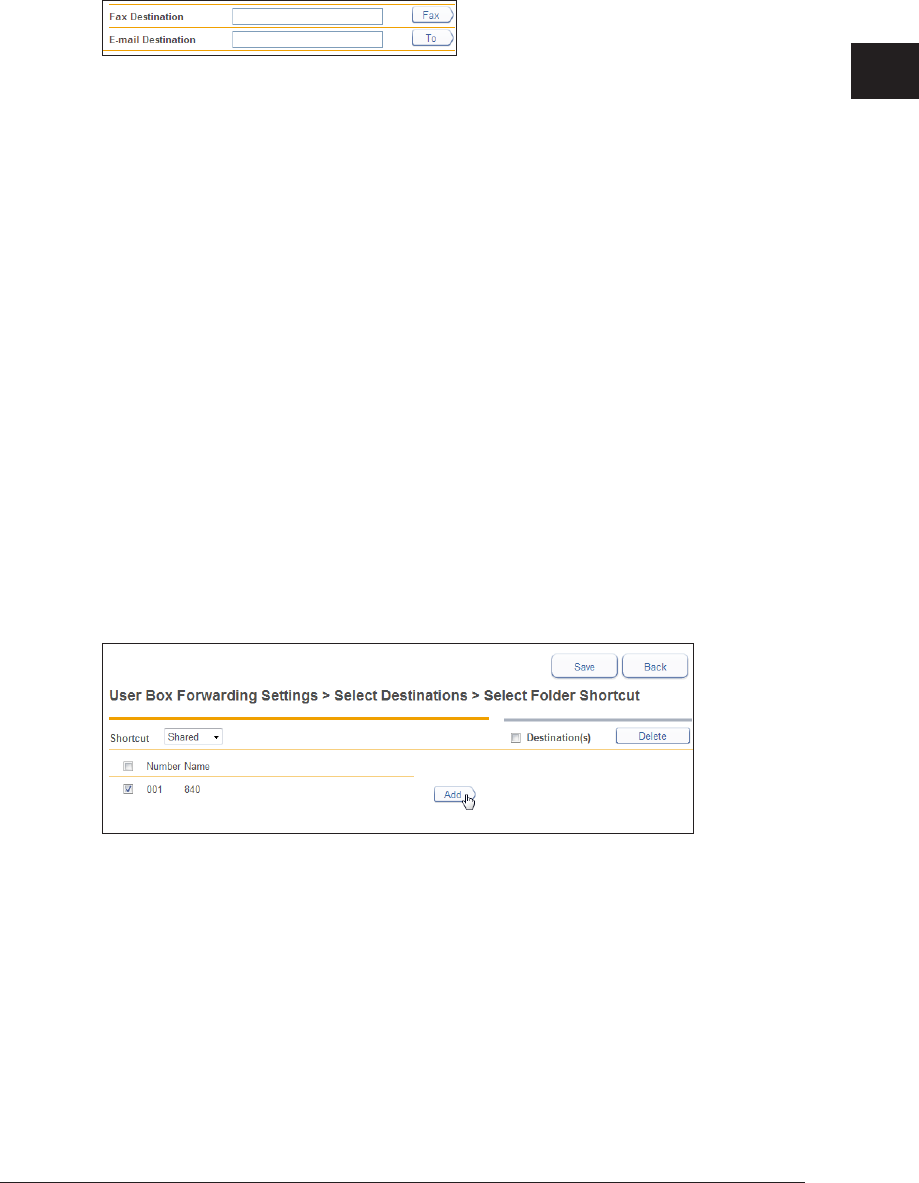
1
2
Operating the Various Functions
Forwarding Documents 2-51
Manually Entering a Fax Destination or E-mail Destination
Enter the fax number or e-mail address of the destination in the “Fax / E-mail
1
Destinations” entry box.
Up to 40 digits can be entered for a fax number. Up to 50 characters can be entered for an •
e-mail address.
Dialing options can be inserted when entering a fax number. For details on dialing options, •
refer to Chapter 3, “Basic Faxing” in the Scanner and Fax Guide.
Click [Fax] if you entered a fax number, or [To] if you entered an e-mail address.
2
The forwarding destination is displayed in the address list.•
To delete a destination, select the forwarding destination to delete from the destination list, •
and click [Delete].
Click [Save].
3
The display returns to the forwarding settings screen.
Specifying Using a Folder Shortcut
Click [Shared] or [Personal] from “Folder Shortcut” in “Folder Destination”.
1
Click [Shared] to open “Shared Folder Shortcut” or [Personal] to open “Personal Folder
Shortcut”.
Select the folder shortcut, and click [Add].
2
The forwarding destination is displayed in the address list.•
To delete a destination, select the forwarding destination to delete from the destination list, •
and click [Delete].
Click [Save].
3
The display returns to the forwarding settings screen.
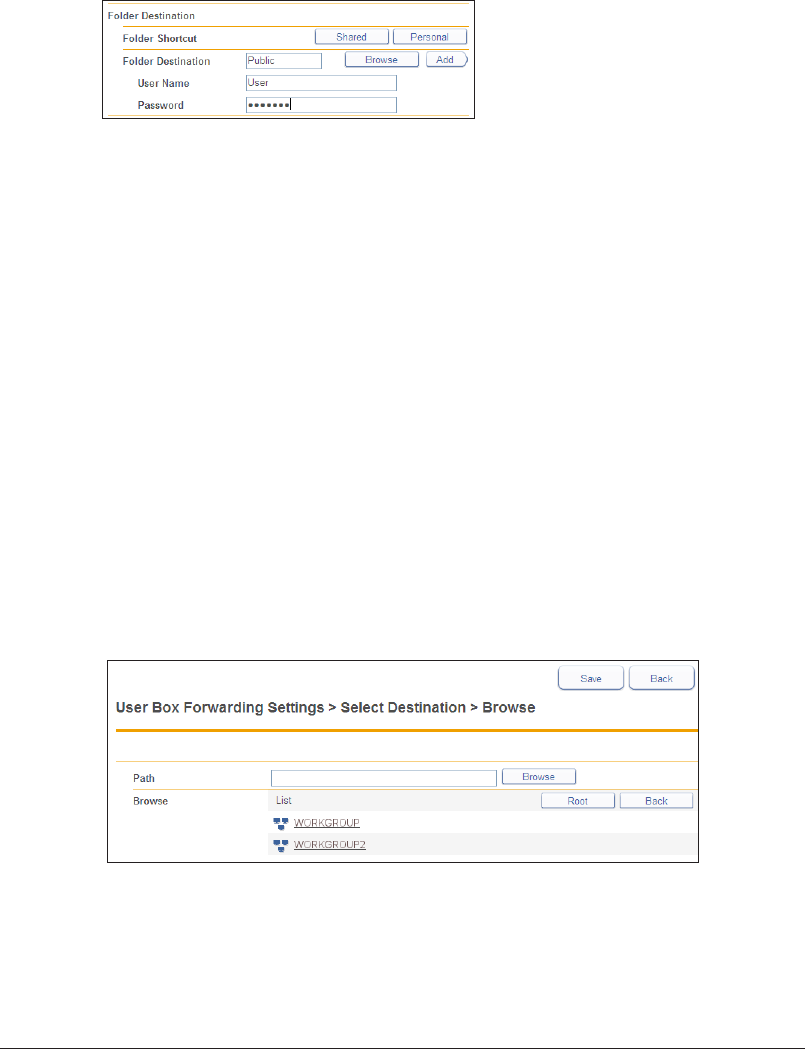
2-52 Forwarding Documents
Manually Entering a Folder Destination
Enter the folder path name of the forwarding destination in the “Folder
1
Destination” entry box in “Folder Destination”.
Up to 128 characters can be entered. The following characters cannot be used in a path •
name; * ? “ < > |.
Enter the path name in the “\\(computer name)\(folder name)\” format.•
If a user name and password are required to access the folder, enter them.
2
Click [Add].
3
The folder is displayed in the destination list.•
To delete a destination, select the forwarding destination from the destination list, and click •
[Delete].
Click [Save].
4
The display returns to the forwarding settings screen.
Browsing for a Folder Destination
Click [Browse] in “Folder Destination” under “Folder Destination”.
1
A list of the network environment you are connected to is displayed.•
If you enter the computer name in the folder path in advance, you can display a list of the •
shared folders in that computer.
Click a displayed computer name or folder name, and select the folder name to
2
set as the forwarding destination.
Click [Back] to return to the previous folder level.•
Click [Root] to return to the first (root) level.•
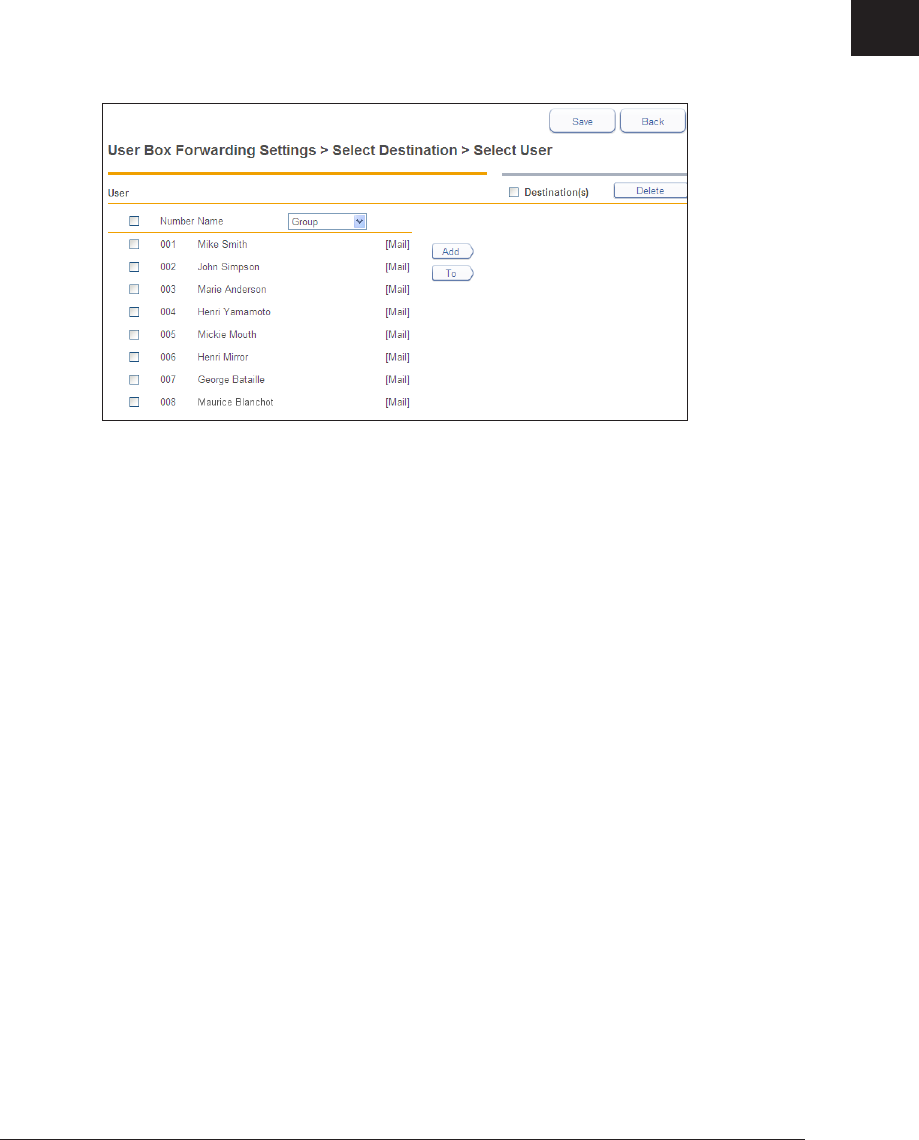
1
2
Operating the Various Functions
Forwarding Documents 2-53
Click [Save].
3
The folder path name is entered as the folder destination.
Specifying From the User List
Click [Select] in the “Users” field.
1
Select a user from the list of users, and click [Add] or [To].
2
When you click [Add], the user box is selected as destination. When you click [To], the •
destination is selected as e-mail destination.
If groups are registered, you can filter the displayed users by group using the [Group] pull-•
down menu.
The registered content is displayed to the right of the user name.•
[Mail] is displayed when an e-mail address is registered. Destinations with nothing •
displayed are only specified as destinations to the user box.
To delete a destination, select the forwarding destination from the destination list, and click •
[Delete].
Click [Save].
3
The display returns to the forwarding settings screen.
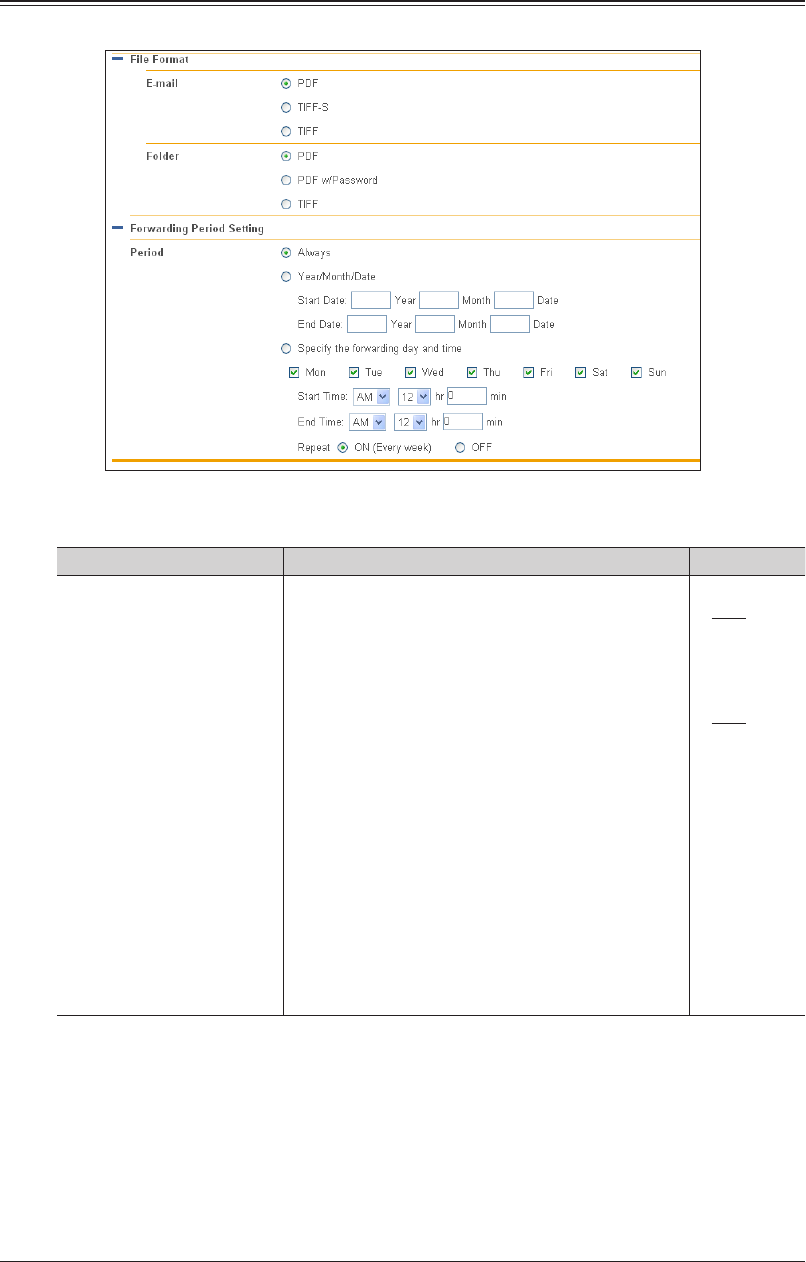
2-54 Forwarding Documents
Setting the Attachment File Format and Forwarding Period
You can specify the file format and forwarding period to use when forwarding documents.
Click the [+] to the left of “File Format” or “Period” to display the settings.
The items displayed are indicated below.
Item Description Settings
E-mail / Folder Set the file format to save the document in when
forwarding via e-mail. You can set the following file
formats.
TIFF: The full mode TIFF format. The
document is transmitted with the
document size and resolution set
when it was created.
TIFF-S: The simple mode TIFF format.
Documents are all converted to
A4 size and 200 dpi resolution for
transmission.
PDF: Documents are transmitted in the
PDF format.
PDF w/Password
: Can only be set for the attachment
file format for a folder. You can
set a password and the various
permissions for the PDF format. If
you select the PDF with password
format, “PDF Encryption Setting” is
displayed.
E-mail:
PDF
TIFF-S
TIFF
Folder:
PDF
PDF w/
Password
TIFF

1
2
Operating the Various Functions
Forwarding Documents 2-55
Item Description Settings
PDF Encryption Setting These items are displayed when “PDF w/ Password”
is selected as the attachment file format for the
folder. Specify the PDF encryption settings.
Document
Access
Password
Enter the password (user password) required to
open the encrypted PDF. Up to 28 characters can be
entered.
28 characters
Change
Permissions
Password
Enter the password (owner password) required to
change the permission settings of the encrypted
PDF. Up to 28 characters can be entered.
28 characters
Permissions Set the printing, editing, and copying permissions.
Set “ON” to enable the operation, or “OFF” to disable
it.
Printing:
ON
OFF
Editing:
ON
OFF
Copying:
ON
OFF
Encryption
Level
Set the security level for viewing the PDF.
The PDF may not be able to be opened, depending on
the version of Acrobat.
For example, if you set the encryption level to “High
(128-bit AES) / Acrobat 7.0 or later”, the PDF will
not be able to be opened using Acrobat 6.0 or earlier.
Low (40-
bit RC4) /
Acrobat 3.0 or
later
High (128-
bit RC4) /
Acrobat 6.0 or
later
High (128-
bit AES) /
Acrobat 7.0 or
later

2-56 Forwarding Documents
Item Description Settings
Period Specify the period for which forwarding is performed.
Always Always execute forwarding. Always
Year/Month/
Date
Specify the
forwarding
day and time
Year/Month/
Date
Specify a date to start forwarding and a date to end
forwarding to only execute forwarding during that
period.
Year:
1992 to 2036
Month:
1 - 12
Day:
1 - 31
Specify the
forwarding
day and time
Execute forwarding on the specified day of the week
during the start time and end time. You can specify
multiple days of the week. You can also specify to
execute forwarding for only the week the forwarding
setting was enabled, or to execute forwarding every
week.
Day of week:
Mon to Sun
AM, PM
Hour:
1 - 12
Minute:
0 - 59
Note
Underlined values are the default settings specified at the time of shipment.

Chapter 3
OfficeBridge Administrator Settings
Administrator settings list .......................................................................................3-3
Registering Users .......................................................................................................3-5
“User Registration” Screen .....................................................................................3-5
Registering a User...................................................................................................3-6
Copying Existing User Information to Register a New User .............................3-10
Deleting User Information....................................................................................3-11
Importing User Information From an External File ...........................................3-12
Exporting User Information to an External File .................................................3-14
Creating Address Books ..........................................................................................3-15
“Address Book” List Screen ...................................................................................3-15
Registering New Destinations ..............................................................................3-17
Registering the Sender of a Received Document to the Address Book ..............3-19
Copying Existing Destination to Register a New Destination ...........................3-20
Registering Destination Using an LDAP Server .................................................3-21
Deleting Destinations ...........................................................................................3-24
Importing Destination From an External File ....................................................3-25
Exporting Destination to an External File ..........................................................3-30
Grouping Multiple Destinations...........................................................................3-31
Registering Shortcuts .............................................................................................3-38
Setting Folder Shortcuts .......................................................................................3-38
Setting FTP Shortcuts ..........................................................................................3-44
Setting Templates .....................................................................................................3-49
Setting Document Names .....................................................................................3-49
Setting Document Categories ...............................................................................3-53
Setting E-mail Templates .....................................................................................3-56
Setting the Connection Environment .................................................................3-60
Setting the Network Environment .......................................................................3-60
Setting the E-mail Transmission / Reception Environment ...............................3-63
Setting the E-mail Operating Environment ........................................................3-67
Setting the Directory Database Environment .....................................................3-70
Setting Communication Device Monitoring / Control .........................................3-75
Setting an Internet Time ......................................................................................3-77
Specifying Device Settings .....................................................................................3-79
Specifying Other Network Settings .....................................................................3-79
Specifying User Install Mode Settings .................................................................3-81
Specifying Default Machine Settings ..................................................................3-82
Settings ..................................................................................................................3-82
Regarding Settings ................................................................................................3-82
Automatically Distributing Received Documents ............................................3-83
Auto Distribution Function ..................................................................................3-83
Setting Auto Distribution (General Settings) ......................................................3-84
Setting Auto Distribution (Individual Settings) ..................................................3-87
Specifying Distribution Destinations ...................................................................3-90
Performing an Auto Distribution Test..................................................................3-94
Copying Existing Auto Distribution Settings to Create New Settings ..............3-96
Deleting Auto Distribution Settings ....................................................................3-97
Usage Management ..................................................................................................3-98
Checking the Usage Status ..................................................................................3-98
Setting the Management History .......................................................................3-101
Resetting the Counters .......................................................................................3-102
Displaying and Copying Machine Settings ......................................................3-103
Setting the Machine Status ................................................................................3-103
Exporting Machine Settings ...............................................................................3-105
Importing Machine Settings ...............................................................................3-106
Specifying Document Box Settings ....................................................................3-107
Saving Transmitted Data (Archive Settings) ...................................................3-111
Specifying Archive Settings ................................................................................3-111
Specifying the Archive Destination ....................................................................3-113
Backing Up Documents .........................................................................................3-117
Specifying Backup Settings ................................................................................3-117
Specifying the Backup Document Display .........................................................3-119
Checking the Backup Log ...................................................................................3-121
Setting Security ......................................................................................................3-123
Setting User Policies ...........................................................................................3-123
Setting the Machine Policy .................................................................................3-130
Setting Access Restrictions .................................................................................3-134
Specifying SSL Certificate Settings ...................................................................3-137
Setting ScanTag ......................................................................................................3-141
“ScanTag Settings” Screen ..................................................................................3-141
ScanTag Settings .................................................................................................3-142

1
2
3
OfficeBridge Administrator Settings
Administrator settings list 3-3
Administrator settings list
On the Administrator screen, the following settings are available. Some settings may also
available for Users and Guests.
Items Description Default authority page
Admin User Guest
User Information
User Registration Register, edit or delete users. 3-5
Address Book Register, edit or delete destinations,
destination groups. 3-15
Shortcut
Register, edit or delete folder
shortcuts and FTP server shortcuts. 3-38
User Box Forwarding
Settings
Register, edit or delete forwarding
settings. —2-48
Templates Register, edit or delete file names,
categories and e-mail templates. 3-49
Machine Settings
TCP/IP Settings Setup network environment. 3-60
E-mail Settings
Setup e-mail transmission/reception
environment. 3-63
LDAP Server
Settings
Setup Lightweight Directory Access
Protocol (LDAP) servers. 3-70
SNMP Settings
Setup SNMP settings.
3-75
Internet Time
Setting
Setup internet time server
synchronization. 3-77
Machine Setup Setup machine setting such as
e-mail gateway and automatic panel
logout time, or default settings (user
install).
3-79
Machine Default
Settings
Setup the machine default settings. 3-82
Machine Management Settings
Auto Distribution
Register, edit or delete distribution
settings.
3-83
Usage Management Setup usage management, and
check the usage status. 3-98
User Policy Setup user policies. 3-123
Secure Settings Setup network filter, SSL certificate,
or machine policies. 3-130
Archive Settings Setup to sent communicated
documents to a specified destination
via fax, or store them in a specified
folder.
3-111
Backup Settings Specify settings for backing up the
document files stored in the machine
to a shared folder on the network.
3-117
Document Box
Settings
Specify settings relating to the
way the document boxes handle
documents.
3-107

3-4 Administrator settings list
Items Description Default authority page
Admin User Guest
ScanTag Settings Register, edit or delete setting to
create image data and metadata
(data indicating the attributes and
rocessing method of the image file)
in a single scan.
3-141
Machine Information
Communication Job
Check the fax and e-mail
transmission reservation status, and
the progress of the communication
job being executed.
2-40
Print Job
Check the progress of print jobs
being printed or reserved for
printing.
2-42
Machine Status Check the machine status. Only
administrator can export / import
machine settings.
3-103
Communication
History
Check the history of transmitted
and received jobs. 2-44
Print Job History
Check the document print job
history.
2-47
Blank: has no authority by default
: has authority by default
—: Unable to set
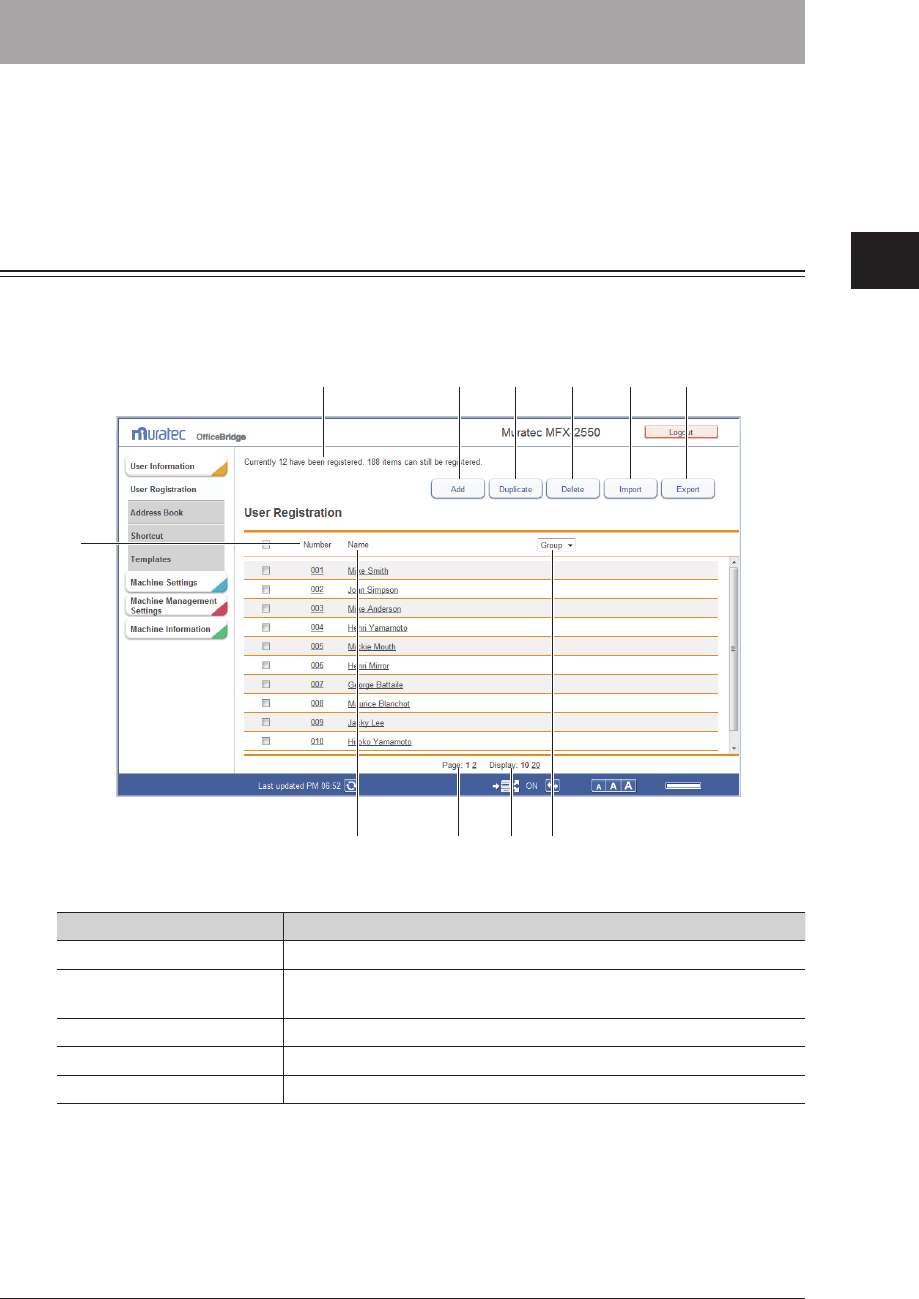
1
2
3
OfficeBridge Administrator Settings
Registering Users 3-5
Registering Users
To utilize the functions of OfficeBridge, it is necessary to first register users.
There are two methods for registering users; registering them from the user information
settings screen, and importing them from an external file in a format such as the vCard
format.
“User Registration” Screen
The “User Registration” screen displays a list of the registered users.
On this screen you can register new user information and change existing user
information.
16
8
2 3 4 5
7
910 11
Button
Button name Description
1 [Add] Registers new user information.
2 [Duplicate] Copies user information that is already registered. The user
information can be edited and used as information for another user.
3 [Delete] Deletes user information.
4 [Import] Imports user information from an external file.
5 [Export] Exports user information in the vCard file format.
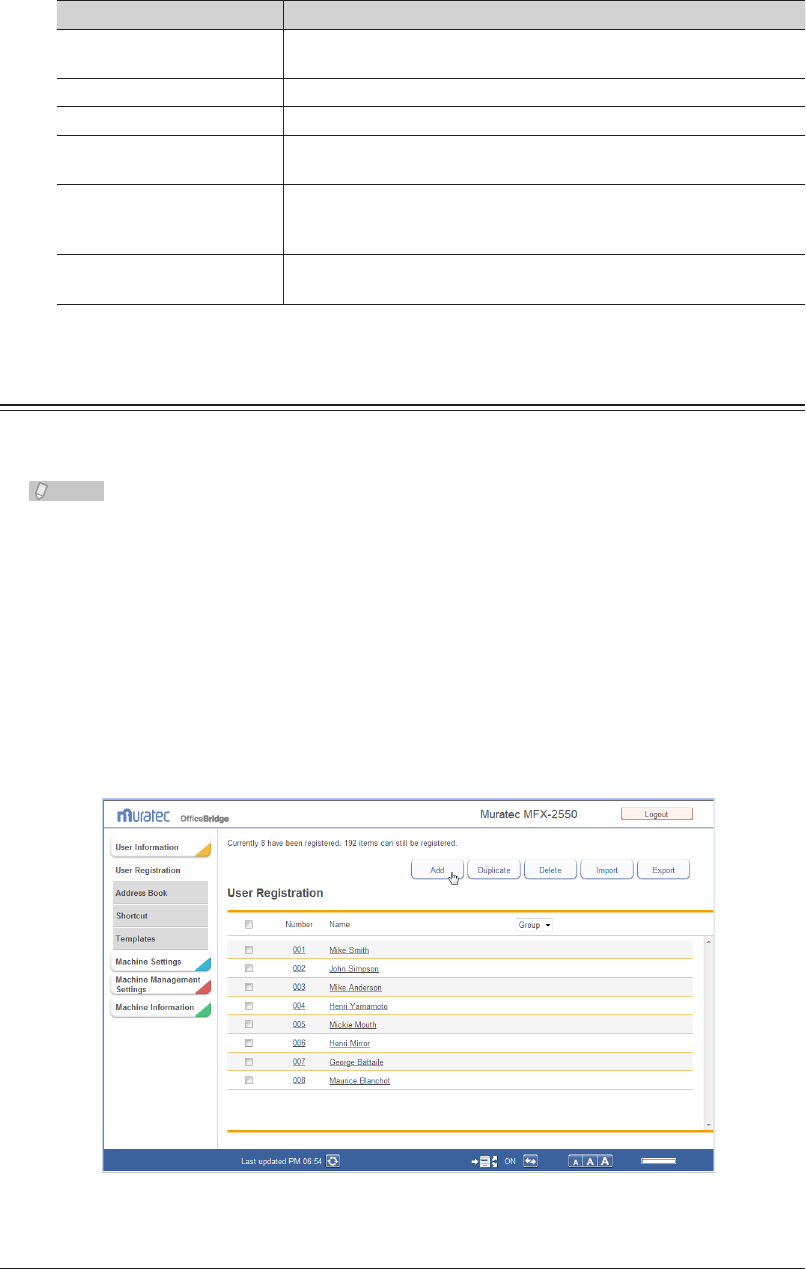
3-6 Registering Users
List Items
Item Description
6 Number of users that can
be registered
Displays the number of users that can be registered.
7 Number The number assigned to the user.
8 Name Displays the name registered.
9 Group Displays the name of the group that the user belongs to. You can
also filter the displayed users by group name.
10 Page Enables you to switch pages when destination information does not
fit on one page. (The number of pages differs according to how many
items are displayed on each page.)
11 Number of displayed
items switch
Switches the number of users displayed on one screen (between 10
and 20).
Registering a User
You can register new user information in OfficeBridge.
User registration is performed from the user information settings screen.
Note
Up to 200 users can be registered.
Log in to OfficeBridge as a user.
1
(See page 2-2.)
This function is also available on Administrator screen.•
This function may also be available on Guest login screen, depending on user policy settings.•
Click [User Information].
2
Click [Add].
3
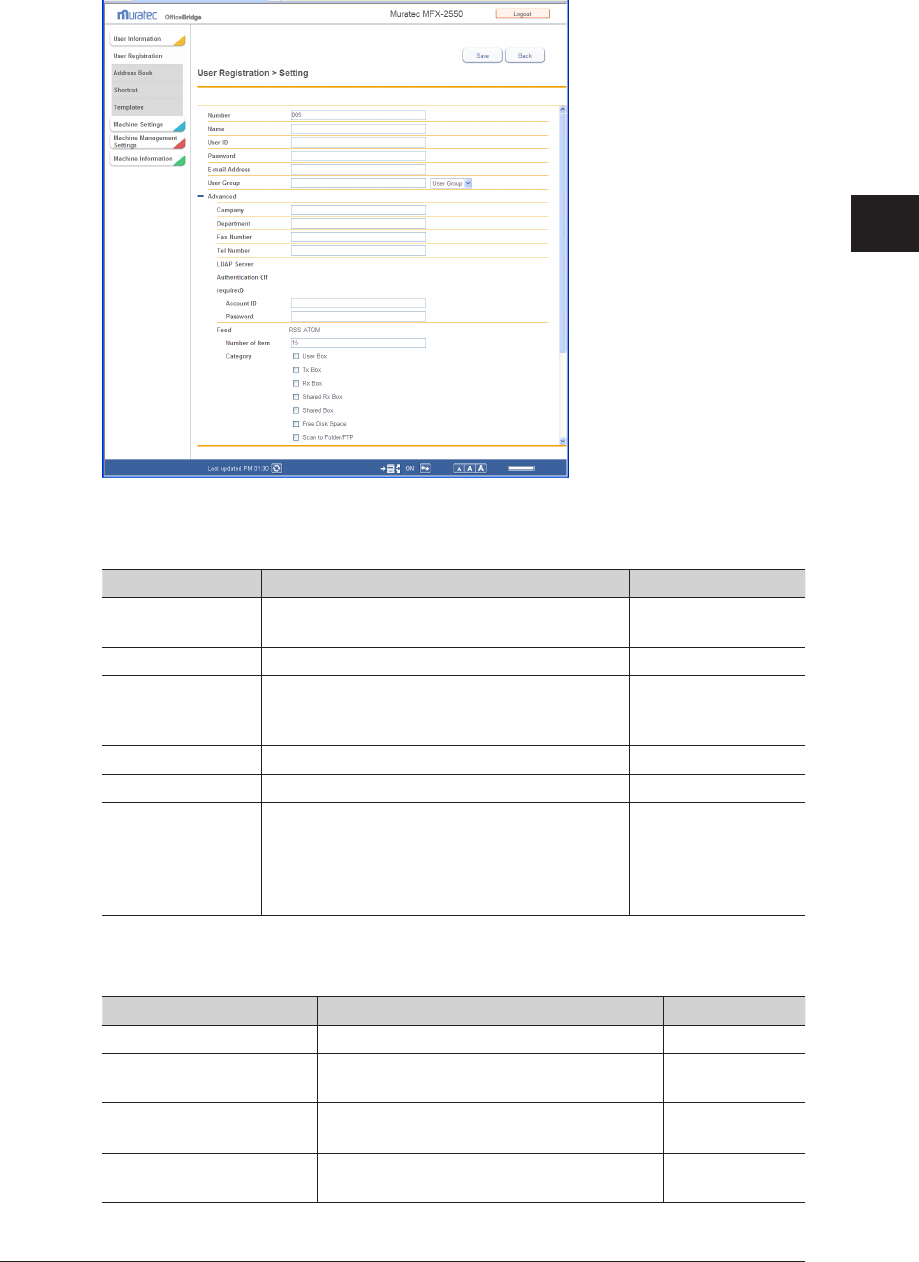
1
2
3
OfficeBridge Administrator Settings
Registering Users 3-7
Register the user information.
4
You can register the following items.
Basic Settings
Setting Description Settings
Number Enter the user number. You cannot enter an
existing number.
001 - 200
Name Enter the user name. 64 characters
User ID Enter the ID used for identifying the user.
You cannot enter an existing user ID. This item
is required.
64 characters
Password Enter the password used for logging in. 28 characters
E-mail Address Enter the e-mail address of the user. 50 characters
User Group Enter the name of the group that the user
belongs to.
If the group name is already registered, you can
also select it from the pull-down menu on the
right.
30 characters
Advanced Settings
These settings are displayed when you click [+].
Setting Description Settings
Company Enter the company name. 50 characters
Department Enter the name of the department that the
user belongs to.
100 characters
Fax Number Enter the user's fax number. 40 characters (0 -
9, *, #, -)
Tel Number Enter the user's telephone number. 40 characters (0 -
9, *, #, -)

3-8 Registering Users
Setting Description Settings
LDAP Server
Authentication
(If required)
Account ID Enter the account for logging in to the LDAP
server.
49 characters
Password Enter the password for logging in to the
LDAP server.
29 characters
Feed
File Format
The file format of the RSS feed is displayed. –
Number of
Item
Enter the maximum number of items of
summary information to include in the RSS
feed.
10 - 50: 15
Category Select the summary information to include
in the RSS feed.
Select from the
following items.
(Multiple items
can be selected.)
• User Box
• Tx Box
• Rx Box
• Shared Rx Box
• Shared Box
• Free Disk
Space
• Scan to Folder/
FTP
• PC Print
• Print Received
Document
• Boot
Policy Select a user policy. (See page 3-123.) –
Theme Setting Select the color theme for the screen. Default Theme
High Contrast
Low Contrast
Language Setting Select the display language on the
OfficeBridge for this user.
English
French
Spanish
Transmission Report
Setting
Set the transmission report to print after
transmission is complete.
Issuing
Location Description
OFF Do not print a transmission
report.
Print Print the transmission report.
E-mail
Transmit the transmission report
via e-mail. If you select this
option, enter an e-mail address.
OFF
Print
E-mail
Click [Save].
5
The display returns to the “User Registration” list screen.
Note
Underlined values are the default settings specified at the time of shipment.
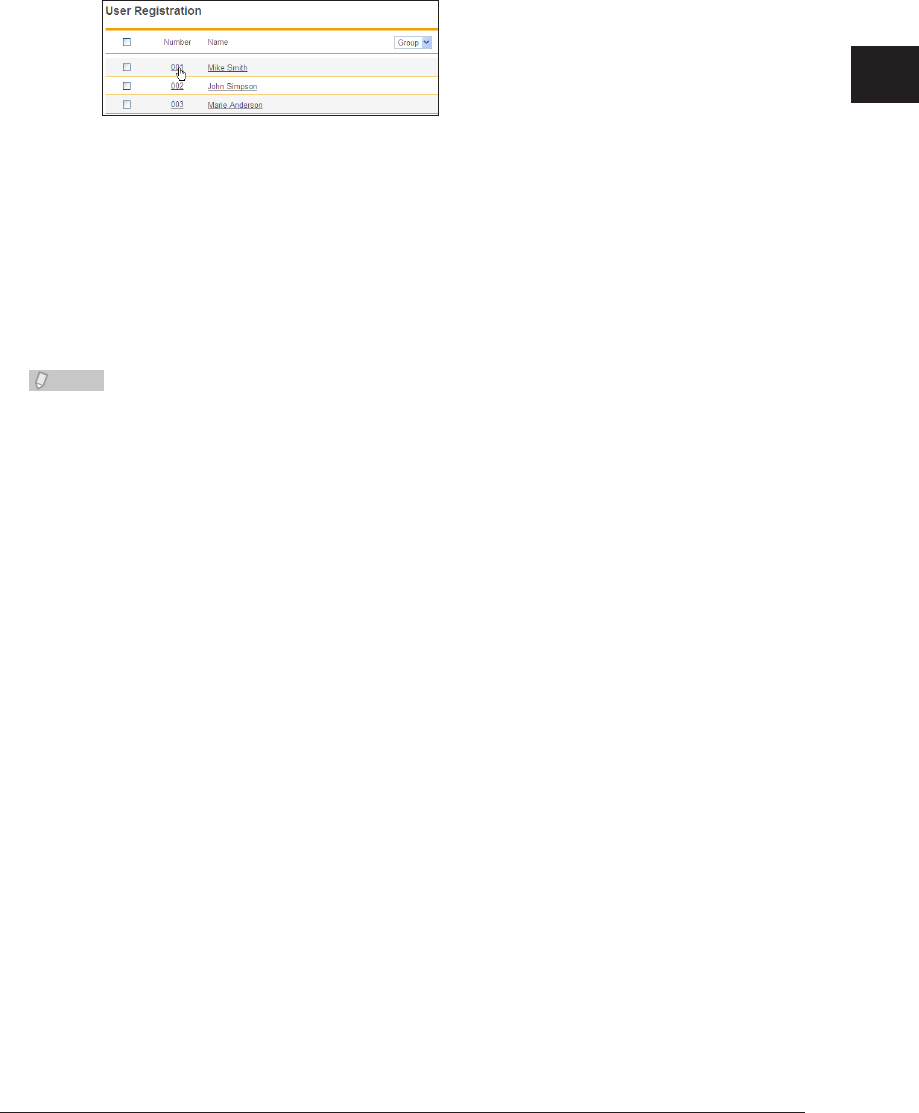
1
2
3
OfficeBridge Administrator Settings
Registering Users 3-9
Changing User Information
You can change user information that has been registered.
On the “User Registration” list screen, click the number or name of the user you
1
want to change.
The “Registration” screen is displayed.
Change the user information.
2
Click [Save].
3
The settings are changed, and the display returns to the “User Registration” list screen.•
Press [Back] to cancel changing the user information and return to the “User Registration” •
list screen.
Note
If you try to change the e-mail address of a user that is currently being used for a
communication job, the error “The e-mail address cannot be changed while a job is
active.” is displayed. Change the e-mail address after the communication job finishes.
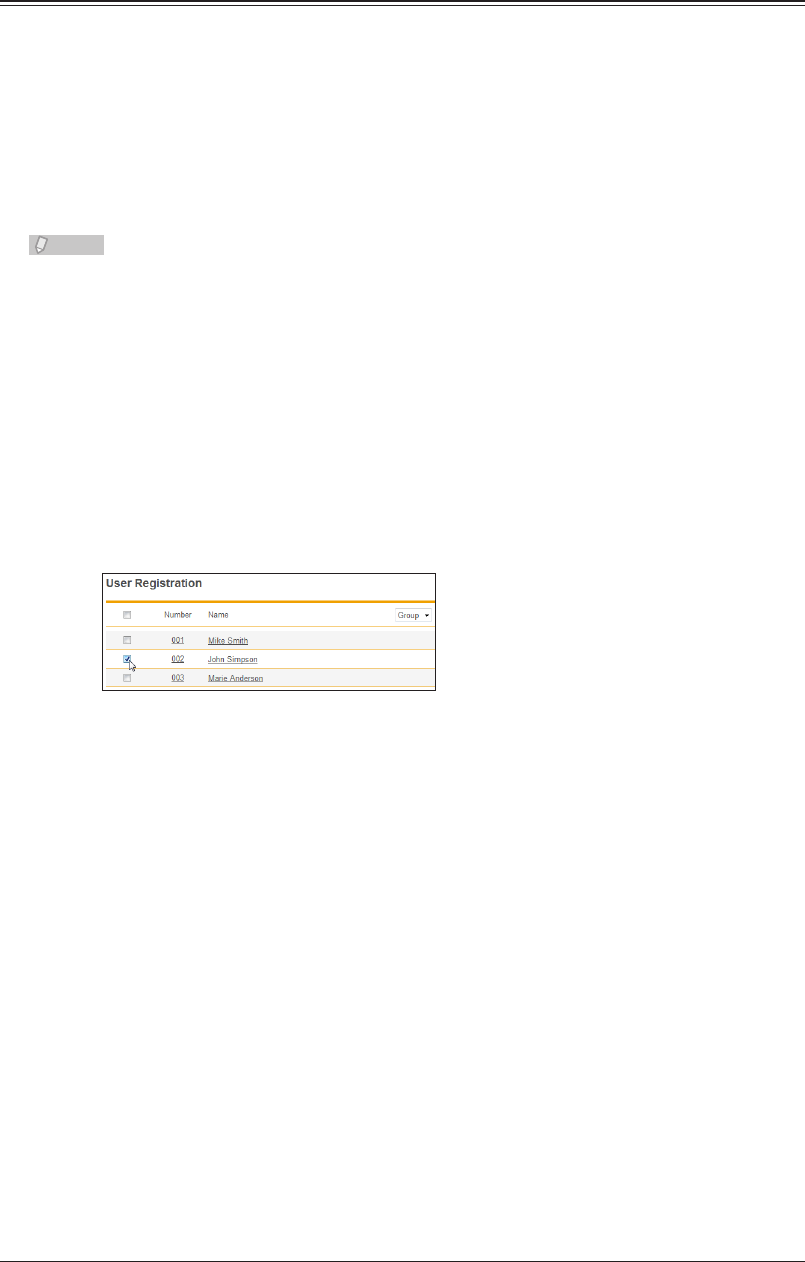
3-10 Registering Users
Copying Existing User Information to Register a New User
You can copy user information that is already registered to register a new user.
The user information items that can be copied are indicated below.
User Group•
Company•
Department•
Tel Number•
Fax Number•
Note
You cannot copy multiple users at the same time.
Log in to OfficeBridge as a user.
1
(See page 2-2.)
This function is also available on Administrator screen.•
This function may also be available on Guest login screen, depending on user policy settings.•
Click [User Information].
2
The “User Registration” list screen is displayed.
Select the checkbox of the user you want to copy.
3
Click [Duplicate].
4
The “Registration” screen is displayed.
Change the settings to those for the new user to register.
5
Click [Save].
6
The display returns to the “User Registration” list screen.•
Press [Back] to cancel registering the user information and return to the “User Registration” •
list screen.
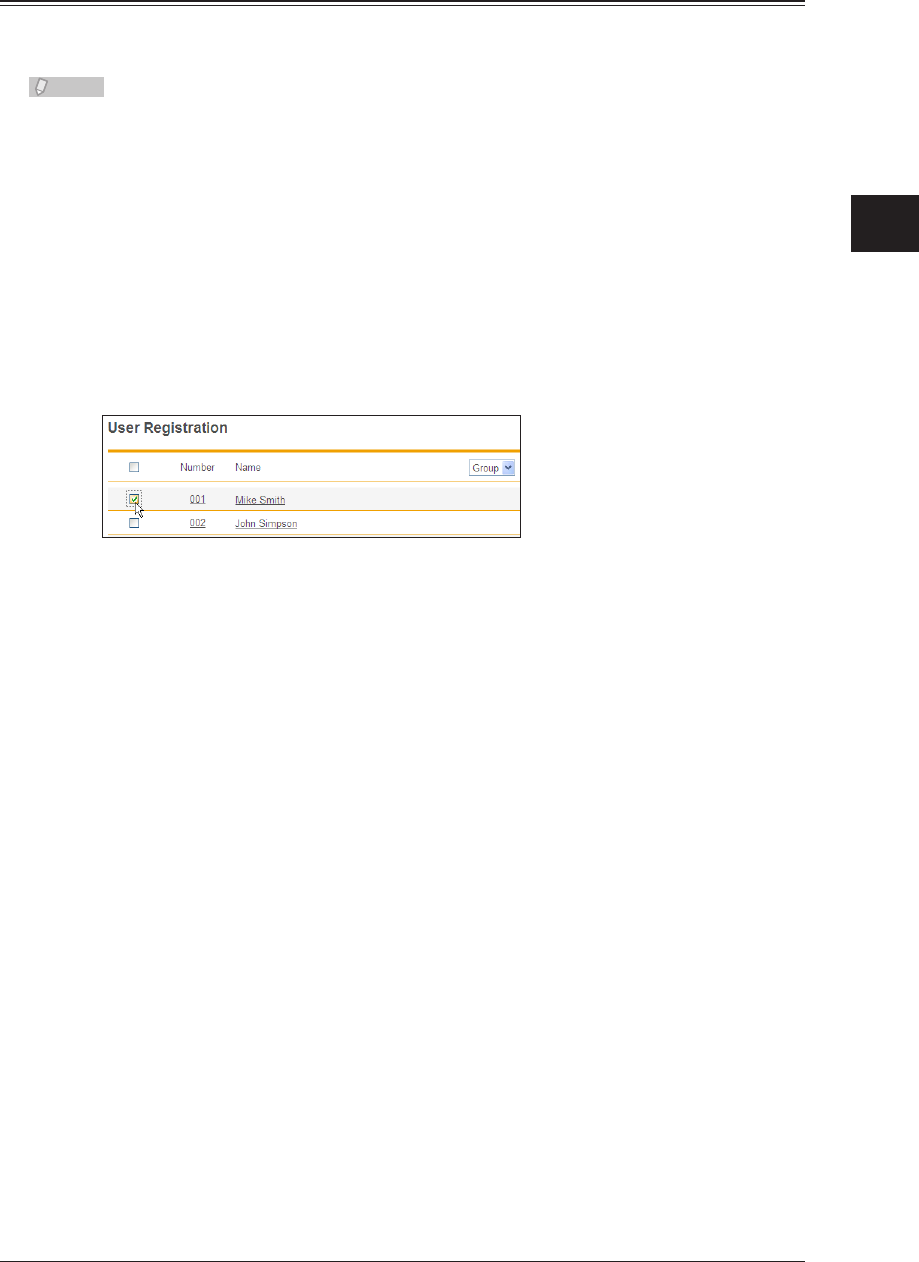
1
2
3
OfficeBridge Administrator Settings
Registering Users 3-11
Deleting User Information
You can delete unnecessary user information from the “User Information” list screen.
You can select multiple users to delete.
Note
The user that is currently logged in can also be deleted.
Log in to OfficeBridge as a user.
1
(See page 2-2.)
This function is also available on Administrator screen.•
This function may also be available on Guest login screen, depending on user policy settings.•
Click [User Information].
2
The “User Registration” list screen is displayed.
Select the checkbox of the users you want to delete.
3
To select all the displayed user information, select the top checkbox.•
Click the same checkbox to deselect the item.•
Click [Delete].
4
The “Is it OK to delete the selected user?” message is displayed.
Click [OK].
5
The selected user information is printed.
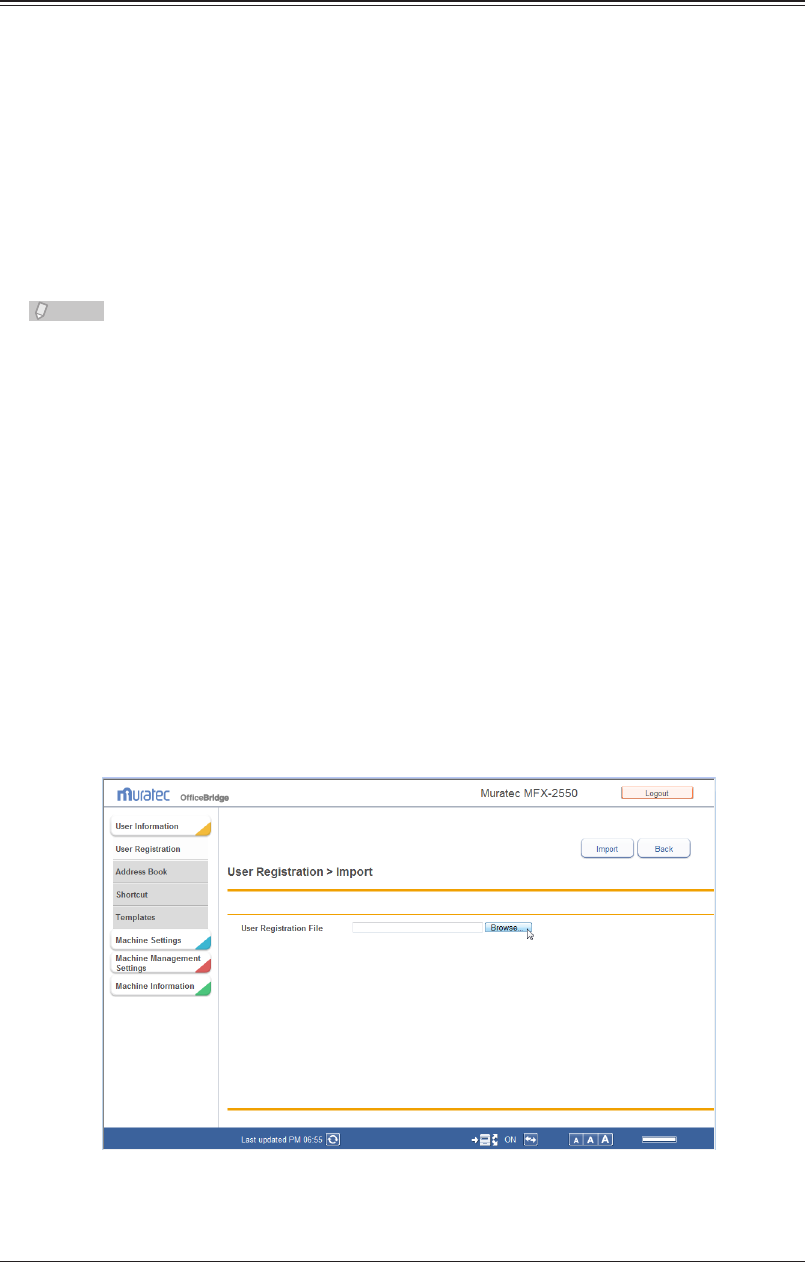
3-12 Registering Users
Importing User Information From an External File
You can import data from an external file in the vCard format and register it as user
information.
The user information items that can be imported and their corresponding vCard item
names are indicated below. The words enclosed in parentheses are the vCard item names.
User ID (N, FN)•
Company (ORG)•
Department (ORG)•
Telephone Number (TEL;WORK;VOICE)•
Fax Number (TEL;WORK;FAX)•
E-Mail Address (EMAIL)•
Note
Only vCard format files can be imported.•
If the “User ID” is already registered, it will be overwritten with the imported •
information.
Log in to OfficeBridge as a user.
1
(See page 2-2.)
This function is also available on Administrator screen.•
This function may also be available on Guest login screen, depending on user policy settings.•
Click [User Information].
2
The “User Registration” list screen is displayed.
Click [Import].
3
The “Import” screen is displayed.
Click [Browse], and specify the location and name of the file to import.
4

1
2
3
OfficeBridge Administrator Settings
Registering Users 3-13
Click [Import].
5
A confirmation message is displayed.
Click [OK].
6
The import process starts.•
When the import process is complete, the display returns to the “User Registration” list •
screen.
Note
When the display returns to the list screen, the number of successful records is
displayed. If the import process failed, one of the following causes is displayed.
Could not analyze the imported file.•
Failed to import. An invalid fax number(s) has been included.•
Failed to import. An invalid phone number(s) has been included.•
Failed to import. An invalid e-mail address(es) has been included.•
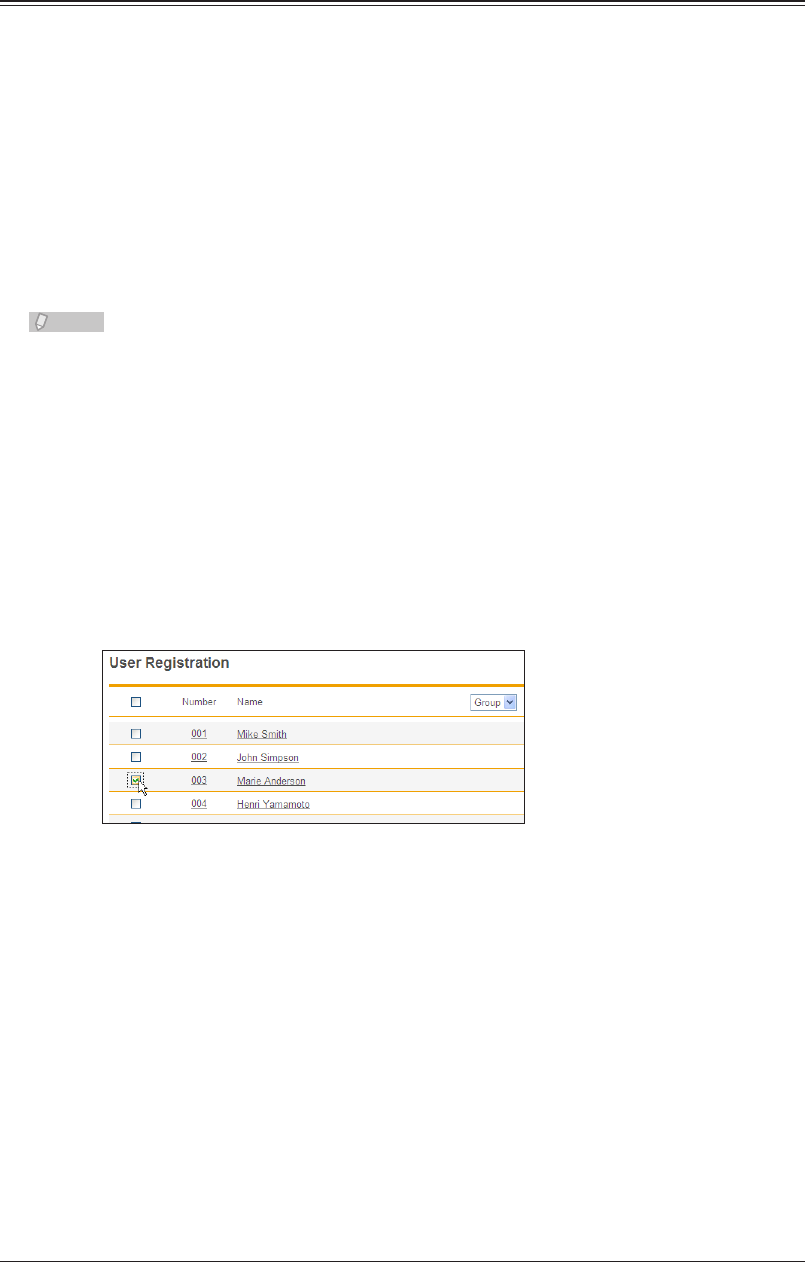
3-14 Registering Users
Exporting User Information to an External File
You can export the selected user information to an external file in the vCard format.
You can select multiple users.
The user information items that can be exported and their corresponding vCard item
names are indicated below. The words enclosed in parentheses are the vCard item names.
Display Name (N)•
User ID (FN)•
Company (ORG)•
Department (ORG)•
Telephone Number (TEL;WORK;VOICE)•
Fax Number (TEL;WORK;FAX)•
E-Mail Address (EMAIL)•
Note
Only one file is created, even when you select multiple users to export.
Log in to OfficeBridge as a user.
1
(See page 2-2.)
This function is also available on Administrator screen.•
This function may also be available on Guest login screen, depending on user policy settings.•
Click [User Information].
2
The “User Information” list screen is displayed.
Select the checkbox of the users you want to export.
3
To select all the displayed user information, select the top checkbox.•
Click the same checkbox to deselect the item.•
If you click [Export] without selecting users, all the users are exported.•
Click [Export].
4
The “Do you want to open or save this file?” message is displayed.
Click [Save].
5
The “Save As” dialog box is displayed.
Specify the name and location to save the file, and click [Save].
6
The export process starts.
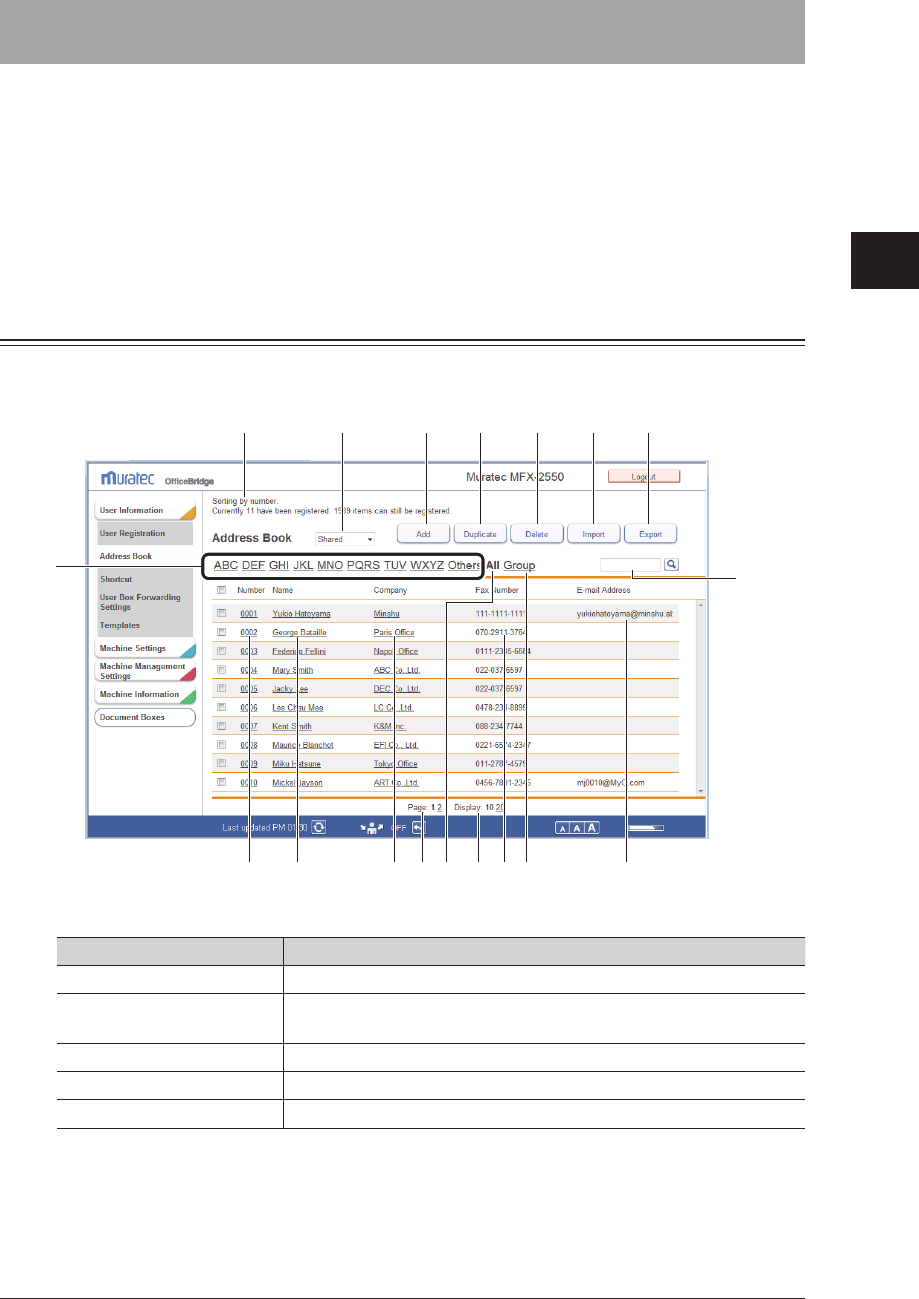
1
2
3
OfficeBridge Administrator Settings
Creating Address Books 3-15
Creating Address Books
You can use OfficeBridge to register frequently used destination information (fax
numbers and e-mail addresses, etc.) in the address book.
By registering destination in the address book, you can easily specify the fax or e-mail
address destination settings when performing transmission.
There are two kinds of address books; the shared address book, which all users can use,
and the personal address book, which can be created for each user. Multiple destinations
can be grouped together.
“Address Book” List Screen
The “Address Book” list screen displays a list of the registered destinations.
On this screen you can register new destinations and change existing destinations.
176
9
2 3 4 5
8 11
12 13 14 1517 18 1610
Button
Button name Description
1 [Add] Registers new destinations.
2 [Duplicate] Copies destinations that is already registered. The destination can
be edited and used as another destination.
3 [Delete] Deletes destinations.
4 [Import] Imports destinations from an external file.
5 [Export] Exports destinations in the specified file format.

3-16 Creating Address Books
List Items
Item Description
6 Number of destinations
that can be registered
Displays the number of destinations that can be registered.
7 Personal / Shared switch Switches the displayed Address Book between personal and shared
destinations. (Only displayed when the user is logged in as a user.)
8 Filter Enables you to filter the displayed destination list according to a
letter or symbol (Others). You can sort the destinations according to
name or according to company name.
9 All Enables you to display the destinations according to the assigned
address book destination numbers.
10 Group Displays a list of the registered groups. You can also register groups.
(See page 3-31.)
11 Destination Search Enables you to search for destination.
You can search for the following items.
• Company
• Name
• Fax Number
• E-Mail Address
Searching is performed separately for personal and shared
destinations.
You can also search groups when groups are displayed. In this case,
searching is performed for the group name.
12 Number The number assigned to the destination.
13 Name Displays the destination names.
If you click [], the destinations are sorted by name.
14 Company Displays the company names of the registered destination.
If you click [], the destinations are sorted by company name.
15 Fax Number Displays the fax numbers of the registered destination.
16 E-mail Address Displays the e-mail addresses of the registered destination.
17 Page Switch Enables you to switch pages when destination does not fit on one
page. (The number of pages differs according to how many items are
displayed on each page.)
18 Number of displayed
items switch
Switches the number of destinations displayed on one screen
(between 10, 20, and 50).
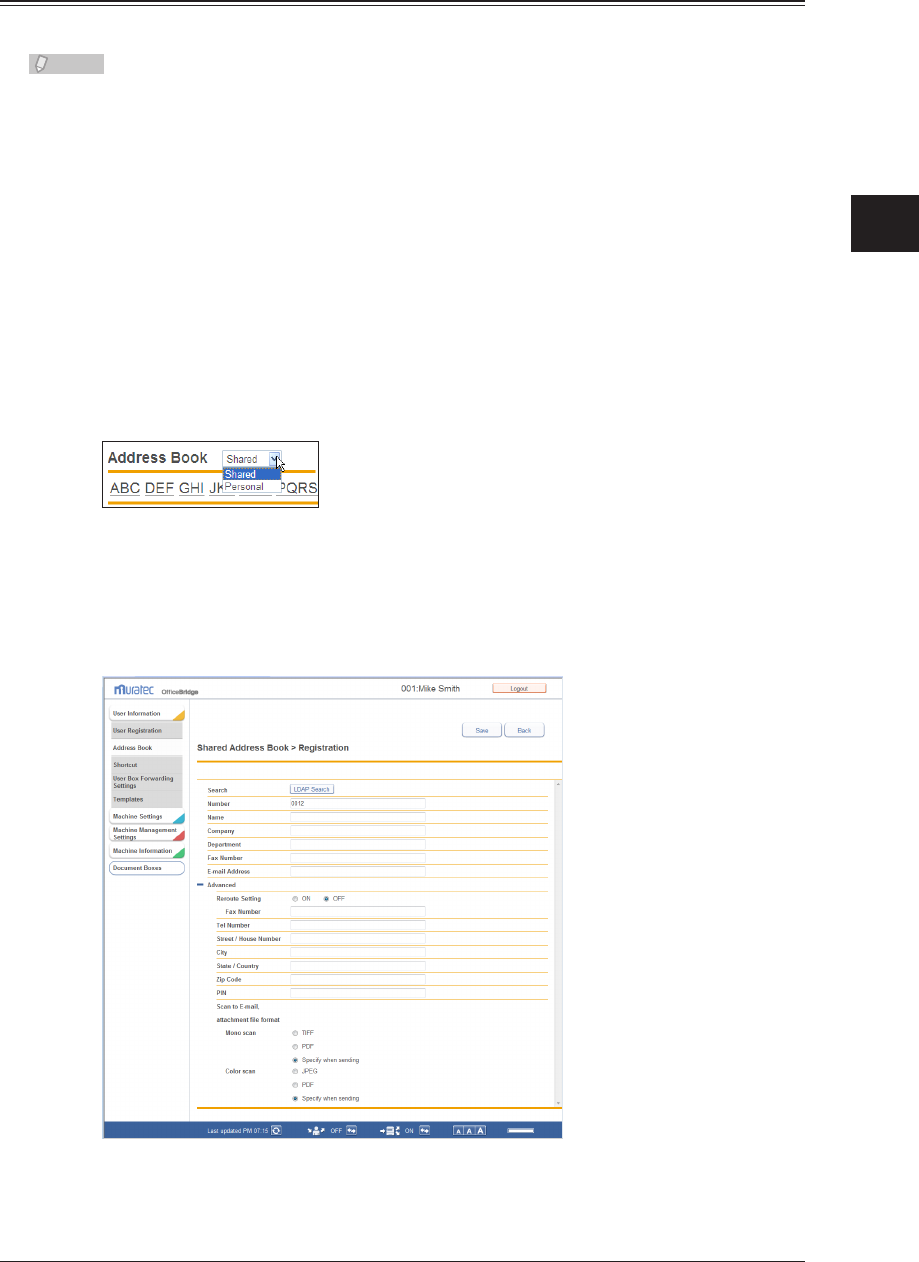
1
2
3
OfficeBridge Administrator Settings
Creating Address Books 3-17
Registering New Destinations
You can register new destinations in OfficeBridge.
Note
Up to 2000 destinations can be registered, including both personal and shared
destinations.
Log in to OfficeBridge as a user.
1
(See page 2-2.)
This function is also available on Administrator screen.•
This function may also be available on Guest login screen, depending on user policy settings.•
Click [User Information], and then [Address Book].
2
The “Address Book” list screen is displayed.
You can select whether to register the destination as personal or shared
3
information.
Click [Add].
4
The “Registration” screen is displayed.
Set the destination.
5

3-18 Creating Address Books
You can register the following items.
Basic Settings
Setting Description Settings
Search Searches an LDAP server to register
destinations in the address book.
Refer to “Registering Destination Using an
LDAP Server”. (See page 3-21.)
Number Enter the speed dial number.
You cannot enter an existing number.
However, the same number can be
registered in both the shared address book
and the personal address book.
1 - 9999
Name
*1
Enter the name of the destination.
You cannot enter an existing name.
However, the same name can be registered
in both the shared address book and the
personal address book.
30 characters
Company
*1
Enter the company name of the destination. 50 characters
Department Enter the name of the department that the
destination belongs to.
100 characters
Fax Number
*2
Enter the fax number of the destination.
40 digits (0 - 9, *, #, -, /
N, /P, /T), where “/(letter)”
indicates a dialing option.
E-mail Address
*2
Enter the e-mail address for the destination. 50 characters
*1 Either the name or company name must be entered.
*2 Either the fax number or e-mail address must be set.
Advanced Settings
These settings are displayed when you click [+].
Setting Description Settings
Reroute
Setting
Setting
ON/OFF
Enables/disables the reroute setting
*1
. ON
OFF
Fax
Number
Enter the destination (fax number) to use
when the reroute function is enabled.
40 digits (0 - 9, *, #, -, /
N, /P, /T), where “/(letter)”
indicates a dialing option.
Tel Number Enter the phone number of the destination. 40 digits (0 - 9, *, #, -)
Street / House
Number
Enter the street and house number of the
destination.
40 characters
City Enter the city name of the destination. 40 characters
State / Country
Enter the state or country of the destination.
20 characters
Zip Code Input the zip code for the destination. 20 digits
PIN Enter the PIN. 8 digits, *, #
Scan to E-Mail,
attachment file format
(for Mono scan)
Select the transmission format to use when
transmitting an e-mail for the Scan to
E-Mail (B&W) function.
TIFF
PDF
Specify when sending
Scan to E-Mail,
attachment file format
(for Color scan)
Select the transmission format to use when
transmitting an e-mail for the Scan to
E-Mail (color) function.
JPEG
PDF
Specify when sending
*1 The reroute function automatically sends the document via fax when a communication
error occurs during e-mail transmission.
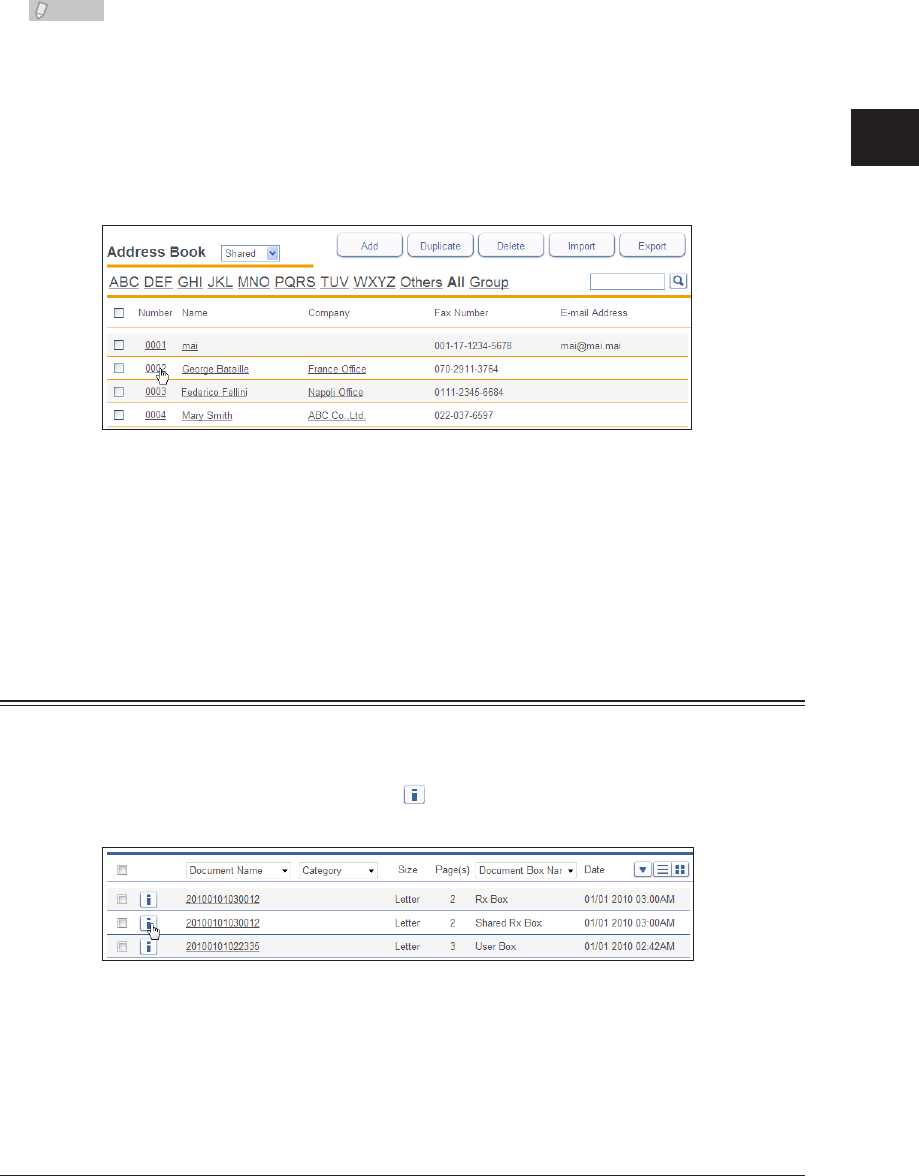
1
2
3
OfficeBridge Administrator Settings
Creating Address Books 3-19
Click [Save].
6
The display returns to the “Address Book” list screen.•
Press [Back] to cancel registering the destination and return to the “Address Book” list •
screen.
Note
Underlined values are the default settings specified at the time of shipment.
Changing Destination
On the “Address Book” list screen, click the number or name (company name) of
1
the destination you want to change.
Change the destination.
2
Click [Save].
3
The settings are changed, and the display returns to the “Address Book” list screen.•
Press [Back] to cancel changing the destination and return to the “Address Book” list screen.•
Registering the Sender of a Received Document to the Address Book
You can register the sender of a received document in the address book.
On the document list screen, click
1
for the document whose sender
information you want to register in the address book.
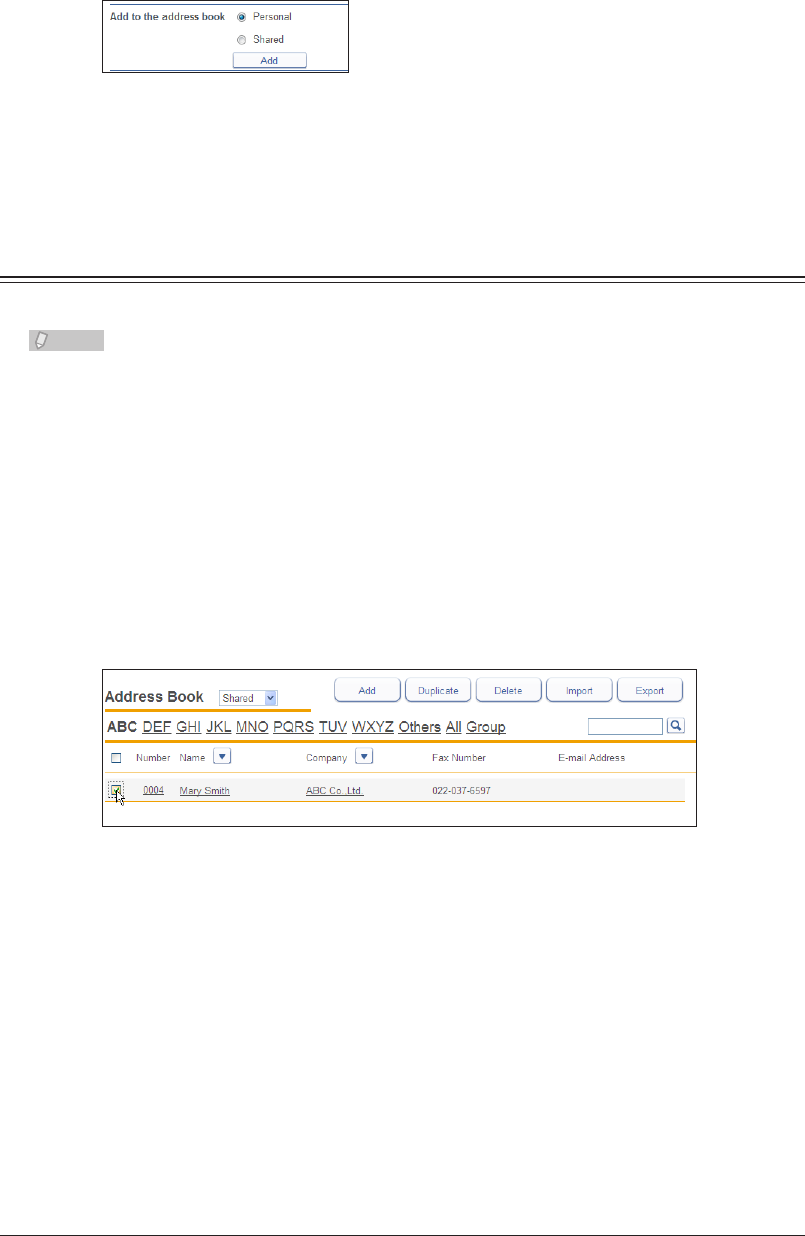
3-20 Creating Address Books
Select the address book to add the information to (shared or personal), and click
2
[Add] in “Add to the address book”.
Register the information to the address book on the new destination settings
3
screen.
For details, refer to “Registering New Destinations”. (See page 3-17.)
Copying Existing Destination to Register a New Destination
You can copy destination that is already registered to register a new destination.
Note
You cannot copy multiple destinations at the same time.
Log in to OfficeBridge as a user.
1
(See page 2-2.)
This function is also available on Administrator screen.•
This function may also be available on Guest login screen, depending on user policy settings.•
Click [User Information], and then [Address Book].
2
The “Address Book” list screen is displayed.
Select the checkbox of the destination you want to copy.
3
Click [Duplicate].
4
The “Registration” screen is displayed with the copied settings entered for the destination.
Change the settings to those for the new destination to register.
5
Click [Save].
6
The display returns to the “Address Book” list screen.•
Press [Back] to cancel registering the destination and return to the “Address Book” list •
screen.
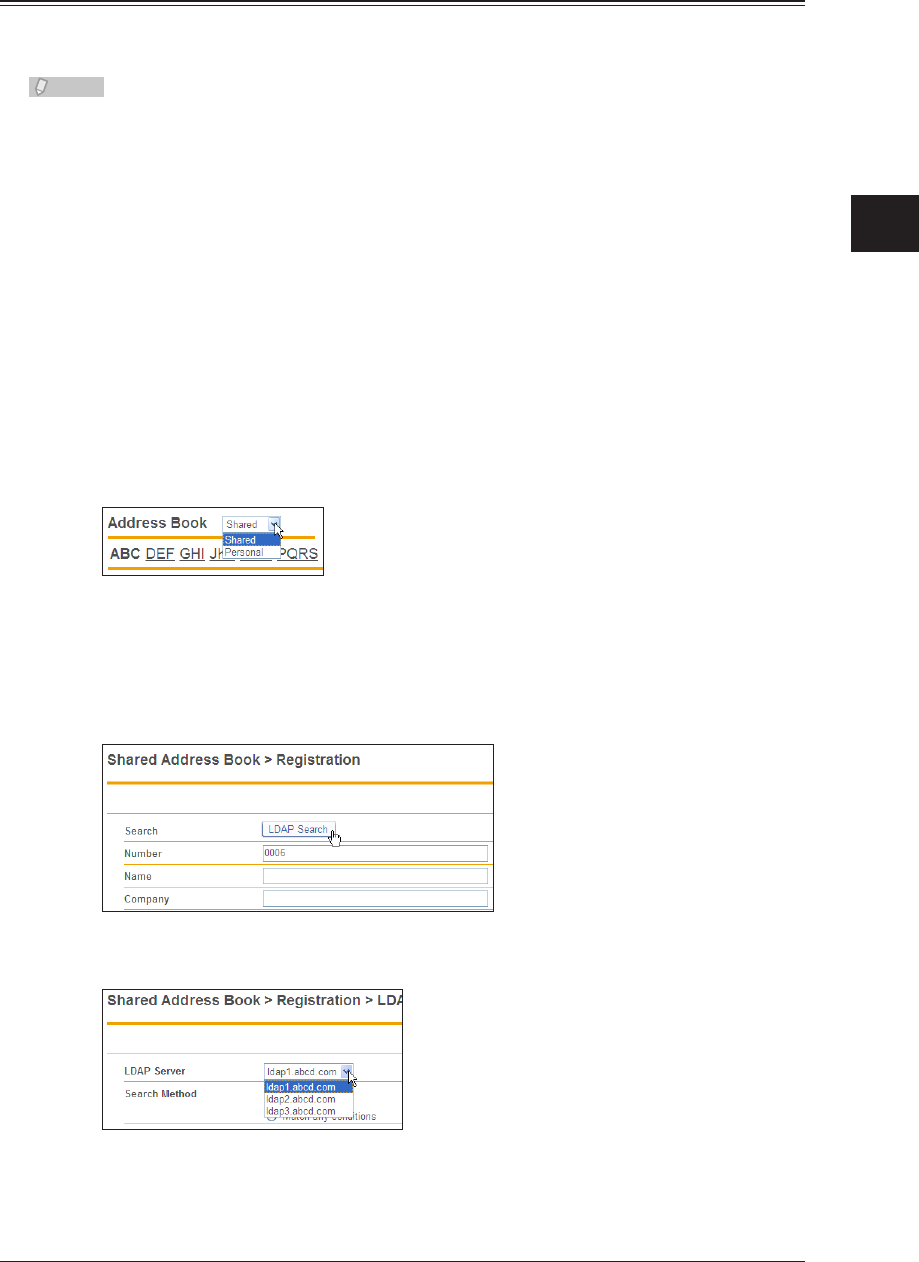
1
2
3
OfficeBridge Administrator Settings
Creating Address Books 3-21
Registering Destination Using an LDAP Server
You can register destination using an LDAP (Lightweight Directory Access Protocol)
server.
Note
The following destination is detected: “User Name”, “E-mail Address”, “Fax Number”, •
and “Company”.
To search an LDAP server, it is necessary to register the LDAP server settings •
in “Machine Settings”. For details, refer to “Setting the Directory Database
Environment”. (See page 3-70.)
Log in to OfficeBridge as a user.
1
(See page 2-2.)
This function is also available on Administrator screen.•
This function may also be available on Guest login screen, depending on user policy settings.•
Click [User Information], and then [Address Book].
2
The “Address Book” list screen is displayed.
You can select whether to register the destination as personal or shared.
3
Click [Add].
4
The “Registration” screen is displayed.
Click [LDAP Search].
5
Select the LDAP server to search from the pull-down menu.
6
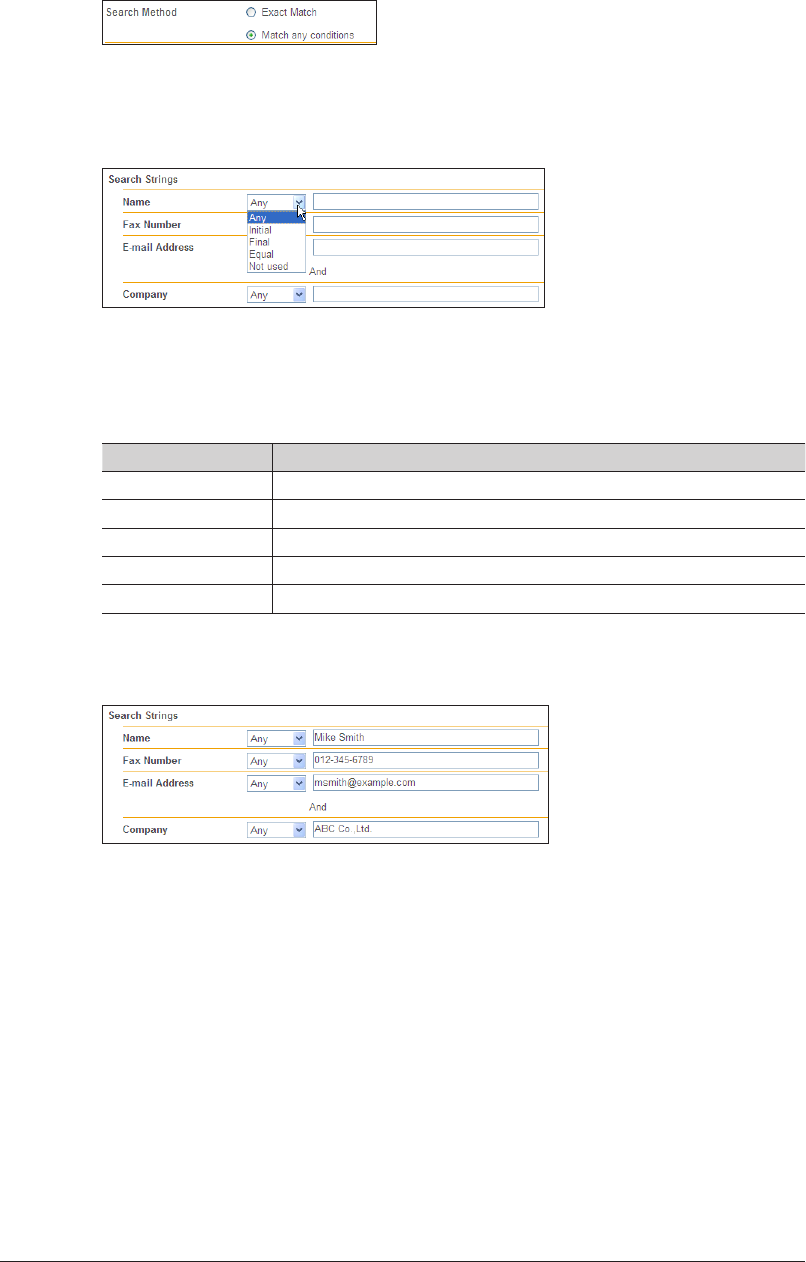
3-22 Creating Address Books
Set the search method.
7
Select either “Exact Match” or “Match any conditions”.
Set the search parameters.
8
The following information is searched: “Name”, “Fax Number”, “E-mail Address”, and •
“Company”.
“Company” cannot be specified as a search condition by itself. Specify it in combination with •
a name, fax number, or e-mail address.
The search parameters you can use are indicated below.•
Search Parameter Description
Any Searches for items that include the specified string.
Initial Searches for items that start with the specified string.
Final Searches for items that end with the specified string.
Equal Searches for items that exactly match the specified string.
Not used The string entered in the entry box is ignored.
Enter the string to search for in the entry box.
9
Click [Search].
10
If “LDAP Server Login” is set to “ON” in the LDAP settings, the “LDAP Server •
Authentication” screen is displayed. Proceed to step 11.
If “LDAP Server Login” is set to “OFF” in the LDAP settings, the “LDAP Server •
Authentication” screen is not displayed. Proceed to step 12.
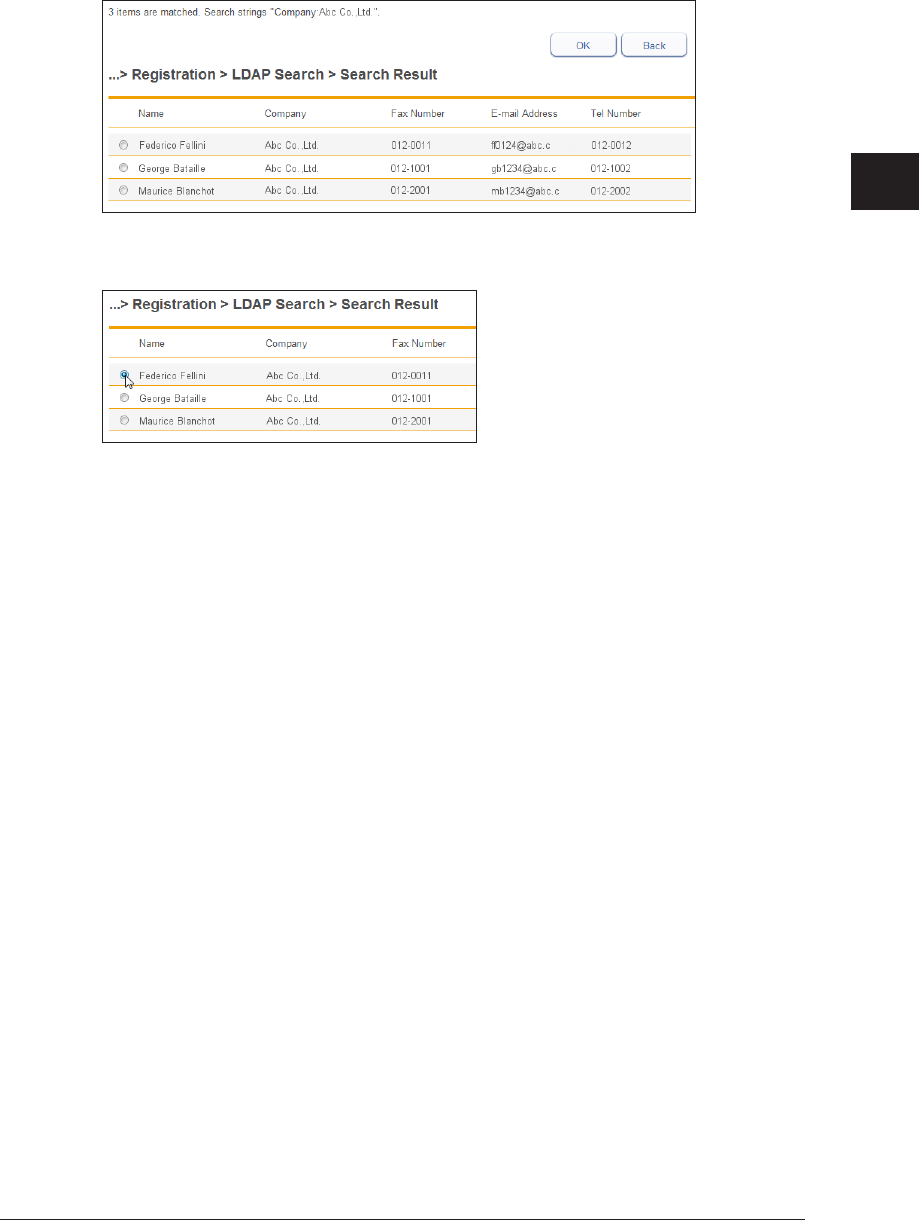
1
2
3
OfficeBridge Administrator Settings
Creating Address Books 3-23
Enter the “Account ID” and “Password”, and click [Login].
11
Searching starts.
The search results are displayed when searching is complete.
Select the destination to register from the search results.
12
You can only select one destination.
Click [OK].
13
The “Registration” screen is displayed.
Refer to step 5 and later in “
14
Registering New Destinations” to register the
destination. (See page 3-17.)
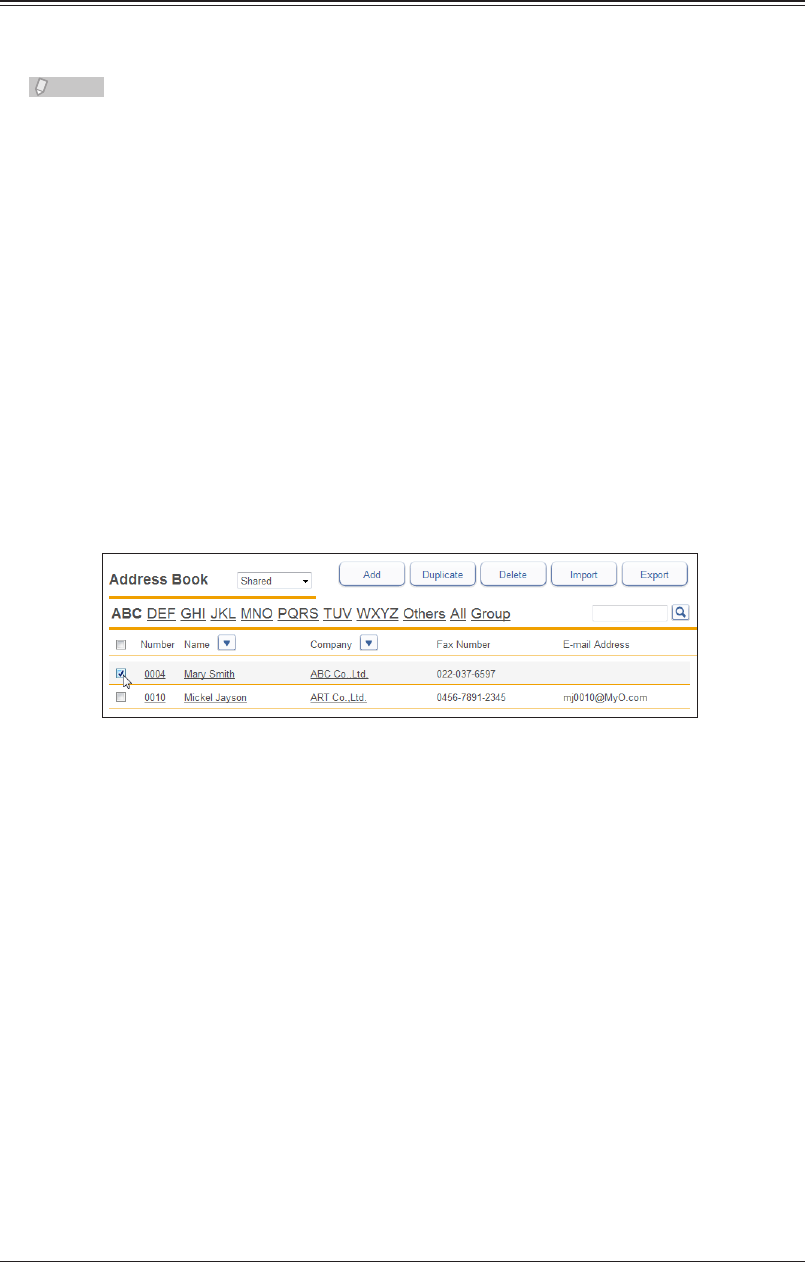
3-24 Creating Address Books
Deleting Destinations
You can delete unnecessary destinations from the “Address Book” list screen.
You can select multiple destinations to delete.
Note
If any of the following functions is set for the destination to delete, an error will occur.
An error also occurs if the destination is being used for a job being transmitted or a
job scheduled to be transmitted.
Auto distribution•
Archive settings•
My Jobs•
Favorite address•
Log in to OfficeBridge as a user.
1
(See page 2-2.)
This function is also available on Administrator screen.•
This function may also be available on Guest login screen, depending on user policy settings.•
Click [User Information], and then [Address Book].
2
The “Address Book” list screen is displayed.
Select the checkbox of the destination you want to delete.
3
To select all the displayed destination, select the top checkbox.•
Click the same checkbox to deselect the item.•
Click [Delete].
4
The message “Is it OK to delete a selected destination?” is displayed.
Click [OK].
5
The selected destination is deleted.
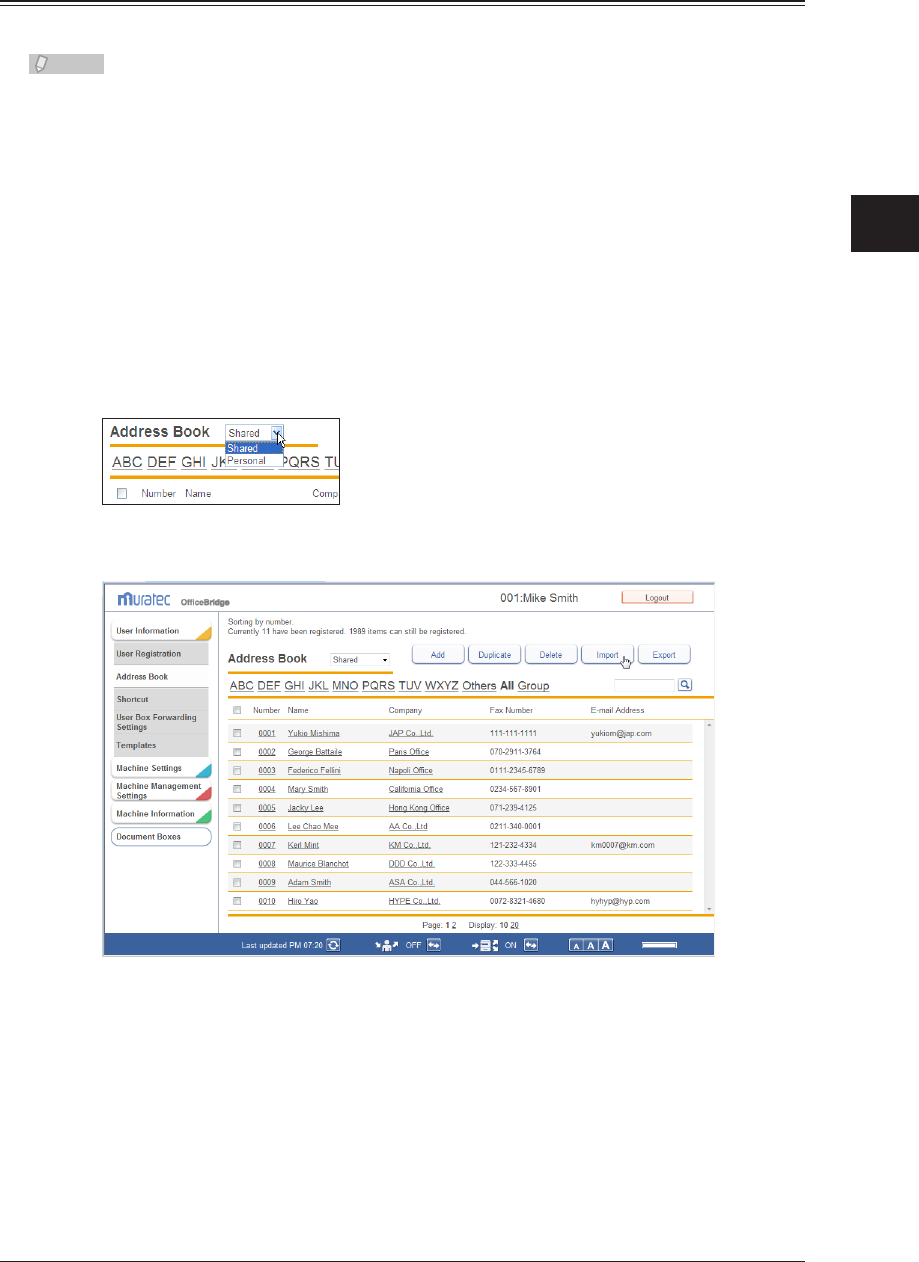
1
2
3
OfficeBridge Administrator Settings
Creating Address Books 3-25
Importing Destination From an External File
You can import data from an external file and register it as destinations.
Note
You can import files in the CSV or vCard format.
Log in to OfficeBridge as a user.
1
(See page 2-2.)
This function is also available on Administrator screen.•
This function may also be available on Guest login screen, depending on user policy settings.•
Click [User Information], and then [Address Book].
2
The “Address Book” list screen is displayed.
You can select whether to import the destination information as personal or
3
shared information.
Click [Import].
4
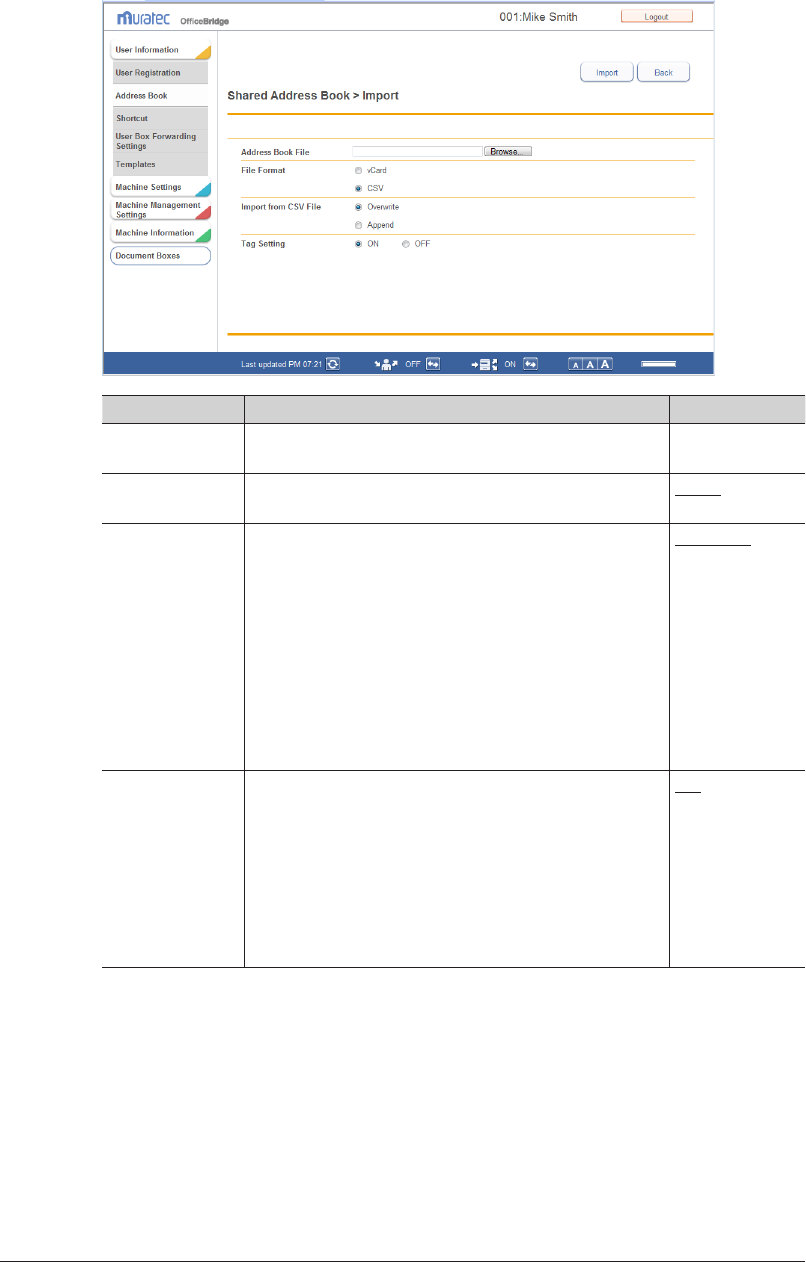
3-26 Creating Address Books
Set the detailed information.
5
Setting Description Settings
*2
Address Book
File
Click [Browse], and specify the file to import. –
File Format Select the format of the file to import. Select “vCard” or
“CSV” .
vCard
CSV
Import from CSV
File
*1
Select the method to use when importing the data to
the address book.
Overwrite: Deletes all the data in the selected
personal address book or shared address
book, and then imports the data. Data for
the “Number” item is also imported.
Append: Adds the data to the address book.
However, the data for the “Number” item
is not imported, and a number is assigned
automatically.
Overwrite
Append
Tag Setting
*1
Set whether to specify tag settings when importing the
data.
Select “ON” to specify tag settings, or “OFF” to not
specify them. If you select “ON”, the address book items
are manually associated with the items in the file. (See
page 3-28.) If you select “OFF”, the item names for
CSV files generated by older models and the export
function of Outlook and Outlook Express are associated
automatically.
ON
OFF
*1 This item is displayed when you select “CSV” for the file format.
*2 Underlined values are the default settings specified at the time of shipment.
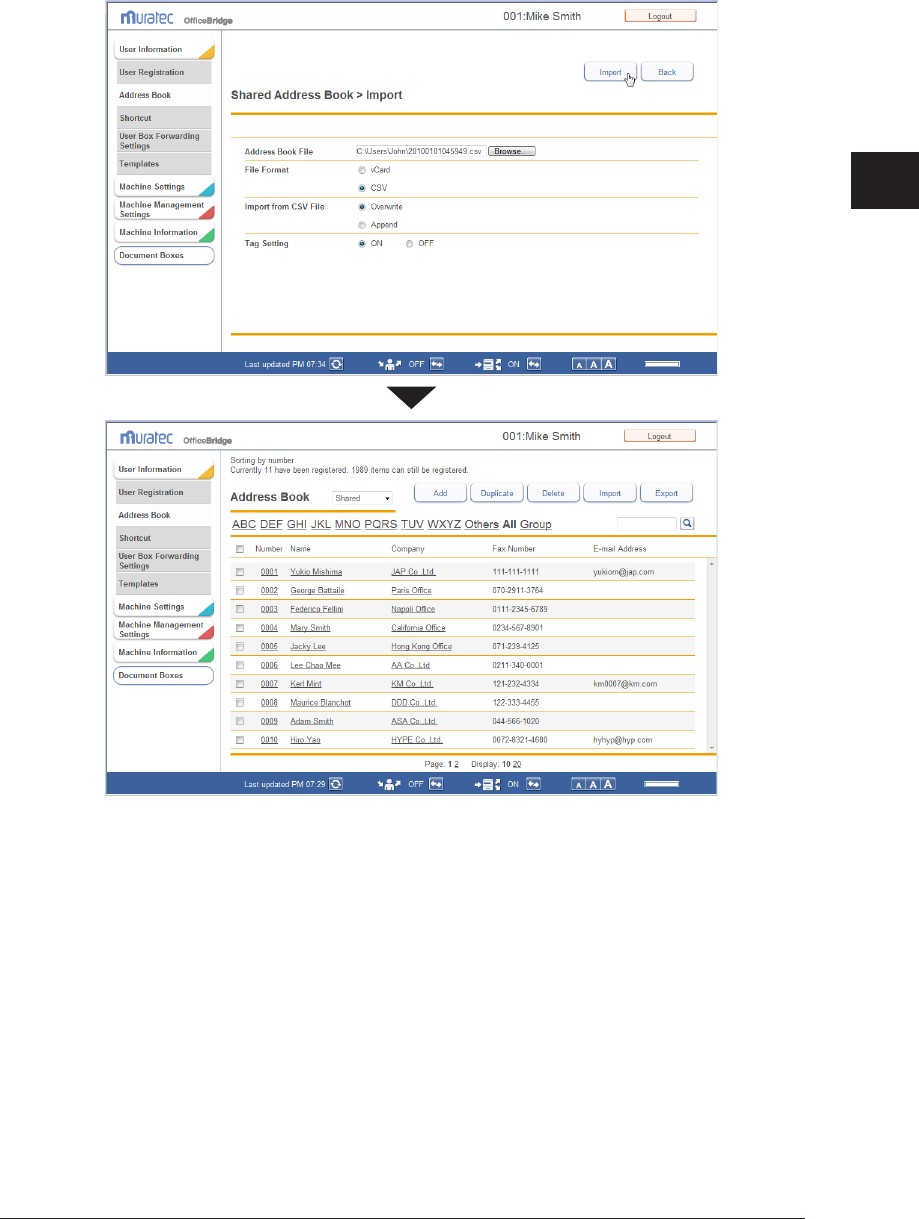
1
2
3
OfficeBridge Administrator Settings
Creating Address Books 3-27
Click [Import].
6
The import process starts.
When the import process is complete, the display returns to the “Address Book” list screen.
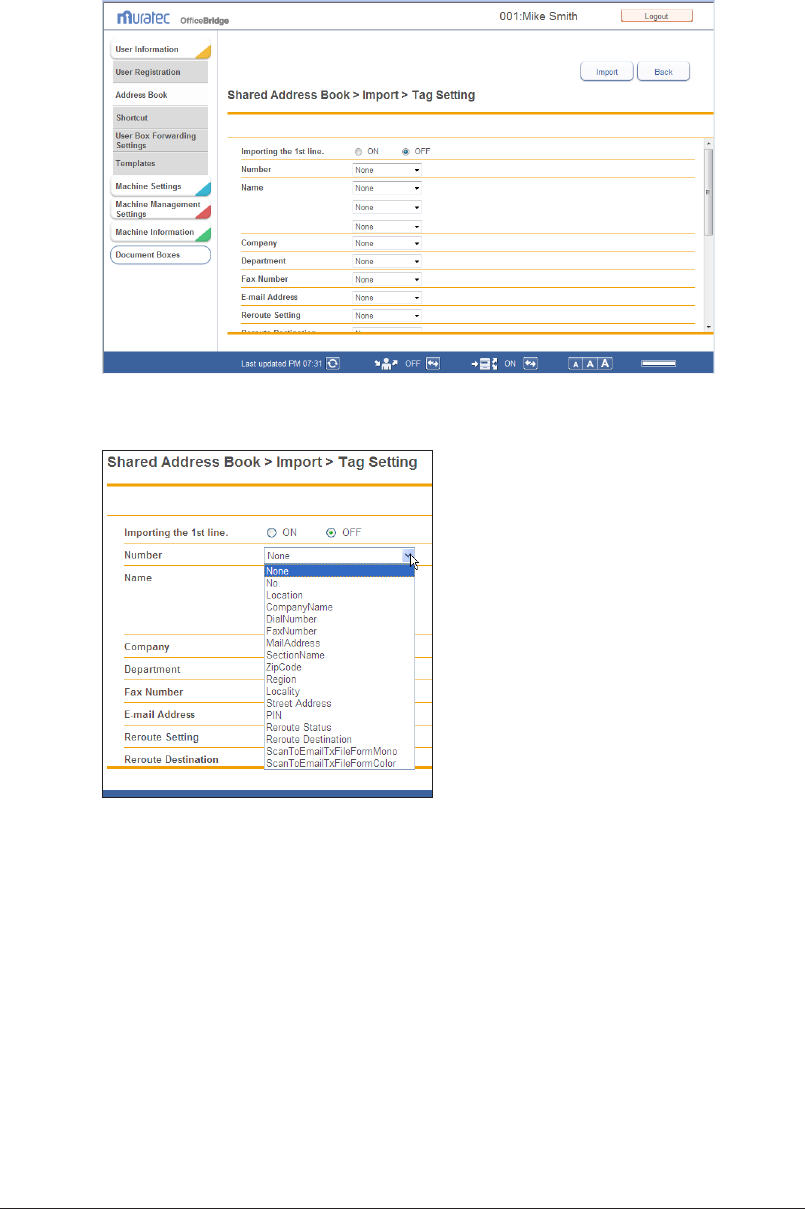
3-28 Creating Address Books
When Tag Setting is Set to “ON”
The “Tag Setting” screen is displayed.
1
Set the tags for each item.
2
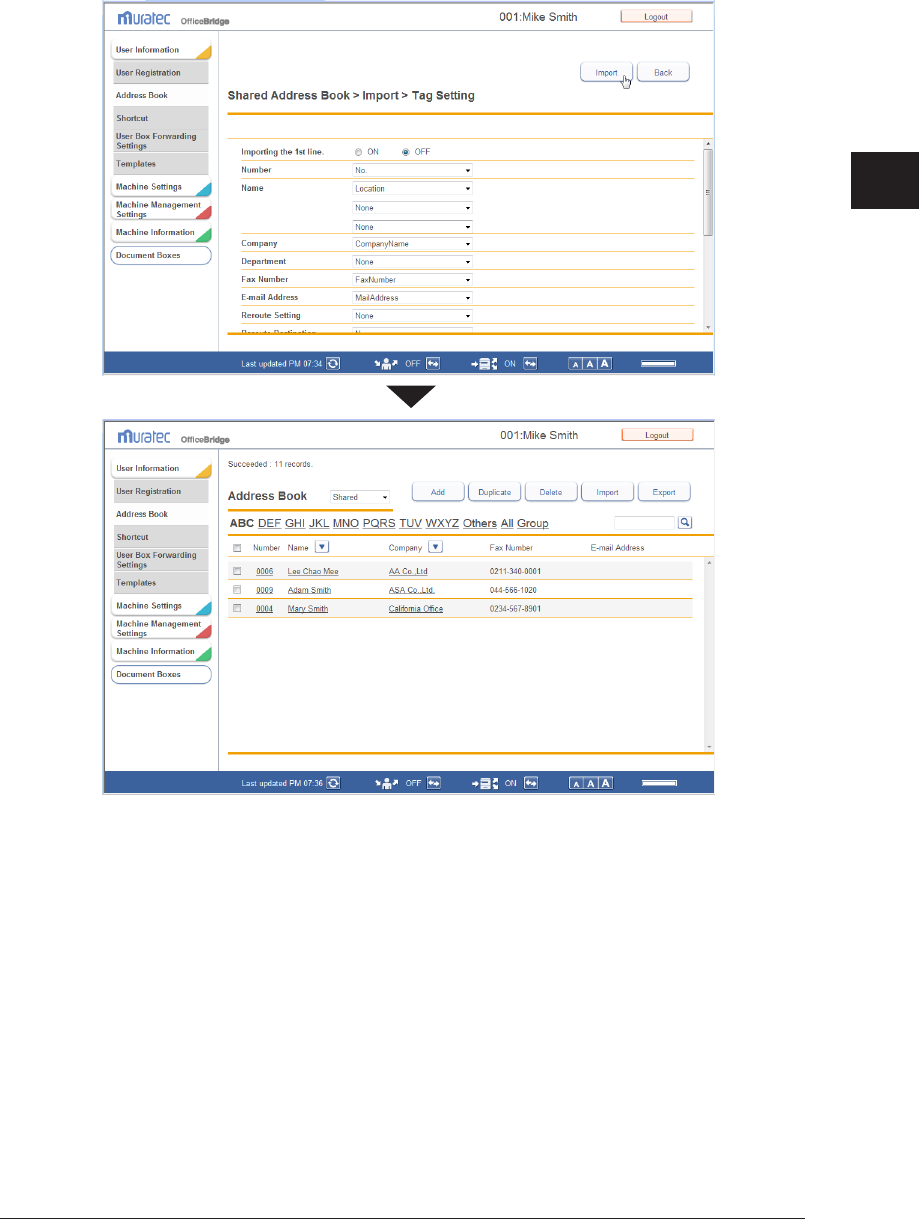
1
2
3
OfficeBridge Administrator Settings
Creating Address Books 3-29
Click [Import].
3
The import process starts.
When the import process is complete, the display returns to the “Address Book” list screen.
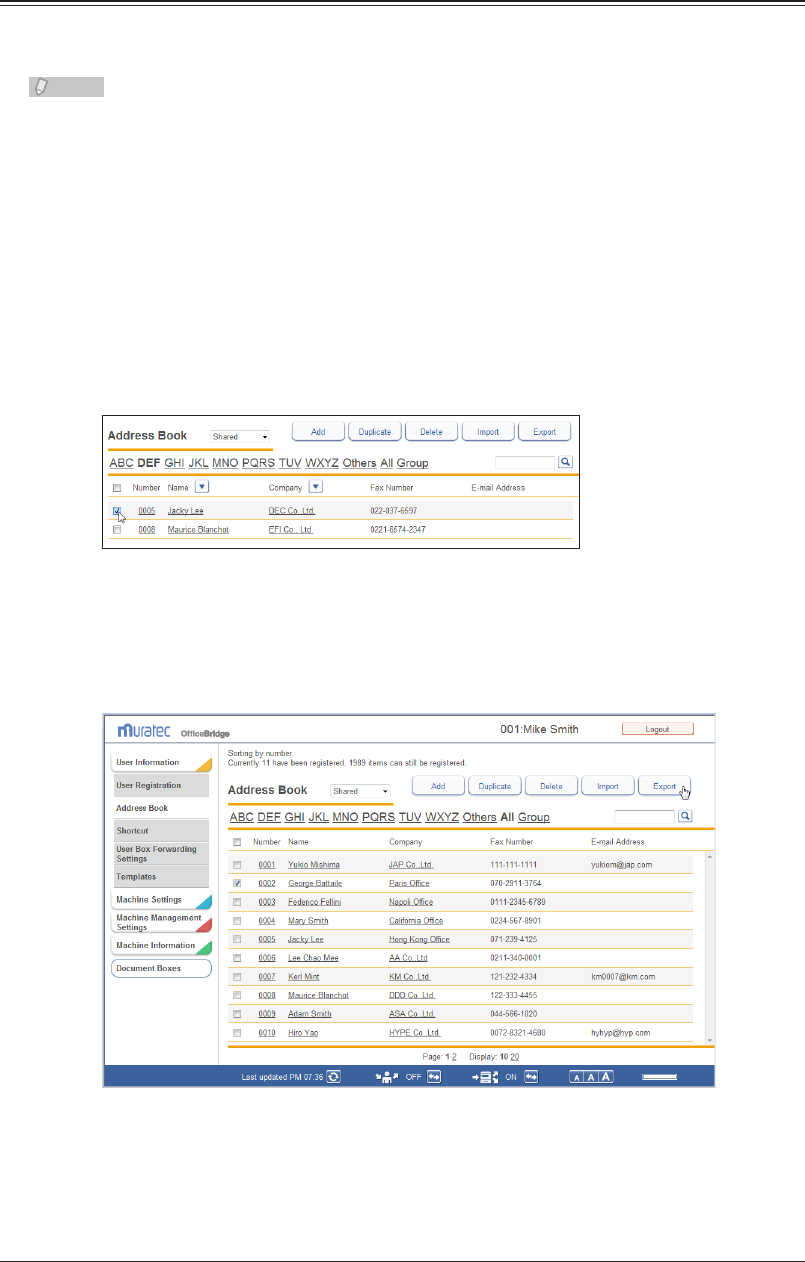
3-30 Creating Address Books
Exporting Destination to an External File
You can export the selected destination to an external file.
You can select multiple destinations.
Note
You can export files in the CSV or vCard format.
Log in to OfficeBridge as a user.
1
(See page 2-2.)
This function is also available on Administrator screen.•
This function may also be available on Guest login screen, depending on user policy settings.•
Click [User Information], and then [Address Book].
2
The “Address Book” list screen is displayed.
Select the checkbox of the destination you want to export.
3
To select all the displayed destination, select the top checkbox.•
Click the same checkbox to deselect the item.•
If you click [Export] without selecting destination, all the destinations are exported.•
Click [Export].
4
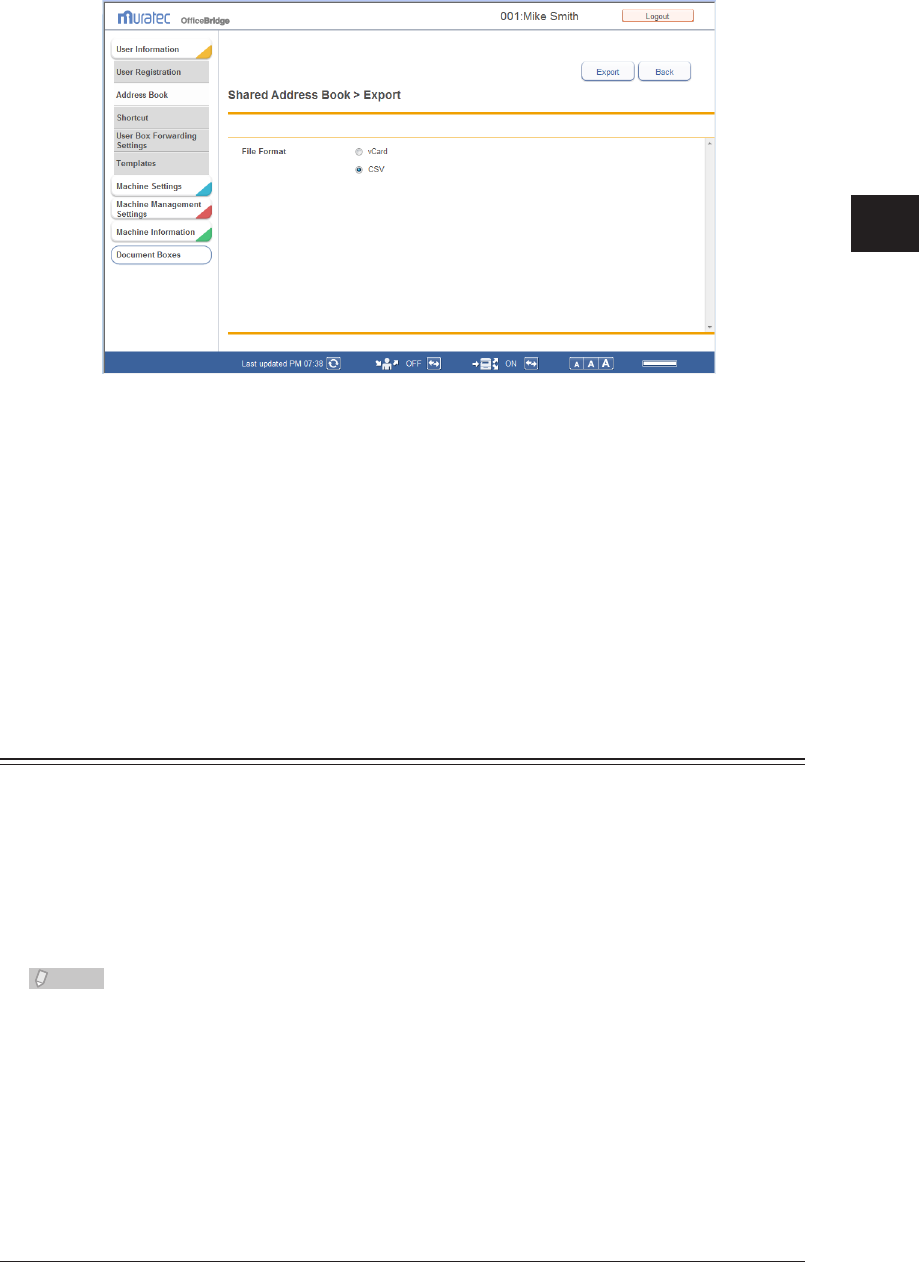
1
2
3
OfficeBridge Administrator Settings
Creating Address Books 3-31
Select the export format.
5
Select “vCard” or “CSV”.
Click [Export].
6
The “Do you want to open or download this file?” message is displayed.
Click [Save].
7
The “Save As” dialog box is displayed.
Specify the name and location to save the file, and click [Save].
8
The export process starts.
Grouping Multiple Destinations
You can group and manage multiple destinations according to your needs.
Since transmission settings can be specified for groups, it is not necessary to specify the
settings for each destination separately.
Registering a New Group
You can create a group in the address book, and register destination in that group.
Note
Up to 200 groups can be registered, including both personal and shared groups.
Log in to OfficeBridge as a user.
1
(See page 2-2.)
This function is also available on Administrator screen.•
This function may also be available on Guest login screen, depending on user policy settings.•
Click [User Information], and then [Address Book].
2
The “Address Book” list screen is displayed.
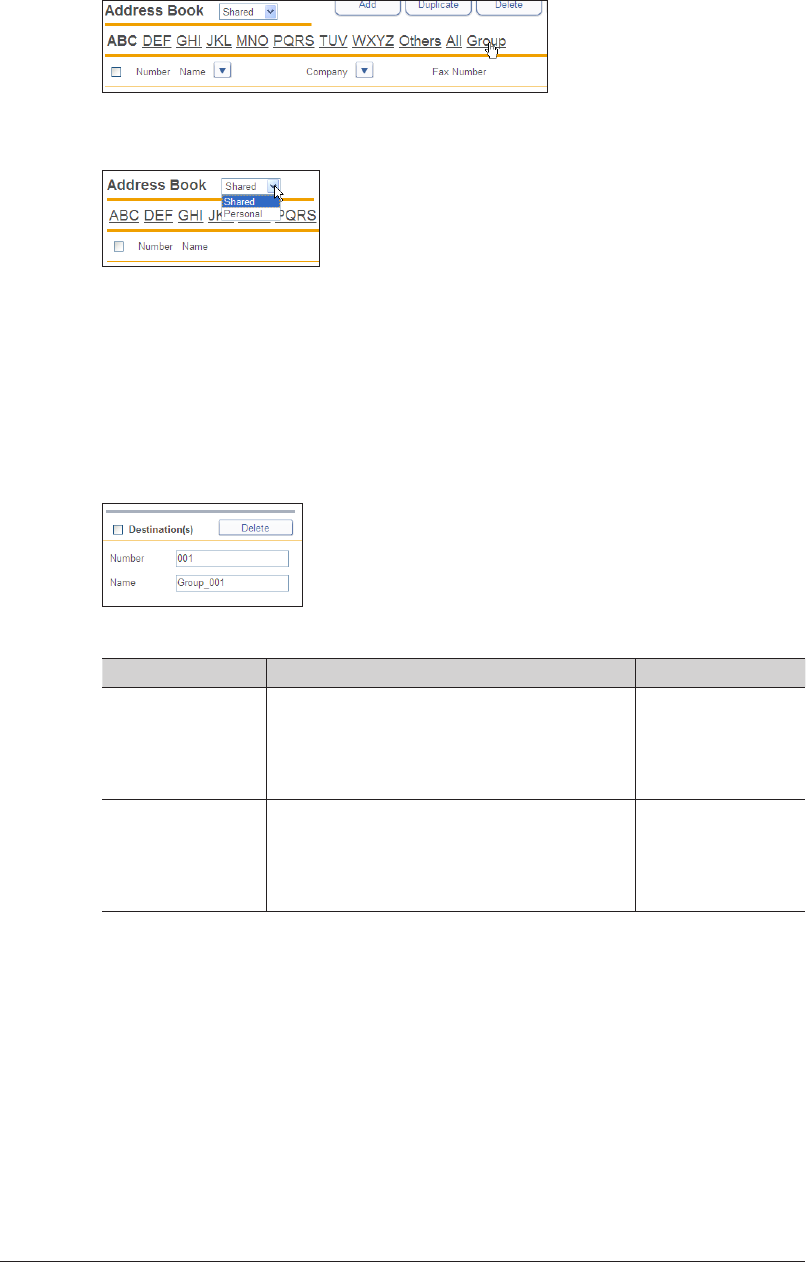
3-32 Creating Address Books
Click [Group].
3
You can select whether to register the group as a personal or shared group.
4
When you register a personal group, you can group both personal and shared destinations.•
When you register a shared group, you can group only shared destinations.•
Click [Add].
5
The “Registration” screen is displayed.
Set the group name.
6
Set the following items in the group edit area on the right side of the screen.
Setting Description Settings
Number Enter the number of the group.
You cannot enter an existing number. However,
the same group number can be registered in
both the shared address book and the personal
address book.
1 - 200
Name Enter the name of the group.
You cannot enter an existing group name.
However, the same group name can be
registered in both the shared address book and
the personal address book.
50 characters
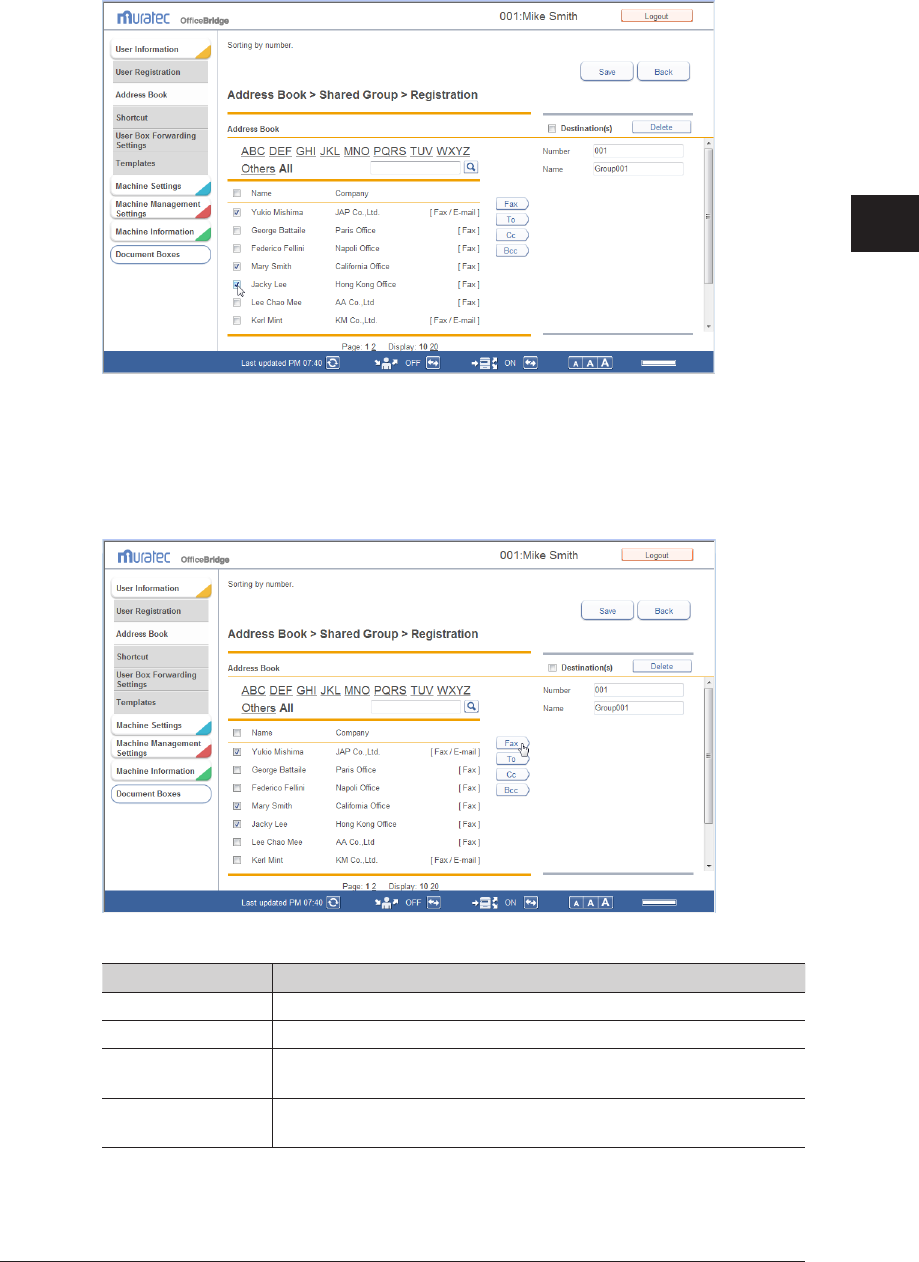
1
2
3
OfficeBridge Administrator Settings
Creating Address Books 3-33
7
Select the destinations to register.
In the address book list on the left, select the checkbox of the destinations to register.•
To select all the displayed destination information, select the top checkbox.•
Click the same checkbox to deselect the item.•
Click a transmission destination registration button.
8
The types and functions of the buttons are indicated below.
Type Meaning
[Fax] Registers the destination as a fax destination.
[To] Registers the destination as an e-mail destination.
[Cc] Registers the destination as a Cc e-mail destination. The original
destination (To) is also notified of the Cc destinations.
[Bcc] Registers the destination as a Bcc e-mail destination. TThe original
destinations (To/Cc) are not notified of the Bcc destinations.

3-34 Creating Address Books
Click [Save].
9
The display returns to the “Address Book” group list screen.•
Press [Back] to cancel registering the group information and return to the “Address Book” •
group list screen.
Changing a Group
Log in to OfficeBridge as a user.
1
(See page 2-2.)
This function is also available on Administrator screen.•
This function may also be available on Guest login screen, depending on user policy settings.•
Click [User Information], and then [Address Book].
2
The “Address Book” list screen is displayed.
Click [Group].
3
Click the number or name of the group to change.
4
To delete a destination, select the checkbox for the destination to delete in the
5
group edit area on the right side of the screen.
To select all the displayed destinations, select the top checkbox.•
Click the same checkbox to deselect the item.•
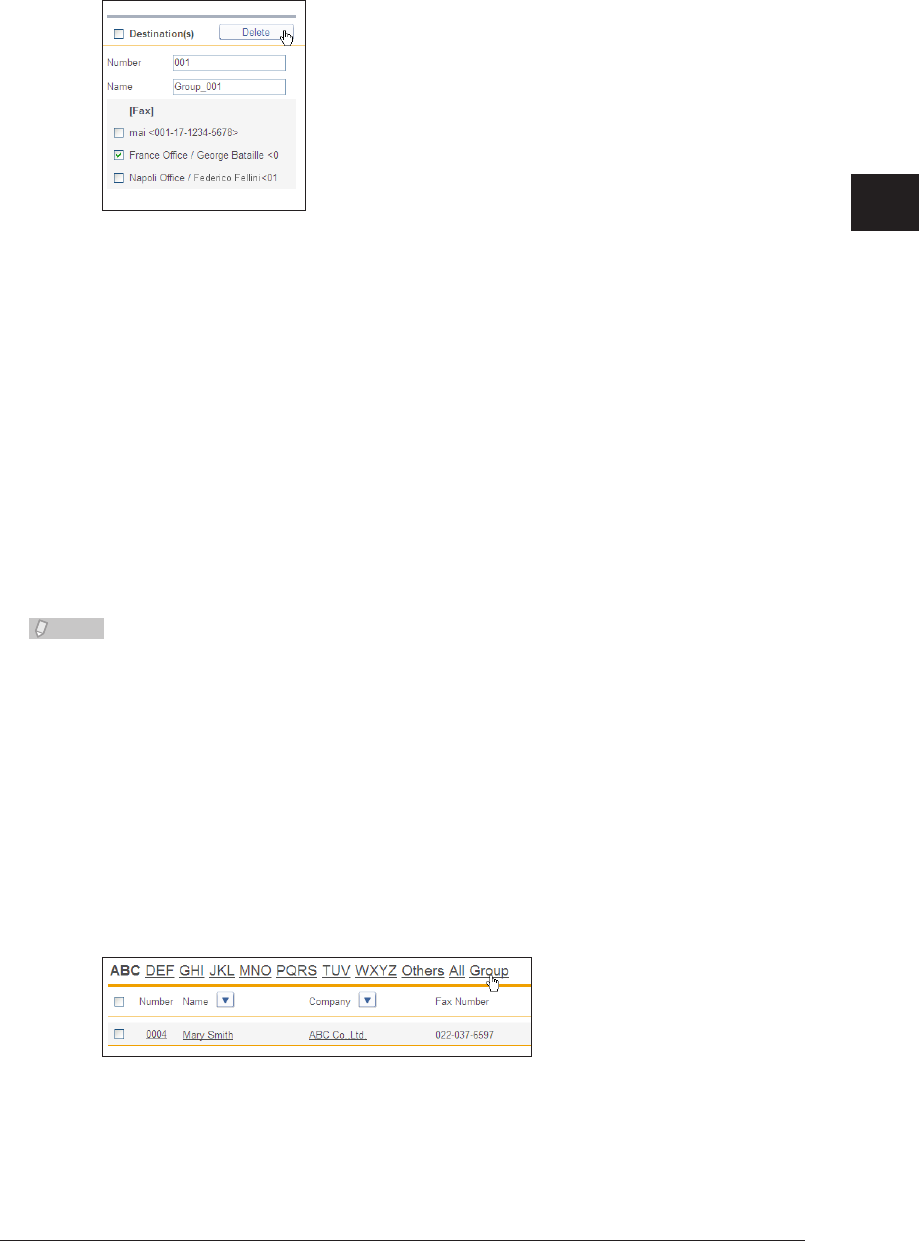
1
2
3
OfficeBridge Administrator Settings
Creating Address Books 3-35
Click [Delete], and then [OK].
6
The selected destinations are deleted.
To add a destination, select the destination to add in the address book list on
7
the left, and click a transmission destination registration button.
For details, refer to step 7 of “Registering a New Group”. (See page 3-33.)
8
Click [Save].
The group is changed, and the display returns to the “Address Book” group list screen.•
Press [Back] to cancel changing the group information and return to the “Address Book” •
group list screen.
Copying an Existing Group to Register a New Group
(Duplicate)
You can copy group information that is already registered to register a new group.
Note
You cannot copy multiple groups at the same time.
Log in to OfficeBridge as a user.
1
(See page 2-2.)
This function is also available on Administrator screen.•
This function may also be available on Guest login screen, depending on user policy settings.•
Click [User Information], and then [Address Book].
2
The “Address Book” list screen is displayed.
Click [Group].
3
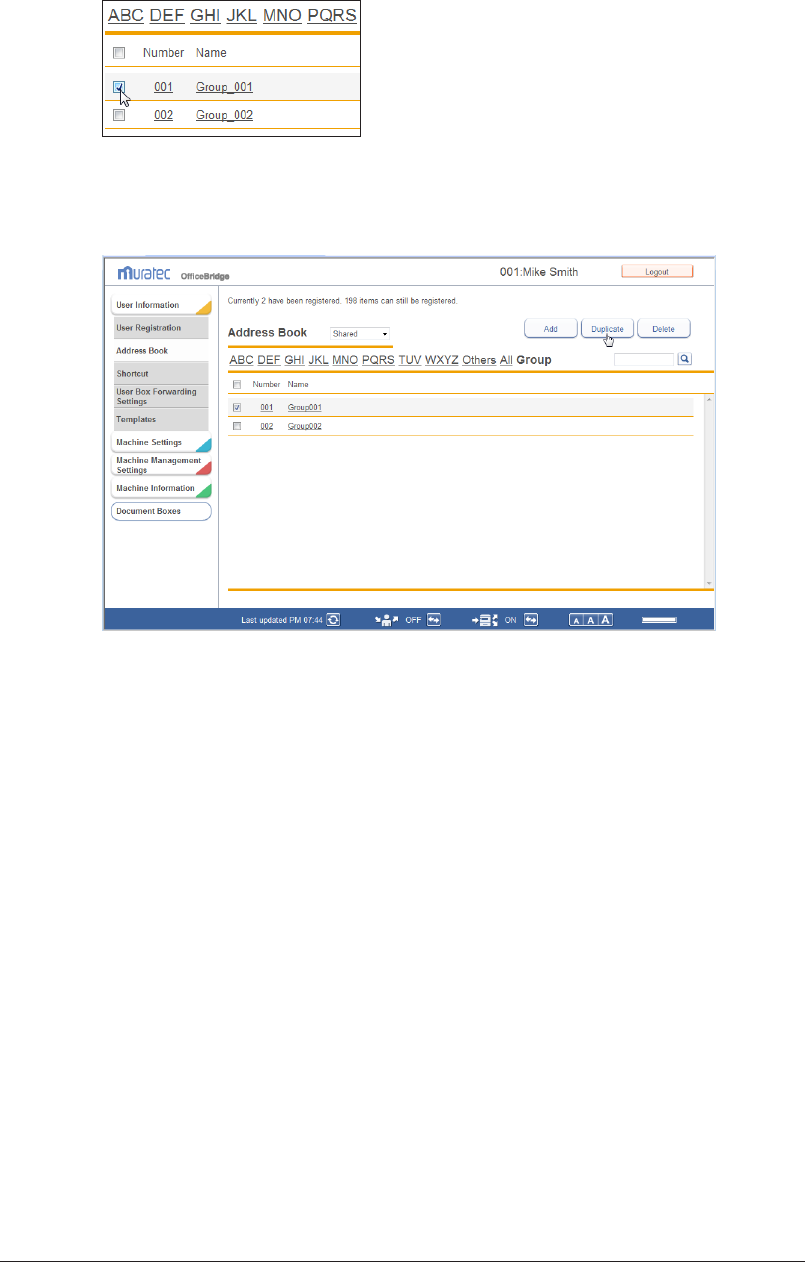
3-36 Creating Address Books
Select the checkbox of the group information you want to copy.
4
Click [Duplicate].
5
The “Edit Address Book Group” screen is displayed with the copied settings entered for the
group information.
Change the settings to those for the new group to register.
6
Click [Save].
7
The display returns to the “Address Book” group list screen.•
Press [Back] to cancel registering the group information and return to the “Address Book” •
group list screen.

1
2
3
OfficeBridge Administrator Settings
Creating Address Books 3-37
Deleting a Group
You can delete unnecessary group information from the “Address Book” group list screen.
You can select multiple groups to delete.
Note
An error will occur if any of the following functions is set for the destination
information you set to delete. An error also occurs if the destination information is
being used for a job being transmitted or a job scheduled to be transmitted.
Auto distribution•
Archive settings•
My Jobs•
Favorite address•
Log in to OfficeBridge as a user.
1
(See page 2-2.)
This function is also available on Administrator screen.•
This function may also be available on Guest login screen, depending on user policy settings.•
Click [User Information], and then [Address Book].
2
The “Address Book” list screen is displayed.
Click [Group].
3
The “Address Book” group list screen is displayed.
Select the checkbox of the groups you want to delete.
4
To select all the displayed group information, select the top checkbox.•
Click the same checkbox to deselect the item.•
Click [Delete].
5
The message “Is it OK to delete a selected destination?” is displayed.
Click [OK].
6
The selected group information is deleted.
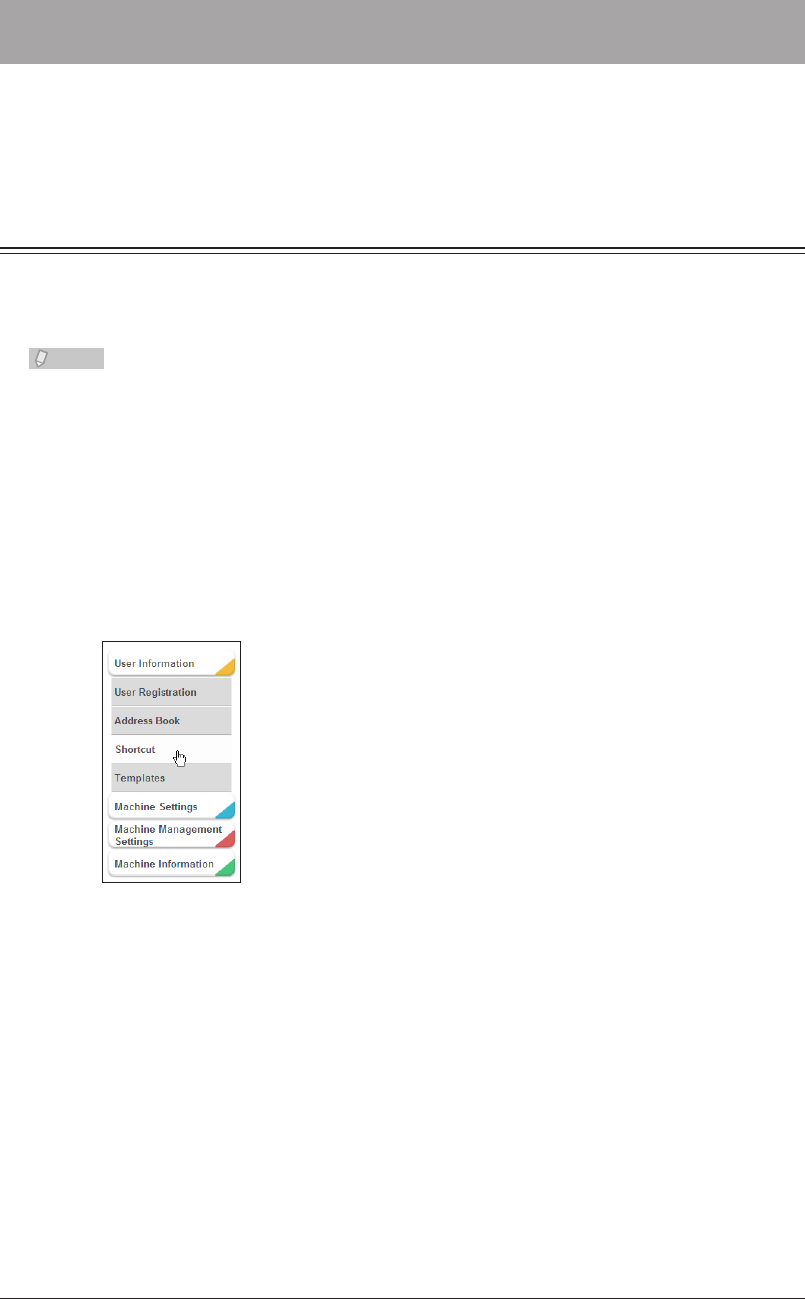
3-38 Registering Shortcuts
Registering Shortcuts
You can use OfficeBridge to register the destination folders and FTP servers specified
when using the Scan to Folder function and Scan to FTP function of the machine in
advance. The shortcuts registered here can be recalled when operating the machine.
Setting Folder Shortcuts
Registering a New Folder Shortcut
You can register a new folder shortcut.
Note
Up to 300 folder shortcuts can be registered.•
Folder shortcuts can also be registered from the control panel. For details, refer to •
Chapter 7, “Registering Destinations” in the Scanner and Fax Guide.
Log in to OfficeBridge as a user.
1
(See page 2-2.)
This function is also available on Administrator screen.•
This function may also be available on Guest login screen, depending on user policy settings.•
Click [User Information], and then [Shortcut].
2
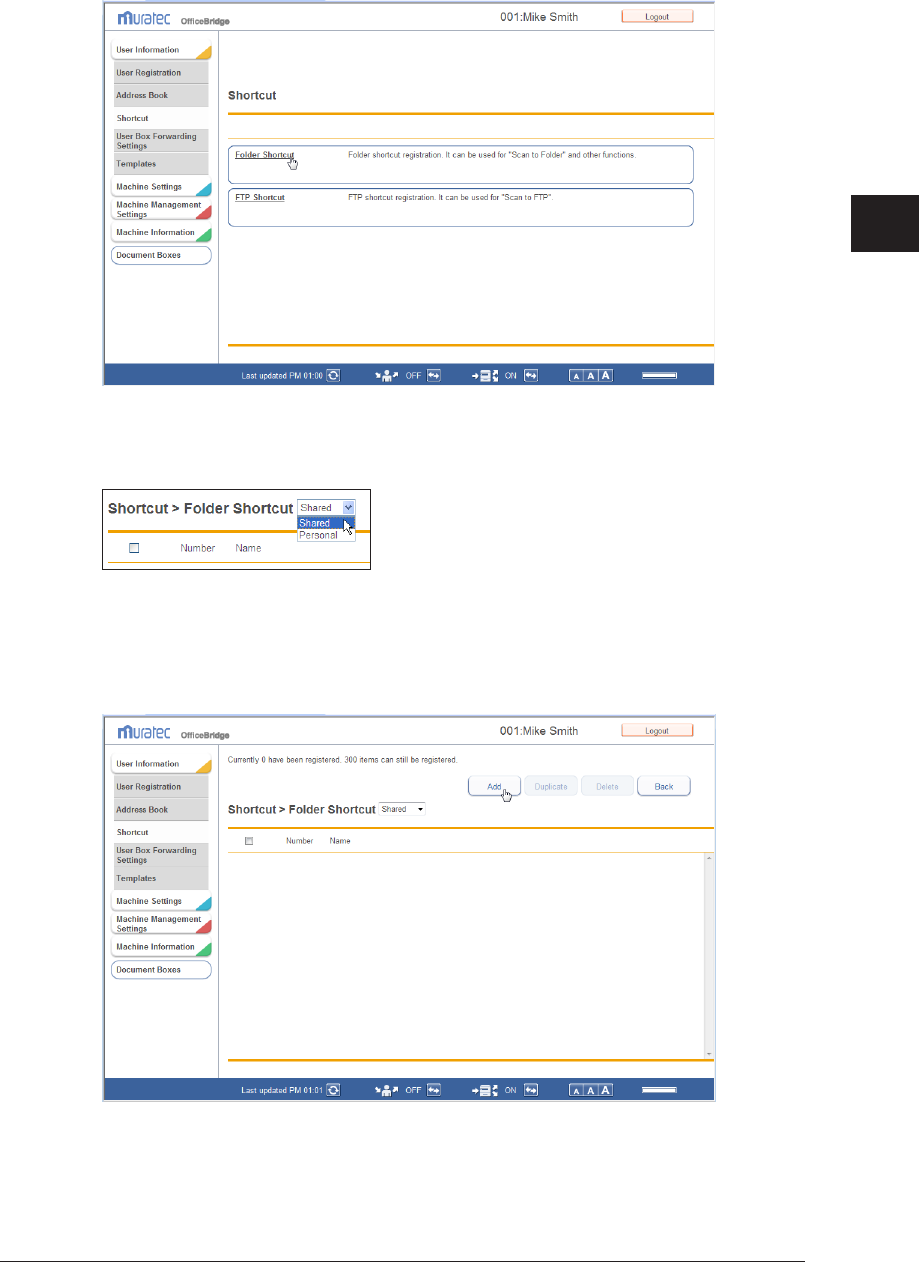
1
2
3
OfficeBridge Administrator Settings
Registering Shortcuts 3-39
Click “Folder Shortcut”.
3
Select the type of shortcut (personal or shared) to register from the pull-down
4
menu.
If you performed a guest login or administrator login, only “shared” shortcuts can be
registered.
Click [Add].
5
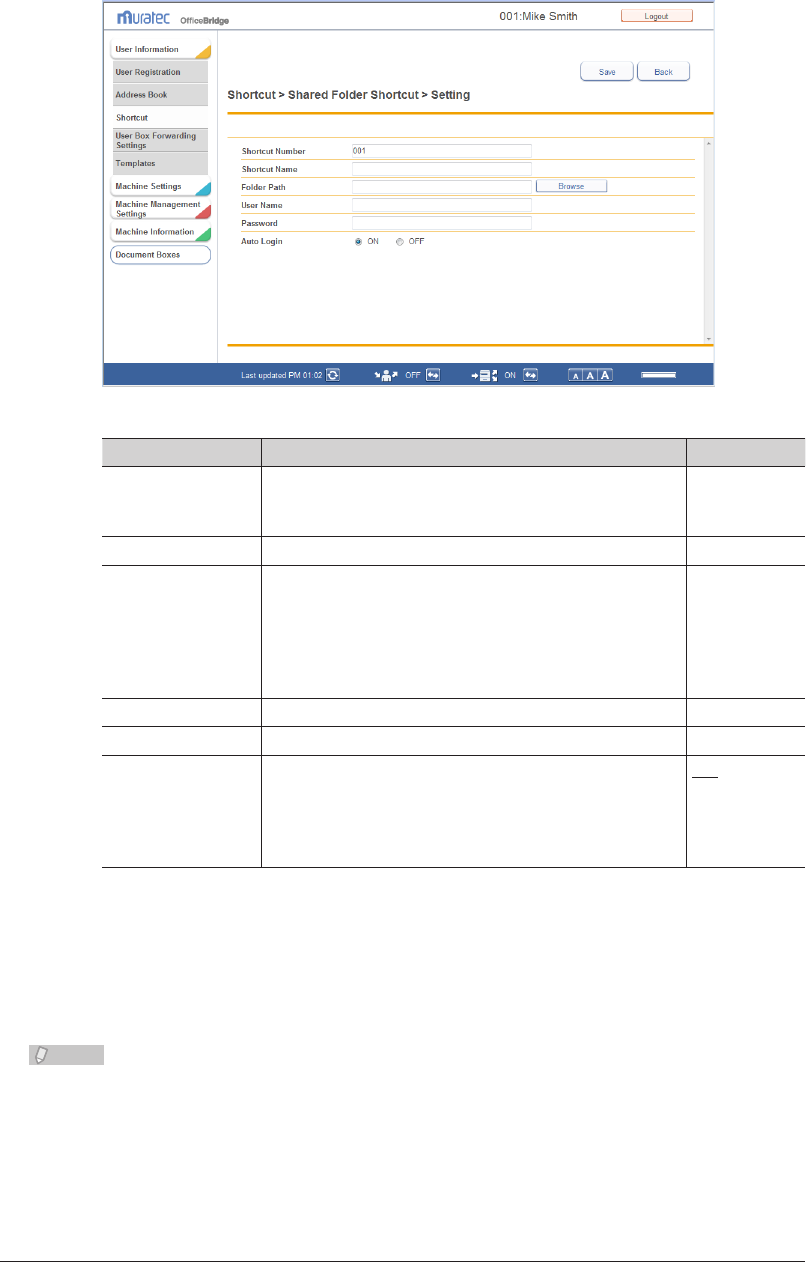
3-40 Registering Shortcuts
Set the detailed information.
6
You can register the following items.
Setting Description Settings
Shortcut Number The smallest free number is automatically entered. You
can change it to a number of your choice. This item is
required.
1 - 300
Shortcut Name Enter the shortcut name. 24 characters
Folder Path Enter the path including the folder to be registered.
Enter the path name in the “//(workgroup computer
name)/(folder name)/” format. You can also browse for
the folder path to enter. (See page 3-41.)
128
characters
(The following
characters
cannot be
used: !:*?"<>|
User Name Enter the user name requested when logging in. 64 characters
Password Set the password requested when logging in. 28 characters
Auto Login Set whether to automatically perform a network login
to the specified folder.
If you set “ON”, the login screen is displayed when you
use the folder shortcut from the control panel of the
machine.
ON
OFF
Click [Save].
7
The display returns to the “Folder Shortcut” settings list screen.•
Press [Back] to cancel registering the folder shortcut settings and return to the “Folder •
Shortcut” settings list screen.
Note
Underlined values are the default settings specified at the time of shipment.
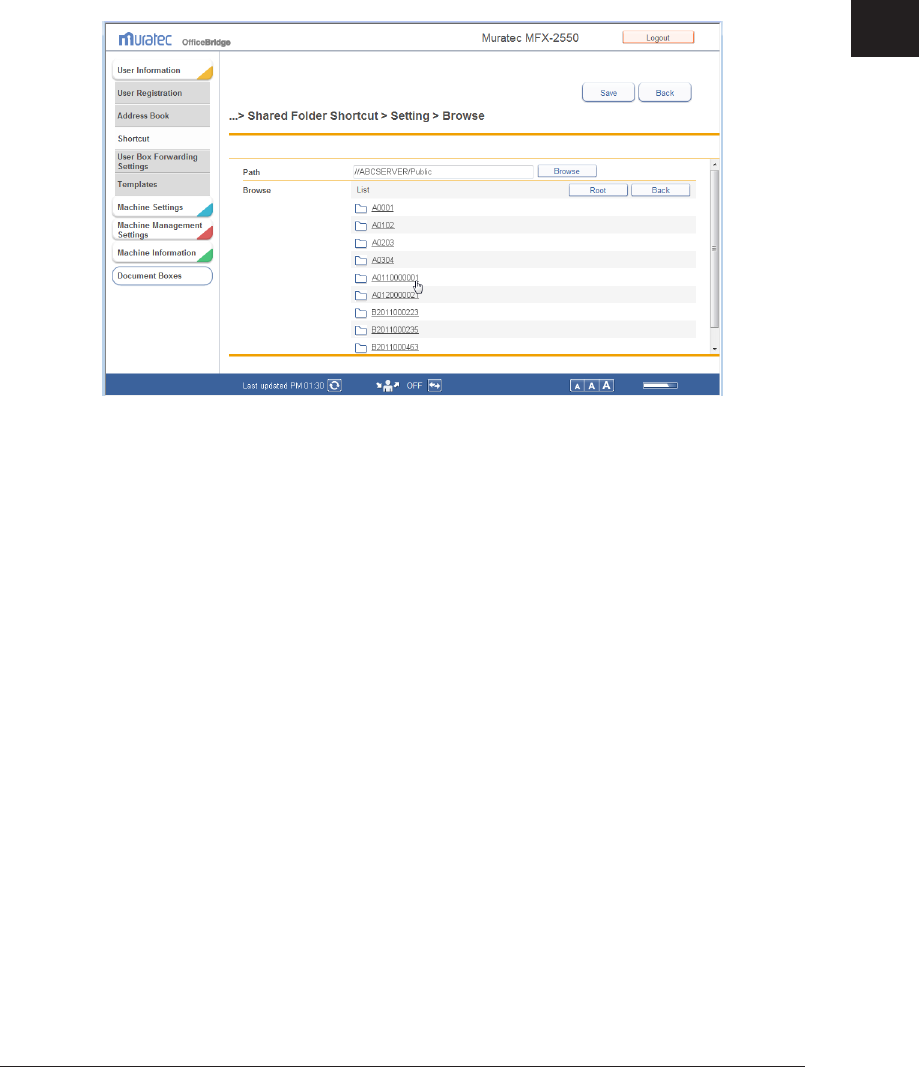
1
2
3
OfficeBridge Administrator Settings
Registering Shortcuts 3-41
Browsing for a Folder Path to Enter
Click [Browse] in “Folder Path”.
1
A list of the network environment you are connected to is displayed.•
If you enter the computer name in the folder path in advance, you can display a list of the •
shared folders in that computer.
Click a displayed computer name or folder name, and select the folder to
2
register in the folder shortcut.
Click [Back] to return to the previous folder level.•
Click [Root] to return to the first (root) level.•
Click [Save].
3
The folder path name is entered.

3-42 Registering Shortcuts
Changing Folder Shortcut Settings
You can change folder shortcut settings that have been registered.
On the “Folder Shortcut” settings list screen, click the number or name of the
1
folder shortcut you want to change.
Change the settings of the folder shortcut.
2
Refer to step 6 of “Registering a New Folder Shortcut”. (See page 3-40.)
Click [Save].
3
The settings are changed, and the display returns to the “Folder Shortcut” settings list •
screen.
Press [Back] to cancel changing the folder shortcut settings and return to the “Folder •
Shortcut” settings list screen.
Copying an Existing Folder Shortcut to Create a New Folder
Shortcut
You can copy a folder shortcut that is already registered to register a new folder shortcut.
On the “Folder Shortcut” settings list screen, select the checkbox of the folder
1
shortcut to copy.
Click [Duplicate].
2
The “Setting” screen is displayed with the copied settings entered for the detailed information.
Change the settings to those for the new folder shortcut to register.
3
Refer to step 6 of “Registering a New Folder Shortcut”. (See page 3-40.)
Click [Save].
4
The display returns to the “Folder Shortcut” settings list screen.•
Press [Back] to cancel registering the folder shortcut settings and return to the “Folder •
Shortcut” settings list screen.
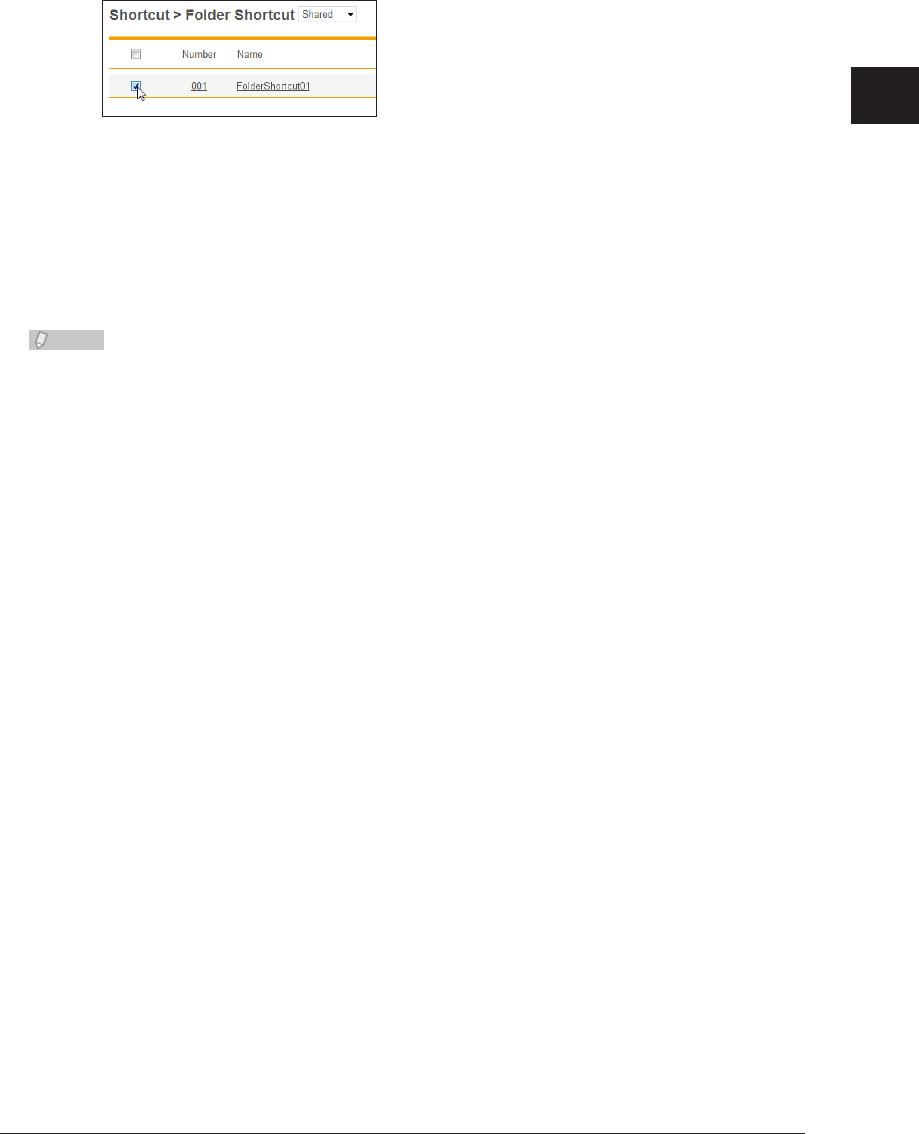
1
2
3
OfficeBridge Administrator Settings
Registering Shortcuts 3-43
Deleting a Folder Shortcut
You can delete unnecessary folder shortcuts from the list.
On the “Folder Shortcut” settings list screen, select the checkbox of the folder
1
shortcut to delete.
Click [Delete].
2
The message “Is it OK to delete the selected item(s)?” is displayed.
Click [OK].
3
The selected folder shortcuts are deleted.
Note
A folder shortcut cannot be deleted when it is being used for another function.
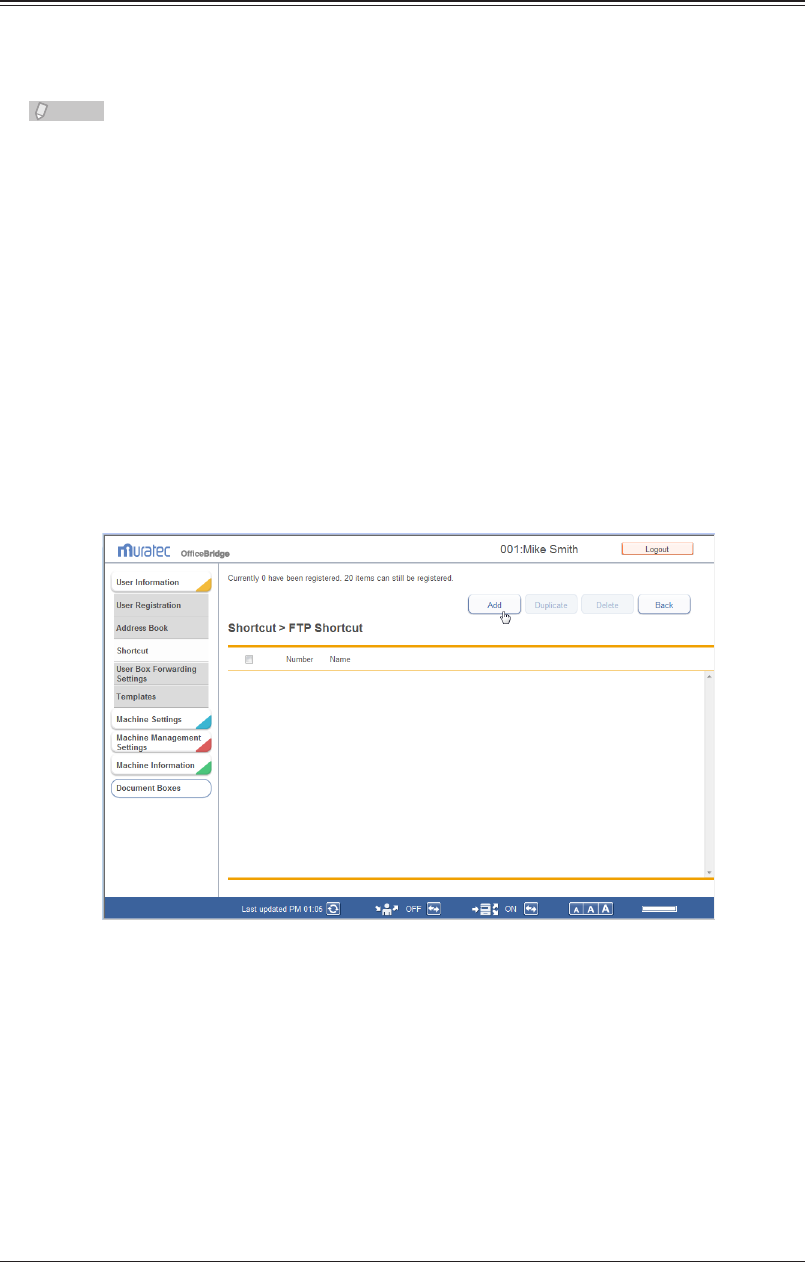
3-44 Registering Shortcuts
Setting FTP Shortcuts
Registering a New FTP Shortcut
You can register a new FTP shortcut.
Note
Up to 20 FTP shortcuts can be registered.•
FTP shortcuts can also be registered from the control panel of the machine. For •
details, refer to Chapter 7, “Registering Destinations” in the Scanner and Fax Guide.
Log in to OfficeBridge as a user.
1
(See page 2-2.)
This function is also available on Administrator screen.•
This function may also be available on Guest login screen, depending on user policy settings.•
Click [User Information], and then [Shortcut].
2
Click “FTP Shortcut”.
3
Click [Add].
4
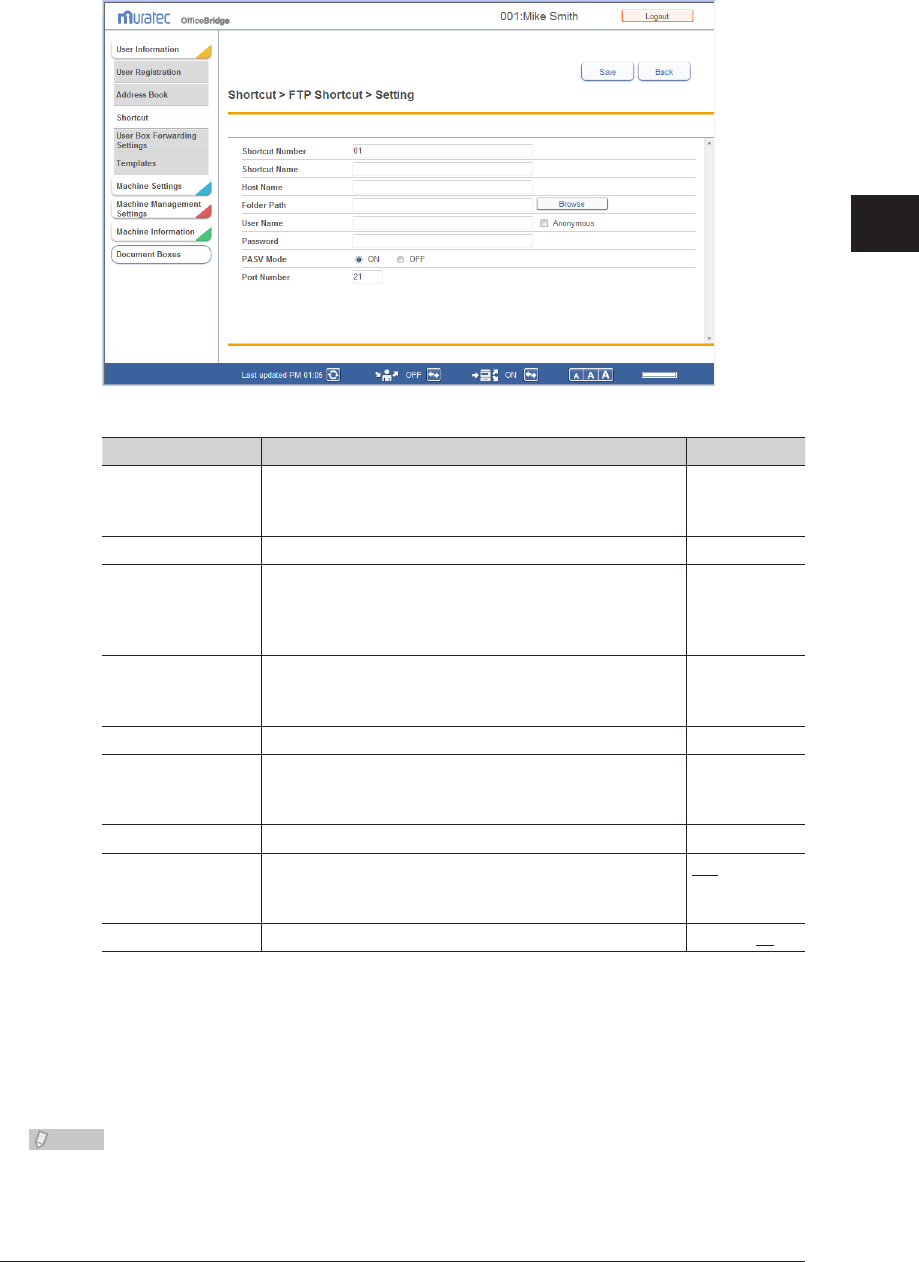
1
2
3
OfficeBridge Administrator Settings
Registering Shortcuts 3-45
Set the detailed information.
5
You can register the following items.
Setting Description Settings
Shortcut Number The smallest free number is automatically entered. You
can change it to a number of your choice.
This item is required.
1 - 20
Shortcut Name Enter the shortcut name. 24 characters
Host Name Enter the address of the FTP server to create the
shortcut for.
Enter an IP address or domain name.
This item is required.
128
characters
Folder Path Enter the path including the folder to be registered.
Enter it in the “/(folder name)” format. You can also
browse the folder path to enter. (See page 3-46.)
126
characters
User Name Enter the user name requested when logging in. 64 characters
Anonymous If you select this, the user name anonymous is entered
automatically. If you deselect this, “User Name” is
cleared.
–
Password Set the password requested when logging in. 28 characters
PASV Mode Select whether to connect with the PASV mode.
Select “ON” to connect with the PASV mode, or “OFF”
to not.
ON
OFF
Port Number Enter the port number of the FTP server. 5 digits: 21
Click [Save].
6
The display returns to the “FTP Shortcut” settings list screen.•
Press [Back] to cancel registering the FTP shortcut settings and return to the “FTP •
Shortcut” settings list screen.
Note
Underlined values are the default settings specified at the time of shipment.
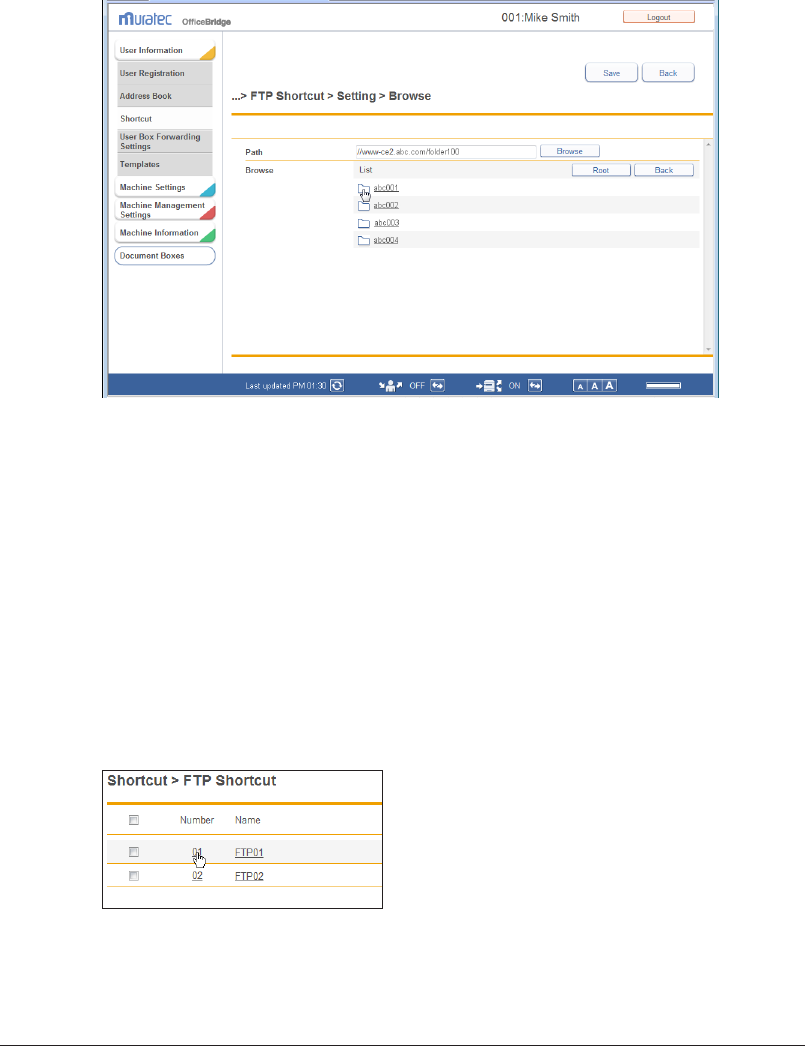
3-46 Registering Shortcuts
Browsing for a Folder Path to Enter
Enter the host name in the “Host Name” field.
1
Click [Browse] in “Folder Path”.
2
The folder of the FTP server is displayed.
Select the folder to register in the folder shortcut.
3
Click [Back] to return to the previous folder level.•
Click [Root] to return to the first (root) level.•
Click [Save].
4
The folder path name is entered.
Changing FTP Shortcut Settings
You can change FTP shortcut settings that have been registered.
On the “FTP Shortcut” settings list screen, click the number or name of the FTP
1
shortcut you want to change.
Change the FTP shortcut settings.
2
Refer to step 5 of “Registering a New FTP Shortcut”. (See page 3-45.)
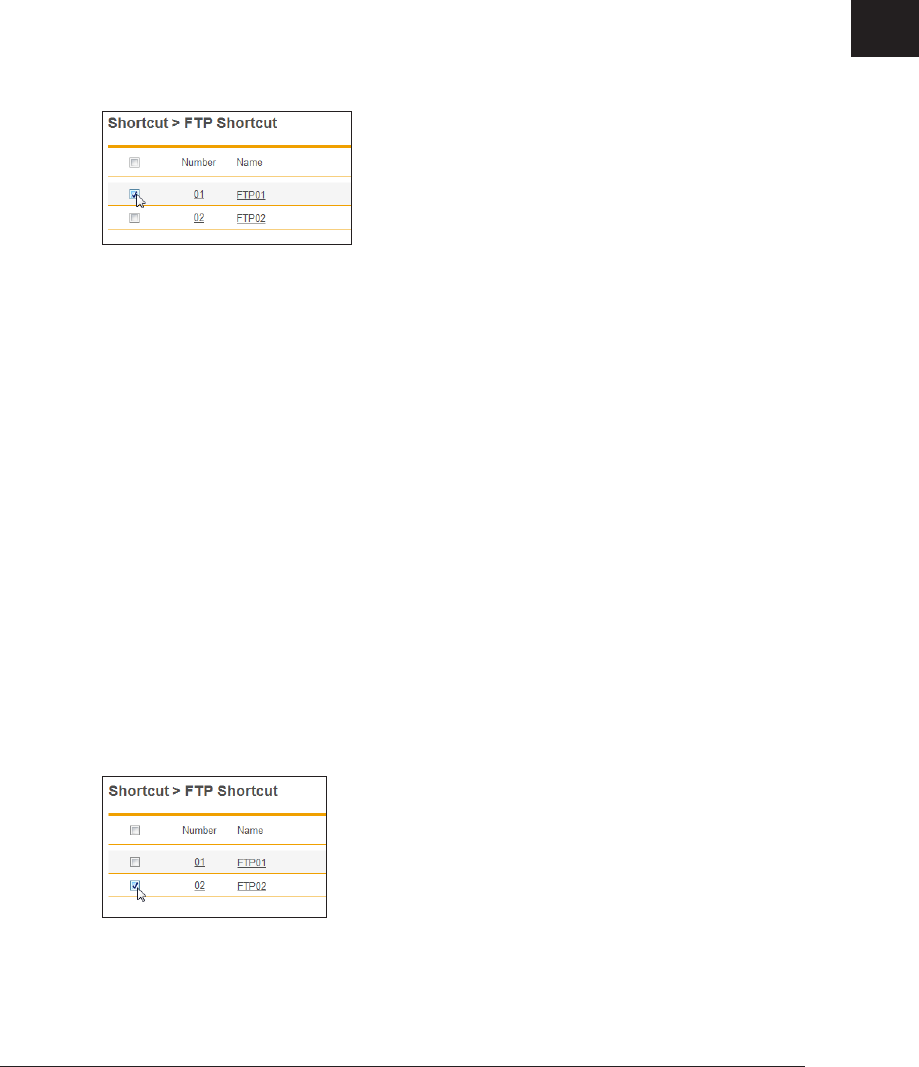
1
2
3
OfficeBridge Administrator Settings
Registering Shortcuts 3-47
Click [Save].
3
The settings are changed, and the display returns to the “FTP Shortcut” settings list screen.•
Press [Back] to cancel changing the FTP shortcut settings and return to the “FTP Shortcut” •
settings list screen.
Copying an Existing FTP Shortcut to Create a New FTP
Shortcut
You can copy a FTP shortcut that is already registered to register a new FTP shortcut.
On the “FTP Shortcut” settings list screen, select the checkbox of the FTP
1
shortcut to copy.
Click [Duplicate].
2
The “Setting” screen is displayed with the copied settings entered for the detailed information.
Change the settings to those for the new FTP shortcut to register.
3
Refer to step 5 of “Registering a New FTP Shortcut”. (See page 3-45.)
Click [Save].
4
The display returns to the “FTP Shortcut” settings list screen.•
Press [Back] to cancel registering the FTP shortcut settings and return to the “FTP •
Shortcut” settings list screen.
Deleting an FTP Shortcut
You can delete unnecessary FTP shortcuts from the list.
On the “FTP Shortcut” settings list screen, select the checkbox of the FTP
1
shortcut to delete.
Click [Delete].
2
The message “Is it OK to delete the selected item (s) ?” is displayed.

3-48 Registering Shortcuts
Click [OK].
3
The selected FTP shortcuts are deleted.
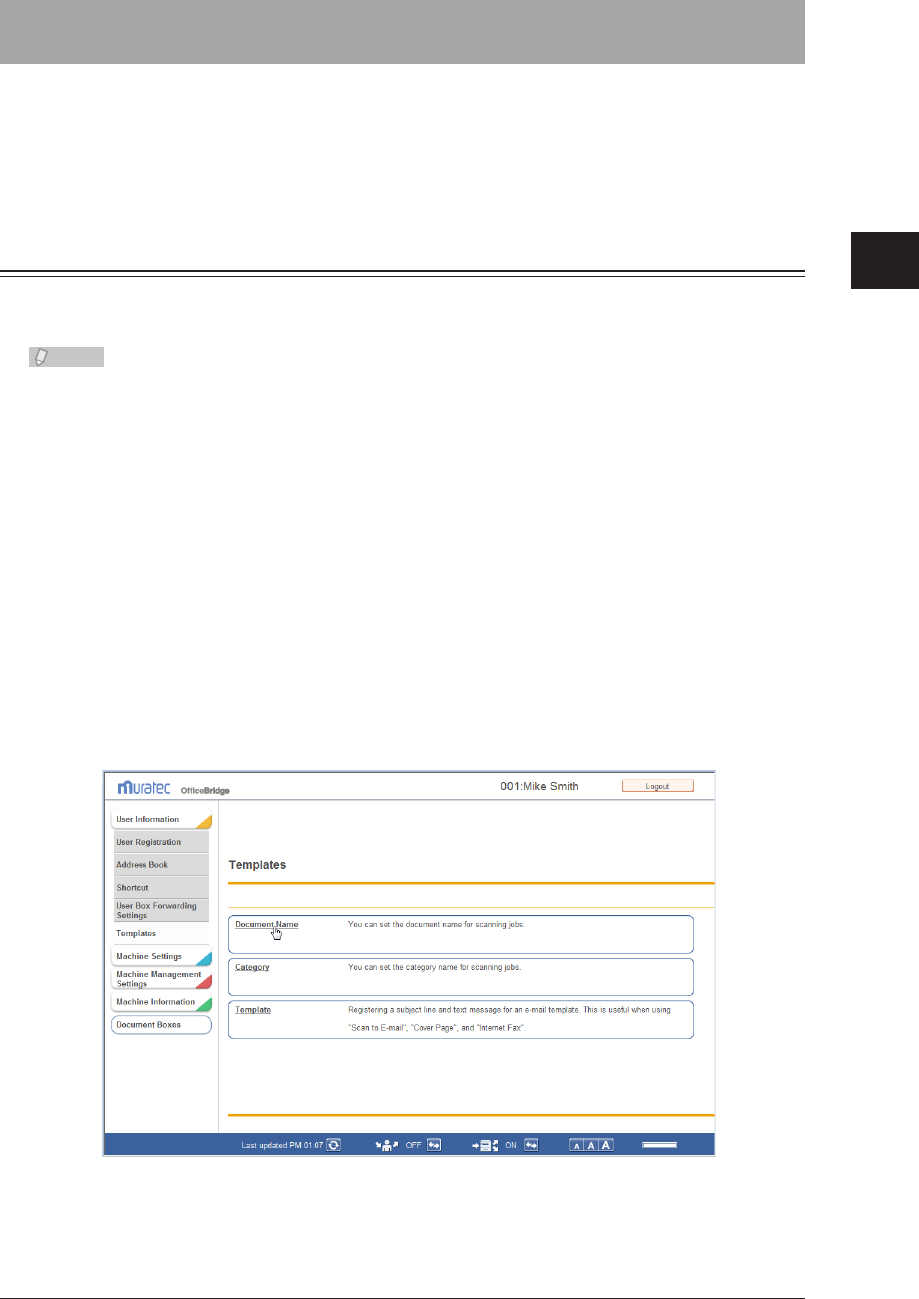
1
2
3
OfficeBridge Administrator Settings
Setting Templates 3-49
Setting Templates
OfficeBridge enables you to register templates to assist users when they enter
information.
You can register three kinds of templates: document names, document categories, and
e-mail templates.
Setting Document Names
When adding a file name to save a scanned image, you can use file names (document
names) registered in advance. Up to 20 file names can be registered.
Note
Document names can also be set from the control panel of the machine. For details, refer
to Chapter 7, “Registering Other Settings” in the Scanner and Fax Guide.
Registering a New Document Name
Log in to OfficeBridge as a user.
1
(See page 2-2.)
This function is also available on Administrator screen.•
This function may also be available on Guest login screen, depending on user policy settings.•
Click [User Information], and then [Templates].
2
The “Templates” screen is displayed.
Click “Document Name”.
3
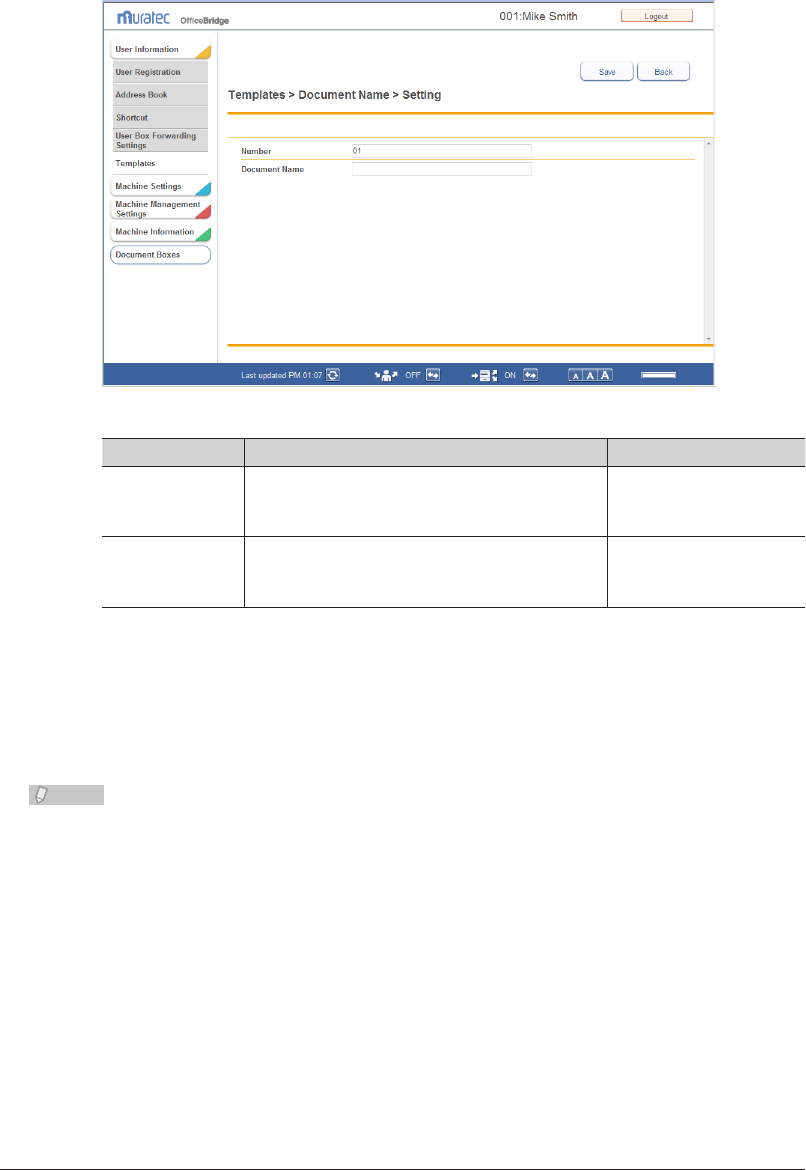
3-50 Setting Templates
Click [Add].
4
The “Document Name” settings screen is displayed.
Set the detailed information.
5
You can register the following items.
Setting Description Settings
Number The smallest free number is automatically
entered. You can change it to a number of your
choice. This item is required.
1 - 20
Document Name Enter the document name for the template. 80 characters (\, /, :, *,
?, ", [, <, >, |, ] cannot be
used.)
Click [Save].
6
The display returns to the “Document Name” settings list screen.•
Press [Back] to cancel registering the document name settings and return to the “Document •
Name” settings list screen.
Note
When the number already exists, a message is displayed with three unused numbers.
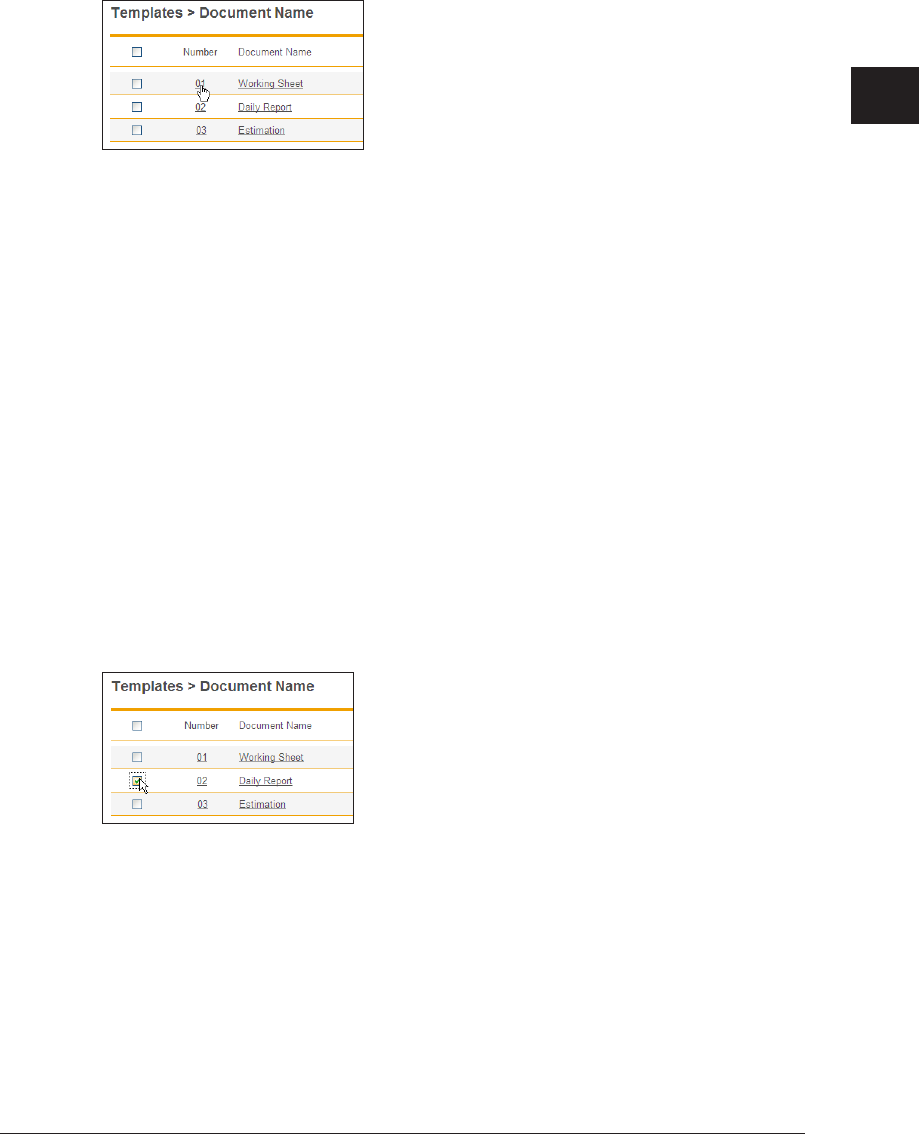
1
2
3
OfficeBridge Administrator Settings
Setting Templates 3-51
Changing a Document Name
You can change a document name that has been registered.
On the “Document Name” settings list screen, click the number or name of the
1
document name you want to change.
Change the number or name of the document.
2
Click [Save].
3
The settings are changed, and the display returns to the “Document Name” list screen.•
Press [Back] to cancel changing the document name settings and return to the “Document •
Name” settings list screen.
Copying an Existing Document Name to Register a New
Document Name
You can copy a document name that is already registered to register a new document
name.
Display the “Document Name” settings list screen.
1
Select the checkbox of the document name you want to copy.
2
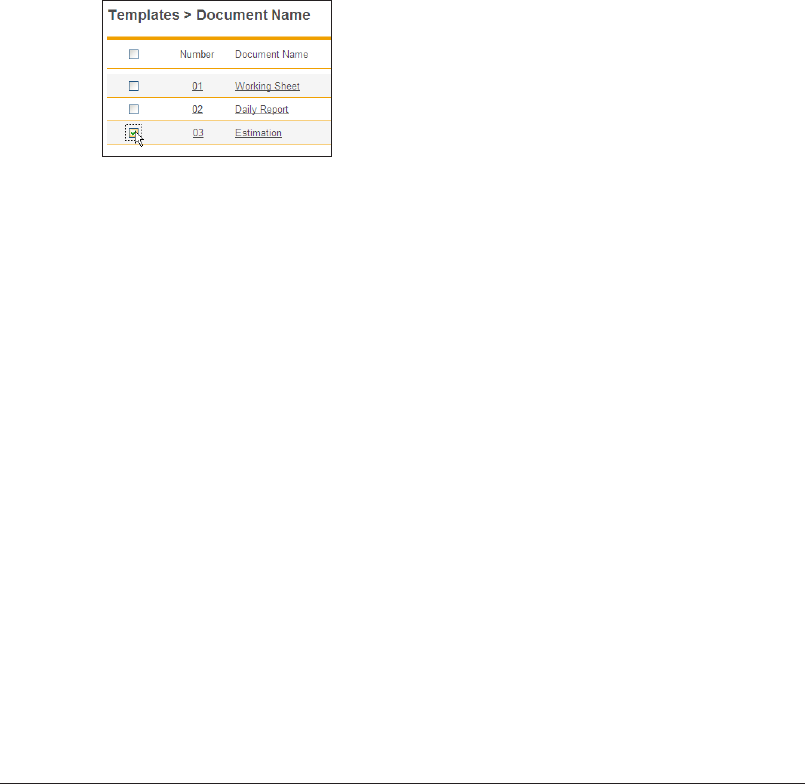
3-52 Setting Templates
Click [Duplicate].
3
The “Document Name” settings screen is displayed.
Change the settings to those for the new document name to register.
4
Click [Save].
5
The display returns to the “Document Name” settings list screen.•
Press [Back] to cancel registering the document name settings and return to the “Document •
Name” settings list screen.
Deleting a Document Name
You can delete unnecessary document names.
Display the “Document Name” settings list screen.
1
Select the checkbox of the document name you want to delete.
2
To select all the displayed document names, select the top checkbox.•
Click the same checkbox to deselect the item.•
Click [Delete].
3
The message “Is it OK to delete the selected item(s)?” is displayed.
Click [OK].
4
The document name is deleted.
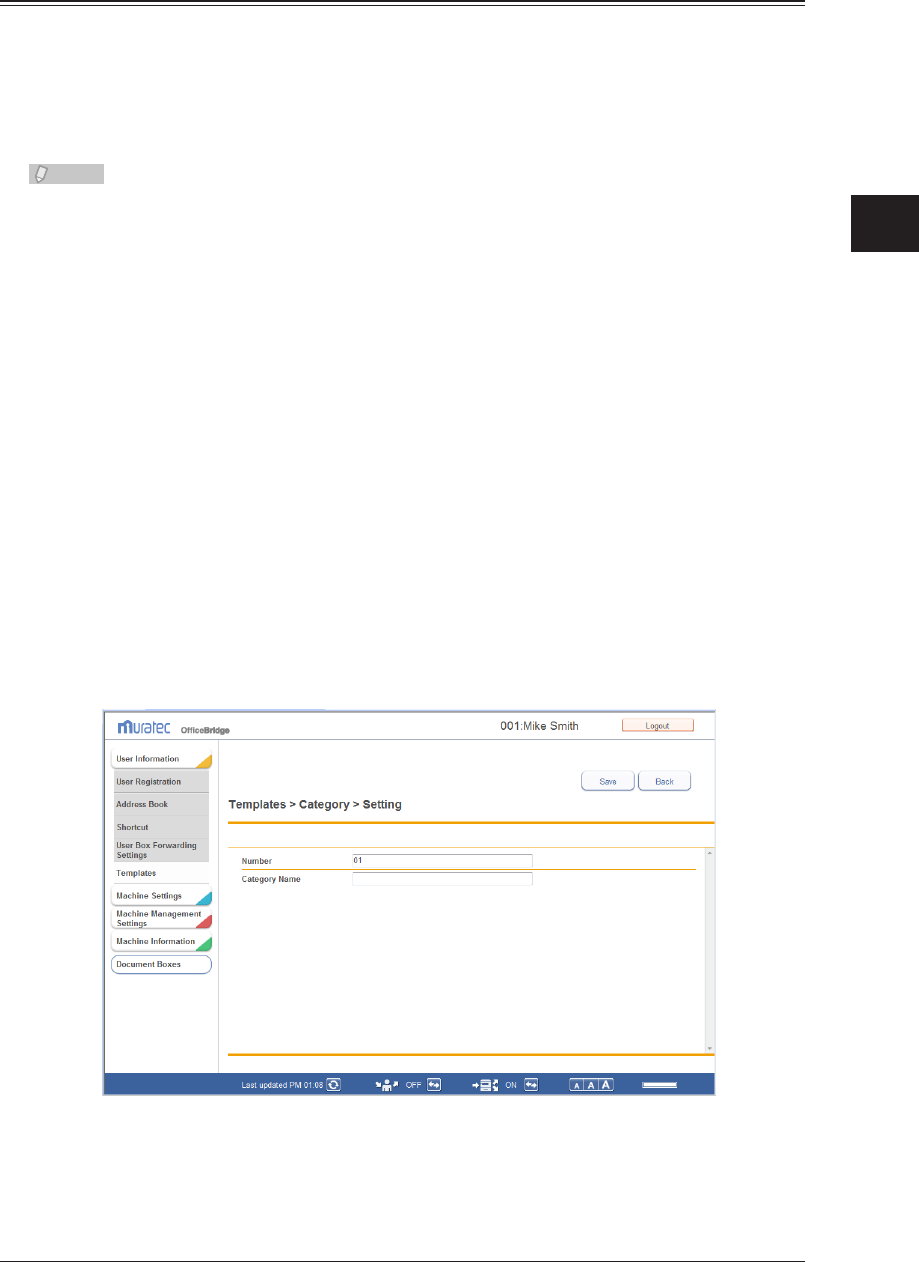
1
2
3
OfficeBridge Administrator Settings
Setting Templates 3-53
Setting Document Categories
When setting document categories to a scanned image, you can use document categories
registered in advance. You can register up to 20 document categories.
Registering a New Document Category
Note
Document category can also be set from the control panel of the machine. For details,
refer to Chapter 7, “Registering Other Settings” in the Scanner and Fax Guide.
Log in to OfficeBridge as a user.
1
(See page 2-2.)
This function is also available on Administrator screen.•
This function may also be available on Guest login screen, depending on user policy settings.•
Click [User Information], and then [Templates].
2
The “Templates” screen is displayed.
Click “Category”.
3
The “Category” settings list screen is displayed.
Click [Add].
4
The “Category” settings screen is displayed.
Set the detailed information.
5
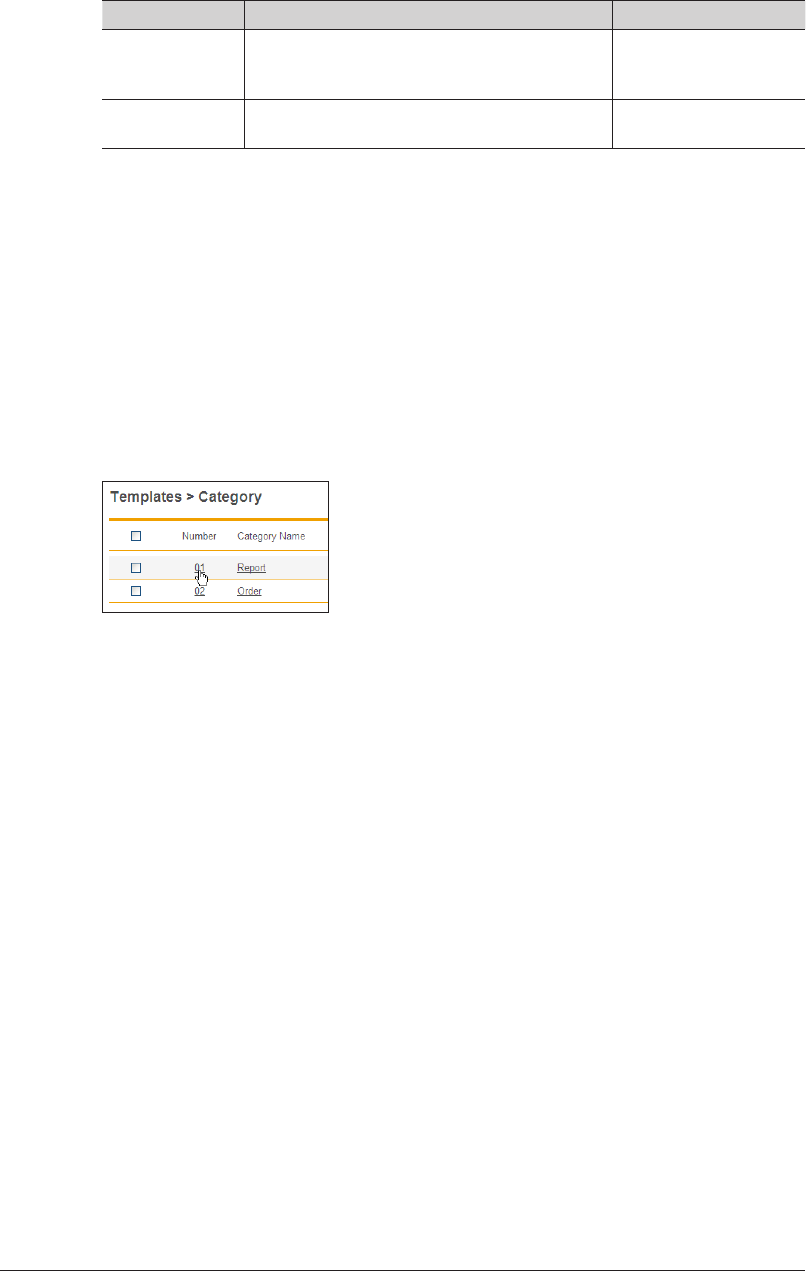
3-54 Setting Templates
You can register the following items.
Setting Description Settings
Number The smallest free number is automatically
entered. You can change it to a number of your
choice. This item is required.
1 - 20
Category Name Enter the document category name for the
template.
20 characters
Click [Save].
6
The display returns to the “Category” settings list screen.•
Press [Back] to cancel registering the document category settings and return to the “Category” •
settings list screen.
Changing a Document Category
You can change a document category that has been registered.
On the “Category” settings list screen, click the number or category name you
1
want to change.
Change the number or category name.
2
Click [Save].
3
The settings are changed, and the display returns to the “Category” settings list screen.•
Press [Back] to cancel changing the category settings and return to the “Category” settings •
list screen.
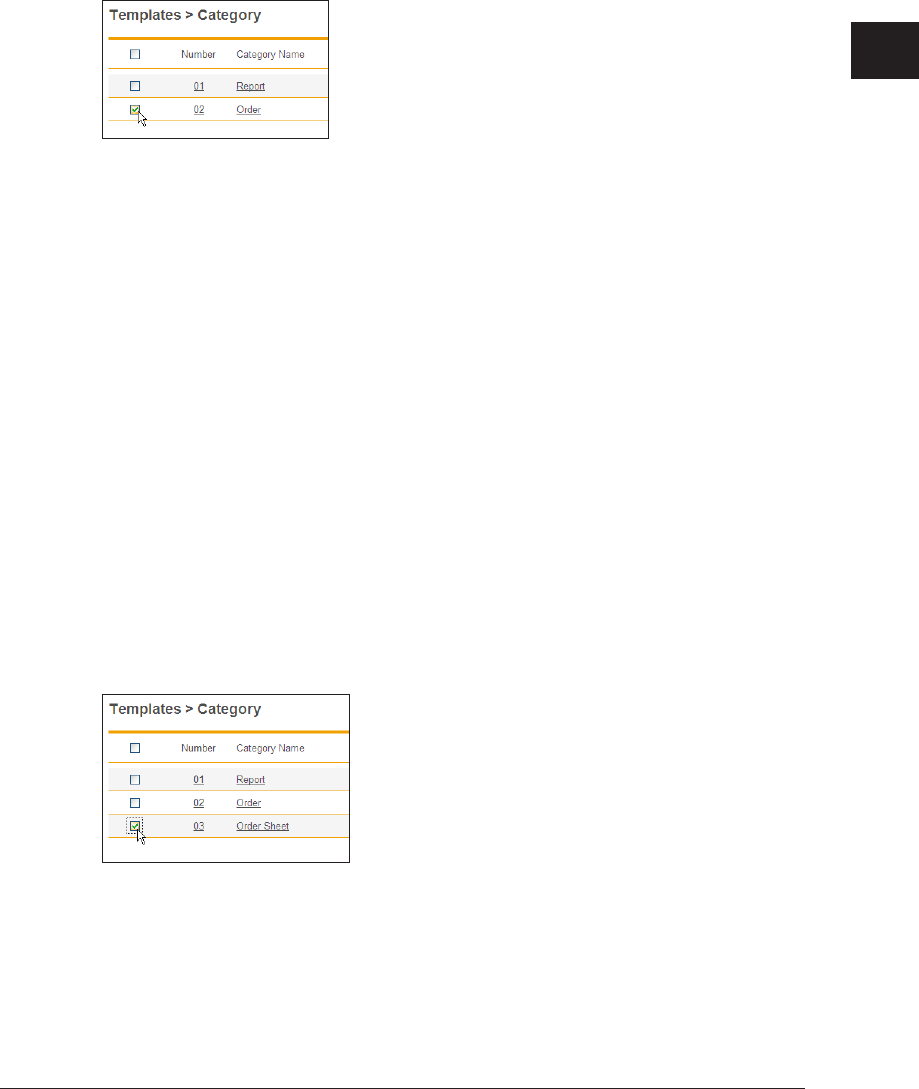
1
2
3
OfficeBridge Administrator Settings
Setting Templates 3-55
Copying an Existing Category to Register a New Category
You can copy a category that is already registered to register a new one.
Display the “Category” settings list screen.
1
Select the checkbox of the category name you want to copy.
2
Click [Duplicate].
3
The “Category” settings screen is displayed.
Change the settings to those for the new category to register.
4
Click [Save].
5
The display returns to the “Category” settings list screen.•
Press [Back] to cancel specifying the category settings and return to the “Category” settings •
list screen.
Deleting a Category
You can delete unnecessary categories.
Display the “Category” settings list screen.
1
Select the checkbox of the category name you want to delete.
2
To select all the category names, select the top checkbox.•
Click the same checkbox to deselect the item.•

3-56 Setting Templates
Click [Delete].
3
The message “Is it OK to delete the selected item(s)?” is displayed.
Click [OK].
4
The category is deleted.
Setting E-mail Templates
When transmitting e-mail, you can use a document registered in advance as the subject
and text of the e-mail. Up to 10 e-mail templates can be registered.
Registering a New E-mail Template
Note
Document names can also be set from the control panel of the machine. For details,
refer to Chapter 7, “Registering Other Settings” in the Scanner and Fax Guide.
Log in to OfficeBridge as a user.
1
(See page 2-2.)
This function is also available on Administrator screen.•
This function may also be available on Guest login screen, depending on user policy settings.•
Click [User Information], and then [Templates].
2
The “Templates” screen is displayed.
Click “Template”.
3
The “Template” settings list screen is displayed.
Click [Add].
4
The “Registration” screen is displayed.
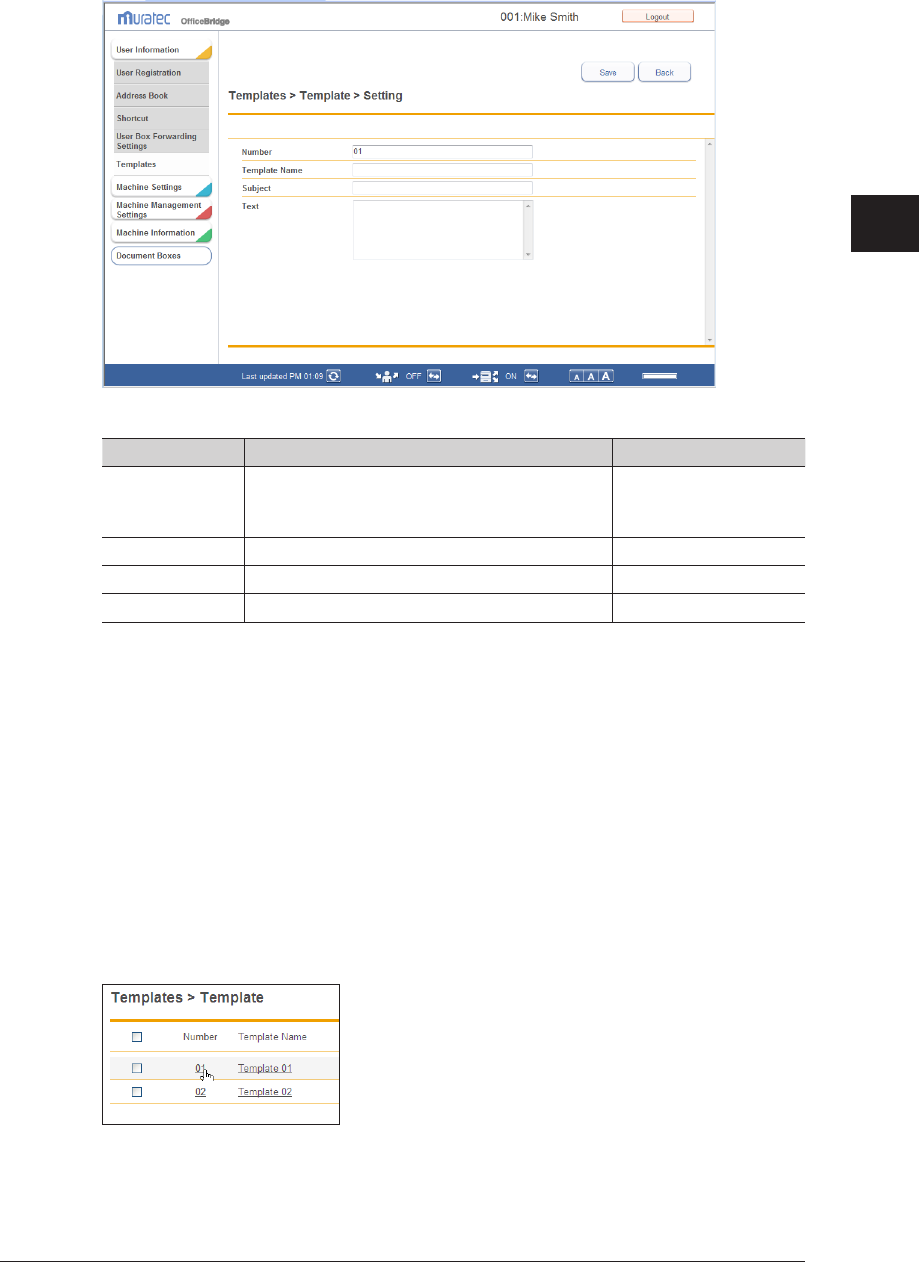
1
2
3
OfficeBridge Administrator Settings
Setting Templates 3-57
Set the detailed information.
5
You can register the following items.
Setting Description Settings
Number The smallest free number is automatically
entered. You can change it to a number of your
choice.
1 - 10
Template Name Enter the name of the e-mail template. 40 characters
Subject Enter the subject of the e-mail template. 80 characters
Text Enter the text of the e-mail template. 1024 characters
Click [Save].
6
The display returns to the “Template” settings list screen.•
Press [Back] to cancel specifying the e-mail template settings and return to the “Template” •
settings list screen.
Changing an E-mail Template
You can change an e-mail template that has been registered.
On the “Template” settings list screen, click the number or template name you
1
want to change.
Change the number, name, or text of the e-mail template.
2
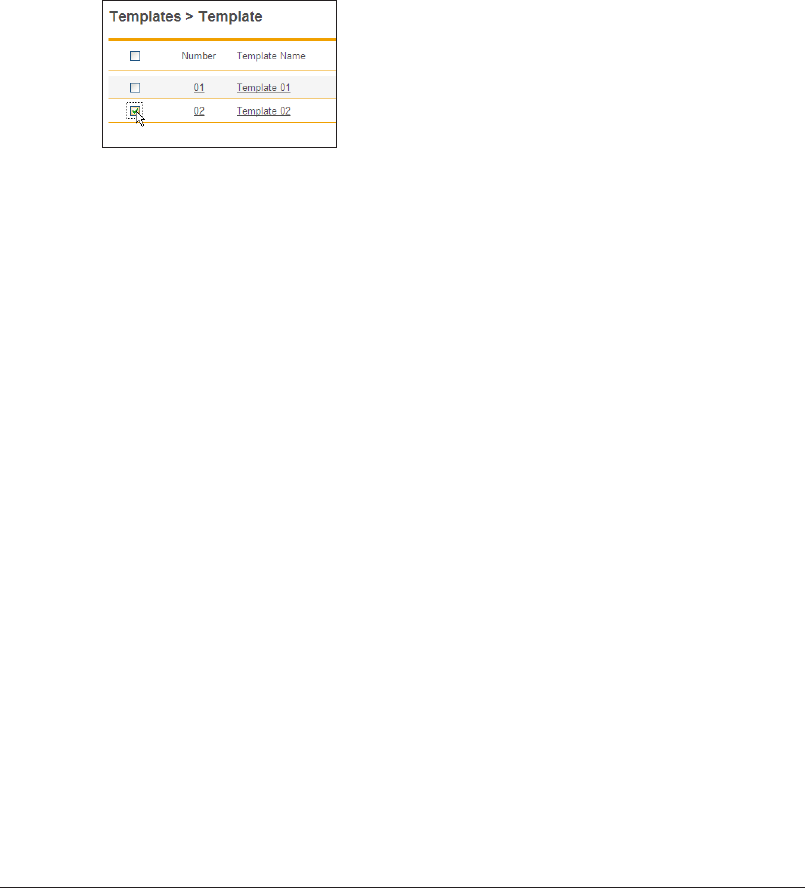
3-58 Setting Templates
Click [Save].
3
The settings are changed, and the display returns to the “Template” settings list screen.•
Press [Back] to cancel changing the e-mail template settings and return to the “Template” •
settings list screen.
Copying an Existing E-mail Template to Register a New E-mail
Template
You can copy an e-mail template that is already registered to register a new e-mail
template.
Display the “Template” settings list screen.
1
Select the checkbox of the e-mail template you want to copy.
2
Click [Duplicate].
3
The “Setting” screen is displayed.
Change the settings to those for the new e-mail template name to register.
4
Refer to step 5 of “Registering a New E-mail Template”. (See page 3-57.)
Click [Save].
5
The display returns to the “Template” settings list screen.•
Press [Back] to cancel specifying the e-mail template settings and return to the “Template” •
settings list screen.

1
2
3
OfficeBridge Administrator Settings
Setting Templates 3-59
Deleting an E-mail Template
You can delete unnecessary e-mail templates.
Display the “Template” settings list screen.
1
Select the checkbox of the e-mail template you want to delete.
2
To select all the displayed e-mail templates, select the top checkbox.•
Click the same checkbox to deselect the item.•
Click [Delete].
3
The message “Is it OK to delete the selected item(s)?” is displayed.
Click [OK].
4
The e-mail template is deleted.
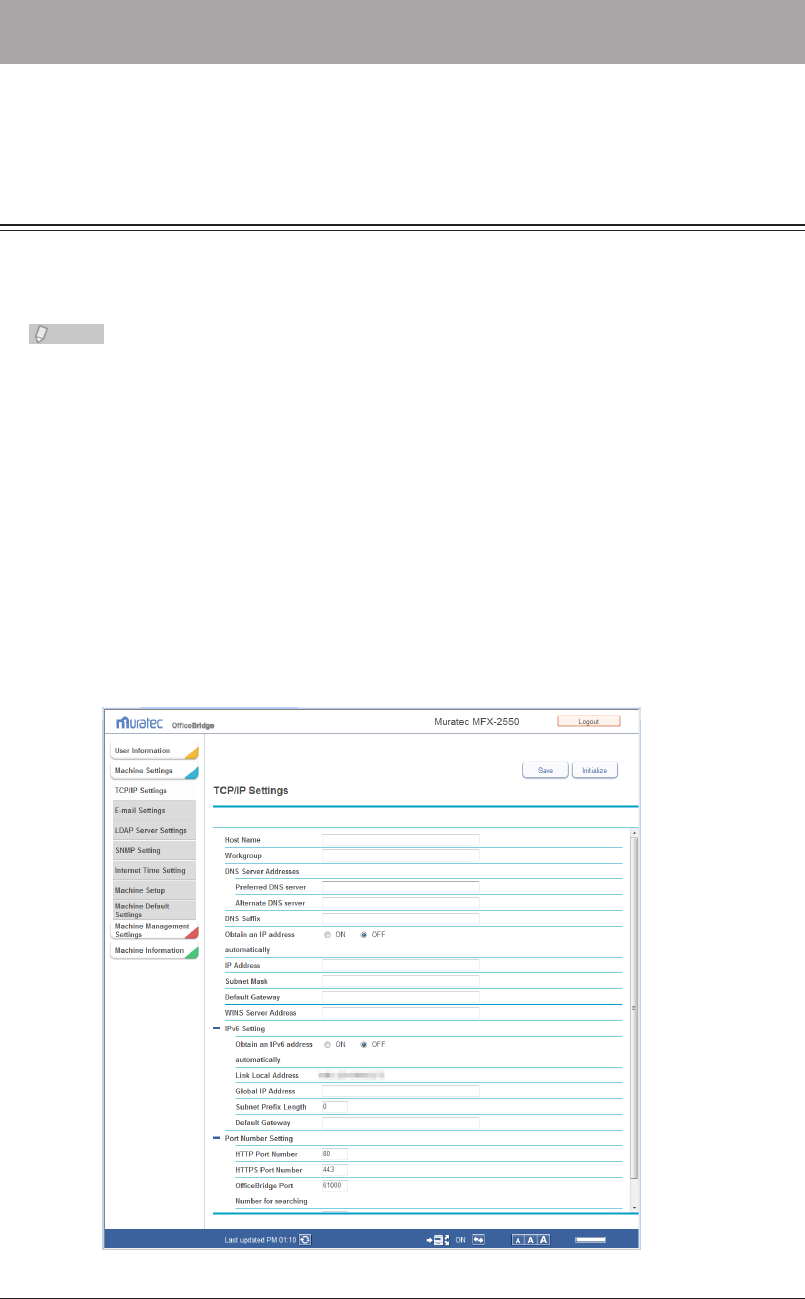
3-60 Setting the Connection Environment
Setting the Connection Environment
You can set the network environment required for OfficeBridge to operate correctly and
the e-mail transmission/reception environment, etc.
Setting the Network Environment
Set the network environment for connecting computers to OfficeBridge.
The settings are divided into four groups: common settings, IPv4 settings, IPv6 settings,
and port number settings.
Note
The network environment can also be set from the control panel of the machine. For
details, refer to Chapter 2, “Specifying the Network Settings” in the Administrator's
Guide.
Click [Admin Login] in OfficeBridge, and log in.
1
(See page 2-7.)
This function may also be available on Guest and User login screen, depending on user policy
settings.
Click [Machine Settings].
2
The “TCP/IP Settings” screen is displayed.
Set the detailed information.
3

1
2
3
OfficeBridge Administrator Settings
Setting the Connection Environment 3-61
You can register the following items.
Common Settings
Setting Description Settings
Host Name Enter the host name of the machine.
The default setting is the MAC address.
If multiple machines are connected to the same
network, make sure to set a different host name
for each machine.
15 characters
(The following
characters cannot
be used: !@#$%^&()-
_’{}.~\*+=|:;”?<>,)
Workgroup Enter the workgroup name of the network the
machine is connected to.
15 characters
(The following
characters cannot be
used: !@# $% ^&()-
_’{}.~ ¥ * +=|:;”?<>,)
WORKGROUP
DNS Server
Addresses
When using a DNS server, enter the primary
DNS server address and the secondary DNS
server address.
XXX.XXX.XXX.XXX
format (Where XXX
is a number between
0 and 255.) 0.0.0.0,
255.255.255.255, and
127.xxx.xxx.xxx cannot
be entered.
DNS Suffix To perform name resolution using only a host
name, register the DNS suffix.
50 characters
IPv4 Setting
Setting Description Settings
Obtain an
IP address
automatically
Set whether to enable or disable the DHCP
setting.
Set “ON” to enable the DHCP setting, or “OFF”
to disable it.
ON
OFF
IP Address Enter the IP address.
If DHCP is enabled, the retrieved IP address is
displayed, and you cannot edit it.
XXX.XXX.XXX.XXX
format (Where XXX
is a number between
0 and 255.) 0.0.0.0,
255.255.255.255, and
127.xxx.xxx.xxx cannot
be entered.
Subnet Mask Enter the subnet mask.
If DHCP is enabled, the retrieved subnet mask
is displayed, and you cannot edit it.
Default Gateway If you are using a gateway, enter the gateway
address.
WINS Server
Address
If you are using a WINS server, enter the WINS
server address.
IPv6 Setting
These settings are displayed when you click [+].
Setting Description Settings
Obtain an
IPv6 address
automatically
Set whether to enable or disable the DHCP
setting.
Set “ON” to enable the DHCP setting, or “OFF”
to disable it.
ON
OFF
Link Local
Address
Displays the link local IP address.
This address cannot be edited.
−
3-62 Setting the Connection Environment
Setting Description Settings
Global IP
Address
Enter the global IP address.
If DHCP is enabled, the retrieved global IP
address is displayed, and you cannot edit it.
XXXX:XXXX:XXXX:
XXXX:XXXX:XXXX:
XXXX:XXXX format
(Where XXXX is a
hexadecimal number.)
0:0:0:0:0:0:0:0,0::0, ::,
0:0:0:0:0:0:0:1, and 0::1
cannot be entered.
Subnet Prefix
Length
Enter the subnet prefix length.
If a global IP address is entered, you cannot
enter 0 here.
0 - 128: 0
Default Gateway If you are using a gateway, enter the gateway
address.
XXXX:XXXX:XXXX:
XXXX:XXXX:XXXX:
XXXX:XXXX format
(Where XXXX is a
hexadecimal number.)
0:0:0:0:0:0:0:0,0::0, ::,
0:0:0:0:0:0:0:1, and 0::1
cannot be entered.
Port Number Setting
These settings are displayed when you click [+].
Setting Description Settings
HTTP Port
Number
Enter the port number of the HTTP server. 0 - 65535: 80
HTTPS Port
Number
Enter the port number of the HTTPS server. 0 - 65535: 443
OfficeBridge
Port Number for
searching
Specify the UDP port number used for
automatically searching OfficeBridge when
installing a printer.
0 - 65535: 61000
RAW port (Port
9100) Number
Specify the port number to use for the RAW
port.
0 - 65535: 9100
Click [Save].
4
Note
Underlined values are the default settings specified at the time of shipment.•
Click [Initialize] to restore the default settings.•
If you disable the DHCP setting, the IP address set when the DHCP setting was •
enabled becomes a static IP address. However, if the power is left OFF for an
extended period, the setting may change. In this case, contact your administrator to
set the static address.
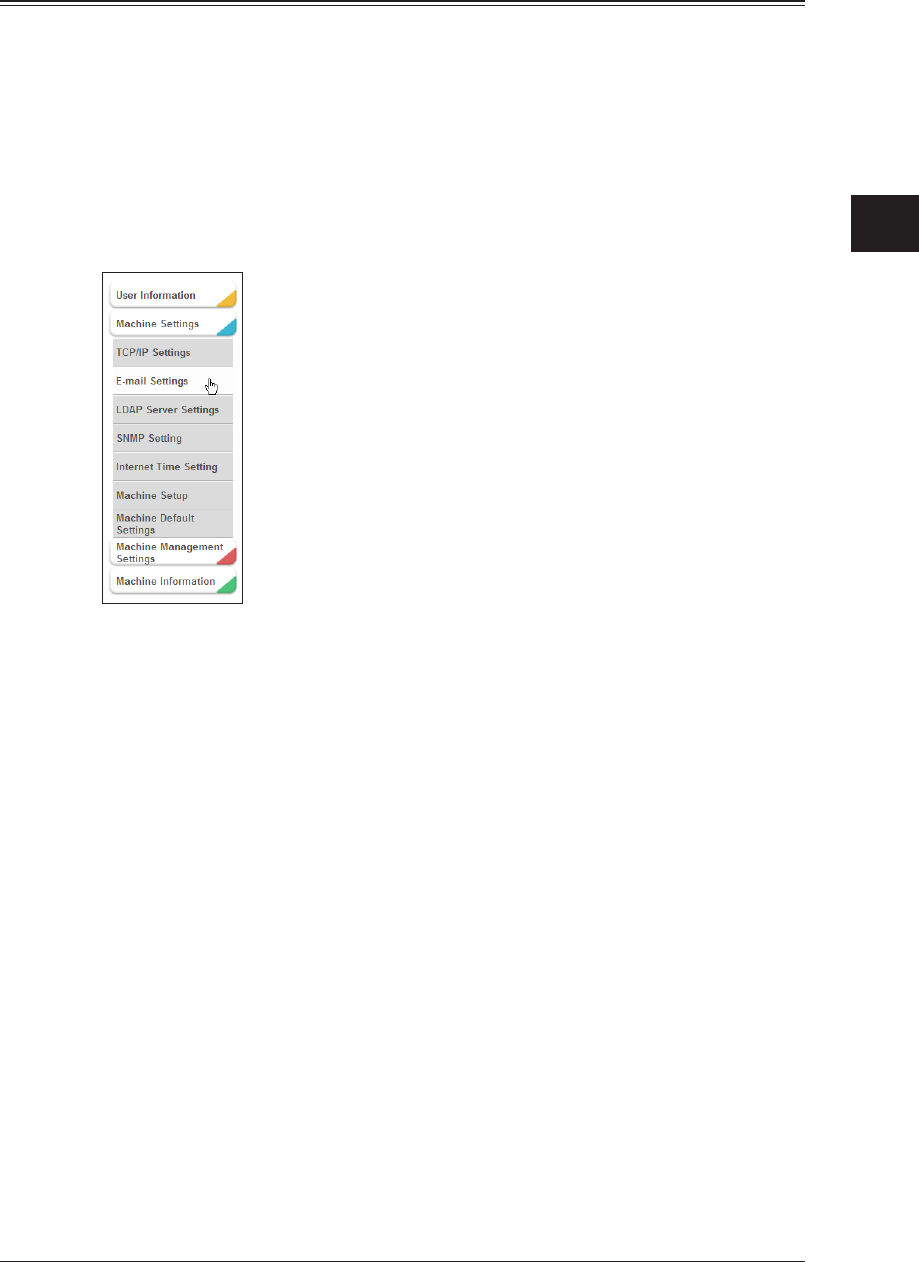
1
2
3
OfficeBridge Administrator Settings
Setting the Connection Environment 3-63
Setting the E-mail Transmission / Reception Environment
Set the environment for transmitting and receiving e-mail with OfficeBridge.
The settings are divided into four groups: machine information, SMTP server settings,
POP server settings, and SMTP reception settings.
Click [Admin Login] in OfficeBridge, and log in.
1
(See page 2-7.)
This function may also be available on Guest and User login screen, depending on user policy
settings.
Click [Machine Settings], and then [E-mail Settings].
2
Click “SMTP/POP Settings”.
3
The “SMTP/POP Settings” screen is displayed.

3-64 Setting the Connection Environment
Set the detailed information.
4
You can register the following items.
Machine Information
Setting Description Settings
Name Enter the name to display in the sender field
(From) when transmitting e-mail.
If e-mail is transmitted after performing a user
long, the e-mail address registered in the user
information is displayed.
40 characters
E-mail Address Enter the e-mail address assigned to the
machine.
50 characters
(0 - 9, A - z, @, ., -, _)
“Reply-To” e-mail
address
Enter the e-mail address used for the
destination to reply to.
50 characters
(0 - 9, A - z, @, ., -, _)
SMTP Server Setting
Setting Description Settings
SMTP Server
Address
Enter the IP address or domain name for the
SMTP server to use when transmitting e-mail.
Use the XXX.XXX.XXX.
XXX format for an IP
address. (Where XXX
is a number between
0 and 255.) 0.0.0.0,
255.255.255.255, and
127.xxx.xxx.xxx cannot
be entered.
For a domain name, you
can enter 50 characters
(0 - 9, a - z, A - Z, -, ., _).
SMTP Port
Number
Enter the SMTP port number. 0 - 65535:25

1
2
3
OfficeBridge Administrator Settings
Setting the Connection Environment 3-65
Setting Description Settings
SSL Set “ON” to use SSL communication, or “OFF”
to not use it.
ON
OFF
SMTPS Port
Number
Enter the SMTPS port number. 0 - 65535: 465
SMTP Send
Authentication
Set the SMTP authentication method when
the SMTP server you are using requires
authentication.
Not used.
LOGIN
PLAIN
CRAM-MD5
SMTP
Authentication
User Name
Set the account to use when logging on to the
SMTP server.
50 characters
SMTP
Authentication
Password
Set the password to use when logging on to the
SMTP server.
50 characters
POP before
SMTP
Set this to “ON” to receive e-mail before
sending.
For some providers, POP authentication is
required before you send e-mail (before a send
request to the SMTP server). In such a case, set
this item.
ON
OFF
POP Server Setting
Setting Description Settings
POP3 Server
Address
Enter the IP address or domain name for the
POP server to use when transmitting e-mail.
Use the XXX.XXX.XXX.
XXX format for an IP
address. (Where XXX
is a number between
0 and 255.) 0.0.0.0,
255.255.255.255, and
127.xxx.xxx.xxx cannot
be entered.
For a domain name, you
can enter 50 characters
(0 - 9, a - z, A - Z, -, .).
POP3 Port
Number
Enter the POP port number 0 - 65535: 110
SSL Set “ON” to use SSL communication, or “OFF”
to not use it.
ON
OFF
POP3S Port
Number
Enter the POP3S port number 0 - 65535: 995
POP Receive
Authentication
Set the POP authentication method when
the POP server you are using requires
authentication.
Normal
APOP
POP3 User
Name
Enter the account to use when logging on to the
POP3 server.
50 characters
POP3 User
Password
Enter the password to use when logging on to
the POP3 server.
50 characters
Check for new
mail
Set whether to check the server for new mail.
To check for new mail, select the periodic
interval to check for mail. You can specify the
time interval between 0 (hours) 0 (minutes)
5 (seconds) and 99 (hours) 59 (minutes) 59
(seconds).
*1
ON
OFF
Interval
hr: 0 - 99
min: 0 - 59
sec : 0 - 59
*1 If you set Check for new mail to “ON”, you cannot set “0” for all the values.

3-66 Setting the Connection Environment
SMTP Reception
These settings are displayed when you click [+].
These settings are for the reception side for direct SMTP.
Setting Description Settings
Confirm that the
following domain
is identical to
the receiving
domain.
Set “ON” to check whether the transmission
forwarding path is the same as your domain, or
select “OFF” to not.
ON
OFF
Domain for
Receiving
Enter the domain name if you set “Confirm
that the following domain is identical to the
receiving domain.” to “ON”.
50 characters
(0 to 9, A - z, @, ., -, _)
Port Number Enter the SMTP reception port number. 0 - 65535: 25
Allow reception
from
Enter the IP address or domain name to allow
reception for. Up to five can be registered.
<To add an IP address or domain name>
Enter the IP address or domain name in the
entry box, and click [Add].
<To delete an IP address or domain name>
Select the IP address or domain name to delete
in the “Approved Senders” list, then click
[Delete].
Use the XXX.XXX.XXX.
XXX format for an IP
address. (Where XXX
is a number between
0 and 255.) 0.0.0.0,
255.255.255.255, and
127.xxx.xxx.xxx cannot
be entered.
For a domain name, you
can enter 50 characters
(0 - 9, a - z, A- Z, -, .).
Click [Save].
5
The display returns to the “E-mail Settings” list screen.•
Press [Back] to cancel registering the “SMTP/POP Settings” and return to the “E-mail •
Settings” list screen.
Note
Underlined values are the default settings specified at the time of shipment.•
Click [Initialize] to restore the default settings.•
Even if the STMP server and the POP3 server are the same server, specify both. •
If you changed the “Port Number” in the SMTP reception settings, make sure to •
restart the machine.
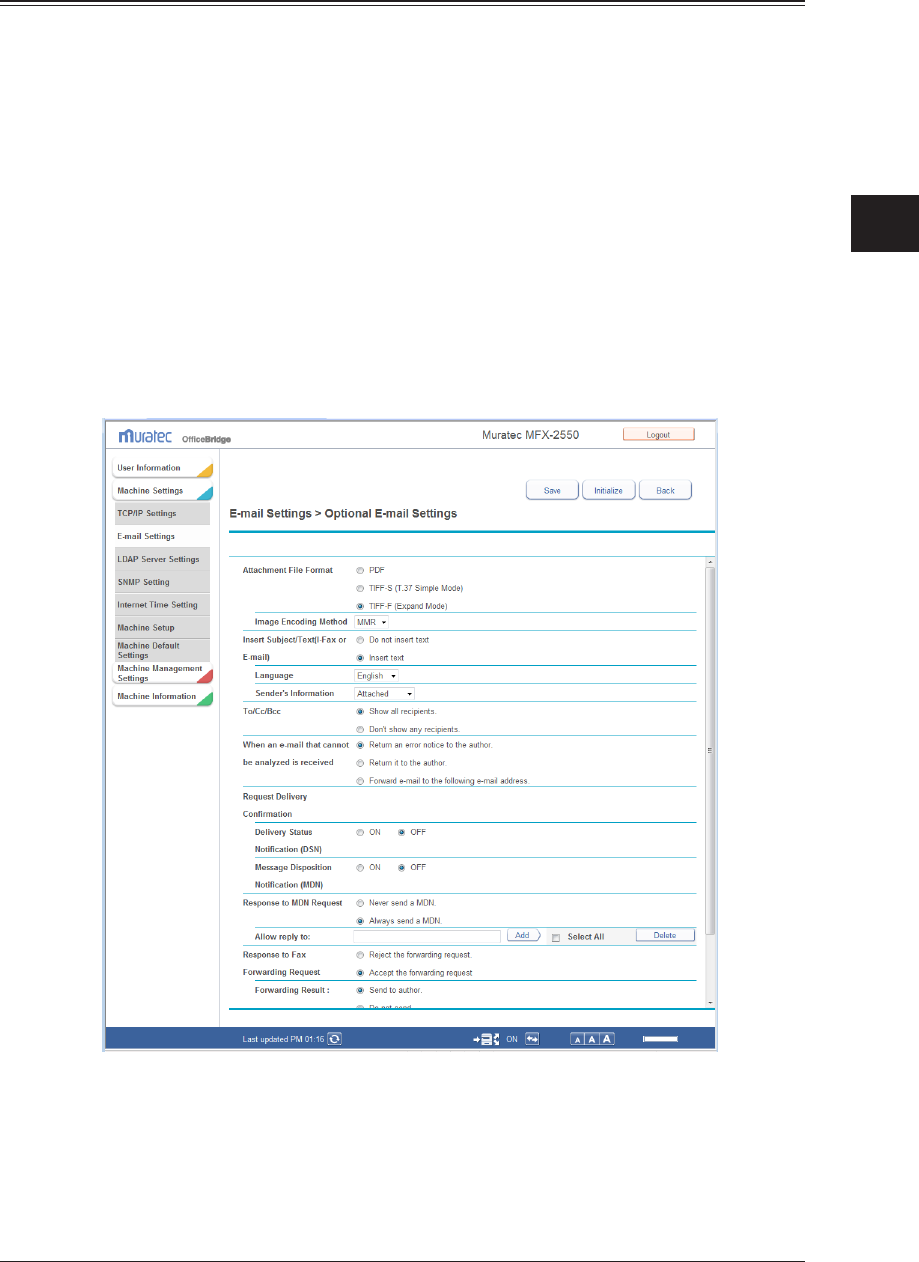
1
2
3
OfficeBridge Administrator Settings
Setting the Connection Environment 3-67
Setting the E-mail Operating Environment
Set the e-mail operating environment for handling e-mail with OfficeBridge.
Click [Admin Login] in OfficeBridge, and log in.
1
(See page 2-7.)
This function may also be available on Guest and User login screen, depending on user policy
settings.
Click [Machine Settings], and then [E-mail Settings].
2
The “E-mail Settings” list screen is displayed.
Click “Optional E-mail Settings”.
3
The “Optional E-mail Settings” dialog box is displayed.
Set the detailed information.
4

3-68 Setting the Connection Environment
You can register the following items.
Setting Description Settings
Attachment File
Format
Set the file format for transmitted documents.
When you send a document from the machine via e-mail,
the document will be converted to the file format specified
here.
PDF
TIFF-S
(T.37
Simple Mode)
*1
TIFF-F
(Expand Mode)
Image
Encoding
Method
If you selected “TIFF-F (Expand Method)” for the file
format, specify the image encoding method for documents
to be sent.
MH
MR
MMR
JBIG
Insert Subject/
Text (I-Fax or
E-mail)
Set whether to automatically insert the following subject
and text when transmitting internet faxes and e-mail. If
you manually set a subject and text, the subject and text
you enter is inserted instead:
Subject: E-mail Message
Text: This is an E-mail message.
Please open the attached file.
Note
If you set a blank subject and text from the control panel
of the machine, the subject and text you enter here is
inserted if “Insert text” is enabled.
Do not insert
text
Insert text
Language Set the language to use. Englich
French
Spanish
Sender’s
Information
Set whether to attach sender information, total page
numbers and transmission date and time to the text.
Attached
Not attached
To/Cc/Bcc
*2
Specify whether to include e-mail destination information
(To, Cc, Bcc) in e-mail headers.
Show all
recipients.
Don't
show any
recipients.
When an e-mail
that cannot
be analyzed is
received
In some cases, the attached file of a received e-mail
message may not be correctly printed due to its file
format. (For example, documents created with application
software such as Microsoft Word)
This sets whether to return such e-mail to the sender or
to forward it to another e-mail address.
To forward it to another e-mail address, select “Forward
e-mail to the following e-mail address” and enter the
address in the “Forward to:” field.
Return an
error notice to
the author.
Return it to
the author.
Forward
e-mail to the
following
e-mail
address.
Request Delivery
Confirmation
*3
Specify whether to request delivery status notification
(DSN) or message disposition notification (MDN)
when sending e-mail. Select [ON] to request delivery
confirmation, or [OFF] to not request it.
The delivery confirmation that can be set is indicated
below.
• Delivery Status Notication (DSN)
• Message Disposition Notication (MDN)
Delivery
Status
Notification
(DSN)
ON
OFF
Message
Disposition
Notification
(MDN)
ON
OFF

1
2
3
OfficeBridge Administrator Settings
Setting the Connection Environment 3-69
Setting Description Settings
Response to
MDN Request
*4
Set whether to return a message disposition notification
(MDN) when e-mail is received with an MDN request.
Never send a
MDN.
Always send a
MDN.
Allow reply
to:
If you select “Always send a MDN.”, you can specify to
return an MDN only for messages received from the
specified e-mail addresses or domain names.
You can register up to five e-mail addresses or domain
names to allow to reply to.
If nothing is registered in the list, an MDN is sent for all
e-mail addresses or domain names.
<To add an e-mail address or domain name>
Enter the e-mail address or domain name in the entry
box, and click [Add].
<To delete an IP address or domain name>
Select the e-mail address or domain name to delete, then
click [Delete]. To select all the registered e-mail address
and domain name, chick [Select All].
50 characters
(0 - 9, A - z, @,
., -, _)
Response to
Fax Forwarding
Request
*5
Specify whether or not to accept a fax forwarding request,
if any, for a received e-mail message.
Reject the
forwarding
request.
Accept the
forwarding
request
Forwarding
Result:
If you select “Accept the forwarding request”, specify
whether to notify the sender of the fax forwarding result.
Send to
author.
Do not send.
E-mail
address
or domain
name that
will accept
forwarded
transmissions
If you select “Send to author.”, you can specify to forward
faxes only for forwarding requests received from the
specified e-mail addresses or domain names. You can
register up to five e-mail addresses or domain names to
allow forwarding requests for.
If nothing is registered in the list, an MDN is sent for all
e-mail addresses or domain names.
<To add an e-mail address or domain name>
Enter the e-mail address or domain name in the entry
box, and click [Add].
<To delete an IP address or domain name>
Select the e-mail address or domain name to delete, then
click [Delete]. To select all the registered e-mail address
and domain name, chick [Select All].
50 characters
(0 to 9, A - z, @,
., -, _)
*1 Select “TIFF-S (T.37 Simple Mode)” when the document size is A4 or smaller and the
resolution is 200 dpi or below. Select “TIFF-F (Expand Mode)” when the document size
is larger than A4 or the resolution is above 200 dpi.
*2 If e-mail is broadcast in large volumes to multiple addresses, some servers may not
accept the e-mail transmissions. If this happens, select “Don't show any recipients.”.
With this selected, the destination information is not written in the e-mail.
*3 Depending on the mail server or the mail software on the receiving side, there may be
no response to delivery confirmation or reading confirmation requests.
*4 If you select “Always send a MDN.”, but do not add specific e-mail addresses or domains
to allow the response for, an MDN is sent for all e-mail addresses.
*5 If you select “Accept the forwarding request.”, but do not add specific e-mail addresses
or domains to allow forwarding requests for, fax forwarding is performed for all e-mail
addresses.
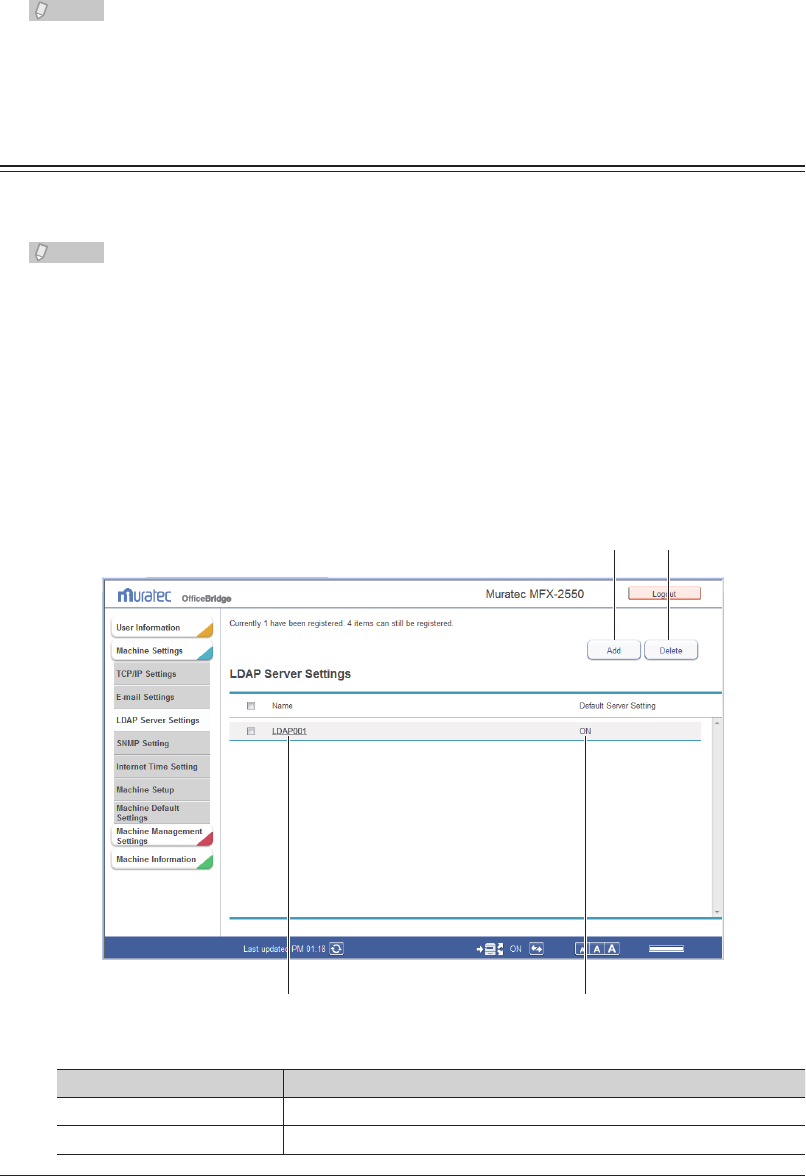
3-70 Setting the Connection Environment
Click [Save].
5
The display returns to the “E-mail Settings” list screen.•
Press [Back] to cancel specifying the optional e-mail settings and return to the “E-mail •
Settings” list screen.
Note
Underlined values are the default settings specified at the time of shipment.•
Click [Initialize] to restore the default settings.•
Setting the Directory Database Environment
Set the environment for searching an Lightweight Directory Access Protocol (LDAP)
server on the machine or in OfficeBridge.
Note
The settings of LDAP server can also be specified from the control panel of the
machine. For details, refer to Chapter 2, “Specifying the Network Settings” in the
Administrator's Guide.
“LDAP Server Settings” List Screen
The “LDAP Server Settings” list screen displays a list of the registered LDAP server
settings.
On this screen you can register new LDAP server search settings and change existing
settings.
1 2
34
Button
Button name Description
1 [Add] Registers new LDAP server search settings.
2 [Delete] Deletes LDAP server search settings.

1
2
3
OfficeBridge Administrator Settings
Setting the Connection Environment 3-71
List Items
Item Description
3 Name Displays the name registered.
If you do not register a name, the LDAP server address is displayed
after it is registered.
4 Default Server Setting You can change the default server used for LDAP searching.
“ON” indicates that the server is enabled, and “OFF” indicates that
the server is disabled. Click to switch the default server setting.
Only one server can be enabled.
Registering New LDAP Server Search Settings
You can register new LDAP server search settings in OfficeBridge.
Register LDAP server search settings on the “LDAP Server Settings” screen.
Note
Up to 5 server settings can be registered.
Click [Admin Login] in OfficeBridge, and log in.
1
(See page 2-7.)
This function may also be available on Guest and User login screen, depending on user policy
settings.
Click [Machine Settings], and then [LDAP Server Settings].
2
The “LDAP Server Settings” list screen is displayed.
Click [Add].
3
The “Registration” screen is displayed.
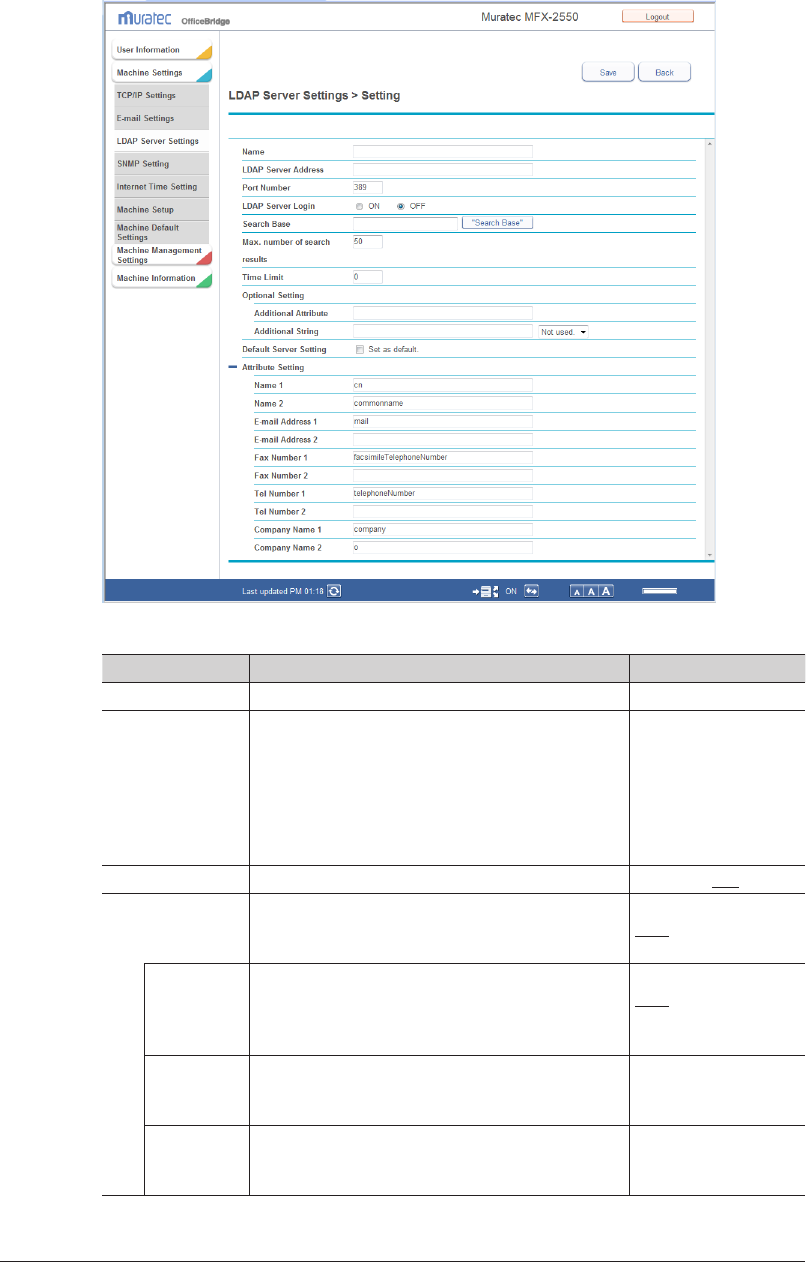
3-72 Setting the Connection Environment
Set the detailed information.
4
You can register the following items.
Setting Description Settings
Name Enter the name to set. 23 characters
LDAP Server
Address
Enter the name or IP address (IPv4 only) of the
LDAP server to set. This item is required.
For an LDAP server
name, 99 characters
Use the XXX.XXX.
XXX.XXX format for
an IP address. (Where
XXX is a number
between 0 and 255.)
Port Number Enter the port number of the LDAP server to set. 0 - 65535: 389
LDAP Server
Login
Set whether a login is required to access the
LDAP server. If you select “ON”, set OfficeBridge
User login, Account ID, and Password.
ON
OFF
OfficeBridge
User login
Set whether to log in using an account and
password registered in the user information. For
details, refer to “Registering Users”. (See page
3-5.)
ON
OFF
Account ID If “LDSP Server Login” is set to “ON” and “User
login” is set to “OFF”, enter the account to use for
logging in to the LDAP server.
49 characters
Password If “LDSP Server Login” is set to “ON” and “User
login” is set to “OFF”, enter the password to use
for logging in to the LDAP server.
29 characters
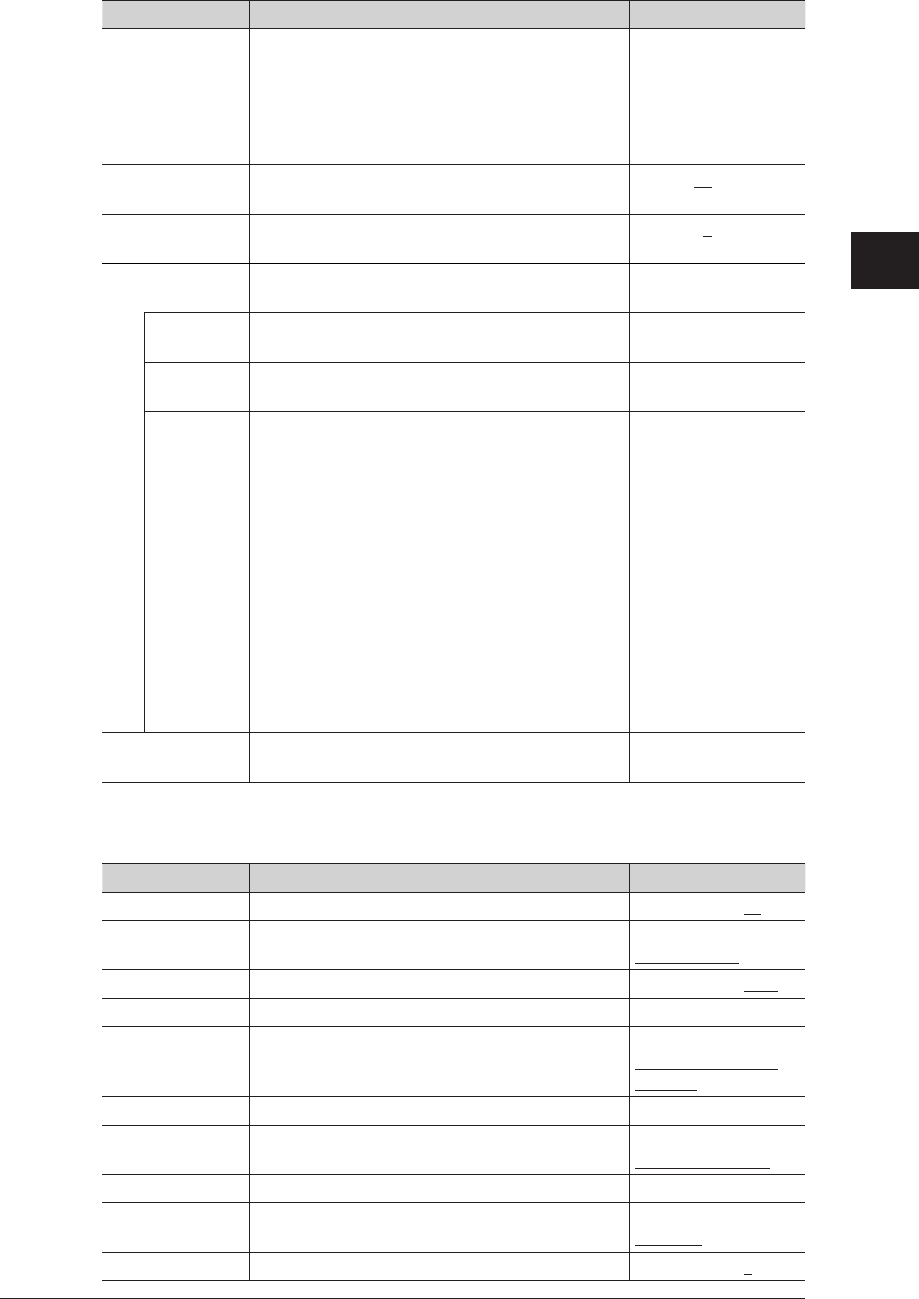
1
2
3
OfficeBridge Administrator Settings
Setting the Connection Environment 3-73
Setting Description Settings
Search Base Enter the starting search position in the
hierarchical structure of the LDAP server.
Searching is performed included all sub
directories under the starting search position.
Click [Search Base] to search for the search base
and automatically enter it in the entry box.
99 characters
Max. number of
search results
Enter the maximum number of search results. 1 - 100: 50
Time Limit Enter the maximum time to use for the search
process in seconds. Enter “0” to set no limit.
0 - 9999: 0
Optional Setting Specify the settings related to attributes used
when searching the LDAP server.
–
Additional
Attribute
Enter the attribute to add to the LDAP search. 49 characters
Additional
String
Enter the attribute value to add to the LDAP
search.
99 characters
Search
Parameter
Set the search parameter with the attribute in
“Additional String” set as the search item.
The search parameters you can use are indicated
below.
Any: Searches for items that include the
specified string.
Initial: Searches for items that start with the
specified string.
Final: Searches for items that end with the
specified string.
Equal: Searches for items that exactly match
the specified string.
Not used.: The string entered in the entry box is
ignored.
Description
Default Server
Setting
Select this to set the server as the default server
to use for LDAP searches.
–
Attribute Setting
These settings are displayed when you click [+].
Setting Description Settings
Name 1 Enter the filter for the name. 49 characters: cn
Name 2 Enter the filter for the name. 49 characters:
commonname
E-mail Address 1 Enter the filter for the e-mail address. 49 characters: mail
E-mail Address 2 Enter the filter for the e-mail address. 49 characters
Fax Number 1 Enter the filter for the fax number. 49 characters:
facsimileTelephone
Number
Fax Number 2 Enter the filter for the fax number. 49 characters
Tel Number 1 Enter the filter for the telephone number. 49 characters
telephoneNumber
Tel Number 2 Enter the filter for the telephone number. 49 characters
Company Name 1 Enter the filter for the company name. 49 characters:
company
Company Name 2 Enter the filter for the company name. 49 characters: o
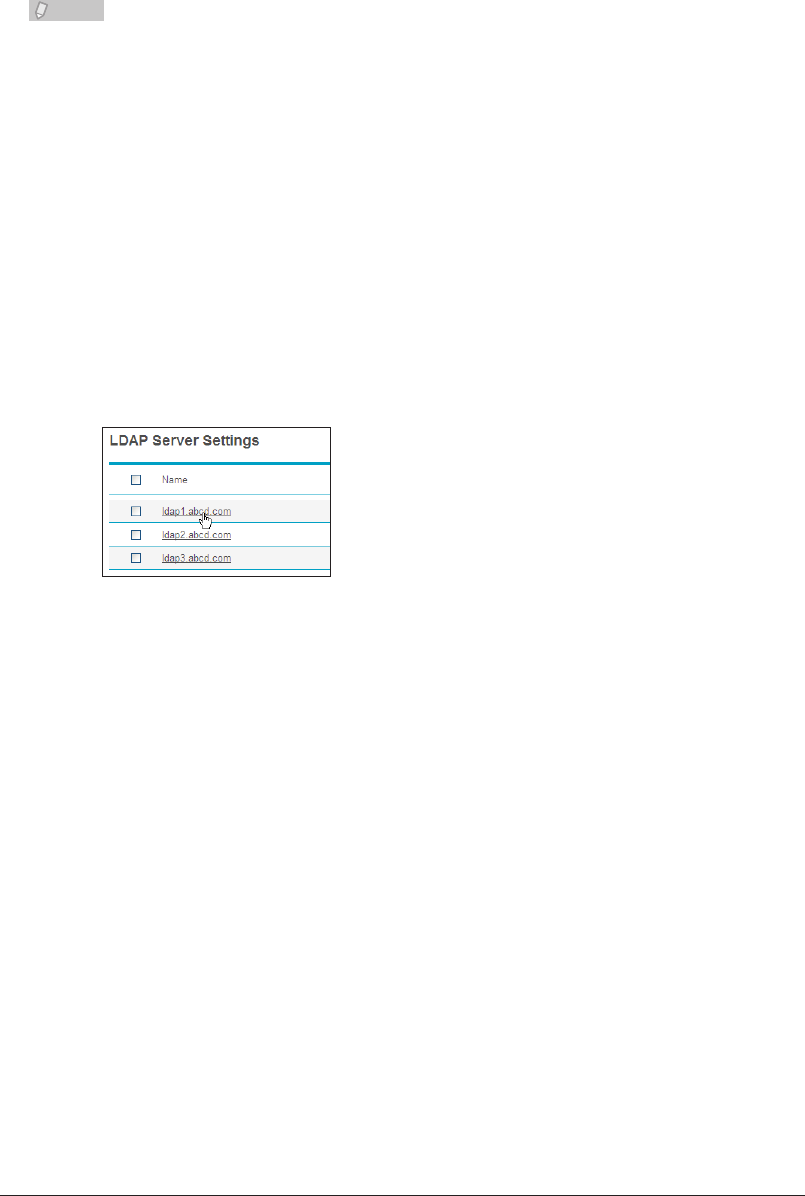
3-74 Setting the Connection Environment
Click [Save].
5
The display returns to the “LDAP Server Settings” list screen.•
Press [Back] to cancel specifying the LDAP server settings and return to the “LDAP Server •
Settings” list screen.
Note
Underlined values are the default settings specified at the time of shipment.
Changing LDAP Server Search Settings
You can change LDAP server search settings that have been registered.
Click [Admin Login] in OfficeBridge, and log in.
1
(See page 2-7.)
This function may also be available on Guest and User login screen, depending on user policy
settings.
Click [Machine Settings], and then [LDAP Server Settings].
2
The “LDAP Server Settings” list screen is displayed.
Click the name of the settings to change.
3
Change the detailed LDAP settings.
4
For details, refer to step 4 of “Registering New LDAP Server Search Settings”. (See page 3-72.)
Click [Save].
5
The settings are changed, and the display returns to the “LDAP Server Settings” list screen.•
Press [Back] to cancel changing the LDAP server settings and return to the “LDAP Server •
Settings” list screen.
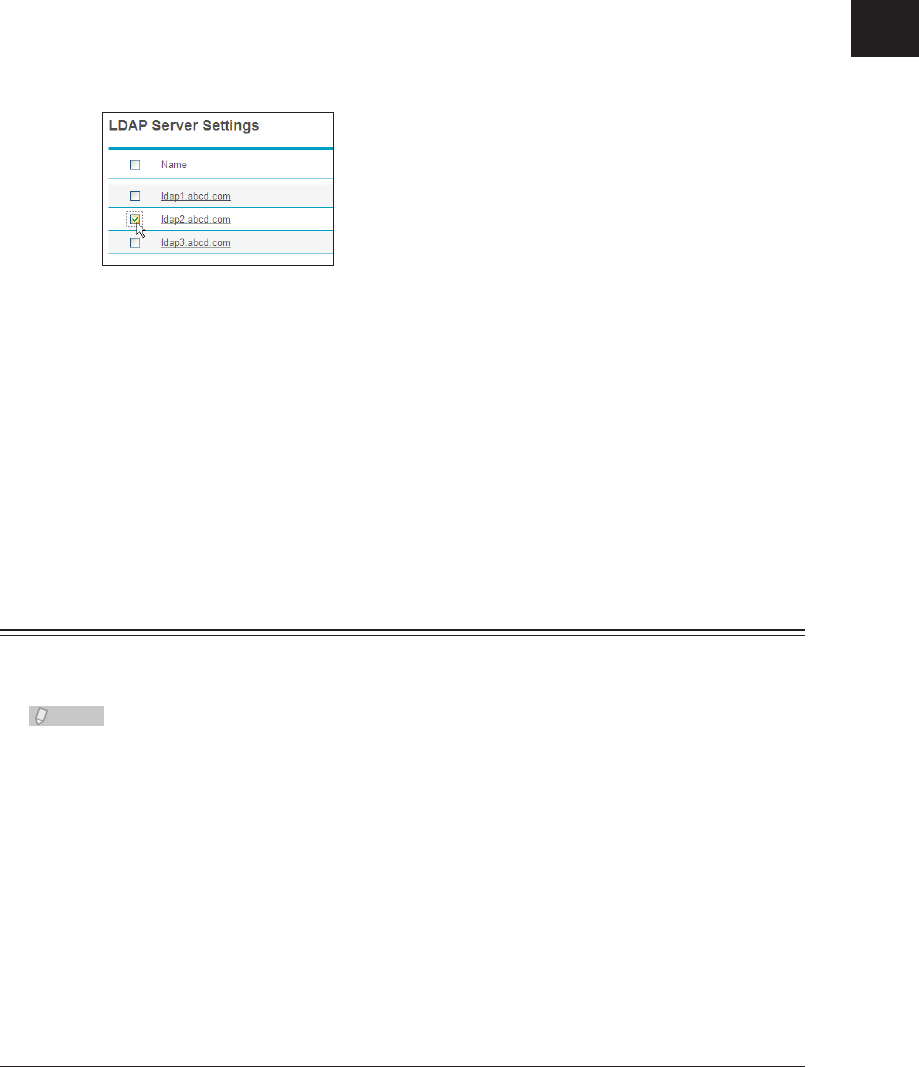
1
2
3
OfficeBridge Administrator Settings
Setting the Connection Environment 3-75
Deleting LDAP Server Search Settings
You can delete unnecessary LDAP server search settings from the list screen.
Click [Admin Login] in OfficeBridge, and log in.
1
(See page 2-7.)
This function may also be available on Guest and User login screen, depending on user policy
settings.
Click [Machine Settings], and then [LDAP Server Settings].
2
The “LDAP Server Settings” list screen is displayed.
Select the checkbox of the LDAP server search settings you want to delete.
3
To select all the displayed LDAP server search settings, select the item name field checkbox.•
Click the same checkbox to deselect the items.•
Click [Delete].
4
A message confirming that you want to delete the LDAP server search settings is displayed.
The message “Is it OK to delete the selected item(s)?” is displayed. Click [OK] to
5
delete the settings.
The selected LDAP server search settings are deleted.
Setting Communication Device Monitoring / Control
You can set the SNMP manager environment for monitoring via the network the status of
devices connected to the network.
Note
This function is not available for Windows 2000.
Click [Admin Login] in OfficeBridge, and log in.
1
(See page 2-7.)
This function may also be available on Guest and User login screen, depending on user policy
settings.
Click [Machine Settings], and then [SNMP Settings].
2
The “SNMP Settings” screen is displayed.
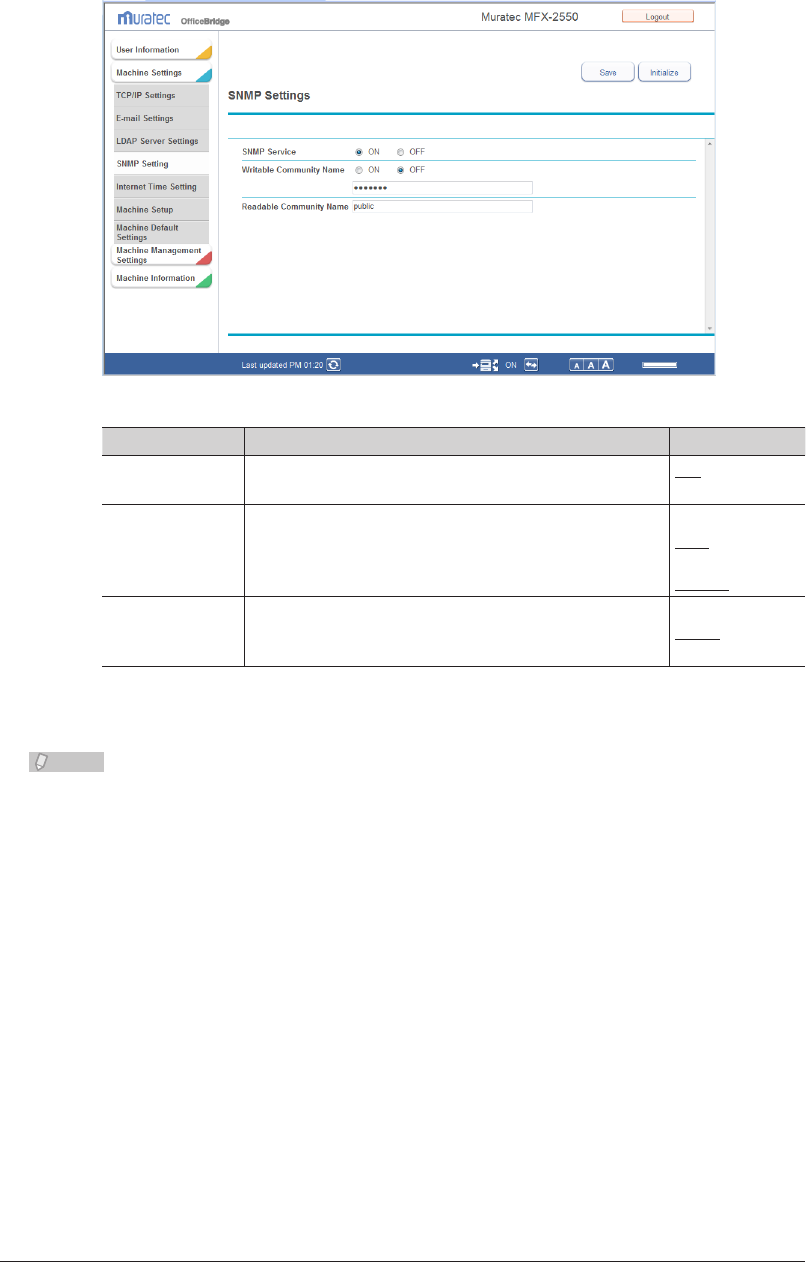
3-76 Setting the Connection Environment
Set the detailed information.
3
You can register the following items.
Setting Description Settings
SNMP Service Set whether to enable or disable the SNMP setting.
Set “ON” to enable the setting, or “OFF” to disable it.
ON
OFF
Writable
Community
Name
Enter a community name that the dedicated read/write
SNMP server will accept. This item is required.
Set “ON” to enable the setting, or “OFF” to disable it.
ON
OFF
20 characters:
private
Readable
Community
Name
Enter a community name that the dedicated read
SNMP server will accept. This item is required.
20 characters:
public
Click [Save].
4
Note
Underlined values are the default settings specified at the time of shipment.•
Click [Initialize] to restore the default settings.•
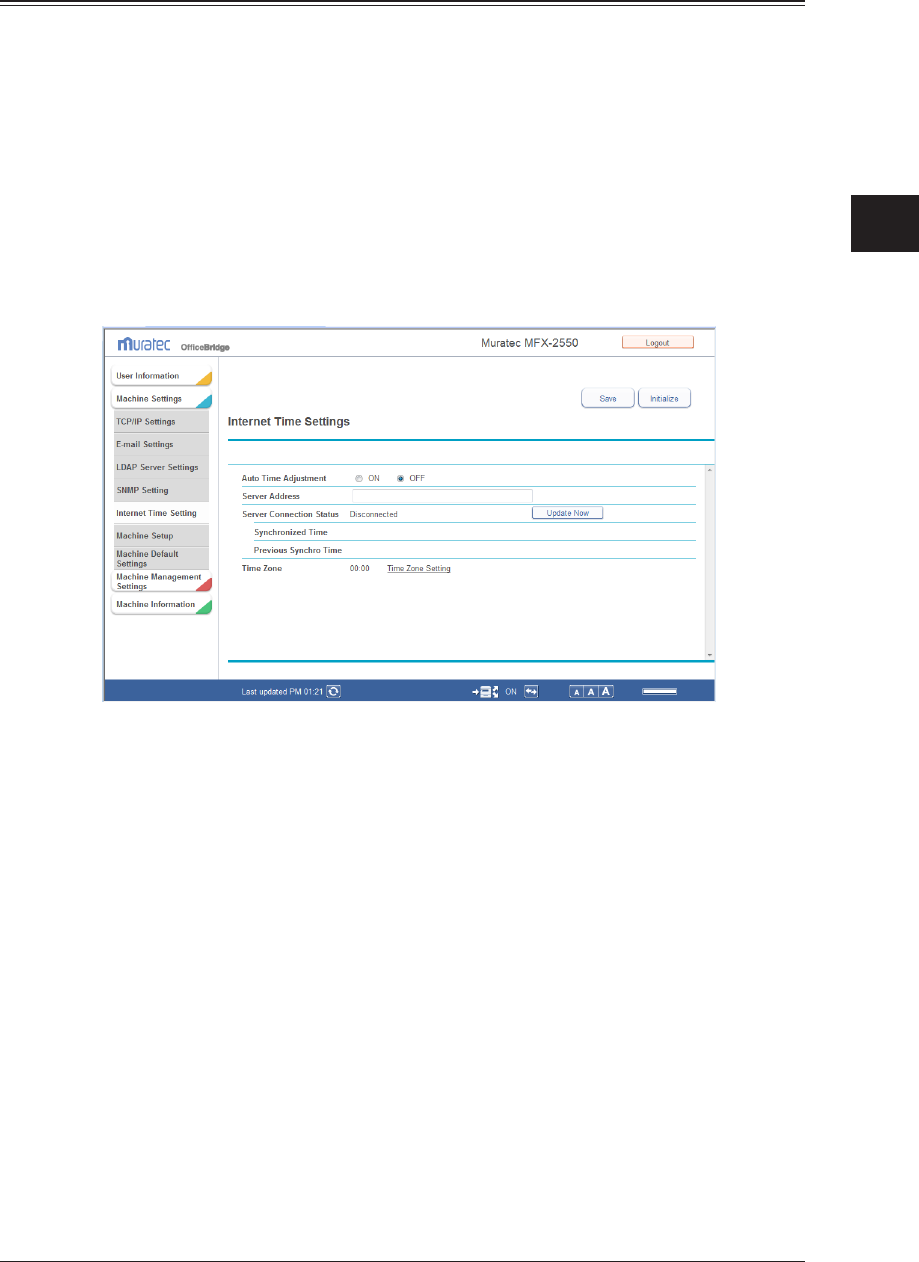
1
2
3
OfficeBridge Administrator Settings
Setting the Connection Environment 3-77
Setting an Internet Time
You can automatically synchronize the system clock with an internet time server.
Click [Admin Login] in OfficeBridge, and log in.
1
(See page 2-7.)
This function may also be available on Guest and User login screen, depending on user policy
settings.
Click [Machine Settings], and then [Internet Time Settings].
2
The “Internet Time Settings” screen is displayed.
Set the detailed information.
3

3-78 Setting the Connection Environment
You can register the following items.
Setting Description Settings
Auto Time
Adjustment
Set whether to enable or disable the internet
time setting.
Set “ON” to enable the setting, or “OFF” to
disable it.
ON
OFF
Server Address Enter the server name or server address of the
time server.
For a server name, 40
characters.
Use the XXX.XXX.XXX.
XXX format for a server
address.
(Where XXX is a
number between 0 and
255.)
Server
Connection
Status
Displays the current connection status of
the internet time server (“Connecting”,
“Disconnected”, “Processing”, or an error).
Click [Update Now] to synchronize with the
time server.
−
Synchronized
Time
Displays the time when the synchronization
was performed.
−
Previous Synchro
Time
Displays the time when the synchronization
was performed last time.
−
Time Zone Displays the time zone set in the machine.
Click “Time Zone Setting” to display the setting
screen.
−
Click [Save].
4
Note
Underlined values are the default settings specified at the time of shipment.•
Click [Initialize] to restore the default settings..•
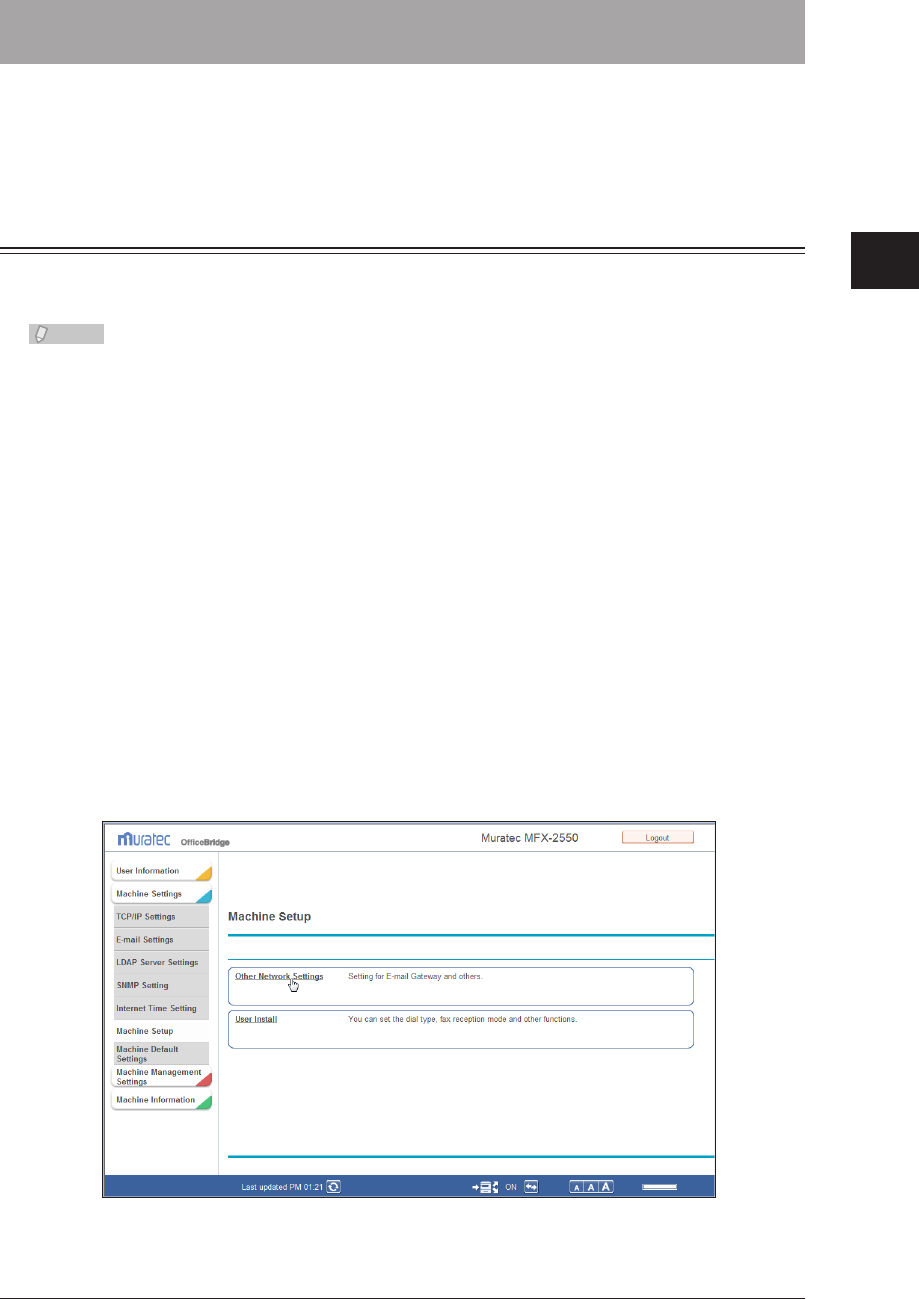
1
2
3
OfficeBridge Administrator Settings
Specifying Device Settings 3-79
Specifying Device Settings
Settings required for using the machine, such as the automatic logout time and the e-mail
gateway settings can be set from OfficeBridge. The same settings can be set from the
control panel of the machine.
Specifying Other Network Settings
You can set the automatic logout time on the control panel and the e-mail gateway
settings, and delete the printer information for Scan to Printer.
Note
The e-mail gateway function enables you to set a prefix and suffix in advance to •
reduce the operations required when transmitting faxes. When transmitting with a
fax number set, the prefix and suffix are automatically merged with the number to
transmit an e-mail.
The network settings can also be specified from the control panel of the machine. For •
details, refer to Chapter 2, “Specifying the Network Settings” in the Administrator's
Guide.
Click [Admin Login] in OfficeBridge, and log in.
1
(See page 2-7.)
This function may also be available on Guest and User login screen, depending on user policy
settings.
Click [Machine Settings], and then [Machine Setup].
2
The “Machine Setup” list screen is displayed.
Click “Other Network Settings”.
3
The “Other Network Settings” screen is displayed.
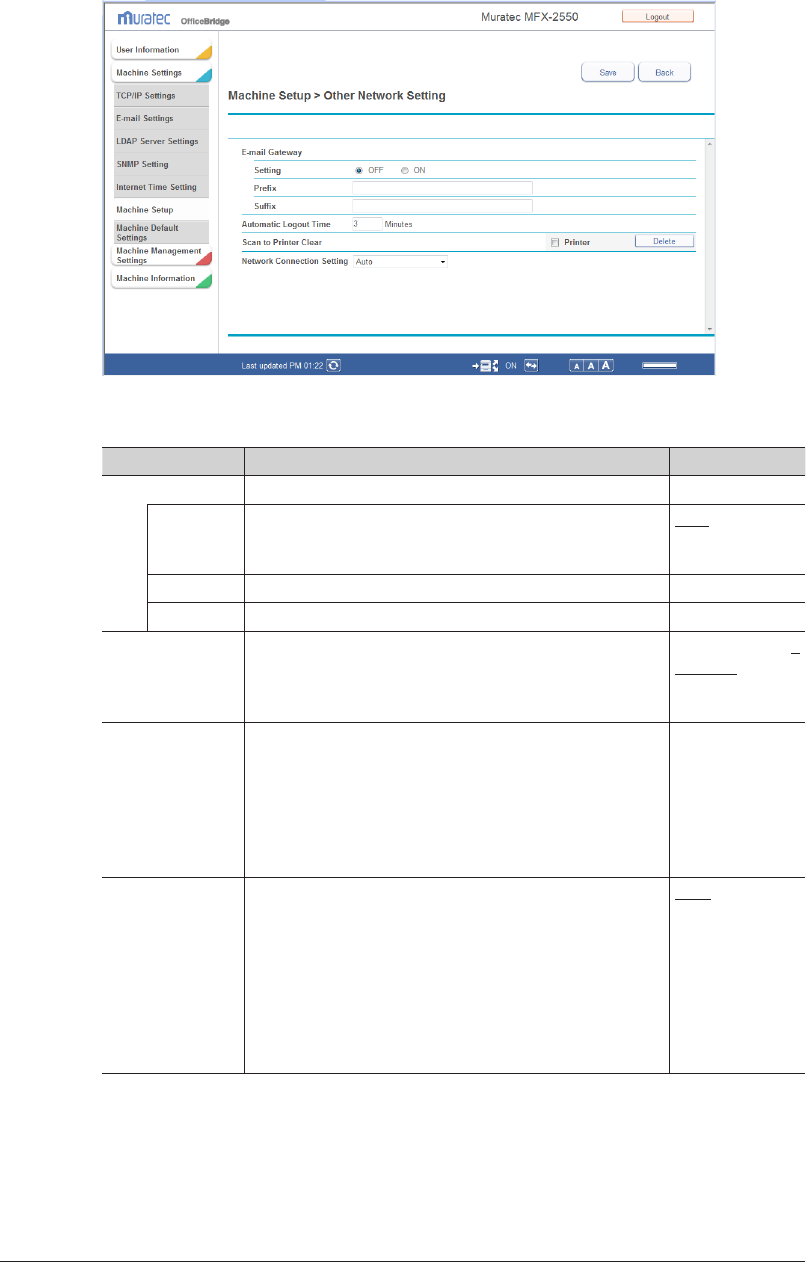
3-80 Specifying Device Settings
Set the detailed information.
4
You can register the following items.
Setting Description Settings
E-mail Gateway
*1
Specify the settings for the e-mail gateway function. −
Setting Set whether to enable or disable the e-mail gateway
function.
Set “ON” to enable the function, or “OFF” to disable it.
OFF
ON
Prefix Enter the prefix for the local part of the e-mail address. 32 characters
Suffix Enter the suffix for the local part of the e-mail address. 48 characters
Automatic
Logout Time
You can set the time it takes before the machine
automatically logs out the user if no operations have
been performed on the machine. This is the logout
setting on the control panel.
1 - 10 Minutes: 3
Minutes
Scan to Printer
Clear
You can delete the printer information registered in the
Scan to Print Monitor.
• Select the checkbox for the printer information to
delete, and click [Delete].
• To select all the displayed printer information, select
the “Printer” checkbox.
• Click the same checkbox to deselect the item.
−
Network
Connection
Setting
Switches the communication speed and communication
method. Change this setting when errors occur during
network communication.
Auto
100Mbps - Full
Duplex
100Mbps - Half
Duplex
10Mbps - Full
Duplex
10Mbps - Half
Duplex
*1 Make sure the total number of characters for the prefix, fax number, and suffix is
within 50 characters.
Click [Save].
5
The display returns to the “Machine Setup” list screen.
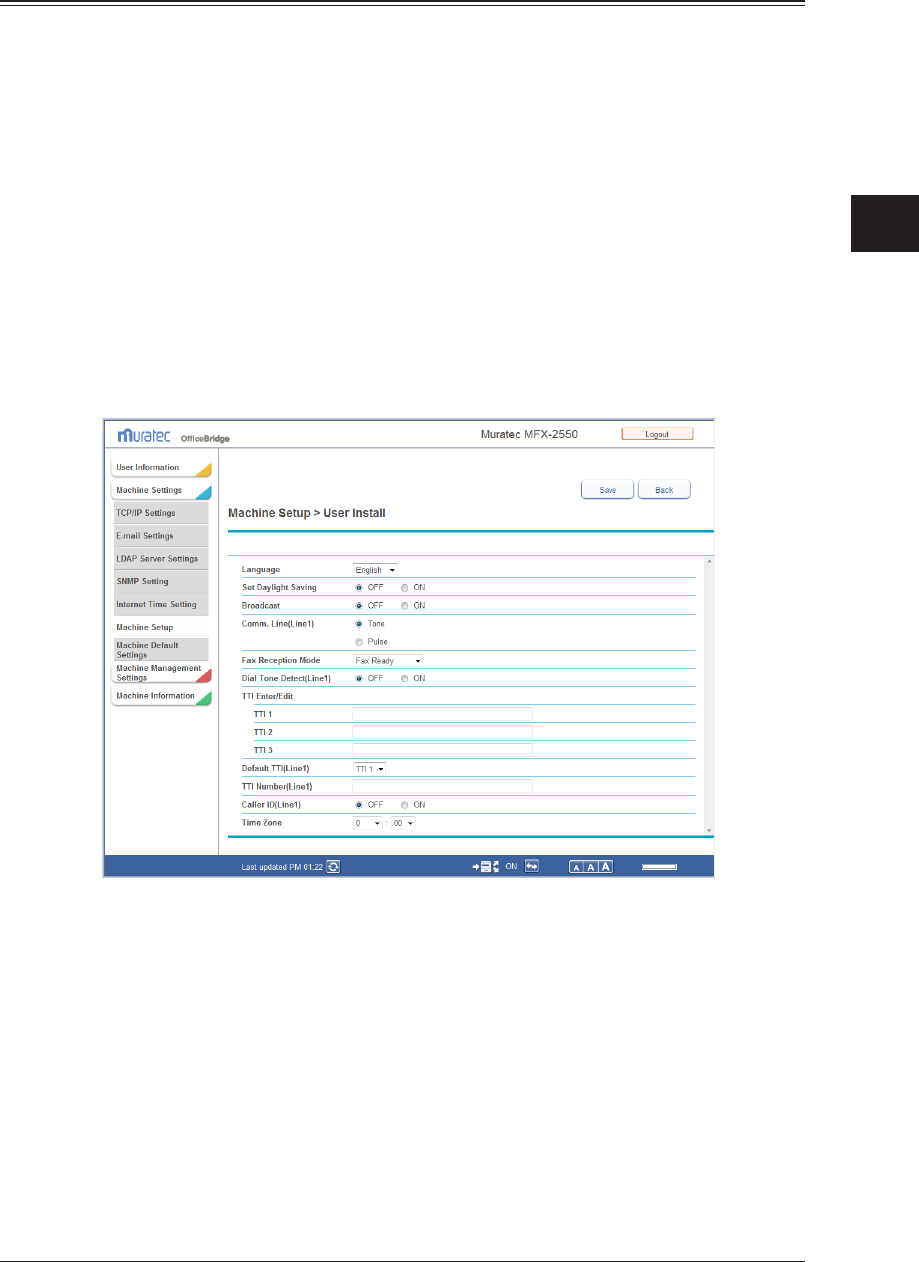
1
2
3
OfficeBridge Administrator Settings
Specifying Device Settings 3-81
Specifying User Install Mode Settings
You can specify the settings required for using the machine.
Click [Admin Login] in OfficeBridge, and log in.
1
(See page 2-7.)
This function may also be available on Guest and User login screen, depending on user policy
settings.
[
2
Click [Machine Settings], and then [Machine Setup].
The “Machine Setup” list screen is displayed.
Click “User Install”.
3
The “User Install” screen is displayed.
Set the detailed information.
4
For details on the settings, refer to Chapter 3, “Initial Setup (User Install)” in the Scanner and
Fax Guide.
Click [Save].
5
The display returns to the “Machine Setup” list screen.

3-82 Specifying Default Machine Settings
Specifying Default Machine Settings
You can set the default values for each function, the ready screen, and the energy save
mode.
The default values are those used when you press <Reset> to return to the ready screen.
Changing the default values of often-used functions can shorten the time required to
adjust settings.
Settings
You can set the default settings for the copy, scanner, e-mail, fax, and printer functions.
Click [Admin Login] in OfficeBridge, and log in.
1
(See page 2-7.)
This function may also be available on Guest and User login screen, depending on user policy
settings.
Click [Machine Settings], and then [Machine Default Settings].
2
Click the function you want to specify the default settings for.
3
Specify the default settings.
4
Click [Save].
5
The display returns to the “Machine Default Settings” list screen.•
Press [Back] to cancel registering the default settings for the copy function and return to the •
“Machine Default Settings” list screen.
Regarding Settings
Refer to the other manuals for details on the settings for each function.
Function Reference manual and chapter
Copy Settings Chapter 3, “Device Settings” in the Copier Guide
Scanner Settings Chapter 7, “Specifying Default Settings” in the Scanner and Fax Guide
E-mail Settings Chapter 7, “Specifying Default Settings” in the Scanner and Fax Guide
Fax Settings Chapter 7, “Specifying Default Settings” in the Scanner and Fax Guide
Printer Settings Chapter 9, “Setting the Print Controller” and “Setting the Auto Deletion Time
for Security Printing” in the Printer Guide.
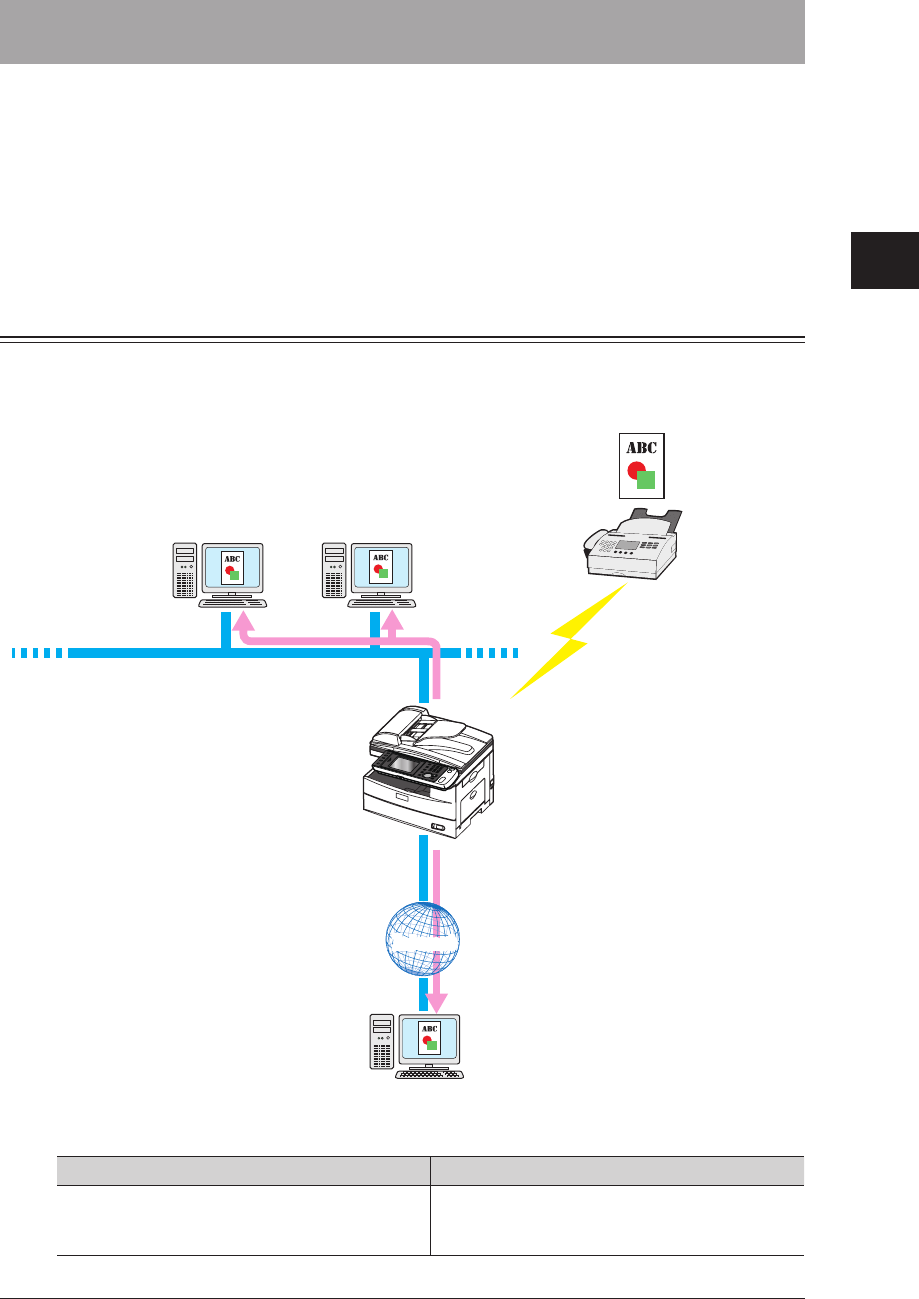
1
2
3
OfficeBridge Administrator Settings
Automatically Distributing Received Documents 3-83
Automatically Distributing Received Documents
In OfficeBridge, you can specify conditions for automatically distributing received fax and
internet fax documents to a specified location (user folders or the shared folder, etc.)
For example, you can set to automatically distribute documents in the following cases:
Forwarding a fax document received from a supplier to multiple staff members.•
Forwarding a fax document transmitted to the headquarters from a supplier to branch •
offices by e-mail, while simultaneously printing it at the headquarters.
Auto Distribution Function
The “auto distribution function” automatically distributes received faxes or internet faxes.
You can specify auto distribution settings to distribute received faxes to a specified
location.
Mr. A Ms. B
Ms. C
• Auto distribution settings specified
(sender: Company ABC)
• “Reception” distribution (Mr. A)
• “E-mail” distribution (Ms. C)
• “Shared Reception” distribution
Sender:
Company ABC
Shared reception
Reception
Internet
Internet
To perform distribution, it is necessary to set “conditions” and a “destination”.
Destination Conditions
User Box, Shared Rx Box, Deleted Documents
Box, destinations registered in the address book,
shared folders
Destination fax numbers, e-mail (addresses,
subjects)

3-84 Automatically Distributing Received Documents
Setting Auto Distribution (General Settings)
You can specify the general settings for auto distribution.
Note
To distributing received fax and internet fax documents to a specified location, set also
individual settings. (See page 3-87.)
Click [Admin Login] in OfficeBridge, and log in.
1
(See page 2-7.)
This function may also be available on Guest and User login screen, depending on user policy
settings.
Click [Machine Management Settings].
2
1 2 3
45
6
7
Setting Description
1 Add Registers new auto distribution settings (Individual). (See page 3-87.)
2 Duplicate Copies the auto distribution settings. (See page 3-96.)
3 Delete Deletes the auto distribution settings selected from the list. (See page 3-97.)
4 Name Displays the registered auto distribution settings name.
Click this to display the “Auto Distribution Settings” screen, and edit the
registered auto distribution settings.
5 Status Displays whether the auto distribution settings are enabled or disabled.
If the auto distribution settings are enabled, “ON” is displayed; if they are
disabled, “OFF” is displayed. Click to enable or disable a setting.
6 General Enables and disables auto distribution, and sets the operation to perform
when error occurs during the distribution process.
7 Test Mode Specify a fax number or e-mail address to display a list of the corresponding
auto distribution settings.
This enables you to check if the auto distribution is set correctly.
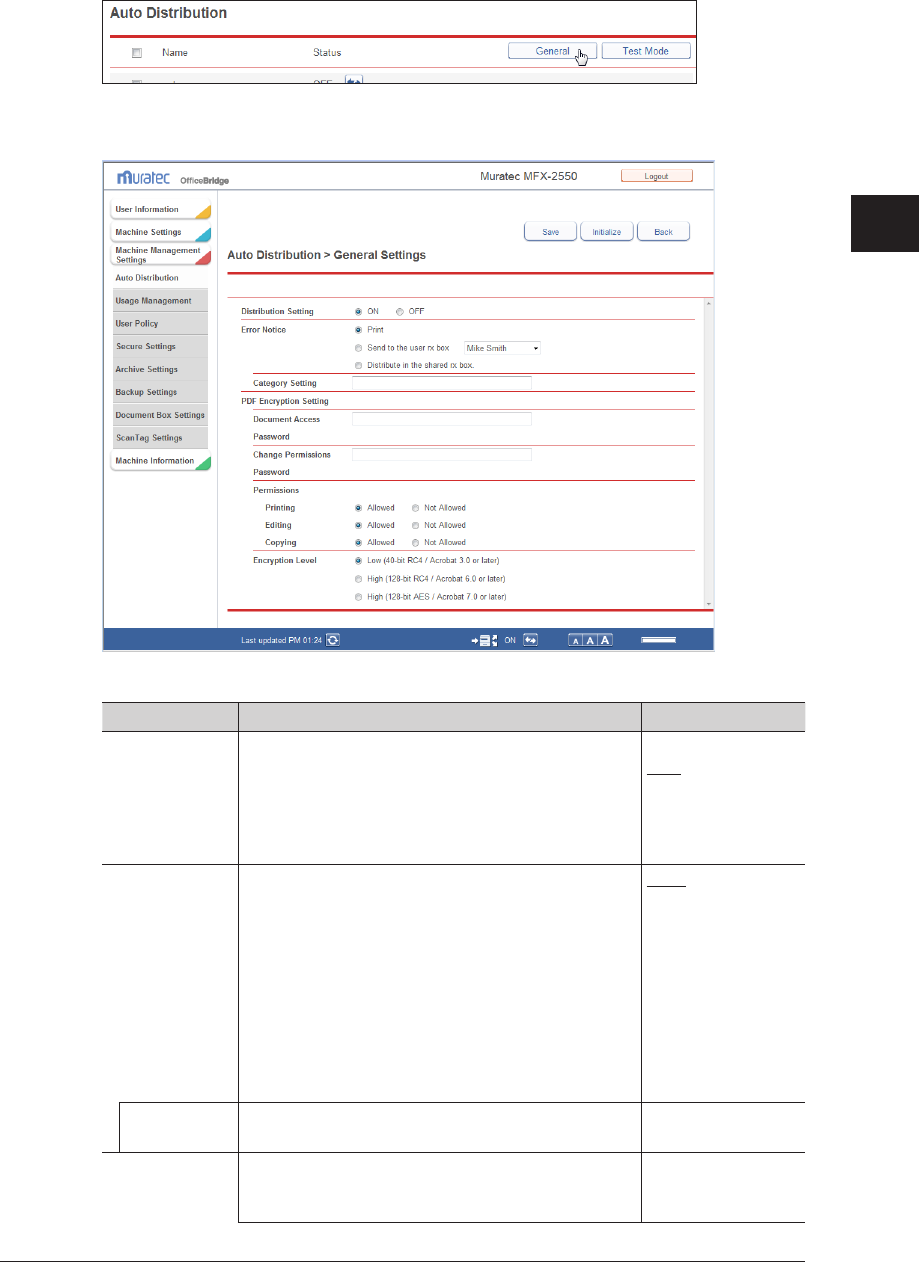
1
2
3
OfficeBridge Administrator Settings
Automatically Distributing Received Documents 3-85
Click [General].
3
Set the distribution information.
4
You can register the following items.
Setting Description Settings
Distribution
Setting
Set whether to enable or disable the auto
distribution setting.
Set “ON” to enable the setting, or “OFF” to disable
it. The ON/OFF status of the distribution setting is
linked to the “auto distribution settings switch” in
the footer area.
ON
OFF
Error Notice Select the procedure to perform when a distribution
error occurs.
Print: Prints the received document from the
machine.
Send to the user rx box:
Distributes the received document to the
specified user. Select a user from the pull-
down menu.
Distribute in the shared rx box.:
Distributes the received document to the
shared reception box.
Print
Send to the user rx
box
Distribute in the
shared rx box.
Category
Setting
Enter the document category name to display in
document lists.
20 characters
PDF Encryption
Setting
Enter the password to use when encrypting a PDF.
This setting is enabled when you have selected
encrypted PDF for the file format. (See page 3-90.)
−
3-86 Automatically Distributing Received Documents
Setting Description Settings
Document
Access
Password
Enter the password (user password) required to
open the encrypted PDF.
28 characters
Change
Permissions
Password
Enter the password (owner password) required to
change the permission settings of the encrypted
PDF.
28 characters
Permissions Set the printing, editing, and copying permissions. Printing:
Allowed
Not allowed
Editing:
Allowed
Not allowed
Copying:
Allowed
Not allowed
Encryption
Level
Set the Acrobat version compatibility.
Low 40-bit RC4: Compatible with Acrobat 3.0 or
later (password only)
High 128-bit RC4:Compatible with Acrobat 6.0, or
later
(password or digital ID)
High 128-bit AES: Compatible with Acrobat 7.0 or
later (password or digital ID)
Low (40-bit RC4 /
Acrobat 3.0 or later)
High (128-bit RC4 /
Acrobat 6.0 or later)
High (128-bit AES /
Acrobat 7.0 or later)
Click [Save].
5
The display returns to the “Auto Distribution” settings list screen.•
Press [Back] to cancel registering the distribution settings and return to the “Auto •
Distribution” settings list screen.
Note
Underlined values are the default settings specified at the time of shipment.
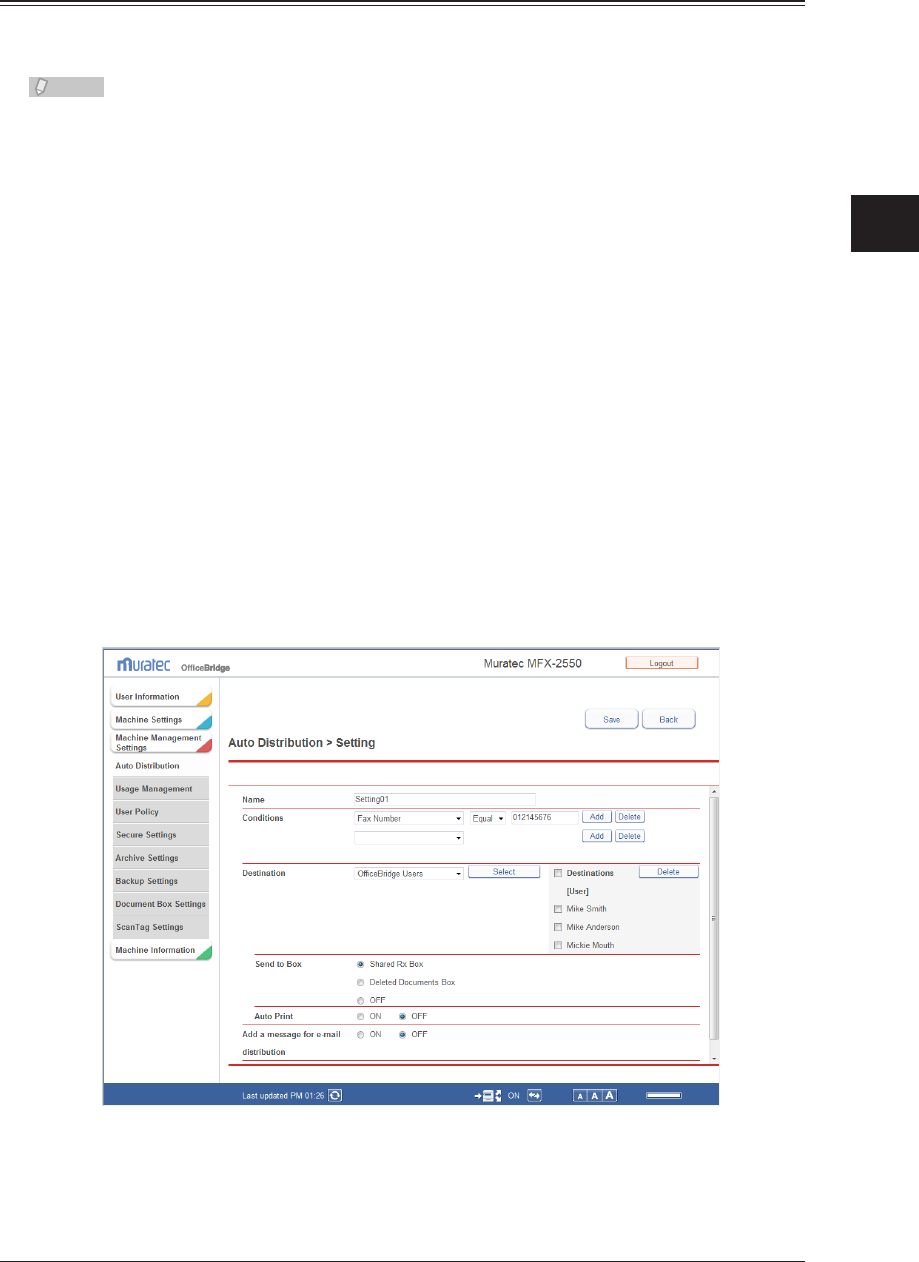
1
2
3
OfficeBridge Administrator Settings
Automatically Distributing Received Documents 3-87
Setting Auto Distribution (Individual Settings)
You can specify the individual settings for automatic distribution. Up to 200 auto
distribution settings destinations can be registered.
Note
The auto distribution settings can also be specified from the control panel of the
machine. For details, refer to Chapter 4, “Useful Reception Functions” in the Scanner
and Fax Guide. However, you cannot change the settings from the control panel of the
machine in the following cases.
When all received faxes, specified fax numbers, or all faxes except those with an •
F-code set are specified for the forwarding conditions
If fax destinations or all except print are set for the forwarding conditions•
If a year, month, and day are specified for the forwarding period•
Click [Admin Login] in OfficeBridge, and log in.
1
(See page 2-7.)
This function may also be available on Guest and User login screen, depending on user policy
settings.
Click [Machine Management Settings].
2
Click [Add] on the “Auto Distribution” settings list screen.
3
The “Auto Distribution” settings screen is displayed.
Set the distribution information.
4

3-88 Automatically Distributing Received Documents
You can register the following items.
Basic Settings
Setting Description Settings
Name Enter a name for the auto distribution settings. This
item is required.
30 characters
Conditions
*1
Condition
Settings
Select the condition to use for distribution from the
pull-down menu.
You can select the following conditions.
All incoming fax documents:
Targets all incoming fax documents.
Fax Number:
Targets documents sent by the specified fax
number.
Unknown Sender/Junk fax:
Targets documents sent by the fax numbers not
registered in the address book.
Fax No. matches in Adr book:
Targets documents sent by the fax numbers
registered in the address book.
All e-mail receptions:
Targets all incoming e-mail.
Specified e-mail adr. (From):
Targets documents sent by the specified e-mail
address (From).
Unknown Sender/Junk mail:
Targets documents sent by e-mail addresses not
registered in the address book.
Mail adr matches in Adr book:
Targets documents sent by e-mail addresses
registered in the address book.
Subject:
Targets documents sent with the specified subject.
F-Code:
Targets documents received with the specified
subaddress. A password can be set, as necessary.
24 digits
(0~9, *, #)
50 characters
80 characters
Sub-Address:
20 digits
Password: 20
digits (* and
# can also be
used)
Search
Parameter
Select the search parameter from the pull-down menu.
The search parameters you can select are indicated
below.
Equal: Searches for items that exactly match the
specified string.
Initial: Searches for items that start with the specified
string.
Final: Searches for items that end with the specified
string.
Any: Searches for items that include the specified
string.
–
[Add] Adds the distribution condition. –
[Delete] Deletes the distribution condition. –
1
2
3
OfficeBridge Administrator Settings
Automatically Distributing Received Documents 3-89
Setting Description Settings
Destination
*2
Destination See “Specifying Distribution Destinations” and
destinations. (See page 3-90.)
–
Destinations Select “OfficeBridge Users”, “Address Book”, or “Folder”
from the pull-down menu, and click [Select]. The
selection screen for each destination is displayed. (See
page 3-90.)
Displays a list of the destinations set in “Destinations”.
Note
• To delete a destination from the destination list,
select the checkbox for the destination, and click
[Delete].
• To select all the destinations displayed in the
destination list, select the top checkbox.
• Click the same checkbox to deselect the item.
–
Send to Box Select “Shared Rx Box”, “Deleted Documents Box”, or
“OFF”.
Shared Rx Box
Deleted
Documents Box
OFF
Auto Print Prints the received fax or internet fax document from
the machine.
Select [ON] to print the document, or [OFF] to not
print it.
ON
OFF
Add a message for
e-mail distribution
Adds a message explaining the distribution.
Select [ON] to add a message, or [OFF] to not.
ON
OFF
*1 Up to three distribution conditions can be combined, depending on the settings.
*2 One destination must be set.
Advanced Settings
These settings are displayed when you click [+].
Setting Description Settings
Priority
*1
Select “Low”, “Middle”, or “High” for the priority of the
distribution settings.
Low
Middle
High
Setting Set whether to enable or disable the individual auto
distribution setting. Set “ON” to enable the setting, or
“OFF” to disable it.
ON
OFF
Attachment File
Format
*2
Specify the file format for distributed documents. –
E-mail You can set the following file formats for e-mail
attachment files.
PDF: Distributes the document as a PDF format
attachment file.
TIFF-S: Distributes the document as a TIFF-S format
attachment file.
TIFF: Distributes the document as a TIFF format
attachment file.
PDF
TIFF-S
TIFF

3-90 Automatically Distributing Received Documents
Setting Description Settings
Folder You can set the following file formats for saved files.
PDF: Distributes the document as a PDF format
saved file.
PDF w/Password:
Distributes the document as an encrypted PDF
format saved file.
TIFF: Distributes the document as a TIFF format
saved file.
PDF
PDF w/
Password
TIFF
Distribution
Schedule
Set the distribution schedule. Always
Year/Month/
Date
Specify the
forwarding day
and time
Always Always performs distribution. –
Year/Month/Date Specify a date to start forwarding and a date to end
forwarding to only execute auto distribution during
that period.
Year:
1992 - 2036
Month: 1 - 12
Date: 1 - 31
Specify the
forwarding day
and time
Executes auto distribution on the specified day of the
week during the start time and end time. (You can
specify multiple days of the week.)
You can set to execute auto distribution for a single
week or every week.
Day of week:
Mon to Sun
AM, PM
hr: 1 - 12
min: 0 - 59
*1 The distribution conditions with the highest priority are applied first. If the distribution
conditions of the distribution settings match, distribution is not executed for the
following distribution conditions. For example, if a distribution condition with “high”
priority matches, distribution will not be performed for distribution conditions with
“middle” or “low” priority.
*2 This setting is enabled when the distribution destination is an e-mail address or the
shared folder.
Click [Save].
5
The display returns to the “Auto Distribution” settings list screen.•
Press [Back] to cancel registering the distribution settings and return to the “Auto •
Distribution” settings list screen.
Note
To enable distribution, set the• “Distribution Setting” to ON in general setting. (See
page 3-84.)
Underlined values are the default settings specified at the time of shipment.•
Specifying Distribution Destinations
Specifying “OfficeBridge Users”
The names of all the users registered in OfficeBridge are displayed in the user name list
on the “Select User” screen.
Users can also be set as groups. If you select “Group” in the pull-down menu, the user
name list changes to the group name list.
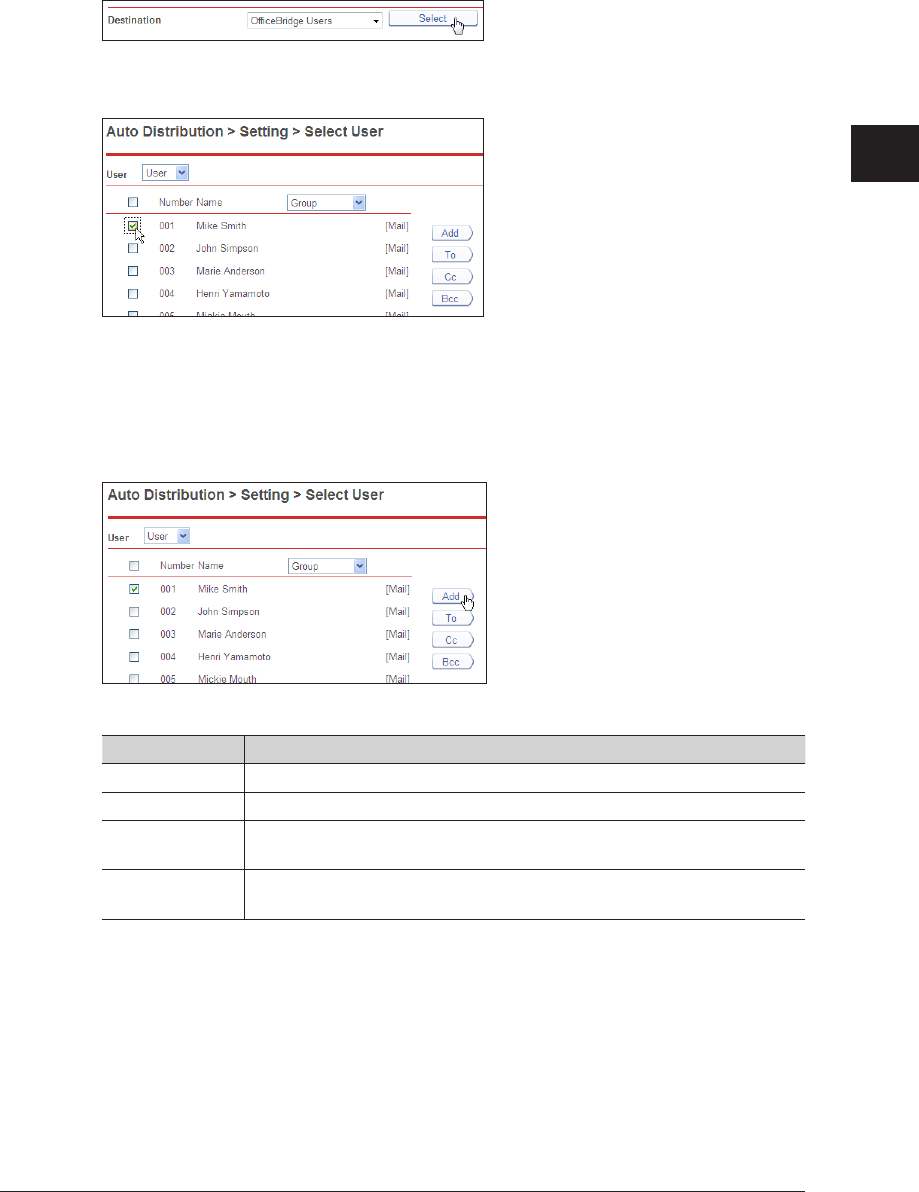
1
2
3
OfficeBridge Administrator Settings
Automatically Distributing Received Documents 3-91
Open the
1
“Setting” screen.
See “Setting Auto Distribution (Individual Settings)” steps 1 to 4. (See page 3-87.)
Select
2
“OfficeBridge Users” from the pull-down menu and click [Select].
Select the checkbox of the users or groups you want to distribute to.
3
To select all the displayed users or groups, select the top checkbox.•
Click the same checkbox to deselect the item.•
Click a transmission destination registration button
4
.
The selected users or groups are added to the destination list on the right.
The types and functions of the buttons are indicated below.•
Type Meaning
Add Registers the user as destination.
To Registers the user as an e-mail destination.
Cc Registers the user as a Bcc e-mail destination. The original destination
(To) is also notified of the Cc destinations.
Bcc Registers the user as a Bcc e-mail destination. The original destinations
(To/Cc) are not notified of the Bcc destinations.
To delete a user name or group name from the destination list, select the checkbox for the •
user name or group name, and click [Delete].
To select all the users or groups displayed in the destination list, select the top checkbox.•
Click [Save].
5
The destinations are set, and the display returns to the “Auto Distribution” settings screen.•
Click [Back] to cancel setting the destinations.•
Click [Save].
6
The display returns to the “Auto Distribution” settings list screen.
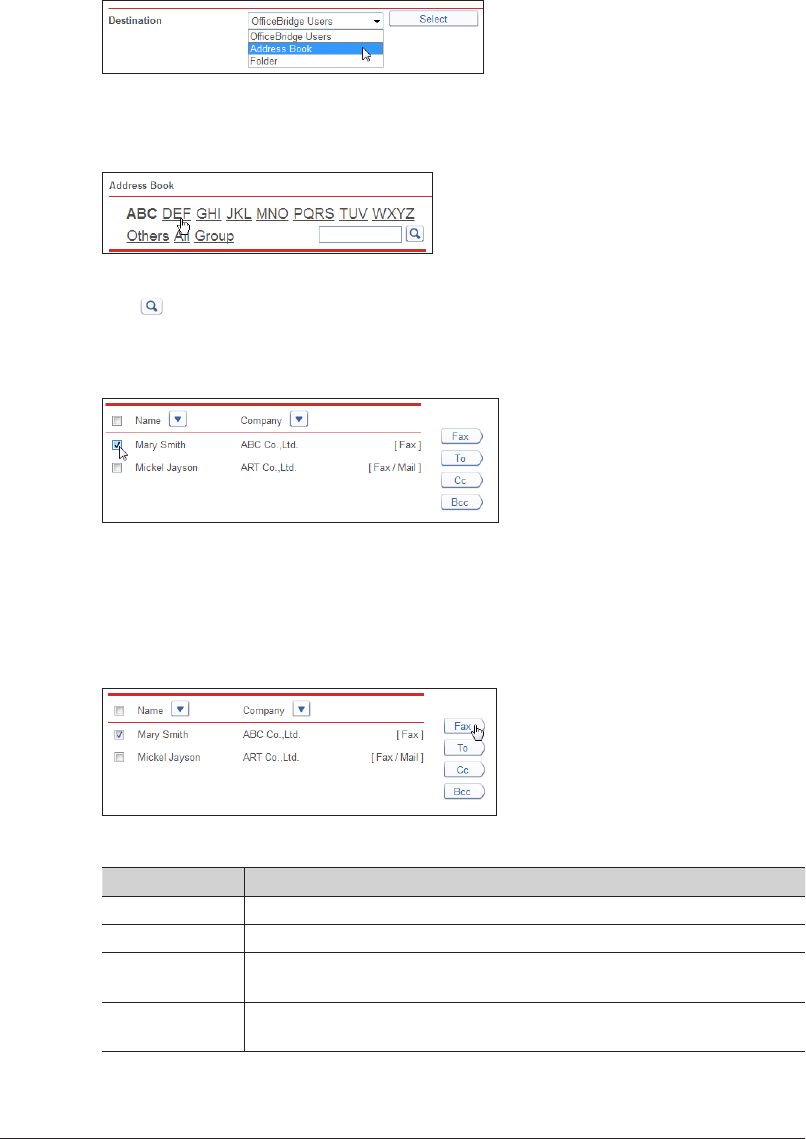
3-92 Automatically Distributing Received Documents
Specifying “Address Book” Destination
Open the
1
“Setting” screen.
See “Setting Auto Distribution (Individual Settings)” steps 1 to 4. (See page 3-87.)
Select
2
“Address Book” from the pull-down menu and click [Select].
Select the destination category (letter or group).
3
A list of the corresponding destinations is displayed.
You can also search using a string. Enter the string to search for in the entry box, and
click .
Select the checkbox of the destination you want to transmit to.
4
To select all the displayed destinations, select the top checkbox.•
Click the same checkbox to deselect the item.•
Click a transmission destination registration button.
5
The selected destinations are displayed in the destination list on the right.
The types and functions of the buttons are indicated below.•
Type Meaning
Fax Registers the destination as a fax destination.
To Registers the destination as an e-mail destination.
Cc Registers the destination as a Bcc e-mail destination. The original
destination (To) is also notified of the Cc destinations.
Bcc Registers the destination as a Bcc e-mail destination. The original
destinations (To/Cc) are not notified of the Bcc destinations.
To delete a destination from the destination list, select the destination to delete, and click •
[Delete].
To select all the displayed destinations, select the top checkbox.•
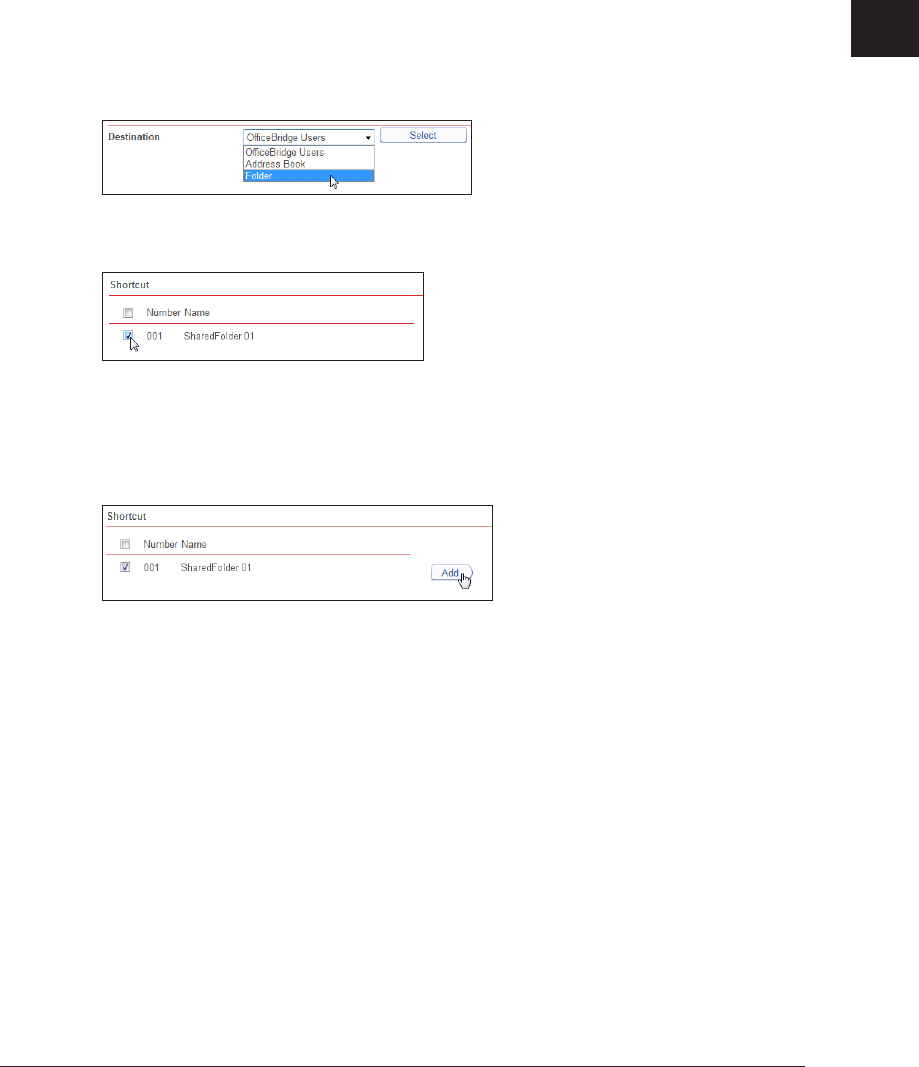
1
2
3
OfficeBridge Administrator Settings
Automatically Distributing Received Documents 3-93
Click [Save].
6
The destinations are set, and the display returns to the “Auto Distribution” settings screen.•
Click [Back] to cancel setting the destinations.•
Click [Save].
7
The display returns to the “Auto Distribution” settings list screen.
Specifying
Folder Destination
Open the
1
“Setting” screen.
See “Setting Auto Distribution (Individual Settings)” steps 1 to 4. (See page 3-87.)
Select
2
“Folder” from the pull-down menu and click [Select].
Select the checkbox of the shortcut you want to transmit to.
3
To select all the displayed shortcuts, select the top checkbox.•
Click the same checkbox to deselect the item.•
Click [Add].
4
The selected shortcuts are added to the destination list on the right.
To delete a shortcut from the destination list, select the shortcut to delete, and click [Delete].•
To select all the shortcuts displayed in the destination list, select the top checkbox.•
Click [Save].
5
The destinations are set, and the display returns to the “Auto Distribution” settings screen.•
Click [Back] to cancel setting the destinations.•
Click [Save].
6
The display returns to the “Auto Distribution” settings list screen.
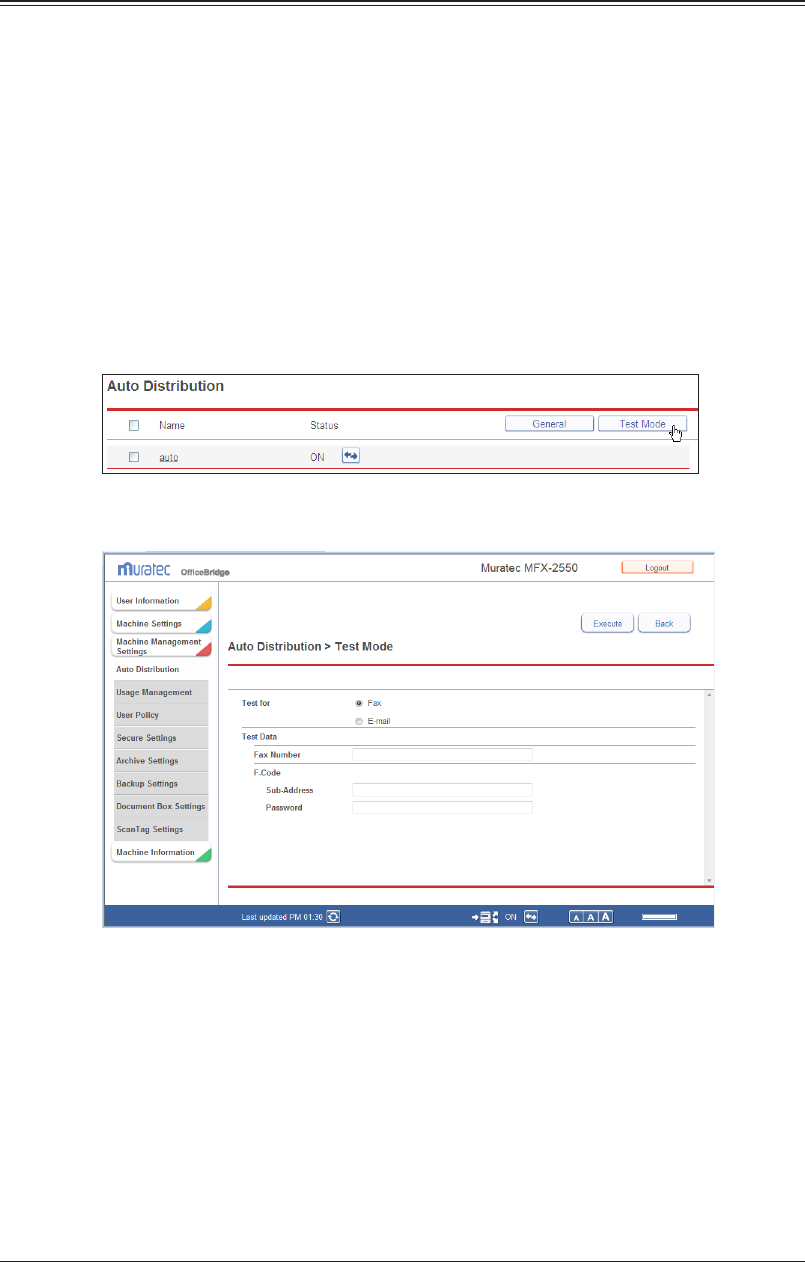
3-94 Automatically Distributing Received Documents
Performing an Auto Distribution Test
You can check the distribution settings that match the distribution conditions in the auto
distribution settings, and display them in a list.
Specify a fax number, F code (sub-address, password), e-mail address (From), or subject to
use as the distribution condition.
Click [Admin Login] in OfficeBridge, and log in.
1
(See page 2-7.)
This function may also be available on Guest and User login screen, depending on user policy
settings.
Click [Machine Management Settings].
2
Click [Test Mode] on the “Auto Distribution” settings list screen.
3
Set the test items.
4
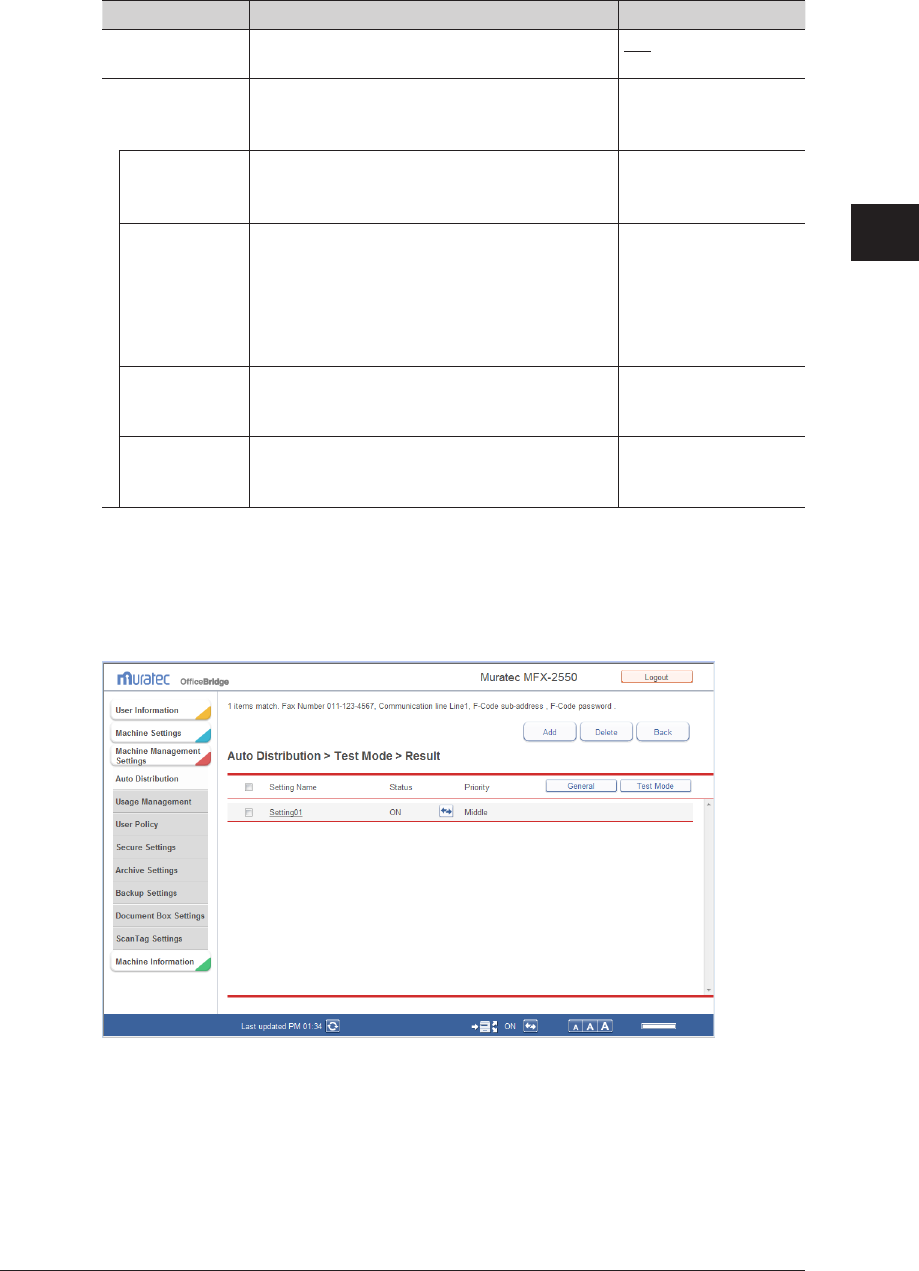
1
2
3
OfficeBridge Administrator Settings
Automatically Distributing Received Documents 3-95
You can register the following items.
Setting Description Settings
Test for Select the item to test (fax or e-mail). Fax
E-mail
Test Data Enter the test data.
The setting to specify depends on the selected
test item.
–
Fax Number Displayed when “Fax” is selected for the test
item.
Enter the fax number.
24 digits
F-Code Displayed when “Fax” is selected for the test
item.
Sub-Address: Enter the sub-address of the
F-Code.
Password: Enter the password of the
F-Code.
Sub-Address:
20 digits
Password:
20 digits (* and # can
also be used)
E-mail Address
(From)
Displayed when “E-mail” is selected for the test
item.
Enter the e-mail address.
50 characters
Subject Displayed when “E-mail” is selected for the test
item.
Enter the subject.
80 characters
Click [Execute].
5
The auto distribution settings test starts.
When the test is complete, the “test result” screen is displayed.
The number of items that matched and the test data items are displayed in the message area.
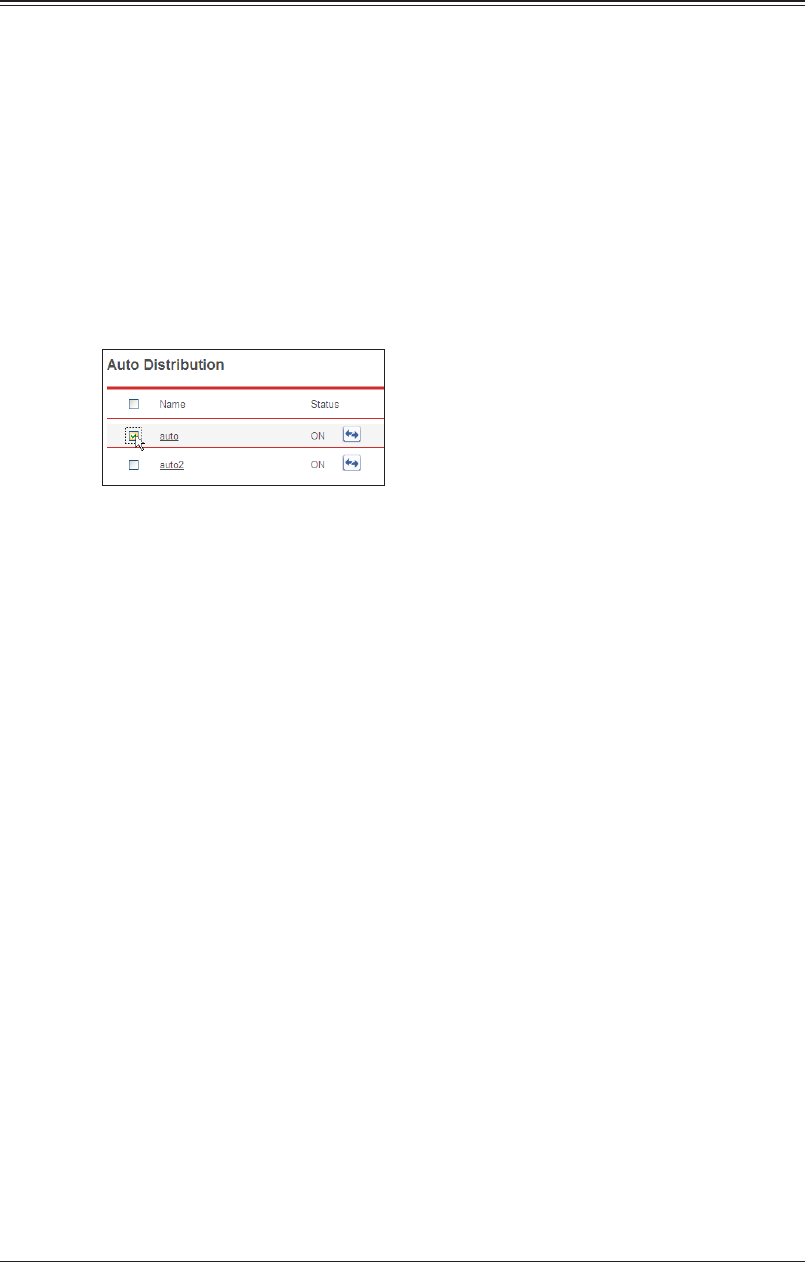
3-96 Automatically Distributing Received Documents
Copying Existing Auto Distribution Settings to Create New Settings
You can copy auto distribution settings that are already registered to register new auto
distribution settings.
Click [Admin Login] in OfficeBridge, and log in.
1
(See page 2-7.)
This function may also be available on Guest and User login screen, depending on user policy
settings.
Click [Machine Management Settings].
2
The “Auto Distribution” settings list is displayed.
Select the checkbox of the auto distribution settings you want to copy.
3
Click [Duplicate].
4
The auto distribution settings are copied, and the “Auto Distribution” settings screen is
displayed. The copied distribution settings are entered for the distribution information.
On the “Auto Distribution” settings screen, change the settings to those for the
5
new distribution settings to register.
For details, refer to steps 4 of “Setting Auto Distribution (Individual Settings)”. (See page
3-87.)
Click [Save].
6
The display returns to the “Auto Distribution” settings list screen.•
Press [Back] to cancel registering the distribution settings and return to the “Auto •
Distribution” settings list screen.
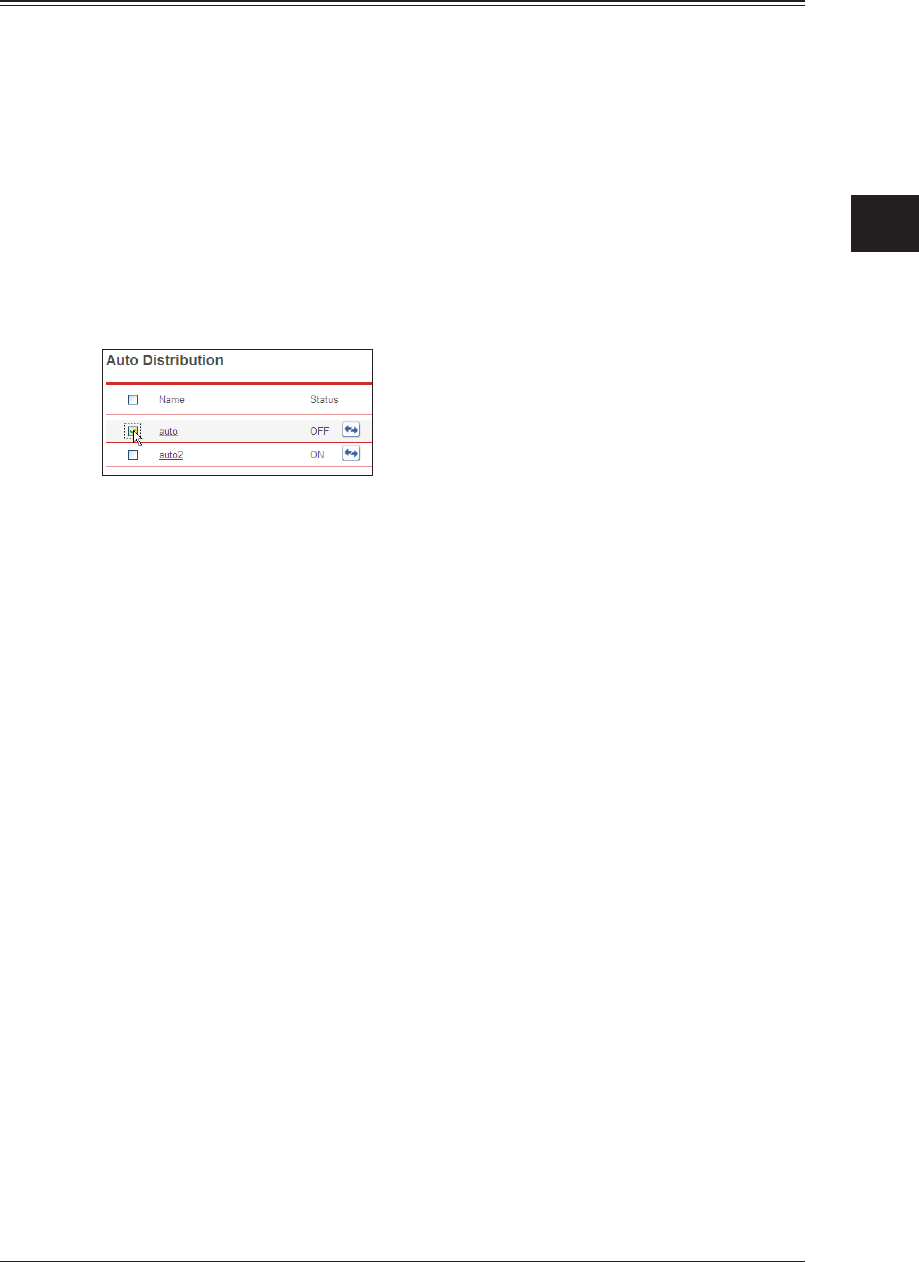
1
2
3
OfficeBridge Administrator Settings
Automatically Distributing Received Documents 3-97
Deleting Auto Distribution Settings
You can delete unnecessary auto distribution settings from the “Auto Distribution”
settings list.
Click [Admin Login] in OfficeBridge, and log in.
1
(See page 2-7.)
This function may also be available on Guest and User login screen, depending on user policy
settings.
Click [Machine Management Settings].
2
The “Auto Distribution” settings list is displayed.
Select the checkbox of the auto distribution settings you want to delete.
3
To select all the displayed auto distribution settings, select the top checkbox.•
Click the same checkbox to deselect the item.•
Click [Delete].
4
The message “Is it OK to delete the selected item(s)?” is displayed.
Click [OK].
5
The selected auto distribution settings are deleted.
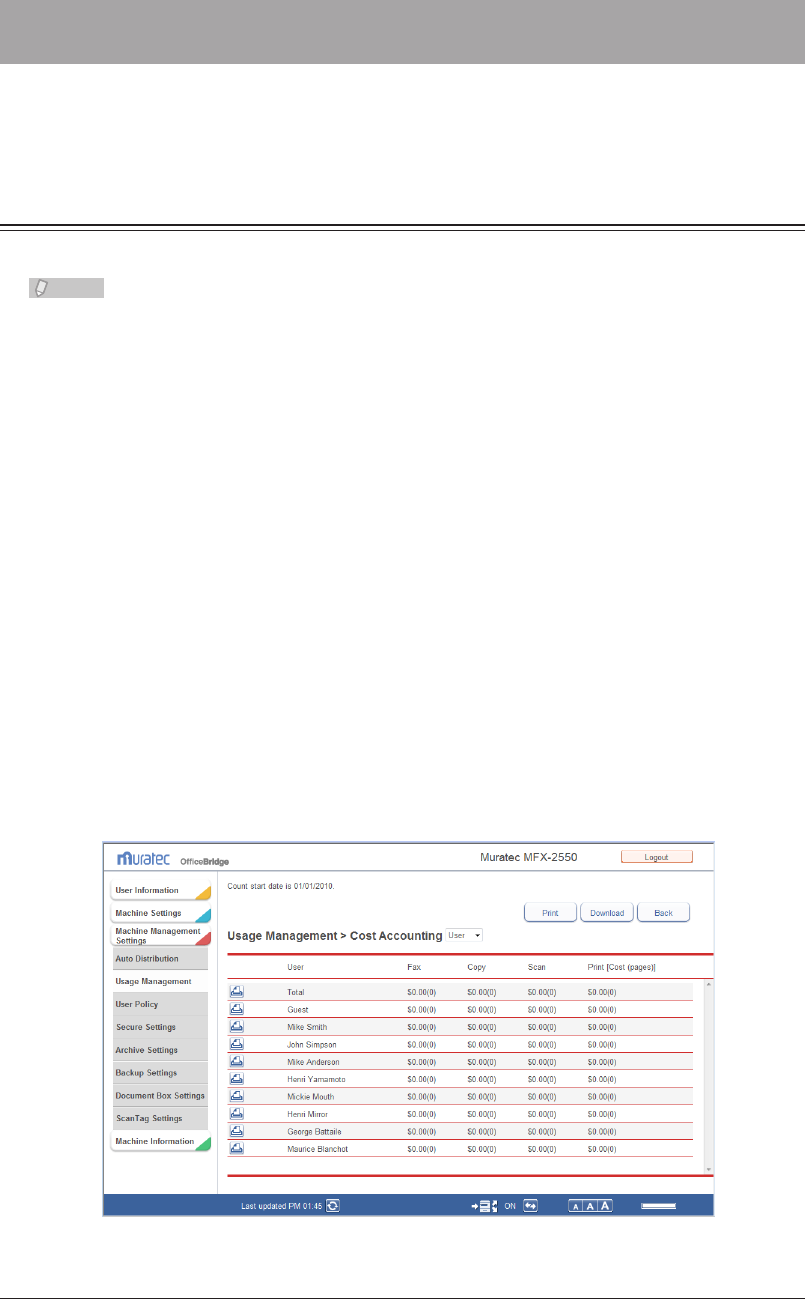
3-98 Usage Management
Usage Management
In OfficeBridge, you can record the usage status (number of pages, cost, and
communication time) of the copy, fax, scan, and print functions for each user or group.
Checking the Usage Status
You can display and print the user access/cost history.
Note
You can only check the usage status for items with cost settings specified. • (See page
3-101.)
The usage status of each user can also be checked from the control panel of the •
machine. For details, refer to Chapter 2, “Managing User Access/Cost Accounting” in
the Administrator's Guide.
Displaying the Access/Cost Accounting History
Click [Admin Login] in OfficeBridge, and log in.
1
(See page 2-7.)
This function may also be available on Guest and User login screen, depending on user policy
settings.
Click [Machine Management Settings], and then [Usage Management].
2
The “Usage Management” list screen is displayed.
Click “Cost Accounting”.
3
Check the usage management history.
4
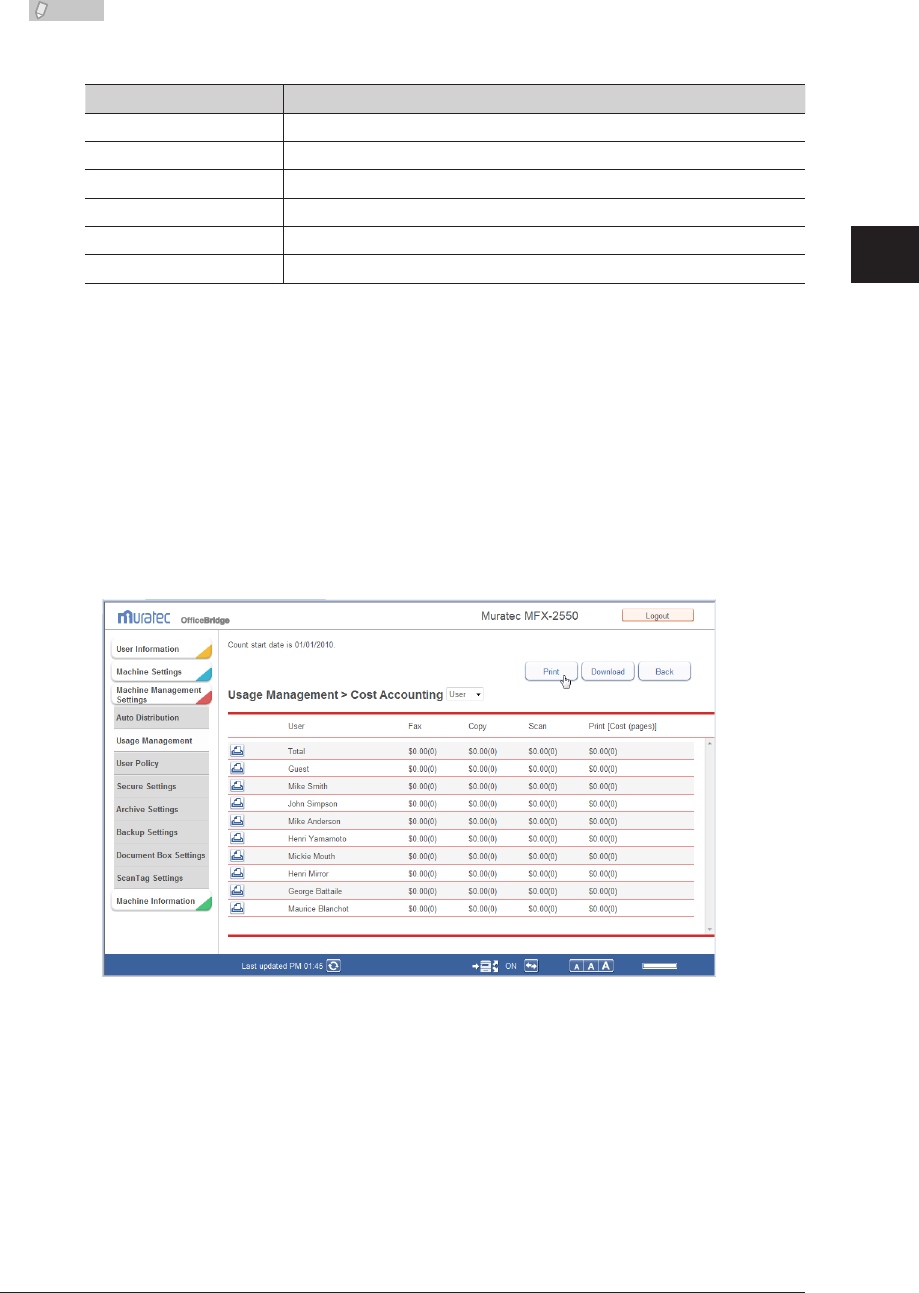
1
2
3
OfficeBridge Administrator Settings
Usage Management 3-99
Note
The total of all users is displayed on the first line.•
The following items are displayed.•
Item Description
Group Displays the name of the group that the user belongs to.
User Displays the user name.
Fax Displays the cost and number of pages used for fax communication.
Copy Displays the cost and number of pages used for copying.
Scan Displays the cost and number of pages used for scanning.
Print Displays the cost and number of pages used for printing.
The guest group is used for guest.•
You can switch between “User” and “Group” from the pull-down menu to switch the •
display between user order and group order.
When displaying in group order, the group total is displayed where the group •
changes. “User” is blank for the group total row.
Printing the Entire Usage Management History
You can print the currently displayed history.
Click [Print] on the “Cost Accounting” screen.
1
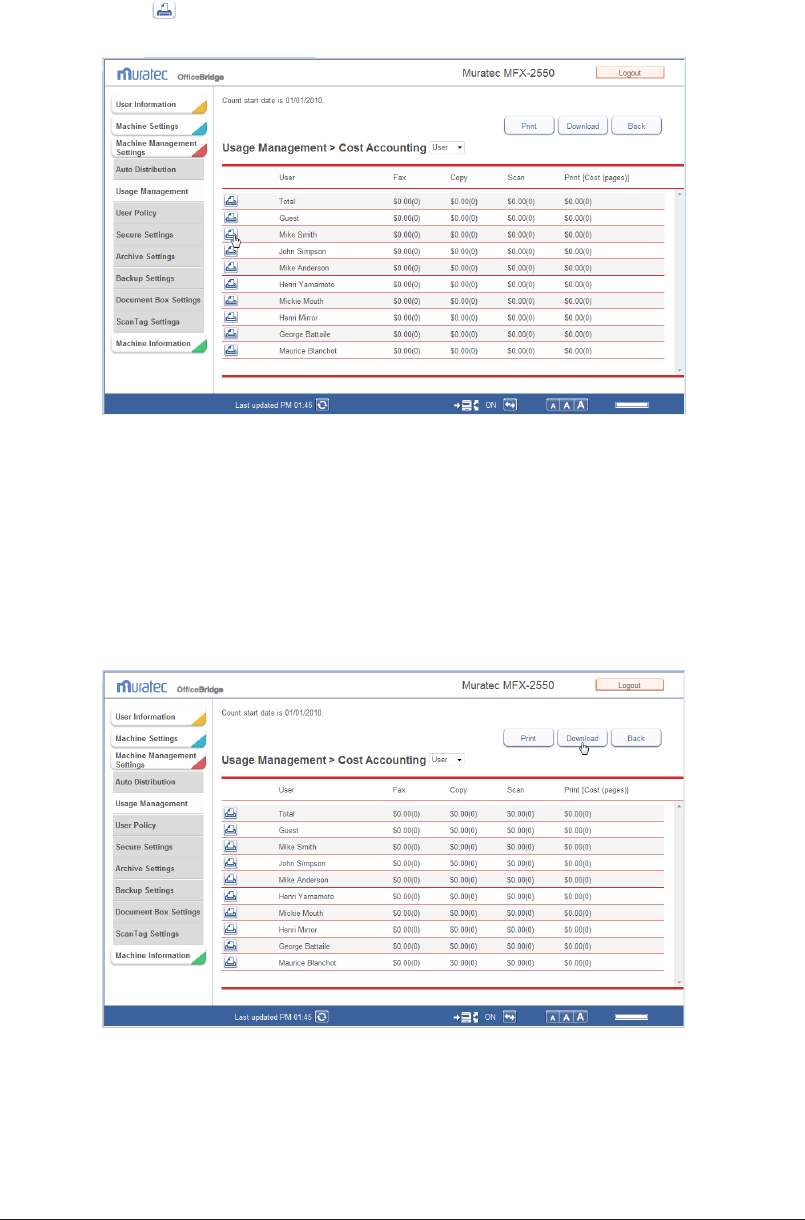
3-100 Usage Management
Printing the Usage Management History for a User
You can print the history for the selected user.
Click
1
for the user to print the history for.
The message “Is it OK to print the selected user's usage summary?” is displayed.
Click [OK].
2
The usage management history for the selected user starts printing.
Downloading the Entire Usage Management History
You can download the currently displayed history in the CSV format.
Click [Download] on the “Cost Accounting” screen.
1
Click [Save].
2
Specify the folder to download to, enter a file name, and click [Save].
3
Click [Close] to close the “Download Complete” dialog box.
4
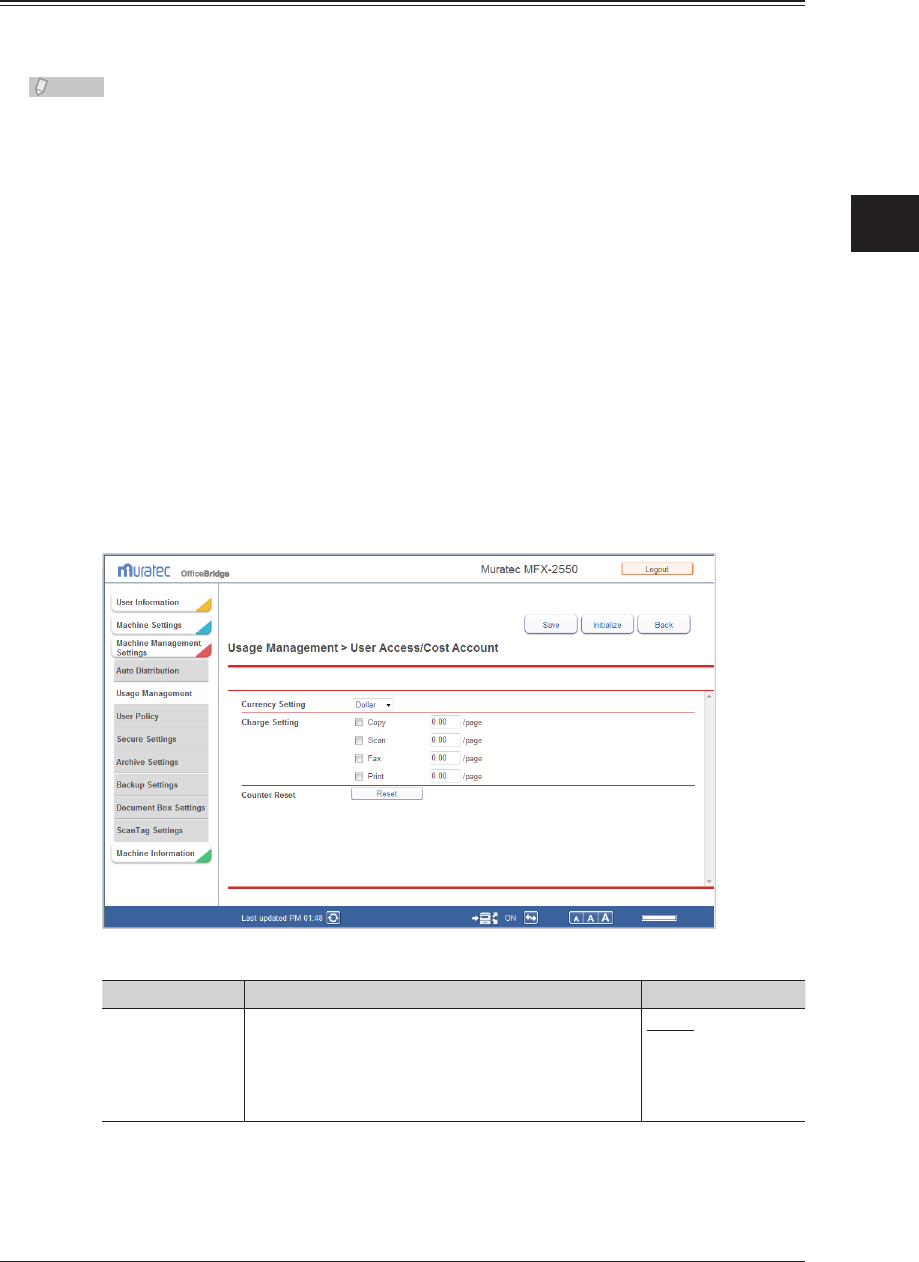
1
2
3
OfficeBridge Administrator Settings
Usage Management 3-101
Setting the Management History
You can set the currency unit and the page costs for each function (copy, fax, scan, and
print) to use in the usage management history.
Note
The currency unit and cost settings can also be specified from the control panel of the
machine. For details, refer to Chapter 2, “Managing User Access/Cost Accounting” in
the Administrator's Guide.
Click [Admin Login] in OfficeBridge, and log in.
1
(See page 2-7.)
This function may also be available on Guest and User login screen, depending on user policy
settings.
Click [Machine Management Settings], and then [Usage Management].
2
The “Usage Management” list screen is displayed.
Click “User Access/Cost Account”.
3
The “User Access/Cost Account” screen is displayed.
Set the detailed information.
4
You can register the following informations.
Setting Description Settings
Currency Setting Set the currency unit to use when display cost
setting history.
Dollar
Euro
Pound
Yen
No Unit
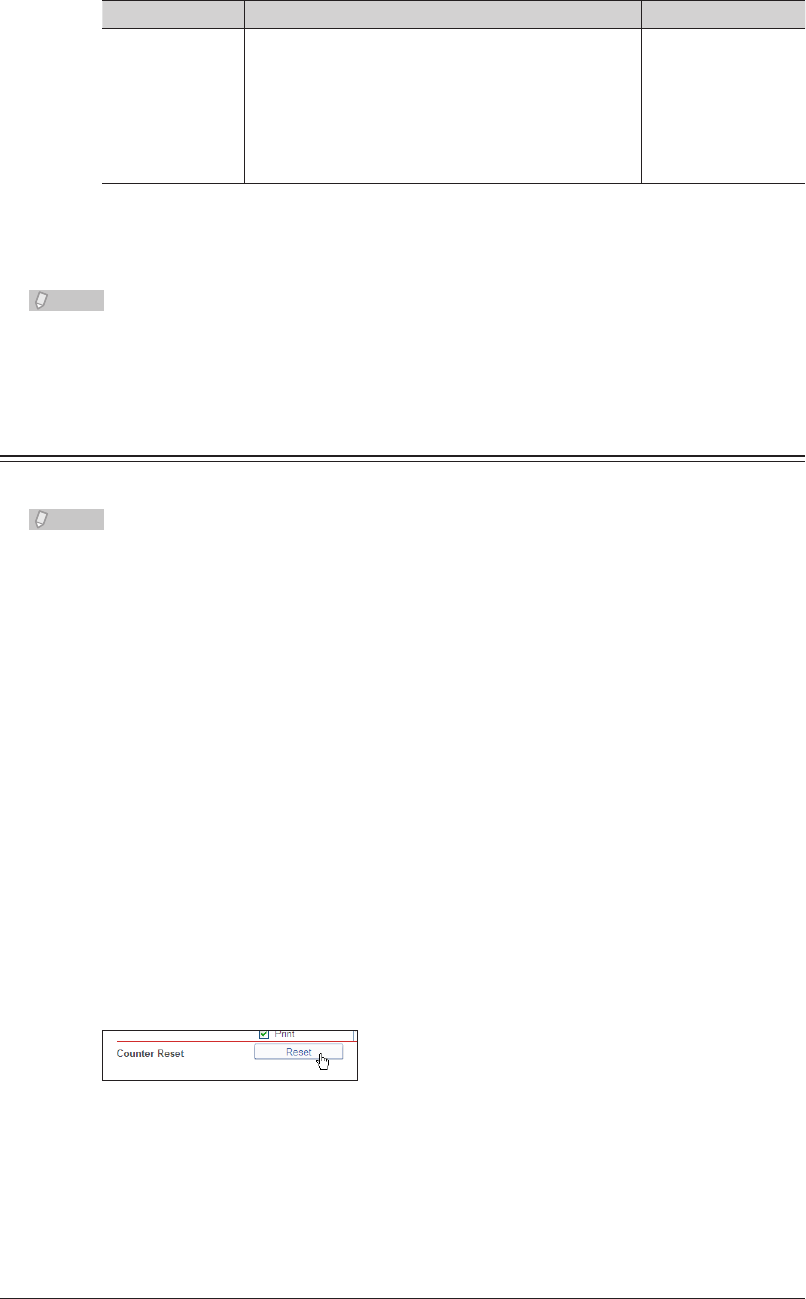
3-102 Usage Management
Setting Description Settings
Charge Setting Select the functions (copy, fax, scan, or print) to
display in the history.
Select the checkbox of the function you want to
display.
Enter the page costs in the entry boxes.
Copy: 0.00
Scan: 0.00
Fax: 0.00
Print: 0.00
6 digits (0.01 -
999.99)
Click [Save].
5
Press [Back] to cancel registering the usage management settings and return to the “Usage
Management” list screen.
Note
Click [Initialize] to restore the default settings.•
Underlined values are the default settings specified at the time of shipment.•
Resetting the Counters
You can reset the counters of the machine.
Note
Take care when resetting the counters, because all the accounting data will be reset.•
The accounting data can also be reset from the control panel of the machine. •
For details, refer to Chapter 2, “Managing User Access/Cost Accounting” in the
Administrator's Guide.
Click [Admin Login] in OfficeBridge, and log in.
1
(See page 2-7.)
This function may also be available on Guest and User login screen, depending on user policy
settings.
Click [Machine Management Settings], and then [Usage Management].
2
The “Usage Management” list screen is displayed.
Click “User Access/Cost Account”.
3
The “User Access/Cost Account” screen is displayed.
Click [Reset].
4
The message “Is it OK to reset the counter?” is displayed.
Click [OK].
5
The counters are reset.
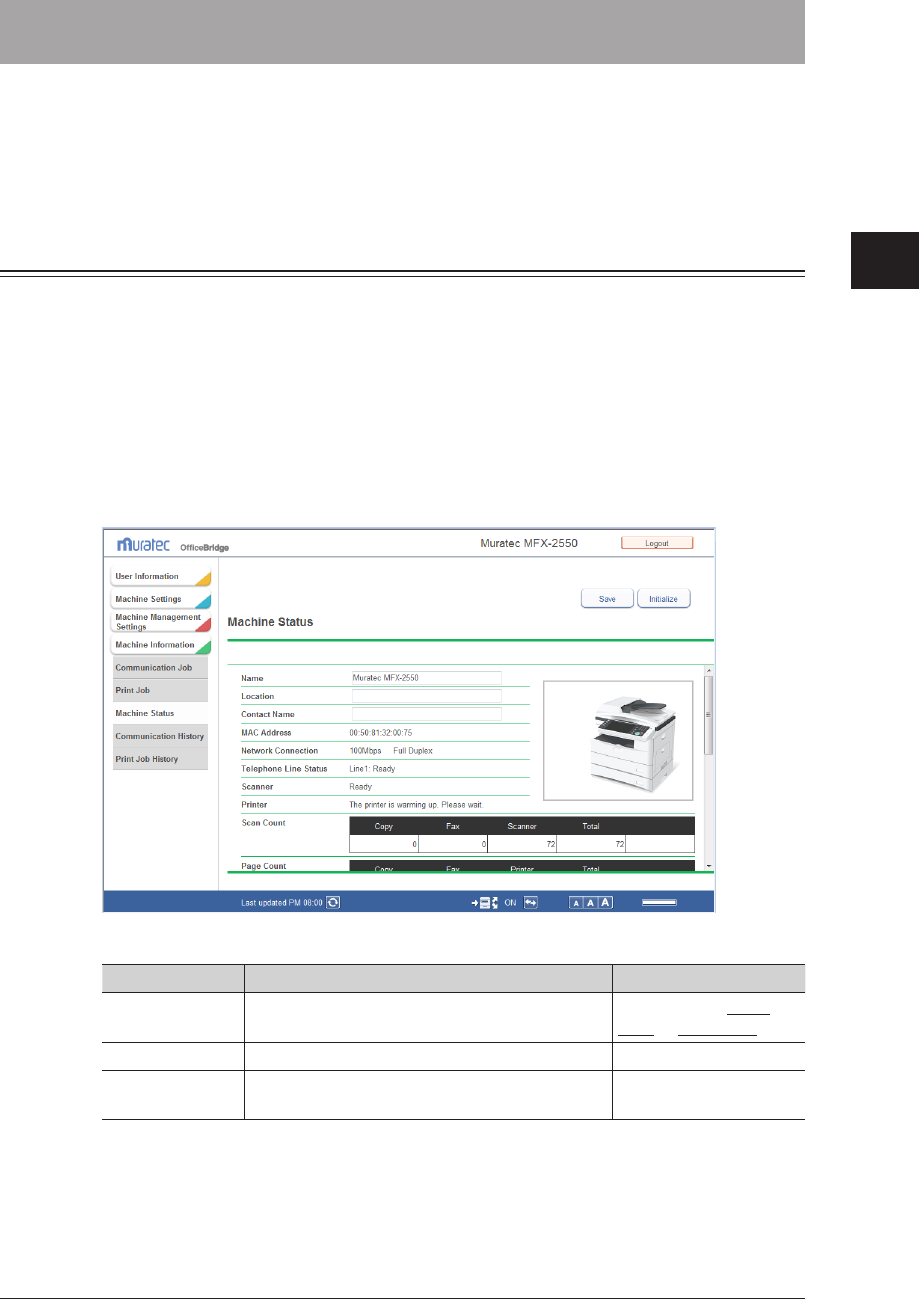
1
2
3
OfficeBridge Administrator Settings
Displaying and Copying Machine Settings 3-103
Displaying and Copying Machine Settings
You can display the status of the machine.
You can also import the information (settings and address books, etc.) in a machine to
another machine of the same model, which enables you to reduce the time it takes to
specify the settings.
Setting the Machine Status
You can display the current machine status, and set the name and installation location of
the machine.
Click [Admin Login] in OfficeBridge, and log in.
1
(See page 2-7.)
This function may also be available on Guest and User login screen, depending on user policy
settings.
You can register the following items.
2
You can register the following items.
Setting Description Settings
Name Enter the name used to identify the machine. 40 characters: MFX-
2570 or MFX-2550
Location Enter the location set for the device. 100 characters
Contact Name Enter the contact name for the administrator of
the device.
100 characters

3-104 Displaying and Copying Machine Settings
The other machine status items that are displayed are indicated below.
Item Description
MAC Address Displays the MAC address set in the machine.
Network Connection Displays the current network speed and communication method.
The following items are displayed.
100Mbps - Full Duplex
100Mbps - Half Duplex
10Mbps - Full Duplex
10Mbps - Half Duplex
The values set in “Other Network Settings” in “Machine Setup” are
displayed. (See page 3-79.)
Telephone Line
Status
Displays the current telephone line status.
The following items are displayed.
Ready
In Use
Scanner Displays the current scanner status.
The following items are displayed.
Unknown
Ready
In Use
Cover is open.
Paper jams.
Scanner Lamp Error
Mirror Carriage Error
Printer Displays the current printer status.
The following items are displayed.
Unknown
Ready to Print
In Use
Cassette is open.
Cover is open.
The drum or toner cartridge is not installed correctly.
Paper Empty
The drum cartridge is almost empty.
Replace the drum cartridge.
The toner is almost empty.
The toner is empty.
Paper jams.
The printer is warming up. Please wait.
Remove the paper on the paper output tray.
The printer is warming up. Please wait.
Please call service.
The fuser needs to be replaced.
Paper size error.
Scan Count Displays the number of pages scanned for the copy, fax, and scan
functions, and the total number of pages scanned.
Page Count Displays the number of pages printed for the copy, fax, and print
functions and list prints, and the total number of pages printed. (Fax
and list pages are combined.)
Paper Cassette Displays the current paper cassette status (paper size, orientation,
paper remaining, paper type).
Machine
Configuration
Displays information for the devices installed to the machine (such as
optional devices).
ROM Version Displays machine software version.
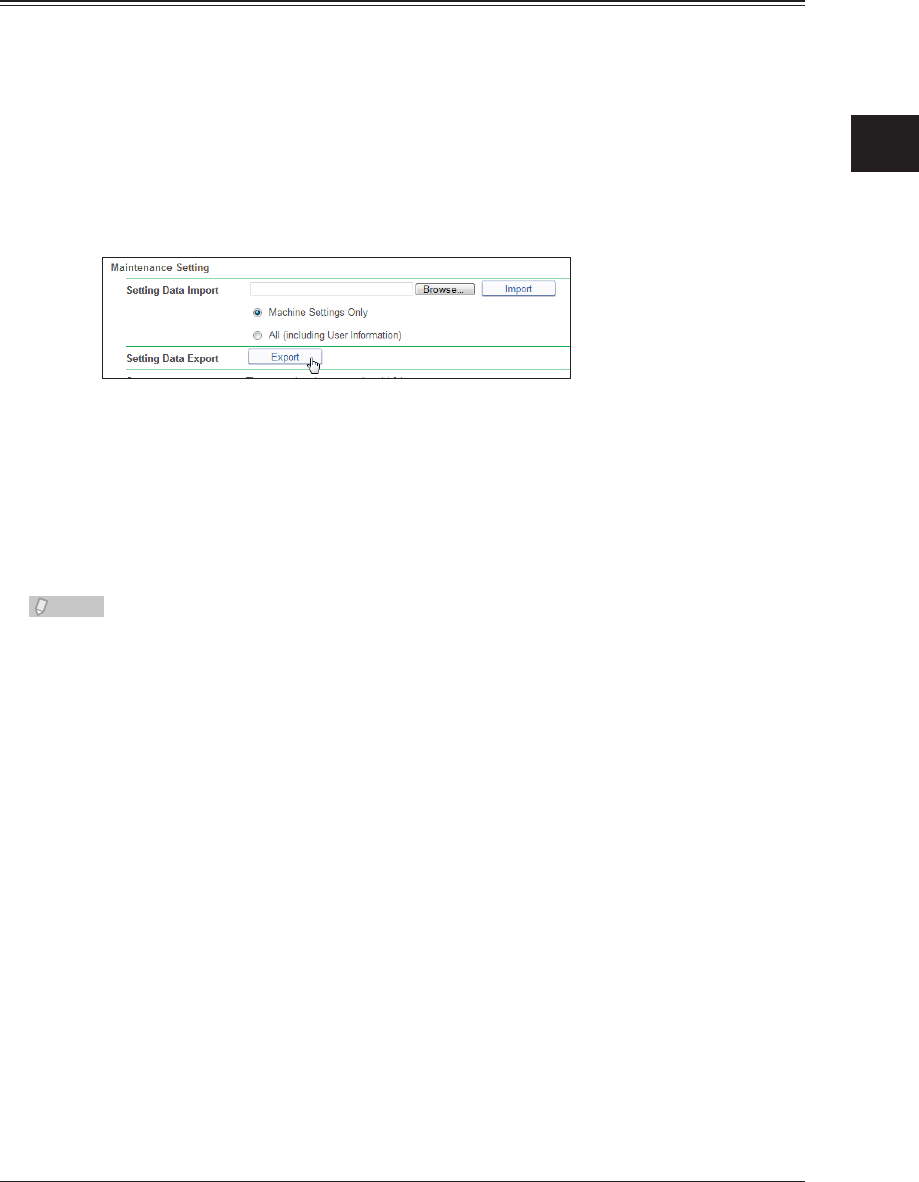
1
2
3
OfficeBridge Administrator Settings
Displaying and Copying Machine Settings 3-105
Click [Save].
3
Exporting Machine Settings
You can export the current machine settings.
The exported data can be imported to another machine.
Click [Admin Login] in OfficeBridge, and log in.
1
(See page 2-7.)
This function may also be available on Guest and User login screen, depending on user policy
settings.
Click [Export] in “Maintenance Setting”.
2
Click [Save].
3
Specify the name and location to save the file, and click [Save].
4
The default file name is “MFX-2550_DC4_Date and Time (YYYYMMDDhhmmss).mdx”.
Note
One of the following export results is displayed in the “Status” field:
The export has been completed.•
Failed to export.•
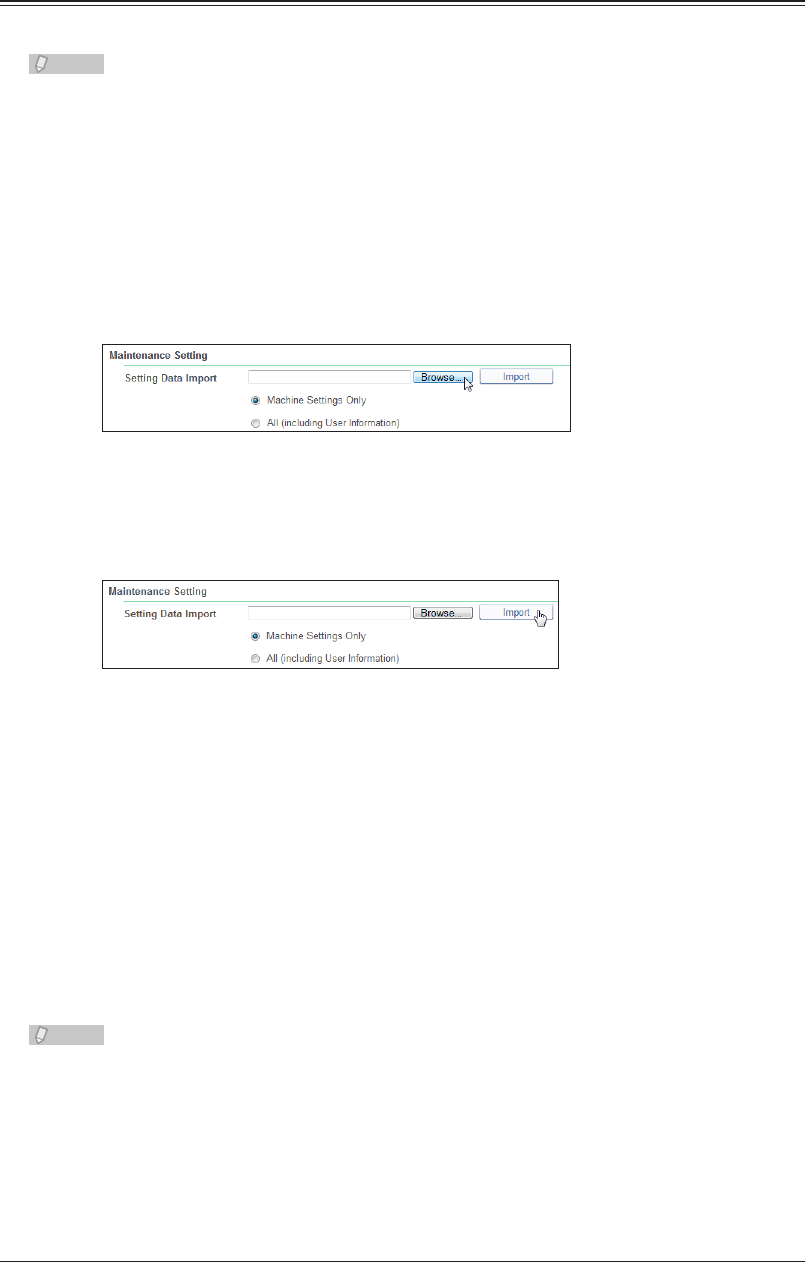
3-106 Displaying and Copying Machine Settings
Importing Machine Settings
You can import the settings from another machine.
Note
Take care when importing the machine settings, as all the information registered by
users (including documents) will be erased.
Click [Admin Login] in OfficeBridge, and log in.
1
(See page 2-7.)
This function may also be available on Guest and User login screen, depending on user policy
settings.
Click [Browse] in “Maintenance Setting”.
2
The “Select File” dialog box is displayed.
Select the file to import, and click [Open].
3
Click [Import].
4
Take care when importing the machine settings, as all the information registered by users •
(including documents) will be erased.
To import only the machine settings, select “Machine Settings Only”.•
To import all the machine settings including the user information, select “All (including User •
Information)”.
Refer to the appendix in “Importing / Exporting Using USB Memory” in Chapter 2, “Mirroring •
the Machine Settings” in the Administrator's Guide for the difference between the settings
imported when you select “Machine Settings Only” and the settings imported when you
select “All (including User Information)”.
The import process starts when you click [OK].
5
When the import process is completed, the machine is automatically restarted.
Note
One of the following import results is displayed in the “Status” field:
The import has been completed.•
Failed to import.•
Importing was canceled. The data was created by a different type of unit.•
Importing was canceled. The data was created by different data source.•
Importing was canceled because the data is invalid.•
Importing was canceled because the remote fax machine prevents direct copying.•
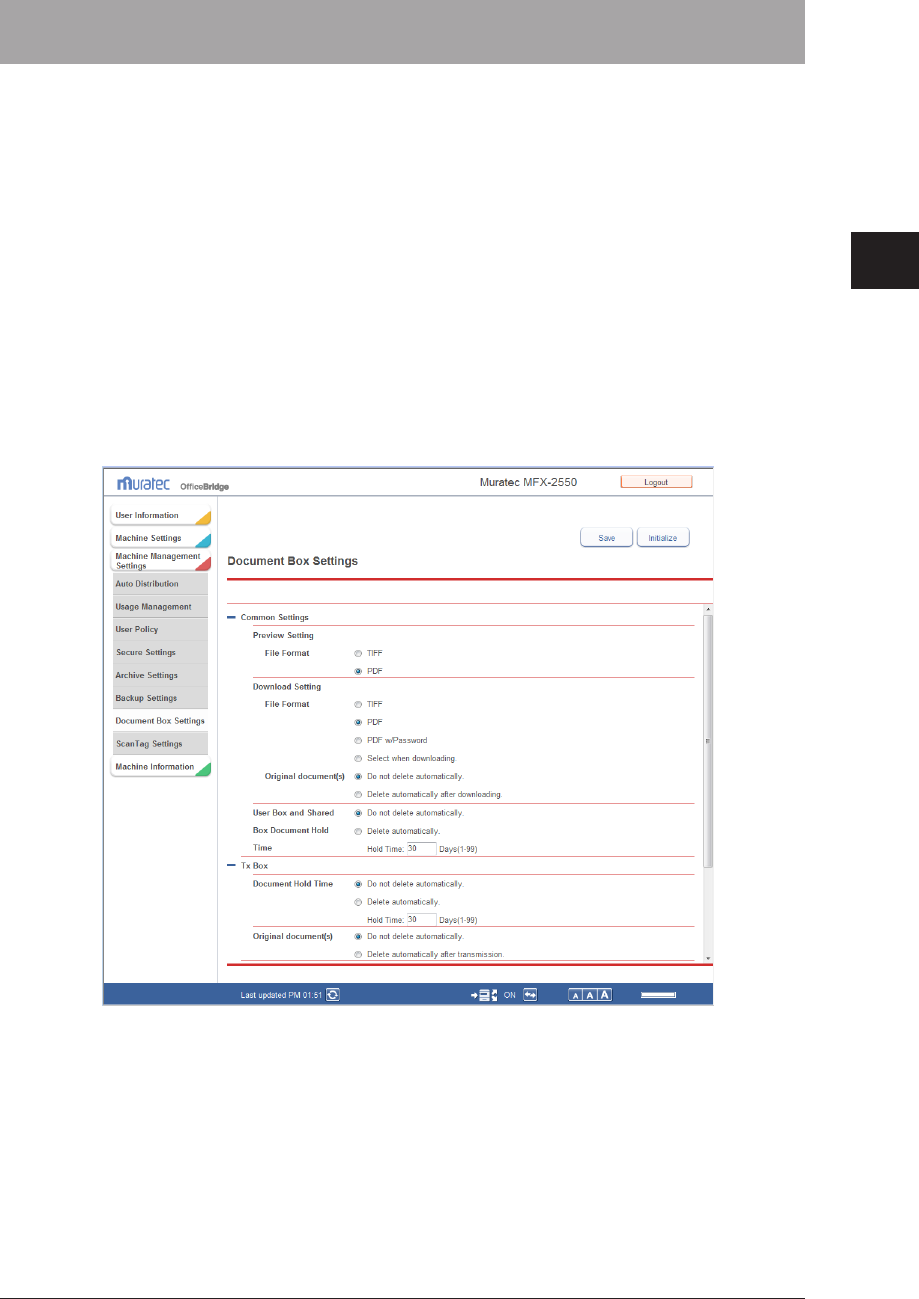
1
2
3
OfficeBridge Administrator Settings
Specifying Document Box Settings 3-107
Specifying Document Box Settings
You can specify settings relating to the way the document boxes handle documents.
The six settings are divided into seven groups: common settings, reception box settings,
transmission box settings, shared reception box settings, shared box settings, and deleted
documents box settings.
Click [Admin Login] in OfficeBridge, and log in.
1
(See page 2-7.)
This function may also be available on Guest and User login screen, depending on user policy
settings.
Click [Machine Management Settings], and then [Document Box Settings].
2
The “Document Box Settings” screen is displayed.
Set the detailed information.
3
3-108 Specifying Document Box Settings
You can register the following items.
Common Settings
These settings are displayed when you click [+].
Setting Description Settings
Preview Setting
File Format Set the file format used when displaying documents in
document lists.
TIFF
PDF
Download Setting Specify the settings for downloading documents from
the machine.
−
File Format Set the file format for downloading documents. TIFF
PDF
PDF w/
Password
Select when
downloading
Original
document(s)
Select whether to delete a file from the document
list of the machine after it has been downloaded.
For the “Shared Rx Box” or “Shared Box”, the data
is not deleted after it has been downloaded if the
administrator privileges for deleting/editing are set to
“Required”.
Do not delete
automatically.
Delete
automatically
after
downloading.
User Box and
Shared Box
Document Hold
Time* 1
Set whether to automatically delete documents from
the “User Box” document list.
Select “Do not delete automatically.” to not
automatically delete documents.
Do not delete
automatically.
Delete
automatically.
Hold Time (1 -
99): 30
Tx Box
These settings are displayed when you click [+].
Setting Description Settings
Document Hold
Time* 1
Set whether or not to delete sent documents
automatically from the “Tx Box” document list.
Select “Do not delete automatically.” to not
automatically delete documents.
To automatically delete documents, select “Delete
automatically after downloading.”, and set the hold
time.
Do not delete
automatically.
Delete
automatically.
Hold Time (1 -
99): 30
Original
document(s)
Select “Delete automatically after transmission.” to
delete documents after transmission is complete.
Select “Do not delete automatically.” to not
automatically delete documents.
Do not delete
automatically.
Delete
automatically
after
transmission.
1
2
3
OfficeBridge Administrator Settings
Specifying Document Box Settings 3-109
Rx Box
These settings are displayed when you click [+].
Setting Description Settings
Document Hold
Time* 1
Set whether or not to delete received documents
automatically from the “Rx Box” document list.
Select “Do not delete automatically.” to not
automatically delete documents.
To automatically delete documents, select “Delete
automatically after downloading.”, and set the hold
time.
Do not delete
automatically.
Delete
automatically.
Hold Time (1 -
99): 30
Shared Rx Box
These settings are displayed when you click [+].
Setting Description Settings
Enable the Shared
Rx Box
Set whether to enable or disable the shared reception
box.
If you select “OFF”, the “Shared Rx Box” is not
displayed on the document box screen.
ON
OFF
Document Hold
Time* 1
Set whether or not to delete shared received documents
automatically from the “Shared Rx Box” document
list. Select “Do not delete automatically.” to not
automatically delete documents.
To automatically delete documents, select “Delete
automatically after downloading.”, and set the hold
time.
Do not delete
automatically.
Delete
automatically.
Hold Time (1 -
99): 30
Administration
authority for
deleting and
editing
Set whether or not administrator authorization is
required to delete shared received documents.
To require authorization, select “Required.”
In this case, the administrator password is required to
delete documents.
Not required.
Required.
Shared Box
These settings are displayed when you click [+].
Setting Description Settings
Enable the Shared
Box
Set whether to enable or disable the shared box.
If you select “OFF”, the “Shared Box” is not displayed
on the document box screen.
ON
OFF
Administration
authority for
deleting and
editing
Set whether or not administrator authorization is
required to delete shared documents.
To require authorization, select “Required.”
In this case, the administrator password is required to
delete documents.
Not required.
Required.
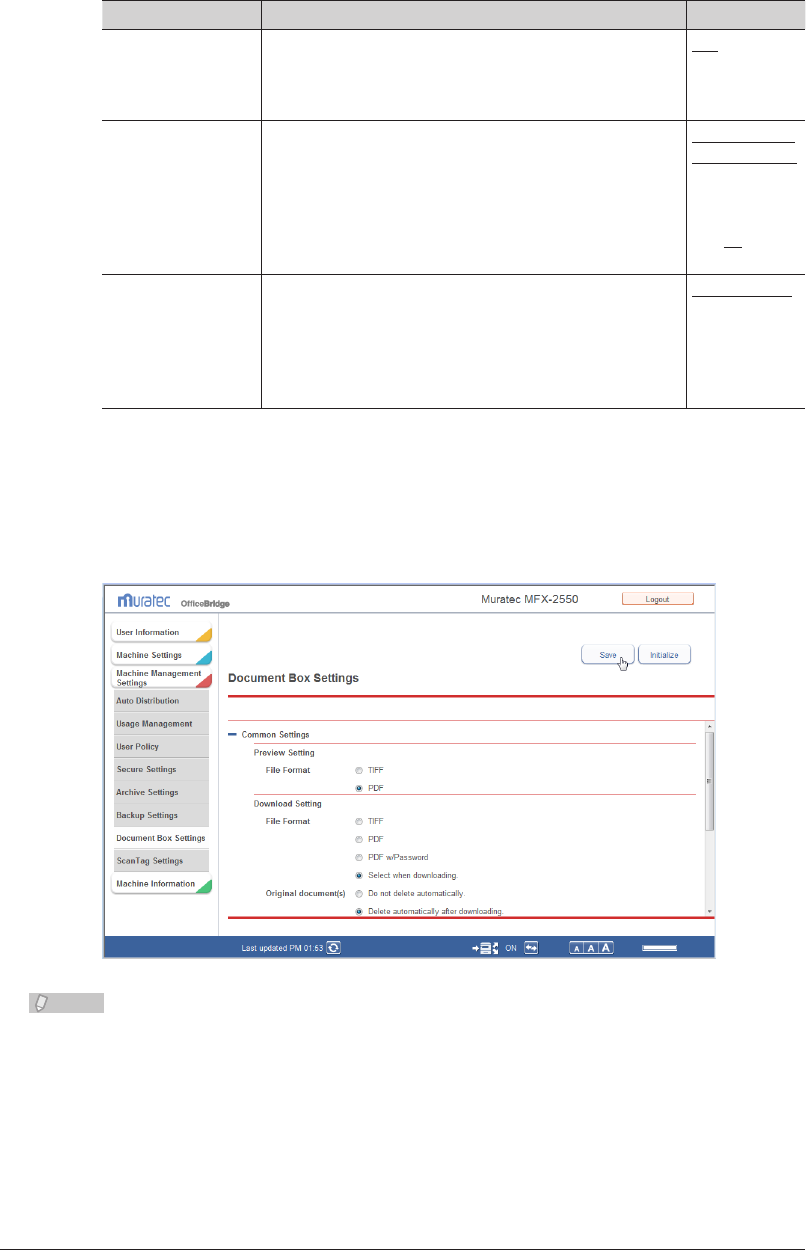
3-110 Specifying Document Box Settings
Deleted Documents Box
These settings are displayed when you click [+].
Setting Description Settings
Enable the deleted
document box
Set whether to enable or disable the deleted documents
box.
If you select “OFF”, the “Deleted Documents Box” is not
displayed on the document box screen.
ON
OFF
Document Hold
Time* 1
Set whether or not to delete documents automatically
from the “Deleted Documents Box” document list.
Select “Do not delete automatically.” to not
automatically delete documents.
To automatically delete documents, select “Delete
automatically after downloading.”, and set the hold
time.
Do not delete
automatically.
Delete
automatically.
Hold Time (1 -
99): 30
Administration
authority for
deleting and
editing
Set whether or not administrator authorization is
required to delete documents in the deleted documents
box.
To require authorization, select “Required.”
In this case, the administrator password is required to
delete documents.
Not required.
Required.
*1 The specified hold time does not include the date that scanning, reception, or forwarding
was performed. For example, when the hold time is set to “1” day, the document is saved
until the next day after the scanning, reception, or forwarding is performed, and will be
deleted at the start of the day after next.
Click [Save].
4
Note
Click [Initialize] to restore the default settings.•
Underlined values are the default settings specified at the time of shipment.•
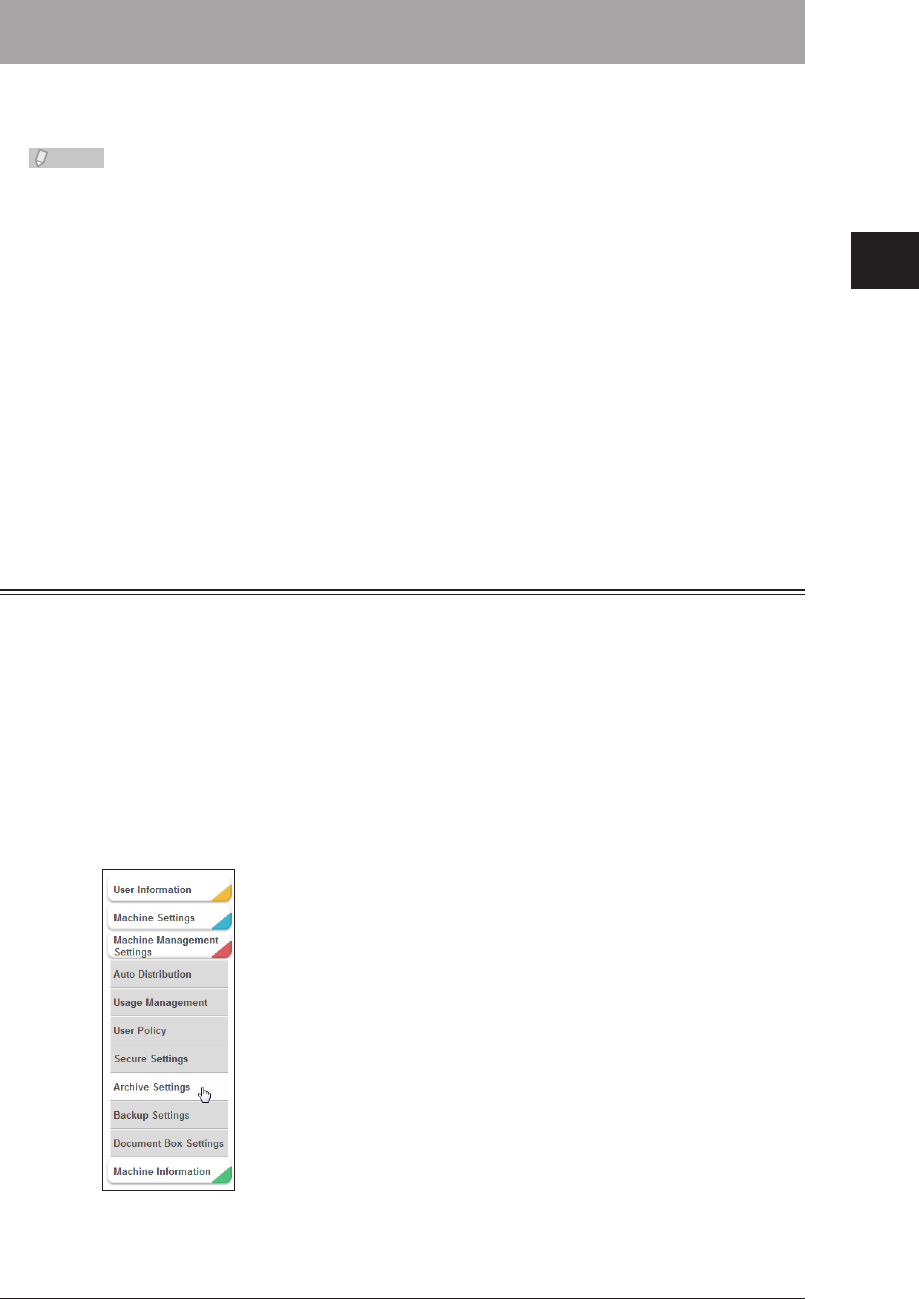
1
2
3
OfficeBridge Administrator Settings
Saving Transmitted Data (Archive Settings) 3-111
Saving Transmitted Data (Archive Settings)
When the machine transmits and receives documents via fax or e-mail, you can send
those documents to a specified destination via fax, or store them in a specified folder.
Note
Archive settings apply to all the documents that correspond to the specified data •
type. For example, when archive settings are enabled for “Transmitted Fax”, all
transmitted fax documents are archived.
The specified archiving is only performed when the transmission/reception is •
completed successfully. When the transmission or reception has not been performed
correctly due to an error, the specified data archiving will not be performed.
When archiving is performed, realtime transmission and manual transmission •
(transmission using the external phone handset or [Monitor]) cannot be used.
When archiving is performed, polling communication and F-code communication are •
not archived.
The archive settings can also be specified from the control panel of the machine. For •
details, refer to Chapter 2, “Specifying the Network Settings” in the Administrator's
Guide.
Transmitted e-mails cannot be archived to a fax destination.•
Specifying Archive Settings
You can save to a folder or transmit to another fax destination the following documents;
transmitted faxes, transmitted internet faxes, transmitted e-mail, received faxes, and
received internet faxes.
Click [Admin Login] in OfficeBridge, and log in.
1
(See page 2-7.)
This function may also be available on Guest and User login screen, depending on user policy
settings.
Click [Machine Management Settings], and then [Archive Settings].
2
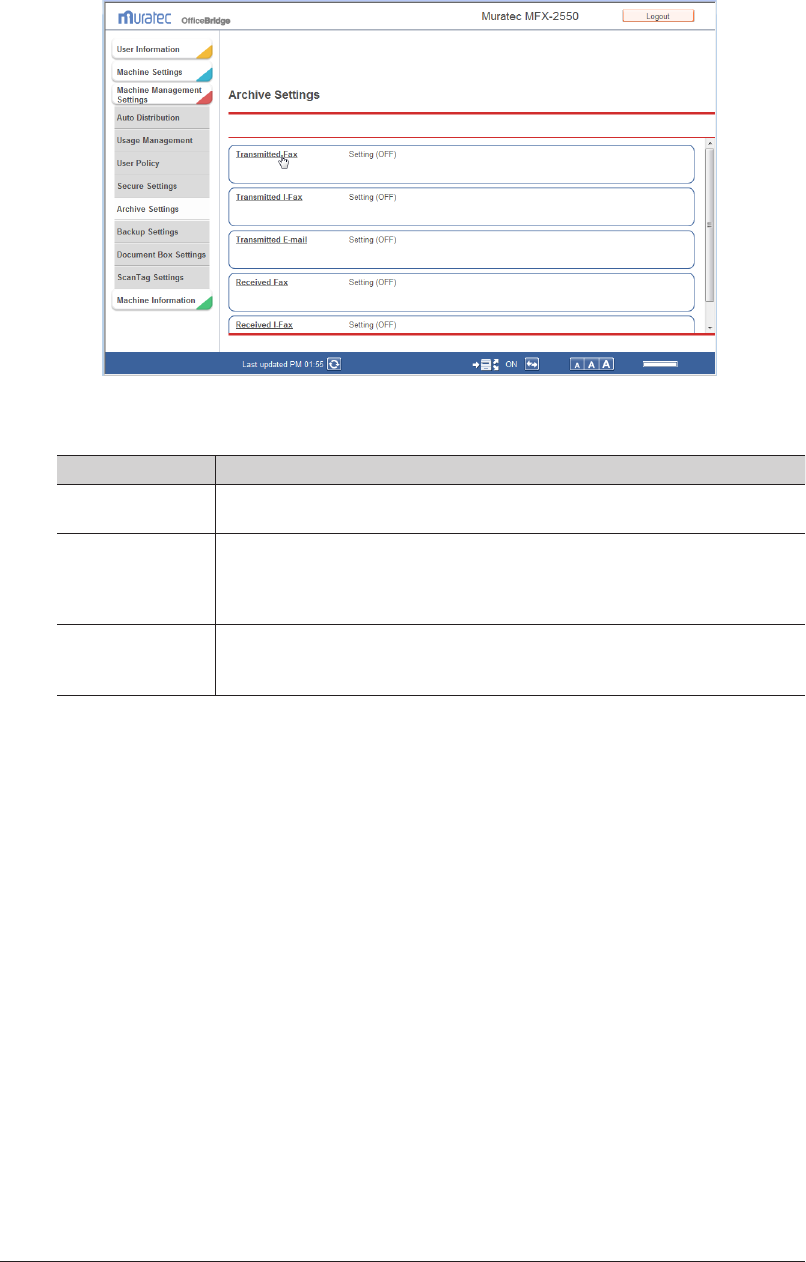
3-112 Saving Transmitted Data (Archive Settings)
Click the data type you want to specify archive settings for.
3
Specify the archive settings.
4
Setting Description
Setting Sets whether to enable or disable the archive settings.
Set “ON” to enable the function, or “OFF” to disable it.
Destination Set the archive destination for the data type. For details, refer to “Specifying
the Archive Destination”. (See page 3-113.)
If you set an archive destination, it is displayed in the list on the right. To
delete an archive destination, select it and click [Delete].
File Format Select the file format for the saved files when a folder is specified for the
archive destination.
Select “PDF” or “TIFF”.
Click [Save] twice.
5
The archive settings are saved. You can now select [ON] or [OFF] for the archive settings to
archive the communication data with the set conditions.

1
2
3
OfficeBridge Administrator Settings
Saving Transmitted Data (Archive Settings) 3-113
Specifying the Archive Destination
You can specify the archive destination using various methods. You can only register a
single archive destination.
Specifying From the Address Book
Click [Select] for the archive destination.
1
Click [Shared] from “Address Book” in “Fax / E-mail Destinations”.
2
Select a destination from the address book, and click [Fax] to add the
3
destination to the destination list as a fax destination or [To] to add it as an
e-mail destination.
The archive destination is displayed in the destination list.•
The registered content is displayed to the right of the address book name. If only a fax •
number is registered, [Fax] is displayed. If only an e-mail address is registered, [Mail] is
displayed. If both are registered, [Fax / Mail] is displayed.
If a fax number is not registered for the destination, the destination cannot be specified as a •
fax destination.
To delete a destination, select the destination you want to delete from the destination list, •
and click [Delete].
Click [Save] twice.
4
The display returns to the archive settings screen.

3-114 Saving Transmitted Data (Archive Settings)
Manually Entering a Destination
Click [Select] for the archive destination.
1
Enter the fax number or e-mail address of the destination in the “Fax / E-mail
2
Destinations” entry box.
Enter either a fax or e-mail transmission destination. You cannot enter both at the same •
time.
Up to 40 digits can be entered for a fax number. Up to 50 characters can be entered for a •
e-mail address.
Dialing options can be inserted when entering a fax number. For details on dialing options, •
refer to Chapter 3, “Basic Faxing” in the Scanner and Fax Guide.
Click [Fax] if you entered a fax number, or [To] if you entered an e-mail address.
3
The archive destination is displayed in the address list.•
To delete a destination, select the destination you want to delete from the destination list, •
and click [Delete].
Click [Save] twice.
4
The display returns to the archive settings screen.
Specifying Using a Folder Shortcut
Click [Select] for the archive destination.
1
Click [Shared] from “Folder Shortcut” in “Folder Destination”.
2
The destination selection screen is displayed.
Select the folder shortcut, and click [Add].
3
The archive destination is displayed in the address list.•
To delete a destination, select the destination you want to delete from the destination list, •
and click [Delete].
Click [Save] twice.
4
The display returns to the archive settings screen.
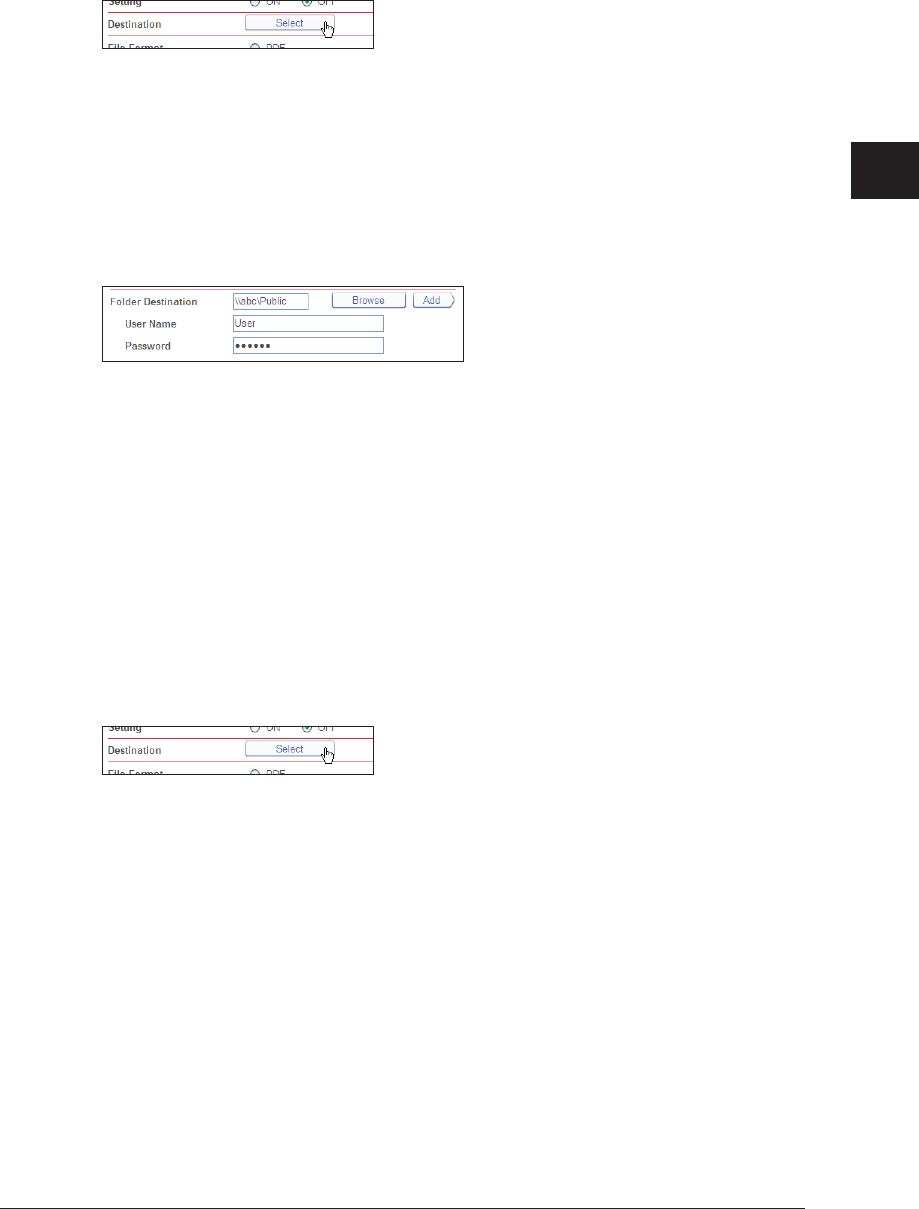
1
2
3
OfficeBridge Administrator Settings
Saving Transmitted Data (Archive Settings) 3-115
Manually Entering a Folder Destination
Click [Select] for the archive destination.
1
Enter the folder path name of the forwarding destination in the “Folder
2
Destination” entry box in “Folder Destination”.
Up to 128 characters can be entered. The following characters cannot be used in a path •
name; * ? “ < > |.
Enter the path name in the “\\(computer name)\(folder name)\” format.•
If a user name and password are required to access the folder, enter them.
3
Click [Add].
4
The archive destination is displayed in the address list.•
To delete a destination, select the destination you want to delete from the destination list, •
and click [Delete].
Click [Save] twice.
5
The display returns to the archive settings screen.
Browsing for a Folder Destination
Click [Select] for the archive destination.
1
Click [Browse] in “Folder Destination”.
2
A list of the network environment you are connected to is displayed.•
If you enter the computer name in the folder path in advance, you can display a list of the •
shared folders in that computer.
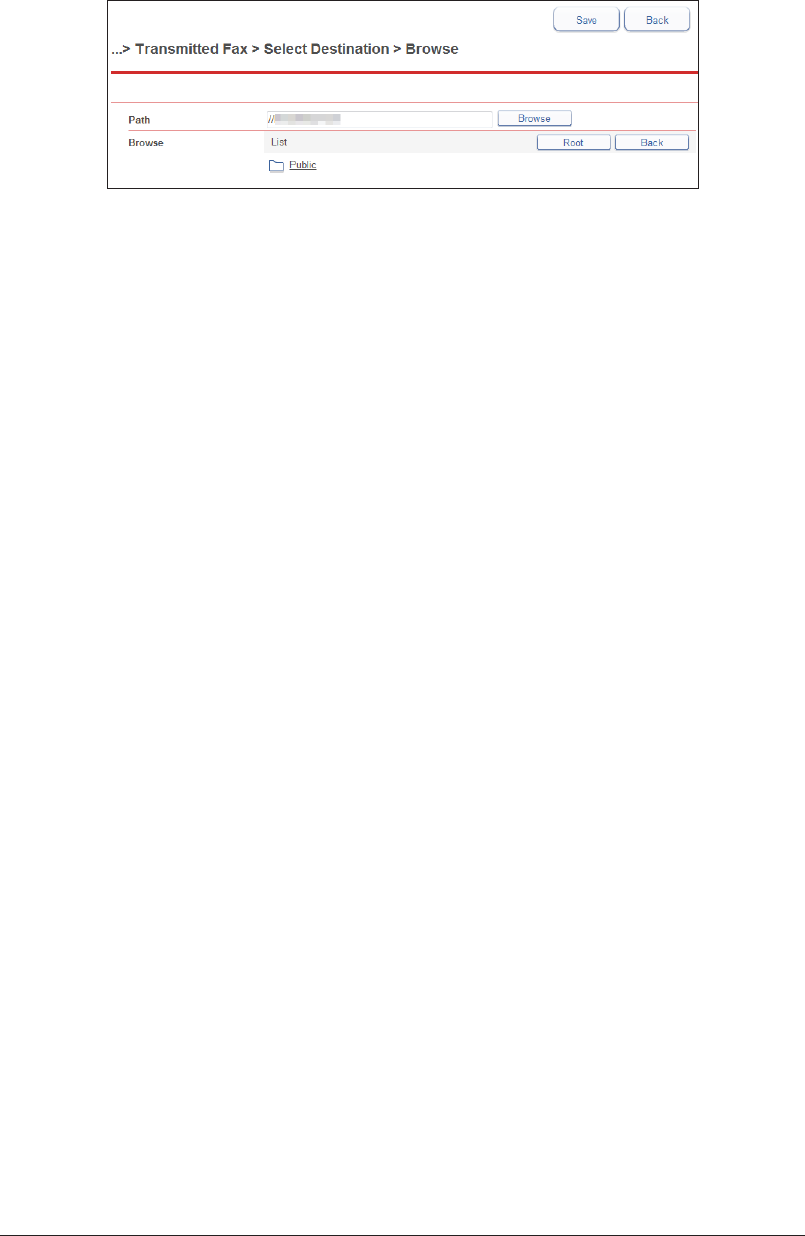
3-116 Saving Transmitted Data (Archive Settings)
Click a displayed computer name or folder name, and select the folder name to
3
set as the forwarding destination.
Click [Back] to return to the previous folder level.•
Click [Root] to return to the first (root) level.•
Click [Save].
4
The folder path name is entered as the folder destination.
Click [Add].
5
The archive destination is displayed in the address list.•
To delete a destination, select the destination you want to delete from the destination list, •
and click [Delete].
Click [Save] twice.
6
The display returns to the archive settings screen.
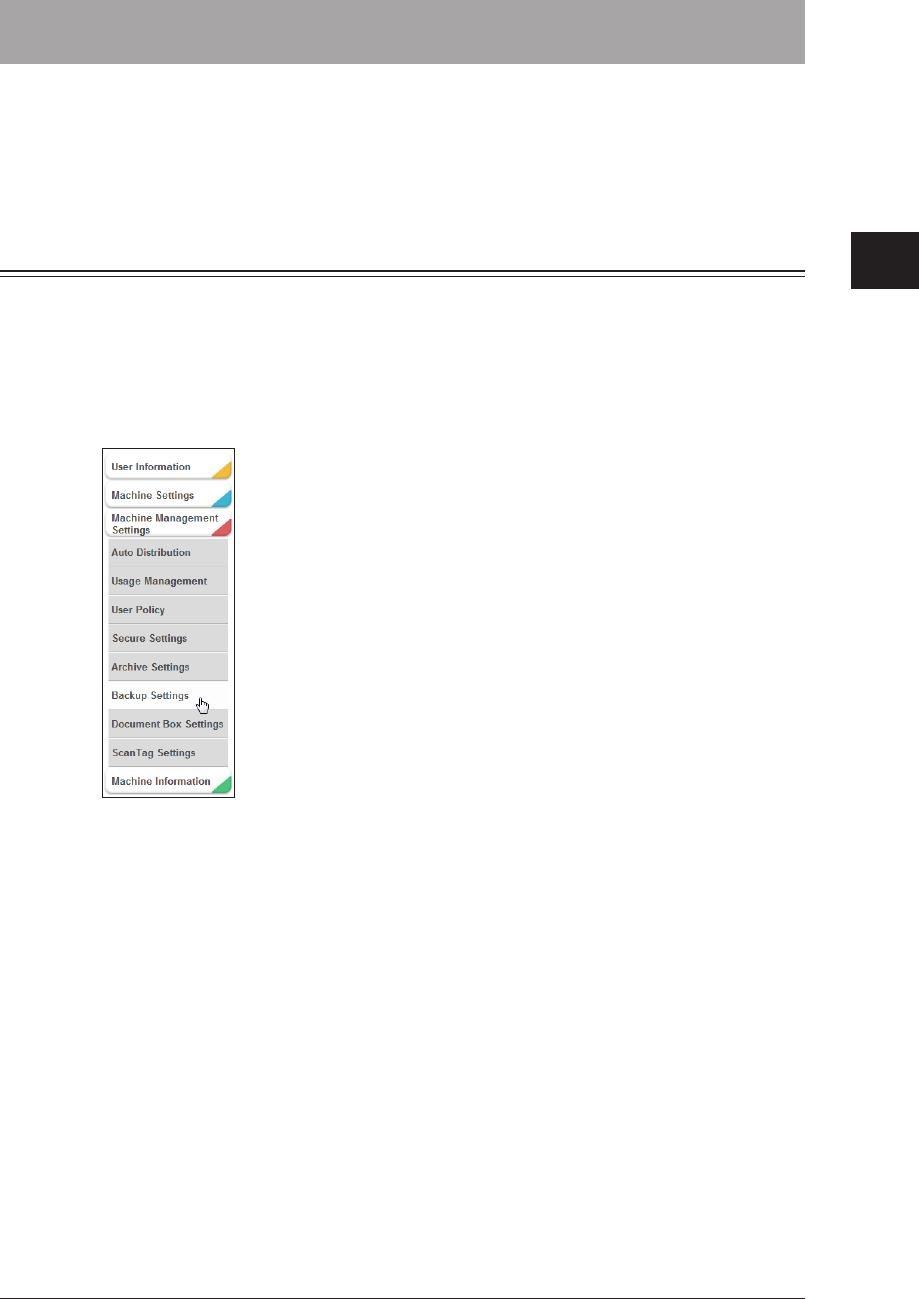
1
2
3
OfficeBridge Administrator Settings
Backing Up Documents 3-117
Backing Up Documents
You can specify settings for backing up the document files stored in the machine to a
shared folder on the network.
You can display the backed up documents on the screen, and check the backup status
from the log.
Specifying Backup Settings
Click [Admin Login] in OfficeBridge, and log in.
1
(See page 2-7.)
This function may also be available on Guest and User login screen, depending on user policy
settings.
Click [Machine Management Settings], and then [Backup Settings].
2
Click “Document Backup”.
3
The “Document Backup” screen is displayed.
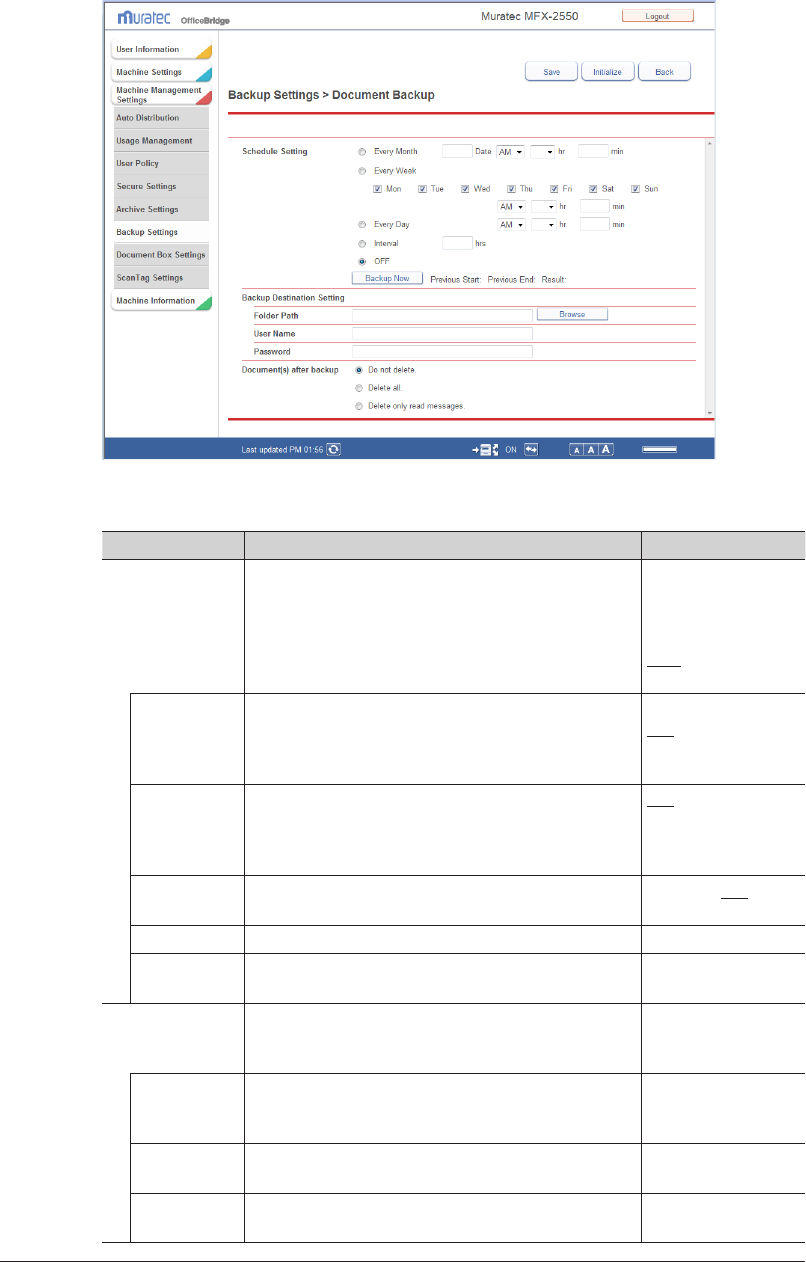
3-118 Backing Up Documents
Set the detailed information.
4
You can register the following items.
Setting Description Settings
Schedule Setting Set the schedule for executing the document
backup.
If you select “OFF”, the document backup is not
executed.
Every Month
Every Week
Every Day
Interval
OFF
Backup Now
Every Month Executes the backup at the same date and time
every month.
Enter the day, hour, and minute in the entry boxes.
Date: 1 - 31
AM, PM
hr: 1 - 12
min: 0 - 59
Every Week Executes the backup at the same day and time
every week.
Select the day of the week to execute the backup,
and enter the hour and minute in the entry boxes.
AM, PM
hr: 1 - 12
min: 0 - 59
Every Day Executes the backup at the same time every day.
Enter the hour and minute in the entry boxes.
hr: 1 - 12, AM, PM
min: 0 - 59
Interval Executes the backup at the set interval. hr: 1 - 23
Backup Now Click this to execute the backup immediately,
regardless of the schedule settings.
−
Backup
Destination
Setting
Set the shared folder on the network for storing the
backed up documents.
−
Folder Path Enter the path to the shared folder.
You can click [Browse] to easily enter the folder
path from the “Browse” screen.
128 characters
User Name Enter the account for logging in to the shared
folder.
64 characters
Password Enter the password for logging in to the shared
folder.
28 characters

1
2
3
OfficeBridge Administrator Settings
Backing Up Documents 3-119
Setting Description Settings
Document(s)
after backup
Set the method for dealing with the document files
in the machine after they have been backed up.
Do not delete.
Delete all.
Delete only read
messages.
Click [Save].
5
Press [Back] to cancel registering the document backup settings and return to the “Backup
Settings” screen.
Note
Underlined values are the default settings specified at the time of shipment.•
Click [Initialize] to restore the default settings.•
The time (start time and end time) and result of the last backup is displayed to the •
right of [Backup Now].
Specifying the Backup Document Display
You can specify the settings for viewing backed up documents. Up to 10 backup document
display settings can be registered. Backed up documents can be displayed from the pull-
down menu on the left side of the document list screen. If you add another folder to
display the backed up documents, the documents are also displayed in that folder.
Click [Admin Login] in OfficeBridge, and log in.
1
(See page 2-7.)
This function may also be available on Guest and User login screen, depending on user policy
settings.
Click [Machine Management Settings], and then [Backup Settings].
2
Click “Backup Document Display”.
3
The “Backup Document Display” screen is displayed.
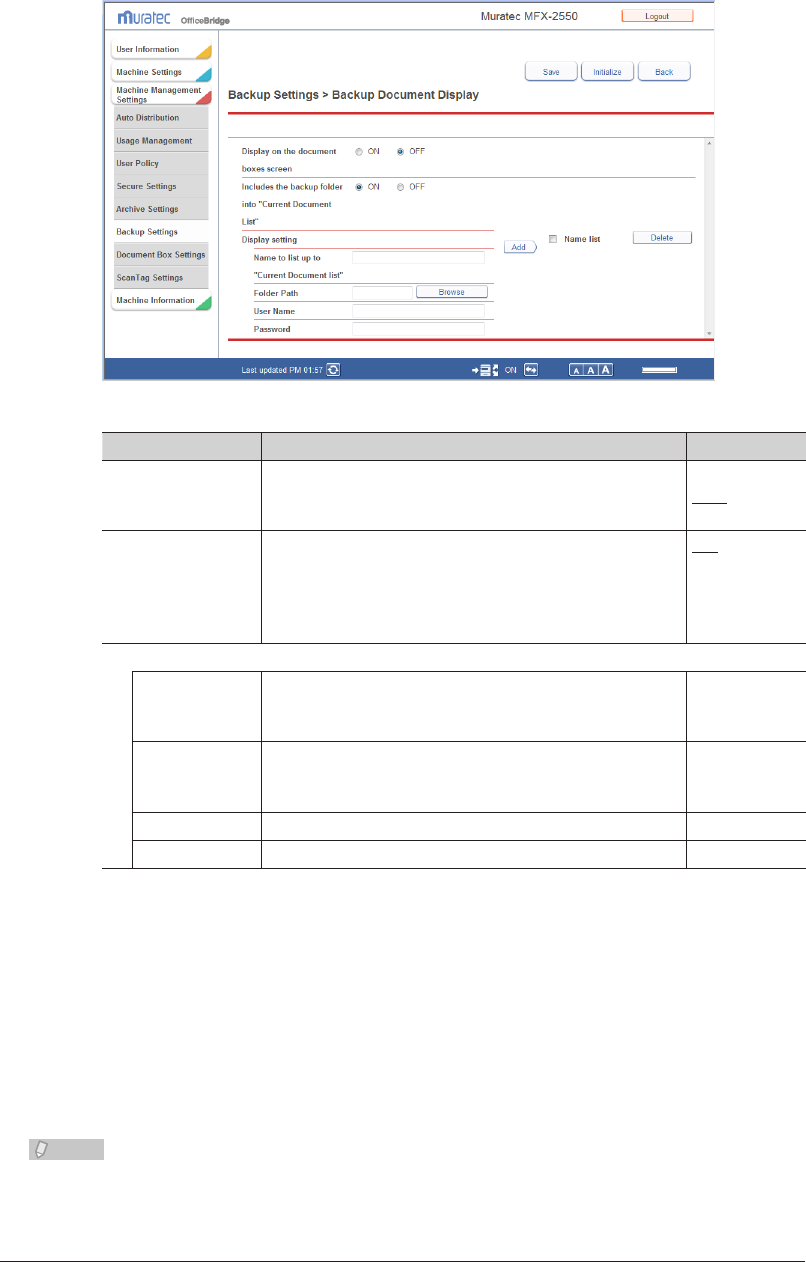
3-120 Backing Up Documents
Set the detailed information.
4
You can register the following items.
Setting Description Settings
Display on the
document boxes
screen
Select whether to enable or disable the backup viewing
settings.
Set “ON” to enable the setting, or “OFF” to disable it.
ON
OFF
Includes the backup
folder into “Current
Document List”
Select whether to enable or disable viewing of the
shared folder on the network in which the backed up
documents are stored.
Select [ON] to enable viewing, or [OFF] to disable
viewing.
ON
OFF
Display setting
Name to list
up to “Current
Document list”
Enter the name to add to the folder path of the shared
folder.
40 characters
Folder Path Enter the path to the shared folder.
You can click [Browse] to easily enter the folder path
from the “Browse” screen.
128
characters
User Name Enter the account for logging in to the shared folder. 64 characters
Password Enter the password for logging in to the shared folder. 28 characters
Click [Add].
5
The settings are added to the list of document viewing folders. (The name you set in “Name •
to list up to “Current Document list” is displayed as the name.)
Up to 10 document viewing folders can be registered.•
Click [Save].
6
Press [Back] to cancel registering the backup viewing settings and return to the “Backup
Settings” screen.
Note
Underlined values are the default settings specified at the time of shipment.•
Click [Initialize] to restore the default settings.•
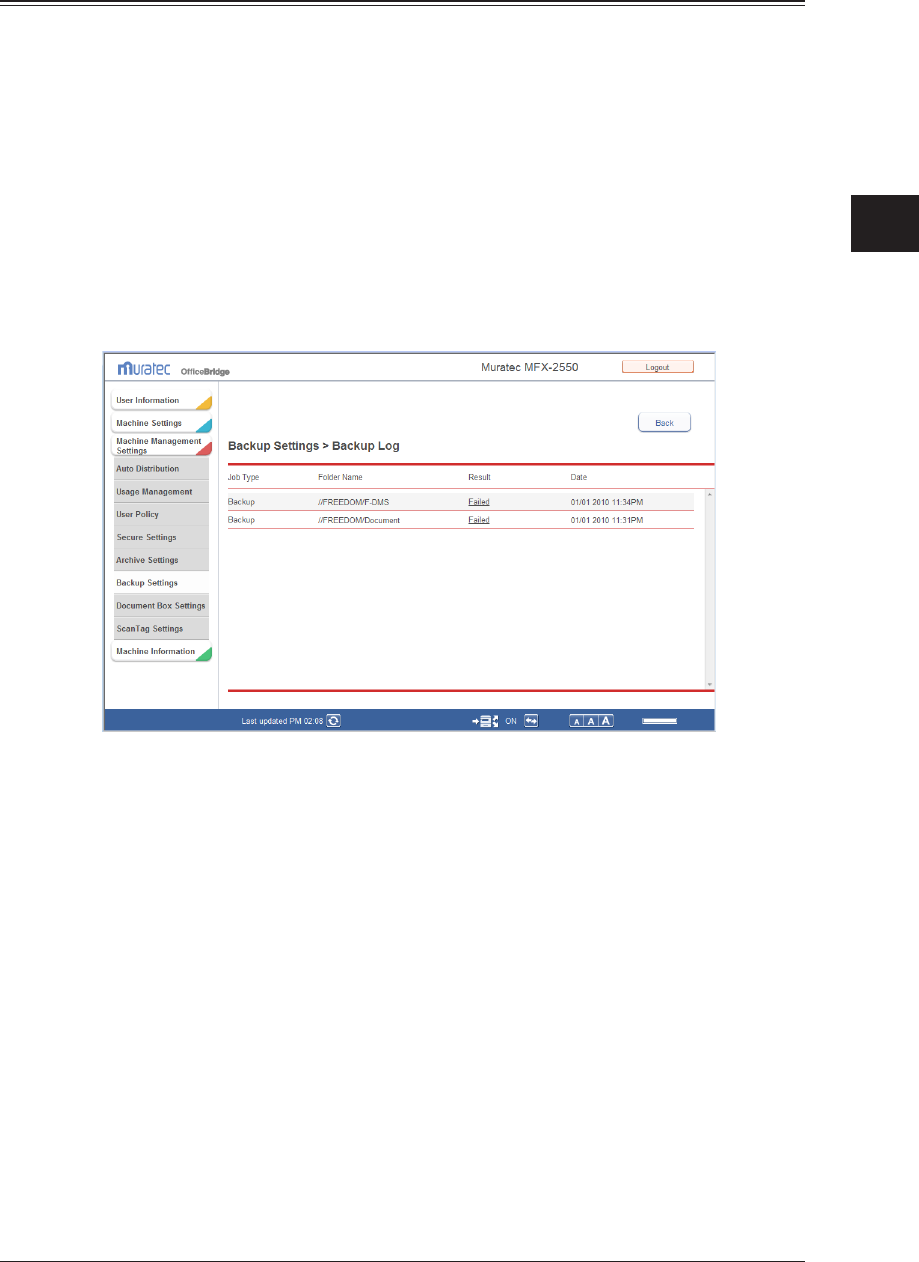
1
2
3
OfficeBridge Administrator Settings
Backing Up Documents 3-121
Checking the Backup Log
You can display the backup log.
The backup log displays the content processed, the shared folder used, the result of the
backup (success or failure), and the date that the backup was executed.
Click [Admin Login] in OfficeBridge, and log in.
1
(See page 2-7.)
This function may also be available on Guest and User login screen, depending on user policy
settings.
Click [Machine Management Settings], and then [Backup Settings].
2
Click “Backup Log”.
3
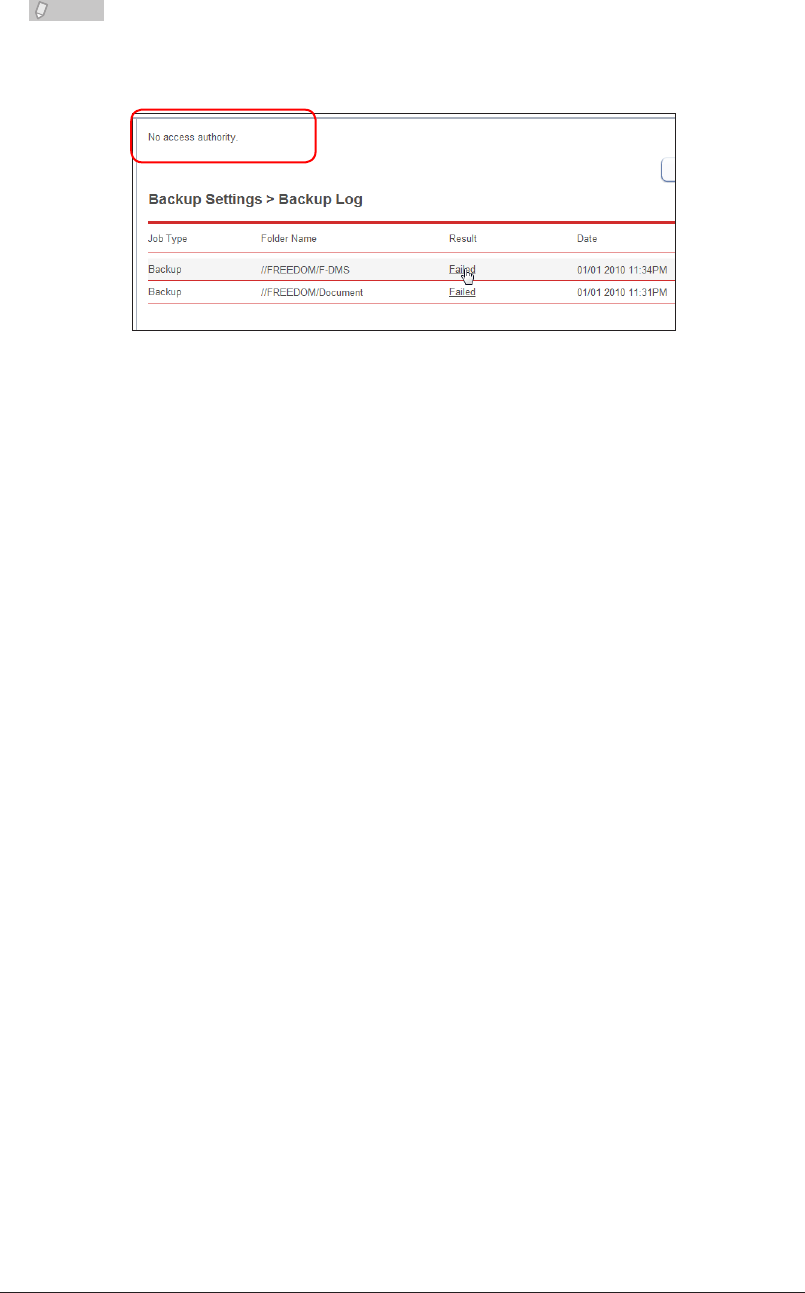
3-122 Backing Up Documents
Note
If “Failed” is displayed as the result of the backup, you can move the mouse cursor
over “Failed” to display the reason the backup failed on the upper left of the “Backup
Log” screen.
The reasons for the backup failing are indicated below.
Failed to connect to the shared folder.•
No access authority.•
Failed to transfer the document.•
Partially failed to backup the document.•
Backup has been canceled.•
Failed to analyze the document management information.•
Failed to update the document management information.•
Unknown error occurred.•
Check the backup settings and folder privileges.

1
2
3
OfficeBridge Administrator Settings
Setting Security 3-123
Setting Security
OfficeBridge enables you to set the user policies to specify function restrictions and
setting restrictions for users, and the machine policy to specify setting restrictions for the
machine.
Setting User Policies
Regarding the User Policies
User policies define authority levels by restricting the functions and settings that users
can use. Users must have a user policy.
The following authorities are set in OfficeBridge as default settings at the time of
shipment. See “Default Security Settings” for details. (See page 3-127.)
Authority
Level Users Applied Description
High User Can use all functions of the machine.
Can specify some machine settings (user registration, destination
registration (shared only), etc.)
Can view communication jobs and machine status information, etc.
Low Guest Can use all functions of the machine.
Cannot specify machine settings.
Can view communication jobs and machine status information, etc.
Registering a New User Policy
You can register new user policies. The registered user policies can also be used when
performing user registration. (See page 3-6.)
Click [Admin Login] in OfficeBridge, and log in.
1
(See page 2-7.)
This function may also be available on Guest and User login screen, depending on user policy
settings.

3-124 Setting Security
Click [Machine Management Settings], and then [User Policy].
2
Click [Add].
3
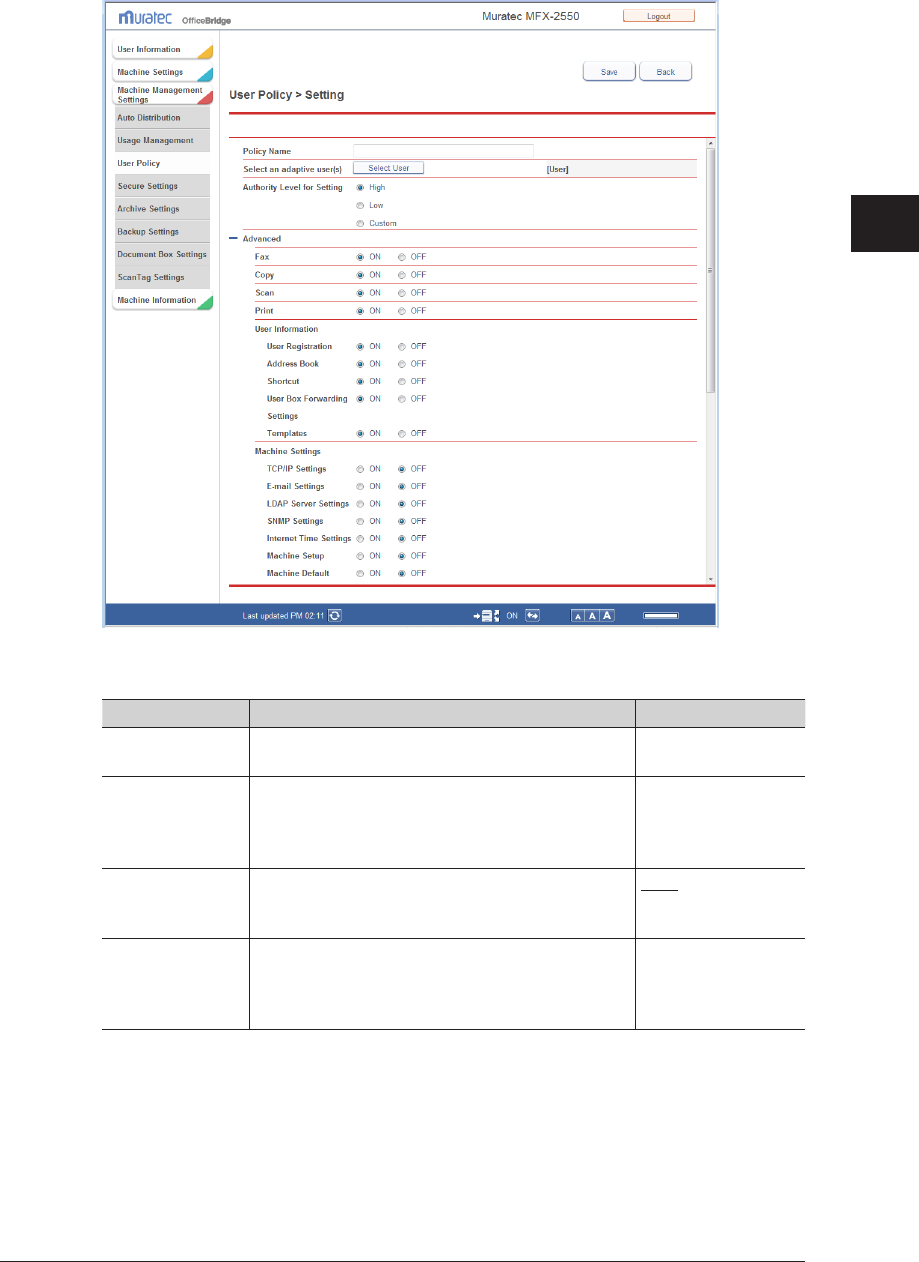
1
2
3
OfficeBridge Administrator Settings
Setting Security 3-125
4
Set the detailed information.
You can register the following items.
Setting Description Settings
Policy name Enter a name for the user policy to set.
This item is required.
30 characters
Select an adaptive
user (s)
Select users to apply the policy to from the list.
For details, refer to “Selecting Users”. (See page
3-126.)
−
Authority Level
for Setting
Select the authority level for the users. High
Low
Custom
Advanced This setting is displayed when you click [+].
Enables/disables the security setting. Set “ON” to
enable the settings, or “OFF” to disable it.
See “Default Security
Settings” to see the
available settings.
(See page 3-127.)
Click [Save].
5
The display returns to the “User Policy” list screen.•
Press [Back] to cancel registering the user policy settings and return to the “User Policy” list •
screen.
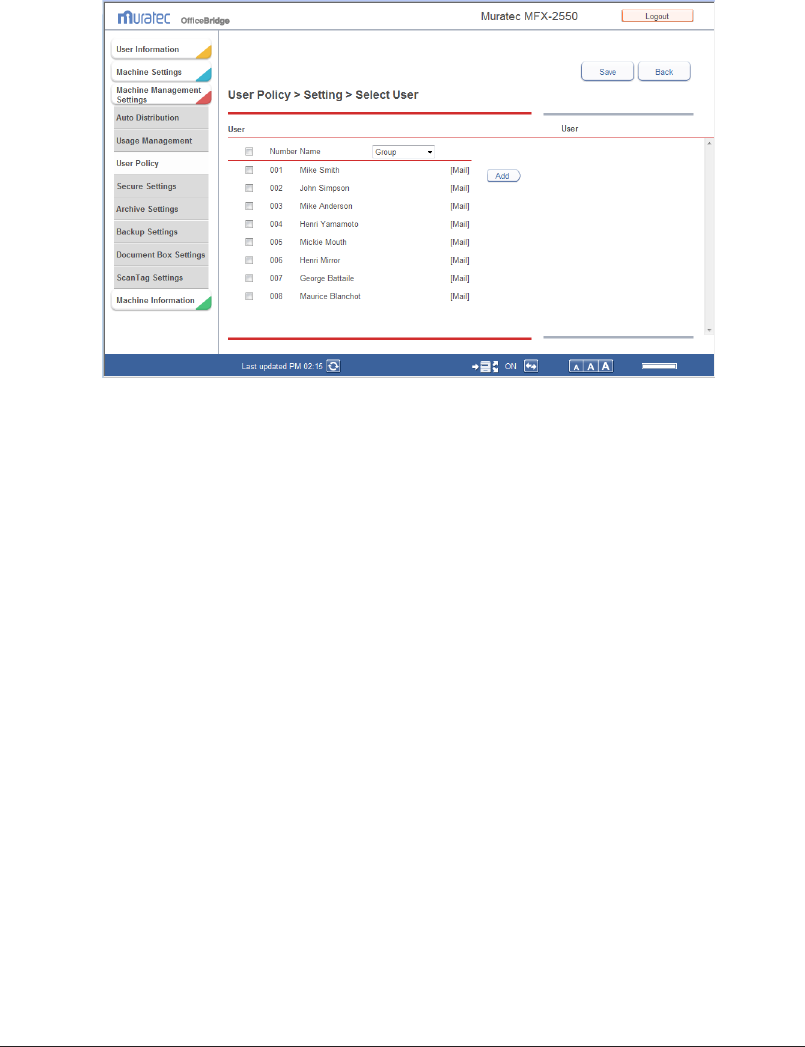
3-126 Setting Security
Selecting Users
Display the User Policy setting screen.
1
See “Registering a New User Policy” step 1 to 4. (See page 3-123.)
Click [Select User] in “Select an adaptive user(s)”.
2
The user selection screen is displayed.
Select the users to add from the user list, and click [Add].
3
If groups are registered, you can filter the displayed users by group using the [Group] pull-
down menu.
Click [Save].
4
The users to apply the policy to are set.
Click [Save].
5
The display returns to the “User Policy” list screen.

1
2
3
OfficeBridge Administrator Settings
Setting Security 3-127
Default Security Settings
The default in the authority levels are indicated below.
If you set “OFF”, the function cannot be operated from the control panel of the
machine. The function is also not displayed in the menu of OfficeBridge.
Security Setting “High” Authority Level “Low” Authority Level
Fax ON ON
Copy ON ON
Scan ON ON
Print ON ON
User Information
User Registration ON OFF
Address Book ON OFF
Shortcut ON OFF
User Box Forwarding Settings ON OFF
Templates ON OFF
Machine Settings
TCP/IP Settings OFF OFF
E-mail Settings OFF OFF
LDAP Server Settings OFF OFF
SNMP Settings OFF OFF
Internet Time Settings OFF OFF
Machine Setup OFF OFF
Machine Default Settings OFF OFF
Machine Management Settings
Auto Distribution OFF OFF
Usage Management OFF OFF
User Policy OFF OFF
Secure Settings OFF OFF
Archive Settings OFF OFF
Backup Settings OFF OFF
Document Box Settings OFF OFF
ScanTag Settings OFF OFF
Machine Information
Communication Job ON ON
Print Job ON ON
Machine Status ON ON
Communication History ON OFF
Print Job History ON OFF
Mode protection can also be set from the control panel of the machine. For details,
refer to Chapter 2, “Setting Mode Protection” in the Administrator's Guide.
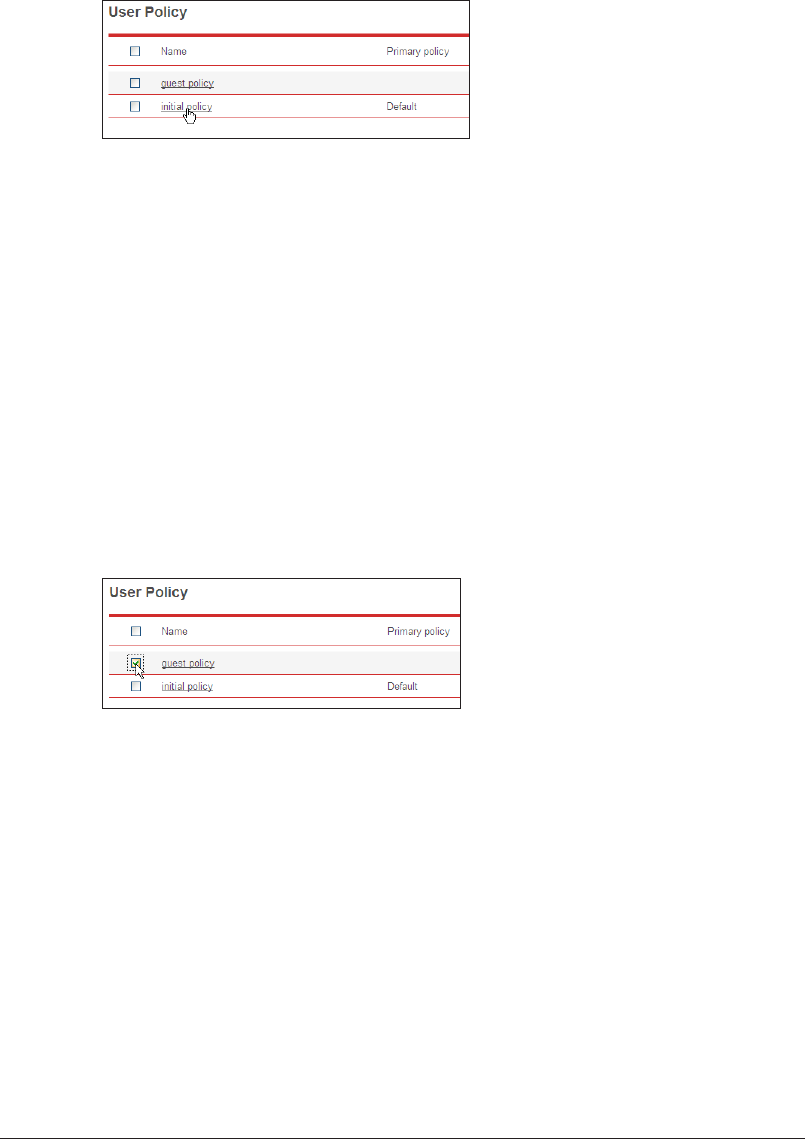
3-128 Setting Security
Changing a User Policy
You can change a user policy that has been registered.
Click the name of the policy to change on the “User Policy” list screen.
1
The “Registration” screen is displayed.
Change the detailed information.
2
For details, refer to step 4 of “Registering a New User Policy”. (See page 3-125.)
Click [Save].
3
The settings are changed, and the display returns to the “User Policy” list screen.•
Press [Back] to cancel changing the user policy settings and return to the “User Policy” list •
screen.
Copying an Existing User Policy to Register a New User Policy
You can copy a user policy that is already registered to register a new user policy.
On the “User Policy” list screen, select the checkbox of the user policy you want
1
to copy.
Click [Duplicate].
2
The “Registration” screen is displayed with the copied settings entered for the detailed
information.
Change the settings to those for the new user policy to register.
3
For details, refer to step 4 of “Registering a New User Policy”. (See page 3-125.)
Click [Save].
4
The display returns to the “User Policy” list screen.•
Press [Back] to cancel registering the user policy settings and return to the “User Policy” list •
screen.
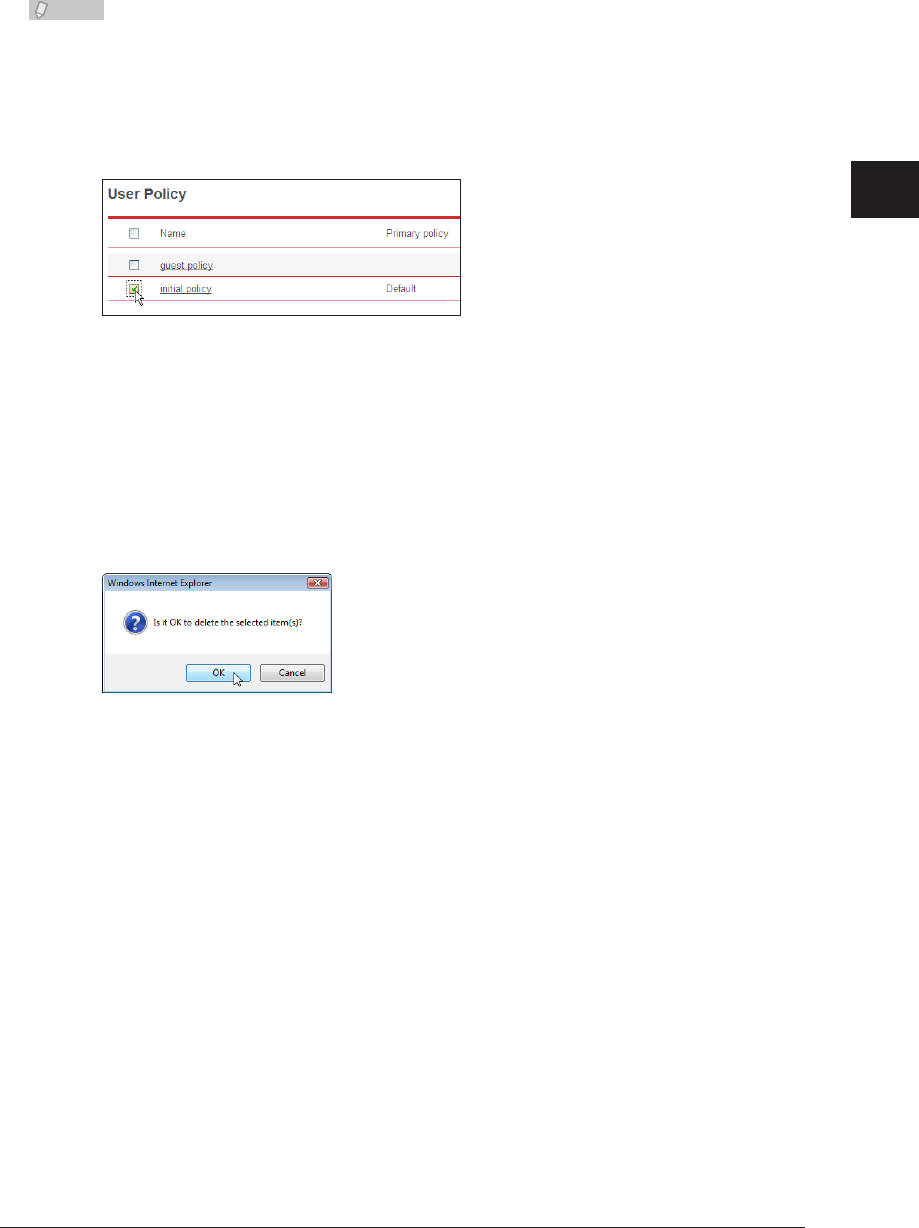
1
2
3
OfficeBridge Administrator Settings
Setting Security 3-129
Deleting a User Policy
You can delete unnecessary user policies from the “User Policy” list screen.
Note
You can delete multiple user policies at the same time.•
You cannot delete a user policy that is assigned to users.•
You cannot delete the “initial policy” or “guest policy”.•
Select the checkbox of the user policy you want to delete.
1
To select all the displayed policies, select the top checkbox.•
Click the same checkbox to deselect the item.•
Click [Delete].
2
A message confirming that you want to delete the user policies is displayed.
Click [OK].
3
The selected user policies are deleted.
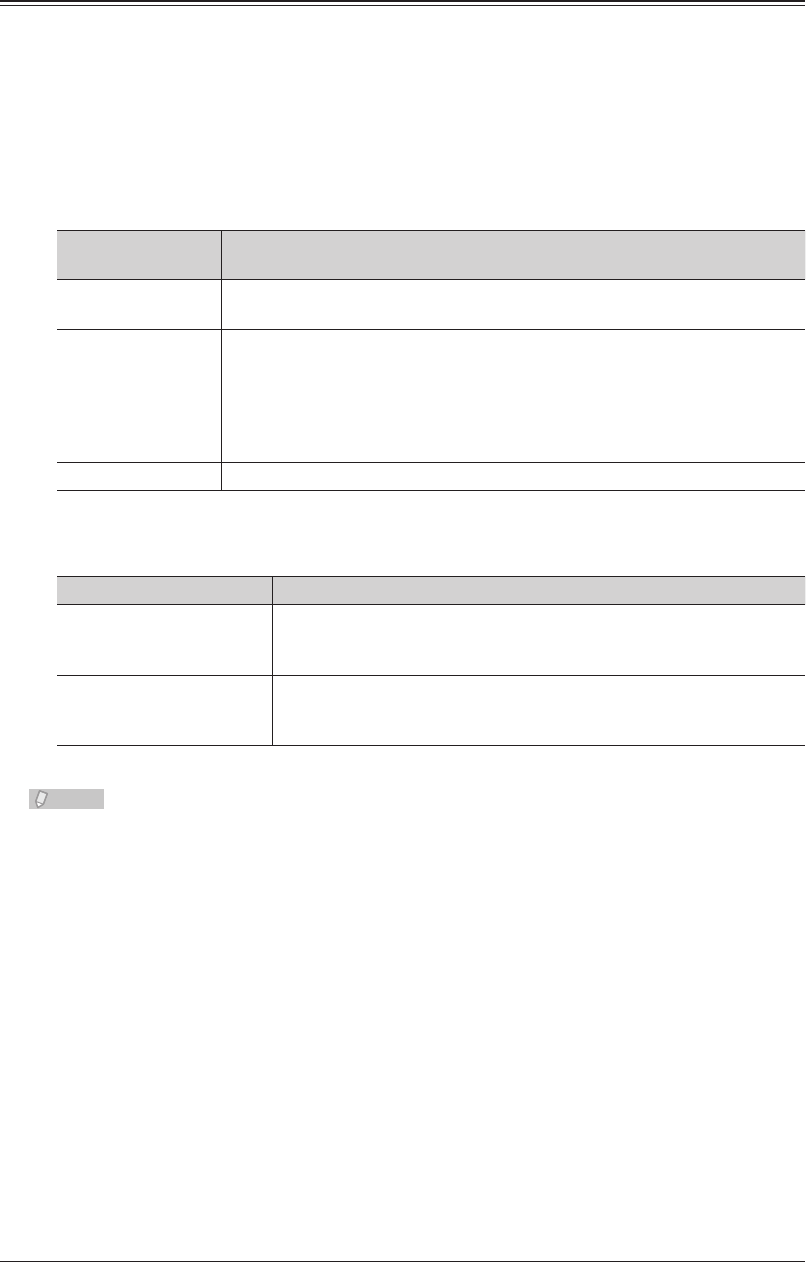
3-130 Setting Security
Setting the Machine Policy
Regarding the Machine Policy
The machine policy restricts the machine itself. You can only set one machine policy.
Authentication Methods
There are three login machine policies provided in OfficeBridge, which depend on the
login authentication method.
Authentication
Method Description
Stand-Alone Performs user authentication using the user information in the machine.
User information must be registered in OfficeBridge in advance.
Single Sign On Performs user authentication using the user information in the machine
after performing Active Directory authentication.
If the corresponding user information is not registered in OfficeBridge, it
will automatically be newly registered. If the corresponding user information
is already registered, it will be overwritten with the information registered
in Active Directory.
Network Performs user authentication using the information in Active Directory.
If you select Stand-Alone or Single Sign On, you can also set the login status of the
control panel when the machine is started.
Panel Login Mode Name Description
Guest Login Mode The machine starts in the guest login mode. The ready screen is
displayed when the machine is started. To perform a user login, press
[Login] to display the login screen.
Logout Mode The machine starts with the user logged out. The login screen is
displayed when the machine is started. Guest can move to other
screens without logging in.
Note
If you disable the guest account settings, the machine will always be in the “Logout
Mode”. (See page 3-133.) A user login must be performed to move to other screens.
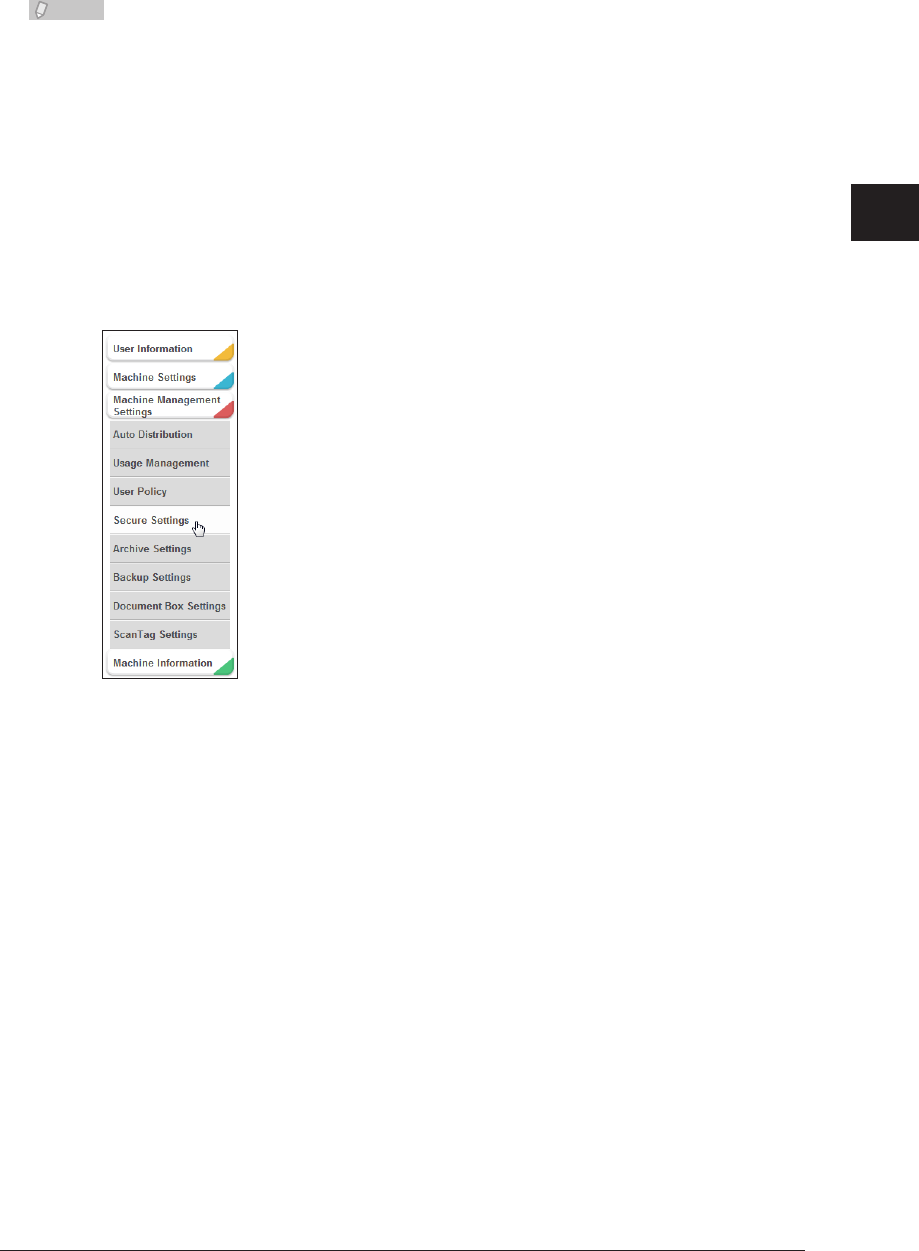
1
2
3
OfficeBridge Administrator Settings
Setting Security 3-131
Setting the Machine Policy
Note
The authentication method can also be specified from the control panel of the •
machine. For details, refer to Chapter 2, “Setting User Authentication” in the
Administrator's Guide.
Do not set the machine policy from the control panel of the machine. Specifying of •
the machine policy settings may fail if you do so.
Click [Admin Login] in OfficeBridg, and log in.
1
(See page 2-7.)
This function may also be available on Guest and User login screen, depending on user policy
settings.
Click [Machine Management Settings], and then [Secure Settings].
2
Click “Machine Policy Setting”.
3
The “Machine Policy Setting” screen is displayed.
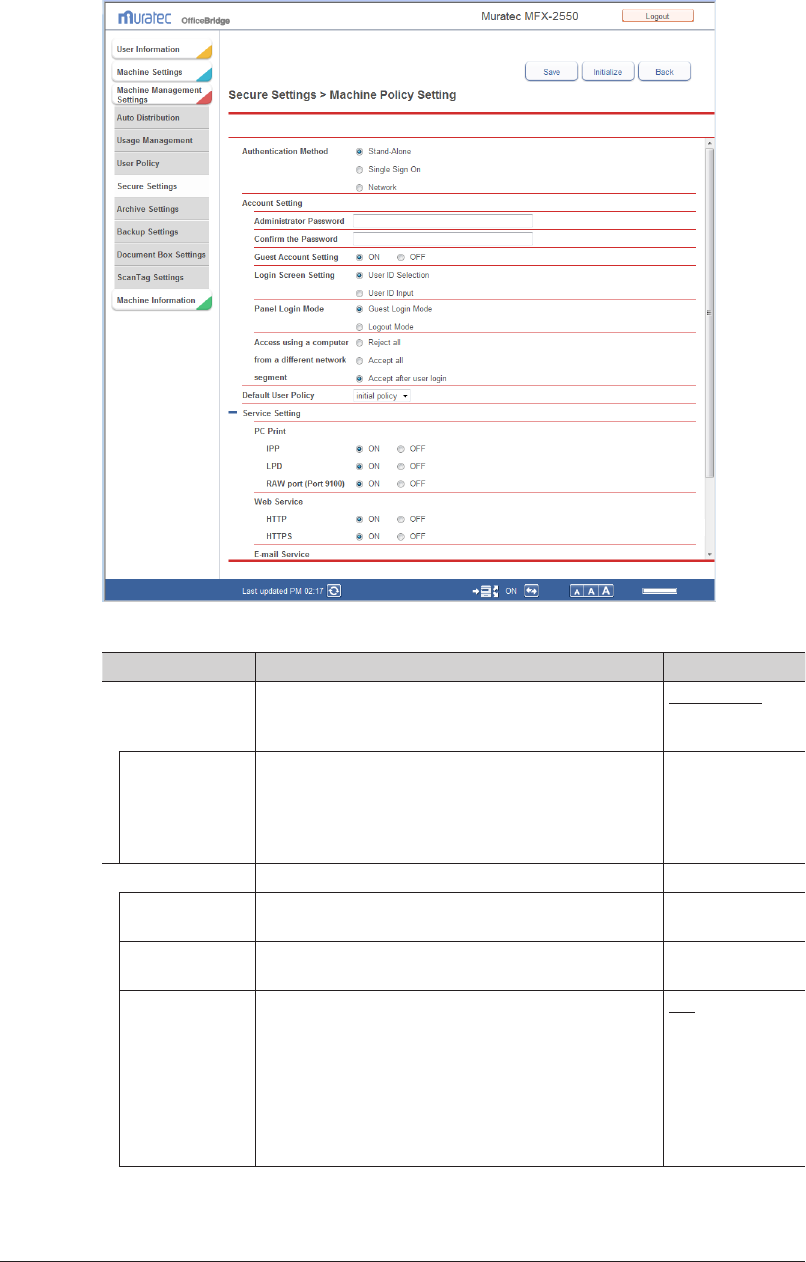
3-132 Setting Security
Set the detailed information.
4
You can register the following items.
Setting Description Settings
Authentication
Method
Select the authentication method. Stand-Alone
Single Sign On
Network
Domain Name Enter the domain name of the Active Directory
server.
If the authentication method is set to “Single Sign
On” or “Network”, this item is required.
If you select “Stand-Alone”, this item is not displayed.
64 characters
(0-9, a-z, A-Z, -, .)
Account Setting Specify the account settings for the login user. −
Administrator
Password
Enter the “Administrator Password”. 28 characters
Confirm the
Password
Enter the “Administrator Password” again. 28 characters
Guest Account
Setting
Set whether to enable or disable the guest account.
When this is set to “OFF”, a user login is required to
operate the machine and OfficeBridge.
“Accept after user login” in “Access using a computer
from a different network segment” will also not be
displayed, and cannot be selected.
If you select “Network” as the authentication method,
this item is not displayed.
ON
OFF
1
2
3
OfficeBridge Administrator Settings
Setting Security 3-133
Setting Description Settings
Login Screen
Setting
Select the screen displayed when a user logs in.
User ID Selection:
This screen is comprised of the user ID and
password entry, and a list of user information.
The account ID can be automatically entered by
selecting it from the list.
User ID Input:
This screen is comprised of the user ID and
password entry.
If you select “Network” as the authentication method,
this item is not displayed.
User ID Selection
User ID Input
Panel Login
Mode
Select the panel login mode.
You can select “Guest Login Mode” or “Logout Mode”.
If you set “Guest Account Setting” to “OFF”, the
machine will always be in the “Logout Mode”, and
this item is not displayed.
Guest Login
Mode
Logout Mode
Access using
a computer
from a different
network
segment
Select the operation to be performed when an access
request from a computer in a different network
segment is received.
You can select “Reject all”, “Accept all”, or “Accept
after user login”.
Reject all
Accept all
Accept after user
login
Default User
Policy
Select a user policy registered in the user policy
settings to use as the default policy.
−
Service Settings
These settings are displayed when you click [+].
Setting Description Settings
PC Print
*1
Set to allow or prohibit the various PC printing services. −
IPP Set to allow or prohibit the IPP port.
Select [ON] to allow the service, or [OFF] to prohibit it.
ON
OFF
LPD Set to allow or prohibit the LPD port.
Select [ON] to allow the service, or [OFF] to prohibit it.
ON
OFF
RAW port (Port
9100)
Set to allow or prohibit the 9100 port.
Select [ON] to allow the service, or [OFF] to prohibit it.
ON
OFF
Web Service Set to allow or prohibit the various Web services. −
HTTP
*1
Set to allow or prohibit the HTTP port.
Select [ON] to allow the service, or [OFF] to prohibit it.
ON
OFF
HTTPS Set to allow or prohibit the HTTPS port.
Select [ON] to allow the service, or [OFF] to prohibit it.
ON
OFF
E-mail Service Set to allow or prohibit the various e-mail services. −
SMTP (Standard
25 Port)
Set to allow or prohibit the SMTP (standard 25 port).
Select [ON] to allow the service, or [OFF] to prohibit it.
ON
OFF
Connection
Settings
Set to allow or prohibit the various device settings. −
LAN (wired) Set to allow or prohibit LAN connections. ON
OFF
USB Set to allow or prohibit USB connections. ON
OFF
*1 If you set HTTP to “OFF”, HTTPS and IPP are also automatically set to “OFF”. If you
set IPP or HTTPS to “ON”, HTTP is also automatically set to “ON”.

3-134 Setting Security
Click [Save].
5
The message “Changing the “Machine Policy” will reboot the machine automatically.” is •
displayed.
Press [Back] to cancel registering the machine policy settings and return to the “Machine •
Policy” list screen.
Click [OK].
6
The machine is restarted to reflect the machine policy settings.•
You will become unable to access OfficeBridge because the machine is restarted. Log in again •
after restarting the browser.
Note
Underlined values are the default settings specified at the time of shipment.•
Click [Initialize] to restore the default settings.•
If you become unable to access OfficeBridge after setting access restrictions, perform •
“Delete Restriction Settings” from the control panel of the machine. For details, refer
to Chapter 2, “Specifying the Network Settings” in the Administrator's Guide.
Setting Access Restrictions
In OfficeBridge, you can set access restrictions based on the MAC addresses or IP
addresses that send access requests from an external network.
You can restrict 50 MAC addresses and 50 IP addresses.
Note
Access cannot be restricted for requests from a network in another segment because
MAC addresses are not retained.
Click [Admin Login] in OfficeBridge, and log in.
1
(See page 2-7.)
This function may also be available on Guest and User login screen, depending on user policy
settings.
Click [Machine Management Settings], and then [Secure Settings].
2
Click “Network Filtering”.
3
The “Network Filtering” screen is displayed.
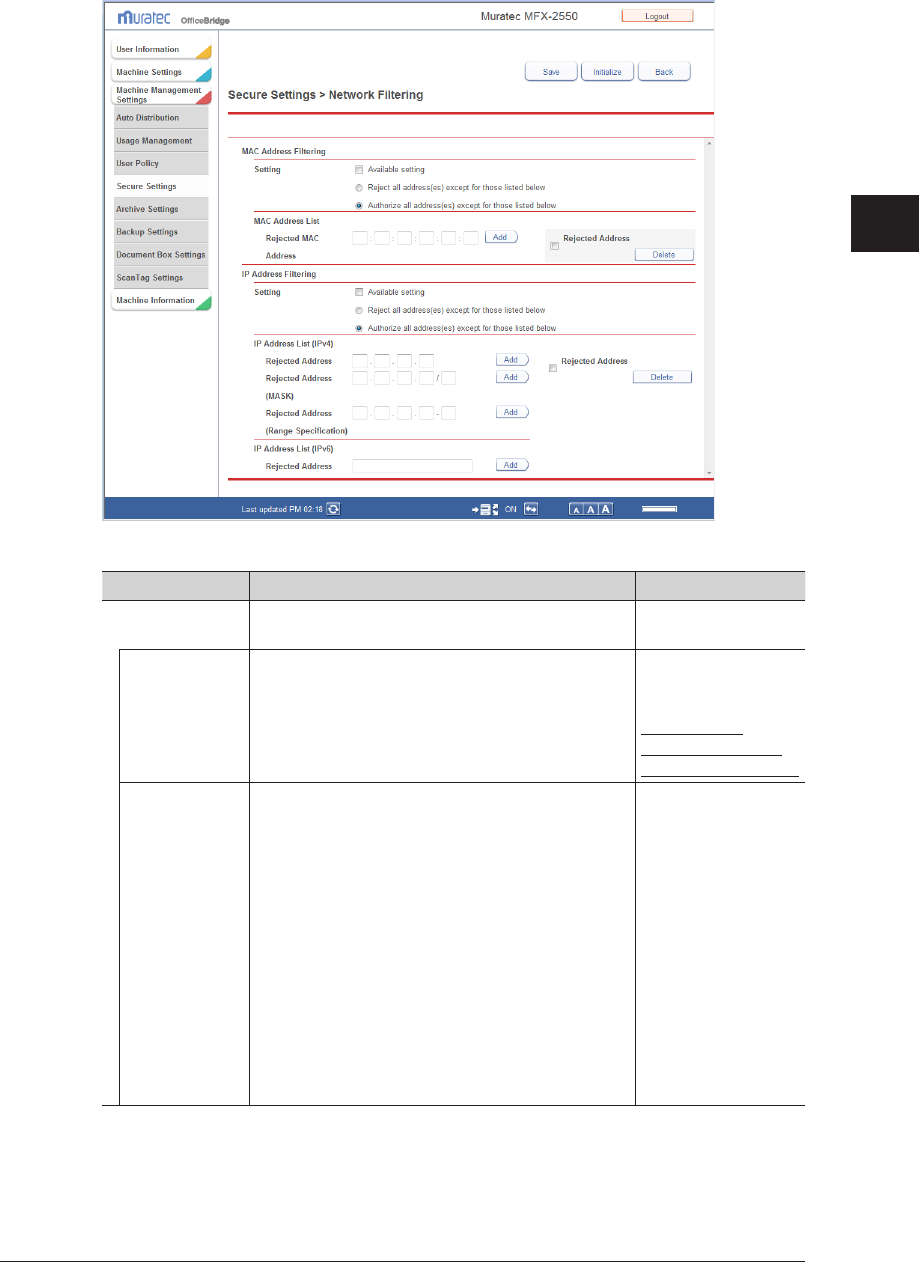
1
2
3
OfficeBridge Administrator Settings
Setting Security 3-135
Set the detailed information.
4
You can register the following items.
Setting Description Settings
MAC Address
Filtering
Set the MAC addresses to restrict. −
Setting
*1
Select the basic policy for the access restrictions.
Select either “Reject all specified address(es)
except for those listed below” or “Authorize all
address(es) except for those listed below”.
Select “Available setting” to enable the settings.
Reject all specified
address(es) except
for those listed below
Authorize all
address(es) except
for those listed below
MAC Address
List
*2
Enter the addresses to set as exceptions to the
basic policy selected in the settings.
• If you selected “Reject all specied address(es)
except for those listed below”, enter the MAC
addresses to allow.
• If you selected “Authorize all address(es) except
for those listed below”, enter the MAC addresses
to reject.
Up to 50 can be registered.
Enter an address and click [Add] to add it to the
list.
• To delete an address entered in the list, select
its checkbox, and click [Delete].
• Click the same checkbox to deselect the item.
XX:XX:XX:XX:XX:XX
format (where XX is
0 to 9, A to F)

3-136 Setting Security
Setting Description Settings
IP Address
Filtering
Set the IP addresses to restrict. −
Setting
*1
Select the basic policy for the access restrictions.
Select either “Reject all specified address(es)
except for those listed below” or “Authorize all
address(es) except for those listed below”.
Select “Available setting” to enable the settings.
Reject all specified
address(es) except
for those listed below
Authorize all
address(es) except
for those listed below
IP Address List
(IPv4)
*2
Enter the IPv4 addresses (specified individually,
with a mask, or with a range) to set as exceptions
to the basic policy selected in the settings.
• If you selected “Reject all specied address(es)
except for those listed below”, enter the IPv4
addresses to allow.
• If you selected “Authorize all address(es) except
for those listed below”, enter the IPv4 addresses
to reject.
Enter an address and click [Add] to add it to the
list.
• To delete an address entered in the list, select
its checkbox, and click [Delete].
• Click the same checkbox to deselect the items.
XXX.XXX.XXX.XXX
format (Where XXX
is a number between
0 and 255.)
IP Address List
(IPv6)
*2
Enter the IPv6 addresses to set as exceptions to
the basic policy.
• If you selected “Reject all specied address(es)
except for those listed below”, enter the IPv6
addresses to allow.
• If you selected “Authorize all address(es) except
for those listed below”, enter the IPv6 addresses
to reject.
Enter an address and click [Add] to add it to the
list.
• To delete an address entered in the list, select
its checkbox, and click [Delete].
• Click the same checkbox to deselect the item.
XXXX:XXXX:XXX
X:XXXX:XXXX:X
XXX:XXXX:XXXX
format (Where XXXX
is a hexadecimal
number.)
*1 If at least one item is registered in the list, you cannot change the basic policy settings.
*2 Depending on the basic policy settings, the address entry item name or the list title
display changes to allow or reject. (For example, if you selected “Allow all specified
address(es)”, the address entry item changes to “Rejected Address” and the list title
changes to “Rejected Address list”.)
Click [Save].
5
The access restrictions are set.•
Press [Back] to cancel specifying the access restrictions and return to the “Secure Settings” •
screen.
Note
Underlined values are the default settings specified at the time of shipment.•
Click [Initialize] to restore the default settings.•
If you become unable to access OfficeBridge after setting access restrictions, perform •
“Delete Restriction Settings” from the control panel of the machine. For details, refer
to Chapter 2, “Specifying the Network Settings” in the Administrator's Guide.
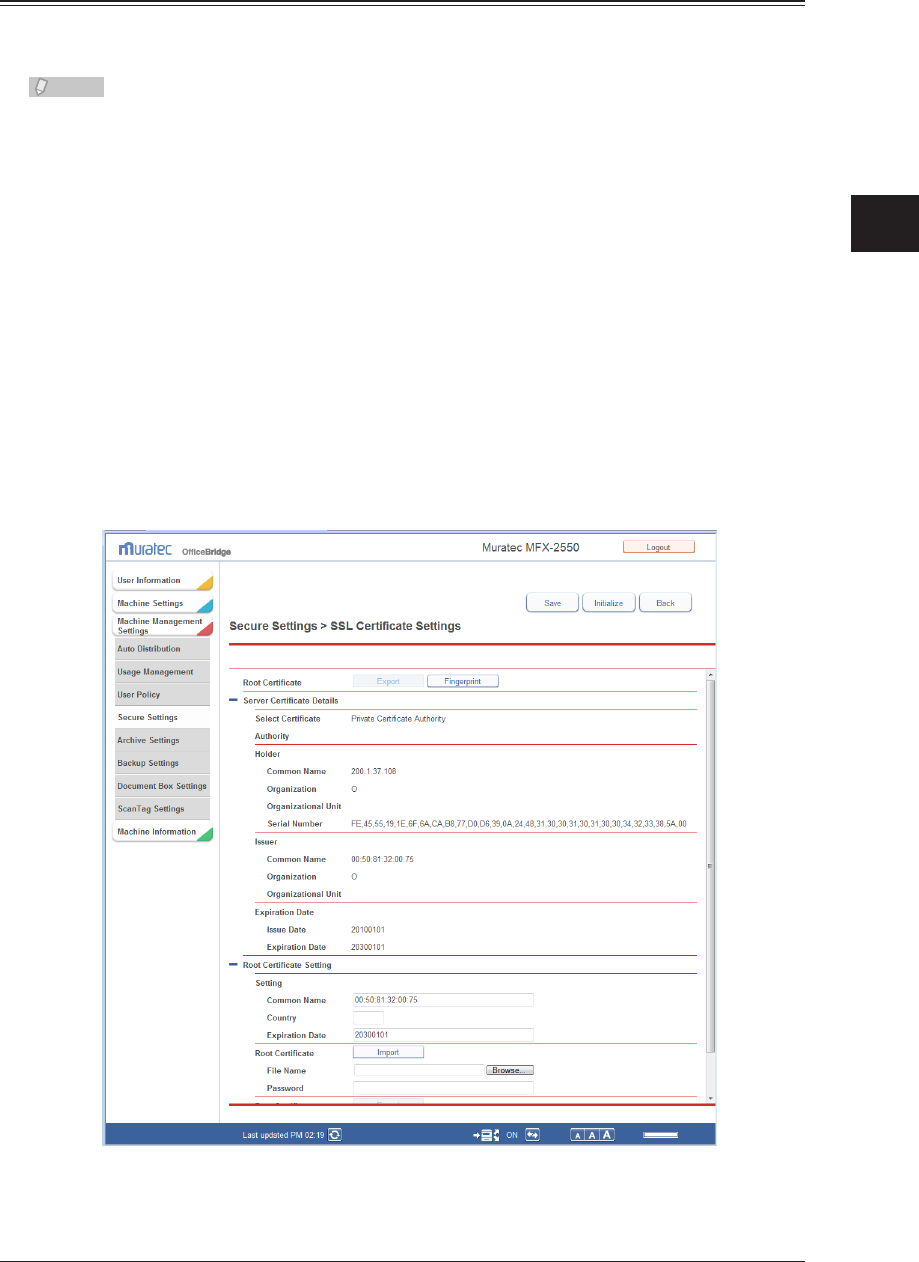
1
2
3
OfficeBridge Administrator Settings
Setting Security 3-137
Specifying SSL Certificate Settings
OfficeBridge supports the setting of the private certificate authority and server certificate
required to perform SSL (Secure Socket Layer) communication.
Note
The root certificate thumbprint can be printed from the control panel of the machine.
For details, refer to Chapter 1, “Outputting Lists” in the Administrator's Guide.
Click [Admin Login] in OfficeBridge, and log in.
1
(See page 2-7.)
This function may also be available on Guest and User login screen, depending on user policy
settings.
Click [Machine Management Settings], and then [Secure Settings].
2
The “Secure Settings” screen is displayed.
Click “SSL Certificate Settings”.
3
The “SSL Certificate Settings” screen is displayed.
Set the detailed information.
4

3-138 Setting Security
You can register the following items.
Root Certificate
Setting Description Settings
Export When using a private certificate authority, this
exports the root certificate.
• The root certicate is exported in the “PKCS#12”
format
*1
.
• It is necessary to set a password when exporting
the certificate.
• If you are not using SSL communication, you
cannot export the certificate.
Password for
exporting: 16
characters
Fingerprint Prints the fingerprint of the root certificate for the
private certificate authority.
−
*1 The “PKCS#12” format is for exchanging private keys and certificates. The private key
is protected with a password.
Server Certificate Details
These settings are displayed when you click [+].
Displayed Item Description
Select Certificate
Authority
Displays the certificate authority (private certificate authority) that is
currently being used.
Holder
Common Name Displays the common name of the name the certificate is issued for.
Organization Displays the organization of the name the certificate is issued for.
Organizational
Unit
Displays the organizational unit of the name the certificate is issued for.
Serial Number Displays the serial number of the certificate.
Issuer
Common Name Displays the common name of the issuer of the certificate.
Organization Displays the organization of the issuer of the certificate.
Organizational
Unit
Displays the organizational unit of the issuer of the certificate.
Expiration Date
Issue Date Displays the date that the certificate was issued.
Expiration
Date
Displays the date that the certificate expires.
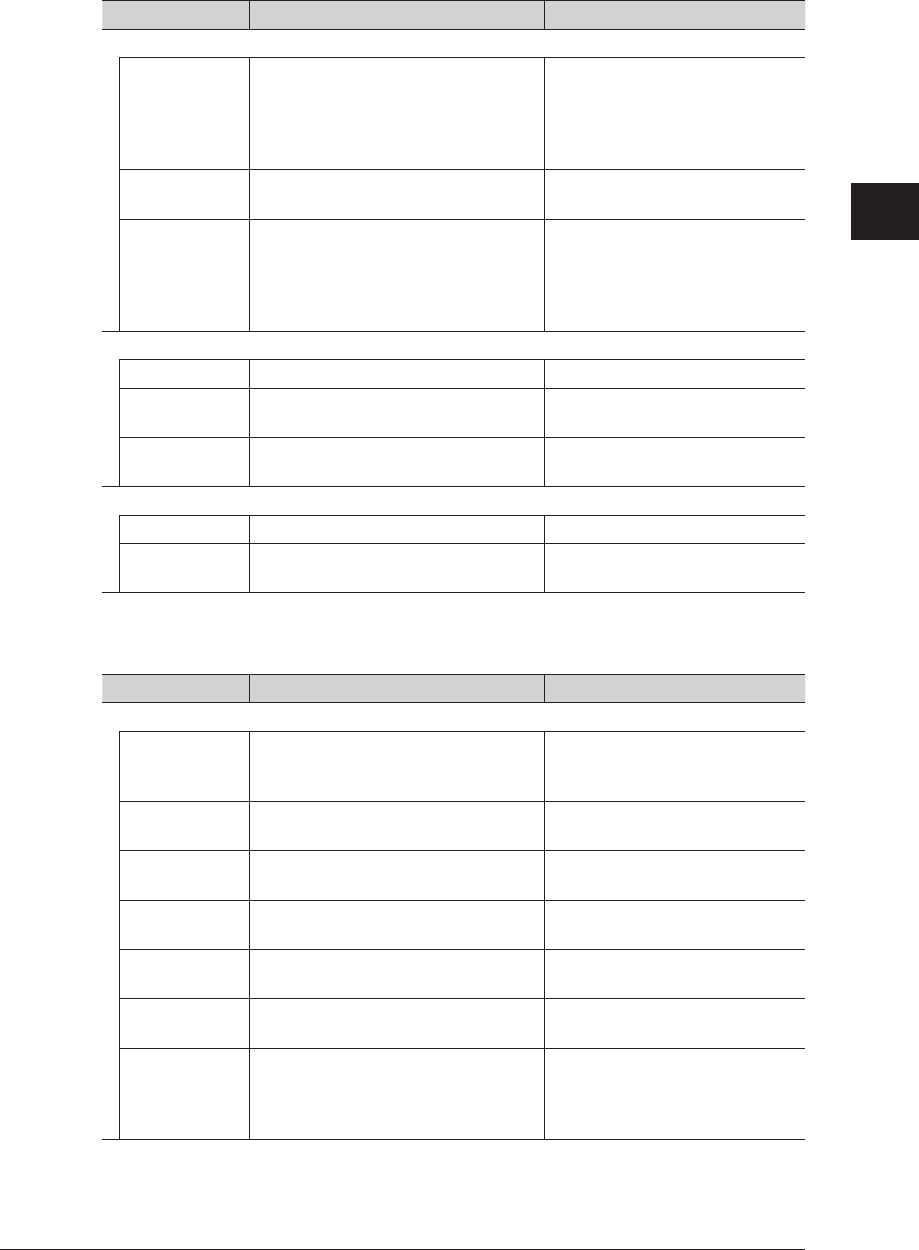
1
2
3
OfficeBridge Administrator Settings
Setting Security 3-139
Root Certificate Setting
These settings are displayed when you click [+].
Setting Description Settings
Setting
Common Name Enter the name of the certificate
authority.
• The MAC address is used when the
name is automatically generated.
64 characters
Country Enter the country code of the
certificate authority.
2 digits
Expiration
Date
Enter the date that the root certificate
expires.
• The generated date + 20 years is
used when automatically generated.
YYYYMMDD (Where YYYY is a
four digit year, MM is a two digit
month, and DD is a two digit
day)
Root Certificate
[Import] Imports the root certificate. −
File Name Click [Browse] to set the path of the
file name to the root certificate.
−
Password Enter the password used when
importing the root certificate.
16 characters
Root Certificate (Export)
[Export] Exports the root certificate. −
Password Enter the password used when
exporting the root certificate.
16 characters
Server Certificate Setting
These settings are displayed when you click [+].
Setting Description Settings
Setting
Common Name Enter the name of the certificate
authority.
64 characters: The default value
is the IP address
of the machine.
Organization Enter the organization name of the
certificate authority.
64 characters
Organizational
Unit
Enter the organizational unit of the
certificate authority.
64 characters
Location Enter the location of the certificate
authority.
128 characters
State Enter the state of the certificate
authority.
128 characters
Country Enter the country code of the
certificate authority.
2 digits
Expiration
Date
Enter the date that the server
certificate expires.
YYYYMMDD (Where YYYY is a
four digit year, MM is a two digit
month, and DD is a two digit
day)

3-140 Setting Security
Setting Description Settings
Server Certificate
[Import] Imports the server certificate. −
File Name Click [Browse] to set the path of the
file name to the server certificate.
−
Password Enter the password used when
importing the server certificate.
16 characters
Server Certificate (Export)
[Export] Exports the server certificate. −
Password Enter the password used when
exporting the server certificate.
16 characters
Click [Save].
5
The SSL certificate settings are set.•
Press [Back] to cancel specifying the SSL certificate settings and return to the “Secure •
Settings” screen.
Note
Click [Initialize] to restore the default settings.

1
2
3
OfficeBridge Administrator Settings
Setting ScanTag 3-141
Setting ScanTag
The ScanTag feature allows you to create image data and metadata (data indicating the
attributes and processing method of the image file) in a single scan. The image data and
metadata will be sent automatically to a network computer.
“ScanTag Settings” Screen
3 4 1 2
5
Setting Description
1 [Add] Registers new ScanTag settings.
2 [Delete] Deletes the ScanTag settings selected from the list.
3 Number The smallest free number is automatically entered. You can change it to a
number of your choice.
Click this to display the “ScanTag Settings” screen, and edit the registered
ScanTag settings.
4 Setting
Name
Displays the name of the registered ScanTag settings.
Click this to display the “ScanTag Settings” screen, and edit the registered
ScanTag settings.
5 Status Displays whether the ScanTag settings are enabled or disabled.
If the settings are enabled, “ON” is displayed; if they are disabled, “OFF” is
displayed. Click to enable or disable the settings.
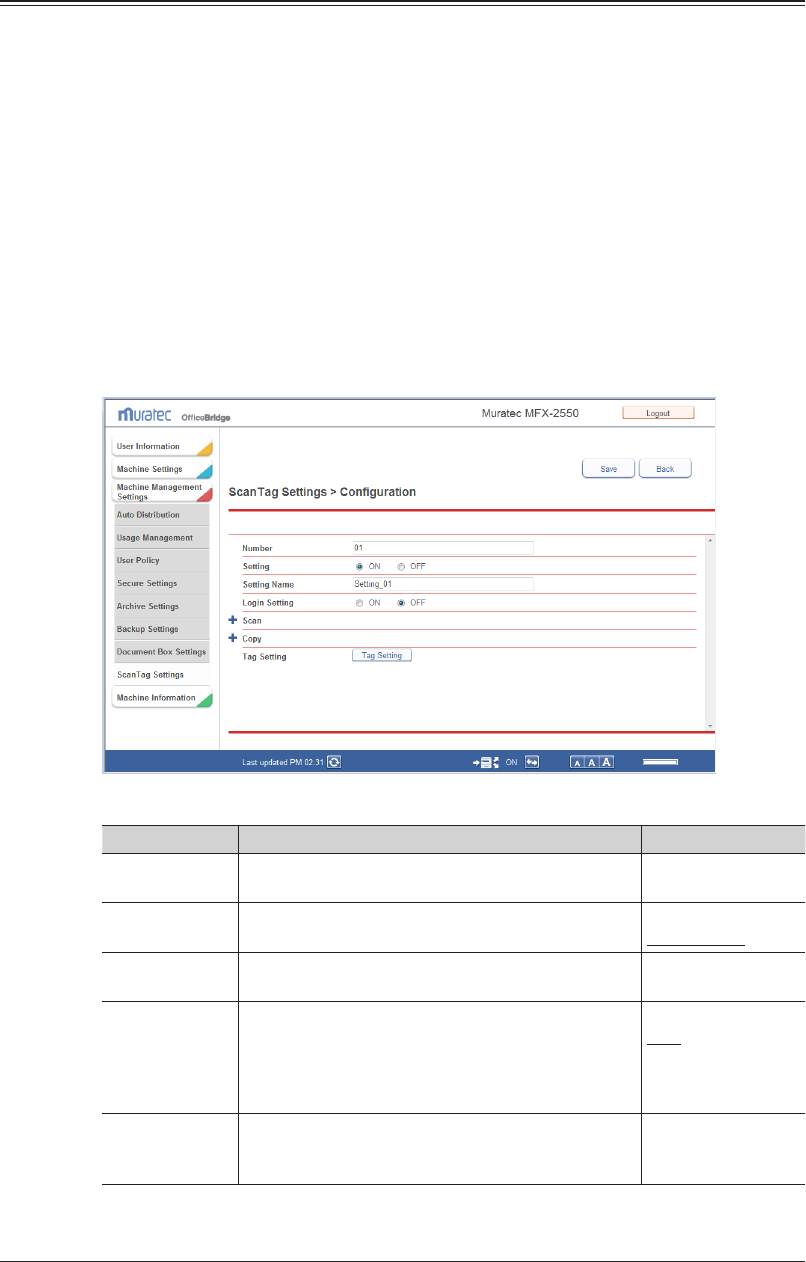
3-142 Setting ScanTag
ScanTag Settings
You can register ScanTag settings. Up to 20 can be registered.
Click [Admin Login] in OfficeBridge, and log in.
1
(See page 2-7.)
This function may also be available on Guest and User login screen, depending on user policy
settings.
Click [Machine Management Settings], and then [ScanTag Settings].
2
The “ScanTag Settings” list screen is displayed.
Click [Add].
3
Specify the detailed ScanTag settings.
4
You can register the following items.
Setting Description Settings
Number The smallest free number is automatically entered.
You can change it to a number of your choice.
01-20
Setting Set to whether to enable or disable the ScanTag
setting.
ON: Enable
OFF: Disable
Setting
Name
Enter the name of the ScanTag setting. 40 characters
Login Setting If you perform a login when using ScanTag,
information for the logged in user is included in the
ScanTag output file.
If you set “ON”, the login screen is displayed when
using ScanTag.
ON
OFF
Tag Setting By clicking [Tag Setting] in the “ScanTag
Configuration” screen, a new window opens to
display the “Tag Setting Registration” screen.
−

1
2
3
OfficeBridge Administrator Settings
Setting ScanTag 3-143
Scan
In order to create and transmit image data and a ScanTag file (metadata file) configure the
following settings.
These settings are displayed when you click [+].
Setting Description Settings
Setting Set “ON” to enable the ScanTag settings when
scanning.
ON: Enable
OFF: Disable
Distribution
Setting
If the ScanTag destination is an FTP server, select
“FTP”. If the ScanTag destination is a network folder,
select “Folder”.
Folder
FTP
Folder Path Specify the ScanTag destination folder path.
You can click [Browse] to easily enter the folder path
from the “Browse” screen.
128 characters
User Name Enter the account for logging in to the shared folder. 64 characters
Password Enter the password for logging in to the shared folder. 28 characters
PASV Mode (This item is displayed when you select “FTP” for
distribution setting.)
Select whether to connect with the PASV mode.
ON
OFF
Port Number (This item is displayed when you select “FTP” for
distribution setting.)
Enter the port number of the FTP server.
0 - 65535: 21
Color/Mono Select scanner mode (Color or Monochrome). Color
Mono
File Format (Mono) Select the file format to use when scanning in black
and white.
TIFF
PDF
PDF w/
Password
File Format (Color) Select the file format to use when scanning in color. JPEG
PDF
PDF w/
Password
Resolution Set the resolution to use when scanning. 100dpi
200dpi
300dpi
600dpi
Output File Format Select either XML or CSV for ScanTag file format.
Also, you can choose the System tag type (e.g. Type A).
XML:
Type A-Type D
CSV
Create System
Tags
*1
When this setting is ON, the machine will
automatically create information (date/time stamp, file
path etc.) and insert it into ScanTag metadata fields.
ON
OFF
File Path
*1
Enter the file path of the folder to save the image data. —
These items are displayed according to the *1 “Output File Format”. For details of settings,
contact your authorized Muratec dealer.
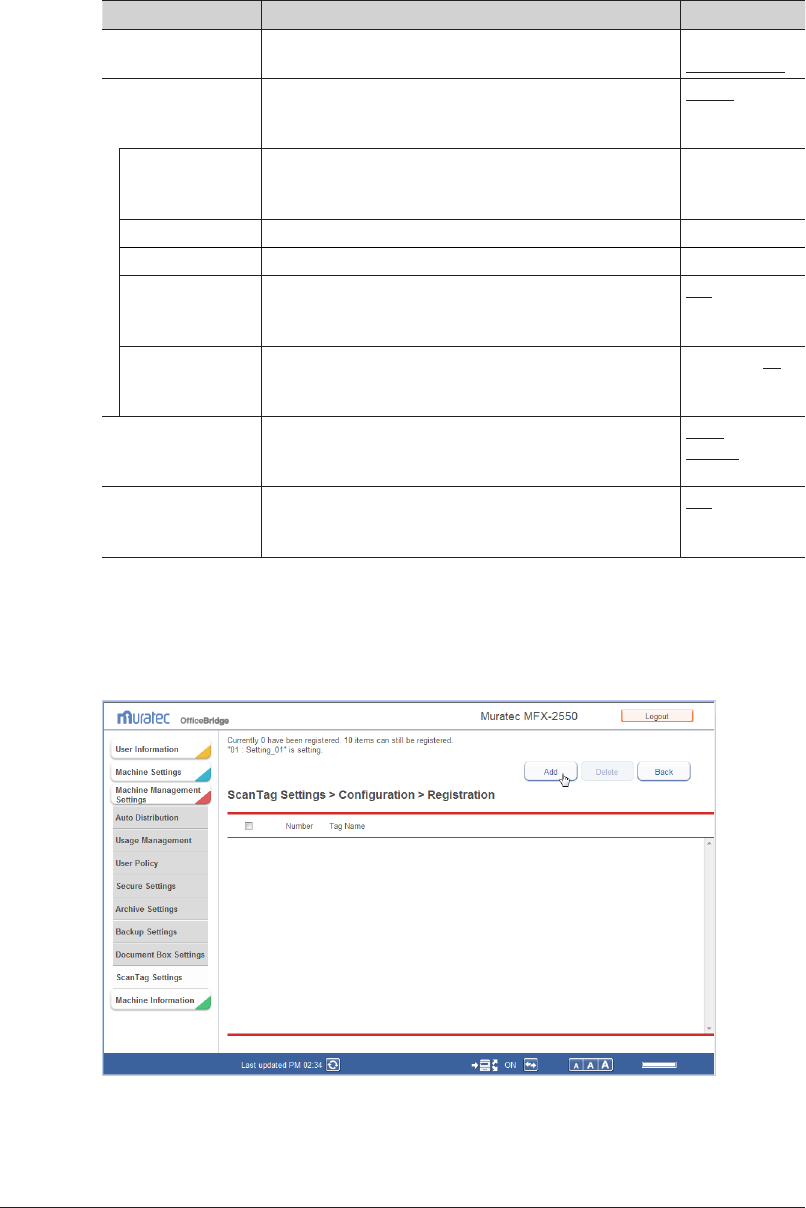
3-144 Setting ScanTag
Copy
In order to create and transmit ScanTag file (metadata file) to a network computer when
making copies,configure the following settings.
These settings are displayed when you click [+].
Setting Description Settings
Setting Set “ON” to enable the ScanTag settings when copying. ON: Enable
OFF: Disable
Distribution
Setting
If the ScanTag destination is an FTP server, select
“FTP”. If the ScanTag destination is a network folder,
select “Folder”.
Folder
FTP
Folder Path Specify the ScanTag destination folder path.
You can click [Browse] to easily enter the folder path
from the “Browse” screen.
128 characters
User Name Enter the account for logging in to the shared folder. 64 characters
Password Enter the password for logging in to the shared folder. 28 characters
PASV Mode (This item is displayed when you select “FTP” for
distribution setting.)
Select whether to connect with the PASV mode.
ON
OFF
Port Number (This item is displayed when you select “FTP” for
distribution setting.)
Enter the port number of the FTP server.
0 - 65535: 21
Output File Format Select either XML or CSV for ScanTag file format.
Also, you can choose the System tag type (e.g. Type A).
XML:
Type A
CSV
Create System Tags When this setting is ON, the machine will
automatically create information (date/time stamp, file
path etc.) and insert it into ScanTag metadata fields.
ON
OFF
Click [Tag Setting].
5
Click [Add].
6
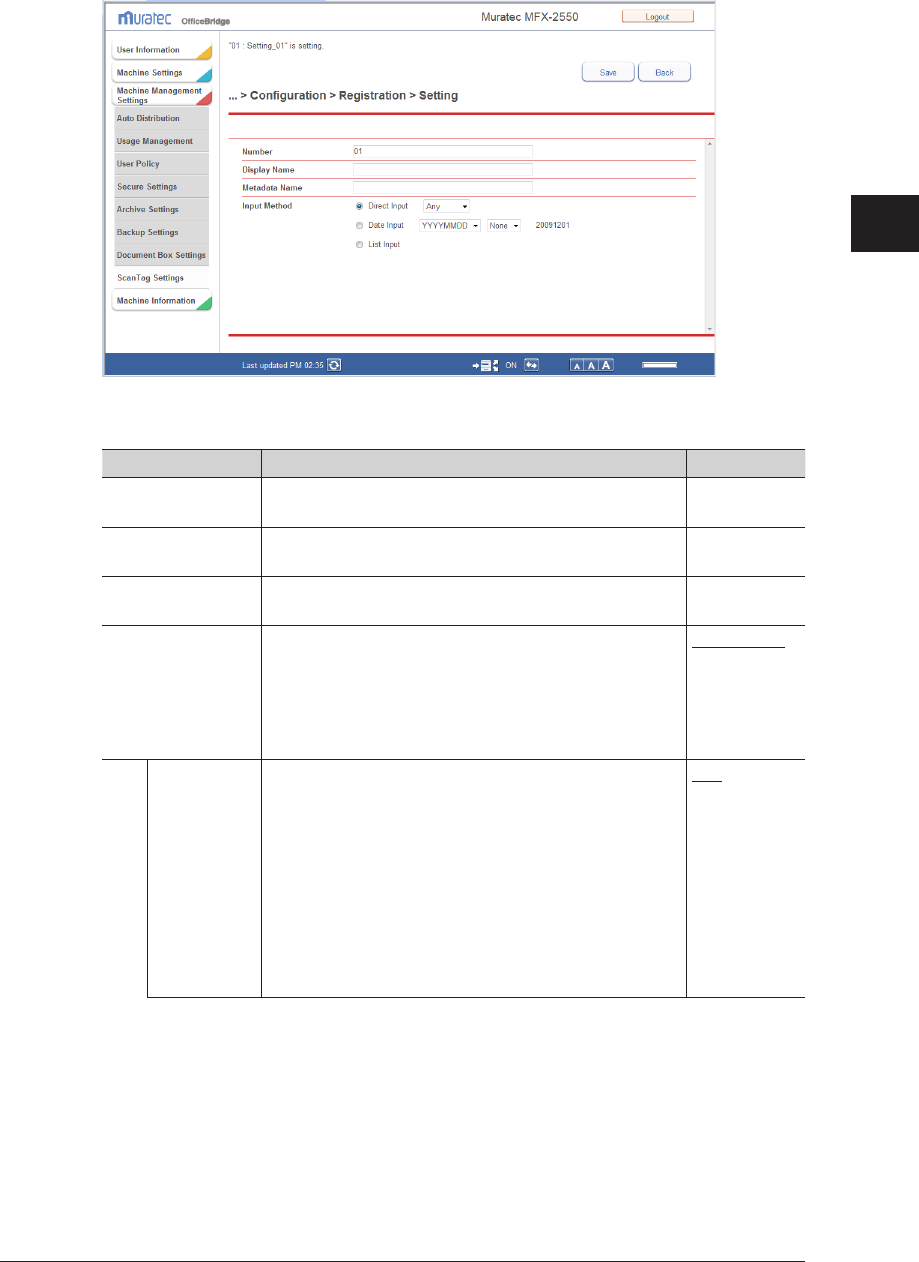
1
2
3
OfficeBridge Administrator Settings
Setting ScanTag 3-145
Set the detailed information.
7
You can register the following items.
Setting Description Settings
Number The smallest free number is automatically entered. You
can change it to a number of your choice.
01 - 10
Display Name Register the name to be displayed on the machine's
control panel.
40 characters
Metadata Name Register the XML tag name of the currently selected
user-defined tag.
40 characters.
Input Method To allow the user to directly input the value, select the
“Direct Input”.
If you want the user to enter the date as a ScanTag
field, select “Date Input” and specify the date format.
If the “List Input” is selected, the user can be allowed
to select from a pre-registered list of values.
Direct Input
Date Input
List Input
Direct Input Any
If this is set, the user can enter numbers, alpha
characters and/or symbols for the selected userdefined
tag at the machine.
Numeric
If this is set, the user can only enter numbers for the
selected user-defined tag at the machine.
Alphabet
If this is set, the user can enter alpha characters
and symbols for the selected user-defined tag at the
machine.
Any
Numeric
Alphabet
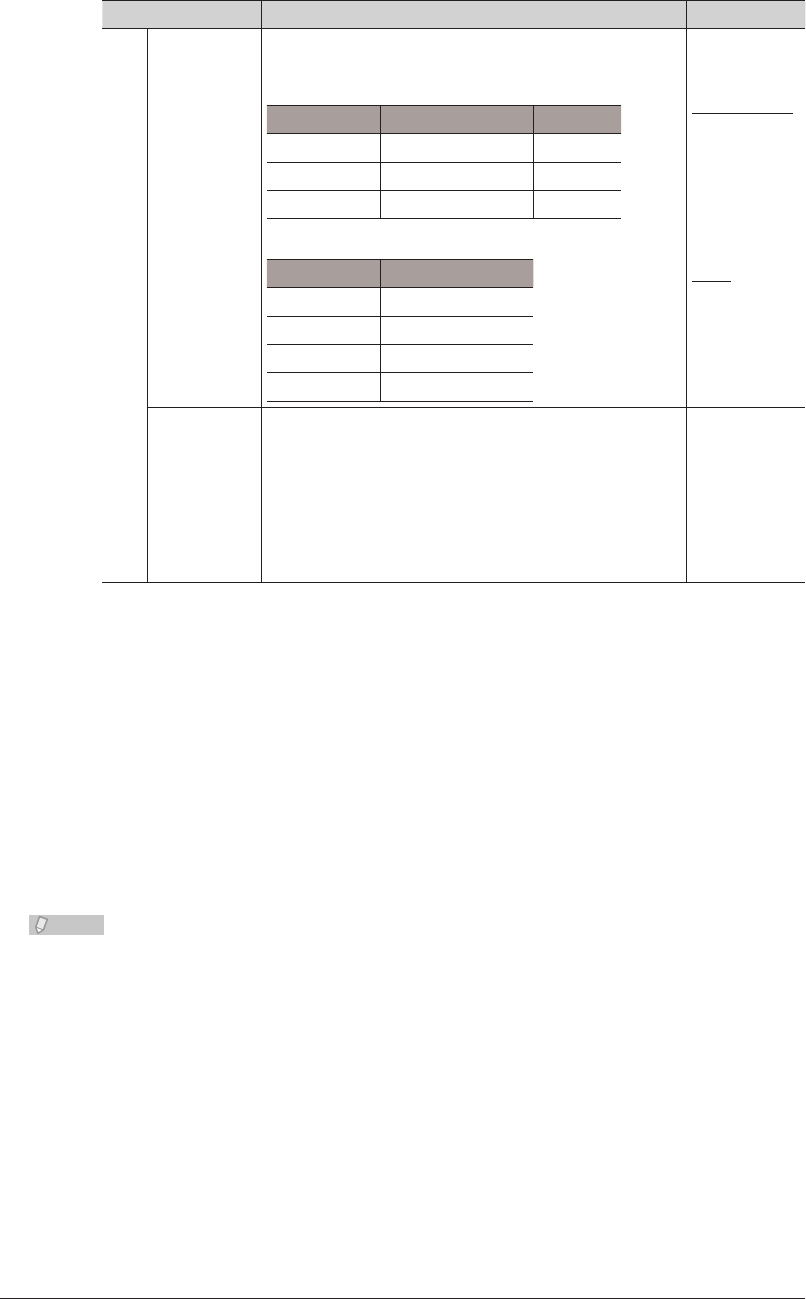
3-146 Setting ScanTag
Setting Description Settings
Date Input Set the date format and separator symbol.
Description of Format Symbols
Format Meaning Example
YYYY Year in 4 digits 2010
MM Month in 2 digits 01
DD Day in 2 digits 05
Separator Symbols and Examples
Symbol Example
None 20100105
/ 2010/01/05
. 2010.01.05
- 2010-01-05
YYYYMMDD
MMDDYYYY
DDMMYYYY
None
/
.
-
List Input Register the values from which the user can make
a selection. If the checkbox of the “Enable to edit” is
checked, user can edit the values on the machine's
control panel.
• Enter the value in the text eld and then press [Add].
• Click the checkbox next to thevalue you want to
delete, then press [Delete].
40 characters
Click [Save].
8
Repeat steps
9
6 to 8 to register all you desired tag settings.
Click [Back] and return to the
10
ScanTag Registration screen.
Click [Save].
11
The “ScanTag Settings” list screen is displayed.•
Press [Back] to cancel registering the distribution settings and return to the “ScanTag •
Settings” list screen.
Note
Underlined values are the default settings specified at the time of shipment.•
To delete ScanTag settings from the list, select the checkbox for the ScanTag •
settings in the list, and click [Delete].

1
2
3
OfficeBridge Administrator Settings
Setting ScanTag 3-147
About the
ScanTag file name
The ScanTag file name of the scan job is the same as the image data. The image data file
name can be specified on the machine's control panel. For more information about the file
name, see the “Entering file name” described in Chapter 2, “Advanced Scan Features” in
the Scanner and Fax Guide.
For the copy job, the scanned date and time are used as the file name. This file name
format cannot be changed.
Image data and ScanTag file name
for scan job ScanTag file name for copy job
When a file name
is specified.
E.g. “ScanTag(metadata).xml” N/A
When a file name
that already
exists is specified.
The scan date and time will be added
to the end of the file name to give it
differentiation.
(E.g. “ScanTag(metadata)-2008051514153
0.xml”)
N/A
When a file name
is not specified.
The scanned date and time are used as
the file name.
E.g., if the document is scanned on
January 15 2010 on 13:30 30 second, the
file will be named “20100115133030.xml”.
The scanned date and time are
used as the file name.

3-148 Setting ScanTag

Chapter 4
Operating Utilities
Managing Events (InfoMonitor) .............................................................................4-2
About InfoMonitor ...................................................................................................4-2
Setting InfoMonitor .................................................................................................4-3
Using InfoMonitor .................................................................................................4-17
Creating Cover Pages (CoverPage Editor) .........................................................4-23
Starting CoverPage Editor ...................................................................................4-24
CoverPage Editor Editing Screen .........................................................................4-25
Cover Page Creation Procedure ............................................................................4-30
Specifying Object Settings ....................................................................................4-39
Editing an Object ..................................................................................................4-42
Printing a Cover Page ...........................................................................................4-45
Uploading Cover Pages to OfficeBridge ...............................................................4-47
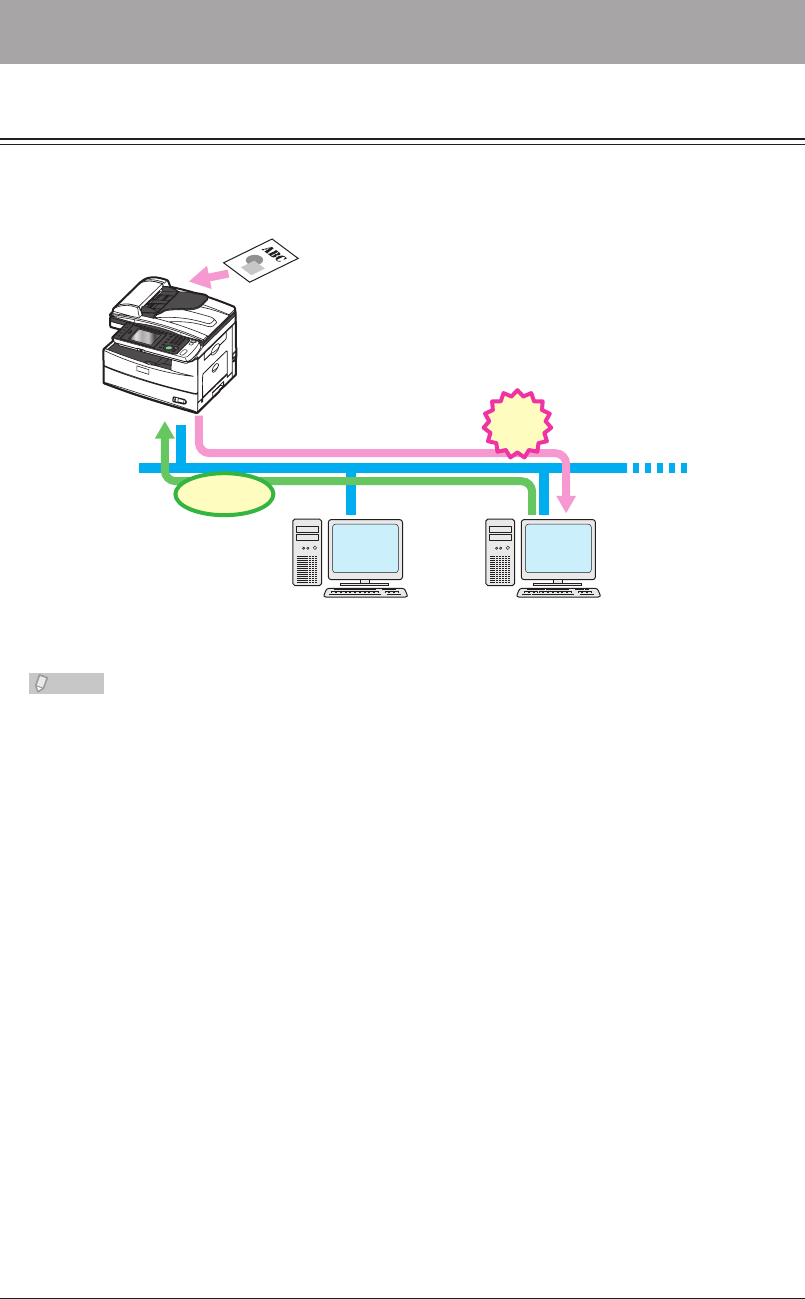
4-2 Managing Events (InfoMonitor)
Managing Events (InfoMonitor)
About InfoMonitor
InfoMonitor is a utility program for managing the history of events (scanning and
transmission/reception of documents, etc.) that occur in the machine. Users can be
notified of events even if there are not logged in to OfficeBridge.
Scan
User A User B
Forward to the
“user box”
of User B
Notify
“InfoMonitor” installed
Display popup indicating
that a new scanned
document is
in the “user box”
Monitor
Monitor machine at
regular intervals
Note
To use InfoMonitor, it is necessary to install a program in the computer of the user. •
For details on installing InfoMonitor, refer to Chapter 2, “Installing to Windows” in
the Printer Guide.
InfoMonitor automatically starts when the computer is started.•
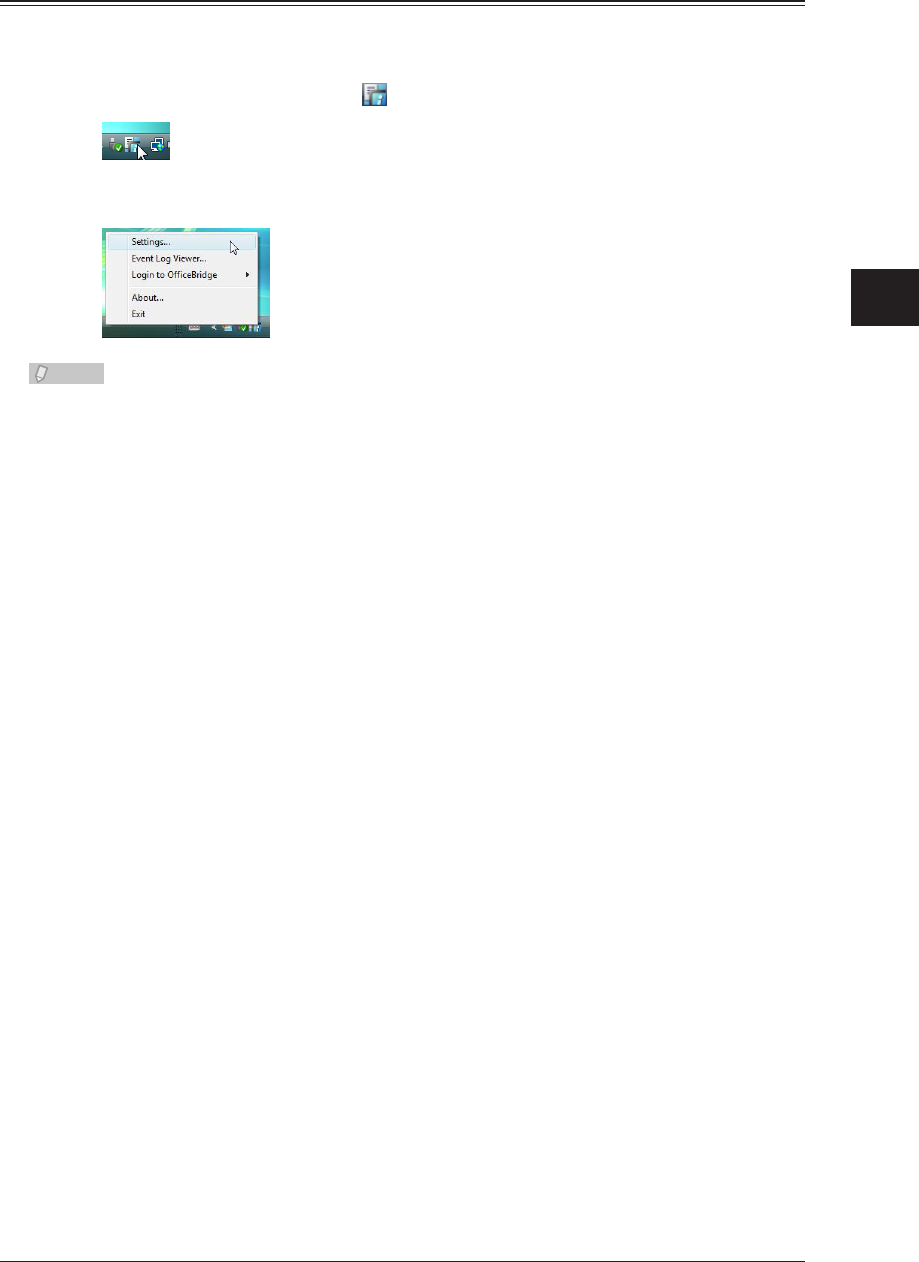
1
2
3
4
Operating Utilities
Managing Events (InfoMonitor) 4-3
Setting InfoMonitor
Opening “User Monitor Settings” Screen
Right-click the task tray icon
1
.
Click [Settings].
2
Note
If there is a shortcut to InfoMonitor on the desktop, you can double-click it to display
the “User Monitor Settings” screen.
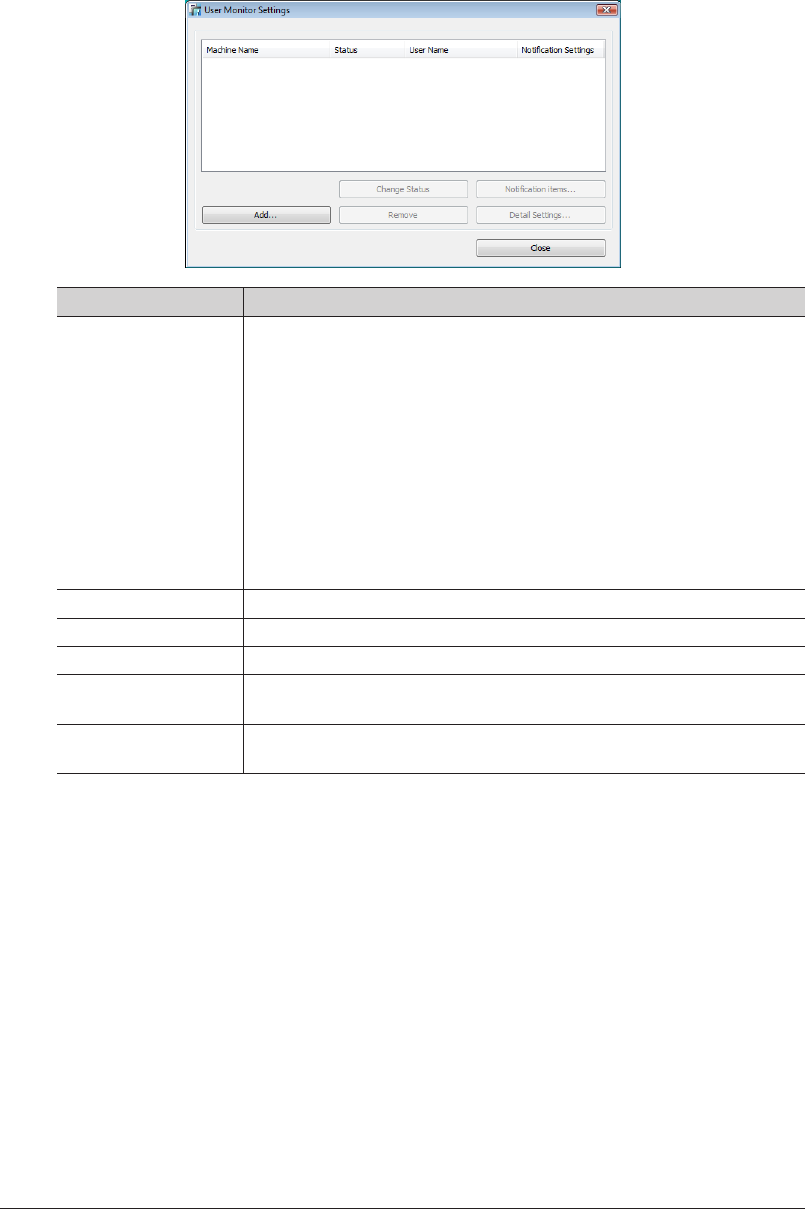
4-4 Managing Events (InfoMonitor)
“User Monitor Settings” Screen
On the “User Monitor Settings” screen, you can check the monitoring status of
InfoMonitor, and specify the various settings.
Item Description
User List Displays a list of the machines for monitoring.
The following items are displayed.
Machine Name: Displays the name of the machine for monitoring.
Status: Displays the current monitoring status (“Monitoring”,
“Not monitoring”, or “Connection error”).“Connection
error” is displayed if the machine cannot be connected
to.
User Name: Displays the name of the user to notify of events.
Notification Settings
: Displays whether to notify the user when an event
occurs.“Yes” is displayed when notification is set, and
“No” is displayed when notification is not set.
Change Status Switches the monitoring status of the device. (See page 4-15.)
Notification items Selects the events to notify the user of. (See page 4-14.)
Add Registers/adds machines to monitor. (See page 4-5.)
Remove Removes a registered machine from the list of monitored devices. (See
page 4-16.)
Detail Settings Specifies monitoring settings (Recordable Number, Monitoring Interval,
and Event notification using popup messages). (See page 4-10.)
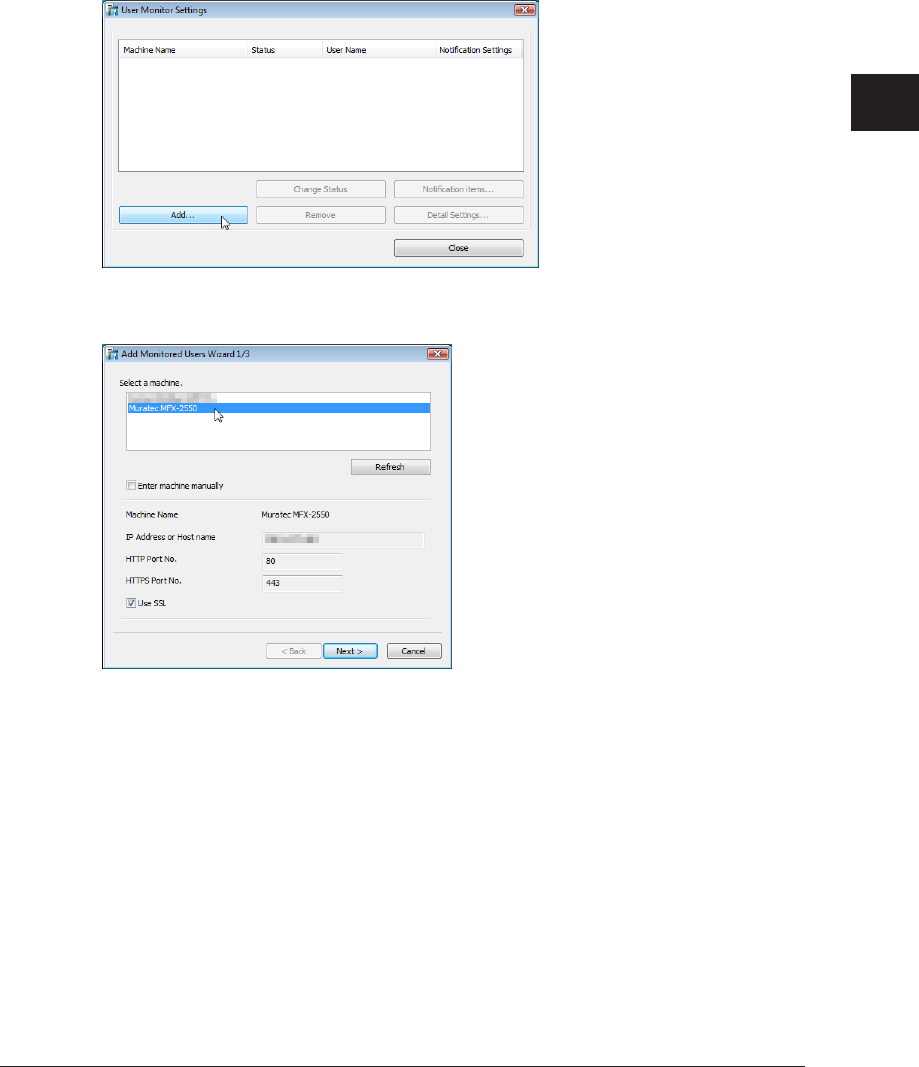
1
2
3
4
Operating Utilities
Managing Events (InfoMonitor) 4-5
Registering (Adding) Machines to Monitor
You can register machines to monitor in InfoMonitor.
You can register up to three machines in the same network segment.
Open the “User Monitor Settings” screen.
1
(See page 4-3.)
Click [Add].
2
Select the name of the machine to monitor.
3
The machines on the current network are displayed.•
Click [Refresh] to refresh the display to show the current connection status of the machines.•
If you select a machine name, “IP Address or Host name”, “HTTP Port No.”, and “HTTPS •
Port No.” are automatically set.
If the machine to monitor is not found, register it manually. • (See page 4-8.)
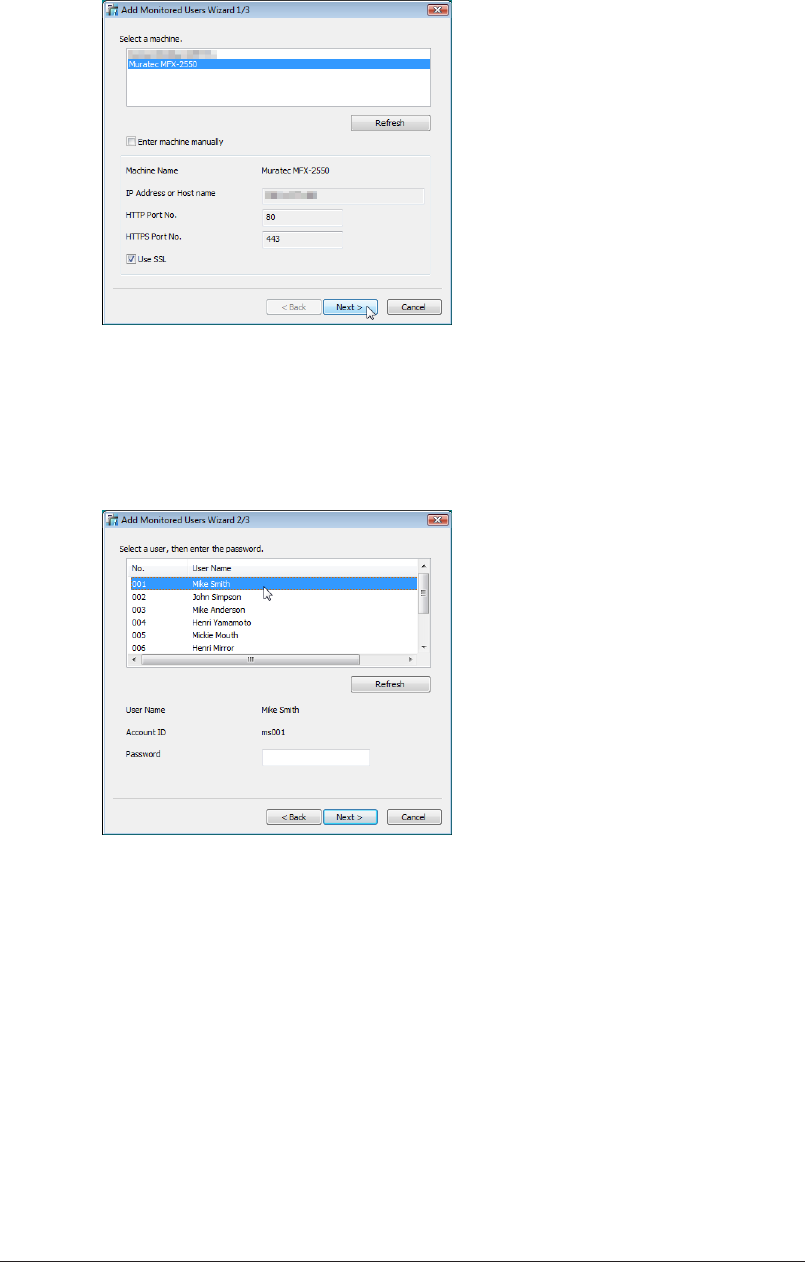
4-6 Managing Events (InfoMonitor)
Click [Next].
4
If the connection is successful, the “Add Monitored Users Wizard 2/3” screen is displayed.•
If the connection fails, the user entry screen is displayed. Manually specify the user settings. •
The user entry screen may be displayed even if the connection is successful, depending on
the logon mode. (See page 4-8.)
Select the user name.
5
Click [Refresh] to refresh the list to display the names of the currently registered users.

1
2
3
4
Operating Utilities
Managing Events (InfoMonitor) 4-7
Enter the password, and click [Next].
6
Click [Finish].
7
If you selected “Select notification items.” on the “Add Monitored Users Wizard 3/3” screen, the
“Notification items” screen is displayed. Set the notification items. (See page 4-14.)
Note
If the password is incorrect, “Connection error” is displayed in “Status” on the “User Monitor
Settings” screen.
Click [Detail Settings], and enter the password again.
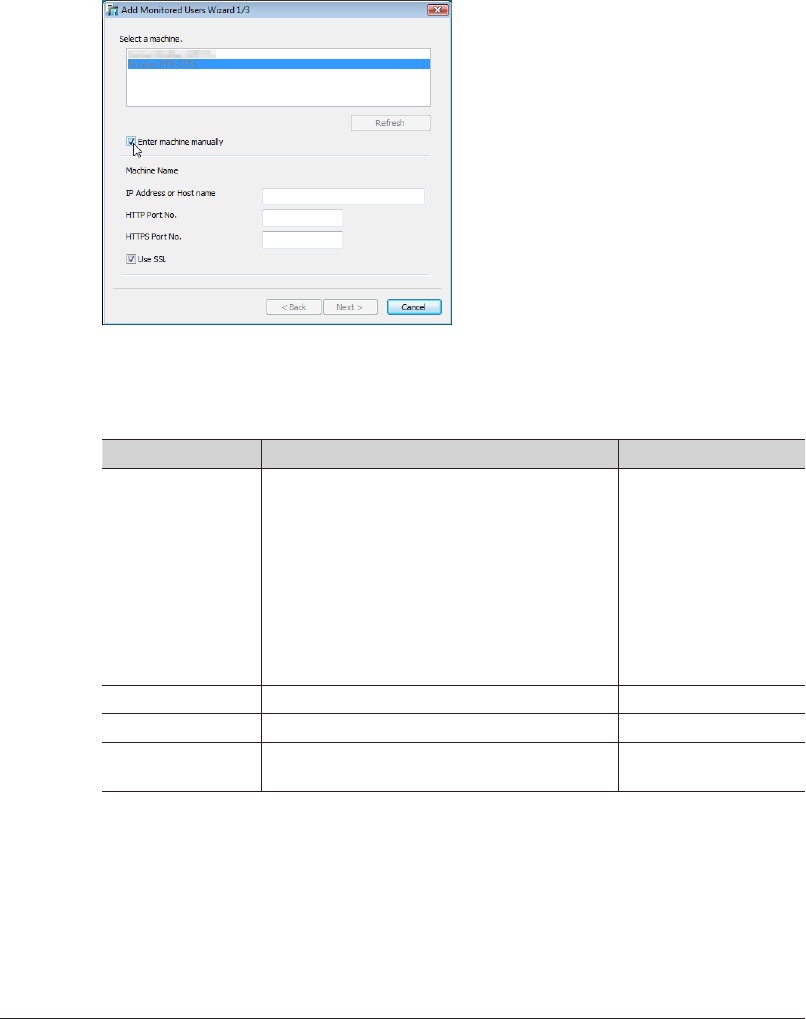
4-8 Managing Events (InfoMonitor)
Manually Registering (Adding) Machines to Monitor
You can also manually register machines to register.
Open the “User Monitor Settings” screen.
1
(See page 4-3.)
Click [Add].
2
Select “Enter machine manually”.
3
You can now set “IP Address or Host name”, “HTTP Port No.”, and “HTTPS Port No.”
Set the detailed information for the device.
4
Item Description Settings
IP Address or Host
Name
Enter the name or IP address of the machine
to monitor.
Name:
IP Address:
XXX.XXX.XXX.XXX
format (Where XXX
is a number between
0 and 255.) 0.0.0.0,
255.255.255.255, and
127.xxx.xxx.xxx local
host addresses cannot
be used.
HTTP Port No. Enter the port number of the HTTP server.
*1
0 - 65535
HTTPS Port No. Enter the port number of the HTTPS server.
*1
0 - 65535
Use SSL Select this to perform SSL communication
with OfficeBridge.
–
*1 Enter the same HTTP port number and HTTPS port number set in “Port Number
Setting” in “TCP/IP Settings”. (See page 3-62.)
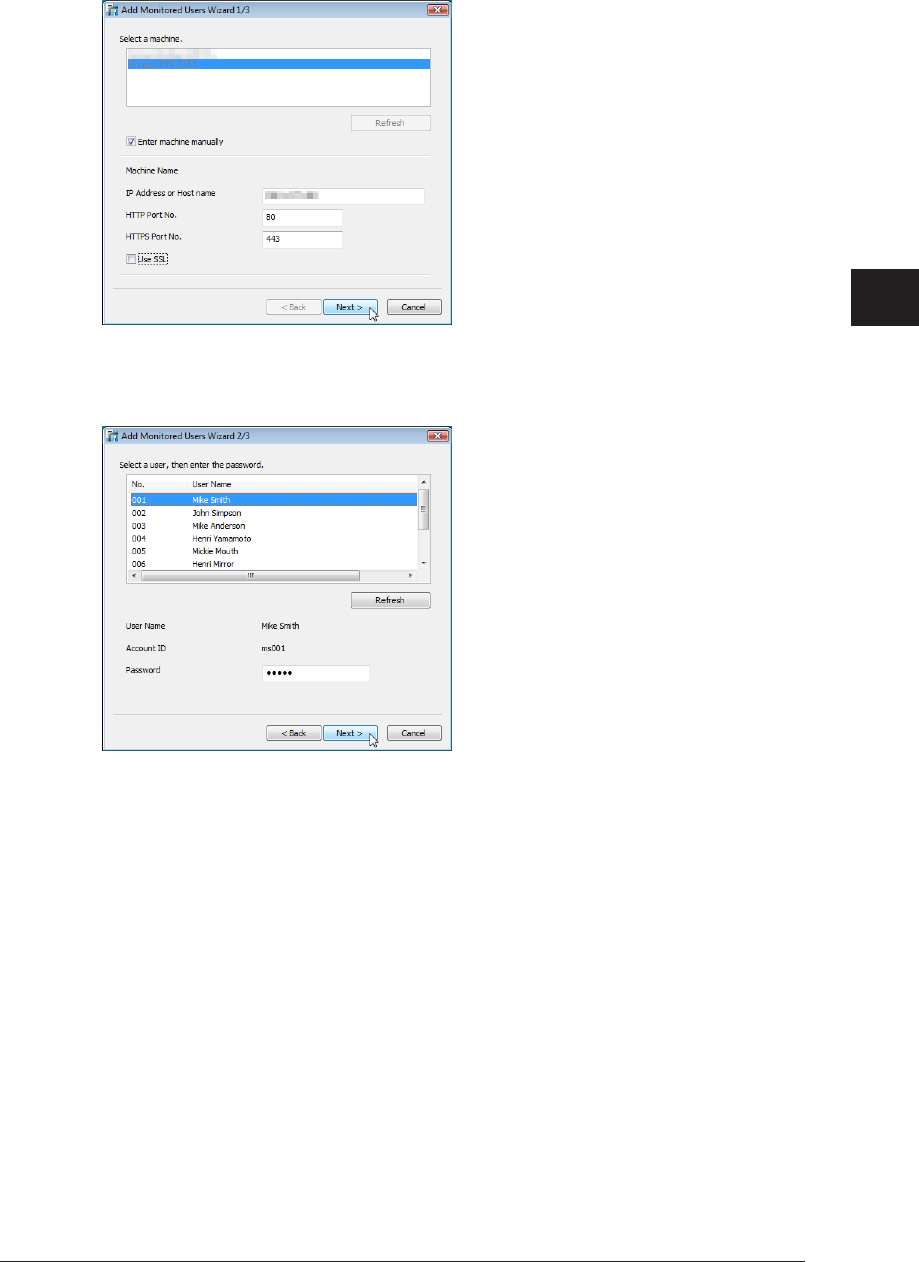
1
2
3
4
Operating Utilities
Managing Events (InfoMonitor) 4-9
Click [Next].
5
Enter the password and user ID, and click [Next].
6
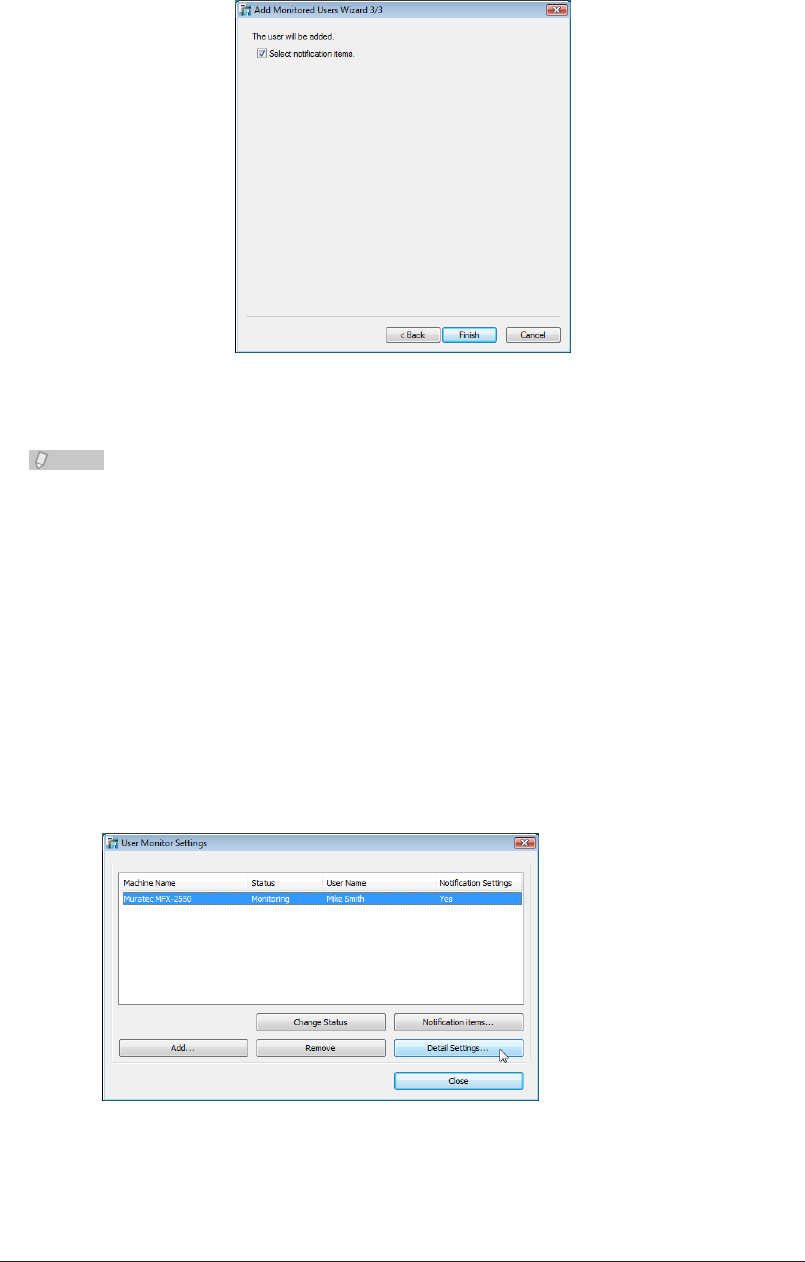
4-10 Managing Events (InfoMonitor)
Click [Finish].
7
If you selected “Select notification items.” on the “Add Monitored Users Wizard 3/3” screen, the
“Notification items” screen is displayed. Set the notification items. (See page 4-14.)
Note
If the password is incorrect, “Connection error” is displayed in “Status” on the “User
Monitor Settings” screen. Click [Detail Settings], and enter the password again.
Specifying Monitoring Settings
You can set the maximum number of events to save in InfoMonitor, and set the interval
for monitoring the event of the machine.
You can also set to notify a user when an event occurs using popup messages.
Open the “User Monitor Settings” screen.
1
(See page 4-3.)
Select the entry to set, and click “Detail Settings”.
2
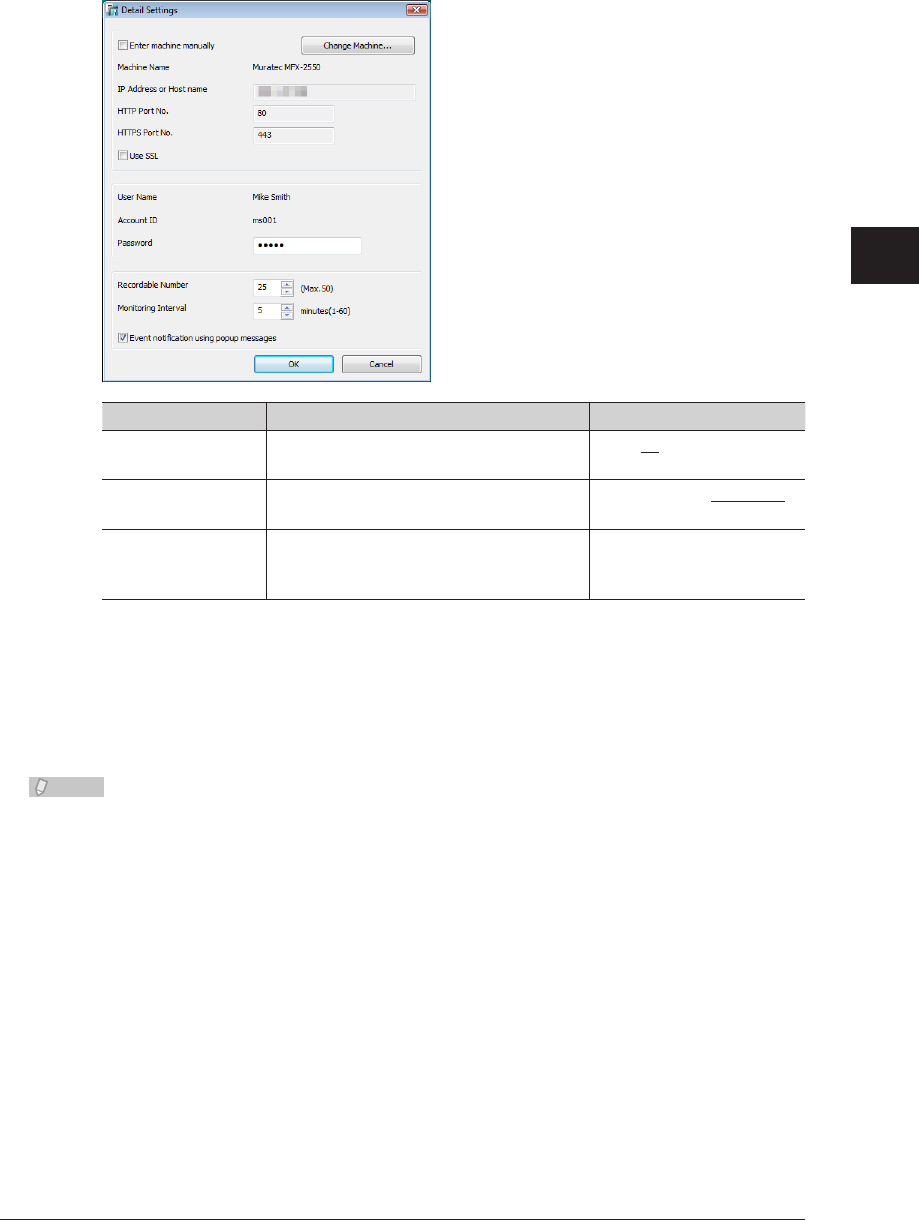
1
2
3
4
Operating Utilities
Managing Events (InfoMonitor) 4-11
You can set the following items.
3
If you set to not perform event notification (if you deselect “Event notification using popup
messages”), “No” is displayed in the “Notification Settings” field.
Item Description Settings
Recordable Number Set the maximum number of events to
save in InfoMonitor.
1 - 50:25
Monitoring Interval Set the interval for monitoring the event
status.
1 - 60 minutes: 5 minutes
Event notification
using popup
messages
Select this to notify the user when an
event occurs using popup messages.
–
Click [Cancel] to cancel the settings.
Click [OK].
4
The “User Monitor Settings” screen is closed.•
“Yes” is displayed in the “Notification Settings” field on the “User Monitor Settings” screen.•
Note
Underlined values are the default settings specified at the time of shipment.
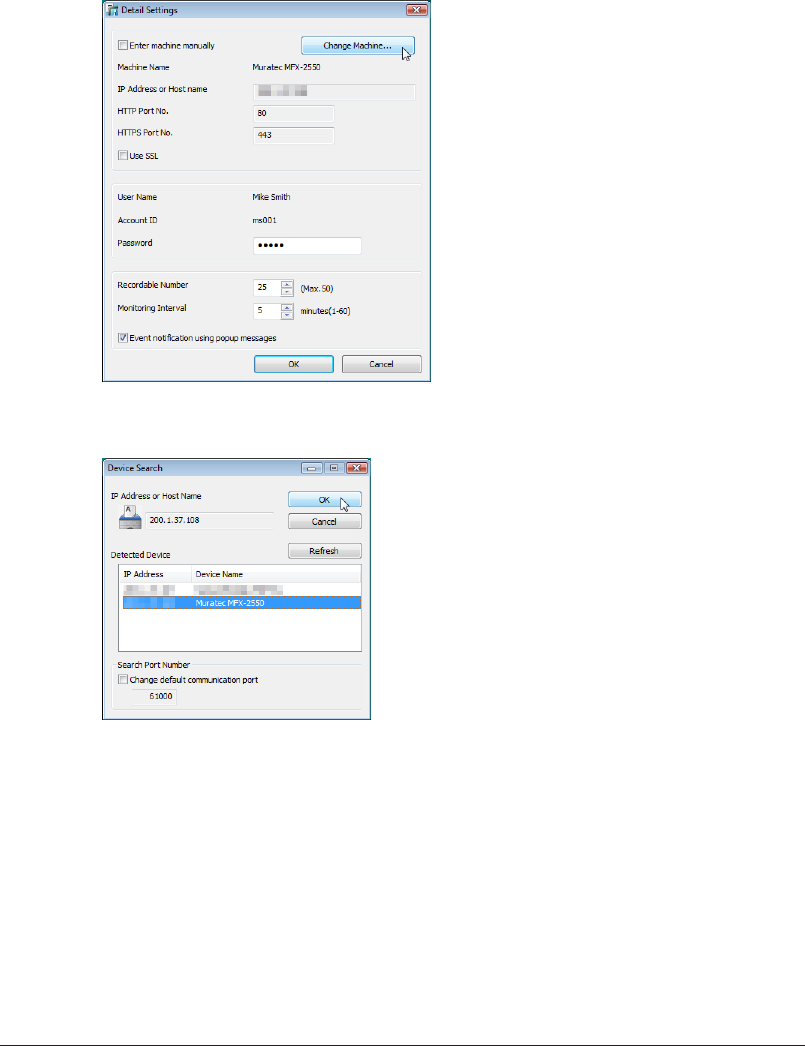
4-12 Managing Events (InfoMonitor)
Specifying Other Device Monitoring Settings
Open the “User Monitor Settings” screen.
1
(See page 4-3.)
Select the entry to set, and click “Detail Settings”.
2
The “Detail Settings” screen is displayed.
Click [Change Machine].
3
Select the name of the machine to set, and click [OK].
4
Click [Refresh] to refresh the display to show the current connection status of the machines.•
To change the port number for printer searching, select “Change default communication •
port”, and enter a port number in the entry box.
Click [Cancel] to cancel machine selection.•
Perform steps 3 and 4 of “Specifying Monitoring Settings”.
5
(See page 4-10.)
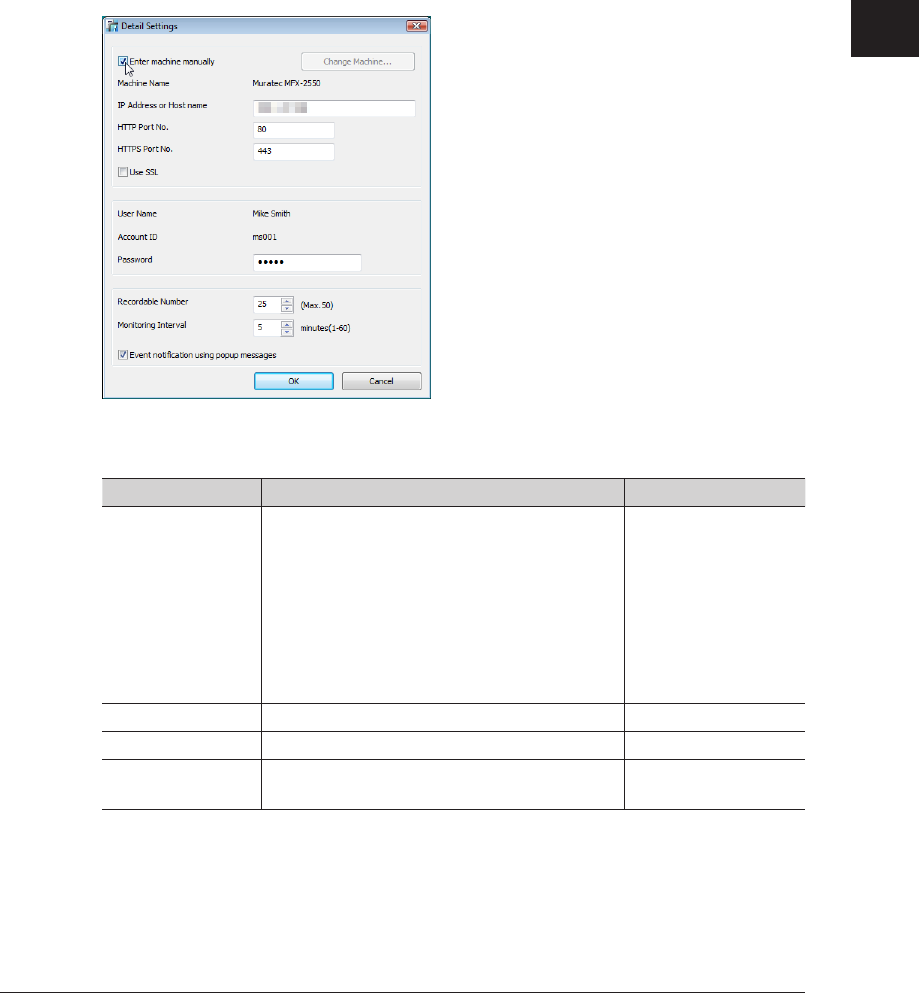
1
2
3
4
Operating Utilities
Managing Events (InfoMonitor) 4-13
Manually Specifying Monitor Settings
You can also manually specify monitoring settings.
Open the “User Monitor Settings” screen.
1
(See page 4-3.)
Select the entry to set, and click “Detail Settings”.
2
The “Detail Settings” screen is displayed.
Select “Enter machine manually”.
3
You can now set “IP Address or Host name”, “HTTP Port No.”, and “HTTPS Port No.”
Set the detailed information for the device.
4
Item Description Settings
IP Address or Host
Name
Enter the name or IP address of the machine
to monitor.
Name:
IP Address:
XXX.XXX.XXX.XXX
format (Where XXX
is a number between
0 and 255.) 0.0.0.0,
255.255.255.255,
and 127.xxx.xxx.xxx
cannot be entered.
HTTP Port No. Enter the port number of the HTTP server. 0 - 65535
HTTPS Port No. Enter the port number of the HTTPS server. 0 - 65535
Use SSL Select this to perform SSL communication
with OfficeBridge.
–
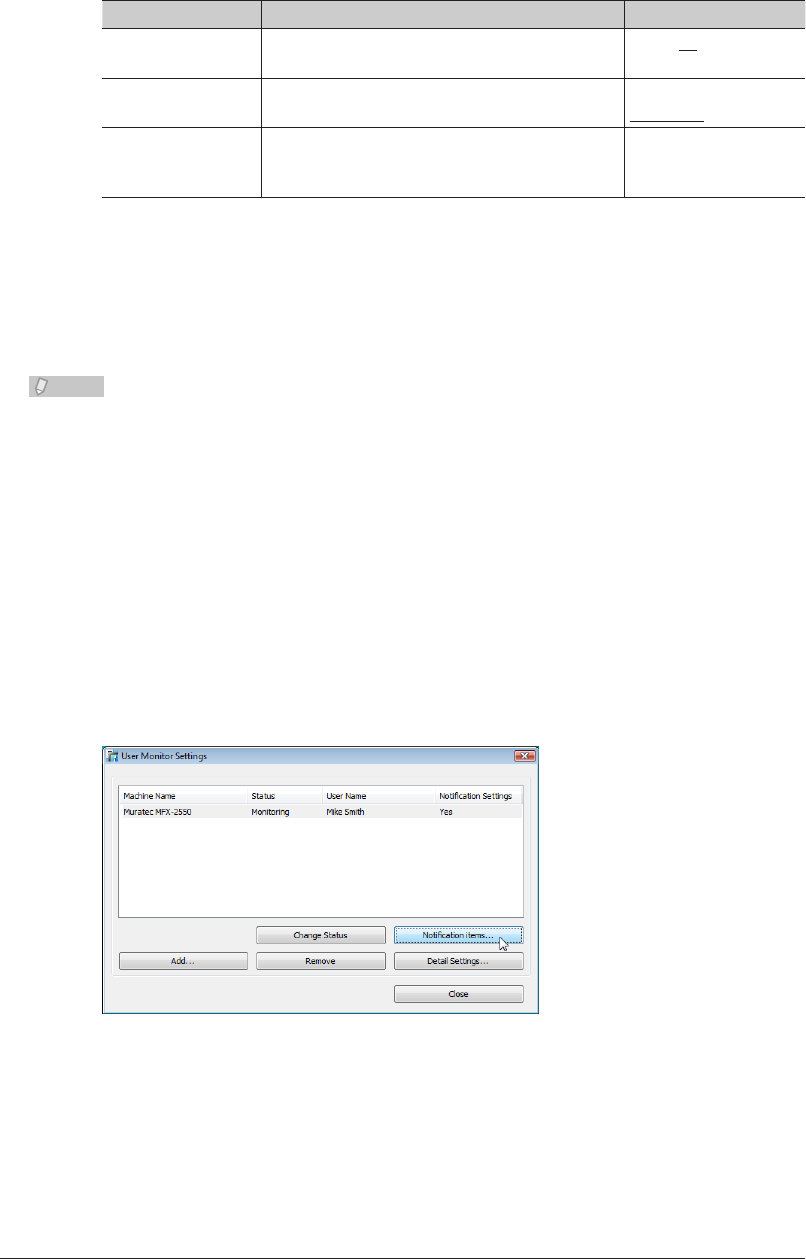
4-14 Managing Events (InfoMonitor)
You can set the following monitoring settings.
5
Item Description Settings
Recordable
Number
Set the maximum number of events to save in
InfoMonitor.
1 - 50: 25
Monitoring
Interval
Set the interval for monitoring the event
status.
1 - 60 minutes:
5 minutes
Event notification
using popup
messages
Select this to notify the user when an event
occurs using popup messages.
–
Click [OK].
6
The “Detail Settings” screen is closed.•
“Yes” is displayed in the “Notification Settings” field on the “User Monitor Settings” screen.•
If you set to not perform event notification (if you deselect “Event notification using popup •
messages”), “No” is displayed in the “Notification Settings” field.
Note
You cannot change the user name.•
Underlined values are the default settings specified at the time of shipment.•
Selecting Notification Events
You can select the types of events to notify the user of using popup messages.
Open the “User Monitor Settings” screen.
1
(See page 4-3.)
Select the user to select the notification events.
2
Click [Notification items].
3
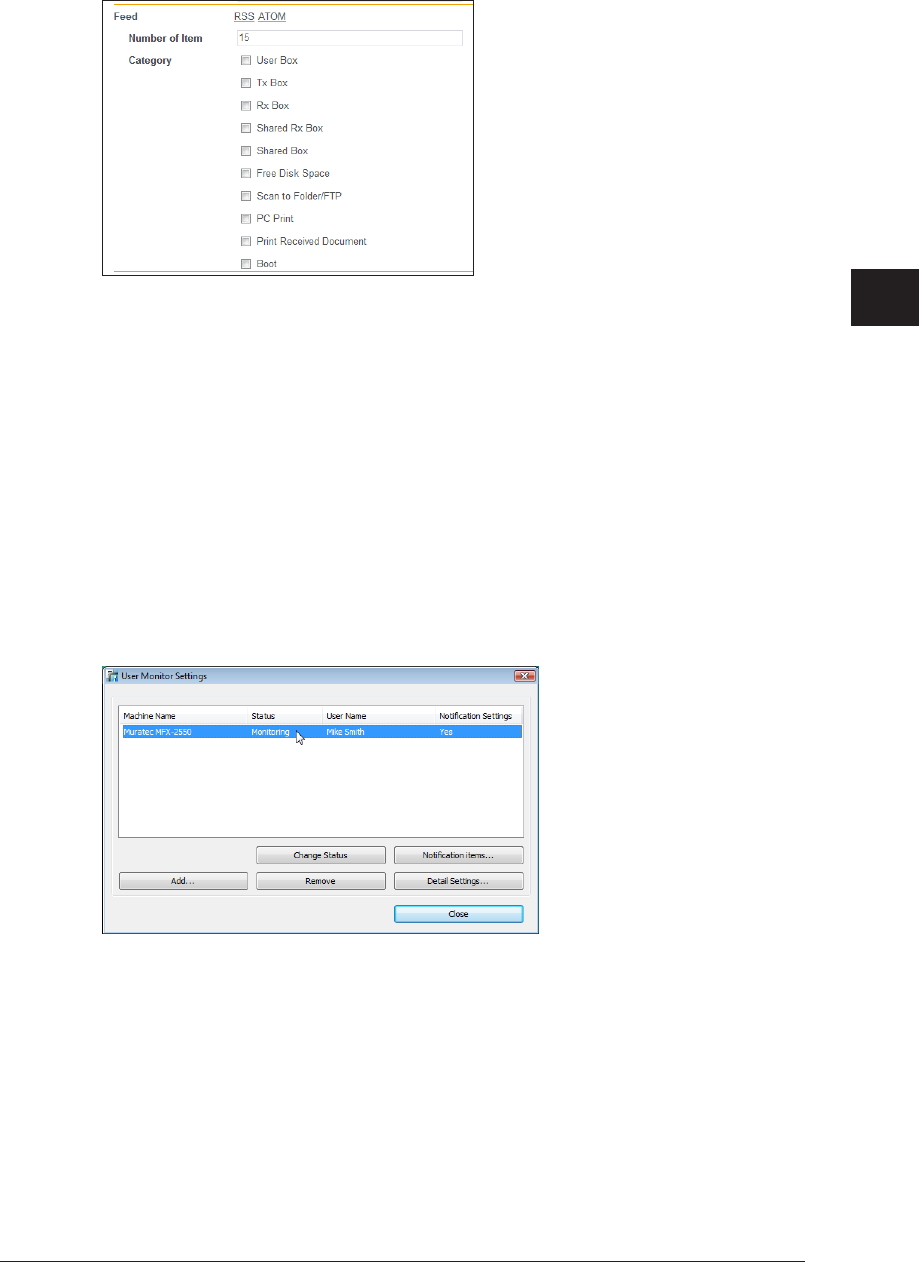
1
2
3
4
Operating Utilities
Managing Events (InfoMonitor) 4-15
Select the events for notification, and click [Save].
4
The items are displayed under • “Advanced Settings”. When they are not displayed, click [+]
next to “Advance” to display them.
You can select multiple events for notification.•
Click [Cancel] to cancel the settings.•
Switching the Monitoring Status
You can switch the monitoring status of InfoMonitor.
The monitoring status is automatically set to “Monitoring” when you register a machine.
Open the “User Monitor Settings” screen.
1
(See page 4-3.)
Select the user to switch the monitoring status.
2

4-16 Managing Events (InfoMonitor)
Click [Change Status].
3
The “Status” field switches between “Monitoring” and “Not monitoring” each time you click
[Change Status].
Deleting Users From the List
You can delete registered users from the list.
Open the “User Monitor Settings” screen.
1
(See page 4-3.)
Select the user to delete.
2
Click [Remove].
3
The selected user is deleted.
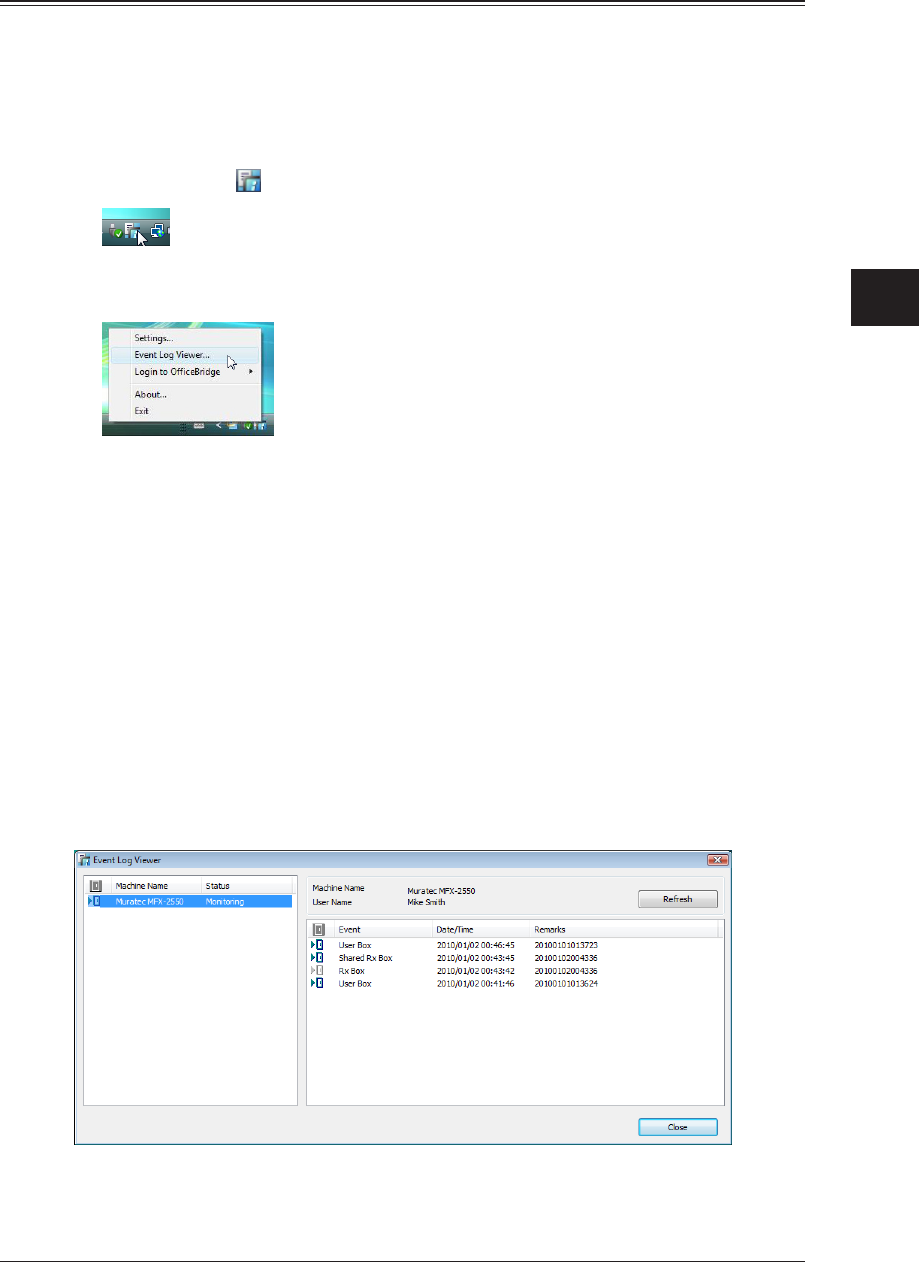
1
2
3
4
Operating Utilities
Managing Events (InfoMonitor) 4-17
Using InfoMonitor
You can use InfoMonitor to view the event history and preview, print or download the
document related to an event.
Viewing the Event History
Right-click the
1
icon in the task tray.
Click [Event Log Viewer].
2
Click [Close] to close the “Event Log Viewer” screen.
Regarding the “Event Log Viewer” Screen
On the “Event Log Viewer” screen, you can check the events that have occurred.
The event categories that can be viewed are indicated below:
User Box•
Tx Box•
Rx Box•
Shared Rx Box•
Shared Box•
Free Disk Space•
Scan to Folder / FTP•
PC Print•
Print Received Document•
Boot•

4-18 Managing Events (InfoMonitor)
Item Description
User List Displays a list of the users.
If you switch the user, the event list display also switches.
The following items are displayed.
Machine Name: Displays the name of the machine for monitoring.
Status: Displays the current monitoring status (“Monitoring” or “Not
monitoring”). “Connection error” is displayed if the machine
cannot be connected to.
Machine Name Displays the name of the machine to view events for.
User Name Displays the name of the user to notify of events.
Event List Displays the history of notification events.
The following items are displayed.
Unread mark: This mark is displayed for events that have not been
previewed.
Event: Displays the event category.
Date/Time: Displays the date and time that the event occurred.
Remarks: The information displayed here depends on the event category.
Refer to the following.
The related information that is displayed is indicated below.
Use Box: Document name
Tx Box: The sender's name, fax number or e-mail
address
Rx Box: The sender's name or fax number. If the sender
has not registered the name or fax number
in their machine, the reception date/time is
displayed.
Shared Rx Box: The sender's name or fax number. If the sender
has not registered the name or fax number
in their machine, the reception date/time is
displayed.
Shared Box: Document name
Free Disk Space “Disk space alarm”
Scan to Folder / FTP Document name
PC Print (when printing is
successful)
“Printing (file name) is completed”
PC Print (when an error
occurs)
“An error occurred when printing (file name)”
PC Print (when offline) “The machine became off line state when
printing (file name)”
Print Received Document “Printing the received document(s) are
completed.”
Boot “Machine is ready”
Note
The events to display can be set on the “Notification items” screen. (See page 4-14.)
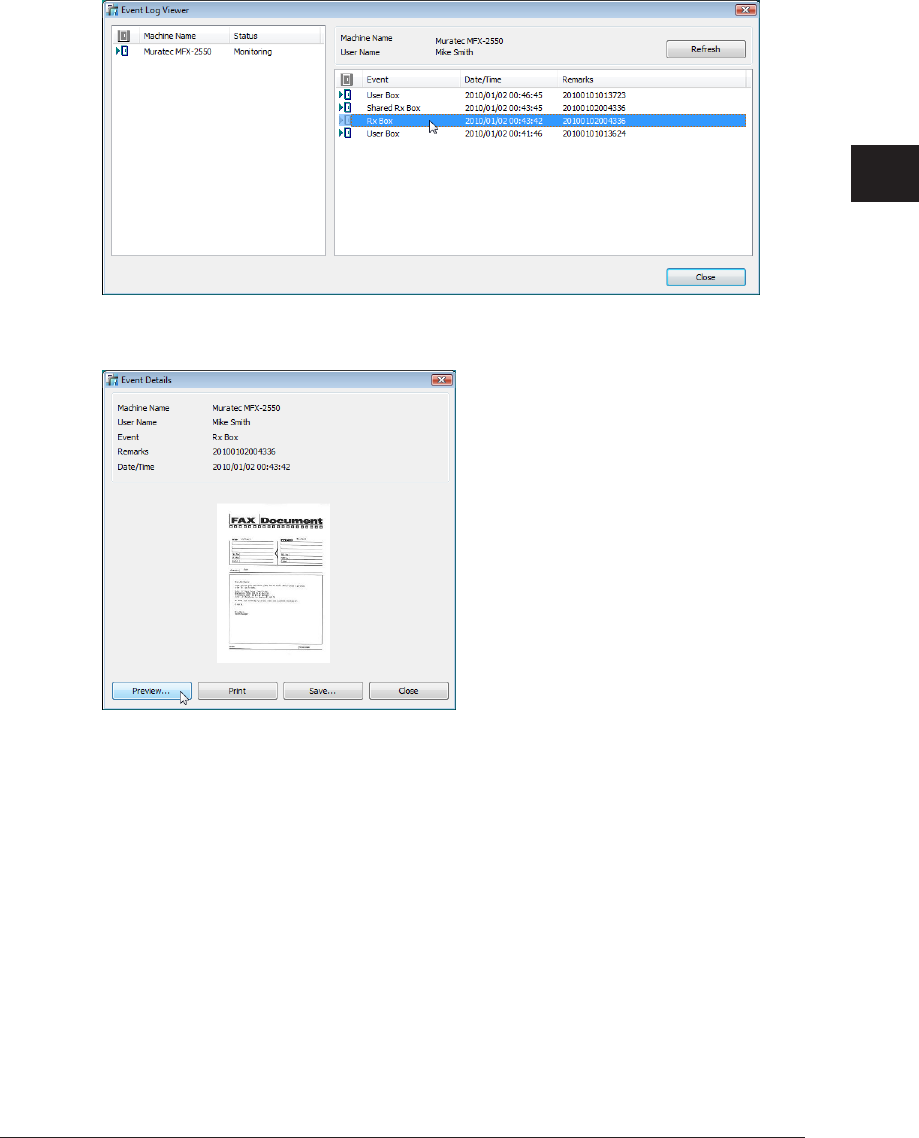
1
2
3
4
Operating Utilities
Managing Events (InfoMonitor) 4-19
Previewing the Document Related to an Event
Open the “Event Log Viewer” Screen.
1
(See page 4-17.)
Double-click the event you want to preview on the “Event Log Viewer” screen.
2
Click [Preview].
3
The viewer that starts depends on the version of the operating system that is installed.•
Click [Close] to close the “Event Log Viewer” screen.•
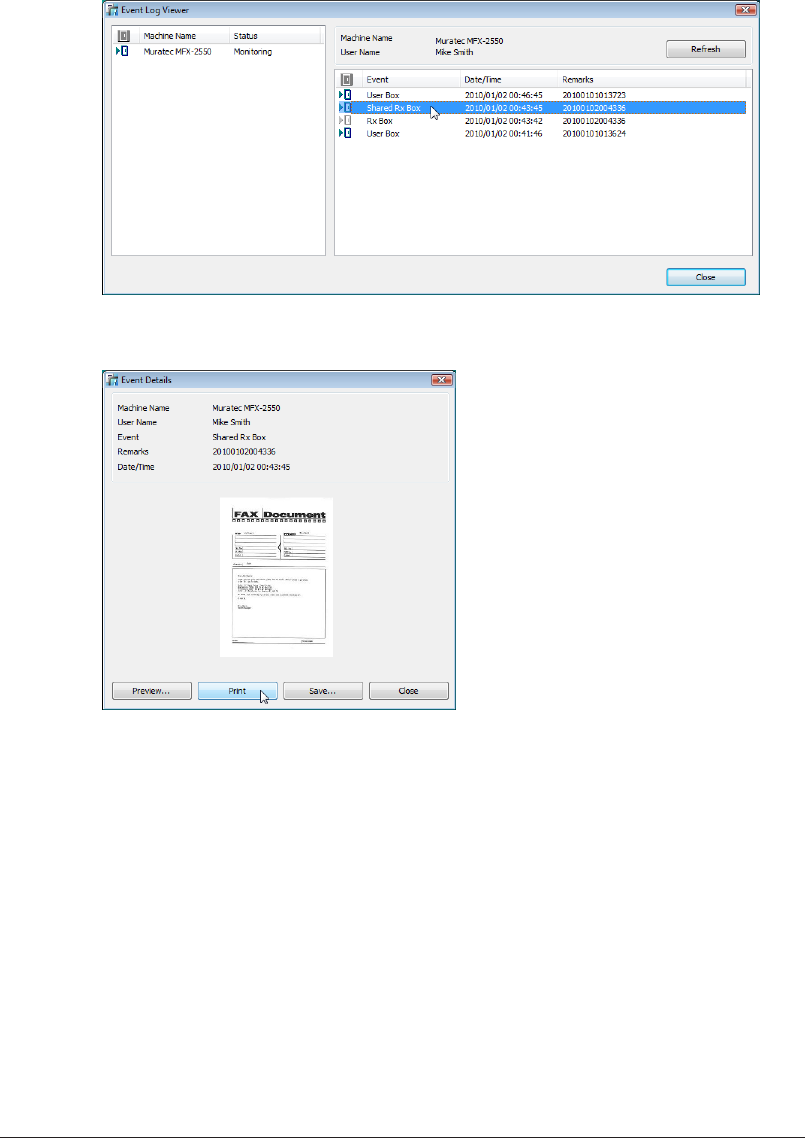
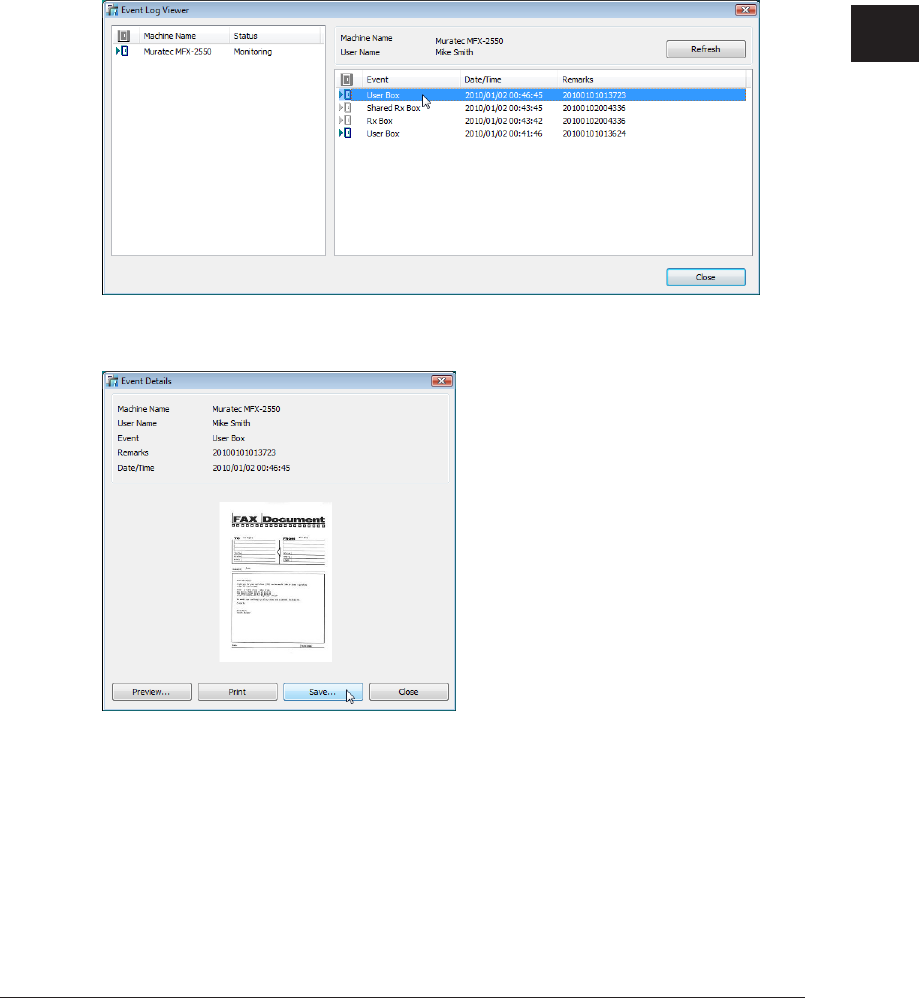
1
2
3
4
Operating Utilities
Managing Events (InfoMonitor) 4-21
Downloading the Document Related to an Event
You can save (download) the document related to an event from OfficeBridge to a local
destination.
The format to save the document in (TIFF, PDF, or PDF w/ password) is set in “Common
Settings” in “Machine Management Settings” – “Document Box Settings” on the “Admin
Login” screen. (See page 3-108.)
Open the “Event Log Viewer” Screen.
1
(See page 4-17.)
Double-click the event you want to print.
2
Click [Save].
3
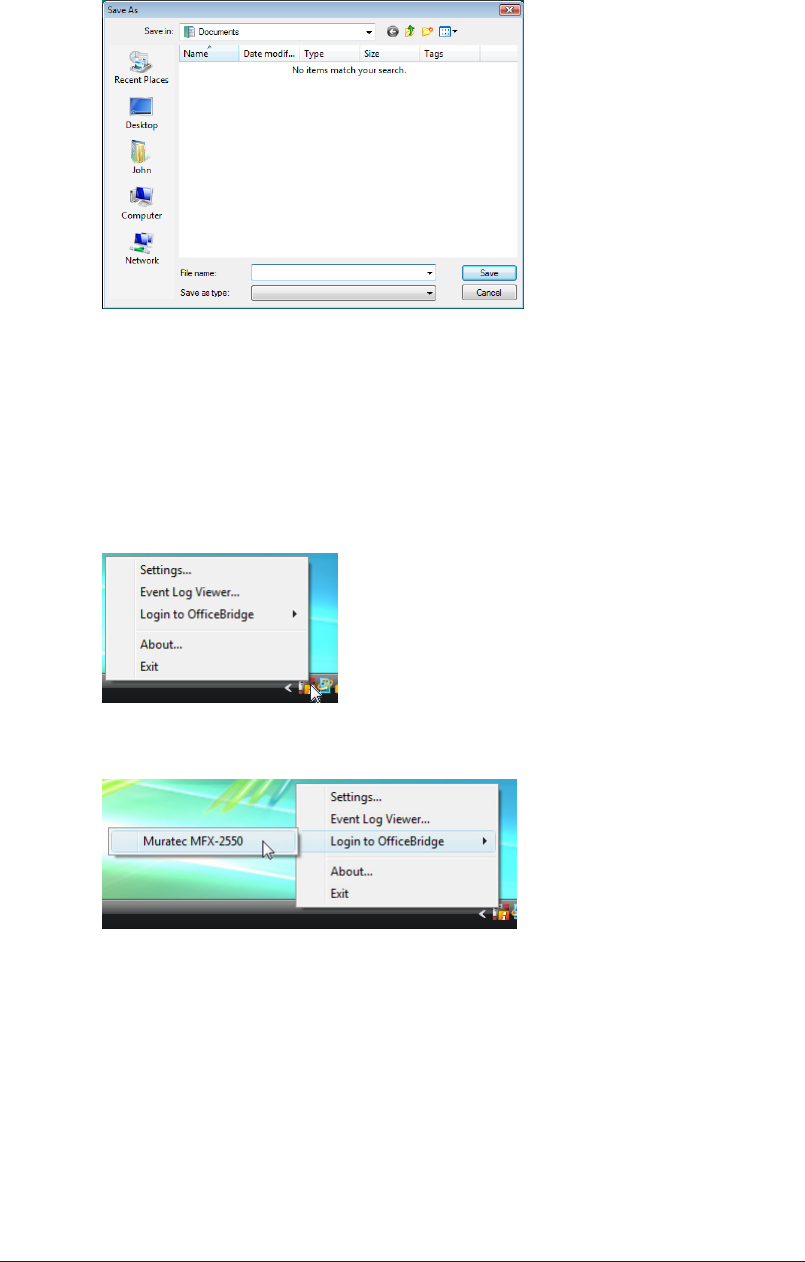
4-22 Managing Events (InfoMonitor)
Specify the name and location to save the file, and click [Save].
4
Click [Close] to close the “Event Log Viewer” screen.
Logging In to the Monitored OfficeBridge
You can log in to the monitored OfficeBridge from InfoMonitor.
Right-click the task tray icon.
1
Click [Login to OfficeBridge], and click the name of the machine to log in to.
2
For details on logging in, refer to “Logging In”. (See page 2-2.)
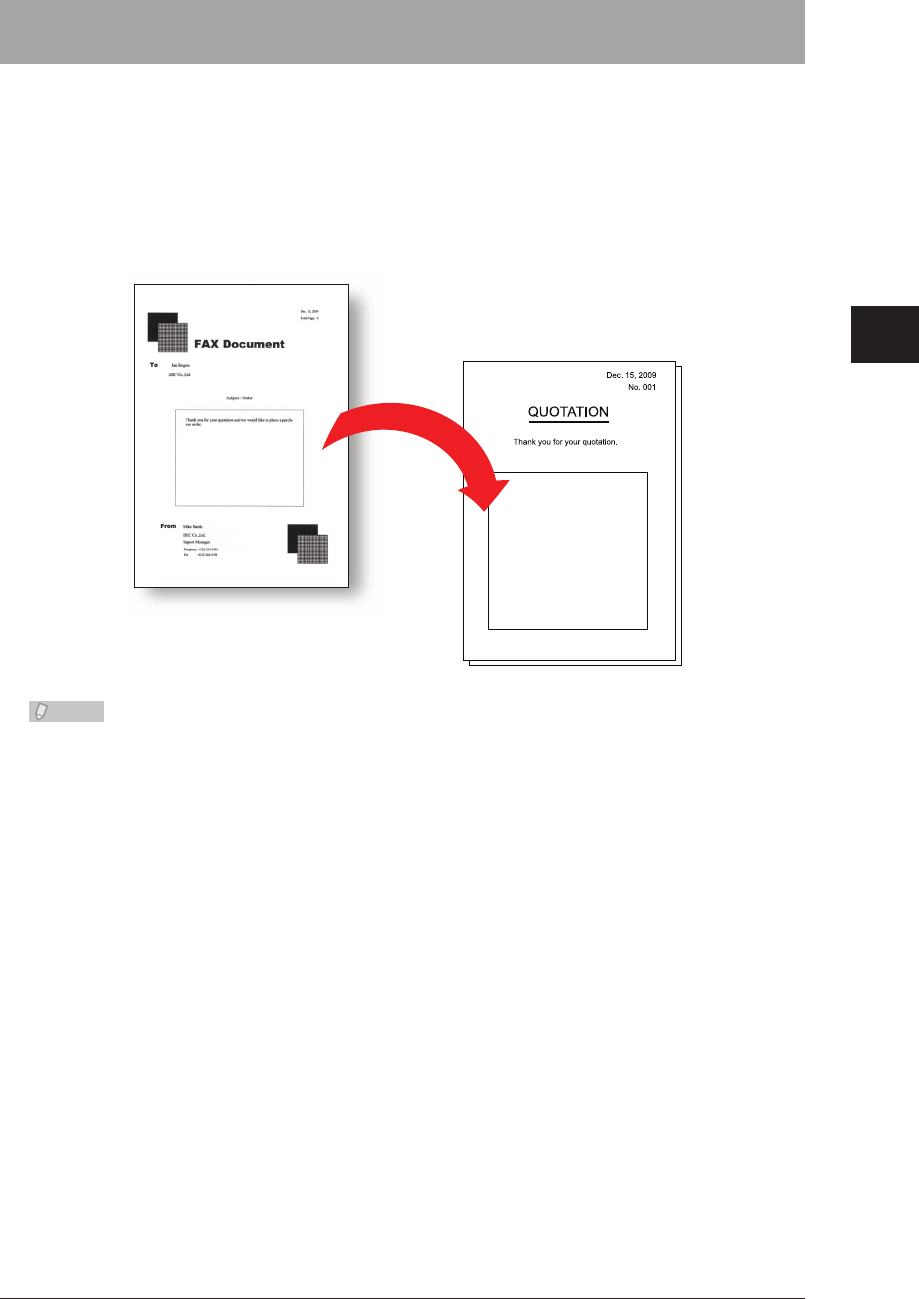
1
2
3
4
Operating Utilities
Creating Cover Pages (CoverPage Editor) 4-23
Creating Cover Pages (CoverPage Editor)
With CoverPage Editor, you can create cover pages to attach at the top of fax documents
you transmit.
On the cover page, you can insert information registered in the address book (recipient
name, company name and department name, etc.) and information set in the user
information (sender name, company name, and department name, etc.), and also insert
strings and pictures.
Cover page
Added when
transmitting
Sent document
Note
In CoverPage Editor, the strings and pictures, etc. to edit are called “objects”.
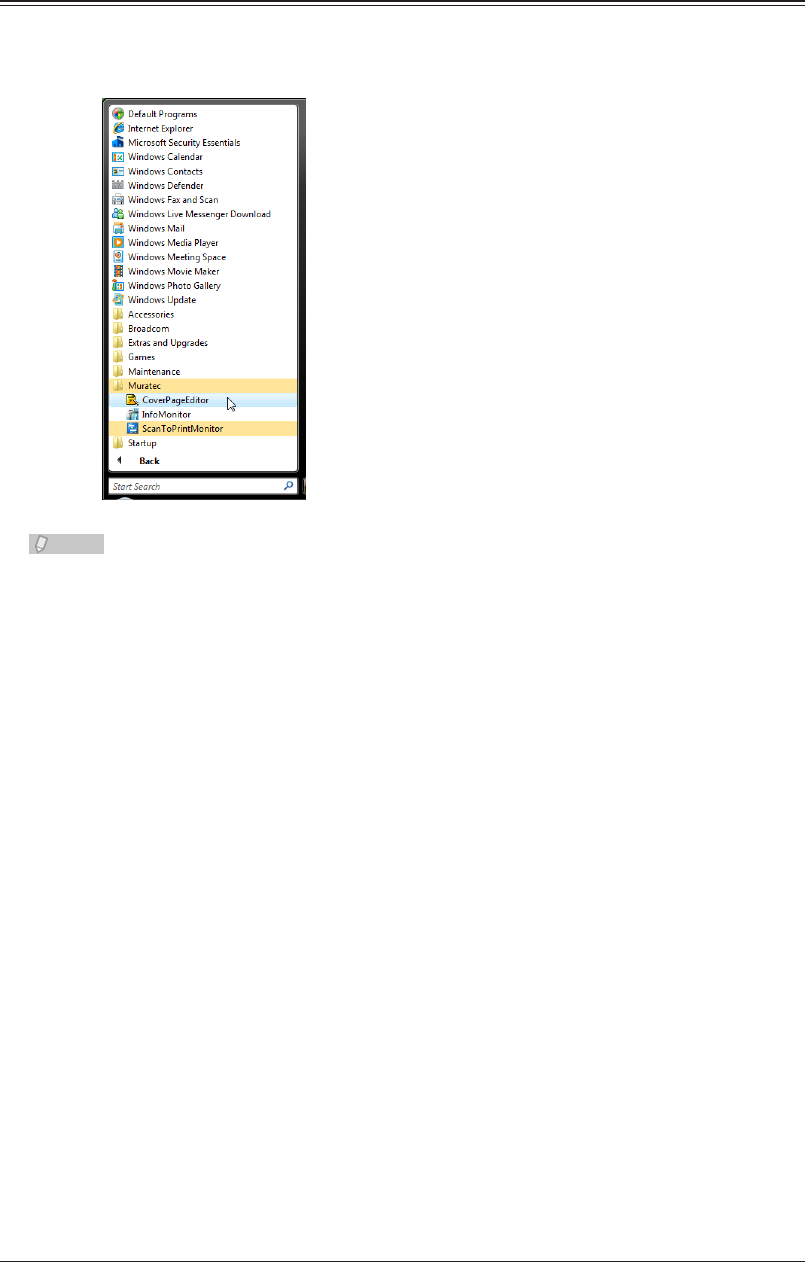
4-24 Creating Cover Pages (CoverPage Editor)
Starting CoverPage Editor
Click [Start], select “Muratec” from “Programs” (or “All programs”), and click
1
“CoverPage Editor”.
Note
A new document screen is displayed when CoverPage Editor is started.•
The size of the cover page is A4.•
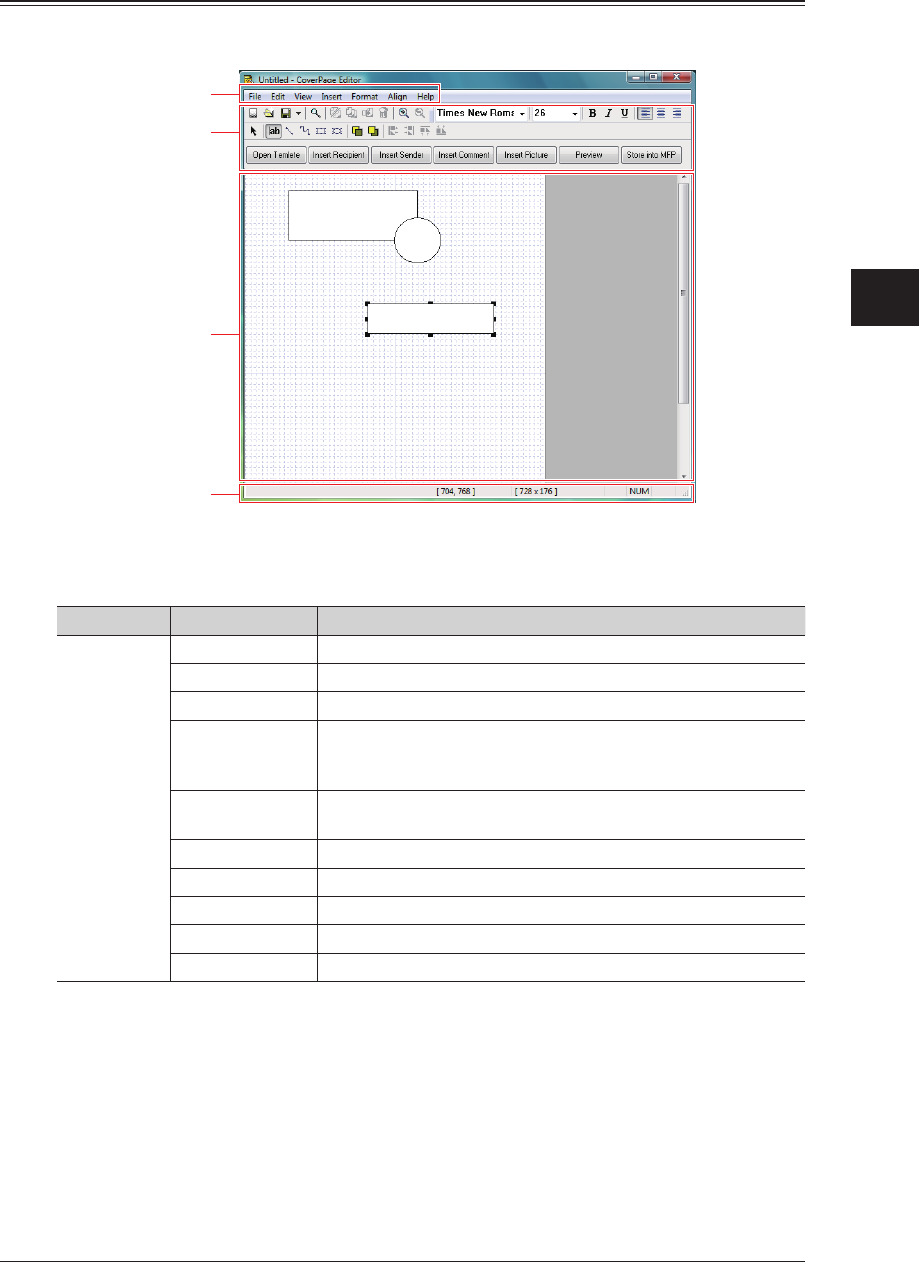
1
2
3
4
Operating Utilities
Creating Cover Pages (CoverPage Editor) 4-25
CoverPage Editor Editing Screen
The part names and functions of the CoverPage Editor editing screen are described below.
Menu bar
Tool bar
Editing area
Status bar
Part Names and Functions
Menu bar
Menu Name Command Name Description
File New Creates a new file.
Open Opens an existing file.
Save Overwrites the edited file.
Save as Saves to a new file. Alternatively, saves an existing file under a
different name.
The extension “.cpt” is added to the file.
Upload Uploads the created file to OfficeBridge. You can use the
uploaded file as a cover page.
Upload Settings Selects the location of the OfficeBridge to upload to.
Print Prints the created file.
Print Preview Displays a print preview of the file you have created.
Recent Files Displays the names of the files used most recently.
Exit Closes CoverPage Editor.

4-26 Creating Cover Pages (CoverPage Editor)
Menu Name Command Name Description
Edit Undo Undoes the previous edit. You can also undo by pressing the
<Ctrl> + <Z> keys.
Cut Cuts the selected object from the editing area. You can also cut
an object by pressing the <Ctrl> + <X> keys.
Copy Copies the selected object in the editing area. You can also copy
an object by pressing the <Ctrl> + <C> keys.
Paste Pastes the cut (copied) object into the editing area. You can also
paste an object by pressing the <Ctrl> + <V> keys.
Delete Deletes the selected object from the editing area.
You can also delete an object by pressing the <Delete> key.
Select All Selects all the objects in the editing area.
View Grid Switches the editing area grid display. A “grid” is used as a
yardstick for positioning objects. The grid is not displayed when
a completed cover page is sent.
Toolbar Switches the editing area toolbar display.
The tool groups whose display you can switch are “Standard”
(“File”, “Edit”, “View” tools), “Font” (“Format” tools), “Drawing”
(“Insert” tools), and “Quick Access”.
Status Bar Switches the editing area status bar display.
Zoom In
*1
Enlarges the editing area display. You can also enlarge the
editing area display by clicking the icon on the tool bar.
Zoom Out
*1
Reduces the editing area display. You can also reduce the
editing area display by clicking the icon on the tool bar.
Insert
*2
Recipient Inserts into the editing area the receiver information registered
in the address book (name, company, department, telephone
number, and fax number or e-mail address). You can select the
recipient information to insert.
Sender Inserts into the editing area the sender information registered
in machine or user settings (name, company, department,
telephone number, and fax number or e-mail address). You can
select the sender information to insert.
Comment Inserts into the editing area the date sent, number of pages
sent, and subject and message entered when transmitting. You
can select the items to insert for the comment.
Picture This inserts into the editing area an illustration or photograph
made with other application software. Pictures inserted into a
cover page must be in the bitmap (bmp), TIFF, or JPEG format.
If you insert a color image, it is automatically converted to
grayscale.
Text Object This inserts a character string into the editing area. You can
also insert a string by clicking the icon on the tool bar.
Draw Object Inserts into the editing area a freehand drawing (freehand
curve), line, rectangle, or ellipse.
If you select “Move”, you can move the selected object by
dragging it.
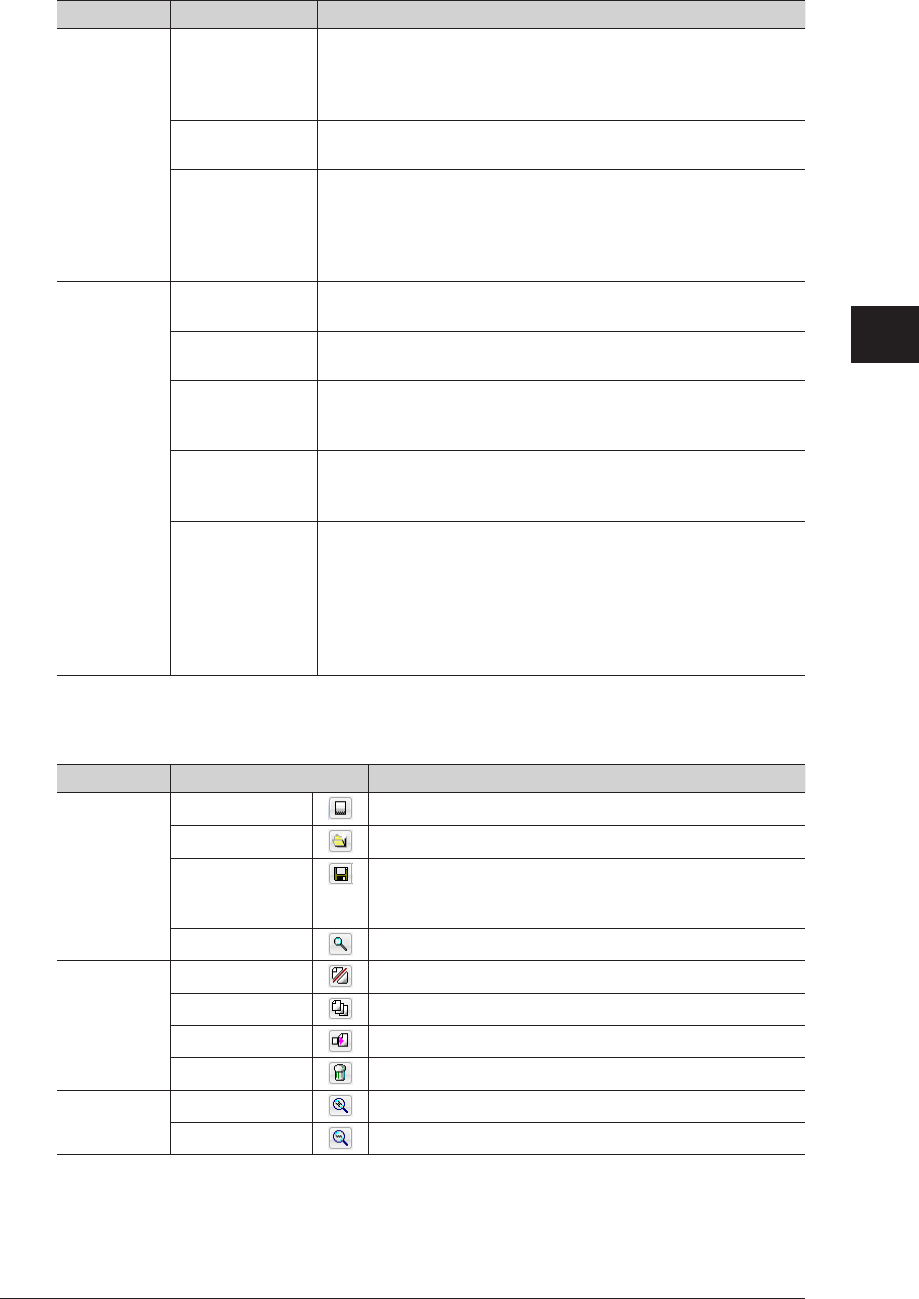
1
2
3
4
Operating Utilities
Creating Cover Pages (CoverPage Editor) 4-27
Menu Name Command Name Description
Format Font This specifies the font and size of character strings in a text box
inserted into the editing area, and the attributes of the text box,
etc.
Specify the settings in the “Config Object” dialog box.
Text Alignment Justifies (right justifies, centers, or left justifies) the character
string inserted in the editing area.
Config Object Specifies the attributes of character strings and figures, and the
placement of objects, etc.
Specify the settings in the “Config Object” dialog box.
For details, refer to “Specifying Object Settings”. (See page
4-39.)
Align Bring Forward Moves the selected object one layer forward if multiple objects
are overlapped with each other in the editing area.
Send Backward Moves the selected object one layer backward if multiple objects
are overlapped with each other in the editing area.
Bring to Front When multiple objects are overlaying each other in the editing
area, this moves the selected object all the way to the front (the
frontmost plane).
Send to Back When multiple objects are overlaying each other in the editing
area, this moves the selected object all the way to the back (the
backmost plane).
Align Objects Aligns the selected objects.
Align Left: Aligns objects with the leftmost object as a reference.
Align Right: Aligns objects with the rightmost object as a
reference.
Align Top: Aligns objects with the topmost object as a reference.
Align Bottom: Aligns objects with the bottommost object as a
reference.
Toolbar
“Standard” tools
Category Tool Name Description
File New Creates a new file.
Open Opens an existing file.
Save Saves an edited file.
When you click the list button on the right, you can
select from “Save” and “Save As”.
Print Preview Displays a print preview of the file you have created.
Edit Cut Cuts the selected object from the editing area.
Copy Copies the selected object in the editing area.
Paste Pastes the cut (copied) object into the editing area.
Delete Deletes the selected object from the editing area.
View
*1
Zoom In Enlarges the editing area display.
Zoom Out Reduces the editing area display.
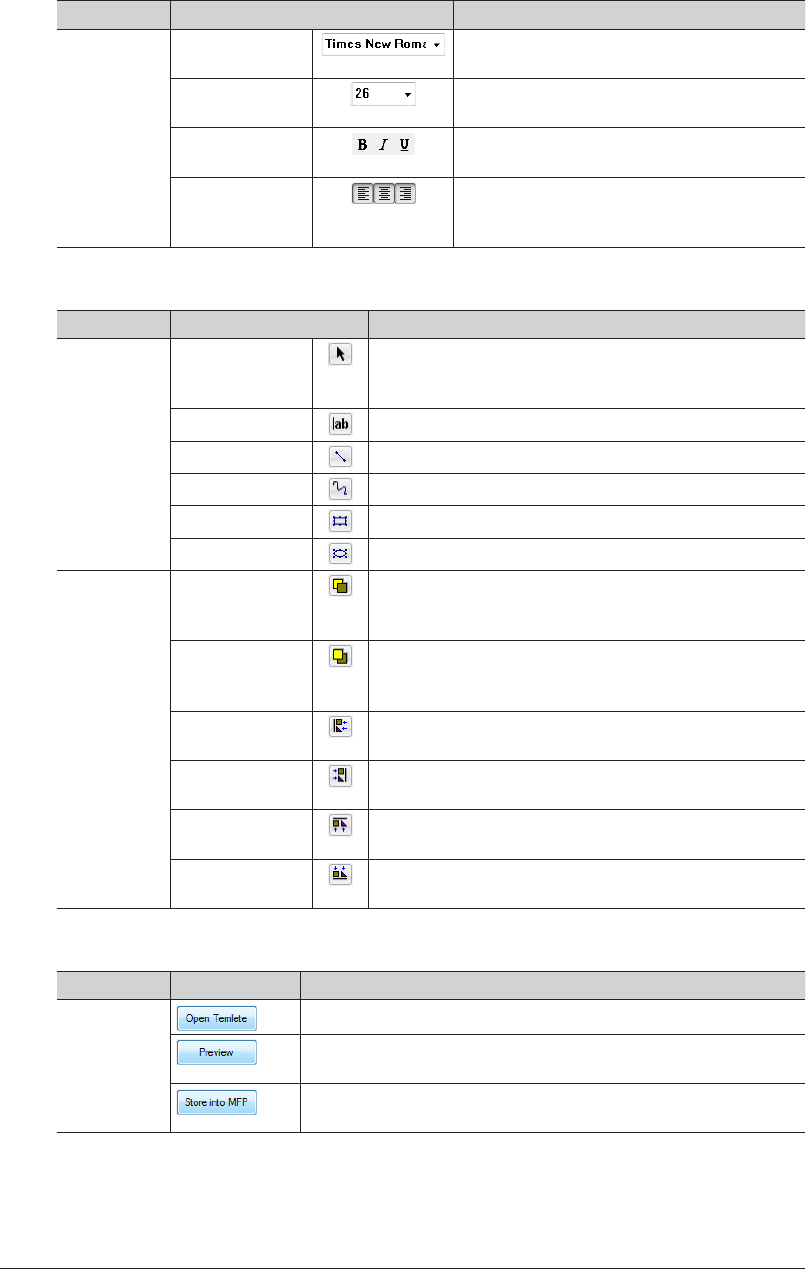
4-28 Creating Cover Pages (CoverPage Editor)
“Font” tools
Category Tool Name Description
Format Font Selects a font for the character string
inserted into the editing area.
Font Size Selects a size for the character string inserted
into the editing area.
Font Style Sets the style (bold, italic, underline) for a
character string inserted in the editing area.
Text Alignment Justifies (left justifies, centers, or right
justifies) a character string inserted in the
editing area.
“Draw Object” tools
Category Tool Name Description
Object
insertion
Select Selects and moves an object in the editing area.
Move the object while holding down the left mouse
button.
Inputs text Inserts a character string into the editing area.
Line Draws a straight line in the editing area.
Freehand Draws a free curve in the editing area.
Rectangle Draws a rectangle in the editing area.
Ellipse Draws an ellipse in the editing area.
Align Bring Forward Moves the selected object one layer forward if multiple
objects are overlapped with each other in the editing
area.
Send Backward Moves the selected object one layer backward if multiple
objects are overlapped with each other in the editing
area.
Align Left Aligns the selected objects with the leftmost object as a
reference.
Align Right Aligns the selected objects with the rightmost object as a
reference.
Align Top Aligns the selected objects with the topmost object as a
reference.
Align Bottom Aligns the selected objects with the bottommost object as
a reference.
“Quick Access” tools
Category Tool Name Description
File Opens an existing file.
Displays a print preview of the file you have created.
This operation is the same as “Print Preview” in the “File” menu.
Uploads the created file to OfficeBridge.
This operation is the same as “Upload” in the “File” menu.
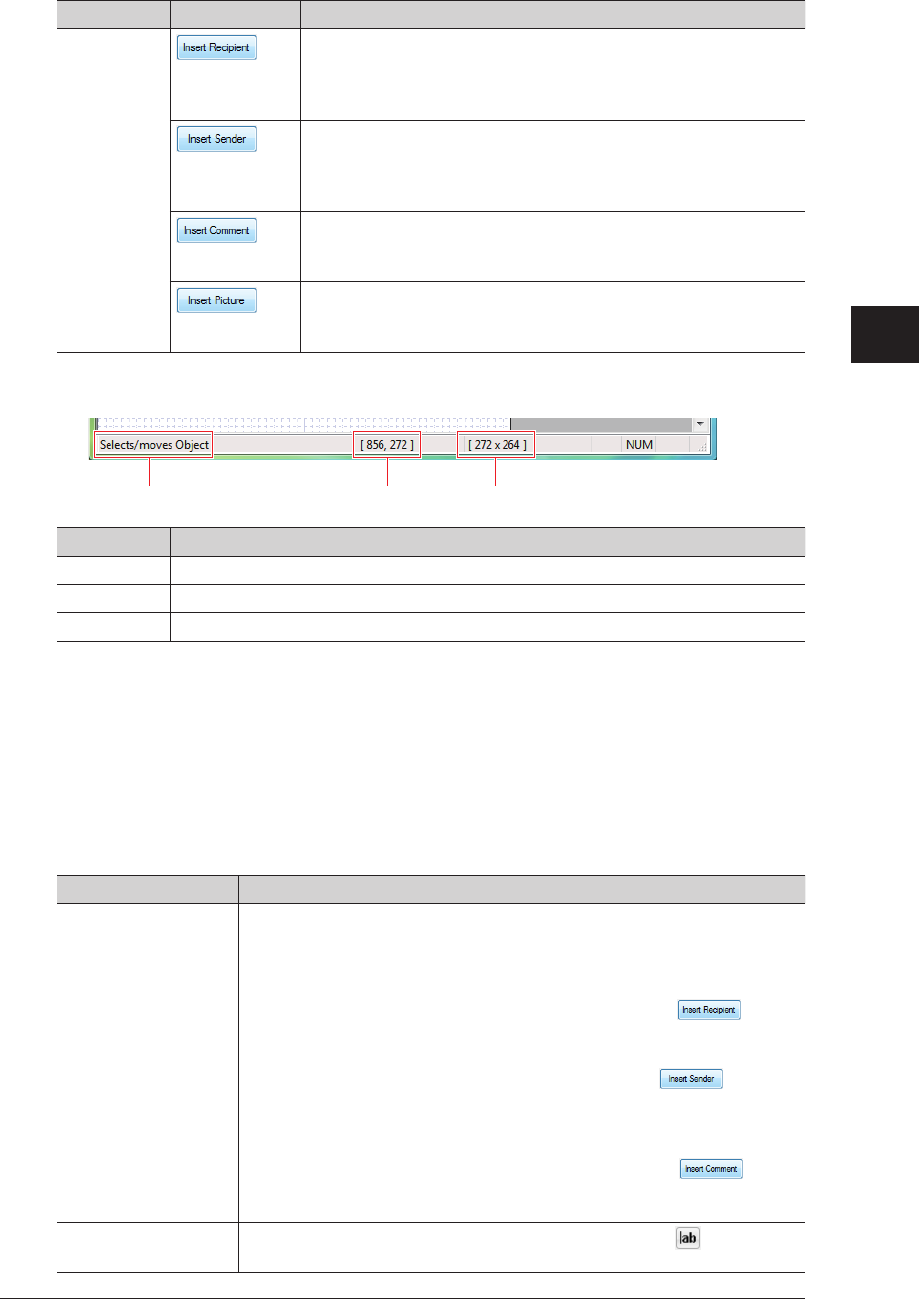
1
2
3
4
Operating Utilities
Creating Cover Pages (CoverPage Editor) 4-29
Category Tool Name Description
Insert
*2
Inserts into the editing area the receiver information registered in
the address book (name, company, department, telephone number,
and fax number or e-mail address).
This operation is the same as “Recipient” in the “Insert” menu.
Inserts into the editing area the sender information registered
in the machine or user settings (name, company, department,
telephone number, and fax number or e-mail address).
This operation is the same as “Sender” in the “Insert” menu.
Inserts into the editing area the date sent, number of pages sent,
and subject and message entered when transmitting.
This operation is the same as “Comment” in the “Insert” menu.
This inserts into the editing area an illustration or photograph
made with other application software.
This operation is the same as “Picture” in the “Insert” menu.
Status Bar
1 2 3
Status Bar Description
1 Displays the function of the selected command or tool.
2 Displays the coordinate position of the selected object.
3 Displays the size of the selected object.
There are four enlargement/reduction ratios: 50%, 100%, 200%, and 400%. The 100% ratio is *1
set when CoverPage Editor is started.
The objects inserted with “Recipient”, “Sender” or “Comment” are inserted as “insertion *2
objects”. (See page 4-35.)
Object Types
CoverPage Editor has the following types of objects.
Type Description
Insertion object Enables you to use the recipient information stored in the address book,
the sender information inserted when transmitting the document, or the
transmission date and number of pages transmitted, etc. created when
transmitting the document, as objects.
• Object inserted with “Recipient” in the “Insert” menu or inserts
the receiver information registered in the address book (name, company,
department, telephone number, fax number, e-mail address).
• Object inserted with “Sender” in the “Insert” menu or inserts
the sender information registered in the machine or user settings (name,
company, department, telephone number, and fax number or e-mail
address).
• Object inserted with “Comment” in the “Insert” menu or
comment information (transmission date, number of pages transmitted,
subject, message) for transmission
Text object Object inserted with “Text Object” in the “Insert” menu or in the “Draw
Object” tools
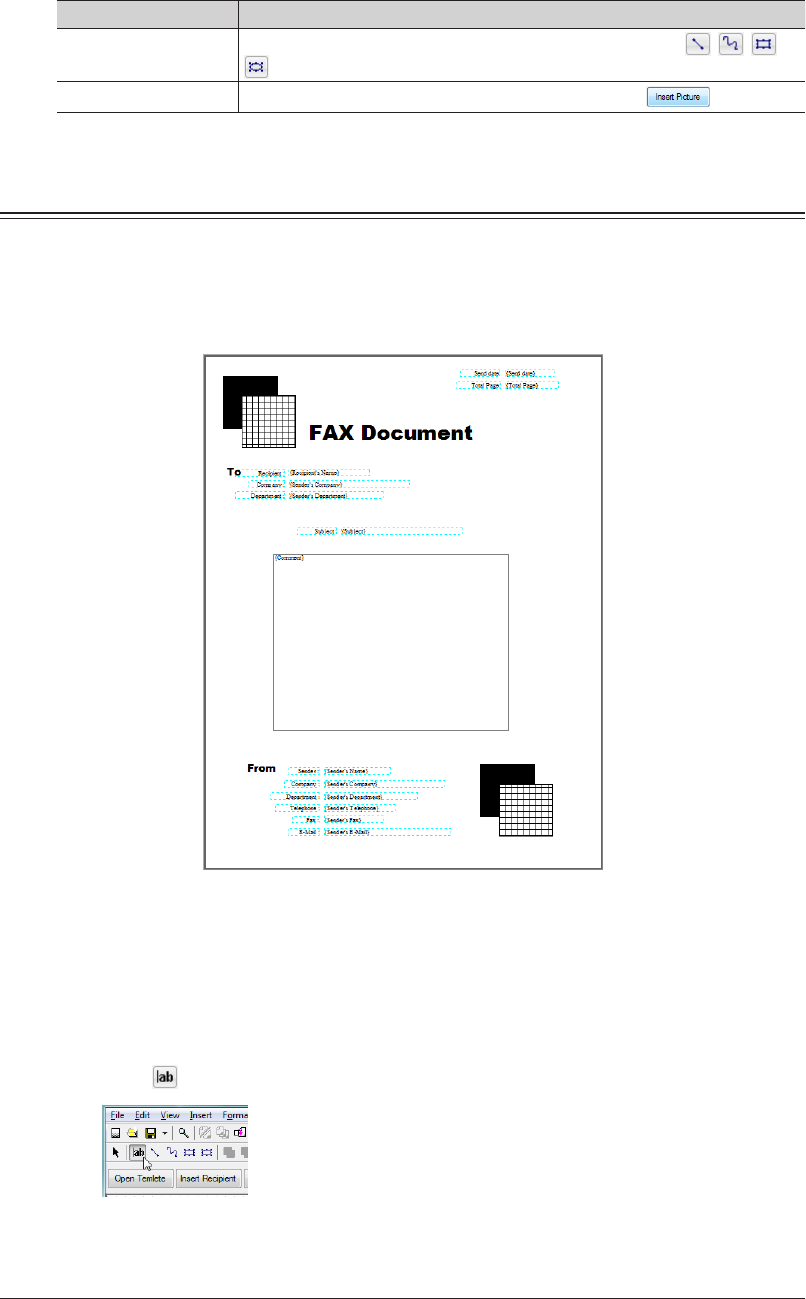
4-30 Creating Cover Pages (CoverPage Editor)
Type Description
Draw object Object inserted with “Draw Object” in the “Insert” menu or , , , or
in the “Draw Object” tools
Image object Object inserted with “Picture” in the “Insert” menu or .
Cover Page Creation Procedure
This section describes an example of the procedure for creating a simple cover page (from
creating a new file to saving it).
This cover page uses the “name”, “company name”, and “department name” of the
destination registered in the address book, and the “name”, “company name”, “department
name”, “telephone number”, and “fax number” of the sender.
Creating a Phrase
You can insert into the editing area “text objects” to use as fixed phrases for titles and
greetings, etc.
Click
1
.
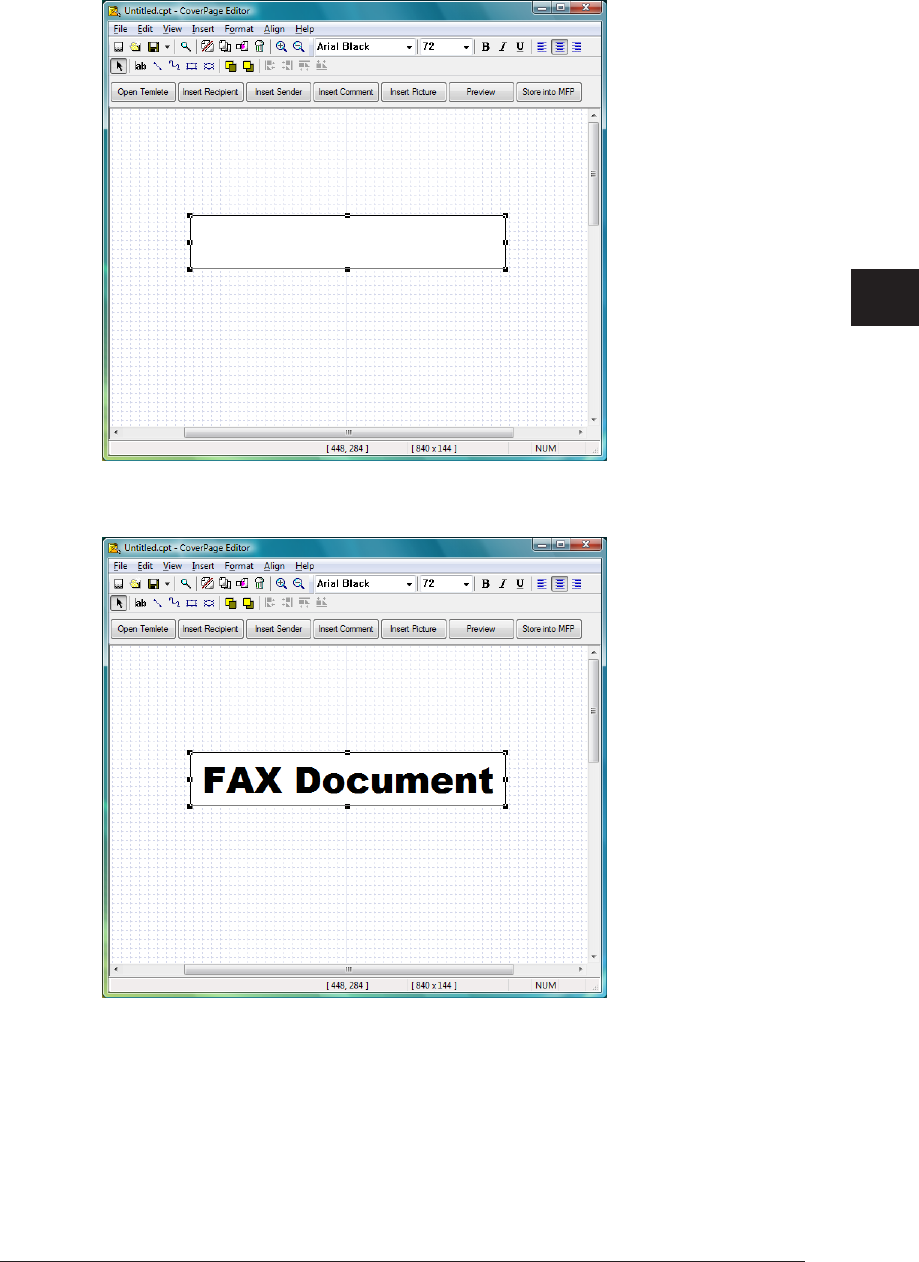
1
2
3
4
Operating Utilities
Creating Cover Pages (CoverPage Editor) 4-31
Drag the mouse pointer in the editing area to create a text box.
2
Enter the title for the cover page in the text box.
3
Adjust the font type and size using the “Format” tool.
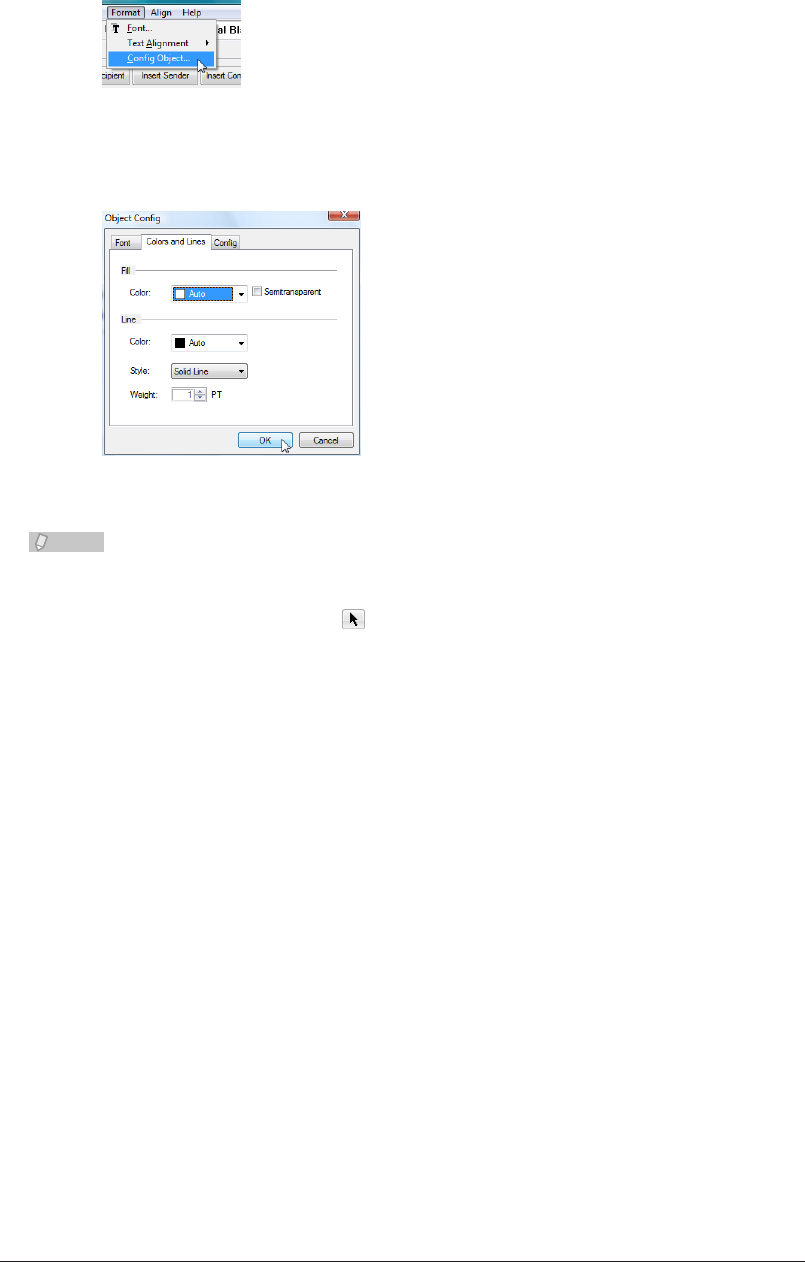
4-32 Creating Cover Pages (CoverPage Editor)
Click “Config Object” from the “Format” menu with the text box selected.
4
You can also select “Config Object” by right-clicking the selected text box.
Specify the object settings in the “Colors and Lines” tab, and click [OK].
5
In this example, “No Fill” is set for “Color” in “Fill”, and “No Line” is set for “Style” in “Line”.
Note
The font type and size, etc. of the text box can be changed later. For details, refer to •
“Changing the Font Properties” in “Editing an Object”. (See page 4-42.)
To edit the text again, select
• (the “Select” tool) and then double-click the text box.
To change the shape of the text box, drag its corner points or middle points.•

1
2
3
4
Operating Utilities
Creating Cover Pages (CoverPage Editor) 4-33
Creating a Figure
You can enter a figure into the editing area as a “draw object”.
Click
1
(the “rectangle” tool).
Drag the mouse pointer in the editing area to create the figure.
2
Click “Config Object” from the “Format” menu with the figure selected.
3
You can also select “Config Object” by right-clicking the selected figure.
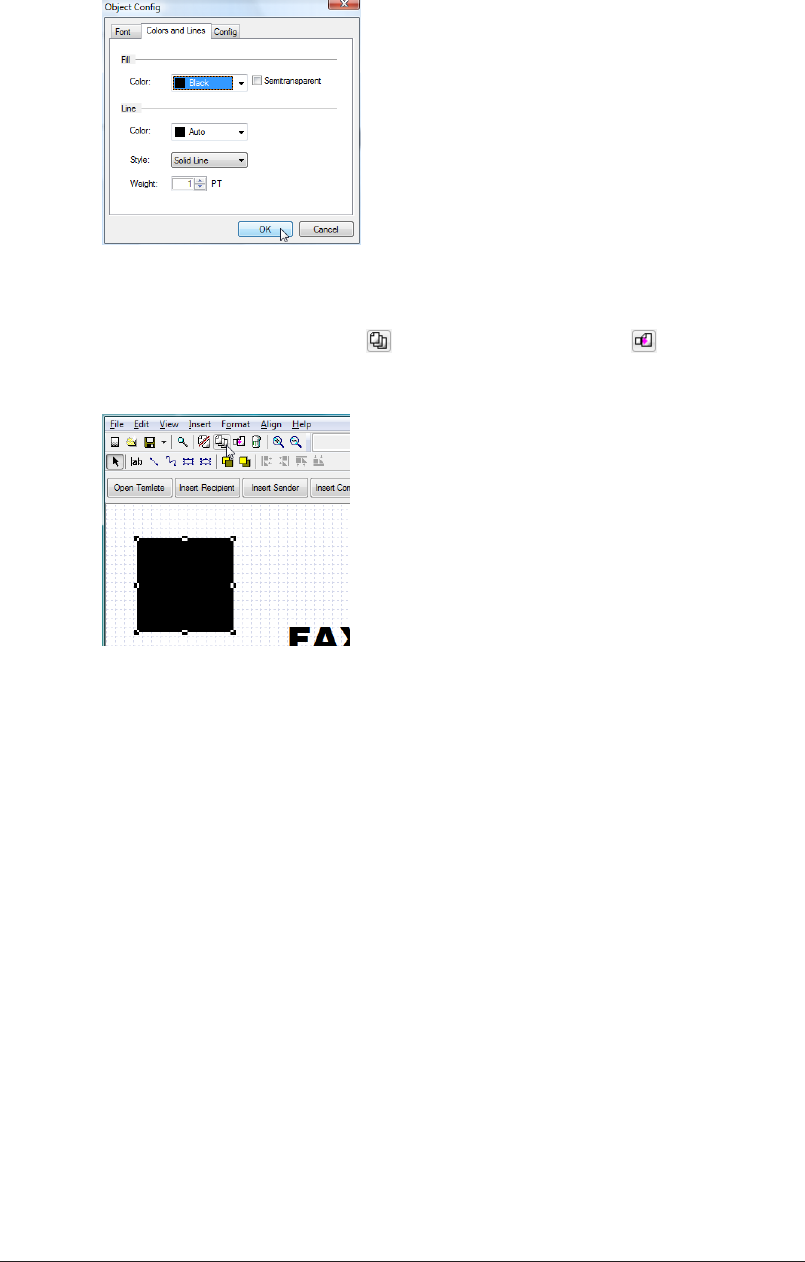
4-34 Creating Cover Pages (CoverPage Editor)
Specify the figure settings in the “Colors and Lines” tab, and click [OK].
4
In this example, “Black” is set for “Color” in “Fill”.
With the figure selected, click
5
(the “Copy” tool), and then (the “Paste”
tool).
A copy of the figure is created.
Adjust the position.
6
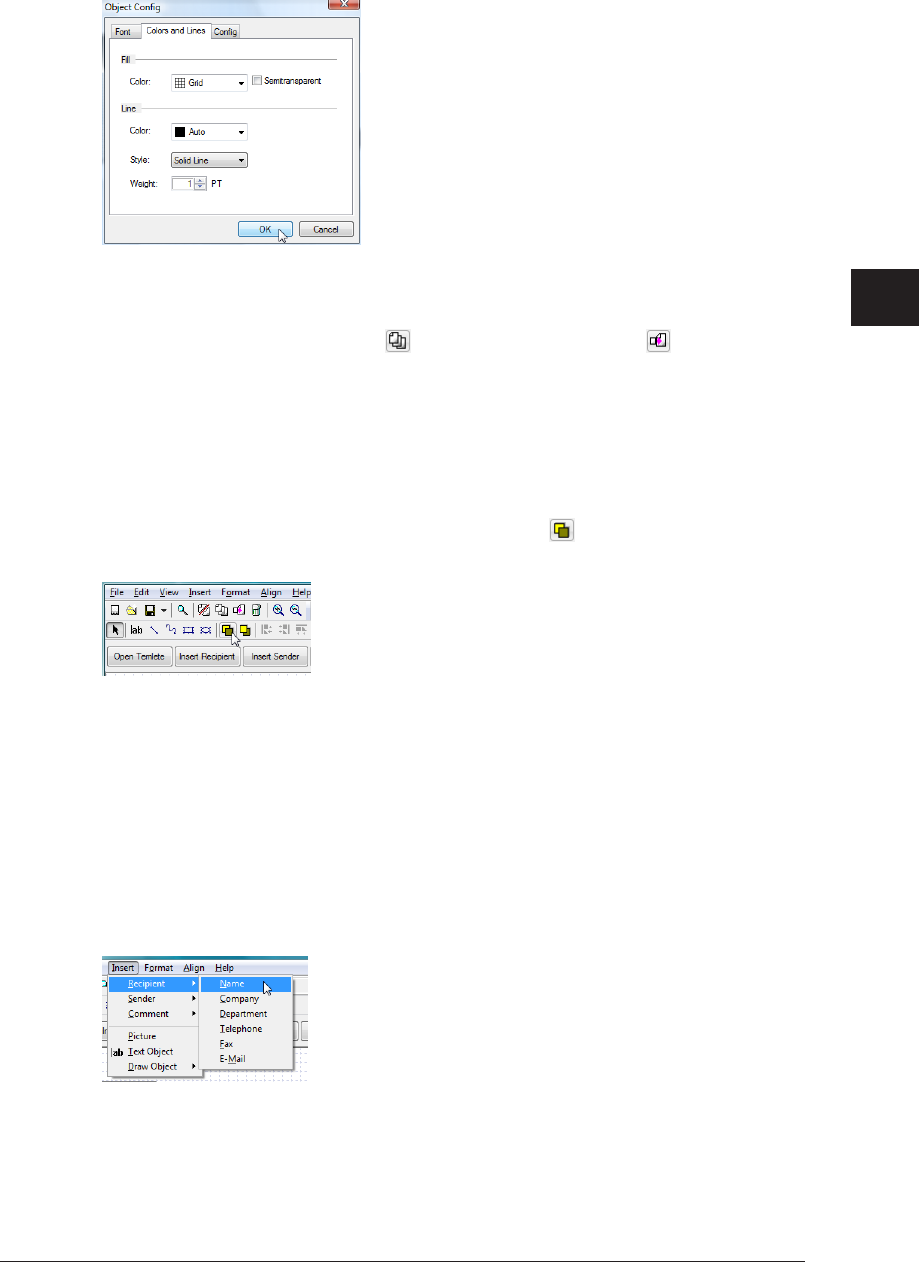
1
2
3
4
Operating Utilities
Creating Cover Pages (CoverPage Editor) 4-35
Specify the figure settings in the “Colors and Lines” tab, and click [OK].
7
In this example, “Grid” is set for “Color” in “Fill”.
With both figures selected, click
8
(the “Copy” tool), and then (the “Paste”
tool).
A copy of the figures is created.
Move the copies of the figures to a location of your choice.
9
Select the bottom figure you moved, and then click
10
(the “Bring Forward”
tool).
Inserting Registered (Recipient or Sender) Information
You can insert information registered in the address book into the editing area as
“insertion objects”.
These insertion objects are linked to the address book, and the name and company name,
etc. change according to the destination.
From the “Insert” menu, select “Recipient” – “Name”.
1
Position the object in a location of your choice.
2
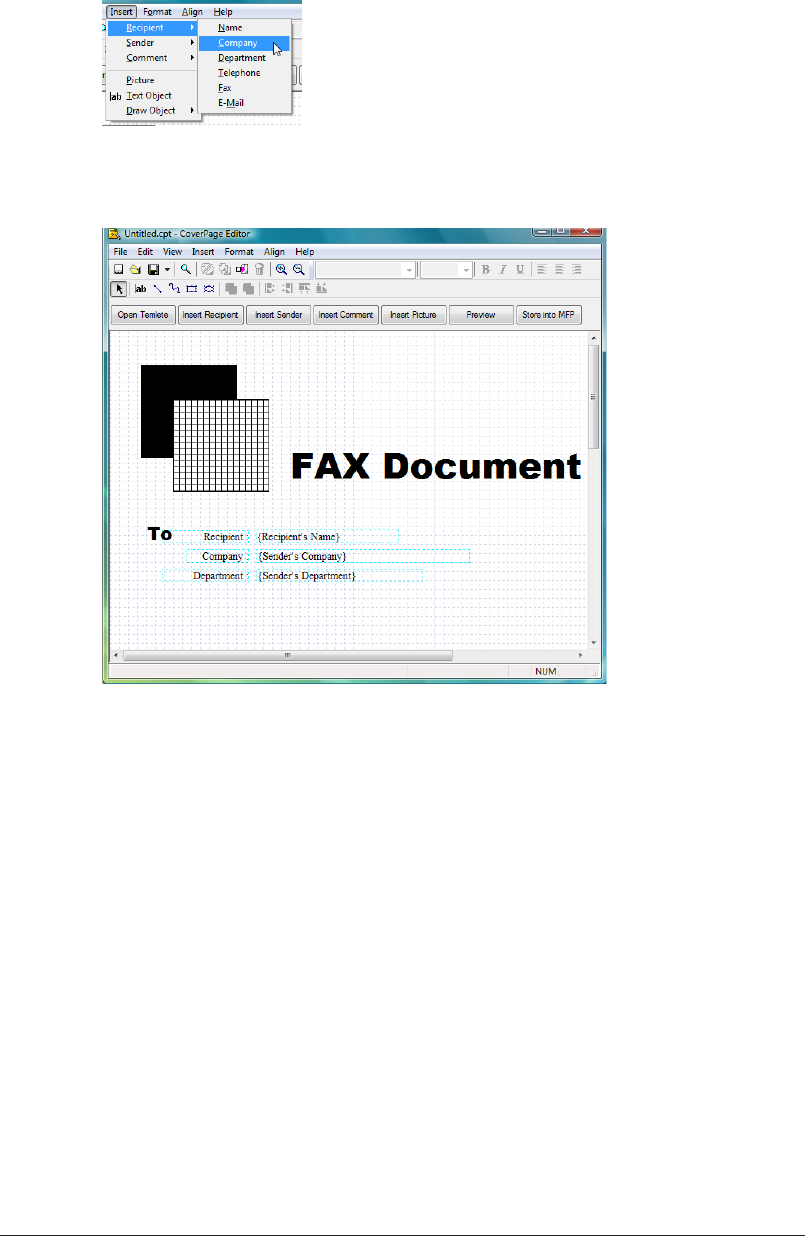
4-36 Creating Cover Pages (CoverPage Editor)
You can also click “Company” or “Department” from the “Insert” menu, and
3
position the object in a location of your choice.
Similarly, insert and position the registered information of the sender (sender
4
name, company name, department name, and phone number, etc.)
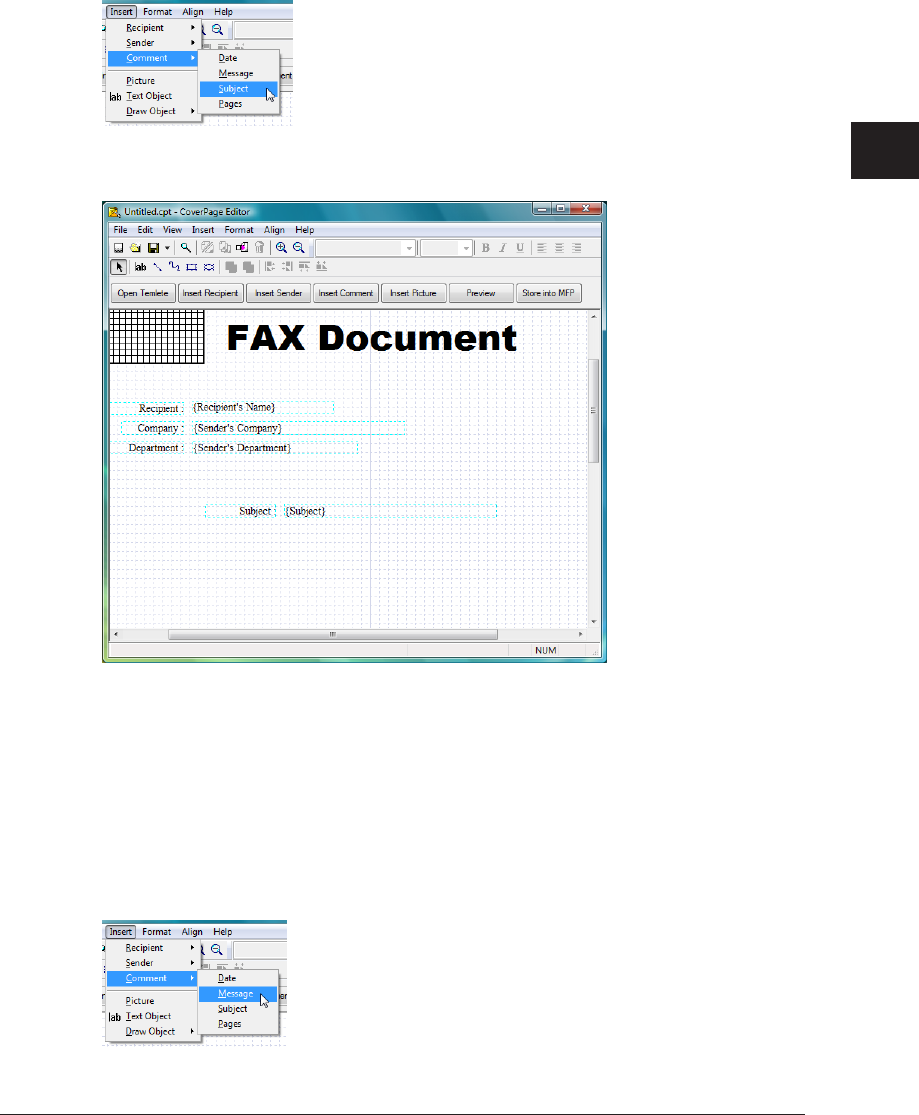
1
2
3
4
Operating Utilities
Creating Cover Pages (CoverPage Editor) 4-37
Inserting a Subject
You can insert a “subject” into the editing area.
The “subject” you enter is set in the “Subject” entry box in “Cover Page” on the
“Transmission” settings screen.
From the “Insert” menu, select “Comment” – “Subject”.
1
Position the object in a location of your choice.
2
Inserting a Message
You can insert a “message” into the editing area.
The “message” you enter is set in the “Text” entry box in “Cover Page” on the
“Transmission” settings screen.
From the “Insert” menu, select “Comment” – “Message”.
1
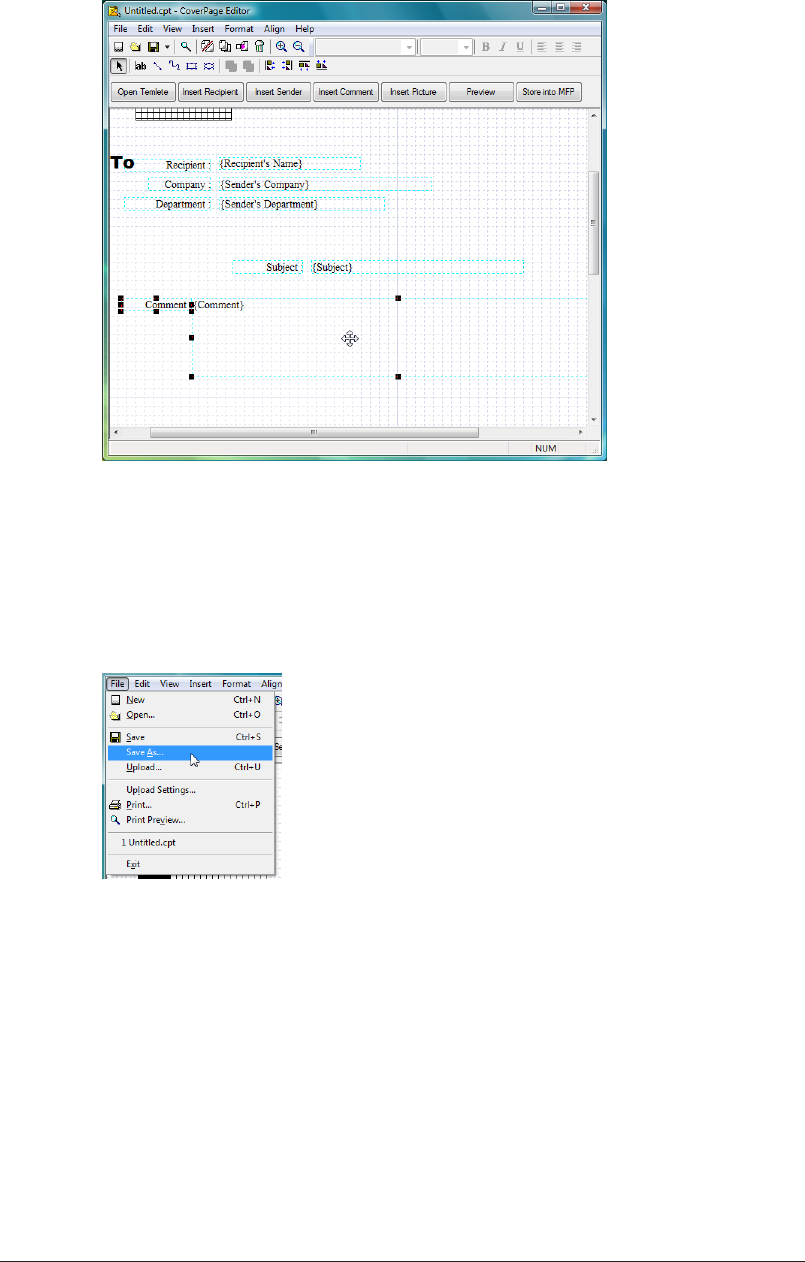
4-38 Creating Cover Pages (CoverPage Editor)
Position the object in a location of your choice.
2
Saving a Cover Page
You can save the cover page you created.
Click “Save As” in the “File” menu.
1
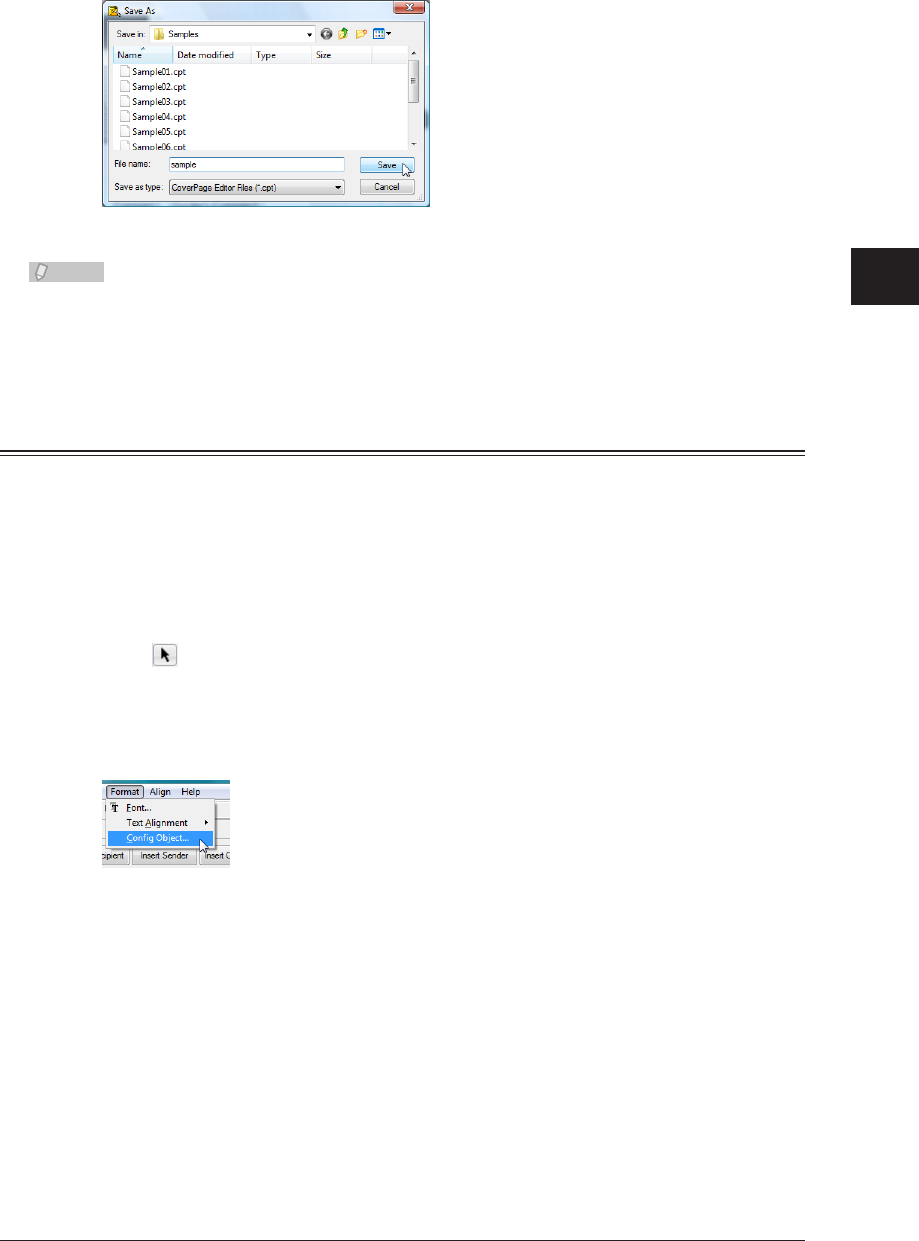
1
2
3
4
Operating Utilities
Creating Cover Pages (CoverPage Editor) 4-39
Specify the name and location to save the file, and click [Save].
2
The cover page you created is saved.
The extension of the saved file is “.cpt”.
Note
The cover pages you create must be uploaded to OfficeBridge in order to use them. •
(See page 4-47.)
You can attach an uploaded cover page to a document you transmit. • (See page 2-10.)
Specifying Object Settings
You can edit an object inserted into the editing area by cutting or pasting it, for example.
Opening “Config Object”
You can open the “Config Object” dialog box to specify the various object settings.
Click
1
(the “Select” tool), and select the object to change.
From the “Format” menu, select “Config Object”. You can also right-click the
2
object and then click “Config Object”.
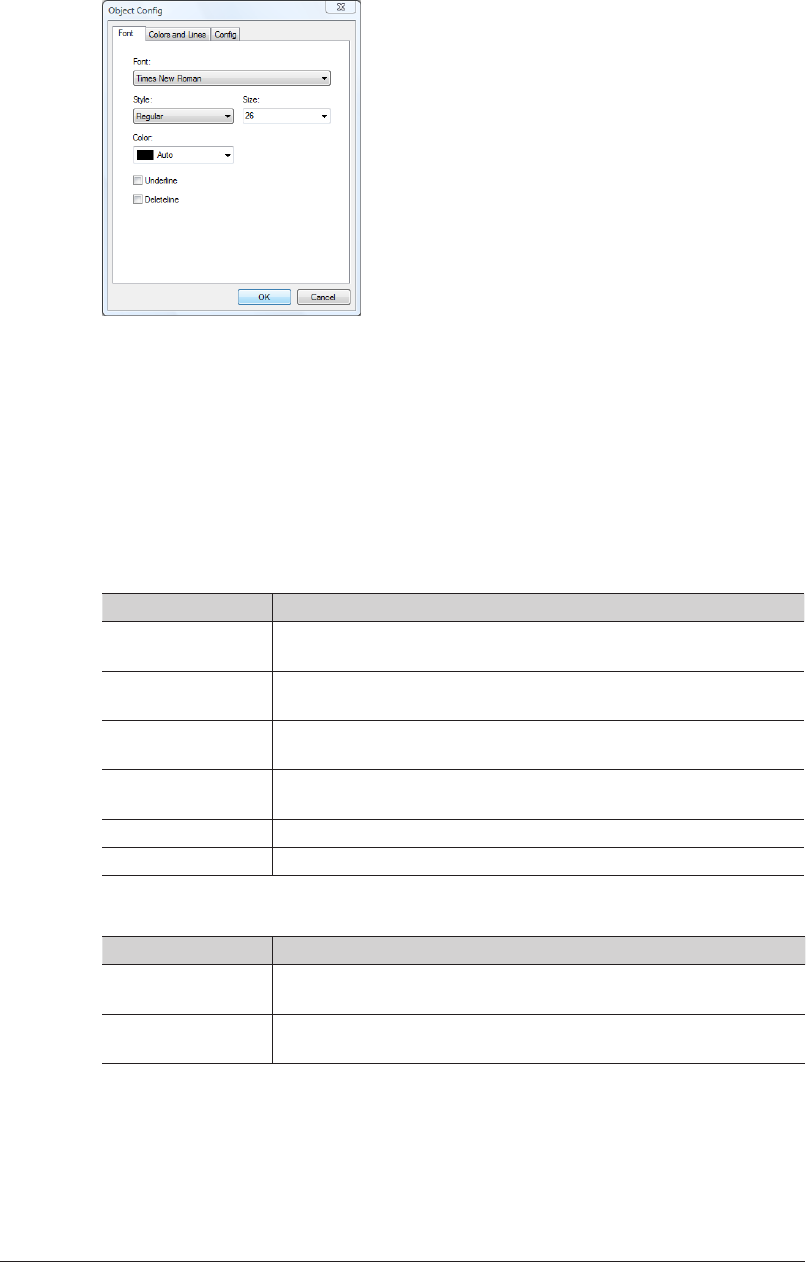
4-40 Creating Cover Pages (CoverPage Editor)
Click the tabs and specify each setting.
3
The setting items displayed depend on the selected object.
Click [OK].
4
The settings are changed.
List of Object Settings
“Font” tab
(When a text object is selected)
Setting Description
Font Set the font type for the selected text box.
Select a font from the pull-down menu.
Style Set the style of the font for the selected text box.
Select a style from the pull-down menu.
Size Set the size of the font for the selected text box.
Select a size from the pull-down menu.
Color Set the color of the font for the selected text box.
Select a color from the pull-down menu.
Underline Select this to underline the text string.
Deleteline Select this to cross out the text string.
(When an insertion object is selected)
Setting Description
V-Rate Set the vertical ratio of the font for the selected text box.
Select a ratio from the pull-down menu.
H-Rate Set the horizontal ratio of the font for the selected text box.
Select a ratio from the pull-down menu.
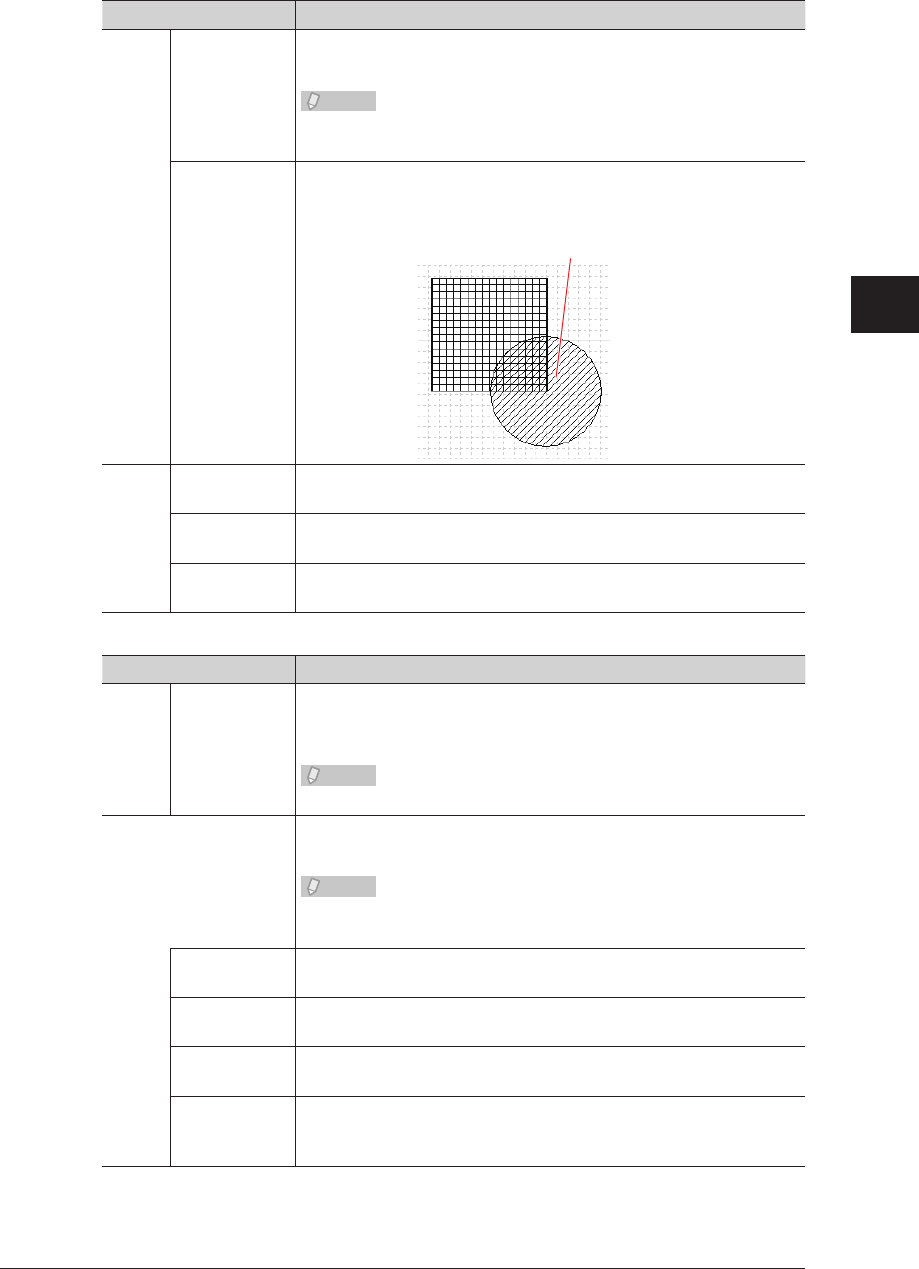
1
2
3
4
Operating Utilities
Creating Cover Pages (CoverPage Editor) 4-41
“Colors and Lines” tab
Setting Description
Fill Color Adjusts the fill color of the selected object.
Click the list button to select a color.
Note
Cannot be set when an insertion object is selected.
(Fixed to white.)
Semitransparent
Select this to make the selected object semitransparent.
<Example >
Line Color Adjusts the line color for the selected object.
Select a color from the pull-down menu.
Style Set the line type for the selected object, (“No Line”, “Solid Line”,
“Dot Line”, “Dash Line”, “DashDot Line”, or “DashDotDot Line”).
Weight Specifies the line width for the selected object.
Click adjustment buttons [] and [] to adjust the line width.
“Config” tab
Setting Description
Text Align Adjusts the alignment of the selected text box character string:
(“Right justified”, “Centered”, or “Left justified”).
Select the alignment from the pull-down menu.
Note
Cannot be set when a draw object is selected.
Order When objects are overlaying each other, selected objects will be
moved to a specified order position.
Note
Cannot be set when an insertion object is selected. (An inserted
object is always positioned at the front.)
Bring to front When selected, the selected object will be moved to the frontmost
plane of the overlaid objects.
Send to Back When selected, the selected object will be moved to the backmost
plane of the overlaid objects.
Bring Forward
X times
When selected, the selected object will be moved back the number
of specified planes. Enter the number of planes in the entry box.
Send
Backward X
times
When selected, the selected object will be moved forward the
number of specified planes. Enter the number of planes in the
entry box.
• “Bring to Front” position
• “Semitransparent” selected

4-42 Creating Cover Pages (CoverPage Editor)
Editing an Object
You can edit objects using the menu commands and tools.
Selecting, Moving, and Deleting Objects
Use (the “Select” tool) to select and move objects.
Click
1
(the “Select” tool), and select the object.
To move the object, drag it while it is selected.
2
To delete the object, click
3
(the “Delete” tool). Or, select “Delete” from the “Edit”
menu.
Note
To select multiple objects together, drag over all those objects with the left mouse •
button held down. To select any object, click the desired object while holding down
the <Shift> key.
You can select all objects by pressing the <Ctrl> + <A> keys.•
Copying, Cutting, and Pasting Objects
Click
1
(the “Select” tool), and select the object.
Perform one of the following operations to copy or cut the object.
2
To copy the object, click • (the “Copy” tool). Or, select “Copy” from the “Edit” menu. You can
also copy an object by pressing the <Ctrl> + <C> keys.
To cut the object, click • (the “Cut” tool). Or, select “Cut” from the “Edit” menu. You can also
cut an object by pressing the <Ctrl> + <X> keys.
To paste the copied or cut object, click
3
(the “Paste” tool). Or, select “Paste”
from the “Edit” menu. You can also paste an object by pressing the <Ctrl> + <V>
keys.
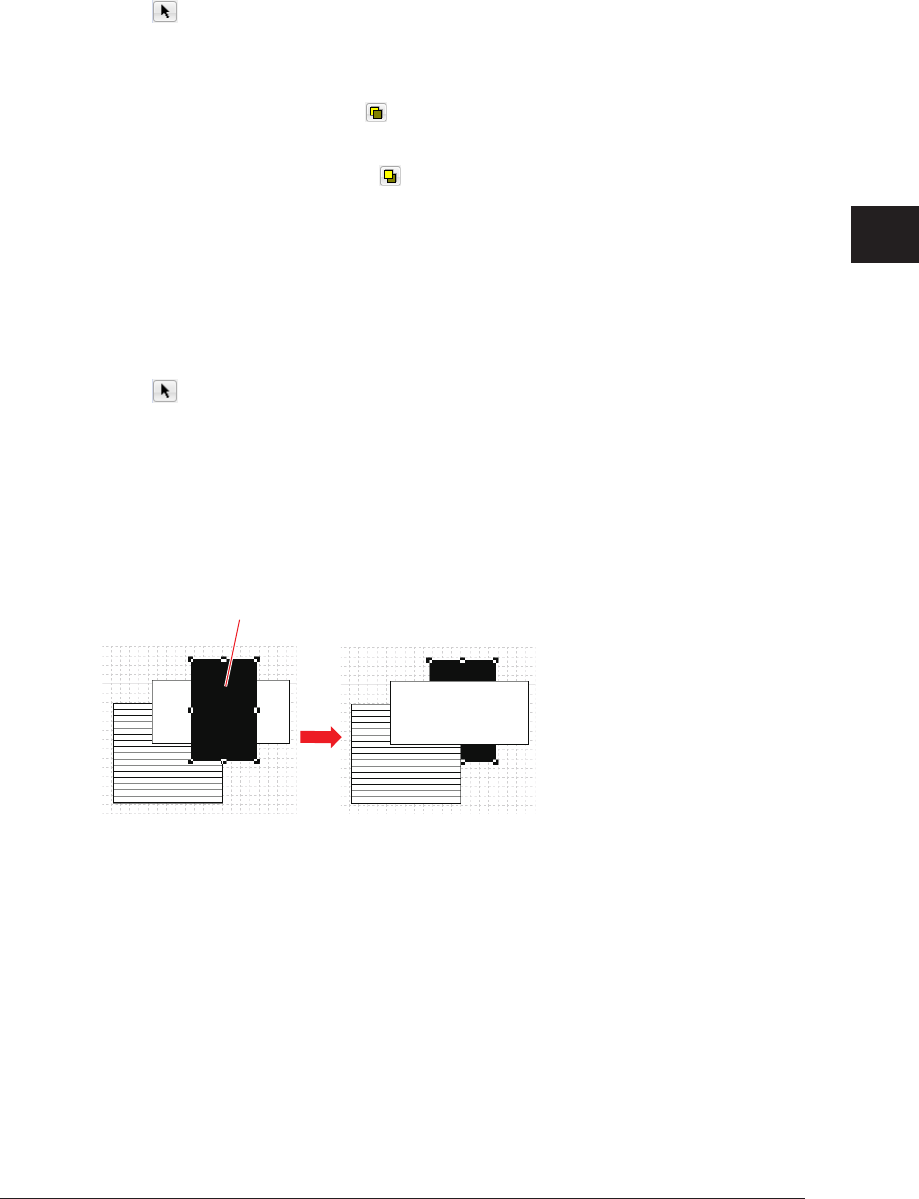
1
2
3
4
Operating Utilities
Creating Cover Pages (CoverPage Editor) 4-43
Moving an Object to Forward or Back
When objects are overlaying each other, you can move the selected object forward or
backward.
Click
1
(the “Select” tool), and select the object.
Perform one of the following operations to move the object forward or backward.
2
To move the object forward, click • (the “Bring Forward” tool). Or, select “Bring Forward”
from the “Format” menu. You can also bring an object forward by pressing the <Ctrl> + <F>
keys.
To move the object backward, click • (the “Send Backward” tool). Or, select “Send
Backward” from the “Format” menu. You can also send an object backward by pressing the
<Ctrl> + <B> keys.
Moving an Object to the Front or Back Plane
When objects are overlaying each other, you can move the selected object to the frontmost
or backmost plane.
Click
1
(the “Select” tool), and select the object.
Perform one of the following operations to move the object to the frontmost or
2
backmost plane.
Select “Bring to Front” from the “Format” menu to move the object to the frontmost plane.•
Select “Send to Back” from the “Format” menu to move the object to the backmost plane.•
<Example>
Selected object
“Send to Back” performed
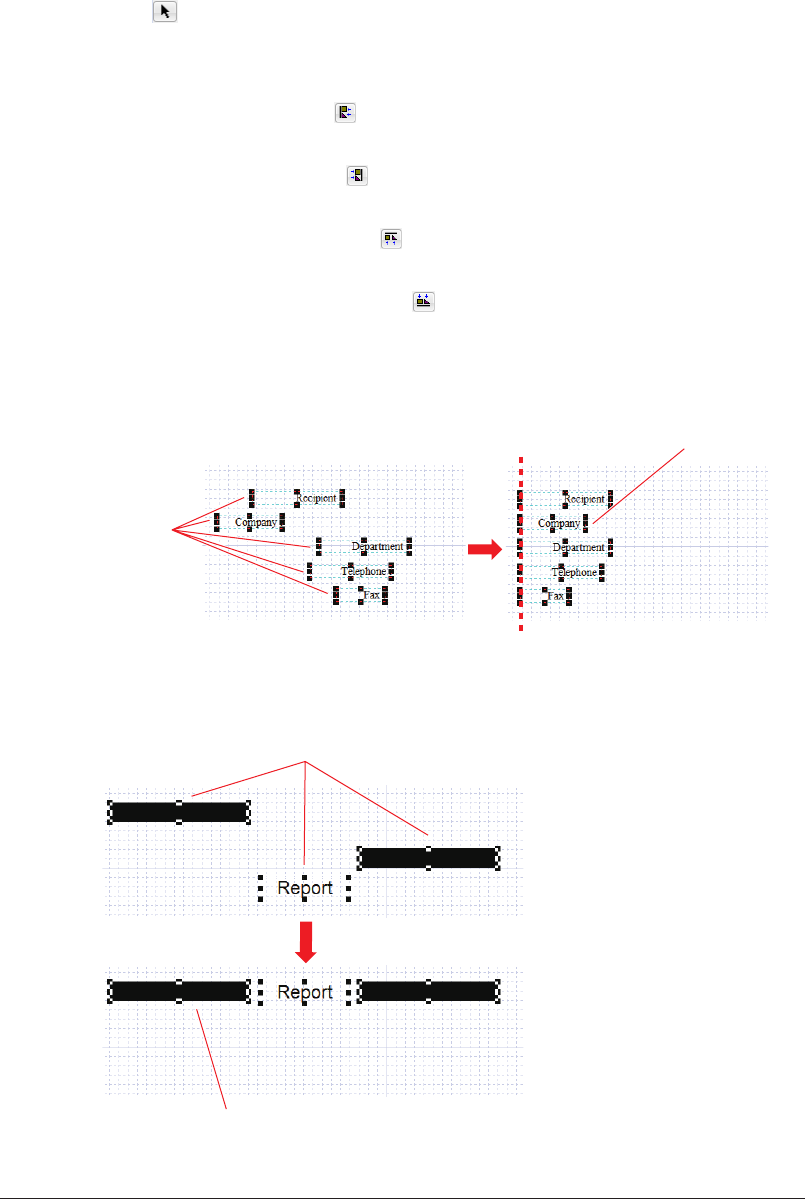
4-44 Creating Cover Pages (CoverPage Editor)
Aligning Objects
You can align multiple objects to the left, right, top, or bottom.
Click
1
(the “Select” tool), and select the object.
Perform one of the following operations.
2
To align the objects left, click • (the “Align Left” tool). Or, select “Align Objects” - “Align
Left” from the “Align” menu.
The selected objects are aligned with the left edge of the leftmost object.
To align the objects right, click • (the “Align Right” tool). Or, select “Align Objects” - “Align
Right” from the “Align” menu.
The selected objects are aligned with the left edge of the rightmost object.
To align the objects on the top, click • (the “Align Top” tool). Or, select “Align Objects” - “Align
Top” from the “Align” menu.
The selected objects are aligned with the left edge of the topmost object.
To align the objects on the bottom, click • (the “Align Bottom” tool). Or, select “Align
Objects” - “Align Bottom” from the “Align” menu.
The selected objects are aligned with the left edge of the bottommost object.
<Example>
Selected
objects
Based on the left side
of this object
“Align Left” performed
<Example>
Selected objects
Based on the top side of this object
“Align Top” performed
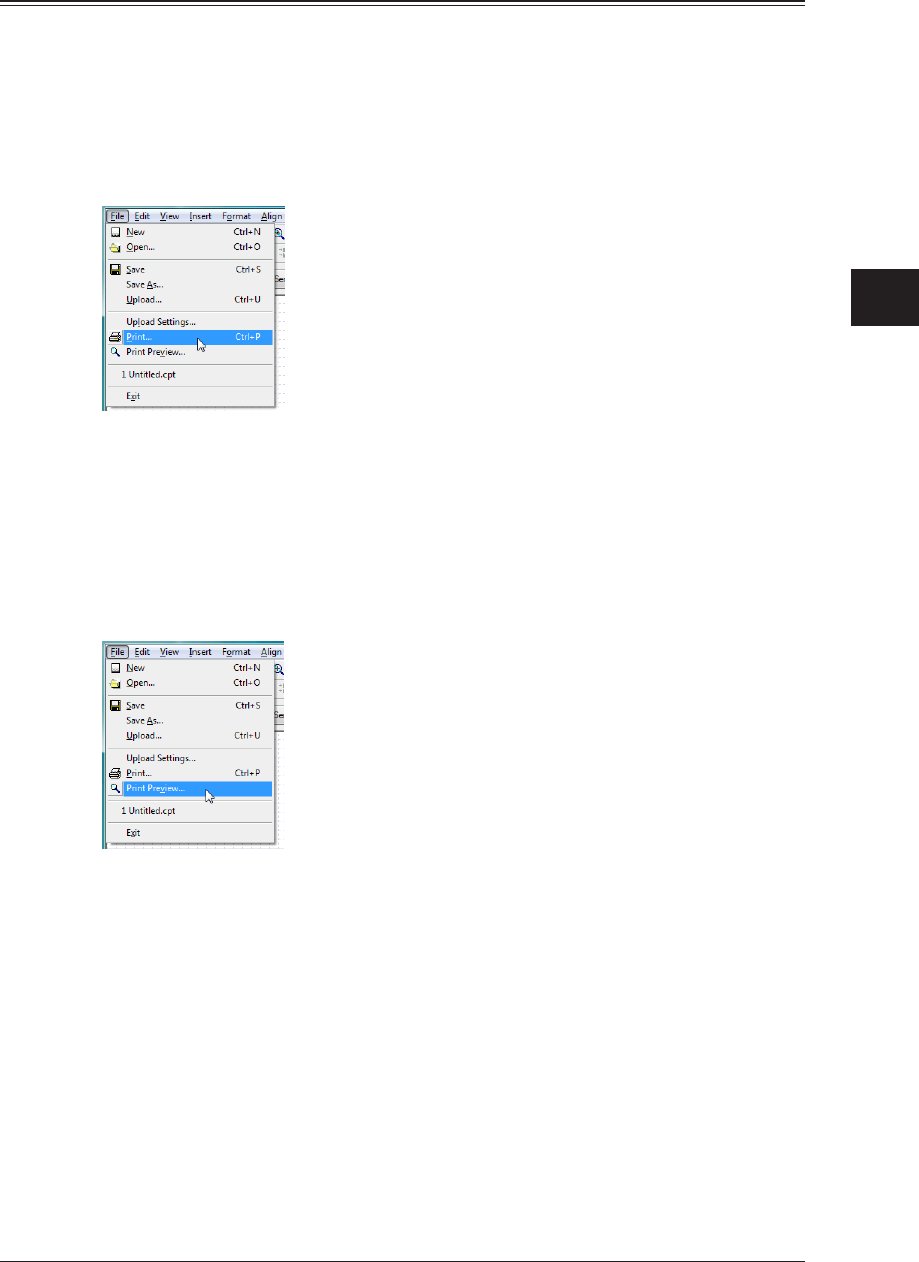
1
2
3
4
Operating Utilities
Creating Cover Pages (CoverPage Editor) 4-45
Printing a Cover Page
You can print a created cover page to check it.
You can also preview the printed state on screen.
Printing a Cover Page
Select “Print” from the “File” menu.
1
Specify the required settings in the “Print” dialog box, and click the [OK] button.
2
Printing is executed.
Checking the Print Preview a Cover Page
Select “Print Preview” from the “File” menu.
1
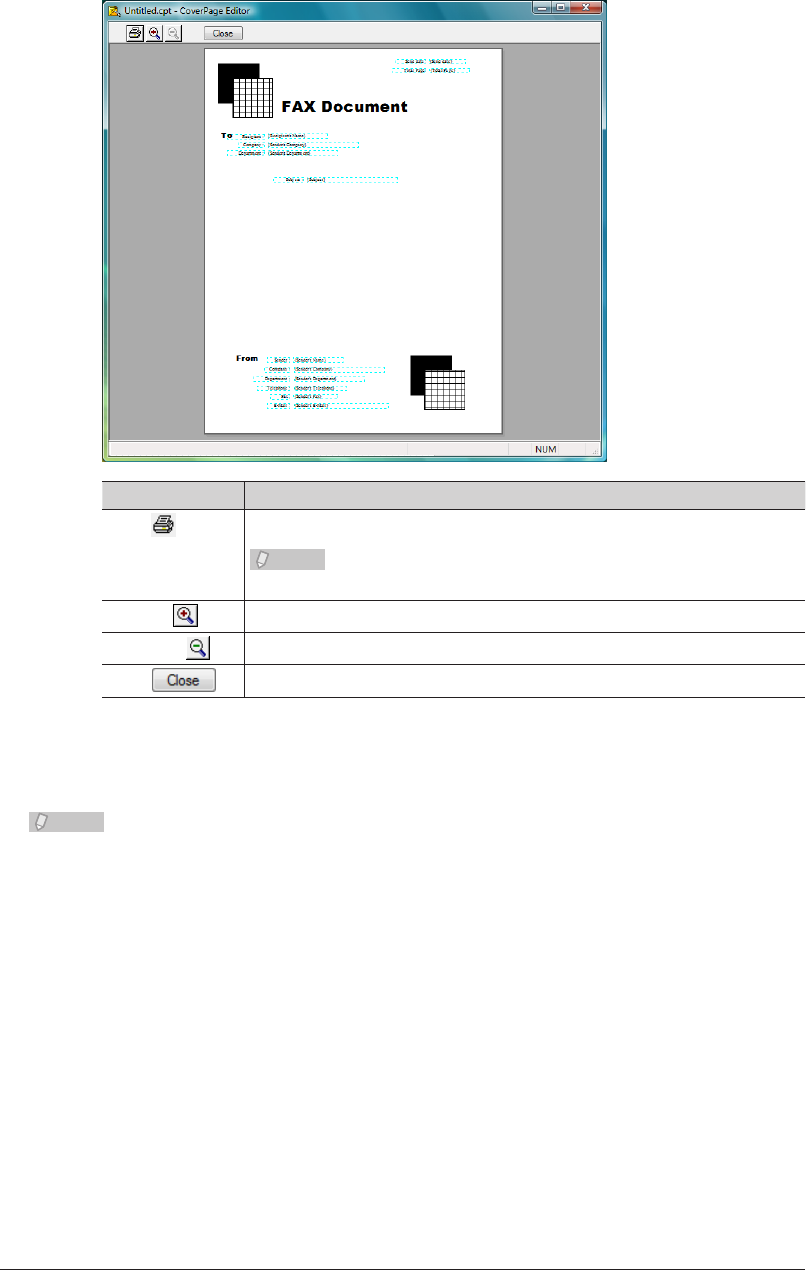
4-46 Creating Cover Pages (CoverPage Editor)
Preview screen
Item Description
Print The “Print” dialog box is displayed to print the cover page.
Note
If you execute printing, the preview screen is automatically closed.
Zoom In The preview is enlarged one level.
Zoom Out The preview is reduced one level.
Close Closes the preview screen.
Click [Close] to close the preview screen.
2
Note
There are three enlargement/reduction ratios: “Small (100%)”, “Medium (150%)”, and
“Large (200%)”.
When the preview screen is first displayed, the ratio is set to “Small (100%)”.
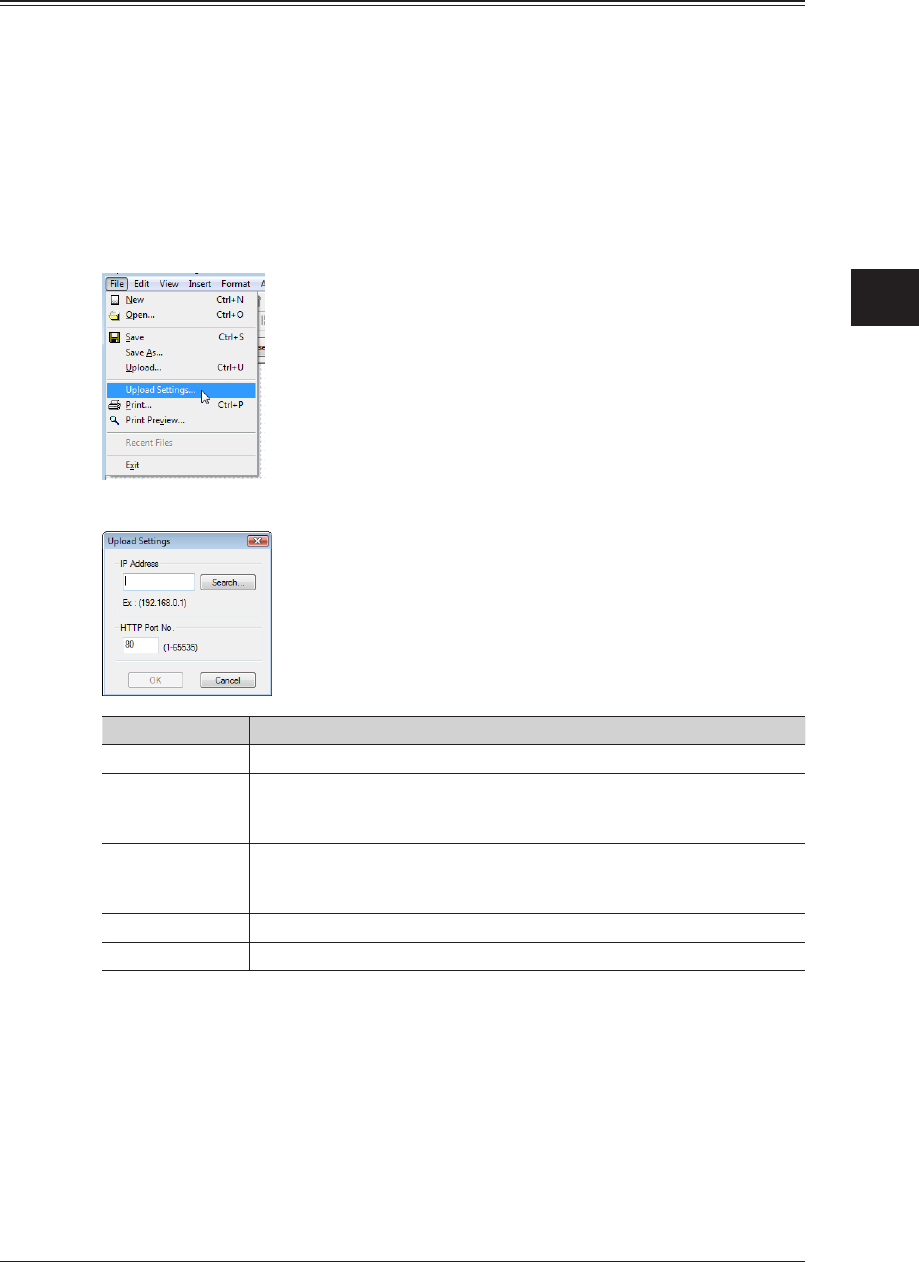
1
2
3
4
Operating Utilities
Creating Cover Pages (CoverPage Editor) 4-47
Uploading Cover Pages to OfficeBridge
You can upload created cover pages to OfficeBridge.
It is necessary to set the location of the OfficeBridge to upload to before uploading cover
pages.
Once a cover page is uploaded, you can attach it to a document for transmission.
Setting the OfficeBridge IP Address
Select “Upload Settings” from the “File” menu.
1
The “Upload Settings” dialog box is displayed.
“Upload Settings” dialog box
Setting Description
IP Address Set the IP address of the OfficeBridge to upload to.
Search Search for a OfficeBridge to upload to.
If you perform a search, a list of the search results is displayed, and you
can select a OfficeBridge.
HTTP Port No. Enter the HTTP port number of OfficeBridge. The HTTP port number is
usually “80”, but change it if the HTTP port number has been changed in
the TCP/IP settings.
OK When you click this, the current settings are saved.
Cancel When you click this, the current settings are canceled.
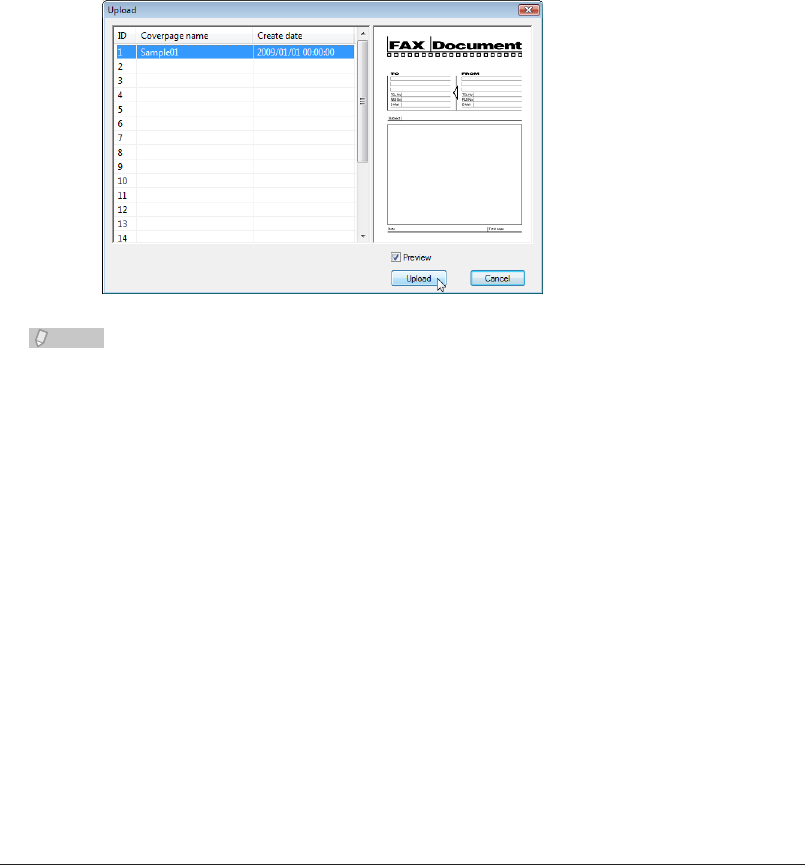
4-48 Creating Cover Pages (CoverPage Editor)
Click [OK].
2
The selected OfficeBridge is set as the location to upload the cover pages, and the “Upload
Settings” dialog box closes.
Uploading a Cover Page
Click [Store into MFP] in the “Quick Access” tools. Or, select “Upload” from the
1
“File” menu.
The “Upload” dialog box is displayed.
Select the ID to upload, and click [Upload].
2
You can upload up to 20 cover pages to OfficeBridge.•
If 20 cover pages have already been uploaded, select the ID for an unnecessary cover page •
and execute the upload (to overwrite it).
To check a cover page that has already been uploaded, select the ID for the cover page to •
check, and select “Preview”.
Note
If the IP address of the OfficeBridge is incorrect, the message “Upload fail!” is
displayed. Select “Upload Settings” and check the IP address settings.
