Users Manual
MR
MR-
-200 MANUAL
200 MANUAL
2

Contents Contents
Name of Each part
Name of Each part Front, Back 3
Top, Bottom, Left/Right 4
Basic Operation
Download File Connect to PC 5
Download File in Win2K, WinXP 6
Download File in Win98 SE
Install Win98 SE Driver Install Win98 SE Driver 7
Charging / Firmware Upgrade Charging 13
Firmware Upgrade
Reset Reset 14
Basic Operation Power On / Off 15
Volume Up / Down
Hold On / Off
Mode Mode 16
Mode Selection Type 1 17
Mode Selection Type 2 18
Music
Listening to Music Listening to Music 19
Track Forward / Track Back
Fast Forward / Rewind
Navigation Navigation 20
Play Menu Using Menu 21
Equalize 22
3D Sound 23
User EQ 24
Repeat Mode 25
Display Menu ID3 Tag 26
Language 27
Speed Menu Speed 28
Set Speed 29
File Menu File Info 30
Delete Bookmark 31
Other Functions Creating Bookmark 32
Delete File 33
Copy File 34
Repeat Section 35
Voice Record
Voice Record Voice Record 37
Voice Record Quality 38
FM Radio
Manual Mode / Preset Mode Manual Mode 39
Preset Mode
Select Manual Preset Mode 40
FM Band FM Band 41
Manual Mode FM Step 42
Selecting Station Manually 43
CH Auto Scan
CH Auto Save 44
CH Auto Scan – Set Sensitivity
Saving CH Saving CH 45
Preset Menu CH List 46
CH Delete Type 1 47
CH Delete Type 2
FM Radio Record FM Radio Record 48
Line in Record
Line in Record Line in Record 49
Quality 50
CD Sync 51
Jpeg View
Jpeg View File Information 52
Seeing Image 53
Seeing Motion Picture 54
System Manager
Control Menu Memory 55
Version 56
Format 57
Screen Saver 58
Reset 59
LCD Color 60
Timer Menu Power Save 61
Sleep 62
12
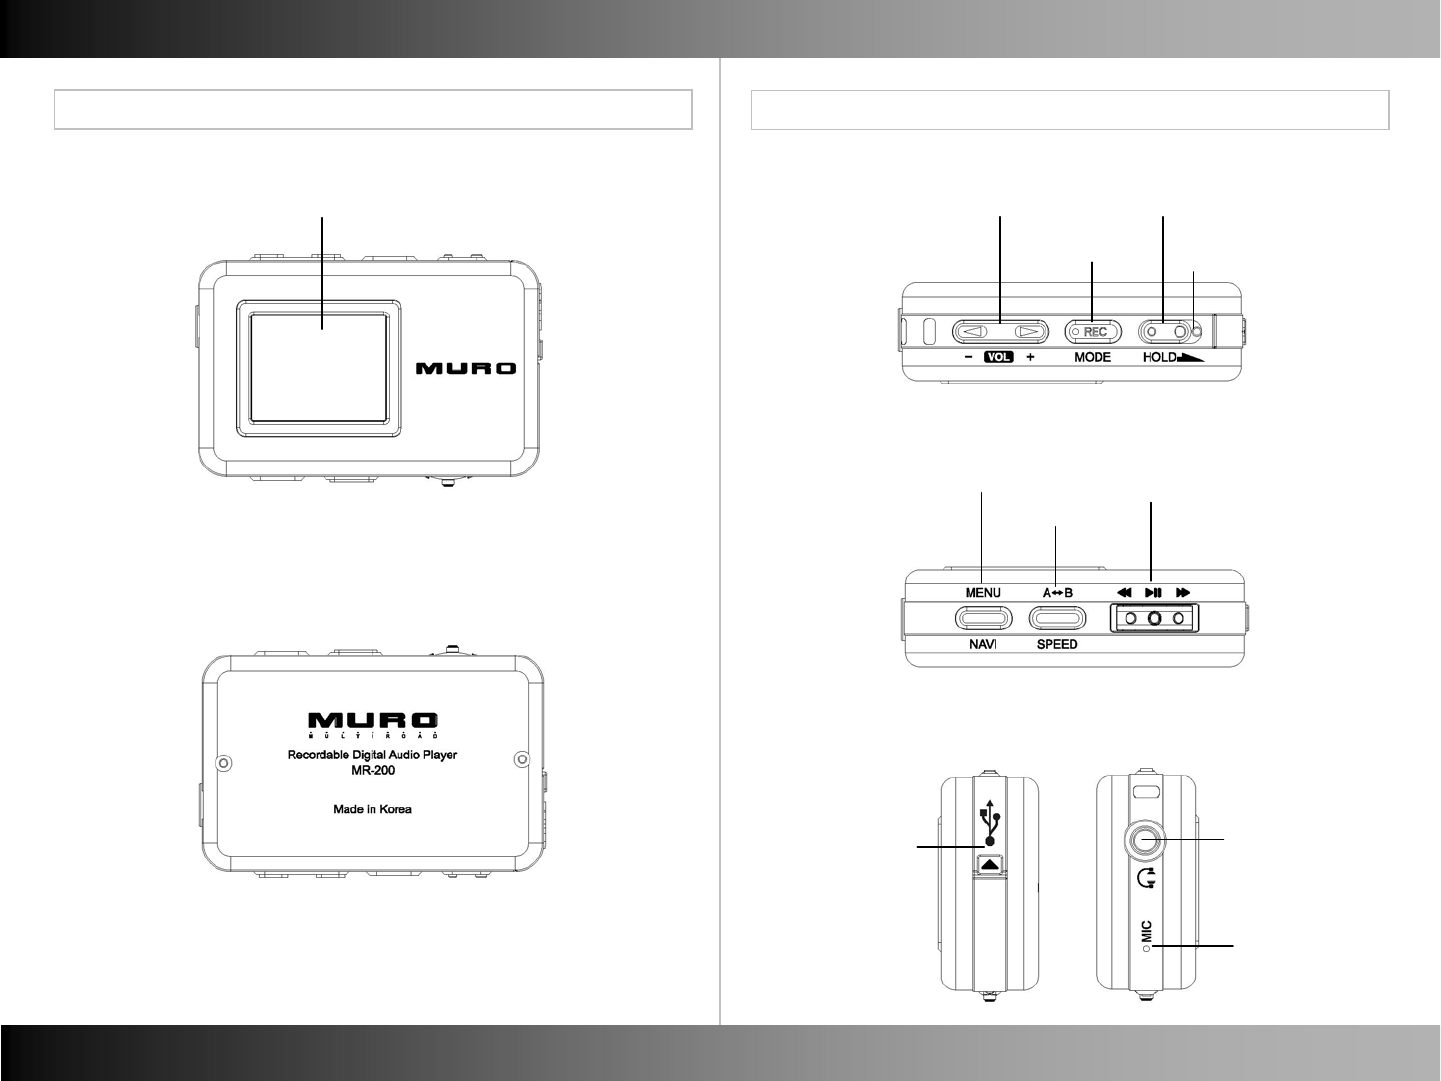
Name of Each Part Name of Each part
Name of Each part Name of Each part
LCD Display
■Front ■Top
■ Bottom
■Back
■Left / Right
4
3
Volume Up / Down
REC / Mode
Hold
Reset
Menu / Navi
A-B / Speed
REW(◀◀)
Play/Pause (▶II)
FF(▶▶)
USB Connect
Earphone Jack /
Line in Jack
Connect
MIC Hole

Basic Operation Basic Operation
Download File Download File
■Connect to PC ■ Download File in Win2K, WinXP, MAC.
6
5
- Connect player to PC with USB Cable.
- The player can be recognized as a removable disk.
- Copy the files you want to download in your PC
and paste them in the removable disk.
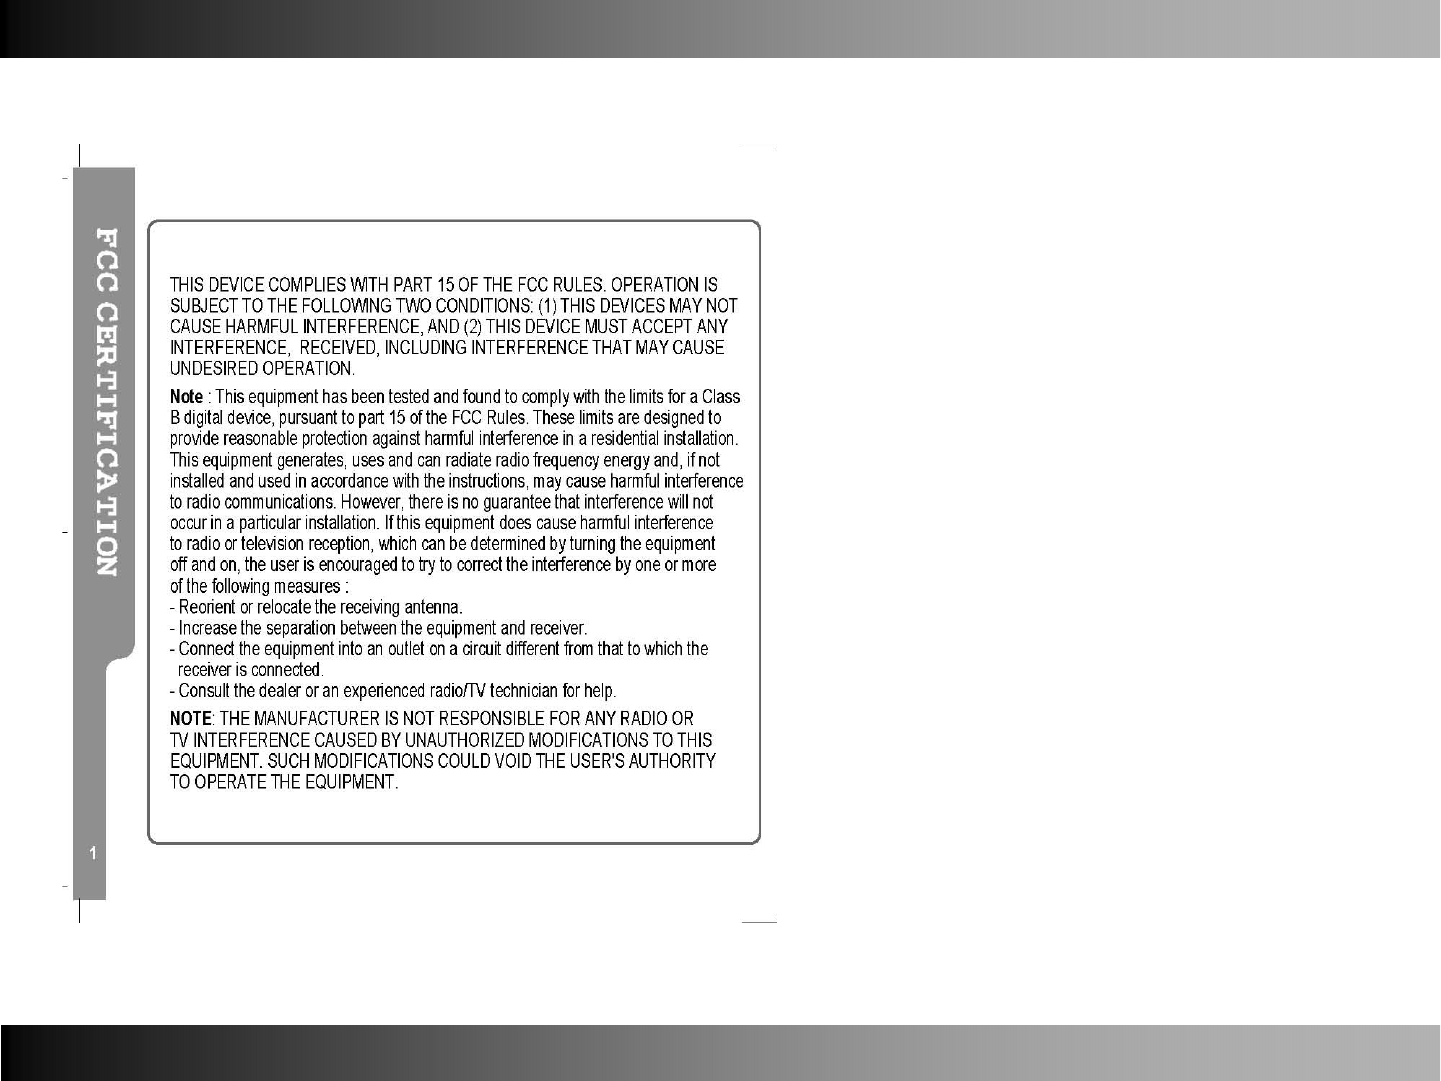
- If your PC window system is Window98 SE, please install MR-200
Installer in your PC.
Installer program is contained in the bundled CD.
■ Download File in Window98 SE
MR-200
Basic Operation Basic Operation
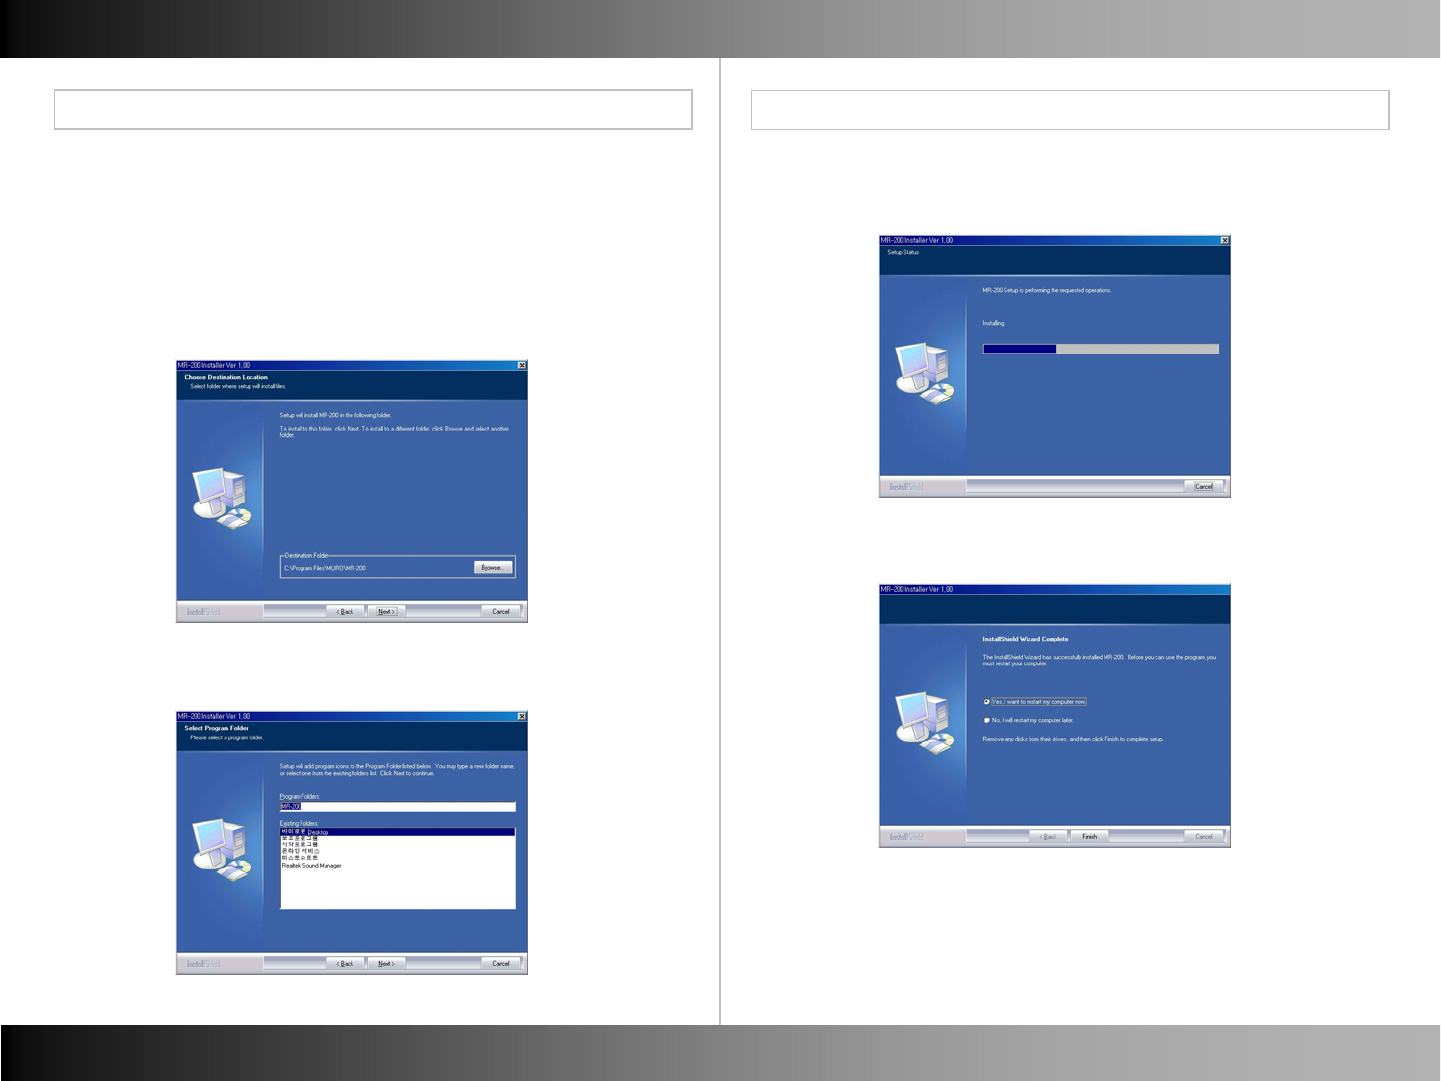
Install Win98 SE Driver Install Win98 SE Driver
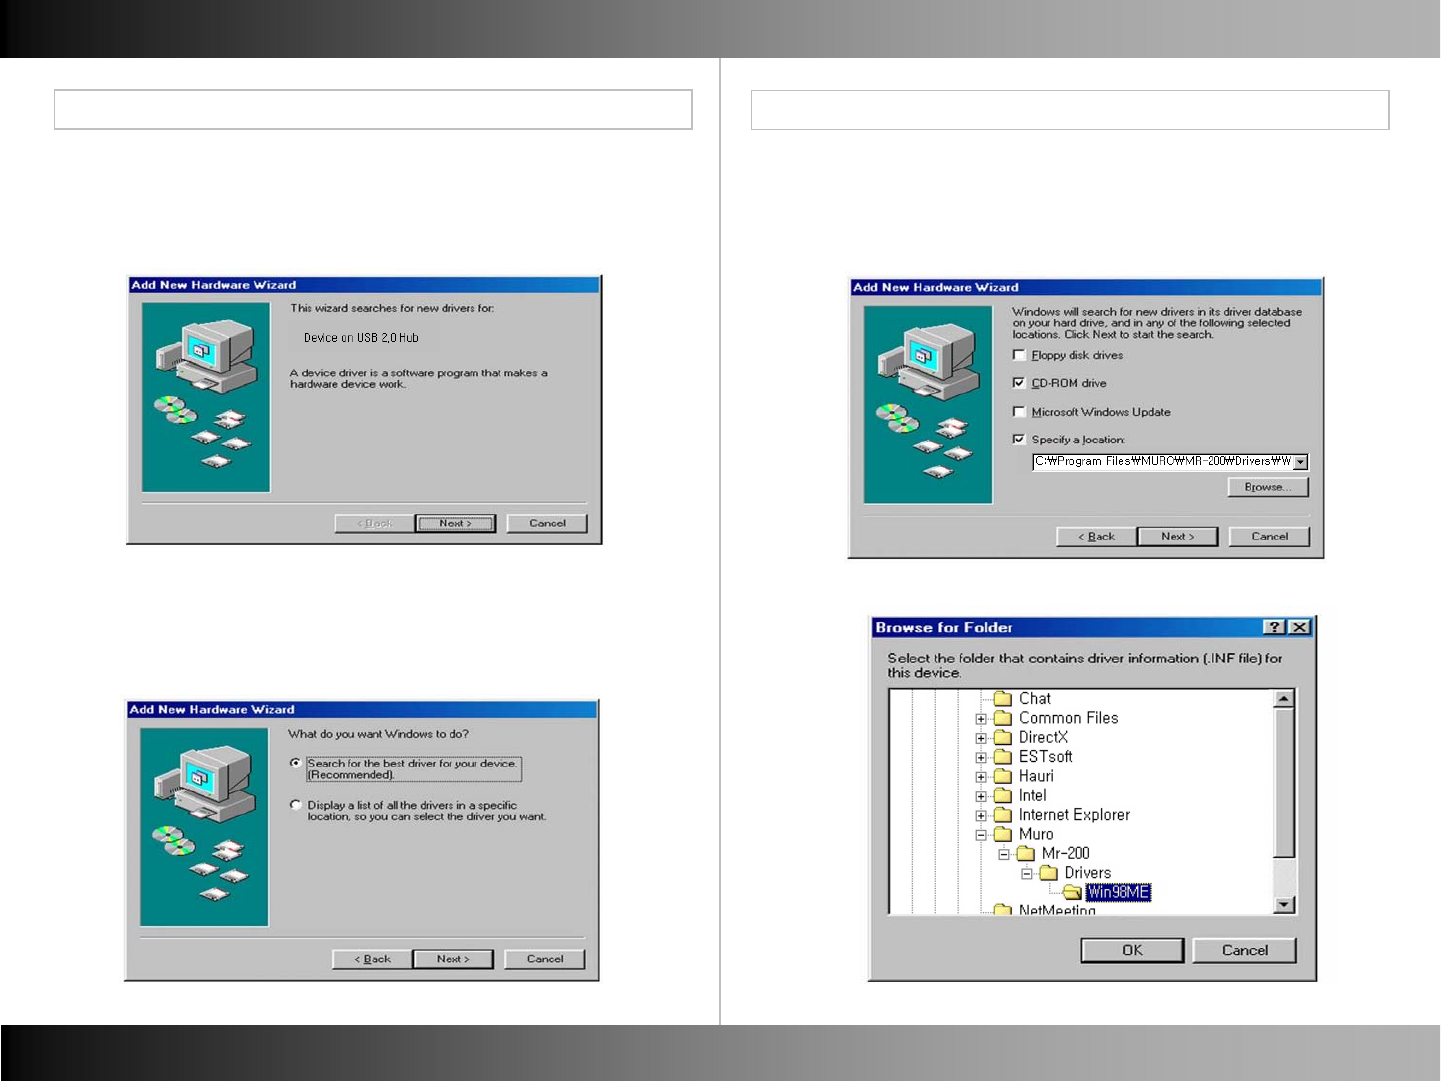
■ Install Win98 SE driver No.1
8
7
- Put the bundled CD in your PC. The CD is executed automatically.
- Choose Win98 SE driver by double click.
- The below image appears and starts install.
- Click “Next”.
- Driver Installs.
- Click “Next”.
- Choose “Yes” and click “Finish”.
- Your PC will re-boot.
- After re-booting, connect the player to PC with USB.
■ Install Win98 driver No.2
Basic Operation Basic Operation
Install Win98 SE Driver Install Win98 SE Driver
10
9
-After re-booting connect player to PC with USB.
-The below window appears, and click “Next”.
- The below window is for the choice for the driver searching way.
- Choose the first one and Click “Next”.
- Choose “designation of the location to be searched” and
click “Search”.
■ Install Win98 SE driver No.3 ■ Install Win98 driver No.4
Basic Operation Basic Operation
Install Win98 SE Driver Install Win98 SE Driver
■ Install Win98 driver
12
11
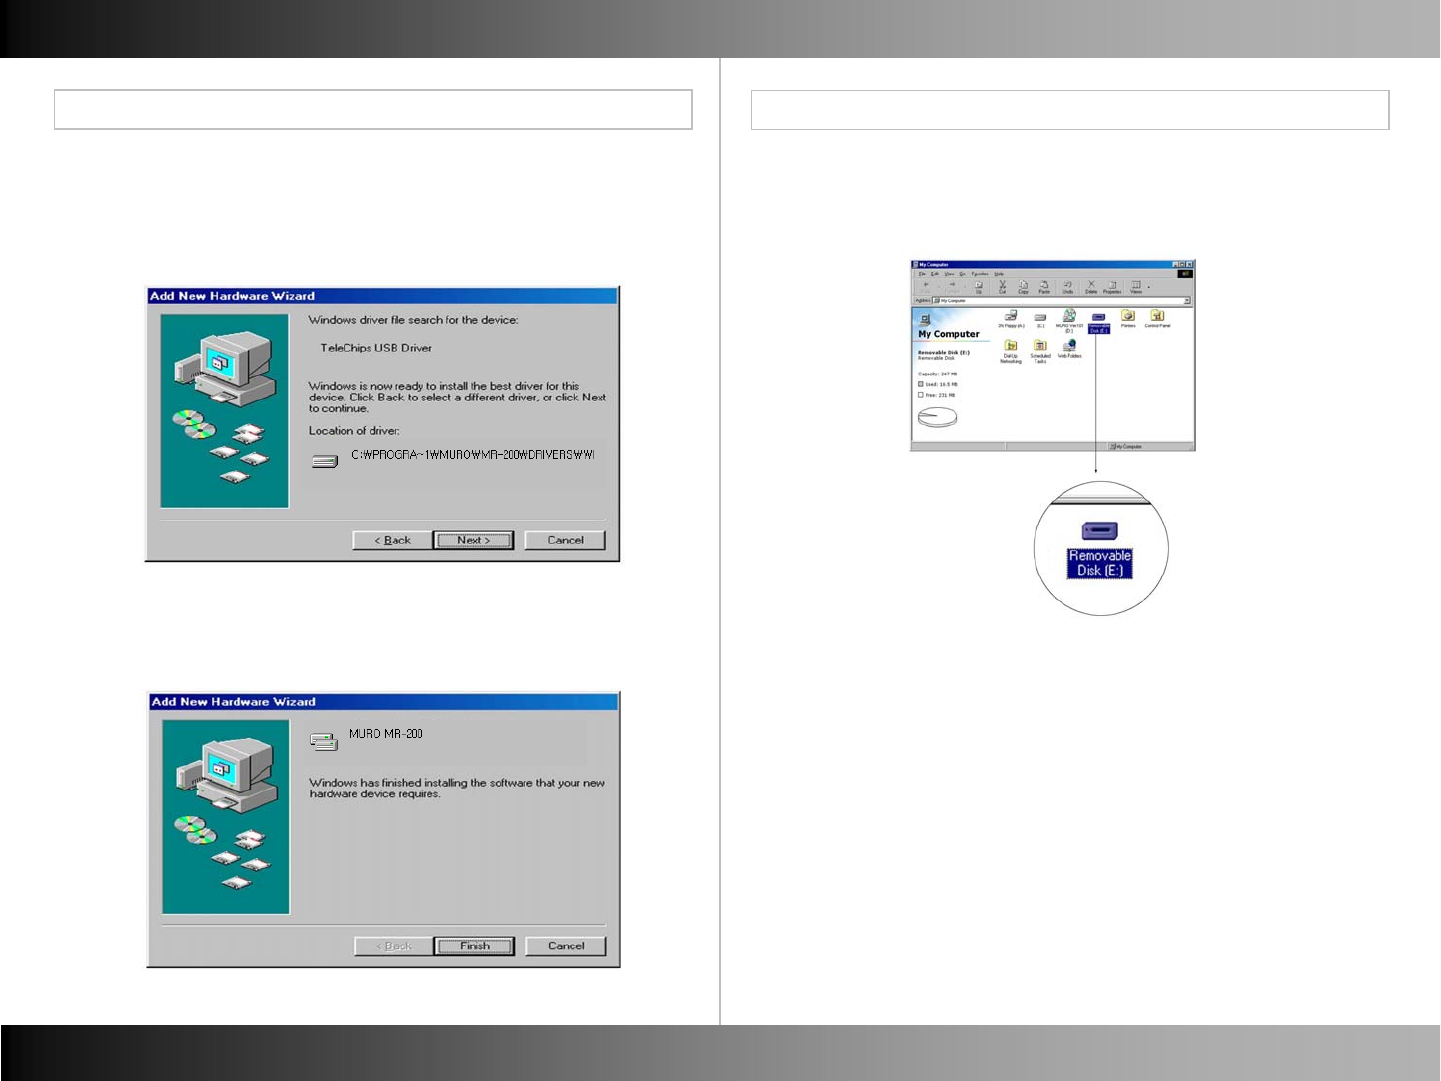
- As you can see the below, the dialogue box appears to tell you
that the driver has been located.
- Start the driver installation by clicking “Next”.
- You will see the dialogue box which says that the driver has been
properly set up.
- Click “Finish” and end the driver installation.
■ Install Win98 SE driver No.5
- The player can be recognized as a removable disk.
Basic Operation Basic Operation
Charging / Firmware Upgrade Reset
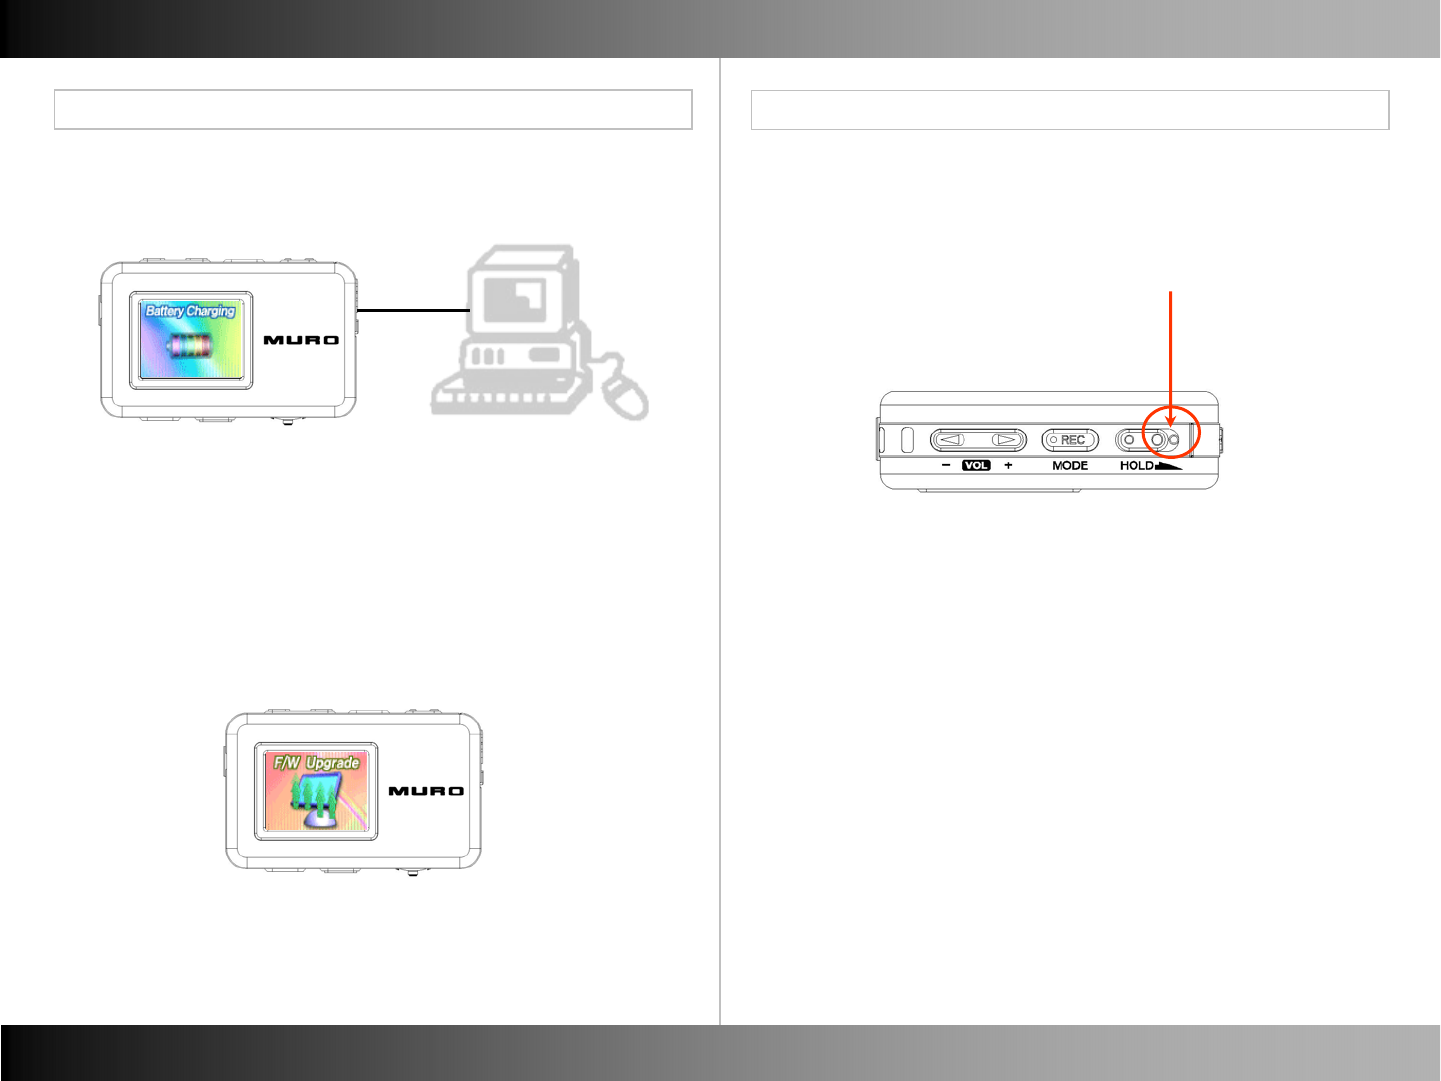
■Charging
■Firmware Upgrade
14
13
- The player can be charged when it is connected to PC.
- Download the newest firmware file to player and remove the
USB Cable and power on. Automatically firmware upgrade starts.
■Reset
- You can reset the player if it has on some error status.
Pock reset point with some pointed thing and power on again.
Basic Operation Basic Operation
■ Power On / Off
■ Hold On / Off
Basic Operation Mode
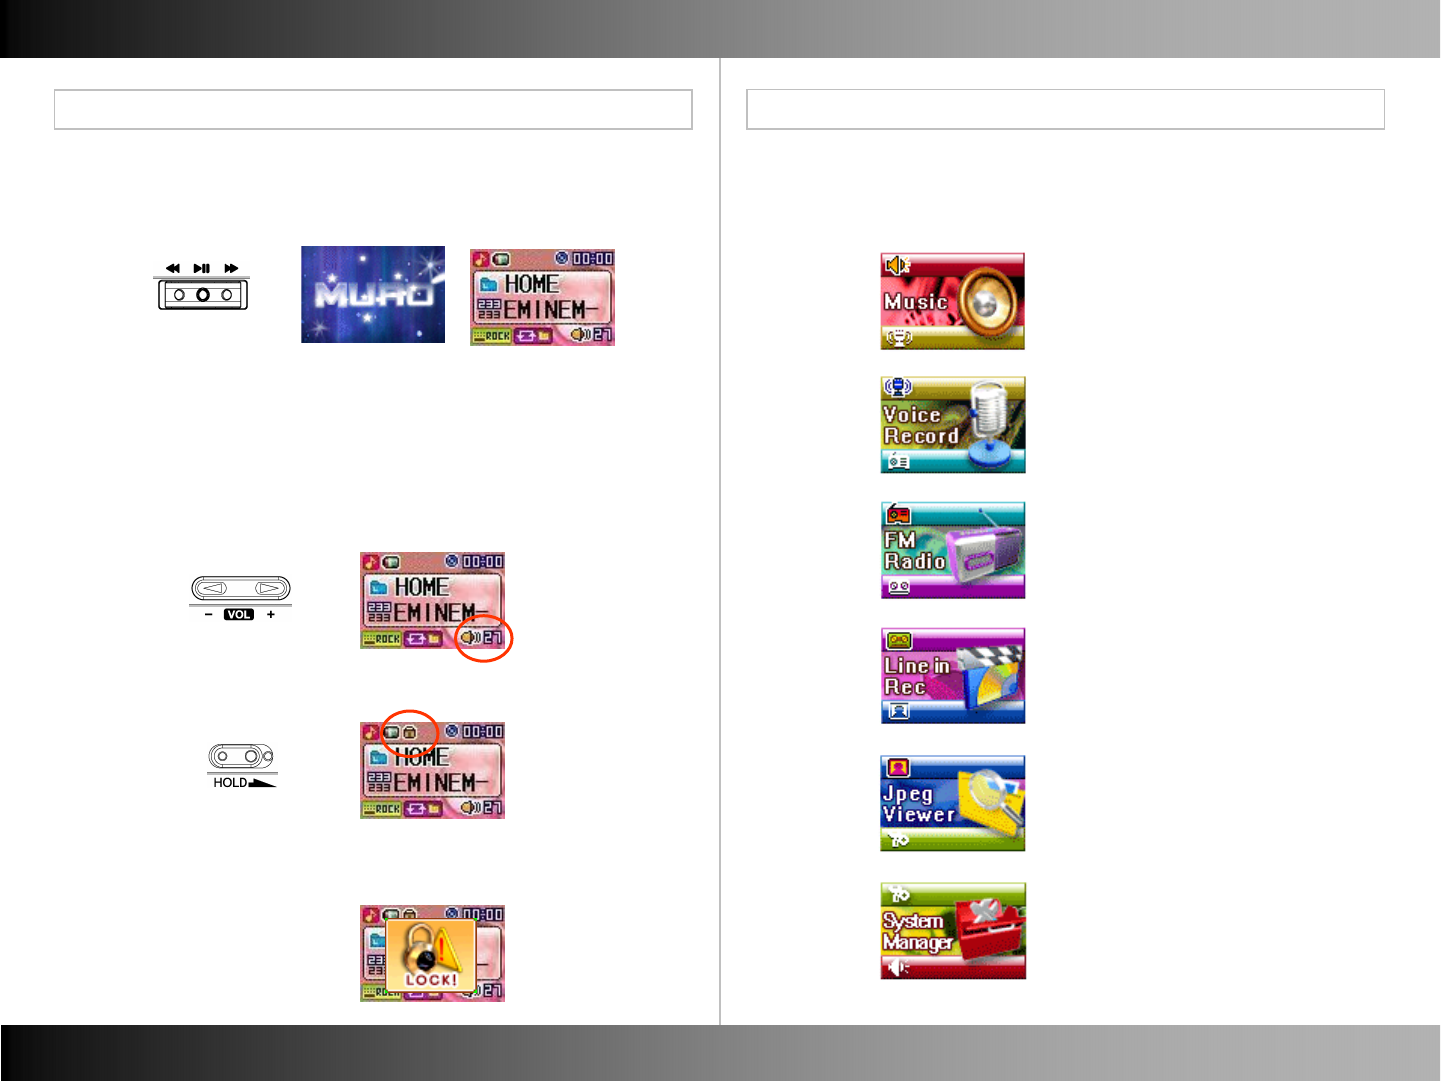
■ Volume Up / Down
-Hold down (▶II) to Power On / Off.
- Push Vol.(◀)/(▶) to set Volume.
- Volume range is 0 ~ 40.
←Hold Off
→Hold On
- If you set “Hold On”, Lock icon will be displayed
if any button is pressed.
■ Mode
- This product have 6 kinds of Mode as the below.
-Music Mode
- Line in Record Mode
- FM Radio Mode
-Voice Record Mode
- Jpeg Viewer Mode
-System Manager Mode
15 16
Basic Operation Basic Operation
■ Mode Selection Type 1 ■ Mode Selection Type 2
Mode Mode
- Click (▶II) to enter the selected Mode.
- You can change to Mode which you want to move to.
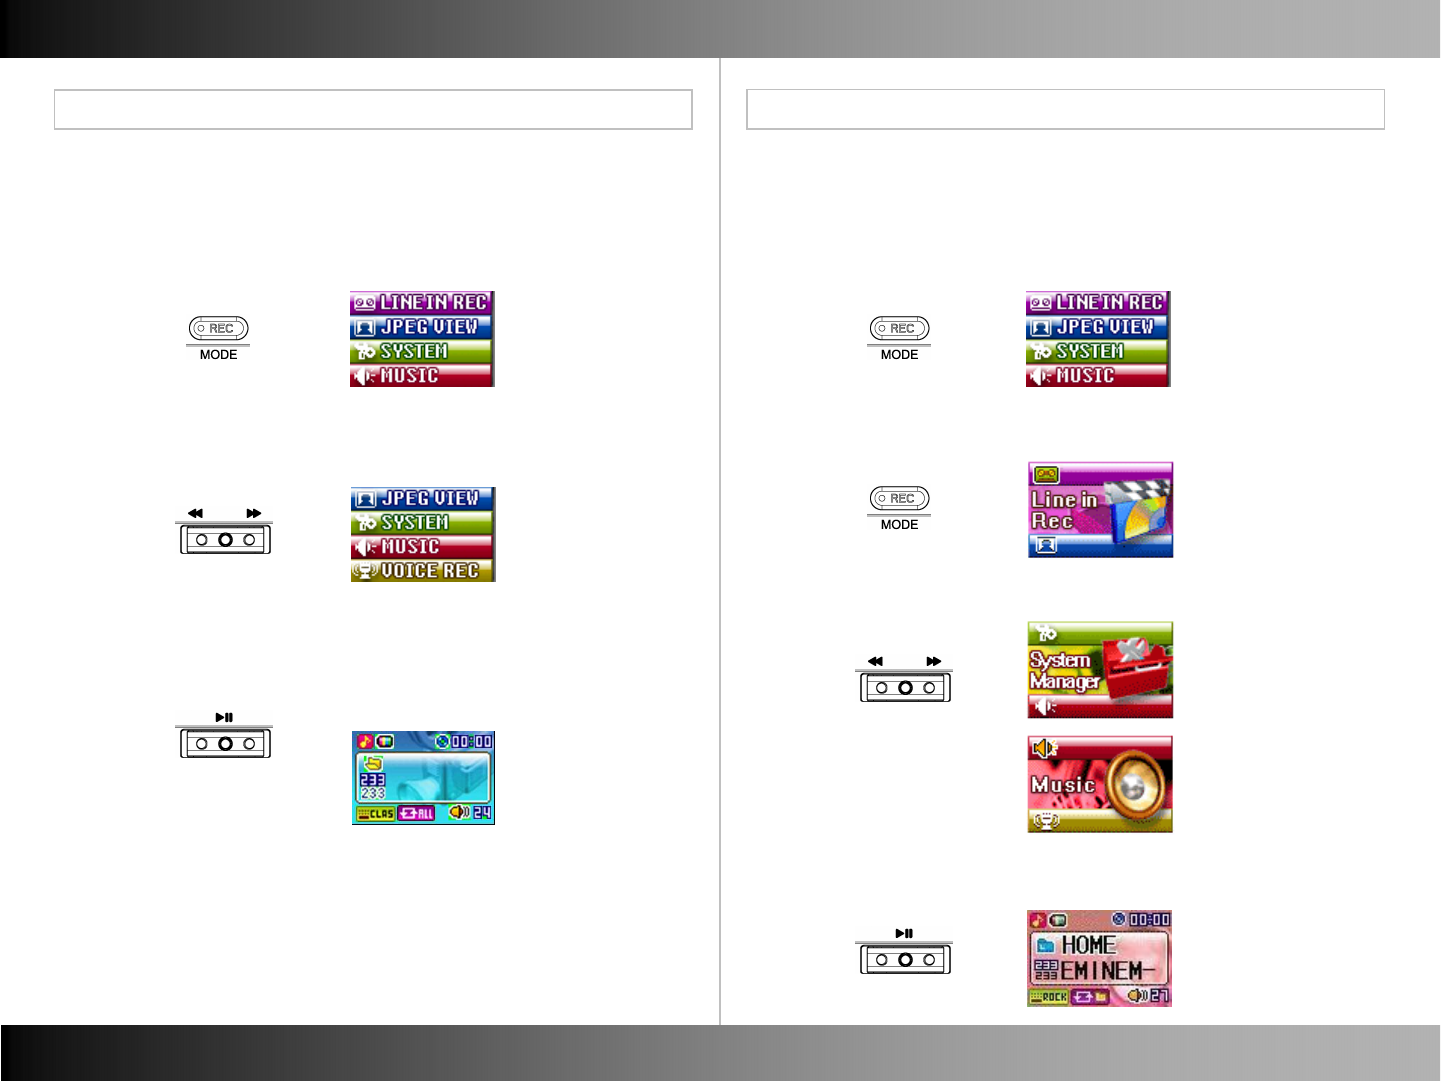
- Hold down (MODE) and Mode Selection Menu displays.
- Push REW(◀◀)/FF(▶▶) and to select Mode. - Click (MODE) and the current Mode image displays.
- Push REW(◀◀)/FF(▶▶) to shift by every Mode.
- Click (▶II) and you can enter the selected Mode.
- The below is another way of Mode Selection.
- Hold down (MODE) and the current Mode image displays.
17 18
Image
Flower
Music Music
■ Listening to Music ■Navigation
Listening to Music Navigation
■ Track Forward / Track Back
■Fast Forward / Rewind
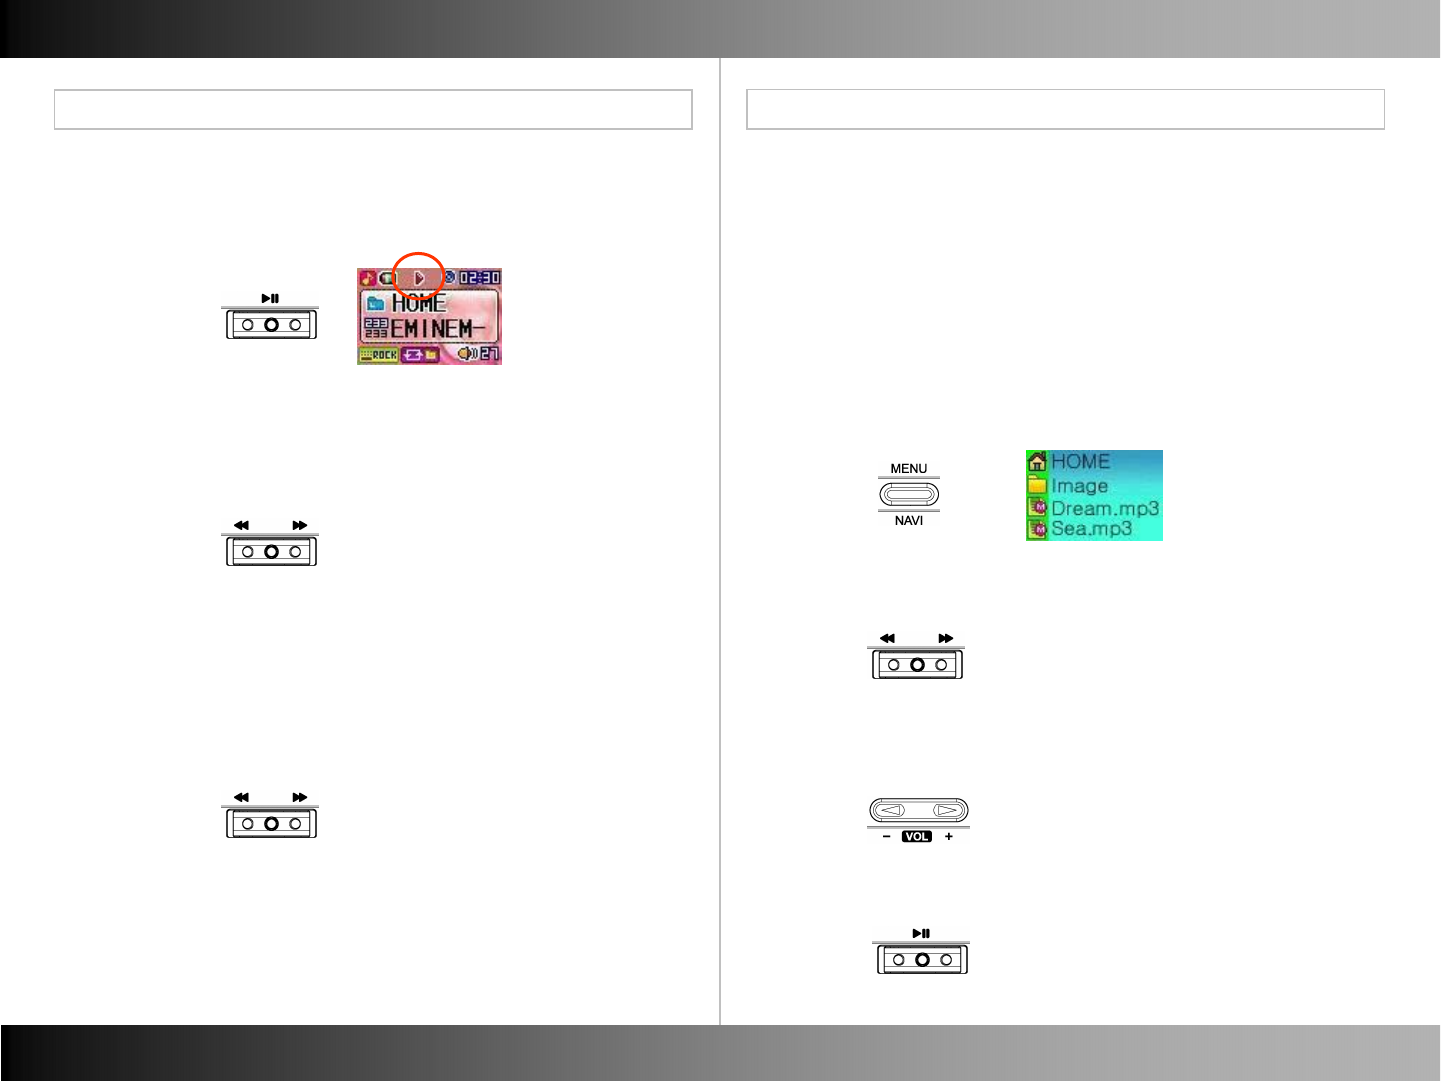
- Click (▶II) to start music playback.
- Default Music folder is set to Home.
- Push REW(◀)/FF(▶) to move to previous or next by one file.
-Hold down REW(◀◀)/FF(▶▶) in play file.
-Navigate within the music file that is being played.
- Hold down (NAVI) in Music Mode to enter Navigation Mode.
- The highest file on the folder which the music being played is
located should be selected.
- In the music mode, just “mp3, wma, ogg” file are displayed.
- In the Viewer mode, just “mp4, jpg” file are displayed.
- Push REW(◀◀)/FF(▶▶) to search file or folder.
- Push Vol.(◀)/(▶) to move to Upper Folder lever or Sub-Folder Level.
- Click (▶II) to play the selected song.
19 20
Music Music
■Using Menu ■Equalizer
Play Menu
Play Menu
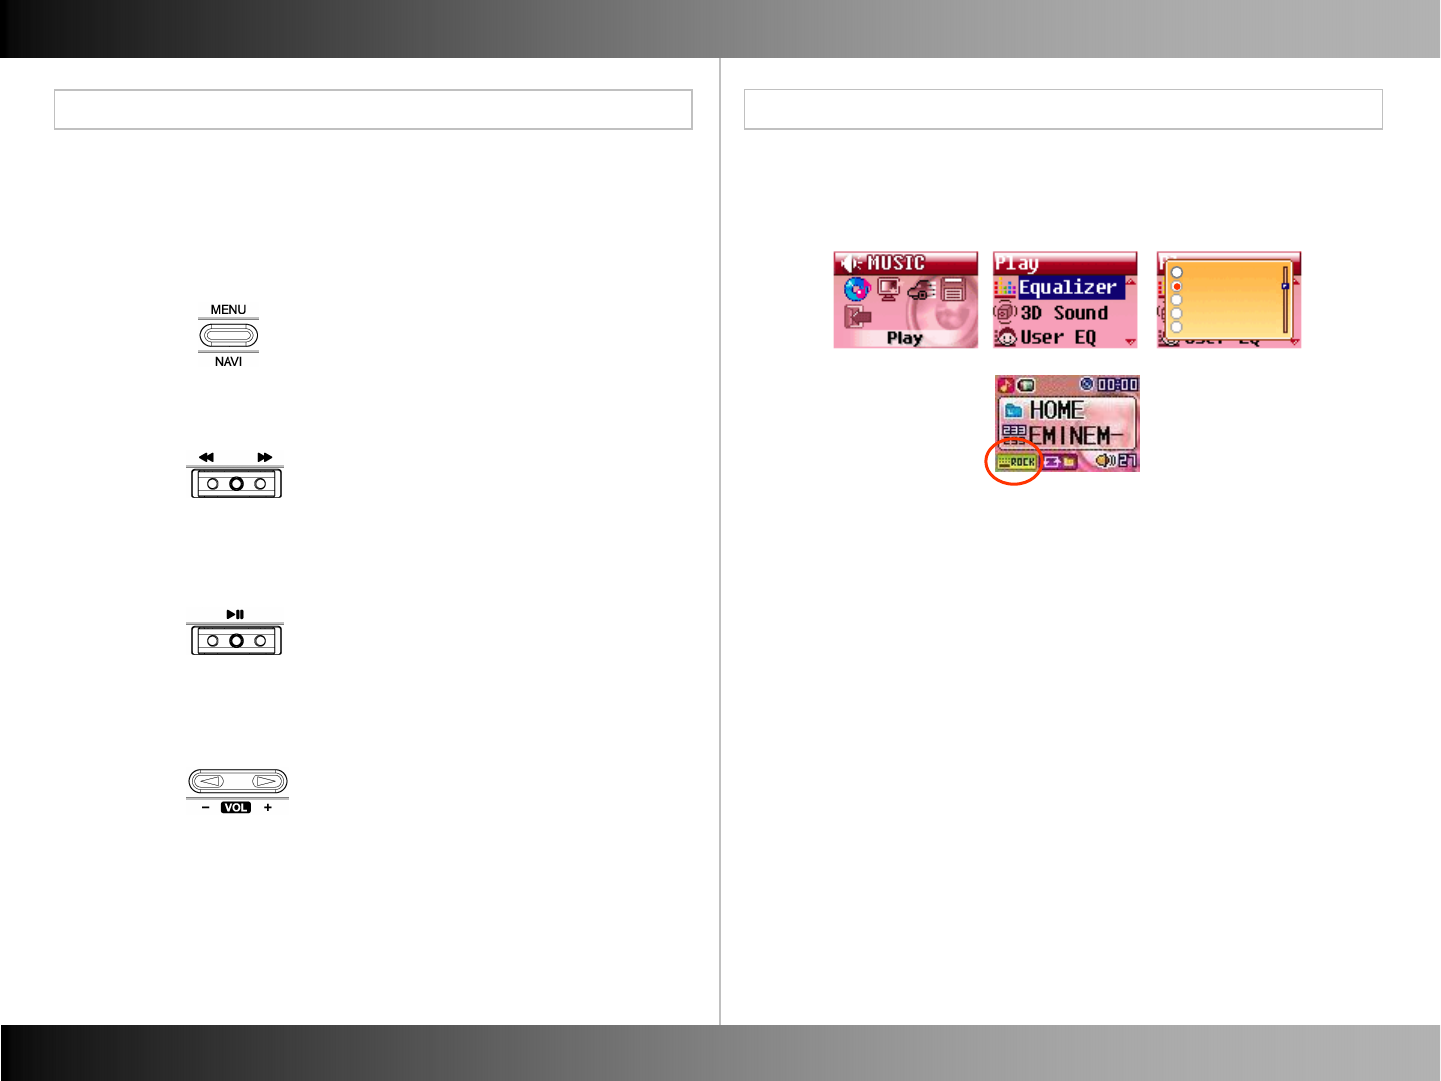
- Menu is for the detail setting for user in each Mode.
- Click (MENU) in each Mode to enter Menu mode.
- Push Vol.(-) to move the previous step.
- Push REW(◀◀)/FF(▶▶) to search the selection which you want.
- Click (▶II) to set complete.
- Normal, Rock, Jazz, Classical, Pop, User EQ.
Normal
Rock
Jazz
Classical
Pop
21 22
Music Music
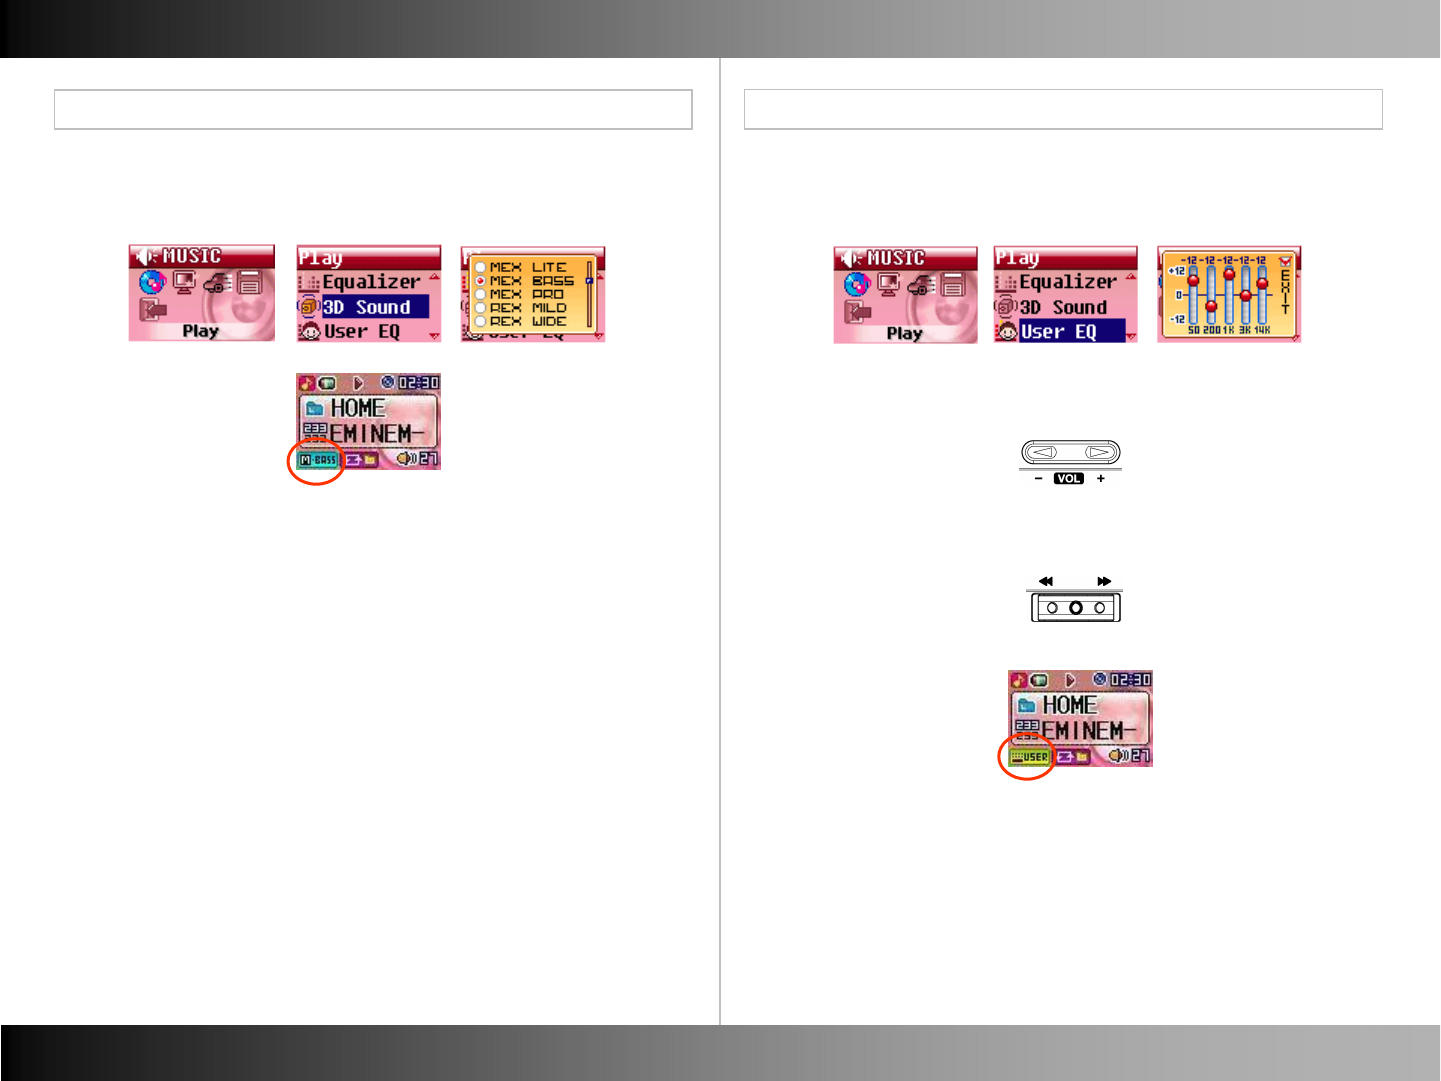
■3D Sound ■User EQ
Play Menu Play Menu
- Mex Lite, Mex Bass, Mex Pro, Rex Mild, Rex Wide, Rex Live - 50, 200, 1K, 3K, 14K
- Push Vol.(◀)/(▶) to move between each level.
- Push REW(◀◀)/FF(▶▶) to adjust level height.
23 24
Music Music
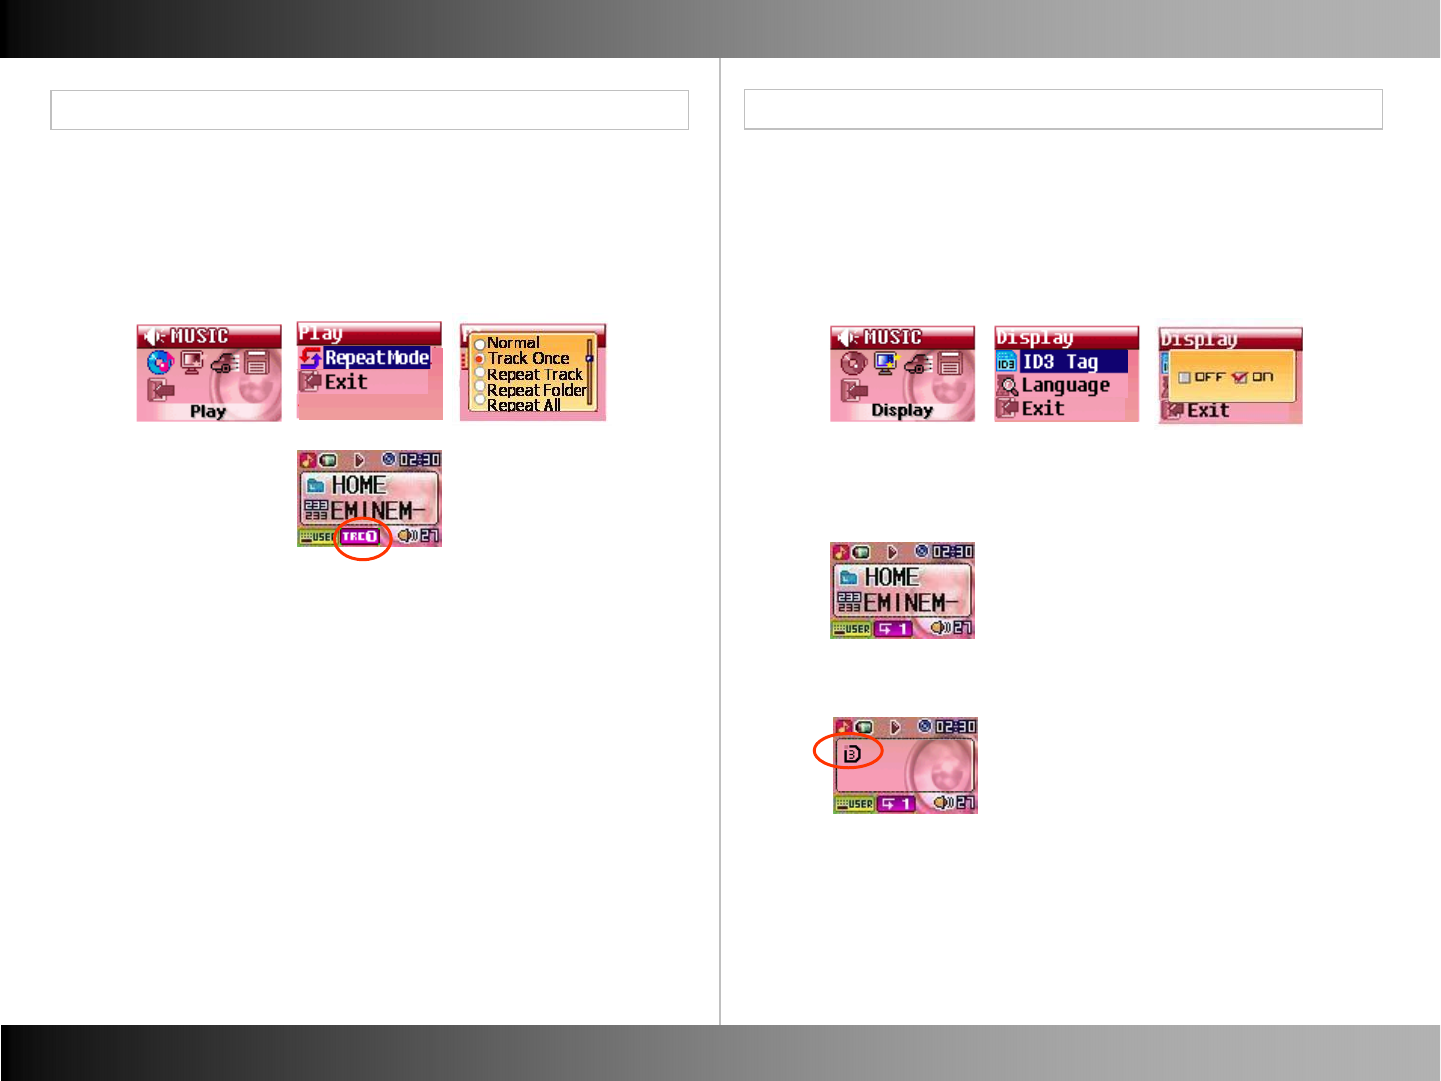
■ Repeat Mode ■ID3 Tag
Display Menu
Play Menu
- Normal, Track Once, Repeat Track, Repeat Folder, Repeat All,
Shuffle Once, Shuffle Folder, Shuffle Repeat,
Intro, B-Mark, B-Mark Repeat
- You can turn ID3 Tag display on or off.
- If you set ID3 Tag on, the name of Artist and Song display.
25 26
* ID3 Tag OFF
* ID3 Tag ON : ID3 Information displays as the below type.
File Name - [Artist Name] - [Song Name]
Speed Menu
Music Music
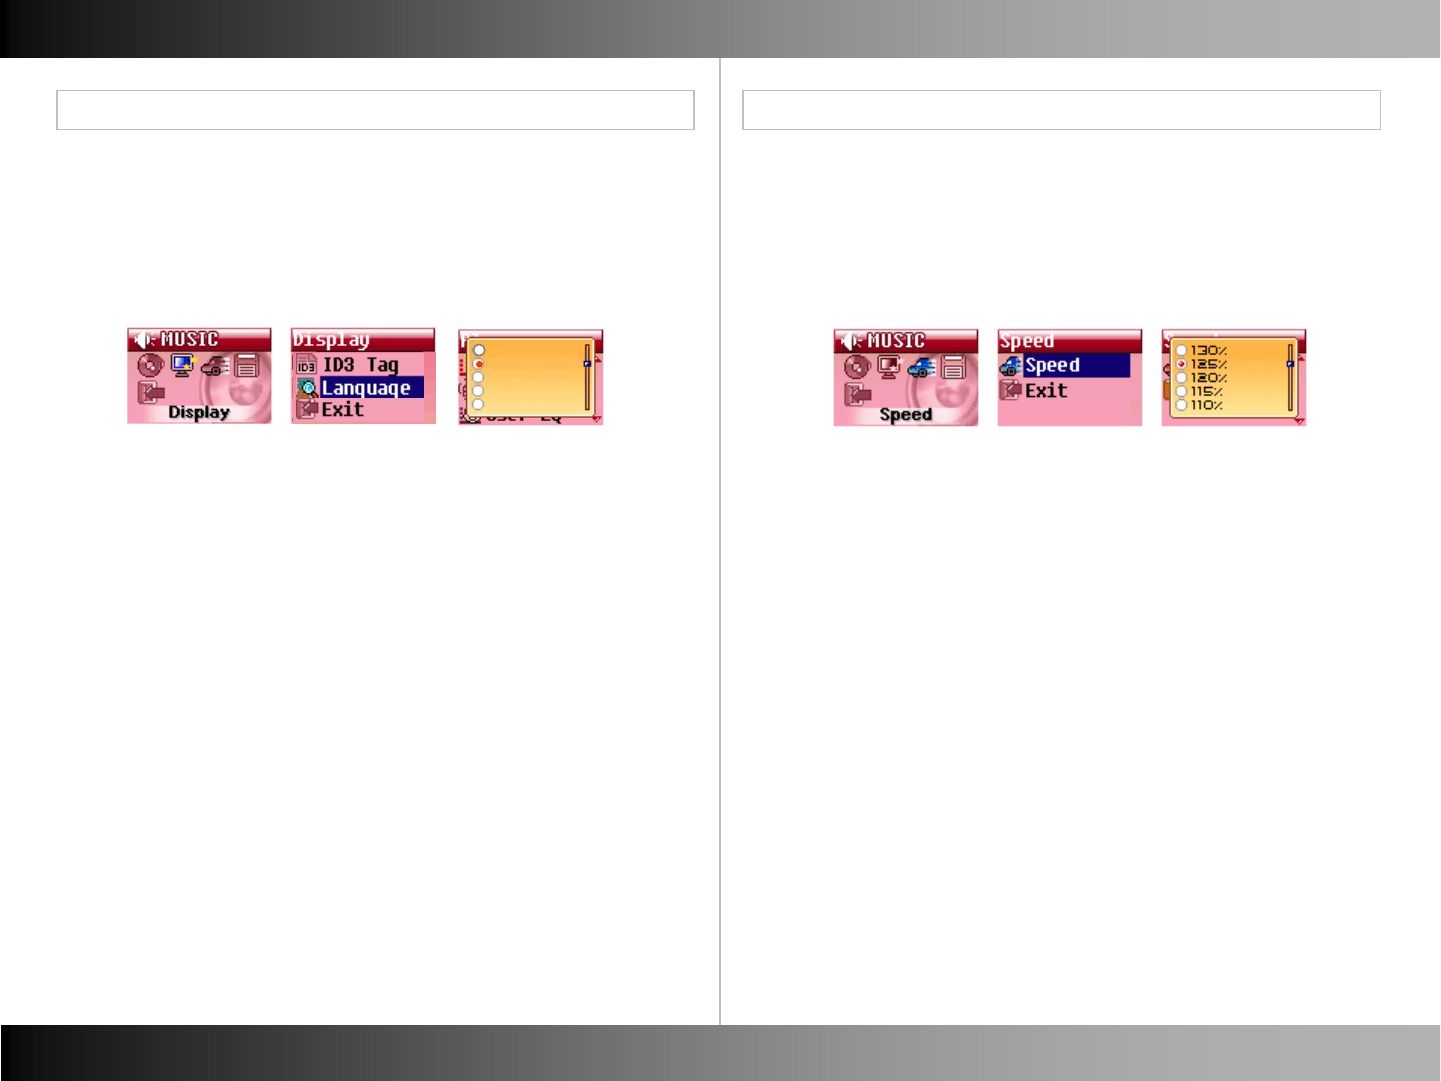
■ Language
Display Menu
- English, German, Spanish, French, Italian, Russian,
Chinese Tr. Chinese Si, Japanese, Portuguese, Danish,
Norwegian, Swedish, Finnish, Korean
■ Speed
- 130%, 125%, 120%, 115%, 110%, 105%, 100%,
95%, 90%, 85%, 80%, 75%
27 28
English
German
Spanish
French
Italian
Music Music
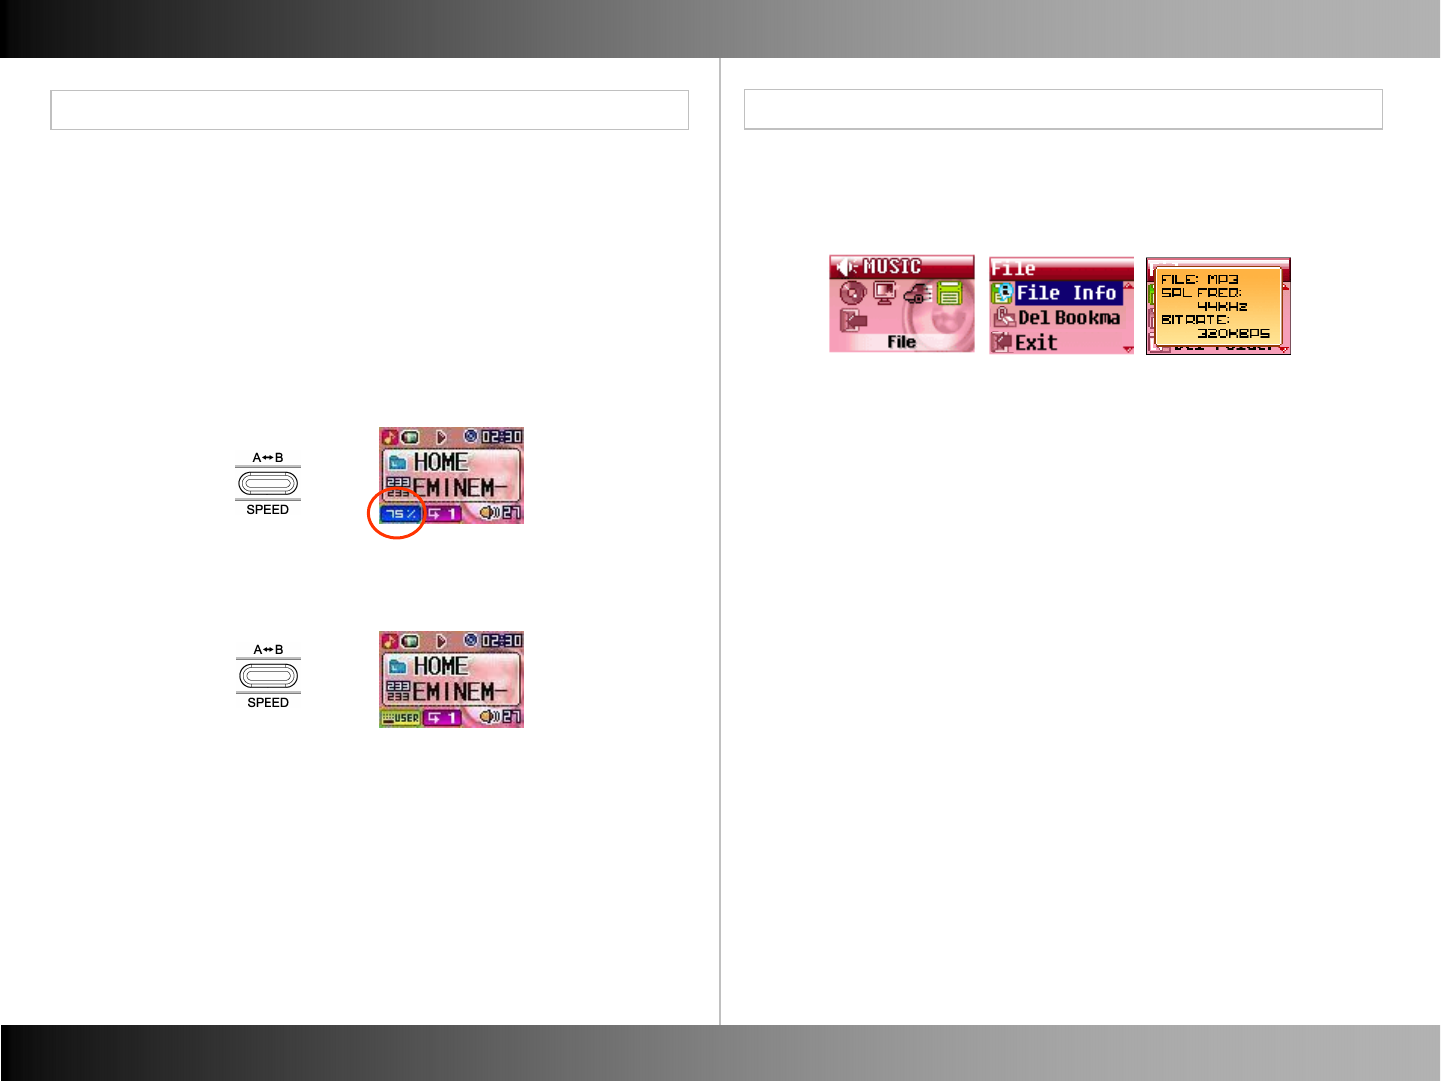
■ Set Speed ■File Info
File Menu
Speed Menu
- You can either speed up or slow down playback.
- 130% ~ 105% : Faster than normal speed.
- 95% ~ 75% : Slower than normal speed.
* Note : You can not set the speed if the player isn’t playing music.
- Hold down (SPEED) to play music by speed which you set.
- Hold down (SPEED) to play music by normal speed (100%).
29 30
- You can display the file information of the active music file.
■ Creating a Bookmark
Music Music
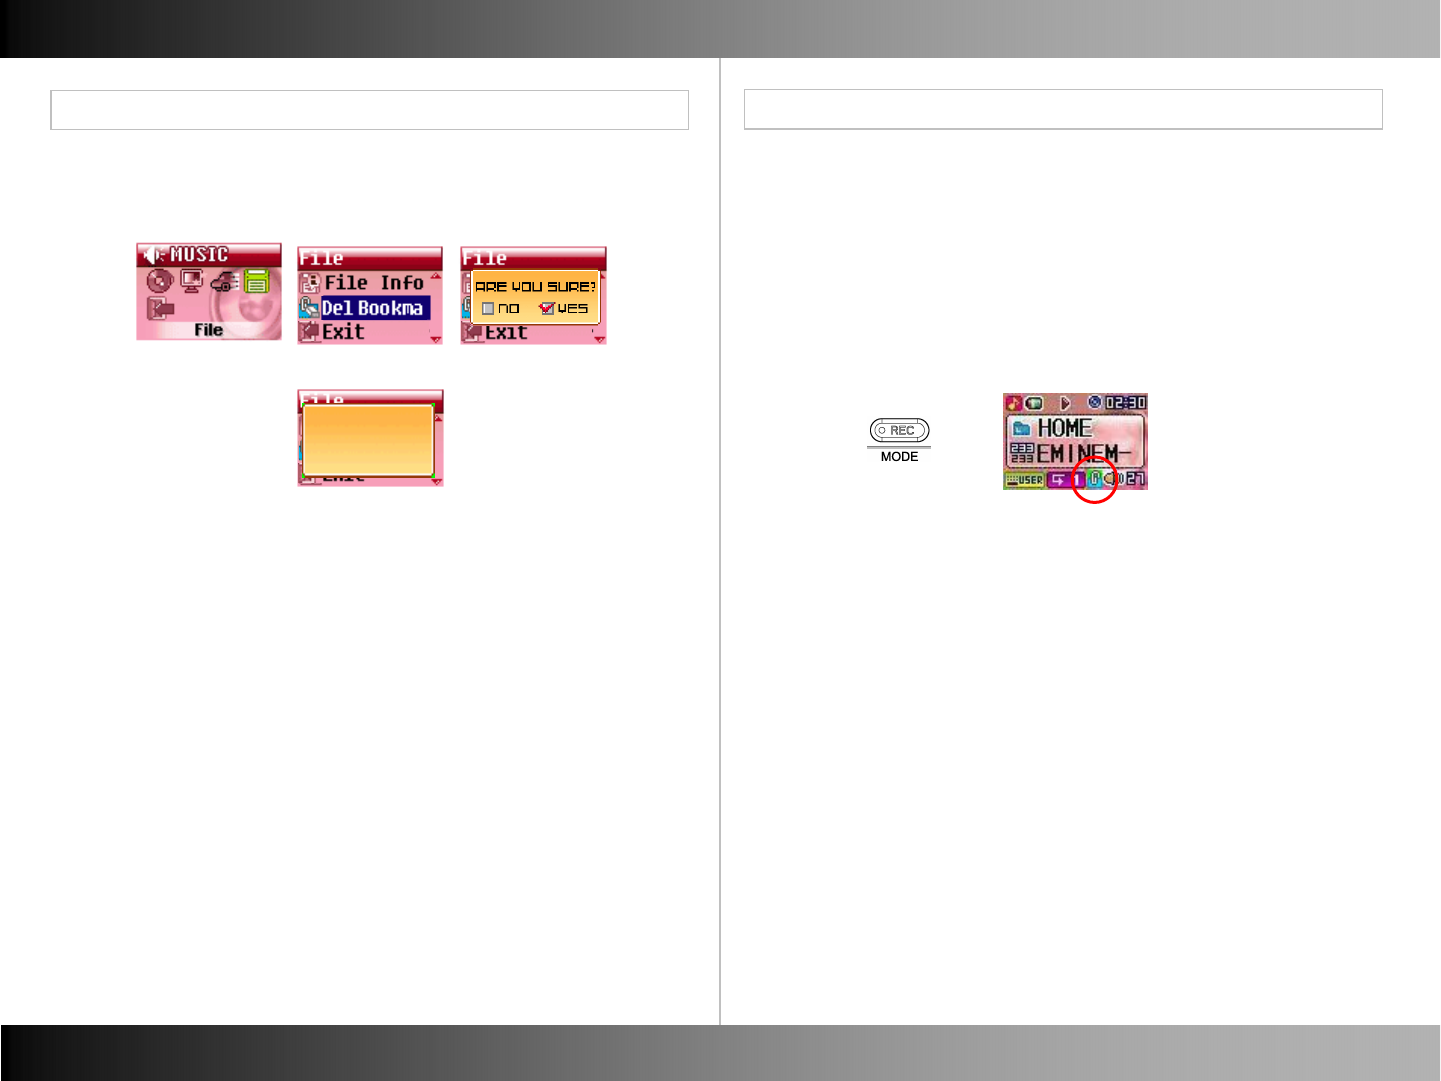
■ Delete Bookmark
File Menu
Bookmark
is erased.
Other Functions
31 32
- You can remove the Bookmarks on songs. - Music can be selected into Bookmark.
- You can select up to 20 tracks in Bookmark.
- It is just made when the song is being played.
- Click (REC) to save the song into Bookmark.
- Bookmark icon displays.
Music Music
33 34
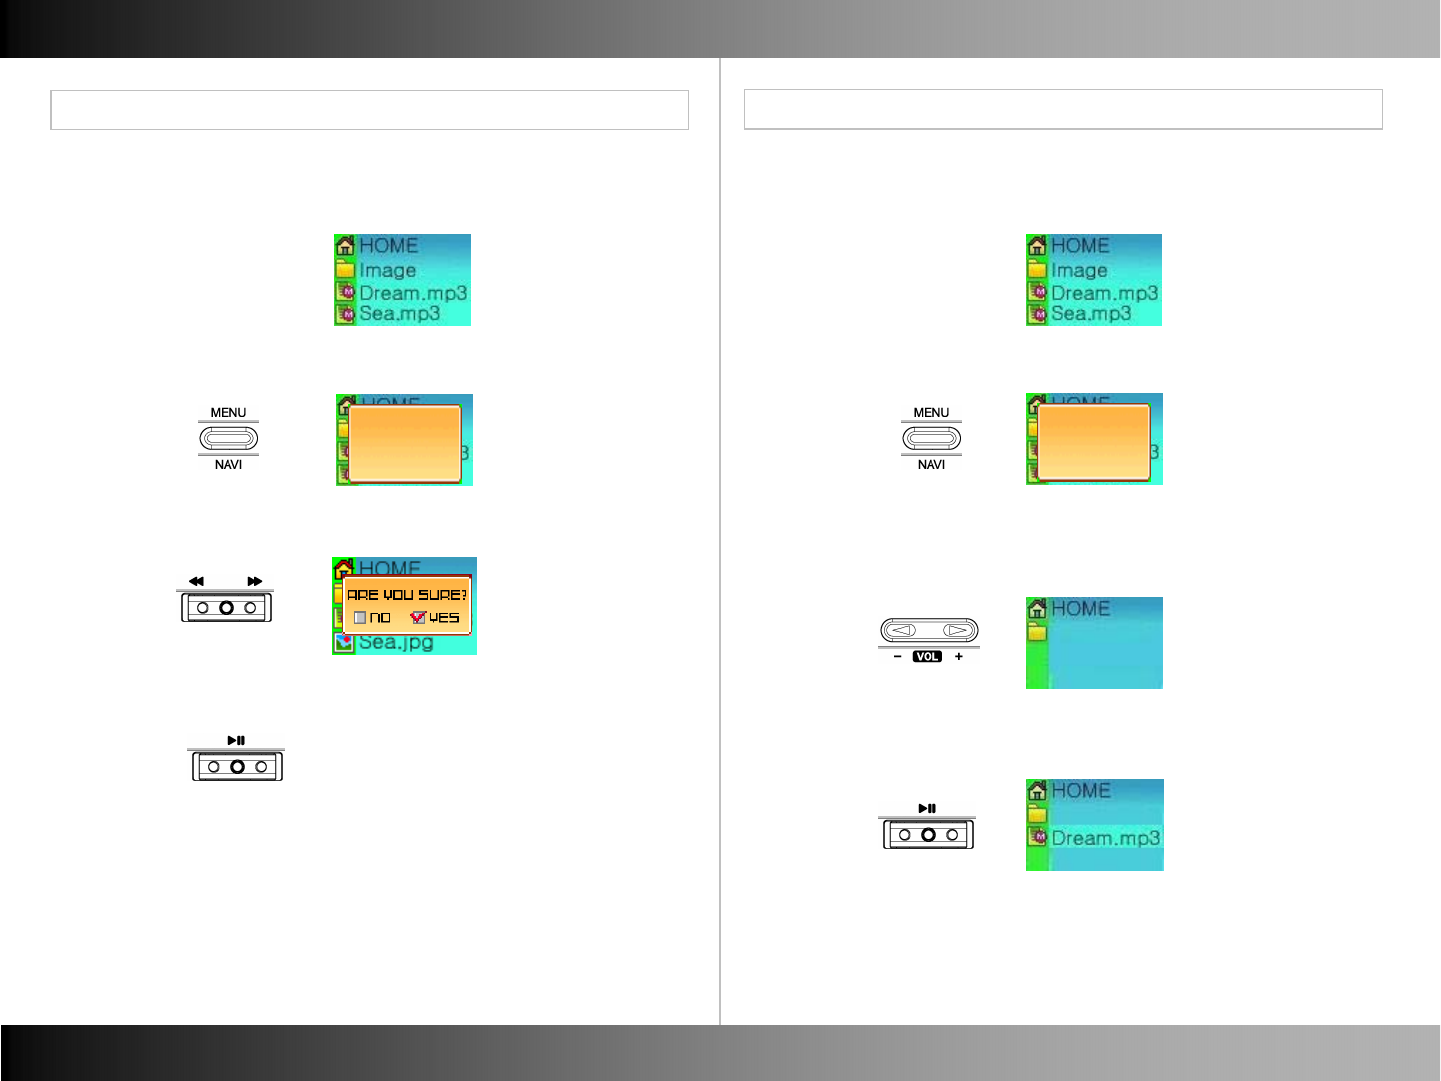
■ Delete File
Other Functions
- Search the file which you want to copy.
- Click (MENU) and the pop up window displays.
•Copy
•Delete
•Exit
- Click (▶II) to set complete.
Beatles
Beatles
■Copy File
Other Functions
- Search the file or Folder which you want to delete in Navigation.
- Click (MENU) and window appears to delete.
- Click (▶II) after selecting “Delete” and select “YES”.
- Click (▶II) to set complete.
•Copy
•Delete
•Exit
- Push Vol.(◀)/(▶) to search the position where you want to
patch it.

Music Mode
■ Repeat Section (A <-> B)
Other Functions
- You can repeat sections of a song. Creating a loop effect.
- Click (A-B) at the section start point.
- (A-) icon appear and starts section save.
- Click (A-B) at the section ending point.
- (A-B) icon appears and start section repeat.
- The repeat section is released when (A-B) key is pressed again.
- Normal playing resumes and the icon disappears from the display.
35 36
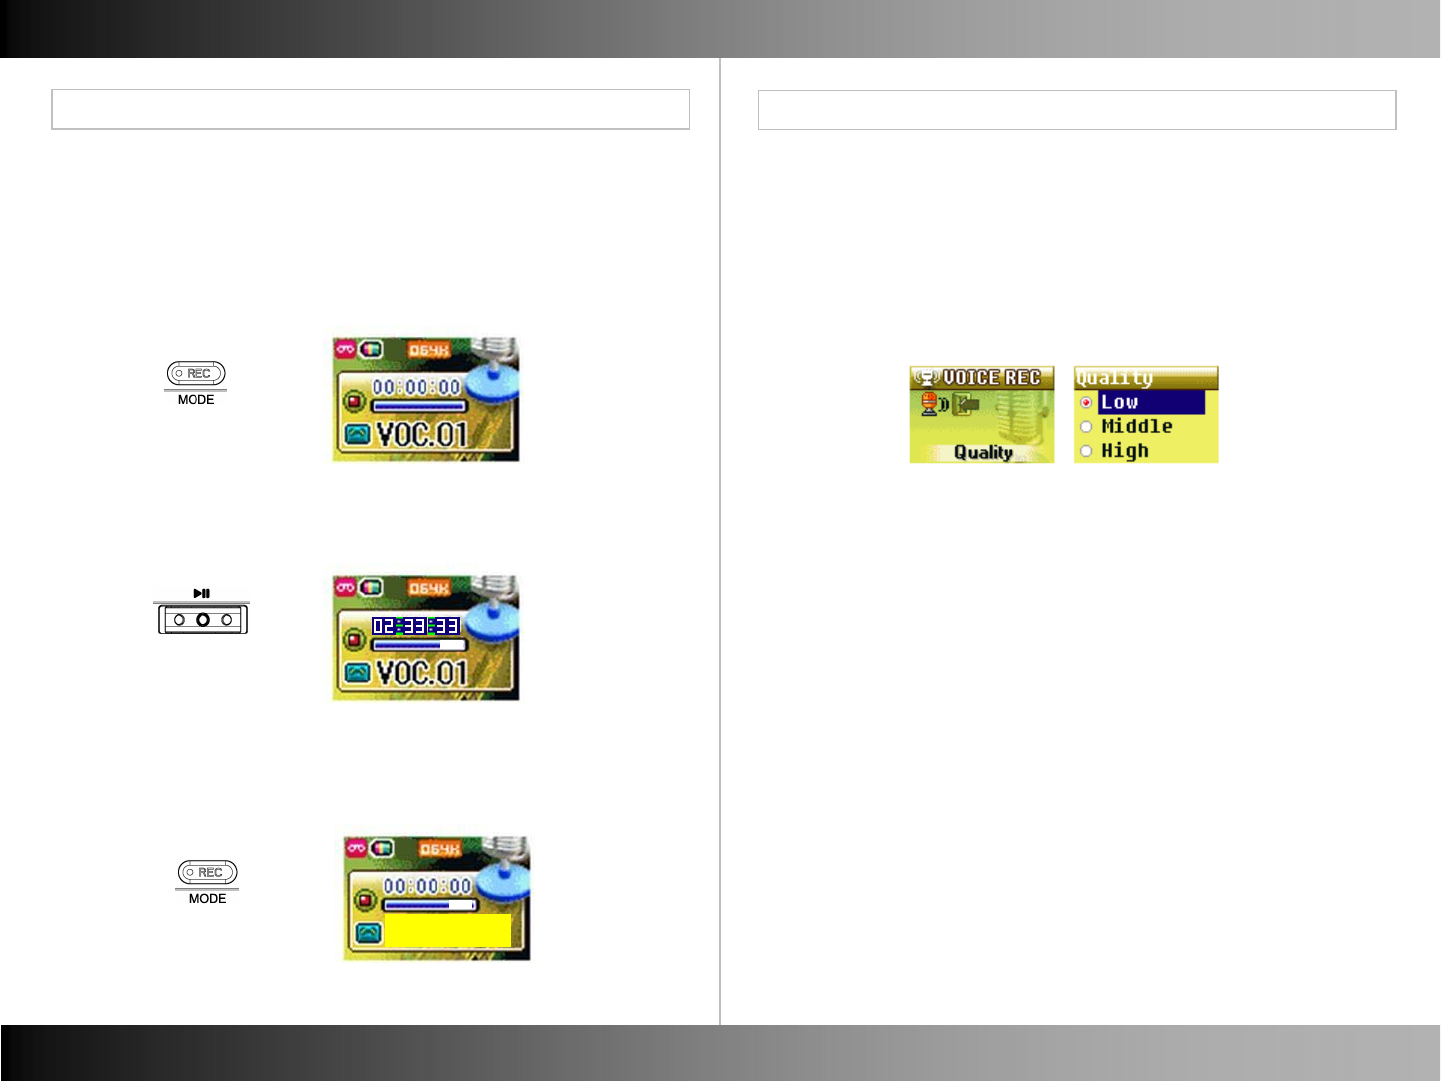
Voice Record
■ Voice Record Quality
Voice Record
■Voice Record
Voice Record
Voice Record
- Click (▶II) to pause Recording.
- Recording Time pauses and icon blinks.
- Click (REC) to stop Recording and back to normal FM Radio Mode.
- Recorded File is automatically saved on “RECORD” folder.
- Click (REC) to start Voice Record.
- Recording Time and icon displays.
- Progress Bar displays the remained memory.
READY
37 38
- You can adjust the voice recording bit rate quality.
- Low : 44KHz, 32Kbps, Mono
- Middle : 44KHz, 64Kbps, Stereo
- High : 44KHz, 96Kbps, Stereo
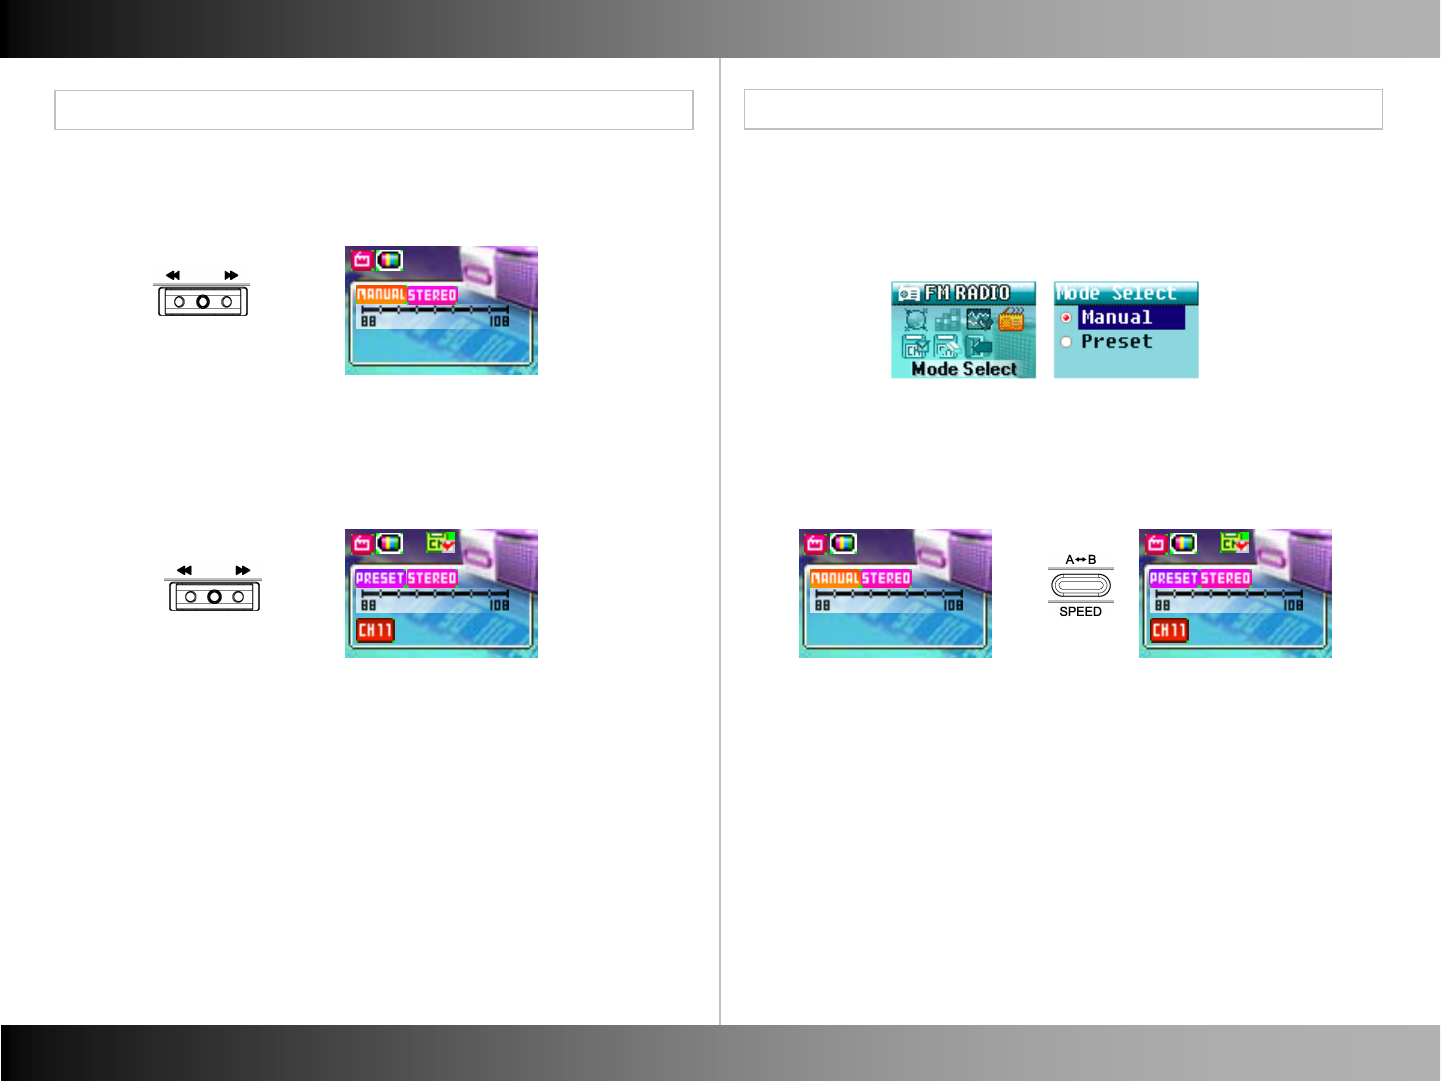
FM Radio FM Radio
Select Manual Mode or Preset Mode
Manual Mode / Preset Mode
■ Manual Mode
- Move between the set step by every REW(◀◀)/FF(▶▶).
■ Preset Mode
- Move between the stored CH by every REW(◀◀)/FF(▶▶).
■ Select Manual Mode or Preset Mode
- In Menu mode of FM Radio, you can select Manual Mode or Preset
Mode.
■ Shift between Manual Mode and Preset Mode
- Click (A-B) to shift easily between Manual Mode and Preset Mode.
107.7MHz
87.5MHz
107.7MHz
100.2MHz
39 40
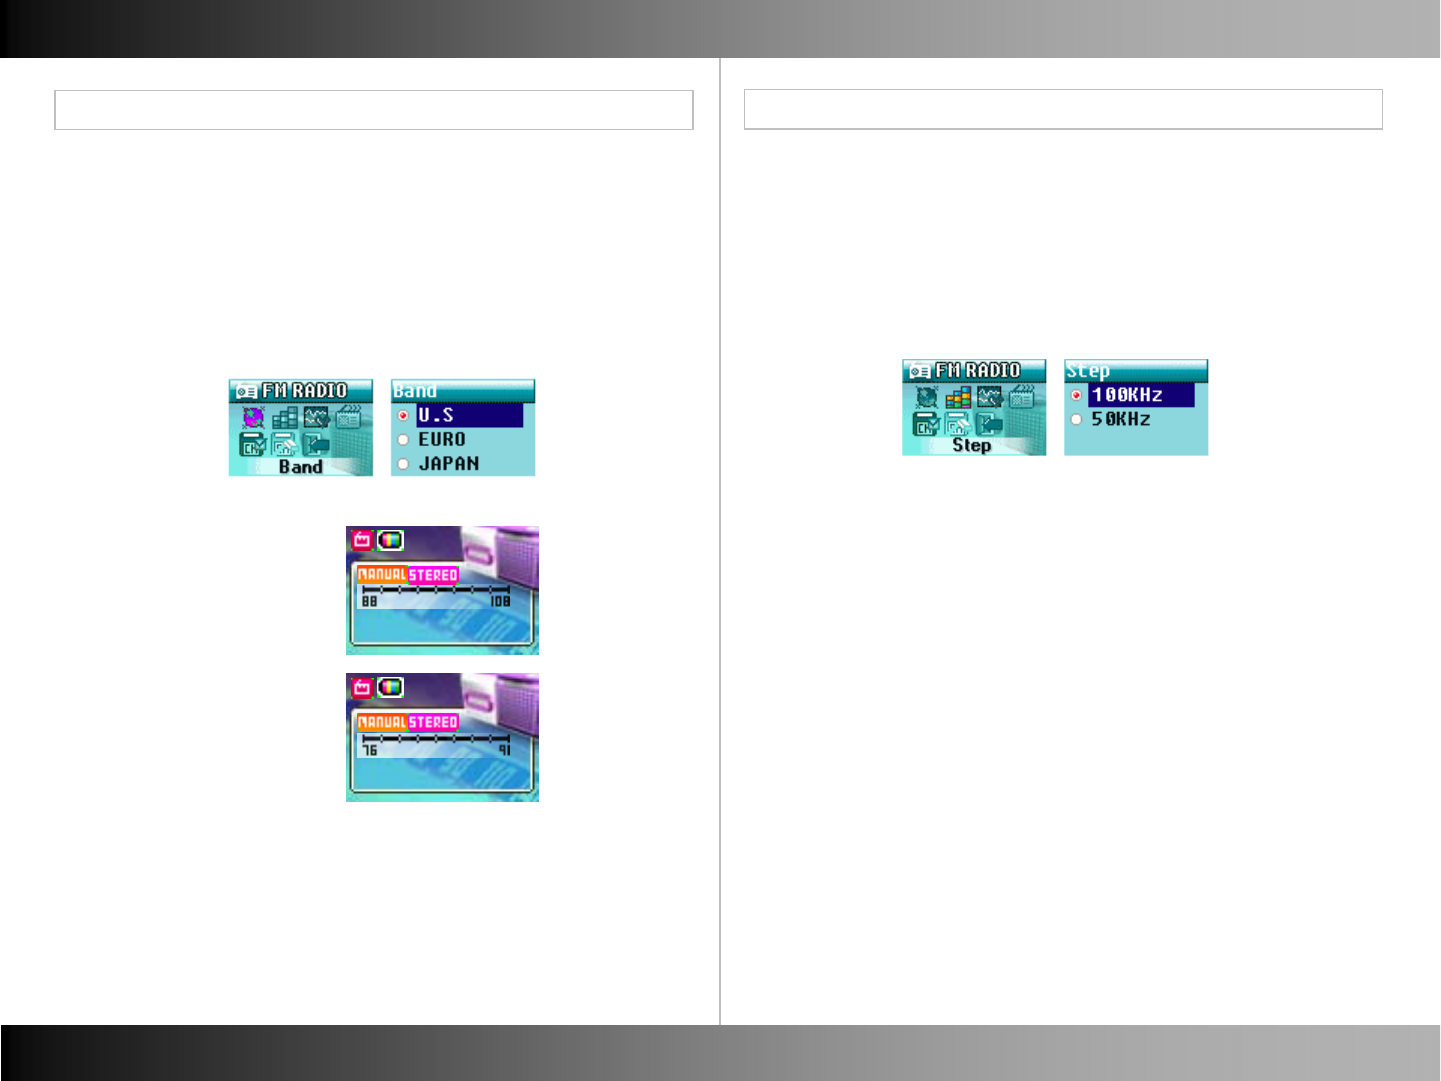
FM Radio FM Radio
Manual Mode
FM Band
■FM Step
- Step is the increment of frequency that moves by pressing
REW(◀◀)/FF(▶▶)to select the frequency interval.
For example, pressing the button moves
93.450-> 93.50-> 93.550 when you set Step in 50KHz.
■FM Band
107.7MHz
107.7MHz
-US
-EURO
-JAPAN
41 42
- You can set the FM Radio band depending on which Region you
are in.
- US - 87.5 ~ 108.0 MHz
- EURO - 87.5 ~ 108.0 MHz
- Japan - 76.0 ~ 91.0 MHz
FM Radio FM Radio
Manual Mode
Manual Mode
■ FM Radio CH Auto Scan – Set Sensitivity
■ Selecting Station Manually in Manual Mode
- You can manually select FM Radio stations.
- Frequency range is “87.5MHz ~ 108.0MHz”.
- By pushing REW(◀◀)/FF(▶▶), you can manually select a specific
frequency.
■ FM Radio CH Auto Scan in Manual Mode.
- Besides selecting FM Radio stations manually, you can also Auto
Scan for available stations.
-Hold down REW(◀◀)/FF(▶▶)to search the next available channel.
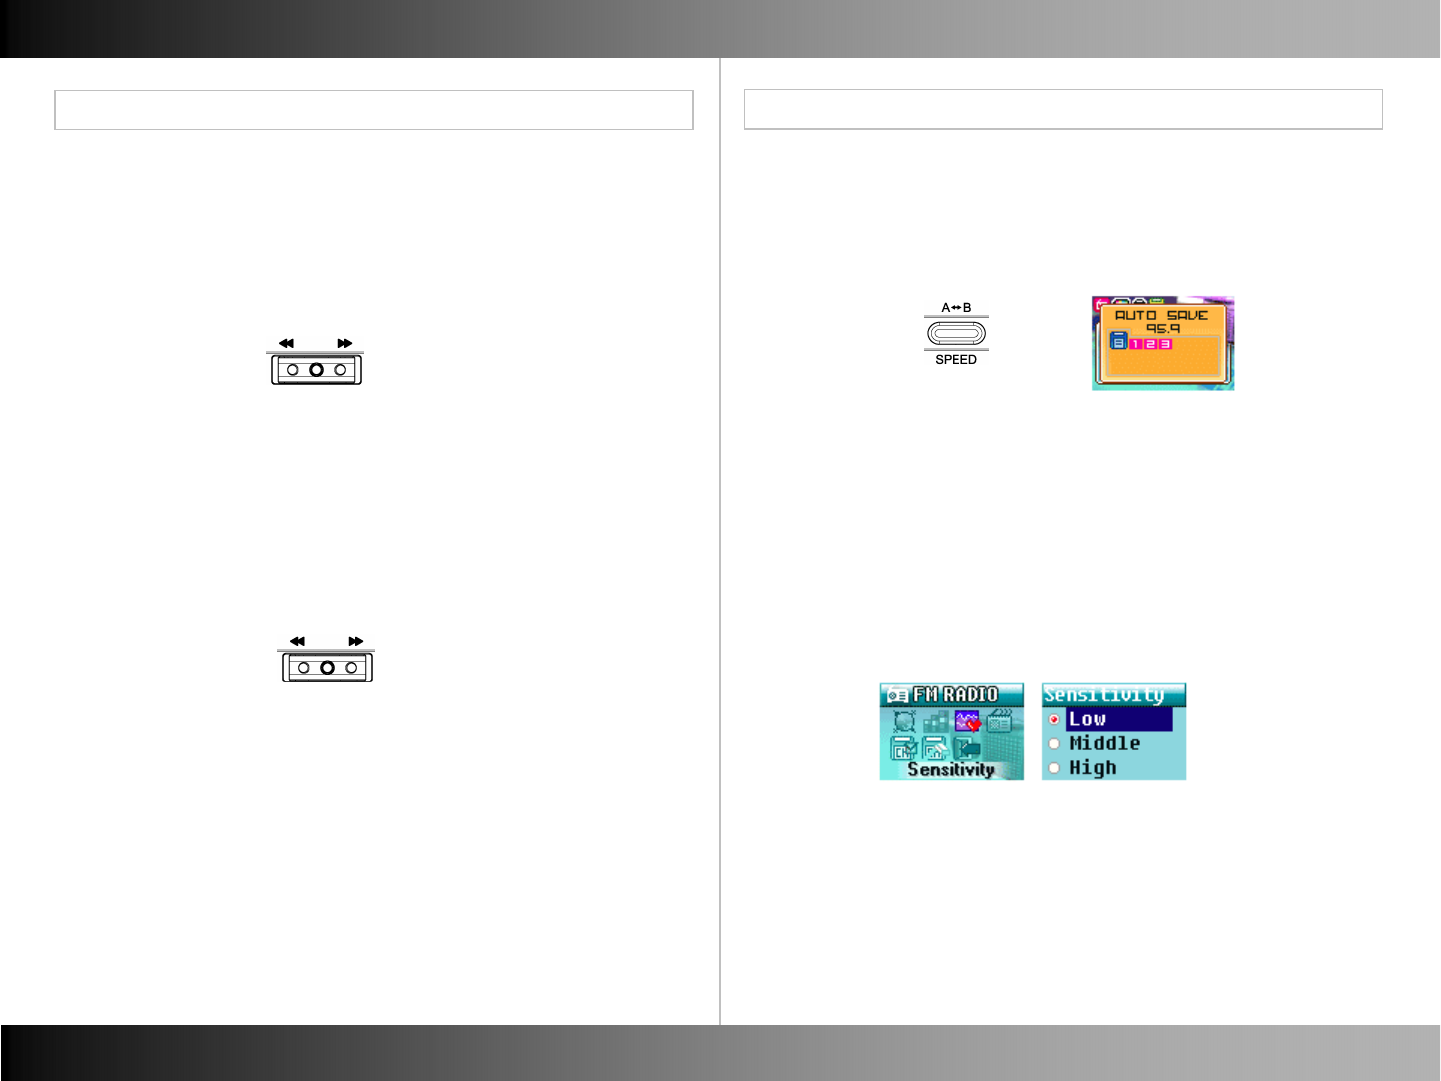
■ FM Radio CH Auto Save in Manual Mode.
- Hold down (A-B) and automatically search the available
channel and save them in CH list.
43 44
- You can adjust the reception sensitivity while in Auto Scan Mode.
- Low : Scan for all channels with low reception sensitivity
- Middle : Scan for channels with middle reception sensitivity
- High : Scan for the channels with high reception sensitivity.
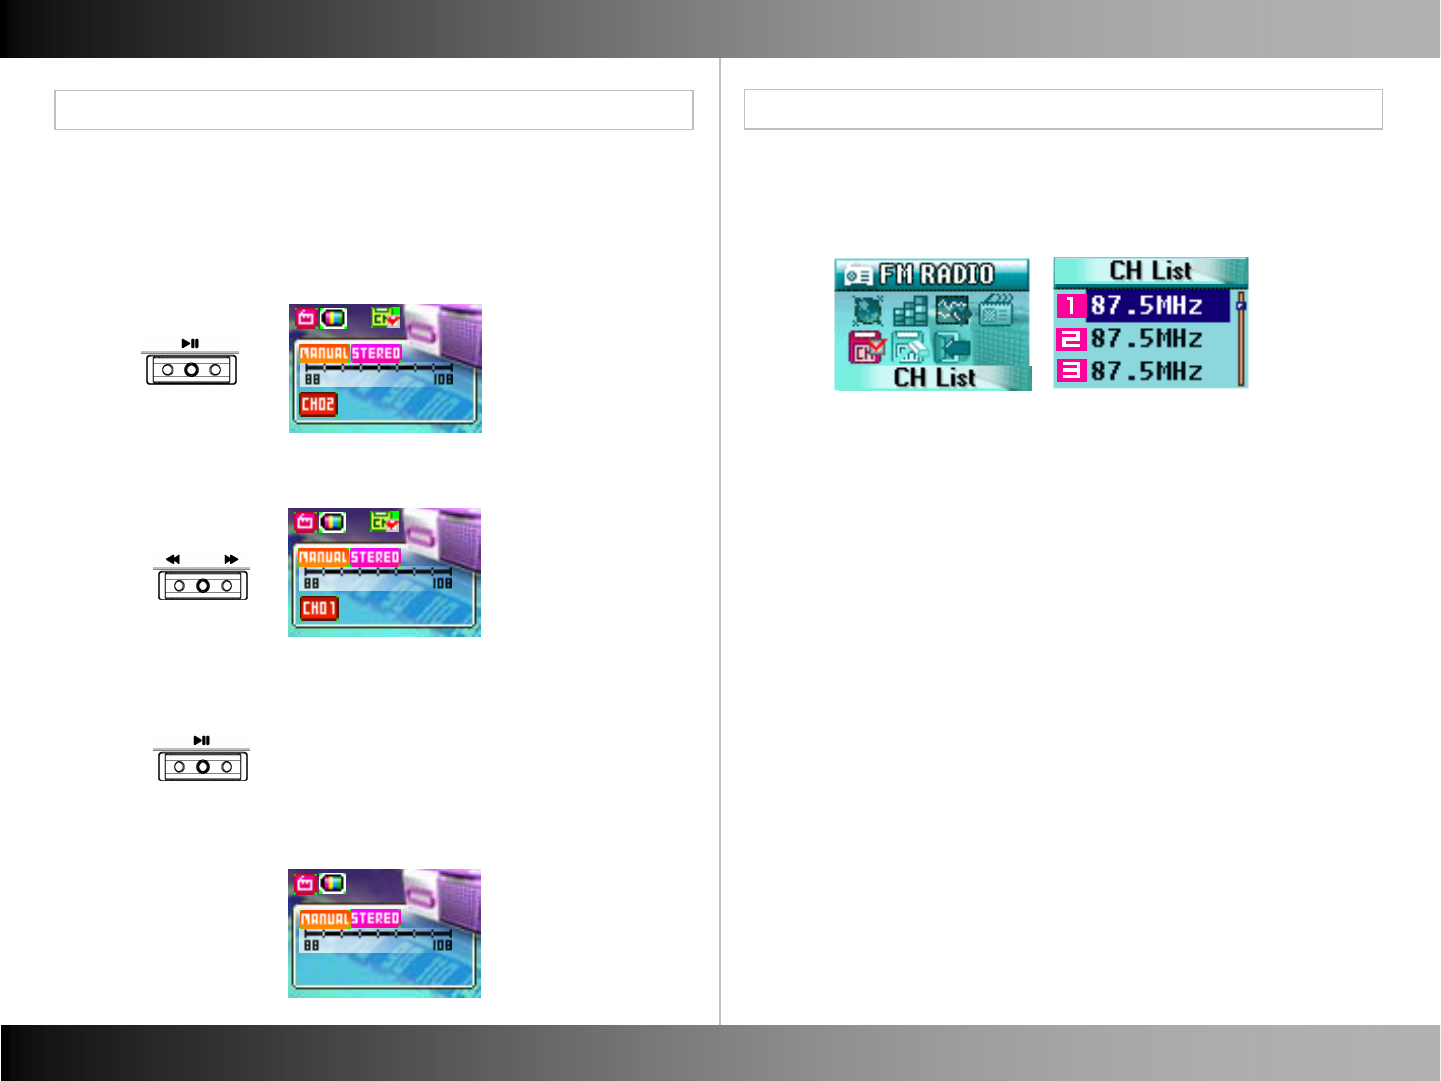
■Saving CH
FM Radio FM Radio
■ CH List
Preset Menu
Saving CH
- You can manually save your favorite Radio stations as Preset.
- Push REW(◀◀)/FF(▶▶)to change CH number which you want to
save.
87.5MHz
87.5MHz
- Click (▶II) to set complete.
- You can check the saved CH in CH View in Menu Mode.
- CH Saved icon and CH number icon display.
45 46
87.5MHz
- Click (▶II) and CH number and CH Saved icon blinks,
after searching the frequency you want.
FM Radio FM Radio
Preset Mode
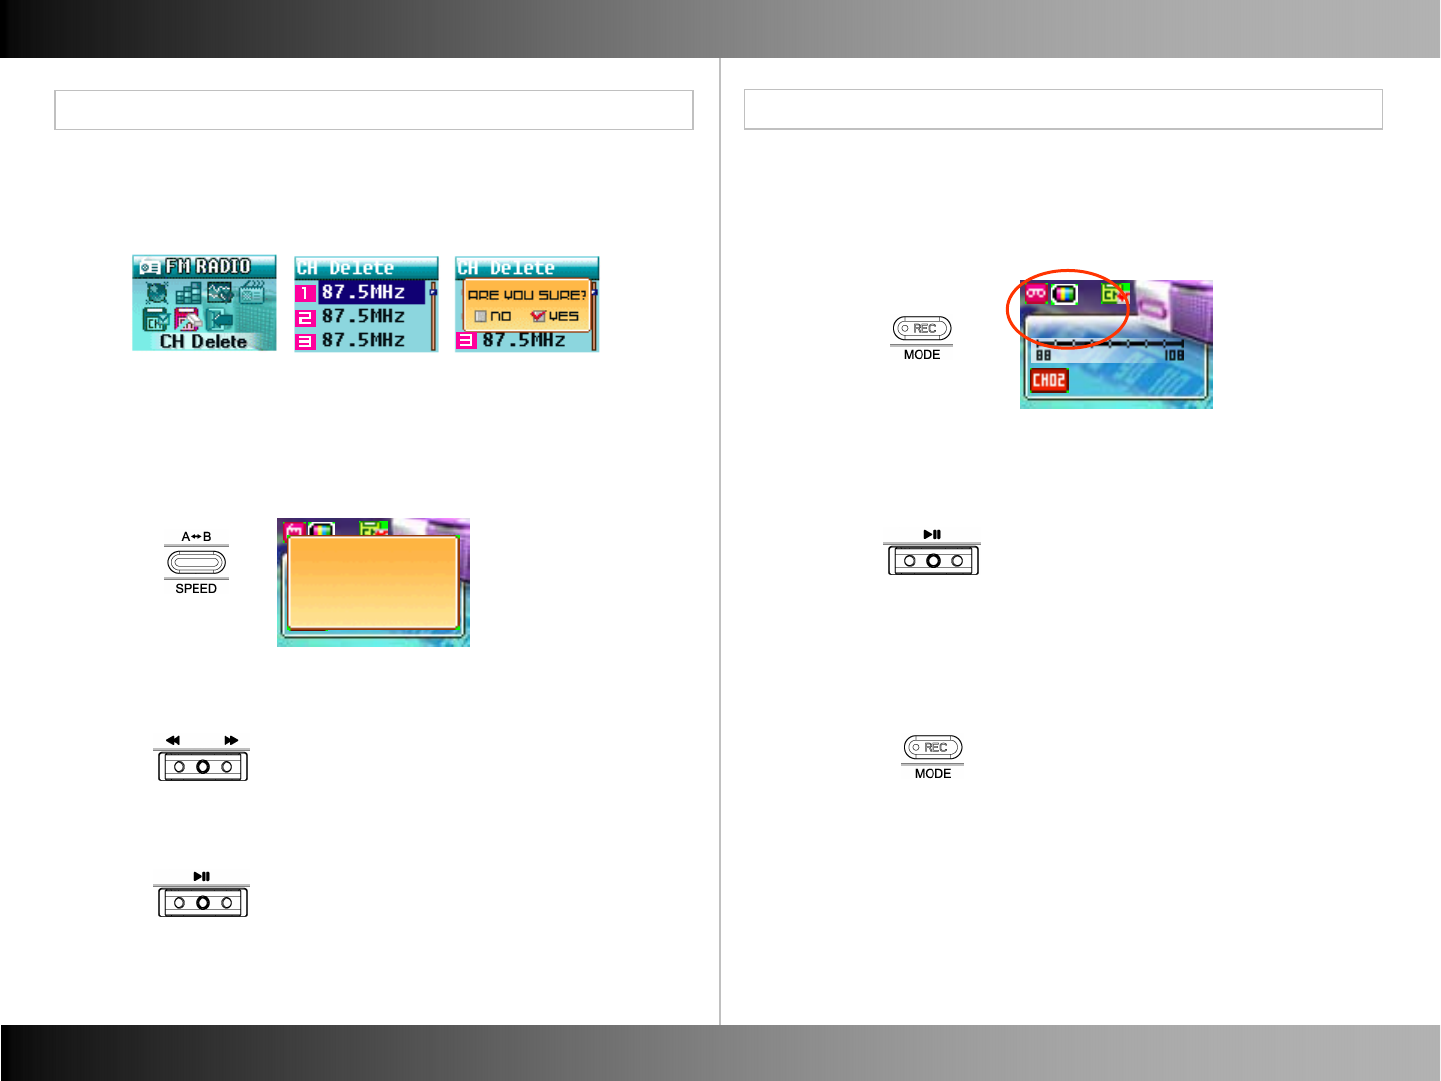
■CH Delete Type 1
■CH Delete Type 2
FM Radio Record
■ FM Radio Record
- You can delete the saved CH in Menu Mode.
- You can delete the saved CH easily.
- Hold down (A-B) and CH delete window display.
87.5MHz
Delete CH?
NO / YES
- Push REW(◀◀)/FF(▶▶) to select “YES”.
- Click (▶II) to set complete.
- Click (REC) in Radio Mode.
- Recording Icon and recording time displays.
- Click (▶II) to pause Recording.
- Recording Time pauses.
- Click (REC) to stop Recording and back to normal FM Radio Mode.
- Recorded File is automatically saved on “RECORD” folder.
87.5MHz
02:25:25
47 48
Line in Record Line In Record
Line in Record
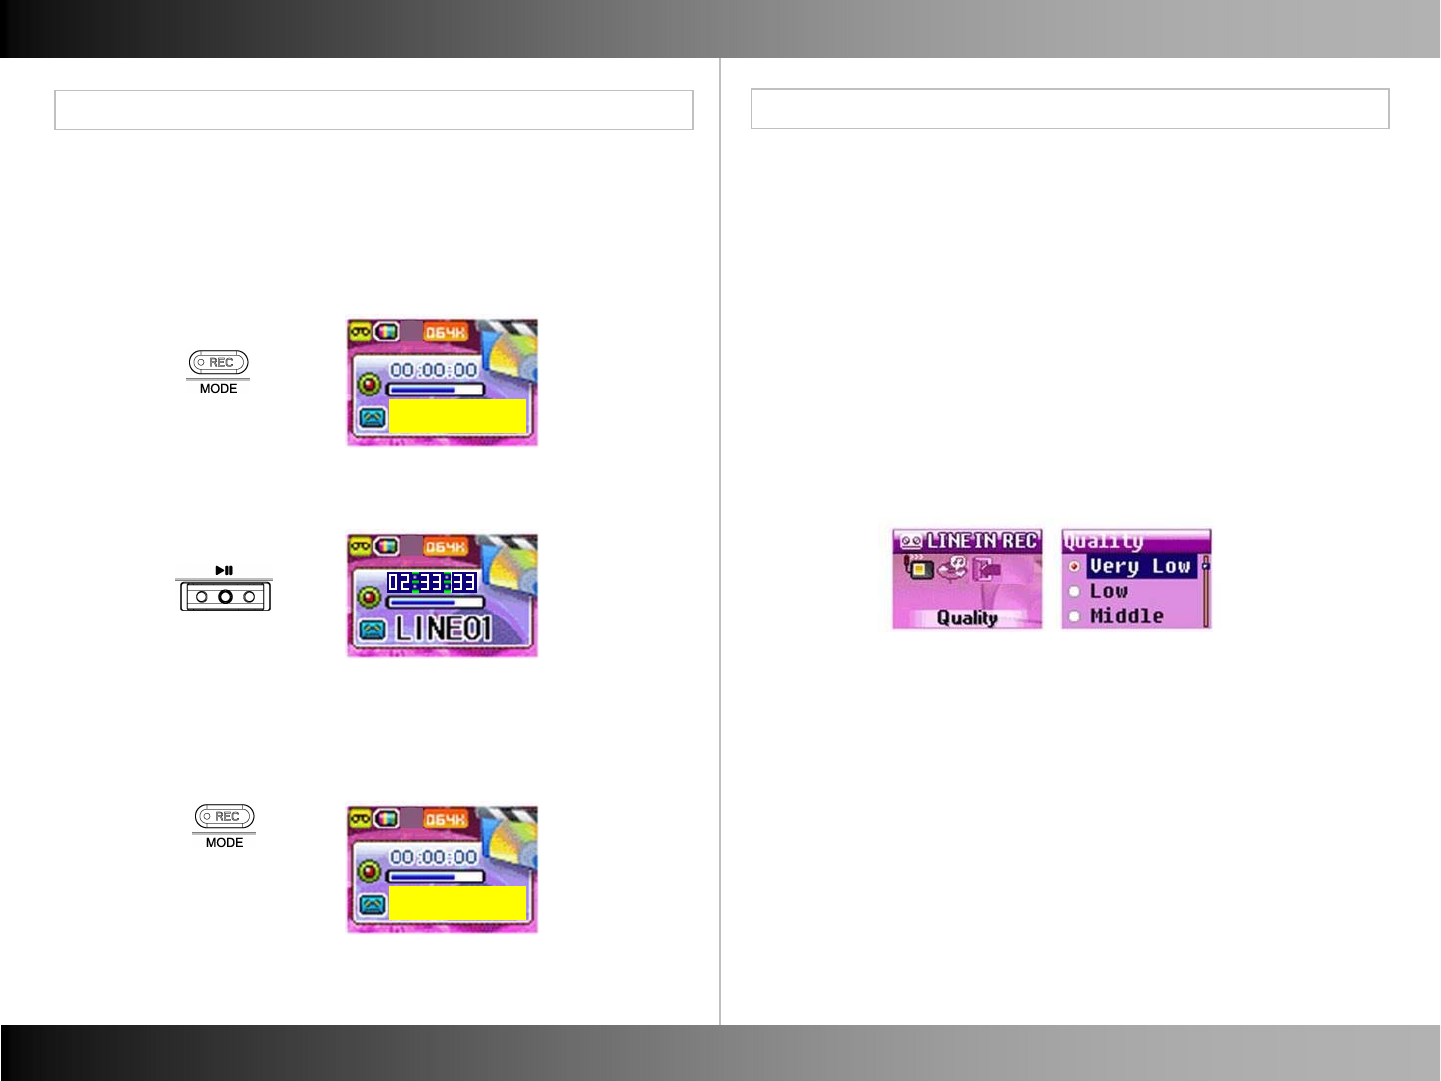
■Line In Record
Line in Record
- Click (REC) to start Line in Record.
- Progress Bar displays the remained memory.
- Recording Time and icon displays.
- Click (▶II) to pause Recording.
- Recording Time pauses.
- Click (REC) to stop Recording.
- Recorded File is automatically saved on “RECORD” folder.
READY
■Quality
- To determine the recording quality of MP32 files in Line in Recording.
- The quality of the recording you choose will determine the memory
size of the file being created.
- Very Low : Very low quality of recording (32kbps)
- Low : Slightly low quality of recording (48kbps)
- Middle : Normal Quality of recording (64kbps)
- High : High quality of recording (96kbps)
- Very High : Very high quality recording (128kbps)
READY
49 50
Line in Record Jpeg View
Line in Record Jpeg View
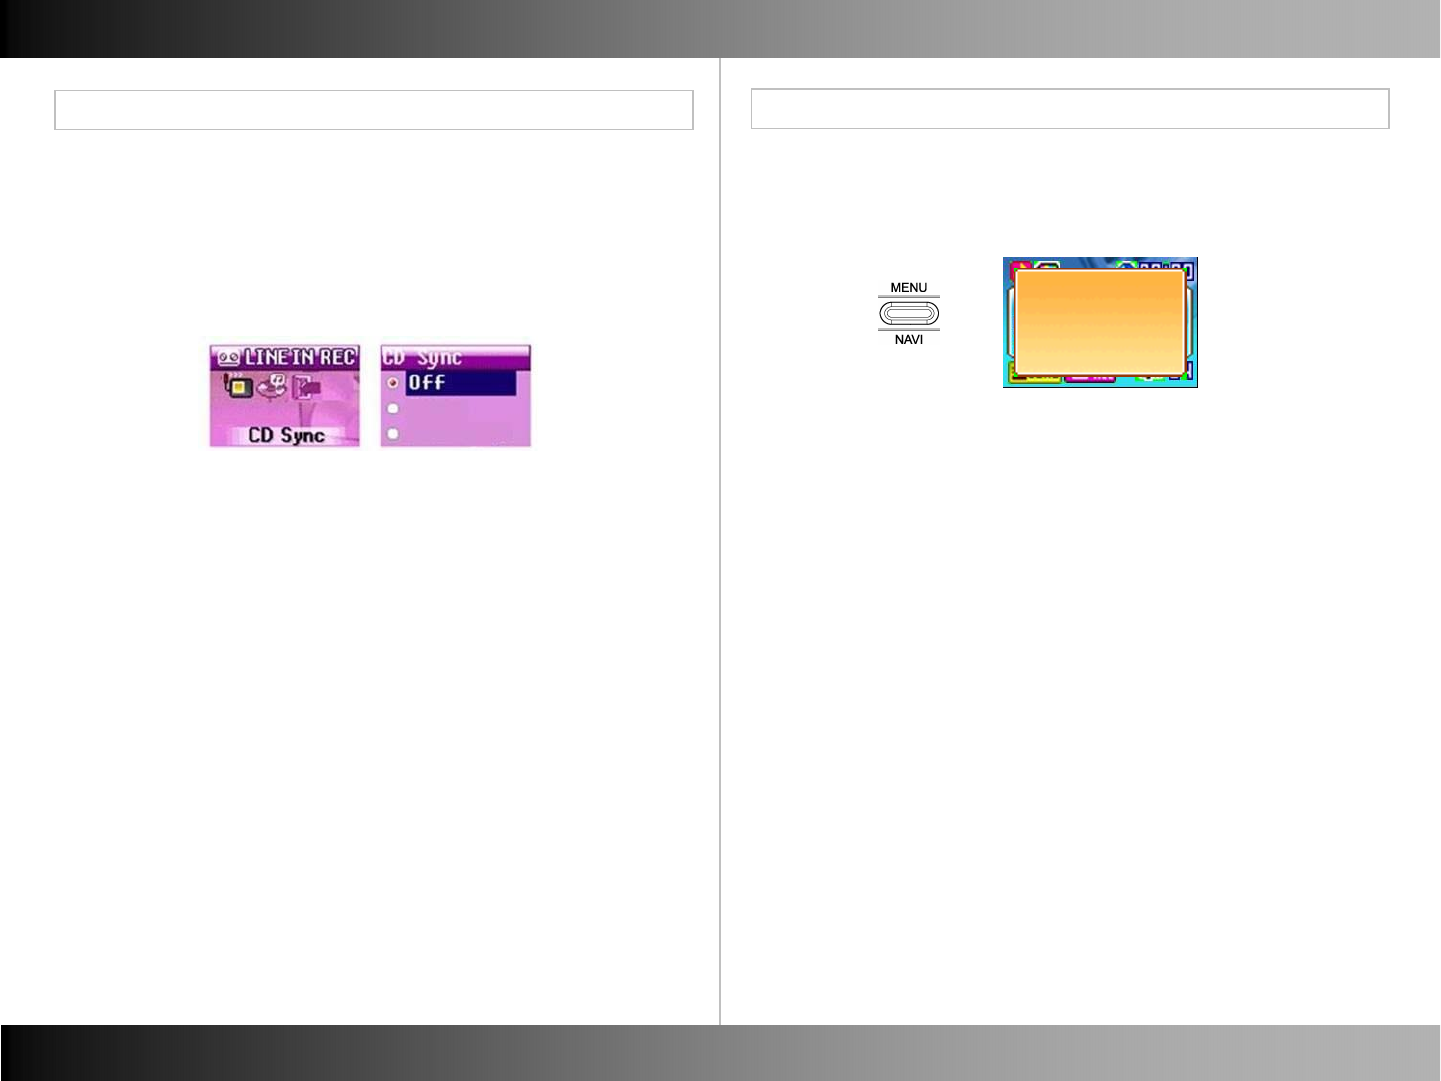
■CD Sync
- Sync will determine whether to make a separate file when the
period of no sound exists.
- OFF, 1 Sec Sync, 2 Sec Sync
■ File Information
- You can see file information by Click (MENU) in Jpeg Mode.
Image
Flower
51 52
1 Sec Sync
2 Sec Sync
Jpeg View Jpeg View
Jpeg View
■ Seeing Image
Jpeg View
- You can see Jpeg file in Jpeg View.
Image
Flower
- Hold down (NAVI) to search what you want to see in Navigation
Mode.
- In Jpeg View Mode, every Jpeg file and Motion picture files can
be searched by Navigation just like music files in Music Mode.
- You can hear music when you can see jpeg image.
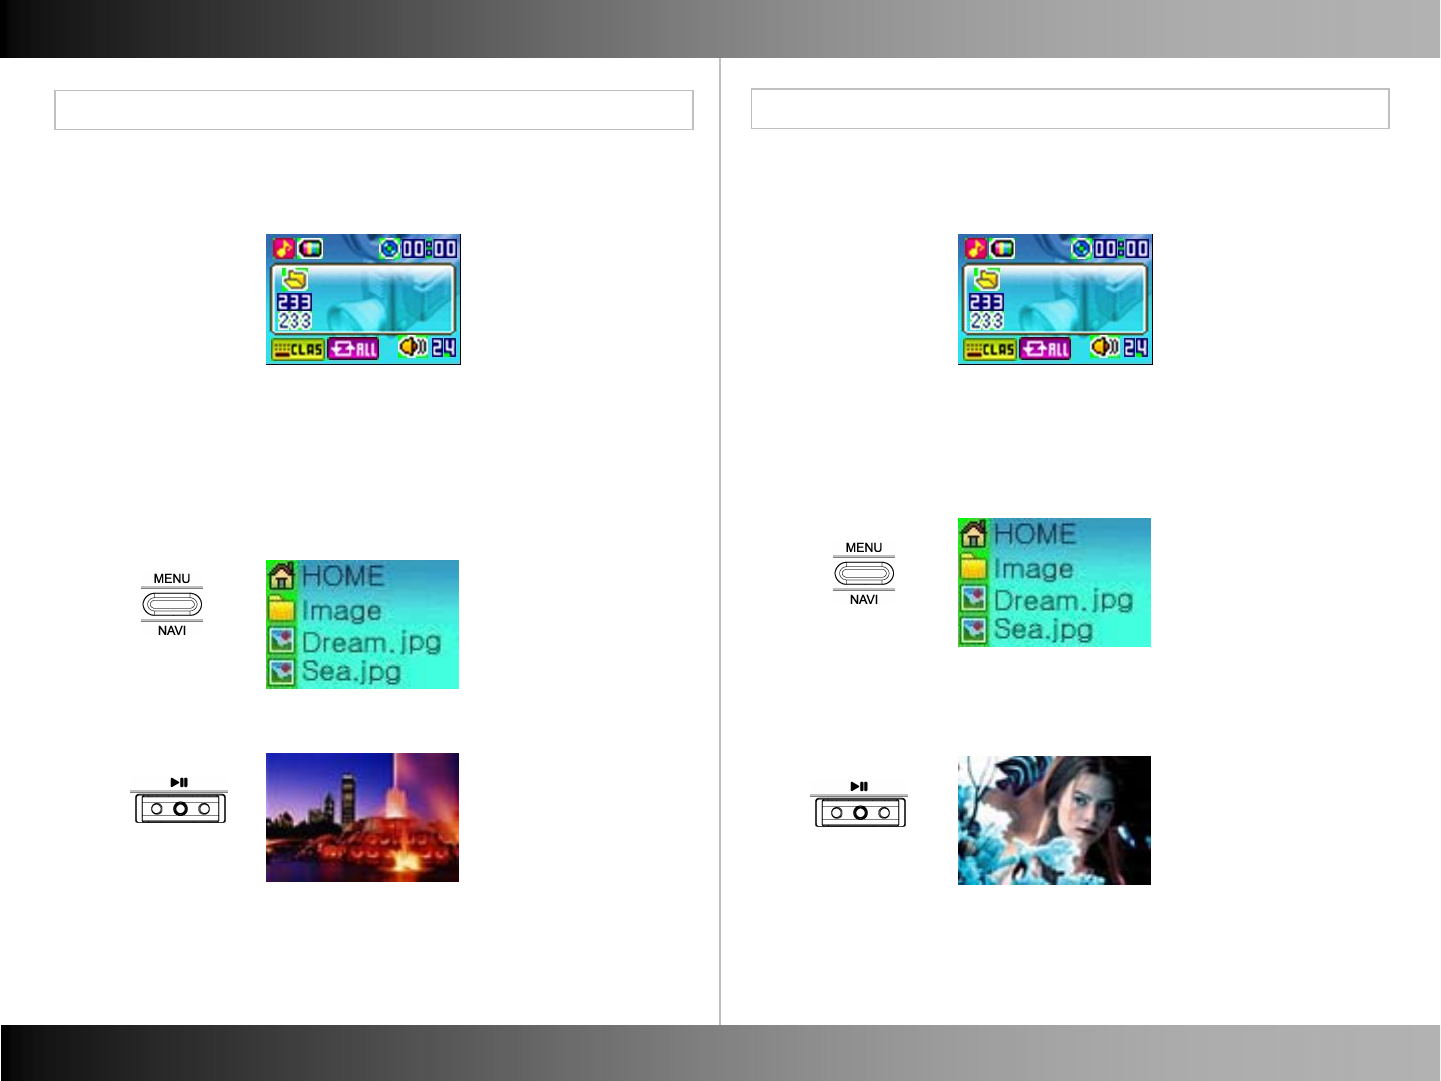
■ Seeing Motion Picture
- You can see Motion Picture file.
MTV
Flower
- Hold down (NAVI) to search what you want to see in Navigation Mode.
- In Jpeg View Mode, every Motion Picture files can be searched
by Navigation just like music files in Music Mode.
- If you are hearing music, the music stops and the selected Motion
pictures playbacks.
53 54
System Manager System Manager
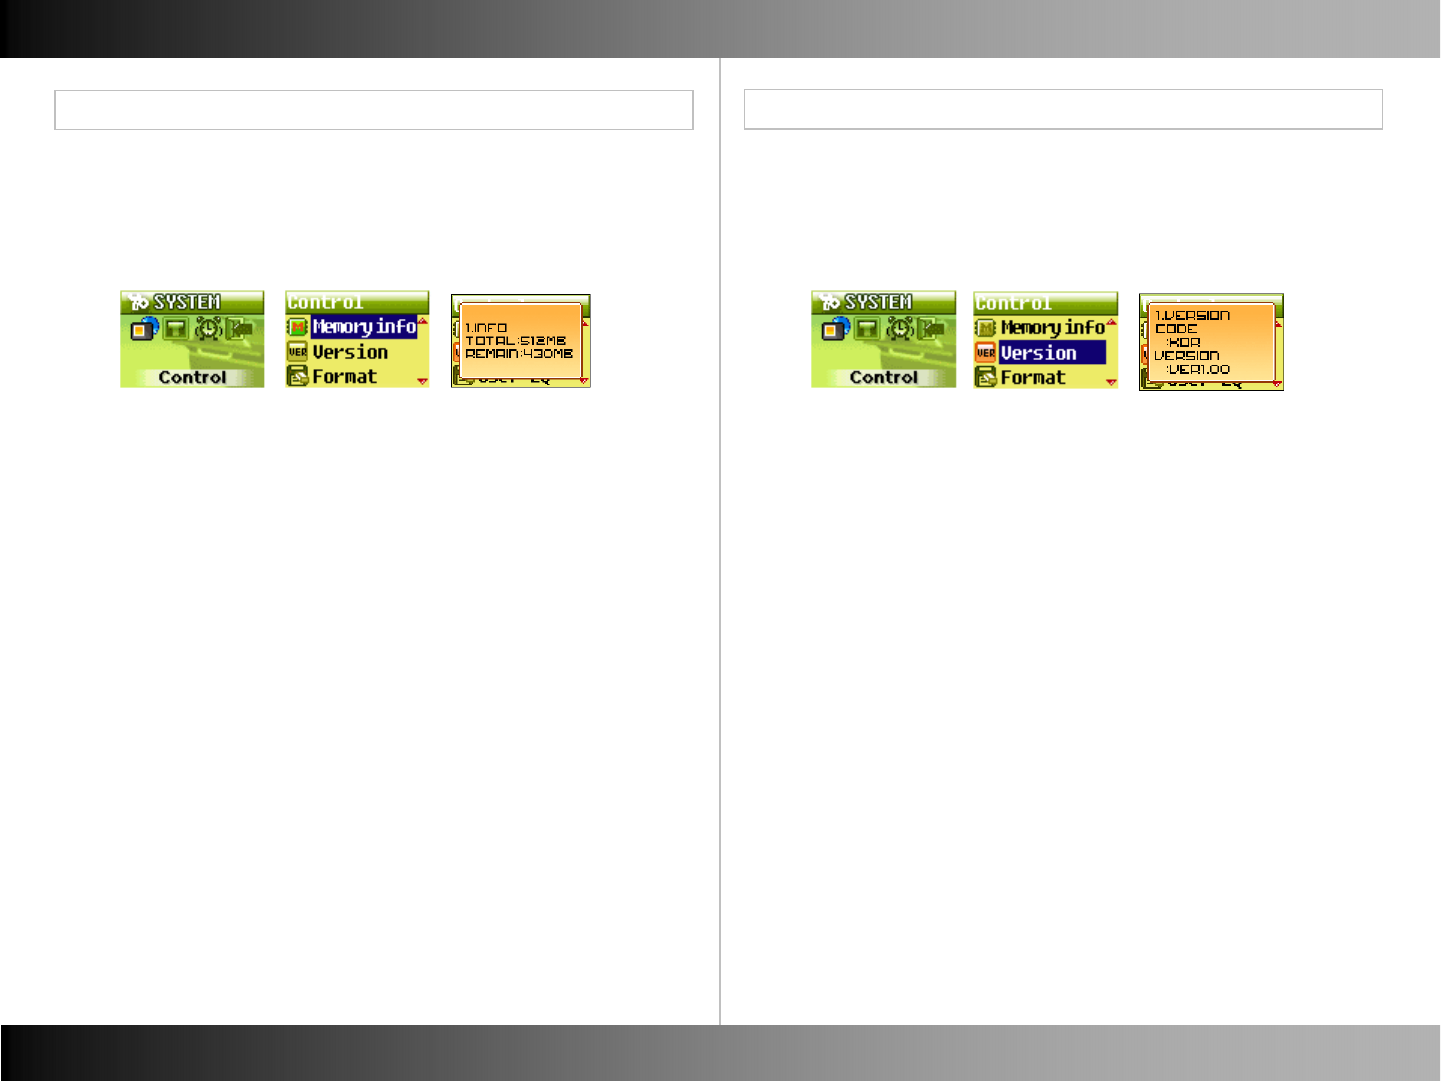
■Memory ■Version
Control Menu
Control Menu
- You can see the amount of total memory and available in your
player.
- You can see Version of the this player.
• Note : If you save the newest firmware file on this player.
its version can be automatically upgraded to the newest
version.
55 56
System Manager System Manager
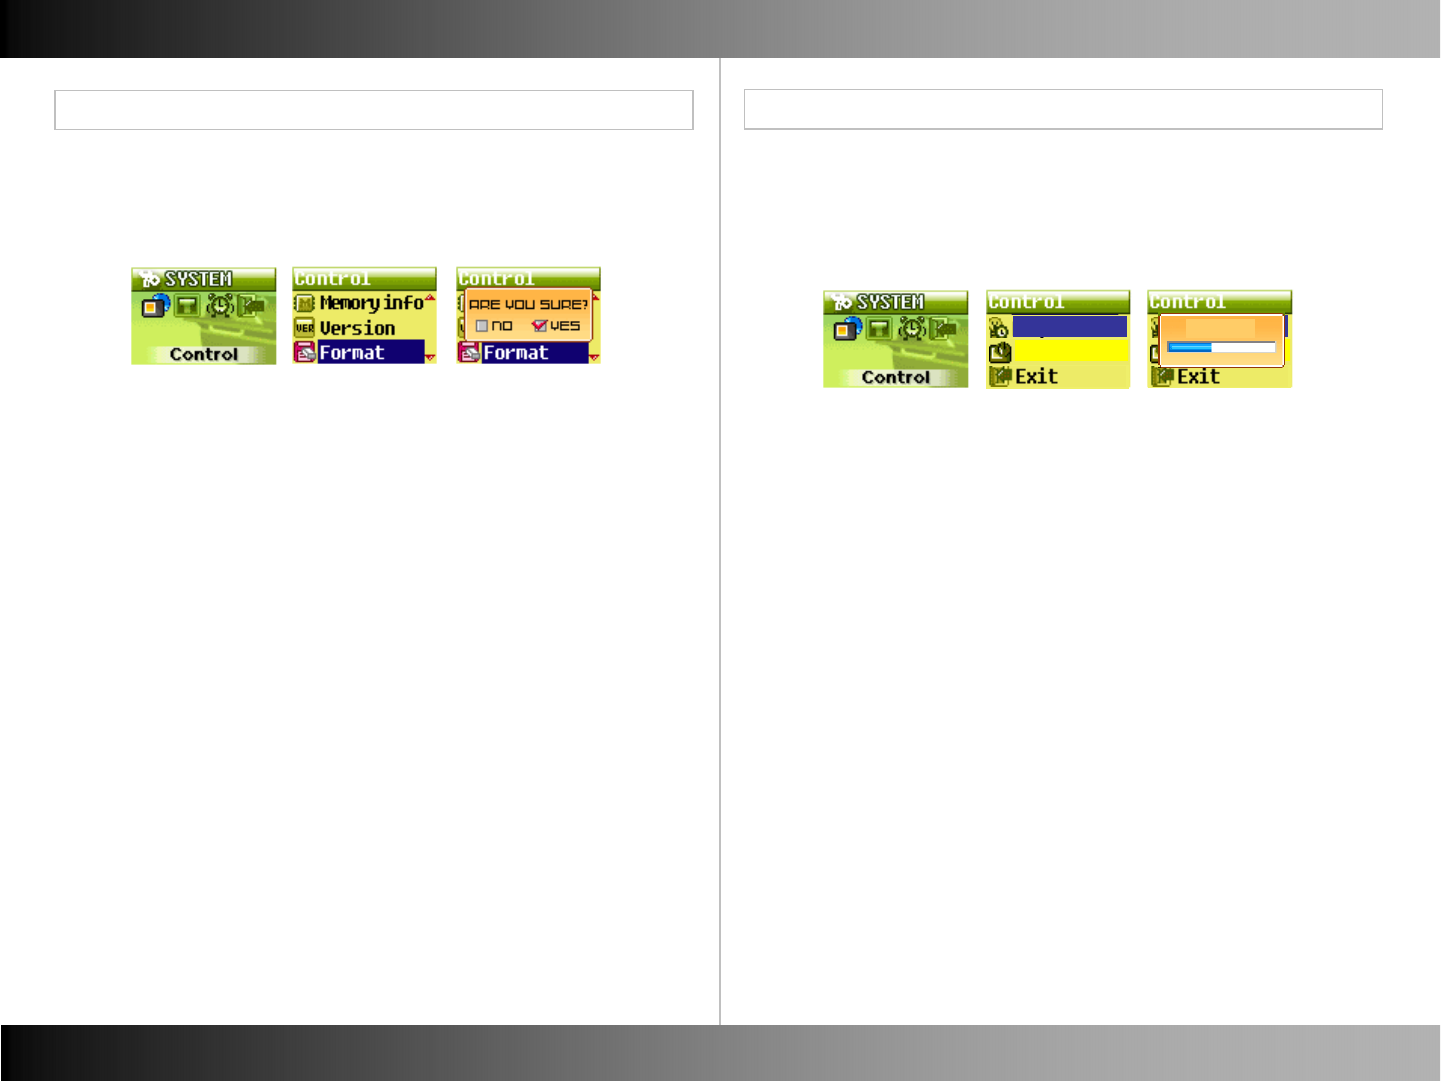
■Format ■ Screen Saver
Control Menu
Control Menu
- You can format the flash memory to erase all stored files. - You can set the amount of time the backlight time stays on after
a key press. The range is from 0 sec to 60 sec.
Screen saver
Reset
Screen saver
Initial
sec
57 58
System Manager
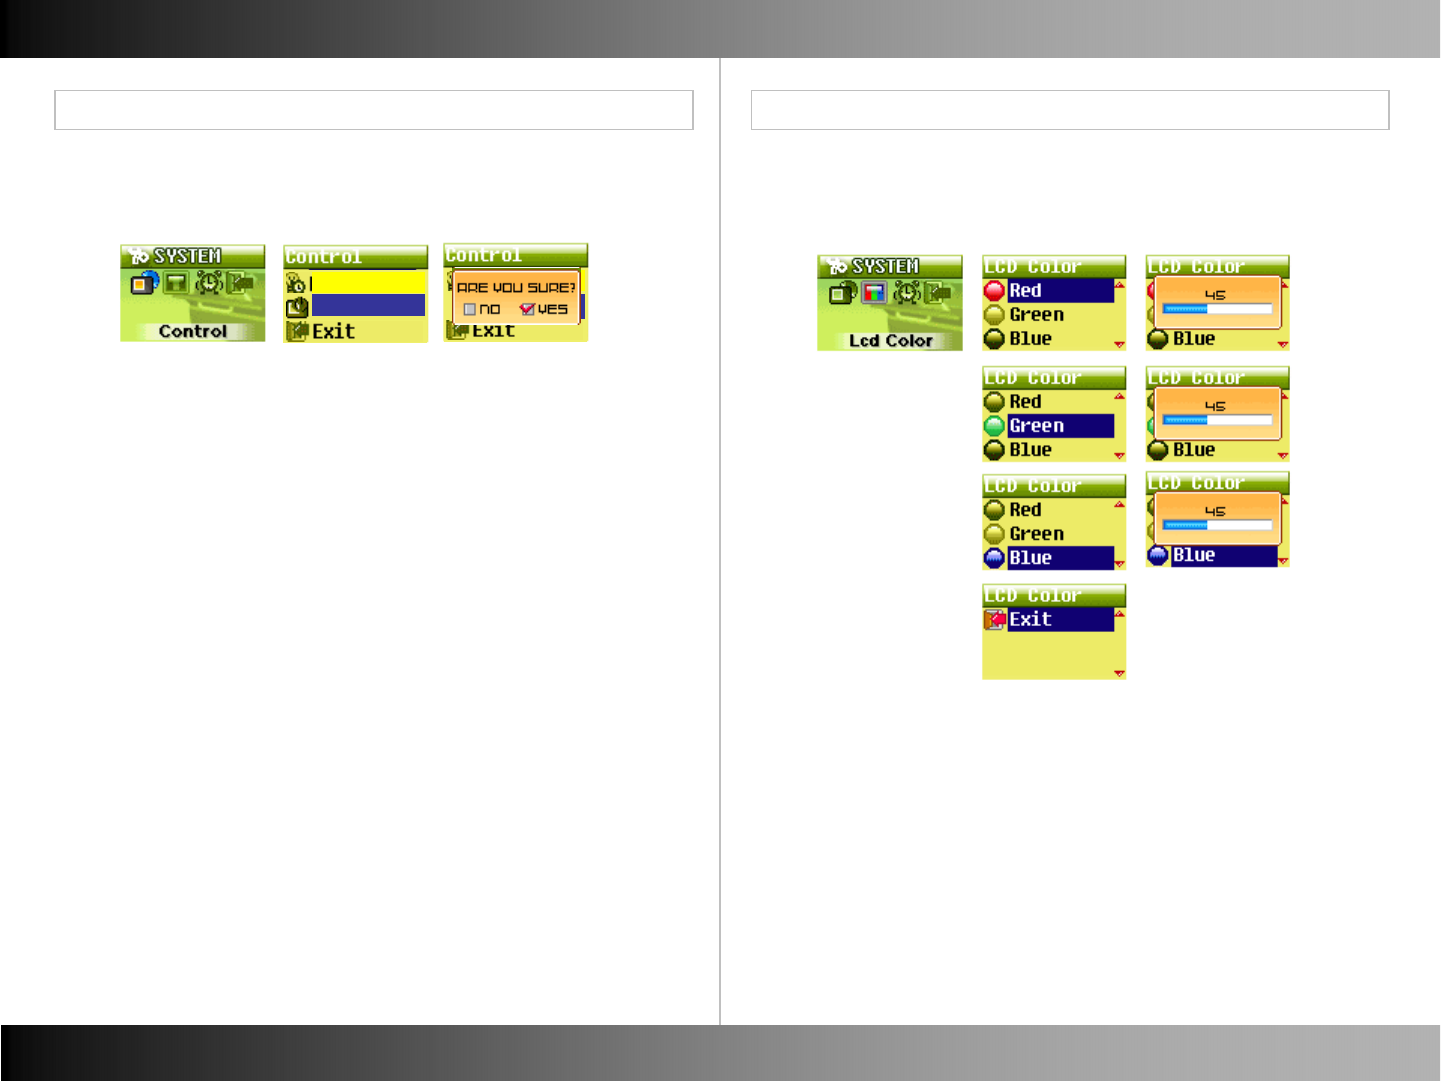
■Reset
Control Menu Control Menu
■LCD Color
System Manager
- You can adjust LCD Color each as Red, Green, Blue parts.
59 60
Screen saver
Reset
Screen saver
Initial
sec
Screen saver
Initial
System Manager
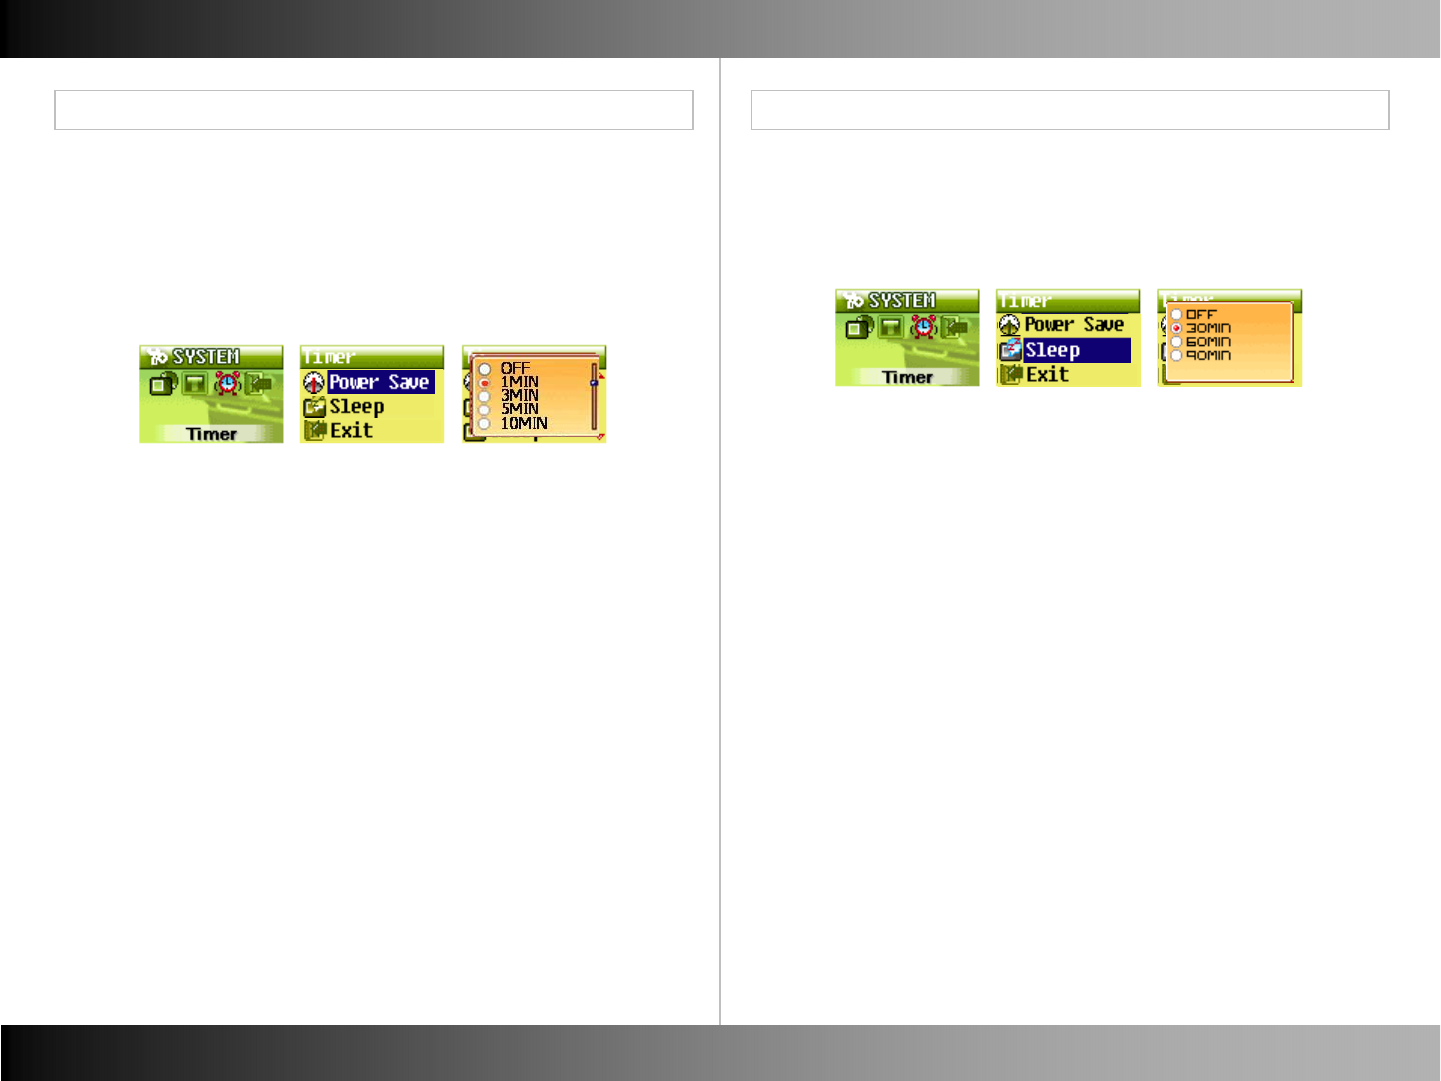
■ Power Save
Timer Menu Timer Menu
■ Sleep
System Manager
- You can set the player to automatically turn off if the player isn’t
playing any music.
- It is just for Music Mode.
- You can set the player to sleep automatically.
- The music will turn off even if the player is playing off.
61 62