Mustek Systems MBTA120 Bluetooth User Manual
Mustek Systems Inc Bluetooth
User manual
Quick Guide
Stereo Headset and Audio Dongle
82-156-00070
EN
DE
FR
IT
ES
NL
PT
SW
DK
FI
TU
PLGR
RU
2Bluetooth Headset & Dongle User Guide
EN
Model No.: MBT-A120
Model No.: MBT-S120
This device complies with part 15 of the FCC rules. Operation is
subject to the following two conditions:
(1) This device may not cause harmful interference.
(2) This device must accept any interference received, including
interference that may cause undesired operation.
Any changes or modications not expressly approved by the
party responsible for compliance could void the authority to
operate equipment.
Tested To Comply With FCC Standards
FOR HOME OR OFFICE USE
FCC ID: HWF-MBTA120
FCC ID: HWF-MBTS120
This symbol on the product or in the instructions means that your electrical and electronic equipment should be disposed at
the end of its life separately from your household waste. There are separate collection systems for recycling in the EU.
For more information, please contact the local authority or your retailer where you purchased the product.
Das Symbol “Mülltonne durchgestrichen” auf dem Produkt bzw. in der Gebrauchsanweisung weist daraufhin, dass Elektro-
und Elektronikgeräte separat vom Hausmüll gesammelt und entsorgt werden müssen. In der EU stehen verschiedene
Sammlungssysteme zur Rücknahme und Wiederverwertung zur Verfügung.
Für weitere Informationen wenden Sie sich bitte an die örtlichen Behörden bzw. an Ihren Händler.
Ce symbole qui apparaît sur le produit ou dans les instructions signie que votre appareil électrique ou électronique,
lorsqu’il ne fonctionne plus, doit être jeté séparément de vos déchets ménagers. En Europe, il existe différents systèmes
de collecte pour le recyclage.
Pour de plus amples informations, contactez l’autorité locale ou le revendeur auprès duquel vous avez acheté le produit.
Questo simbolo sul prodotto o nelle istruzioni signica che l’apparecchiatura elettrica ed elettronica va smaltita, alla ne del
suo ciclo di durata, separatamente dai riuti domestici.
Nell’UE esistono sistemi di raccolta separati per il riciclaggio.
Per maggiori informazioni, rivolgersi all’autorità locale o al dettagliante presso il quale il prodotto è stato acquistato.
Este símbolo que puede aparecer en el producto o en las instrucciones indica que el aparato electrónico o eléctrico no
deberá desecharse al nal de su vida con el resto de los desechos domésticos sino por separado.
En la UE existen sistemas de recogida selectiva para el reciclado.
Para más información, póngase en contacto con las autoridades locales o el comercio donde haya adquirido el producto.
3
Bluetooth Headset & Dongle User Guide
EN
This symbol on the product or in the instructions means that your electrical and electronic equipment should be disposed at
the end of its life separately from your household waste. There are separate collection systems for recycling in the EU.
For more information, please contact the local authority or your retailer where you purchased the product.
Das Symbol “Mülltonne durchgestrichen” auf dem Produkt bzw. in der Gebrauchsanweisung weist daraufhin, dass Elektro-
und Elektronikgeräte separat vom Hausmüll gesammelt und entsorgt werden müssen. In der EU stehen verschiedene
Sammlungssysteme zur Rücknahme und Wiederverwertung zur Verfügung.
Für weitere Informationen wenden Sie sich bitte an die örtlichen Behörden bzw. an Ihren Händler.
Ce symbole qui apparaît sur le produit ou dans les instructions signie que votre appareil électrique ou électronique,
lorsqu’il ne fonctionne plus, doit être jeté séparément de vos déchets ménagers. En Europe, il existe différents systèmes
de collecte pour le recyclage.
Pour de plus amples informations, contactez l’autorité locale ou le revendeur auprès duquel vous avez acheté le produit.
Questo simbolo sul prodotto o nelle istruzioni signica che l’apparecchiatura elettrica ed elettronica va smaltita, alla ne del
suo ciclo di durata, separatamente dai riuti domestici.
Nell’UE esistono sistemi di raccolta separati per il riciclaggio.
Per maggiori informazioni, rivolgersi all’autorità locale o al dettagliante presso il quale il prodotto è stato acquistato.
Este símbolo que puede aparecer en el producto o en las instrucciones indica que el aparato electrónico o eléctrico no
deberá desecharse al nal de su vida con el resto de los desechos domésticos sino por separado.
En la UE existen sistemas de recogida selectiva para el reciclado.
Para más información, póngase en contacto con las autoridades locales o el comercio donde haya adquirido el producto.
Dit symbool op het product of de handleiding betekent dat u elektrische en elektronische apparatuur aan het einde van de levensduur,
gescheiden van huishoudelijk afval moet weggooien. Er zijn afzonderlijke inzamelsystemen voor recyclage in de EU.
Neem contact op met uw lokale instanties of met de verkoper waar u het product hebt gekocht voor meer informatie.
Este símbolo presente no produto ou nas instruções signica que o seu equipamento eléctrico ou electrónico deve ser eliminado no
m da sua vida útil mas separadamente do lixo doméstico. Existem diferentes sistemas de recolha para reciclagem na EU.
Para mais informações, contacte as entidades locais ou o vendedor junto do qual comprou o seu produto.
Den här symbolen på produkten eller i instruktionerna betyder att den elektriska och elektroniska utrustningen ska slängas separat från
annat hushållsavfall när den inte fungerar längre. Inom EU nns separata återvinningssystem för avfall.
Kontakta lokala myndigheter eller din återförsäljare för mer information.
Dette symbol på produktet eller i vejledningen betyder, at det udtjente elektriske eller elektroniske udstyr ikke må bortskaffes sammen
med husholdningsaffald. I EU-lande ndes der separate indsamlingssystemer til genbrug.
Kontakt de lokale myndigheder eller forhandleren for at få yderligere information.
Tämä tuotteeseen tai ohjeisiin merkitty symboli tarkoittaa, että sähkölaitteet ja elektroniikka on hävitettävä käyttöikänsä päättyessä
erillään kotitalousjätteestä. EU:ssa on kierrätystä varten erilliset keruujärjestelmät.
Jos haluat lisätietoja, ota yhteys paikallisiin viranomaisiin tai tuotteen myyneeseen liikkeeseen.
Üründeki veya talimatlardaki bu iþaret elektrikli ve elektronik cihazýnýzýn kullaným ömrü sona erdiðinde cihazýn ev çöplerinden ayrý
olarak atýlmasý gerektiði anlamýna gelmektedir. AB’de yeniden iþlemek için ayrý toplama sistemleri bulunmaktadýr.
Ayrýntýlý bilgi için lütfen yerel yetkili veya ürünü satýn aldýðýnýz bayi ile temasa geçiniz.
Niniejszy symbol na produkcie lub w instrukcji oznacza, że po zakończeniu eksploatacji urządzenia elektrycznego lub elektronicznego
nie należy wyrzucać go razem z innymi odpadami domowymi. W krajach UE istnieją oddzielne systemy gromadzenia i utylizacji tego
typu odpadów.
Dodatkowe informacje można uzyskać od władz lokalnych lub w punkcie zakupu tego produktu.
Αυτό το σύμβολο στο προϊόν ή στις οδηγίες σημαίνει πως η ηλεκτρική και ηλεκτρονική σας συσκευή θα πρέπει να απορριφθεί στο τέλος
της ζωής της ξεχωριστά από τα οικιακά σας απορρίμματα. Στην ΕΕ υπάρχουν ξεχωριστά συστήματα συλλογής για την ανακύκλωση.
Για περισσότερες πληροφορίες, παρακαλούμε επικοινωνήστε με τις τοπικές αρχές ή με το κατάστημα στο οποίο αγοράσατε το προϊόν.
Данный символ на изделии или в инструкциях означает, что указанное электрическое или электронное
оборудование необходимо утилизировать по окончании срока службы отдельно от бытовых отходов. В ЕС
применяются раздельные системы сбора для переработки.
За дополнительной информацией обращайтесь в местные органы власти или к продавцу, у которого было
приобретено изделие.
Model No.: MBT-A120
Model No.: MBT-S120
This device complies with part 15 of the FCC rules. Operation is subject to the fol-
lowing two conditions:
(1) This device may not cause harmful interference.
(2) This device must accept any interference received, including interference that
may cause undesired operation.
Any changes or modifi cations not expressly approved by the party responsible for
compliance could void the authority to operate equipment.
FCC ID: HWF-MBTA120
FCC ID: HWF-MBTS120
FEDERAL COMMUNICATIONS COMMISSION INTERFERENCE STATEMENT
This equipment has been tested and found to comply with the limits for a Class B
digital device, pursuant to Part 15 of the FCC Rules. These limits are designed to
provide reasonable protection against harmful interference in a residential installation.
This equipment generates, uses and can radiate radio frequency energy and, if not
installed and used in accordance with the instructions, may cause harmful interference
to radio communications. However, there is no guarantee that interference will not
occur in a particular installation. If this equipment does cause harmful interference to
radio or television reception, which can be determined by turning the equipment off
and on, the user is encouraged to try to correct the interference by one or more of the
following measures:
82-156-00090

--Reorient or relocate the receiving antenna.
--Increase the separation between the equipment and receiver.
--Connect the equipment into an outlet on a circuit different from that to which the
receiver is connected.
--Consult the dealer or an experienced radio/TV technician for help.
CAUTION:
Any changes or modifi cations not expressly approved by the grantee of this device
could void the user's authority to operate the equipment.
RF EXPOSURE WARNING:
The equipment complies with FCC RF exposure
limits set forth for an uncontrolled environment.
The equipment must not be co-located or operating in conjunction with any other
antenna or transmitter.
3
Bluetooth Headset & Dongle User Guide
EN
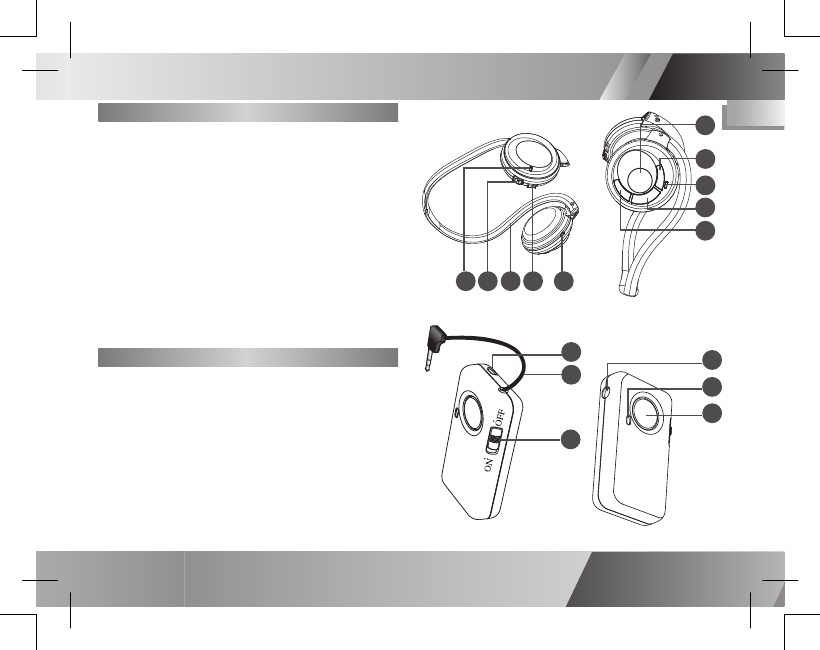
Identifying the Parts
Headset
1 LED Indicator
2 Power Switch
3 Behind-the-neck Band
4 DC-In Jack
5 Microphone
6 Talk/Pairing Button
7 Volume Up Button
8 LED Indicator
9 Stop Button
10 Volume Down Button
9
10
6
1 25
4
5
4
3
2
1
Dongle
1 Strap Holder
2 Audio-In Connector
3 Power Switch
4 DC-In Jack
5 LED Indicator
6 Pairing Button
3
7
8
6
Bluetooth Headphone & Dongle User Guide
4
EN
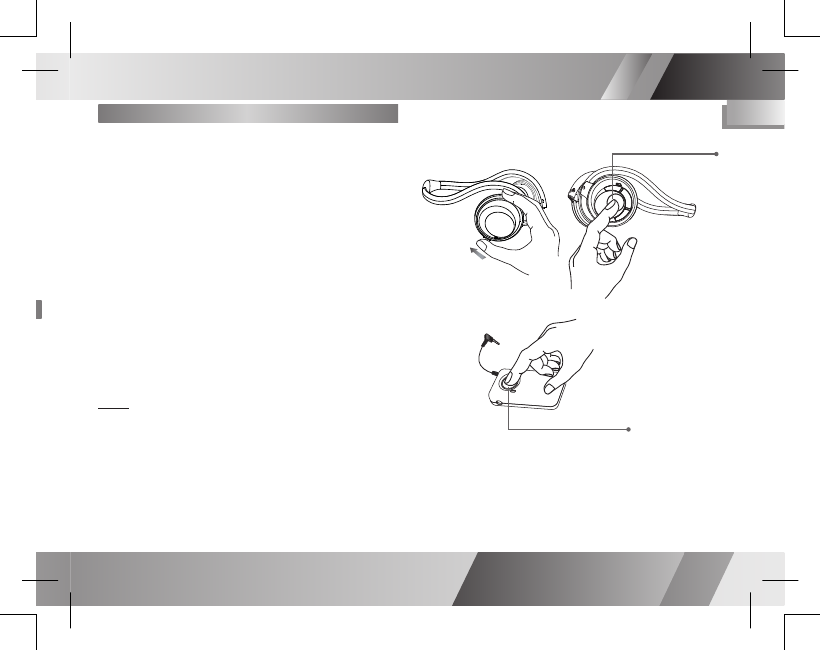
Pairing the Headset and Dongle
1 Press and hold the TALK/PAIRING
button on the headset and then
slide the power switch to power it on.
2 Power on the dongle and then press
the PAIRING button to start pairing.
3 Release the buttons when the LEDs
ash red and blue alternatively. (Now
they are in pairing mode.)
4 The LEDs ash blue once per second
when the devices are successfully
paired.
Note:
If the pairing fails, power off both the devices and
repeat steps 1~2 until the pairing succeeds.
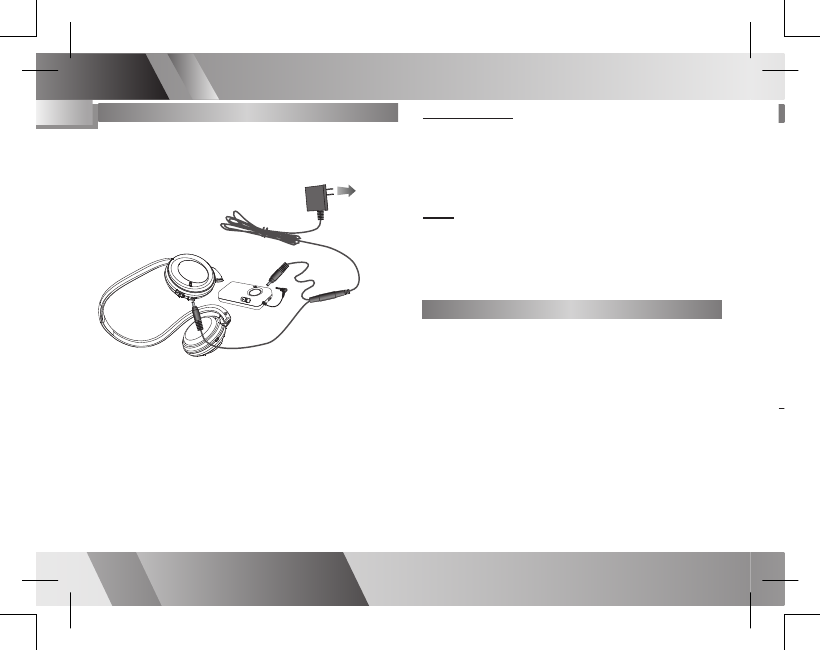
• Connect the split ends of the supplied
AC adapter (5V/0.5A) to the DC-IN
jacks of the headset and the dongle.
Connect the other end to a wall outlet.
• The LED indicator will light RED when
charging.
• The LED indicator will TURN OFF when
batteries are fully charged.
Charging
To Power Outlet
Low battery
When the battery is low, the LED indicator
will ash red. Please charge the battery
for approximately 3 hours.
Note:
Do not use the headset or dongle while charging,
and do not connect the AC Adapter while the
headset or dongle is in use.
Please charge the built-in battery for 5 hours
before initial use.
Slide the power switch to power on/off the
headset and dongle. The LED indicator
ashes blue when the power is ON.
Power on/off
Preparation
Bluetooth Headphone & Dongle User Guide
5
EN
Pairing the Headset and Dongle
1 Press and hold the TALK/PAIRING
button on the headset and then
slide the power switch to power it on.
2 Power on the dongle and then press
the PAIRING button to start pairing.
3 Release the buttons when the LEDs
ash red and blue alternatively. (Now
they are in pairing mode.)
4 The LEDs ash blue once per second
when the devices are successfully
paired.
Note:
If the pairing fails, power off both the devices and
repeat steps 1~2 until the pairing succeeds.
Low battery
When the battery is low, the LED indicator
will ash red. Please charge the battery
for approximately 3 hours.
Note:
Do not use the headset or dongle while charging,
and do not connect the AC Adapter while the
headset or dongle is in use.
Press PAIRING button
Press TALK/PAIRING button
Slide the power switch to power on/off the
headset and dongle. The LED indicator
ashes blue when the power is ON.
Pairing
Bluetooth Headphone & Dongle User Guide
6
EN
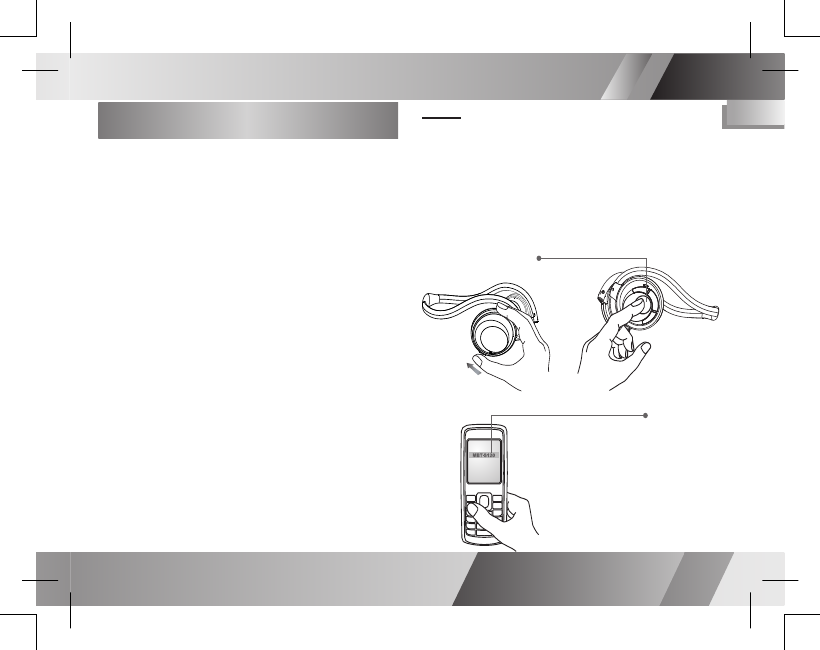
Pairing the Headset and a Mobile
Phone
1 Press and hold the TALK/PAIRING
button on the headset and then
power on the headset.
2 Release the button when the LED
ashes red and blue alternatively.
3 The headset is now in pairing
mode and is ready to pair with your
bluetooth mobile phone.
4 Use your bluetooth mobile phone to
start searching for bluetooth audio
devices.
5 Select “MBT-S120” in the mobile
phone display when the headset is
found.
6 The phone will ask for a pin code,
enter: 0000.
7 The LED indicator ashes blue
once every 2 seconds when both
the headset and mobile phone are
successfully paired.
Make sure the headset and dongle have
been paired successfully before playing
music.
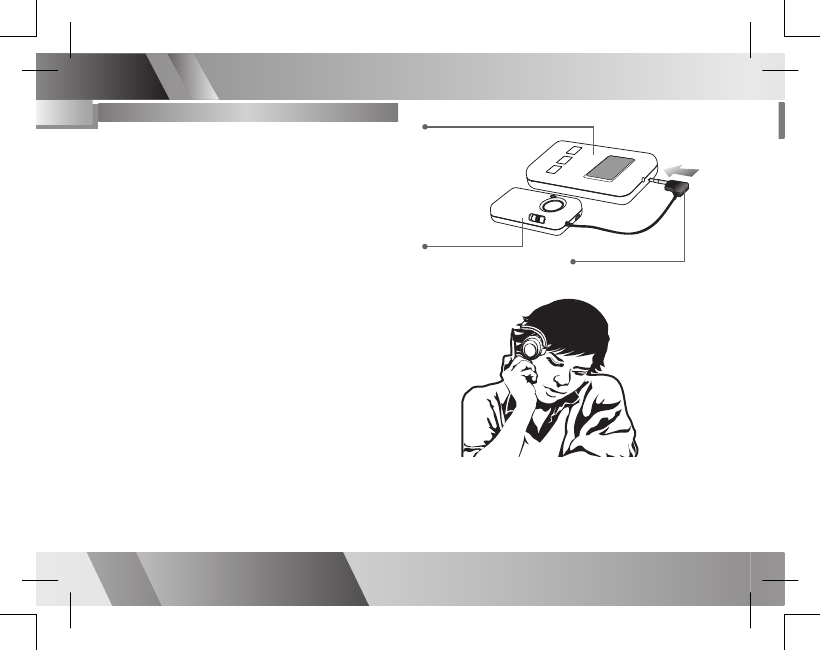
1 Connect the dongle’s AUDIO-IN
connector into a music player,
walkman or CD player.
2 Power on the dongle, headset and
music player.
3 Play the music player and the music
will be heard on the headset.
4 To stop the music, press the
PAIRING button on the dongle.
5 To play the music again, press the
PAIRING button on the dongle.
Listening to the Music Music Player (Example Only)
Audio Dongle
Audio-In Connector
Using Your Dongle
Bluetooth Headphone & Dongle User Guide
7
EN
Pairing the Headset and a Mobile
Phone
1 Press and hold the TALK/PAIRING
button on the headset and then
power on the headset.
2 Release the button when the LED
ashes red and blue alternatively.
3 The headset is now in pairing
mode and is ready to pair with your
bluetooth mobile phone.
4 Use your bluetooth mobile phone to
start searching for bluetooth audio
devices.
5 Select “MBT-S120” in the mobile
phone display when the headset is
found.
6 The phone will ask for a pin code,
enter: 0000.
7 The LED indicator ashes blue
once every 2 seconds when both
the headset and mobile phone are
successfully paired.
Notes:
1) Your headset can save the pairing
information
of up to 8 phones, but connect to only one phone
at a
time.
2) The mobile phone may provide the function
of changing the headset’s name. “MBT-S120“
can be replaced by the name that you prefer.
Press TALK/PAIRING button
Select MBT-S120 in the display
Pairing
Bluetooth Headphone & Dongle User Guide
8
EN
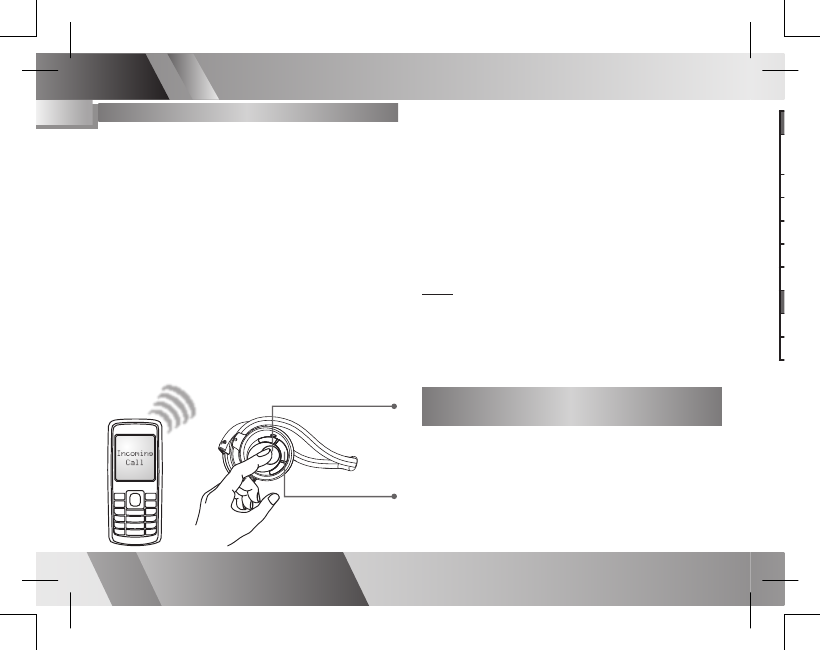
Using the Headset
Make a Call
Use the phone’s keypad to dial the phone
number that you want to call.
Answer a Call
When receiving a call, you will hear a
ring tone through the headset. Press the
TALK/PAIRING button to answer the call.
End a Call
Press the STOP button on the headset or
the end-call button on the mobile phone to
end a call.
Receiving or Making a Call While
Listening to the Music
The headset enables an auto-switching
function. Once you receive or make a call
during music playback, you can hear the
ring or dial tone from the headset. When the
call ends, the music will resume.
Using Your Headset
Press TALK/PAIRING
button to answer a call
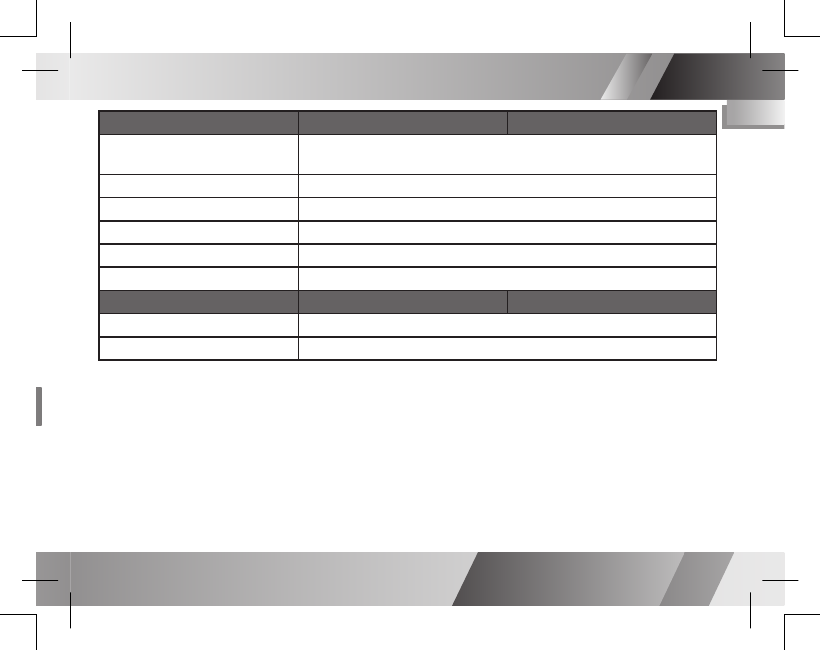
Status
Headset Left Ear LED
Dongle
Pairing Flashes blue and red alternatively until the pairing is complete or
time out (within 60 seconds)
Connecting
Flashes blue twice per second
Connected (to mobile phone) Flashes blue once every 2 seconds (headset only)
Connected Flashes blue once per second
Idle (pairing fails) Flashes blue once every 3 seconds
Battery low Flashes red
Status
Headset Right Ear LED
Dongle
Charging
Light red
Battery Full
Light out
Redial the Last Call
Press and hold the STOP button on the
headset for approximately 2 seconds to
redial the last number.
Make a Voice Dial
Press and hold the TALK/PAIRING button
until you hear a tone, then speak a voice
tag to make a voice dial.
Note:
Make sure your mobile phone supports voice dial-
ing function and you have already recorded the
voice tag befor operating.
Press STOP button to
end a call
Bluetooth Headphone & Dongle User Guide
9
EN
Receiving or Making a Call While
Listening to the Music
The headset enables an auto-switching
function. Once you receive or make a call
during music playback, you can hear the
ring or dial tone from the headset. When the
call ends, the music will resume.
LED Indicators
Status
Headset Left Ear LED
Dongle
Pairing Flashes blue and red alternatively until the pairing is complete or
time out (within 60 seconds)
Connecting
Flashes blue twice per second
Connected (to mobile phone) Flashes blue once every 2 seconds (headset only)
Connected Flashes blue once per second
Idle (pairing fails) Flashes blue once every 3 seconds
Battery low Flashes red
Status
Headset Right Ear LED
Dongle
Charging
Light red
Battery Full
Light out
Redial the Last Call
Press and hold the STOP button on the
headset for approximately 2 seconds to
redial the last number.
Make a Voice Dial
Press and hold the TALK/PAIRING button
until you hear a tone, then speak a voice
tag to make a voice dial.
Note:
Make sure your mobile phone supports voice dial-
ing function and you have already recorded the
voice tag befor operating.