User Manual
www.nayaxvend.com
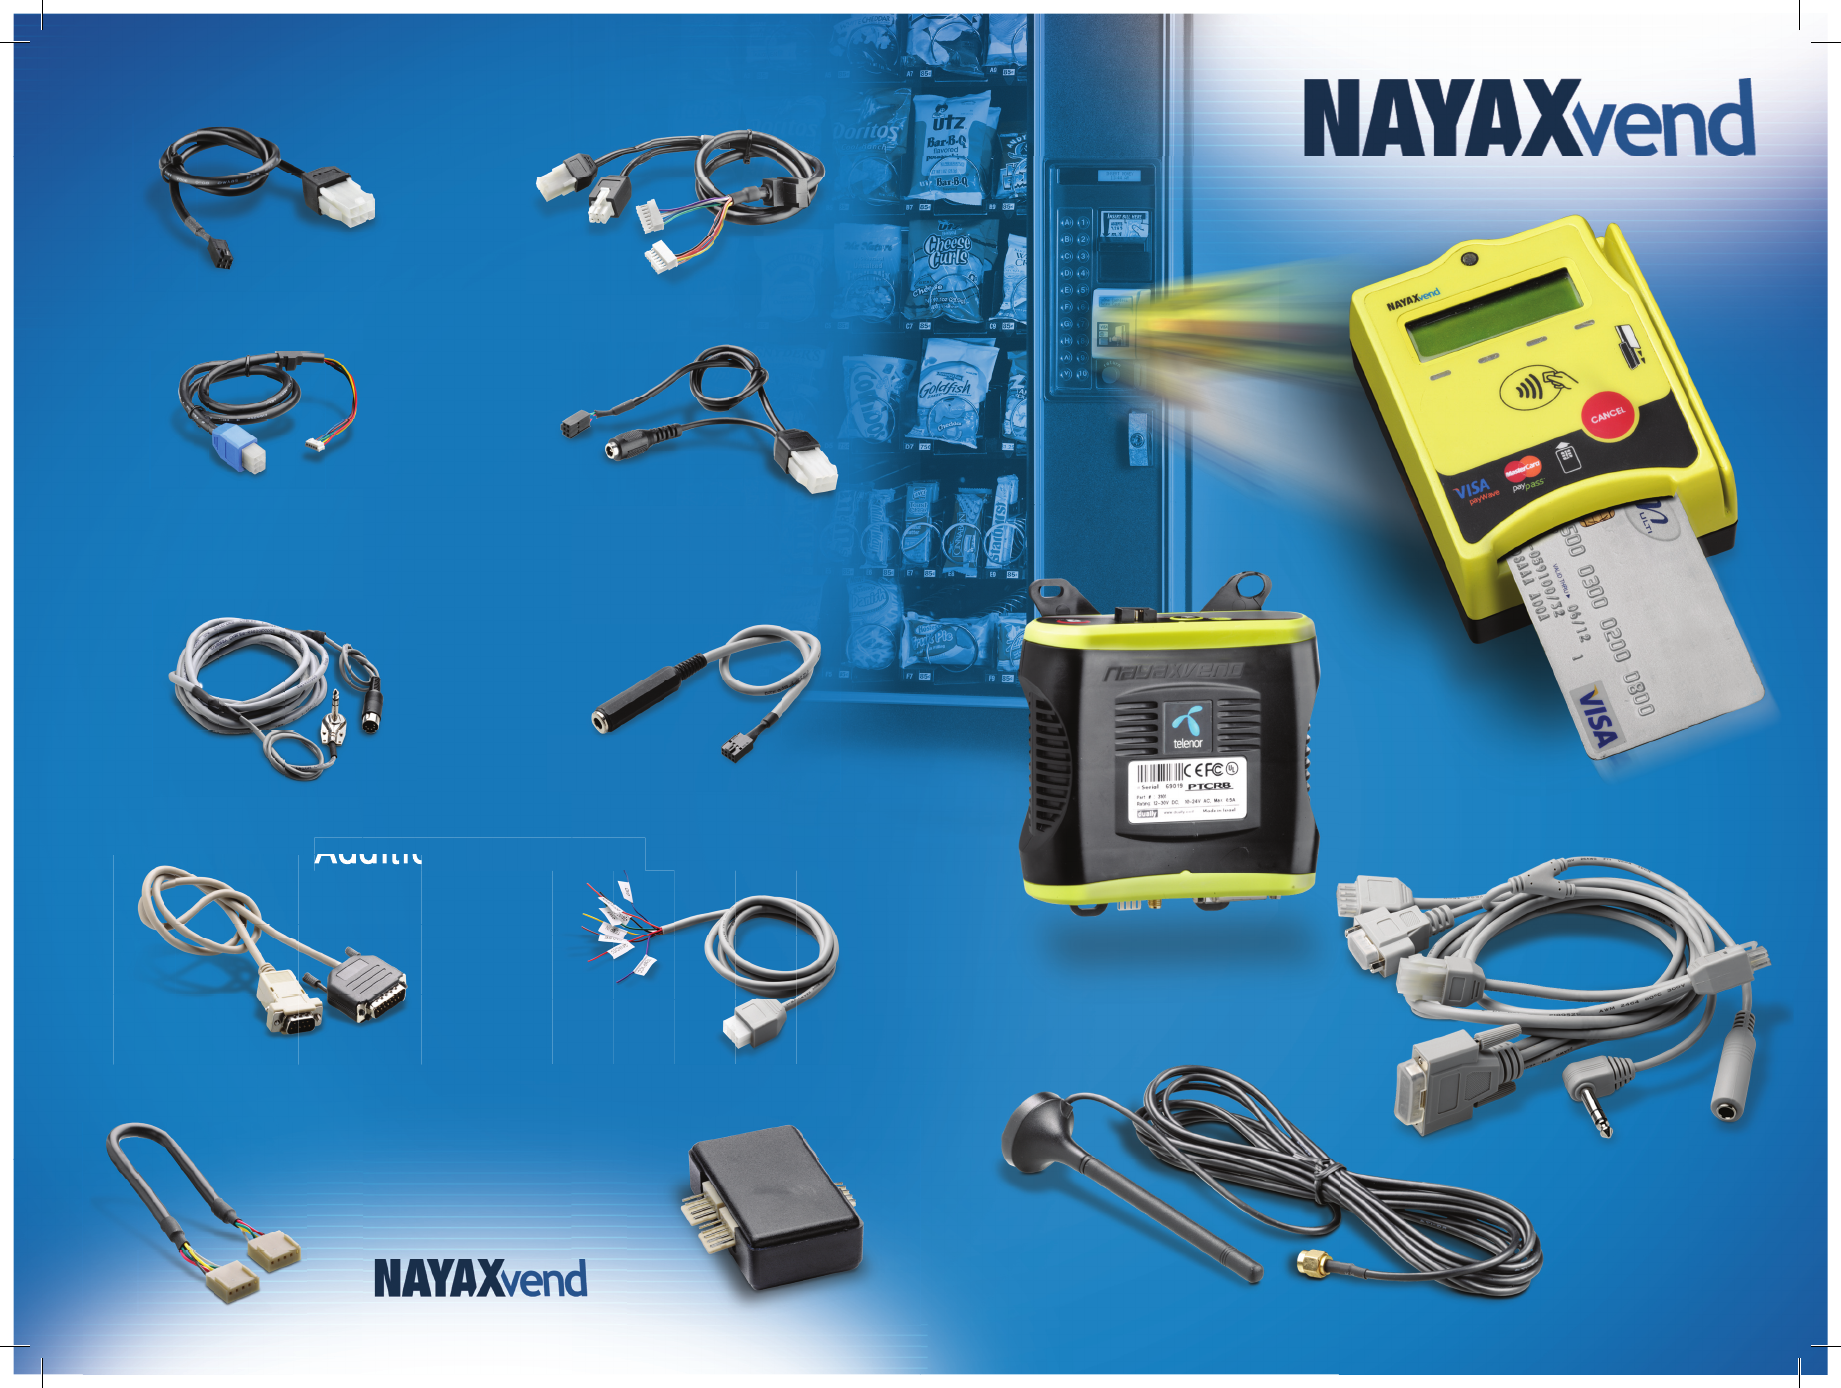
MDB Peripheral Cables
DEX Adaptor Cables
Additional Adaptors
P/N: 3108
MDB Peripheral Adaptor Cable
For MEI CF690 Coin Mechanism
P/N: 3113
MDB Peripheral Adaptor Cable
For CoinCo - Global 2 Coin Mechanism
P/N: 3111
MDB Peripheral Adaptor Cable
For MEI CF7xxx Series Coin Mechanism
P/N: 3109
MDB Peripheral Adaptor Cable
For MEI CF694 Coin Mechanism
P/N: 3118
DEX Adaptor Cable
For Jofemar Machines
P/N: 3110
DEX Adaptor Cable
For MEI CF690/CF694 Coin Mechanism
Additional Adaptors
P/N: 3105
Cashless Adaptor Cable
For Jofemar Machines
P/N: 3116
Adaptor Cable For :
Pulse / Door Switch / Temperature Probe
P/N: 3107
Dual Reader Adaptor Cable P/N: 3107
Dual Reader
Adaptor
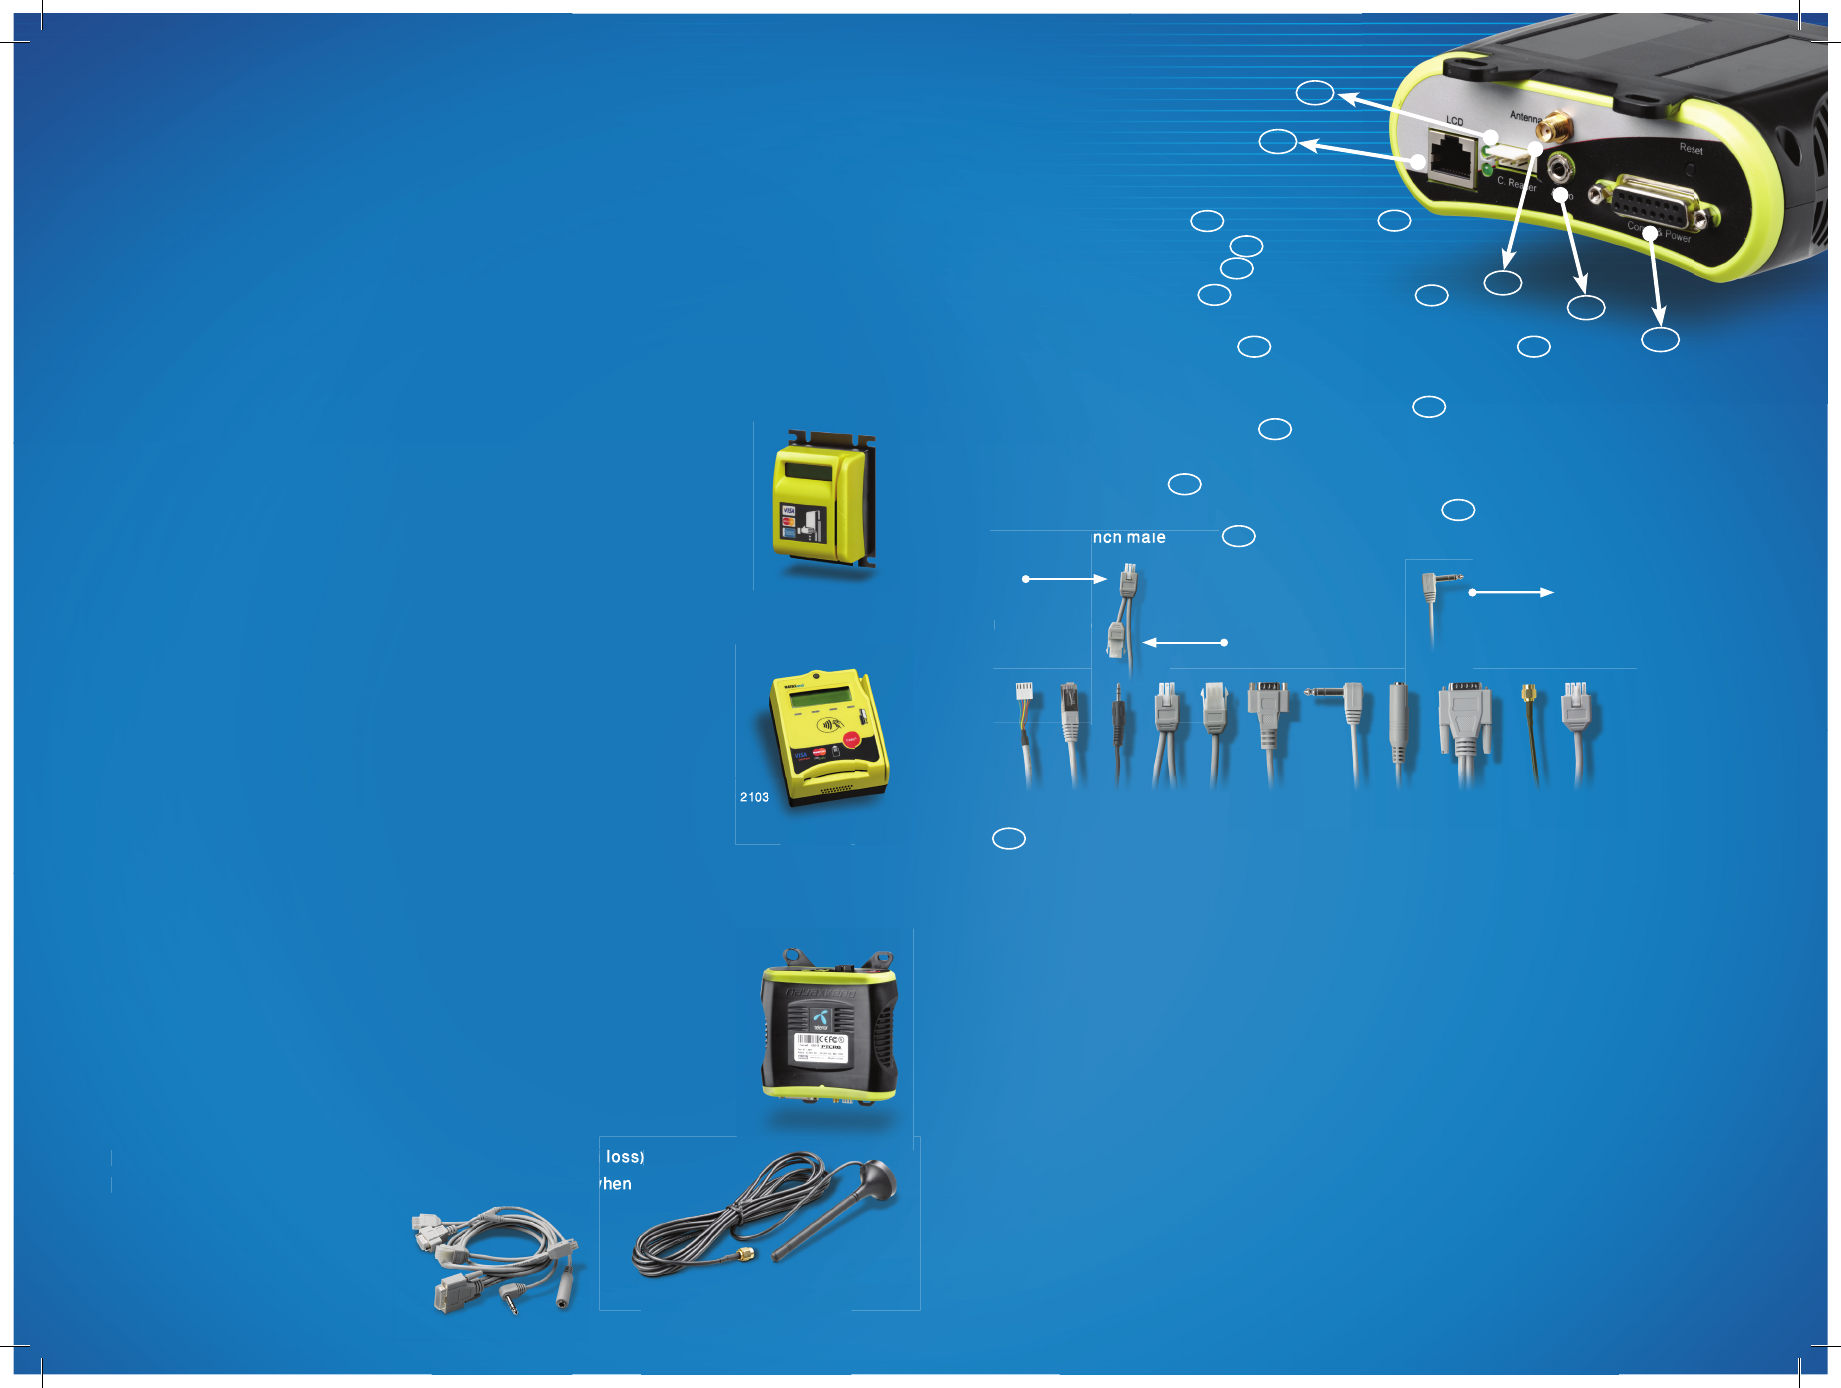
171611 14109 13 1512 19
18
Once all purchases are successfully completed the unit is fully installed and ready for use!
Cable Connections
1. Connect Bezel cables to Wireless module:
- LCD RJ45 connector #10 to LCD RJ45 Plug #1
- Card Reader white Molex #9 to Card Reader
5 pin Molex Connector #2
- Speaker 3.5mm Jack #11 to 3.5mm Audio Plug #3
2. Connect Antenna to Wireless module:
- SMA Screw on Connector #18 to SMA Screw on Connector #4
3. Connect MDB Cable to Vending Machine Controller*(VMC) and Coin Mech. :
- Connect DB15 Comm. & Power Male Connector #17 to DB15 Comm.
& Power Female Connector #5
- Sever Connection Between VMC and Coin Mech.
- MDB Male Molex #12 to VMCs MDB female Molex
- Coin Mech. MDB Male Molex to MDB female Molex #13
- DEX 1/4 inch male Jack #15 to VMCs DEX 1/4 female plug
Connect to
VMC MDB cable
- DEX 1/4 inch male Jack
VMC MDB cable
Connect to
Coinmech MDB cable
DEX cable
male jack
Connect to
Machine DEX port
19 8 Pin Molex for Connection of the Pulse / Door Switch / Temperature Probe Adaptor cable
Installation Guide
Prior to installation make sure you perform the following:
1. Check machine model and protocol:
- With MDB Protocol the connection is between the VMC and the coinmech
- Executive Protocol requires MDB Peripheral cable (see separate installation instructions)
- Mechanical Protocol requires MDB Peripheral cable and 12v DC Power Adaptor
(see separate installation instructions)
2. Check that the machine software supports card readers
3. Make sure the cable length is sufficient when choosing the installation position
4. Check for DEX plug or DDCMP connector
5. Check that all parts of cashless unit are present (Wireless module, Bezel, MDB Cable, Antenna)
6. Make sure machine power is off
Card Reader – internal installation (Bill acceptor window):
- Locate and remove window cover
- Place the Card Reader from within the vending machin
- Fasten it with nuts
Card Reader – External Installation (Bill acceptor present or no acceptor window):
- Remove the back plate of the Card Reader by unscrewing the 4 bolts
- Locate a place on the external wall for the Card Reader
- Make sure the reader’s location will allow a successful card swipe
- Use back plate as a stencil to mark the 5 holes for drilling
- Use #4 drill bit to drill the 5 marked holes
- Use a cone shaped drill to widen the center hole
- Thread cables in the center hole
- Fasten Card Reader to machine with the 4 bolts that held the back plate
Wireless Module
Must be placed in a visible location with clear access to the buttons,
Make sure that the module position will not interfere with normal operation of the machine:
- Do NOT place module in a damp or refrigerated area
- Do NOT place module in a hot area (engine etc.)
- Do NOT expose module to outside moisture (e.g. rain)
- Place module with easy access to it in case part replacement is necessary.
Antenna (Magnetic mount)
- Locate internally avoid vandalism
- Locate externally to increase signal strength
- Make sure antenna is not surrounded by metal (reception loss)
- Make sure the antenna cord is not damaged or pinched when
the door is closed
MDB Cable - Gray Comm & Power
Operating and Testing
1. Turn machine On
- Make sure products are present before the vend test
- Make sure prices are setup before the vend test
- Make sure door switch does not inhibit the machine's work state
2. Once Machine is powered up, a system Self-Test is automatically initiated, performing:
- SIM Card check
- GPRS Communication check
- Server Connectivity check
3. Once the LCD displays "Swipe Card / Dial" - Swipe card for testing purposes.
"Sound" and "Communication" check is performed.
4. Carry out trial purchases using the following methods:
- A Cash Purchase – check that charge price was correct
- A Credit Card Purchase - check that charge price was correct
- A Card Vend Cancel – check that credit is not retained on transaction cancel
P/N: 2101
P/N: 3101
P/N: 3103
- Make sure antenna is not surrounded by metal (reception loss)
- Make sure the antenna cord is not damaged or pinched when
P/N: 3102
P/N: 2103
P/N: 2103
1
2
435