NComputing X300 Multi-user Networking Card User Manual xtenda x300 manual
NComputing Co., Ltd. Multi-user Networking Card xtenda x300 manual
users manual
1
User’s guide for XtendaTM
(X300 Series)
© Copyright by Ncomputing Co. Ltd. 2004 . - Illegal copying of this software, hardware and this
documentation is prohibited by law. All other brand- and product names are trademarks of
registered trademarks of the respective owners.

2
Safety Instructions
The following instructions pertain to the risk of fire, electric shock or bodily injury.
Please read all of these instructions carefully.
- Do not use this system on an unstable cart, stand or table.
The product may fall, causing serious damage to the product.
- Slots and openings in the cabinet and the back have been provided for
ventilation. To ensure reliable operation of your computer, and to protect it
from overheating, do not block or cover these openings.
- Never push objects of any kind into the system through the cabinet
openings. Objects may touch dangerous voltage points or short out parts that
could result in a fire or electrical shock. Never spill liquid of any kind on the
product.
- This computer should only be connected to the adapter comes with your
system. If you want to use other adapter, consult your dealer.
- Do not allow anything to rest on the power cord. Do not locate this product
where people will walk on the cord.
- Unplug your system form the main electrical power outlet before cleaning.
Do not use liquid cleaners or aerosol cleaners. Use a damp cloth for
cleaning.
- Do not use this system near water.
- Your adapter plug will only fit into a grounding-type power outlet. This is a
safety feature. If you are unable to insert or replace your obsolete outlet,
contact your electrician to replace your obsolete outlet. Do not defeat the
purpose of the grounding-type plug.
- To avoid generating an electric shock, be sure to plug the power cord into
the system before plugging it into the wall socket.
- For protection of your system and other devices during a lightning storm, or
when it is left unattended and unused for long periods of time, unplug the
computer and other devices form the wall outlet and disconnect the cable
form system. This will prevent damage to the system and other devices due
to lighting and power line surges.
Warning

3
FCC Information to Use
Note : This equipment has been tested and found to comply with the limit for a
Class B digital device, pursuant 15 of the FCC Rules.
These limits are designed to provide reasonable protection against harmful
interference in a residential installation. This equipment generates, uses, and can
radiate radio frequency energy and, if not installed and used in accordance with the
instructions. May cause harmful interference to radio communications. However,
there is no guarantee that interference will not occur in a particular installation. IF
this equipment does cause harmful interference to radio or television reception,
which can be determined by turning the equipment off nad on, the user is encourage
to try to correct the interference by one or the following measures:
- Reorient or relocate the receiving antenna.
- Increase the separation between the equipment and receiver
- Connect the equipment into an outlet on a circuit different from that to
which the receiver is connected
- Consult the dealer or an experience radio TV technician for help
Change or modification not expressly approved by the party responsible for
Compliance could void the user’s authority to operate the equipment
For enhancing the performance and the reliability of our product, We recommend that a user use the FTP
or STP cable between X300 PCI Card and X300 Multi Box.

4
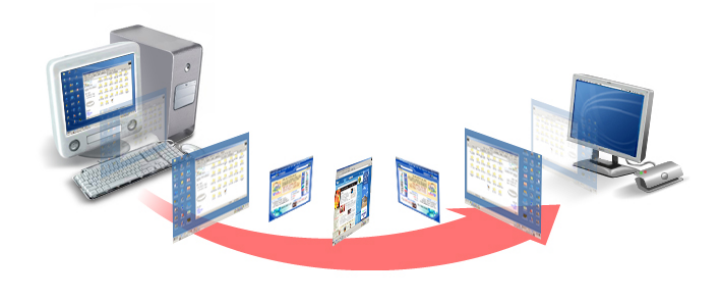
Introductions
What is XtendaTM ?
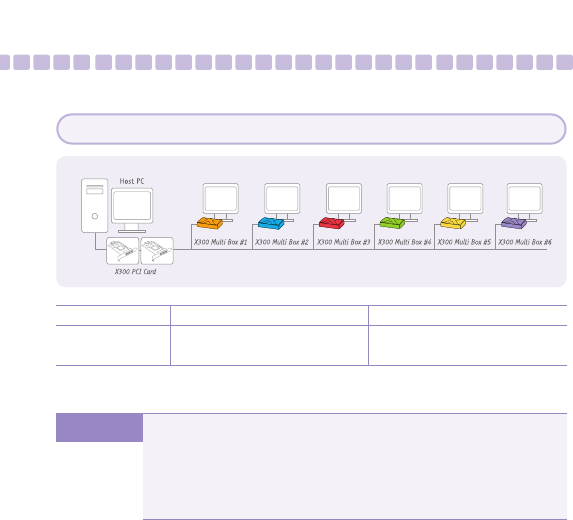
Xtenda X300 allows you to extend your computer for additional users without any
hassle. Instantly up to 7 users can use the computer simultaneously and independently.
NComputing’s patent-pending proprietary remote computing technologies including
SoC(System on Chip) based multi-user terminal processing, virtual termainal server
software and unique optimized protocol will scale efficiently your underutilized CPU
horsepower to share without sacrificing any speed.
Features of important chip
*** X300 PCI Card
z CPLD Device : ALTERA Cyclone EP1C6Q240
z PLD Device : ALTERA MAX EPM3128ATC100
z SDRAM : SAMSUNG K4S043232H-TC60
*** X300 Multi Box
z PLD Device : ALTERA MAX EPM3064ATC44
Features of I/O Ports
*** X300 PCI Card
z Three PC(RJ-45) Port
*** X300 Multi Box
z One PS/2 Type Keyboard
z One PS/2 Type Mouse
z One VGA Port
z One PC(RJ-45) Port
z One Speaker Jack
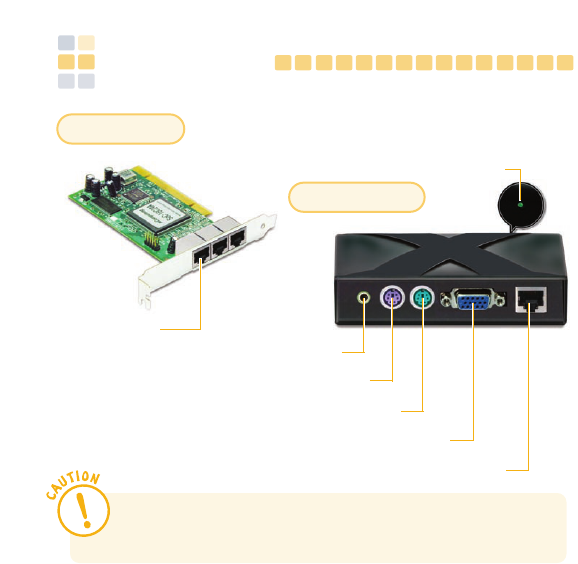
1
Speaker/Headphone Jack
PS/2 Keyboard Port
PS/2 Mouse Port
VGA Monitor Port
X300 PCI Card Connection Port
Power LED
X300 Multi Box
Connection Port
Overview
X300 PCI Card
X300 Multi Box
The X300 PCI Card ports are for connection with the X300 Multi Box only.
They are not LAN ports for generic Ethernet connections. Connecting generic LAN
devices may result in damage to the product .
※The product may vary depending on your model type.
2
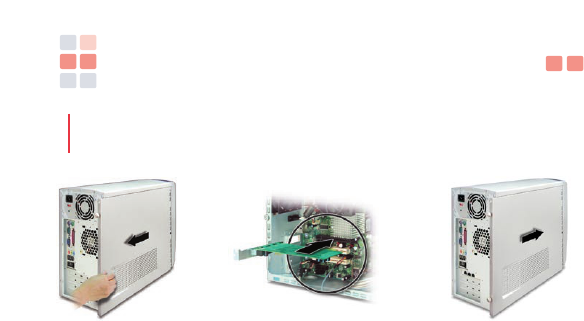
Installing the X300 PCI Card
Please follow the instructions below for installing the
X300 PCI Card in the Host PC:
1Disconnect all peripheral and power cables from the Host PC.
2
Remove the system cover of the Host PC.
3Find an available PCI slot for the installation of the X300 PCI Card.
Remove the slot cover.
4Insert the X300 PCI Card and secure the end of the card to the chassis with
a retaining screw.
5Replace the Host PC cover and reconnect all peripheral and power cables.
3
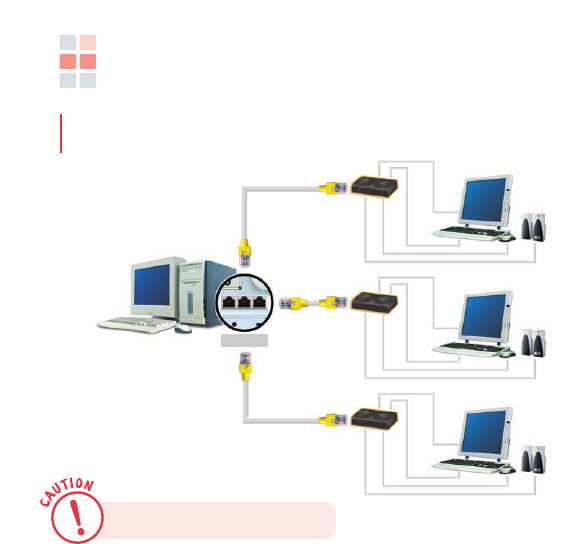
Connecting the X300 PCI Card to the X300 Multi Box
Please follow the instructions below for connecting
the X300 PCI Card to the X300 Multi Box:
Connect a PS/2 type keyboard, mouse,
speakers & monitor to the X300 Multi Box
Use a LAN cable to connect
the X300 PCI Card to the
X300 Multi Box.
Use speakers with built-in amplifier only.
Rear view

4
Recommended Specifications
- Windows® 2000 Professional
- Windows® XP Home Edition
- Windows® XP Professional
※Changes may be made to the list of supported Operating Systems without prior notice.
Operating Systems supported by the X300 PCI Card are as follows:
- Screen Resolution : 800 ×600, 1024 ×768
- Color Depth : 256 Color, 16 bit
- Refresh Rate : 60 Hz
Screen Resolutions Supported
A maximum of 2 X300 PCI Cards can be installed on a Host PC to support
6 X300 Multi Boxes. (Up to 3 X300 Multi Boxes can be connected to each X300 PCI Card.)
Maximum number of users per Host PC
5
▶Always ensure that the Host PC has adequate processing power.
Check the CPU and Memory requirements listed on the table above when
adding users.
▶Recommended specifications for connecting X300 Boxes may be changed
as enhancements are made to the functionality of the X300 PCI Card.
NOTE
※HT : IntelHyper-Threading Technology
※Actual minimum requirements may vary depending on the performance
and configuration of the Host PC.
Recommended Specifications for Using the X300 PCI Card and the X300 Multi Box
Xtenda 1 X300 PCI Card
(1~3 X300 Multi Box)
2 X300 PCI Card
(4~6 X300 Multi Box)
CPU and Memory
on Host PC
1.3GHz~2.4GHz(P4/HT)
512MB or more
2.4GHz~3.8GHz(P4/HT)
1GB or more
6
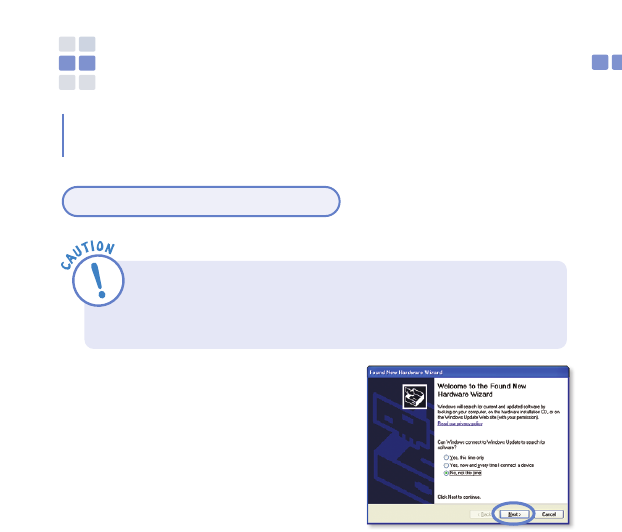
Verify that the X300 PCI Card is properly connected before
installing the Xtenda TS program.
Installing the XtendaTS Program
Verify that the LAN cable, PS/2 type keyboard/mouse, external monitor, and
speakers are connected to the X300 Multi Box before starting the computer.
Please note that the Xtenda X300 devices may not function properly if you start the
computer before the external devices are connected.
Start the computer. At the Windows initial
screen, select ‘Found New Hardware
Wizard’ and click the <Next> button.
1
Insert the ‘Software Installation CD’ into the CD-ROM drive.
2
Installing X300 PCI Card Driver
7
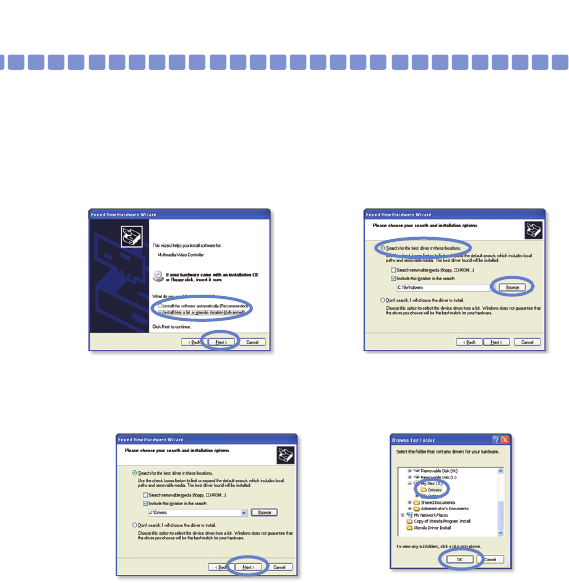
When prompted with the `Found New
Hardware Wizard' screen, select `Install
from a list orspecific location(Advanced)'
and click the <Next> button.
3
Under ‘Search for the best driver in
these locations,' select ‘Include
this location in the search’ and
click the <Browse> button.
4
Select the ‘Drivers’ folder from ‘CD-ROM Drive.' Click the <OK> button and then click
the <Next> button.
5
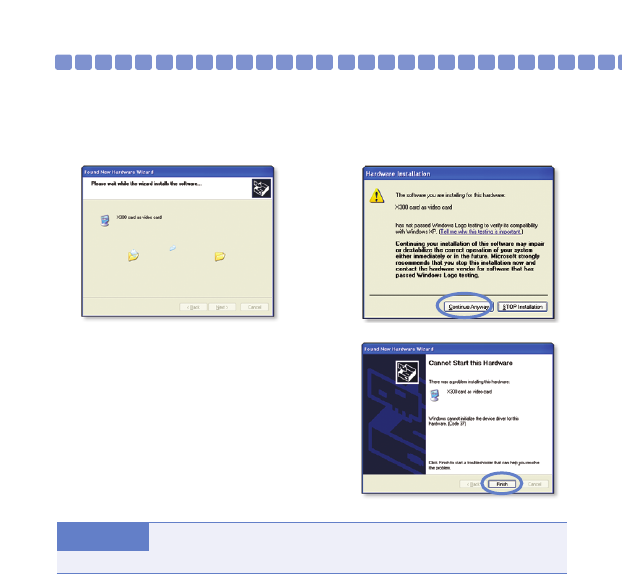
Install the `X300 PCI Card' driver. When prompted with the `Hardware Installation' warning
screen, click the <Continue> button.
6
Click the <Finish> button to complete the
driver installation. After you press the
<Finish> button you will be required to
restart the system.
7
Check under `Display Adapter' in the `Device Manager` located in the Control
Panel's `System Properties' to verify installation of the X300 PCI Card driver.
NOTE
8
9
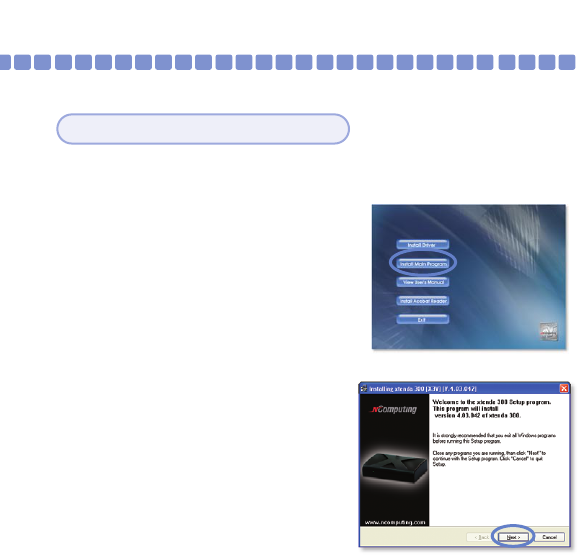
Insert the ‘Software Installation CD’ into the CD-ROM drive.
1
Double-click ‘Install Main Program.’
2
Click the <Next> button illustrated by the
screen below.
3
Installing the Xtenda TS Program
10
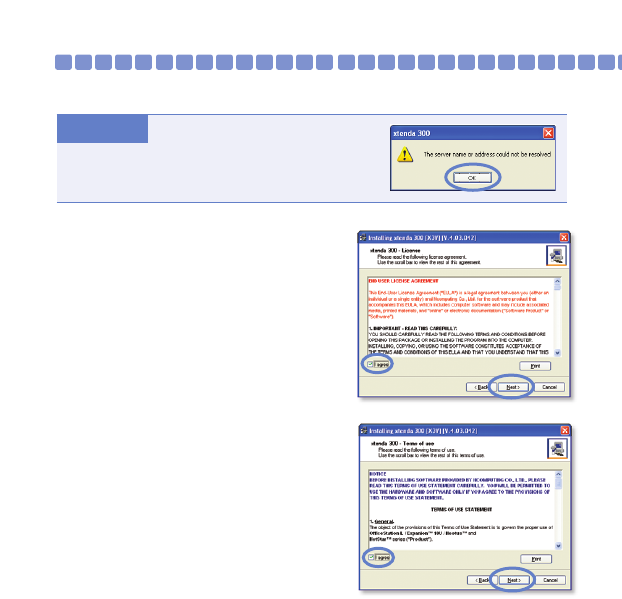
Read the ‘End-User License Agreement'
carefully. Select ‘I Agree’, and click the
<Next> button.
4
Read the ‘Terms of Use' carefully.
Select ‘I Agree’, and click the <Next> button.
5
The following screen will be displayed
if the computer is not connected to the
Internet. Click the <OK> button to proceed.
NOTE
11
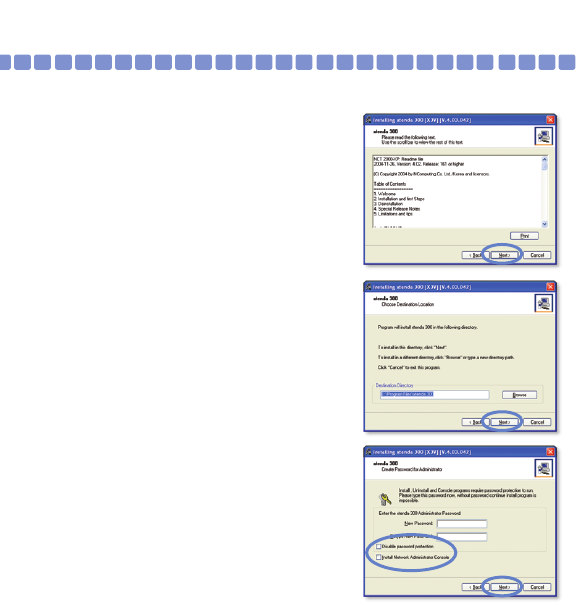
At the screen illustrated below, read the
information and click the <Next> button.
6
Confirm the installation location, and click
the <Next> button.
7
When prompted for the administrator
password, read the ‘Information’ section,
and select the options to install. Click the
<Next> button.
8
12
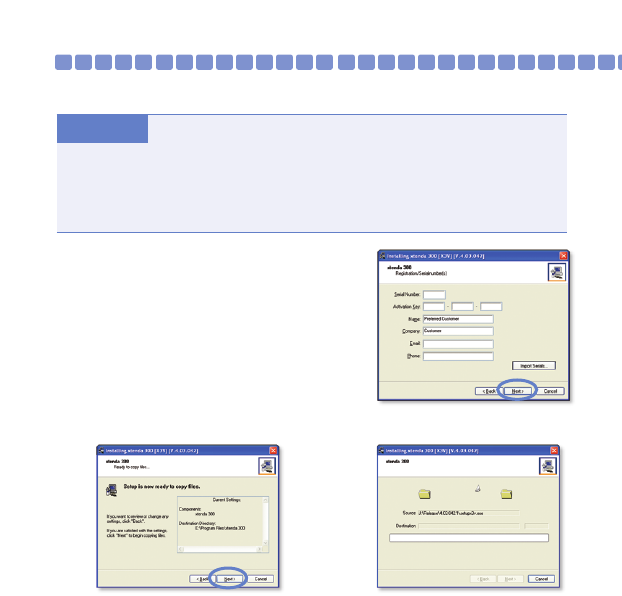
At the user registration screen, enter the serial
number and activation key from the label on the
bottom of the X300 Multi Box, in addition to the
rest of the required information. Click the <Next>
button.
9
●Administrator Password : This is the password that will enable access to the
Administration Console. It is important that you store this information in a
secure location.
●
Network Control Console : A management utility for users and groups. The "Software Settings
(LAN)" item will be installed in the Xtenda TS console if this option is checked. This extra option
allows for the management of computers and Xtenda X300 devices that are currently connected.
NOTE
When presented with the `Preparing to Copy Files' screen, click the <Next> button.
10

13
NComputing Co., Ltd. All rights reserved.
NComputing is a registered or pending trademark. Intel and Pentium are registered trademark
of Intel Corporation. Microsoft and Windows are registered trademark of Microsoft Corporation.
The information above may be changed without prior notice for performance improvements.
www.ncomputing.com
Part No. 160-0116 (Rev.B)
If the screen is appeared, click <Yes> to
add a new user, or click <No>.
(If you do not have any extra user accounts,
click the <Yes> button to add an account.)
11
Once the program installation is complete,
select the ‘Yes I want to restart my computer
now’ option and click the <Restart> button.
The system will recognize the Xtenda X300
product after the restart.
12