NEAT Electronics 1123001 Wireless Wall Push and Pear Button User Manual WALL Family
NEAT Electronics AB Wireless Wall Push and Pear Button WALL Family
WALL Family (3PUSH+PEAR) - User Manual
Wall mounted I/O unit
User manual
WALL Family
NE41 12005-02 v2.0
2 WALL Family User manual NE41 12005- 02 v2.0
Informaon in this User manual is subject to change without
noce.
NEAT Electronics AB reserves the right to change or improve
their products and to make changes to the content without
obligaon to nofy any person or organizaon of such changes
or improvements.
NEAT Electronics AB is not responsible for any loss of data,
income or any consequenal damage whatsoever caused.
For more informaon, details and descripons, visit our
web site:
www. neat-group.com
© NEAT Electronics AB 2015
All rights reserved.
Document number: NE41 12005-02 v2.0
Revision date: 2016-03-03
NEAT Electronics AB
Varuvägen 2
SE-24642 Löddeköpinge
Sweden
Phone:+46 (0)46 707065
Fax: +46 (0)46 707087
EU Notes
NEAT Electronics declares that this mobile device, type
WALL Family, is in compliance with the essenal requirements
and other relevant provisions:
Direcve:
1999/5/CE (RTTE), 2004/108/EC (EMC), 2006/95/EC (LVD)
Standards:
EMC:
EN 301 489-1 V1.8.1 (2008)
EN 301 489-3 V1.4.1 (2002)
Radio:
EN 300 220-2 V2.3.1 Category III
Low Voltage:
EN 60950-1:2006+A11:2010
US Notes
FCC ID: 2AGLF1123001
Changes or modicaons not expressly approved by the party
responsible for compliance could void the user’s authority to
operate the equipment.
This device complies with part 15 of the FCC Rules. Operaon is
subject to the following two condions: (1) This device may not
cause harmful interference, and (2) this device must accept any
interference received, including interference that may cause
undesired operaon.
NOTE: This equipment has been tested and found to comply
with the limits for a Class B digital device, pursuant to part 15 of
the FCC Rules. These limits are designed to provide reasonable
protecon against harmful interference in a residenal
installaon. This equipment generates, uses and can radiate
radio frequency energy and, if not installed and used in
accordance with the instrucons, may cause harmful
interference to radio communicaons. However, there is no
guarantee that interference will not occur in a parcular
installaon. If this equipment does cause harmful interference
to radio or television recepon, which can be determined by
turning the equipment o and on, the user is encouraged to try
to correct the interference by one or more of the following
measures:
• Reorient or relocate the receiving antenna.
• Increasetheseparaonbetweentheequipment
and receiver.
• Connecttheequipmentintoanoutletonacircuit
dierentfromthattowhichthereceiveris
connected.
• Consult the dealer or an experienced radio/TV technician
forhelp.
Ulrik Lundberg
Managing director

3WALL Family User manual NE41 12005- 02 v2.0
About WALL Family products 3
Product variants 4
Hardware overview 4
Front overview 4
Back overview 4
The screw connector 5
Power 5
Inputs IN1 and IN2 5
Outputs OUT1 and OUT2 5
Jumpers J1 and J2 6
Buons and LEDs 6
Ports 1 and 2 6
Manual conguraon 7
Remove a transmier 9
WALL family Programmer 9
More informaon 9
Important! 9
Care and maintenance 9
Safety Notes 9
Disposal 10
Technical data 11
About WALL Family products
The WALL Family consist of 11 prod-
ucts divided into two categories,
WIOR and ROOM categories, each
with a dierent hardware setup
to accomodate special needs and
requests. The terms WALL, WALL
units and WALL family all refer to
a common denominaon for all 11
products.
The products are equipped with
dierent connectors for dierent
funcons:
• A key cylinder to lock/unlock the
unit from operaon.
• Pull cord to trig alarms by pulling
the aached string
• Push buon(s) to trig alarms
• 6.35 mm tele jack for e.g. a pear
buon
Contents
4 WALL Family User manual NE41 12005- 02 v2.0
Product variants
Product Buon Connector
WIOR Category products
WIOR - -
KEY - Key cylinder
PULL - Pull cord
PEAR - 6.35 mm tele jack
PUSH x 1 -
PUSH+PEAR x 1 6.35 mm tele jack
PUSH+PULL x 1 Pull cord
3PUSH x 3
3PUSH+PEAR x 3 6.35 mm tele jack
ROOM Category products
ROOM x 3 -
ROOM+PEAR x 3 6.35 mm tele jack
Hardware overview
Front overview
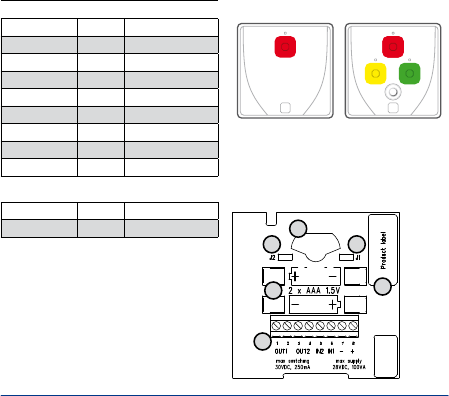
The front basically consist of a plasc
cover with one or three LEDs and a
combinaon of buons and connec-
tors (examples below).
The unit is designed to t in an inset
coupling box with cc 60 mm. To
mount directly on a wall, an oponal
mounng frame must be ed.
PUSH+PEAR ROOM+PEAR/
3PUSH+PEAR
Back overview
On the back are the connectors and
contacts.
1
4
5
2 3
6
5WALL Family User manual NE41 12005- 02 v2.0
Item Denominaon
①Place for 6.35 mm tele jack
connector/Pull cord/Key cylinder
② Jumper J2
③ Jumper J1
④ AAA-baery connectors
⑤ Screw connector
⑥ Product (data) label
The screw connector
The screw connector allows for con-
necng external power, inputs and
outputs by cable to the WALL unit.
10-28 VDC
Power
The unit can be powered either by
10-28VDC or 2 x AAA baeries.
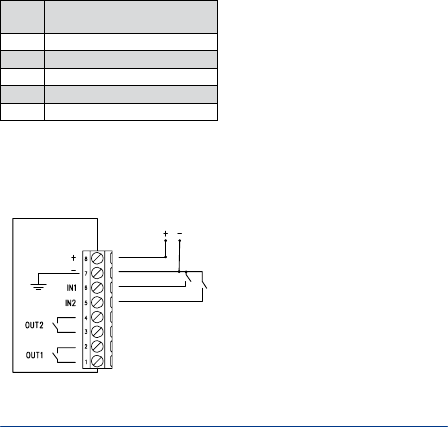
Inputs IN1 and IN2
In the screw connector there are
two wired inputs, IN1 (pin 6) and IN2
(pin 5). Both inputs have a common
ground (pin 7) and must be con-
nected to potenal free contacts.
Input acvaon is ignored during the
rst 10 seconds aer start up.
Outputs OUT1 and OUT2
The outputs are galvanically sepa-
rated from the wired inputs and each
other and works according to below.
ROOM and ROOM+PEAR
The relay outputs acts according to
the sengs in the builn aconplan
or by a superior system (by radio).
6 WALL Family User manual NE41 12005- 02 v2.0
The builn aconplan acvates the
outputs as below.
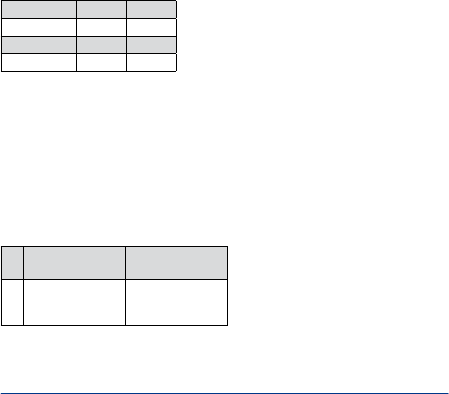
Mode OUT1 OUT2
Standby - -
Alarm Acve -
Presence - Acve
Assistance Acve Acve
All other products
The relay outputs acts according to
sengs made by manual congura-
on or by a superior system (by
radio).
Jumpers J1 and J2
As default the jumpers J1 and J2 has
the funcons as described below.
Mounted Not mounted
J1 Receiver on, 24V
mode1
Receiver o,
baery mode
J2 Inputs (IN1 and
IN2) normally
closed2
Inputs (IN 1 and
IN2) normally
open2
1If Jumper J1 is mounted the unit must be
externally powered.
2IN1 for ROOM and ROOM+PEAR is always
normally open.
However, jumper J2 can be overrided
by using WALL family Programmer
(except for ROOM and ROOM+PEAR).
Buons and LEDs
The buons are used to trig alarms.
For ROOM and ROOM+PEAR it will
also change the unit’s mode.
The dierent modes are:
• Standby mode
• Alarm mode
• Presence mode
• Assistance mode
The LEDs indicate acon and/or the
unit’s state and can either blink or
light steady depending on how the
units is congured and/or used.
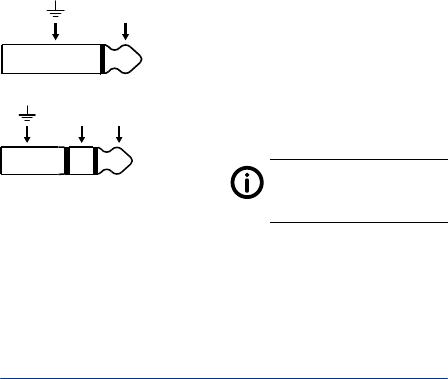
Ports 1 and 2
The tele jack connector provides
two ports when a stereo tele plug is
used or one port if a mono teleplug
is used .
The ports are of type Normally Open.
7WALL Family User manual NE41 12005- 02 v2.0
Both ports have a common ground
and must be connected to potenal
free contacts (see below).
Port 1
Port 1Port 2
If an inserted tele plug is removed,
the unit sends a Tamper alarm. If the
plug is inserted again the unit sends
a Tamper OK alarm.
Manual conguraon
(not valid for ROOM and ROOM+PEAR)
Any unit can be manually congured
regarding adding transmiers and
how the two relay outputs should
act when the added transier is
acvated.
The procedure is in short:
• Determine what posion to acvate
• Add the radio transmier
• Determine the acon when the
added transmier is acvated
Please read the following instrucon
carefully before aempng to
manually congure a radio
transmier.
1. Power o the unit (both 24VDC
and baeries must be removed)
2. Remove J2
3. Power on the unit and replace
the J2 within 5 seconds from
power on.
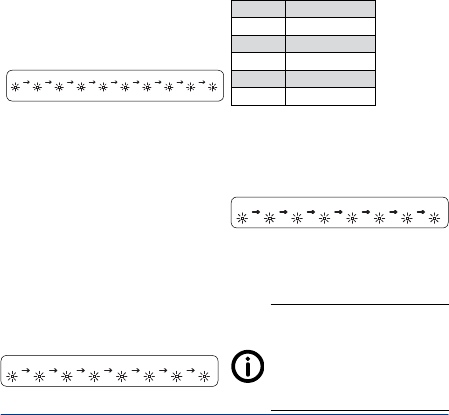
4. The LED blinks green 3 mes.
8 WALL Family User manual NE41 12005- 02 v2.0
5. Aer the inial “three green
blink”, the unit now starts to
blink red. The number of blinks
indicates the current radio posi-
on, i.e. 3 red blinks equals radio
posion 3.
1234567812
6. To select radio posion, press
any buon, port or input.
7. The unit will conrm the
selecon by lighng green for 2
second.
8. Now acvate the radio transmit-
ter (e.g. press the red buon on
an ATOM).
9. The unit will conrm the succes-
ful recepon of the radio ID code
by lighng green for 2 seconds.
10. The unit now starts blinking
green, allowing the seng the
acon for relay 1.
12345612
The number of blinks indicates what
acon to set.
1 blink Pulse
2 blinks On
3 blinks O
4 blinks Toggle
5 blinks No acon
6 blinks Stop pulse
11. Press any port, buon or input at
the appropriate acon blink.
12. The unit now starts blinking red,
allowing the seng the acon
for relay 2 (see #10).
12345612
13. Acvate any port, buon or input
at the appropriate acon blink.
14. If successful, the LED rapidly
blinks green for 2 seconds.
At any stage during the manual
conguraon, if there is an
unsuccessful conguraon, the LED
will blink rapidly for 2 seconds.
When this happens the manual
conguraon is cancelled and it is
necessary to restart the procedure.

9WALL Family User manual NE41 12005- 02 v2.0
In the event of inacvity during man-
ual conguraon (e.g. a transmier
is not acvated aer #8 or a port/
buon is not pressed aer #11) the
unit waits for 60 seconds and then
returns to normal mode. The manual
conguraton must then be restarted.
Remove a transmier
To remove a transmier, follow steps
#1 trough #7 above. Aer step #7,
remove jumper J2. The device will
conrm the deleon by rapidly blink
green for 2 seconds.
WALL family Programmer
All WALL units can be congured
with a Neat Programming Unit
(NPU) and the soware WALL Family
Programmer.
The NPU can be purchased from
NEAT Electronics and the soware
can be downloaded from our home-
page: www.neat-group.com/se/en
More informaon
For more informaon, please refer to
WALL Family - Technical Handbook,
NE41 11014-02.
Important!
Care and maintenance
• Do not expose to direct sunlight.
• Keepawayfromdust,moistanddirt.
• Donotdrop,knock,twistorshakethe
device.
• Donotwarmupthedeviceoruseit
nearre.
• Cleanthedevicewithasocloth,damp-
enedslightlywithmildsoapywater.Do
notcleanthedevicewithharshchemicals,
solventsorothercorrosivesubstances.
Safety Notes
• Readinstruconspriortouse.
• Alwaystestthesystemperinstrucons
prior to use.
• Thisproductmaynotbesuitableforall
persons.

10 WALL Family User manual NE41 12005- 02 v2.0
• OurunitsareNOTintendedforanylife
supportdevice,thusintendingadevice
whosemalfunconmayresultin
damagetoalife.
Disposal
Attheendoftheproduct’suselife,please
disposeofitatappropriatecolleconpoints
provided in your country. For disposal or
recyclinginformaon,pleasecontactyour
localauthoriesortheElectronicIndustries
Alliance(EIA,www.eiae.org).IntheEuropean
Union,thebinlabelindicatesthatthis
productshouldnotbedisposedofwith
householdwaste.Itshouldbedepositedat
anappropriatefacilitytoenablerecovery
and recycling or returned to NEAT
Electronics AB.
• Thisproductshouldnotbeasubstutefor
therounevisualmonitoring
protocolbycaregiver.
• Mustnotbeusedinsituaonswherea
delayinthearrivalofappropriatemedical
care,couldleadtoapotenallylife-
threateningsituaon.
• Checkdeviceregularlyandreplacewhen
necessary.
• Do not integrate to other systems other
thanthosespeciedinthisdocument.
• Alwayskeepthedevicedry.Exposureto
excessivemoistcancausemalfuncon.
• Theproductfullstherequirementsofthe
EMC-Direcve2004/108/EC.
• Itdoesnotcauseelectromagnecdistur-
bancesundernormalworkingcondions.
• Theproductcanbeplacednearother
products or devices as long as mechanical
vibraonisnotpresent.
• Alwayscheckthefunconofthe
productaermakingadjustments.
• Pleaseremovebaeriesiftheunitisto
beoutofuseorstoredforanextended
periodofme.
11WALL Family User manual NE41 12005-02 v2.0
Technical data
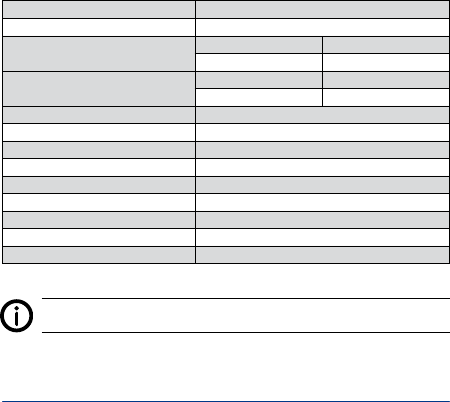
Data Value
Dimension (incl. wallframe)(mm) 86 x 86 x 26 mm
Weight (incl. baeries) 125 g
Frequencytransmit EU US
868.7, 869.2 MHz 916.2, 916.4 MHz
Frequencyreceive EU US
868.7, 869.2, 869.4 MHz 916.2, 916.4 MHz
Supply voltagemin 10 VDC
Supply powermax 28 VDC, 100 VA
Baery type GP Ultra Alkaline AAA or GP Super Alkaline AAA
Relay output, switchingmax 30 VDC, 250 mA
Baery life 5 years3
Buon push memin 150 ms
Wired input open/closemin 150 ms
Jumper change delay 3 s
Tamper remove/insert delay 3 s
3Radio test alarm + 4 alarms every day (when baery powered)
The frequencies for each market is programmed during producon and not
changeable by the user.
www.neatelectronics.se