NEC of America FOMA-N600I Mobile Phone User Manual SEKITO Users manual
NEC Corporation of America Mobile Phone SEKITO Users manual
UserManual.wiki
>
NEC of America
>
FOMA N600I User Manual
Users Manual
Navigation menu
Upload a User Manual
Namespaces
Wiki Guide
HTML
PDF
Info
Views
User Manual
Discussion / Help
Navigation
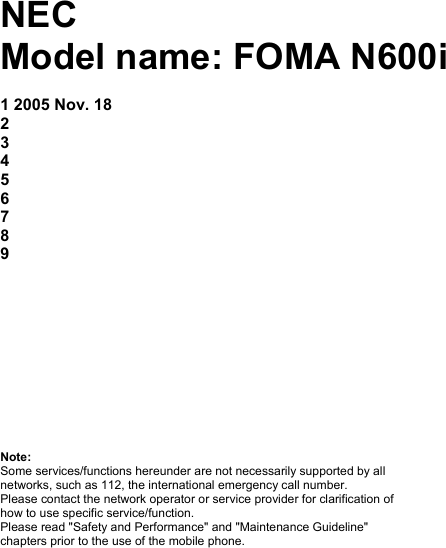
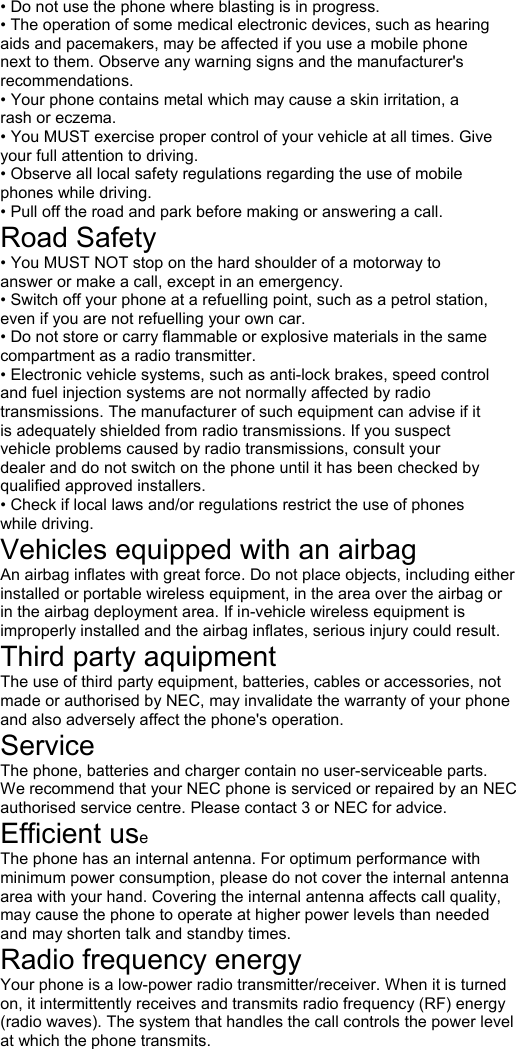
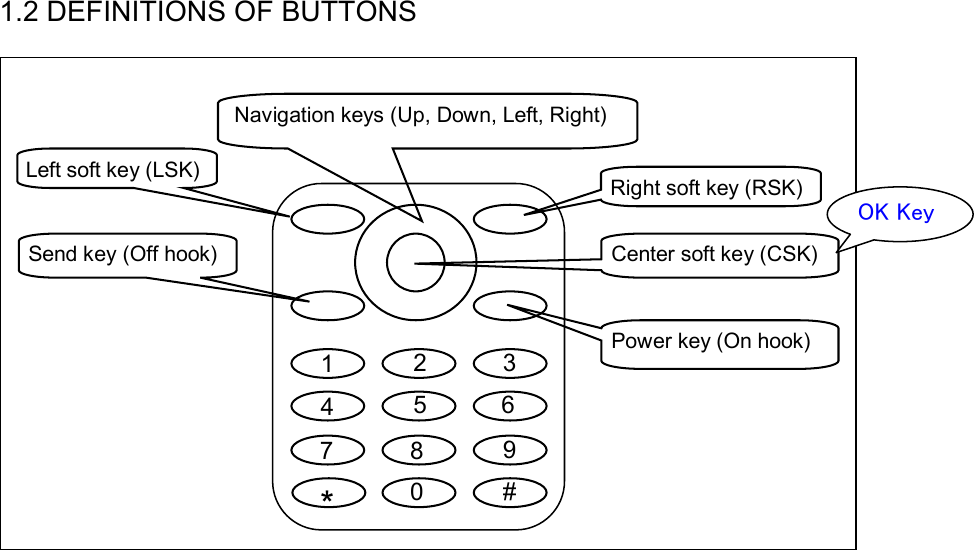
![Left/RSK keys LSK key Idle mode: enter into the menu, hold it to decide whether to lock the N600i keyboard, press [LSK] and "*" key to unlock the keyboard Menu mode: Select menu or pop-up menu Editing mode: switch over the input methods RSK key Idle mode: enter into WAP browser Menu mode: back to the last page Editing mode: clear off text and characters OK KEY Idle mode: initiate picture-taking pre-view mode Menu mode: select menu or confirm options Direction key Upper navigation key Idle mode: directly enter into [Phone mode] function Menu mode: scroll the menu upward Down navigation key Idle mode: directly enter into [my data] function Menu mode: scroll the menu downward Left navigation key Idle mode: directly enter into [Message] function List mode: paging Forward Editing mode: cursor leftward Right navigation key Idle mode: directly open [Phone book] list function List mode: paging backward Editing mode: cursor rightward Send key Idle mode: directly enter into [Dialed calls] function, press [RSK] could enter into [Received calls] and [Missed calls] function circularly Dialing and incoming-call mode: dial or receive calls Power key Press it to hang up or cancel operations, hold to turn on/off the N600i Letter/number key Idle mode: press it to input 0-9 Hold [number key 1] to call voice box Hold [number key 2-9] to call the number whose caller ID is corresponding number registed in phone Hold [number key 0] to input "+" Menu mode: press it to enter into the corresponding menu option * key Idle mode: press it to input "*" # key Idle mode: press it to input "#", hold it to input suspended dialing symbol "P" Editing mode: press it to display general symbols](https://usermanual.wiki/NEC-of-America/FOMA-N600I/User-Guide-614785-Page-9.png)
![2. BASIC FUNCTIONS 2. Basic Functions Caution: The N600i supports audio and video session in 3G network, and supports only audio session in GSM network. 2.12.1 On/off 2.1 On/Off Power on Press [Power] for 2-3 seconds to power on N600i while hearing the power-on tone and seeing power-on animation or text. Then the N600i will prompt you to input PIN code if applicable. It will prompt you to input the lock password if applicable. When not inserting USIM card, the N600i will prompt you to insert the card, but allow calling of emergency numbers. Power off Hold [Power] for seconds until you see the power-off picture and hear the power-off tone. 2.2 PIN and PUK Codes 2.2 PIN and PUK Codes PIN and PIN2 Codes PIN code Avoid unauthorized use of USIM card. If initiating the power-on Pin code function, the MP will require the PIN code when powered on, USIM card will be automatically locked and display the lock prompt when inputting three wrong PIN codes. The PIN code digits are 4-8. PIN2 code If inputting 3 wrong PIN2 codes in a row, the MP requires PUK2 code for unlocking. PUK Code and PUK2 Code PUK code When modifying locked PIN code, MP requires PUK code (personal unlocking code that is issued with USIM card. Please contact with the service provider for PUK code otherwise. In case of inputting 10 wrong PUK codes in a row, the USIM card will be permanently locked. Users are prohibited from changing PUK code; users should contact the service provider for lost PUK code. PUK2 code PUK2 code is not supplied with USIM car, is needed when modifying the locked PIN2 code. If inputting 10 wrong PUK2 codes in a row, the user is prohibited permanently to use the menu options of PIN2 code.](https://usermanual.wiki/NEC-of-America/FOMA-N600I/User-Guide-614785-Page-12.png)
![2.3 OUTGOING CALL 13 Number Keys The max number can be inputed in the idle screen is 57 digits and user can’t change to another line manually. Input phone number in the idle screen with number keys, then press [send key], then dial the audio call to such number; dial video call to such number by pressing [OK]. One-key dialing In idle mode, hold “1” to dial audio voice mail. In idle mode, hold number keys 2-9, directly dial the numbers 2-9 stored in USIM card by audio call. Caution: If you dial an empty number, i.e. not stored in USIM card or MP, the MP will prompt “No contact matched”. Fast dialing You can directly dial the numbers stored in USIM card or MP without inputting the numbers. 1. In idle mode, Input the number then press “*” key, the screen will display the phone number stored in the MP. 2. In idle mode, input the number then press "#" key, the screen will display the phone number stored in USIM card. 3. Press [send key] to dial audio call to the number; press [OK] to dial video call to such number. Caution: If you dial an empty number, i.e. not stored in USIM card or MP, the MP will prompt failure to find such contact in the current position. Dial from phonebook search for a number in the telephone book, press [send key] to dial the audio call to such number; or dial video call to the number in the menu. Dial the number through call options Search for the session lists in the session options, or in idle screen, press [send key] to search for the dialed numbers, press [send key] again to dial audio call to such number, or dial video call to the number in the menu. Dial international call Add international call prefix "+" in front of the number (pressing "0" for seconds, "+" will display on the number column, then input nation code and telephone number, press send key for the call. Directly dial extension number The MP permits direct dialing of extension number or voice mail. You can insert a suspension symbol "P" between the phone number and extension number. In this case, the MP will suspend the dialing of extension number until the response of the receiving party. The "P" shall be inserted as below: 1. In general dialing practice, input the telephone exchange number, then hold "#" key to input "P", then extension number. 2.3 Outgoing Call Caution: If you dial an empty number, i.e. not stored in USIM card or MP, the MP will prompt failure to find such contact in the current position.](https://usermanual.wiki/NEC-of-America/FOMA-N600I/User-Guide-614785-Page-13.png)
![14 BASIC FUNCTIONS > RECEIVE CALLS 2. Then press "send key" to dial the number, MP will automatically dial the extension number when connected with the telephone exchange. Emergency call Your service provider configures your MP with one or more than one emergency numbers (e.g. 112). In the service coverage area, the users can input the emergency number, and then press the send key to call emergency numbers even without the USIM card. Caution: The function entails the network support. 2.4 Receive Calls The MP will ring or vibrate when incoming calls, answer calls by pressing [OK] and [send key], [LSK] is mute and cancel the vibration function. If configured any-key answer function, you can press any key other than [RSK], [LSK] and [Power] to answer calls. The received numbers are stored in the received number calls. Caution: If you have inserted the earphoneHandset Connector, you can press the button on it to answer incoming calls, when the keys of the MP can still normally operate. 2.5 Reject Calls Press [RSK] and [Power] to reject incoming calls. In case of having not received incoming calls, the icon of the non-received calls will display on the screen. 2.6 Functions in Audio Session Caution: The function depends on the support of network service provider and whether you have registered the function. In the session, you can conduct many operations. In the session, press [LSK] to enter into the session menu, including Hold, Mute, New SMS, enter phonebook etc. Hold During the session, press [LSK] to enter into in-session menu to keep the call by pressing "Hold", when you can dial another number. Press LSK key and select "switch-over", the current call is sustained and the Hold call becomes the current call; you can talk with either party of the two, but only one party can hear you. 5 Mute During the session, press [LSK] to enter into in-session menu; in case of suspension of the mike, select "Mute" when the other party cannot hear you; to restore the session, press [LSK] and select "turn off silent tone". New SMS In one call, two calls or telephone conference, press [LSK] to enter into the in-session menu, select new SMS, and conduct relevant operations; you can edit it or make selections in the phone book. Hand-free session In the session, press [OK] for hand-free session. Multi-party session Caution: The function depends on the support of network service provider and whether you have registered the function. The function can connect with the current session and maintained session to hold multi-party session. In the session, all parties can hear the talking party. You can add or separate the parties based on needs. 1. Multi-party conference Please follow the steps below for multi-party conference: 1. Dial the number of one party; 2. Dial the number of another party, see the provisions of "Functions in Session"; 3. Press "LSK key" to select "Conference"; you can conduct multi-party session with the current session and maintained session. To dial more numbers to add the parties; receive incoming calls in the session while maintaining the multi-party session; press "LSK key" to select "telephone conference", you can conduct the new multi-party session with the added numbers and maintained numbers. 4. The maximum parties are 6. It bases on the network operator service. 2. Isolate multi-session parties 1. Press "LSK key" to select "isolation";](https://usermanual.wiki/NEC-of-America/FOMA-N600I/User-Guide-614785-Page-14.png)
![2. Select the number or numbers to be isolated (name or number); 3. Press "LSK key" to select "Split", then return to the session status; 4. You can then talk with the isolated party (maintain the session with other parties), then disconnect the number, then conduct multi-party session with the maintained parties (or hold on the isolated number, press "LSK key" to select "add" to conduct multi-party session.) 2.7 Functions in Audio Session Hand-free Session Caution: Video phone session is only available in 3G network. In the session, press [OK] to realise hand-free function, or press "LSK key" to enter into the in-session menu to select the hand-free option. Front camera/Rear camera The MP supports dual lens; in the session, press "LSK key" to enter into the in-session menu to select "Front camera" or "Rear camera" for video session. Hold During the session, press [LSK] to enter into the in-session menu to select "Hold", the maintained party will not hear your audio or video data. Mute During the session, press [LSK] to enter into in-session menu to select "Mute" to shut off the mike, or press [LSK] to select "shut off silent tone" to restore session. Audio/video During the session, you can send video or static pictures; press [LSK] to enter into in-session menu, select "Use photo instead" to send static picture to the other party; select "Use video instead" to make video session. Zoom During the session, press [LSK] to enter into in-session menu; select "Zoom" to define lens focus levels 1, 2 and 4. Brightness During the session, press [LSK] to enter into in-session menu; select "Brightness" for brightness levels +2, +1, 0, -1 and -2. Picture quality During the session, press [LSK] to enter into in-session menu; select "picture quality" to configure quality levels as Normal, FineSuper and fine. Screen mode During the session, press [LSK] to enter into in-session menu; select "screen mode" to configure screen modes as "My side is smaller", "My side is larger", "Other side only" or "My side only". 2.7 Functions in Audio Session](https://usermanual.wiki/NEC-of-America/FOMA-N600I/User-Guide-614785-Page-15.png)
![3. MAIN MENU 17 Press [LSK] in the idle screen. In the main menu, select the 9 options by [direction navigation key]: 3. Main Menu _ _ _ _](https://usermanual.wiki/NEC-of-America/FOMA-N600I/User-Guide-614785-Page-16.png)
![3.1 SETTINGS Press [direction navigation key] to switch over the sub-menus, then press [OK] or relevant number key for confirmation. The default configuration of your MP will enable to use the functions immediately after inserting USIM card. For more needs and application modes, this MP allows you to define and change the setting for your habits to meet senior communication needs. 1. In the idle screen, press [LSK] to enter into the menu. 2. Press [direction navigation key] to scroll to [1.settings], then press [OK] for confirmation (or press [number key1]). The system settings menu includes: 1. Phone 2. Phone modes 3. Main-LCD 4. Power-saving 5. Calls 6. Security 7. Network 8. Reset settings 9. Videophone 0. Data statistic Each setting covers multiple setting items allowing selecting or inputting setting values, which create the automatic control of the MP. 1. Phone MP settings make setting based on the MP service status, including Ring setting, Answer option, Clock, language setting. 1. Ring: the option window provides Voice call ring, Video call ring, Message ring, Volume, Alert tone, to be selected by [up and down navigation key]. 2. Answer options: configure whether to respond to incoming calls by any key. 3. Clock: Configure time and date and the formats by [up and down navigation key]. Press [OK] to determine the modification contents. - Set time: allows input of correct time; Note: 1. If the wallpaper is calendar, banner won't be disapplyed. 2. [9. SIM toolkit] display will vary with USIM cards. 3.1 Settings 9 - Set date: allows input of correct date; - Set time format: adjust the date display format in12/24-hour system; - Set date format: adjust the date display formats of 6. 4. Language: Configure the current menu and prompt language as English and Japanese.. 2. Phone modes 1. Select mode In the scene mode screen, enter into [select mode], select an option among Normal Mode, Meeting Mode, Pocket Mode or Car Mode. Then the MP will follow the selected mode in operation. 2. Normal mode In the scene mode screen, select the desired working mode, then configure the parameters as per your personal taste, including the following setting items: - Ring volume: adjust the tone volume - Keypad volume: "press key volume" can adjust the volume of key pressing; - Earpiece volume: "headphone volume" can adjust the headphone volume in dialogue, or adjust it by direction navigation key in session; - Message volume: adjust the information prompt volume; - Ringtones: select voice calls, video calls and message; - Vibration pattern: 3 types, or "shut off vibration"; - Other settings: select key tone, coverage tone and auto answer. 3. Main-LCD Display screen setting covers Greetings, wall paper, color style and idle banner. - Greetings: screen display upon power on; including no greeting, text and animation, "text" option allows user editing in the editing screen. - Wall paper: select the favorite pictures from the pictures stored in the MP, camera pictures and download pictures, as the background paper; to configure the background paper, enter into the picture base to select the favorite. - Color style: 3 color keynotes, to be selected by [up and down navigation key]. - Idle banner: display on the idle screen; you can edit it by text editing window.](https://usermanual.wiki/NEC-of-America/FOMA-N600I/User-Guide-614785-Page-17.png)
![meanwhile you can delete the priority network from the list. 4. Acquisition order Provide the selection of network access orders, including WCDMA/GSM, GSM/WCDMA, WCDMA only and GSM only. 8. Reset settings Select the option, you can restore the MP settings to ex-work setting. 9. Videophone During the video session, you can configure the communication needs, including camera setting, video call option and video call service. 22 1. Camera settings: Setting of camera parameters in video session. - Screen mode: setting of the screen display in video session, including my side is smaller, my side is larger, Other side only, my side only. - Picture quality: configure the display speed of the picture, including Standard, Better picture, Faster movement. - Camera mode: setting of camera display mode, including default, sepia and night. 2. Video call options: Setting of picture display, including video settings and show timer. - Video settings: setting of live video or photo video. - Show timer: setting of the time display. 3. Video call service: Setting of call services, including voice if no video, ignore video calls. 10. Data statistic The setting and display of network parameters, you can edit your own network access parameters. In the interface of data statistic display, you can search for the last access flux count and total flux count. Clear off all connection flux count by pressing [LSK]. In the interface of editing data connection mode, you can configure 16 modes each corresponding to a set of parameters. - Name: Display the name of the data connection mode. - APN: cmwap for country Mobile. - IP address: IP address provided by operator. - Primary DNS: input primary DNS server address - Secondary DNS: input secondary DNS server address - Security: Set the security for network, include None, PAP and CHAP; In the interface of Select active data profile, you can select profile of MMS, JAVA or Web browser application. For each application, you can select one of the 5 modes for network access services. 3.2 Message In "Message" application, you can create, send, receive, browse, edit and sort "short message" and "MMS". 3.2 Message 1. SMS 1. Create and send short message 1. In "SMS" screen, press [LSK] to enter into the new interface. 2. In the new short message interface, select "add receivers" to input new numbers, press [down navigation key] to select from the phone book list; select "short message content" to enter into the text editing interface and input short message contents. 3. In the new short message interface, press [LSK] to pop up the menu, press [up and down navigation key] to select [send] or [save]. [send]-the MP will send out the short message to the number. [save]-store the message into the "draft box" list. 4. The MP allows selection of more than one contact in the number list; each contact can select [Mobile number], [home number], [office number], then return to the contact list interface. 2. Read SMS In idle mode, press [LSK] to directly enter into "short message" sub-menu; select [1 Inbox], [2 Outbox], [3 Sent], [4 Drafts] menu, enter into the message list; press [up and down navigation key] for scrolling list inquiry. Press [OK] to read the message and relevant information, such as receiving number and sending number, date and time. - Inbox: store the received messages. In the message list, press [LSK] for pop-up menu to execute the operation below: Read: See details of the messages not sent out yet.](https://usermanual.wiki/NEC-of-America/FOMA-N600I/User-Guide-614785-Page-19.png)
![Delete: delete the messages from receiving box. Delete all: delete all messages in the receiving box. - Outbox: store messages failing to be sent out. In the message list, press [LSK] pop-up menu for operations below: Read: examine the details of messages not sent out yet. Delete: delete selected messages from the sending box. Delete all: Delete all messages form the sending box. - Sent: store the sent messages. In the message list, press [LSK] pop-up menu for operation below: Read: read details of sent messages. Delete: delete selected messages from the receiving box. Delete all: delete all sent messages. - Drafts: store messages for future use. In the message list, press [LSK] pop-up menu for operation below: 24 Edit: edit message details in the draft box. Delete: delete selected messages from the draft box. Delete all: delete all messages from the draft box. 3. Voice mail By "voice mailbox" function, you may forward the incoming calls to the voice mail center, and the calling party can leave a message in the mailbox, when you will receive the notice message. The service provider can provide such number to you, and you can configure and modify the number. 4. Settings Short message setting, including short message service center, short message valid term, status report, storage type, community broadcast, templates. - Service center: the number is provided by MP service provider. Once you key in a short message service center number, the number will be displayed on the screen; you can modify or delete the number; you shall first key in the number with such option prior to sending short message. - Expire period: setting of message validity term to determine the stay duration in the message center prior to deletion, e.g. 1 hour, 6 hours, 1 day, 3 days, 1 week and the maximum. - Status report: activate or deactivate report function; when activated, the network will notify you the message sending status. - Storage type: select short message storage type: USIM card and Phone; if you select USIM card storage, the short message will be automatically stored to USIM card. - Broadcast: the function of group broadcasting through MP service network; activate the function in "option" menu; in "channel" menu, press [LSK] to create, edit or delete the channel number. - Canned message: the examples of some SM sentences for reference and editing. 5. Memory status: Display free room you can store and total roomage in SIM and Phone. 2. MMS The MMS may include text, picture and audio clips. The received or sent MMS shall not exceed 300k, otherwise the MP will reject the mail. Upon incoming new mail, the MMS center will send the notice message to you, and you can decide on receiving or rejecting it. 1. Create Message 1. In Message Type Select, select "Videomessage" and "SMIL Message". 2. In the new Videomessage interface, select "add contact" to input new number or email box, Press [up and down navigation key] to switch over among "subject", "attention", "cc", "attachment", options; select "Sub" to enter into the text edit interface, input mail subject. MESSAGE < MAIN MENU 25 3. In the new MMS Message interface, select "add contact" to input new number or email box, Press [up and down navigation key] to switch over among "subject", "attention", "cc", "attachment", "new SMIL" options; select "Sub" to enter into the text edit interface, input mail subject; select "Create SMIL" for content editing. 4. In the new Videomessage and MMS Message interface, press [LSK] pop-up menu, press [up and down navigation key] to select [Edit], [Send], [Save], [Send Option]. [Edit] - Add receiver upon vacancy; otherwise, enter into the receiver list to search for or edit all contact numbers. [Send] - The MP will send out the SMIL to the input number or email box.](https://usermanual.wiki/NEC-of-America/FOMA-N600I/User-Guide-614785-Page-20.png)
![[Save] - Store the message to " Drafts" list. [Send Option] -Configure Message Priority, Delivery Report, Deliver Time. In the "Create SMIL" editing interface, you can insert picture, tone and text.You can edit slide timing. Press [LSK] pop-up menu, Press [up and down navigation key] to switch over among the following options: [Remove]: remove picture, tone, or text, [Add Slide]: add new frame. [Insert Slide]: insert a frame between two. [Delete Slide]: delete a frame. [Preview Slide]: pre-view the frame. [Preview]: pre-view all contents and effect of the SMIL. [Slide Options]: Configure Image Timing, Sound Timing, Text Timing, Image Fit Mode. 5. It may take longer to send a SMIL than a short message. Upon sending failure, the SMIL well be stored in "Inbox" for attempt of resending. 2. Read MMS 1. In idle mode, press [LSK] to enter into the menu list, select "message" option; select [2 MMS], enter into the menu list; press [up and down navigation key] to scroll the list for inquiry, press [OK] for function options. 2. Inbox: store the notices or the received MMS. In the message list, press [LSK] pop-up menu for operation below: Open: read details of received notices or MMS. Reply: automatically add the sender number or mailbox address to the receiver column in the MMS editing interface. Reply all: automatically add the sender or receiver number or mailbox address to the receiver column in the MMS editing interface. Forward: forward the MMS to other parties. Move: move the notices and MMS Delete: delete the selected notices or MMS from Inbox. Delete All: delete all notices and MMS in the Inbox. Sort: queue the notices and MMS as requested Filter View: extraction of specified message 26 - Outbox: store MMS failing sending. In the message list, press [LSK] pop-up menu for operation below: Edit: re-edit MMS content. Delete: delete selected MMS from the Outbox. Delete All: delete all MMS in the Outbox. Sort: queue MMS as requested Filter View: extraction of specified message - Drafts: store MMS not sent or save. In the message list, press [LSK] pop-up menu for operation below: Edit: re-edit MMS content. Delete: delete selected MMS from the Drafts. All delete: delete all MMS in the Drafts. Sort: queue the MMS as requested. Filter View: extraction of specified message - Sent : store MMS successfully sent out. In the message list, press [LSK] pop-up menu for operation below: Open: read the sent messages. Edit: re-edit MMS content. Delete: delete selected MMS from the sending box. Delete All: delete all sent SMILs. Sort: queue the MMS as requested. Filter View: extraction of specified message - My folders: store the notices or the received MMS. In the message list, press [LSK] pop-up menu for operation below: Open: read details of received notices or MMS. Reply: automatically add the sender number or mailbox address to the receiver column in the MMS editing interface. Reply All: automatically add the sender or receiver number or mailbox address to the receiver column in the MMS editing interface. Forward: forward the MMS to other parties. Move: move the notices and MMS Delete: delete the selected notices or MMS from Inbox. Delete All: delete all notices and MMS in the Inbox. Sort: queue the notices and MMS as requested Filter View: extraction of specified message 27](https://usermanual.wiki/NEC-of-America/FOMA-N600I/User-Guide-614785-Page-21.png)
![3. Select a SMIL in inbox or Userbox to display details, e.g. size and subject. Press [LSK] pop-up menu, select "Show" to play the details of the SMIL, including the text, picture and voice. 4. Settings Configure General Settings, MMS Settings, Reset Settings. - General Settings: configure Scrolling, Heading text, Signaure setting, Quote indicator. - MMS Settings: receive options, Send reports, Validity, Delivery Time, Server URL, Proxy Server. - Reset Settings: reset settings. 3.3 WEB BROWSER You shall follow the steps below prior to using WAP functions: 1. Apply for WAP services; contact your network service provider for specifics of WAP services. 2. Make necessary WAP setting on your MP by referring to the data statistic setting or proxy. Activate WAP browsing webpage: 1. In the idle screen, press [RSK] to enter into WAP home page. 2. In the idle screen, press [LSK] to enter into the menu, press [direction navigation key] to scroll to [Web browse], then press [OK] for confirmation (or directly press [number key 3]) to enter into WAP application. 3. You can expediently access Internet by home page. The home page provides home page URL and correct name, the home page is default as "MONTERNET". 1. History Display the address list of web pages lately browsed.when the cursor is in a web page, select the menu in the interface to pop up the options below: 1. Go To: display the web page. 2. Delete: delete the web page. 3. Delete all: delete all web pages. 4. Show Address: display the web page address. 2. Bookmark List The bookmark can store interested websites, and can be configured freely for easy memorization. When the cursor is in a web page, select the menu in the interface to pop up the options below: 1. Go to: display the web page. 2. Edit: edit the title and address of the web page. 3.3 Web browser 3. Delete: delete the web page. 4. Delete all: delete all web pages. 5. Show Address: display the web page address. 3. Page Memo List Store web pages browsed and stored; when the cursor is in a web page, select the menu in the interface to pop up the options below: 1. Show: display the web page. 2. Edit Title: edit the title of the web page. 3. Delete: delete the web page other than the protected page. 4. Delete All: delete all web pages. 5. Show Address: display the web page address. 6. Protect On/Off: configure whether to activate protection; in case the protected pages exceed the maximum setting, you shall not configure protection. 7. Unprotect All: cancel all protection setting of pages. 4. Push Messages Store received Push messages, and can browse them. 5. Options 1. Home page: edit address and configure home page address. 2. View: configure view format, script text, animation, picture and table. 3. Proxy: configure the use of proxy and proxy server address; input IP address in the proxy server address, input port or select HTTP1.1. 4. Cache: configure caching types and clear off the cache. 5. Cookies: Cookies refer to the trivial information from the server to store your access to WAP websites. If you agree to receive Cookies, the server will inquire about your use of WAP website, interested contents and desired contents. Cookie Mode: select one from 3 options, i.e. Accept All, Reject All and Prompt. Delete All: delete all Cookies. 6. Certificates: display certificate information 7. Push Sttings: select whether to receive Push messages. 8. AutoDetectLang: automatically recognize languages, European languages or Chinese.](https://usermanual.wiki/NEC-of-America/FOMA-N600I/User-Guide-614785-Page-22.png)
![9. Browsing mode: select display browser mode 0. Show all display: display all configured information. Reset: restore initial setting. About browser: display browser version. 29 8. Exit Exit the browser. Browse the web page Initiate WAP to browse web pages, the caption column in the window will display the title of the web page, the right/LSK keys in the screen will prompt the operations, the contents are displayed in the middle and the underlined text refers to the super linkage. Press [LSK] for pop-up menu, press [direction navigation key] to scroll among functions of "1 Home", "2 Go to Webpage", "3 Hitory", "4 Add Bookmark", "5 Bookmark List", "6 Savev Page", "7 Page Memo List", "8 Push Messages", "8 Show Properties", "0 Save Image", " Reload", "Text Size", " Encoding", " Options" and " Exit" 3.4 PHONE BOOK The phone book contains list and session options. 1.In the idle screen, press right navigation key to the list menu. 2.In the menu mode, press [direction navigation key] to scroll to [4 phone book], then press [OK] for confirmation (or directly press [number key 4]). 1. Lists The list records the information of contacts, including names, number, mobile number and etc; input the contact information for calling and sending short messages. You can store the phone book or the names to the MP storage (internal phone book) or USIM card (USIM phone book). The internal phone book (MP) can store 500 items of numbers, and USIM card storage capacity varies with the types. From the list, enter "Complete", "USIM", "Phone", "SDN", "FDN", "Own number" applications. 1. Contact list Complete: display all contacts stored in the USIM card and MP. Press [direction navigation key] to select contact items by up/down scrolling or paging, then confirm by pressing [OK], display detailed information of the contact; press [Dial key] to dial the contact; select [LSK] for pop-up menu; press [direction navigation key] for scrolling selection of searching, creation, audio session, video session, delete, copy, delete all, copy all, delete multiple items, copy multiple items, group, storage status and other items. 3.4 Phone Book USIM: display the contact list stored in USIM card. Press [direction navigation key] to select contact items by up/down scrolling or paging, then confirm by pressing [OK], display detailed information of the contact; press [Dial key] to dial the contact; select [LSK] for pop-up menu; press [direction navigation key] for scrolling selection of searching, creation, audio session, video session, delete, copy, delete all, copy all, delete multiple items, copy multiple items, group, storage status and other items. Phone: display contact list stored in the MP. 30 1. Find by In "contact items" screen, select [LSK] to pop up the menu, press [direction navigation key] for scrolling selection of "searching". You may select: - Name: input key characters in the input window, search for the numbers of designated character string in the contact name list; - Number: input key numbers in the input window, search for the numbers of designated character string in the contact name list; - Memo: input key characters in the input window, search for the numbers of designated character string in the contact name list; - USIM location: input designated numbers in the input window, search for the contact of designated position from all contacts stored in USIM card; - Phone location: input designated numbers in the input window, search for the contact of designated position from all](https://usermanual.wiki/NEC-of-America/FOMA-N600I/User-Guide-614785-Page-23.png)
![contacts stored in MP; - Group: select a group, search for all contact records of the group. 2. Add In the "new contact" window, first select the new records to be stored in USIM card/Phone, and then enter into new contact screen. - If USIM card: input name, a number and position. - If Phone: input name, group, MP/home numbers, office number, email, memo, portrait and position. Input name and mailbox, enter into the text editing window; input other phone numbers, enter into the number-input window, select the group to enter into the group names list window and then press [OK]. If you do not select group when creating record, you will be divided into the ordinary group. Enter into [my data] [picture] list to edit and pre-view the head portrait. 3. Voice call Dial the selected number for voice session. Press [direction navigation key] to select contact items by up/down scrolling or paging, then confirm by pressing [OK], display detailed information of the contact; press [Dial key] to dial the contact; select [LSK] for pop-up menu; press [direction navigation key] for scrolling selection of searching, creation, audio session, video session, delete, copy, delete all, copy all, delete multiple items, copy multiple items, group, storage status and other items. SDN: service dialing number. The number stored in the directory is provided by your network service provider. It will call the service provider for such service. The number is preset in the USIM card, please contact your network service provider. FDN: fixed number dialing. The function means that you can dial the numbers stored in the FDN list; with FDN function on, you can only dial the numbers in FDN list and emergency numbers. Own number: for user setting of local number stored in USIM card, input two names and numbers. 31 4. Video call Dial the selected number for video session. 5. Delete (Delete/Delete all/Multi-Delete) Delete one, more than one or all contact records. 6. Copy (copy/copy all/Multi- Copy) Copy one or more than one or all contact records from USIM card to MP or from MP to USIM card. 7. Group You can divide the contacts stored in the MP into groups, such as "general", "business" or "family". This MP pre-sets 6 fixed contact groups and 2 defined groups. 8. Memory status The MP is equipped with memory status inquiry function to enable you to understand the operation status of the MP. The storage status inquiry primarily covers recording capacity in USIM card, MP, FDN, SDN and the used capacity. 9. Function menu of contact details In contact list, select the highlighted item, the screen will display detailed contact information; select [LSK] for pop-up menu, press [direction navigation key] to select: - Edit: edit all items. - Voice call: audio dial the selected number. - Video call: video dial the selected number. - Send SMS: send short message to selected numbers. - Send MMS: send SMIL to selected numbers. - Delete: delete undesired numbers. - Copy: copy to USIM/MP. 2. Own number Local number stores user numbers; automatically into the number input window, you can edit and modify the numbers. 2. Call options The session record records the latest rejected number, received number, dialed number and session duration, and can delete records. The session record has 2 contents, call history and and total calls duration. In call history content, there are 3 contents, dialed calls, received calls and missed calls. To operate the selected number in inquiry, press [LSK] for pop-up menu to execute the functions like save, send SMS, send MMS, voice call, video call, delete, delete all or press [OK] for detailed information. 32 - Read detailed information can enable you to read the detailed information about the record, including name, number, time, date,](https://usermanual.wiki/NEC-of-America/FOMA-N600I/User-Guide-614785-Page-24.png)
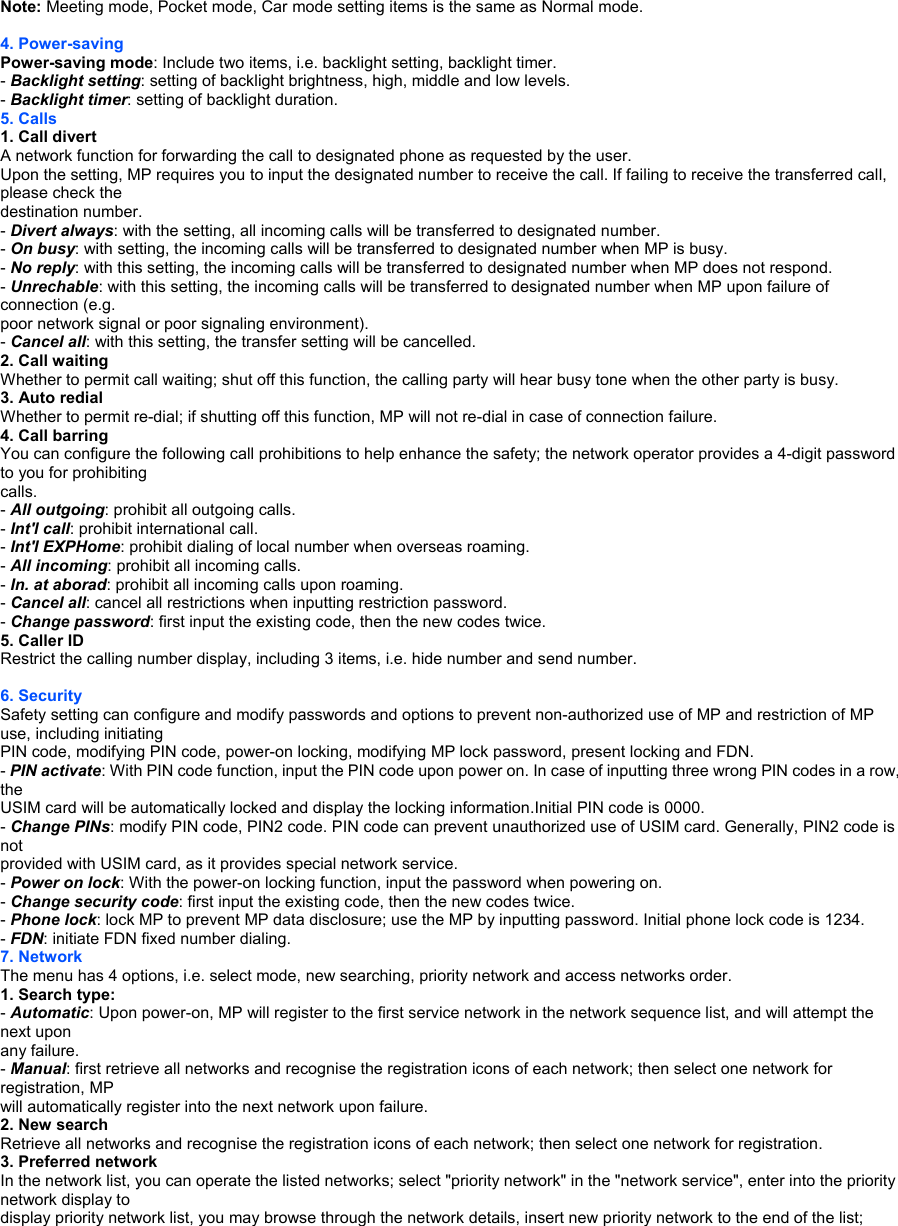
![session duration. - Save: store desired contents to the phone book. - Send SMS: send short message to selected numbers. - Send MMS: send MMS to selected number. - Voice call: audio dial selected number. - Video call: video dial selected number. - Delete: delete undesired contents. - Delete all: delete all contents in the contact list. 3.5 Camera You can take pictures or film of those around you, which can be automatically stored in "my data". The pictures can be sent to others by MMS. You can use the picture as the wall paper, or configure the picture as the head portrait of certain contact in the phone book. The picture and film are stored in Jpeg and 3GP format. 1. Initiate camera/shooting function 1. In idle screen, press [OK] for taking pictures. 2. In idle screen, press [LSK] to enter into the menu, the cursor-lined option is [camera], then press [OK] to confirm (or directly press [number key 5]), enter into camera menu interface, press [OK] to initiate camera function. 3. In the idle screen, hold [OK] (over 2 seconds) to initiate video recorder function. 3.5 Camera CAMERA < MAIN MENU 33 2. Taking pictures Initiate camera function, enter into the view frame as shown in figure 1. - In the camera view-finding screen, adjust camera position to display the object on the screen. - Keep the lens fixed, then press [OK]. 1. Zoom In view-finding screen, press [up and down navigation key] to adjust focus. 2. Adjust brightness In view-finding screen, press [left/right navigation key] to adjust brightness. 3. Camera function options Prior to taking pictures In view-finding screen, press [LSK] to pop up the menu, then press required key for desired options. Front camera: when the view frame adopts front lens/back lens, the item in the menu display back lens/front lens; when selecting the item, return to the view frame interface, which displays the view of back lens/front lens. Video mode: initiate video recorder function Zoom: setting of focus adjustment levels, i.e. x1, x2 and x4; Figure 1 Photo size: setting of picture sizes, i.e. VGA (640×480), CFI (352×288), wall paper (176×180), QCIF (176×144), CLI (120×120), SubQCIF(128×96).](https://usermanual.wiki/NEC-of-America/FOMA-N600I/User-Guide-614785-Page-25.png)
![Quality: levels, 3 Normal, Fine, and Super fine. White balance: automatic, sunny, cloudy or indoors. Filtering: setting of the display style, i.e. Normal, Sepia and Monochrome. Shutter sound: No. 1, No. 2 and No. 3 tones (in conference mode, the tone will ring upon taking pictures or shooting) Brightness: 5 levels, i.e. +2, +1, 0, -1, -2. Shutter mode: setting of camera mode, i.e. normal, continuous, frame and self shutter Continuous: 2, 4, or 6. Frame: in the modification option, press [up/down direction key] to browse all frames, press [OK] to select desired frame. Self shutter: take self pictures, configure time, i.e. 5 seconds, 10 seconds and 15 seconds. End of taking pictures After taking pictures, press [LSK] to store; enter into the storage interface, input the picture name, the system will provide a default name. You can also send your pictures out by pressing [OK] to enter into name editing interface, input the name, press [OK] to store the picture, and then press [my data] to enter into MMS sending interface to send out the picture. 3. Shooting function options Shooting a film In the view frame screen, press [LSK] for pop-up menu, then press relevant keys for desired options. 1. Front camera: when the view frame adopts front lens/back lens, the item in the menu display back lens/front lens; when selecting the item, return to the view frame interface, which displays the view of back lens/front lens. 2. Photo mode: initiate shooting function 3. Zoom: setting of focus adjustment levels, i.e. x1, x2 and x4; 4. Video size: setting of picture sizes, i.e. QCIF (176×144) and SubQCIF (128×96). 5. Quality: 3 levels, normal, fine and super fine. 6. White balance: auto, sunny, cloudy or indoors. 7. Video time: configure the longest time, i.e. 10 seconds, 30 seconds and 60 seconds. 35 In the view frame screen, shoot the film by pressing [OK] as shown in figure 2 below. End of shooting After taking pictures, press [OK] to store; enter into the storage interface, input the picture name, the system will provide a default name. You can also send your pictures out by pressing [LSK] to enter into name editing interface, input the name, press [OK] to store the picture, and then press [my data] to enter into SMIL sending interface to send out the picture. 3.6 My Data In My Data menu, you can play sound, display pictures or short film or downloaded pictures, seethe pictures or animations downloaded or from MMS. The MP can store 300 tones, pictures or film clips. 1. In the idle screen, press [LSK] to enter into the menu, press [direction navigation key] to scroll to [My Data], then press [OK] for confirmation.(or directly pressing [number key 6]).In the idle screen, press [Down navigation key] to directly enter into My Data interface. 1. Movies](https://usermanual.wiki/NEC-of-America/FOMA-N600I/User-Guide-614785-Page-26.png)
![The clip stores the film clips; press [LSK] in the film list screen for options below: View: pre-view the film by pressing [OK] to suspend it and then press [OK] for pre-view. Send by MMS: send the film out in the form of SMIL. Rename: rename the film. Sort by: queue the films as per name, size or date. 3.6 My Data Delete: delete current files. Delete all: delete all files. Property: display file name, size, date and time etc. Listing: setting of the list display manner, name or picture. 2. Pictures Press [LSK] to select the options below. For embedded pictures, some options below are gray. View: pre-view the pictures. Send by MMS: send the picture out in the form of MMS. Rename: rename the picture. Sort by: queue the pictures as per names, sizes and dates. Delete: delete current files. Delete all: delete all files. Property: display file name, size, date and time. Listing: setting of the list display manner, name or sketch. 3. Sound Press [LSK] to select the options below. Play: play the file. Send by MMS: send the sound out in the form of SMIL. Rename: rename the sound. Sort by: queue the sounds as per names, sizes and dates. Delete: delete current files. Delete all: delete all files. Set voice call ring: configure current sound as the voice call tone. Set video call ring: configure current sound as the video call tone. Set message tone: configure the sound as message tone. Property: display file name, size, date and time etc. 4. Others Store the text downloaded and from MMS. 5. Memory status You can review the storage status, including pictures, videos, sound and other films storage capacity, total capacity and remaining capacity. 3.7 Java TM You can download Java program from the website, and operate it on your MP. 1. In the idle screen, press [LSK] to enter into the menu. 2. Press [direction navigation key] to scroll to [Java™], then press [OK] for confirmation (or directly press [number key 7]). Display Java application list in your MP, you can press [up and down navigation key] to display all application programs. (In the idle screen, hold [RLK] (over 2 seconds) to display Java application list) 1. Execute Java program In Java program list interface, when the desired application program is highlighted, press [OK] to operate the Java program. 2. Update Java program In Java program list interface, press [LSK] for pop-up menu, select Update to update the current Java program. 3. Delete, Select Delete Java program In Java program list interface, press [LSK] for pop-up menu, select Delete to delete the highlighted Java program. 4. Delete all Java programs In Java program list interface, press [LSK] for pop-up menu, select Delete All to delete all downloaded Java programs. 5. Create, Delete and Rename user-defined Folder In Java program list interface, press [LSK] for pop-up menu, select Create Folder to create the user-defined Folder in the root directory, or delete/rename the Folder. 6. Move, Move All to the Folder In Java program list interface, press [LSK] for pop-up menu, select Move to Folder to move the highlighted Java program to designated Folder. 7. Sort In Java program list interface, press [LSK] for pop-up menu, select Sort to sort all Java programs in the order below: - Name< Alphabetical order> (backward or forward)](https://usermanual.wiki/NEC-of-America/FOMA-N600I/User-Guide-614785-Page-27.png)
![- Date<Creation time> (backward or forward) - Size (backward or forward) - Exc Time<Operating time> (backward or forward) - Exc Count<Operating count> (backward or forward) 8. Attribute In Java program list interface, press [LSK] for pop-up menu, select Attribute to review Java program information. 3 9. Permission In Java program list interface, press [LSK] for pop-up menu, select Permission to review the Permission of the program operating, you can modify the Permission. 10.Proxy setting In Java program list interface, press [LSK] for pop-up menu, select Proxy setting to review the Proxy setting screen. You can configure the use of proxy and proxy server address for Java Application Manager and Java Application; input IP address in the proxy server address, input port. 11.System information In Java program list interface, press [LSK] for pop-up menu, select System Information to review JV-Lite2 system information, including version, size, occupied storage capacity and remaining capacity 3.8 Accessaory. There are some common applications in the attachment. 1. In the idle screen, press [LSK] to enter into the menu. 2. Press [direction navigation key] to scroll to [Attachment], then press [OK] for confirmation (or directly press [number key 8]). 3. If the MP is power off, it's noneffective when alarm or schedule time is arriving. 1. Alarm Clock 1. In "Attachment" list, select "clock alarm", display 3 alarm clock lists. 2. Select one alarm clock for specific setting. - Set time: set alarm ring time. - Period: input alarm clock time.- Cycle setting: select [once /everyday/weekly]. - Ring: change the prompt tone of alarm clock. - Rename: change the name of alarm clock. - Status: activate or deactivate alarm clock. Above operations also apply to setting of "alarm clock 2" and "alarm clock 3". Caution: After downloading Java application program, be sure to review the contents in application program list to confirm the successful download. Otherwise, the downloaded Java program may be lost. 3.8 Accessory Caution: The above function is available when MP is on, otherwise the alarm clock will not operate. 39 2. Schedule 1. In "Accessory" list, press [direction navigation key] to scroll to "schedule", then press [OK] for confirmation to schedule and record the planned affairs. At the scheduled time, your MP will send out prompt tone to notify you. 2. In calendar, display current date; press [direction navigation key] to move the icon to select desired dates, the caption column provides the calendar year and month of the current date. The date of scheduled event will be displayed in red (others in blue). 3. When selecting a day, press [ok] to see the arrangement; if no arrangement, it will display "list is empty". 4. In the calendar interface, press [LSK] pop-up menu, press [direction navigation key] to scroll to "Create", then press [OK] for confirmation, display new screen. -Date: input scheduled date. -Time: setting of scheduled prompt time. -Memo: in the text input interface, input the event of the created schedule. -Ring: setting of prompt tone. -Repeat: select [once, daily, weekly, monthly]. -Status: activate or deactivate the schedule. 5. In the calendar screen, press [LSK] pop-up menu, press [direction navigation key] to scroll to "select date", then press [OK] for confirmation, the screen plays a date selection block, you can edit dates and inquire about the schedule. 6. In the calendar screen, press [LSK] pop-up menu, press [direction navigation key] to scroll to "schedule list", then press [OK] for confirmation, display the schedules of all dates, you can view, edit or delete in the same steps of "new schedule". 7. At the scheduled prompt date, the MP will play the event tone (if configured) and the prompt picture; browse the schedule, the content will scroll out.](https://usermanual.wiki/NEC-of-America/FOMA-N600I/User-Guide-614785-Page-28.png)
![3. Calculator 1. In "Accessory" list, press [direction navigation key] to scroll to "calculator", then press [OK] for confirmation, enter into the calculator screen for simple arithmetic. 2. You can directly input the numbers for calculation, press [direction navigation key] to switch over the calculation rules. 3. Press [OK] to display calculation result, press [LSK] to clear off. 4. Press [RSK] to exit to "attachment" screen. 4. Currency exchange 1. In "Accessory" list, press [direction navigation key] to scroll to "currency exchange", then press [OK] for confirmation, exchange the given amount of currency into the currencies of other nations or regions. 2. Press [direction navigation key] to enter into the list, select "exchange currency", "target currency", then select "exchange rate" and "amount". 3. The screen will display result. 4. Press [RSK] to exit to "Currency exchange" screen. 5. PC Tool PC Tool is a convenience function for user. It can transfer data in phonebook or other rings and pictures that user prefer by data line which is a special accessory. Steps to use it: 1. If you want to use it, firstly, you should setup drive and synchronization software for it in your computer. Windows95, Windows98, WindowsNT and Windows2000 operating systems are all OK. 2. Secondly, enter the main menu in MP, then choose accessory and set data transfer function on. 3. Thirdly, connect your computer and your MP with PC Tool data line. Note: If it doesn't include PC Tool data line when you buy it, you can order it from provider. 3.9 SIM toolkit 4. 4. Reference Information Input Text The MP provides many kinds of expedient text input methods matching other functions, including T9 English, T9 Japanese, ABC, 123 number input methods. - English/ Japanese input: press [LSK] to switch over the input methods, select "T9 English". In English imagination mode, input the letters by the keyboard, one screen displays one English word, press [Upper navigation key] to display the last word, press [Down navigation key] to display the next word; press [OK] for confirmation, the word will be displayed on the cursor of the input column. Press [* key] to switch over the input methods, select "abc", "Abc" or "ABC". "T9 Japanese" shares identical input methods with "T9 English". - Letter input: press [LSK] to switch over the input methods, select "ABC", input letters by number keys on the keyboard; press keys to](https://usermanual.wiki/NEC-of-America/FOMA-N600I/User-Guide-614785-Page-29.png)
![input the letters, the letters or numbers will display on the cursor of the input column Press [* key] to switch over the input methods, select "abc", "Abc" or "ABC". - Number input: press [LSK] to switch over the input methods, select "123", input the numbers by [number key] on the keyboard. - Symbol input: in the text input screen, press [# key] to enter into the symbol input mode, select more symbols by [upper navigation key] or [down navigation key], input the symbols by corresponding [number key] or [OK]. 4. Reference Information _ _ 5.Repair Guideline You are welcome to use the MP produced by NEC. In case of any problem of N600i MP in use, please contact the distributor or NEC repair center. In case of repair, please send your MP to local repair station (see the Warranty Certificate attached with MP); in case of no repair station locally, please send your MP and duplicate invoice to the distributor for EMS. To inquire about the latest repair outlet and replacement center address, please contact 800-820-7007, or http://www.necmobile.com 5. Repair Guideline Common problems Potential causes Solution 1. Weak signals Far away from base station or strong insulation Get near the windows or corridors. 2. The screen will display "no card" or "invalid card" Possibly dirty contact pad of USIM card Gently clean the contact pad of USIM card. 3. Backlight constantly light Possibly configured power-on backlight Re-configure backlight mode 4. Battery charged full holds short Possibly configured power-on backlight, to consume high electricity Re-configure backlight mode 5. Silent headphone Possibly configured minimum volume Adjust the volume by up/down volume key 6. Only vibration no ring upon incoming call Possibly configure the MP as Conference Mode Re-configure "standard mode" 7. No billing function (AoC) No such service of domestic network at present Contact network service provider 8. Fail to access WAP network Possibly wrong WAP setting Reset WAP Connection setting in Phone settings, or contact network service provider](https://usermanual.wiki/NEC-of-America/FOMA-N600I/User-Guide-614785-Page-30.png)