NETIS SYSTEMS WF2416R 150Mbps Wireless N Portable Router User Manual PKUM05176 WF2416 QIG
NETIS SYSTEMS CO., LTD. 150Mbps Wireless N Portable Router PKUM05176 WF2416 QIG
User Manual
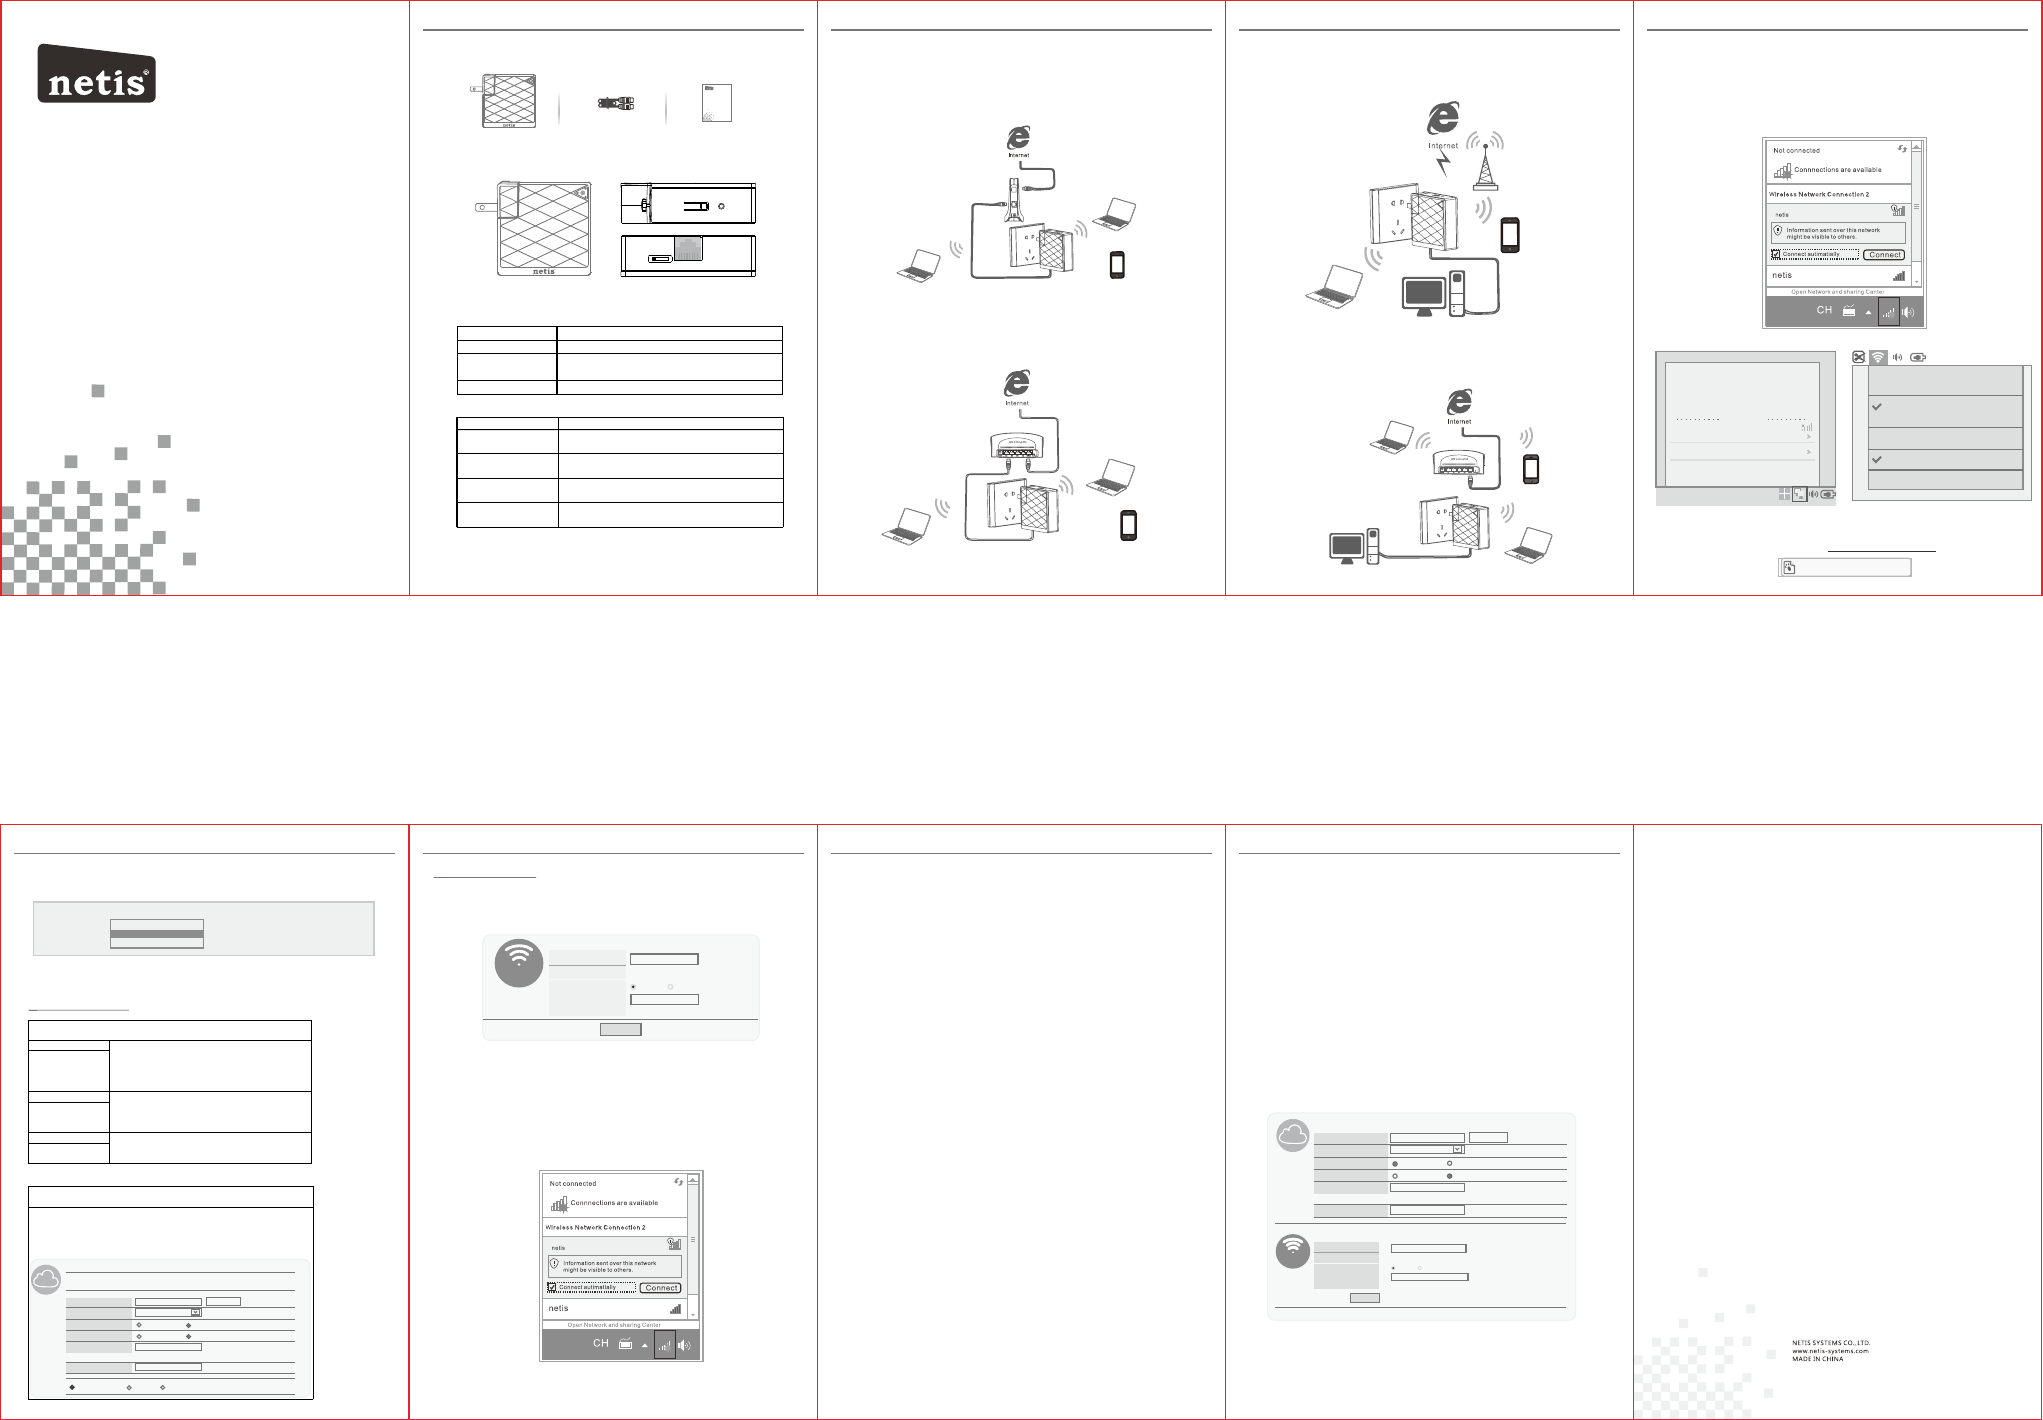
WISP Mode :
Select target network and Connection Type.
1. Click “AP Scan” button to select your target network and click “Connect”
button.
2. Type in the wireless security info of the target network.
3. Select connection type. (Please refer to “Internet Settings” à ”AP Router
Mode”)
precedenza, viene creata una rete Powerline utilizzabile.
2. Assicurarsi che la rete sia collegata correttamente a Internet.
Deutsch
Nach Durchführung der obigen Schritte können Sie im
Internet surfen.
HINWEIS:
1. Sobald die Powerline-Adapter wie oben angeschlossen sind, ist ein
nutzbares Powerline-Netzwerk hergestellt.
2. Bitte stellen Sie sicher, dass Ihr Netzwerk richtig mit dem Internet
verbunden ist.
Nederlands
Na de bovenstaande stappen te hebben gezet, kunt u over
internet surfen.
OPMERKING:
1. Zodra de lichtnet-adapters zijn aangesloten zoals hierboven is
beschreven, is een bruikbaar netwerk via het lichtnet ontstaan.
2. Controleer of het netwerk met internet is verbonden.
Polski
Po wykonaniu powyższych czynności możesz surfować po
Internecie.
UWAGA:
1.Package Contents
WF2416 Ethernet Cable
2.Hardware Information
3.LED and Button Descriptions
Five min utes after th e LAN port is disconne cted or the con necte d device is tur ned off, the p owerline ad apter
will aut omaticall y switc h to power-sa ving mode.
150Mbps Wireless N Portable Router Quick Installation Guide
Tip: It 's str ongl y reco mmen ded th at you p lug th e adap ter di rect ly int o the wa ll soc ket, f or som e powe r stri ps
have su rge pr otec tor which can filter the data.
Tip: Di ffer ent po wer pl ug is pr ovid ed for d iffe rent r egio n. Her e we tak e the US v ersi on for e xamp le.
After taking the steps above, you can surf the Internet.
NOTE:
1).As soon as the powerline adapters are connected as above, a usable
powerline network is built up. To
secure the network, please refer to the Appendix: Useing Group Button
2).Please make sure that your network is properly connected to the internet.
Appendix: Using the Group Button (Setting up a
4.Network Installation
Internet
4
5
6
Internet
Adap ter A Adap ter B
Adap ter C
Adap ter A Adap ter B
4
5
6
Internet
Adapter A Adapter B
To set up a private group:
1).Pre ss the Group bu tton on Adapter A for 1 secon d and the Power line LE D will begin f lashing.
2).Wit hin 2 minutes , press the Gro up butt on on Adapter B fo r 1-3 seconds and the PL C LED will begi n flash ing
as well. I n about 60 seco nds you ’ll see the PLC L ED on both adap ters li ght up, indic ating that th e two ada pters
have int ercommuni cated w ith each othe r successfu lly.
Tip 1: It is highl y recommend ed to fir st set up the two a dapters as cl ose as possible and th en place them i n
a suitab le location .
To join an existing private group:
If you wan t to add adapte r C to the existi ng priv ate group, pl ease fo llow the step s.
1).Pres s the Group but ton on the Adapter A or B for 1 sec ond (do not pre ss both), and the Powe rline LED
will beg in fl ashin g.
2).With in 2 minutes pr ess the Group button o n Adapter C for 1 se cond, the Powerlin e LED on the adap ter C
will lig ht up in about 60 s econd s.
Tip 2: You can fol low the steps a bove to add mor e adapt ers to the priv ate group one b y one.
Tip 3: If you want t o reset or rena me the device please i nstall the Po werli ne Utility fr om
the reso urce CD. (Onl y for Wi ndows )
Troubleshooting
Q1. I have followe d the above ins tructions , but my adapte rs are st ill not worki ng. What can I do ?
1).Mak e sure that all t he adap ters are unde r the same elec tric me ter.
2).If th e Power LED doe s not light up at all, the re may be a hardw are pro blem.
3).The p owerline de vices m ight not comm unicate wit h each ot her if they are i n differen t phrases of a fo ur-wi re
three- phase circu it
4).As som e power strip s have surge protect or, please mak e sure th e adapters ar e not separat ed by the t hem.
Q2. The ada pters w ere working f i ne b ut no longer wo rk now since th ey've b een moved. Ho w do I make
them wor k again?
Plug the a dapters int o the sam e power strip a nd follow App endix U sing the Grou p Button to gro up them. If the y
still do n't work, ple ase che ck for possib le interfer ence ca uses:
1).Air -conditio ners, w ashing mach ines, and oth er simi lar househo ld appl iances are wo rking too clo se to the
adapte rs.
2).Air sw itch may lead t o failed communica tion among po werli ne devices. c heck whether there a re air switch es
hinder ing communi catio n.
Q3. How can I restor e the factory d efaults?
With the a dapter is pow ered on . Press the def ault button a t least 15 seconds.
AV200 Powerline Adapter Quick Installation Guide
Español
Después de realizar los pasos anteriores, pueden navegar
por Internet.
NOTA:
1. Tan pronto como los adaptadores para cable eléctrico estén
conectados como se indica anteriormente, dispondrá de una red a través
de cables eléctricos lista para usarse.
2. Asegúrese de que la red está correctamente conectada a Internet.
Português
Depois de executar os passos indicados acima, poderá
navegar na Internet.
NOTA:
1. Após a ligação dos adaptadores powerline, tal como indicado acima, a
rede powerline será criada.
2. Assegure-se de que a sua rede está devidamente ligada à Internet.
Français
Une fois l'installation faite comme ci-dessus, vous êtes prêt
pour surfer sur Internet.
Note
1.Dès la connexion de l'adaptateur CPL [Adaptateur Courant Por teur en
Ligne], une ligne réseau est disponible.
2.Vérifiez que votre réseau est bien connecté à Internet.
Italiano
Una volta effettuate le procedure precedenti, è possibile
navigare su Internet.
NOTA:
1. Quando gli adattatori Powerline sono collegati come indicato in
繁體中文
採取上述步驟後,便可以瀏覽互聯網。
注意:
1. 一旦電力線橋接器以上述方式連接後,便會建立可用的電力線網路。
2. 請確認您的網路已妥善連線到互聯網。
Button Description
Group Group button is used to secure a powerline network, To secure your network,
please refer to Appendix: Using the Group Button.
Default Default button is used to set factory defaults.
LED Status Indication
Power On
Off
The adapter is powered on.
The adapter is powered off.
PLC On
Flashing
Off
The adapter is connected to the powerline network
The adapter is transferring data.
The adapter isn’t connected to the powerline network.
LAN On
Flashing
Off
The Ethernet Port is connected, but there is not data being transferred.
The Ethernet Port is transferring data.
The Ethernet Port is not connected.
netis 150Mbps Wireless N Portable Router
Quick Installation Guide
Quick Installation Gui de
AV200 Powerline Adapter Quick Installation Guide AV200 Powerline Adapter Quick Installation Guide
150Mbps Wireless N Portable Router Quick Installation Guide 150Mbps Wireless N Portable Router Quick Installation Guide
150Mbps Wireless N Portable Router Quick Installation Guide 150Mbps Wireless N Portable Router Quick Installation Guide 150Mbps Wireless N Portable Router Quick Installation Guide
LAN /WA N
Extender Router
WPS D ef aul t
LED Status Indication
Solid on System is running.
Flashing Data is transmitting. Or WPS is pairing with
remote device.
Off Power is off.
Hardware Description
Extender Router switch This switch is for changing the operation mode of
WF2416.
LAN/WAN port It is LAN port in AP, WISP, Wi-Fi Extender mode, while
it is WAN port in AP Router mode.
WPS button WPS is for quick wireless security setup and also for
extending existing wireless range with one click.
Default button This button is for resetting the router to factory
defaults.
Modem
WF2416
3.Typical Applications
(1)AP Router Mode(Default mode)
The WF2416 can be connected to a DSL or cable modem and works
as a regular wireless router.
(2)AP Mode
The WF2416 is connected to a network by wired and transforms
the wired network into wireless so that multiple wireless devices
can share the network .
Router
WF2416
(3)WISP Mode
The WF2416 is connected wirelessly to an ISP's Wi-Fi Station, acting
as a gateway and sharing the Internet access to multiple devices.
(4)Wi-Fi Extender Mode
The WF2416 copies and boosts the root wireless signal to extend the
coverage of the signal.
WISP s ign al
WF2416
Root Router
WF2416
150Mbps Wireless N Portable Router Quick Installation Guide
4.Router Configurations
Step 1 Connecting your computer to WF2416 wirelessly.
Please click on the “Wireless Network Connection” icon (for Windows)
or “Airport/Wi-Fi” icon (for MAC OS) on the task bar/menu bar.
Double click on “netis” and click on “Connect” button, then type in
“password” as the wireless security key.
Windows OS
(Charged)
AirPort: On
Turn AirPor t Off
netis
Other...
Create Network...
Use Interference Robustness
Open Internet Connect...
Mac OS
Wired Network
Auto etho
Disconnect
Wireless Networks
disconnected
netis
More networ ks...
VPN Connections
Connect to Hidden Wi reless Network...
Create New Wireless Network...
Available
Linux
Step 2 Login to the router.
Open a web browser and type in http://192.168.100.1 .
http://192.168.100.1
Step 3 Configure the router.
Select the Operation Mode you need from the pull-down menu.
Internet Connection
Operation Mode:
AP
WISP
AP Router
Note: The configuration includes “Internet settings” and “Wireless settings” ,
if you choose “AP”, please go to Wireless Settings directly.
●Internet settings
AP Router Mode :
Select the correct Connection Type.
PPPoE Select “PPPoE” when:
1. WF2416 is connected to a DSL pure modem.
2. Got username & password from ISP.
3. Broadband connection is needed on PC when bypassing
WF2416.
Type in the Username
& Password provided
by the ISP.
DHCP Select “DHCP” when:
1. WF2416 is connected to a cable modem/DSL modem
router.
2. Internet works directly on PC when bypassing WF2416.
(Dynamic IP)
Static IP Select “Static IP” when:
1. Got IP Address, Subnet Mask, Default Gateway,
DNS Server from ISP.
Type in all the IP Info.
●Wireless settings
Setup a wireless network name in “SSID” box, it is recommended to use
WPA-PSK/WPA2-PSK for “Security” and set a wireless network key in the
“Password” box, then click “Save” button.
Note: The DHCP Ser ver will be disabled after switching to “AP” mode successfully, so you
will have to set a static IP address for your PC first if you need to login to the web-based
management page again. Please refer to “ Tip 1” for how to setup a static IP for PC.
Step 4 Connect your wireless devices to WF2416 to get Internet Access.
For example, on Windows 7, click on the Wireless Network Connection icon
and select the name you set for WF2416 and type in the password you created.
Internet Connection Type
Wiress Setup
SSID:
2.4GHz
5GHz
Passwo rd
Advanced
Internet
Wiress
Save
netis_ 2_4G
netis_ 5G
DHCP(Cable Modem) Static IP PPPoE
Enable Disable
tip.mo st inte rnet co nnect ion typ e is DHCP as long as
you don’ t have ID /Pass word fo r conne ction I nternet
Password:
tip.pl ease e nter any 8-63 c harcters
http://www. netis-sys tems.com E- mail i nfo@netis -systems. com
R
Inte rn et
DHCP (dynamic) Static IP PP PoE
Ope ratio n Mode: WISP
SSID :
Secu rity
Encr y pti on Type:
Key Mode:
Key:
Key Renewa l:
neti s
WPA- PSK
TKIP A ES
HEX AS CⅡ
(ple ase ent er any 8- 63 char cte rs ( ASCⅡ ch ar cte rs A-Z,a-z,0-9) )
sec on ds (60-86400)
AP Scan
Inter net C onnecti on
8640 0
Wiress Setup
SSID:
Passw ord
Wiress
Save
netis
None WP -P SK/WPA2-PSKA
Password:
Security:
(ple ase ent er any 8- 63 charc ters ( AS CⅡ charc ter s A-Z,a-z,0-9))
5.Extender Configurations
Note:Please make sure that the WPS feature is Enabled on your main router. If the main router
is unsecured, router's WPS feature will generate a random SSID & Password automatically.
For this case, please contact the technician of your main router for help.
Step 1 Plug in the WF2416.
Step 2 Press the “WPS” button on your existing router. Please refer to the
instructions of the existing router for detailed way to use the WPS button.
Step 3 Press the “WPS” button on WF2416 for 1s and wait for 1 minute
and check if the signal strength of your wireless network got boosted or not.
Note: If you need to do advanced settings, please refer to “Tip 1” to set a static IP for your PC first and
refer to “Router Configurations”>“Step1 & Step2” to login to the web-based management page.
Tip 1 : Setup a Static IP for PC
Manually set the IP address of the wired network adapter on your
computer as below.
IP Address/ IPv4 Address: 192.168.100.x (1<x<255)
Subnet Mask: 255.255.255.0
Default Gateway/ Router: 192.168.100.1
For Windows 8/ 7/Vista
1)Go to "Settings” (for Windows 8)/“Start” (for Windows 7/Vista) >
"Control Panel".
2)Left-click on“Network and Internet” >“Network and Sharing Center ”
>“Change adapter settings” (for Windows 8/ 7)/”Manage network
connections” (for Windows Vista).
3)Right-click on“Local Area Connection” and left-click on“Proper ties”.
4)Double-click on“Internet Protocol Version 4 (TCP/IPv4)”.
5)Select "Use the following IP address" then lef t-click on“OK”.
For Windows XP/2000
1)Go to "Star t" > "Control Panel".
2)Left-click on“Network and Internet Connections” >“Network
Connections”.
3)Right-click on“Local Area Connection” and left-click on“Proper ties”.
4)Double-click on“Internet Protocol (TCP/IP)”.
5)Select "Use the following IP address" then lef t-click on“OK”.
For MAC OS
1)Click on the "Apple" menu > "System Preferences".
2)Click on the “Network” icon.
3)Click on “Ethernet” in the left side box and click on “Advanced” in the
lower right corner.
4)In the top options, select “ TCP/IP”.
5)In the pull-down menu next to “Configure IPv4″ select “Manually”.
6)Fill in the “IPv4 Address/Subnet Mask/Router ” parameters, and click
“OK” then “Apply”.
150Mbps Wireless N Portable Router Quick Installation Guide
Troubleshooting
Q: How do I restore my netis WF2416 to default settings?
A With the router powered on, holding “Default” button for 8s~10s
with a pin to restore it to factory defaults.
Q: What can I do if fails to extend the wireless range by “WPS”button?
A:
1) Refer to “Tip1” to set a Static IP address for your PC and connect the
WF2416 to your PC.
2) Open a web browser and login to http://192.168.100.1
3) Click “AP Scan” button to select the existing router and click
“Connect” button. Type in the wireless security info of the existing
router.
4) Under “Wireless Setup”, you may setup a wireless network name in
“SSID” box, it is recommended to use WPA-PSK/WPA2-PSK for
“Security” and set a wireless network key in the “Password” box,
then click “Save” button.
Inte rn et Repreater SSID:
Security
Encryp tion Type:
Key Mo de:
Key:
Key Rene wal:
WPA2-PSK
TKIP AES
HEX ASCⅡ
(ple ase ent er a ny 8 -6 3 ch arc ters ( AS CⅡ charc te rs A-Z,a-z,0-9) )
sec on ds (60-86400)
AP Scan
WIFI Ext ender Setti ngs
86400
Wiress Set up
SSID:
Pas sw or d
Wire ss
Save
net is
None WP -PSK/W PA2- PSKA
Password :
Security :
(ple ase ent er a ny 8 -6 3 ch ar cters ( ASCⅡ charc te rs A-Z,a-z,0-9) )
PKUM05176
Appendix : FCC Statement
Technical Suppor t:
USA/ Canada
Toll Free: +1 866 71 network (+1 866 716 3896)
E-mail: usa_support@netis-systems.com
Other Regions:
E-mail: support@netis-systems.com
1 2 34
5 6 7 8
netis 150Mbps Wireless N Portable Router
Quick Installation Guide
Note: Different power plug is provided for different region. Here we take US
version for example.
This equipment has been tested and found to comply with the limits for a Class B
digital device, pursuant to part 15 of the FCC Rules. These limits are designed to
provide reasonable protection against harmful interference in a residential
installation. This equipment generates uses and can radiate radio frequency energy
and, if not installed and used in accordance with the instructions, may cause harmful
interference to radio communications. However, there is no guarantee that
interference will not occur in a particular installation. If this equipment does cause
harmful interference to radio or television reception, which can be determined by
turning the equipment off and on, the user is encouraged to try to correct the
interference by one or more of the following measures:
—Reorient or relocate the receiving antenna.
—Increase the separation between the equipment and receiver.
—Connect the equipment into an outlet on a circuit different from that to which the
receiver is connected.
—Consult the dealer or an experienced radio/TV technician for help.
FCC Radiation Exposure Statement
This device complies with FCC radiation exposure limits set forth for an uncontrolled
environment and it also complies with Part 15 of the FCC RF Rules. This transmitter
must not be co-located or operating in conjunction with any other antenna or
transmitter.
This equipment should be installed and operated with a minimum distance of
20 centimeters between the radiator and your body.
This device complies with Part 15 of the FCC Rules. Operation is subject to the
following two conditions:
(1) this device may not cause harmful interference, and (2)
this device must accept any interference received, including interference that may
cause undesired operation.
Caution!
Any changes or modifications not expressly approved by the party responsible for
compliance could void the user's authority to operate the equipment.
Model No. WF2416