NEXTECH DSM Automotive Scanner User Manual DSM
NEXTECH CO., LTD. Automotive Scanner DSM
UserManual.wiki
>
NEXTECH
>
DSM User Manual
>
User manual 1 of 2
Contents
1.
User manual 1 of 2
2.
User manual 2 of 2
User manual 1 of 2
Navigation menu
Upload a User Manual
Namespaces
Wiki Guide
HTML
PDF
Info
Views
User Manual
Discussion / Help
Navigation

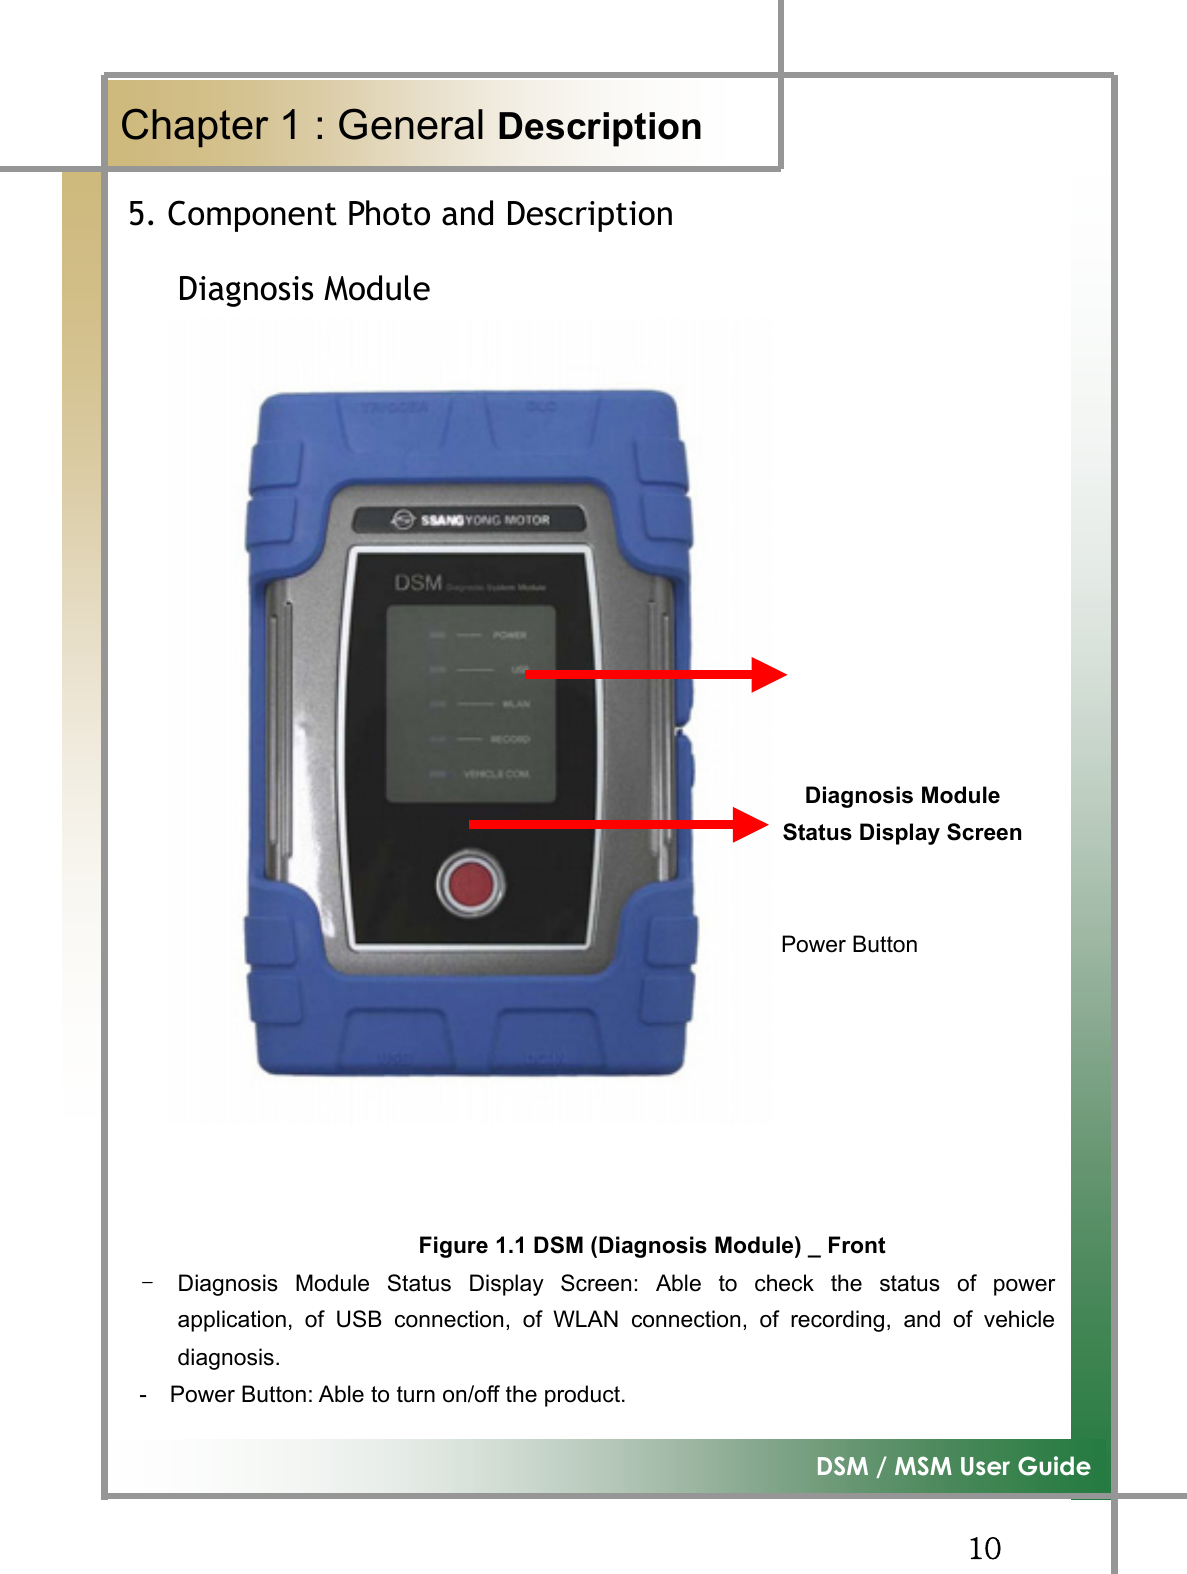
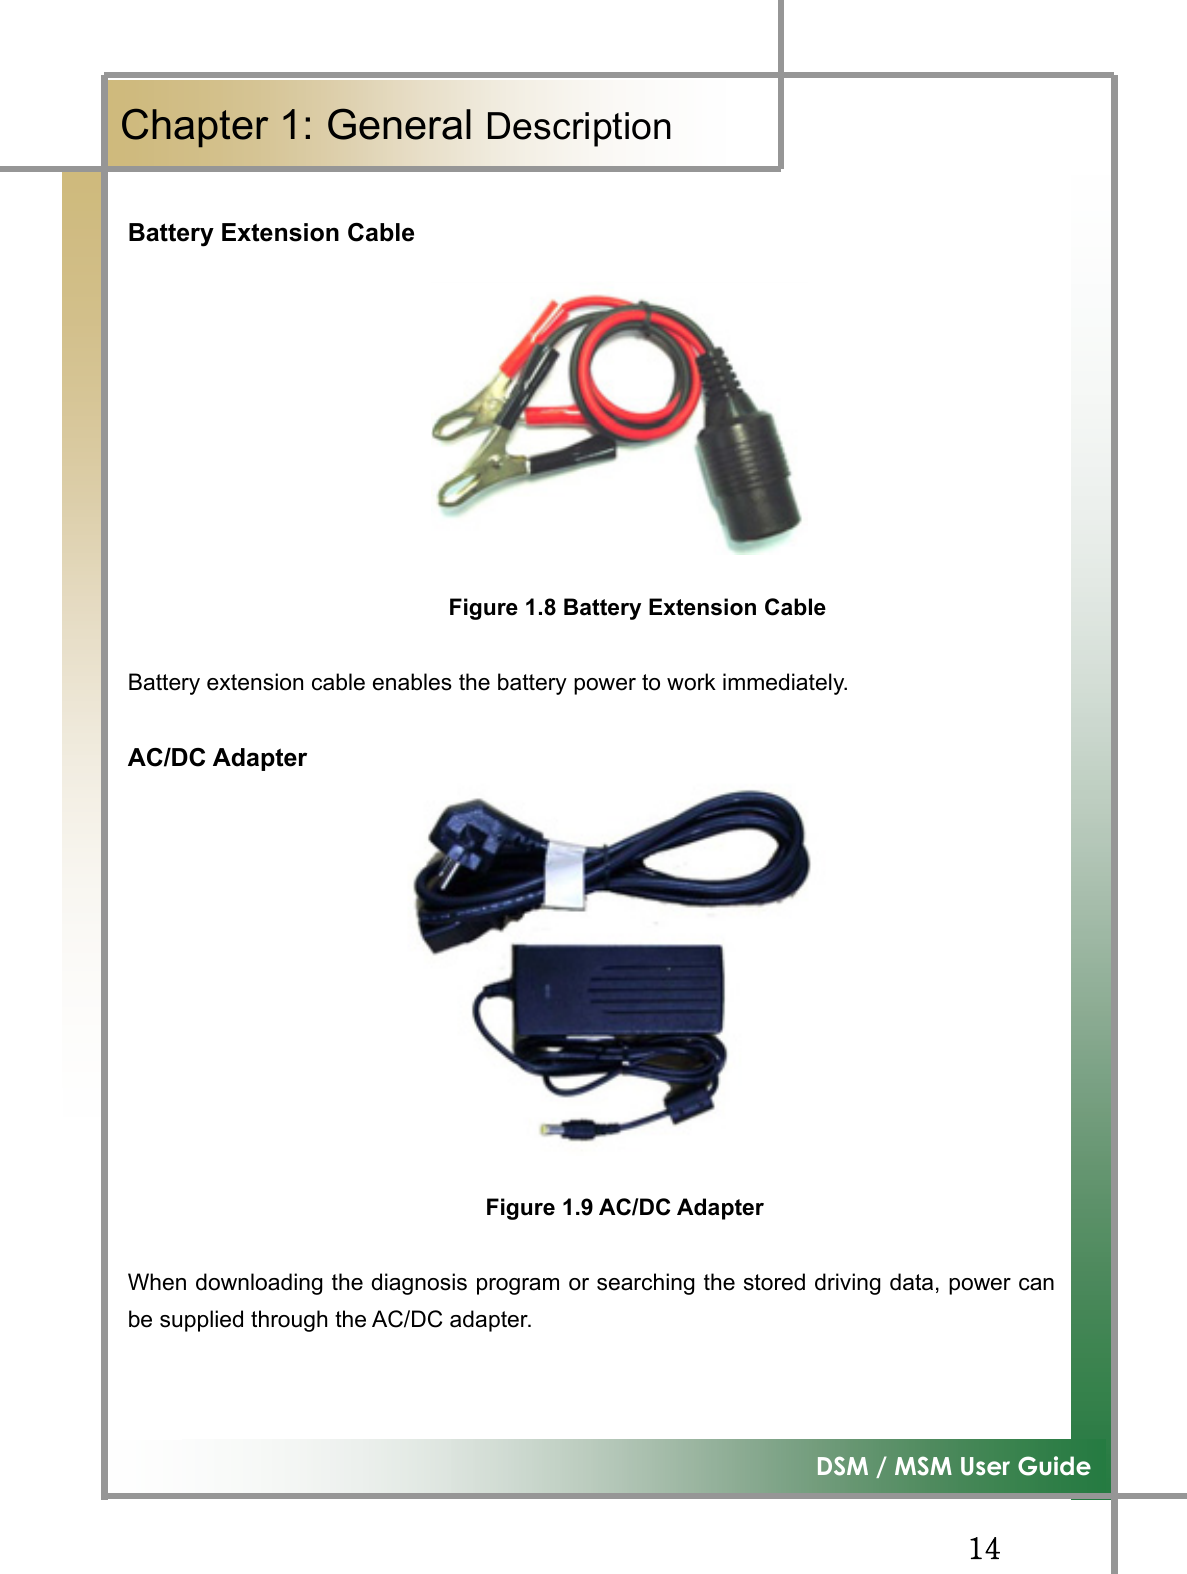
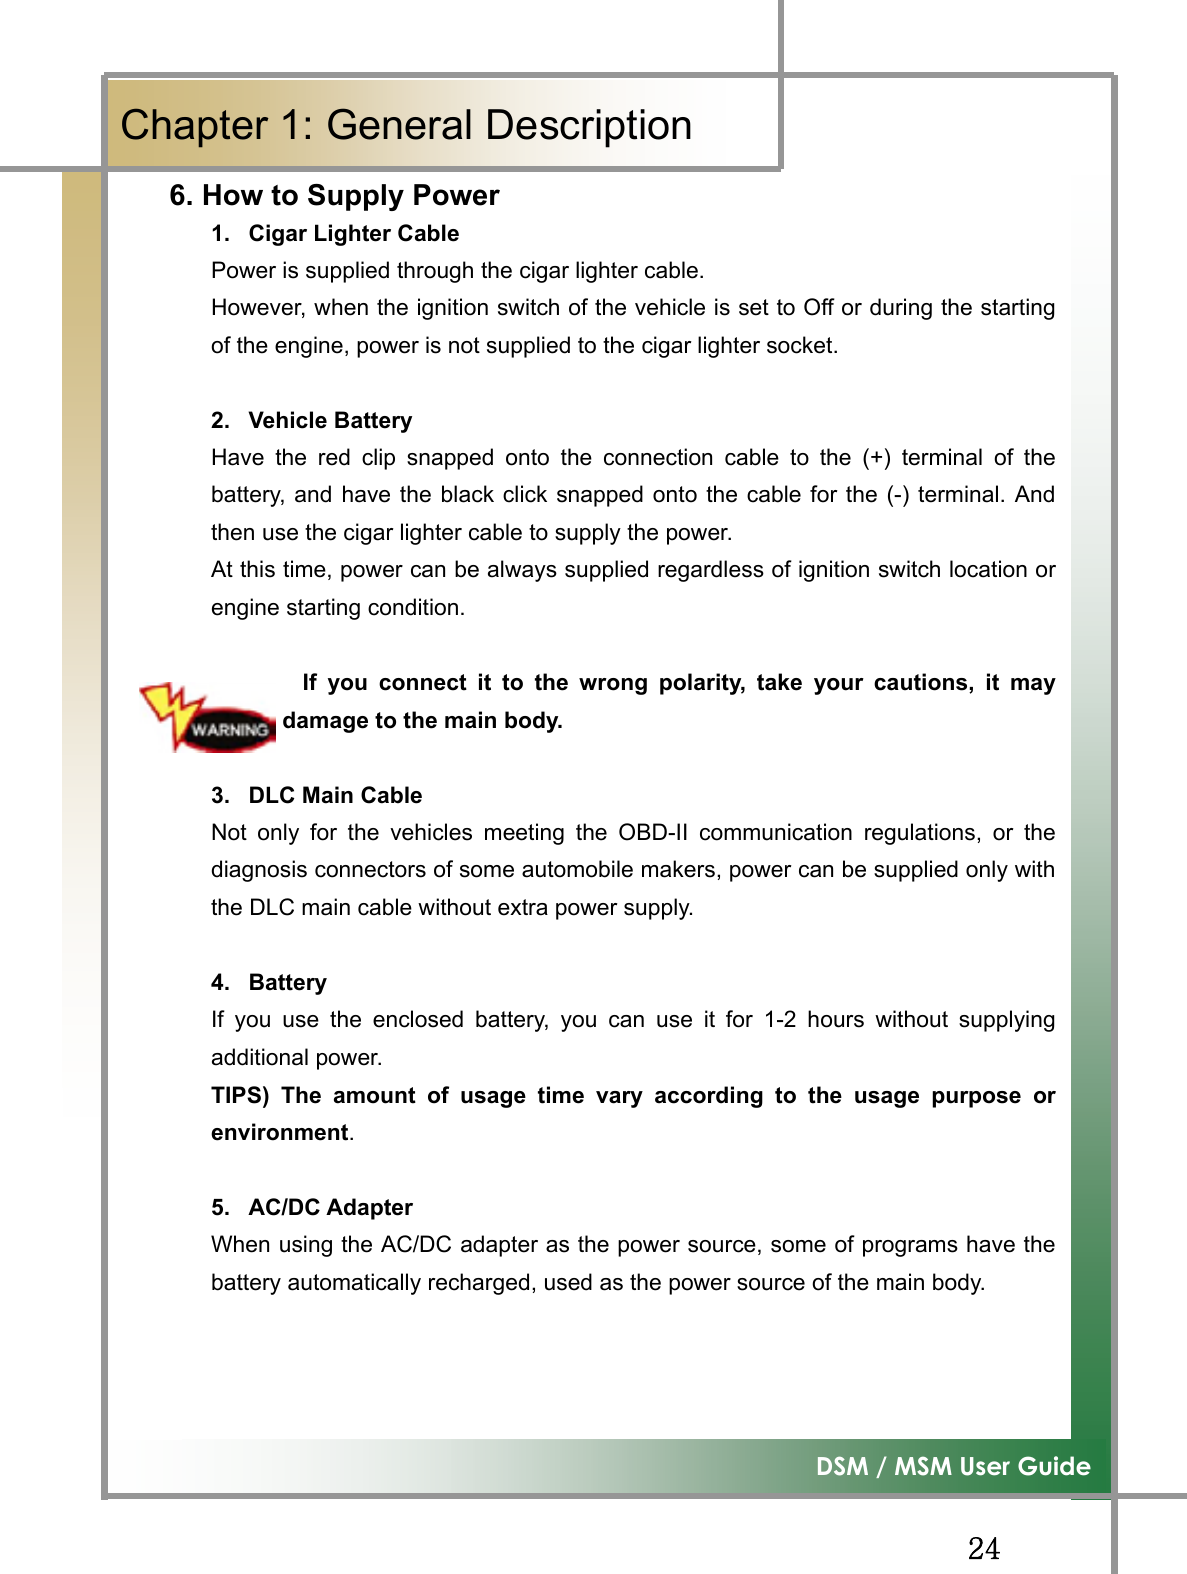
![GG]G͑DSM / MSM User GuideGChapter 1 : ڢۀۉۀۍڼۇٻڟۀێھۍۄۋۏۄۊۉٻYUGzGzGzG kztGOkGtPG tztGOtGtPGpGG ^}G¥GZ]}G ^UY}G¥GZ^UY}G GpGG ZWWhGGXY}G _WWhGGXY}GhytGjw|G z{y^XWG zZjY[[WGpGG X]to¡G GO[_to¡G G GpGvGjPGX]U`Z[[to¡G GOXXXto¡GGGpGvGjPG GiTGGOzyhtPG G G YtGG ][tGGiTGGOmshzoPG ZYtGG ][tGrG|ziG }GYUWG }GXUXG GiGG sTGwGZU^}G[YWWhGOXzGYwPGsTGwG^U[}G[YWWhGOYzGYwPGjGG r~wYWWWSGpzvG`X[XSG GjhuGYUWh¥iSG GqX_\WGw~tV}w~G GGGGGGGGGGGGGTTGG~GshuG plllG_WYUXXG GGGGGGGGGTTGzjvwlGjohuulsG GGGGGGGGGGGTG [joGiujGGGtUGGGGzGGGGGGGGGGGTG ·G \WW}GGG](https://usermanual.wiki/NEXTECH/DSM.User-manual-1-of-2/User-Guide-998770-Page-6.png)
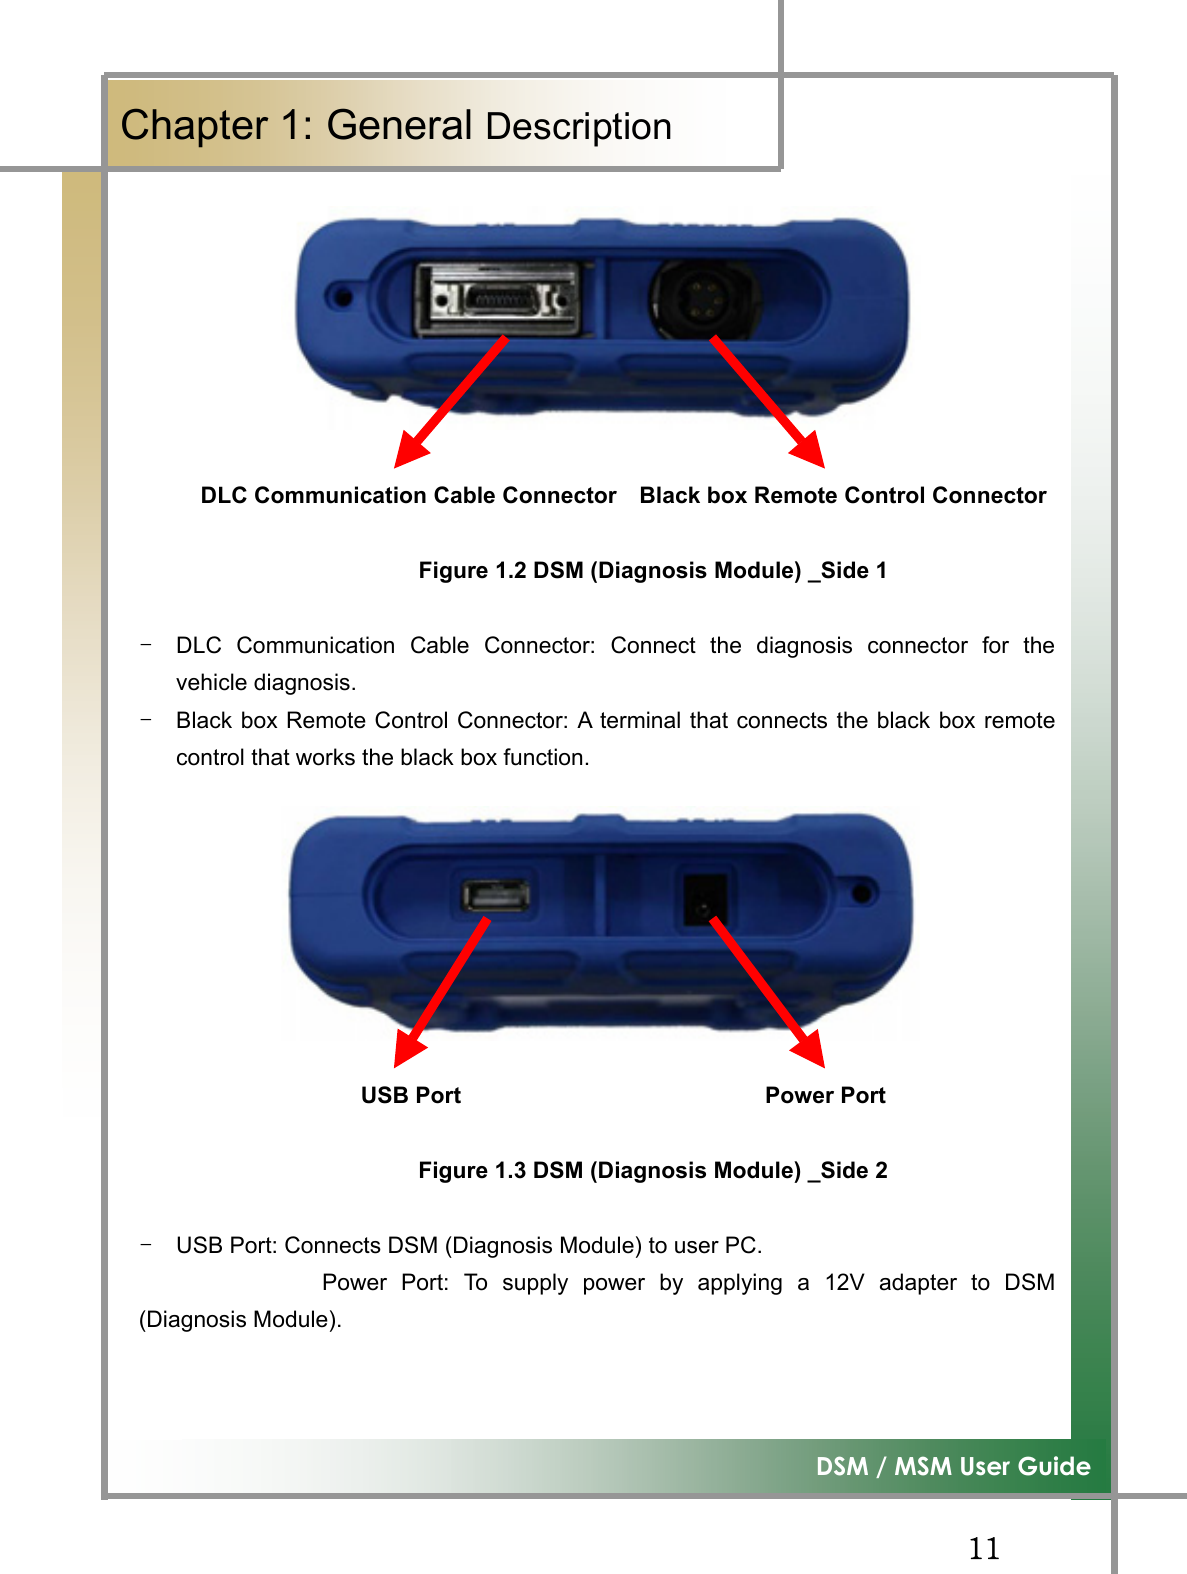
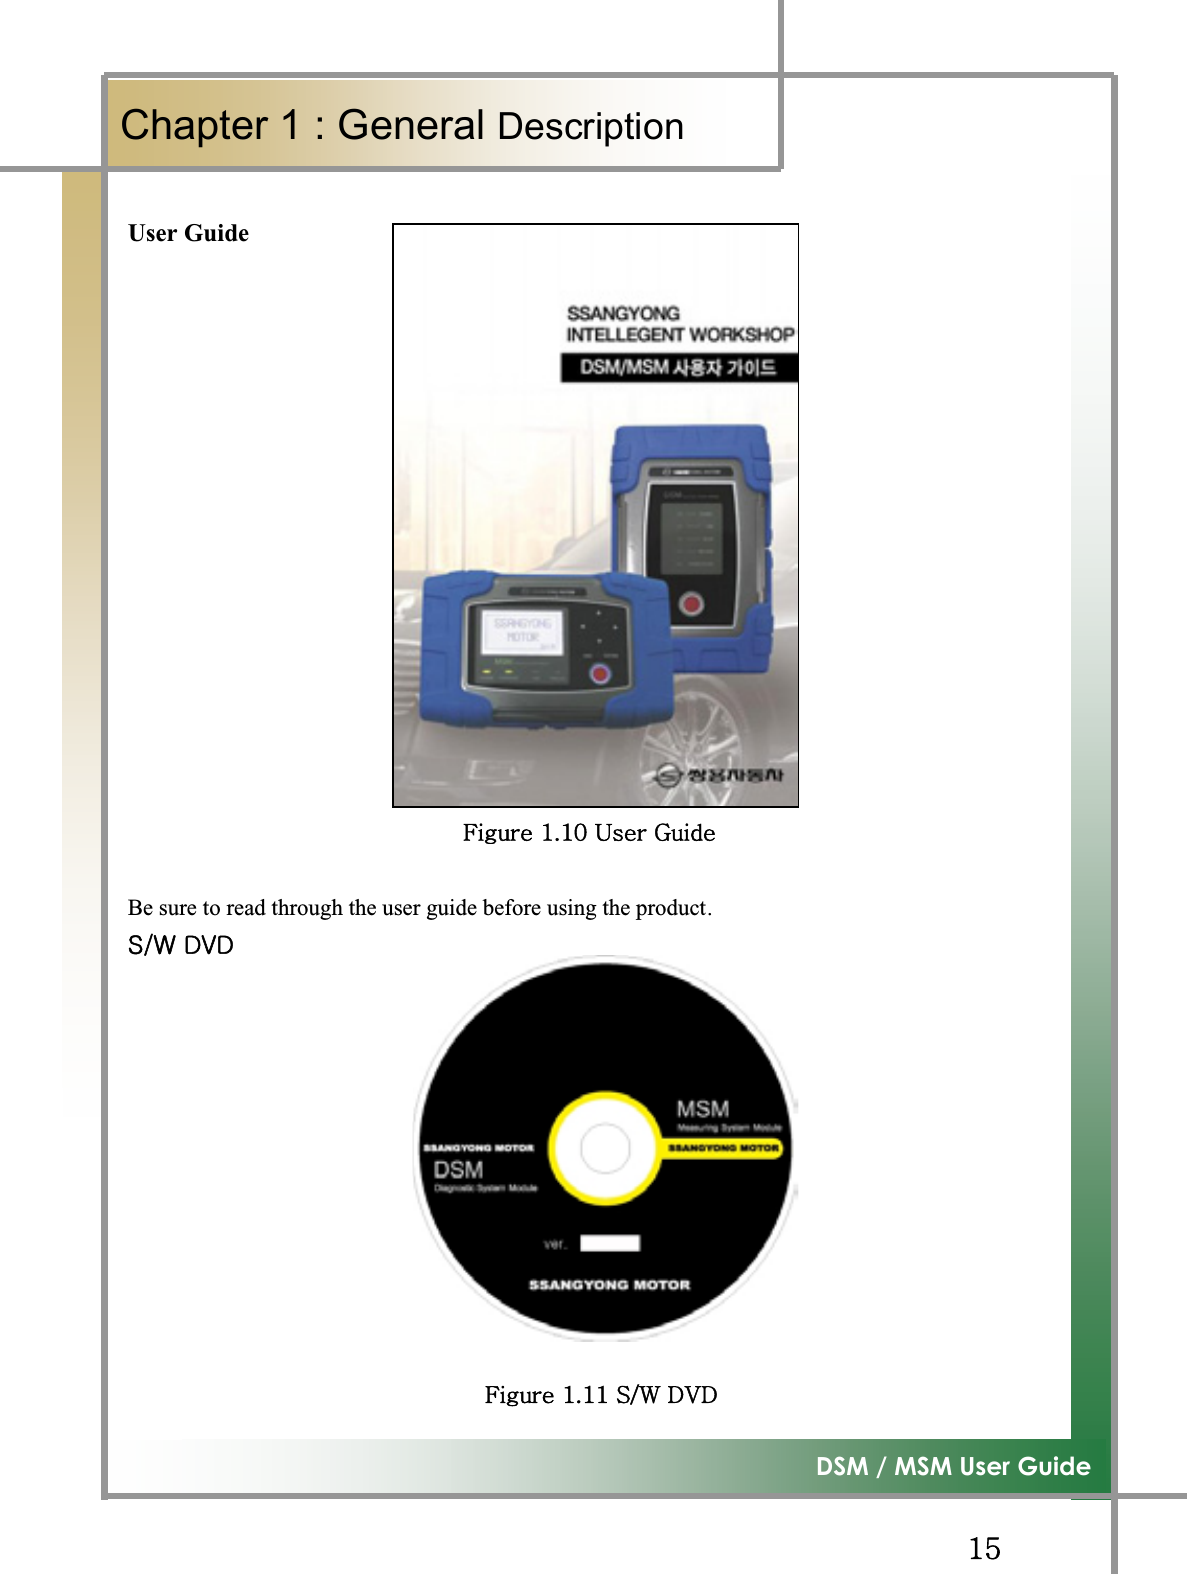
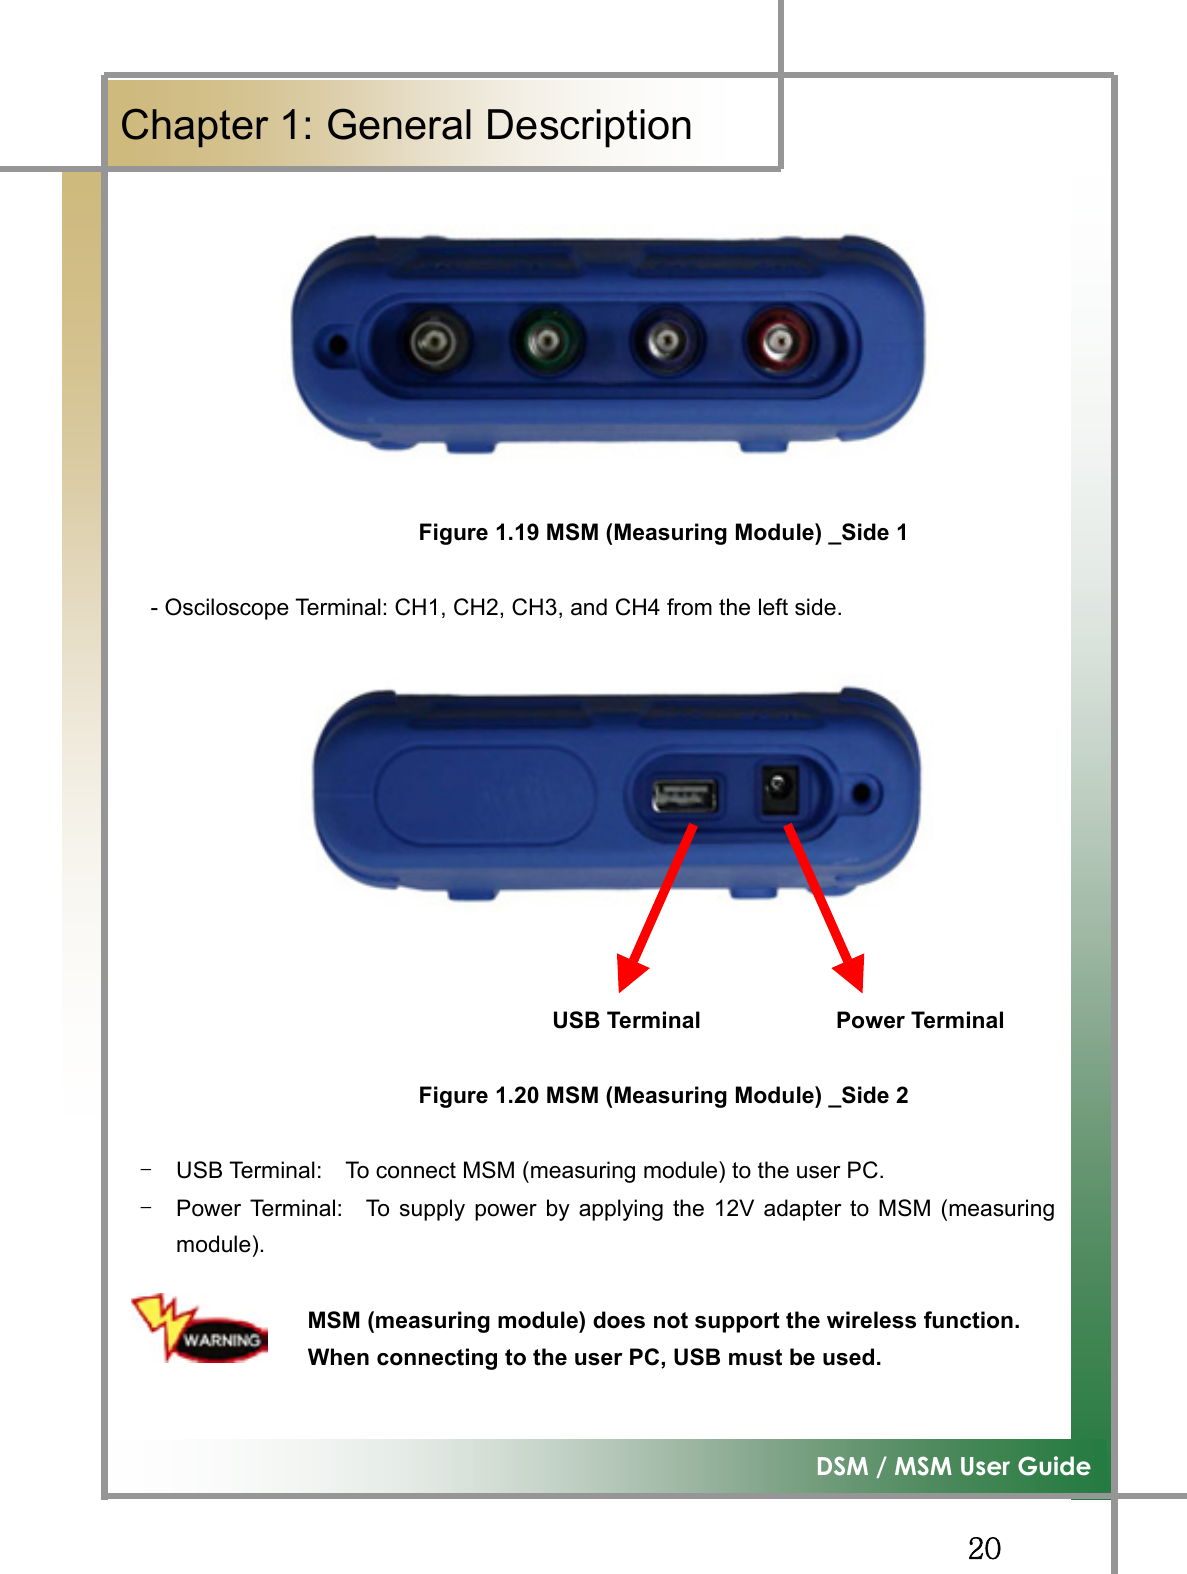
![GG^G͑DSM / MSM ㌂㣿㧦 Ṗ㧊✲GChapter 1 : ڢۀۉۀۍڼۇٻڟۀێھۍۄۋۏۄۊۉZUGyGiG G{GGGGGGGaG GTG }GGGGGGGGGGGGGUGTG iGGGGGGGGSGGGGGGGUGGhGGGGGGGGu{UGG G G G G G G G G G G G G G G G G G TG|GGZGGGGGUGG G G G G G G G G G G G G G G G G G G G G O^U[}GYYWWhGGGGPGGGGGGGGGGGGGGGGGGGkGGGGGUGG G G G G G G G G G G G G G G G G G TGpGGGUGGGGGGGGGGGGGGGGGGGGkGGGGGGUGG G G G G G G G G G G G G G G G G G TGpGGGUGGGGGGGGGGGGGGGGGGGGkGGGGGGGGGGGG]WjUGG G G G G G G G G G G G G G G G G G TGpGGGUGGGG G rGGGGGGGGGGUG G G G G G G G G G GGGGGGGGGGGGGGGTGpGGGGGUGG{GGGGGGGSGGGG G G GG GGGGUGiGGGGGG GGGGSGGGSGUGGG{pwzPGhGGGGGGGGSGGGG]GGGGGGUGGG](https://usermanual.wiki/NEXTECH/DSM.User-manual-1-of-2/User-Guide-998770-Page-7.png)
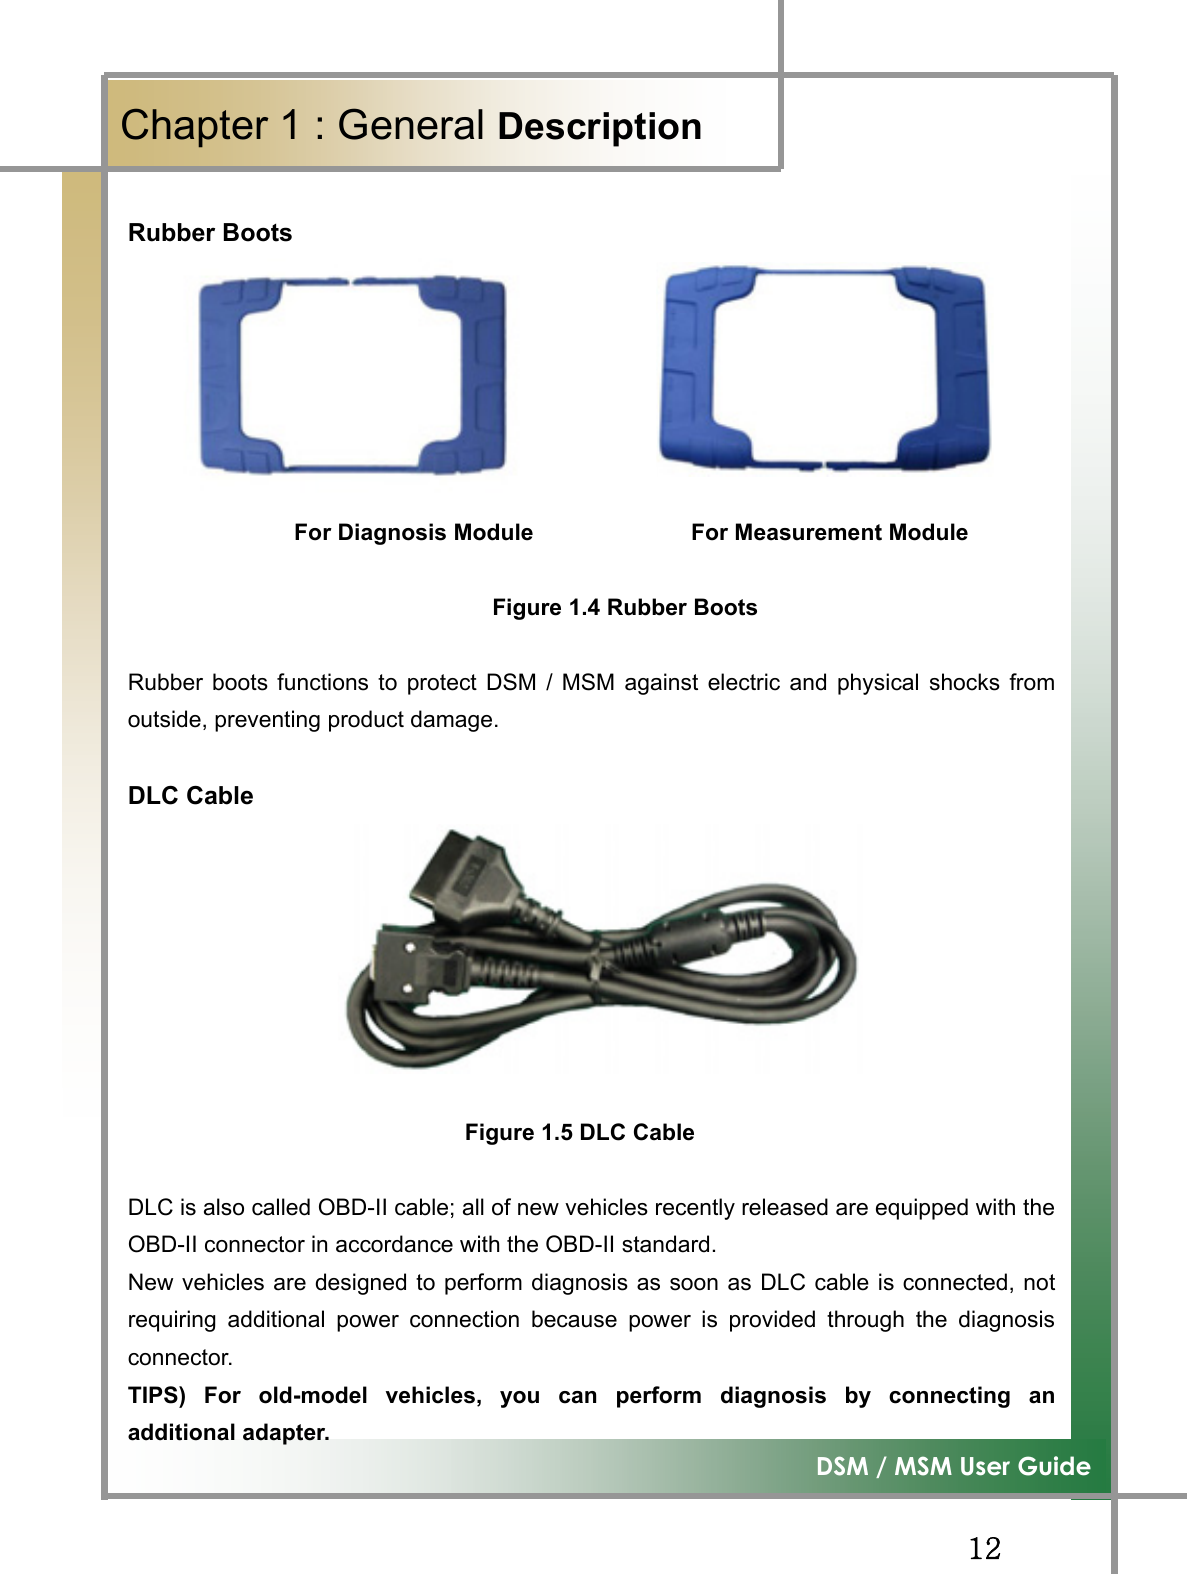
![GG_G͑DSM / MSM User GuideGChapter 1 : ڢۀۉۀۍڼۇٻڟۀێھۍۄۋۏۄۊۉٻ[UGsGGjGGGGGXPGkztGOkGtPGG G pGuG G pGkG GXG h```XWYXYhG kztGOkGtPG GYG h```XWZ_YhG yGGOGGkztPGZG h```XWY^YhG ksjGGG[G h```XWY[YhG |ziGGOGSGYtPG G\G h```XWY_YhG jGGGG G]G h```XWY\YhG iGGG^G h```XWY`YhG hjVkjGhkhw{vyG_G h```XWZWYhG hjGwv~lyGjvykG`G h```XWZXYhG kztGVGtztG G |˅GnGOrvylhPGXWG h```XWZYYhG zV~Gk}kGXXG h```XWZ`YhG yGGOTPGXYG h```XWYYYhG zGX[wG G GXZG h```XWYZYhG zGYWwGGX[G h```XWY]YhG ~YWWGjhuGGX\G h```XW[WYhG iGGGX]G h```XWZZYhG zGkGGX^G h```XWZ^YhG |ziGGshuGGO|PGtT\[nGX_G h```XW^WYhG kVtGtGzGOkztGGtztGPGX`G h```XWYWYhG kGtGzGOkztGzPGYWG h```XW\WYhG tGtGzGOtztGzPG](https://usermanual.wiki/NEXTECH/DSM.User-manual-1-of-2/User-Guide-998770-Page-8.png)
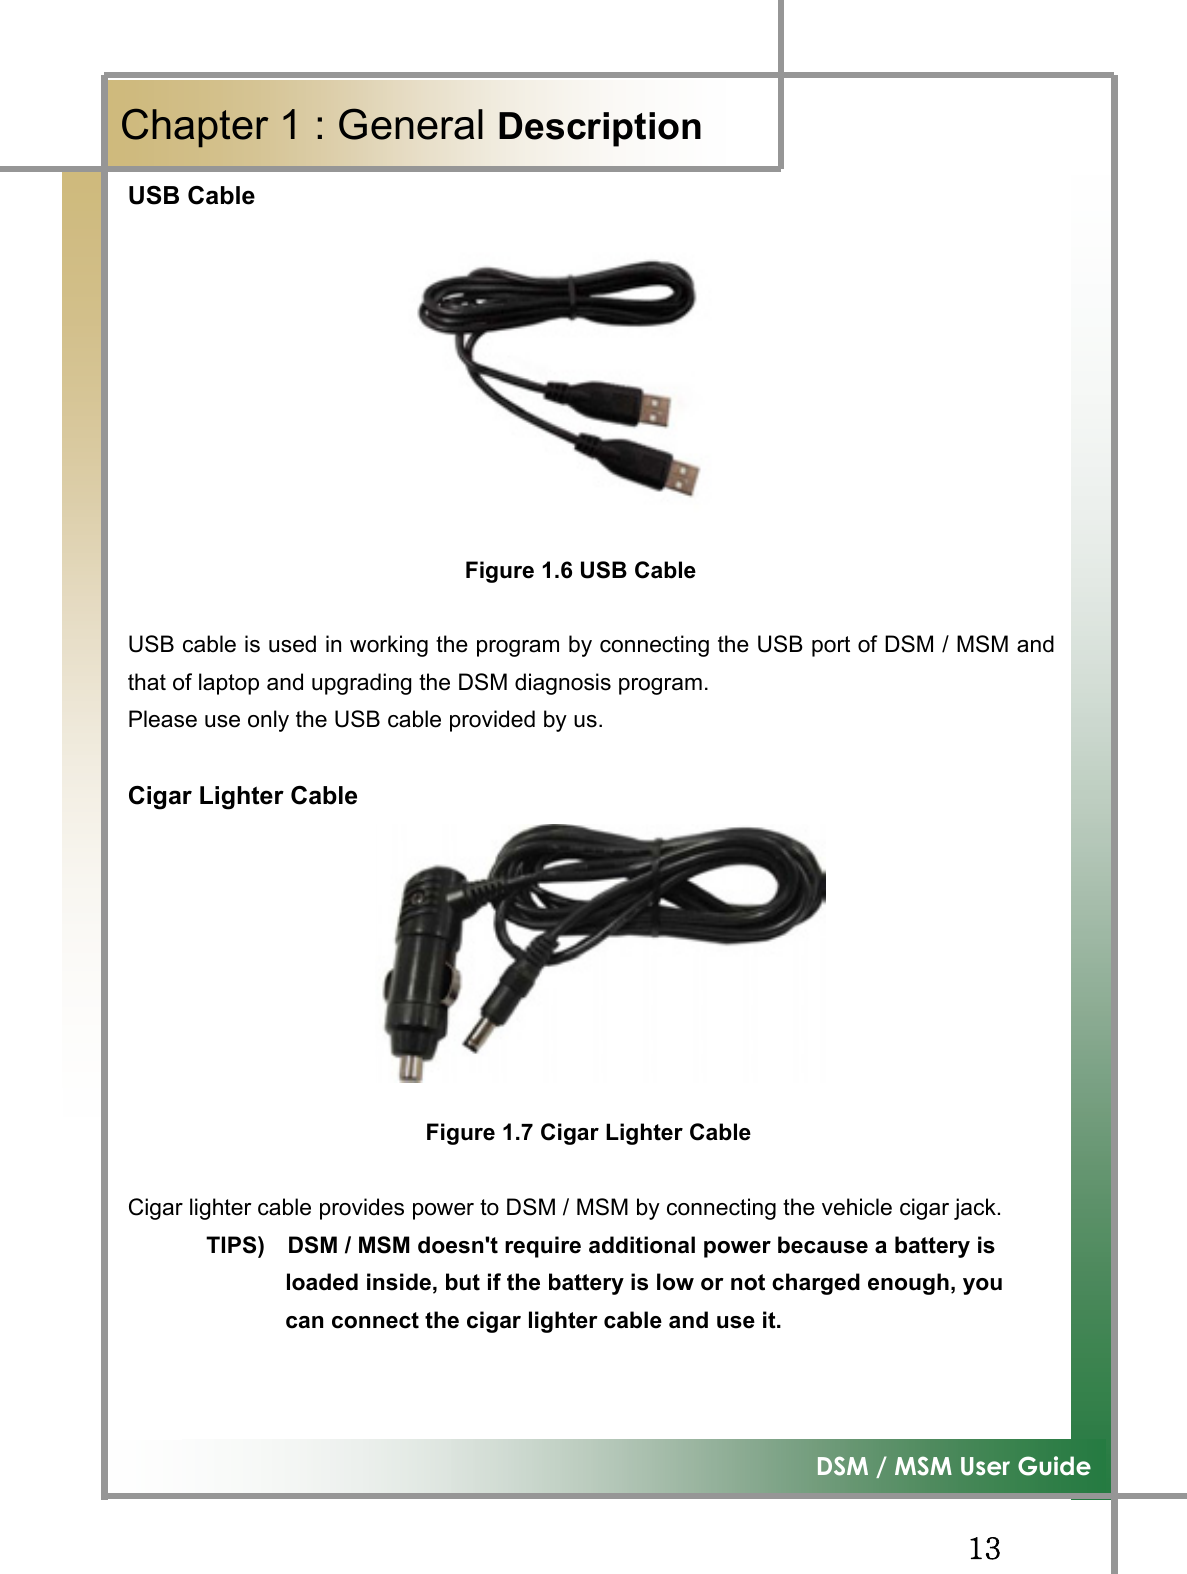
![GG`G͑DSM / MSM User GuideGChapter 1 : ڢۀۉۀۍڼۇٻڟۀێھۍۄۋۏۄۊۉٻYPGtztGOtGtPGG G pGuG G pGkG GXG h```XW\XYhG tztGOtGtPGYG h```XW]XYhG yGGOGGtztPGZG h```XW\YYhG pGGG[G h```XW\ZYhG zGGG\G h```XW\[YhG |ziGGOGPG]G h```XW]ZYhG yGGOTPG^G h```XW\\YhG {TGOhGiPG_G h```XW\^YhG {TGOiT]wPG`G h```XW\]YhG {TGO{GiPGXWG h```XW\_YhG {TGO~GzTjPGXXG h```XW\`YhG {TGO~GzTlPGXYG h```XW]YYhG jhuGwyvilGXZG h```XW]WYhG kGGOY˟PGZPGvGG G G pGuG G pGkG GXG G kspGGYG G {GGZG G iGGG[G G zGGG\G G {GG]G G wGGGG](https://usermanual.wiki/NEXTECH/DSM.User-manual-1-of-2/User-Guide-998770-Page-9.png)
![GGX]G͑DSM / MSM User GuideGChapter 1: General DescriptionGVehicle Diagnosing AdapterGGGGGGGGGmGXUXYGzGhOX[wPG G G mGXUXZGzGhOYWwPGG~YWWGjhuGAdapterGGGGGGGGGGmGXUX[G~YWWGjhuGhGG~YWWGjhuGGGGGGGGGG](https://usermanual.wiki/NEXTECH/DSM.User-manual-1-of-2/User-Guide-998770-Page-16.png)
![GGX^G͑DSM / MSM User GuideGChapter 1 : General DescriptionGBlack box SwitchGGGGGGGGGGGmGXUX\GiGGzGGUsed in realizing the black box function when the user is in need of itUGGzGkG{GiGGGGGGGGGGGGGGGGGGGGGGGGGGGGGGGGGGGGGmGXUX]GzGkG{GiGG{GG GG SG GG G G G SGG G GGGGGGGUG](https://usermanual.wiki/NEXTECH/DSM.User-manual-1-of-2/User-Guide-998770-Page-17.png)
![GGY\G͑DSM / MSM User GuideGChapter 2: Install Program (for XP)1. Install Diagnosing Program Step 1) Insert the program installation DVD 1[Disk1: Diagnosis and DiagnosingGuide #1] to your laptop. The following screen will be prompted.GGGGGGGGGGGGGGStep 2) Click the [Diagnosing Program] icon to proceed to the next step. GGGGGGGGGGGG](https://usermanual.wiki/NEXTECH/DSM.User-manual-1-of-2/User-Guide-998770-Page-25.png)
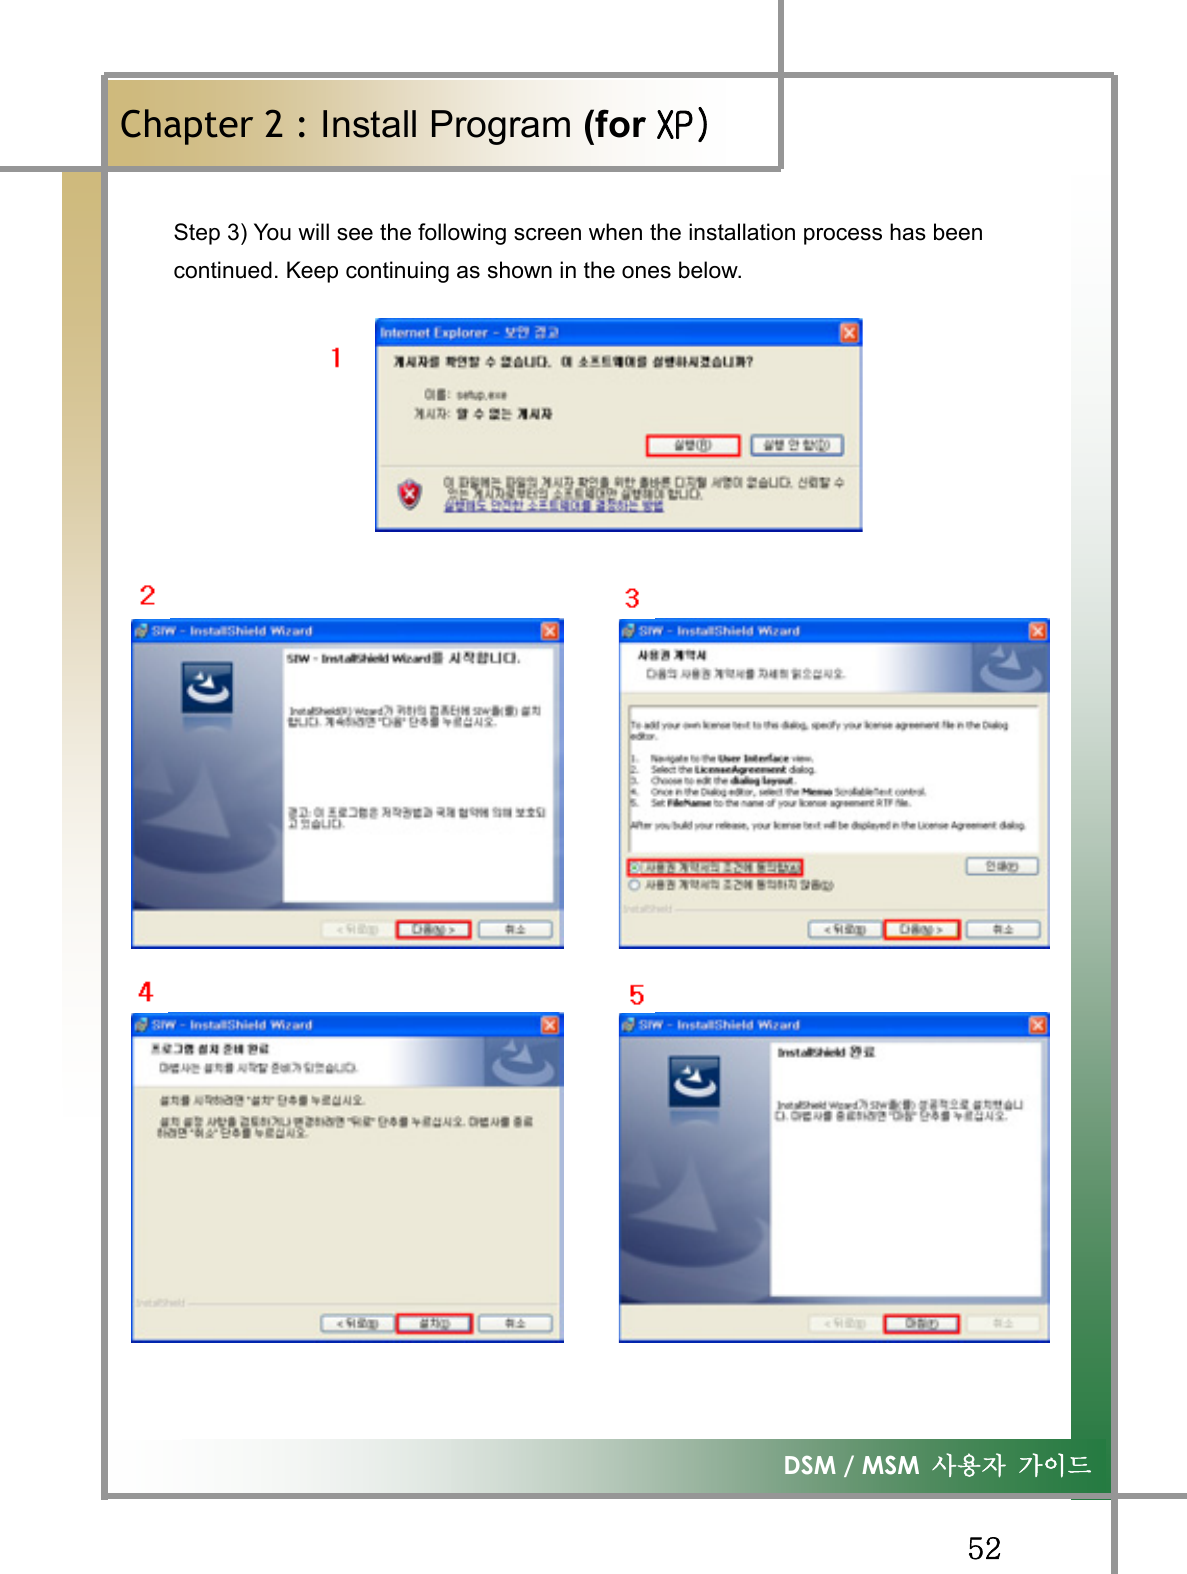
![GGY]G͑DSM / MSM User GuideGChapter 2: Install Program (for XP)If the program is already installed, click the [Recovery] icon and continue the process.]Step 3) The installation process is continued, showing the following screen. Click[Next(N)>] to continue the process. GGGGGGGGGGGGzG[PG{GGGGUGjGAgree OhPSGGGNext OuPeUGG](https://usermanual.wiki/NEXTECH/DSM.User-manual-1-of-2/User-Guide-998770-Page-26.png)
![GGY^G͑DSM / MSM User GuideGChapter 2 : Install Program (forٻڳګڄGStep 5) The following screen is displayed. Enter customer information. After entering information, click [Next(N)>] and continue the process. GGGGGGGGGStep 6) Click the [Standard(I)] icon.](https://usermanual.wiki/NEXTECH/DSM.User-manual-1-of-2/User-Guide-998770-Page-27.png)
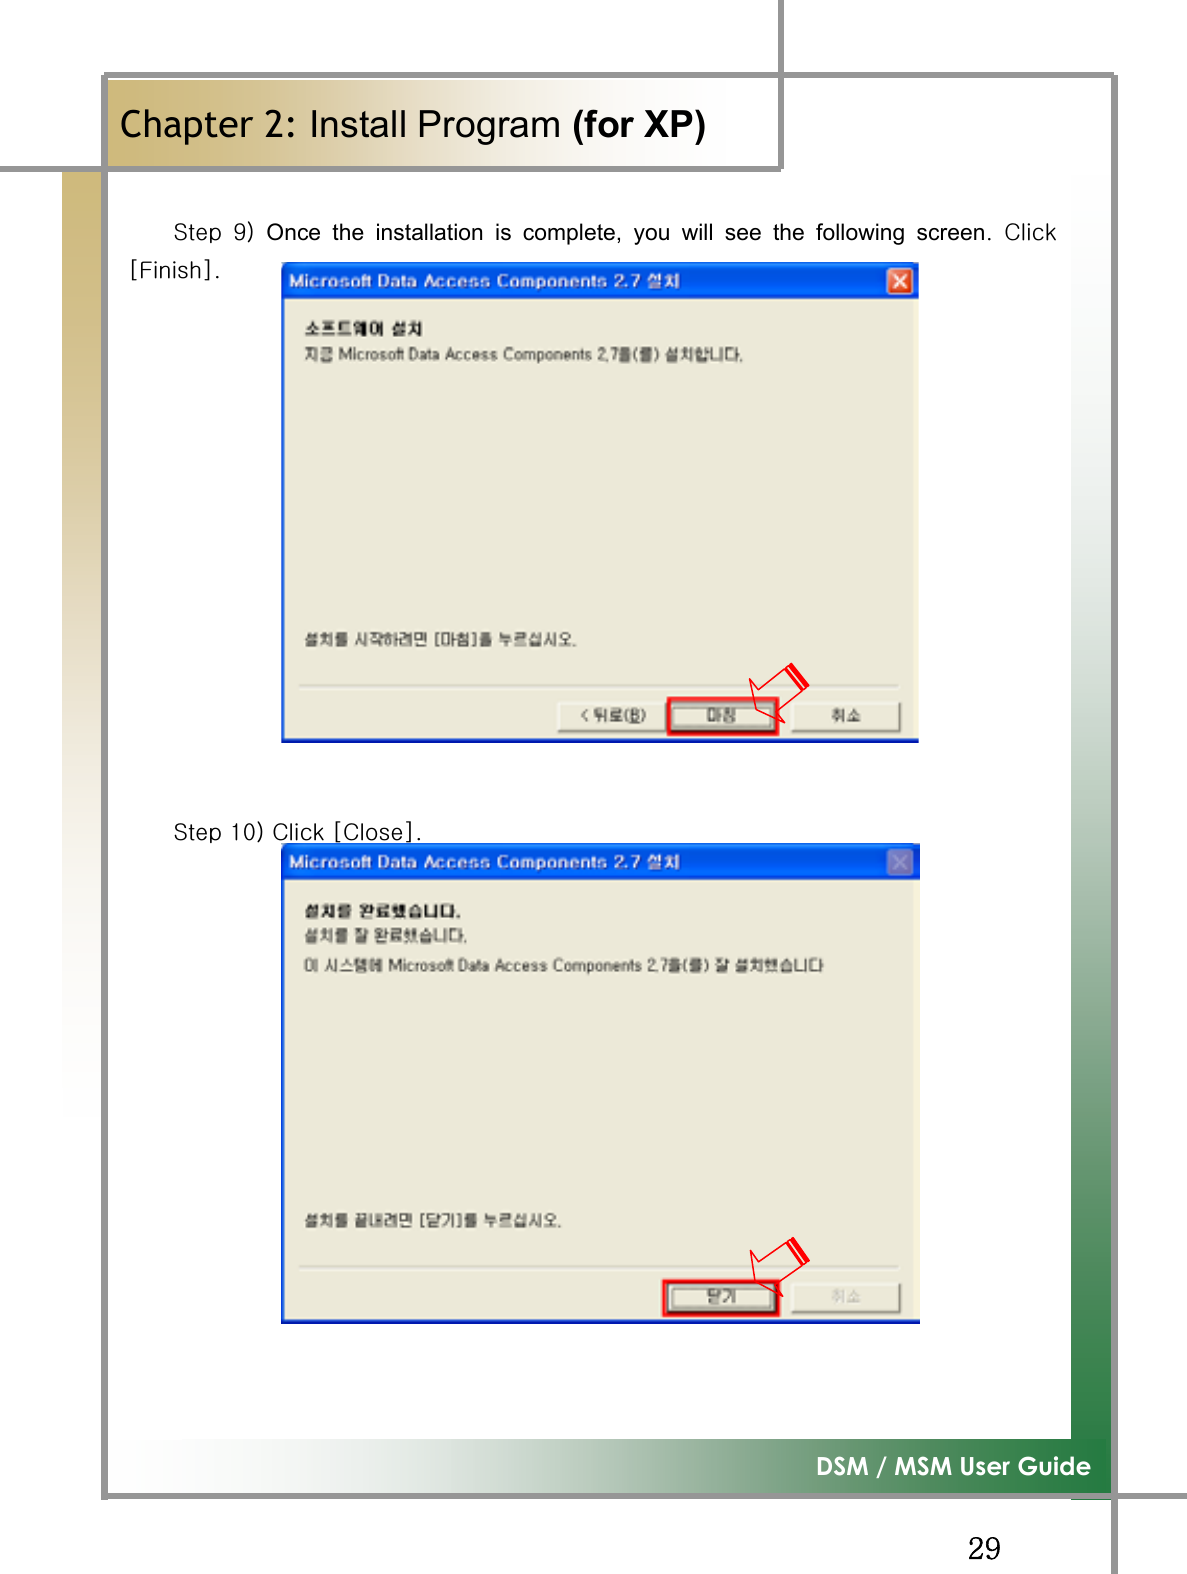
![GGY_G͑DSM / MSM User GuideGChapter 2: Install Program (for XP)GStep 7) Once the installation is complete, you will see the following screen. Click[Finish (F)].Step 8) After selecting [Agree to EULA(A)], click [Next(N)>].](https://usermanual.wiki/NEXTECH/DSM.User-manual-1-of-2/User-Guide-998770-Page-28.png)
![GGZWG͑DSM / MSM User GuideGChapter 2:Install Program (for XPڄ[If the program was already installed, you can skip the following process.]Step 11) Click [Next(N)>] to continue the installation. GGGGGGGGGGGGGGStep 12) You will see the following screen. Click [Agree(A)], and then click[installation(I)>].G](https://usermanual.wiki/NEXTECH/DSM.User-manual-1-of-2/User-Guide-998770-Page-30.png)
![GGZXG͑DSM / MSM User GuideGChapter 2: Install Program (for XPڄGStep 13) Once the installation is complete, you will see the following screen. Click [Finish (F)].GGGGGGGGGGGGzGX[PGjGmGGGGGGGUG](https://usermanual.wiki/NEXTECH/DSM.User-manual-1-of-2/User-Guide-998770-Page-31.png)
![GGZYG͑DSM / MSM User GuideGChapter 2: Install Program (for XPڄ2. Install Diagnosing Guide Step 1) Insert the program installation DVD 1[Disk1: Diagnosis and DiagnosingGuide #1] into your laptop. You will see the following screen. GGGGStep 2) Click the [Diagnosing Guide] icon to continue the installation process.](https://usermanual.wiki/NEXTECH/DSM.User-manual-1-of-2/User-Guide-998770-Page-32.png)
![GGZZG͑DSM / MSM User GuideGChapter 2: Install Program (for XPڄGStep 3) The installation process continues as shown in the below screen. GGGStep 4) Once the installation is complete, insert DVD 2 [Disk2: Diagnosis andDiagnosing Guide #2] into the drive as shown in the following screen.](https://usermanual.wiki/NEXTECH/DSM.User-manual-1-of-2/User-Guide-998770-Page-33.png)
![GGZ[G͑DSM / MSM User GuideGChapter 2: Install Program (for XP)GStep 5) Click the [Next] icon to continue the next step. Step 6) The installation process continues as shown in the below screen](https://usermanual.wiki/NEXTECH/DSM.User-manual-1-of-2/User-Guide-998770-Page-34.png)
![GGZ\G͑DSM / MSM User GuideGChapter 2: Install Program (for XP)GStep7) Once the [Diagnosing Guide] installation is complete, you will see the following screen. Insert DVD 1[Disk1:Diagnosis and Diagnosing Guide #1] and continue the installation of [Install Wireless LAN]. GGGGGG [DVD 1] If you had [DVD 2] inserted first, the following screen will bedisplayed. Continue the process by inserting [DVD 1] according to the screenmessage.](https://usermanual.wiki/NEXTECH/DSM.User-manual-1-of-2/User-Guide-998770-Page-35.png)
![GGZ]G͑DSM / MSM User GuideGChapter2: Install Program (for ڳګڄٻ3. How to Install Wireless USB LAN Card (MX-54G) [Unicone] Step 1) Insert the program installation DVD 1[Disk1: Diagnosis and Diagnosing Guide #1] into your laptop. You will see the following screen. Step 2) Click the [Install Wireless LAN] icon to continue the process.GG](https://usermanual.wiki/NEXTECH/DSM.User-manual-1-of-2/User-Guide-998770-Page-36.png)
![GGZ^G͑DSM / MSM User GuideGChapter 2: Install Program (for ڳګڄGStep 3) Once the installation process is complete, click [Yes].Step 4) Select [Microsoft Zero Configuration Tool], and click [Next>] to continue the process. You must select Micro Zero Configuration Tool as shown in the abovefigure.](https://usermanual.wiki/NEXTECH/DSM.User-manual-1-of-2/User-Guide-998770-Page-37.png)
![GGZ_G͑DSM / MSM User GuideGChapter 2: Install Program (for ڳګڄGStep 5) Select [Optimize for WiFi mode] and click [Next>] to continue the process. Itsprocessing speed may be delayed according to the PC status.Step 6) Select [Yes, I want to restart my computer now.], and click [Finish]. Pleasetake your caution when the system is rebooted.](https://usermanual.wiki/NEXTECH/DSM.User-manual-1-of-2/User-Guide-998770-Page-38.png)
![GGZ`G͑DSM / MSM User GuideGChapter 2 : Install Program (for ڳګڄGStep7) Once the computer is rebooted, turn on Diagnosing Module, and insert USBWireless LAN(MX-54G) into the USB port of your PC. Wireless icon isrecognized. Double click the wireless iconUGGGG{GGGGGGGGGG~GGGGㇵ䈐GÎGGStep8) Utility will be excuted as shown in the below screen. Point to [SSY-IWS001], and then double click it. (If [SSY-IWS001] is not found, click 㧀㽕 ㇵ␜㜄 㠸㾌䚐 that is in the leftupper corner.)](https://usermanual.wiki/NEXTECH/DSM.User-manual-1-of-2/User-Guide-998770-Page-39.png)
![GG[WG͑DSM / MSM User GuideGChapter 2: Install Program (for ڳګڄGStep9) Click [Connect (C)] to continue the process. Step 10) Wireless network is connected as shown in the below screen.](https://usermanual.wiki/NEXTECH/DSM.User-manual-1-of-2/User-Guide-998770-Page-40.png)
![GG[XG͑DSM / MSM User GuideGChapter 2 : Install Program (for ڳګڄGStep 11) Click that is in the left lower corner to continue the IP setting process. GGGGGGGGGGGGStep 12) Check if the device to be connected is [RT73 USB Wireless LAN Card] or not.Move the scroll to select [Internet Protocol(TCP/IP)], and double click it.GGjtGG ㏘䆠㟴㫵](https://usermanual.wiki/NEXTECH/DSM.User-manual-1-of-2/User-Guide-998770-Page-41.png)
![GG[YG͑DSM / MSM User GuideGChapter 2 : Install Program (for ڳګڄStep 13) You will see the below screen. Check the example, and continue thesetting for IP and subnet mask. Ex) ྙSelect [Use next IP Address(S)]. ྚEnter [IP Address(I)]. For IP address, enter 200. 8. 100 that is common in allcases, and enterany number from 10 to 90 intothe final space. ྛEnter [Subnet Mask(U)]⏼␘.. Enter 255. 255. 0. 0. Click [OK].ྜWhen your work site operates multiple machines, for the last bracket of the IPaddress, please enter any of different numbers from 10 to 90. If you see the IPconflict warning message after entering your random number, select another numberfrom 10 to 90. lGGXWG`WUG](https://usermanual.wiki/NEXTECH/DSM.User-manual-1-of-2/User-Guide-998770-Page-42.png)
![GG[ZG͑DSM / MSM User GuideGChapter 2 : Install Program (for ڳګڄGStep 14) In the Step 13) screen, after clicking the [Wireless Network] tab as shownbelow, click [Advanced (V)] to continue the process. GGGGGGGGGGUGG㝸⨀G 䟸G GStep 15) Select [Inter-Computer Network (Special) (C)], and then click [Close]. GGGGGGGGGStep 16) Click [OK], and close the opening window to finish the setting process.G](https://usermanual.wiki/NEXTECH/DSM.User-manual-1-of-2/User-Guide-998770-Page-43.png)
![GG[[G͑DSM / MSM User GuideGChapter 2 : Install Program (for ڳګڄ4. Firewall Setting Step 1) Set the firewall according to the step-by-step process. Execute [Start] Î[Control Panel] Î [Security Center].](https://usermanual.wiki/NEXTECH/DSM.User-manual-1-of-2/User-Guide-998770-Page-44.png)
![GG[\G͑DSM / MSM User GuideGChapter 2: Install Program (for ڳګڄGStep 2) Click [Windows Firewall] to execute the firewall. Step 3) Click the [Exception] tab, and then click [Add Program(R)..] as shown in thefollowing screen.](https://usermanual.wiki/NEXTECH/DSM.User-manual-1-of-2/User-Guide-998770-Page-45.png)
![GG[]G͑DSM / MSM User GuideGChapter 2 : Install Program (for ڳګڄGStep 4) Point to the [IWS_DiagStart] icon and click it. And then click [OK] to continuethe process. Step 5) Click [Add Program(R)...] one more time. Move the scroll fornavigation](https://usermanual.wiki/NEXTECH/DSM.User-manual-1-of-2/User-Guide-998770-Page-46.png)
![GG[^G͑DSM / MSM User GuideGChapter 2 : Install Program (for ڳګڄGStep 6) Click [Search (B)...].Step 7) You will see the following screen. The search path for [Location(I)] is "c:\IWS\DIAGNOSIS\IWSCAN.exe" in the folder where the program is located. After clicking [iWScan], and click [Open (O)] to continue the process.](https://usermanual.wiki/NEXTECH/DSM.User-manual-1-of-2/User-Guide-998770-Page-47.png)
![GG[_G͑DSM / MSM User GuideGChapter 2 : Install Program (for ڳګڄGStep 8) You will see the following screen. Click [OK] to continue. Step 9) You will see the following screen. Make sure that [IWS_DiagStart] and[iWScan] are checked under the firewall exception tab, and then click [OK]to finish. }G](https://usermanual.wiki/NEXTECH/DSM.User-manual-1-of-2/User-Guide-998770-Page-48.png)
![GG[`G͑DSM / MSM ㌂㣿㧦 Ṗ㧊✲GChapter 2 : Install Program (for ڳګڄ5. Chairman W Diagnosing Guide InstallationStep1) Insert the program installation DVD 3[Disk3:Chairman W Maintenance Manual] into your laptop. You will see the following screen. Click [Next(N)>] to continue. Step 2) You will see the following screen. Click the [Install (I)] icon to continue. GGGGGGGGGGGGGG](https://usermanual.wiki/NEXTECH/DSM.User-manual-1-of-2/User-Guide-998770-Page-49.png)
![GG\WG͑DSM / MSM User GuideGChapter 2 : Install Program (for ڳګڄGStep 3) The installation process continues as shown below. Step 4) Click the [Finish] icon to finish the installationUGGGGGGGGGGGGGGTIPS) You cannot use the diagnosing guide until all of diagnosing contents in DISK1,DISK2, and DISK3 have been installed.](https://usermanual.wiki/NEXTECH/DSM.User-manual-1-of-2/User-Guide-998770-Page-50.png)
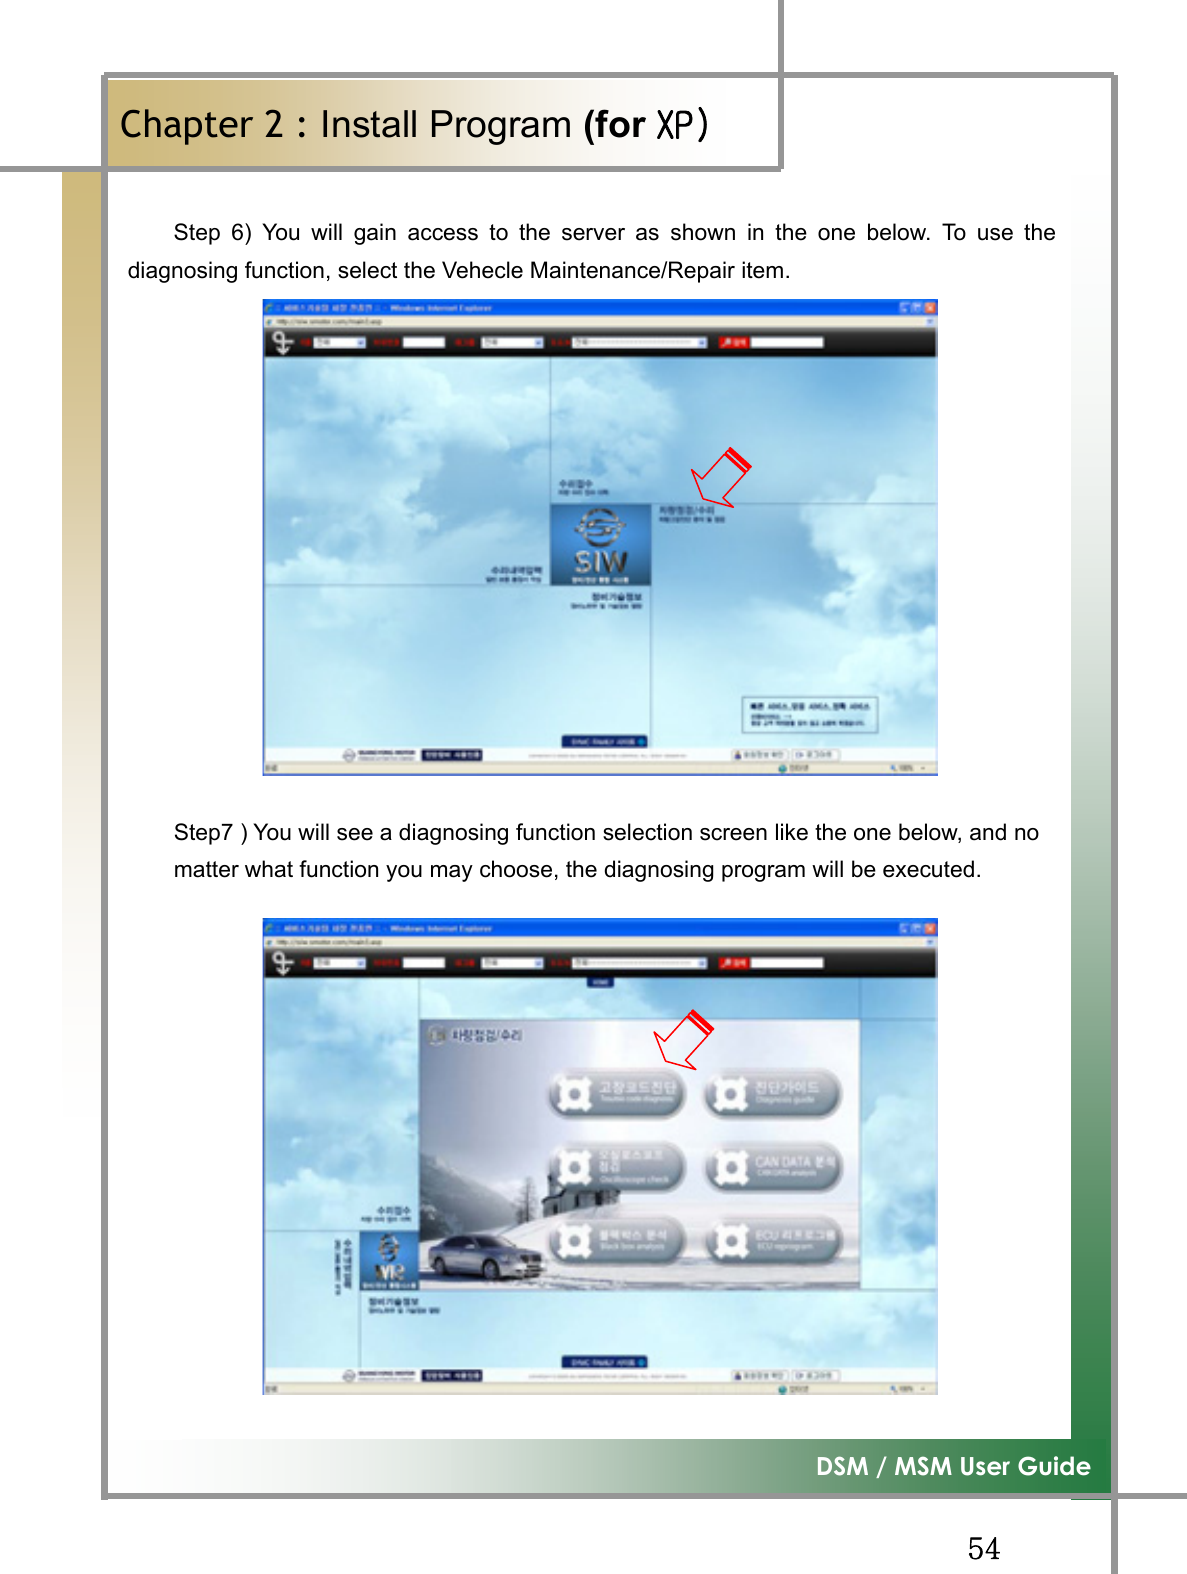
![GG\XG͑DSM / MSM ㌂㣿㧦 Ṗ㧊✲GChapter 2 : Install Program (for ڳګڄ6. Install SIW Access Program and Configure Program SettingsStep1) Type [http://siw.smotor.com] into the internet address window, and click the [Enter] key. You will see the screen as shown below. Click [SIW Program Download] to continue. Step 2) You will see the following screen. Click the [Execute] icon to continue. G](https://usermanual.wiki/NEXTECH/DSM.User-manual-1-of-2/User-Guide-998770-Page-51.png)
![GG\]G͑DSM / MSM User GuideGChapter 2 : Install Program (for XP)GStep 10) Click the [Configuration] icon in the upper right corner of the screen tocontinue.Step 11) You will see the following screen. Click the [Search Wireless IP] icon. Step12) If the wireless LAN is found, you will see the following screen. Double-click thewireless LAN IP. (Verify that the selected IP is the same by clicking thecorresponding wireless LAN)GGGGGGG If a number of diagnosis modules are operated in the same work site, besure to verify the IPUG G}G](https://usermanual.wiki/NEXTECH/DSM.User-manual-1-of-2/User-Guide-998770-Page-56.png)
![GG\^G͑DSM / MSM User GuideGChapter 2: Install Program (for XP)GSte13) Click [Save Setting] to finish the process. There are multiple USB 2.0 ports in your laptop. You must keep connecting the USB wireless LAN card and USB cable only to thelaptop USB port that has firstly recognized the device or installed. Ifthey are connected to a different port, you must reset the device fromthe scratch.G](https://usermanual.wiki/NEXTECH/DSM.User-manual-1-of-2/User-Guide-998770-Page-57.png)
![GG\_G͑DSM / MSM User GuideGChapter 3: How to Connect to Vehicle- How to connect to the vehicle and select the diagnosing program. 1. Check the location of vehicle diagnosing connector - As the most of new cars released since2002 are designed to meet the OBD-II Communication Regulations, all of them areequipped with the OBD-II diagnosing connector, and have the diagnosing connector mostlyabove the brake pedal below the driver handle. [Sssangyong 20Pin] [Sssangyong 14Pin] [OBD-II] Figure 3.1 Diagnosing Connector Location 2. Connect the vehicle diagnosing connect to DSM, using the diagnosing cable. Figure3.2 Diagnosing Cable Connection](https://usermanual.wiki/NEXTECH/DSM.User-manual-1-of-2/User-Guide-998770-Page-58.png)