Contents
- 1. User manual 1 of 2
- 2. User manual 2 of 2
User manual 1 of 2

G
G
XG
DSM / MSM
User’s Guide
G
G
G
G
G
G
G
G
G
G
G
G
G
G
G
G
G
G
}UGW_WZY_G
G
zG~GGGGGGGGGUG G
wGGGGGGGUG
G
G
G
G
G
G
G
YG
͑DSM / MSM User Guide
G
ڲڼۍۉۄۉۂٻ
zGpG
G
Safety WarningsG
G
Carmanscan Lite mentioned in this User's Guide is designed for those who have basic
qualifications for using this system.G
G
For safe and effective use, follow the safety instructions described in this User's Guide.
G
The followings are general instructions that you must remember when you use the
system.
G
Do not drop the product.
GGGGGGGGGGGGGGGGAlways use the product in the rubber boots to protect it.
G
Do not place the product on the ignition coil.
Although the product is designed to be free from
electromagnetic interference, but excessive electromagnetic
interference may damage the system.
G
GGGGGGGGGGGGGGGGGExcessive surge or electric shock fed by power cable may damage
GGGGGGGGGGGGGGGGGpower supply system of the system. G G
GGGGGGGGGGGGGGGGGDo not use the system when power supply is unstable.
GGGGGGGGGGGGGGG
The AC/DC adapter was designed for 12V DC.
Use only the AC/DC adapter with rated voltage.
G
Note that the radio transmission system may cause radio
interference. No service will be available with respect to
personal casualty and injury.
G
G

G
G
ZG
͑
DSM / MSM ㌂㣿㧦 Ṗ㧊✲
G
ڞۊۉۏۀۉۏٻ
ڲڼۍۉۄۉۂډډډډډډډډډډډډډډډډډډډډډډډډډډډډډډډډډډډډډډډډډډډډډډډډډډډډډډډډڍ
ڞڣڜګگڠڭٻڌٻڢۀۉۀۍڼۇٻڟۀێھۍۄۋۏۄۊۉډډډډډډډډډډډډډډډډډډډډډډډډډډډډډډډډډډڐ
ٻڌډٻڮ۔ێۏۀۈٻڡۀڼۏېۍۀێډډډډډډډډډډډډډډډډډډډډډډډډډډډډډډډډډډډډډډډډډډډډډډډډډډډډډډډڐ
ٻڍډٻڮ۔ێۏۀۈٻڮۋۀھۄہۄھڼۏۄۊۉډډډډډډډډډډډډډډډډډډډډډډډډډډډډډډډډډډډډډډډډډډډډډډډډډډڑ
ٻڎډٻڭۀھۃڼۍۂۀڼڽۇۀٻڝڼۏۏۀۍ۔ٻګڼھۆډډډډډډډډډډډډډډډډډډډډډډډډډډډډډډډډډډډډډډډډډډډډډڒ
ٻڏډٻڧۄێۏٻۊہٻڞۊۈۋۊۉۀۉۏێډډډډډډډډډډډډډډډډډډډډډډډډډډډډډډډډډډډډډډډډډډډډډډډډډډډډړ
ٻڐډٻڞۊۈۋۊۉۀۉۏٻګۄھۏېۍۀێٻڼۉڿٻڟۀێھۍۄۋۏۄۊۉێډډډډډډډډډډډډډډډډډډډډډډډډډډډډډډډډډډڌڋ
ٻڑډٻڣۊےٻگۊٻڮېۋۋۇ۔ٻګۊےۀۍډډډډډډډډډډډډډډډډډډډډډډډډډډډډډډډډډډډډډډډډډډډډډډډډډډڍڏ
ڞڣڜګگڠڭٻڍٻڤۉێۏڼۇۇٻګۍۊۂۍڼۈډډډډډډډډډډډډډډډډډډډډډډډډډډډډډډډډډډډډډڍڐ
ٻڌډٻڤۉێۏڼۇۇٻڟۄڼۂۉۊێۄێٻګۍۊۂۍڼۈډډډډډډډډډډډډډډډډډډډډډډډډډډډډډډډډډډډډډډډډډډډډڍڐ
ٻڍډٻڤۉێۏڼۇۇٻڟۄڼۂۉۊێۄێٻڢېۄڿۀډډډډډډډډډډډډډډډډډډډډډډډډډډډډډډډډډډډډډډډډډډډډډډڎڍ
ٻڎډٻڤۉێۏڼۇۇٻڲۄۍۀۇۀێێٻڰڮڝٻڧڼۉٻڞڼۍڿډډډډډډډډډډډډډډډډډډډډډډډډډډډډډډډډډډډډډډډډڎڑ
ٻڏډٻڡۄۍۀےڼۇۇٻڮۀۏۏۄۉۂډډډډډډډډډډډډډډډډډډډډډډډډډډډډډډډډډډډډډډډډډډډډډډډډډډډډډڏڏ
ٻڐډٻڤۉێۏڼۇۇٻڞۃڼۄۍۈڼۉٻڲٻڟۄڼۂۉۊێۄێٻڢېۄڿۀډډډډډډډډډډډډډډډډډډډډډډډډډډډډډډډډډډډڏڔ
ٻڑډٻڤۉێۏڼۇۇٻڼۉڿٻڞۊۉہۄۂېۍۀٻڮڤڲٻڞۊۉۉۀھۏۄۊۉٻګۍۊۂۍڼۈډډډډډډډډډډډډډډډډډډډډډډډډډڐڌ
ڞڣڜګگڠڭٻڎٻڣۊےٻگۊٻڞۊۉۉۀھۏٻڞڼۍډډډډډډډډډډډډډډډډډډډډډډډډډډډډډډډډډډڐړ
ڞڣڜګگڠڭٻڏٻڨڼۄۉٻڨۀۉېٻڲۄۉڿۊےډډډډډډډډډډډډډډډډډډډډډډډډډډډډډډډډډډډډڑڋ
ڞڣڜګگڠڭٻڐٻڣۊےٻگۊٻڟۄڼۂۉۊێۀٻڞڼۍډډډډډډډډډډډډډډډډډډډډډډډډډډډډډډډډډڑڍ
ٻڌډٻڟۄڼۂۉۊێۄێٻڡۀڼۏېۍۀډډډډډډډډډډډډډډډډډډډډډډډډډډډډډډډډډډډډډډډډډډډډډډډډډډډډڑڍ
ڞڣڜګگڠڭٻڑٻڟۄڼۂۉۊێۄێٻڢېۄڿۀډډډډډډډډډډډډډډډډډډډډډډډډډډډډډډډډډډډډډړڎ
ڞڣڜګگڠڭٻڒٻڭۀۋۍۊۂۍڼۈۈۄۉۂډډډډډډډډډډډډډډډډډډډډډډډډډډډډډډډډډډډډډډډړڐ
ڞڣڜګگڠڭٻړٻڝۇڼھۆٻڝۊۓډډډډډډډډډډډډډډډډډډډډډډډډډډډډډډډډډډډډډډډډډډډړڑ
ٻڌډٻڮۀۏۏۄۉۂډډډډډډډډډډډډډډډډډډډډډډډډډډډډډډډډډډډډډډډډډډډډډډډډډډډډډډډډډډډډډډړڒ
ٻڍډٻڧۊڼڿډډډډډډډډډډډډډډډډډډډډډډډډډډډډډډډډډډډډډډډډډډډډډډډډډډډډډډډډډډډډډډډډډڔڋ

G
G
[G
͑DSM / MSM User Guide
G
ڞۊۉۏۀۉۏٻ
ڎډٻڱۄۀےٻڟڼۏڼډډډډډډډډډډډډډډډډډډډډډډډډډډډډډډډډډډډډډډډډډډډډډډډډډډډډډډډډډډډډډڔڌ
ڞڣڜګگڠڭٻڔٻڞڜکٻڟڼۏڼډډډډډډډډډډډډډډډډډډډډډډډډډډډډډډډډډډډډډډډډډډډډډڔڍ
ڞڣڜګگڠڭٻڌڋٻڪێھۄۇۇۊێھۊۋۀډډډډډډډډډډډډډډډډډډډډډډډډډډډډډډډډډډډډډډډڔڎ
ڌډٻڞۊۉۉۀھۏٻڞڼۍډډډډډډډډډډډډډډډډډډډډډډډډډډډډډډډډډډډډډډډډډډډډډډډډډډډډډډډډډڔڎ
ڍډٻڮھۊۋۀٻڃڜېۏۊٻڨۀۏۀۍۄۉۂڄډډډډډډډډډډډډډډډډډډډډډډډډډډډډډډډډډډډډډډډډډډډډډډډڔڐ
ڎډٻڮھۊۋۀٻڃڨڼۉېڼۇٻڨۀۏۀۍۄۉۂڄډډډډډډډډډډډډډډډډډډډډډډډډډډډډډډډډډډډډډډډډډډډډډڔڑ
ڏډٻڨۀۏۀۍۄۉۂٻڤۂۉۄۏۄۊۉٻڲڼۑۀہۊۍۈډډډډډډډډډډډډډډډډډډډډډډډډډډډډډډډډډډډډډډډډډډڔړ
ڐډٻڨۀۏۀۍۄۉۂٻڞڜکٻڲڼۑۀہۊۍۈډډډډډډډډډډډډډډډډډډډډډډډډډډډډډډډډډډډډډډډډډډډډډډڌڋڎ
ڑډٻڨۀۏۀۍۄۉۂٻڡۀڼۏېۍۀډډډډډډډډډډډډډډډډډډډډډډډډډډډډډډډډډډډډډډډډډډډډډډډډډډډڌڋڐ
ڒډٻڮۄۈېۇڼۏۊۍډډډډډډډډډډډډډډډډډډډډډډډډډډډډډډډډډډډډډډډډډډډډډډډډډډډډډډډډډڌڋڑٻ
ڞڣڜګگڠڭٻڌڌٻڞۊۉہۄۂېۍڼۏۄۊۉډډډډډډډډډډډډډډډډډډډډډډډډډډډډډډډډډډډډډڌڋڔ
ڲڼۍۍڼۉۏ۔ډډډډډډډډډډډډډډډډډډډډډډډډډډډډډډډډډډډډډډډډډډډډډډډډډډډډډڌڌڍ
ڤگٻڨڼھۃۄۉۀٻڞۀۍۏۄہۄھڼۏۀٻڤۉہۊۍۈڼۏۄۊۉډډډډډډډډډډډډډډډډډډډډډډډډډډډڌڌڎ
G
G
G
G
G
G
G
G
G
G
G
G
G
G

G
G
\G
͑
DSM / MSM User Guide
G
Chapter 1 : General Description
XUGzGmG
kztGOkGzGtPGGlj|GGGGGGvikTpSGvikTppS
GjhuGUG
tztGOtGzGtPGG
GSGSG
S
SGUG
kztGGGGGGGGGGGGGGS
GGGGSGGSGhizSGGSG
GSGG
GGGGGGMGGGGGGUG
G
kztGGGGaG G
ඖG G kztGGGGGGzGGGGOGGGG
PUG
TGzGvikTpGSvikTppGaGvikTppGOpzvG`X[XTYPSGvikTppGOzhlTqX_\WPSG
r~wTYWWWSGjhuGGzhlGqX\_^UG G
G
ඖG G kztGGGGGGGGGGUG G
G G TG|GGGGGGGGSGGGGSG
GGSGGGGGGGUG
ඖG G kztGGGGGUG
T|GGSGGGGG
GGGGGGGGG G G G
GGGGGGGUG
ඖG G {GkGnGGGGGGGGGGG
GGGGGUG G
ඖG G hGG
GwjGGGGSGGGGGGGGG
GGGGGGGpUG
ඖG G ~G shuG G G G G G G G G G UG p
SGGGGGG GSG G G
GGG|ziGUG
ඖG G {GGGGGGGGGGUG
൘G G zG G G G G G G G G |˅G nG
GGGGUG
G

G
G
]G
͑
DSM / MSM User Guide
G
Chapter 1 :
ڢۀۉۀۍڼۇٻڟۀێھۍۄۋۏۄۊۉٻ
YUGzGzG
zG kztGOkGtPG tztGOtGtPG
pGG ^}G¥GZ]}G ^UY}G¥GZ^UY}G G
pGG ZWWhGGXY}G _WWhGGXY}G
hytGjw|G z{y^XWG zZjY[[WG
pGG X]to¡G G
O[_to¡G
G G
pGvGjPG
X]U`Z[[to¡G G
OXXXto¡G
GG
pGvGjPG G
iTGGOzyhtPG G G YtGG ][tGG
iTGGOmshzoPG ZYtGG ][tGrG
|ziG }GYUWG }GXUXG G
iGG sTGwGZU^}G
[YWWhGOXzGYwPG
sTGwG^U[}G
[YWWhGOYzGYwPG
jGG r~wYWWWSGpzvG`X[XSG G
jhuGYUWh¥iSG G
qX_\WGw~tV}w~G G
G
GGGGGGGGGGGT
T
G
G
~GshuG plllG_WYUXXG GGGGGGGGGT
T
G
zjvwlGjohuulsG G
G
GGGGGGGGGTG [joGiujG
G
G
tUGGGG
zG
GGGGGGGGGGTG ·G \WW}G
G
G
G
G
^G
͑
DSM / MSM ㌂㣿㧦 Ṗ㧊✲
G
Chapter 1 :
ڢۀۉۀۍڼۇٻڟۀێھۍۄۋۏۄۊۉ
ZUGyGiG G
{GGGGGGGaG G
TG }GGGGGGGGGGGGG
UG
TG iGGGGGGGGSGGGGGGGUG
G
hGGGGGGGGu{UG
G G G G G G G G G G G G G G G G G G TG|GGZGGGGGUG
G G G G G G G G G G G G G G G G G G G G G O^U[}GYYWWhGGGGPG
GGGGGGGGGGGGGGGGGG
kGGGGGUG
G G G G G G G G G G G G G G G G G G TGpGGGUG
G
GGGGGGGGGGGGGGGGGGkGGGGGGUG
G G G G G G G G G G G G G G G G G G TGpGGGUG
G
GGGGGGGGGGGGGGGGGGkGGGGGGGGGGGG]WjUG
G G G G G G G G G G G G G G G G G G TGpGGGUG
G
G
G G rGGGGGGGGGGUG G G G G G G G G G G
GGGGGGGGGGGGGGTGpGGGGGUG
G
{GGGGGGGSGGGG G G G
G GGGGUGiGGGGG
G GGGGSGGGSGUG
G
G
{pwzPGhGGGG
GGG
GSGGG
G
]GGGGGGUG
G
G

G
G
_G
͑
DSM / MSM User Guide
G
Chapter 1 :
ڢۀۉۀۍڼۇٻڟۀێھۍۄۋۏۄۊۉ
ٻ
[UGsGGjG
GGGGXPGkztGOkGtPG
G G pGuG G pGkG G
XG h```XWYXYhG kztGOkGtPG G
YG h```XWZ_YhG yGGOGGkztPG
ZG h```XWY^YhG ksjGGG
[G h```XWY[YhG |ziGGOGSGYtPG G
\G h```XWY_YhG jGGGG G
]G h```XWY\YhG iGGG
^G h```XWY`YhG hjVkjGhkhw{vyG
_G h```XWZWYhG hjGwv~lyGjvykG
`G h```XWZXYhG kztGVGtztG G |˅GnGOrvylhPG
XWG h```XWZYYhG zV~Gk}kG
XXG h```XWZ`YhG yGGOTPG
XYG h```XWYYYhG zGX[wG G G
XZG h```XWYZYhG zGYWwGG
X[G h```XWY]YhG ~YWWGjhuGG
X\G h```XW[WYhG iGGG
X]G h```XWZZYhG zGkGG
X^G h```XWZ^YhG |ziGGshuGGO|PGtT\[nG
X_G h```XW^WYhG kVtGtGzGOkztGG
tztGPG
X`G h```XWYWYhG kGtGzGOkztGzPG
YWG h```XW\WYhG tGtGzGOtztGzPG
G
G
`G
͑
DSM / MSM User Guide
G
Chapter 1 :
ڢۀۉۀۍڼۇٻڟۀێھۍۄۋۏۄۊۉ
ٻ
YPGtztGOtGtPG
G G pGuG G pGkG G
XG h```XW\XYhG tztGOtGtPG
YG h```XW]XYhG yGGOGGtztPG
ZG h```XW\YYhG pGGG
[G h```XW\ZYhG zGGG
\G h```XW\[YhG |ziGGOGPG
]G h```XW]ZYhG yGGOTPG
^G h```XW\\YhG {TGOhGiPG
_G h```XW\^YhG {TGOiT]wPG
`G h```XW\]YhG {TGO{GiPG
XWG h```XW\_YhG {TGO~GzTjPG
XXG h```XW\`YhG {TGO~GzTlPG
XYG h```XW]YYhG jhuGwyvilG
XZG h```XW]WYhG kGGOY˟PG
ZPGvG
G G G pGuG G pGkG G
XG G kspGG
YG G {GG
ZG G iGGG
[G G zGGG
\G G {GG
]G G wGGG
G
G
G
XWG
͑
DSM / MSM User Guide
G
Chapter 1 : General Description
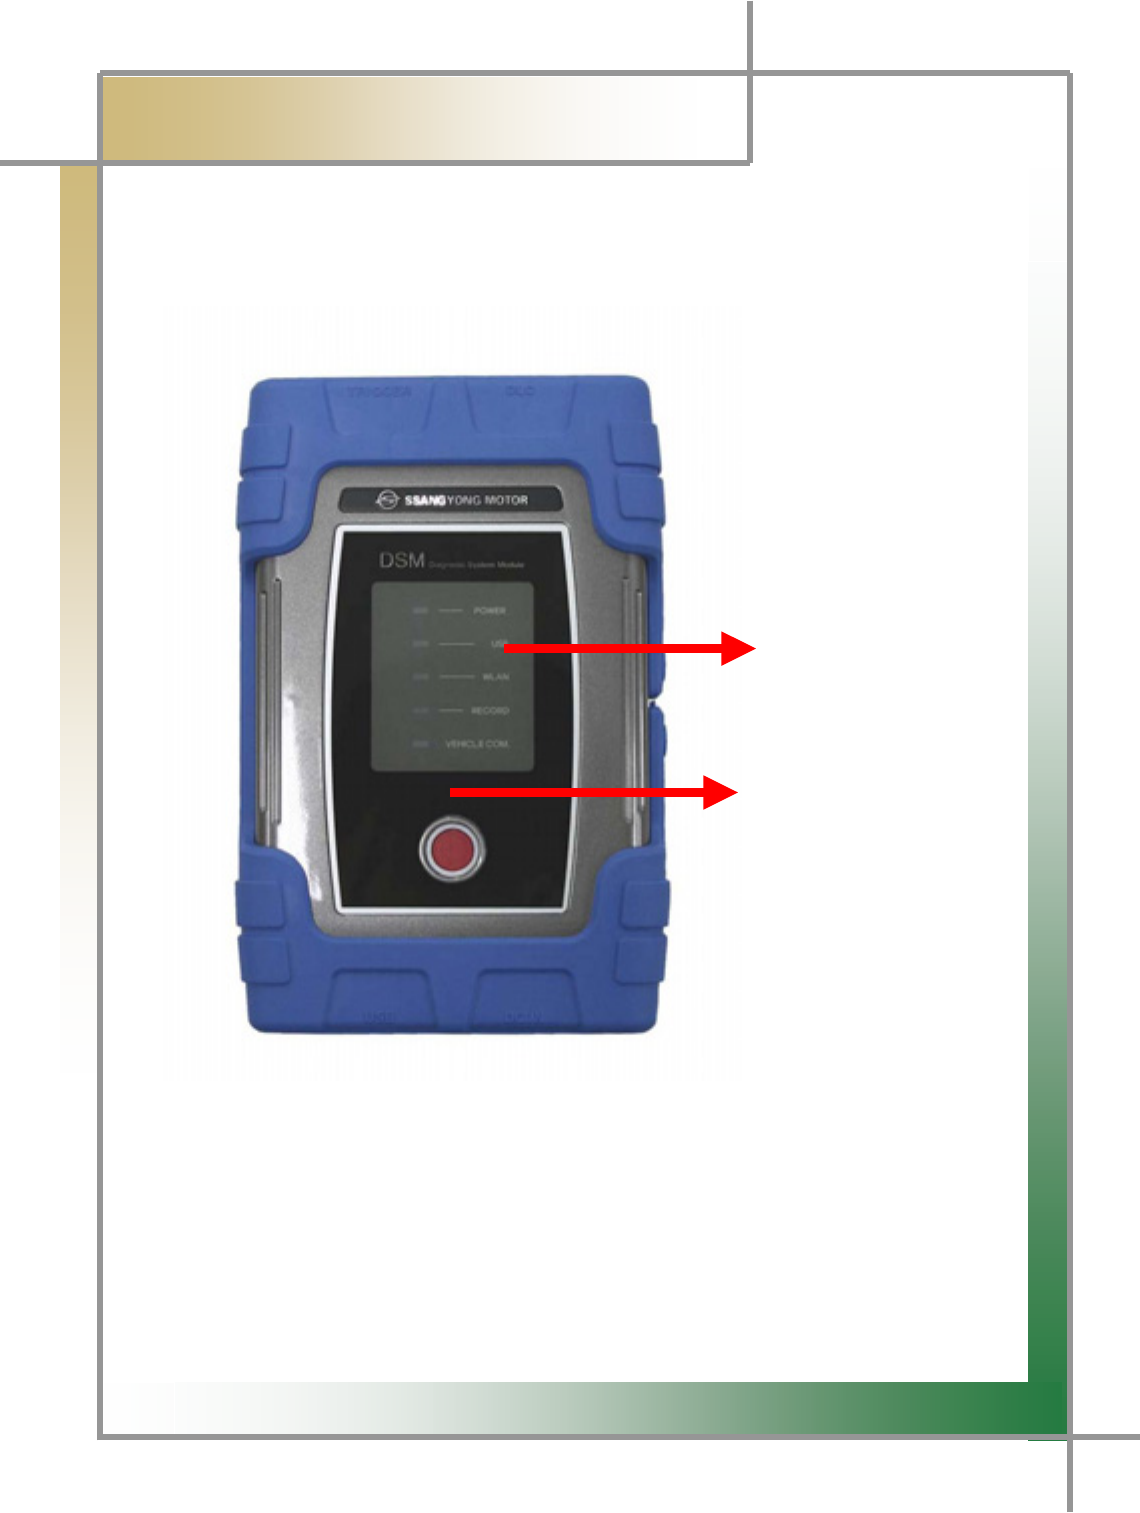
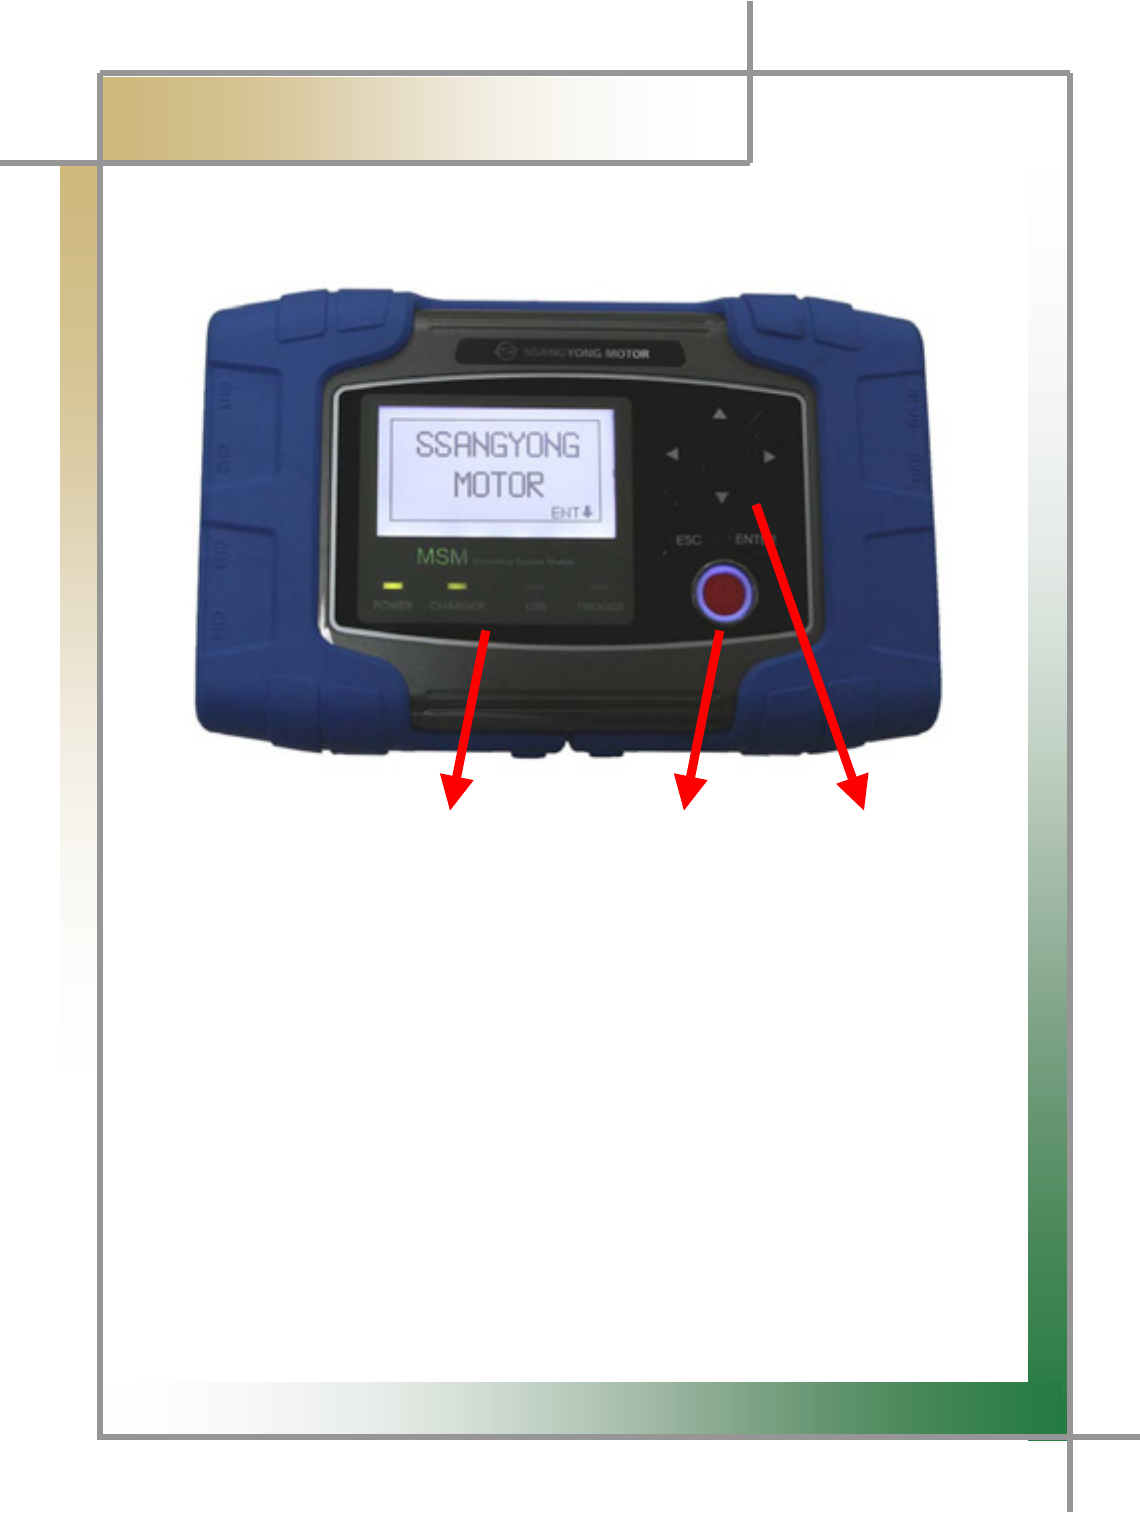
5. Component Photo and Description
Diagnosis Module
G
G
G
G
G
G
G
G
G
GGGGGGGGGGGGGGGGGGGGGGGGGGG
GGGGGGGGGGGGGGGGGGGGGGGGGGGGGGGGGGGGGGGGGGGGGGGGGGGGGGGGGGGGGGGGGDiagnosis Module
Status Display Screen
Power Button
Figure 1.1 DSM (Diagnosis Module) _ Front
TG Diagnosis Module Status Display Screen: Able to check the status of powe
r
application, of USB connection, of WLAN connection, of recording, and of vehicle
diagnosis.
- Power Button: Able to turn on/off the product.
G
G
XXG
͑
DSM / MSM User Guide
G
Chapter 1: General Description
G
G
G
G
G
G
G
GGGGGGGGGGGG
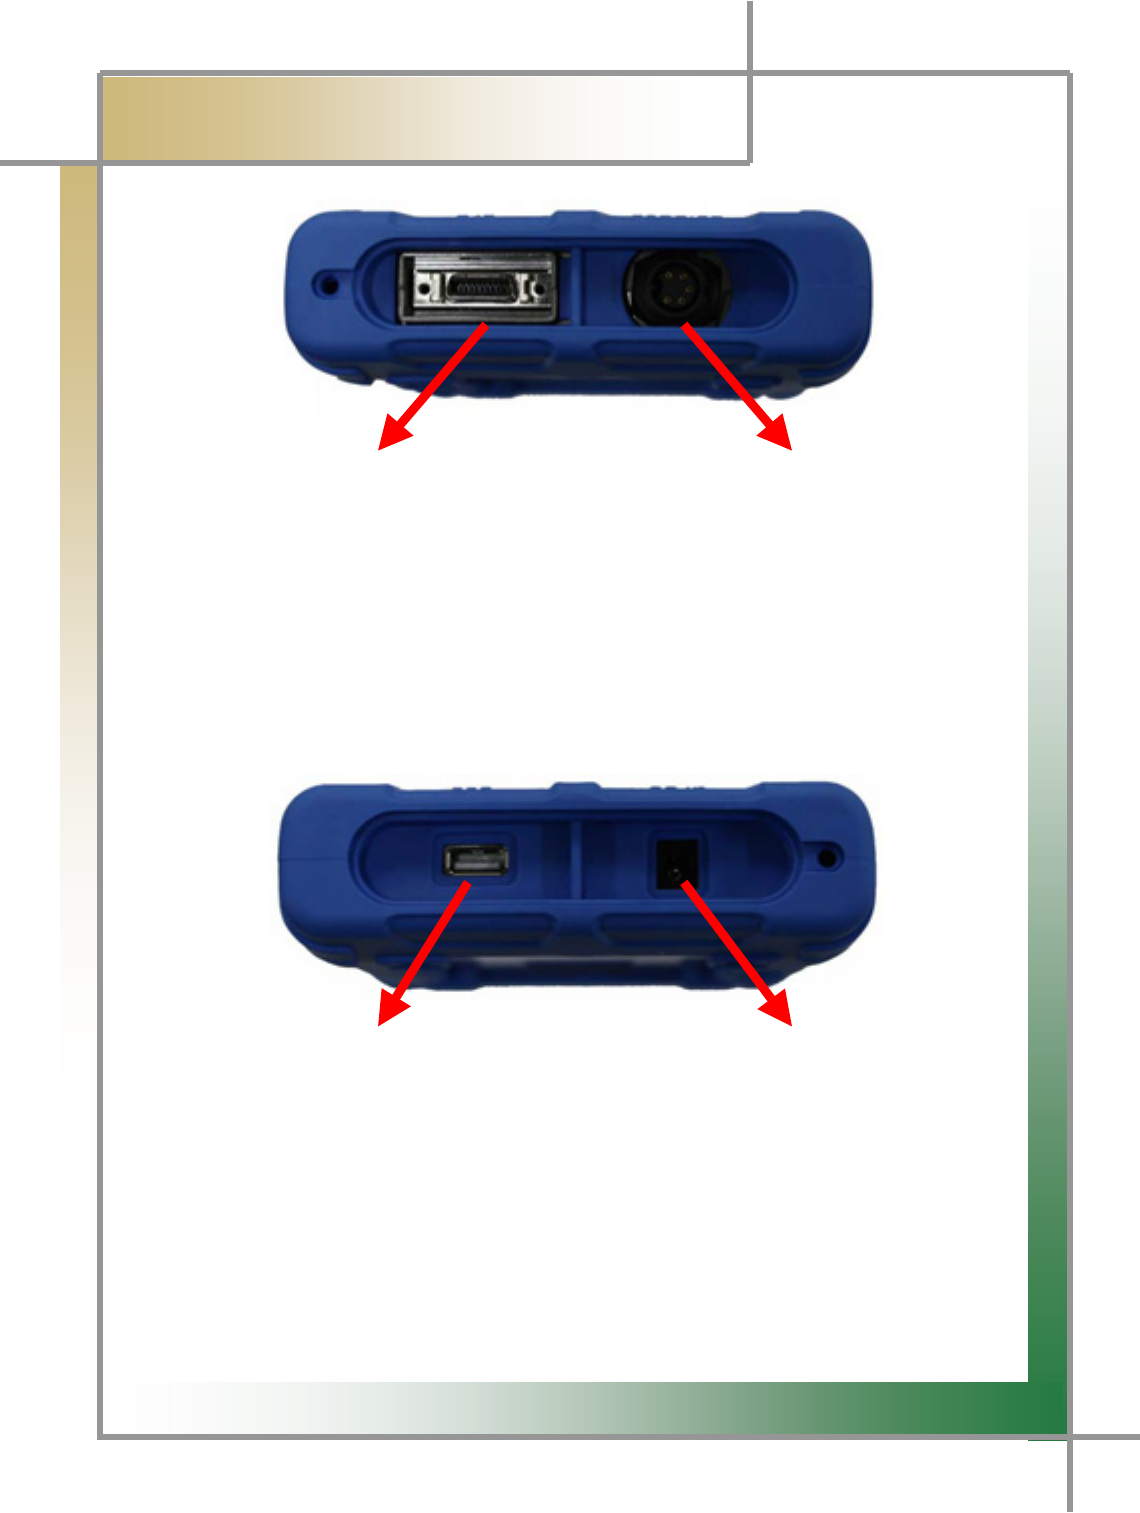
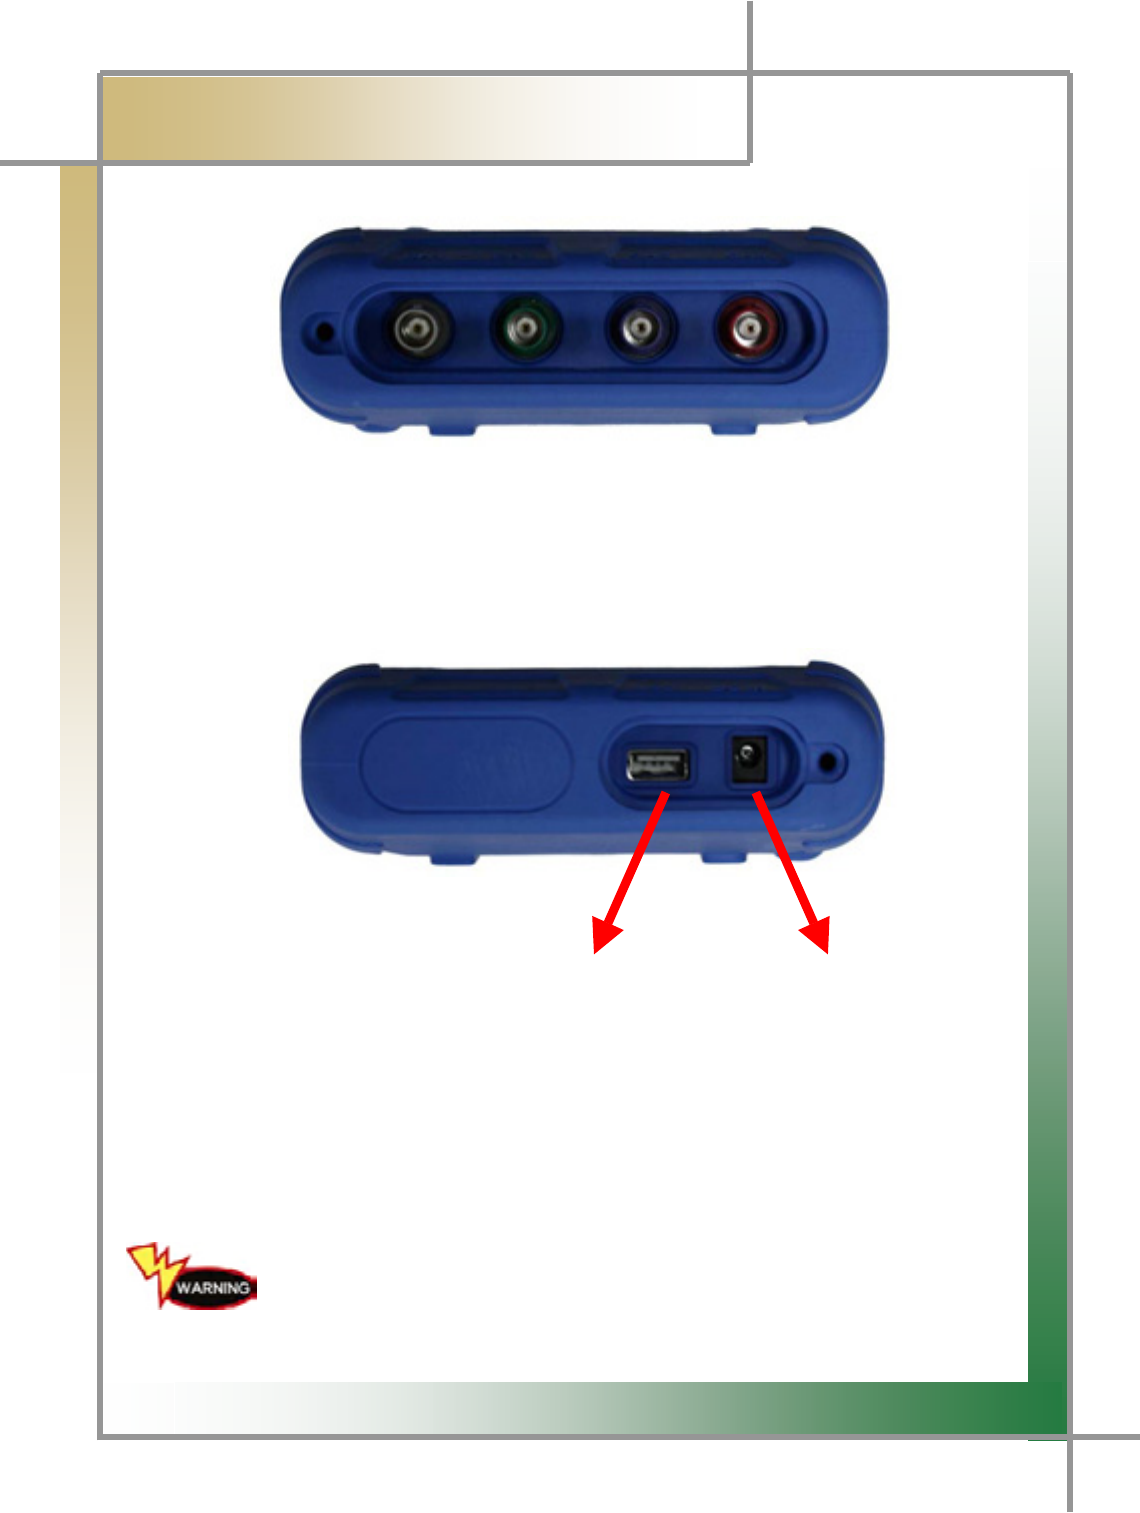
GGGGGGGDLC Communication Cable Connector Black box Remote Control Connector
Figure 1.2 DSM (Diagnosis Module) _Side 1
TG DLC Communication Cable Connector: Connect the diagnosis connector for the
vehicle diagnosis.
TG Black box Remote Control Connector: A terminal that connects the black box remote
control that works the black box function.
G
G
G
G
G
G
G
GGGGGGGGGGGGGGGGGGGUSB Port Power Port
Figure 1.3 DSM (Diagnosis Module) _Side 2
TG USB Port: Connects DSM (Diagnosis Module) to user PC.
Power Port: To supply power by applying a 12V adapter to DSM
(Diagnosis Module).
G
G
G
G
XYG
͑
DSM / MSM User Guide
G
Chapter 1 : General Description
G
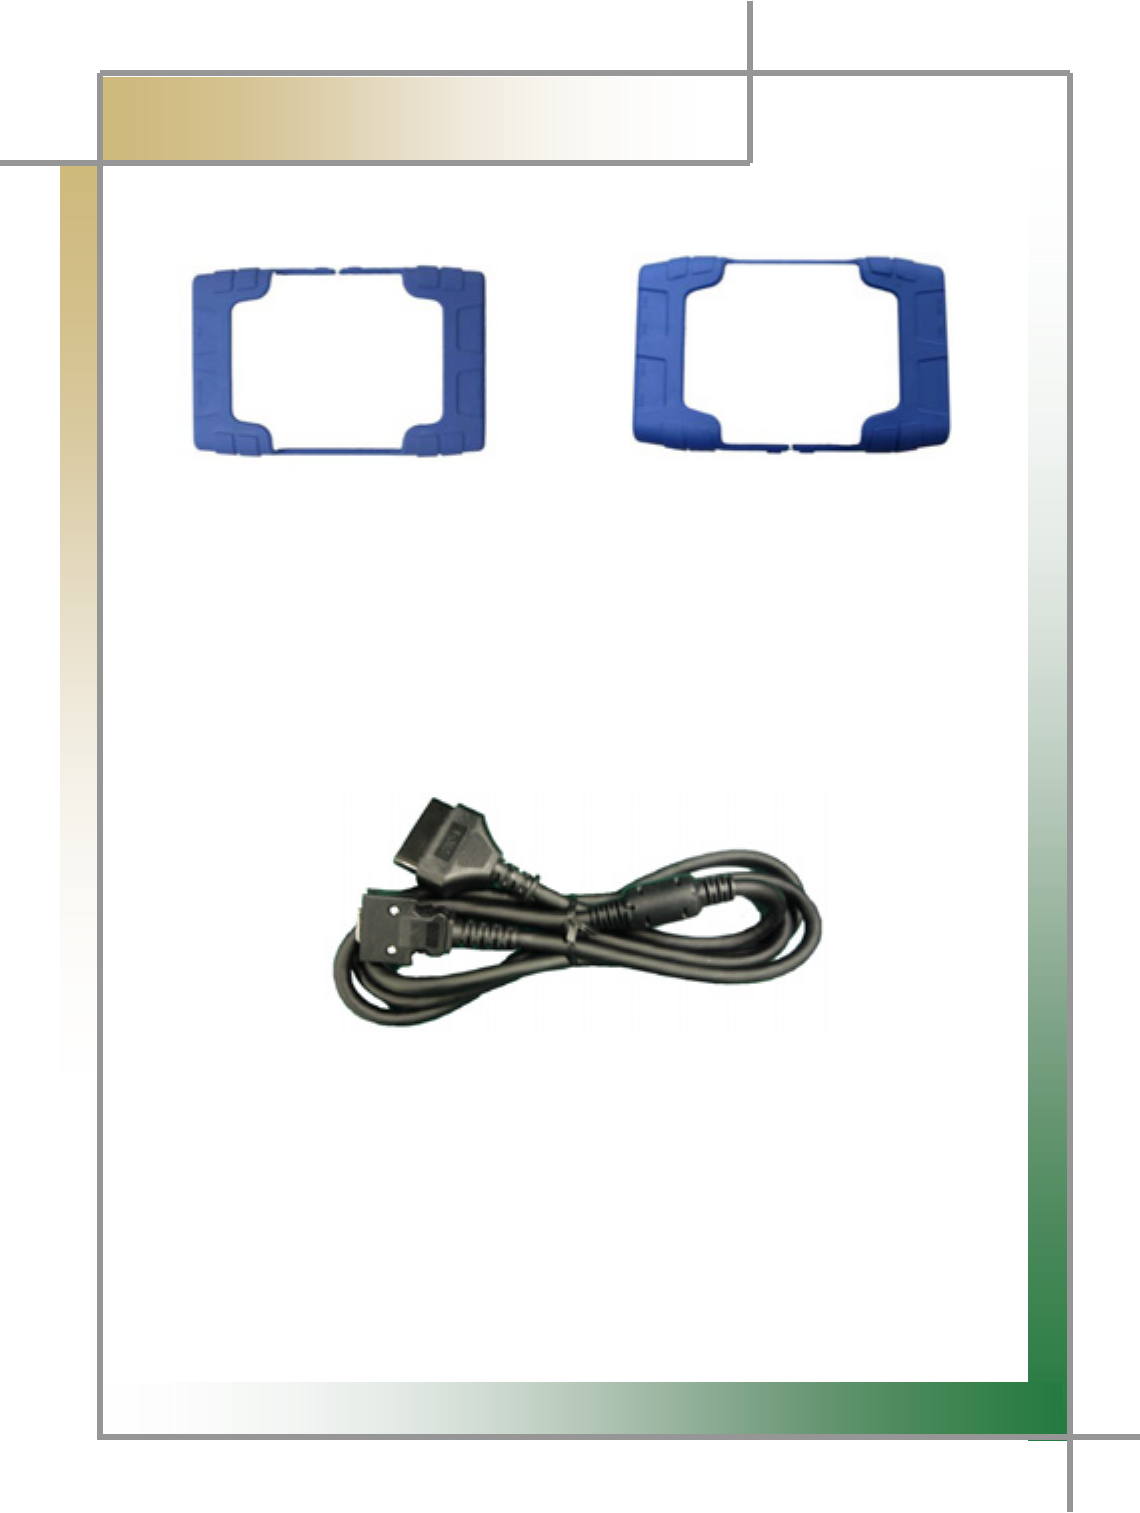
Rubber Boots
For Diagnosis Module For Measurement Module
Figure 1.4 Rubber Boots
Rubber boots functions to protect DSM / MSM against electric and physical shocks from
outside, preventing product damage.
DLC Cable
G
G
G
G
G
G
GG
G
Figure 1.5 DLC Cable
DLC is also called OBD-II cable; all of new vehicles recently released are equipped with the
OBD-II connector in accordance with the OBD-II standard.
New vehicles are designed to perform diagnosis as soon as DLC cable is connected, no
t
requiring additional power connection because power is provided through the diagnosis
connector.
TIPS) For old-model vehicles, you can perform diagnosis by connecting an
additional adapter.
G
G
XZG
͑
DSM / MSM User Guide
G
Chapter 1 : General Description
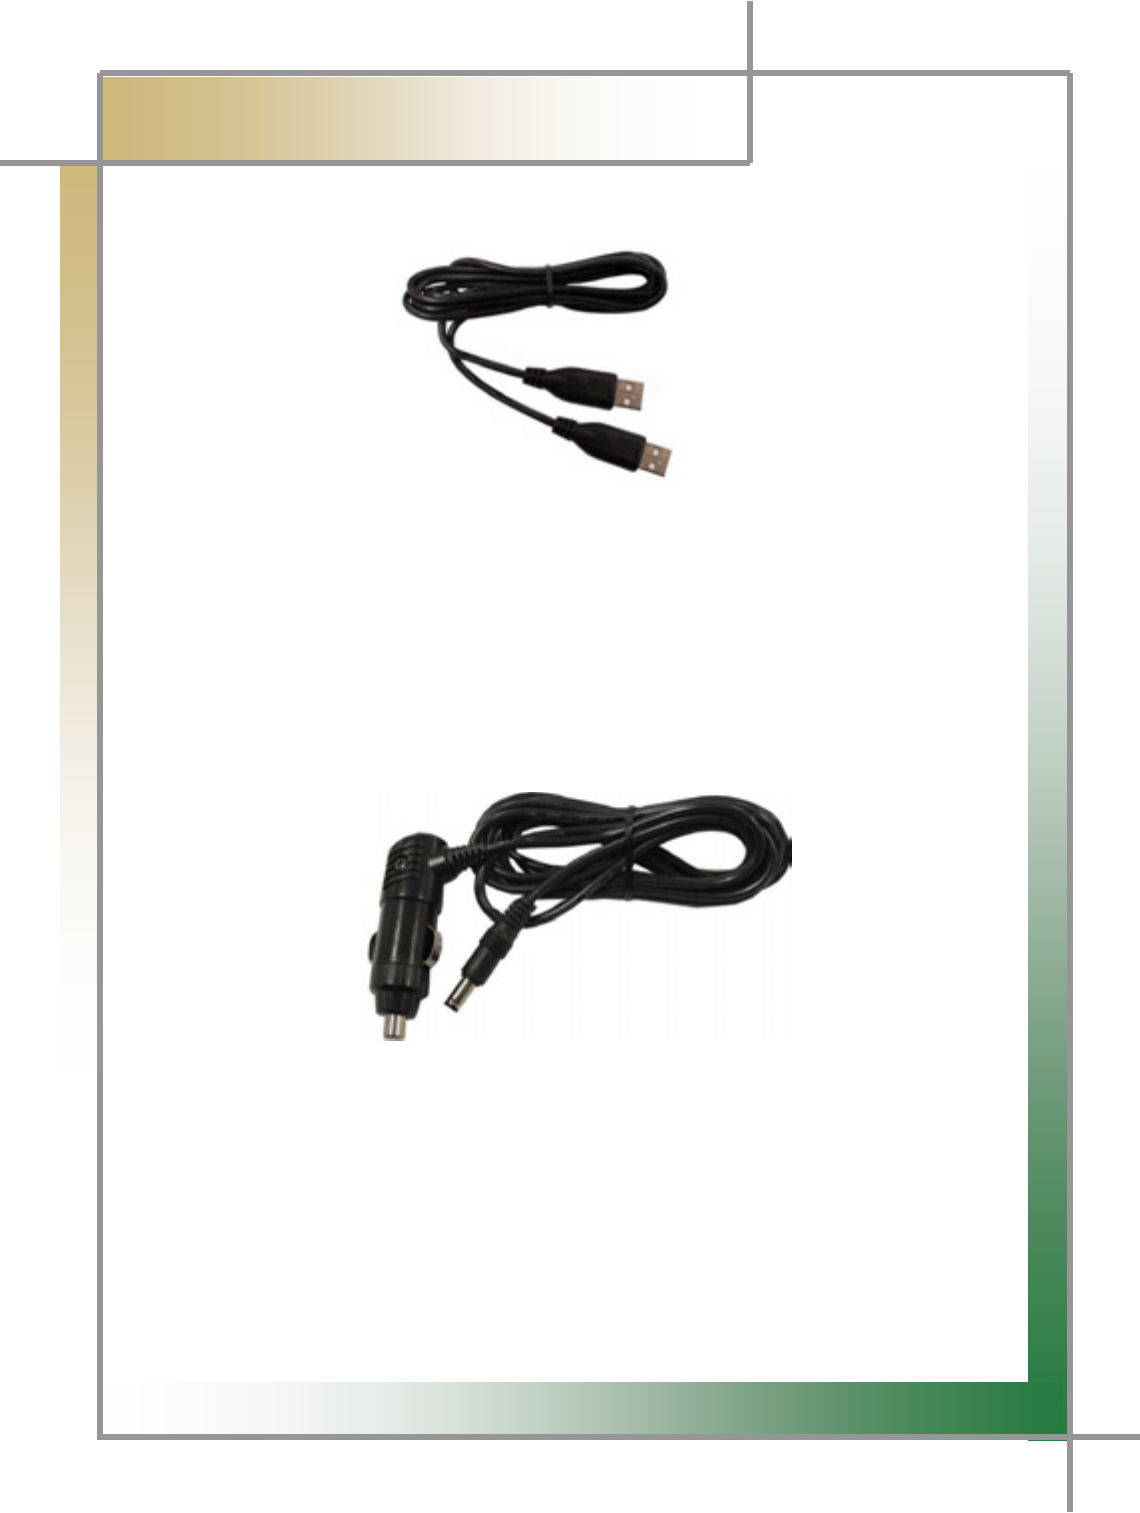
USB Cable
G
G
G
G
G
G
GG
G
G
Figure 1.6 USB Cable
USB cable is used in working the program by connecting the USB port of DSM / MSM and
that of laptop and upgrading the DSM diagnosis program.
Please use only the USB cable provided by us.
Cigar Lighter Cable
G
G
G
G
G
G
G
G
GGGGGGGGGGGGGGGGGGGGGGGGGGFigure 1.7 Cigar Lighter Cable
Cigar lighter cable provides power to DSM / MSM by connecting the vehicle cigar jack.
TIPS) DSM / MSM doesn't require additional power because a battery is
loaded inside, but if the battery is low or not charged enough, you
can connect the cigar lighter cable and use it.
G
G
G
G
X[G
͑
DSM / MSM User Guide
G
Chapter 1: General Description
G
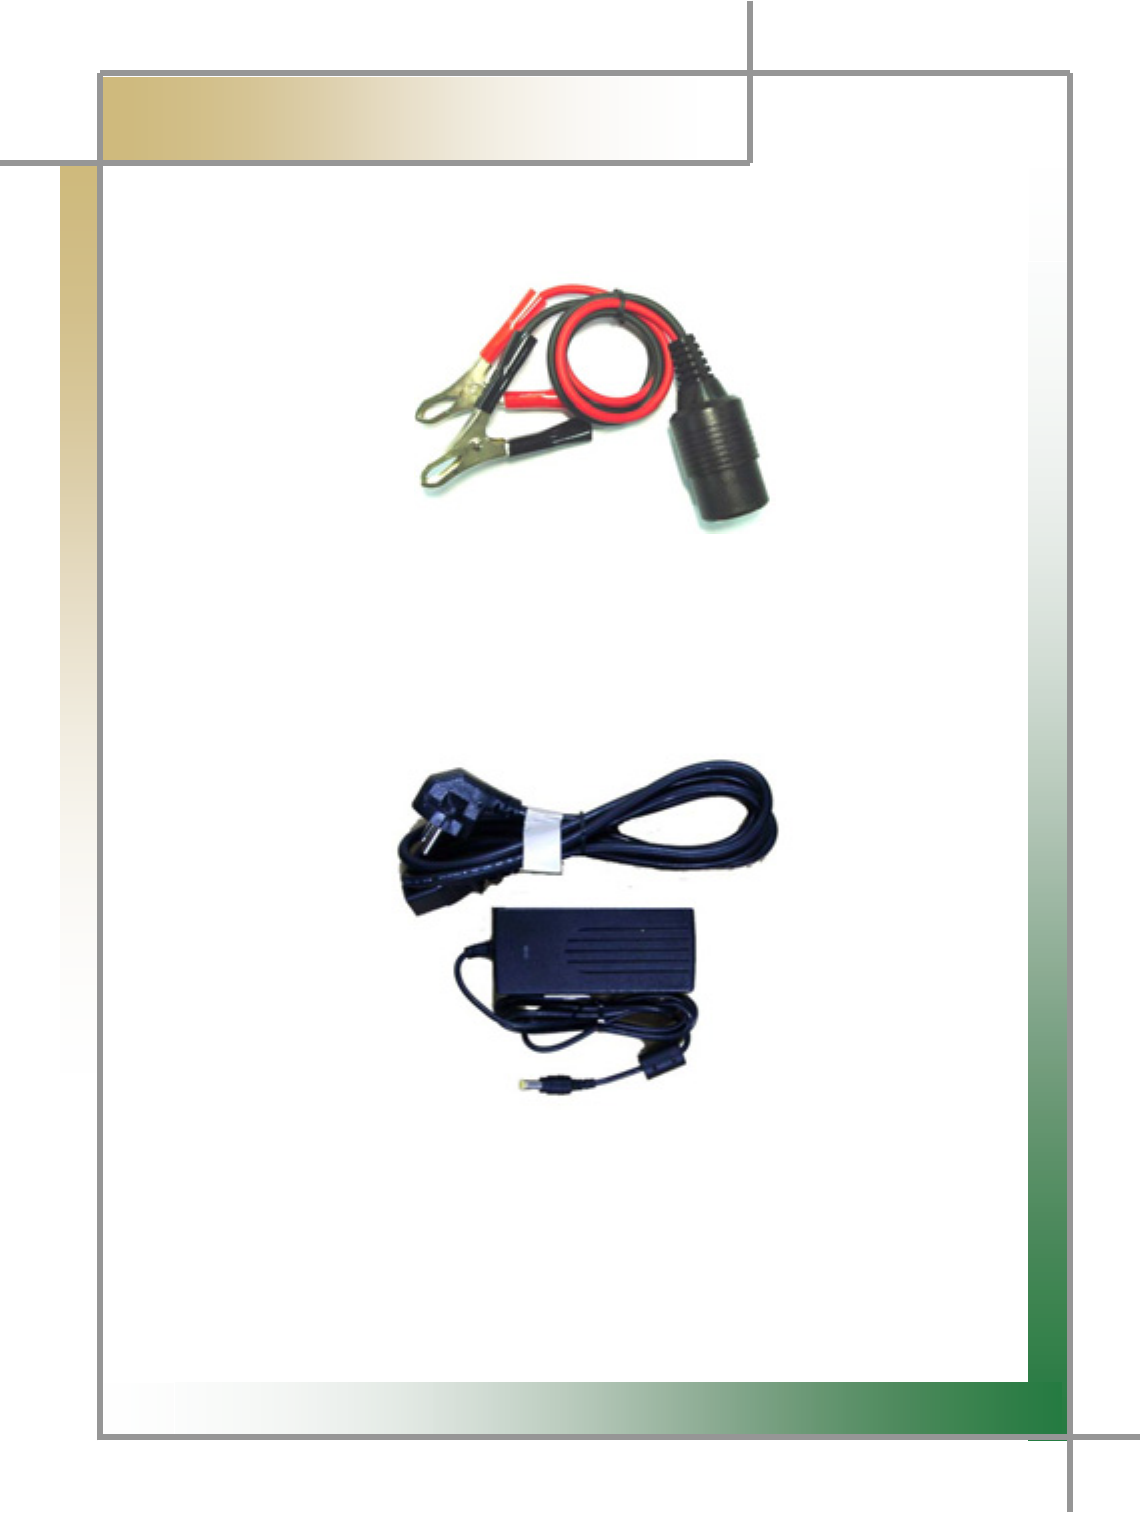
Battery Extension Cable
G
G
G
G
G
G
G
G
G
Figure 1.8 Battery Extension Cable
Battery extension cable enables the battery power to work immediately.
AC/DC Adapter
G
G
G
G
G
G
G
G
G
G
G
Figure 1.9 AC/DC Adapter
When downloading the diagnosis program or searching the stored driving data, power can
be supplied through the AC/DC adapter.
G
G
G
G
X\G
͑
DSM / MSM User Guide
G
Chapter 1 : General Description
G
User GuideG
G
G
G
G
G
G
G
G
G
G
GGGGGGGGGGGGGGG
G
G
G
GGGGGG
mGXUXWG|GnG
G
Be sure to read through the user guide before using the productUG
zV~Gk}kG
G
G
G
G
G
G
G
G
G
G
G
mGXUXXGzV~Gk}kG
G
G
X]G
͑
DSM / MSM User Guide
G
Chapter 1: General Description
G
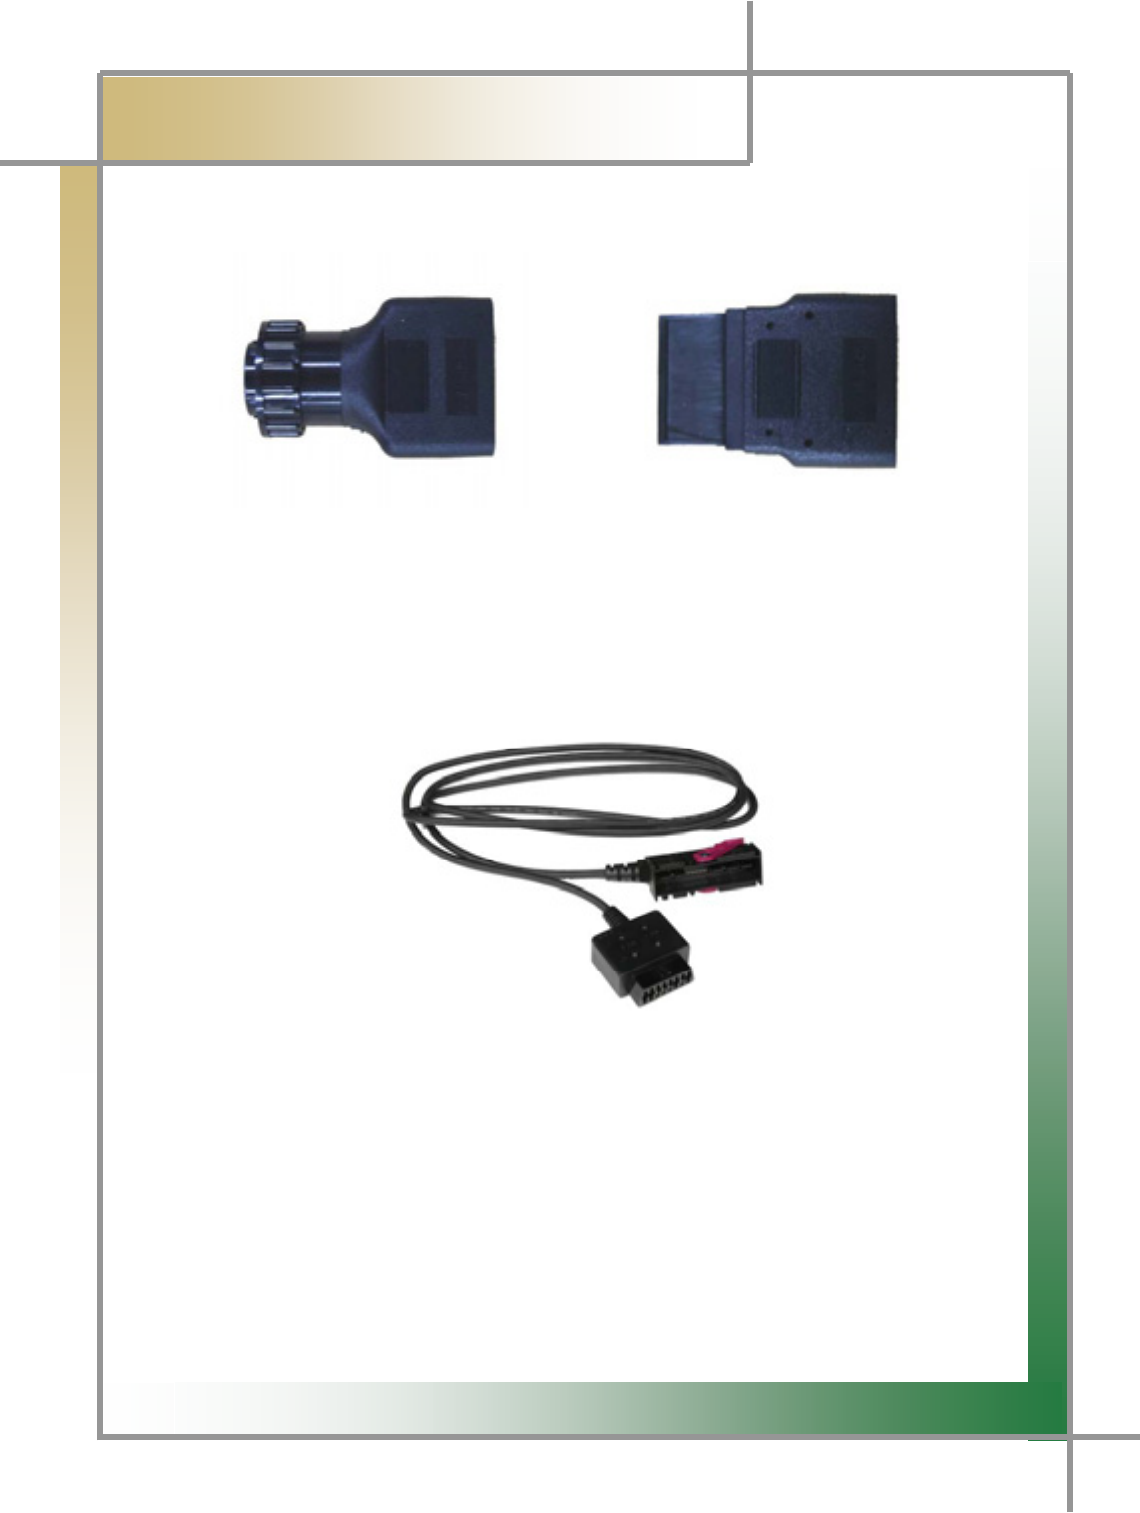
Vehicle Diagnosing AdapterG
G
G
G
G
G
G
G
G
mGXUXYGzGhOX[wPG G G mGXUXZGzGhOYWwP
G
G
~YWWGjhuGAdapter
G
G
G
G
G
G
G
G
G
G
mGXUX[G~YWWGjhuGhG
G
~YWWGjhuGGGG
G
G
G
G
G
G
G
G
X^G
͑
DSM / MSM User Guide
G
Chapter 1 : General Description
G
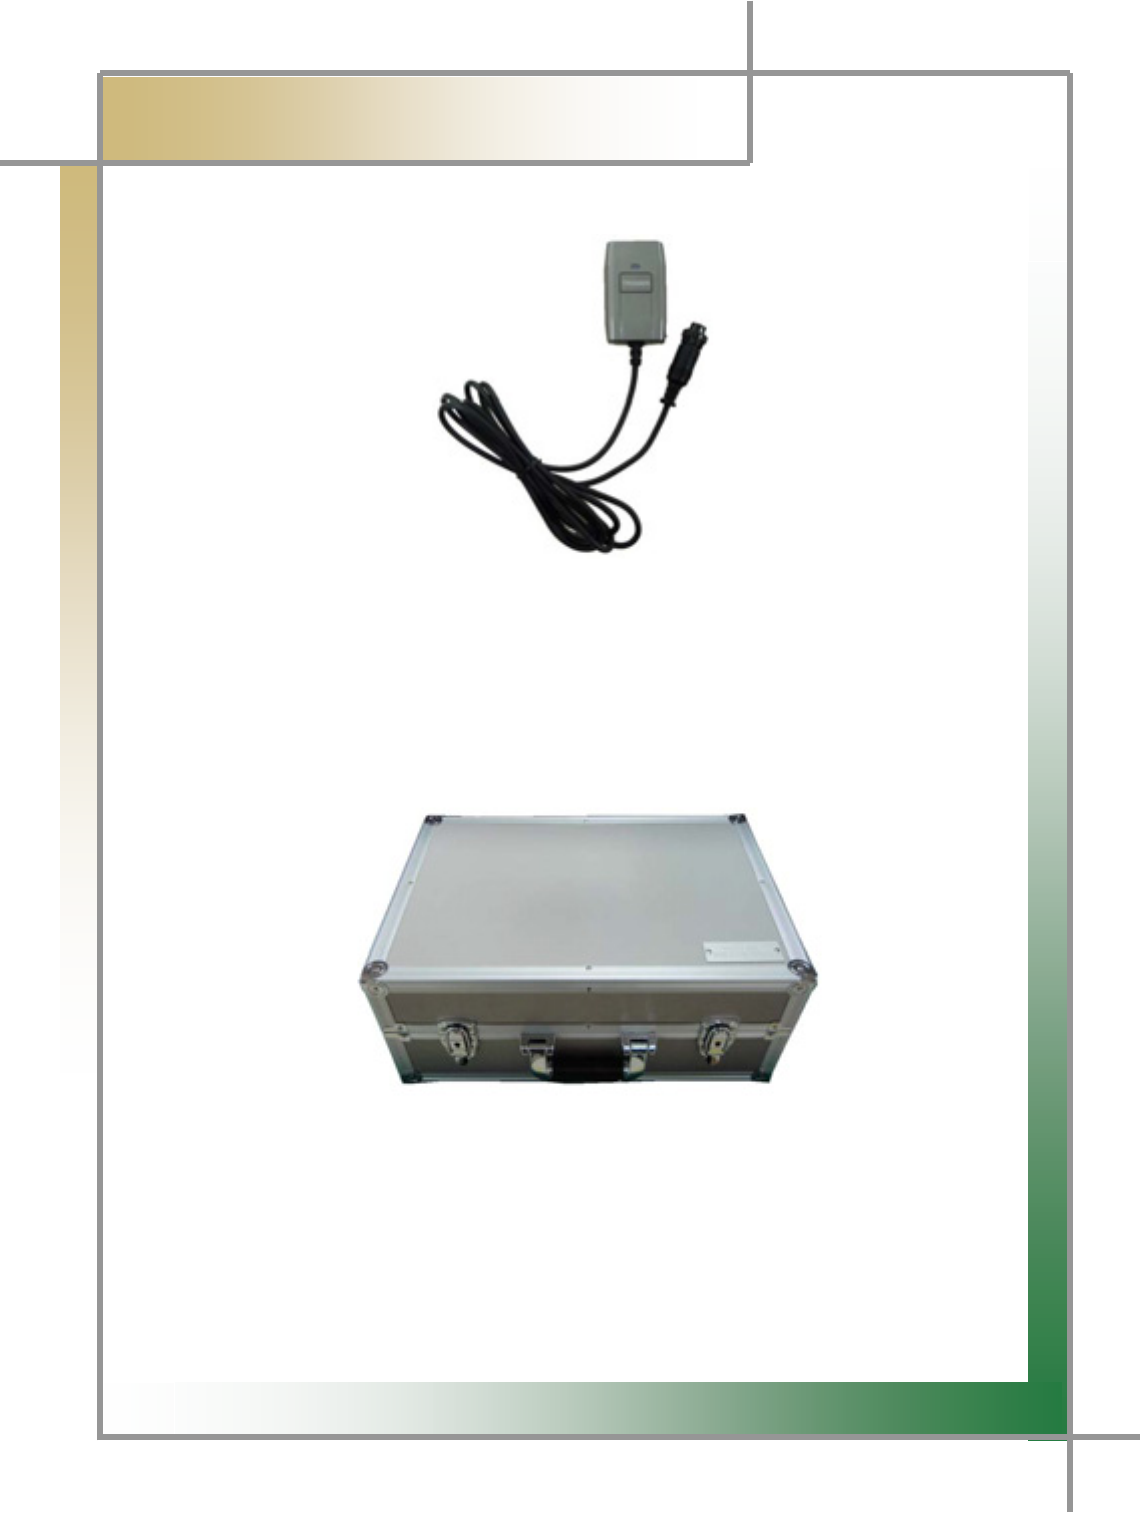
Black box SwitchG
G
G
G
G
G
G
G
G
G
G
mGXUX\GiGGzG
G
Used in realizing the black box function when the user is in need of itUG
G
zGkG{GiG
G
G
G
G
G
G
G
G
G
G
GGGGGGGGGGGGGGGGGGGGGGGGGGmGXUX]GzGkG{GiG
G
{G
G G
G SG G
G G G G SG
G G
GGGGGGGUG
G
G
X_G
͑
DSM / MSM User Guide
G
Chapter 1: General Description
G
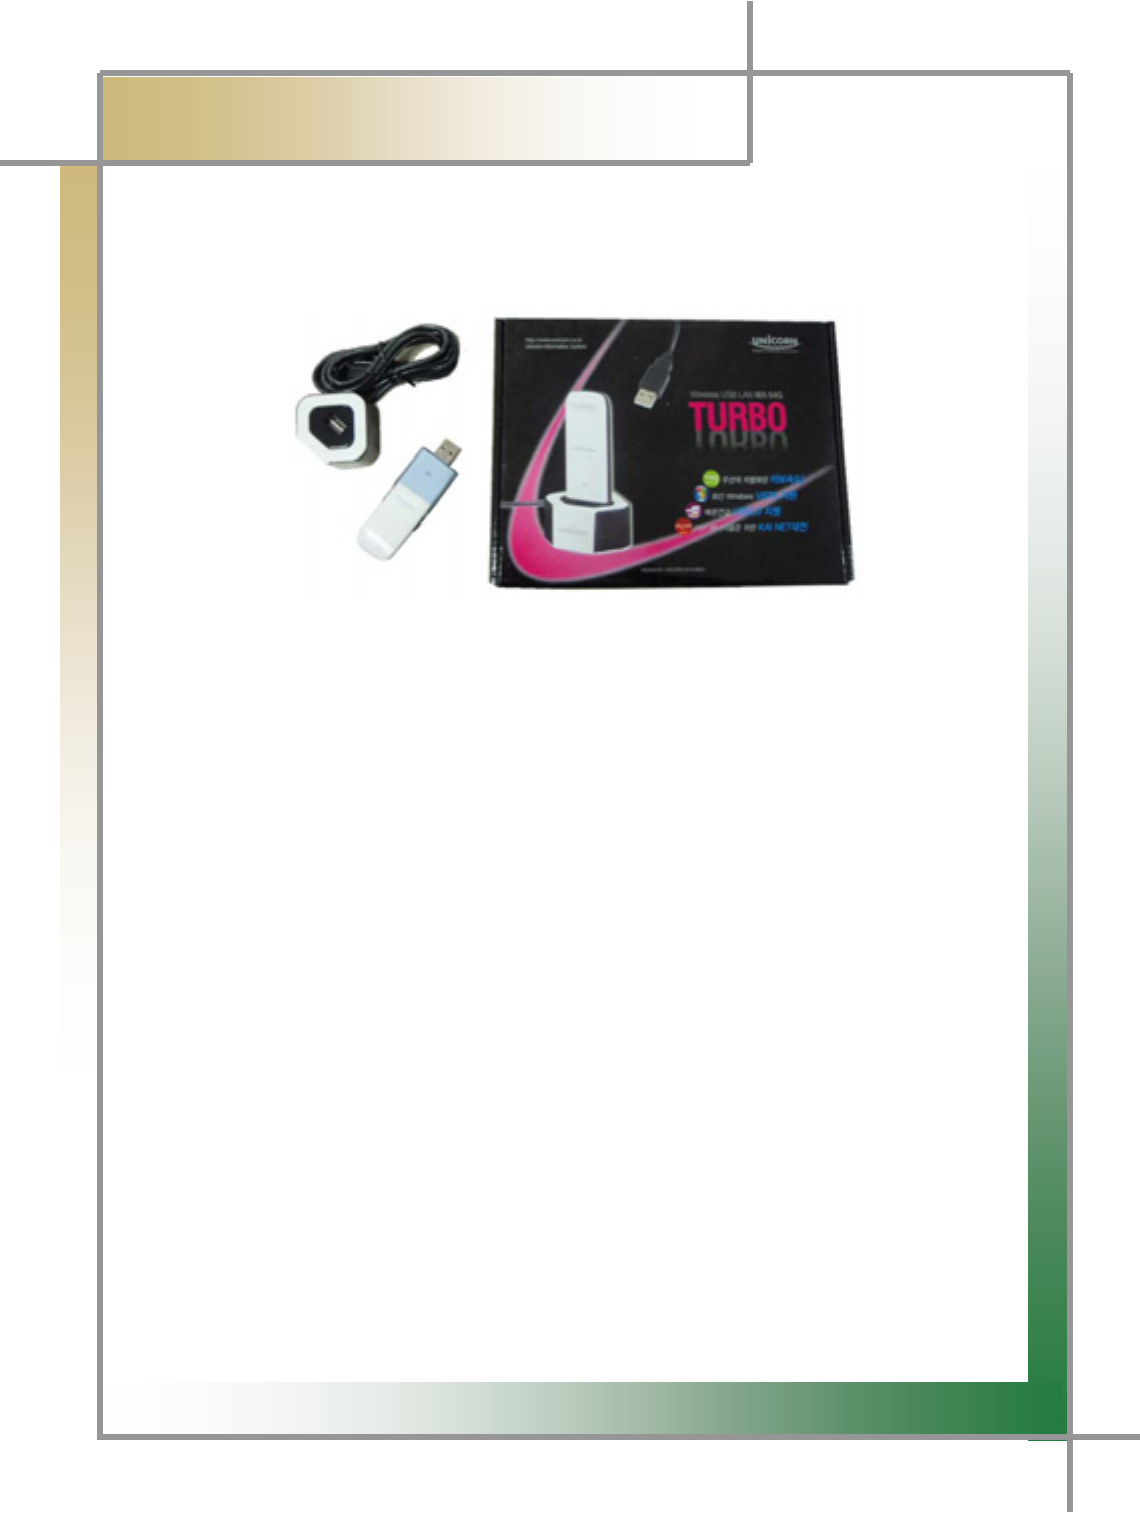
|ziG~GsGjGOPGtT\[nG
G
G
G
G
G
G
G
G
G
G
G
Figure 1.17 USB Wireless Lan Card (unicone) MX-54G
Used for the connection to the diagnosing module after attached to PC.
G
G
X`G
͑
DSM / MSM User Guide
G
Chapter 1: General Description
G
Measuring ModuleG
G
G
G
G
G
G
G
G
G
G
G
G
G
G
G
G
GGGGGGGGGGGGGGGGGGGGGGGGGLCD/Measuring Module Power Button Arrow Key
Status Display Screen
Figure 1.18 MSM (Measuring Module) _Front
TG LCD: You can check the operation mode and perform the multi-meter function
independently even without PC connection.
TG Measuring Module Status Display Screen: You can check the status of product powe
r
application, of battery, of USB connection, and of trigger operation.
TG Power Button: You can turn on/off the product.
TG Arrow Key: You can move Up/Down/Left/Right by selecting the menu.
G
G
G
G
G
G
YWG
͑
DSM / MSM User Guide
G
Chapter 1: General Description
G
G
G
G
G
G
G
G
G
Figure 1.19 MSM (Measuring Module) _Side 1
- Osciloscope Terminal: CH1, CH2, CH3, and CH4 from the left side.
G
G
G
G
G
G
G
G
G
USB Terminal Power Terminal
Figure 1.20 MSM (Measuring Module) _Side 2
TG USB Terminal: To connect MSM (measuring module) to the user PC.
TG Power Terminal: To supply power by applying the 12V adapter to MSM (measuring
module).
MSM (measuring module) does not support the wireless function.
When connecting to the user PC, USB must be used.

G
G
YXG
͑
DSM / MSM User Guide
G
Chapter 1: General Description
G
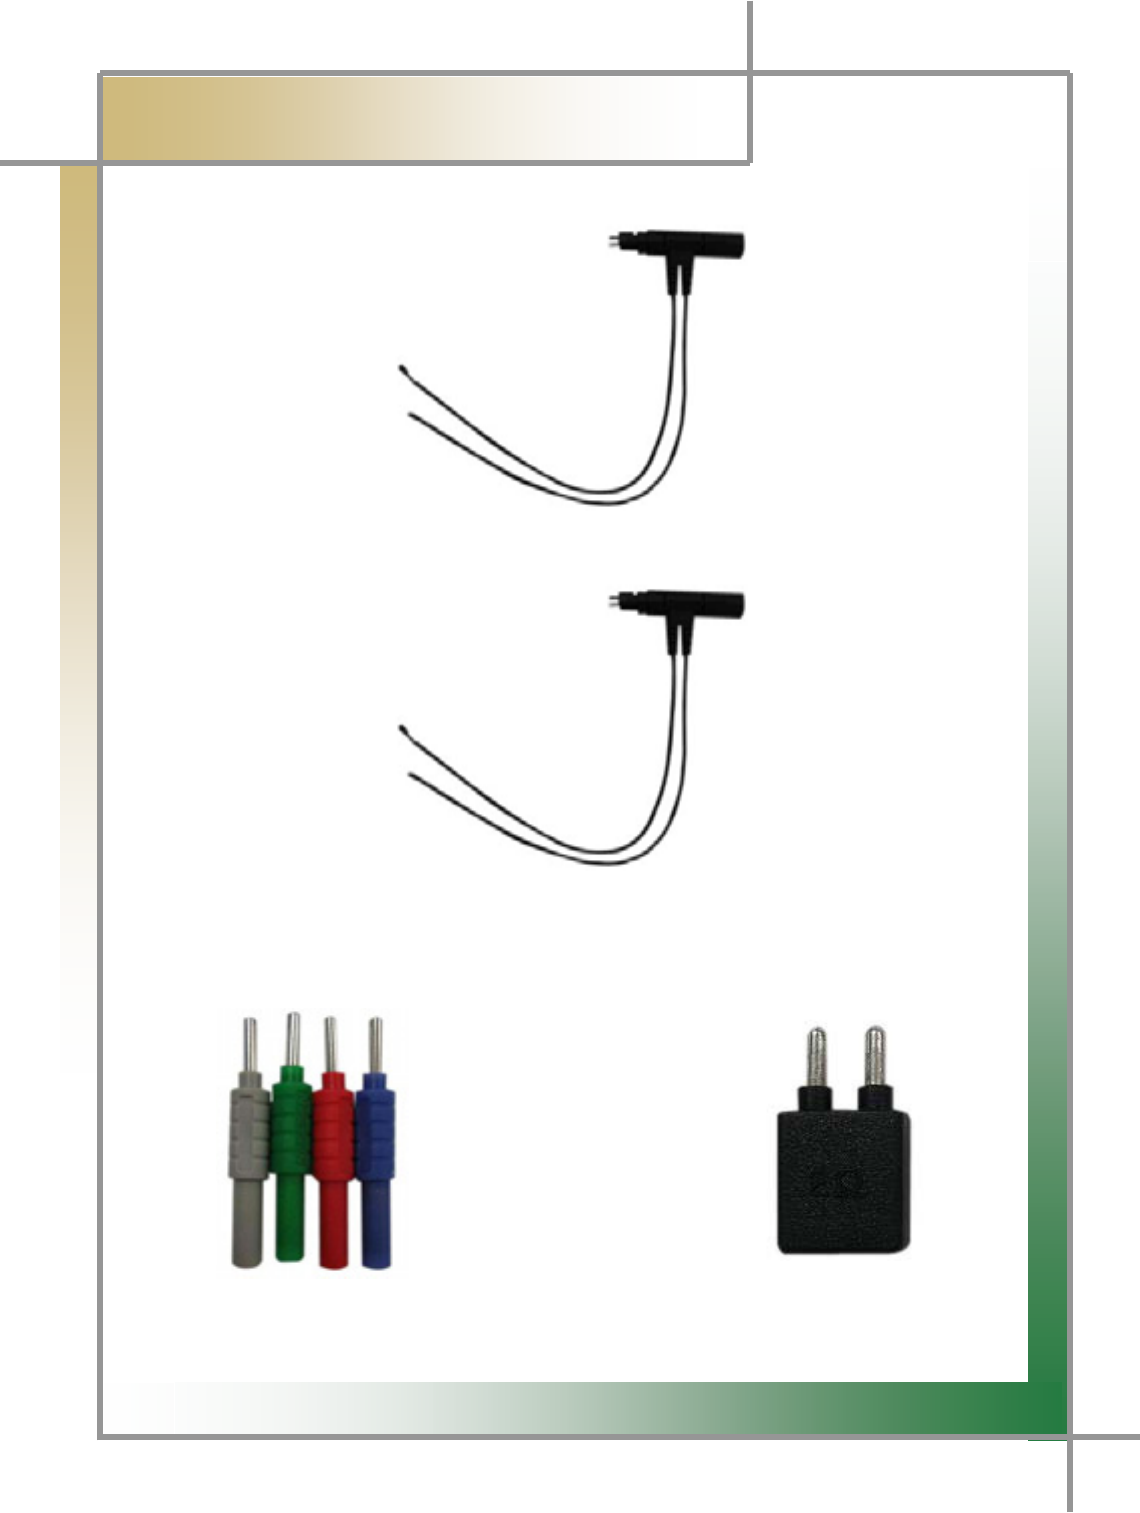
2nd Ignition Pickup
G
G
G
G
G
G
G
G
G
G
Figure 1.21 2nd Ignition Pickup
Used when 2nd ignition single wave is measured.
Scope Set
G
G
G
G
G
G
G
G
G
G
Figure 1.22 Scope Set
You can use it when measuring the sensor wave.
G
G
YYG
͑
DSM / MSM User Guide
G
Chapter 1: General Description
G
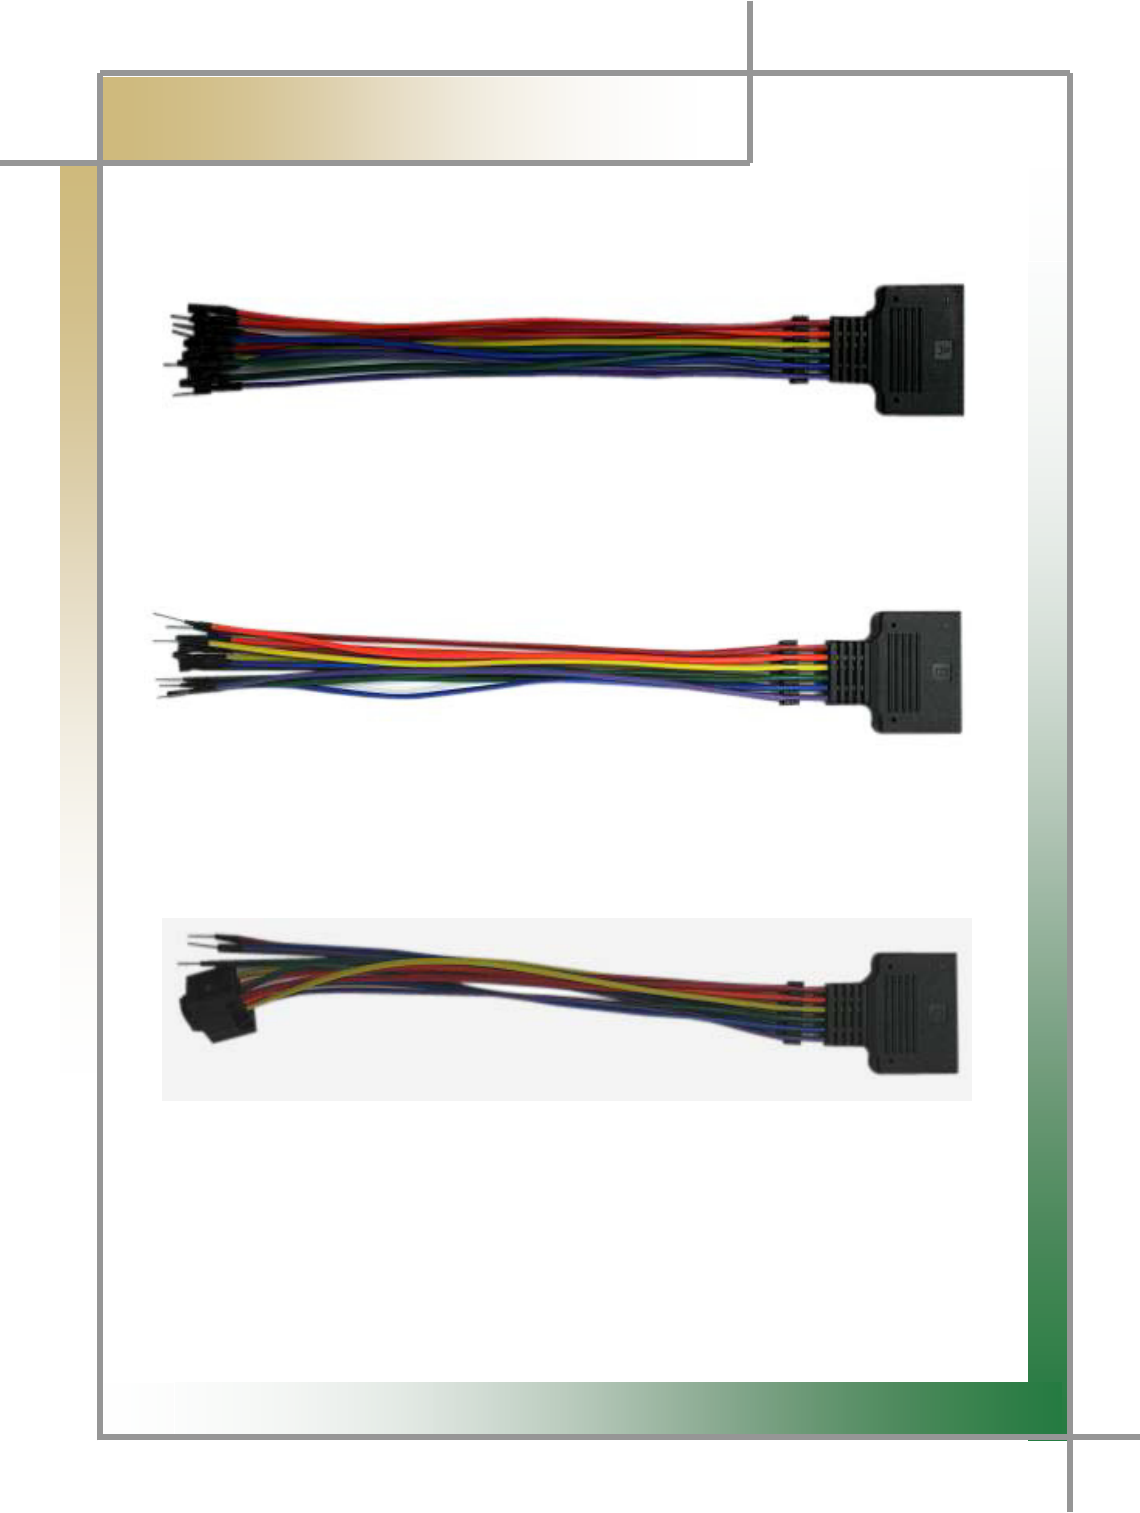
T-Connector (A)
Figure 1.23 T- Connector (A)
T-Connector (B)
Figure 1.24 T- Connector (B)
T-Connector (C)
Figure 1.25 T- Connector (C)
It is designed to prevent wiring damage when measuring the T-connector scope and to
measure the scope waveform after taking away and connecting the sensor connector.
* A - for measuring air bag B – for general measurement C – for measuring TPS
G
G
YZG
͑
DSM / MSM User Guide
G
Chapter 1: General Description
G
T-Connector (WH)
Figure 1.26 T - Connector (WH)
T-Connector (WHW)
Figure 1.27 T- Connector (WHW)
CAN PROBE Dummy Resistance (2)
Figure 1.28 CAN PROBE Figure 1.29 Dumy Resistance
(2) *2EA
G
G
Y[G
͑DSM / MSM User Guide
G
Chapter 1: General Description
6. How to Supply Power
1. Cigar Lighter Cable
Power is supplied through the cigar lighter cable.
However, when the ignition switch of the vehicle is set to Off or during the starting
of the engine, power is not supplied to the cigar lighter socket.
2. Vehicle Battery
Have the red clip snapped onto the connection cable to the (+) terminal of the
battery, and have the black click snapped onto the cable for the (-) terminal. And
then use the cigar lighter cable to supply the power.
A
t this time, power can be always supplied regardless of ignition switch location o
r
engine starting condition.
If you connect it to the wrong polarity, take your cautions, it may
cause damage to the main body.
3. DLC Main Cable
Not only for the vehicles meeting the OBD-II communication regulations, or the
diagnosis connectors of some automobile makers, power can be supplied only with
the DLC main cable without extra power supply.
4. Battery
If you use the enclosed battery, you can use it for 1-2 hours without supplying
additional power.
TIPS) The amount of usage time vary according to the usage purpose o
r
environment.
5. AC/DC Adapter
When using the AC/DC adapter as the power source, some of programs have the
battery automatically recharged, used as the power source of the main body.

G
G
Y\G
͑DSM / MSM User Guide
G
Chapter 2: Install Program (for XP)
1. Install Diagnosing Program
Step 1) Insert the program installation DVD 1[Disk1: Diagnosis and Diagnosing
Guide #1] to your laptop. The following screen will be prompted.
G
G
G
G
G
G
G
G
G
G
G
G
G
G
Step 2) Click the [Diagnosing Program] icon to proceed to the next step.
G
G
G
G
G
G
G
G
G
G
G
G
G
G
Y]G
͑DSM / MSM User Guide
G
Chapter 2: Install Program (for XP)
If the program is already installed, click the [Recovery] icon and continue the process.]
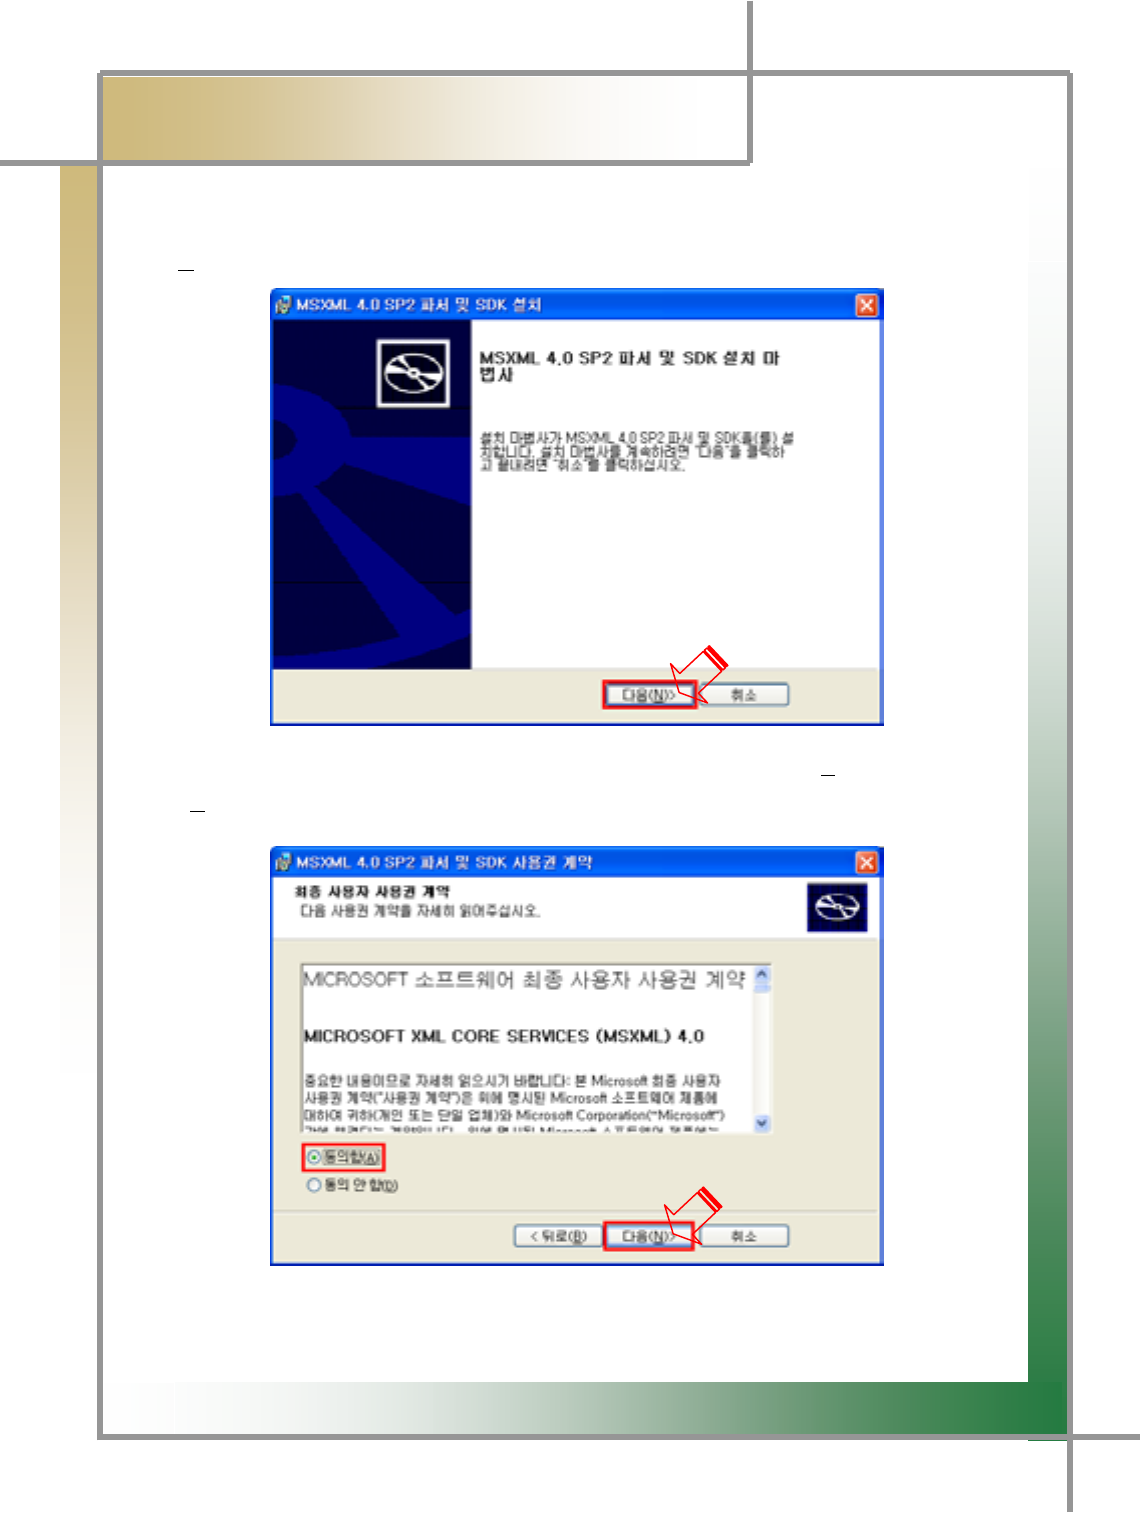
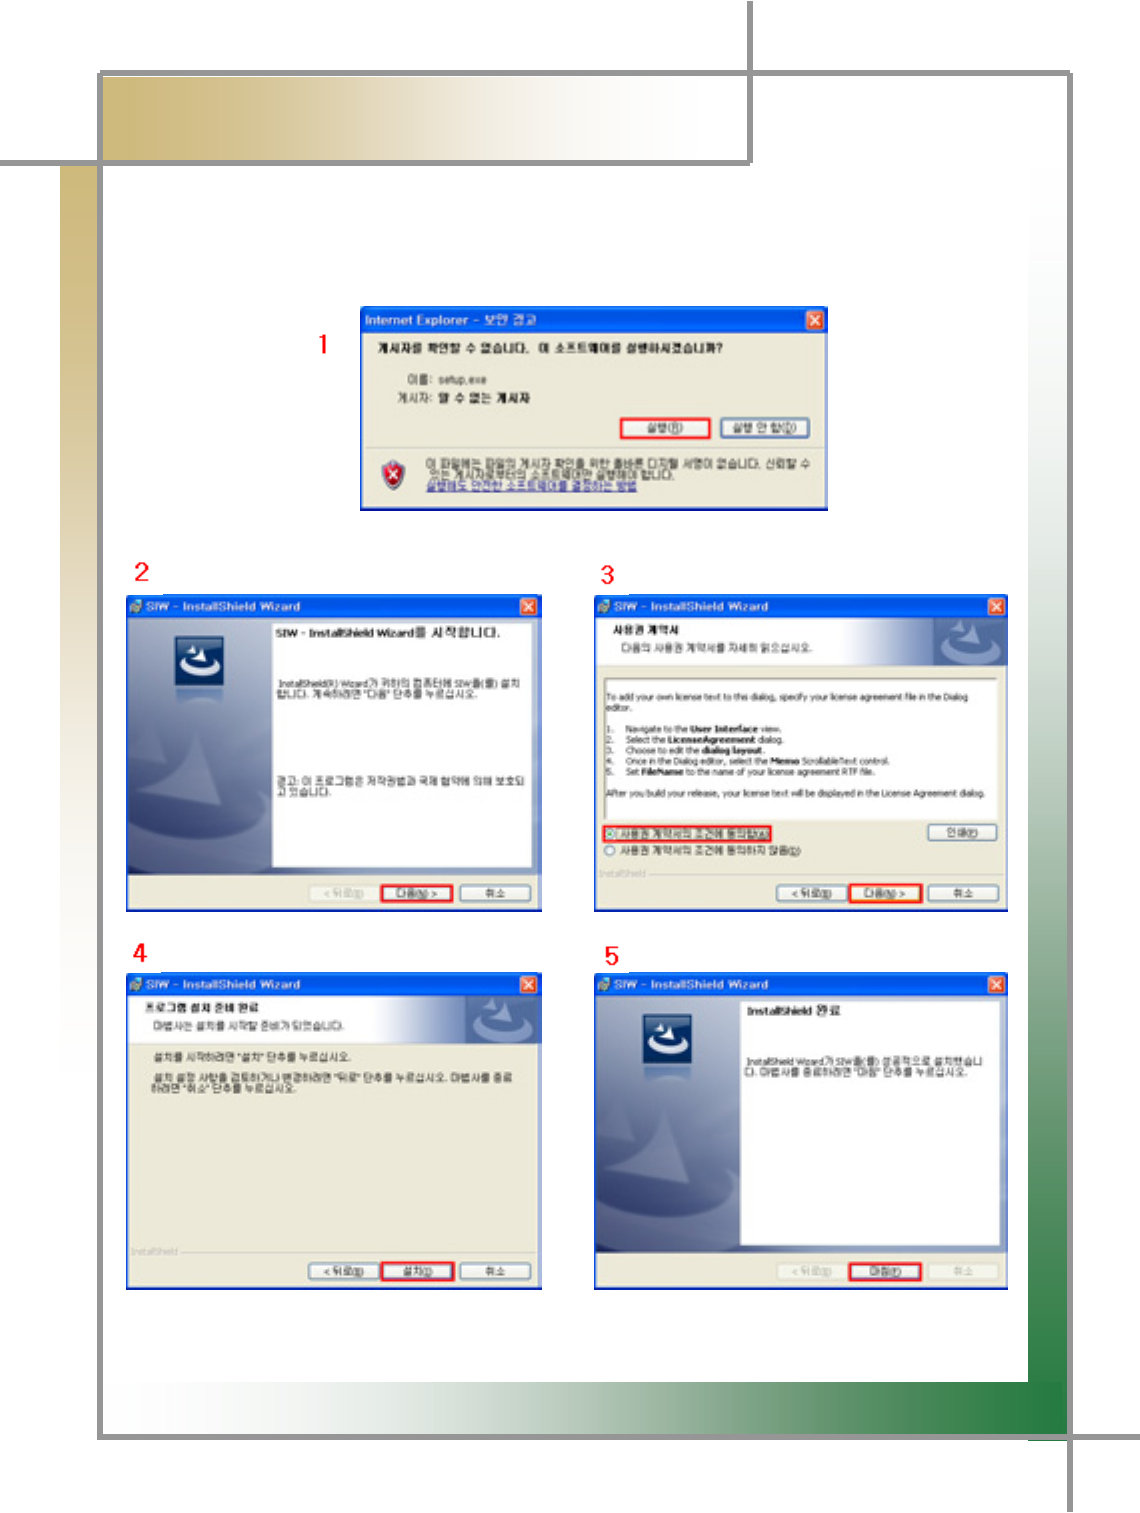
Step 3) The installation process is continued, showing the following screen. Clic
k
[Next(N)>] to continue the process.
G
G
G
G
G
G
G
G
G
G
G
G
zG[PG{GGGGUGjGAgree OhPSGGG
Next OuPeUG
G
G
G
Y^G
͑DSM / MSM User Guide
G
Chapter 2 : Install Program (forٻڳګڄ
G
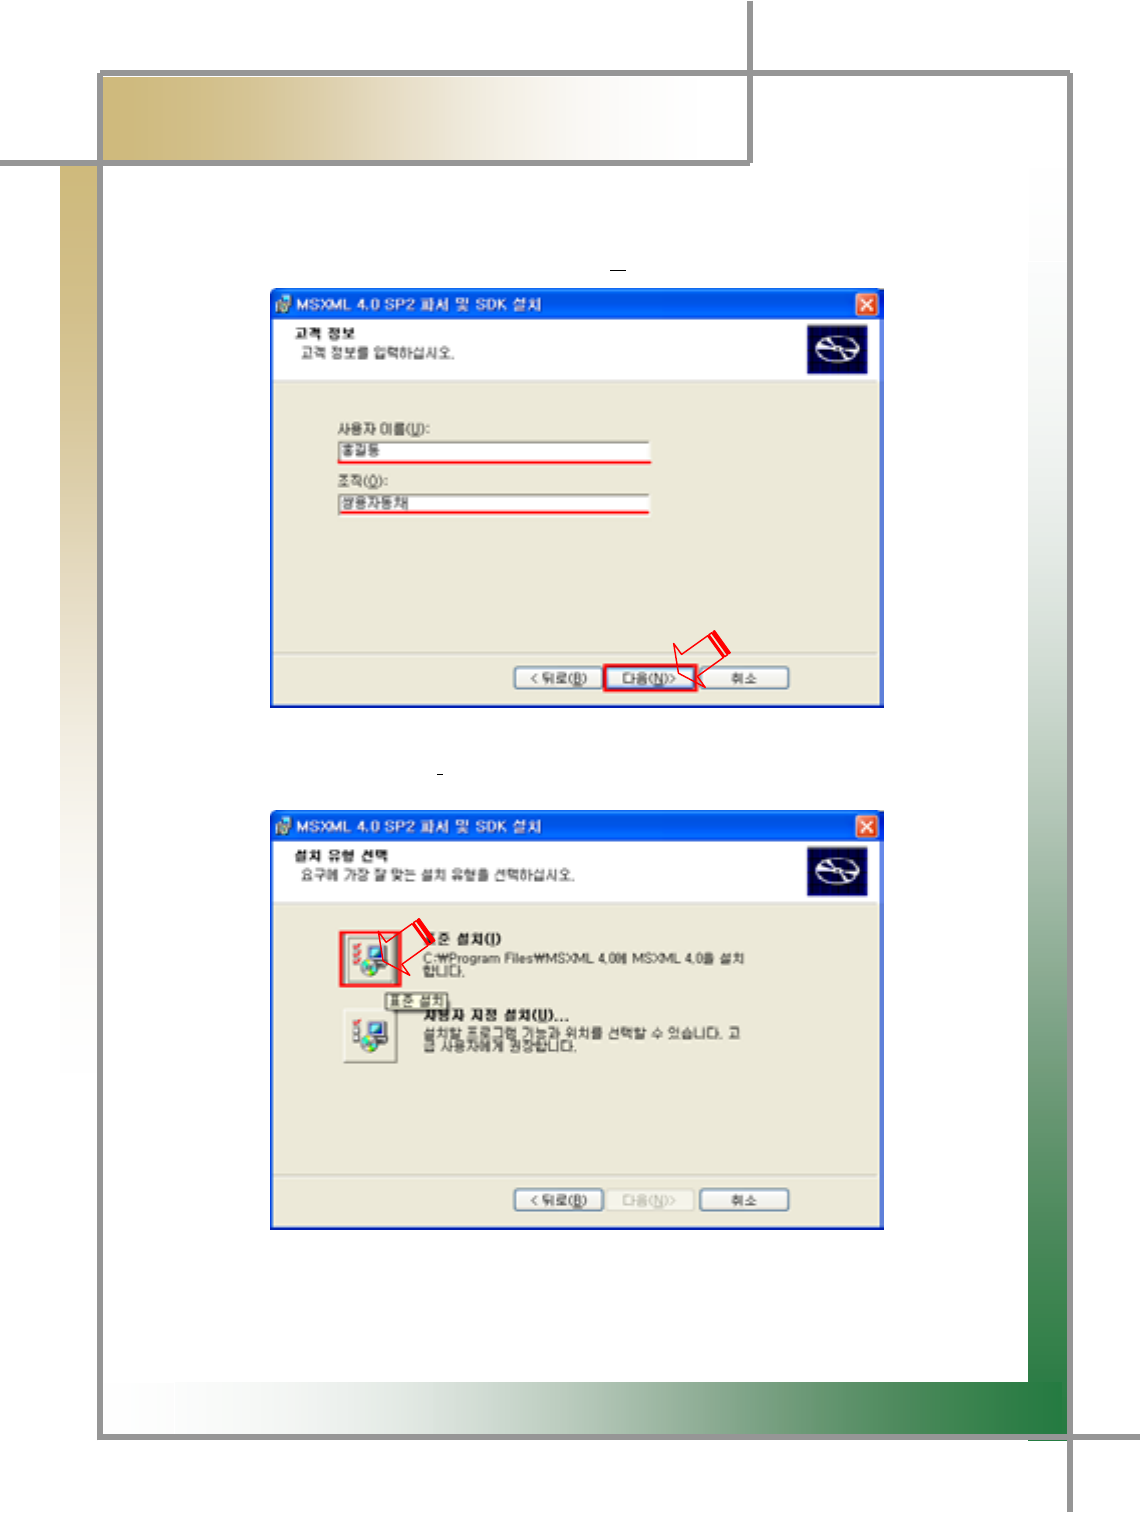
Step 5) The following screen is displayed. Enter customer information.
After entering information, click [Next(N)>] and continue the process.
G
G
G
G
G
G
G
G
G
Step 6) Click the [Standard(I)] icon.
G
G
Y_G
͑DSM / MSM User Guide
G
Chapter 2: Install Program (for XP)
G
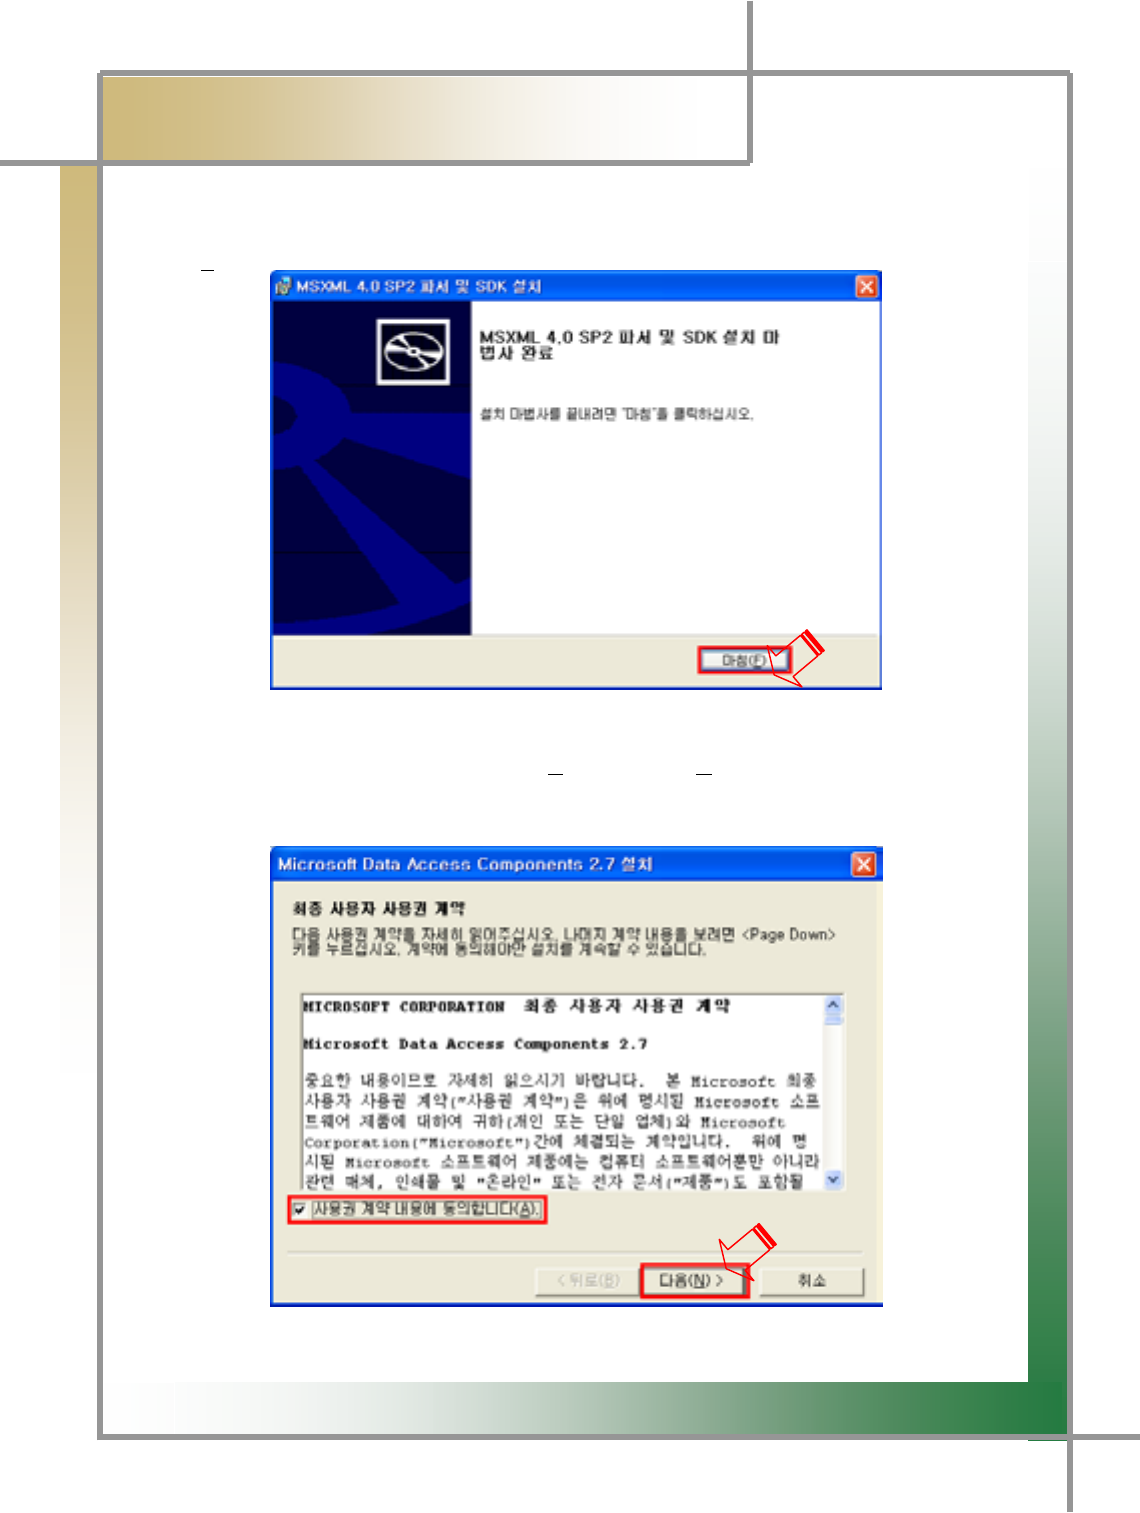
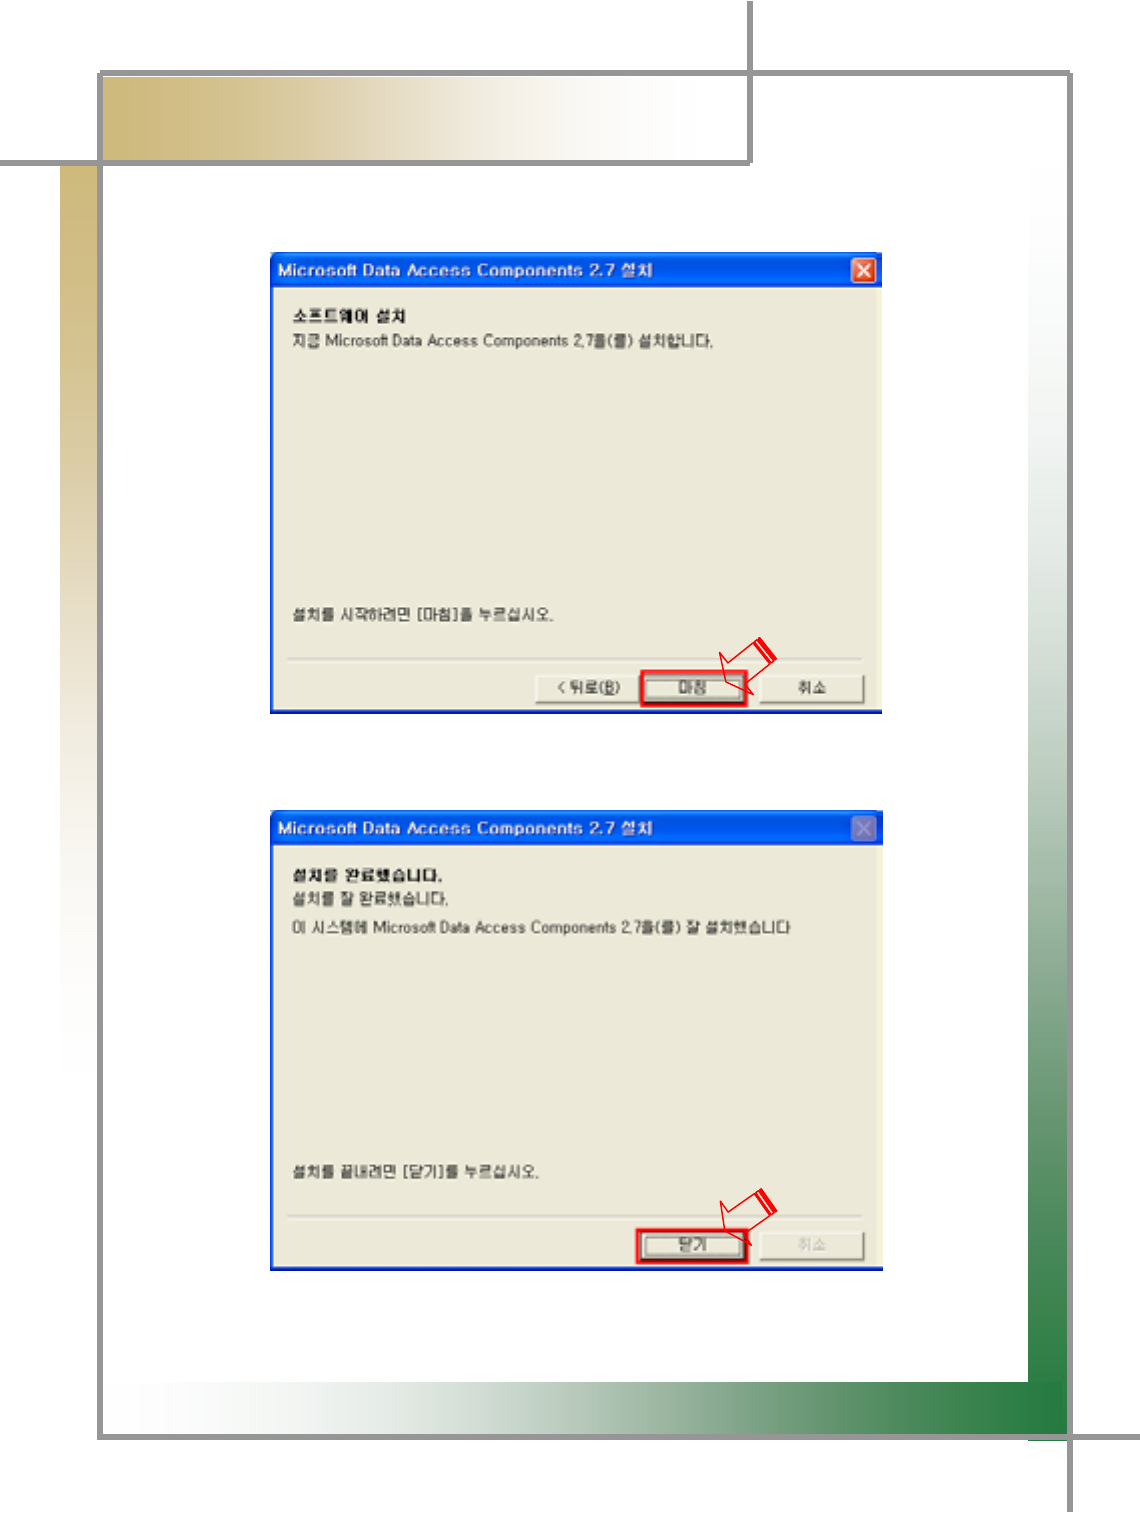
Step 7) Once the installation is complete, you will see the following screen. Click
[Finish (F)].
Step 8) After selecting [Agree to EULA(A)], click [Next(N)>].
G
G
Y`G
͑DSM / MSM User Guide
G
Chapter 2: Install Program (for XP)
G
zG `PG Once the installation is complete, you will see the following screenUG j
mUG
G
G
G
G
G
G
G
G
G
G
zGXWPGjGjUG

G
G
ZWG
͑DSM / MSM User Guide
G
Chapter 2:Install Program (for XPڄ
[If the program was already installed, you can skip the following process.]
Step 11) Click [Next(N)>] to continue the installation.
G
G
G
G
G
G
G
G
G
G
G
G
G
G
Step 12) You will see the following screen. Click [Agree(A)], and then clic
k
[installation(I)>].
G
G
G
ZXG
͑DSM / MSM User Guide
G
Chapter 2: Install Program (for XPڄ
G
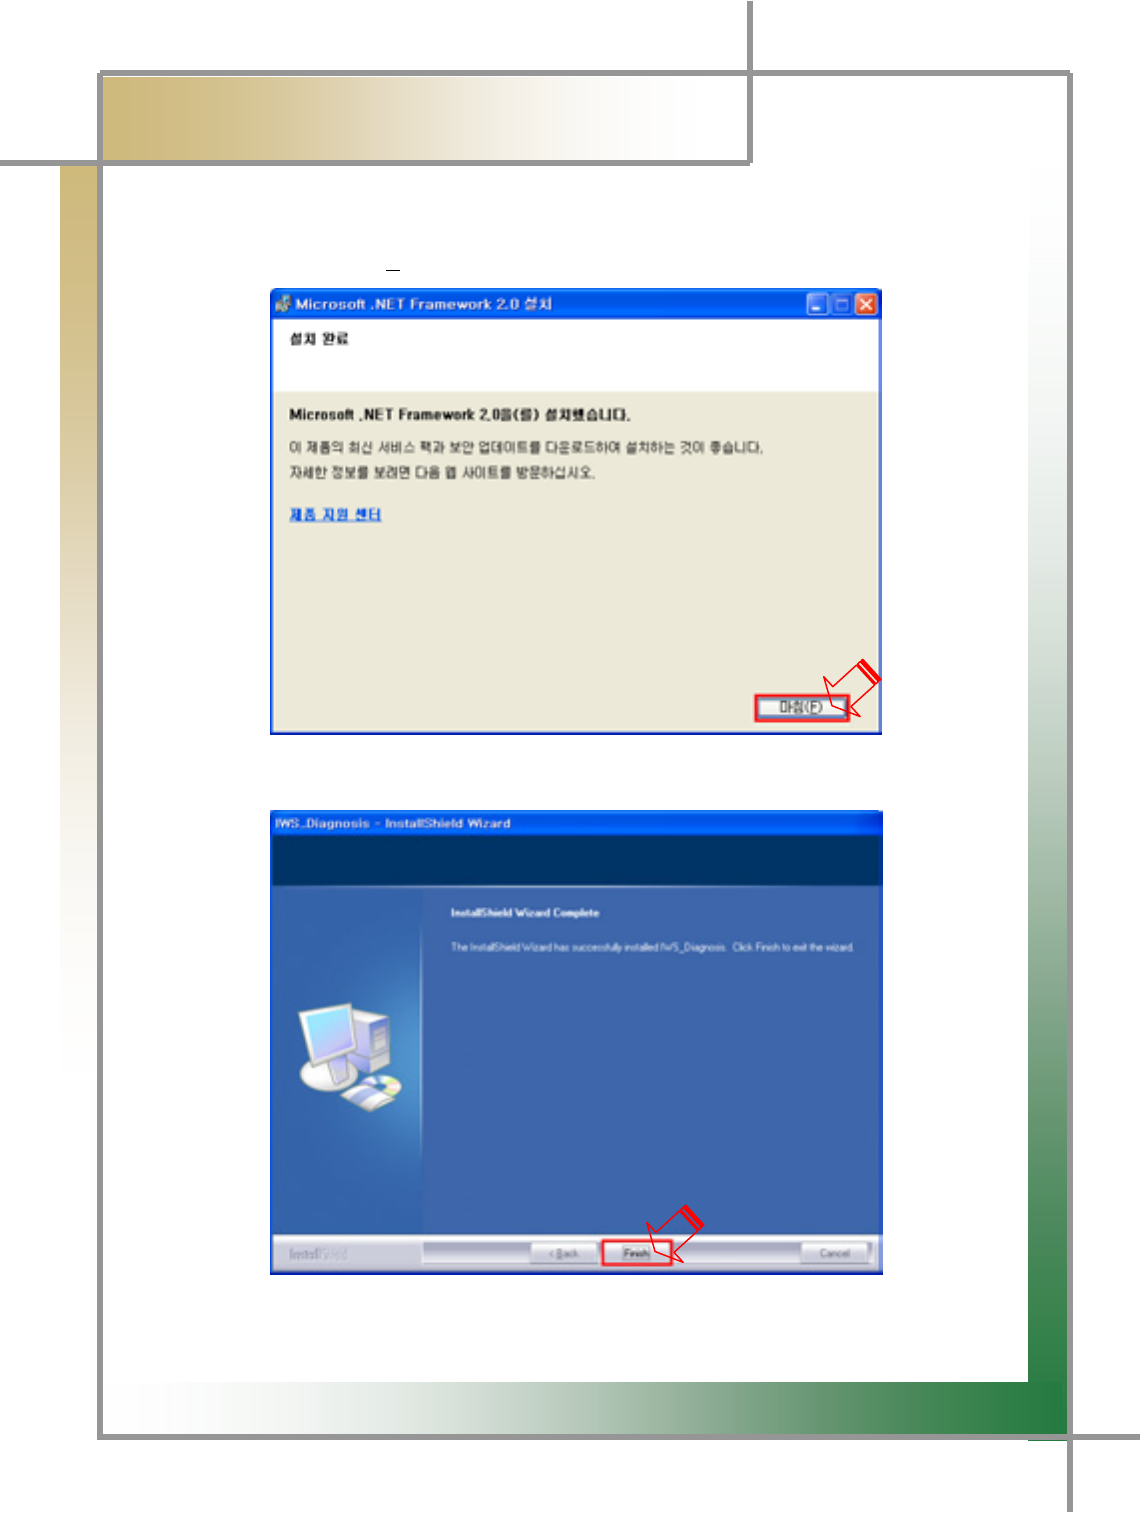
Step 13) Once the installation is complete, you will see the following screen.
Click [Finish (F)].
G
G
G
G
G
G
G
G
G
G
G
G
zGX[PGjGmGGGGGGGUG

G
G
ZYG
͑DSM / MSM User Guide
G
Chapter 2: Install Program (for XPڄ
2. Install Diagnosing Guide
Step 1) Insert the program installation DVD 1[Disk1: Diagnosis and Diagnosing
Guide #1] into your laptop. You will see the following screen.
G
G
G
G
Step 2) Click the [Diagnosing Guide] icon to continue the installation process.
G
G
ZZG
͑DSM / MSM User Guide
G
Chapter 2: Install Program (for XPڄ
G
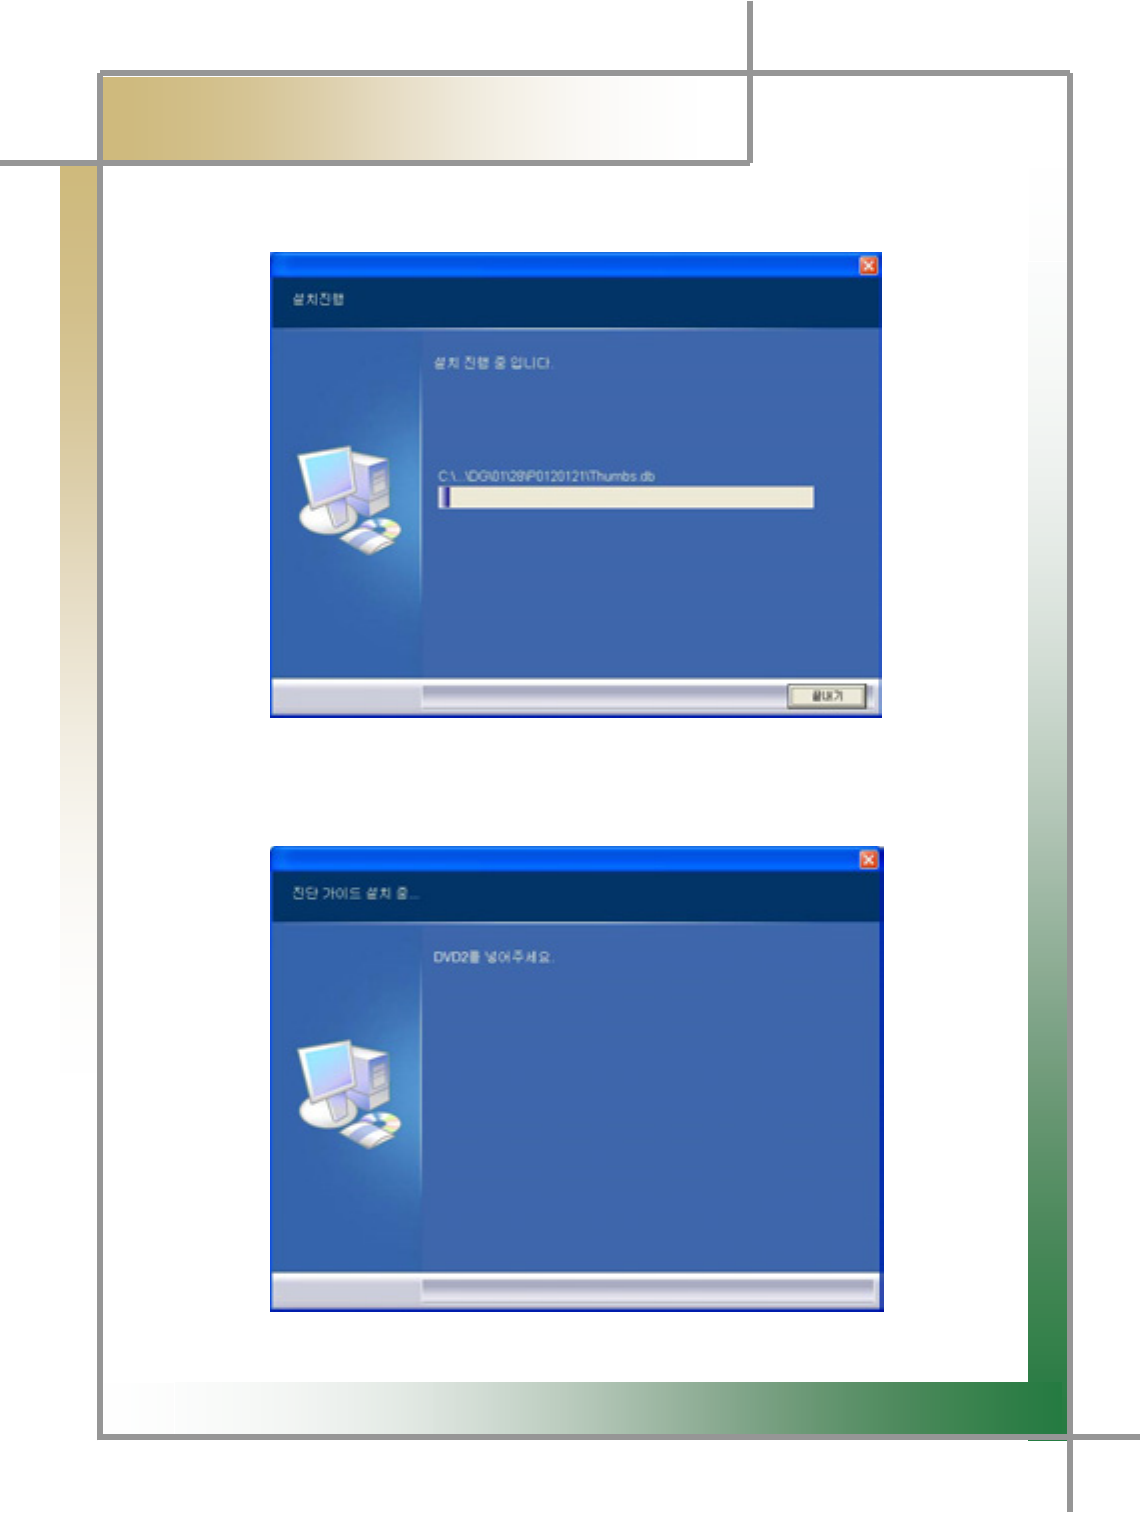
Step 3) The installation process continues as shown in the below screen.
G
G
G
Step 4) Once the installation is complete, insert DVD 2 [Disk2: Diagnosis and
Diagnosing Guide #2] into the drive as shown in the following screen.
G
G
Z[G
͑DSM / MSM User Guide
G
Chapter 2: Install Program (for XP)
G
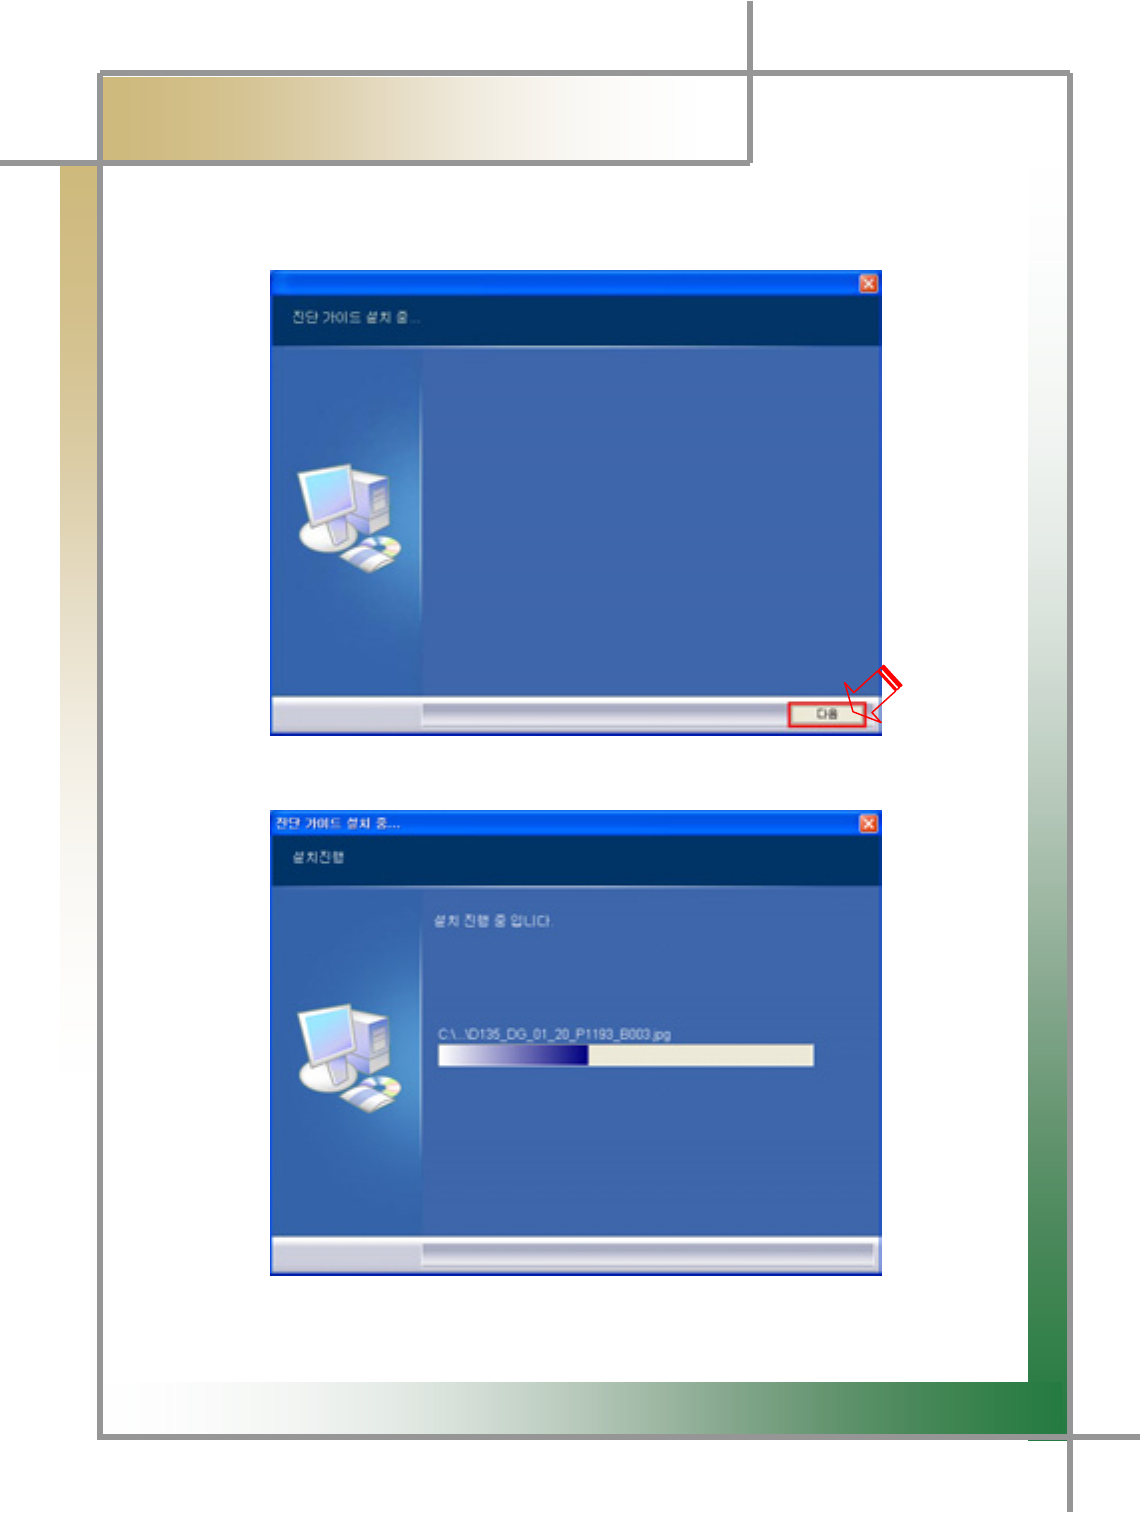
Step 5) Click the [Next] icon to continue the next step.
Step 6) The installation process continues as shown in the below screen
G
G
Z\G
͑DSM / MSM User Guide
G
Chapter 2: Install Program (for XP)
G
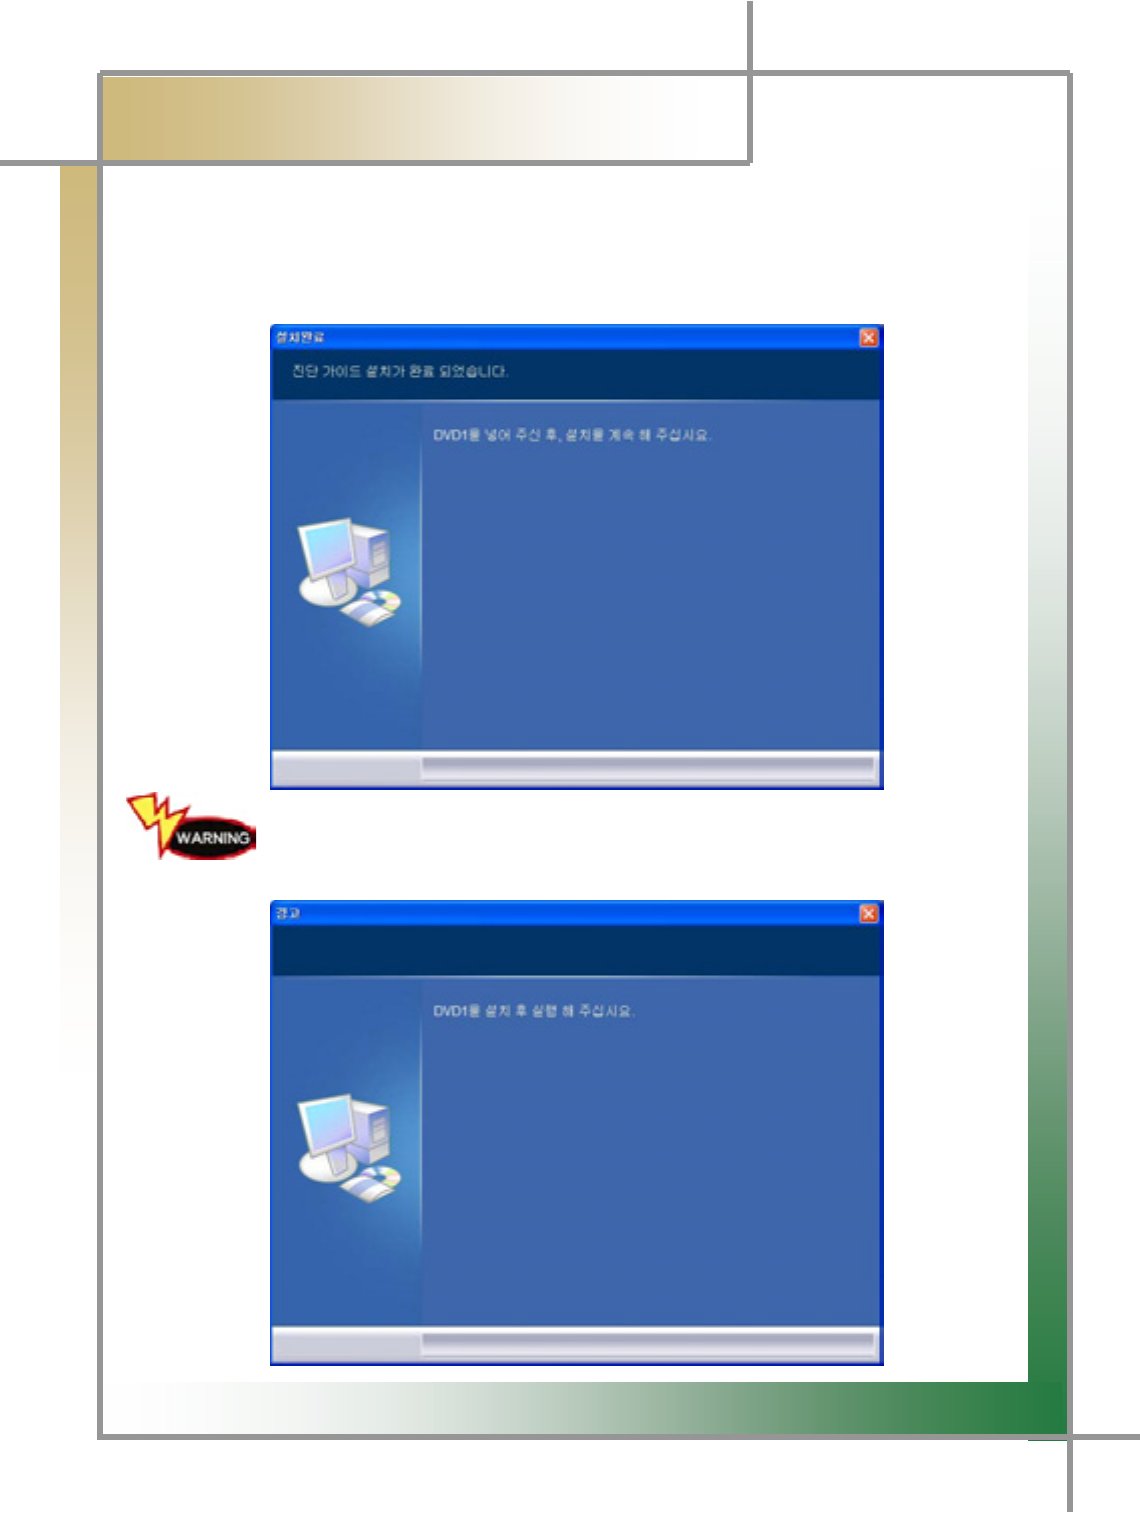
Step7) Once the [Diagnosing Guide] installation is complete, you will see the following
screen. Insert DVD 1[Disk1:Diagnosis and Diagnosing Guide #1] and continue the
installation of [Install Wireless LAN].
G
G
G
G
G
G
[DVD 1] If you had [DVD 2] inserted first, the following screen will be
displayed. Continue the process by inserting [DVD 1] according to the screen
message.
G
G
Z]G
͑DSM / MSM User Guide
G
Chapter2: Install Program (for ڳګڄٻ
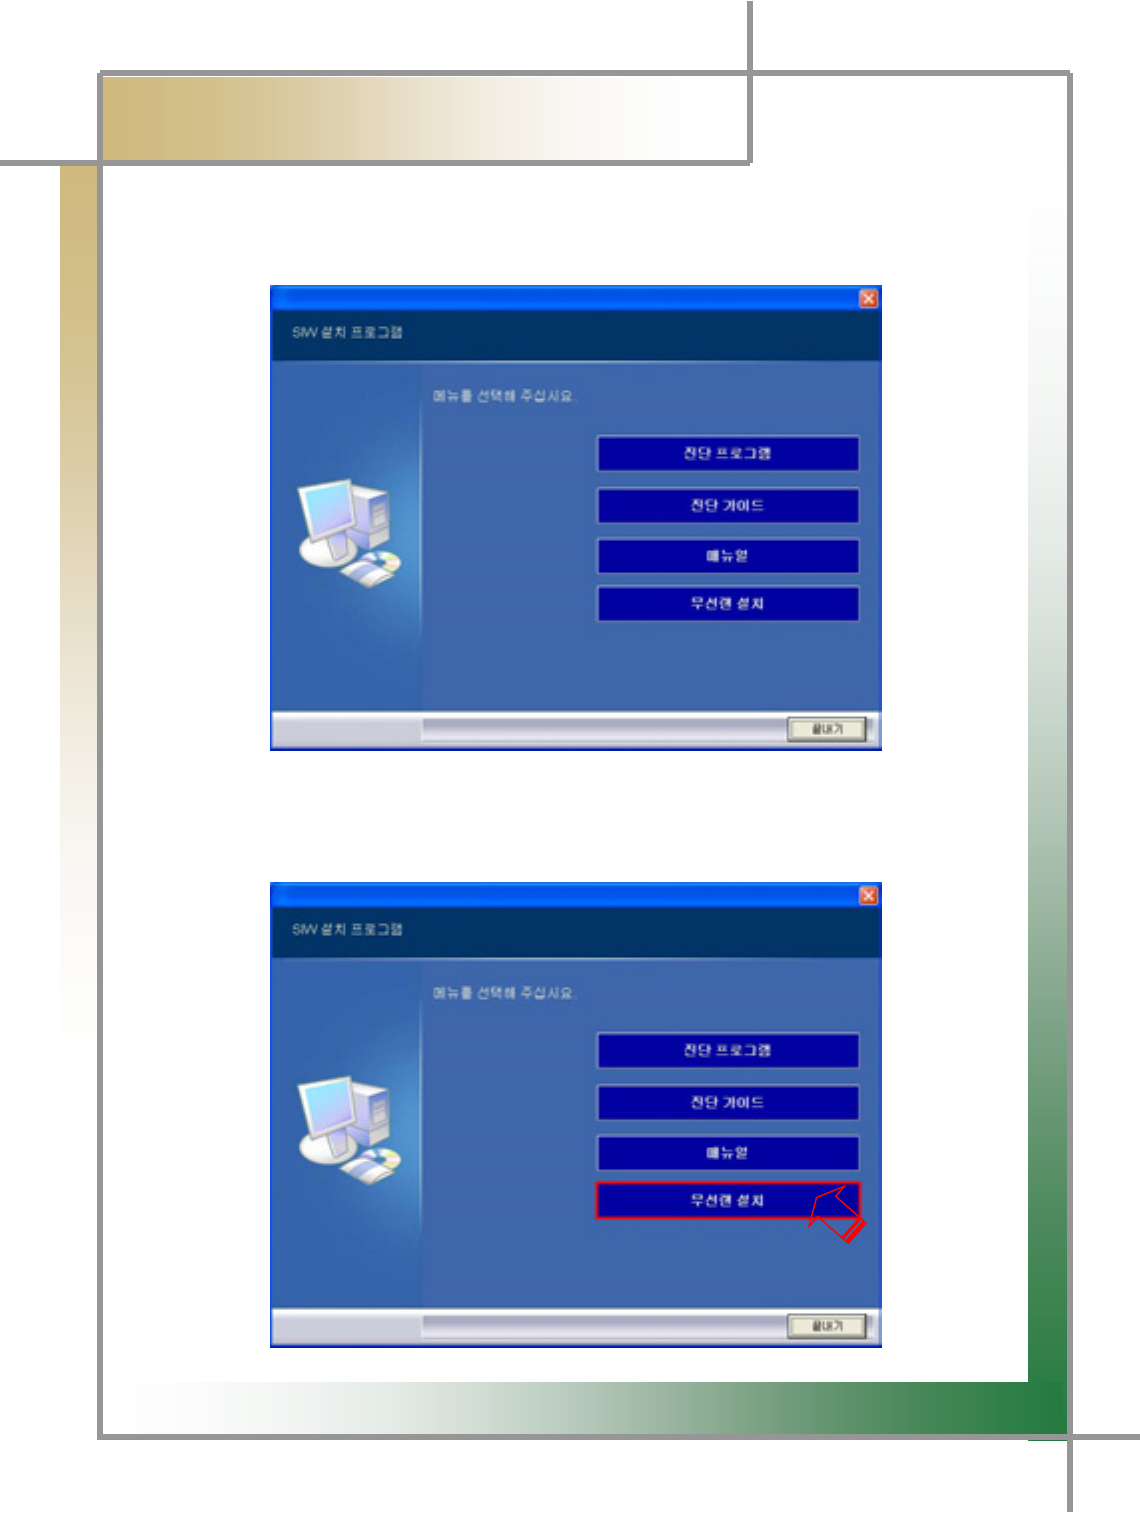
3. How to Install Wireless USB LAN Card (MX-54G) [Unicone]
Step 1) Insert the program installation DVD 1[Disk1: Diagnosis and Diagnosing
Guide #1] into your laptop. You will see the following screen.
Step 2) Click the [Install Wireless LAN] icon to continue the process.
G
G
G
G
Z^G
͑DSM / MSM User Guide
G
Chapter 2: Install Program (for ڳګڄ
G
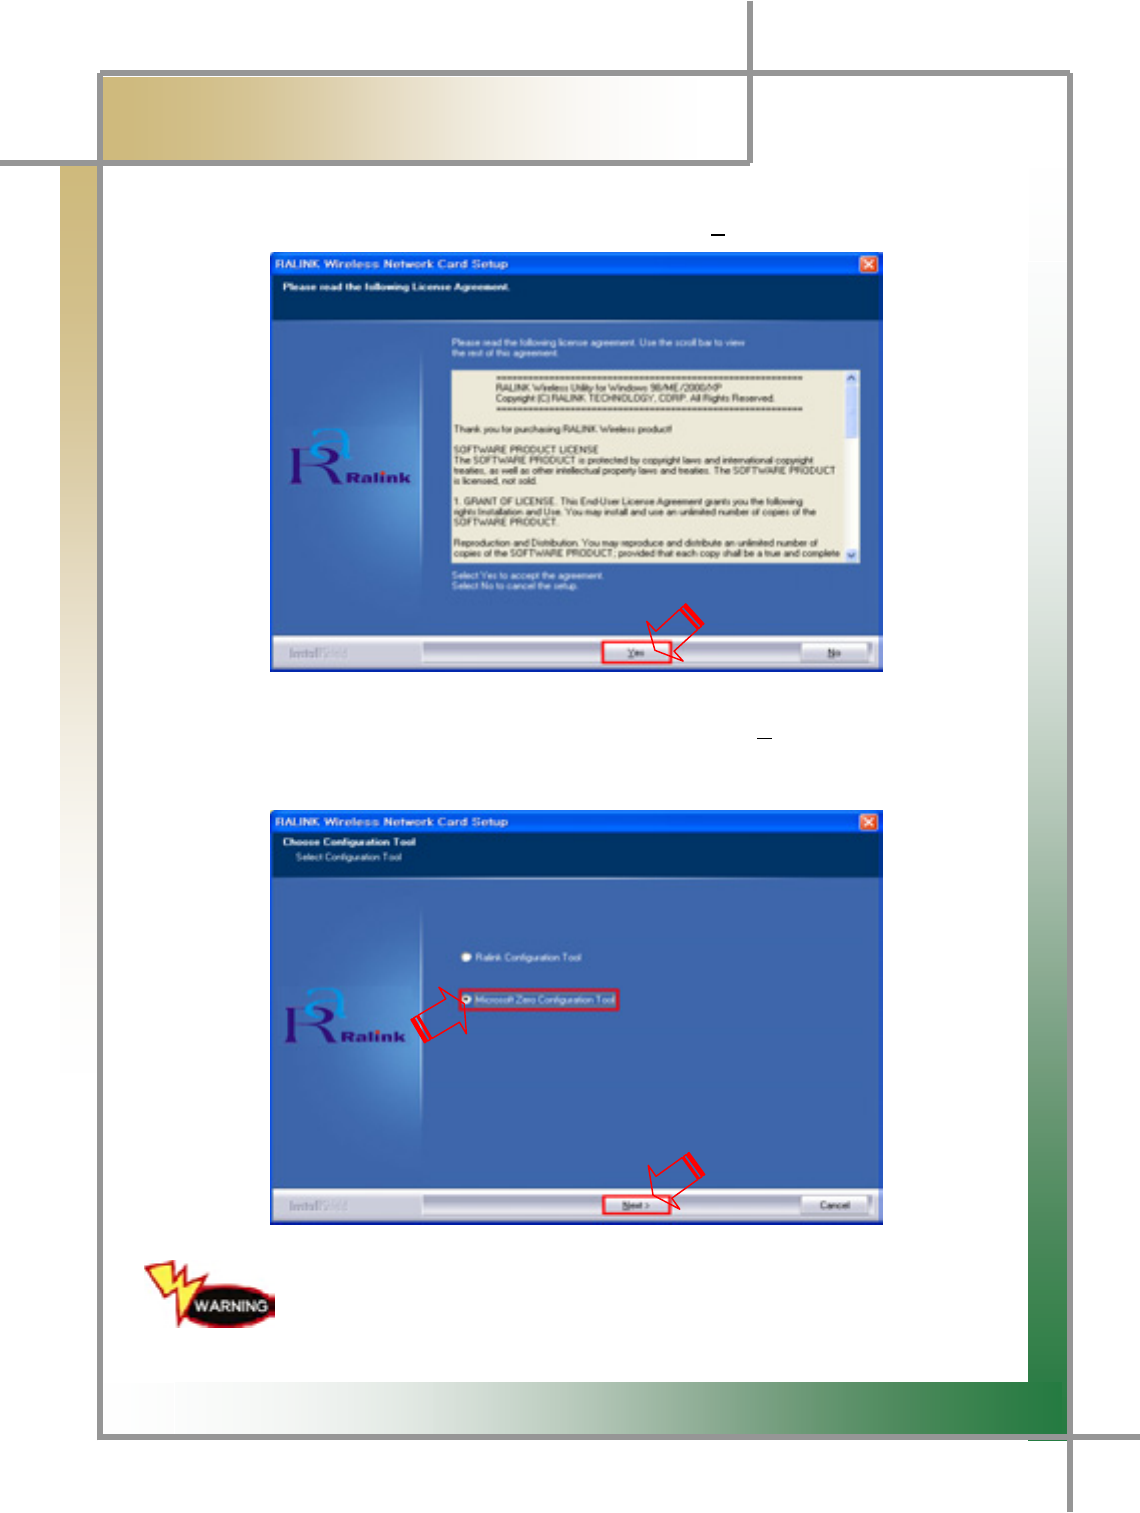
Step 3) Once the installation process is complete, click [Yes].
Step 4) Select [Microsoft Zero Configuration Tool], and click [Next>] to continue the
process.
You must select Micro Zero Configuration Tool as shown in the above
figure.
G
G
Z_G
͑DSM / MSM User Guide
G
Chapter 2: Install Program (for ڳګڄ
G
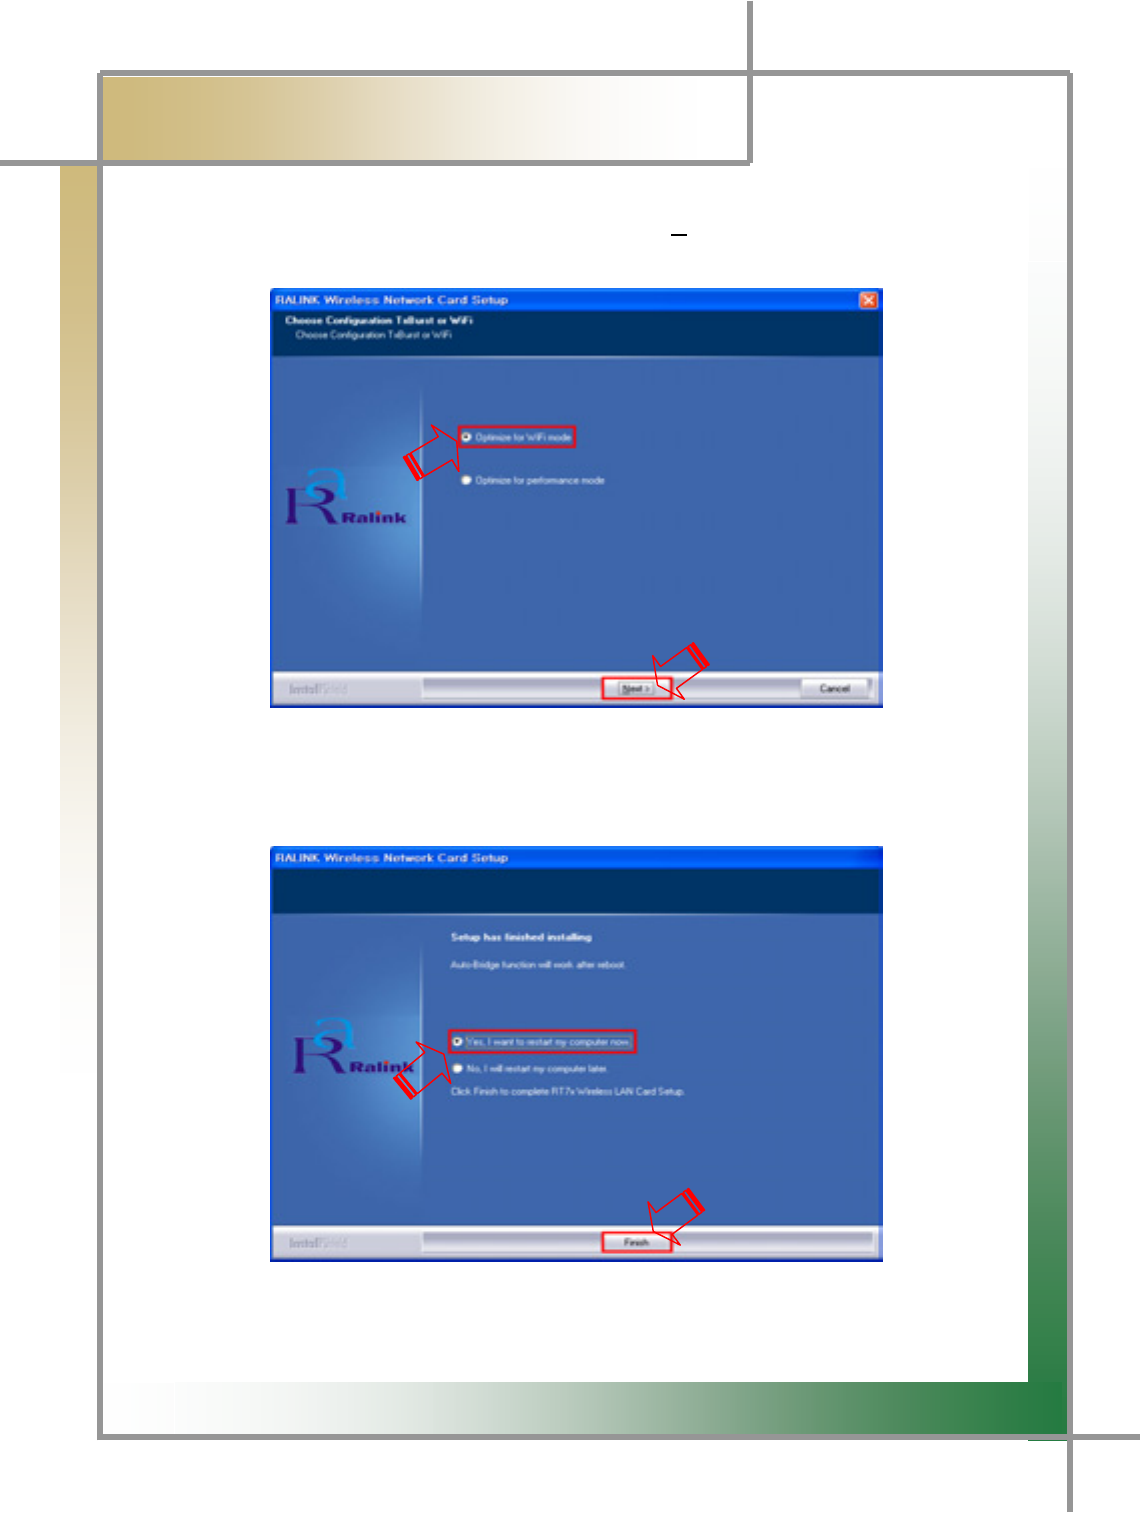
Step 5) Select [Optimize for WiFi mode] and click [Next>] to continue the process. Its
processing speed may be delayed according to the PC status.
Step 6) Select [Yes, I want to restart my computer now.], and click [Finish]. Please
take your caution when the system is rebooted.

G
G
Z`G
͑DSM / MSM User Guide
G
Chapter 2 : Install Program (for ڳګڄ
G
Step7) Once the computer is rebooted, turn on Diagnosing Module, and insert USB
Wireless LAN(MX-54G) into the USB port of your PC. Wireless icon is
recognized. Double click the wireless iconUG
G
G
G
{G
G
G
GGGGGGG~GGGGㇵ䈐GÎGG
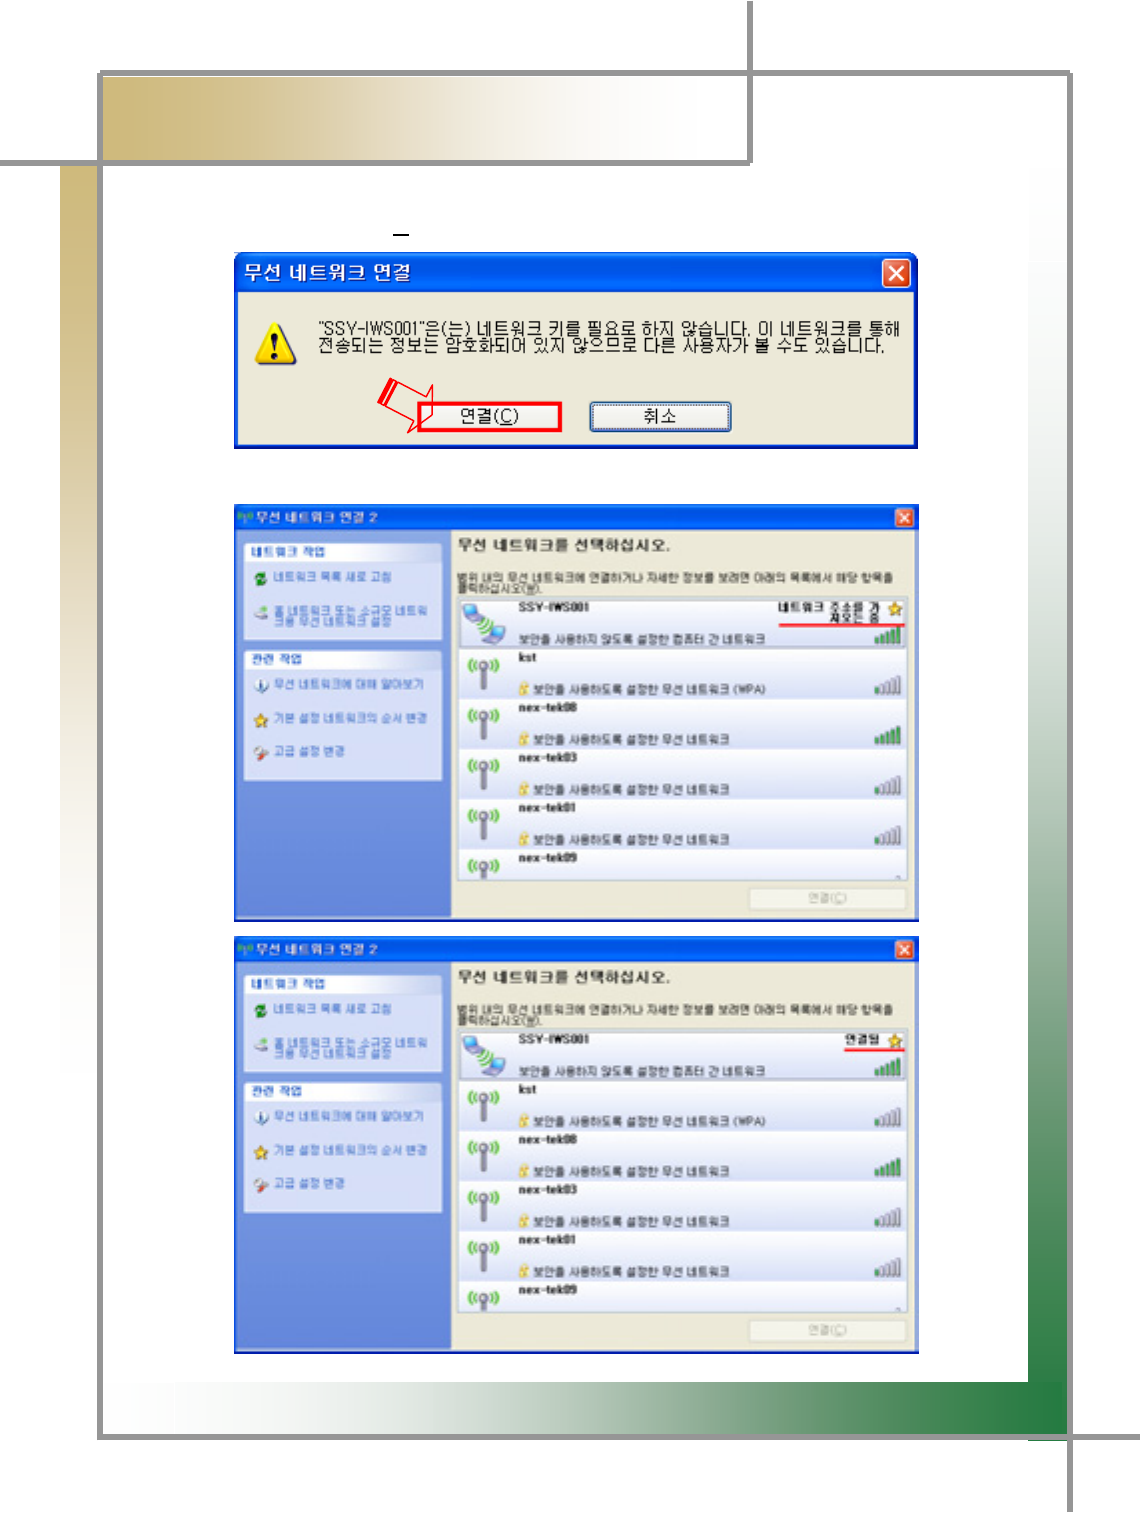
Step8) Utility will be excuted as shown in the below screen. Point to [SSY-IWS001],
and then double click it.
(If [SSY-IWS001] is not found, click 㧀㽕 ㇵ␜㜄 㠸㾌䚐 that is in the lef
t
upper corner.)
G
G
[WG
͑DSM / MSM User Guide
G
Chapter 2: Install Program (for ڳګڄ
G
Step9) Click [Connect (C)] to continue the process.
Step 10) Wireless network is connected as shown in the below screen.
G
G
[XG
͑DSM / MSM User Guide
G
Chapter 2 : Install Program (for ڳګڄ
G
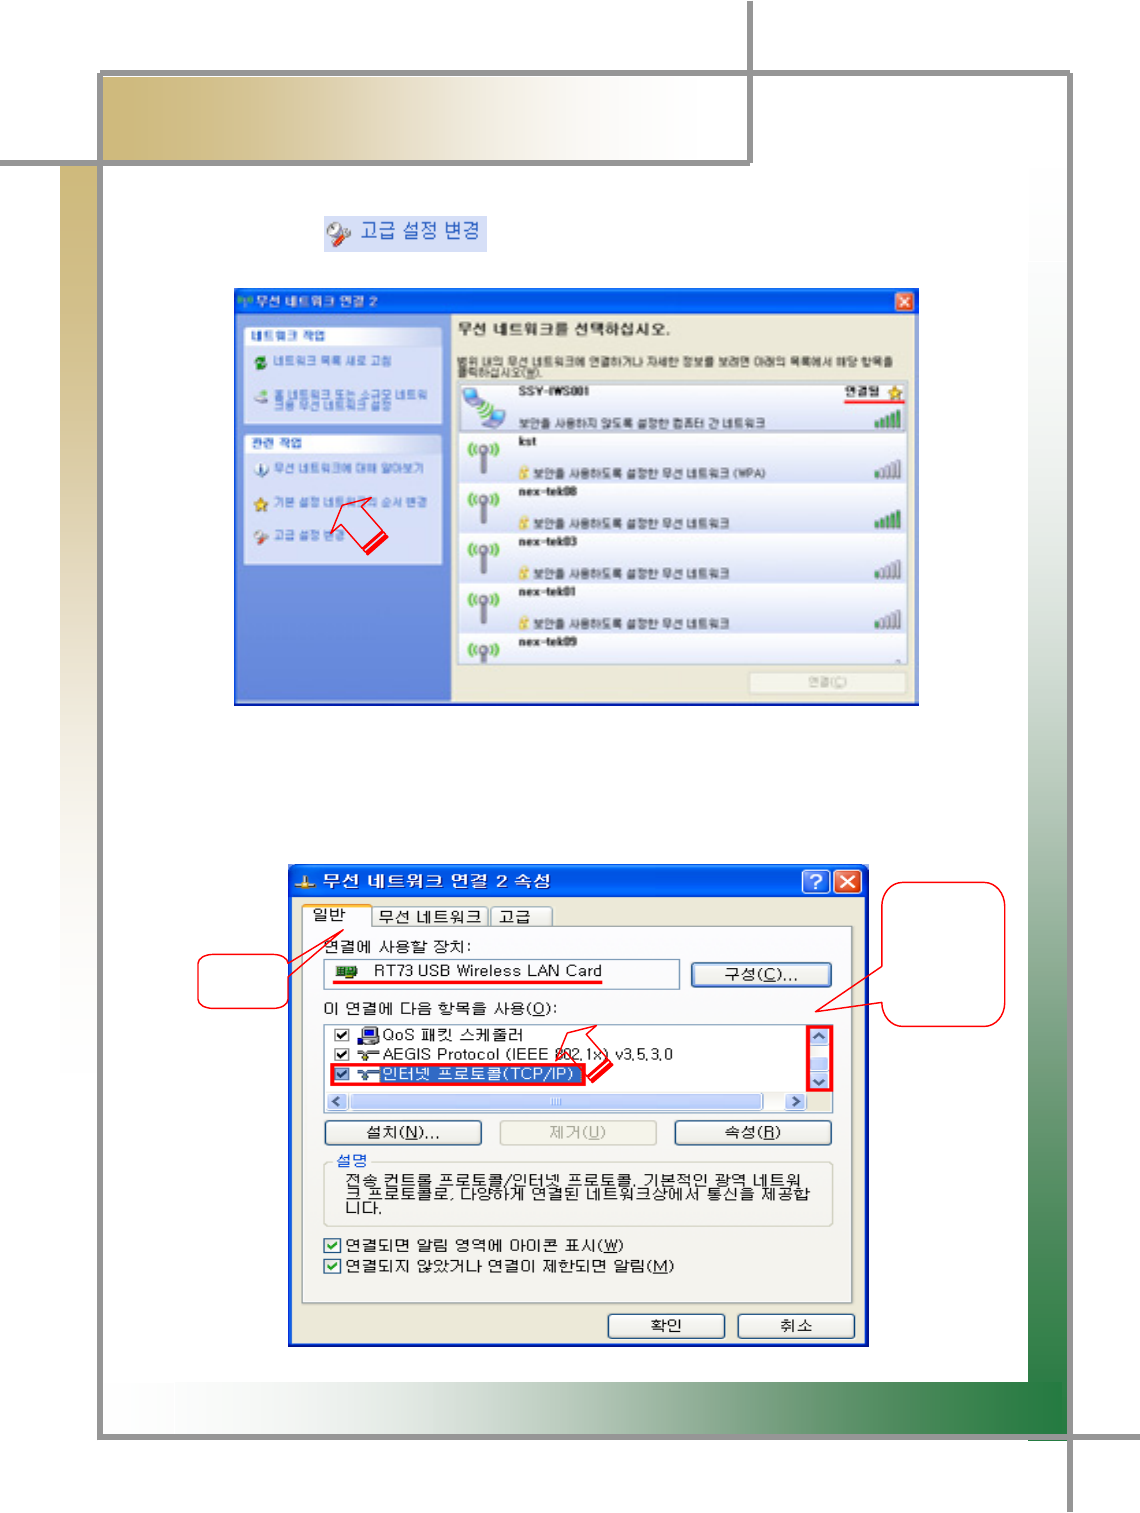
Step 11) Click that is in the left lower corner to continue the IP
setting process.
G
G
G
G
G
G
G
G
G
G
G
G
Step 12) Check if the device to be connected is [RT73 USB Wireless LAN Card] or not.
Move the scroll to select [Internet Protocol(TCP/IP)], and double click it.
G
G
j
tG
G
㏘䆠㟴㫵
G
G
[YG
͑DSM / MSM User Guide
G
Chapter 2 : Install Program (for ڳګڄ
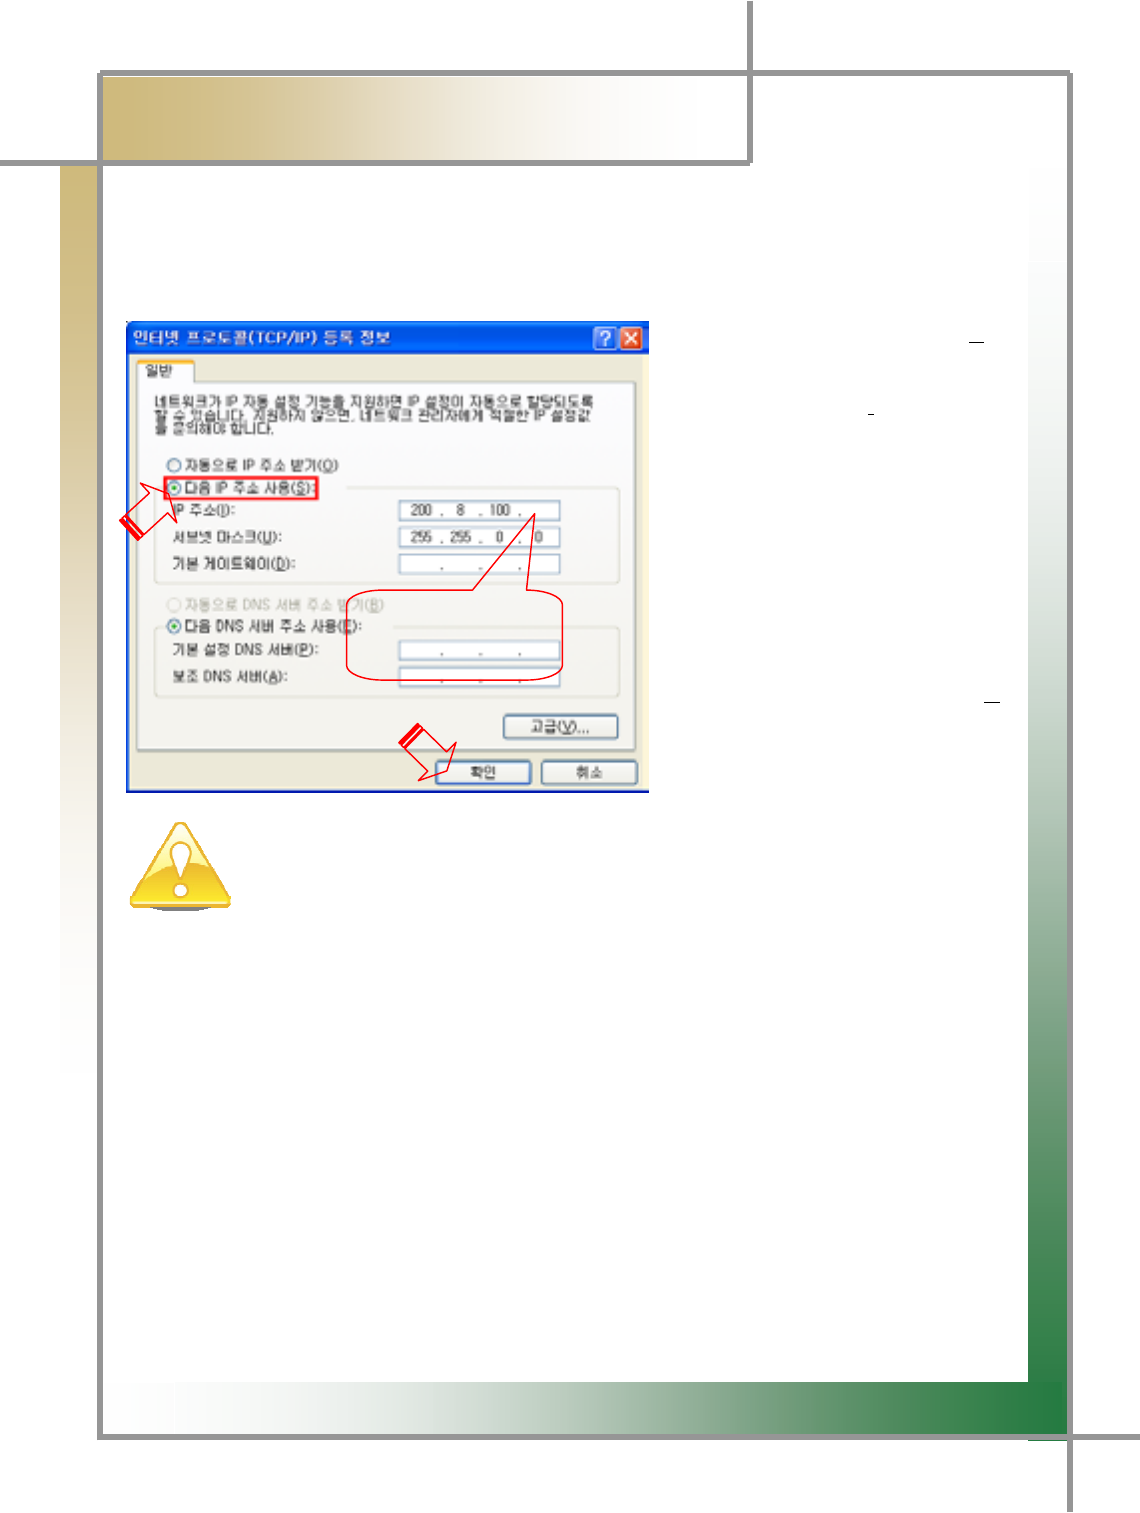
Step 13) You will see the below screen. Check the example, and continue the
setting for IP and subnet mask.
Ex)
ྙSelect [Use next IP Address(S)].
ྚEnter [IP Address(I)].
For IP address, enter 200. 8.
100 that is common in all
cases, and ente
r
any number from 10 to 90 into
the final space.
ྛEnter [Subnet Mask(U)]
⏼␘..
Enter 255. 255. 0. 0.
Click [OK].ྜ
When your work site operates multiple machines, for the last bracket of the IP
address, please enter any of different numbers from 10 to 90. If you see the IP
conflict warning message after entering your random number, select another numbe
r
from 10 to 90.
lGGXWG
`WUG
G
G
[ZG
͑DSM / MSM User Guide
G
Chapter 2 : Install Program (for ڳګڄ
G
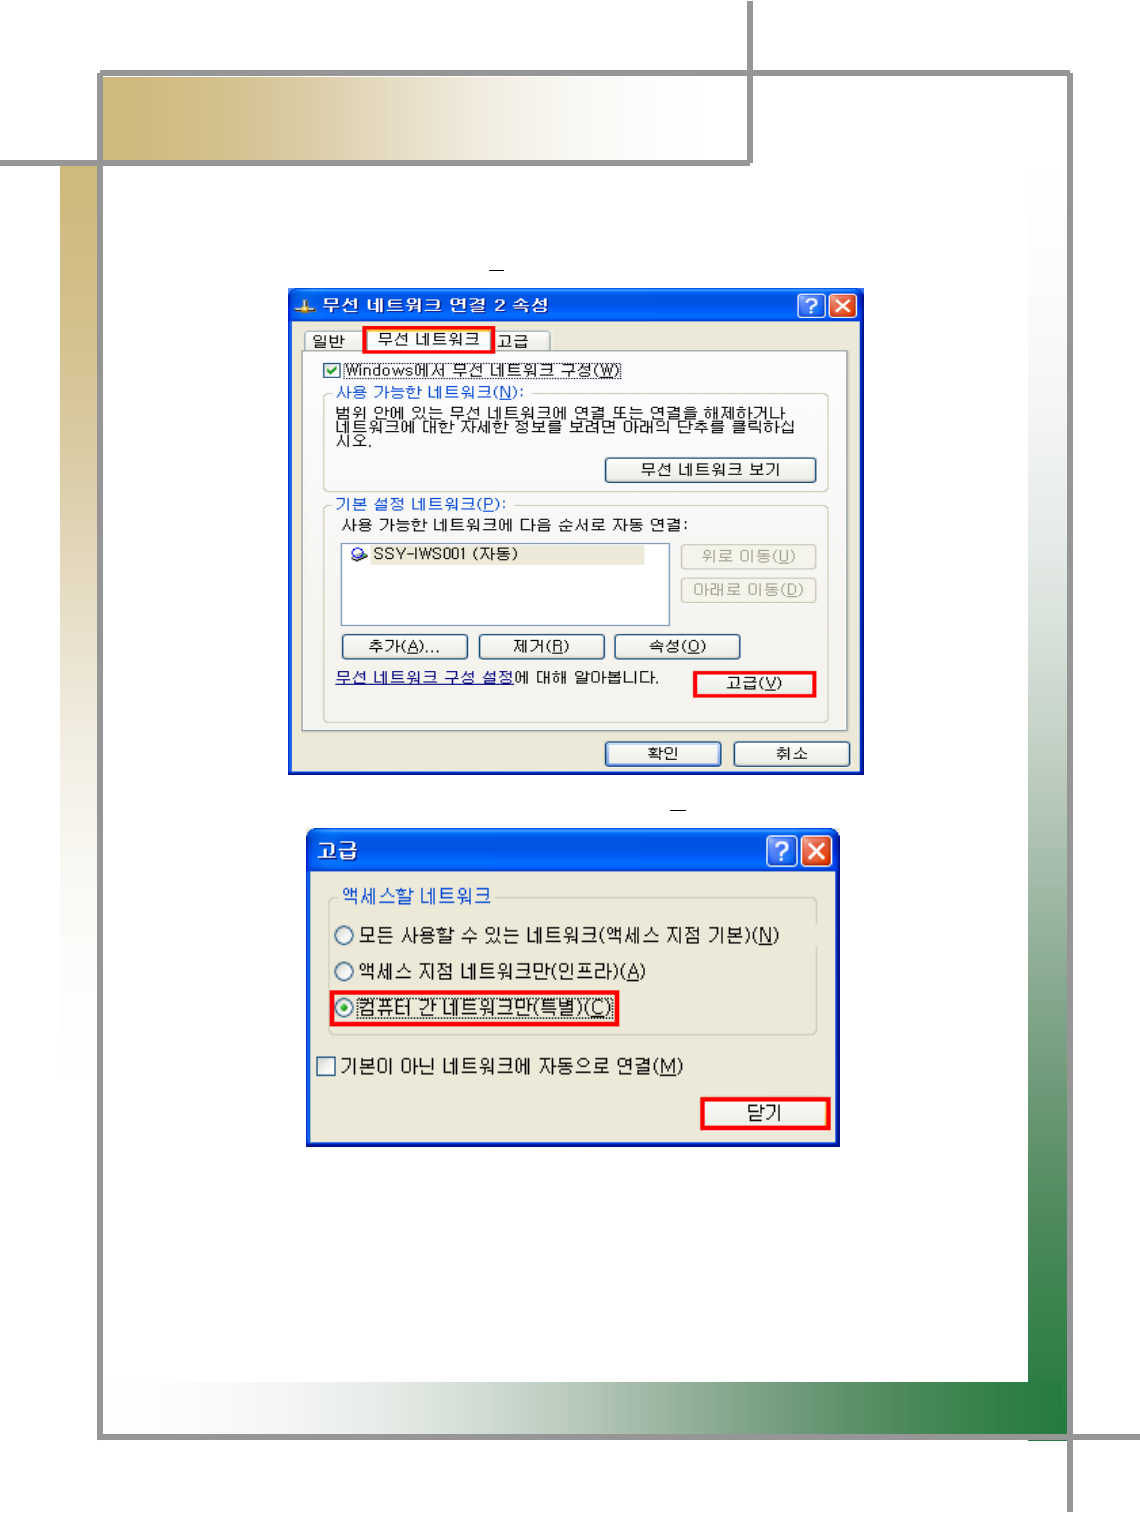
Step 14) In the Step 13) screen, after clicking the [Wireless Network] tab as shown
below, click [Advanced (V)] to continue the process.
G
G
G
G
G
G
G
G
G
G
UG
G
㝸⨀G 䟸G G
Step 15) Select [Inter-Computer Network (Special) (C)], and then click [Close].
G
G
G
G
G
G
G
G
G
Step 16) Click [OK], and close the opening window to finish the setting process.
G
G
G
[[G
͑DSM / MSM User Guide
G
Chapter 2 : Install Program (for ڳګڄ
4. Firewall Setting
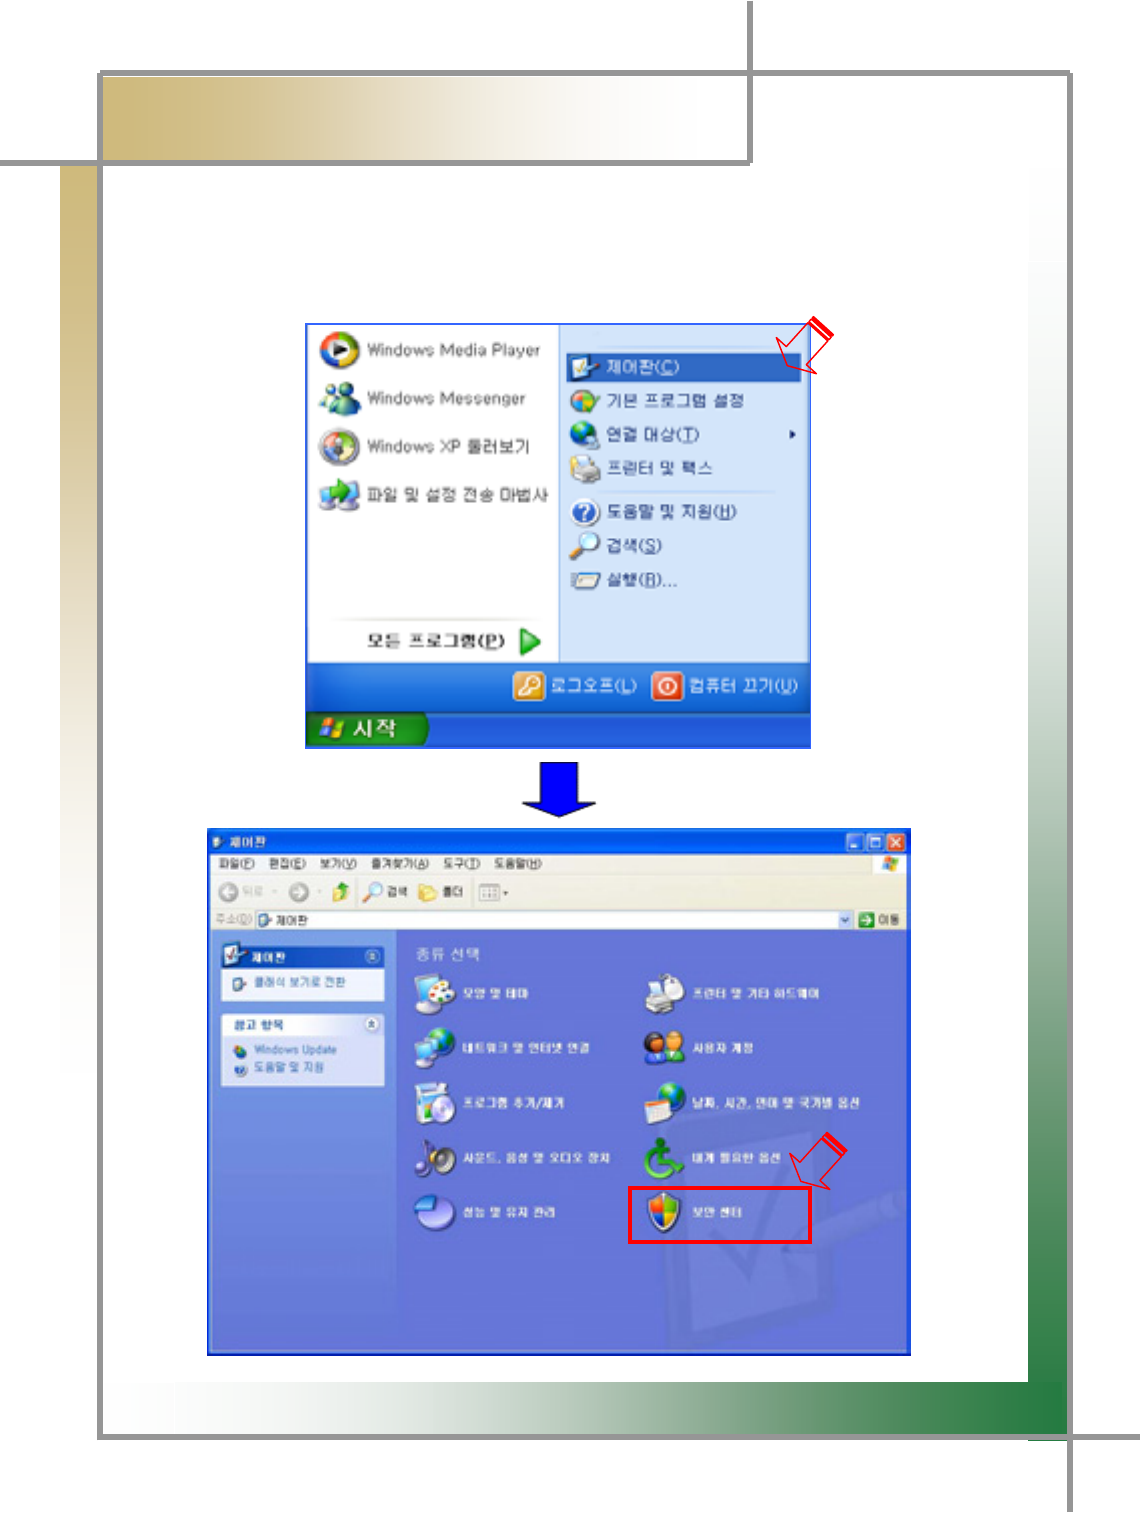
Step 1) Set the firewall according to the step-by-step process.
Execute [Start] Î[Control Panel] Î [Security Center].
G
G
[\G
͑DSM / MSM User Guide
G
Chapter 2: Install Program (for ڳګڄ
G
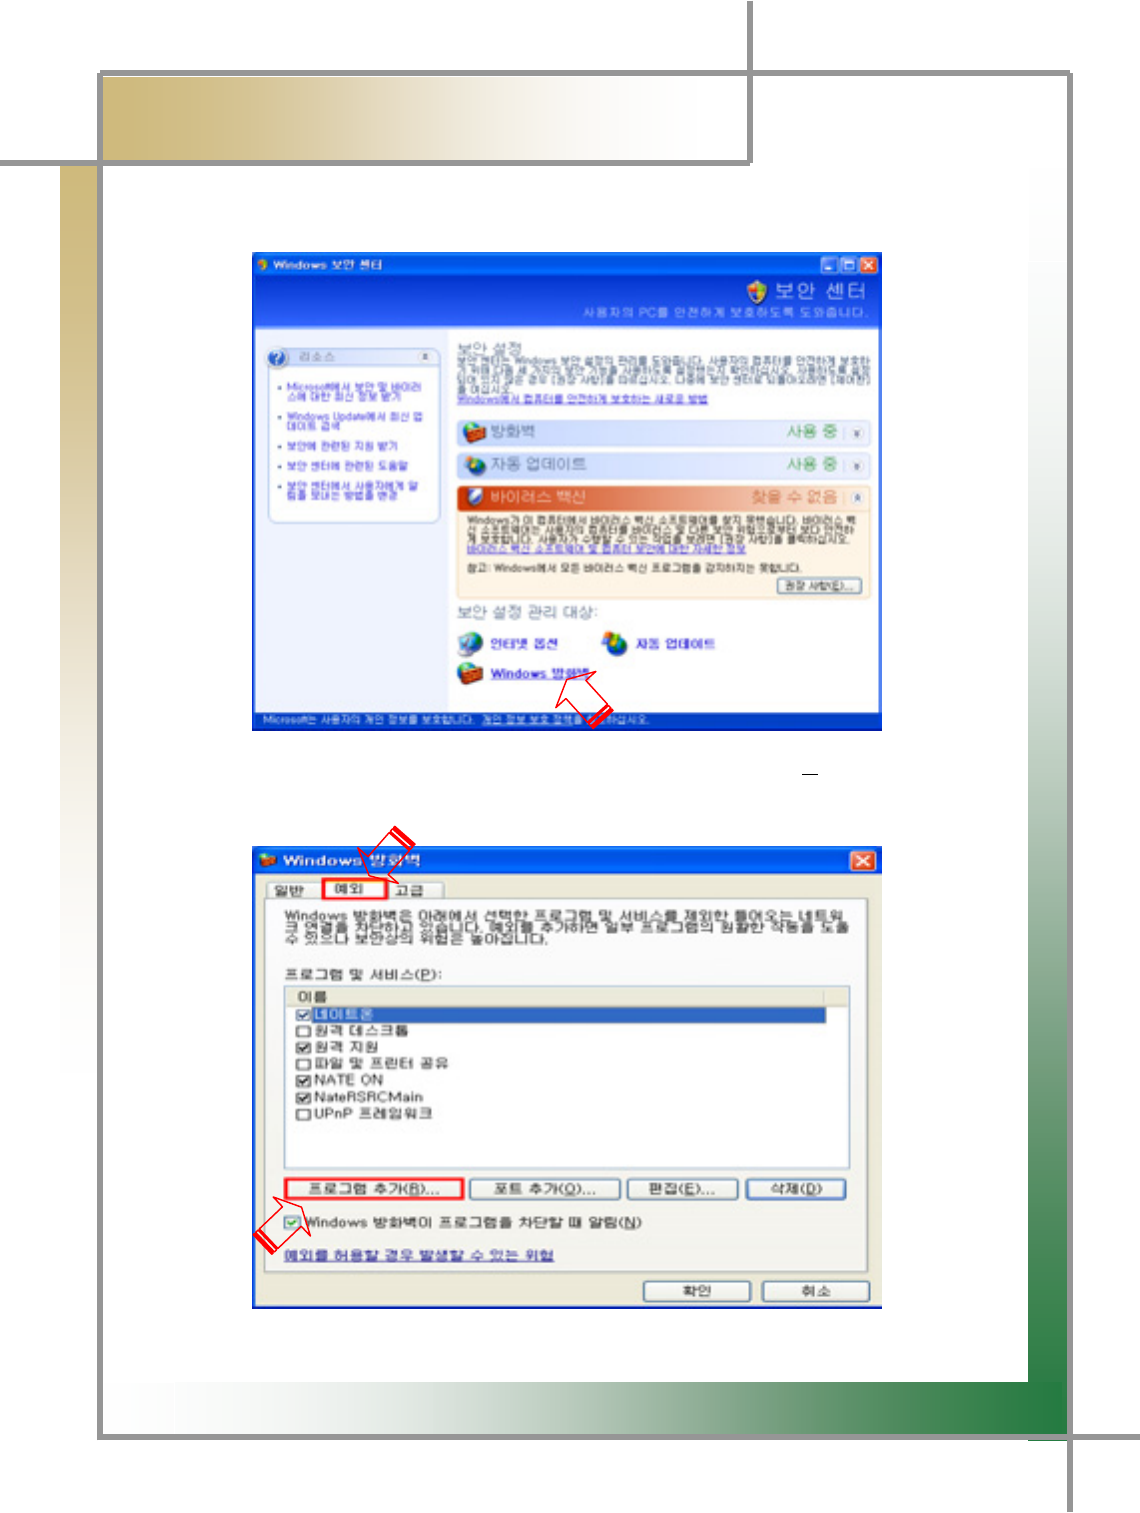
Step 2) Click [Windows Firewall] to execute the firewall.
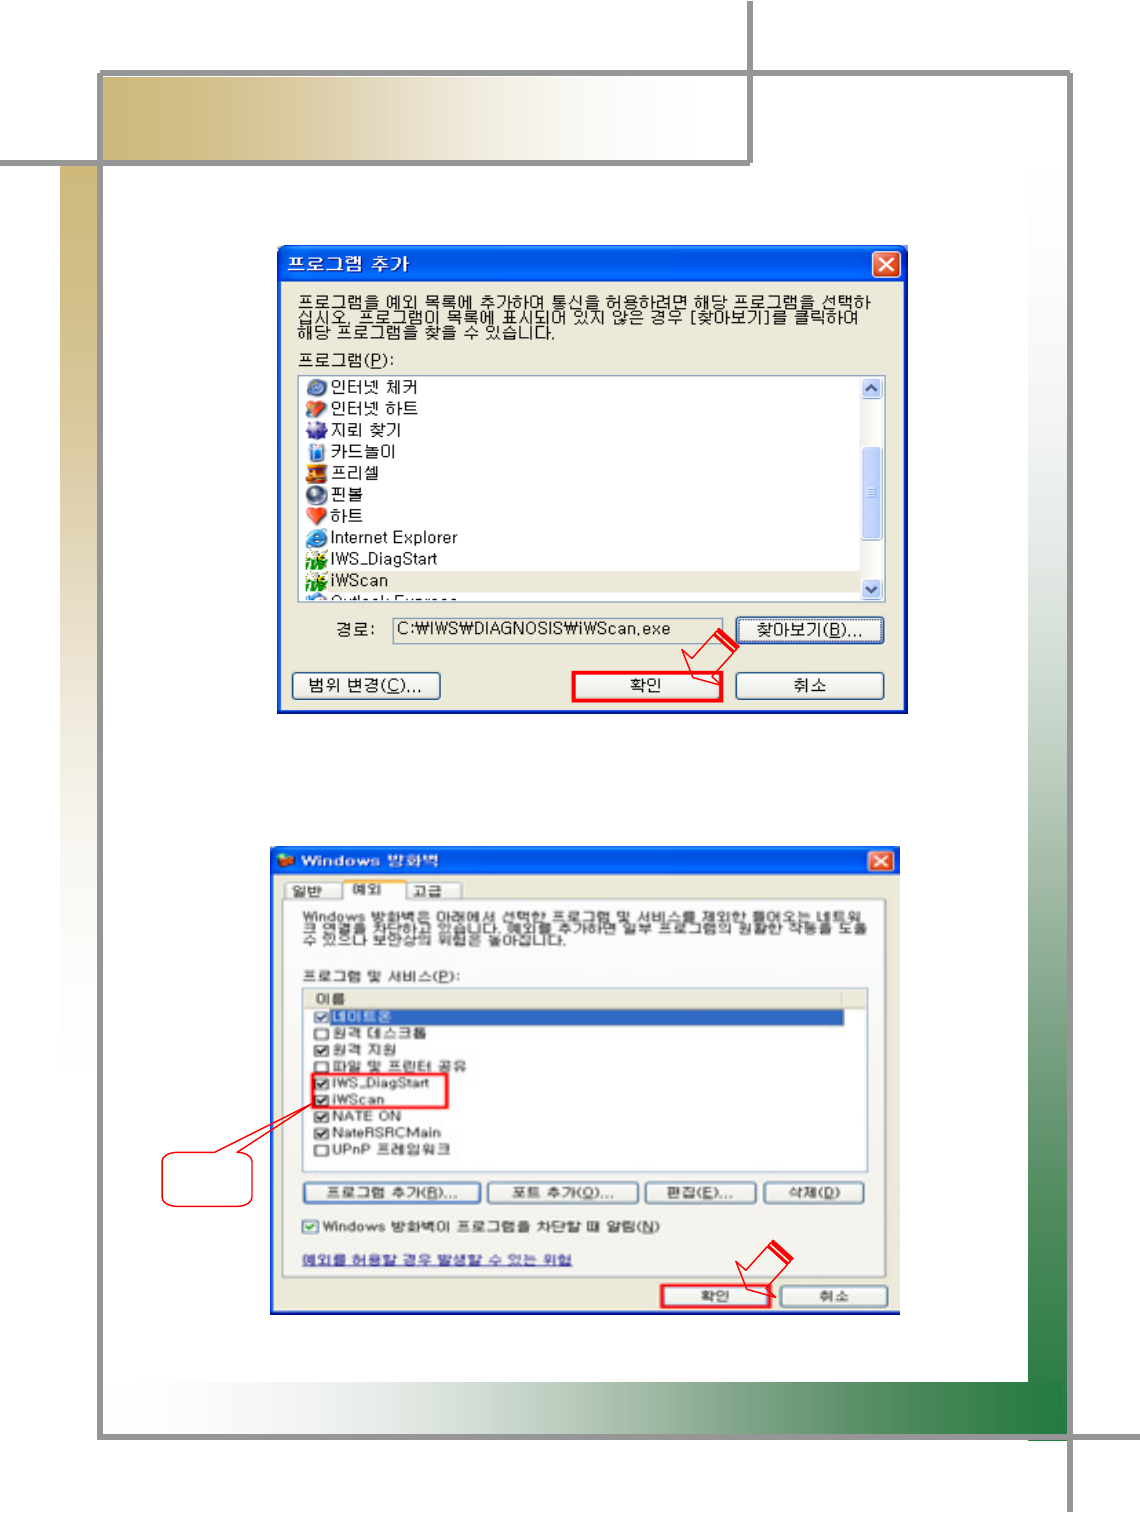
Step 3) Click the [Exception] tab, and then click [Add Program(R)..] as shown in the
following screen.
G
G
[]G
͑DSM / MSM User Guide
G
Chapter 2 : Install Program (for ڳګڄ
G
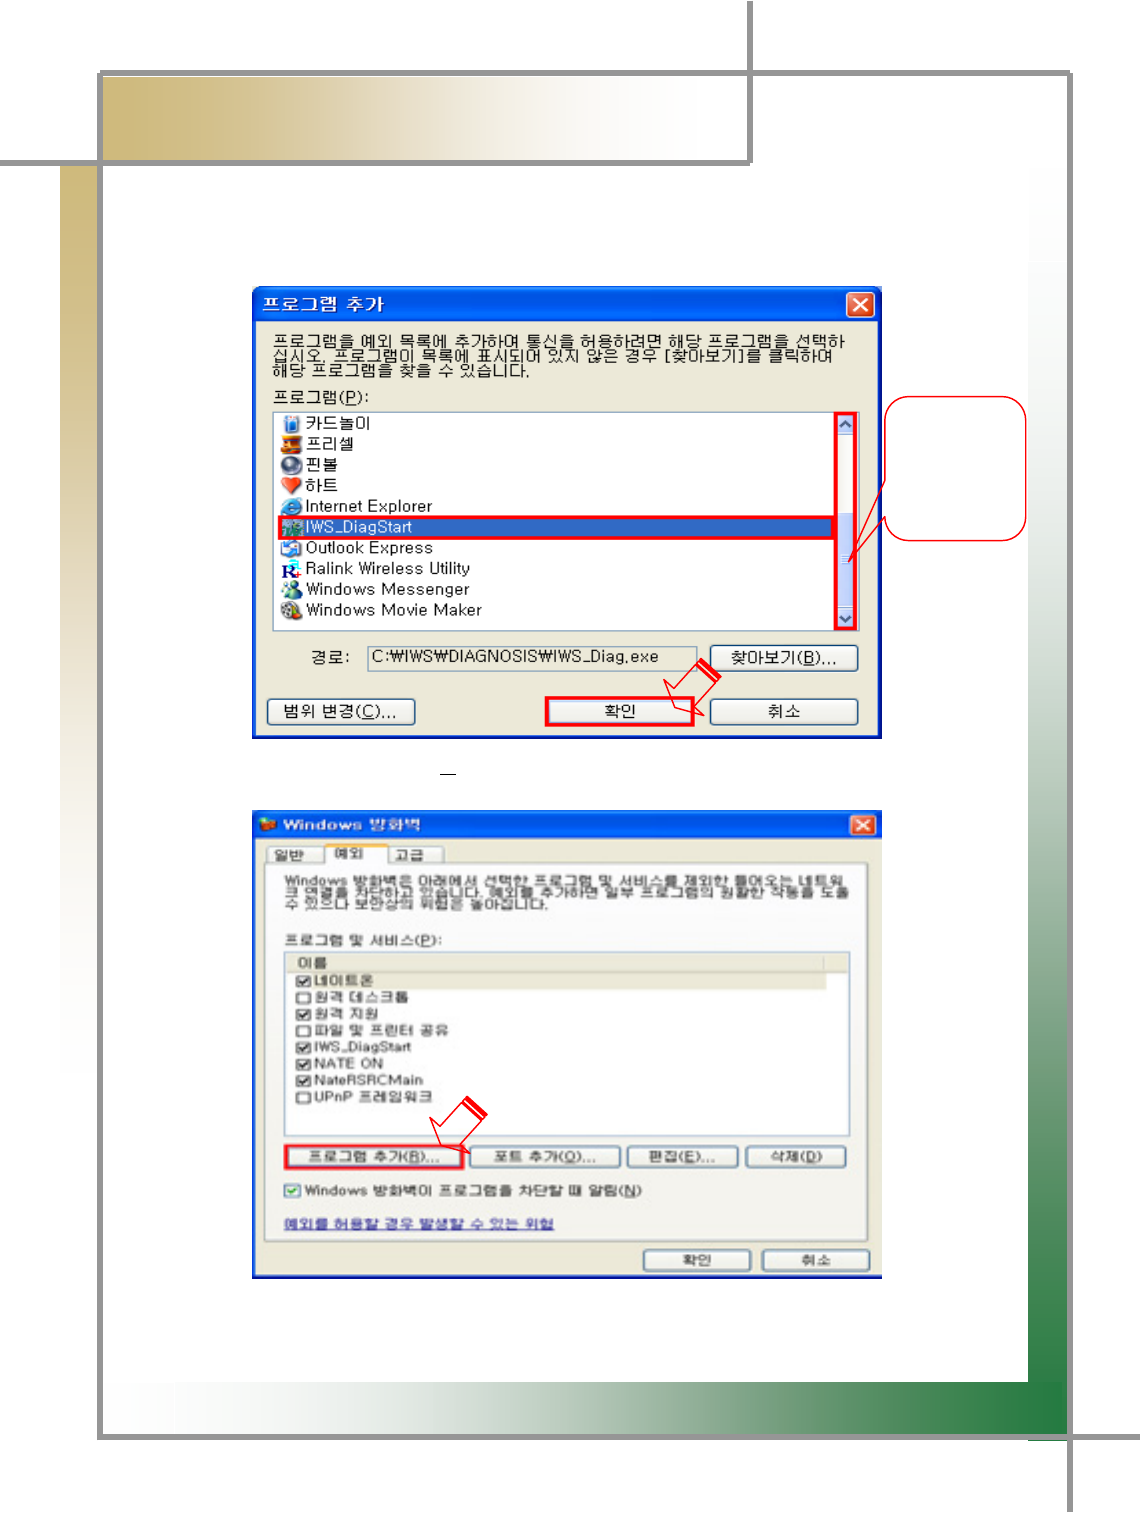
Step 4) Point to the [IWS_DiagStart] icon and click it. And then click [OK] to continue
the process.
Step 5) Click [Add Program(R)...] one more time.
Move the
scroll fo
r
navigation
G
G
[^G
͑DSM / MSM User Guide
G
Chapter 2 : Install Program (for ڳګڄ
G
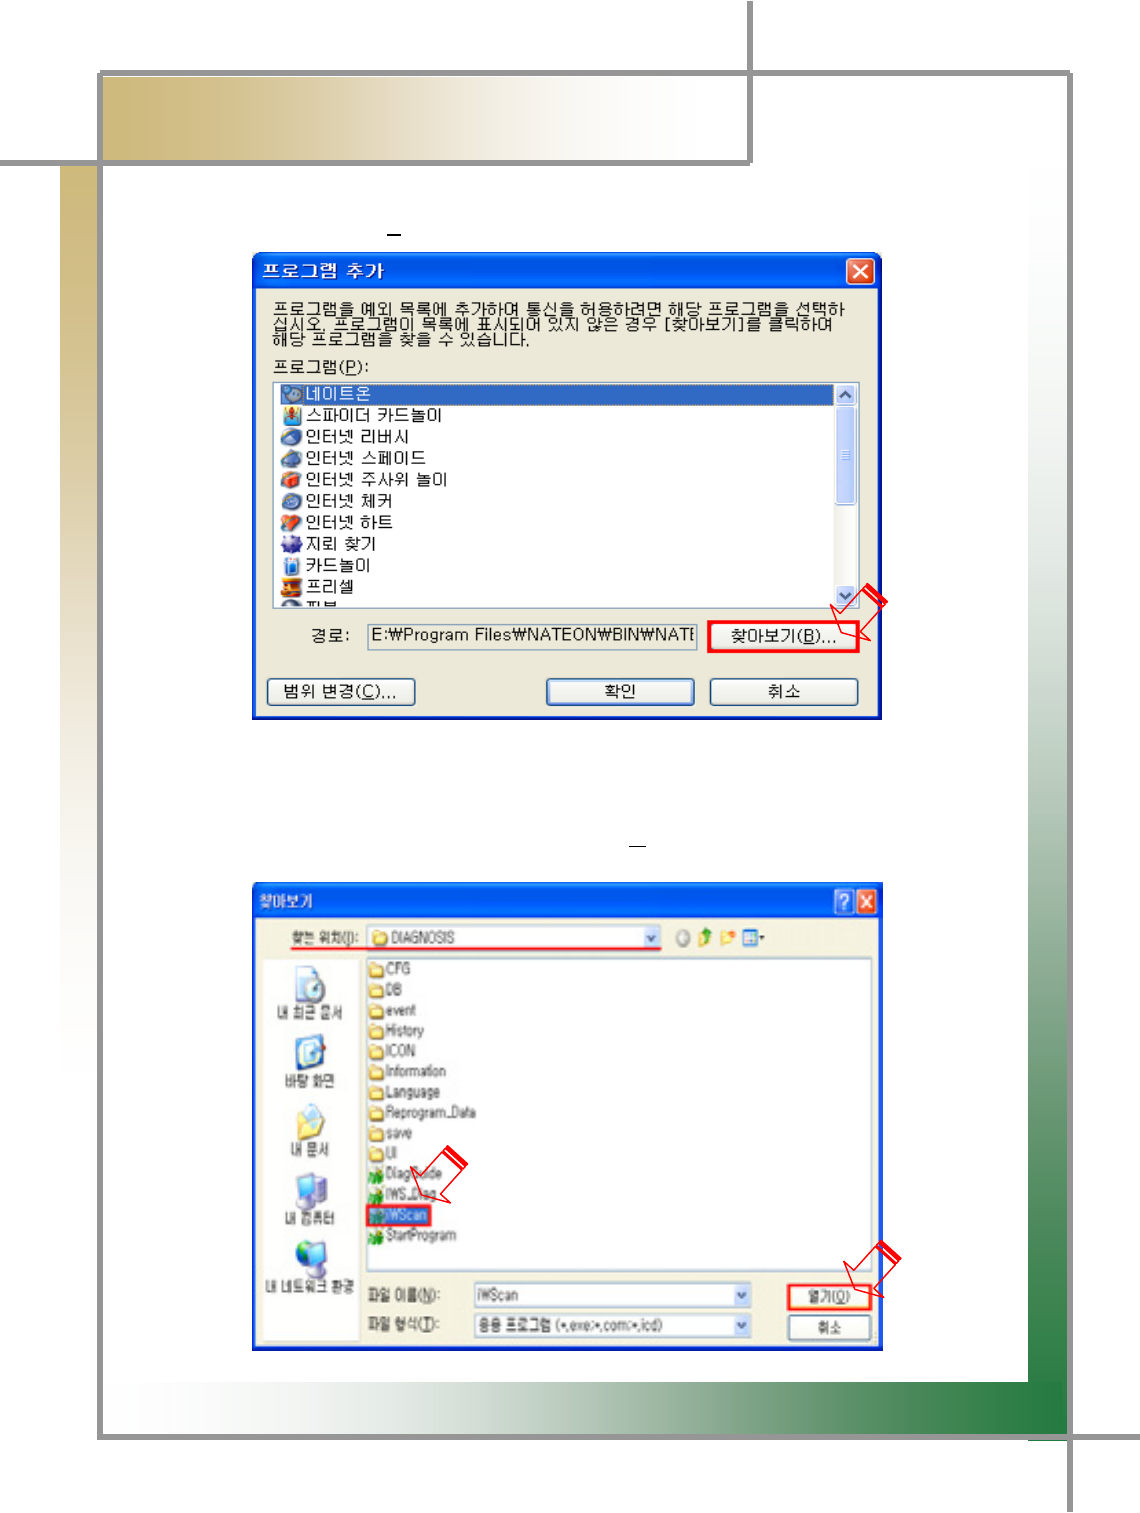
Step 6) Click [Search (B)...].
Step 7) You will see the following screen. The search path for [Location(I)] is
"c:\IWS\DIAGNOSIS\IWSCAN.exe" in the folder where the program is located.
After clicking [iWScan], and click [Open (O)] to continue the process.
G
G
[_G
͑DSM / MSM User Guide
G
Chapter 2 : Install Program (for ڳګڄ
G
Step 8) You will see the following screen. Click [OK] to continue.
Step 9) You will see the following screen. Make sure that [IWS_DiagStart] and
[iWScan] are checked under the firewall exception tab, and then click [OK]
to finish.
}G
G
G
[`G
͑DSM / MSM ㌂㣿㧦 Ṗ㧊✲
G
Chapter 2 : Install Program (for ڳګڄ
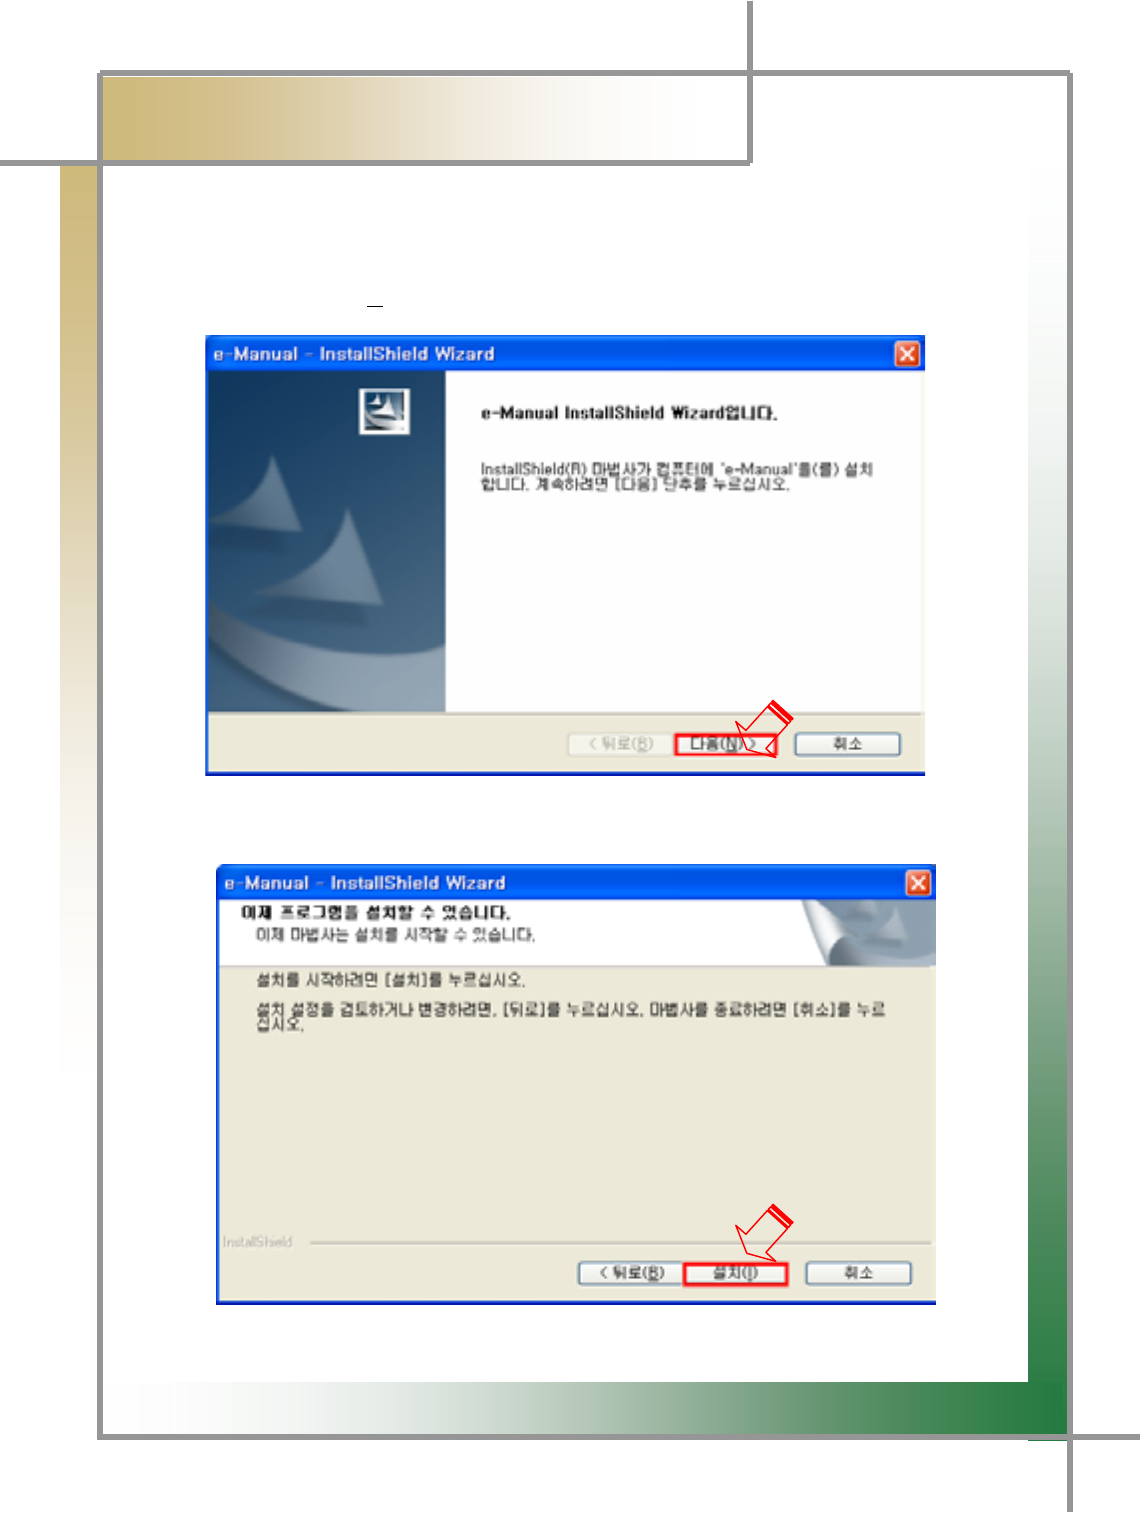
5. Chairman W Diagnosing Guide Installation
Step1) Insert the program installation DVD 3[Disk3:Chairman W
Maintenance Manual] into your laptop. You will see the following screen.
Click [Next(N)>] to continue.
Step 2) You will see the following screen. Click the [Install (I)] icon to continue.
G
G
G
G
G
G
G
G
G
G
G
G
G
G
G
G
\WG
͑DSM / MSM User Guide
G
Chapter 2 : Install Program (for ڳګڄ
G
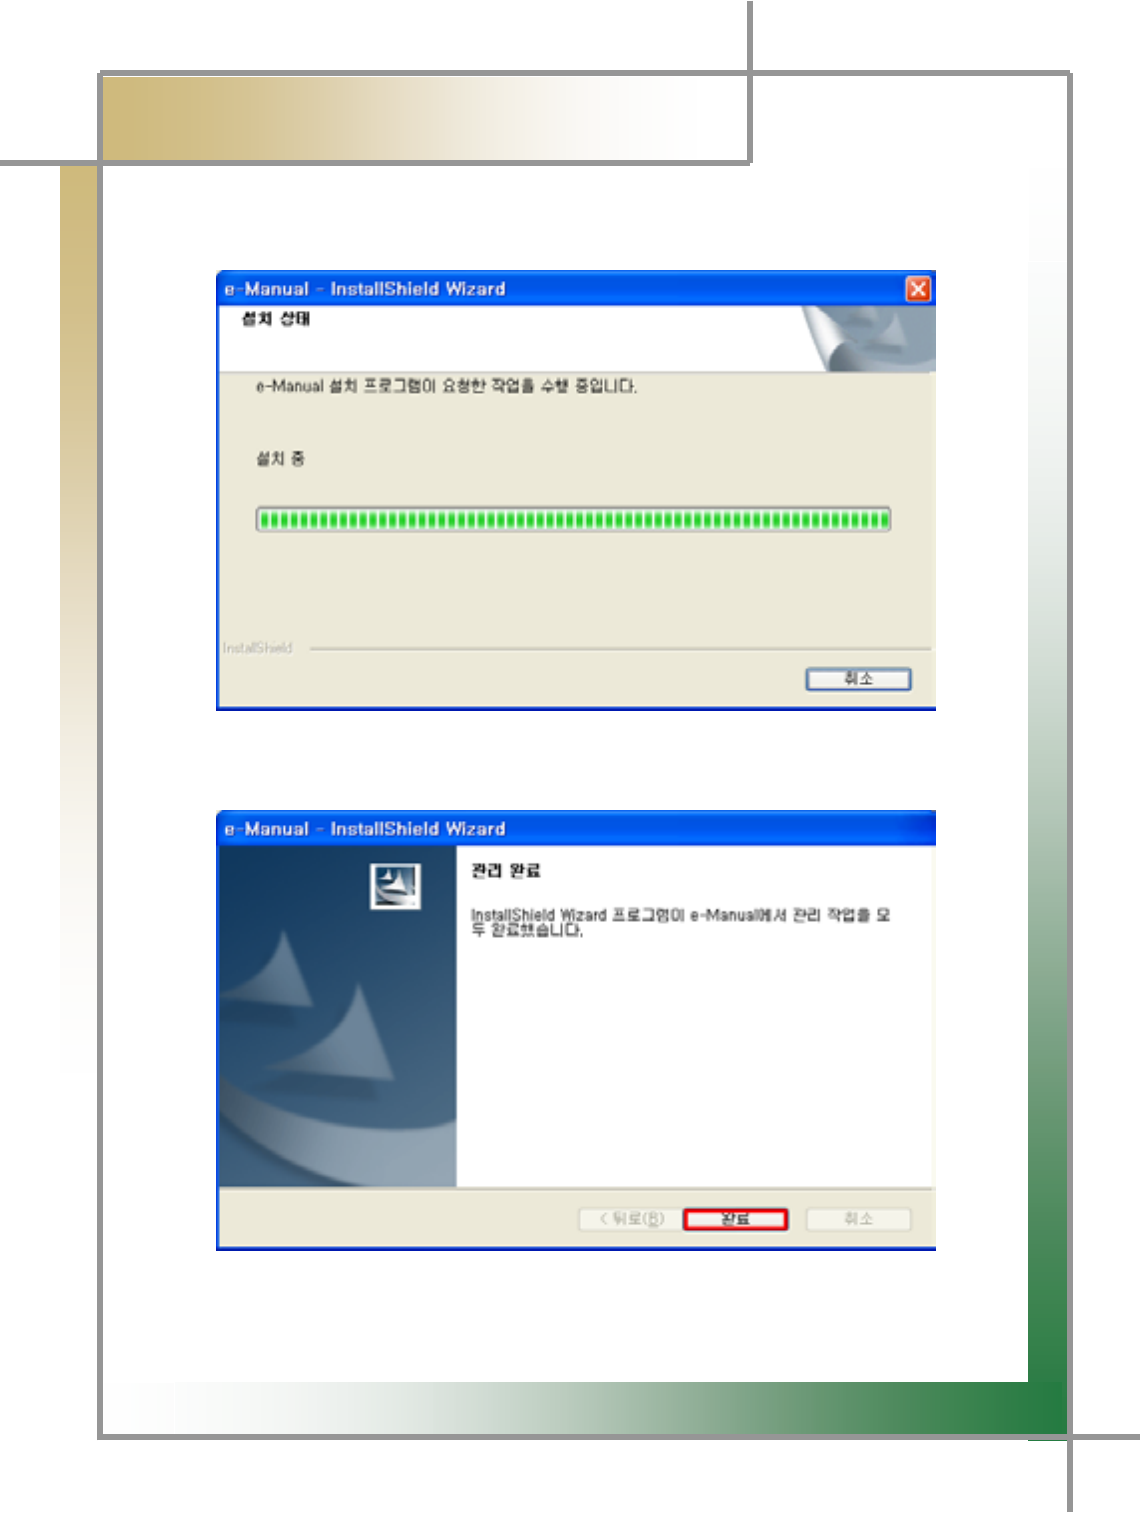
Step 3) The installation process continues as shown below.
Step 4) Click the [Finish] icon to finish the installationUG
G
G
G
G
G
G
G
G
G
G
G
G
G
TIPS) You cannot use the diagnosing guide until all of diagnosing contents in DISK1,
DISK2, and DISK3 have been installed.
G
G
\XG
͑DSM / MSM ㌂㣿㧦 Ṗ㧊✲
G
Chapter 2 : Install Program (for ڳګڄ
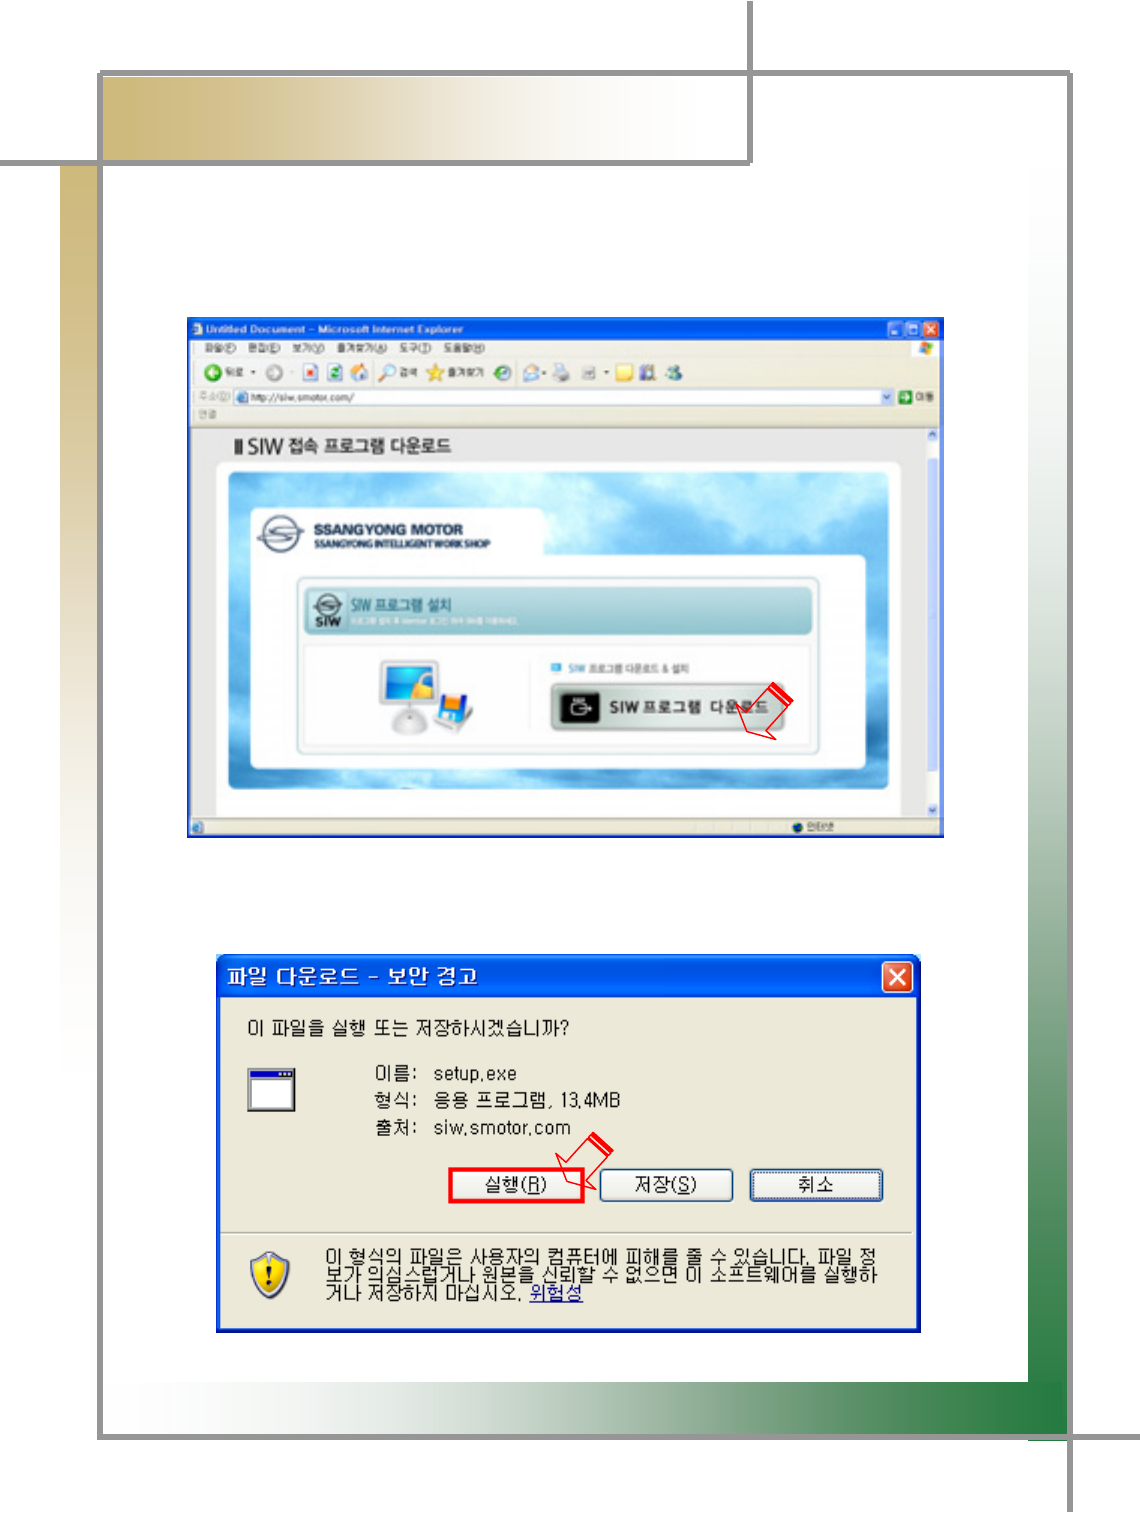
6. Install SIW Access Program and Configure Program Settings
Step1) Type [http://siw.smotor.com] into the
internet address window, and click the [Enter] key. You will see the screen as
shown below. Click [SIW Program Download] to continue.
Step 2) You will see the following screen. Click the [Execute] icon to continue.
G
G
G
\YG
͑DSM / MSM ㌂㣿㧦 Ṗ㧊✲
G
Chapter 2 : Install Program (for ڳګڄ
G
Step 3) You will see the following screen when the installation process has been
continued. Keep continuing as shown in the ones below.
G
G
G
G
G
\ZG
͑DSM / MSM ㌂㣿㧦 Ṗ㧊✲
G
Chapter 2 : Install Program (for ڳګڄ
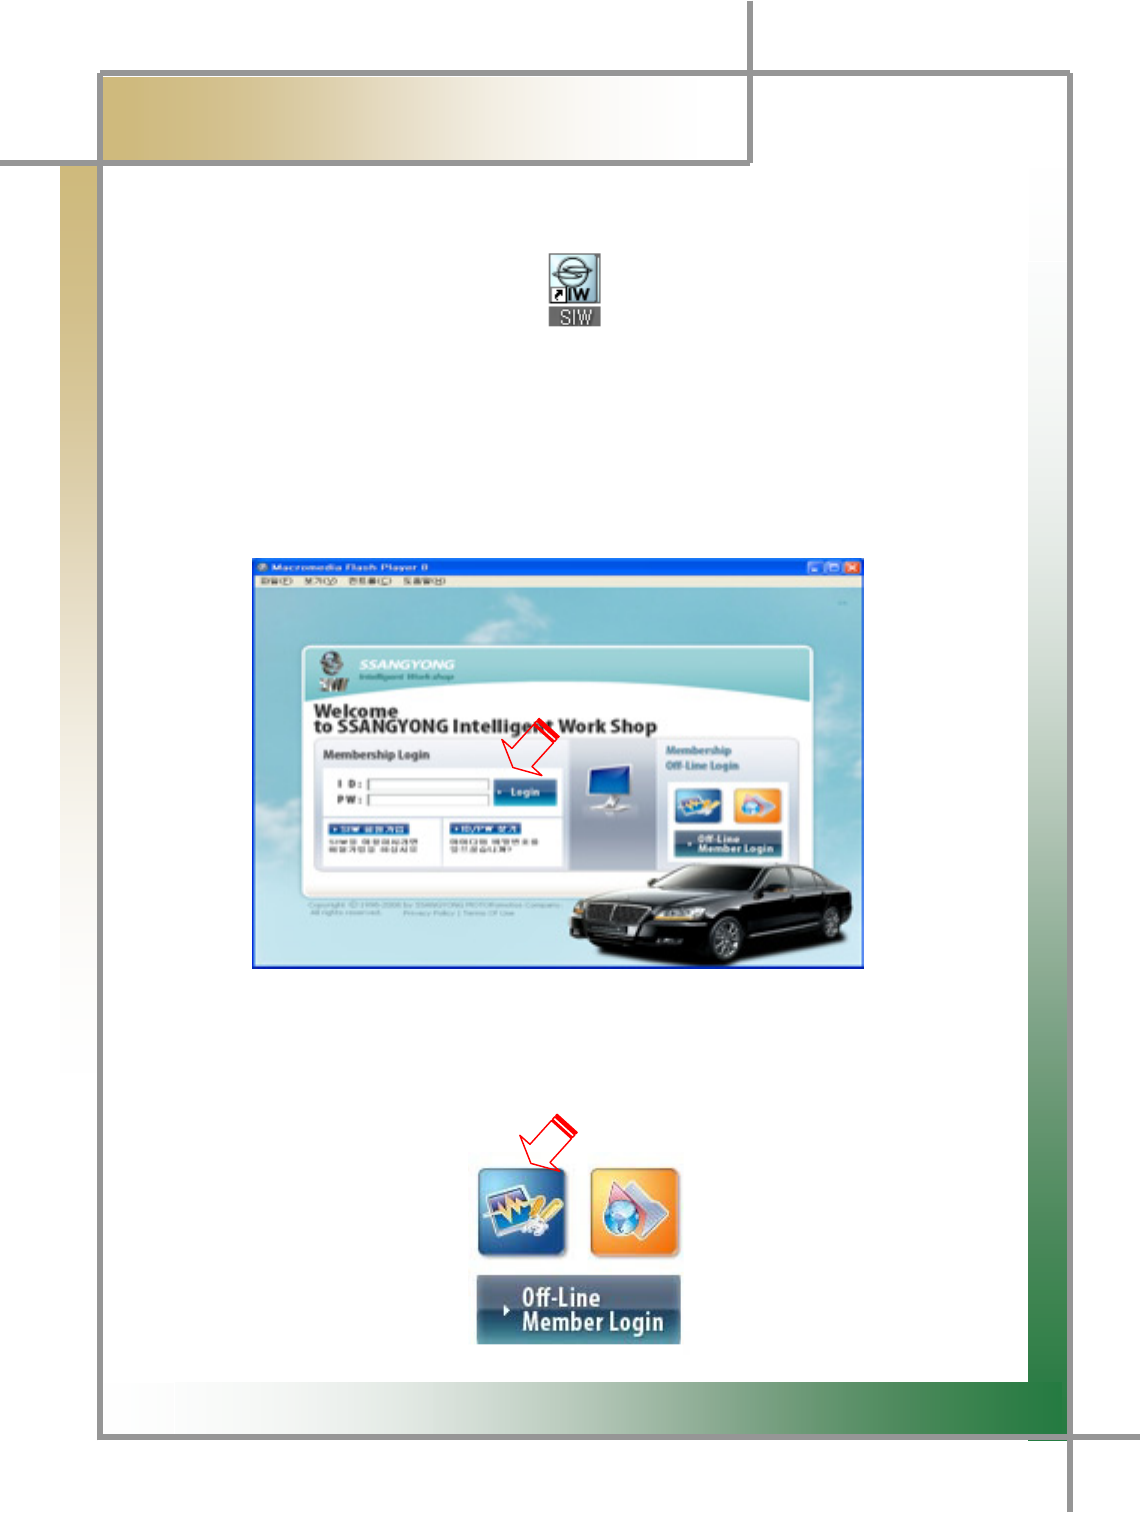
Step 4) An executable icon is created on the desktop as shown below.
Step5) The clicking the icon takes you to get access and see the login screen as
shown below. Enter ID / Password to be logged in.
TIPS) If this is the first time you have been logged in, you must sign up the
membership.
G
G
G
G
G
G
G
G
G
G
G
G
G
TIPS) If you would like to use the diagnosing function without server connection, you
can execute the diagnosing program by the use of the Off-Line Member Login
function.
G
G
\[G
͑DSM / MSM User Guide
G
Chapter 2 : Install Program (for ڳګڄ
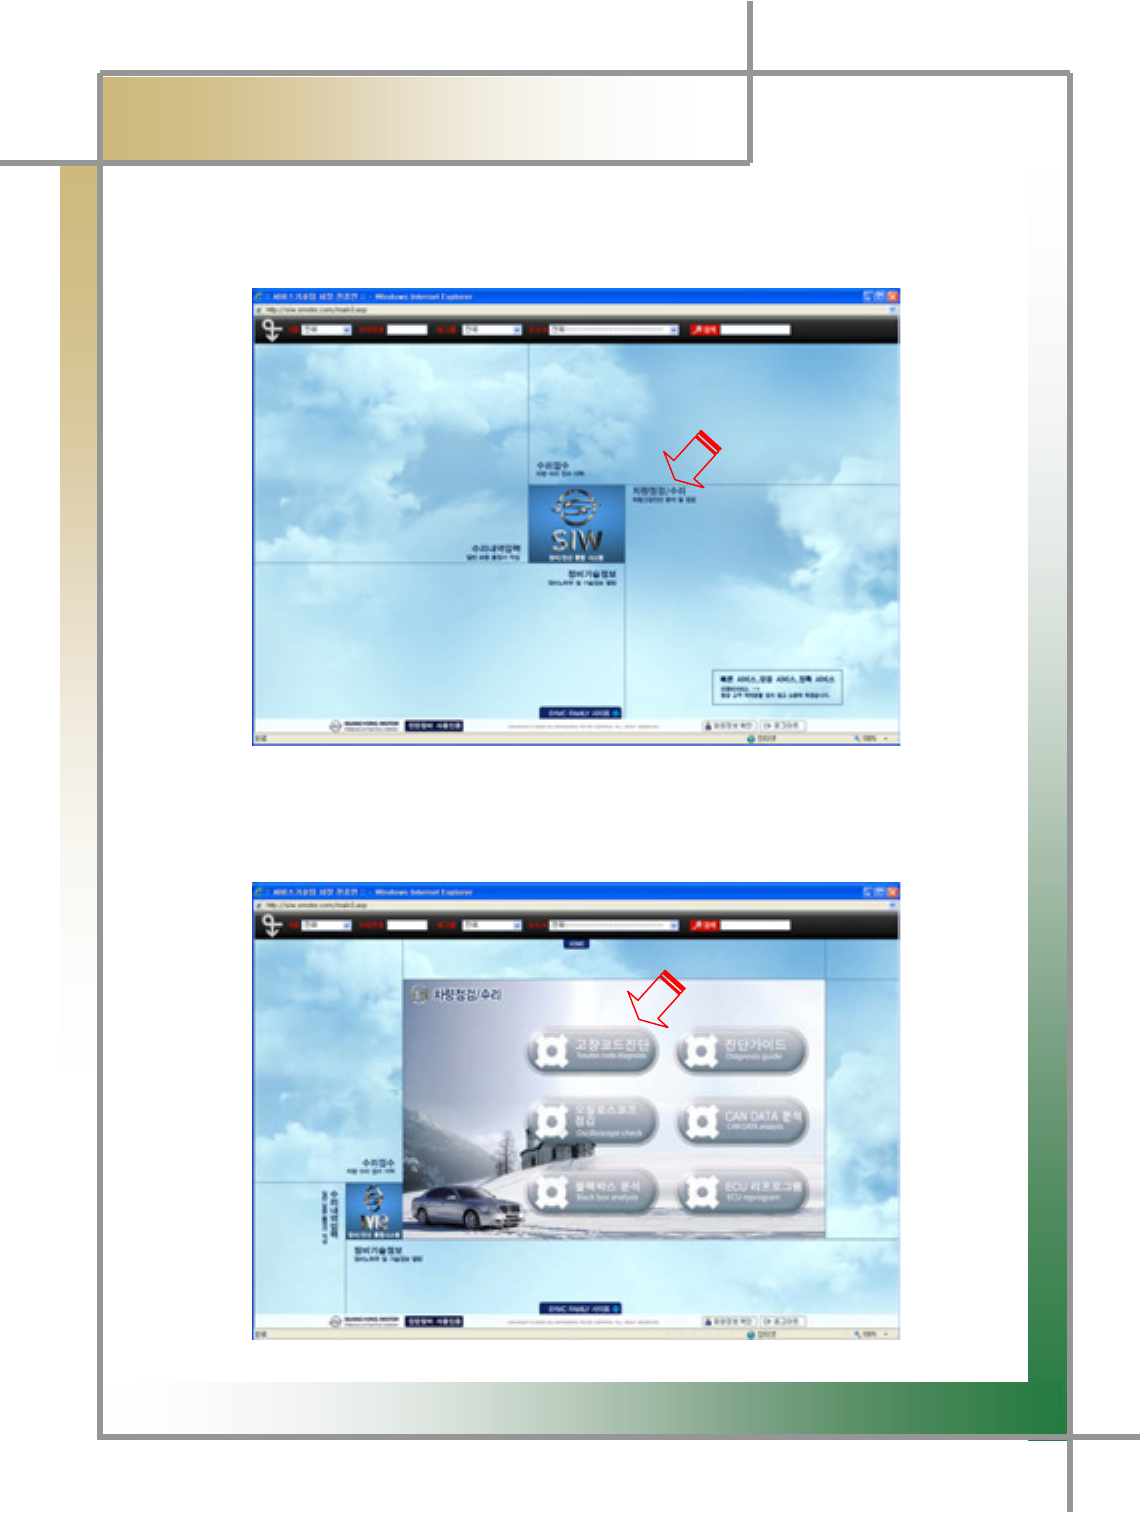
Step 6) You will gain access to the server as shown in the one below. To use the
diagnosing function, select the Vehecle Maintenance/Repair item.
Step7 ) You will see a diagnosing function selection screen like the one below, and no
matter what function you may choose, the diagnosing program will be executed.
G
G
\\G
͑DSM / MSM User Guide
G
Chapter 2: Install Program (for XP)
G
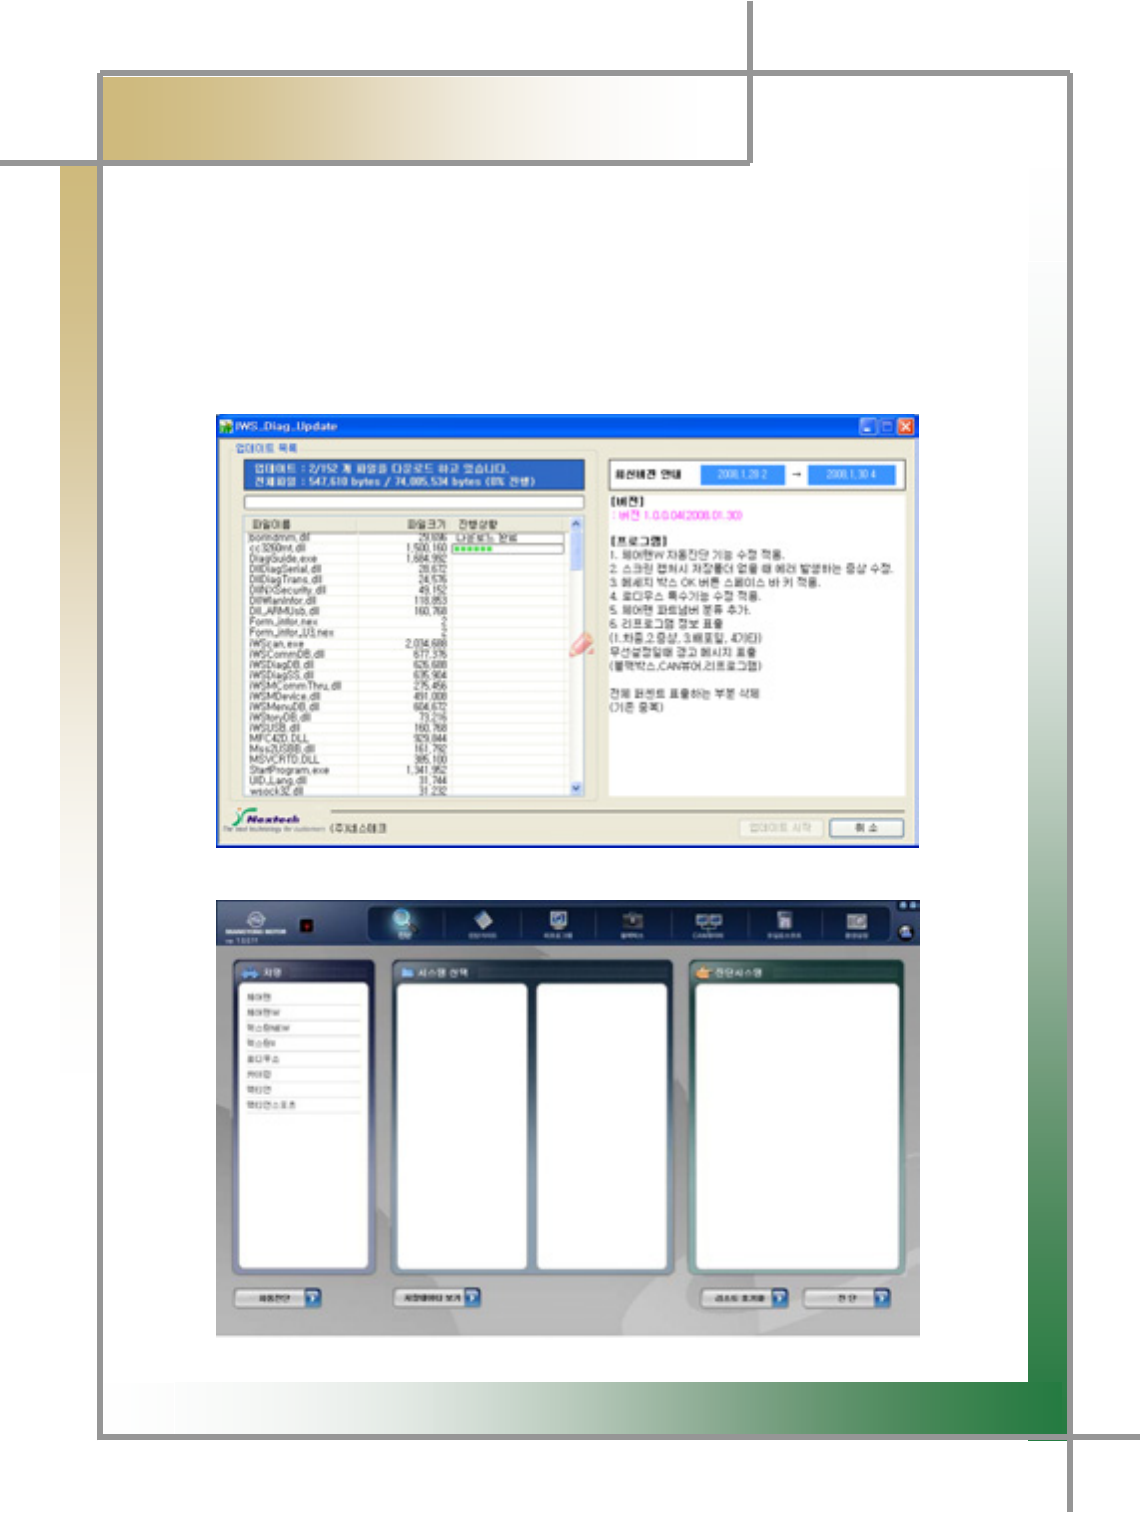
Step 8) If there is an item to be updated before the diagnosing program is launched,
automatic update will be continued.
TIPS) Update is not implemented whenever connecting to the program; it is only
processed only when there is an item to be updated.
G
G
G
G
G
G
G
G
G
G
G
G
Step 9) Once the update has been complete, the diagnosig program will be executed.
G
G
\]G
͑DSM / MSM User Guide
G
Chapter 2 : Install Program (for XP)
G
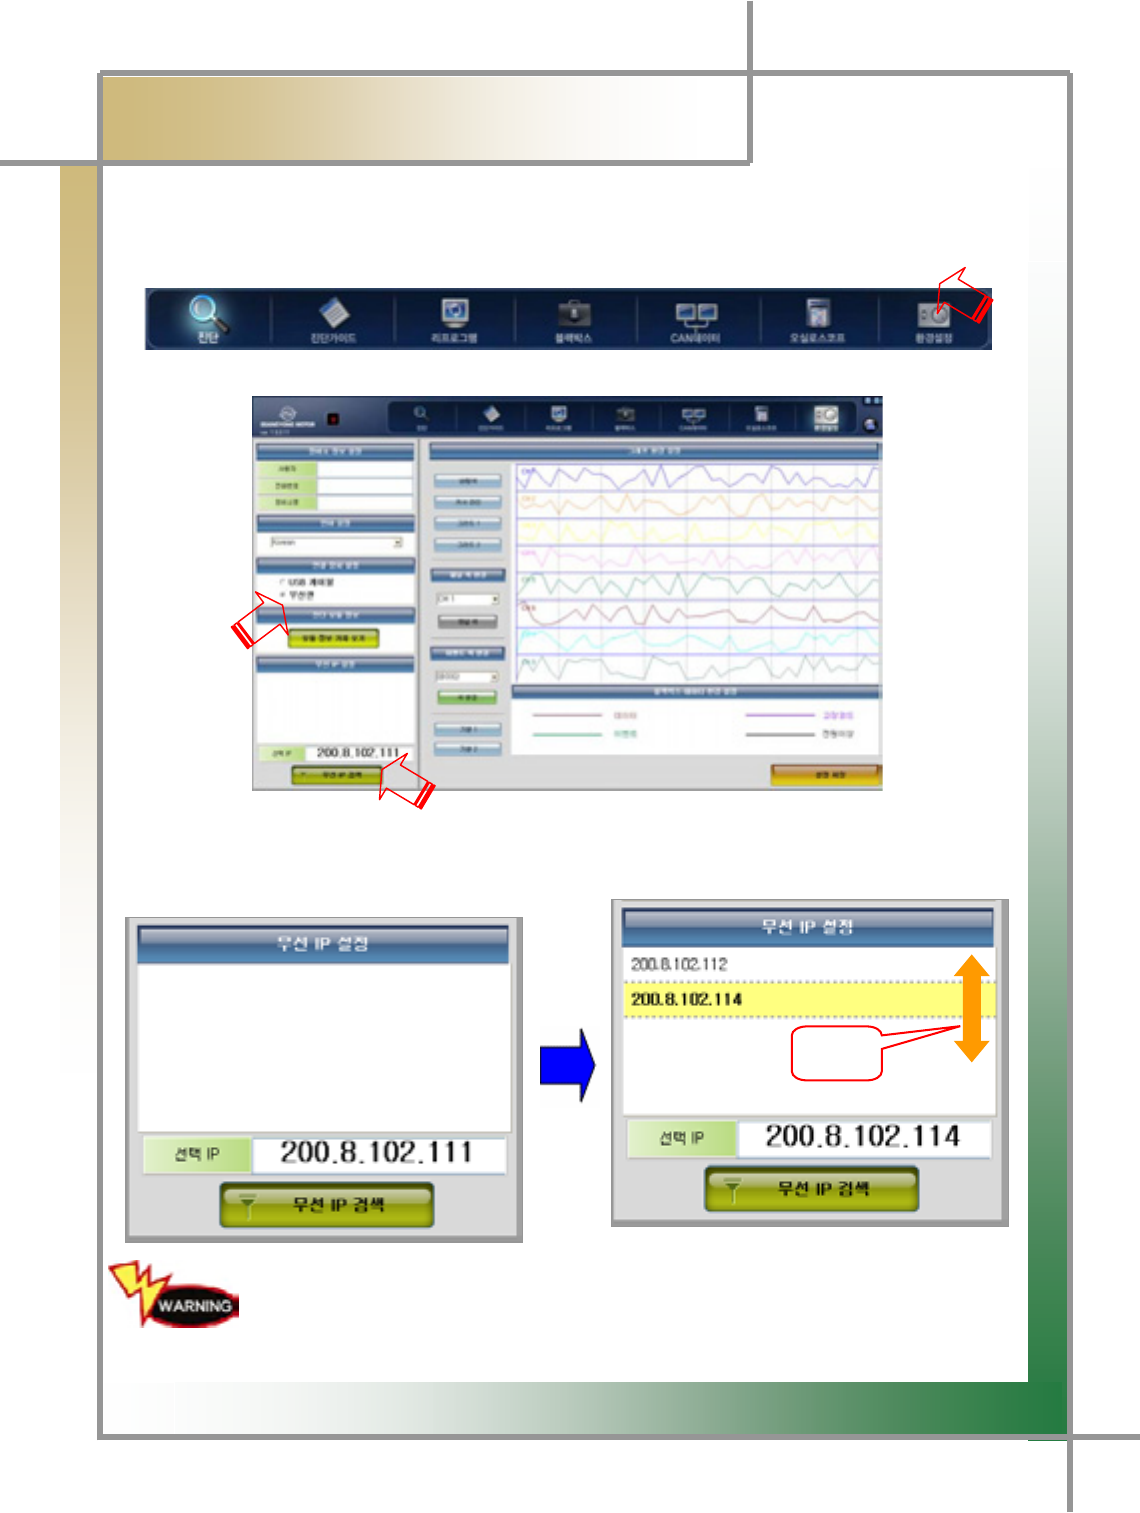
Step 10) Click the [Configuration] icon in the upper right corner of the screen to
continue.
Step 11) You will see the following screen. Click the [Search Wireless IP] icon.
Step12) If the wireless LAN is found, you will see the following screen. Double-click the
wireless LAN IP. (
V
erify that the selected IP is the same by clicking the
corresponding wireless LAN)
G
G
G
G
G
G
G
If a number of diagnosis modules are operated in the same work site, be
sure to verify the IPUG G
}G
G
G
\^G
͑DSM / MSM User Guide
G
Chapter 2: Install Program (for XP)
G
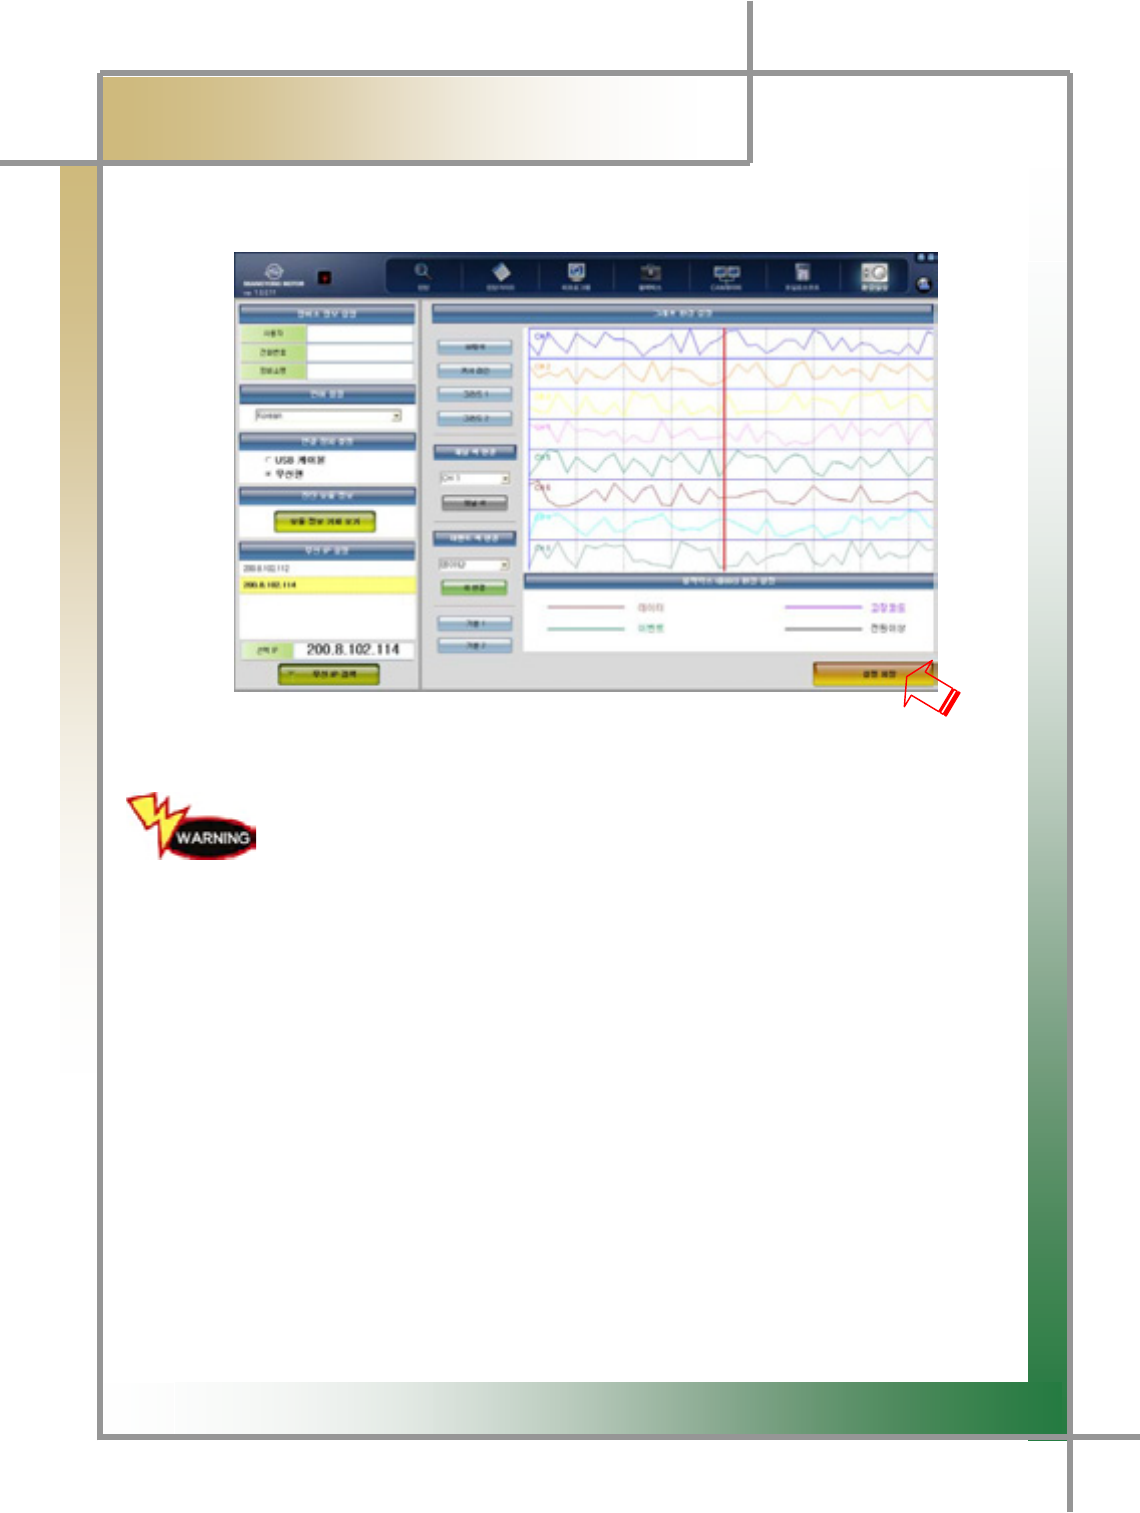
Ste13) Click [Save Setting] to finish the process.
There are multiple USB 2.0 ports in your laptop.
You must keep connecting the USB wireless LAN card and USB cable only to the
laptop USB port that has firstly recognized the device or installed. I
f
they are connected to a different port, you must reset the device from
the scratch.
G
G
G
\_G
͑
DSM / MSM User Guide
G
Chapter 3: How to Connect to Vehicle
- How to connect to the vehicle and select the diagnosing program.
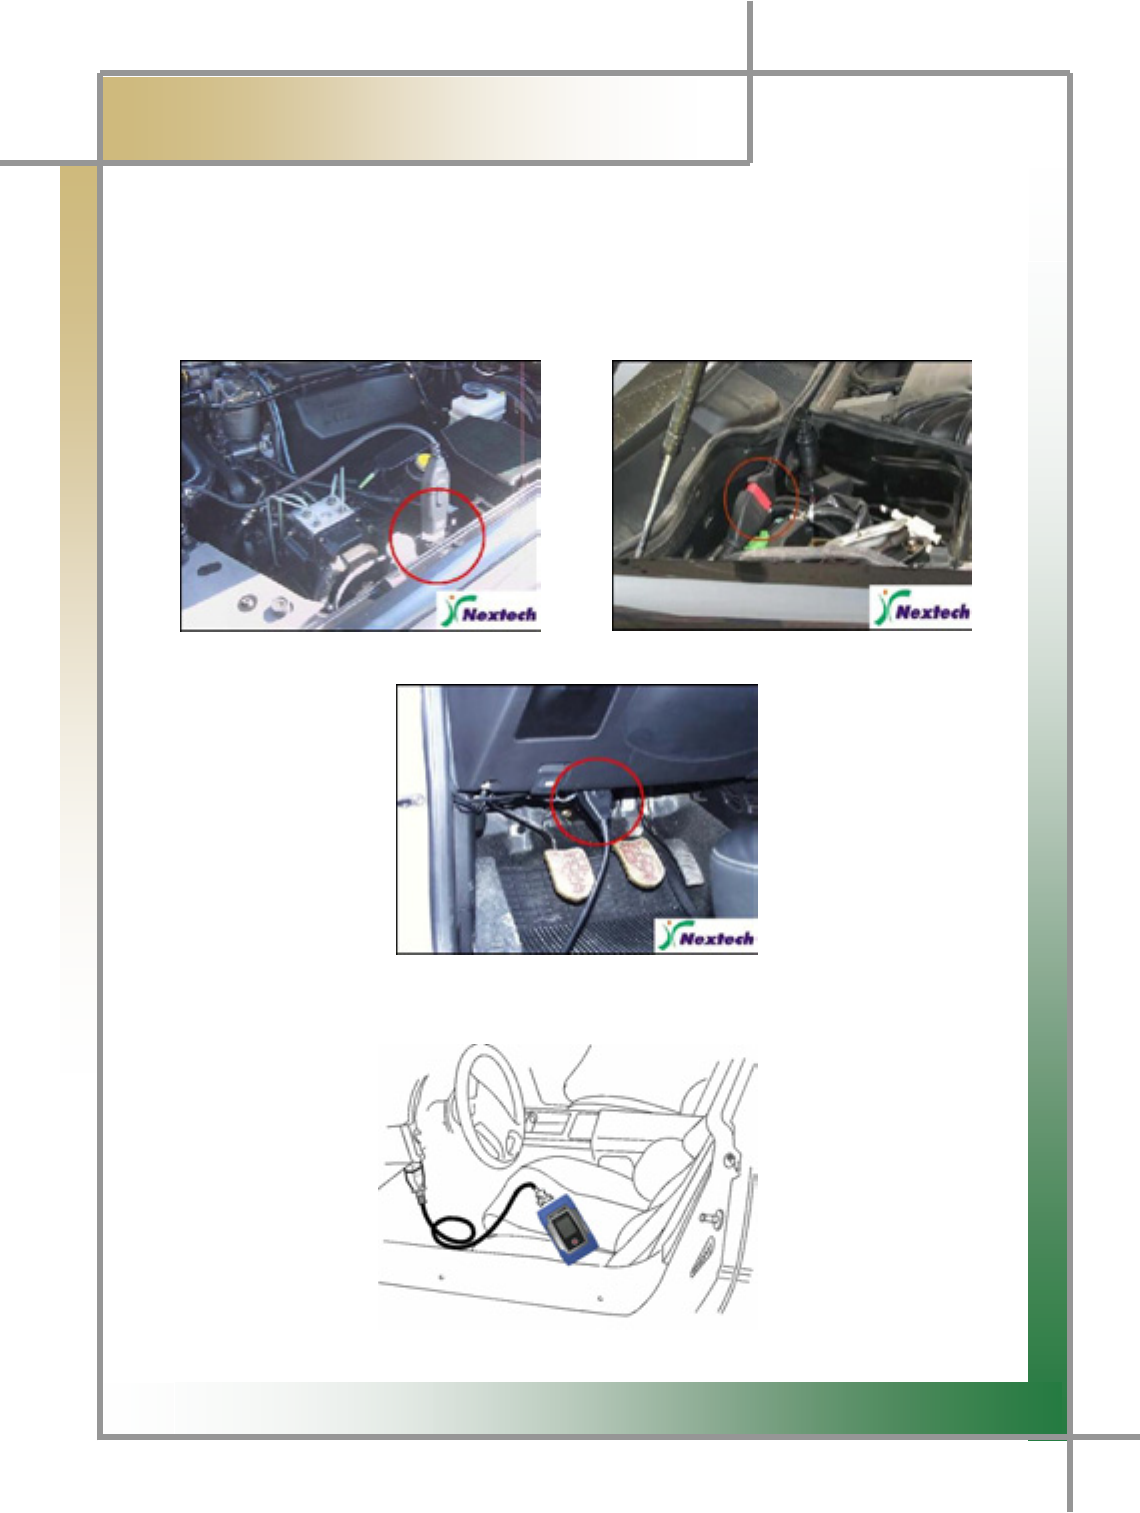
1. Check the location of vehicle diagnosing connector - As the most of new cars released since
2002 are designed to meet the OBD-II Communication Regulations, all of them are
equipped with the OBD-II diagnosing connector, and have the diagnosing connector mostl
y
above the brake pedal below the driver handle.
[Sssangyong 20Pin] [Sssangyong 14Pin]
[OBD-II]
Figure 3.1 Diagnosing Connector Location
2. Connect the vehicle diagnosing connect to DSM, using the diagnosing cable.
Figure3.2 Diagnosing Cable Connection