NEXTO DI ND2325 EXTERNAL STORAGE EQUIPMENT User Manual USERS MANUAL
NEXTO DI Inc. EXTERNAL STORAGE EQUIPMENT USERS MANUAL
NEXTO DI >
USERS MANUAL
2. Thing to Remember Before Using Nexto-M1
The Features
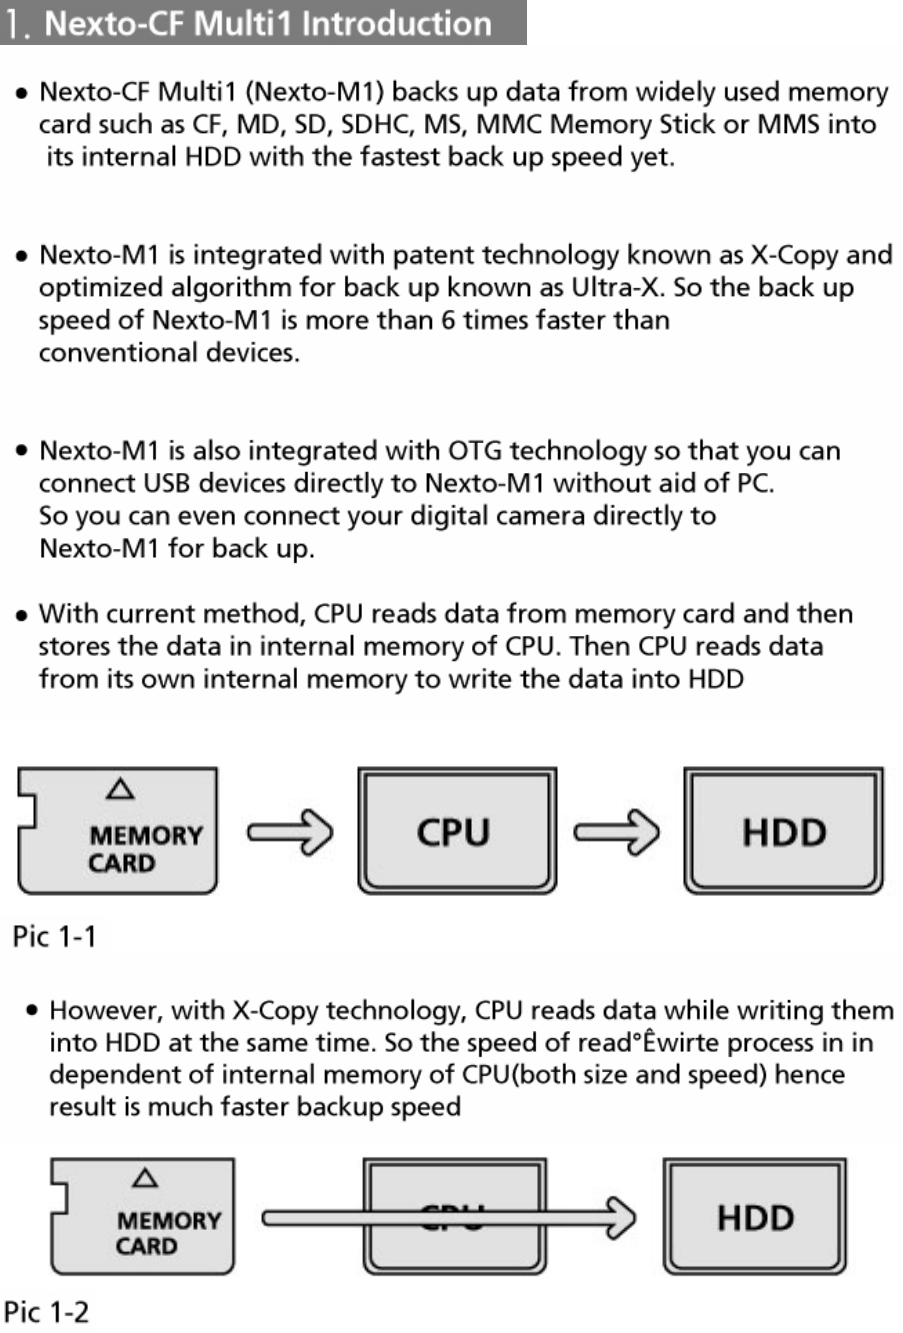
z Nexto-M1 can back up data from CF, MD, SD, SDHC, MemoryStick or MMC into HDD. The
back up speed is fastest in the world so far. (With help of OTG feature you can back up data
from any kind of memory cards)
z With maximum speed of 20MB/sec and average speed of 14MB/sec, it only takes about 1
minute for Nexto-M1 to back up 1G bytes of data.
z Nexto-M1 has verification feature that you can double check the integrity of your data.
z You can install large sized HDD into Nexto-M1. Most of legacy devices can only manage
HDD size less than 120G, but you can install maximum of 2000G bytes HDD into Nexto-M1.
Things to be careful
z For Nexto-M1 to work properly, 2.5” PATA type HDD must be installed. Without HDD, Nexto-
M1 will not work properly.
(※ Nexto-M1 doesn’t match with SATA type HDD
z HDD is fragile to magnetic field and impact. So be careful not to drop Nexto-M1 or place it
near magnetic devices such as TV, radio or speaker. The company will not be responsible
for loss of data stored in HDD under any conditions.
z Nexto-M1 has many slots for variety of cables and memory card. Do not let dust or foreign
objects get into those slots.
z Nexto-M1 has internal slots for CF, MD, SD, SDHC, MemoryStick and MMC memory cards.
However you can back up other kinds of memory cards with USB card readers using OTG
feature of Nexto-M1.
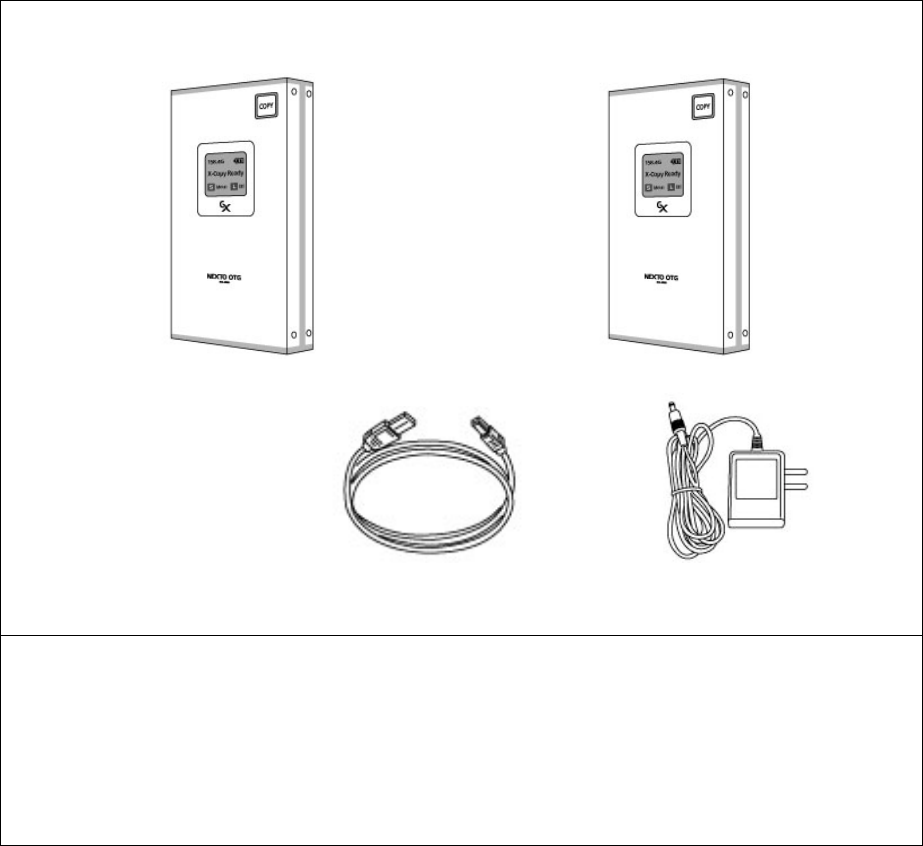
3. Contents and Part Name
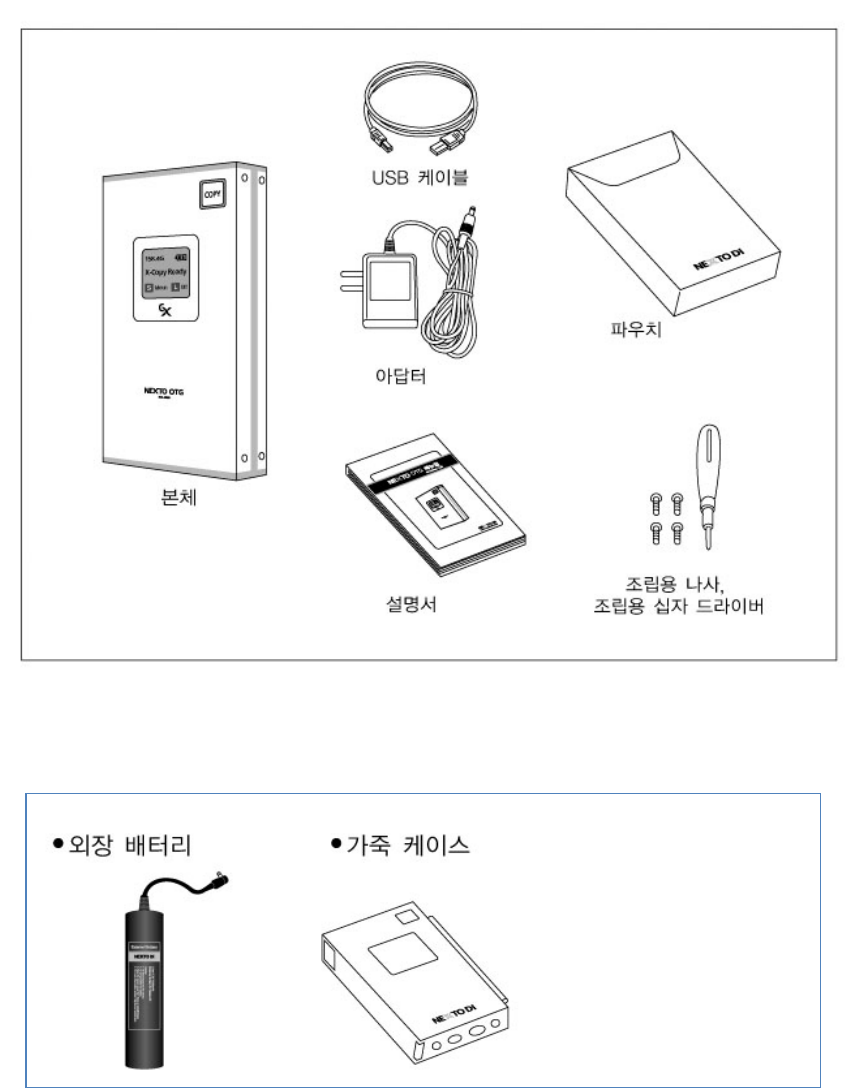
Contents
Nexto-M1, USB Cable, Power DC Adapter, Pouch, Screw Driver and Screws, User Manual
Optional Items
External Battery Leather Case
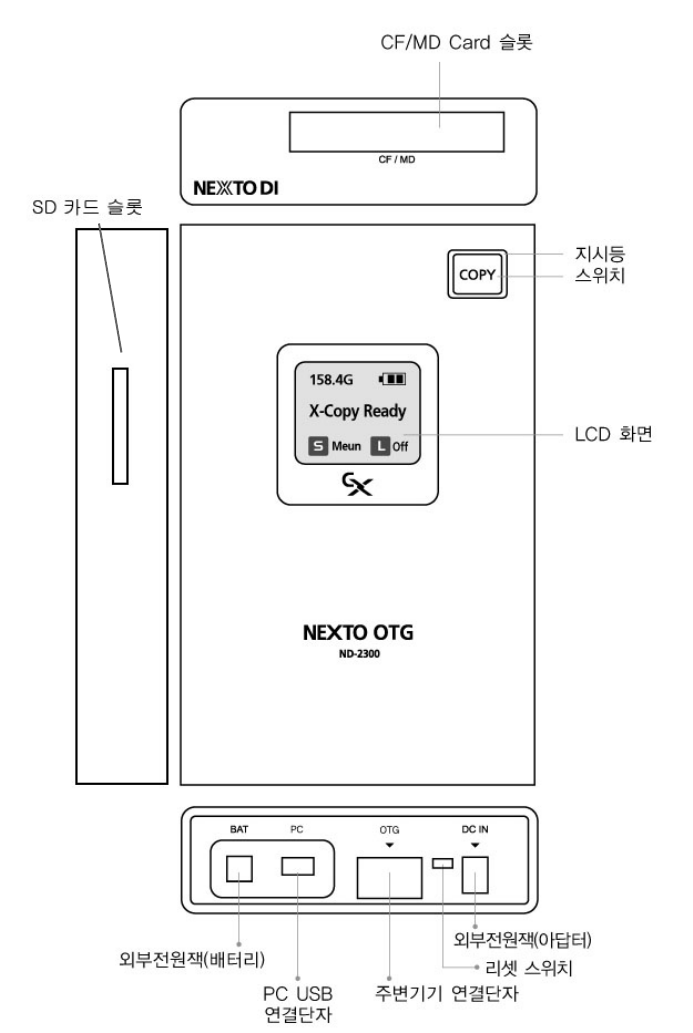
Part Name

4. HDD Installation
Nexto-M1 requires 2.5” laptop HDD to work properly. However, Nexto-M1 does not support SATA
type HDD. To install HDD into Nexto-M1;
Remove lower aluminum case of Nexto-M1
Connect HDD to 50-pin connector. Align the pins
on PCB with connector on HDD and insert
gently. Make sure all the pins are firmly inserted
and place insulator between PCB and HDD.
Replace the lower case and screw it to the main
frame.
5. Button and LCD Screen
Turn On and Off
Nexto-M1 is single button operating device. You can control all the features with the button.
To turn on Nexto-M1, press the button for more than 2 seconds. Nexto-M1 will turn itself off 30
seconds after the last button press.
To turn off Nexto-M1 when error occurs, press the reset button at the bottom of Nexto-M1 with sharp
object such as screw driver in Nexto-M1’s package.
Button Operation
There are 3 ways to control the button.
Screen Display Operation Method
S Press the button once like mouse click. (‘Short’)
L Press down the button for more than a second. (‘Long’)
D Click the button twice like mouse double click. (‘Double Click’)
LCD Screen Display
On LCD screen of Nexto-M1 shows status commands and how to execute the commands as well as
the status of the device.
Internal battery status and remain HDD capacity is
displayed at the top of the screen.
Current status of commands to confirm is displayed at the
middle of the screen.,
The ways to execute command are displayed at the bottom
of the screen.
More details on operating Nexto-M1 will be explained in later chapters.
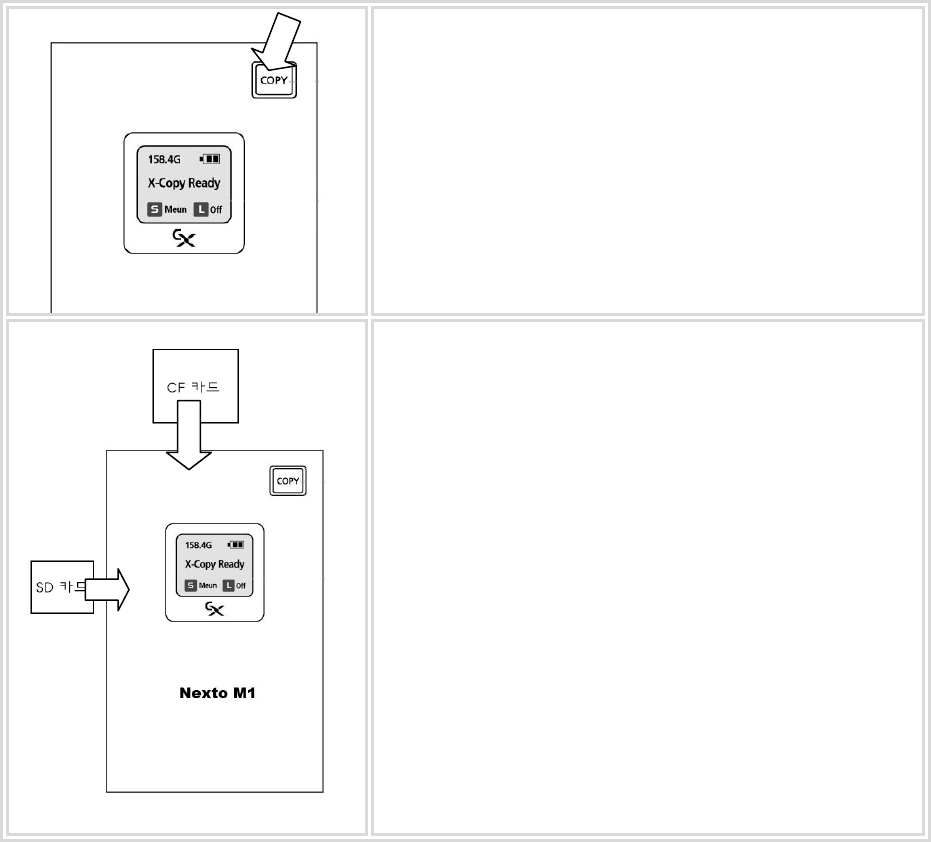
6. Data Backup
The basic function of Nexto-M1 is to backup data from memory card to HDD. Executing the function is
easy and is done through the single button.
Nexto-M1 has built-in slot for CF, MD, SD, SDHC, MemoryStick and MMC card. Or you can use USB
card readers to back up data from other kinds of memory cards. Refer to chapter 11 for more
information on USB card reader connection.
[Caution] For MS Duo, MS Duo MagicGate, MS Pro Duo, or MS Pro Duo MagicGate use the
MemoryStick transform adapter. Do not insert these cards into Nexto-M1 directly. Also use SD card
transform adapter for mini SD, TransFlash, MMC mobile or RSMMC.
To backup data;
Turn on Nexto-M1. (You can insert memory card before turn
on Nexto-M1)
If screen displays other messages than the screen shown
here, refer to “Error Messages” at the end of this chapter.
Insert memory card. For CF or Md use the slot at the top
and for SD, SDHC, MemoryStick or MMC use the slot at the
side.
If you insert 2 cards at the same time, Nexto-M1 will only
back up from the card inserted first.
[Caution] If any device or cable is connected to USB
connector at the bottom the backup process will not work
properly so remove any device of cable from the USB
connector before inserting the cards.
“CF Detected” or “Mem Detected” will be displayed on the
screen depend on the card you inserted.
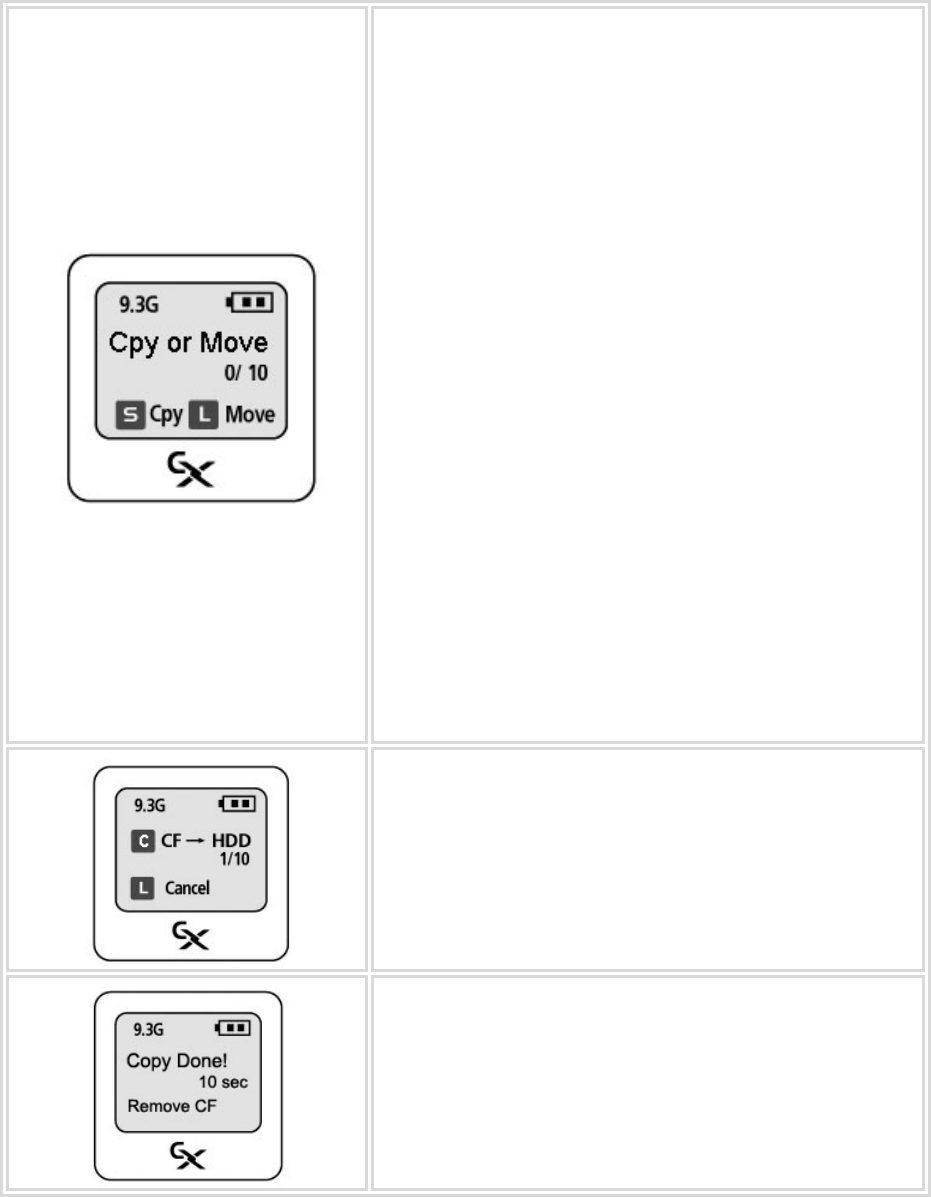
There are 2 ways you can backup.
z Copy: With copy method, Nexto-M1 only copies
data from memory card to HDD. So all the data in
memory card remains.
z Move: With move method, Nexto-M1 copies data
from memory card to HDD and verifies the integrity
then deletes all data in memory card. If however
verification fails, Nexto-M1 will not delete the data
in memory card.
As seen at the bottom of the screen;
z Press the button once for copy.
z Press down the button for more than 1 second for
move
The number on the screen indicates the number of files to
be copied and number of files copied to HDD.
As the backup proceeds, the number of files copied is
displayed on the screen.
During the process you can press down the button to cancel
the job as indicated at the bottom of the screen.
The total time for the backup is displayed when backup is
completed.
Remove the memory card to end the process. Even if you
do not remove the card, Nexto-M1 will turn itself off after 15
seconds.
Other Features
When backup is completed, if you do not remove the card for next 15 seconds, Nexto-M1 will turn
itself off.

In this case when you turn on Nexto-M1 next time, it will show you the result of last process.
This message tells you the last backup process was
successful.
Press the button once to go back to the initial state.
This message tells you the last backup process was
failure. Backup the same card again or check for other
possible reason for failure such as shortage of power.
Error Messages
Nexto-M1 may display other messages than explained above.
If nothing comes on the screen, check the battery status.
Refer to chapter 8 for power management.
If you see the message shown on the picture you will
need to;
1. Install HDD. Refer to chapter 2 for installing
HDD.
2. Format the HDD. Refer to chapter 10 for
formatting HDD.
If you see the message show on the picture, you need to
format the HDD.
Refer to chapter 10 for more information on HDD format.
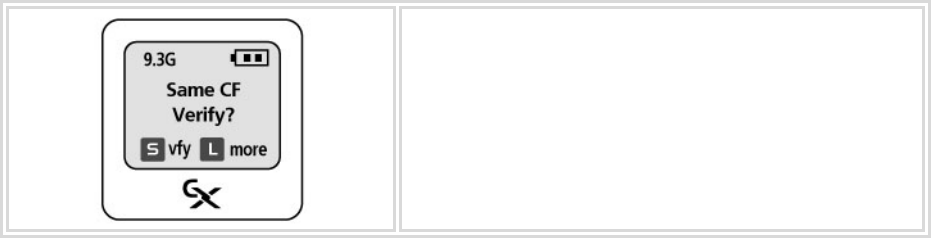
This is not the error message. This message tells you
that same data is already backed up. Refer to chapter 9
for verification of backup data.
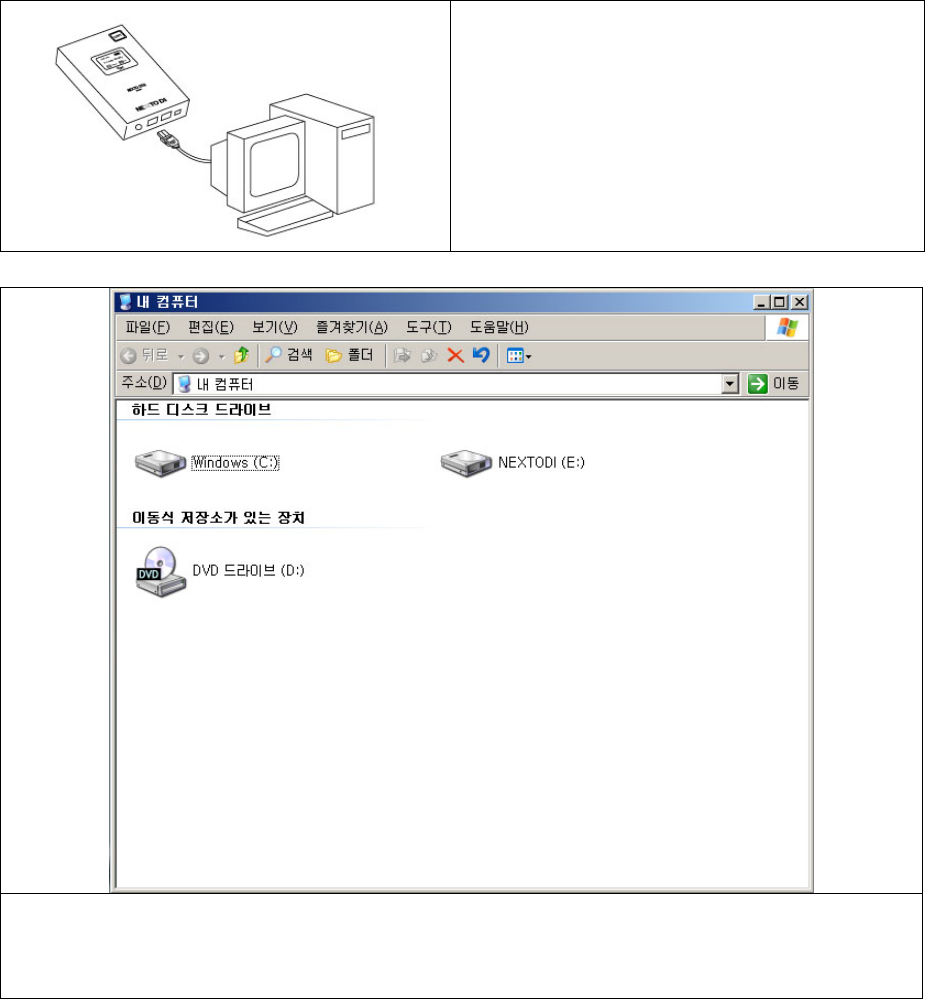
7. Connecting to PC
Nexto-M1 can be connected to PC through USB connection.
z There are 2 USB ports at the bottom of Nexto-M1. When connecting to PC use the USB
connector of Nexto-M1 marked “PC” which is smaller USB port.
z Use USB port at the back of PC when connecting Nexto-M1. Sometimes the PC will not
recognize Nexto-M1 when USB port at the front of PC is used.
z Nexto-M1 will not work as card reader when connected to PC.
Use the USB cable to connect Nexto-M1 to PC.
Windows 2000, XP or Vista will recognize Nexto-
M1 without extra device driver. However you will
need driver in Windows 98 which you can
download from www.nextodi.com.
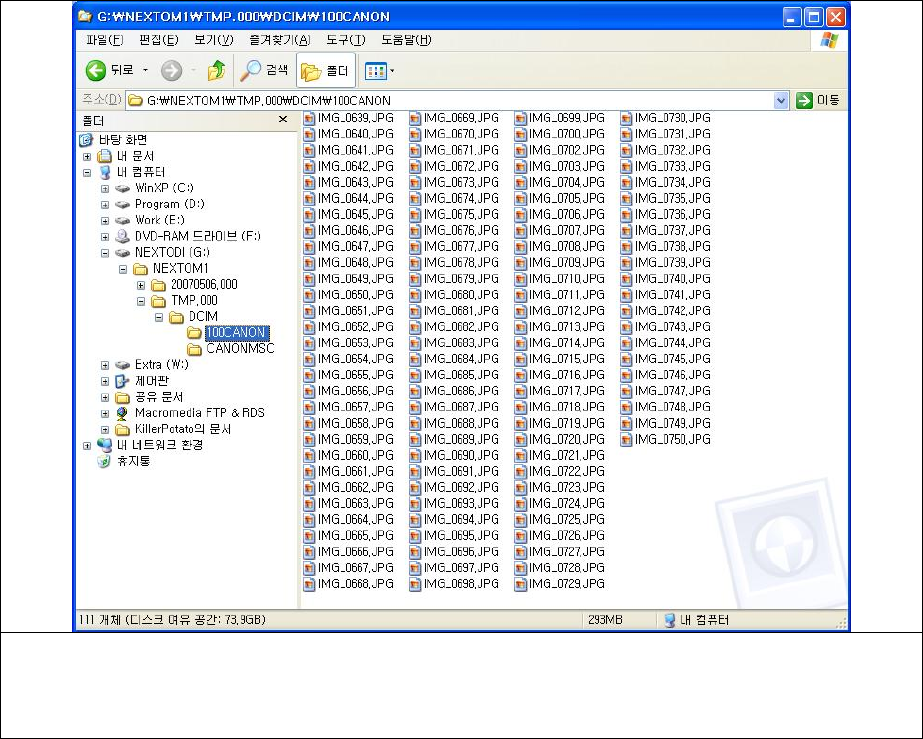
Open MyComputer folder after connecting Nexto-M1 to the PC. You will see new driver added.
Nexto-M1 will be name NEXTODI in the MyComputer folder.

Nexto-M1 will copy the exact structure and files from the memory card inserted.
Every time you backup data, a new folder is created under NEXTOM1 folder. The new folder will have
name like YYYYMMDD.XXX. Nexto-M1 checks the files and extracts the latest creation date among
the files and use to name the folder. The 3 letters of suffix is version number of the folder in case
same date comes up more than once among the backup files.
For example, if the latest file creation date is 2007-10-25 then new folder 200071025.000 is created
for backup.
[Caution] Every time you backup, even for the very same data more than once, new folder is created
and no data is over written.
When backup fail.
When Nexto-M1 fails backup data properly, Tmp folder is created. In the Tmp folder, it appears all the
files are backed up properly, however the files in the Tmp folder are garbage. So you will need to
back up again.
8. Battery Recharge and Power Management
Battery Recharge
To recharge internal or external battery of Nexto-M1;
z Connect DC adapter to Nexto-M1. To recharge external battery, connect the battery to
Nexto-M1 and connect DC adapter to the device. It takes 4 hours for internal battery and 5
hours for external battery to be fully recharged.
z Connect Nexto-M1 to PC through USB connection. Internal and external batteries will be
recharged simultaneously. Remember to turn off Nexto-M1 for recharging.
The red light in right side of the button will lit while recharging. When battery is fully recharged, the
light will be turned off.
You can backup up to 60G bytes with fully charged battery and 140G bytes with external battery.
Power Management
When Nexto-M1 is connected to PC through USB connection, Nexto-M1 will only use the power from
USB bus not from internal or external battery.
9. Verification of Backup Data
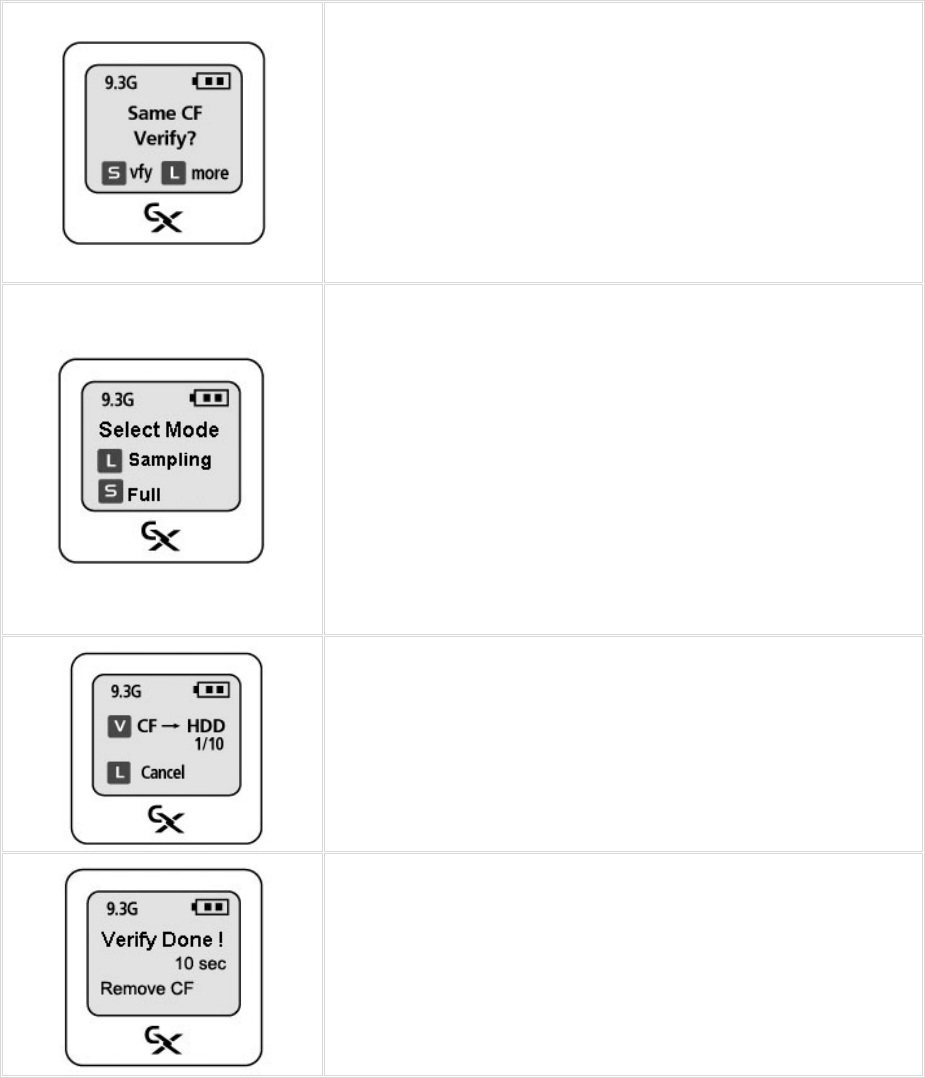
You can compare data in the memory card and data in the HDD to verify safe backup.
If you insert the same card after backup, Nexto-M1 will show
message shown in the picture.
Press the button once to choose “vfy” to verify the data or if you
want to backup same data once more press down the button to
choose “more” command.
Here, press the button once to verify the data.
There are 2 types of verification.
Press the button once for Sampling Verification or press down
the button for Full Verification.
With full verification, Nexto-M1 compares every bit of original
data and backup data, so it takes longer time to verify.
With sampling verification, Nexto-M1 compares only sampled
bits, so it takes less time to verify.
Once verification starts, you will see the number of verified files
and number of to be verified files.
When done, you will see the message shown in the picture.
Remove the memory card to end the process.
Backup the same card more than once.
When you insert the same card more than once, you can choose to backup the same data again.
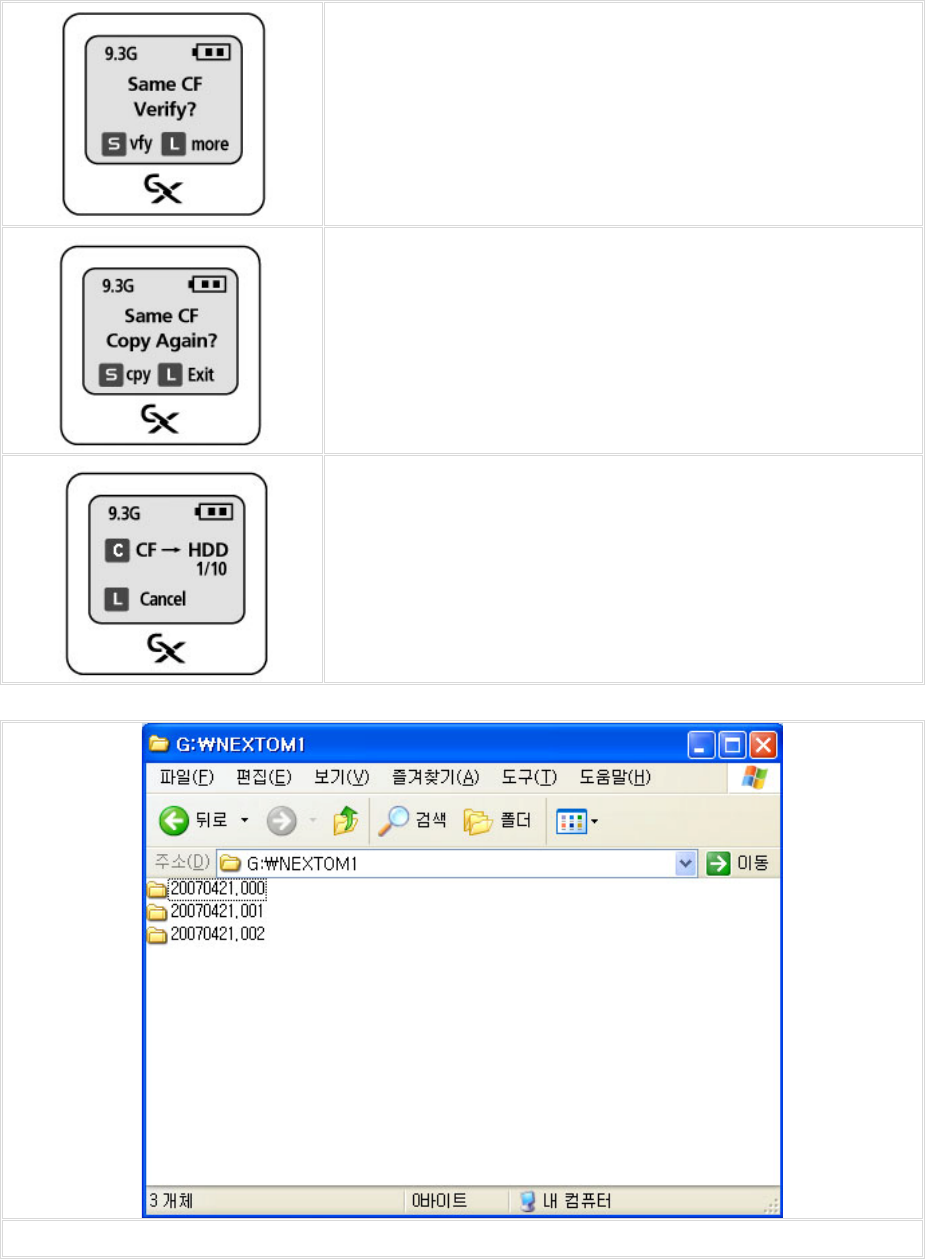
Even if you back up the same data, Nexto-M1 will not overwrite the existing data, instead it creates
new folder and backup the data in the new folder.
Insert the same memory card, here press down the button to
choose “more” command.
Here you can backup the same card once more. However you
can only choose “copy” method. “move” method is the option in
this process.
You can always go back to initial screen by press down the
button for more than a second.
You can see the number of files copied and number of files to be
copied.
When you backup the same data more than once, Nexto-M1 creates new folder every time. First it

creates folder named 20070421.000 then 20070421.001 and so on.
So existing data remains in the different folder.
10. HDD Format
Nexto-M1 has format function so you do not need PC to format the HDD installed in Nexto-M1.
[Caution] All the data in HDD will be erased after formatting the HDD. Remember to back up
important data to some other media before formatting your HDD.
Formatting New HDD
When you install brand new HDD to Nexto-M1, you must first format the HDD.
Nexto-M1 does not support partitioning of HDD, so if you need to create partitions connect Nexto-M1
to PC and do it in Windows environment.
Nexto-M1 formats HDD in FAT32 file system. For more information on file systems please refer to OS
guide books or web sites.
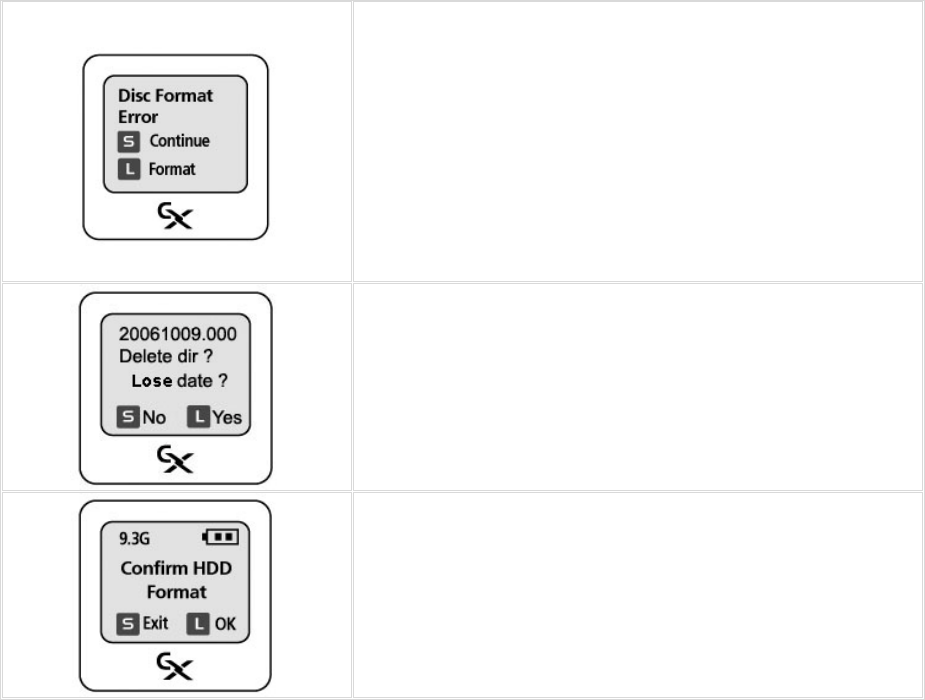
Install HDD into Nexto-M1 (refer to chapter 2 for installing
HDD) and turn on the power and you will see the message as
shown in the picture.
Press down the button to choose “Format” command.
If you choose “Continue” menu, Nexo-M1 will display error
message.
Nexto-M1 will ask you twice for confirmation. Press down the
button to choose “Yes” command.
This will be the first confirmation.
Press down the button for second and final confirmation to
proceed formatting.
Press down the button to choose “Yes” command and format
will proceed.
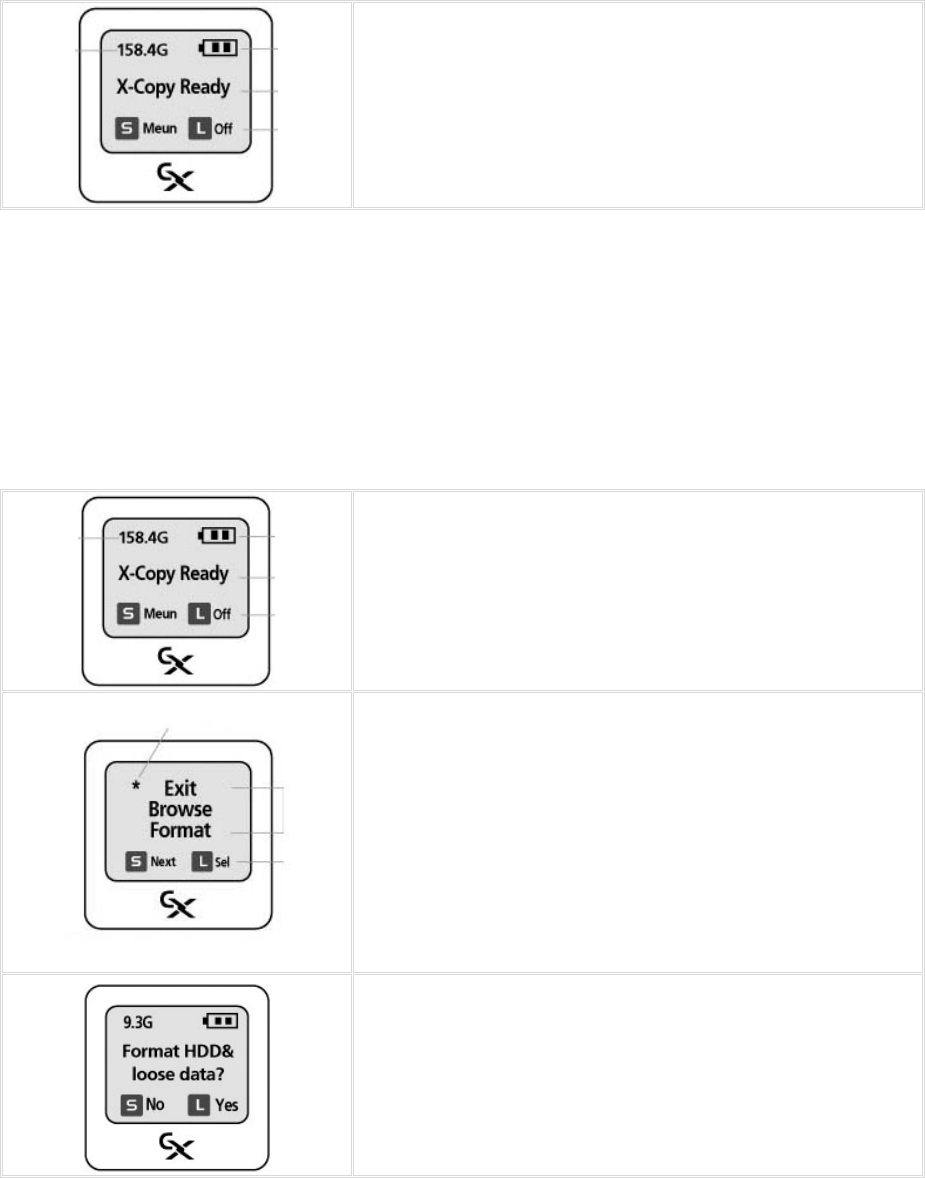
When format is completed, Nexto-M1 will display the initial
screen.
Formatting HDD in Use
You can format the HDD in use. All the data in the HDD will be erased after formatting so be careful
not to lose important data.
Even you have partitions in your HDD Nexto-M1 will format the HDD as single partition in FAT32 file
system.
Turn on Nexto-M1 and at the initial screen press the button to
choose “Menu” command.
At the menu screen you can choose one of three menus
displayed.
Move the cursor (*) by press the button and place it next to
“Format” command then press down the button.
You can always go back to initial screen by choosing “Exit”
menu.
Again Nexto-M1 will ask you for confirmation twice before
proceed to format.
Select “Yes” command by pressing down the button.
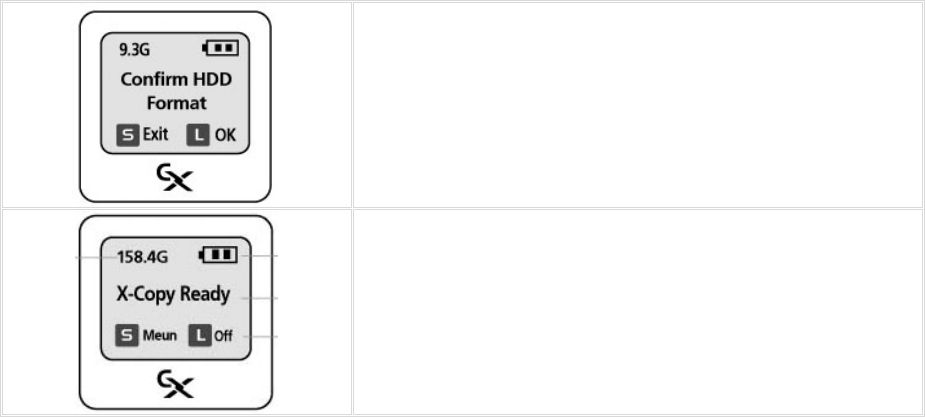
This is second and last confirmation. Press down the button
to choose “Yes” command.
After formatting, Nexto-M1 will display the initial screen.
Partition and File Systems
The file system and portioning is somewhat too technical for some users. So if you do not have the
proper knowledge on the subjects use the format function of Nexto-M1 to set up the HDD.
Nexto-M1 will only use HDD formatted in FAT32 file system. If you have more than one partition in
your HDD, Nexto-M1 will backup data in the first partition formatted in FAT32 file system.
If no partition is formatted in FAT 32 file system, Nexto-M1 will try to format entire HDD in FAT32 file
system and you may lose all data in the HDD. So check the file system and partition before installing
used HDD into Nexto-M1.
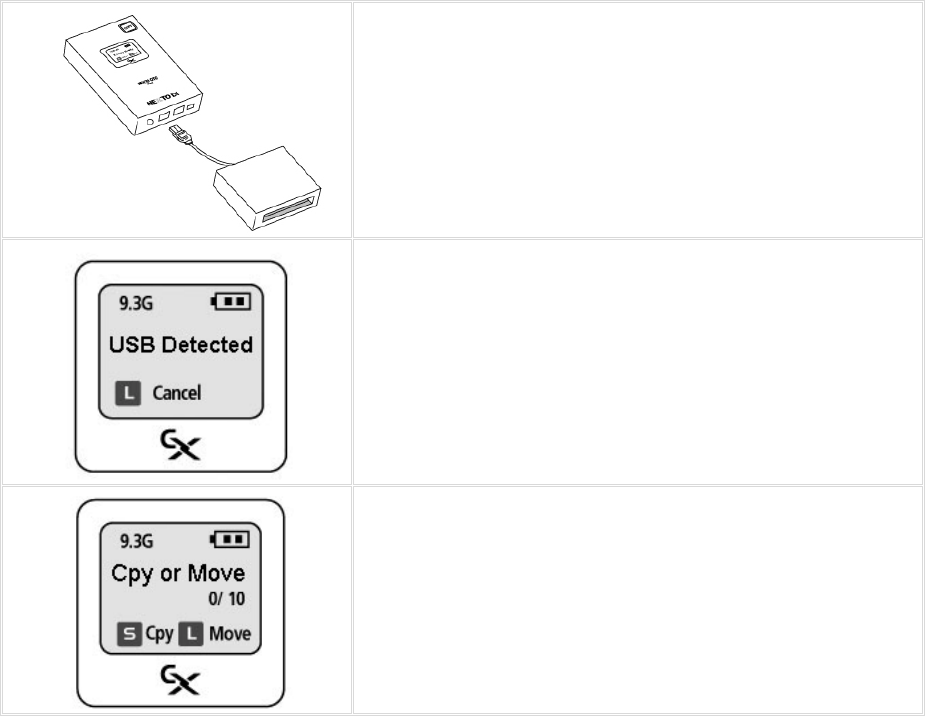
11. Connecting USB Devices
Nexto-M1 has OTG feature that you can connect USB devices such as card reader, USB storage or
digital camera directly to Nexto-M1.
[Caution] Not all USB devices can be connected to Nexto-M1. Nexto-M1 may not support devices that
consume more power than Nexto-M1 can supply. And Nexto-M1 does not support MP3 Player.
Turn on Nexto-M1 and connect USB device to the USB port
at the bottom of Nexto-M1 marked “OTG” using USB cable.
Nexto-M1 automatically detects the USB device. You can
copy data from/to USB devices or delete data in USB devices.
Refer to chapter 12 for more information.
If the USB device consumes more power than Nexto-M1 can
supply or USB device that does not support common USB
protocols Nexto-M1 will turn itself off.
You can copy data from USB device the same way as you
copy data from memory card.
12. Browsing HDD and Memory Cards
You can check the store data in HDD of Nexto-M1 without connecting to PC. You can even
browse through the data in connected memory card or storage of USB devices.
You can also copy file or folder to/from HDD from/to memory card or USB devices and delete
file or folder in HDD or memory card.
Browse or delete file/folder in HDD or Memory Card
At the initial screen press down the button to choose “Menu”
command.
At this time no memory card or USB device should be
connected to Nexto-M1
Move the cursor (*) by pressing button next to “Browse”
command and press down the button for more than 1
second.
On next screen move the cursor next to HDD and press down
the button to choose “HDD” command.
Nexto-M1 shows you the summary information of root
directory of HDD.
As shown in the picture, the root directory has 10 files total
size of 190Ksbytes and 2 folders.
Press button once to continue.
Next, you can see the actual structures of folders and files in
root directory of HDD.
To move the cursor;
z [S]: Press the button once to move the cursor down.
z [D]: Double click the button to move the cursor up.
[L]: Press down the button for more than one second to
select the file or folder.
Move the cursor to NESXODI folder and select it by pressing
down the button.
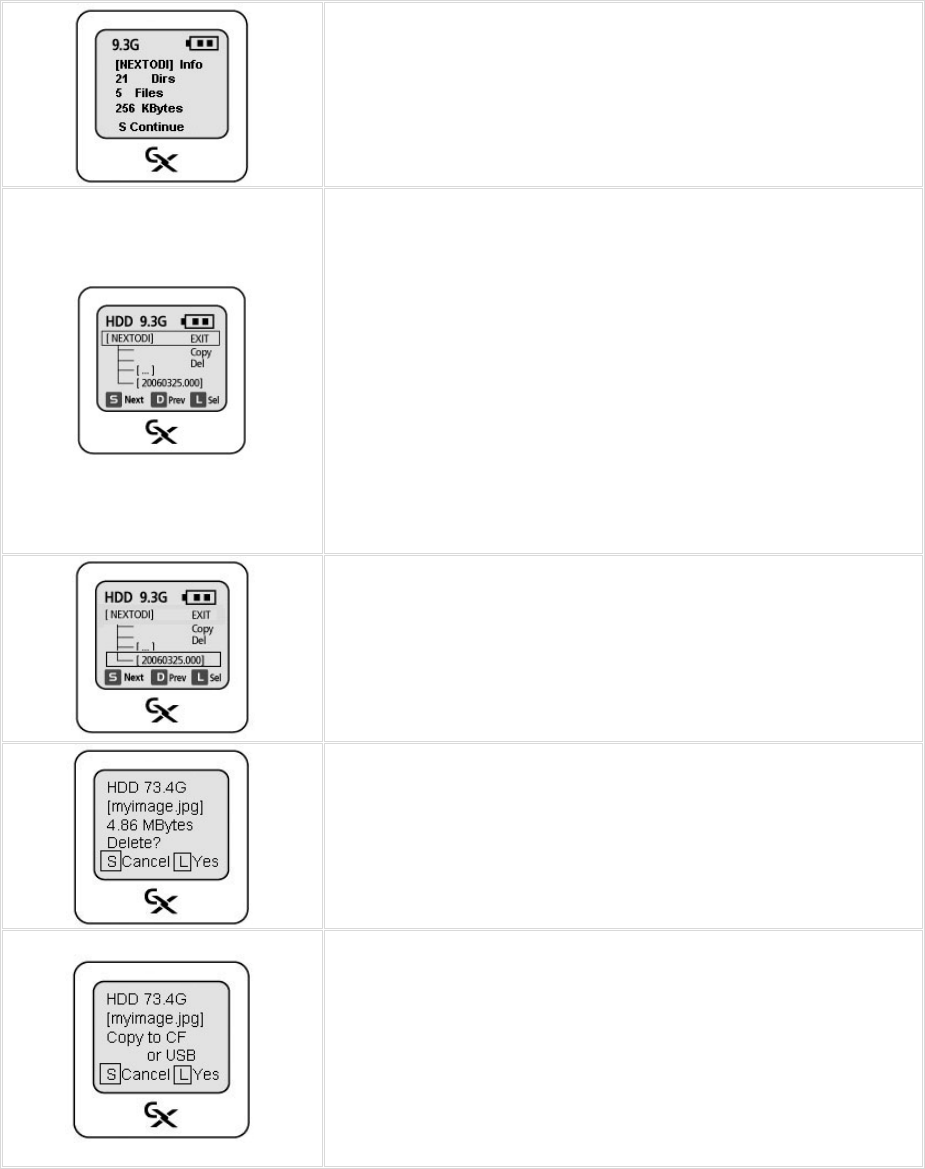
When you select a folder, first you can see the summary
information of the folder.
When you select a file you will first see the summary of the
file.
At the top of the screen there are 3 menus you can choose
from; “Exit”, “Copy” and “Del”
z “Exit”: Go back to initial screen.
z “Copy” Copy the file or entire folder, sub structure and
files in the folders to memory card or connected USB
device.
z “Del”: Delete the selected file or folder and entire sub
hierarchy folders and files
[Caution] Be careful when you choose delete a folder. It
deletes not only the selected folder but also all sub folders in
the selected folder.
You can browse through sub folder by moving the cursor to
the folder you wish to browse and press down the button to
select.
Choose one of the menus to copy or delete the folder.
You can also select a file to copy or delete.
When you select delete menu, Nexto-M1 ask you twice for
confirmation.
Press down the button to select “Yes” command to delete
the selected folder.
If you choose to copy a folder or a file, Nexto-M1 will ask you
to insert memory card of connect USB device.
You can then browse through memory card of USB device in
the same way as browsing HDD to choose the destination
folder to copy the data from HDD.
Press down the button to select “Yes” command to copy the
file or folder.
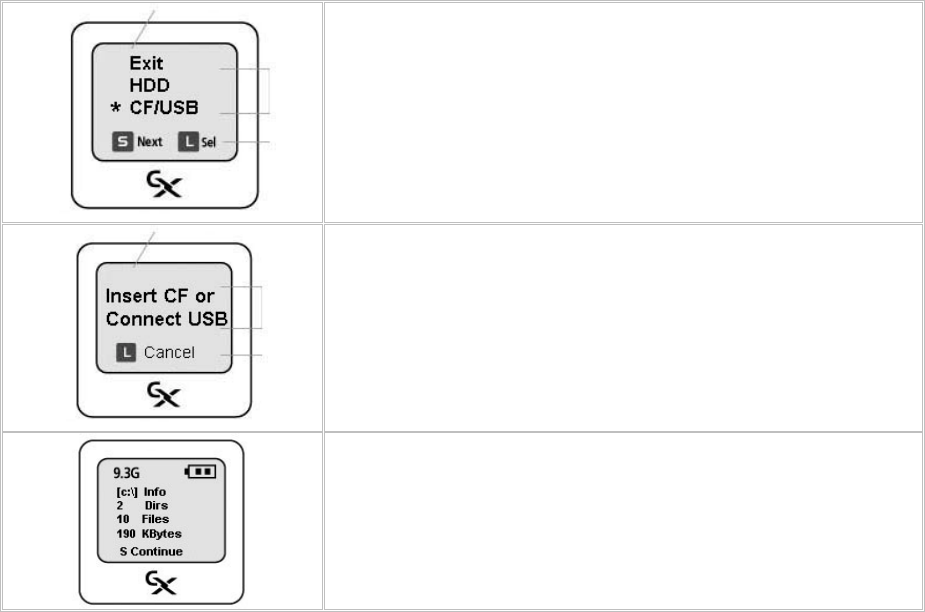
Browse or delete file/folder in HDD or Memory Card
You can browse through memory card or connected USB
device the same way as browsing through HDD.
Select “CF/USB” command at the menu screen. Remember
you should not insert memory card or connect USB device
before Nexto-M1 asks to do so.
Insert memory card or connect USB device when Nexto-M1
asks to do so.
Nexto steps will be same as browsing HDD. But when you
choose to copy, the data will be transferred into HDD from
memory card or USB device.
13. Sync
You can sync data between two Nexto series devices. It is useful when you deal with important photo
data.
The professionals may want carry two Nexto devices to ensure the safety of their data.
You can sync data between Nexto-M1 and;
z Nexto-M1
z Nexto-Ultra
z Nexto-OTG And Nexto Xpress
z Nexto-CF
Nexto-M1 Nexto-XX
Connect Nexto-M1 to Nexto-XXX using USB cable. Remember use the port marked “OTG” on Nexto-
M1 and “PC” on Nexto-XXX.
Connect DC adapter to the Nexto-XXX (the target)
Nexto-M1 will search the target for folder named “NEXTODI” and compare the data with its own and
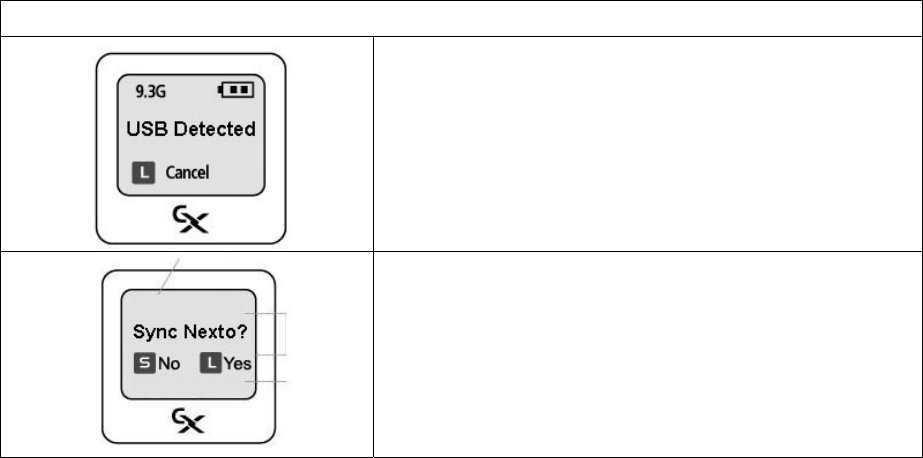
copies new data from the target.
When target is connected to Nexto-M1, it automatically
detects the target and search through data to compare.
It may take some time depend on the size of target’s data.
Press down the button to sync. The number of files to be
copied and number of files copied will be displayed on the
screen during the process.

14. Specification
CF/MD Slot CF Type 1/2, MD (MicroDrive)
SD/MS/MMC
Slot
SD / SDHC / MMC /MMC Plus / MS / MS MagicGate / MS
Pro / MS Pro MagicGate
※ Use SD transform adapter for mini SD / TransFlash /
MMC mobile /RSMMC
※ Use MemoryStick transform adapter for MS Duo / MS
Duo MagicGate / MS Pro Duo / MS Pro Duo MagicGate
Memory Card
OTG Port Digital Camera, HDD type camcoder
※ Some products may not be compatible.
Power Rechargeable internal battery / Rechargeable external battery (Option)
DC Adapter (5V DC, 2A) / BUS Power from USB
Battery /
Backup Capacity
Internal battery : Li-Poly (3.7V, 1550mAh, 60GG Backup capable)
External battery : Li-Ion (3.7V, 2200mAh, 80GB backup capable, Option)
Compatible
HDD
2.5” PATA Type HDD
Big volume HDD(more than 128GB) support
Interface USB 2.0/1.1 (USB Slave), OTG (USB Host) Interface
Backup Speed By CF Slot : MAX 20MB/s, Sustained 14MB/s
By SD/SDHC/MS/MMC Slot : MAX 24MB/s, Sustained 19MB/s
Compatible
OS
WINDOW 98SE/Me/2000/XP/Vista Mac OS 9.2 or above,
Linux 2.4.18 or above
Files System HDD: FAT32
Memory Card: FAT12/16/32
Dimension 128mm x 77mm x 23mm (D x W x H)
Weight 130g (without HDD )
Accessories USB Cable / Power DC Adapter / Pouch / Screw Driver / Screws /
User Manual

15. Error Codes
The common error messages are;
Error
Code Error Name Symptom and Solution
0x0001 ERR_FAIL Low level error. HDD failure or USB communication
failure
0x000E ERR_UNEXPECTED USB communication failure. Check the cable.
0x0015 ERR_INVALID_FAT Format error. Reformat the memory card.
0x003B ERR_UNEXPECTED_ZERO FAT error
0x0051 ERR_12_NOT_IMPL Unable to write to FAT12 Memory.
0x0063 ERR_CLUSTER_CHAIN FAT error
0x0080 ERR_NO_FREE_CLUSTER No more space in HDD
0x00A0 ERR_BUSY_TOO_LONG ATA I/F error, possible HDD error.
0x00A4 ERR_READ ATA I/F error, possible HDD error.
0x00A5 ERR_IDE_ERR ATA I/F error, possible HDD error.
Nexto-CF Multi1 User Manual Index
1. Nexto-M1 Introduction
2. Thing to Remember Before Using Nexto-M1
3. Contents and Part Name
4. HDD Installation
Basic Features
5. Button and LCD Screen
6. Data Backup
7. Connect to PC
8. Battery Recharge and Power Management
Advanced Features
9. Verification of Backup Data
10. HDD Format
11. Connecting USB Devices
Extra Features
12. Browsing HDD and Memory Cards
13. Sync
14. Specification
15. Error Codes
FCC NOTE
:This equipment has been tested and found to comply with the limits for a Class B digital device,
pursuant to Part 15 of the FCC Rules. These limits are designed to provide reasonable
protection against harmful interference in a residential installation. This equipment generates,
uses and can radiate radio frequency energy and, if not installed and used in accordance with
the instructions, may cause harmful interference to radio communications.
However, there is no guarantee that interference will not occur in a particular installation. If this
equipment does cause harmful interference to radio or television reception, which can be
determined by turning the equipment off and on, the user is encouraged to try to correct the
interference by one or more of the following measures:
-- Reorient or relocate the receiving antenna.
-- Increase the separation between the equipment and receiver.
-- Connect the equipment into an outlet on a circuit different from that to which
the receiver is connected.
-- Consult the dealer or an experienced radio/TV technician for help.
THIS DEVICE COMPLIES WITH PART 15 OF THE FCC RULES.
OPERATION IS SUBJECT TO THE FOLLOWING TWO CONDITIONS:
(1) THIS DEVICE MAY NOT CAUSE HARMFUL INTERFERENCE, AND
(2) THIS DEVICE MUST ACCEPT ANY INTERFERENCE RECEIVED,
INCLUDING INTERFERENCE THAT MAY CAUSE UNDESIRED OPERATION
THE MANUFACTURER IS NOT RESPONSIBLE FOR ANY RADIO OR TV INTERFERENCE
CAUSED UNAUTHORIZED MODIFICATIONS TO THIS EQUIPMENT. SUCH
MODIFICATIONS COULD VOID THE USER'S AUTHORITY TO OPERATE THE EQUIPMENT.