NEXXT SOLUTIONS 320U1 IP Camera User Manual Manual 2
NEXXT SOLUTIONS IP Camera Manual 2
Contents
- 1. Manual 1
- 2. Manual 2
- 3. Manual 3
- 4. Addendum
Manual 2
Nexxt Solutions - Integrated Wireless IP Camera
21
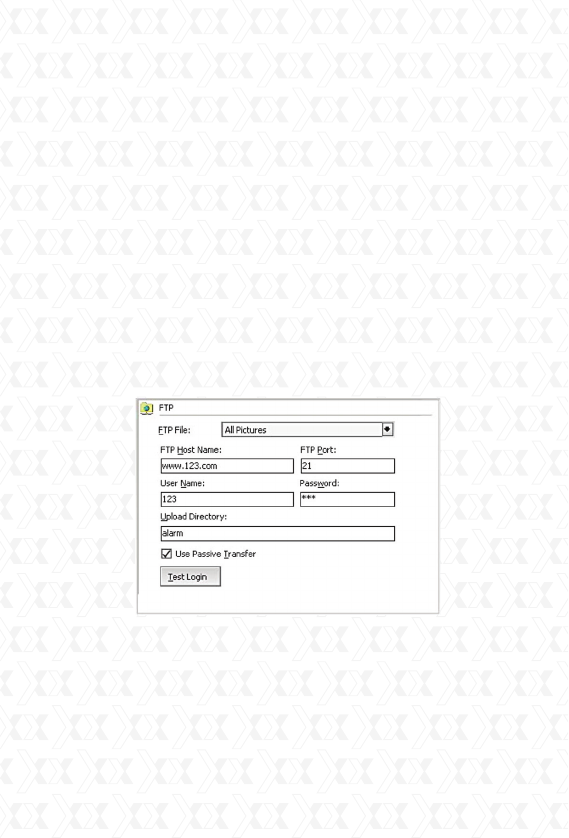
FTP Uploading: when the alarm is triggered, the
program will upload the snapshots to the FTP server.
Upload file: three options are available: picture only,
video only, or both picture and video.
FTP host address: account information required to
access the File Transfer Protocol host.
FTP port: the default is set to 21.
User name: the user name used in the FTP login
window.
Password: the FTP password used in the login
window.
Upload Directory: This is the path used for saving
uploaded files. The program will create a folder using
the time the alarm went off. The pictures and videos
will be saved to this directory.
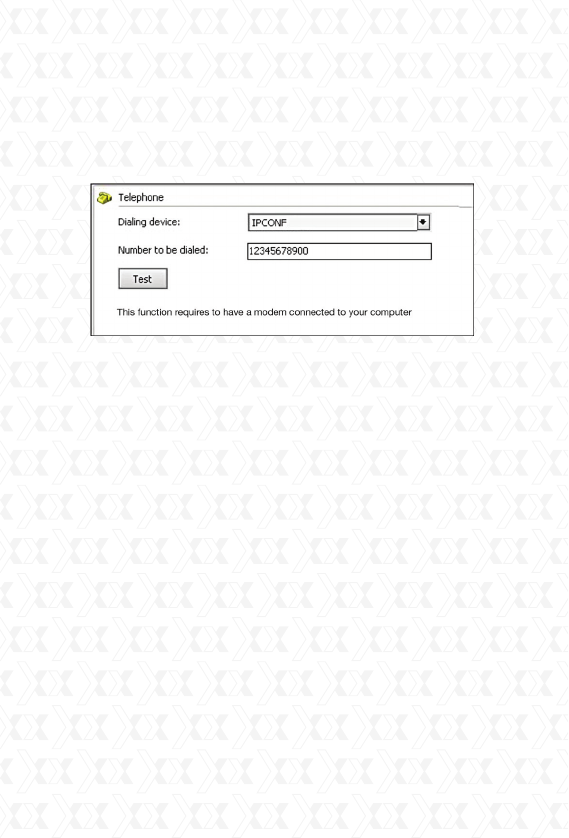
Dialing: when the alarm is triggered, the program
will dial the assigned telephone number automati-
cally using the PC’s modem. This service requires
a modem to be installed on the PC which supports
dialing functions.
Dialing device: choose the modem from the list that
Nexxt Solutions - Integrated Wireless IP Camera
22
supports the dialing feature.
Number to be dialed: the number which will be
dialed once the alarm is triggered.
Test: Click Test to make sure this setting is
functional.
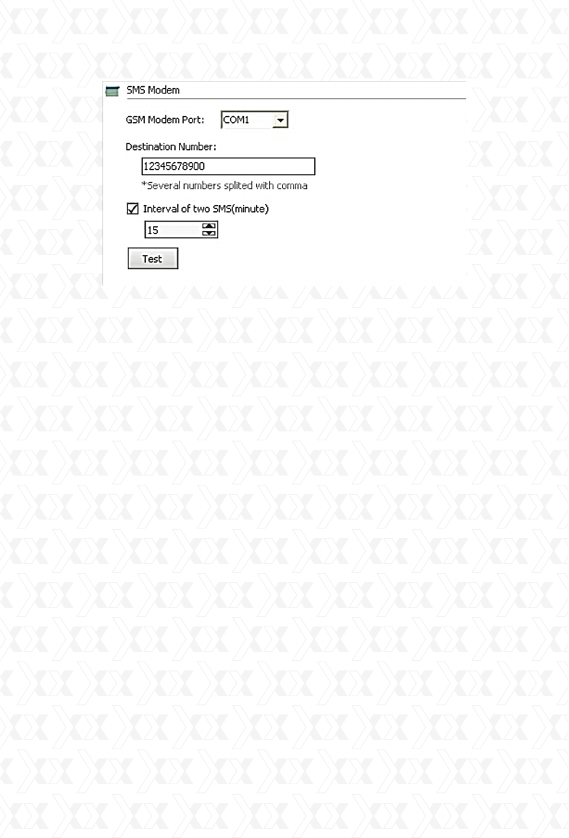
SMS modem: when an alarm is triggered, the pro-
gram will send a Short Message Service transmis-
sion to the assigned phone through the modem.
This service requires an SMS modem to be installed
on the PC.
SMS modem port: the serial port number which is
attributed to the SMS modem.
Receiving phone number: the enabled-SMS land
line or mobile phone number which will receive the
incoming message when the alarm is triggered.
SMS interval (in minutes): defines the time interval
in minutes that the SMS alerts will go off while the
alarm is active.
Test: click this button to test this service, the
program will send a SMS to the assigned phone
number.
Nexxt Solutions - Integrated Wireless IP Camera
23
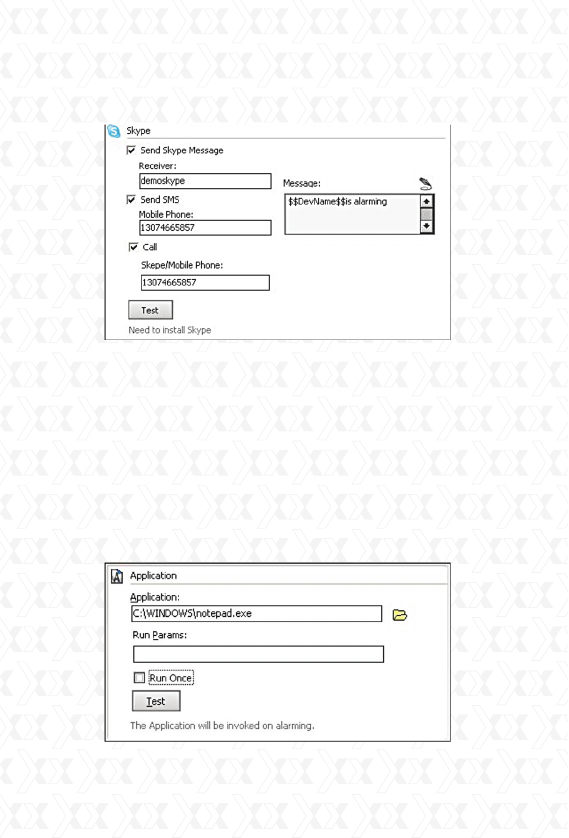
Skype: when an alarm is triggered, the program will
use Skype to send Skype messages, text messages,
Skype calls and call a mobile phone.
This feature requires for Skype to be installed on
your computer. When the alarm is triggered, the
program will call or open the Skype interface, so
that it can execute the actions mentioned above. If
Skype is not running, the program will automatically
start Skype. You can download Skype by going to
http://www.skype.com.
Send Skype Message: this option sends a text
“message” to the designated Skype account.
Send SMS: this option sends a text “message” to
the designated phone. Please note that this feature
requires a Skype account balance. To know more
about using Skype to send SMS, recharge informa-
tion, etc., please visit the official Skype website.
Call: it places a call to the designated Skype account
or to a designated phone number. Please note that
the “dial a designated telephone number” feature
requires a Skype account balance. To know more
about using Skype to make calls, please visit the
Skype official website.
Nexxt Solutions - Integrated Wireless IP Camera
24
Test: click Test to make sure this setting is
functional.
Application: when the alarm is triggered, the
program will execute the selected program.
Program: it defines the path for the .exe file
belonging to the selected program.
Run parameter: the run parameter values should
be entered in this box.
Run once: this option will execute the command only
when the alarm goes off for the first time, with no
further action after that.
Nexxt Solutions - Integrated Wireless IP Camera
25
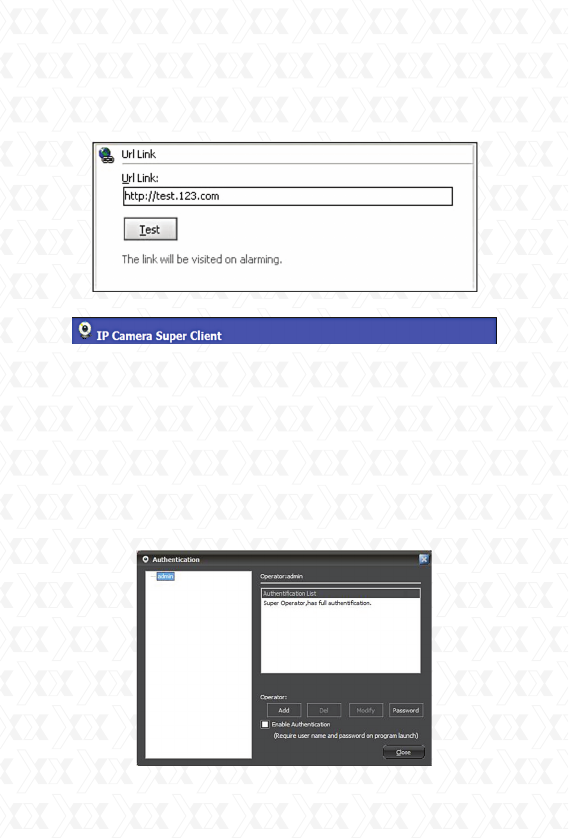
URL Link: when the alarm is triggered, the program
will open the assigned URL. Usually, this is used to
inform other systems about the alert.
User Account Administration
The Client supports a multi-level management sys-
tem, whereby different users are granted specific
privileges and passwords for controlled access.
This function is not enabled by default. Please click
the Setup menu button on the lower right side of
the dialog window and choose User Account Setup
to continue.
Nexxt Solutions - Integrated Wireless IP Camera
26
When this feature is enabled, the program will
always request authentication from users.
By default, the admin account enjoys full administra-
tor privileges. This account can never be deleted;
however, its password can be changed.
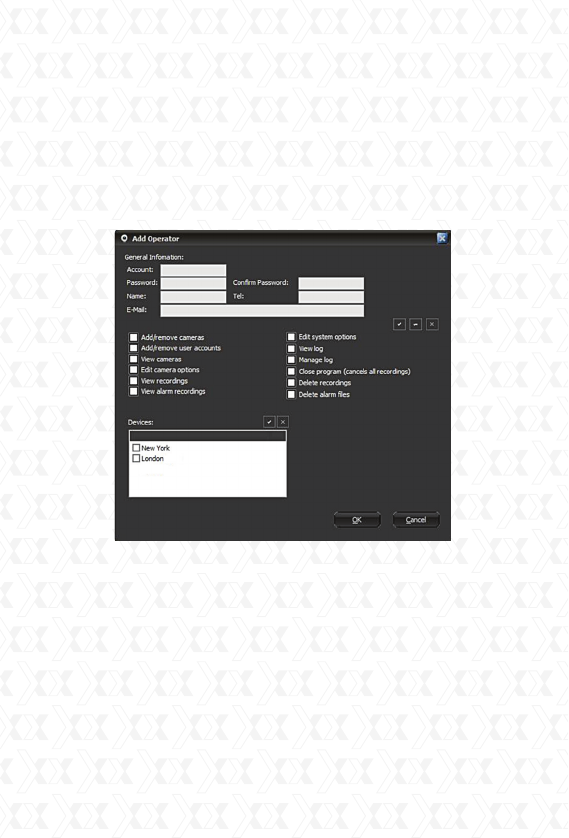
Add operator: click the Add button and the dialogue
box below will appear.
Once you type in the account information and assign
the corresponding permissions, click OK to save it.
Privileges to add or remove accounts mean that the
account operator can include or delete its depen-
dant users. This takes effect only after logging in
with this account.
Nexxt Solutions - Integrated Wireless IP Camera
27
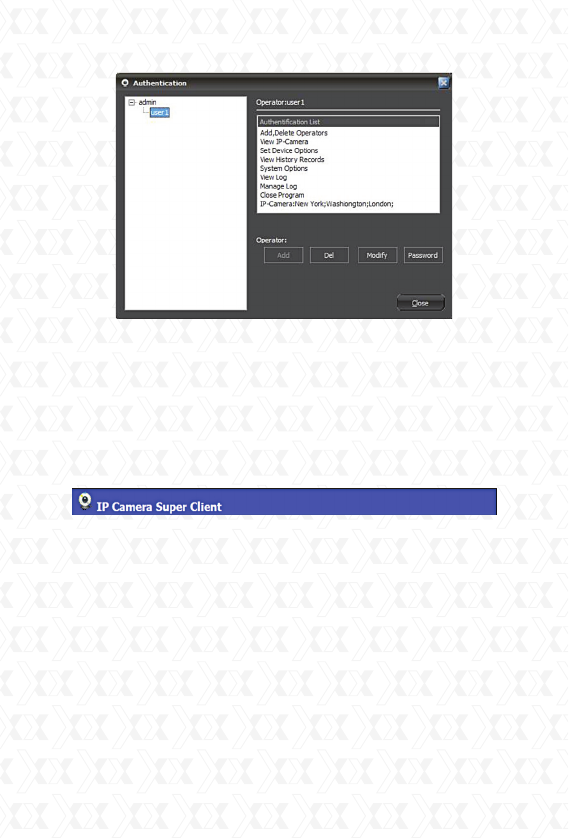
Delete: the currently selected operator will be
erased.
Modify authority: it changes the permission level
assigned to this operator.
Change password: it allows the user to modify the
existing password.
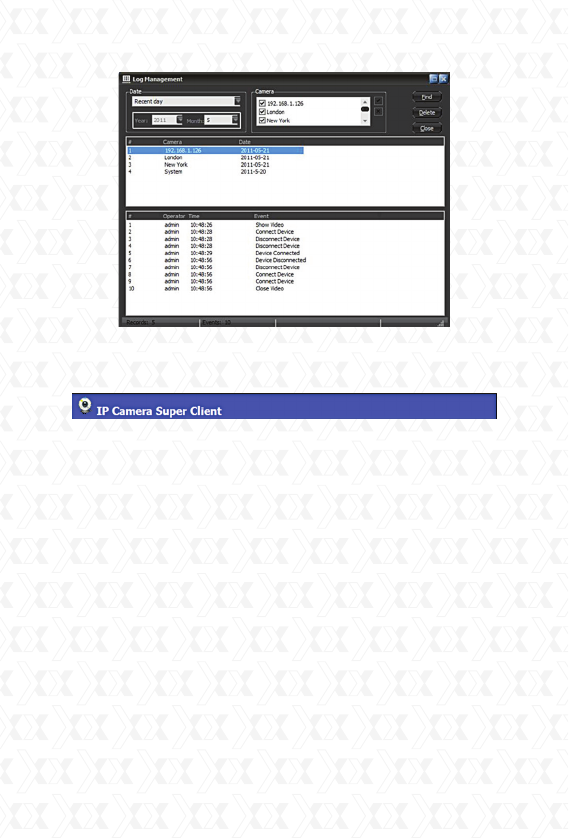
Log manager
The client software has log management function.
It will keep records of user operation and device
connection information. Click the Setup menu
button on the bottom right corner of the dialog box,
and then choose Log Management to open the
window.
Nexxt Solutions - Integrated Wireless IP Camera
28
After selecting the desired device and date, click the
Find button.
Records publisher
Users can remotely view videos and alarm logs
using the records publishing tool from the client.
Click the Setup menu on the bottom right corner
of the dialog box, and choose Record History Web
Publisher. The following window will be displayed, as
shown below.
Nexxt Solutions - Integrated Wireless IP Camera
29
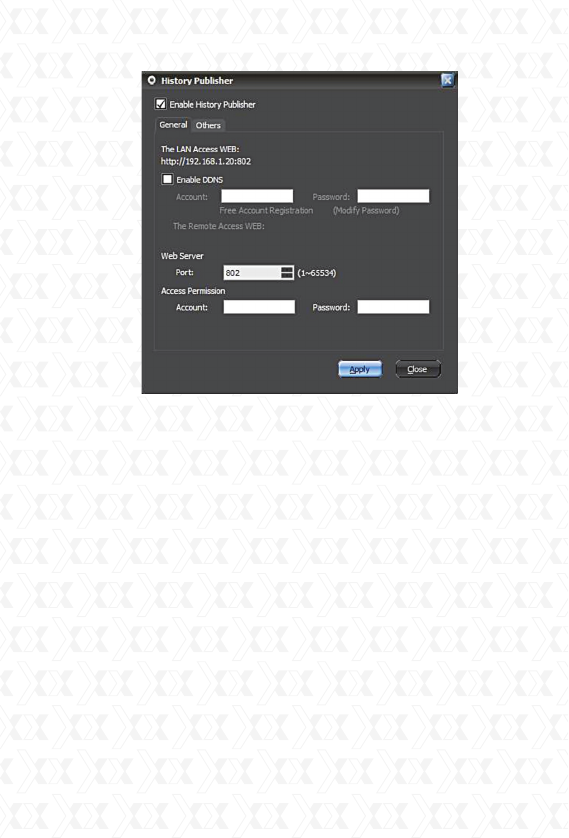
By default, this function is not enabled. You must first
select the Enable History Publisher option and click
the Apply button to enable this feature. The LAN IP
address will be displayed at this point. Users can
directly view records in the LAN if the PC has a fixed
IP address. Records can also be accessed by
entering the IP address and adding the port number.
If using a dynamic IP, then the DDNS feature must
be active to be able to view this information remotely.
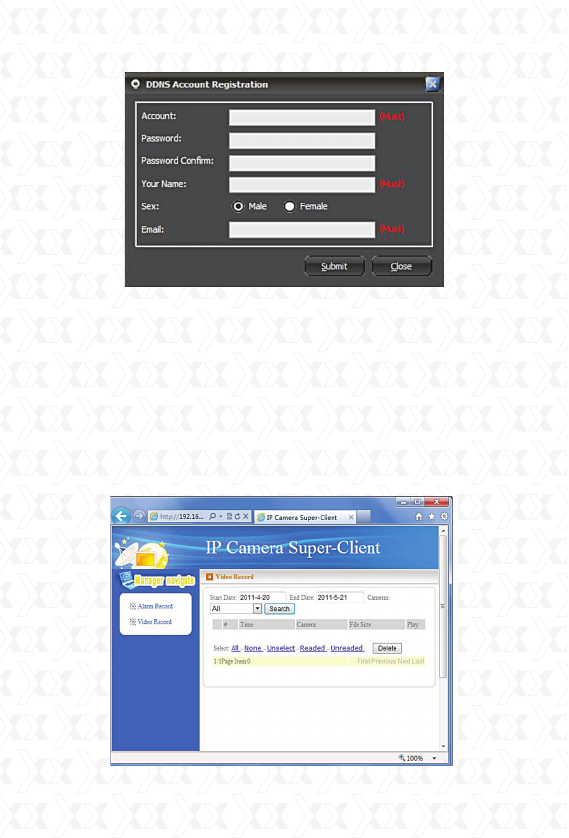
This tool should allow users to register a DDNS
account for free. The account name needs to be
longer than 5 characters.
Click on the free account registration option. The
DDNS registration box will appear, as shown below.
Fill the form and click the Submit button to save your
settings. Once completed, it will exhibit the
remote access URL. Please note that port forwarding
needs to be set up directly on your router.
Nexxt Solutions - Integrated Wireless IP Camera
30
Users can set a password for controlled access
permissions.
The Web server port is the port provided for
remote visit. Normally, this value does not need to
be changed, but if that port is being occupied by
other devices, users can assign a different port
number within the 1 ~ 65535 range.
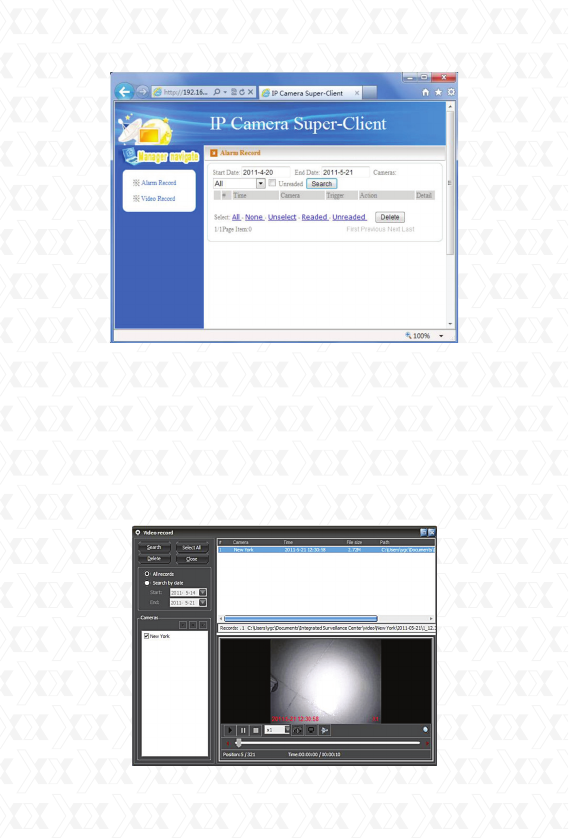
When entering the URL in IE address box, a page
like the one below this will be displayed.
Nexxt Solutions - Integrated Wireless IP Camera
31
A list containing all the devices with recorded video
files will appear. Next, click on any specific device,
and a list of recordings identified with the date will
be displayed at this stage.
When the operator chooses a certain date, the
page below will pop up on the screen.
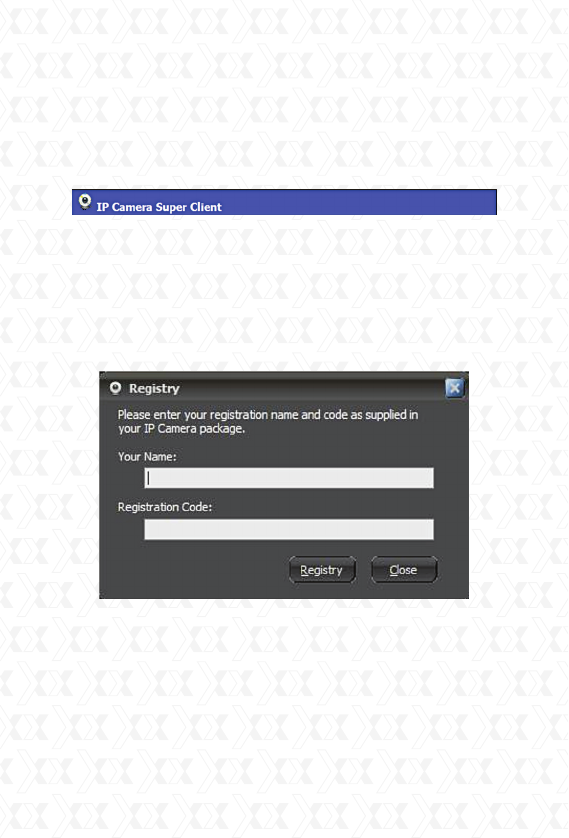
The list contains the files recorded that day. When
you click on a specific file, it will play the video.
Nexxt Solutions - Integrated Wireless IP Camera
32
During playback, the user can rewind or forward
the video, take a snapshot or invert the recorded
images.
The process to remotely access alarm records is
the same as with video records.
Registration
Go to the Setup menu and select Registration.
Enter the registration name and code, and click
Register to complete the process.
The registration name and code can be found on
the supplied CD-ROM.
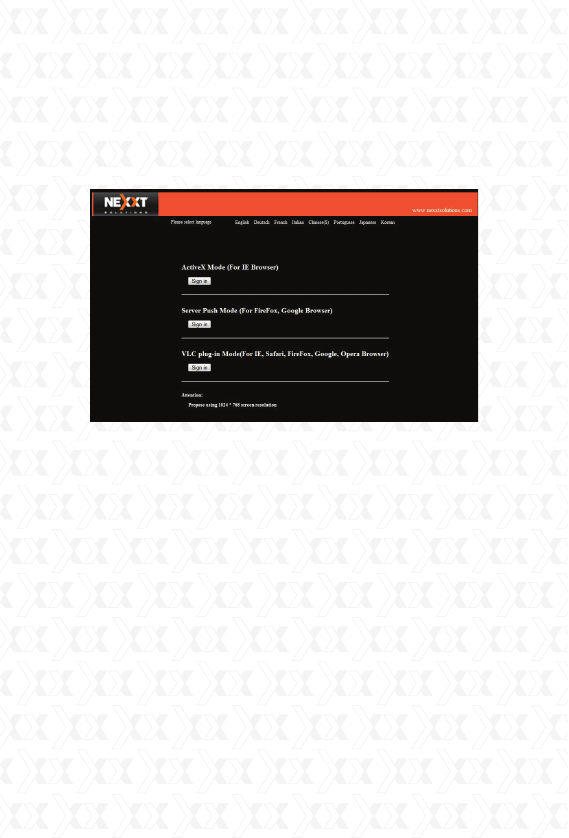
Web browser
1. If you access the camera through the Internet
Explorer browser directly, type the camera’s IP
address. To do so, follow the format http://XXX.
XXX.XXX.XXX:81, (“X” represents the IP address
and the “:81” represents the default port number).
Nexxt Solutions - Integrated Wireless IP Camera
33
When done, the camera login page will be displayed
on the screen.
2. Click “sign in” to enter your account and password
on the camera login page, as shown below.
By default, the administrator’s username is “admin”
and the password is left blank. You can log on to this
page as an Administrator, Operator or Visitor.
Access privileges will be assigned on the web
browser interface based on the user. Details
regarding access rights and user interface are
included below.
Visitor: When logged in as visitor, the user will be
able to view the main monitoring page for all the
enabled cameras on the network.
Operator: When logged in as an operator, the user
will have access to controls and to certain
parameters associated with the operation of the
camera.
Administrator: When logged in as an administrator,
Nexxt Solutions - Integrated Wireless IP Camera
34
the user will have full access to controls, critical
functions and to the advanced configuration of the
camera.
3. If you are using a PC, follow the top link for IE
Browsers. This will activate ActiveX which allows
access to additional features of the user interface.
If you are a Mac user, you can view the camera via
a second link, Server Push Mode. This web browser
mode features limited functionality; however, it
allows you to view live video and take snapshot
pictures using the XPY 320.
Upgrade firmware
Enter the correct User Name and Password to
upgrade the system firmware and Web user
interface.
Main User Interface (as seen in Internet Explorer)
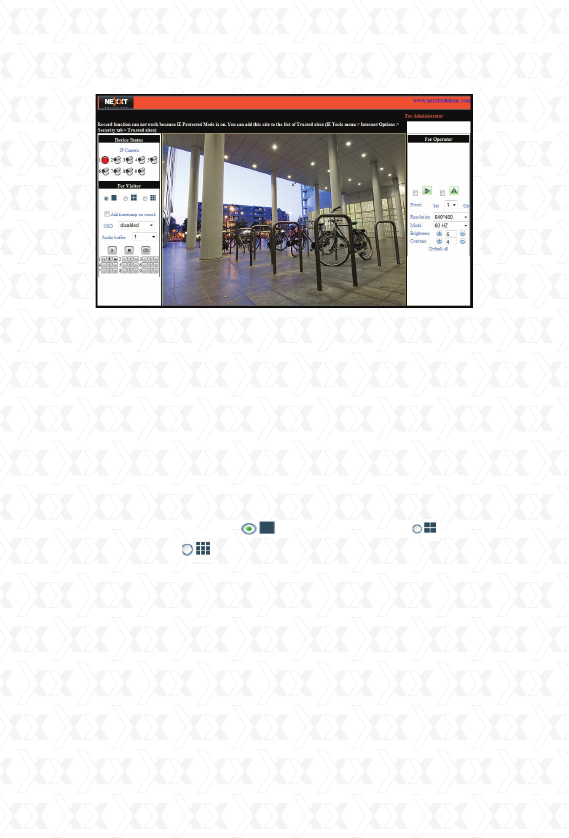
Nexxt Solutions - Integrated Wireless IP Camera
35
Indicates the number of cameras connected on the
network.
For Viewer
When logged in as visitor, the user will be able to
view the main monitoring page for all the enabled
cameras on the network. This window allows you to
choose between Full View or Split Screen
configurations. Select the icons according to the
view preferred.
For example: select for Full Screen, for
Quad view or for Multi Split Screen.
Add timestamp on record
When checked, a timestamp will be added in the
bottom right corner of recorded videos.
OSD (On Screen Display) for multi-device settings
The On Screen Display allows you to see the date
and time on the video. Use this option to select
the color of the timestamp or to disable the OSD
feature.
Device Status

Nexxt Solutions - Integrated Wireless IP Camera
36
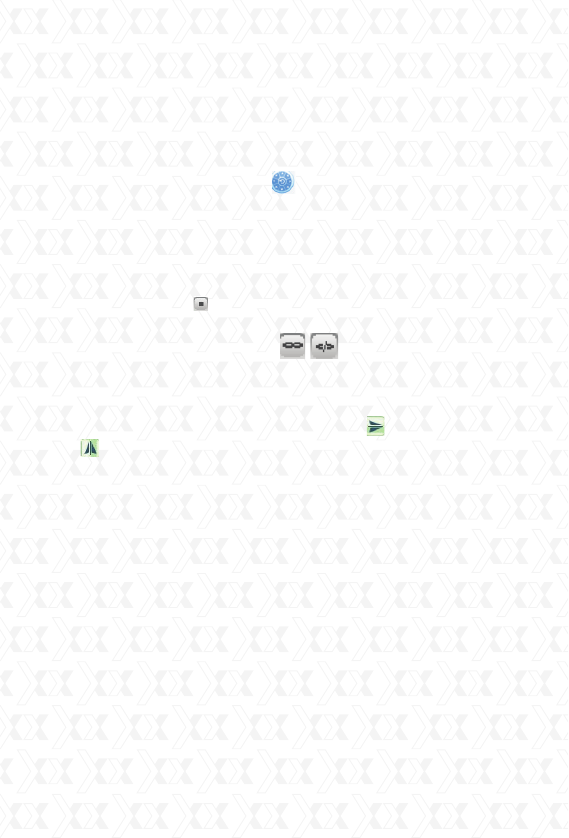
Audio switch
Click to enable the audio stream from the
camera. The icon will change to . In order to be
able to listen to the sound around the camera, you
need to have an earphone or speaker connected to
the computer, and the microphone function enabled.
Click this icon once again when you want to disable
this feature.
Record
Click on the icon to begin video recording. The
camera will create an AVI file and save it in the
folder you specified. Click on this button again when
you wish to stop the recording. The audio will be
stored provided that the microphone function has
been previously enabled.
Snapshot: Click on the icon to take a snapshot
image. This button provides users a fast way to
capture a single image of the video from the
camera.
Note: the video file would be assigned a name
according to the following format:
Alias_actual date.avi
For example: if the name of the file containing
the video is XPY320_20101211124441.avi,
it means this recording belongs to the device
having ´XPY320´ as its alias, and that the video was
recorded at 12:44:41 on December 11, 2010.
For operator
When logged in as an operator, the user will have
Nexxt Solutions - Integrated Wireless IP Camera
37
access to the Operator Page, and to certain
parameters associated with the operation of the
camera.
Pan/Tilt
Direction control arrows : click the arrow keys to
aim the lens in the direction you wish to look.
1. Patrol selection
Vertical patrol
Horizontal patrol
Stop patrol
Switch alarm input on Switch alarm
input off.
Mirror
Click the icons to see the horizontal or vertical
mirror image. Video rotation options allow you
to adjust the image if you set up the camera upside
down or in a special position.
Resolution
Select either VGA (640x480) or QVGA (320x240).
Operating mode
Select 50Hz or 60Hz frequency, or Outdoor mode
Color parameters: click Brightness and Contrast
to adjust the quality of the video.
Image PT function: the Pan-Tilt capability is
recommended to control the aim of the camera
directly using the full screen view. Double click the

Nexxt Solutions - Integrated Wireless IP Camera
38
right mouse button on the image to enable the PT
function. A green arrow on the video image
will be displayed. Use the left button of the mouse
to aim the camera in the direction of the target. If
you want to cancel, double-click on the right mouse
button once again.
Default All
Click to return the settings to their factory default
values.
For Administrator
When logged in as an administrator, the user will
have full access to controls, critical functions and to
the advanced configuration of the system.
Device Information: it displays the device ID,
firmware and embedded Web UI version of the
device, along with other basic information pertaining
to the camera.
Alias Settings: allow the administrator to set a
name to easily identify the IP camera. Anonymous is
the default alias for the XPY320.
Date & Time Settings: these are used to determine
the time zone for your country. You can choose Sync
with NTP Server or Sync with PC Time.
User Settings: the administrator can set up a
maximum of eight (8) user accounts. New users
can be added as an administrator, operator or
visitor, each with their own username and
password.

Nexxt Solutions - Integrated Wireless IP Camera
39
UPnP Settings - Access this page to find out if the
UPnP (Universal Plug and Play) is working correctly on
your computer.
Upgrade Device Firmware - Upgrade the camera’s
Firmware and device embedded web UI software on
this page.
Restore Factory Settings - Restores the original
settings of the device.
Reboot Device - Reboots the device.
Multi-Device Settings
In the Multi Device Settings page, the user can
visualize all devices detected in the LAN. The firmware
inside the camera supports up to 9 cameras
monitoring at the same time. You may view either
9 or 4 cameras at once in a grid on one screen, or
choose to view a single camera at a time.
The ‘1st device’ is the default IP camera. You can add
more cameras to the list in the network for
monitoring different areas.

Nexxt Solutions - Integrated Wireless IP Camera
40
To add cameras to the LAN
Click ‘The 2nd Device’ and double click the IP
camera from the ‘Device List in LAN’. The Alias,
Host and HTTP Port will fill in automatically. Enter
the correct User Name and Password then click
‘Add’. Repeat the same procedure to add additional
cameras.
To add cameras to the Internet
First make sure the camera added can be
accessed on the Internet with the IP address or
DDNS domain. (for example: http://XXX.XXX.XXX.
XXX:81 or http://ipcamera.dyndns.org:81).
Enter the Host in the format: XXX.XXX.XXX.XXX
port: 81 or Host: ipcamera.dyndns.org port: 81.
Enter the correct User Name and Password
followed by ‘Add’. Repeat the same procedure to
add more cameras.
Basic Network Settings
If the router that the IP camera connects to has
a DHCP function, you can choose ‘Obtain IP from
DHCP Server´ or you may fill in the network
parameters manually.