NEXXT SOLUTIONS 320U1 IP Camera User Manual Manual 3
NEXXT SOLUTIONS IP Camera Manual 3
Contents
- 1. Manual 1
- 2. Manual 2
- 3. Manual 3
- 4. Addendum
Manual 3
Nexxt Solutions - Integrated Wireless IP Camera
41
HTTP Port - In most cases, you can leave this value
as 80; however, if your Internet Service Provider
blocks this port, you may have to switch to another
port number, such as 8005.
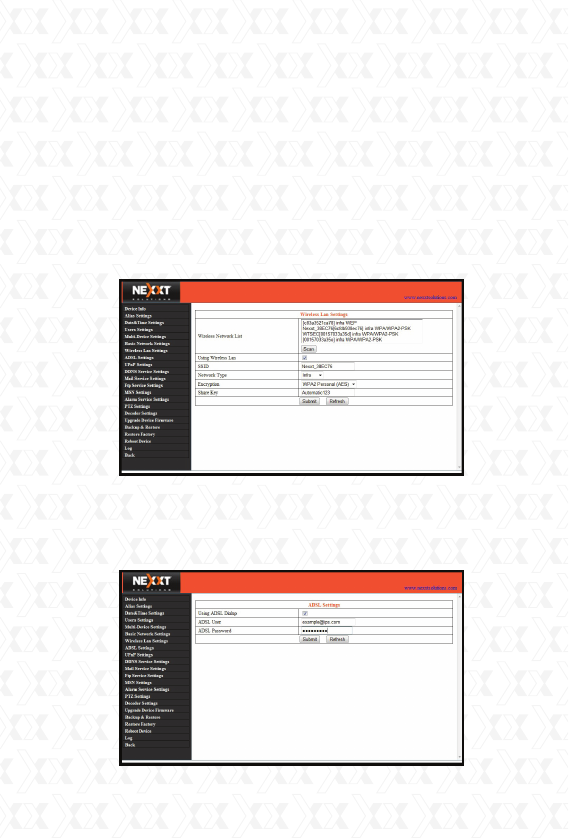
Wireless LAN Settings
Enter the wireless settings page of the Wireless
Router to find out the SSID, Channel, Encryption and
Authentication details. This product supports WEP
and WAP security encryption methods.
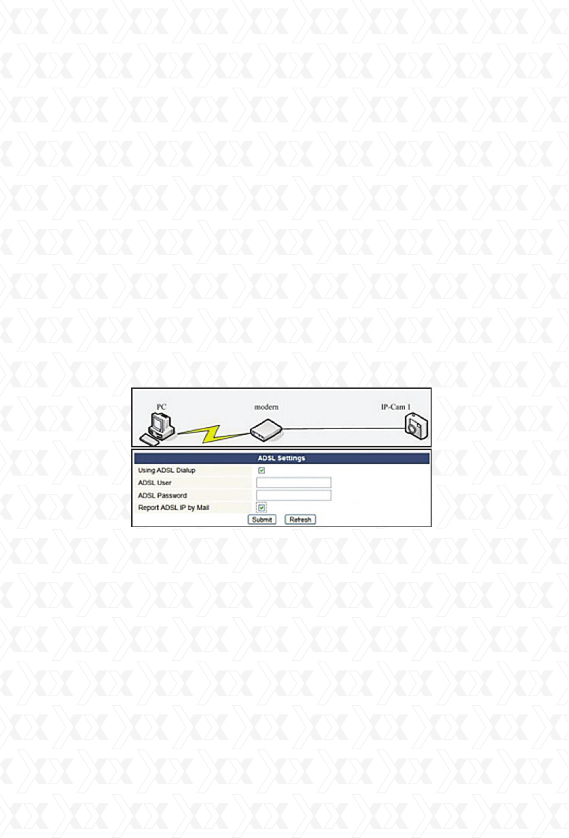
ADSL Settings
When connected to the Internet through ADSL,
you can enter the ADSL username and password
obtained directly from your ISP.
Nexxt Solutions - Integrated Wireless IP Camera
42
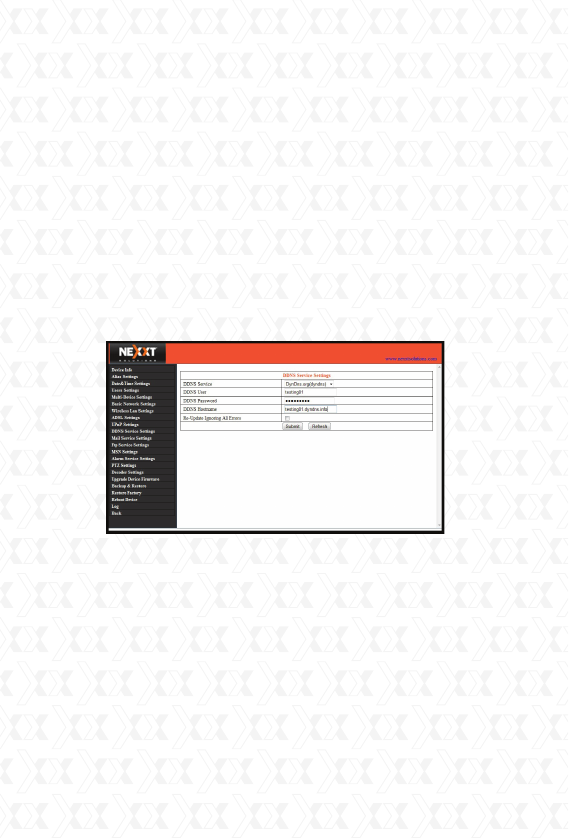
DDNS Service Settings
The system supports protocols from some DDNS
providers such as dyndns.org. Fill in the following fields
once the DDNS service has been setup.
User and Password: The User Name and Password
used when applying for the domain name.
DDNS Host: The domain name.
DDNS or Proxy Server: If you access the DDNS host
through a proxy, you should enter the Proxy
IP here.
DDNS or Proxy Port: The Proxy Port.
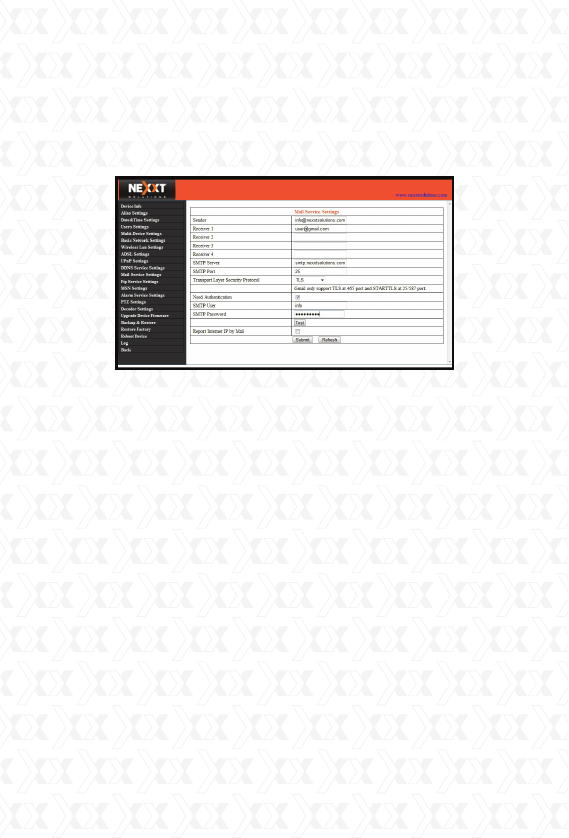
Mail Service Settings
Configure the email addresses that will receive and
send mails after an alarm is triggered.
Sender - This device uses the sender mailbox to send
mails.
Receiver – The account used to receive mails from
the Sender. You can set up to 4 receiver mailboxes.
SMTP Server - The SMTP server for the sender
mailbox.
Nexxt Solutions - Integrated Wireless IP Camera
43
Need Authentication - Check the box if the email
needs authentication. If so, please enter the SMTP
User Name & Password.
Mail test: Set the Mail parameters and click
‘Submit’ before attempting to send a test email.
There are 8 possible Mail Test errors:
1. Cannot connect to the server.
2. Network Error. Please try later.
3. Server Error.
4. Incorrect username or password.
5. The Sender is denied by the server - The server
needs to authenticate the user; check settings and
try again.
6. The Receiver is denied by the server - Could be
caused by the anti-spam privacy settings of the
server.
7. The message is denied by the server - Could
be caused by the anti-spam privacy settings of the
server.
8. The server does not support the authentication
mode used by the device.
Report Internet IP by Mail - Check the box
so when the IP camera is powered on or the
Internet IP address changes, an email will be
Nexxt Solutions - Integrated Wireless IP Camera
44
sent. (For example: XPY 320`s address is
http://119.123.207.96:9002). Make sure the
port is mapped to the router correctly by UPnP or
Virtual Map function.
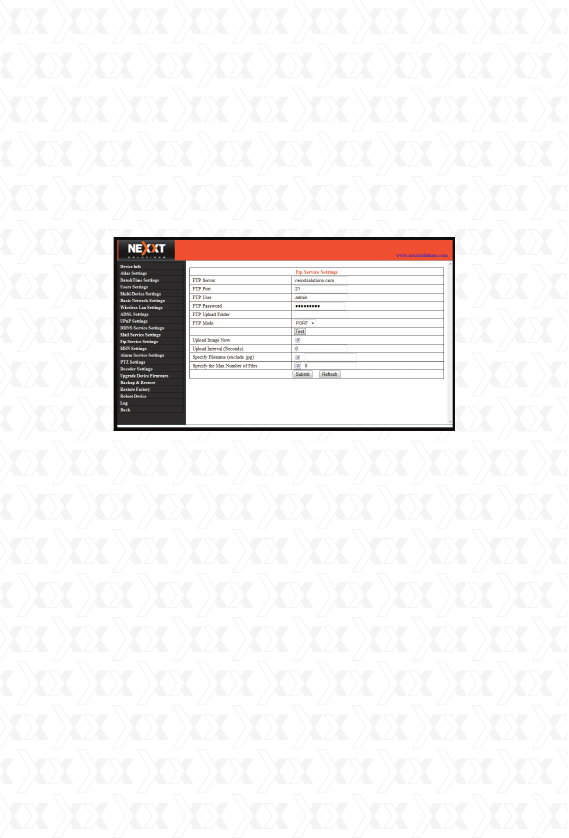
FTP Service Settings
Note: When under Alarm Service Settings the
option “Upload Image on Alarm” is checked, the FTP
Service takes effect.
FTP Server - The FTP server address.
FTP port - The port usually is 21.
FTP Mode - Supports standard (PORT) mode and
passive (PASV) mode.
Upload Image Now - Check the box to upload an
image. When checked, you can input the upload
interval time in seconds.
FTP Test - Set the FTP parameters and then click
‘Submit’ before testing the FTP settings.
If successful, the user will be prompted accordingly.
Otherwise, an error message will be displayed.
There are 8 possible FTP test errors:
1. Cannot connect to the server - Please check FTP
Server settings.
2. Network Error. Please try later.
3. Server Error.
Nexxt Solutions - Integrated Wireless IP Camera
45
4. Incorrect username or password - Check the
username and password.
5. Cannot access the folder - Ensure the folder
exists and your account is authorized.
6. Error in PASV mode - Ensure the server supports
PASV mode.
7. Error in PORT mode - PASV mode should be
selected if the device is behind a NAT.
8. Cannot upload file - Ensure your account is
authorized.
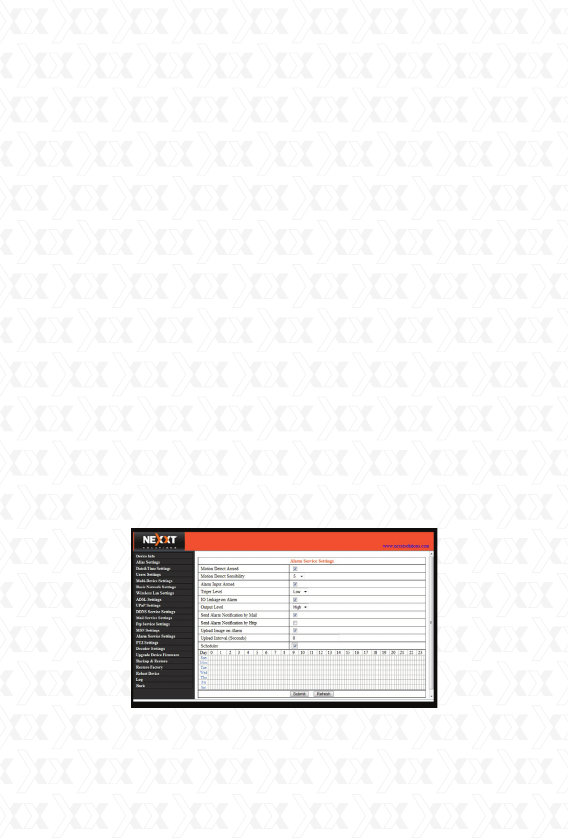
Alarm Service Settings (Motion Detection)
Enter the Alarm Service Settings page to
configure the Motion Detection function. When
motion detection is enabled, the camera can be
triggered to send email alerts and upload images.
In the camera monitoring page, the green icons will
turn to red and you will hear an alert sound if
motion is detected.
Note: The default path for saving recorded files is
C:\Documents and Settings\All Users\Documents.
Motion Detection Sensitivity - Sensitivity can be
determined in a scale from 1 to 10, 1 being the

Nexxt Solutions - Integrated Wireless IP Camera
46
setting with the highest motion detection sensitivity,
while 10 represents the lowest sensitivity available
you can preset.
Send Mail on Alarm - Sends picture & mail
information to the set email address after the alarm
is triggered.
Upload Image on Alarm - Enable this function to
upload an image after the alarm is triggered.
REC on schedule and save to PC - Enable this
function for automatic recording to start on the
scheduled time for several seconds, and save the
video in the PC when an alarm has been triggered.
ACCESSING THE IP CAMERA
Using the WiFi capability
To use the wireless feature of the IP Camera, a
wireless router is required. Follow the instructions
below to get started after the camera has been
mounted properly.
1. Use the Network cable to connect the IP Camera
to the LAN.
2. Enter IP Camera Tool to search for the camera.
3. When IP address of the camera is listed in the
Result Field of the IP Camera Tool, it means the
basic configuration is completed.
4. Set the security settings in Internet Explorer on
the PC when you view it for the first time.
5. Log in to the web browser of the IP camera.
6. Now you can use the IP Camera as a Visitor,
Operator or Administration in the LAN.
Nexxt Solutions - Integrated Wireless IP Camera
47
7. Open the wireless router setup page and enter
the SSID, Channel, Security Method (NONE, WEP),
Authentication Type and Encryption. NOTE: This
product supports WEP and WAP security
encryption methods.
8. Click “Submit” to reboot the device.
9. Wait at least 30 seconds, then unplug the
ethernet cable followed by the power supply. Power
on the camera once again, making sure only the
power supply is connected. After 30 seconds, if the
LED blinks, it indicates the IP camera has started
working on WiFi mode.
Connect to the Internet through ADSL directly
1. Use the Network cable to connect the IP Camera
to PC.
2. Enter IP Camera Tool to search for the camera.
3. Log in to the IP camera web browser page as an
Administrator.
4. Enter the ADSL Settings page to input ADSL
User Name and password.
5. Enter DDNS Settings Page and enable the DDNS
service. Next, click ‘Submit’ to reboot the camera.
6. By connecting the IP Camera to the ADSL
directly, you can access the Camera through the
Nexxt Solutions - Integrated Wireless IP Camera
48
Internet using the domain name.
NOTE: Choose the option ‘Report ADSL IP by Mail’,
for the ADSL IP address to be sent via email.
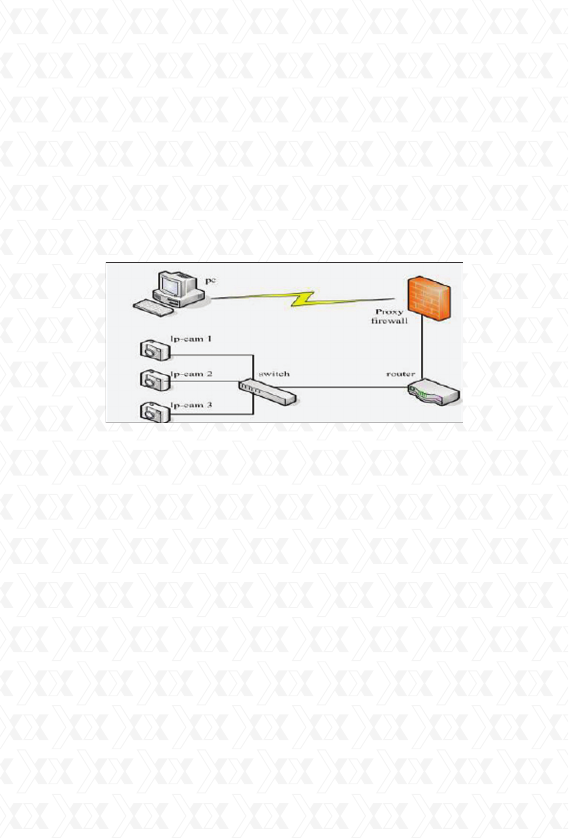
Connect to the Internet using a router
Follow the steps below to use a router to access the
Internet by shared ADSL. If a router is set for dial-up
Internet access, setting an ADSL dial-up account
and password on the IP Camera is not required.
1. Use the Network cable to connect the IP Camera
to the LAN.
2. Open the IP Camera Tool in order to search for
the camera.
3. Log in to the IP camera web browser page as an
Administrator.
4. Enter the DDNS Settings Page to enable the
DDNS service. Next, click ‘Submit’ to reboot the
camera.
5. Now access the Camera directly through the
Internet using the domain name.
Static IP address users
Static IP address users do not need to use DDNS
for remote access. When the settings of the IP
camera in LAN mode are complete, you can access
Nexxt Solutions - Integrated Wireless IP Camera
49
the Camera directly through the Internet using the
WAN IP.
Two methods are available to obtain the WAN IP
address.
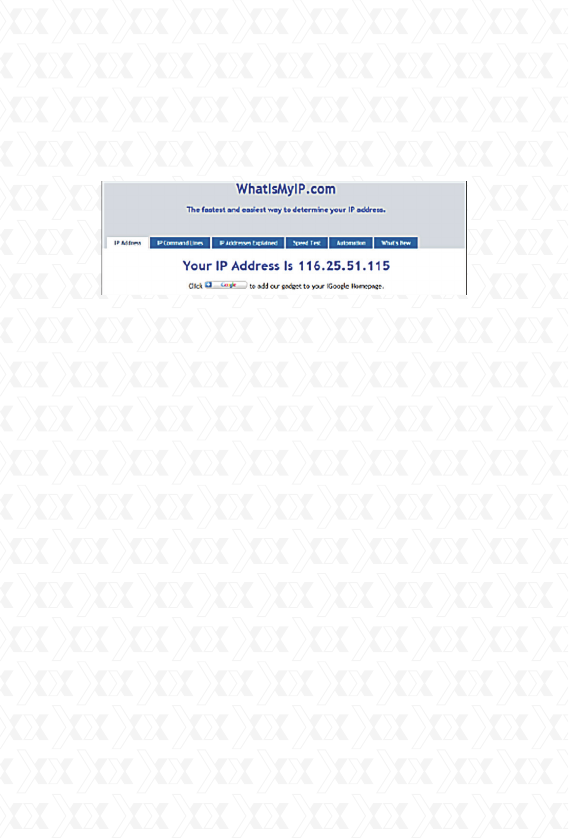
1: Obtain the WAN IP from a Website
You can discover this easily by turning on a
computer using the same connection as the IP
camera and entering this address: http://www.
whatismyip.com.The page at this address will show
you the current WAN IP.
2: Obtain the WAN IP address from the router
1. Obtain the IP address of the router (LAN Gateway
address), User Name and Password for logging into
the router.
2. Enter the LAN IP address of the router
(ie:192.168.1.1) in the address bar of your PC
browser to log on to the router.
3. Open the Status page to find out the WAN
address of the router. In this example, the address
is 116.25.51.115.
Accessing the IP Camera over the Internet
Users can access the IP Camera from the Internet.
Enter the WAN IP address and port number into the
browser. For example, http://116.25.51.115:85.

Nexxt Solutions - Integrated Wireless IP Camera
50
Note: Make sure Port mapping is successful. Port
mapping can be configured in two ways:
•EnterthesettingpageoftherouterwhichtheIP
camera connects with to enable the UPNP function.
To do so, open the the IP camera “Upnp Settings”
dialog box, and make sure the status for “Upnp is
successful”.
•IfyourrouterhastheVirtualMapfunction,enter
the router settings page, add the IP camera’s IP
address and port number to the Virtual map list.
How to use DDNS
When using ADSL, the IP Camera will connect to
the Internet through ADSL automatically. For each
ADSL reconnection, your Internet Service Provider
will re-assign a new IP address for the IP Camera to
facilitate the access. DDNS (Dynamic Domain Name
Server) can map the dynamic IP address of an IP
Camera to a fixed domain name. Therefore, we can
access the IP Camera by the fixed domain name
whether the IP address changes or not. The IP
address is not necessary when using the DDNS via
the domain name to find your network.
1. Go to the website that provides free domain
names, such as http://www.dyndns.com. Register
to apply for a free domain name.

Nexxt Solutions - Integrated Wireless IP Camera
51
2. Enter DDNS Settings Page to enable the DDNS
service, and click ‘Submit’ to reboot the camera.
3. Re-log in to the Camera web browser as
Administrator and enter the ”DDNS Service
Settings” page to check if the DDNS Status has
been successfully changed to DynDNS.
4. Enter the ‘UPnP Settings’ page, the UPnP Status
should be ‘Successful UPnP Session’. If not, you may
enter the “Basic Network Settings” page to change
the Http Port. Then click “SUBMIT” and reboot
device.
5. Re-log in to the Camera homepage to check and
make sure the DDNS Status and UPnP Status have
been successfully configured.
6. You only need to enter the domain name (Domain
name+Port number http://ipcam.domain.net:81) in
the IE address bar, and the browser will visit the IP
Camera. Wait for several minutes and the IP
Camera will access the Internet automatically.
Another way the user can access the IP camera
from a WAN is by using the DDNS domain name. If
the gateway settings and DDNS settings have been
completed, enter the DDNS dynamic domain name

Nexxt Solutions - Integrated Wireless IP Camera
52
(for example,http://ipcam.vicp.net, do not add www.)
in the address bar of IE to access the IP Camera.
If multiple IP Cameras are connected to the same
router, enter DDNS dynamic domain with the port
number (for example, http://ipcam.vicp.net:85) in
the address bar of IE to access different IP cameras.
Accessing the IP Camera from your mobile phone
Compatibility with mobile phones using 3G
technology (iPhone, Android, Blackberry, and PDAs)
enables you to view real-time videos over the
internet using a standard browser.
An IP camera can send a snapshot picture to an
email account accessible via a cell phone. Cell phone
surveillance also allows the user to adjust camera
settings and video resolution for a mobile feed where
video could then be accessible on a cell phone. There
are applications that allow for advanced PT control
at your fingertips, access to multiple cameras from
different locations and even remote video playback.
Follow the steps below to gain access to the
IP Camera from your mobile phone:
1. Go to mobile internet browser
2. Enter http://the external IP address of your IP
Camera: port number.
3. Demo example: http://y-cam.dtns.net:8152.
4. This will bring up the authentication window to
enter your user security settings.
5. Next, a window with 3 different options will pop up.
6. Select the best option based on the web browser
supported by your particular phone.
7. Click on ‘Live Video’ to see real time video footage
captured by the camera.

Nexxt Solutions - Integrated Wireless IP Camera
53
Frequently Asked Questions
Note: Please check network connections first to
troubleshoot any potential problems. Check if any
LED on the network, server, hub, exchange or
network card is showing signs of malfunction. In
case of abnormal operation, verify that all connec-
tions on the network have been done correctly.
In addition, you can see the list of problems below,
as it contains the solution to the most common
problems encountered while setting up the camera:
What do I do if I have forgotten the administrator
User Name and/or password?
To reset the administrator User Name and pass-
word, press and hold down the RESET button for 5
seconds. Release the power button and the User
Name and password will be reset back to their
factory default configuration.
Default administrator User Name: admin
Default administrator password: no password
IP Address configuration
Check whether the IP address of the IP Camera
server shares the same subnet as your work
station: Click My Computer > Control Panel >
Network & Dial-up Connections > LAN > Attributes
>Internet Protocols (TCP/IP), and check the IP
Address and Subnet Mask. Make sure they are in
the same subnet when configuring the camera’s
IP address manually if you are unable to access IP
Camera via a web browser.

Nexxt Solutions - Integrated Wireless IP Camera
54
Network Configuration
Double check to ensure that your HTTP server
software is configured and running properly. If you
are running any firewall software, make sure it is
allowing inbound connections to port 80. Also, if you
happen to be using a cable/DSL router, verify that
you have set up the port forwarding feature
properly (consult your router’s documentation for
more information).
If none of these seem to be the problem, it is also
possible that your ISP is blocking inbound connec-
tions to port 80 - many ISPs have done this because
of internet worms, such as Code Red. If this is the
case, you will have to setup your HTTP server on an
alternate port (such as 8080).
Picture Problems
Video streaming is transmitted by the ActiveX
controller. If the ActiveX controller is not installed
correctly, no video image will be seen.
There are two ways to solve this problem:
1. Install the ‘IP Camera Tool’. ActiveX controller will
be installed simultaneously (recommended).
2. Download ActiveX controller and set the Security
Properties of IE on the PC when you view it for the
first time: Go to Tools > Internet Properties >
Security > Custom Level > ActiveX control and
Plug-ins. All 3 options need to be set to ‘Enable’.
- Enable: Download unsigned ActiveX controls.
- Enable: Initialize and script ActiveX controls not
marked as safe.
- Enable: Run ActiveX controls and plug-ins.

Nexxt Solutions - Integrated Wireless IP Camera
55
Problems with network bandwidth
The image frame rate depends on the following
factors:
1. Network bandwidth.
2. PC performance, network environment and
display preference setting (brightness, theme, etc).
3. The number of visitors (too many visitors will slow
down the image frame rate).
4. Choice of switch or hub (use a switch for multiple
IP cameras rather than a hub).
Pop up appears saying
‘Fail to connect to the device’
This prompt will only appear when using multiple
cameras. Enter the Multi-Device Settings page (log
in as an Administrator) to check whether the Device
settings are correct.
When one of the multiple cameras disconnects,
the icon changes color to yellow and the pop-up
prompt “Failed to connect to the device” is
displayed.
Can’t access the IP camera on the internet?
There could be a number of reasons:
1. ActiveX controller is not installed correctly.
2. The port IP camera being used is blocked by
Firewall or an anti-virus software. Use a different
port number and try again.
3. Port mapping failed. There are two ways available
for configuring port mapping:
Open the setting page of the router which the IP
camera connects with to allow the UPNP function.

Nexxt Solutions - Integrated Wireless IP Camera
56
Go to the IP camera’s ‘UPnP Settings’ to enable
UPnP, making sure the ‘UPnP” configuration is
successful.
If your router has the Virtual Map function, enter
the router setting page, and add the IP camera’s IP
address and port number to the Virtual map list.
Problems with using the Firefox browser -
monitoring pages are not displayed normally
Due to security issues, the Firefox browser does not
support ActiveX controls, but it provides a
plug-in named IE-Tab which enables Firefox to
support ActiveX controls. Using the Firefox browser,
you can access the website as follows:
https://addons.mozilla.org/en-US/firefox/
addon/1419.
On the download page, select the right version for
your browser, download it, and start installing the
plug in. The installation steps for the Firefox browser
(version 2.0.0.18) plug-in are detailed as follows:
1. Select the right version, as shown in the figure
below.
2. Click ‘Add to Firefox (in Windows)’ to start the
download.
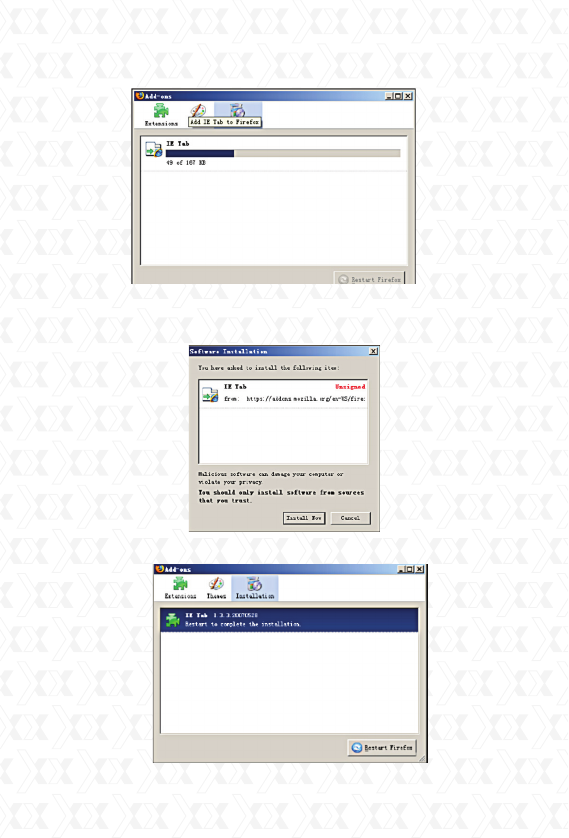
Nexxt Solutions - Integrated Wireless IP Camera
57
3. Wait for the download to complete. A dialog box
will pop-up as shown as in the chart below.
4. Click the ‘Install Now’ button to start installation.
Nexxt Solutions - Integrated Wireless IP Camera
58
5. When installation is complete, click ‘Restart
Firefox’ to initialize the browser.
6. Log in to your device and locate the monitoring
page, right click on the web browser page and click
the new menu item named ‘View page in IE-Tab’ to
log in to the IP camera again.

Nexxt Solutions - Integrated Wireless IP Camera
59
Default Parameters
Default network parameters
IP address: Automatically obtained
Subnet mask: 255.255.255.0
Gateway: Automatically obtained
DHCP: Disabled
DDNS: Disabled
Username and password
Default Administrator User Name: admin
Default Administrator Password: no password

Nexxt Solutions - Integrated Wireless IP Camera
60
SPECIFICATIONS
Model AILP324U1
Specifications
Camera
Image sensor
Lens
Infrared LED
Pixels
Night vision range
AWS/AGC/AES
Compression format
Minimum illumination
Audio
Input
Output
Image format
Max. frame rate
Resolution
PT angle
Horizontal speed
Vertical speed
Network interface
Supported protocols
Wi-Fi
Motion detection
Alarm events
Periodic sending
User authentication
Web browser
Simultaneous viewers
Mobile compatibility
Power
Power consumption
Operating temperature
Storage temperature
Operating humidity
Storage humidity
Gross weight
Certifications
Warranty
1/4 color CMOS
4 mm
10 pcs
300,000
15 m
Auto
MJPEG
0.1 Lux
2 way audio
Built-in microphone
Built-in speaker
PAL/NTSC
25 fps
Resolution 640×480 (VGA), 320×240 (QVGA)
Horizontal up to 265°, vertical up to 100°
0 - 16 °/s
0 - 16 °/s
RJ-45 (10BASE-T/100BASE-TX)
TCP/UDP/IP/ARP/ICMP/DHCP/DNS/HTTP/FTP/SMTP/NTP/PPPOE/UPNP/DDNS
IEE802.1 b/g
Motion detection and video recording to local storage
Notification via email, FTP - Video recording to local storage
Send pictures to Email/FTP within the time specified
User/password; administrator/operator/general user
IE 6.0 or above version, Mozilla Firefox, Safari, Opera, Chrome ,etc
10 viewers@320x240 4 viewers@640x480
Supports Nokia, Android, Windows mobile phone, Iphone and other smart cellular phones
DC 5V 1.5 A
4W/6W (Infrared off/on)
-10 to+55 °C
-20 to+60 °C
20- 80% RH
20- 95% RH
600 g (including accessories)
CE; FCC; RoHS
Limited one year warranty
Audio
Video
Pan/Tilt
Network
Alarm
General