NEXXT SOLUTIONS 350U1 2.4GHz High Power Wireless Outdoor Access Point User Manual AELPLDR4U1 P41 80 REV5
NEXXT SOLUTIONS 2.4GHz High Power Wireless Outdoor Access Point AELPLDR4U1 P41 80 REV5
Contents
- 1. AELPLDR4U1_User Manual(P1-40)-rev5
- 2. AELPLDR4U1_User Manual(P41-80)_REV5
AELPLDR4U1_User Manual(P41-80)_REV5
Nexxt Solutions - NetGate Wireless Access Point
41
•
•
•
•
Protocol - The protocol used for this application, either TCP, UDP, or All (all protocols
supported by the router).
Status - This field displays either Enabled or Disabled, as the current status for the device.
Modify - Click the Modify button next to in the entry you want to change. If you want to erase
that entry, click on Delete.
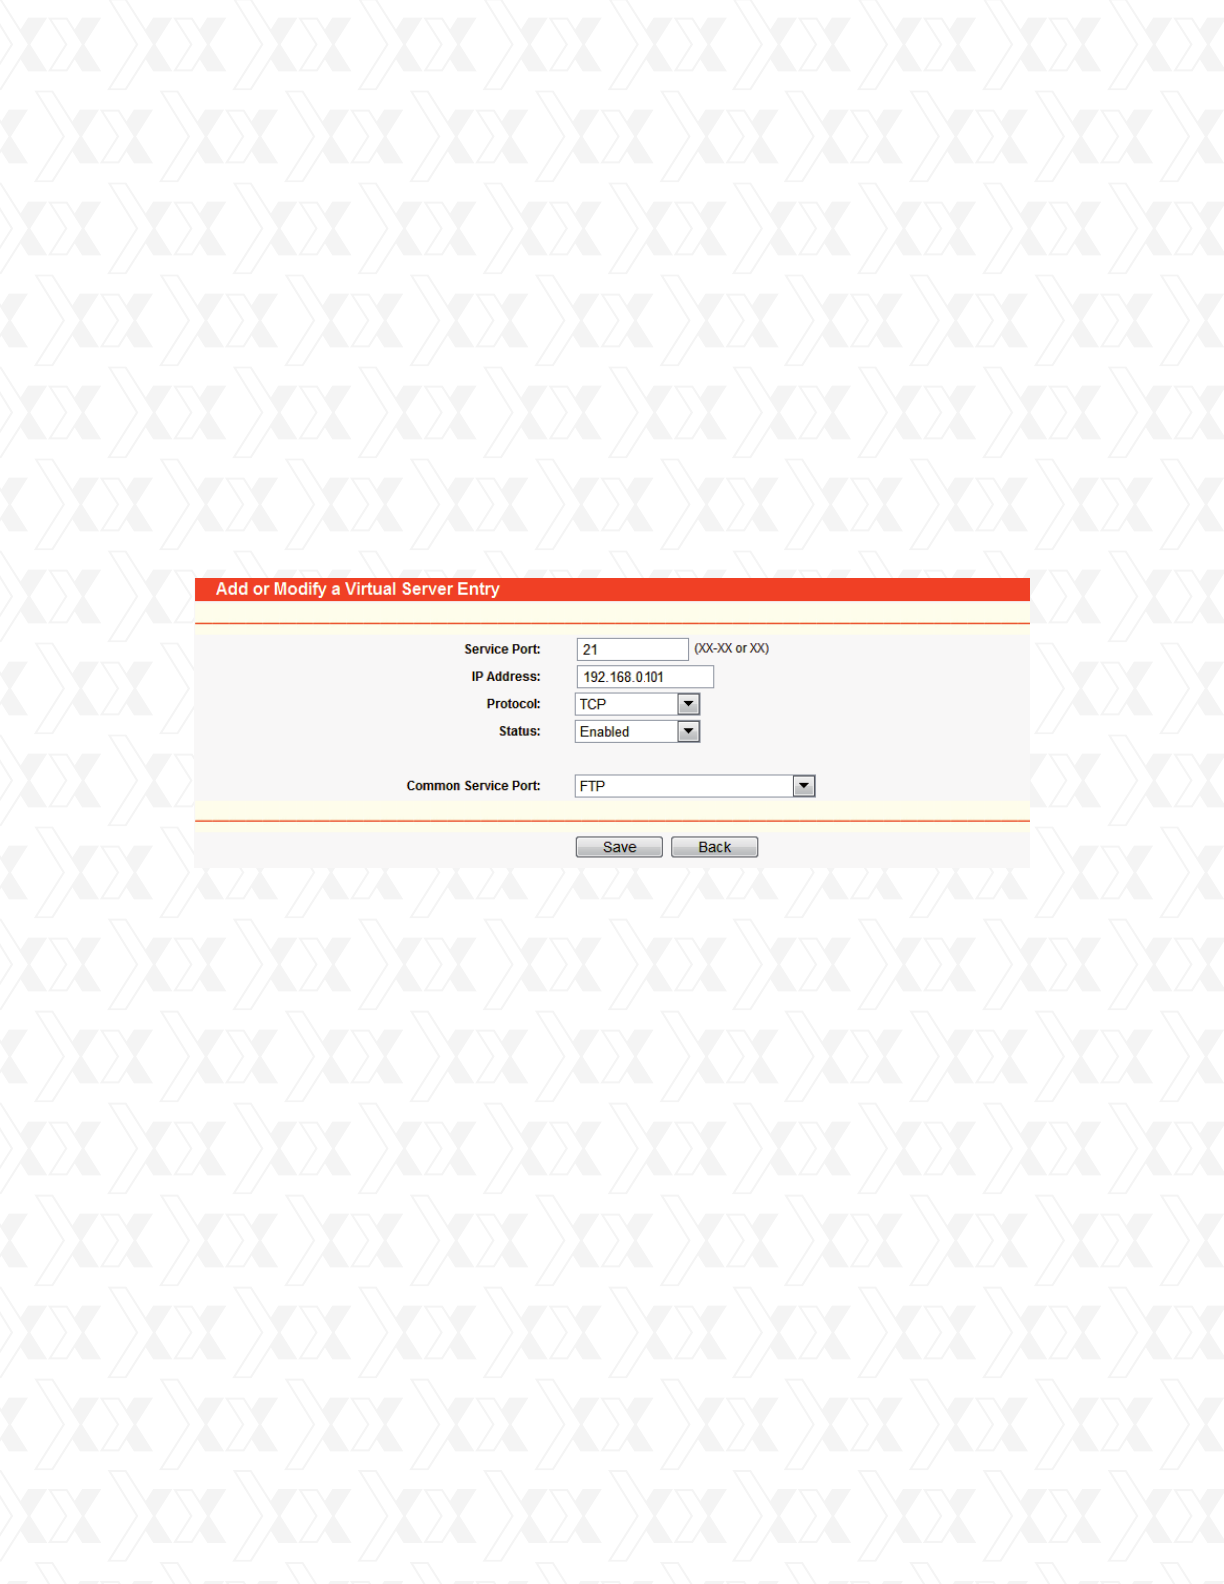
Common Service Port - Some common services are already available from the pull-down list.
To setup a virtual server entry, follow the steps described below:
Click the Add New… button on the virtual servers page. (Figure 4-29)
Select the service you want to use from the Common Service Port list. If the Common
Service Port list does not have the service that you want to use, type the number of the
service port or service port range in the Service Port field.
Type the IP Address of the computer in the Server IP Address field.
Select the protocol used for this application.
Select the Enable option to activate the virtual server.
Click the Save button.
Click the Modify button next to the entry you want to modify. If you want to erase this entry,
click on the Delete button.
Proceed with the changes you want to make.
Click the Save button when you are done.
Click the Enable All button to activate all entries.
Click the Disabled All button to cancel all entries.
Click the Delete All button to erase all entries.
Click the Next button to go to the following page. Click the Previous button to return to the last page.
Note:
If you set the virtual server of service port as 80, you must configure the Web management port
on System Tools –> Remote Management page to be any value other than 80, such as 8080.
Otherwise, there will be a conflict to disable the virtual server.
1.
2.
3.
4.
5.
6.
1.
2.
3.
Note:
If your computer or server has more than one type of service available, please select
a different service, and enter the same IP Address for that computer or server.
To modify or delete an existing entry:
Figure 4-29 Add or Modify a Virtual Server Entry
Nexxt Solutions - NetGate Wireless Access Point
42
4.9.2 Port triggering
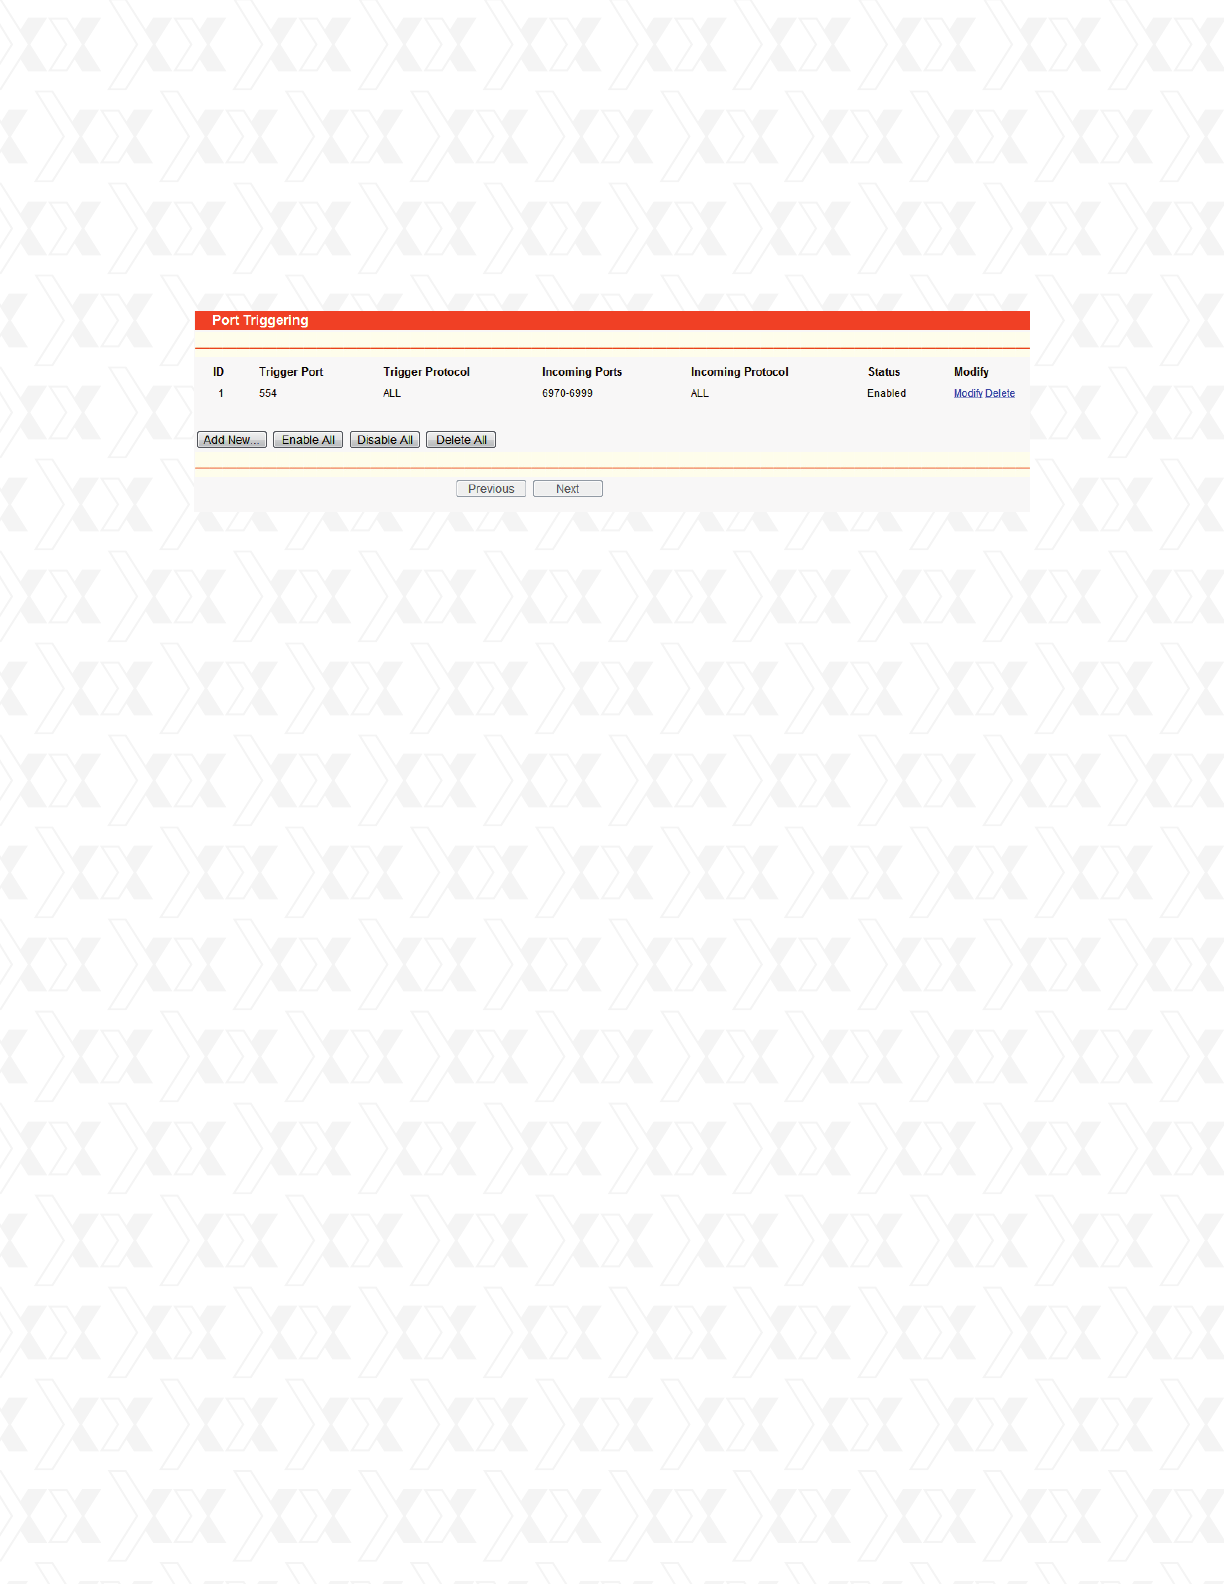
Go to Forwarding > Port Triggering in order to configure the Port Triggering parameters on
this menu, as shown in Figure 4-30.
Once configured, the operation is as follows:
To add a new rule, follow the steps below:
A local host makes an outgoing connection to an external host using a destination port
number defined in the Trigger Port field.
The router records this connection, opens the incoming port or ports associated with this
entry in the Port Triggering table, and associates them with the local host.
When necessary, the external host will be able to connect to the local host using one of the
ports defined in the Incoming Ports field.
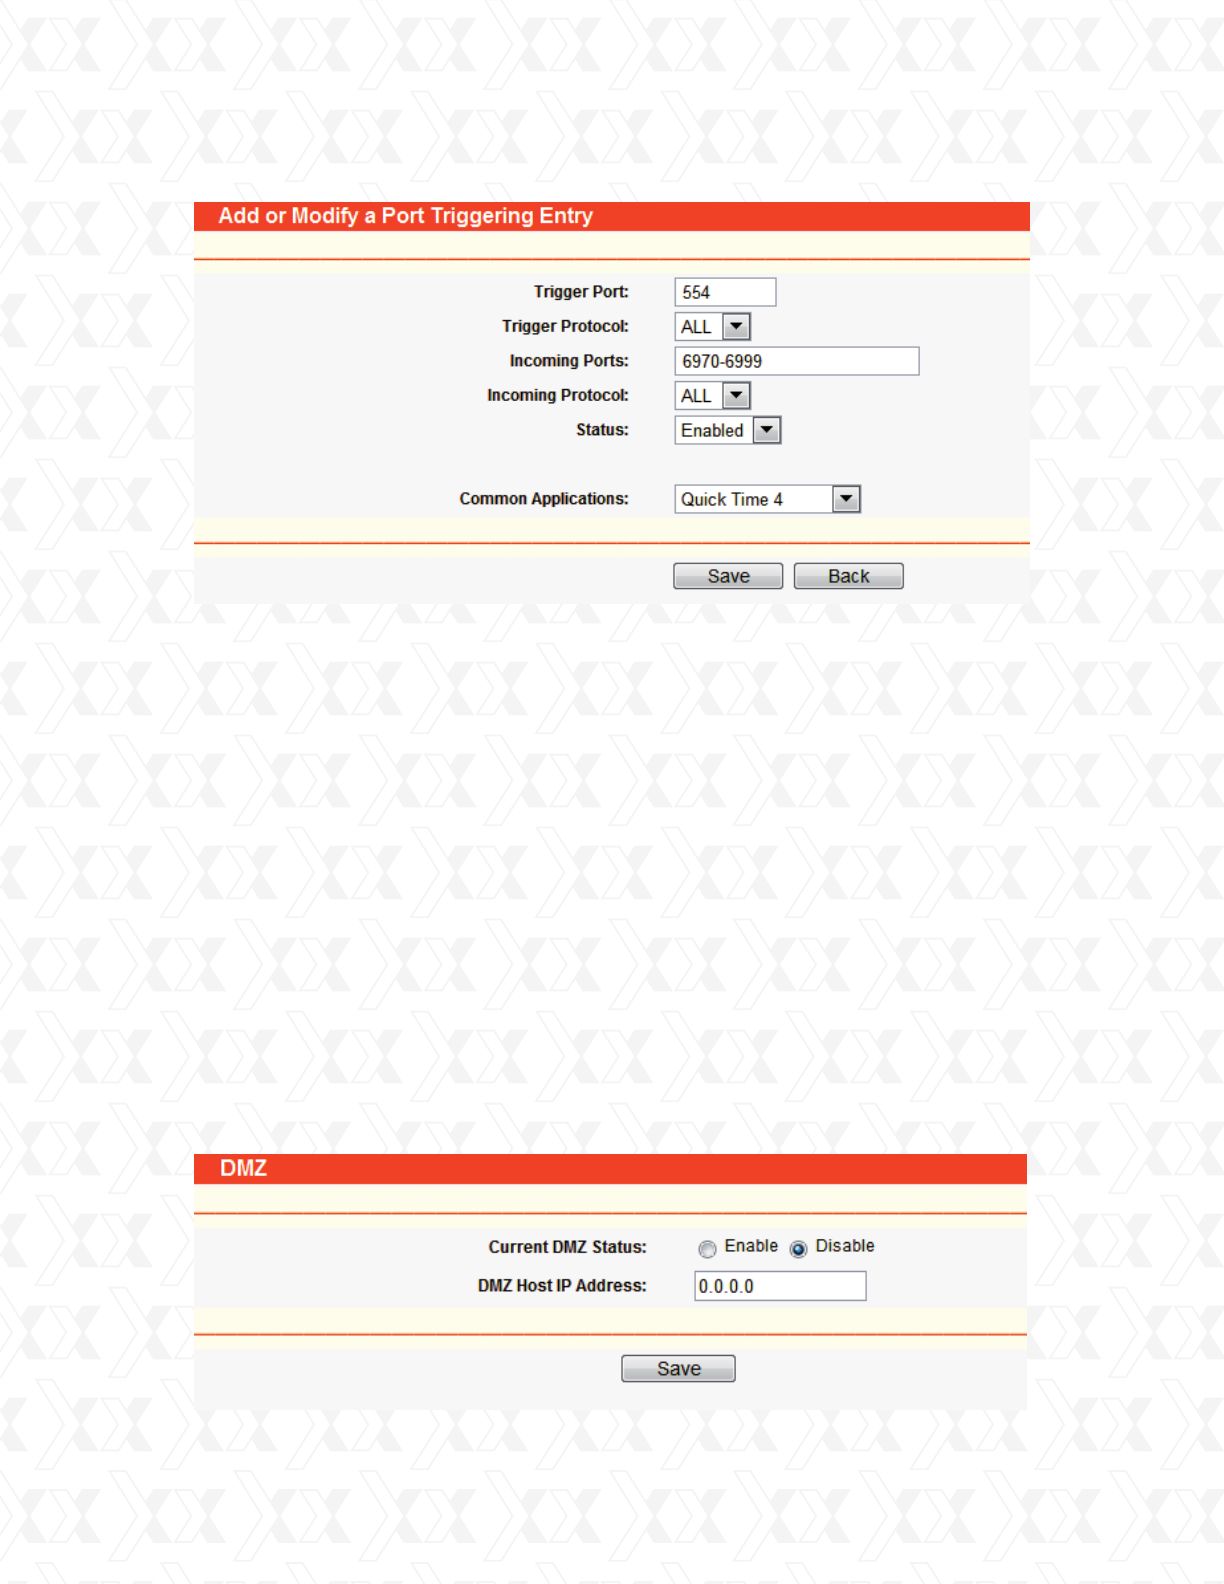
Click the Add New… button o the Port Triggering page. (Figure 4-31)
Select a common application from the Common Applications drop-down list, then the port
parameters will be automatically filled in the corresponding field. If the Common Applications
list does not have the application you want, enter the port parameters manually.
Select the protocol used for Trigger Port and Incoming Ports from the corresponding
pull-down list.
Click on Enable on the Status field.
Click the Save button to save the new rule.
1.
2.
3.
1.
2.
3.
4.
5.
•
•
•
•
•
Trigger Port - The port for outgoing traffic. An outgoing connection using this port will
“Trigger” this rule.
Trigger Protocol - The protocol used for Trigger Ports, either TCP, UDP, or All (all protocols
supported by the router).
Incoming Ports Range - The port or port range used by the remote system when it responds
to the outgoing request. A response using one of these ports will be forwarded to the PC that
triggered this rule. You can input at most 5 groups of ports (or port section). Every group
of ports must be separated by commas “,”. For example, 2000-2038, 2050-2051, 2085,
3010-3030.
Incoming Protocol - The protocol used for Incoming Ports Range, either TCP , UDP, or ALL
(all protocols supported by the router).
Status - This field displays either Enabled or Disabled, as the current status for the device.
Figure 4-30 Port triggering
Nexxt Solutions - NetGate Wireless Access Point
43
To modify or delete an existing entry, please complete the steps below:
Note:
Click the Enable All button to activate all entries.
Click the Disabled All button to cancel all entries.
Click the Delete All button to erase all entries.
Click the Modify button next to the entry you want to change. If you want to delete that entry,
click the Delete in this stage.
Proceed with the changes you want to make.
Click the Save button when you are done.
When the trigger connection is released, will cause the closing of the corresponding opened
ports.
Each rule can only be used by one host on the LAN at a time. The trigger connection of other
hosts on the LAN will be refused.
Incoming Port Range enabled cannot overlap each other at the same time.
1.
2.
3.
1.
2.
3.
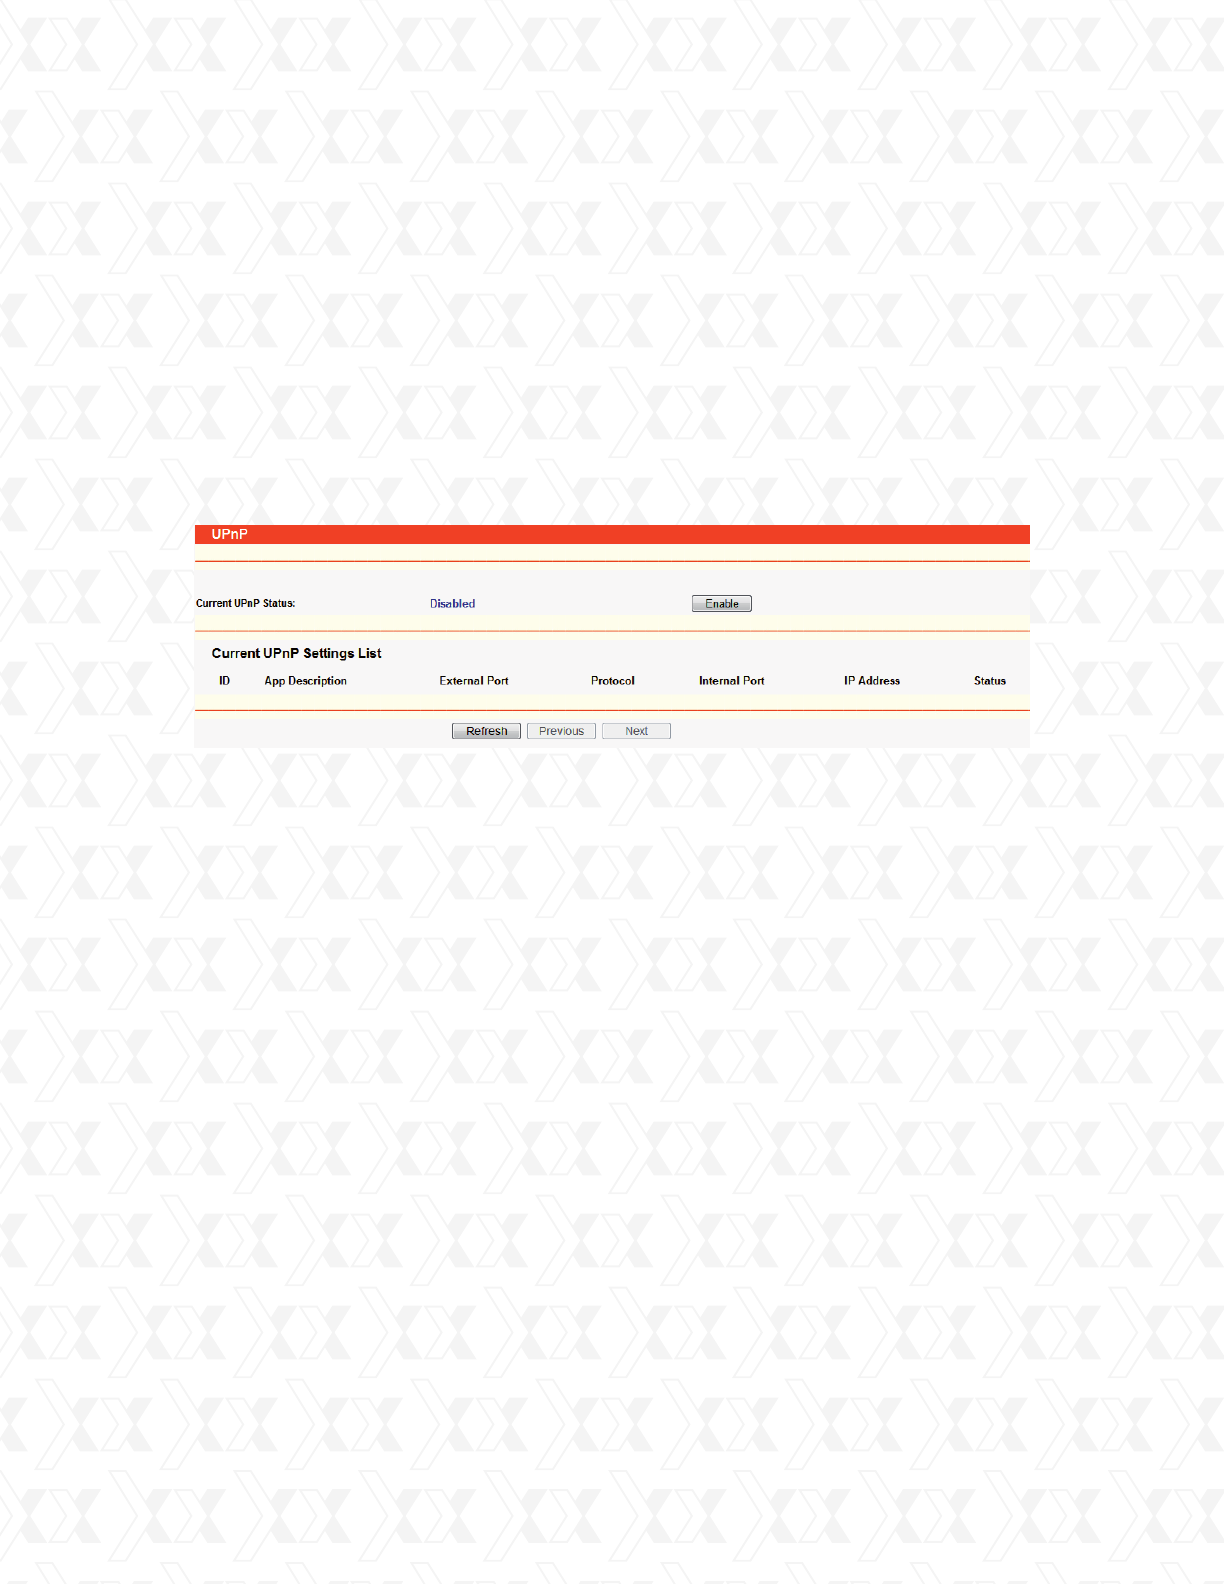
4.9.3 DMZ (Demilitarized Zone)
Go to Forwarding > DMZ in order to set up an DMZ host on this page, as shown in
Figure 4-32.
Figure 4-31 Add or Modify a Triggering Entry
Figure 4-32 DMZ
Nexxt Solutions - NetGate Wireless Access Point
44
To assign a computer or server to be a DMZ server:
Note:
Once you set the DMZ host, the firewall protection for that host will be disabled.
Click the Enable radio button.
Enter the IP address in the DMZ Host IP Address field of the local PC that you want to set as
the DMZ host.
Click the Save button when done.
1.
2.
3.
•
•
•
•
•
•
•
•
Current UPnP Status - UPnP can be enabled or disabled by clicking the corresponding
button. As enabling UPnP may present a risk to security, this feature is disabled by default.
Current UPnP Settings List - This table displays the current UPnP information.
Click Enable to activate the UPnP feature.
Click Disable to cancel the UPnP feature.
Click Refresh to update the Current UPnP Settings List.
App Description - The description provided by the application in the UPnP request.
External Port - The external port that the router opened for the application.
Protocol - Shows which type of protocol is opened.
Internal Port – The Internal port that the router opened as a local host.
IP Address - The IP address of the local host that initiates the UPnP request.
Status - The port status is displayed in this field. “Enabled” means that the port is still active.
Otherwise, the port will be inactive.
4.9.4 UPnP
Go to Forwarding > UPnP in order to configure the UPnP function on this page, as shown in
Figure 4-33:
Figure 4-33 UPnP Settings
Nexxt Solutions - NetGate Wireless Access Point
45
4.10 Security
This menu offers an enhanced level of protection for your network. IP address Filtering allows
you to control the Internet Access of specific users on your LAN based on their IP addresses.
Domain Filtering allows you to control access to certain websites on the Internet by specifying
their domains or key words. Like IP Address Filtering, MAC Address Filtering allows you to control
access to the Internet of users on your local network based on their MAC Addresses. Advanced
Security helps to protect the router from cyber attacks. Remote Management allows you to
manage your Router from a remote location via the Internet.
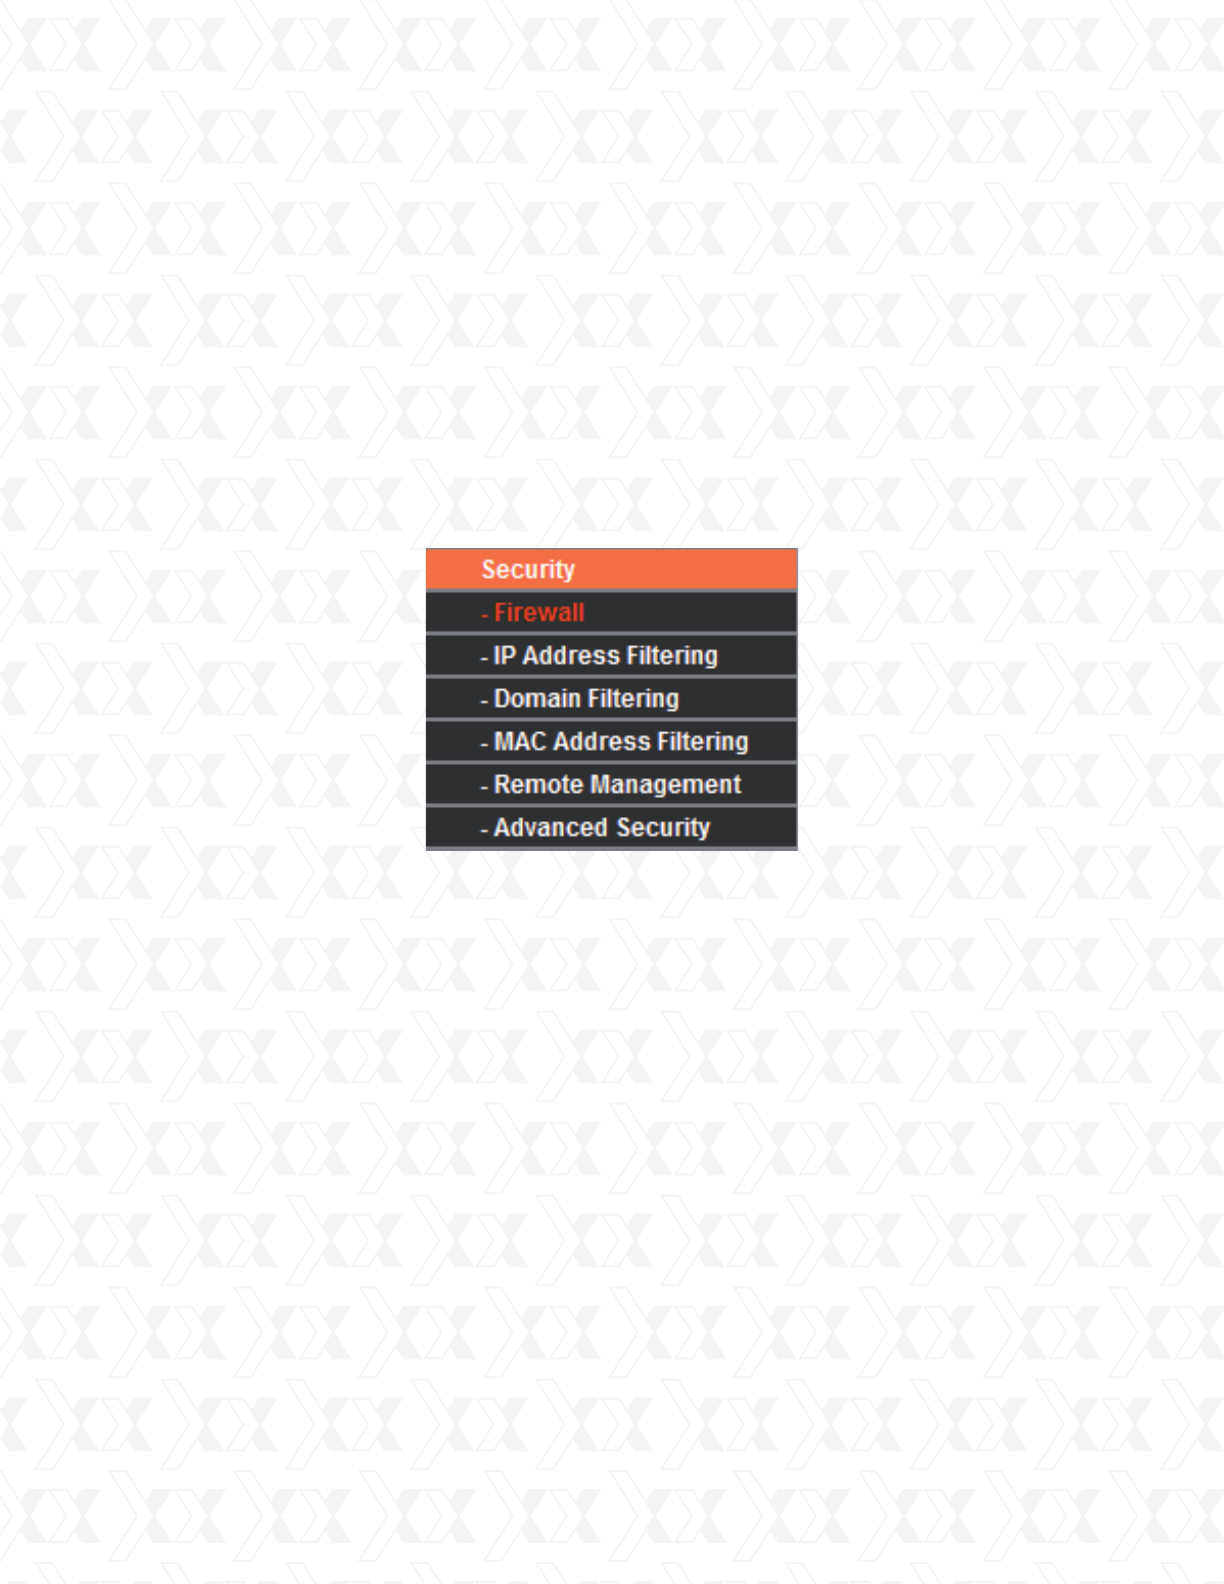
There are six submenus under the Security menu (shown in Figure 4-34): Firewall, IP Address
Filtering, Domain Filtering, MAC Address Filtering, Remote Management and Advanced
Security. Click any of them in order to configure the corresponding function. A detailed
description of each submenu is provided below.
!
Figure 4-34 The Security menu
Nexxt Solutions - NetGate Wireless Access Point
46
4.10.1 Firewall
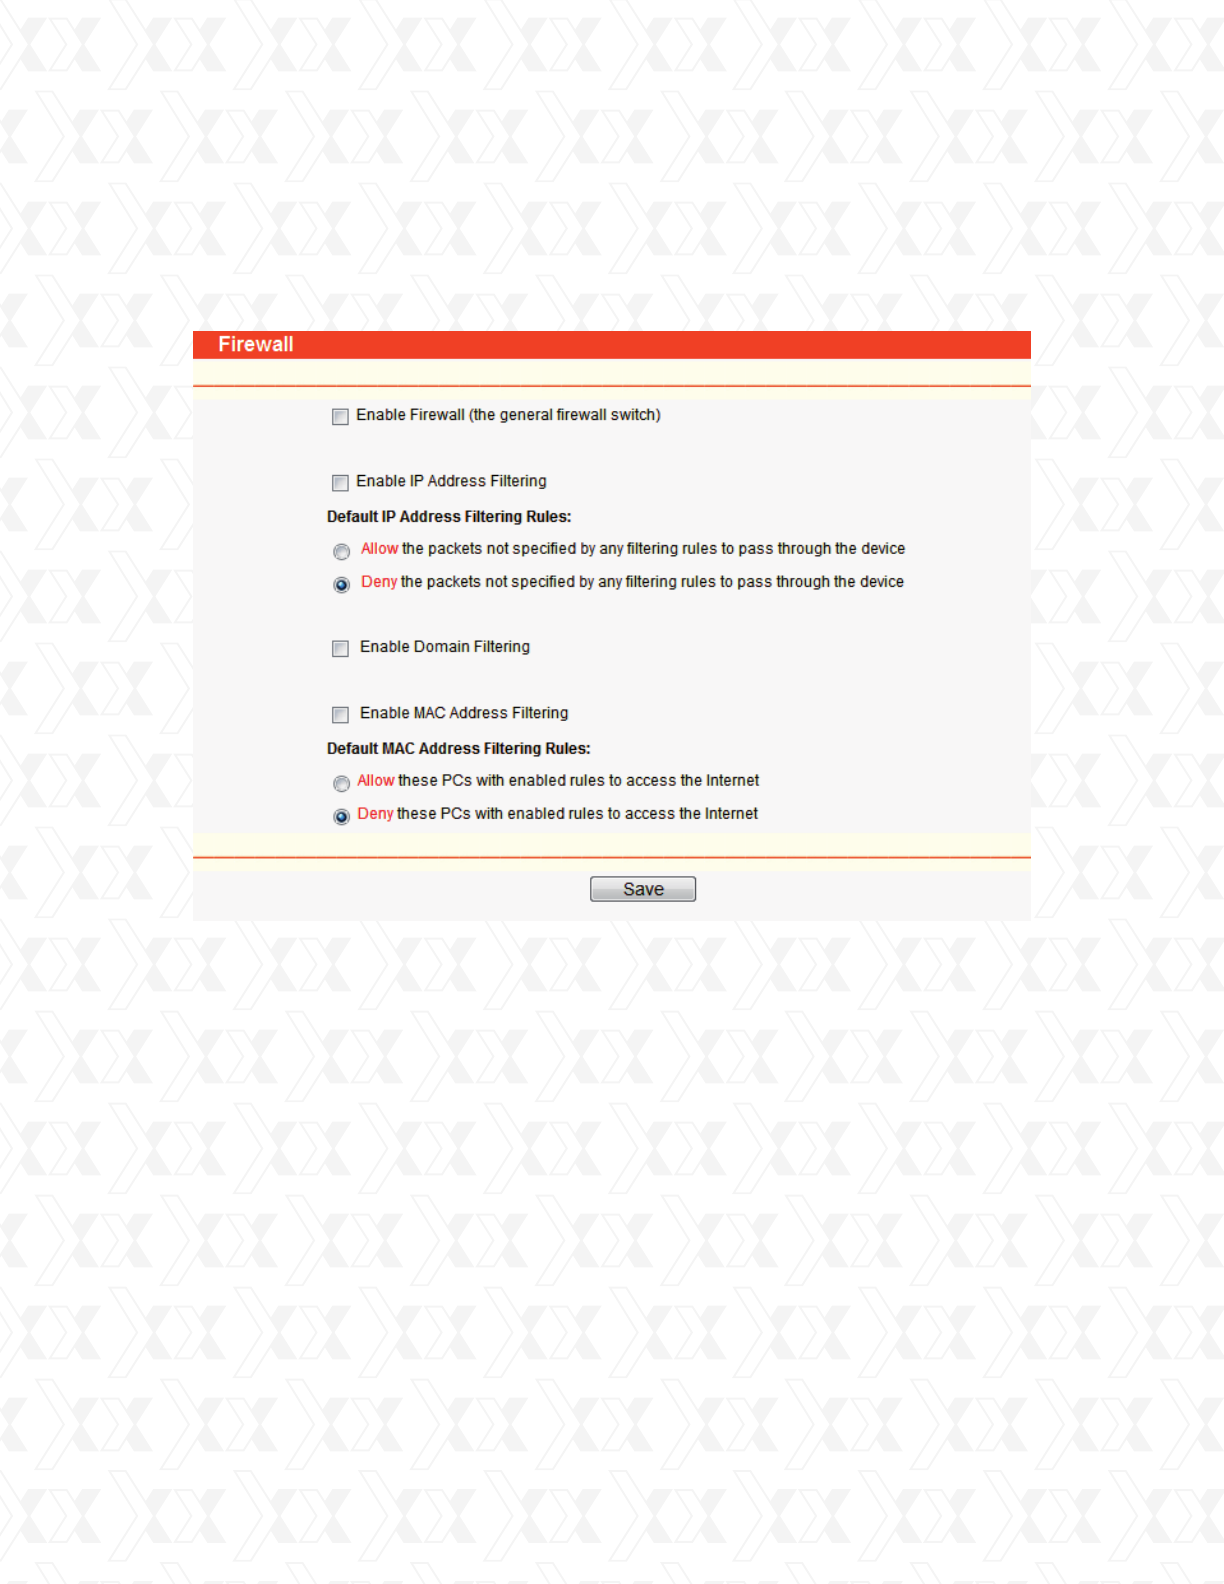
Go to Security > Firewall in order to enable the main firewall screen, as shown in Figure 4-35.
The default setting for the switch is off. Turning the general firewall switch to off will disable IP
Filtering, Domain Filtering and MAC Filtering even if their individual settings are enabled.
Enable Firewall - Check this box to activate the Firewall.
Enable IP Address Filtering - Check this box to activate IP Address Filtering on the AP. There are
two default filtering rules for IP Address Filtering: Allow or Deny the packets specified to pass
through the router.
Enable Domain Filtering - Check this box to enable Domain Filtering.
Enable MAC Filtering - Check this box to activate MAC Address Filtering on the AP. There are
two default filtering rules for MAC Address Filtering: Allow or Deny the packets specified to pass
through the router.
•
•
•
•
Figure 4-35 Firewall Settings
Nexxt Solutions - NetGate Wireless Access Point
47
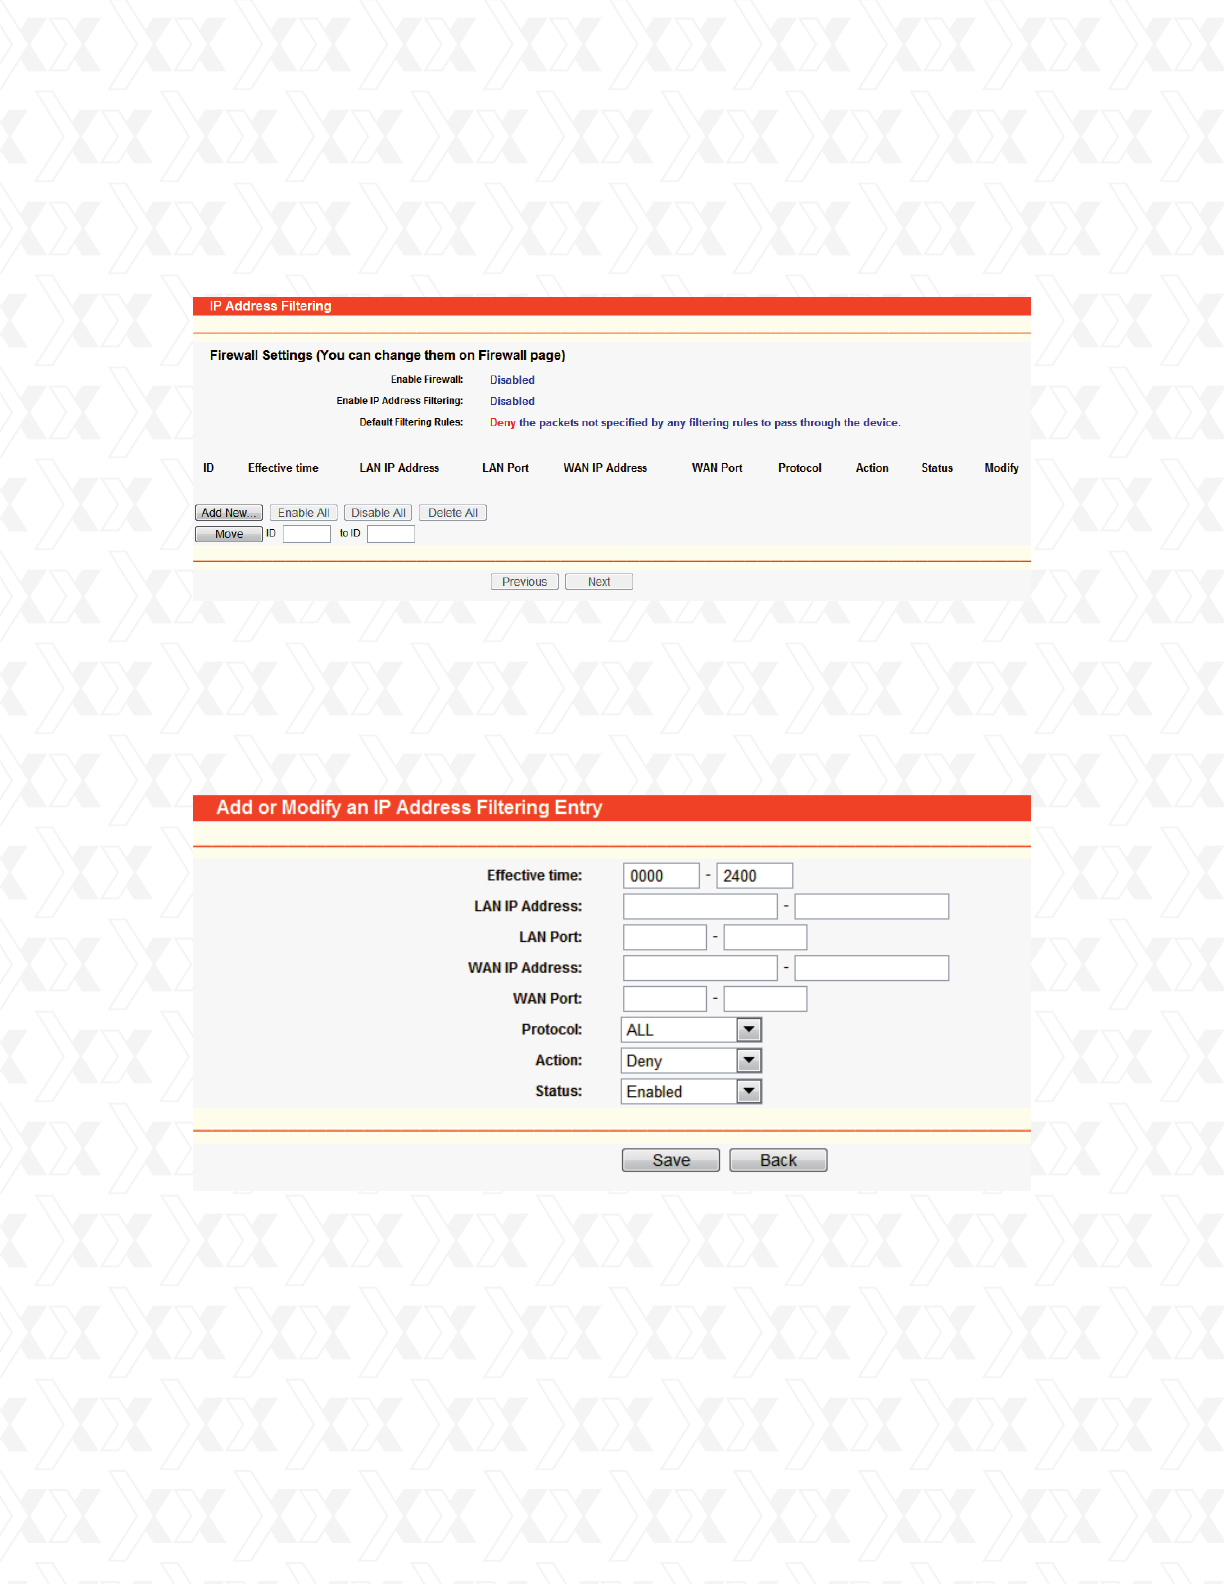
Effective Time - Enter a time range using the HHMM format. It represents the period within
which the entry shall remain active. For example 0803 - 1705, means that the command will
be effective from 08:03 to 17:05.
LAN IP Address - Enter a LAN IP Address or a range of LAN IP addresses in this field, in
dotted-decimal notation format. For example, 192.168.0.20 192.168.0.30. Leave the field
blank if you want all LAN IP Addresses to be used.
4.10.2 IP address filtering
Go to Security > IP Address Filtering in order to configure the IP address filtering entry on the
current page, as shown in Figure 4-36.
Do not change the default setting if you want to keep the IP Address Filtering feature disabled.
To set up an IP Address Filtering entry, you should first enable the Firewall, followed by the
IP Address Filtering on the Firewall page, as shown in Figure 4-35, and then click the Add New…
button, as illustrated in Figure 4-36. This will cause the page Add or Modify an IP Address
Filtering entry to be displayed, just like the one shown in Figure 4-37 below.
To create or modify an IP Address Filtering entry, follow these instructions below:
!
1.
2.
Figure 4-36 IP address Filtering
Figure 4-37 Add or Modify an IP Address Filtering Entry
Nexxt Solutions - NetGate Wireless Access Point
48
LAN Port - Enter a LAN Port or a range of LAN ports in this field. For example, 1030 2000.
Leave the field blank if you want all LAN ports to be used.
WAN IP Address - Enter a WAN IP Address or a range of WAN IP Addresses in this field, in
dotted-decimal notation format. For example, 61.145.238.6 - 61.145.238.47. Leave the
field blank if you want all WAN IP Addresses to be used.
WAN Port - Enter a WAN Port or a range of WAN Ports in this field. For example, 25 110.
Leave the field blank if you want all WAN to be used.
Protocol - Select the protocol to be used, either TCP, UDP, or All (all protocols supported by
the router).
Action - Select either Allow or Deny through the router.
Status - Select Enabled or Disabled for this entry from the Status pull-down list.
Click the Modify next the entry you want to change. If you want to erase the entry, click the
Delete button.
Proceed with the changes you want to make.
Click the Save button.
Click the Save button to confirm this entry.
To add another entry, repeat steps 1-9.
When finished, click the Back button.
To modify or delete an existing entry:
Click the Enable All button to activate all entries.
Click the Disabled All button to cancel all entries.
Click the Delete All button to erase all entries.
You can change the entry’s order as desired. Fore entries are before hind entries. Enter the
ID number in the first box you want to move and another ID number in second box you want to
move to, and then click the Move button to change the entry’s order.
Click the Next button to move to the following page and click the Previous button to return to
the last page.
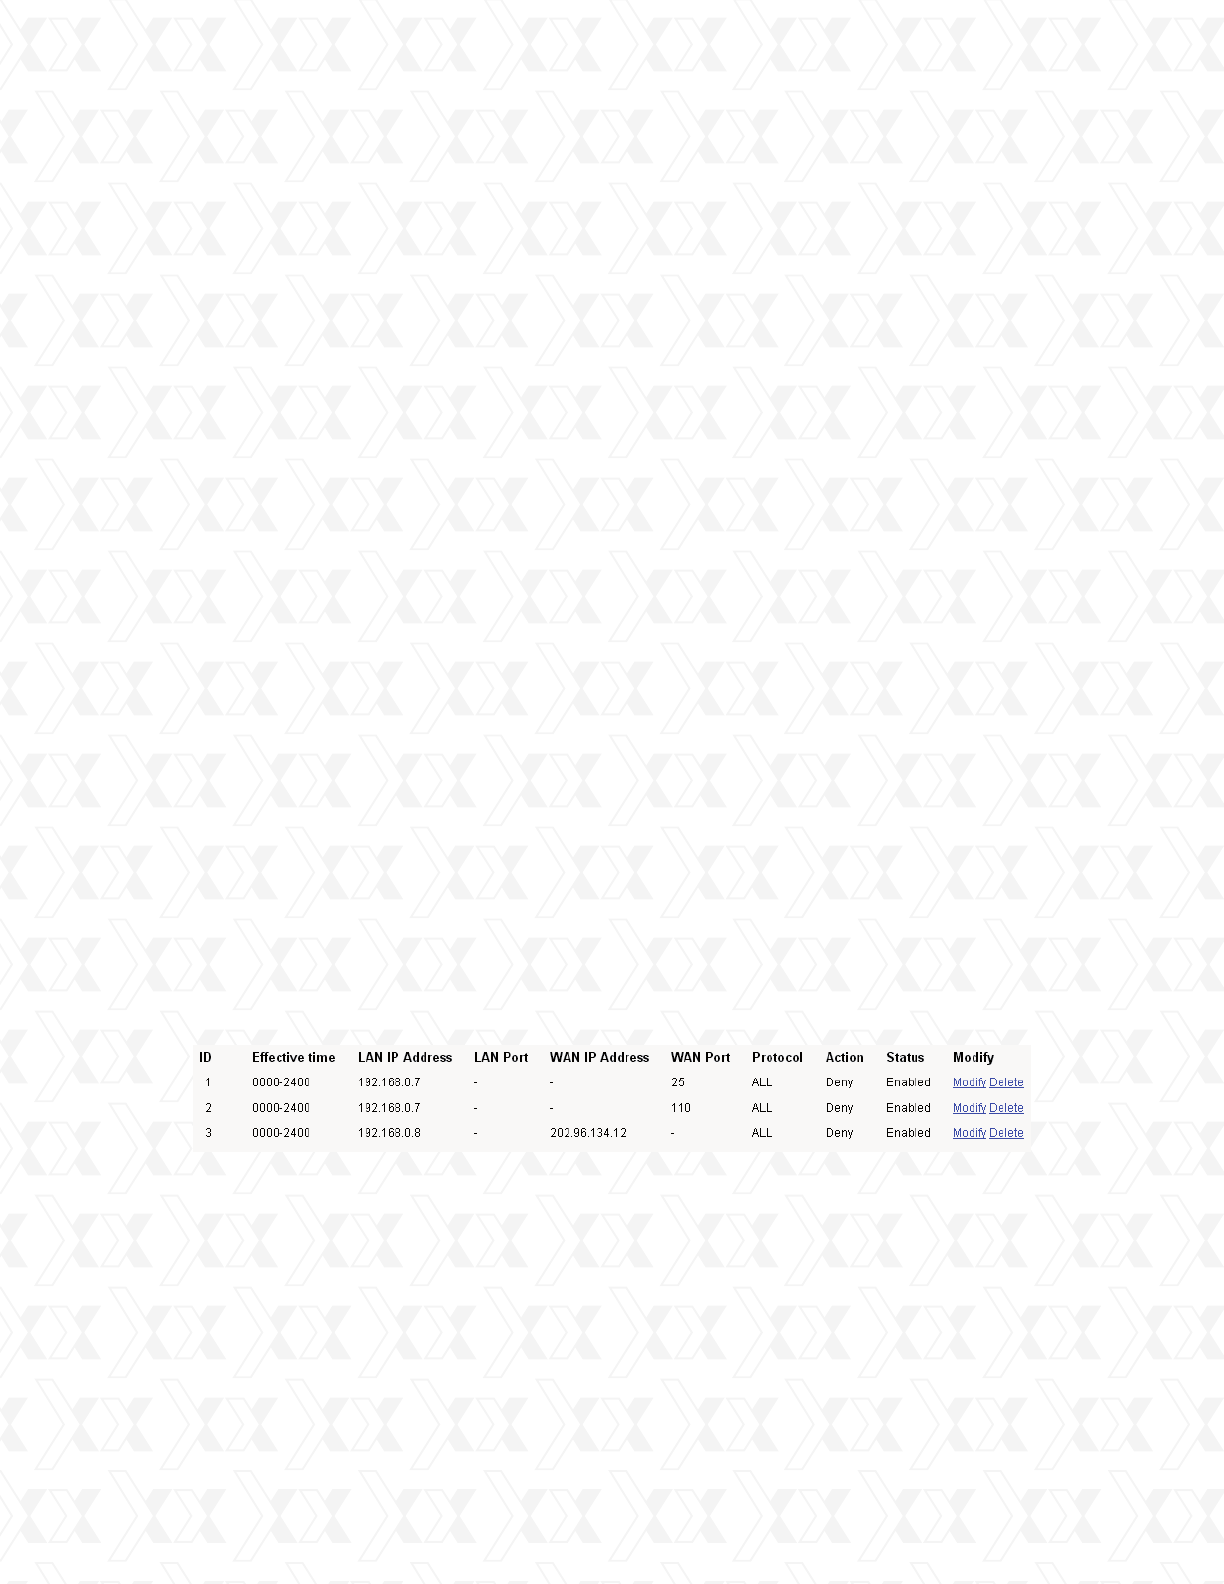
For example: If you wish to block e-mail received and sent by the IP Address 192.168.0.7
on your local network, and to make the PC with IP Address 192.168.0.8 unable to visit the
website of IP Address 202.96.134.12, while imposing no limitations on other PC(s), you should
specify the following IP address filtering list:
3.
4.
5.
6.
7.
8.
1.
2.
3.
Nexxt Solutions - NetGate Wireless Access Point
49
Effective Time - Enter a time range using the HHMM format. It represents the period within
which the entry shall remain active. For example 0803 - 1705, means that the command will
be effective from 08:03 to 17:05.
Domain Name - Type the domain or key word as desired in the field. Leave the field blank if
you want all websites on the Internet to be used. For example: www.xxyy.com.cn, .net.
Status - Select Enabled or Disabled for this entry on the Status pull-down list.
Click the Save button to confirm this entry.
1.
2.
3.
4.
4.10.3 Domain Filtering
Go to Security > Domain Filtering in order to configure the domain filtering feature, as shown
in Figure 4-38.
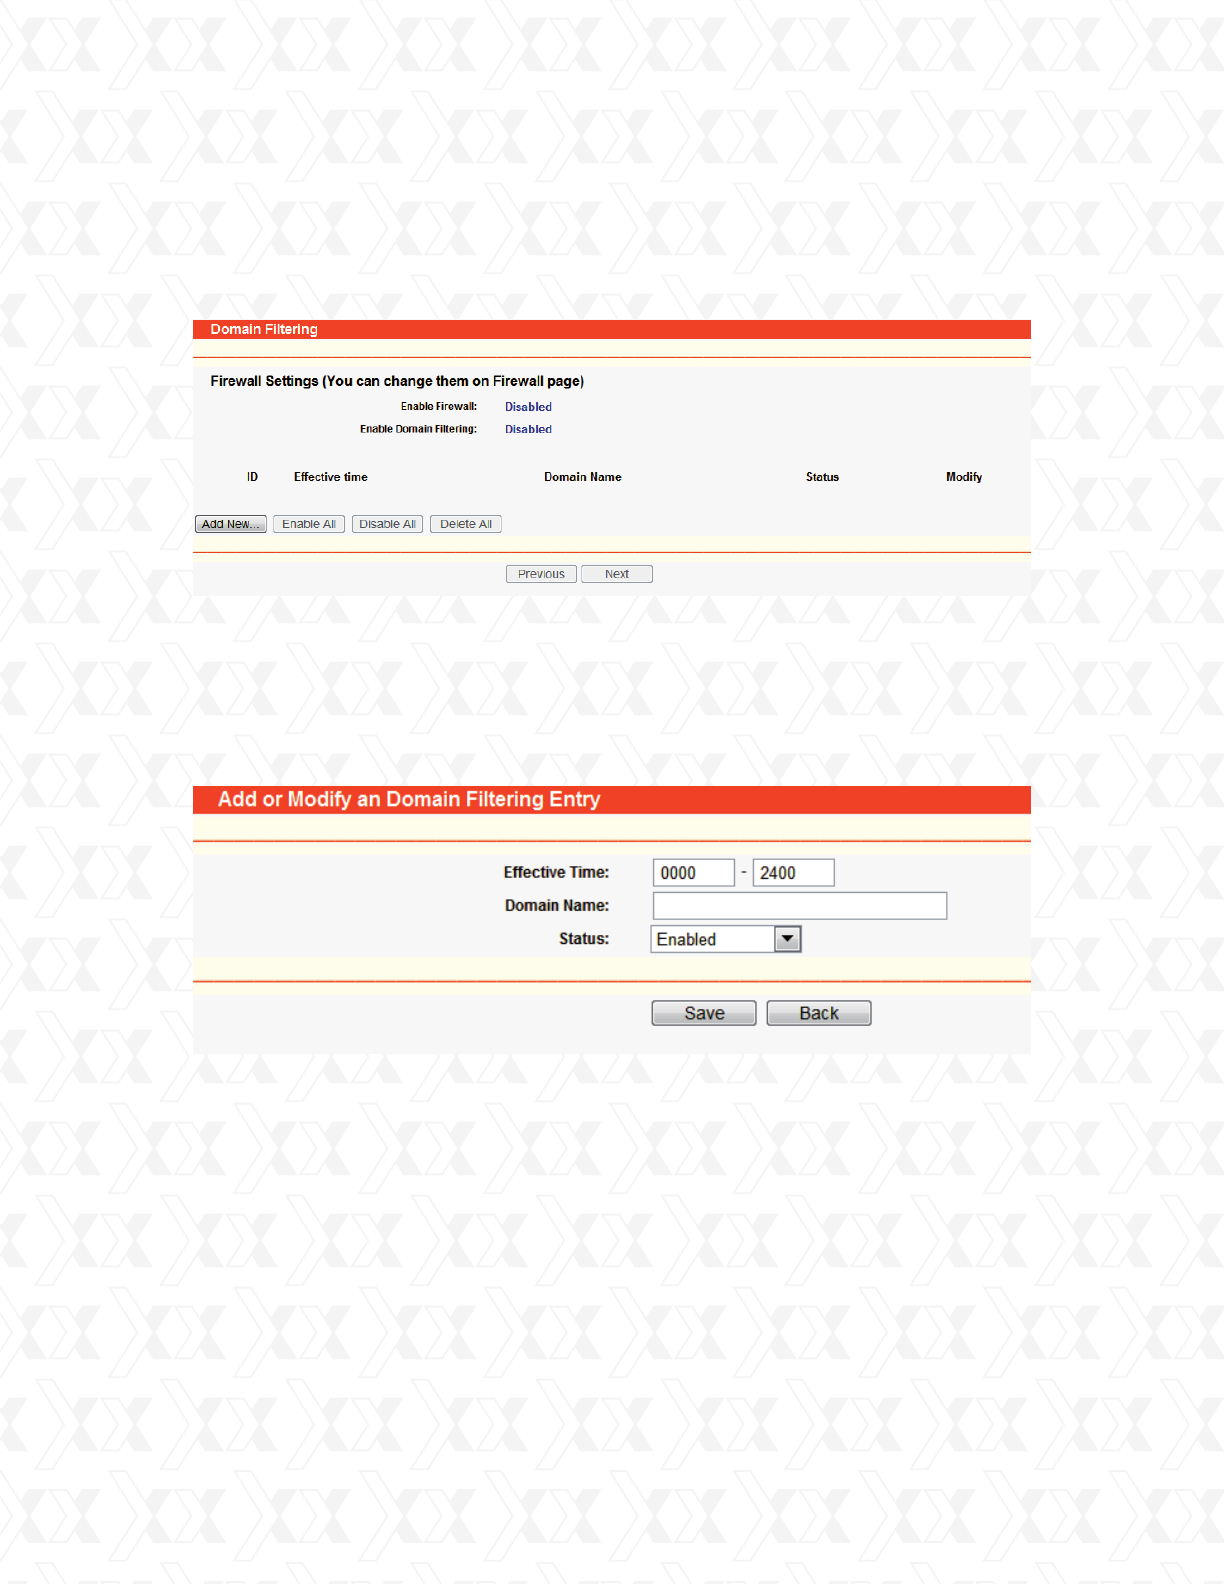
Before adding a Domain Filtering entry, you must ensure that Enable Firewall and Enable Domain
Filtering have been selected on the Firewall page, as shown in Figure 4-35. To Add a Domain
filtering entry, click the Add New… button, as it appears in Figure 4-38. This will open the Add or
Modify a Domain Filtering entry page, as in Figure 4-39.
To add or modify a Domain Filtering entry, follow these instructions:
To add or modify a Domain Filtering entry, follow these instructions:
Figure 4-38 Domain Filtering
Figure 4-39 Add or Modify a Domain Filtering entry
Nexxt Solutions - NetGate Wireless Access Point
50
Click the Modify button next the entry you want to change. If you want to erase the entry,
click the Delete button.
Proceed with the changes you want to make.
Click the Save button when done.
Click the Enabled All button to activate all entries .
Click the Disabled All button to cancel all entries.
Click the Delete All button to erase all entries
Click the Next button to go to the following page and the Previous button to return to the last
page.
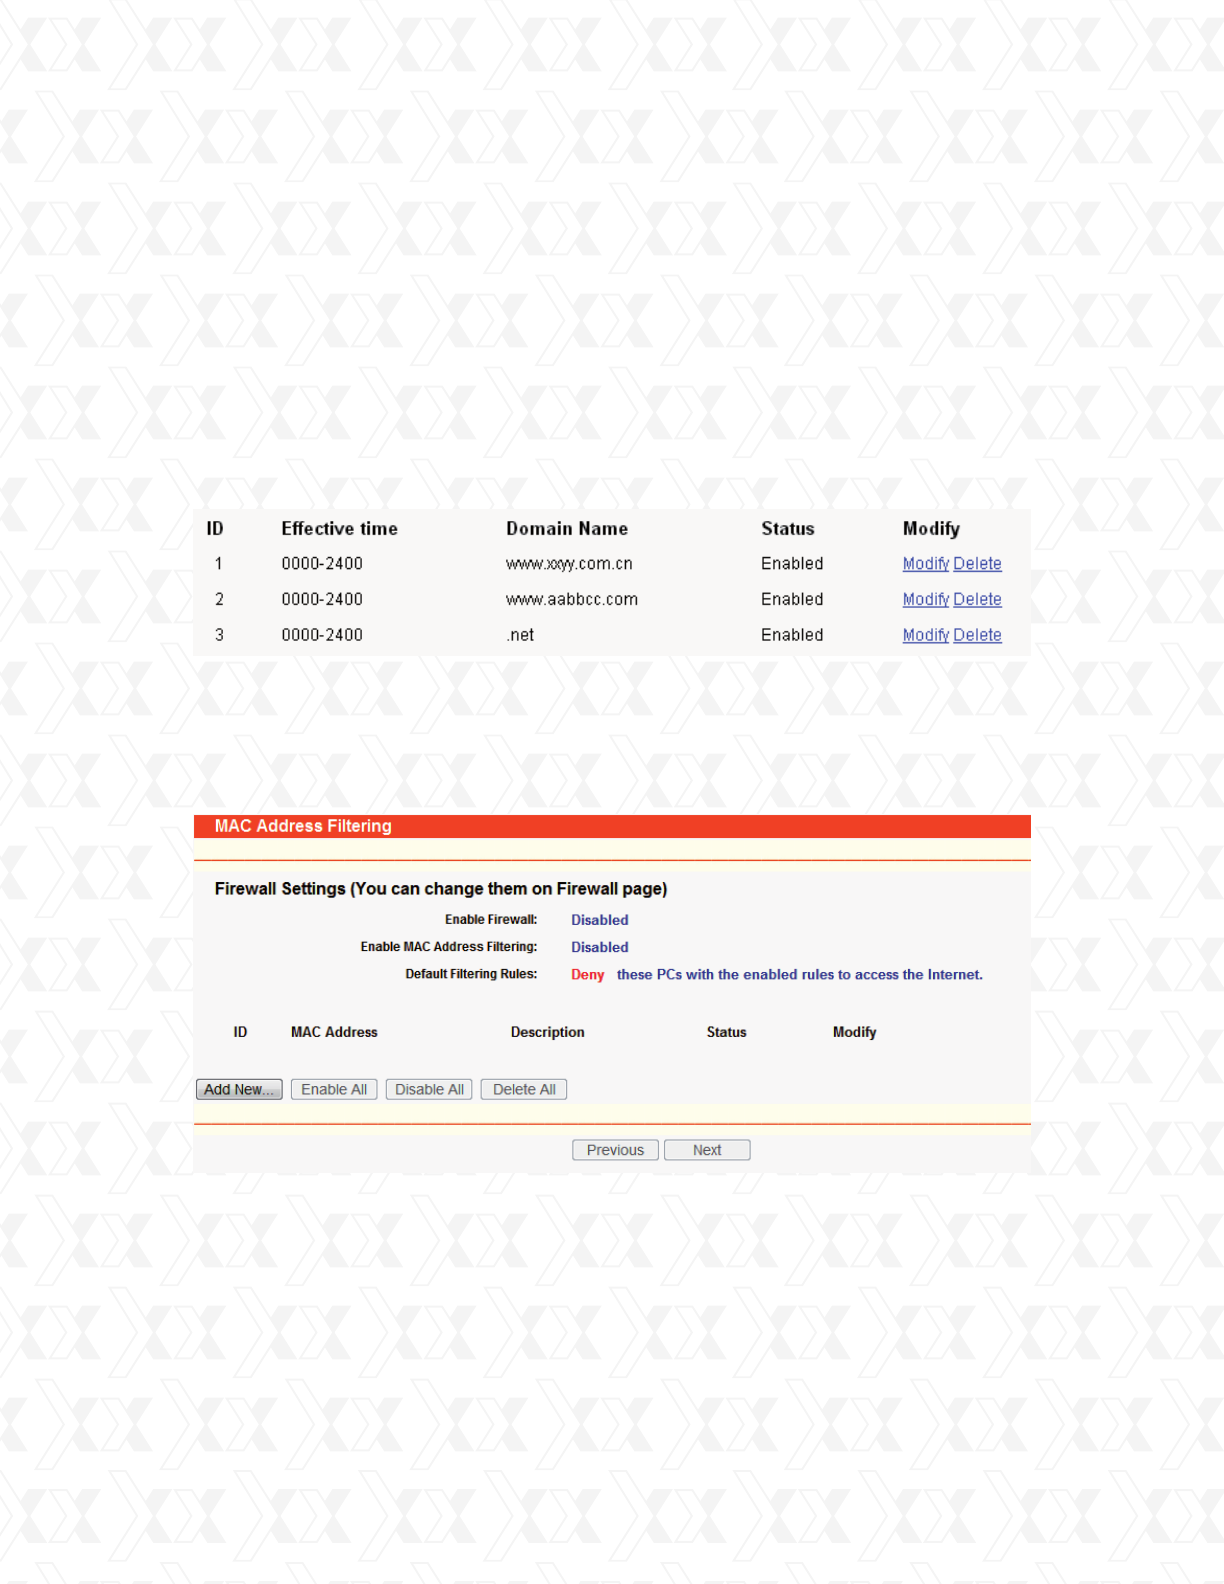
For example, if you want to block the PC(s) on your LAN to access websites www.xxyy.com.cn,
www.aabbcc.com and websites ending in .net on the Internet, while imposing no limitations
on other websites, you should specify the following Domain filtering list.
1.
2.
3.
4.10.4 MAC address filtering
Go to Security > Domain Filtering in order to configure the MAC address filtering feature on the
current page, as shown in Figure 4-40.
Before setting up MAC Filtering entries, you must first ensure that Enable Firewall and Enable
MAC Filtering have been selected on the Firewall page, as shown in Figure 4-35. To Add a MAC
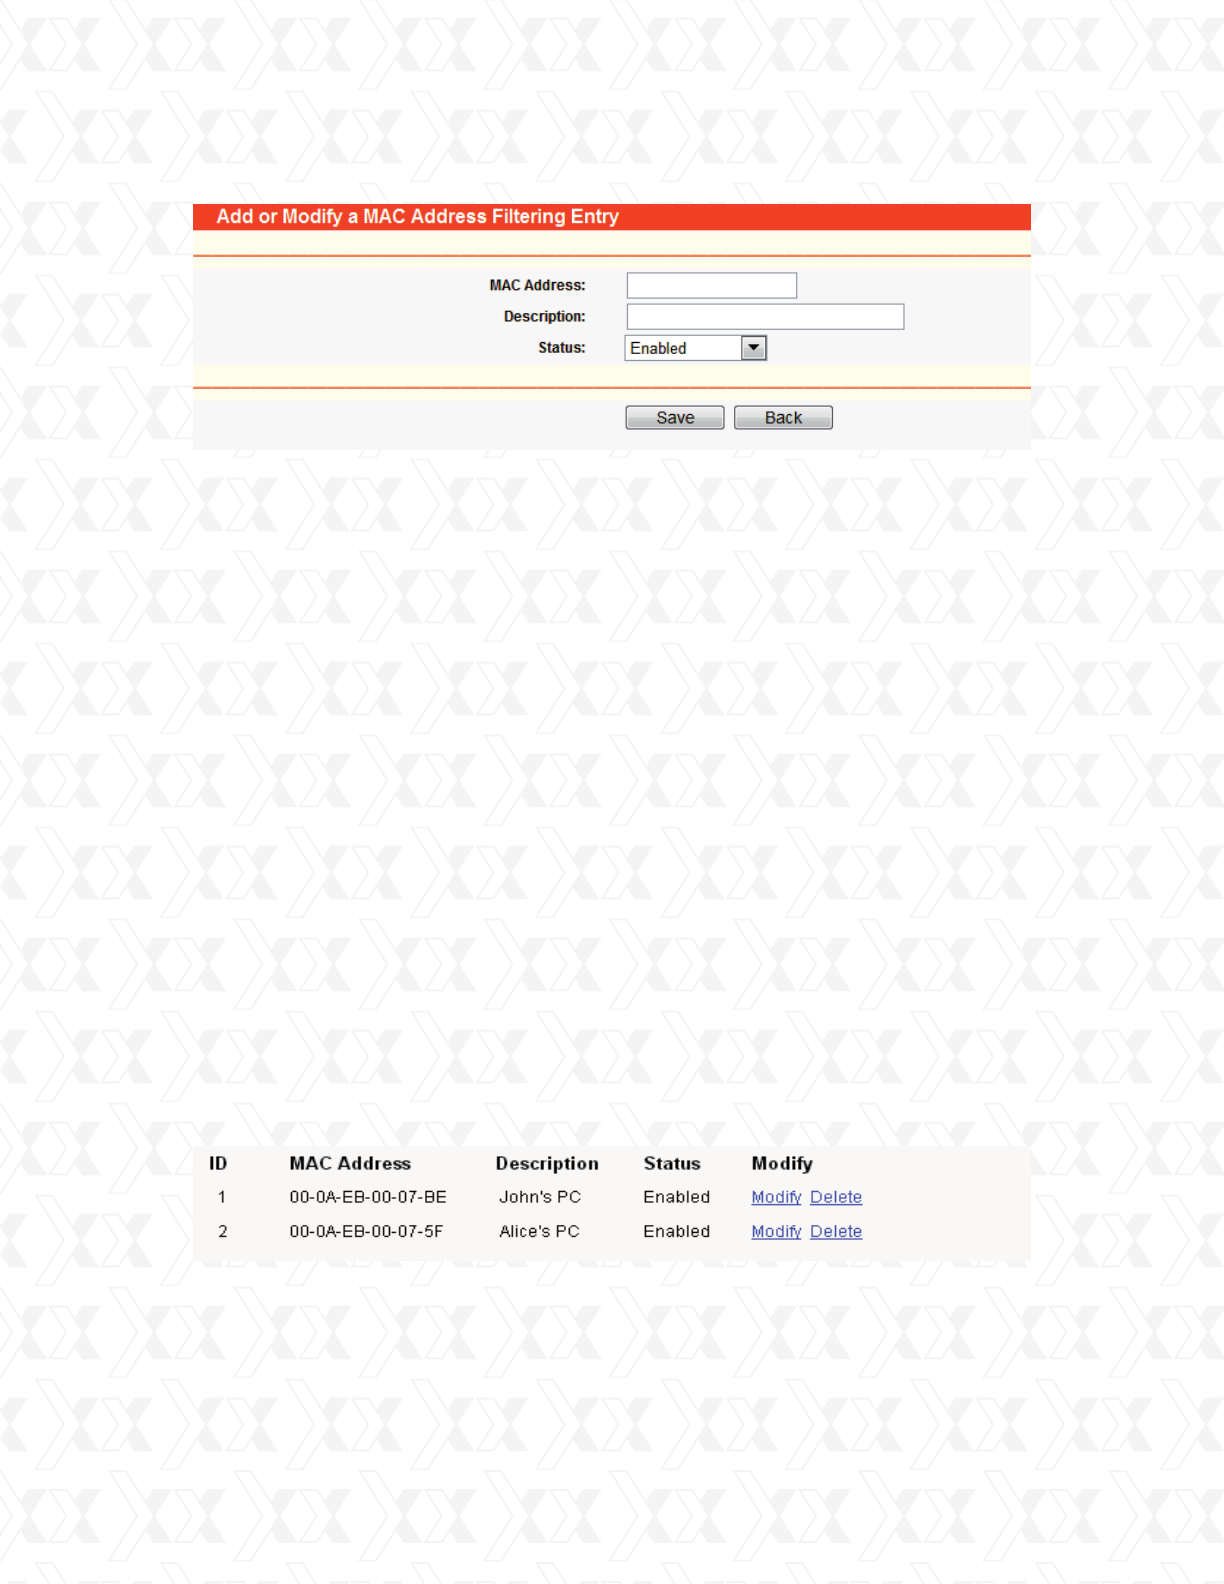
Address filtering entry, click the Add New… button in Figure 4-40. Then the Add or Modify a
MAC Address Filtering entry page will be displayed, as shown in Figure 4-41:
Figure 4-40 MAC address Filtering
Nexxt Solutions - NetGate Wireless Access Point
51
Enter the appropriate MAC Address into the MAC Address field. The format of the MAC
Address is XX-XX-XX-XX-XX-XX (X represents any hexadecimal digit).
For example: 00-0E-AE-B0-00-0B.
Enter a short description of the PC in the Description field. Fox example: John’s PC.
Status - Select Enabled or Disabled for this entry, from the Status pull-down list.
Click the Save button to confirm this entry.
Click the Modify button next to the entry you want to change. If you want to erase the
entry, click the Delete button.
Proceed with the changes you want to make.
Click the Save button once you are done.
1.
2.
3.
4.
1.
2.
3.
To add or modify a MAC Address Filtering entry, follow these instructions:
To add additional entries, repeat steps 1-4.
When finished, click the Return button to go back to the MAC Address Filtering page.
To modify or delete an existing entry:
Click the Enabled All button to activate all entries .
Click the Disabled All button to cancel all entries.
Click the Delete All button to erase all entries
Click the Next button to go to the following page and click the Previous button to return to the
last page.
Fox example: If you want to block the PC with MAC addresses 00-0A-EB-00-07-BE and
00-0A-EB-00-07-5F from accessing the Internet, first, enable the Firewall and MAC Address
Filtering on the Firewall page. Then, you should specify the Default MAC Address Filtering Rule
Deny these PC(s) with effective rules to access the Internet on the Firewall page, and include
the following MAC address filtering list on this page:
Figure 4-41 Add or Modify a MAC Address Filtering entry
Nexxt Solutions - NetGate Wireless Access Point
52
4.10.5 Remote management
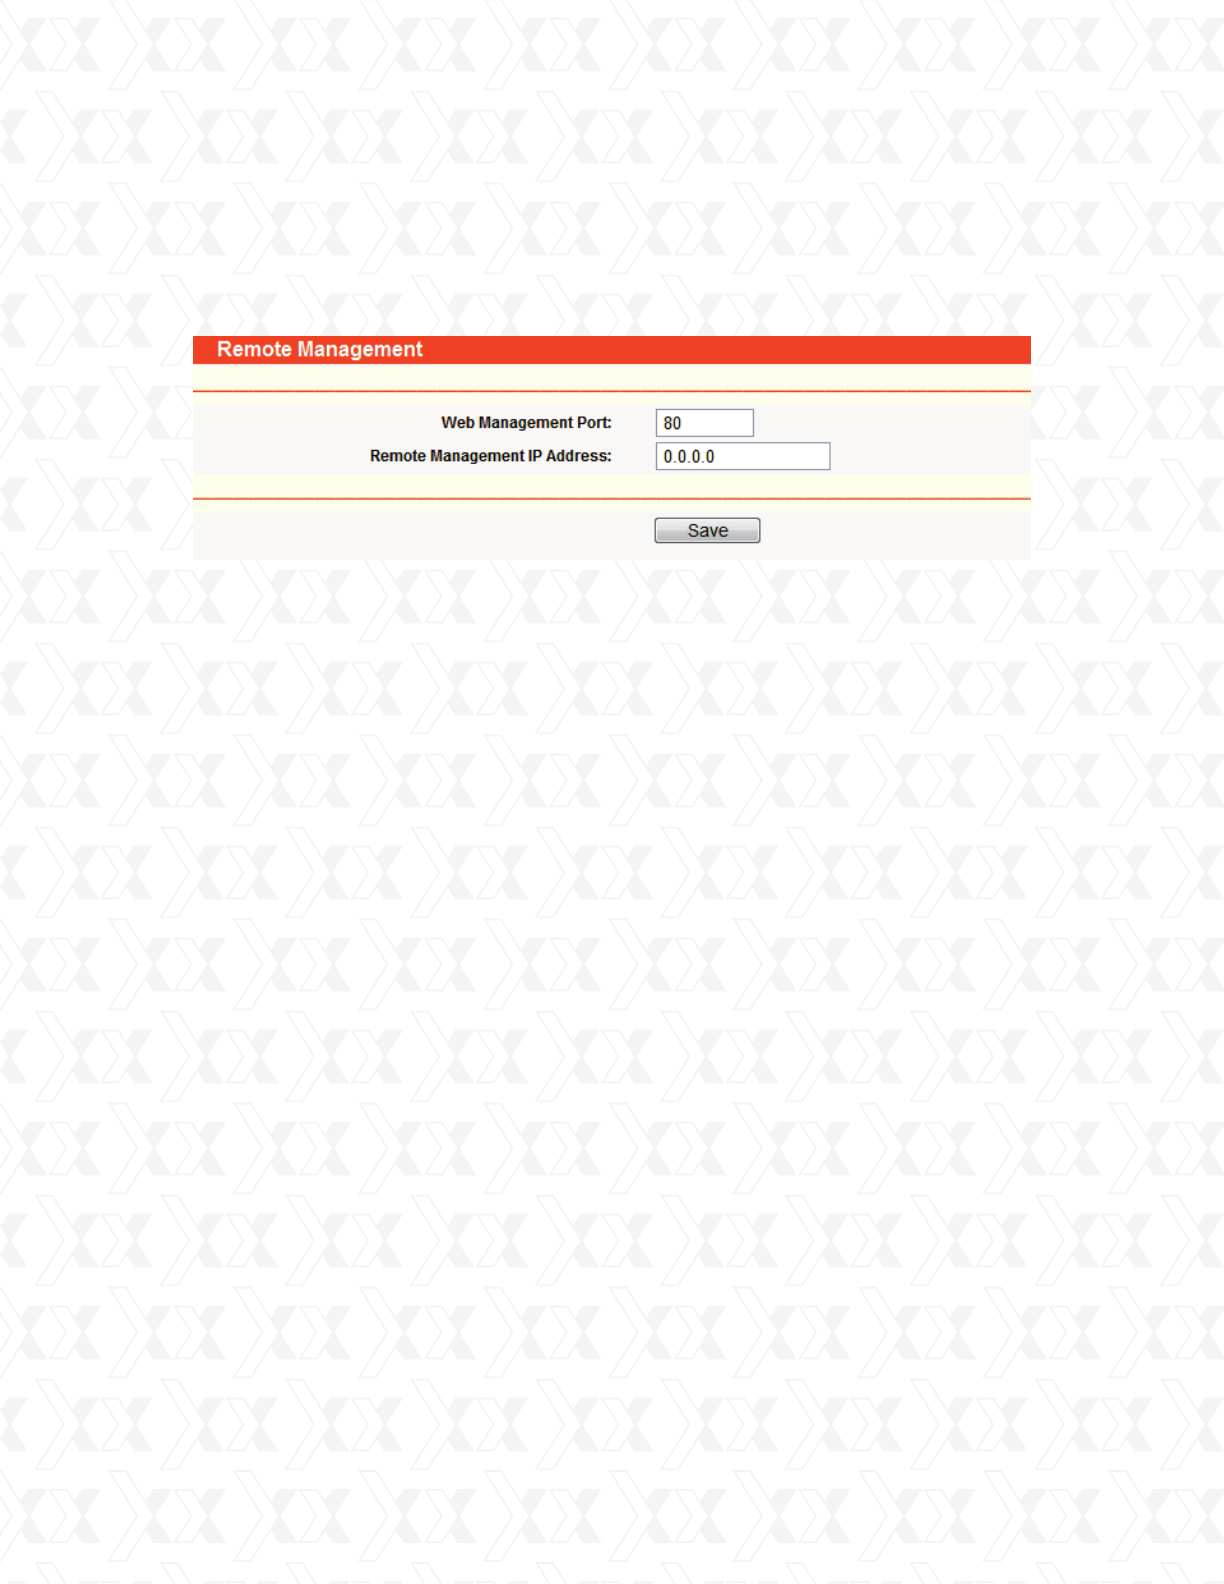
Go to Security > Remote Management in order to configure the Remote Management function
on this screen, as shown in Figure 4-42. This feature allows you to manage your Router from a
remote location via the Internet.
Web Management Port – The web browser normally uses the standard HTTP service port 80
for access.. This Router’s default remote management web port number is 80. For greater
security, you can change the remote management web port to a custom port by entering that
number in the box provided. Choose a number between 1 and 65534 but do not use the number
of any common service port.
Remote Management IP Address - This is the current address you will use when accessing
your Router from the Internet. This function is disabled when the IP address is set to the
default value of 0.0.0.0. To enable this function, change 0.0.0.0 to a valid IP address. If set to
255.255.255.255, then all the hosts will be able to access the Router from the internet.
Note:
•
•
To access the Router, you should type your Router’s WAN IP address into your browser’s
address (in IE) or Location (in Navigator) box, followed by a colon and the custom port
number. For example, if your Router’s WAN address is 202.96.12.8, and the port number
used is 8080, please enter http://202.96.12.8:8080 in your browser. Later, you may be
asked for the Router’s password. After successfully entering the username and password,
you will be able to access the Router’s web-based utility.
Be sure to change the Router’s default password to a more secure password.
1.
2.
Figure 4-42 Remote Management
Nexxt Solutions - NetGate Wireless Access Point
53
4.10.6 Advanced security
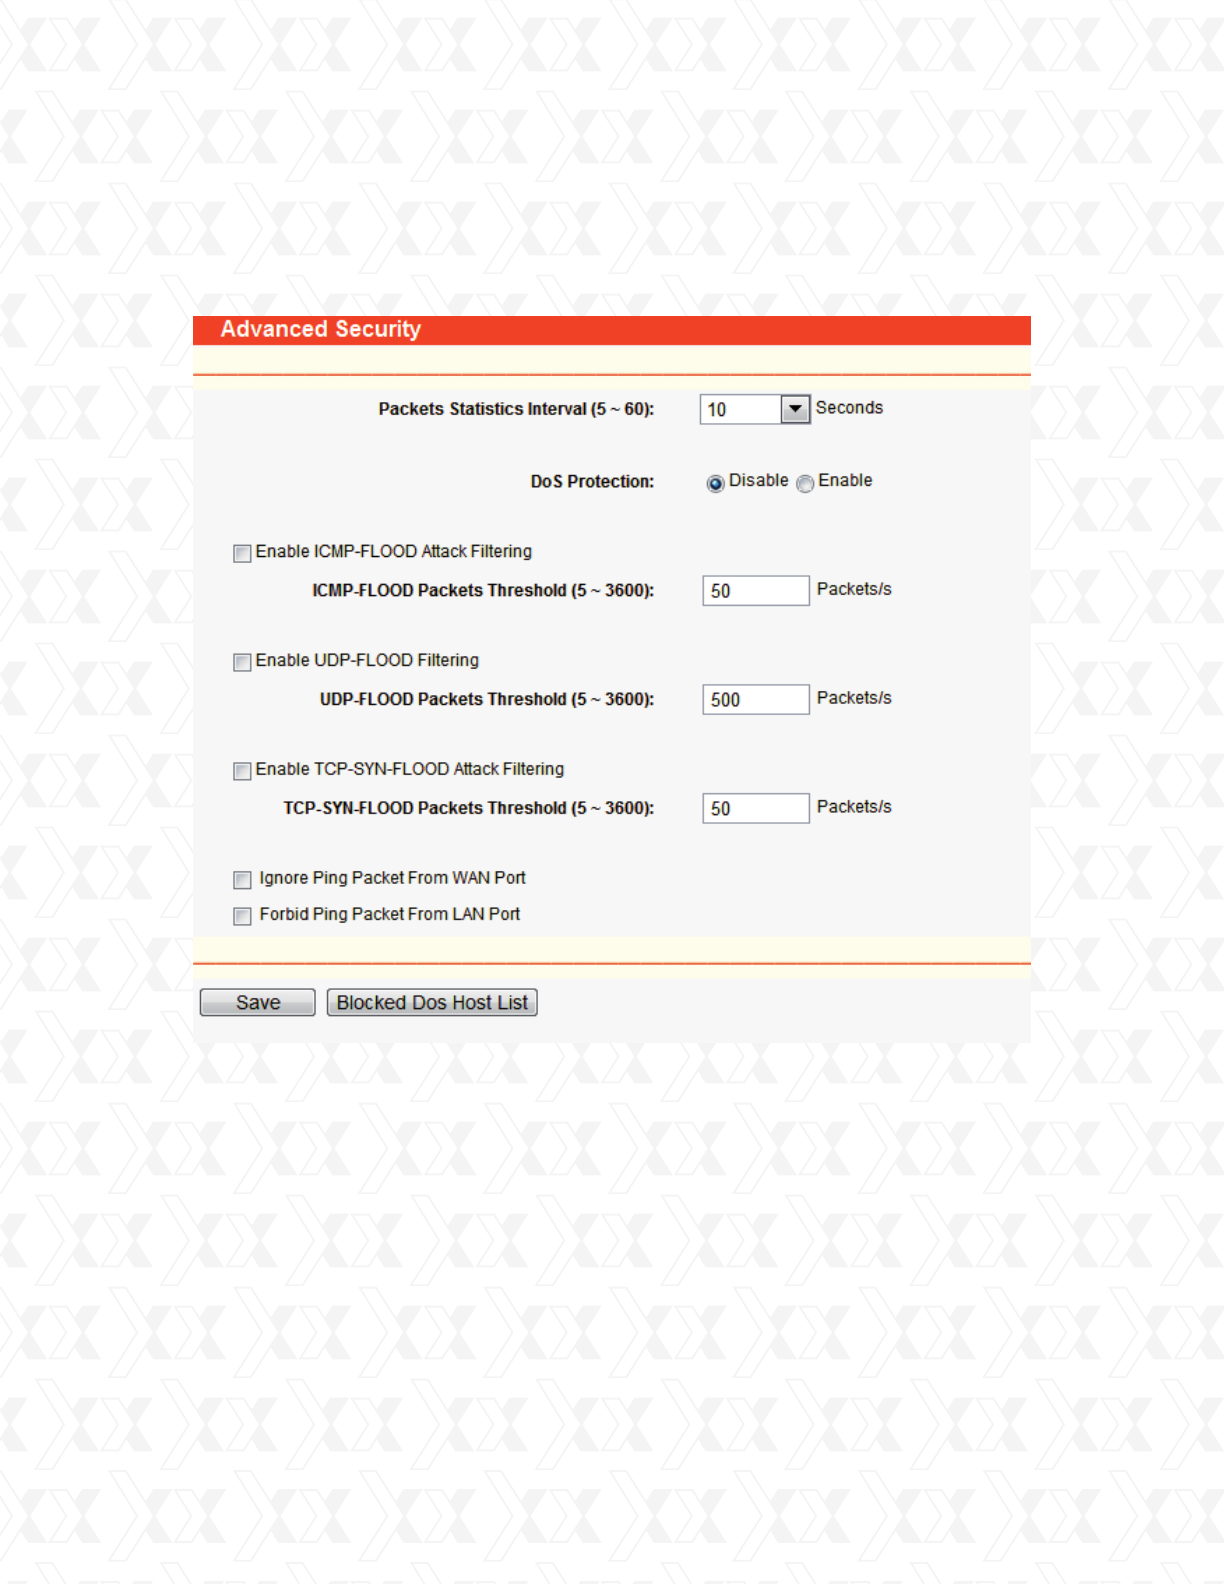
Go to Security > Advanced Security in the menu in order to prevent the router from being
attacked by TCP-SYN Flood, UDP Flood and ICMP-Flood from LAN, as shown in Figure 4-43.
Packets Statistic interval (5 ~ 60) - The default value is 10. Select a value between 5 and 60
seconds from the pull-down list. The Packets Statistic interval value indicates the time section of
the packets statistic. The result of the statistic is used for analysis by SYN Flood, UDP Flood and
ICMP-Flood.
DoS protection - Enable or Disable the DoS protection function. Only when enabled, flood filters
will be effective.
Enable ICMP-FLOOD Attack Filtering – Check this box to Enable or Disable the ICMP-FLOOD
Attack Filtering.
•
•
•
!
Figure 4-43 Advanced Security settings
Nexxt Solutions - NetGate Wireless Access Point
54
ICMP-FLOOD Packets threshold: (5 ~ 3600) - The default value is 50. Enter a value between
5 ~ 3600 packets. When the current ICMP-FLOOD Packets number is beyond the set value,
the router will start up the blocking function immediately.
Enable UDP-FLOOD Filtering - Enable or Disable the UDP-FLOOD Filtering.
UDP-FLOOD Packets threshold: (5 ~ 3600) - The default value is 50. Select the desired setting
between 5 ~ 3600 packets. When the current UPD-FLOOD Packets numbers exceeds the set
value, the router will immediately start up the blocking feature.
Enable TCP-SYN-FLOOD Attack Filtering - Check this box to Enable or Disable the
TCP-SYN- FLOOD Attack Filtering.
TCP-SYN-FLOOD Packets threshold: (5 ~ 3600) - The default value is 50. Select the desired
setting between 5 ~ 3600 packets. When the current TCP-SYN-FLOOD Packets numbers
exceeds the set value, the router will immediately start up the blocking feature.
Ignore Ping Packet from WAN Port - Check this box to Enable or Disable this option. The default
setting is disabled. If enabled, the ping packet from the Internet will be denied access to the
router.
Forbid Ping Packet from LAN Port - Check this box to Enable or Disable Ping Packet access to
the router from the LAN port. The default value is disabled. If enabled, the ping packet from the
LAN port will be denied access to the router. (This can be used to defend the network against
some viruses)
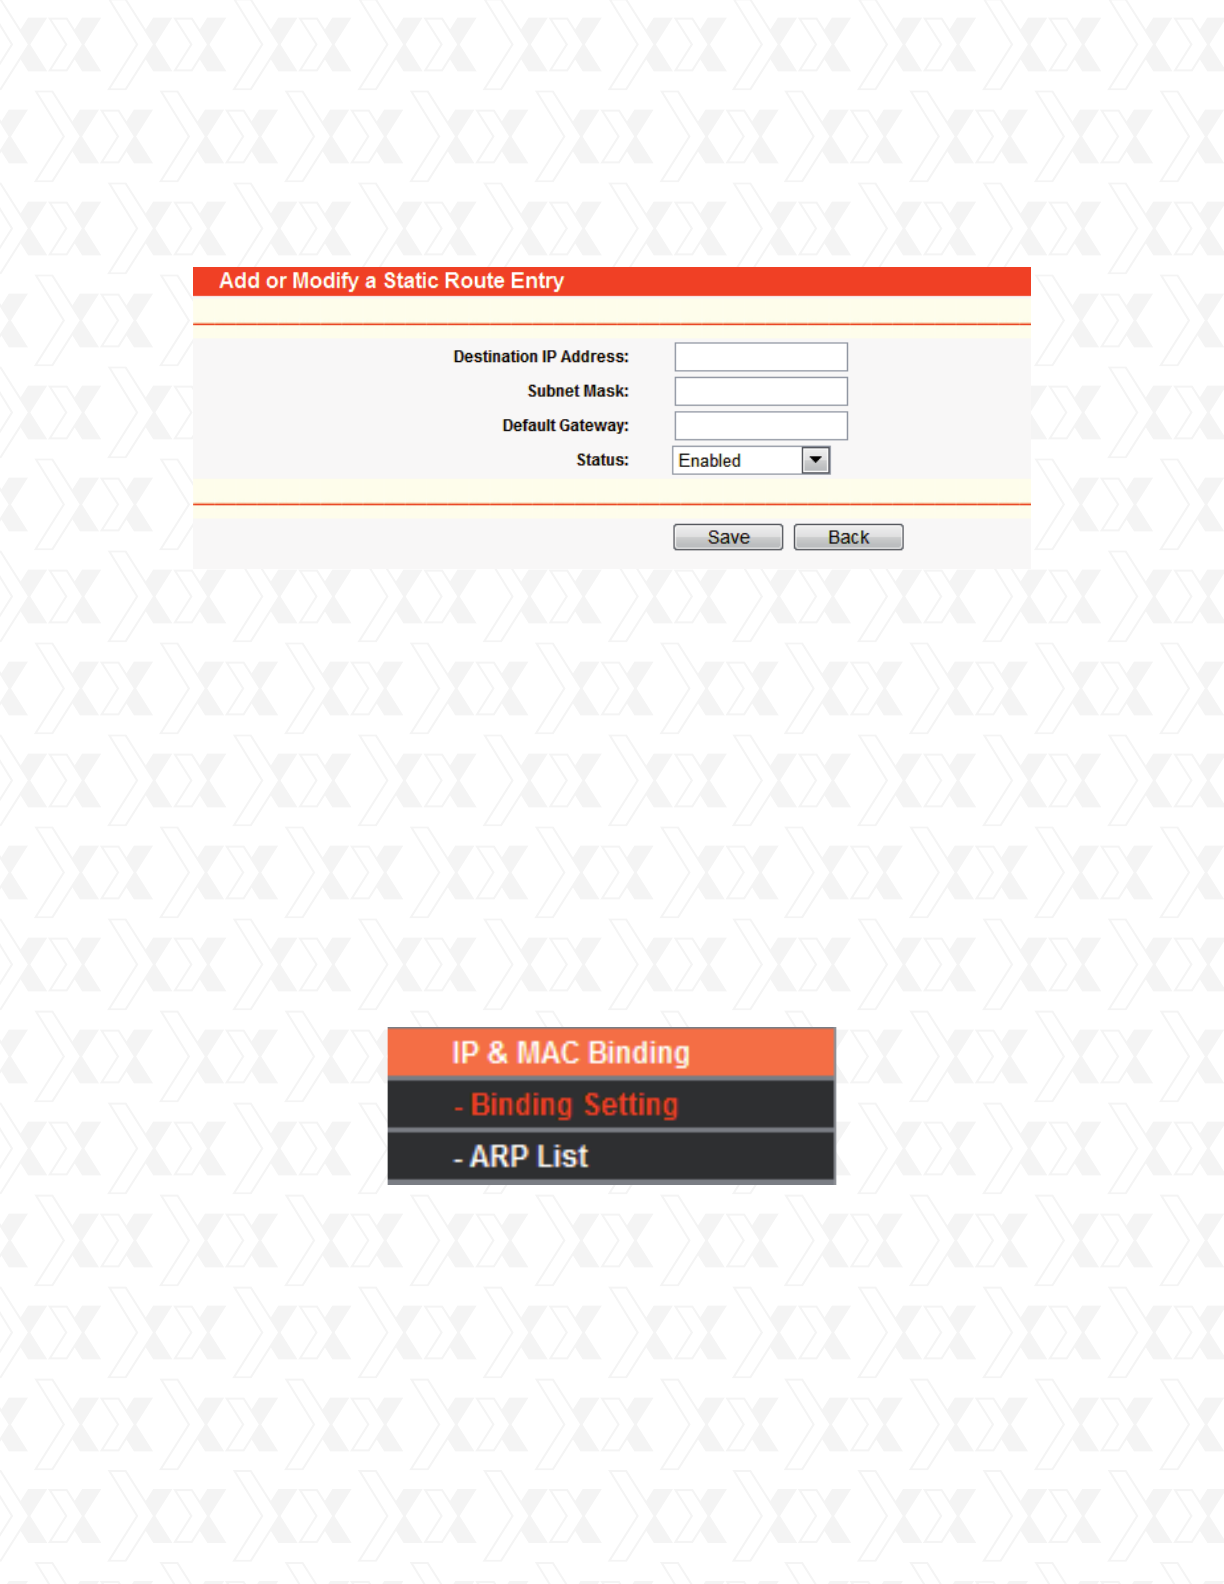
Destination IP Address - The Destination IP Address is the address of the network or host that
you want to assign a static route to.
Subnet Mask - The Subnet Mask determines which portion of an IP Address is the network
portion, and which portion is the host portion.
Default Gateway - This is the IP Address of the gateway device that allows for contact between
the router and the network or host.
•
•
•
•
•
•
•
•
•
•
Click the Save button to store the settings.
Click the Blocked DoS Host Table button to display the DoS host list with the items excluded.
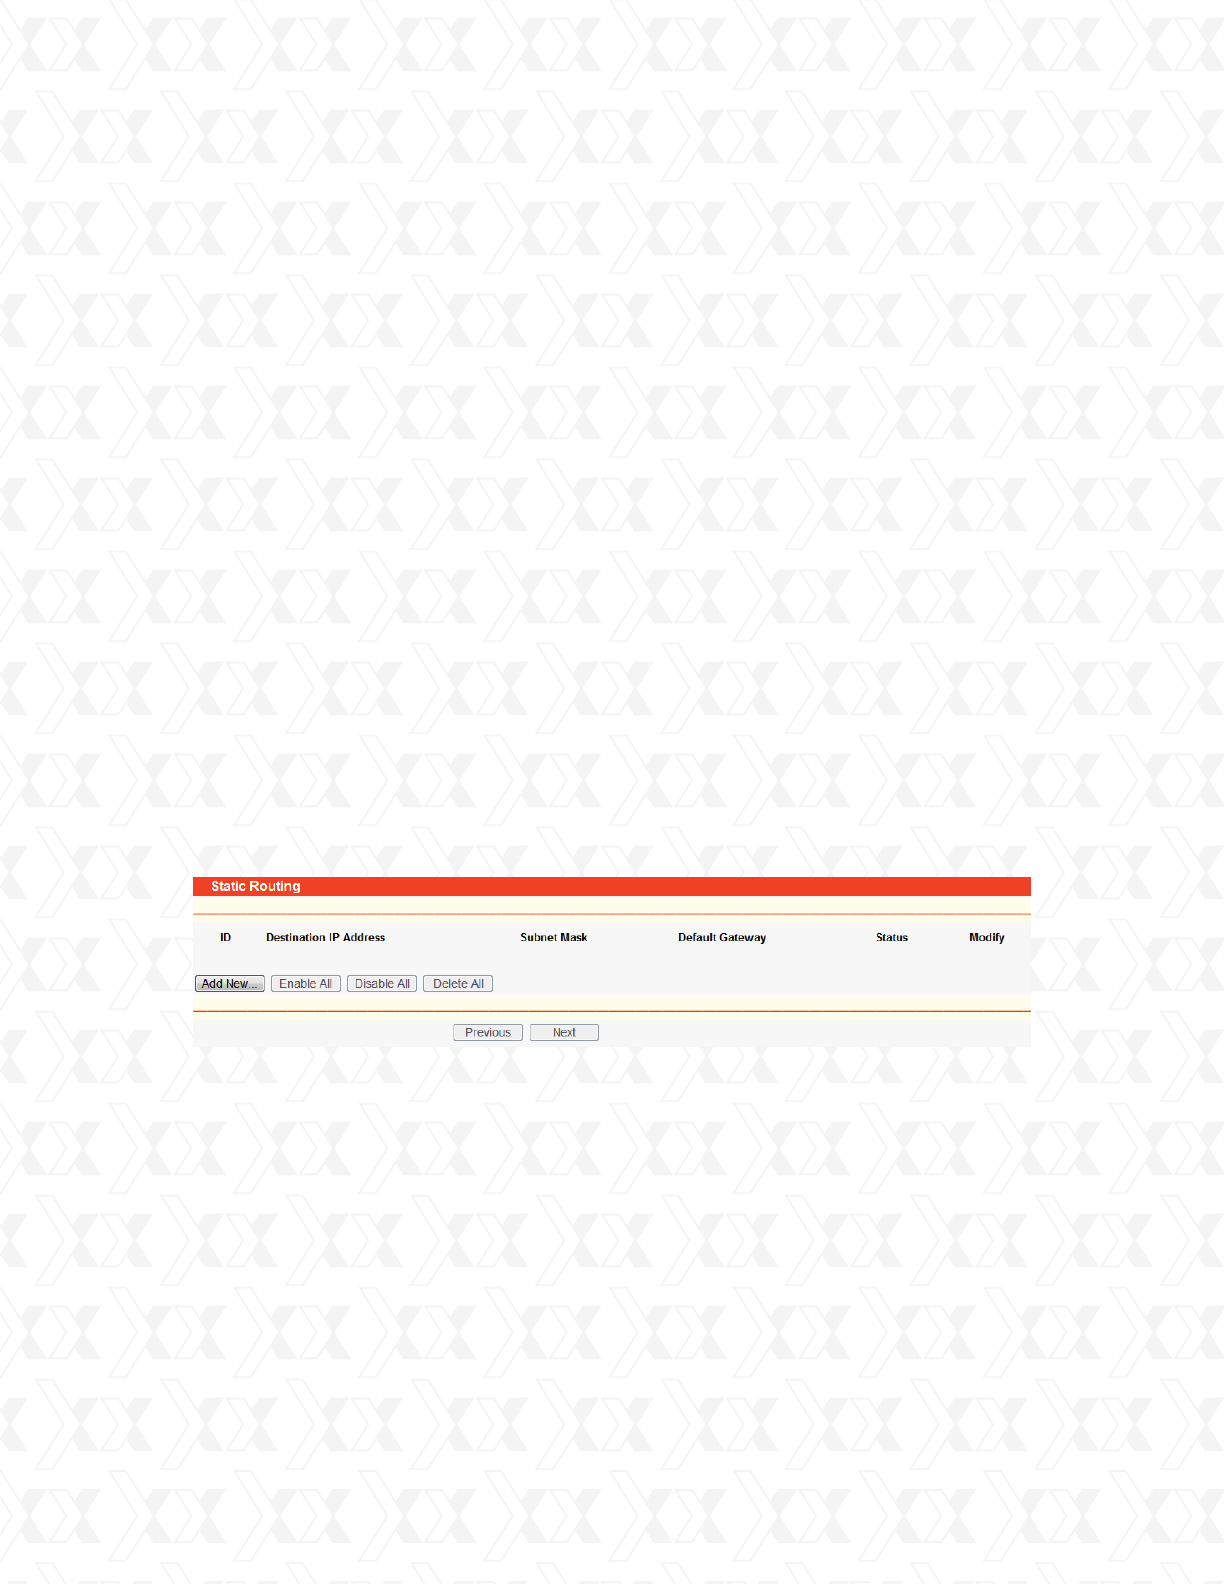
4.11 Static routing
A static route is a pre-determined path that network information must travel to reach a specific
host or network. To add or delete a route, use the parameters under the Static Routing page, as
shown in Figure 4-44.
To add static routing entries:
!
Click the Add New button. The screen, as shown in Figure 4-45 will open.
Enter the following parameters.
1.
2.
Figure 4-44 Static Routing
Nexxt Solutions - NetGate Wireless Access Point
55
Click the Enabled All button to activate all entries.
Click the Disabled All button to cancel all entries.
Click the Delete All button to erase all entries.
To modify or delete an existing entry:
4.12 IP & MAC binding
ARP Binding is useful for controlling access of specific computers in the LAN. This page displays
the IP & MAC Binding Setting table; which you can configure based on your particular needs.
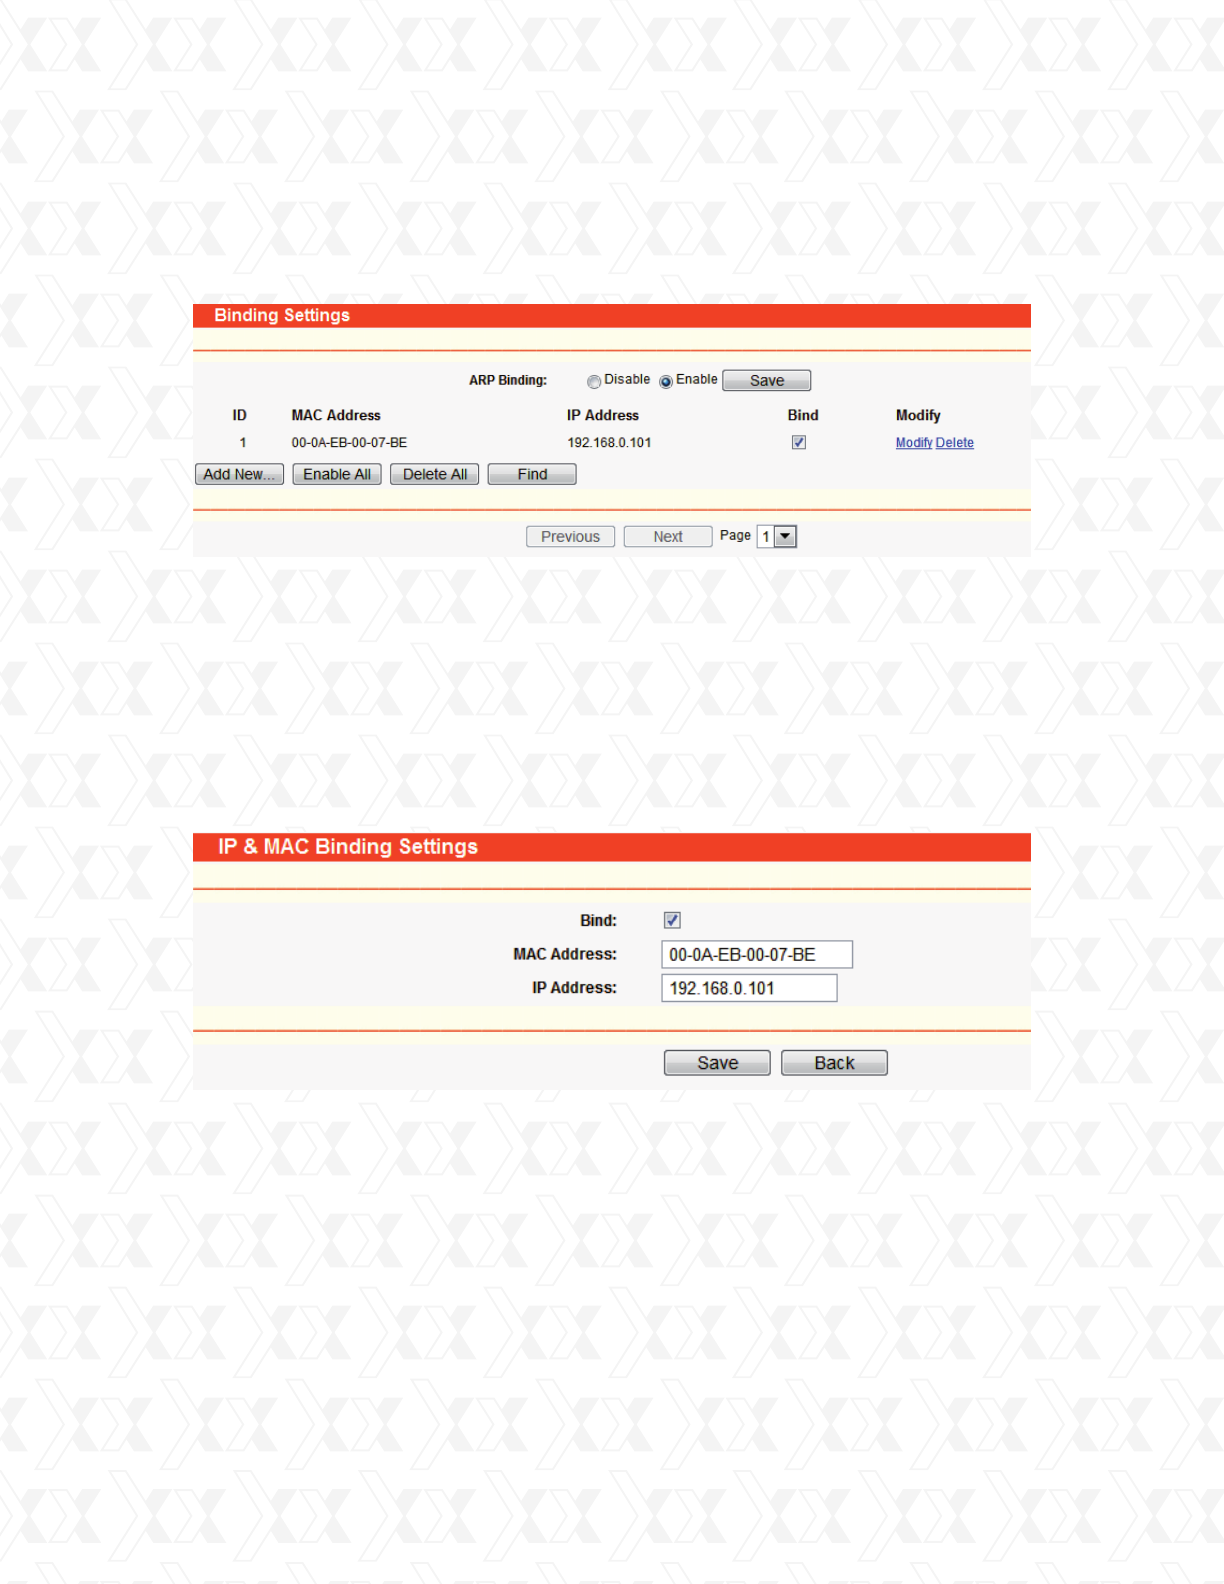
There are two submenus under the IP & MAC Binding menu (shown in Figure 4-46):
Binding Setting and ARP List. Click any of them in order to configure the corresponding function.
Detailed descriptions for each submenu are provided below.
Select Enabled or Disabled for this entry from the Status pull-down list.
Click the Save button to keep your settings.
Click the Modify button next to the entry you want to change. If you want to erase the entry,
click the Delete button.
Proceed with the changes you want to make.
Click the Save button when done.
3.
4.
1.
2.
3.
!
Figure 4-45 Add or Modify a Static Route Entry
Figure 4-46 the IP & MAC Binding menu
Nexxt Solutions - NetGate Wireless Access Point
56
4.12.1 Binding setting
Go to IP & MAC Binding > Binding Setting in order to configure the binding parameters,
as shown in Figure 4-47.
When you want to add or modify an IP & MAC Binding entry, you can click the Add New button
or Modify button, and then you will be directed to the next page. This page is used for adding or
modifying an IP & MAC Binding entry (shown in Figure 4-48).
To add IP & MAC Binding entries, follow the steps below.
To modify or delete an existing entry, follow the steps below.
MAC Address - The MAC address of the monitored computer in the LAN.
IP Address - The assigned IP address of the monitored computer in the LAN.
Bind - Check this option to enable ARP binding for a specific device.
Modify - Use this link to edit or delete an existing entry.
•
•
•
•
Click the Add New... button, as shown in Figure 4-48.
Enter the MAC Address and IP Address.
Select the Bind checkbox.
Click the Save button to accept your changes.
Find the desired entry in the table.
Click Modify or Delete as desired, on the Modify column.
1.
2.
3.
4.
1.
2.
Figure 4-47 Binding Setting
Figure 4-48 IP & MAC Binding Setting (Add & Modify)
Nexxt Solutions - NetGate Wireless Access Point
57
4.12.2 ARP list
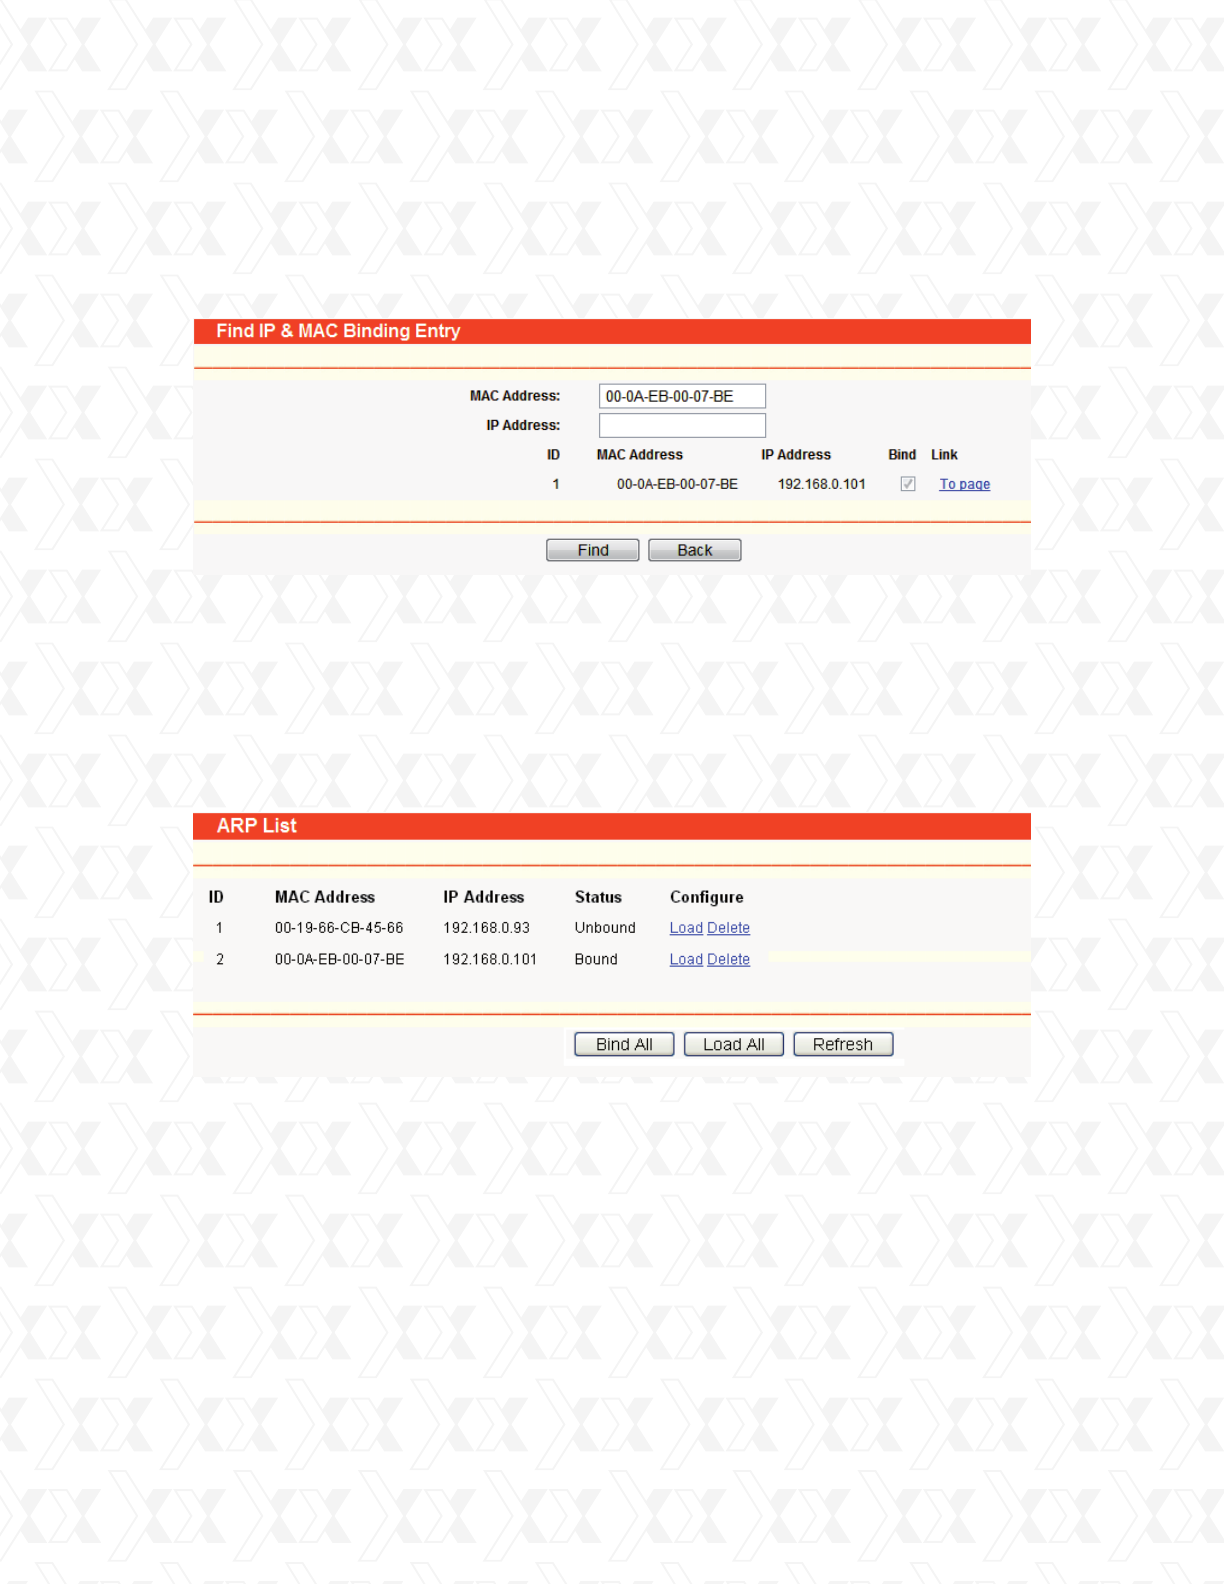
To find an existing entry, follow the steps below.
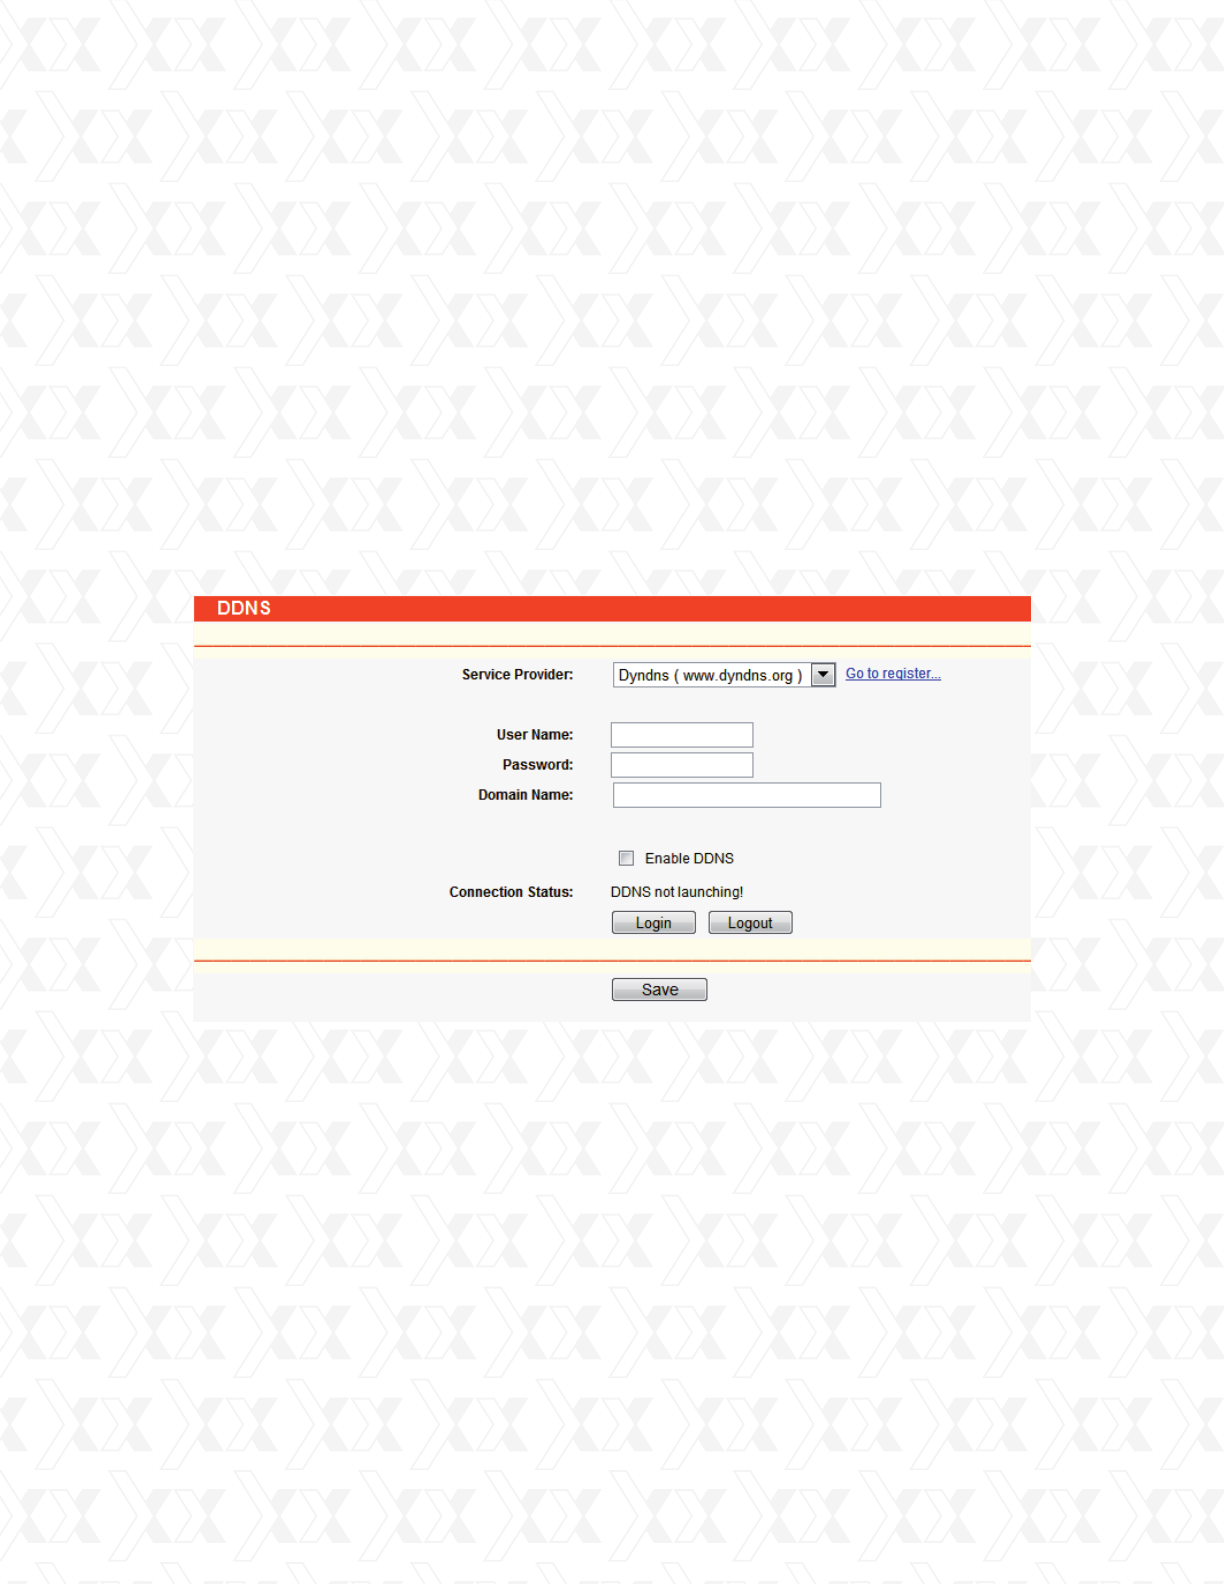
Go to IP & MAC Binding > ARP List in order to see the IP addresses on the LAN and their
associated MAC addresses included in the ARP list.
You can also use the list to configure the corresponding parameters from there. (Figure 4-50).
Click the Bind All button to bind all the current items. This option is only available when the ARP
binding is enabled.
Click the Load All button to include all items in the IP & MAC Binding list.
Click the Refresh button to update all items.
MAC Address - The MAC address of the monitored computer in the LAN.
IP Address - The assigned IP address of the controlled computer in the LAN.
Status - Indicates whether or not the MAC and IP addresses are bound.
Configure – To load or delete an item.
Load - To load the item into the IP & MAC Binding list.
Delete - To erase the item.
•
•
•
•
•
•
Click the Find button, to open the window.
Enter the MAC Address or IP Address.
Click the Bind button on the page, as shown in Figure 4-49.
Click the Enabled All button to activate all entries .
Click the Delete All button to erase all entries.
1.
2.
3.
Figure 4-49 Find IP & MAC Binding Entry
Figure 4-50 ARP List
Nexxt Solutions - NetGate Wireless Access Point
58
4.13 Dynamic DNS
4.13.1 Dyndns.org DDNS
The router offers a Dynamic Domain Name System (DDNS) feature. DDNS lets you assign a fixed
host and domain name to a dynamic Internet IP Address. It is useful when you are hosting your
own website, FTP server, or other server behind the router. Before using this feature, you need
to sign up for DDNS service providers such as www.dyndns.org, www.oray.net or www.comexe.
cn. The Dynamic DNS client service provider will give you a password or key.
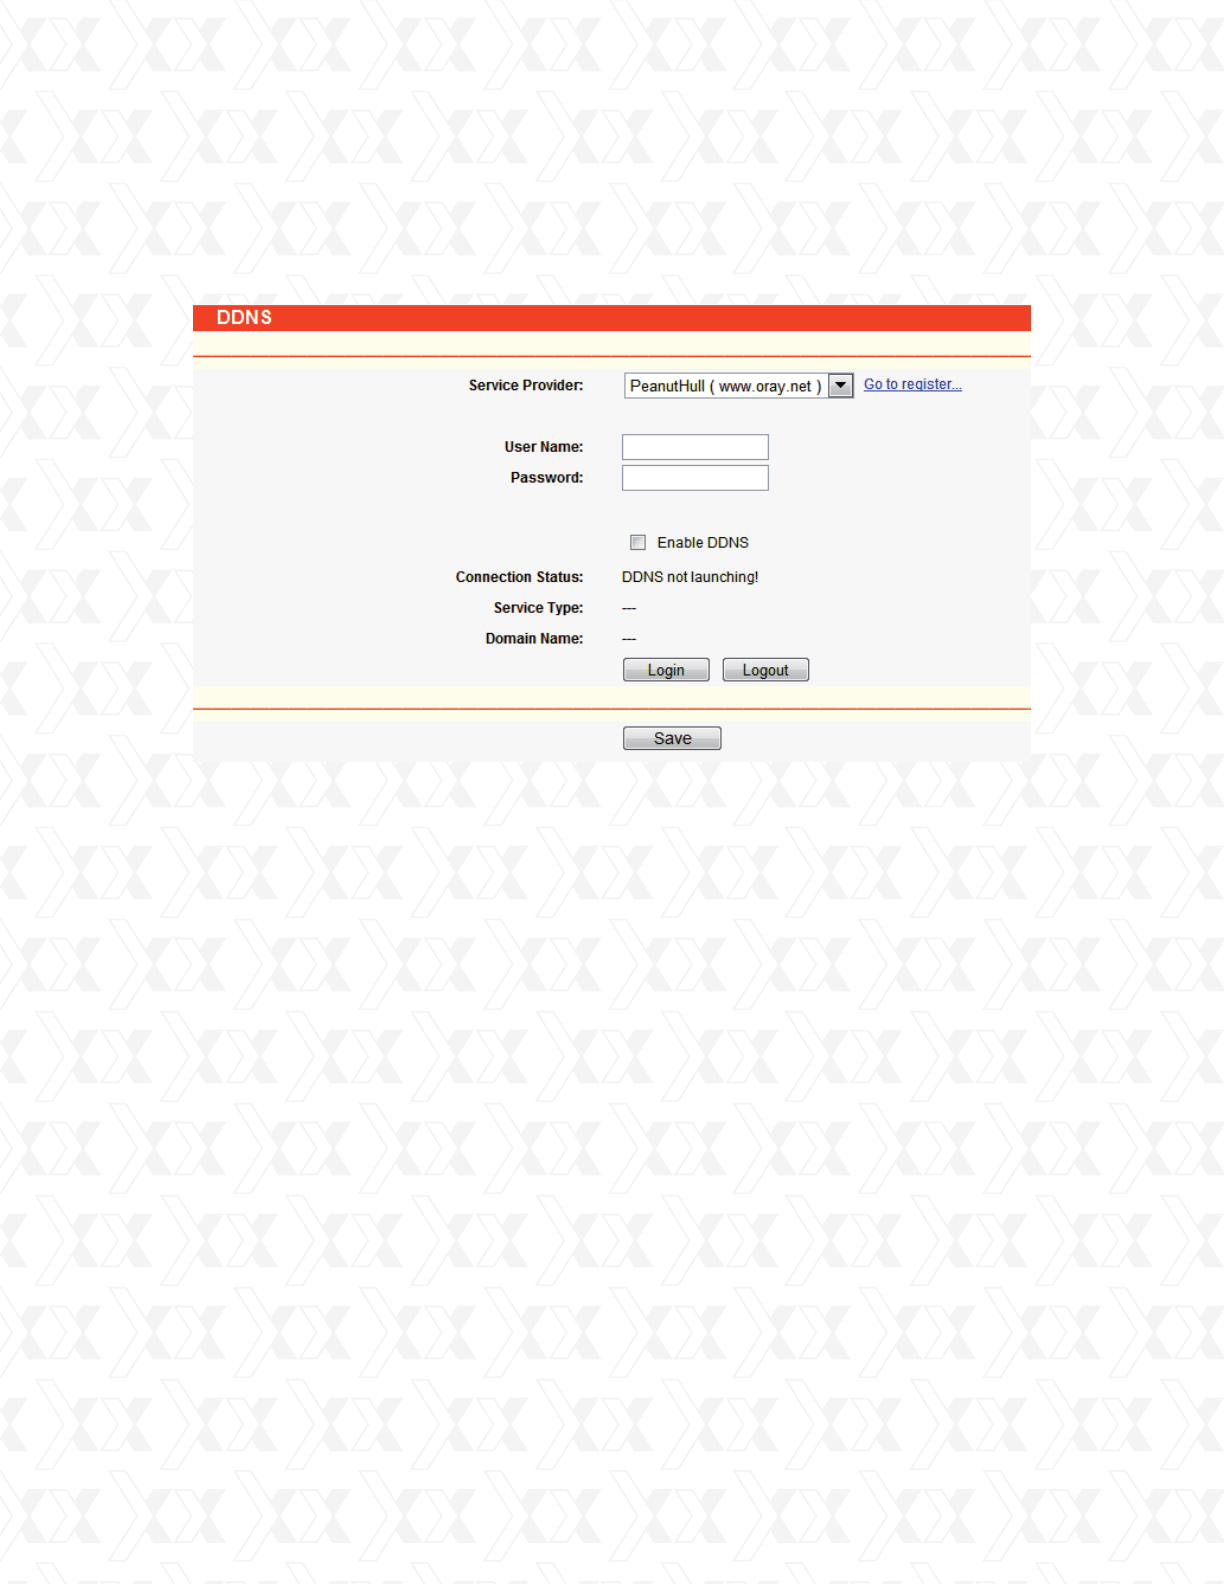
If your selected dynamic DNS Service Provider is www.dyndns.org, the page will appear as shown
in Figure 4-51.
To set up DDNS, follow these instructions:
Click Logout to exit the DDNS service.
Enter the User Name for your DDNS account.
Enter the Password for your DDNS account.
Enter the Domain Name you received from the dynamic DNS service provider
Click the Login button to log into the DDNS service.
Connection Status - The status of the DDNS service connection is displayed in this field.
1.
2.
3.
4.
Note:
An item cannot be entered into the IP & MAC Binding list if the IP address of the item has been
loaded before. An error warning will be displayed as well. Likewise, The Load All command will
only load the items without interfering with the IP & MAC Binding list.
•
Figure 4-51 Dyndns.org DDNS Settings
Nexxt Solutions - NetGate Wireless Access Point
59
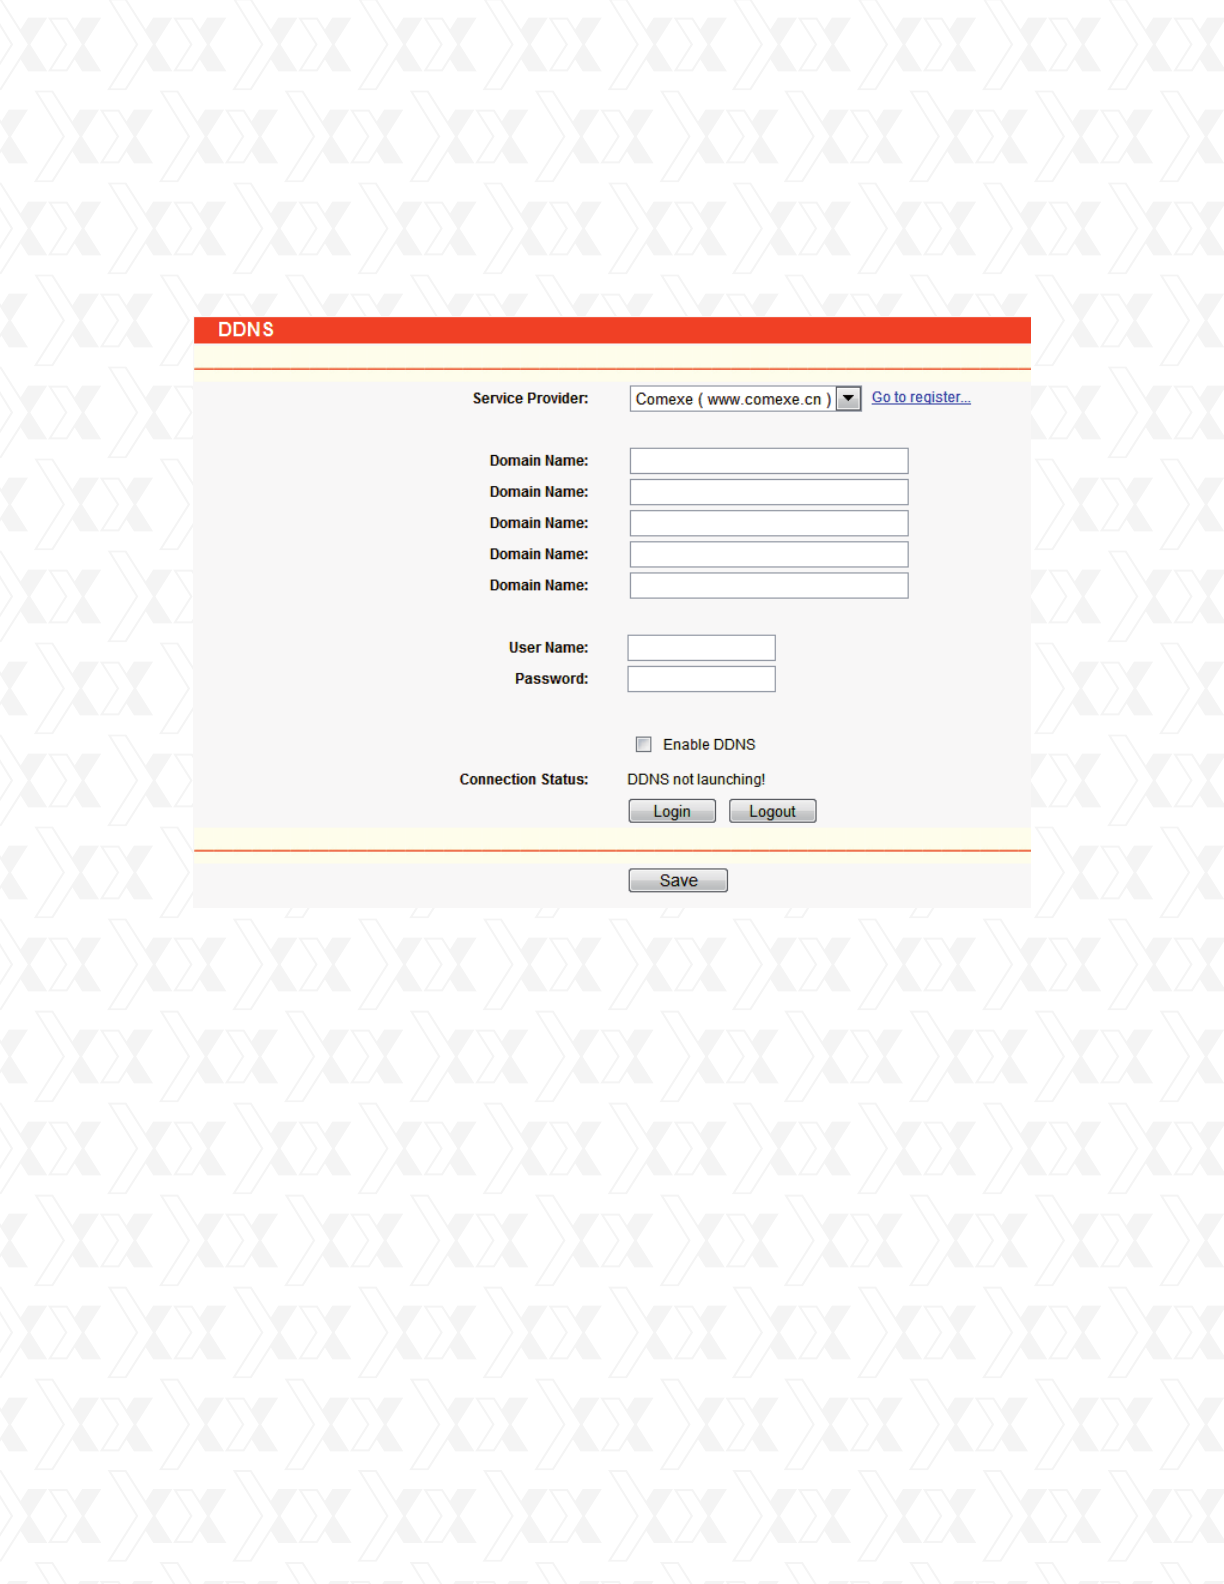
To set up DDNS, follow these instructions:
Click Logout to log out the DDNS service.
Enter the User Name for your DDNS account.
Enter the Password for your DDNS account.
Click the Login button to log in to the DDNS service.
Connection Status - The status of the DDNS service connection is displayed here.
Domain Name - The domain names are displayed in this field.
1.
2.
3.
•
•
4.13.2 Oray.net DDNS
If your selected dynamic DNS Service Provider is www.oray.net, the following page will appear, as
shown in Figure 4-52.
Figure 4-52 Oray.net DDNS Settings
Nexxt Solutions - NetGate Wireless Access Point
60
4.13.3 Comexe.cn DDNS
If your selected dynamic DNS Service Provider is www.comexe.cn, the page will appear as shown
in Figure 4-53.
Click Logout to log out the DDNS service.
To set up for DDNS, follow these instructions:
Enter the domain names your dynamic DNS service provider gave.
Enter the User Name for your DDNS account.
Enter the Password for your DDNS account.
Click the Login button to log in to the DDNS service.
Connection Status -The status of the DDNS service connection is displayed here.
1.
2.
3.
4.
•
Figure 4-53 Comexe.cn DDNS Settings
Nexxt Solutions - NetGate Wireless Access Point
61
4.14 SNMP
4.14.1 Community setting
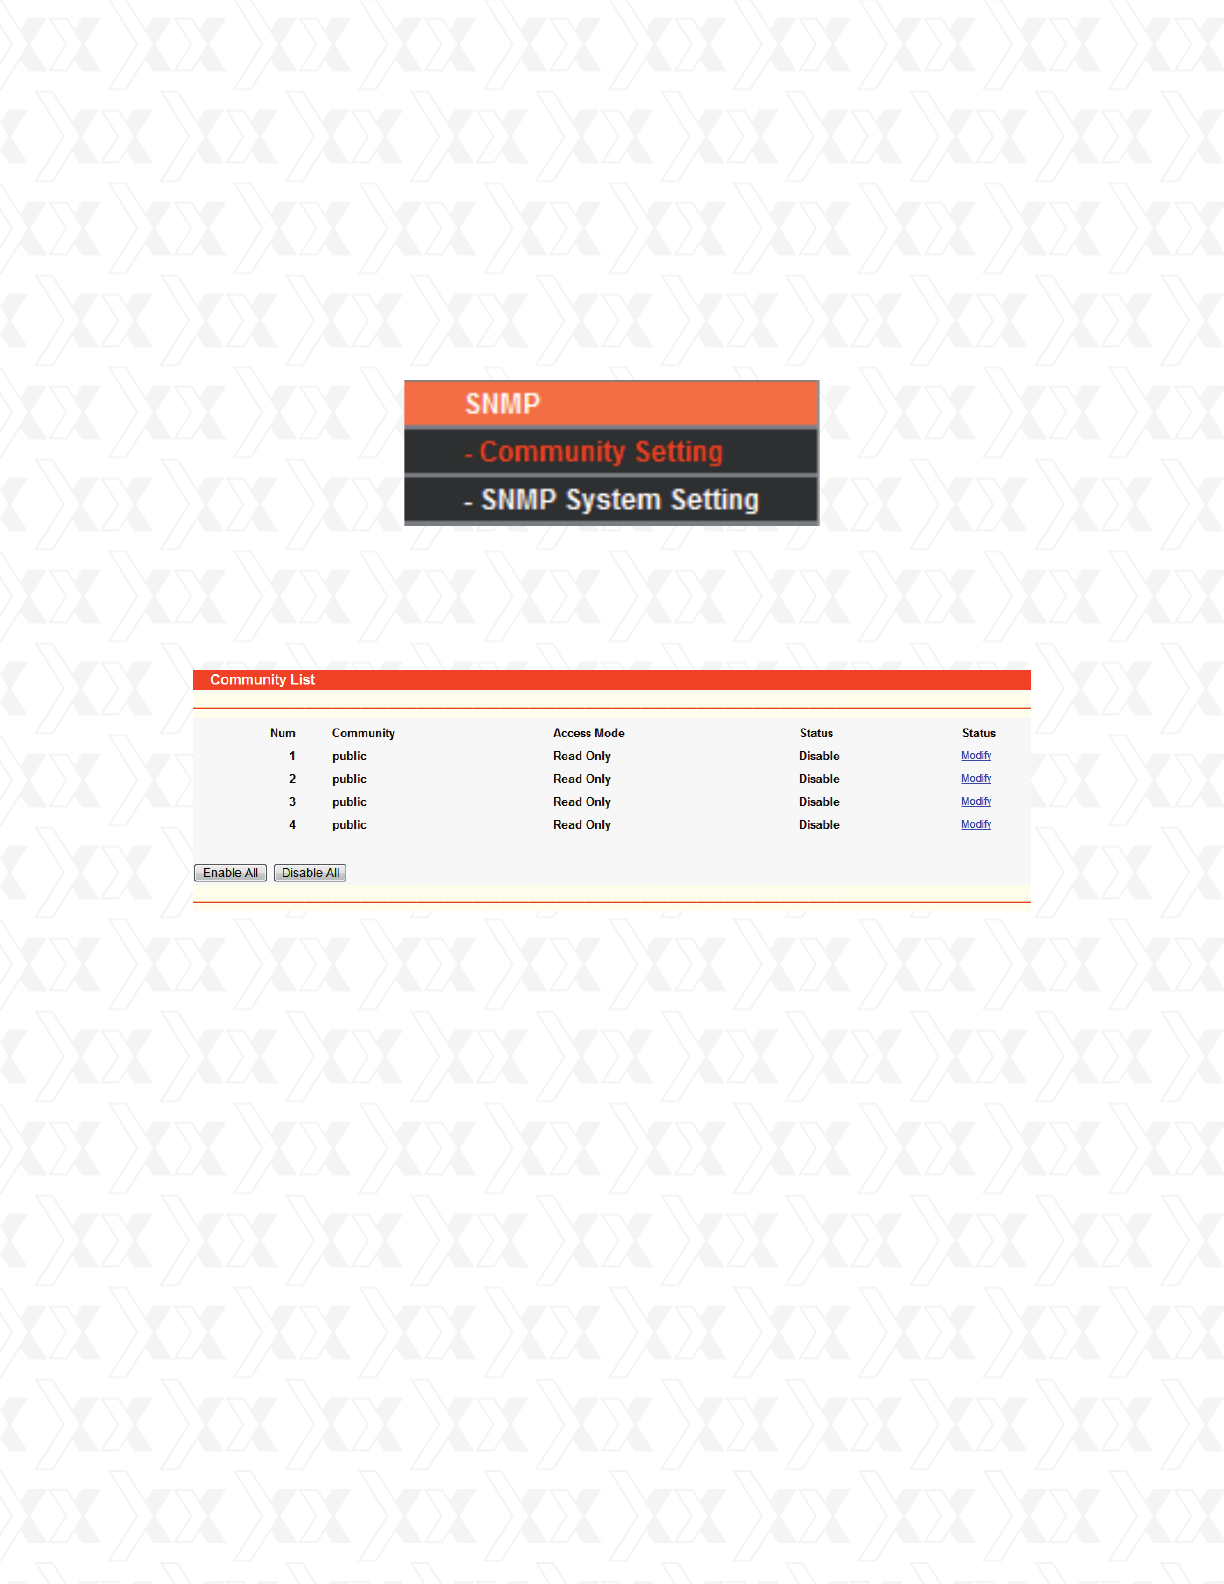
SNMP will allow the network management station to retrieve statistics and status from the
SNMP agent in this device. Simple Network Management Protocol (SNMP) is a popular network
monitoring and management tool, which encompasses a collection of specifications for network
management that include the protocol itself. To use this function, select Enable and enter the
following parameters in Figure 4-54.
Go to SNMP > Community Setting in order to configure SNMP (Simple Network Management
Protocol) communities, which are helpful for managing client access authority levels.
To modify a community setting entry:
Find the desired entry in the table.
Click the Modify button in front of the community you wish to change
Modify the community access to the SNMP entity.
From the Access Mode pull-down list, select the Read Only or Read&Write option.
Select the Enabled option from the Status pull-down list.
Click the Save button to save your changes.
Num - It displays the number for which the SNMP community is defined.
Community String - Enter the password used to authenticate the management station to the
device.
Access Mode - This field allows you to specify the access privileges of the community.
Read Only indicates that the community is only permitted to visualize the device configuration.
Read & Write indicates that the community has been granted permission to read and change
the device configuration.
Status - This field allows you to enable/disable the corresponding entry.
Modify - This field allows you to modify an entry.
Click the Enabled All button to activate all entries.
Click the Disable All button cancel all entries.
1.
2.
3.
4.
5.
6.
•
•
•
•
•
!
!
Figure 4-54 SNMP Settings
Figure 4-55 Community Setting
Nexxt Solutions - NetGate Wireless Access Point
62
4.14.2 SNMP System Setting
4.15 System tools
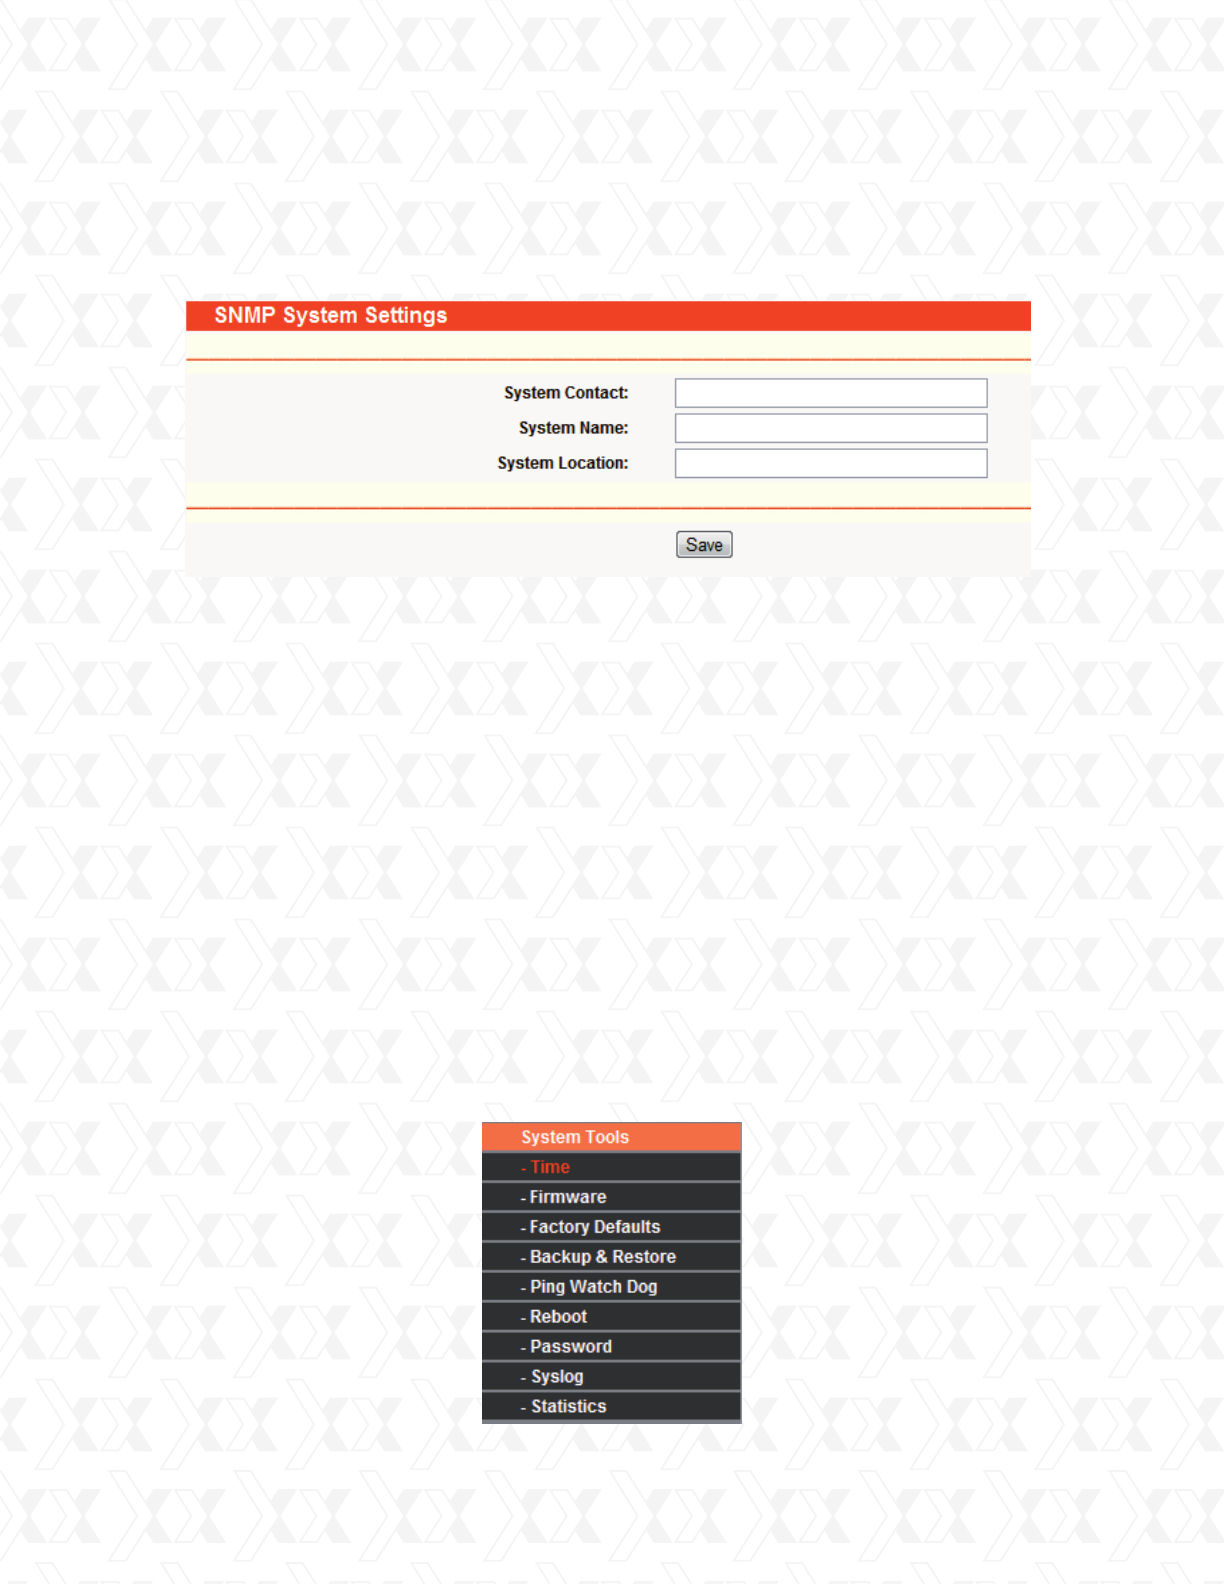
Go to SNMP > SNMP Setting in order to configure several system-related parameters
(iso.org.dod.internet.mgmt.mib-2.system), as shown in Figure 4-56.
System Tools option helps you to optimize the configuration of your device. You can upgrade the
AP to the latest version of firmware, as well as backup or restore the AP’s configuration files.
Ping Watch Dog is designed to constantly monitor a particular connection to a remote host
using the Ping tool. Speed Test helps to test the connection speed to and from any reachable
IP address on current network, especially when we are building wireless network between
devices which are far away from each other. It’s suggested that you change the default password
to a more secure one because it controls access to the device’s web-based management page.
Besides, you can find out what happened to the system in System Log.
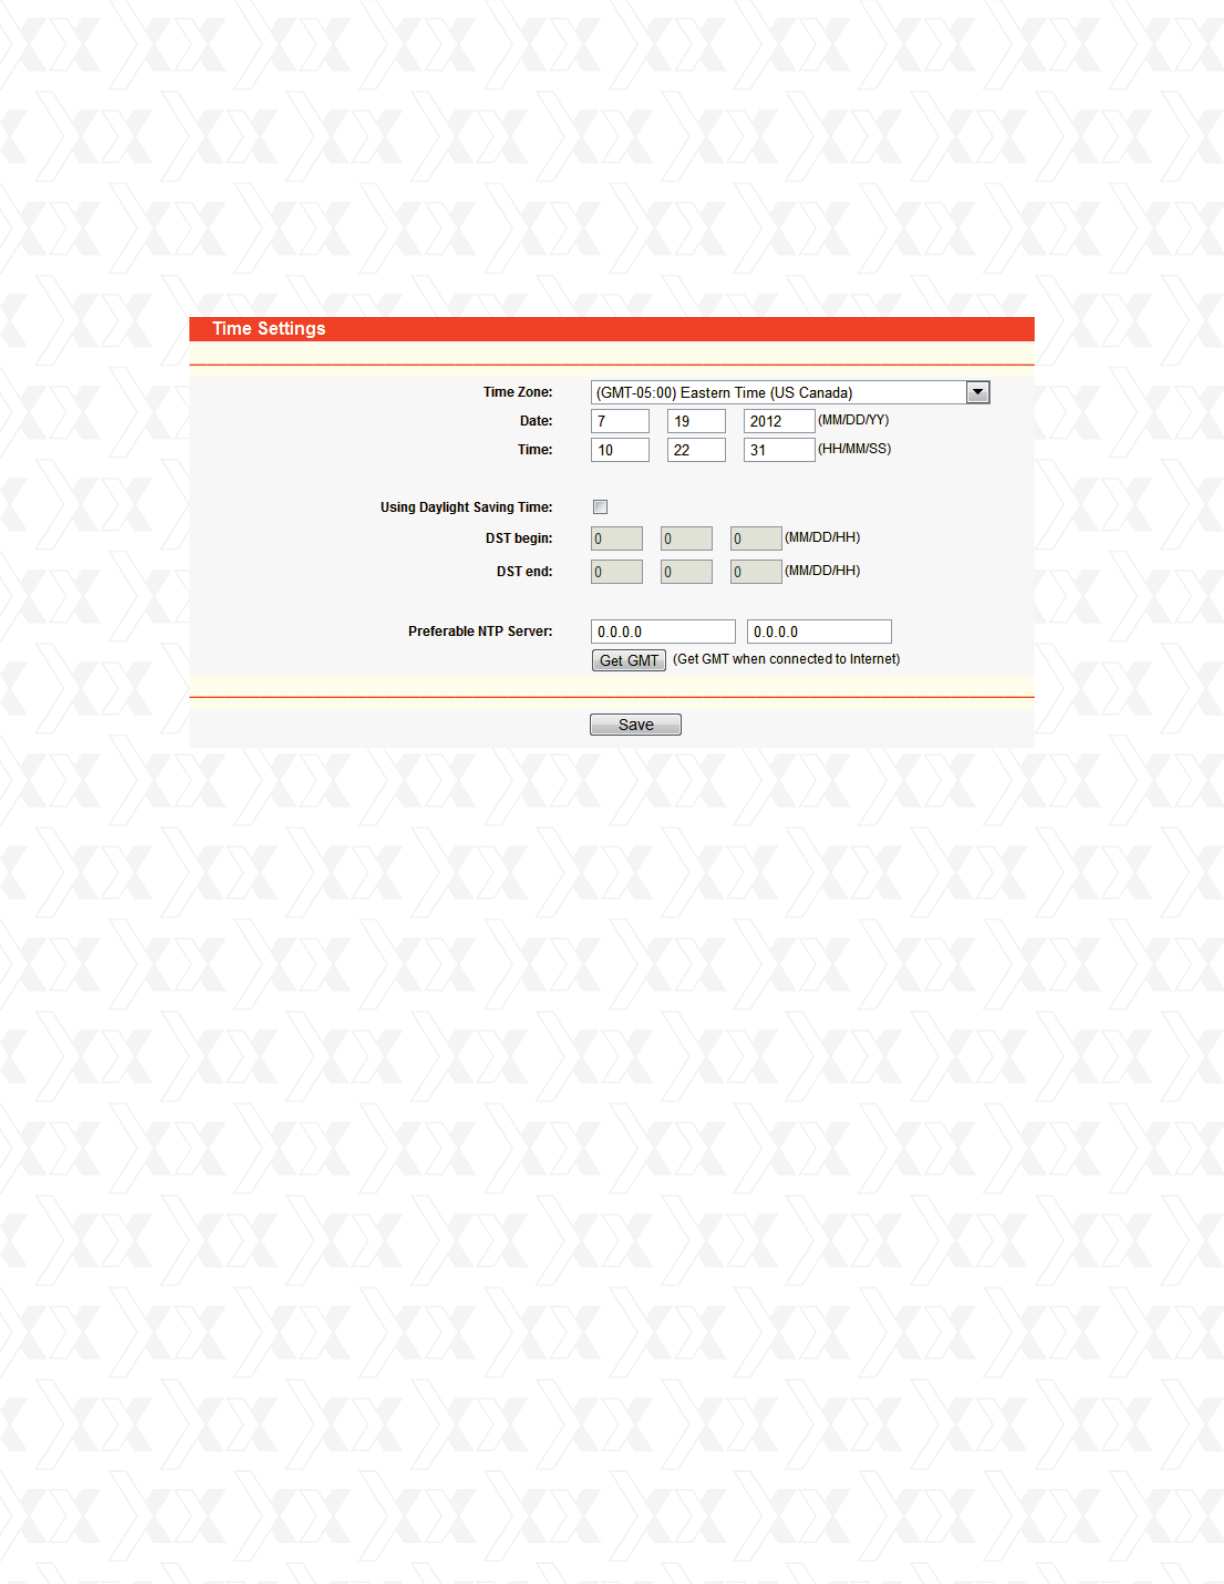
There are ten submenus under the System Tools menu (shown as Figure 4-57): Time, Firmware,
Factory Defaults, Backup & Restore, Ping Watch Dog, Reboot, Password, Syslog and Statistics.
Clicking any of them will enable you to configure the corresponding function. The detailed
explanations for each submenu are provided below.
Click the Save button to keep the configuration of the current page.
!
System Contact - The textual identification of the contact person for this managed node,
together with information on how to contact this person.
System Name - An administratively-assigned name for this managed node. By convention,
this is the node’s fully-qualified domain name.
System Location - The physical location of this node.
•
•
•
Figure 4-56 SNMP System Setting
Figure 4-57 System Tools menu
Nexxt Solutions - NetGate Wireless Access Point
63
4.15.1 Time
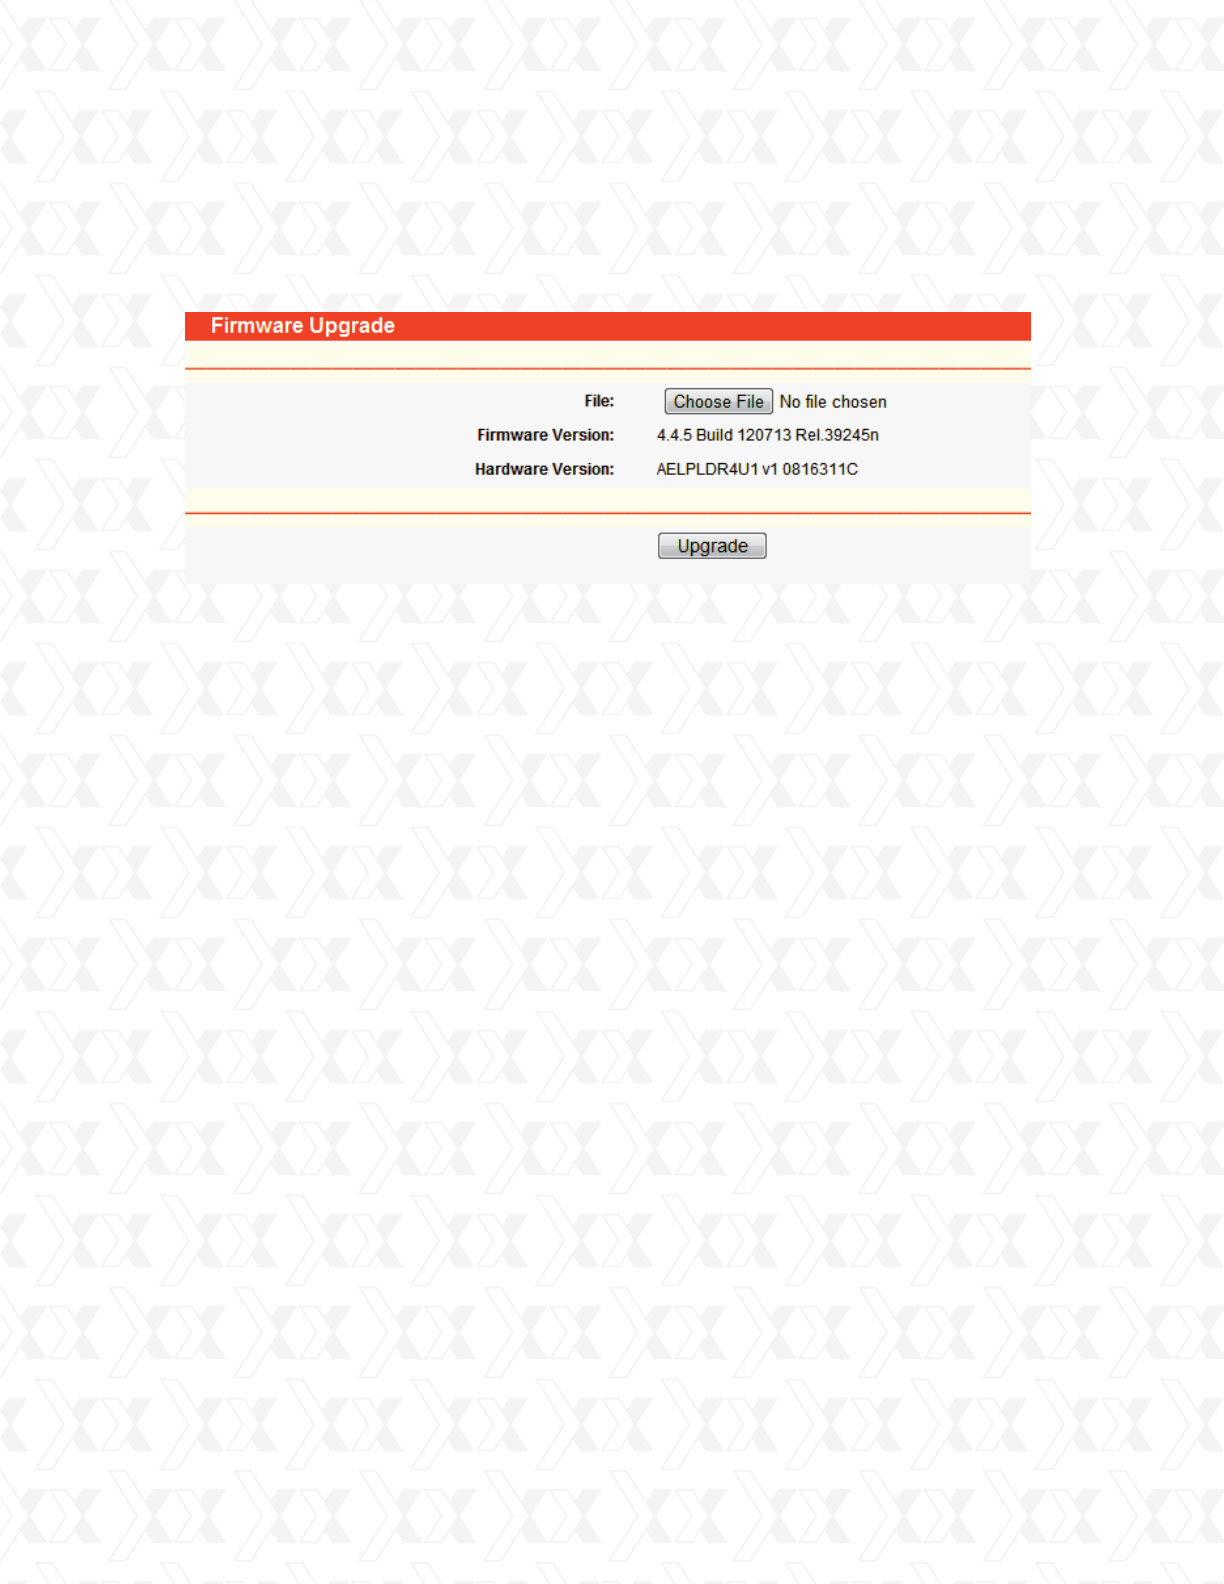
Go to System Tools > Time in order to set the time manually or get the GMT from the Internet
for the router on the page as shown in Figure 4-58.
To configure Time settings, please follow the steps below:
The router will obtain GMT automatically when it connects to Internet.
Note:
Select your local time zone.
Enter date and time in the corresponding blank fields.
Click Save.
This setting will be used for some time-based functions such as firewall. You must specify
your time zone once you log in to the router successfully, otherwise, none of these functions
will work.
The time will be lost if the router is turned off.
1. Select Using Daylight Saving Time.
2. Enter daylight saving start time and end time in the blanks.
Time Zone - Select your local time zone from this drop-down list.
Date - Enter your local date in MM/DD/YY into the blank fields.
Time - Enter your local time in HH/MM/SS into the blank fields.
Click the Get GMT button to get GMT time from the Internet if you have an active internet connection.
If you’re using Daylight saving time, please follow the steps below.
1.
2.
3.
1.
2.
•
•
•
Figure 4-58 Time settings
Nexxt Solutions - NetGate Wireless Access Point
64
4.15.2 Firmware
Go to System Tools > Firmware in order to upgrade the latest version of firmware for the device,
as seen on the screen shown in Figure 4-59.
New firmware versions are posted at http://www.tp-link.com and can be downloaded for free.
There is no need to upgrade the firmware unless the new firmware has a new feature you want
to use. However, when experiencing problems caused by the AP itself, you can try to upgrade the
firmware.
Note:
Before upgrading the AP’s firmware, you should write down some of your customized settings to
avoid losing important configuration settings of AP.
To upgrade the AP’s firmware, please take the following steps:
Note:
Do not turn off the AP or press the Reset button while the firmware is being upgraded.
The AP will reboot after the Upgrading is complete.
Download a more recent firmware upgrade file from our website
(http://www.nexxtsolutions.com).
Click Choose File to view the folders and select the downloaded file.
Click Upgrade.
Firmware Version - Displays the current firmware version.
Hardware Version - Displays the current hardware version. The upgrade file must match the
current hardware version.
1.
2.
3.
•
•
Figure 4-59 Firmware Upgrade
Nexxt Solutions - NetGate Wireless Access Point
65
Note:
Any settings you have saved will be lost after the default settings are restored.
Note:
4.15.3 Factory defaults
4.15.4 Backup & restore
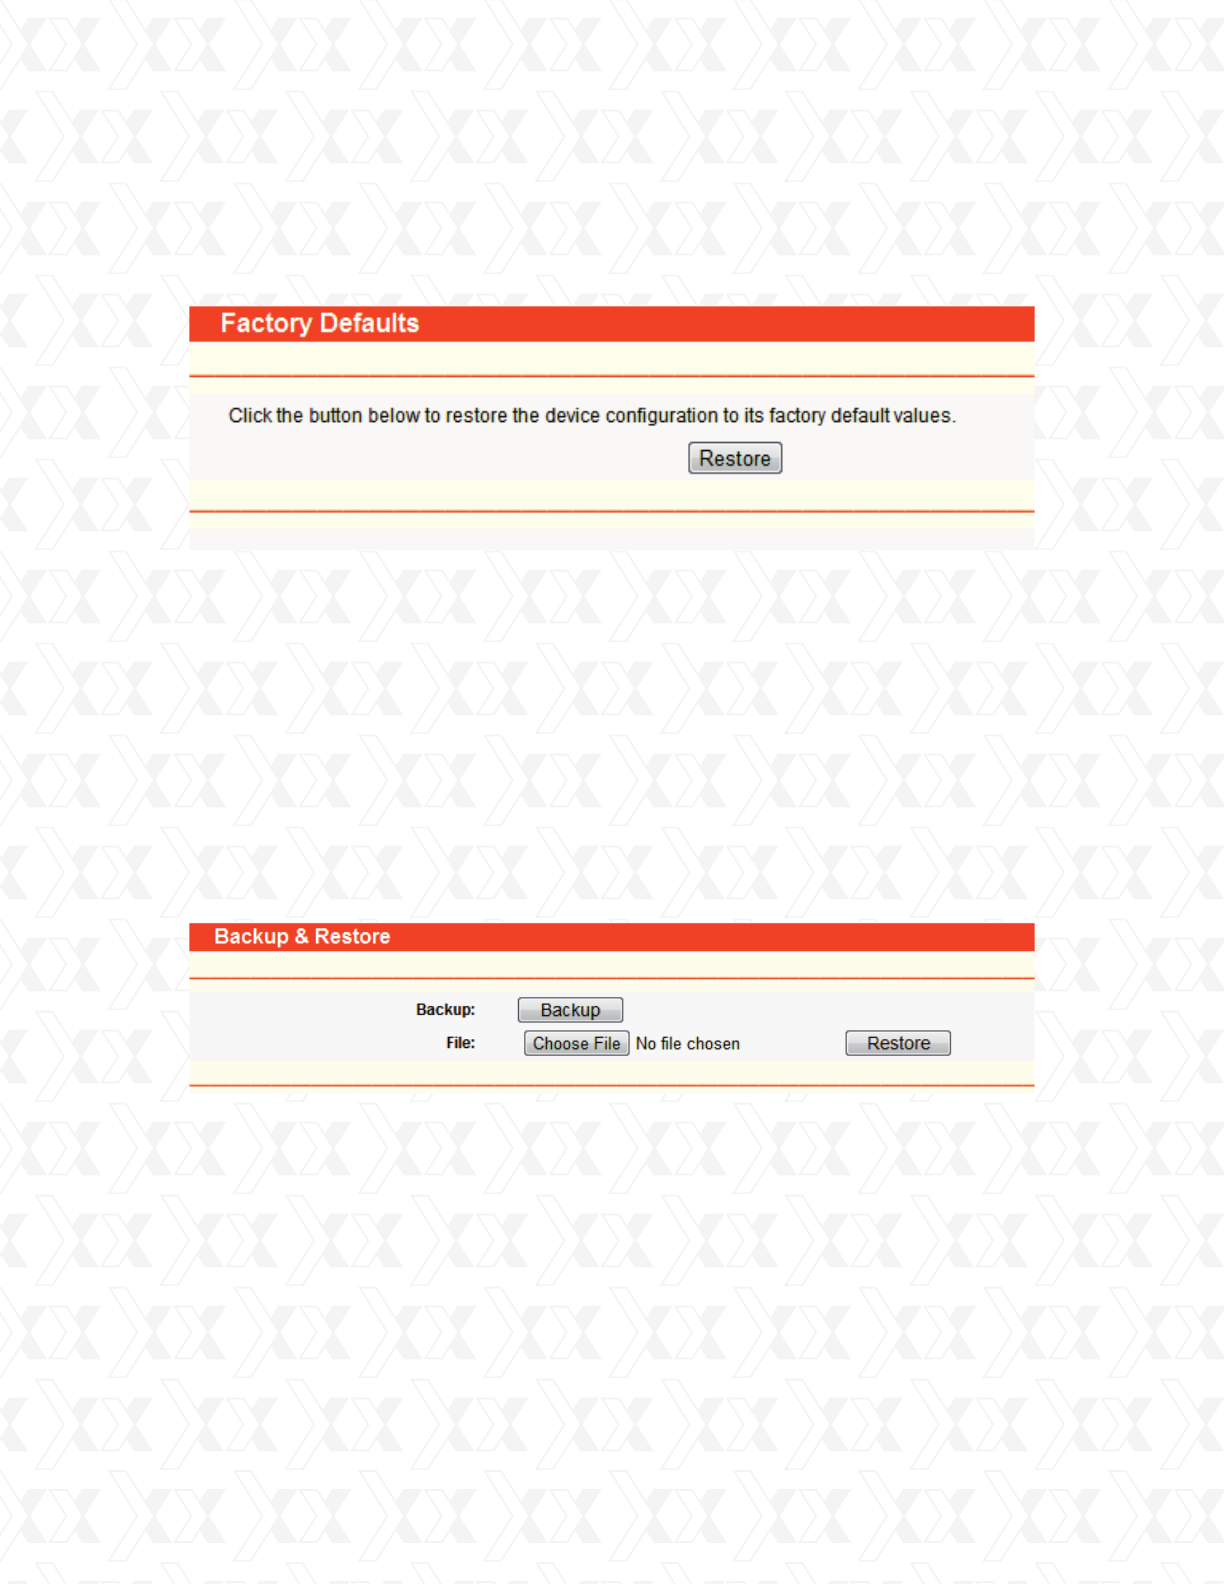
Go to System Tools > Factory Default in order to restore the router configuration to its factory
default values, as seen on the following screen (Figure 4-60).
Click the Backup button to save all configuration settings as a backup file in your local computer.
To restore the AP’s configuration, please take the following steps:
Go to System Tools > Backup & Restore button to save all the configuration settings as
a backup file in your local computer, as shown in Figure 4-61.
Click Restore to reset all configuration settings to their default values.
The current configuration will be overwritten by the uploaded configuration file.
If the process is not done correctly, it could render the device unmanageable.
The upgrade process lasts around 20 seconds, after which the router will restart
automatically. Keep the router on during the entire upgrading process to prevent any
potential damage to the unit.
The default User Name: admin
Default Password: admin
Default IP Address: 192.168.0.1
Default Subnet Mask: 255.255.255.0
Click Choose File to find the location of configuration file which you want to restore.
Click Restore to update the configuration with the file using the path you have entered or
selected in the blank field.
1.
2.
3.
•
•
•
•
•
•
!
Figure 4-60 Restore Factory Default
Figure 4-61 Save or Restore the Configuration
Nexxt Solutions - NetGate Wireless Access Point
66
4.15.5 Ping Watch Dog
4.15.6 Speed test
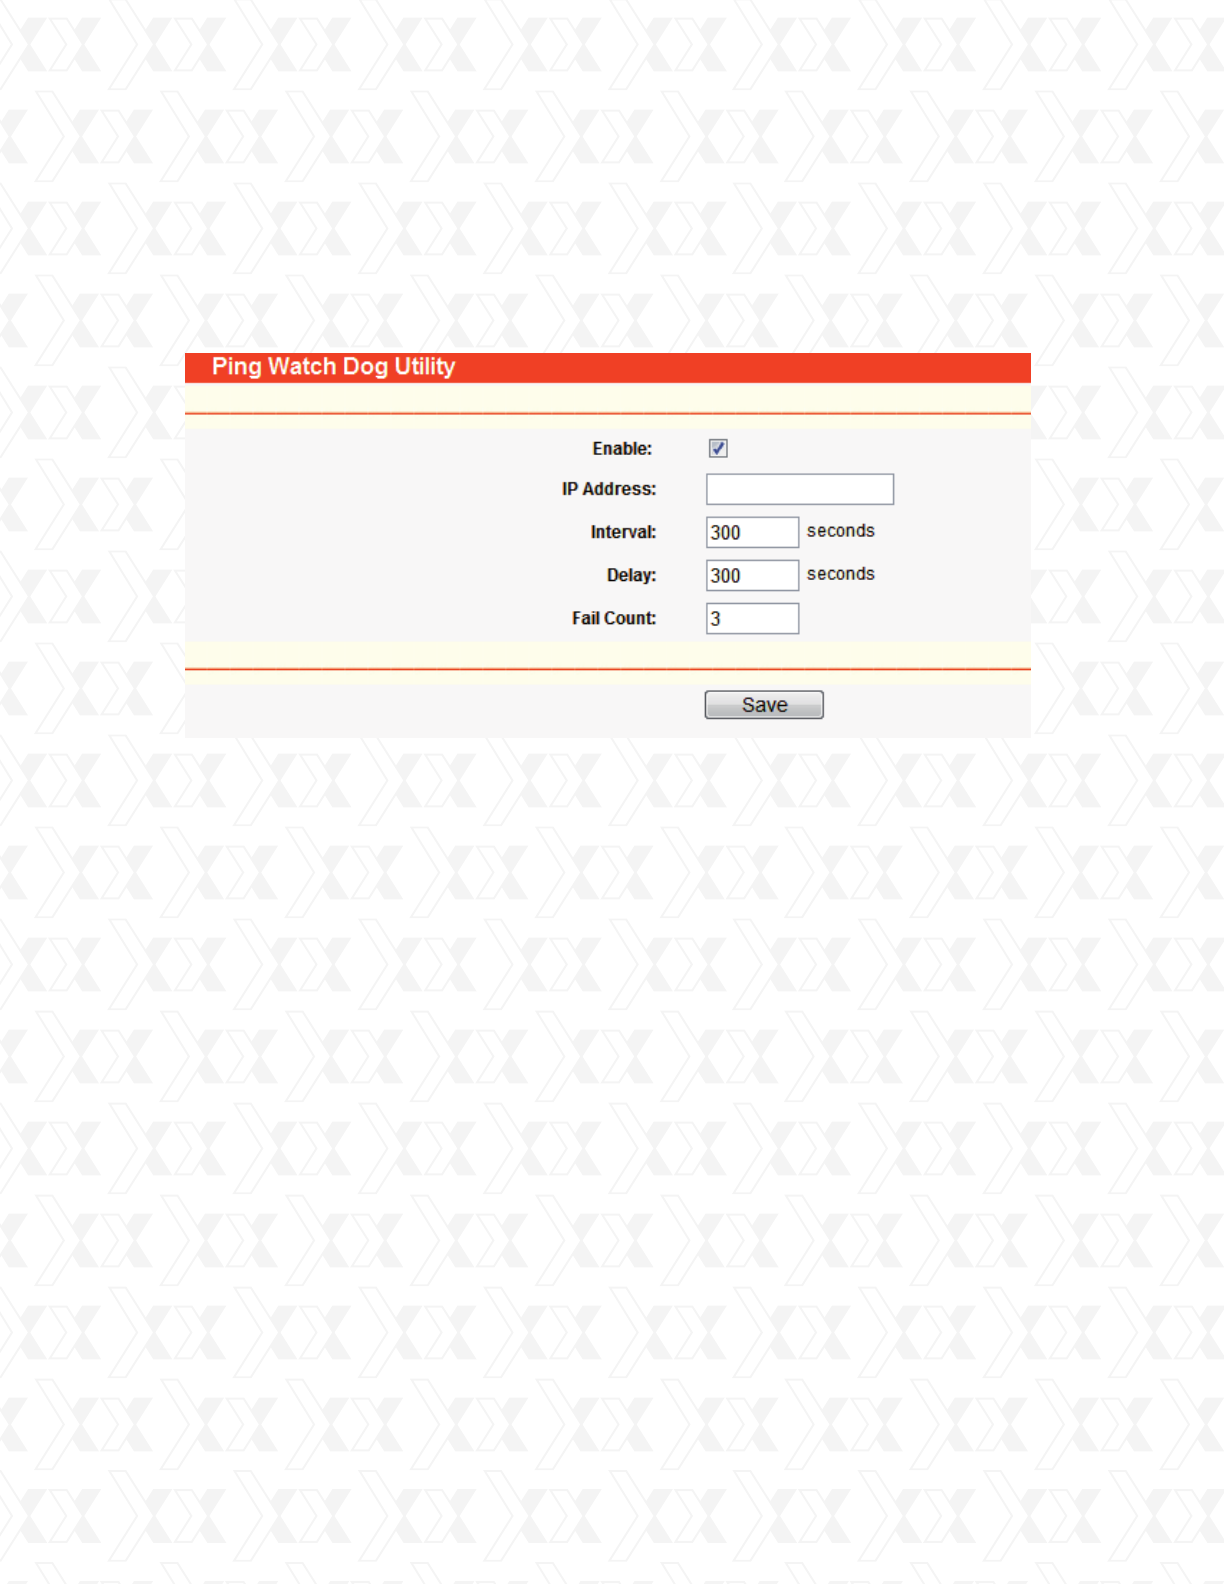
Go to System Tools > Ping Watch Dog in order to constantly monitor a particular connection to
a remote host using the Ping tool. It makes this device continuously ping a user defined IP
address (it can be the internet gateway, for example). If it is unable to ping under the user-defined
constraints, this device will automatically reboot.
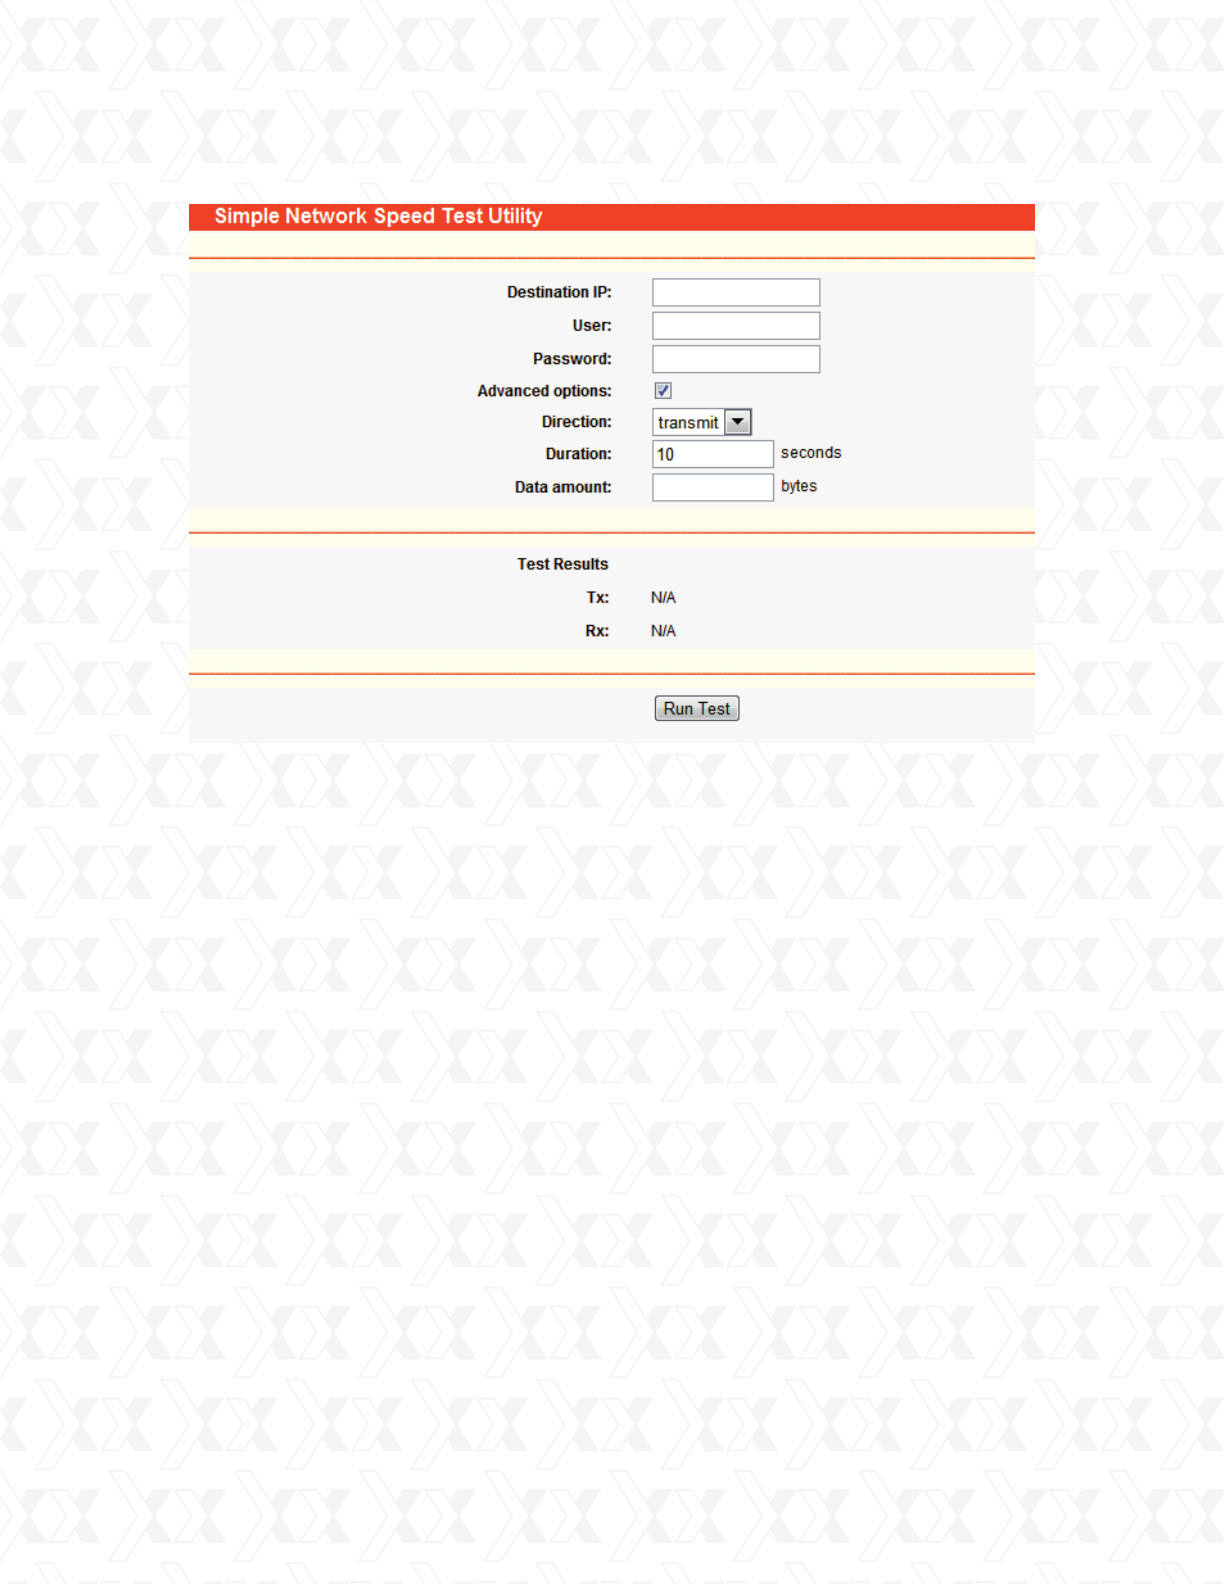
Go to Wireless > Speed in order to test the connection speed to and from any reachable IP
address of the existing network, especially when establishing a wireless link between devices
which are far away from each other. It should be used for the preliminary throughput reading
between two network devices. This reading is a rough estimate. You can input the remote
device’s administrator Username and Password to get a precise reading, provided the remote
device do support the Speed Test Utility of our AP.
Make sure to click the Save button to make your settings changes effective.
!
Enable - Check this box to Enable or Disable the Ping Watch Dog..
IP Address - The IP address of the target host where the Ping Watch Dog Utility is sending
ping packets.
Interval - Sets the time interval between two consecutive ping packets being sent..
Delay - Sets the time delay before first ping packet is sent out when the device is restarted.
Fail Count - Upper limit of the ping packet the device can drop continuously. If this value is
overrun, the device will restart automatically.
•
•
•
•
•
Figure 4-62 Ping Watch Dog Utility
Nexxt Solutions - NetGate Wireless Access Point
67
Note:
If either User or Password is incorrect, only a basic test will be performed. In other words, none
of the advanced options you set will take effect.
Note:
If both Duration and Data amount are specified, the test will stop after any of them is met.
Be sure to click the Run Test button to start a new test after you filled enough information.
You can also stop a running test by clicking the Stop Test button at any time.
Destination IP - The Remote device’s IP address.
User - Administrator password of the remote device. It should be filled correctly if you want
to get a precise reading. Otherwise, leave this field blank.
Advanced options - This command is used to display the advanced test options, when the
precise reading is being selected.
Duration - Use this box to specify how long the test should last.
Data amount - The maximum data amount to be sent out during the whole test.
transmit - Estimates the outgoing throughput (TX).
receive - Estimates the ingoing throughput (RX).
both - Estimates the incoming throughput (Rx) first, followed by the outgoing (Tx) throughput.
Direction - There are 3 options available for the traffic direction while estimating the throughput
•
•
•
•
•
•
•
•
•
Figure 4-63 Speed Test
Nexxt Solutions - NetGate Wireless Access Point
68
4.15.7 Reboot
4.15.8 Password
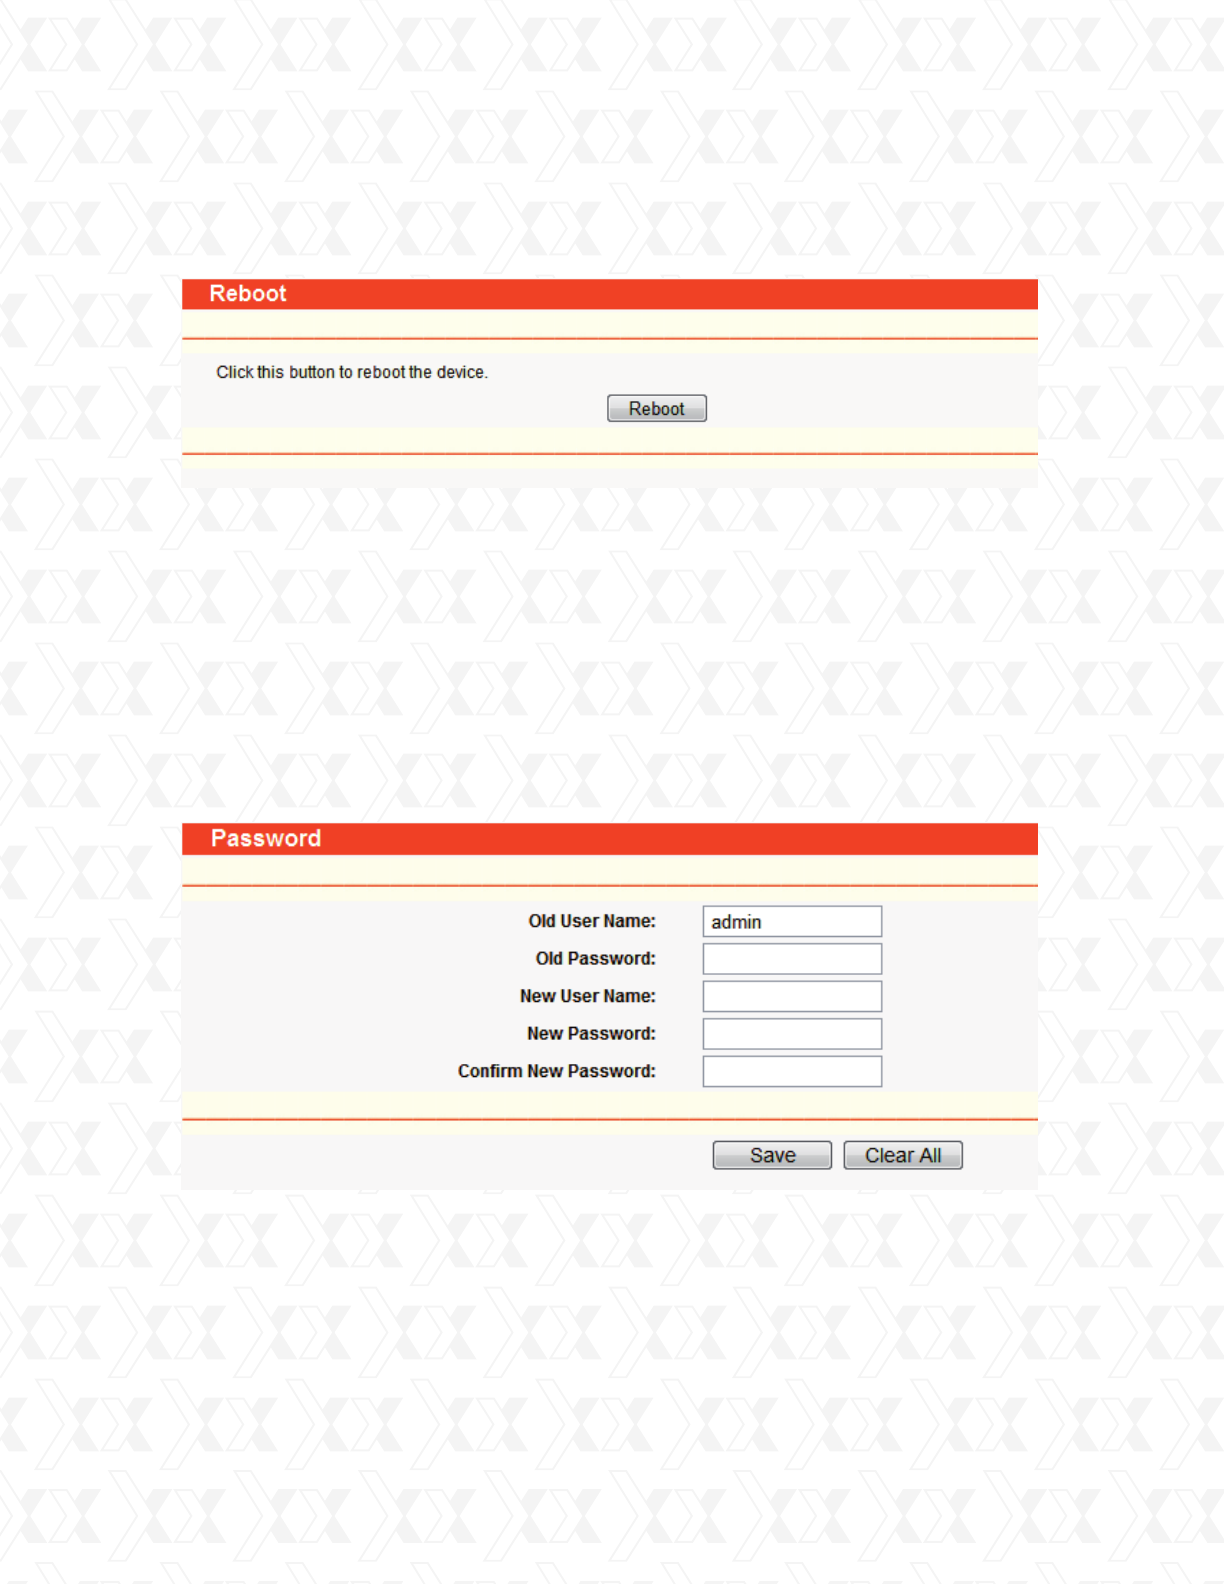
Go to System Tools > Reboot in order to reset the device, as shown in the screen below.
Go to System Tools > Password in order to change the router’s factory default user name and
password, using the screen shown in Figure 4-65.
Click Reboot to initialize the AP.
Some device settings take effect only after the device is rebooted., which include:
It is strongly recommended that you change the factory default user name and password of the
AP to more secure ones because they control access to the AP’s web-based utility. All users who
try to access the AP’s web-based utility or Quick Setup will be prompted to type the AP’s user
name and password.
Note:
The new user name and password must not exceed 14 characters in length and must not
include any space. Enter the new Password twice to confirm it.
Click Save when finished.
Click Clear All to delete all existing entries.
Change LAN IP Address. (system will reboot automatically)
Upgrade the firmware of the AP (system will reboot automatically).
Restore the AP’s settings to factory default (system will reboot automatically).
DHCP service function.
Static address assignment of DHCP server.
•
•
•
•
•
Figure 4-64 Reboot the AP
Figure 4-65 Password
Nexxt Solutions - NetGate Wireless Access Point
69
4.15.9 Syslog
4.15.10 Statistics
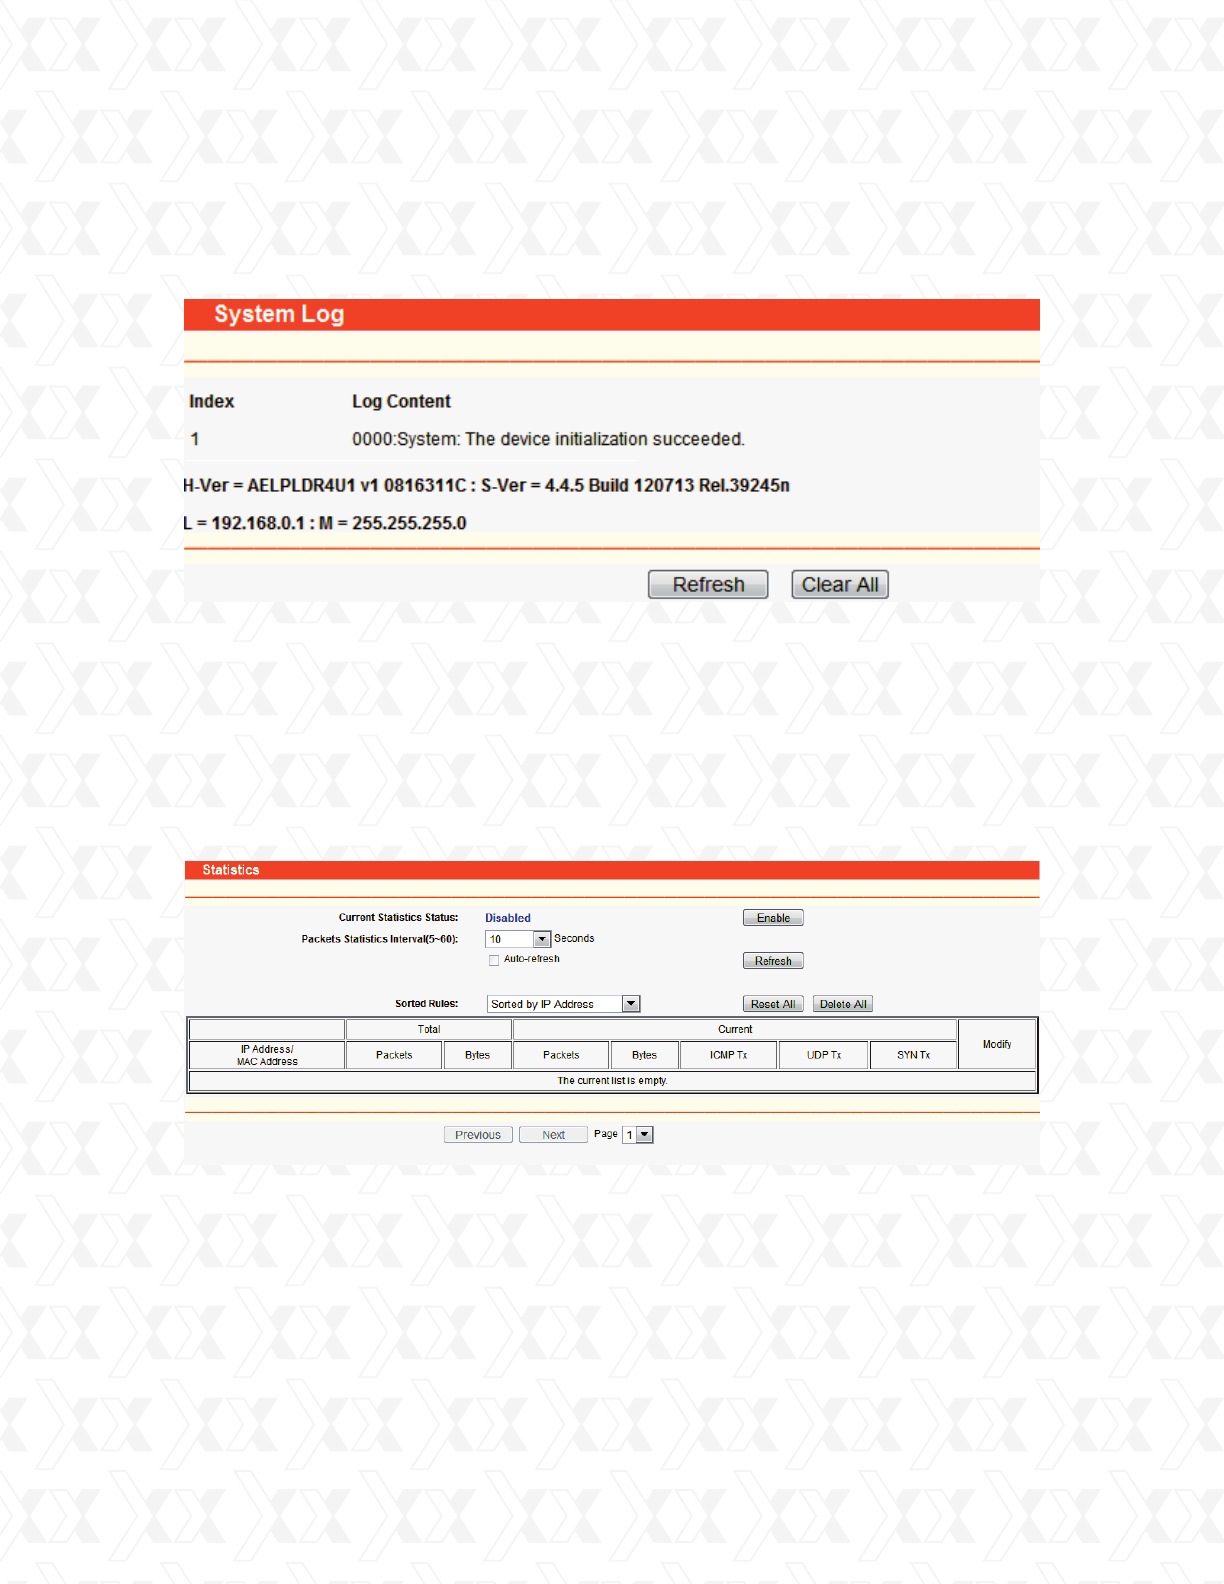
Go to System Tools > System Log to query the logs in order to visualize the activity of the device,
as shown in Figure 4-66.
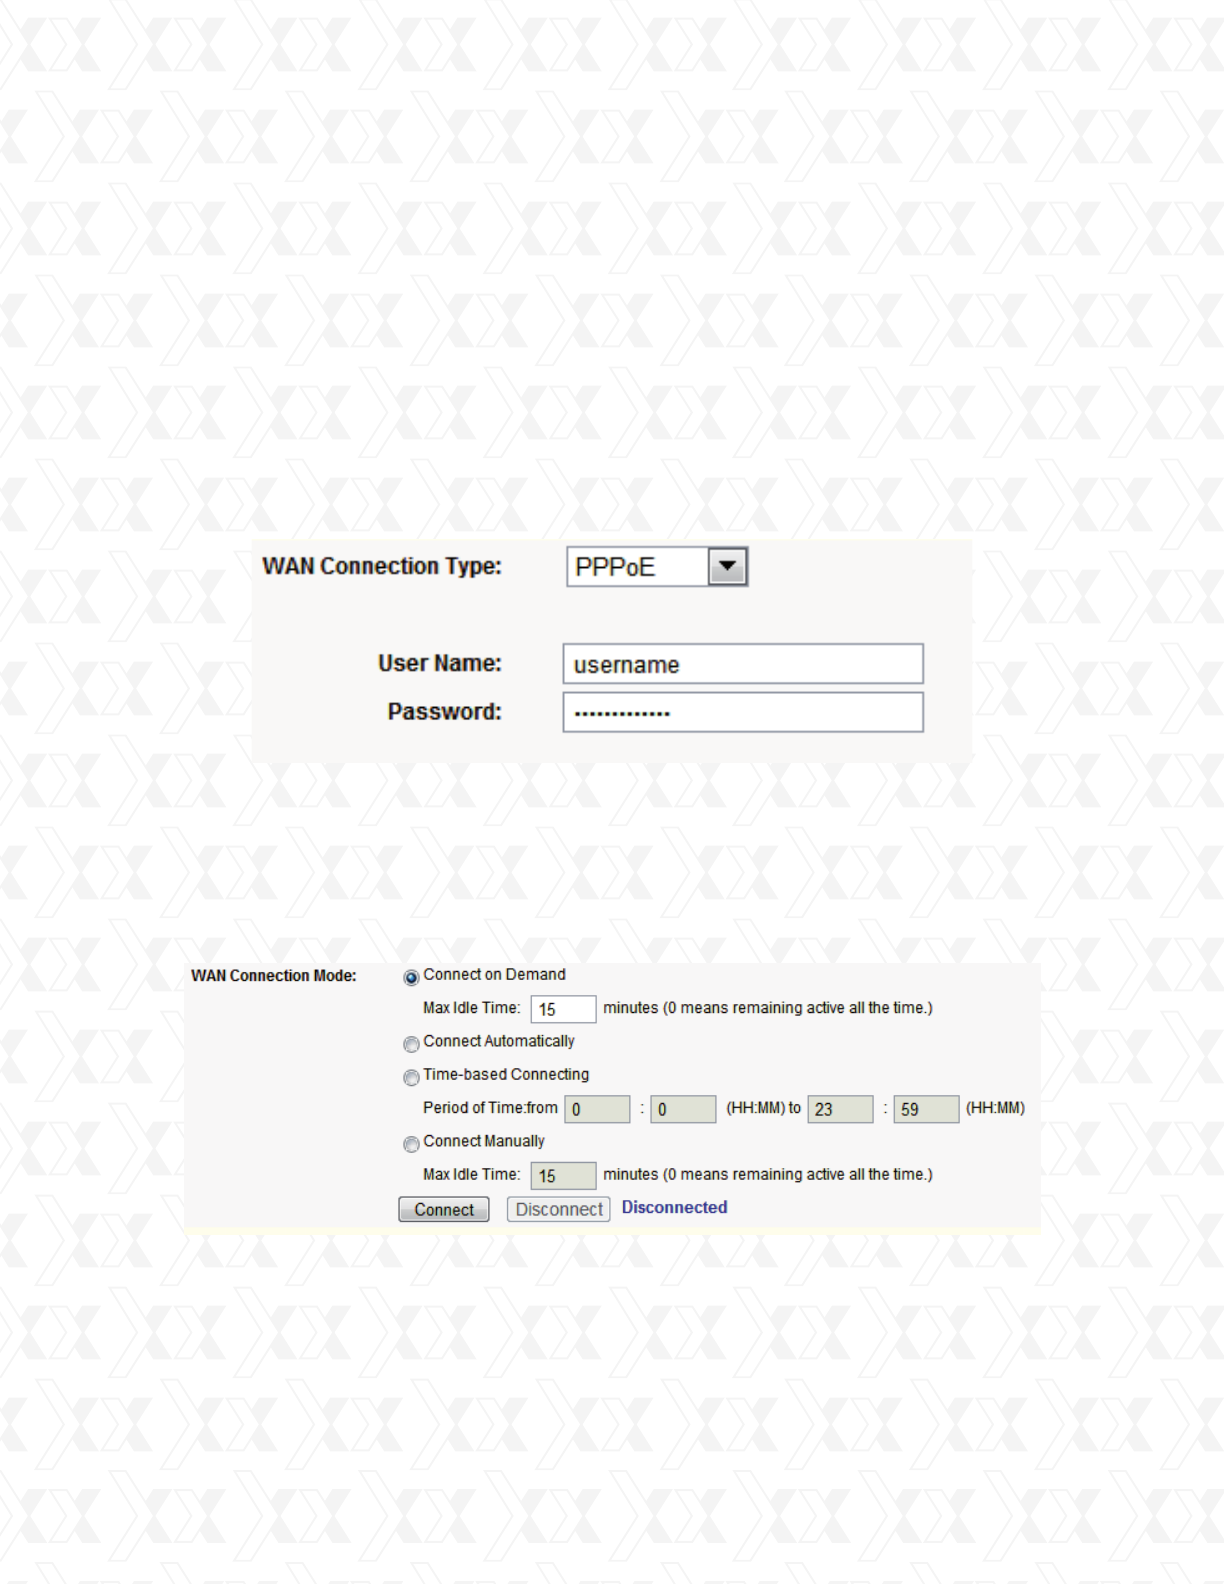
The Statistics page (shown in Figure 4-67) displays the network traffic of each PC on the LAN,
including total traffic and the traffic of the last Packets Statistic interval in seconds.
The AP can keep logs of all traffic. You can query the logs to see the activity in the AP.
Click Refresh to show the latest log lists
Click Clear All to delete all the log entries.
Current Statistics Status - Enabled or Disabled. The default value is disabled. To enable,
click the Enable button. If disabled, the function of DoS protection in Security settings will
be ineffective.
Packets Statistics Interval - The default value is 10. Select a value between 5 and 60
seconds from the pull-down list. This statistics interval defines the time between each
transmission of data packets.
Sorted Rules - Select a rule from the pull-down list to display the corresponding statistics.
•
•
•
Figure 4-66 System Log
Figure 4-67 Statistics

Nexxt Solutions - NetGate Wireless Access Point
70
Statistics Table:
Click the Save button to store the Packets Statistic interval value.
Click the Auto-refresh checkbox to update the page automatically.
Click the Refresh button to refresh the page immediately.
IP Address
Total
Packets
The IP Address displayed with statistics
The total amount of packets received and transmitted by the router.
The total amount of bytes received and transmitted by the router.
The total amount of packets received and transmitted in the last
Packets Statistic interval seconds.
Packets
ICMP Tx
Current
Bytes
The total amount of bytes received and transmitted in the last
Packets Statistic interval seconds.
The total amount of the ICMP packets transmitted to WAN
in the last Packets Statistic interval seconds.
UDP Tx The total amount of the UDP packets transmitted to WAN
in the last Packets Statistic interval seconds.
TCP SYN Tx The total amount of the TCP SYN packets transmitted to WAN
in the last Packets Statistic interval seconds.
Bytes
Nexxt Solutions - NetGate Wireless Access Point
71
Appendix A: FAQ
Go to System Tools > System Log to query the logs in order to visualize the activity of the device,
as shown in Figure 4-66.
1. How do I configure the router for ADSL users to access the Internet?
First, configure the ADSL Modem configured in RFC1483 bridge mode.
Connect the Ethernet cable from your ADSL Modem to the WAN port on the router.
The telephone cord plugs into the Line port of the ADSL modem.
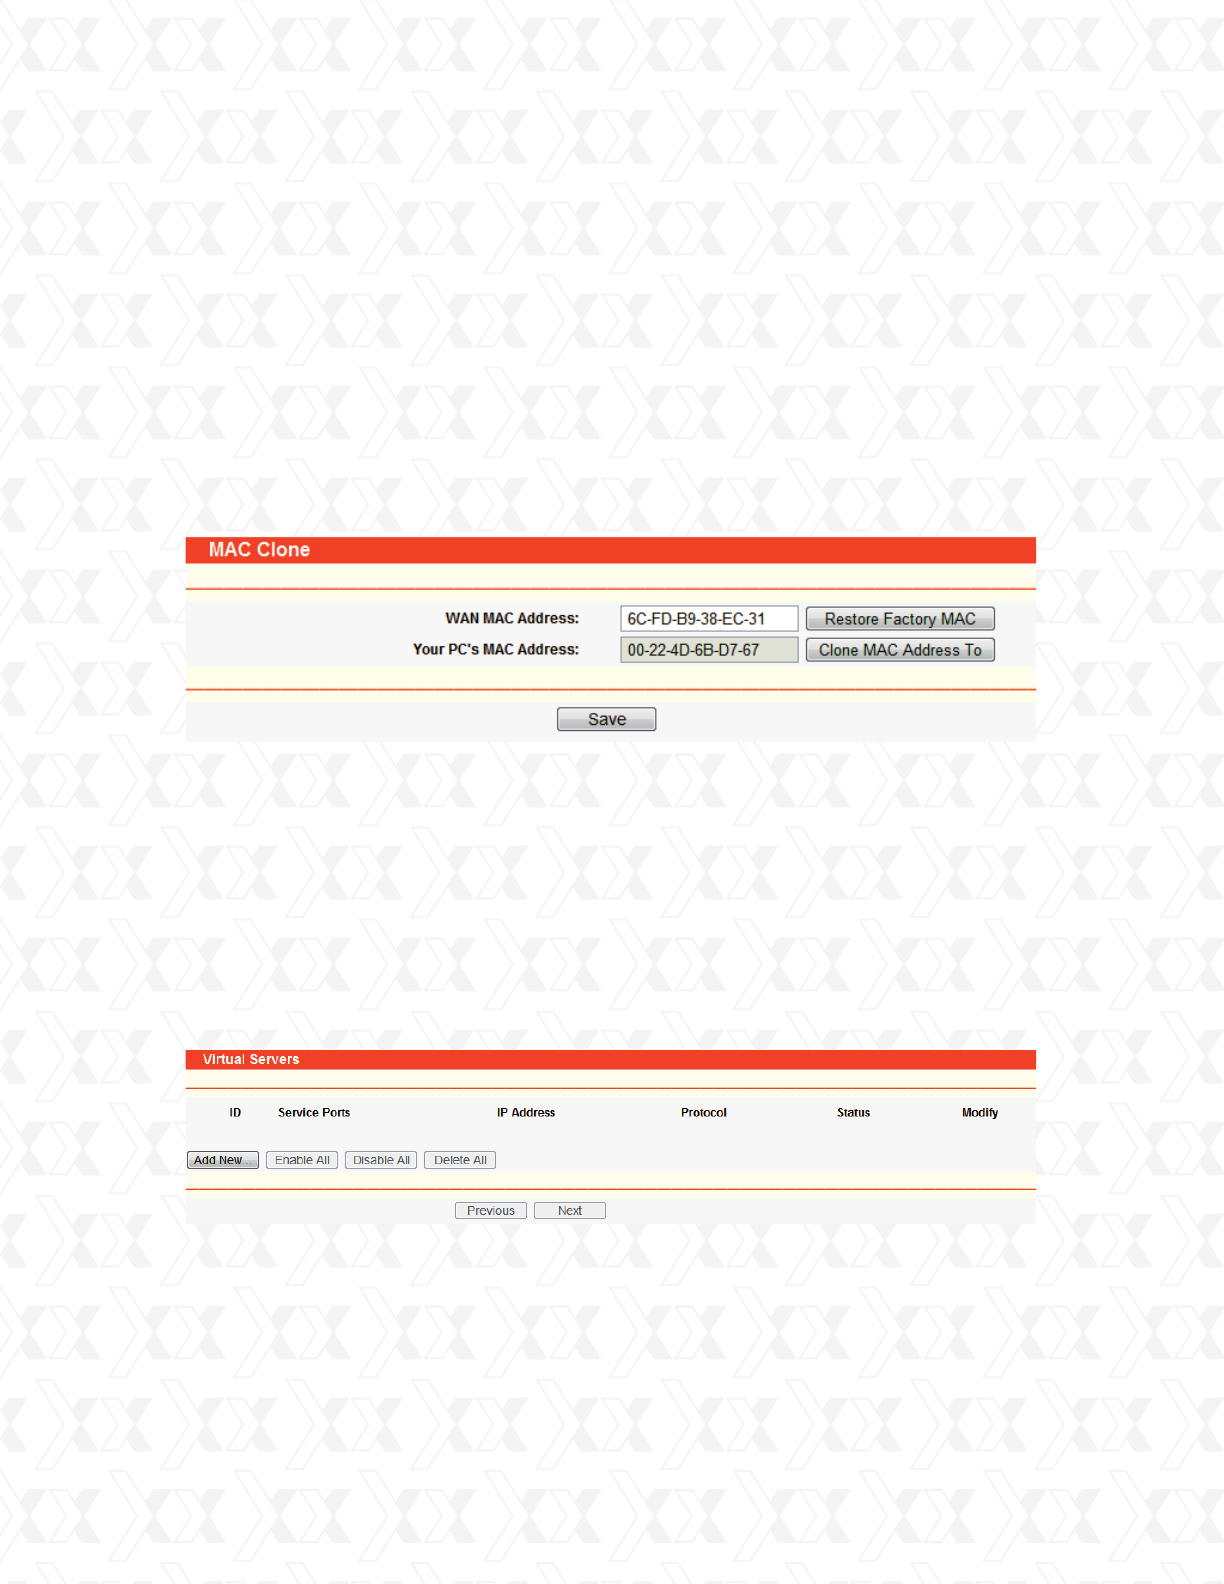
Login to the router, click the “Network” menu on the left of your browser, and click “WAN”
submenu. On the WAN page, select “PPPoE” for WAN Connection Type. Type user name
in the “User Name” field and password in the “Password” field, finish by clicking on the
“Connect” button.
If your ADSL lease is in “pay-according-time” mode, select “Connect on Demand” or
“Connect Manually” as your Internet connection mode. Type an appropriate value for
“Max Idle Time” to avoid wasting paid time. Otherwise, you can select “Auto-connecting”
as your Internet connection mode.
Sometimes the connection cannot be terminated despite your setting of the ”Max Idle Time”
interval. This is due to some applications are continually linked to the internet in the background.
If you are a Cable user, please configure the router following the above steps.
Note:
1.
2.
3.
4.
1.
2.
!
Figure A-1 PPPoE Connection Type
Figure A-2 PPPoE Connection Mode
Nexxt Solutions - NetGate Wireless Access Point
72
2. How do I configure the router for Ethernet users to access the Internet?
3. I want to use Netmeeting, what do I need to do?
Login to the router. Go to the “Network” in the menu located on the left of your browser, and
select “WAN” in the submenu. Once the WAN page opens, select “Dynamic IP” as the WAN
Connection Type, and finish by clicking on the “Save” button.
Some ISPs require that you register the MAC Address of your adapter, which is connected to your
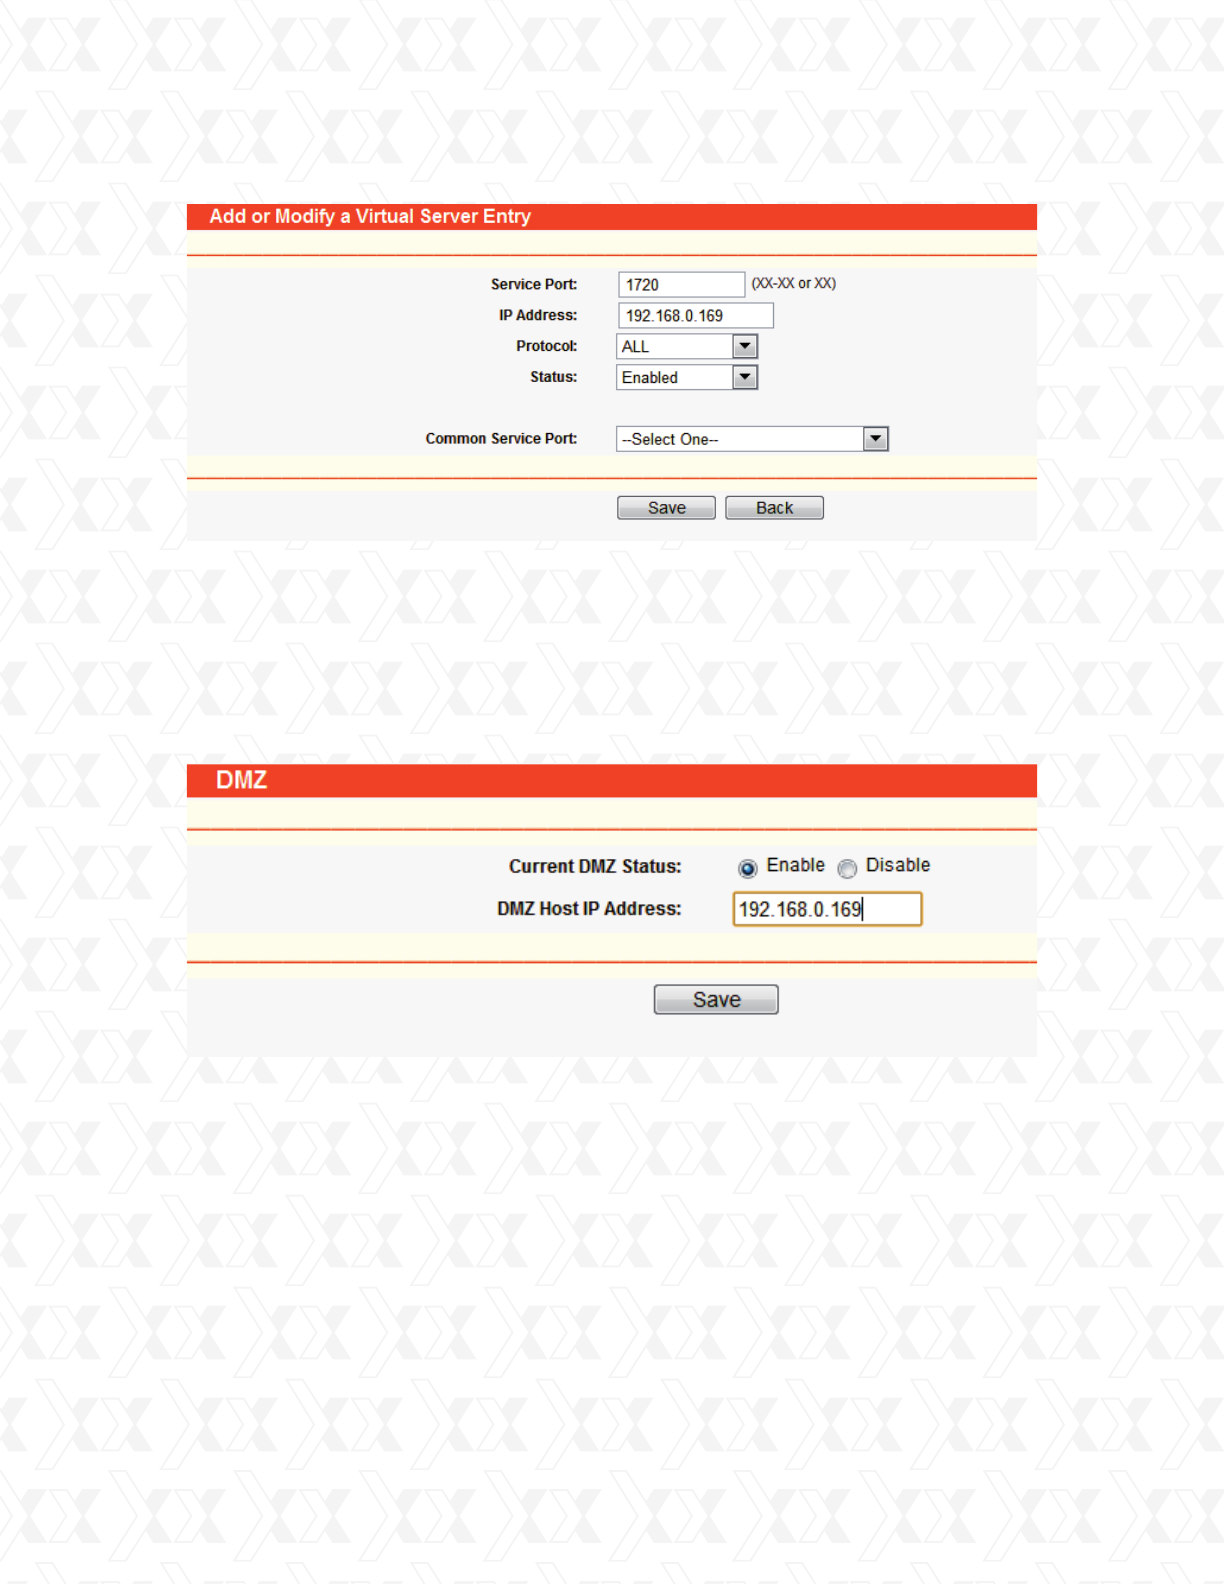
cable/DSL Modem during installation. If your ISP requires MAC register, login to the router and
click the “Network” menu link on the left of your browser, and then click “MAC Clone”
submenu link. On the “MAC Clone” page, if your PC’s MAC address is proper MAC address, click
the “Clone MAC Address” button and your PC’s MAC address will copied into the “WAN MAC
Address” field. Or you may type the MAC Address directly into the “WAN MAC Address” field.
The format for the MAC Address is XX-XX-XX-XX-XX-XX. Then click the “Save” button. It will take
effect after rebooting.
If you start Netmeeting as a host, you don’t need to do anything with the router.
If you start as a response, you need to configure Virtual Server or DMZ Host.
How to configure Virtual Server: Login to the router, click the “Forwarding” menu on the left of
your browser, and click “Virtual Servers” submenu. On the “Virtual Server” page, click Add New,
then on the “Add or Modify a Virtual Server” page, enter “1720 in the “Service Port” blank field,
and your IP address in the corresponding field, using 192.168.0.169 as an example. Remember
to Enable and Save your settings at the end.
1.
2.
1.
2.
3.
Figure A-3 MAC Clone
Figure A-4 Virtual Servers
Nexxt Solutions - NetGate Wireless Access Point
73
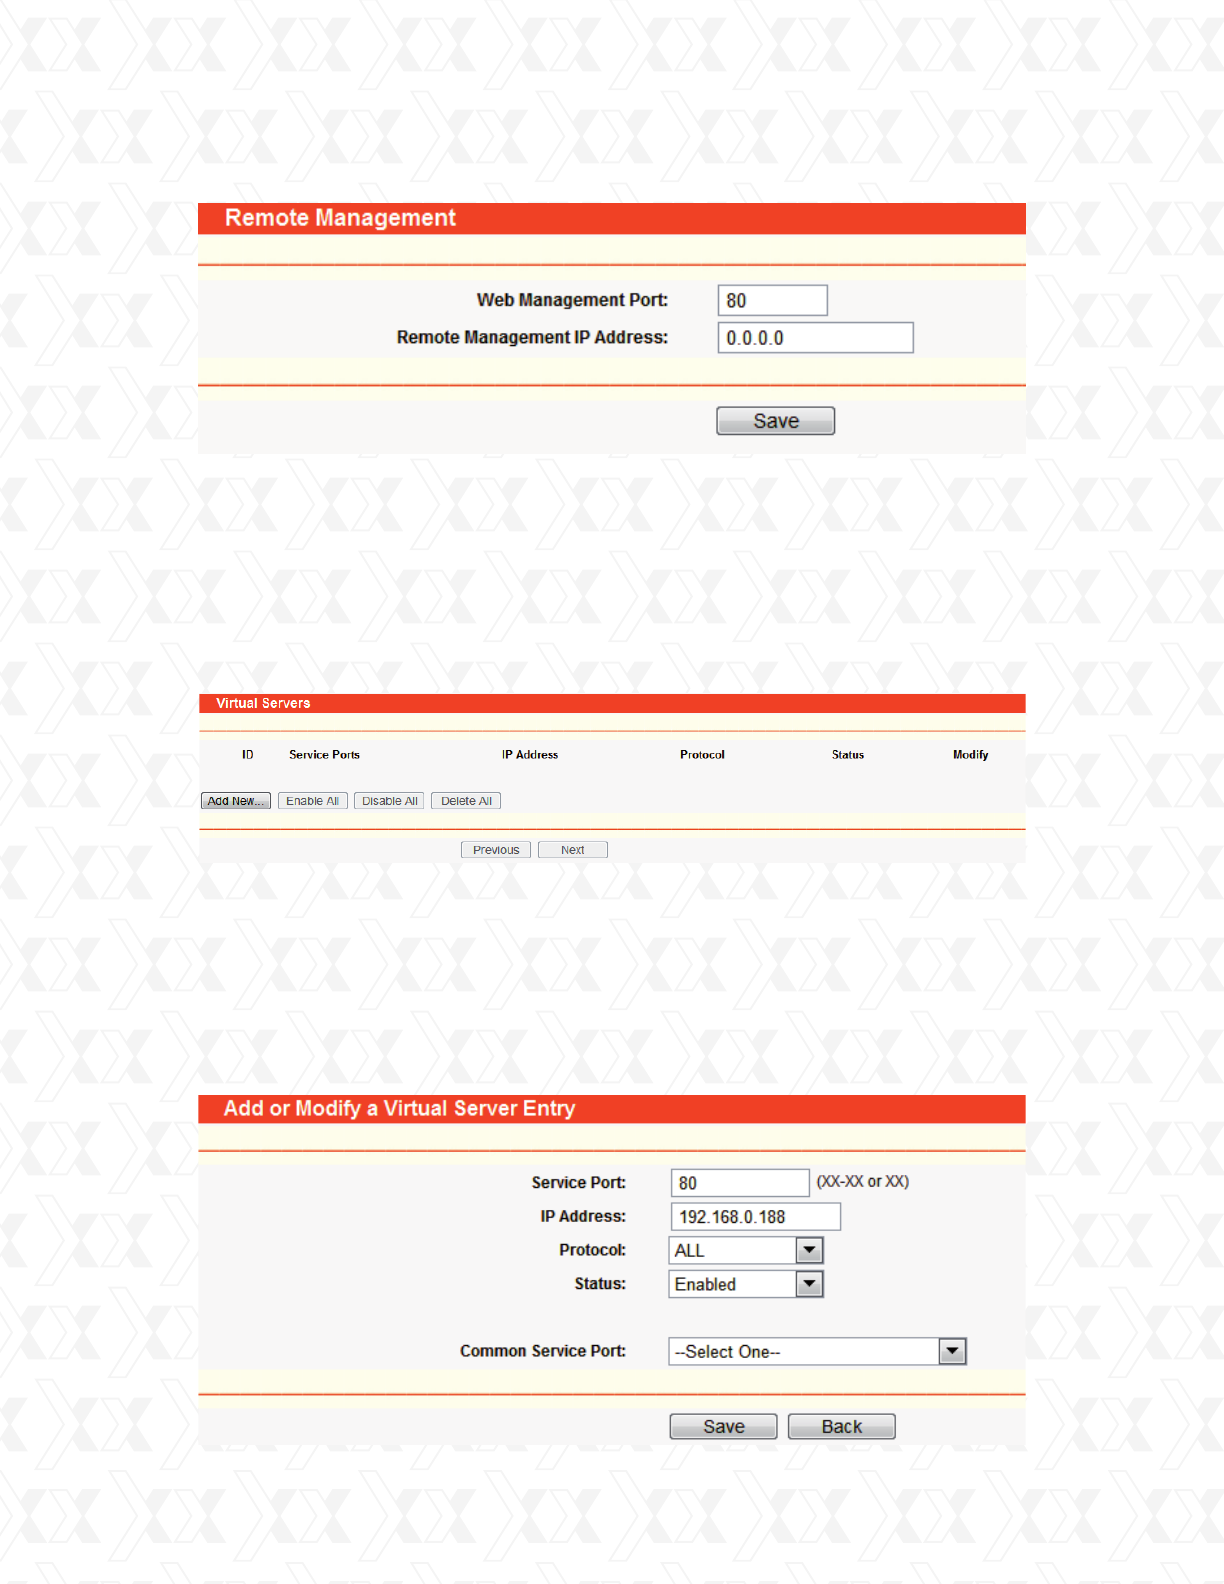
4. I want to build a Web Server on the LAN, what should I do?
Note:
The caller on the other end should call your WAN IP, which is displayed on the “Status” page.
Because the Web Server port 80 will interfere with the Web management port 80 on the router,
you must change the Web management port number to avoid it.
To change the Web management port number: Login to the router, click the “Security” menu on
the left of your browser, and select “Remote Management” submenu. On the “Remote Manage-
ment” page, type any port number other than 80, such as 88, into the “Web Management Port”
field. Click “Save” and reboot the router.
How to enable DMZ Host: Login to the router, click the “Forwarding” menu on the left of your
browser, and click “DMZ” submenu. On the “DMZ” page, click the “Enable” radio button and type
your IP address into the “DMZ Host IP Address” field, using 192.168.0.169 as an example.
Remember to click the Save button when you are done.
1.
2.
4.
Figure A-5 Add or Modify a Virtual server Entry
Figure A-6 DMZ
Nexxt Solutions - NetGate Wireless Access Point
74
5. The wireless stations cannot connect to the router.
Login to the router, click the “Forwarding” menu on the left of your browser, and click the “Virtual
Servers” submenu. On the “Virtual Server” page, click Add New, then on the “Add or Modify a
Virtual Server” page, enter “80” into the blank field next to “Service Port”, and your IP address
next to the corresponding blank field, taking 192.068.0.188 as an example. Remember to
Enable and Save your settings at the end.
Make sure the “Wireless Router Radio” is enabled.
Make sure that the wireless stations’ SSID matches the router’s SSID.
Make sure the wireless stations have chosen the right KEY for encryption when the router
is encrypted.
If the wireless connection is ready, but you can’t access the router, check the IP Address
of your wireless stations.
Note:
If the above configuration takes effect, type http://192.168.0.1:88/ to access the router in the
address field of the Web browser (the router’s LAN IP address: Web Management Port).
3.
1.
2.
3.
4.
Figure A-7 Remote Management
Figure A-8 Virtual Servers
A-9 Add or Modify a Virtual server Entry
Nexxt Solutions - NetGate Wireless Access Point
75
Appendix B: Configuring the PC
In this section, we will explain how to install and configure the TCP/IP correctly in Windows XP.
First, make sure your Ethernet Adapter is working. Refer to the adapter’s manual for further
information, if needed.
1. Configure TCP/IP component
On the Windows taskbar, click the Start button, and then click Control Panel.
After clicking the Network and Internet Connections icon, select the Network Connections tab
in the new window.
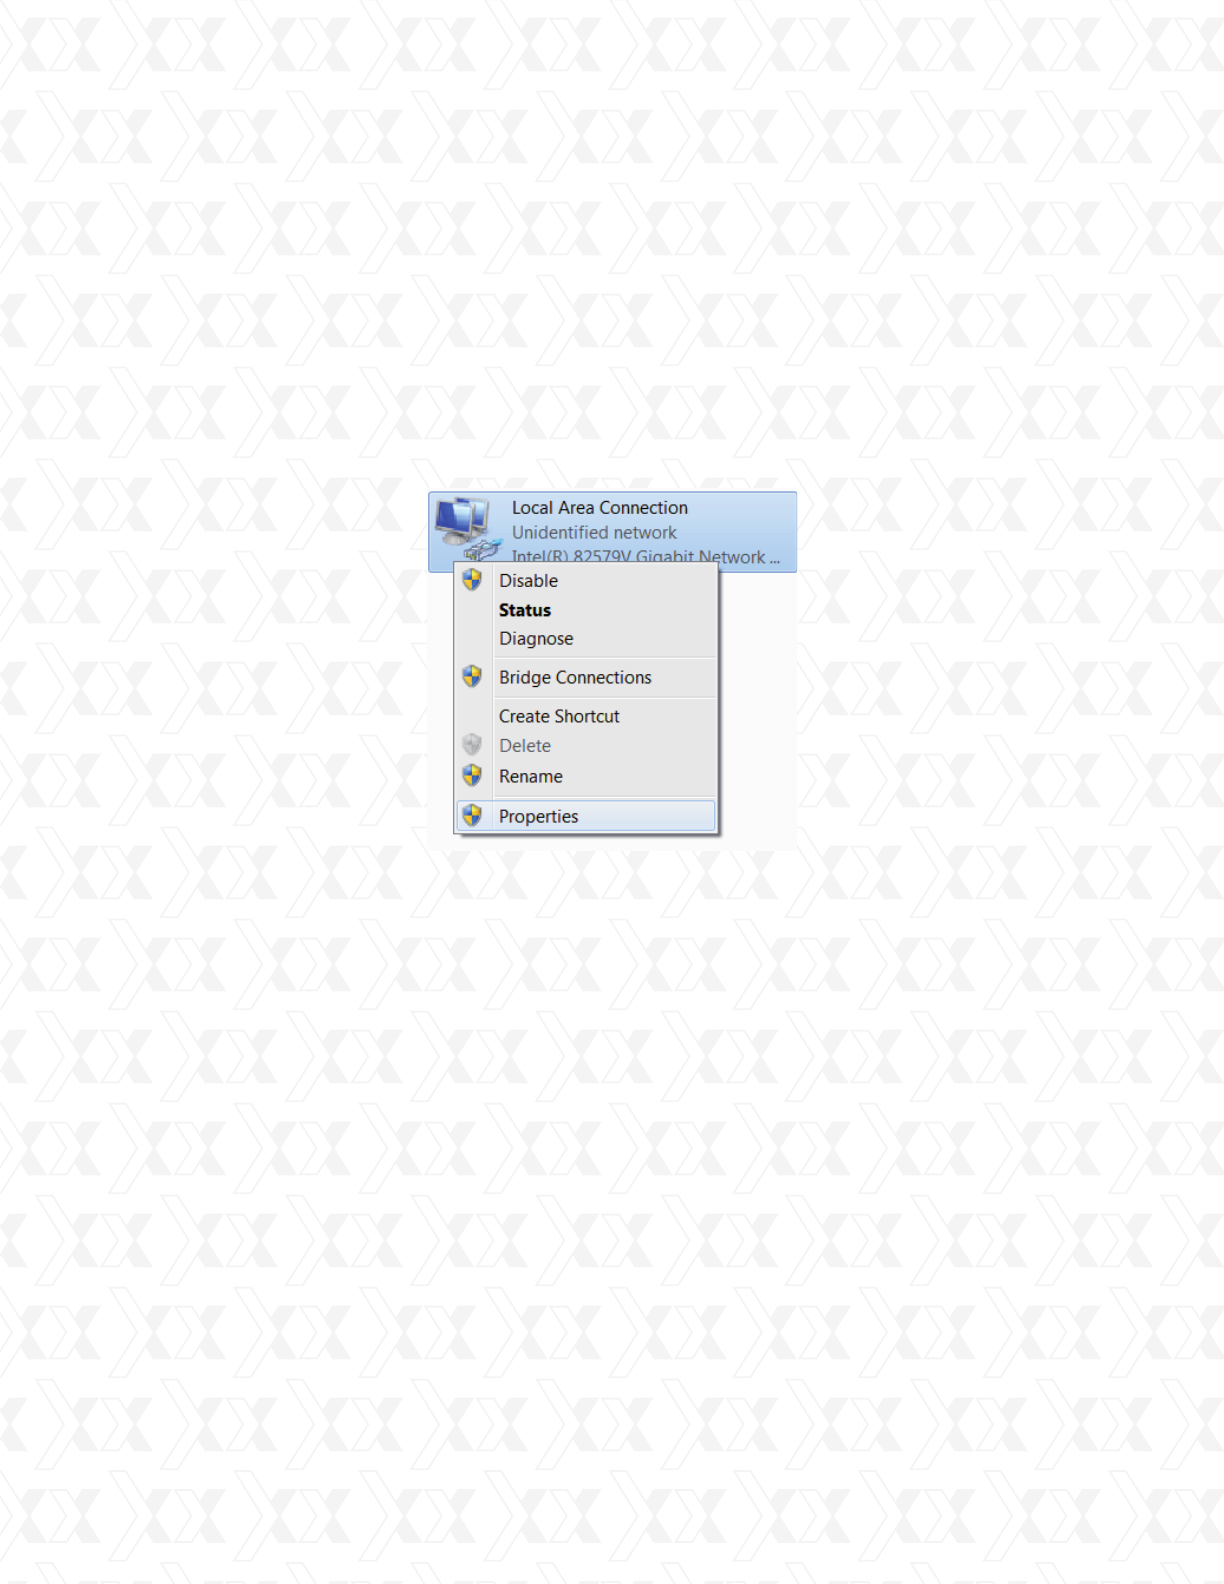
Right click the icon displayed below, and select Properties on the popup menu.
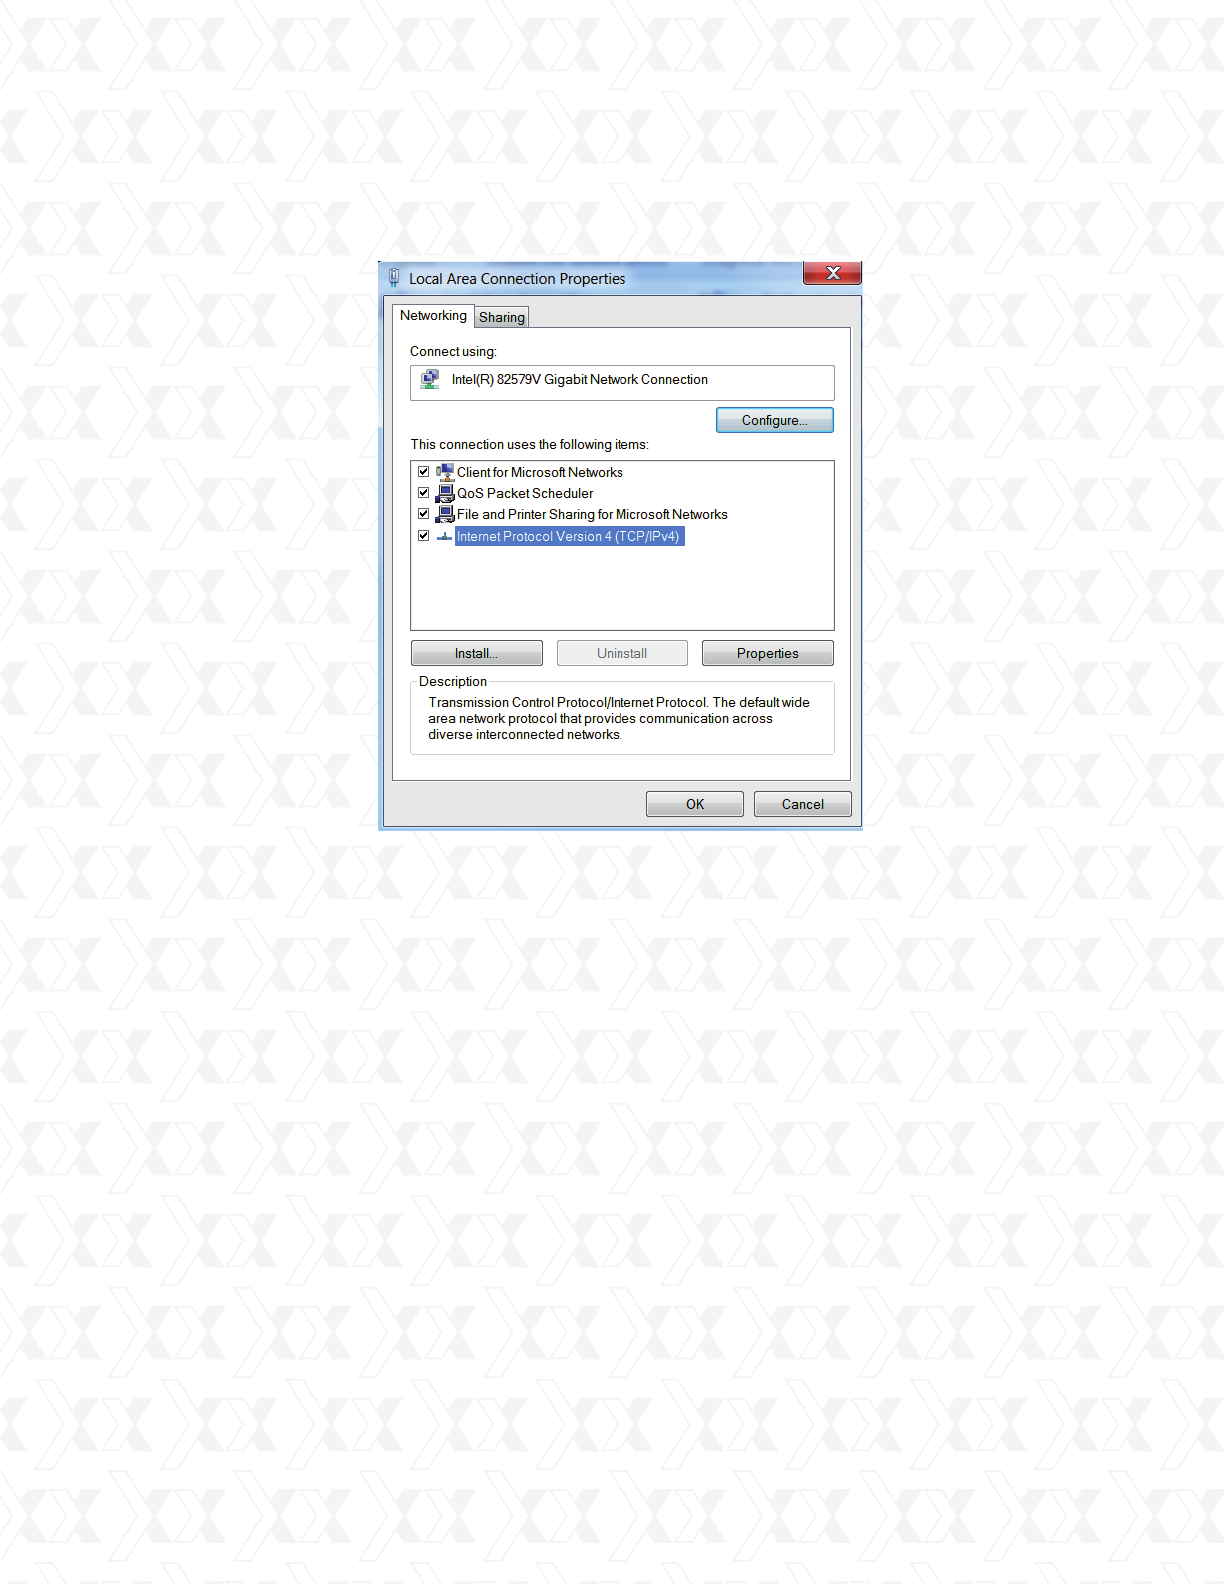
In the page displayed below, double click on Internet Protocol (TCP/IP).
1.
2.
3.
4.
Figure B-1
Nexxt Solutions - NetGate Wireless Access Point
76
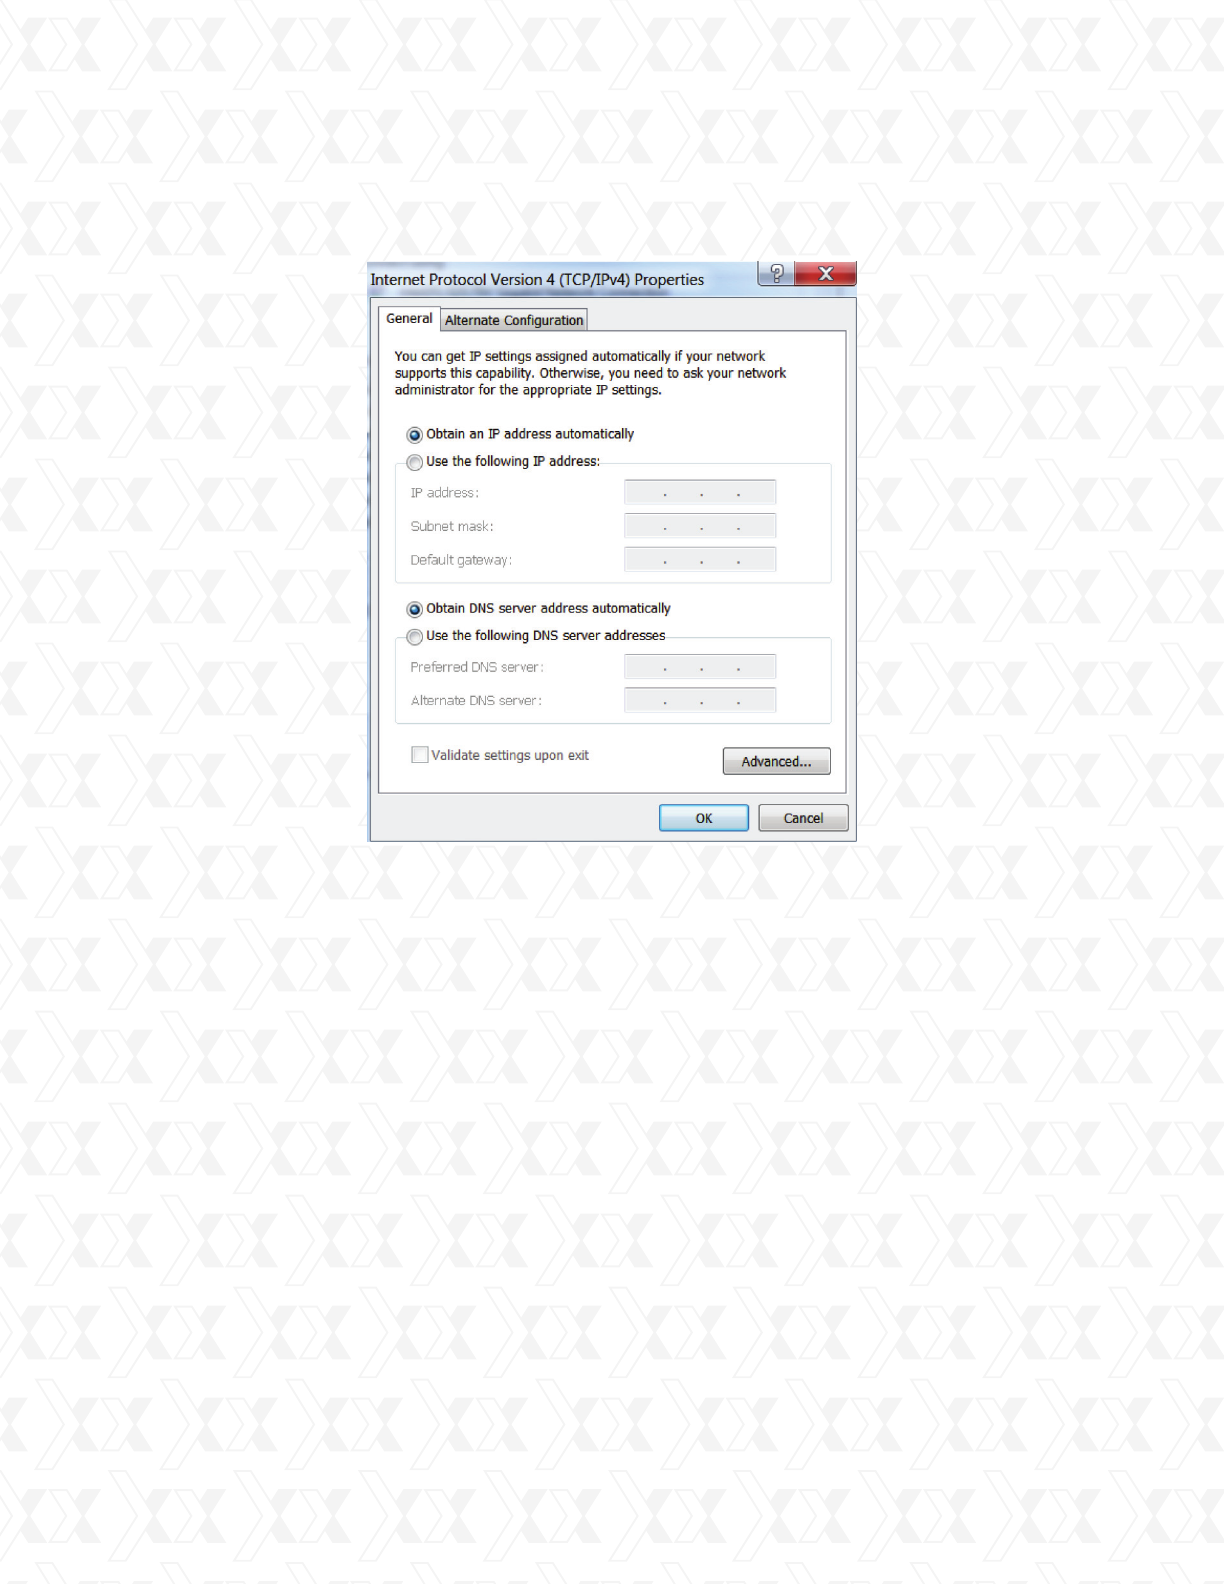
The following TCP/IP Properties window will be displayed, with the IP Address tab open by
default.
Now you have two ways to configure the TCP/IP protocol below:
Setting IP address automatically
Select Obtain an IP address automatically, and then choose Obtain DNS server automatically, as
shown in the Figure below:
5.
•
Figure B-2
Nexxt Solutions - NetGate Wireless Access Point
77
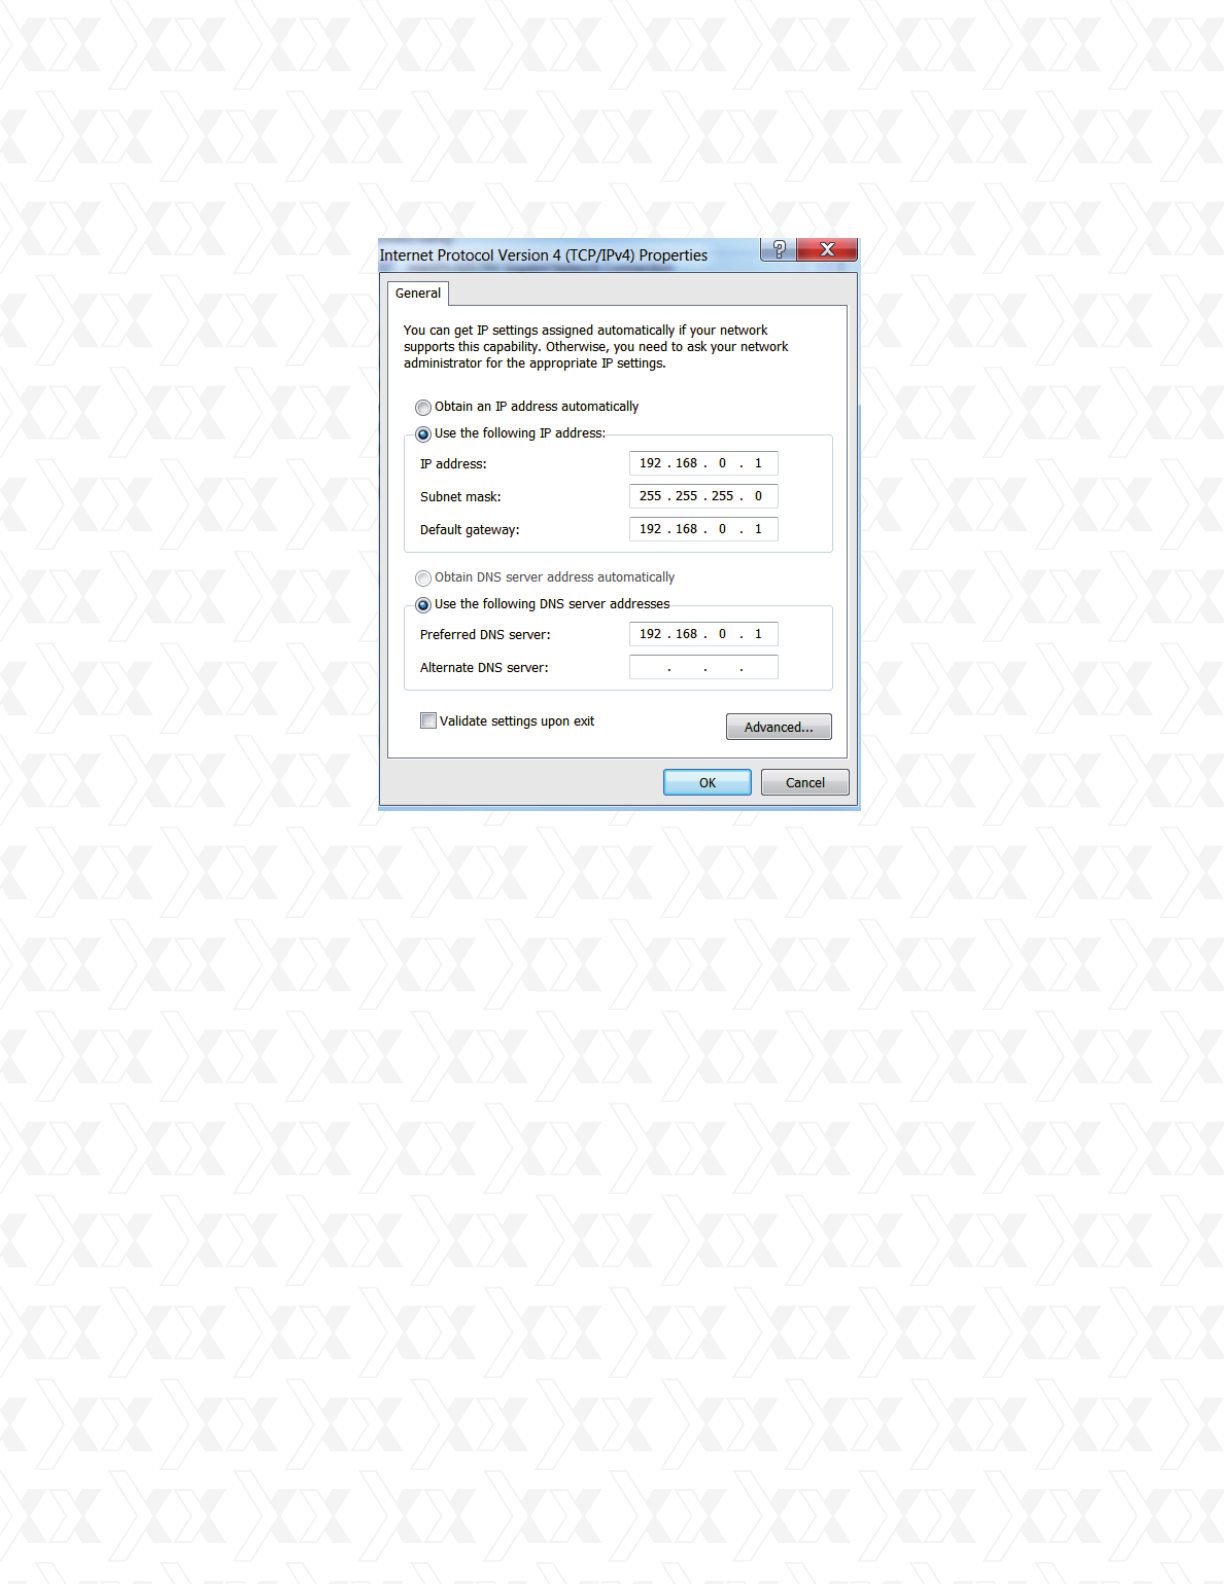
Select Use the following IP address radio button. The following items will be available.
If the Router’s LAN IP address is 192.168.0.1, type IP address 192.168. 0.x (whereby x is
any value from 1 to 253), and Subnet mask is 255.255.255.0.
Type the router’s LAN IP address (the default IP is 192.168.0.1) into the Default gateway
field.
Select Use the following DNS server addresses. In the Preferred DNS Server field you can
enter the same value as the Default gateway or type the local DNS server IP address.
1.
2.
3.
4.
•
Note: For Windows 98 OS or before, the PC and router may need to be restarted.
Setting IP address manually
Figure B-3
Nexxt Solutions - NetGate Wireless Access Point
78
5. Click OK when done to save your settings.
Figure B-4

Nexxt Solutions - NetGate Wireless Access Point
79
Appendix C: Specications
9dBi Derectional Outdoor Antenna
General
Wireless
Physical and Environment
IEEE 802.3, 802.3u, 802.11b and 802.11g, TCP/IP, DHCPStandards and protocols
Frequency range
12dBi Dual-Polarized Aluminum AntennaAntenna
Horizontal: 60°
Vertical: 30°
Beamwidth
One 10/100M Auto-Negotiation LAN RJ45 port,
supporting passive PoE
Ports
10BASE-T: UTP category 3, 4, 5 cable
(maximum 100m) EIA/TIA-568 100 Ω STP (maximum 100m)
100BASE-TX: UTP category 5, 5e cable
(maximum 100m) EIA/TIA-568 100 Ω STP (maximum 100m)
Cabling Type
IEEE 802.11b: DQPSK, DBPSK, DSSS, and CCK
IEEE 802.11g: BPSK, QPSK, 16QAM, 64QAM, OFDM
Modulation type
802.11g54M: -76dBm 48M: -78dBm 36M: -82dBm 12M:
-91dBm 9M:-92dBm802.11b11M:-90dBm 5.5M:-92dBm 1M:-98dBm
Receiver sensitivity
Outdoor weatherproof ABSEnclosure
Grounding TerminalLighting protection
Output: 12VDC / 1A switching PSUPower supply
FCCCertifications
54/48/36/24/18/12/9/6Mbps or 11/5.5/3/2/1MbpsWireless Data Rates
Dimensions
Working Temperature
Working Humidity
Storage Temperature
Storage Humidity
10.4 × 4.7 × 3.2 in. (265x120x83mm)
-30 ºC~70 ºC
10% ~ 90% RH, Non-condensing
-40 ºC~70 ºC(-40ºF~158 ºF)
5% ~ 90% RH, Non-condensing
64/128/152-bit WEP, WPA/WPA2, WPA-PSK/WPA2-PSKWireless Encryptions
Interface One 10/100M Auto-Sensing RJ45 Port(Auto MDI/MDIX),
supporting Passive PoE
2.412-2.462GHz

Nexxt Solutions - NetGate Wireless Access Point
80
Appendix D: Glossary
2x to 3x eXtended Range™ WLAN Transmission Technology - The WLAN device with 2x to 3x
eXtended Range™ WLAN transmission technology is able to increase its sensitivity up to 105
dB, providing a robust, longer-range wireless connection in the coverage area. With this
range-enhancing technology, a 2x to 3x eXtended Range™ based-client and access point can
maintain up to three times the transmission distance of traditional 802.11b and 802.11g
solutions. While the typical transmission distance of 802.11b and 802.11g devices is about
300m, a 2x to 3x eXtended Range™ based client and access point is able to maintain a much
higher transmission range of nearly 830m.
802.11b - The 802.11b standard specifies a wireless networking at 11 Mbps using
direct-sequence spread-spectrum (DSSS) technology and operating in the unlicensed radio
spectrum at 2.4GHz, and WEP encryption for security. 802.11b networks are also referred to
as Wi-Fi networks.
802.11g - specification for wireless networking at 54 Mbps using direct-sequence
spread-spectrum (DSSS) technology, using OFDM modulation and operating in the unlicensed
radio spectrum at 2.4GHz, and backward compatibility with IEEE 802.11b devices, and WEP
encryption for security.
DDNS (Dynamic Domain Name System) - The capability of assigning a fixed host and domain
name to a dynamic Internet IP Address.
DHCP (Dynamic Host Configuration Protocol) - A protocol that automatically configure the
TCP/IP parameters for the all the PC(s) that are connected to a DHCP server.
DMZ (Demilitarized Zone) - A Demilitarized Zone allows one local host to be exposed to the
Internet for a special-purpose service such as Internet gaming or videoconferencing.
DNS (Domain Name System) – An Internet Service that translates the names of websites into
IP addresses.
Domain Name - A descriptive name for an address or group of addresses on the Internet.
DoS (Denial of Service) - A hacker attack designed to prevent your computer or network from
operating or communicating.
DSL (Digital Subscriber Line) - A technology that allows data to be sent or received over existing
traditional phone lines.
ISP (Internet Service Provider) - A company that provides access to the Internet.
MTU (Maximum Transmission Unit) - The size in bytes of the largest packet that can be
transmitted.
NAT (Network Address Translation) - NAT technology translates IP addresses of a local area
network to a different IP address for the Internet.
PPPoE (Point to Point Protocol over Ethernet) - PPPoE is a protocol for connecting remote
hosts to the Internet over an always-on connection by simulating a dial-up connection.
SSID - A Service Set Identification is a thirty-two character (maximum) alphanumeric key
identifying a wireless local area network. For the wireless devices in a network to communicate
with each other, all devices must be configured with the same SSID. This is typically the
configuration parameter for a wireless PC card. It corresponds to the ESSID in the wireless
Access Point and to the wireless network name.
WEP (Wired Equivalent Privacy) - A data privacy mechanism based on a 64-bit or 128-bit or
152-bit shared key algorithm, as described in the IEEE 802.11 standard.
Wi-Fi - is a trademark of the Wi-Fi Alliance, founded in 1999 as Wireless Internet Compatibility
Alliance (WICA), comprising more than 300 companies, whose products are certified by the
Wi-Fi Alliance, based on the IEEE 802.11 standards (also called Wireless LAN (WLAN) and
Wi-Fi). This certification warrants interoperability between different wireless devices.
WISP - Wireless Internet Service Providers (WISPs) are Internet service providers with networks
built around wireless networking. The technology used ranges from commonplace Wi-Fi mesh
networking or proprietary equipment designed to operate over open 900MHz, 2.4GHz, 4.9, 5.2,
5.4, and 5.8GHz bands or licensed frequencies in the UHF or MMDS bands.
WLAN (Wireless Local Area Network) - A group of computers and associated devices
communicate with each other wirelessly, which network serving users are limited in a local area.