NHJ VHD-5500BOX MP3 Music Juke Box (Player) User Manual PM001 UM English B 050502
NHJ LIMITED MP3 Music Juke Box (Player) PM001 UM English B 050502
UserManual.wiki
>
NHJ
>
VHD 5500BOX User Manual
Users Manual
Navigation menu
Upload a User Manual
Namespaces
Wiki Guide
HTML
PDF
Info
Views
User Manual
Discussion / Help
Navigation
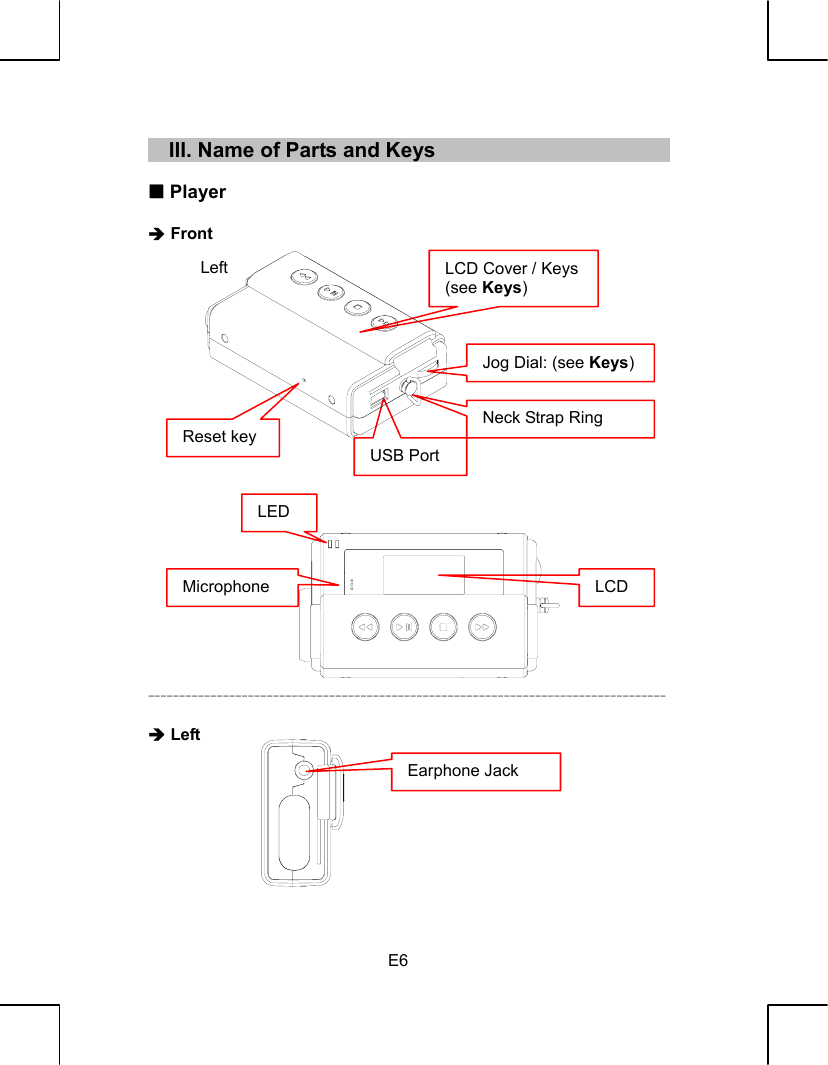
![E8 Keys Î Player Key Icon Name Functions Power (Power key is the LCD Cover) 1. Push down to open the LCD Cover to power on the Player. 2. Push up to close the LCD Cover to power off the Player. <WW> -- Rewind (keep pressing) / Previous file / Previous menu <X> PLAY and PAUSE Play / Pause <> STOP Stop <XX> -- Fast-forward (keep pressing) / Next file / Enter <S> <UP> Upward / Volume up <ENTER> Menu / Confirm <T> Jog Dial <DOWN> Downward / Volume down Reset If error or busy occur, press the Reset switch with the tip of a propelling or similar object. ¼ How to power on the Player Push Down the LCD Cover to power on the player. ¼ How to lock the keys when playing music During playback, push up the LCD Cover and the Keys will be locked. ¼ How to power off the Player when playing music (or making voice recording) 1. Press <> key first. 2. Push up the LCD Cover to power off the player. ¼ How to skip to first (last) track from last (first) track when using <WW> (<XX>) key Set the [Repeat] function to [Repeat All] first.](https://usermanual.wiki/NHJ/VHD-5500BOX/User-Guide-549609-Page-8.png)

![E17 2. Playback Functions There are 6 major playback functions in the top-level menu of Player. Artists Tracks Playlists Albums Genres List Manager ----------------------------------------------------------------------------------- Artists This menu selection allows you to view the available list of artists that have been loaded onto the Player. xHow to play 1. In the main menu, pressing <S> and <T> keys to select [Artists] and then press <ENTER> key. A list of artists will be displayed. 2. Selecting an artists and then if pressing one of the following: <PLAY> key to play the first album found by the selected artist. <ENTER> key to display a list of albums by the selected artist. An album can be selected from this list and played by pressing <PLAY> key. <ENTER> key to display a list of albums by the selected artist and then press <S> and <T> keys to select an album. Press <ENTER> key again, a list of tracks of the selected album will be displayed. Select a track and press <PLAY> key to play. NOTE Albums are stored alphabetically. If any of the play modes (Random, Repeat, Intro mode) are switch on then this will be applied to the selected album. -----------------------------------------------------------------------------------](https://usermanual.wiki/NHJ/VHD-5500BOX/User-Guide-549609-Page-17.png)
![E18 Albums This function allows user to view the available list albums that have been loaded onto the Player. xHow to play 1. In the main menu, pressing <S> and <T> keys to select [Albums] and then press <ENTER> key. A list of albums will be displayed. 2. Selecting an albums and then if pressing one of the following: <PLAY> key to play the first track found by the selected album. <ENTER> key to display a list of tracks by the selected album. A track can be selected from this list and played by pressing <PLAY> key. NOTE: See NOTE in Artists. ----------------------------------------------------------------------------------- Tracks This function allows user to view the available list of tracks that have been loaded onto the Player. xHow to play 1. In the main menu, pressing <S> and <T> keys to select [Tracks] and then press <ENTER> key. A list of tracks will be displayed. 2. Selecting a track and then pressing the <PLAY> key to play. NOTE: See NOTE in Artists. -----------------------------------------------------------------------------------](https://usermanual.wiki/NHJ/VHD-5500BOX/User-Guide-549609-Page-18.png)
![E19 Genres This menu selection allows you to view the available list of genre that has been loaded onto the Player. xHow to play 1. In the main menu, pressing <S> and <T> keys to select [Genres] and then press <ENTER> key A list of genres will be displayed. 2. Selecting a genre and then if pressing one of the following: <PLAY> key to play the first track found by the selected genre. <ENTER> key to display a list of tracks by the selected genre. A track can be selected from this list and played by pressing <PLAY> key. NOTE: See NOTE in Artists. ----------------------------------------------------------------------------------- Playlists Selecting [Playlists] and pressing <ENTER> key will display a list of all current Playlists stored on the Player. Use the <S> and <T> keys to highlight the desired Playlist and press <PLAY> key to play the Playlist. NOTE Please create your Playlists first. ----------------------------------------------------------------------------------- List Manager There are 3-major functions in List Manager. Entering the List Manager Menu 1. Power on the Player. 2. Use <S> and <T> keys to highlight [List Manager] and then pressing <ENTER> key. List Manager Menu will be displayed. 3. Use <S> and <T> keys to select [Create list], [Modify list] or [Delete list]. -----------------------------------------------------------------------------------](https://usermanual.wiki/NHJ/VHD-5500BOX/User-Guide-549609-Page-19.png)
![E20 When [Create list] is selected 4. Press <ENTER> key. The submenu of Artists, Albums, Tracks, and Genres will be displayed. 5. Use <S> and <T> keys to select one of these options and then pressing <ENTER> key. Press <ENTER> key if necessary until you reach the list of tracks. 6. Use <S> and <T> keys to process through the listed tracks to locate the track you want to add to the playlist. 7. Press <ENTER> key to add the track to the list and return to list of tracks. NOTE The platlist will be named, for example, PLY000, PLY001, etc. The file number of playlist is limited to 999. If you delete any playlist file, the playlist file number will be used when you create a new playlist. ----------------------------------------------------------------------------------- When [Modify list] is selected 4. Press <ENTER> key. The submenu of [Add tracks] and [Delete tracks] will be displayed. ´ when [Add tracks] is selected 5. Press < ENTER> key. The Playlist will be displayed. Press < ENTER> key to select a playlist which you want to add tracks. 6. Press <ENTER> key. The submenu of Artists, Albums, Tracks, and Genres will be displayed. 7. Use <S> and <T> keys to select one of these options and then pressing <ENTER> key. Press <ENTER> key if necessary until you reach the list of tracks. 8. Use <S> and <T> keys to process through the listed tracks to locate the track you want to add to the playlist. 9. Press <ENTER> key to add the track to the list and return to list of tracks.](https://usermanual.wiki/NHJ/VHD-5500BOX/User-Guide-549609-Page-20.png)
![E21 ´ when [Delete tracks] is selected 5. Press <ENTER> key. The current list of Playlists will be displayed. 6. Use <S> and <T> keys to select the Playlist in which tracks will be deleted. 7. Press <ENTER> key. The current list of tracks under the Playlist will be displayed. 8. Use <S> and <T> keys to select the track to be deleted and then press <ENTER> key to mark it down. 9. Press <WW> key to delete the selected track and return to the list of tracks. ----------------------------------------------------------------------------------- When [Delete list] is selected 4. Press <ENTER> key. The current list of Playlists will be displayed. 5. Use <S> and <T> keys to select the Playlist to be deleted and then press <ENTER> key to mark it down. .6. Press <WW> key to delete the selected Playlist and return to the Playlists Menu.](https://usermanual.wiki/NHJ/VHD-5500BOX/User-Guide-549609-Page-21.png)
![E22 3. Voice Follow the procedure below to record sound. Under any screens 1. Press <STOP> key first, and then pressing <PLAY> key. Release both keys and recording starts. 2. Press <STOP> key to stop recording and return to Voice Mode Menu. NOTE The voice file will be named, for example, V001, V002, etc. The voice file number is from 000 to 999. If you make a record after file number is full, the original file number 000 will be overwritten. Make sure the battery power is sufficient before making recording. File size less than 1 second cannot be saved and played in this player. ----------------------------------------------------------------------------------- xHow to play 1. In the main menu, pressing <S> and <T> keys to select [Voice] and then press <ENTER> key A list of voice will be displayed. 2. Selecting a voice file and then press<PLAY> key to play. Microphone](https://usermanual.wiki/NHJ/VHD-5500BOX/User-Guide-549609-Page-22.png)
![E23 4. Settings There are 11 functions in the settings menu of the Player. Backlight Intro mode Language Equalizer Contrast Pairing Random Power saving About Repeat Refresh index ----------------------------------------------------------------------------------- Entering the Settings Menu STEP 1. Power on the Player STEP 2. In Main Menu, Use <S> and <T> keys to highlight Settings and then pressing <ENTER> key. Settings Menu will be displayed. ----------------------------------------------------------------------------------- Backlight The backlight will turn on automatically only when keys manipulated. 1. Follow STEP 1 and 2 to enter the settings menu. 2. Use <S> and <T> keys to highlight [Backlight]. 3. Press <ENTER> key to set the backlight to ON. Press <ENTER> key again to set it to OFF. Press <WW> key returns to main menu. ----------------------------------------------------------------------------------- Equalizer 1. Follow STEP 1 and 2 to enter the settings menu. 2. Use <S> and <T> keys to highlight [Equalizer]. 3. Press <ENTER> key. The equalizer menu will be displayed. 4. Use <S> and <T> keys to highlight [Normal], [Bass Boost], [Rock], [Jazz], [Classical], [Pop] or [5-Band EQ]. The function has been set if highlighted. 5. Press <ENTER> key to return to the settings menu. -----------------------------------------------------------------------------------](https://usermanual.wiki/NHJ/VHD-5500BOX/User-Guide-549609-Page-23.png)
![E24 How adjust [5-Band EQ] 1. Select [5-Band EQ] and then press <ENTER> key. The 5-Band EQ setting menu will be displayed. Use <WW> and <XX> keys to select an item. Use <S> and <T> keys to adjust the item. 2. Press <ENTER> key to confirm and return to the settings menu. ----------------------------------------------------------------------------------- Random The function will select music randomly according to the selection criteria (Album, Artist, Track or Genre). 1. Follow STEP 1 and 2 to enter the settings menu. 2. Use <S> and <T> keys to highlight [Random]. 3. Press <ENTER> key to set the random to ON. Press <ENTER> key again to set it to OFF. Press <WW> key returns to main menu. ----------------------------------------------------------------------------------- Repeat At the end of the current music this mode will repeat according to the selection criteria (Album, Artist, Track or Genre). 1. Follow STEP 1 and 2 to enter the settings menu. 2. Use <S> and <T> keys to highlight [Repeat] 3. The repeat function can be set in the sequence as below each time you press <ENTER> key: Press <WW> key returns to main menu. ----------------------------------------------------------------------------------- Off ´ Repeat One ´Repeat All ´ Off5-Band EQEqualizerPopSettingsBacklight](https://usermanual.wiki/NHJ/VHD-5500BOX/User-Guide-549609-Page-24.png)
![E25 Intro mode This function allows user to play the first 10 seconds of each tracks in the selection criteria (Album, Artist, Track or Genre). 1. Follow STEP 1 and 2 to enter the settings menu. 2. Use <S> and <T> keys to highlight [Intro mode]. 3. Press <ENTER> key to set the intro mode to ON. Press <ENTER> key again to set it to OFF. Press <WW> key returns to main menu. ----------------------------------------------------------------------------------- Contrast This function allows user to adjust the LCD contrast to fit your need. There is 10-level of contrast. 1. Follow STEP 1 and 2 to enter the settings menu. 2. Use <S> and <T> keys to highlight [Contrast] and then pressing <ENTER> key. Menu of contrast will be displayed. 3. Use <WW> and <XX> key to adjust the contrast. 4. Press <ENTER> key to save the setting and return to settings menu. ----------------------------------------------------------------------------------- SettingsIntro modeContrast Contrast](https://usermanual.wiki/NHJ/VHD-5500BOX/User-Guide-549609-Page-25.png)
![E26 Power saving The Player has an auto power off function that will preserve the battery life when the player is not being used. The power savingfunction can be set in: Disabled, 1 min, 2 mins, 5 mins, 10 mins. 1. Follow STEP 1 and 2 to enter the settings menu. 2. Use <S> and <T> keys to highlight [Power saving] and then pressing <ENTER> key. Menu of power saving will be displayed. 3. Use <S> and <T> keys to select the auto power off time. The function has been set if highlighted. 4. Press <ENTER> key to return to settings menu. ----------------------------------------------------------------------------------- Refresh index This sorting function allows user to renew the sequence of tracks. Tracks are stored alphabetically. 1. Follow STEP 1 and 2 to enter the settings menu. 2. Use <S> and <T> keys to highlight [Refresh index] and then pressing <ENTER> key. The tracks start to renew their sequence. ----------------------------------------------------------------------------------- Language This function allow user to set the menu language to English, 繁體中文, or 日本語. 1. Follow STEP 1 and 2 to enter the settings menu. 2. Use <S> and <T> keys to highlight [Language] and then pressing <ENTER> key. Menu of language will be displayed. 3. Use <S> and <T> key to select a language. The function has been set if highlighted. 4. Press <ENTER> key to return to settings menu. ----------------------------------------------------------------------------------- SettingsContrastPower saving1 minPower savingDisabled](https://usermanual.wiki/NHJ/VHD-5500BOX/User-Guide-549609-Page-26.png)
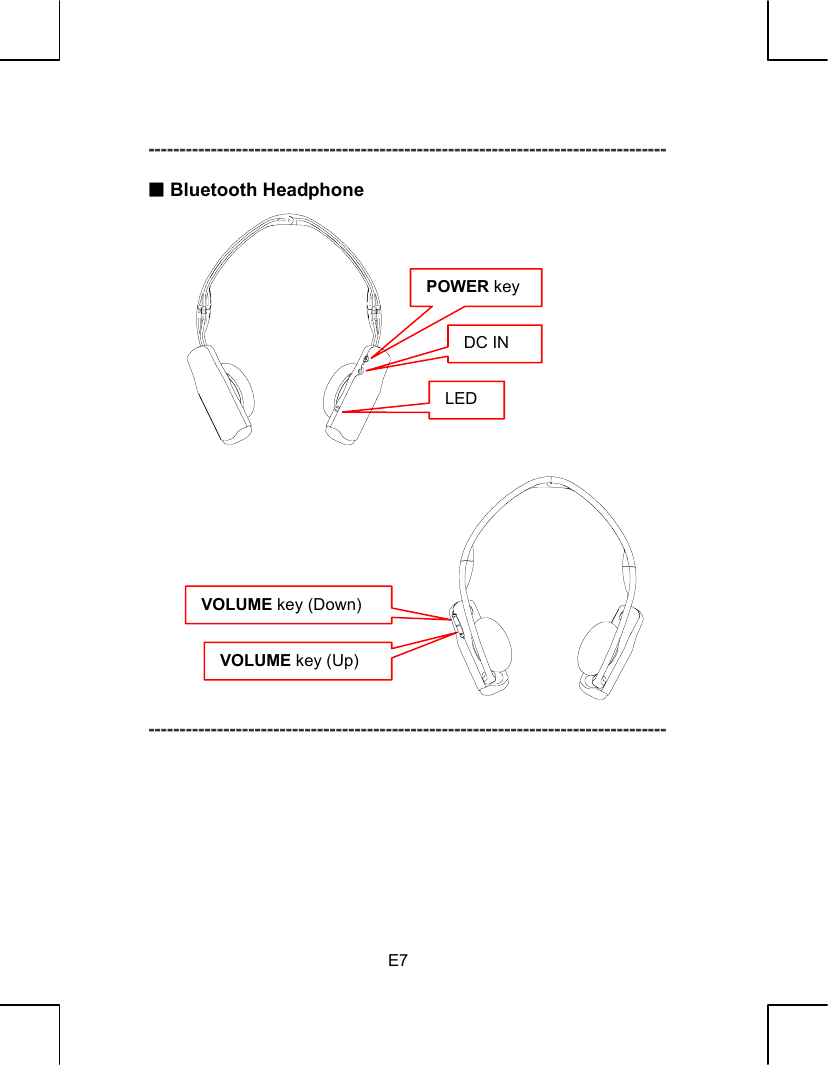
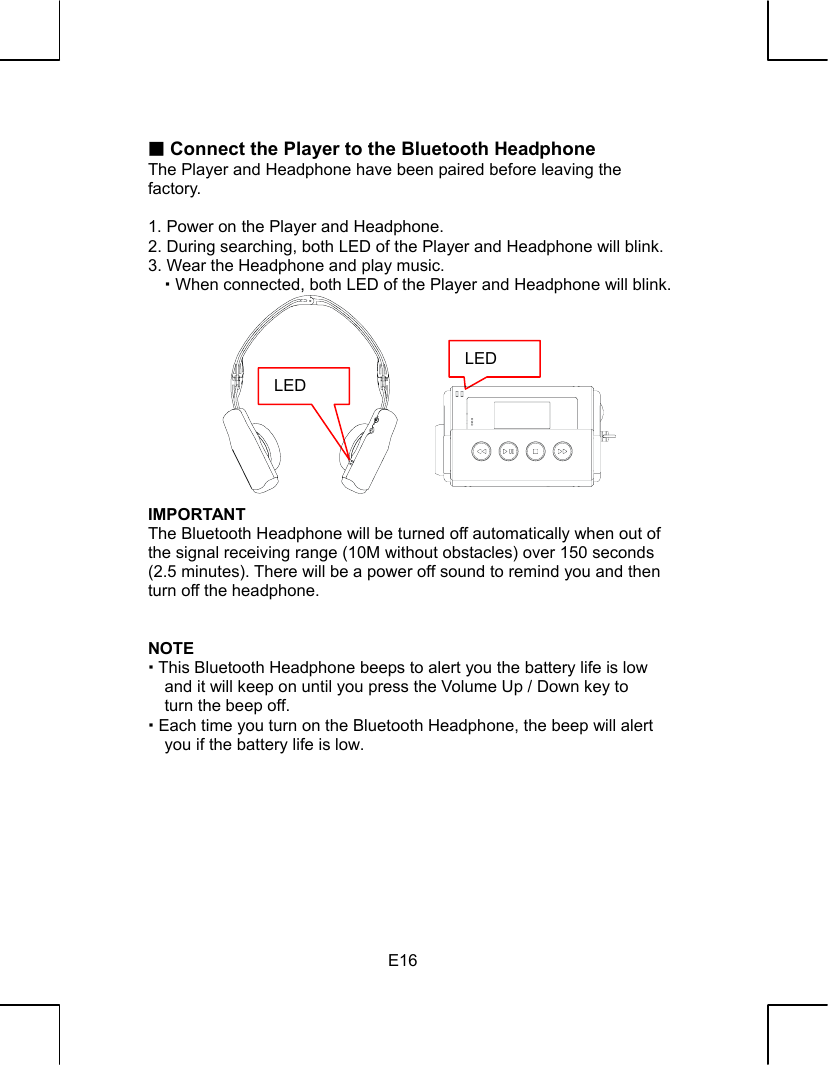
![E27 Pairing If the connection between the Player and the Bluetooth Headphone cannot be established, please follow the steps as below to pair again. STEP 1Î Player 1. Follow STEP 1 and 2 to enter the settings menu. 2. Use <S> and <T> keys to highlight [Pairing]. 3. Press <ENTER> key. STEP 2 Î Turn off the Player and then turn on it again. STEP 3 Î Bluetooth Headphone Press and hold the <VOLUME UP> key of the Headphone, and then press the <POWER> key. Keep holding the two keys until the LED starts blinking. ----------------------------------------------------------------------------------- About The “About” function displays information the revision of the firmware loaded in your Player and maximum capacity of the hard drive. ´ Information Model name, Revision, Copyright, Disk Capacity and Disk type.](https://usermanual.wiki/NHJ/VHD-5500BOX/User-Guide-549609-Page-27.png)