NHJ VHD-5500BOX MP3 Music Juke Box (Player) User Manual PM001 UM English B 050502
NHJ LIMITED MP3 Music Juke Box (Player) PM001 UM English B 050502
NHJ >
Users Manual

E1
VHD-5500
MP3 MUSIC JUKE BOX

E2
Contents
I. Safety Instructions E 3
II. Specifications E 4
III. Name of Parts and Keys E 6
IV. LCD & LED Displays E 10
1. Before Using the Player and Headphone E 13
Package Contents E 13
Charging the battery E 13
Connect the Player to the Bluetooth Headphone E 16
2. Playback Functions E 17
Artists E 17
Albums E 18
Tracks E 18
Genres E 19
Playlists E 19
List Manager E 19
3. Voice E 22
4. Settings E 23
Backlight E 23
Equalizer E 23
Random E 24
Repeat E 24
Intro mode E 25
Contrast E 25
Power saving E 26
Refresh index E 26
Language E 26
Pairing E 27
About E 27
5. Mass Storage / Application Software E 28
-

E3
I. Safety Instructions
Do not attempt to disassemble, repair or alter the equipment
yourself. The high-voltage circuitry in the equipment poses
significant electrical hazard.
Do not attempt to disassemble, alter or directly solder the battery.
Do not try to change the built-in battery.
Do not use batteries that are significantly damaged or deformed.
Do not put it into water or allow it to get wet.
Do not use this product in the bathroom.

E4
II. Specifications
General
Power
Source
Player: Rechargeable Li-Polymer Battery 3.7V /
1200mAh
Bluetooth Headphone: Rechargeable Li-Polymer
Battery 3.7V / 500mAh
AC Adapter 5.0V / 2.0A
Dimensions Player: 75(L)X48(H)X27.1(D) (in mm)
Weight Player: Approx. 95.6g (with battery)
Bluetooth Headphone: Approx. 58.6g (with battery)
Operating
Conditions
Temperature: 0°C to 40°C (32°F to 104°F)
Humidity: 5% ~ 90%
Storage
Temperature
-20°C ~ 60°C (-4°F to 140°F)
Memory Media
Internal Memory 5 GB HDD
(for voice recording: approx.291 hours)
Player
LCD Display Mono STN with Blue EL backlight(128X64 dots)
MP3 x MPEG 1,2,2.5 Layer3
x Bit Rate: 32 ~ 320 kbps
x Sample Rate: 8 ~ 48 KHz
WMA x Bit Rate: 5 ~ 192 kbps
x Bit Rate: 44.1 and 48 VBR
x Sample Rate:8 ~ 48 KHz
Playback
Format
WAV
Voice Recording Format ADPCM@WAV
PC Interface USB 2.0
ID3 1. ID3 version 2
2. Display limit
xTrack Title: 40 characters
xArtist Name: 40 characters
xAlbum Name: 40 characters
xGenre Type: 24 characters
xM3U Filename: 15 characters
E5
Headphone
Type Bluetooth Headphone
Signal Receiving Range 10M (without obstacles / tested by
laboratory)
PC Platforms
Windows 98SE / ME / 2000 / XP
System Requirements
Windows x Windows 98SE or higher (Win 2000 recommended)
x Pentium III 700 processor or equivalent (Pentium III
1GHz recommended)
x 310 MB free hard disk space (1 GB recommended)
x 128 MB RAM (256 MB recommended)
x 16-bit or higher color display at 800 x 600
x CD ROM and Mouse
E6
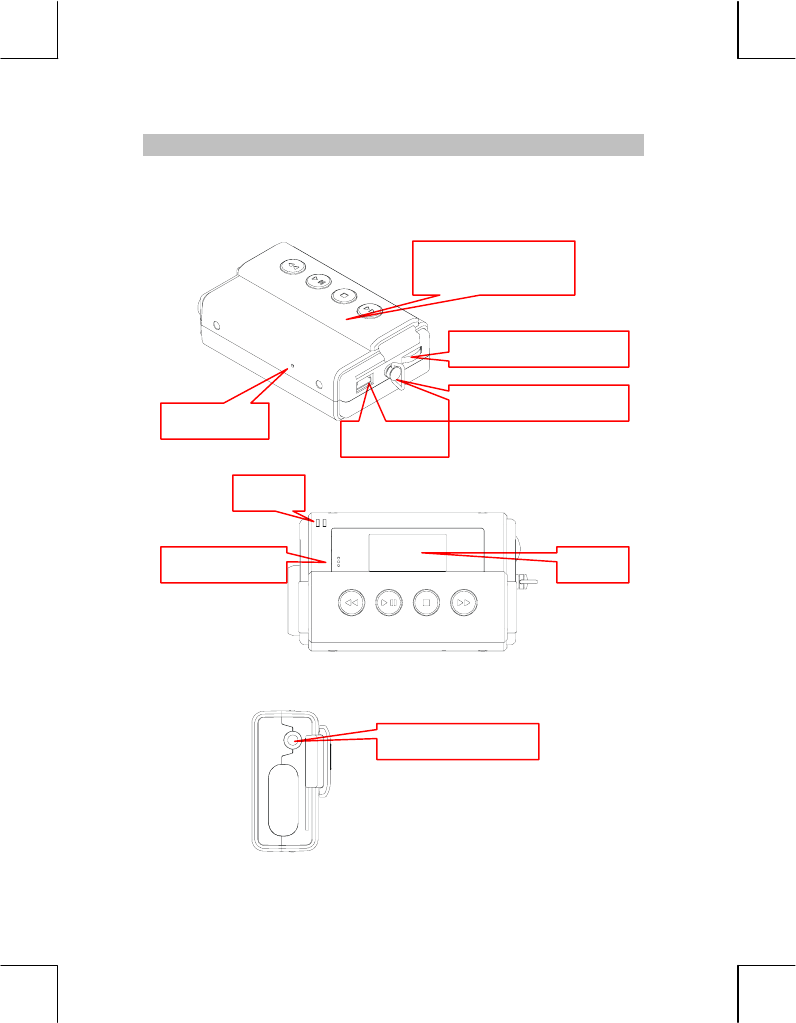
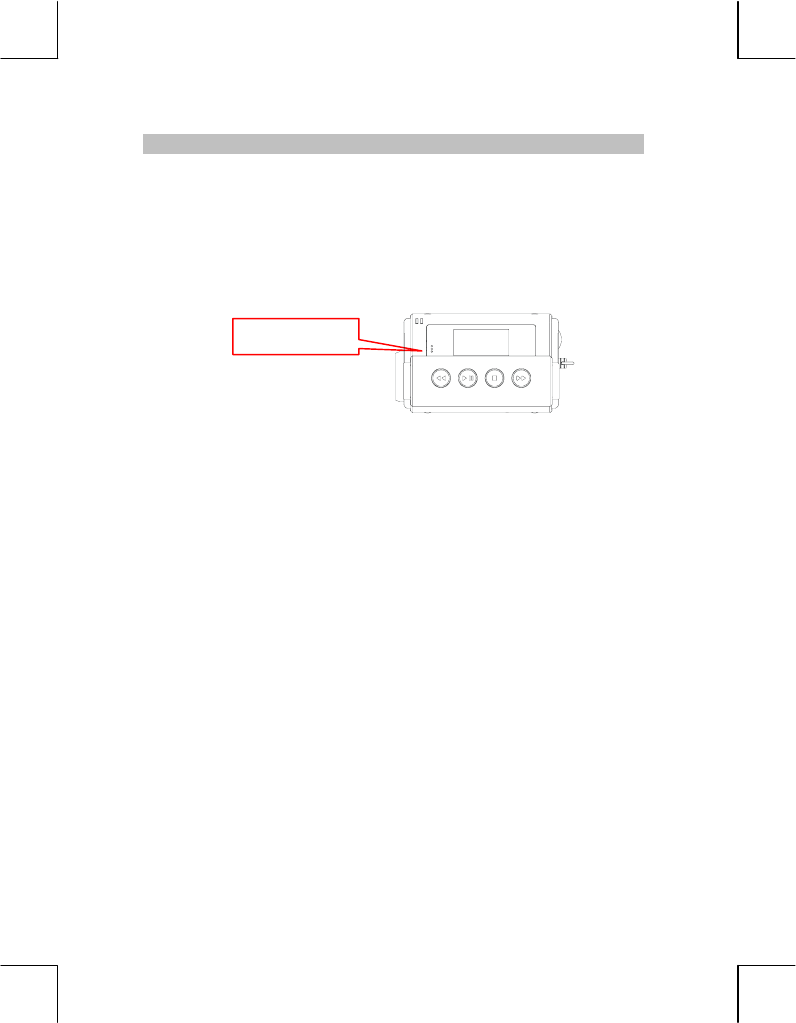
III. Name of Parts and Keys
Player
Î Front
-----------------------------------------------------------------------------------
Î Left
LCD Microphone
LED
Earphone Jack
Left LCD Cover / Keys
(see Keys)
Jog Dial: (see Keys)
USB Port
Neck Strap Ring
Reset key
E7
-----------------------------------------------------------------------------------
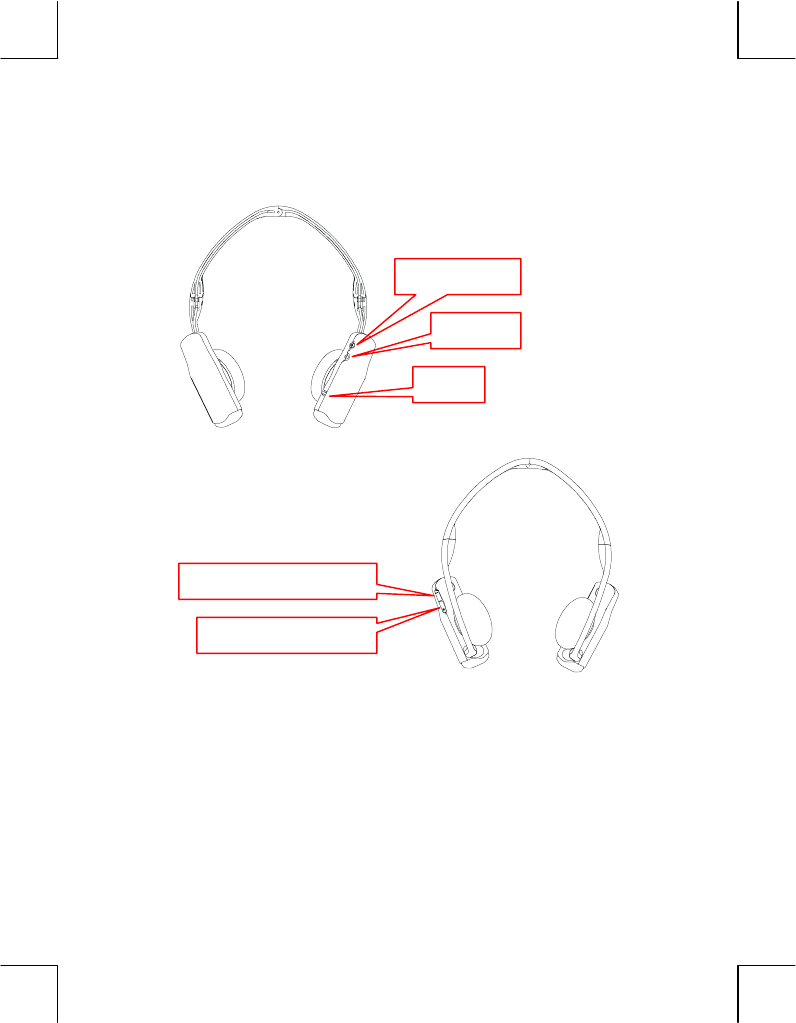
Bluetooth Headphone
-----------------------------------------------------------------------------------
POWER key
DC IN
LED
VOLUME key (Down)
VOLUME key (Up)
E8
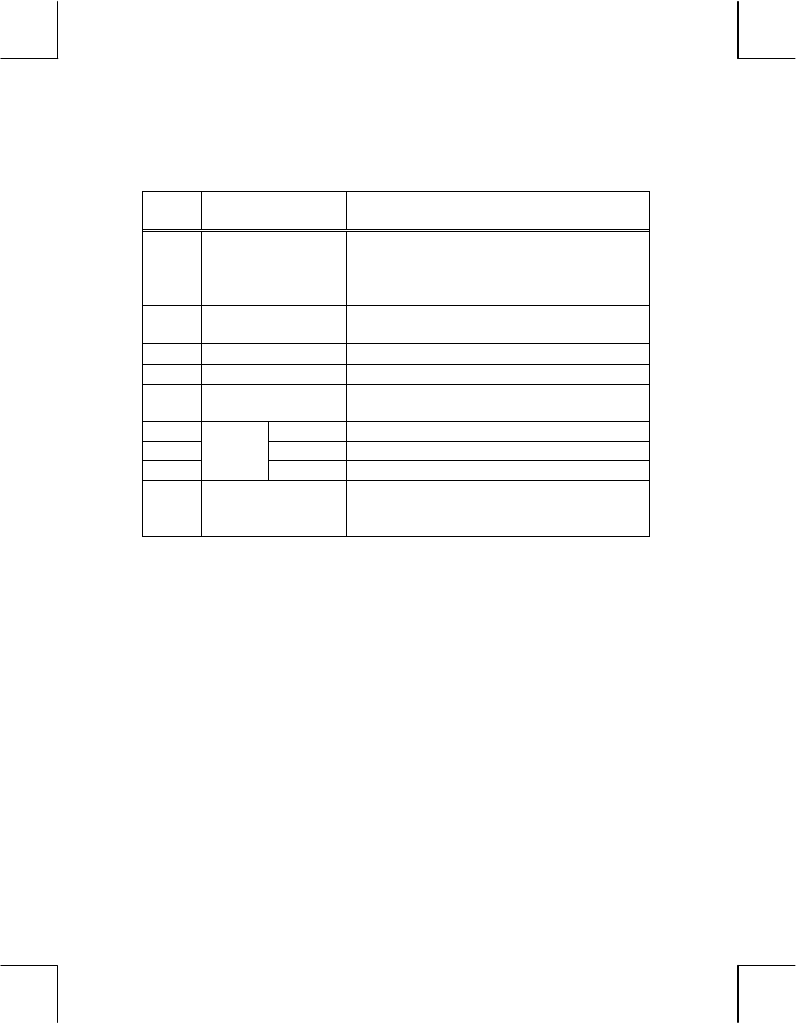
Keys
Î Player
Key
Icon
Name Functions
Power
(Power key is the
LCD Cover)
1. Push down to open the LCD Cover to
power on the Player.
2. Push up to close the LCD Cover to
power off the Player.
<WW> -- Rewind (keep pressing) / Previous file /
Previous menu
<X> PLAY and PAUSE Play / Pause
<> STOP Stop
<XX> -- Fast-forward (keep pressing) / Next file /
Enter
<S> <UP> Upward / Volume up
<ENTER> Menu / Confirm
<T>
Jog
Dial <DOWN> Downward / Volume down
Reset If error or busy occur, press the Reset
switch with the tip of a propelling or similar
object.
¼ How to power on the Player
Push Down the LCD Cover to power on the player.
¼ How to lock the keys when playing music
During playback, push up the LCD Cover and the Keys will be locked.
¼ How to power off the Player when playing music (or making
voice recording)
1. Press <> key first.
2. Push up the LCD Cover to power off the player.
¼ How to skip to first (last) track from last (first) track when using
<WW> (<XX>) key
Set the [Repeat] function to [Repeat All] first.
E9
-----------------------------------------------------------------------------------
Î Bluetooth Headphone
Keys Functions
Power To power on the Bluetooth Headphone
Up To volume up Volume
Down To v o l u m e d o wn
E10
IV. LCD & LED Displays
LCD
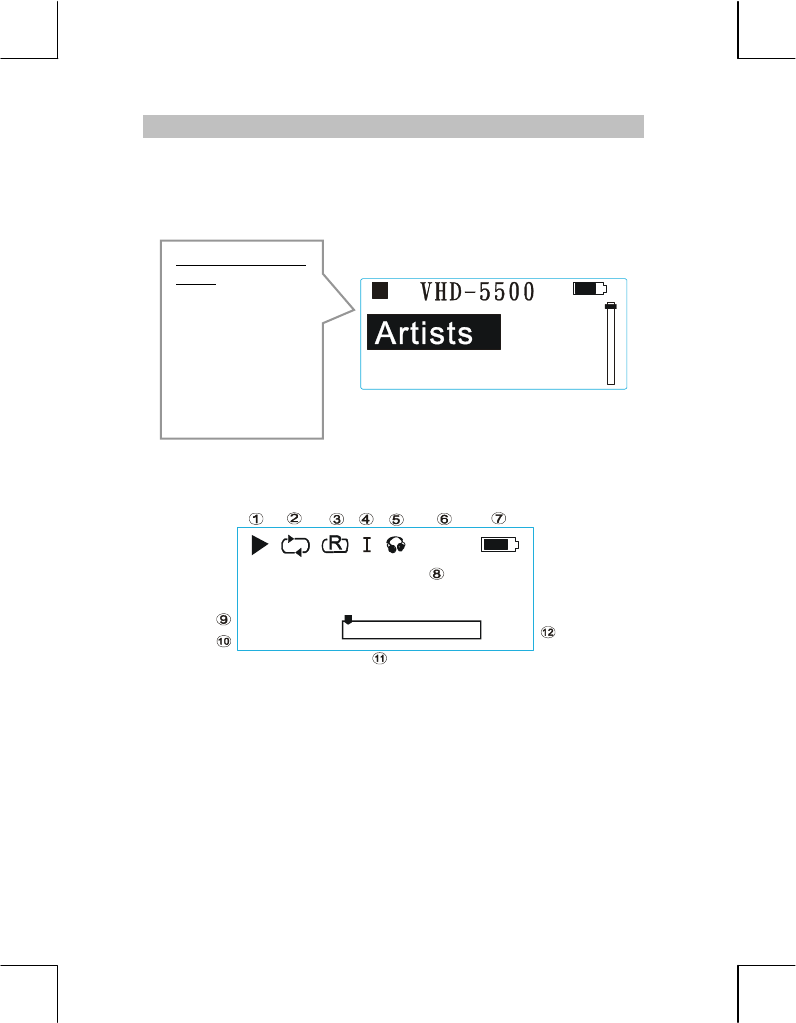
Î Main Menu
-----------------------------------------------------------------------------------
Î Playback Screen
NOTE
The description of the numbers, please see “Location of Major Icon”.
-----------------------------------------------------------------------------------
Functions in Main
Menu
A
rtists
A
lbums
Tracks
Genres
Playlists
List Manager
Voice
Settin
g
s
Albums
Track 7
1/15
000:00:53
128K
class
E11
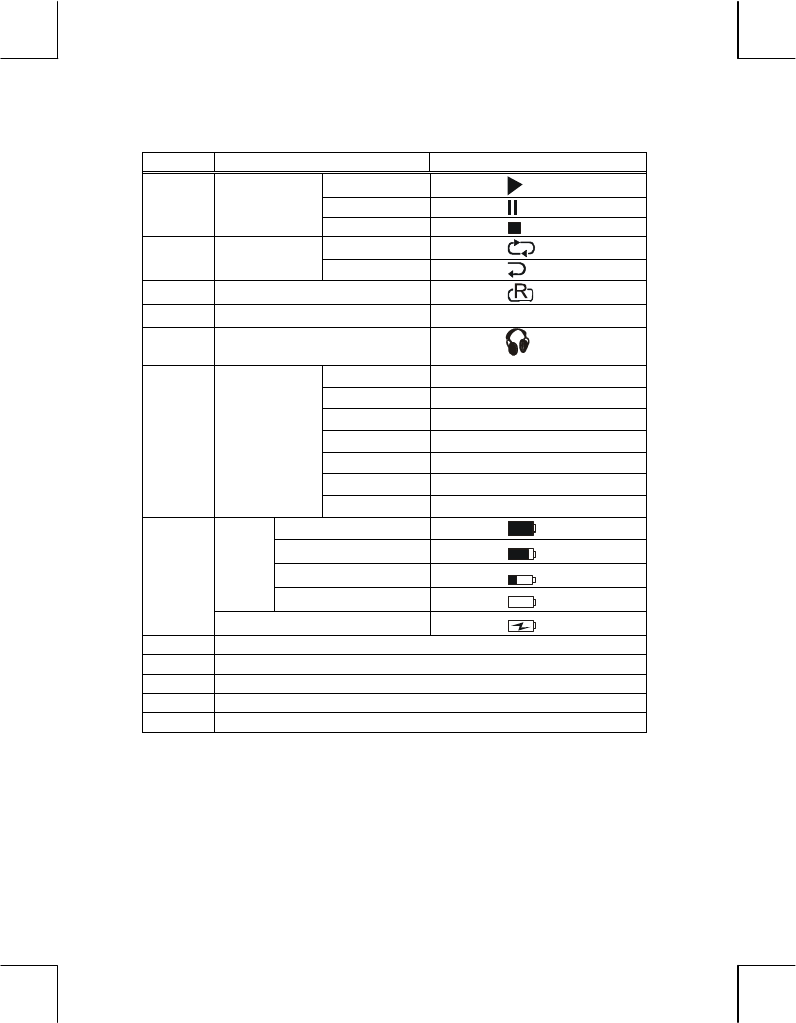
Î Location of Major Icon
No. Descriptions / Functions Icon
Playing
Pause
1
Play
Stop
All
2 Repeat
One
3 Random
4 Intro mode
I
5 Bluetooth Headphone
connected
Normal Normal
Bass Boost Bass
Rock Rock
Jazz Jazz
Classical Class
Pop Pop
6
Equalizer
5-Band EQ Graph
Full
60%
30%
Battery
Empty
7
AC Adapter
8 Song Name
9 Number of Song
10 Playback Time
11 Location of Processing Bar / Volume Bar
12 Bit Rate
-----------------------------------------------------------------------------------
E12
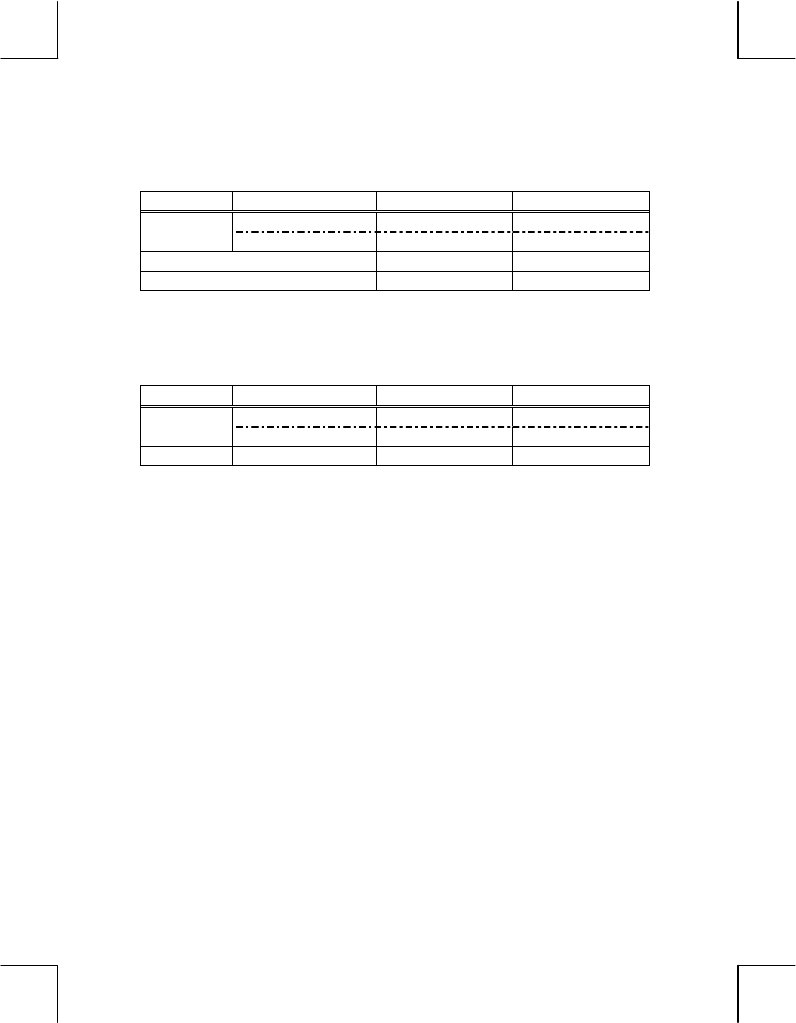
LED
Î Player
Functions Status Red LED Blue LED
Recharge Lit-on -- Charge
Recharge complete Off --
Use Bluetooth Headphone -- Blinking
Use Earphone -- --
-----------------------------------------------------------------------------------
Î Bluetooth Headphone
Functions Status Red LED Blue LED
Recharge Lit-on Charge
Recharge complete Off
Power on Searching Blinking
NOTE
If you connect the earphone (32 ohm recommended) to the player, the
bluetooth function will be disabled.
E13
1. Before using the Player and Headphone
Package Contents
y Player
y Bluetooth Headphone
y Carrying Case X 2 (1 for Player / 1 for Headphone)
y Neck Strap
y Warranty Card
y CD-ROM (Driver, User Manual, Application Software, and
Acrobat Reader)
y User Manual
y USB Cable
y Y Cable (for USB-AC / DC IN Terminal connection)
y AC Adapter (+ Electric Plug X 4)
-----------------------------------------------------------------------------------
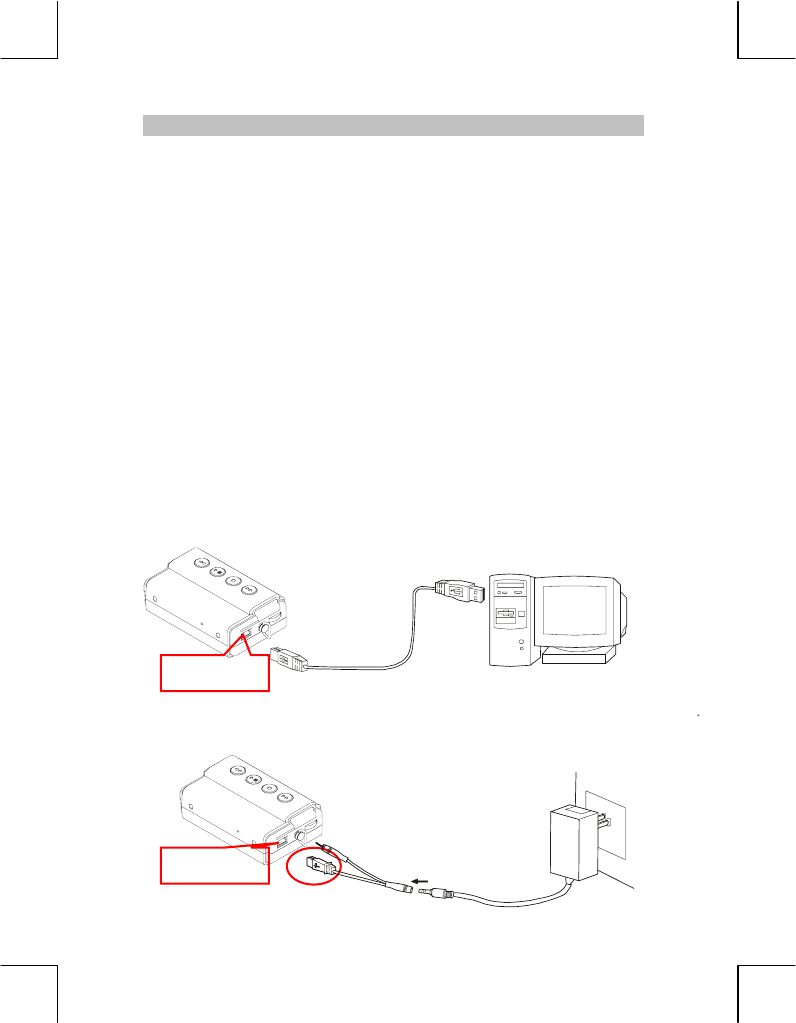
Charging the battery
Î Player
Using the USB to recharge the battery
-----------------------------------------------------------------------------------
Using the AC Adapter to recharge the battery
USB Port
USB Port Y cable
E14
-----------------------------------------------------------------------------------
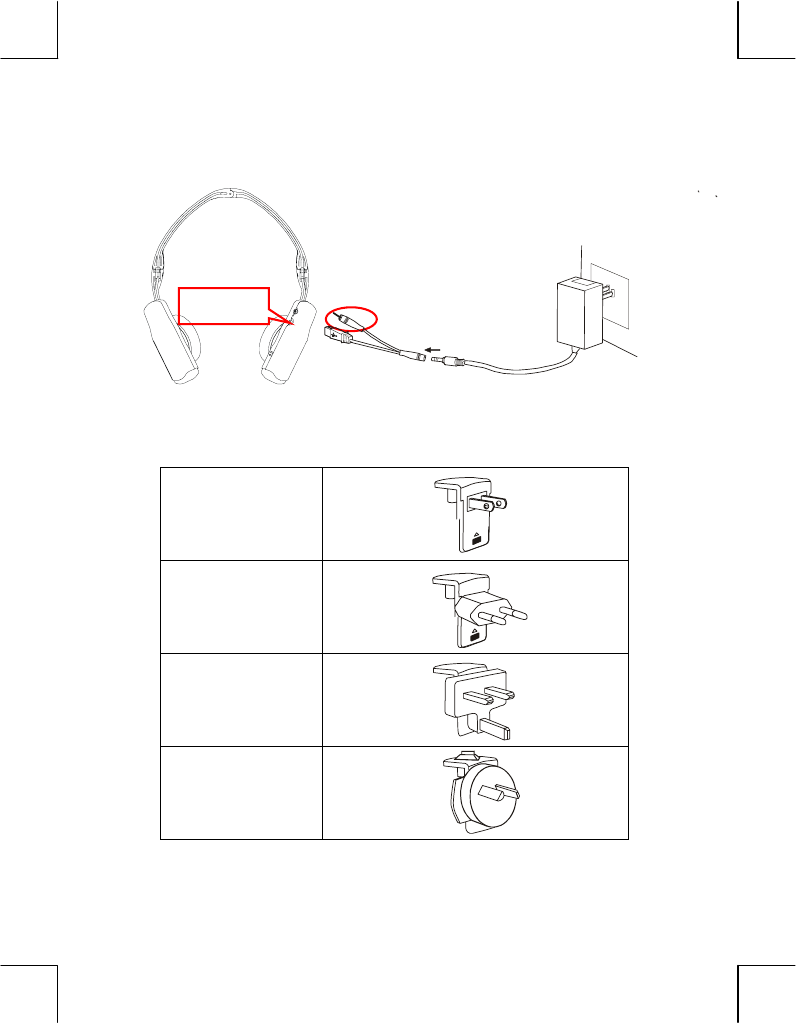
Î Bluetooth Headphone
----------------------------------------------------------------------------------------------
Four different types of Electric Plug
Flat Blade Plug
Round Pin Plug
Rectangular Blade
Plug
Oblique Flat Blades
Plug (no Ground)
----------------------------------------------------------------------------------------------
DC IN
Y cable
E15
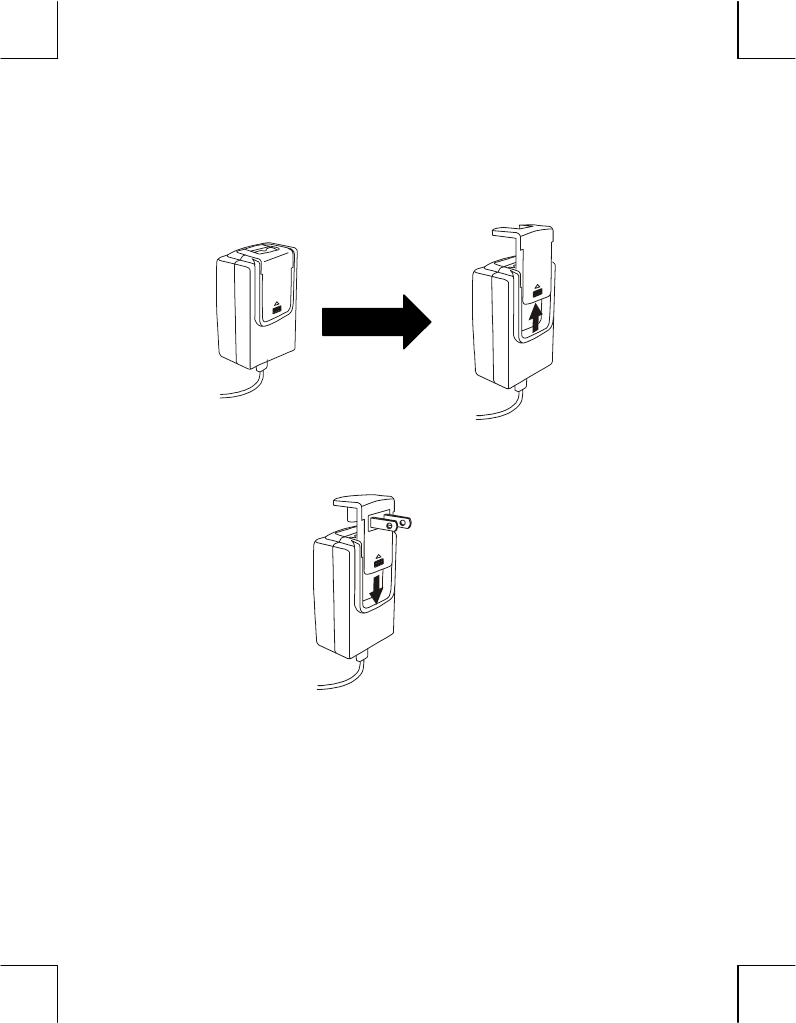
How to attach the Electric Plug to the AC Adapter
1. Take out the Adapter Cover
2. Attach the Electric Plug to the AC Adapter
-----------------------------------------------------------------------------------
E16
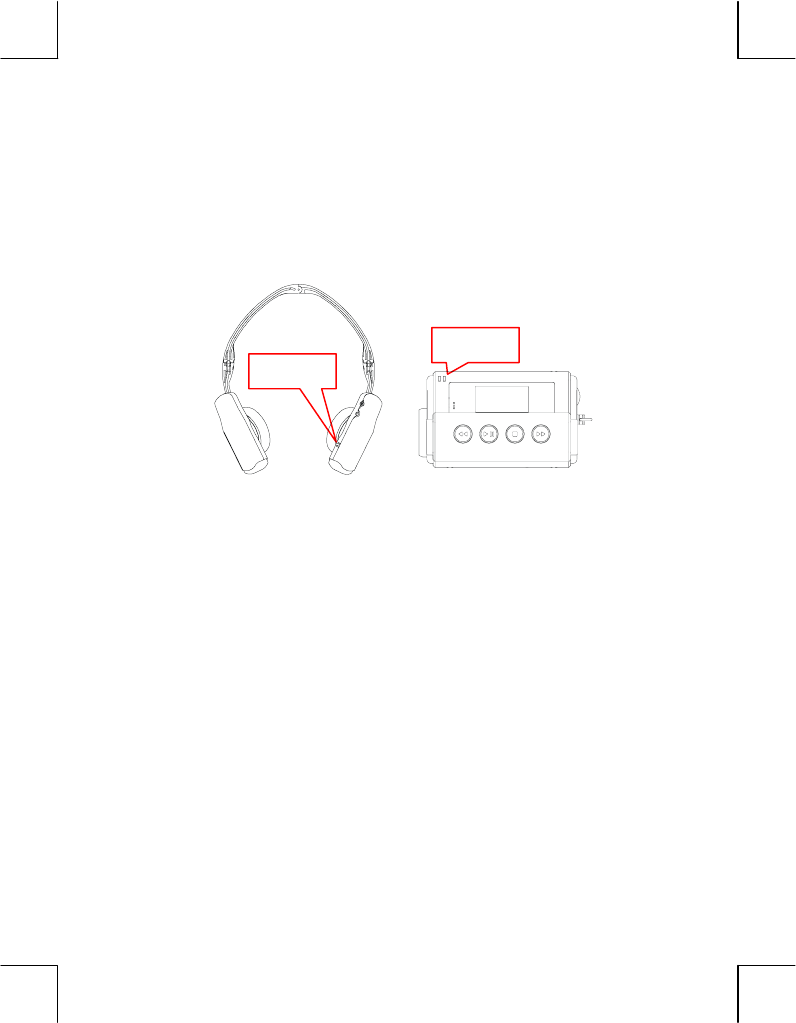
Connect the Player to the Bluetooth Headphone
The Player and Headphone have been paired before leaving the
factory.
1. Power on the Player and Headphone.
2. During searching, both LED of the Player and Headphone will blink.
3. Wear the Headphone and play music.
When connected, both LED of the Player and Headphone will blink.
IMPORTANT
The Bluetooth Headphone will be turned off automatically when out of
the signal receiving range (10M without obstacles) over 150 seconds
(2.5 minutes). There will be a power off sound to remind you and then
turn off the headphone.
NOTE
This Bluetooth Headphone beeps to alert you the battery life is low
and it will keep on until you press the Volume Up / Down key to
turn the beep off.
Each time you turn on the Bluetooth Headphone, the beep will alert
you if the battery life is low.
LED
LED

E17
2. Playback Functions
There are 6 major playback functions in the top-level menu of Player.
Artists Tracks Playlists
Albums Genres List Manager
-----------------------------------------------------------------------------------
Artists
This menu selection allows you to view the available list of artists that
have been loaded onto the Player.
xHow to play
1. In the main menu, pressing <S> and <T> keys to select [Artists]
and then press <ENTER> key.
A list of artists will be displayed.
2. Selecting an artists and then if pressing one of the following:
<PLAY> key to play the first album found by the selected artist.
<ENTER> key to display a list of albums by the selected artist. An
album can be selected from this list and played by pressing
<PLAY> key.
<ENTER> key to display a list of albums by the selected artist and
then press <S> and <T> keys to select an album. Press
<ENTER> key again, a list of tracks of the selected album will be
displayed. Select a track and press <PLAY> key to play.
NOTE
Albums are stored alphabetically.
If any of the play modes (Random, Repeat, Intro mode) are switch on
then this will be applied to the selected album.
-----------------------------------------------------------------------------------

E18
Albums
This function allows user to view the available list albums that have
been loaded onto the Player.
xHow to play
1. In the main menu, pressing <S> and <T> keys to select [Albums]
and then press <ENTER> key.
A list of albums will be displayed.
2. Selecting an albums and then if pressing one of the following:
<PLAY> key to play the first track found by the selected album.
<ENTER> key to display a list of tracks by the selected album. A
track can be selected from this list and played by pressing <PLAY>
key.
NOTE: See NOTE in Artists.
-----------------------------------------------------------------------------------
Tracks
This function allows user to view the available list of tracks that have
been loaded onto the Player.
xHow to play
1. In the main menu, pressing <S> and <T> keys to select [Tracks]
and then press <ENTER> key.
A list of tracks will be displayed.
2. Selecting a track and then pressing the <PLAY> key to play.
NOTE: See NOTE in Artists.
-----------------------------------------------------------------------------------

E19
Genres
This menu selection allows you to view the available list of genre that
has been loaded onto the Player.
xHow to play
1. In the main menu, pressing <S> and <T> keys to select [Genres]
and then press <ENTER> key
A list of genres will be displayed.
2. Selecting a genre and then if pressing one of the following:
<PLAY> key to play the first track found by the selected genre.
<ENTER> key to display a list of tracks by the selected genre. A
track can be selected from this list and played by pressing <PLAY>
key.
NOTE: See NOTE in Artists.
-----------------------------------------------------------------------------------
Playlists
Selecting [Playlists] and pressing <ENTER> key will display a list of all
current Playlists stored on the Player. Use the <S> and <T> keys to
highlight the desired Playlist and press <PLAY> key to play the Playlist.
NOTE
Please create your Playlists first.
-----------------------------------------------------------------------------------
List Manager
There are 3-major functions in List Manager.
Entering the List Manager Menu
1. Power on the Player.
2. Use <S> and <T> keys to highlight [List Manager] and then
pressing <ENTER> key.
List Manager Menu will be displayed.
3. Use <S> and <T> keys to select [Create list], [Modify list] or [Delete
list].
-----------------------------------------------------------------------------------

E20
When [Create list] is selected
4. Press <ENTER> key.
The submenu of Artists, Albums, Tracks, and Genres will be
displayed.
5. Use <S> and <T> keys to select one of these options and then
pressing <ENTER> key.
Press <ENTER> key if necessary until you reach the list of tracks.
6. Use <S> and <T> keys to process through the listed tracks to
locate the track you want to add to the playlist.
7. Press <ENTER> key to add the track to the list and return to list of
tracks.
NOTE
The platlist will be named, for example, PLY000, PLY001, etc.
The file number of playlist is limited to 999.
If you delete any playlist file, the playlist file number will be used when
you create a new playlist.
-----------------------------------------------------------------------------------
When [Modify list] is selected
4. Press <ENTER> key.
The submenu of [Add tracks] and [Delete tracks] will be displayed.
´
when [Add tracks] is selected
5. Press < ENTER> key.
The Playlist will be displayed.
Press < ENTER> key to select a playlist which you want to add
tracks.
6. Press <ENTER> key.
The submenu of Artists, Albums, Tracks, and Genres will be
displayed.
7. Use <S> and <T> keys to select one of these options and then
pressing <ENTER> key.
Press <ENTER> key if necessary until you reach the list of tracks.
8. Use <S> and <T> keys to process through the listed tracks to
locate the track you want to add to the playlist.
9. Press <ENTER> key to add the track to the list and return to list of
tracks.

E21
´ when [Delete tracks] is selected
5. Press <ENTER> key.
The current list of Playlists will be displayed.
6. Use <S> and <T> keys to select the Playlist in which tracks will be
deleted.
7. Press <ENTER> key.
The current list of tracks under the Playlist will be displayed.
8. Use <S> and <T> keys to select the track to be deleted and then
press <ENTER> key to mark it down.
9. Press <WW> key to delete the selected track and return to the list of
tracks.
-----------------------------------------------------------------------------------
When [Delete list] is selected
4. Press <ENTER> key.
The current list of Playlists will be displayed.
5. Use <S> and <T> keys to select the Playlist to be deleted and then
press <ENTER> key to mark it down.
.6. Press <WW> key to delete the selected Playlist and return to the
Playlists Menu.
E22
3. Voice
Follow the procedure below to record sound.
Under any screens
1. Press <STOP> key first, and then pressing <PLAY> key.
Release both keys and recording starts.
2. Press <STOP> key to stop recording and return to Voice Mode
Menu.
NOTE
The voice file will be named, for example, V001, V002, etc.
The voice file number is from 000 to 999. If you make a record after
file number is full, the original file number 000 will be overwritten.
Make sure the battery power is sufficient before making recording.
File size less than 1 second cannot be saved and played in this player.
-----------------------------------------------------------------------------------
xHow to play
1. In the main menu, pressing <S> and <T> keys to select [Voice] and
then press <ENTER> key
A list of voice will be displayed.
2. Selecting a voice file and then press<PLAY> key to play.
Microphone

E23
4. Settings
There are 11 functions in the settings menu of the Player.
Backlight Intro mode Language
Equalizer Contrast Pairing
Random Power saving About
Repeat Refresh index
-----------------------------------------------------------------------------------
Entering the Settings Menu
STEP 1. Power on the Player
STEP 2. In Main Menu, Use <S> and <T> keys to highlight Settings
and then pressing <ENTER> key.
Settings Menu will be displayed.
-----------------------------------------------------------------------------------
Backlight
The backlight will turn on automatically only when keys manipulated.
1. Follow STEP 1 and 2 to enter the settings menu.
2. Use <S> and <T> keys to highlight [Backlight].
3. Press <ENTER> key to set the backlight to ON.
Press <ENTER> key again to set it to OFF.
Press <WW> key returns to main menu.
-----------------------------------------------------------------------------------
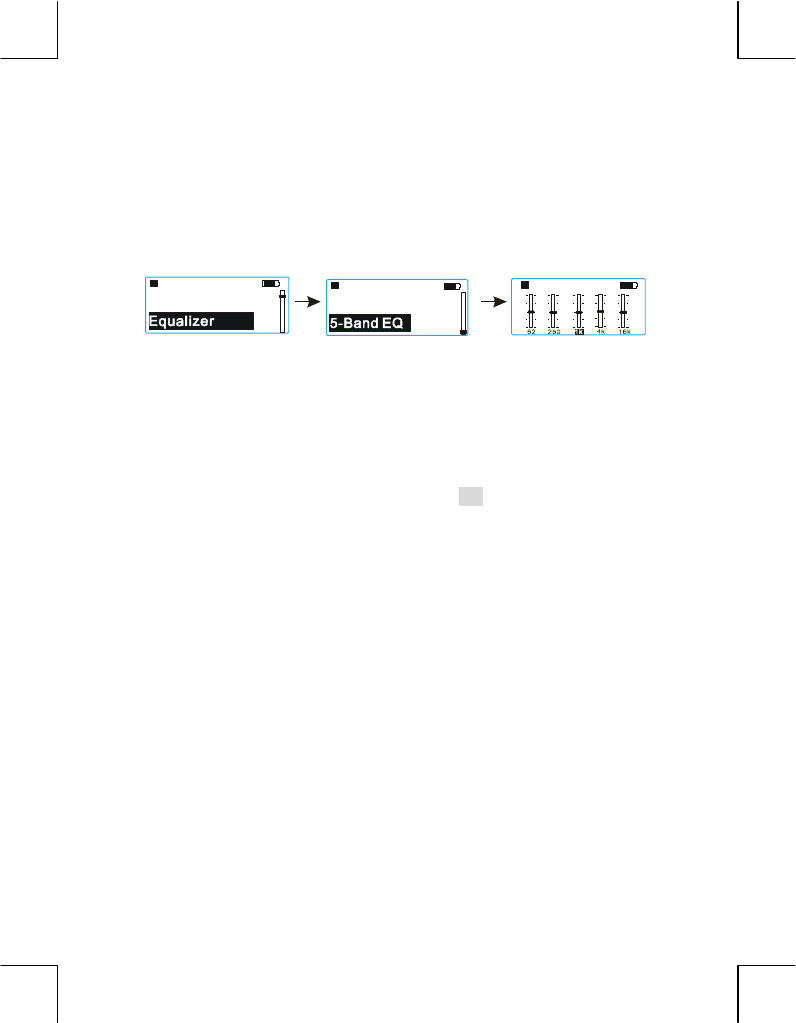
Equalizer
1. Follow STEP 1 and 2 to enter the settings menu.
2. Use <S> and <T> keys to highlight [Equalizer].
3. Press <ENTER> key.
The equalizer menu will be displayed.
4. Use <S> and <T> keys to highlight [Normal], [Bass Boost], [Rock],
[Jazz], [Classical], [Pop] or [5-Band EQ].
The function has been set if highlighted.
5. Press <ENTER> key to return to the settings menu.
-----------------------------------------------------------------------------------
E24
How adjust [5-Band EQ]
1. Select [5-Band EQ] and then press <ENTER> key.
The 5-Band EQ setting menu will be displayed.
Use <WW> and <XX> keys to select an item.
Use <S> and <T> keys to adjust the item.
2. Press <ENTER> key to confirm and return to the settings menu.
-----------------------------------------------------------------------------------
Random
The function will select music randomly according to the selection
criteria (Album, Artist, Track or Genre).
1. Follow STEP 1 and 2 to enter the settings menu.
2. Use <S> and <T> keys to highlight [Random].
3. Press <ENTER> key to set the random to ON.
Press <ENTER> key again to set it to OFF.
Press <WW> key returns to main menu.
-----------------------------------------------------------------------------------
Repeat
At the end of the current music this mode will repeat according to the
selection criteria (Album, Artist, Track or Genre).
1. Follow STEP 1 and 2 to enter the settings menu.
2. Use <S> and <T> keys to highlight [Repeat]
3. The repeat function can be set in the sequence as below each time
you press <ENTER> key:
Press <WW> key returns to main menu.
-----------------------------------------------------------------------------------
Off ´ Repeat One ´Repeat All ´ Off
5-Band EQ
Equalizer
Pop
Settings
Backlight
E25
Intro mode
This function allows user to play the first 10 seconds of each tracks in
the selection criteria (Album, Artist, Track or Genre).
1. Follow STEP 1 and 2 to enter the settings menu.
2. Use <S> and <T> keys to highlight [Intro mode].
3. Press <ENTER> key to set the intro mode to ON.
Press <ENTER> key again to set it to OFF.
Press <WW> key returns to main menu.
-----------------------------------------------------------------------------------
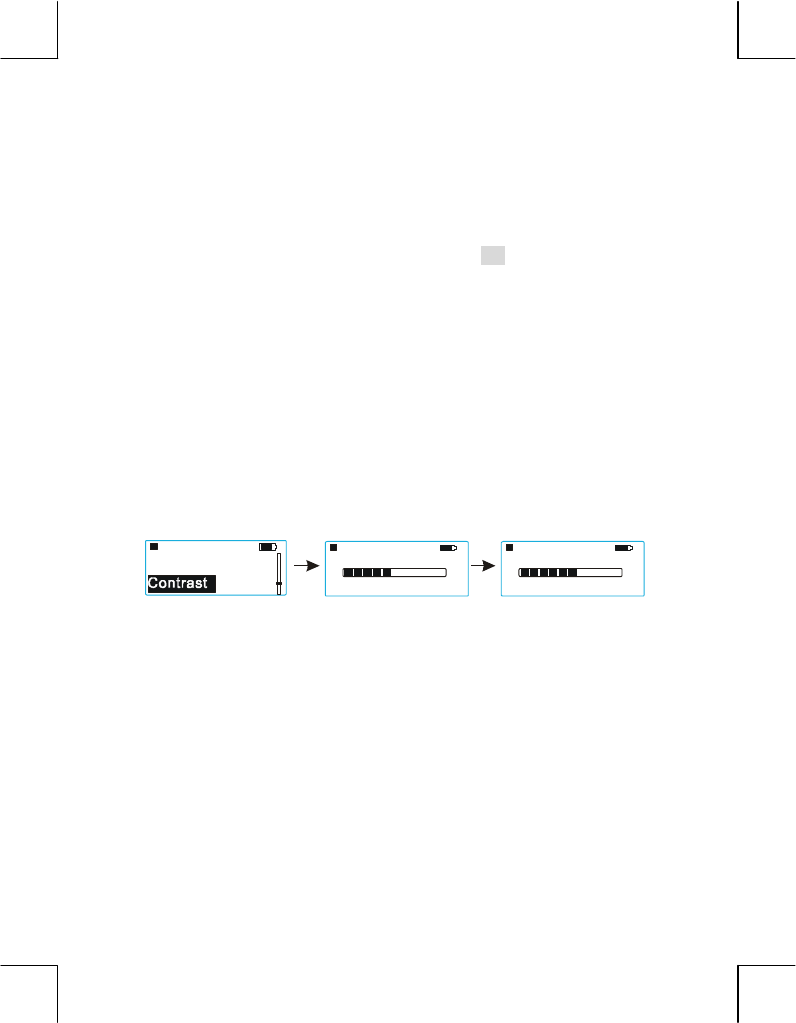
Contrast
This function allows user to adjust the LCD contrast to fit your need.
There is 10-level of contrast.
1. Follow STEP 1 and 2 to enter the settings menu.
2. Use <S> and <T> keys to highlight [Contrast] and then pressing
<ENTER> key.
Menu of contrast will be displayed.
3. Use <WW> and <XX> key to adjust the contrast.
4. Press <ENTER> key to save the setting and return to settings menu.
-----------------------------------------------------------------------------------
Settings
Intro mode
Contrast Contrast
E26
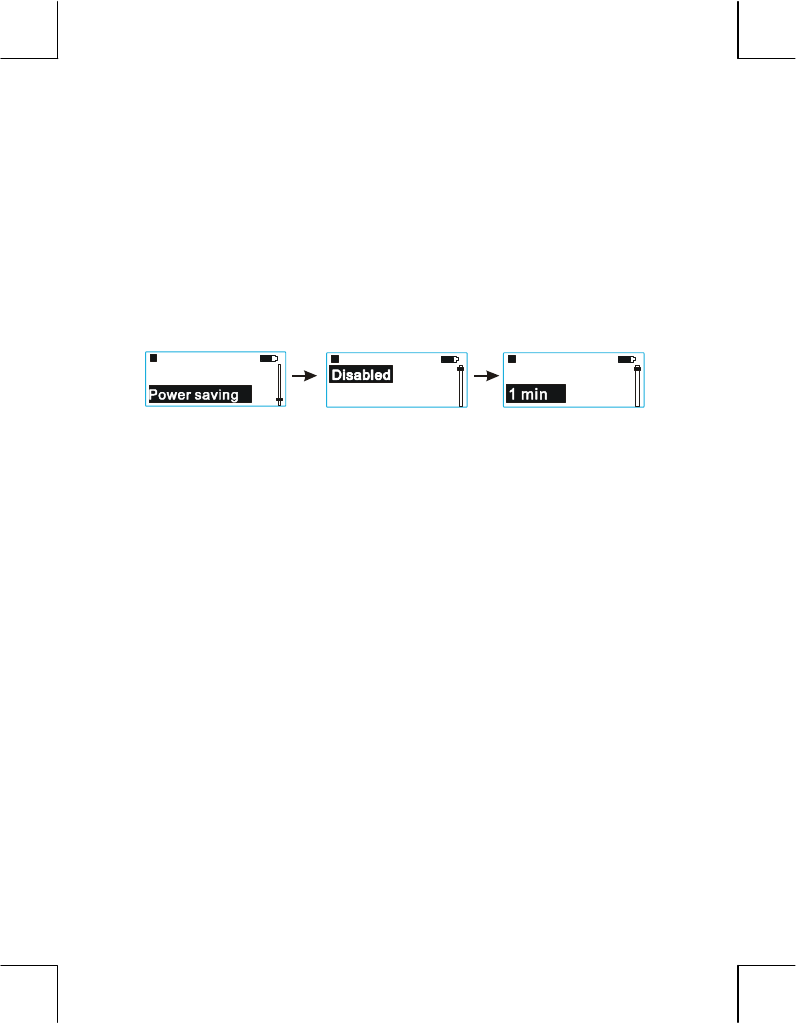
Power saving
The Player has an auto power off function that will preserve the battery
life when the player is not being used. The power savingfunction can be
set in: Disabled, 1 min, 2 mins, 5 mins, 10 mins.
1. Follow STEP 1 and 2 to enter the settings menu.
2. Use <S> and <T> keys to highlight [Power saving] and then
pressing <ENTER> key.
Menu of power saving will be displayed.
3. Use <S> and <T> keys to select the auto power off time.
The function has been set if highlighted.
4. Press <ENTER> key to return to settings menu.
-----------------------------------------------------------------------------------
Refresh index
This sorting function allows user to renew the sequence of tracks.
Tracks are stored alphabetically.
1. Follow STEP 1 and 2 to enter the settings menu.
2. Use <S> and <T> keys to highlight [Refresh index] and then
pressing <ENTER> key.
The tracks start to renew their sequence.
-----------------------------------------------------------------------------------
Language
This function allow user to set the menu language to English, 繁體中文,
or 日本語.
1. Follow STEP 1 and 2 to enter the settings menu.
2. Use <S> and <T> keys to highlight [Language] and then pressing
<ENTER> key.
Menu of language will be displayed.
3. Use <S> and <T> key to select a language.
The function has been set if highlighted.
4. Press <ENTER> key to return to settings menu.
-----------------------------------------------------------------------------------
Settings
Contrast
Power saving
1 min
Power saving
Disabled

E27
Pairing
If the connection between the Player and the Bluetooth Headphone
cannot be established, please follow the steps as below to pair again.
STEP 1Î Player
1. Follow STEP 1 and 2 to enter the settings menu.
2. Use <S> and <T> keys to highlight [Pairing].
3. Press <ENTER> key.
STEP 2 Î Turn off the Player and then turn on it again.
STEP 3 Î Bluetooth Headphone
Press and hold the <VOLUME UP> key of the Headphone, and then
press the <POWER> key. Keep holding the two keys until the LED
starts blinking.
-----------------------------------------------------------------------------------
About
The “About” function displays information the revision of the firmware
loaded in your Player and maximum capacity of the hard drive.
´ Information
Model name, Revision, Copyright, Disk Capacity and Disk type.

E28
5. Mass Storage / Application Software
Mass Storage
Î Driver Installation
Please install Mass Storage driver for Windows 98SE (only) before
using the Mass Storage Function.
1. Insert the software CD-ROM disc into your CD-ROM Drive.
2. The setup program starts and follows the screen instructions to
complete the driver installation.
ÎSTEPS to use Mass Storage Function
1. Turn on the Player.
2. Use USB Cable to connect your Player to PC.
3. Double click (to open) “My Computer“.
4. Double click (to open) the newly created “Removable Device”
location in PC.
Disconnecting safely from computer
If you disconnect the Player before closing the Mass Storage, the
Storage Destination will be damaged.
WINDOWS 98SE users: there is no safely remove icon ( ). Simply
disconnect the player after file transfer completes.
When using the Mass Storage Function to copy or delete data, please
DO NOT turn off the Player or disconnect the USB Cable.
Formatting your player
Only format your player with FAT32 file system.
-----------------------------------------------------------------------------------
Application Software
The Application Software we provide:
MusicMatch
NOTE
1. Insert the software CD-ROM disc into your CD-ROM Drive.
2. The setup program starts and follows the screen instructions to
complete the installation.
Introduction
The stylish and lightweight Bluetooth headset HERMES BT-100 is a portable
headset solution based on Bluetooth wireless technology and is compatible
with Bluetooth v1.1 cellular phones.
y What is included in this package?
- Bluetooth headset x 1
- Headset charging cradle x 1
- AC/DC power adaptor x 1
- Ear hook x 1
- Ear cushions x 2
y How to use my headset?
You can connect your HERMES BT-100 to your cellular phone, computer or
any devices with Bluetooth wireless technology that supports Headset Profile
or Hands-free Profile.
This guide will focus on the communication between the headset and your
cellular phone, either with built-in Bluetooth wireless technology or with a
Bluetooth adapter connected to it.
Using the Headset
y Charging
With built-in lithium battery, the headset could be recharged simply by the
following steps:
1. Plug the AC/DC power adapter into the charging cradle, and then plug the
whole set into the wall outlet.
2. Place the headset in the charging cradle, and the blue light on the cradle will
flash at an interval of 1 second.
If the red light flashes every 3 seconds when the headset is on, the headset is
running out of battery and needs to be recharged. If the headset is not
recharged, the red light will illuminate after 60-second flashing and the headset
will turn off.
We recommend you charge the battery until the blue light illuminates when
using the headset first time. The full battery charge takes approximately 1.5 to
2 hours.
y Paring
Before enjoying the Bluetooth wireless technology of the headset, you have to
pair it with the phone by adding it to a list of paired devices in the phone.
1. Press the “Control Button” around 5 seconds until you hear dual tones
followed by a single tone or the blue indicator light on the headset flashes
twice (The two flashes are at an interval of 5 seconds). Now the headset is in
the pairing mode.
2. Make sure the Bluetooth function of the phone is enabled.
3. Initiate the pairing procedures on the phone. For more information about the
device discovery, please refer to the user's manual of your cellular phone.
4. When the phone requests passkey, enter “0000” to pair the headset with
the phone. When pairing is successful, the blue indicator light on the
headset will flashes twice rapidly at an interval of 1 second.
You can now make and receive calls directly from your headset. However, your
headset and phone should be within the working range of 10m outdoors or 5m
indoors without any obstacles in between.
When the headset enters the pairing mode, the blue indicator light on the
headset will flash at an interval of 1 second. If no devices are paired in 3
minutes, 1 single tone will sound and the headset will turn off automatically.
Once your headset and phone are paired, you do not need to pair the two
devices every time you use the headset. However, if you want to pair your
phone with other Bluetooth devices, you have to proceed the paring again.
y Wearing the Headset
You can wear the HERMES BT-100 Bluetooth Headset on either ear with or
without the ear hook, which is detachable.

y Turning on the Headset
To turn on the headset: Press the “Control Button” for around 1 second until
you hear dual tones or see the blue light on the headset. When the headset is
on, the blue light will flash at an interval of 4 seconds.
y Turning off the Headset
To turn off the headset, press the “Control Button” for around 2 seconds until
you hear dual low tones or the blue indicator light shows a series of rapid
flashes. The blue light will illuminate and the headset will turn off. Now, the
connection between the headset and your phone is terminated.
y Making / receiving a call
Making a call using the phone keypad
After the headset is connected with the phone, you can dial the number
through the keypad on the phone as usual. The signals will be transferred to
your headset automatically.
Making a call using voice dialing
You can make a call by using the voice dialing function if your phone supports
this feature.
1. Make sure the voice dialing function is activated and voice tags have been
already recorded. For more instructions of storing voice tags, please refer to
the user’s manual of your phone.
2. Make sure the phone and the headset are on and they are placed within the
required working range.
3. Press the “Control Button” on the headset until you hear a single tone from
the headset. After the tone, say the name you wish to call.
4. End the call by pressing the “Control Button.”
Making a call using the redial function
To use this feature, make sure your phone supports the function of last call
redialing.
1. Press the “Volume-up + Button” on the headset for around 3 seconds to
redial the last call.
2. End the call by pressing the “Control Button.”

Answering a call
Make sure the phone and the headset are on and connected. When an
incoming call is received, a ring tone will sound in your headset. Press the
“Control Button” on the headset to answer the call.
Transferring a call
To transfer a call from your headset to the phone, press the “Volume-down -
Button” on the headset for around 3 seconds.
y Adjusting the volume
Press the “Volume-up + Button” or the “Volume-down - Button” to adjust the
volume of headset speaker or ringing tones.
1. To increase the volume: Press the “Volume-up + Button.”
2. To decrease the volume: Press the “Volume-down - Button.”
y Mute function
1. To turn off the microphone or to activate the mute function during a call,
press both the “Volume-up + Button” and the “Volume-down - Button” for 1
second until you hear a low tone.
2. Press both the “Volume-up + Button” and the “Volume-down - Button”
again to resume the conversation.
Headset LED Indicator
Headset Status LED Status Remark
Power On Blue LED flashes once.
Power Off Blue LED flashes 4 times.
Paring mode Blue LED flashes once every 1
second.
Paring succeeds or
talking mode
Blue LED flashes 2 times rapidly
every 2 seconds.
Standby mode Blue LED flashes once every 4
seconds.
When the battery is
low, the blue light and
the red light will flash
alternatively.
Battery low Red LED flashes once every 3
seconds. After 1 minute, the
headset turns off.

Charging Cradle Indicator
Status LED Status Remark
Charging in process Blue LED flashes once slowly
every 1 second.
Charging complete Blue LED turns off.
Saving battery Blue LED keeps lighting. The battery is
exhausted.
Audio Signals
Status Audio Status Remark
Power On Single tone
Entering paring
mode
Dual tones
Ending paring mode Single tone
If no devices are paired
within 3 minutes, the
pairing mode ends and
the headset turns off
automatically.
Paring succeeds Dual tones
Incoming call A ring sounds every 2 seconds
Volume control Single tone when pressing once
Mute Single tone
Un-mute Single tone
Battery low Single tone every 3 seconds
Power Off Dual tones

Troubleshooting
The headset and the phone have been successfully paired, but there is
no link between the headset and the phone
1. Make sure the headset and the phone are within working range of up to 10m
in open space or up to 5m indoors without any obstacles in between.
2. Turn off the headset and disable the Bluetooth function of the phone.
3. Turn on the headset and enable the Bluetooth function of the phone.
4. Perform the pairing procedures again.
If the problem cannot be solved, try the following steps:
1. Turn off the headset and disable the Bluetooth function of the phone.
2. Delete all the paired devices on the phone.
3. Turn on the headset and enable the Bluetooth function of the phone.
4. Paring the headset with the phone again.
Safety and additional information
Users are not permitted to make changes or modify the device in any way.
Changes or modifications not expressly by the party responsible for
compliance could void the user’s authority to operate the equipment.
FCC Notices
This device complies with part 15 of the FCC rules. Operation is subject to the
following two conditions:
1. The device may not cause harmful interference, and
2. This device must accept any interference received, including interference
that may cause undesired operation.
CE Statement
This product is in compliance with the essential requirements of European
Union Directive 1999/5/EC (R&TTE Directive).
Product care
1. Do not expose your product to liquid or moisture or to humidity.
2. Do not expose your product to extreme high or low temperatures.
3. Do not expose your product to lit candles, cigarettes, or cigars, or to open
flames etc.
4. Do not drop, throw or try to bend the product as rough treatment could
damage it.
5. Only the ear hook is available for user to assemble or disassemble. Do not
attempt to disassemble the product.
6. If you will not be using the product for a while, store it in a place that is dry,
free from damp, dust and extreme temperatures.
The Bluetooth® word mark and logos are owned by the Bluetooth SIG, Inc. and any use of such marks by SINBON is
under license. Other trademarks and trade names are those of their respective owners.
This equipment has been tested and found to comply with the limits for a Class B
digital device, pursuant to part 15 of the FCC rules. These limits are designed to
provide reasonable protection against harmful interference in a residential installation.
This equipment generates, uses and can radiate radio frequency energy and, if not
installed and used in accordance with the instructions, may cause harmful interference
to radio communications. However, there is no guarantee that interference will not
occur in a particular installation. If this equipment does cause harmful interference to
radio or television reception, which can be determined by turning the equipment off
and on, the user is encouraged to try to correct the interference by one or more of the
following measures:
-Reorient or relocate the receiving antenna.
-Increase the separation between the equipment and receiver.
-Connect the equipment into an outlet on a circuit different from that to which the
receiver is connected.
-Consult the dealer or an experienced radio/TV technician for help.
This Transmitter must not be co-located or operating in conjunction with any other
antenna or transmitter.
Any changes or modifications (including the antennas) made to this device that are
not expressly approved by the manufacturer may void the user’s authority to operate
the equipment.