NT ware Systemprogrammierung MICARDLM03 USB RF-Cardreader MiCard V3 User Manual MiCard V3 Installation Manual Full Install Guide
NT-ware Systemprogrammierung GmbH USB RF-Cardreader MiCard V3 MiCard V3 Installation Manual Full Install Guide
user manual
MiCard V3 Installation Manual (Full
Install Guide)

Versioning
Versioning
Version
Author(s)
Revision date
Reviewer(s)
1.0
Thomas Lemmer
WP Name
MiCard V3 - Installation Manual
Knowledge Base
File Name
MiCard_V3_Full_Installation_Guide_EN_V1.0.pdf
Technologies
concerned
uniFLOW Login Manager/MomClient (Secure/Public Printing Applet)
Short Summary
This manual describes the features, the installation, and the configuration of the MiCard V3 Reader
in detail.
MiCard is a registered trademark of NT-ware Systemprogrammierung GmbH.
Document
changes
Version
Changes
Disclaimer
All rights reserved. No parts of this work may be reproduced in any form or by any means - graphic, electronic, or
mechanical, including photocopying, recording, taping, or information storage and retrieval systems - without the
written permission of NT-ware Systemprogrammierung GmbH.
Company and product names mentioned herein are registered or unregistered trademarks of their respective
companies. Mention of third-party products is for information purposes only and constitutes neither an endorsement
nor a recommendation. NT-ware assumes no responsibility with regard to the performance or use of these products.
Also, NT-ware makes no claim to these trademarks. Any use of trademarks, logo, service marks, trade names, and
product names is prohibited without the written permission of the respective owners.
Adlib Software of Adlib Software; Adobe®, Adobe® Reader, Acrobat®, Distiller®, PostScript® and products of the
CREATIVE SUITE(S) of Adobe Systems Incorporated; Apple®, the Apple® logo, Mac®, Mac OS®, Macintosh®, iPhone®,
iPad® and AirPrint® of Apple Inc.; CANON, imageRUNNER, imageRUNNER ADVANCE, MEAP, CPCA, AMS, iW AMS, iW
Desktop, iSend, iW SAM of Canon Inc.; Crystal Reports of Business Objects SA, as of July 1, 2008: BusinessObjects of
SAP; eCopy™, eCopy ShareScan®, and eCopy ScanStation® of Nuance Communications, Inc.; Foxit Reader of Foxit
Corporation; Google Docs of Google Inc.; Helix™ Production Workflow is a trademark of NT-ware
Systemprogrammierung GmbH; Hewlett Packard, HP, LaserJet, and PCL of Hewlett-Packard Company; iOS® of Cisco
Technology Inc.; I.R.I.S. Group s.a.; JAWS pdf courier™ are trademarks of Global Graphics SA.; Microsoft®, Windows®,
Windows Vista®, Windows 7®, Internet Explorer®, Internet Information Server, Microsoft® Word, Microsoft® Excel,
SQL Server® of Microsoft Corporation; Neevia Document Converter ProTM of Neevia Technology; NetWare, Novell®,
Novell eDirectory® of Novell Inc.; OpenOffice.org™ of Oracle Corporation; PAS™ of Equitrac Corporation; PosterJet of
Eisfeld Datentechnik GmbH & Co. KG; Red Titan EscapeE of Red Titan Limited; NETAPHOR ®, SiteAudit™ are
trademarks of NETAPHOR SOFTWARE Inc.; Therefore™ of Therefore; UNIX® of The Open Group; uniFLOW OM®,
uniFLOW®, uniFLOW Serverless Secure Printing®, MIND®, microMIND®, and MiCard® are registered trademarks of
NT-ware Systemprogrammierung GmbH; pcProx®, AIR ID® are registered trademarks of RFIdeas Inc.Readers;
CASI-RUSCO® is registered trademark of ID Card Group; Radio Key® is registered trademark of Secura Key; GProx™ II is
unregistered trademark of Guardall; HID® ProxHID is registered trademark of HID Global Corporation; Indala® is
registered trademark of Motorola; ioProx™ is unregistered trademark of Kantech.
All other trademarks, trade names, product names, service marks are property of their respective owners and are
hereby acknowledged.
While every precaution has been taken in the preparation of this document, NT-ware assumes no responsibility for
errors or omissions, or for damages resulting from the use of information contained in this document or from the use
of programs and source code that may accompany it. NT-ware does not assume any responsibility or liability for any
malfunctions or loss of data caused by the combination of at least of one NT-ware product and the used operation
system and/or third-party products. In no event shall NT-ware be liable for any loss of profit or any other commercial
damage caused or alleged to have been caused directly or indirectly by this document.
In addition, this manual provides links to the sites of affiliated or independent companies and certain other
businesses. NT-ware is not responsible for examining or evaluating, and NT-ware does not warrant the offerings of,
any of these businesses or individuals or the content of their websites. NT-ware does not assume any responsibility or
liability for the actions, product, and content of all these and any other third parties. You should carefully review their
privacy statements and other conditions of use.
PLEASE NOTE: Serious problems might occur if you modify the registry of your Windows operating system incorrectly.
These problems might require that you reinstall the operating system. We strongly recommend to always back up the
registry of your Windows operating system before applying changes to it, just in case you do something wrong.
NT-ware does not assume any responsibility or liability for any impact on the operating system after changing the
Registry. You understand and accept that you use this information and modify the registry of your Windows operating
system at your own risk.
Friday, October 26, 2012, Bad Iburg (Germany)

Symbols
Text Styles
Text that appears in this style is used for screen text that appears in the uniFLOW user interface and on
user interface controls.
Text that appears in this style is used for User entries on screen, text that the user actually has to type in.
Text that appears in this style is used for hyperlinks to an external web page, or internal links to other pages
of this manual.
Text that appears in this style is used for code examples: XML code, variables or
regular expressions.
Pictograms
Important note: Information that is crucial for the correct functioning of the uniFLOW
software.
External manual: Pointer to additional manuals for third party hardware or third party
software.
Region Specific Feature: In case some features of uniFLOW are not universally
available, this icon will indicate it.
Link to an external reference within the WWW.
Detailed explanation of configuration settings or operational procedures.
Copyright and Contact
©1998-2012 NT-ware Systemprogrammierung GmbH.
In case of errors or improvement suggestions please contact documentation@nt-ware.com.

MiCard V3 Installation Manual (Full Install Guide) Contents
I
Contents
1 MiCard V3 contactless card reader ............................................................. 2
1.1 Scope of supply ............................................................................................................. 2
1.2 Requirements ............................................................................................................... 2
1.3 FCC and IC Compliance Note .......................................................................................... 4
1.4 Supported Card Standards............................................................................................. 4
1.5 System Setup ................................................................................................................ 4
1.6 Installation of the MiCard V3 on the imageRUNNER ADVANCE ...................................... 5
1.7 LED Status ..................................................................................................................... 9
1.8 Beep Status ................................................................................................................... 9
2 Configuration ........................................................................................... 10
2.1 Upgrading from SSP to uniFLOM OM V4.1 or uniFLOW V5.0 ........................................ 13
3 MiCard V3 Configuration on the uniFLOW Server ..................................... 13
3.1 Global MiCard V3 Configuration .................................................................................. 14
3.1.1 Configuration - General ..................................................................................................................... 14
3.1.2 Configuration - Multi ......................................................................................................................... 15
3.1.3 Device Specific MiCard V3 Configuration .......................................................................................... 16
4 Index ........................................................................................................ 19

MiCard V3 Installation Manual (Full Install Guide)
2
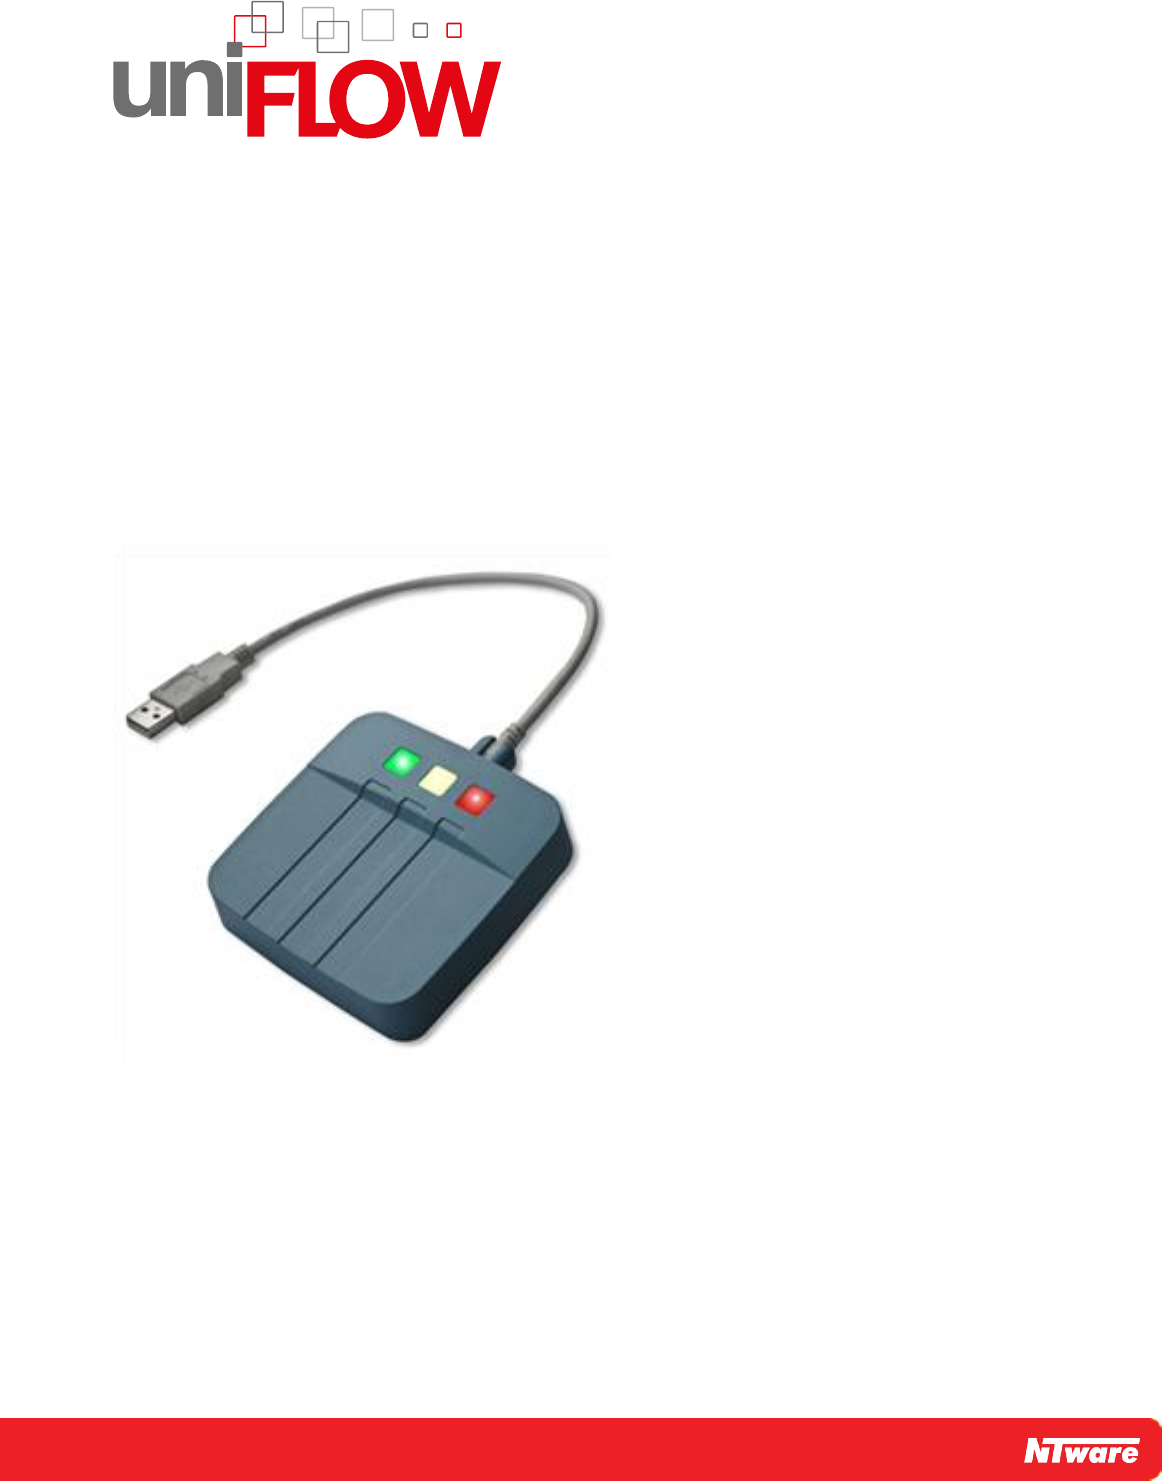
1 MiCard V3 contactless card reader
MiCard V3 provides an easy to use, easy to install and cost effective solution for user
identification with a contactless card alongside your Canon iR and Canon
imageRUNNER ADVANCE. With MiCard V3 users can be identified by simply waving
their card over the reader. After identification the device unlocks and you are able to
make your copies or pick up your secure print jobs.
Installation and configuration has never been easier. You simply connect the MiCard
V3 directly to the device via USB. Even power is supplied via USB, thus providing a cost
effective solution by removing expenses normally required for an additional interface.
After connecting MiCard V3 to the device, it will automatically be recognized and
configured by the uniFLOW MEAP application, which has been integrated with the
device.
There are many different technologies for Radio Frequency Identification (RFID) on the
market. For additional flexibility, the MiCard V3 contactless card reader is available in a
number of different versions, all supporting different RFID frequencies and
technologies.
MiCard V3 Multi
The uniFLOW MEAP application embedded in the device will also make your life in the
office much easier. You can use it for printing confidential information securely. Simply
select the print job you want to print directly from the control panel of the device, with
no risk of being intercepted by anyone else.
Additionally, it can be used for charging copy jobs back to specific cost centers,
departments or customers, printing of general/internal company documents, or for
cross-authentication into other applications, like eCopy for example.
1.1 Scope of supply
The MiCard V3 reader package includes
the MiCard V3 reader unit
a short USB cable for the installation in an imageRUNNER ADVANCE (please refer
to chapter Installation of the MiCard V3 on the imageRUNNER ADVANCE (on page
5))
a longer cable to connect the reader unit to another imageRUNNER
a pull relief
adhesive tape
a Quick-Install Guide
1.2 Requirements
MiCard V3 Installation Manual (Full Install Guide)
3
Rated Voltage:
5 V LPS
USB:
1.1 (Full-Speed) or 2.0 (Hi-Speed
Ambient Temperature:
0 … +50 °C (23 … +122 °F)
Canon Device:
Has to be a Canon MEAP enabled
MFP
USB Application Interface board of
the respective Canon iR or Canon
imageRUNNER ADVANCE
uniFLOW Login Manager/MomClient
(Secure/Public Printing Applet) V2.1.0
onwards (V2.4.0 recommended)
uniFLOW:
uniFLOW OM / uniFLOW and / or RPS V4.0.5
or higher
The MiCard V3 is supported by every MiCard supported MEAP version. Note that the
extended configuration of the MiCard V3 is only possible with MEAP applets from
V2.4.0 onwards.
Important Note:
Changes and/or modifications of the MiCard not approved by NT-ware
Systemprogrammierung GmbH will make void the user’s authority to operate the
MiCard.

MiCard V3 Installation Manual (Full Install Guide)
4
1.3 FCC and IC Compliance Note
This equipment has been tested and found to comply with the limits for a Class B
digital device, pursuant to part 15 of the FCC Rules. These limits are designed to
provide reasonable protection against harmful interference in a residential installation.
This equipment generates, uses and can radiate radio frequency energy and, if not
installed and used in accordance with the instructions, may cause harmful interference
to radio communications. However, there is no guarantee that interference will not
occur in a particular installation. If this equipment does cause harmful interference to
radio or television reception, which can be determined by turning the equipment off
and on, the user is encouraged to try to correct the interference by one or more of the
following measures:
Reorient or relocate the receiving antenna.
Increase the separation between the equipment and receiver.
Connect the equipment to an outlet on a circuit different from that to which the
receiver is connected.
Consult the dealer or an experienced radio/TV technician for help.
This Class B digital apparatus complies with Canadian ICES-003.
Cet appareil numérique de la classe B est conforme à la norme NMB-003 du Canada.
1.4 Supported Card Standards
MiCard V3 Multi
Read unique ID number using the following
standards
MIFARE® and MIFARE® ultra light
technologies, MIFARE® DESFire (EV1),
iCLASS®, Inside Contactless, other ISO15693 /
ISO14443A cards/transponders.
Configurable
LEGIC prime, LEGIC advant
Operating frequency
13,56 MHz
1.5 System Setup
Ensure that the MFP is equipped with a USB Application Board.
The uniFLOW Login Manager or MomClient (Secure/Public Printing Applet) V2.1.0
onwards (V2.4.0 recommended) should be installed and running on the MFP. For
installation details of the uniFLOW MEAP Applets, please see the uniFLOW User
Manual.

MiCard V3 Installation Manual (Full Install Guide)
5
Note that the extended configuration of the MiCard V3 is only possible with MEAP
applets from V2.4.0 onwards.
To connect the MiCard V3 reader to the MFP, simply plug the USB cable into the
USB Host Connection of the MFP and into the USB socket of the card reader
(Please be aware that the USB connections may be arranged in a different order
depending on the model of the copier). You can also connect the MiCard V3
reader to a USB hub that is connected to the MFP, the reader will work in the
same way. The USB connection also acts as the power supply for the MiCard V3
reader.
On ´power up´, the MiCard V3 will send off two short beep tones and the red and
green LED´s will flash twice.
1.6 Installation of the MiCard V3 on the imageRUNNER
ADVANCE
To install the MiCard V3 into a Canon imageRUNNER ADVANCE device proceed as
follows.
The mounting guidelines below are based on an imageRUNNER ADVANCE C5051i. On
other imageRUNNER ADVANCE devices this process is generally the same. However,
some differences may occur concerning the dismounting of the reader cover. This is
shown in a separate picture at the end of this topic.
Required components and tools:
Screwdriver cross recess
MiCard V3
Hook-and-loop fastener
Short USB cable (delivered with the MiCard V3)
The MiCard V3 is delivered with a pull relief. Please do not use the pull relief if you
install the MiCard V3 in an imageRUNNER ADVANCE.
Installation on an imageRUNNER ADVANCE C5051i:
The installation of the MiCard V3 card reader in an imageRUNNER ADVANCE should
only be carried out by trained and authorized people with expert knowledge.
The device must be switched off and the power cord must be unplugged before you
start any operation on the device.
Installation on an imageRUNNER ADVANCE C5051i:
MiCard V3 Installation Manual (Full Install Guide)
6
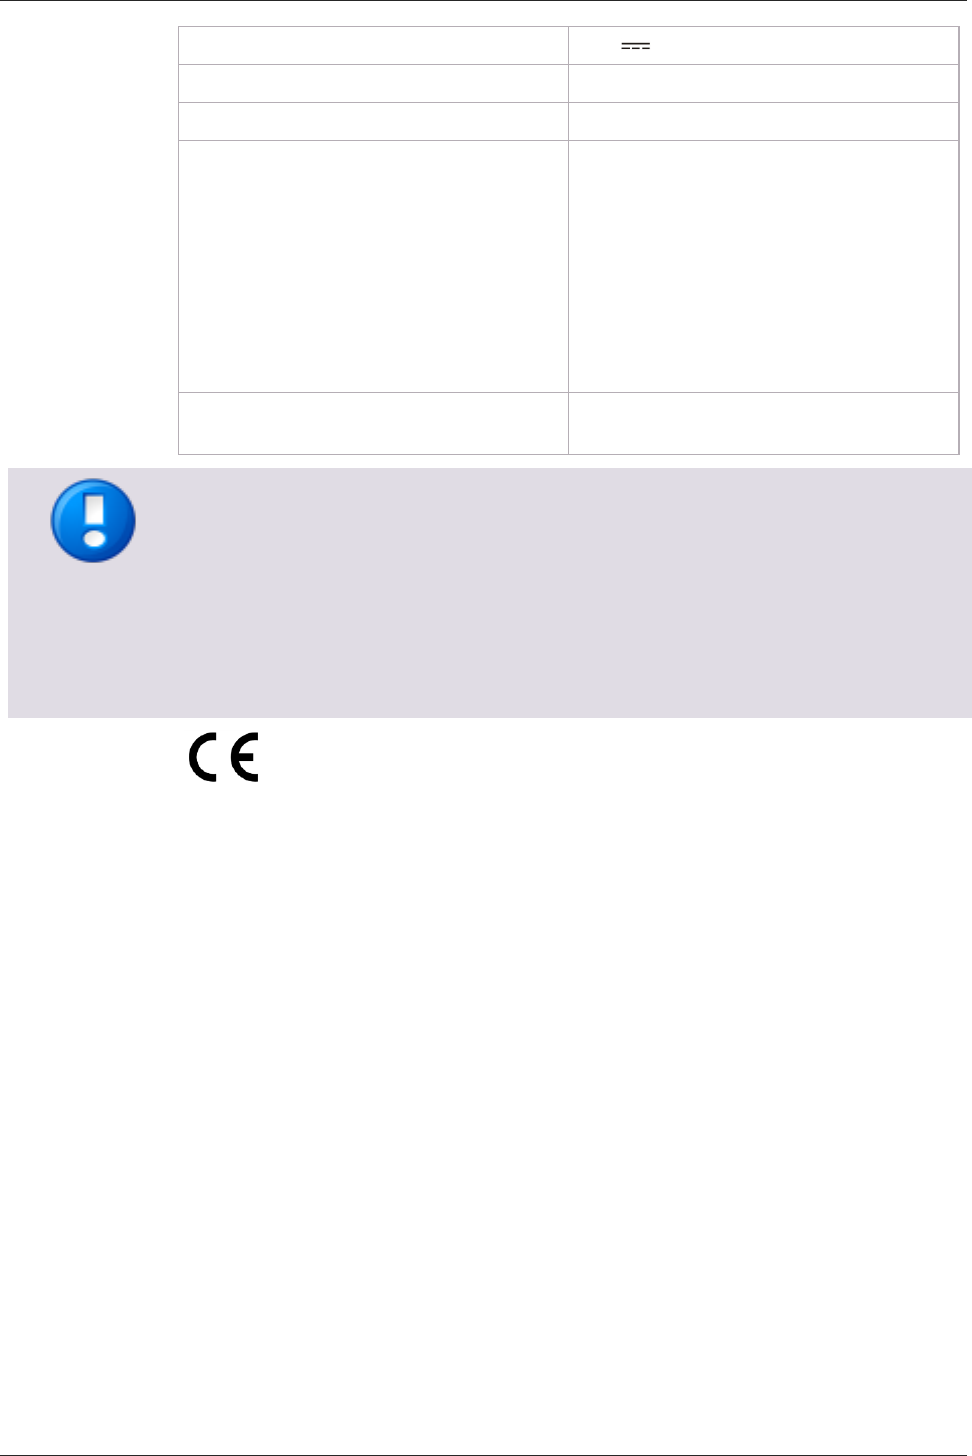
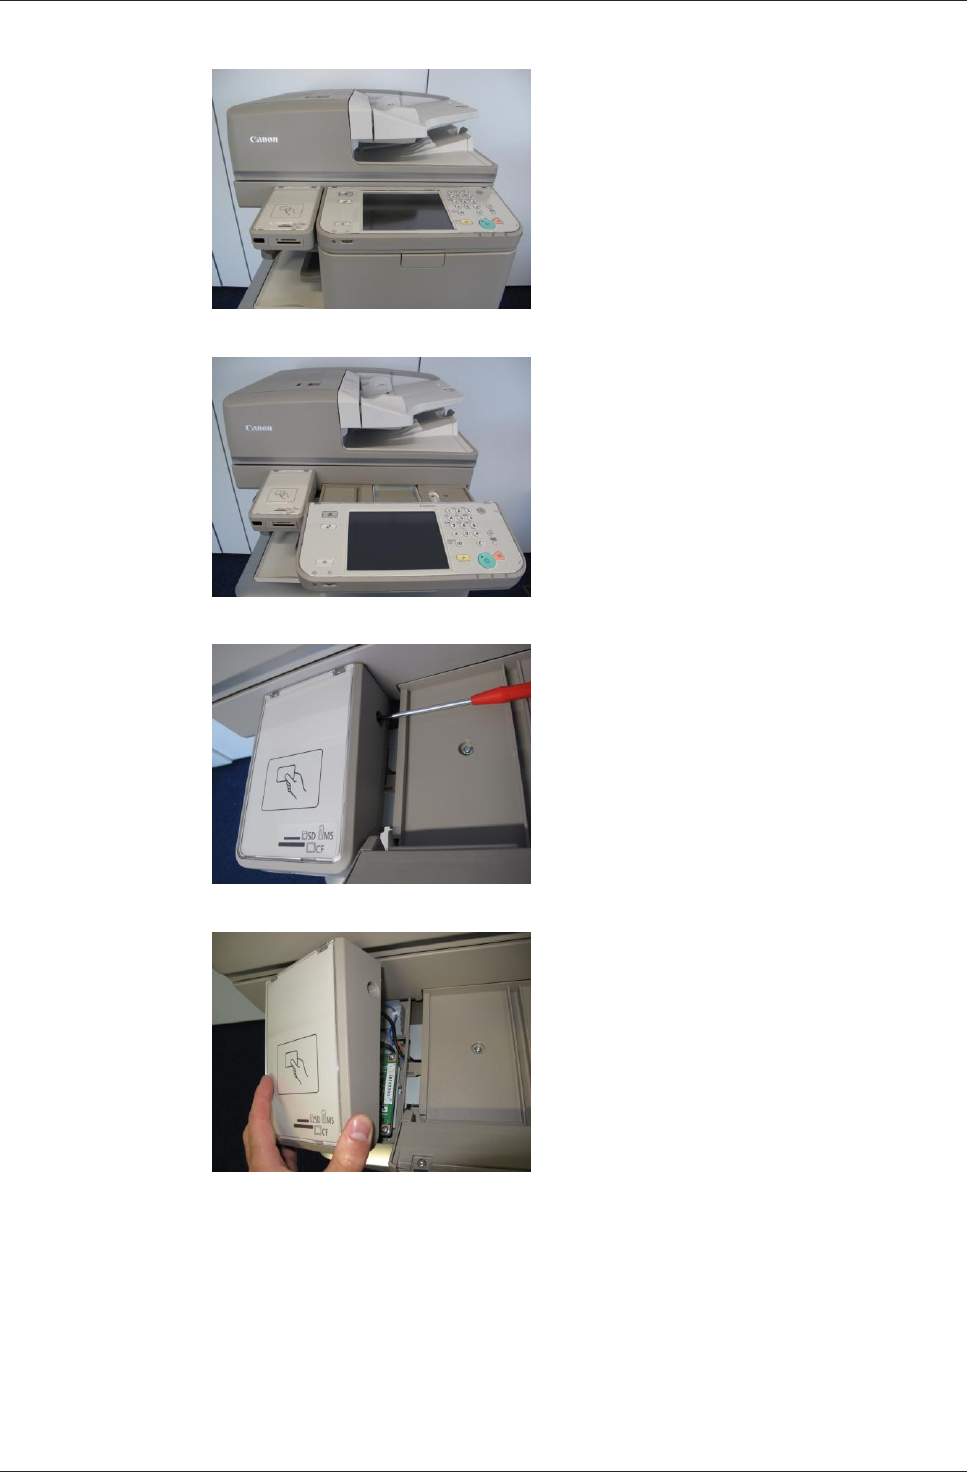
This is the control panel of an imageRUNNER ADVANCE C5051i.
Pull the control panel forward, towards you.
Unscrew the screw on the right side of the reader cover.
To open the cover, pull it towards you and lift it up.
MiCard V3 Installation Manual (Full Install Guide)
7
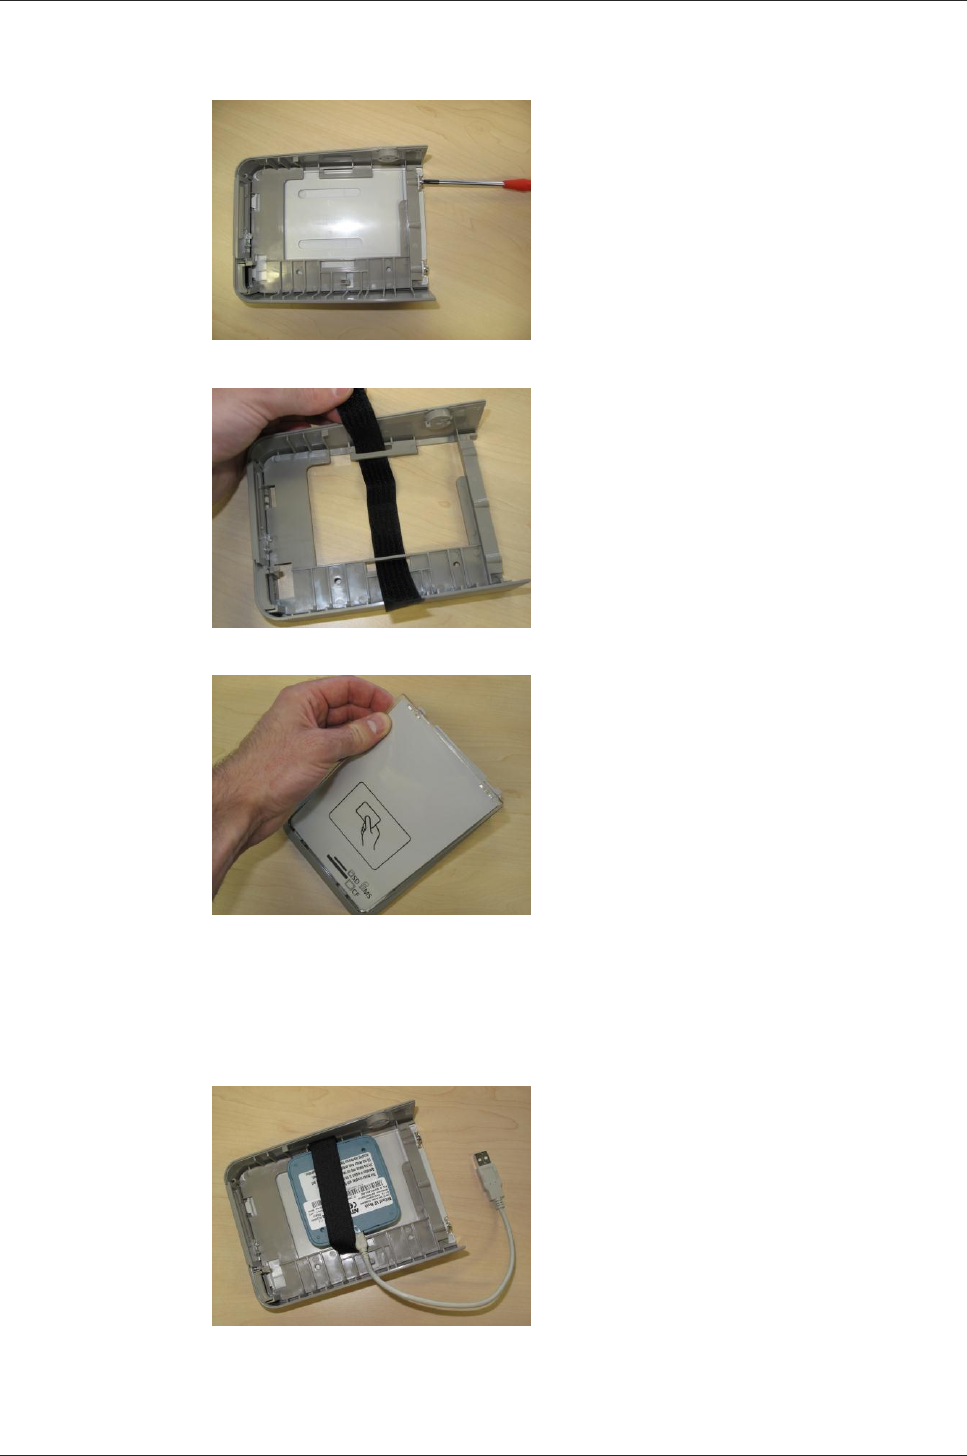
Detach the surface cover of the reader cover to mount the hook-and-loop
fastener.
Attach the hook-and-loop fastener as can be seen in these pictures.
Attach the surface cover to the reader cover and screw in the cover screws.
Assemble the MiCard V3 as can be seen in the next picture. It is important that
you assemble the device like that, otherwise the LEDs of the MiCard V3 will not
shine through the half transparent cover of the card reader case. Ensure the USB
cable doesn't cover the mounting clip of the reader cover. Tighten the
hook-and-loop fastener.
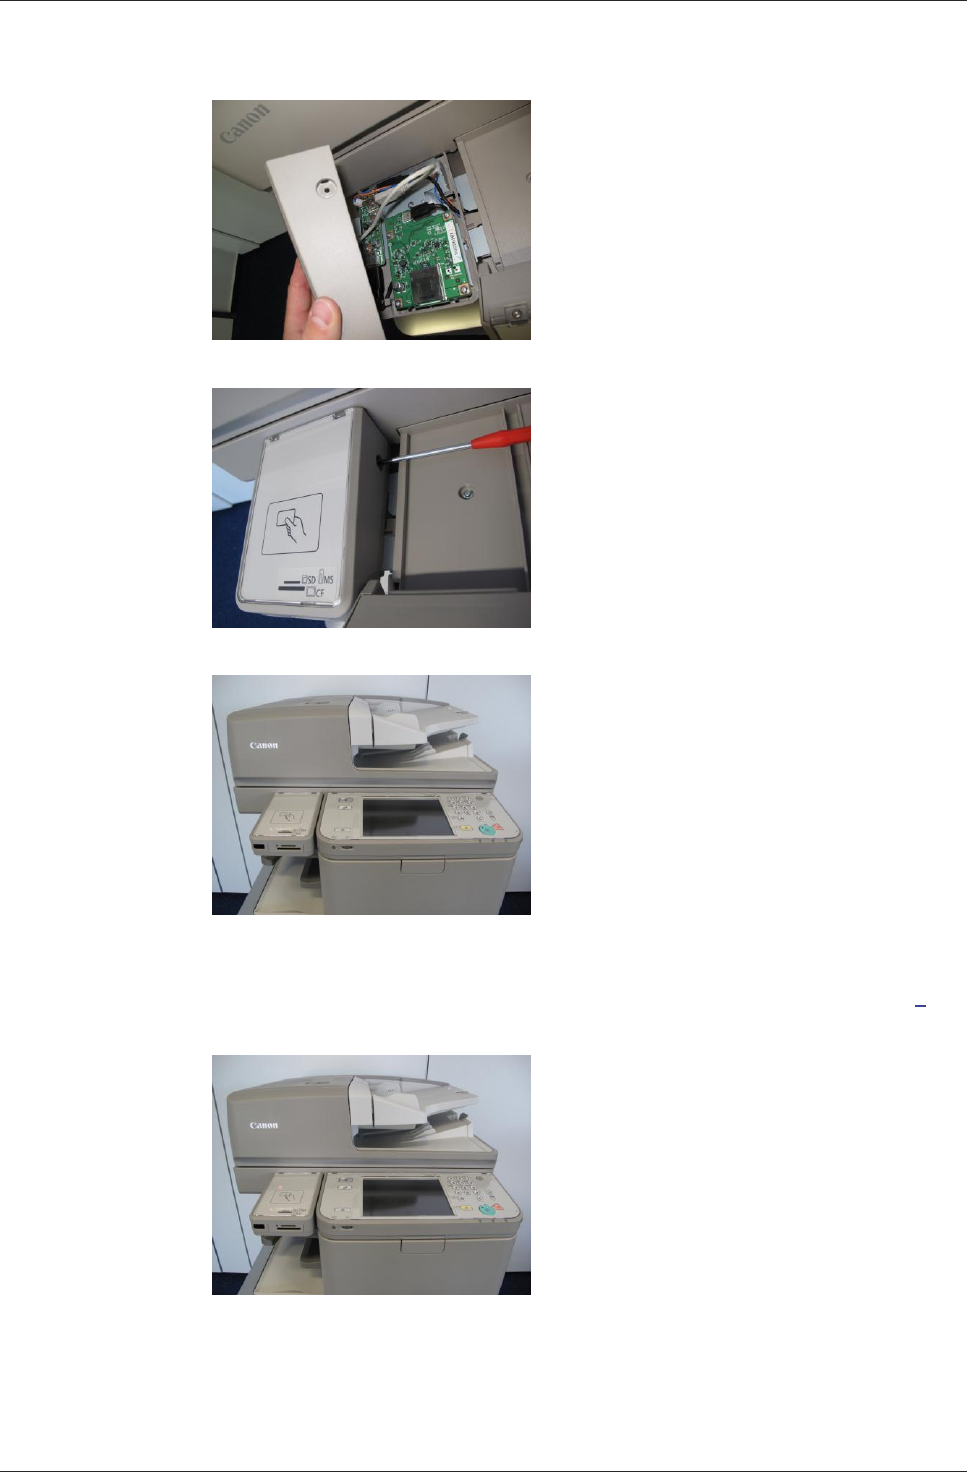
MiCard V3 Installation Manual (Full Install Guide)
8
Plug in the USB cable (USB sign facing the back of the device, i.e. not towards you)
and close the cover.
Screw in the cover screw.
Slide the control panel back into its original position.
When all covers are closed, you can switch on the device. The machine and the
card reader will boot up. During the boot up process of the card reader, the red
LED of the MiCard V3 should flash. See the chapter on LED Status (on page 9) for
more information about the different LED colors and their status descriptions.
Other imageRUNNER ADVANCE models:
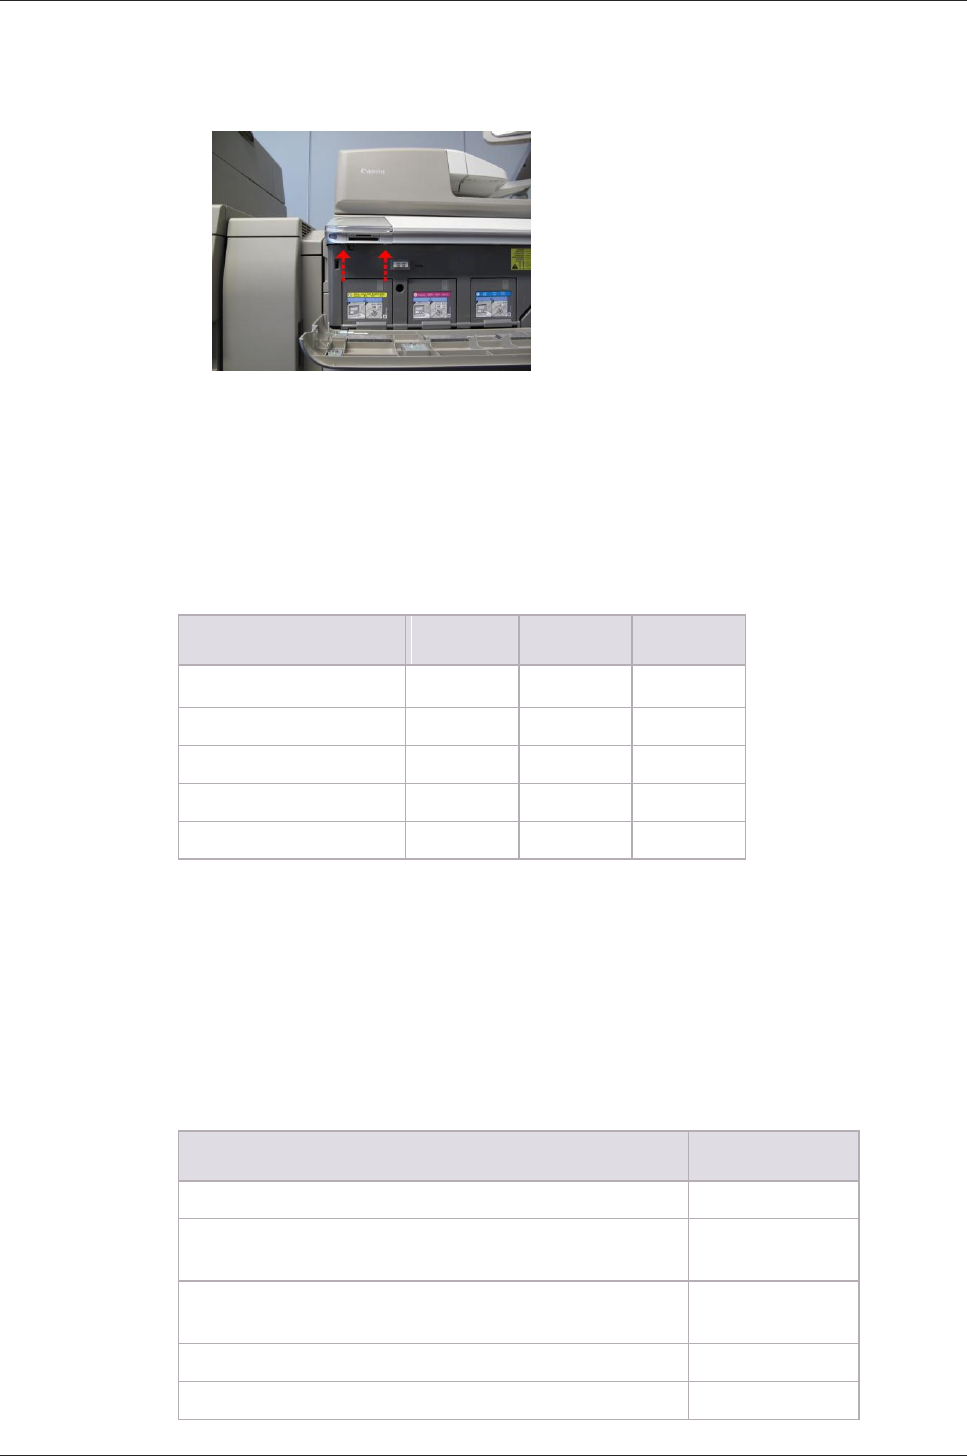
MiCard V3 Installation Manual (Full Install Guide)
9
On other imageRUNNER ADVANCE models like the C9070PRO for example, or the
C7065, open the toner cartridge cover and unscrew the two card reader cover
screws as shown in the picture. Proceed as described above.
1.7 LED Status
The MiCard V3 reader is equipped with 3 status LEDs: green (left), yellow (middle) and
red (right). The table below shows the status information given by the respective LED.
Status
Green LED
Yellow LED
Red LED
Booting up
flashing
flashing
Not synchronized
flashing
Synchronized (operating)
flashing
Authentication OK
on
flashing
Authentication failed
flashing
on
1.8 Beep Status
The MiCard V3 reader is equipped with a little beeper which emits different beep
tones for different statuses. The table below shows the status information given by the
beeper.
Status of the Beeper
Beep Signal
The MiCard V3 is booting up.
2 x fast
The MiCard V3 is not parameterized which means, there was
no saved config found.
2 x slow
The MiCard V3 is parameterized. A configuration was found
on the device.
1 x short
If parameters are sent to the MiCard V3
2 x slow
A card has been detected.
1 x long
MiCard V3 Installation Manual (Full Install Guide)
10
If a Facility Code has been detected as invalid.
3 x fast
2 Configuration
The MiCard device works without any additional configuration, however, some
"advanced" options are available.
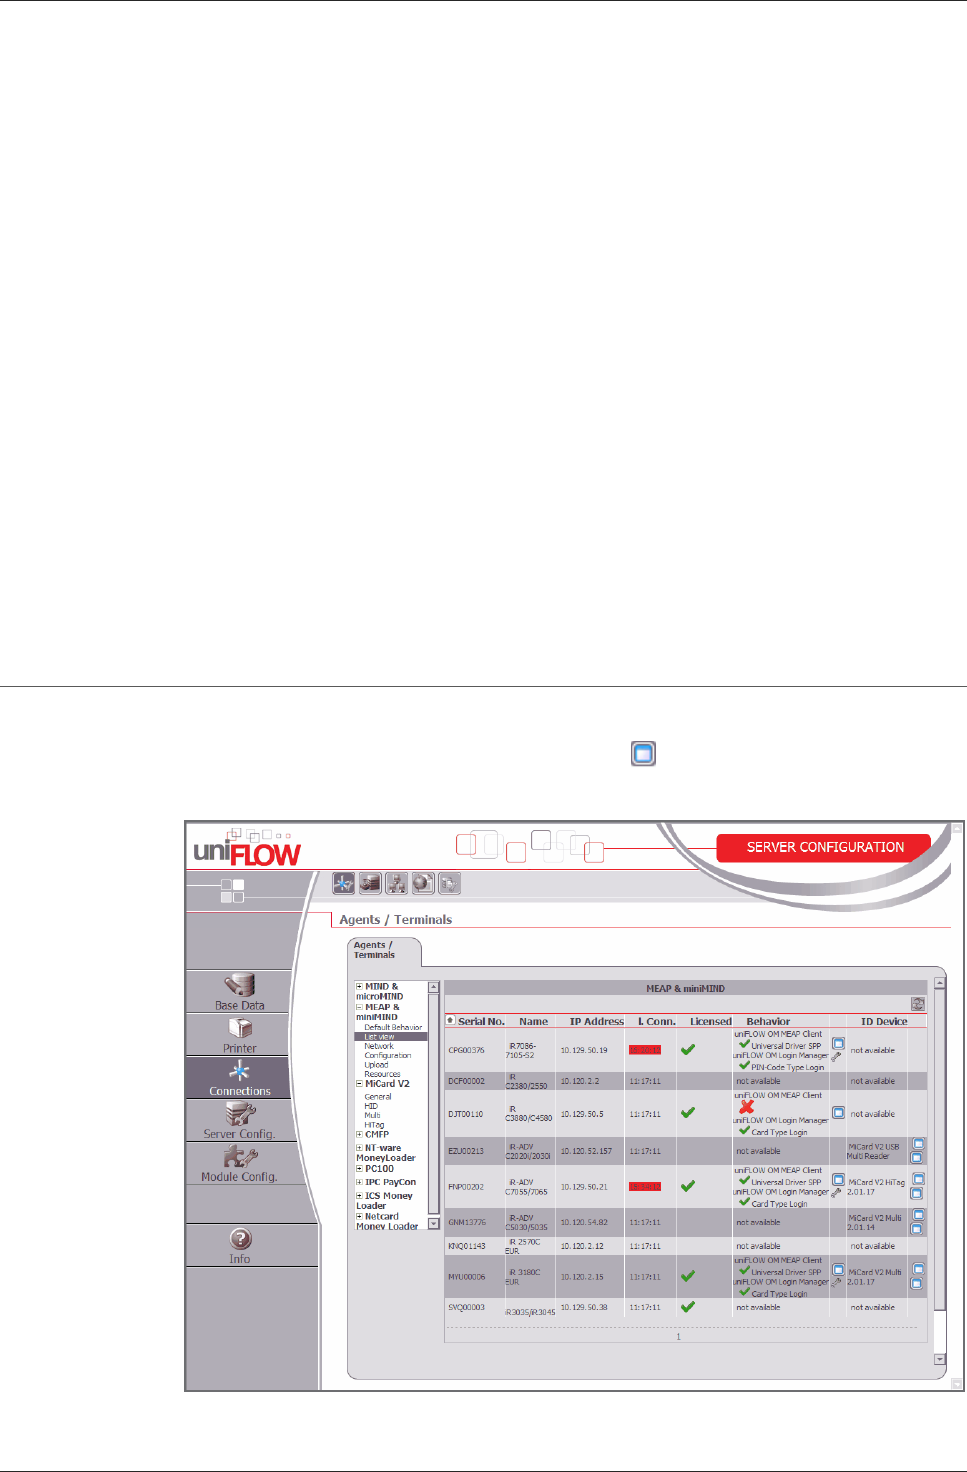
When using uniFLOW OM V3.1.1 or higher you can see the connected MiCard readers
on the MEAP/miniMIND Status tab (or List view tab for uniFLOW V5.x) of the main
menu Connections.
By clicking on in the ID-Device column, a new window will open showing you the
advanced options. If you are using a uniFLOW version older than uniFLOW OM V3.1.1,
you won’t see the connected MiCard readers in the status overview, but you can open
the configuration page using this URL:
http://<mfp-ip>:8000/usbidmodule/base.htm
Replace the term 'MFP-IP' between the brackets with the IP number of your printing
device.
MiCard V3 Installation Manual (Full Install Guide)
11
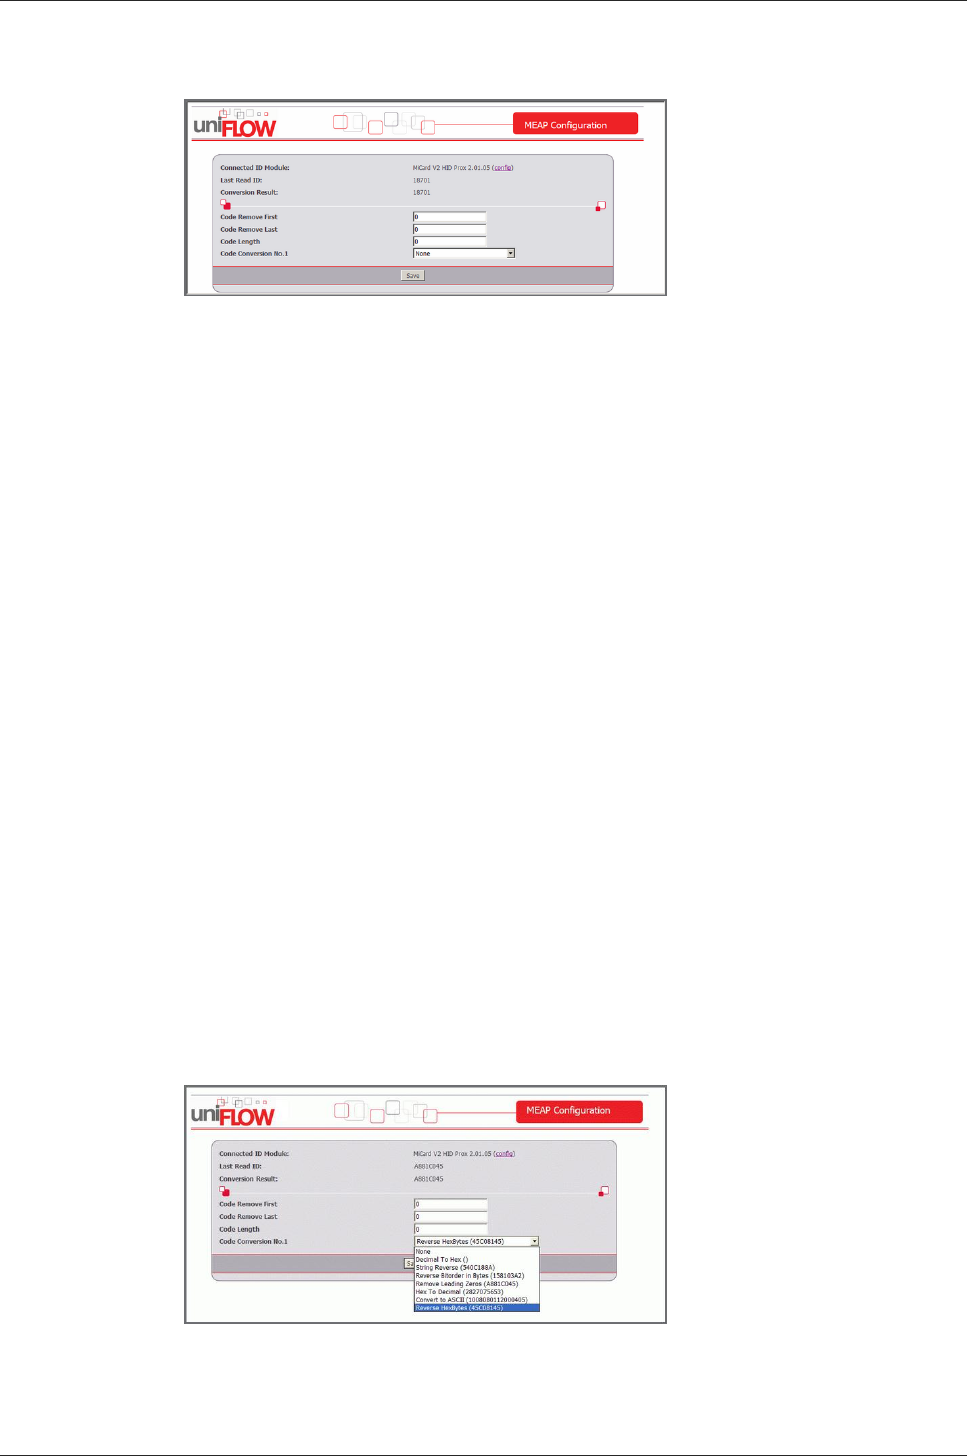
Click on the ID-Device column to open a configuration pop-up. This will look like the
screenshot below:
The terms used and the possible settings of the configuration window are as follows:
Connected ID Module
Shows the ID Module connected, e.g. MiCard / miniMIND.
Last Read ID
Shows the last ID read by a card swipe.
Conversion Result
Shows the result of the last read ID when the configured code conversions are applied.
This is the ID sent to the server for authentication.
Code Remove First
Specifies the number of characters to be removed from the start of the ID read before
the code conversion takes place. For instance a value of 3 applied to A881C045 will
result in 1C045.
Code Remove Last
Specifies the number of characters to be removed at the end of the ID read before the
code conversion takes place. For instance a value of 3 applied to A881C045 will result
in A881C.
Code Length
Specifies the code length applied after the code conversion. For instance a value of 6
applied to A881C045 will result in A881C0, whereas a value of 10 applied to
A881C045 will result in 00A881C045.
Code Conversion No. [N]
Specifies the code conversion that has to be applied to the ID read in a series of code
conversions at step [N]. The results of the code conversions at step [N] are displayed
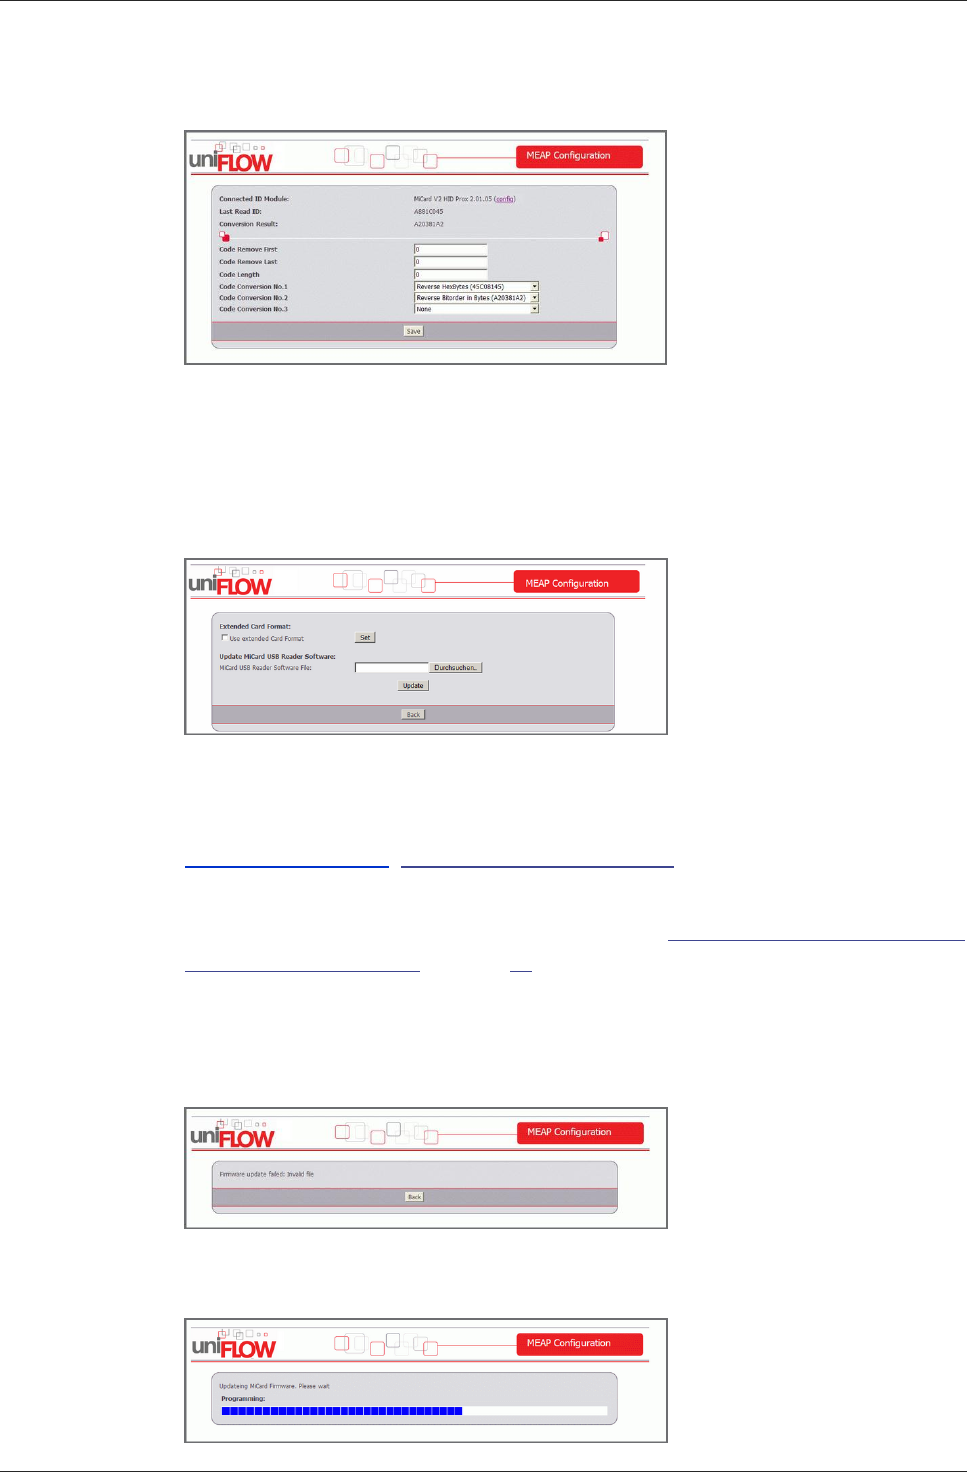
MiCard V3 Installation Manual (Full Install Guide)
12
next to the name of the selected code conversion in the drop down list. If the result is
empty "()", this code conversion can’t be applied in the actual step (cf. screenshot
above).
After a code conversion step [N] has been saved by clicking the Save button the
configuration page will be allowed to specify code conversion step [N+1] as shown in
the screenshot above.
Next to the name of the Connected ID Module in the configuration page (MiCard) you
can click on a link (config) which will bring up the page shown below.
With uniFLOW Login Manager / MomClient (Secure/Public Printing Applet), from
V2.1.2 onwards, updating the MiCard Firmware is possible via this configuration page.
A Firmware Update File can be requested from our support department (Email:
support@nt-ware.com) mailto:support@nt-ware.com).
The Extended Card Format option is explained in detail in chapter Upgrading to
uniFLOW OM V4.1 or uniFLOW V5.0 from SSP (see "Upgrading from SSP to uniFLOM
OM V4.1 or uniFLOW V5.0" on page 13).
To upload the new firmware browse for the file and click on Update.
If the file is not a valid MiCard (V3) Firmware file, you will be presented with the
following message:
If a valid MiCard (V3) Firmware file is selected, the upload will start and you will see
the upload progress via a progress bar.
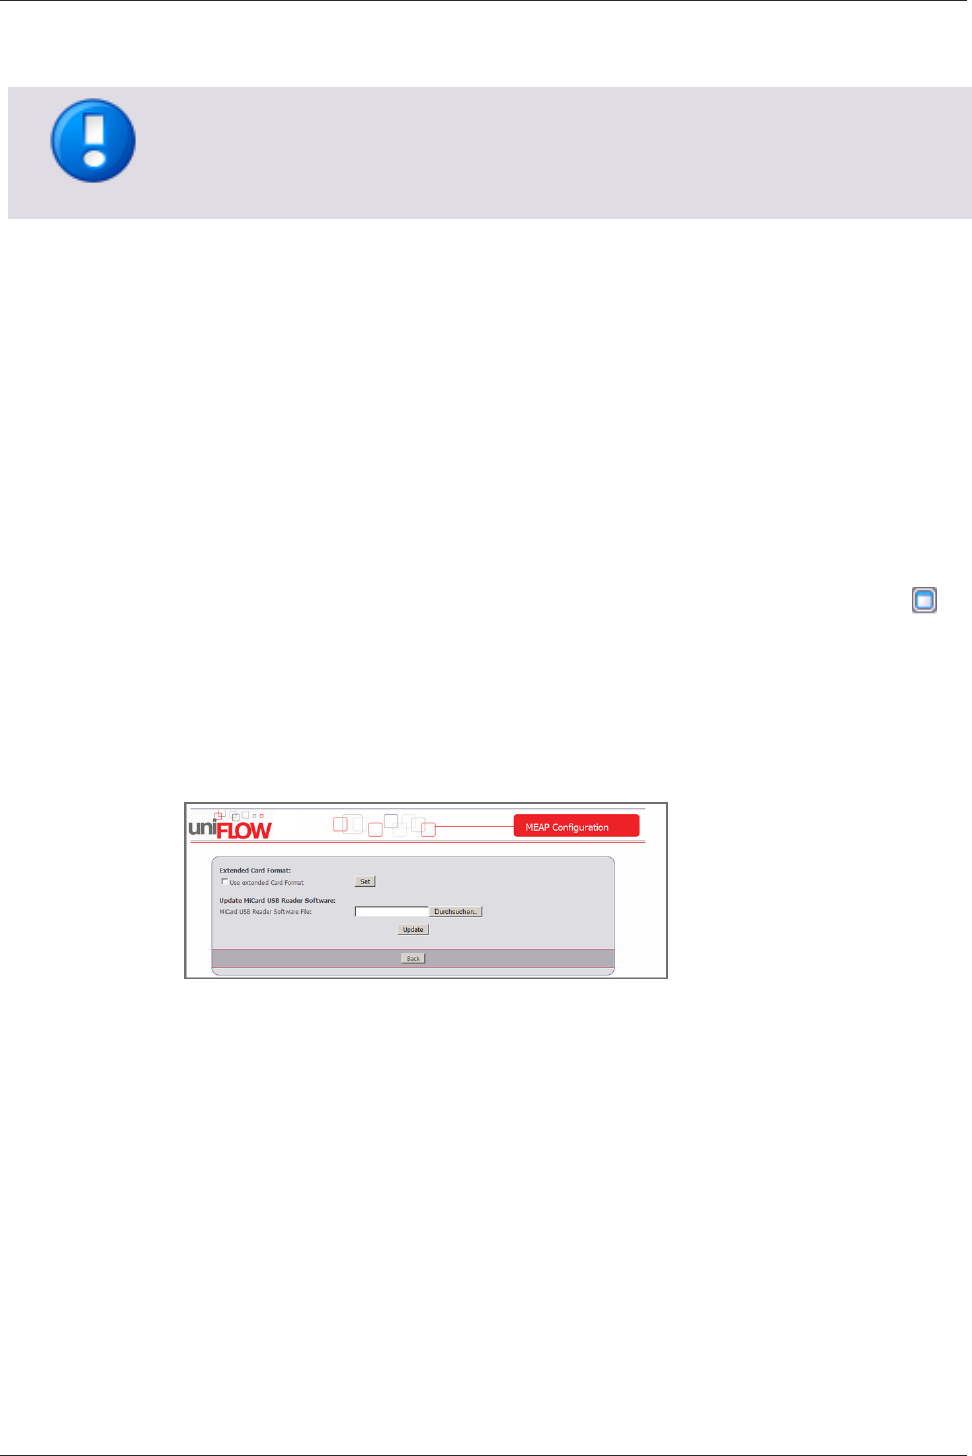
MiCard V3 Installation Manual (Full Install Guide)
13
Once the upload is complete, the MiCard (V3) is automatically rebooted with the new
Firmware. A device restart is not necessary.
If the update fails, the MiCard will start in a "Bootloader" mode that allows updating
the Firmware again, but has no card reading functionality. Note, with a failed Firmware
update, it can take a considerable amount of time before the reader is once again
visible in uniFLOW.
2.1 Upgrading from SSP to uniFLOM OM V4.1 or
uniFLOW V5.0
If you are upgrading from SSP to uniFLOW V4.1 or V5.0 and are using the MiCard,
observe the following:
If you use some new Canon printing devices with MEAP, you have to enable the Use
extended Card Format function for the new devices.
You'll find this option on the MEAP Configuration website. Therefore click on in
the ID-Device column on the MEAP & miniMIND Status page. In the pop-up window
click on config - behind Connected ID Module.
The reason for this is that devices configured with SSP use the extended Card Format.
You need to enable this setting in order to make the new machines compatible in an -
already set up - environment.
3 MiCard V3 Configuration on the uniFLOW
Server
The MiCard V3 contactless card reader is available as MiCard V3 Multi, supporting
different RFID frequencies and technologies.
The following chapter explains the global and device specific configuration of the
MiCard V3 in uniFLOW. The configuration Multi has been explained in detail, in a
separate sub-chapter.
MiCard V3 Installation Manual (Full Install Guide)
14
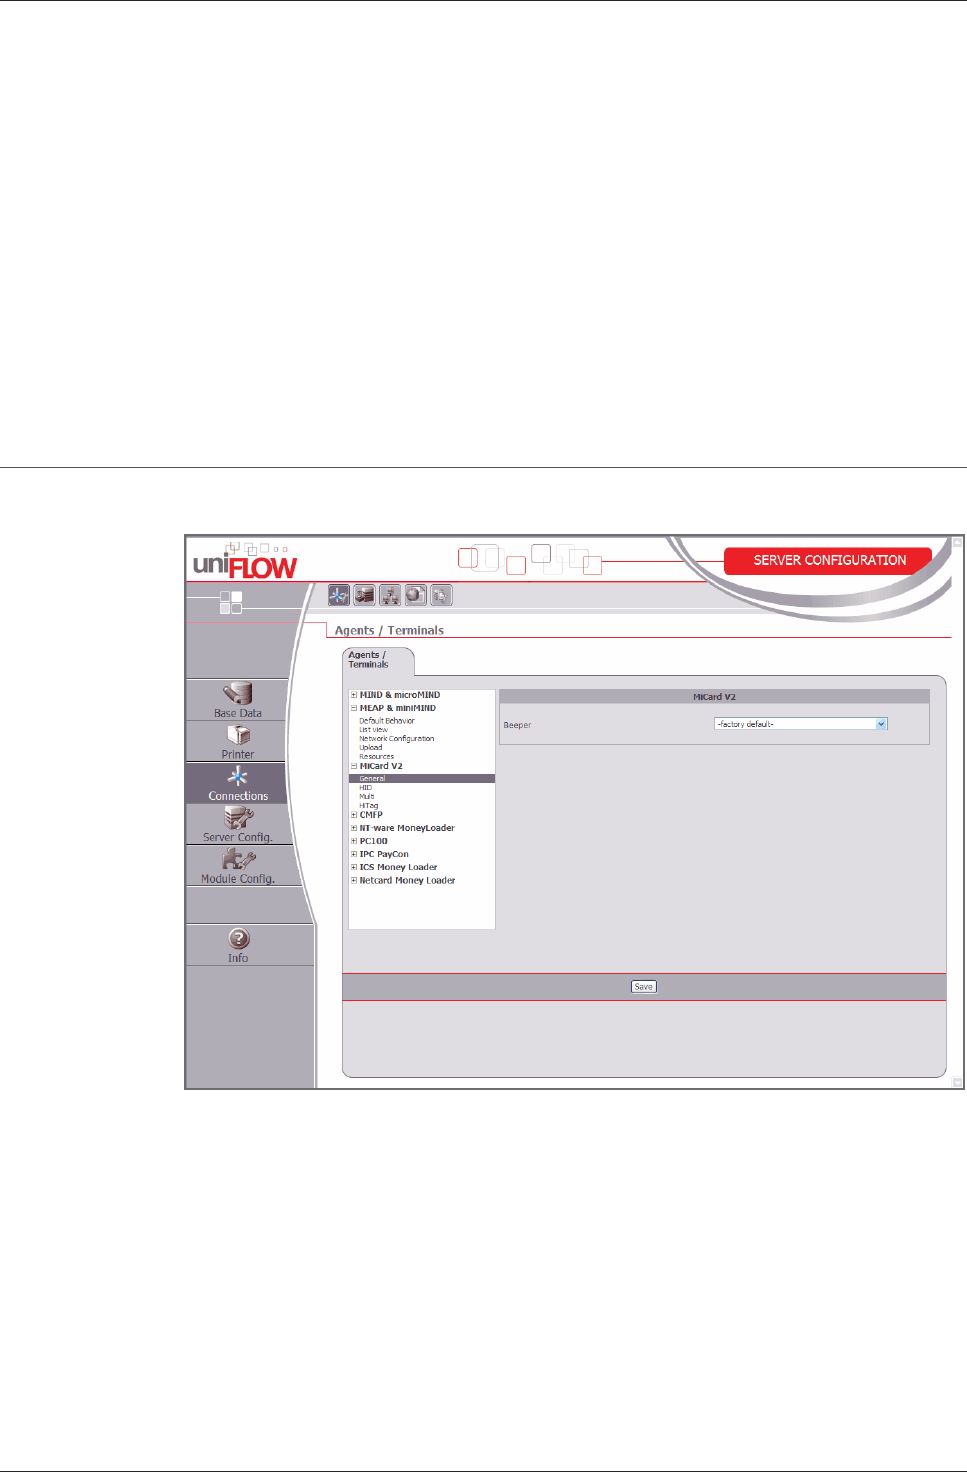
3.1 Global MiCard V3 Configuration
With MiCard V3, it is possible to configure the MiCard contactless card reader right
from the uniFLOW server. To do so, go to Connections / MEAP & miniMIND (uniFLOW
V5.x: Connections/Agents/Terminals/MiCard V3, then open the Global MiCard V3
Config. tab Multi.
You can configure the MiCard V3 for a number of different contactless card types:
Multi for Legic cards
3.1.1 Configuration - General
Here, you have the possibility to change the general options.
Beeper
This field allows you to set basic options for the card readers' beeper
-factory default- - restores the manufacturers' presets.
off - The beeper will not emit any audible signals when presenting a card. All other
signals are still emitted.
on - The beeper never suppresses any audible signal.

MiCard V3 Installation Manual (Full Install Guide)
15
3.1.2 Configuration - Multi
On this page options for the contactless card reader Multi can be configured.
The contactless card reader Multi offers four different card technologies, ISO 14443A,
ISO 15693, Legic Prime and Inside contactless. However, the MiCard V3 only allows
one ID or card technology to be read at the same time. This makes sense, as only one
ID should be transmitted to the uniFLOW Server or RPS in order to identify the user.
In general a card carries only one technology. Therefore, and to have the highest
compatibility, all possible card technologies are enabled by default.
However, some cards in the field contain more than one technology. In such cases
disable all the technologies you do not want to use for reading out the ID. Otherwise,
the MiCard V3 reader cannot read out the correct ID.
In addition to that, you can enter which Sector Number or Sector Type contains the
user ID. In case you leave all fields empty on the Multi config page, the <UID> of the
card will be read out and transmitted.
Enable ISO 14443A
-factory default- (Yes)
No
Yes
Enable ISO 15693
-factory default- (Yes)
No
Yes
Enable Legic Prime
-factory default- (Yes)
No
Yes
Enable Inside contactless
-factory default- (Yes)
No
Yes
Sector Number
Enter the sector number which contains the user ID.
Sector Type
Enter the sector type which contains the user ID.
MiCard V3 Installation Manual (Full Install Guide)
16
Search String
Enter a string to search for, to find the sector containing the user ID.
Auto Logoff when Card gone
-factory default- (No)
No
Yes - If this parameter is set to Yes, the contactless card must lie on the card reader as
long as the user is using the device. When the card is removed from the reader, the
user is logged off automatically.
Data Length
This value defines the length of the data that has to be read from the Legic card. Enter
a value between 0 and 255 (one Byte).
CRC Type
The CRC Type defines which kind of checksum is used on the Legic card. You can
choose either CRC 8Bit, CRC 16Bit or none. The factory default value is none.
3.1.3 Device Specific MiCard V3 Configuration
If a MiCard V3 is attached to the machine, the ID Device column on the MEAP &
miniMIND Status page contains a second icon as can be seen in the following
screenshot.

MiCard V3 Installation Manual (Full Install Guide)
17
By clicking on this second icon a window opens in which you can set up a specific
MiCard V3 configuration.
The device specific parameters are the same as for the Global MiCard V3 Configuration
(on page 14). You can enable your device specific settings by changing the parameter
Use Specific MiCard V3 Config to Yes. The device specific settings will become active
by clicking the Save button. Now, the specific MiCard V3 configuration takes priority
over the global MiCard V3 configuration.
It is very important that you enter each parameter which is necessary to read out the
cards correctly. No default parameter will be taken over if a parameter field has not
been filled out. This means, if you change the beeper settings for example, you also
have to enter the Multi configuration, even if they are the same as in the Global
MiCard V3 configuration. Summarized one can say that if you have already entered a
global configuration, these settings will not be taken over for the device specific
settings.

MiCard V3 Installation Manual (Full Install Guide) Index
19
4 Index
B
Beep Status ........................................................... 9
C
Configuration ...................................................... 10
Configuration - General ...................................... 14
Configuration - Multi .......................................... 15
D
Device Specific MiCard V3 Configuration ........... 16
Disclaimer ............................................................. 5
F
FCC and IC Compliance Note ................................ 4
G
Global MiCard V3 Configuration ......................... 14
I
Installation of the MiCard V3 on the
imageRUNNER ADVANCE ..................................... 5
L
LED Status .............................................................9
M
MiCard V3 Configuration on the uniFLOW Server
........................................................................... 13
MiCard V3 contactless card reader ......................2
R
Requirements .......................................................2
S
Scope of supply .....................................................2
Supported Card Standards ....................................4
Symbols .................................................................6
System Setup ........................................................4
U
Upgrading from SSP to uniFLOM OM V4.1 or
uniFLOW V5.0 .................................................... 13
V
Versioning .............................................................3

© NT-ware 2009-2012