Navico LHR80US HANDHELD MARINE TRANSCEIVER User Manual LHR 80 82 Owner s Manual
Navico Auckland Limited HANDHELD MARINE TRANSCEIVER LHR 80 82 Owner s Manual
Navico >
USERS MANUAL

1
LHR-80/82 Marine Radio
Owner’s Manual
2
A. KEY FUNCTION.................................................................................................................... 4
A.1 Front Panel Key ............................................................................................................... 4
A.2 Top Side Key..................................................................................................................... 4
A.3 Right Side Key.................................................................................................................. 4
A.4 Left Side Key .................................................................................................................... 4
A.5 Handmike Key.................................................................................................................. 5
B. DIRECT KEY OPERATION................................................................................................... 6
B.1 Power ON/OFF................................................................................................................. 6
B.2 Volume Control ................................................................................................................ 6
B.3 Squelch .............................................................................................................................. 6
B.4 Hi/Lo Tx Power ................................................................................................................ 6
B.5 16 Channel ........................................................................................................................ 7
B.6 BAND................................................................................................................................. 7
B.7 Scan.................................................................................................................................... 7
B.8 Watch................................................................................................................................. 9
D
UAL
W
ATCH
.................................................................................................................................. 9
T
RI
W
ATCH
...................................................................................................................................... 9
B.9 CHANNEL UP/DOWN.................................................................................................... 9
B.10 Enter ................................................................................................................................ 9
B.11 Setup MENU................................................................................................................. 10
B.12 DISTRESS..................................................................................................................... 10
B.13 Navigation Mode .......................................................................................................... 10
B.14 WP Select Mode............................................................................................................ 10
B.15 Plotter Mode ................................................................................................................. 11
B.16 PTT ................................................................................................................................ 11
B.17 Exit................................................................................................................................. 11
B.18 3CH Mode ..................................................................................................................... 12
Notes :..................................................................................................................................... 13
C. SPECIAL FUNCTION OPERATION.................................................................................... 14
C.1 SETUP MENU................................................................................................................ 14
BUDDY
LIST ............................................................................................................................... 16
LOCAL/DISTANT ....................................................................................................................... 18
BACKLIGHT
A
DJUSTMENT
......................................................................................................... 18
CONTRAST
A
DJUSTMENT
.......................................................................................................... 19
GPS
/
TIME.................................................................................................................................. 19
RADIO SETUP ..................................................................................................................... 21
CHANNEL
NAME ....................................................................................................................... 21
3
RING
VOLUME
ADJUSTMENT ............................................................................................... 22
BEEP
VOLUME
ADJUSTMENT .............................................................................................. 22
RESET ......................................................................................................................................... 22
C.4 DISTRESS Operation.................................................................................................... 23
SENDING
AND
RECEIVING
DISTRESS
CALLS.................................................................. 23
SENDING
A
CALL
TO
CANCEL
A
TRANSMITTED
DISTRESS
CALL.............................. 24
RECEIVING
DISTRESS
CALLS .............................................................................................. 24
RECEIVING
A
DISTRESS
CALL
FROM
ANOTHER
VESSEL............................................ 24
RECEIVING
A
DISTRESS
ACK
SENT
FROM
A
COAST
STATION .................................. 25
RECEIVING
A
DISTRESS
RELAY
SENT
BY
ANOTHER
VESSEL ................................... 25

4
A. KEY FUNCTION
A.1 Front Panel Key
Key Short Press ( < 3 sec ) Long Press ( > 3 sec )
Hi/Lo / Tx Hi/Lo power control
16 /9 Jump to Channel 16 or 9 Change the priority channel
3CH Change to 3CH mode Add/ Del 3CH
Go/ Mob Reset the route to WP Mark current location as
MOB
Wx/Nav Change to weather channel Save the selection
SQ Up/ Down
Squelch level up/down
Chan Up/Dn Change Channel # Repeat Key function
Distress Call up Distress Menu Make Distress Call
Soft Key
Watch DW or Triwatch All scan
Exit Cancel selection/ Back 1 level
A.2 Top Side Key
Power Key lock / unlock Power on/ off the radio
A.3 Right Side Key
Vol up/down Volume up/down
A.4 Left Side Key
Distress Call up Distress Menu Make Distress Call
5
A.5 Handmike Key
Key Function
16 Jump to Channel 16
Hi/Lo Toggle the Tx power from Hi to Lo or vice versa
Up / Down Channel UP/DOWN and navigate the menu item selection
.
6
B. DIRECT KEY OPERATION
B.1 Power ON/OFF
Press and hold the Power key for over 3 sec, the unit will power on.
The unit will start with Normal mode. .
- display the splash screen info stored at EEPROM for 2sec
- recall the last channel # , TX power settings and operational mode
- Go to Channel 16, Tx Power be Hi
- Display the position and time if GPS data available
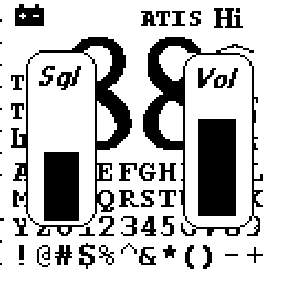
B.2 Volume Control
Press volume up/ down to adjust the volume level. A volume sub-menu will appear
when press. And timeout after 5 sec.
B.3 Squelch
Press Sql up/ down to adjust the squelch level. A sql sub-menu will appear when
press. And timeout after 5 sec.
B.4 Hi/Lo Tx Power
Press the Hi/Lo key will toggle the Tx power from Hi to Lo or vice versa. The
corresponding Hi/Lo icon will turn ON on the LCD.
Some of the channel has been limited to be low power only or high power only.
Thus, the software need to check against the channel setting stored in the
EEPROM
If the operation request is denied, warning beep tone ON for 2 sec.
7
For some channel is allowed to over-rule the restriction temporary such as CH 13
& 67. Press and hold the PTT key and the Hi/Lo key to switch the Tx power to Hi
power temporarily until the either key is released.
B.5 16 Channel
Jump to either Channel 16 directly by pressing the 16 Key. Toggle between
Channel 16 at High Power. Press 16 key again will go back to last channel.
(channel before enter 16 mode )
16 key also can use to cancel all mode and switch to CH 16 HI power mode
independent the current Hi/Lo setting.
It will quit the menu mode and jump to CH16 directly when pressed.
B.6 BAND
Switch the operational channel band [USA, International & Canada ] in the setup
menu, see C3 for detail.
Please refer to the EEPROM channel table for detail. The corresponding icon will
turn on as indication.
B.7 Scan
In normal mode, long press the right soft key will act as Scan key function.
This is the function to scan for broadcasting channel. When available channel
detected, the receiver will stop at that channel and continue to search when that
transmission ceased.
There are 2 Scan mode available – ALL Scan; 3 CH Scan.
During the SCAN modes :
Press Up/Down key ( CH knob clockwise/anti-clockwise ) will change the scan
direction.
Press SCAN key again will terminate the scan operation and stop at the last used
channel.
Press EXIT key will also terminate the scan function and state at the last used
channel
WATCH or H/L key will be no function and sound an error beep if pressed.
8
All Scan
In All Scan mode, all channels in the channel set are scanned in sequences in
repeat cycle.
SCAN U
01
A
SCAN U
02
A
SCAN U
03
A
SCAN U
16
A
SCAN U
05
A
SCAN U
88
A
During the all scan, CH 16 will be visit for at least 2s a time.
3CH SCAN
In 3CH mode, when long press the SCAN key, it will enter 3 CH mode, only the
3CH and CH16 will be scan.
SCAN U
01
A
SCAN U
15
A
SCAN U
18
A
SCAN U
16
A
SCAN U
01
A
SCAN U
15
A
No function at Menu and DSC mode. Error Beep
Press any other keys will send error Beep
To quit the SCAN mode, press the following keys :
- SCAN key state at the searched channel
- EXIT key to state at last used channel
- PTT go to tuned channel at Tx mode
- DISTRESS go to DISTRESS mode
9
Press any other keys will send error Beep
B.8 Watch
Dual Watch
Short Press Watch key to activate the DUAL WATCH mode. Monitor the current
channel and Ch 16 in cycle. Icon “DUAL” will be turn ON.
Weather Alert is also activate automatically.
Current Channel - CH 16 – Current Channel – CH 16 –Current Channel -…
Tri Watch
When select in the setup Menu. Short Press Watch key to activate the TRI
WATCH mode instead. Monitor the current channel, Ch 9 and Ch 16 in cycle.
Icon “TRI” will be turn ON.
Weather Alert is also activate automatically.
Current Channel - CH 9 - CH 16 – Current Channel – CH 9 - CH 16 –Current
Channel -…
B.9 CHANNEL UP/DOWN
Under non-menu mode, the Channel key knob ( up/down keys ) are used as
Channel adjustment. The channel advance to previous or next listed channel #
as every key stroke. The channel sequences should follow the band ( U,I, C or
Wx ) or memory list.
For UP/DOWN key style, pressing the key over 3sec will advance the channel
automatically in 5 channel/sec.
Under menu mode, the key function will be switched to setting up / down function.
B.10 Enter
Under the menu mode, the right soft key will act as the enter key. When enter the
menu mode, push the will act as Enter key to confirm the selection and store up
the setting.
When in non-menu mode, ( while DIM key option is off ), it will call up the
DIMMER control function as describe on B.11
While DIM key option is off, it will be no action when key knob is pushed under
normal model.

10
B.11 Setup MENU
To activate the setup menu, press and hold the Hi/Lo/MENU key over 3 sec.
The detail setup menu operation, refer to the MENU operation paragraph.
B.12 DISTRESS
Under jeopardy condition, Distress call should be transmitted. Press the
DISTRESS key will activate the DISTRESS menu and enable DISTRESS call to
be send out. Detail DISTRESS menu and associated operation refer to the
DISTRESS Operation paragraph.
B.13 Navigation Mode
Short press the NAV key will enter the Navigation Mode, Bearing, Distance and cross
track error from the last select Way Point will display on the screen.
If no WP is set, it will go to WP select page mode.
During Nav Mode:
Up/Down – It will go to WP select page mode.
PTT – return to normal mode and TX.
EXIT – return to normal mode
16/9 – return to normal mode and go to 16/9
NAV – go to Plotter mode
GO – Reset the cross track error (XTE)
Other key – error beep
B.14 WP Select Mode
The screen is divided into two part, the left is the pointed WP information. The right is
the selection Menu.
During WP Select Mode:
Up/Down – Select the WP.
Enter – Choose the current WP and return to Navigation Mode.
Other key – Return toe Navigation Mode and act same as Navigation Mode.
>FISHY
10’23.2323N
123’12,5446W
11
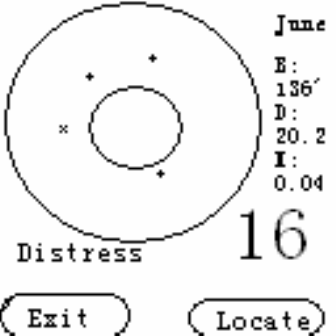
B.15 Plotter Mode
During plotter Mode:
Up/Down – It will cycle and highlight the buddy in the surround .
Left/ right – It will zoom in/out the circle to see more/less area.
PTT – return to normal mode and TX.
EXIT – return to normal mode
Locate – actively transmit self location to other.
16/9 – return to normal mode and go to 16/9
NAV – go to normal mode
Other key – error beep
B.16 PTT
Press the PTT key will start transmission. It also quit all menu mode when PTT
key pressed. Ack beep will be sound before Tx. There is a 5-minute timer that
shuts down the transmission in case of a stuck key. Error beep is emitted 10 sec
before the time out is triggered. Any PTT release and press again reset the timer
over again.
B.17 Exit
In most cases, the left soft key will act as exit key. The Exit key to cancel last
selection or change without saving. It allows step back one level on menu mode.
It cancels DSC Distress calls & auto-retransmission of DISTRESS calls.
Press 16 key at menu mode to quit that mode same as EXIT function

12
B.18 3CH Mode
When short press the 3CH key in normal mode, it will enter 3CH mode and go to
CH1. If there is no 3CH is stored, error beep will sound and remain in normal
mode.
When short press the 3CH key in 3CH mode, it will go as:
CH1 -> CH2 -> CH3 -> CH1.
If only 1 3CH is stored, error beep will sound and remain in CH1.
If CH3 is not stored, the CH3 will be skipped.
When long press the 3CH key, it will bring up a menu for stored/delete the
current channel as 3CH. If all 3 3CH is stored, error beep and warning meesage
will be sounded and display.
When in 3CH mode:
- 16CH key will function as normal and leave 3CH mode.
- channel up/down key will function as normal and leave 3CH mode.
- Batt key will function as normal and leave 3CH mode.
- Scan key will function as 3CH Scan.
ERROR MESSAGE IF NO FAV. CHANNELS.
72
INTERSHIP
NO FAV
CHANNELS ARE
SAVED.
13
Notes :
BEEP TONE :
Error Beep ( Beep 1 for Nav ) : 3-beep error tone with 60ms ON @512Hz, then
20ms OFF for 3 cycles. Sound out for any error operation. The tone freq can be
read out from EEPROM
ACK Beep ( Beep 2 for Nav ) : 100ms ON @ 1024Hz then OFF. Sound out
when any valid key pressed or new mode / screen page entered. Tone freq can
be read out from EEPROM
ALARM Beep ( Beep 3 for Nav ) : 6 beep alarm warning tones followed by a 2
sec pause for DSC Distress or Urgency category received calls or serious alarm
warnings. Warnings can never be disabled in the MENU screen and are
cancelled by any keypress or after a 2-min. duration. 300ms ON @ 512Hz then
100ms OFF between each tone burst. Read out tone freq from EEPROM.
RINGER Beep ( Beep 4 for Nav ) : Alert the user of an incoming DSC call. 60ms
1024Hz, then 60ms 512Hz then 20ms OFF. Cycle goes on until the timeout
cycle is reached or a key is pressed.

14
C. SPECIAL FUNCTION OPERATION
C.1 SETUP MENU
Press the DSC / MENU key to enter radio set-up mode. This allows the following
functions to be accessed. Scroll down the list and press ENTER. To exit the Menu
mode or sub-mode press 16 or EXIT.
Menu Buddy List
Way Point List
Setting Bearing
Distance
SAME List
Local/Dist Local
Dist
Backlight
Contrast
GPS/Time POS DISPLAY
TIME DISPLAY
TIME OFFSET
TIME FORMAT
COG/SOG
Radio Setup Band
CH Name
Ring Volume
Beep Volume
Watch Mode
Reset
Exit

15
• BUDDY LIST - Selects the Buddy List Entry routine to enter Names and
MMSID's for frequently called DSC stations. Up to 20
names could be stored.
• WP List - Select the WP List Entry can enter names and LL position for a
WP. Up to 500 WP can be stored.
• SAME List – Select the SAME List can enter\activated the SAME code,
up to 10 SAME code can be stored.
• LOCAL/DST – “OFF” allows normal receive sensitivity. “ON” eliminates
receiver noise, but degrades receiver sensitivity. The
LOCAL icon is displayed in LCD.
• BACKLIGHT - Set the backlight level, total 8 level be available.
• CONTRAST - Selects display contrast setting: 1-4 levels.
• GPS/TIME - define the display POS and Time format, Offset and
COG/SOG display..
• RADIO SETUP- There are 6 items could be user customized – Band, CH
Name, Ring Tone Volume, Beep Volume , Internal
Speaker on/off and NMEA.
• RESET - recall ex-factory setting
• EXIT - quit the menu
MENU
>BUDDY LIST
LOCAL/DST
BACKLIGHT
16
16
BUDDY LIST
The Buddy List can store up to 20 entries with Name and MMSID#. User can add,
edit or delete the record from the list through this submenu.
Adding an Entry
- Select Buddy List from the MENU
- Select first line <NEW> for adding entry
- Entry page prompt up to allow enter Name and MMSID. 1
st
digit of NAME be
underscored
- Use CH Knob to pick up the desired character and push ENT to confirm. Then
shift right to 2
nd
digit
- Push and hold the ENT over 3sec. to finish the NAME entry or fill up to max. 16
character. Then the MMSID# 1
st
digit will be underscored.
- Same as Name entry using CH Knob to key in the digit ( only 0 –9 will be
chosen at this stage ). All 9 digits should be entered to finish the entry, push
and hold CH knob will no effect to terminate the entry
- Prefix 00 will treat as Coast Station
- Once 9 digit be entered, a new page prompt in to ask for confirmation to save.
- Then go back to Buddy List page no matter Save or Cancel
- Press EXIT will terminate the process without saving go back to Buddy list page
>BUDDY LIST
LOCAL/DST
BACKLIGHT
CONTRAST
><NEW>
SEA ROSE
FISHY #2
END OF LIST
ENTER NAME
- - - - - - - - - - - - - - -
ENTER MMSID#
- - - - - - - - -
ENTER NAME
HAPPY VESSEL - -
ENTER MMSID#
- - - - - - - - -
ENTER NAME
HAPPY VESSEL - -
ENTER MMSID#
0 - - - - - - - -
ENTER NAME
HAPPY VESSEL - -
ENTER MMSID#
123456789
Press & hold ENTER
CH Knob + ENT
ENTER

17
Edit Existing Entry
- Pick up the one from Buddy List for edit
- Page prompt up for Edit or Delete. Choose EDIT
- Full record screen shown up with 1
st
character of NAME be underscored for
edit
- Use CH Knob to alter the character or ENT to shift to next or skip.
- To edit the ID# should shift the cursor to end of NAME Entry and push ENT to
1
st
digit of ID
- Press and hold ENT to terminate the edit back to Buddy list
To Delete the Entry
- select the one want to be deleted from the list
- select the Delete option
- press and hold the ENT to confirm the delete action
- the record will be removed and go back to Buddy List page
16
HAPPY VESSEL
123456789
>SAVE
CANCEL
16
><NEW>
SEA ROSE
FISHY #2
HAPPY VESSEL
FISHY#2
>EDIT
DELETE
NAME
FISHY#2 - - - - - - - - -
MMSID
123456789
NAME
FISHY#3- - - - - - - -
MMSID
123657894
<NEW>
SEA ROSE
>FISHY #2
HAPPY VESSEL
FISHY#3
123657894
>SAVE
CANCEL
><NEW>
SEA ROSE
FISHY #3
HAPPY VESSEL

18
LOCAL/DISTANT
To set the Receiver to LOCAL to eliminate noise & use the radio locally, select the
LOCAL/DST from the MENU list and press ENTER. The value is stored when
screen is exited. The LOCAL icon turns ON in the LCD. Default is DISTANT
MENU LIST SET SENSISTIVITY NORMAL DISPLAY
BACKLIGHT Adjustment
Select BACKLIGHT and press ENTER. The BACKLIGHT has 8 levels for the LCD.
The higher numbers produce a brighter backlight. The value is stored when
screen is exited.
Stored on exiting mode.
MENU LIST SET
BUDDY LIST
>LOCAL/DST
CALL LOG
BACKLIGHT
SENSITVITY
>DISTANT
LOCAL
LOCAL
COAST GUARD
N 27º34.126
W 82º55.558
12:56am LOC
FISHY#3
EDIT
>DELETE
<NEW>
SEA ROSE
>FISHY #3
HAPPY VESSEL
><NEW>
SEA ROSE
HAPPY VESSEL
END OF LIST
Press & hold ENTER
LOCAL/DST
>BACKLIGHT
CONTRAST
GPS/TIME
CONTRAST
LO HI
19
CONTRAST Adjustment
Select CONTRAST and press ENTER. The Contrast has 4 levels for the LCD. The
higher numbers produce a darker LCD. The contrast value is stored when screen
is exited.
Stored on exiting mode.
MENU LIST SET
GPS / TIME
Enable POSition Display
LOCAL/DST
BACKLIGHT
>CONTRAST
GPS/TIME
CONTRAST
LO HI
LOCAL/DIST
BACKLIGHT
CONTRAST
>GPS / TIME
>POS DISPLAY
TIME DISPLAY
TIME OFFSET
TIME FORMAT
TIME DISPLAY
TIME OFFSET
TIME FORMAT
> COG / SOG

20
POSITION DISPLAY to determine the position data displayed on the normal mode or
not
TIME DISPLAY to turn on / off the time display at normal mode
TIME OFFSET to set the add/subtract value from UTC time to equal to local time.
When offset value is added, the time will be displayed as LOC instead of UTC
First to set the offset direction + or – then value in ½ hr. step. The update result will
be displayed immediately to assist adjustment
TIME FORMAT setting indicate whether the time is displayed in 12 hr or 24 hr format.
POS DISPLAY
>ON
OFF
>POS DISPLAY
TIME DISPLAY
TIME OFFSET
TIME FORMAT
TIME DISPLAY
>ON
OFF
POS DISPLAY
>TIME DISPLAY
TIME OFFSET
TIME FORMAT
TIME OFFSET
>+1.5 Hrs
12:56am LOC.
TIME FORMAT
>12 Hr.
24 Hr.
12:56am LOC.

21
COG/SOG to enable COG (Course over Ground ) and SOG ( Speed over Ground )
displayed on normal mode.
If the TIME DISPLAY is turn ON, COG/SOG will be turn off automatically irrespective
this setting due to it share the same bottom line for display.
RADIO SETUP
Under Radio Setup submenu, there are 4 items could be alter settings.
CHANNEL NAME
To set the channel name be ON or blank on the first line. Max. 12 characters could be
set for Channel Name. It also allow to edit the channel name, same as Buddy List edit
procedures.
COAST GUARD
27º34.1268 N
82º55.5587 W
356º 12.6Kts
COG/SOG?
>ON
OFF
BACKLIGHT
CONTRAST
GPS / TIME
>RADIO SETUP
>CHANNEL NAME
RING VOL
BEEP VOL
INT SPK
CHANNEL NAME
>CH INFO
EDIT
CHANNEL NAME
SHIP INTERCOM
CHANNEL NAME
SHIP TO SHIP
>SAVE
CANCEL
22
RING VOLUME ADJUSTMENT
Select the RING VOLUME by ENT and then display the option – LOUD and SOFT as
ringer tone setting. Press ENT key again to confirm the changes.
Stored on exiting mode.
MENU LIST SET LOUD or SOFT (ringer sounds when changed)
BEEP VOLUME ADJUSTMENT
To alter the key beep tone volume level. Select the BEEP VOL by ENT and then
display the option – HIGH, LOW & OFF as key beep setting. Press ENT key again to
confirm the changes.
Stored on exiting mode.
RESET
All features are returned to factory settings, except USER MMSI and BUDDY LIST.
RESET RESET WARNING RESET MESSAGE
CHANNEL NAME
>RING VOL
BEEP VOL
INT SPK
RING VOLUME
>LOUD
SOFT
RESET
ARE YOU SURE?
>NO
YES
GPS/TIME
RADIO SETUP
>RESET
ALL USER
SETTINGS
RESTORED
TO DEFAULT.
CHANNEL NAME
RING VOL
>BEEP VOL
INT SPK
BEEP VOLUME
>HIGH
LOW
OFF

23
C.4 DISTRESS Operation
SENDING AND RECEIVING DISTRESS CALLS
Sending a Distress call is initiated with this 3-step procedure. Your MMSID number
must be entered before DSC will function.
1. Open the RED Distress cover door.
2. Press and release the DISTRESS key. If time permits, use the SELECT knob to
select the Nature of Distress. A cursor moves down the list. Press the ENTER
knob to select. Otherwise, hold the red button until the DISTRESS is sent
(about 3 seconds). You may release the red button anytime to reset the
countdown timer.
NATURE OF DISTRESS DISTRESS TIMER COUNTDOWN DISTRESS SENT
The various NATURE OF DISTRESS categories are:
• UNDESIGNATED
• FIRE
• FLOODING
• COLLISION
• GROUNDING
• LISTING
• SINKING
• ADRIFT
• ADBANDONING
• PIRACY
• MAN IN WATER
• EPRIB
• EXIT?
3. After the Nature of Distress is entered, continuously HOLD DOWN the key for 3
seconds to advance the DSC Emergency transmission cycle. A count down
timer is sequenced in the LCD and BEEP2 is emitted every second. Releasing
the key stops & resets the timer.
To cancel this mode, press EXITor the CH16 key.
DISTRES CALL
>UNDEFINED
FIRE
FLOODING
DISTRES CALL
>UNDEFINED
HOLD DISTRES
3 SECONDS..
DISTRES CALL
SENT! WAIT..
PRESS CANCEL
TO CANCEL...

24
The Distress call is now sent 5 times continuously with the preamble dot pattern
in front of each string. The whole display FLASHES and BEEPS very loudly. If
Channel 70 is BUSY, the radio transmits anyway and the cycle is repeated
randomly every 3.5 – 4.5 minutes until an acknowledgement is received or the
mode is manually cancelled.
The Tx and Hi annunciators turn ON during Tx on CH70. After Tx the channel
reverts to CH16 and high power. Your transceiver is automatically set to
Channel 16 in order to listen for, and respond to, voice replies from SAR
authorities or other vessels that may have received your distress call. The
Automatic re-transmission mode is entered. The alarm sounds every 2 minutes
to remind you that a distress message is active. Press EXIT to cancel this
mode. This is the only key that functions at this time.
Re-transmissions of DSC distress calls are canceled automatically when a DSC
acknowledgment is received from an authorized SAR coast station, or canceled
manually by you.
SENDING A CALL TO CANCEL A TRANSMITTED DISTRESS CALL
From the Distress Cancellation Screen, cancel the Distress Call by pressing the
Channel/Select key. The text area of the display reconfigures to have the user
confirm the distress cancellation. Select "YES" and push distress key to
transmit a call to cancel the transmitted distress call. Select "NO" and press
Channel/Select button to abort cancellation. Once cancellation has been
confirmed, the radio returns to normal VHF operation on channel 16 with high
power selected.
RECEIVING DISTRESS CALLS
The NC392/363 receives distress messages sent by another vessel and/or
acknowledgments (ACK) sent by a coast station to another vessel in distress.
In such cases you should maintain a listening watch on channel 16 and standby
to lend assistance. There is no automatically reply/relay to distress or ACK or
relay DSC calls.
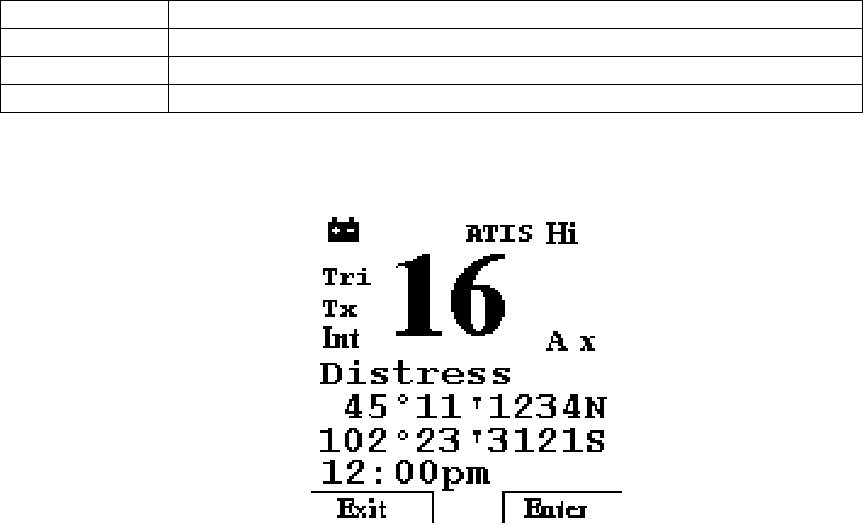
RECEIVING A DISTRESS CALL FROM ANOTHER VESSEL
When a distress call is received, the NC392/363 automatically tunes to channel
16, and the Distress Alarm Tone sounds. Pressing any key disables the alarm.
When position data and time is included within the signal, it is displayed in the
Text Area of the LCD. If invalid GPS or Time data is received, the Lat/Lon
position shows ‘9’ in all digits and the time shows all ‘8’s. The 2 alternating
pages of data are recorded in the DISTRESS CALL LOG. Make VOICE contact
on CH16.
ALTERNATING
DISTRESS!
ID123456789
99º99. X
999º99. Y
DISTRESS!
ID123456789
PIRACY
12:45PM LOC
25
RECEIVING A DISTRESS ACK SENT FROM A COAST STATION
When a DISTRESS ACK is received from a Coast Station (Coast Guard or Search
& Rescue), an alarm sounds and the following screen appears in the display. The
NAME/ID on page#1 is the ID of the vessel sending the message. The NAME/ID
on page#2 is the ID of the Vessel in Distress. Maintain a listening watch on CH16
and standby to lend assistance.
ALTERNATING
DISTRESS ACK BY COAST STATION P#1 DISTRESS ACK BY COAST STATION P#2
RECEIVING A DISTRESS RELAY SENT BY ANOTHER VESSEL
When a DISTRESS RELAY is received from another Vessel, an alarm sounds and
the following screen appears in the display. The screen displays the local time of
distress, the MMSID of the vessel sending the relay message and Lat/Lon
coordinates of the vessel in distress. The NAME/ID on page#1 is the ID of the
vessel sending the message. The NAME/ID on page#2 is the ID of the Vessel in
Distress. Your vessel does not re-send a distress relay message. Maintain a
listening watch on CH16 and standby to lend assistance.
ALTERNATING
DISTRESS RELAY BY DISTRESS RELAY BY
ANOTHER VESSEL P#1 ANOTHER VESSEL P#2
DISTRESS ACK
ID123456789
99º99. X
999º99. Y
DISTRESS ACK
ID987654321
PIRACY
12:45PM LOC
DISTRESS ACK
ID123456789
99º99. X
999º99. Y
DISTRESS ACK
ID987654321
PIRACY
12:45PM LOC