Nec Express5800 Gt110D S Installation Guide Express5800/GT110d, S, R110d 1E, E110d 1
Nec-Express5800-R110D-1E-Installation-Guide-728828 nec-express5800-r110d-1e-installation-guide-728828
2015-05-18
: Nec Nec-Express5800-Gt110D-S-Installation-Guide-728744 nec-express5800-gt110d-s-installation-guide-728744 nec pdf
Open the PDF directly: View PDF ![]() .
.
Page Count: 278 [warning: Documents this large are best viewed by clicking the View PDF Link!]
- Cover
- Documents Provided with This Product
- Contents
- Notations Used in This Document
- Trademarks
- Regulatory Notices
- Warnings and Additions to This Document
- Chapter 1. Installing Windows
- 1. Before Starting Setup
- 2. Setting Up the Operating System
- 3. Setting Up Windows Server 2008 R2
- 3.1 Before Starting Setup
- 3.2 Setup with EXPRESSBUILDER
- 3.3 Setup with OS Standard Installer
- 3.4 Installing the Starter Pack
- 3.5 Setting Up Device Drivers
- 3.5.1 Installing the LAN and BACS (teaming) drivers
- 3.5.2 Setting up LAN drivers
- 3.5.3 Setting up team/LiveLink
- 3.5.4 Graphics accelerator driver
- 3.5.5 When using a SCSI controller (N8103-75/107)
- 3.5.6 When using a SAS controller (N8103-104A/142)
- 3.5.7 When using a RAID Controller (N8103-135)
- 3.5.8 When using a Fibre Channel controller (N8190-127/131/153/154)
- 3.6 Installing the Bundled Software
- 3.7 License Authentication
- 3.8 Installation When Multiple Logical Drives Exist
- 4. Setting Up Windows Server 2008
- 4.1 Before Starting Setup
- 4.2 Setup with EXPRESSBUILDER
- 4.3 Setup with OS Standard Installer
- 4.4 Installing the Starter Pack
- 4.5 Setting Up Device Drivers
- 4.5.1 Installing the LAN and BACS (teaming) drivers
- 4.5.2 Setting up LAN drivers
- 4.5.3 Setting up team/LiveLink
- 4.5.4 Graphics accelerator driver
- 4.5.5 When using a SCSI controller (N8103-75/107)
- 4.5.6 When using a SAS controller (N8103-104A/142)
- 4.5.7 When using a RAID Controller (N8103-135)
- 4.5.8 When using a Fibre Channel controller (N8190-127/131/153/154)
- 4.6 Specifying PAE Option
- 4.7 Installing the Bundled Software
- 4.8 License Authentication
- 4.9 Installation When Multiple Logical Drives Exist
- 5. Setting Up Windows Server 2003 R2 x64 Edition
- 6. Setting Up Windows Server 2003
- 7. Setup for Solving Problems
- 8. Windows OS Parameter File
- Chapter 2. Installing the Bundled Software
Chapter 1 Installing Windows
Chapter 2 Installing the Bundled Software
NEC Express Server
Express5800 Series
10.020.01-102.02
August 2011, Second Edition
© NEC Corporation 2011
Express5800/GT110d, GT110d-S,
GT110d-S (2C/i3-2120), R110d-1E, E110d-1
EXP280A, EXP281A, EXP282A
Installation Guide (Windows)
Model Number: N8100-1738F/1739F/1740F/1741F/1742F/1744F/1745F/1743F
Documents Provided with This Product
Express5800/GT-110d, GT-110d -S, R110d-1E, E110d-1 Installation Guide (Windows)
2
Documents Provided with This Product
Documents for this product are provided as accompanying booklets ( ) and as electronic manuals (
PDF
) stored
within the EXPRESSBUILDER DVD ( ).
Precautions for Use Describes points of caution to ensure the safe use of this server.
Read these cautions before using this server.
Getting Started Describes how to use this server, from unpacking to operations.
Refer to this guide as you begin for an overview of this server.
User’s Guide
Chapter 1: General Description Overviews, names, and functions of the server’s parts
Chapter 2: Preparations Installation of additional options, connection of peripheral devices,
and ideal location for this server
Chapter 3: Setting Up Your Server System BIOS configurations and summary of EXPRESSBUILDER
PDF
Chapter 4: Appendix Specifications and other information
Installation Guide (Windows)
Chapter 1: Installing Windows Installation of Windows and drivers, and important information for
installation
PDF
Chapter 2: Installing the Bundled
Software
Installation of bundled software, such as ESMPRO and Universal
RAID Utility
Maintenance Guide
Chapter 1: Maintenance Server maintenance and troubleshooting
Chapter 2: Convenient Features Useful features and the detail of system BIOS settings, RAID
Configuration Utility, and EXPRESSBUILDER
PDF
Chapter 3: Appendix Error messages and Windows Event Logs
Other documents
PDF
Provides the detail of ESMPRO, Universal RAID Utility, and the other features.
EXPRESSBUILDER

Contents
Express5800/GT-110d, GT-110d -S, R110d-1E, E110d-1 Installation Guide (Windows) 3
Contents
Documents Provided with This Product................................................................................................................. 2
Contents ................................................................................................................................................................ 3
Notations Used in This Document .........................................................................................................................6
Notations used in the text..............................................................................................................................6
Optical disk drives .........................................................................................................................................6
Hard Disk Drives ...........................................................................................................................................6
Removable media .........................................................................................................................................6
Abbreviations of Operating Systems (Windows) ...........................................................................................7
Trademarks ...........................................................................................................................................................8
Regulatory Notices ................................................................................................................................................9
Warnings and Additions to This Document .......................................................................................................... 10
Latest editions............................................................................................................................................. 10
Chapter 1 Installing Windows .............................................................................................................................. 11
1. Before Starting Setup .................................................................................................................................. 12
1.1 Starting EXPRESSBUILDER ........................................................................................................... 12
1.1.1 When using the EXPRESSBUILDER DVD ........................................................................ 12
1.1.2 When using Internal Flash Memory ................................................................................... 12
1.2 Service Pack Support .......................................................................................................................... 13
1.3 Large-Capacity Storage Controllers Supported by EXPRESSBUILDER ......................................... 14
1.4 When Using a Large-Capacity Storage Controller Not Supported by EXPRESSBUILDER ............. 15
2. Setting Up the Operating System................................................................................................................ 16
3. Setting Up Windows Server 2008 R2.......................................................................................................... 17
3.1 Before Starting Setup....................................................................................................................... 17
3.2 Setup with EXPRESSBUILDER.......................................................................................................20
3.2.1 Setup flow.......................................................................................................................... 21
3.2.2 Setup procedure ................................................................................................................22
3.3 Setup with OS Standard Installer ..................................................................................................... 33
3.3.1 Setup flow.......................................................................................................................... 33
3.3.2 Requirements for Setup with OS standard installer ........................................................... 34
3.3.3 Setup procedure ................................................................................................................35
3.4 Installing the Starter Pack ................................................................................................................ 51
3.4.1 When using the EXPRESSBUILDER DVD ........................................................................ 51
3.4.2 When using Internal Flash Memory ................................................................................... 53
3.5 Setting Up Device Drivers................................................................................................................ 59
3.5.1 Installing the LAN and BACS (teaming) drivers ................................................................. 59
3.5.2 Setting up LAN drivers....................................................................................................... 60
3.5.3 Setting up team/LiveLink ................................................................................................... 61
3.5.4 Graphics accelerator driver................................................................................................ 72
3.5.5 When using a SCSI controller (N8103-75/107).................................................................. 73
3.5.6 When using a SAS controller (N8103-104A/142)............................................................... 73
3.5.7 When using a RAID Controller (N8103-135)...................................................................... 73
3.5.8 When using a Fibre Channel controller (N8190-127/131/153/154).................................... 73
3.6 Installing the Bundled Software........................................................................................................ 74
3.7 License Authentication..................................................................................................................... 75
3.8 Installation When Multiple Logical Drives Exist................................................................................ 78
4. Setting Up Windows Server 2008 ............................................................................................................... 80
4.1 Before Starting Setup....................................................................................................................... 80
4.2 Setup with EXPRESSBUILDER.......................................................................................................85

Contents
Express5800/GT-110d, GT-110d -S, R110d-1E, E110d-1 Installation Guide (Windows)
4
4.2.1 Setup flow.......................................................................................................................... 86
4.2.2 Setup procedure ................................................................................................................87
4.3 Setup with OS Standard Installer ..................................................................................................... 99
4.3.1 Setup flow.......................................................................................................................... 99
4.3.2 Requirements for Setup with OS standard installer ......................................................... 100
4.3.3 Setup procedure .............................................................................................................. 101
4.4 Installing the Starter Pack .............................................................................................................. 118
4.4.1 When using the EXPRESSBUILDER DVD...................................................................... 118
4.4.2 When using Internal Flash Memory ................................................................................. 120
4.5 Setting Up Device Drivers.............................................................................................................. 126
4.5.1 Installing the LAN and BACS (teaming) drivers ............................................................... 126
4.5.2 Setting up LAN drivers..................................................................................................... 127
4.5.3 Setting up team/LiveLink ................................................................................................. 128
4.5.4 Graphics accelerator driver.............................................................................................. 140
4.5.5 When using a SCSI controller (N8103-75/107)................................................................ 141
4.5.6 When using a SAS controller (N8103-104A/142)............................................................. 141
4.5.7 When using a RAID Controller (N8103-135).................................................................... 141
4.5.8 When using a Fibre Channel controller (N8190-127/131/153/154).................................. 141
4.6 Specifying PAE Option ................................................................................................................... 142
4.7 Installing the Bundled Software...................................................................................................... 143
4.8 License Authentication................................................................................................................... 144
4.9 Installation When Multiple Logical Drives Exist.............................................................................. 147
5. Setting Up Windows Server 2003 R2 x64 Edition ..................................................................................... 149
5.1 Before Starting Setup..................................................................................................................... 149
5.2 Setup with OS Standard Installer ................................................................................................... 152
5.2.1 Setup flow........................................................................................................................ 152
5.2.2 Requirements for Setup with OS standard installer ......................................................... 153
5.2.3 Setup procedure .............................................................................................................. 154
5.3 Installing the Starter Pack (Service Pack) ...................................................................................... 166
5.3.1 Procedures for applying the Starter Pack and Windows x64 hotfix (KB) 921411 ............. 167
5.3.2 Recovery process ............................................................................................................ 178
5.4 Setting Up Device Drivers.............................................................................................................. 179
5.4.1 Installing the LAN and BACS (teaming) drivers ............................................................... 179
5.4.2 Setting up LAN drivers..................................................................................................... 182
5.4.3 Setting up team/LiveLink ................................................................................................. 183
5.4.4 When using a SCSI controller (N8103-75/107)................................................................ 194
5.4.5 When using a SAS controller (N8103-104A/142)............................................................. 194
5.4.6 When using a RAID Controller (N8103-135).................................................................... 194
5.4.7 Graphics accelerator driver.............................................................................................. 195
5.5 Installing the Bundled Software...................................................................................................... 196
5.6 License Authentication................................................................................................................... 197
5.7 Installation When Multiple Logical Drives Exist.............................................................................. 198
6. Setting Up Windows Server 2003 ............................................................................................................. 199
6.1 Before Starting Setup..................................................................................................................... 199
6.2 Setup with OS Standard Installer ................................................................................................... 202
6.2.1 Setup flow........................................................................................................................ 202
6.2.2 Items necessary for installation from an OS media.......................................................... 203
6.2.3 Setup procedure .............................................................................................................. 204
6.3 Installing the Starter Pack (Service Pack) ...................................................................................... 216
6.3.1 Procedure to apply Windows Server 2003 hotfix: KB921411 ........................................... 217
6.3.2 Recovery process ............................................................................................................ 228
6.4 Setting Up Device Drivers.............................................................................................................. 229
6.4.1 Installing the LAN and BACS (teaming) drivers ............................................................... 229
6.4.2 Setting up LAN drivers..................................................................................................... 232
6.4.3 Setting up team/LiveLink ................................................................................................. 233
6.4.4 Graphics accelerator driver.............................................................................................. 245
6.4.5 When using a SCSI controller (N8103-75/107)................................................................ 245
6.4.6 When using a SAS controller (N8103-104A/142)............................................................. 245
6.4.7 When using a RAID Controller (N8103-135).................................................................... 245
6.5 Specifying PAE Option ................................................................................................................... 246
6.6 Installing the Bundled Software...................................................................................................... 247
6.7 License Authentication................................................................................................................... 248
6.8 Installation When Multiple Logical Drives Exist.............................................................................. 249

Contents
Express5800/GT-110d, GT-110d -S, R110d-1E, E110d-1 Installation Guide (Windows) 5
7. Setup for Solving Problems....................................................................................................................... 250
7.1 Specifying Memory Dump Settings (Debug Information) ............................................................... 250
7.1.1 For Windows Server 2008 R2.......................................................................................... 250
7.1.2 For Windows Server 2008 ............................................................................................... 252
7.1.3 For Windows Server 2003 ............................................................................................... 254
7.2 How to Create a User-mode Process Dump File ........................................................................... 256
7.2.1 For Windows Server 2008 R2 and Windows Server 2008............................................... 256
7.2.2 For Windows Server 2003 (setting up Dr. Watson) .......................................................... 257
7.3 Installing Network Monitor.............................................................................................................. 258
7.3.1 For Windows Server 2008 R2 and Windows Server 2008............................................... 258
7.3.2 For Windows Server 2003 ............................................................................................... 259
8. Windows OS Parameter File..................................................................................................................... 260
8.1 Creating a Parameter File.............................................................................................................. 260
8.1.1 How to create a parameter file......................................................................................... 261
Chapter 2 Installing the Bundled Software......................................................................................................... 272
1. Bundled Software for the Server ............................................................................................................... 273
1.1 NEC ESMPRO Agent (for Windows) ............................................................................................. 273
1.2 NEC ESMPRO Agent Extension.................................................................................................... 274
1.3 BMC Configuration ........................................................................................................................ 274
1.4 NEC ExpressUpdate Agent............................................................................................................ 274
1.5 Universal RAID Utility .................................................................................................................... 275
1.5.1 Setup of Universal RAID Utility ........................................................................................ 275
1.5.2 Management by NEC ESMPRO Manager ....................................................................... 276
1.6 NEC Product Info Collection Utility ................................................................................................ 277
1.6.1 Installation........................................................................................................................ 277
1.6.2 Uninstallation ................................................................................................................... 277
2. Bundled Software for PC for Management................................................................................................ 278
2.1 NEC ESMPRO Manager................................................................................................................ 278

Notations Used in This Document
Express5800/GT-110d, GT-110d -S, R110d-1E, E110d-1 Installation Guide (Windows)
6
Notations Used in This Document
Notations used in the text
In addition to safety-related symbols urging caution, 3 other types of notations are used in this document.
These notations have the following meanings.
Important Indicates critical items that must be followed when handling the server or operating software.
If the procedures described are not followed, server failure, data loss, and other serious
malfunctions could occur.
Note Indicates items that must be confirmed when handling the server or operating software.
Tips Indicates information that is helpful to keep in mind when using this server.
Optical disk drives
This server is equipped with one of the following drives, depending on the order at the time of purchase. These
drives are referred to as optical disk drives in this document.
DVD-ROM drive
DVD Super MULTI drive
Hard Disk Drives
Unless otherwise stated, Hard Disk Drives (HDD) described in this document refer to the following.
Hard disk drives (HDD)
Solid state drive (SSD)
Removable media
Unless otherwise stated, removable media described in this document refer to the following.
USB memory
Flash FDD

Notations Used in This Document
Express5800/GT-110d, GT-110d -S, R110d-1E, E110d-1 Installation Guide (Windows) 7
Abbreviations of Operating Systems (Windows)
Windows Operating Systems are referred to as follows.
Notations in this document Official names of Windows
Windows Server 2008 R2 Windows Server 2008 R2 Standard
Windows Server 2008 R2 Enterprise
Windows Server 2008 R2 Foundation
Windows Server 2008*1 Windows Server 2008 Standard
Windows Server 2008 Enterprise
Windows Server 2003 R2 x64 Edition Windows Server 2003 R2 Standard x64 Edition
Windows Server 2003 R2 Enterprise x64 Edition
Windows Server 2003 R2*2 Windows Server 2003 R2 Standard Edition
Windows Server 2003 R2 Enterprise Edition
Windows Server 2003*2 Windows Server 2003 Standard Edition
Windows Server 2003 Enterprise Edition
Windows PE Windows Preinstallation Environment
*1: Includes 64-bit and 32-bit Editions unless otherwise stated.
The following appears on EXPRESSBUILDER screen.
Windows Server 2008 64-bit Edition: Windows Server 2008 x64
Windows Server 2008 32-bit Edition: Windows Server 2008 x32
*2: Unless otherwise stated, Windows Server 2003 R2 and Windows Server 2003 are collectively referred to as
Windows Server 2003.
Supported Operating Systems differ depending on the model of this product. For details, see the following table.
Editions or Families of Windows GT110d GT110d-S R110d-1E E110d-1
Windows Server 2008 R2 Standard
Windows Server 2008 R2 Enterprise
Windows Server 2008 R2 Foundation
Windows Server 2008 Standard
Windows Server 2008 Enterprise
Windows Server 2003 R2 Standard x64 Edition*1
Windows Server 2003 R2 Enterprise x64 Edition*1
Windows Server 2003 R2 Standard Edition*1
Windows Server 2003 R2 Enterprise Edition*1
Windows Server 2003 Standard Edition*1
Windows Server 2003 Enterprise Edition*1
Windows PE *2
*1: Service Pack2 or later.
*2: Used as an installation platform only.
: Supported : Not supported

Trademarks
Express5800/GT-110d, GT-110d -S, R110d-1E, E110d-1 Installation Guide (Windows)
8
Trademarks
ESMPRO and EXPRESSSCOPE are registered trademarks of NEC Corporation.
Microsoft, Windows, Windows Server, Windows Vista, and MS-DOS are registered trademarks or trademarks of Microsoft
Corporation in the United States and other countries. Intel, Pentium, and Xeon are registered trademarks of Intel Corporation of the
United States. AT is a registered trademark of International Business Machines Corporation of the United States and other countries.
Adaptec, its logo, and SCSI Select are registered trademarks or trademarks of Adaptec, Inc. of the United States. LSI and the LSI
logo design are trademarks or registered trademarks of LSI Corporation. Adobe, the Adobe logo, and Acrobat are trademarks of
Adobe Systems Incorporated. DLT and DLTtape are trademarks of Quantum Corporation of the United States. PCI Express is a
trademark of Peripheral Component Interconnect Special Interest Group. Linux is a trademark or registered trademark of Linus
Torvalds in Japan and other countries. Red Hat® and Red Hat Enterprise Linux are trademarks or registered trademarks of Red Hat,
Inc. in the United States and other countries.
All other product, brand, or trade names used in this publication are the trademarks or registered trademarks of their respective
trademark owners.

Regulatory Notices
Express5800/GT-110d, GT-110d -S, R110d-1E, E110d-1 Installation Guide (Windows) 9
Regulatory Notices
FCC Statement
This equipment has been tested and found to comply with the limits for a Class A digital device, pursuant
to Part 15 of the FCC Rules. These limits are designed to provide reasonable protection against harmful
interference when the equipment is operated in a commercial environment. This equipment generates,
uses, and can radiate radio frequency energy and, if not installed and used in accordance with the
instruction manual, may cause harmful interference to radio communications. Operation of this equipment
in a residential area is likely to cause harmful interference in which case the user will be required to
correct the interference at his own expense.
CE Statement
This is a Class A product. In domestic environment this product may cause radio interference in which
case the user may be required to take adequate measures (EN55022).
BSMI Statement

Warnings and Additions to This Document
Express5800/GT-110d, GT-110d -S, R110d-1E, E110d-1 Installation Guide (Windows)
10
Warnings and Additions to This Document
1. Unauthorized reproduction of the contents of this document, in part or in its entirety, is
prohibited.
2. The contents of this document may change without prior notice.
3. Do not make copies or alter the document content without permission from NEC Corporation.
4. Every effort has been made to ensure the completeness of this document. However, if you
have any concerns, or discover errors or omissions, please contact your retailer.
5. Regardless of these 4 items, NEC Corporation assumes no responsibility for effects resulting
from operations.
6. The sample values used in this document are not the actual values.
Keep this document nearby so that you may refer to it as necessary.
Latest editions
This document was created based on the information available at the time of its creation. The screen images,
messages and procedures may differ from the actual screens, messages and procedures. Substitute as
appropriate when content has been modified.
The most recent version of User’s Guide, as well as other related documents, is also available for download
from the following website.
http://www.nec.com/

NEC Express5800 Series
Express5800/GT-110d, GT-110d-S, R110d-1E, E110d-1
Installing Windows
This chapter describes setup procedures. Read through this chapter to set up the system correctly.
1. Before Starting Setup
Describes the Service Packs and mass storage device controllers that support EXPRESSBUILDER
supplied with this product)
2. Setting Up the Operating System
Describes the general process of setting up the operating system
3. Setting Up Windows Server 2008 R2
Describes how to set up the system for operation with Windows Server 2008 R2
4. Setting Up Windows Server 2008
Describes how to set up the system for operation with Windows Server 2008
5. Setting Up Windows Server 2003 R2 x64 Edition
Describes how to set up the system for operation with Windows Server 2003 R2 x64 Edition
6. Setting Up Windows Server 2003
Describes how to set up the system for operation with Windows Server 2003
7. Setting Up for Solving Problems
Describes the features that must be set up in advance so that the server can recover from any trouble
immediately and precisely
8. Windows OS Parameter File
Describes how to set up the operating system by using the parameter file.
This document has descriptions on which a floppy disk is used. However, the
server does not have an internal floppy disk drive. Use an optional Flash FDD.
Express5800/GT-110d, GT-110d-S, R110d-1E, E110d-1 Installation Guide (Windows) 11

1. Before Starting Setup
Chapter 1 Installing Windows
1. Before Starting Setup
This section describes important points for setting up Service Packs that support EXPRESSBUILDER
(contained in this product) and for setting up Windows operating systems. Setting up the server begins with the
hardware.
1.1 Starting EXPRESSBUILDER
Follow the procedure below to start EXPRESSBUILDER.
1.1.1 When using the EXPRESSBUILDER DVD
1. Turn peripheral device power on, and then turn the server power on.
2. Set EXPRESSBUILDER DVD to the optical disk drive.
3. Once the DVD is set, restart the server by resetting it (press <Ctrl> + <Alt> + <Delete>) or by turning the
power off and then on.
The system starts up and runs EXPRESSBUILDER.
4. When the boot menu appears, select Os installation *** default ***.
You will advance automatically to the next screen, with no need for further input.
1.1.2 When using Internal Flash Memory
1. Turn peripheral device power on, and then turn the server power on.
2. When "Press <F2> Setup, <F3> Internal Flash Memory, <F4> ROM Utility, <F12> Network" appears,
press the <F3> key. EXPRESSBUILDER starts from the Internal Flash Memory.
3. When the boot menu appears, select Os installation *** default ***.
You will advance automatically to the next screen, with no need for further input.
Express5800/GT-110d, GT-110d-S, R110d-1E, E110d-1 Installation Guide (Windows)
12

1. Before Starting Setup
Chapter 1 Installing Windows
1.2 Service Pack Support
The following combination of operating system installation media and Service Packs are supported by
EXPRESSBUILDER.
OS Installation Media No SP SP1 No SP + SP2 SP2 SP1 + SP2
Windows Server 2008 R2
Windows Server 2008
Windows Server 2003 R2 x64 Edition
Windows Server 2003 R2
Windows Server 2003
: Supported : Not supported
Note You can install the Service Pack on the server. When the Service Pack is not
attached to your system, prepare it by yourself.
Express5800/GT-110d, GT-110d-S, R110d-1E, E110d-1 Installation Guide (Windows) 13

1. Before Starting Setup
Chapter 1 Installing Windows
1.3 Large-Capacity Storage Controllers Supported by
EXPRESSBUILDER
When you install the Windows operating system, device drivers supporting the controllers (boards) connected
to the Hard Disk Drive and/or other types of large-capacity storages are required.
The table below lists the controllers for this server, supported by the supplied EXPRESSBUILDER.
If an optional board not mentioned below is connected, set it up while referring to the instructions supplied with
the board and Chapter 1 (1.4 When Using a Large-Capacity Storage Controller Not Supported by
EXPRESSBUILDER).
OS
Windows
Server 2008
R2
Windows Server
2008
Windows Server
2003 R2 x64 Edition
Windows Server
2003
RAID Controllers supporting EXPRESSBUILDER OS installation
N8103-128 RAID Controller
(128 MB, RAID 0/1)
N8103-G128 RAID Controller
(128 MB,RAID 0/1)*1
N8103-129 RAID Controller
(256 MB RAID 0/1)
N8103-130 RAID Controller
(256 MB RAID 0/1/5/6)
N8103-134 RAID Controller
(512 MB RAID 0/1/5/6)
Onboard RAID Controller
(LSI Embedded MegaRAID)
Other options
N8103-75 SCSI controller*1
N8103-104A SAS controller*2
N8103-107 SCSI controller
N8103-135 RAID Controller
(512 MB, RAID 0/1/5/6)*3
N8103-142 SAS controller*2
N8190-127 Fibre Channel controller *3
N8190-131 Fibre Channel controller
(2 ch)*3
N8190-153 Fibre Channel controller
(1 ch) *3
N8190-154 Fibre Channel controller
(2 ch) *3
*1: Available for Express5800/GT110d and GT110d-S only
*2: Available for Express5800/GT110d, R110d-1E, and E110d-1 only
*3: Available for Express5800/R110d-1E and E110d-1 only
: Supported : Not supported
Tips The drivers for the optional boards listed above are included in
EXPRESSBUILDER.
If a RAID Controller not listed above is used, the RAID System cannot be
configured by using EXPRESSBUILDER. In this case, refer to the instructions
supplied with the board for how to configure the RAID System.
Express5800/GT-110d, GT-110d-S, R110d-1E, E110d-1 Installation Guide (Windows)
14

1. Before Starting Setup
Chapter 1 Installing Windows
1.4 When Using a Large-Capacity Storage Controller Not
Supported by EXPRESSBUILDER
Use the following setup process when reinstalling an operating system to a system on which a large capacity
controller is connected that is not supported by EXPRESSBUILDER (such as the newest RAID Controllers).
1. When you are about to set up the system, have the manual for the large capacity storage controller ready.
Note If the contents of this document differ from that of the large capacity storage
controller, prioritize the contents of the controller manual.
2. When using a RAID Controller, follow the controller manual to set up the RAID System.
If using a large capacity storage controller for which RAID setting is not required, go to step 3.
When you install using OS standard installer, refer to (setup with OS standard installer) section of each
OS.
Note Click [Skip] in RAID settings.
3. Start the system from EXPRESSBUILDER.
4. Select Configure EXPRESSBUILDER settings from the top menu, and then select Load a driver into
EXPRESSBUILDER from the screen that appears. Next, click [Next].
Insert the media in which the driver for the large capacity storage controller is copied to the optical device
drive, select the destination, and then click [Perform].
Tips By selecting this option, the driver supplied by the CD-ROM or floppy disk is
loaded, and you can proceed with the EXPRESSBUILDER setup.
5. Execute Setup with EXPRESSBUILDER by using the following procedure:
Click [Skip] in RAID settings.
Confirm that Apply drivers for mass storage controller appears under Selected applications in
Application settings.
Express5800/GT-110d, GT-110d-S, R110d-1E, E110d-1 Installation Guide (Windows) 15

2. Setting Up the Operating System
Chapter 1 Installing Windows
2. Setting Up the Operating System
After setting up the hardware, read through the explanation below for the operating system you use. If you
reinstall the operating system, read through the explanation before you start reinstallation.
Start
End
Yes
Windows Server 2008 R2
Setup with EXPRESSBUILDER
Windows Server 2008
Setup with OS standard installer
Windows Server 2008
Windows Server 2003 R2
x64 Edition
No
Windows Server 2003
Windows Server 2008 R2
Setup for solving problems
Windows Server 2008
Windows Server 2003 R2
x64 Edition
Windows Server 2003
Chapter 1 (7)
Chapter 1 (3.3)
Chapter 1 (4.3) Chapter 1 (4.4)
Chapter 1 (6.2)
Execute Setup with EXPRESSBUILDER?
Windows Server 2008 R2 Chapter 1 (3.4)
Chapter 1 (5.2)
Express5800/GT-110d, GT-110d-S, R110d-1E, E110d-1 Installation Guide (Windows)
16
3. Setting Up Windows Server 2008 R2
Chapter 1 Installing Windows
3. Setting Up Windows Server 2008 R2
Set up Windows Server 2008 R2 and the system.
3.1 Before Starting Setup
Read through the cautions explained here before starting setup.
: Confirm during Setup with EXPRESSBUILDER
: Confirm during Setup with OS standard installer
(1/3)
Setup Items to confirm
Windows
family The following editions of the Windows Server 2008 R2 family may be installed. For
information about Service Packs, refer to Chapter 1 (1.2 Service Pack Support).
Windows Server 2008 R2 Standard
Windows Server 2008 R2 Enterprise
Windows Server 2008 R2 Foundation*
* Only supported by GT110d-E and GT110d-S
Inquiries about installing other editions may be made at your sales dealer or
maintenance service company.
When installing Windows Server 2008 R2, the following hardware configurations
require special procedures.
Hardware
configuration
warnings
Reinstalling to a mirrored volume
When reinstalling to a Hard Disk Drive that has been converted to a dynamic disk,
the operating system can only be installed to a simple dynamic volume.
If installing to a mirrored volume by using Disk Management, disable mirroring
and return to a basic disk prior to installation. After the operating system is
installed, return to the mirrored state.
Click on Computer Management and then Disk Management to create, release,
or delete mirrored volumes
Connecting MO devices
Installing Windows while an MO device is connected can result in installation
failure. Remove the MO device, and then start installation from the beginning.
DAT, LTO, and similar media
Do not set media that is unnecessary to installation during setup.
RDX and similar peripheral devices
Depending on the configuration of the hardware being used, it may be necessary
to remove or stop peripheral devices prior to starting setup.
Refer to the manuals of each peripheral device to make sure each is in its
appropriate state, and then proceed with setup.
Reinstalling to Hard Disk Drives that have been upgraded to dynamic disks
If the Hard Disk Drive has been upgraded to a dynamic disk, an operating system
cannot be reinstalled to it with the existing partitions.
Set up the operating system with the OS standard installer.
Express5800/GT-110d, GT-110d-S, R110d-1E, E110d-1 Installation Guide (Windows) 17

3. Setting Up Windows Server 2008 R2
Chapter 1 Installing Windows
(2/3)
Setup Items to confirm
Connecting to multiple Hard Disk Drives (Logical Drives)
For details on installing operating systems to a system in which multiple Logical
Drives exist, refer to Chapter 1 (3.8 Installation When Multiple Logical Drives
Exist).
Hardware
configuration
warnings
The system partition size can be calculated by using the following formula.
Size required to install the OS + paging file size + dump file size + application size
Size required to install the OS = 8,000 MB (Full installations)
= 3,500 MB (Server Core installations)
Paging file size (recommended) = installed memory size 1.5
Dump file size = installed memory size + 300 MB
Application size = as required by the application
For example, if the installed memory size is 1 GB (1,024 MB) and Full installation is
selected, the partition size is calculated as follows:
8,000 MB + (1,024 MB 1.5) + 1,024 MB + 300 MB + application size = 10,860
MB + application size
Important The above mentioned partition size is the minimum partition size
required for system installation.
Ensure that the partition size is sufficient for system operations.
The following partition sizes are recommended.
Full installations: 32,768 MB (32 GB) or more
Server Core installations: 10,240MB (10 GB) or more
*1 GB = 1,024 MB
The above paging file sizes are recommended for collecting debug
information (dump file). The initial size of the Windows partition paging
file must be large enough to store dump files.
Make sure you set a sufficient paging file size. If the paging file is
insufficient, there will be a virtual memory shortage that may result in
an inability to collect correct debug information.
Regardless of the sizes of internal memory and write debug
information, the maximum size of the dump file is "size of internal
memory + 300 MB".
When installing other applications or other items, add the amount of
space needed by the application to the partition.
System
partition size
Express5800/GT-110d, GT-110d-S, R110d-1E, E110d-1 Installation Guide (Windows)
18
3. Setting Up Windows Server 2008 R2
Chapter 1 Installing Windows
(3/3)
Setup Items to confirm
If the partition size for installing the system is smaller than the size required for
installation + paging file size, expand the partition size or add another disk. If your
system does not have a sufficient dump file size, divide the required file space into
multiple disks by performing the following steps.
1. Set the system partition size to a size sufficient to install the OS and paging file.
2. Write the debug information of the dump file onto another disk by referring to 7.
Setup for Solving Problems.
If there is not enough disk space to write the debug information, set the partition
size to a size sufficient to install the OS and paging file, and then add another disk
for the dump file.
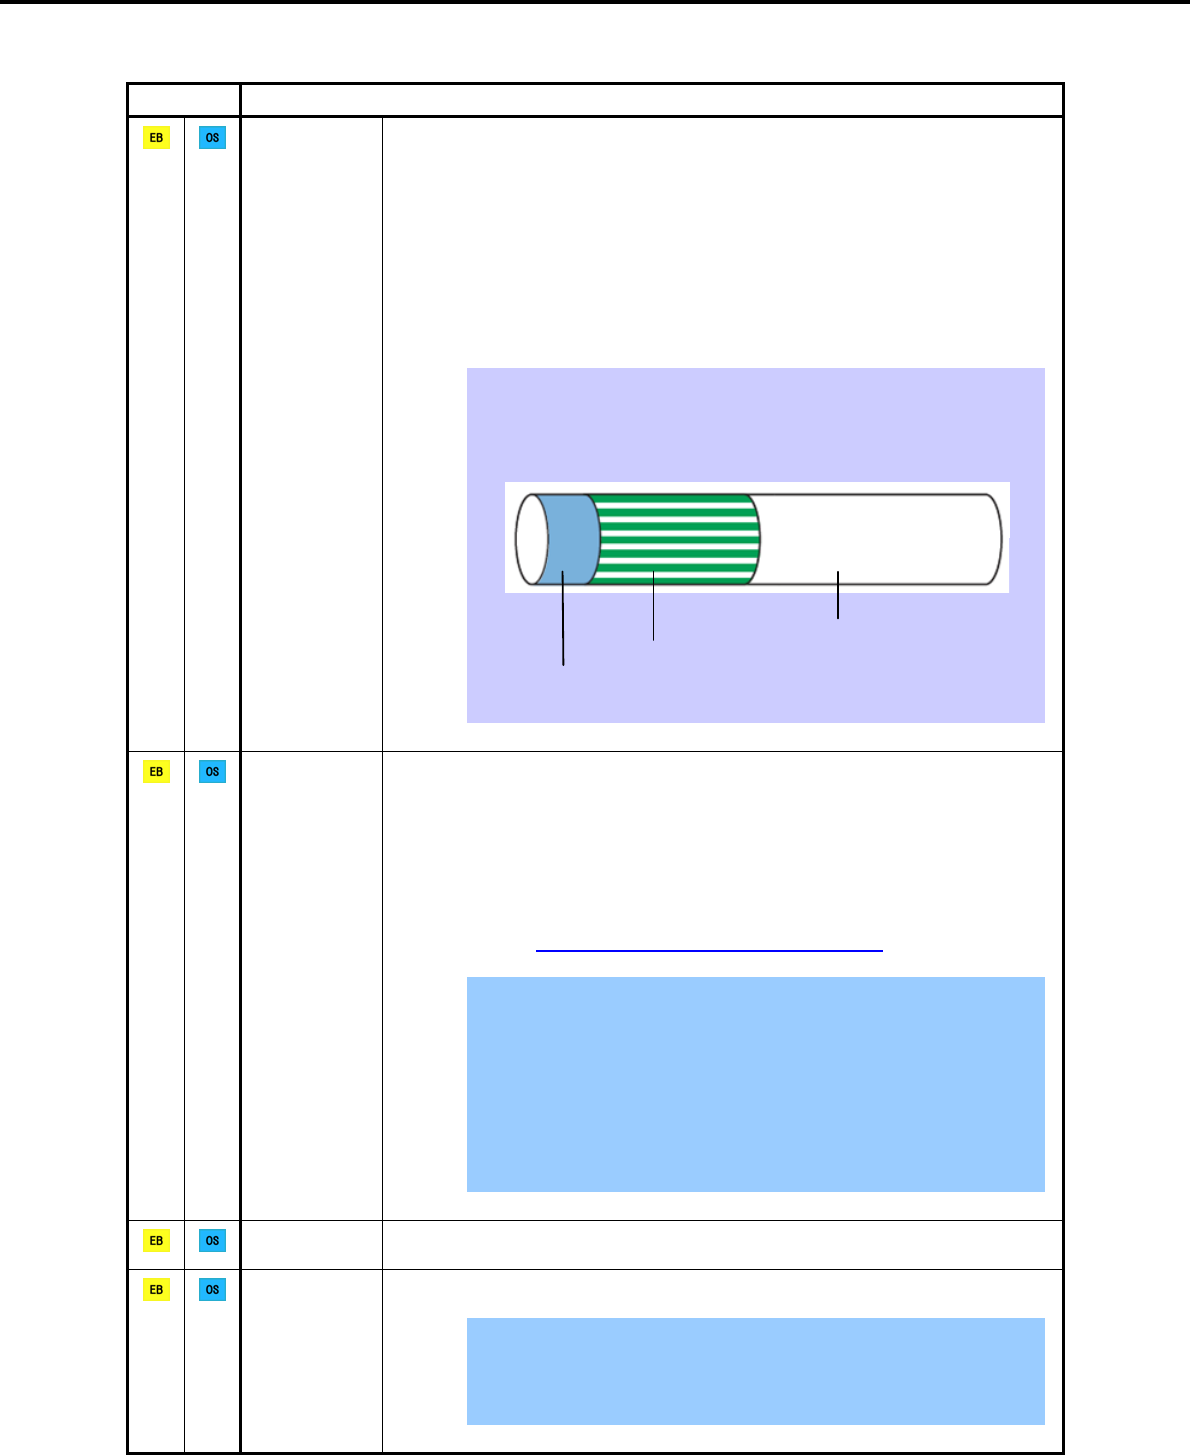
Tips When creating a new partition, Windows OS assigns an initial boot partition of
100 MB.
For example, when making a partition of 40,960 MB (40 GB), usable space will
be 40,960 MB – 100 MB = 40,860 MB.
Free space
Windows Partition (40,860 MB)
Boot Partition (100 MB)
The boot partition is not recognized from the operating system.
System
partition size
If using BitLocker, note the following.
Be sure to keep the recovery password secure. Do not keep it near a server
running BitLocker.
To reinstall the operating system into a partition that is encrypted with BitLocker,
delete the BitLocker-encrypted partition prior to reinstallation.
Microsoft releases software updates for BitLocker encryption. If using BitLocker, it
is important that you read through the information provided by Microsoft. Also
read through the checklist published by Microsoft.
For details, visit http://support.microsoft.com/kb/975496/en-us.
Important If the recovery password is not entered, the OS cannot be started, and the
content of the partition encrypted by BitLocker cannot be referenced any
more.
The recovery password might be required at startup of the OS after the
following:
Replacement of motherboard
Initialization of trusted platform module (TPM)
Change of BIOS setting
Using
BitLocker
Installing
Service Pack You can install the Service Pack on the server. When the Service Pack is not
attached to your system, prepare it by yourself.
License authentication might be required, depending on the operating environment.
For details, refer to 3.7 License Authentication.
Important Activate within 30 days following installation.
A virtual product key is used when installing in a virtual environment. It
is not used when directly installing an operating system to a physical
server.
License
authentication
Express5800/GT-110d, GT-110d-S, R110d-1E, E110d-1 Installation Guide (Windows) 19

3. Setting Up Windows Server 2008 R2
Chapter 1 Installing Windows
3.2 Setup with EXPRESSBUILDER
This section describes how to install Windows with EXPRESSBUILDER.
This function automatically recognizes the RAID Controller connected to the server and configures the RAID
System, so you must complete setup of the server by following the "User’s Guide " in advance.
Important The Scalable Networking Pack (SNP) function is disabled on systems that
have been installed by using EXPRESSBUILDER.
The setting of SNP function may affect the system performance.
Contact the sales agent for details.
Setup with EXPRESSBUILDER may delete some data in the Hard Disk Drive
depending on the system settings. Pay attention to input parameters. You
must be especially careful when configuring the following:
RAID settings wizard
Partition Settings in the Windows Setup wizard
Backing up user data, as needed, is recommended.
Note For a non-standard setup procedure without using EXPRESSBUILDER, refer to
the descriptions in Chapter 1 (1.4 When Using a Large-Capacity Storage Controller
Not Supported by EXPRESSBUILDER) or (3.8 Installation When Multiple Logical
Drives Exist).
Tips Setup with EXPRESSBUILDER allows you to use a prespecified parameter file
or save the parameters specified in setup as a parameter file on a removable
media or Internal Flash Memory (if purchased optionally).
You can create a parameter file by using the Create a parameter file for
Windows OS function in EXPRESSBUILDER.
For details on creating a parameter file, refer to 8 Windows OS Parameter File.
Express5800/GT-110d, GT-110d-S, R110d-1E, E110d-1 Installation Guide (Windows)
20
3. Setting Up Windows Server 2008 R2
Chapter 1 Installing Windows
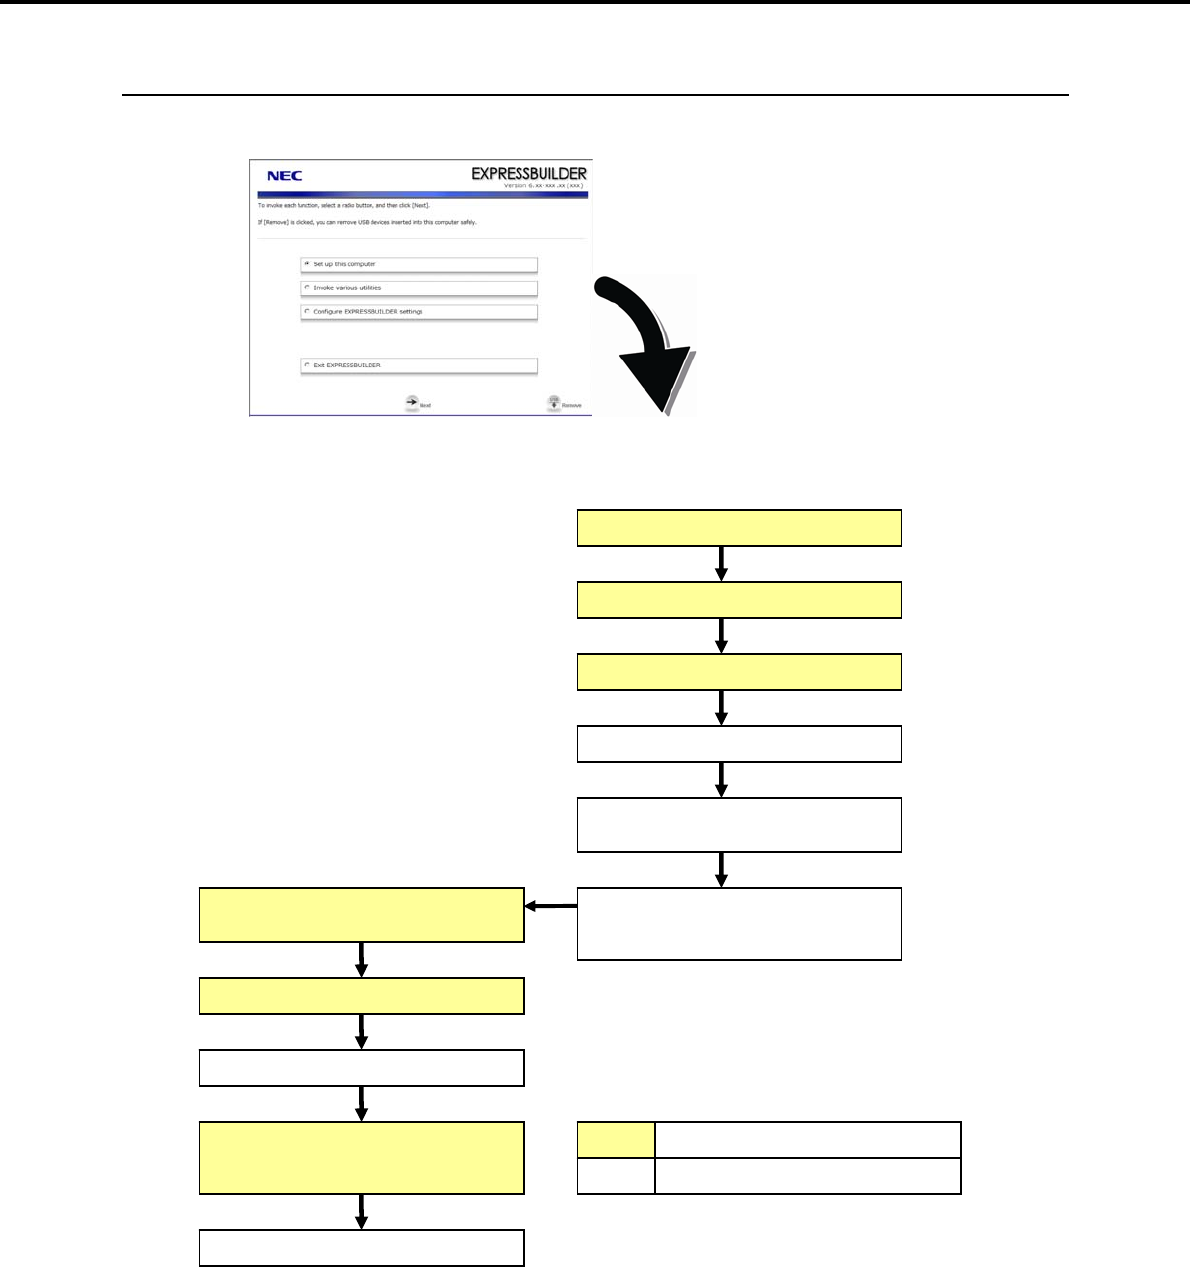
3.2.1 Setup flow
Parameter setup menu
Configure RAID system
Create and format the Windows
system partition
Copy Windows drivers
Copy the selected application
Agree to the terms of the license
Log on
Automatic installation
Insert the OS installation media
Remove the CD/DVD-ROM or
removable media
Process that requires input or selection
Process that proceeds automatically
Setup execution screen
End of installation
Setup selection menu
Express5800/GT-110d, GT-110d-S, R110d-1E, E110d-1 Installation Guide (Windows) 21
3. Setting Up Windows Server 2008 R2
Chapter 1 Installing Windows
3.2.2 Setup procedure
During Setup with EXPRESSBUILDER, parameters are specified through the wizard. You can also save the
parameters as one file (a parameter file) to removable media.
Important Read through the items in Chapter 1 (3.1 Before Starting Setup) prior to
installing Windows.
If modifying or adding network adapters or other drivers, refer to Chapter 1
(3.5 Setting Up Device Drivers).
1. Turn peripheral device power on, and then turn the server power on.
2. Use the following procedure to start EXPRESSBUILDER.
Note Be sure to disconnect removable media before starting EXPRESSBUILDER.
When using the EXPRESSBUILDER DVD
(1) Insert the EXPRESSBUILDER DVD into the optical disk drive of the server.
(2) Once the DVD is inserted, restart the server by resetting it (press <Ctrl> + <Alt> + <Delete>) or by
turning the power off and then on again.
EXPRESSBUILDER starts.
When using the Internal Flash Memory
(1) When “Press <F2> Setup, <F3> Internal Flash Memory, <F4> ROM Utility, <F12> Network”
appears below the POST window, press the <F3> key.
EXPRESSBUILDER starts.
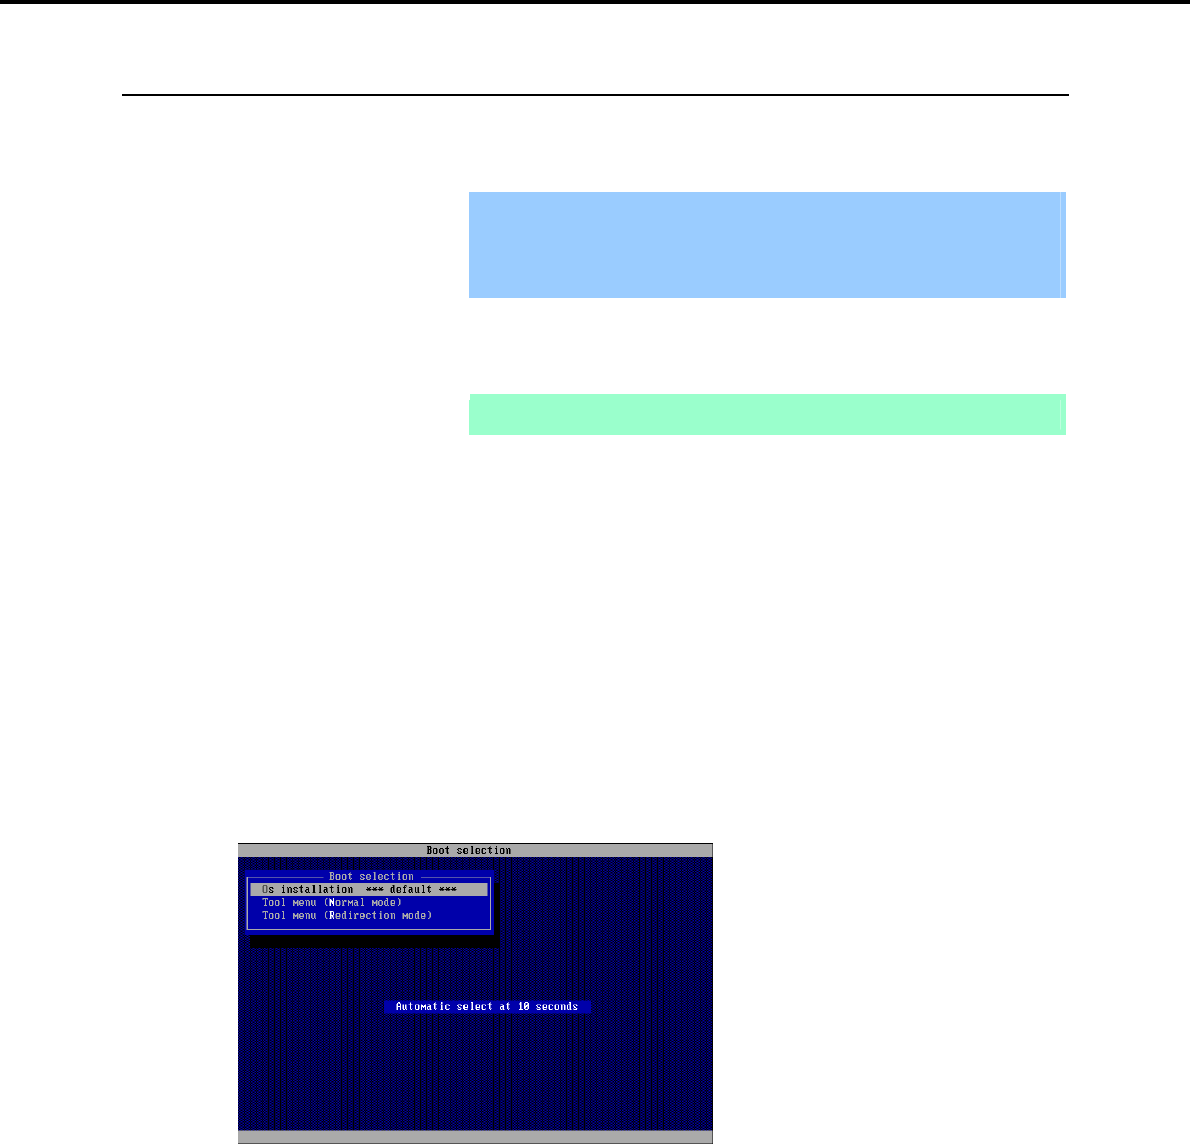
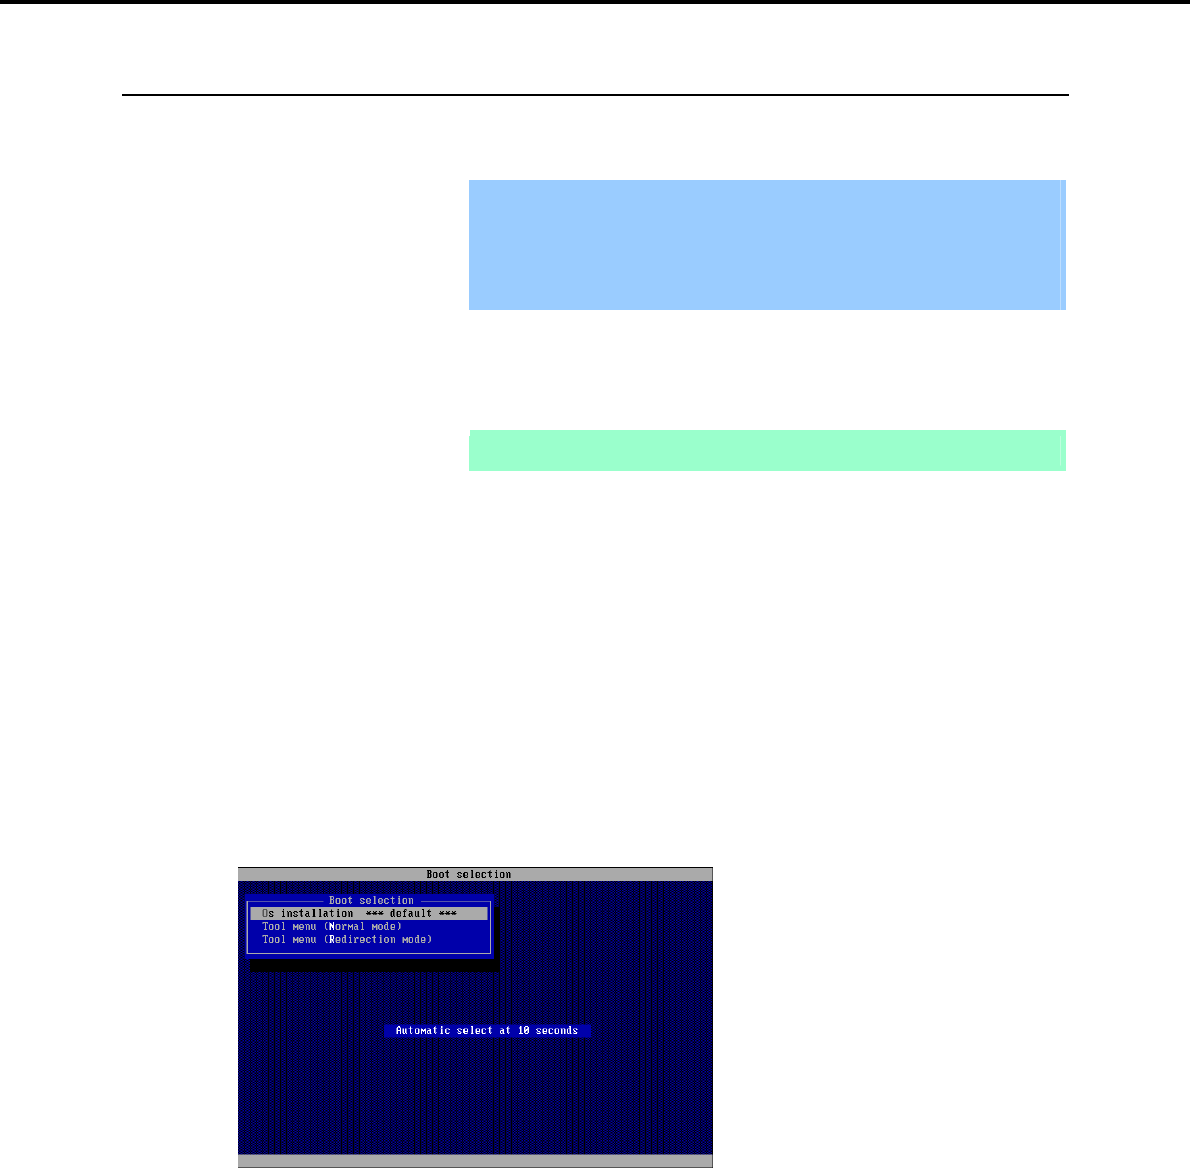
3. When the following message appears, select Os installation *** default ***.
You will automatically advance to step 4, with no need for further input.
Express5800/GT-110d, GT-110d-S, R110d-1E, E110d-1 Installation Guide (Windows)
22
3. Setting Up Windows Server 2008 R2
Chapter 1 Installing Windows
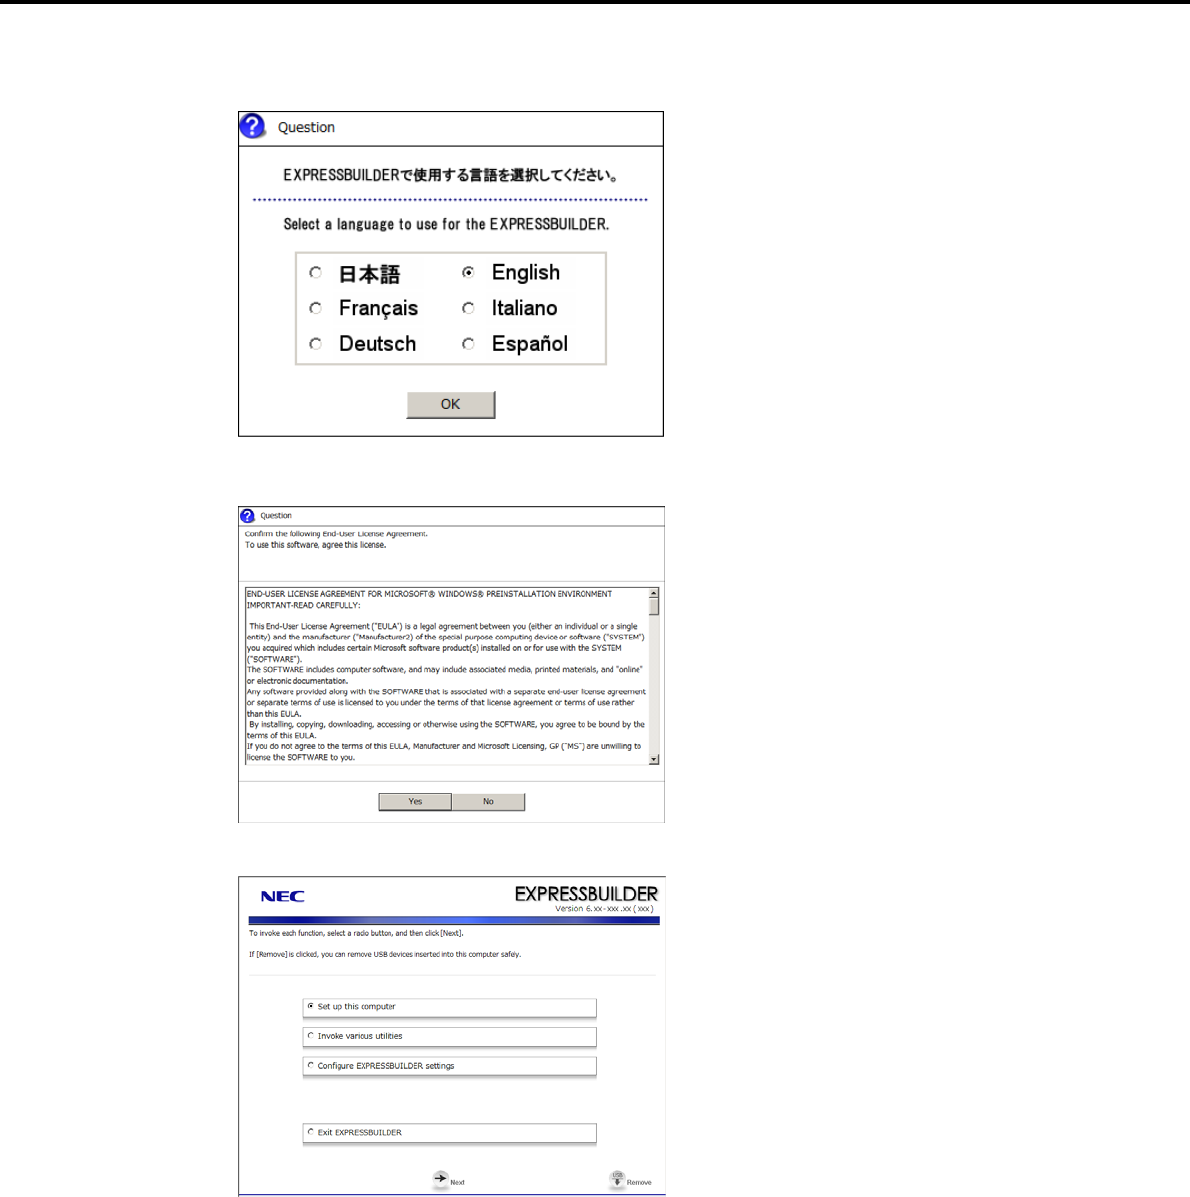
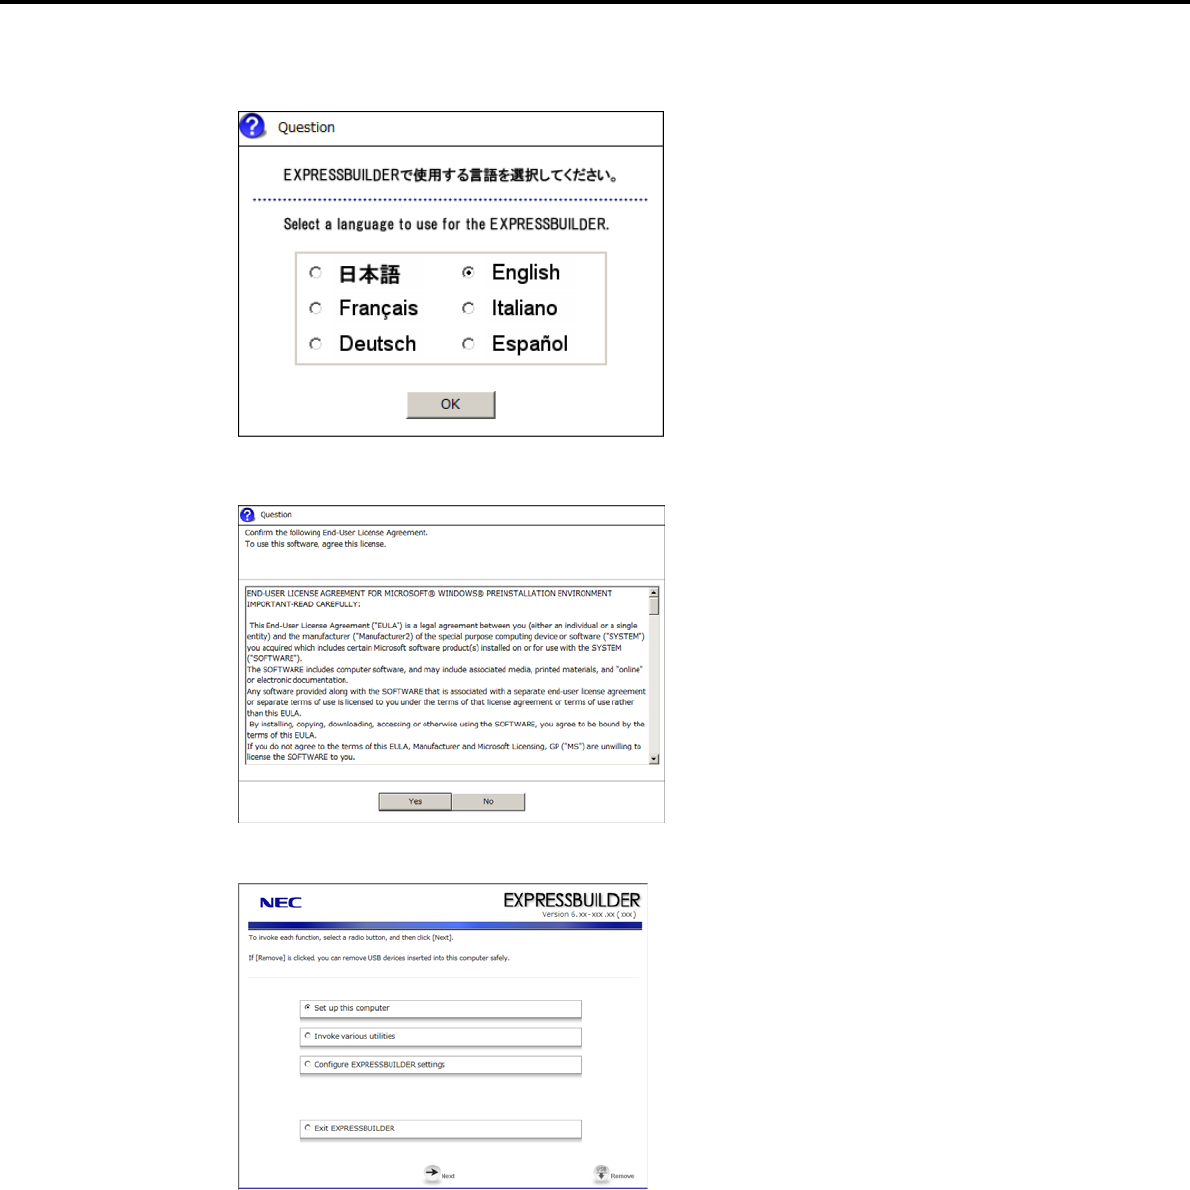
4. Select English on the language selection window, and then click [OK].
5. When the Windows PE software license agreement window appears, click [Yes].
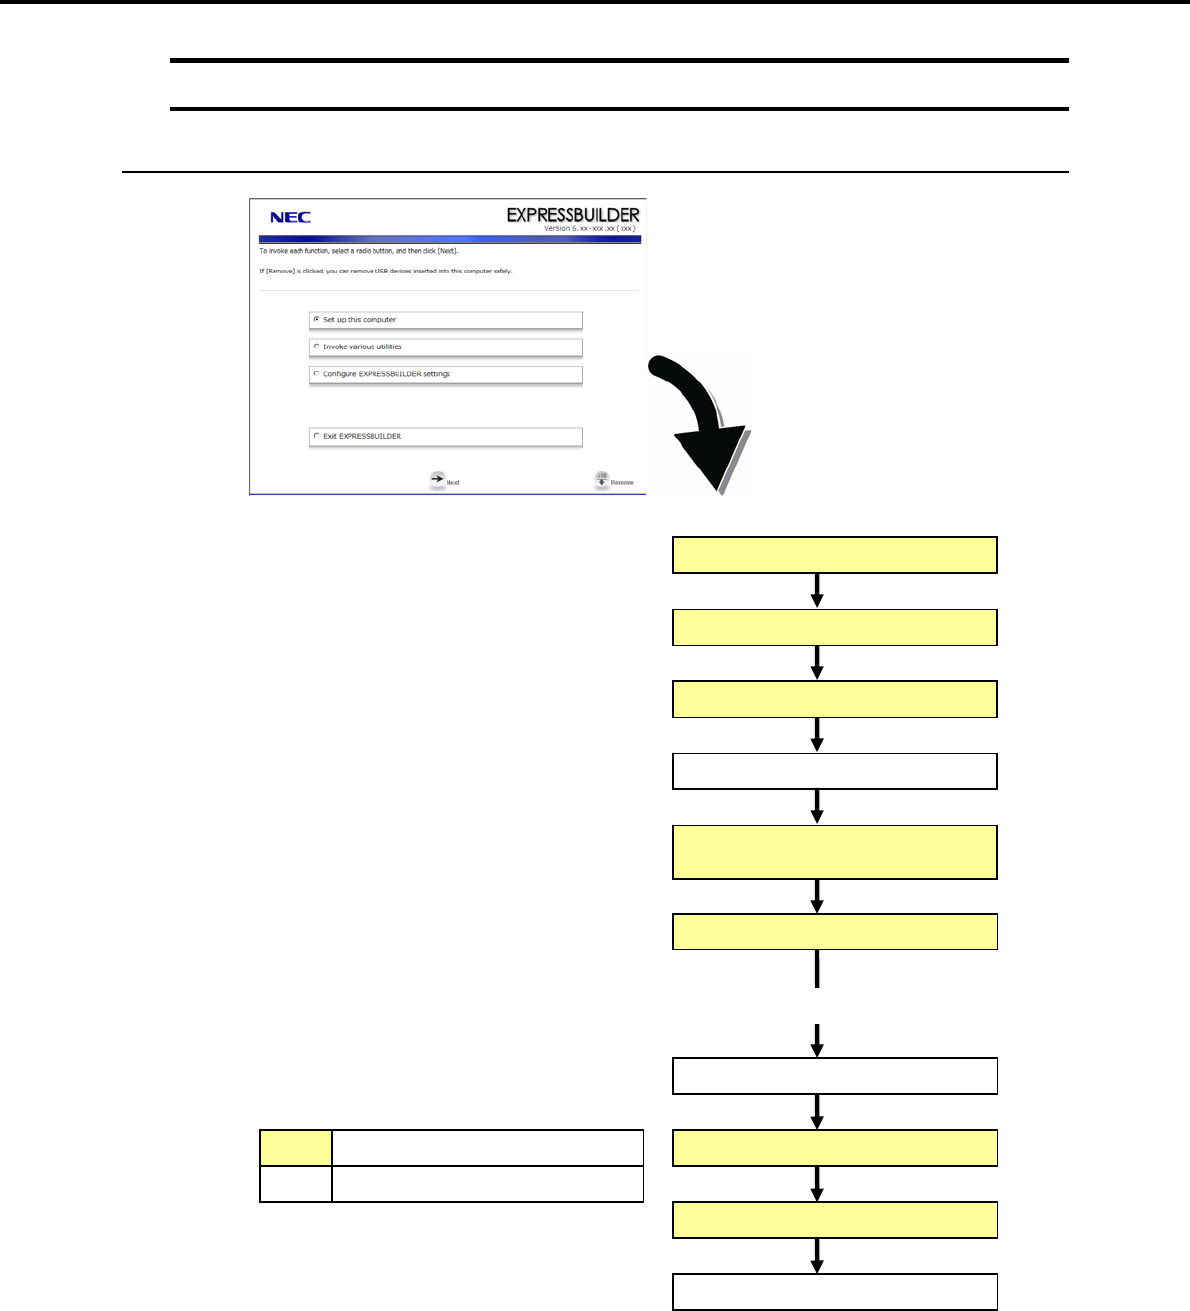
6. Select Set up this computer from the top menu, and then click [Next].
Express5800/GT-110d, GT-110d-S, R110d-1E, E110d-1 Installation Guide (Windows) 23

3. Setting Up Windows Server 2008 R2
Chapter 1 Installing Windows
7. When the setup selection menu appears, use the following steps to specify the parameters.
Note When setting up again, parameter input via the wizard can be omitted by loading
the saved parameter file.
When not using a parameter file:
Select the appropriate OS from the Install Windows drop-down list, and then click [Next].
Go to the following (1) RAID settings.
When using a parameter file:
Select Load a parameter file, and then click [Next].
Load the desired parameter file according to the onscreen instructions.
Confirm the settings on the parameter setup menu as required, and then click [Next].
Go to the following (4) Executing setup.
Express5800/GT-110d, GT-110d-S, R110d-1E, E110d-1 Installation Guide (Windows)
24
3. Setting Up Windows Server 2008 R2
Chapter 1 Installing Windows
(1) RAID settings
This function automatically recognizes the RAID Controller connected to the server and configures the RAID
System, so you must complete setup of the server by following the "User’s Guide " in advance.
Important Some data in the Hard Disk Drive might be deleted depending on the system
settings. Pay attention to input parameters. You must be especially careful
when configuring the following:
RAID settings wizard
Partition Settings in the Windows Setup wizard
Backing up user data, as needed, is recommended.
Note When using an onboard RAID Controller (LSI Embedded MegaRAID):
This function does not support the creation of RAID10 by using the onboard
RAID Controller.
Refer to Chapter 2 (4. RAID System Configuration) in “Maintenance Guide” when
creating RAID10.
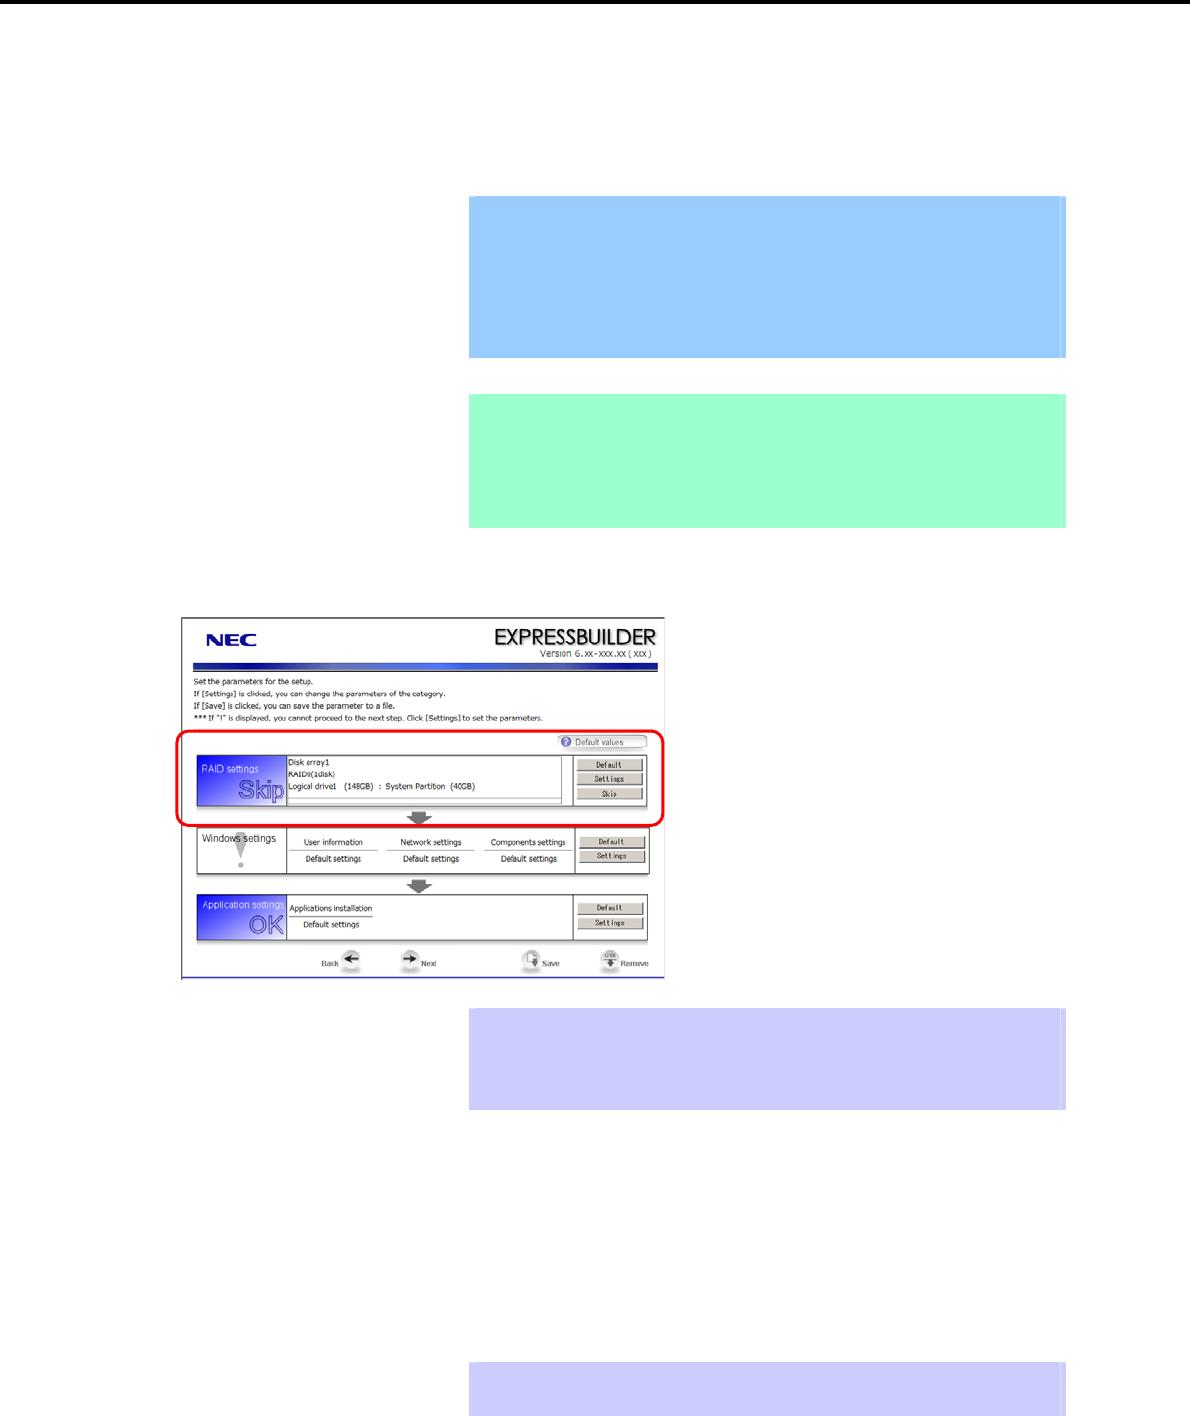
Specify the RAID settings using the RAID settings wizard on the parameter setup menu.
Tips Use the [Default] button when you want to return to the default value of parameters
after having modified them with the wizard.
You can confirm the value set by clicking the [Default] button if you click the
[Default values] button.
When creating a new Logical Drive
1. Click [Settings] in RAID settings.
2. Use the wizard to set up the Logical Drive.
When skipping the creation of a new Logical Drive
1. Click [Skip] in RAID settings.
Tips Use the [Skip] button if, after modifying the settings with the RAID settings wizard,
you want to install the existing configurations without modifying them.
Express5800/GT-110d, GT-110d-S, R110d-1E, E110d-1 Installation Guide (Windows) 25
3. Setting Up Windows Server 2008 R2
Chapter 1 Installing Windows
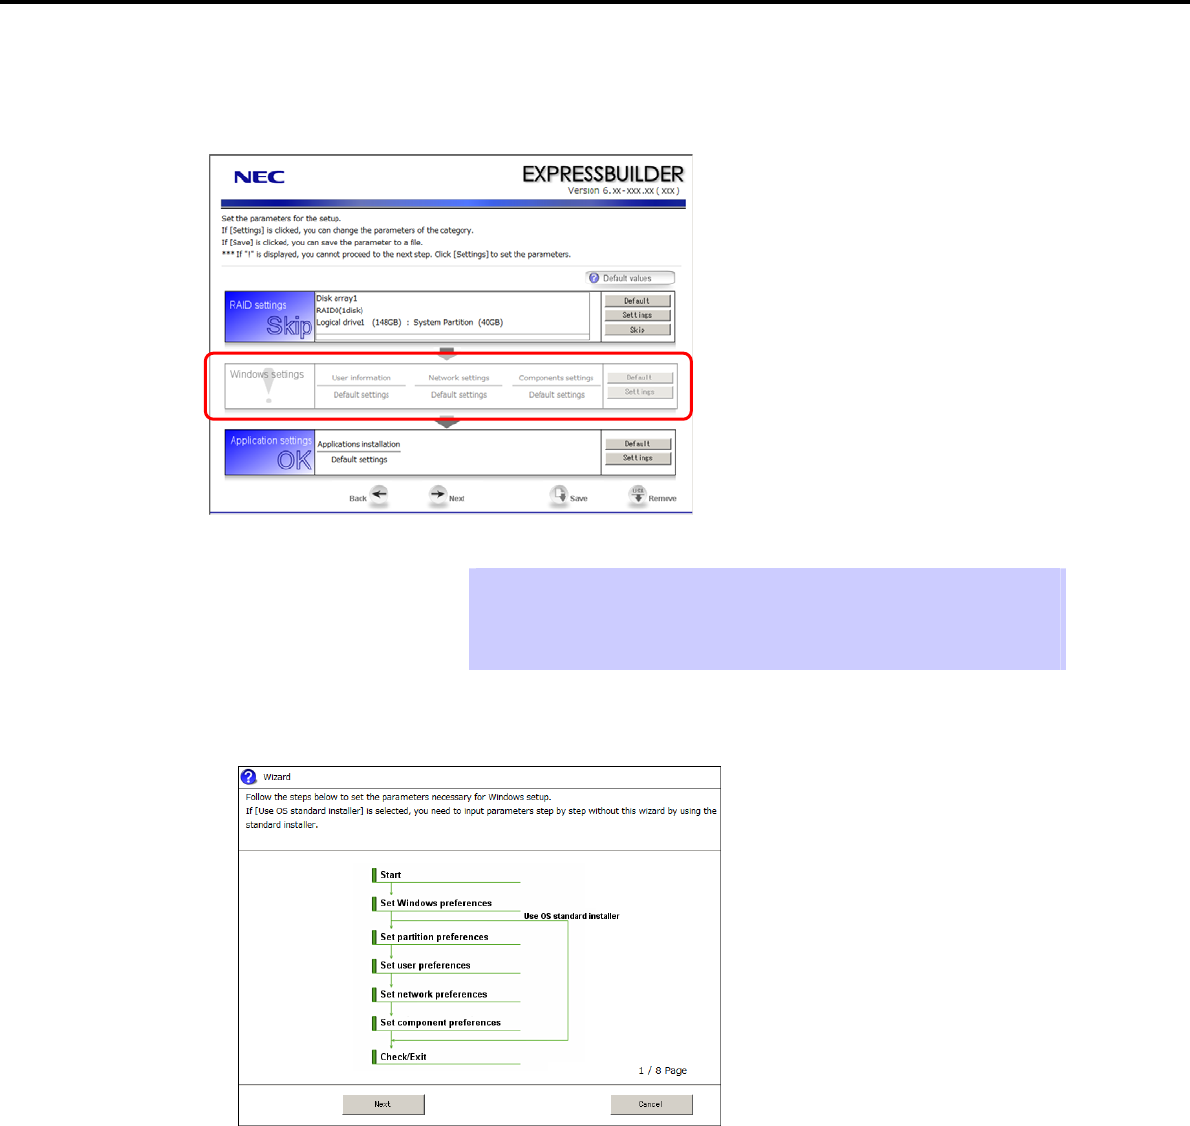
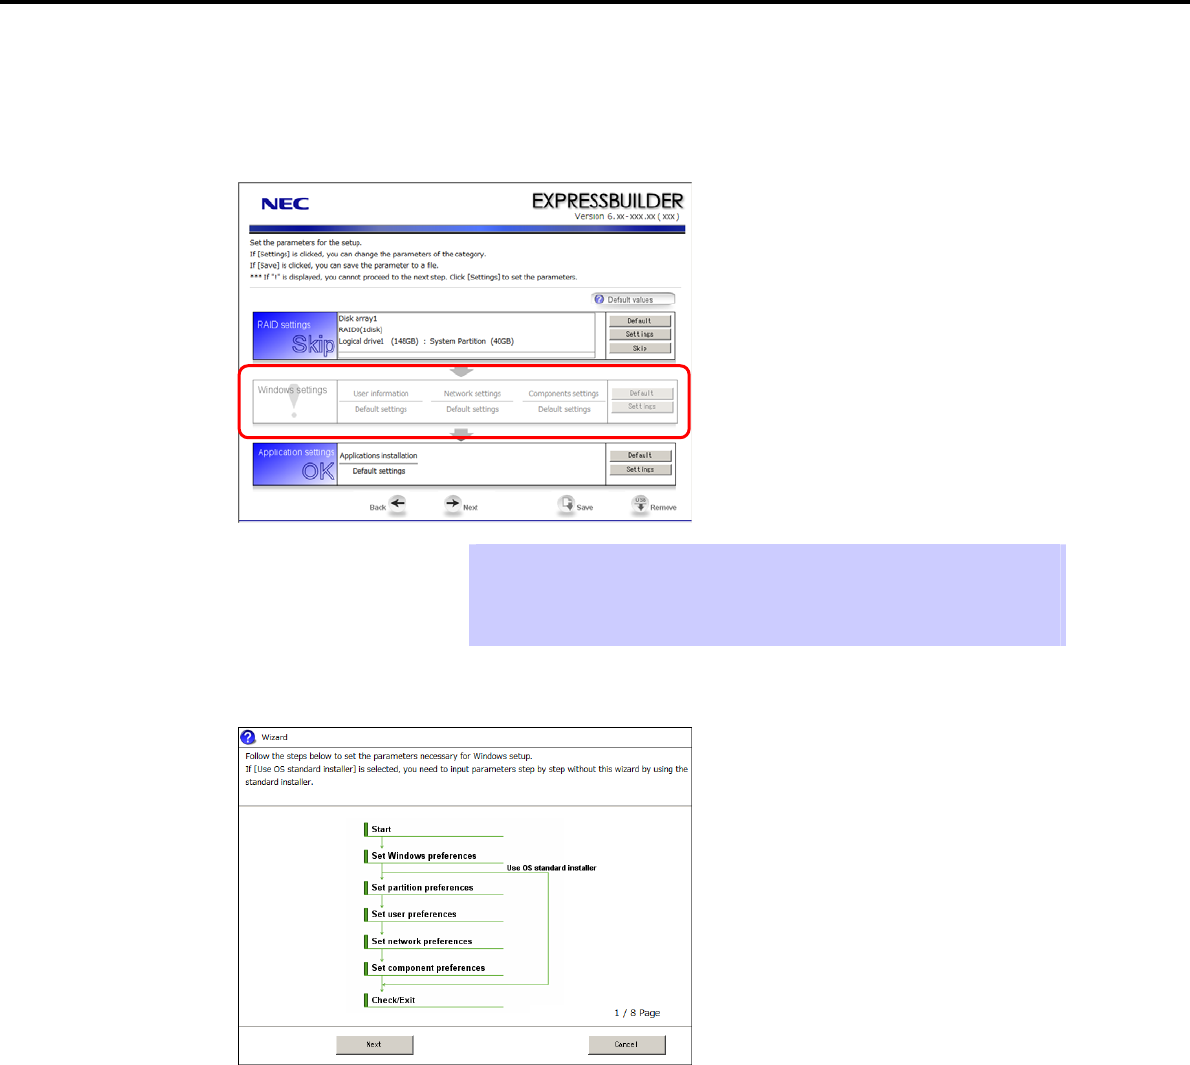
(2) Windows settings
Set up Windows by using the Windows settings wizard on the parameter setup menu.
Tips Use the [Default] button when you want to return to the default value of parameters
after having modified them with the wizard.
You can confirm the value set by clicking the [Default] button if you click the
[Default values] button.
1. Click [Settings] in Windows settings.
2. Click [Next] in the Windows settings wizard.
Express5800/GT-110d, GT-110d-S, R110d-1E, E110d-1 Installation Guide (Windows)
26
3. Setting Up Windows Server 2008 R2
Chapter 1 Installing Windows
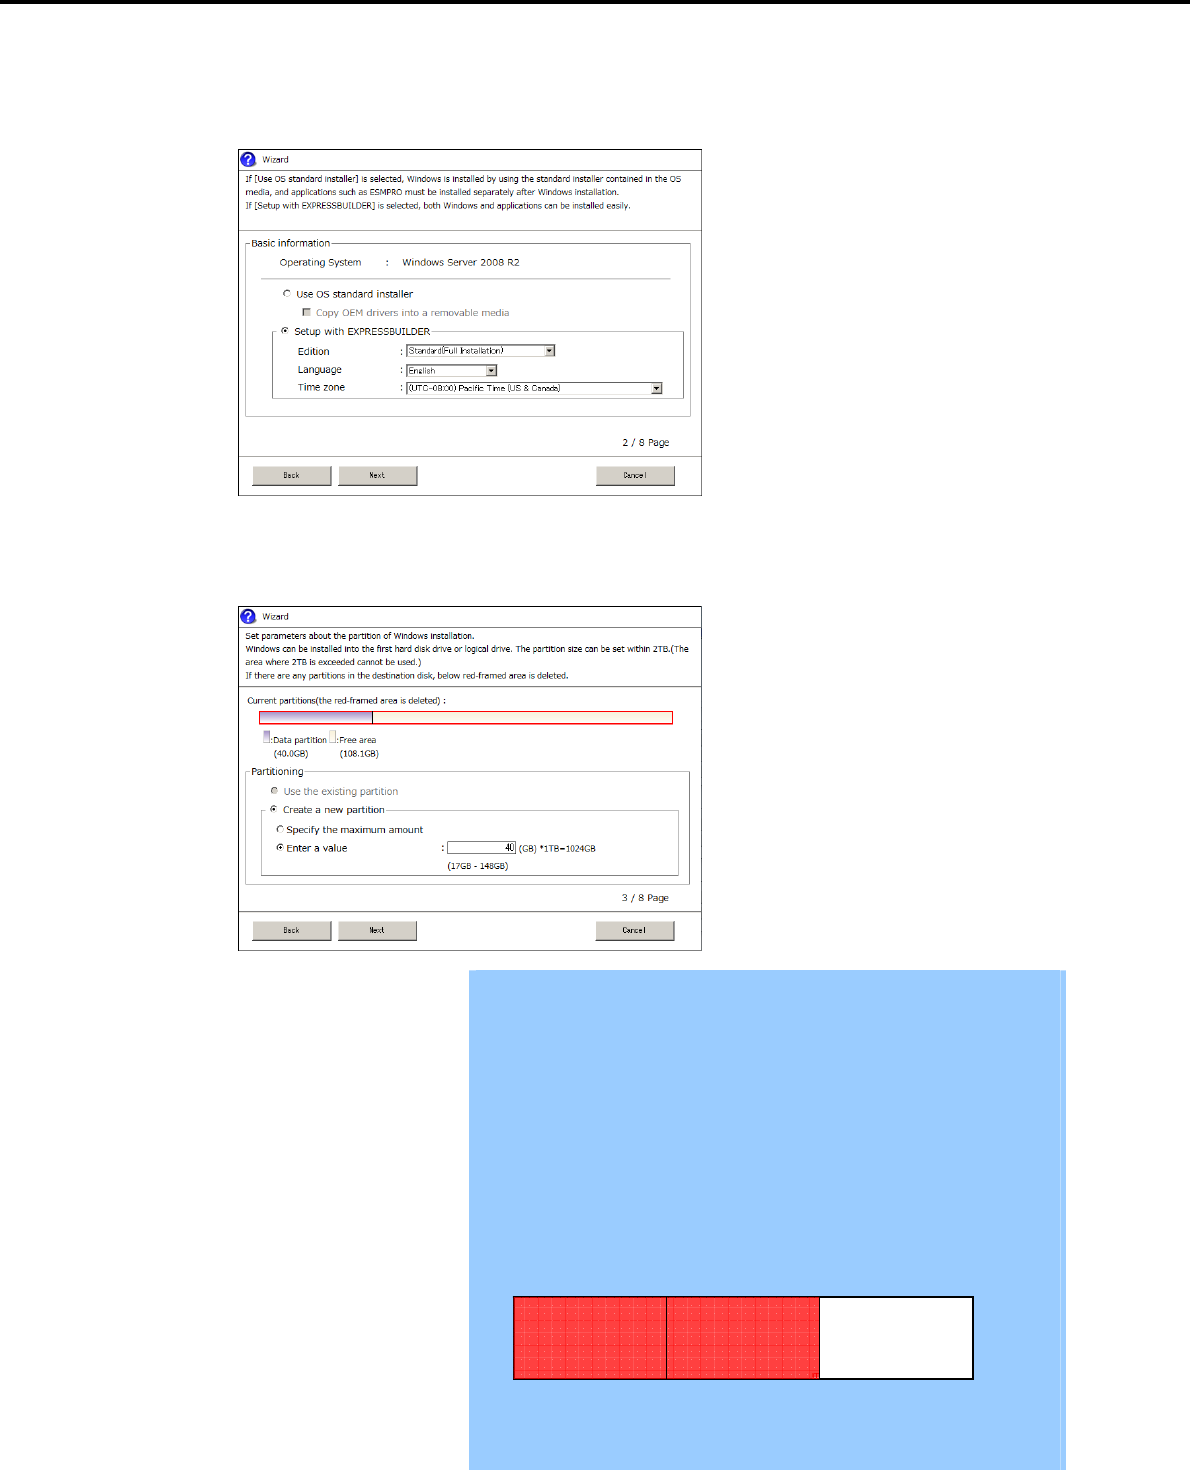
3. Specify the Windows basic settings.
The basic information window appears. Confirm the settings, making corrections as needed, and then
click [Next].
4. Set up the partitions.
The partitioning window appears. Confirm the settings, making corrections as needed, and then click
[Next].
Important
Partition size
Specify a partition size larger than the minimum required for installing
the operating system. (Refer to Chapter 1 (3.1 Before Starting Setup).)
Do not specify a size that is greater than the capacity of the connected
Hard Disk Drive.
The maximum partition size is 2,097,152 MB.
If you select Create a new partition under Partitioning, the entire contents
of the Hard Disk Drive will be deleted.
If you select Use the existing partition under Partitioning, data in the boot
partition (if it exists) and Windows partition is formatted and deleted. Data
in other partitions will be kept.
The figure below shows in which partitions data will be deleted.
Boot partition
Deleted
Windows partition
Deleted
User data partition
Retained
You cannot reinstall to an existing partition that has been upgraded to a
Dynamic Disk (refer to Chapter 1 (3.1 Before Starting Setup)). Do not select
Use the existing partition under Partitioning.
Express5800/GT-110d, GT-110d-S, R110d-1E, E110d-1 Installation Guide (Windows) 27
3. Setting Up Windows Server 2008 R2
Chapter 1 Installing Windows
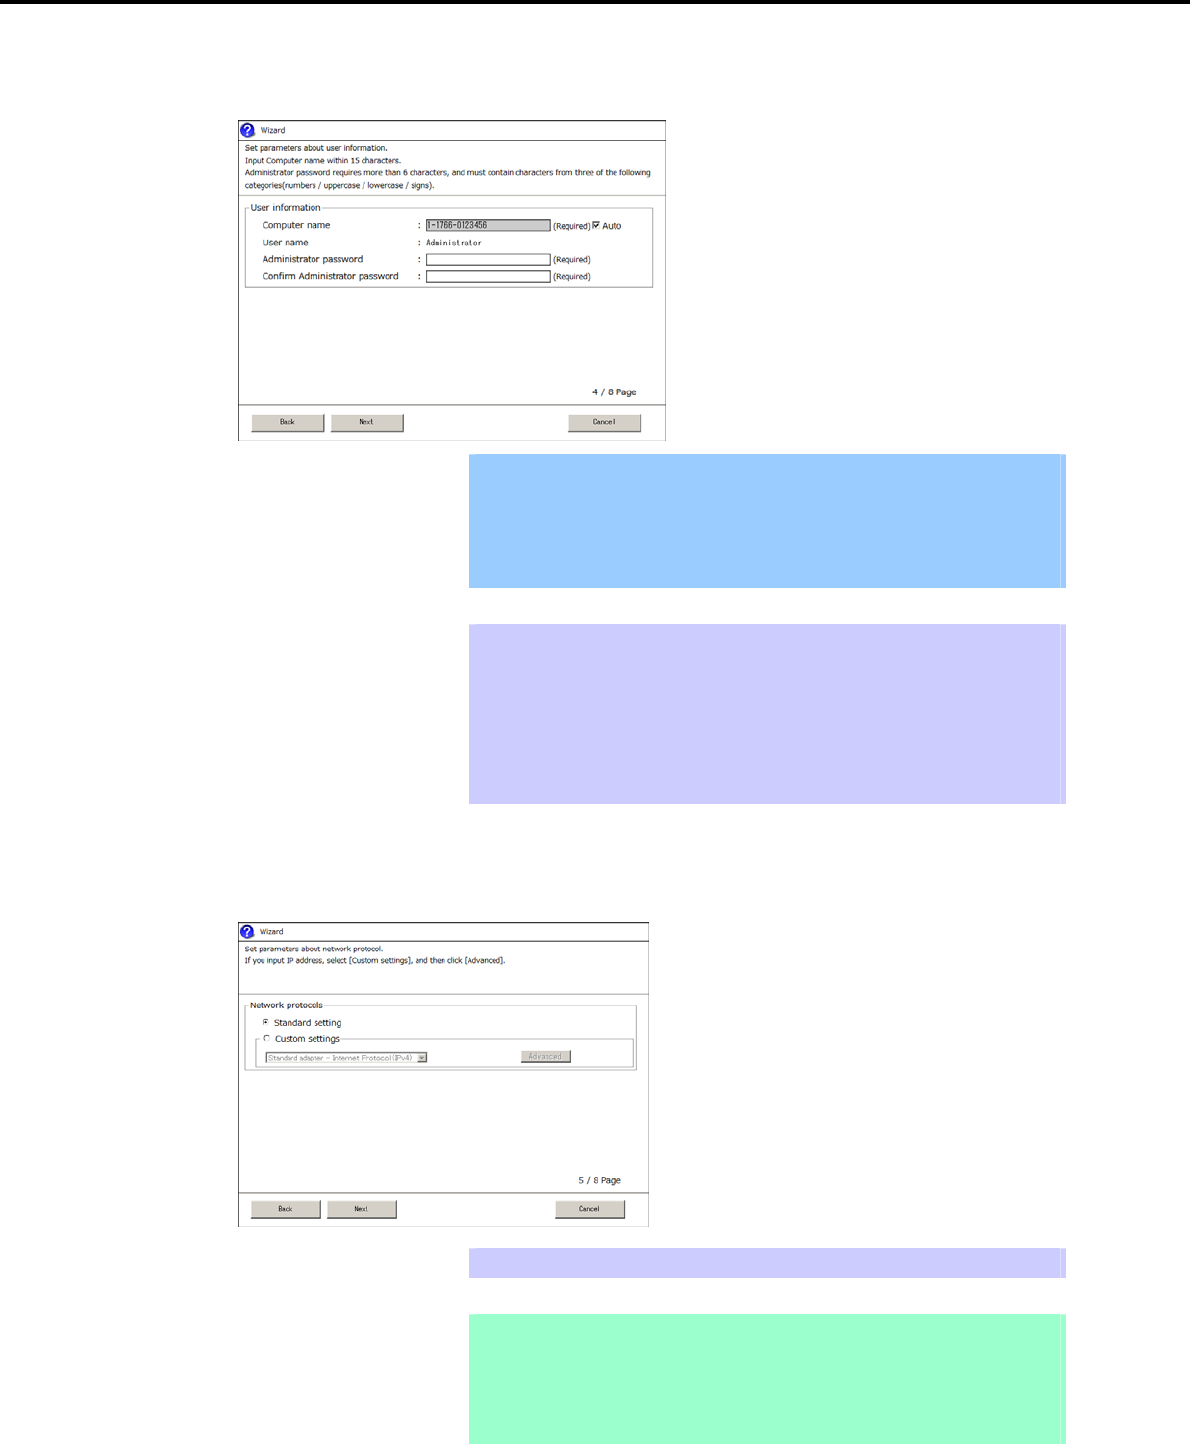
5. Enter user information.
The user information window appears. Enter the user information, and then click [Next].
Important For Windows Server 2008 R2, you must enter a computer name and
administrator password that satisfies the following conditions:
Contains 6 or more characters
Contains characters from at least three of the following categories:
numbers, uppercase letters, lowercase letters, and symbols.
Tips - The Computer name has been assigned by automatic assignment
function. If you need to assign another computer name, remove the
checkmark from "Auto", and enter the desired computer name.
- If a parameter file is used for setup or if you return to a previous screen,
is displayed in the Administrator password and Confirm
Administrator password text boxes even if no value has been entered.
6. Set up the network.
The network setting window appears. Confirm the settings, making corrections as needed, and then click
[Next].
Tips The order of entry in Custom settings may differ from the numbering of LAN ports.
Note Even when an optional network board is connected, the custom setting list only
shows standard network boards. Optional network boards are not displayed.
When an optional network board has been mounted, the optional network board
may need to be configured for the custom settings. After finishing Setup with
EXPRESSBUILDER, specify the network settings again.
Express5800/GT-110d, GT-110d-S, R110d-1E, E110d-1 Installation Guide (Windows)
28
3. Setting Up Windows Server 2008 R2
Chapter 1 Installing Windows
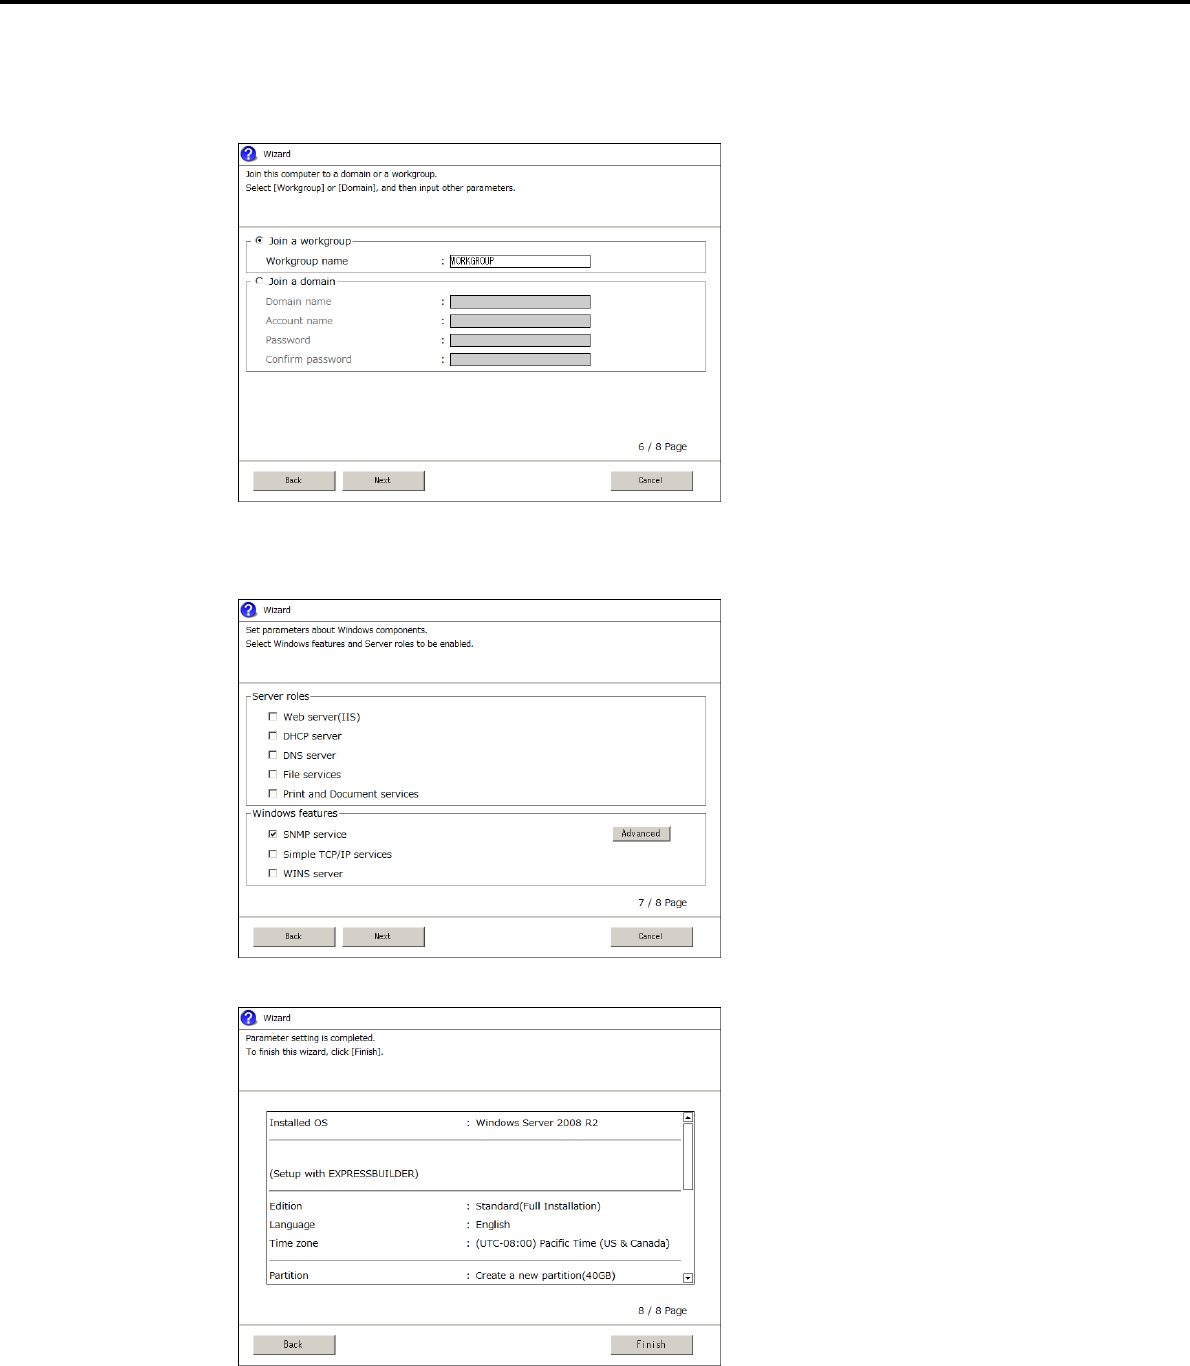
7. Enter the domain or workgroup name to be used.
The domain and workgroup setting window appears. Confirm the settings, making corrections as needed,
and then click [Next].
8. Select the Windows components for installation.
The Windows components selection window appears. Confirm the settings, making corrections as
needed, and then click [Next].
9. Click [Finish] on the confirmation window.
Return to the parameter setup menu.
Proceed to application setup.
Express5800/GT-110d, GT-110d-S, R110d-1E, E110d-1 Installation Guide (Windows) 29

3. Setting Up Windows Server 2008 R2
Chapter 1 Installing Windows
(3) Application settings
Set up applications using the Application settings wizard in the parameter setup menu.
Tips Use the [Default] button when you want to return to the default value of parameters
after having modified them with the wizard.
You can confirm the value set by clicking the [Default] button if you click the
[Default values] button.
1. Click [Setting] in Application settings.
The application setting window appears. Confirm the settings, making corrections as needed, and then
click [Finish].
2. Save the parameters.
If you are not saving a parameter file:
Go to the following (4) Executing setup.
If you are saving a parameter file:
Click [Save], and then follow the onscreen instructions to save the parameter file.
Go to the following (4) Executing setup.
Express5800/GT-110d, GT-110d-S, R110d-1E, E110d-1 Installation Guide (Windows)
30
3. Setting Up Windows Server 2008 R2
Chapter 1 Installing Windows
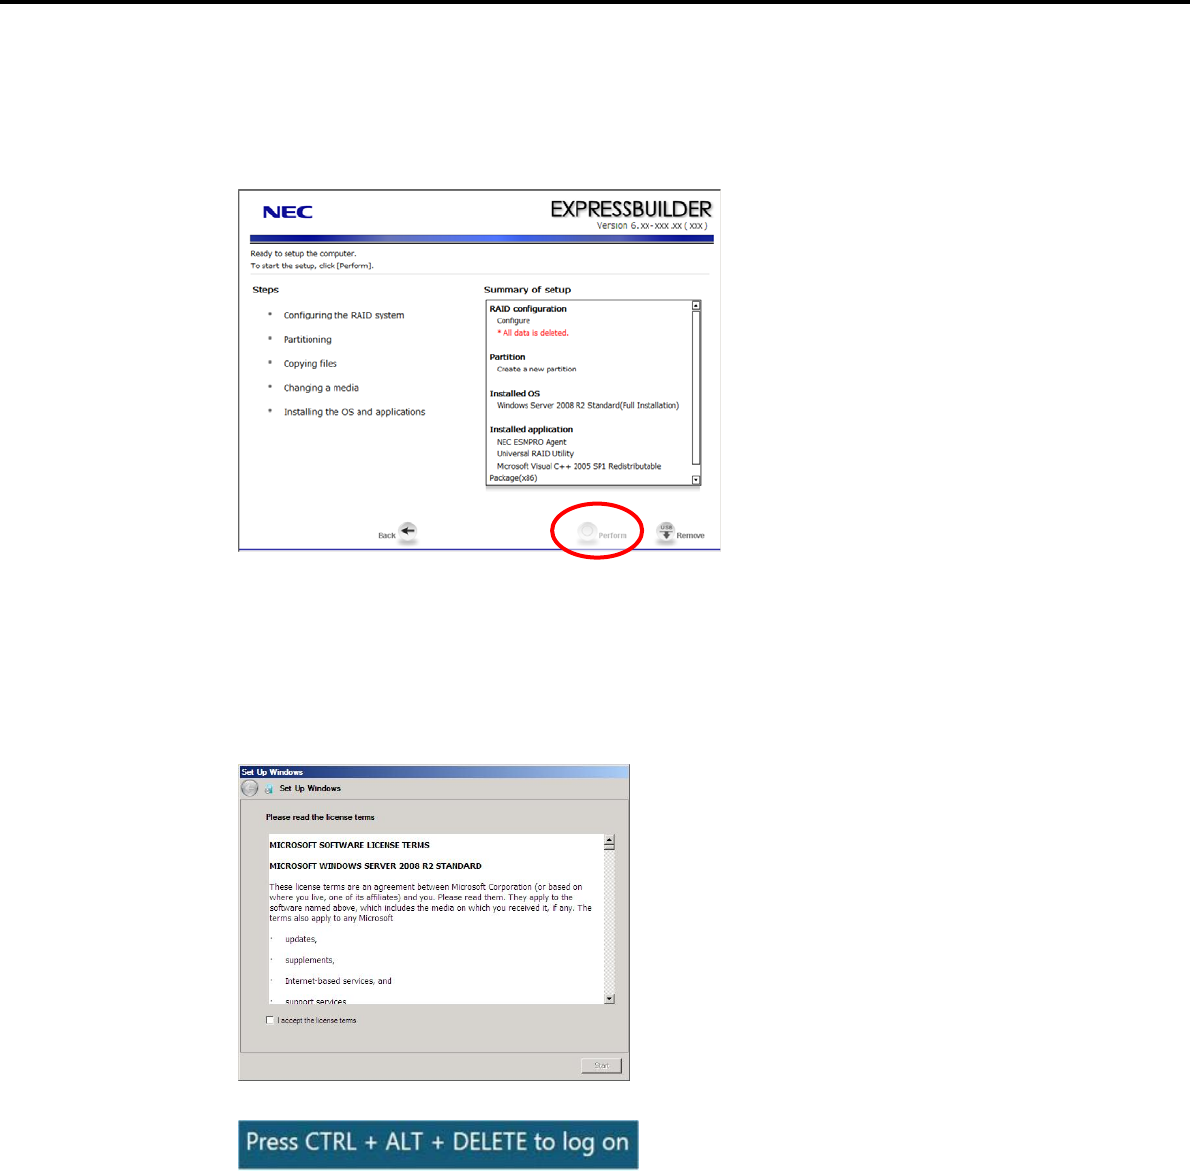
(4) Executing setup
1. Click [Next] on the parameter setup menu.
2. From the setup execution window, click [Perform].
3. Remove the EXPRESSBUILDER DVD and any removable media if inserted or connected.
4. Insert the Windows Server 2008 R2 DVD-ROM into the optical disk drive.
Windows Server 2008 R2 and selected applications will be installed automatically and restart several
times.
5. When the software license agreement window appears, select I accept the license terms, and then
click [Start] (Full installation only).
6. When the following message appears, press <Ctrl> + <Alt> + <Del>.
7. Follow the onscreen instructions to log on to the system.
Express5800/GT-110d, GT-110d-S, R110d-1E, E110d-1 Installation Guide (Windows) 31
3. Setting Up Windows Server 2008 R2
Chapter 1 Installing Windows
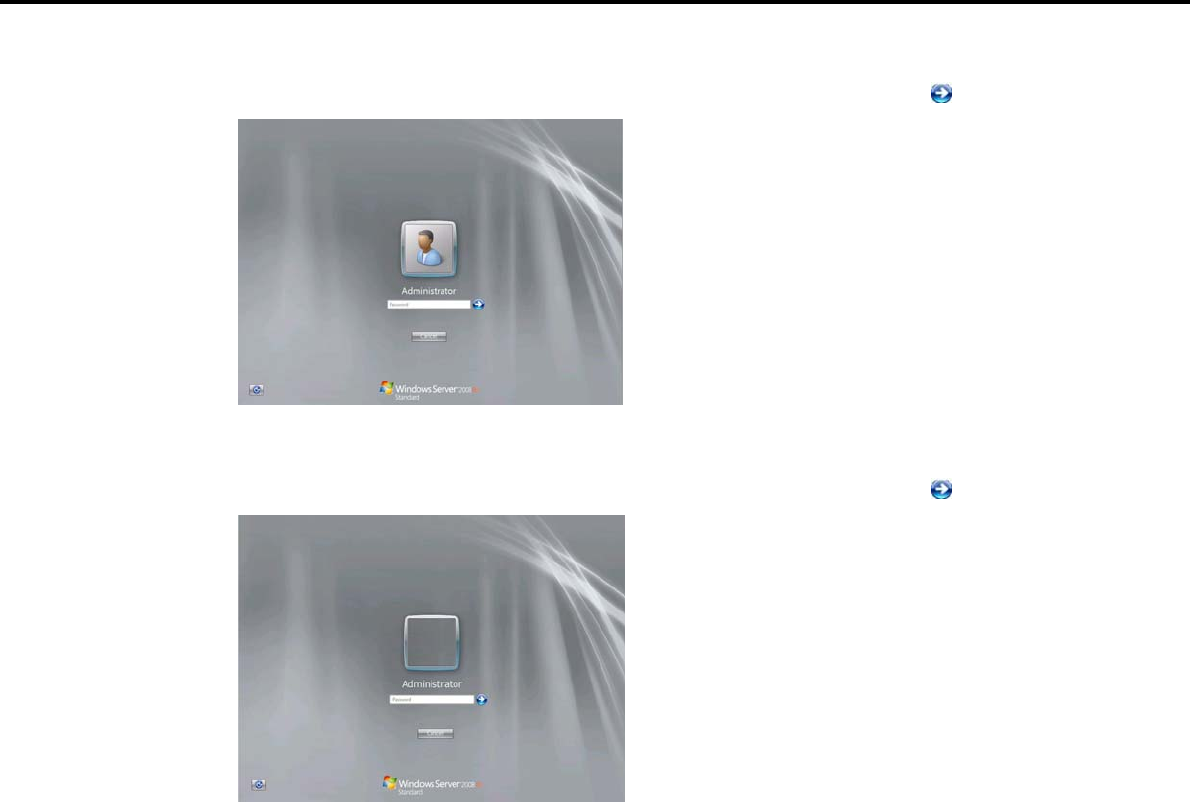
For Full installations:
When the following window appears, enter your password into the text box, and then click .
For Server Core installations:
When the following window appears, enter your password into the text box, and then click .
8. Click [OK] in the Setup Complete window.
9. Follow the instructions described in Chapter 1 (3.5 Setting Up Device Drivers) to set up the device
drivers.
10. For optional devices whose driver has not been installed, install the device drivers according to the
instructions supplied in the driver manual.
11. Execute setup by following the instructions described in Chapter 1 (7. Setup for Solving Problems).
Setup with EXPRESSBUILDER is now complete.
Express5800/GT-110d, GT-110d-S, R110d-1E, E110d-1 Installation Guide (Windows)
32
3. Setting Up Windows Server 2008 R2
Chapter 1 Installing Windows
3.3 Setup with OS Standard Installer
3.3.1 Setup flow
End of installation
Setup execution screen
Configure RAID System
Copy the OEM drivers (if required)
Parameter setup menu
Setup selection menu
Process that requires input or selection
Process that proceeds automatically
Install the Starter Pack
Restart (automatically)
Insert the OS installation media
Installation
Log on
Express5800/GT-110d, GT-110d-S, R110d-1E, E110d-1 Installation Guide (Windows) 33

3. Setting Up Windows Server 2008 R2
Chapter 1 Installing Windows
3.3.2 Requirements for Setup with OS standard installer
Prepare the following disks and instruction manuals before starting setup.
Operating system installation media
NEC operating system installation media (hereafter referred to as backup DVD-ROM)
Microsoft operating system installation media (hereafter referred to as Windows Server 2008 R2
DVD-ROM)
First Steps Guide
EXPRESSBUILDER DVD
If you purchased optional Internal Flash Memory, you can use it during installation.
Prepare if needed:
OEM drivers (Windows Server 2008 R2)
Tips EXPRESSBUILDER may be distributed in Internal Flash Memory.
EXPRESSBUILDER can be run from the Internal Flash Memory if it is installed in
the server.
If you are using a server with Internal Flash Memory installed, you can install the
OS without using the EXPRESSBUILDER DVD. .
OEM drivers are required in the following cases. Prepare Flash FDD or other
removable media should these conditions apply.
Yes
Yes
Does the server have Internal Flash Memory?
Yes
The OEM drivers do not
need to be created.
The OEM drivers must be
created.
No
Is the built-in DVD drive used for installation in an onboard RAID
Controller (LSI Embedded MegaRAID) environment?
Express5800/GT-110d, GT-110d-S, R110d-1E, E110d-1 Installation Guide (Windows)
34
3. Setting Up Windows Server 2008 R2
Chapter 1 Installing Windows
3.3.3 Setup procedure
This section describes the procedure for installing Windows Server 2008 R2 with OS standard installer.
Important Before starting setup, refer to Chapter 1 (3.1 Before Starting Setup). It
describes how to make partitions.
The procedure differs depending on the media on which
EXPRESSBUILDER is stored. Use Internal Flash Memory if you have
purchased it as an option.
1. Turn peripheral device power on, and then turn the server power on.
2. Use the following procedure to start EXPRESSBUILDER.
Note Be sure to disconnect removable media before starting EXPRESSBUILDER.
When using the EXPRESSBUILDER DVD:
(1) Insert the EXPRESSBUILDER DVD into the optical disk drive of the server.
(2) Once the DVD is inserted, restart the server by resetting it (press <Ctrl> + <Alt> + <Delete>) or
by turning the power off and then on again. EXPRESSBUILDER starts.
When using Internal Flash Memory:
(1) When “Press <F2> Setup, <F3> Internal Flash Memory, <F4> ROM Utility, <F12> Network”
appears below the POST window, press the <F3> key. EXPRESSBUILDER starts.
3. When the following message appears, select Os installation *** default ***.
You will automatically advance to step 4, with no need for further input.
Express5800/GT-110d, GT-110d-S, R110d-1E, E110d-1 Installation Guide (Windows) 35
3. Setting Up Windows Server 2008 R2
Chapter 1 Installing Windows
4. Select English on the language selection window, and then click [OK].
5. When the Windows PE software license agreement window appears, click [Yes].
6. Select Set up this computer from the top menu, and then click [Next].
Express5800/GT-110d, GT-110d-S, R110d-1E, E110d-1 Installation Guide (Windows)
36

3. Setting Up Windows Server 2008 R2
Chapter 1 Installing Windows
7. When the setup selection menu appears, use the following steps to set up the parameters.
Note When setting up again, an already saved parameter file can be loaded, so that you
can skip inputting parameters in the wizard.
If not using a parameter file:
Select the appropriate OS from the Install Windows drop-down list, and then click [Next].
Go to the following (1) RAID settings.
If using a parameter file:
Select Load a parameter file, and then click [Next].
Follow the onscreen instructions to load the parameters.
Confirm the settings on the parameter setup menu as required, and then click [Next].
Go to the following (2) Executing setup – Executing setup 5.
Express5800/GT-110d, GT-110d-S, R110d-1E, E110d-1 Installation Guide (Windows) 37

3. Setting Up Windows Server 2008 R2
Chapter 1 Installing Windows
(1) RAID settings
This function automatically recognizes the RAID Controller connected to the server and configures the RAID
System, so you must complete setup of the server by following the "User’s Guide " in advance.
Important Some data in the Hard Disk Drive might be deleted depending on the system
settings. Pay attention to input parameters. You must be especially careful
when configuring the following:
RAID settings wizard
Backing up user data, as needed, is recommended.
Note When using an onboard RAID Controller (LSI Embedded MegaRAID):
This function does not support the creation of RAID10 by using the onboard
RAID Controller.
Refer to Chapter 2 (4. RAID System Configuration) in “Maintenance Guide” when
creating RAID10.
Specify the RAID settings using the RAID settings wizard on the parameter setup menu.
Tips Use the [Default] button when you want to return to the default value of parameters
after having modified them with the wizard.
You can confirm the value set by clicking the [Default] button if you click the
[Default values] button.
When creating a new Logical Drive:
1. Click [Settings] in RAID settings.
2. Use the wizard to set up the Logical Drive.
When skipping the creation of a new Logical Drive:
1. Click [Skip] in RAID settings.
Tips Use the [Skip] button if, after modifying the settings with the RAID settings wizard,
you want to install the already existing configurations without modifying them.
Express5800/GT-110d, GT-110d-S, R110d-1E, E110d-1 Installation Guide (Windows)
38
3. Setting Up Windows Server 2008 R2
Chapter 1 Installing Windows
(2) Executing setup
Install Windows using the following procedure.
1. Click [Settings] in Windows settings.
Tips Use the [Default] button when you want to return to the default value of parameters
after having modified them with the wizard.
You can confirm the value set by clicking the [Default] button if you click the
[Default values] button.
2. Click [Next] in the Windows settings wizard.
Express5800/GT-110d, GT-110d-S, R110d-1E, E110d-1 Installation Guide (Windows) 39
3. Setting Up Windows Server 2008 R2
Chapter 1 Installing Windows
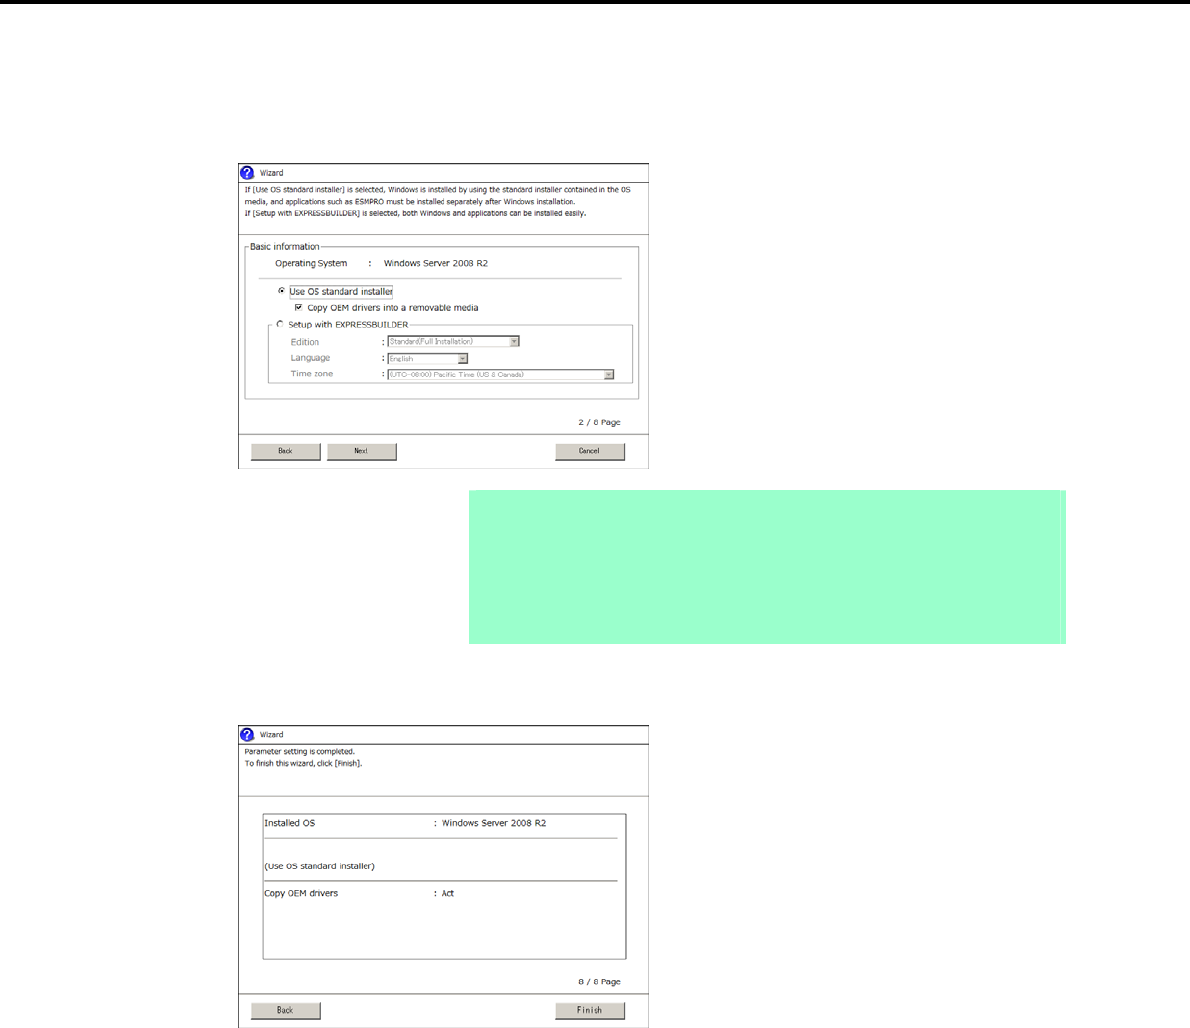
3. Specify the Windows basic settings.
The basic information window appears. Select Use OS standard installer, and then click [Next].
If copying the OEM drivers to the removable media, select Copy OEM drivers into a removable media.
Note If using Internal Flash Memory:
Clear the Copy OEM drivers into a removable media check box.
You must enable Internal Flash Memory when installing the operating system.
If using the EXPRESSBUILDER DVD:
Select the Copy OEM drivers into a removable media check box only if the
OEM drivers are required to be copied.
4. After clicking [Finish] on the confirmation window, click [Next] in the parameter setup menu.
Express5800/GT-110d, GT-110d-S, R110d-1E, E110d-1 Installation Guide (Windows)
40

3. Setting Up Windows Server 2008 R2
Chapter 1 Installing Windows
5. From the setup execution window, click [Perform].
The server automatically restarts.
If using Internal Flash Memory: Go to step 6
If using the EXPRESSBUILDER DVD: Go to step 7
Express5800/GT-110d, GT-110d-S, R110d-1E, E110d-1 Installation Guide (Windows) 41

3. Setting Up Windows Server 2008 R2
Chapter 1 Installing Windows
Note If the Copy OEM drivers into a removable media checkbox is selected in step
3, the following window appears. Follow the onscreen instructions and continue
the operation.
When the following message appears, insert the OS installation media, and then
click [OK].
6. Enable Internal Flash Memory.
If the following message appears below the POST window during reboot, press the <F3> key.
Press <F2> Setup, <F3> Internal Flash Memory, <F4> ROM Utility, <F12> Network
Note Because this setting enables the Internal Flash Memory to be used, start the OS
from the OS media, not from the Internal Flash Memory.
Express5800/GT-110d, GT-110d-S, R110d-1E, E110d-1 Installation Guide (Windows)
42
3. Setting Up Windows Server 2008 R2
Chapter 1 Installing Windows
7. Run from the OS installation media.
Important If a bootable operating system is already installed on the Hard Disk Drive,
press the <Enter> key while the message “Press any key to boot from CD
or DVD…” is displayed on the top of the screen. This step is unnecessary if
no bootable operating system exists.
If the Windows installation window (from step 8) does not appear, the
<Enter> key was not pressed correctly. Turn the system power on and start
again from the beginning.
Do not remove the media while copying OEM drivers.
The message “Windows is loading files…” appears.
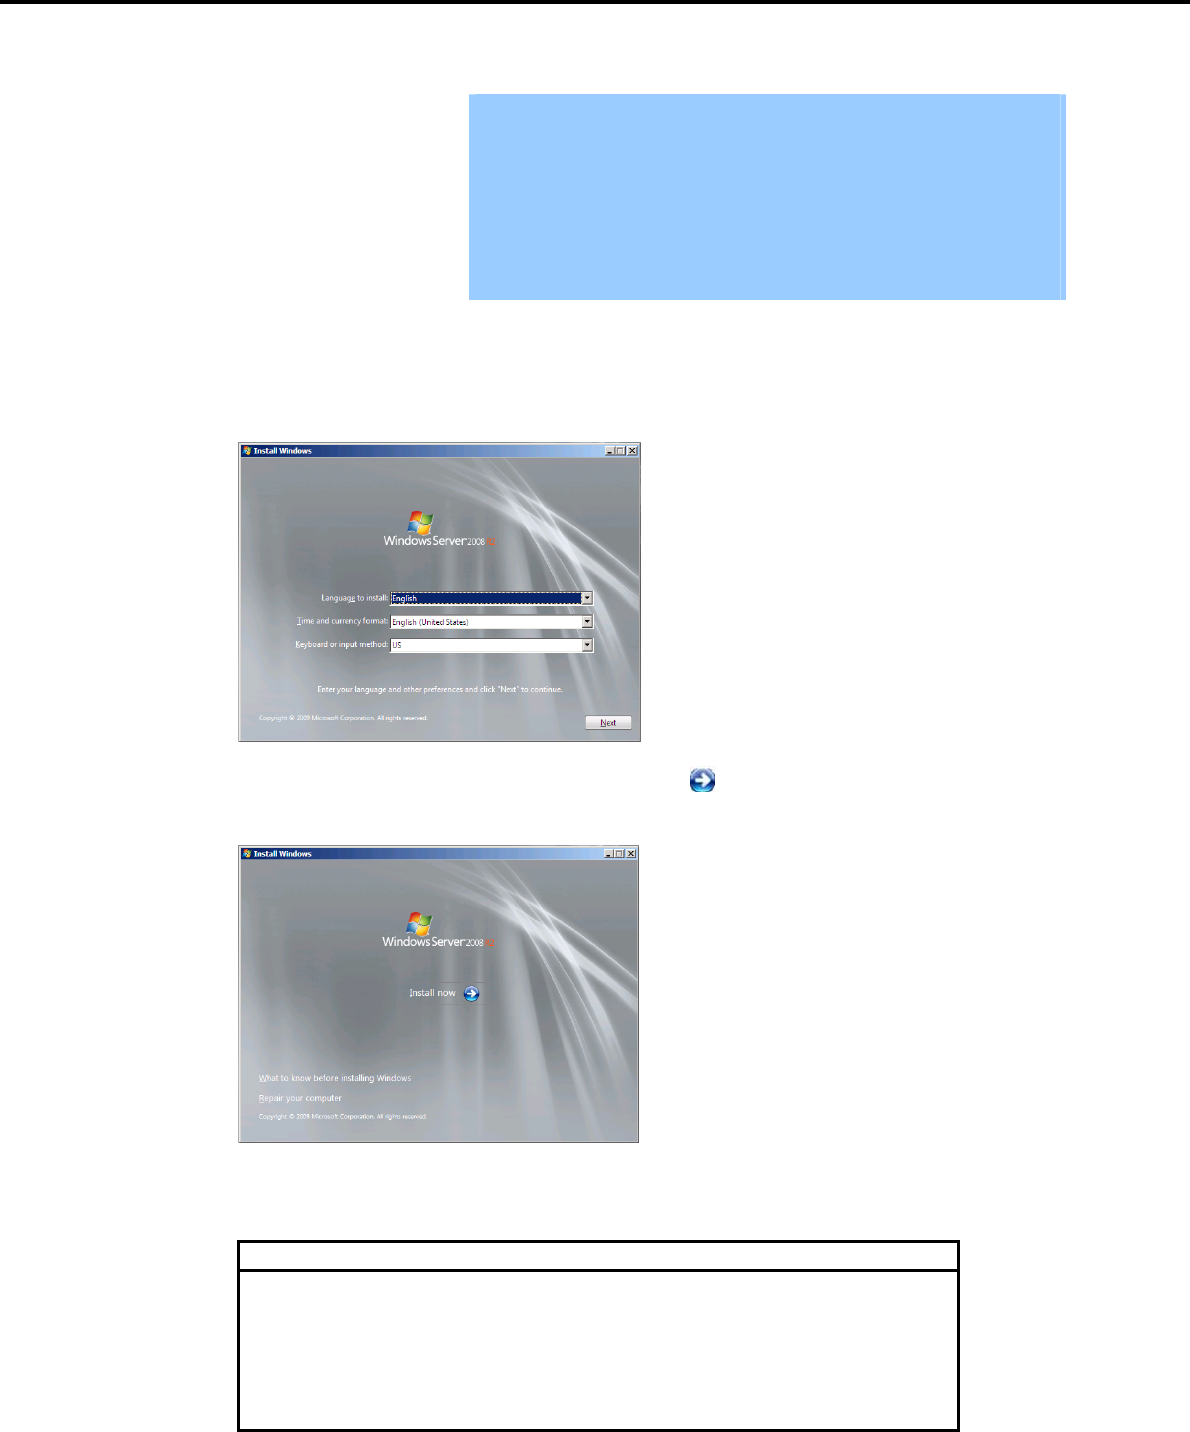
8. When the following window appears, select a language, enter information for the other items, and then
click [Next].
9. When the following message appears, click [Install Now ].
Windows Server 2008 R2 installation starts.
If the following message appears, go to step 10.
If the following message does not appear, go to step 12.
Load Driver
A required CD/DVD drive device driver is missing. If you have a driver
floppy disk, CD, DVD, or USB flash drive, please insert it now.
Note: If the Windows installation media is in the CD/DVD drive, you
can safely remove it for this step.
[Browse] [OK] [Cancel]
Express5800/GT-110d, GT-110d-S, R110d-1E, E110d-1 Installation Guide (Windows) 43
3. Setting Up Windows Server 2008 R2
Chapter 1 Installing Windows
Tips The above message appears if you are using an onboard RAID Controller (LSI
Embedded MegaRAID) in an environment equipped with an internal DVD drive.
When this message appears, the message will say “CD, DVD, or USB flash
drive”, but you must use Internal Flash Memory or removable media with the
OEM drivers copied onto it.
10. Select the destination, and then click [OK].
If using OEM drivers:
Removable media drive letter:\OEM_Driver\ws2008r2\megasr1
If using Internal Flash Memory:
Internal Flash Memory drive letter:\020\win\winnt\oemfd\ws2008r2\megasr1
Tips The volume label of the Internal Flash Memory is INTER-FLASH.
11. Select LSI Embedded MegaRAID, and then click [Next].
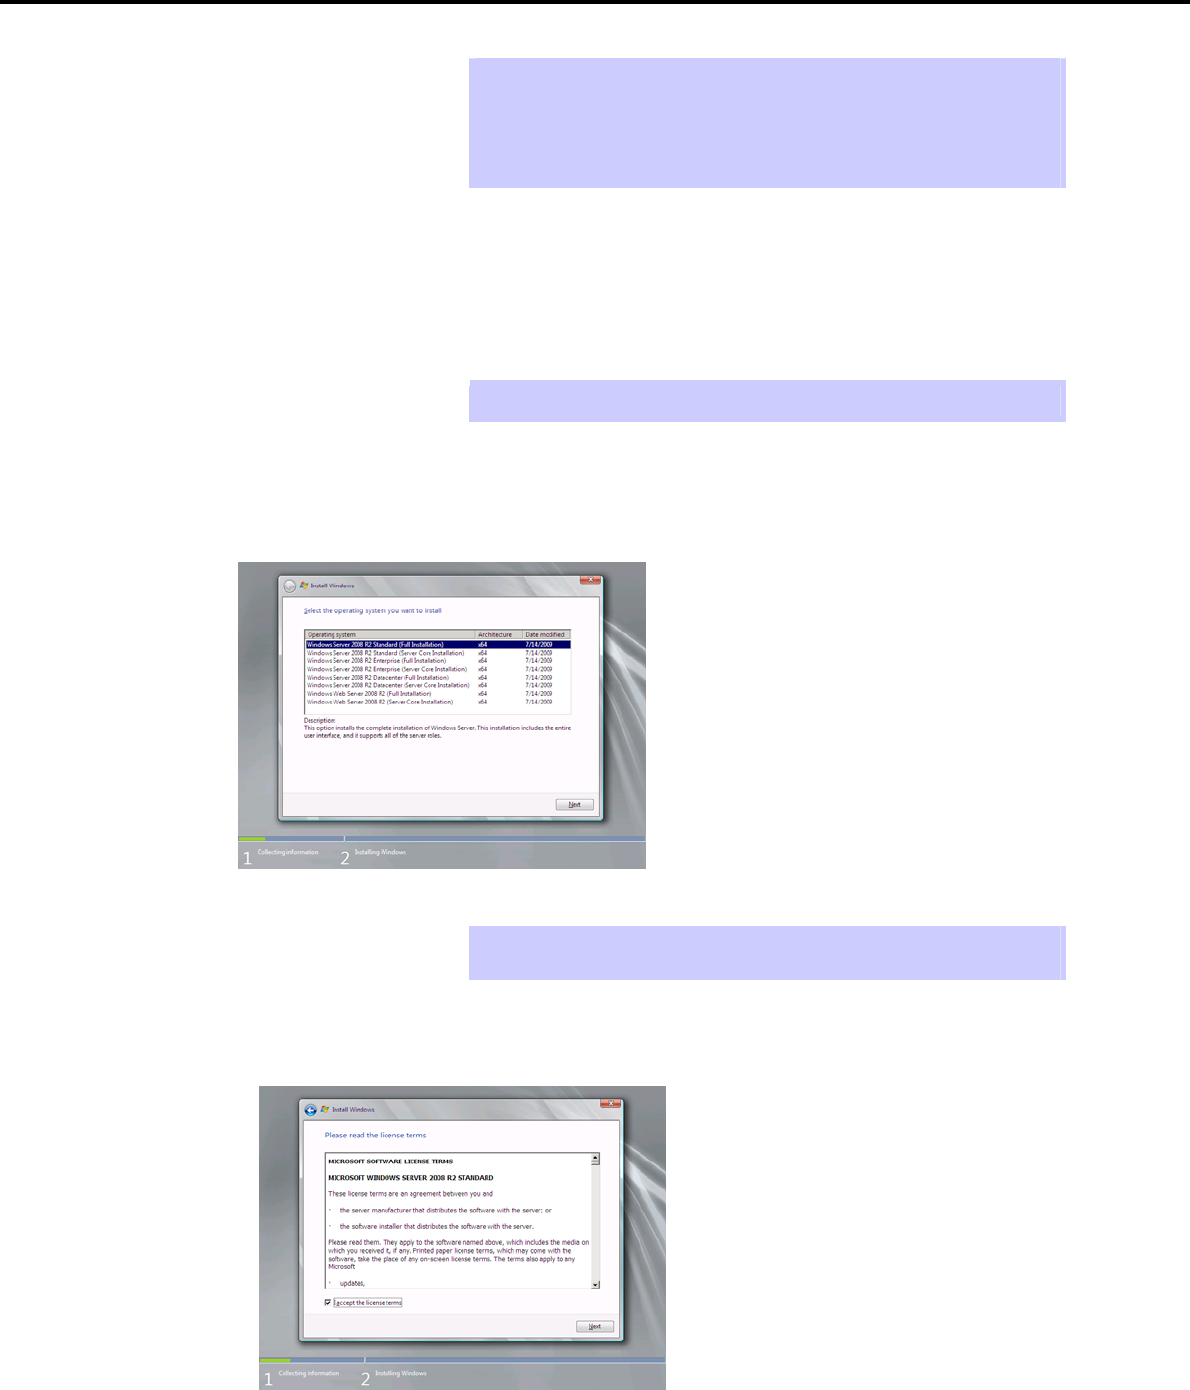
12. When the following window appears, select the Windows edition you have purchased and your preferred
installation method.
Tips The Windows versions that appear on the screen differ depending on the OS
installation media used.
13. When the following window appears, confirm the content of the license agreement. If you agree, select I
agree and then click [Next].
Express5800/GT-110d, GT-110d-S, R110d-1E, E110d-1 Installation Guide (Windows)
44
3. Setting Up Windows Server 2008 R2
Chapter 1 Installing Windows
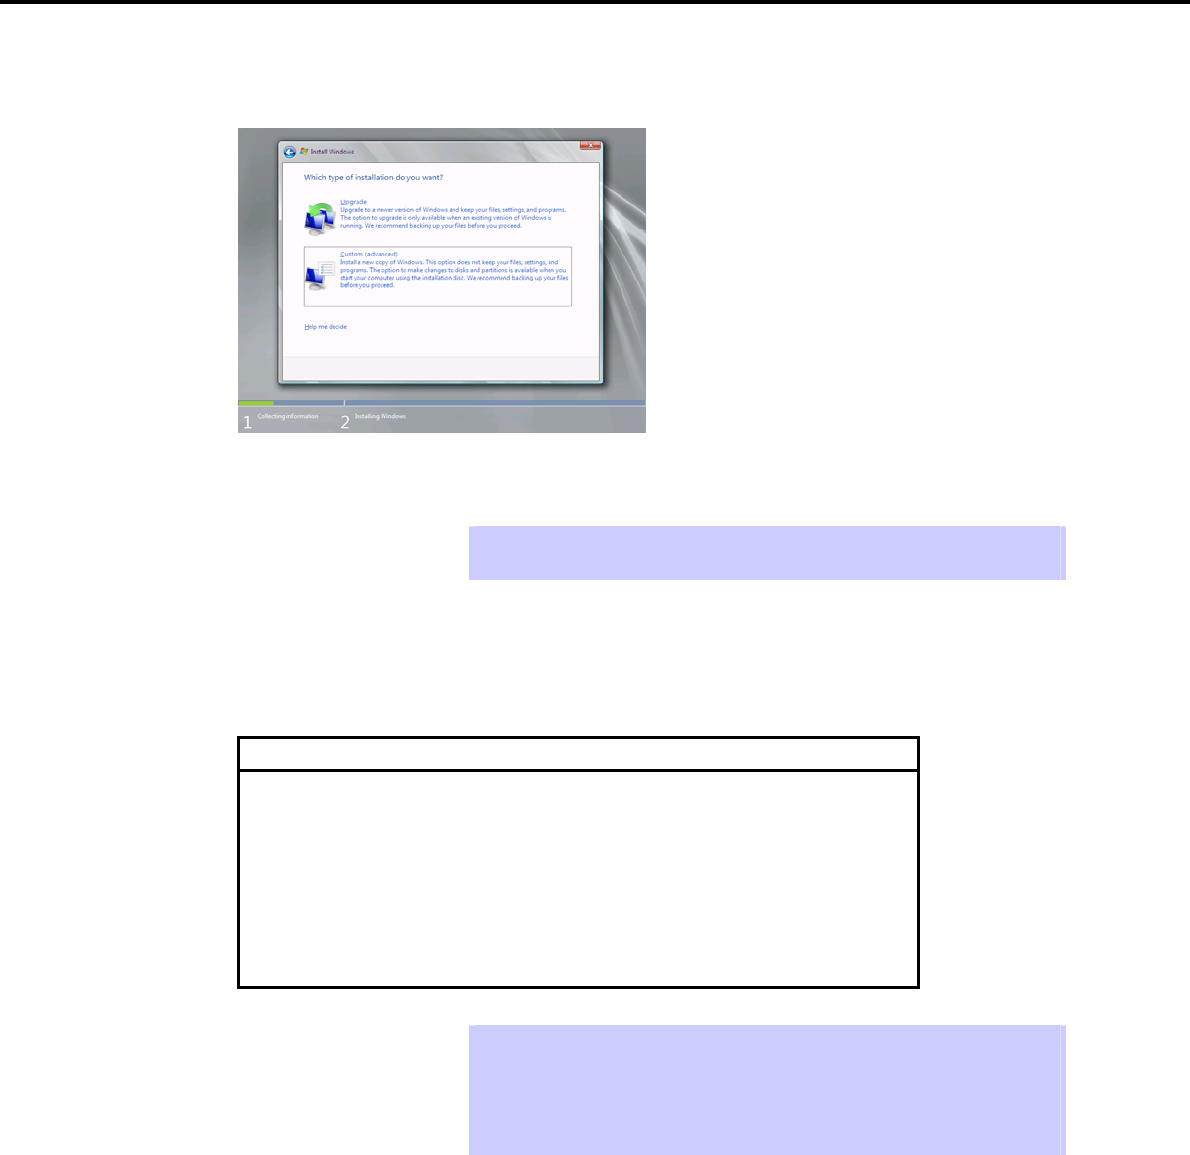
14. When the following message appears, select the installation type.
Select Custom (advanced) in this case.
15. The “Where do you want to install Windows?” window appears.
Tips If the driver was loaded in steps 10 to 11, or if not using a RAID Controller, go to
step 19.
Click Load Driver.
If the following message appears, replace the OS installation media and EXPRESSBUILDER DVD in the
optical disk drive, and then click [Browse]. Next, go to step 16.
Load Driver
To install the driver needed to access your hard drive, insert
the installation media containing the driver files
,
and then click
OK.
Note: The installation media can be a floppy disk, CD, DVD, or
USB flash drive.
[Browse] [OK] [Cancel]
Tips If using the Internal Flash Memory, you do not need to remove the OS installation
media.
At this time, a message “The Installation media can be a floppy disk, CD, DVD, or
USB flash drive.” Appears on the screen, you must use the supplied
EXPRESSBUILDER DVD or Internal Flash Memory.
Express5800/GT-110d, GT-110d-S, R110d-1E, E110d-1 Installation Guide (Windows) 45

3. Setting Up Windows Server 2008 R2
Chapter 1 Installing Windows
16. Specify one of the following locations, and then click [OK].
If using the EXPRESSBUILDER DVD:
When using the N8103-129/130 RAID Controller
Optical disk drive letter:\020\win\winnt\oemfd\ws2008r2\megasas2
When using the N8103-128/G128/134 RAID Controller
Optical disk drive letter:\020\win\winnt\oemfd\ws2008r2\stexstpt
If using an onboard RAID Controller (LSI Embedded MegaRAID) in an environment containing the
DVD drive with USB connection
Optical disk drive letter:\020\win\winnt\oemfd\ws2008r2\megasr1
If using Internal Flash Memory:
When using the N8103-129/130 RAID Controller
Internal Flash Memory Drive letter:\020\win\winnt\oemfd\ws2008r2\megasas2
When using the N8103-128/G128/134 RAID Controller
Internal Flash Memory Drive letter:\020\win\winnt\oemfd\ws2008r2\stexstpt
If using an onboard RAID Controller (LSI Embedded MegaRAID) in an environment containing the
DVD drive with USB connection
Internal Flash Memory Drive letter:\020\win\winnt\oemfd\ws2008r2\megasr1
Tips The driver does not have to be loaded at this time if it was loaded in steps 10 and
11.
The volume label of the Internal Flash Memory is INTER-FLASH.
17. Select the necessary driver from the driver list shown, and then click [Next].
When using an N8103-129/130 RAID Controller
[LSI MegaRAID SAS 9264-8i]
When using an N8103-128/G128/134 RAID Controller
[Promise SuperTrak SAS 6G RAID Controller]
If using an onboard RAID Controller (LSI Embedded MegaRAID) in an environment containing the
DVD drive with USB connection
[LSI Embedded MegaRAID]
18. If you used the EXPRESSBUILDER DVD, remove it and then insert the OS installation media.
Tips If you have not replaced the OS installation media after loading the driver, the
following message may appear.
If it appears, replace the OS installation media, and then click [Refresh].
Express5800/GT-110d, GT-110d-S, R110d-1E, E110d-1 Installation Guide (Windows)
46
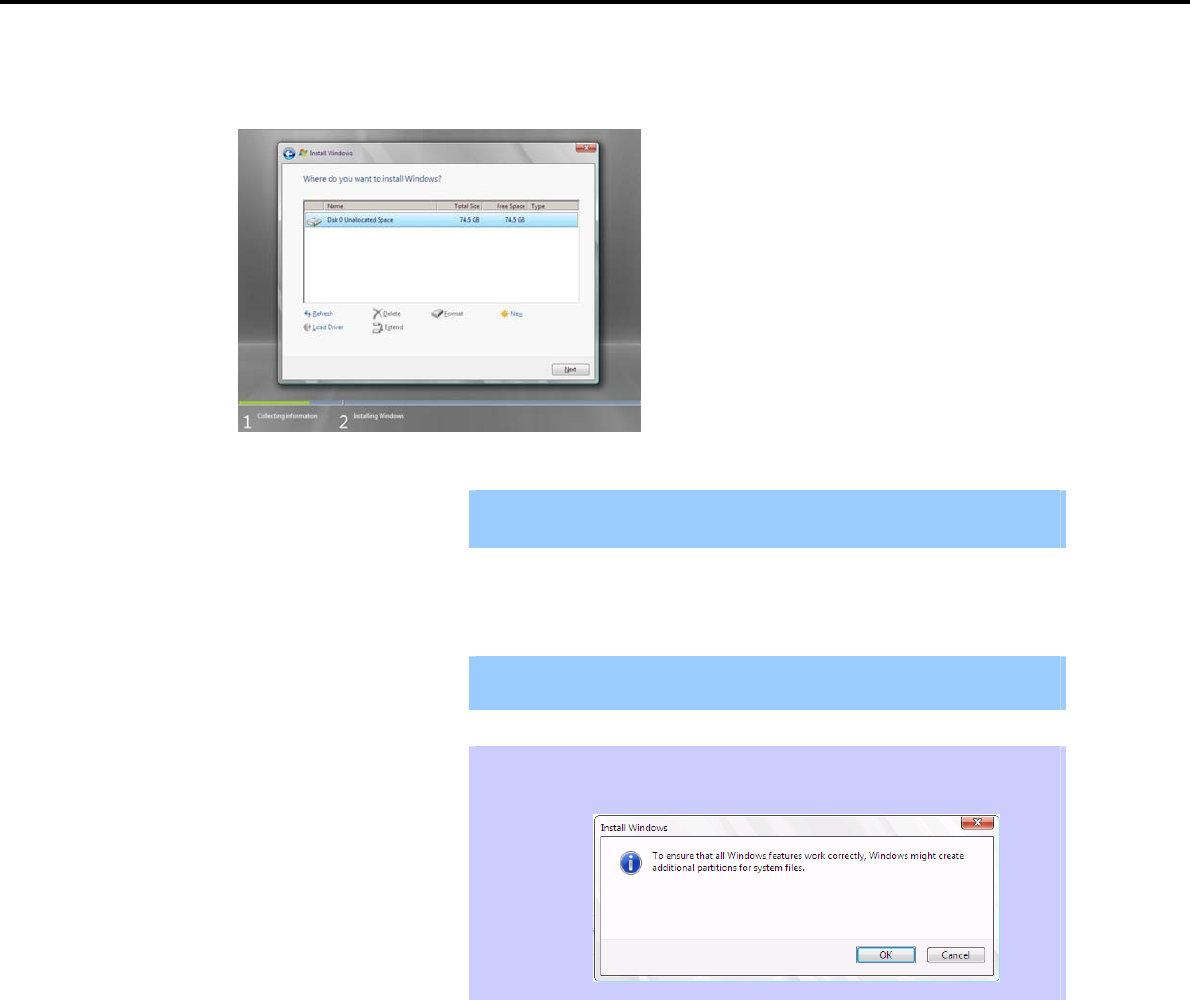
3. Setting Up Windows Server 2008 R2
Chapter 1 Installing Windows
19. When the following window appears, select the disk in which the partition will be created, and then click
Drive options (advanced).
Important If a partition has already been created, go to step 22.
20. Click [New], enter the partition size into the size input box, and then click [Apply].
Important When installing the OS to a disk of over 2,097,152 MB (2 TB), the partition
size can only be set to 2,097,152 MB or less.
Tips When creating a new partition and installing the OS, a 100 MB boot partition is
created. When the following window appears,click [OK].
21. Select the partition created in step 20, and then click [Format].
Express5800/GT-110d, GT-110d-S, R110d-1E, E110d-1 Installation Guide (Windows) 47
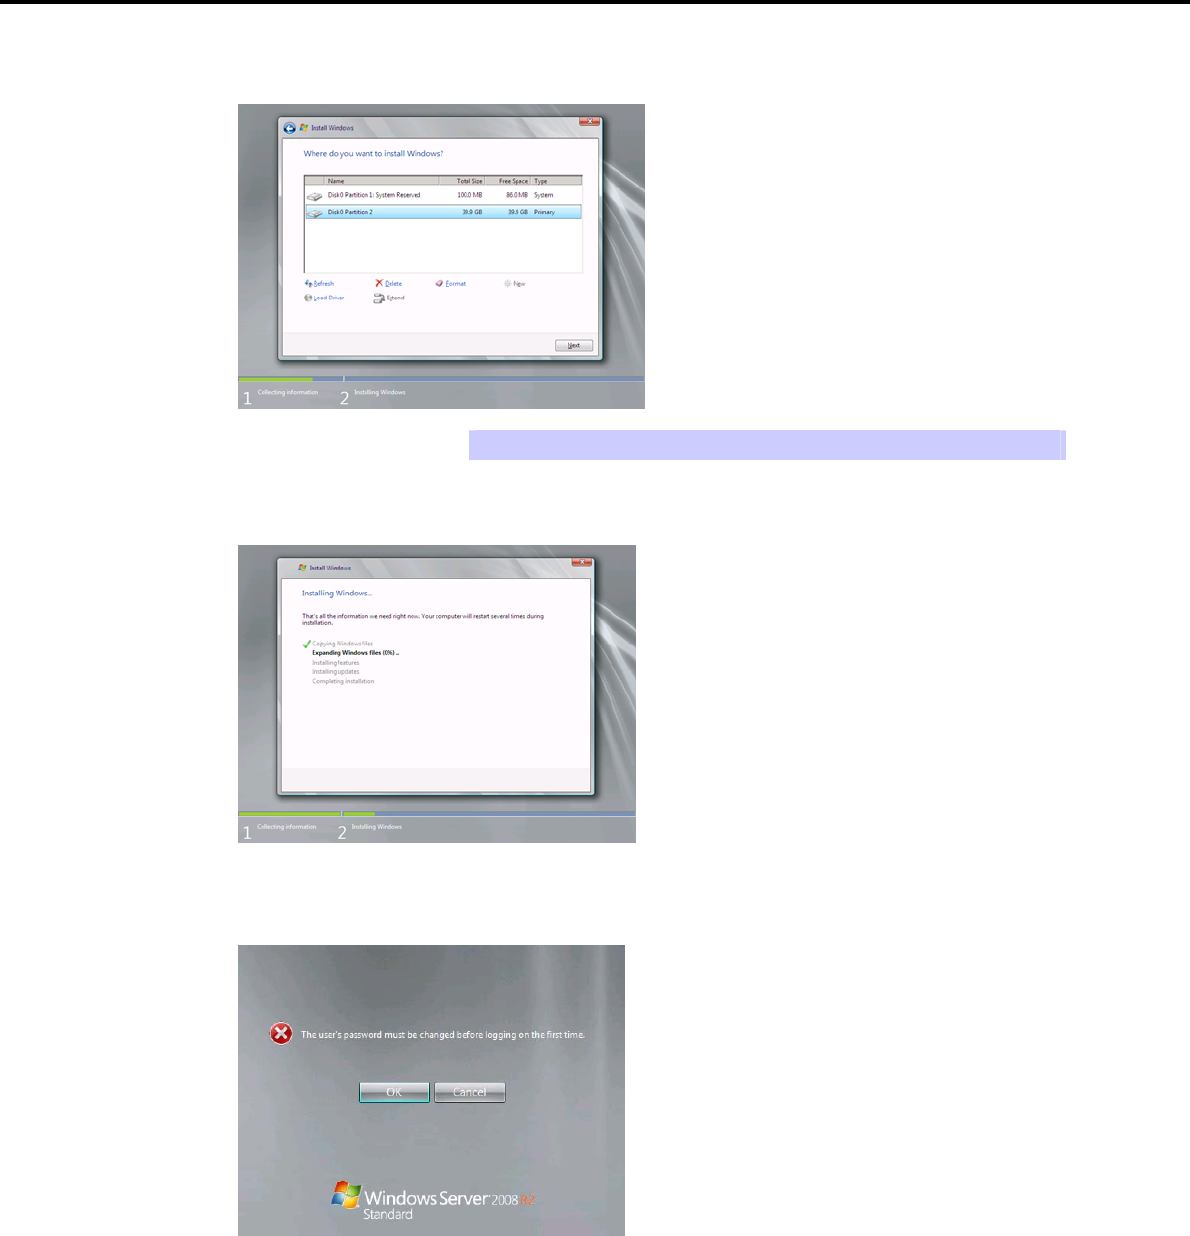
3. Setting Up Windows Server 2008 R2
Chapter 1 Installing Windows
22. In the window below, select the created partition, and then click [Next].
Tips The number of partitions displayed differs depending on the environment used.
When the following message appears, Windows installation starts automatically.
23. After a Full installation of Windows Server 2008 R2 is completed, the following window appears,
prompting you to change your password before logging on. Click [OK].
Express5800/GT-110d, GT-110d-S, R110d-1E, E110d-1 Installation Guide (Windows)
48

3. Setting Up Windows Server 2008 R2
Chapter 1 Installing Windows
24. Change your password, and then click the [ ] button.
Full installations:
Server Core installations:
Tips Passwords must fulfill the following requirements in Windows Server 2008 R2.
Contains 6 or more characters
Contains characters from at least three of the following categories: numbers,
uppercase letters, lowercase letters, and symbols.
25. When the following message appears, click [OK].
Express5800/GT-110d, GT-110d-S, R110d-1E, E110d-1 Installation Guide (Windows) 49
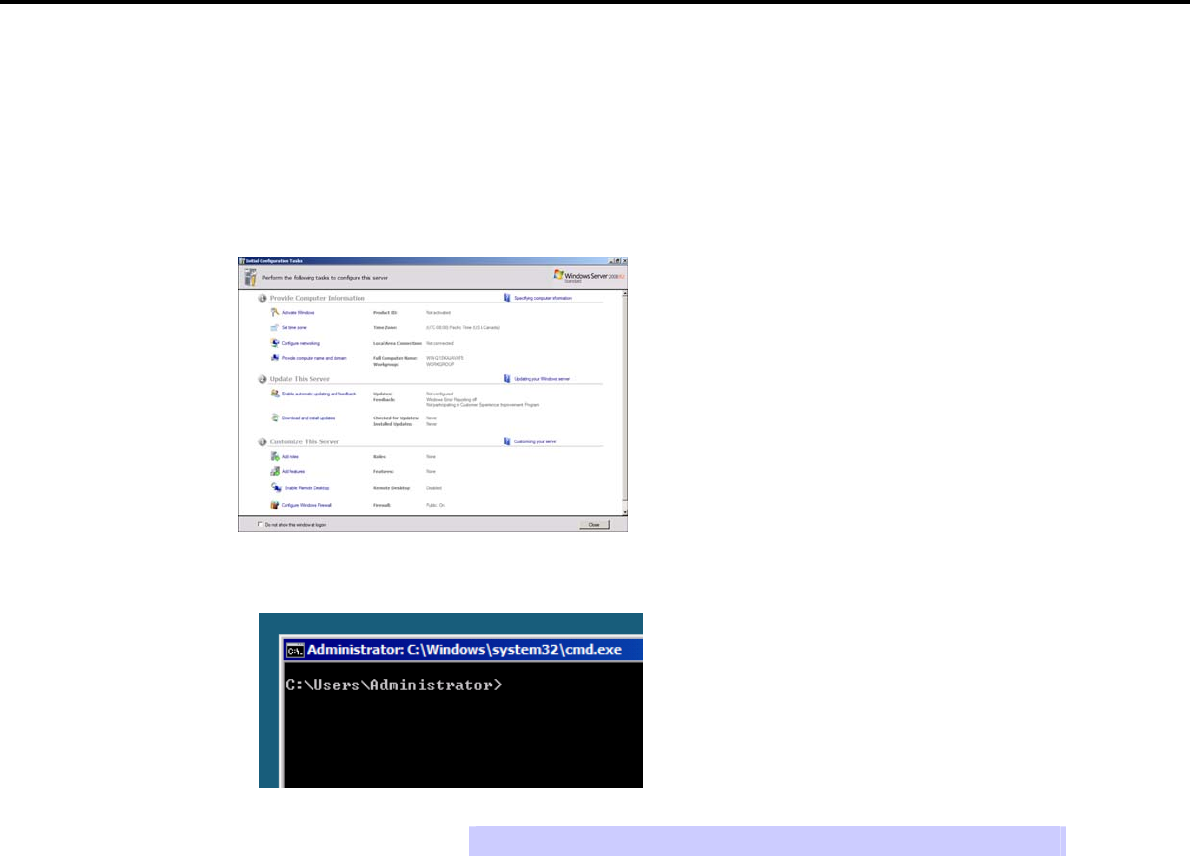
3. Setting Up Windows Server 2008 R2
Chapter 1 Installing Windows
26. The content displayed differs depending on what you selected in step 12. Confirm the following, and then
proceed.
Full installations
Server Core installations
For Full installations:
When the Initial Configuration Tasks window appears after you log on, enter the user information.
For Server Core installations:
The command prompt will appear. Set the user information.
Tips For detailed setup procedures, refer to the Microsoft “Step by Step Guide”.
27. Install the Starter Pack by referring to Chapter 1 (3.4 Installing the Starter Pack).
28. Install drivers and specify detailed settings by referring to Chapter 1 (3.5 Setting Up Device Drivers).
29. Execute setup by following the instructions described in Chapter 1 (7.Setup for Solving Problems).
Setup with OS standard installer is now complete.
Express5800/GT-110d, GT-110d-S, R110d-1E, E110d-1 Installation Guide (Windows)
50
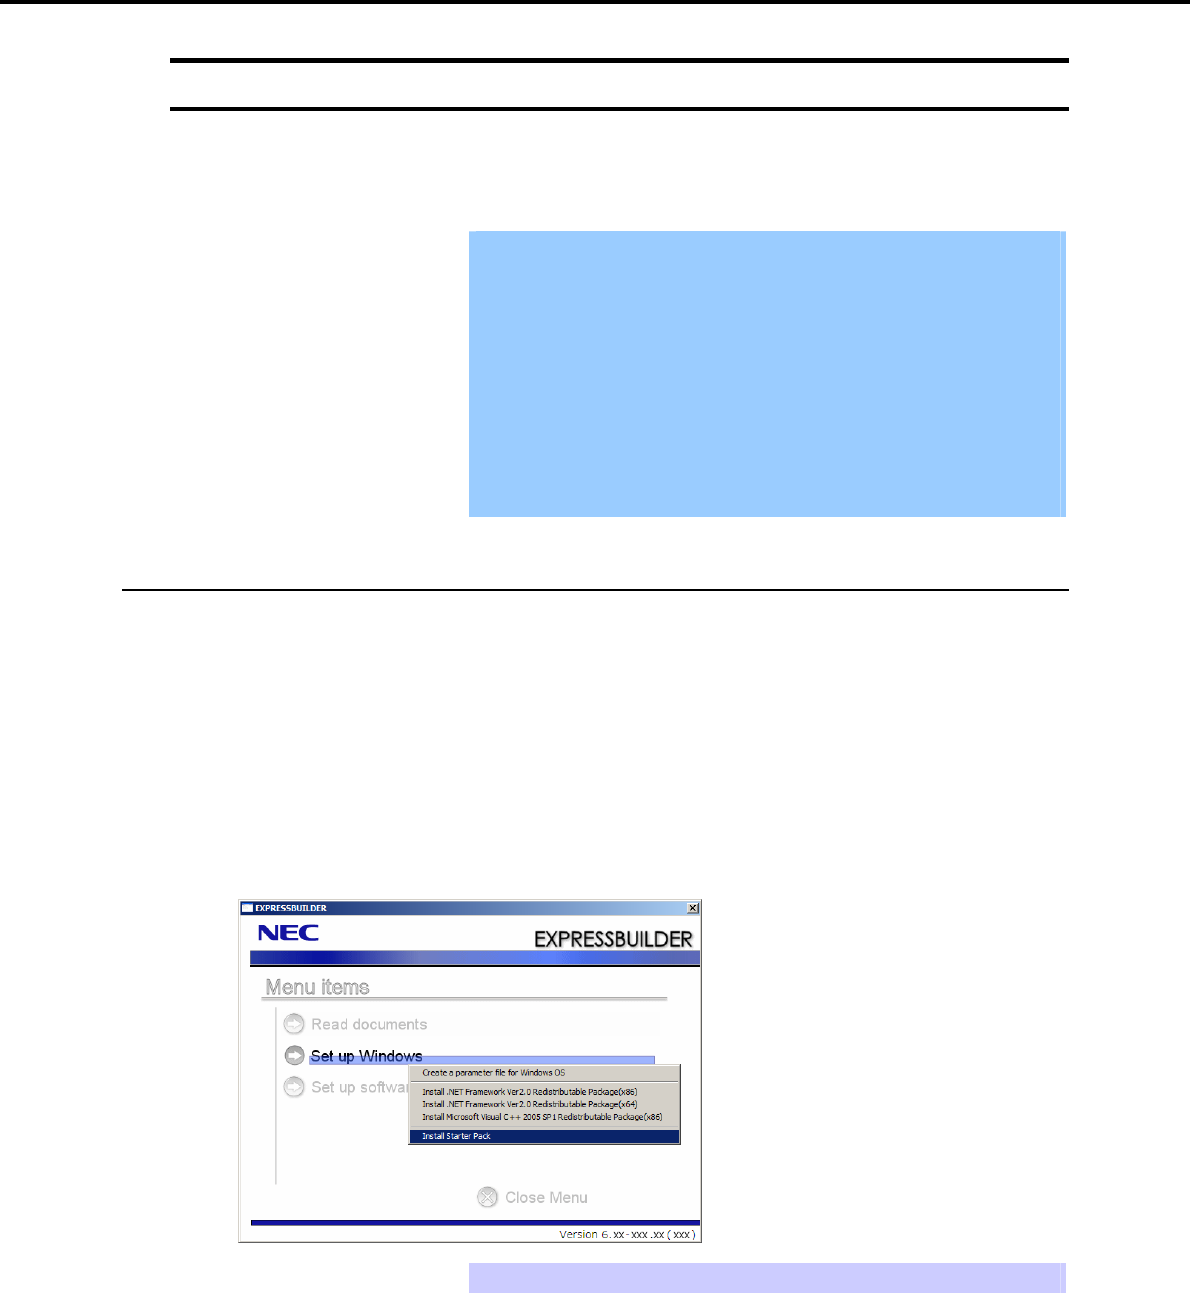
3. Setting Up Windows Server 2008 R2
Chapter 1 Installing Windows
3.4 Installing the Starter Pack
After installing Windows Server 2008 R2, follow the steps below and install the Starter Pack. The Starter Pack
installs all drivers required by the Express5800 Series.
Important Also install the Starter Pack in the following cases.
The system configurations have changed (when internal option devices
have been added or removed)
If a dialog box prompting you to restart appears after changing system
configurations, click [No] and then install the Starter Pack.
If the system was restored using a restore process
If a system has been restored using the backup tool
The Scalable Networking Pack (SNP) function is disabled upon Starter
Pack installation is complete.
The setting of SNP function may affect the system performance. Contact
the sales agent for details.
3.4.1 When using the EXPRESSBUILDER DVD
1. Log on to the system with the built-in administrator, which has administrative privileges.
2. Insert the EXPRESSBUILDER DVD into the optical disk drive.
3. The content displayed differs depending on what the content selected when installing Windows Server
2008 R2. Confirm the following, and then proceed.
Full installations
Server Core installations
For Full installations
When the menu window appears, click Set up Windows to open the short-cut menu and then select
Install Starter Pack.
Tips The short-cut menu also appears by right-clicking on the menu window.
Express5800/GT-110d, GT-110d-S, R110d-1E, E110d-1 Installation Guide (Windows) 51
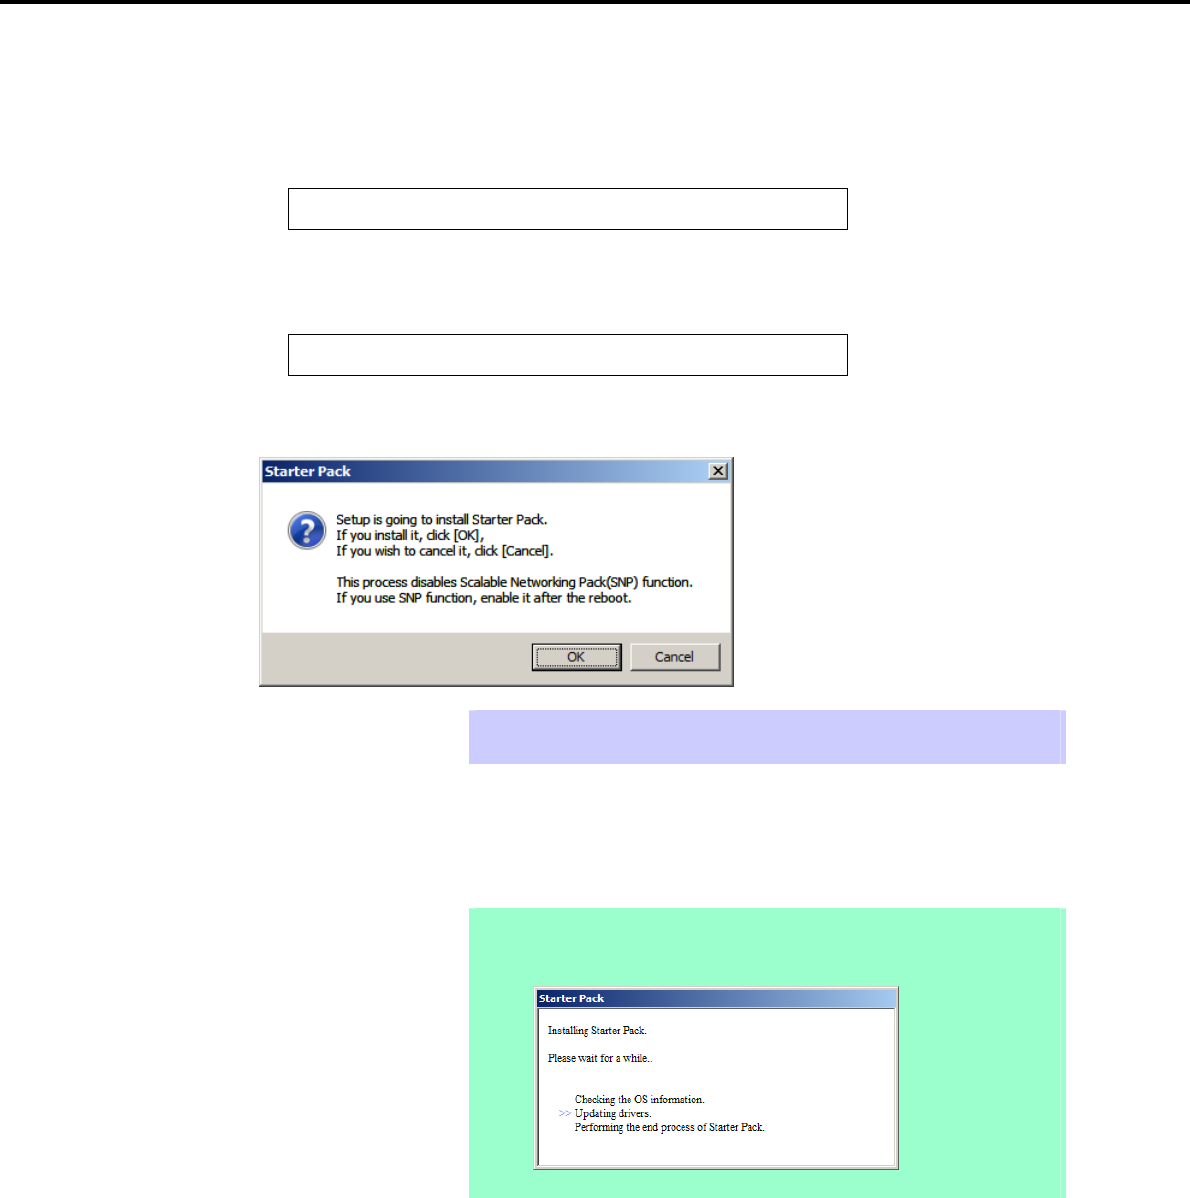
3. Setting Up Windows Server 2008 R2
Chapter 1 Installing Windows
For Server Core installations
(1) Enter the following command at the command prompt, and then specify the optical disk drive
letter (for example, the D drive).
Cd /d D:\020\win\winnt\bin
C:\Users\administrator>cd /d D:\020\win\winnt\bin
(2) Enter the following, and then press the <Enter> key.
Pkgsetup.vbs
D:\020\win\winnt\bin>pkgsetup.vbs
4. A setup message appears.
Tips Although it may take several minutes for the above window to appear, wait for the
window to appear without attempting any further operation.
Read the message that appears, and then click [OK].
Starter Pack installation starts.
Note If you chose Full installation, the following progress message will appear while the
Starter Pack is being installed. Wait a moment until the update is complete.
Express5800/GT-110d, GT-110d-S, R110d-1E, E110d-1 Installation Guide (Windows)
52

3. Setting Up Windows Server 2008 R2
Chapter 1 Installing Windows
5. When the following message appears, Starter Pack installation is complete. Follow the instructions in the
message, and remove the EXPRESSBUILDER DVD.
6. Click [OK] and then restart the system.
Installation of Starter Pack is now complete.
3.4.2 When using Internal Flash Memory
1. After installing the operating system, the system will restart.
2. Use the Internal Flash Memory to run EXPRESSBUILDER.
When “Press <F2> Setup, <F3> Internal Flash Memory, <F4> ROM Utility, <F12> Network” appears
below the POST window, press the <F3> key.
Note At this time, be sure to remove the DVD from the optical disk drive.
If running from the OS, restart, and then press the <F3> key on the POST
window.
3. When the following message appears, select Os installation *** default ***.
You will automatically advance to the next window, with no need for further input.
Express5800/GT-110d, GT-110d-S, R110d-1E, E110d-1 Installation Guide (Windows) 53
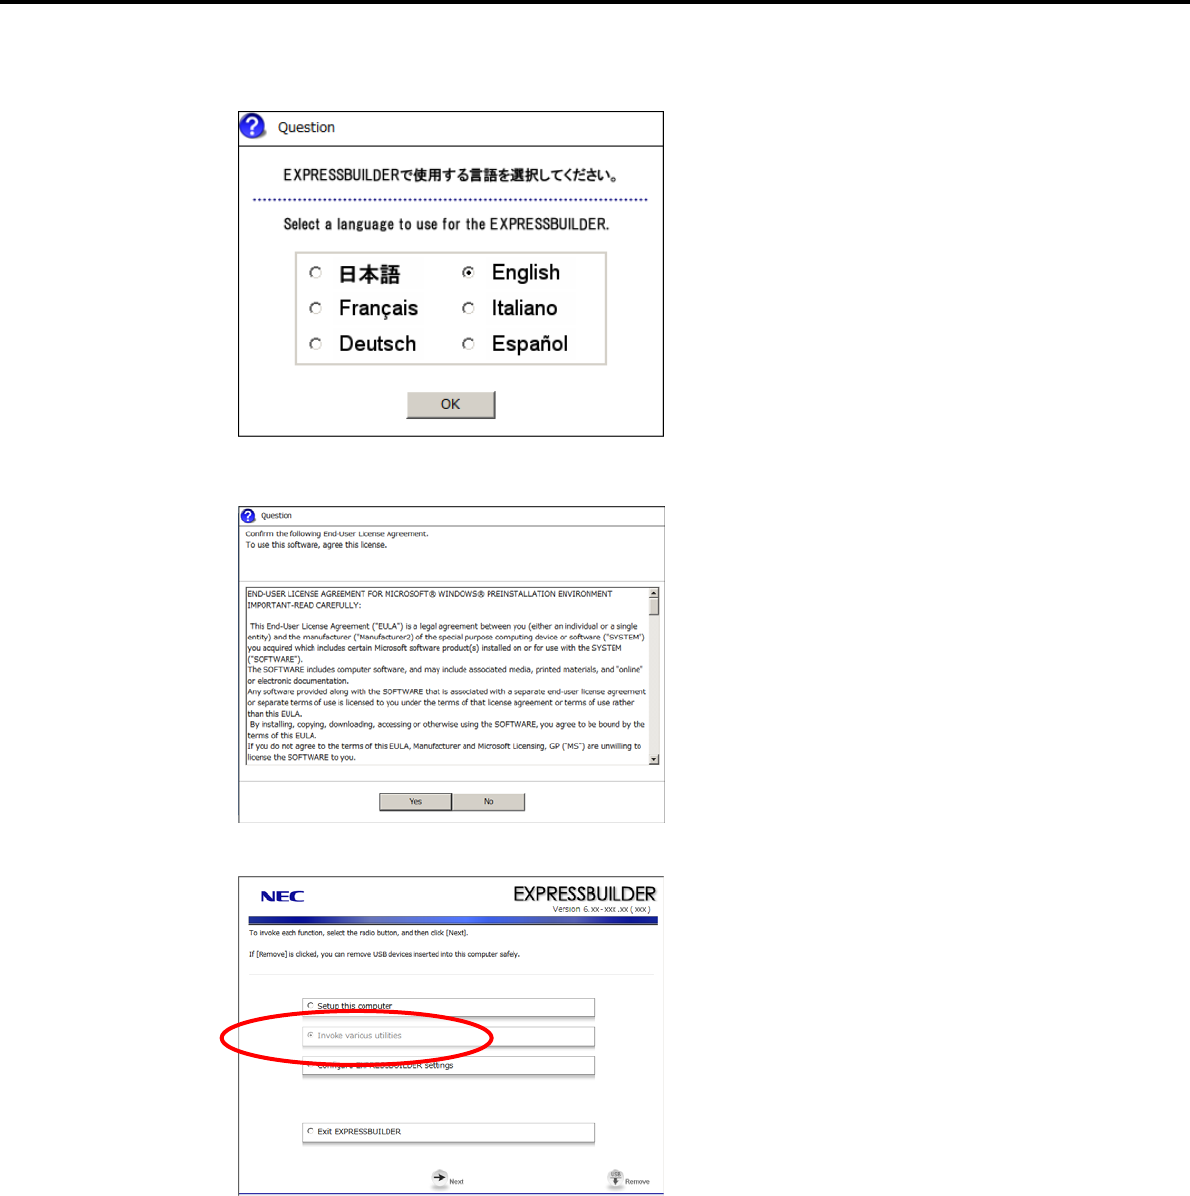
3. Setting Up Windows Server 2008 R2
Chapter 1 Installing Windows
4. Select English on the language selection window, and then click [OK].
5. When the Windows PE software license agreement window appears, click [Yes].
6. Select Invoke various utilities from the top menu, and then click [Next].
Express5800/GT-110d, GT-110d-S, R110d-1E, E110d-1 Installation Guide (Windows)
54
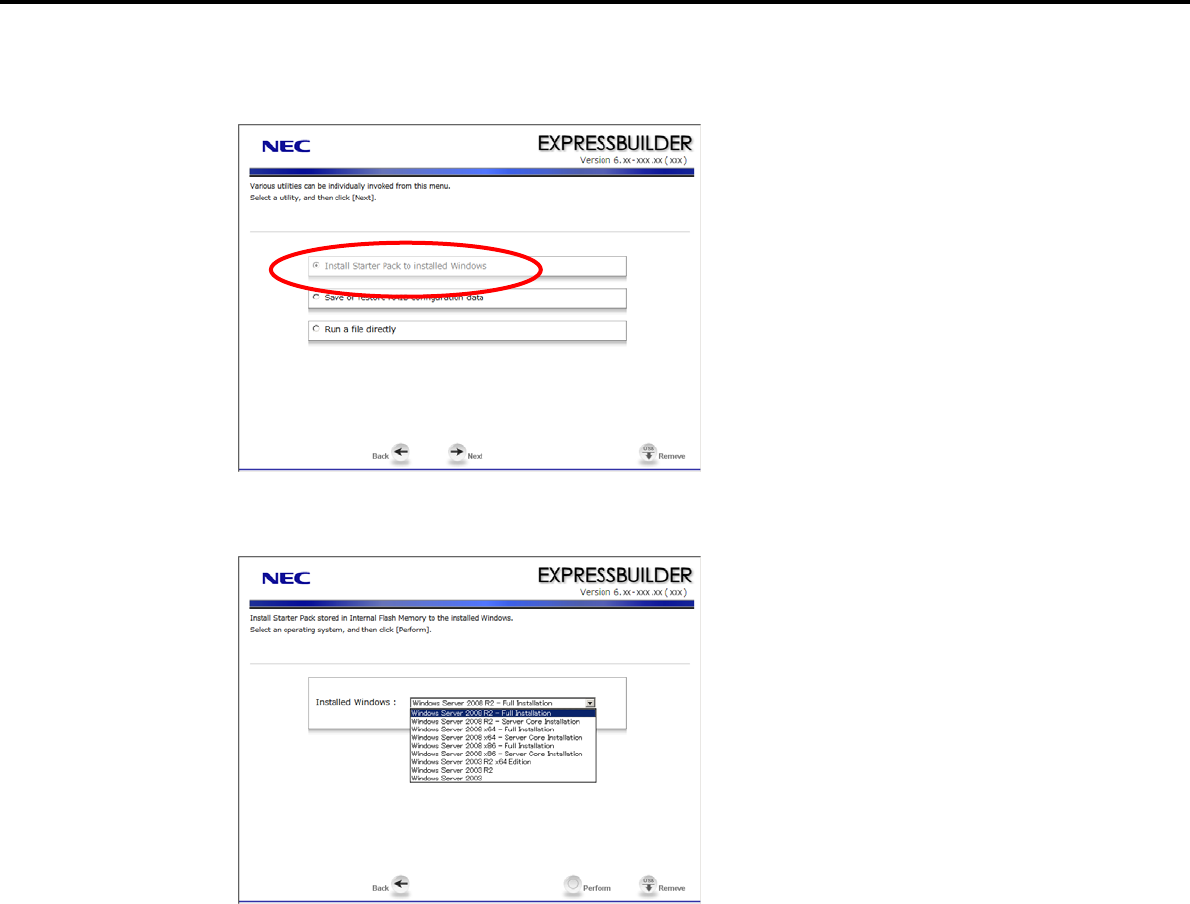
3. Setting Up Windows Server 2008 R2
Chapter 1 Installing Windows
7. When the utility start menu appears, select Install Starter Pack to installed Windows and then click
[Next].
8. When the window for selecting Windows to install the Starter Pack appears, select the installed Windows
from the drop-down list, and then click [Perform].
Express5800/GT-110d, GT-110d-S, R110d-1E, E110d-1 Installation Guide (Windows) 55
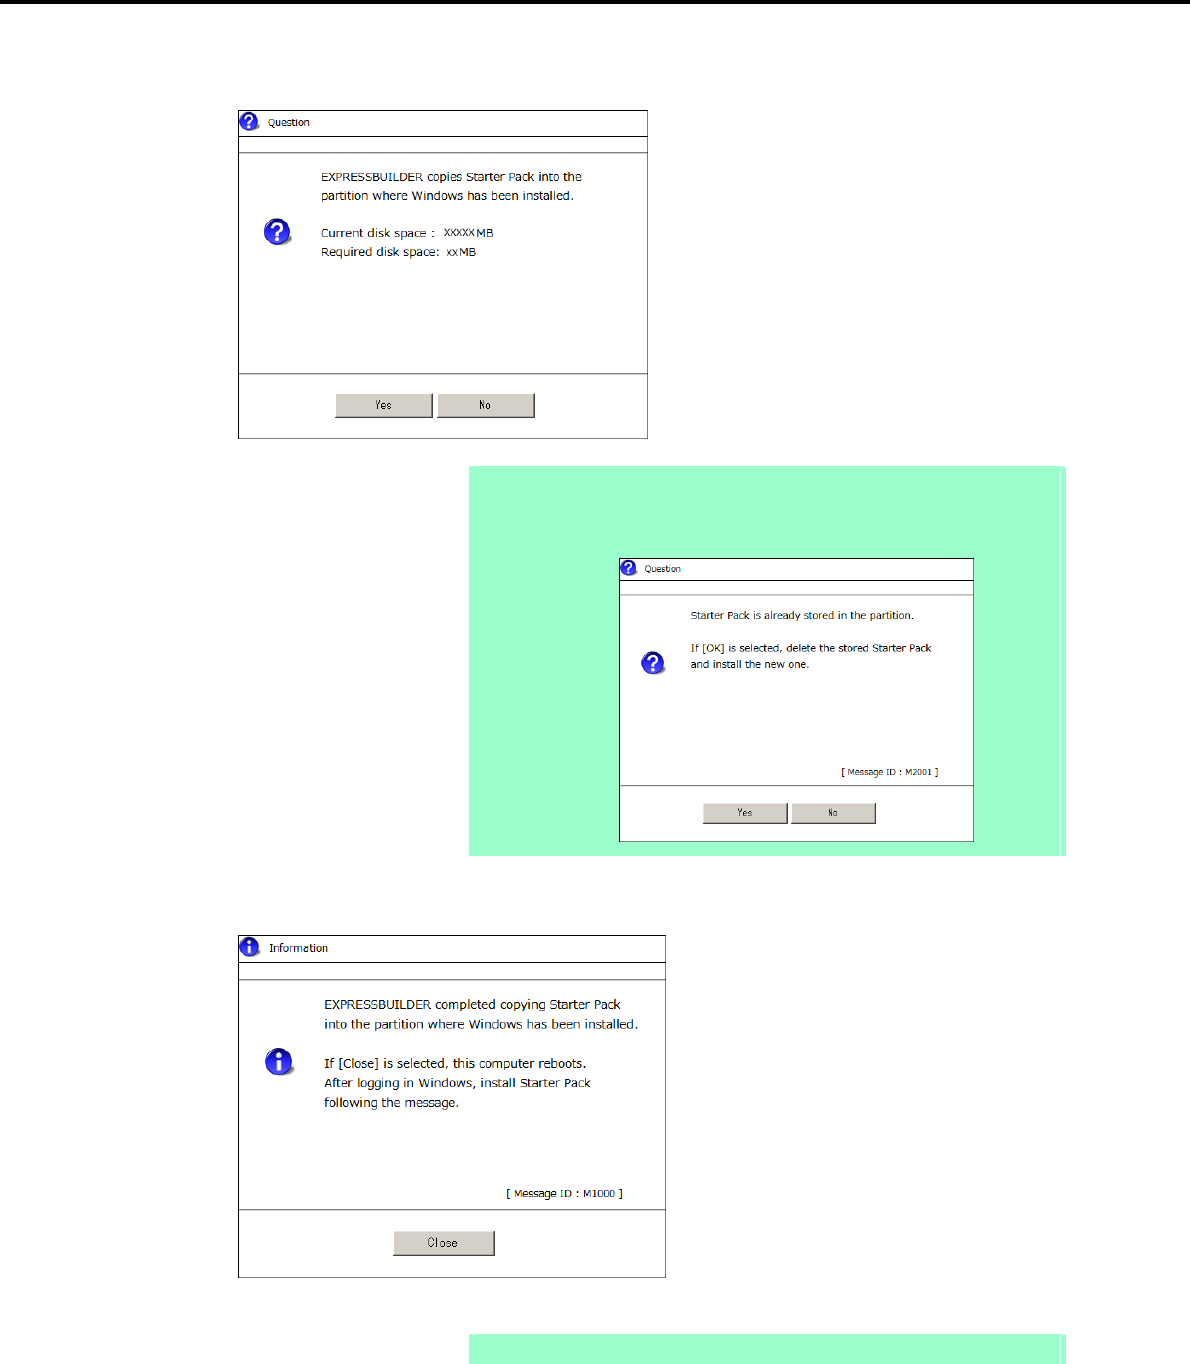
3. Setting Up Windows Server 2008 R2
Chapter 1 Installing Windows
9. When the following confirmation window appears, read the content and then click [Yes].
Note The following window will appear if the Starter Pack has been installed using the
Internal Flash Memory.
Read the message, and then click [Yes].
10. After copying the module, the following window appears. Click [Close].
The server then restarts.
Note You do not need to press the <F3> key at this time.
Express5800/GT-110d, GT-110d-S, R110d-1E, E110d-1 Installation Guide (Windows)
56

3. Setting Up Windows Server 2008 R2
Chapter 1 Installing Windows
11. The content displayed differs depending on what content was selected when installing Windows Server
2008 R2. Confirm the following, and then proceed.
Full installations
Server Core installations
For Full installations
After Windows starts, the following window appears. Click [OK].
For Server Core installations
Enter the following command at the command prompt, and then specify the system drive letter (for
example, the C drive).
Cd /d C:\StartPKG\bin
C:\Users\administrator>cd /d C:\StartPKG\bin
Enter the following, and then press the <Enter> key.
Pkgsetup.vbs
C:\StartPKG\bin>pkgsetup.vbs
12. Read the message that appears, and then click [OK].
Tips Although it may take several minutes for the above window to appear, wait for the
window to appear without attempting any further operation.
Express5800/GT-110d, GT-110d-S, R110d-1E, E110d-1 Installation Guide (Windows) 57
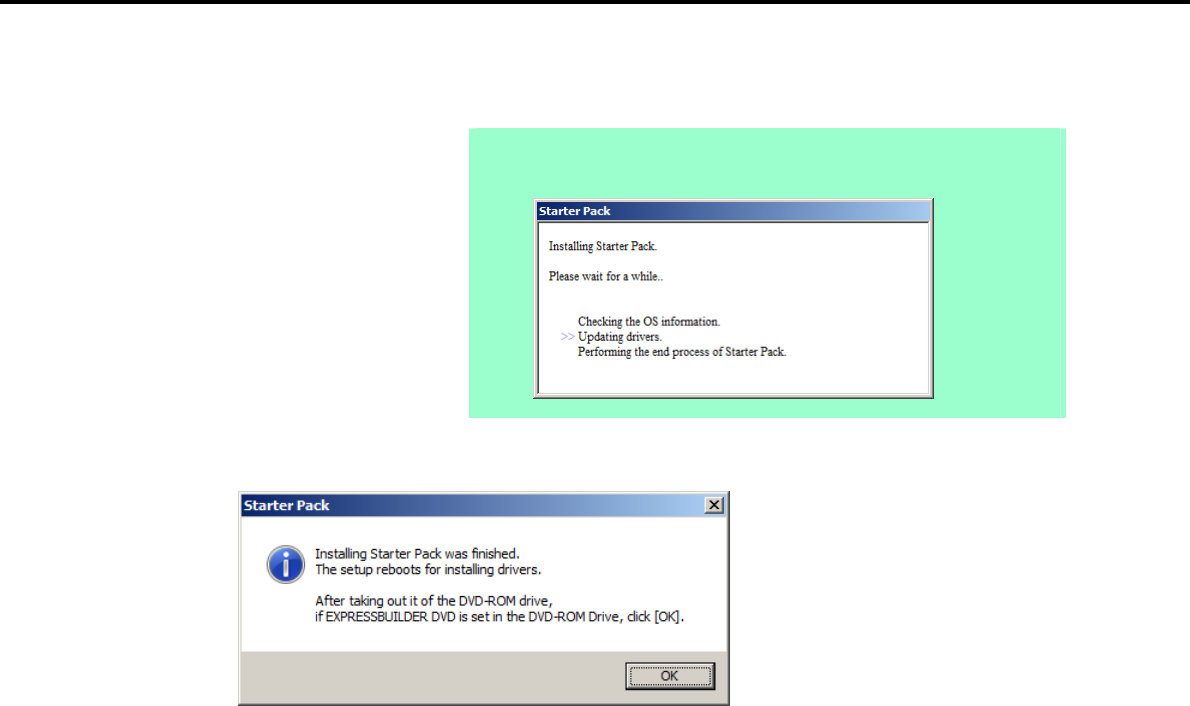
3. Setting Up Windows Server 2008 R2
Chapter 1 Installing Windows
Installation of the Starter Pack starts.
Note If you chose Full installation, the following progress message appears while the
Starter Pack is being installed. Wait a moment until the update is complete.
13. When the following message appears, Starter Pack installation is complete.
14. Click [OK] to restart the system.
Installation of the Starter Pack is now complete.
Express5800/GT-110d, GT-110d-S, R110d-1E, E110d-1 Installation Guide (Windows)
58

3. Setting Up Windows Server 2008 R2
Chapter 1 Installing Windows
3.5 Setting Up Device Drivers
Install and set up device drivers provided for the standard configuration.
For details regarding the installation and setup of a driver for an optional device, refer to the manual supplied
with the optional device.
3.5.1 Installing the LAN and BACS (teaming) drivers
(1) LAN and BACS drivers
If EXPRESSBUILDER is used for setup, the driver will automatically be installed.
If the OS standard installer is used for setup, install the Starter Pack to install the LAN and BACS driver.
Note To change the LAN or BACS driver settings, log on to the system from a local
console using an administrator’s account. Remotely changing the settings by
using the operating system’s remote desktop feature is not supported.
Be sure to select the Internet Protocol (TCP/IP) check box when specifying an
IP address.
(2) Optional LAN board
This server supports the following optional LAN boards.
Optional LAN boards: N8104-128/134*
* N8104-128 is supported by Express5800/R110d-1E and E110d-1 only.
When an optional LAN board is added, the drivers for LAN boards are automatically installed using the OS
plug-and-play function.
(3) Network adapter name
After installing the LAN drivers, the following network adapter names will be displayed by the Device Manager or
BACS.
Network adapters for the standard configuration
Broadcom NetXtreme Gigabit Ethernet #xx*
If connecting with an optional LAN board:
[N8104-128] Broadcom BCM57711 NetXtreme II 10 GigE (NDIS VBD Client) #xx*
[N8104-134] Broadcom BCM5709C NetXtreme II GigE (NDIS VBD Client) #xx*
* If there are adapters with the same name, a different identification number will be assigned to xx.
Important The ID for N8104-128/134 might be a number of two or more digits. This is
due to the LAN driver specifications and not an error. This number cannot be
changed.
Express5800/GT-110d, GT-110d-S, R110d-1E, E110d-1 Installation Guide (Windows) 59

3. Setting Up Windows Server 2008 R2
Chapter 1 Installing Windows
3.5.2 Setting up LAN drivers
Important About WOL
- WOL is supported by the standard network adapters only.
- The Change of WOL setting is not supported.
- WOL from a shutdown is only supported if the system is started using
MagicPacket.
- WOL from hibernation is not supported.
Tips MagicPacket refers to a packet dedicated to WOL.
(1) Setting link speed
The transfer rate and duplex mode of the network adapter must be the same as those of the switching hub.
Follow the procedure below to specify the transfer rate and duplex mode.
1. Open the Device Manager.
2. Expand Network Adapters, and then double-click the name of the network adapter you want to set.
The properties of the network adapter will be displayed.
3. Select the Advanced tab, and then set the Speed & Duplex values to the same as those of the
switching hub.
4. Click [OK] in the Network Adapter Properties dialog box.
5. Restart the system.
The link speed setting is now complete.
(2) Setting the TCP/iSCSI Offload Engine (if using N8104-134)
If using N8104-134 with the server, TCP/iSCSI Offload Engine must be set to off.
Follow the procedure below to set it.
1. Double-click the Broadcom Control Suite3 icon on the Control Panel window.
Broadcom Advanced Control Suite3 starts.
2. Select Device Management under Explorer View, and then N8104-134 network adapter from System
device (VBD).
3. Select the Configurations tab, and then expand Resource Reservations.
4. Clear the iSCSI Offload Engine and TCP Offload Engine check boxes (if selected) under
Pre-Allocated Resource, and then click [Apply].
Tips If TCP Offload Engine does not exist, proceed to the next step.
5. Select N8104-134 network adapter from Network Adapters (NDIS driver) in the Explorer View.
6. Select the Configurations tab, specify Disable for TCP Connection Offload (IPv4) and TCP
Connection Offload (IPv6), and then click [Apply].
Do not make changes if they are already disabled.
7. Complete steps 2 to 6 for each N8104-134 network adapter.
8. Restart the system.
TCP/iSCSI Offload Engine setup is now complete.
Express5800/GT-110d, GT-110d-S, R110d-1E, E110d-1 Installation Guide (Windows)
60

3. Setting Up Windows Server 2008 R2
Chapter 1 Installing Windows
3.5.3 Setting up team/LiveLink
Important You must set up LiveLink when setting up a team. Teams that are not
configured for LiveLink are not supported.
When deleting the team, refer to Chapter 1 (3.5.3 Setting up team/LiveLink)
– (4) Procedure for deleting team. When replacing the motherboard or a
LAN board, follow these steps to remove the team and then create it again
after replacement.
Be sure to specify the same Jumbo Mtu (Jumbo Packet) setting to all the
adapters that compose a team.
(1) Team types
The following team types are supported.
Smart Load Balancing and Failover (without Standby Member)
All adapters that compose the team perform communication.
If a communication failure occurs on an adapter, other adapters that compose the team continue the
communication.
When the adapter on which the communication failure occurred recovers, it joins the team again and
resumes the communication.
Smart Load Balancing (Auto-Failback Disable) (with Standby Member)
Among the adapters that compose the team, primary adapters except the standby member perform
communication.
If a communication failure occurs, the standby member continues the communication.
When the adapter on which the communication failure occurred recovers, it joints the team again and
the standby adapter returns to the standby state.
(2) LiveLink
LiveLink is a function that detects communication route failures of adapters.
It periodically investigates the communication status of specified destinations (IP address).
Link packets are sent from each adapter within a team.
If a response to the transmission of a link packet within the specified range is not detected, it is identified as a
communication route failure and adapter communication is stopped.
When a response to the submission of a link packet is detected, communication LiveLink identifies
communication as having been recovered, and communication using that adapter automatically resumes.
Important You must set up LiveLink when you create a team.
Express5800/GT-110d, GT-110d-S, R110d-1E, E110d-1 Installation Guide (Windows) 61
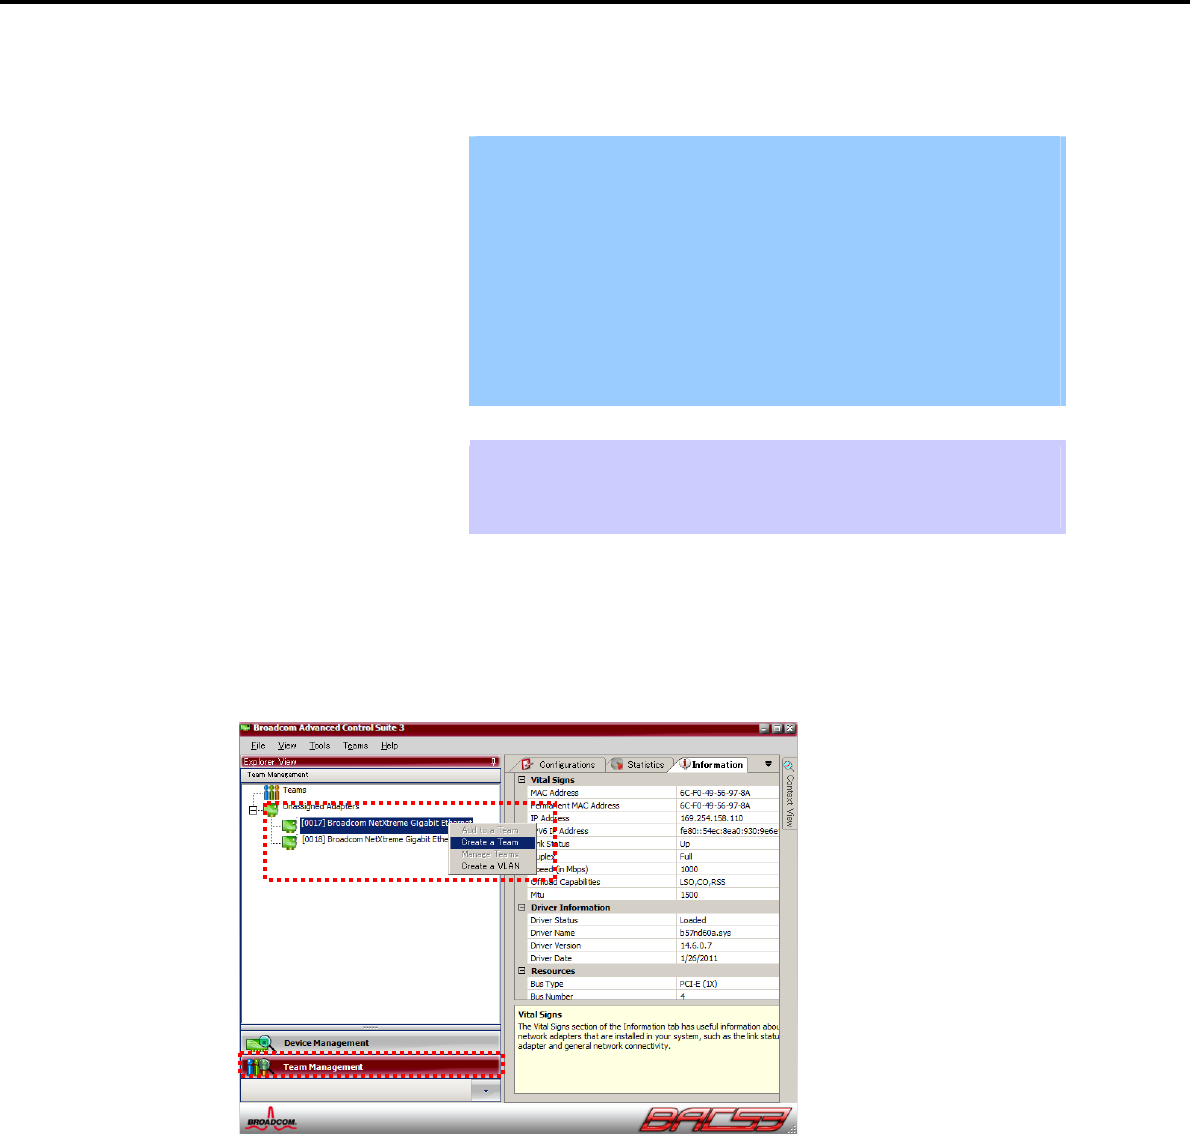
3. Setting Up Windows Server 2008 R2
Chapter 1 Installing Windows
(3) Setting up team/LiveLink
Important The team must be composed of two adapters.
Possible combinations of network adapters that compose the team are as
follows.
Between standard network adapters.
Between N8104-128 adapters
Between N8104-134 adapters
A standard network adapter and an N8104-134 adapter
For details about how to specify a team and enable LiveLink for N8104-128,
refer to “N8104-128 LAN Driver Installation Guide” supplied with the LAN
board.
Tips To edit a team, right-click on the BACS team, and then select Edit TEAM.
Then refer to step 3 and later in Chapter 1 (3.5.3 Setting up team/LiveLink) – (3)
Setting up team to edit the team.
1. Double-click the Broadcom Control Suite3 icon on the Control Panel window.
Broadcom Advanced Control Suite3 starts.
2. Select Team Management from the left menu, right-click the adapter to be used for the team, and then
select Create a Team from the short-cut menu.
The Broadcom Teaming wizard appears.
Express5800/GT-110d, GT-110d-S, R110d-1E, E110d-1 Installation Guide (Windows)
62
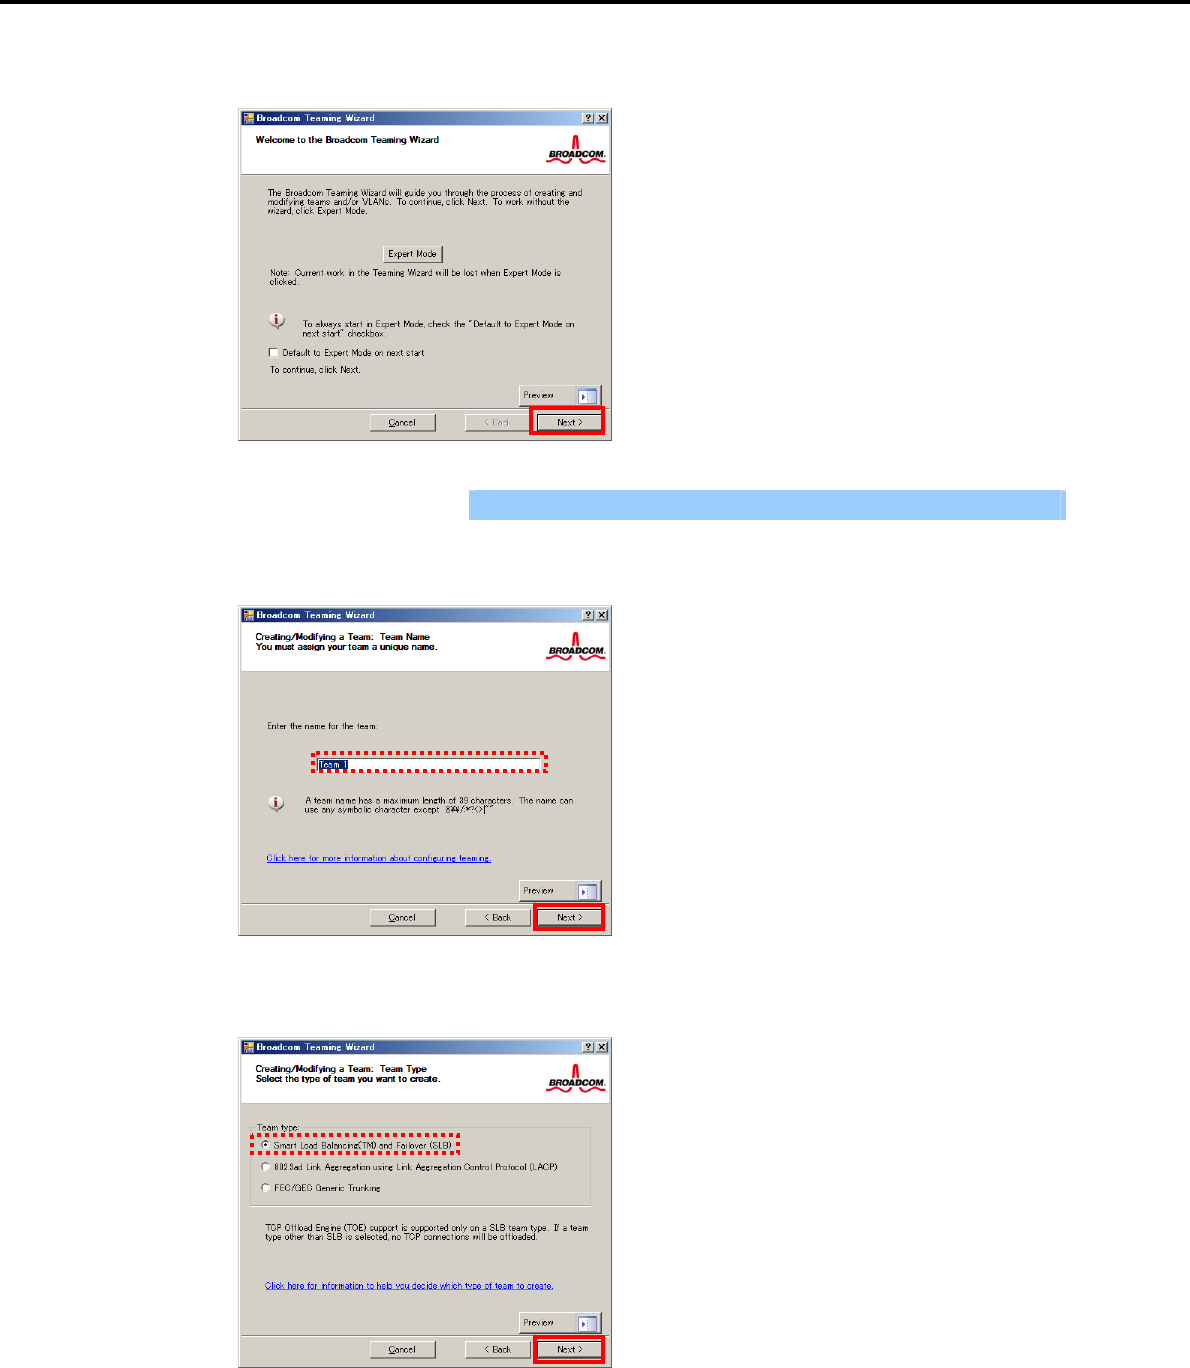
3. Setting Up Windows Server 2008 R2
Chapter 1 Installing Windows
3. Click [Next].
Important Do not use Expert Mode.
4. Enter any name into the team name entry column, and then click [Next].
5. Make sure that the following team type is selected, and then click [Next].
Team type: Smart Load Balancing WITH and Failover (SLB)
Express5800/GT-110d, GT-110d-S, R110d-1E, E110d-1 Installation Guide (Windows) 63

3. Setting Up Windows Server 2008 R2
Chapter 1 Installing Windows
6. Select the adapters that compose the team, click [Add] to add them to the Team Members area, and
then click [Next].
7. Proceed according to your desired team type.
Smart Load Balancing and Failover (without Standby Member)
(1) Select Do not configure a standby member.
(2) Click [Next].
(1)
(2)
Express5800/GT-110d, GT-110d-S, R110d-1E, E110d-1 Installation Guide (Windows)
64
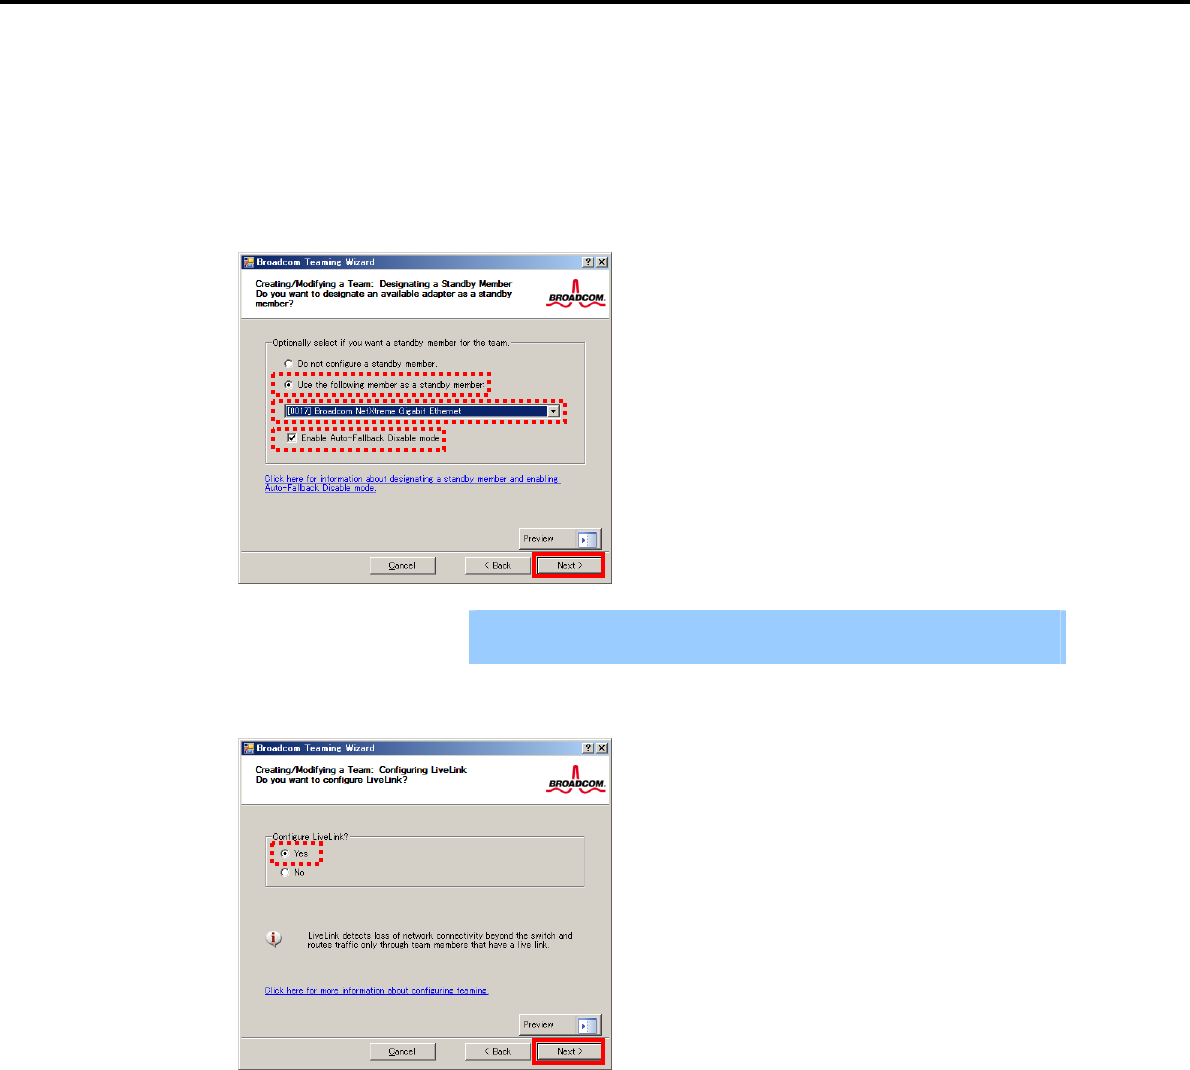
3. Setting Up Windows Server 2008 R2
Chapter 1 Installing Windows
Smart Load Balancing (Auto-Failback Disable) (with Standby Member)
(1) Select Use the following member as a standby member.
(2) Select the adapter that is to be a standby member from the drop-down list.
(3) Select Enable Auto-Failback Disable mode.
(4) Click [Next].
(1)
(3)
(2)
(4)
Important Enable Auto-Failback Disable mode is cleared while editing the team. Select
it again.
8. Select Yes for Configure LiveLink?, and then click [Next].
Express5800/GT-110d, GT-110d-S, R110d-1E, E110d-1 Installation Guide (Windows) 65
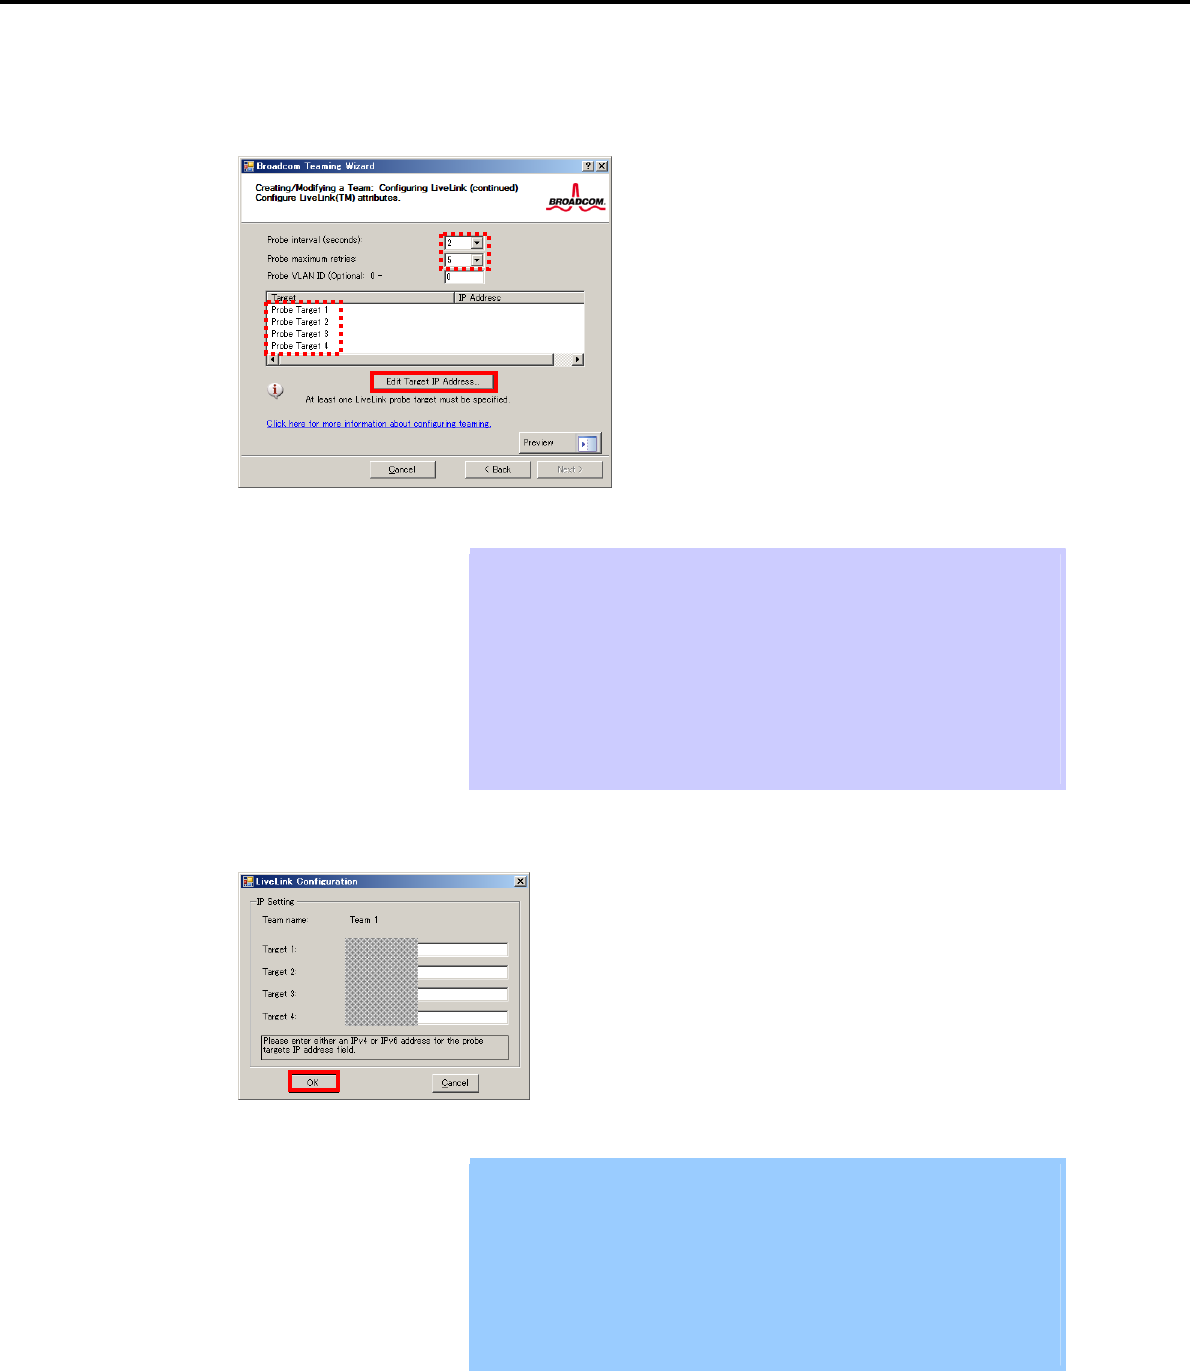
3. Setting Up Windows Server 2008 R2
Chapter 1 Installing Windows
9. You can use the default setting for Probe interval and Probe maximum retries. If you change these
values, select a value from each drop-down list, click the target probe (Probe Target xx), and then click
[Edit Target IP Address…].
Tips The setting range of Probe interval (link packet transmission interval) is 1 to 60
(units: seconds).
The setting range of Probe maximum retries (link packet retry count) is 1 to 10
(times).
Switching a path upon detection of a communication path error by LiveLink takes
(Probe maximum retries + 1) x Probe interval (seconds) at maximum.
If an optional LAN board detects that a link is down, failover occurs immediately
after the link goes down. It takes the time specified for Probe interval (seconds)
to recover from the link going down.
10. In the Target xx text box, enter the IP address of the alive monitoring server, and then click [OK].
Important Target xx must be the same broadcast domain as that specified for the data
communication IP and LiveLink communication IP (described in step 13).
Specify an IP address that exists on the network and with which
communication is possible.
If communication with the IP address specified in Target xx is not possible,
the team will also be unable to communicate. It is therefore recommended
that you specify multiple IP addresses using Probe Target. Up to four IP
addresses can be specified.
Express5800/GT-110d, GT-110d-S, R110d-1E, E110d-1 Installation Guide (Windows)
66

3. Setting Up Windows Server 2008 R2
Chapter 1 Installing Windows
11. Click [Next].
12. Select an adapter from the Team Members area, and then click [Edit Member IP Address…].
13. Enter the IP address used for LiveLink communication, and then click [OK].
Important Be sure to specify an IP address for LiveLink communication for all the
adapters that compose the team. The address specified here is the IP
address for LiveLink communication. Specify a different IP address for
data communication.
For Target xx, specify an IP address that is unique on the network and with
which communication is possible.
Express5800/GT-110d, GT-110d-S, R110d-1E, E110d-1 Installation Guide (Windows) 67

3. Setting Up Windows Server 2008 R2
Chapter 1 Installing Windows
14. Click [Next].
15. Make sure that Skip manage VLAN is selected under Manage VLAN, and then click [Next].
Express5800/GT-110d, GT-110d-S, R110d-1E, E110d-1 Installation Guide (Windows)
68
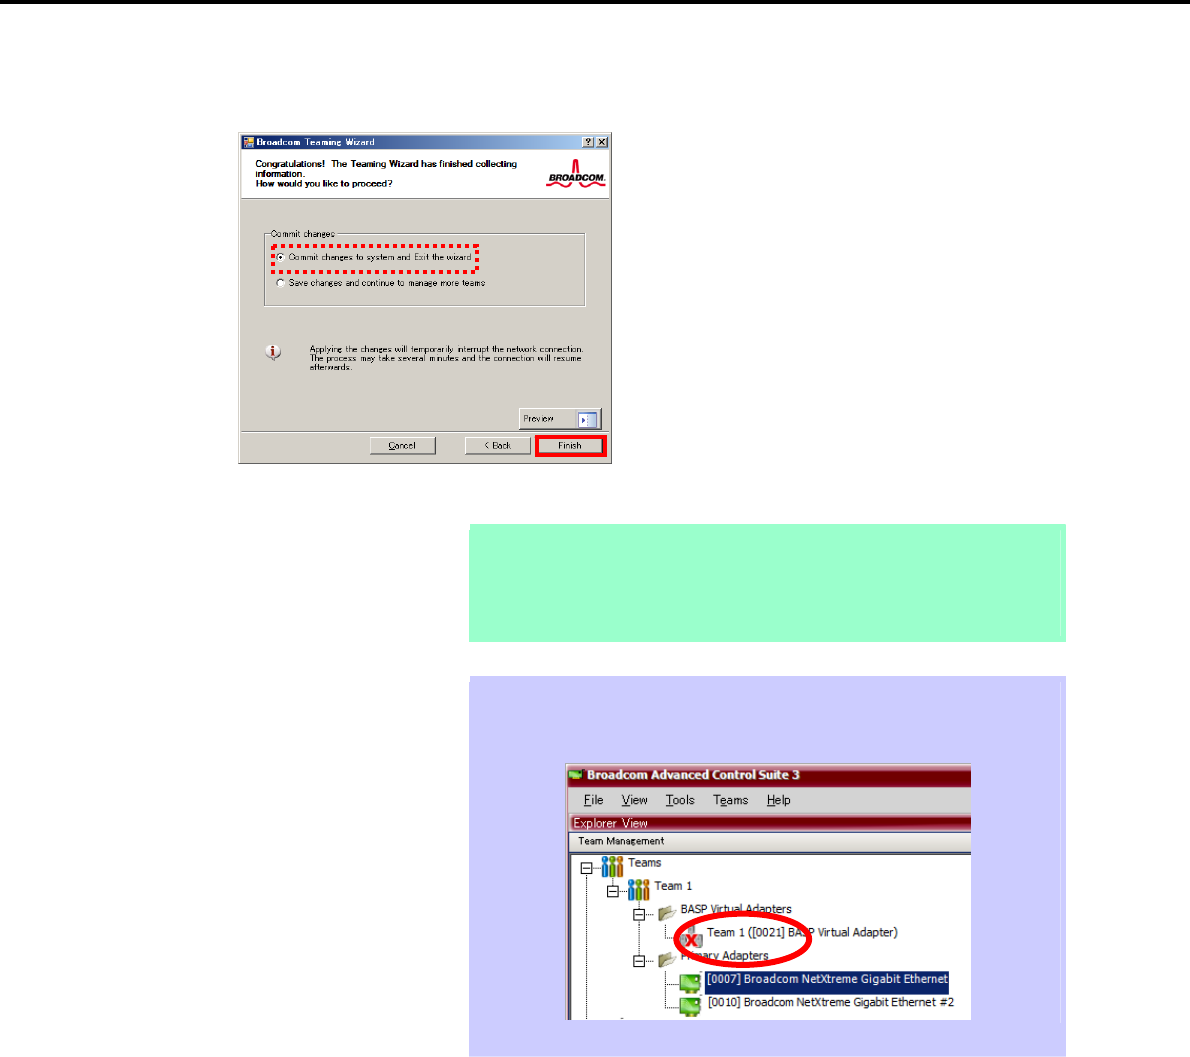
3. Setting Up Windows Server 2008 R2
Chapter 1 Installing Windows
16. Make sure that Commit changes to system and Exit the wizard is selected under Commit changes,
and then click [Finish].
Note When the message below appears, select [Yes].
“
A
pplying the changes will temporarily interrupt the network
connection
.
The process may take several minutes and the
connection will resume afterwards. Do you want to continue?”
Tips After creating a team, if the teaming adapter displays like the following image,
perform steps 8 through 14 again and correct the LiveLink settings.
17. Restart the system.
Express5800/GT-110d, GT-110d-S, R110d-1E, E110d-1 Installation Guide (Windows) 69
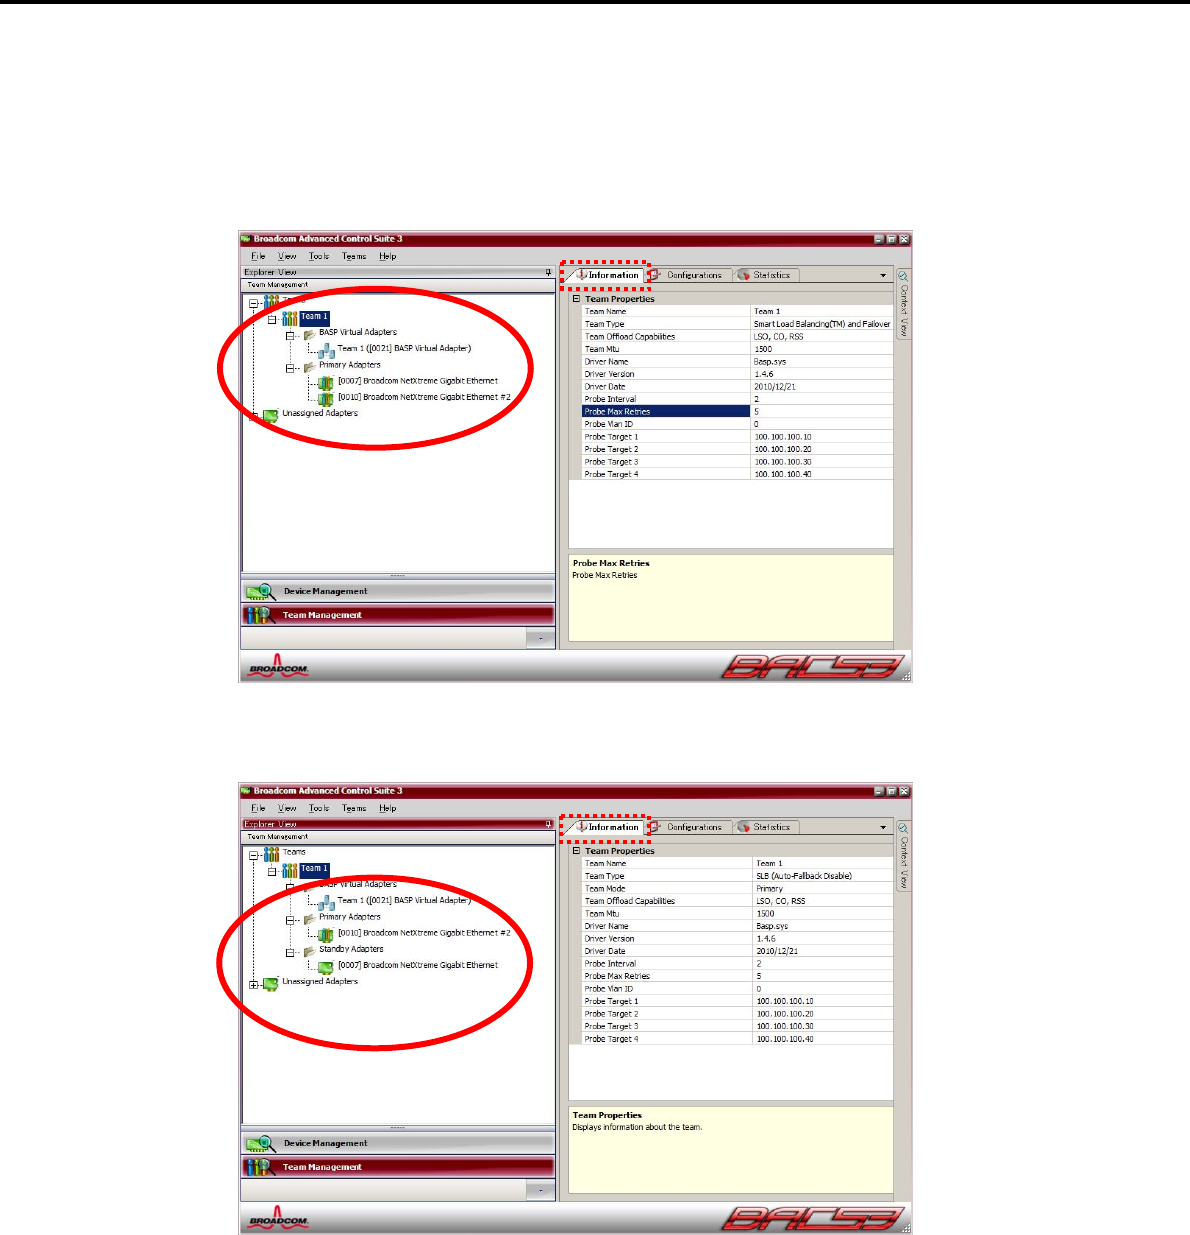
3. Setting Up Windows Server 2008 R2
Chapter 1 Installing Windows
18. After the system starts, follow step 1 to start Broadcom Control Suite3 and confirm that a team has
been created. Confirm the team settings on the Information window to the right.
Smart Load Balancing and Failover (without Standby Member)
Smart Load Balancing (Auto-Failback Disable) (with Standby Member)
Team setup is now complete.
Express5800/GT-110d, GT-110d-S, R110d-1E, E110d-1 Installation Guide (Windows)
70

3. Setting Up Windows Server 2008 R2
Chapter 1 Installing Windows
(4) Procedure for deleting team
Important You must delete teams from Broadcom Control Suite3.
You cannot delete the team from the team adapter displayed in the Device
Manager.
1. Double-click Broadcom Control Suite3 in the Control Panel window.
Broadcom Advanced Control Suite3 starts.
2. Click Team Management from the left menu, right-click the team name under Teams, and then select
Delete Team from the short-cut menu.
Tips When the message below appears, select [Yes].
“The selected team will be deleted from system, do you want to
proceed?
NOTE:
A
pplying the changes will temporarily interrupt the
network connection. The process may take se
v
eral
minutes and the connection will resume afterwards.”
3. Insert the EXPRESSBUILDER DVD into the optical disk drive.
If an autorun menu appears, close the menu window.
Important You do not have to insert the EXPRESSBUILDER DVD if the Starter Pack was
installed from the Internal Flash Memory. Proceed to the next step.
4. Double-click addlvlanstats.vbs in the following folder.
When using the EXPRESSBUILDER DVD:
Optical disk drive letter:\020\win\winnt\ws2008x64\lan
If the Starter Pack was installed from the Internal Flash Memory:
System drive letter:\StartPKG\ws2008x64\lan
Express5800/GT-110d, GT-110d-S, R110d-1E, E110d-1 Installation Guide (Windows) 71
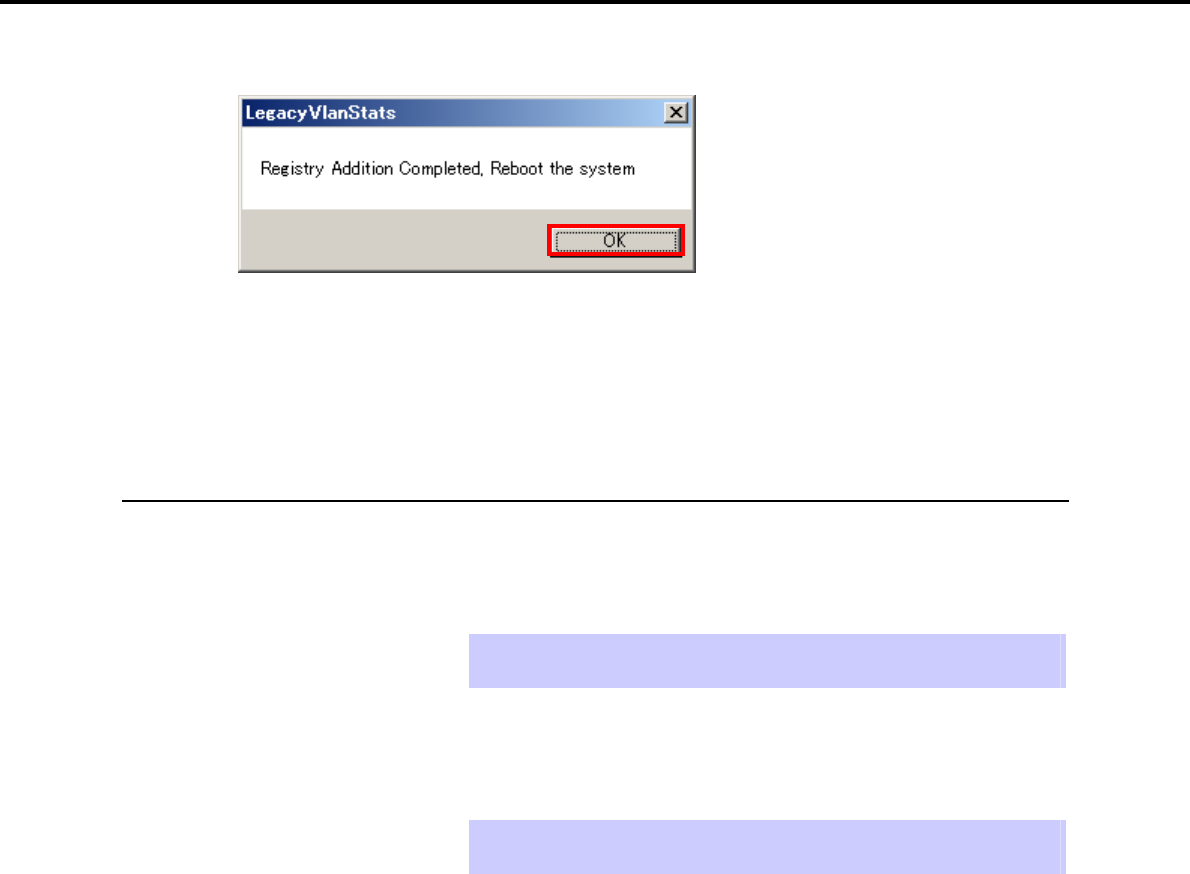
3. Setting Up Windows Server 2008 R2
Chapter 1 Installing Windows
5. When the following message appears, click [OK].
6. Eject the EXPRESSBUILDER DVD from the optical disk drive, and then restart the system.
Team deletion is now complete.
3.5.4 Graphics accelerator driver
The graphics accelerator driver for standard configurations is installed when the Starter Pack is installed
from EXPRESSBUILDER.
If you completed Setup with EXPRESSBUILDER, then the graphics accelerator driver has been
automatically installed.
Tips The graphics accelerator driver is only enabled in Full installations. Standard VGA
is used in the case of Server Core installation.
To reinstall drivers separately, complete the following steps.
1. Insert the EXPRESSBUILDER DVD into the optical disk drive.
If an autorun menu appears, close the menu window.
Tips You do not have to insert the EXPRESSBUILDER DVD if the Starter Pack was
installed from the Internal Flash Memory.
2. From the Start menu, point to All programs, Accessories, and then select Explorer.
3. Double-click the install.bat icon in the following folder.
When using the EXPRESSBUILDER DVD:
Optical disk drive letter:\020\win\winnt\ws2008x64\video
If the Starter Pack was installed from the Internal Flash Memory:
System drive letter:\StartPKG\ws2008x64\video
You will be prompted to confirm the End User License Agreement during this process. Click the
[ACCEPT] button and continue.
4. Eject the EXPRESSBUILDER DVD from the optical disk drive, and then restart the system.
Graphic accelerator driver installation is now complete.
Express5800/GT-110d, GT-110d-S, R110d-1E, E110d-1 Installation Guide (Windows)
72

3. Setting Up Windows Server 2008 R2
Chapter 1 Installing Windows
3.5.5 When using a SCSI controller (N8103-75/107)
The driver for SCSI controller N8103-75/107 is automatically installed by Windows Plug-and-Play. You do
not need to install it manually.
3.5.6 When using a SAS controller (N8103-104A/142)
The driver for SAS controller N8103-104A/142 is automatically installed by Windows Plug-and-Play. You do
not need to install it manually.
3.5.7 When using a RAID Controller (N8103-135)
The driver for RAID Controller N8103-135 is automatically installed by Windows Plug-and-Play. You do not
need to install it manually.
3.5.8 When using a Fibre Channel controller (N8190-127/131/153/154)
The driver for Fibre Channel controller N8190-127/131/153/154 is automatically installed by Windows
Plug-and-Play. You do not need to install it manually.
Express5800/GT-110d, GT-110d-S, R110d-1E, E110d-1 Installation Guide (Windows) 73

3. Setting Up Windows Server 2008 R2
Chapter 1 Installing Windows
3.6 Installing the Bundled Software
The supplied EXPRESSBUILDER DVD contains the server monitoring software NEC ESMPRO Agent and
system management software NEC ESMPRO Manager. You can install NEC ESMPRO Agent automatically by
performing Setup with EXPRESSBUILDER.
Open the Programs or Control Panel window from the Start menu, and make sure that the folders for the utilities
you have installed are contained. If you did not install them at the time of Setup with EXPRESSBUILDER, refer
to Chapter 2 Installing the Bundled Software to install the software separately.
Express5800/GT-110d, GT-110d-S, R110d-1E, E110d-1 Installation Guide (Windows)
74

3. Setting Up Windows Server 2008 R2
Chapter 1 Installing Windows
3.7 License Authentication
To use Windows Server 2008 R2, confirm whether the license has been authenticated, and if it has not, perform
the license authentication procedure.
The following describes the license authentication procedure.
(1) For Full installations
1. Open the Control Panel from the Start menu, click System and Security, and then select System.
Important If the following message appears, Windows has already been activated on
your system. You do not need to complete this procedure.
2. For installation from the backup DVD, replace the product key.
When the following window appears, click Change product key.
Express5800/GT-110d, GT-110d-S, R110d-1E, E110d-1 Installation Guide (Windows) 75

3. Setting Up Windows Server 2008 R2
Chapter 1 Installing Windows
3. When the following window appears, enter the product key found on the COA label, and then click [Next].
4. Follow the instructions in the following message to start the license authentication process.
Windows activation is now complete.
(2) For Server Core installations
1. At the command prompt, enter the following, and then press the <Enter> key.
slmgr –dli
Important If the following message appears, Windows has already been activated on
your system. You do not need to complete this procedure. Click [OK] to
finish.
Express5800/GT-110d, GT-110d-S, R110d-1E, E110d-1 Installation Guide (Windows)
76
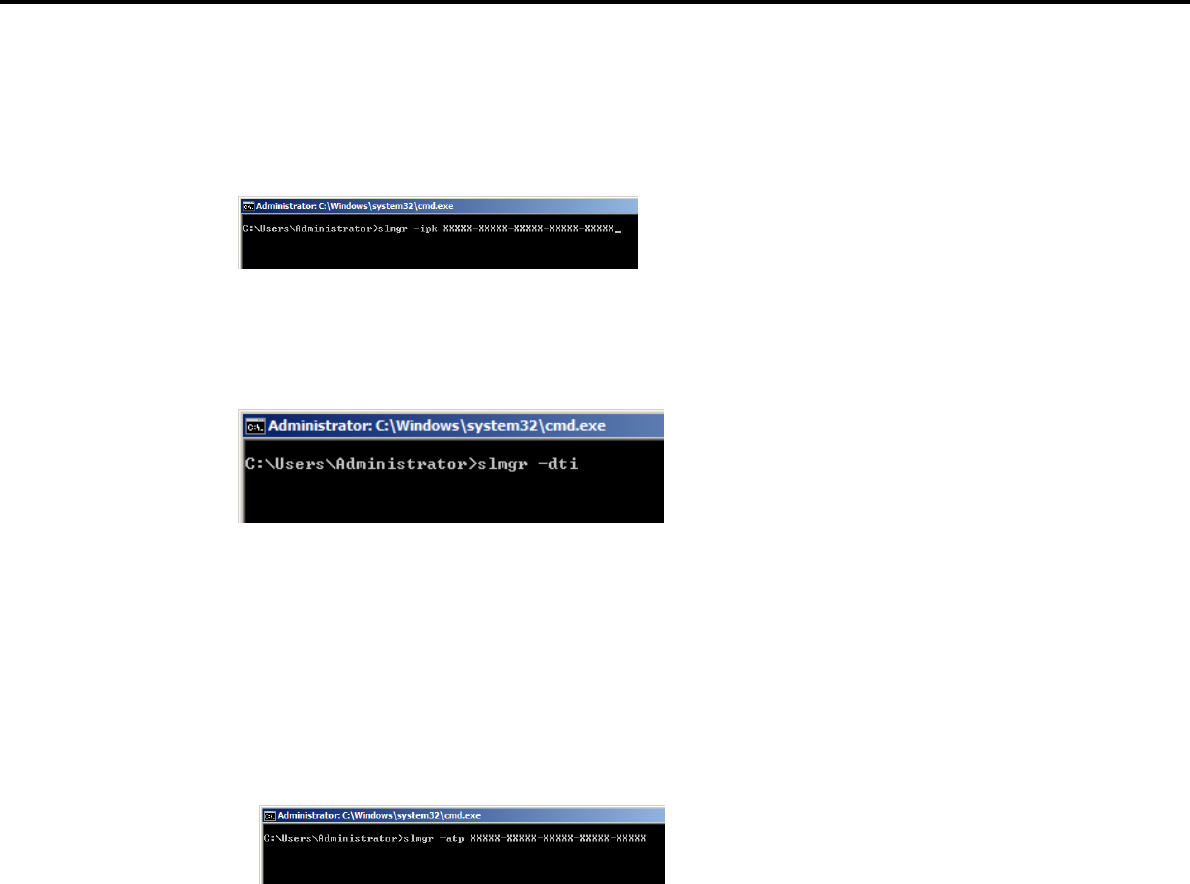
3. Setting Up Windows Server 2008 R2
Chapter 1 Installing Windows
2. For installation from the backup DVD, replace the product key
At the command prompt, enter the following, and then press the <Enter> key. Set the product key found
on the COA label in PID.
slmgr –ipk PID
3. Obtain an installation ID for Windows activation.
At the command prompt, enter the following, and then press the <Enter> key.
slmgr –dti
4. Reference %systemroot%\system32\sppui\phone.inf for the telephone number of the license
authentication customer service.
5. Call the above number, inform the representative of the installation ID which you obtained in step 3, and
receive a confirmation ID.
6. Type the confirmation ID you received in step 5.
At the command prompt, enter the following, and then press the <Enter> key. CID is the confirmation ID
that you received from customer service.
slmgr –atp CID
Windows activation is now complete.
Express5800/GT-110d, GT-110d-S, R110d-1E, E110d-1 Installation Guide (Windows) 77

3. Setting Up Windows Server 2008 R2
Chapter 1 Installing Windows
3.8 Installation When Multiple Logical Drives Exist
Before starting reinstallation, backup data for future use in case of data loss.
(1) Installation process
Setup with EXPRESSBUILDER
Refer to Chapter 1 (3.2 Setup with EXPRESSBUILDER), and proceed with setup.
Important The operating system will be installed on the first detected Hard Disk Drive or
logical disk drive.
Setup with OS standard installer
1. Refer to Chapter 1 (3.3 Setup with OS Standard Installer), and start setup.
2. When the following message appears, select the partition to which you want to install the operating
system.
Select the location to which Windows will be installed
Important When you install a Windows system into an environment where multiple
Hard Disk Drives are connected, these drives are displayed as a
destination to install the system during setup.
At this time, the order and numbers of the disks displayed on the screen
might not match those of the Hard Disk Drives connected to the Hard Disk
Drive bay.
Distinguish between the Hard Disk Drives by viewing the Hard Disk Drive
capacity and partition size displayed on the screen, and then select a drive
to install the Windows system.
Selecting an improper drive might cause an unintentional corruption of the
existing data. Be careful when selecting a Hard Disk Drive on which to
install the system.
For details, refer to the following Microsoft website:
http://support.microsoft.com/kb/937251/en-us
You cannot edit the drive letters for the system volume or boot volume
after setup is complete. Make sure that the drive letters assigned in this
window are correct, and then proceed with setup.
3. Refer to Chapter 1 (3.3 Setup with OS Standard Installer), and proceed to setup Windows with OS
standard installer and the instructions.
The installation process is now complete.
Tips The drive letter might change after installation. If you want to change the drive
letter, use the procedure shown in Changing drive letter assignments below.
Express5800/GT-110d, GT-110d-S, R110d-1E, E110d-1 Installation Guide (Windows)
78

3. Setting Up Windows Server 2008 R2
Chapter 1 Installing Windows
(2) Changing drive letter assignments
The steps below cannot change drive letter assignments for the system volume or boot volume. Be careful
when assigning these.
1. From the Start menu, right-click Computer and then select Management. Next, launch Server
Manager.
2. From the window on the left, select Storage and then Disk Management.
3. Right-click the volume whose drive letter you want to change, and then select Change drive letter and
path.
4. Click [Change].
5. Click [Assign next drive letter], and then select the drive letter you want to assign.
6. Click [OK].
7. When the following message appears, read the contents and then click [OK].
Some programs are dependent on drive letters, and may
not run properly. Continue?
8. Close the Server Manager.
Express5800/GT-110d, GT-110d-S, R110d-1E, E110d-1 Installation Guide (Windows) 79

4. Setting Up Windows Server 2008
Chapter 1 Installing Windows
4. Setting Up Windows Server 2008
Set up Windows Server 2008 and the system.
4.1 Before Starting Setup
Read through the cautions explained here before starting setup.
: Confirm during Setup with EXPRESSBUILDER
: Confirm during Setup with OS standard installer
(1/5)
Setup Items to confirm
Windows
family The following editions of the Windows Server 2008 family may be installed. For
information about Service Packs, refer to 1.2 Service Pack Support.
Windows Server 2008 Standard 64-bit (x64) Edition
Windows Server 2008 Enterprise 64-bit (x64) Edition
Windows Server 2008 Standard 32-bit (x86) Edition
Windows Server 2008 Enterprise 32-bit (x86) Edition
Inquiries about installing other editions may be made at your sales dealer or
maintenance service company.
When installing Windows Server 2008, the following hardware configurations
require special procedures.
Reinstalling to a mirrored volume
When reinstalling to a Hard Disk Drive that has been converted to a dynamic disk,
the operating system can only be installed to a simple dynamic volume.
If installing to a mirrored volume by using Disk Management, disable mirroring
and return to a basic disk prior to installation. After the operating system is
installed, return to the mirrored state.
Click on Computer Management and then Disk Management to create, release,
or delete mirrored volumes
Connecting MO devices
Installing Windows while an MO device is connected can result in installation
failure. Remove the MO device, and then start installation from the beginning.
DAT, LTO, and similar media
Do not set media that is unnecessary to installation during setup.
Hardware
configuration
warnings
RDX and similar peripheral devices
Depending on the configuration of the hardware being used, it may be necessary
to remove or stop peripheral devices prior to starting setup. Refer to the manuals
of each peripheral device to make sure each is in its appropriate state, and then
proceed with setup.
Express5800/GT-110d, GT-110d-S, R110d-1E, E110d-1 Installation Guide (Windows)
80

4. Setting Up Windows Server 2008
Chapter 1 Installing Windows
(2/5)
Setup Items to confirm
Connecting to multiple Hard Disk Drives (Logical Drives)
For details on reinstalling operating systems to a system in which multiple Logical
Drives exist, refer to Chapter 1 (4.9 Installation When Multiple Logical Drives
Exist).
Hardware
configuration
warnings
The system partition size can be calculated by using the following formula.
Size required to install the OS + paging file size + dump file size + application size
[Full installations]
Size required to install the OS = 11,600 MB (Windows Server 2008)
= 12,300 MB (Windows Server 2008 with
Service Pack 2)
= 16,720 MB (Windows Server 2008 + Service
Pack 2 DVD-ROM)
Paging file size (recommended) = installed memory size 1.5
Dump file size = installed memory size + 300 MB
Application size = as required by the application
[Server Core installations]
Size required to install the OS = 4,100 MB (Windows Server 2008)
= 12,300 MB (Windows Server 2008 with
Service Pack 2)
= 9,300 MB (Windows Server 2008 + Service
Pack 2 DVD-ROM)
Paging file size (recommended) = installed memory size 1.5
Dump file size = installed memory size + 300 MB
Application size = as required by the application
Important The above paging file sizes are recommended for collecting debug
information (dump file). The initial size of the boot volume paging file
must be large enough to store dump files. Make sure you set a sufficient
paging file size. If the paging file is insufficient, there will be a virtual
memory shortage that may result in an inability to collect correct debug
information.
Regardless of the sizes of internal memory and write debug
information, the maximum size of the dump file is "size of internal
memory + 300 MB".
When installing other applications or other items, add the amount of
space needed by the application to the partition.
System
partition size
<Windows
Server 2008
64-bit Edition>
Express5800/GT-110d, GT-110d-S, R110d-1E, E110d-1 Installation Guide (Windows) 81

4. Setting Up Windows Server 2008
Chapter 1 Installing Windows
(3/5)
Setup Items to confirm
System
partition size
<Windows
Server 2008
64-bit Edition>
For example, if the installed memory size is 1 GB (1,024 MB) and Full installation is
selected, the partition size is calculated as follows:
11,600 MB + (1,024 MB 1.5) + 1,024 MB + 300 MB + application size = 14,460
MB + application size
If the partition size for installing the system is smaller than the size required for
installation + paging file size, expand the partition size or add another disk. If your
system does not have a sufficient dump file size, divide the required file space into
multiple disks by performing the following steps.
1. Set the system partition size to a size sufficient to install the OS and paging file.
2. Write the debug information of the dump file onto another disk by referring to
Chapter 1 (7. Setup for Solving Problems).
If there is not enough disk space to write the debug information, set the partition
size to a size sufficient to install the OS and paging file, and then add another disk
for the dump file.
System
partition size
<Windows
Server 2008
32-bit Edition>
The system partition size can be calculated by using the following formula.
Size required to install the OS + paging file size + dump file size + application size
[Full installations]
Size required to install the OS = 6,300 MB (Windows Server 2008)
= 9,300 MB (Windows Server 2008 with
Service Pack 2)
= 9,400 MB (Windows Server 2008 + Service
Pack 2 DVD-ROM)
Paging file size (recommended) = installed memory size 1.5
Dump file size = installed memory size + 300 MB
Application size = as required by the application
[Server Core installations]
Size required to install the OS = 2,200 MB (Windows Server 2008)
= 9,300 MB (Windows Server 2008 with
Service Pack 2)
= 5,300 MB (Windows Server 2008 + Service
Pack 2 DVD-ROM)
Paging file size (recommended) = installed memory size 1.5
Dump file size = installed memory size + 300 MB
Application size = as required by the application
For example, if the installed memory size is 1 GB (1,024 MB) and Full installation is
selected, the partition size is calculated as follows:
6,300 MB + (1,024 MB 1.5) + 1,024 MB + 300 MB + application size = 9,160 MB
+ application size
Express5800/GT-110d, GT-110d-S, R110d-1E, E110d-1 Installation Guide (Windows)
82

4. Setting Up Windows Server 2008
Chapter 1 Installing Windows
(4/5)
Setup Items to confirm
Important The above paging file sizes are recommended for collecting debug
information (dump file). The initial size of the boot volume paging file
must be large enough to store dump files. Make sure you set a sufficient
paging file size. If the paging file is insufficient, there will be a virtual
memory shortage that may result in an inability to collect correct debug
information.
A paging file size of 4096 MB or greater cannot be specified for one
partition in some system configurations.
If a message prompting you to specify a value smaller than 4096 MB
appears, specify 4095 MB.
If the mounted memory size is 2 GB or greater, the maximum size of the
dump file is "2048 MB + 300 MB".
When installing other applications or other items, add the amount of
space needed by the application to the partition.
System
partition size
<Windows
Server 2008
32-bit (x86)
Edition>
If the partition size for installing the system is smaller than the size required for
installation + paging file size, expand the partition size or add another disk. If your
system does not have a sufficient dump file size, divide the required file space into
multiple disks by performing the following steps.
1. Set the system partition size to a size sufficient to install the OS and paging file.
2. Write the debug information of the dump file onto another disk by referring to
Chapter 1 (7. Setup for Solving Problems).
If there is not enough disk space to write the debug information, set the partition
size to a size sufficient to install the OS and paging file, and then add another disk
for the dump file.
Inplace upgrade from Windows Server 2003 to Windows Server 2008 is not
recommended because it overwrites the files and registries and might make an
unexpected effect on the system and applications.
If you want to use Windows Server 2008, back up the necessary data before
installing Windows Server 2008.
Tips Inplace upgrade refers to overwriting an existing OS (in this case,
Windows 2003) with another OS (Windows Server 2008).
Upgrade to
Windows
Server 2008
Express5800/GT-110d, GT-110d-S, R110d-1E, E110d-1 Installation Guide (Windows) 83

4. Setting Up Windows Server 2008
Chapter 1 Installing Windows
(5/5)
Setup Items to confirm
If using BitLocker, note the following.
Before installing an OS, be sure to create the following two partitions in the Hard
Disk Drive:
System partition (to store the loader)
Boot partition (to store the OS)
For details, refer to the following document provided in Microsoft TechNet:
BitLocker Drive Encryption Step-by-Step Guide
Note
Be sure to keep the recovery password secure. Do not keep it near a server
running BitLocker.
Important If the recovery password is not entered, the OS cannot be started, and the
content of the partition encrypted by BitLocker cannot be referenced any
more.
The recovery password might be required at startup of the OS after the
following:
Replacement of motherboard
Initialization of trusted platform module (TPM)
Change of BIOS setting
Using
BitLocker
To reinstall the operating system into a partition that is encrypted with BitLocker,
delete the BitLocker-encrypted partition prior to reinstallation.
Application of
Service Pack You can install the Service Pack on the server. When the Service Pack is not
attached to your system, prepare it by yourself.
License authentication might be required, depending on the operating environment.
For details, refer to Chapter 1 (4.8 License Authentication).
Important Activate within 60 days following installation.
A virtual product key is used when installing in a virtual environment. It
is not used when directly installing an operating system to a physical
server.
License
authentication
Express5800/GT-110d, GT-110d-S, R110d-1E, E110d-1 Installation Guide (Windows)
84

4. Setting Up Windows Server 2008
Chapter 1 Installing Windows
4.2 Setup with EXPRESSBUILDER
This section describes how to install Windows with EXPRESSBUILDER.
This function automatically recognizes the RAID Controller connected to the server and configures the RAID
System, so you must complete setup of the server by following the "User’s Guide " in advance.
Important The Scalable Networking Pack (SNP) function is disabled on systems that
have been installed by using EXPRESSBUILDER.
The setting of SNP function may affect the system performance. Contact
the sales agent for details.
Setup with EXPRESSBUILDER may delete some data in the Hard Disk Drive
depending on the system settings. Pay attention to input parameters. You
must be especially careful when configuring the following:
RAID settings wizard
Partition Settings in the Windows Setup wizard
Backing up user data, as needed, is recommended.
Note For a non-standard setup procedure without using EXPRESSBUILDER, refer to
the descriptions in Chapter 1 (1.4 When Using a Large-Capacity Storage Controller
Not Supported by EXPRESSBUILDER) or (4.9 Installation When Multiple Logical
Drives Exist).
Tips Setup with EXPRESSBUILDER allows you to use a prespecified parameter file or
save the parameters specified in setup as a parameter file on a removable media
or Internal Flash Memory (if purchased optionally).
You can create a parameter file by using the Create a parameter file for
Windows OS function in EXPRESSBUILDER.
For details on creating a parameter file, refer to Chapter 1 (8 Windows OS
Parameter File).
Express5800/GT-110d, GT-110d-S, R110d-1E, E110d-1 Installation Guide (Windows) 85
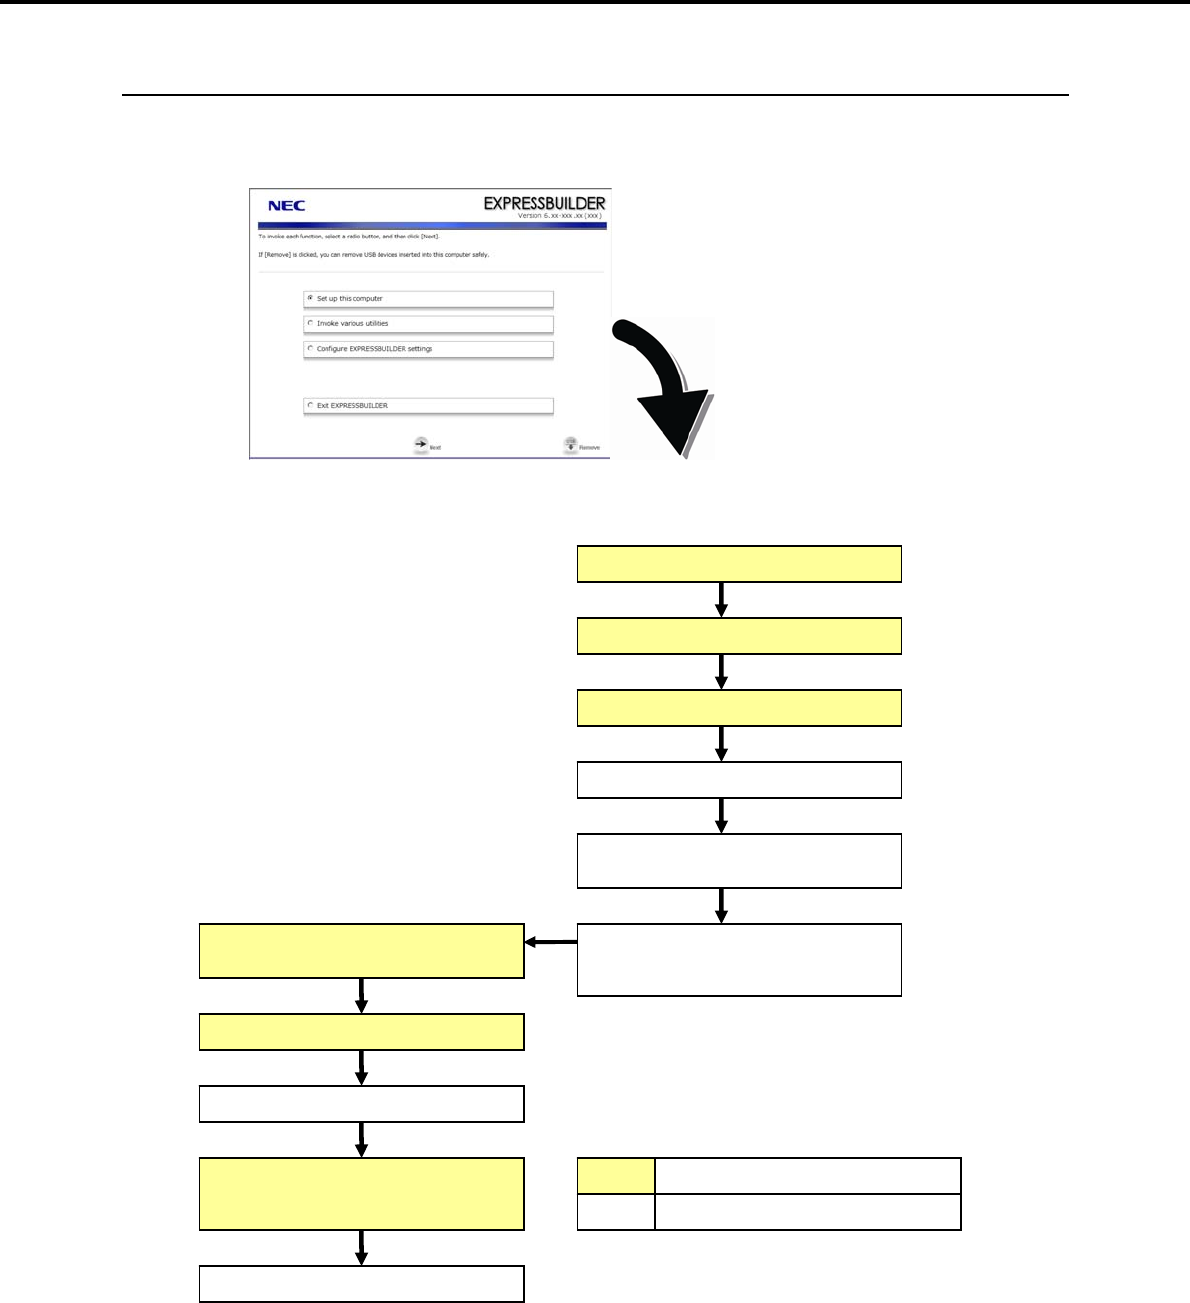
4. Setting Up Windows Server 2008
Chapter 1 Installing Windows
4.2.1 Setup flow
The following flowchart shows the installation procedure with EXPRESSBUILDER.
Parameter setup menu
Configure RAID system
Create and format the Windows
system partition
Copy Windows drivers
Copy the selected application
End of installation
Agree to the terms of the license
Log on
Automatic installation
Insert the OS installation media
Remove the CD/DVD-ROM or
removable media
Process that requires input or selection
Process that proceeds automatically
Setup execution screen
Setup selection menu
Express5800/GT-110d, GT-110d-S, R110d-1E, E110d-1 Installation Guide (Windows)
86
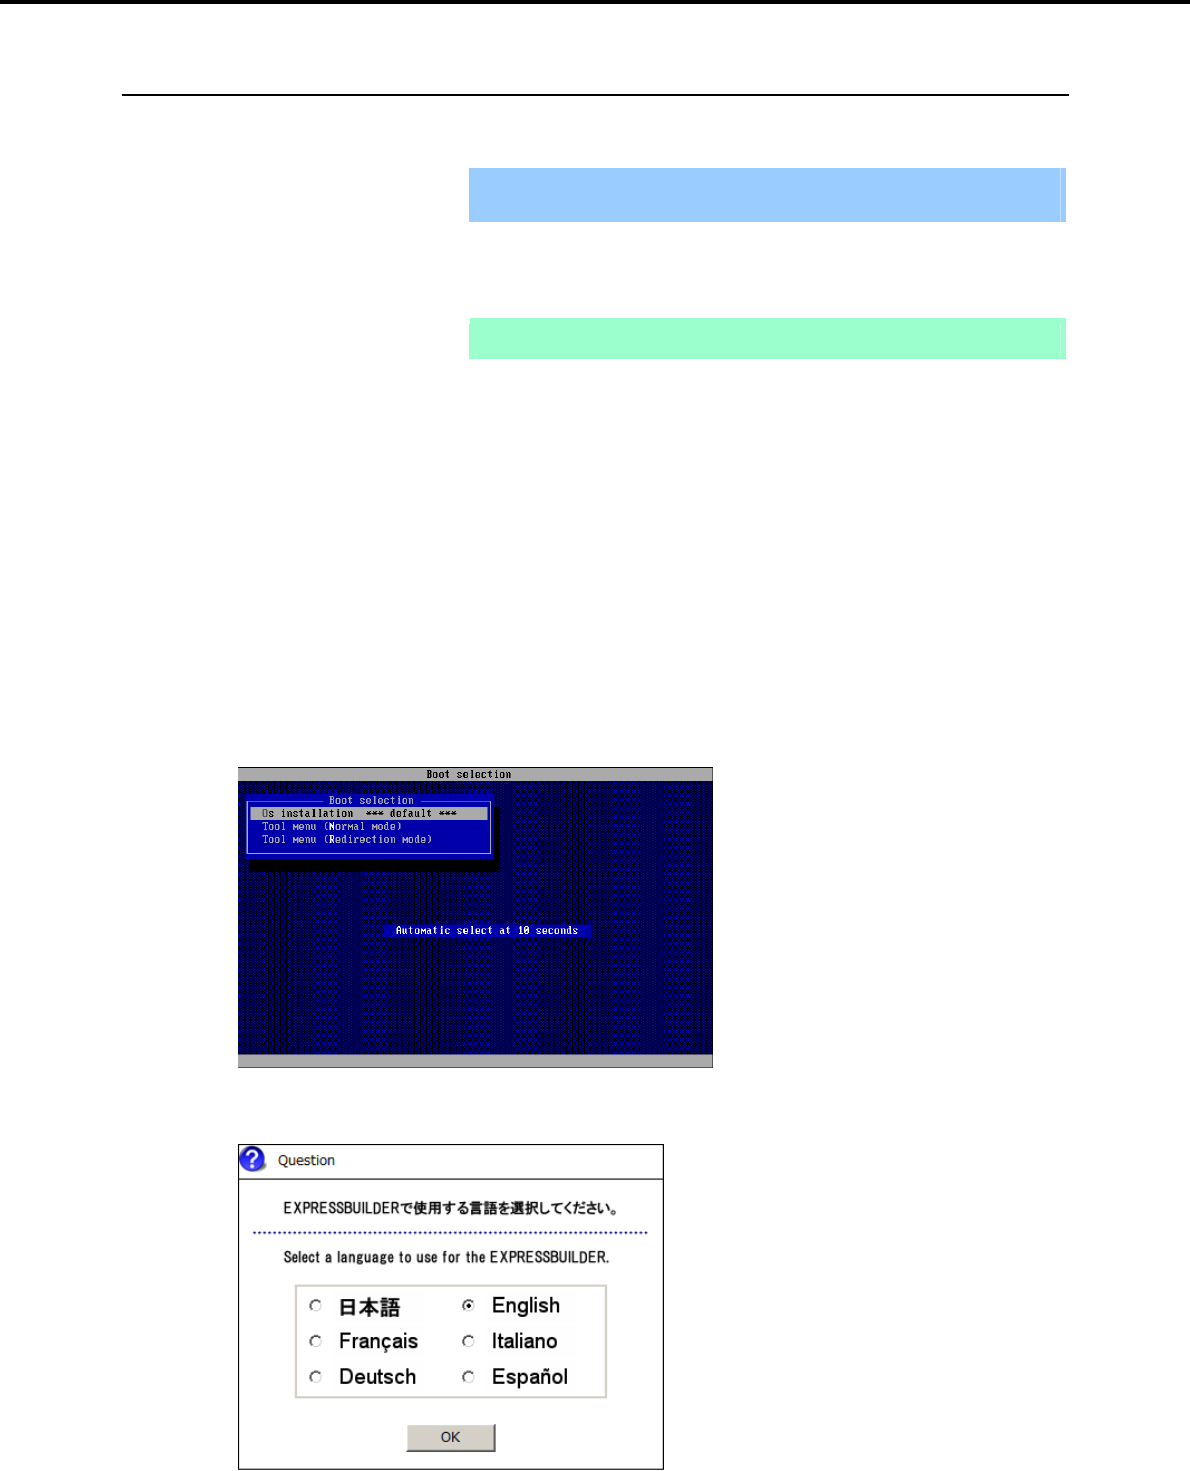
4. Setting Up Windows Server 2008
Chapter 1 Installing Windows
4.2.2 Setup procedure
During Setup with EXPRESSBUILDER, parameters are specified through the wizard. You can also save the
parameters as one file (a parameter file) to removable media.
Important Read through the items in Chapter 1 (4.1 Before Starting Setup) prior to
installing Windows.
1. Turn peripheral device power on, and then turn the server power on.
2. Use the following procedure to start EXPRESSBUILDER.
Note Be sure to disconnect removable media before starting EXPRESSBUILDER.
When using the EXPRESSBUILDER DVD:
(1) Insert the EXPRESSBUILDER DVD into the optical disk drive of the server.
(2) Once the DVD is inserted, restart the server by resetting it (press <Ctrl> + <Alt> + <Delete>) or
by turning the power off and then on again.
EXPRESSBUILDER starts.
When using the Internal Flash Memory:
(1) When "Press <F2> Setup, <F3> Internal Flash Memory, <F4> ROM Utility, <F12> Network"
appears below the POST window, press the <F3> key.
EXPRESSBUILDER starts.
3. When the following message appears, select Os installation *** default ***.
You will automatically advance to step 4, with no need for further input.
4. Select English on the language selection window, and then click [OK].
Express5800/GT-110d, GT-110d-S, R110d-1E, E110d-1 Installation Guide (Windows) 87
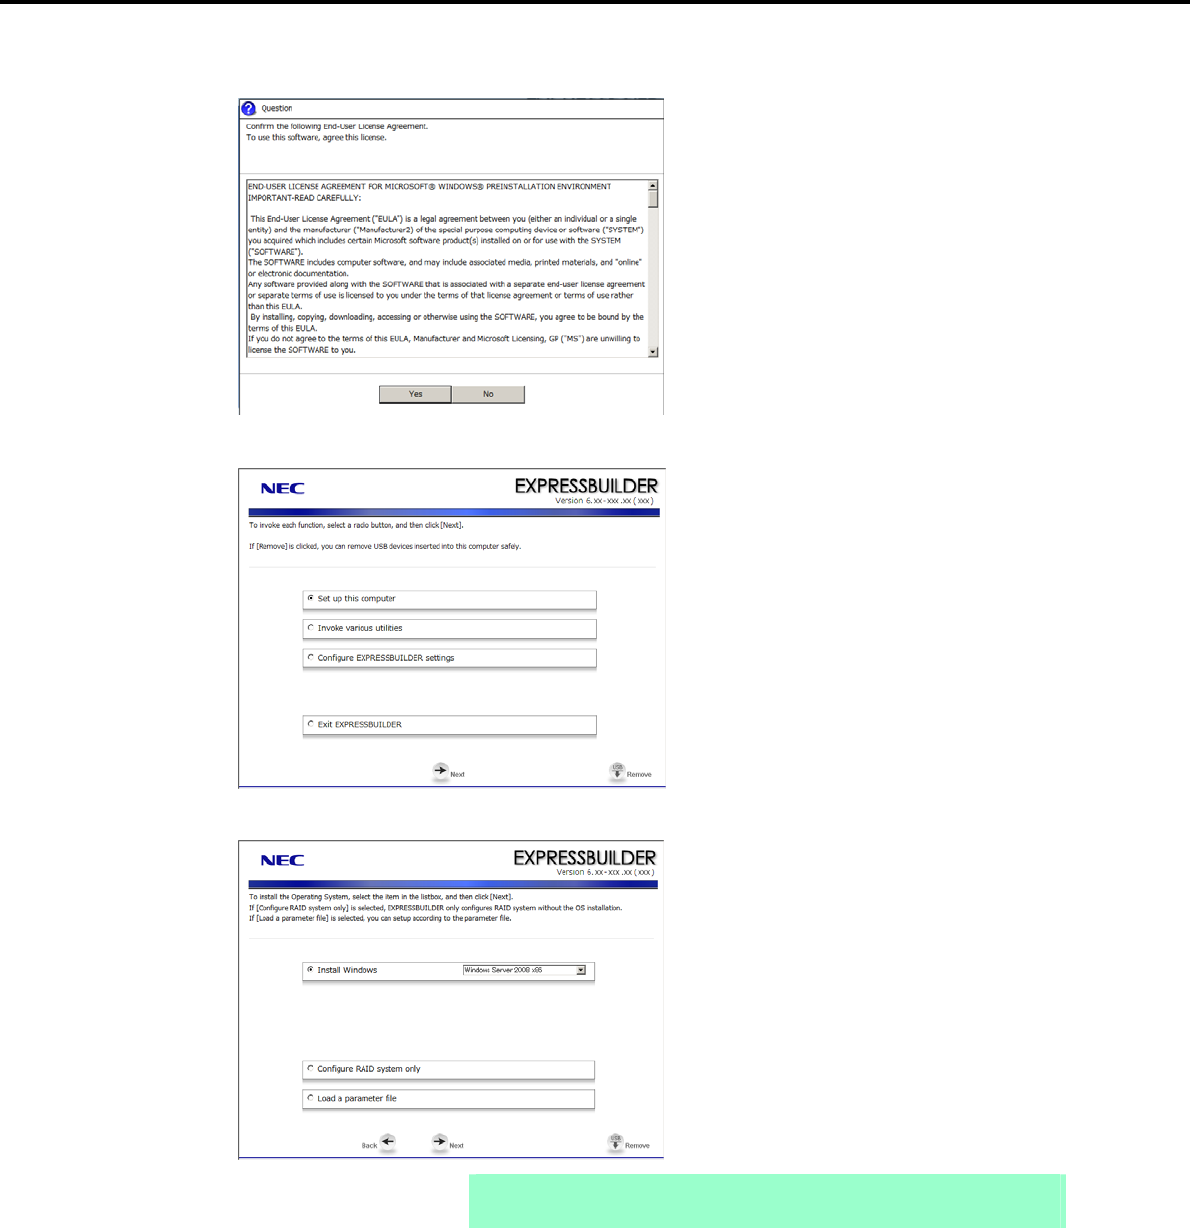
4. Setting Up Windows Server 2008
Chapter 1 Installing Windows
5. When the Windows PE software license agreement window appears, click [Yes].
6. Select Set up this computer from the top menu, and then click [Next].
7. When the setup selection menu appears, use the following steps to specify the parameters.
Note When setting up again, parameter input via the wizard can be omitted by loading
the saved parameter file.
Express5800/GT-110d, GT-110d-S, R110d-1E, E110d-1 Installation Guide (Windows)
88

4. Setting Up Windows Server 2008
Chapter 1 Installing Windows
When not using a parameter file:
Select the appropriate OS from the Install Windows drop-down list, and then click [Next].
Go to the following (1) RAID settings.
When using a parameter file:
Select Load a parameter file, and then click [Next].
Load the desired parameter file according to the onscreen instructions.
Confirm the settings on the parameter setup menu as required, and then click [Next].
Go to the following (4) Executing setup.
Express5800/GT-110d, GT-110d-S, R110d-1E, E110d-1 Installation Guide (Windows) 89
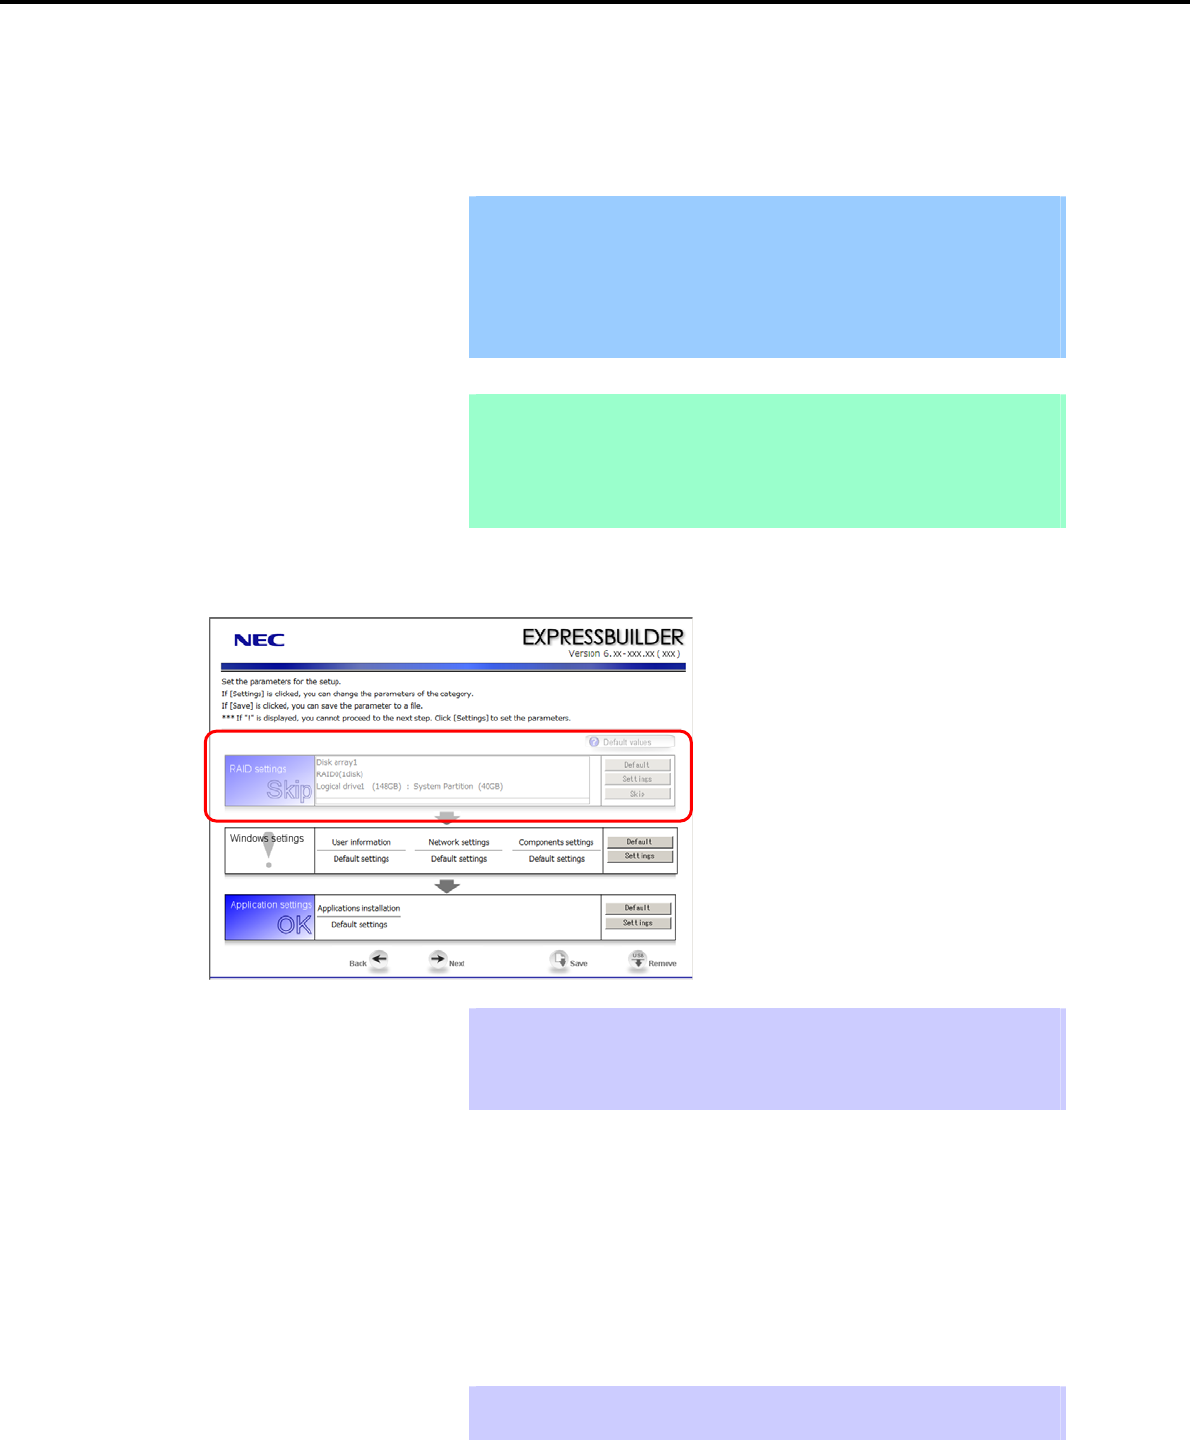
4. Setting Up Windows Server 2008
Chapter 1 Installing Windows
(1) RAID settings
This function automatically recognizes the RAID Controller connected to the server and configures the RAID
System, so you must complete setup of the server by following the "User’s Guide " in advance.
Important Some data in the Hard Disk Drive might be deleted depending on the system
settings. Pay attention to input parameters. You must be especially careful
when configuring the following:
RAID settings wizard
Partition Settings in the Windows Setup wizard
Backing up user data, as needed, is recommended.
Note When using an onboard RAID Controller (LSI Embedded MegaRAID):
This function does not support the creation of RAID10 by using the onboard
RAID Controller.
Refer to Chapter 2 (4. RAID System Configuration) in "Maintenance Guide" when
creating RAID10.
Specify the RAID settings using the RAID settings wizard on the parameter setup menu.
Tips Use the [Default] button when you want to return to the default value of parameters
after having modified them with the wizard.
You can confirm the value set by clicking the [Default] button if you click the
[Default values] button.
When creating a new Logical Drive
1. Click [Settings] in RAID settings.
2. Use the wizard to set up the Logical Drive.
When skipping the creation of a new Logical Drive
1. Click [Skip] in RAID settings.
Tips Use the [Skip] button if, after modifying the settings with the RAID settings wizard,
you want to install the existing configurations without modifying them.
Express5800/GT-110d, GT-110d-S, R110d-1E, E110d-1 Installation Guide (Windows)
90
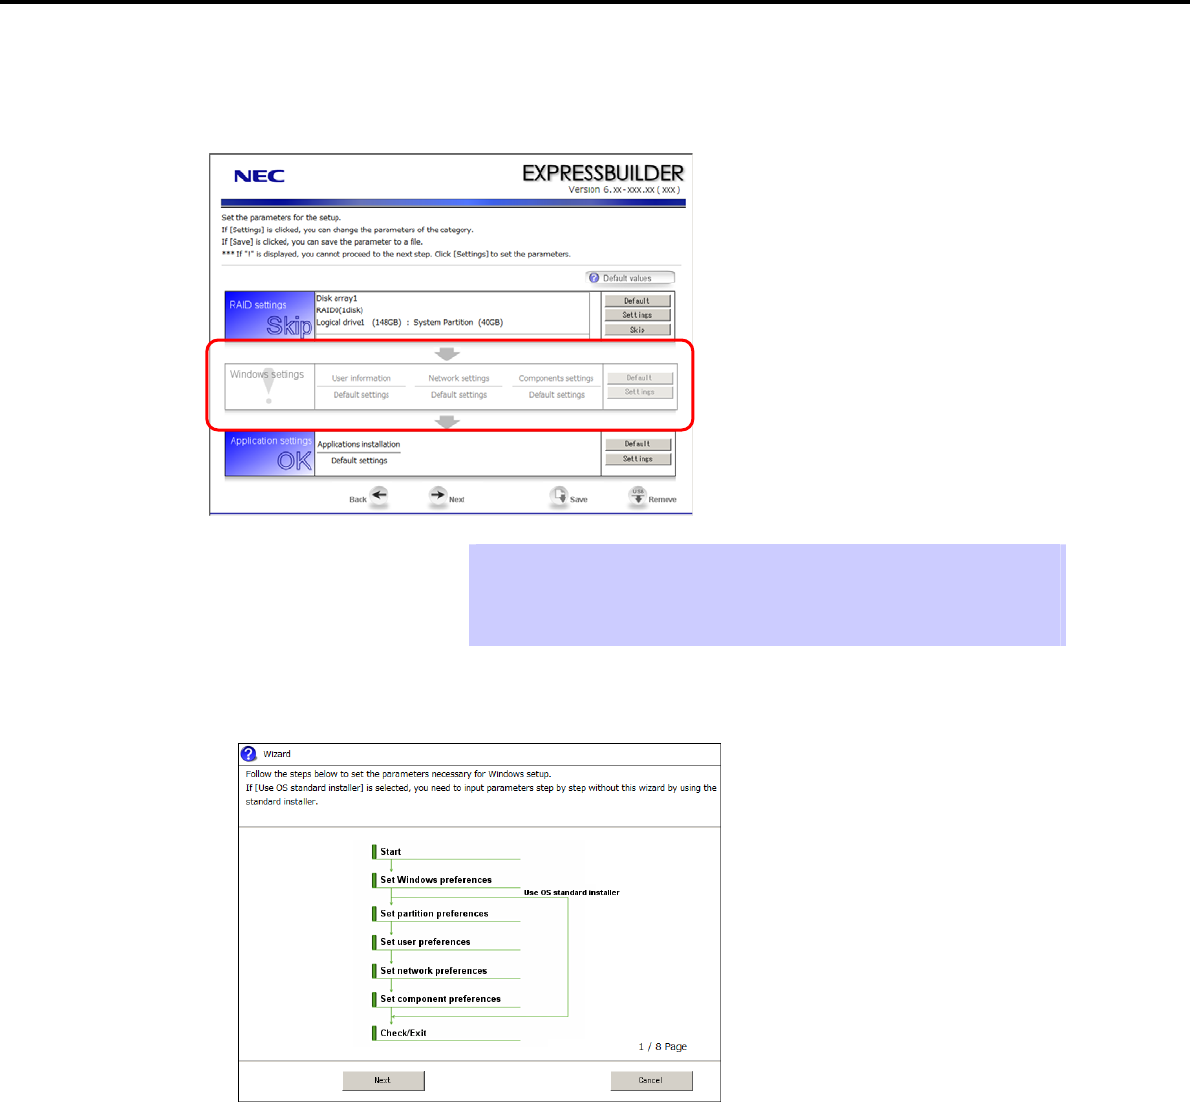
4. Setting Up Windows Server 2008
Chapter 1 Installing Windows
(2) Windows settings
Set up Windows by using the Windows settings wizard on the parameter setup menu.
Tips Use the [Default] button when you want to return to the default value of parameters
after having modified them with the wizard.
You can confirm the value set by clicking the [Default] button if you click the
[Default values] button.
1. Click [Settings] in Windows settings.
2. Click [Next] in the Windows settings wizard.
Express5800/GT-110d, GT-110d-S, R110d-1E, E110d-1 Installation Guide (Windows) 91
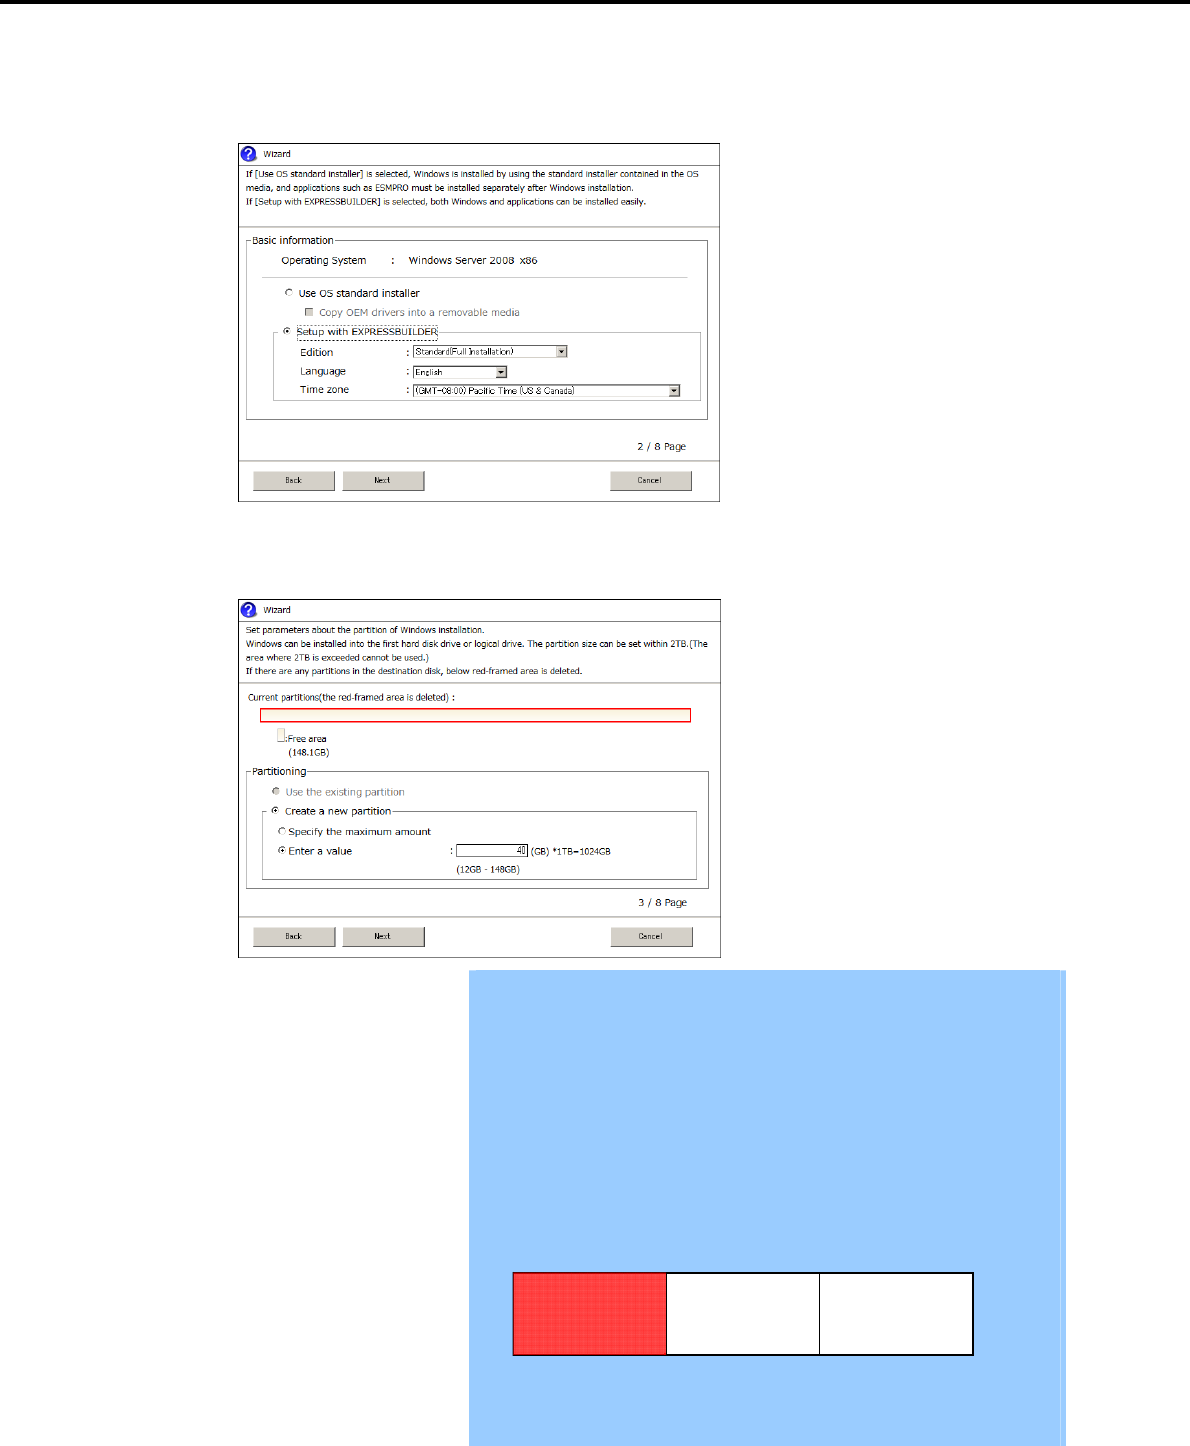
4. Setting Up Windows Server 2008
Chapter 1 Installing Windows
3. Specify the Windows basic settings.
The basic information window appears. Confirm the settings, making corrections as needed, and then
click [Next].
4. Set up the partitions.
The partitioning window appears. Confirm the settings, making corrections as needed, and then click
[Next].
Important
Partition size
Specify a partition size larger than the minimum required for installing
the operating system. (Refer to Chapter 1 (4.1 Before Starting Setup).)
Do not specify a size that is greater than the capacity of the connected
Hard Disk Drive.
The maximum partition size is 2,097,152 MB.
If you select Create a new partition under Partitioning, the entire contents
of the Hard Disk Drive will be deleted.
If you select Use the existing partition under Partitioning, data in the first
partition is formatted and deleted. Data in other partitions will be kept. The
figure below shows in which partitions data will be deleted.
First partition
Deleted
Second partition
Retained
Third partition
Retained
You cannot reinstall to an existing partition that has been upgraded to a
Dynamic Disk (refer to Chapter 1 (4.1 Before Starting Setup)). Do not select
Use the existing partition under Partitioning.
Express5800/GT-110d, GT-110d-S, R110d-1E, E110d-1 Installation Guide (Windows)
92
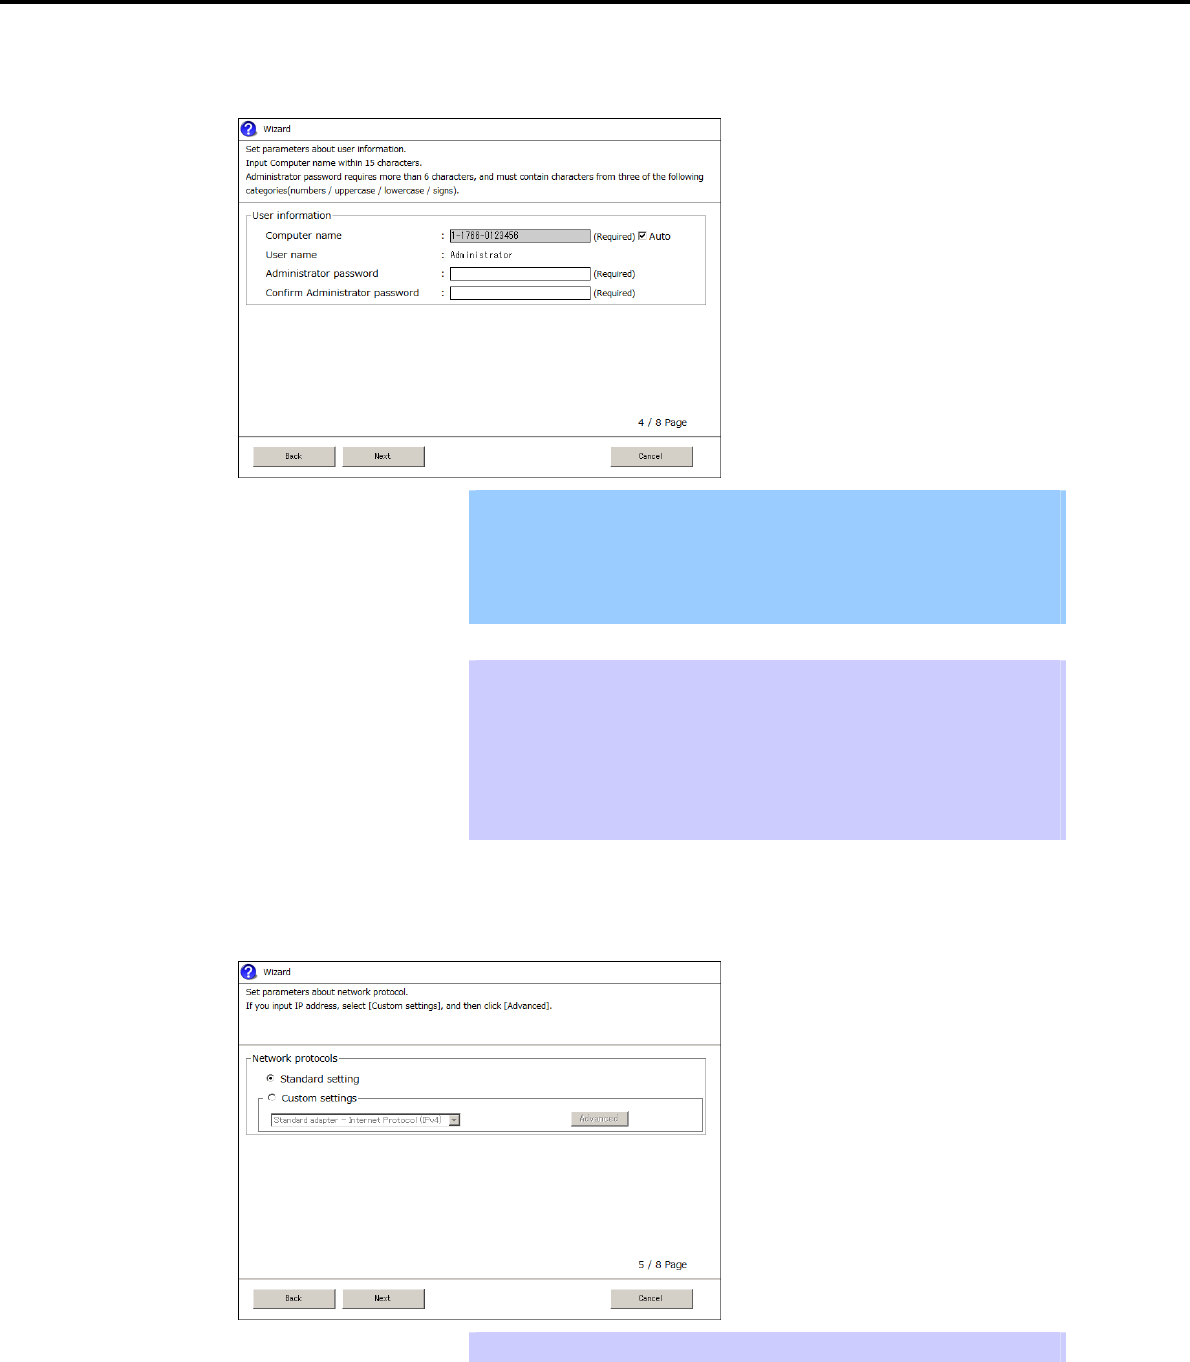
4. Setting Up Windows Server 2008
Chapter 1 Installing Windows
5. Enter user information.
The user information window appears. Enter the user information, and then click [Next].
Important For Windows Server 2008, you must enter a computer name and
administrator password that satisfies the following conditions:
Contains 6 or more characters
Contains characters from at least three of the following categories:
numbers, uppercase letters, lowercase letters, and symbols.
Tips - The Computer name has been assigned by automatic assignment function. If
you need to assign another computer name, remove the checkmark from
"Auto", and enter the desired computer name.
- If a parameter file is used for setup or if you return to a previous screen,
is displayed in the Administrator password and Confirm Administrator
password text boxes even if no value has been entered.
6. Set up the network.
The network setting window appears. Confirm the settings, making corrections as needed, and then click
[Next].
Tips The order of entry in Custom settings may differ from the numbering of LAN ports.
Express5800/GT-110d, GT-110d-S, R110d-1E, E110d-1 Installation Guide (Windows) 93
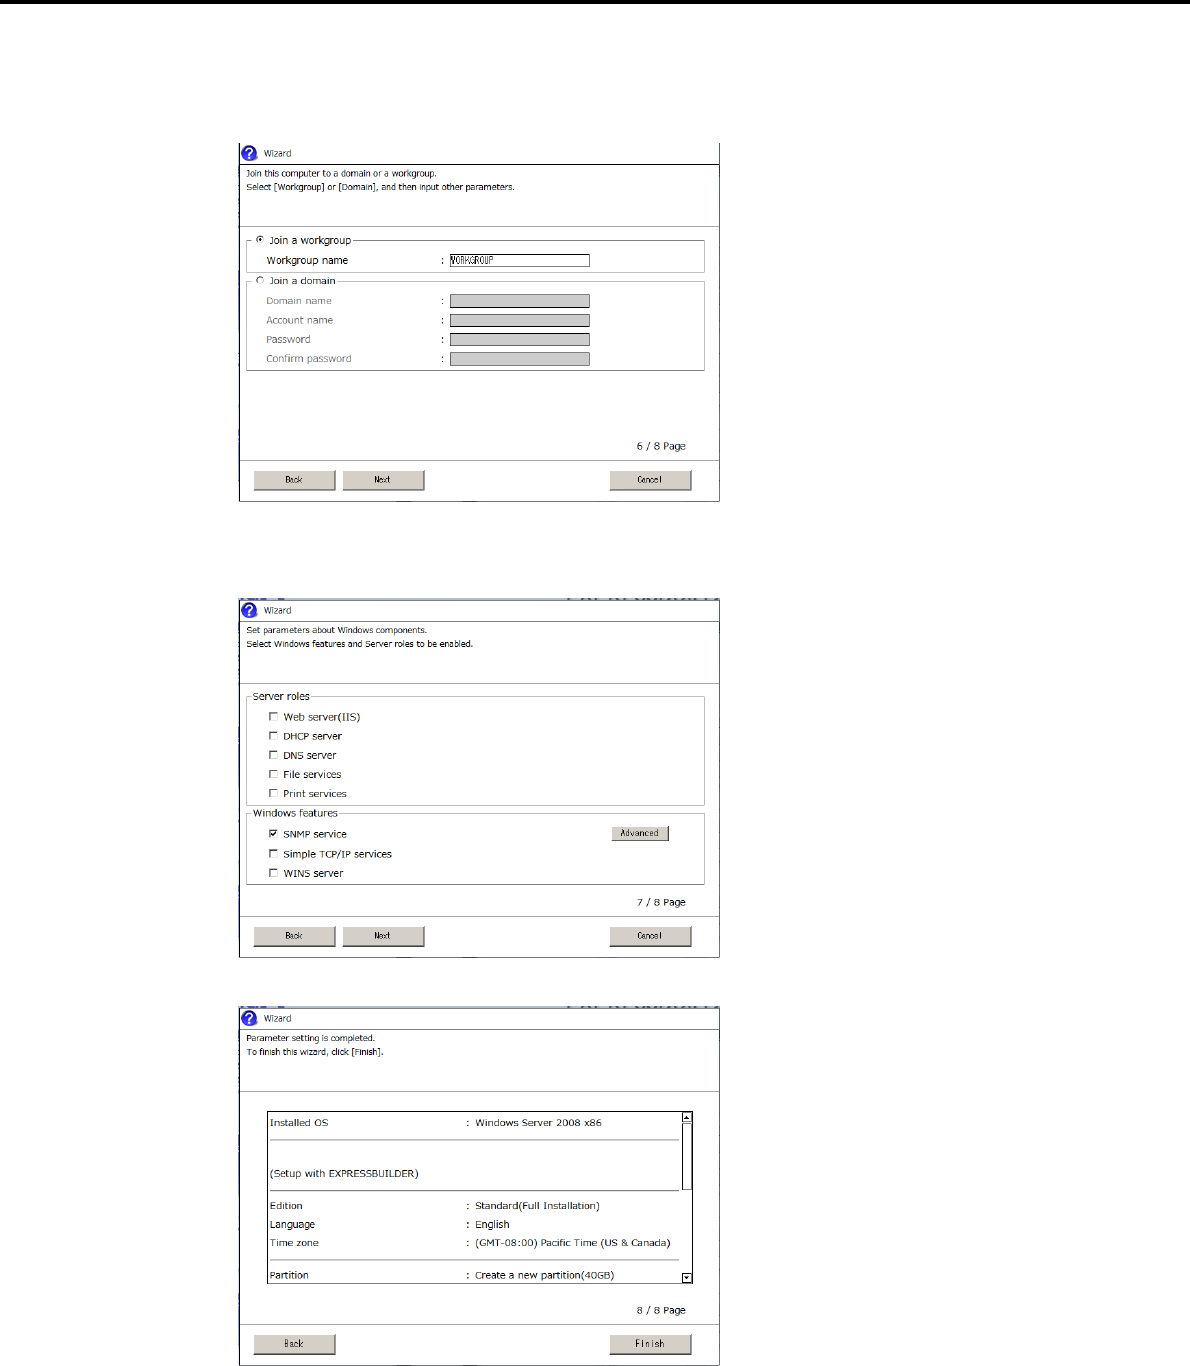
4. Setting Up Windows Server 2008
Chapter 1 Installing Windows
7. Enter the domain or workgroup name to be used.
The domain and workgroup setting window appears. Confirm the settings, making corrections as needed,
and then click [Next].
8. Select the Windows components for installation.
The Windows components selection window appears. Confirm the settings, making corrections as
needed, and then click [Next].
9. Click [Finish] on the confirmation window.
Return to the parameter setup menu.
Proceed to application setup.
Express5800/GT-110d, GT-110d-S, R110d-1E, E110d-1 Installation Guide (Windows)
94
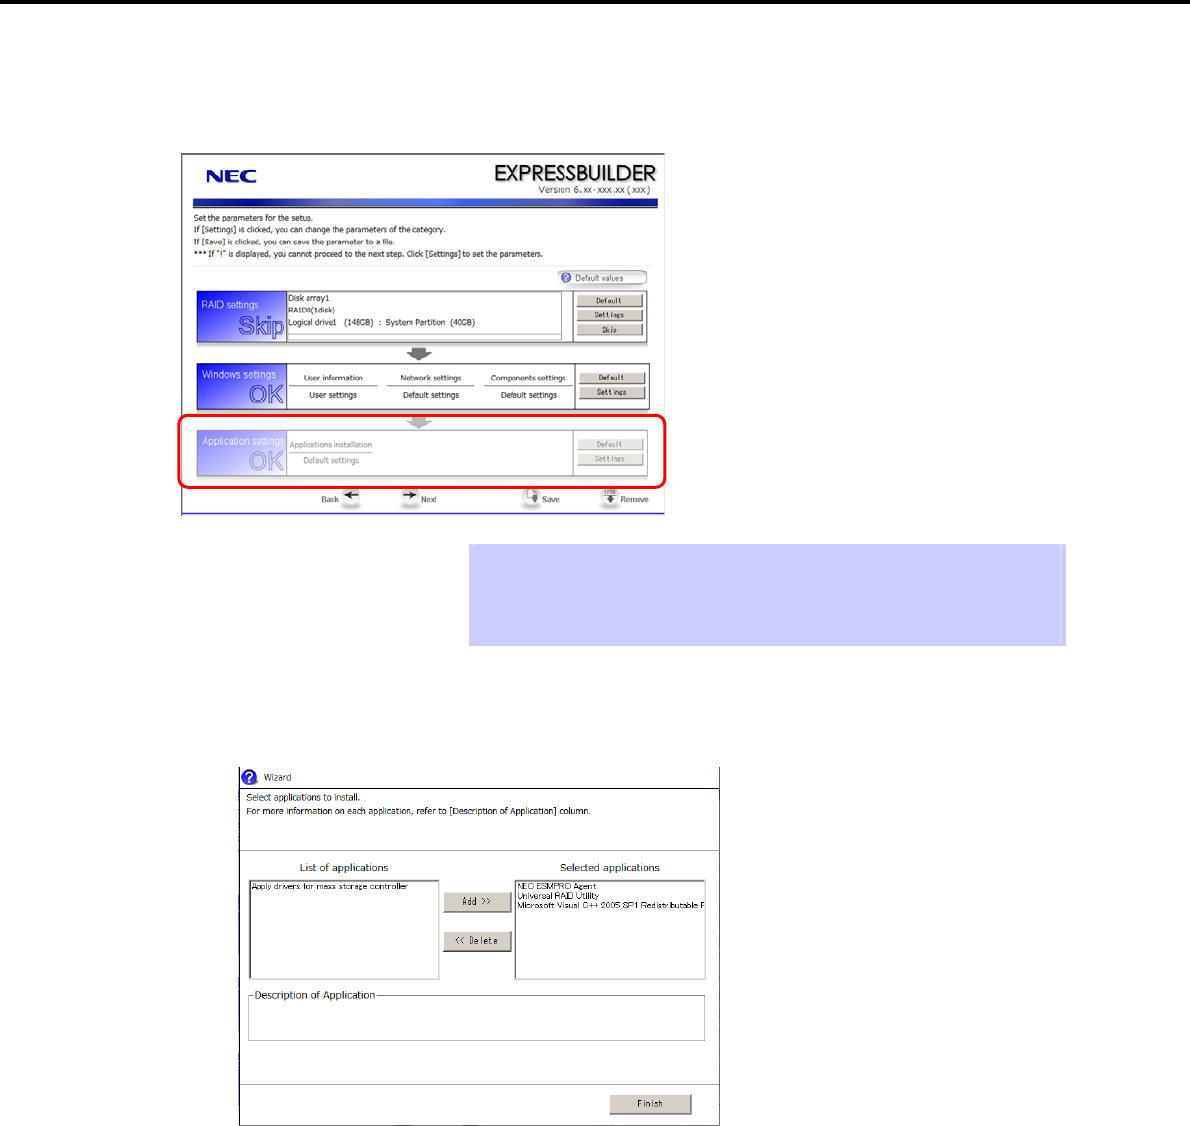
4. Setting Up Windows Server 2008
Chapter 1 Installing Windows
(3) Application settings
Set up applications using the Application settings wizard in the parameter setup menu.
Tips Use the [Default] button when you want to return to the default value of parameters
after having modified them with the wizard.
You can confirm the value set by clicking the [Default] button if you click the
[Default values] button.
1. Click [Settings] in Application settings.
The application setting window appears. Confirm the settings, making corrections as needed, and then
click [Finish].
2. Save the parameters.
If you are not saving a parameter file:
Go to the following (4) Executing setup.
If you are saving a parameter file:
Click [Save], and then follow the onscreen instructions to save the parameter file.
Go to the following (4) Executing setup.
Express5800/GT-110d, GT-110d-S, R110d-1E, E110d-1 Installation Guide (Windows) 95
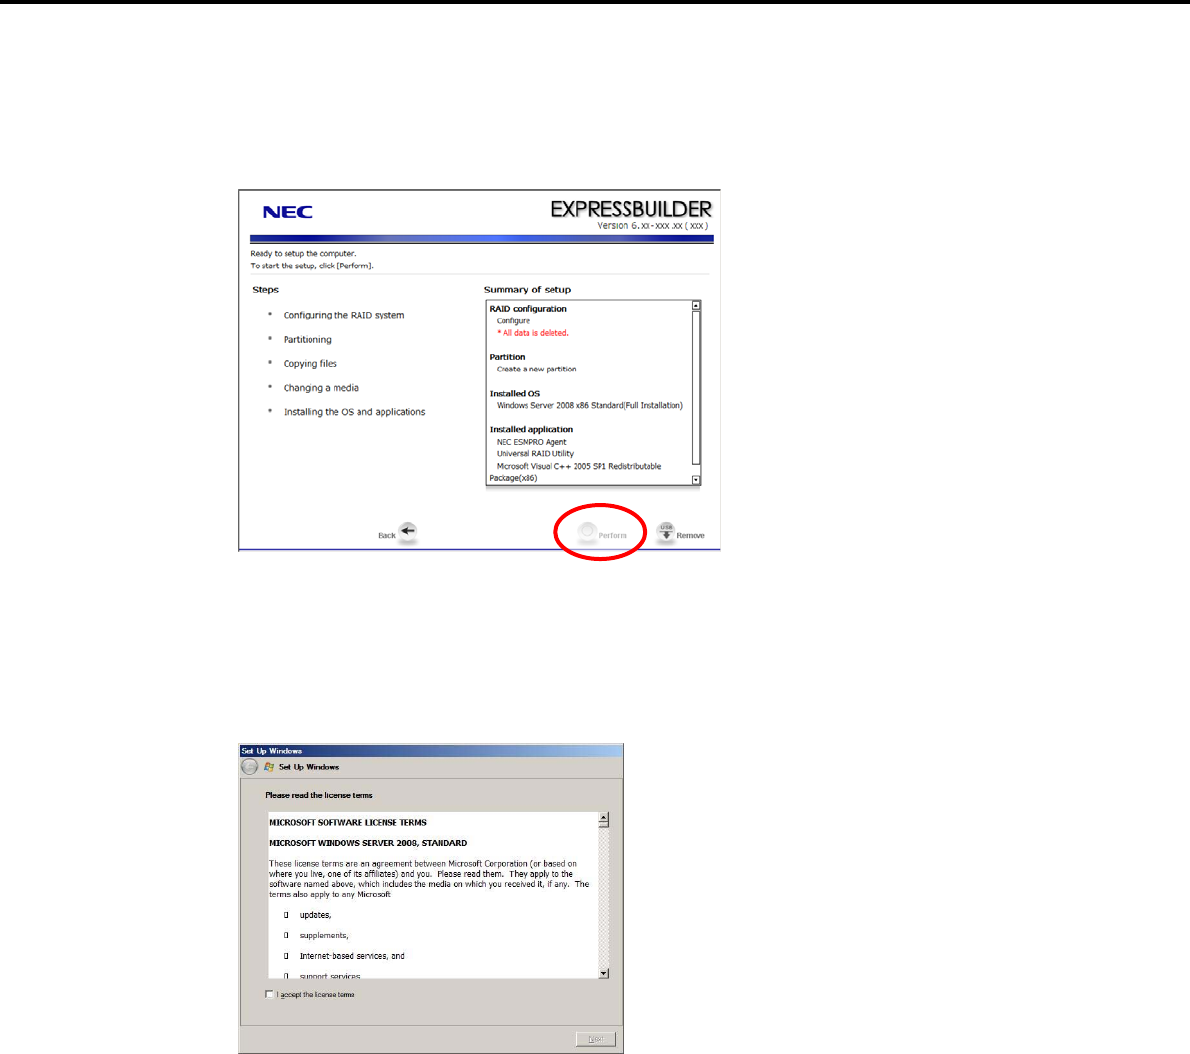
4. Setting Up Windows Server 2008
Chapter 1 Installing Windows
(4) Executing setup
1. Click [Next] on the parameter setup menu.
2. From the setup execution window, click [Perform].
3. Remove the EXPRESSBUILDER DVD and any removable media if inserted or connected.
4. Insert the Windows Server 2008 DVD-ROM into the optical disk drive.
Windows Server 2008 and selected applications will be installed automatically and restart several times.
5. When the software license agreement window appears, select I accept the license terms, and then
click [Next].
Express5800/GT-110d, GT-110d-S, R110d-1E, E110d-1 Installation Guide (Windows)
96

4. Setting Up Windows Server 2008
Chapter 1 Installing Windows
6. When the message "Thank you" appears, click [Start].
Tips It may take several minutes until the logon window appears. Wait until it appears,
even though nothing changes on the screen.
7. When the following message appears, press <Ctrl> + <Alt> + <Del>.
8. Follow onscreen instructions to log on to the system.
Full installations:
When the following window appears, enter your password into the text box, and then click .
Express5800/GT-110d, GT-110d-S, R110d-1E, E110d-1 Installation Guide (Windows) 97
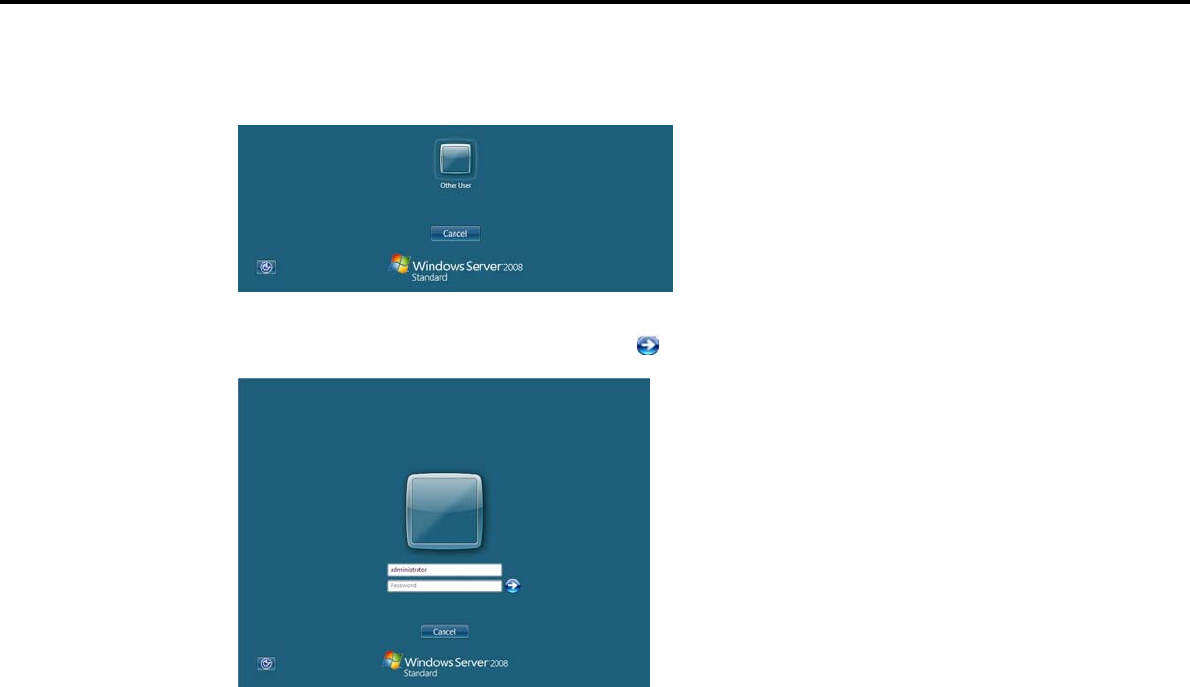
4. Setting Up Windows Server 2008
Chapter 1 Installing Windows
Server Core installations:
When the following window appears, click Someone.
When the following window appears, enter administrator into the User text box and the specified
password into the Password text box, and then click .
9. Click [OK] in the Setup Complete window.
10. Follow the instructions described in Chapter 1 (4.5 Setting Up Device Drivers) to set up the device
drivers supplied with this server as standard.
11. For optional devices whose driver has not been installed, install the device drivers according to the
instructions supplied in the driver manual.
12. Execute setup by following the instructions described in Chapter 1 (7. Setup for Solving Problems).
Setup with EXPRESSBUILDER is now complete.
Express5800/GT-110d, GT-110d-S, R110d-1E, E110d-1 Installation Guide (Windows)
98

4. Setting Up Windows Server 2008
Chapter 1 Installing Windows
4.3 Setup with OS Standard Installer
4.3.1 Setup flow
Process that requires input or selection
Process that proceeds automatically
Install the Starter Pack
End of installation
Log on
Installation
Restart (automatically)
Setup selection menu
Insert the OS installation media
Setup execution screen
Configure RAID system
Copy the OEM drivers (if required)
Parameter setup menu
Express5800/GT-110d, GT-110d-S, R110d-1E, E110d-1 Installation Guide (Windows) 99

4. Setting Up Windows Server 2008
Chapter 1 Installing Windows
4.3.2 Requirements for Setup with OS standard installer
Prepare the following disks and instruction manuals before starting setup.
Operating system installation media
NEC operating system installation media (hereafter referred to as backup DVD-ROM)
Microsoft operating system installation media (hereafter referred to as Windows Server 2008
DVD-ROM)
First Steps Guide
EXPRESSBUILDER DVD
If you purchased optional Internal Flash Memory, you can use it during installation.
Prepare if needed:
OEM drivers (Windows Server 2008)
OEM drivers (Windows Server 2008 x64)
Tips EXPRESSBUILDER may be distributed in Internal Flash Memory.
EXPRESSBUILDER can be run from the Internal Flash Memory if it is installed in
the server.
If you are using a server with Internal Flash Memory installed, you can install the
OS without using the EXPRESSBUILDER DVD.
OEM drivers are required in the following cases. Prepare Flash FDD or other
removable media should these conditions apply.
Is the built-in DVD drive used for installation in an onboard RAID
Controller (LSI Embedded MegaRAID) environment?
Yes
Does the server have Internal Flash Memory?
No
The OEM drivers must be
created.
The OEM drivers does not
need to be created.
Yes
Yes
Express5800/GT-110d, GT-110d-S, R110d-1E, E110d-1 Installation Guide (Windows)
100
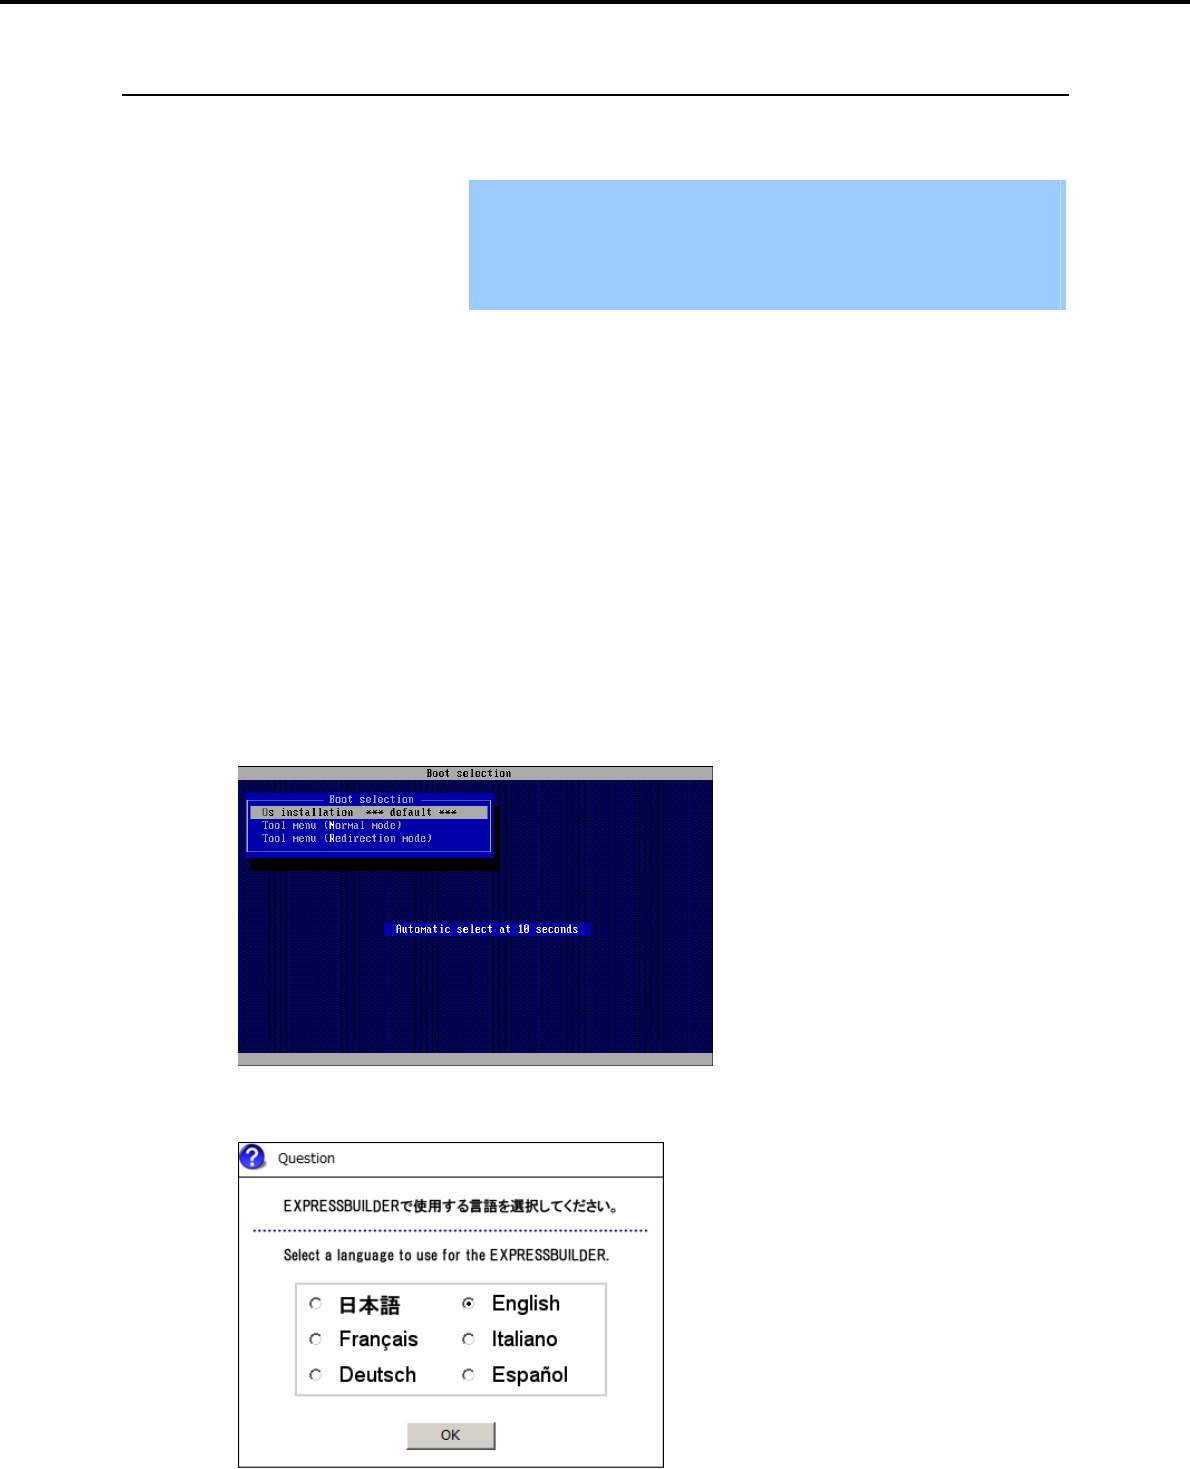
4. Setting Up Windows Server 2008
Chapter 1 Installing Windows
4.3.3 Setup procedure
This section describes the procedure for installing Windows Server 2008 with OS standard installer.
Important Before starting setup, refer to Chapter 1 (4.1 Before Starting Setup). It
describes how to make partitions.
The procedure differs depending on the media on which
EXPRESSBUILDER is stored. Use Internal Flash Memory if you have
purchased it as an option.
1. Turn peripheral device power on, and then turn the server power on.
2. Use the following procedure to set EXPRESSBUILDER.
When using the EXPRESSBUILDER DVD:
(1) Insert the EXPRESSBUILDER DVD into the optical disk drive of the server.
(2) Once the DVD is inserted, restart the server by resetting it (press <Ctrl> + <Alt> + <Delete>) or
by turning the power off and then on again. EXPRESSBUILDER starts.
When using Internal Flash Memory:
(1) When "Press <F2> Setup, <F3> Internal Flash Memory, <F4> ROM Utility, <F12> Network"
appears below the POST window, press the <F3> key. EXPRESSBUILDER starts.
3. When the following message appears, select Os installation *** default ***.
You will automatically advance to step 4, with no need for further input.
4. Select English on the language selection window, and then click [OK].
Express5800/GT-110d, GT-110d-S, R110d-1E, E110d-1 Installation Guide (Windows) 101
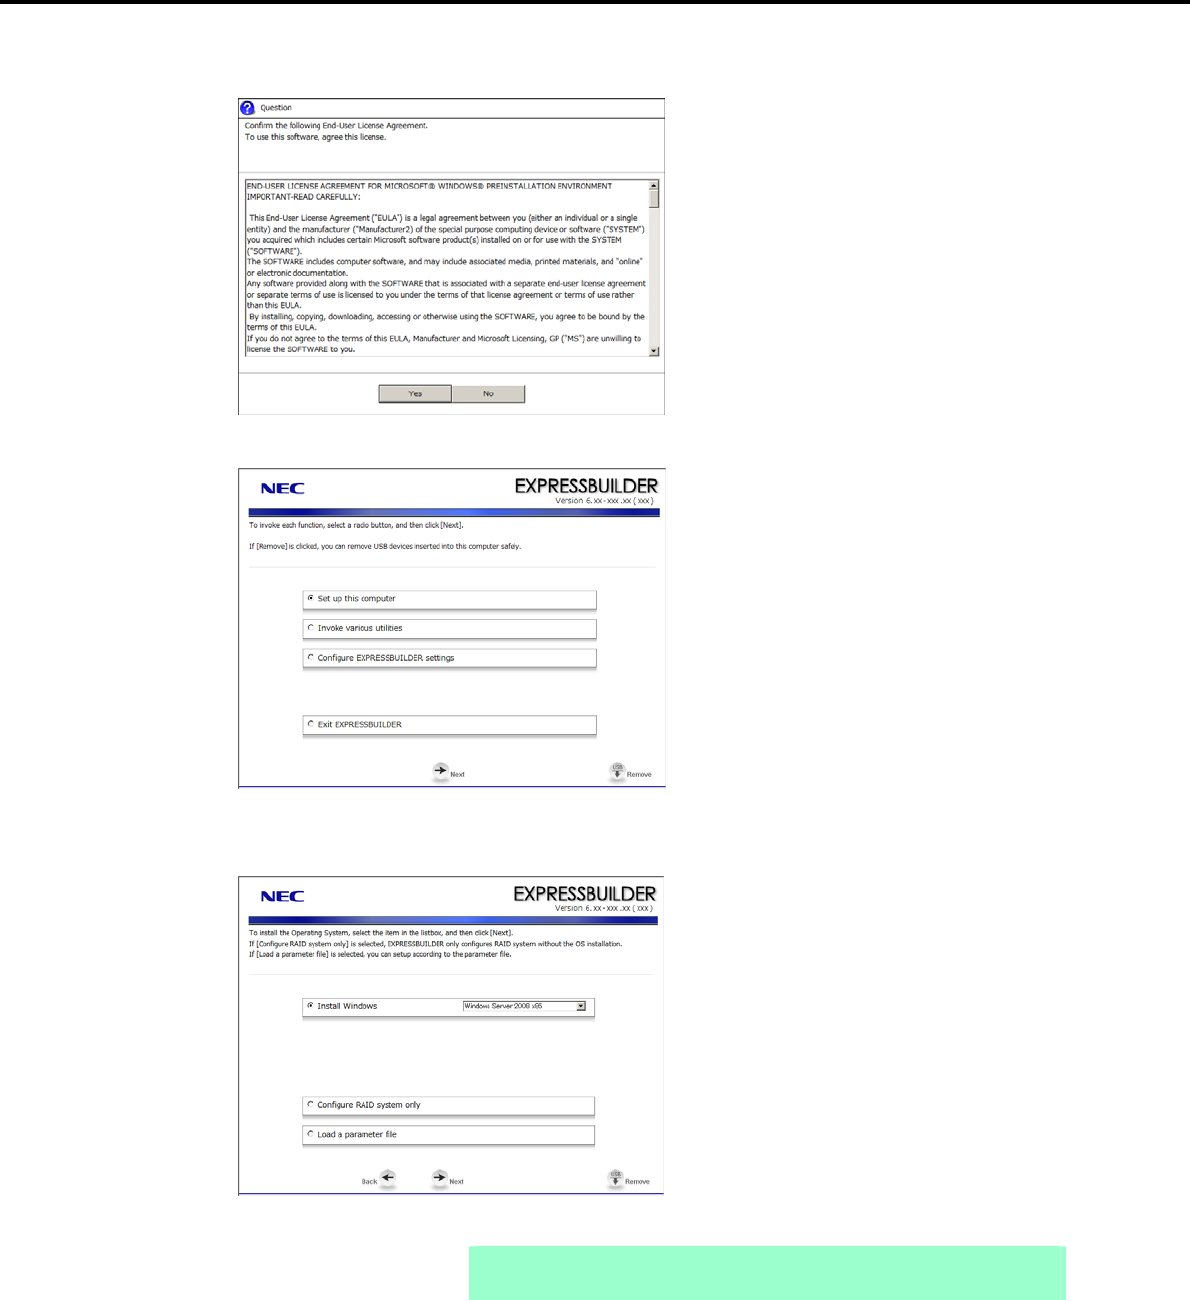
4. Setting Up Windows Server 2008
Chapter 1 Installing Windows
5. When the Windows PE software license agreement window appears, click [Yes].
6. Select Set up this computer from the top menu, and then click [Next].
7. When the setup selection menu appears, use the following steps to set up the parameters.
Note When setting up again, an already saved parameter file can be read, so that you
can skip inputting parameters in the wizard.
Express5800/GT-110d, GT-110d-S, R110d-1E, E110d-1 Installation Guide (Windows)
102

4. Setting Up Windows Server 2008
Chapter 1 Installing Windows
If not using a parameter file:
Select the appropriate OS from the Install Windows drop-down list, and then click [Next].
Go to the following (1) RAID settings.
If using parameter file:
Select Load a parameter file, and then click [Next].
Follow the onscreen instructions to load the parameters.
Confirm the settings on the parameter setup menu as required, and then click [Next].
Go to the following (2) Executing setup - Executing setup 5.
Express5800/GT-110d, GT-110d-S, R110d-1E, E110d-1 Installation Guide (Windows) 103
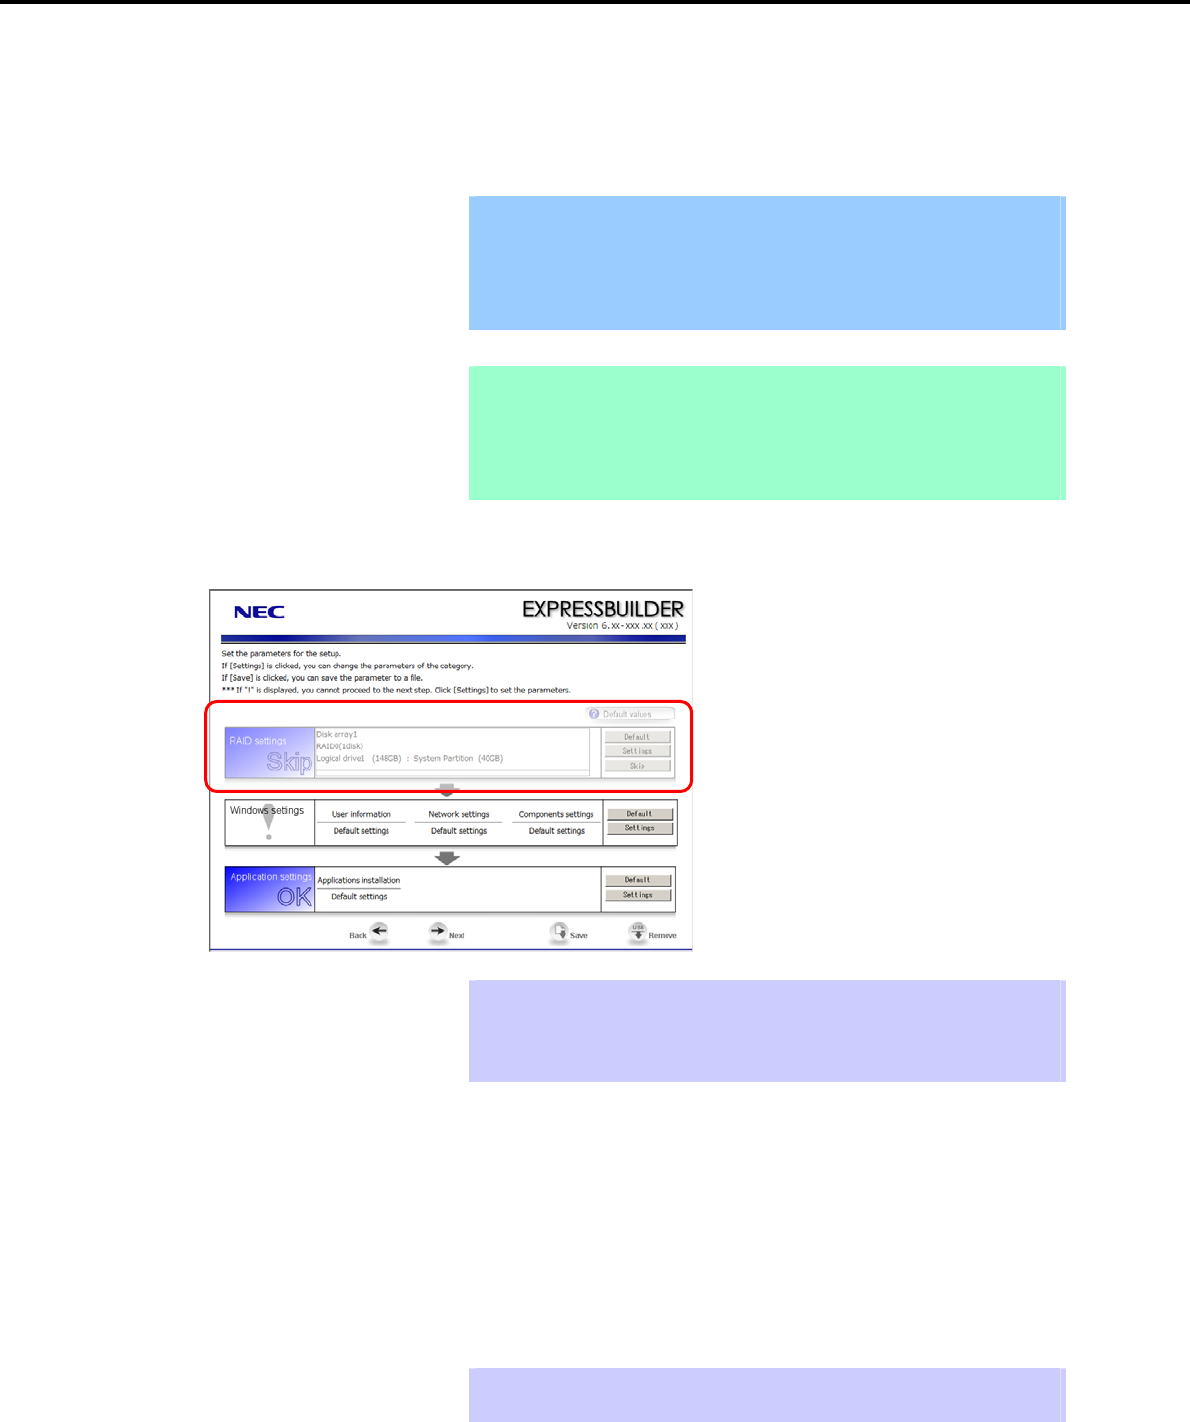
4. Setting Up Windows Server 2008
Chapter 1 Installing Windows
(1) RAID settings
This function automatically recognizes the RAID Controller connected to the server and configures the RAID
System, so you must complete setup of the server by following the "User’s Guide " in advance.
Important Some data in the Hard Disk Drive might be deleted depending on the system
settings. Pay attention to input parameters. You must be especially careful
when configuring the following:
RAID settings wizard
Backing up user data, as needed, is recommended.
Note When using an onboard RAID Controller (LSI Embedded MegaRAID):
This function does not support the creation of RAID10 by using the onboard
RAID Controller.
Refer to Chapter 2 (4. RAID System Configuration) in "Maintenance Guide" when
creating RAID10.
Specify the RAID settings using the RAID settings wizard on the parameter setup menu.
Tips Use the [Default] button when you want to return to the default value of parameters
after having modified them with the wizard.
You can confirm the value set by clicking the [Default] button if you click the
[Default values] button.
When creating a new Logical Drive:
1. Click [Settings] in RAID settings.
2. Use the wizard to set up the Logical Drive.
When skipping the creation of a new Logical Drive:
1. Click [Skip] in RAID settings.
Tips Use the [Skip] button if, after modifying the settings with the RAID settings wizard,
you want to install the already existing configurations without modifying them.
Express5800/GT-110d, GT-110d-S, R110d-1E, E110d-1 Installation Guide (Windows)
104

4. Setting Up Windows Server 2008
Chapter 1 Installing Windows
(2) Executing setup
Install Windows using the following procedure.
1. Click [Settings] in Windows settings.
Tips Use the [Default] button when you want to return to the default value of parameters
after having modified them with the wizard.
You can confirm the value set by clicking the [Default] button if you click the
[Default values] button.
2. Click [Next] in the Windows settings wizard.
Express5800/GT-110d, GT-110d-S, R110d-1E, E110d-1 Installation Guide (Windows) 105
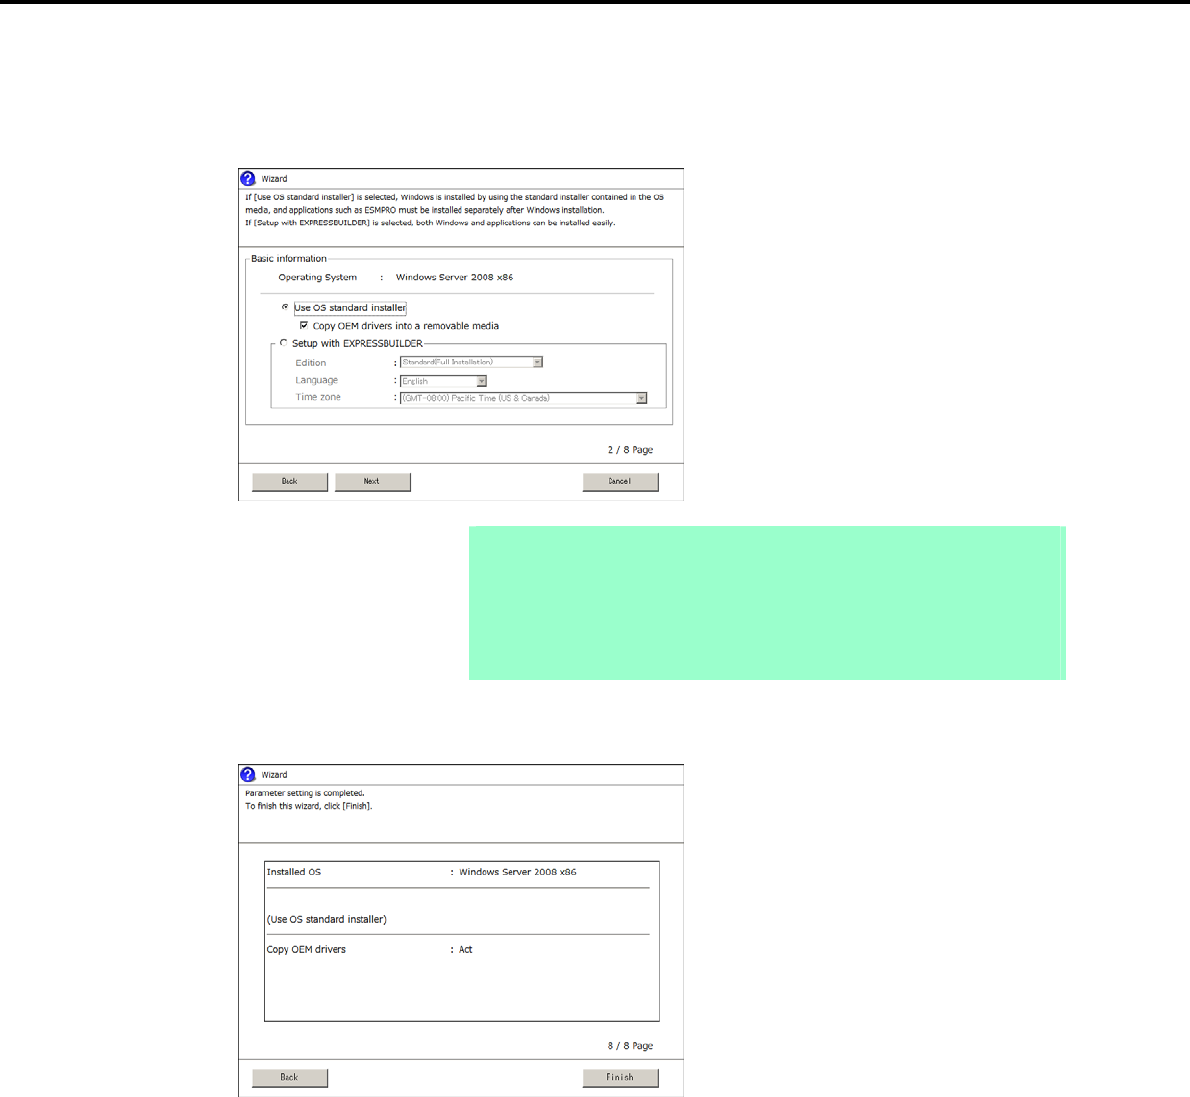
4. Setting Up Windows Server 2008
Chapter 1 Installing Windows
3. Specify the Windows basic settings
The basic information window appears. Select Use OS standard installer, and then click [Next].
If copying the OEM drivers to the removable media, select Copy OEM drivers into a removable media.
Note If using Internal Flash Memory:
Clear the Copy OEM drivers into a removable media check box.
You must enable Internal Flash Memory when installing the operating system.
If using the EXPRESSBUILDER DVD:
Select the Copy OEM drivers into a removable media check box only if the
OEM drivers is required to be copied.
4. After clicking [Finish] on the confirmation window, click [Next] in the parameter setup menu.
Express5800/GT-110d, GT-110d-S, R110d-1E, E110d-1 Installation Guide (Windows)
106

4. Setting Up Windows Server 2008
Chapter 1 Installing Windows
5. From the setup execution window, click [Perform].
The server automatically restarts.
If using Internal Flash Memory: Go to step 6
If using the EXPRESSBUILDER DVD: Go to step 7
Express5800/GT-110d, GT-110d-S, R110d-1E, E110d-1 Installation Guide (Windows) 107

4. Setting Up Windows Server 2008
Chapter 1 Installing Windows
Tips If the Copy OEM drivers into a removable media checkbox is selected in step
3, the following window appears. Follow the onscreen instructions and continue
the operation.
When the following message appears, insert the OS installation media, and then
click [OK].
6. Enable Internal Flash Memory.
If the following message appears below the POST window during reboot, press the <F3> key.
Press <F2> Setup, <F3> Internal Flash Memory, <F4> ROM Utility, <F12> Network
Note Because this setting enables the Internal Flash Memory to be used, start the OS
from the OS media, not from the Internal Flash Memory.
Express5800/GT-110d, GT-110d-S, R110d-1E, E110d-1 Installation Guide (Windows)
108
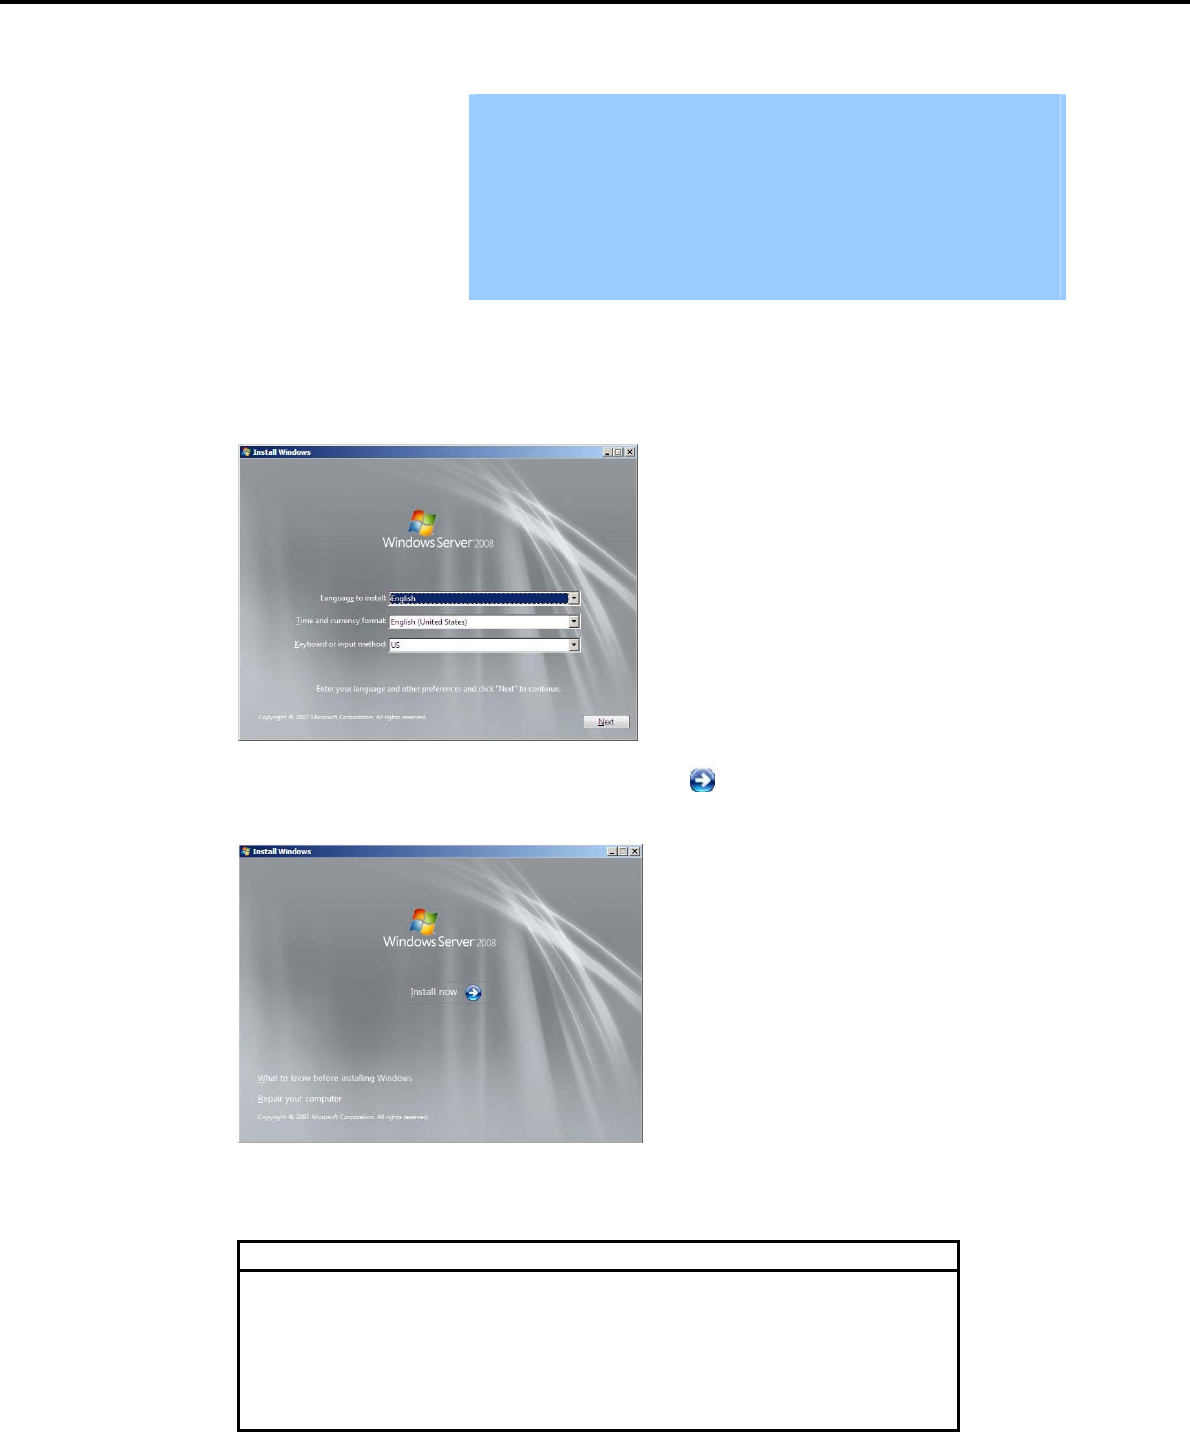
4. Setting Up Windows Server 2008
Chapter 1 Installing Windows
7. Run from the OS installation media.
Important If a bootable operating system is already installed on the Hard Disk Drive,
press the <Enter> key while the message "Press any key to boot from CD
or DVD…" is displayed on the top of the screen. This step is unnecessary if
no bootable operating system exists.
If the Windows installation window (from step 8) does not appear, the
<Enter> key was not pressed correctly. Turn the system power on and start
again from the beginning.
Do not remove the media while copying OEM drivers.
The message "Windows is loading files…" appears.
8. When the following window appears, select a language, enter information for the other items, and then
click [Next].
9. When the following message appears, click [Install Now ].
Windows Server 2008 installation starts.
If the following message appears, go to step 10.
If the following message does not appear, go to step 12.
Load Driver
A required CD/DVD drive device driver is missing. If you have a driver
floppy disk, CD, DVD, or USB flash drive, please insert it now.
Note: If the Windows installation med
i
a is in the CD/DVD drive, you
can safely remove it for this step.
[Browse] [OK] [Cancel]
Express5800/GT-110d, GT-110d-S, R110d-1E, E110d-1 Installation Guide (Windows) 109

4. Setting Up Windows Server 2008
Chapter 1 Installing Windows
Tips The above message appears if you are using an onboard RAID Controller (LSI
Embedded MegaRAID) in an environment equipped with an internal DVD drive.
When this message appears, the message will say "CD, DVD, or USB flash
drive", but you must use Internal Flash Memory or removable media with the
OEM drivers copied onto it.
<Windows Server 2008 64-bit Edition>
OEM drivers (Windows Server 2008 x64)
<Windows Server 2008 32-bit Edition>
OEM drivers (Windows Server 2008)
10. Select the destination, and then click [OK].
If using the OEM drivers:
<Windows Server 2008 64-bit Edition>
Removable media drive letter:\OEM_Driver\ws2008x64\megasr1
<Windows Server 2008 32-bit Edition>
Removable media drive letter:\OEM_Driver\ws2008\megasr1
If using Internal Flash Memory:
<Windows Server 2008 64-bit Edition>
Internal Flash Memory drive letter:\020\win\winnt\oemfd\ws2008x64\megasr1
<Windows Server 2008 32-bit Edition>
Internal Flash Memory drive letter:\020\win\winnt\oemfd\ws2008\megasr1
Tips The volume label of the Internal Flash Memory is INTER-FLASH.
11. Select LSI Embedded MegaRAID, and then click [Next].
12. When the following window appears, enter the product key and then click [Next].
Note that this window does not appear if you use a backup DVD-ROM for installation. Go to the next
step.
Express5800/GT-110d, GT-110d-S, R110d-1E, E110d-1 Installation Guide (Windows)
110
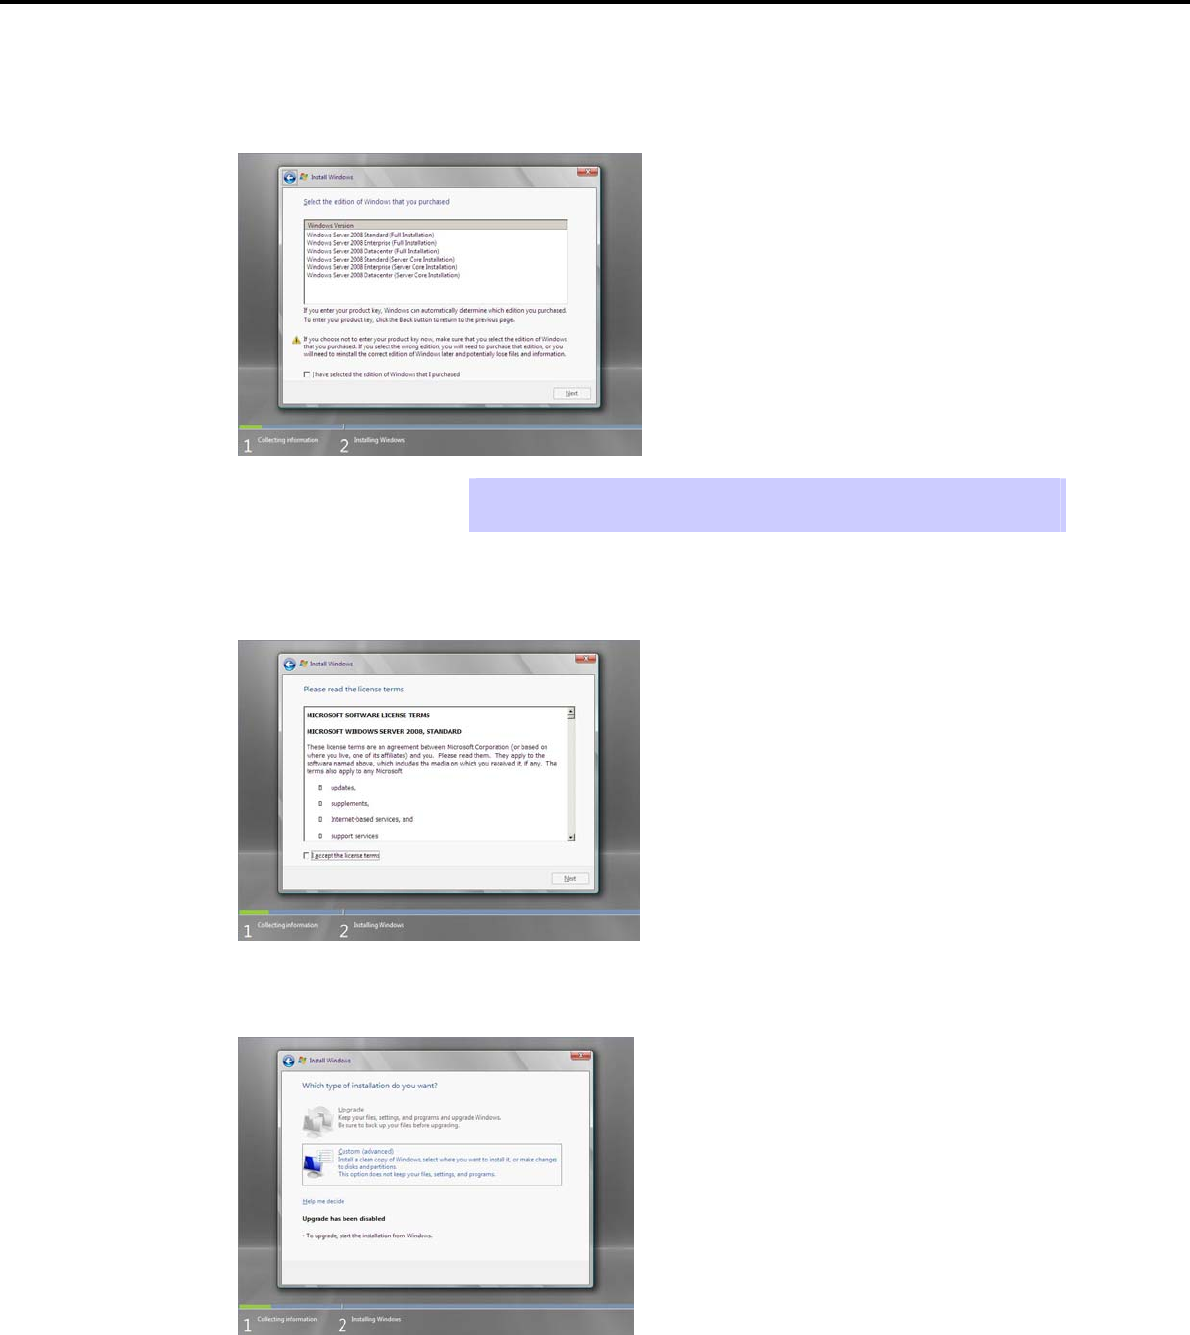
4. Setting Up Windows Server 2008
Chapter 1 Installing Windows
13. When the following window appears, select the Windows edition you have purchased.
Select the I have selected the edition of Windows that I purchased check box, and then click [Next].
If the product key was entered, only the corresponding editions are displayed.
Tips The Windows versions that appear on the screen differ depending on the OS
installation media used.
14. When the following window appears, confirm the content of the license agreement. If you agree, select I
agree and then click [Next].
15. When the following message appears, select the installation type.
Select Custom (advanced) in this case.
Express5800/GT-110d, GT-110d-S, R110d-1E, E110d-1 Installation Guide (Windows) 111

4. Setting Up Windows Server 2008
Chapter 1 Installing Windows
16. The "Where do you want to install Windows?" window appears.
Tips If the driver was loaded in steps 10 to 11, and if not using a RAID Controller, go to
step 20.
Click Load Driver.
If the following message appears, replace the OS installation media and EXPRESSBUILDER DVD in the
optical disk drive, and then click [Browse]. Next, go to step 17.
Load Driver
To install the driver needed to access your hard drive, insert
the installation media containing the driver files
,
and then click
OK.
Note: The installation media can be a floppy disk, CD, DVD, or
USB flash drive.
[Browse] [OK] [Cancel]
Tips If using the Internal Flash Memory, you do not need to remove the OS installation
media.
At this time, a message "The Installation media can be a floppy disk, CD, DVD,
or USB flash drive." appears on the screen, you must use the supplied
EXPRESSBUILDER DVD or Internal Flash Memory.
17. Specify one of the following locations, and then click [OK].
If using the EXPRESSBUILDER DVD:
When using the N8103-129/130 RAID Controller
Windows Server 2008 64-bit Edition
Optical disk drive letter:\020\win\winnt\oemfd\ws2008x64\megasas2
Windows Server 2008 32-bit Edition
Optical disk drive letter:\020\win\winnt\oemfd\ws2008\megasas2
When using the N8103-128/G128/134 RAID Controller
Windows Server 2008 64-bit Edition
Optical disk drive letter:\020\win\winnt\oemfd\ws2008x64\stexstpt
Windows Server 2008 32-bit Edition
Optical disk drive letter:\020\win\winnt\oemfd\ws2008\stexstpt
If using an onboard RAID Controller (LSI Embedded MegaRAID) in an environment containing the
DVD drive with USB connection
Windows Server 2008 64-bit Edition
Optical disk drive letter:\020\win\winnt\oemfd\ws2008x64\megasr1
Windows Server 2008 32-bit Edition
Optical disk drive letter:\020\win\winnt\oemfd\ws2008\megasr1
Express5800/GT-110d, GT-110d-S, R110d-1E, E110d-1 Installation Guide (Windows)
112

4. Setting Up Windows Server 2008
Chapter 1 Installing Windows
If using Internal Flash Memory:
When using the N8103-129/130 RAID Controller
Windows Server 2008 64-bit Edition
Internal Flash Memory drive letter:\020\win\winnt\oemfd\ws2008x64\megasas2
Windows Server 2008 32-bit Edition
Internal Flash Memory drive letter:\020\win\winnt\oemfd\ws2008\megasas2
When using the N8103-128/G128/134 RAID Controller
Windows Server 2008 64-bit Edition
Internal Flash Memory drive letter:\020\win\winnt\oemfd\ws2008x64\stexstpt
Windows Server 2008 32-bit Edition
Internal Flash Memory drive letter:\020\win\winnt\oemfd\ws2008\stexstpt
If using an onboard RAID Controller (LSI Embedded MegaRAID) in an environment containing the
DVD drive with USB connection
Windows Server 2008 64-bit Edition
Internal Flash Memory drive letter:\020\win\winnt\oemfd\ws2008x64\megasr1
Windows Server 2008 32-bit Edition
Internal Flash Memory drive letter:\020\win\winnt\oemfd\ws2008\megasr1
Tips The driver does not have to be loaded at this time if it was loaded in steps 10 and
11.
The volume label of the Internal Flash Memory is INTER-FLASH.
18. Select the necessary driver from the driver list shown, and then click [Next].
When using an N8103-129/130 RAID Controller
[LSI MegaRAID SAS 9264-8i]
When using an N8103-128/G128/134 RAID Controller
[Promise SuperTrak SAS 6G RAID Controller]
If using an onboard RAID Controller (LSI Embedded MegaRAID) in an environment containing the
DVD drive with USB connection
[LSI Embedded MegaRAID]
19. If you used the EXPRESSBUILDER DVD, remove it and then insert the OS installation media.
20. Select the disk in which the partition will be created, and then click Drive options (advanced).
Important If a partition has already been created, go to step 23.
21. Click [New], enter the partition size into the size input box, and then click [Apply].
Important When installing the OS to a disk of over 2,097,152 MB (2 TB), the partition
size can only be set to 2,097,152 MB or less.
22. Select the partition created in step 21, and then click [Format].
Express5800/GT-110d, GT-110d-S, R110d-1E, E110d-1 Installation Guide (Windows) 113
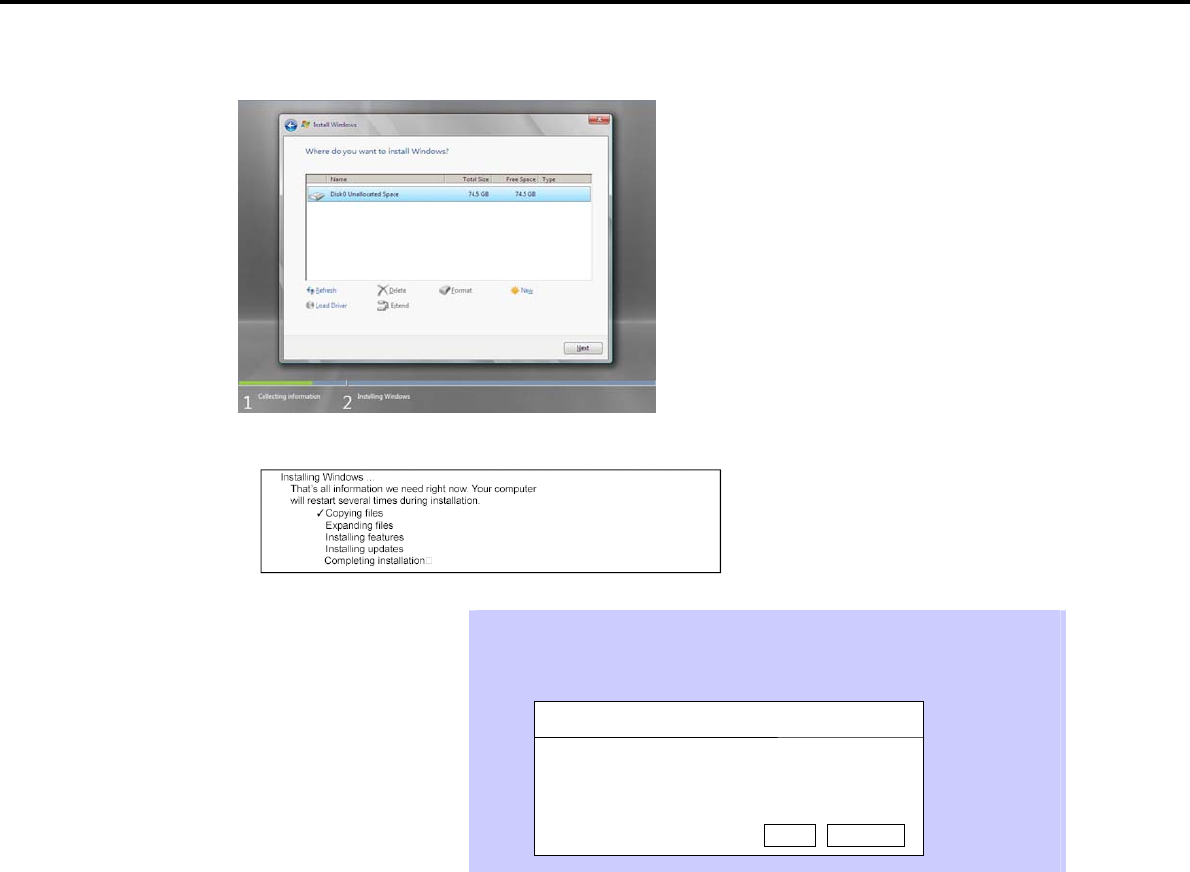
4. Setting Up Windows Server 2008
Chapter 1 Installing Windows
23. In the window below, select the created partition, and then click [Next].
When the following message appears, Windows installation starts automatically.
Tips At this time, if the EXPRESSBUILDER DVD is still in the optical disk drive, a
message prompting you to replace it with an OS installation media appears.
Remove the EXPRESSBUILDER DVD and then insert the OS installation media.
Install Windows – Insert Disc
Please insert Windows installation disc 1.
OK Cancel
24. The content displayed differs depending on what you selected in step 13. Confirm the following, and then
proceed.
Full installations
Server Core installations
Express5800/GT-110d, GT-110d-S, R110d-1E, E110d-1 Installation Guide (Windows)
114
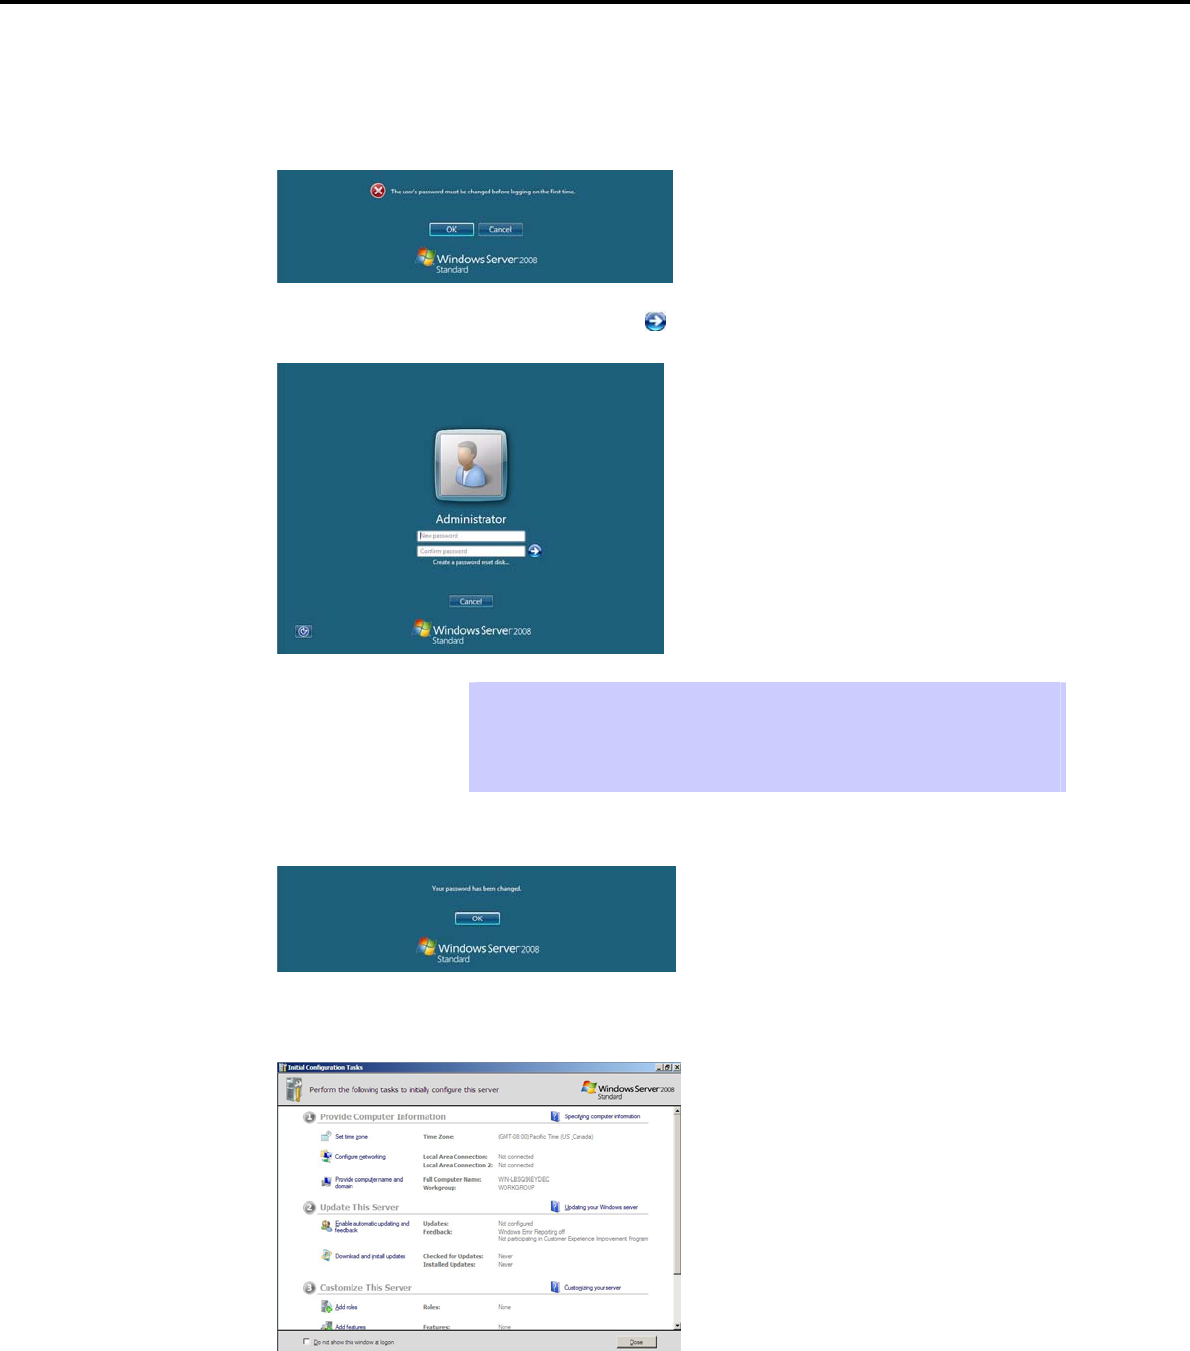
4. Setting Up Windows Server 2008
Chapter 1 Installing Windows
For Full installations:
(1) After setup of Windows Server 2008 is completed, the following window appears, prompting you
to change your password before logging on. Click [OK].
(2) Change your password, and then click the [ ] button.
Tips Passwords must fulfill the following requirements in Windows Server 2008.
Contains 6 or more characters
Contains characters from at least three of the following categories: numbers,
uppercase letters, lowercase letters, and symbols.
(3) When the following message appears, click [OK].
(4) When the Initial Configuration Tasks window appears after you log on, enter the user
information.
Express5800/GT-110d, GT-110d-S, R110d-1E, E110d-1 Installation Guide (Windows) 115
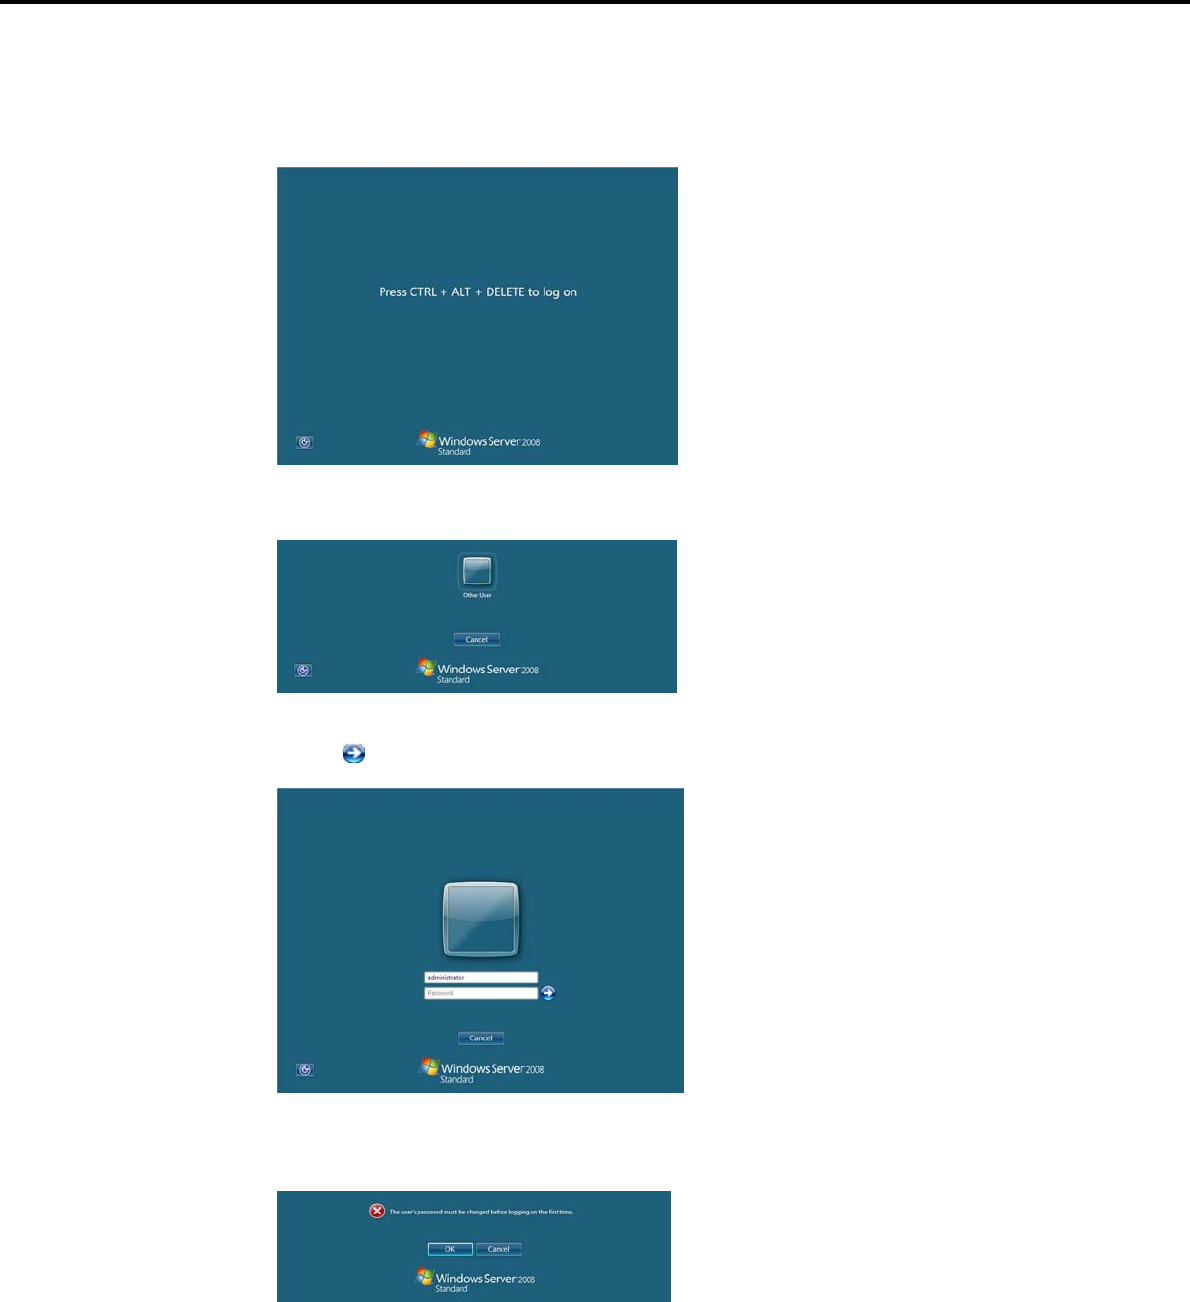
4. Setting Up Windows Server 2008
Chapter 1 Installing Windows
For Server Core installations:
(1) If the following message appears after Windows Server 2008 setup has completed, press <Ctrl>
+ <Alt> + <Del>.
(2) When the following message appears, click Someone.
(3) When the following window appears, enter administrator into the User text box and then
click . Password entry is not required at this time.
(4) The following window appears, prompting you to change your password before logging on. Click
[OK].
Express5800/GT-110d, GT-110d-S, R110d-1E, E110d-1 Installation Guide (Windows)
116

4. Setting Up Windows Server 2008
Chapter 1 Installing Windows
(5) Change your password, and then click [ ].
Tips Passwords must fulfill the following requirements in Windows Server 2008.
Contains 6 or more characters
Contains characters from at least three of the following categories: numbers,
uppercase letters, lowercase letters, and symbols.
(6) When the following message appears, click [OK].
(7) The command prompt will appear. Set the user information.
Tips For detailed setup procedures, refer to the Microsoft "Step by Step Guide".
25. Install the Starter Pack by referring to Chapter 1 (4.4 Installing the Starter Pack).
26. Install drivers and specify detailed settings by referring to Chapter 1 (4.5 Setting Up Device Drivers).
27. Execute setup by following the instructions described in Chapter 1 (7. Setup for Solving Problems).
Setup with OS standard installer is now complete.
Express5800/GT-110d, GT-110d-S, R110d-1E, E110d-1 Installation Guide (Windows) 117

4. Setting Up Windows Server 2008
Chapter 1 Installing Windows
4.4 Installing the Starter Pack
After installing Windows Server 2008, follow the steps below and install the Starter Pack. The Starter Pack
installs all drivers required by the Express5800 Series.
Important Also install the Starter Pack in the following cases.
The system configurations have changed (when internal option devices
have been added or removed)
If a dialog box prompting you to restart appears after changing system
configurations, click [No] and then install the Starter Pack.
If the system was restored using a restore process
If a system has been restored using the backup tool
The Scalable Networking Pack (SNP) function is disabled upon Starter
Pack installation is complete.
The setting of SNP function may affect the system performance. Contact
the sales agent for details.
4.4.1 When using the EXPRESSBUILDER DVD
1. Log on to the system with the built-in administrator, which has administrative privileges.
2. Insert the EXPRESSBUILDER DVD into the optical disk drive.
3. The content displayed differs depending on what the content selected when installing Windows Server
2008. Confirm the following, and then proceed.
Full installations
Server Core installations
For Full installations
When the menu window appears, click Set up Windows to open the short-cut menu and then select
Install Starter Pack.
Tips The short-cut menu also appears by right-clicking on the menu window.
Express5800/GT-110d, GT-110d-S, R110d-1E, E110d-1 Installation Guide (Windows)
118

4. Setting Up Windows Server 2008
Chapter 1 Installing Windows
For Server Core installations
(1) Enter the following command at the command prompt, and then specify the optical disk drive
letter (for example, the D drive).
cd /d D:\020\win\winnt\bin
C:\Users\administrator>cd /d D:\020\win\winnt\bin
(2) Enter the following, and then press the <Enter> key.
pkgsetup.vbs
D:\020\win\winnt\bin>pkgsetup.vbs
4. A setup message appears.
Tips Although it may take several minutes for the above window to appear, wait for the
window to appear without attempting any further operation.
Read the message that appears, and then click [OK].
Starter Pack installation starts.
Note If you chose Full installation, the following progress message will appear while the
Starter Pack is being installed. Wait a moment until the update is complete.
Express5800/GT-110d, GT-110d-S, R110d-1E, E110d-1 Installation Guide (Windows) 119
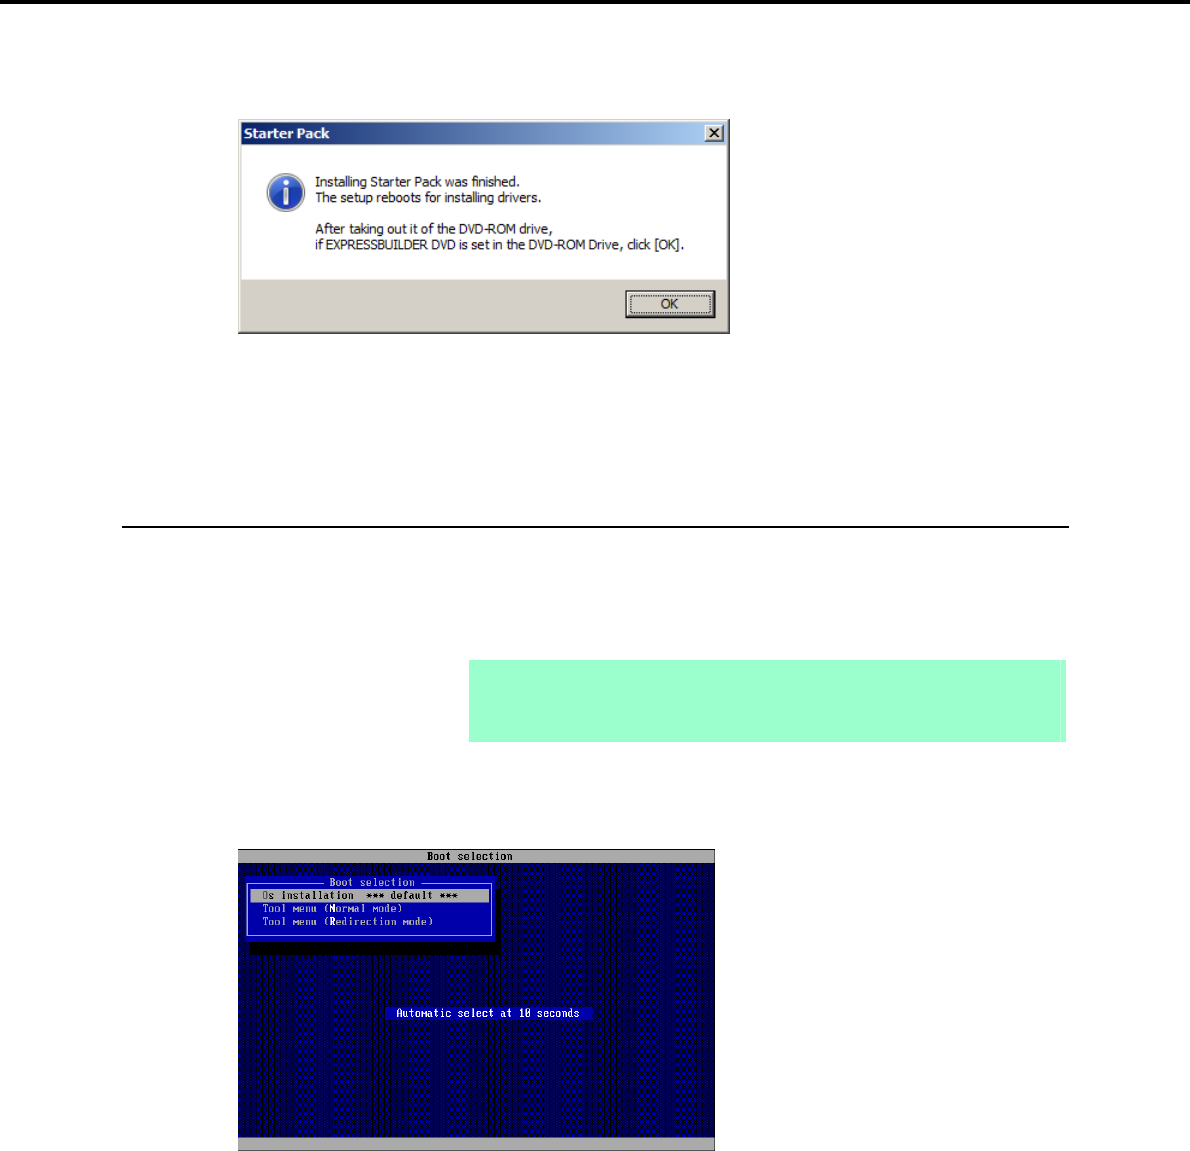
4. Setting Up Windows Server 2008
Chapter 1 Installing Windows
5. When the following message appears, Starter Pack installation is complete. Follow the instructions in the
message, and remove the EXPRESSBUILDER DVD.
6. Click [OK] and then restart the system.
Installation of Starter Pack is now complete.
4.4.2 When using Internal Flash Memory
1. After installing the operating system, the system will restart.
2. Use the Internal Flash Memory to run EXPRESSBUILDER.
When "Press <F2> Setup, <F3> Internal Flash Memory, <F4> ROM Utility, <F12> Network" appears
below the POST window, press the <F3> key.
Note At this time, be sure to remove the DVD from the optical disk drive.
If running from the OS, restart, and then press the <F3> key on the POST
window.
3. When the following message appears, select Os installation *** default ***.
You will automatically advance to the next window, with no need for further input.
Express5800/GT-110d, GT-110d-S, R110d-1E, E110d-1 Installation Guide (Windows)
120

4. Setting Up Windows Server 2008
Chapter 1 Installing Windows
4. Select English on the language selection window, and then click [OK].
5. When the Windows PE software license agreement window appears, click [Yes].
6. Select Invoke various utilities from the top menu, and then click [Next].
Express5800/GT-110d, GT-110d-S, R110d-1E, E110d-1 Installation Guide (Windows) 121

4. Setting Up Windows Server 2008
Chapter 1 Installing Windows
7. When the utility start menu appears, select Install Starter Pack to installed Windows and then click
[Next].
8. When the window for selecting Windows to install the Starter Pack appears, select the installed Windows
from the drop-down list, and then click [Perform].
Express5800/GT-110d, GT-110d-S, R110d-1E, E110d-1 Installation Guide (Windows)
122
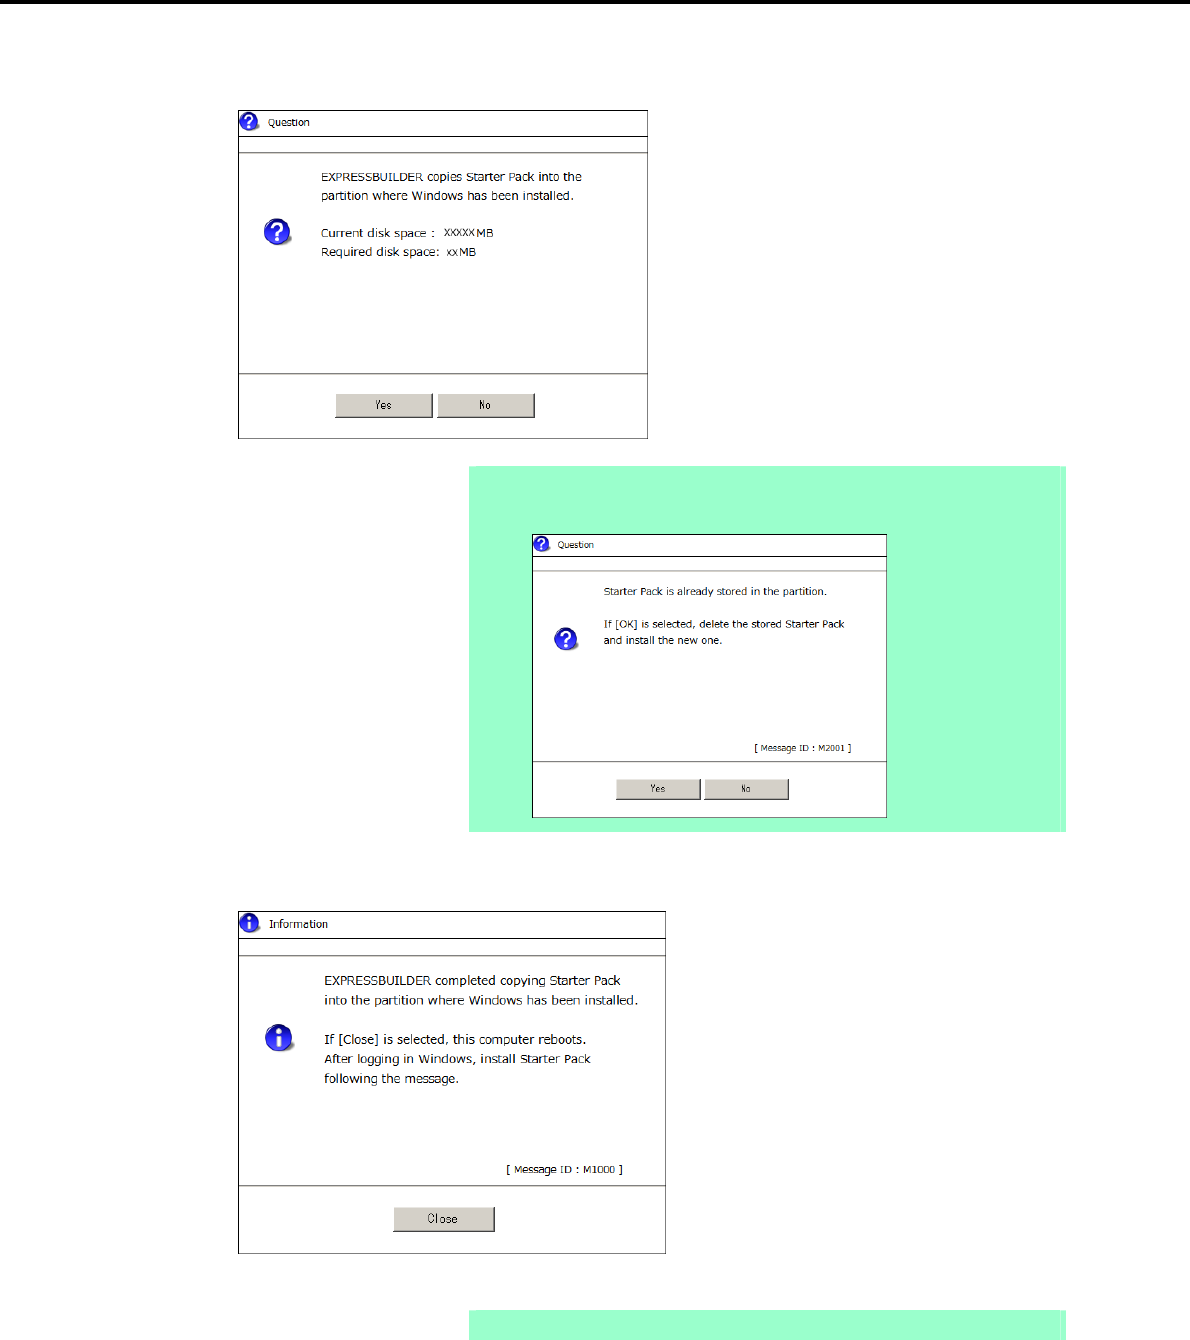
4. Setting Up Windows Server 2008
Chapter 1 Installing Windows
9. When the following confirmation window appears, read the content and then click [Yes].
Note The following window will appear if the Starter Pack is already installed.
Read the message, and then click [Yes].
10. After copying the module, the following window appears. Click [Close].
The server then restarts.
Note You do not need to press the <F3> key at this time.
Express5800/GT-110d, GT-110d-S, R110d-1E, E110d-1 Installation Guide (Windows) 123
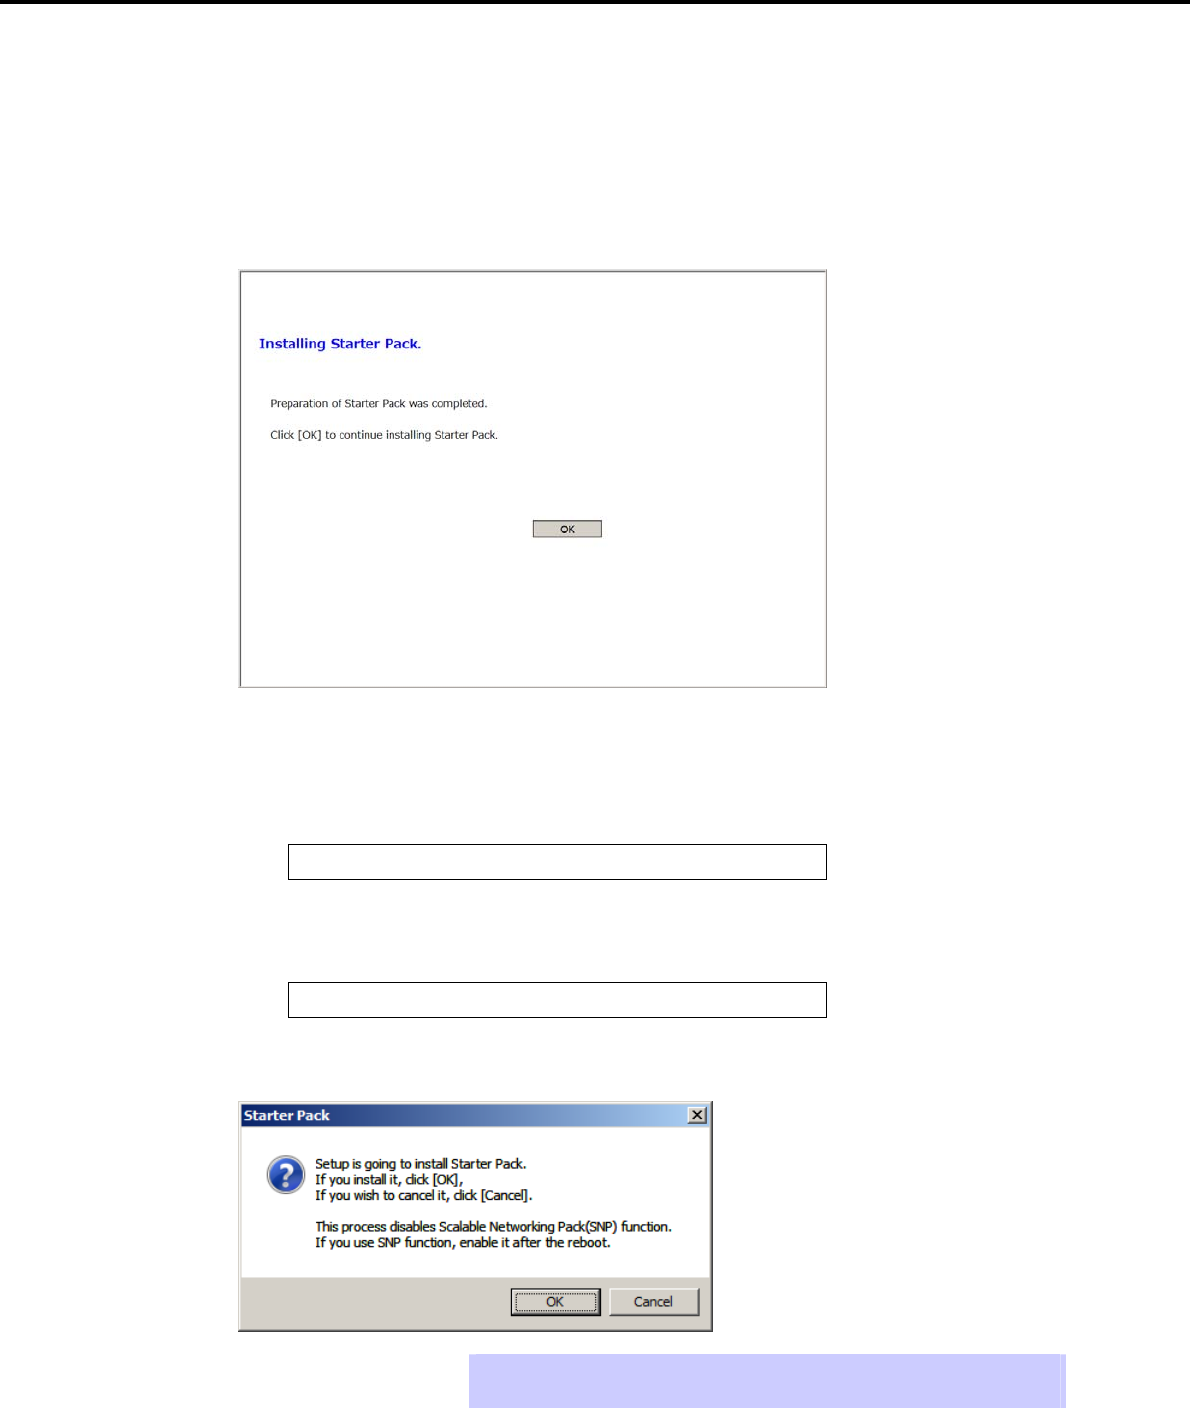
4. Setting Up Windows Server 2008
Chapter 1 Installing Windows
11. The content displayed differs depending on what content was selected when installing Windows Server
2008. Confirm the following, and then proceed.
Full installations
Server Core installations
For Full installations
After Windows starts, the following window appears. Click [OK].
For Server Core installations
(1) Enter the following command at the command prompt, and then specify the system drive letter
(for example, the C drive).
cd /d C:\StartPKG\bin
C:\Users\administrator>cd /d C:\StartPKG\bin
(2) Enter the following, and then press the <Enter> key.
pkgsetup.vbs
C:\StartPKG\bin>pkgsetup.vbs
12. Read the message that appears, and then click [OK].
Tips Although it may take several minutes for the above window to appear, wait for the
window to appear without attempting any further operation.
Express5800/GT-110d, GT-110d-S, R110d-1E, E110d-1 Installation Guide (Windows)
124

4. Setting Up Windows Server 2008
Chapter 1 Installing Windows
Installation of the Starter Pack starts.
Note If you chose Full installation, the following progress message appears while the
Starter Pack is being installed. Wait a moment until the update is complete.
13. When the following message appears, Starter Pack installation is complete.
14. Click [OK] to restart the system.
Installation of the Starter Pack is now complete.
Express5800/GT-110d, GT-110d-S, R110d-1E, E110d-1 Installation Guide (Windows) 125

4. Setting Up Windows Server 2008
Chapter 1 Installing Windows
4.5 Setting Up Device Drivers
Install and set up device drivers provided for the standard configuration.
For details regarding the installation and setup of a driver that is not described here, refer to the manual
supplied with the driver.
4.5.1 Installing the LAN and BACS (teaming) drivers
(1) LAN and BACS drivers
If EXPRESSBUILDER is used for setup, the driver will automatically be installed.
If the OS standard installer is used for setup, install the Starter Pack to install the LAN and BACS driver.
Note To change the LAN or BACS driver settings, log on to the system from a local
console using an administrator's account. Remotely changing the settings by
using the operating system’s remote desktop feature is not supported.
Be sure to select the Internet Protocol (TCP/IP) check box when specifying an
IP address.
(2) Optional LAN board
This server supports the following optional LAN boards.
The drivers for LAN boards are automatically installed using the OS plug-and-play function.
Optional LAN boards: N8104-128/134*
* N8104-128 is supported by Express5800/R110d-1E and E110d-1 only.
(3) Network adapter name
After installing the LAN drivers, the following network adapter names will be displayed by the Device Manager or
BACS.
Network adapters for the standard configuration
Broadcom NetXtreme Gigabit Ethernet #xx*
If connecting with an optional LAN board:
[N8104-128] Broadcom BCM57711 NetXtreme II 10 GigE (NDIS VBD Client) #xx*
[N8104-134] Broadcom BCM5709C NetXtreme II GigE (NDIS VBD Client) #xx*
* If there are adapters with the same name, a different identification number will be assigned to xx.
Important The ID for N8104-128/134 might be a number of two or more digits. This is
due to the LAN driver specifications and not an error. This number cannot be
changed.
Express5800/GT-110d, GT-110d-S, R110d-1E, E110d-1 Installation Guide (Windows)
126

4. Setting Up Windows Server 2008
Chapter 1 Installing Windows
4.5.2 Setting up LAN drivers
Important About WOL
- WOL is supported by the standard network adapters only.
- The Change of WOL setting is not supported.
- WOL from a shutdown is only supported if the system is started using
MagicPacket.
- WOL from hibernation is not supported.
Tips MagicPacket refers to a packet dedicated to WOL.
(1) Setting link speed
The transfer rate and duplex mode of the network adapter must be the same as those of the switching hub.
Follow the procedure below to specify the transfer rate and duplex mode.
1. Open the Device Manager.
2. Expand Network Adapters, and then double-click the name of the network adapter you want to set.
The properties of the network adapter will be displayed.
3. Select the Advanced tab, and then set the Speed & Duplex values to the same as those of the
switching hub.
4. Click [OK] in the Network Adapter Properties dialog box.
5. Restart the system.
The link speed setting is now complete. Proceed to set up WOL.
(2) Setting the TCP/iSCSI Offload Engine (if using N8104-134)
If using N8104-134 with the server, TCP/iSCSI Offload Engine must be set to off.
Follow the procedure below to set it.
1. Double-click the Broadcom Control Suite3 icon on the Control Panel window.
Broadcom Advanced Control Suite3 starts.
2. Select Device Management under Explorer View, and then N8104-134 network adapter from System
device (VBD).
3. Select the Configurations tab, and then expand Resource Reservations.
4. Clear the iSCSI Offload Engine and TCP Offload Engine check boxes (if selected) under
Pre-Allocated Resource, and then click [Apply].
Tips If TCP Offload Engine does not exist, proceed to the next step.
5. Select N8104-134 network adapter from Network Adapters (NDIS driver) in the Explorer View.
6. Select the Configurations tab, specify Disable for TCP Connection Offload (IPv4) and TCP
Connection Offload (IPv6), and then click [Apply].
Do not make changes if they are already disabled.
7. Complete steps 1 to 6 for each N8104-134 network adapter.
8. Restart the system.
TCP/iSCSI Offload Engine setup is now complete.
Express5800/GT-110d, GT-110d-S, R110d-1E, E110d-1 Installation Guide (Windows) 127

4. Setting Up Windows Server 2008
Chapter 1 Installing Windows
4.5.3 Setting up team/LiveLink
Important You must set up LiveLink when setting up a team. Teams that are not
configured for LiveLink are not supported.
When deleting the team, refer to Chapter 1 (4.5.3 Setting up team/LiveLink)
- (4) Procedure for deleting team. When replacing the motherboard or a
LAN board, follow these steps to remove the team and create it again after
replacement.
Be sure to specify the same Jumbo Mtu (Jumbo Packet) setting to all the
adapters that compose a team
(1) Team types
The following team types are supported.
Smart Load Balancing and Failover (without Standby Member)
All adapters that compose the team perform communication.
If a communication failure occurs on an adapter, other adapters that compose the team continue the
communication.
When the adapter on which the communication failure occurred recovers, it joins the team again and
resumes the communication.
Smart Load Balancing (Auto-Failback Disable) (with Standby Member)
Among the adapters that compose the team, primary adapters except the standby member perform
communication.
If a communication failure occurs, the standby member continues the communication.
When the adapter on which the communication failure occurred recovers, it joints the team again and
the standby adapter returns to the standby state.
(2) LiveLink
LiveLink is a function that detects communication route failures of adapters.
It periodically investigates the communication status of specified destinations (IP address).
Link packets are sent from each adapter within a team.
If a response to the transmission of a link packet within the specified range is not detected, it is identified as a
communication route failure and adapter communication is stopped.
When a response to the submission of a link packet is detected, communication LiveLink identifies
communication as having been recovered, and communication using that adapter automatically resumes.
Important You must set up LiveLink when you create a team.
Express5800/GT-110d, GT-110d-S, R110d-1E, E110d-1 Installation Guide (Windows)
128
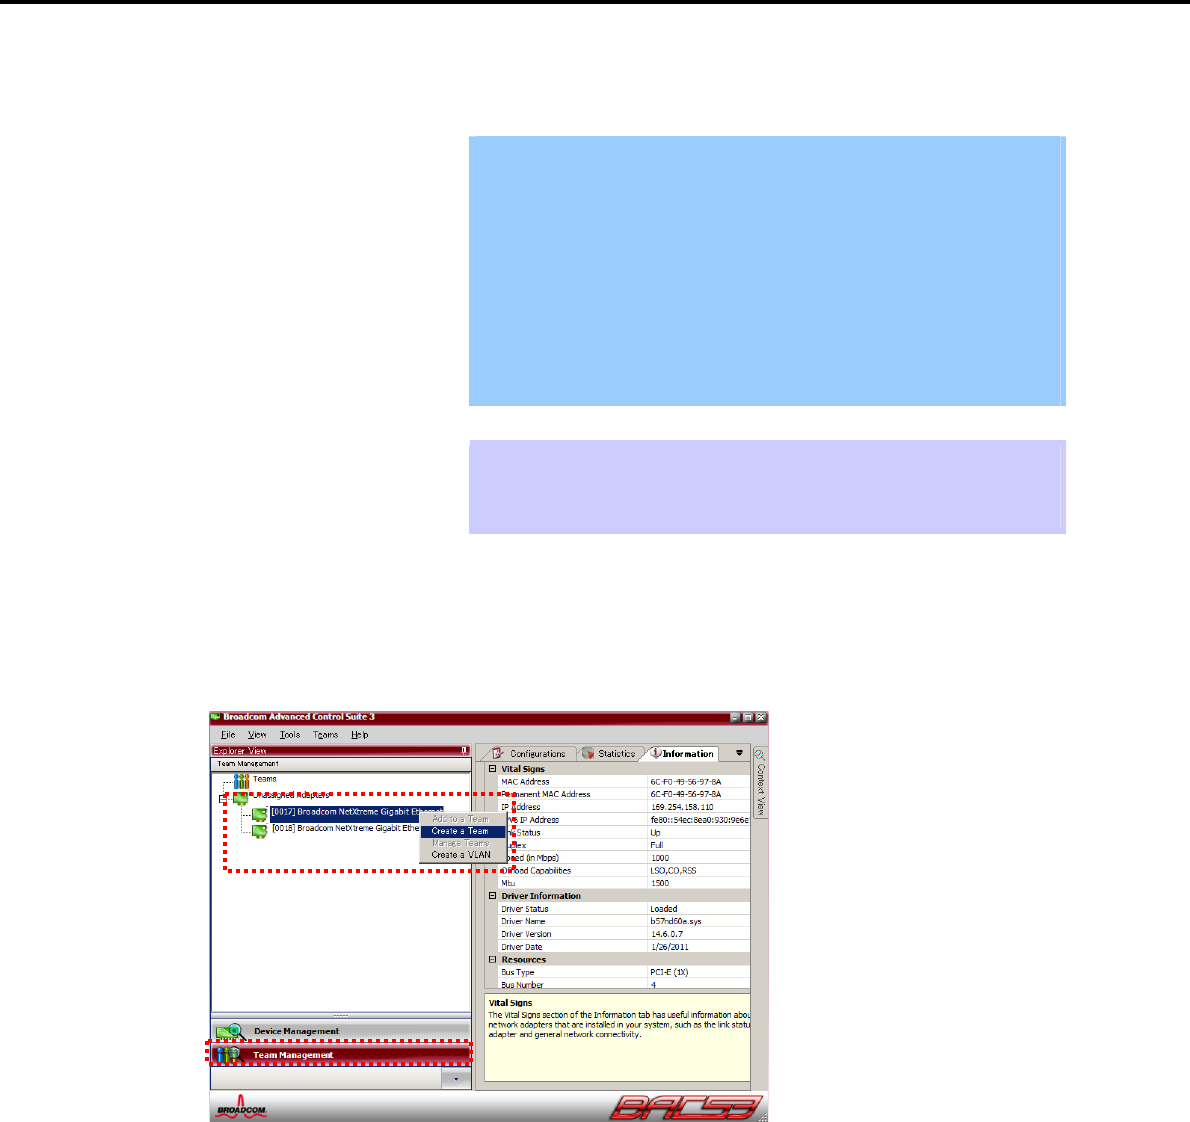
4. Setting Up Windows Server 2008
Chapter 1 Installing Windows
(3) Setting up team/LiveLink
Important The team must be composed of two adapters.
Possible combinations of network adapters that compose the team are as
follows.
Between standard network adapters.
Between N8104-128 adapters
Between N8104-134 adapters
A standard network adapter and an N8104-134 adapter
For details about how to specify a team and enable LiveLink for N8104-128,
refer to "N8104-128 LAN Driver Installation Guide" supplied with the LAN
board.
Tips To edit a team, right-click on the BACS team, and then select Edit TEAM.
Then refer to step 3 and later in Chapter 1 (4.5.3 Setting up team/LiveLink) - (3)
Setting up team/LiveLink to edit the team.
1. Double-click the Broadcom Control Suite3 icon on the Control Panel window.
Broadcom Advanced Control Suite3 starts.
2. Select Team Management from the left menu, right-click the adapter to be used for the team, and then
select Create a Team from the short-cut menu.
The Broadcom Teaming wizard appears.
Express5800/GT-110d, GT-110d-S, R110d-1E, E110d-1 Installation Guide (Windows) 129
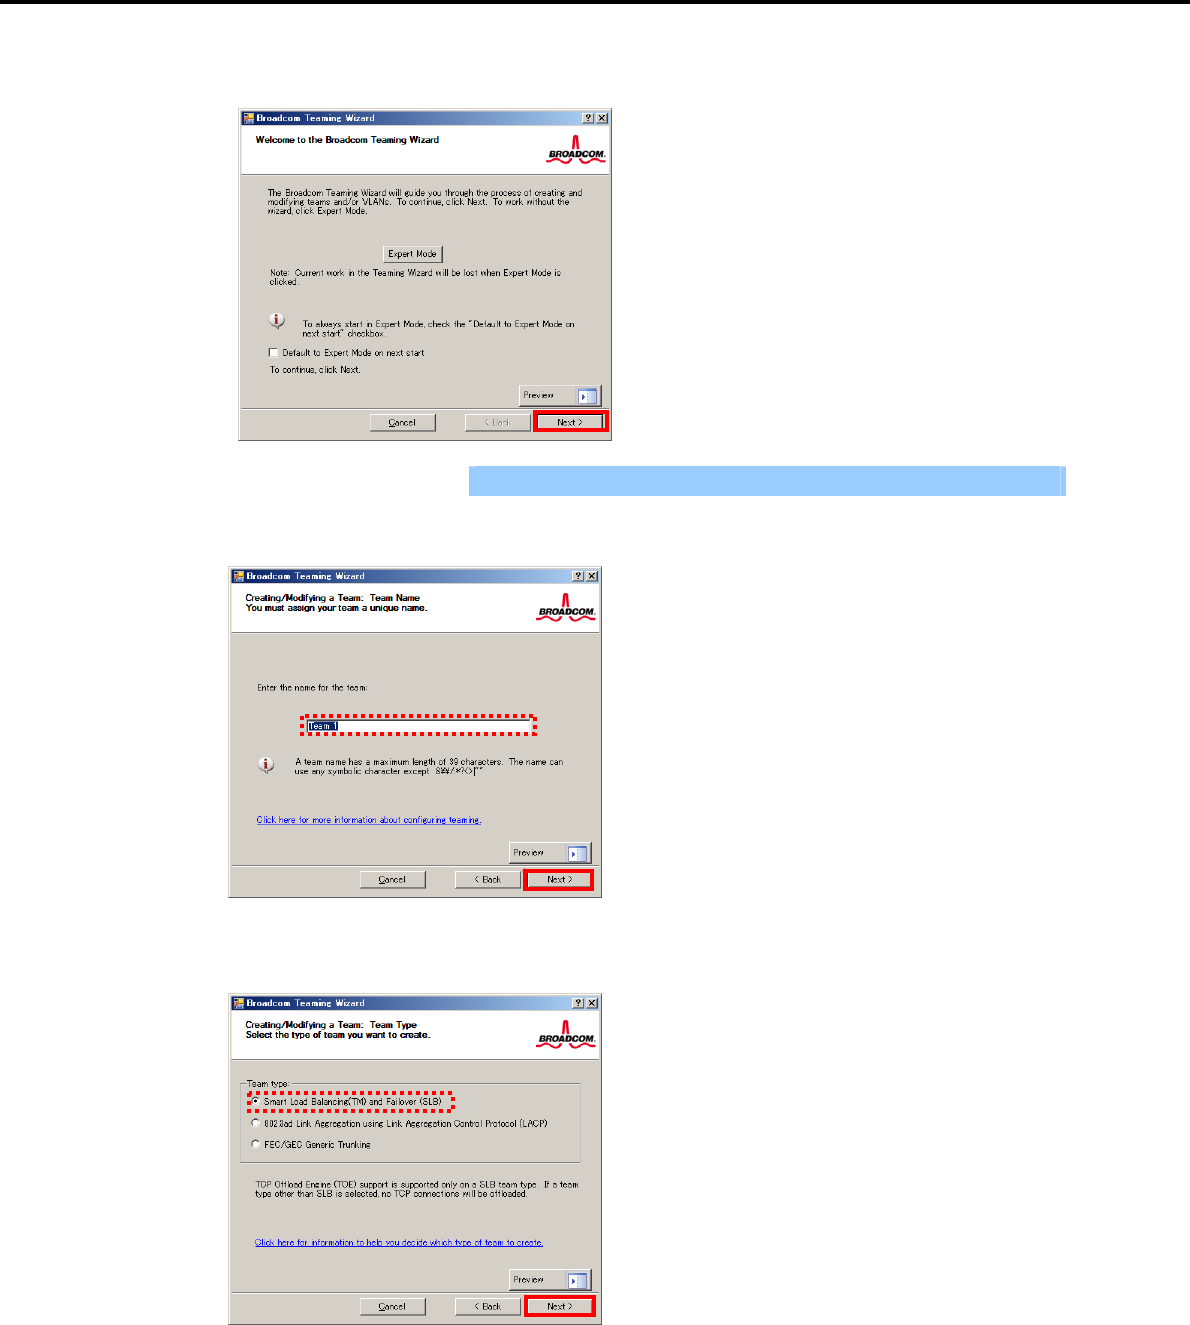
4. Setting Up Windows Server 2008
Chapter 1 Installing Windows
3. Click [Next].
Important Do not use Expert Mode.
4. Enter any name into the team name entry column, and then click [Next].
5. Make sure that the following team type is selected, and then click [Next].
Team type: Smart Load Balancing (TM) and Failover (SLB)
Express5800/GT-110d, GT-110d-S, R110d-1E, E110d-1 Installation Guide (Windows)
130
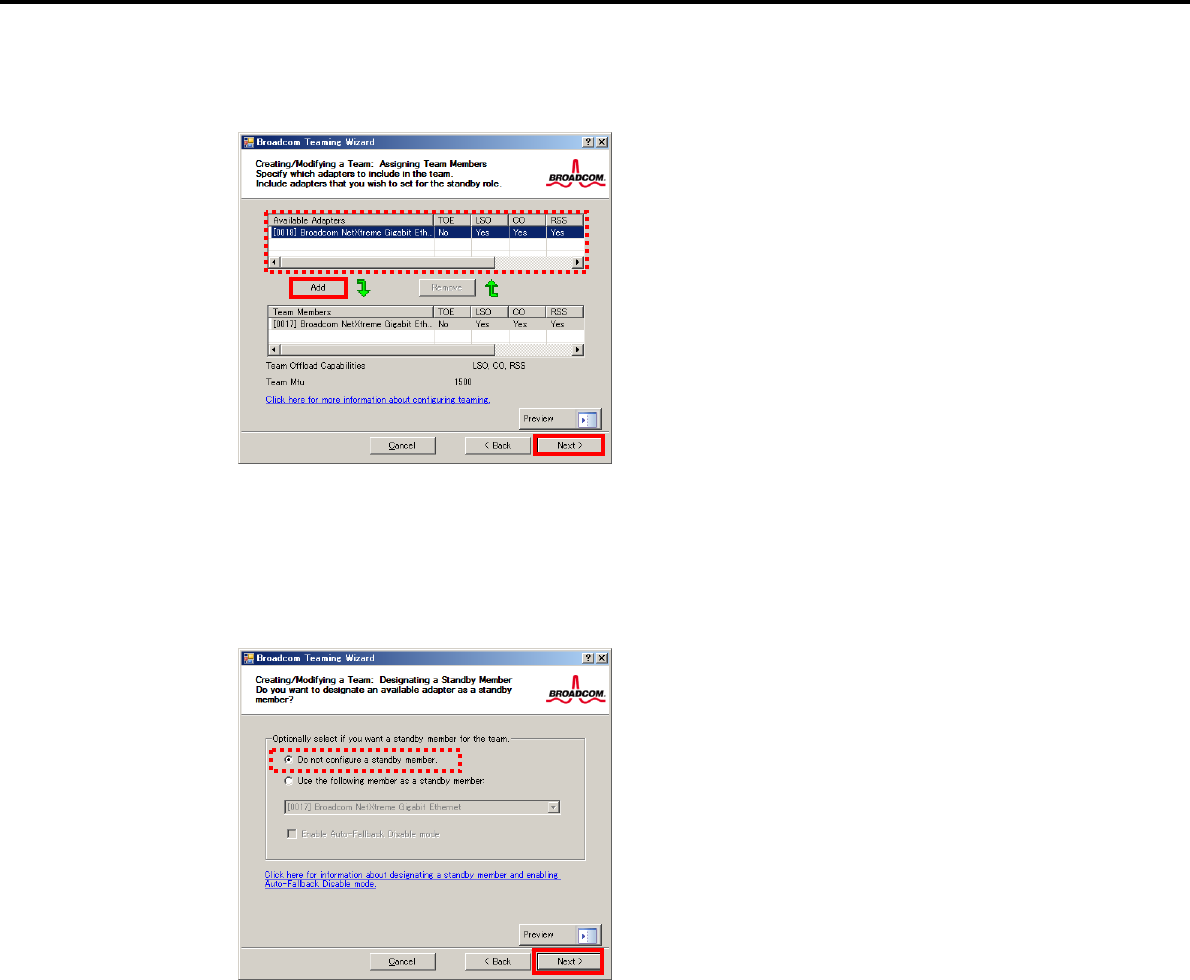
4. Setting Up Windows Server 2008
Chapter 1 Installing Windows
6. Select the adapters that compose the team, click [Add] to add them to the Team Members area, and
then click [Next].
7. Proceed according to your desired team type.
Smart Load Balancing and Failover (without Standby Member)
(1) Select Do not configure a standby member.
(2) Click [Next].
(1)
(2)
Express5800/GT-110d, GT-110d-S, R110d-1E, E110d-1 Installation Guide (Windows) 131

4. Setting Up Windows Server 2008
Chapter 1 Installing Windows
Smart Load Balancing (Auto-Failback Disable) (with Standby Member)
(1) Select Use the following member as a standby member.
(2) Select the adapter that is to be a standby member from the drop-down list.
(3) Select Enable Auto-Failback Disable mode.
(4) Click [Next].
Important Enable Auto-Failback Disable mode is cleared while editing the team. Select
it again.
8. Select Yes for Configure LiveLink?, and then click [Next].
(3)
(1)
(2)
(4)
Express5800/GT-110d, GT-110d-S, R110d-1E, E110d-1 Installation Guide (Windows)
132

4. Setting Up Windows Server 2008
Chapter 1 Installing Windows
9. You can use the default setting for Probe interval and Probe maximum retries. If you change these
values, select a value from each drop-down list, click the target probe (Probe Target xx), and then click
[Edit Target IP Address…].
Tips The setting range of Probe interval (link packet transmission interval) is 1 to 60
(units: seconds).
The setting range of Probe maximum retries (link packet retry count) is 1 to 10
(times).
Switching a path upon detection of a communication path error by LiveLink takes
(Probe maximum retries + 1) x Probe interval (seconds) at maximum.
If an optional LAN board detects that a link is down, failover occurs immediately
after the link goes down. It takes the time specified for Probe interval (seconds)
to recover from the link going down.
10. In the Target xx text box, enter the IP address of the alive monitoring server, and then click [OK].
Important Target xx must be the same broadcast domain as that specified for the data
communication IP and LiveLink communication IP (described in step 13).
Specify an IP address that exists on the network and with which
communication is possible.
If communication with the IP address specified in Target xx is not possible,
the team will also be unable to communicate. It is therefore recommended
that you specify multiple IP addresses using Probe Target. Up to four IP
addresses can be specified.
Express5800/GT-110d, GT-110d-S, R110d-1E, E110d-1 Installation Guide (Windows) 133

4. Setting Up Windows Server 2008
Chapter 1 Installing Windows
11. Click [Next].
12. Select an adapter from the Team Members area, and then click [Edit Member IP Address…].
13. Enter the IP address used for LiveLink communication, and then click [OK].
Important Be sure to specify an IP address for LiveLink communication for all the
adapters that compose the team. The address specified here is the IP
address for LiveLink communication. Specify a different IP address for
data communication.
For Target xx, specify an IP address that is unique on the network and with
which communication is possible.
Express5800/GT-110d, GT-110d-S, R110d-1E, E110d-1 Installation Guide (Windows)
134

4. Setting Up Windows Server 2008
Chapter 1 Installing Windows
14. Click [Next].
15. Make sure that Skip manage VLAN is selected under Manage VLAN, and then click [Next].
Express5800/GT-110d, GT-110d-S, R110d-1E, E110d-1 Installation Guide (Windows) 135

4. Setting Up Windows Server 2008
Chapter 1 Installing Windows
16. Make sure that Commit changes to system and Exit the wizard is selected under Commit changes,
and then click [Finish].
Note When the message below appears, select [Yes].
"
Applying the changes will temporarily interrupt the network
c
onnection. The process may take several minutes and the
connection will resume afterwards. Do you want to continue?"
Tips After creating a team, if the teaming adapter displays like the following image,
perform steps 8 through 14 again and correct the LiveLink settings.
17. Restart the system.
Express5800/GT-110d, GT-110d-S, R110d-1E, E110d-1 Installation Guide (Windows)
136

4. Setting Up Windows Server 2008
Chapter 1 Installing Windows
18. After the system starts, follow step 1 to start Broadcom Control Suite3 and confirm that a team has
been created. Confirm the team settings on the Information window to the right.
Smart Load Balancing and Failover (without Standby Member)
Smart Load Balancing (Auto-Failback Disable) (with Standby Member)
Team setup is now complete.
Express5800/GT-110d, GT-110d-S, R110d-1E, E110d-1 Installation Guide (Windows) 137

4. Setting Up Windows Server 2008
Chapter 1 Installing Windows
(4) Procedure for deleting team
Important You must delete teams from Broadcom Control Suite3.
You cannot delete the team from the team adapter displayed in the Device
Manager.
1. Double-click Broadcom Control Suite3 in the Control Panel window.
Broadcom Advanced Control Suite3 starts.
2. Click Team Management from the left menu, right-click the team name under Teams, and then select
Delete Team from the short-cut menu.
Tips When the message below appears, select [Yes].
"The selected team will be deleted from system, do you want to
proceed?
NOTE: Applying the changes wil
l
temporarily interrupt the
n
etwork connection. The process may take several
minutes and the connection will resume afterwards."
3. Insert the EXPRESSBUILDER DVD into the optical disk drive.
If an autorun menu appears, close the menu window.
Important You do not have to insert the EXPRESSBUILDER DVD if the Starter Pack was
installed from the Internal Flash Memory. Proceed to the next step.
Express5800/GT-110d, GT-110d-S, R110d-1E, E110d-1 Installation Guide (Windows)
138
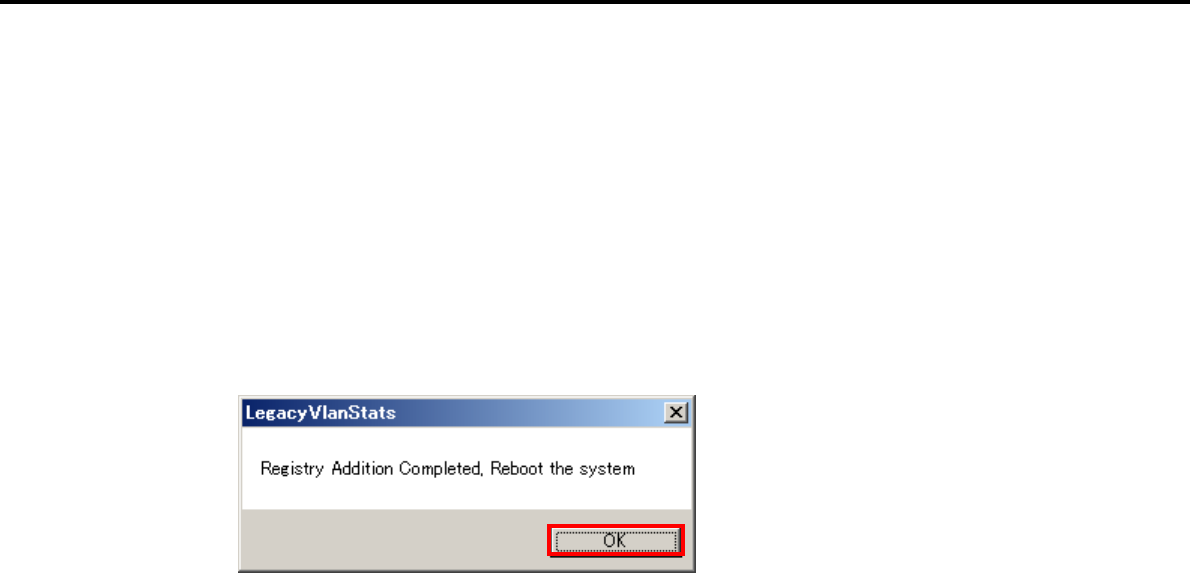
4. Setting Up Windows Server 2008
Chapter 1 Installing Windows
4. Double-click addlvlanstats.vbs in the following folder.
When using the EXPRESSBUILDER DVD:
<Windows Server 2008 64-bit Edition>
Optical disk drive letter:\020\win\winnt\ws2008x64\lan
<Windows Server 2008 32-bit Edition>
Optical disk drive letter:\020\win\winnt\ws2008\lan
If the Starter Pack was installed from the Internal Flash Memory:
<Windows Server 2008 64-bit Edition>
System drive letter:\StartPKG\ws2008x64\lan
<Windows Server 2008 32-bit Edition>
System drive letter:\StartPKG\ws2008\lan
5. When the following message appears, click [OK].
6. Eject the EXPRESSBUILDER DVD from the optical disk drive, and then restart the system.
Team deletion is now complete.
Express5800/GT-110d, GT-110d-S, R110d-1E, E110d-1 Installation Guide (Windows) 139

4. Setting Up Windows Server 2008
Chapter 1 Installing Windows
4.5.4 Graphics accelerator driver
The graphics accelerator driver for standard configurations is installed when the Starter Pack is installed
from EXPRESSBUILDER.
If you completed Setup with EXPRESSBUILDER, then the graphics accelerator driver has been
automatically installed.
Tips The graphics accelerator driver is only enabled in Full installations. Standard VGA
is used in the case of Server Core installation.
To reinstall drivers separately, complete the following steps.
1. Insert the EXPRESSBUILDER DVD into the optical disk drive.
If an autorun menu appears, close the menu window.
Tips You do not have to insert the EXPRESSBUILDER DVD if the Starter Pack was
installed from the Internal Flash Memory.
2. From the Start menu, point to All programs, Accessories, and then select Explorer.
3. Double-click the install.bat icon in the following folder.
When using the EXPRESSBUILDER DVD:
Windows Server 2008 64-bit Edition
Optical disk drive letter:\020\win\winnt\ws2008x64\video
Windows Server 2008 32-bit Edition
Optical disk drive letter:\020\win\winnt\ws2008\video
If the Starter Pack was installed from the Internal Flash Memory:
Windows Server 2008 64-bit Edition
System drive letter:\StartPKG\ws2008x64\video
Windows Server 2008 32-bit Edition
System drive letter:\StartPKG\ws2008\video
Continue installation according to the onscreen messages.
You will be prompted to confirm the End User License Agreement during this process. Click the
[ACCEPT] button and continue.
4. Eject the EXPRESSBUILDER DVD from the optical disk drive, and then restart the system.
Graphic accelerator driver installation is now complete.
Express5800/GT-110d, GT-110d-S, R110d-1E, E110d-1 Installation Guide (Windows)
140

4. Setting Up Windows Server 2008
Chapter 1 Installing Windows
4.5.5 When using a SCSI controller (N8103-75/107)
The driver for SCSI controller N8103-75/107 is automatically installed by Windows Plug-and-Play. You do
not need to install it manually.
4.5.6 When using a SAS controller (N8103-104A/142)
The driver for SAS controller N8103-104A/142 is automatically installed by Windows Plug-and-Play. You do
not need to install it manually.
4.5.7 When using a RAID Controller (N8103-135)
The driver for RAID Controller N8103-135 is automatically installed by Windows Plug-and-Play. You do not
need to install it manually.
4.5.8 When using a Fibre Channel controller (N8190-127/131/153/154)
The driver for Fibre Channel controller N8190-127/131/153/154 is automatically installed by Windows
Plug-and-Play. You do not need to install it manually.
Express5800/GT-110d, GT-110d-S, R110d-1E, E110d-1 Installation Guide (Windows) 141

4. Setting Up Windows Server 2008
Chapter 1 Installing Windows
4.6 Specifying PAE Option
If the server can mount a memory of more than 4 GB in a 32-bit system, specify the PAE option settings to use
that memory.
Important The PAE option is not supported by Windows Server 2008 Standard.
For Windows Server 2008, the PAE option can be specified by using the Bcdedit.exe file. Follow the
procedure below to specify the PAE option.
1. Select Run from the Start menu.
2. Enter cmd.exe in the Open text box, and then click [OK] to start the command prompt.
3. Execute the following command at the command prompt:
bcdedit /set pae forceenable
4. Restart the system.
The above setting is applied after restart.
5. Execute the following command at the command prompt:
bcdedit
Make sure that pae ForceEnable is added to Windows Boot Loader.
Specification of the PAE option settings is now complete.
For details about Bcdedit.exe, refer to the following:
Boot Configuration Data Editor Frequently Asked Questions
http://technet.microsoft.com/en-us/library/cc721886(WS.10).aspx
Express5800/GT-110d, GT-110d-S, R110d-1E, E110d-1 Installation Guide (Windows)
142

4. Setting Up Windows Server 2008
Chapter 1 Installing Windows
4.7 Installing the Bundled Software
The supplied EXPRESSBUILDER DVD contains the server monitoring software NEC ESMPRO Agent and
system management software NEC ESMPRO Manager.
You can install NEC ESMPRO Agent automatically by performing Setup with EXPRESSBUILDER.
Open the Programs or Control Panel window from the Start menu, and make sure that the folders for the utilities
you have installed are contained. If you did not install them at the time of Setup with EXPRESSBUILDER, refer
to Chapter 2 Installing the Bundled Software to install the software separately.
Express5800/GT-110d, GT-110d-S, R110d-1E, E110d-1 Installation Guide (Windows) 143
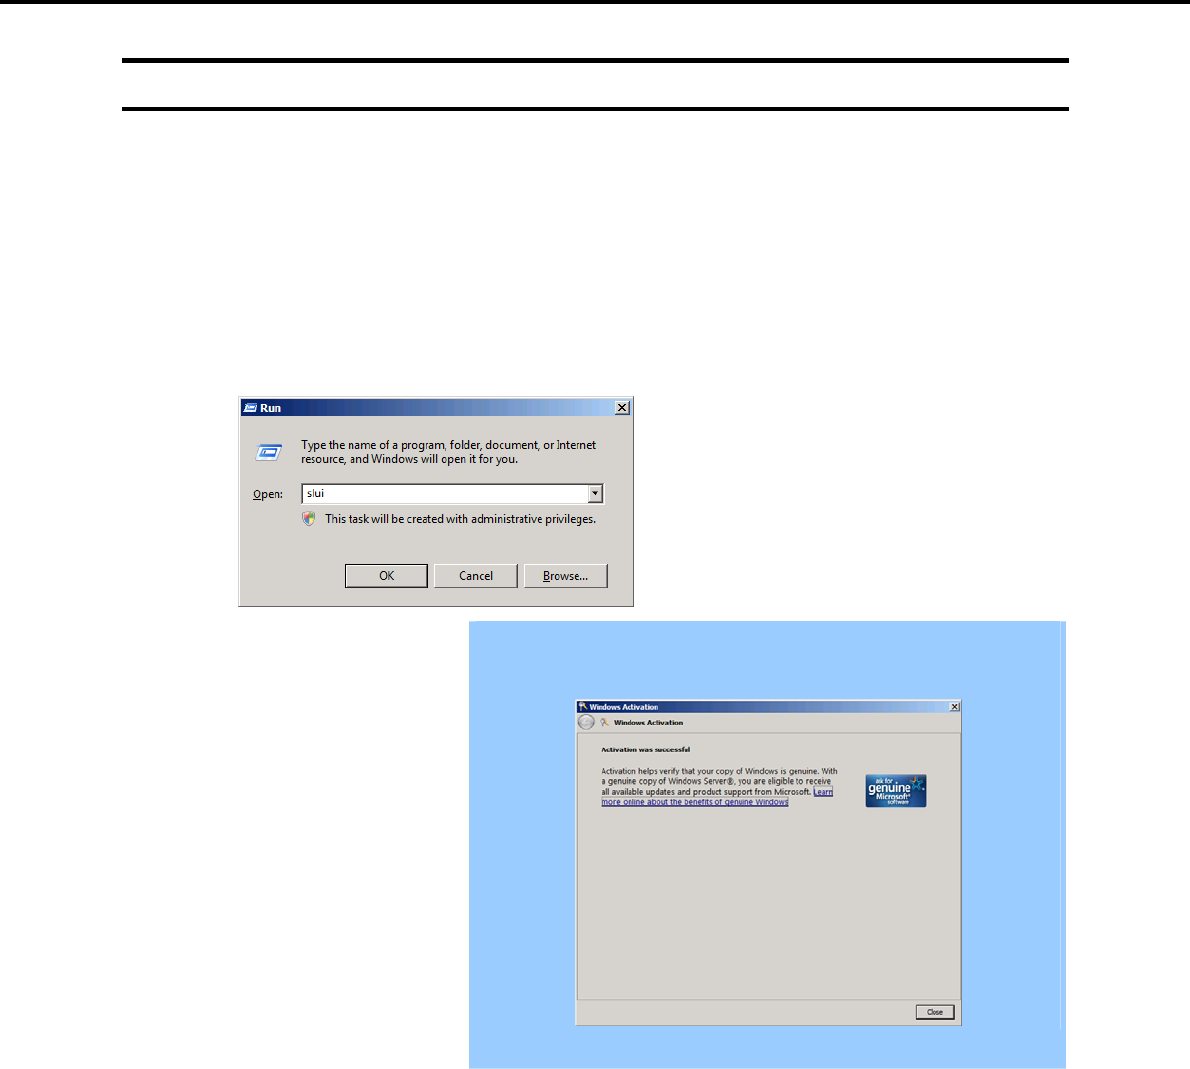
4. Setting Up Windows Server 2008
Chapter 1 Installing Windows
4.8 License Authentication
To use Windows Server 2008, confirm whether the license has been authenticated, and if it has not, perform
the license authentication procedure.
The following describes the license authentication procedure.
(1) For Full installations
1. Select Run from the Start menu.
Enter the following, and then press the <Enter> key.
slui
Important If the following message appears, Windows has already been activated on
your system. You do not need to complete this procedure. Click [Close] to
exit.
Express5800/GT-110d, GT-110d-S, R110d-1E, E110d-1 Installation Guide (Windows)
144
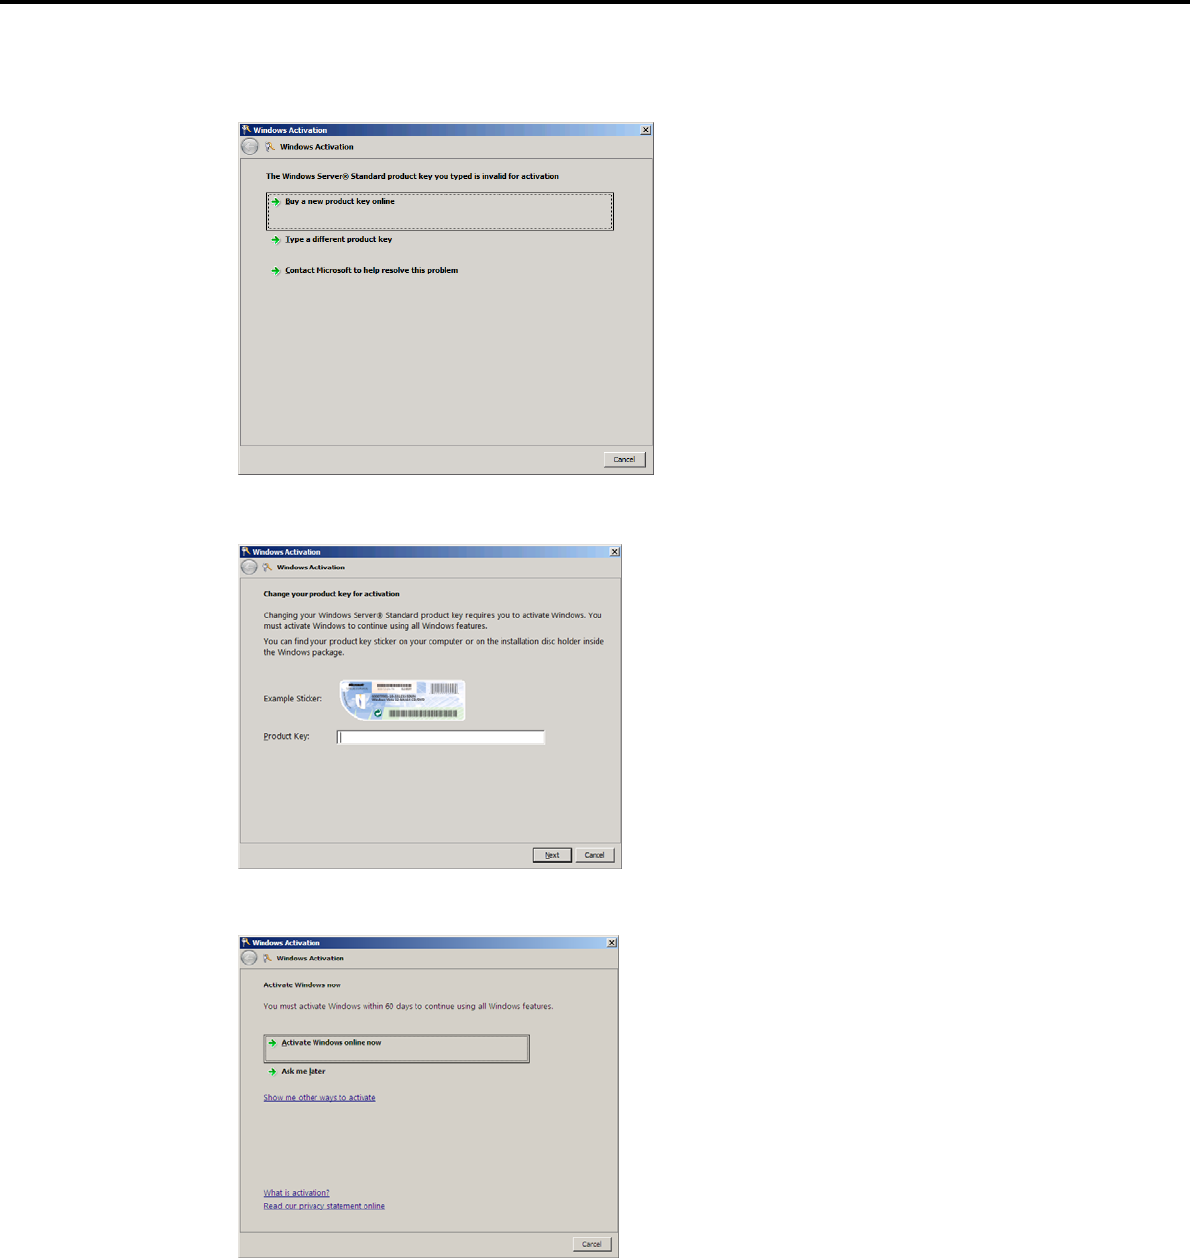
4. Setting Up Windows Server 2008
Chapter 1 Installing Windows
2. For installation from the backup DVD, replace the product key.
When the following window appears, click Change product key.
3. When the following window appears, enter the product key found on the COA label, and then click [Next].
4. Follow the instructions in the following message to start the license authentication process.
Windows activation is now complete.
Express5800/GT-110d, GT-110d-S, R110d-1E, E110d-1 Installation Guide (Windows) 145
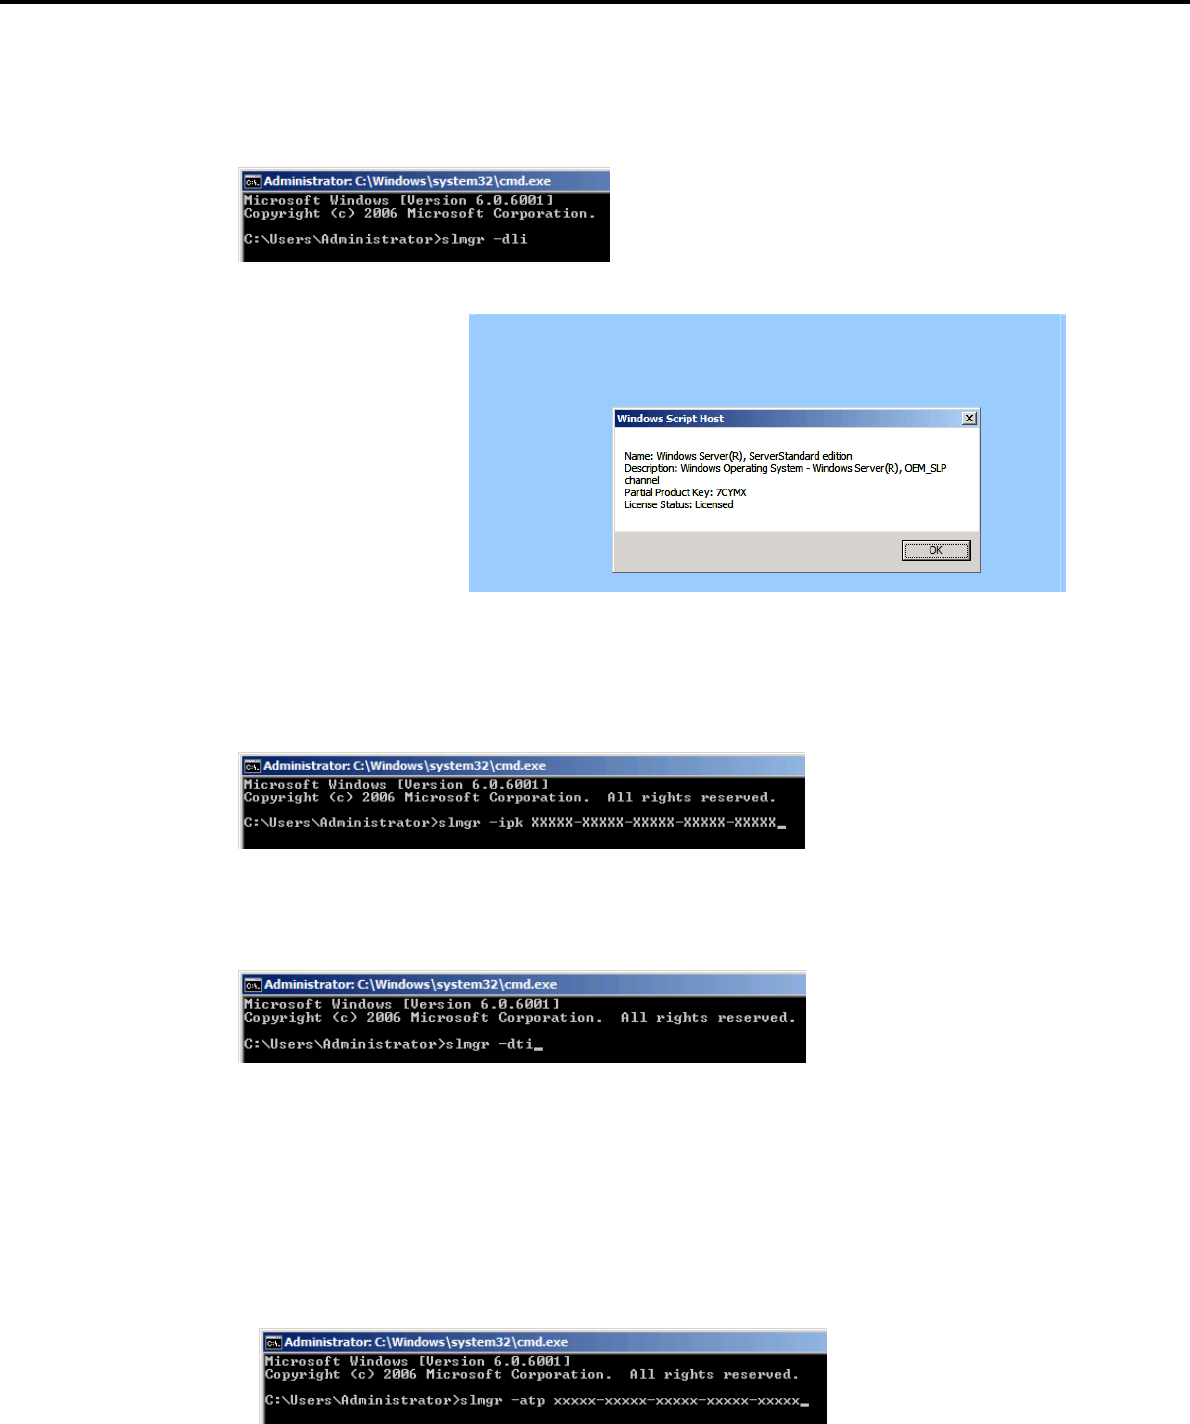
4. Setting Up Windows Server 2008
Chapter 1 Installing Windows
(2) For Server Core installations
1. At the command prompt, enter the following, and then press the <Enter> key.
slmgr -dli
Important If the following message appears, Windows has already been activated on
your system. You do not need to complete this procedure. Click [OK] to
finish.
2. For installation from the backup DVD, replace the product key.
At the command prompt, enter the following, and then press the <Enter> key. Set the product key found
on the COA label in PID.
slmgr -ipk PID
3. Obtain an installation ID for Windows activation.
At the command prompt, enter the following, and then press the <Enter> key.
slmgr -dti
4. Reference %systemroot%\system32\slui\phone.inf for the telephone number of the license
authentication customer service.
5. Call the above number, inform the representative of the installation ID which you obtained in step 3, and
receive a confirmation ID.
6. Type the confirmation ID you received in step 5.
At the command prompt, enter the following, and then press the <Enter> key. CID is the confirmation ID
that you received from customer service.
slmgr -atp CID
Windows activation is now complete.
Express5800/GT-110d, GT-110d-S, R110d-1E, E110d-1 Installation Guide (Windows)
146

4. Setting Up Windows Server 2008
Chapter 1 Installing Windows
4.9 Installation When Multiple Logical Drives Exist
Before starting reinstallation, backup data for future use in case of data loss.
(1) Installation process
Setup with EXPRESSBUILDER
Refer to Chapter 1 (4.2 Setup with EXPRESSBUILDER), and proceed with setup.
Important The operating system will be installed on the first detected Hard Disk Drive or
logical disk drive.
Setup with OS standard installer
1. Refer to Chapter 1 (4.3 Setup with OS Standard Installer), and start setup.
2. When the following message appears, select the partition to which you want to set up the operating
system.
Select the location to which Windows will be installed
Important When you install a Windows system into an environment where multiple
Hard Disk Drives are connected, these drives are displayed as a
destination to install the system during setup.
At this time, the order and numbers of the disks displayed on the screen
might not match those of the Hard Disk Drives connected to the Hard Disk
Drive bay.
Distinguish between the Hard Disk Drives by viewing the Hard Disk Drive
capacity and partition size displayed on the screen, and then select a drive
to install the Windows system.
Selecting an improper drive might cause an unintentional corruption of the
existing data. Be careful when selecting a Hard Disk Drive on which to
install the system.
For details, refer to the following Microsoft website:
http://support.microsoft.com/kb/937251/en-us
You cannot edit the drive letters for the system volume or boot volume
after setup is complete. Make sure that the drive letters assigned in this
window are correct, and then proceed with setup.
3. Refer to Chapter 1 (4.3 Setup with OS Standard Installer), and proceed to setup Windows with OS
standard installer and the instructions.
The installation process is now complete.
Tips The drive letter might change after installation. If you want to change the drive
letter, use the procedure shown in Changing drive letter assignments below.
Express5800/GT-110d, GT-110d-S, R110d-1E, E110d-1 Installation Guide (Windows) 147

4. Setting Up Windows Server 2008
Express5800/GT-110d, GT-110d-S, R110d-1E, E110d-1 Installation Guide (Windows)
148
Chapter 1 Installing Windows
(2) Changing drive letter assignments
The steps below cannot change drive letter assignments for the system volume or boot volume. Be careful
when assigning these.
1. From the Start menu, right-click Computer and then select Management. Next, launch Server
Manager.
2. From the window on the left, select Storage and then Disk Management.
3. Right-click the volume whose drive letter you want to change, and then select Change drive letter and
path.
4. Click [Change].
5. Click [Assign next drive letter], and then select the drive letter you want to assign.
6. Click [OK].
7. When the following message appears, read the contents and then click [OK].
Some programs are dependent on drive letters, and may
not run properly. Continue?
8. Close the Server Manager.

5. Setting Up Windows Server 2003 R2 x64 Edition
Chapter 1 Installing Windows
5. Setting Up Windows Server 2003 R2 x64 Edition
Set up Windows Server 2003 R2 x64 Edition and the system.
5.1 Before Starting Setup
Read through the cautions explained here before starting setup.
: Confirm during Setup with EXPRESSBUILDER
: Confirm during Setup with OS standard installer
(1/3)
Setup Items to confirm
The following editions of the Windows Server 2003 family may be installed.
Windows Server 2003 R2 Standard x64 Edition
Windows Server 2003 R2 Enterprise x64 Edition*
* Only supported by R110d-1E and E110d-1
Inquiries about installing other editions may be made at your sales dealer or
maintenance service company.
Important Setup with EXPRESSBUILDER cannot be used.
Windows
family
If Windows Server 2003 R2 x64 Edition is installed from a backup CD, the license is
already activated. If Windows Server 2003 R2 x64 Edition is installed from an OS
CD instead of a backup CD, a product key is required for license authentication. At
this time, the product key must be the same as that indicated on the COA label of
Windows Server 2003 R2 x64 Edition.
For details, refer to Chapter 1 (5.6 License Authentication).
Important Activate within 30 days following installation. The system might be
locked if 30 days have passed without activation.
License
authentication
When installing Windows Server 2003 R2 x64 Edition using the OS standard
installer, the following hardware configurations require special procedures.
When using the OEM drivers, be sure to change the boot order of the Flash FDD
on the BIOS setup window as follows:
Select Boot, Floppy Drive BBS priorities, Boot Option #1, and then specify
the Flash FDD used.
Note Change as instructed in Chapter 1 (5.2.3 Setup procedure).
Connecting MO devices
Installing Windows while an MO device is connected can result in installation
failure. Remove the MO device, and then start installation from the beginning.
Hardware
configuration
warnings
DAT, LTO, and similar media
Do not set media that is unnecessary to installation during setup.
Express5800/GT-110d, GT-110d-S, R110d-1E, E110d-1 Installation Guide (Windows) 149
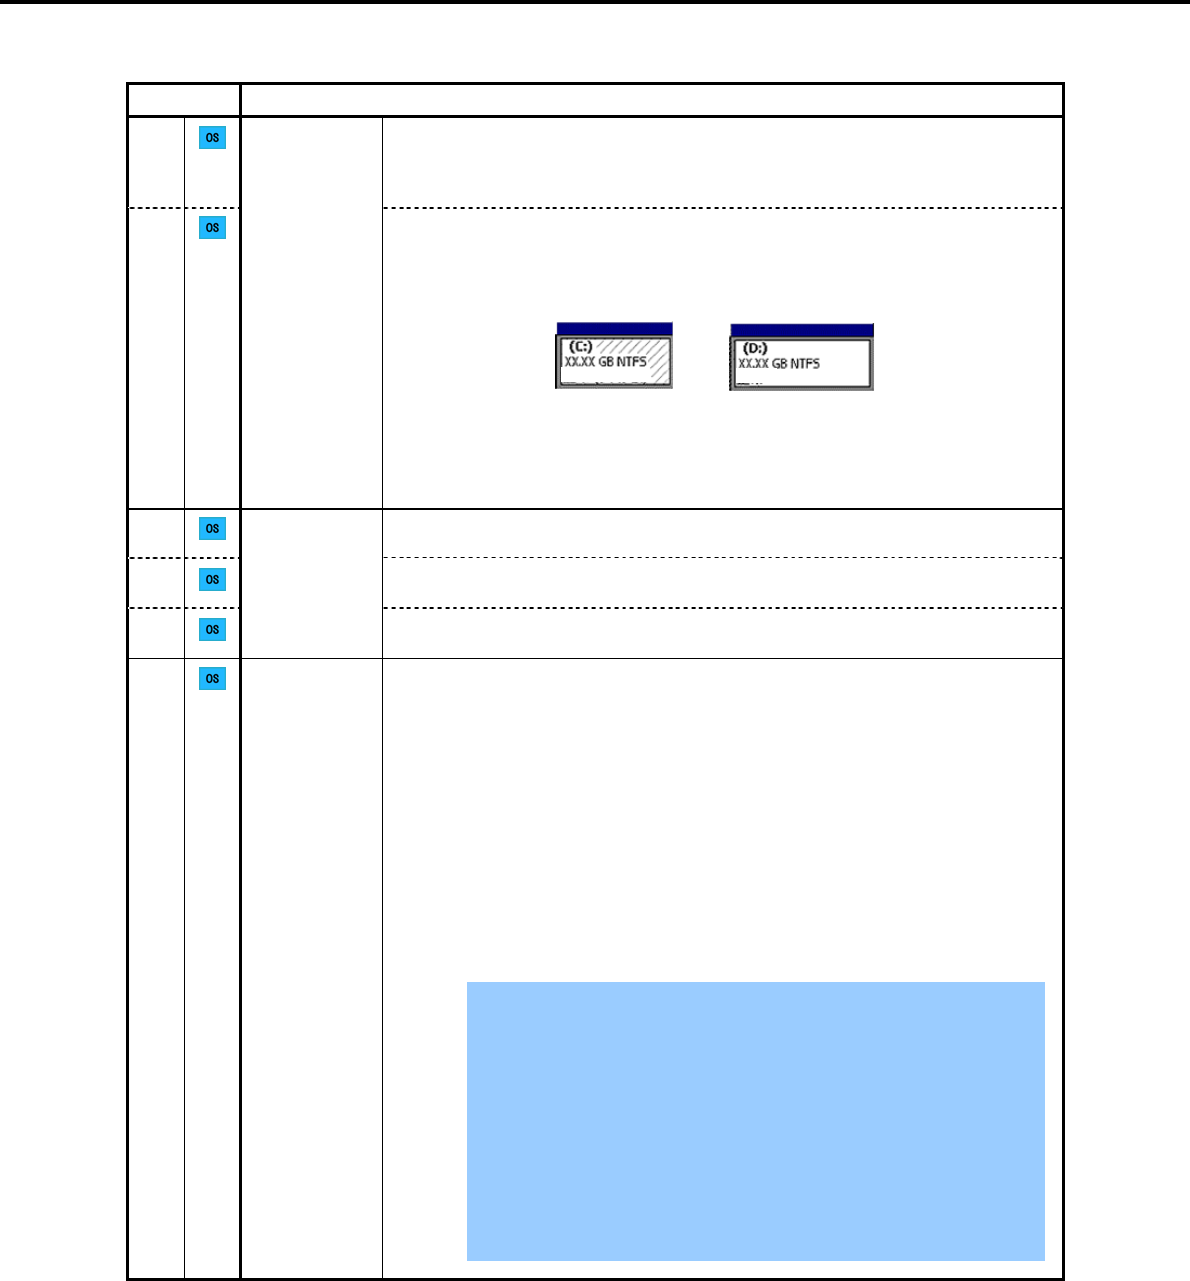
5. Setting Up Windows Server 2003 R2 x64 Edition
Chapter 1 Installing Windows
(2/3)
Setup Items to confirm
Connecting to multiple Hard Disk Drives (Logical Drives)
For details on installing operating systems to a system in which multiple Logical
Drives exist, refer to Chapter 1 (5.7 Installation When Multiple Logical Drives
Exist).
Hardware
configuration
warnings
Reinstallation to a dynamic disk:
When installing the OS on a Hard Disk Drive with multiple partitions that was
upgraded to a dynamic drive and you wish to retain the existing partition
configuration and data areas, note the following:
Normal (system) Normal
Data area
(partition to be retained)
- Select the partition on which the OS was previously installed.
- Select Leave the current file system intact (no change) for the OS partition
format.
Before applying a Service Pack, make sure that Windows Server 2003 R2 Edition
DISC 2 has been installed.
Use the Starter Pack when you apply a Service Pack from the Service Pack 2
CD-ROM.
Application of
Service Packs
If you used OS installation media including Service Pack 2 for installation, you do
not have to install Service Pack 2 again.
The system partition size can be calculated by using the following formula.
Size required to install the OS + paging file size + dump file size + application size
Size required to install the OS = 4,100 MB (Windows Server 2003 R2 x64
Edition with Service Pack 2)
= 5,900 MB (Windows Server 2003 R2 x64
Edition + Service Pack 2 CD-ROM)
Paging file size (recommended) = installed memory size 1.5
Dump file size = installed memory size + 1 MB
Application size = as required by the application
For example, if the installed memory size is 1 GB (1,024 MB) and Full installation is
selected, the partition size is calculated as follows:
4,100 MB + (1,024 MB 1.5) + 1,024 MB + 1 MB + application size = 6,661 MB +
application size
Important The above paging file sizes are recommended for collecting debug
information (dump file). The initial size of the boot volume paging file
must be large enough to store dump files. Make sure you set a sufficient
paging file size. If the paging file is insufficient, there will be a virtual
memory shortage that may result in an inability to collect correct debug
information.
Regardless of the sizes of internal memory and write debug
information, the maximum size of the dump file is "size of internal
memory + 1 MB".
When installing other applications or other items, add the amount of
space needed by the application to the partition.
System
partition size
Express5800/GT-110d, GT-110d-S, R110d-1E, E110d-1 Installation Guide (Windows)
150

5. Setting Up Windows Server 2003 R2 x64 Edition
Chapter 1 Installing Windows
(3/3)
Setup Items to confirm
System
partition size
If the partition size for installing the system is smaller than the size required for
installation + paging file size, expand the partition size or add another disk. If your
system does not have a sufficient dump file size, divide the required file space into
multiple disks by performing the following steps.
1. Set the system partition size to a size sufficient to install the OS and paging file.
2. Write the debug information of the dump file onto another disk by referring to 7.
Setup for Solving Problems.
If there is not enough disk space to write the debug information, set the partition
size to a size sufficient to install the OS and paging file, and then add another disk
for the dump file.
Setup with OS
standard
installer
The Hardware Installation/Software Installation dialog box might appear several
times during installation, but it does not affect system installation. Click [Yes] on
such dialog boxes, and continue installation according to the displayed messages.
Express5800/GT-110d, GT-110d-S, R110d-1E, E110d-1 Installation Guide (Windows) 151

5. Setting Up Windows Server 2003 R2 x64 Edition
Chapter 1 Installing Windows
5.2 Setup with OS Standard Installer
5.2.1 Setup flow
End of installation
Insert the OS installation media
Setup execution screen
Copy the OEM drivers (if required)
Configure RAID System
Parameter setup menu
Setup selection menu
Process that requires input or selection
Process that proceeds automatically
Install the Starter Pack
Log on
Installation
Restart (automatically)
Express5800/GT-110d, GT-110d-S, R110d-1E, E110d-1 Installation Guide (Windows)
152

5. Setting Up Windows Server 2003 R2 x64 Edition
Chapter 1 Installing Windows
5.2.2 Requirements for Setup with OS standard installer
Prepare the following disks and instruction manuals before starting setup.
Operating system installation media (prepare one of the following)
Backup CD-ROM Windows Server 2003 R2, Standard x64 Edition DISC 1
(hereafter referred to as backup CD-ROM DISC 1), and
Microsoft Windows Server 2003 R2 Standard x64 Edition DISC 2 (x2)
(hereafter referred to as Windows Server 2003 R2 Edition x64 DISC 2)
Backup CD-ROM Windows Server 2003 R2, Enterprise x64 Edition DISC 1
(hereafter referred to as backup CD-ROM DISC 1), and
Microsoft Windows Server 2003 R2, Enterprise x64 Edition DISC 2 (x2)
(hereafter referred to as Windows Server 2003 R2 x64 Edition DISC 2)
Microsoft Windows Server 2003 R2, Standard x64 Edition DISC 1
(hereafter referred to as Windows Server 2003 R2 x64 Edition DISC 1), and
Microsoft Windows Server 2003 R2 Standard x64 Edition DISC 2 (x2)
Microsoft Windows Server 2003 R2, Enterprise x64 Edition DISC 1
(hereafter referred to as Windows Server 2003 R2 x64 Edition DISC 1), and
Microsoft Windows Server 2003 R2 Enterprise x64 Edition DISC 2 (x2)
Windows Server 2003 Editions Service Pack 2(CD-ROM)
First Steps Guide
EXPRESSBUILDER DVD
If you purchased optional Internal Flash Memory, you can use it during installation.
Prepare if needed:
OEM drivers (Windows Server 2003 x64 Edition)
Important For precautions about the Service Pack, refer to Application of Service Packs
in Chapter 1 (5.1 Before Starting Setup).
Note OEM drivers are necessary if a RAID Controller or optional board is connected.
Use a Flash FDD as the removable media to create OEM drivers.
Express5800/GT-110d, GT-110d-S, R110d-1E, E110d-1 Installation Guide (Windows) 153
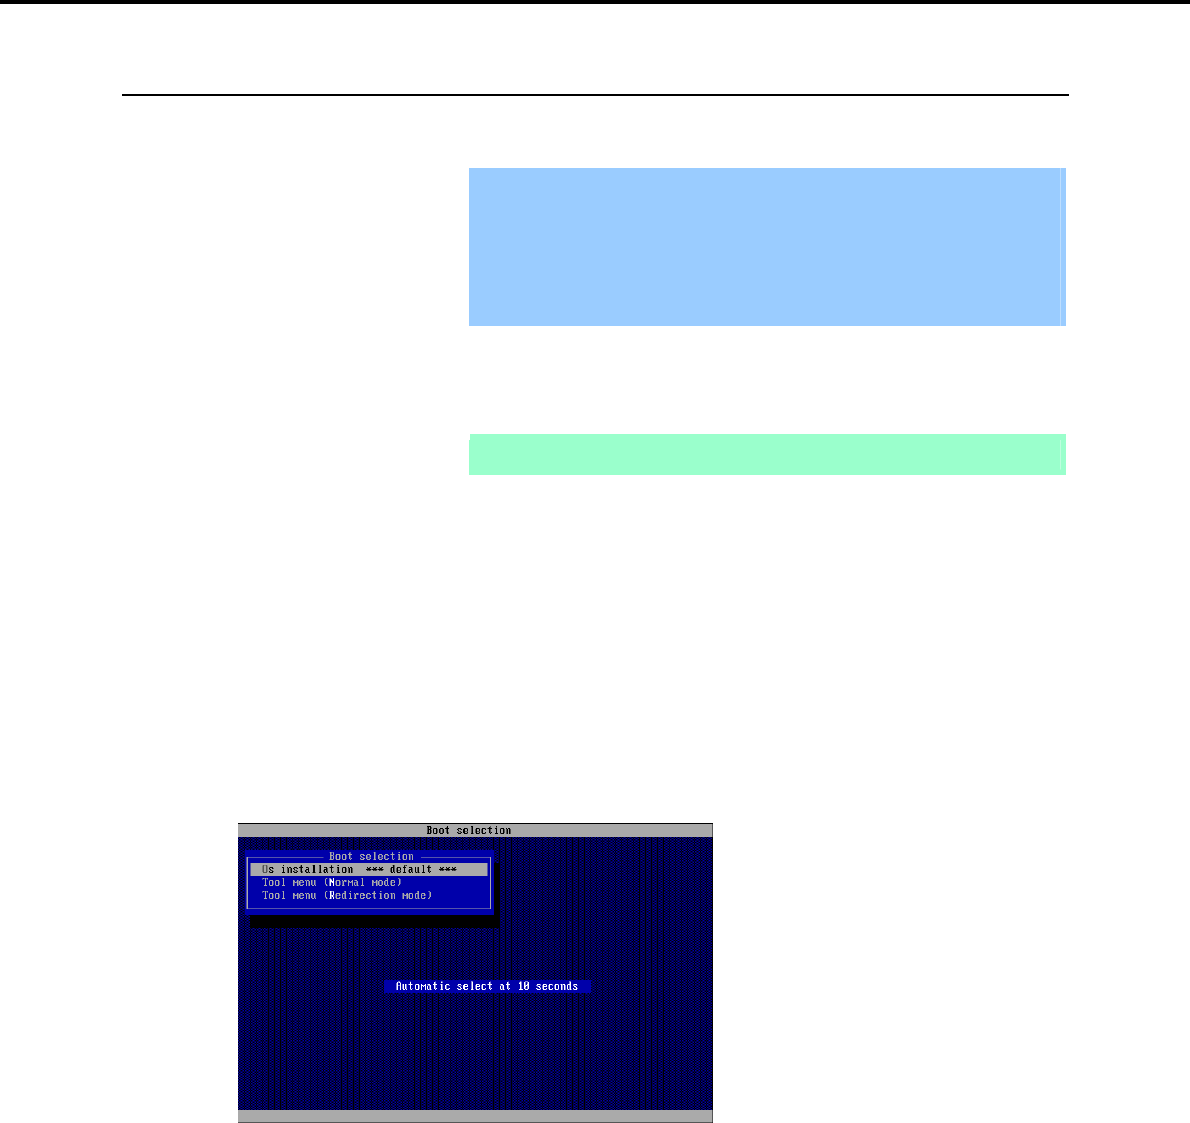
5. Setting Up Windows Server 2003 R2 x64 Edition
Chapter 1 Installing Windows
5.2.3 Setup procedure
This section describes the procedure for installing Windows Server 2003 R2 x64 Edition using the OS
standard installer.
Important Before starting setup, refer to Chapter 1 (5.1 Before Starting Setup). It
describes how to make partitions.
The procedure differs depending on the media on which
EXPRESSBUILDER is stored.
The installation procedure depends on the environment. Check your
environment before starting installation.
1. Turn peripheral device power on, and then turn the server power on.
2. Use the following procedure to start EXPRESSBUILDER.
Note Be sure to disconnect removable media before starting EXPRESSBUILDER.
When using the EXPRESSBUILDER DVD:
(1) Insert the EXPRESSBUILDER DVD into the optical disk drive of the server.
(2) Once the DVD is inserted, restart the server by resetting it (press <Ctrl> + <Alt> + <Delete>) or
by turning the power off and then on again. EXPRESSBUILDER starts.
When using the Internal Flash Memory:
(1) When "Press <F2> Setup, <F3> Internal Flash Memory, <F4> ROM Utility, <F12> Network"
appears below the POST window, press the <F3> key. EXPRESSBUILDER starts.
3. When the following message appears, select Os installation *** default ***.
You will automatically advance to step 4, with no need for further input.
Express5800/GT-110d, GT-110d-S, R110d-1E, E110d-1 Installation Guide (Windows)
154

5. Setting Up Windows Server 2003 R2 x64 Edition
Chapter 1 Installing Windows
4. Select English on the language selection window, and then click [OK].
5. When the Windows PE software license agreement window appears, click [Yes].
6. Select Set up this computer from the top menu, and then click [Next].
Express5800/GT-110d, GT-110d-S, R110d-1E, E110d-1 Installation Guide (Windows) 155

5. Setting Up Windows Server 2003 R2 x64 Edition
Chapter 1 Installing Windows
7. When the setup selection menu appears, use the following steps to specify the parameters.
Note When setting up again, parameter input via the wizard can be omitted by loading
the saved parameter file.
When not using a parameter file:
Select the appropriate OS from the Install Windows drop-down list, and then click [Next].
Go to the following (1) RAID settings.
When using a parameter file:
Select Load a parameter file, and then click [Next].
Load the desired parameter file according to the onscreen instructions.
Confirm the settings on the parameter setup menu as required, and then click [Next].
Go to the following (2) Executing setup-
エラー
!
参照元が見つかりません。
5.
Express5800/GT-110d, GT-110d-S, R110d-1E, E110d-1 Installation Guide (Windows)
156

5. Setting Up Windows Server 2003 R2 x64 Edition
Chapter 1 Installing Windows
(1) RAID settings
This function automatically recognizes the RAID Controller connected to the server and configures the RAID
System, so you must complete setup of the server by following the "User’s Guide " in advance.
Important Some data in the Hard Disk Drive might be deleted depending on the system
settings. Pay attention to input parameters. You must be especially careful
when configuring the following:
RAID settings wizard
Backing up user data, as needed, is recommended.
Note When using an onboard RAID Controller (LSI Embedded MegaRAID):
This function does not support the creation of RAID10 by using the onboard
RAID Controller.
Refer to Chapter 2 (4. RAID System Configuration) in "Maintenance Guide" when
creating RAID10.
Specify the RAID settings using the RAID settings wizard on the parameter setup menu.
Tips Use the [Default] button when you want to return to the default value of parameters
after having modified them with the wizard.
You can confirm the value set by clicking the [Default] button if you click the
[Default values] button.
When creating a new Logical Drive
1. Click [Settings] in RAID settings.
2. Use the wizard to set up the Logical Drive.
When skipping the creation of a new Logical Drive
1. Click [Skip] in RAID settings.
Tips Use the [Skip] button if, after modifying the settings with the RAID settings wizard,
you want to install the existing configurations without modifying them.
Express5800/GT-110d, GT-110d-S, R110d-1E, E110d-1 Installation Guide (Windows) 157

5. Setting Up Windows Server 2003 R2 x64 Edition
Chapter 1 Installing Windows
(2) Executing setup
Install Windows using the following procedure.
1. Click [Settings] in Windows settings.
Tips Use the [Default] button when you want to return to the default value of parameters
after having modified them with the wizard.
You can confirm the value set by clicking the [Default] button if you click the
[Default values] button.
2. Click [Next] in the Windows settings wizard.
Express5800/GT-110d, GT-110d-S, R110d-1E, E110d-1 Installation Guide (Windows)
158
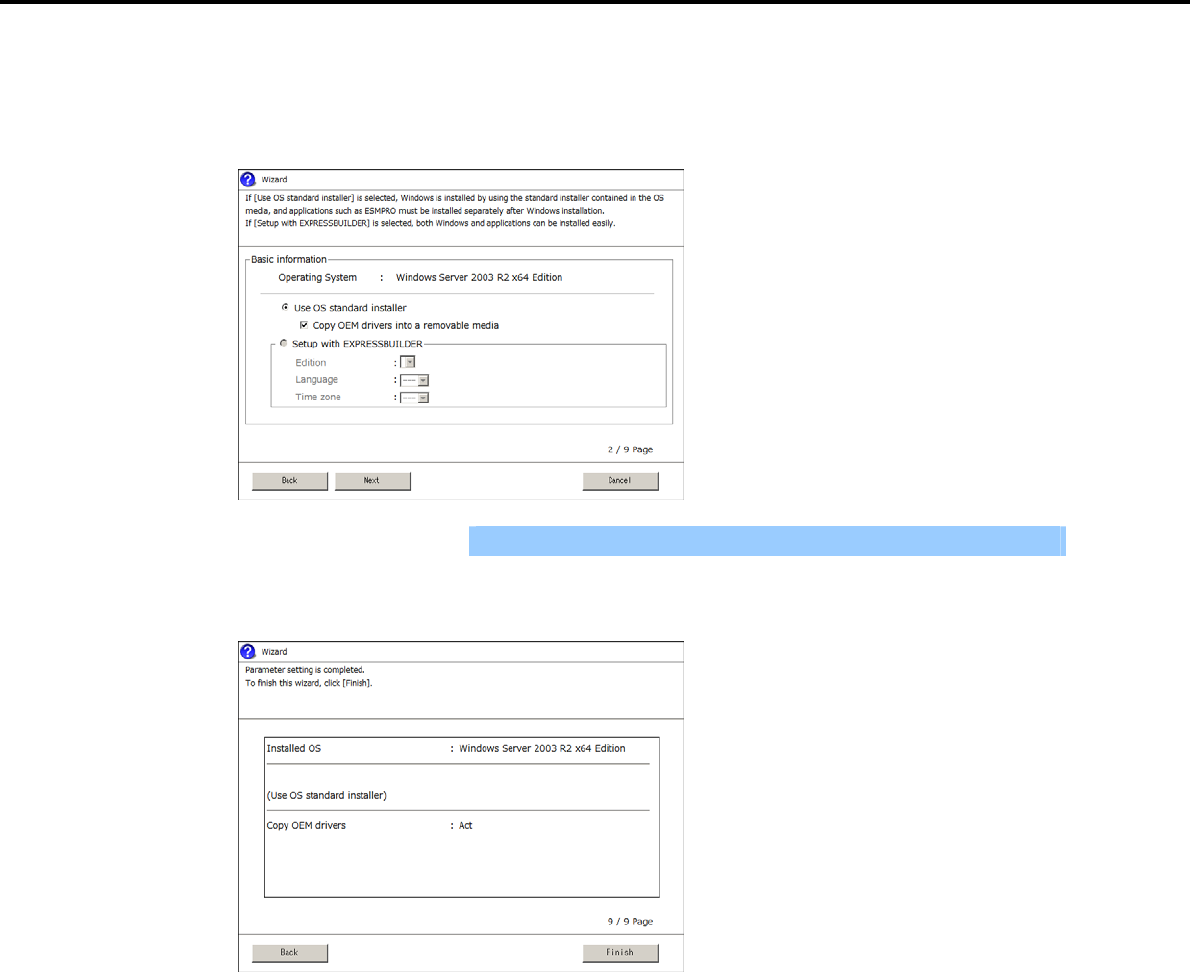
5. Setting Up Windows Server 2003 R2 x64 Edition
Chapter 1 Installing Windows
3. Specify the Windows basic settings
The basic information window appears. Select Use OS standard installer, and then click [Next].
If copying the OEM drivers to the removable media, select Copy OEM drivers into a removable media.
Important If you copied the OEM drivers to a Flash FDD, format it to FAT16.
4. After clicking [Finish] on the confirmation window, click [Next] in the parameter setup menu.
Express5800/GT-110d, GT-110d-S, R110d-1E, E110d-1 Installation Guide (Windows) 159
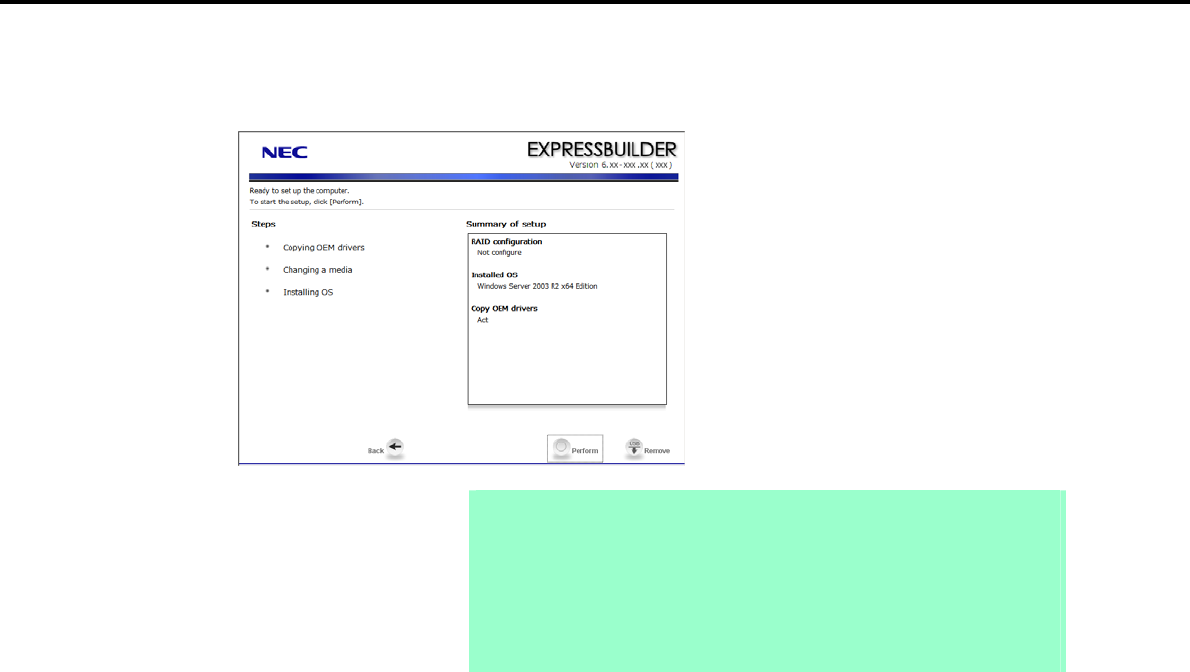
5. Setting Up Windows Server 2003 R2 x64 Edition
Chapter 1 Installing Windows
5. From the setup execution window, click [Perform].
The server automatically restarts.
Note If you select the Copy OEM drivers into a removable media check box, insert a
Flash FDD into the server and then click [Perform].
Do not remove the media while copying OEM drivers.
When using the OEM drivers, after following step 5 to restart, change the boot
order of the Flash FDD from the BIOS settings window.
Select Boot, Floppy Drive BBS priorities, Boot Option #1, and then specify
the Flash FDD used.
Express5800/GT-110d, GT-110d-S, R110d-1E, E110d-1 Installation Guide (Windows)
160
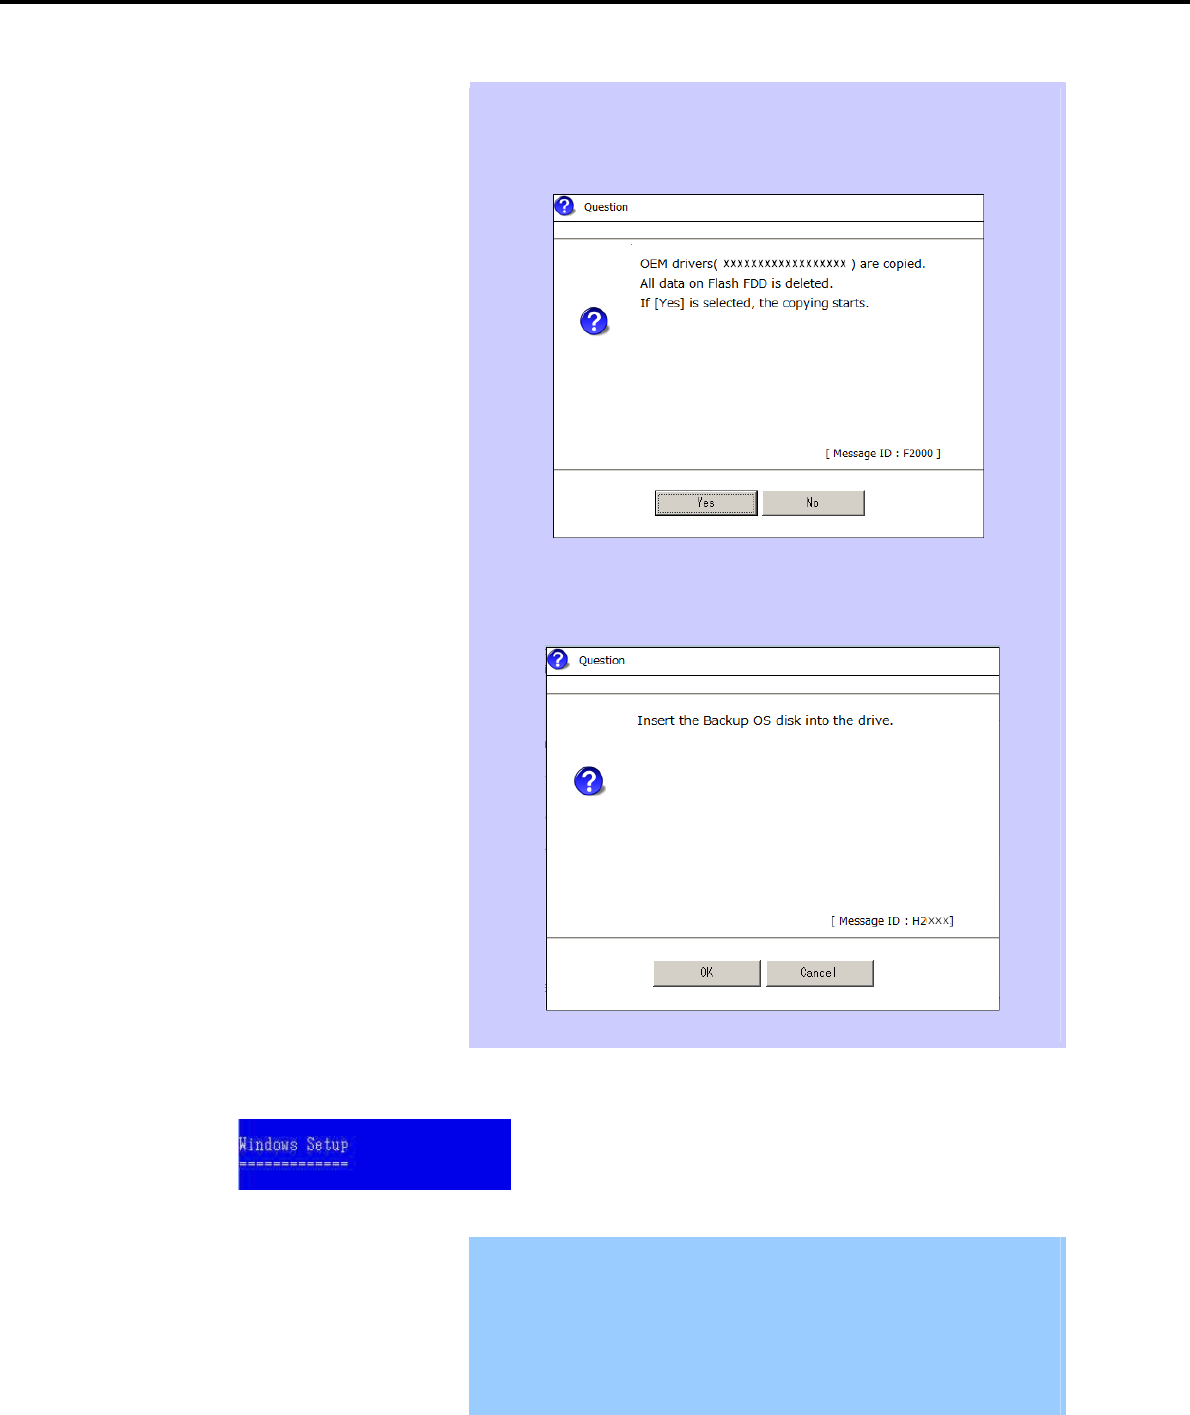
5. Setting Up Windows Server 2003 R2 x64 Edition
Chapter 1 Installing Windows
Tips If the Copy OEM drivers to a removable media checkbox is selected in step 3,
the following window appears. Follow the onscreen instructions and continue the
operation.
When the following message appears, insert the OS installation media, and then
click [OK].
6. The system starts up from the CD-ROM, and the Express5800 server runs.
Important If a bootable operating system is already installed on the Hard Disk Drive,
press the <Enter> key while the message "Press any key to boot from CD or
DVD…" is displayed on the top of the screen. This step is unnecessary if no
bootable operating system exists.
If the Windows Setup window does not appear, the <Enter> key was not
pressed correctly. Turn the system power on and start again from the
beginning.
Express5800/GT-110d, GT-110d-S, R110d-1E, E110d-1 Installation Guide (Windows) 161
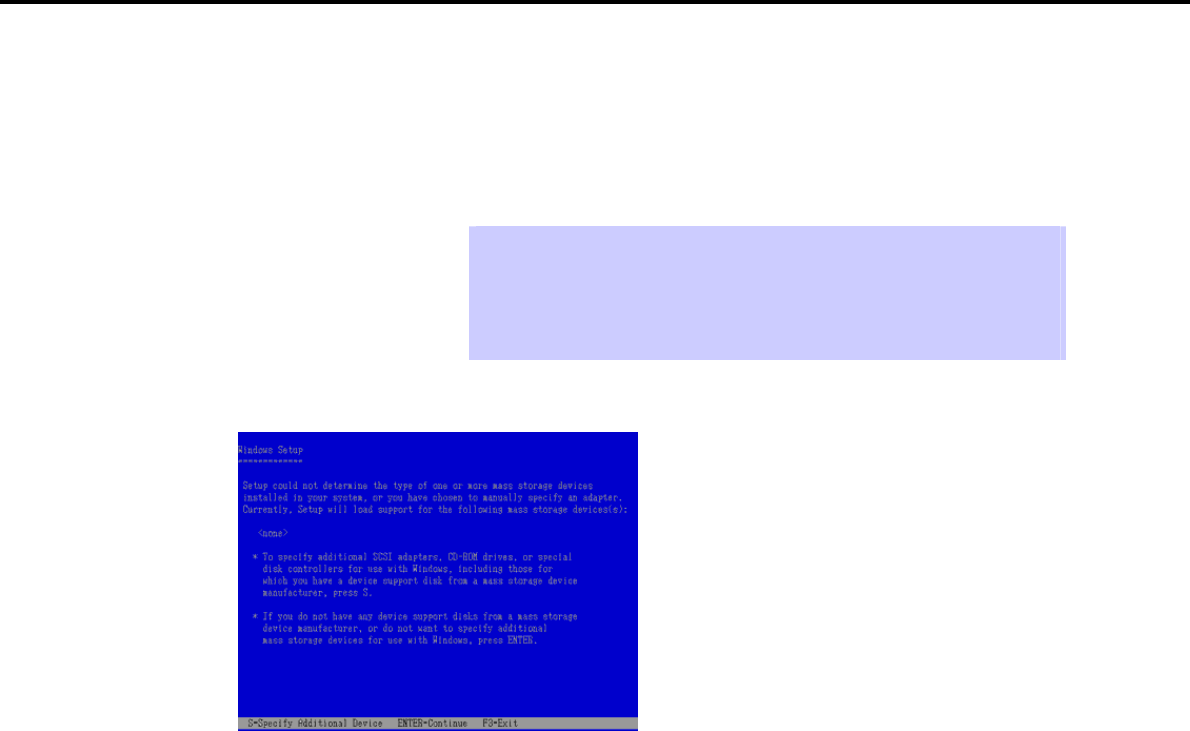
5. Setting Up Windows Server 2003 R2 x64 Edition
Chapter 1 Installing Windows
7. If a RAID Controller or optional Controller is used, press the <F6> key while either of the following
messages is displayed.
"Setup is inspecting your computer's hardware configuration" (on the top of the screen)
"Press F6 if you need to install a third party SCSI or RAID driver…" (on the bottom of the screen)
Tips You do not have to press the <F6> key if no RAID Controller or optional
Controller is used. Go to step 14.
Note that nothing changes on the screen even when the <F6> key is pressed.
If the OEM drivers list is not displayed, check the boot order of the Flash FDD on
the BIOS setup window.
8. The following message appears.
When using a RAID Controller: Press the <S> key and go to step 9.
When not using a RAID Controller: Go to step 10.
9. Select one of the following from the driver list, and then press the <Enter> key.
When using an onboard RAID Controller (LSI Embedded MegaRAID):
[LSI Embedded MegaRAID (Windows XP/2003 64-bit)]
When using an N8103-129/130 RAID Controller:
[LSI MegaRAID SAS RAID Controller Driver (Server 2003 for x64)]
When using an N8103-G128/128/134 RAID Controller:
[Promise SuperTrak EX Family Controller - 64bits platform]
The window shown in step 8 appears.
10. Check the connection status of other options.
When no optional Controller is used: Press the <Enter> key and go to step 14.
When N8103-107 is connected: Press the <S> key on the window in step 8, and go to step 11.
When no N8103-107 is connected: Go to step 12.
Express5800/GT-110d, GT-110d-S, R110d-1E, E110d-1 Installation Guide (Windows)
162
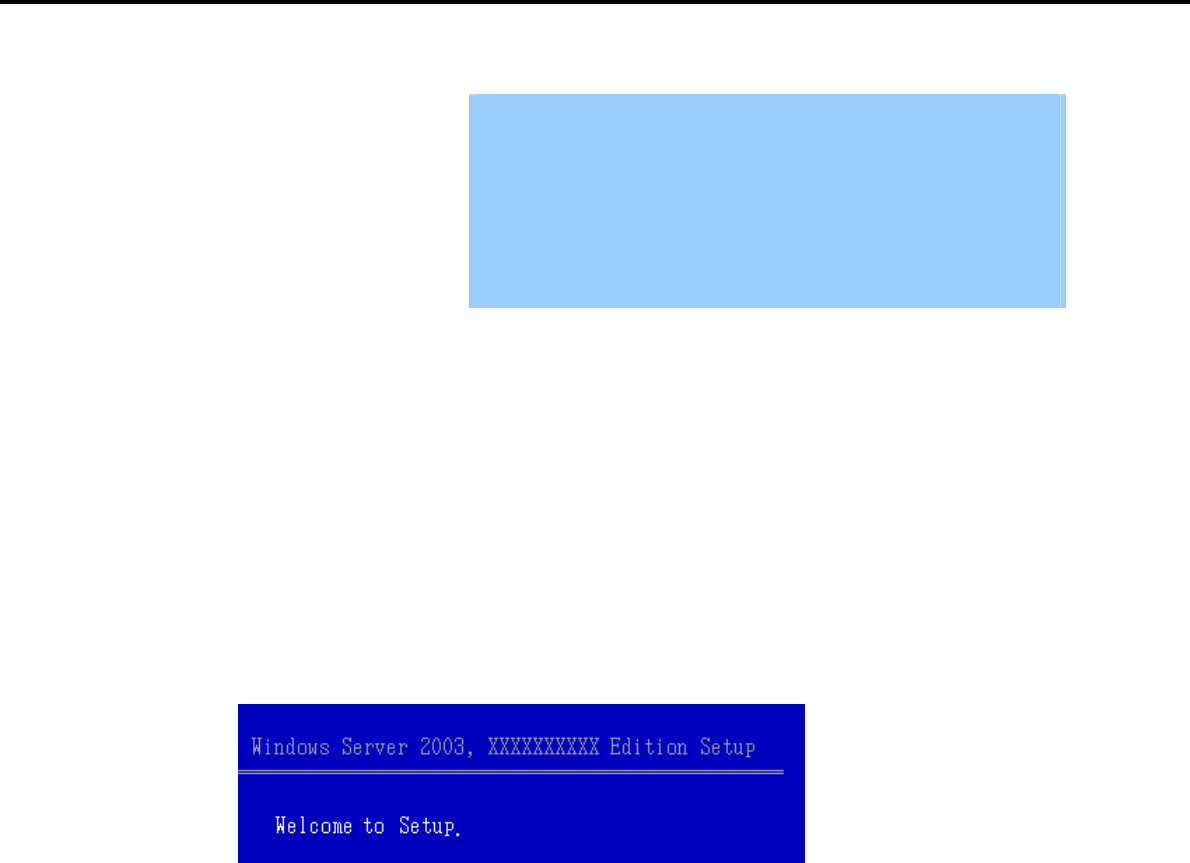
5. Setting Up Windows Server 2003 R2 x64 Edition
Chapter 1 Installing Windows
11. Select Adaptec Ultra320 SCSI Cards (Windows 64-bit), and then press the <Enter> key.
Important If the following message appears, press the <S> key to proceed.
The driver you provided seems to be newer than the Windows default
driver.
Windows already has a driver that you can use for “Adaptec Ultra
320 SCSI Cards (Windows 64-bit)”
Unless the device manufacturer prefers that you use the driver
on the floppy disk, you should use the driver in Windows.
The window shown in step 8 appears. Go to step 12.
12. Check the connection status of other options.
When N8103-104A is connected: Press the <S> key on the window in step 8, and go to step 13.
When no N8103-104A is connected: Press the <Enter> key and go to step 14.
13. Select LSI Fusion-MPT SAS Driver (Server 2003 x64), and then press the <Enter> key.
The window shown in step 8 appears. Press the <Enter> key and go to step 14.
14. If the following message appears, press the <Enter> key to start Windows setup.
Express5800/GT-110d, GT-110d-S, R110d-1E, E110d-1 Installation Guide (Windows) 163
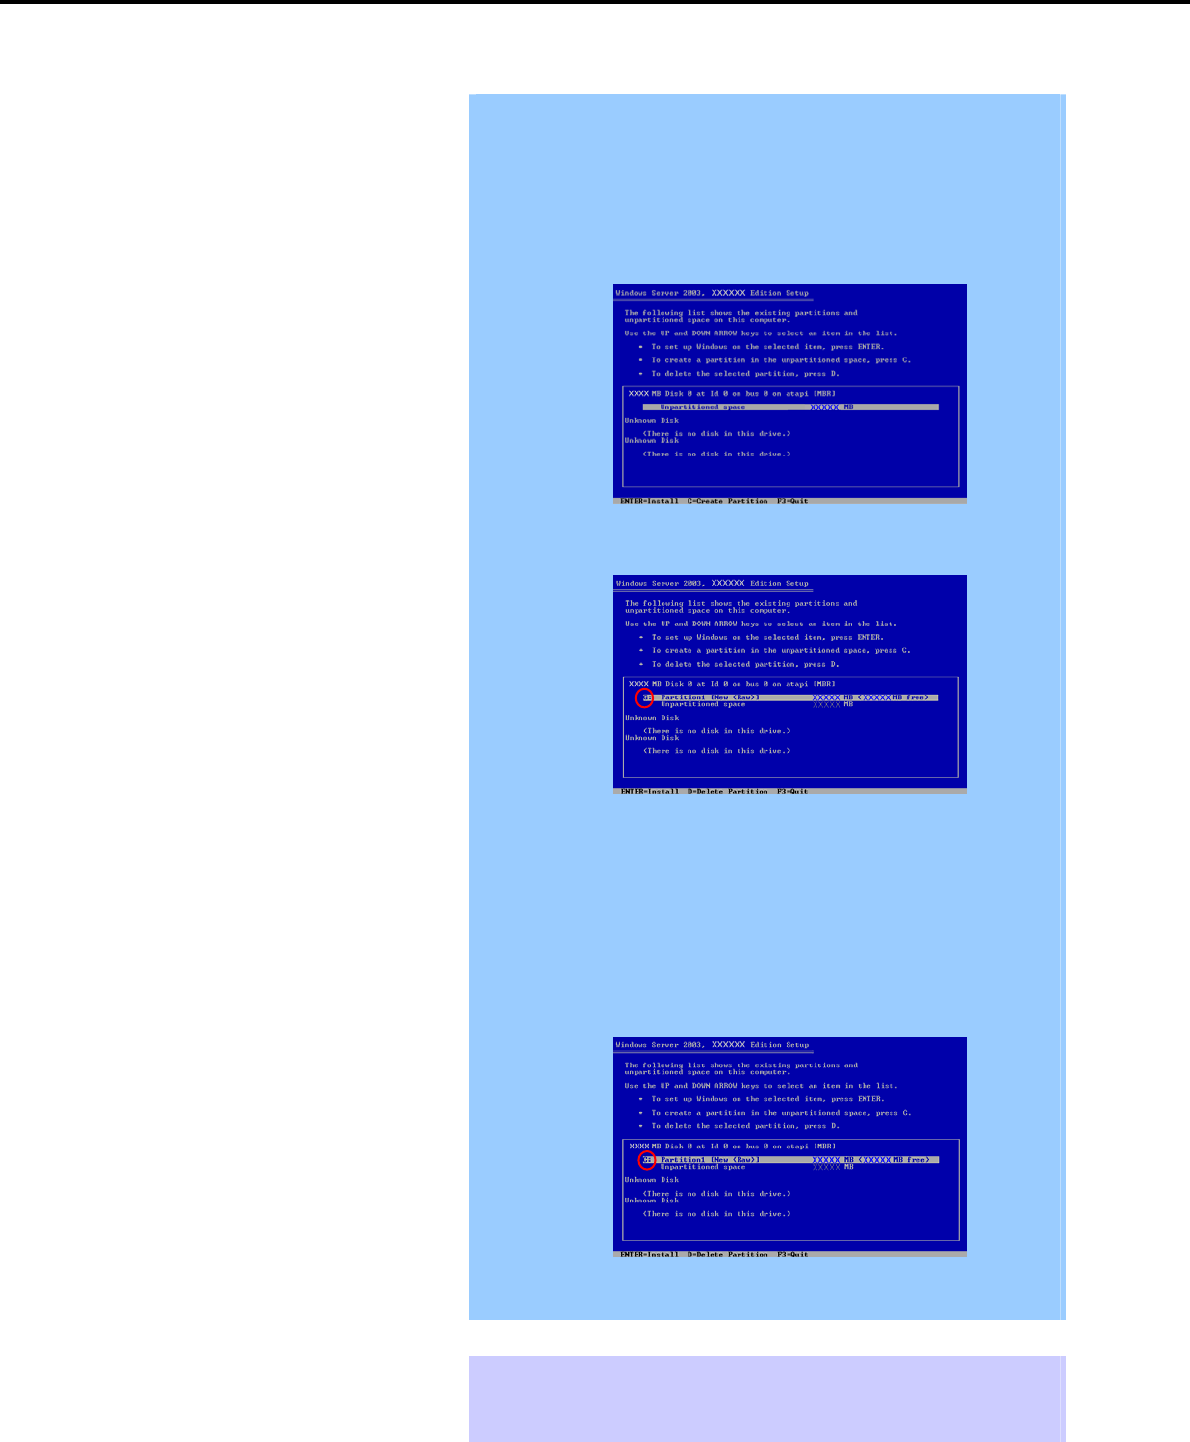
5. Setting Up Windows Server 2003 R2 x64 Edition
Chapter 1 Installing Windows
Important During setup, the dialog box to specify the size of the partition on which
Windows Server 2003 R2 x64 Edition is installed. Consider the partition
size if you create a new partition during installation.
1. The window to specify the partition size appears.
(* The windows below are examples. The actual display differs
depending on the system configuration.)
2. Create a partition on which Windows is installed.
When creating a new partition, the created partition is displayed as G:.
3. Delete the created partition G:, and create a new partition by using the
following procedure.
The operation might be different according to the installed language.
Delete it careFully according to the instructions on the screen.
(1) Select the created partition G:, and then press the <D> key.
(2) Read the displayed content, and then press the <L> key.
4. Create a partition on which Windows is installed again.
Partition creation is complete if the created partition is displayed as C:,
as shown below:
When installing Windows Server 2003 R2 Edition to a disk of over 2,097,152
MB (2 TB), the partition size can only be set to 2,097,152 MB or less.
Tips The system automatically restarts after copying files.
You do not have to remove the Flash FDD or CD-ROM.
Do not remove the CD-ROM if you do not remove the Flash FDD.
Express5800/GT-110d, GT-110d-S, R110d-1E, E110d-1 Installation Guide (Windows)
164
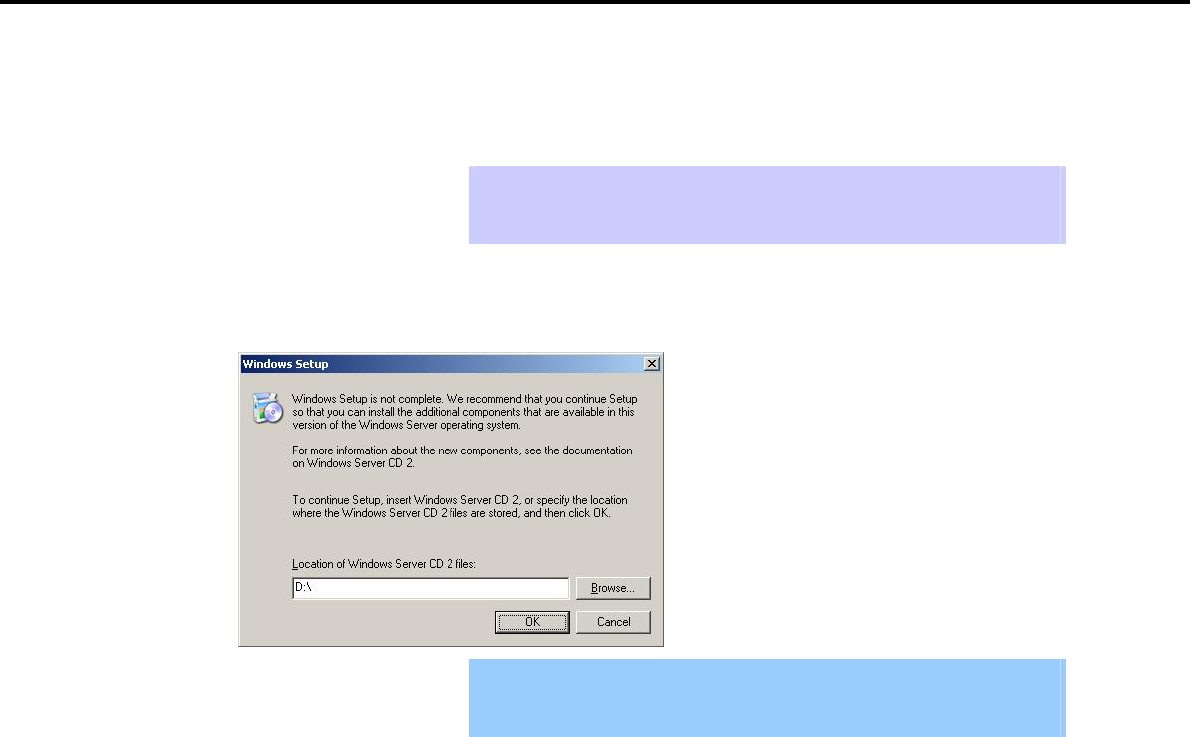
5. Setting Up Windows Server 2003 R2 x64 Edition
Chapter 1 Installing Windows
After this, follow the onscreen instructions to continue setup.
For details, refer to "First Step Guide" supplied with the OS.
Tips When a driver is selected from the drive list, a message indicating that the driver
has not passed logo testing might appear, but this does not affect the setup. Click
[OK] to continue setup.
15. The system automatically restarts after installing Windows Server 2003 R2 x64 Edition.
16. The Windows Setup window appears after login.
Important The Windows Setup window might not appear at this time. In this case, be
sure to install the Windows Server 2003 R2 x64 Edition DISC 2 according to
the following steps.
17. Insert the Windows Server 2003 R2 x64 Edition DISC 2 into the optical disk drive.
Check the settings, and then click [OK].
18. When the installation procedure completes, remove the Windows Server 2003 R2 x64 Edition DISC 2
from the optical disk drive and then restart the system.
19. Install the Starter Pack by referring to Chapter 1 (5.3 Installing the Starter Pack (Service Pack)).
20. Install drivers and specify detailed settings by referring to Chapter 1 (5.4 Setting Up Device Drivers).
21. Execute setup by following the instructions described in Chapter 1 (7. Setup for Solving Problems).
Setup with OS standard installer is now complete.
Express5800/GT-110d, GT-110d-S, R110d-1E, E110d-1 Installation Guide (Windows) 165

5. Setting Up Windows Server 2003 R2 x64 Edition
Chapter 1 Installing Windows
5.3 Installing the Starter Pack (Service Pack)
After installing Windows Server 2003 R2 x64 Edition, follow the steps below to install the Starter Pack and
Windows x64 hotfix: KB921411. The Starter Pack installs all drivers required by the Express5800 Series.
Important Also install the Starter Pack and Windows x64 hotfix: KB921411 in the
following cases:
The system configurations have changed (when internal option devices
have been added or removed)
If a dialog box prompting you to restart appears after changing system
configurations, click [No] and then update the system.
If the system was restored using a restore process
If a system has been restored using the backup tool
Be sure to install Service Pack 2 (CD-ROM) from the Starter Pack.
If you used a Windows Server 2003 CD-ROM including Service Pack 2 for
installation, you do not have to install Service Pack 2 again.
Note Before applying a Service Pack, make sure that Windows Server 2003 R2 is
displayed in the system properties window.
Tips If you used the Windows Server 2003 Editions CD-ROM including Service Pack 2
for installation, you do not have to install Windows x64 hotfix: KB921411 again.
Install the Starter Pack after applying Windows x64 hotfix: KB921411.
If Windows Server 2003 R2 x64 Edition is operated in the following environment, the system might halt while
returning from the hibernation state:
The system is in a multi-processor configuration
Service Pack 2 has not been installed
To set hibernation, apply Service Pack 2 or KB902839 hotfix*.
* KB902839 can be obtained from the following website:
http://support.microsoft.com/kb/902839/en-us
Express5800/GT-110d, GT-110d-S, R110d-1E, E110d-1 Installation Guide (Windows)
166
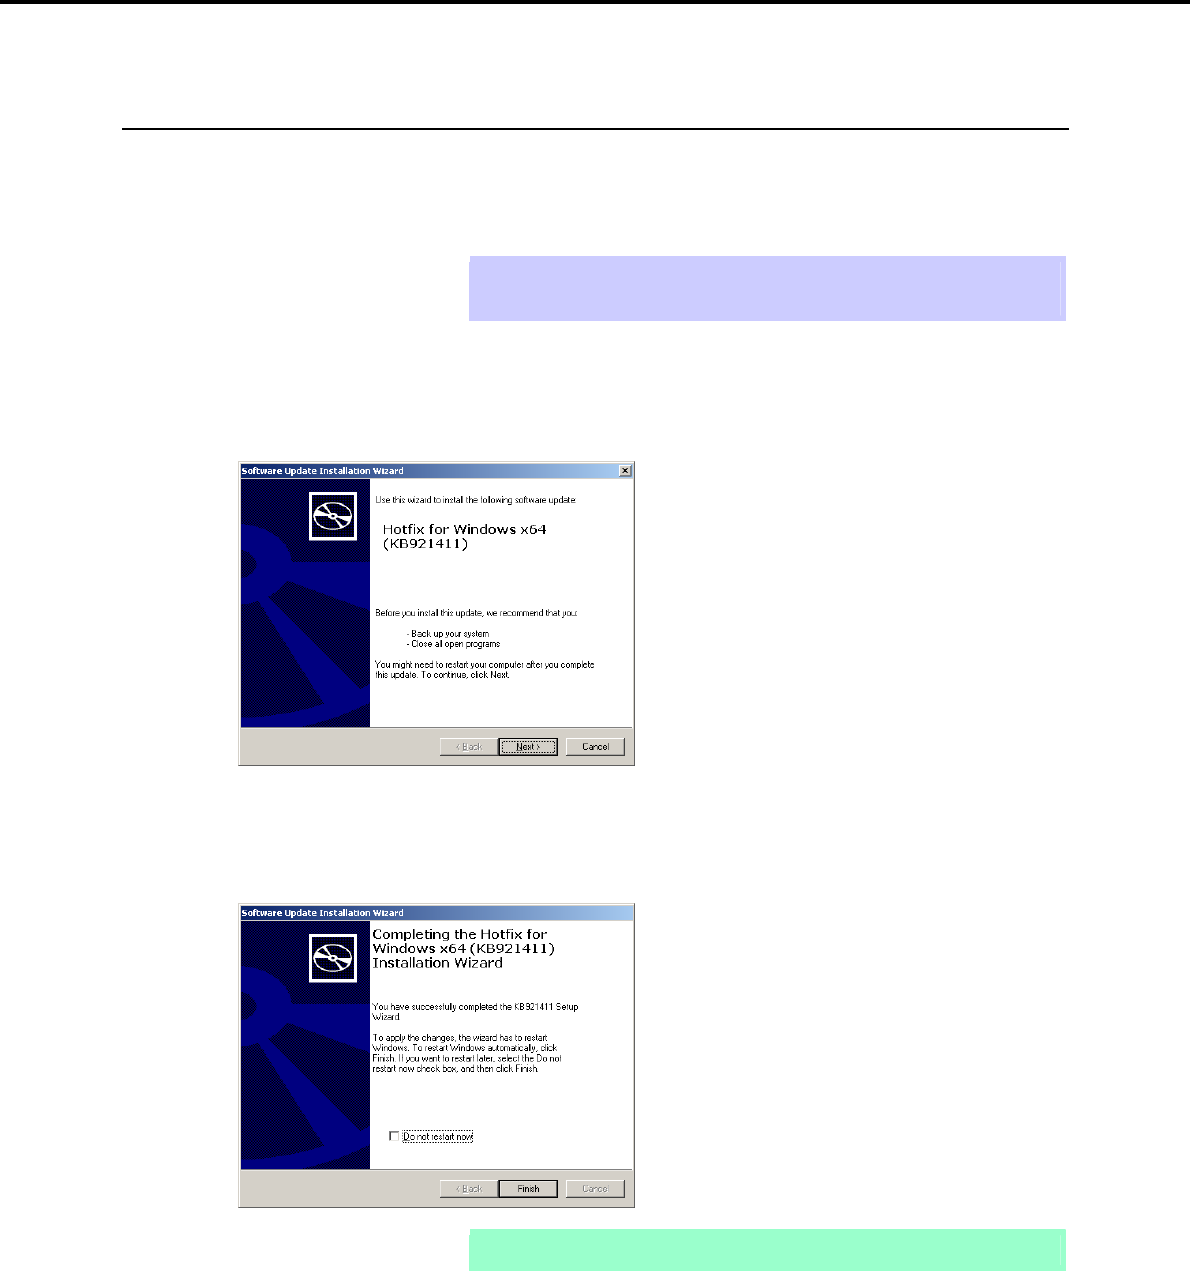
5. Setting Up Windows Server 2003 R2 x64 Edition
Chapter 1 Installing Windows
5.3.1 Procedures for applying the Starter Pack and Windows x64 hotfix (KB)
921411
(1) When using the EXPRESSBUILDER DVD
1. Log on to the system with a user account that has administrative privileges (such as an administrator).
2. Insert the EXPRESSBUILDER DVD into the optical disk drive.
Tips If you are installing with the Windows Server 2003 CD-ROM, which contains
Service Pack 2, proceed to step 8.
3. Select Run from the Start menu, and then execute the following command:
Optical disk drive letter:\020\win\winnt\w2k3amd\qfe\enu\kb921411.exe
4. When the following message appears, click [Next].
After this, continue installation according to the onscreen messages.
5. When the following message appears, you must click [Finish] to restart the system.
Note If the EXPRESSBUILDER DVD is inserted, remove it immediately.
6. Log on to the system with a user account that has administrative privileges (such as an administrator).
7. Insert the EXPRESSBUILDER DVD into the optical disk drive.
Express5800/GT-110d, GT-110d-S, R110d-1E, E110d-1 Installation Guide (Windows) 167

5. Setting Up Windows Server 2003 R2 x64 Edition
Chapter 1 Installing Windows
8. When the following window appears, click Set up Windows to open the short-cut menu, and then select
Install Starter Pack.
Tips The short-cut menu also appears by right-clicking on the menu window.
9. Read the setup message when it appears, and then click [OK].
Tips Wait until the message appears without attempting any further operation. This
may take several minutes.
Starter Pack installation starts.
Important The dialog box shown below might appear while installing the Starter Pack,
but this does not affect the installation. This dialog box disappears after
several seconds. Do not click [Cancel].
Express5800/GT-110d, GT-110d-S, R110d-1E, E110d-1 Installation Guide (Windows)
168
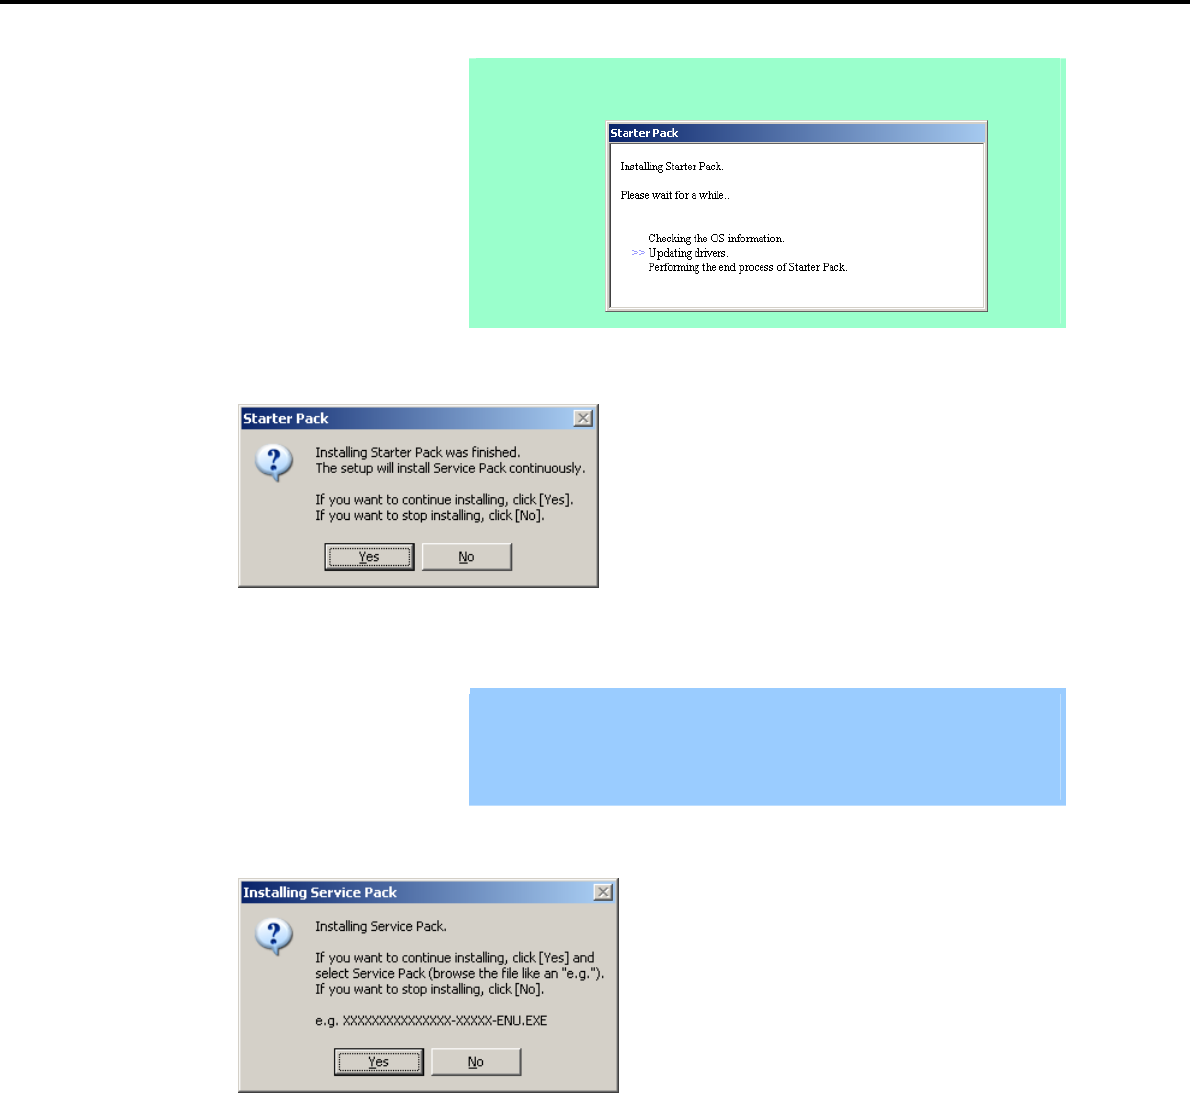
5. Setting Up Windows Server 2003 R2 x64 Edition
Chapter 1 Installing Windows
Note The following progress message will appear while the Starter Pack is being
installed. Wait a moment until the update is complete.
10. When the following message appears, Starter Pack installation is complete.
To apply the Service Pack, click [Yes] and go to step 6.
To not apply the Service Pack, click [No] and go to step 8.
Important If you are using OS installation media that does not contain Service Pack 2,
click [Yes]. You must apply Service Pack 2.
If the Starter Pack is being reinstalled in an environment where Service Pack
2 has already been installed, you do not need to reinstall Service Pack 2.
11. When the following message appears, click [Yes].
Express5800/GT-110d, GT-110d-S, R110d-1E, E110d-1 Installation Guide (Windows) 169
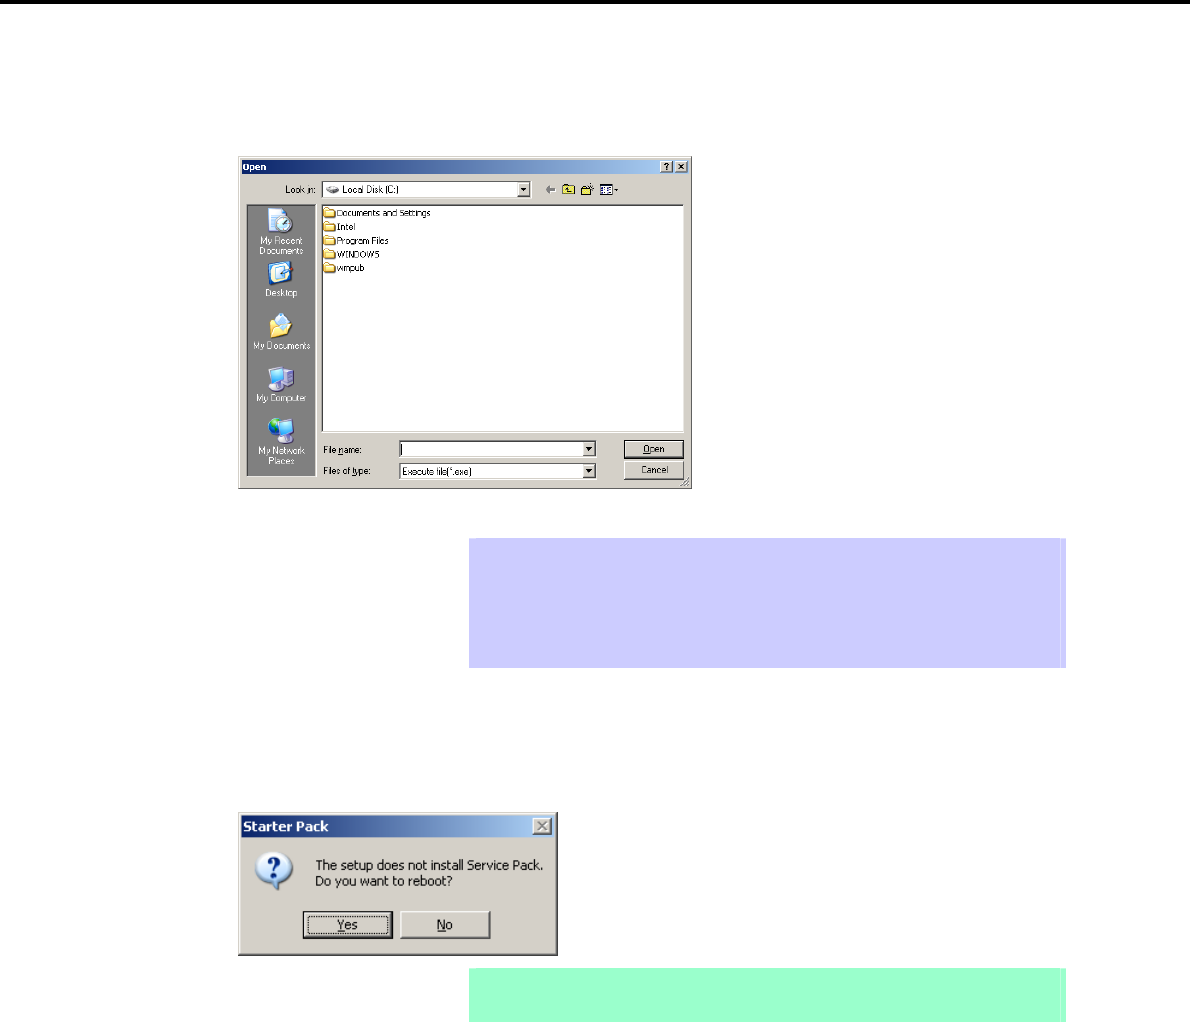
5. Setting Up Windows Server 2003 R2 x64 Edition
Chapter 1 Installing Windows
12. When the following dialog box appears, specify the Service Pack to apply and then click [Open].
Tips If you use a Service Pack CD-ROM, when the dialog box above appears, remove
the EXPRESSBUILDER DVD from the optical disk drive and then insert the
Service Pack CD-ROM.
The extension of the Service Pack applicable to the Starter Pack is *.exe or
*.msu. No other Service Pack files can be installed.
Installation of the specified Service Pack starts. When the Service Pack installation completion window
appears, restart the system.
13. When the following message prompts you to restart the computer, click [Yes].
Note If the EXPRESSBUILDER DVD or Service Pack CD-ROM is in the optical disk
drive, remove it immediately.
Installation of Starter Pack is now complete.
Express5800/GT-110d, GT-110d-S, R110d-1E, E110d-1 Installation Guide (Windows)
170
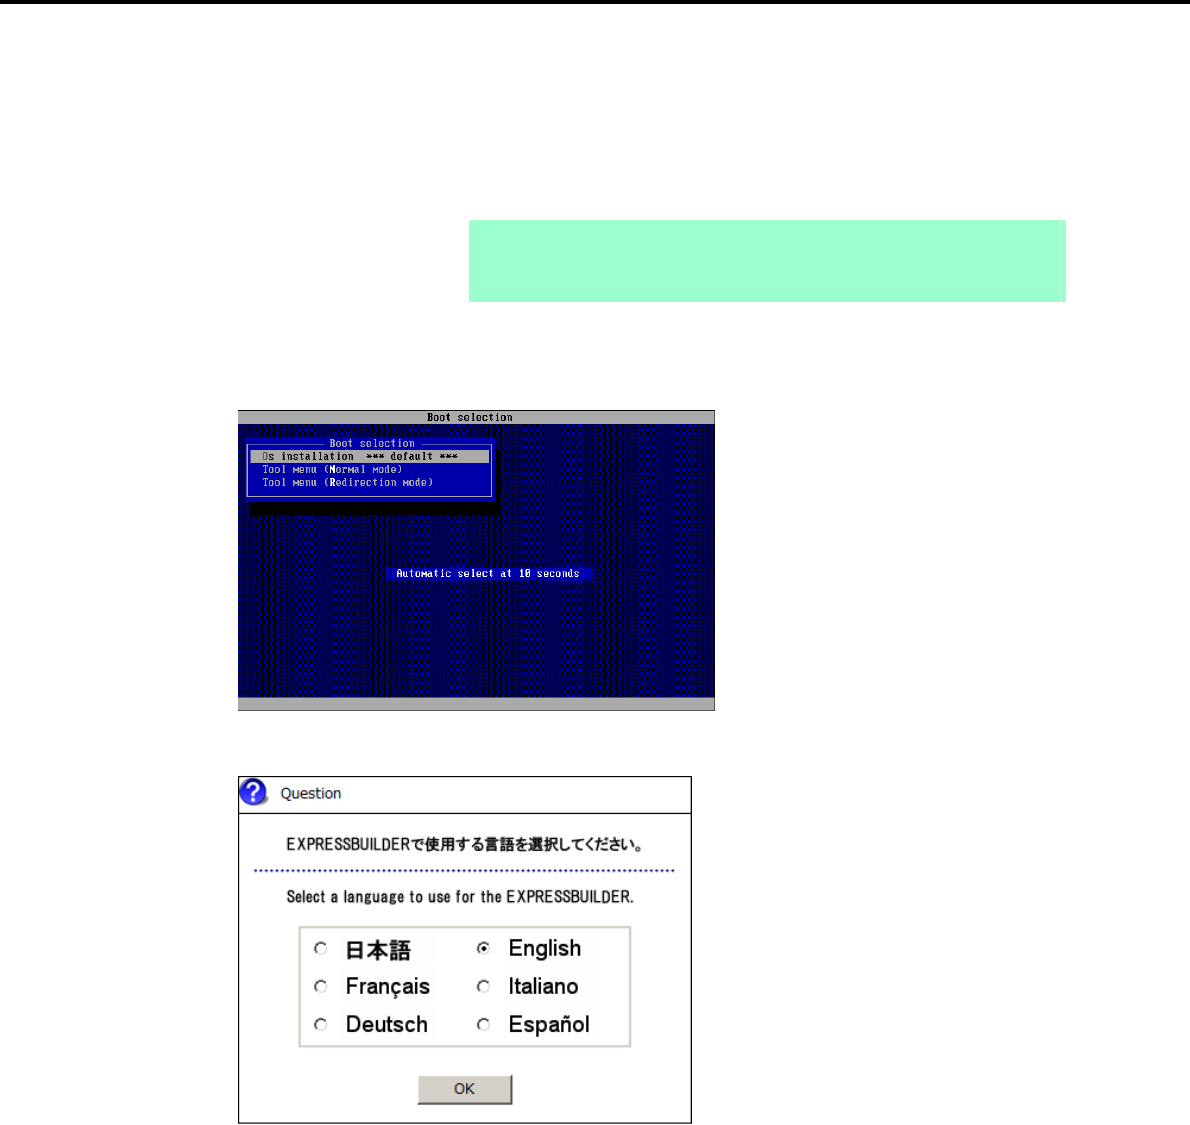
5. Setting Up Windows Server 2003 R2 x64 Edition
Chapter 1 Installing Windows
(2) When using Internal Flash Memory
1. After installing the operating system, the system will restart.
2. Use the Internal Flash Memory to run EXPRESSBUILDER.
When "Press <F2> Setup, <F3> Internal Flash Memory, <F4> ROM Utility, <F12> Network" appears
below the POST window, press the <F3> key.
Note At this time, be sure to remove the DVD from the optical disk drive.
If running from the OS, restart, and then press the <F3> key on the POST
window.
3. When the following message appears, select Os installation *** default ***.
You will automatically advance to the next window, with no need for further input.
4. Select English on the language selection window, and then click [OK].
Express5800/GT-110d, GT-110d-S, R110d-1E, E110d-1 Installation Guide (Windows) 171
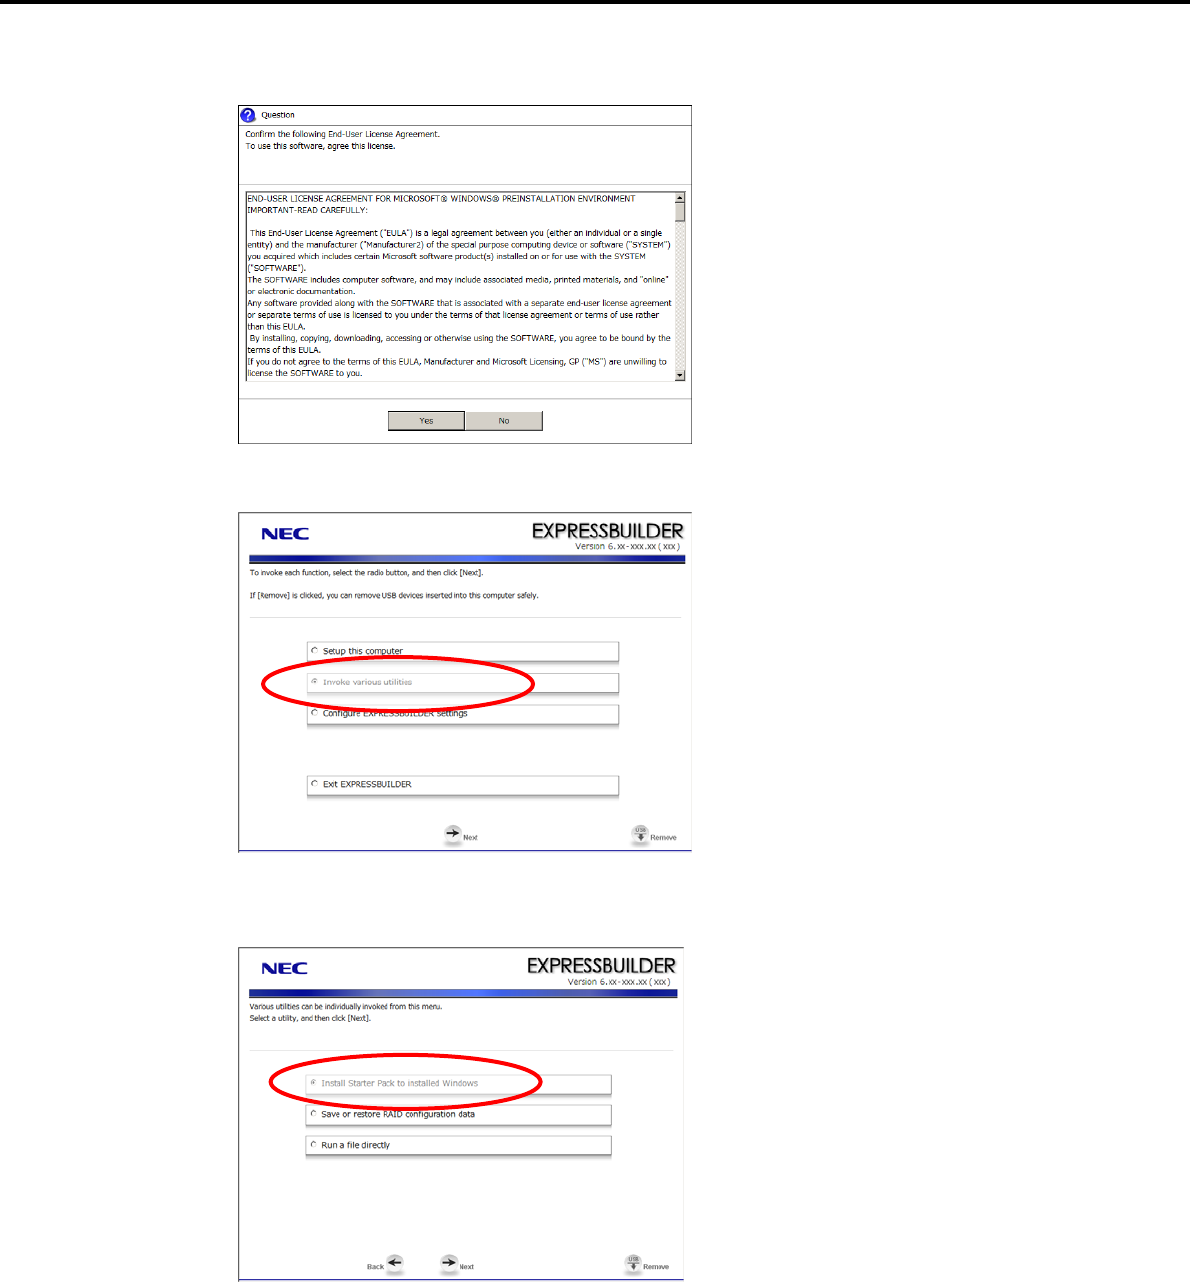
5. Setting Up Windows Server 2003 R2 x64 Edition
Chapter 1 Installing Windows
5. When the Windows PE software license agreement window appears, click [Yes].
6. Select Invoke various utilities from the top menu, and then click [Next].
7. When the utility start menu appears, select Install Starter Pack to installed Windows and then click
[Next].
Express5800/GT-110d, GT-110d-S, R110d-1E, E110d-1 Installation Guide (Windows)
172

5. Setting Up Windows Server 2003 R2 x64 Edition
Chapter 1 Installing Windows
8. When the window for selecting Windows to install the Starter Pack appears, select the installed Windows
from the drop-down list, and then click [Perform].
9. When the following confirmation window appears, read the content and then click [Yes].
Note The following window will appear if the Starter Pack is already installed.
Read the message, and then click [Yes].
Express5800/GT-110d, GT-110d-S, R110d-1E, E110d-1 Installation Guide (Windows) 173
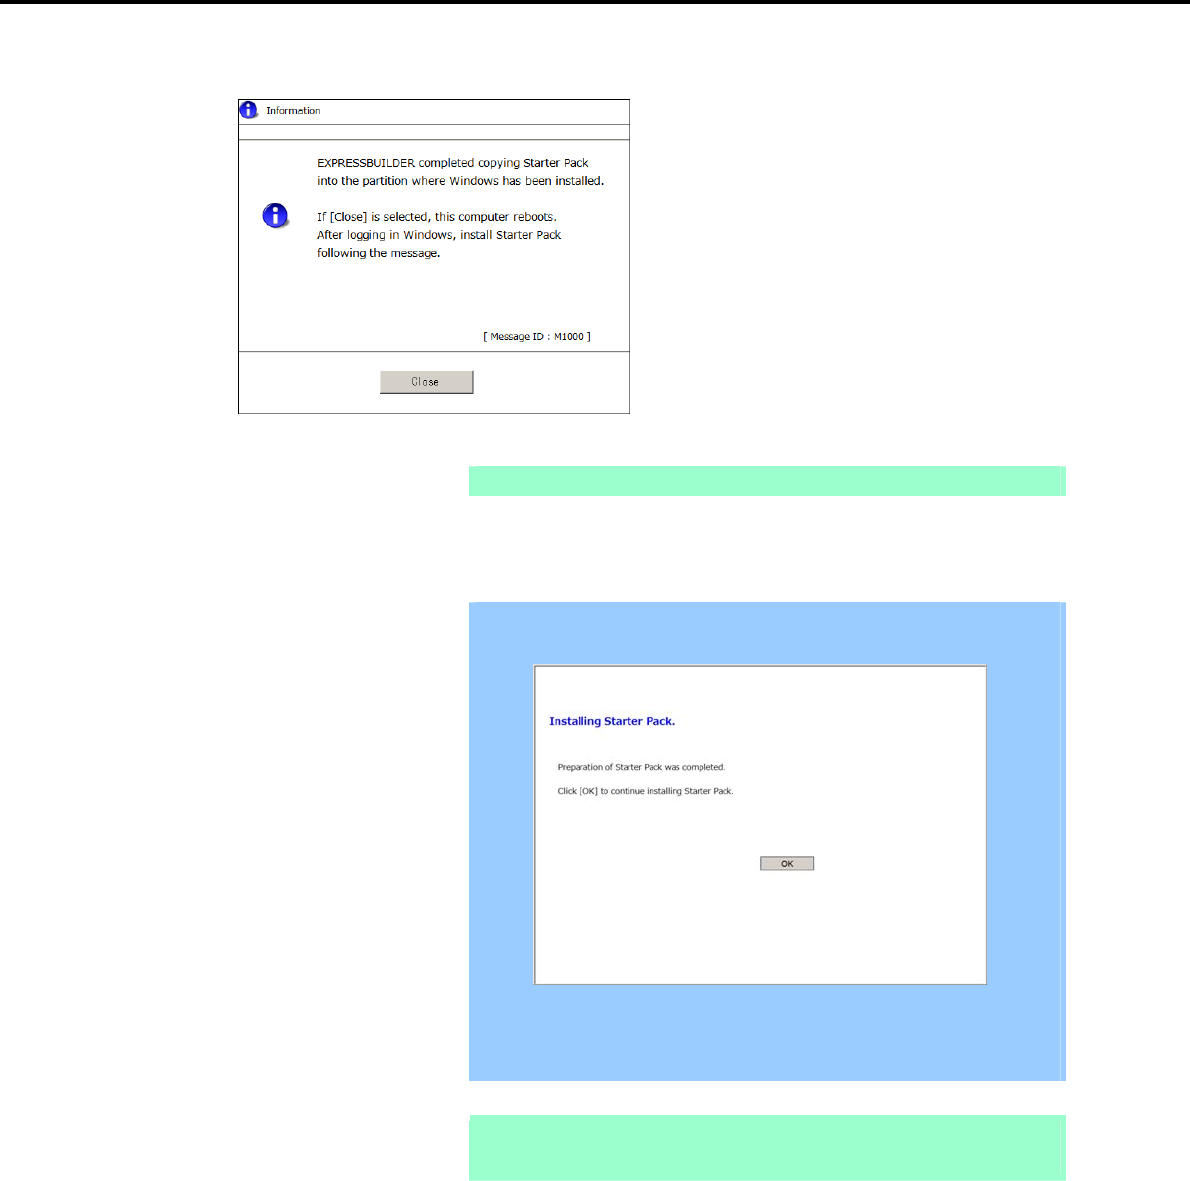
5. Setting Up Windows Server 2003 R2 x64 Edition
Chapter 1 Installing Windows
10. After copying the module, the following window appears. Click [Close].
The server then restarts.
Note You do not need to press the <F3> key at this time.
11. Log on to the system with a user account that has administrative privileges (such as an administrator).
Important The screen as shown below appears when Windows starts. Do not click [OK]
on this screen. Proceed to Step 12.
If you click [OK], "KB921411" will not be applied.
Go to Step 16, and click [Cancel] on the screen to install Starter Pack. Then,
perform from Step 1 of (2) When using Internal Flash Memory.
Note If you are installing with the Windows Server 2003 CD-ROM, which contains
Service Pack 2, go to step 15.
12. Select Run from the Start menu, and then execute the following command:
System drive letter:\StartPKG\w2k3amd\qfe\enu\kb921411.exe
Express5800/GT-110d, GT-110d-S, R110d-1E, E110d-1 Installation Guide (Windows)
174
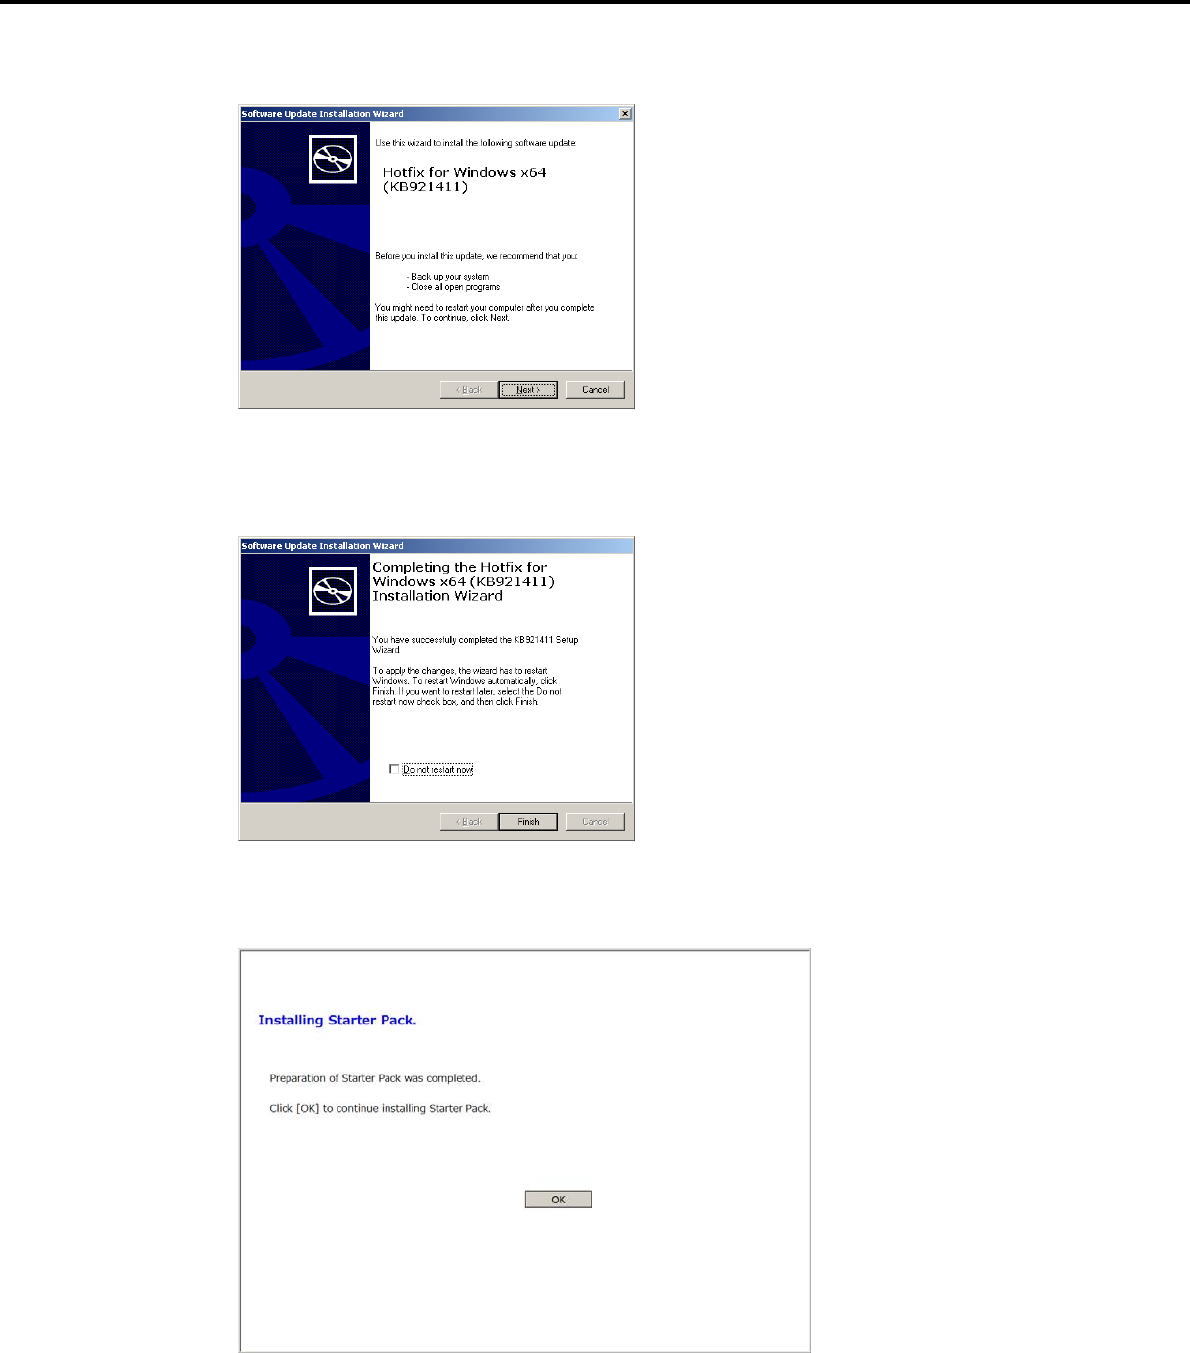
5. Setting Up Windows Server 2003 R2 x64 Edition
Chapter 1 Installing Windows
13. When the following message appears, click [Next].
After this, continue installation according to the onscreen messages.
14. When the following message appears, you must click [Finish] to restart the system.
15. After Windows starts, the following window appears. Click [OK].
Express5800/GT-110d, GT-110d-S, R110d-1E, E110d-1 Installation Guide (Windows) 175
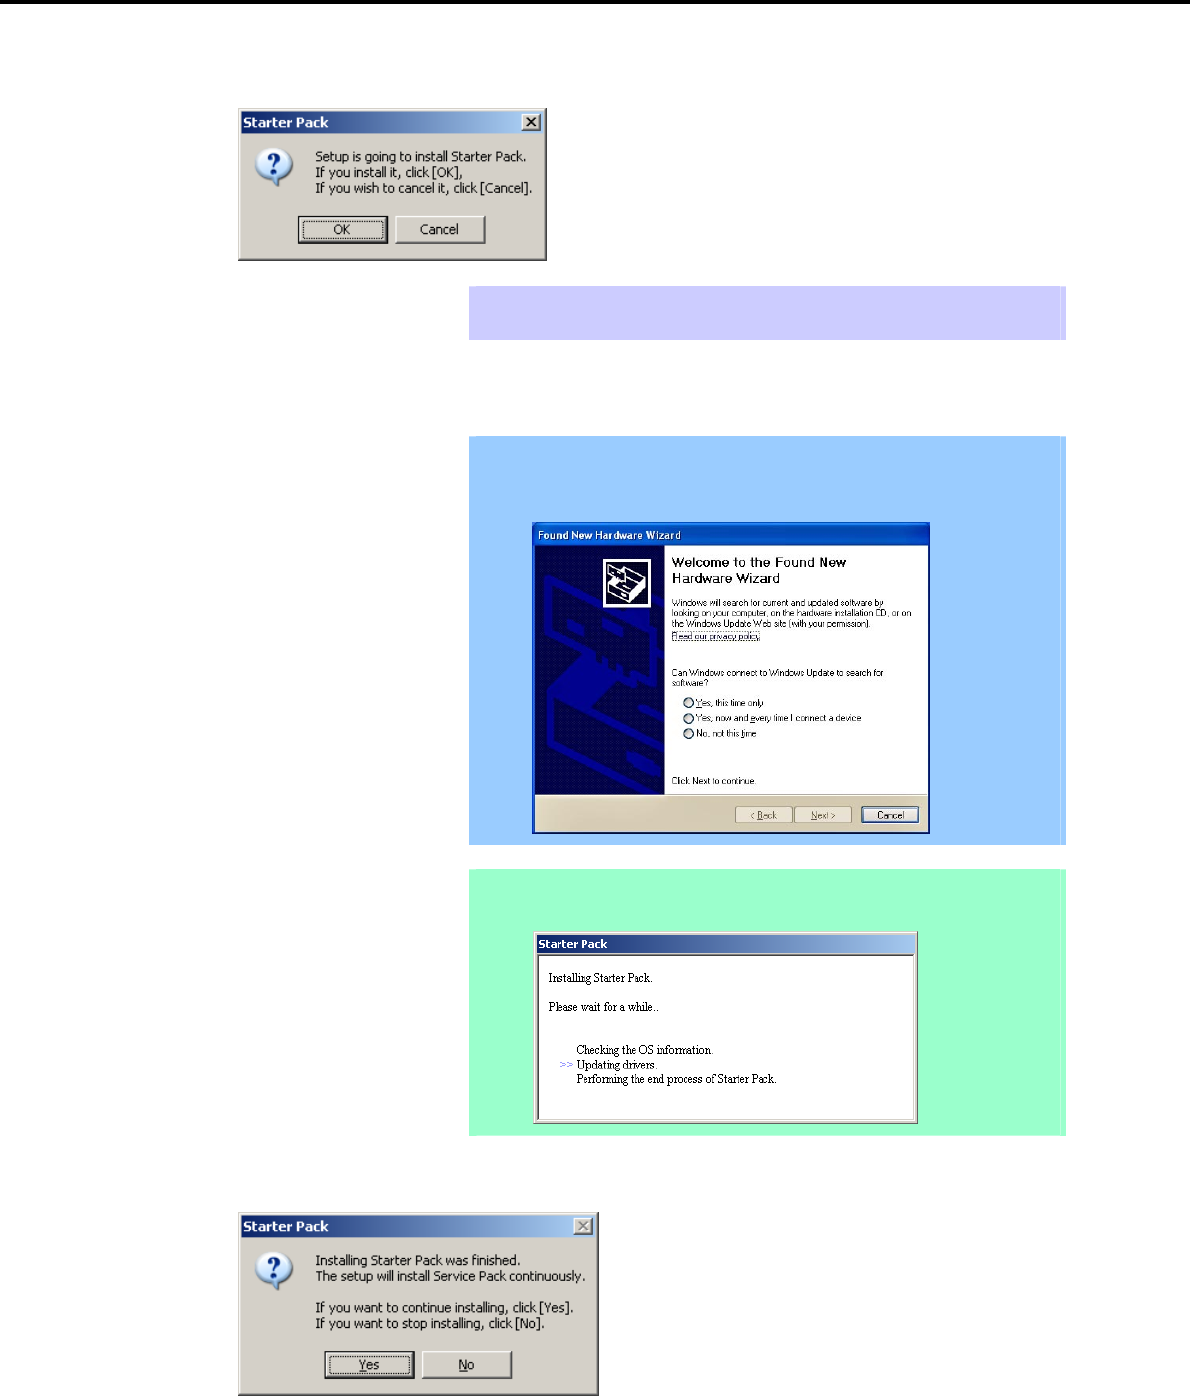
5. Setting Up Windows Server 2003 R2 x64 Edition
Chapter 1 Installing Windows
16. Read the message that appears, and then click [OK].
Tips Although it may take several minutes for the above window to appear, wait for the
window to appear without attempting any further operation.
Installation of the Starter Pack starts.
Important The dialog box shown below might appear while installing the Starter Pack,
but this does not affect the installation. This dialog box disappears after
several seconds. Do not click [Cancel].
Note The following progress message appears while the Starter Pack is being installed.
Wait a moment until the update is complete.
When the following message appears, Starter Pack installation is complete.
To apply the Service Pack, click [Yes] and go to step 17.
To not apply the Service Pack, click [No] and go to step 19.
Express5800/GT-110d, GT-110d-S, R110d-1E, E110d-1 Installation Guide (Windows)
176
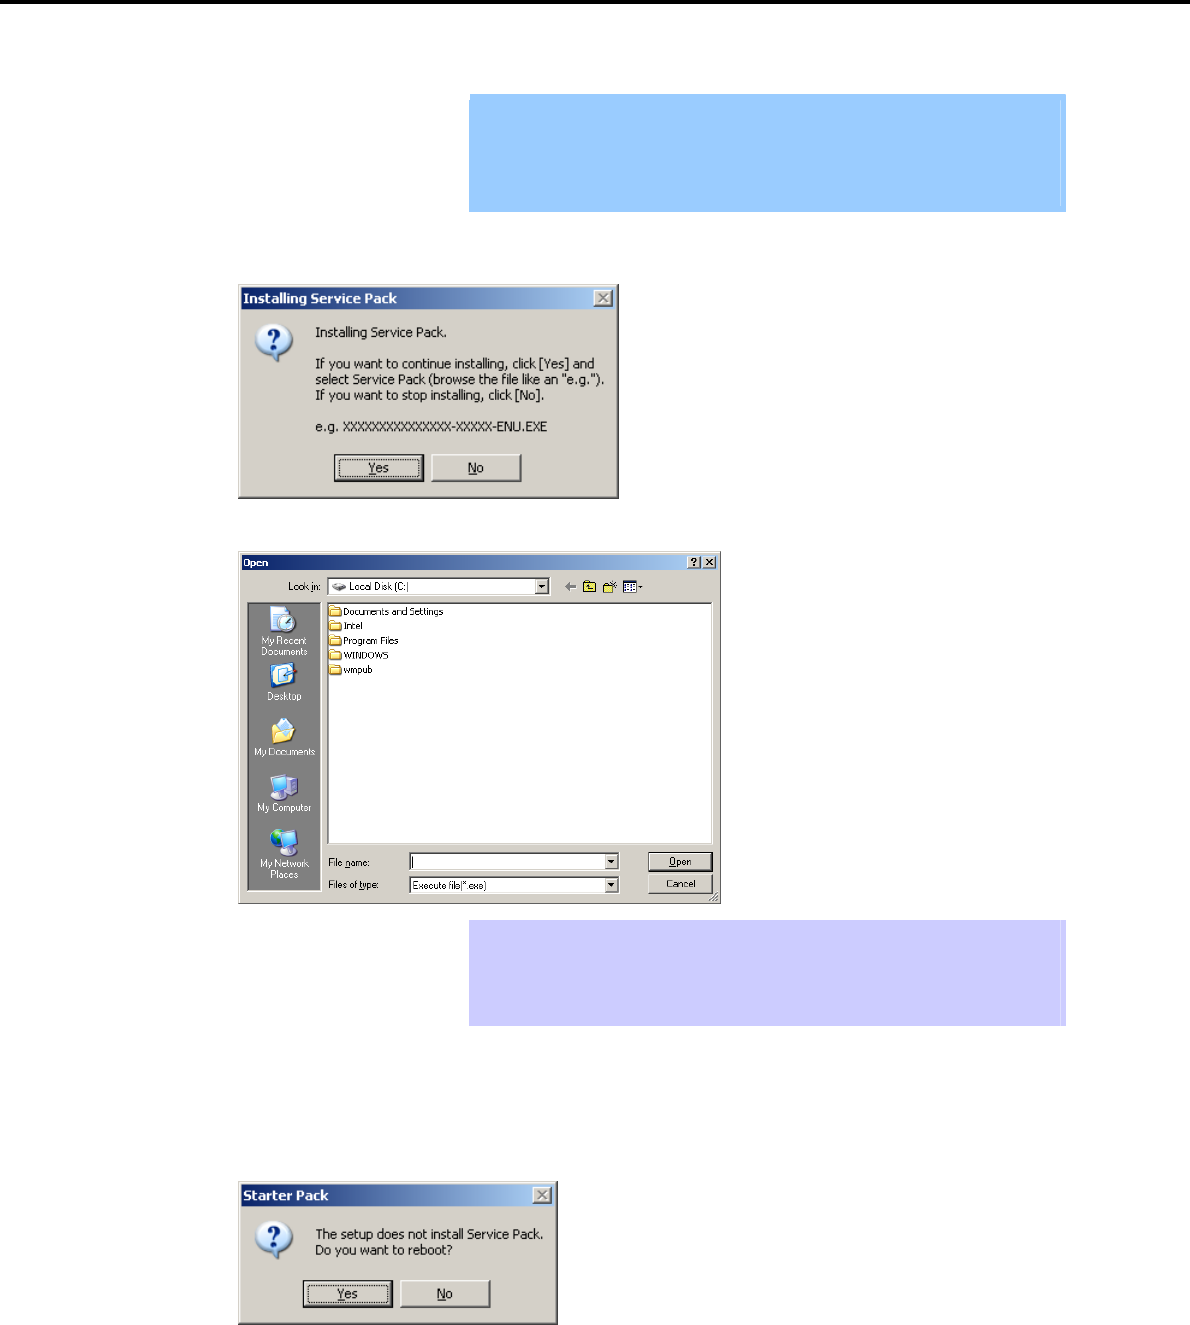
5. Setting Up Windows Server 2003 R2 x64 Edition
Chapter 1 Installing Windows
Important If you are using OS installation media that does not contain Service Pack 2,
click [Yes]. You must apply Service Pack 2.
If the Starter Pack is being reinstalled in an environment where Service Pack
2 has already been installed, you do not need to reinstall Service Pack 2.
17. When the following message appears, click [Yes].
18. When the following dialog box appears, specify the Service Pack to install and then click [Open].
Tips When the window above appears, insert the Service Pack CD-ROM into the
optical disk drive.
The extension of the Service Pack applicable to the Starter Pack is *.exe or
*.msu. No other Service Pack files can be installed.
Installation of the specified Service Pack starts. When the Service Pack installation completion window
appears, restart the system.
19. When the following message prompts you to restart the system, click [Yes].
Installation of the Starter Pack is now complete.
Express5800/GT-110d, GT-110d-S, R110d-1E, E110d-1 Installation Guide (Windows) 177

5. Setting Up Windows Server 2003 R2 x64 Edition
Chapter 1 Installing Windows
5.3.2 Recovery process
If Windows x64 hotfix: KB921411 is not applied before installing the Starter Pack, “!” might be displayed on
the USB root hub in the Device Manager window.
In this case, apply Windows x64 hotfix: KB921411 and install the Starter Pack according to the procedure
below.
1. Start Windows Explorer, and then select Folder Options from the Tool menu.
2. In the Advanced settings area on the View tab, select the Show hidden files and folders option
button for Hidden files and folders under Files and Folders.
3. Clear the following check boxes under Files and Folders, and then click [OK].
Hide extensions for known file types
Hide protected operating system files (recommended)
When the message “You have chosen to display protected operating system files…” appears, click
[Yes].
4. Check the files.
Open the drivers folder under System drive:\WINDOWS\system32, and make sure that
usbhub.sys and usbport.sys are stored in the folder.
If a file is missing, copy the target file(s) according to the procedure below.
(1) Open the dllcache folder under System drive:\WINDOWS\system32.
(2) Copy the usbhub.sys and/or usbport.sys to the drivers folder under System
drive:\WINDOWS\system32.
5. Restart the system.
6. Refer to Chapter 1 (5.3.1 Procedures for applying the Starter Pack and Windows x64 hotfix (KB) 921411)
to install the Starter Pack.
7. Restart the system.
The recovery process is now complete.
Note If the system files and hidden files still do not display, select the check boxes that
were cleared in step 3.
Express5800/GT-110d, GT-110d-S, R110d-1E, E110d-1 Installation Guide (Windows)
178

5. Setting Up Windows Server 2003 R2 x64 Edition
Chapter 1 Installing Windows
5.4 Setting Up Device Drivers
For details regarding the installation and setup of an optional device driver, refer to the manual supplied with
the optional device.
5.4.1 Installing the LAN and BACS (teaming) drivers
(1) LAN and BACS drivers
If the OS standard installer is used for setup, install the Starter Pack to install the LAN and BACS driver.
Important To use the BACS, Microsoft .NET Framework Version 2.0 must be installed.
To install Microsoft .NET Framework 2.0, insert the EXPRESSBUILDER DVD
to the optical disk drive, select Setup Windows and then Install the .NET
Framework Ver2.0 Redistributable Package(x64) from the autorun menu.
Note To change the LAN or BACS driver settings, log on to the system from a local
console using an administrator's account. Remotely changing the settings by
using the operating system’s remote desktop feature is not supported.
Be sure to select the Internet Protocol (TCP/IP) check box when specifying an
IP address.
(2) Optional LAN board
This server supports the following optional LAN boards.
Optional LAN boards: N8104-134
If !Ethernet Controller is displayed under Other devices in the Device Manager window after an optional LAN
board is added, you must install the driver using the following procedure:
1. Insert the EXPRESSBUILDER DVD into the optical disk drive.
If an autorun menu appears, close the menu window.
Tips You do not have to insert the EXPRESSBUILDER DVD if the Starter Pack was
installed from the Internal Flash Memory.
2. Open the Device Manager window, and then double-click the !Ethernet Controller icon under Other
devices.
The Ethernet Controller Properties dialog box appears.
3. Click [Update Driver…] on the Driver tab.
The Hardware Update Wizard window appears.
4. Select the No, not this time option button, and then click [Next].
5. Select the Install from a list or specific location (Advanced) option button, and then click [Next].
Express5800/GT-110d, GT-110d-S, R110d-1E, E110d-1 Installation Guide (Windows) 179

5. Setting Up Windows Server 2003 R2 x64 Edition
Chapter 1 Installing Windows
6. Select the Search for the best driver in these locations option button, select the Include this location
in the search check box, and then enter the following path. Then, click [Next].
When using the EXPRESSBUILDER DVD
When applying the driver to !Ethernet Controller under Other devices in the Device Manager window:
Optical disk drive letter:\020\win\winnt\w2k3amd\lan\bcom\drvinst\06020401\w2k3_w2k8_64\b06bdrv
When applying the driver to NDIS Client For Broadcom NetXtreme II GigE under Other devices in the
Device Manager window:
Optical disk drive letter:\020\win\winnt\w2k3amd\lan\bcom\drvinst\06020401\w2k3_w2k8_64\l4nd_w2k3
If the Starter Pack was installed from the Internal Flash Memory
When applying the driver to !Ethernet Controller under Other devices in the Device Manager window:
System drive letter:\StartPKG\w2k3amd\lan\bcom\drvinst\06020401\w2k3_w2k8_64\b06bdrv
When applying the driver to NDIS Client For Broadcom NetXtreme II GigE under Other devices in the
Device Manager window:
System drive letter:\StartPKG\w2k3amd\lan\bcom\drvinst\06020401\w2k3_w2k8_64\l4nd_w2k3
Note Be sure to clear the Search removable media (floppy, CD-ROM…) check box.
7. Click [Finish].
8. NDIS Client For Broadcom NetXtreme II GigE is displayed under Other devices in the Device
Manager window. Double-click this icon to open the NDIS Client For Broadcom NetXtreme II GigE
Properties dialog box.
9. Perform steps 3 to 7 again.
10. After applying the LAN driver to all N8104-134 network adapters, eject the EXPRESSBUILDER DVD
from the optical disk drive, and then restart the system.
Driver installation is now complete.
Important After an additional N8104-134 is connected, !Ethernet Controller might not
be displayed under Other devices in the Device Manager window. In that
case, the LAN driver has been automatically installed. Confirm that the
N8104-134 network adapter is displayed under Network adapters in the
Device Manager window.
After the N8104-134 LAN driver has been installed, the following devices
might be displayed with "!" under SCSI and RAID Controllers in the Device
Manager window. They can be deleted from the list by performing the
procedure shown in Chapter 1 (5.4.2 Setting up LAN drivers) – (2) Setting
the TCP/iSCSI Offload Engine (if using N8104-134).
! Broadcom BCM5709C NetXtreme II GigE iSCSI Adapter
! iSCSI Client For Broadcom NetXtreme II GigE
Express5800/GT-110d, GT-110d-S, R110d-1E, E110d-1 Installation Guide (Windows)
180

5. Setting Up Windows Server 2003 R2 x64 Edition
Chapter 1 Installing Windows
(3) Network adapter name
After installing the LAN drivers, the following network adapter names will be displayed by the Device Manager or
BACS.
Network adapters for the standard configuration
Broadcom NetXtreme Gigabit Ethernet #xx*
If connecting with an optional LAN board:
[N8104-134] Broadcom BCM5709C NetXtreme II GigE (NDIS VBD Client) #xx*
* If there are adapters with the same name, a different identification number will be assigned to xx.
Important The ID for N8104-134 might be a number of two or more digits. This is due to
the LAN driver specifications and not an error. This number cannot be
changed.
Express5800/GT-110d, GT-110d-S, R110d-1E, E110d-1 Installation Guide (Windows) 181

5. Setting Up Windows Server 2003 R2 x64 Edition
Chapter 1 Installing Windows
5.4.2 Setting up LAN drivers
Important About WOL
- WOL is supported by the standard network adapters only.
- The Change of WOL setting is not supported.
- WOL from a shutdown is only supported if the system is started using
MagicPacket.
- WOL from hibernation is not supported.
Tips MagicPacket refers to a packet dedicated to WOL.
(1) Setting link speed
The transfer rate and duplex mode of the network adapter must be the same as those of the switching hub.
Follow the procedure below to specify the transfer rate and duplex mode.
1. Open the Device Manager.
2. Expand Network Adapters, and then double-click the name of the network adapter you want to set.
The properties of the network adapter will be displayed.
3. Select the Advanced tab, and then set the Speed & Duplex values to the same as those of the
switching hub.
4. Click [OK] in the Network Adapter Properties dialog box.
5. Restart the system.
The link speed setting is now complete. Proceed to set up WOL.
(2) Setting the TCP/iSCSI Offload Engine (if using N8104-134)
If using N8104-134 with the server, TCP/iSCSI Offload Engine must be set to off.
Follow the procedure below to set it.
1. Double-click the Broadcom Control Suite3 icon on the Control Panel window.
Broadcom Advanced Control Suite3 starts.
2. Select Device Management under Explorer View, and then N8104-134 network adapter from System
device (VBD).
3. Select the Configurations tab, and then expand Resource Reservations.
4. Clear the iSCSI Offload Engine and TCP Offload Engine check boxes (if selected) under
Pre-Allocated Resource, and then click [Apply].
Tips If TCP Offload Engine does not exist, proceed to the next step.
5. Complete steps 2 to 4 for each N8104-134 network adapter.
6. Restart the system.
TCP/iSCSI Offload Engine setup is now complete.
Express5800/GT-110d, GT-110d-S, R110d-1E, E110d-1 Installation Guide (Windows)
182

5. Setting Up Windows Server 2003 R2 x64 Edition
Chapter 1 Installing Windows
5.4.3 Setting up team/LiveLink
Important You must set up LiveLink when setting up a team. Teams that are not
configured for LiveLink are not supported.
When deleting the team, refer to Chapter 1 (5.4.3 Setting up team/LiveLink)
- (4) Procedure for deleting team. When replacing the motherboard or a
LAN board, follow these steps to remove the team and create it again after
replacement.
Be sure to specify the same Jumbo Mtu (Jumbo Packet) setting to all the
adapters that compose a team
(1) Team types
The following team types are supported.
Smart Load Balancing and Failover (without Standby Member)
All adapters that compose the team perform communication.
If a communication failure occurs on an adapter, other adapters that compose the team continue the
communication.
When the adapter on which the communication failure occurred recovers, it joins the team again and
resumes the communication.
Smart Load Balancing (Auto-Failback Disable) (with Standby Member)
Among the adapters that compose the team, primary adapters except the standby member perform
communication.
If a communication failure occurs, the standby member continues the communication.
When the adapter on which the communication failure occurred recovers, it joints the team again and
the standby adapter returns to the standby state.
(2) LiveLink
LiveLink is a function that detects communication route failures of adapters.
It periodically investigates the communication status of specified destinations (IP address).
Link packets are sent from each adapter within a team.
If a response to the transmission of a link packet within the specified range is not detected, it is identified as a
communication route failure and adapter communication is stopped.
When a response to the submission of a link packet is detected, communication LiveLink identifies
communication as having been recovered, and communication using that adapter automatically resumes.
Important You must set up LiveLink when you create a team.
Express5800/GT-110d, GT-110d-S, R110d-1E, E110d-1 Installation Guide (Windows) 183
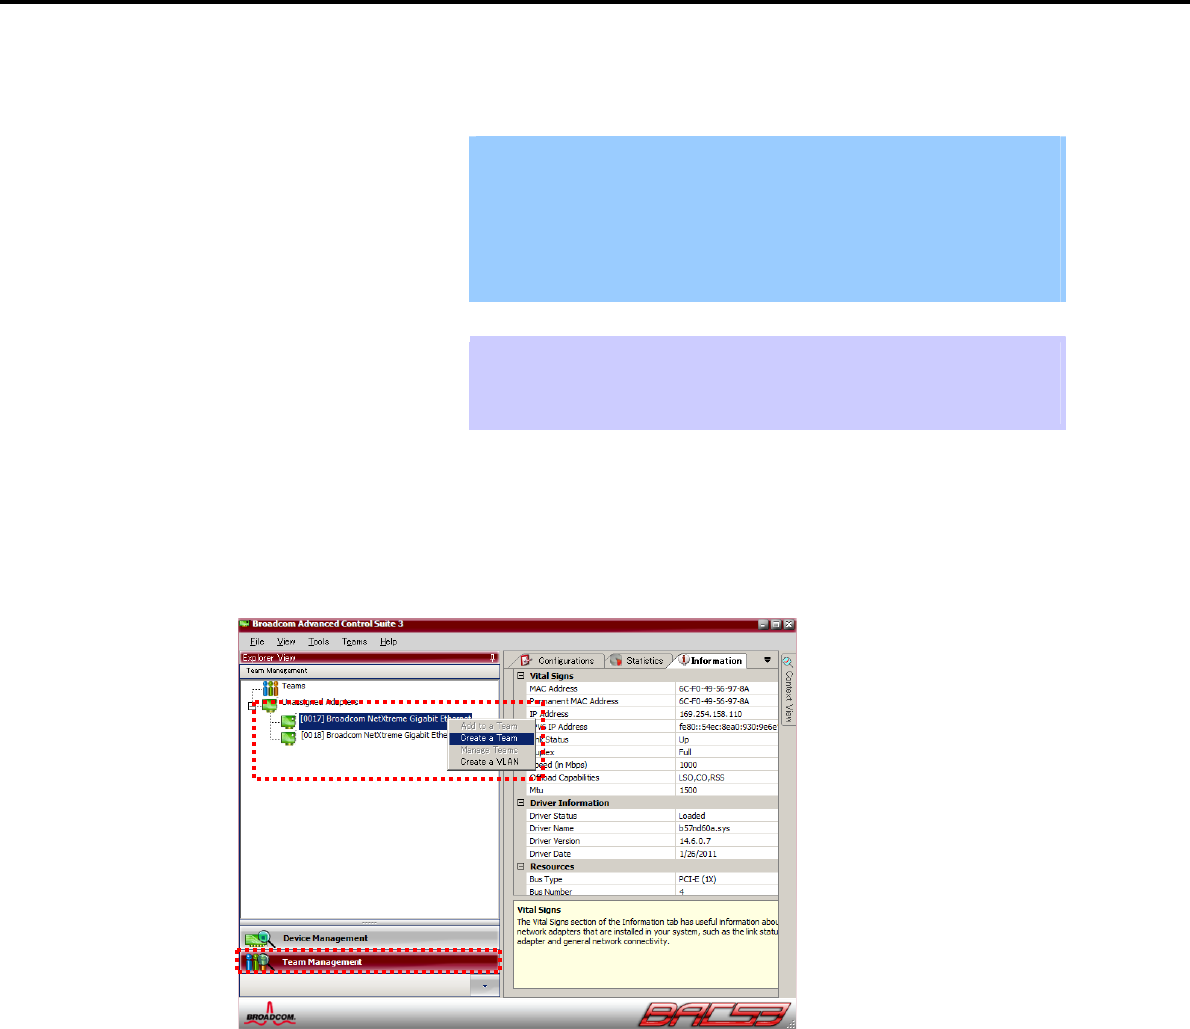
5. Setting Up Windows Server 2003 R2 x64 Edition
Chapter 1 Installing Windows
(3) Setting up team/LiveLink
Important The team must be composed of two adapters.
Possible combinations of network adapters that compose the team are as
follows.
Between standard network adapters.
Between N8104-134 adapters
A standard network adapter and an N8104-134 adapter
Tips To edit a team, right-click on the BACS team, and then select Edit TEAM.
Then refer to step 3 and later in Chapter 1 (5.4.3 Setting up team/LiveLink) - (3)
Setting up team/LiveLink to edit the team.
1. Double-click the Broadcom Control Suite3 icon on the Control Panel window.
Broadcom Advanced Control Suite3 starts.
2. Select Team Management from the left menu, right-click the adapter to be used for the team, and then
select Create a Team from the short-cut menu.
The Broadcom Teaming wizard appears.
Express5800/GT-110d, GT-110d-S, R110d-1E, E110d-1 Installation Guide (Windows)
184

5. Setting Up Windows Server 2003 R2 x64 Edition
Chapter 1 Installing Windows
3. Click [Next].
Important Do not use Expert Mode.
4. Enter any name into the team name entry column, and then click [Next].
5. Make sure that the following team type is selected, and then click [Next].
Team type: Smart Load Balancing (TM) and Failover (SLB)
Express5800/GT-110d, GT-110d-S, R110d-1E, E110d-1 Installation Guide (Windows) 185

5. Setting Up Windows Server 2003 R2 x64 Edition
Chapter 1 Installing Windows
6. Select the adapters that compose the team, click [Add] to add them to the Team Members area, and
then click [Next].
7. Proceed according to your desired team type.
Smart Load Balancing and Failover (without Standby Member)
(1) Select Do not configure a standby member.
(2) Click [Next].
(1)
(2)
Express5800/GT-110d, GT-110d-S, R110d-1E, E110d-1 Installation Guide (Windows)
186
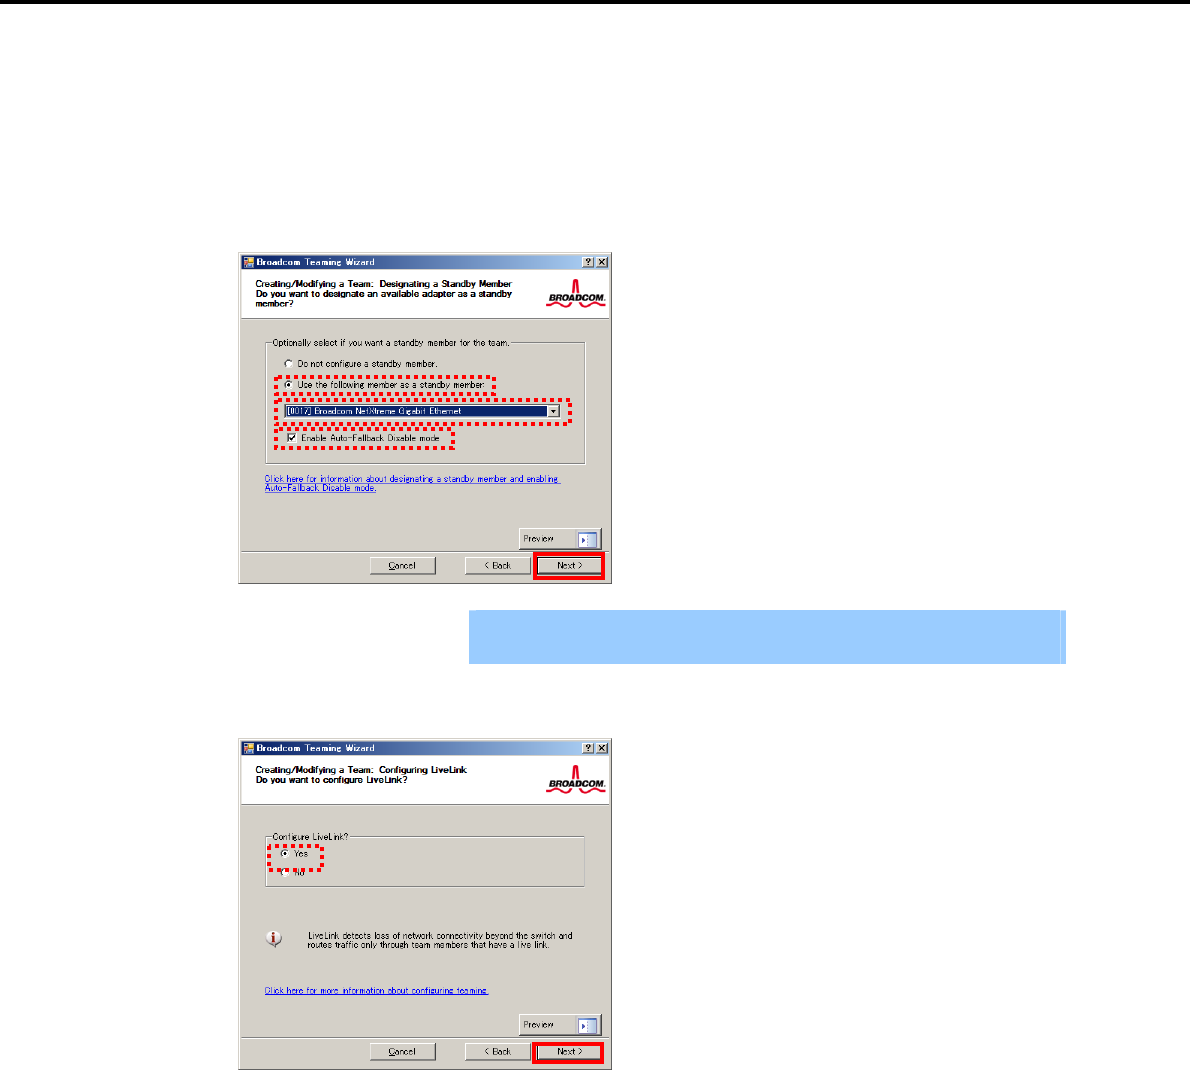
5. Setting Up Windows Server 2003 R2 x64 Edition
Chapter 1 Installing Windows
Smart Load Balancing (Auto-Failback Disable) (with Standby Member)
(1) Select Use the following member as a standby member.
(2) Select the adapter that is to be a standby member from the drop-down list.
(3) Select Enable Auto-Failback Disable mode.
(4) Click [Next].
Important Enable Auto-Failback Disable mode is cleared while editing the team. Select
it again.
8. Select Yes for Configure LiveLink?, and then click [Next].
(3)
(1)
(2)
(4)
Express5800/GT-110d, GT-110d-S, R110d-1E, E110d-1 Installation Guide (Windows) 187
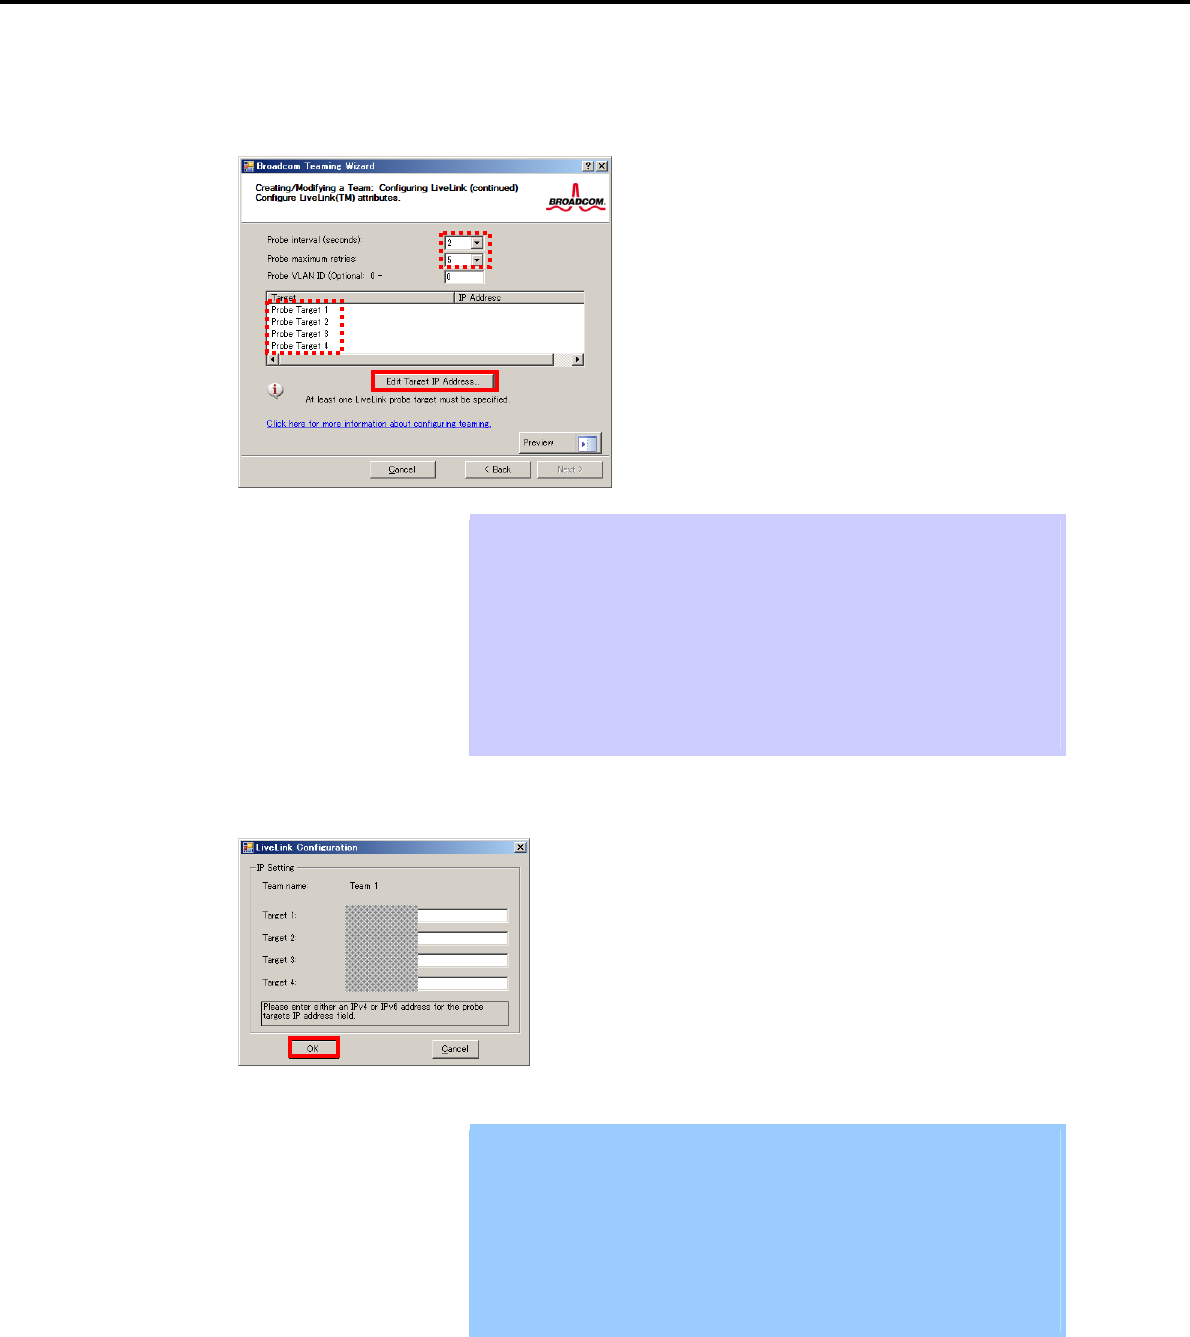
5. Setting Up Windows Server 2003 R2 x64 Edition
Chapter 1 Installing Windows
9. You can use the default setting for Probe interval and Probe maximum retries. If you change these
values, select a value from each drop-down list, click the target probe (Probe Target xx), and then click
[Edit Target IP Address…].
Tips The setting range of Probe interval (link packet transmission interval) is 1 to 60
(units: seconds).
The setting range of Probe maximum retries (link packet retry count) is 1 to 10
(times).
Switching a path upon detection of a communication path error by LiveLink takes
(Probe maximum retries + 1) x Probe interval (seconds) at maximum.
If an optional LAN board detects that a link is down, failover occurs immediately
after the link goes down. It takes the time specified for Probe interval (seconds)
to recover from the link going down.
10. In the Target xx text box, enter the IP address of the alive monitoring server, and then click [OK].
Important Target xx must be the same broadcast domain as that specified for the data
communication IP and LiveLink communication IP (described in step 13).
Specify an IP address that exists on the network and with which
communication is possible.
If communication with the IP address specified in Target xx is not possible,
the team will also be unable to communicate. It is therefore recommended
that you specify multiple IP addresses using Probe Target. Up to four IP
addresses can be specified.
Express5800/GT-110d, GT-110d-S, R110d-1E, E110d-1 Installation Guide (Windows)
188

5. Setting Up Windows Server 2003 R2 x64 Edition
Chapter 1 Installing Windows
11. Click [Next].
12. Select an adapter from the Team Members area, and then click [Edit Member IP Address…].
13. Enter the IP address used for LiveLink communication, and then click [OK].
Important Be sure to specify an IP address for LiveLink communication for all the
adapters that compose the team. The address specified here is the IP
address for LiveLink communication. Specify a different IP address for
data communication.
For Target xx, specify an IP address that is unique on the network and with
which communication is possible.
Express5800/GT-110d, GT-110d-S, R110d-1E, E110d-1 Installation Guide (Windows) 189
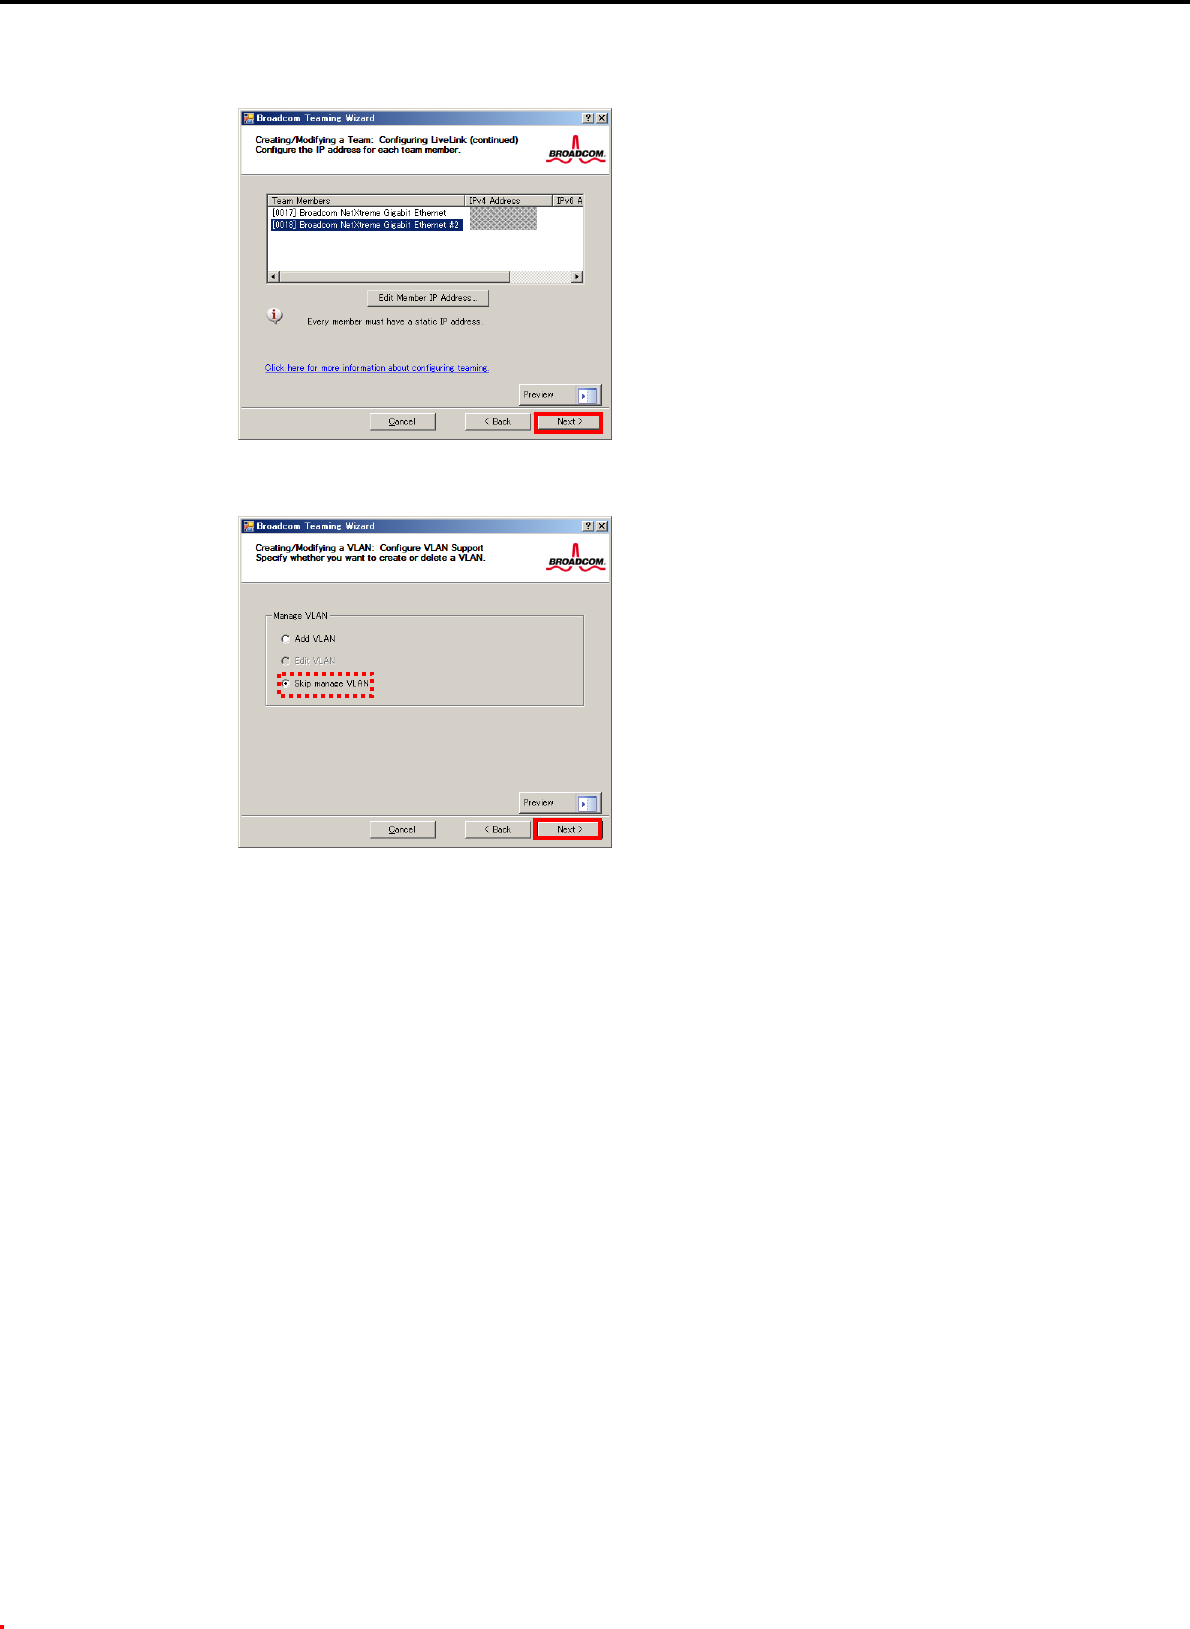
5. Setting Up Windows Server 2003 R2 x64 Edition
Chapter 1 Installing Windows
14. Click [Next].
15. Make sure that Skip manage VLAN is selected under Manage VLAN, and then click [Next].
Express5800/GT-110d, GT-110d-S, R110d-1E, E110d-1 Installation Guide (Windows)
190
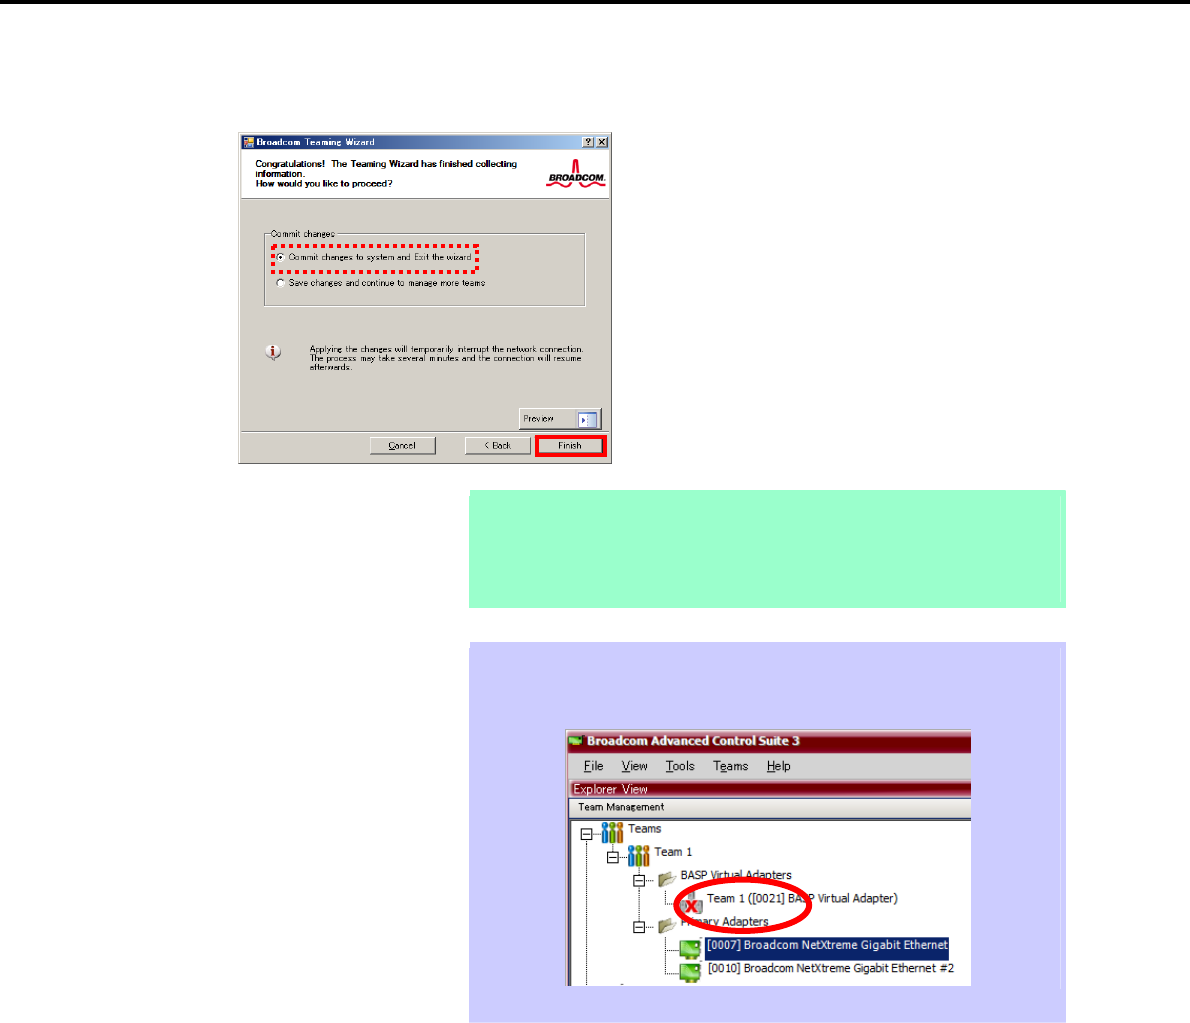
5. Setting Up Windows Server 2003 R2 x64 Edition
Chapter 1 Installing Windows
16. Make sure that Commit changes to system and Exit the wizard is selected under Commit changes,
and then click [Finish].
Note When the message below appears, select [Yes].
"
Applying the changes will temporarily interrupt the network
connection. T
h
e process may take several minutes and the
connection will resume afterwards. Do you want to continue?"
Tips After creating a team, if the teaming adapter displays like the following image,
perform steps 8 through 14 again and correct the LiveLink settings.
17. Restart the system.
Express5800/GT-110d, GT-110d-S, R110d-1E, E110d-1 Installation Guide (Windows) 191
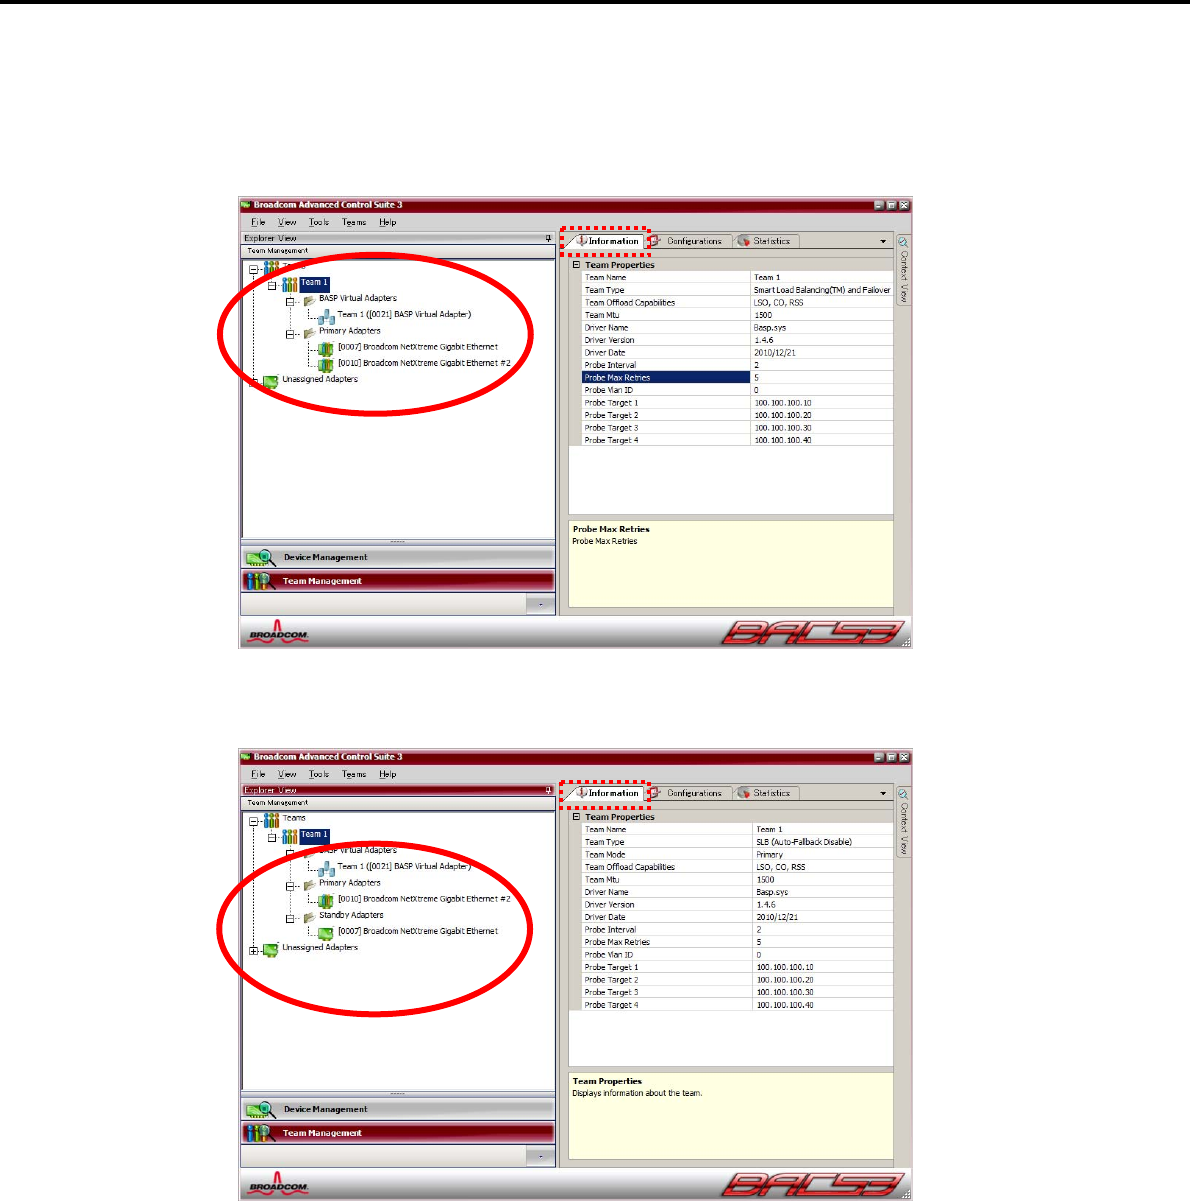
5. Setting Up Windows Server 2003 R2 x64 Edition
Chapter 1 Installing Windows
18. After the system starts, follow step 1 to start Broadcom Control Suite3 and confirm that a team has
been created. Confirm the team settings on the Information window to the right.
Smart Load Balancing and Failover (without Standby Member)
Smart Load Balancing (Auto-Failback Disable) (with Standby Member)
Team setup is now complete.
Express5800/GT-110d, GT-110d-S, R110d-1E, E110d-1 Installation Guide (Windows)
192

5. Setting Up Windows Server 2003 R2 x64 Edition
Chapter 1 Installing Windows
(4) Procedure for deleting team
Important You must delete teams from Broadcom Control Suite3.
You cannot delete the team from the team adapter displayed in the Device
Manager.
1. Double-click Broadcom Control Suite3 in the Control Panel window.
Broadcom Advanced Control Suite3 starts.
2. Click Team Management from the left menu, right-click the team name under Teams, and then select
Delete Team from the short-cut menu.
Tips When the message below appears, select [Yes].
"The selected team will be deleted from system, do you want to
proceed?
NOTE:
A
pplying the changes will temporarily interrupt the
network connection. The process may take severa
l
minutes and the connection will resume afterwards."
3. Insert the EXPRESSBUILDER DVD into the optical disk drive.
If an autorun menu appears, close the menu window.
Important You do not have to insert the EXPRESSBUILDER DVD if the Starter Pack was
installed from the Internal Flash Memory. Proceed to the next step.
4. Double-click addlvlanstats.vbs in the following folder.
When using the EXPRESSBUILDER DVD:
Optical disk drive letter:\020\win\winnt\w2k3amd\lan
If the Starter Pack was installed from the Internal Flash Memory:
System drive letter:\StartPKG\w2k3amd\lan
Express5800/GT-110d, GT-110d-S, R110d-1E, E110d-1 Installation Guide (Windows) 193
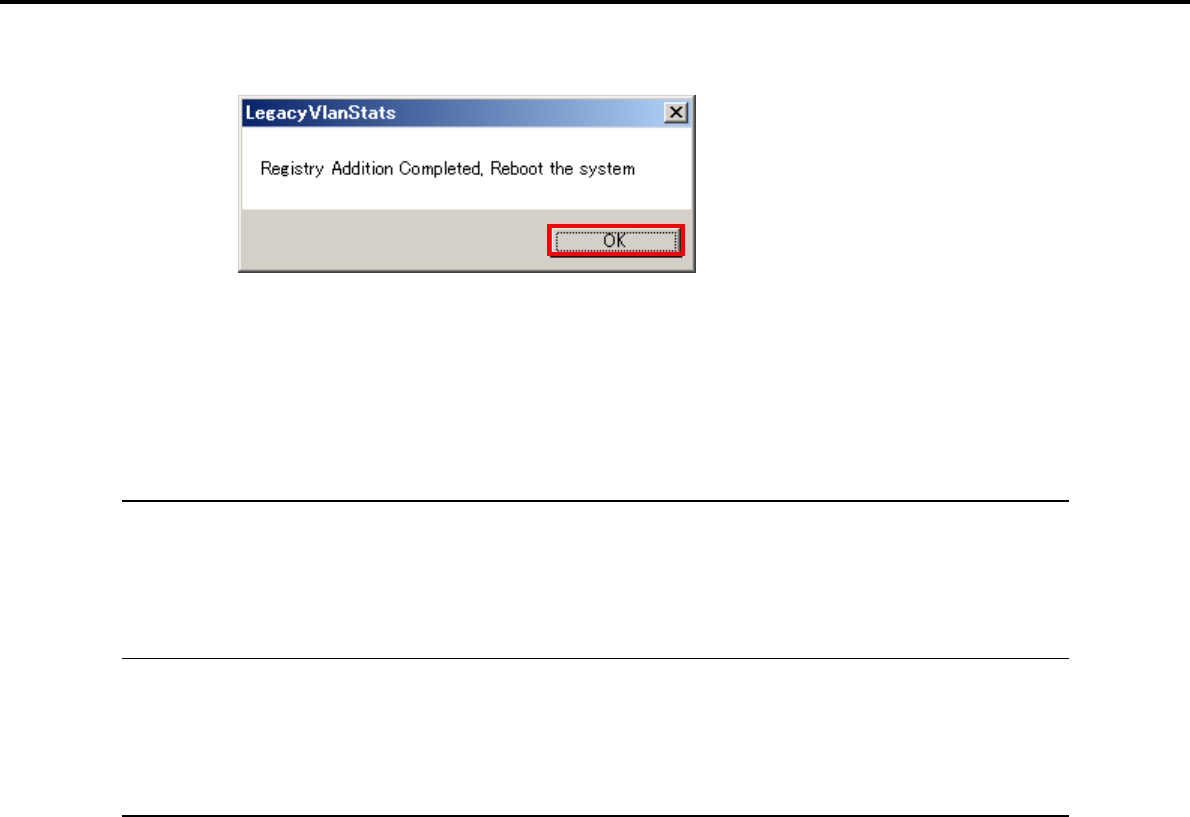
5. Setting Up Windows Server 2003 R2 x64 Edition
Chapter 1 Installing Windows
5. When the following message appears, click [OK].
6. Eject the EXPRESSBUILDER DVD from the optical disk drive, and then restart the system.
Team deletion is now complete.
5.4.4 When using a SCSI controller (N8103-75/107)
If the OS standard installer is used for setup, install the Starter Pack to install the driver.
If an additional SCSI controller is connected after setup, install the Starter Pack to install the driver.
5.4.5 When using a SAS controller (N8103-104A/142)
If the OS standard installer is used for setup, install the Starter Pack to install the driver.
If an additional SAS controller is connected after setup, install the Starter Pack to install the driver.
5.4.6 When using a RAID Controller (N8103-135)
The driver installation procedure depends on the environment. Use the procedure according to your
environment for installing the driver.
When using a RAID Controller (N8103-128/G128/134)
The OS will run the plug-and-play function and the driver will automatically be installed. You do not
need to install it manually.
When not using a RAID Controller (N8103-128/G128/134)
If the OS standard installer is used for setup, install the Starter Pack to install the driver.
If an additional RAID Controller is connected after setup, install the Starter Pack to install the driver.
Express5800/GT-110d, GT-110d-S, R110d-1E, E110d-1 Installation Guide (Windows)
194

5. Setting Up Windows Server 2003 R2 x64 Edition
Chapter 1 Installing Windows
5.4.7 Graphics accelerator driver
The graphics accelerator driver for standard configurations is installed when the Starter Pack is installed
from EXPRESSBUILDER.
To reinstall drivers separately, complete the following steps.
1. Insert the EXPRESSBUILDER DVD into the optical disk drive.
If an autorun menu appears, close the menu window.
Tips You do not have to insert the EXPRESSBUILDER DVD if the Starter Pack was
installed from the Internal Flash Memory.
2. From the Start menu, point to All programs, Accessories, and then select Explorer.
3. Double-click the install.bat icon in the following folder.
When using the EXPRESSBUILDER DVD:
Optical disk drive letter:\020\win\winnt\w2k3amd\video
If the Starter Pack was installed from the Internal Flash Memory:
System drive letter:\StartPKG\w2k3amd\video
You will be prompted to confirm the End User License Agreement during this process. Click the
[ACCEPT] button and continue.
4. Eject the EXPRESSBUILDER DVD from the optical disk drive, and then restart the system.
Graphic accelerator driver installation is now complete.
Express5800/GT-110d, GT-110d-S, R110d-1E, E110d-1 Installation Guide (Windows) 195

5. Setting Up Windows Server 2003 R2 x64 Edition
Chapter 1 Installing Windows
5.5 Installing the Bundled Software
The supplied EXPRESSBUILDER DVD contains the server monitoring software NEC ESMPRO Agent and
system management software NEC ESMPRO Manager. Refer to Chapter 2 Installing the Bundled Software to
install the software separately.
Express5800/GT-110d, GT-110d-S, R110d-1E, E110d-1 Installation Guide (Windows)
196
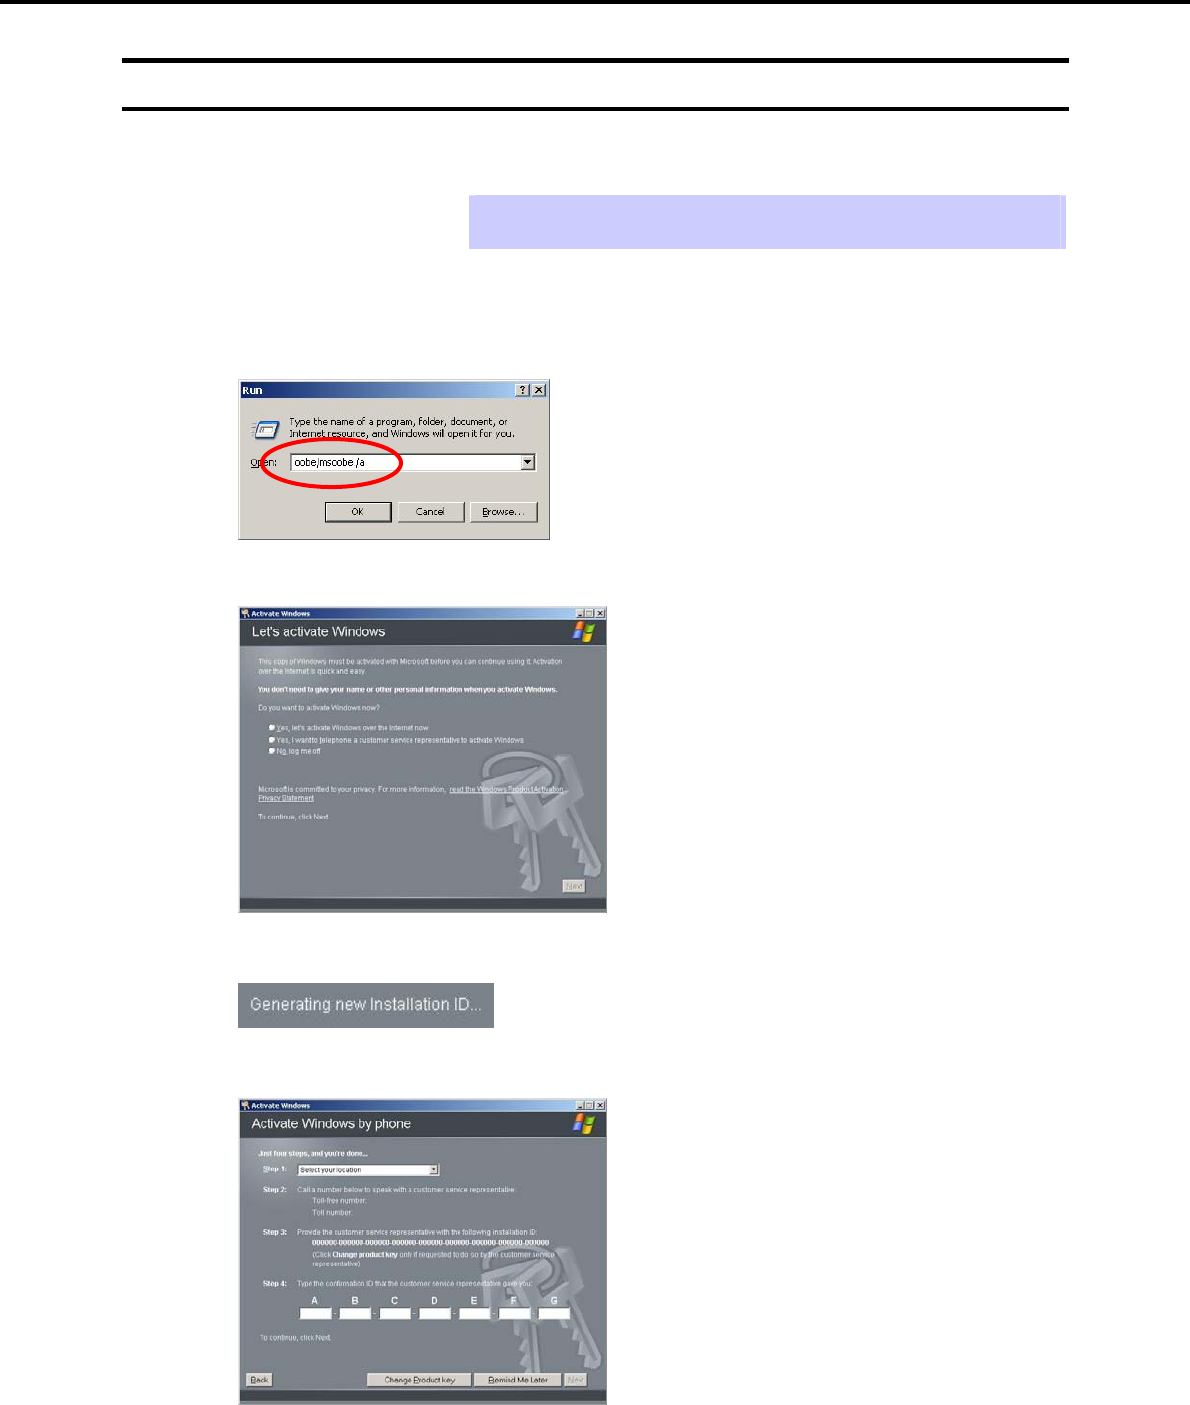
5. Setting Up Windows Server 2003 R2 x64 Edition
Chapter 1 Installing Windows
5.6 License Authentication
To use Windows Server 2003 R2 x64 Edition, the license must be authenticated in advance. Following
describes the license authentication procedure.
Tips Following this procedure is not required if you use a backup CD-ROM for
installation.
1. Select Run from the Start menu.
Enter the following to the Open text box, and then click [OK].
oobe/msoobe /a
2. When the following message appears, click [Next].
The following message appears.
3. Follow the instructions in the following message to start the license authentication process.
Windows activation is now complete.
Express5800/GT-110d, GT-110d-S, R110d-1E, E110d-1 Installation Guide (Windows) 197

5. Setting Up Windows Server 2003 R2 x64 Edition
Chapter 1 Installing Windows
5.7 Installation When Multiple Logical Drives Exist
Before starting reinstallation, backup data for future use in case of data loss.
(1) Installation process
1. Follow the steps to start installation with OS standard installer.
2. When the following message appears, select the partition to which you want to set up the operating
system.
The following list shows the existing partitions and
unpartitioned space on this computer.
Use the UP and DOWN ARROW keys to select an item in the
list.
Important You cannot edit the drive letters for the system volume or boot volume after
setup is complete. Make sure that the drive letters assigned in this window
are correct, and then proceed with setup.
3. Follow the steps to proceed with installation with OS standard installer.
Installation is now complete.
Tips The drive letter might change after installation. If you want to change the drive
letter, use the procedure shown in Changing drive letter assignments below.
(2) Changing drive letter assignments
The steps below cannot change drive letter assignments for the system volume or boot volume. Be careful
when assigning these.
1. From the Start menu, right-click My Computer and then select Management. Next, launch Computer
Management.
2. From the window on the left, select Disk Management.
3. Right-click the volume whose drive letter you want to change, and then select Change drive letter and
path.
4. Click [Change].
5. Click [Assign next drive letter], and then select the drive letter you want to assign.
6. Click [OK].
7. When the following message appears, read the contents and then click [OK].
Changing the drive letter of a volume might cause programs
to no longer run. Are you sure you want to change this drive
letter?
8. Close the Computer Management window.
Changing drive letter assignments is now complete.
Express5800/GT-110d, GT-110d-S, R110d-1E, E110d-1 Installation Guide (Windows)
198

6. Setting Up Windows Server 2003
Chapter 1 Installing Windows
6. Setting Up Windows Server 2003
Set up Windows Server 2003 and the system.
6.1 Before Starting Setup
Read through the cautions explained here before starting setup.
: Confirm during Setup with EXPRESSBUILDER
: Confirm during Setup with OS standard installer
(1/3)
Setup Items to confirm
The following editions of the Windows Server 2003 family may be installed.
Windows Server 2003 R2 Standard Edition
Windows Server 2003 R2 Enterprise Edition*1
Windows Server 2003 Standard Edition*2
*1 Only supported by R110d-1E and E110d-1
*2 Only supported by GT110d and GT110d-S
Inquiries about installing other editions may be made at your sales dealer or
maintenance service company.
Important Setup with EXPRESSBUILDER cannot be used.
Windows
family
If Windows Server 2003 is installed from a backup CD, the license is already
activated. If Windows Server 2003 is installed from an OS CD instead of a backup
CD, a product key is required for license authentication. At this time, the product
key must be the same as that indicated on the COA label of Windows Server 2003.
For details, refer to Chapter 1 (6.7 License Authentication).
Important Activate within 30 days following installation. The system might be
locked if 30 days have passed without activation.
License
authentication
When installing Windows Server 2003 using the OS standard installer, the following
hardware configurations require special procedures.
When using OEM drivers, be sure to change the boot order of the Flash FDD
on the BIOS setup window as follows:
Select Boot, Floppy Drive BBS priorities, Boot Option #1, and then specify
the Flash FDD used.
Note Change as instructed in Chapter 1 (6.2.3 Setup procedure).
Connecting MO devices
Installing Windows while an MO device is connected can result in installation
failure. Remove the MO device, and then start installation from the beginning.
Hardware
configuration
warnings
DAT, LTO, and similar media
Do not set media that is unnecessary to installation during setup.
Express5800/GT-110d, GT-110d-S, R110d-1E, E110d-1 Installation Guide (Windows) 199
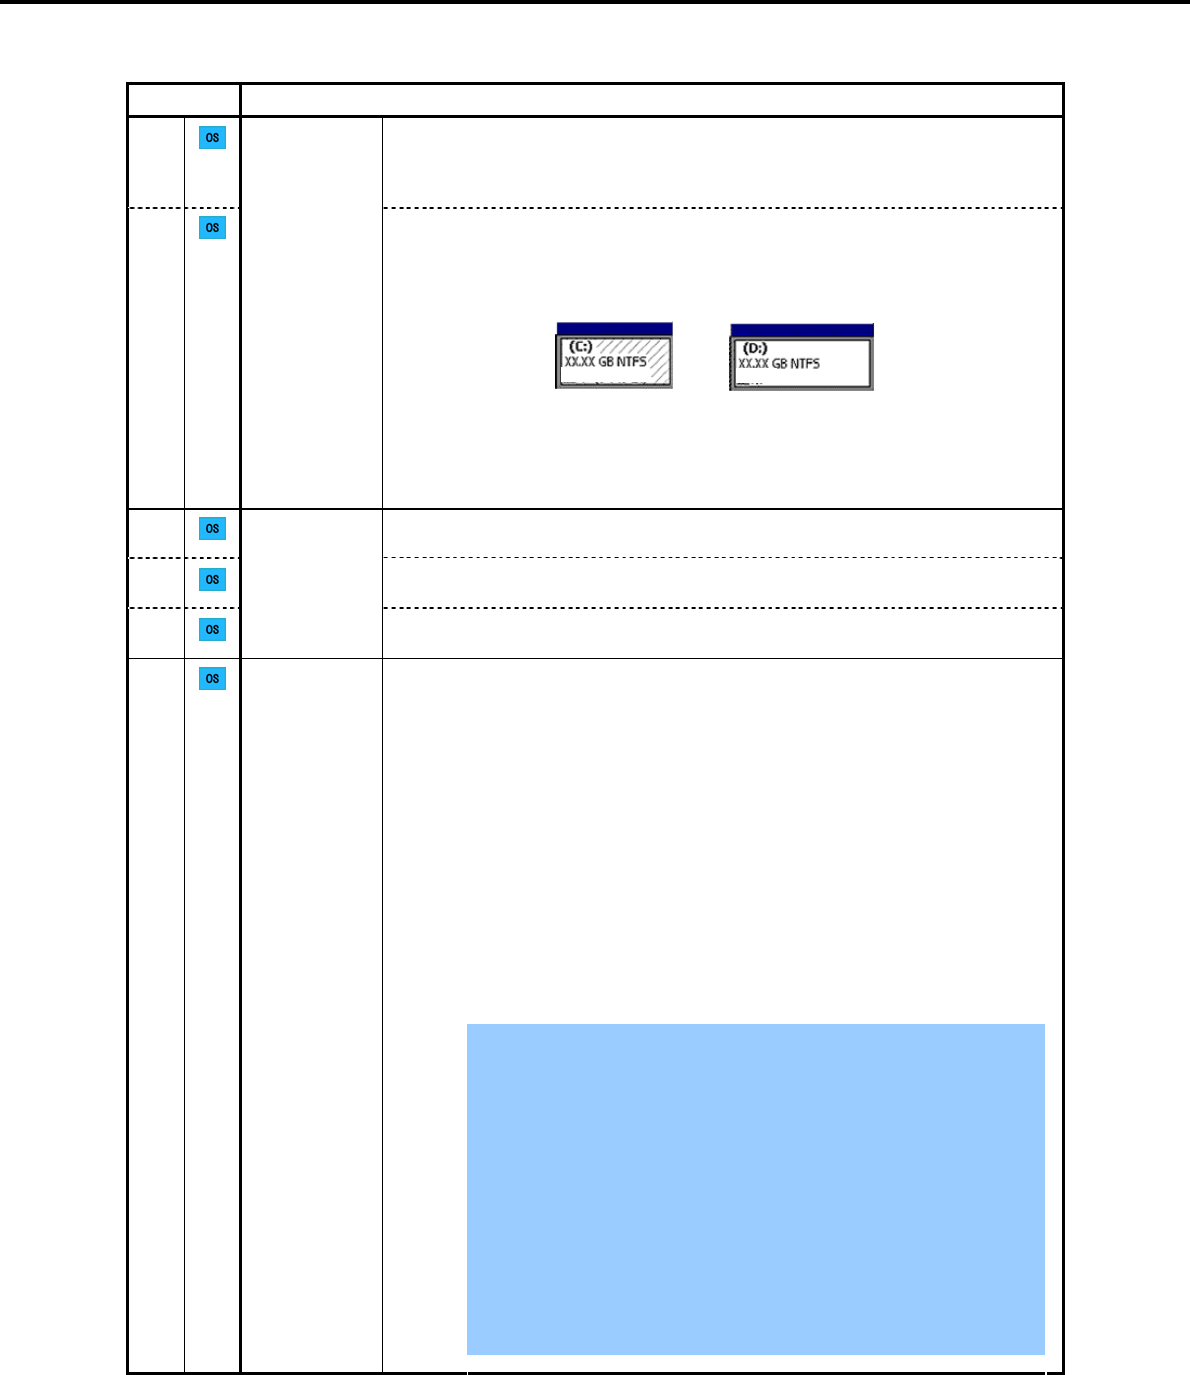
6. Setting Up Windows Server 2003
Chapter 1 Installing Windows
(2/3)
Setup Items to confirm
Connecting to multiple Hard Disk Drives (Logical Drives)
For details on installing operating systems to a system in which multiple Logical
Drives exist, refer to Chapter 1 (6.8 Installation When Multiple Logical Drives
Exist).
Hardware
configuration
warnings
Reinstallation to a dynamic disk:
When installing the OS on a Hard Disk Drive with multiple partitions that was
upgraded to a dynamic drive and you wish to retain the existing partition
configuration and data areas, note the following:
Normal (system) Normal
Data area
(partition to be retained)
- Select the partition on which the OS was previously installed.
- Select Leave the current file system intact (no change) for the OS partition
format.
If Windows Server 2003 R2 is already installed, make sure that Windows Server
2003 R2 Edition DISC 2 has been installed before applying a Service Pack.
Use the Starter Pack when you apply a Service Pack from the Service Pack 2
CD-ROM.
Application of
Service Packs
If you used OS installation media including Service Pack 2 for installation, you do
not have to install Service Pack 2 again.
The system partition size can be calculated by using the following formula.
Size required to install the OS + paging file size + dump file size + application size
Size required to install the OS = 3,500 MB (Windows Server 2003 R2 with
Service Pack 2)
= 5,300 MB (Windows Server 2003 R2 + Service
Pack 2 CD-ROM)
= 5,300 MB (Windows Server 2003 with Service
Pack 1 + Service Pack 2 CD-ROM)
Paging file size (recommended) = installed memory size 1.5
Dump file size = installed memory size + 12 MB
Application size = as required by the application
For example, if the installed memory size is 1 GB (1,024 MB), the partition size is
calculated as follows:
3,500 MB + (1,024 MB 1.5) + 1,024 MB + 12 MB + application size = 6,072 MB
+ application size
Important The above paging file sizes are recommended for collecting debug
information (dump file). The initial size of the boot volume paging file
must be large enough to store dump files. Make sure you set a sufficient
paging file size. If the paging file is insufficient, there will be a virtual
memory shortage that may result in an inability to collect correct debug
information.
The maximum paging file size that can be specified for one partition is
4095 MB. If 1.5 times of the mounted memory size exceeds 4095 MB,
specify 4095 MB.
If the mounted memory size is 2 GB or greater, the maximum size of the
dump file is “2048 MB + 12 MB”.
When installing other applications or other items, add the amount of
space needed by the application to the partition.
System
partition size
Express5800/GT-110d, GT-110d-S, R110d-1E, E110d-1 Installation Guide (Windows)
200

6. Setting Up Windows Server 2003
Chapter 1 Installing Windows
(3/3)
Setup Items to confirm
System
partition size
If the partition size for installing the system is smaller than the size required for
installation + paging file size, expand the partition size or add another disk. If your
system does not have a sufficient dump file size, divide the required file space into
multiple disks by performing the following steps.
1. Set the system partition size to a size sufficient to install the OS and paging file.
2. Write the debug information of the dump file onto another disk by referring to 7.
Setup for Solving Problems.
If there is not enough disk space to write the debug information, set the partition
size to a size sufficient to install the OS and paging file, and then add another disk
for the dump file.
Setup with OS
standard
installer
The Hardware Installation/Software Installation dialog box might appear several
times during installation, but it does not affect system installation. Click [Yes] on
such dialog boxes, and continue installation according to the displayed messages.
Inplace upgrade from Windows Server 2003 to Windows Server 2003 R2 is not
recommended because it overwrites the files and registries and might cause an
unexpected effect on the system and applications.
If you want to use Windows Server 2003 R2, back up the necessary data before
installing Windows Server 2003 R2.
Tips Inplace upgrade refers to overwriting an existing OS (in this case,
Windows 2003) with another OS (Windows Server 2003 R2).
Upgrade to
Windows
Server 2003
R2
Express5800/GT-110d, GT-110d-S, R110d-1E, E110d-1 Installation Guide (Windows) 201
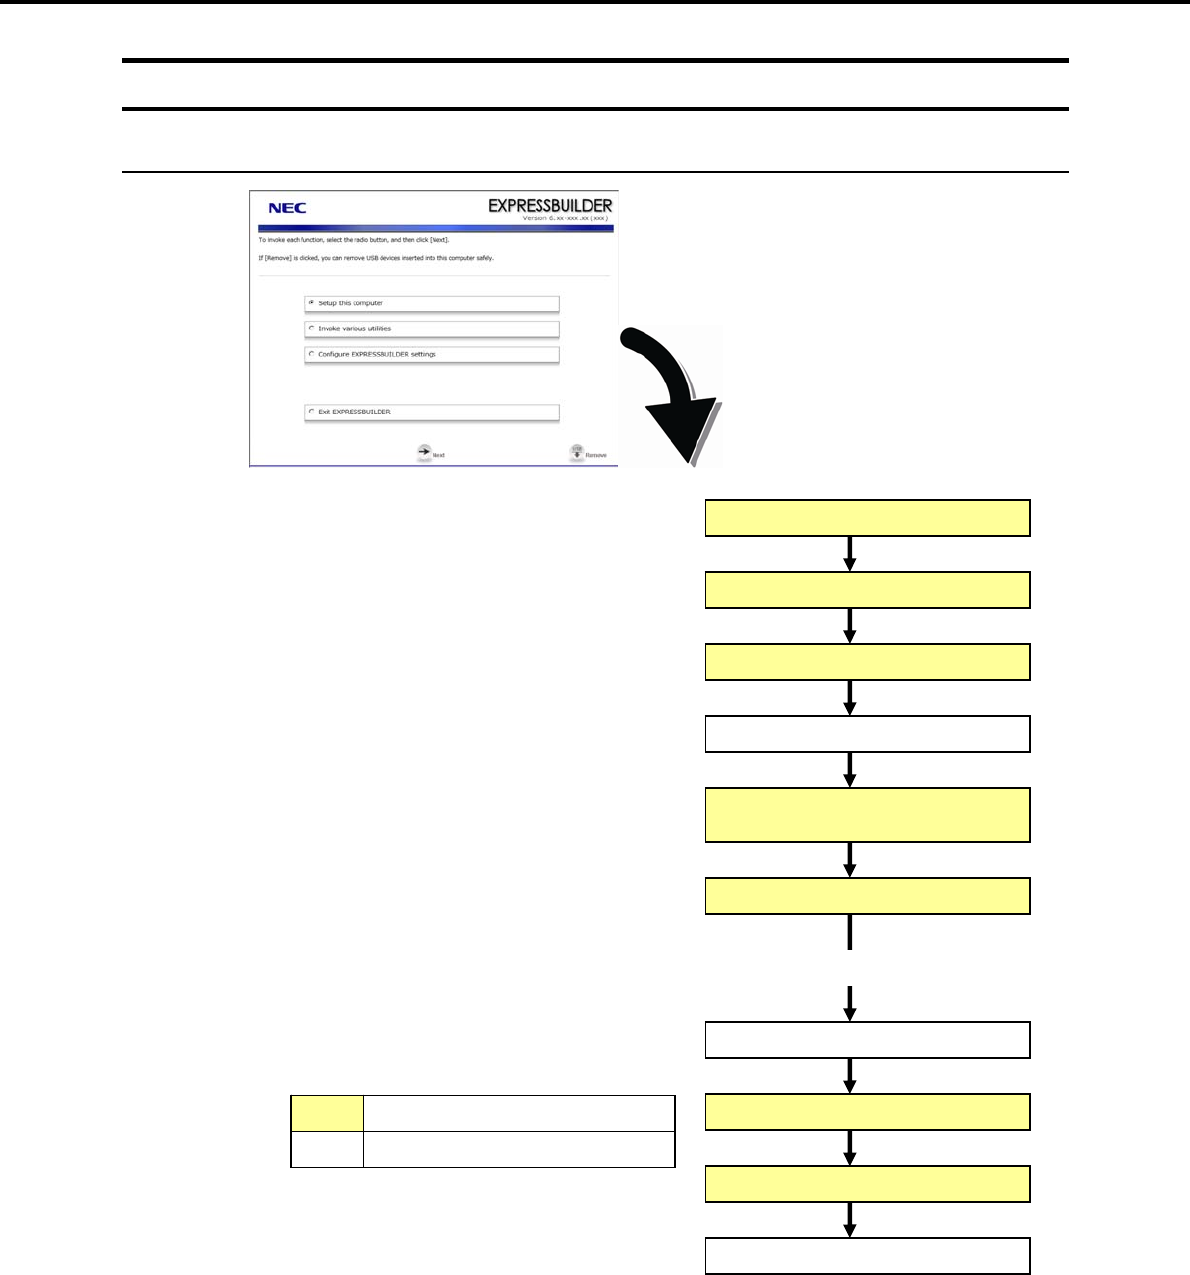
6. Setting Up Windows Server 2003
Chapter 1 Installing Windows
6.2 Setup with OS Standard Installer
6.2.1 Setup flow
Parameter setup menu
Setup execution screen
Configure RAID System
Copy the OEM drivers (if required)
End of installation
Log on
Installation
Insert the OS installation media
Install the Starter Pack
Restart (automatically)
Setup selection menu
Process that requires input or selection
Process that proceeds automatically
Express5800/GT-110d, GT-110d-S, R110d-1E, E110d-1 Installation Guide (Windows)
202

6. Setting Up Windows Server 2003
Chapter 1 Installing Windows
6.2.2 Items necessary for installation from an OS media
Prepare the following disks and instruction manuals before starting setup.
Operating system installation media (prepare one of the following)
<Windows Server 2003 R2>
Backup CD-ROM Windows Server 2003 R2, Standard Edition DISC 1
(hereafter referred to as backup CD-ROM DISC 1), and
Microsoft Windows Server 2003 R2 Standard Edition DISC 2 (x2)
(hereafter referred to as Windows Server 2003 R2 DISC 2)
Backup CD-ROM Windows Server 2003 R2, Enterprise Edition DISC 1
(hereafter referred to as backup CD-ROM DISC 1), and
Microsoft Windows Server 2003 R2 Enterprise Edition DISC 2 (x2)
(hereafter referred to as Windows Server 2003 R2 DISC 2)
Microsoft Windows Server 2003 R2, Standard Edition DISC 1
(hereafter referred to as Windows Server 2003 CD-ROM), and
Microsoft Windows Server 2003 R2 Standard Edition DISC 2 (x2)
Microsoft Windows Server 2003 R2, Enterprise Edition DISC 1
(hereafter referred to as Windows Server 2003 CD-ROM), and
Microsoft Windows Server 2003 R2 Enterprise Edition DISC 2 (x2)
<Windows Server 2003>
Be sure to prepare a Windows Server 2003 CD-ROM that contains Service Pack 1.
Microsoft Windows Server 2003 Standard Edition (CD-ROM)
(hereafter referred to as Windows Server 2003 CD-ROM)
Microsoft Windows Server 2003 Enterprise Edition (CD-ROM)
(hereafter referred to as Windows Server 2003 CD-ROM)
Windows Server 2003 Service Pack (CD-ROM)
First Steps Guide
EXPRESSBUILDER DVD
If you purchased optional Internal Flash Memory, you can use it during installation.
Prepare if needed:
OEM drivers (Windows Server 2003)
Note OEM drivers are is necessary if a RAID Controller or optional board is connected.
Use a Flash FDD as the removable media to create OEM drivers.
Express5800/GT-110d, GT-110d-S, R110d-1E, E110d-1 Installation Guide (Windows) 203
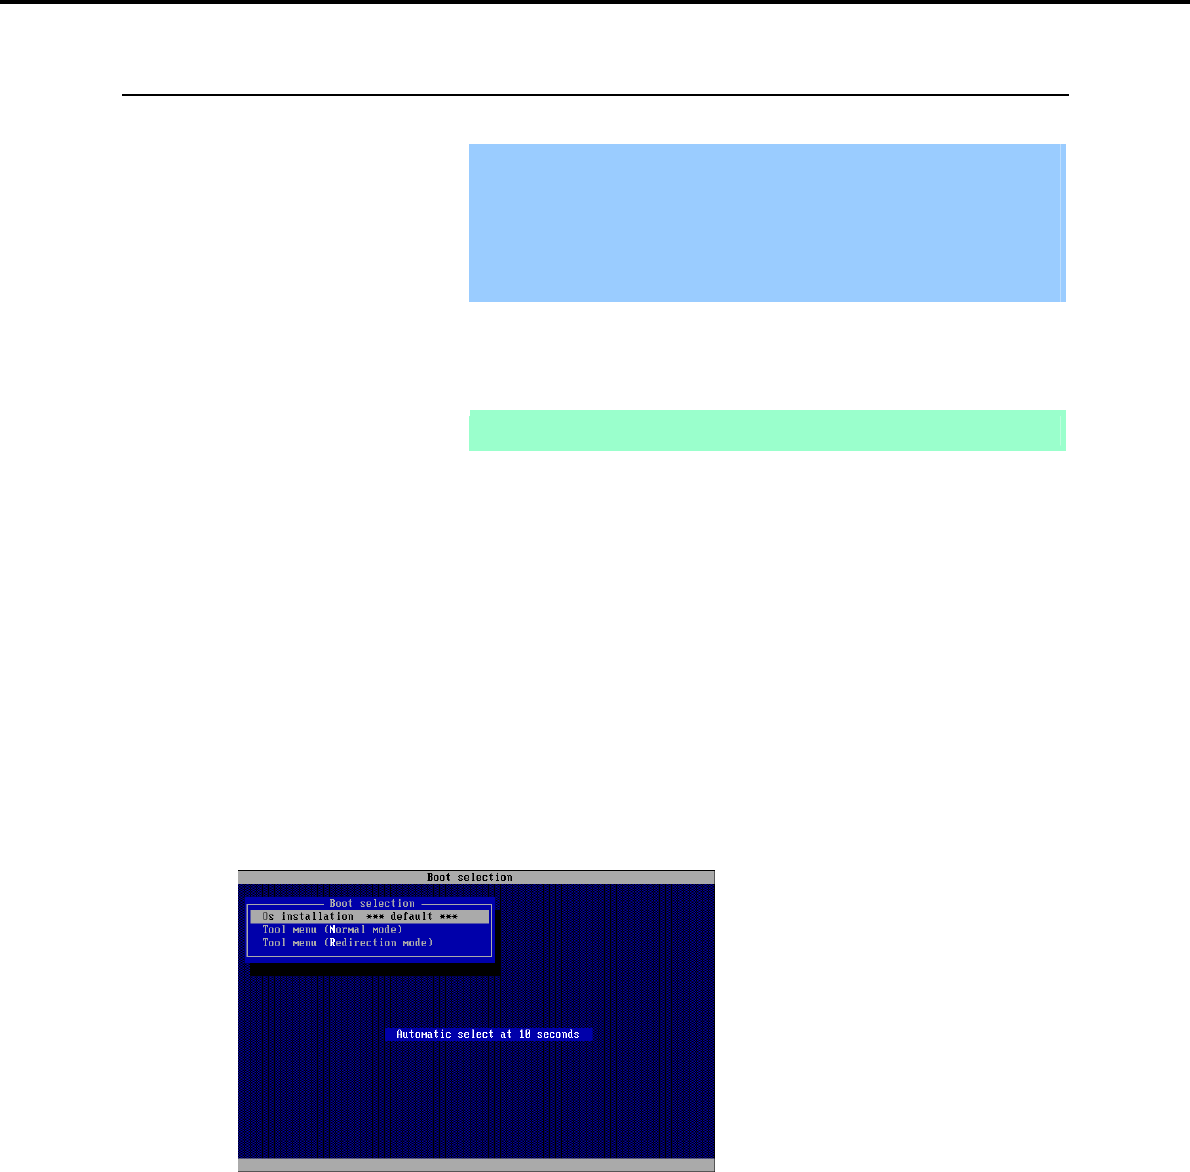
6. Setting Up Windows Server 2003
Chapter 1 Installing Windows
6.2.3 Setup procedure
This section describes the procedure for installing Windows Server 2003 using the OS standard installer.
Important Before starting setup, refer to 6.1 Before Starting Setup. It describes how
to make partitions.
The procedure differs depending on the media on which
EXPRESSBUILDER is stored.
The installation procedure depends on the environment. Check your
environment before starting installation.
1. Turn peripheral device power on, and then turn the server power on.
2. Use the following procedure to start EXPRESSBUILDER.
Note Be sure to disconnect removable media before starting EXPRESSBUILDER.
When using the EXPRESSBUILDER DVD
(1) Insert the EXPRESSBUILDER DVD into the optical disk drive of the server.
(2) Once the DVD is inserted, restart the server by resetting it (press <Ctrl> + <Alt> + <Delete>) or by
turning the power off and then on again.
EXPRESSBUILDER starts.
When using Internal Flash Memory
(1) When "Press <F2> Setup, <F3> Internal Flash Memory, <F4> ROM Utility, <F12> Network"
appears below the POST screen, press the <F3> key.
EXPRESSBUILDER starts.
3. When the following message appears, select Os installation *** default ***.
You will automatically advance to step 4, with no need for further input.
Express5800/GT-110d, GT-110d-S, R110d-1E, E110d-1 Installation Guide (Windows)
204
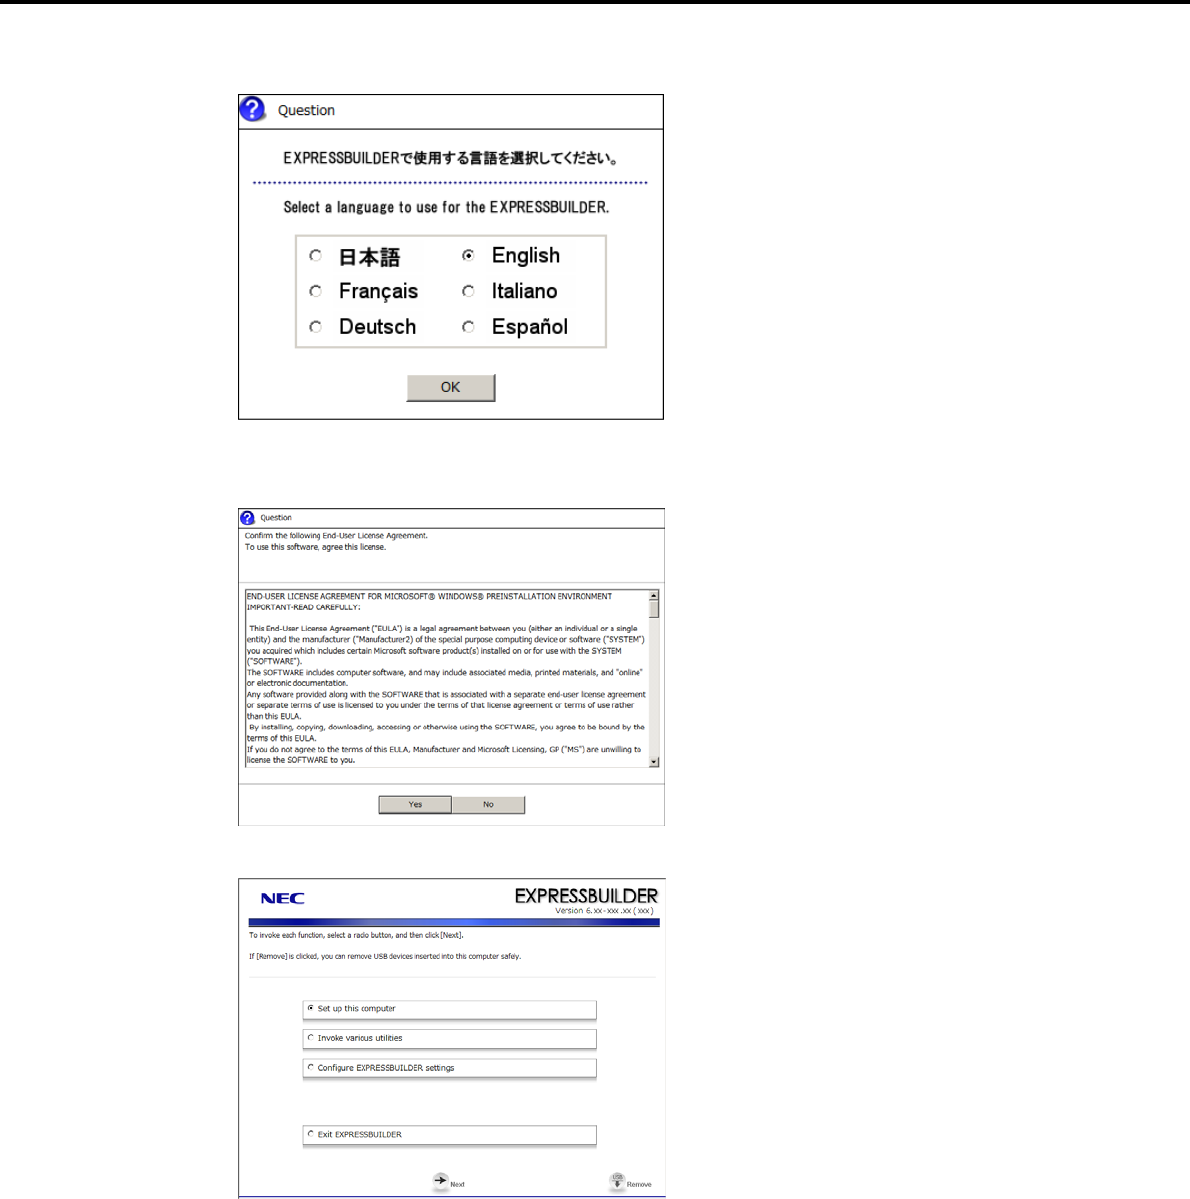
6. Setting Up Windows Server 2003
Chapter 1 Installing Windows
4. Select English on the language selection window, and then click [OK].
5. When the Windows PE software license agreement window appears, click [Yes].
6. Select Set up this computer from the top menu, and then click [Next].
Express5800/GT-110d, GT-110d-S, R110d-1E, E110d-1 Installation Guide (Windows) 205

6. Setting Up Windows Server 2003
Chapter 1 Installing Windows
7. When the setup selection menu appears, use the following steps to set up the parameters.
Note When setting up again, an already saved parameter file can be read, so that you
can skip inputting parameters in the wizard
When not using a parameter file:
Select the appropriate OS from the Install Windows drop-down list, and then click [Next].
Go to the following (1) RAID settings.
When using a parameter file:
Select Load a parameter file, and then click [Next].
Load the desired parameter file according to the onscreen instructions.
Confirm the settings on the parameter setup menu as required, and then click [Next].
Go to the following (2) Executing setup -
エラー
!
参照元が見つかりません。
5.
Express5800/GT-110d, GT-110d-S, R110d-1E, E110d-1 Installation Guide (Windows)
206
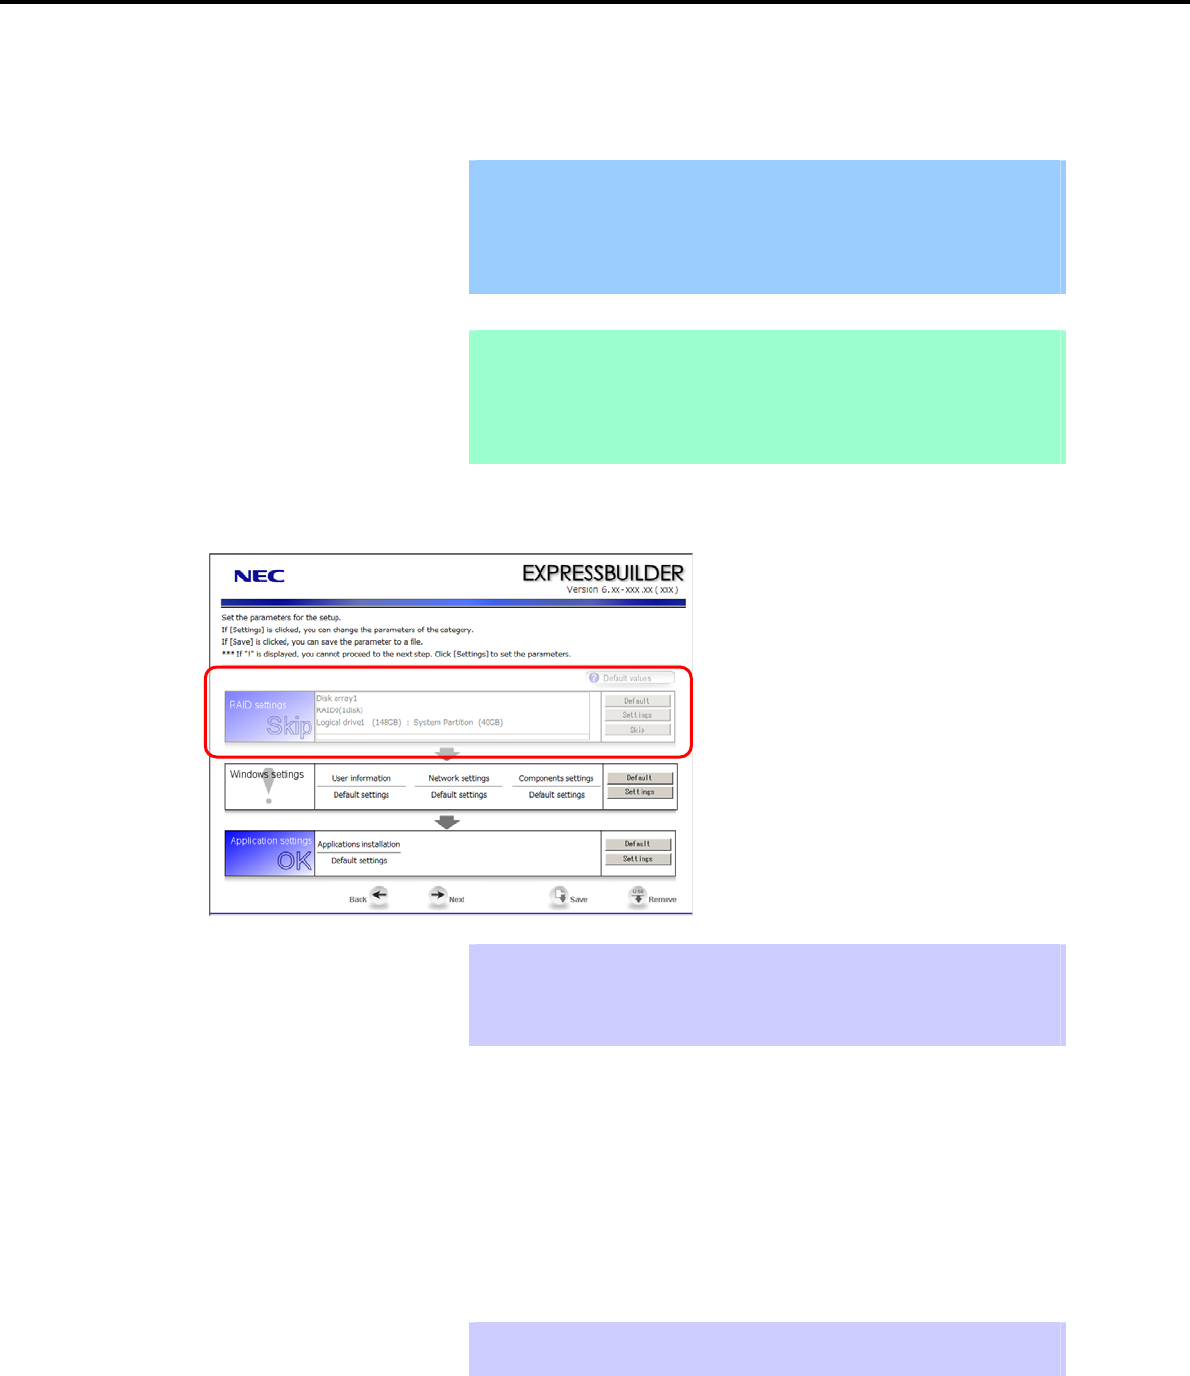
6. Setting Up Windows Server 2003
Chapter 1 Installing Windows
(1) RAID settings
This function automatically recognizes the RAID Controller connected to the server and configures the RAID
System, so you must complete setup of the server by following the "User’s Guide " in advance.
Important Some data in the Hard Disk Drive might be deleted depending on the system
settings. Pay attention to input parameters. You must be especially careful
when configuring the following:
RAID settings wizard
Backing up user data, as needed, is recommended.
Note When using an onboard RAID Controller (LSI Embedded MegaRAID):
This function does not support the creation of RAID10 by using the onboard
RAID Controller.
Refer to Chapter 2 (4. RAID System Configuration) in "Maintenance Guide" when
creating RAID10.
Specify the RAID settings using the RAID settings wizard on the parameter setup menu.
Tips Use the [Default] button when you want to return to the default value of parameters
after having modified them with the wizard.
You can confirm the value set by clicking the [Default] button if you click the
[Default values] button.
When creating a new Logical Drive
1. Click [Settings] in RAID settings.
2. Use the wizard to set up the Logical Drive.
When skipping the creation of a new Logical Drive
1. Click [Skip] in RAID settings.
Tips Use the [Skip] button if, after modifying the settings with the RAID settings wizard,
you want to install the existing configurations without modifying them.
Express5800/GT-110d, GT-110d-S, R110d-1E, E110d-1 Installation Guide (Windows) 207
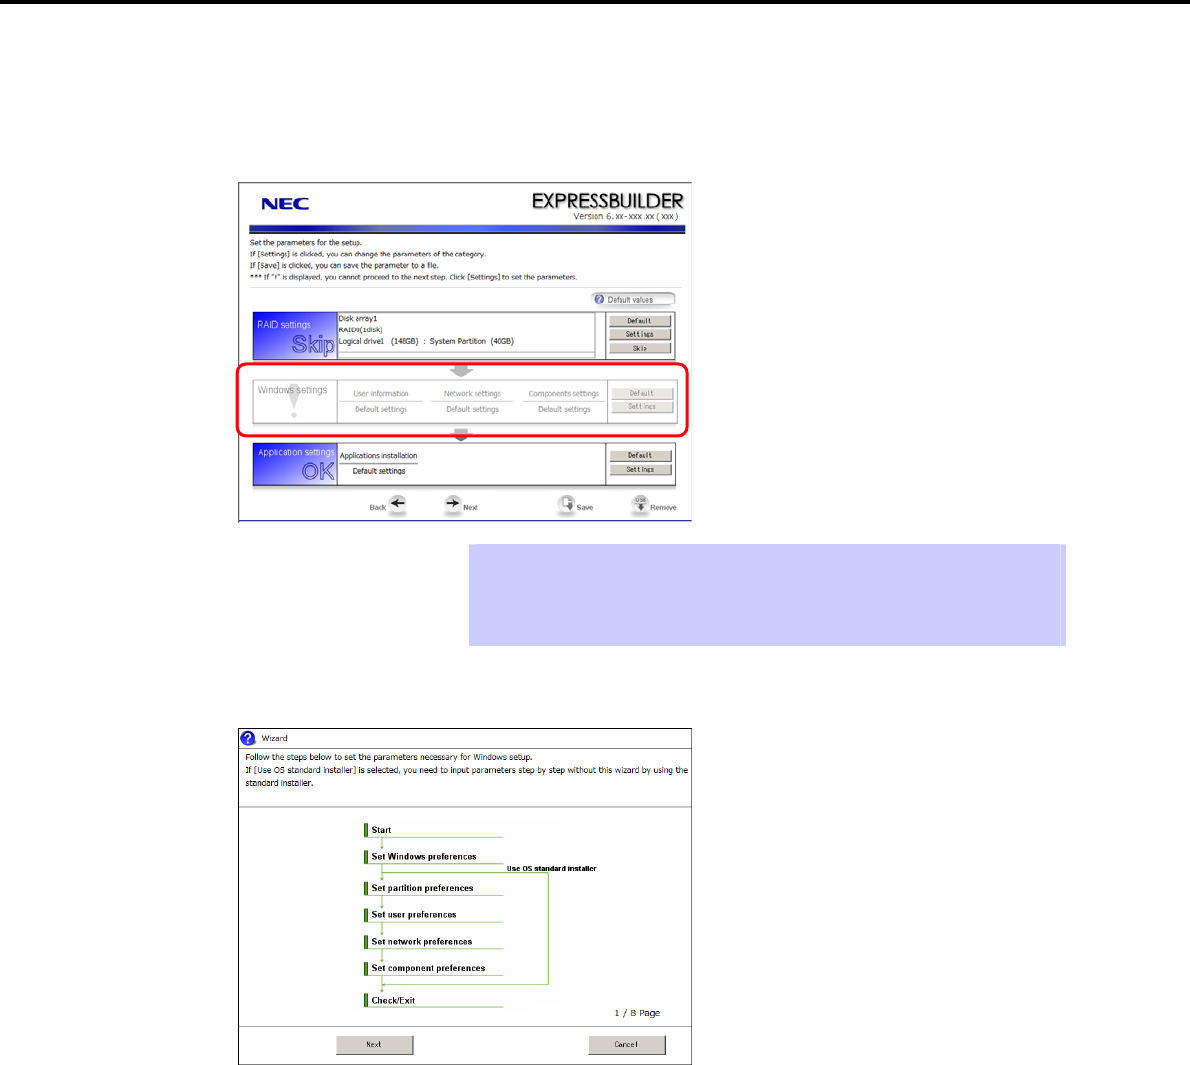
6. Setting Up Windows Server 2003
Chapter 1 Installing Windows
(2) Executing setup
Install Windows using the following procedure.
1. Click [Settings] in Windows settings.
Tips Use the [Default] button when you want to return to the default value of parameters
after having modified them with the wizard.
You can confirm the value set by clicking the [Default] button if you click the
[Default values] button.
2. Click [Next] in the Windows settings wizard.
Express5800/GT-110d, GT-110d-S, R110d-1E, E110d-1 Installation Guide (Windows)
208
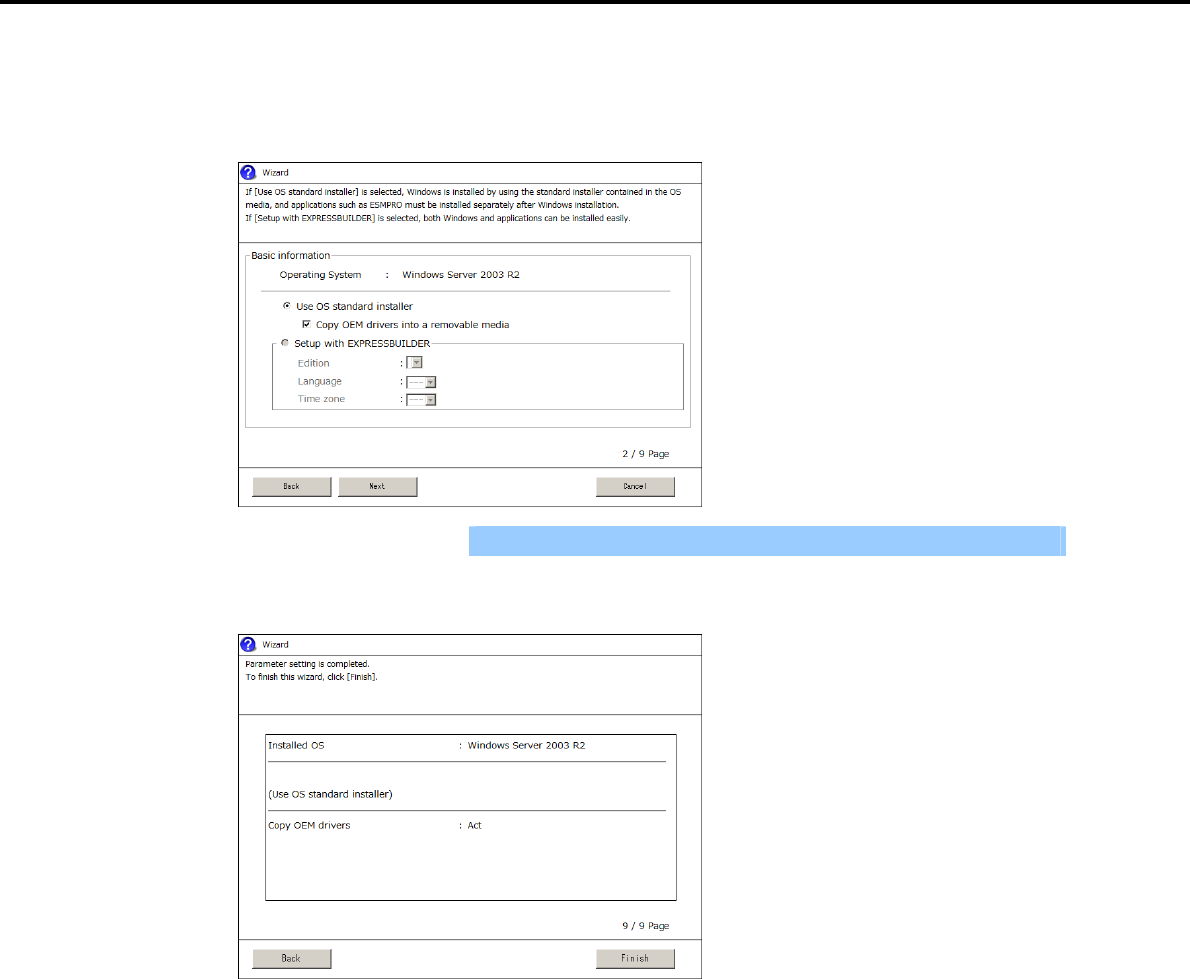
6. Setting Up Windows Server 2003
Chapter 1 Installing Windows
3. Specify the Windows basic settings
The basic information window appears. Select Use OS standard installer, and then click [Next].
If copying the OEM drivers to the removable media, select Copy OEM drivers into a removable media.
Important If you copied the OEM drivers to a Flash FDD, format it to FAT16.
4. After clicking [Finish] on the confirmation window, click [Next] in the parameter setup menu.
Express5800/GT-110d, GT-110d-S, R110d-1E, E110d-1 Installation Guide (Windows) 209
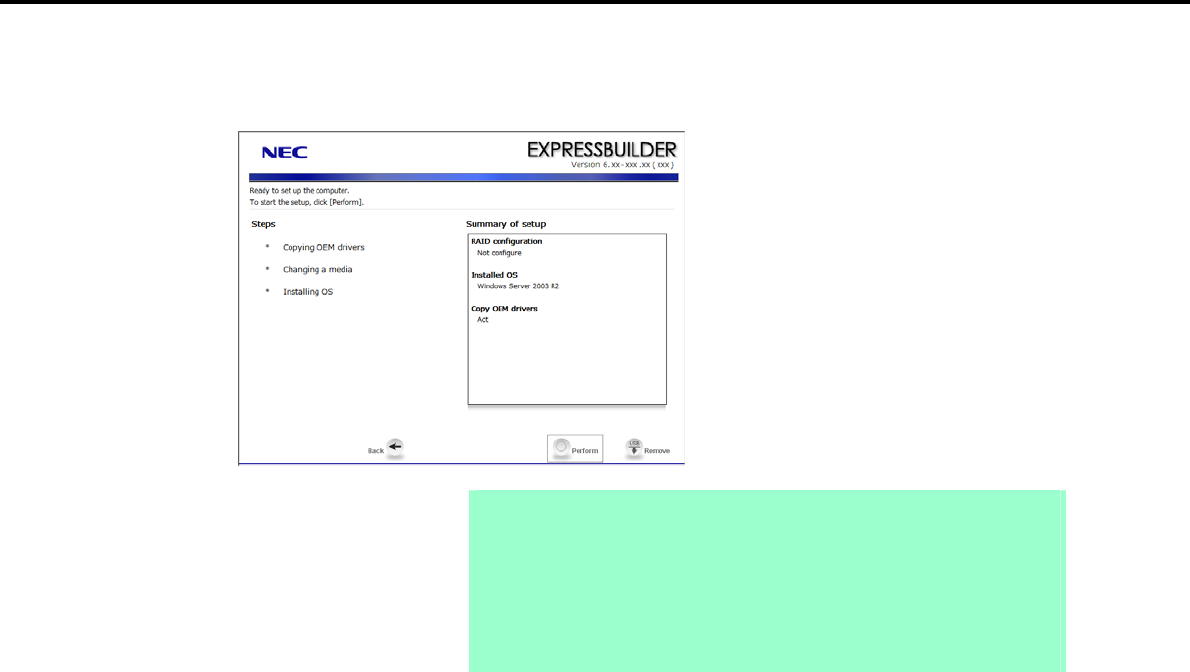
6. Setting Up Windows Server 2003
Chapter 1 Installing Windows
5. From the setup execution window, click [Perform].
The server automatically restarts.
Note If you select the Copy OEM drivers into a removable media check box, insert a
Flash FDD into the server and then click [Perform].
Do not remove the media while copying OEM drivers.
When using the OEM drivers, after following step 5 to restart, change the boot
order of the Flash FDD from the BIOS settings window.
Select Boot, Floppy Drive BBS priorities, Boot Option #1, and then specify
the Flash FDD used.
Express5800/GT-110d, GT-110d-S, R110d-1E, E110d-1 Installation Guide (Windows)
210
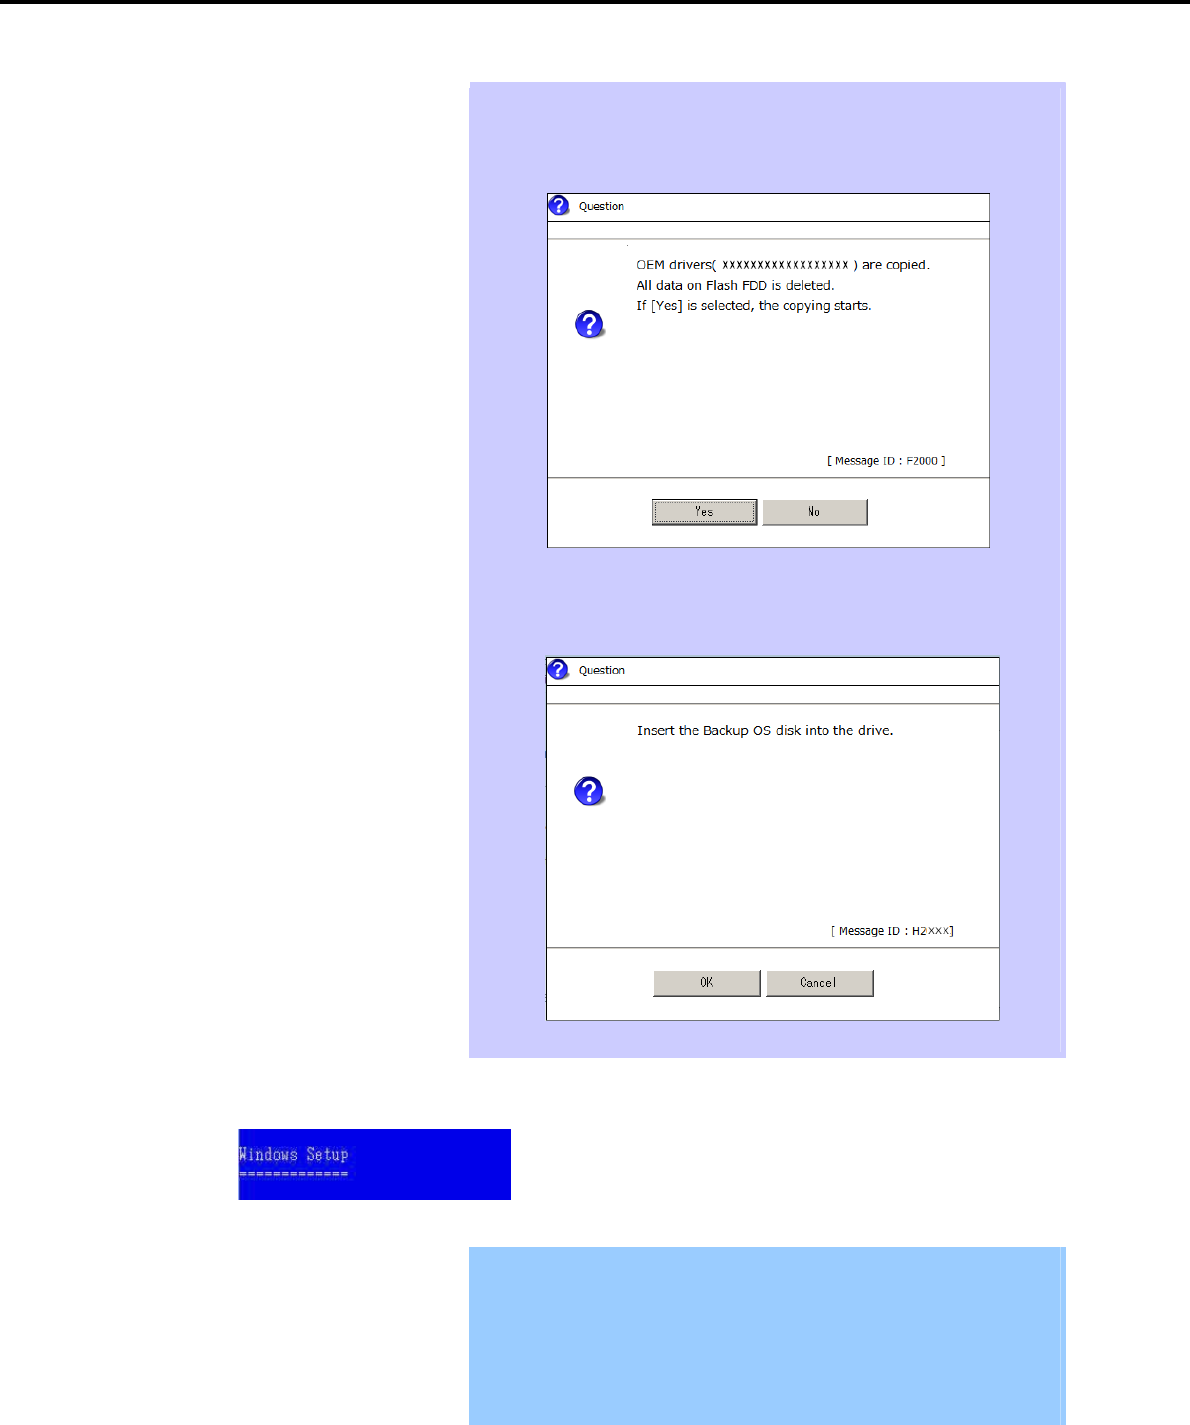
6. Setting Up Windows Server 2003
Chapter 1 Installing Windows
Tips If the Copy OEM drivers to a removable media checkbox is selected in step 3,
the following window appears. Follow the onscreen instructions and continue the
operation.
When the following message appears, insert the OS installation media, and then
click [OK].
6. The system starts up from the CD-ROM, and the Express5800 server runs.
Important If a bootable operating system is already installed on the Hard Disk Drive,
press the <Enter> key while the message "Press any key to boot from CD or
DVD…" is displayed on the top of the screen. This step is unnecessary if no
bootable operating system exists.
If the Windows Setup window does not appear, the <Enter> key was not
pressed correctly. Turn the system power on and start again from the
beginning.
Express5800/GT-110d, GT-110d-S, R110d-1E, E110d-1 Installation Guide (Windows) 211
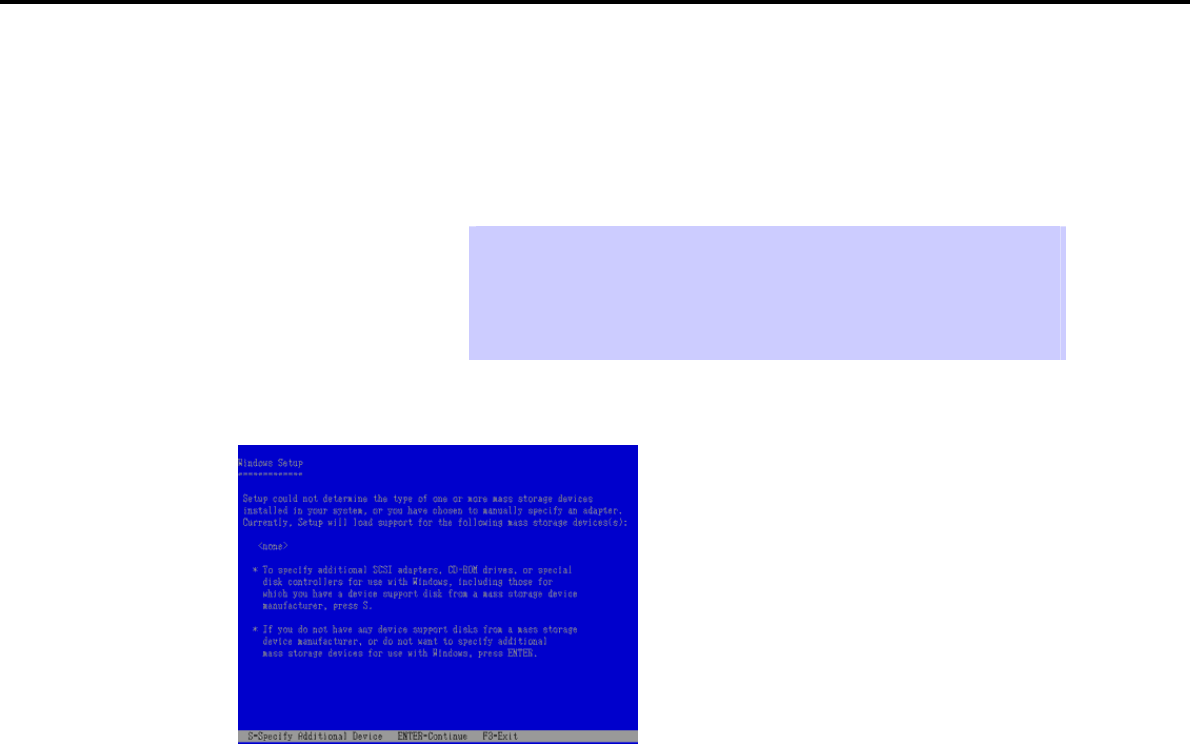
6. Setting Up Windows Server 2003
Chapter 1 Installing Windows
7. If a RAID Controller or optional Controller is used, press the <F6> key while either of the following
messages is displayed.
"Setup is inspecting your computer's hardware configuration" (on the top of the screen)
"Press F6 if you need to install a third party SCSI or RAID driver…" (on the bottom of the screen)
Tips You do not have to press the <F6> key if no RAID Controller or optional
Controller is used. Go to step 14.
Note that nothing changes on the screen even when the <F6> key is pressed.
If the OEM drivers list is not displayed, check the boot order of the Flash FDD on
the BIOS setup window.
8. The following message appears.
When using a RAID Controller: Press the <S> key and go to step 9.
When not using a RAID Controller: Go to step 10.
9. Select one of the following from the driver list, and then press the <Enter> key.
When using an onboard RAID Controller (LSI Embedded MegaRAID):
[LSI Embedded MegaRAID (Windows XP/2003)]
When using an N8103-129/130 RAID Controller:
[LSI MegaRAID SAS RAID Controller Driver (Server 2003 for 32-bit)]
When using an N8103-G128/128/134 RAID Controller:
[Promise SuperTrak EX SAS 6G RAID Controller-32bits platform]
The window shown in step 8 appears.
10. Check the connection status of other options.
When no optional Controller is used: Press the <Enter> key and go to step 14.
When N8103-107 is connected: Press the <S> key on the window in step 8, and go to step 11.
When no N8103-107 is connected: Go to step 12.
Express5800/GT-110d, GT-110d-S, R110d-1E, E110d-1 Installation Guide (Windows)
212
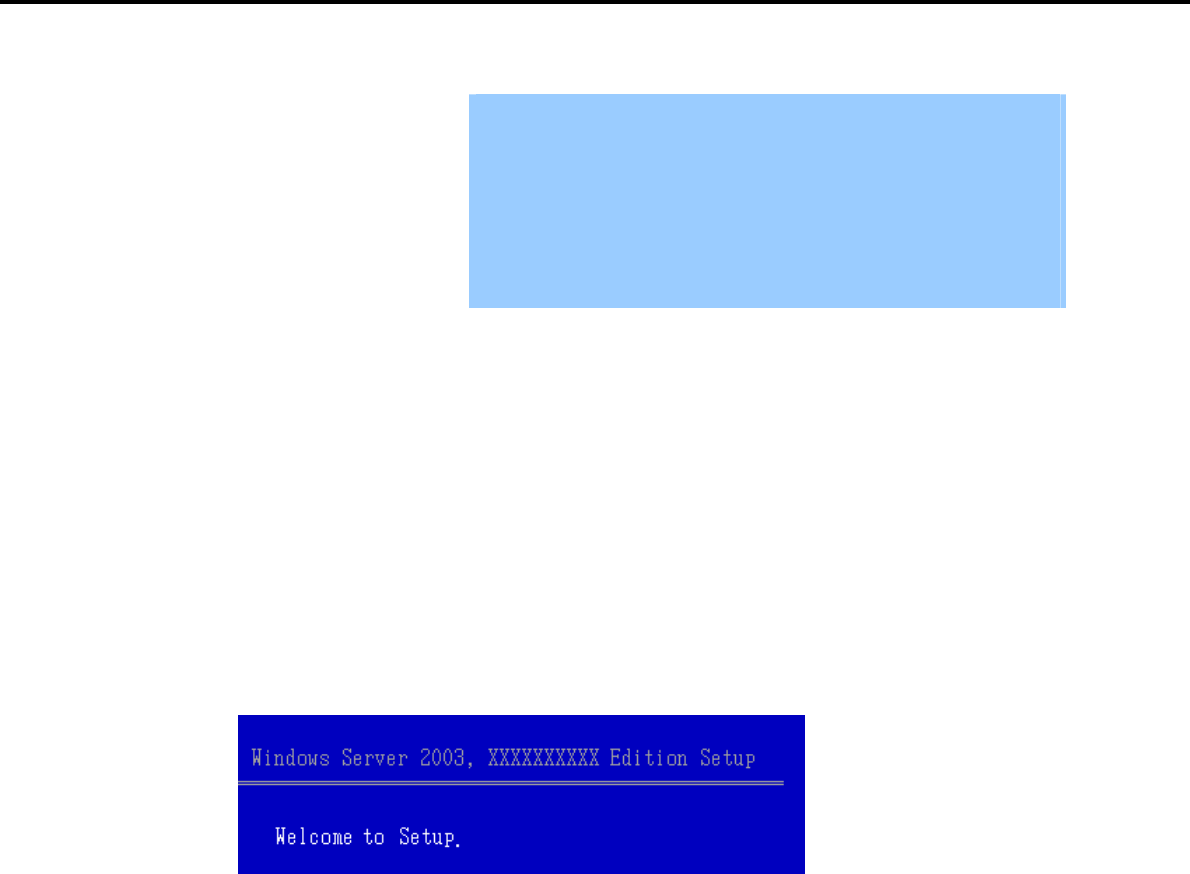
6. Setting Up Windows Server 2003
Chapter 1 Installing Windows
11. Select Adaptec Ultra320 SCSI Cards (Windows 32-bit), and then press the <Enter> key.
Important If the following message appears, press the <S> key to proceed.
The driver you provided seems to be newer than the Windows default
driver.
Windows already has a driver that you can use for “Adaptec Ultra
320 SCSI Cards (Windows 32-bit)”
Unless the device m
a
nufacturer prefers that you use the driver
on the floppy disk, you should use the driver in Windows.
The window shown in step 8 appears. Go to step 12.
12. Check the connection status of other options.
When N8103-104A is connected: Press the <S> key on the window in step 8, and go to step 13.
When no N8103-104A is connected: Press the <Enter> key and go to step 14.
13. Select LSI Fusion-MPT SAS Driver (Server 2003 32-bit), and then press the <Enter> key.
The window shown in step 8 appears. Press the <Enter> key and go to step 14.
14. If the following message appears, press the <Enter> key to start Windows setup.
Express5800/GT-110d, GT-110d-S, R110d-1E, E110d-1 Installation Guide (Windows) 213

6. Setting Up Windows Server 2003
Chapter 1 Installing Windows
Important During setup, the dialog box to specify the size of the partition on which
Windows Server 2003 is installed. Consider the partition size if you create a
new partition during installation.
1. The window to specify the partition size appears.
(* The windows below are examples. The actual display differs
depending on the system configuration.)
2. Create a partition on which Windows is installed.
When creating a new partition, the created partition is displayed as G:.
3. Delete the created partition G:, and create a new partition by using the
following procedure.
The operation might be different according to the installed language.
Delete it careFully according to the instructions on the screen.
(1) Select the created partition G:, and then press the <D> key.
(2) Read the displayed content, and then press the <L> key.
4. Create a partition on which Windows is installed again.
Partition creation is complete if the created partition is displayed as C:,
as shown below:
When installing Windows Server 2003 to a disk of over 2,097,152 MB (2 TB),
the partition size can only be set to 2,097,152 MB or less.
Tips The system automatically restarts after copying files.
You do not have to remove the Flash FDD or CD-ROM.
Do not remove the CD-ROM if you do not remove the Flash FDD.
Express5800/GT-110d, GT-110d-S, R110d-1E, E110d-1 Installation Guide (Windows)
214
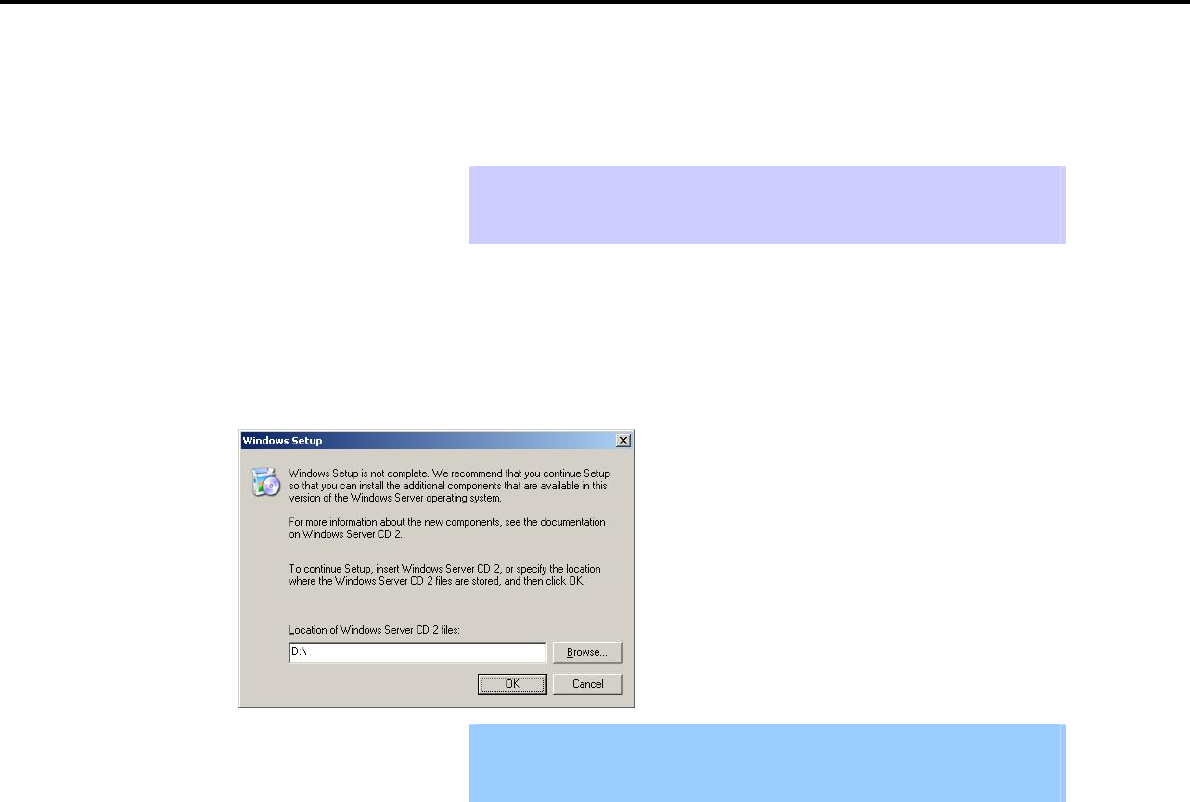
6. Setting Up Windows Server 2003
Chapter 1 Installing Windows
After this, follow the onscreen instructions to continue setup.
For details, refer to "First Step Guide" supplied with the OS.
Tips When a driver is selected from the drive list, a message indicating that the driver
has not passed logo testing might appear, but this does not affect the setup. Click
[OK] to continue setup.
15. The system automatically restarts after installing Windows Server 2003.
If installing Windows Server 2003: Go to step 19.
If installing Windows Server 2003 R2: Go to step 16.
16. If Windows Server 2003 R2 is installed, the Windows Setup window appears after login.
Important The Windows Setup window might not appear at this time. In this case, be
sure to install the Windows Server 2003 R2 DISC 2 according to the following
steps.
17. Insert the Windows Server 2003 R2 DISC 2 into the optical disk drive.
Check the settings, and then click [OK].
18. When the installation procedure completes, remove the Windows Server 2003 R2 Edition DISC 2 from
the optical disk drive and then restart the system.
19. Install the Starter Pack by referring to Chapter 1 (6.3 Installing the Starter Pack (Service Pack)).
20. Install drivers and specify detailed settings by referring to Chapter 1 (6.4 Setting Up Device Drivers).
21. Execute setup by following the instructions described in Chapter 1 (7. Setup for Solving Problems).
Setup with OS standard installer is now complete.
Express5800/GT-110d, GT-110d-S, R110d-1E, E110d-1 Installation Guide (Windows) 215

6. Setting Up Windows Server 2003
Chapter 1 Installing Windows
6.3 Installing the Starter Pack (Service Pack)
After installing Windows Server 2003, be sure to install the Starter Pack and Windows Server 2003 hotfix:
knowledge base (KB) 921411. The Starter Pack installs all drivers required by the Express5800 Series.
Important The Starter Pack and Windows Server 2003 hotfix: KB921411 must also be
installed in the following cases. Be sure to install the Starter Pack and
Windows x64 hotfix: KB921411 in the following cases:
The system configurations have changed (when internal option devices
have been added or removed)
If a dialog box prompting you to restart appears after changing system
configurations, click [No] and then update the system.
If the system was restored using a restore process
If a system has been restored using the backup tool
Be sure to install Service Pack 2 (CD-ROM) from the Starter Pack.
If you used a Windows Server 2003 CD-ROM including Service Pack 2 for
installation, you do not have to install Service Pack 2 again.
Note For Windows Server 2003 R2, make sure that Windows Server 2003 R2 is
displayed in the system properties window before applying a Service Pack.
Tips If you used the Windows Server 2003 CD-ROM including Service Pack 2 for
installation, you do not have to install Windows Server 2003 hotfix: KB921411.
Express5800/GT-110d, GT-110d-S, R110d-1E, E110d-1 Installation Guide (Windows)
216

6. Setting Up Windows Server 2003
Chapter 1 Installing Windows
6.3.1 Procedure to apply Windows Server 2003 hotfix: KB921411
(1) When using the EXPRESSBUILDER DVD
1. Log on to the system with a user account that has administrative privileges (such as an administrator).
2. Insert the EXPRESSBUILDER DVD into the optical disk drive.
Tips If you are installing with the Windows Server 2003 CD-ROM, which contains
Service Pack 2, proceed to step 8.
3. Select Run from the Start menu, and then execute the following command:
Optical disk drive letter:\020\win\winnt\dotnet\qfe\enu\kb921411.exe
4. When the following message appears, click [OK].
After this, continue installation according to the onscreen messages.
5. When the following message appears, be sure to click [Finish] to restart the system.
Note If the EXPRESSBUILDER DVD is inserted, remove it immediately.
6. Log on to the system with a user account that has administrative privileges (such as an administrator).
7. Insert the EXPRESSBUILDER DVD into the optical disk drive.
Express5800/GT-110d, GT-110d-S, R110d-1E, E110d-1 Installation Guide (Windows) 217
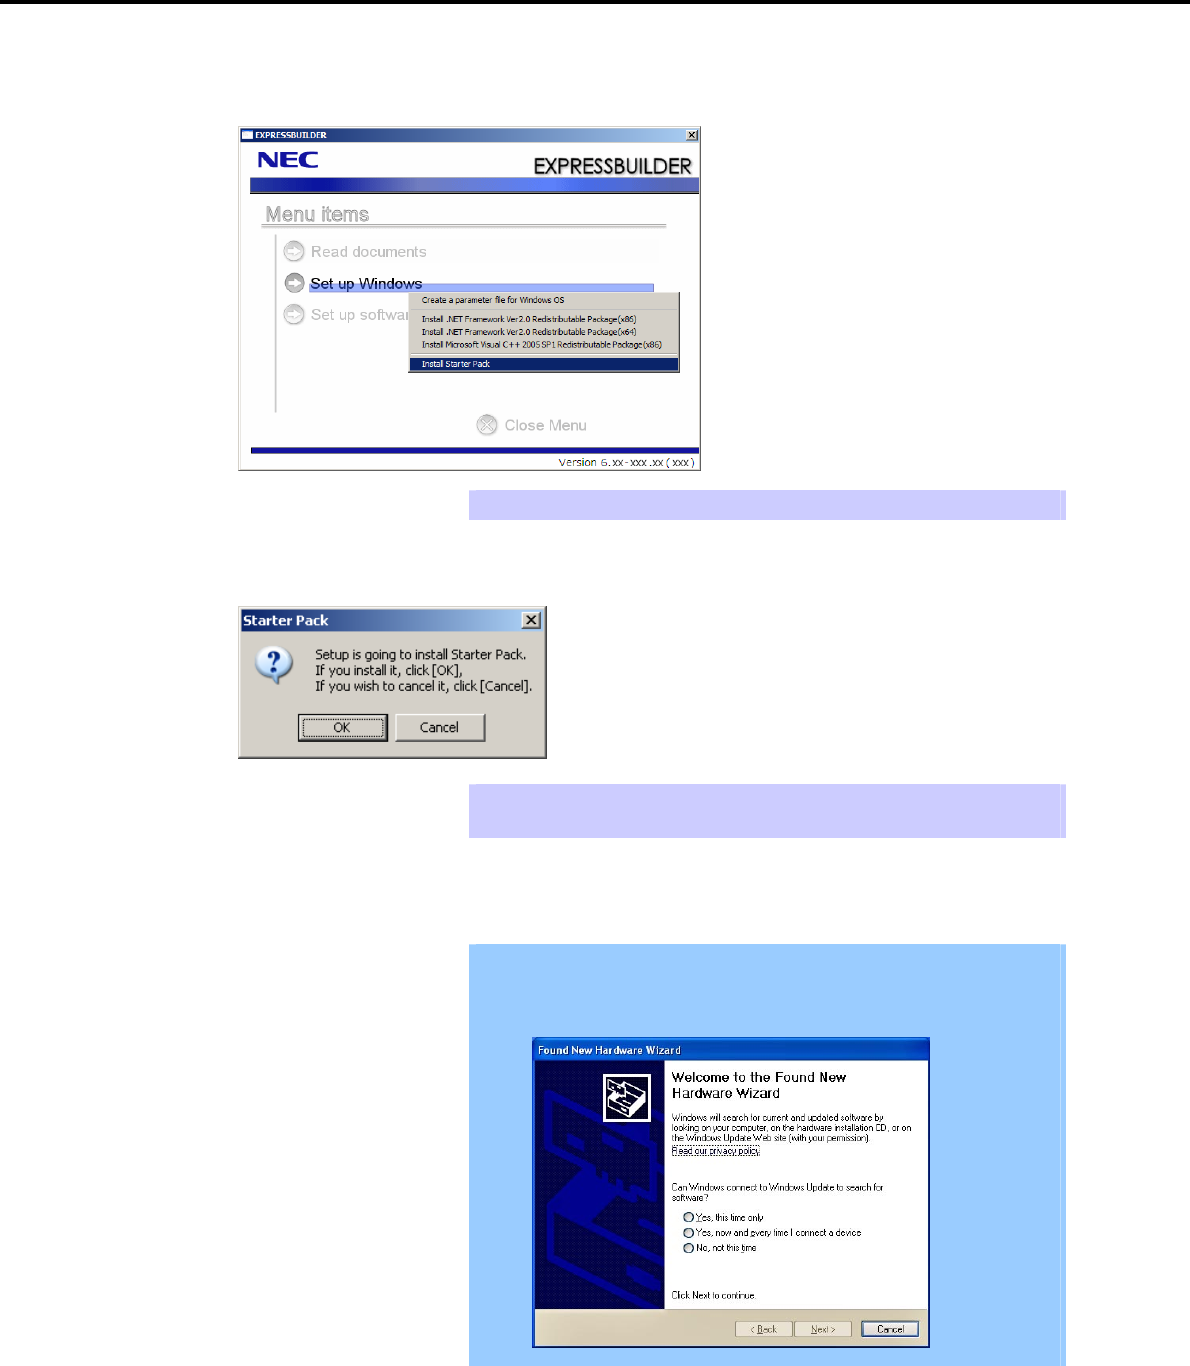
6. Setting Up Windows Server 2003
Chapter 1 Installing Windows
8. When the menu window appears, click Set up Windows to open the short-cut menu and then select
Install Starter Pack.
Tips The short-cut menu also appears by right-clicking on the menu window.
9. Read the setup message when it appears, and then click [OK].
Tips Wait until the message appears without attempting any further operation. This may
take several minutes.
Starter Pack installation starts.
Important The dialog box shown below might appear while installing the Starter Pack,
but this does not affect the installation. This dialog box disappears after
several seconds. Do not click [Cancel].
Express5800/GT-110d, GT-110d-S, R110d-1E, E110d-1 Installation Guide (Windows)
218
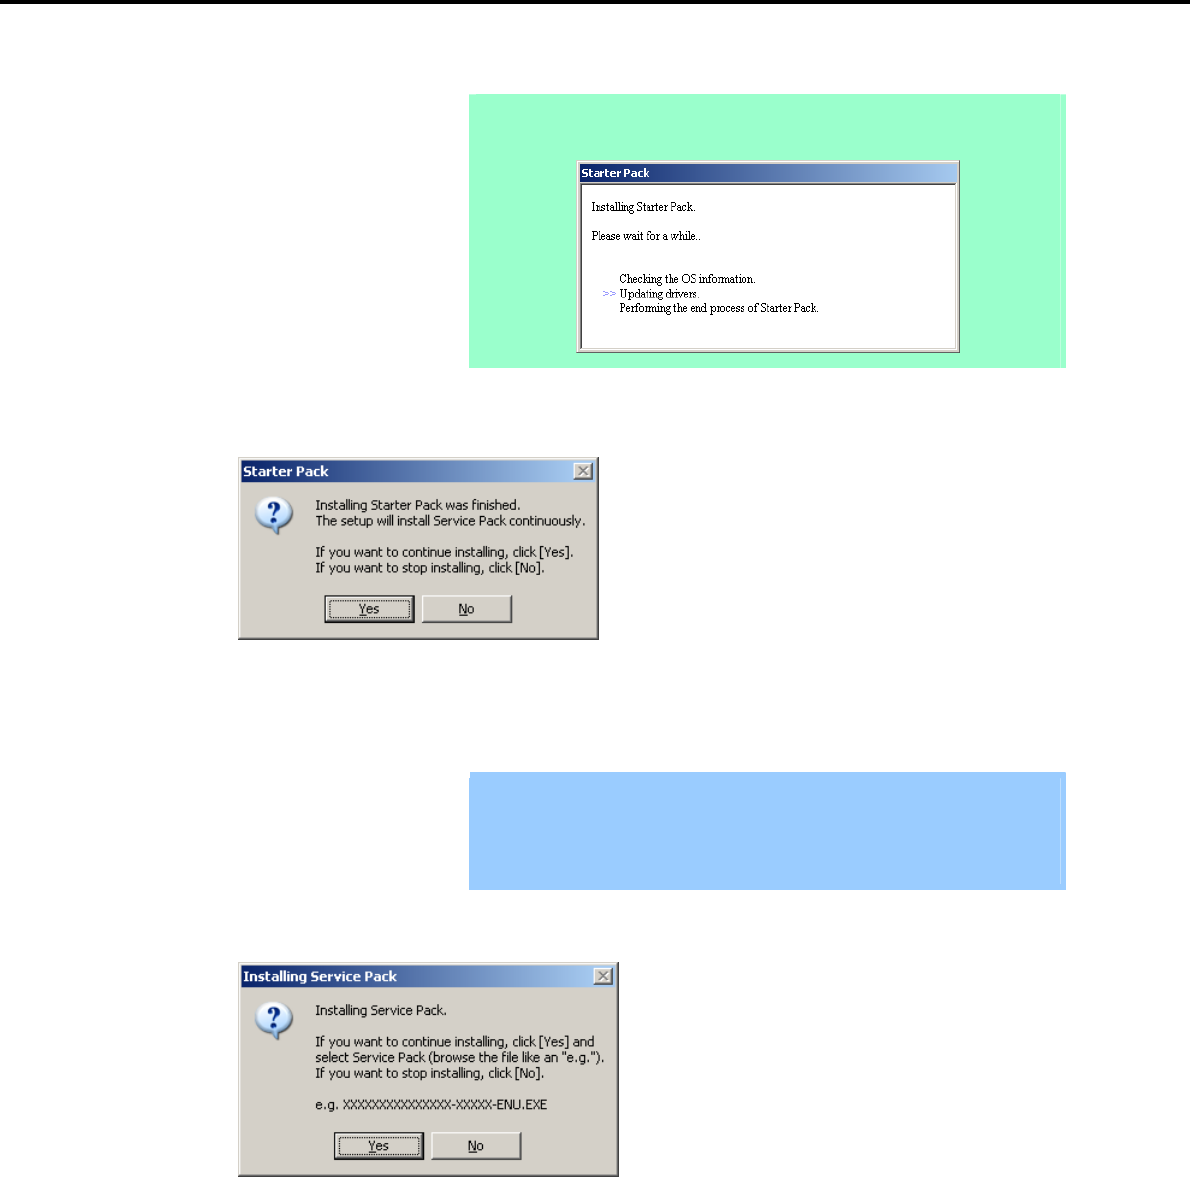
6. Setting Up Windows Server 2003
Chapter 1 Installing Windows
Note The following progress message will appear while the Starter Pack is being
installed. Wait a moment until the update is complete.
10. When the following message appears, Starter Pack installation is complete.
To apply the Service Pack, click [Yes] and go to step 11.
To not apply the Service Pack, click [No] and go to step 13.
Important If you are using OS installation media that does not contain Service Pack 2,
click [Yes]. You must apply Service Pack 2.
If the Starter Pack is being reinstalled in an environment where Service Pack
2 has already been installed, you do not need to reinstall Service Pack 2.
11. When the following message appears, click [Yes].
Express5800/GT-110d, GT-110d-S, R110d-1E, E110d-1 Installation Guide (Windows) 219

6. Setting Up Windows Server 2003
Chapter 1 Installing Windows
12. When the following dialog box appears, specify the Service Pack to apply and then click [Open].
Tips If you use a Service Pack CD-ROM, when the dialog box above appears, remove
the EXPRESSBUILDER DVD from the optical disk drive and then insert the
Service Pack CD-ROM.
The extension of the Service Pack applicable to the Starter Pack is *.exe or
*.msu. No other Service Pack files can be installed.
Installation of the specified Service Pack starts. When the Service Pack installation completion window
appears, restart the system.
13. When the following message prompts you to restart the computer, click [Yes].
Note If the EXPRESSBUILDER DVD or Service Pack CD-ROM is in the optical disk
drive, remove it immediately.
Installation of Starter Pack is now complete.
Express5800/GT-110d, GT-110d-S, R110d-1E, E110d-1 Installation Guide (Windows)
220
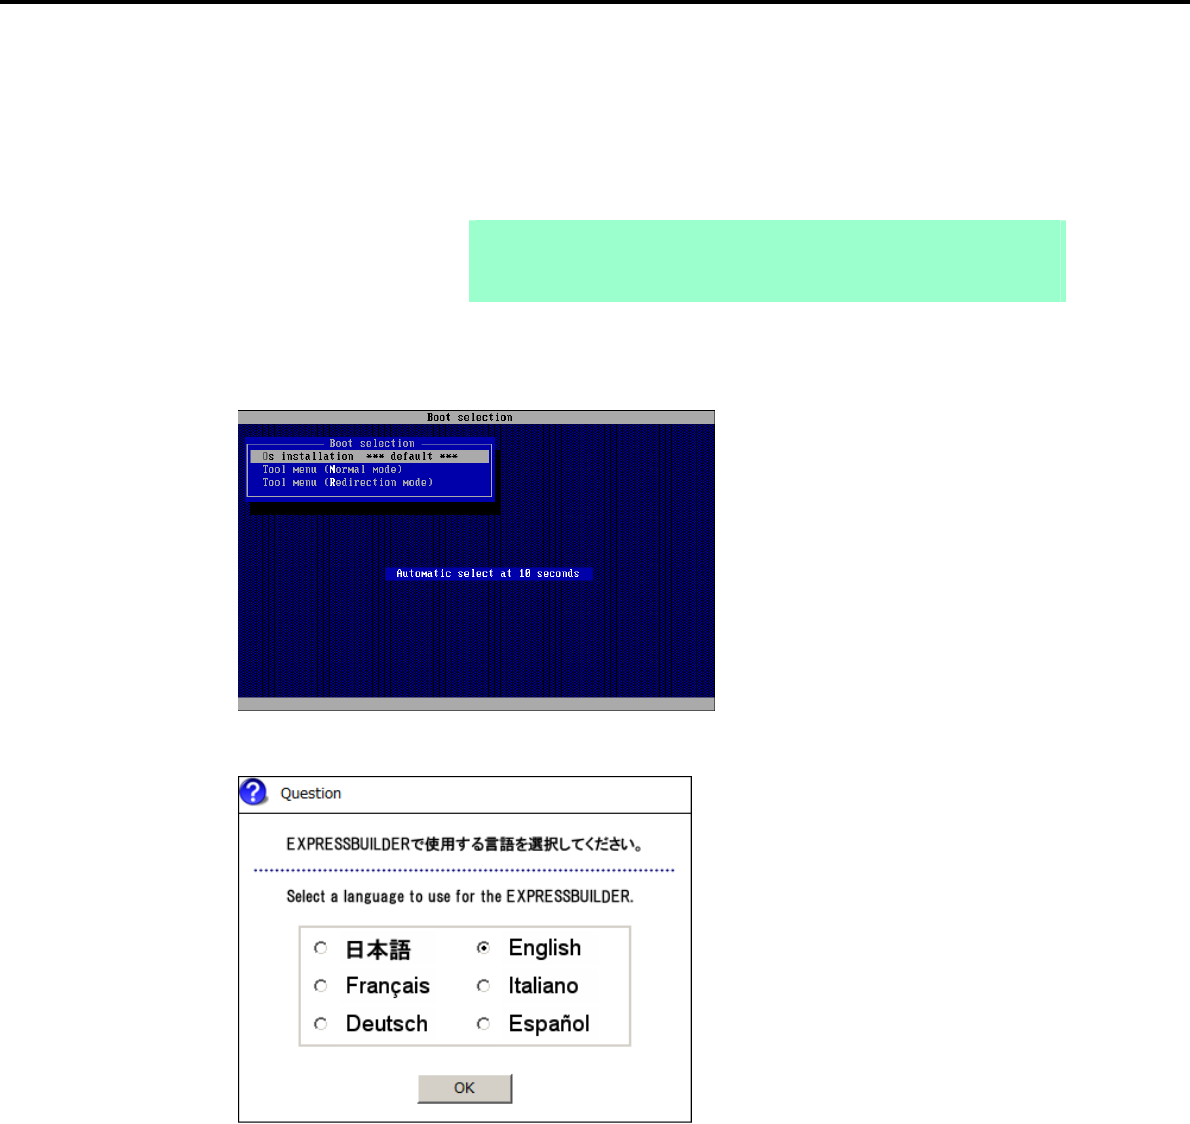
6. Setting Up Windows Server 2003
Chapter 1 Installing Windows
(2) When using Internal Flash Memory
1. After installing the operating system, the system will restart.
2. Use the Internal Flash Memory to run EXPRESSBUILDER.
When "Press <F2> Setup, <F3> Internal Flash Memory, <F4> ROM Utility, <F12> Network" appears
below the POST window, press the <F3> key.
Note At this time, be sure to remove the DVD from the optical disk drive.
If running from the OS, restart, and then press the <F3> key on the POST
window.
3. When the following message appears, select Os installation *** default ***.
You will automatically advance to the next window, with no need for further input.
4. Select English on the language selection window, and then click [OK].
Express5800/GT-110d, GT-110d-S, R110d-1E, E110d-1 Installation Guide (Windows) 221

6. Setting Up Windows Server 2003
Chapter 1 Installing Windows
5. When the Windows PE software license agreement window appears, click [Yes].
6. Select Invoke various utilities from the top menu, and then click [Next].
7. When the utility start menu appears, select Install Starter Pack to installed Windows and then click
[Next].
Express5800/GT-110d, GT-110d-S, R110d-1E, E110d-1 Installation Guide (Windows)
222
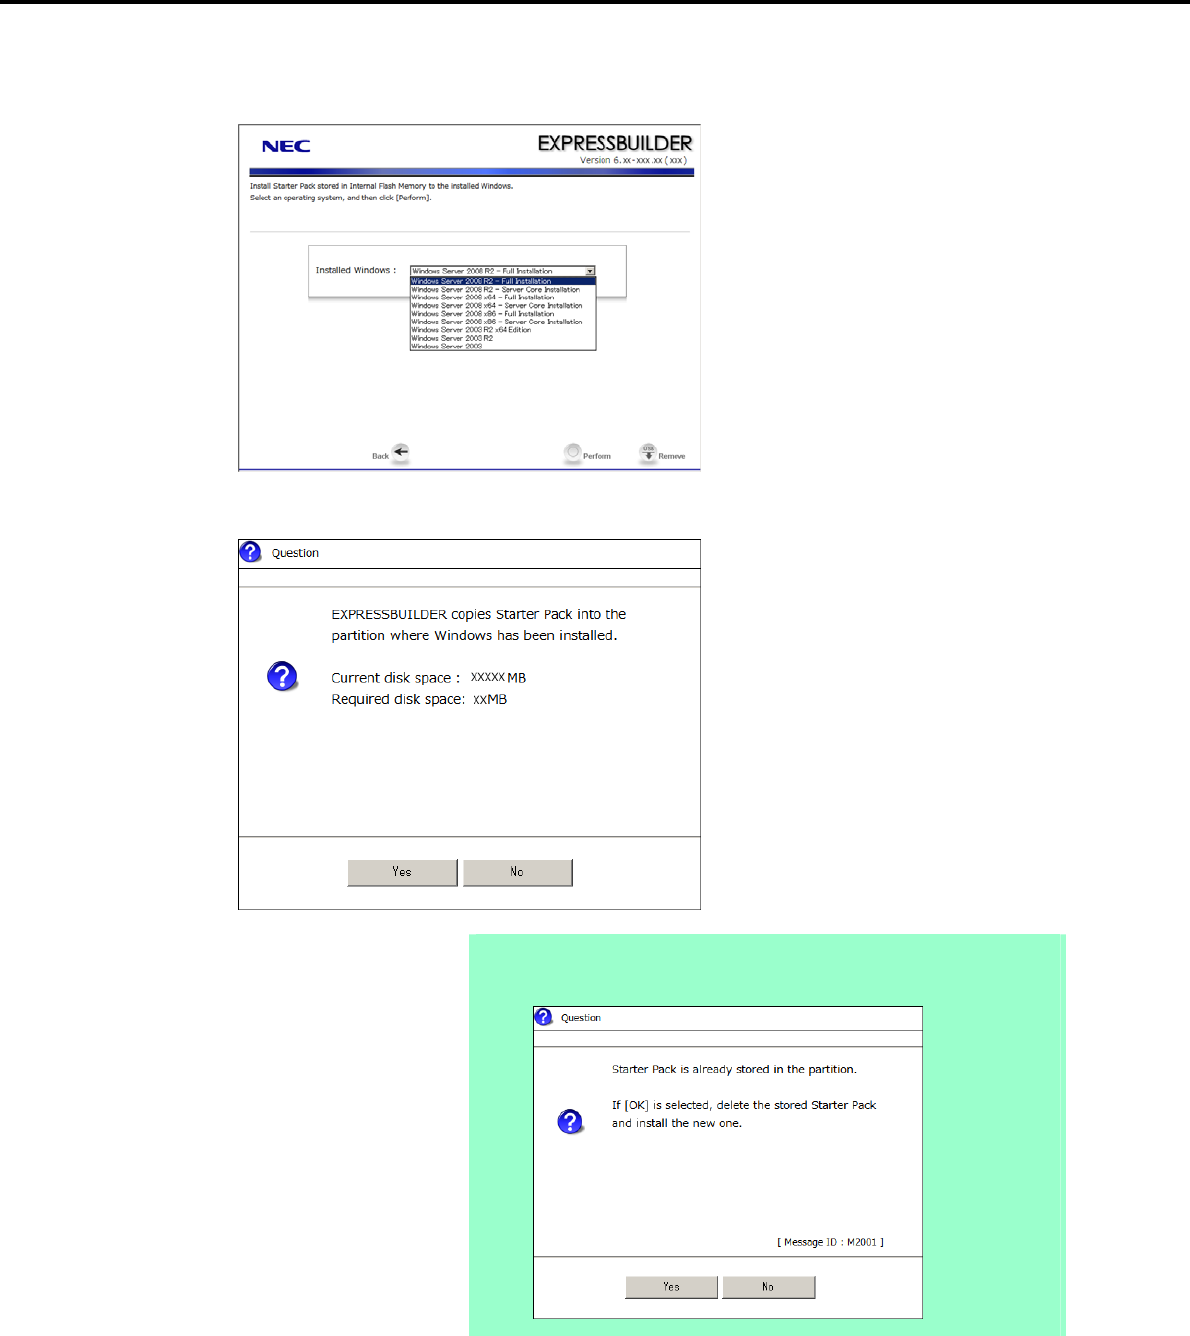
6. Setting Up Windows Server 2003
Chapter 1 Installing Windows
8. When the window for selecting Windows to install the Starter Pack appears, select the installed Windows
from the drop-down list, and then click [Perform].
9. When the following confirmation window appears, read the content and then click [Yes].
Note The following window will appear if the Starter Pack is already installed.
Read the message, and then click [Yes].
Express5800/GT-110d, GT-110d-S, R110d-1E, E110d-1 Installation Guide (Windows) 223

6. Setting Up Windows Server 2003
Chapter 1 Installing Windows
10. After copying the module, the following window appears. Click [Close].
The server then restarts.
Note You do not need to press the <F3> key at this time.
11. Log on to the system with a user account that has administrative privileges (such as an administrator).
Important The screen as shown below appears when Windows starts. Do not click [OK]
on this screen. Proceed to Step 12.
If you click [OK], "KB921411" will not be applied.
Go to Step 16, and click [Cancel] on the screen to install Starter Pack. Then,
perform from Step 1 of (2) When using Internal Flash Memory.
Note If you are installing with the Windows Server 2003 CD-ROM, which contains
Service Pack 2, go to step 15.
12. Select Run from the Start menu, and then execute the following command:
System drive letter:\StartPKG\dotnet\qfe\enu\kb921411.exe
Express5800/GT-110d, GT-110d-S, R110d-1E, E110d-1 Installation Guide (Windows)
224
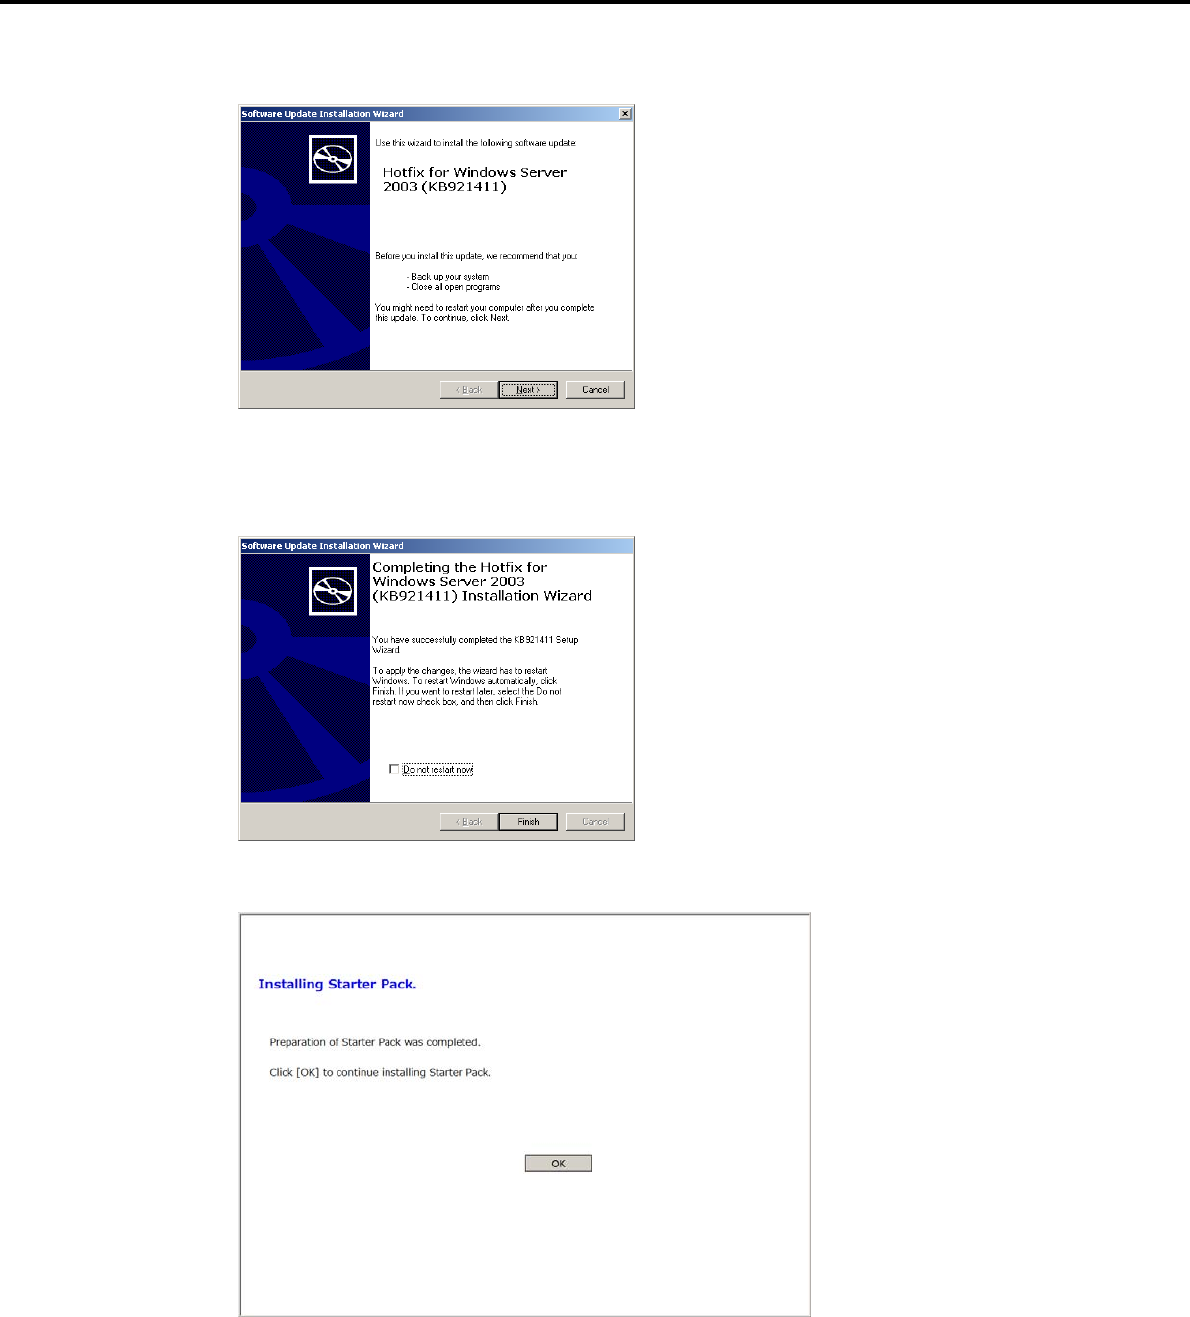
6. Setting Up Windows Server 2003
Chapter 1 Installing Windows
13. When the following message appears, click [Next].
After this, continue installation according to the onscreen messages.
14. When the following message appears, you must click [Finish] to restart the system.
15. After Windows starts, the following window appears. Click [OK].
Express5800/GT-110d, GT-110d-S, R110d-1E, E110d-1 Installation Guide (Windows) 225
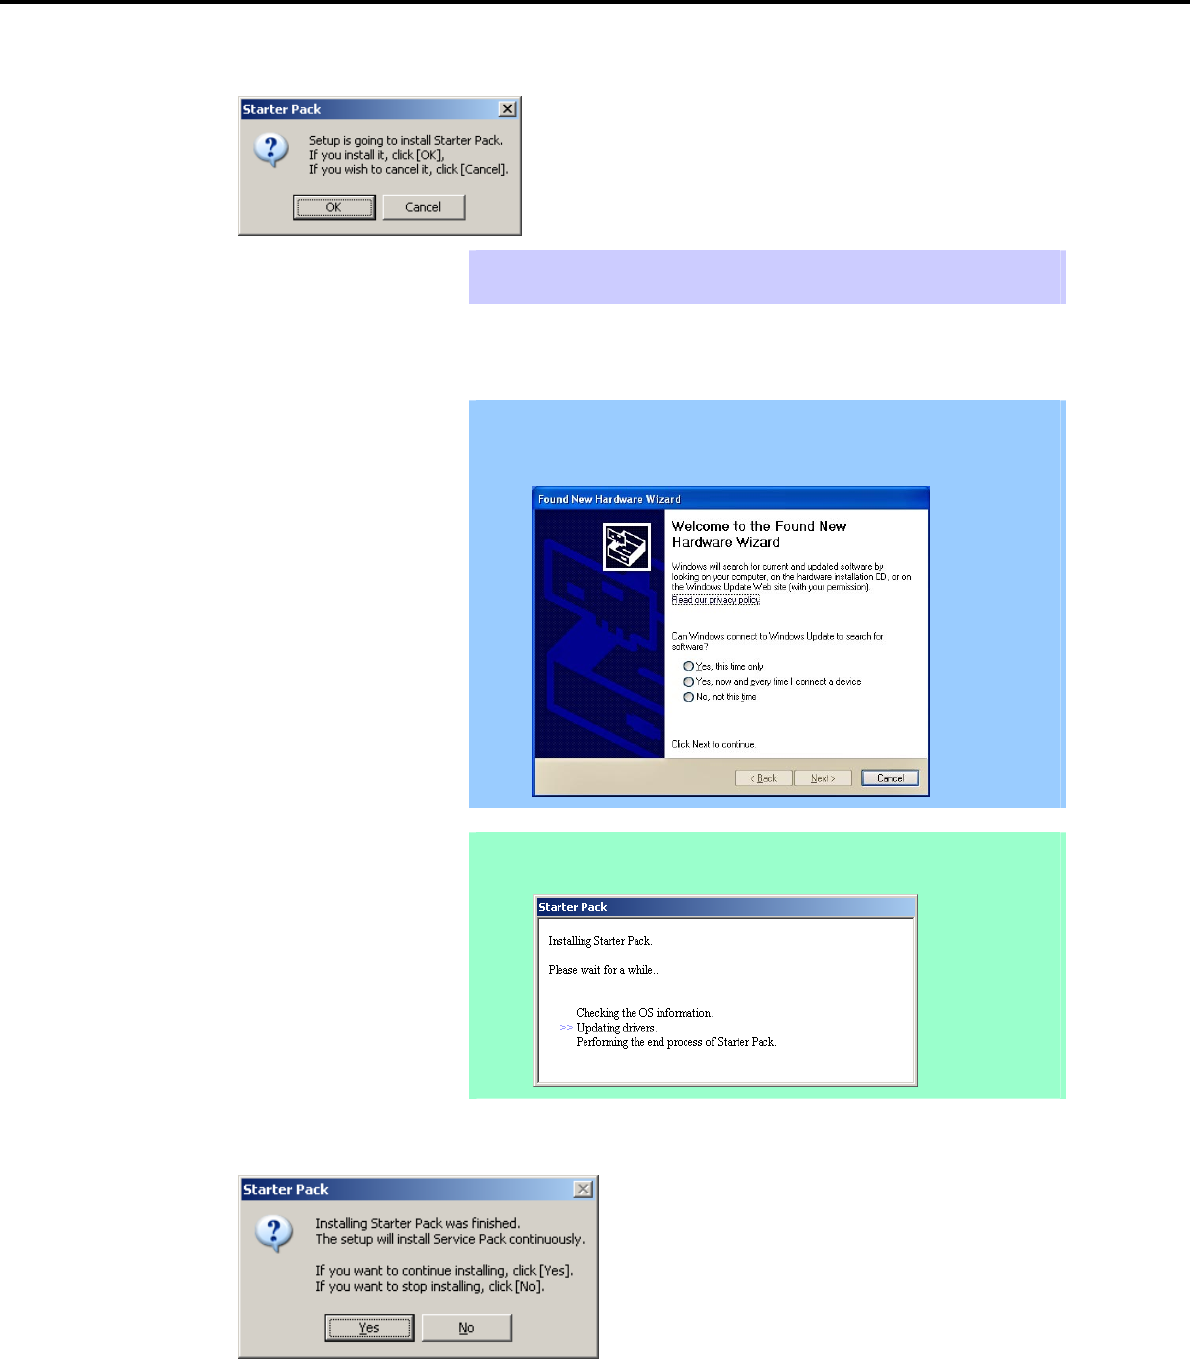
6. Setting Up Windows Server 2003
Chapter 1 Installing Windows
16. Read the message that appears, and then click [OK].
Tips Although it may take several minutes for the above window to appear, wait for the
window to appear without attempting any further operation.
Installation of the Starter Pack starts.
Important The dialog box shown below might appear while installing the Starter Pack,
but this does not affect the installation. This dialog box disappears after
several seconds. Do not click [Cancel].
Note The following progress message appears while the Starter Pack is being installed.
Wait a moment until the update is complete.
When the following message appears, Starter Pack installation is complete.
Express5800/GT-110d, GT-110d-S, R110d-1E, E110d-1 Installation Guide (Windows)
226
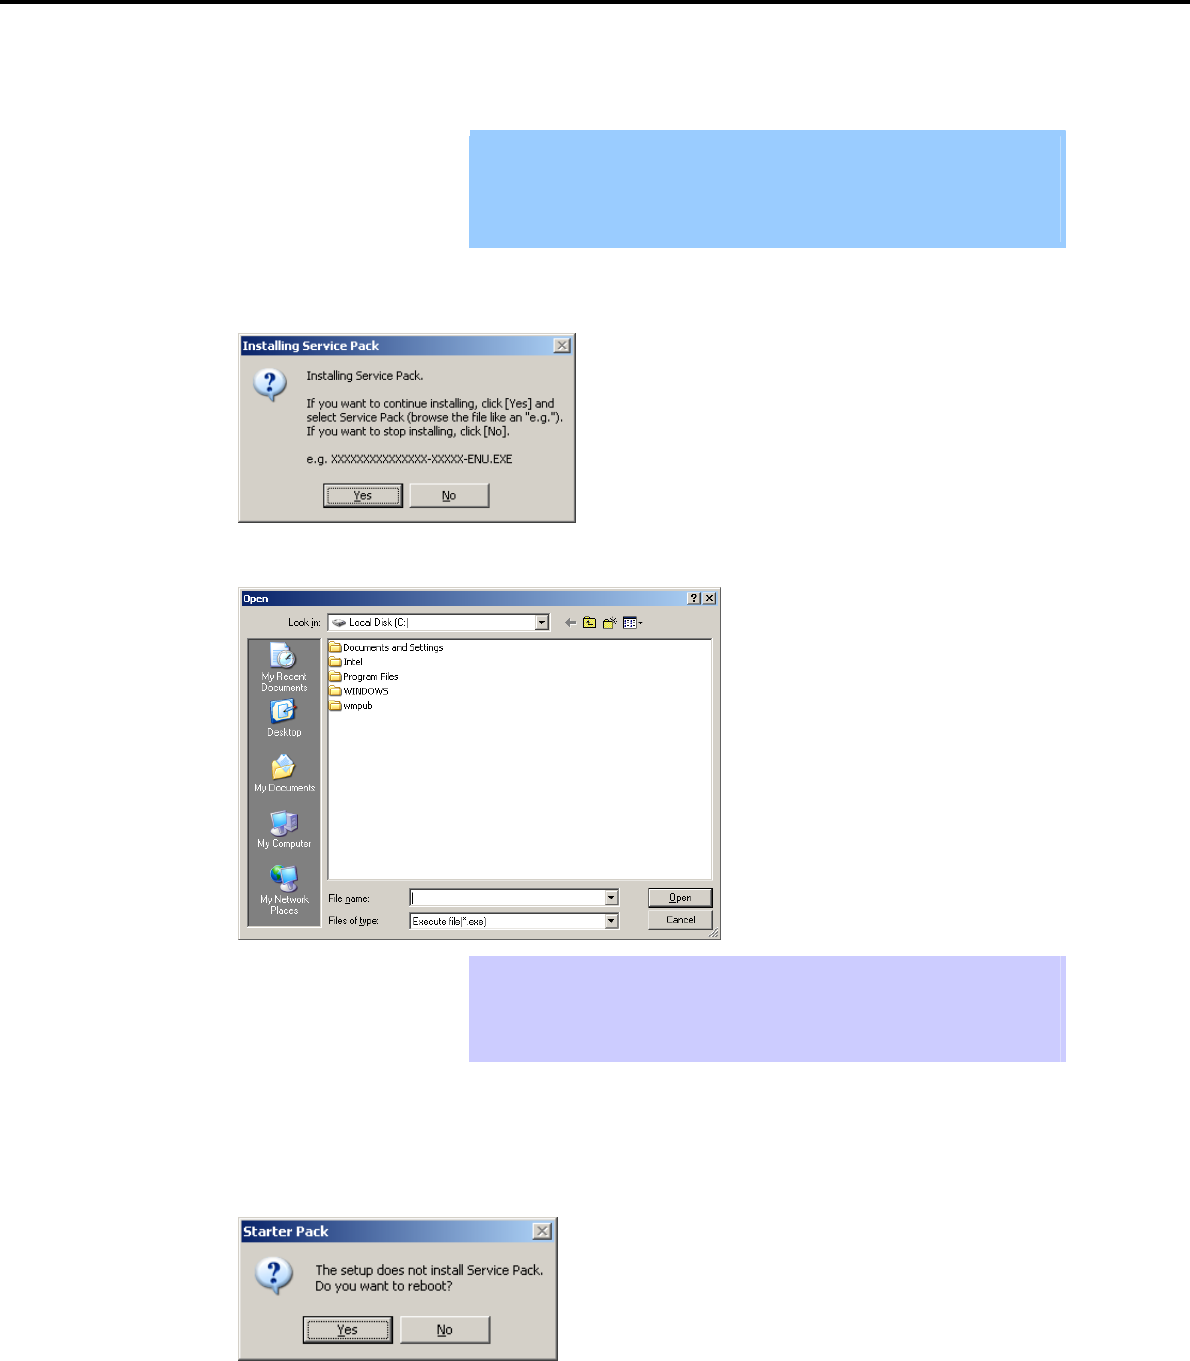
6. Setting Up Windows Server 2003
Chapter 1 Installing Windows
To apply the Service Pack, click [Yes] and go to step 17.
To not apply the Service Pack, click [No] and go to step 19.
Important If you are using OS installation media that does not contain Service Pack 2,
click [Yes]. You must apply Service Pack 2.
If the Starter Pack is being reinstalled in an environment where Service Pack
2 has already been installed, you do not need to reinstall Service Pack 2.
17. When the following message appears, click [Yes].
18. When the following dialog box appears, specify the Service Pack to install and then click [Open].
Tips When the window above appears, insert the Service Pack CD-ROM into the
optical disk drive.
The extension of the Service Pack applicable to the Starter Pack is *.exe or
*.msu. No other Service Pack files can be installed.
Installation of the specified Service Pack starts. When the Service Pack installation completion window
appears, restart the system.
19. When the following message prompts you to restart the system, click [Yes].
Installation of the Starter Pack is now complete.
Express5800/GT-110d, GT-110d-S, R110d-1E, E110d-1 Installation Guide (Windows) 227

6. Setting Up Windows Server 2003
Chapter 1 Installing Windows
6.3.2 Recovery process
If Windows Server 2003 hotfix: KB921411 is not applied before installing the Starter Pack, "!" might be
displayed on the USB root hub in the Device Manager window.
In this case, apply Windows Server 2003 hotfix: KB921411 and install the Starter Pack according to the
procedure below.
1. Start Windows Explorer, and then select Folder Options from the Tool menu.
2. In the Advanced settings area on the View tab, select the Show hidden files and folders option
button for Hidden files and folders under Files and Folders.
3. Clear the following check boxes under Files and Folders, and then click [OK].
Hide extensions for known file types
Hide protected operating system files (recommended)
When the message "You have chosen to display protected operating system files…" appears, click
[Yes].
4. Check the files.
Open the drivers folder under System drive:\WINDOWS\system32, and make sure that
usbhub.sys and usbport.sys are stored in the folder.
If a file is missing, copy the target file(s) according to the procedure below.
(1) Open the dllcache folder under System drive:\WINDOWS\system32.
(2) Copy the usbhub.sys and/or usbport.sys to the drivers folder under System
drive:\WINDOWS\system32.
5. Restart the system.
6. Refer to Chapter 1 (6.3.1 Procedure to apply Windows Server 2003 hotfix: KB921411) to install the
Starter Pack.
7. Restart the system.
The recovery process is now complete.
Note If the system files and hidden files still do not display, select the check boxes that
were cleared in step 3.
Express5800/GT-110d, GT-110d-S, R110d-1E, E110d-1 Installation Guide (Windows)
228

6. Setting Up Windows Server 2003
Chapter 1 Installing Windows
6.4 Setting Up Device Drivers
For details regarding the installation and setup of an optional device driver, refer to the manual supplied with
the optional device.
6.4.1 Installing the LAN and BACS (teaming) drivers
(1) LAN and BACS drivers
If the OS standard installer is used for setup, install the Starter Pack to install the LAN and BACS driver.
Important To use the BACS, Microsoft .NET Framework Version 2.0 must be installed.
To install Microsoft .NET Framework 2.0, insert the EXPRESSBUILDER DVD
to the optical disk drive, select Setup Windows and then Install the .NET
Framework Ver2.0 Redistributable Package(x86) from the autorun menu.
Note To change the LAN or BACS driver settings, log on to the system from a local
console using an administrator's account. Remotely changing the settings by
using the operating system’s remote desktop feature is not supported.
Be sure to select the Internet Protocol (TCP/IP) check box when specifying an
IP address.
(2) Optional LAN board
This server supports the following optional LAN boards.
Optional LAN boards: N8104-134
If !Ethernet Controller is displayed under Other devices in the Device Manager window after an optional LAN
board is added, you must install the driver using the following procedure:
1. Insert the EXPRESSBUILDER DVD into the optical disk drive.
If an autorun menu appears, close the menu window.
Tips You do not have to insert the EXPRESSBUILDER DVD if the Starter Pack was
installed from the Internal Flash Memory.
2. Open the Device Manager window, and then double-click the !Ethernet Controller icon under Other
devices.
The Ethernet Controller Properties dialog box appears.
3. Click [Update Driver…] on the Driver tab.
The Hardware Update Wizard window appears.
4. Select the No, not this time option button, and then click [Next].
5. Select the Install from a list or specific location (Advanced) option button, and then click [Next].
Express5800/GT-110d, GT-110d-S, R110d-1E, E110d-1 Installation Guide (Windows) 229

6. Setting Up Windows Server 2003
Chapter 1 Installing Windows
6. Select the Search for the best driver in these locations option button, select the Include this location
in the search check box, and then enter the following path. Then, click [Next].
When using the EXPRESSBUILDER DVD
When applying the driver to !Ethernet Controller under Other devices in the Device Manager window:
Optical disk drive letter:\020\win\winnt\dotnet\lan\bcom\drvinst\06020401\w2k3_w2k8\b06bdrv
When applying the driver to NDIS Client For Broadcom NetXtreme II GigE under Other devices in the
Device Manager window:
Optical disk drive letter:\020\win\winnt\dotnet\lan\bcom\drvinst\06020401\w2k3_w2k8\l4nd_w2k3
If the Starter Pack was installed from the Internal Flash Memory
When applying the driver to !Ethernet Controller under Other devices in the Device Manager window:
System drive letter:\StartPKG\dotnet\lan\bcom\drvinst\06020401\w2k3_w2k8\b06bdrv
When applying the driver to NDIS Client For Broadcom NetXtreme II GigE under Other devices in the
Device Manager window:
System drive letter:\StartPKG\dotnet\lan\bcom\drvinst\06020401\w2k3_w2k8\l4nd_w2k3
Note Be sure to clear the Search removable media (floppy, CD-ROM…) check box.
7. Click [Finish].
8. NDIS Client For Broadcom NetXtreme II GigE is displayed under Other devices in the Device
Manager window. Double-click this icon to open the NDIS Client For Broadcom NetXtreme II GigE
Properties dialog box.
9. Perform steps 3 to 7 again.
10. After applying the LAN driver to all N8104-134 network adapters, eject the EXPRESSBUILDER DVD
from the optical disk drive, and then restart the system.
Driver installation is now complete.
Important After an additional N8104-134 is connected, !Ethernet Controller might not
be displayed under Other devices in the Device Manager window. In that
case, the LAN driver has been automatically installed. Confirm that the
N8104-134 network adapter is displayed under Network adapters in the
Device Manager window.
After the N8104-134 LAN driver has been installed, the following devices
might be displayed with "!" under SCSI and RAID Controllers in the Device
Manager window. They can be deleted from the list by performing the
procedure shown in Chapter 1 (6.4.2 Setting up LAN drivers) – (2) Setting
the TCP/iSCSI Offload Engine (if using N8104-134).
! Broadcom BCM5709C NetXtreme II GigE iSCSI Adapter
! iSCSI Client For Broadcom NetXtreme II GigE
Express5800/GT-110d, GT-110d-S, R110d-1E, E110d-1 Installation Guide (Windows)
230

6. Setting Up Windows Server 2003
Chapter 1 Installing Windows
(3) Network adapter name
After installing the LAN drivers, the following network adapter names will be displayed by the Device Manager or
BACS.
Network adapters for the standard configuration
Broadcom NetXtreme Gigabit Ethernet #xx*
If connecting with an optional LAN board:
[N8104-134] Broadcom BCM5709C NetXtreme II GigE (NDIS VBD Client) #xx*
* If there are adapters with the same name, a different identification number will be assigned to xx.
Important The ID for N8104-134 might be a number of two or more digits. This is due to
the LAN driver specifications and not an error. This number cannot be
changed.
Express5800/GT-110d, GT-110d-S, R110d-1E, E110d-1 Installation Guide (Windows) 231

6. Setting Up Windows Server 2003
Chapter 1 Installing Windows
6.4.2 Setting up LAN drivers
Important About WOL
- WOL is supported by the standard network adapters only.
- The Change of WOL setting is not supported.
- WOL from a shutdown is only supported if the system is started using
MagicPacket.
- WOL from hibernation is not supported.
Tips MagicPacket refers to a packet dedicated to WOL.
(1) Setting link speed
The transfer rate and duplex mode of the network adapter must be the same as those of the switching hub.
Follow the procedure below to specify the transfer rate and duplex mode.
1. Open the Device Manager.
2. Expand Network Adapters, and then double-click the name of the network adapter you want to set.
The properties of the network adapter will be displayed.
3. Select the Advanced tab, and then set the Speed & Duplex values to the same as those of the
switching hub.
4. Click [OK] in the Network Adapter Properties dialog box.
5. Restart the system.
The link speed setting is now complete. Proceed to set up WOL.
(2) Setting the TCP/iSCSI Offload Engine (if using N8104-134)
If using N8104-134 with the server, TCP/iSCSI Offload Engine must be set to off.
Follow the procedure below to set it.
1. Double-click the Broadcom Control Suite3 icon on the Control Panel window.
Broadcom Advanced Control Suite3 starts.
2. Select Device Management under Explorer View, and then N8104-134 network adapter from System
device (VBD).
3. Select the Configurations tab, and then expand Resource Reservations.
4. Clear the iSCSI Offload Engine and TCP Offload Engine check boxes (if selected) under
Pre-Allocated Resource, and then click [Apply].
Tips If TCP Offload Engine does not exist, proceed to the next step.
5. Complete steps 2 to 4 for each N8104-134 network adapter.
6. Restart the system.
TCP/iSCSI Offload Engine setup is now complete.
Express5800/GT-110d, GT-110d-S, R110d-1E, E110d-1 Installation Guide (Windows)
232

6. Setting Up Windows Server 2003
Chapter 1 Installing Windows
6.4.3 Setting up team/LiveLink
Important You must set up LiveLink when setting up a team. Teams that are not
configured for LiveLink are not supported.
When deleting the team, refer to Chapter 1 (6.4.3 Setting up team/LiveLink)
- (4) Procedure for deleting team. When replacing the motherboard or a
LAN board, follow these steps to remove the team and create it again after
replacement.
Be sure to specify the same Jumbo Mtu (Jumbo Packet) setting to all the
adapters that compose a team
(1) Team types
The following team types are supported.
Smart Load Balancing and Failover (without Standby Member)
All adapters that compose the team perform communication.
If a communication failure occurs on an adapter, other adapters that compose the team continue the
communication.
When the adapter on which the communication failure occurred recovers, it joins the team again and
resumes the communication.
Smart Load Balancing (Auto-Failback Disable) (with Standby Member)
Among the adapters that compose the team, primary adapters except the standby member perform
communication.
If a communication failure occurs, the standby member continues the communication.
When the adapter on which the communication failure occurred recovers, it joints the team again and
the standby adapter returns to the standby state.
(2) LiveLink
LiveLink is a function that detects communication route failures of adapters.
It periodically investigates the communication status of specified destinations (IP address).
Link packets are sent from each adapter within a team.
If a response to the transmission of a link packet within the specified range is not detected, it is identified as a
communication route failure and adapter communication is stopped.
When a response to the submission of a link packet is detected, communication LiveLink identifies
communication as having been recovered, and communication using that adapter automatically resumes.
Important You must set up LiveLink when you create a team.
Express5800/GT-110d, GT-110d-S, R110d-1E, E110d-1 Installation Guide (Windows) 233

6. Setting Up Windows Server 2003
Chapter 1 Installing Windows
(3) Setting up team/LiveLink
Important The team must be composed of two adapters.
Possible combinations of network adapters that compose the team are as
follows.
Between standard network adapters.
Between N8104-134 adapters
A standard network adapter and an N8104-134 adapter
Tips To edit a team, right-click on the BACS team, and then select Edit TEAM.
Then refer to step 3 and later in Chapter 1 (6.4.3 Setting up team/LiveLink) - (3)
Setting up team/LiveLink to edit the team.
1. Double-click the Broadcom Control Suite3 icon on the Control Panel window.
Broadcom Advanced Control Suite3 starts.
2. Select Team Management from the left menu, right-click the adapter to be used for the team, and then
select Create a Team from the short-cut menu.
The Broadcom Teaming wizard appears.
Express5800/GT-110d, GT-110d-S, R110d-1E, E110d-1 Installation Guide (Windows)
234
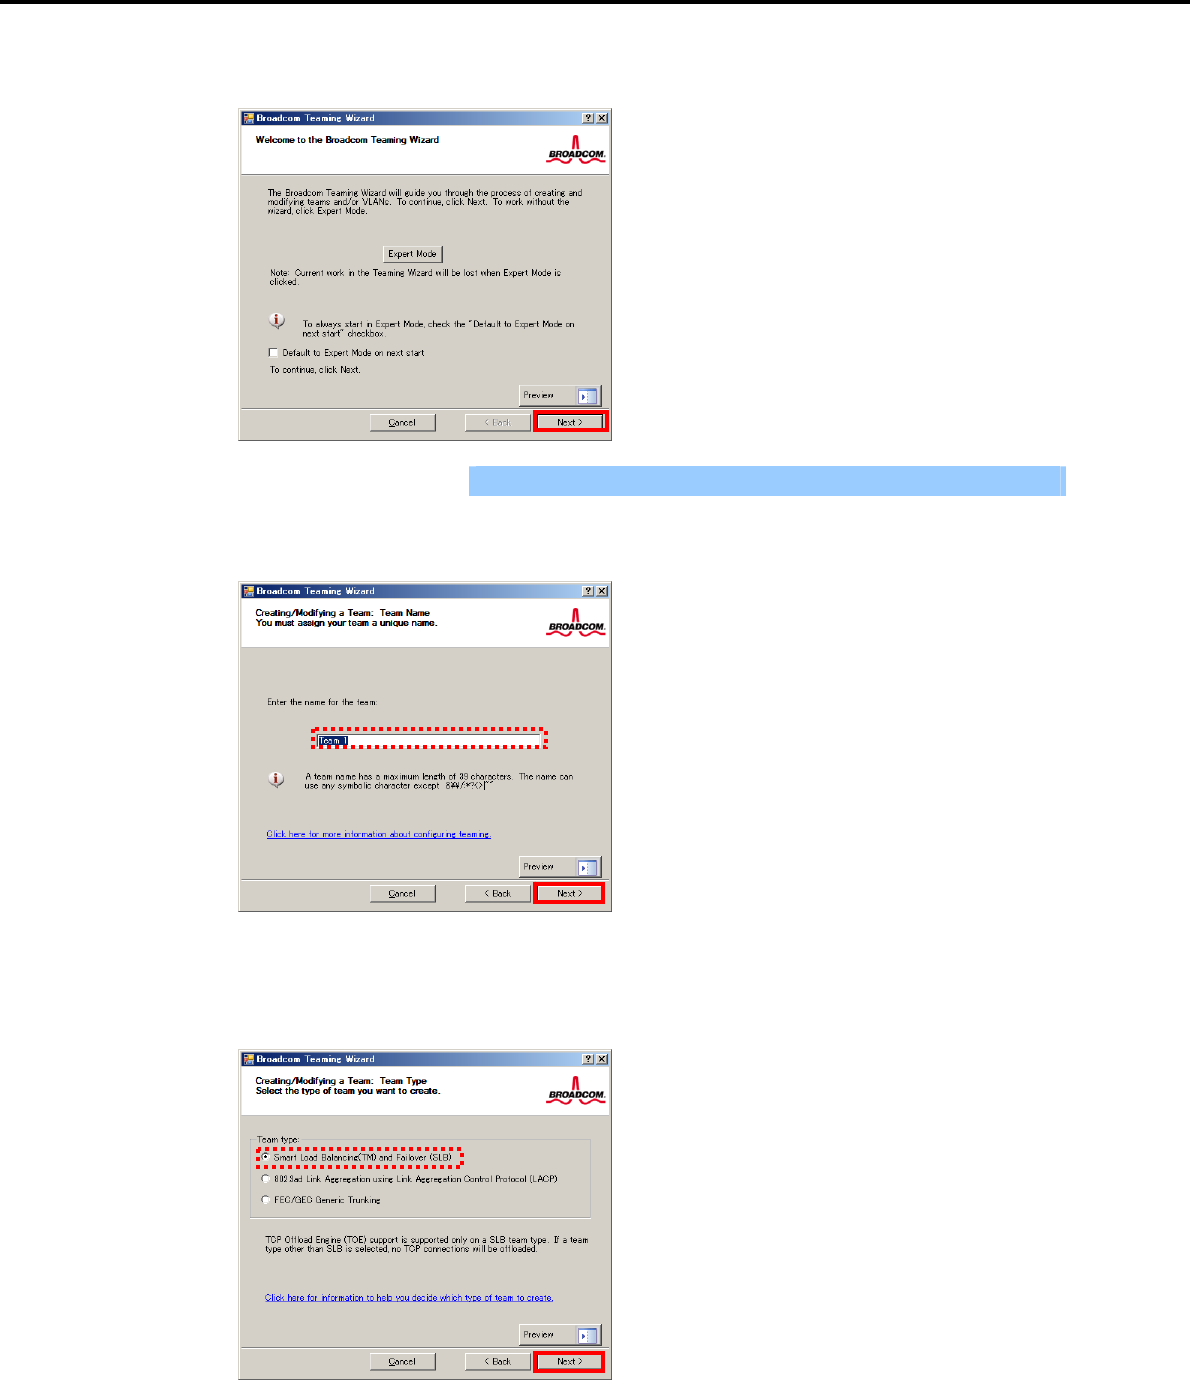
6. Setting Up Windows Server 2003
Chapter 1 Installing Windows
3. Click [Next].
Important Do not use Expert Mode.
4. Enter any name into the team name entry column, and then click [Next].
5. Make sure that the following team type is selected, and then click [Next].
Team type: Smart Load Balancing (TM) and Failover (SLB)
Express5800/GT-110d, GT-110d-S, R110d-1E, E110d-1 Installation Guide (Windows) 235

6. Setting Up Windows Server 2003
Chapter 1 Installing Windows
6. Select the adapters that compose the team, click [Add] to add them to the Team Members area, and
then click [Next].
7. Proceed according to your desired team type.
Smart Load Balancing and Failover (without Standby Member)
(1) Select Do not configure a standby member.
(2) Click [Next].
(1)
(2)
Express5800/GT-110d, GT-110d-S, R110d-1E, E110d-1 Installation Guide (Windows)
236

6. Setting Up Windows Server 2003
Chapter 1 Installing Windows
Smart Load Balancing (Auto-Failback Disable) (with Standby Member)
(1) Select Use the following member as a standby member.
(2) Select the adapter that is to be a standby member from the drop-down list.
(3) Select Enable Auto-Failback Disable mode.
(4) Click [Next].
Important Enable Auto-Failback Disable mode is cleared while editing the team. Select
it again.
8. Select Yes for Configure LiveLink?, and then click [Next].
(3)
(1)
(2)
(4)
Express5800/GT-110d, GT-110d-S, R110d-1E, E110d-1 Installation Guide (Windows) 237

6. Setting Up Windows Server 2003
Chapter 1 Installing Windows
9. You can use the default setting for Probe interval and Probe maximum retries. If you change these
values, select a value from each drop-down list, click the target probe (Probe Target xx), and then click
[Edit Target IP Address…].
Tips The setting range of Probe interval (link packet transmission interval) is 1 to 60
(units: seconds).
The setting range of Probe maximum retries (link packet retry count) is 1 to 10
(times).
Switching a path upon detection of a communication path error by LiveLink takes
(Probe maximum retries + 1) x Probe interval (seconds) at maximum.
If an optional LAN board detects that a link is down, failover occurs immediately
after the link goes down. It takes the time specified for Probe interval (seconds)
to recover from the link going down.
10. In the Target xx text box, enter the IP address of the alive monitoring server, and then click [OK].
Important Target xx must be the same broadcast domain as that specified for the data
communication IP and LiveLink communication IP (described in step 13).
Specify an IP address that exists on the network and with which
communication is possible.
If communication with the IP address specified in Target xx is not possible,
the team will also be unable to communicate. It is therefore recommended
that you specify multiple IP addresses using Probe Target. Up to four IP
addresses can be specified.
Express5800/GT-110d, GT-110d-S, R110d-1E, E110d-1 Installation Guide (Windows)
238
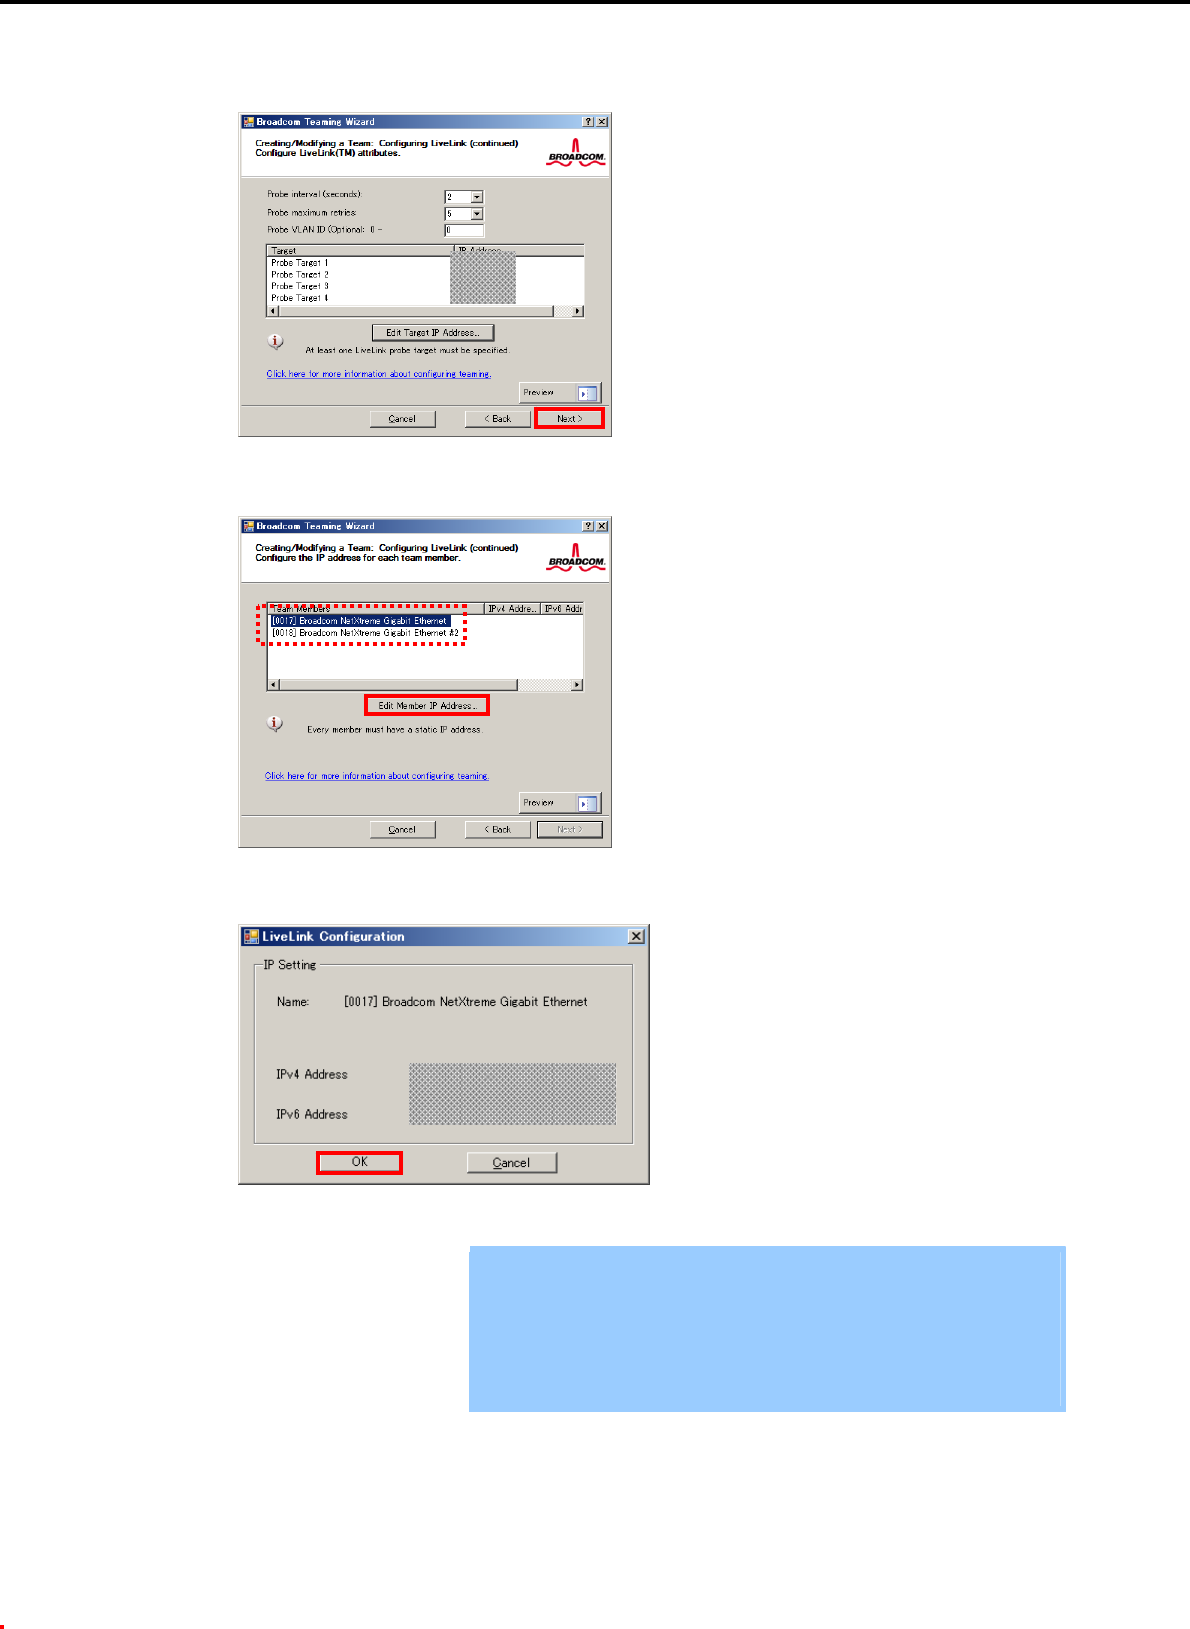
6. Setting Up Windows Server 2003
Chapter 1 Installing Windows
11. Click [Next].
12. Select an adapter from the Team Members area, and then click [Edit Member IP Address…].
13. Enter the IP address used for LiveLink communication, and then click [OK].
Important Be sure to specify an IP address for LiveLink communication for all the
adapters that compose the team. The address specified here is the IP
address for LiveLink communication. Specify a different IP address for
data communication.
For Target xx, specify an IP address that is unique on the network and with
which communication is possible.
Express5800/GT-110d, GT-110d-S, R110d-1E, E110d-1 Installation Guide (Windows) 239

6. Setting Up Windows Server 2003
Chapter 1 Installing Windows
14. Click [Next].
15. Make sure that Skip manage VLAN is selected under Manage VLAN, and then click [Next].
Express5800/GT-110d, GT-110d-S, R110d-1E, E110d-1 Installation Guide (Windows)
240

6. Setting Up Windows Server 2003
Chapter 1 Installing Windows
16. Make sure that Commit changes to system and Exit the wizard is selected under Commit changes,
and then click [Finish].
Note When the message below appears, select [Yes].
"
Applying the changes will temporarily interrupt the network
c
onnection. The process may take several minutes and the
connection will resume afterwards. Do you want to continue?"
Tips After creating a team, if the teaming adapter displays like the following image,
perform steps 8 through 14 again and correct the LiveLink settings.
17. Restart the system.
Express5800/GT-110d, GT-110d-S, R110d-1E, E110d-1 Installation Guide (Windows) 241

6. Setting Up Windows Server 2003
Chapter 1 Installing Windows
18. After the system starts, follow step 1 to start Broadcom Control Suite3 and confirm that a team has
been created. Confirm the team settings on the Information window to the right.
Smart Load Balancing and Failover (without Standby Member)
Smart Load Balancing (Auto-Failback Disable) (with Standby Member)
Team setup is now complete.
Express5800/GT-110d, GT-110d-S, R110d-1E, E110d-1 Installation Guide (Windows)
242
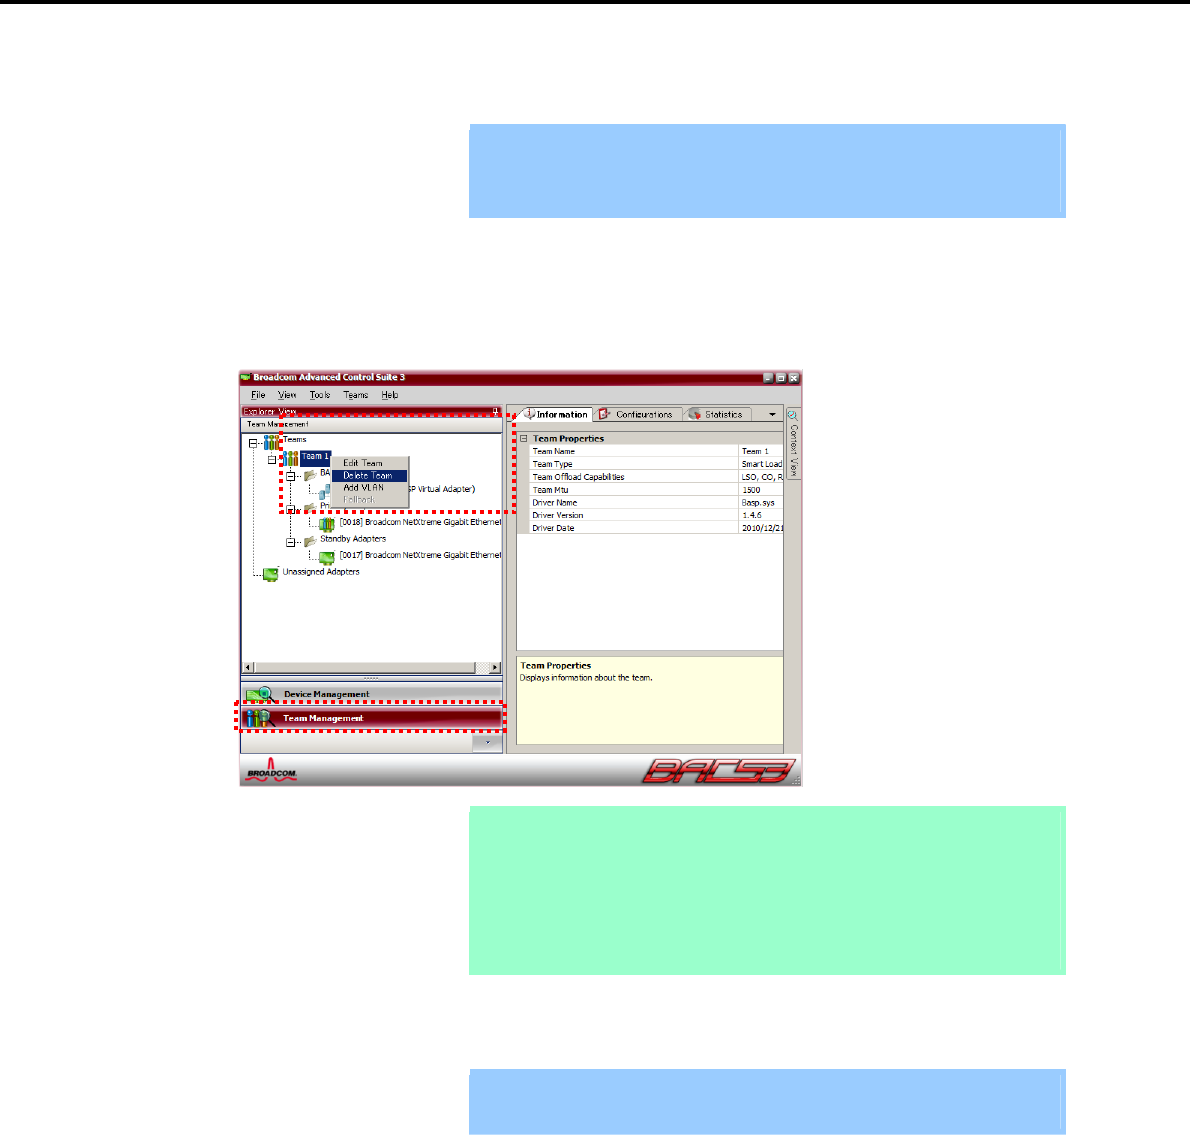
6. Setting Up Windows Server 2003
Chapter 1 Installing Windows
(4) Procedure for deleting team
Important You must delete teams from Broadcom Control Suite3.
You cannot delete the team from the team adapter displayed in the Device
Manager.
1. Double-click Broadcom Control Suite3 in the Control Panel window.
Broadcom Advanced Control Suite3 starts.
2. Click Team Management from the left menu, right-click the team name under Teams, and then select
Delete Team from the short-cut menu.
Tips When the message below appears, select [Yes].
"The selected team will be deleted from system, do you want to
proceed?
NOTE:
A
pplying the changes will temporarily interrupt the
n
etwork connection. The process may take several
minutes and the connection will resume afterwards."
3. Insert the EXPRESSBUILDER DVD into the optical disk drive.
If an autorun menu appears, close the menu window.
Important You do not have to insert the EXPRESSBUILDER DVD if the Starter Pack was
installed from the Internal Flash Memory. Proceed to the next step.
Express5800/GT-110d, GT-110d-S, R110d-1E, E110d-1 Installation Guide (Windows) 243

6. Setting Up Windows Server 2003
Chapter 1 Installing Windows
4. Double-click addlvlanstats.vbs in the following folder.
When using the EXPRESSBUILDER DVD:
Optical disk drive letter:\020\win\winnt\dotnet\lan
If the Starter Pack was installed from the Internal Flash Memory:
System drive letter:\StartPKG\dotnet\lan
5. When the following message appears, click [OK].
6. Eject the EXPRESSBUILDER DVD from the optical disk drive, and then restart the system.
Team deletion is now complete.
Express5800/GT-110d, GT-110d-S, R110d-1E, E110d-1 Installation Guide (Windows)
244

6. Setting Up Windows Server 2003
Chapter 1 Installing Windows
6.4.4 Graphics accelerator driver
The graphics accelerator driver for standard configurations is installed when the Starter Pack is installed
from EXPRESSBUILDER.
To reinstall drivers separately, complete the following steps.
1. Insert the EXPRESSBUILDER DVD into the optical disk drive.
If an autorun menu appears, close the menu window.
Tips You do not have to insert the EXPRESSBUILDER DVD if the Starter Pack was
installed from the Internal Flash Memory.
2. From the Start menu, point to All programs, Accessories, and then select Explorer.
3. Double-click the install.bat icon in the following folder.
When using the EXPRESSBUILDER DVD:
Optical disk drive letter: \020\win\winnt\dotnet\video]
If the Starter Pack was installed from the Internal Flash Memory:
System drive letter:\StartPKG\dotnet\video]
You will be prompted to confirm the End User License Agreement during this process. Click the
[ACCEPT] button and continue.
4. Eject the EXPRESSBUILDER DVD from the optical disk drive, and then restart the system.
6.4.5 When using a SCSI controller (N8103-75/107)
If the OS standard installer is used for setup, install the Starter Pack to install the driver.
If an additional SCSI controller is connected after setup, install the Starter Pack to install the driver.
6.4.6 When using a SAS controller (N8103-104A/142)
If the OS standard installer is used for setup, install the Starter Pack to install the driver.
If an additional SAS controller is connected after setup, install the Starter Pack to install the driver.
6.4.7 When using a RAID Controller (N8103-135)
The driver installation procedure depends on the environment. Use the procedure according to your
environment for installing the driver.
When using a RAID Controller (N8103-128/G128/134)
The OS will run the plug-and-play function and the driver will automatically be installed. You do not
need to install it manually.
When not using a RAID Controller (N8103-128/G128/134)
If the OS standard installer is used for setup, install the Starter Pack to install the driver.
If an additional RAID Controller is connected after setup, install the Starter Pack to install the driver.
Express5800/GT-110d, GT-110d-S, R110d-1E, E110d-1 Installation Guide (Windows) 245

6. Setting Up Windows Server 2003
Chapter 1 Installing Windows
6.5 Specifying PAE Option
If the server can mount a memory of more than 4 GB in a 32-bit system, specify the PAE option settings to use
that memory.
Important The PAE option is not supported by all products.
Refer to the following knowledge base to confirm whether your product
supports the PAE option:
KB291988
A description of the 4 GB RAM Tuning feature and the Physical Address
Extension parameter
For Windows Server 2003, the PAE option can be specified by editing the Boot.ini file. The following shows
an example of editing the Boot.ini file.
1. From the Start menu, point to Settings and then click Control Panel.
2. Double-click the System icon in the Control Panel window.
The System Properties dialog box appears.
3. Select the Advanced tab, and then click [Settings] under Startup and Recovery.
4. Click [Edit] in the System startup area on the Startup and Recovery dialog box, and then open the
Boot.ini file.
5. Add /PAE to operating systems, and then save the Boot.ini file.
Boot.ini example:
[boot loader]
timeout=30
default=multi(0)disk(0)rdisk(0)partition(2)\WINDOWS
[operating systems]
multi(0)disk(0)rdisk(0)partition(2)\WINDOWS=Windows Server 2003”
/fast detect
multi(0)disk(0)rdisk(0)partition(2)\WINDOWS=”Windows Server 2003,
PAE”/fastdetect/PAE
C:\CMDCONS\BOOTSECT.DAT=”Microsoft Windows Recovery Console”/cmdcons
Editing of the Boot.ini file is now complete.
Tips You can specify an OS to start up automatically from the Default operating
system drop-down list in the Startup and Recovery dialog box.
Express5800/GT-110d, GT-110d-S, R110d-1E, E110d-1 Installation Guide (Windows)
246

6. Setting Up Windows Server 2003
Chapter 1 Installing Windows
6.6 Installing the Bundled Software
The supplied EXPRESSBUILDER DVD contains the server monitoring software NEC ESMPRO Agent and
system management software NEC ESMPRO Manager. Refer to Chapter 2 Installing the Bundled Software to
install the software separately.
Tips Some utilities should be installed into PC for Management on the network. For
details, refer to Chapter 2 Installing the Bundled Software.
Express5800/GT-110d, GT-110d-S, R110d-1E, E110d-1 Installation Guide (Windows) 247
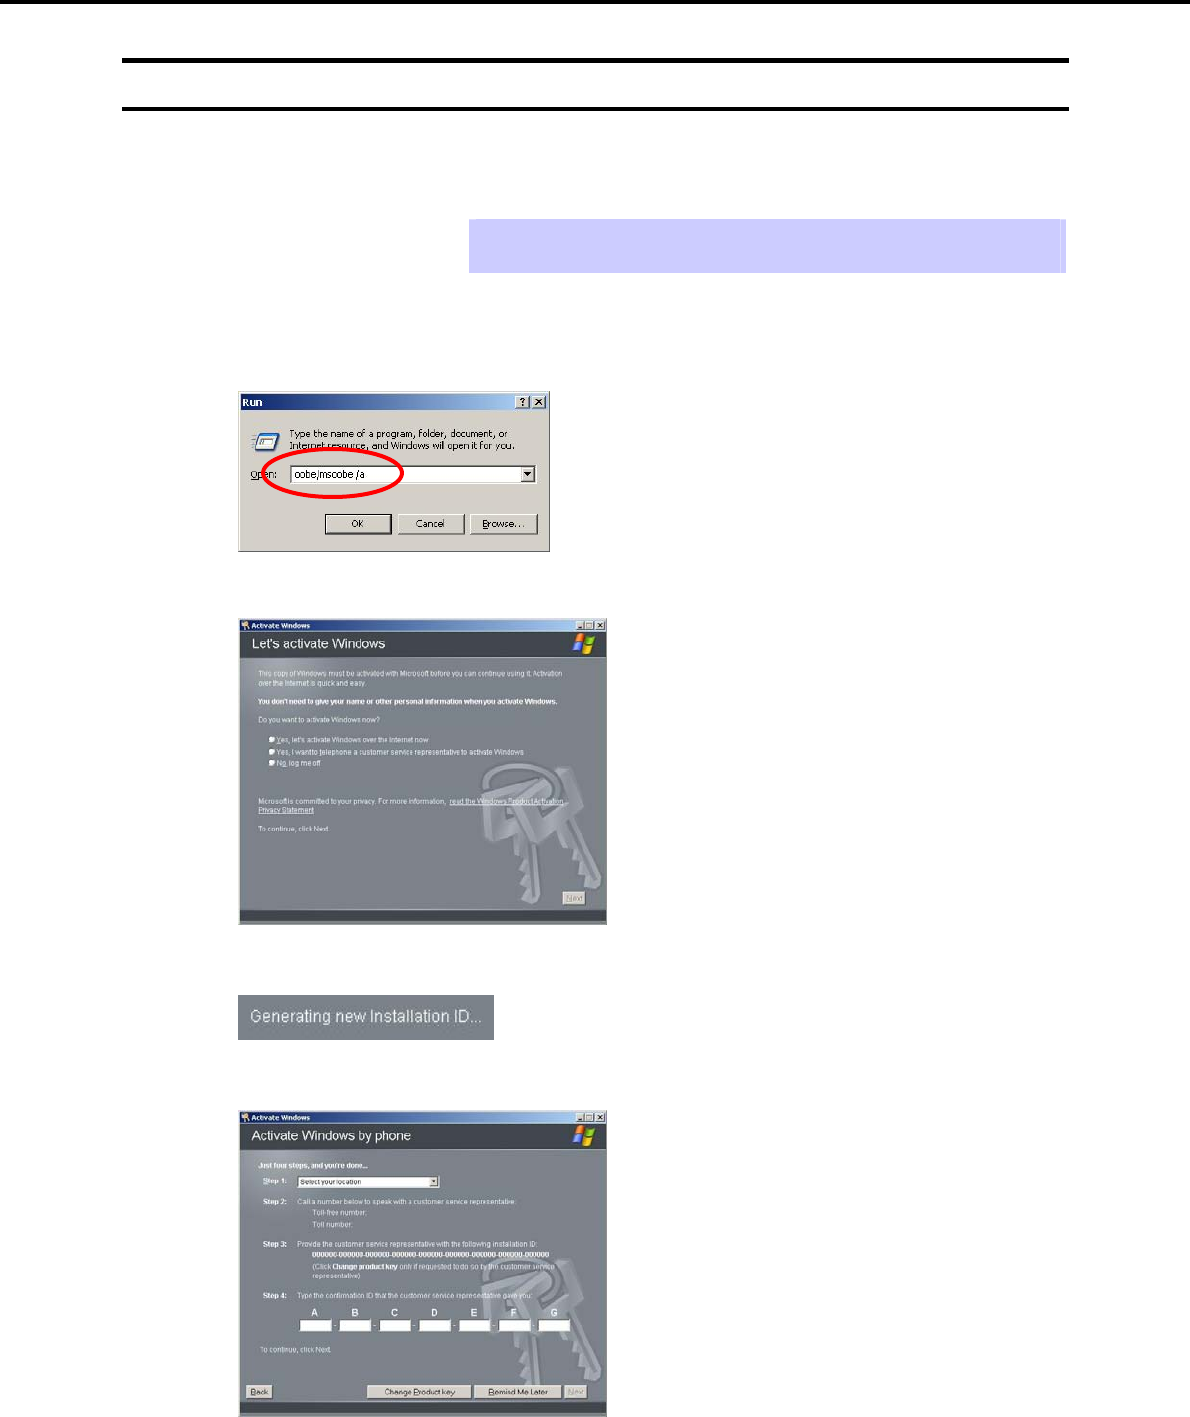
6. Setting Up Windows Server 2003
Chapter 1 Installing Windows
6.7 License Authentication
To use Windows Server 2003, the license must be authenticated in advance. The following describes the
license authentication procedure.
Tips Following this procedure is not required if you use a backup CD-ROM for
installation.
1. Select Run from the Start menu.
Enter the following to the Open text box, and then click [OK].
oobe/msoobe /a
2. When the following message appears, click [Next].
The following message appears.
3. Follow the instructions in the following message to start the license authentication process.
License authentication is now complete.
Express5800/GT-110d, GT-110d-S, R110d-1E, E110d-1 Installation Guide (Windows)
248

6. Setting Up Windows Server 2003
Chapter 1 Installing Windows
6.8 Installation When Multiple Logical Drives Exist
Before starting reinstallation, backup data for future use in case of data loss.
(1) Installation process
1. Follow the steps to start Setup with OS standard installer.
2. When the following message appears, select the partition to which you want to set up the operating
system.
The following list shows the existing partitions and
unpartitioned space on this computer.
Use the UP and DOWN ARROW keys to select an item in the
list.
Important You cannot edit the drive letters for the system volume or boot volume after
setup is complete. Make sure that the drive letters assigned in this window
are correct, and then proceed with setup.
3. Follow the steps to proceed with Setup with OS standard installer.
Installation is now complete.
Tips The drive letter might change after installation. If you want to change the drive
letter, use the procedure shown in Changing drive letter assignments below.
(2) Changing drive letter assignments
The steps below cannot change drive letter assignments for the system volume or boot volume. Be careful
when assigning these.
1. From the Start menu, right-click My Computer and then select Management. Next, launch Computer
Management.
2. From the window on the left, select Disk Management.
3. Right-click the volume whose drive letter you want to change, and then select Change drive letter and
path.
4. Click [Change].
5. Click [Assign next drive letter], and then select the drive letter you want to assign.
6. Click [OK].
7. When the following message appears, read the contents and then click [OK].
Changing the drive letter of a volume might cause programs
to no longer run. Are you sure you want to change this drive
letter?
8. Close the Computer Management window.
Changing drive letter assignments is now complete.
Express5800/GT-110d, GT-110d-S, R110d-1E, E110d-1 Installation Guide (Windows) 249

7. Setup for Solving Problems
Chapter 1 Installing Windows
7. Setup for Solving Problems
This section describes the features that must be set up in advance so that the server can recover from any
trouble immediately and precisely.
7.1 Specifying Memory Dump Settings (Debug Information)
This section describes the procedures for collecting a memory dump (debug information) in the server.
Important Cautions concerning memory dumpsMemory dumps must be collected by
a staff member from the maintenance service company. Customers only
need to specify the settings for the memory dump.
If any trouble occurs after specifying the settings below and you attempt to
restart the system to save the memory dump, a message informing you
that the system is short of virtual memory might appear. However, this
message can be ignored and you can proceed with the restart. If you
restart the system a second time, the memory dump might not be stored
normally.
7.1.1 For Windows Server 2008 R2
Follow the procedure below to specify the memory dump settings.
1. Select Control Panel from the Start menu.
The Control Panel window appears.
2. Click System and Security on the Control Panel window.
Tips If View by is not Category, select System from Control Panel directly.
3. Click System.
4. Click Advanced system settings.
The System Properties dialog box appears.
5. Select the Advanced tab, and then click [Settings] under Startup and Recovery.
6. Specify the folder to store the debug information in the Dump file: text box.
Example: To store the debug information in D drive under the file name MEMORY.DMP:
D:\MEMORY.DMP
Important For the Write debugging information drop-down list, we recommend
specifying Complete memory dump. If the mounted memory size is greater
than 2 GB, however, Complete memory dump cannot be specified because
it is not displayed on the drop-down list. In this case, specify Kernel
memory dump instead.
Specify a drive that has a free space of at least "the memory capacity
mounted on the server + 300 MB".
If you attempt to add memory that will cause the mounted memory size to
exceed 2 GB, specify Kernel memory dump from the Write debugging
information drop-down list before adding the memory. The size of the
debug information (memory dump) to be collected changes if memory is
added. Make sure that the free space of the drive to store the debug
information (memory dump) is sufficient.
Express5800/GT-110d, GT-110d-S, R110d-1E, E110d-1 Installation Guide (Windows)
250

7. Setup for Solving Problems
Chapter 1 Installing Windows
7. Click [Settings] under Performance.
The Performance Options dialog box appears.
8. Click the Advanced tab on the Performance Options dialog box.
9. Click [Change] under Virtual memory.
10. Clear the Automatically manage paging file size for all drives check box, and then select the Custom
size option button.
11. In the Paging file size for each drive group box, specify as follows:
For the Initial size text box, specify a value equal to or greater than the Recommended value shown in
the Total paging file size for all drives area.
For the Maximum size text box, specify a value equal to or greater than the value specified in the Initial
size text box.
After specifying the above values, click [Set].
Important The above paging file sizes are recommended for collecting debug
information (dump file). The initial size of the Windows partition paging file
must be large enough to store dump files. Make sure to set a sufficient
paging file size. If the paging file size is insufficient, correct debug
information might not be able to be collected due to a shortage of virtual
memory.
For details about the Recommended value in the Total paging file size for
all drives area, refer to System partition size in Before Starting Setup.
When memory is added, re-specify the paging file according to the
increased memory size.
12. Click [OK].
A message to restart the system might appear, depending on the modifications made.
In this case, restart the system.
Specification of the memory dump settings is now complete.
Express5800/GT-110d, GT-110d-S, R110d-1E, E110d-1 Installation Guide (Windows) 251

7. Setup for Solving Problems
Chapter 1 Installing Windows
7.1.2 For Windows Server 2008
Follow the procedure below to specify the memory dump settings.
1. Select Control Panel from the Start menu, and then click System.
The System dialog box appears.
2. Click Advanced system settings.
The System Properties dialog box appears.
3. Select the Advanced tab, and then click [Settings] under Startup and Recovery.
4. Specify the folder to store the debug information in the Dump file: text box.
Example: To store the debug information in D drive under the file name MEMORY.DMP:
D:\MEMORY.DMP
Important For Windows Server 2008 64-bit (x64) Edition
For the Write debugging information drop-down list, we recommend
specifying Complete memory dump. If the mounted memory size is greater
than 2 GB, however, Complete memory dump cannot be specified because
it is not displayed on the drop-down list. In this case, specify Kernel
memory dump instead.
Specify a drive that has a free space of at least "the memory capacity
mounted on the server + 300 MB".
If you attempt to add memory that will cause the mounted memory size to
exceed 2 GB, specify Kernel memory dump from the Write debugging
information drop-down list before adding the memory. The size of the
debug information (memory dump) to be collected changes if memory is
added. Make sure that the free space of the drive to store the debug
information (memory dump) is sufficient.
For Windows Server 2008 32-bit (x86) Edition
For the Write debugging information drop-down list, we recommend
specifying Complete memory dump. If the mounted memory size is greater
than 2 GB, however, Complete memory dump cannot be specified because
it is not displayed on the drop-down list. In this case, specify Kernel
memory dump instead.
Specify a drive that has a free space of at least "the memory capacity
mounted on the server + 300 MB" (or 2048 MB + 300 MB if the memory size
exceeds 2 GB).
If you attempt to add memory that will cause the mounted memory size to
exceed 2 GB, specify Kernel memory dump from the Write debugging
information drop-down list before adding the memory. The size of the
debug information (memory dump) to be collected changes if memory is
added. Make sure that the free space of the drive to store the debug
information (memory dump) is sufficient.
5. Click [Settings] under Performance.
The Performance Options dialog box appears.
6. Click the Advanced tab on the Performance Options dialog box.
7. Click [Change] under Virtual memory.
8. Clear the Automatically manage paging file size for all drives check box, and then select the Custom
size option button.
Express5800/GT-110d, GT-110d-S, R110d-1E, E110d-1 Installation Guide (Windows)
252

7. Setup for Solving Problems
Chapter 1 Installing Windows
9. In the Paging file size for each drive group box, specify as follows:
For the Initial size text box, specify a value equal to or greater than the Recommended value shown in
the Total paging file size for all drives area.
For the Maximum size text box, specify a value equal to or greater than the value specified in the Initial
size text box.
After specifying the above values, click [Set].
Important The above paging file sizes are recommended for collecting debug
information (dump file). The initial size of the boot volume paging file must
be large enough to store dump files. Make sure to set a sufficient paging
file size. If the paging file size is insufficient, correct debug information
might not be able to be collected due to a shortage of virtual memory.
For details about the Recommended value in the Total paging file size for
all drives area, refer to System partition size in Before Starting Setup.
When memory is added, re-specify the paging file according to the
increased memory size.
10. Click [OK].
A message to restart the system might appear, depending on the modifications made.
In this case, restart the system.
Specification of the memory dump settings is now complete.
Express5800/GT-110d, GT-110d-S, R110d-1E, E110d-1 Installation Guide (Windows) 253

7. Setup for Solving Problems
Chapter 1 Installing Windows
7.1.3 For Windows Server 2003
Follow the procedure below to specify the memory dump settings.
Tips Although the procedure below uses Windows Server 2003 as an example,
Windows Server 2003 R2 x64 Edition can be set up using the same procedure.
1. Select Control Panel from the Start menu, and then click System.
The System Properties dialog box appears.
2. Click the Advanced tab.
3. Click [Settings] under Startup and Recovery.
4. Specify the folder to store the debug information in the Dump file: text box.
Example: To store the debug information in D drive under the file name MEMORY.DMP:
D:\MEMORY.DMP
Important For Windows Server 2003 R2 x64 Edition
For the Write debugging information drop-down list, we recommend
specifying Complete memory dump. If the mounted memory size is greater
than 2 GB, however, Complete memory dump cannot be specified because
it is not displayed on the drop-down list. In this case, specify Kernel
memory dump instead.
Specify a drive that has a free space of at least "the memory capacity
mounted on the server + 1 MB".
If you attempt to add memory that will cause the mounted memory size to
exceed 2 GB, specify Kernel memory dump from the Write debugging
information drop-down list before adding the memory. The size of the
debug information (memory dump) to be collected changes if memory is
added. Make sure that the free space of the drive to store the debug
information (memory dump) is sufficient.
For Windows Server 2003
For the Write debugging information drop-down list, we recommend
specifying Complete memory dump. If the mounted memory size is greater
than 2 GB, however, Complete memory dump cannot be specified because
it is not displayed on the drop-down list. In this case, specify Kernel
memory dump instead.
Specify a drive that has a free space of at least "the memory capacity
mounted on the server + 12 MB" (or 2048 MB + 12 MB if the memory size
exceeds 2 GB).
If you attempt to add memory that will cause the mounted memory size to
exceed 2 GB, specify Kernel memory dump from the Write debugging
information drop-down list before adding the memory. The size of the
debug information (memory dump) to be collected changes if memory is
added. Make sure that the free space of the drive to store the debug
information (memory dump) is sufficient.
5. Click [Settings] under Performance.
The Performance Options dialog box appears.
6. Click the Advanced tab on the Performance Options dialog box.
7. Click [Change] under Virtual memory.
Express5800/GT-110d, GT-110d-S, R110d-1E, E110d-1 Installation Guide (Windows)
254

7. Setup for Solving Problems
Chapter 1 Installing Windows
8. For the Initial size text box in the Paging file size for selected drive group box, specify a value equal to
or greater than the Recommended value shown in the Total paging file size for all drives area, and
then click [Set].
Important The above paging file sizes are recommended for collecting debug
information (dump file). The initial size of the boot volume paging file must
be large enough to store dump files. Make sure to set a sufficient paging
file size. If the paging file size is insufficient, correct debug information
might not be able to be collected due to a shortage of virtual memory.
For details about the Recommended value in the Total paging file size for
all drives area, refer to System partition size in Before Starting Setup.
When memory is added, re-specify the paging file according to the
increased memory size.
9. Click [OK].
A message to restart the system might appear, depending on the modifications made. In this case,
restart the system.
Specification of the memory dump settings is now complete.
Express5800/GT-110d, GT-110d-S, R110d-1E, E110d-1 Installation Guide (Windows) 255

7. Setup for Solving Problems
Chapter 1 Installing Windows
7.2 How to Create a User-mode Process Dump File
7.2.1 For Windows Server 2008 R2 and Windows Server 2008
The user-mode process dump file records information when an application error occurs.
If an application error occurs, obtain user-mode process dump information using the following procedures
without closing the pop-up window that reported the error:
1. Right-click an empty area of the taskbar and then click Task Manager, or press the <CTRL> + <SHIFT>
+ <ESC> keys to start Task Manager.
2. Click the Processes tab.
3. Right-click the name of the process that you want to obtain dump information for, and then click Create
Dump File.
4. A dump file for the process is created in the following folder:
C:\Users\user name\AppData\Local\Temp
Tips The folder above may be treated as a hidden folder.
If the folder is not displayed, perform the following:
For Windows Server 2008 R2:
Open Explorer, click Organize and then Folder and search options. Click the
View tab and then select the Show hidden files, folders, and drives check box.
For Windows Server 2008:
Open Explorer, select Folder and search options from the Tools menu. Click
the View tab and then select the Show hidden files and folders option button.
Once the user-mode process dump file has been created, obtain the file from the folder shown in step 4.
For details about how to create a user-mode process dump file, visit the following Microsoft Support web
page:
How to create a user-mode process dump file in Windows Server 2008
http://support.microsoft.com/kb/949180/en-us
Tips For Windows Server 2008 R2 and Windows Server 2008, because Dr. Watson is
replaced by Problem Reports and Solutions, it is not possible to obtain a crash
dump file by executing Dr. Watson. Use the procedure above to obtain information
equivalent to a crash dump file.
User-mode process dump file creation is now complete.
Express5800/GT-110d, GT-110d-S, R110d-1E, E110d-1 Installation Guide (Windows)
256

7. Setup for Solving Problems
Chapter 1 Installing Windows
7.2.2 For Windows Server 2003 (setting up Dr. Watson)
Dr. Watson for Windows is a debugger for application errors. If an application error is detected, Dr. Watson
analyzes the system and records the diagnostic information (log). Follow the procedure below for collecting
diagnostic information.
1. Select Run from the Start menu.
2. Enter drwtsn32.exe in the Open text box, and then click [OK].
The Dr. Watson for Windows dialog box appears.
3. Specify the path to save the diagnostic information file in the Log File Path text box.
The diagnostic information file is saved under the file name DRWTSN32.LOG.
Note A network path cannot be specified. Specify a path on the local computer.
4. Specify the path to save the crash dump file into the Crash Dump text box.
Tips A crash dump file is a binary file that can be read by Windows Debugger.
5. For Crash Dump Type, select the Full option button.
6. In the Options group box, select the following check boxes:
Dump Symbol Table
Dump All Thread Context
Append To Existing Log File
Create Crash Dump File
For details about the function of each option, refer to the online help.
7. Click [OK].
Dr. Watson setup is now complete.
Express5800/GT-110d, GT-110d-S, R110d-1E, E110d-1 Installation Guide (Windows) 257

7. Setup for Solving Problems
Chapter 1 Installing Windows
7.3 Installing Network Monitor
Utilizing Network Monitor helps you investigate and manage network troubles.
7.3.1 For Windows Server 2008 R2 and Windows Server 2008
(1) Setting up Network Monitor
Tips Windows Server 2008 R2 and Windows Server 2008 do not provide Network
Monitor.
To capture network traces on Windows Server 2008 R2 or Windows Server 2008,
Microsoft Network Monitor must be installed using the procedure described below.
1. Download Network Monitor from the following Microsoft web page:
http://support.microsoft.com/kb/933741/en-us
2. Run the downloaded file to start the installer.
Follow the onscreen instructions to install Network Monitor.
Tips If the Security Alert message appears, click [Run].
In the setup format selection window, select Complete.
Network Monitor installation is now complete.
Tips To uninstall Network Monitor, use Programs and Features.
(2) Capturing network traces
1. Select Microsoft Network Monitor from the Start menu to start Network Monitor.
2. On the Start Page tab, click [Create a new capture tab... ]. Or, select New from the File menu, and then
click [Capture…].
A new tab for capturing network traces is created.
3. On the Select Networks pane, select the network whose traces are to be captured.
4. Select Start from the Capture menu to start capturing the network traces.
5. Select Stop from the Capture menu to stop capturing the network traces.
6. Select Save As… from the File menu.
The Save As dialog box appears. Select All captured frames from Frame selection, and then enter the
folder and file names.
Tips The default folder is as follows:
C:\Users\<User name>\Documents\Network Monitor 3\Captures
7. Click [Save].
The network trace file is created in the folder specified in step 6.
The setup for capturing network traces is now complete.
Express5800/GT-110d, GT-110d-S, R110d-1E, E110d-1 Installation Guide (Windows)
258

7. Setup for Solving Problems
Chapter 1 Installing Windows
7.3.2 For Windows Server 2003
Utilizing Network Monitor helps you investigate and manage network failures.Because the system must be
restarted after installing Network Monitor, it is recommended to perform installation before a failure occurs.
1. From the Start menu, point to Settings and then click Control Panel.
The Control Panel window appears.
2. Double-click the Add/Remove Programs icon.
The Add/Remove Programs dialog box appears.
3. Click the Add/Remove Windows Components icon.
The Windows Components Wizard dialog box appears.
4. Select Management and Monitoring Tools under Components, and then click [Details].
The Management and Monitoring Tools dialog box appears.
5. Select the Network Monitor Tools check box under Subcomponents of Management and
Monitoring Tools, and then click [OK].
6. The Windows Components Wizard dialog box appears again. Click [Next].
7. When a message prompting you to insert an installation disk appears, insert the required CD into the
optical disk drive and then click [OK].
Tips The message prompting insertion of the disk states that it is required to insert the
CD with the label Service Pack 1 CD-ROM. For Windows Server 2003 R2,
however, insert Windows Server 2003 R2 DISC 1 into the optical disk drive.
8. Click [Finish] in the Windows Components Wizard dialog box.
9. Click the [Close] button in the Add/Remove Programs dialog box.
10. Close the Control Panel window.
Network Monitor installation is now complete.To start Network Monitor, point to Programs and then
Management Tools from the Start menu, and then select Network Monitor. For details about how to
operate Network Monitor, refer to the online help.
Express5800/GT-110d, GT-110d-S, R110d-1E, E110d-1 Installation Guide (Windows) 259

8. Windows OS Parameter File
Chapter 1 Installing Windows
8. Windows OS Parameter File
This section describes a parameter file for Windows OS.
8.1 Creating a Parameter File
If a parameter file is used when performing Setup with EXPRESSBUILDER, a series of setup procedures from
installing of the OS to installing several utilities can be executed automatically just by pressing keys for
confirmation.
The settings from the previous installation can also be used when re-installing the system.
It is therefore recommended to use a parameter file to set up the server.
Tips Windows can be installed without a parameter file.
A parameter file can be created or modified during Setup with EXPRESSBUILDER.
Express5800/GT-110d, GT-110d-S, R110d-1E, E110d-1 Installation Guide (Windows)
260
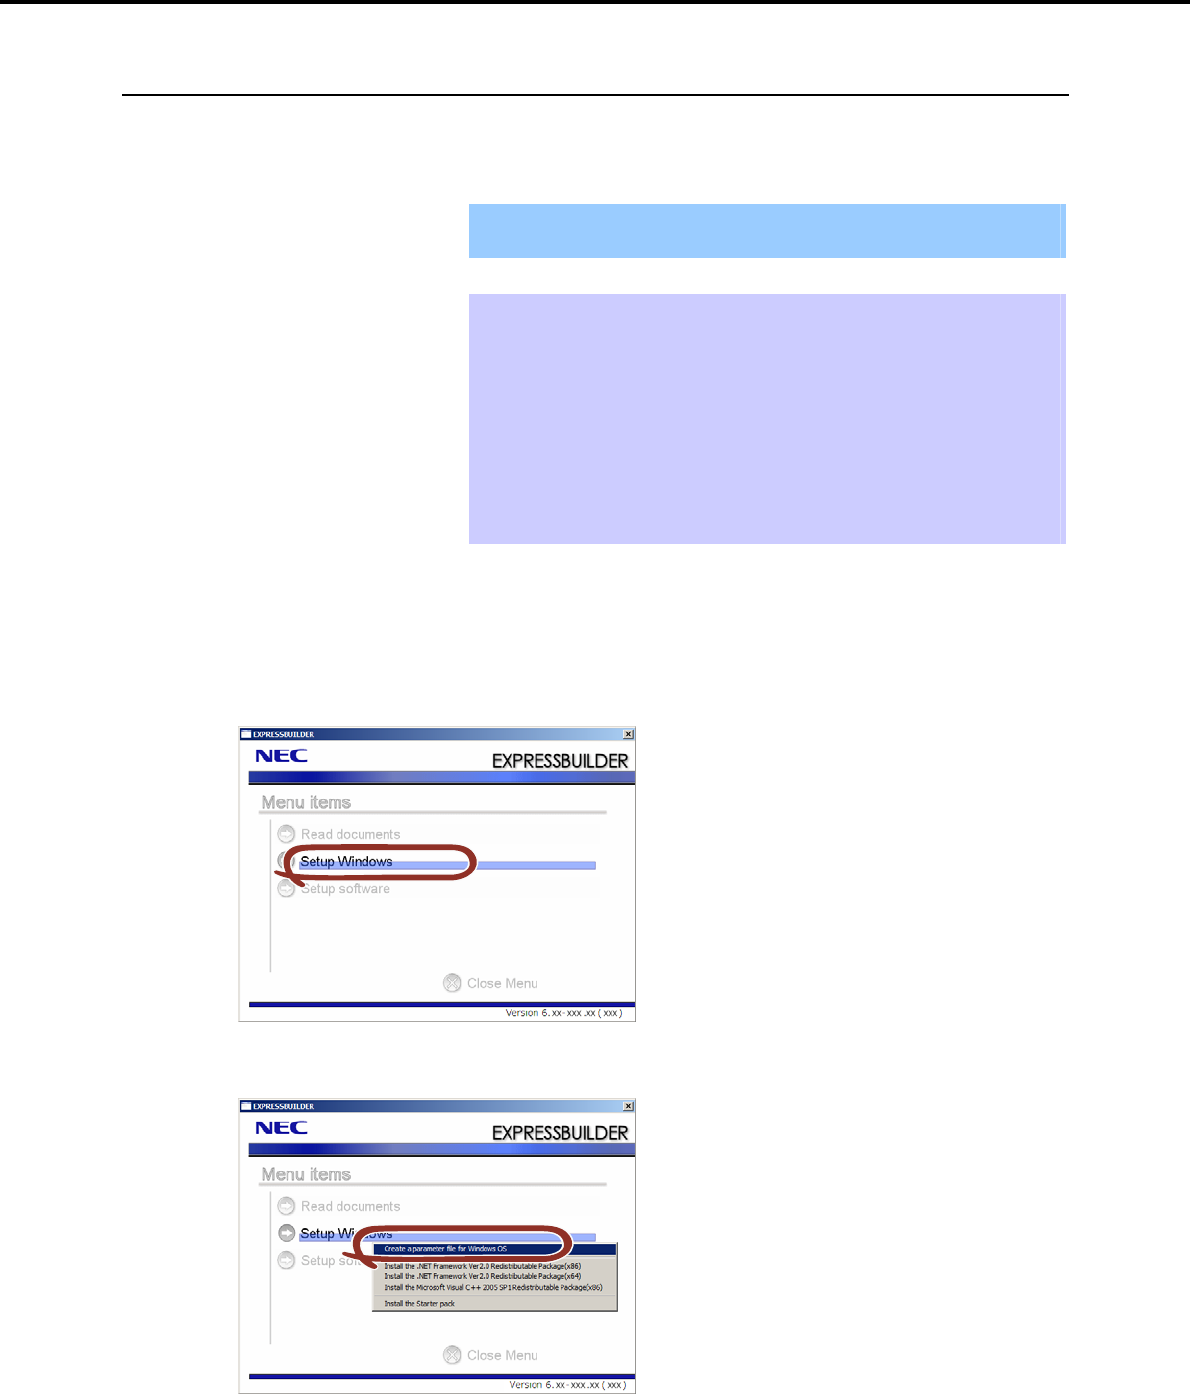
8. Windows OS Parameter File
Chapter 1 Installing Windows
8.1.1 How to create a parameter file
This section describes how to specify the setup information necessary for OS installation and how to create
a parameter file.
Follow the procedure described below.
Important Do not remove the EXPRESSBUILDER DVD from the drive while creating a
parameter file.
Tips A parameter file can be created when using PC98-NX series, PC-9800 series,
and PC-AT compatible PCs.
A parameter file can be created when using the following operating systems:
Windows Server 2008 R2 (Full installation)
Windows Server 2008 (Full installation)
Windows Server 2003 x64 Edition, Windows Server 2003
Windows 7
Windows Vista
Windows XP x64 Edition, Windows XP
1. Start the OS.
2. Insert the supplied EXPRESSBUILDER DVD into the optical disk drive. The EXPRESSBUILDER menu
item window appears.
3. Right-click on the window or click Setup Windows to open the short-cut menu.
4. Select Create a parameter file for Windows OS.
Express5800/GT-110d, GT-110d-S, R110d-1E, E110d-1 Installation Guide (Windows) 261
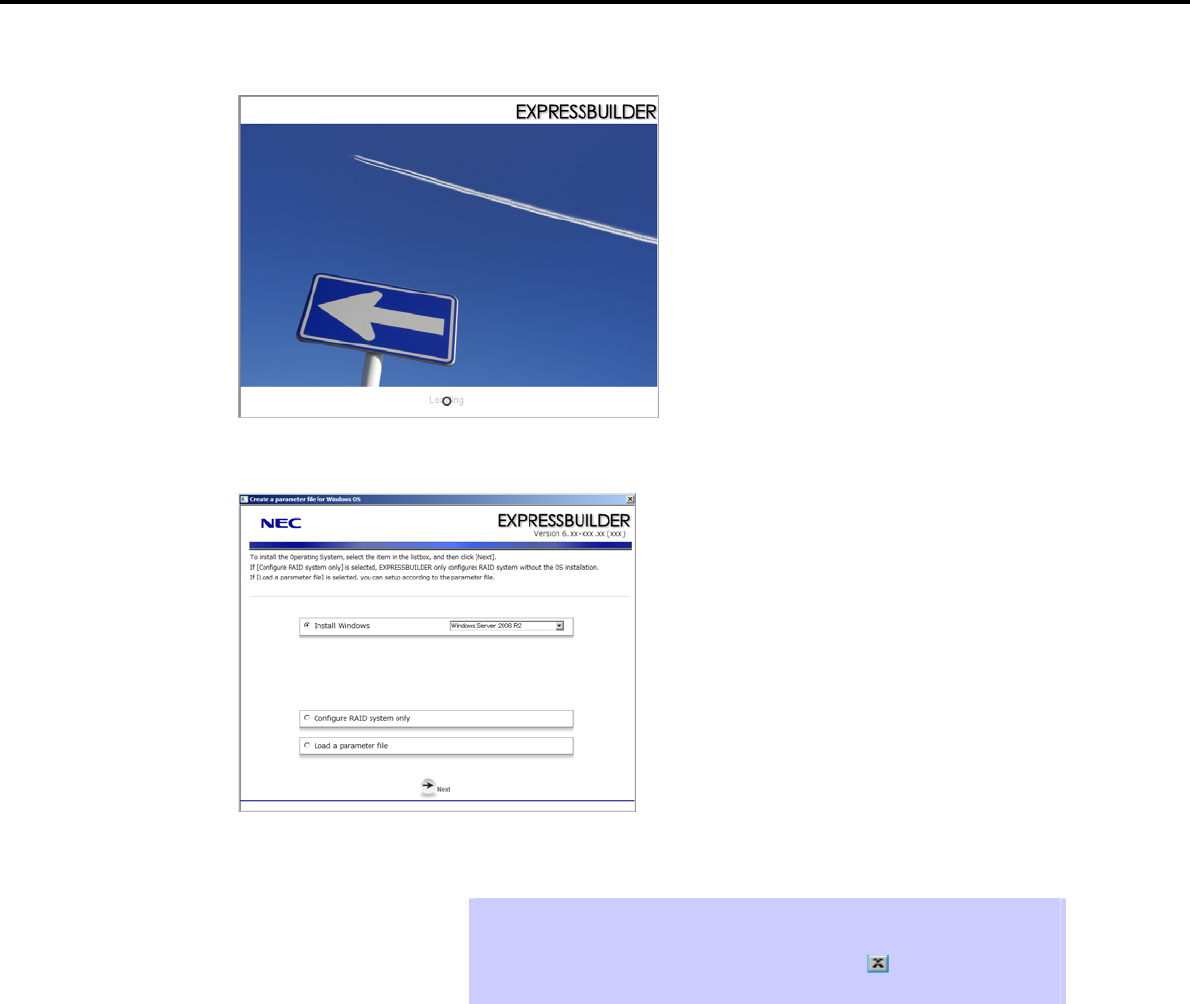
8. Windows OS Parameter File
Chapter 1 Installing Windows
The following window appears.
5. When the setup selection menu window appears, specify the parameters according to the following
procedure.
Select the appropriate OS from the Install Windows drop-down list, and then click [Next].
Go to Chapter 1 (8.1.1 How to create a parameter file) - (1) RAID settings.
Tips To modify an existing parameter file, click Load a Parameter file on the setup
selection menu.
To cancel parameter file creation in the middle, click [ ] on the upper right of
the dialog box.
Express5800/GT-110d, GT-110d-S, R110d-1E, E110d-1 Installation Guide (Windows)
262
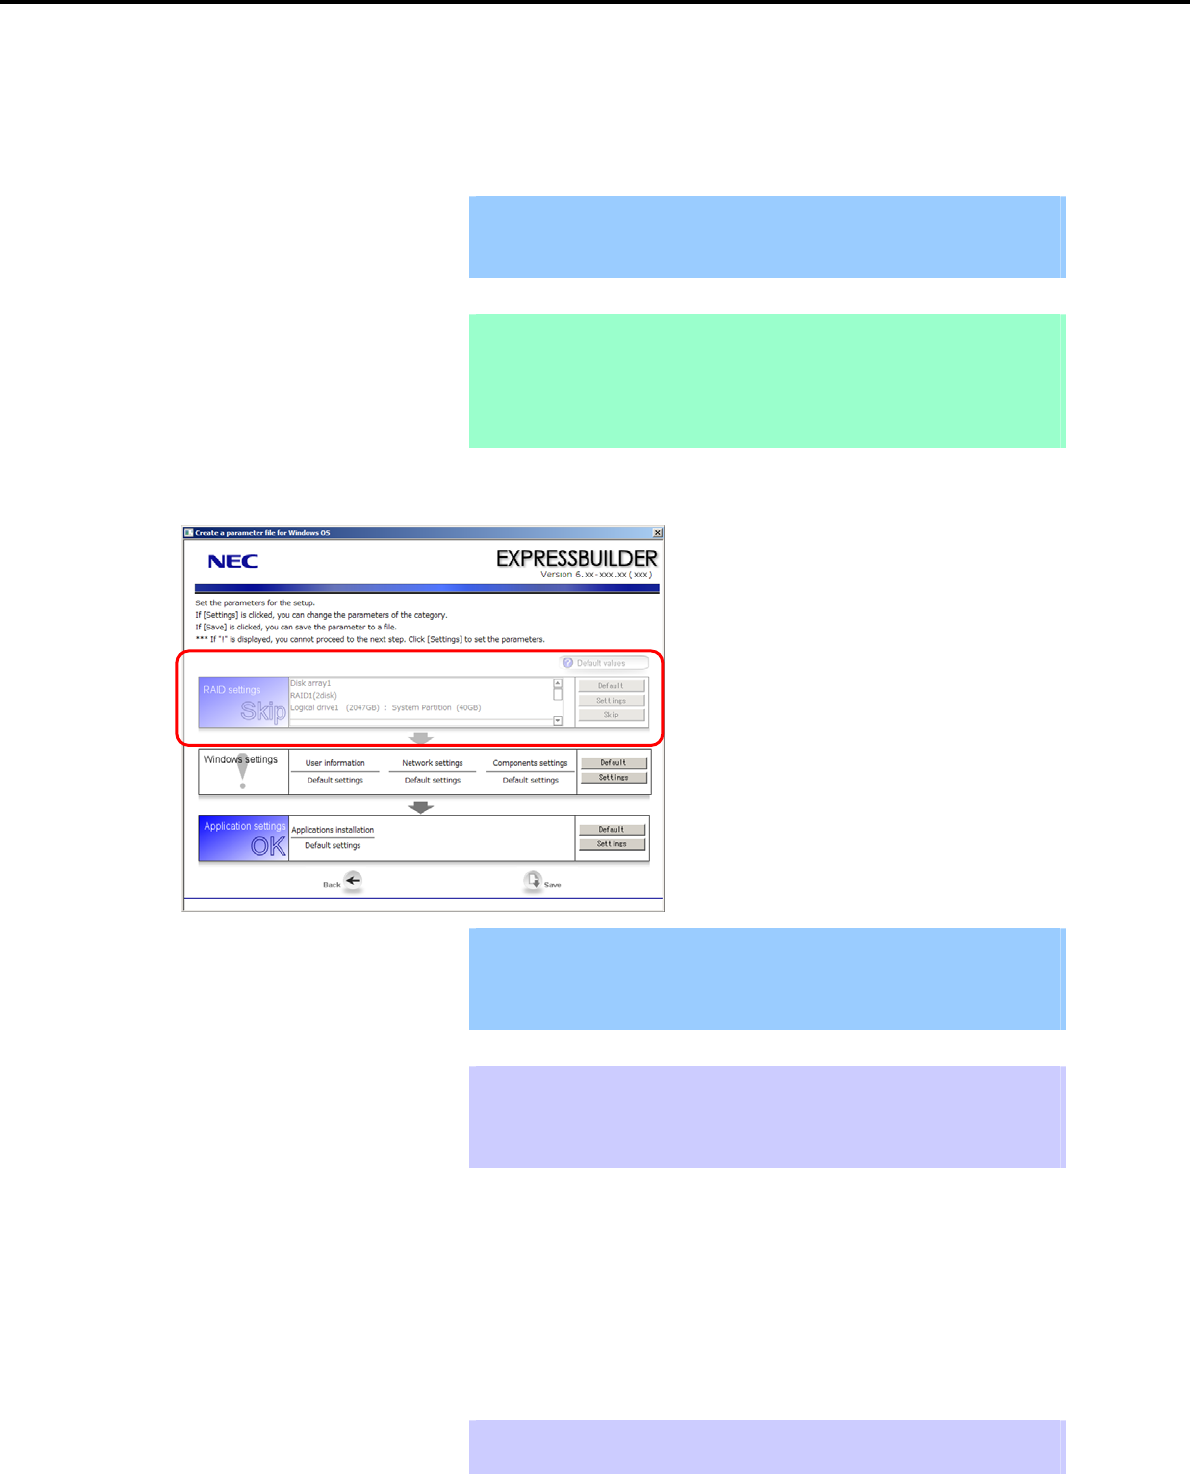
8. Windows OS Parameter File
Chapter 1 Installing Windows
(1) RAID settings
This function automatically recognizes the RAID Controller connected to the server and configures the RAID
System,so you must complete setup of the server by following the "User’s Guide " in advance.
Important Some data in the Hard Disk Drive might be deleted depending on the system
settings. Pay attention to input parameters.
Backing up user data, as needed, is recommended.
Note When using an onboard RAID Controller (LSI Embedded MegaRAID):
This function does not support the creation of RAID10 by using the onboard
RAID Controller.
Refer to Chapter 2 (4. RAID System Configuration) in "Maintenance Guide" when
creating RAID10.
Specify the RAID settings using the RAID settings wizard on the parameter setup menu.
Important The number of Physical Devices displayed on the RAID settings wizard is the
upper limit supported by the RAID Controller.
Make sure that the number of actually connected Physical Devices does not
exceed this value.
Tips Use the [Default] button when you want to return to the default value of parameters
after having modified them with the wizard.
You can confirm the value set by clicking the [Default] button if you click the
[Default values] button.
When creating a new Logical Drive
1. Click [Settings] in RAID settings.
2. Use the wizard to set up the Logical Drive.
When skipping the creation of a new Logical Drive
1. Click [Skip] in RAID settings.
Tips Use the [Skip] button if, after modifying the settings with the RAID settings wizard,
you want to install the existing configurations without modifying them.
Express5800/GT-110d, GT-110d-S, R110d-1E, E110d-1 Installation Guide (Windows) 263
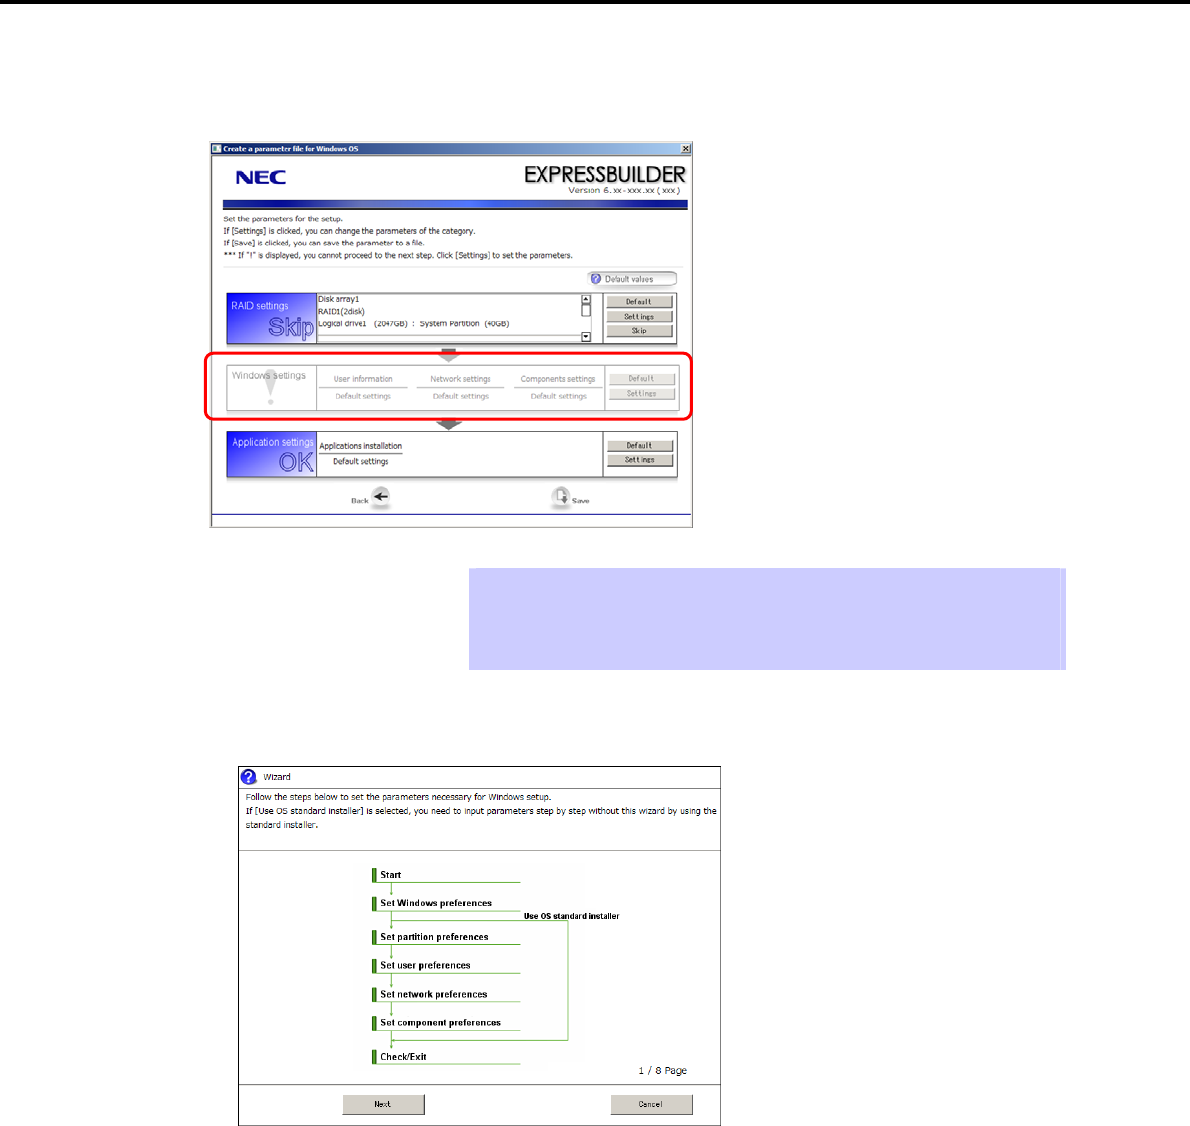
8. Windows OS Parameter File
Chapter 1 Installing Windows
(2) Windows settings
Set up Windows by using the Windows settings wizard on the parameter setup menu.
Tips Use the [Default] button when you want to return to the default value of parameters
after having modified them with the wizard.
You can confirm the value set by clicking the [Default] button if you click the
[Default values] button.
1. Click [Settings] in Windows settings.
2. Click [Next] in the Windows settings wizard.
Express5800/GT-110d, GT-110d-S, R110d-1E, E110d-1 Installation Guide (Windows)
264
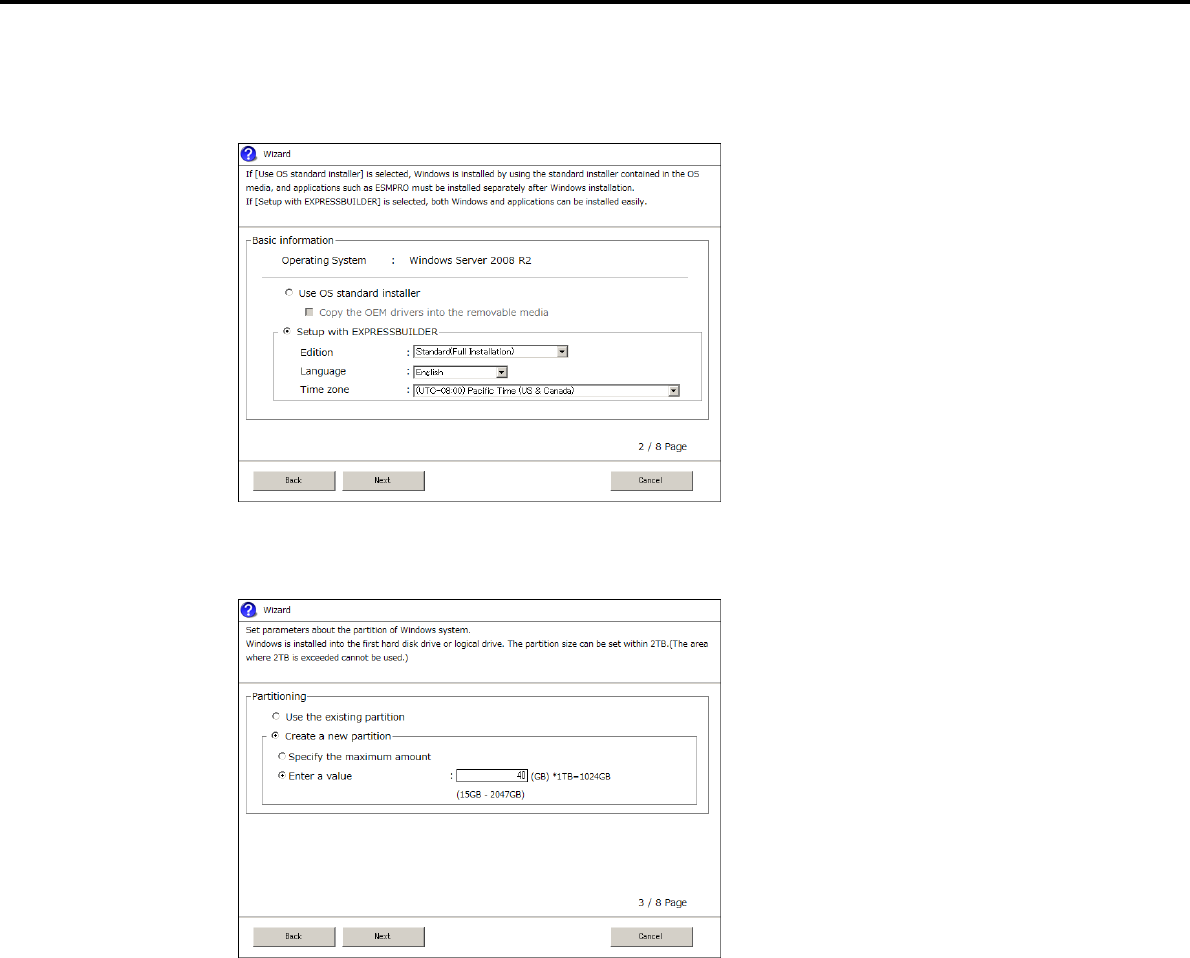
8. Windows OS Parameter File
Chapter 1 Installing Windows
3. Specify the Windows basic settings.
The basic information window appears. Confirm the settings, making corrections as needed, and then
click [Next].
4. Set up the partitions.
The partitioning window appears. Confirm the settings, making corrections as needed, and then click
[Next].
Express5800/GT-110d, GT-110d-S, R110d-1E, E110d-1 Installation Guide (Windows) 265
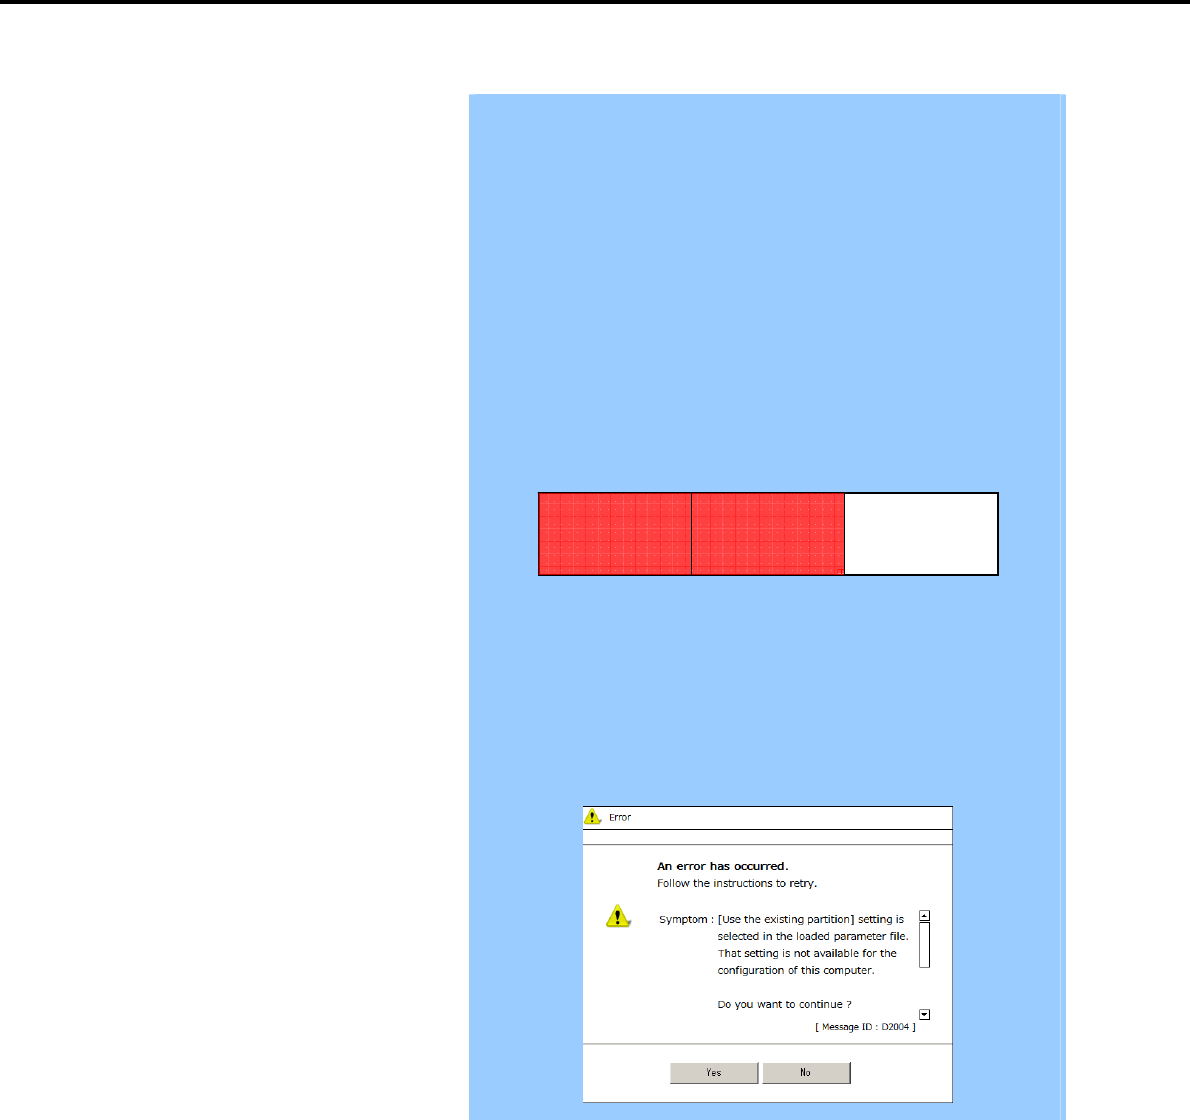
8. Windows OS Parameter File
Chapter 1 Installing Windows
Important Some data in the Hard Disk Drive might be deleted depending on the
system settings. Pay attention to input parameters.
Backing up user data, as needed, is recommended.
Partition size
Specify a partition size larger than the minimum size required for
installing the operating system. (Refer to System partition size in Before
Starting Setup.)
Do not specify a size that is greater than the capacity of the connected
Hard Disk Drive.
If you select Create a new partition under Partitioning, the entire contents
of the Hard Disk Drive will be deleted.
If you select Use the existing partition under Partitioning, data in the boot
partition (if it exists) and Windows partition is formatted and deleted. Data
in other partitions will be kept.
The figure below shows in which partitions data will be deleted.
Boot partition
Deleted
Windows partition
Deleted
User data partition
Retained
You cannot reinstall the operating system in an existing partition that has
been upgraded to a Dynamic Disk (refer to Hardware configuration
warnings in Before Starting Setup). Do not select Use the existing partition
under Partitioning.
The following message might be displayed when a created parameter file is
loaded. In this event, installation using an existing partition cannot be
executed. Select Create a new partition under Partitioning for installation. If
there is a data partition, it will be deleted.
Express5800/GT-110d, GT-110d-S, R110d-1E, E110d-1 Installation Guide (Windows)
266
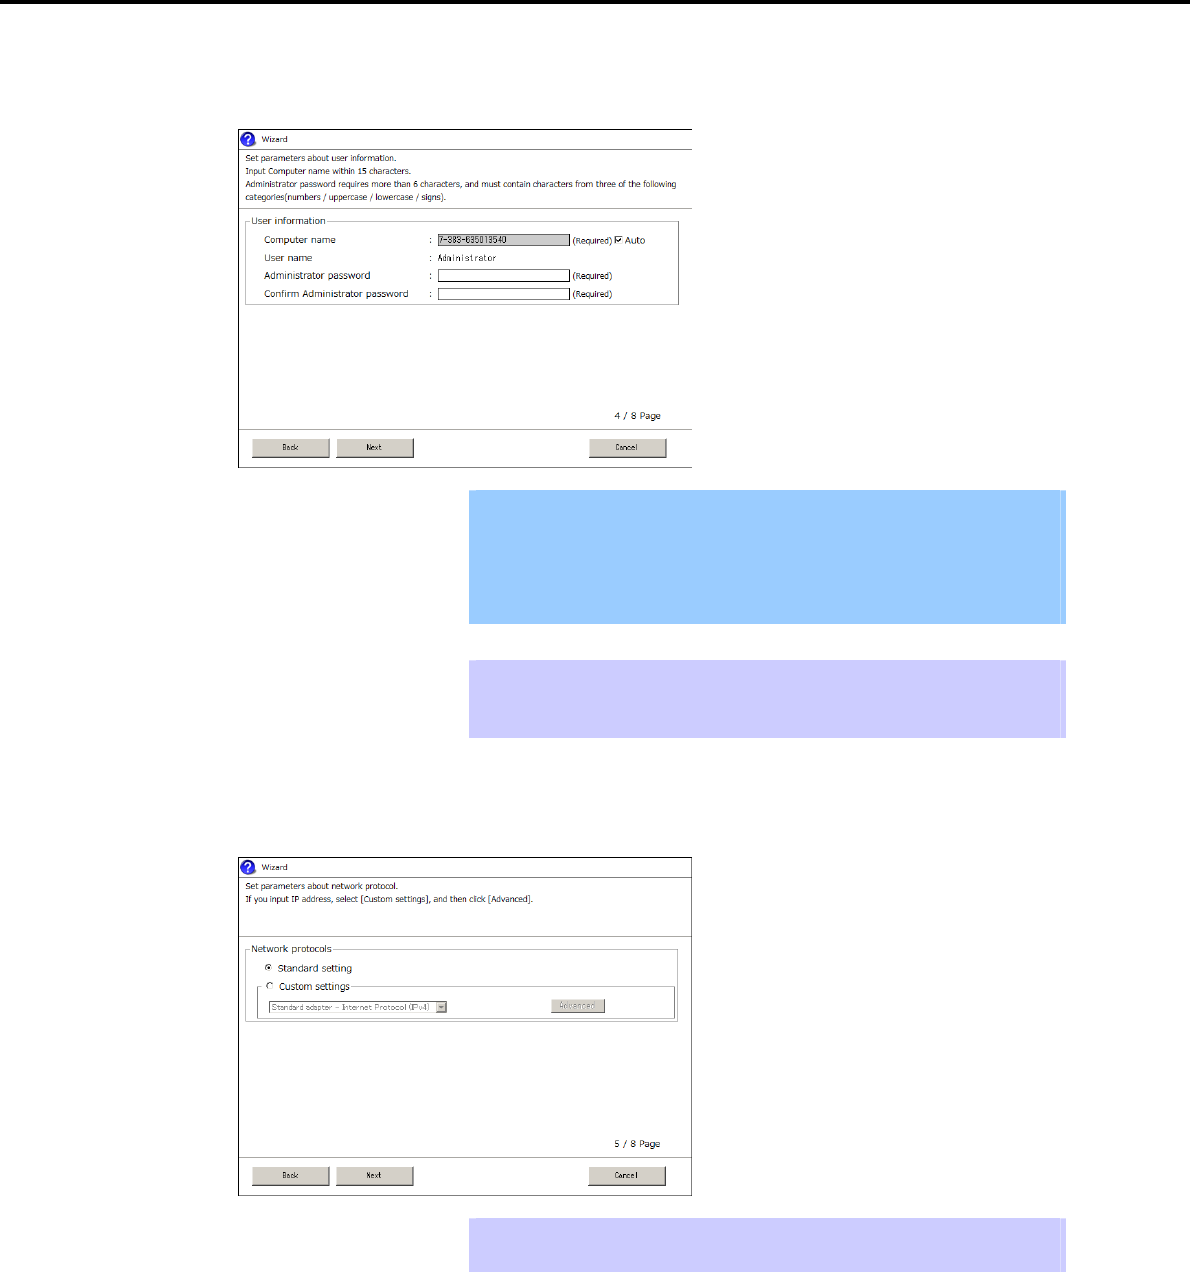
8. Windows OS Parameter File
Chapter 1 Installing Windows
5. Enter the user information.
The user information window appears. Enter the user information, and then click [Next].
Important For Windows Server 2008 R2/Windows 2008, you must enter a computer
name and administrator password that satisfies the following conditions:
Contains 6 or more characters
Contains characters from at least three of the following categories:
numbers, uppercase letters, lowercase letters, and symbols.
Tips If a parameter file is used for setup or if you return to the previous screen,
is displayed in the Administrator password and Confirm Administrator
password text boxes even if no value has been entered.
6. Set up the network.
The network setting window appears. Confirm the settings, making corrections as needed, and then click
[Next].
Tips The order of entry in the custom settings might differ from the numbering of the
LAN ports.
Express5800/GT-110d, GT-110d-S, R110d-1E, E110d-1 Installation Guide (Windows) 267
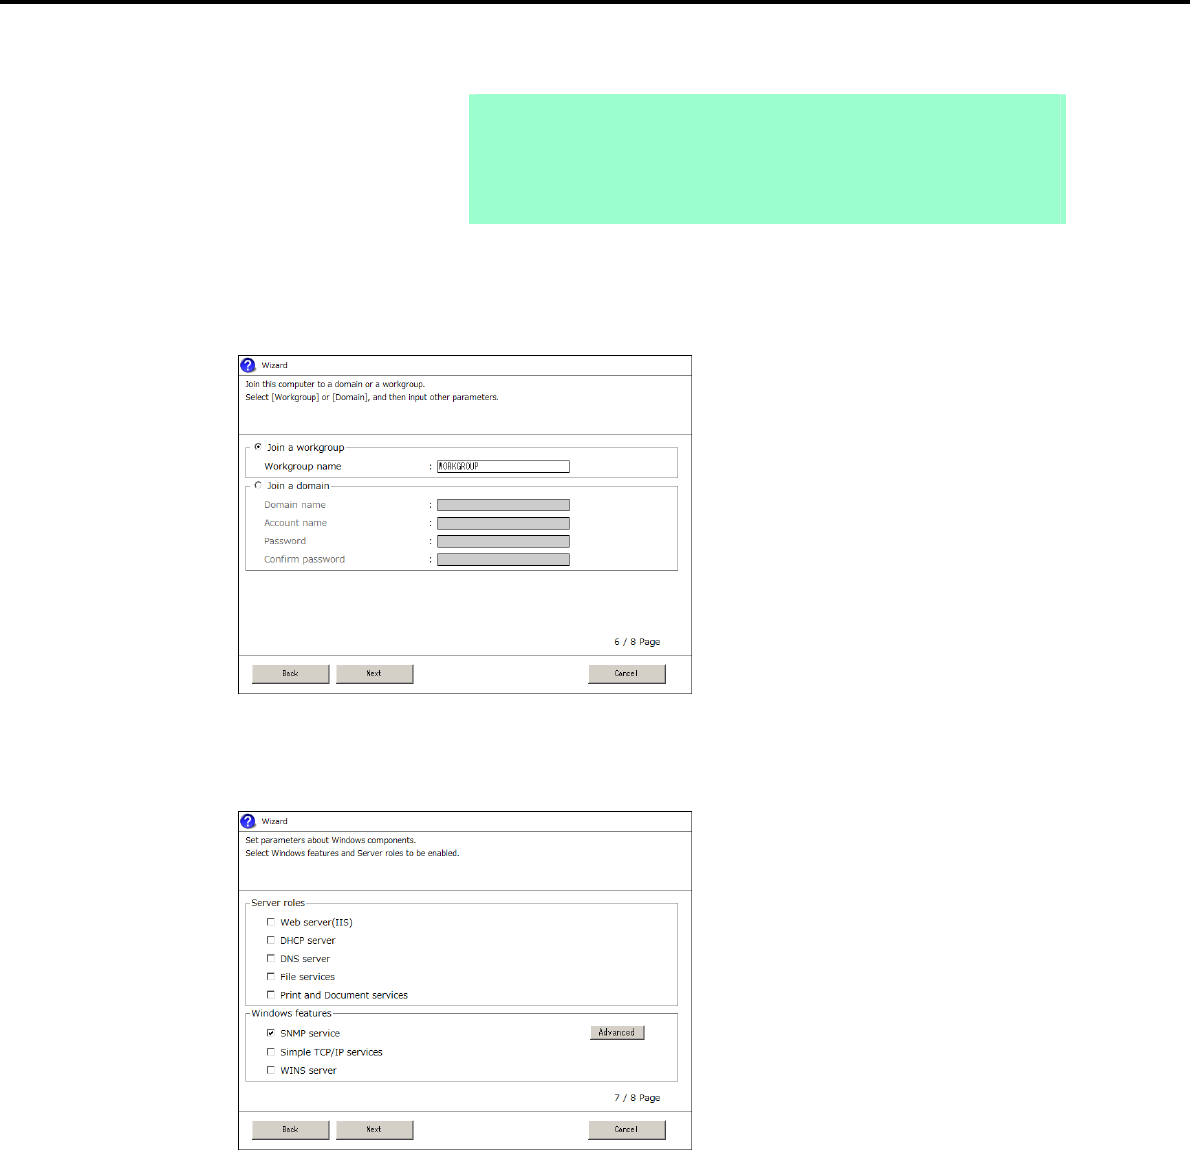
8. Windows OS Parameter File
Chapter 1 Installing Windows
Note Even when an optional network board is connected, the custom setting list only
shows standard network boards. Optional network boards are not displayed.
When an optional network board has been mounted, the optional network board
may need to be configured for the custom settings. After finishing Setup with
EXPRESSBUILDER, specify the network settings again.
7. Enter the domain or workgroup name to be used.
The domain and workgroup setting window appears. Confirm the settings, making corrections as needed,
and then click [Next].
8. Select the Windows components for installation.
The Windows components selection window appears. Confirm the settings, making corrections as
needed, and then click [Next].
Express5800/GT-110d, GT-110d-S, R110d-1E, E110d-1 Installation Guide (Windows)
268
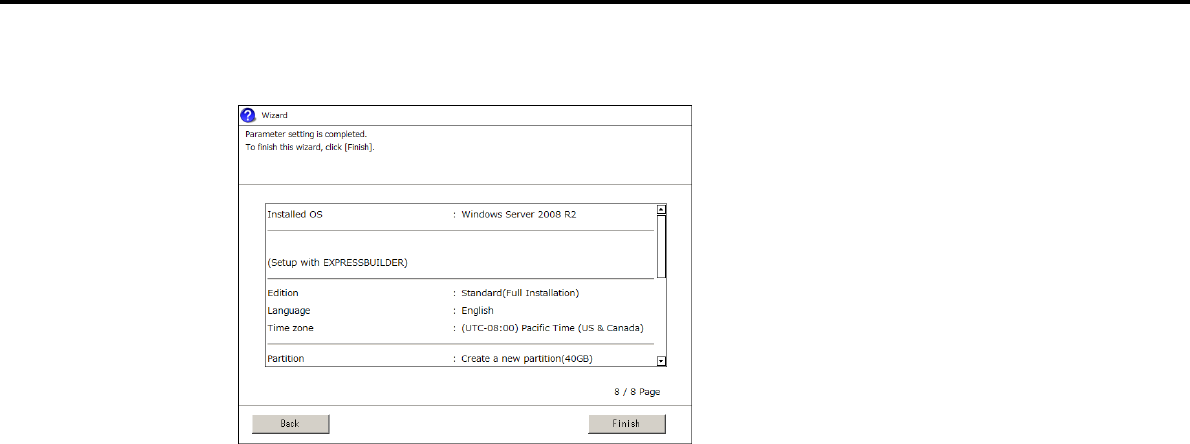
8. Windows OS Parameter File
Chapter 1 Installing Windows
9. Click [Finish] on the confirmation window.
Return to the parameter setup menu.
Proceed to application setup.
Express5800/GT-110d, GT-110d-S, R110d-1E, E110d-1 Installation Guide (Windows) 269
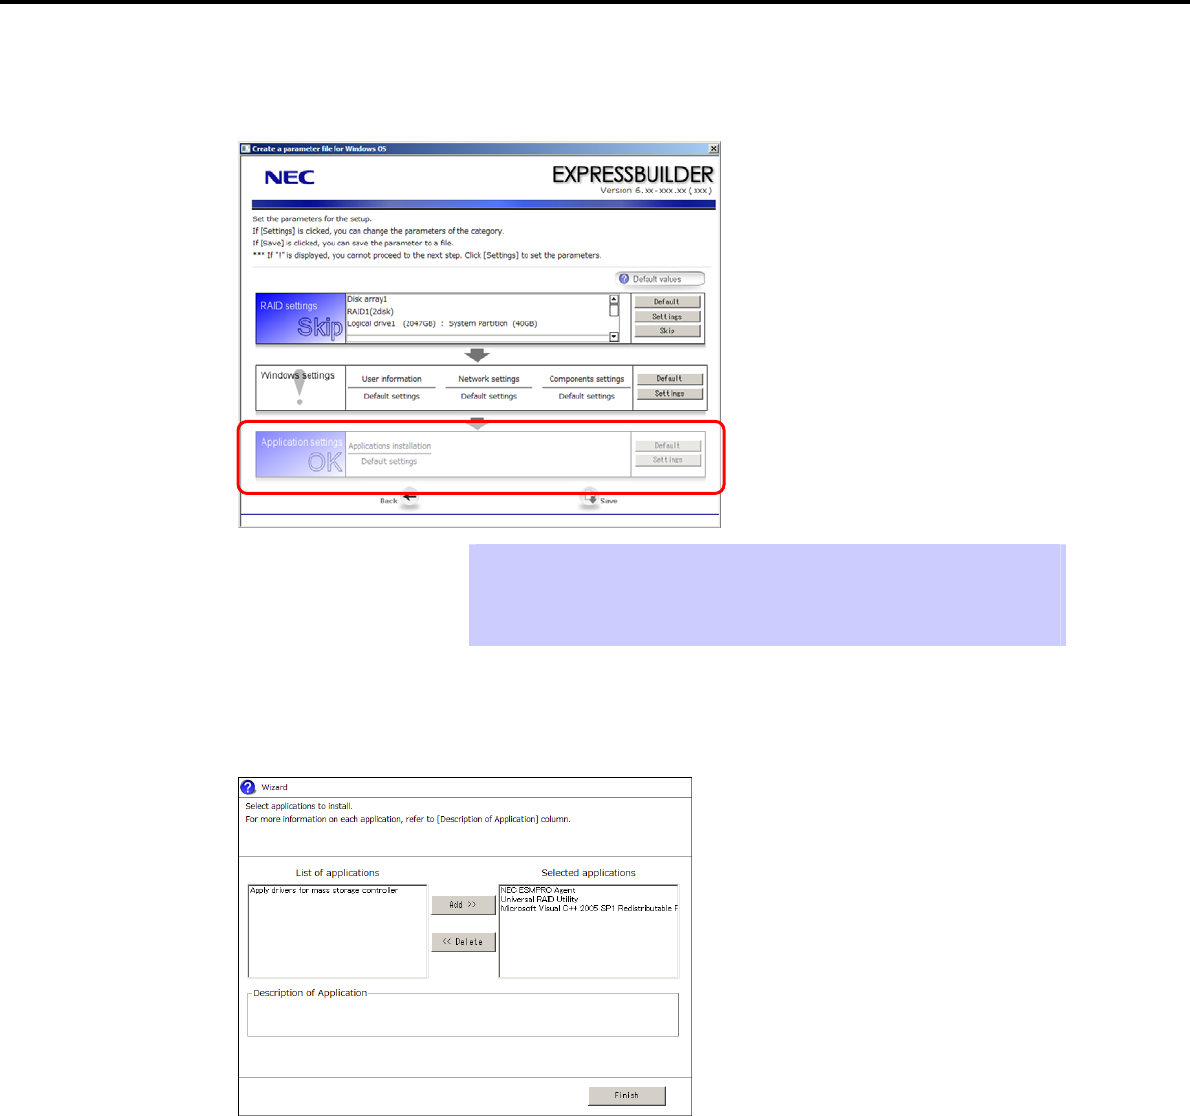
8. Windows OS Parameter File
Chapter 1 Installing Windows
(3) Application settings
Set up applications using the Application settings wizard on the parameter setup menu.
Tips Use the [Default] button when you want to return to the default value of parameters
after having modified them with the wizard.
You can confirm the value set by clicking the [Default] button if you click the
[Default values] button.
Click [Settings] in Application settings.
The application setting window appears. Confirm the settings, making corrections as needed, and then click
[Finish].
Express5800/GT-110d, GT-110d-S, R110d-1E, E110d-1 Installation Guide (Windows)
270
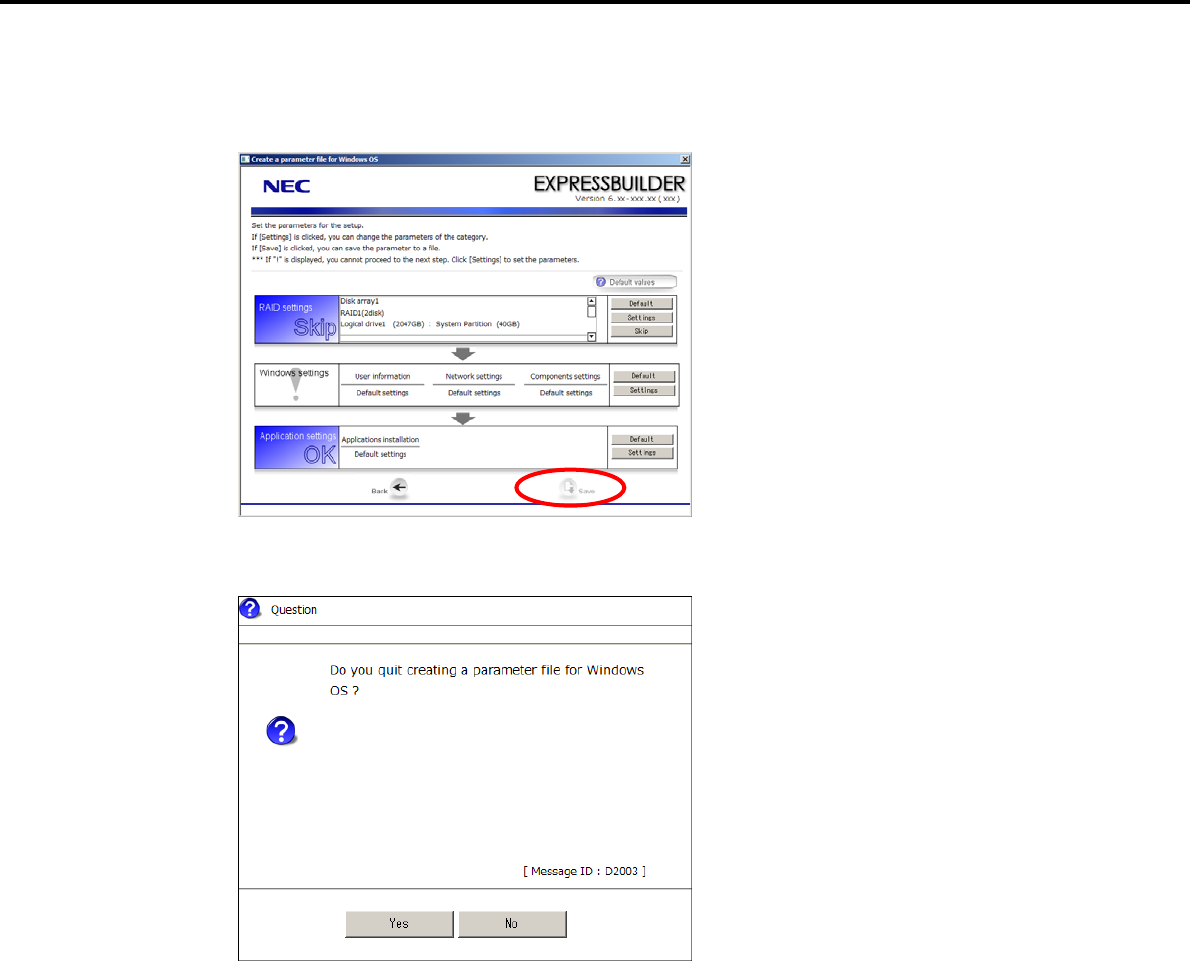
8. Windows OS Parameter File
Express5800/GT-110d, GT-110d-S, R110d-1E, E110d-1 Installation Guide (Windows) 271
Chapter 1 Installing Windows
(4) Saving the parameter file
When the dialog box shown below appears, click [Save] to save the parameter file to removable media.
When the following message appears, click [Yes] to complete parameter file creation.
Parameter file creation is now complete.

NEC Express5800 Series
Express5800/GT-110d, GT-110d-S, R110d-1E, E110d-1
Installing the Bundled Software
This chapter describes the software provided for the Express5800 Series.
1. Bundled software for the server
Describes the bundled software to be installed in the server system.
2. Bundled software for PC for Management
Describes the bundled software to be installed in PC for Management that is used to monitor and manage
the server system.
Express5800/GT-110d, GT-110d-S, R110d-1E, E110d-1 Installation Guide (Windows)
272

1. Bundled Software for the Server
Express5800/GT-110d, GT-110d-S, R110d-1E, E110d-1 Installation Guide (Windows) 273
Chapter 2 Installing the Bundled Software
1. Bundled Software for the Server
This section introduces the software bundled in the server package. For details, refer to the online software
documents.
1.1 NEC ESMPRO Agent (for Windows)
NEC ESMPRO Agent (for Windows) is an application used to monitor the server.
It is automatically installed when a Windows OS is installed by using EXPRESSBUILDER.
To install NEC ESMPRO Agent (for Windows) separately, refer to "NEC ESMPRO Agent Installation Guide
(Windows)" supplied with this product.

1. Bundled Software for the Server
Chapter 2 Installing the Bundled Software
1.2 NEC ESMPRO Agent Extension
NEC ESMPRO Agent Extension allows you to manage this server remotely by the server’s BMC connecting
with NEC ESMPRO Manager.
For details about how to install NEC ESMPRO Agent Extension, refer to "NEC ESMPRO Agent Extension
Installation Guide" on the NEC EXPRESSBUILDER DVD.
1.3 BMC Configuration
BMC Configuration enables you to specify configuration information to this server’s BMC.
For details about how to install BMC Configuration, refer to "BMC Configuration User’s Guide" on the NEC
EXPRESSBUILDER DVD.
1.4 NEC ExpressUpdate Agent
NEC ExpressUpdate Agent enables you to manage and update the versions of the firmware and software
installed in this server.
By using NEC ESMPRO Manager, you can download update packages automatically and install them without
interrupting the system.
For details about how to install NEC ExpressUpdate Agent, refer to "NEC ExpressUpdate Agent Installation
Guide" on the NEC EXPRESSBUILDER DVD.
Important Updates are available for some firmware and software that do not support
NEC ExpressUpdate. Refer to the following website to install these
packages.
http://www.nec.com/global/prod/express/index.html
Express5800/GT-110d, GT-110d-S, R110d-1E, E110d-1 Installation Guide (Windows)
274

1. Bundled Software for the Server
Chapter 2 Installing the Bundled Software
1.5 Universal RAID Utility
Universal RAID Utility is an application used to manage and monitor the following RAID Controllers:
Onboard RAID Controller (LSI Embedded MegaRAID)
N8103-128 RAID Controller (128 MB, RAID 0/1)
N8103-G128 RAID Controller (128 MB, RAID 0/1)
N8103-129 RAID Controller (256 MB, RAID 0/1)
N8103-130 RAID Controller (256 MB, RAID 0/1/5/6)
N8103-134 RAID Controller (512 MB, RAID 0/1/5/6)
N8103-135 RAID Controller (512 MB, RAID 0/1/5/6)
For details about how to install and operate Universal RAID Utility and its functions, refer to "Universal RAID
Utility User’s Guide" on the supplied EXPRESSBUILDER DVD.
If the operating environment (such as the operating system) for Universal RAID Utility described in the user’s
guide differs from the one described in the user’s guide of this product, follow the operating environment in the
user’s guide of this product.
1.5.1 Setup of Universal RAID Utility
This section describes setup of Universal RAID Utility.
(1) Setup for BTO (Built To Order) models
If you purchased a BTO model configured with a RAID System, Universal RAID Utility is already installed. You
do not need to install Universal RAID Utility for such models.
(2) Setup with EXPRESSBUILDER
You can easily install Universal RAID Utility by using EXPRESSBUILDER. When you execute Setup with
EXPRESSBUILDER, Universal RAID Utility is installed along with Windows. Select Universal RAID Utility in
the application selection dialog box during setup.
(3) Setup using Universal RAID Utility setup program
The Universal RAID Utility setup program can be launched from the autorun menu of EXPRESSBUILDER.
From the autorun menu, select Setup software and then Universal RAID Utility.
For Windows, the following runtime components are required:
Microsoft .NET Framework 2.0 to 3.5
Microsoft Visual C++ 2005 SP1 library
These applications can also be installed from the autorun menu.
To install Microsoft .NET Framework 2.0, select Setup Windows and then Install the .NET Framework Ver2.0
Redistribution Package (x86) (Install the .NET Framework Ver2.0 Redistribution Package (x64) in the
case of x64) from the autorun menu.
Express5800/GT-110d, GT-110d-S, R110d-1E, E110d-1 Installation Guide (Windows) 275

1. Bundled Software for the Server
Express5800/GT-110d, GT-110d-S, R110d-1E, E110d-1 Installation Guide (Windows)
276
Chapter 2 Installing the Bundled Software
To install the Microsoft Visual C++ 2005 SP1 library runtime component, select Setup Windows and then
Install the Microsoft Visual C++ 2005 SP1 Redistribution Package (x86) (use x86 regardless of the CPU
architecture) from the autorun menu.
Tips Microsoft .NET Framwork
To use the RAID Viewer and Log Viewer, Microsoft .NET Framework Version 2.0
to 3.5 or later is required.
Windows Server 2008 and Windows Server 2008 R2 include .NET Framework
2.0 to 3.5.
Therefore, .NET Framework does not need to be installed when using these
operating systems.
Microsoft Visual C++ 2005 SP1 library runtime component
To use the RAID Viewer, the Microsoft Visual C++ 2005 SP1 library runtime
component is required.
Windows Server 2008 R2 includes the Microsoft Visual C++ 2005 SP1 library.
Therefore, the Microsoft Visual C++ SP1 library runtime component does not
need to be installed when using these operating systems.
1.5.2 Management by NEC ESMPRO Manager
NEC ESMPRO Manager Ver. 5.3 or later is used to remotely reference and monitor the RAID System that is
managed by Universal RAID Utility.
For details about the operating environment NEC ESMPRO Manager, refer to “NEC ESMPRO Manager
Installation Guide”.

1. Bundled Software for the Server
Chapter 2 Installing the Bundled Software
1.6 NEC Product Info Collection Utility
NEC Product Info Collection Utility is used to collect server information during maintenance or in the case of
failure.
It can be installed from the EXPRESSBUILDER DVD.
This utility might be pre-installed in some server models.
1.6.1 Installation
You can install this utility through the following procedure.
1. Log in to Windows, and then insert the EXPRESSBUILDER DVD into the optical disk drive. The autorun
menu shown below appears.
2. From the autorun menu, select Setup Software and then Product Info Collection Utility.
Installation of this utility starts. After this, follow the instructions in the dialog boxes until installation is
complete. (By default, it is installed in the System drive: \ezclct folder.)
Important Log in to the system with an account that has administrator rights.
The installation drive must have at least 2.5 GB of free space.
1.6.2 Uninstallation
When the server is not in a Server Core configuration:
From Control Panel, select Add/Remove Programs and then Product Info Collection Utility (Vx.x.x).
After this, follow the instructions in the dialog boxes until uninstallation is complete.
When the server is in the Server Core configuration:
Execute the following command at the command prompt:
Wmic product where name="Product Info Collection Utility" call uninstall
Express5800/GT-110d, GT-110d-S, R110d-1E, E110d-1 Installation Guide (Windows) 277

2. Bundled Software for PC for Management
Chapter 2 Installing the Bundled Software
2. Bundled Software for PC for Management
This section describes the bundled software required to configure PC for Management used to manage the
server system.
2.1 NEC ESMPRO Manager
NEC ESMPRO Manager is an application used to remotely manage and monitor the hardware and RAID
System of the server.
To use this function, install the bundled software such as NEC ESMPRO Agent for the server.
For details about the operating environment of NEC ESMPRO Manager and how to install it, refer to "NEC
ESMPRO Manager Installation Guide" on the EXPRESSBUILDER DVD supplied with this product.
Express5800/GT-110d, GT-110d-S, R110d-1E, E110d-1 Installation Guide (Windows)
278
