Nedap N V VP500X Inductive Card Reader User Manual Installation Manual sow feed station
N. V. Nederlandsche Apparatenfabriek NEDAP Inductive Card Reader Installation Manual sow feed station
Contents
- 1. 14ar01_5280036 VP5004 GEA IDnote manual 1.1 CGDVP500X
- 2. 14br01_5280044 VP5004 IDnote manual 1.1 CGDVP500X
- 3. 19_VP5002 Vscan 2.7 GB 5275571 CGDVP500X
14br01_5280044 VP5004 IDnote manual 1.1 CGDVP500X
IDnote
Article number 5280036 August 2012 / Manual version 1.1
Service manual
For installation, operation and service
VP5004-IDnote Manual version 1.1
Preface
This manual describes the installation, operation, troubleshooting and maintenance of the
IDnote handheld reader. Read this manual entirely and install the IDnote step by step as
described in the manual.
Pictograms
Please pay extra attention here. This pictogram indicates an important subject.
More information
Later versions of this document will be posted to the Nedap Agri Website, as required. Please
visit our website (http://www.nedap-agri.com) for more information or to find related manuals.
For questions or for further information, please contact your dealer or Nedap Agri.
Software
Check our website (http://www.nedap-agri.com) for the latest software releases.
Version overview
Manual version 1.0 / July 2012
First release.
Manual version 1.1 / August 2012
FCC and IC warning.
Compliance statements (part15.19)
This device complies with part 15 of the FCC Rules and to RSS210 of Industry Canada.
Operation is subject to the following two conditions:
(1) this device may not cause harmful interference, and
(2) this device must accept any interference received, including interference that may cause undesired operation.
Cet appareil se conforme aux normes RSS210 exemptés de license du Industry Canada. L'opération est soumis aux
deux conditions suivantes:
(1) cet appareil ne doit causer aucune interférence, et
(2) cet appareil doit accepter n'importe quelle interférence, y inclus interférence qui peut causer une opération non pas
voulu de cet appareil.
Warning (part15.21)
Changes or modifications not expressly approved by party responsible for compliance could void the user’s authority to
operate the equipment.
This information is furnished for guidance, and with no guarantee as to its accuracy or completeness; its publication conveys no
license under any patent or other right, nor does the publisher assume liability for any consequence of its use; specifications and
availability of goods mentioned in it are subject to change without notice; it is not to be reproduced in any way, in whole or in part,
without the written consent of the publisher.
© Nedap N.V., AGRI P.O. Box 104 NL-7140 AC GROENLO The Netherlands

VP5004-IDnote Manual version 1.1

VP5004-IDnote Manual version 1.1 / Page 1
Table of contents
Version overview
Preface
Table of contents
1. Description .......................................................................................................................... 2
1.1. Tag scan mode ..................................................................................................................... 3
1.2. Batch scan mode .................................................................................................................. 3
2. Working/Functioning .......................................................................................................... 4
2.1. Tag scan mode ..................................................................................................................... 4
2.2. Batch scan mode .................................................................................................................. 4
3. Safety.................................................................................................................................... 6
4. Installation ........................................................................................................................... 7
5. Start up operation ............................................................................................................. 10
5.1. IDnote Data Manager program settings on PC ................................................................... 10
5.2. Bluetooth device settings .................................................................................................... 11
5.3. IDnote device settings ......................................................................................................... 12
6. Operation ........................................................................................................................... 14
6.1. Scan button ......................................................................................................................... 14
6.2. Main menu .......................................................................................................................... 14
6.3. Tag menu ............................................................................................................................ 15
6.4. Batch menu ......................................................................................................................... 16
6.5. Batch data transfer .............................................................................................................. 17
6.6. Operation IDnote Data Manager PC program..................................................................... 18
7. Maintenance, cleaning and disposal ............................................................................... 19
7.1. Batteries .............................................................................................................................. 19
7.2. Cleaning .............................................................................................................................. 20
7.3. Disposal .............................................................................................................................. 20
Appendix A Technical specifications .................................................................................. 21
Appendix B Display Icons .................................................................................................... 22
Appendix C Setup a Bluetooth connection ........................................................................ 23
VP5004-IDnote Manual version 1.1 / Page 2
1. Description
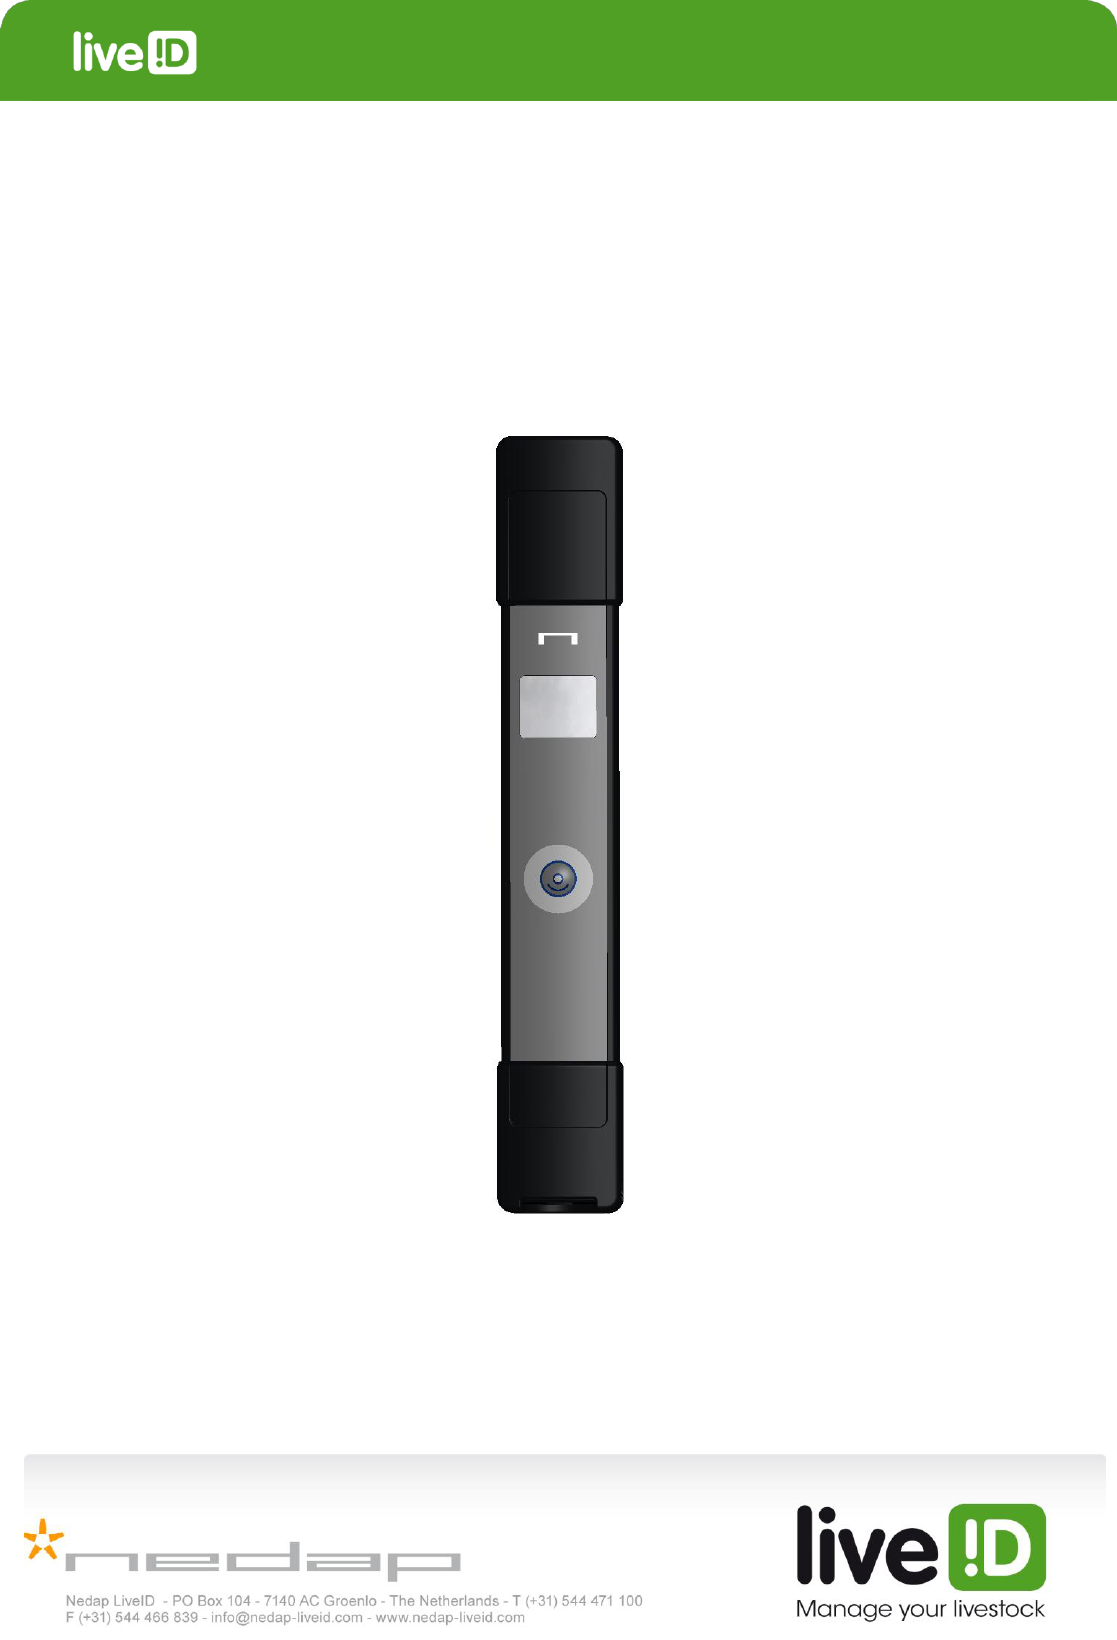
The IDnote handheld reader is used for easy and reliable ISO tag reading.
The IDnote has a scan button and a display. The scan button is used to
scan a tag or to navigate through the IDnote menu. After scanning a tag,
the animal ID number is visible on the IDnote display. A battery inside
makes it possible to use the device wireless.
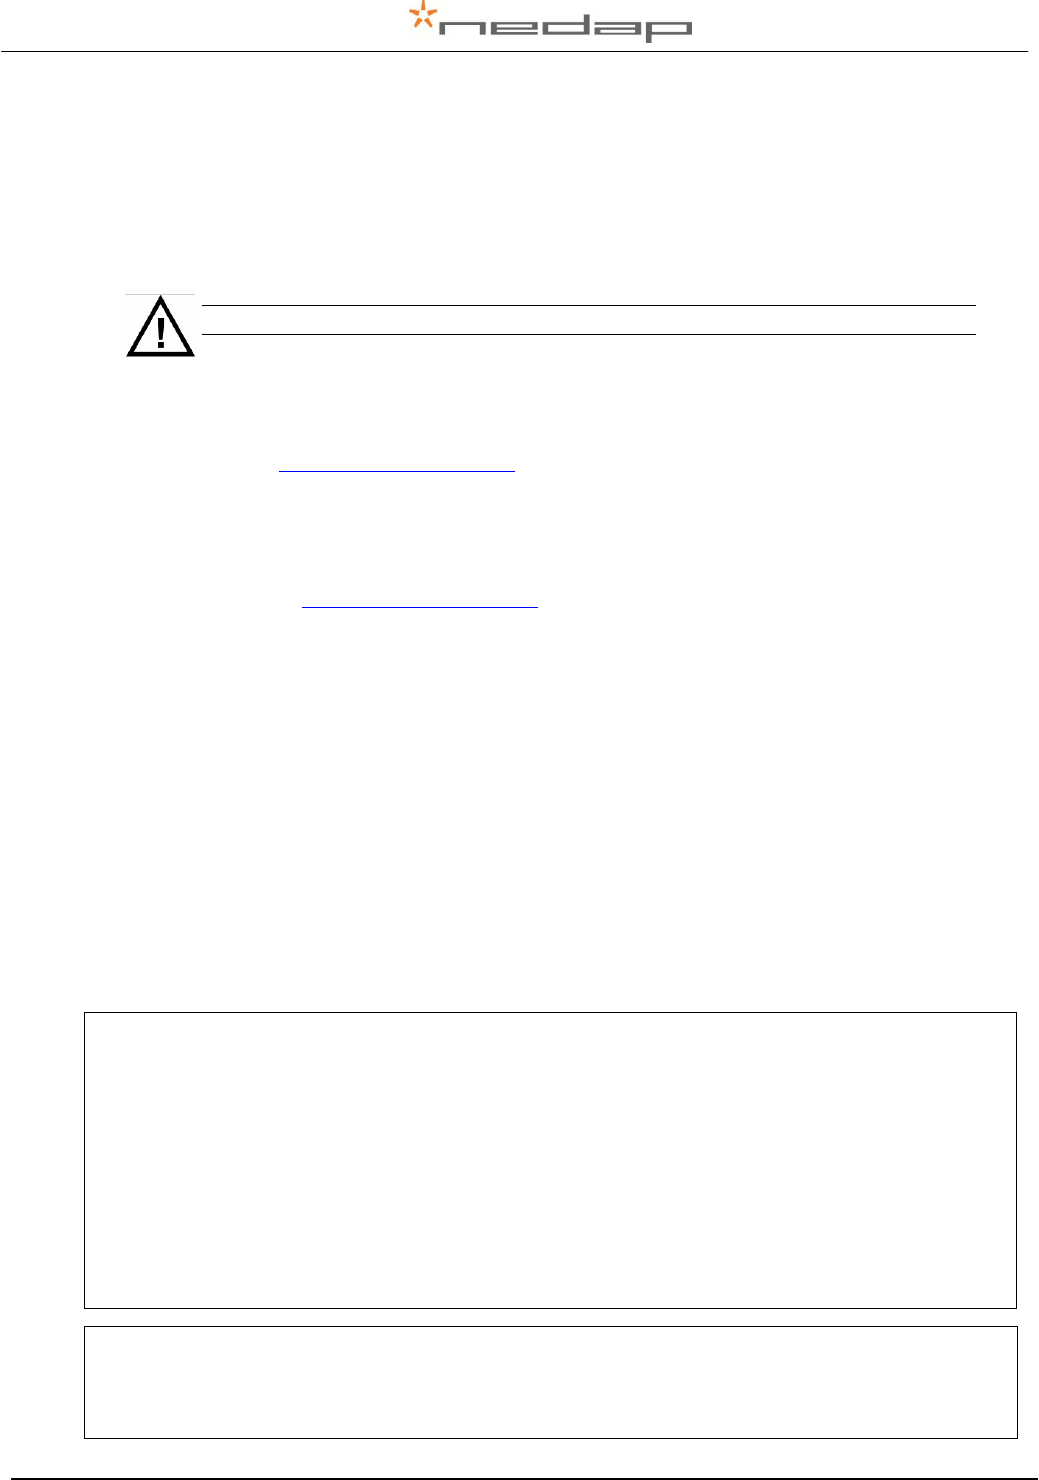
Display
- Icon on battery, scanning or connection status
- Tag mode
- Batch mode
- Menu settings
Scan button:

VP5004-IDnote Manual version 1.1 / Page 3
1.1. Tag scan mode
The tag scan mode is used to check the animal ID number or to check other details like the type
of tag or the activity data from an animal.
- Scan a tag from one individual animal.
- Scanning stops after first identification.
- Animal ID number visible on the display.
- No data storage. Data dump right after identification.
1.2. Batch scan mode
The batch scan mode is used to scan a batch of animals.
- Scan tags from a batch of animals (a group).
- Rapid continuous scanning. Press scan button to start scanning and when ready press
again to stop scanning. An animal that is scanned more often is only stored once.
- Number of animals in the batch, the batch number and the animal ID number of the last
scanned animal are visible on the display and stored in memory.
- Data transfer between the IDnote and any PC via an USB or Bluetooth connection or a
Bluetooth device like a thermal printer or an automated weighing scale is possible any time.
VP5004-IDnote Manual version 1.1 / Page 4
2. Working/Functioning
The IDnote handheld reader is used to scan the tag of individual animals. There are 2 modes
that can be used to scan tags: the Tag scan mode or the Batch scan mode.
2.1. Tag scan mode
In the Tag mode it is possible to scan a tag from one individual animal. When a new tag is
identified the device stops scanning. After scanning a tag, the animal ID number is visible on the
IDnote display. The tag scan mode is used to check the animal ID number or to check other
details like the type of tag or the activity data from the animal.
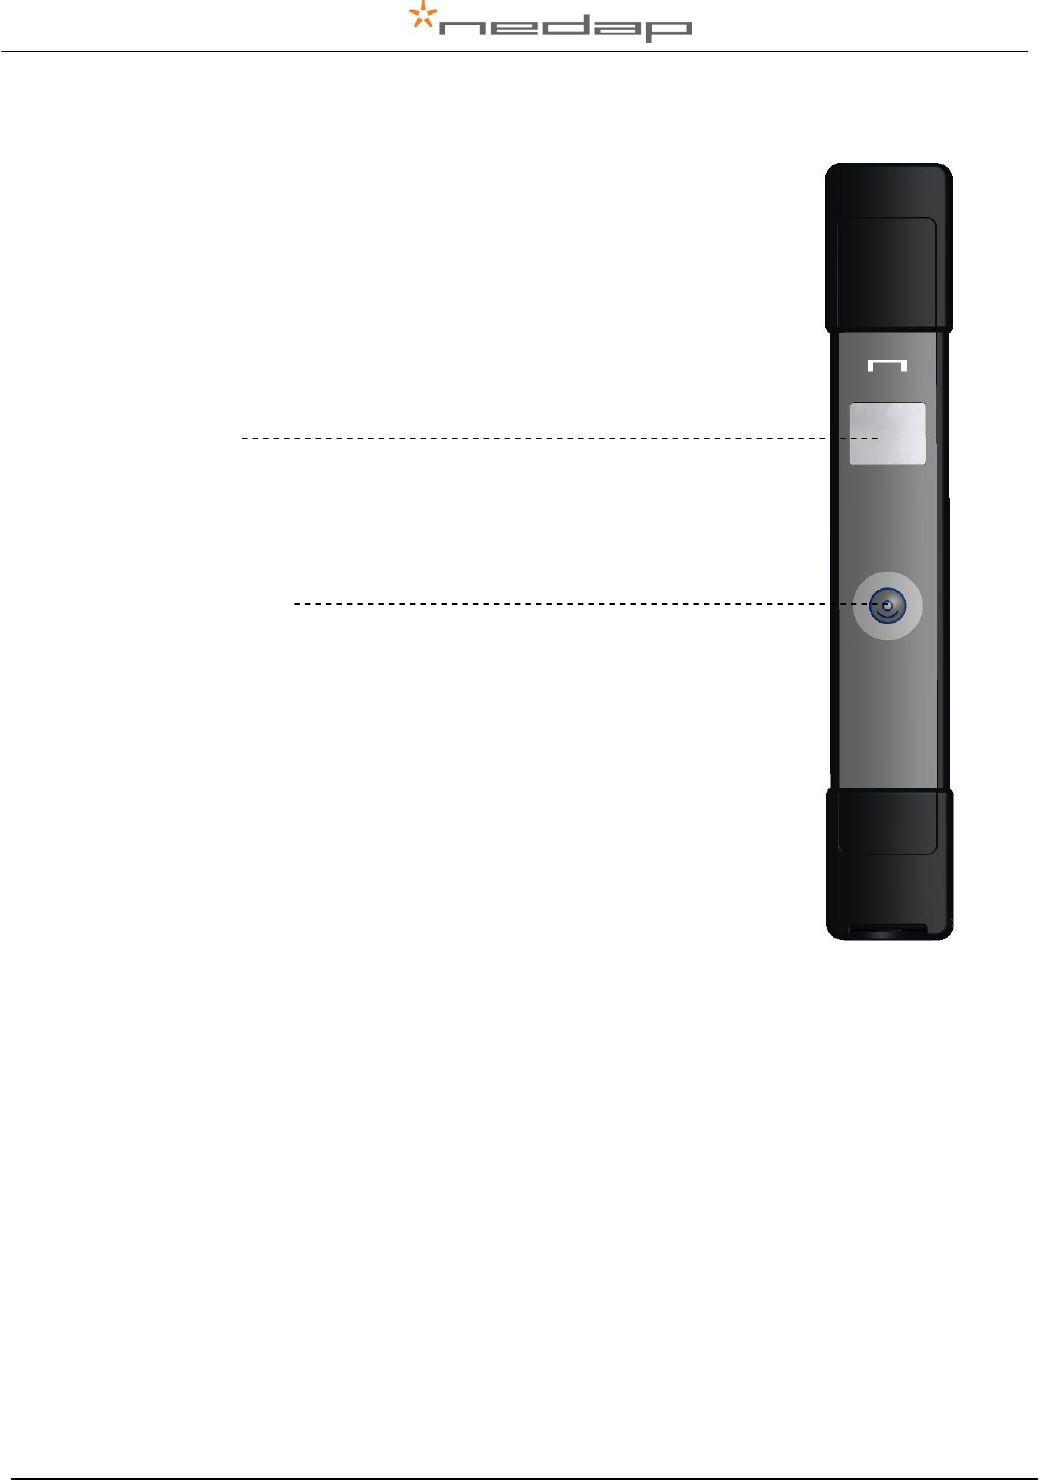
TAG SCAN
Tag scan mode
948 0000 HDX/FDX
First 7 digits of the animal ID
12345678
Last 8 digits of the animal ID
R:2 UD:34 A:1
R: Retag count, UD: User data (if animal bit is 1), A: Animal bit.
TAG SCAN
Tag scan mode
948 0000 HDX/FDX
First 7 digits of the animal ID
12345678
Last 8 digits of the animal ID
ACT:1234
ACT: Activity data (counter value activity tag. if animal bit is 0)
More details can be shown through the “Detail” menu.
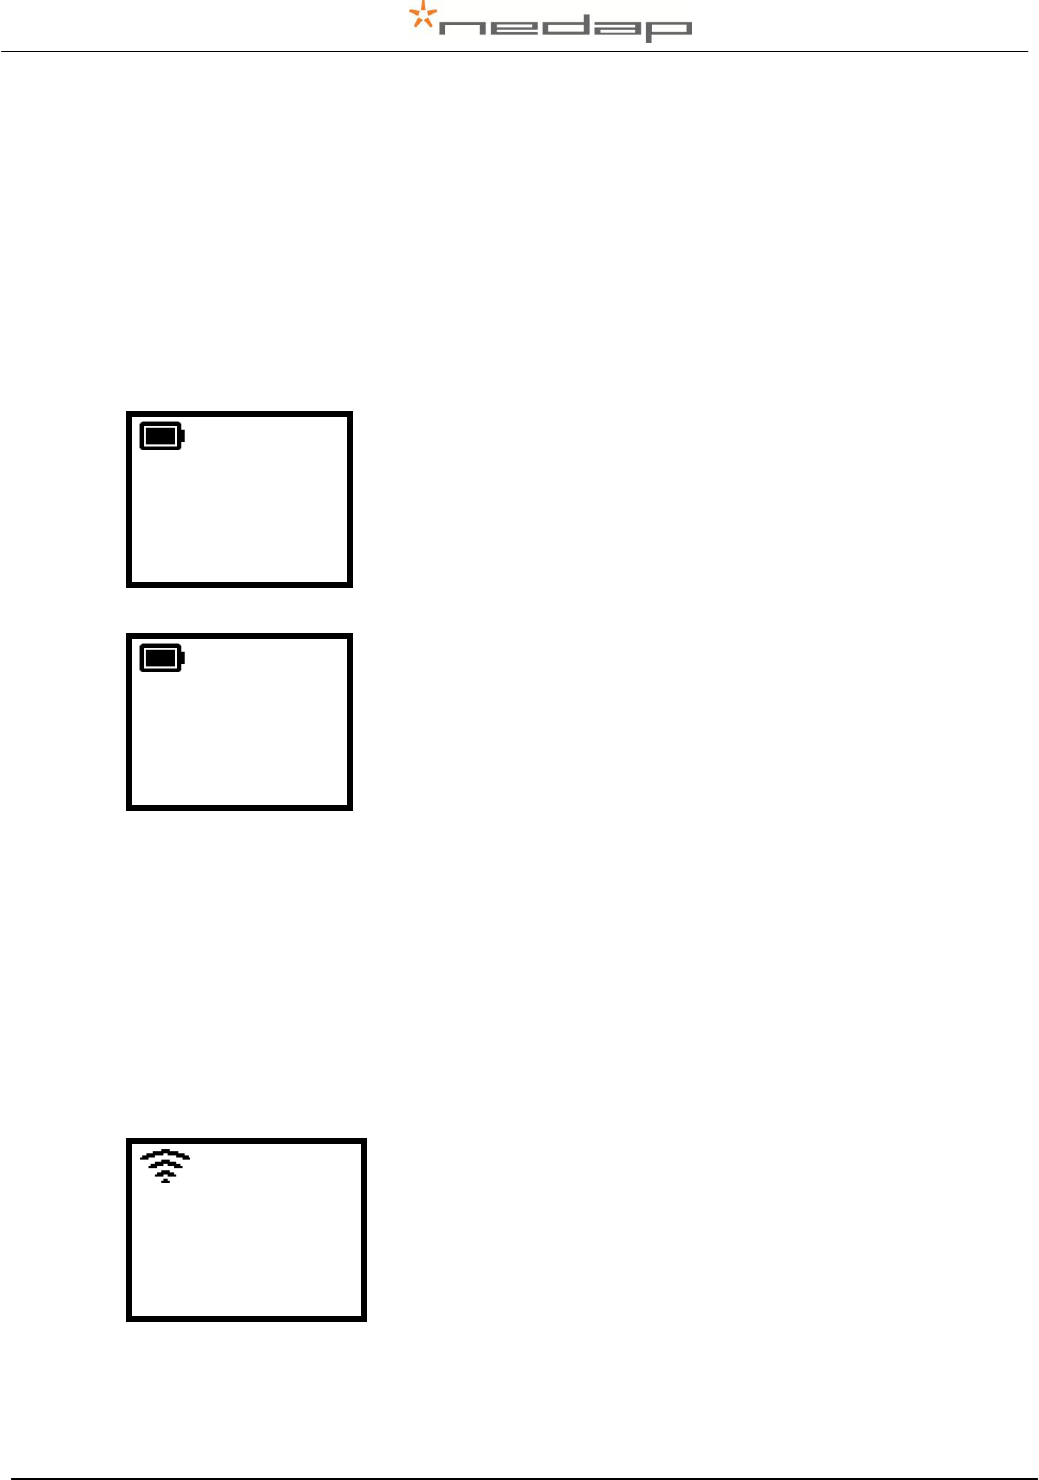
2.2. Batch scan mode
In the Batch mode it is possible to scan a batch of animals. When multiscan is turned on
(default) the tags can be scanned rapidly because reader starts scanning when the scan button
is pressed short and it continues to scan new tags until the scan button is pressed short again.
When scanning a group of animals, the batch number and the number of animals in this batch
will be visible on the IDnote display. The ID number of the last scanned animal is also visible on
the display. All new ID’s are stored in the batch as a list of tag numbers.
123
An animal is scanned for the first time.
Animal counter
123
Batch number (>999 animals smaller digits)
123456789012
Animal ID number (last 12 digits)

VP5004-IDnote Manual version 1.1 / Page 5
If a tag is scanned for the second time then the display will show the number inverse in white on
a black surface and the number of animals will not increase.
123
If the animal is scanned for the second time.
123
Animals counter: same number of animals.
123456789012
Same Animal ID number (last 12 digits)
The collected data will be saved on the IDnote and can be transferred to a PC. The IDnote
enables easy data transfer between the IDnote and any PC via an USB or Bluetooth connection
or a Bluetooth device like a thermal printer or an automated weighing scale. An ASCII protocol is
available to send the read and/or stored data in the IDnote to an host application. See Appendix
D for more information about this protocol.
VP5004-IDnote Manual version 1.1 / Page 6
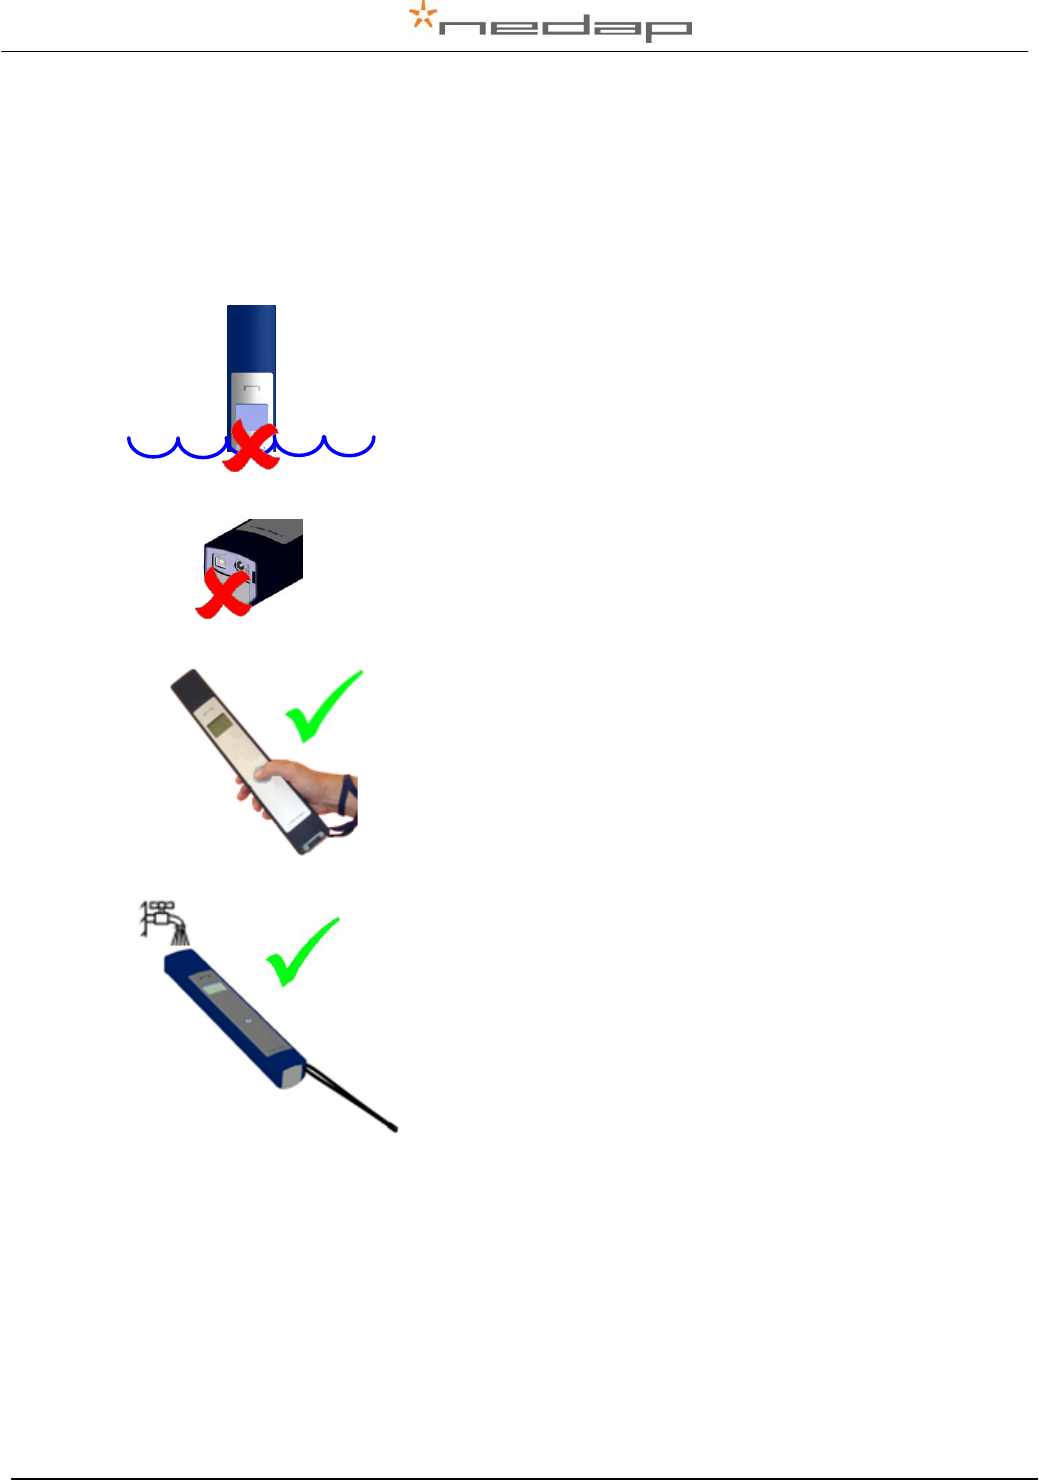
3. Safety
Before connecting and using the IDnote read this information. Not following this guidelines may
be dangerous and helps to avoid possible problems using the IDnote. Read this complete user
manual for further information.
Do not submerge.
Do not power hose.
Keep connectors free of dirt. Always close lid when cables
are not connected.
Use wrist cord to prevent from dropping.
The IDnote can be rinsed with water for cleaning.
VP5004-IDnote Manual version 1.1 / Page 7
4. Installation
Execute the set up to install the necessary drivers and the IDnote data manager transfer
program on a Windows computer.
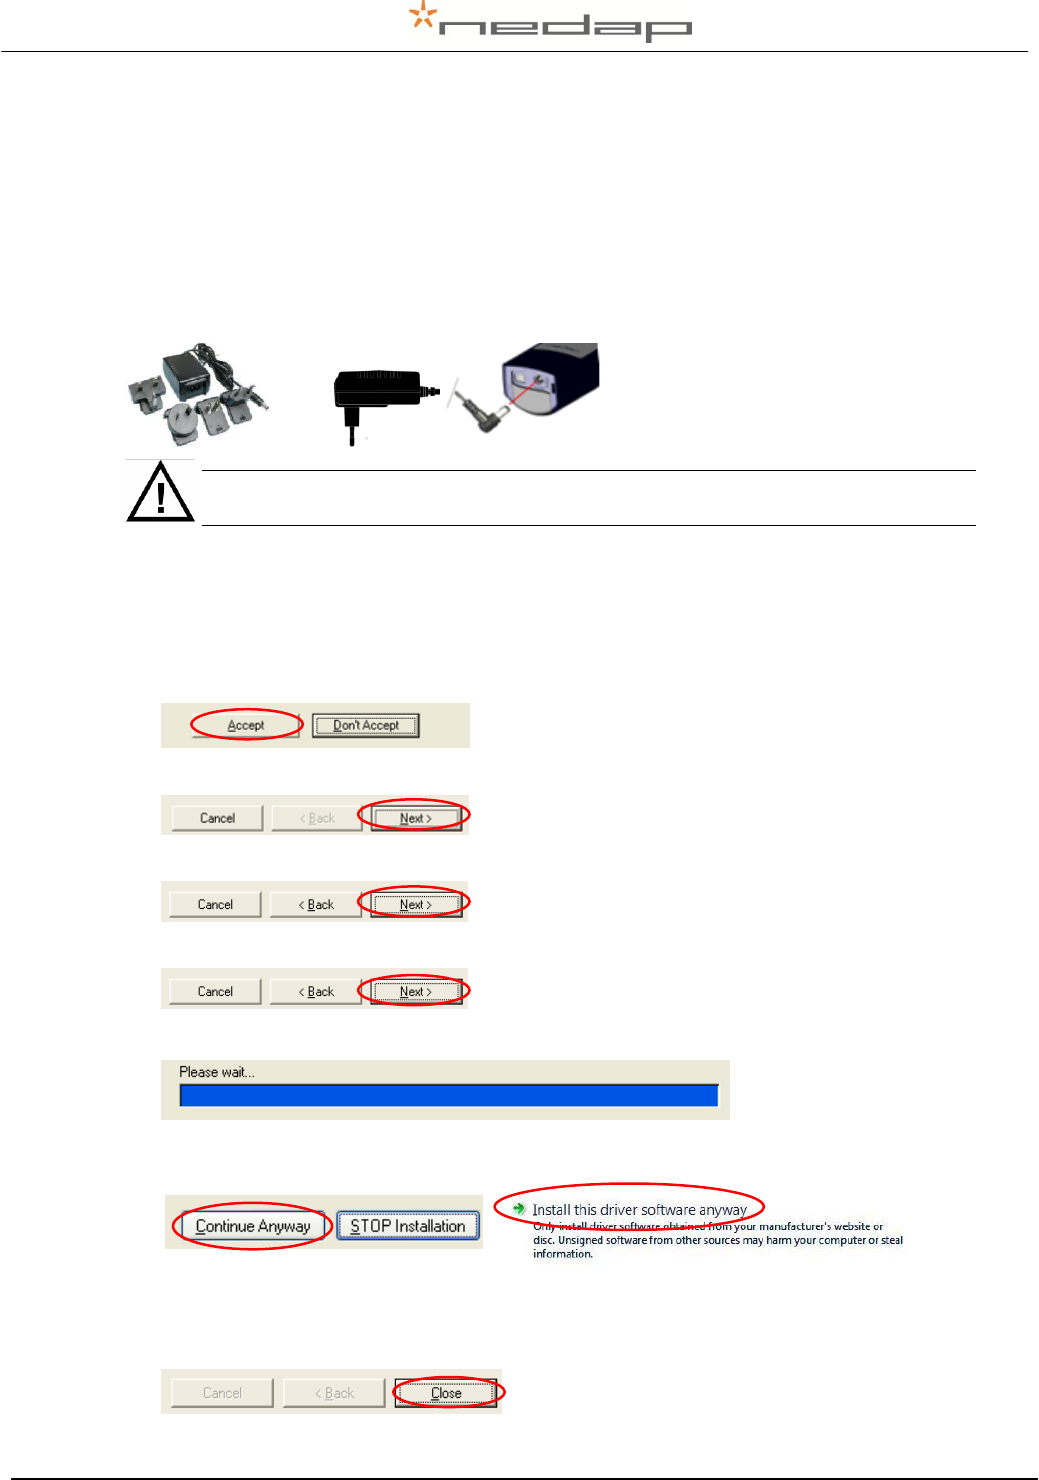
1. Before first use of the IDnote, charge batteries at least 16 hours for obtaining the maximum
battery capacity (ambient temperature between 5 and 25°C) During charging
communication between IDnote and PC is possible. Scanning tags is disabled.
Connect the plug in the connector on the right side to charge the batteries.
Before first use of the IDnote, charge batteries at least 16 hours for obtaining the
maximum battery capacity.
1. Insert the IDnote - Velos Sync CD in the CD-ROM drive The IDnote Setup Wizard will start
automatically. If not, choose Start > Run > open D:\setup.exe and click OK (supposing D is
CD-ROM drive).
2. Install a new version of NET Framework if necessary. Click Accept.
3. Install IDnote application Click Next.
4. Change installation folder, if necessary, click Next.
5. Confirm installation, click Next.
6. Software will be installed, please wait.
7. Continue Software Installation, click Continue Anyway (XP), or Install this driver anyway
(Vista).
Windows XP
Windows Vista
8. Setup is completed, click Close.
VP5004-IDnote Manual version 1.1 / Page 8
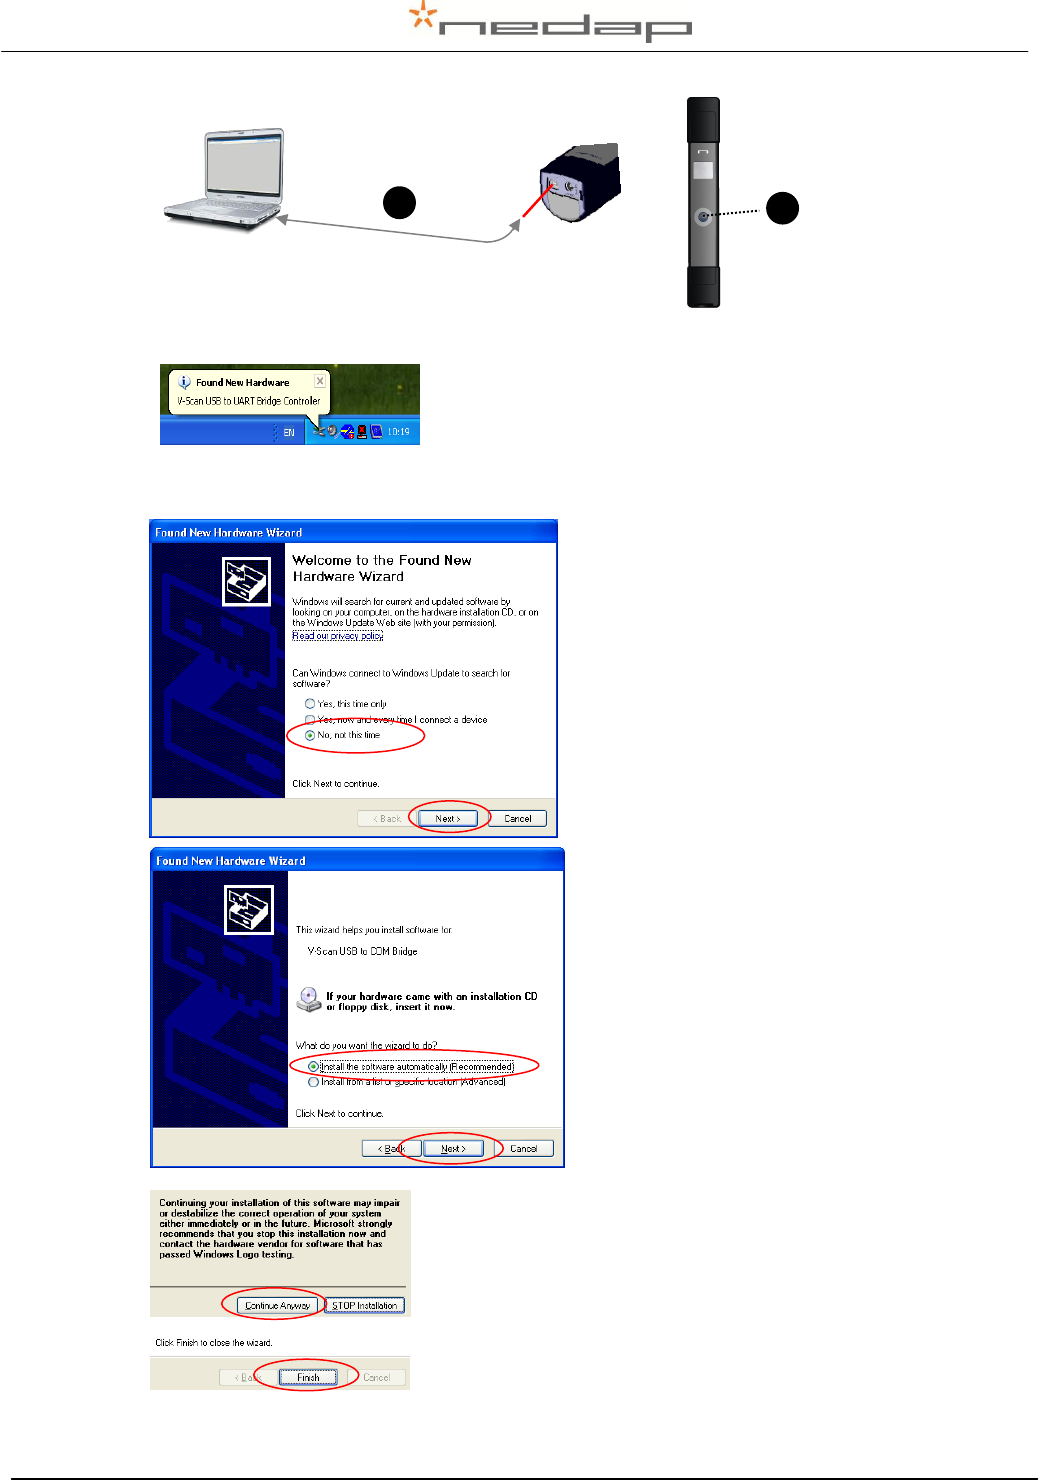
9. Connect the IDnote to the PC and switch on the IDnote.
10. After the IDnote is connected to the PC, the message “Found New Hardware” appears.
The next screen will appear. Install USB to COM driver as described below.
(Microsoft Vista: driver will be installed automatically)
Choose No, not this time.
Click Next.
Choose Install the software automatically.
Click Next.
Continue Software Installation, click Continue
Anyway.
After completing the installation, click Finish.
1. Connect USB cable
2. Switch IDnote on, by pressing the Scan
button long
2
1
VP5004-IDnote Manual version 1.1 / Page 9
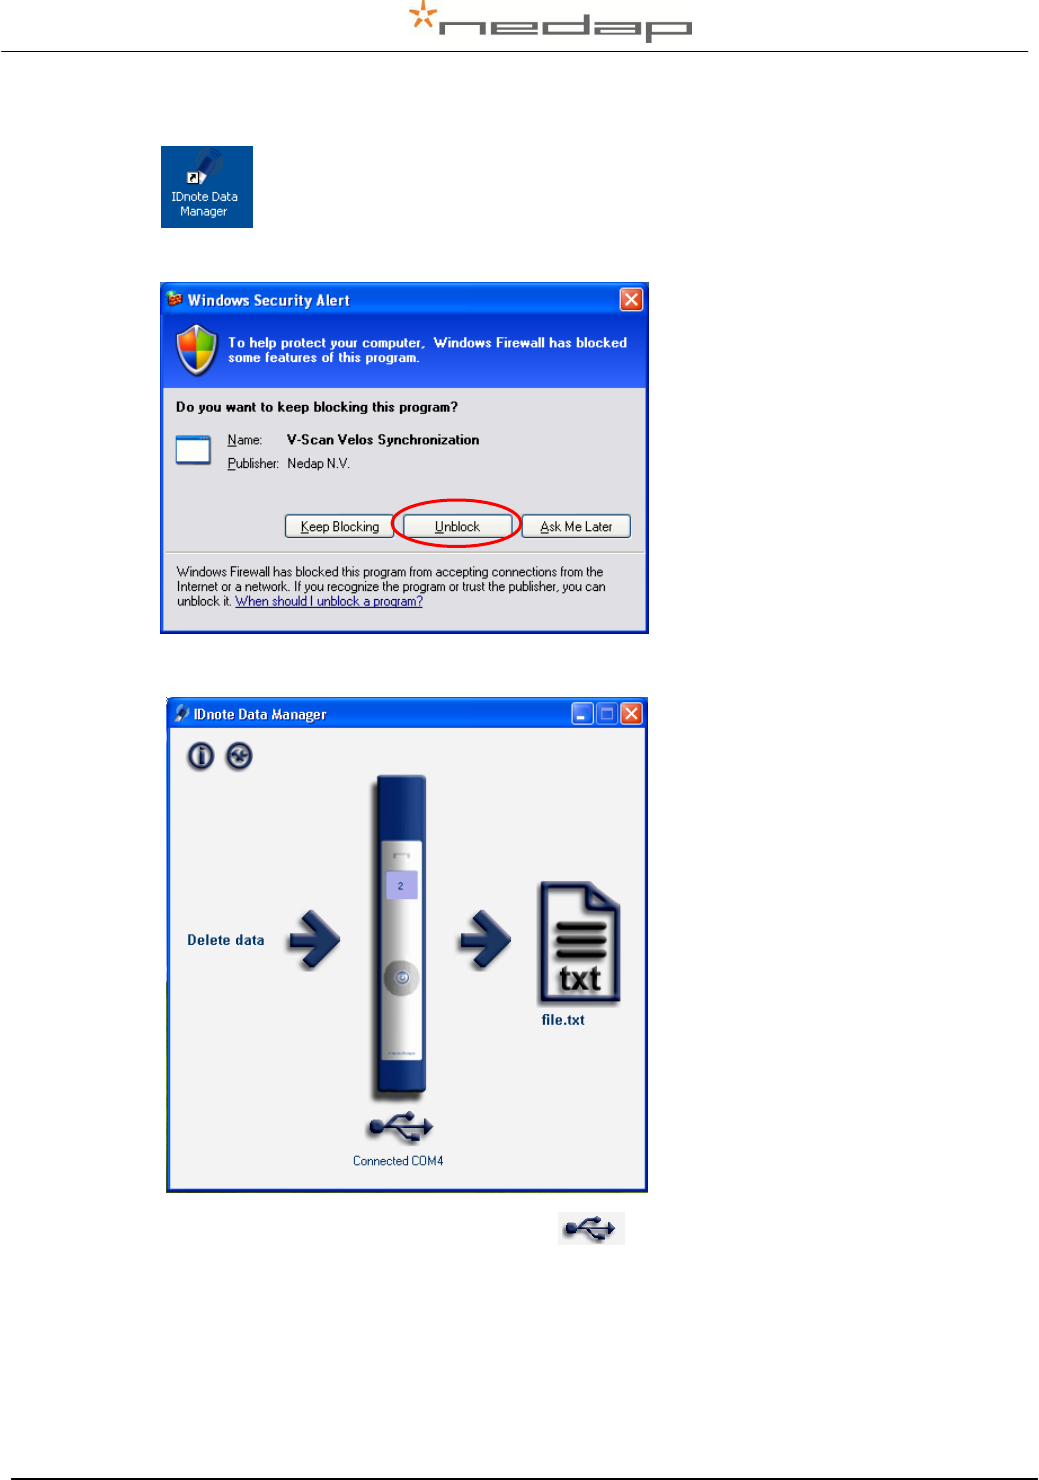
11. Open the IDnote Transfer Application by double clicking the IDnote - Velos Sync icon on
the desktop. The IDnote has to be connected to the PC with the USB cable.
12. When the Windows Security Alert appears, choose Unblock.
13. Following screen appears. The IDnote is connected to the PC.
Click on the bottom image to select the com port.
Service menu: Click on the IDnote image in the IDnote Data Manager program to check or alter
the settings of the device in this program e.g. to view or update the firmware.
VP5004-IDnote Manual version 1.1 / Page 10
5. Start up operation
5.1. IDnote Data Manager program settings on PC
Connect the charger. Click on the IDnote image in the IDnote Data Manager program to check
the service settings and alter them if necessary. Most of these settings can also be made in the
IDnote device.
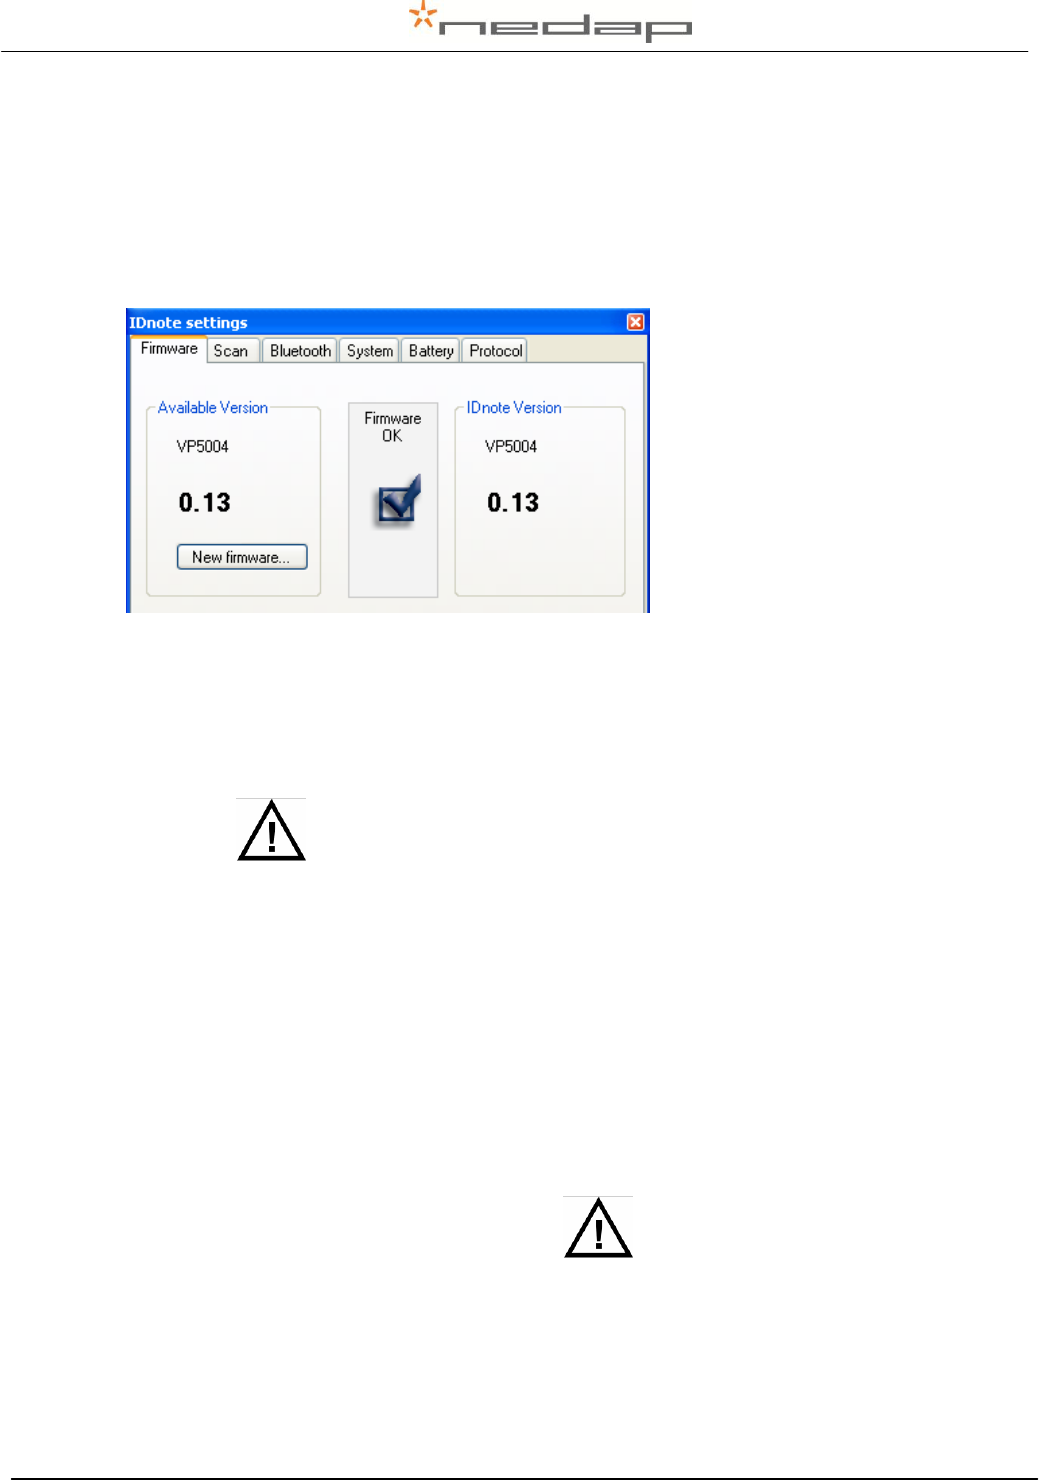
Firmware:
Scan:
Bluetooth:
System:
Battery:
Protocol:
- Firmware version
Check firmware version of the IDnote. Update the version if necessary.
- Auto create
Auto create has to be switched on!
- Scan time:
The time the IDnote keeps scanning for tags after the scan button is
released when using multiscan. The IDnote keeps scanning until Scan
time is passed or until the Scan key is pressed again.
The Scan time must be set other than zero for the multiscan function.
- Sound:
Select whether sound is enabled/disabled when scanning tags.
- On/Off:
Switch the Bluetooth communication on/off.
- Name:
Enter a name for the IDnote
- Pin:
Enter the Pincode (option)
- Address:
Enter the Mac Address
- Language
Select a language.
- Display contrast:
Set the contrast level (1- 7) of the display. 1 means little contrast.
- Date format:
Set the system type European (eur) or American date format (usa).
- Date
Set the system date.
- Time
Set the system date.
- Factory defaults
Return to default settings. Data will be lost!
- Battery info
Displays battery voltage and battery level (percentage).
- Type:
Protocol type (Nedap, ISO, Sync) used when “Dump on serial comm” is
enabled.
VP5004-IDnote Manual version 1.1 / Page 11
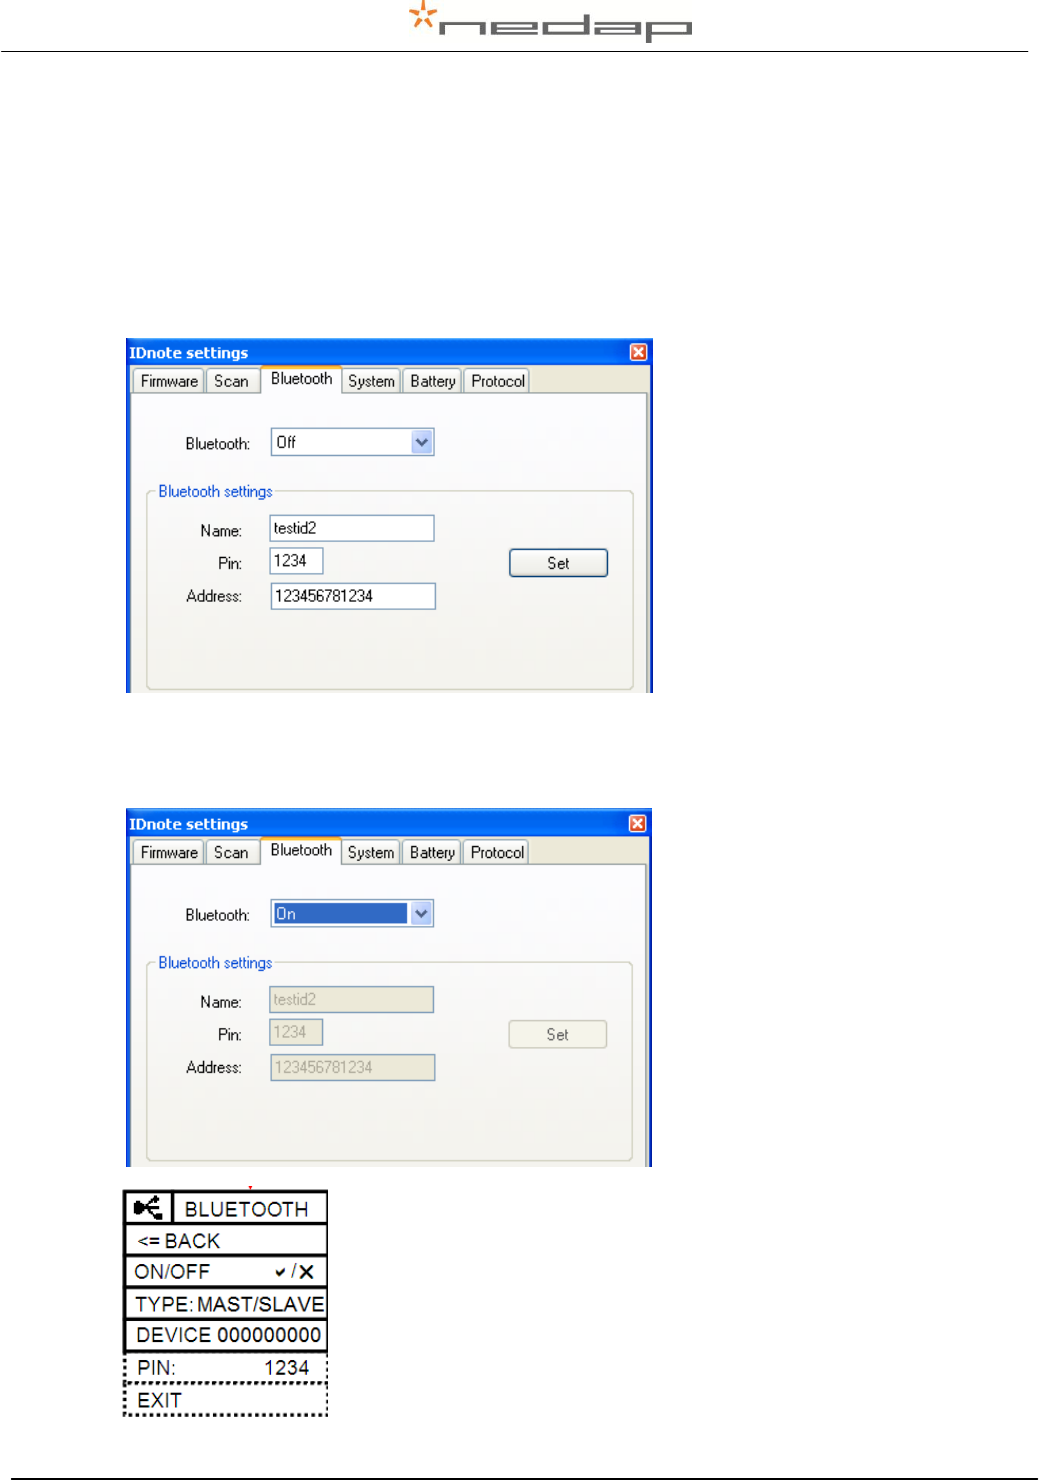
5.2. Bluetooth device settings
The IDnote can be set up as a master Bluetooth device so that other slave devices, like
Bluetooth printers, can be connected to it. The Bluetooth connection uses the serial port profile.
Click on the IDnote image in the IDnote Data Manager program and on the Bluetooth tabsheet
to alter the bluetooth settings. The bluetooth settings can only be modified when Bluetooth is
switched off and the USB cable is connected. Click on the arrow down behind Bluetooth to
switch it off.
Enter a Name for the IDnote and enter the Mac Address of the device and if necessary the
pincode. Click on set to save the new Bluetooth settings. Click on the arrow down behind
Bluetooth to switch it back on.
Now go to the Bluetooth Settings in the Menu on the IDnote device and
change the Bluetooth setting from Type slave to Type master. Be
aware that the scanning process might now operate slower because
the data are to be transferred to the bluetooth device after scanning.
See the next chapter for more information about the menu.
VP5004-IDnote Manual version 1.1 / Page 12
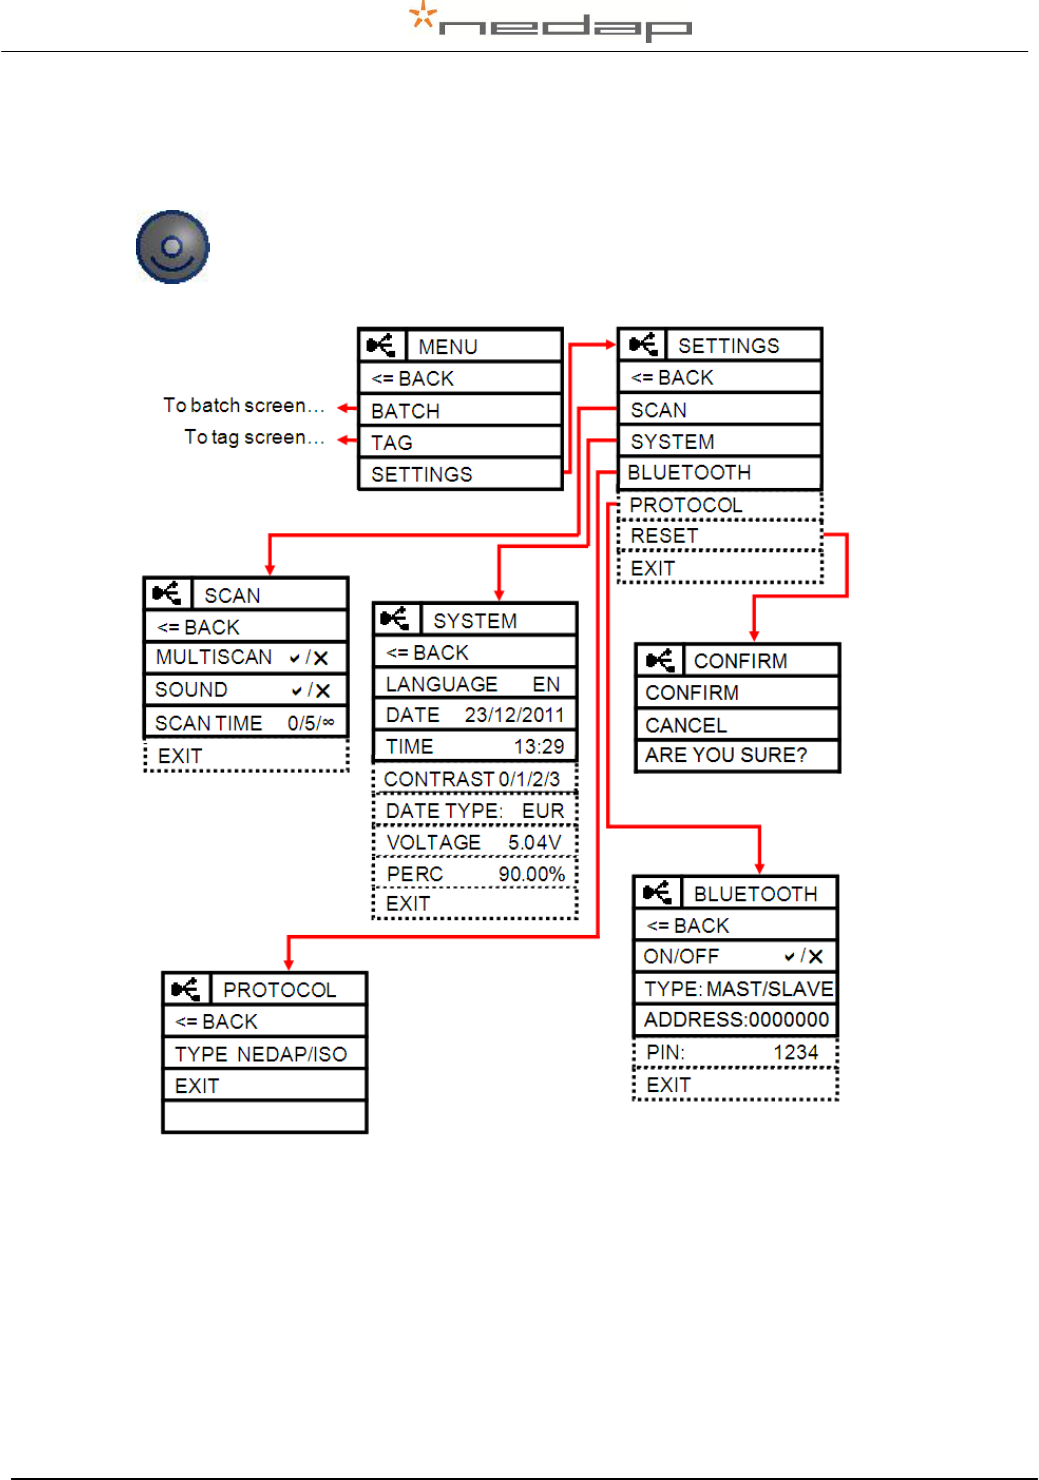
5.3. IDnote device settings
Connect the charger. Use the scan button to change the default settings if necessary.
Use the scan button to navigate through the different settings in the menu screens.
Press the scan button long to switch from the Tag or Batch scan mode to the menu.
Use the scan button short to navigate through the different settings in the menu
screens. Press long to enter a menu choice.
See the next page for more information about the settings in the menu. Most of these settings
can also be made in the IDnote Data Manager program on the PC.

VP5004-IDnote Manual version 1.1 / Page 13
Scan
System
Bluetooth
Protocol
Reset:
- Multiscan:
More than one tag can be scanned during one read-session
without pressing the scan key again.
- Sound:
Select whether sound is enabled/disabled when scanning tags.
- Scan time:
The time the IDnote keeps scanning for tags after the scan button
is released when using multiscan. The IDnote keeps scanning until
Scan time is passed or until the Scan key is pressed again.
The Scan time must be set other than zero for the multiscan
function.
- Language:
Select a language.
- Date:
Set the system date.
- Time:
Set the system time.
- Date type:
Set the system type European (eur) or American date format (usa).
- Contrast:
Set the contrast level (1- 7) of the display. 1 means little contrast.
- Voltage
Displays battery voltage.
- Percentage
Displays battery level (percentage).
- On/Off:
Switch the Bluetooth communication on/off.
- Type:
Master or Slave device
- Address:
Mac Address (enter via PC)
- Pin:
Pincode (enter via PC)
- Type:
Protocol type (Nedap, ISO, ASCII 15 used when “Dump on serial
comm” is enabled. X =no dump.
All data will be lost!
- Confirm
Confirm you are sure to reset to factory defaults and lose all data.
- Cancel
<= Back

VP5004-IDnote Manual version 1.1 / Page 14
6. Operation
Use the Tag or the Batch scan mode to scan tags or use the menu for other actions. Press the
scan button long to switch from the scan mode to the menu. Use the exit option in the menu to
return to the Tag or Batch scan mode. Use the option <= Back o go back to the previous menu.
6.1. Scan button
Use the scan button for scanning or to navigate through the different settings in the
menu screens.
Tag scan mode: Press the scan button short in the Tag scan mode to scan a tag.
Batch scan mode: Use the Batch scan mode to scan tags of one or more groups of animals.
Press the scan button short to turn on the scanning mode and press it short again to turn it off.
Menu: Use the scan button to navigate through the different settings in the menu screens. Press
the scan button long to switch from the Tag or Batch scan mode to the menu. Use the scan
button short to navigate through the different settings in the menu screens. Press long to enter a
menu choice.
Use the scan button to turn on the IDnote. The IDnote turns off automatically. Connect the
charger to prevent that.
6.2. Main menu
The main menu is the same for both the Tag and the Batch menu.
MENU
<= BACK
BATCH
TAG
SETTINGS
Main menu title
Switch to Batch scan mode
Switch to Tag scan mode
Navigate to Settings submenus
See the chapter Installation for more information about the settings in the menu.
Press short - turn on the IDnote
- start a scan routine (tag mode)
- start/stop a scan routine (batch mode)
- navigate through the menu
Press long - enter a menu
- enter a menu option
VP5004-IDnote Manual version 1.1 / Page 15
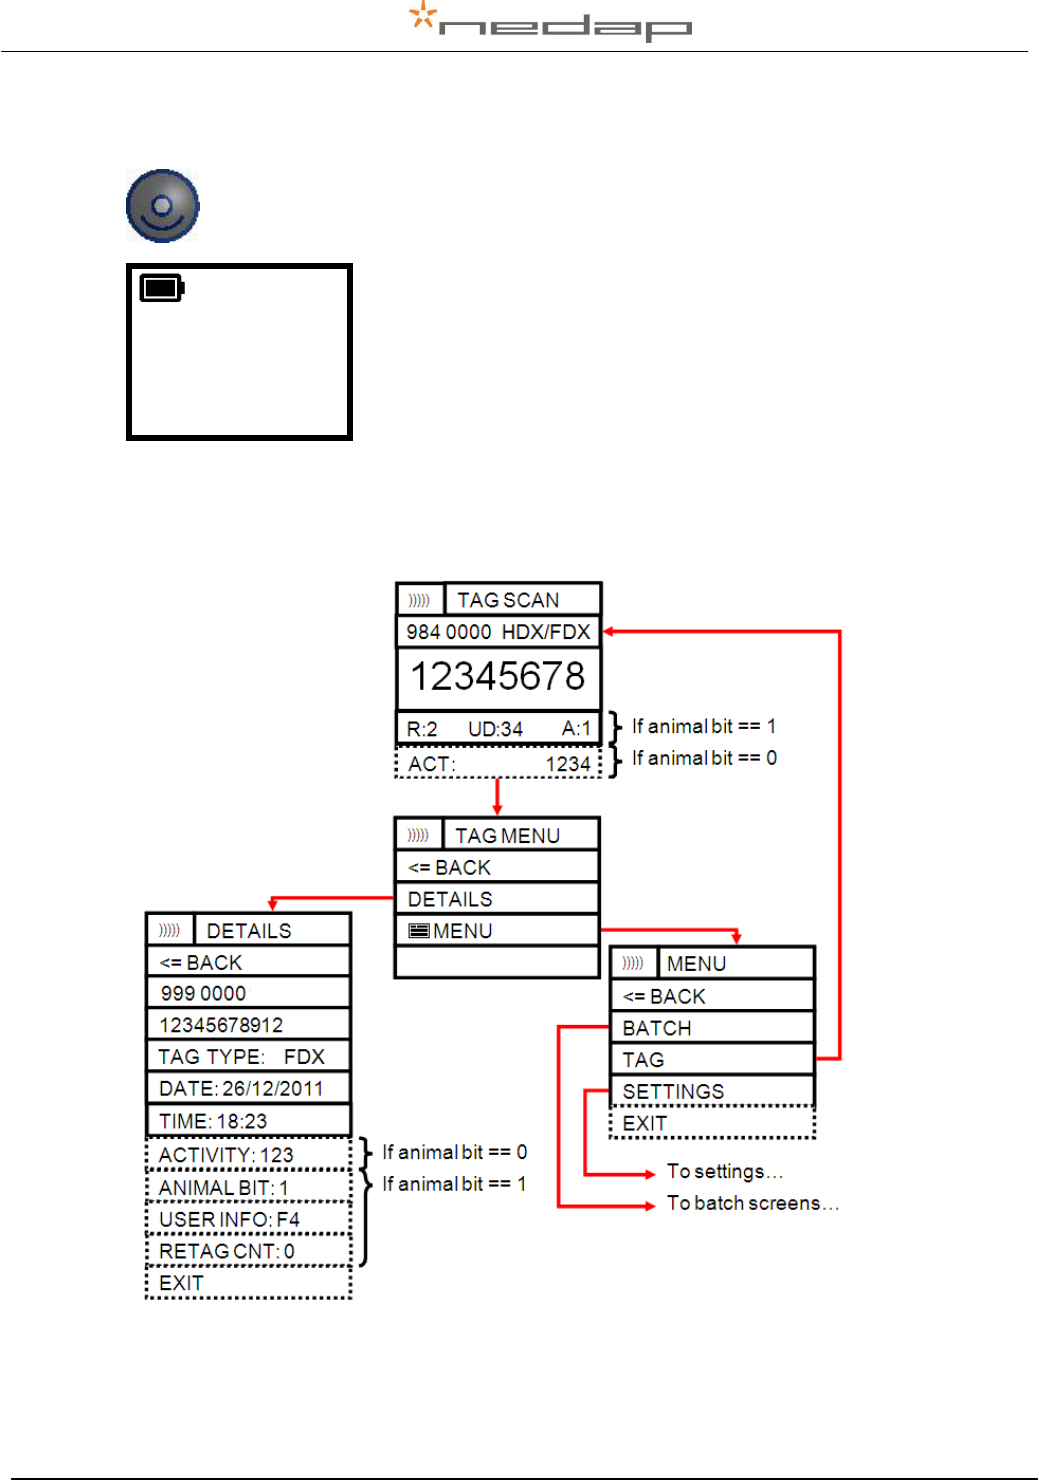
6.3. Tag menu
Press the scan button short in the Tag scan mode to scan a tag. After scanning a tag,
the device stops scanning. Watch the displayed information e.g. the ID number.
TAG SCAN
948 0000
First 7 digits of the animal ID
12345678
Last 8 digits of the animal ID
R:2 UD:34 A:1
A: Animal bit, R: Retag count, UD: User data
After scanning a tag, press the scan button long to switch from the scan mode to the menu. Use
the scan button to navigate through the different settings in the menu screens. Open the details
menu to watch data like the type of tag or the activity data from this animal.
The data of the last scanned animal are temporarely stored in the Tag scan mode. It is not
possible to transfer these data to a PC other than the realtime dump.
VP5004-IDnote Manual version 1.1 / Page 16
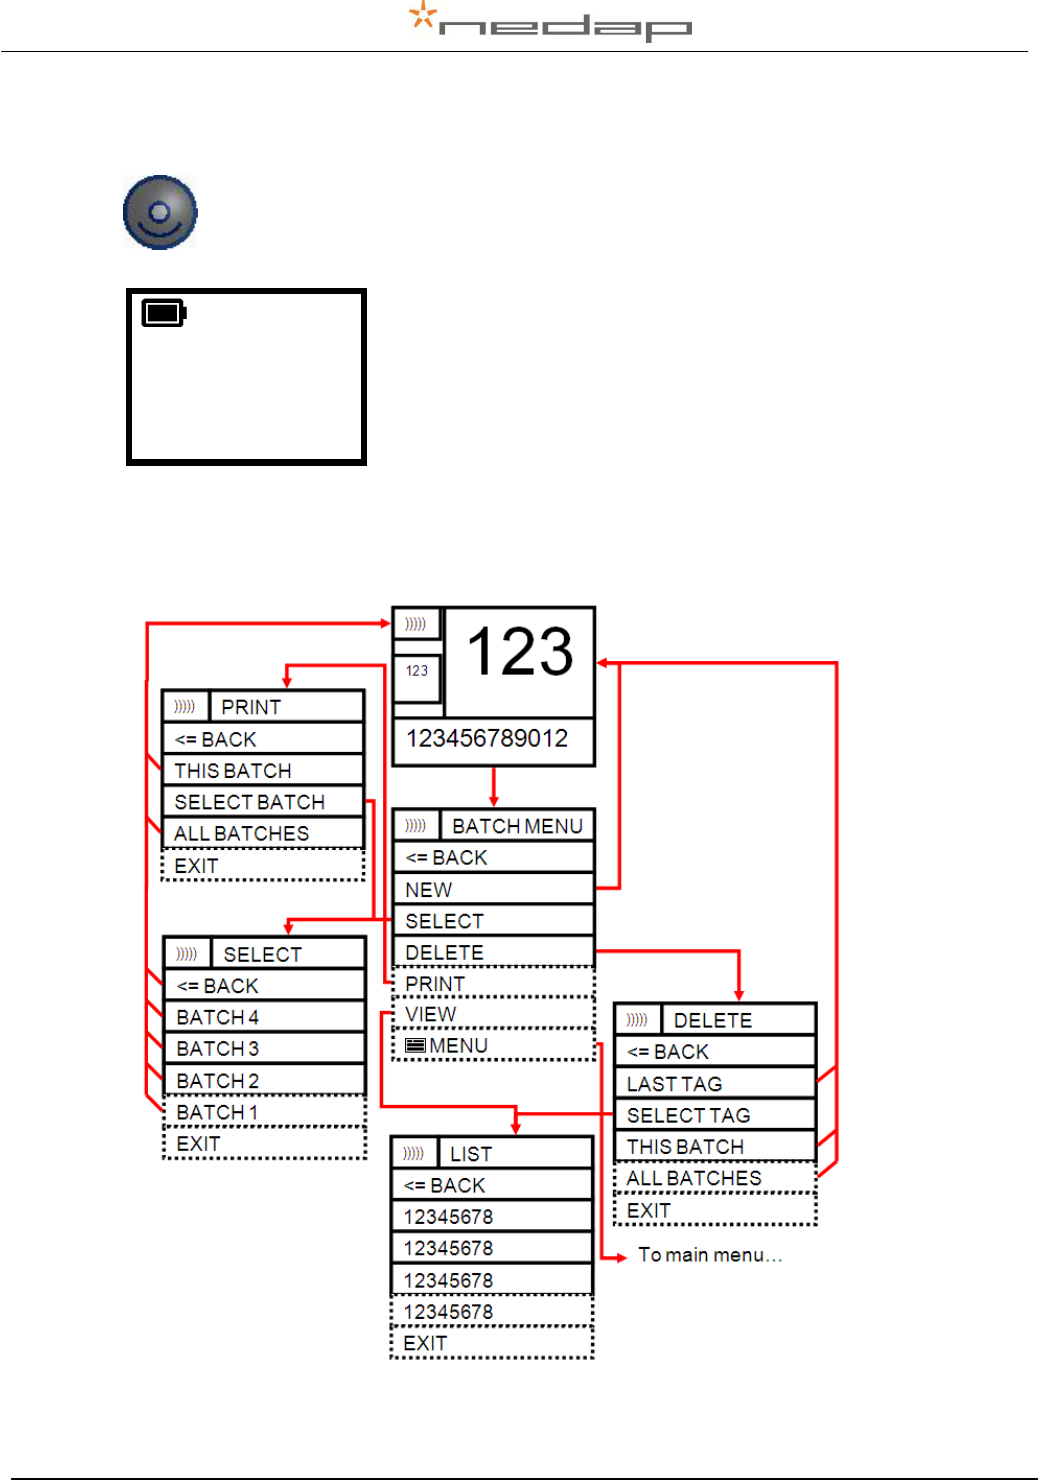
6.4. Batch menu
Use the Batch scan mode to scan and store tags of one or more groups of animals.
Press the scan button short to turn on the scanning mode and press it short again to
turn it off. Watch the displayed information e.g. the group number and the number of
animals in the group.
123
Animal counter
123
Batch number (>999 animals smaller numbers)
123456789012
Animal ID number (last 12 digits)
After scanning a group of animals, press the scan button long to switch from the scan mode to
the menu. Use the scan button to navigate through the different options in the Batch menu
screens. It is possible to start a new batch, select another batch, to delete the batch or the tag of
the last scanned animal, to print a batch or view the tags in a batch.

VP5004-IDnote Manual version 1.1 / Page 17
6.5. Batch data transfer
In the Batch scan mode the data of the scanned tags are stored by the IDnote.
Stored information:
Data item
Description
Size
Tag number
Complete ID of the animal
Record index
Index of record in database
Batch number
Number of batch to which ID belongs
Batch index
Index of record in batch
Scan date
Date when tag was scanned
Scan time
Time when tag was scanned
IF animalbit == 0
Store activity data
Classic activity
Step counter
2 bytes / 12 bits
IF animalbit == 1
Store iso data
Retag count
Animal got new tag
Animal bit
Iso data
1 bit
Userinfo
Iso data
Save or change the information of the batches on the IDnote or export the data to a PC or to a
Bluetooth connected storage.
The data collected by the device can be transferred to a computer through a (USB or Bluetooth)
serial port. In the scan settings menu is a dump option which causes the device to transmit
every scanned tag immediately over the serial port.
See manual VP5002-100SS-05 ASCII Protocols on the Cd that was supplied with the IDnote for a
description of the dump protocols Nedap, ISO and Sync.
VP5004-IDnote Manual version 1.1 / Page 18
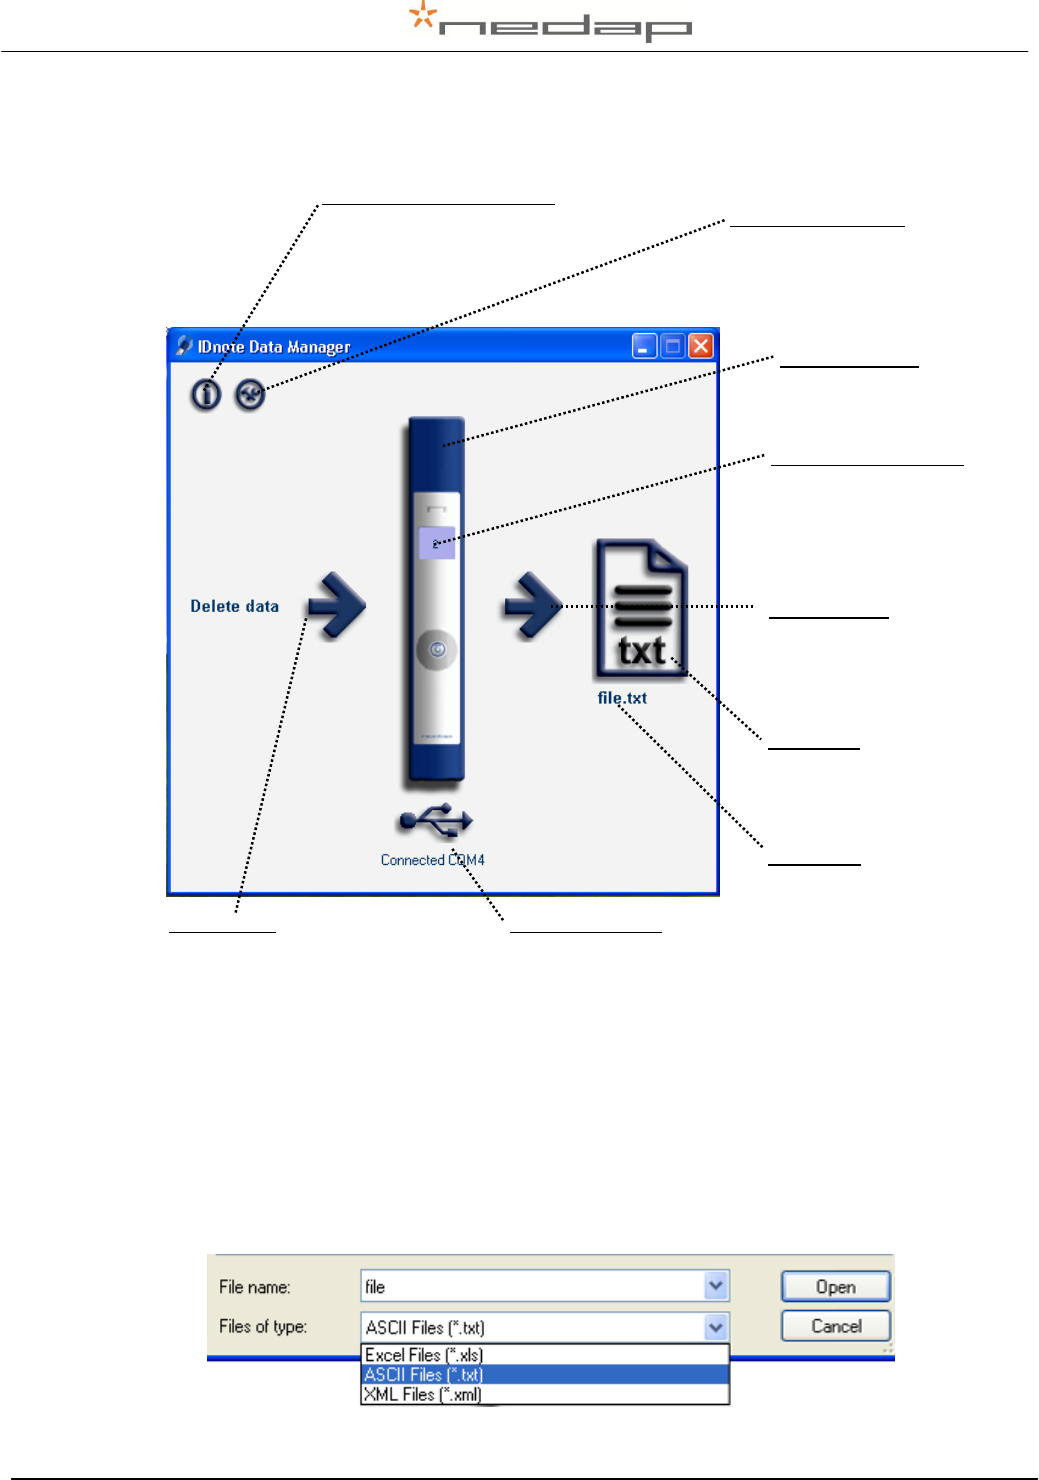
6.6. Operation IDnote Data Manager PC program
Click on the IDnote image in the IDnote Data Manager program to view or alter the settings of
the device in this program e.g. to view or update the firmware. View the number of animals in the
IDnote display.
Click on the arrow behind Delete data to delete all data from the IDnote. Click on the arrow
before the data file to transfer the data from the IDnote to the data file. Click on the file image to
view or edit the data. The transfer program can export the data to a .xls, xml and .txt file. Click
on the file name to change the file or the type of file to e.g. an excel file.
File name:
Press to select a file to
store data on PC (e.g.
file.txt). The extension
.txt , .xls (.xlsx) or
.xml defines the file
format.
Select COM port:
USB is connected
now.
Nr of records present:
Displaying number of
records in IDnote.
Data present:
Press get data button
to store IDnote data
into file on PC.
Open File:
Click on file icon to
open file for editing or
viewing.
IDnote settings:
Click on IDnote icon to
view or alter settings
IDnote Data Manager info:
Click on Information icon
to view program information
IDnote preferences:
Click on Settings icon
to open the preference
window
Delete data:
Click delete data button
to delete the IDnote data.
VP5004-IDnote Manual version 1.1 / Page 19
7. Maintenance, cleaning and disposal
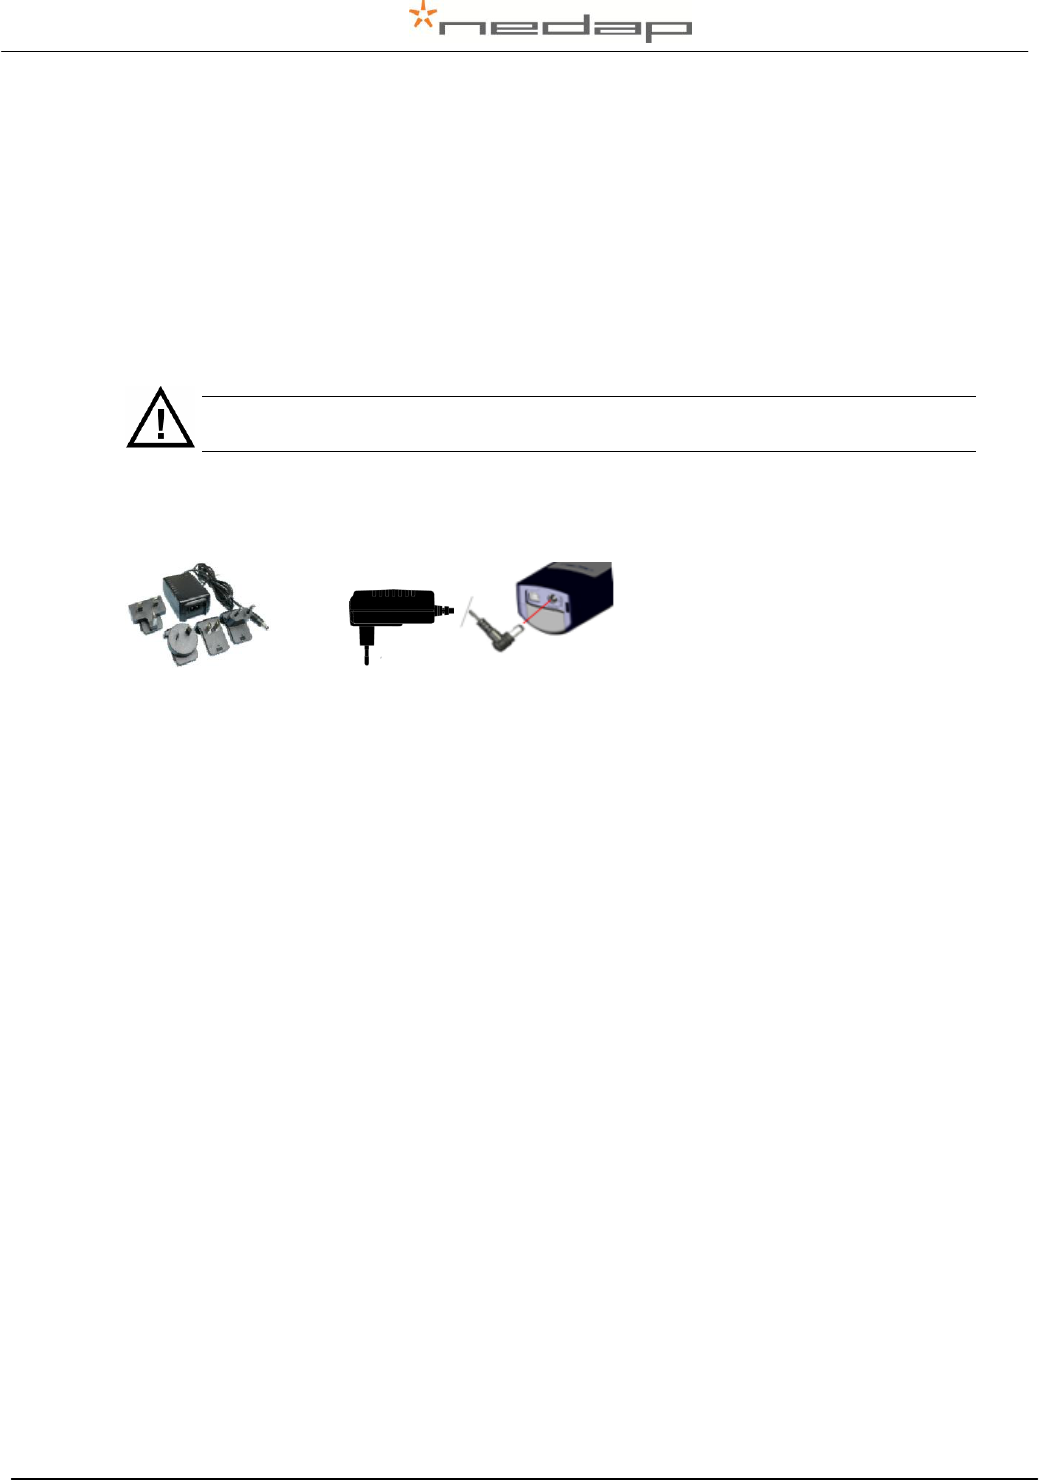
7.1. Batteries
The IDnote is powered by four rechargeable batteries. The full performance of new batteries is
achieved only after a few charge and discharge cycles. The ambient temperature for charging
the batteries of the IDnote must be between 5°C and 25°C. Only use the charger ( 230/110V
AC – 12VDC) provided along with the IDnote.
Before first use of the IDnote, charge batteries at least 16 hours for obtaining the
maximum battery capacity.
Connect the plug in the connector on the right side to charge the batteries.
The batteries can be charged and discharged hundreds of times, but it will eventually wear out.
When the scanning time is noticeable shorter than normal, replace the batteries. Warranty is not
applicable for the rechargeable batteries.
VP5004-IDnote Manual version 1.1 / Page 20
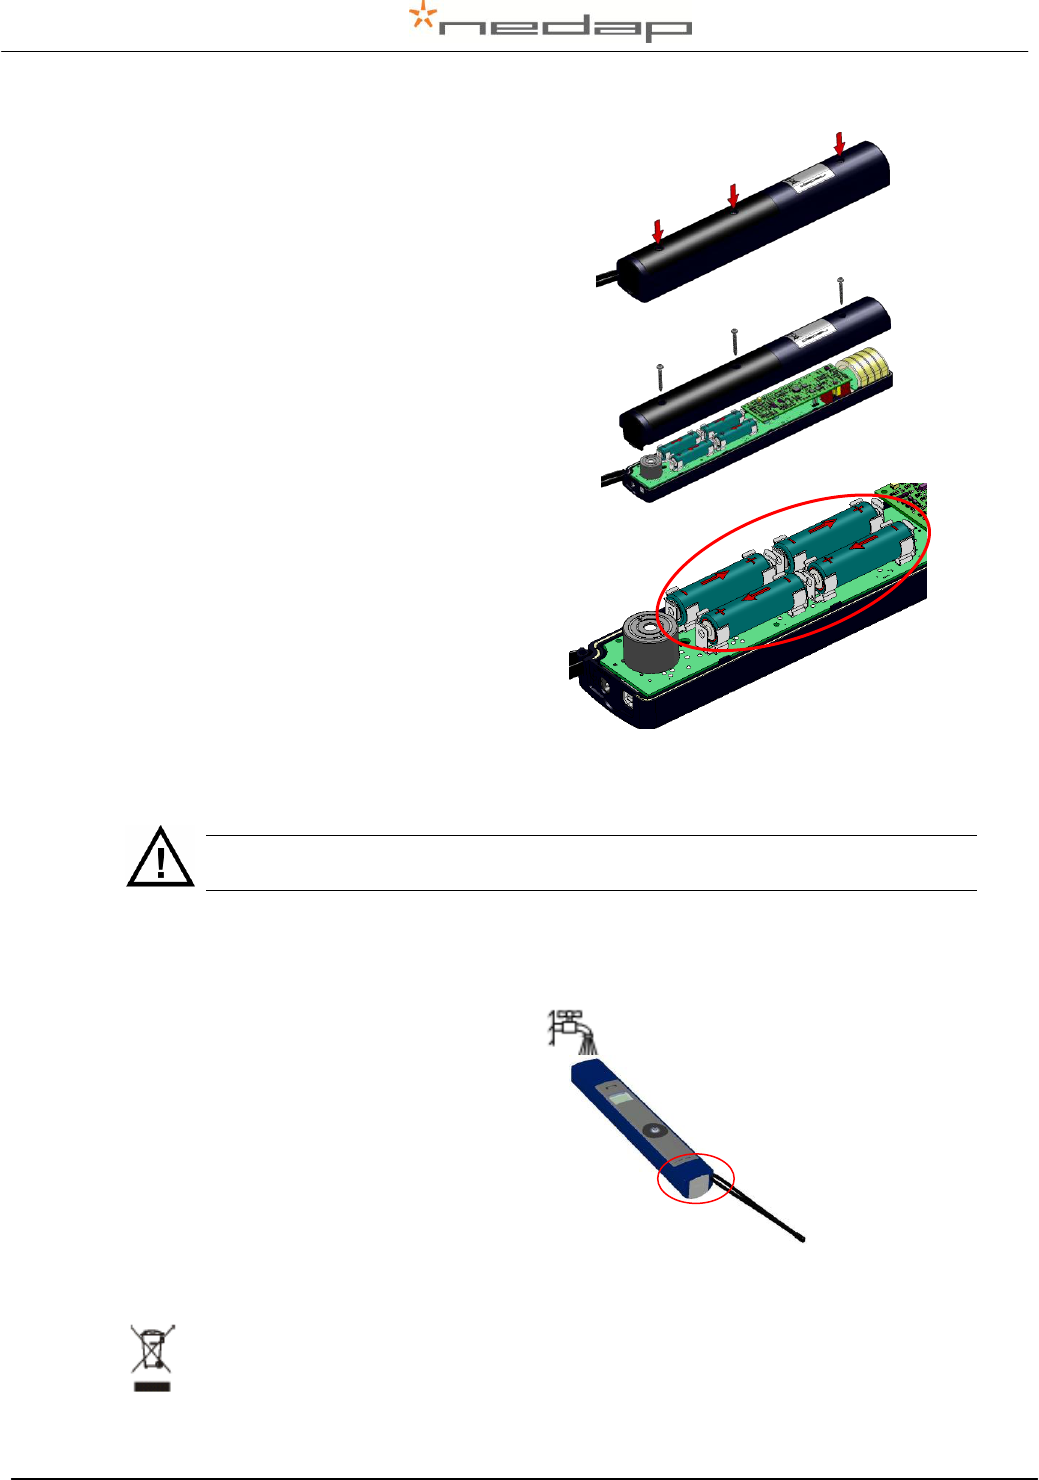
Steps for replacement of rechargeable batteries:
7.2. Cleaning
The IDnote can be rinsed with water
for cleaning. Be sure that the cover lid
is closed.
7.3. Disposal
The crossed-out wheeled bin means that within the European Union the product must
be taken to separate collection at the product-end-of-life. This applies to your device
but also to any enhancements marked with this symbol. Do not dispose of these
products as unsorted municipal waste.
1. Open the back cover of the IDnote. Use
PZ2 screw driver.
2. Open the back cover.
3. Replace the batteries. Mount the batteries
in the correct direction. Watch the positive
and negative terminals of the batteries for
the direction.
Dispose of batteries according to local
regulations (e.g. recycling). Do not dispose
as household waste.
4. After replacing batteries, close the back
cover and fix the screws firmly.
5. Connect the charger, now the IDnote can
be switched on.
Only replace batteries with same type (4x AA-size, rechargeable, Recyko+, 1.2V,
2100mAh, NiMH, GP210AAHCB)

VP5004-IDnote Manual version 1.1 / Page 21
Appendix A Technical specifications
VP5004, IDnote ISO hand Held Reader (EU/USA)
Physical
Size (LxWxH)
330 x 50 x 40 mm
Weight
0,535 kg
Display
LCD with back light, 6 rows of 16 positions
Keyboard
Numeric + Menu control keys
Environment
Operating temperature
-10 - +50 °C
Storage temperature
-25 - +50 °C
Relative humidity
30 -100 %
Protection classification
IP64
Reliability
MTBF
200.000 hours
Expected Life
5 years, minimum
RFID
Technology
ISO 11784
ISO 11785 FDX and HDX
Synchronization
ISO 11985 Annex C compliant
Reading distance
> 20 cm (depending on label)
Reading speed
< 70 msec
Reading confirmation
Audible and visible signal
Certifications
CE, IC, FCC
Data
Clock
Real time clock for reading time stamp
Communication
USB 2.0 and Bluetooth (at least 5 m)
Format
ASCII (Nedap Dump, ISO Dump or Nedap
Sync)
Memory
1 Mbyte static memory (=10000 animals)
Power
Power source
4x AA-size, rechargeable, Recyko+, 1.2V,
2100mAh, NiMH (GP210AAHCB)
Stand-by
50 days
In action scanning tags
> 2 hours equals ± 5000 readings
Charging time
± 3 – 4 hours
Charger
230/110V AC – 12V DC > 1A
Accessories
Battery charger 230/110V AC – 12V DC,
USB cable, Software package, User manuals
VP5004-IDnote Manual version 1.1 / Page 22
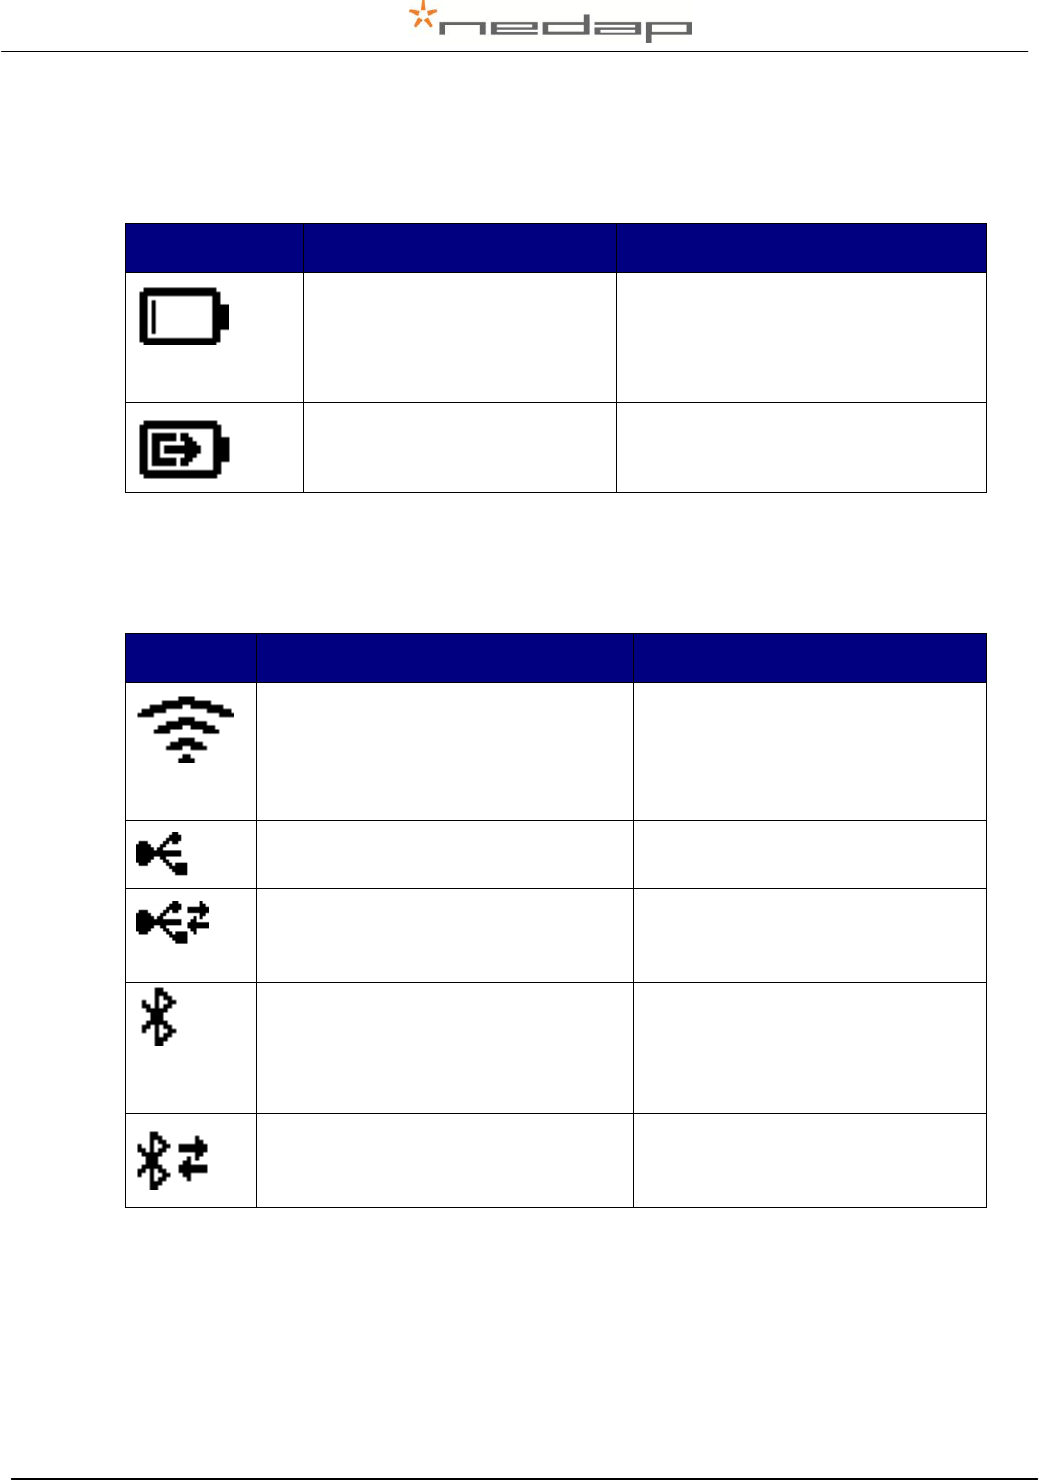
Appendix B Display Icons
In the header the battery status and the connection is displayed. The table below shows the
meaning of the battery icons.
Icon
Function
Description
Battery capacity
(100%.. 0%) , no charger connected
Battery charge*
Charger is continuing with normal
charge.
*) If the temperature of the batteries is too low or too high, the charger stops charging temporally
until the right temperature is reached. The charger remains in fast charge mode until it detects
the full status. Then a period of normal charging is done to achieve the maximum capacity.
The table below shows the meaning of the communication icons:
Icon
Function
Description
Scanning is turned on
Scan button has been pressed.
USB cable connected
USB cable connected
USB cable connected and
communication
USB cable connected and
communication is established with
the IDnote application.
Bluetooth paired with host
A host has paired the IDnote device
using Bluetooth.
Bluetooth paired with host and
communication
A host has paired the IDnote device
using Bluetooth and communication
is established with IDnote application.
For a Bluetooth connection the IDnote device must be paired. Appendix D explains how to pair a
Bluetooth device using the PC.
VP5004-IDnote Manual version 1.1 / Page 23
Appendix C Setup a Bluetooth connection
The IDnote Application only communicates with serial COM Ports. The USB connection
automatically generates a COM Port on the PC by the installed drivers. These drivers come
along with the IDnote Application
Before the IDnote can be connected to the PC using Bluetooth, the “Bluetooth Serial Port” must
be installed on the PC. Follow up next steps to setup the “Bluetooth serial Port” .
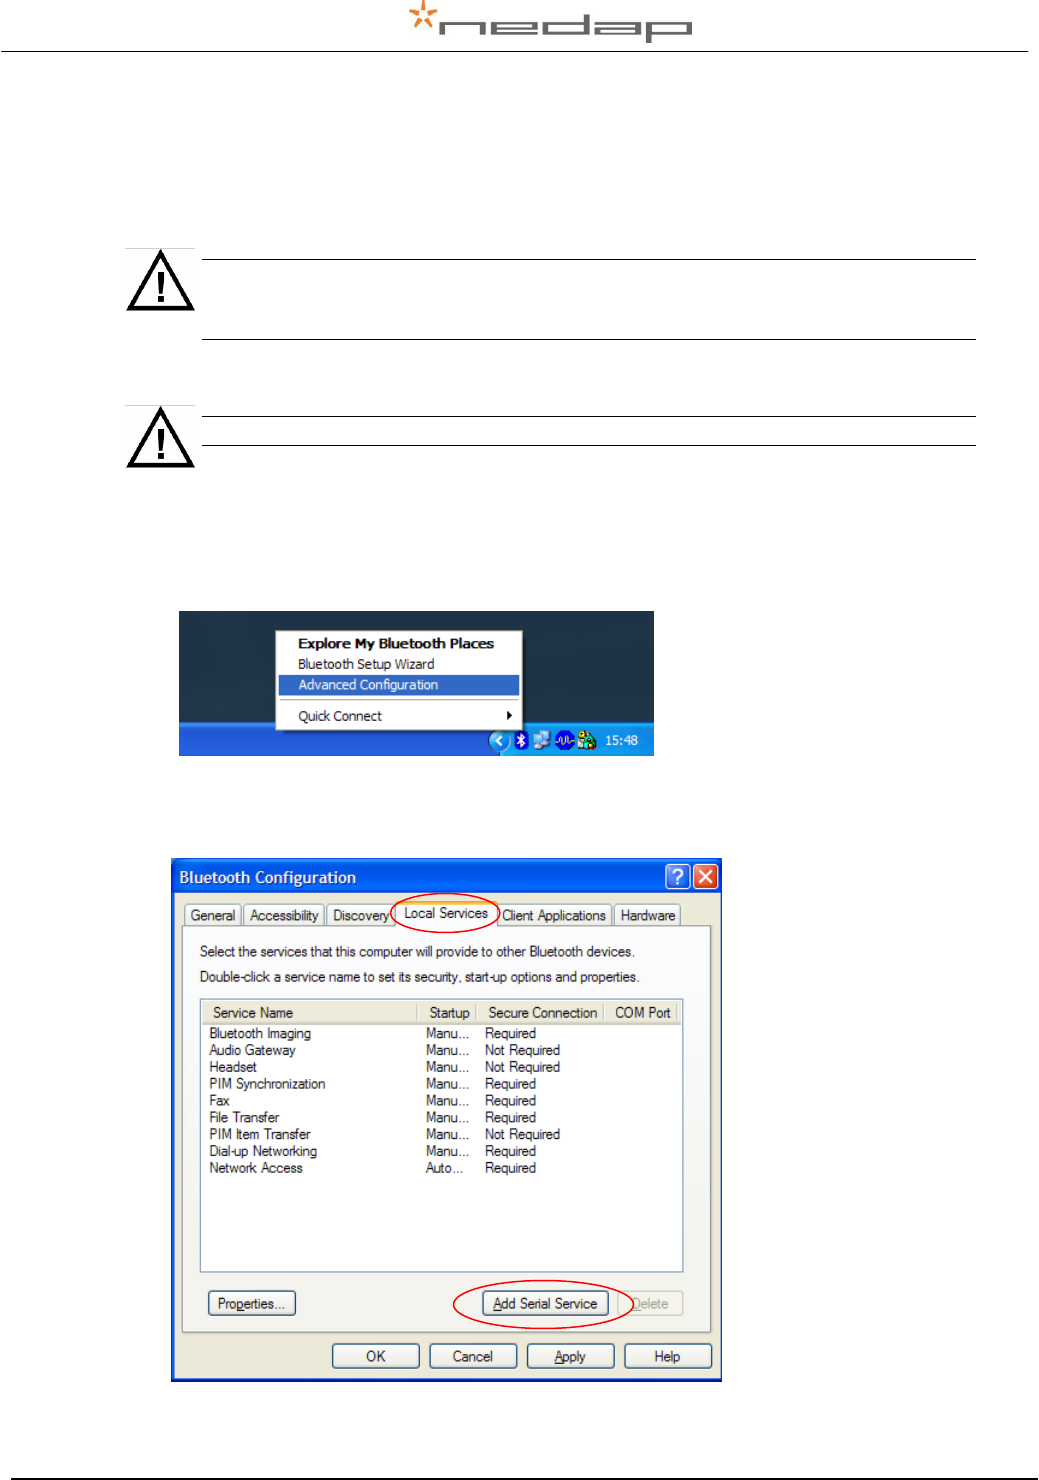
1. Right mouse button click on the icon in the system tray. Select Advanced Configuration.
2. Open the tab “Local Services”. If no Bluetooth Serial Port is listed, click Add Serial Device.
If a Bluetooth Serial Port is listed, start with step 5.
The Bluetooth COM-Port driver software is not included in IDnote Application
installation software. This driver software is dependent on the manufacturer of your
Bluetooth Device.
Make sure that Bluetooth is switched on in the IDnote. Settings > System menu
VP5004-IDnote Manual version 1.1 / Page 24
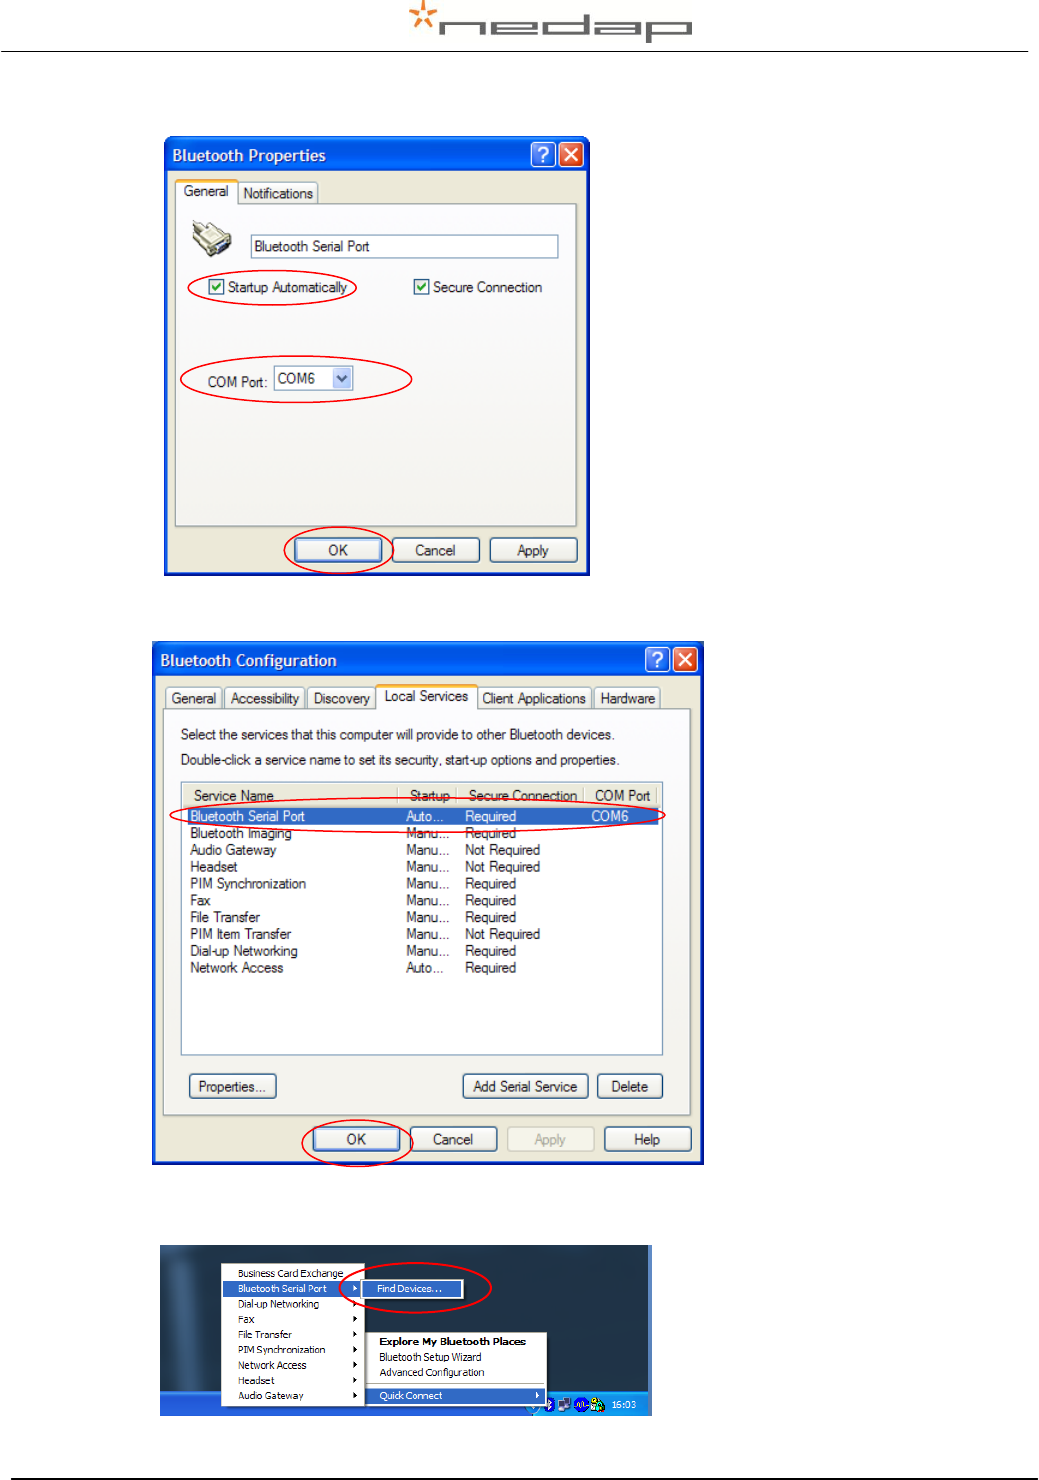
3. Select the COM Port and setup Startup Automatically. Click OK to save the setup.
4. Now the Bluetooth Serial Port (COM 6) is setup, Click OK
5. Switch on the IDnote.
6. Right mouse button click on the icon in the system tray. Select Find devices.
VP5004-IDnote Manual version 1.1 / Page 25
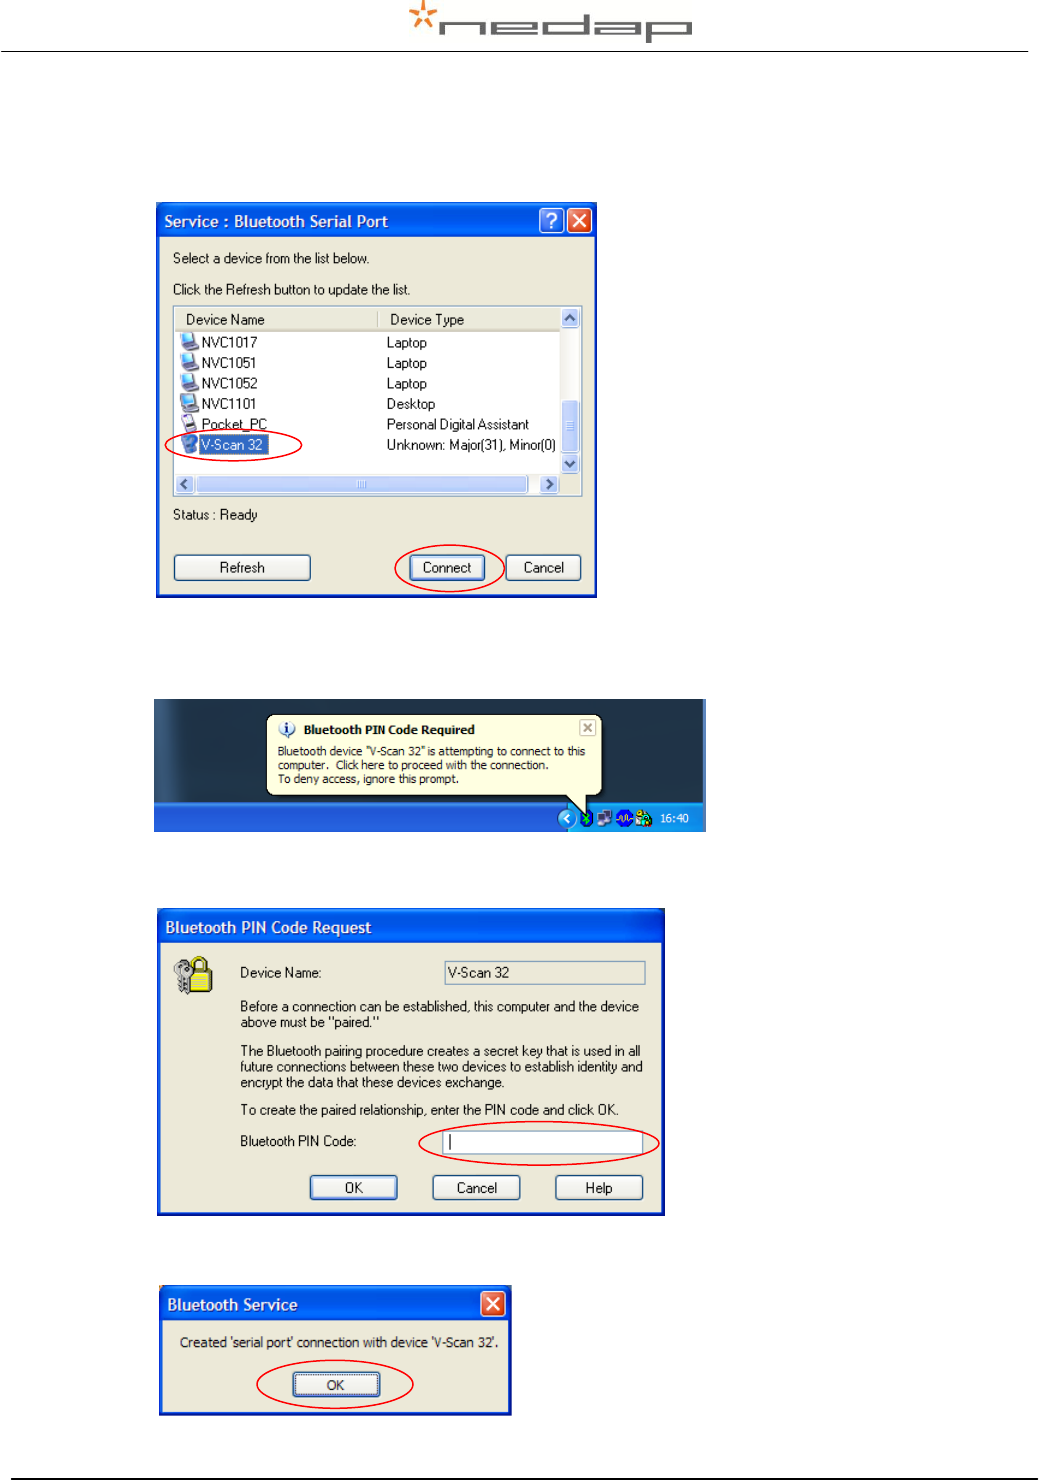
7. Click on the Refresh button. “IDnote xx” will appear in the list. The IDnote number is the last
number of the IDnote’s serial number. Select the correct IDnote and click Connect.
8. The PC starts to make a connection with the IDnote (“pairing this IDnote”). A pop-up balloon
may appear in the right bottom corner of the screen. Click on the balloon.
9. Enter the PIN code “0000”(four zeros) and press OK.
10. Next screen appears. The connection with the IDnote is made successfully. Click OK.

VP5004-IDnote Manual version 1.1 / Page 26
11. From now on the Bluetooth Serial Connection with the IDnote is set up.
After the setup, the Bluetooth connection will be established automatically. Steps to proceed:
1. Switch on the IDnote
2. Start the IDnote Data Manager / IDnote – Velos synchronisation application.
3. The connection will be established automatically.
When the IDnote switches off (automatically), the communication will be lost. It takes
some time (> 5 seconds) before the IDnote Application gets the “no connection
signal” from the Bluetooth Serial Port. Also when the IDnote is switched on again, it
takes some time before the communication is established again.
VP5004-IDnote Manual version 1.1 / Page 27
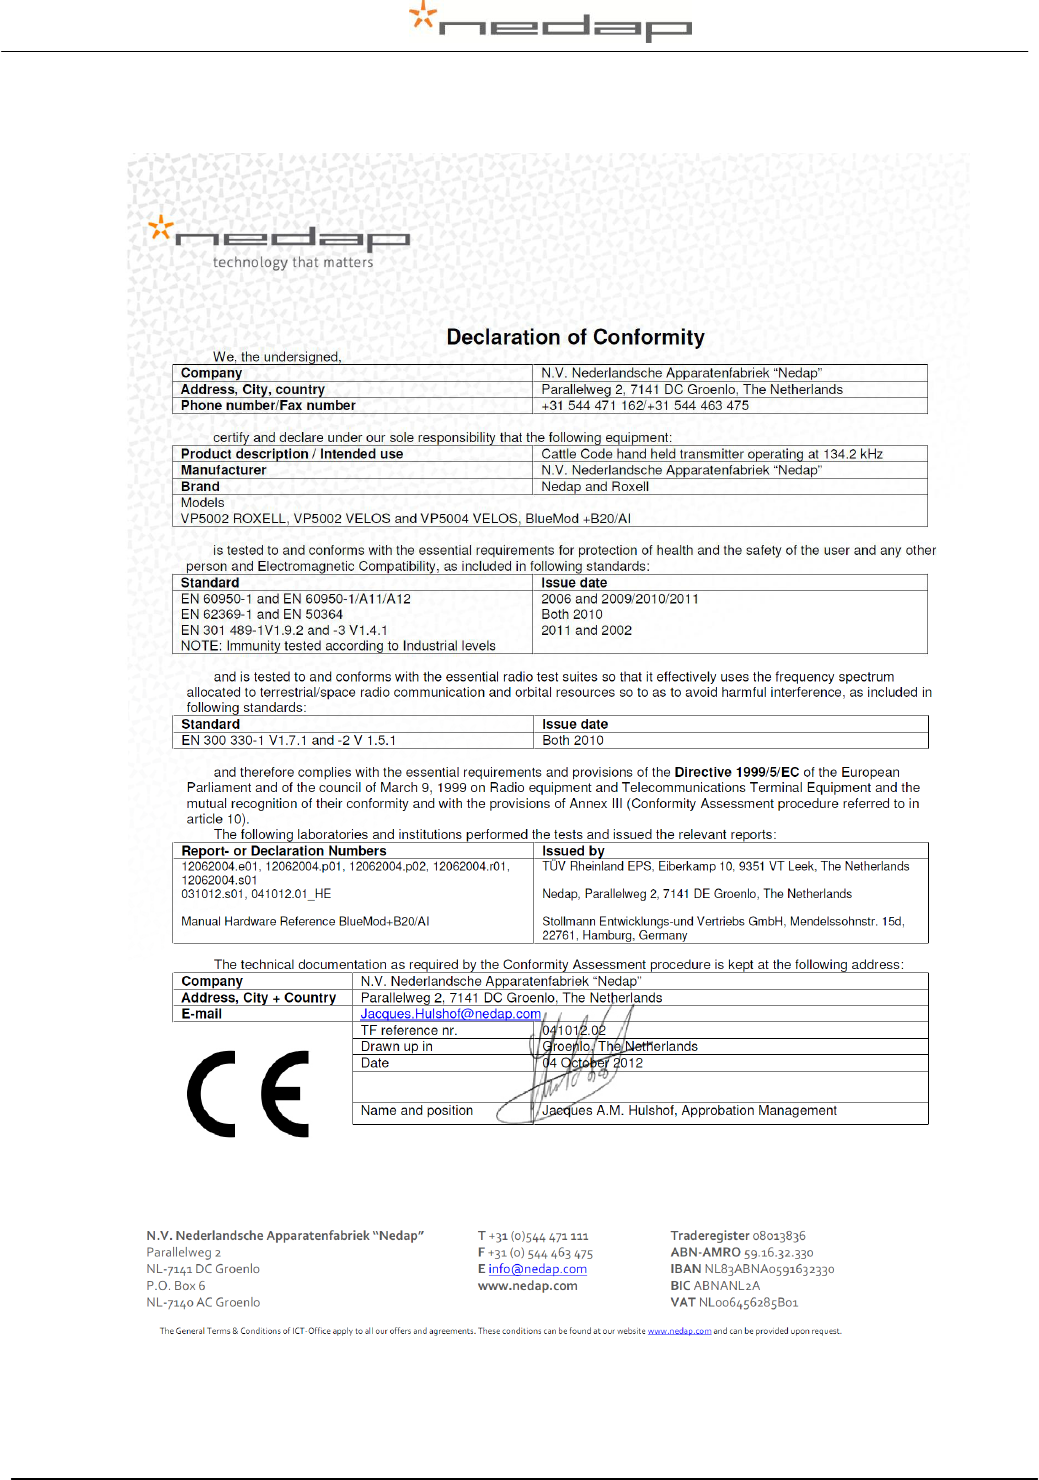
Appendix A Declarations

VP5004-IDnote Manual version 1.1 / Page 28