Nespresso Ef483 484 Users Manual
EF485486 to the manual ebb0b7cc-c080-4946-a2e2-63f83acd52d2
2015-01-21
: Nespresso Nespresso-Ef483-484-Users-Manual-220467 nespresso-ef483-484-users-manual-220467 nespresso pdf
Open the PDF directly: View PDF ![]() .
.
Page Count: 158 [warning: Documents this large are best viewed by clicking the View PDF Link!]
S E R V I C E M A N U A L
C I T I Z C O F F E E M A C H I N E S
Citiz EF483/484
Citiz&milk EF485/486
Citiz&Co EF487/488
Version1.2en

Citizservicemanual
2
C O N T E N T S
1 GeneralSafetyNotes........................................................................................6
2 Modeloverview ...................................................................................................7
2.1 Modelrange ....................................................................................................... 7
2.2 Coreunitversions .............................................................................................. 8
3 MainComponents ..............................................................................................9
3.1 Overviewcoreunit,Drange ..........................................................................9
3.1.1 Interiorviewcoreunit,Drange...........................................................10
3.2 Overviewcoreunit,Crange ........................................................................ 11
3.2.1 Interiorviewcoreunit,Crange...........................................................12
3.3 OverviewmodelCitiz ..................................................................................... 13
3.4 OverviewmodelCitiz&milk ..........................................................................14
3.4.1 OverviewmilkfrotherAERO3 ...............................................................15
3.5 OverviewmodelCitiz&Co ............................................................................ 16
3.6 FluidSystem.................................................................................................... 17
3.6.1 Watercircuitdiagramofcoreunit(allCitizversions)..............................17
3.6.2 WatercircuitofmodelsCitiz/Citiz&milk............................................... 18
3.6.3 WatercircuitofmodelCitiz&Co ............................................................19
4 TechnicalData ..................................................................................................20
4.1 RatingPlates....................................................................................................20
4.1.1 Examplesofbrandspecificratingplates ................................................ 20
4.1.2 Ratingplatedetails .................................................................................23
4.1.3 Ratingplateofmilkfrother(modelCitiz&milk) ......................................24
4.2 Summaryoftechnicaldata............................................................................... 25
4.2.1 Technicaldataofcoffeemachines .........................................................25
4.2.2 Technicaldataofmilkfrother(modelCitiz&milk)..................................27
4.2.3 DimensionsandweightmodelCitiz......................................................28
4.2.4 DimensionsandweightmodelCitiz&milk ...........................................29
4.2.5 Dimensionsandweightmilkfrother......................................................29
4.2.6 DimensionsandweightmodelCitiz&Co.............................................30
5 Operation............................................................................................................31
5.1 Generalinformation.......................................................................................... 31
5.2 Statusindication...............................................................................................31
5.2.1 Statusindicationofcoffeemachine ........................................................31
5.2.2 StatusindicationofmilkfrotherAERO3..................................................33
5.3 Machinemodes................................................................................................34
5.3.1 MachinemodesofCitizcoffeemachines...............................................34
5.3.2 MachinemodesofmilkfrotherAERO3...................................................35
5.4 Program/resetfilluplevel............................................................................... 36
5.4.1 Programmingthefilluplevel................................................................... 36
5.4.2 Resettingthefilluplevel .........................................................................36
5.5 Emptywatersystem.........................................................................................37

Citizservicemanual3
6 Maintenance ...................................................................................................... 38
6.1 Dailymaintenanceandcleaning ...................................................................... 38
6.1.1 Beforefirstcoffeeoratthestartofday.................................................. 38
6.1.2 Afterlastcoffeeorattheendofday....................................................... 39
6.1.3 MilkfrotherofmodelCitiz&milk ............................................................ 40
6.2 Descaling ......................................................................................................... 41
6.2.1 DescalingprocedureformodelsCitizandCitiz&milk ........................... 41
6.2.2 DescalingprocedureformodelCitiz&Co.............................................. 45
7 Troubleshooting ............................................................................................... 49
7.1 Checklistforcoffeemachine(allmodels) ....................................................... 49
7.2 Checklistformilkfrother ................................................................................. 51
8 Repairs............................................................................................................... 52
8.1 Safetyinstructions........................................................................................... 52
8.2 Repairandmountingtips ................................................................................. 52
8.3 Toolsandaccessories ..................................................................................... 55
8.4 PlatformdisassemblymodelCitiz.................................................................. 56
8.4.1 Generaldisassembly .............................................................................. 56
8.4.2 Replacingwatertankconnector ............................................................. 59
8.4.3 Replacingmainsswitch .......................................................................... 60
8.4.4 Replacingpowercord ............................................................................. 62
8.4.5 Removingcoreunit................................................................................. 64
8.5 PlatformdisassemblymodelCitiz&milk ....................................................... 67
8.5.1 Generaldisassembly .............................................................................. 67
8.5.2 Replacingwatertankconnector ............................................................. 71
8.5.3 Replacingmilkfrotherconnector ............................................................ 73
8.5.4 Replacingmainsswitch .......................................................................... 74
8.5.5 Replacingpowercord ............................................................................. 75
8.5.6 Removingcoreunit................................................................................. 77
8.6 PlatformdisassemblymodelCitiz&Co......................................................... 80
8.6.1 Generaldisassembly .............................................................................. 80
8.6.2 Replacingwatertankconnector ............................................................. 84
8.6.3 Replacingmainsswitch .......................................................................... 85
8.6.4 Replacingpowercord ............................................................................. 87
8.6.5 Removingcoreunits ............................................................................... 89
8.7 Disassemblyofcoreunit,Crange................................................................. 91
8.7.1 Generaldisassembly .............................................................................. 91
8.7.2 Replacingcompactbrewingunit............................................................. 96
8.7.3 Replacingpump...................................................................................... 98
8.7.4 Replacingflowmeter ............................................................................ 101
8.7.5 Replacingautomaticprimingdevice(APD) .......................................... 102
8.7.6 ReplacingthermoblockwithNTCsensorandfinewirefuse(s) ............ 104
8.7.7 Replacingelectroniccontrolboardwithbuttonprints ........................... 107
8.8 Disassemblyofcoreunit,Drange............................................................... 109
8.8.1 Generaldisassembly ............................................................................ 109
8.8.2 Replacingelectroniccontrolboardwithbuttonprints ........................... 116
8.9 Wiringdiagrams ............................................................................................. 118
8.9.1 WiringdiagramsmodelCitiz............................................................... 118
8.9.2 WiringdiagramsmodelCitiz&milk,EF 485 /486 ............................. 124
8.9.3 WiringdiagramsmodelCitiz&Co,EF487/488 ............................... 128

Citizservicemanual
4
9 Functiontests .................................................................................................130
9.1 Safetyinstructions..........................................................................................130
9.2 Requiredequipment.......................................................................................130
9.2.1 Overview ............................................................................................... 130
9.2.2 Pressureadapter ..................................................................................131
9.3 Measureflowrate........................................................................................... 132
9.4 Pressureandleakagechecks ........................................................................133
9.4.1 Preparations.......................................................................................... 134
9.4.2 Testrun ................................................................................................. 135
9.5 Measurecoffeetemperature .......................................................................... 136
9.6 Milkfrothertests.............................................................................................138
9.6.1 Measurehotmilktemperature ..............................................................138
9.6.2 Measuremilkfrothratio ........................................................................138
9.7 NTCtemperaturesensorfunctionality............................................................ 139
9.8 Protectiveearth(PE)continuitytest...............................................................141
9.8.1 Whatcoffeemachinehastobetestedandwhen? ............................... 141
9.8.2 General .................................................................................................141
9.8.3 Testsequence ......................................................................................142
9.8.4 Whattodoiftheprotectiveearthcontinuitytestfails............................143
9.9 Protectiveinsulationtest ................................................................................144
9.9.1 Whatcoffeemachineshavetobetestedandwhen? ........................... 144
9.9.2 General .................................................................................................144
9.9.3 Testsequence ......................................................................................145
9.9.4 Whattodoiftheinsulationtestfails .....................................................147
10 ExplosionDrawings......................................................................................148
10.1 ModelCitiz,coreunitDrange(EF483).......................................................148
10.2 ModelCitiz,coreunitCrange(EF484).......................................................149
10.3 ModelCitiz&milk,coreunitDrange(EF485)............................................ 150
10.4 ModelCitiz&milk,coreunitCrange(EF486)............................................ 151
10.5 ModelCitiz&Co,coreunitDrange(EF487).............................................. 152
10.6 ModelCitiz&Co,coreunitCrange(EF488).............................................. 153
11 PartsList ..........................................................................................................154
12 Notes .................................................................................................................158
Citizservicemanual5
P R E F A C E
Thepurposeofthisservicemanualistoprovidetheservicepersonnelwithallnecessary
informationwithregardstocorrecthandling,maintenanceandrepairoftheCitizcoffee
machinetypesEF483/484,EF485/486andEF487/488.
Thismanualshouldbeusedbythetechniciansasavaluableaidtoguaranteethe
permanentreadinessforuseofthemachines.Inordertotakefulladvantageofallthe
functions,itisabsolutelynecessarytofollowtheinstructionsinthismanual.
ForfastaccesstoinformationdirectlyfromthePCorMACmonitor,this servicemanual
isavailableasPDFfileandcanbedownloadedfromthe
Nespresso
technicalwebsite
underhttps://business.nespresso.com.
TherequiredutilitysoftwaretoreadPDFfiles(AdobeReader
®
)forPCsandMAC
computerscanbedownloaded(under http://www.adobe.com)forfreepleaseclickthe
logo:
C O N T E N T U P D A T E S
Version1.2
• Chapter"Functiontests":correctionoftheprotectiveinsulationtest(connectionof
thetestequipmenttobothneutralandphasepinsinsteadofgroundpin).See
subtitle"Testsequence"onpage145,steps1till3(connectionofthemeasuring
cable).
• Servicemanualisavailableinadditionallanguages:French,German,Spanishand
Italian
Version1.1
• Firstreleasedservicemanualversion,inEnglishonly.
Version1.0
• Testversionforproofreading,inEnglishonly.
Pleasekeepthis
manualtogetherwith
thecorresponding
servicedocumentation.
Thiswayyouareassured
tohavethenecessary
information.
2PDFversionsofthis
servicemanualcan
beselected:
• Ahighlycompressed
versionwithlowpicture
resolutionandsmallfile
size.
• Aversioninprintquality
withhyperlinks,butwith
bigfilesize.
Theversionnumber
ofthisservicemanual
isprintedonthelower
rightcornerofthefront
page.
Citizservicemanual
6
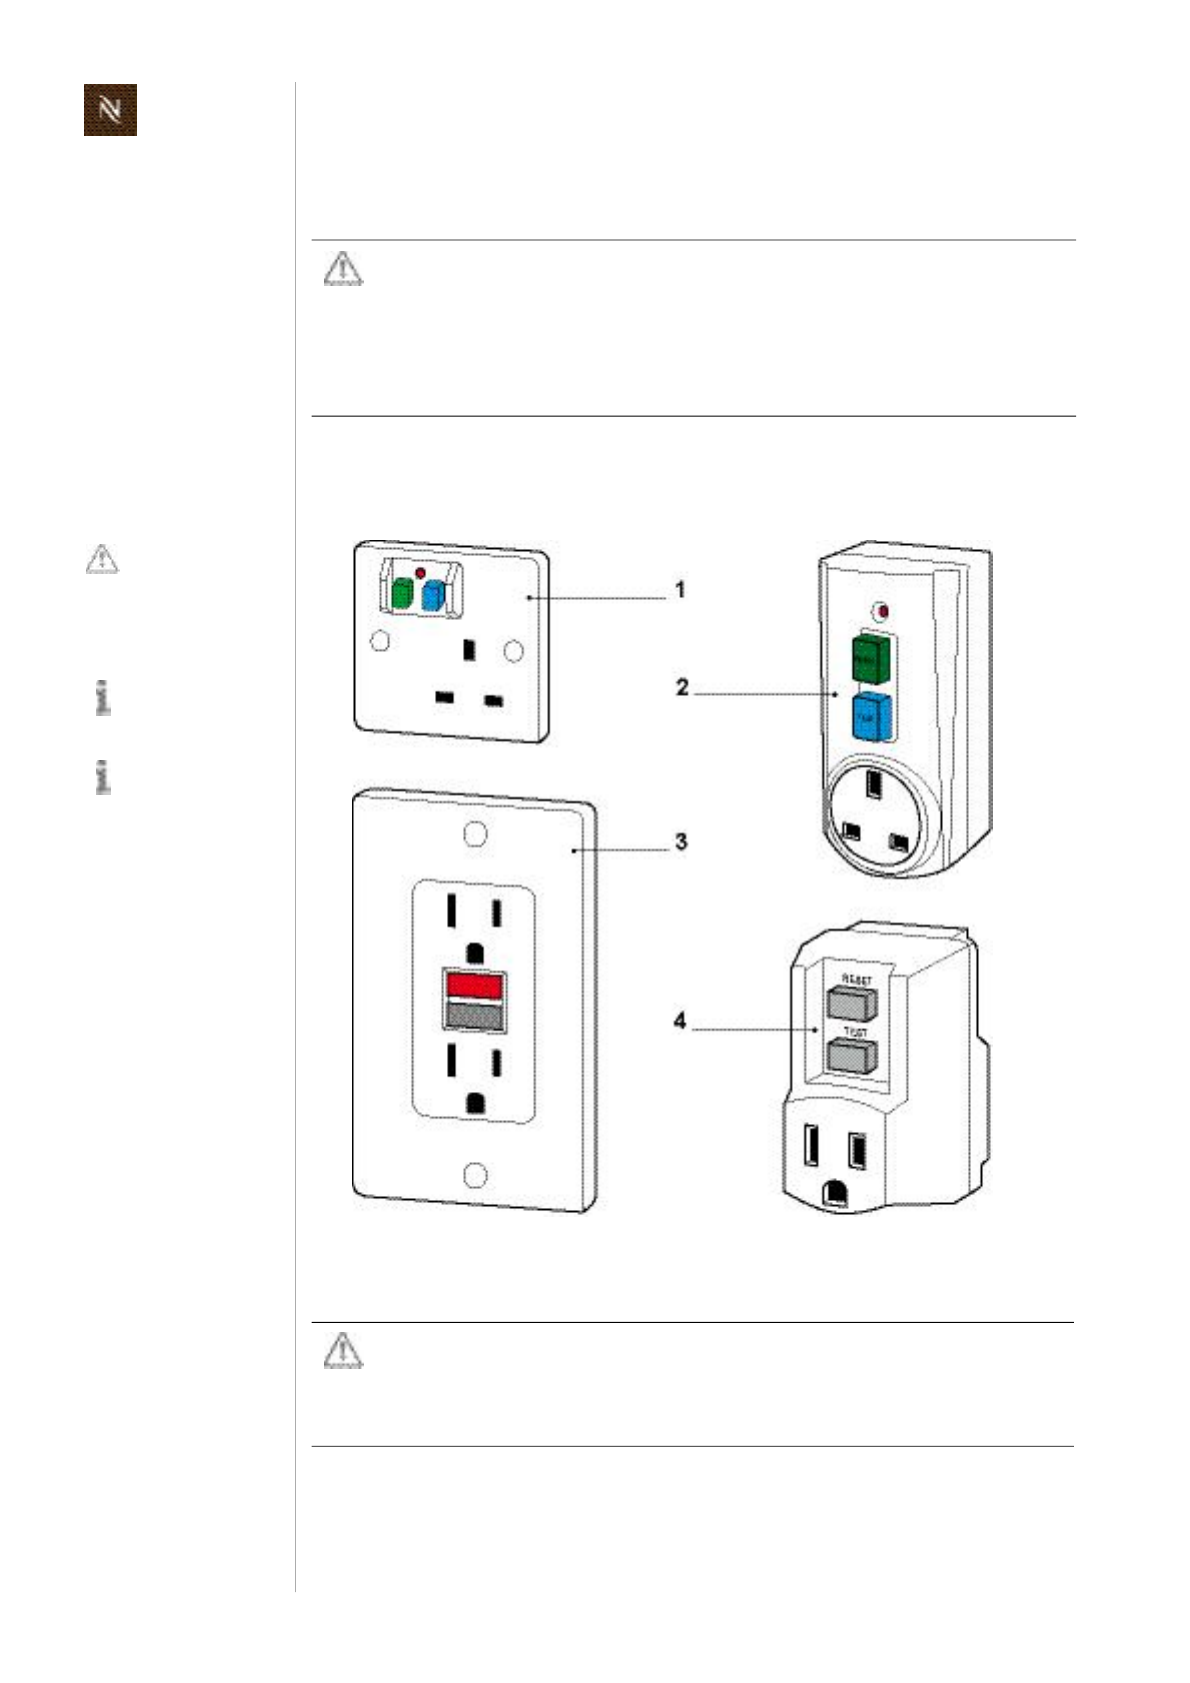
G E N E R A L S A F E T Y N O T E S
1 G E N E R A L S A F E T Y N O T E S
Asanadditionalsafetymeasure,theuseofaresidualcurrentdevice(RCD),alsocalled
thegroundfaultcircuitinterrupter(GFCI),intherepaircentreishighlyrecommended.
Riskoffatalelectricalshockandfire!
Mainsvoltageinsidethecoffeemachine.
• Unplugappliancebeforecleaning.
• Nevercleanwetorimmerseplug,cordorapplianceinanyfluid.
• Disconnectthemainsplugbeforedisassemblytheappliancemust
befreeofvoltage.
Thisdevicedoes
notprotectagainst
electricalshockdue
tocontactwithbothcir
cuitconductors.
Exampleillustrations
oftypicaldevices.
UseaGFCIwithatrip
levelof46mA(USA)
resp.aRCDwithatrip
levelof1530mA(Europe).
Atriplevelabove30mA
providesonlyverylimited
protectionagainstharm
fromanelectricshock.
1) RCDprotectedsocketoutlet
2) PluginRCDunit
3) GFCIsocket
4) PluginGFCI
Dangerofburns!
Hotpartsandwaterunderpressureinsidethecoffeemachine
(particularlyinthethermoblock).
• Letcoffeemachinecooldownbeforecleaningordisassembly.
Citizservicemanual7
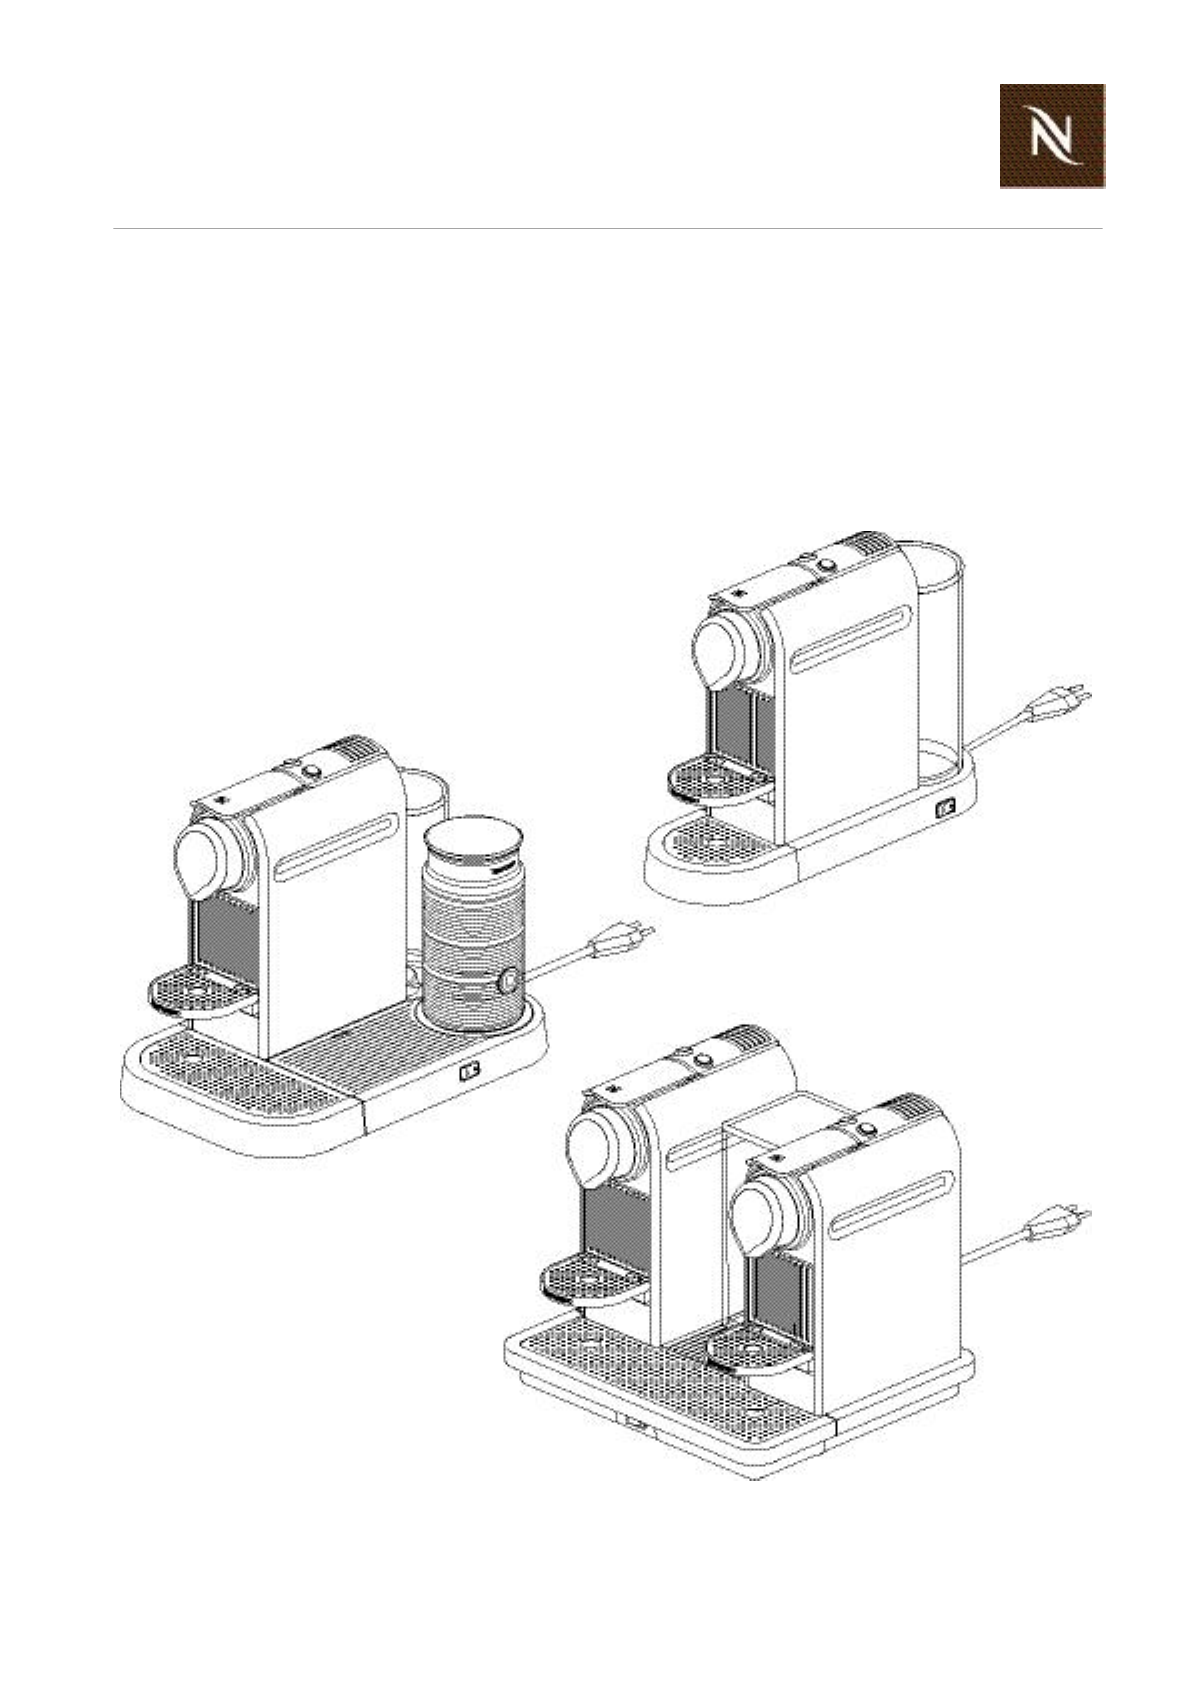
M O D E L O V E R V I E W
2 M O D E L O V E R V I E W
2.1 Modelrange
WithcoreunitDrange:WithcoreunitCrange:
Eachmodel
hasaspecialplatform
isavailablein2differentdesigns,dependingonthecoreunitversion(CorDrange).
1) Citiz
2) Citiz&milk
3) Citiz&Co
Acoreunitisthe
actualcoffee
machine,mountedon
aplatform.
Citizservicemanual
8
M O D E L O V E R V I E W
2.2 Coreunitversions
Drange Crange
Thiscomparison
helpstoidentifythe
coreunitversion.
1) Coffeeoutlet
2) Closinghandle
3) Coffeebuttons
4) Cupholder
Thereareadditional
differencesbetween
the2versions(cov
ers,wiringetc.)notmen
tionedinthetable.
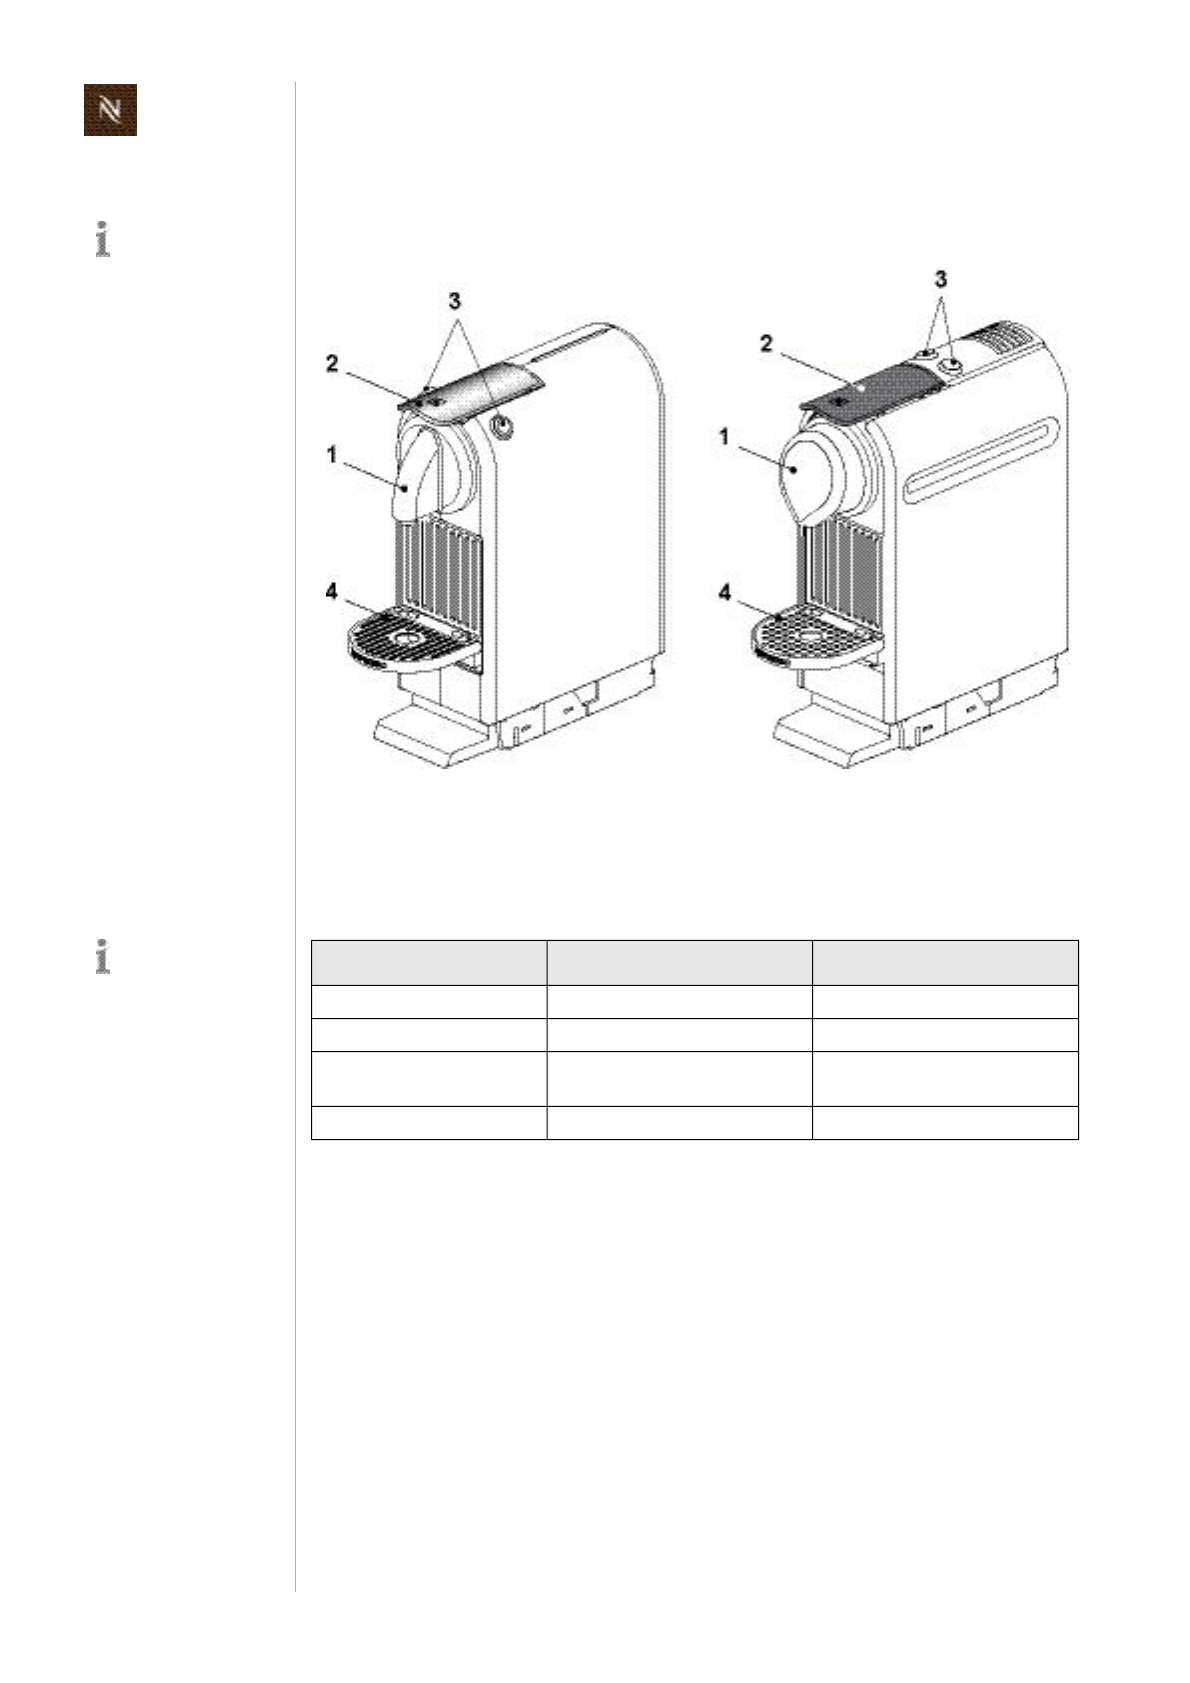
Differentcomponents Drange Crange
Coffeeoutlet(1) conturedcoffeeoutlet "flat"coffeeoutlet
Closinghandle(2) chromiumplatedclosinghandle blackclosinghandle
Coffeebuttons(3) arrangedonbothsidesofthe
closinghandle
arrangedbehindtheclosing
handle
Cupholder(4) cupholderwithslottedrecesses cupholderwithcircularrecesses
Citizservicemanual9
M A I N C O M P O N E N T S
3 M A I N C O M P O N E N T S
3.1 Overviewcoreunit,Drange
Forplatformcompo
nentsrefertomodel
overview.
1) Cupsupport
2) Wastewatercontainer
3) Capsulecontainer(usedcapsules)
4) Coffeenozzle
5) Steamcover
6) Closinghandle
7) Button"smallcup"(Espresso)
8) Button"largecup"(Lungo)
9) Sidepanelsleft/right
10)Rearcover
Citizservicemanual
10
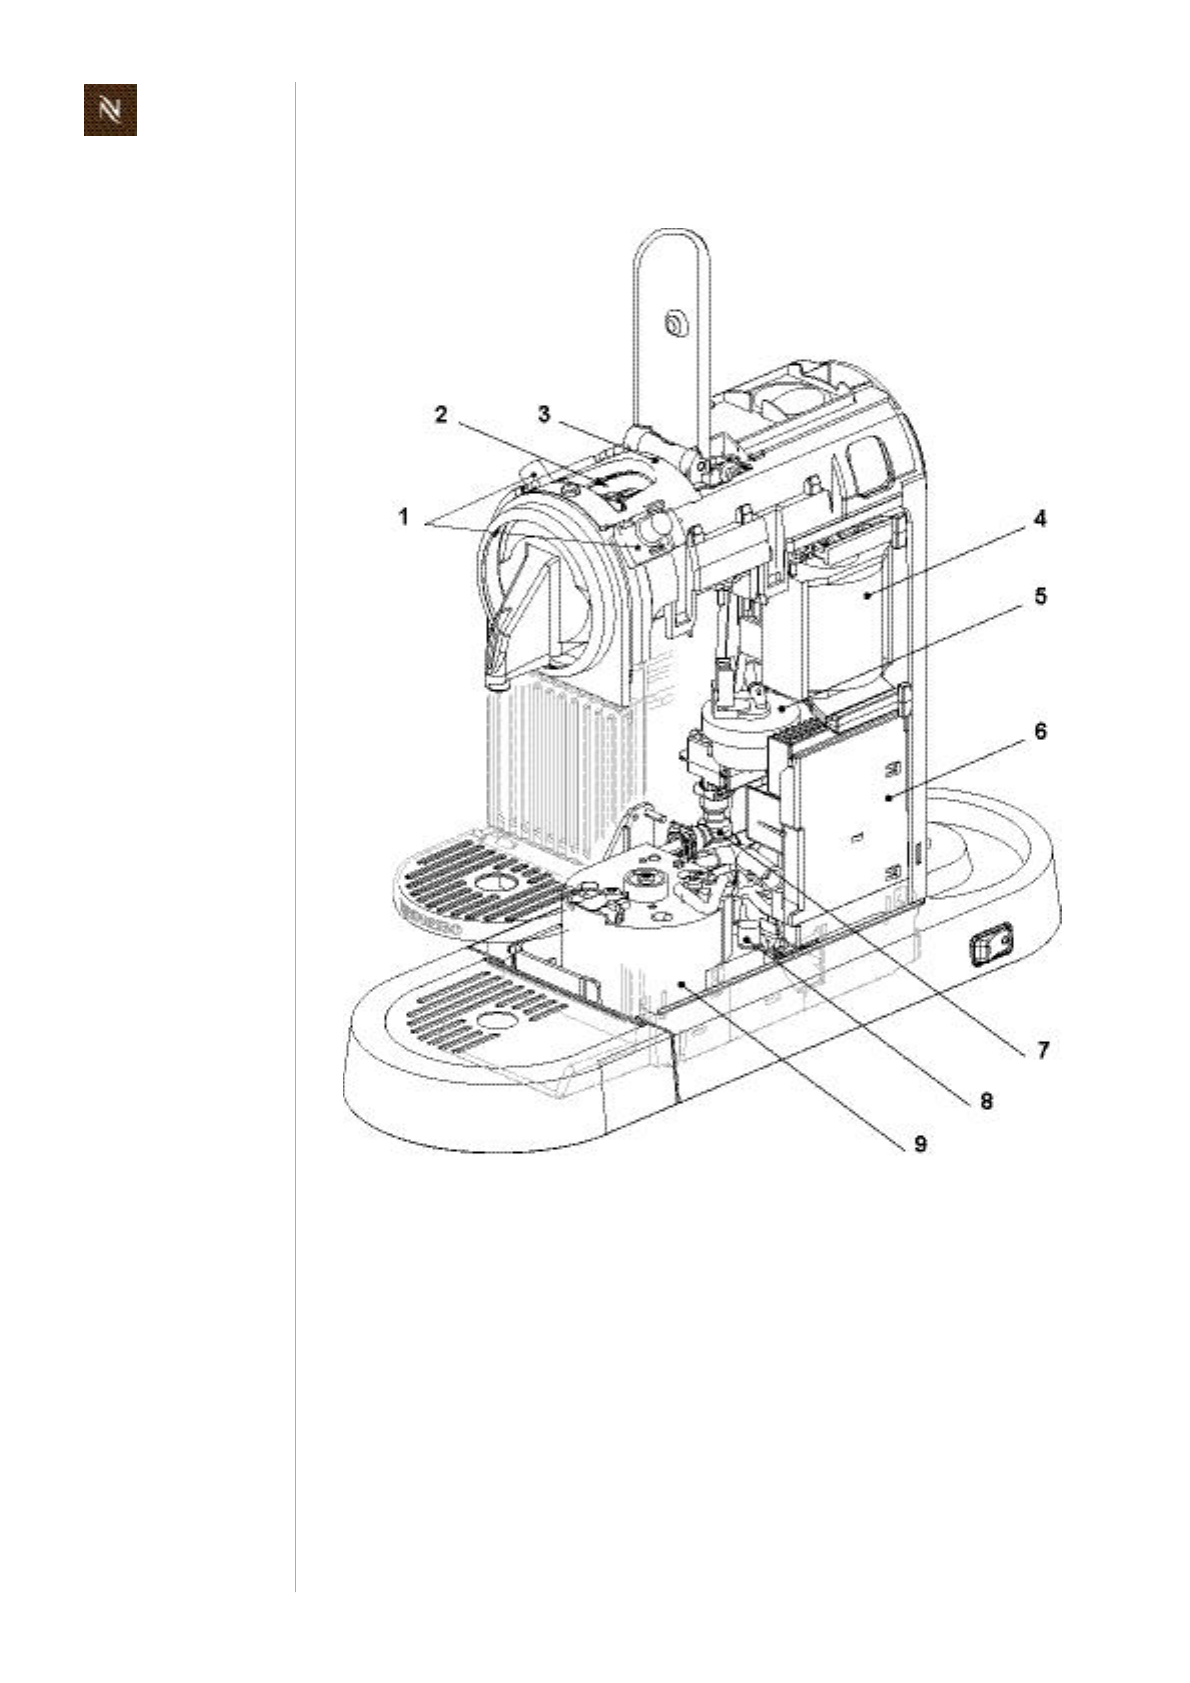
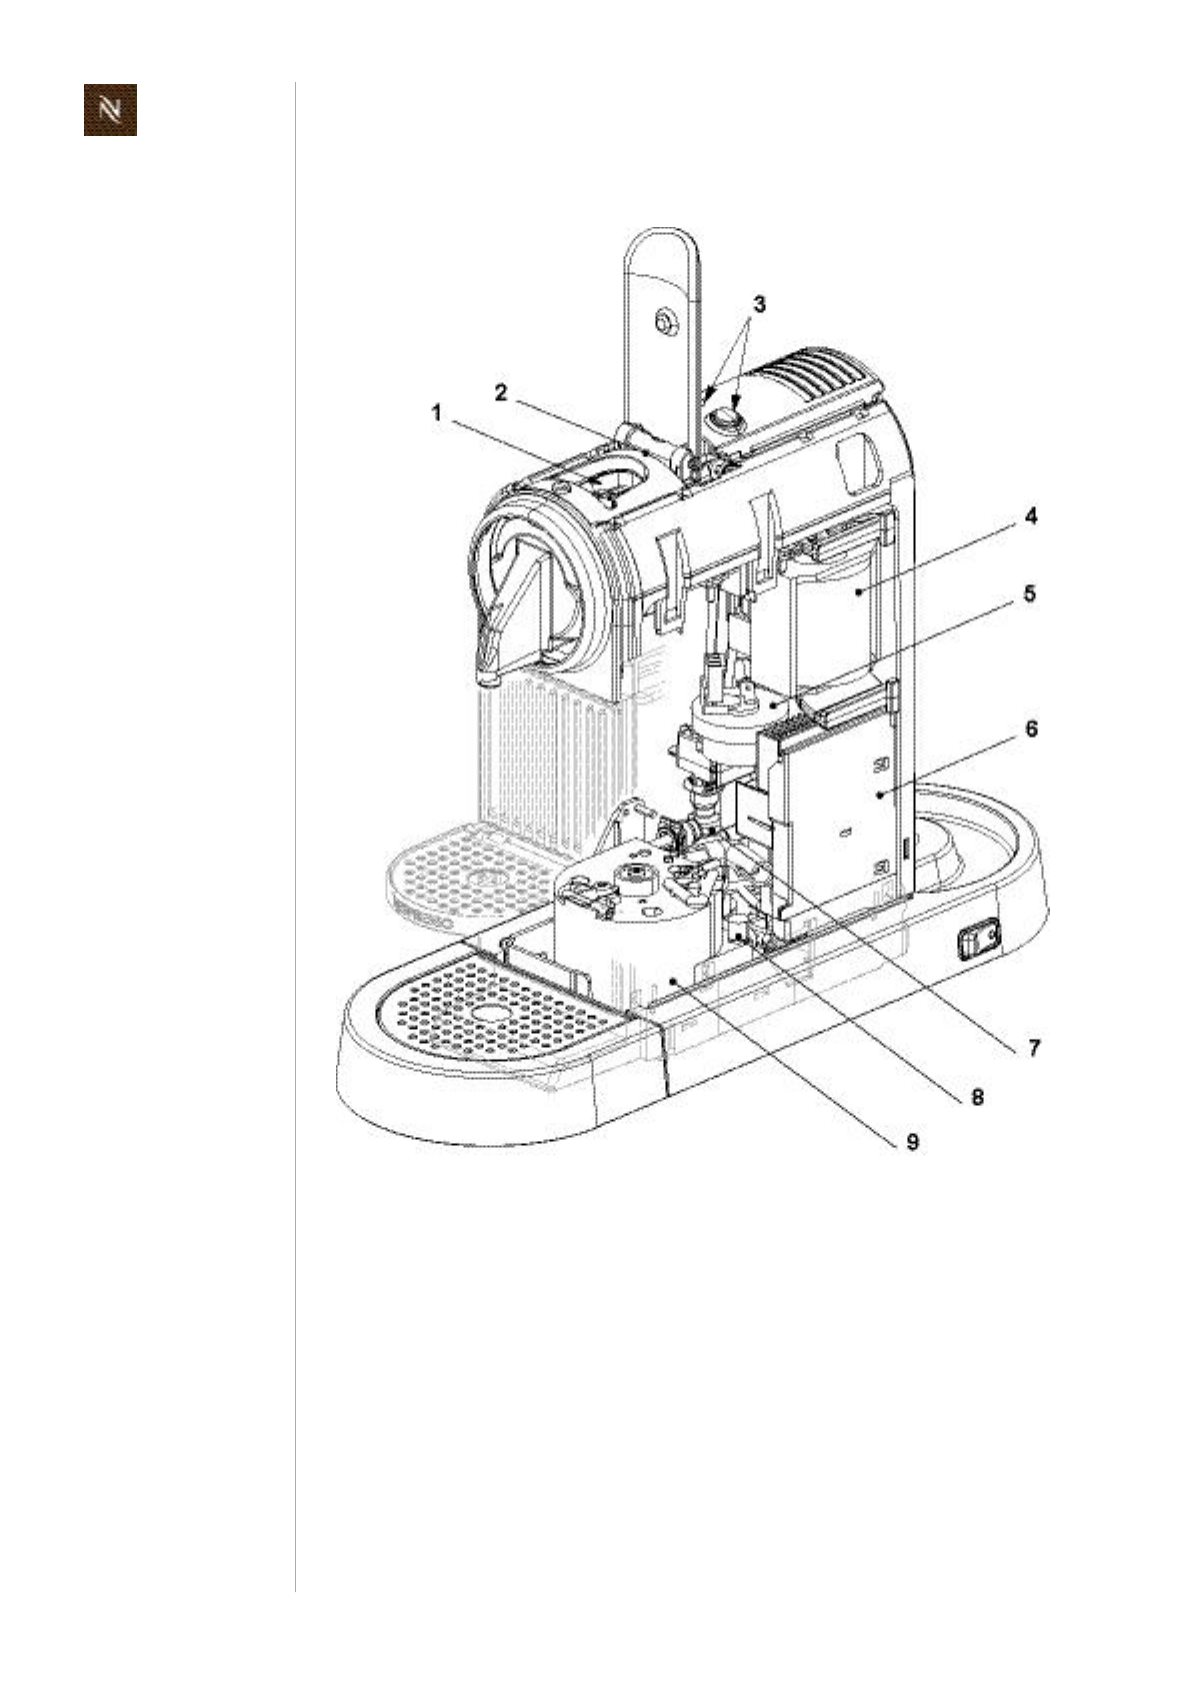
M A I N C O M P O N E N T S
3.1.1 Interiorviewcoreunit,Drange
1) Buttonprints
2) Capsulebay
3) Brewingunit(TMBU,TolkienMini
BrewingUnit)
4) Pump(InvensysCP4/SP)
5) Flowmeter(FHKSC12)
6) Electroniccontrolboard
(withprotectivecovers)
7) Selfprimingdevice(APD)
8) NTCtemperaturesensor
9) Thermoblock(EF2003)
Citizservicemanual11
M A I N C O M P O N E N T S
3.2 Overviewcoreunit,Crange
1) Cupsupport
2) Wastewatercontainer
3) Capsulecontainer(usedcapsules)
4) Sidepanel,left
5) Sidepanel,right
6) Coffeenozzle
7) Steamcover
8) Closinghandle
9) Button"smallcup"(Espresso)
10)Button"largecup"(Lungo)
11)Topcover
12)Rearcover
Citizservicemanual
12
M A I N C O M P O N E N T S
3.2.1 Interiorviewcoreunit,Crange
1) Capsulebay
2) Brewingunit(TMBU,TolkienMini
BrewingUnit)
3) Buttonprints(undertopcover)
4) Pump(InvensysCP4/SP)
5) Flowmeter(FHKSC12)
6) Electroniccontrolboard
(withprotectivecovers)
7) Selfprimingdevice(APD)
8) NTCtemperaturesensor
9) Thermoblock(EF2003)

Citizservicemanual13
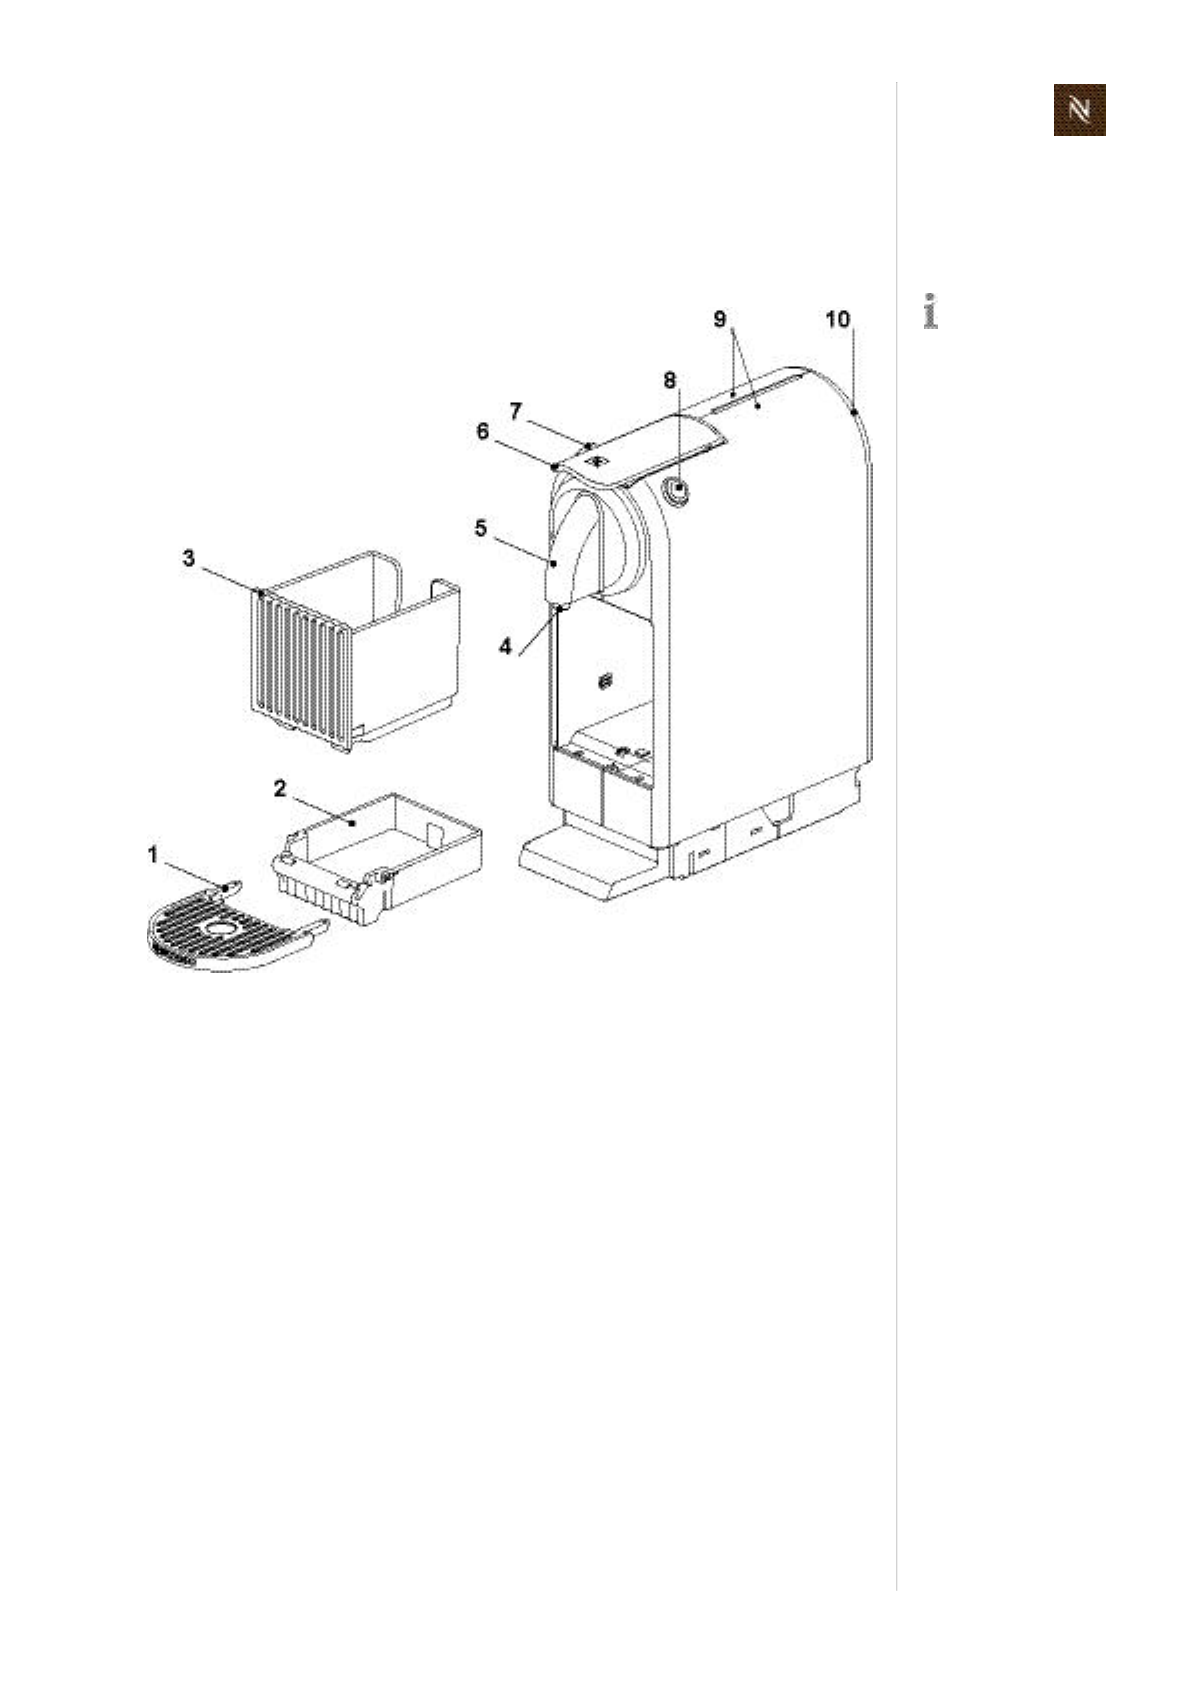
M A I N C O M P O N E N T S
3.3 OverviewmodelCitiz
Thisisthebasicmodelwiththesmallestplatform(9).
Thedripgrid(1)
existsin2versions,
matcheswiththecupholderofthecoreunitversion(e.g.circularrecesses).
Thismodelispictured
withaCrangecore
unit.
1) Dripgrid
2) Driptray
3) Coreunit(e.g.Crange)
4) Watertankcover
5) Watertank
6) Watertankconnector
7) Powercord
8) ON/OFFswitch(mainsswitch)
9) Platform
Thecoreunitsof
modelCitizandCitiz
&milkarenotcom
patibleduetodifferent
electroniccontrolboards.
Citizservicemanual
14
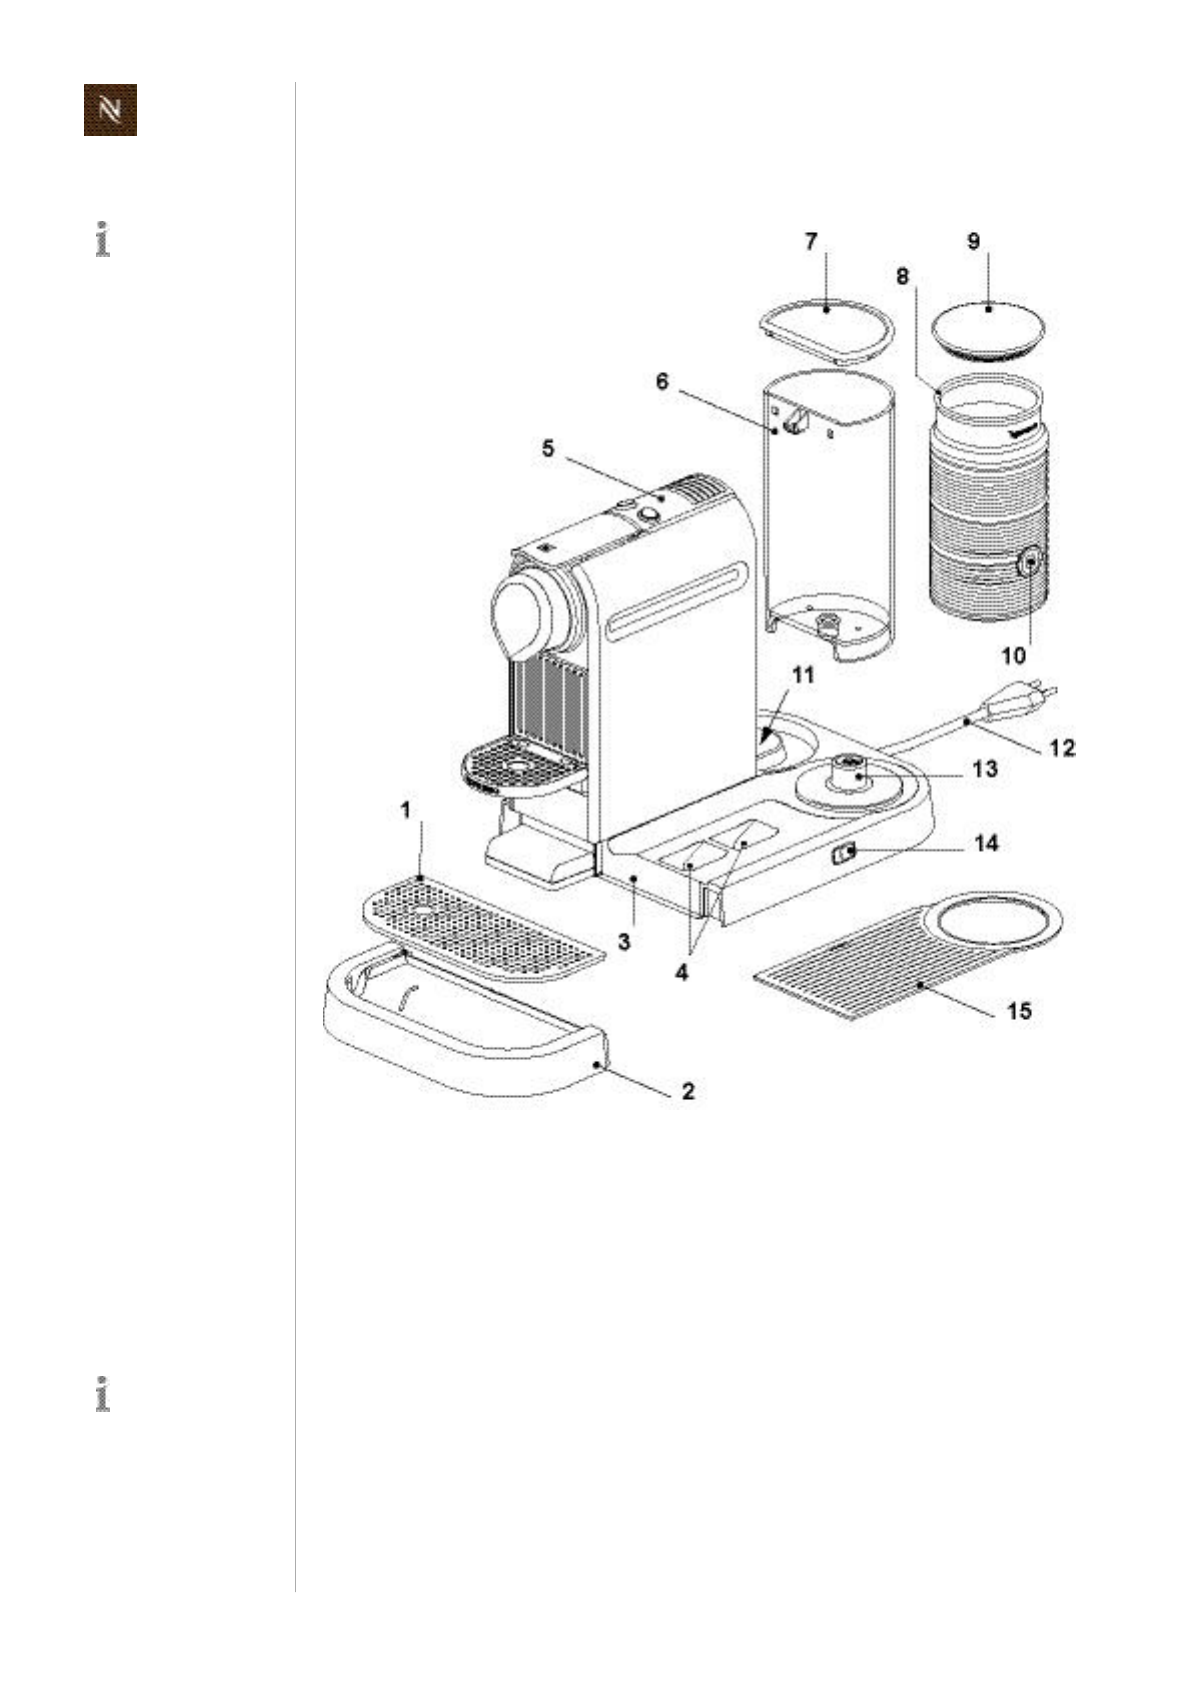
M A I N C O M P O N E N T S
3.4 OverviewmodelCitiz&milk
Theplatformofthismodelisequippedwithamilkfrother(8).
Thedripgrid(1)
existsin2versions,
matcheswiththecupholderofthecoreunitversion(e.g.circularrecesses).
Thismodelispictured
withaCrangecore
unit.
1) Dripgrid
2) Driptray
3) Platform
4) Storageplacesforwhisks
5) Coreunit(e.g.Crange)
6) Watertank
7) Watertankcover
8) Milkfrother(Aero3)
9) Lid
10) Milkfrotherstartbutton
11) Watertankconnector
12) Powercord
13) Milkfrotherconnector
14) ON/OFFswitch(mainsswitch)
15) Cupstorage(removable)
Thecoreunitsof
modelCitizandCitiz
&milkarenotcom
patibleduetodifferent
electroniccontrolboards.
Citizservicemanual15
M A I N C O M P O N E N T S
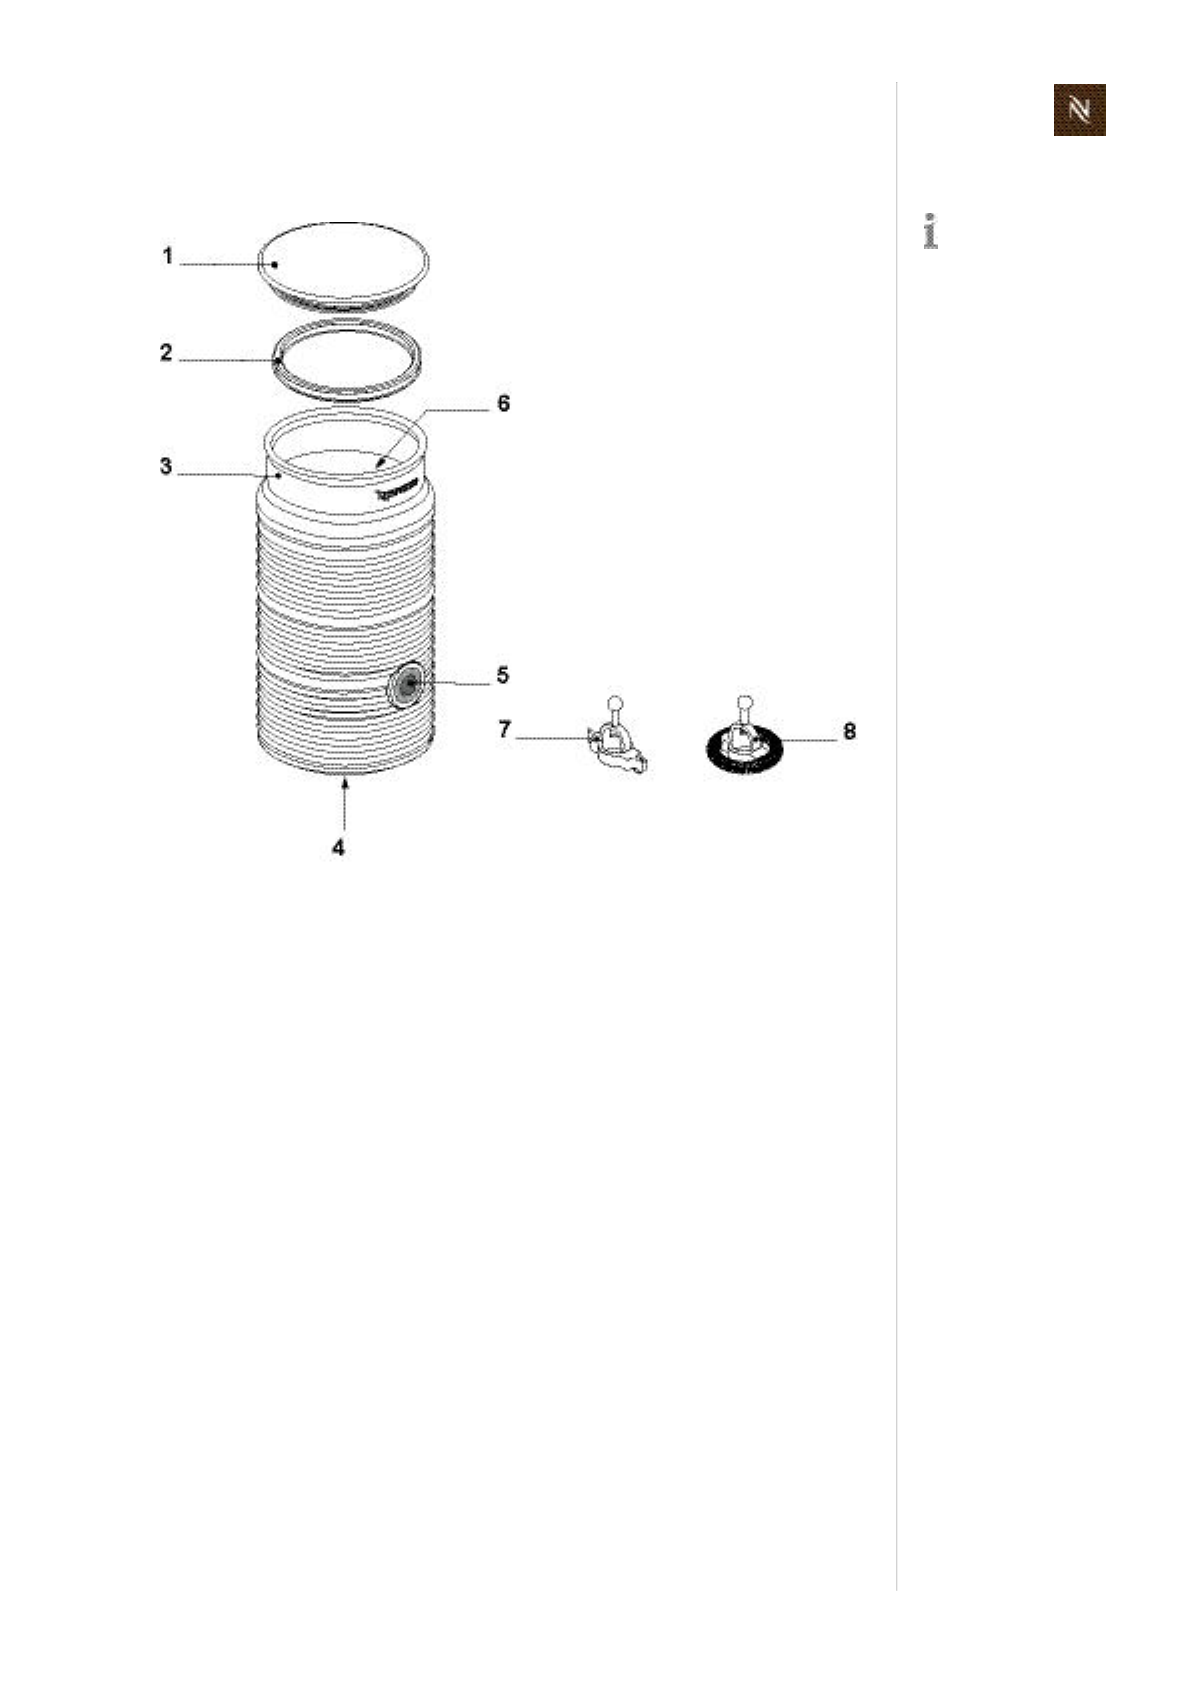
3.4.1 OverviewmilkfrotherAERO3
Theinsideofthejug(3)
haslevelmarks(6),
issurfacecoatedforeasycleaning.
Themilkfrother
AERO3ispartofthe
standardequipment
ofthemodelCitiz&milk.
1) Lid
2) Seal
3) Jug
4) Powerplug
5) Startbutton(red/bluebacklighted)
6) Indicationof2max.milklevels
(120ml/240ml)
7) Mixerforhotmilk
8) Springwhiskformilkfoam
Citizservicemanual
16
M A I N C O M P O N E N T S
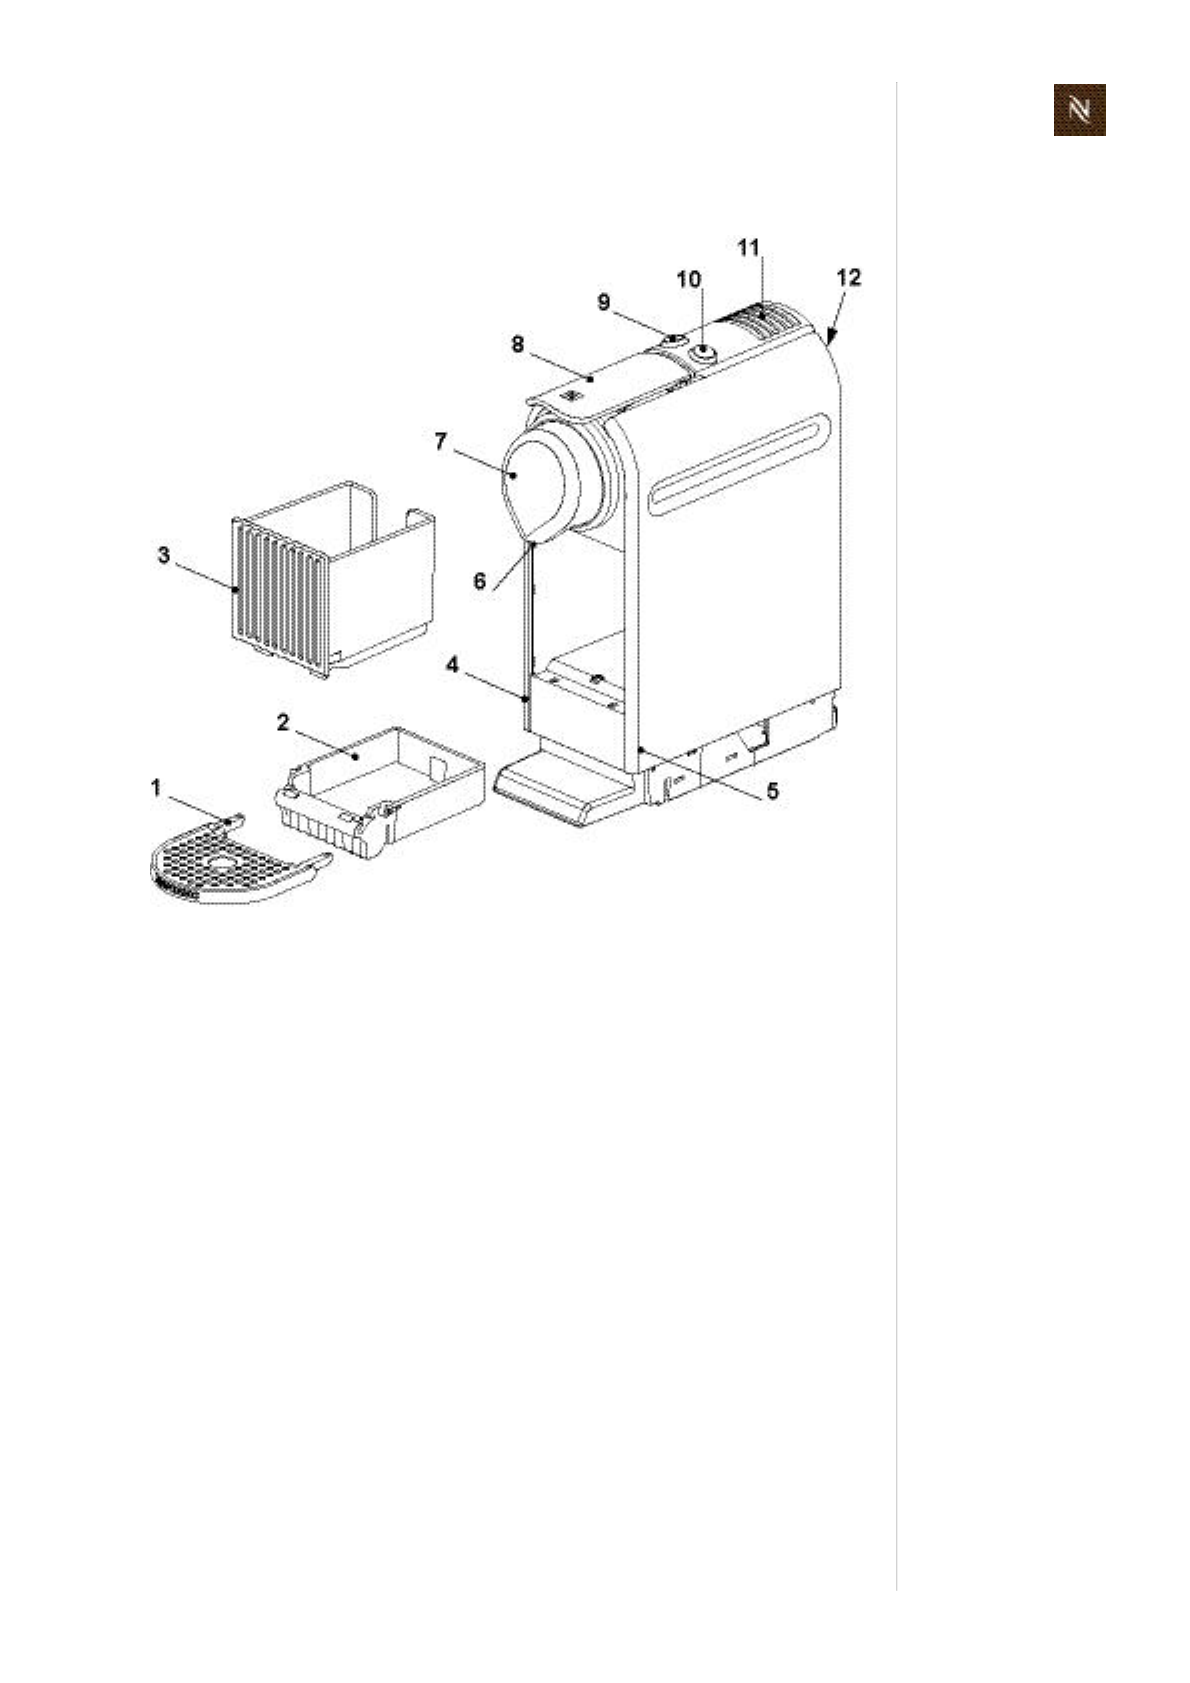
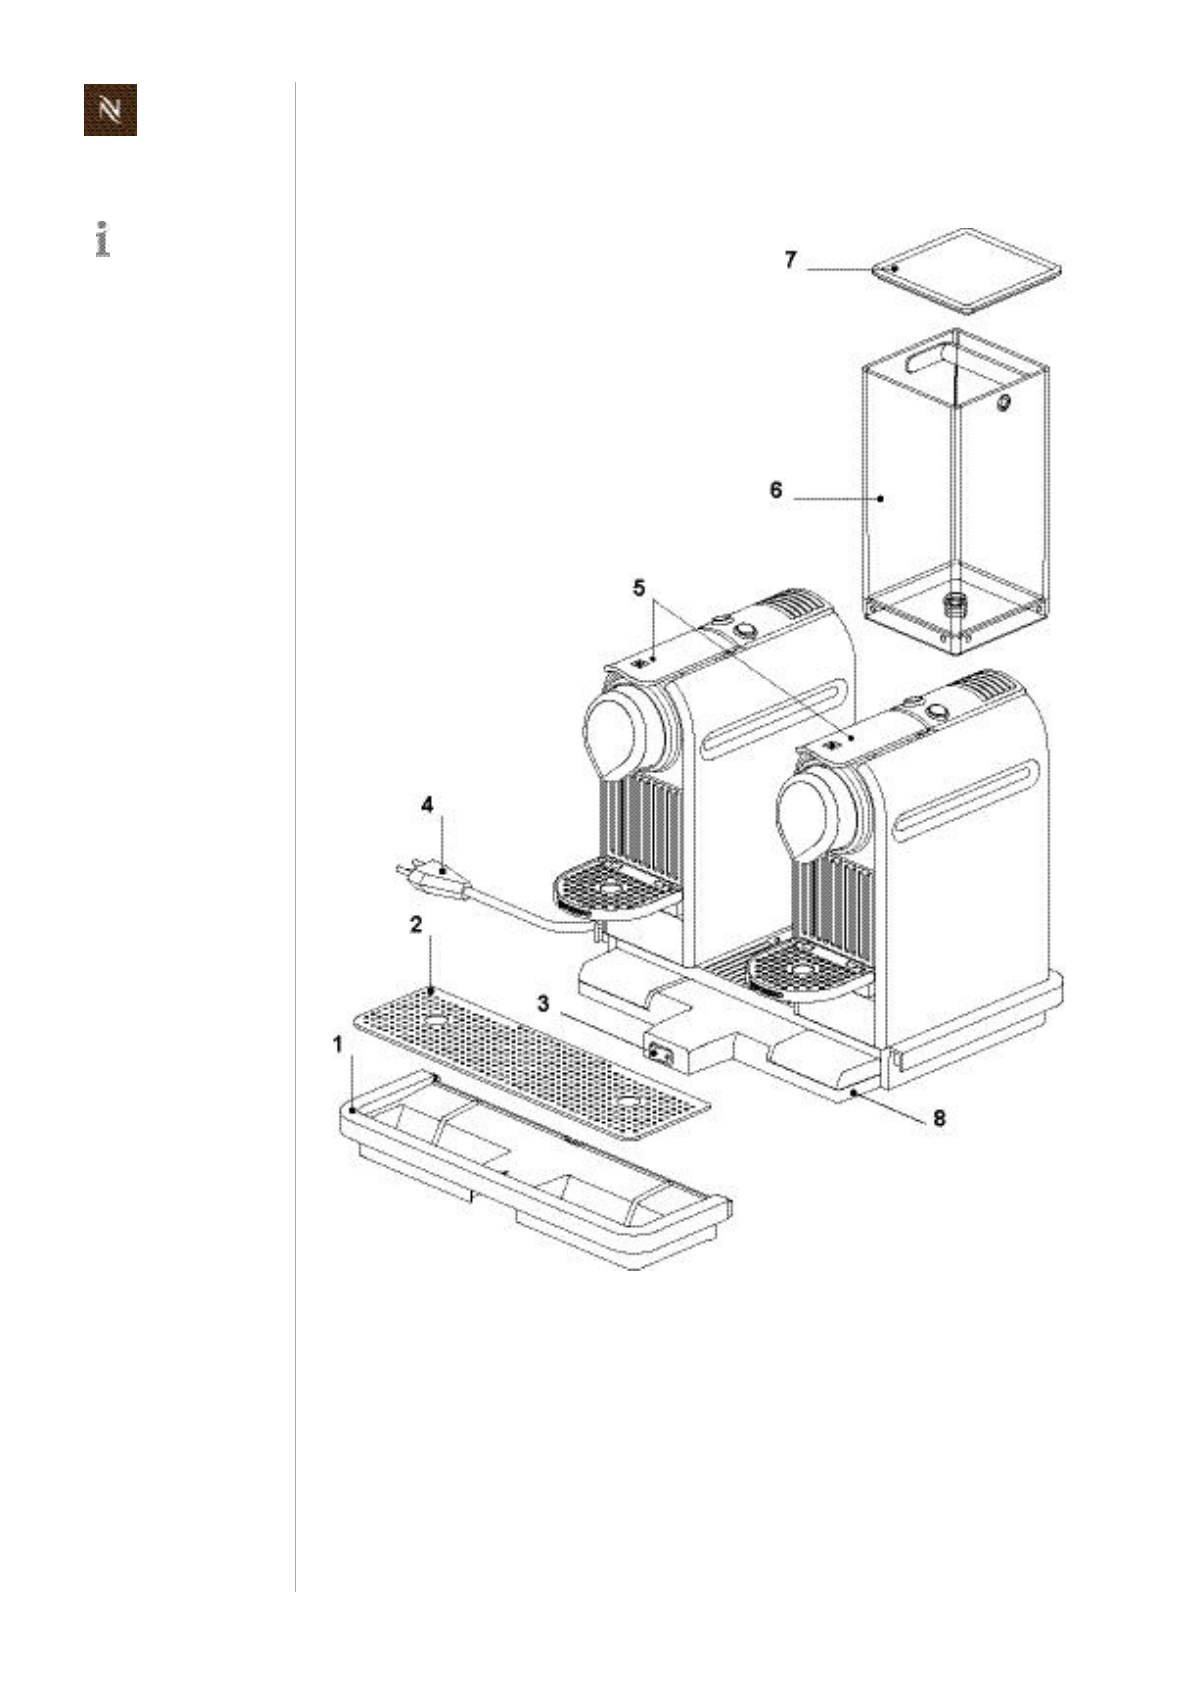
3.5 OverviewmodelCitiz&Co
Thedripgrid(1)
existsin2versions,
matcheswiththecupholderofthecoreunitversion(e.g.circularrecesses).
Thismodelispictured
withaCrangecore
unit.
1) Driptray
2) Dripgrid
3) ON/OFFswitch(mainsswitch)
4) Powercord
5) Coreunits(e.g.2xCrange)
6) Watertank
7) Watertankcover
8) Platform
Citizservicemanual17
M A I N C O M P O N E N T S
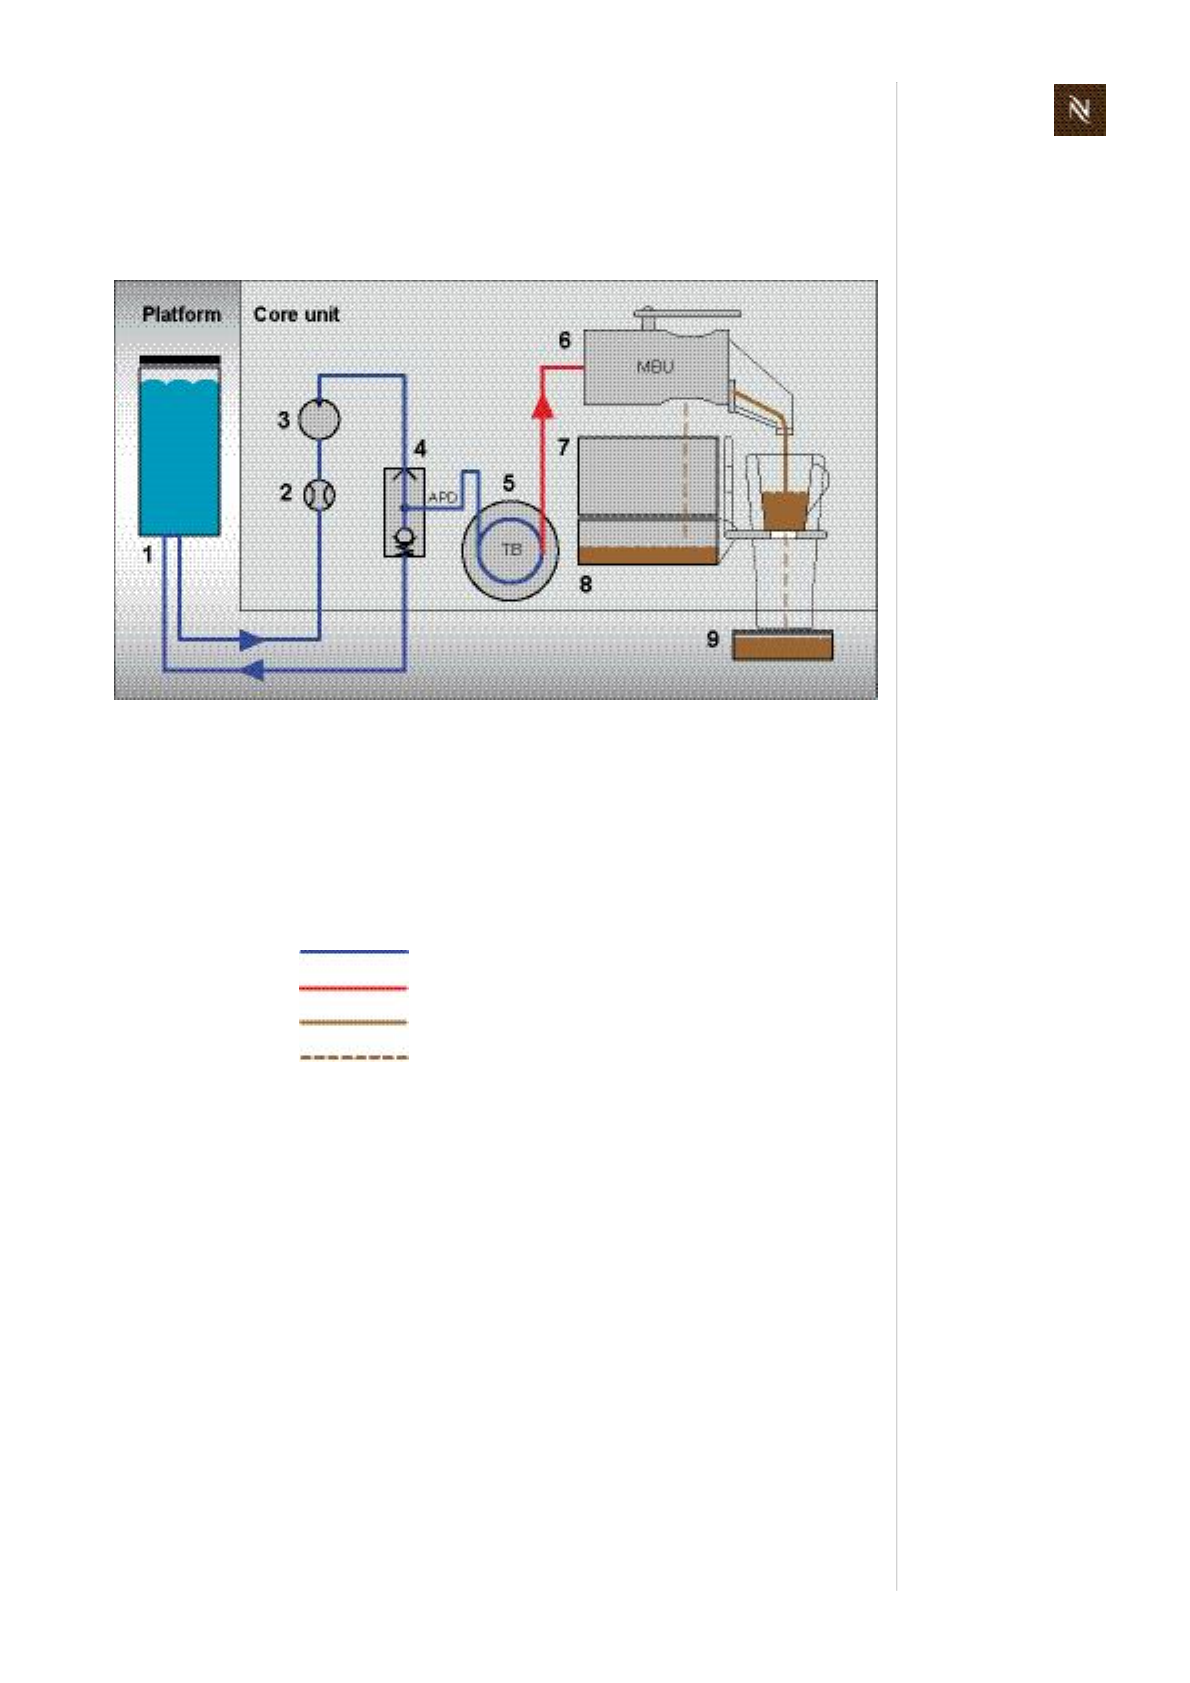
3.6 FluidSystem
3.6.1 Watercircuitdiagramofcoreunit(allCitizversions)
Legend:
Theselfprimingdevice(4)
allowsthepumptosuckwaterwhenitisfilledwithair(newmachine,emptywater
tanketc.)
removesairbubblesfromthewatercircuit
feedsawater/airmixbackintothewatertank.
1) Watertank
2) Flowmeter
3) Pump
4) Selfprimingdevice
5) Thermoblock
6) Minibrewingunit(MBU)
7) Capsulecontainer
8) Wastewatercontainer
9) Driptray
Freshcoldwater
Freshhotwater
Coffee
Waste/dripwater
Citizservicemanual
18
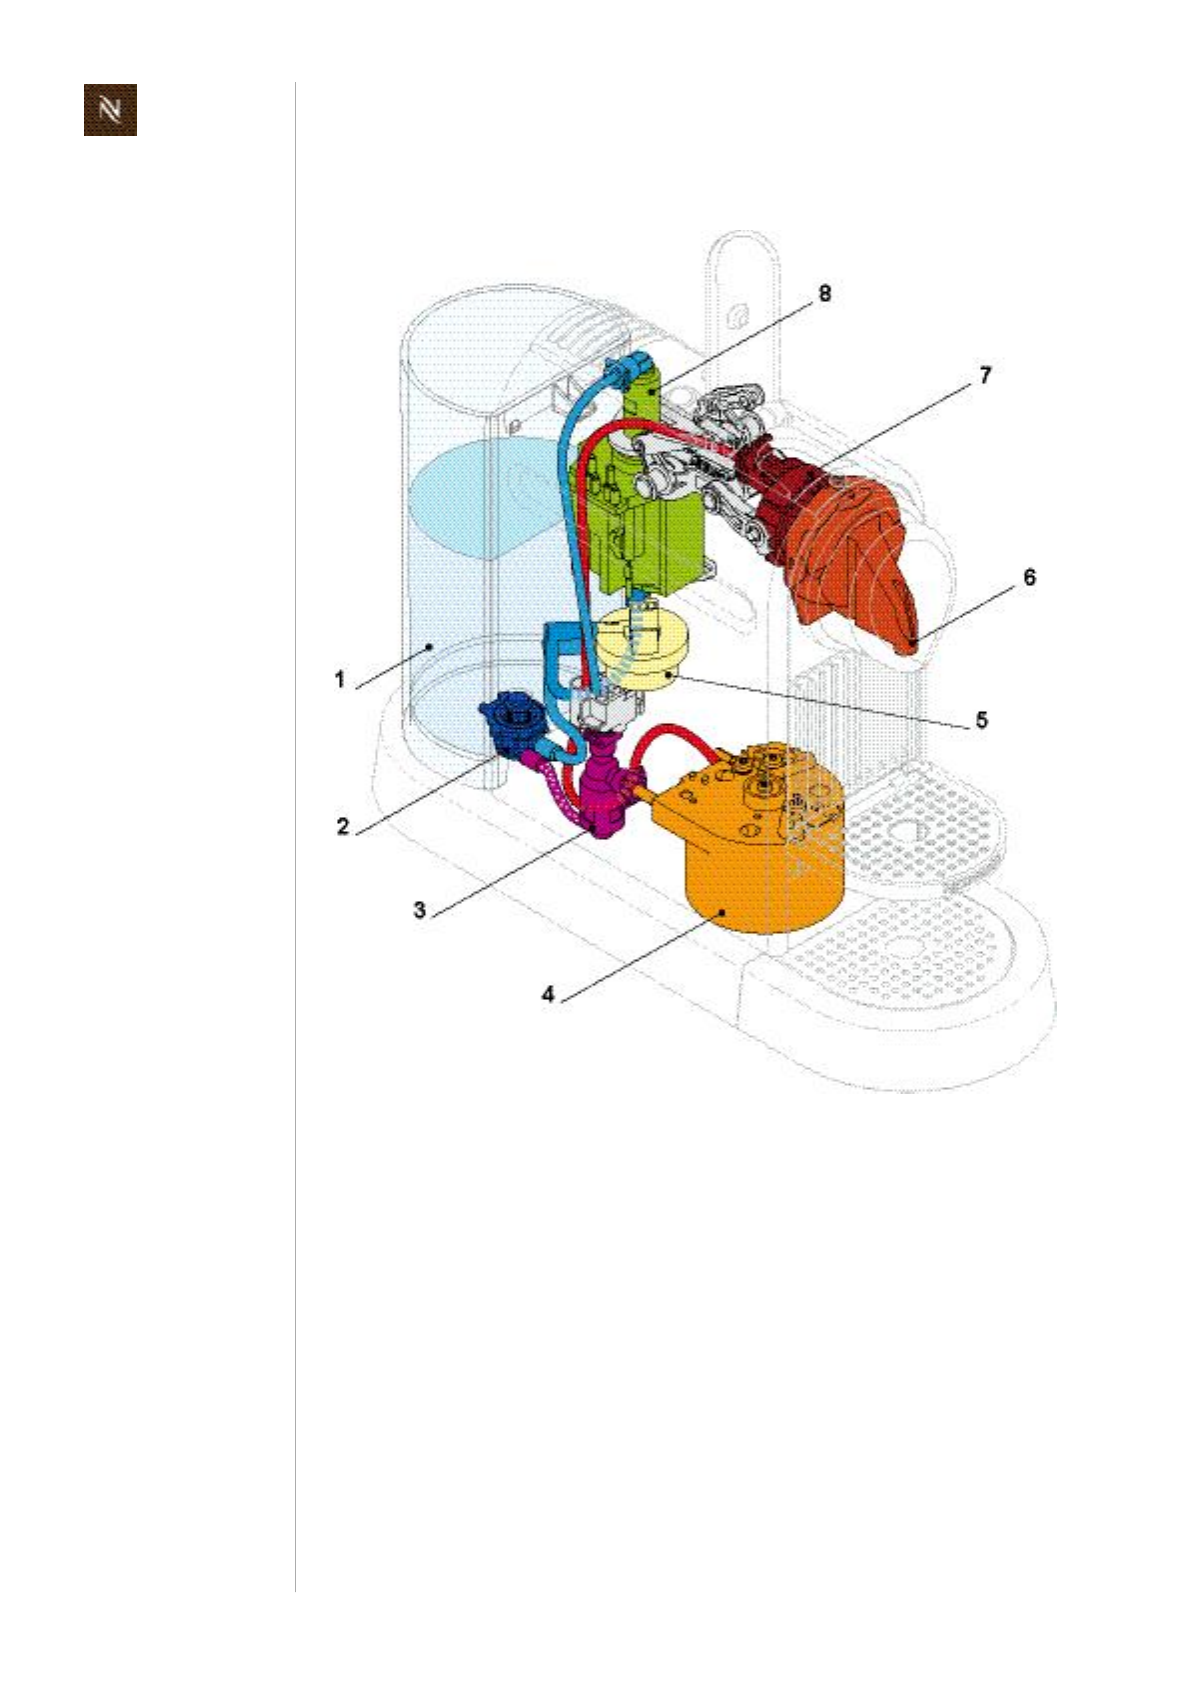
M A I N C O M P O N E N T S
3.6.2 WatercircuitofmodelsCitiz/Citiz&milk
1) Watertank
2) Watertankconnector
3) Selfprimingdevice
4) Thermoblock
5) Flowmeter
6) Coffeeoutlet
7) Brewingunit
8) Pump
Citizservicemanual19
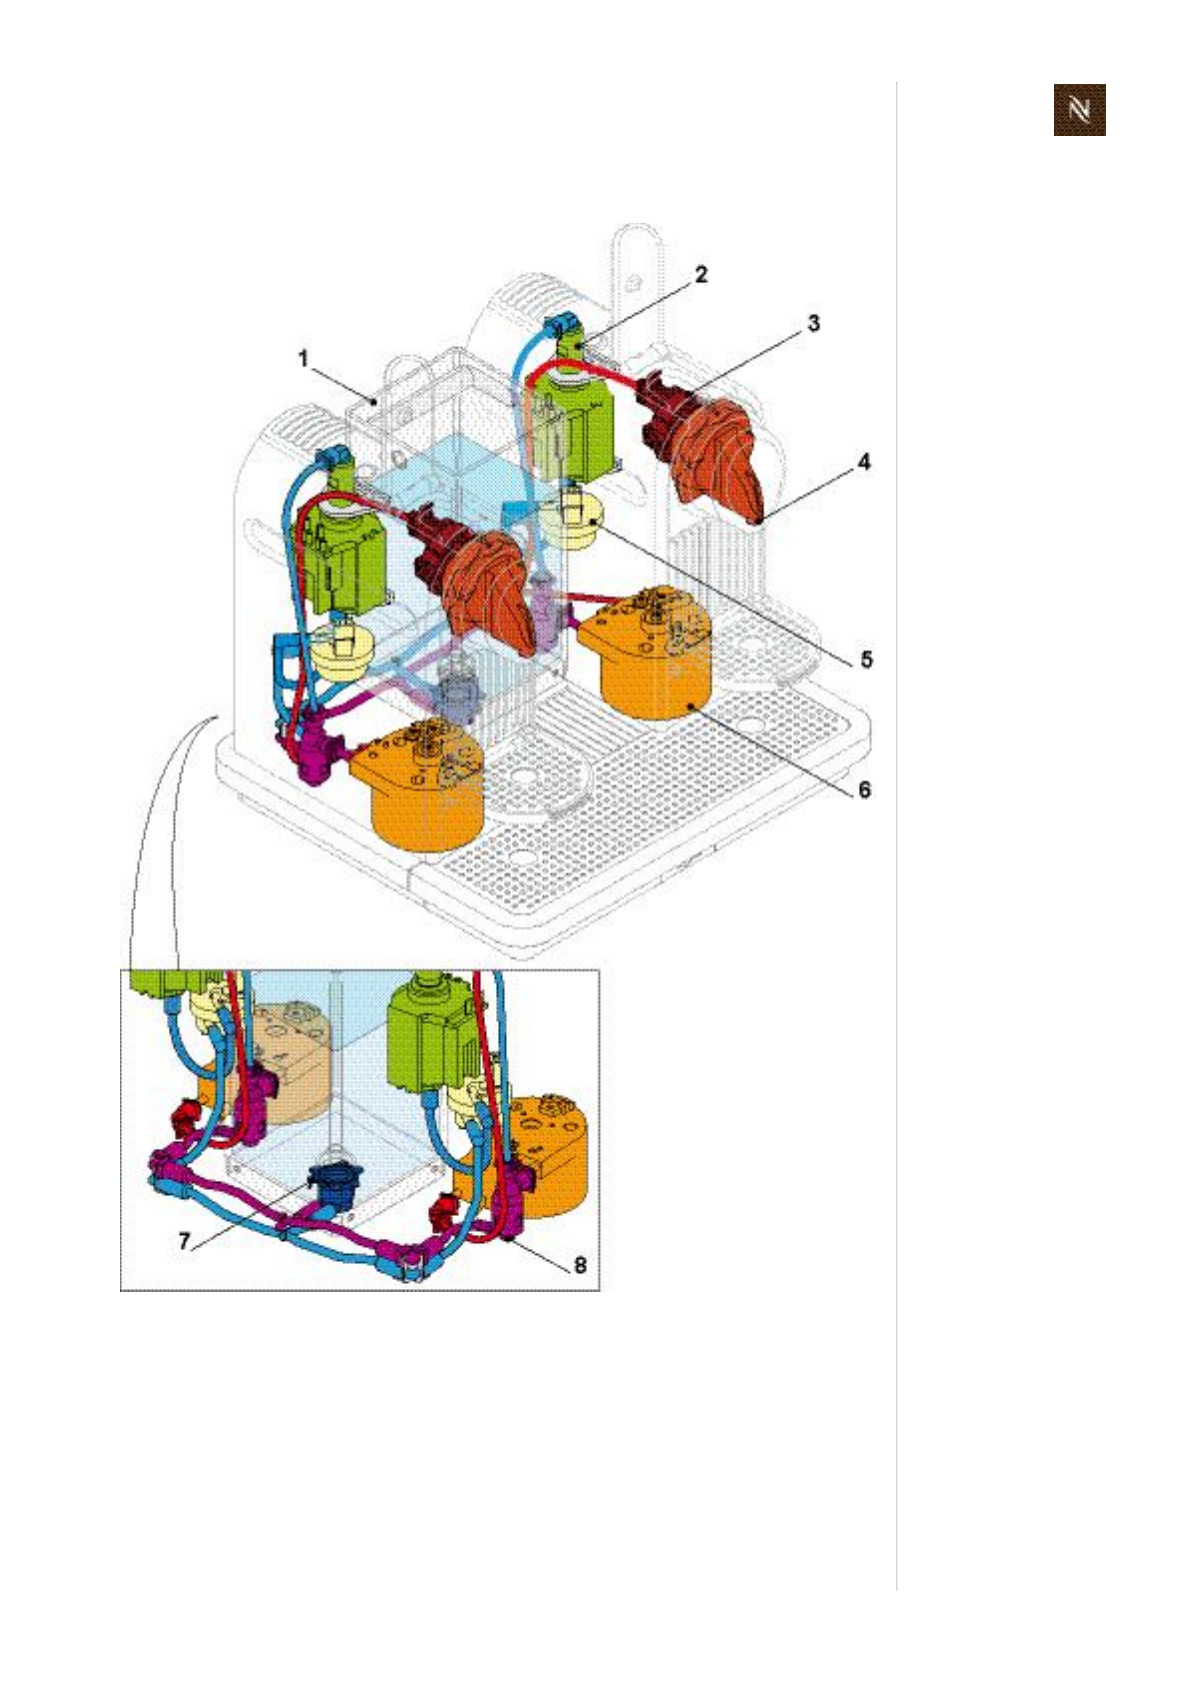
M A I N C O M P O N E N T S
3.6.3 WatercircuitofmodelCitiz&Co
1) Watertank
2) Pump
3) Brewingunit
4) Coffeeoutlet
5) Flowmeter
6) Thermoblock
7) Watertankconnector
8) Selfprimingdevice
Citizservicemanual
20
T E C H N I C A L D A T A
4 T E C H N I C A L D A T A
4.1 Ratingplates
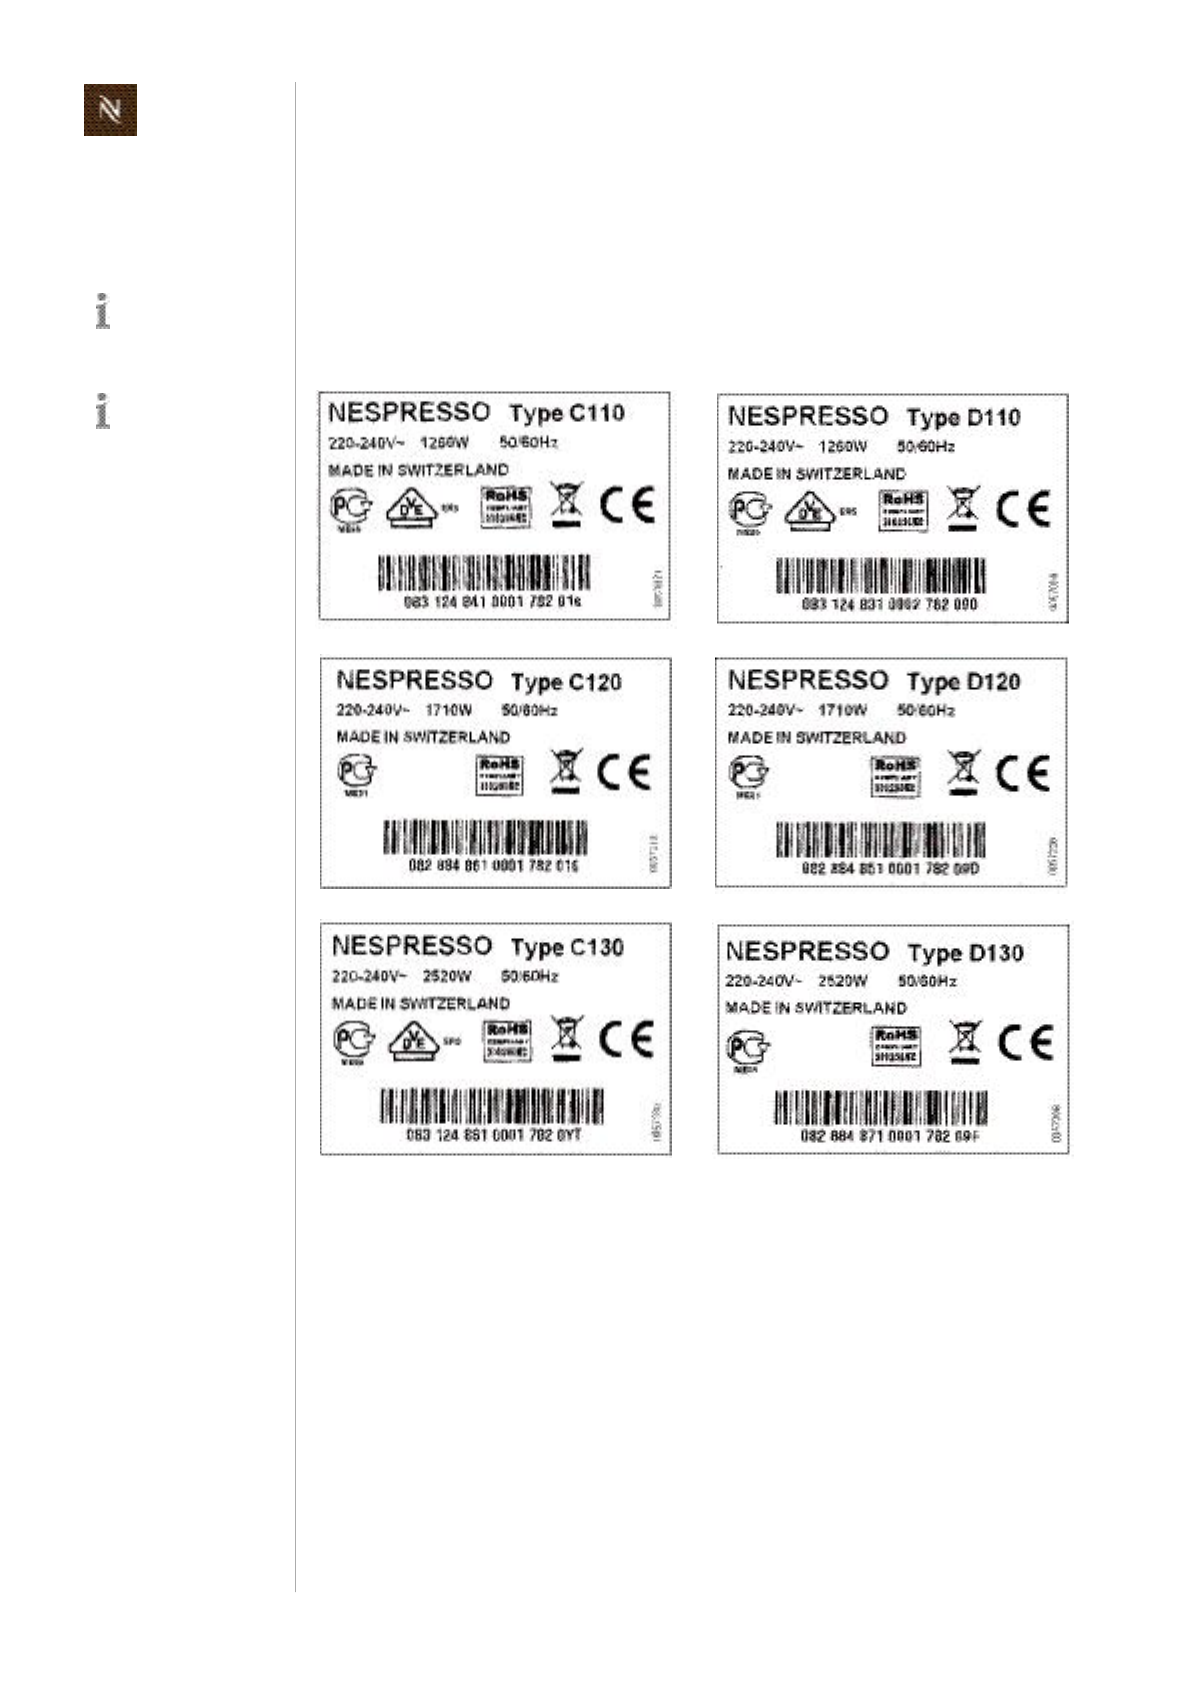
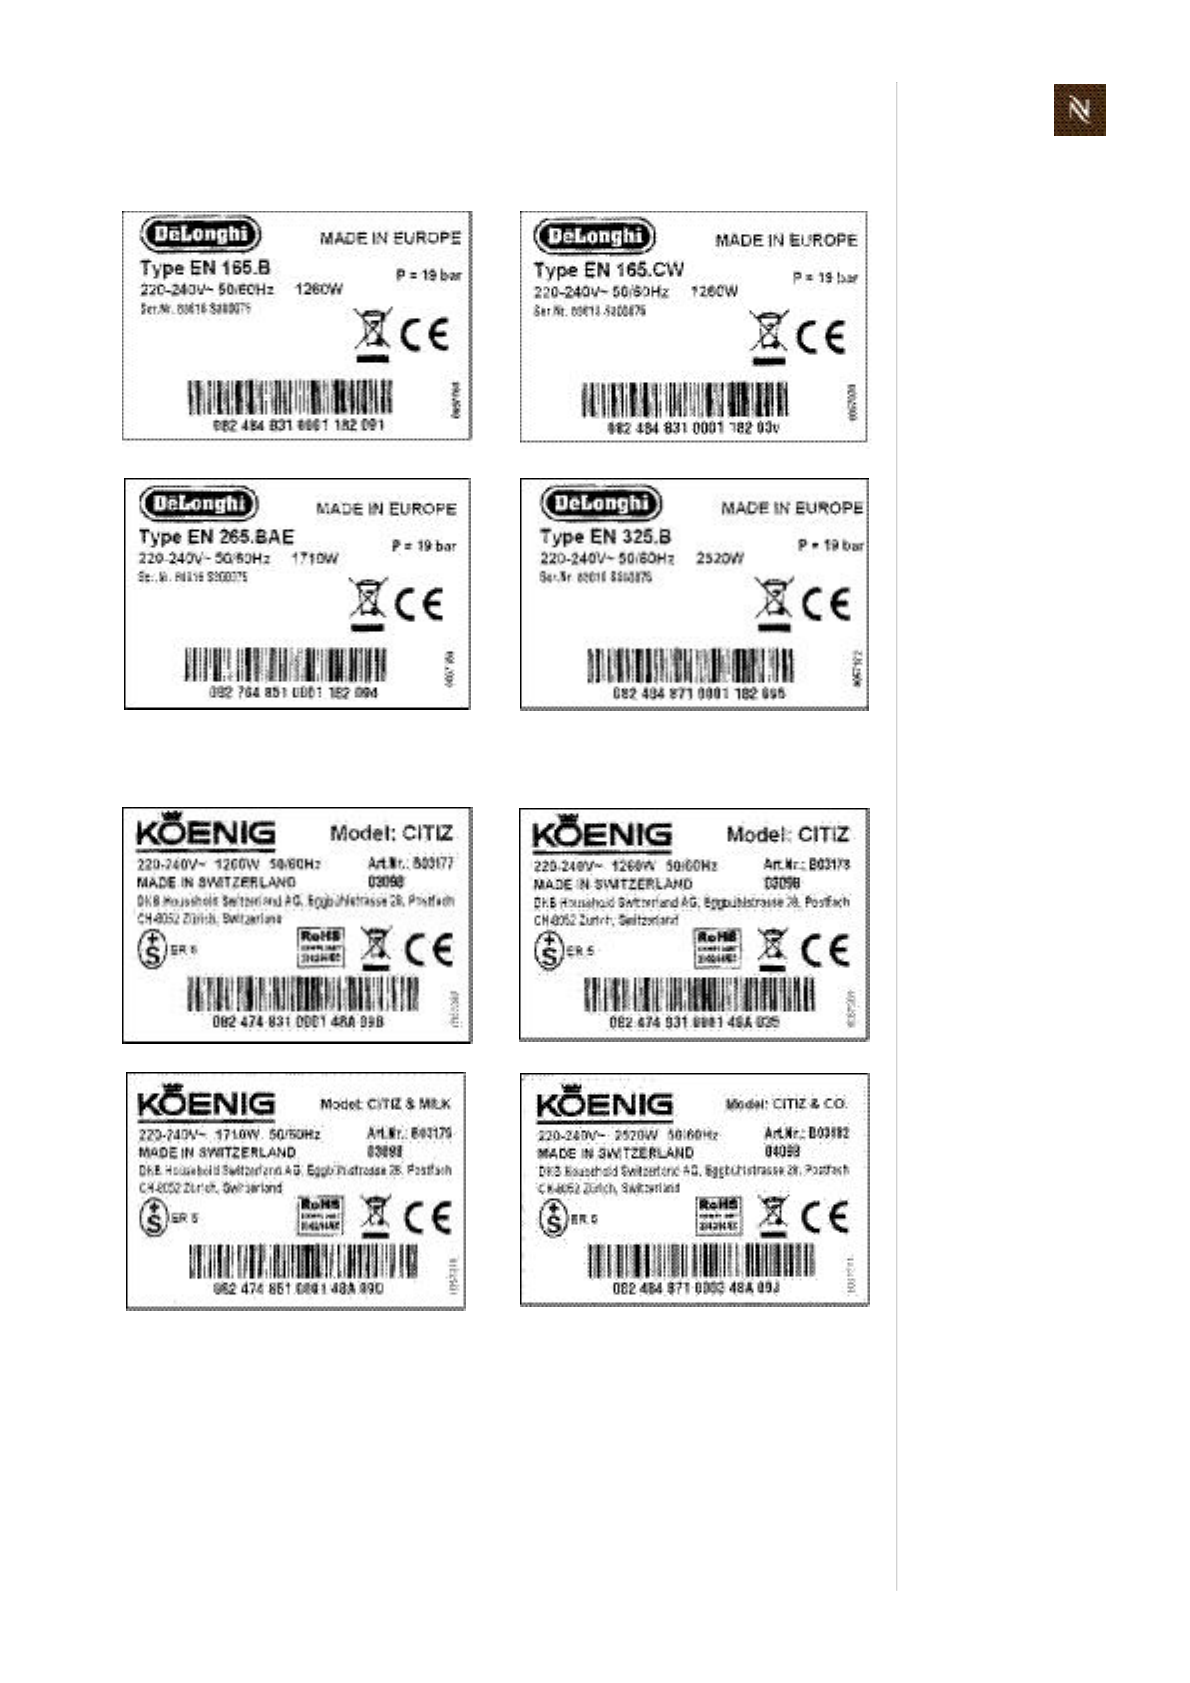
4.1.1 Examplesofbrandspecificratingplates
Nespresso,EUversion
Thetypeplatecanbe
foundatthebottomof
thecoffeemachine’s
platform.
Thisoverviewshows
examplesofvarious
brandsandissubject
toalterations.
EF484CitizC110red EF483CitizD110black
EF486Citiz&milkC120red EF485Citiz&milkD120black
EF488Citiz&CoC130red EF487Citiz&CoD130black
Citizservicemanual21
T E C H N I C A L D A T A
DeLonghi,EUversion
Koenig,CHversion
EF483CitizD110Limousineblack/DeLonghiEN165.B EF483CitizD11060'sWhite/DeLonghiEN165.CW
EF485Citiz&milkD120Limousineblack/DeLonghi
EN265.BAE
EF487Citiz&Co.D130Limousineblack/DeLonghi
EN325.B
EF483CitizD110Limousineblack/KoenigCitiz EF483CitizD11060'sWhite/KoenigCitiz
EF485Citiz&milkD120Limousineblack/KoenigCitiz&milk
EF487Citiz&Co.D130Limousineblack/KoenigCitiz&Co.
Citizservicemanual
22
T E C H N I C A L D A T A
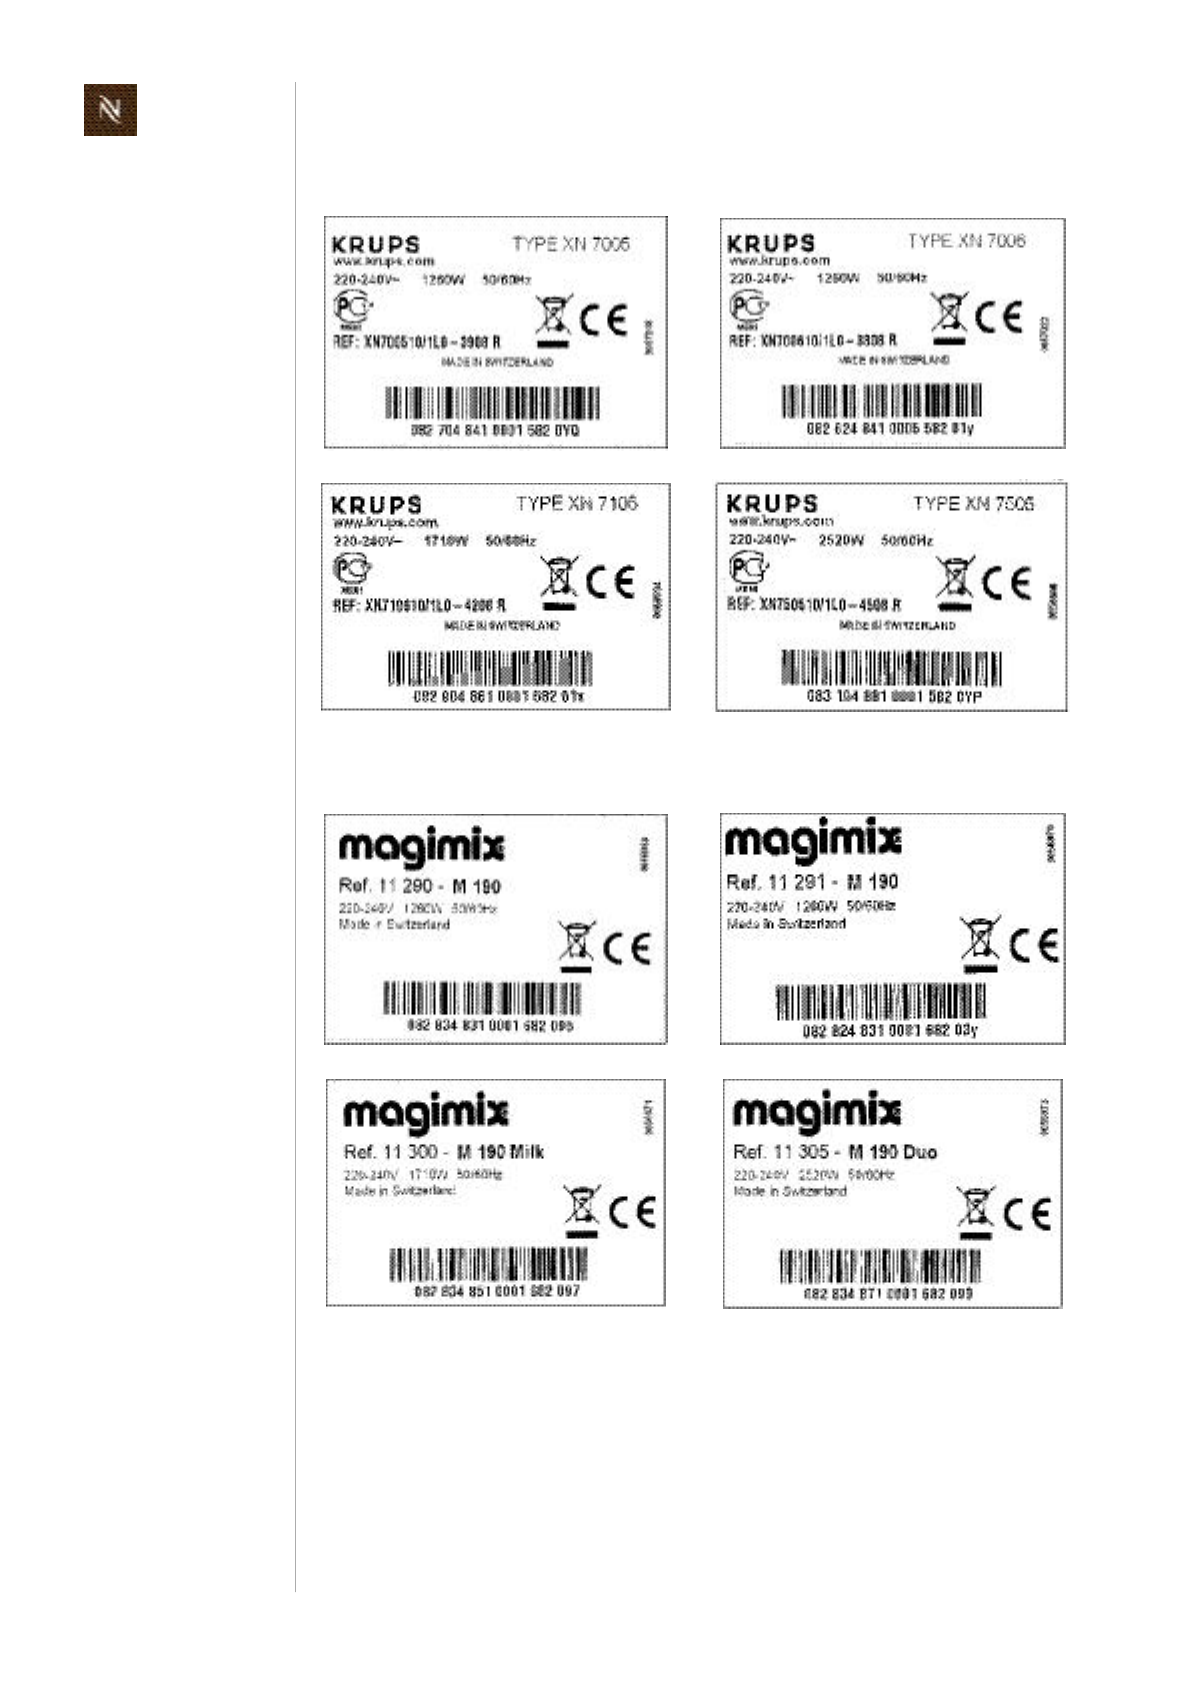
Krups,EUversion
Magimix,EUversion
EF484CitiZXN700510grey EF484CitiZXN700610red
EF486CitiZ&milkXN710610red EF488CitiZ&CoXN750510grey
EF483CitizM190Ref11290black EF483CitizM190Ref11291cream
EF485CitizM190MilkRef11300black EF487CitizM190DuoRef11305black
Citizservicemanual23
T E C H N I C A L D A T A
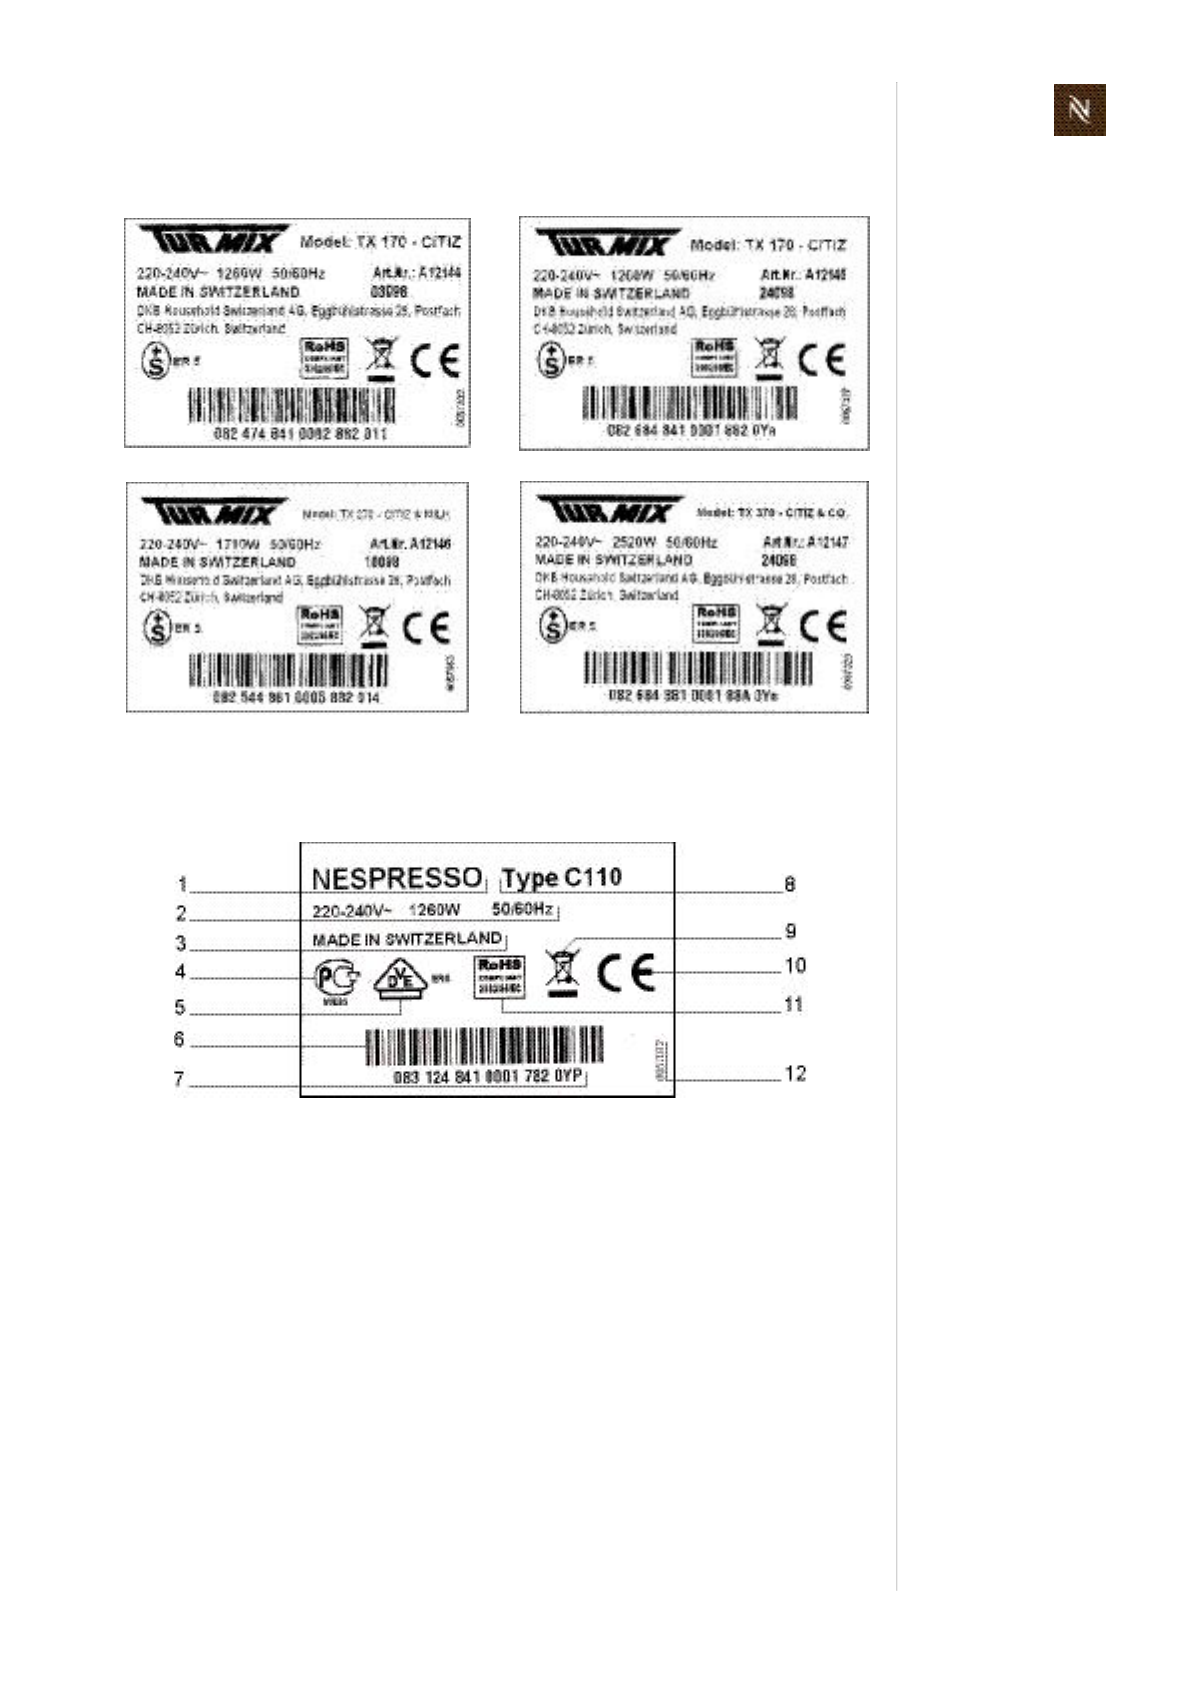
Turmix,ATversion
4.1.2 Ratingplatedetails
EF484CitizC110fireenginered/TurmixTX170Citiz EF484CitizC110steelgrey/TurmixTX170Citiz
EF486Citiz&milkC120fireenginered/
TurmixTX270Citiz&milk
EF488Citiz&Co.C130steelgrey/
TurmixTX370Citiz&Co.
1) Brandname
2) Voltageandpowerrating
3) Placeofmanufacture
4) NationalapprovalsignofRussia
(GOSTR)
5) NationalapprovalsignofGermany
(VDE)
6) Barcode
7) Serialnumber
8) Machinetype
9) Specialdisposalicon
(donotdisposewithordinarywaste)
10)Signofconformity(CE)
11)ConformwithRoHSguidelines(lead
freesolder,etc.)
12)Articlenumberoftheratingplate
Citizservicemanual
24
T E C H N I C A L D A T A
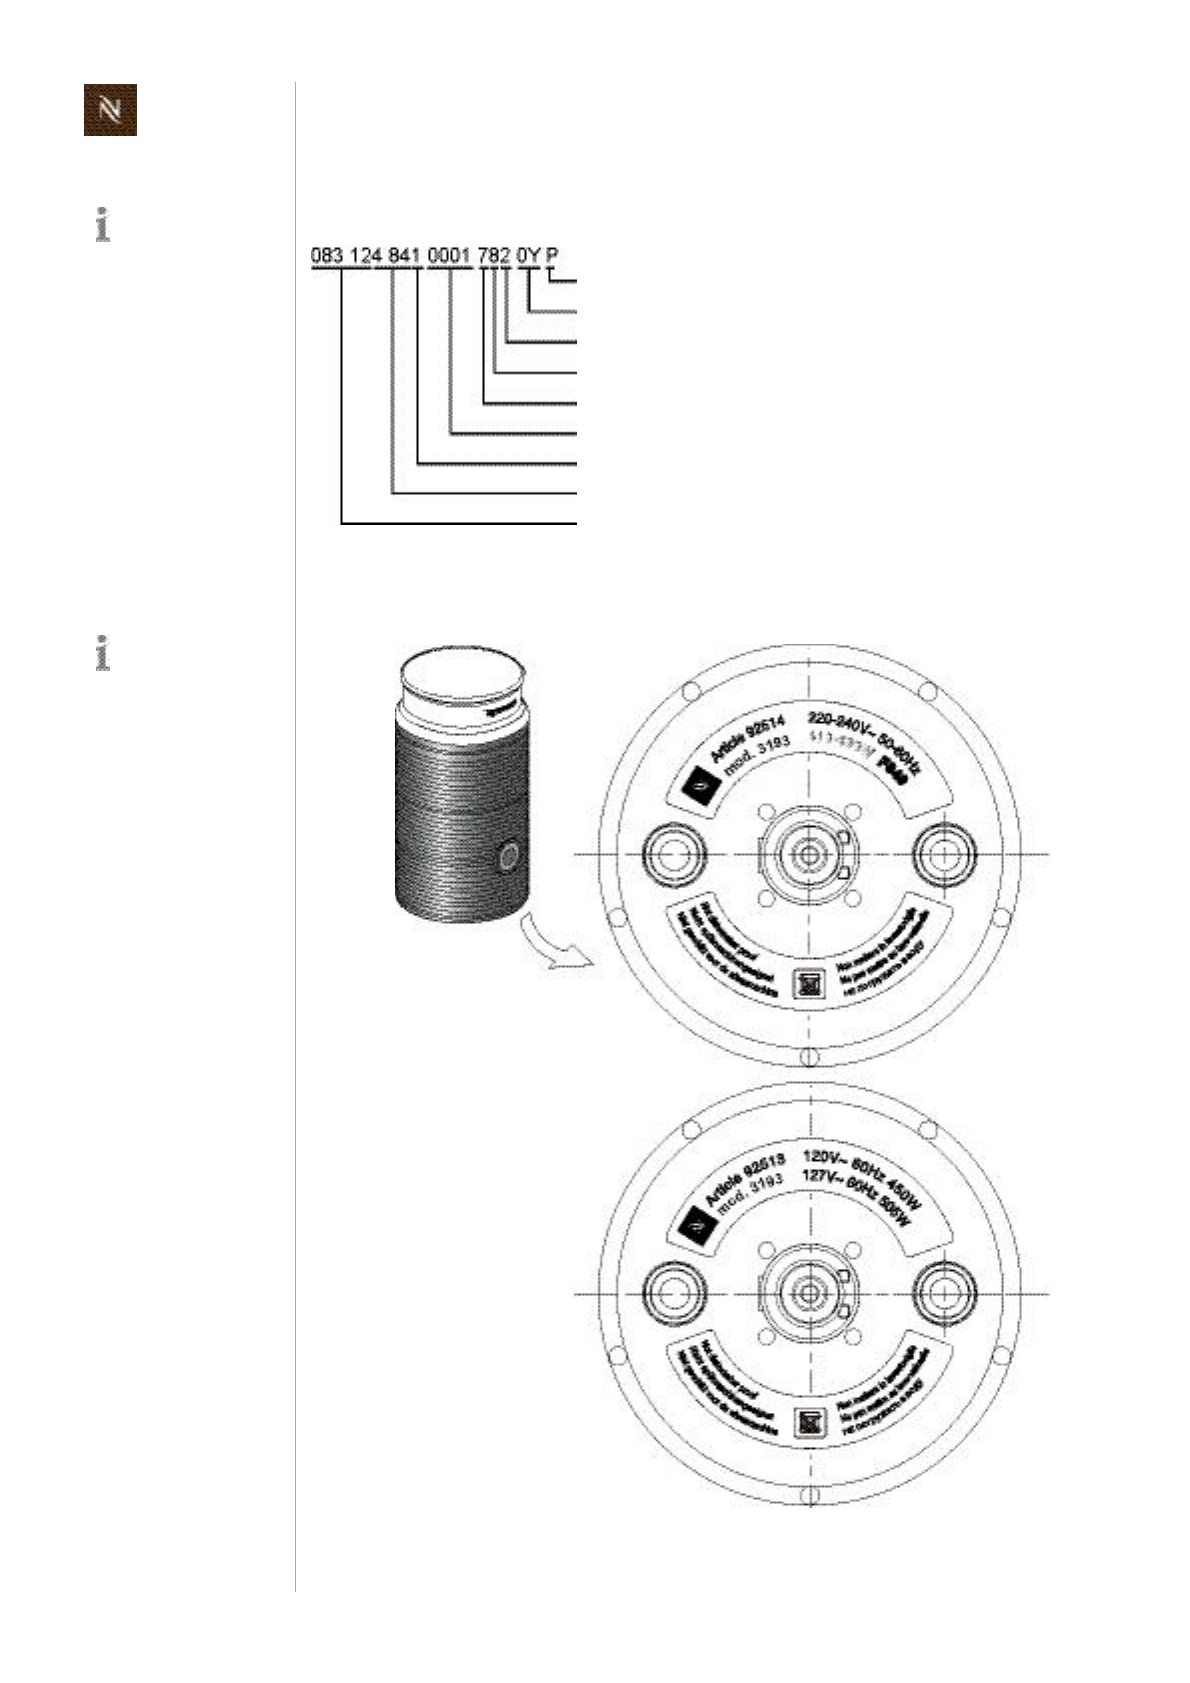
Decodingthealphanumericserialnumber
Example:
4.1.3 Ratingplateofmilkfrother(modelCitiz&milk)
Bydecodingthedate
ofproductionand
machinetype,the
coffeemachinecanbe
identifiedexactly. Checksum(ifavailable)
Colorversion
Typeofmainsplug
Mainsvoltage
Distributingpartner
Incrementalnumberperproductionday
Manufacturingplant
Manufacturerdesignationofthemachinetype(EF484)
08312...Dateofproduction
(08=year2008,312=312dayoftheyear)
Notehemainsvolt
agerangesofthedif
ferentmodels.

Citizservicemanual25
T E C H N I C A L D A T A
4.2 Summaryoftechnicaldata
4.2.1 Technicaldataofcoffeemachines
Mainsvoltageranges
MainsvoltageforCitiz
Europe,RU,AU,CN,KR,SG,HK,ME,ZA,IL,BR,AR........... 220240V/5060Hz
USA,Canada,BR,MX..............................................................120127V/5060Hz
Japan .............................................................................................. 100V/5060Hz*
MainsvoltageforCitiz&milk
Europe,RU,AU,CN,KR,SG,HK,ME,ZA,IL,BR,AR........... 220240V/5060Hz
USA,Canada,BR,MX..............................................................120127V/5060Hz
MainsvoltageforCitiz&Co
Europe,RU,AU,ME,IL............................................................ 220240V/5060Hz
Approvals
ApprovalsforCitiz ........................ CE,UL"forUSAandCanada",PSE,GostR,Ctick,
CCC,KTL,SPRING,SASO,SABS,ISI,IRAM,NOM
ApprovalsforCitiz&milk ............ CE,UL"forUSAandCanada",GostR,Ctick,CCC,
KTL,SPRING,SASO,SABS,ISI,IRAM,NOM
ApprovalsforCitiz&Co .................................................. CE,GostR,Ctick,SASO,ISI
Powerratingsofcoffeemachinemaincomponents
(forallvoltagesandfrequencies)
Thermoblock .....................................................................................................1200W*
*modelCitiz&Co,Australia:1080W
Pump................................................................................................................. 55/60W
Performancedataofcoreunit
Heatingup
Citiz ...................................................................................................... approx.7.6Wh
Citiz&milk ........................................................................................... approx.7.6Wh
Citiz&Co........................................................................................... approx.14.9Wh
1smallcup(40ml*)
Citiz ...................................................................................................... approx.4.3Wh
Citiz&milk ........................................................................................... approx.4.3Wh
Citiz&Co(bothheads)........................................................................ approx.7.6Wh
*Defaultsetting
Technicaldataare
validforallCitizmod
elsunlessexplicitly
statedotherwise.

Citizservicemanual
26
T E C H N I C A L D A T A
1largecup(110ml*)
Citiz ...................................................................................................... approx.8.7Wh
Citiz&milk ........................................................................................... approx.8.7Wh
Citiz&Co(bothheads) ...................................................................... approx.14.8Wh
*Defaultsetting
Standbyoperation(in1hour)
Citiz ...................................................................................................... approx.0.7Wh
Citiz&milk ........................................................................................... approx.0.7Wh
Citiz&Co ............................................................................................. approx.2.2Wh
Pump
Pumppressure
Max.permissible .............................................................................. 17.5bar±1.5bar
Duringcoffeepreparation(dependingonthetypeofcoffee).......................... 916bar
Flowperformance..................................................................120240ml/min.at12bar
Capacities
Watertank
Citiz ........................................................................................................................1.0l
Citiz&milk .............................................................................................................1.0l
Citiz&Co ...............................................................................................................1.4l
Driptray
Citiz ....................................................................................................................100ml
Citiz&milk .........................................................................................................180ml
Citiz&Co ...........................................................................................................250ml
Capsulecontainer
Citiz,Citiz&milk .................................................................................... 911capsules
Citiz&Co ........................................................................................2x(912)capsules
Temperatures
Operatingtemperature ................................................................... +5°Cupto+45°C
Storagetemperature..................................................................... 25°Cupto+60°C
Safetytemperature(thermalcutoff)................................................................... 167°C
Coffeetemperatureatoutlet....................................................................... 86°C±3°C
Variousdata
Noiseduringbrewingcycle....................................................................max.60dB(A)*
*modelCitiz&milk:measuredwithoutmilkfrother
*modelCitiz&Co:measuredwithonlyonecoreunitrunning
Preheatingtime .......................................................................................approx.60sec
Cablelength .............................................................................................. approx.1.2m
Advisedwatertank
capacitiestoavoid
spilling.
Citizservicemanual27
T E C H N I C A L D A T A
4.2.2 Technicaldataofmilkfrother(modelCitiz&milk)
Mainsvoltage
Europe........................................................................................ 220240V/5060Hz
USA/Canada ................................................................................120127V/5060Hz
Themilkfrother
isavailablein2differentmodels,dependingonabovemainsvoltageranges,
hastomatchthemainsvoltagerangeoftheassociatedcoffeemachine.
Powerrating(dependingonmainsvoltage)
220240V,5060Hz ..................................................................................... 410490W
110127V,5060Hz ..................................................................................... 380505W
Standbyoperation ............................................................................................... <1W
Powerconsumption
Capacity
Hotmilk ...................................................................................................... max.240ml
Hot/coldmilkformilkfroth........................................................................... max.130ml
Ifreplacingadefect
milkfrother,check
mainsvoltagerange.
Preparation Voltage 120V 127V 220V 230V 240V
Unit
Frothmilk:hot
(startingwithcolddevice)
Measuredpower W 452 506 407 445 485
Intensity A 3.77 3.98 1.85 1.93 2.02
Consumptionfor
2testpreparations Wh 19 19 19 19 19
Frothmilk:cold
(startingwithcolddevice)
Measuredpower W 1.98 2.24 2.72 2.80 3.01
Intensityofcurrent
(cos.=0.58) A 40.93 44 30.82 27.51 25.97
Consumptionfor
2testpreparations Wh 0.08 0.09 0.11 0.12 0.13
Hotmilk
(startingwithcolddevice)
Measuredpower W 452 506 407 445 485
Intensityofcurrent A 3.77 3.98 1.85 1.93 2.02
Consumptionfor
2testpreparations Wh 37 37 37 37 37
Citizservicemanual
28
T E C H N I C A L D A T A
Performancedata
Whiskspeed......................................................................................... 2’0002’700rpm
Preparationtimes
(withfull,semiskimmedorskimmedmilkat8°10°Cfridgetemperature)
Hotmilkfroth(120ml) .....................................................................................5080sec
Coldmilkfroth(120ml) ...................................................................................6080sec
Hotmilk(240ml) .........................................................................................120180sec
Temperature
Hotmilk ............................................................................................. +60°Cto+70°C
Foammilk.......................................................................................... +60°Cto+70°C
Variousdata
Noiseemission ........................................................................................ max.55dB(A)
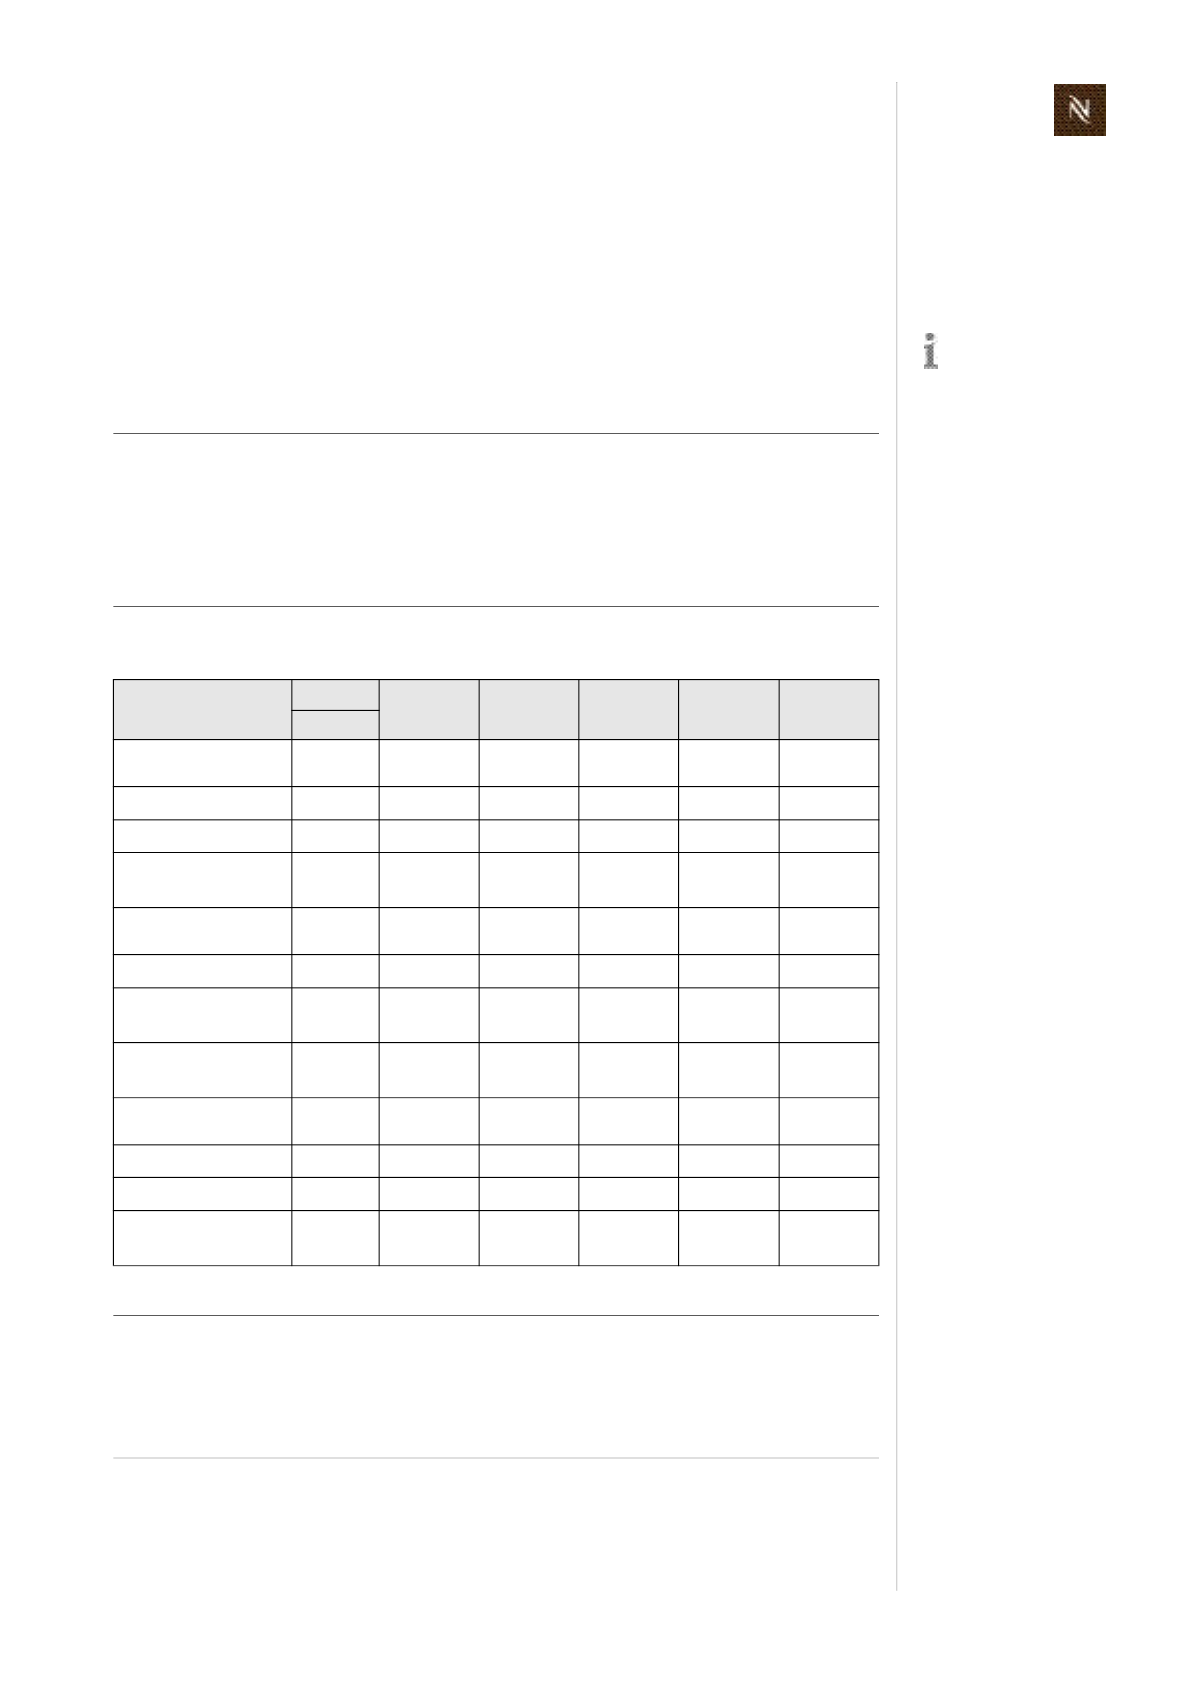
4.2.3 DimensionsandweightmodelCitiz
Dimensions(widthxheightxlength).............................................130x277x372mm
Cupsupportdown .............................. 8590mm,forespressoandlungocups/glasses
Cupsupportup .......................................................150155mm,formacchiatoglasses
Weight(withoutwater)..............................................................................approx.3.4kg
Theoveralldimen
sionsarethesame
forbothcoreunitver
sions(CandDrange).
Dimensionsinmm
Citizservicemanual29
T E C H N I C A L D A T A
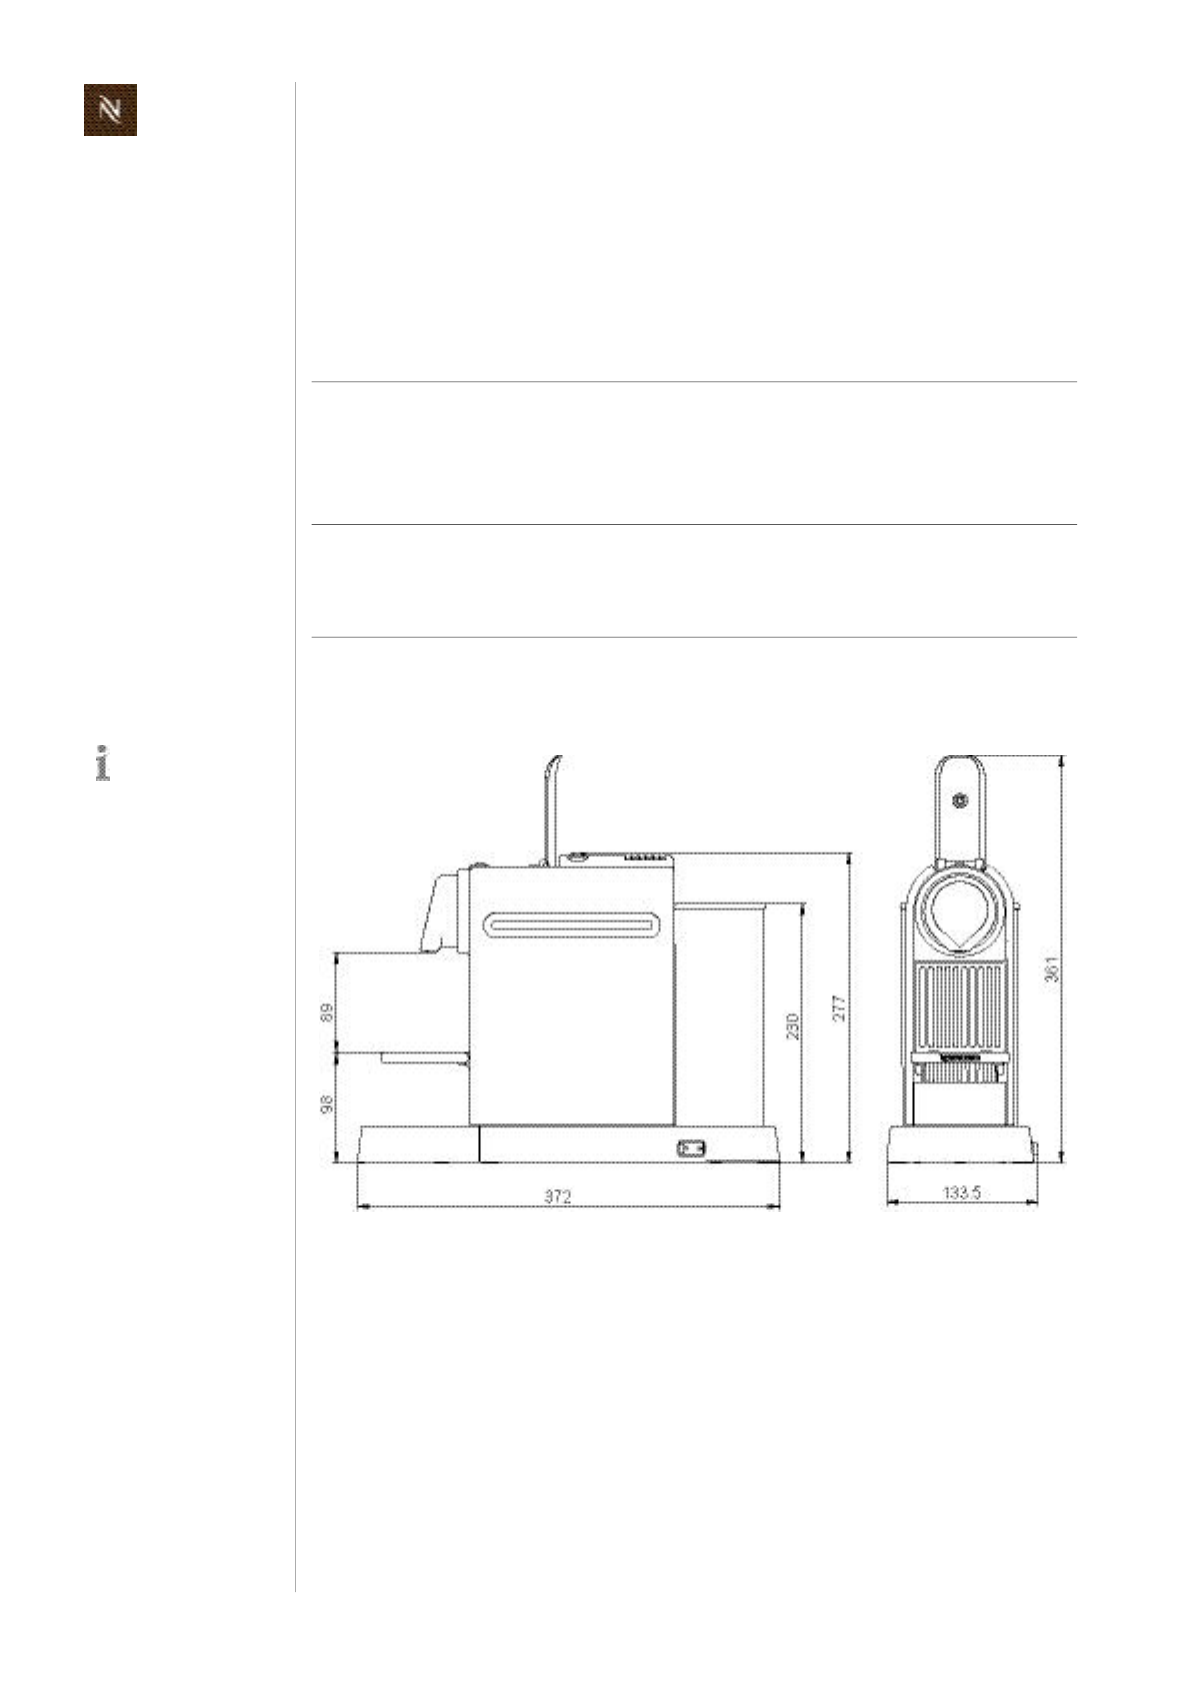
4.2.4 DimensionsandweightmodelCitiz&milk
Dimensions(widthxheightxlength) ............................................ 237x277x372mm
Weight(withoutwater,milkfrotherincluded) ...........................................approx.4.6kg
4.2.5 Dimensionsandweightmilkfrother
Dimensionsofjugcpl.(diameterxheight) ................................................91x170mm
Whiskforfoam(diameterxheight) ..............................................................33x32mm
Mixerforhotmilk.................................................................................. 15x34x32mm
Weight(withwhiskandmixer) ..............................................................................0.7kg
Theoveralldimen
sionsarethesame
forbothcoreunitver
sions(CandDrange).
Dimensionsinmm
Citizservicemanual
30
T E C H N I C A L D A T A
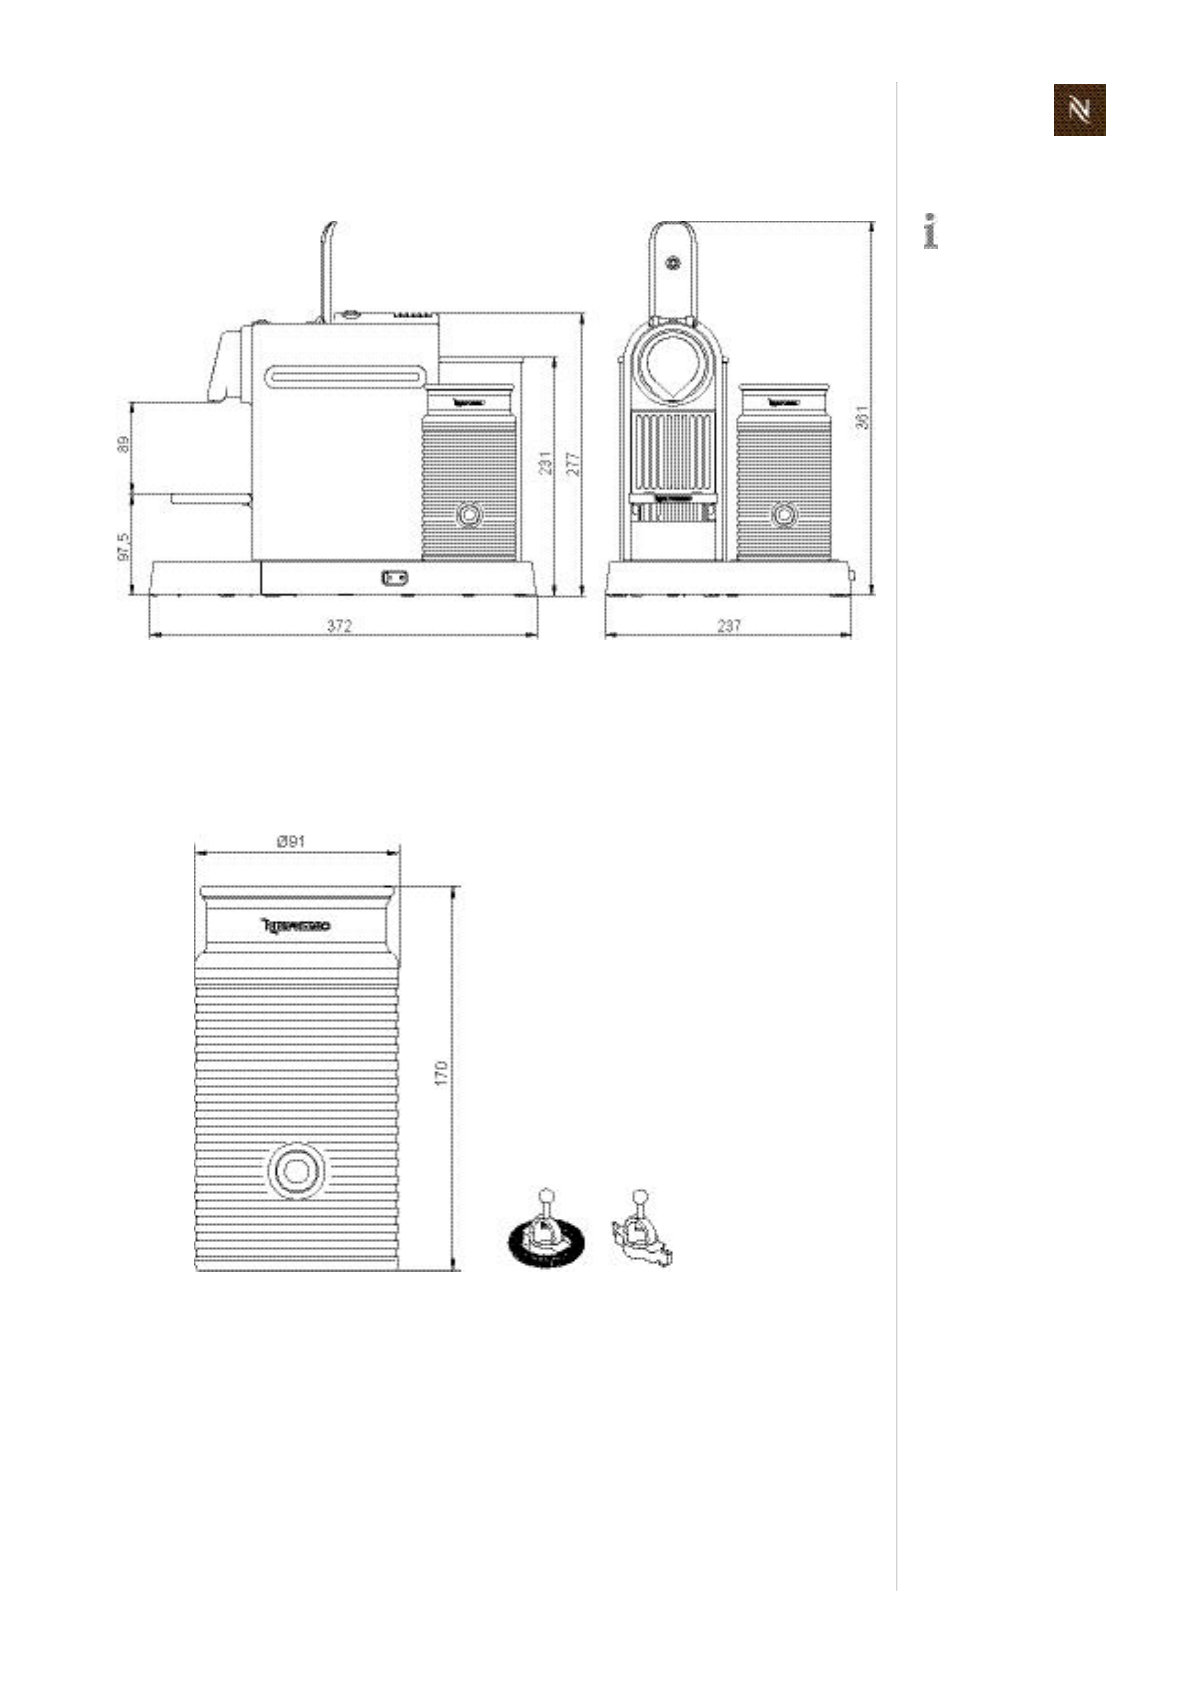
4.2.6 DimensionsandweightmodelCitiz&Co
Dimensions(widthxheightxlength).............................................326x281x286mm
Weight(withoutwater).................................................................................approx.7kg
Theoveralldimen
sionsarethesame
forbothcoreunitver
sions(CandDrange).
Dimensionsinmm.
Citizservicemanual31
O P E R A T I O N
5 O P E R A T I O N
5.1 Generalinformation
Foranoverviewofoperationalcontrolssee“MainComponents”onpage 9.
Forbasicoperationofthemachinesuchaspreparingacoffeeandotherrelatedinfor
mation,refertotheusermanual.
Tosimplifymatters,themodelCitizwithcoreunitCrangeisusedtoexemplifythroughout
thischapter.
5.2 Statusindication
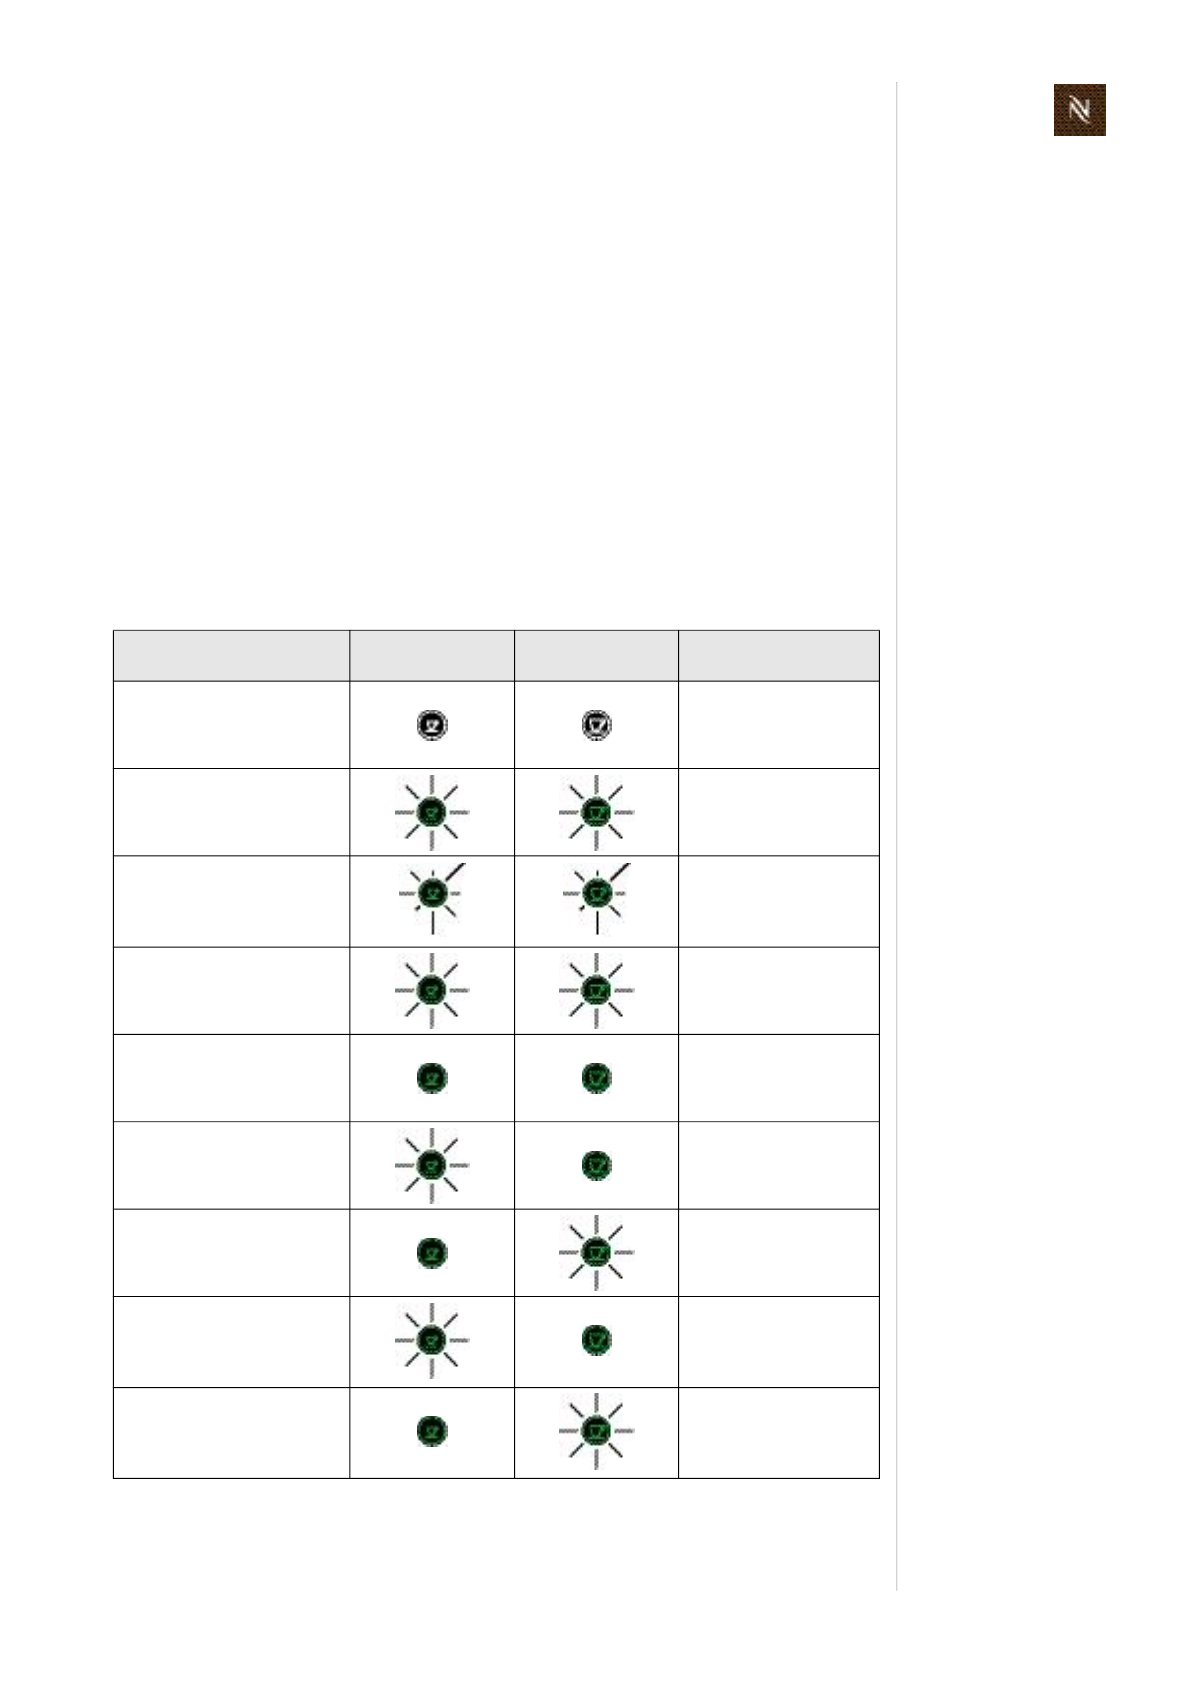
5.2.1 Statusindicationofcoffeemachine
ThetwocoffeebuttonswithgreenLEDbacklightshowthestatusofthecoffeemachine
accordingtothefollowingtable:
Machinestatusetc. " Smallcup"
button
" Largecup"
button LEDsignal
Off BothLED‘soff
Selftest Blinking1Hz,
0.5son,0.5soff
Error
Blinkingfast(2Hz,
0.25 son/0.25soff)
3timesevery2sec
onds
Heatup Blinking1Hz,
0.5son,0.5soff
Ready BothLED‘son
Brewingsmallcup Blinking1Hz,
0.5son,0.5soff
Brewingbigcup Blinking1Hz,
0.5son,0.5soff
Rinsesmallcup
Blinking1Hz,
0.5son,0.5soff
(sameasbrewingsmall
cup)
Rinsebigcup
Blinking1Hz,
0.5son,0.5soff
(sameasbrewingbig
cup)

Citizservicemanual
32
O P E R A T I O N
Volumebrewingsmallcup
Blinking1Hz,
0.5son,0.5soff
(sameasbrewingsmall
cup)
Volumebrewingbigcup
Blinking1Hz,
0.5son,0.5soff
(sameasbrewingbig
cup)
Descalingready Blinking2Hz,
0.25son,0.25soff
Descalingpumpon(descal)
Blinking2Hz,
0.25son,0.25soff
(sameasdescaling
readymode)
Descalingpumpoff(descal)
Blinking2Hz,
0.25son,0.25soff
(sameasdescaling
readymode)
Emptying/Evaporating Blinking2Hz,
0.25son,0.25soff
Standby
Blinking0.5Hz,
1son,1soff
alternately
Resetting
Blinking2Hz,
0.25son,0.25soff
indicationfor3s
Powersave
Blinking0.2Hz,
2.5son,2.5soff
alternately
Overheat
Blinking1Hz,
0.5son,0.5soff
(sameasheatup)
Powersaveactivation
Blinking0.5Hz,
1son,1soff
alternately5times
Machinestatusetc. " Smallcup"
button
" Largecup"
button LEDsignal
Citizservicemanual33
O P E R A T I O N
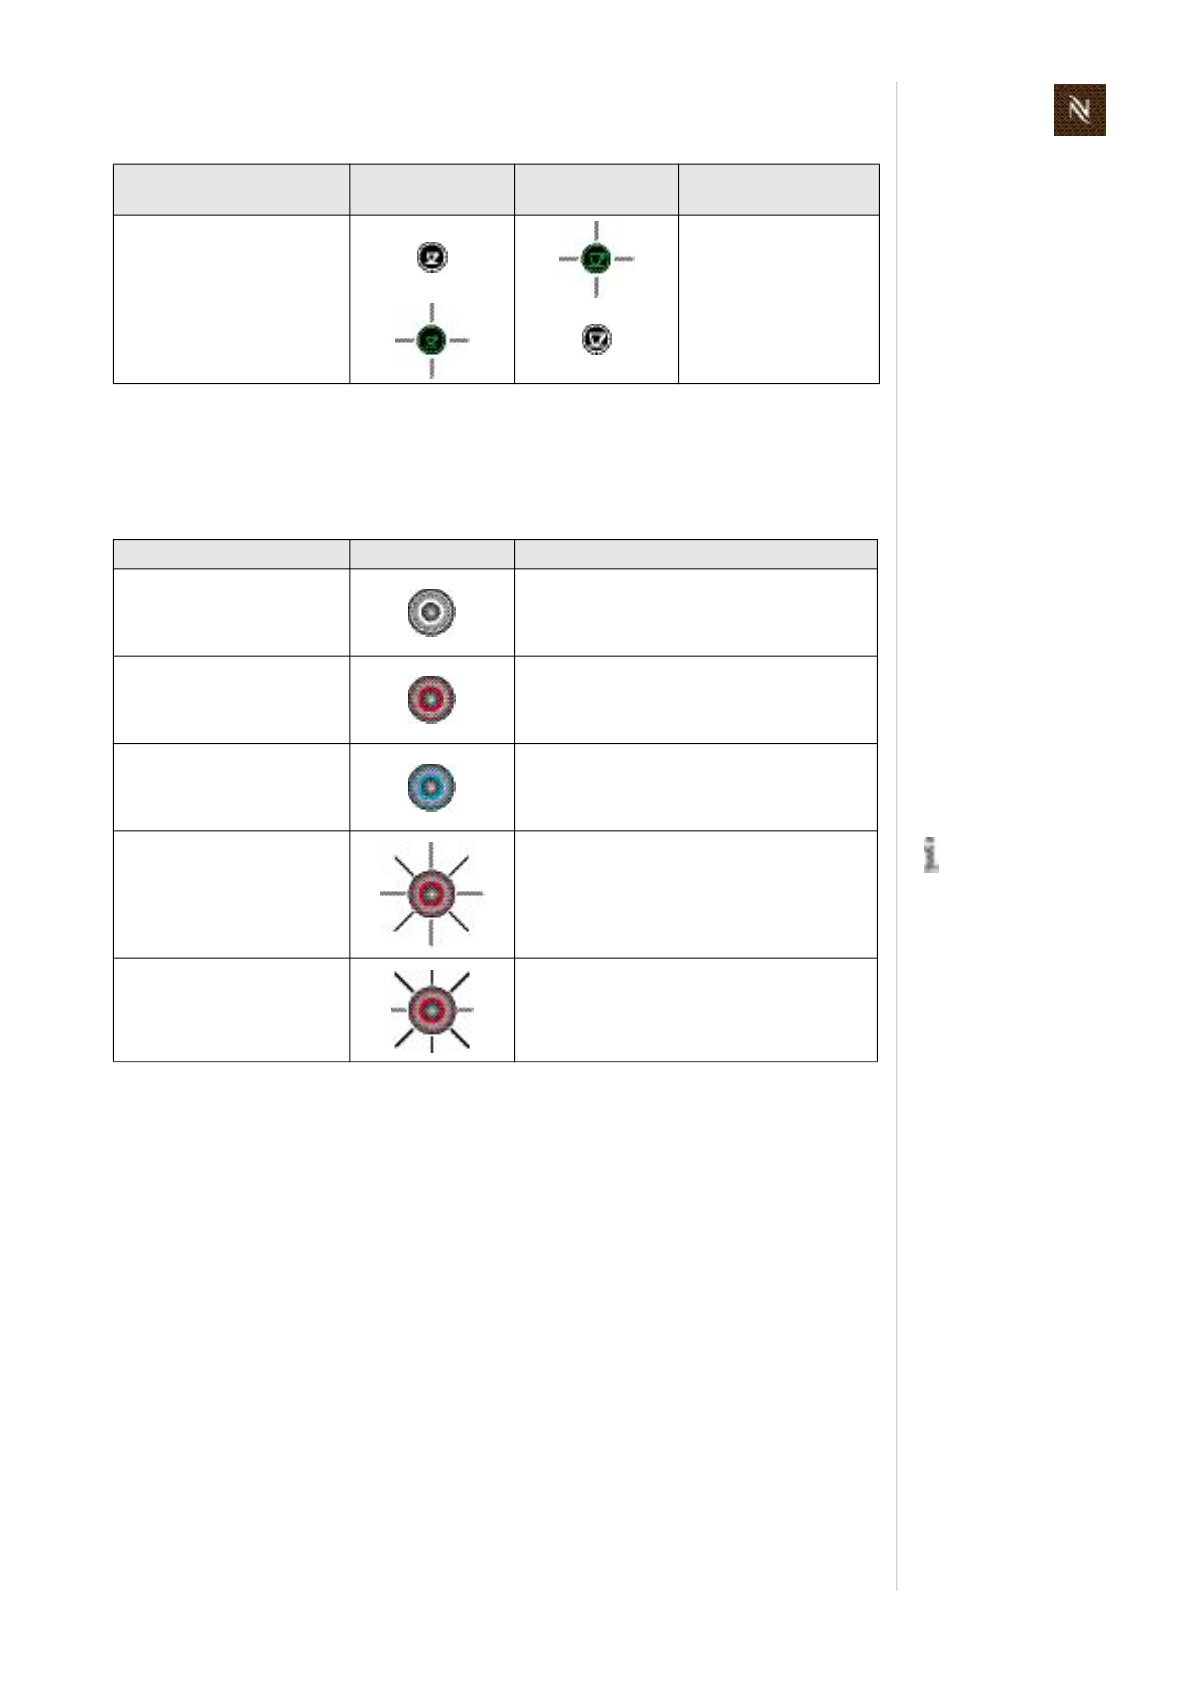
5.2.2 StatusindicationofmilkfrotherAERO3
Theoperatingbuttonwithred/bluebacklightshowsthestatusofthemilkfrother
accordingtothefollowingtable:
Powersavedeactivation
(onlyformodelCitiz&Co)
Blinking0.5Hz,
1son,1soff
alternately3times
Machinestatusetc. " Smallcup"
button
" Largecup"
button LEDsignal
Toresetaredblink
ingbacklight:
1.Removemilkfrotherfrom
platform.
2.Removecauseoffailureif
possible.
Machinestatusetc. Operatingbutton Lightsignal
Off Backlightoff
Onhotmilkpreparation Redbacklighton
Oncoldmilkfrothprepara
tion Bluebacklighton
Failure/malfunction
(e.g.overheatingbecauseof
burntmilk,toolessorno
milk)
Blinkingredbacklight
(1Hz,0.5son,0.5soff)
Failure:milkfrotherhas
wrongmainsvoltagerange
Fastblinkingredbacklight
(2Hz,0.25son,0.25soff

Citizservicemanual
34
O P E R A T I O N
5.3 Machinemodes
5.3.1 MachinemodesofCitizcoffeemachines
ThistablehelpstounderstandtheoperatingmodesofaCitizcoffeemachine:
Machinemode Entermode Actions Exitmode
1Heatupmode Everytimeafterswitch
ingonmachine
Heatsupthermoblock
toreadytemperature
90°Cwithin60swith
outovershootingtarget
temperature
e.g.switchingoff
machine
2Selftestmode Everytimeafterswitch
ingonmachine
Tests:
• NTCshortcircuit
• NTCconnected
• Thermoblockheating
curve
Errorhandling:
Trackingofthelast5
errorsbyaringbuffer
e.g.switchingoff
machine
3Readymode
• Afterheatupandself
testmodewasok
• Afterbrewingor
volumebrewing
coffee
• Afterresetmode
• Afterleaving
descalingmode
Keepsthermoblock
temperatureat90°C
e.g.switchingoff
machine
4aBrewingmode
4bVolumebrewing
mode(program
mingcupsize)
• Pressandrelease
largeorsmallcoffee
button(brewing
mode)
• Pressandholdlarge
orsmallcoffee
buttonformorethan
3s(programming
mode)
• Pressandrelease
largeorsmallcoffee
buttonwhen
machinewasin
brewingmodeor
automaticexitgiven
bytheflowmeter
• Releaselargeor
smallcoffeebutton
whenmachinewas
inprogramming
mode
• Switchingoff
machine
5Descalingmode
• Switchonmachine,
waituntilready
• Pressandholdboth
coffeebuttonsforat
least3s
• Regulatetempera
tureto65°C(after
pumpwasstarted)
• Stopandstartpump
withanycoffee
button,novolume
brewingindescaling
mode
• Pressandholdboth
coffeebuttonsforat
least0.5s
Note:
Whenmachineis
switchedoffduringany
descalingmode,thenit
goestodescaling
modereadystateafter
nextswitchon.

Citizservicemanual35
O P E R A T I O N
5.3.2 MachinemodesofmilkfrotherAERO3
6Emptyingmode
(evaporing)
1) Switchoffmachine
2) Pressandhold
smallcoffeebutton
3) Switchonmachine
1) Startpump
2) Stoppumpafter
10 s
3) Heatupthermo
blockto105 °C
(100%power)
4) Switchoffther
moblock
5) Gotostandby
mode
Switchoffmachine
7Resettingmode
1) Switchoffmachine
2) Pressandhold
largecoffeebutton
3) Switchonmachine
• Resetthe
programmedlarge
andsmallcoffee
volumestofactory
setting
• Indicatetheresetting
modefor3s
Factorysettings:
• smallcup....40ml
• largecup...110ml
proceedswithselftest
modeautomatically
8Powersavemode
Toenablepowersave
mode:
1) Switchoffmachine
2) Pressandhold
bothcoffeebuttons
3) Switchonmachine
4) Coffeebutton
LED‘sblink5times
alternativelyas
confirmation
Afterthatautomatically
after30 minofnonuse
• Reducethermoblock
temperature
• SwitchLEDindica
tiontopowersave
mode(blinkingalter
natelyevery2sec)
Pressanycoffeebut
tontoactivateready
mode
Todisablepowersave
mode:
1) Switchoffmachine
2) Pressandhold
bothcoffeebuttons
3) Switchonmachine
4) Coffeebutton
LED‘sblink3times
alternativelyas
confirmation
9Failuremode
Automaticallybyfol
lowingfailures:
a)NTCshortcircuit
b)NTCnotconnected
c)Heatuptooslow
Machineindicatesfail
urewithcoffeebutton
LED‘saslongasthe
failureispresent
Whenfailureisfixed
10Standbymode Automaticallyafter
emptyingmode
• Switchthermoblock
off
• SwitchLEDindica
tiontostandbymode
Switchoffthemachine
Machinemode Entermode Actions Exitmode
1Hotmilk/milkfroth
preparation
Pressstartbutton
briefly
Startbuttonlightsup
red.Milkisheatedand
mixed.
Automaticswitchoff
afterpreparation
2Coldmilkfrothprepa
ration
Keepstartbutton
pressedforapprox.
2 sec
Startbuttonlightsup
blue.Milkismixedonly.
Automaticswitchoff
afterpreparation
Machinemode Entermode Actions Exitmode
Citizservicemanual
36
O P E R A T I O N
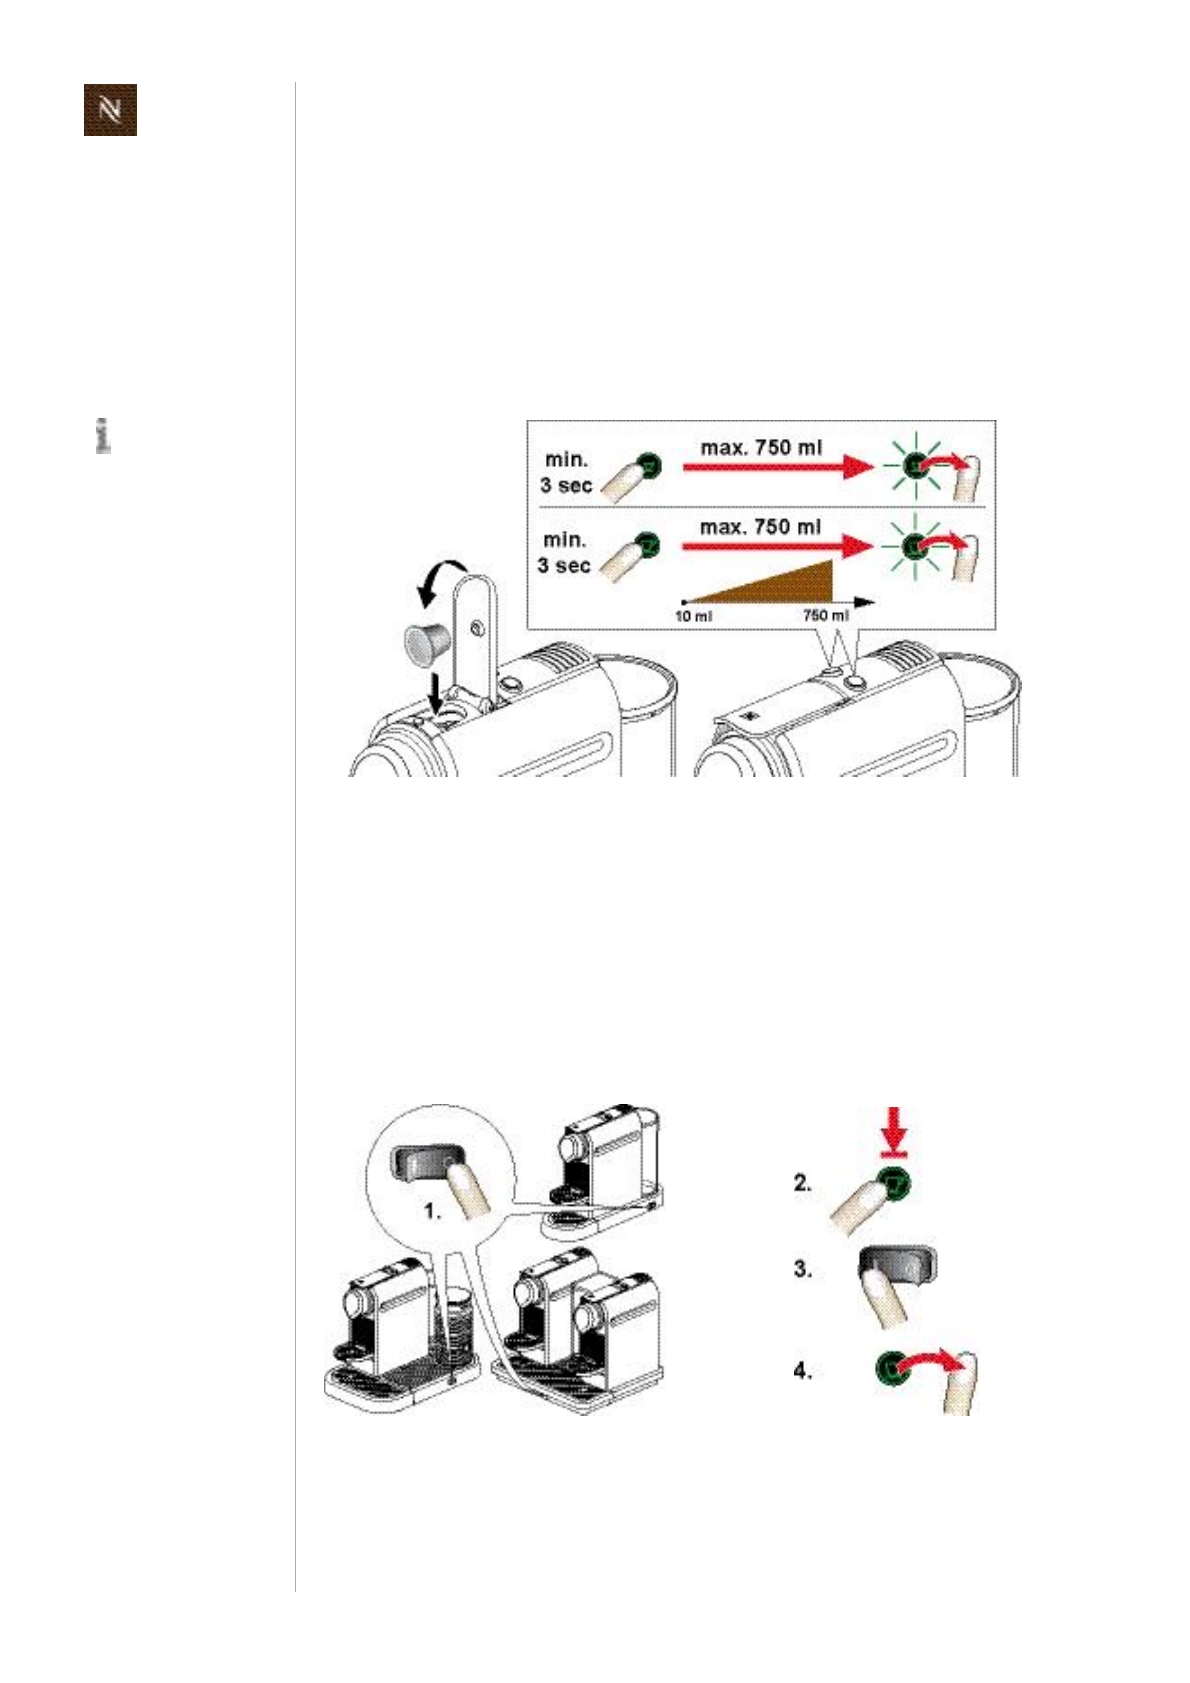
5.4 Program/resetfilluplevel
Eachcoffeebuttoncanbeprogrammedwithacoffeevolumeforanindividualcupsize.
Theprocedureforprogramming/resettingisthesameforbothcoffeebuttons.
5.4.1 Programmingthefilluplevel
Programmablevolumerange ..........................................................................10750ml
5.4.2 Resettingthefilluplevel
Withthefollowingprocedureallprogrammedfilluplevelswillbesetbacktothisfactory
settings:
Coffeebutton"smallcup" ....................................................................................... 40ml
Coffeebutton"largecup"..................................................................................... 110ml
Eachnewprogram
mingcyclestartswith
themin.volume
(10 mlafter3sec),regard
lessofapreprogrammed
coffeevolume.
1) Preparecoffeeasusual(seeuser
manual),butkeepthecoffeebutton
pressedforatleast3secondsin
ordertostartprogrammingmode.
2) Onlyreleasethebuttonwhenthe
desiredfilllevelisreached.
1) Switchoffthecoffeemachine. 2) Pressandholdthe"largecup"button.
3) Switchonthecoffeemachine.
4) Release"largecup"button.
Citizservicemanual37
O P E R A T I O N
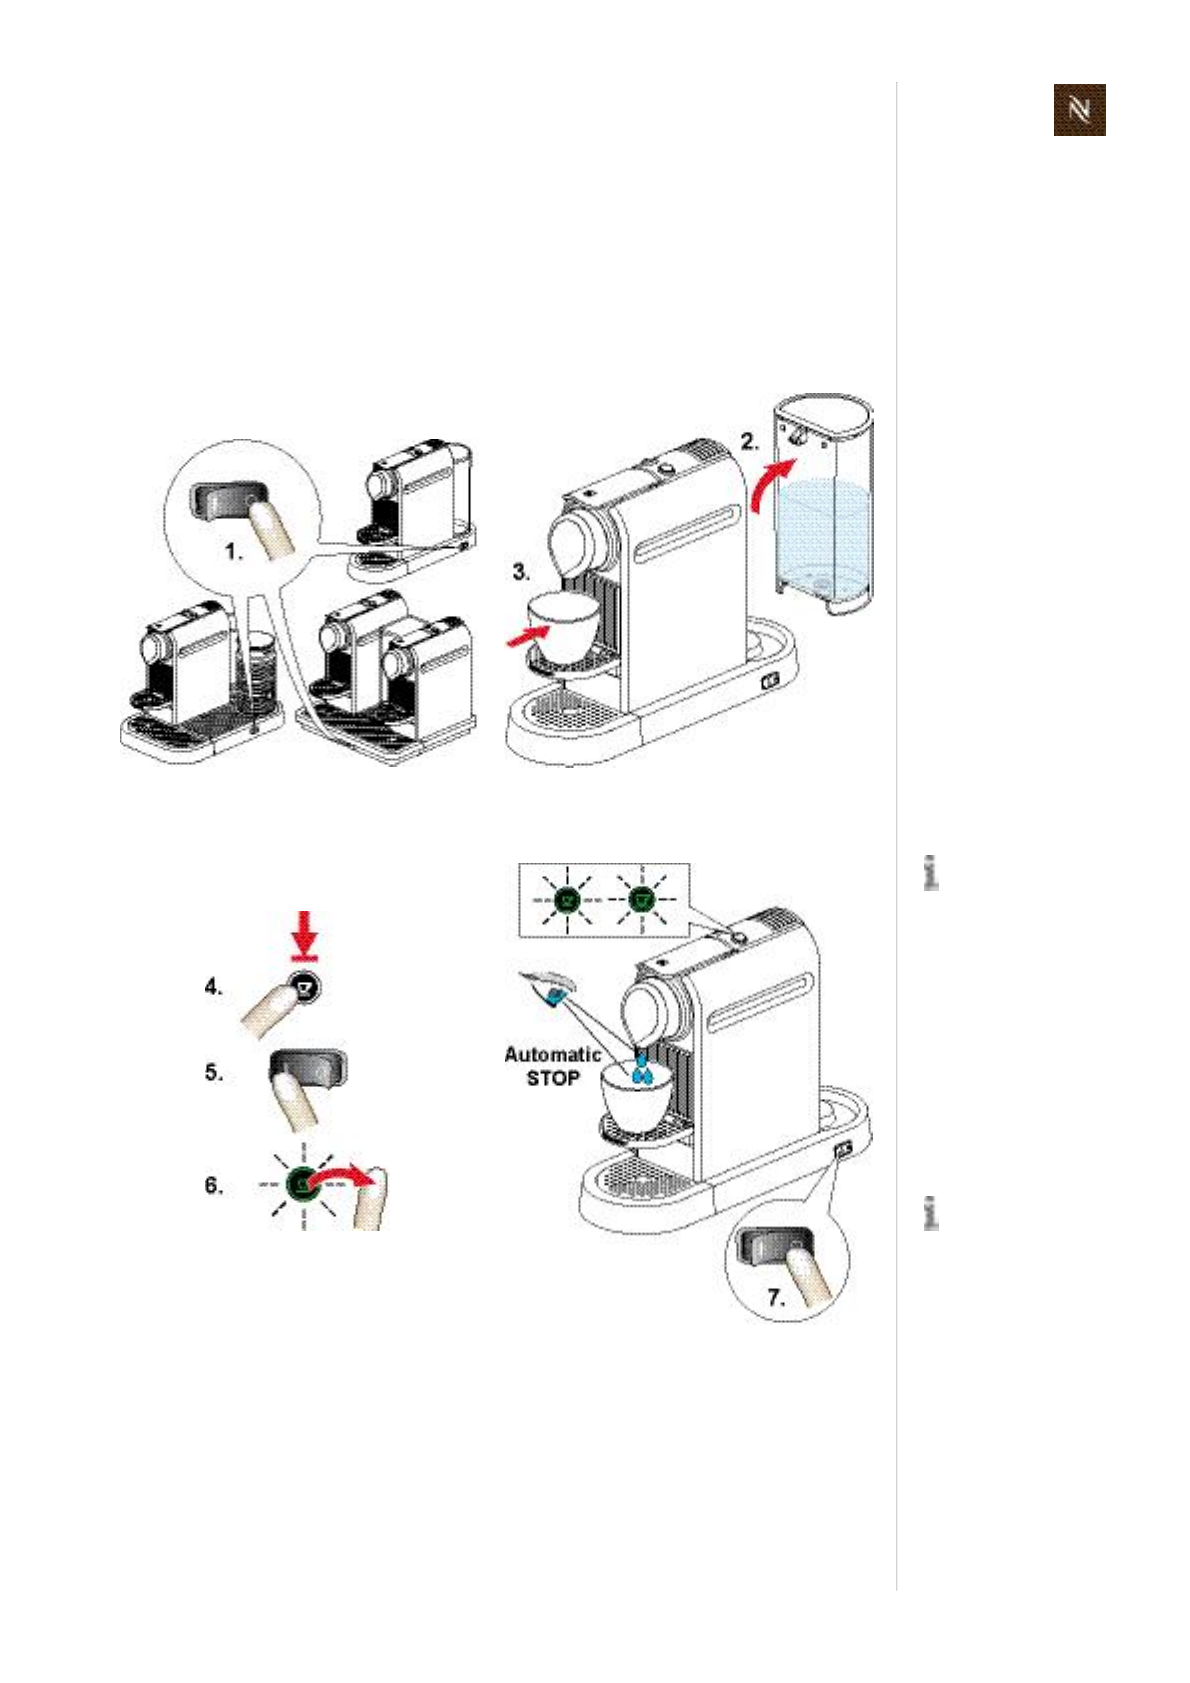
5.5 Emptywatersystem
Aftereveryoperation,somewaterremainsinthecoffeemachine.Thereforethewater
systemmustbeemptied
ifthecoffeemachinewillnotbeusedforalongtime
asantifreezemeasure
forrepairsandshipment.
1) Switchoffcoffeemachine. 2) Removewatertank.
3) Placeabeakerunderthecoffeeout
let.
ModelCitiz&Co:
Onlyonecoreunit
shouldbeemptiedat
thesametime(dangerof
mainssupplyoverload).
Afterthisprocedure,
thecoffeemachine
willnotbereadyfor
approx.10min(untilthe
thermoblockcoolstobelow
100 °C).
4) Pressandholdbutton"smallcup".
5) Switchthecoffeemachineonagain.
6) Releasebutton"smallcup".
Thepumpstartstodrainthewater
systemandstopsautomatically.
Thecoffeebuttonsblinkfastsimulta
neously.
7) Afterautomaticstop,switchoffthe
coffeemachine.
Citizservicemanual
38
M A I N T E N A N C E
6 M A I N T E N A N C E
6.1 Dailymaintenanceandcleaning
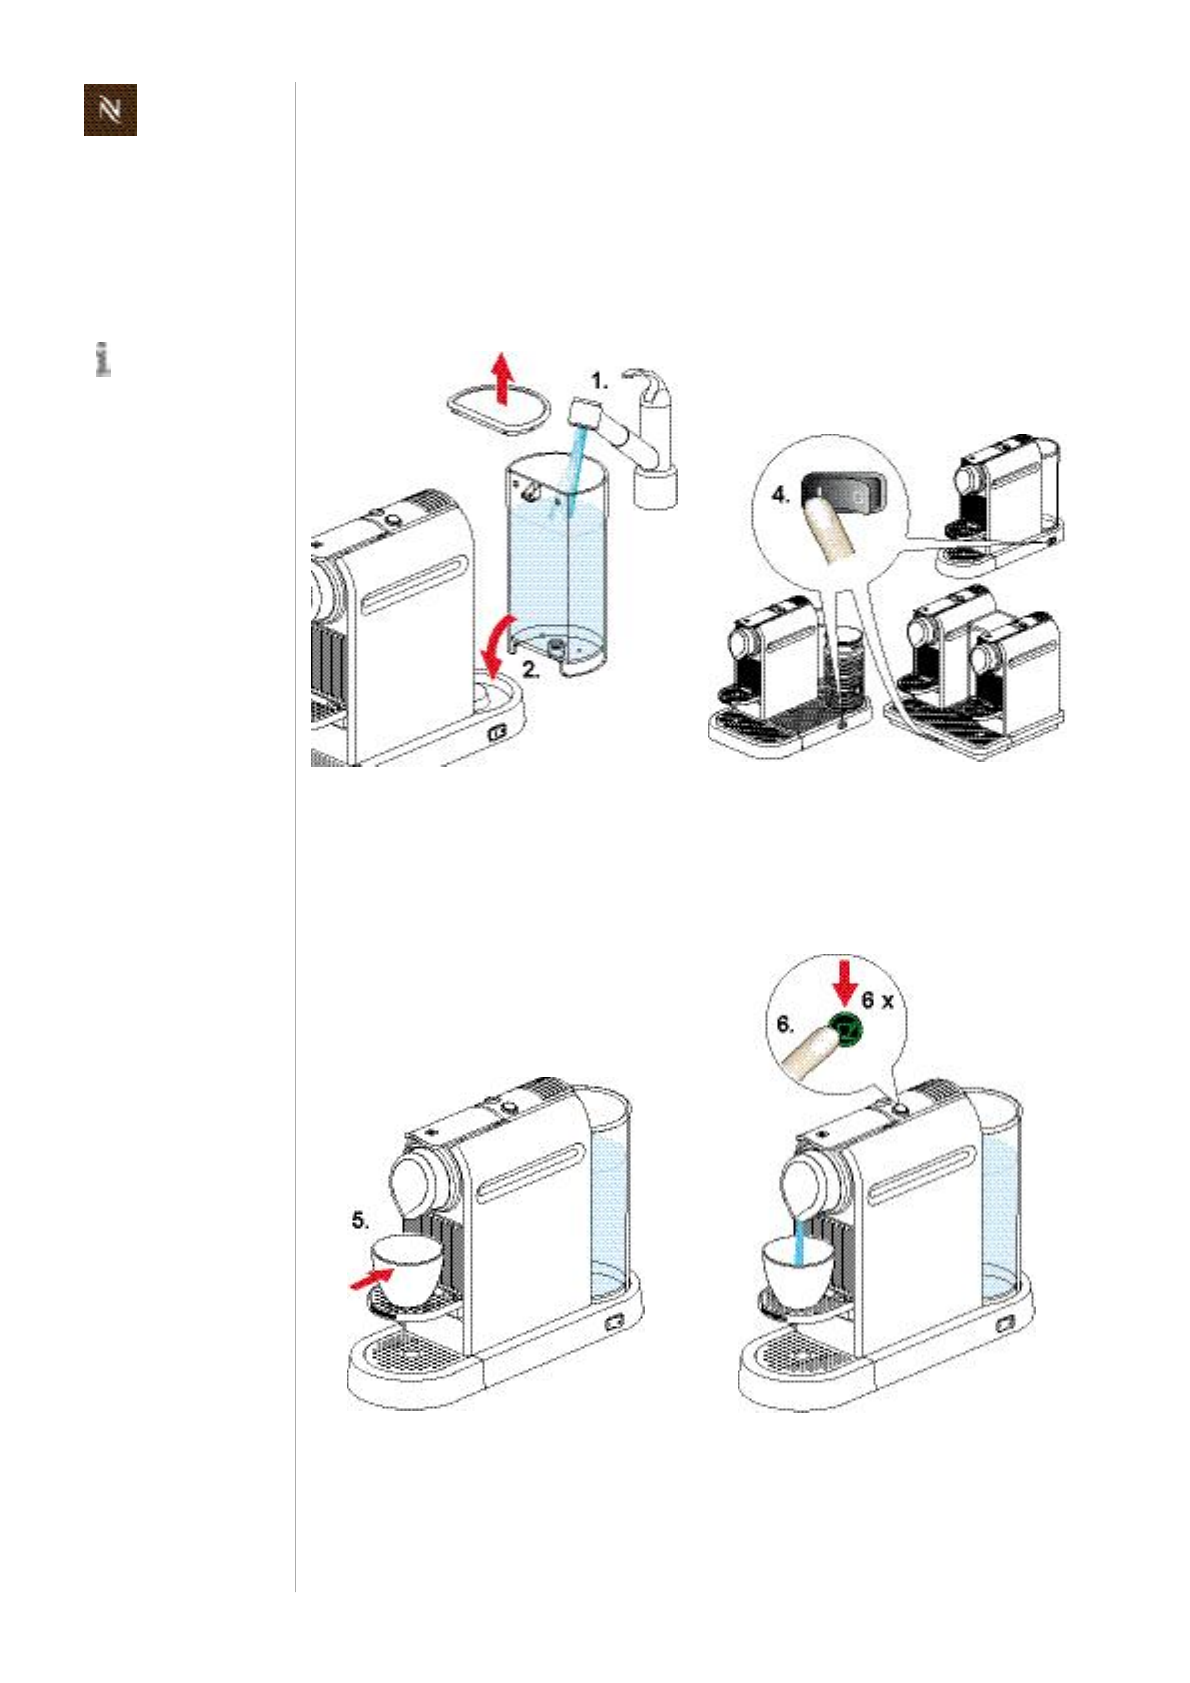
6.1.1 Beforefirstcoffeeoratthestartofday
TheCitizmodelis
shownasexample.
Maintainandclean
othermodelsaccordingly
.
1) Fillwatertankwithfreshpotable
water.
2) Insertwatertank.
3) FormodelCitiz&milk:
Attachwhisktomilkfrother.Placemilk
frotheronbaseplateconnector.
4) Switchmachineon.
Afteralongerperiodofnonuse:
5) Placeacontainerundercoffeeoutlet.
6) Rinsecoffeemachinebypressingbut
ton"largecup"about6times.
Citizservicemanual39
M A I N T E N A N C E
6.1.2 Afterlastcoffeeorattheendofday
Riskoffatalelectricalshockandfire!
Nevercleanwetorimmerseplug,cordorapplianceinanyfluid.
Unplugapplianceandletitcooldowntoavoidburns.
Platformanddriptray
surfacesarenot
abrasionproof.
Neverusebrushesand/or
cleaningagentsthatcon
tainaggressiveorchemical
componentsresp.sol
vents.
Donotputanypartina
dishwasher.
Useonlyadampclothor
spongeandamildcleaning
agentifnecessary
1) Switchmachineoff.
2) Checkifcapsuleisejected.
3) Emptyandclean
capsulecontainer(a)
wastewatercontainerwithcup
support(b)
driptraywithdripgrid(c).
Donotuseabrush
thewatertankcanbe
scratched.
4) Empty,rinseandcleanwatertank. 5) Reassemblecoffeemachine.
6) Cleancoffeemachinewithadamp
clothifnecessary.
Citizservicemanual
40
M A I N T E N A N C E
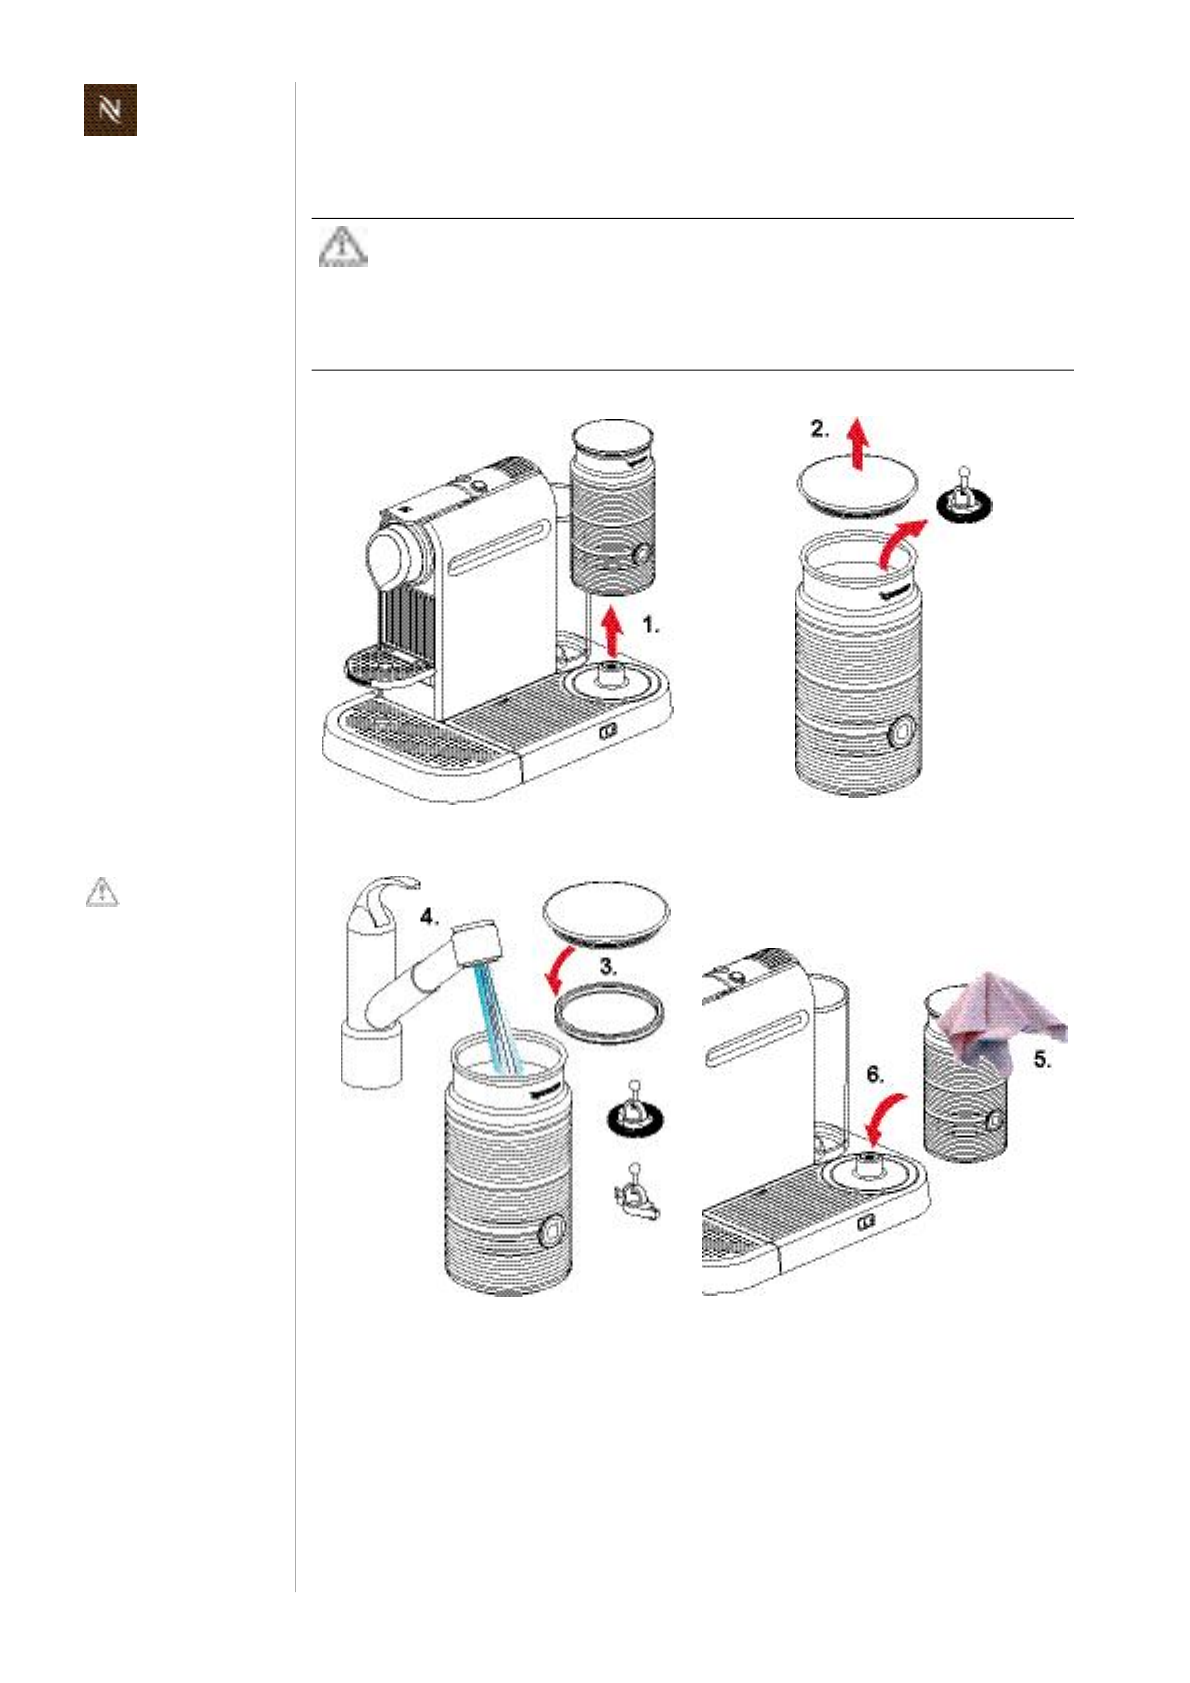
6.1.3 MilkfrotherofmodelCitiz&milk
Riskofdamage!
Theinsideofthejugiscoatedforeasycleaning.
Neverusebrushesand/orcleaningagentsthatcontainabrasiveor
aggressive,chemicalcomponentsresp.solvents.
Donotputanypartinadishwasher.
Useonlyadampclothandamildcleaningagentifnecessary.
1) Removemilkfrotherfromplatform. 2) Removelidanddismantlewhisk.
Keepconnectors
dry(onplatformand
atundersideofmilk
frother).
3) Removesealfromlid.
4) Rinseandcleanmilkfrothertogether
withwhiskormixer,lidandseal.
5) Cleanoutsideofmilkfrotherwitha
dampclothifnecessary.
6) Reassemblemilkfrother.
Citizservicemanual41
M A I N T E N A N C E
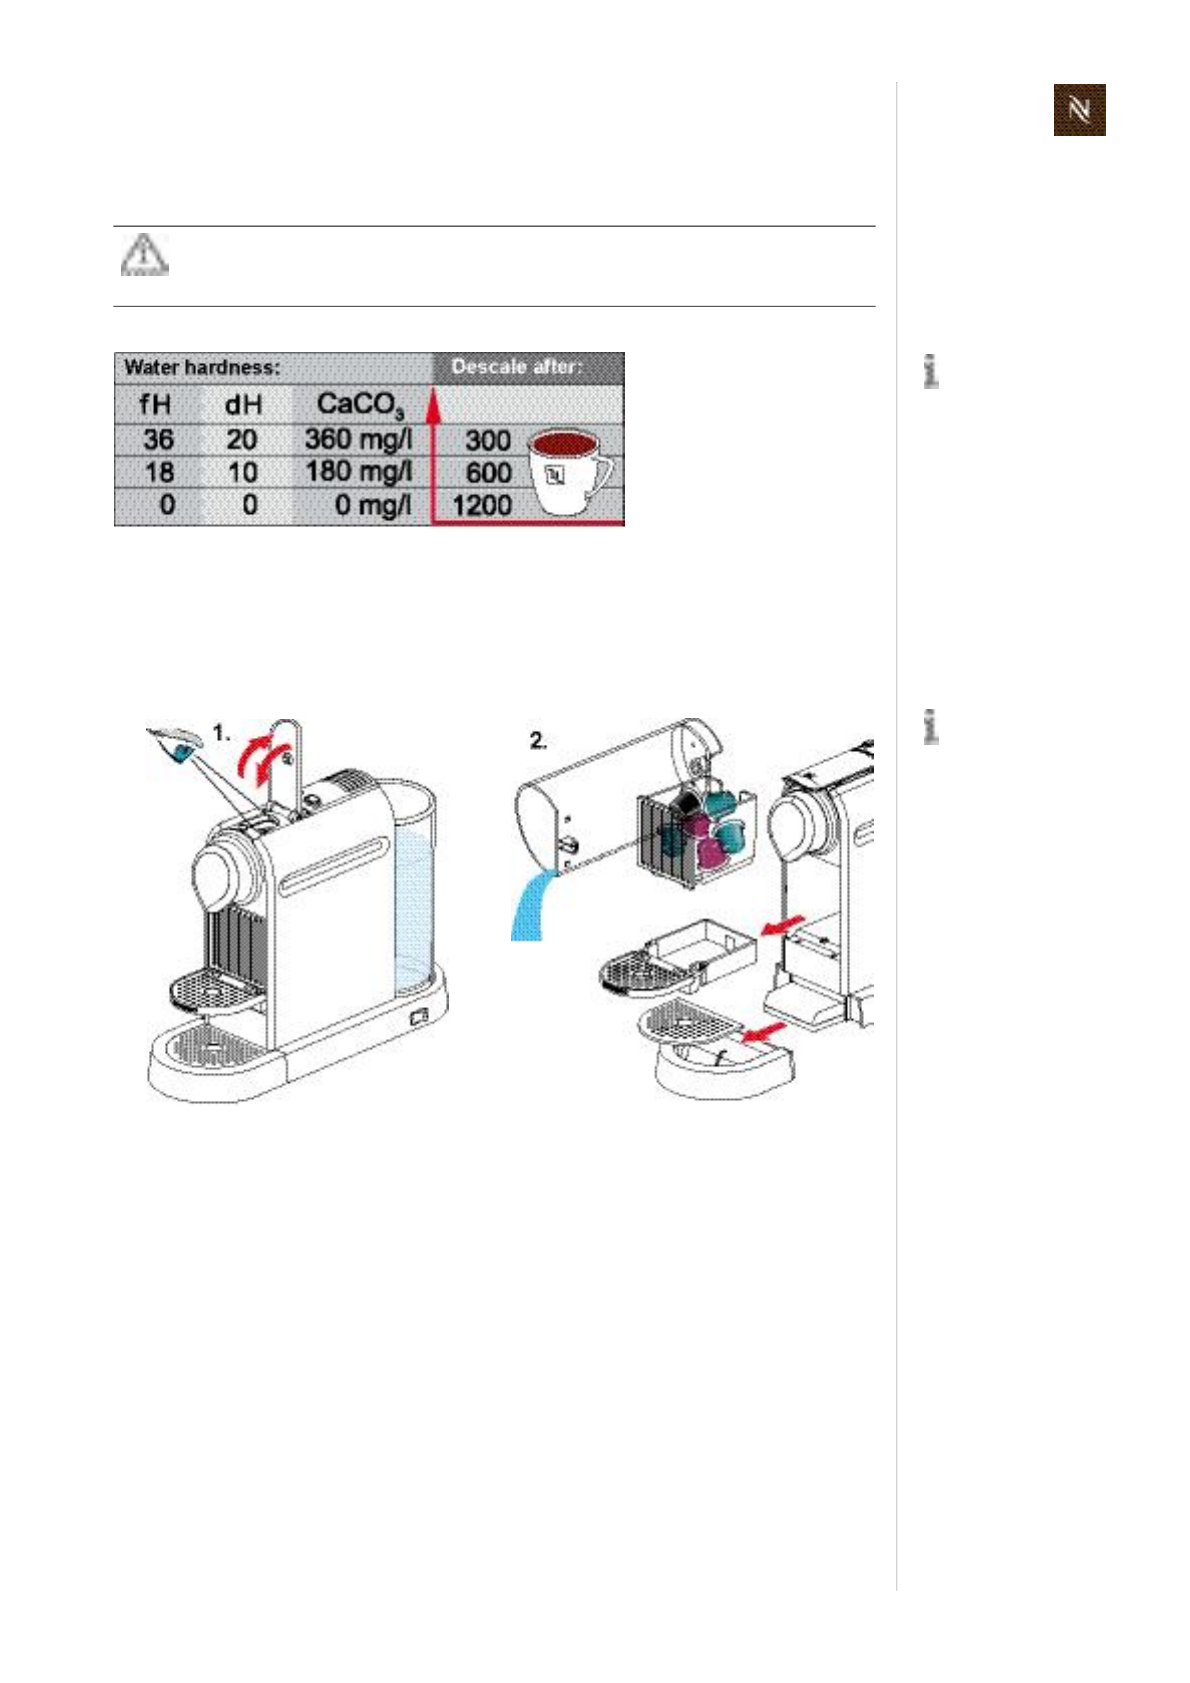
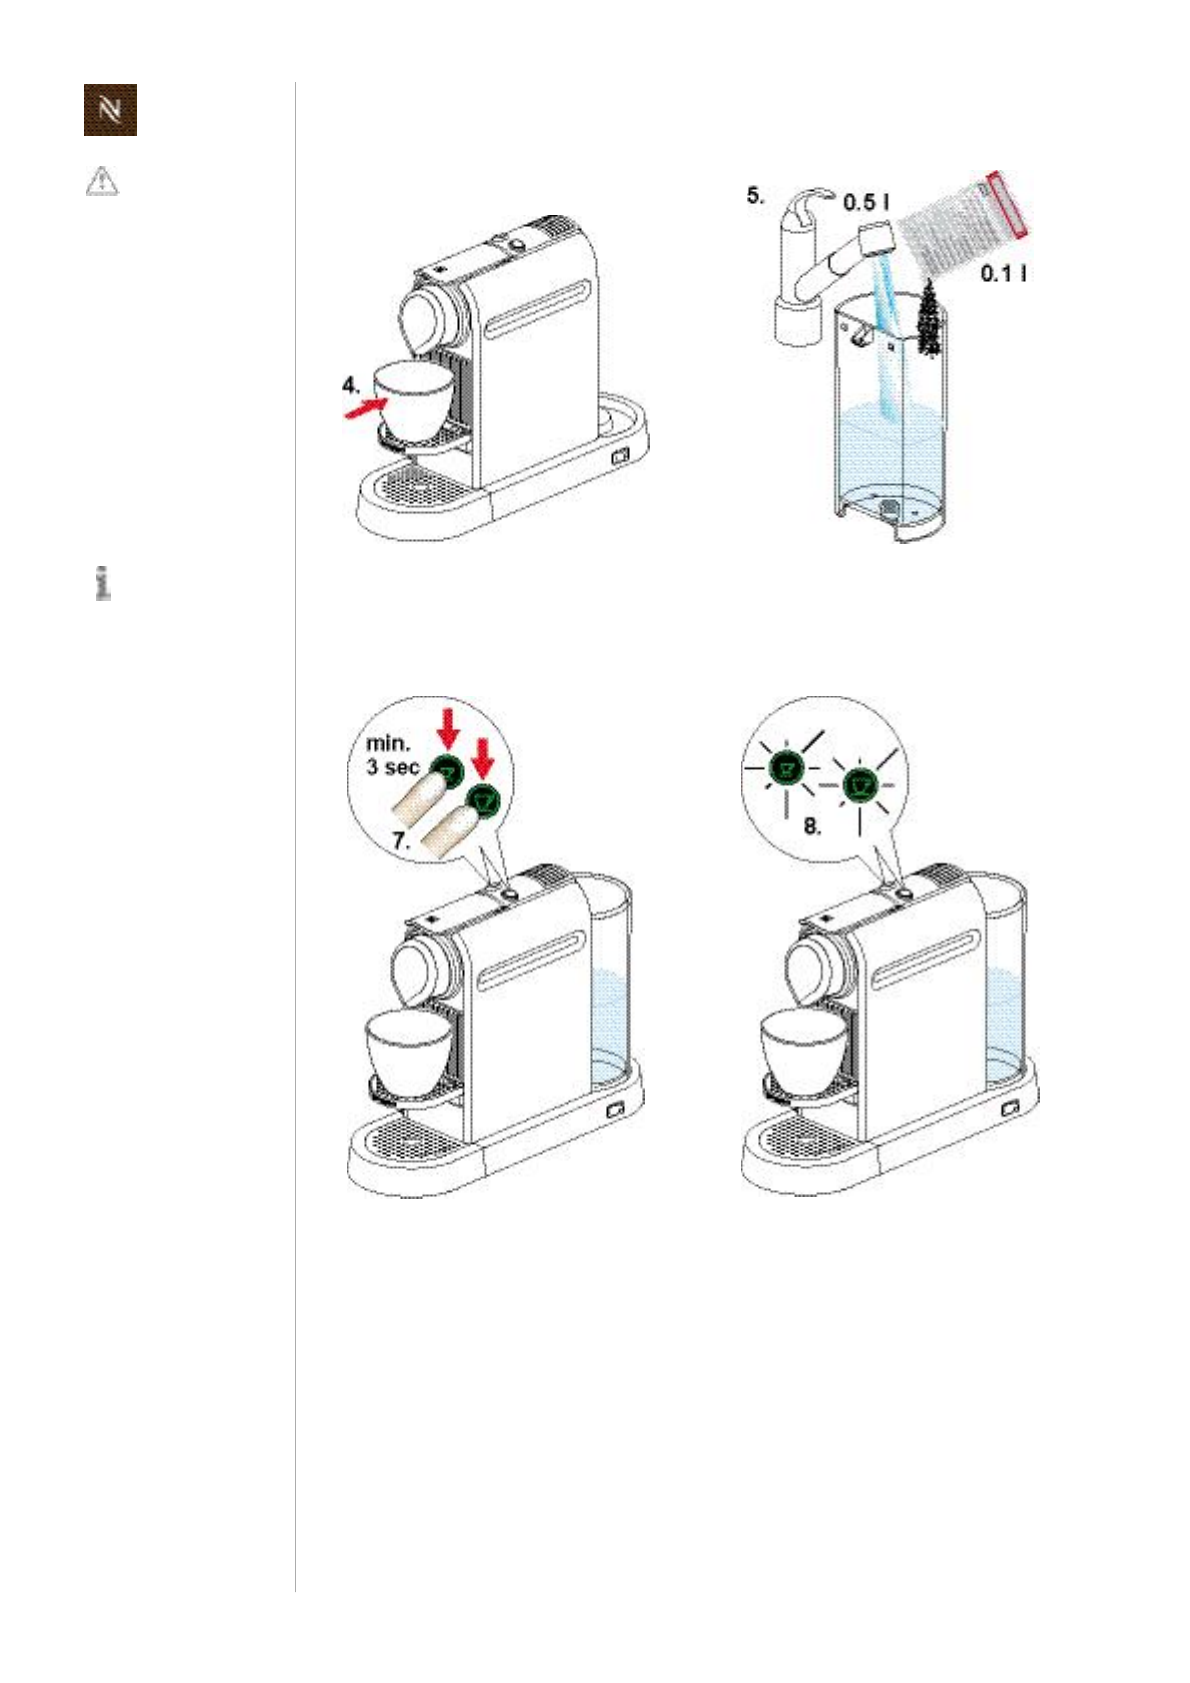
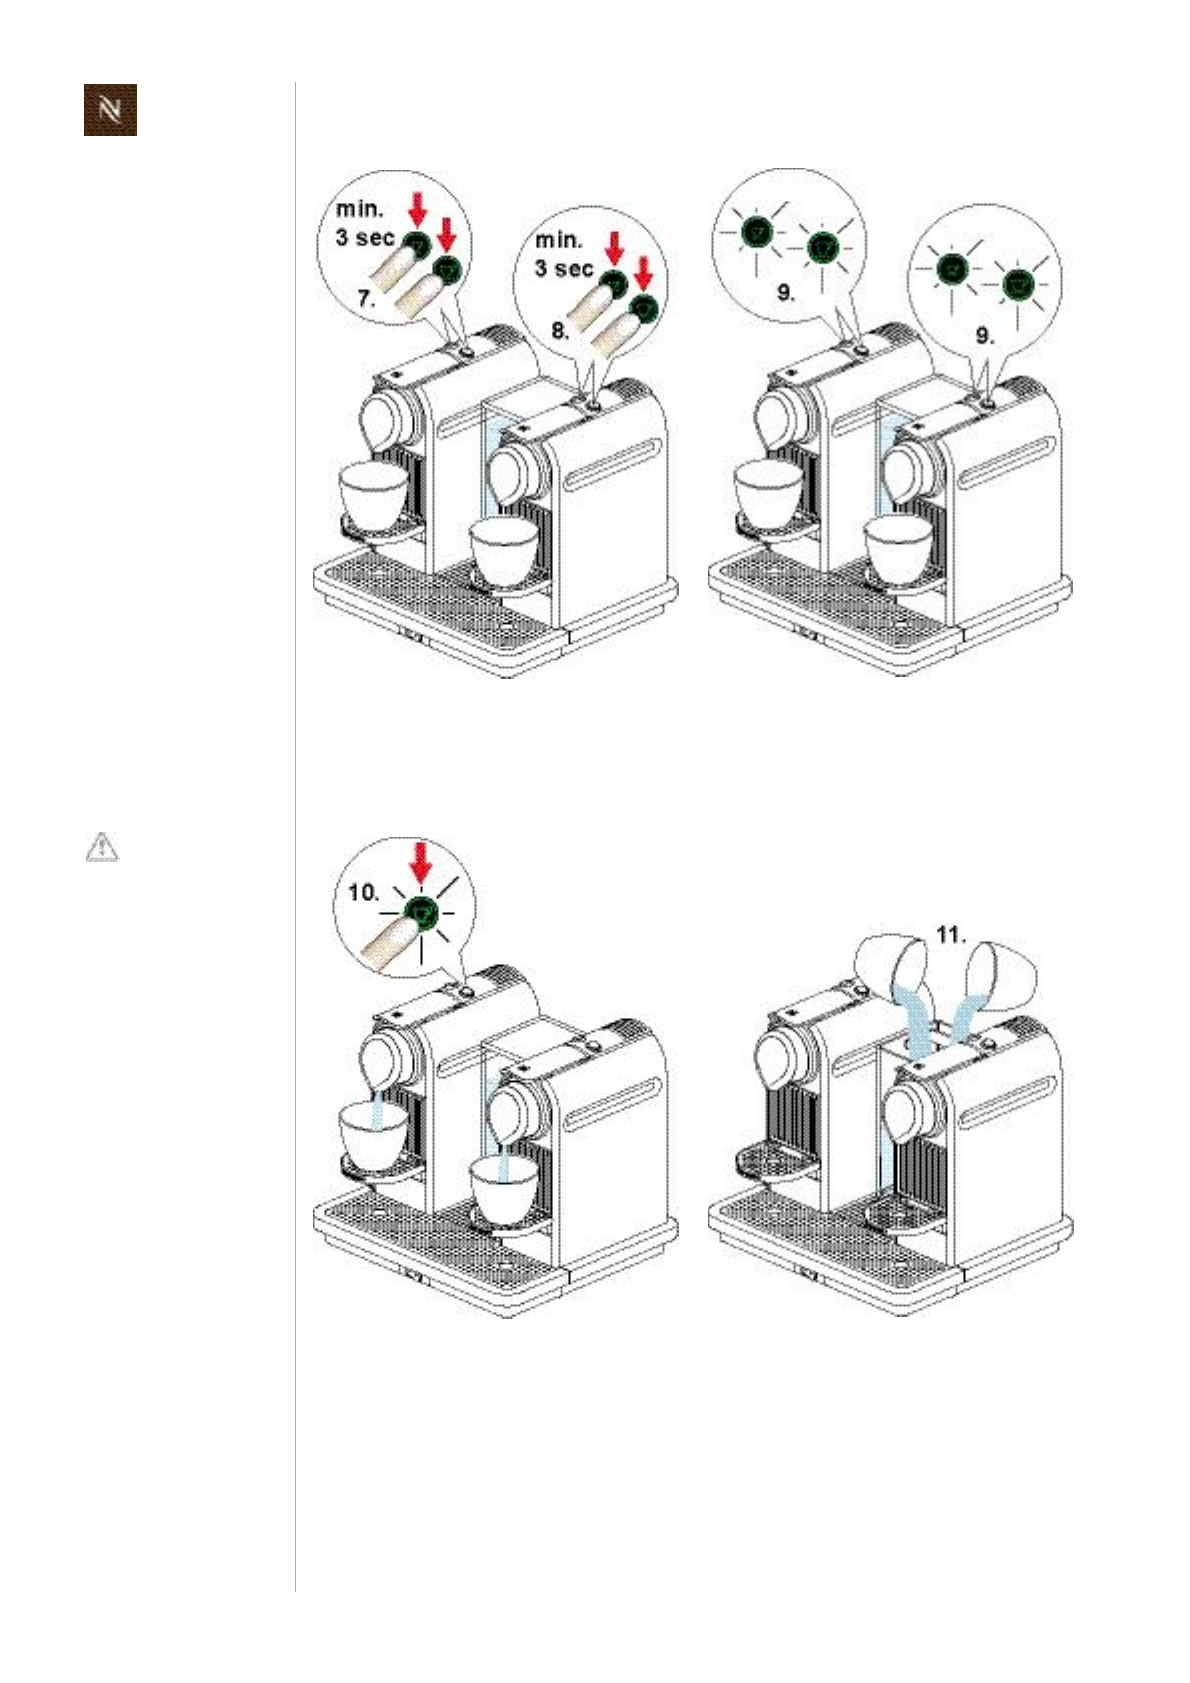
6.2 Descaling
Usethischarttoinformacustomerwhentodescalethecoffeemachinedependingon
localwaterhardnessandaveragecoffeeconsumption.Doubletheestimatedtime
intervalformodelCitiz&Co.
6.2.1 DescalingprocedureformodelsCitizandCitiz&milk
Onlyuse
Nespresso
descalerordescalingkitneverusevinegar!
Descalercandamagecasingandcontactsurfaces.
Immediatelycleandropsofdescalingsolution.
Thedescalingchartis
basedonacupsizeof
40ml.
fH...Frenchgrade
dH...Germangrade
CaCO
3
...Calciumcarbonate
TheCitizmodelis
shownasexample.
1) Ejectcapsuleorcheckifcapsuleis
removed.
2) Removeandemptycapsule/waste
watercontainer,driptrayandwater
tank.
Citizservicemanual
42
M A I N T E N A N C E
Observethesafety
instructionsonthe
descalerpackage.
Useacontainerwitha
capacityof1 lmin.
3) Reassemblecoffeemachinewithout
watertank.
4) Placeacontaineronthecupsupport.
5) Fillthewatertankwith0.1 ldecalcifier
(1bag)and0.5 lwater.
6) Insertwatertankintothecoffee
machine.
7) Pressbothcoffeebuttonssimulta
neouslyforatleast3 sec.
8) Themachineisindescalingmodenow
(bothbuttonsblinkingfast).
Citizservicemanual43
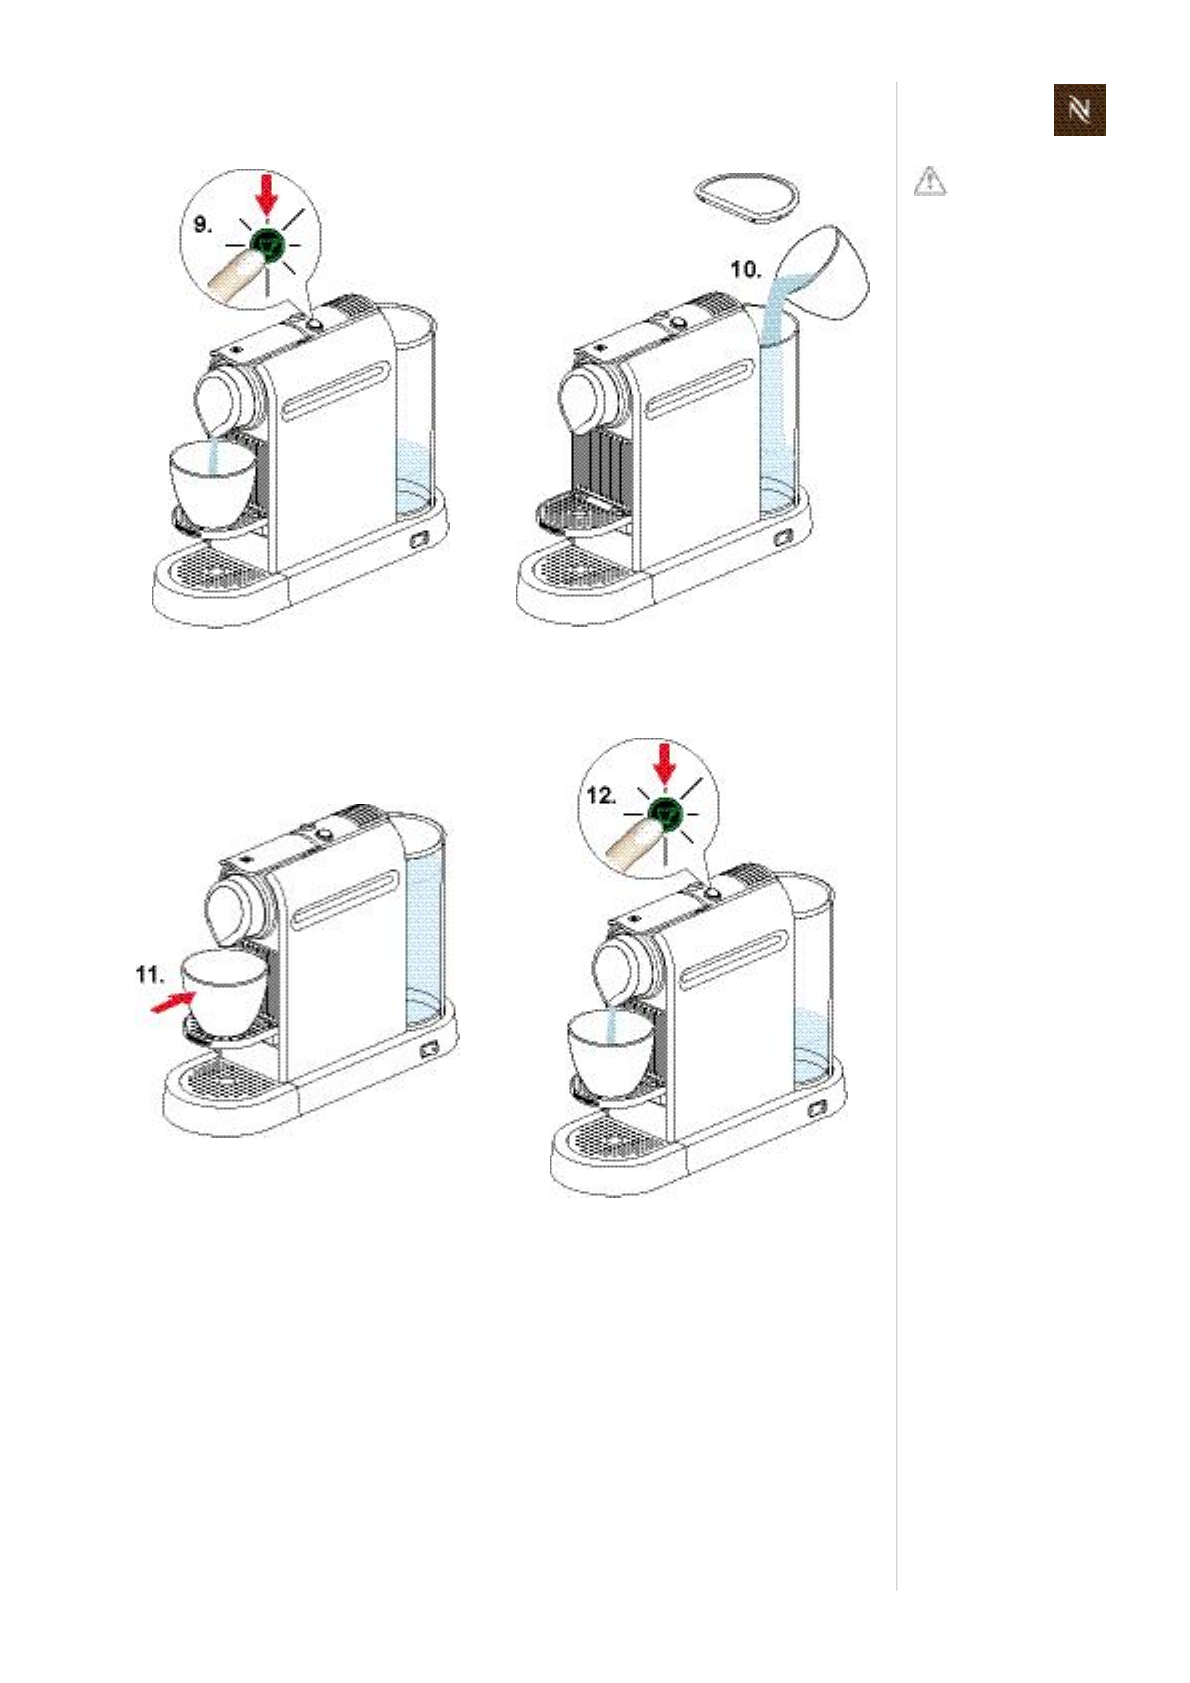
M A I N T E N A N C E
Danger!
Hotsplashesof
descalingsolution.
Donotopenhandledur
ingdescalingprocess.
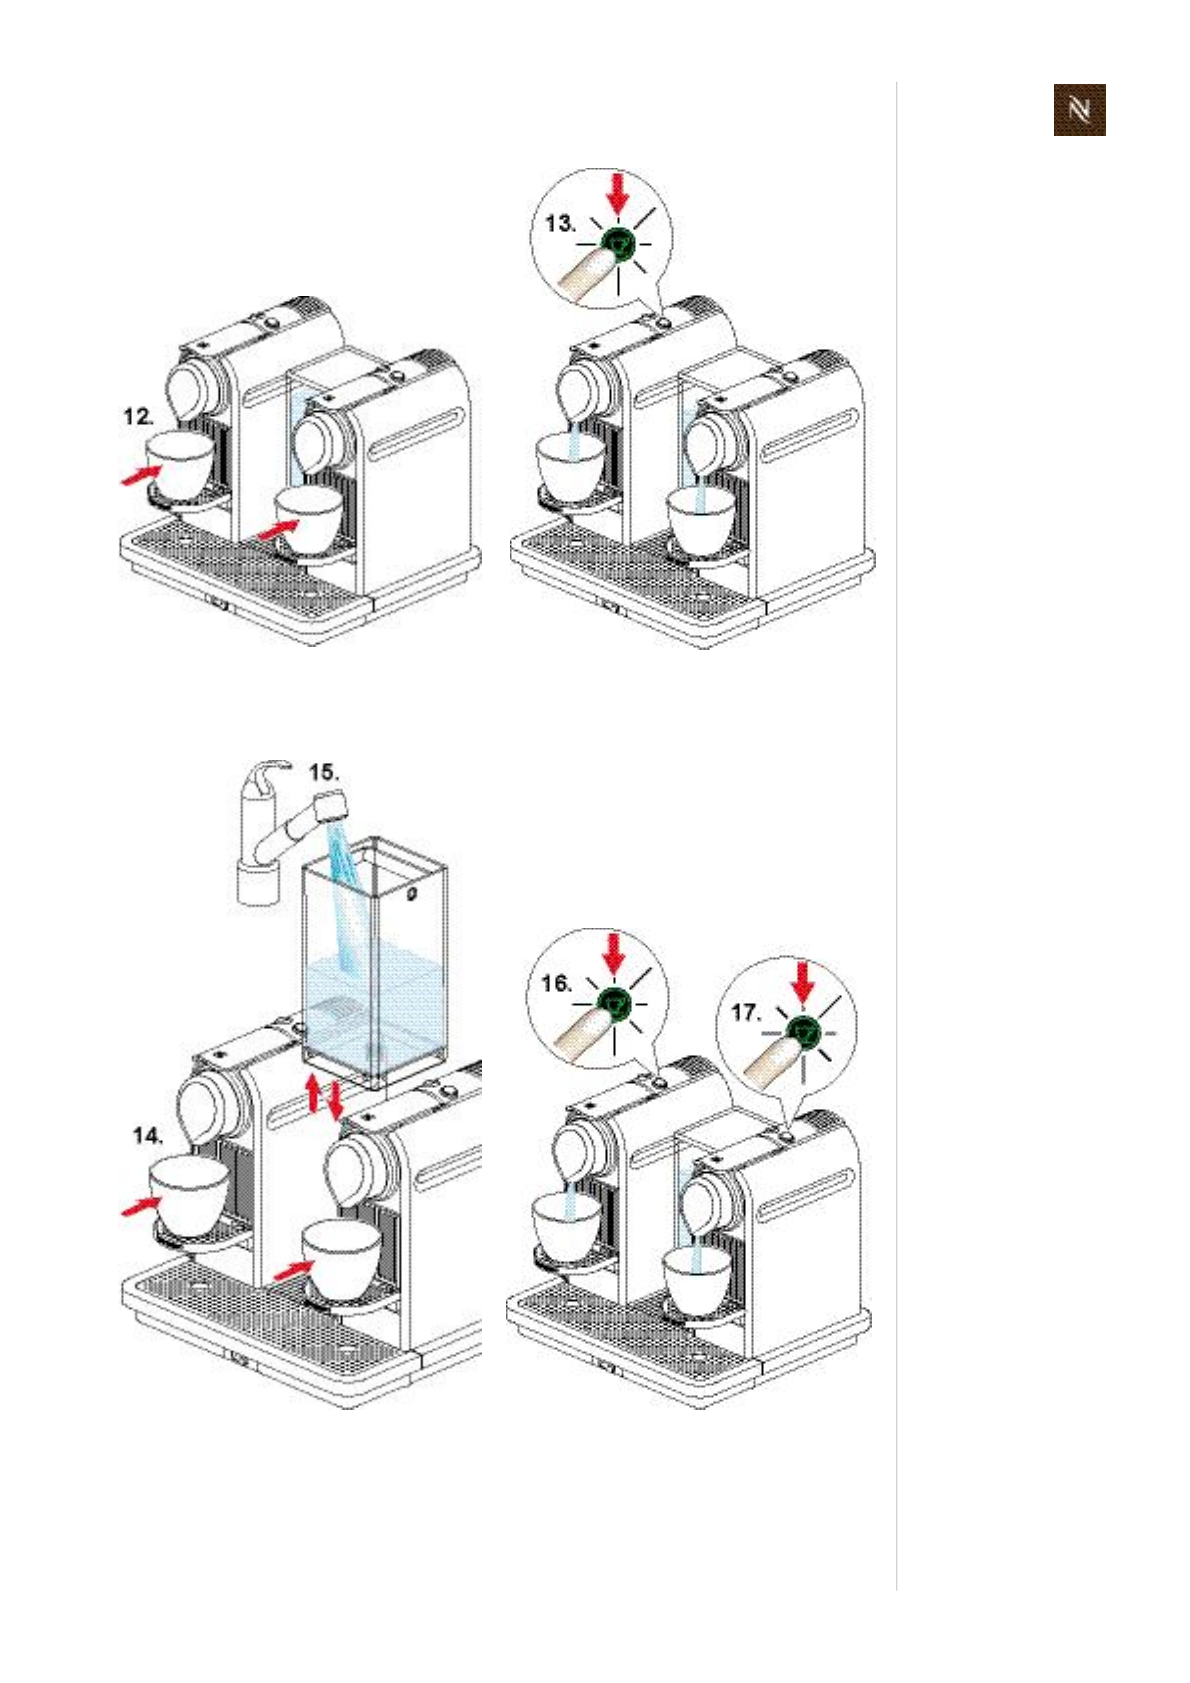
9)
Pressanybuttontostartpump.
Lettheentiresolutioninthetankrun
throughthesystem.
10) Afterwatertankisempty,pourdescal
ingsolutionbackintowatertank.
11)Placeemptycontainerbackoncup
support.
12) Descaleagain:pressany
button
and
waituntilwatertankisempty.
Citizservicemanual
44
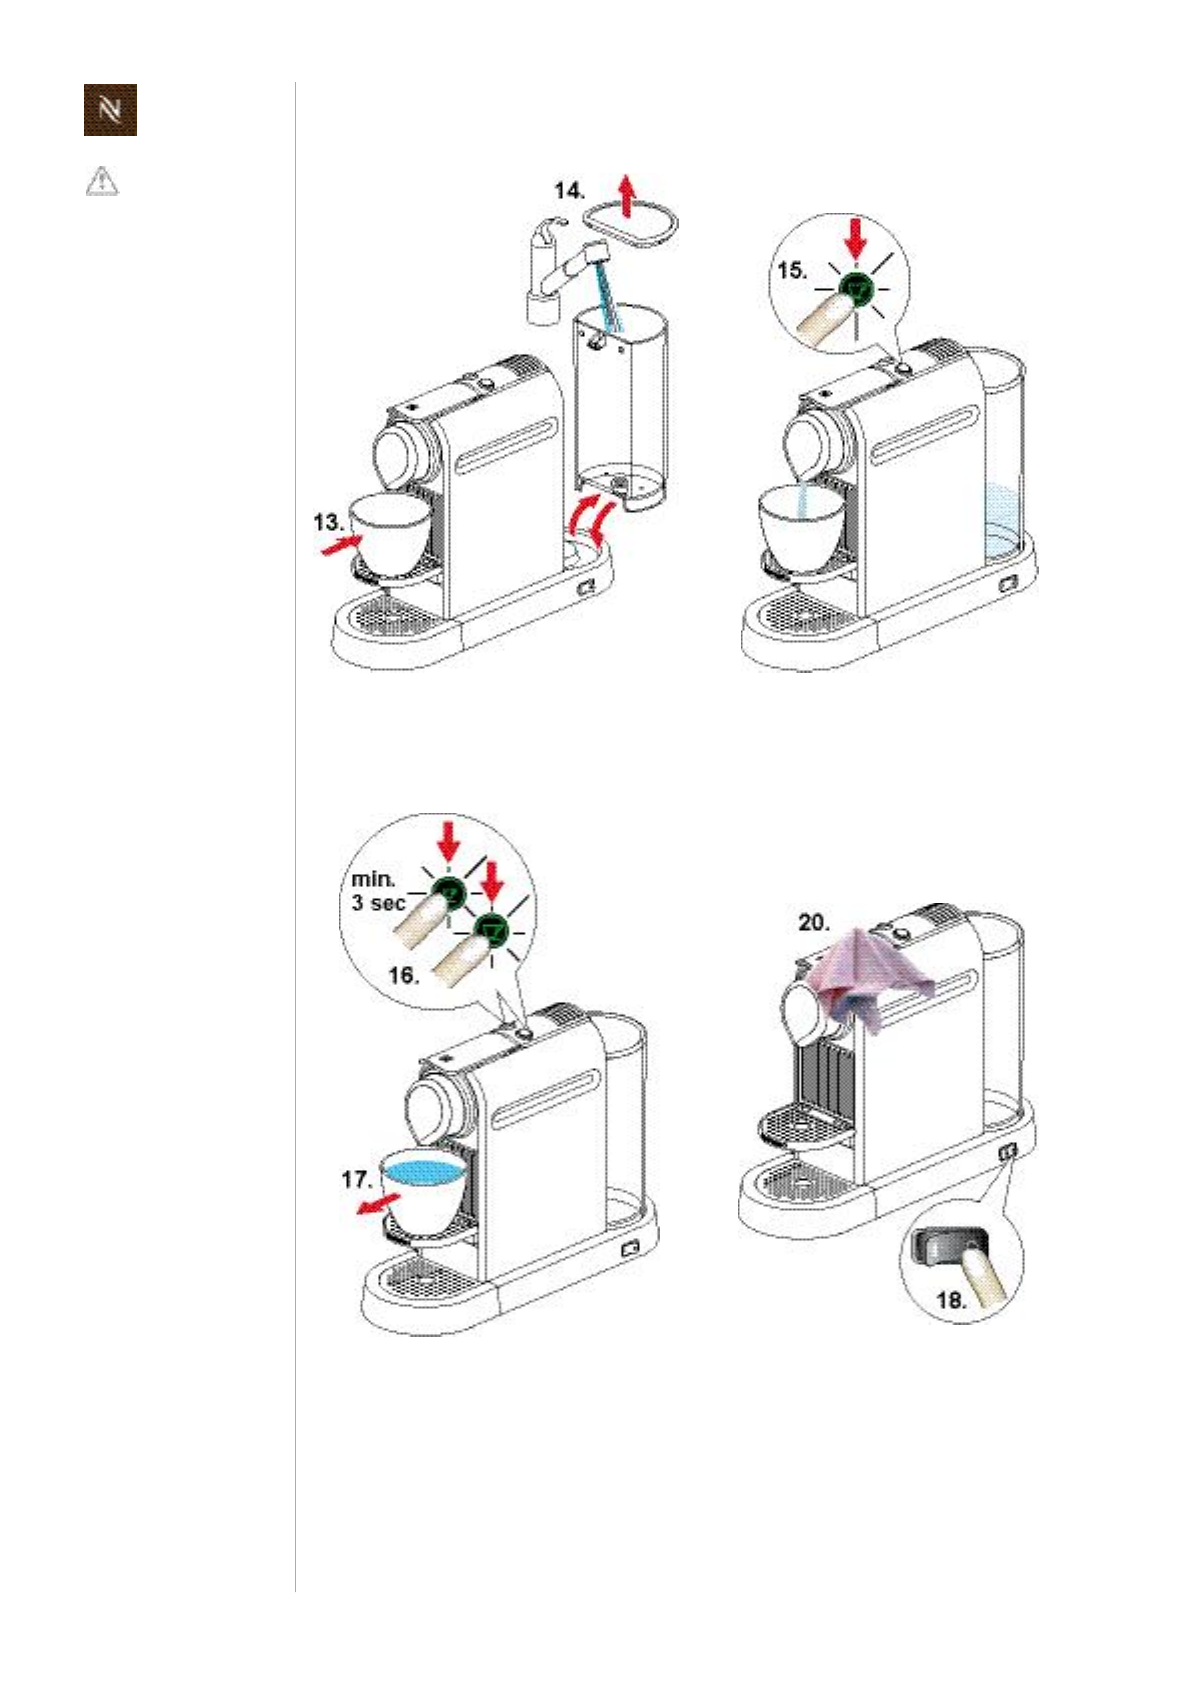
M A I N T E N A N C E
Dangerofinjury!
Residualdescaler
maybeharmful.
Rinsethoroughlyto
removeanyresidue.
13) Emptycontainerandputitbackon
cupsupport.
14) Rinseandcleanwatertankthoroughly
andfillitwithfreshpotablewater.
15) Rinsecoffeemachinebypressingany
buttonandwaituntilwatertankis
empty.
16) Pressbothcoffeebuttonssimultane
ouslyforatleast3 sectoenddescal
ingmode.
17) Removeandemptycontainer.
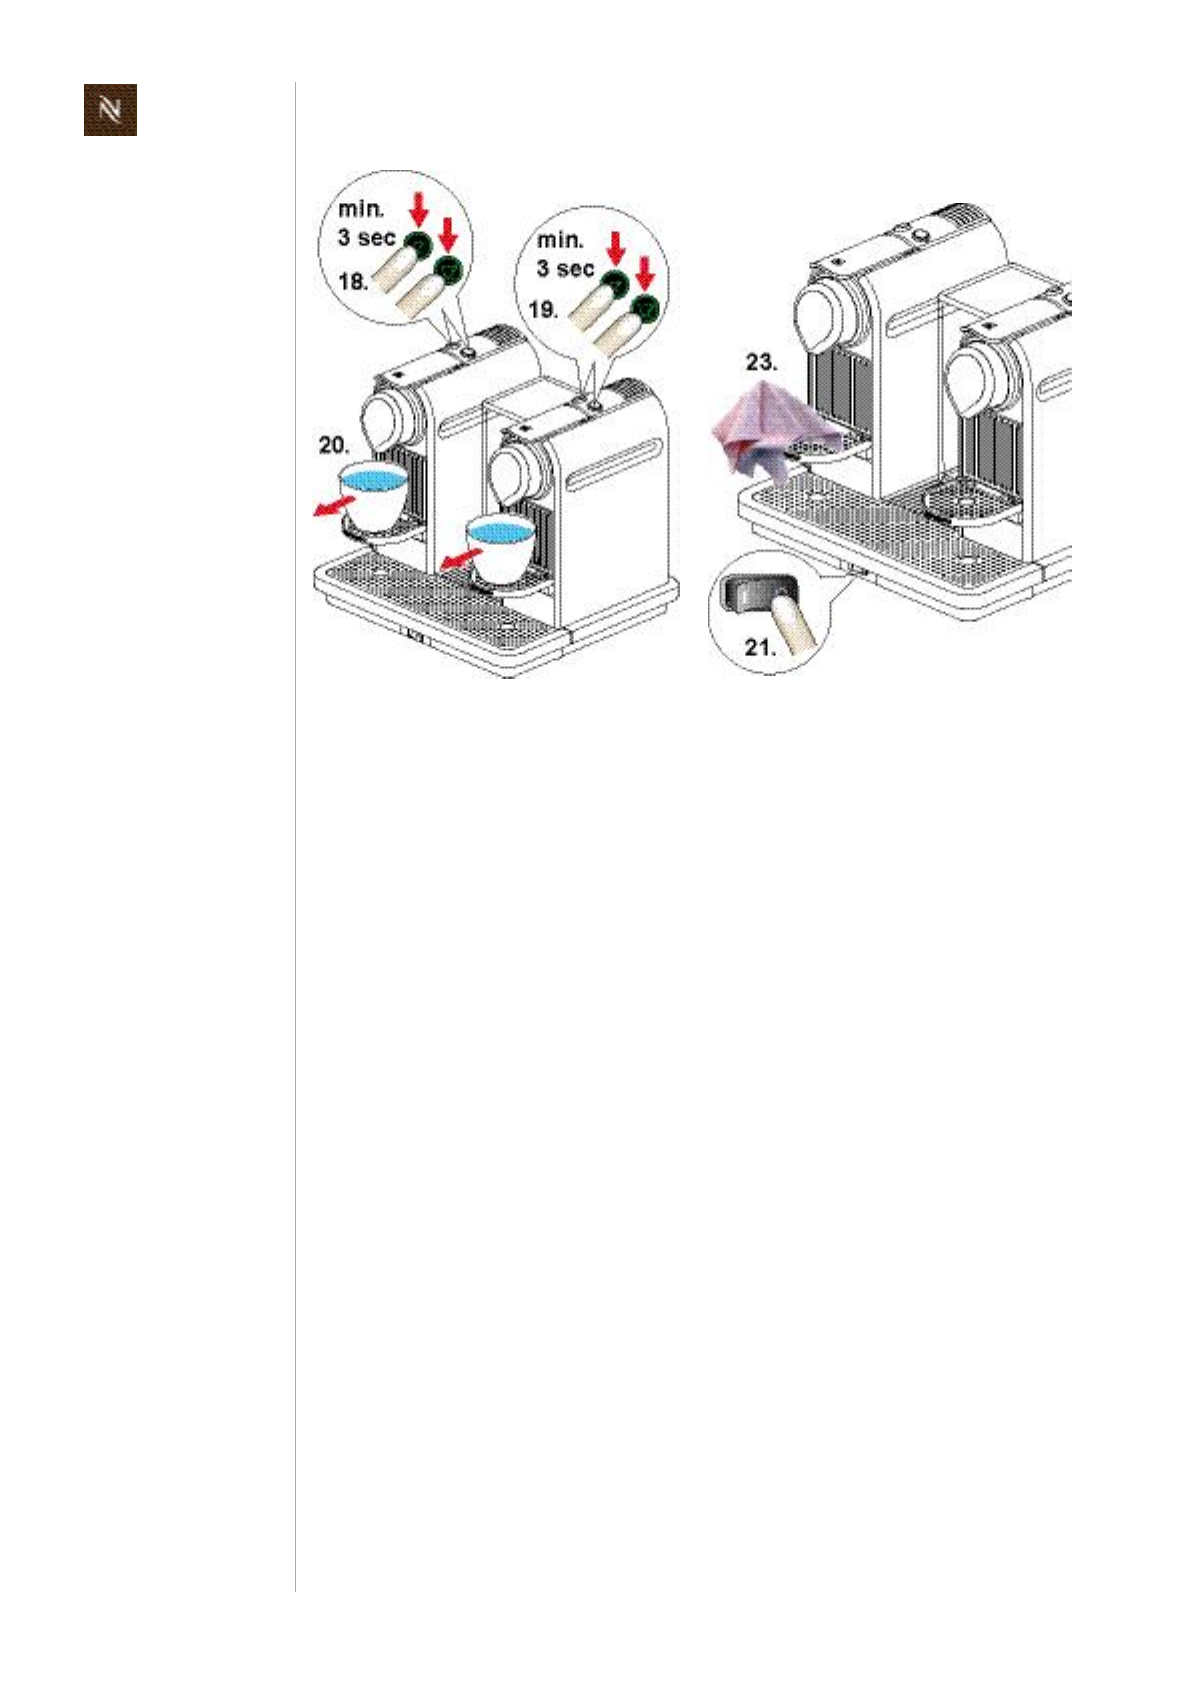
18) Switchoffcoffeemachine.
19) Emptyandcleancapsule/wastewater
containeranddriptray.
20) Cleancoffeemachinewithadamp
clothifnecessary.
Citizservicemanual45
M A I N T E N A N C E
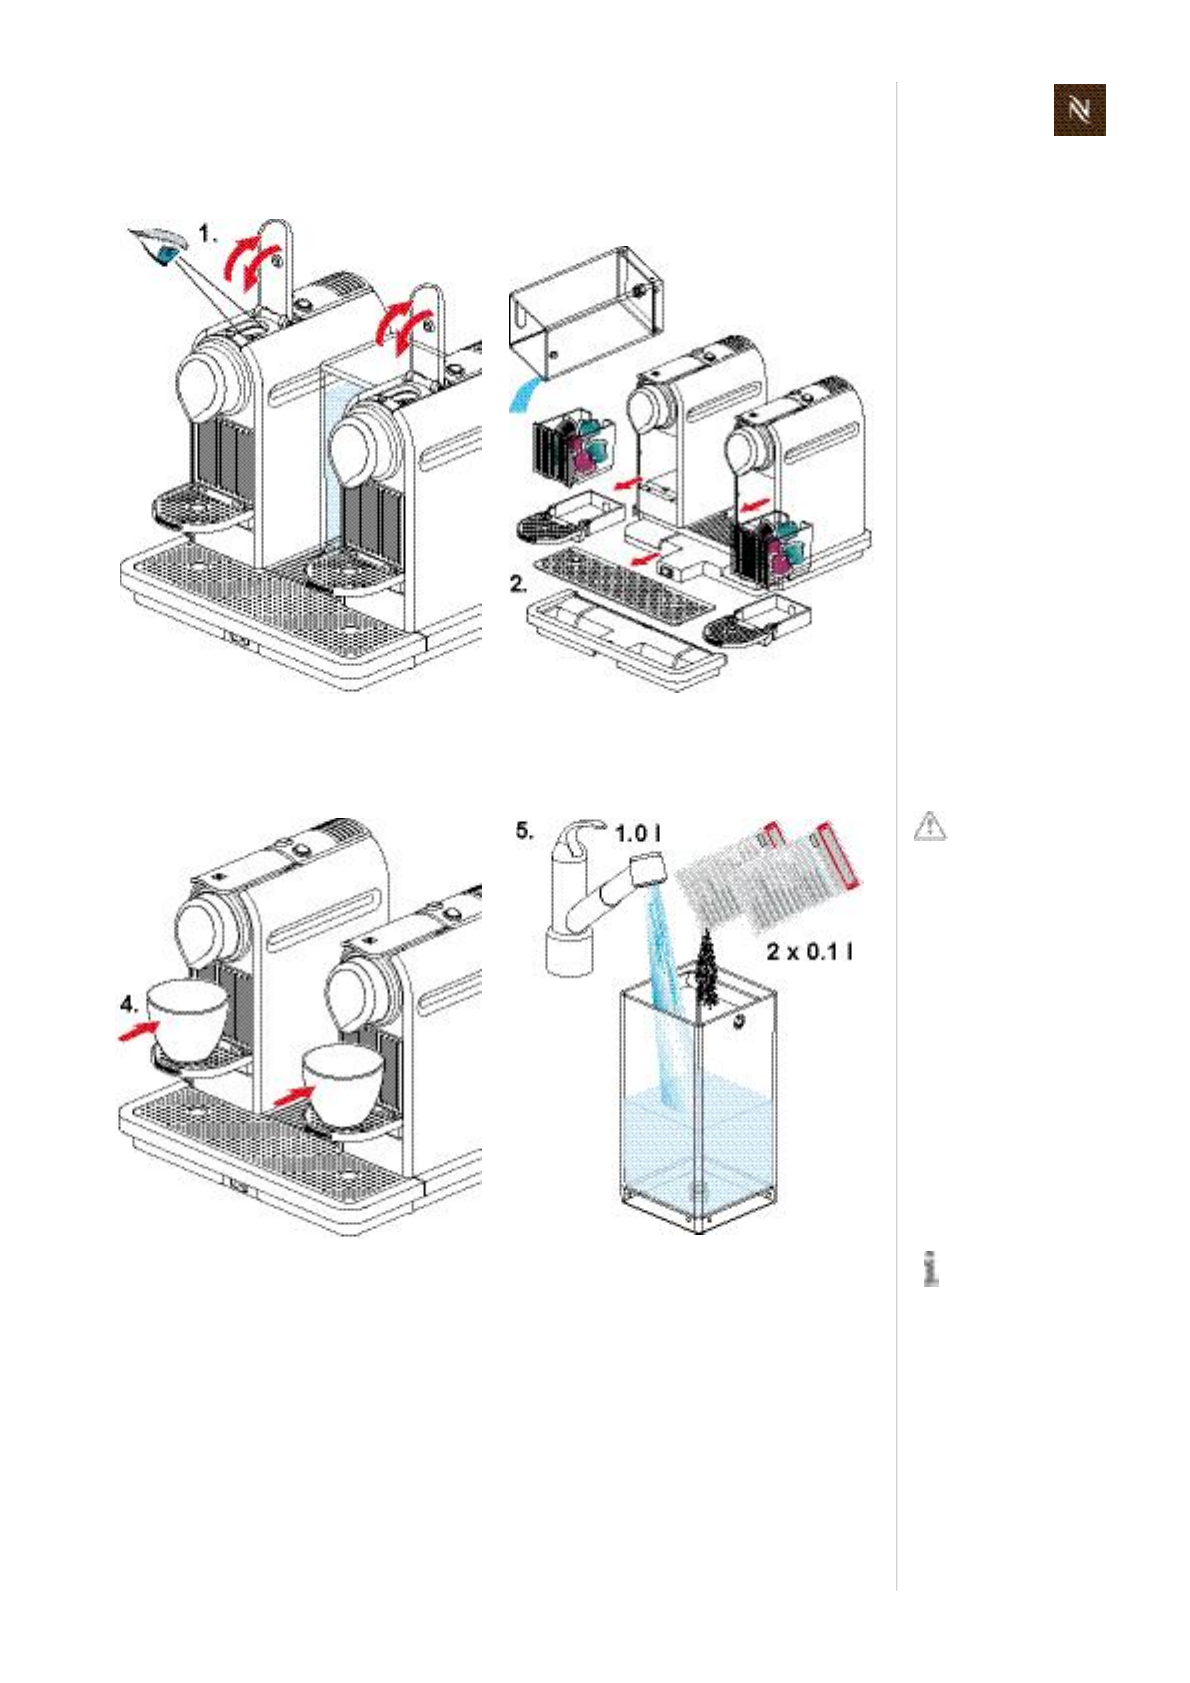
6.2.2 DescalingprocedureformodelCitiz&Co
1) Ejectcapsulesorcheckifcapsules
areremoved.
2) Removeandemptycapsule/waste
watercontainers,driptrayandwater
tank.
Observethesafety
instructionsonthe
descalerpackage.
Usecontainerswitha
capacityof1 lmin.
3) Reassemblecoffeemachinewithout
watertank.
4) Placeacontainerundereachcoffee
outlet.
5) Fillthewatertankwith0.2 ldecalcifier
(2bags)and1.0 lwater.
6) Insertwatertankintothecoffee
machine.
Citizservicemanual
46
M A I N T E N A N C E
7) Pressbothcoffeebuttonssimulta
neouslyforatleast3 sec.onfirstcore
unit.
8) Repeatprocedurewithsecondcore
unit.
9) Themachineisindescalingmodenow
(bothcoffeebuttonsblinkingfaston
coreunits).
Dangerofinjury!
Hotsplashesof
descalingsolution.
Donotopenhandlesdur
ingdescalingprocess.
10)
Pressanybuttononacoreunittostart
pumps.
Lettheentiresolutioninthetankrun
throughthesystem.
11) Afterwatertankisempty,pourdescal
ingsolutionfrombothcontainersback
intowatertank.
Citizservicemanual47
M A I N T E N A N C E
12)Placeemptycontainersbackoncup
supports.
13) Descaleagain:pressany
buttonona
coreunit
andwaituntilwatertankis
empty.
14)Emptycontainersandputthemback
oncupsupports.
15)Rinseandcleanwatertankthoroughly
andfillitwithfreshpotablewater.
16)Rinsecoffeemachinebypressingany
buttononfirstcoreunit.
17) Repeatprocedureonsecondcore
unitandwaituntilwatertankisempty.
Citizservicemanual
48
M A I N T E N A N C E
18) Pressbothcoffeebuttonssimultane
ouslyforatleast3 sectoenddescal
ingmode.
19) Repeatprocedureonsecondcoreunit
toenddescalingmode.
20) Removeandemptycontainers.
21) Switchoffcoffeemachine.
22) Emptyandcleancapsule/wastewater
containersanddriptray.
23) Cleancoffeemachinewithadamp
clothifnecessary.

Citizservicemanual49
T R O U B L E S H O O T I N G
7 T R O U B L E S H O O T I N G
7.1 Checklistforcoffeemachine(allmodels)
Afteraninitialinspec
tioninaccordance
withthischecklist,
errorsarequicklyfoundand
correctedwiththeappropri
atemeasure.
Therefore,adheretothe
sequenceofthechecklist.
Repaireveryoccurringerror
andworkthechecklist
throughuntilitiscompleted.
Check Errorsymptoms Measure/
repairwork
Furthermeasures/repair
work
1Checkthecoffee
machineforvisi
bledamage
1.1Housingpartsbro
kenordamaged
YESreplacehousingpartsif
necessary
NOcontinue
1.2Powercorddam
aged
YESreplacepowercord
NOconnectpowercordof
machinetothemainsandcon
tinue
2Checkmechani
calcomponents
2.1Cupsupportdoes
notremaininverti
calposition
YEScheckifthecapsuleand
wastewatercontainerarecor
rectlyinsertedandmounted
NOcontinue
YESreplacedamagedor
deformedcapsulecontainer
and/orwastewatercontainer.
2.2Cupsupportrattles
whenfoldeddown
YEScheckif2rubberstop
persaremountedonwaste
watercontainer
NOcontinue
NOreplacestoppers
2.3Closinghandle
malfunction
YESitisverydifficultor
almostimpossibletoclosethe
handleandtopressitallthe
waydown
NOcontinue
YESreplacethecompact
brewingunit
2.4Closinghandle
unusualnoisedur
ingactuation
YEScheckifdamperis
mountedunderneathclosing
handle
NOcontinue
NOreplacedamper
2.5Capsuleisnot
ejectedcorrectly
YESreplacebrewingunit
(TMBU)
NOcontinue
2.6Sealoncapsule
cageisdamaged
(checksealwith
yourfinger)
YESreplacebrewingunit
(TMBU)
NOcontinue
3Fillwatertank 3.1Watertankleaks YESreplacewatertank
NOcontinue
4ActivateOn/Off
switchtoperform
automaticselftest
4.1Coffeemachineis
notworking
(doesnotfunction)
a)YESpowercordisokay
(looseconnection)
YEScontinue
NOreplacepowercord
b)YESOn/Offswitchisokay YEScontinue
NOreplaceOn/Offswitch
c)YESpumpworks(pressa
coffeebutton)
YEScontinuewithpointf)
NOcontinuewithpointd)
d)YESbothcoffeebuttons
areworking
YEScontinue
NOreplaceelectroniccontrol
board
e)YESthermostatonpumpis
defective
YESreplacethermostat
NOreplacepump
f)YESfinewirefuse(s)
(167°C)onthermoblockdefec
tive
YESreplaceelectroniccon
trolboard,ifnecessaryreplace
thermoblock
NOcontinue
g)YESwiringisokay
NOcontinuewithpoint4.3
YESreplaceelectroniccon
trolboard
NOreplacedefectivecables
4.2Bothcoffeebuttons
areblinking3xfast
YESthermoblockishot
NOselftestokcontinue
YESreplaceNTCtempera
turesensor
NOreplacethermoblock

Citizservicemanual
50
T R O U B L E S H O O T I N G
5Measurecoffee
temperaturedur
ingpreparation
(seepage136)
5.1Nocoffee
YESa)watersystemisemptyYESreplaceselfpriming
device(APD)
NOcontinue
YESb)flowmeterblocked YEScleanorreplace
NOcontinue
YESc)pyramideplate
blocked
YESreplacethecompact
brewingunit
NOcontinue
YESd)coffeemachineiscal
cified
NOcontinue
YESdescalecoffeemachine
(seepage41)
5.2Temperatureistoo
low(below83°C)
YESdescalecoffeemachine
(seepage41)
NOcontinue
5.3Temperaturetoo
high(over89°C)
YESreplaceNTCtempera
turesensor
NOcontinue
6Checkforleakage
(seepage133)
andmeasureflow
rate(seepage
132)
6.1Compactbrewing
unitleaks
YESreplacecompactbrew
ingunit
NOcontinue
6.2Hoseconnections
leak
YESreplacedefectivehoses
andseals
NOcontinue
6.3Rateofflownotin
thestandardrange
YEScoffeemachineiscalci
fied
NOcontinuewithpoint9
YESdescalecoffeemachine
(seepage41)
NOreplacepump
7
Descalecoffee
machine
(ifnecessary)
7.1Coffeemachineis
calcified
YESdescalecoffeemachine
(seepage41)
NOcontinuewithpoint9
8Checkwatertank
contentsafterdes
calingandrinising
8.1Particlesofcalcium
andrustvisiblein
water
YESdescaleandrinsecoffee
machineagaintocleanwater
circuit
(seepage41)
NOcontinue
YESinformcustomertodes
calecoffeemachineperiodi
callyandtousespecifieddes
calingproductonly.
9Finalcleaning
(seepage38)
Noerrorsfoundaccordingto
checklist?
YESformoreinformation
pleasecontact
Nespresso
ServiceDivision
Endofchecklist
Check Errorsymptoms Measure/
repairwork
Furthermeasures/repair
work

Citizservicemanual51
T R O U B L E S H O O T I N G
7.2 Checklistformilkfrother
Themilkfrotherispart
oftheCitiz&milk
model.
Check Errorsymptoms Measure/
repairwork
Furthermeasures/repair
work
1Checkmilkfrother
andaccessoryfor
visibledamage
1.1Lid/sealbrokenor
damaged
YESreplacelid/seal
NOcontinue
1.2Insidecoatingof
jugbadlyscratched
YESreplacemilkfrotherin
agreementwithcustomer
NOcontinue
YESinformcustomerhowto
cleanmilkfrother
1.3Whisksbrokenor
damaged
YESreplacewhisks
NOcontinue
4Placemilkfrother
onplatformcon
nector.
Attachwhisk.
Switchoncoffee
machine.
Pressstartbutton
briefly(hotmilk
preparation).
4.1Milkfrotherisnot
working(doesnot
function)
YESa)coffeemachineis
heatingup
YEScontinue
NOcontinuewithchecklistfor
coffeemachine
YESb)connectoronplatform
isok(testitwithanothermilk
frother)
YESreplacemilkfrother
NOreplaceconnectoronplat
form(see page73)
4.2Abnormalnoise
duringpreparation
YESreplacemilkfrother
NOcontinue
4.3Milkfrotherdoes
notswitchoffauto
matically
YESreplacemilkfrother
NOcontinue
4.4Insideofjugstays
cold
YESreplacemilkfrother
NOcontinue
5Pressstartbutton
foratleast2sec
(coldmilkprepa
ration)
5.1Startbuttonisnot
backlightedinblue
YESreplacemilkfrother
6Finalcleaning
(seepage40)
Noerrorsfoundaccordingto
checklist?
YESformoreinformation
pleasecontact
Nespresso
ServiceDivision
Endofchecklist

Citizservicemanual
52
R E P A I R S
8 R E P A I R S
Theserepairinstructions
arebasedonexplodeddrawingswithpositionnumberscombinedwithrepairand
mountingtips,
presupposebasicknowledgeinrepairing
Nespresso
coffeemachines.
Asarule,identicalcomponents(e.g.pumps,thermoblocksetc.)are
presentedindetailonlyonce.
8.1 Safetyinstructions
8.2 Repairandmountingtips
Thesegeneraladvicesarecompletedwithspecificrepairtipsinthischapter.
Additionalinformation
Forcomponentsnotmentionedinthisrepairchapter,refertothechapters"Explosion
Drawings"onpage148and"PartsList"onpage154.
Snapconnections
Partsofthecaseandcomponentsofthecoffeemachineareconnectedscrewlesswith
latches.
Whenlooseningtheselatches,proceedwithcareandpatiencetoavoid
causinganydamage.
Thesidepanelsofthecoreunithavedelicatesnapconnectionsthatcanbrakeeasily.
Whenremovingthesesidepanels,usethespecialdisassemblytooland
procceedaccordingtothedisassemblyinstructions.
Screwconnections
Donotovertightenscrews.Plasticthreadsandinsertsaredelicate.
Observemax.torqueforthescrewconnectionsaccordingtothefollowingtable.
Riskoffatalelectricalshock!
Mainsvoltageinsidethecoffeemachine.
Disconnectthemainsplugbeforedisassemblythecoffeemachine
mustbefreeofvoltage.
Dangerofburns!
Hotpartsandwaterunderpressureinsidethecoffeemachine(ther
moblockinparticular).
Letcoffeemachinecooldownbeforedisassembly.
Citizservicemanual53
R E P A I R S
Screw/screwconnection Torque Position
Screwwithovalshapedhead 50(+30/0)Ncm
0.5(+0.3/0)Nm Bottomofplatform
TX10screw(4x)/
brewingunit(TMBU)
50(+30/0)Ncm
0.5(+0.3/0)Nm
TX10screw/
thermoblocksupport(central)
150(+30/0)Ncm
1.5(+0.3/0)Nm
NTCfixationonthermoblock 80100Ncm
0.81.0Nm
TX20screw(2x)/
thermofusefixationsonther
moblock
150(+30/0)Ncm
1.5(+0.3/0)Nm
Citizservicemanual
54
R E P A I R S
Designationofspareparts
Thecomponentsinthefollowingillustrationsareindexedwithpositionnumbers.
Seeseparatesparepartslistforcorrespondingsparepartnumbers.
Distinguishbetweensparepartsofthedifferentmodelsandcoreunit
versions.
Electrostaticdischargeprotection
Wheninstallinganewelectroniccontrolboard,theservicetechnicianmustbeearthed
withagroundingband.
Wiringarrangement
Randomchangesinthewiringarrangementduringarepaircancause
electromagneticinterferences,
squeezedwires,
insulationdefectsduetocontactwithhotparts,
insulationproblemsiflowandhighvoltagewiresarenotseparated.
Protectivemeasures:
• Donotchangethecourseofinternalwiringduringrepair.
• Makesurethatwiresaredistantfromhotpartsuseexistingcableductsandclips.
Residualwater
• Ifitisnecessarytopulloffhosesfromcomponents,holdreadyasmallbeakerand
atoweltocollectandwipeawayleakingwater.
• Aspecialprocedureisnecessarytoemptythefluidsystemofthecoffeemachinefor
repairorshipment(referto"Emptywatersystem"onpage37).
TX20screw/
groundconnection(PE)onther
moblock
150(+30/0)Ncm
1.5(+0.3/0)Nm
Screw/screwconnection Torque Position
Citizservicemanual55
R E P A I R S
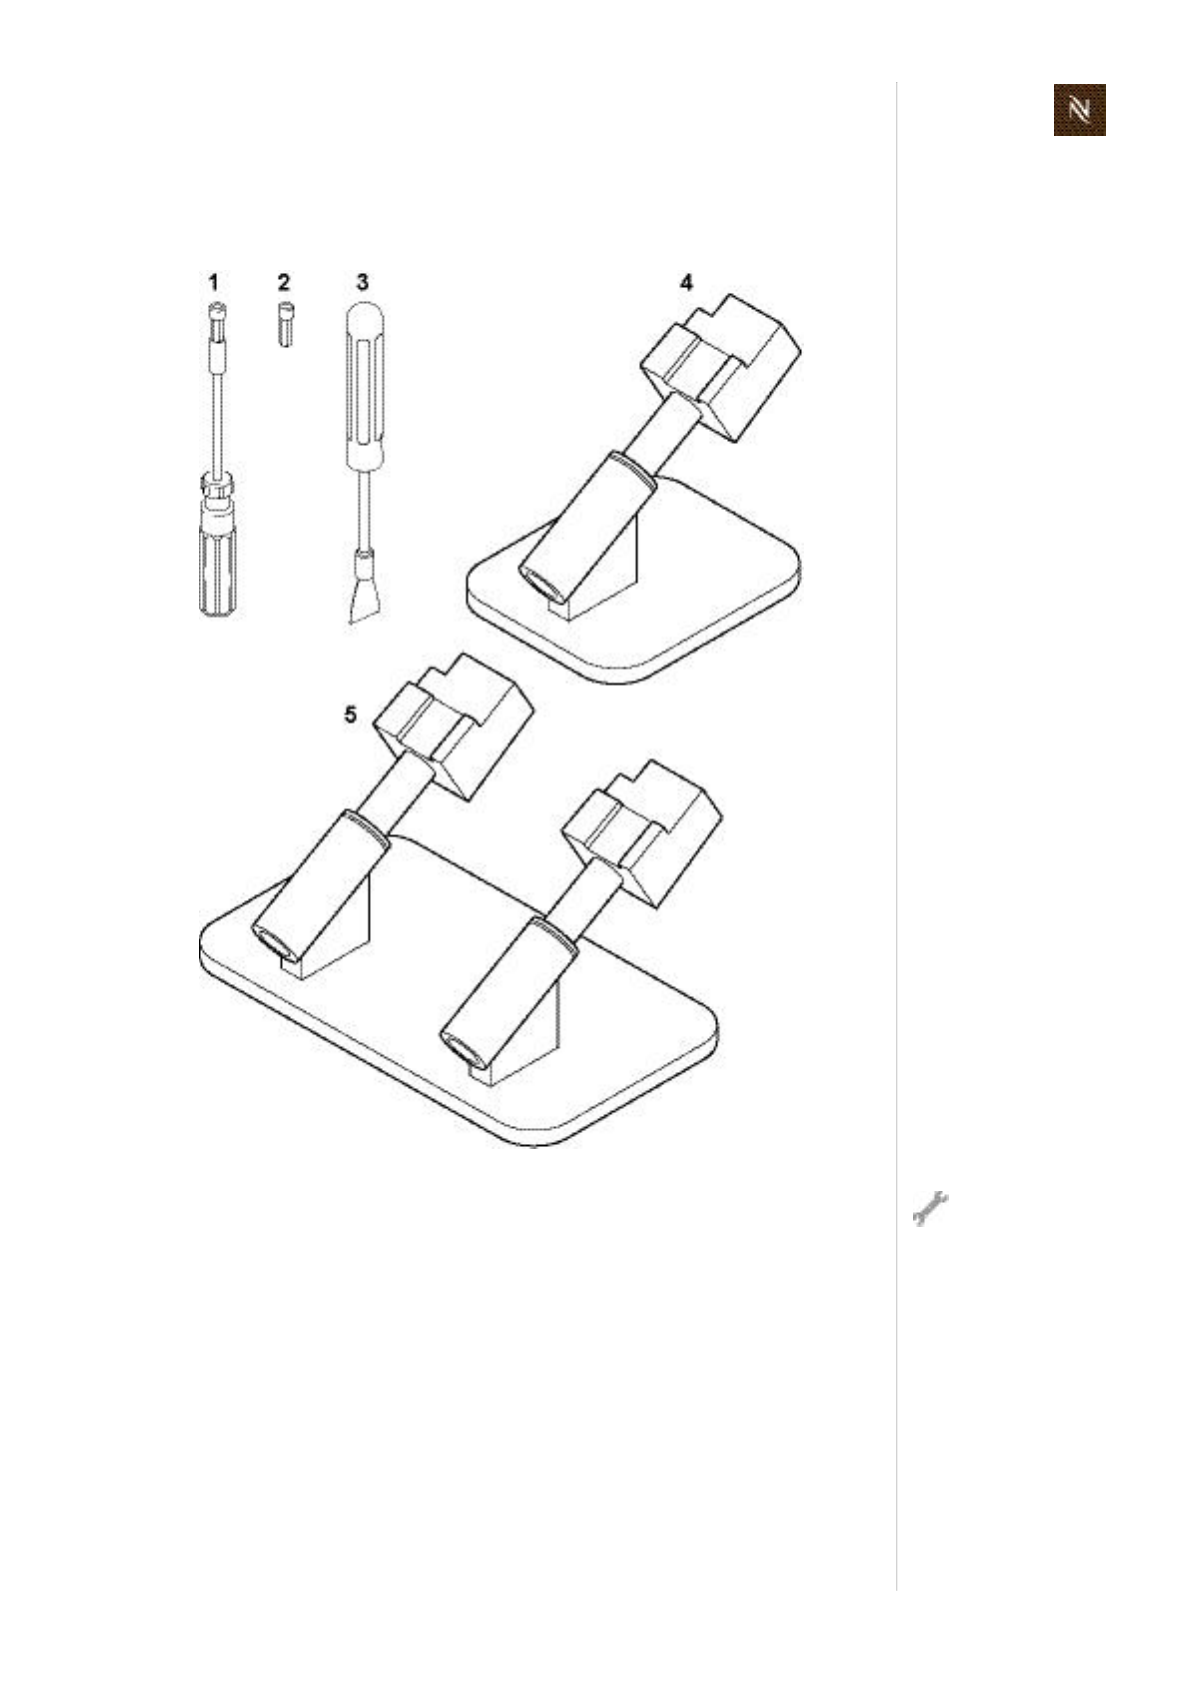
8.3 Toolsandaccessories
Withthefollowingassortmentoftools,allrepairsdescribedcanbemade:
Adynamometric
screwdriverwithsuit
ablebitsisrecom
mended.
1) Specialscrewdriverwithshortovalbit
(EFRno.0004872)
2) Shortovalbitonly
(EFRno.0004878)
3) Disassemblytool(forsidepanelsetc.)
(EFRno.0060611)
4) Repairing/serviceholderdevicefor
modelsCitizandCitiz&milk(availa
blefrom
Nespresso
)
5) Repairing/serviceholderdevicefor
modelCitiz&Co(availablefrom
Nes
presso
)
6) TORXscrewdriver(TX10,TX15)
7) Screwdriverwithapprox.4mmtooltip
8) HexagonalwrenchSW4
9) FlatwrenchSW14,10mmAF
10)Torquewrench
11)Longnosedpliers
12)Flatpliers
13)Beakerandtoweltocatchandwipe
awayleakingwater
Citizservicemanual
56
R E P A I R S
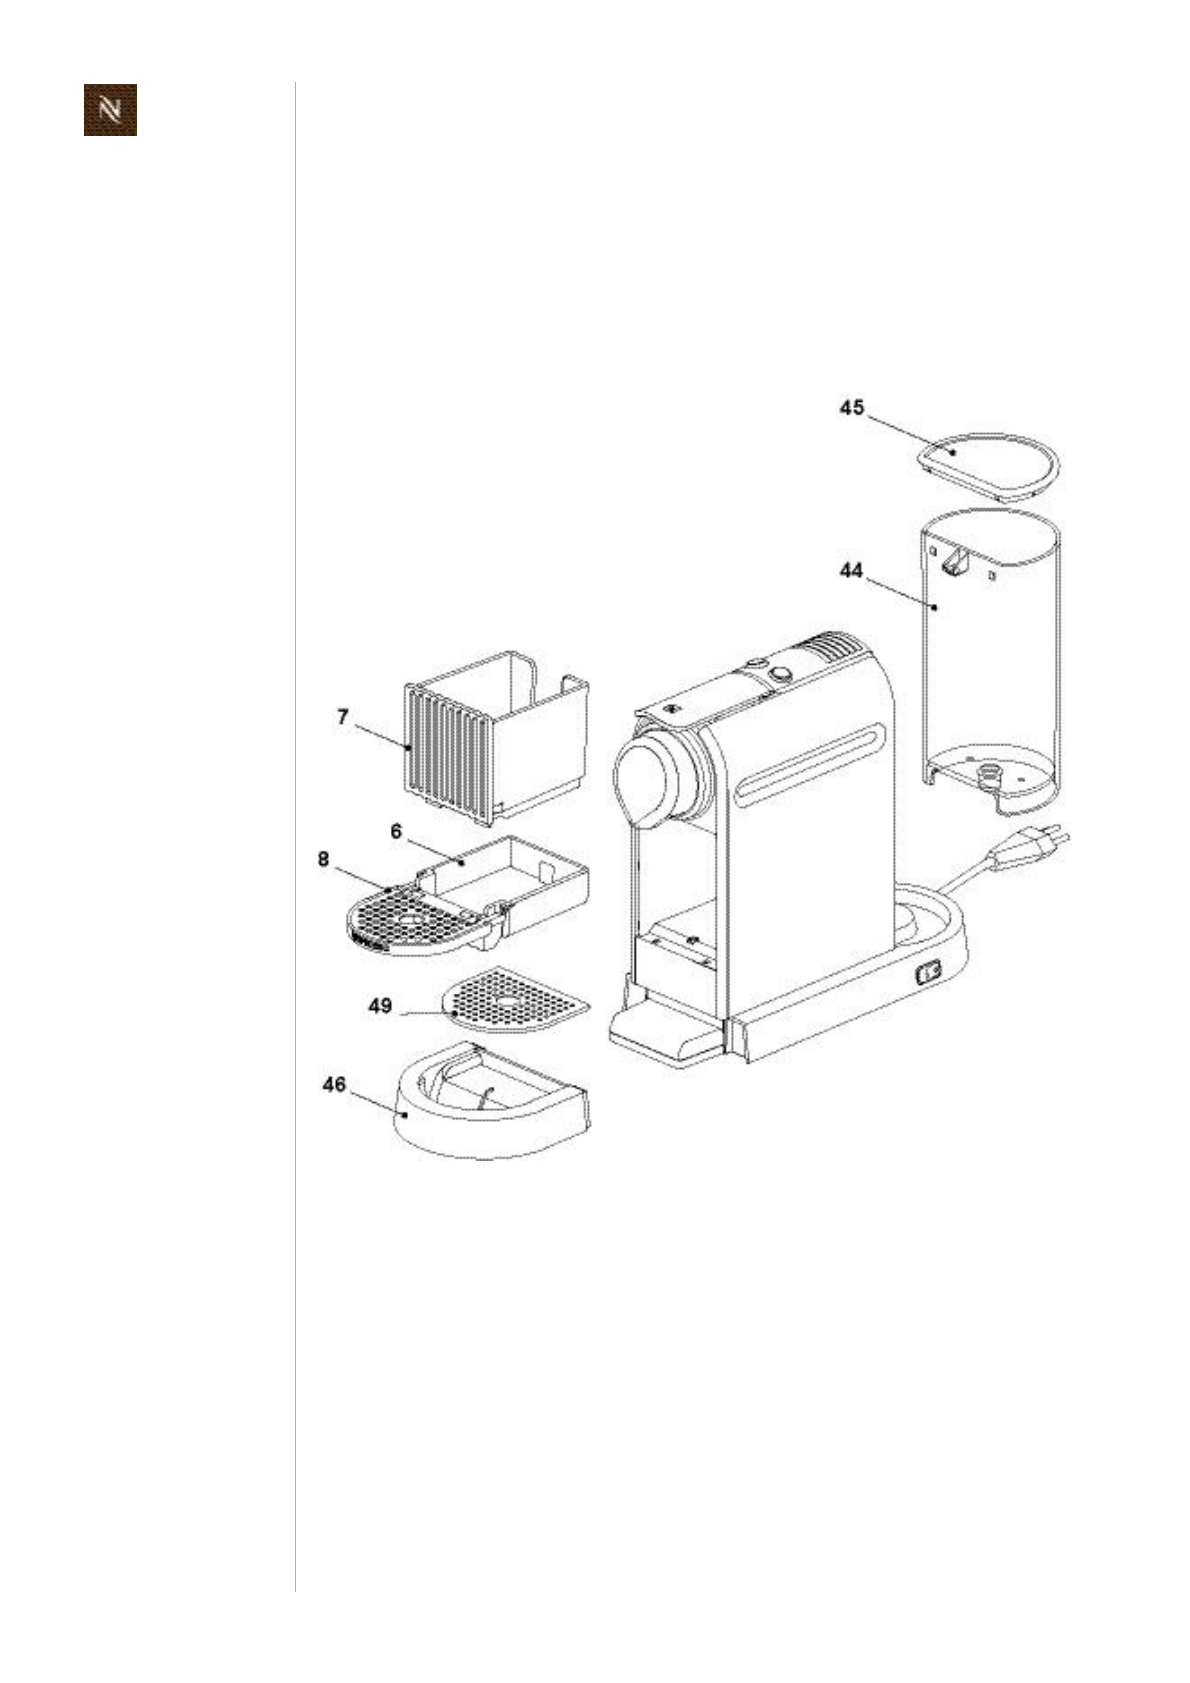
8.4 PlatformdisassemblymodelCitiz
8.4.1 Generaldisassembly
Thisgeneraldisassembly
isnecessarybeforetheremoval/disassemblyofacoreunitispossible,
givesaccesstothecomponentsandwiringoftheplatform.
• Takeawayallremovablepartsfromplatformandcoreunit
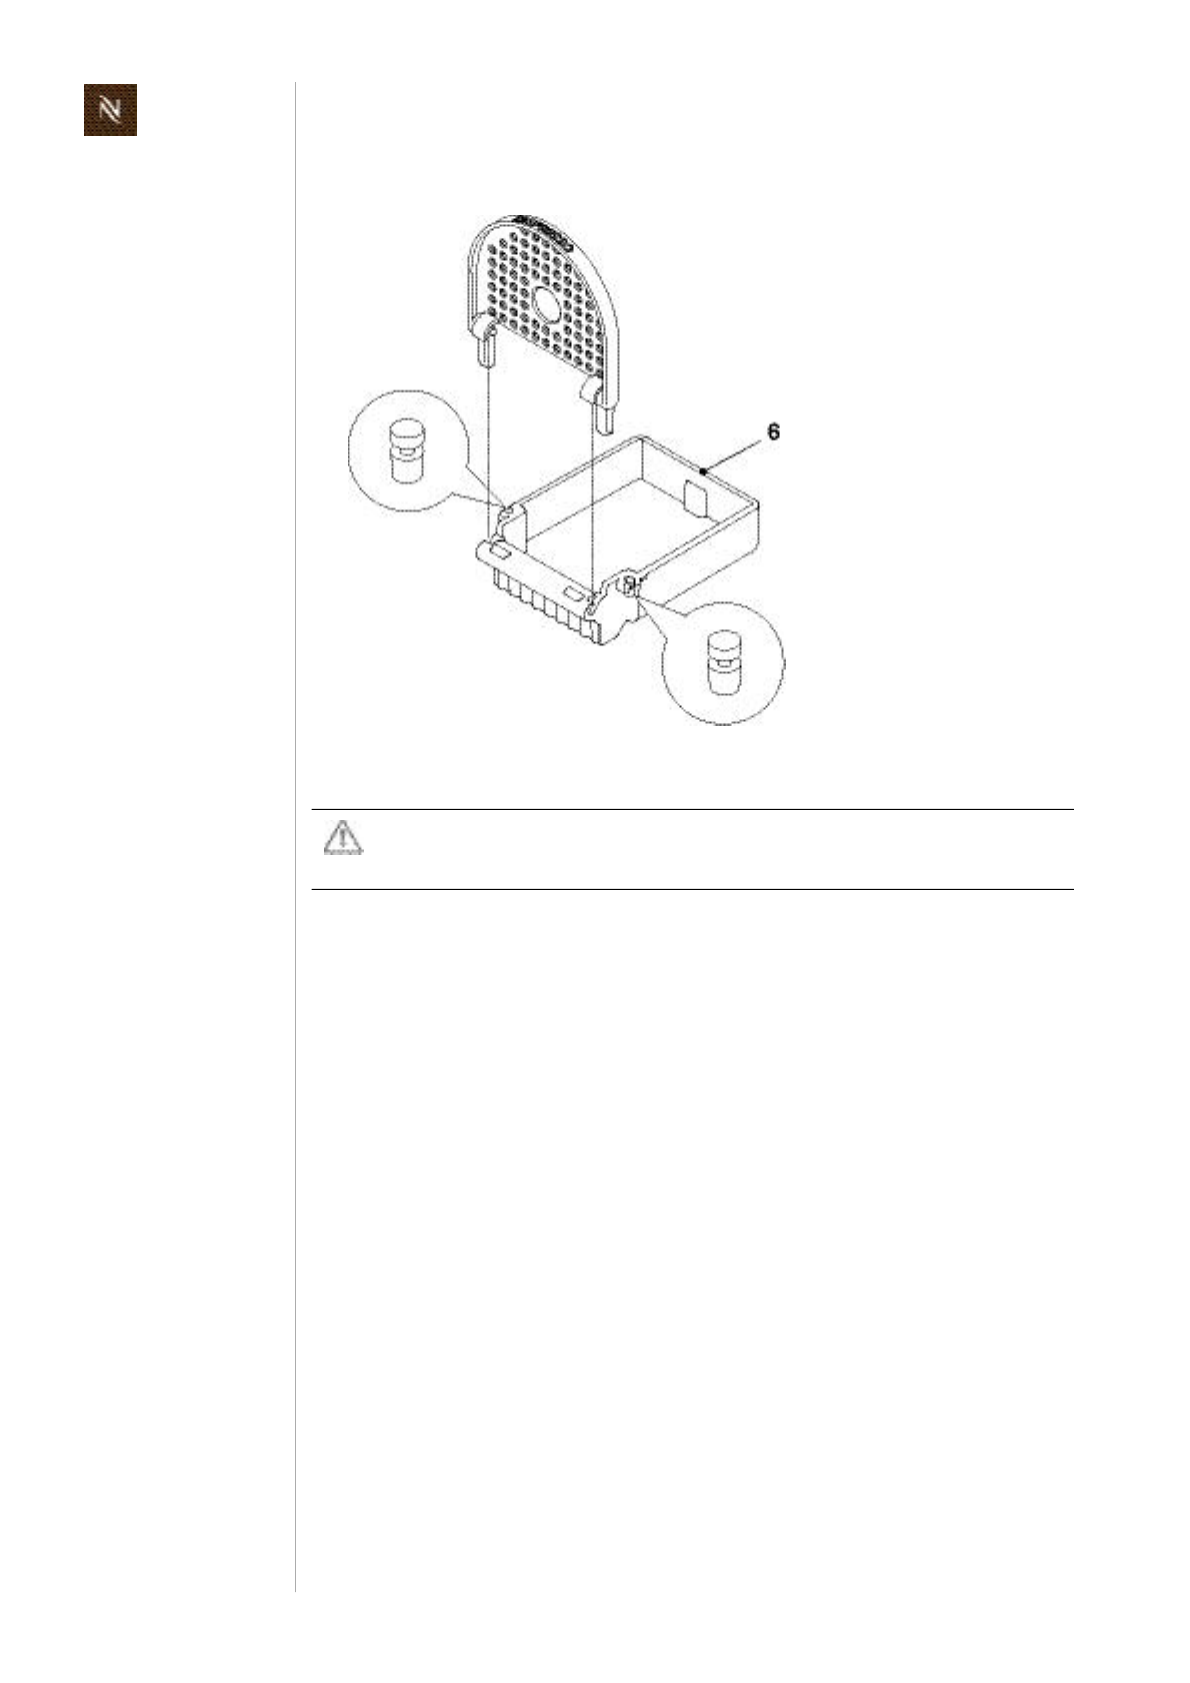
cupsupport(8)withwastewatercontainer(6)
capsulecontainer(7)
driptray(46)withdripgrid(49)
watertank(44)withcover(45).
Citizservicemanual57
R E P A I R S
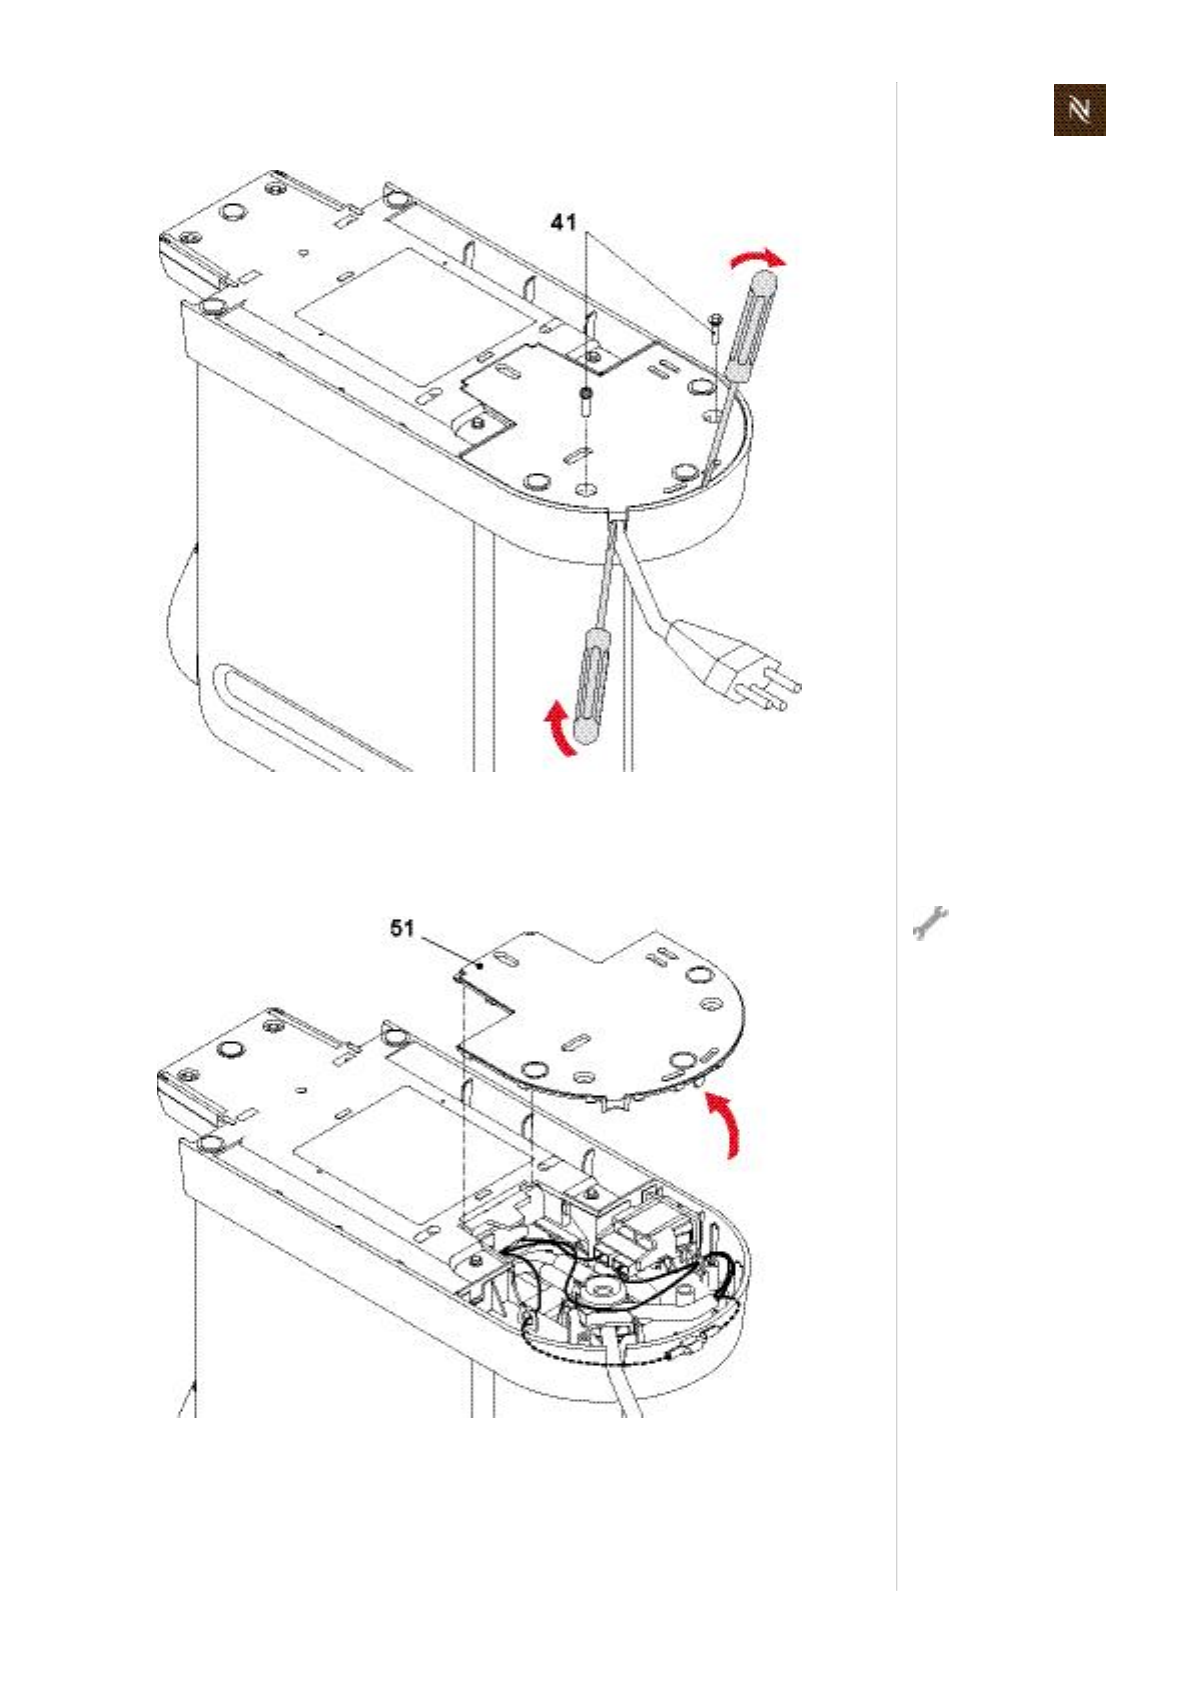
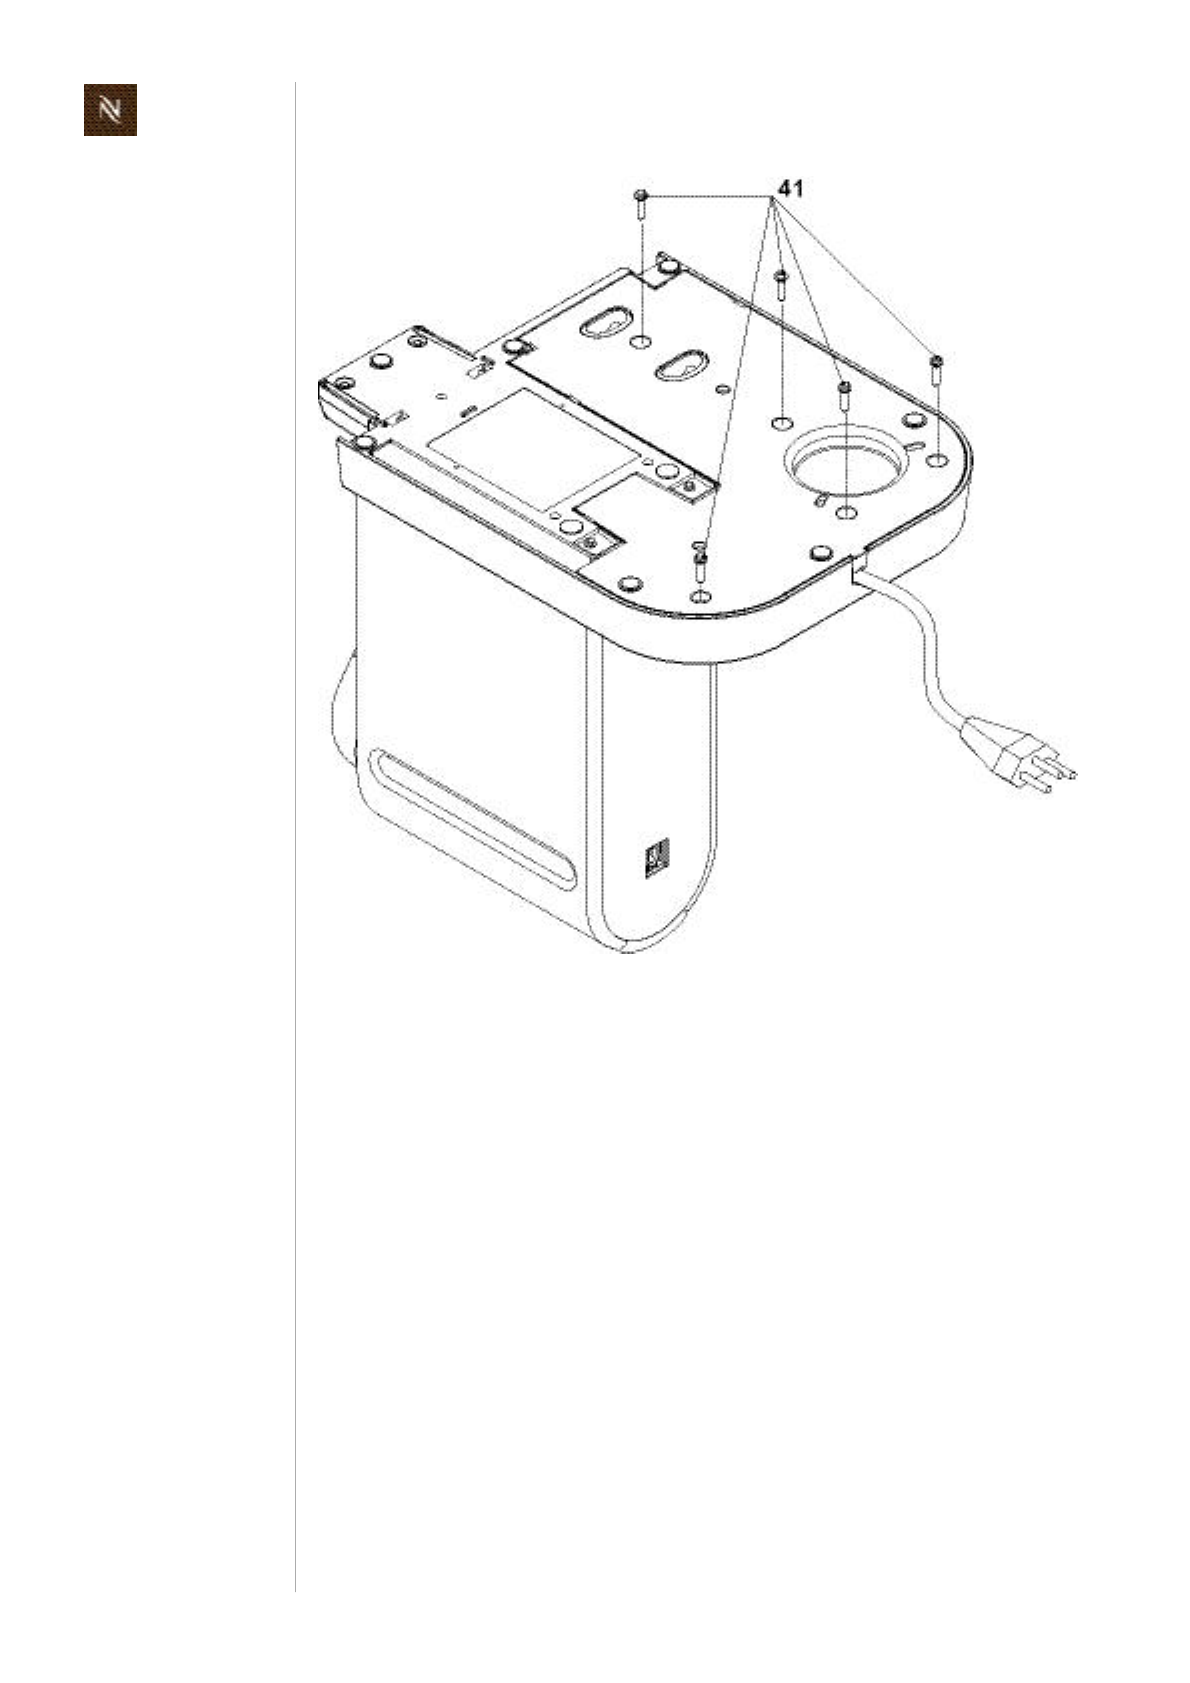
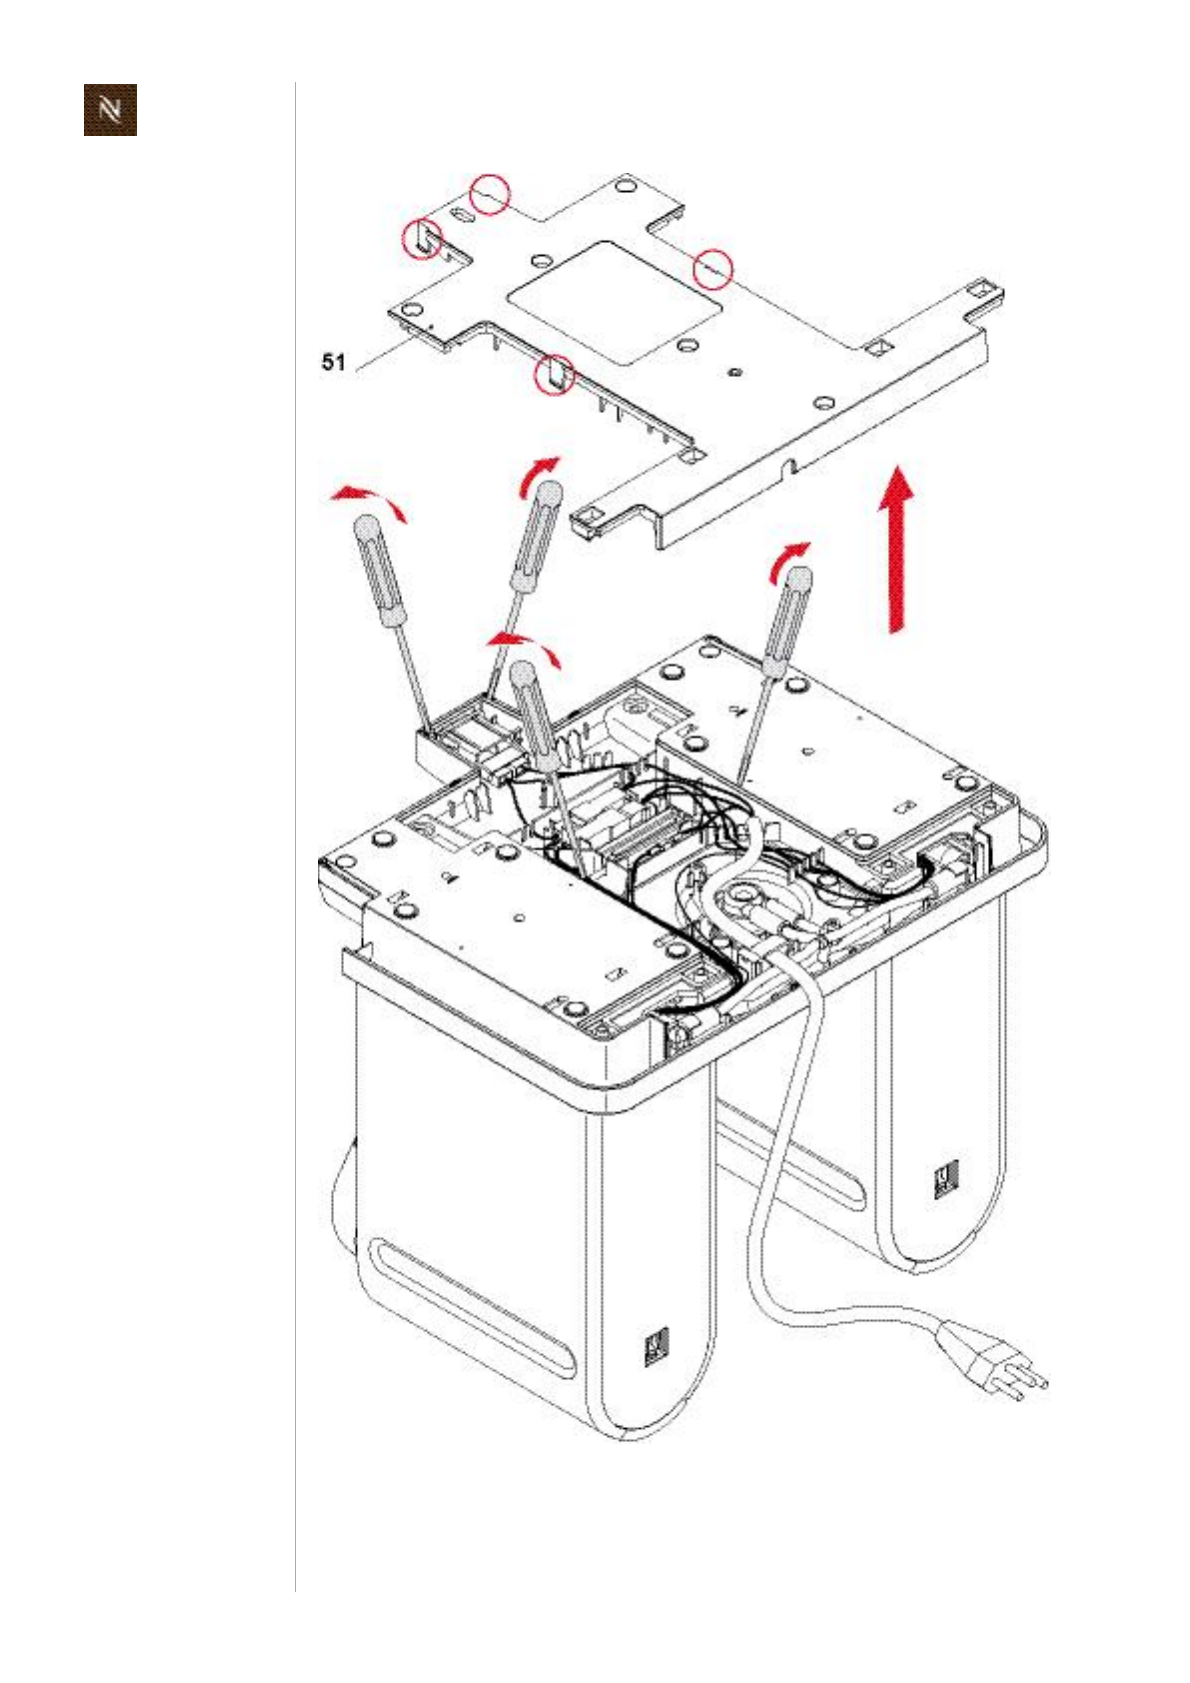
• Loosen2screws(41,ovalshapedhead)atthebottomsideofplatform.
• Usescrewdrivertoreleaselatches.Startbyinsertingthesrewdriverintheopening
forthepowercord.
• Removebottomcover(51)byswingingituplikeshown.
Thebottomcover
(51)isinsertedinto
theplatformwithboth
edgesofitssmallend.Only
removebottomcoverby
swinginguptheroundend.
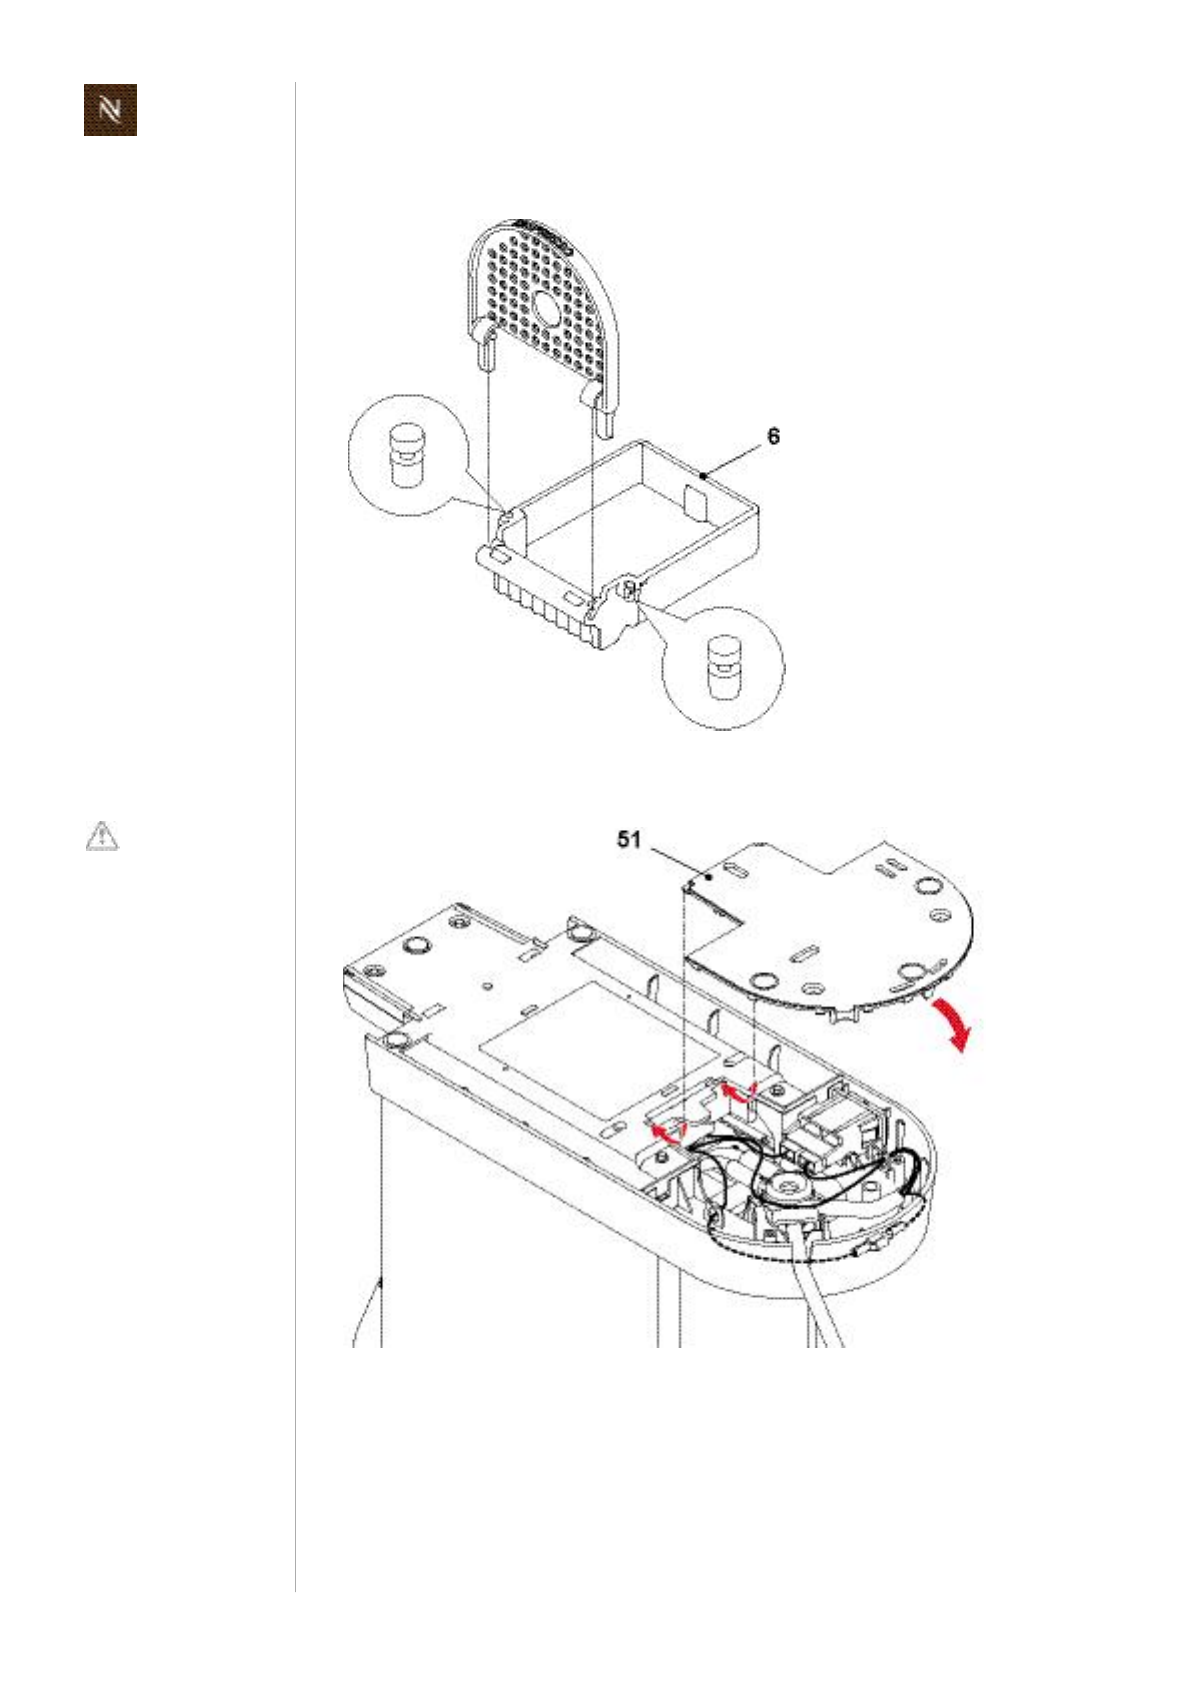
Citizservicemanual
58
R E P A I R S
Assemblycheckpoints
• Checkif2rubberstoppersaremountedonwastewatercontainer(6).
• Insertbottomcover(51)withsmallendintoplatformatfirst.Thenfolditdownand
closelatches.
Takecarenottojam
anywiresatthe
screwconnections.
Citizservicemanual59
R E P A I R S
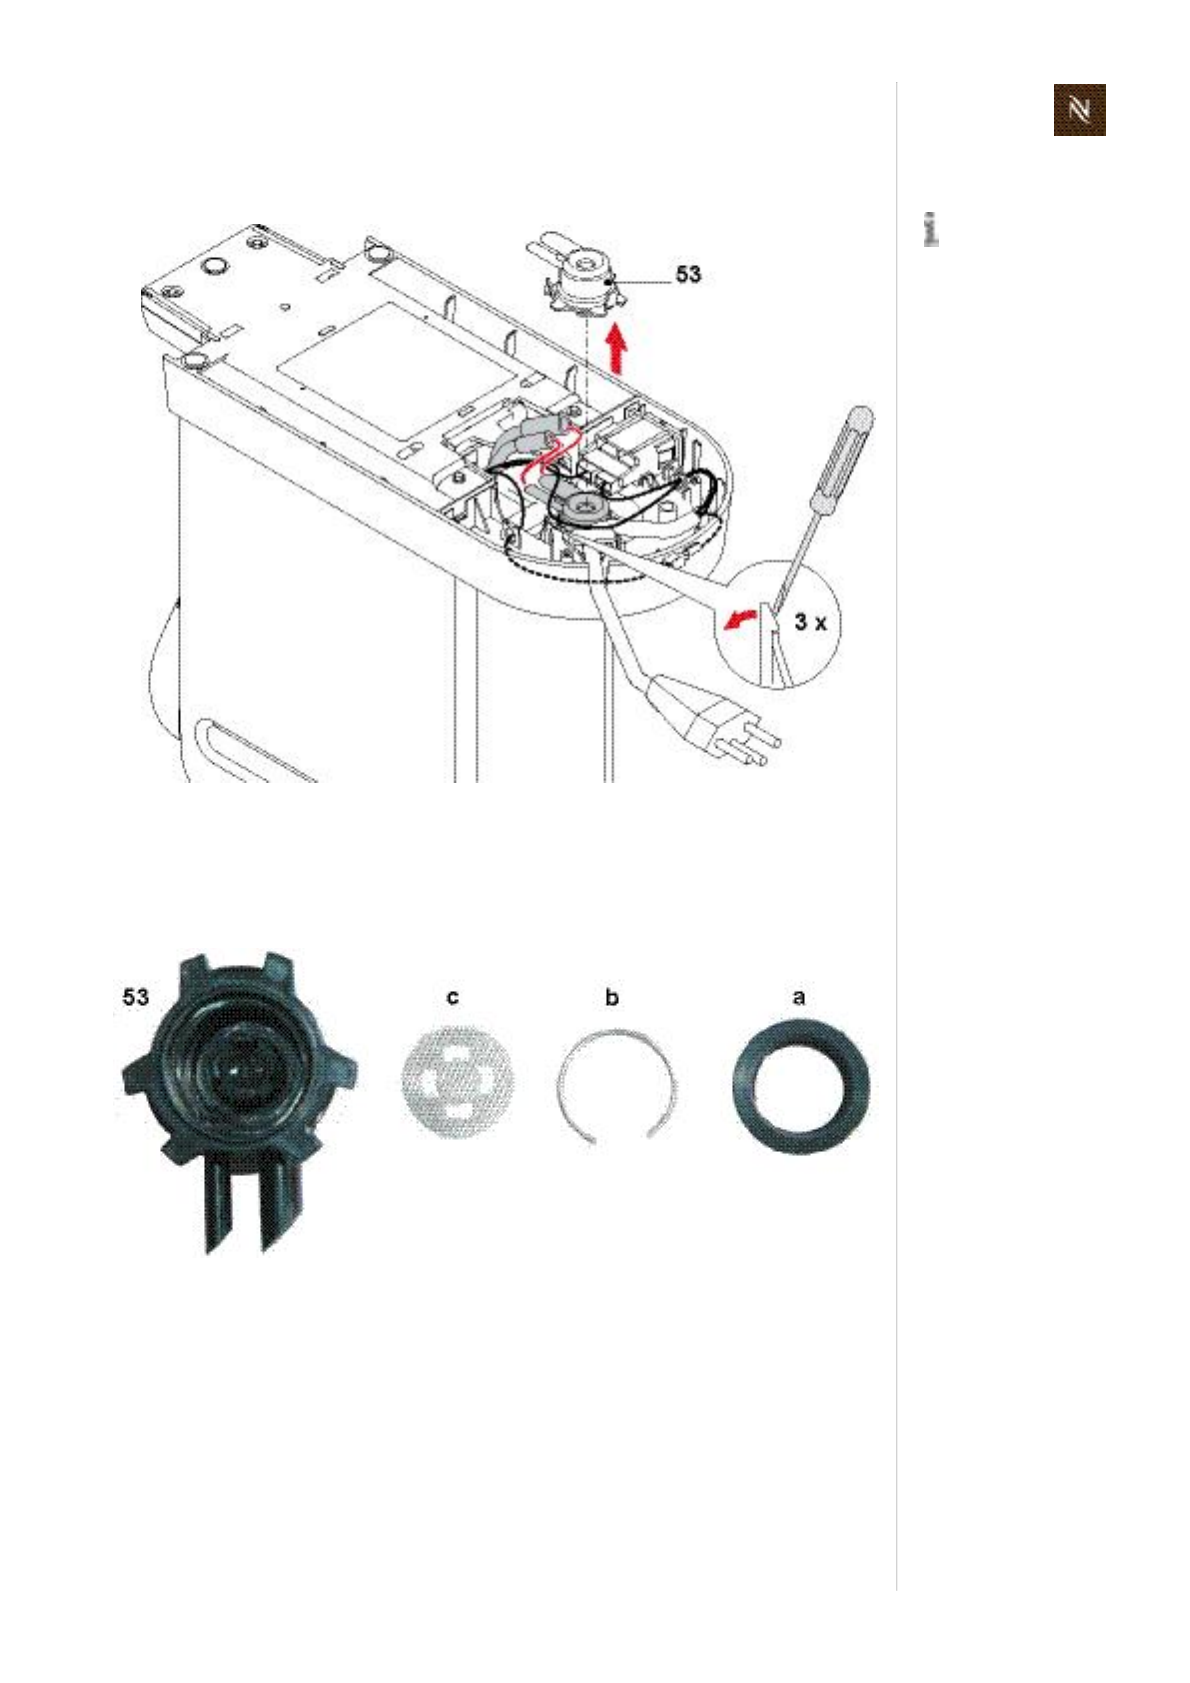
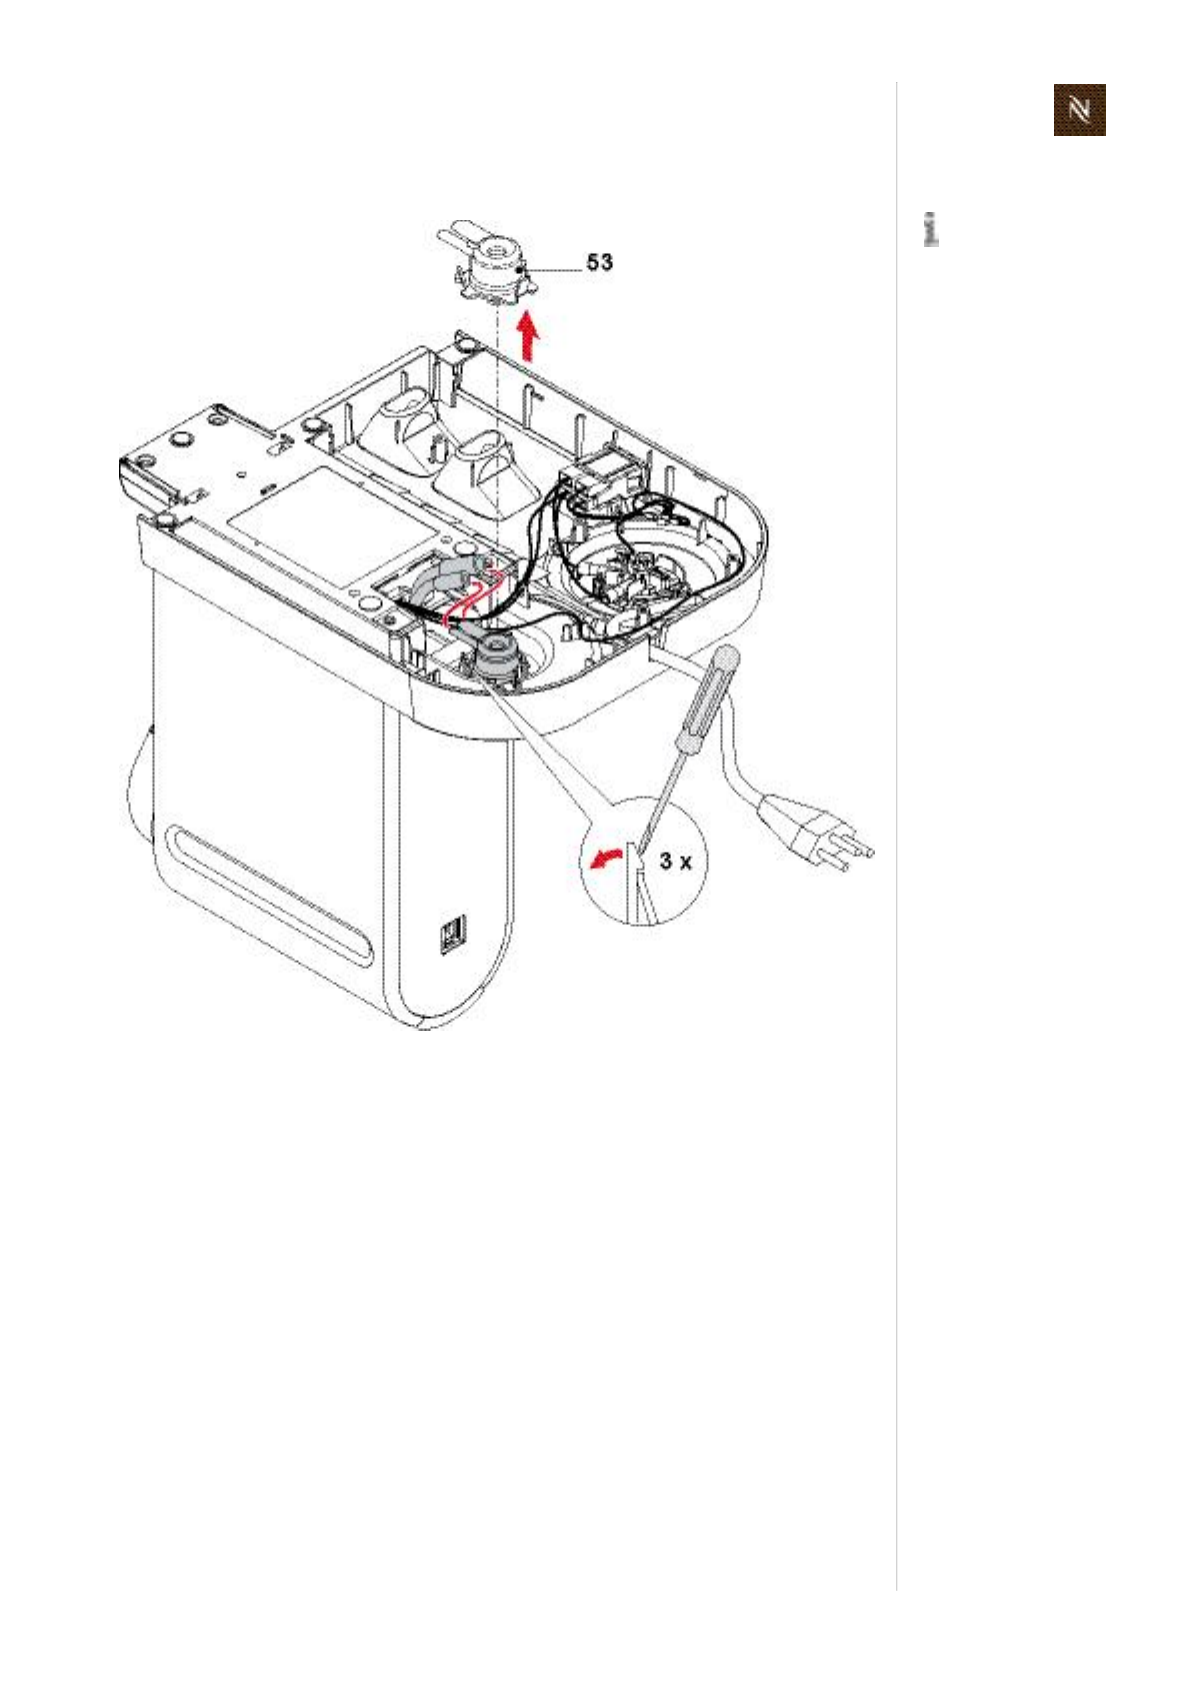
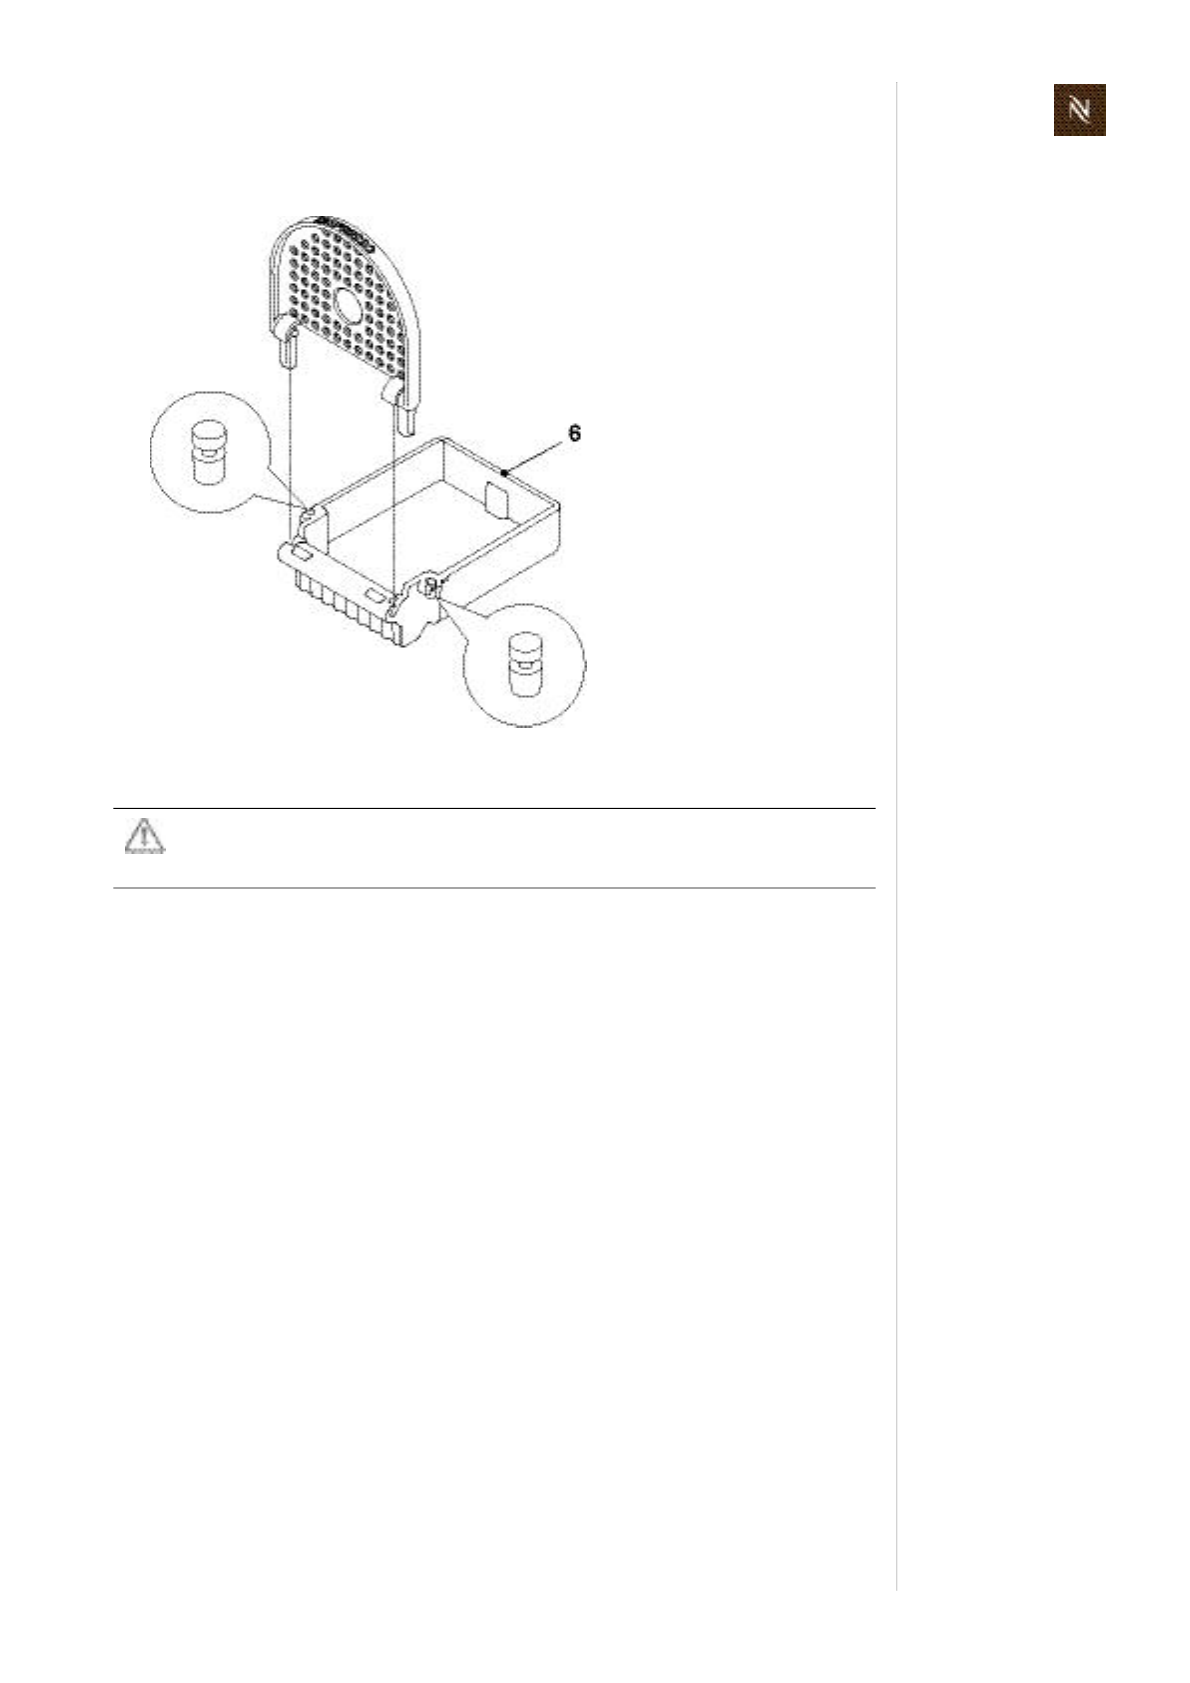
8.4.2 Replacingwatertankconnector
• Pulloffbothhosesfromwatertankconnector(53).
• Releasethe3latchesaroundthewatertankconnectoroneaftertheotherby
pressingthetopoftheirhooksoutwardswithascrewdriver(seedetail)andlifting
thewatertankconnectoratthesametime.
• Removegasket(a)fromwatertankconnector(53).
• Withthehelpofapairoftweezers,removeclampingring(b)andmetalsieve(c).
• Cleanorreplaceparts.
Thewatertankcon
nector(53)is
replacedtogether
withgasket,clampingring
andmetalsieve.
Citizservicemanual
60
R E P A I R S
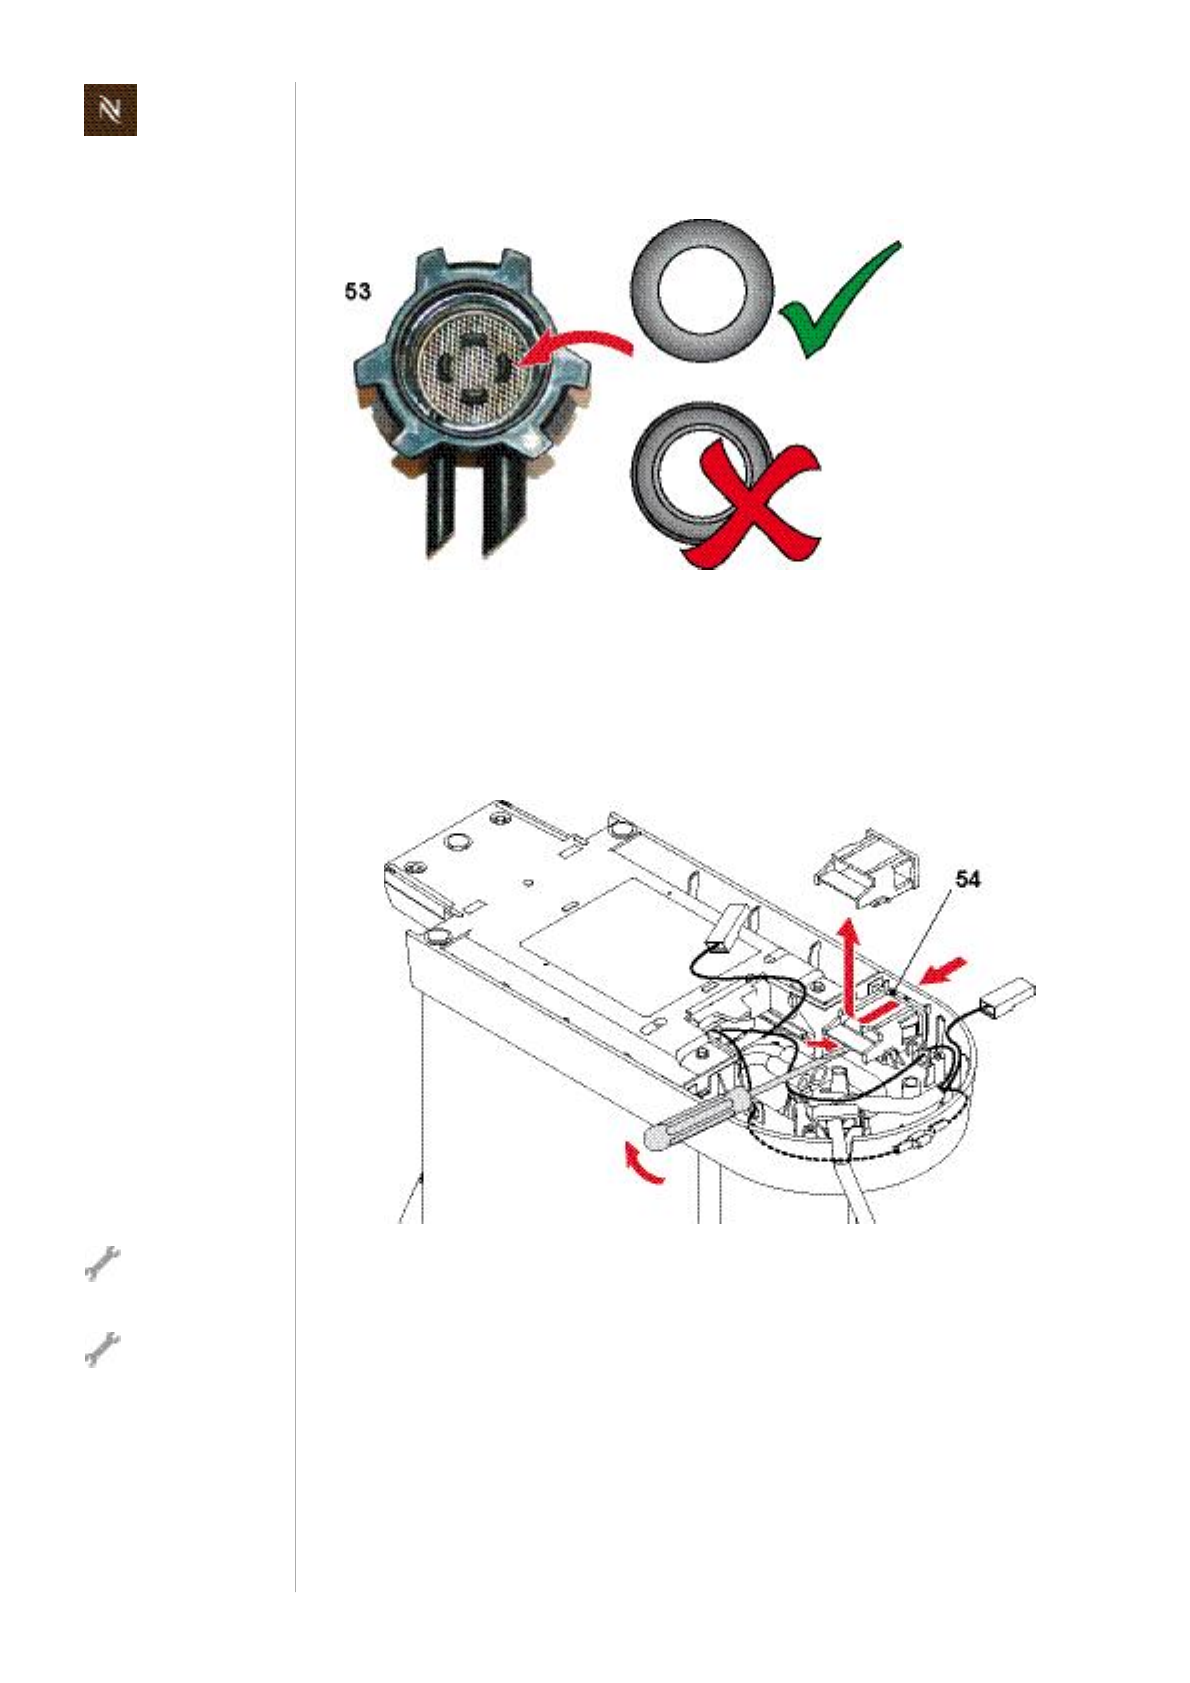
Assemblycheckpoints
• Checkthatgasketisinsertedinwatertankconnector(53)correctly.
• Duringassemblyofthewatertankconnectorontheplatform,eachofits3latches
hastoengagewithanaudibleclick.
• Mindthedifferentdiametersofhosesforthewatertankconnector.
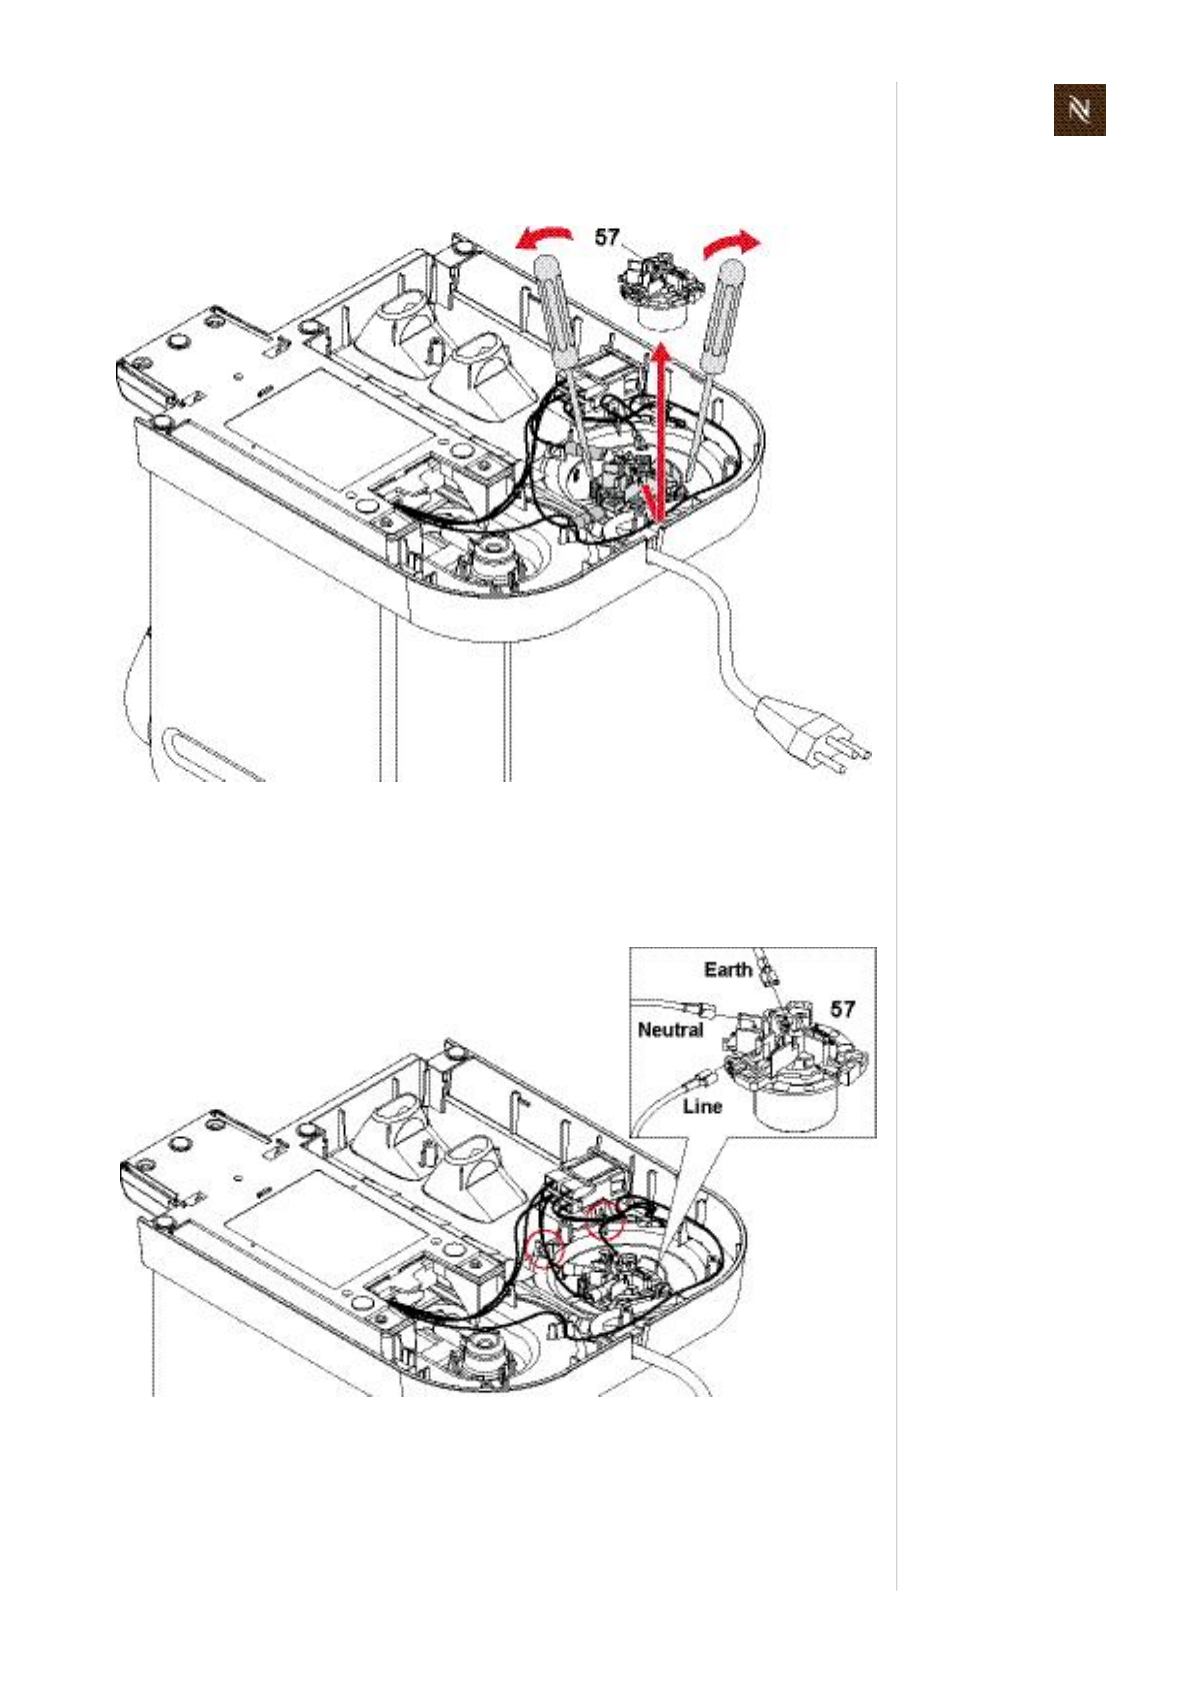
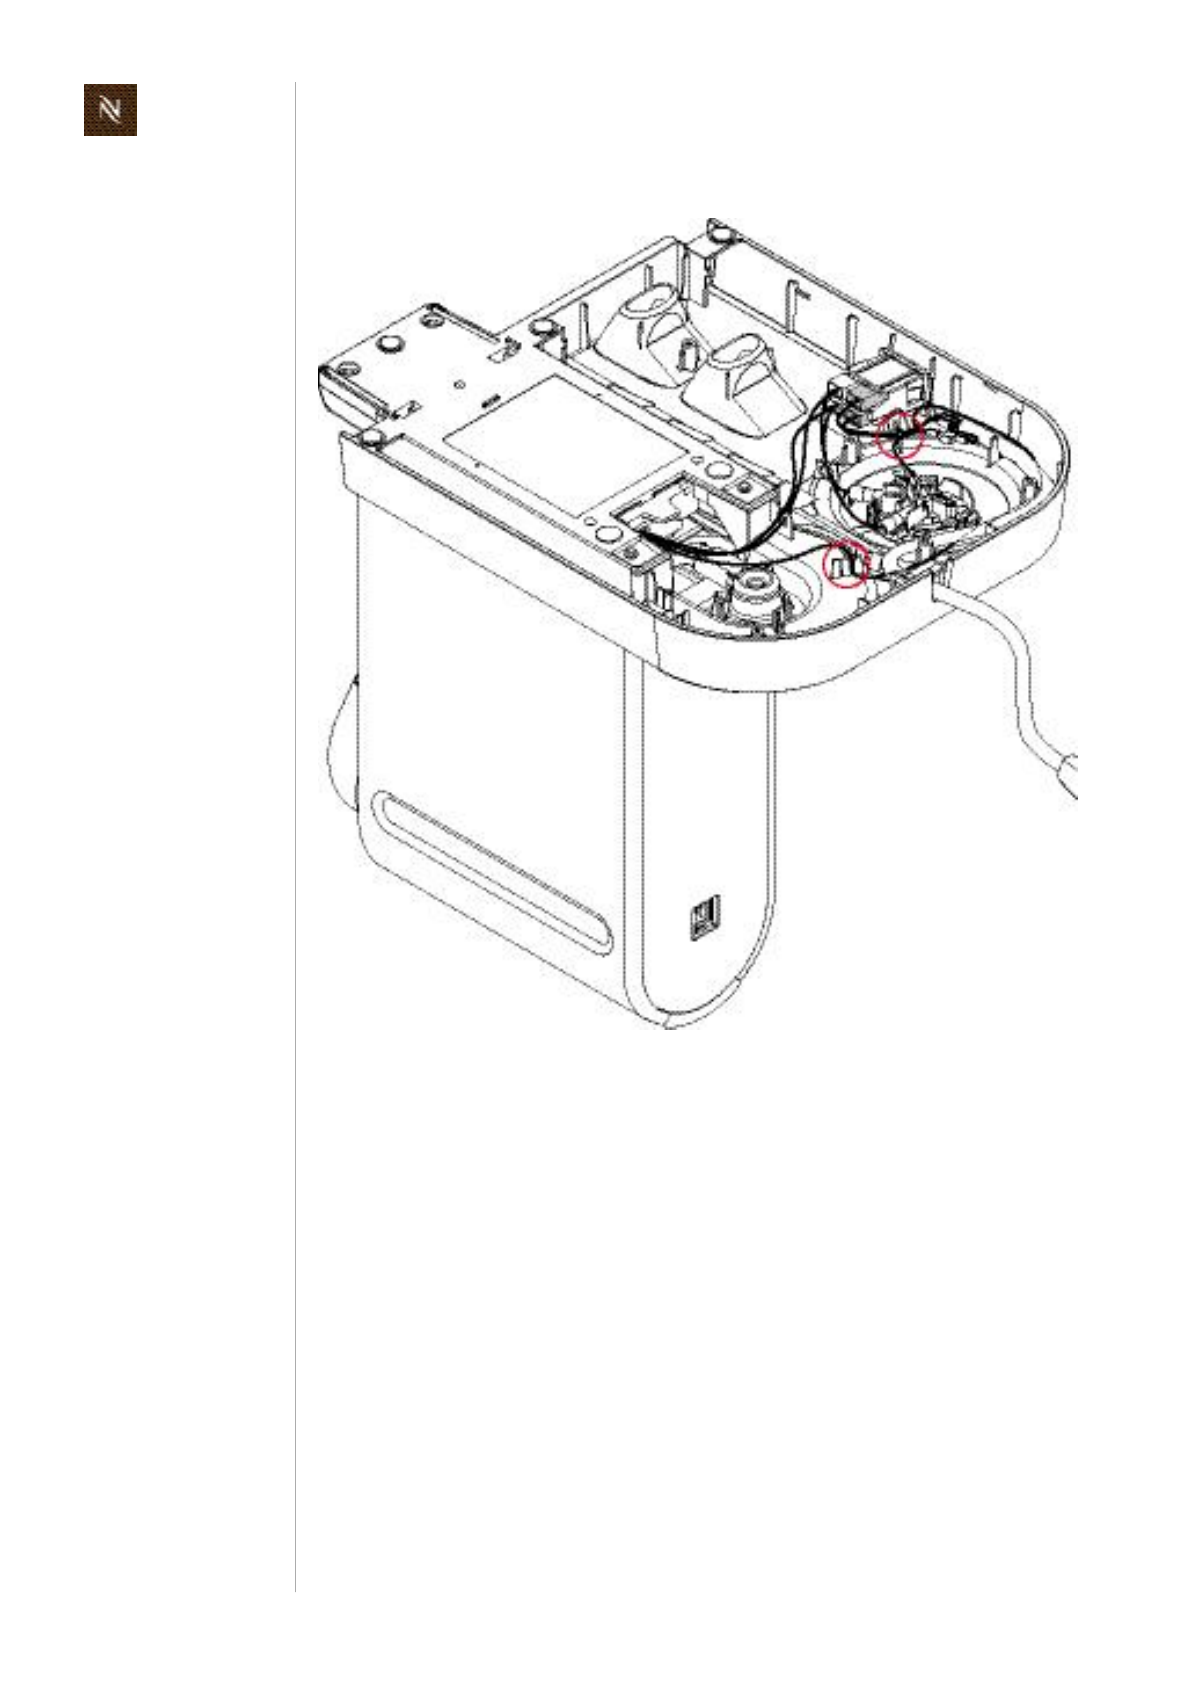
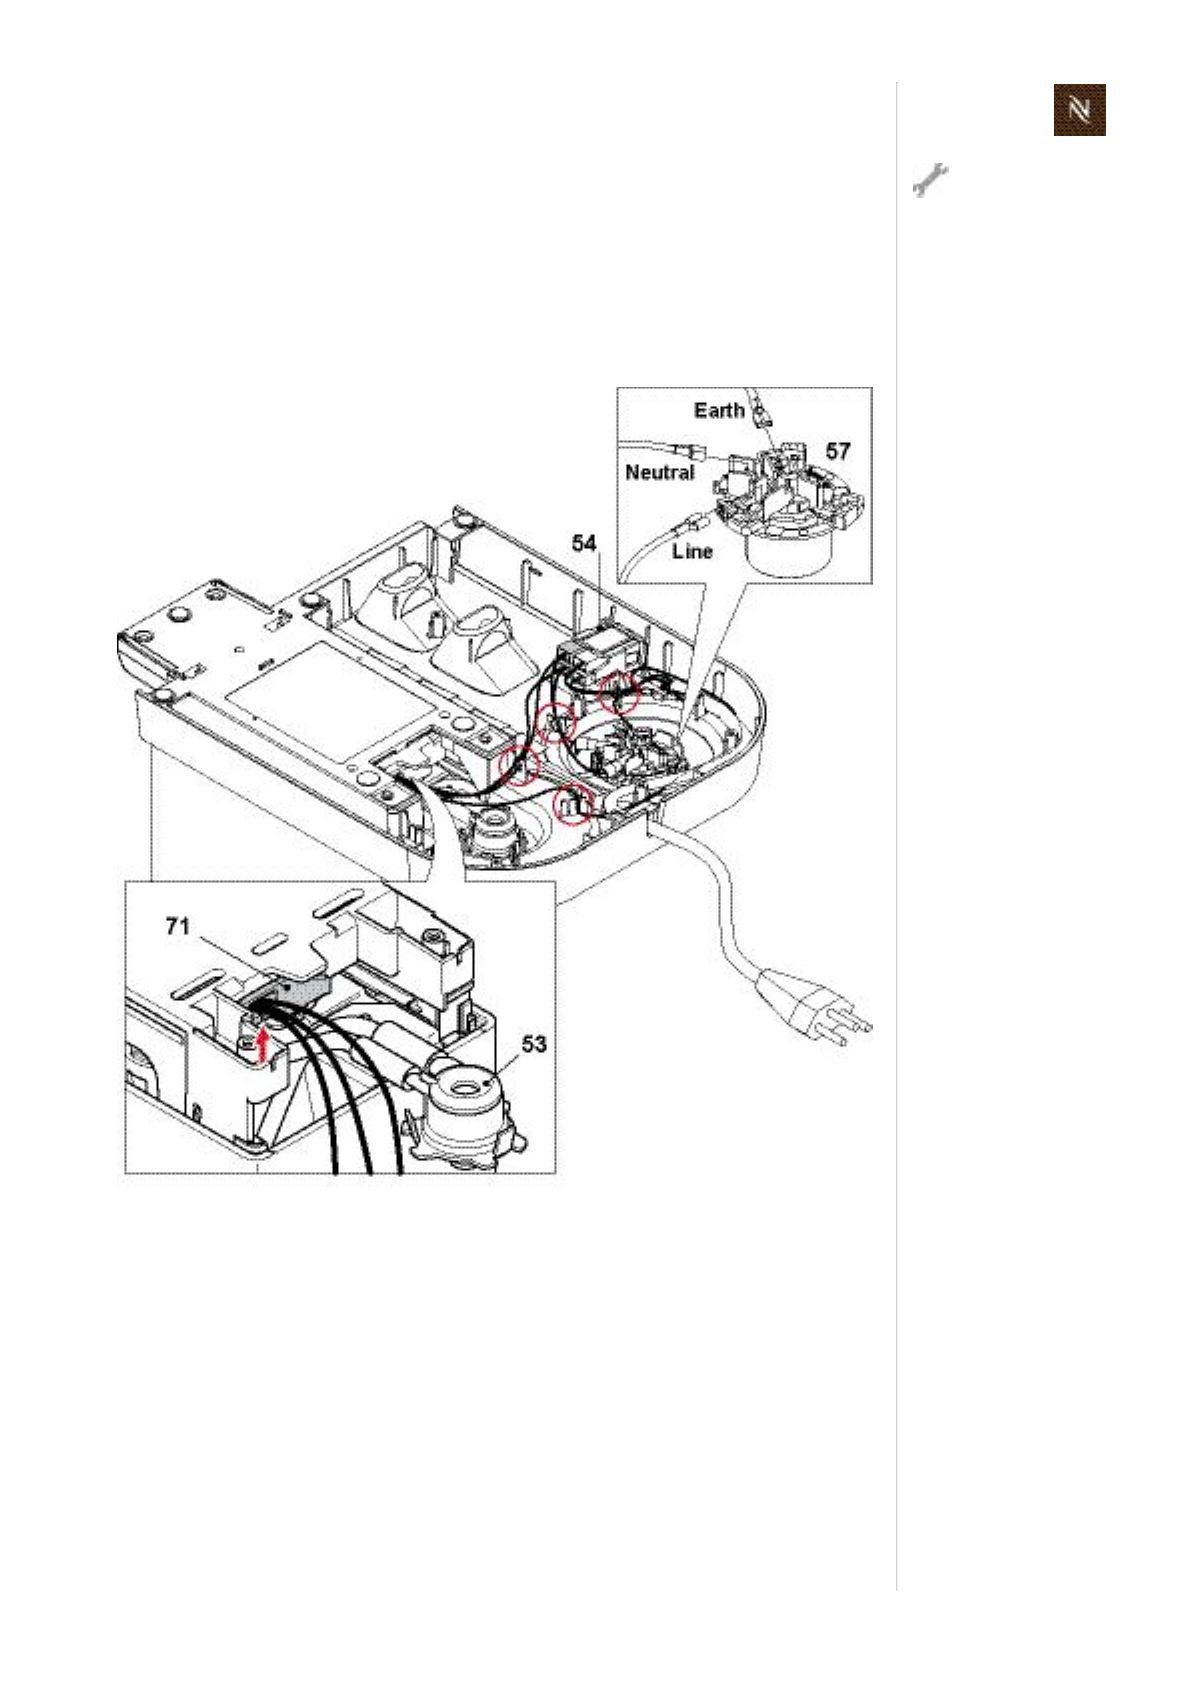
8.4.3 Replacingmainsswitch
• Removewatertankconnectorfromplatformfirst(seepage59).
• Removebothinsulatedfastonreceptaclesfrommainsswitch(54).
• Pressbladeofscrewdriverbetweenholderofmainsswitchandplatformcarefully.
Liftholderwithscrewdriverslightly.Thenpressholderwithmainsswitch(54)
inwardsuntilitcanberemoved.
Thehosescan
remainonthewater
tankconnector.
Useapairofflatpli
erstopulloffinsulat
ingsleevewithrecep
tacle.
Citizservicemanual61
R E P A I R S
Assemblycheckpoints
• Usemarkedcableguidetolaywires.
• Themainsswitchholder(54)hasanotch:correctfittingpositioniswithmainsswitch
connectionsnexttotheplatform(seedetail).
• Duringassemblyofthewatertankconnector(53)ontheplatform,eachofits3
latcheshastoengagewithanaudibleclick.
Citizservicemanual
62
R E P A I R S
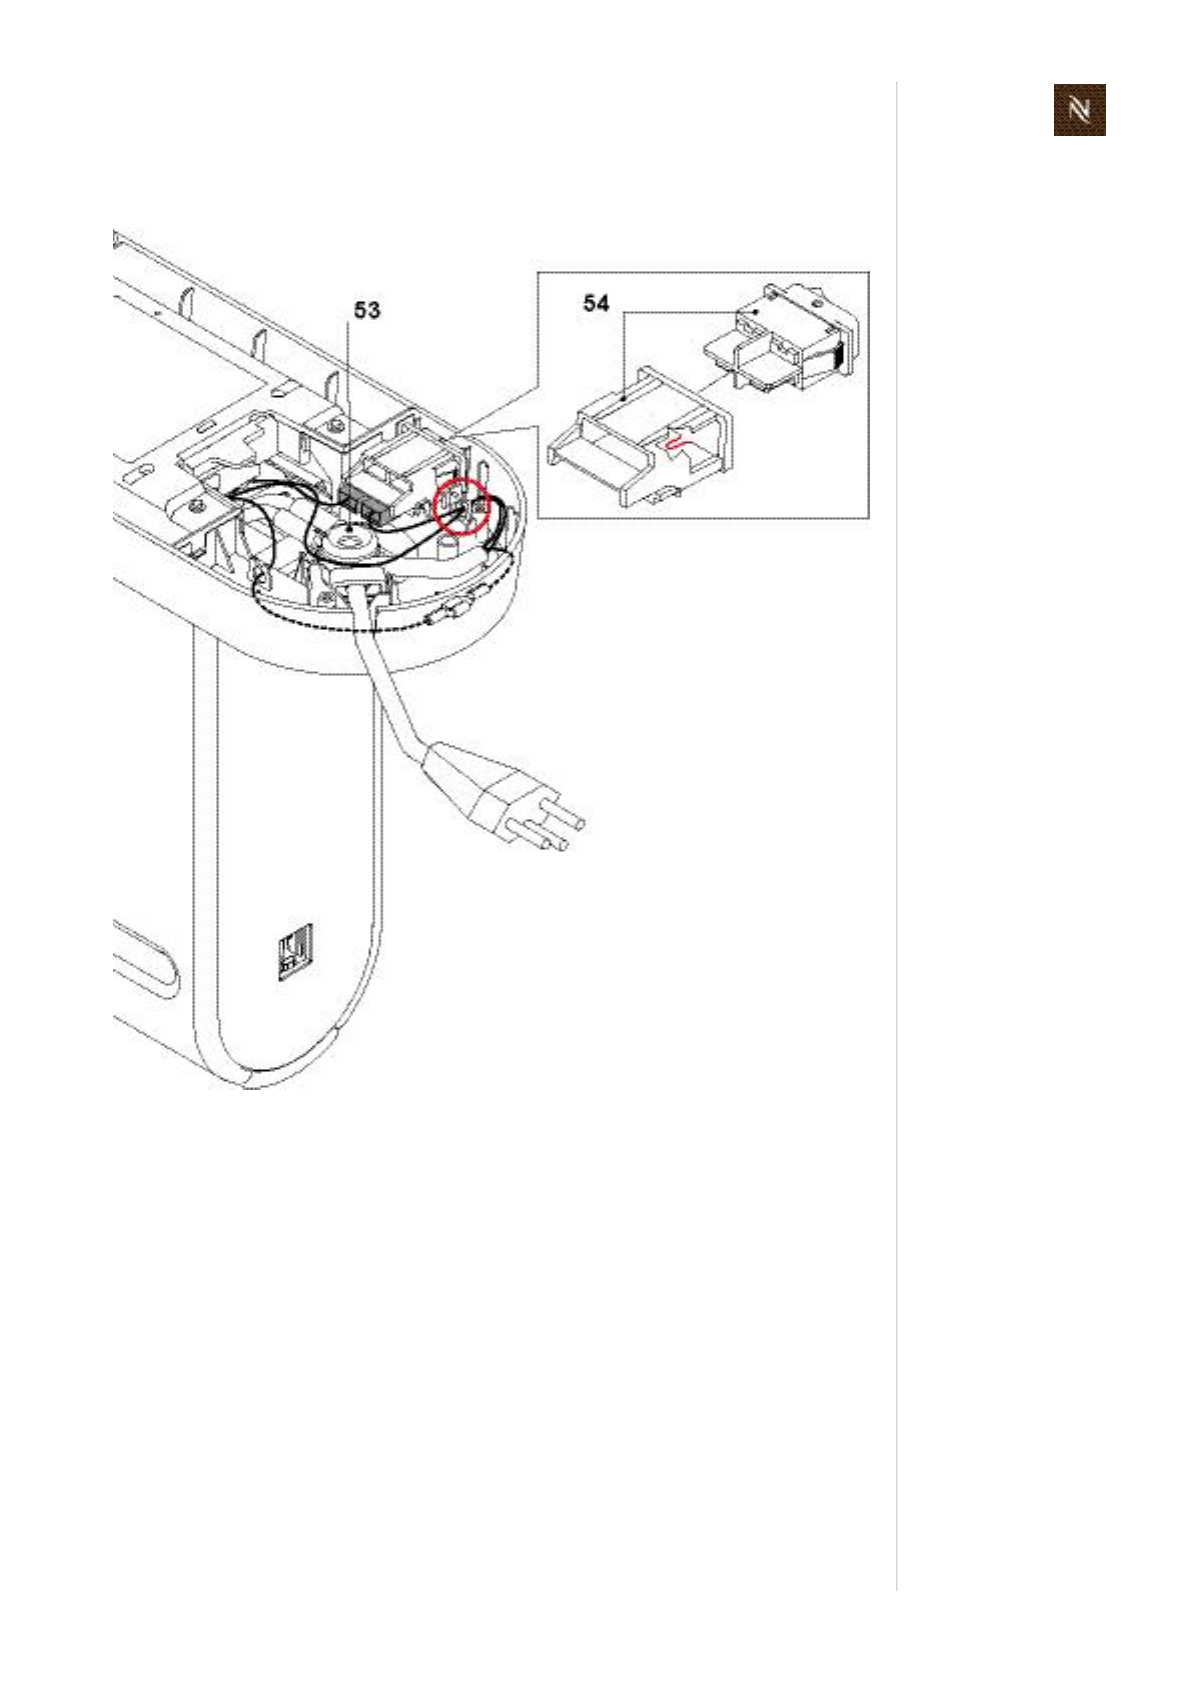
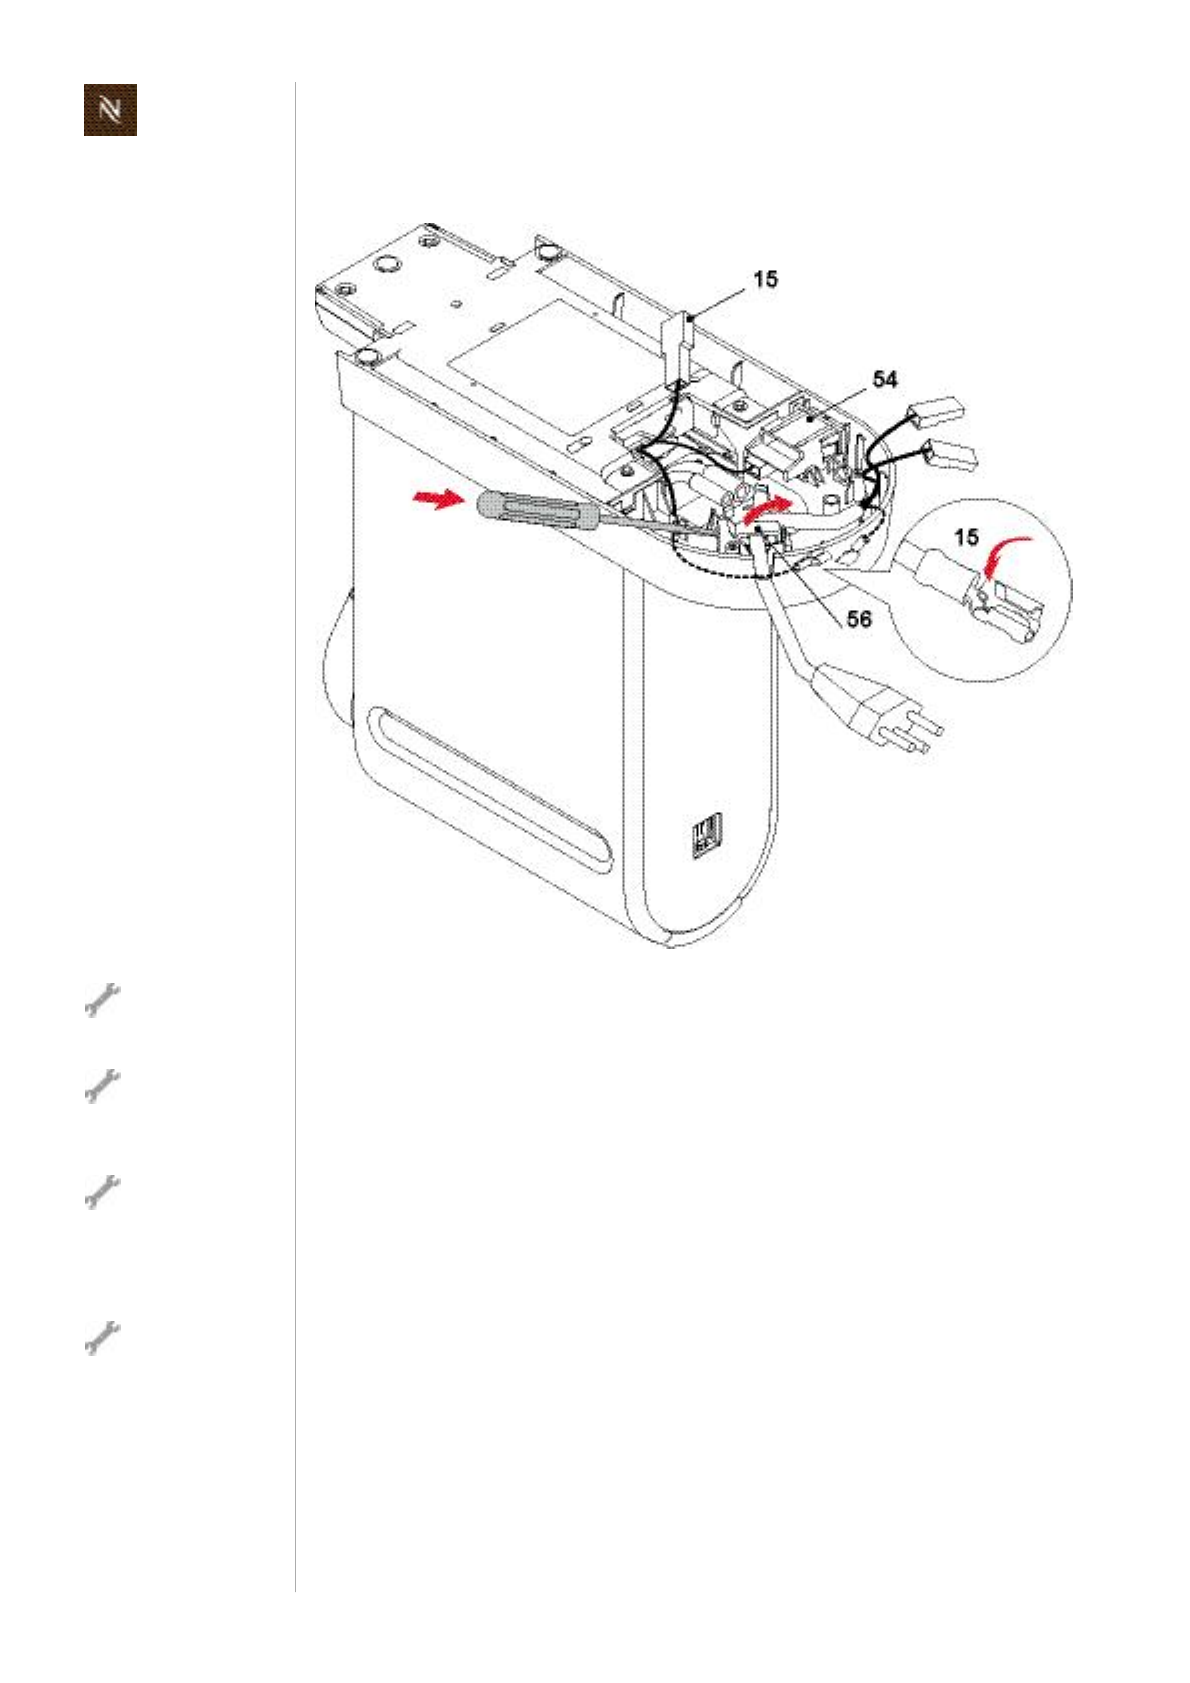
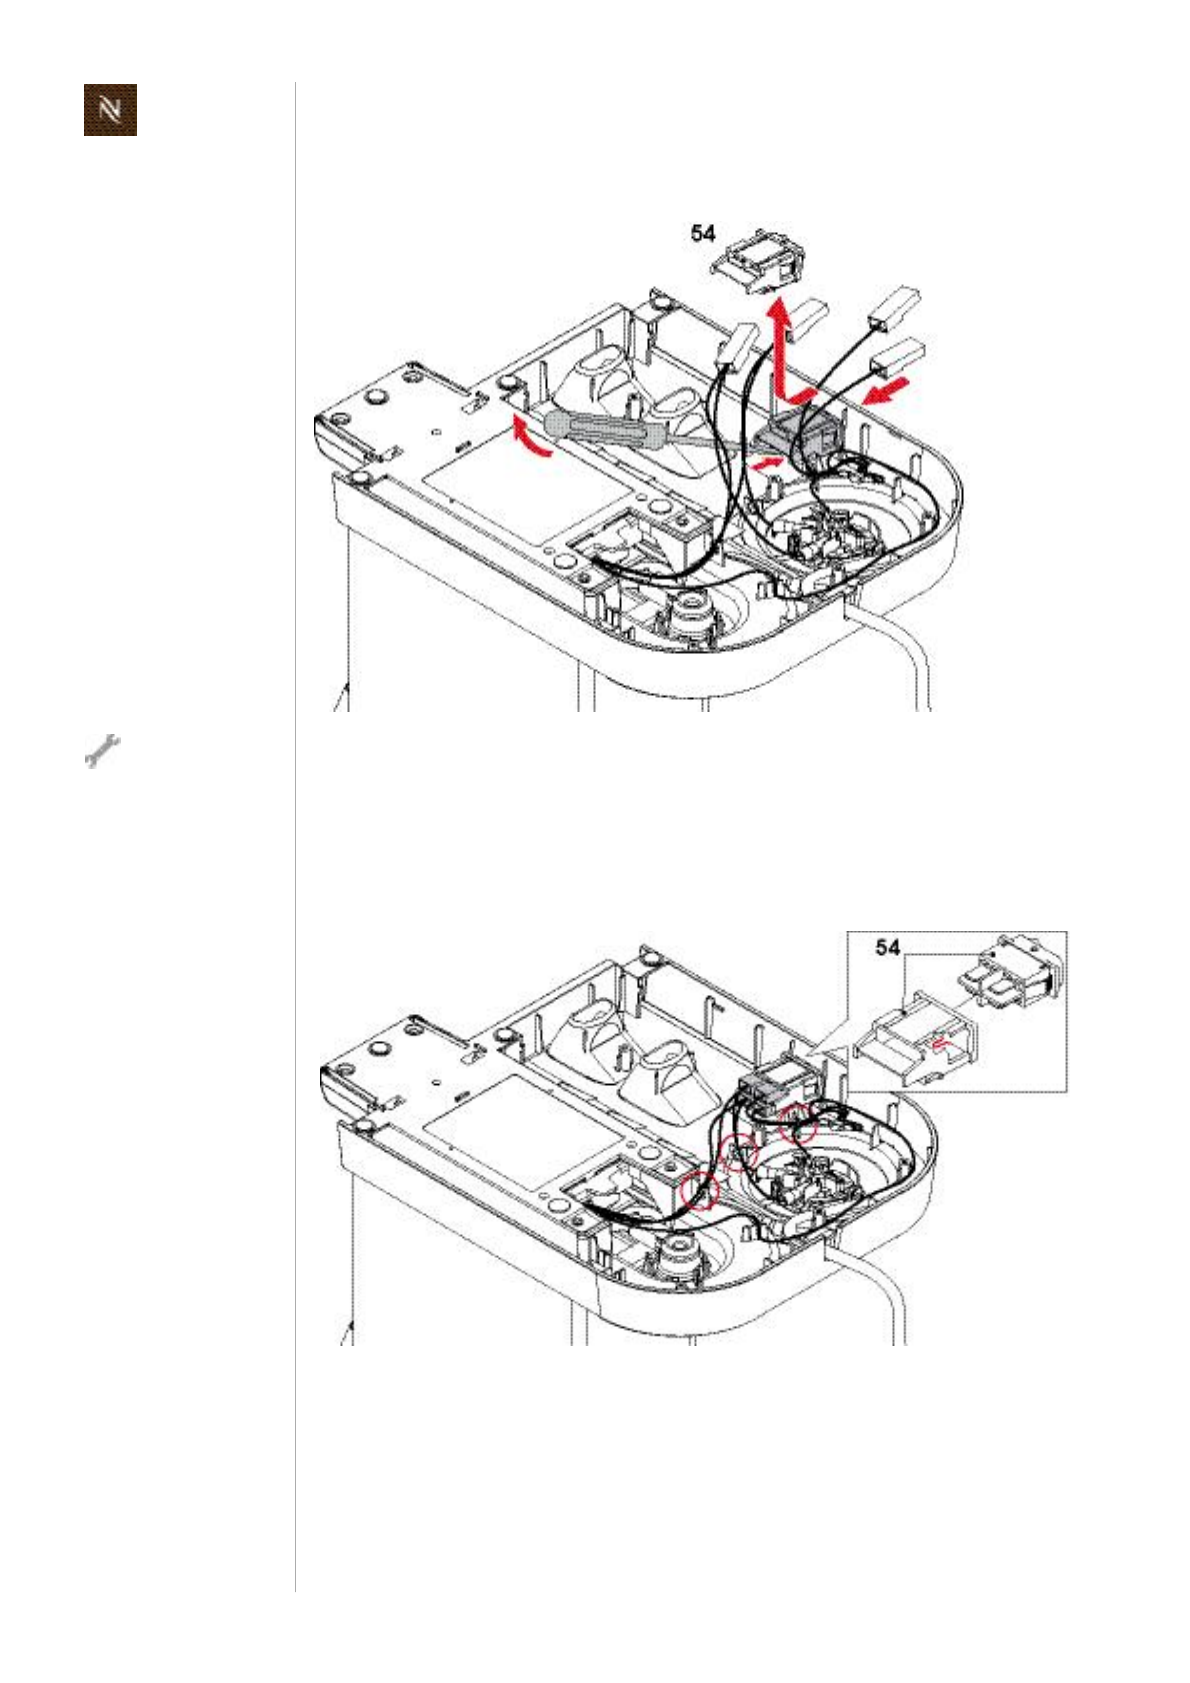
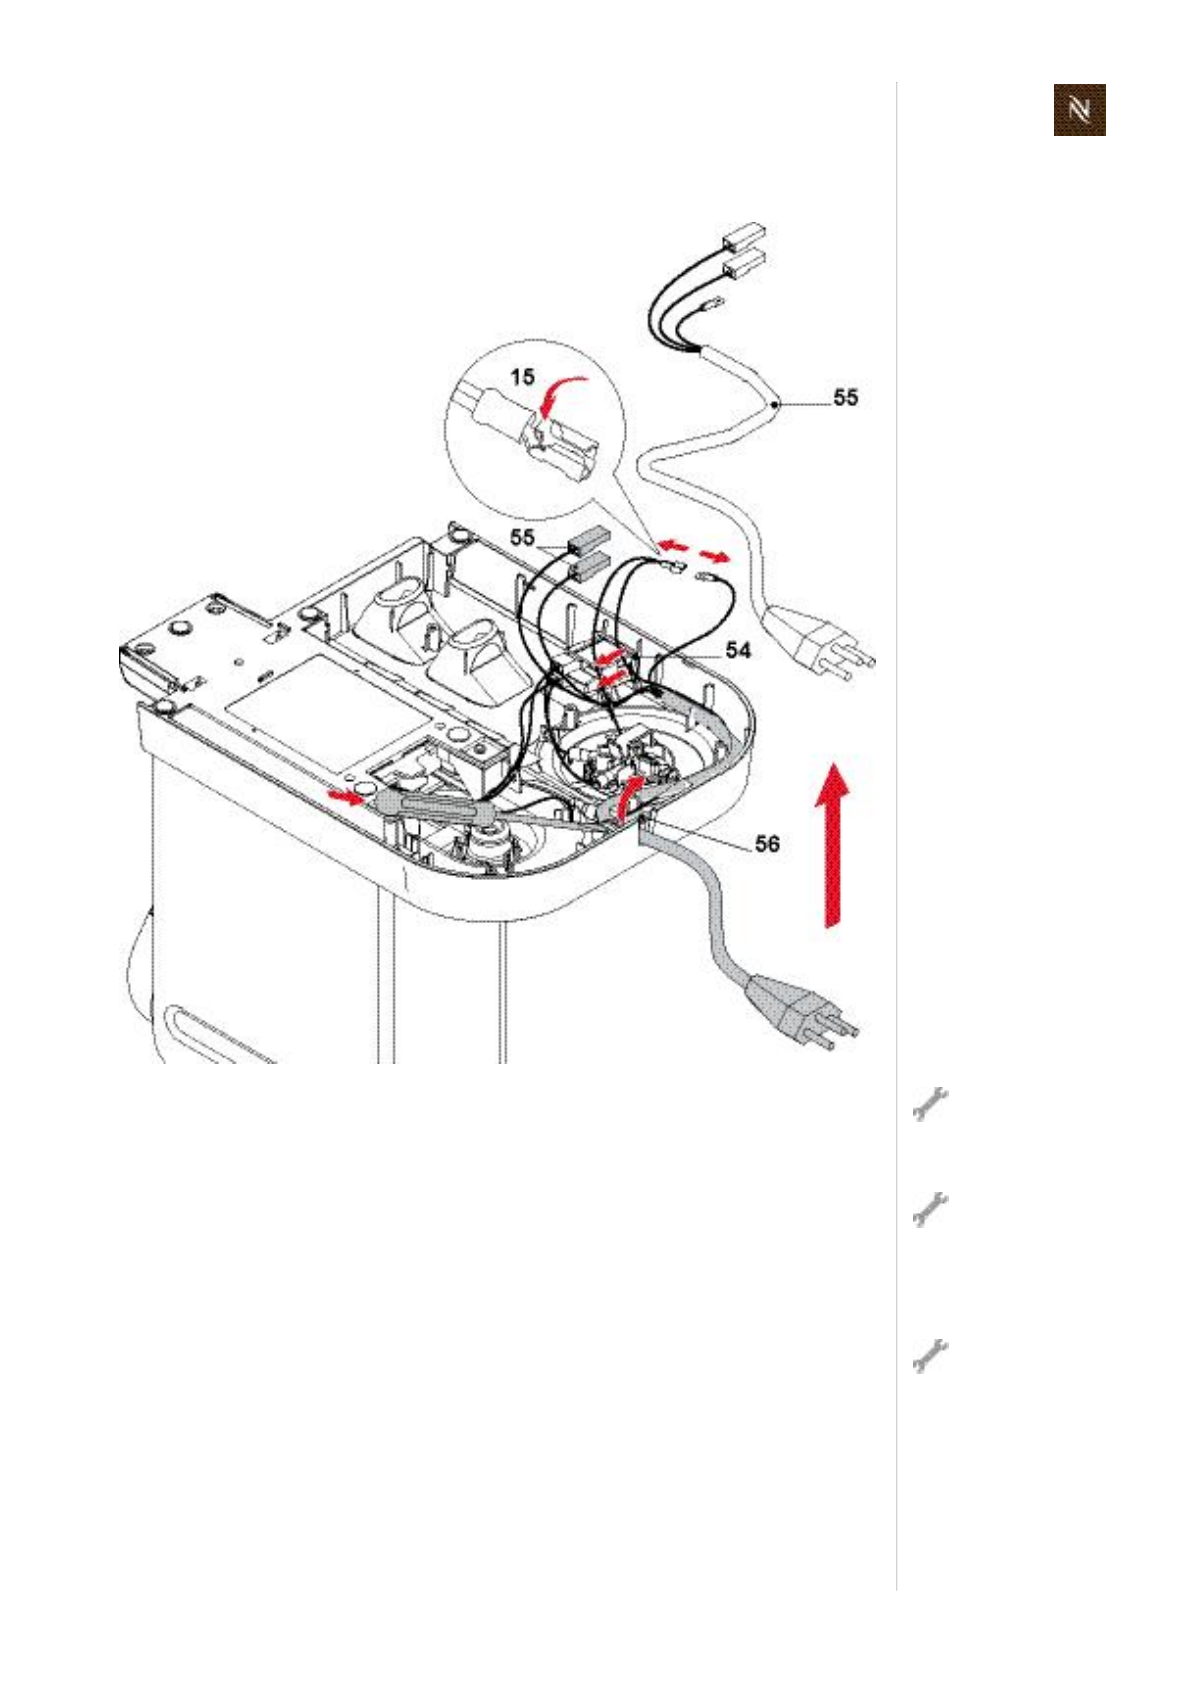
8.4.4 Replacingpowercord
• Removewatertankconnectorfromplatformfirst(seepage59).
• Removeinsulatedfastonreceptacleofphasewirefrommainsswitch(54).
• Disconnectadapterplugofneutralwire(15).
• Ifpresent,disconnectgroundwire(15,seedetail).
• Unlatchcablebracket(56)withscrewdriver.
Thehosescan
remainonthewater
tankconnector.
Useapairofflatpli
erstopulloffinsulat
ingsleevewithrecep
tacle.
Theflatreceptacleon
thegroundwirehasa
specialconnector
latching(seedetail).Press
downleveratfirst,thenpull
offreceptacle.
Thecablebracketis
undertension.There
fore,holdthecable
bracketwithyourfinger
whenunlatchingit.
Citizservicemanual63
R E P A I R S
Assemblycheckpoints
Wiringwiththreecorepowercord: Wiringwithtwocorepowercord:
• Usemarkedcableguidestolaywires.
• Checkwiring(see"WiringdiagramsmodelCitiz"onpage118andfollowing).
• Duringassemblyofthewatertankconnector(53)ontheplatform,eachofits
3 latcheshastoengagewithanaudibleclick.
Citizservicemanual
64
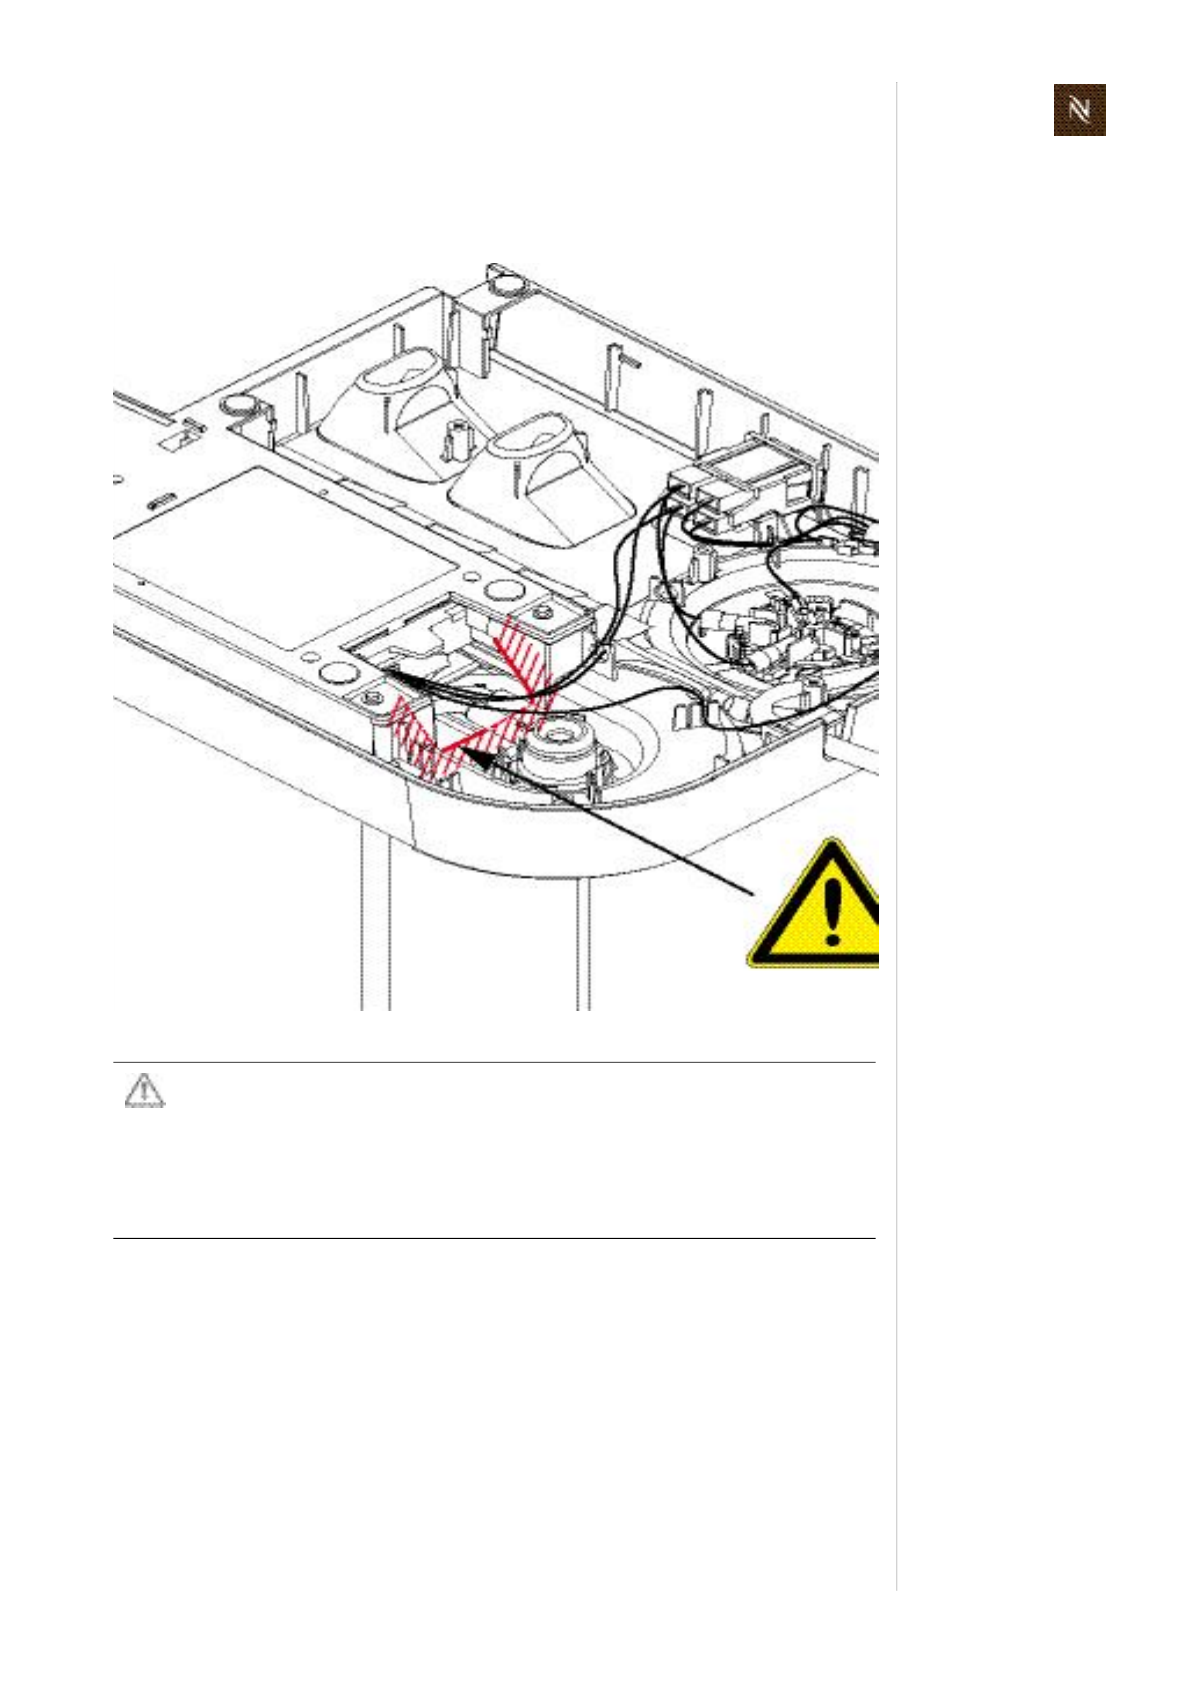
R E P A I R S
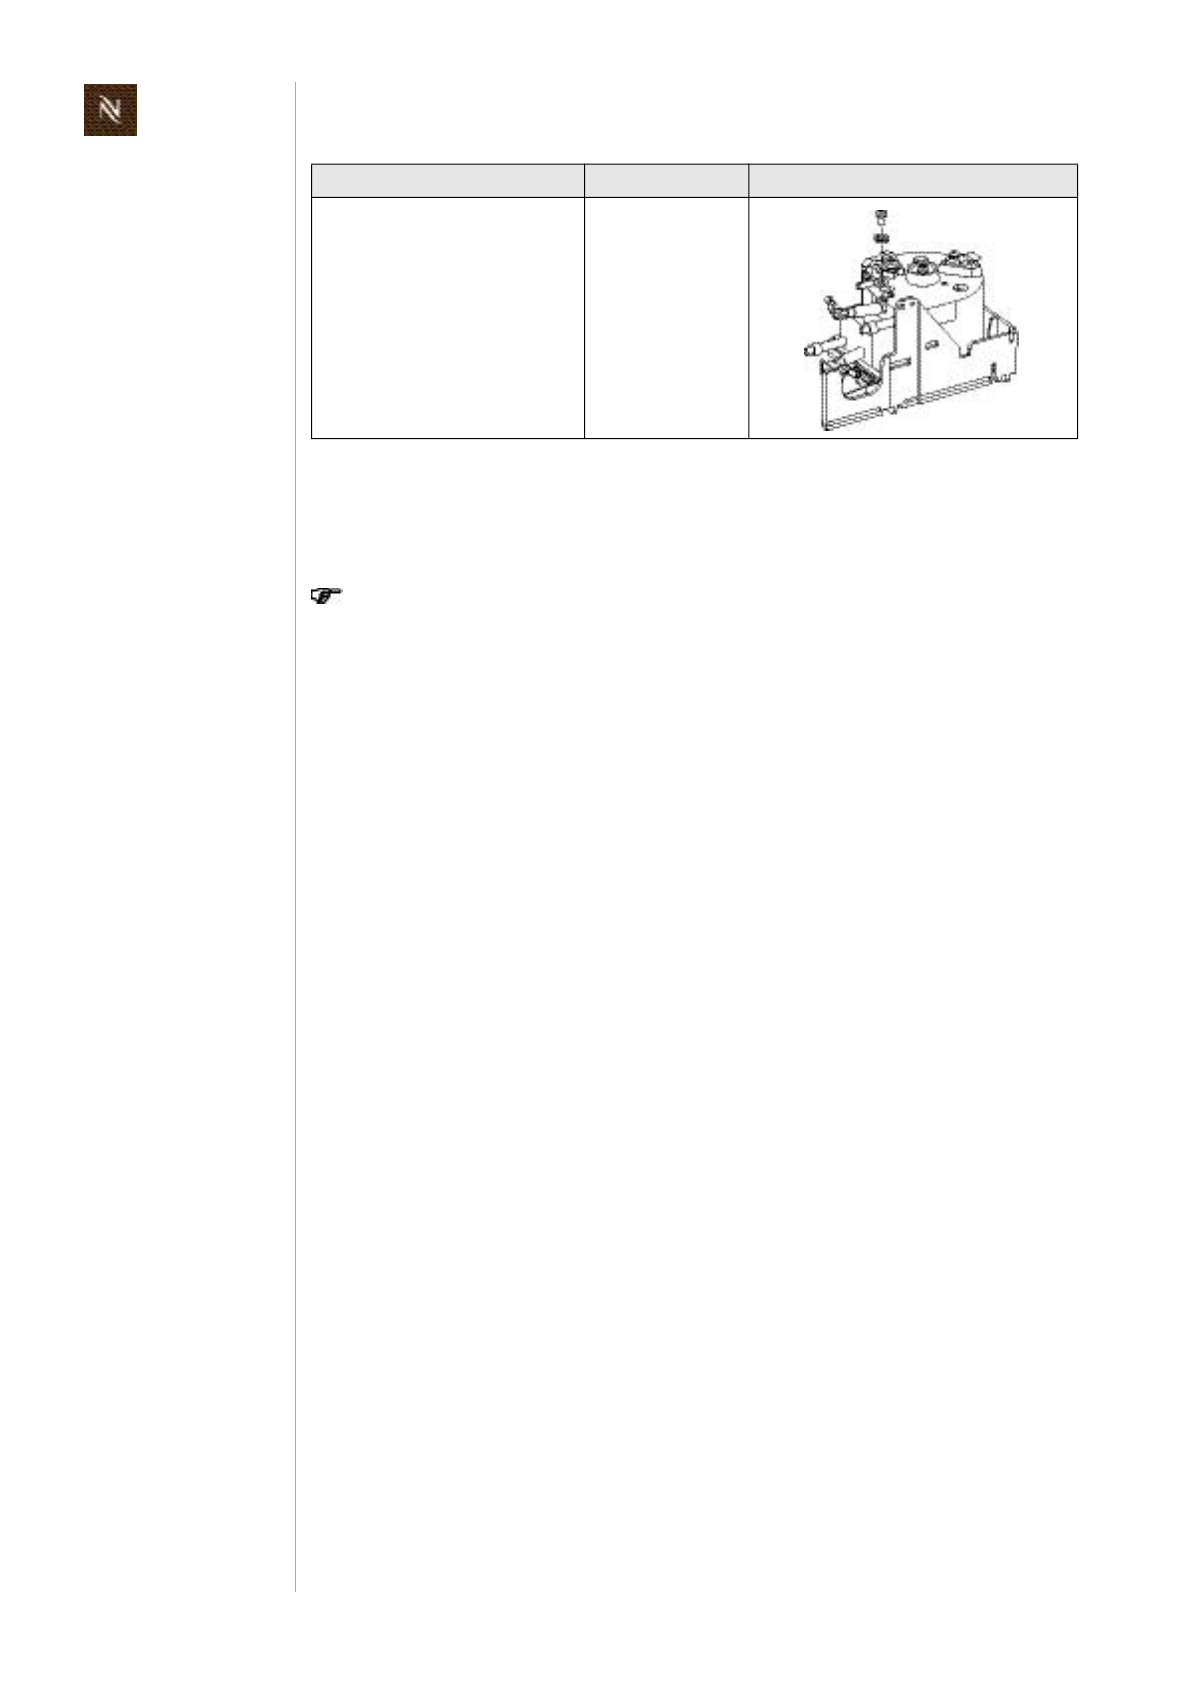
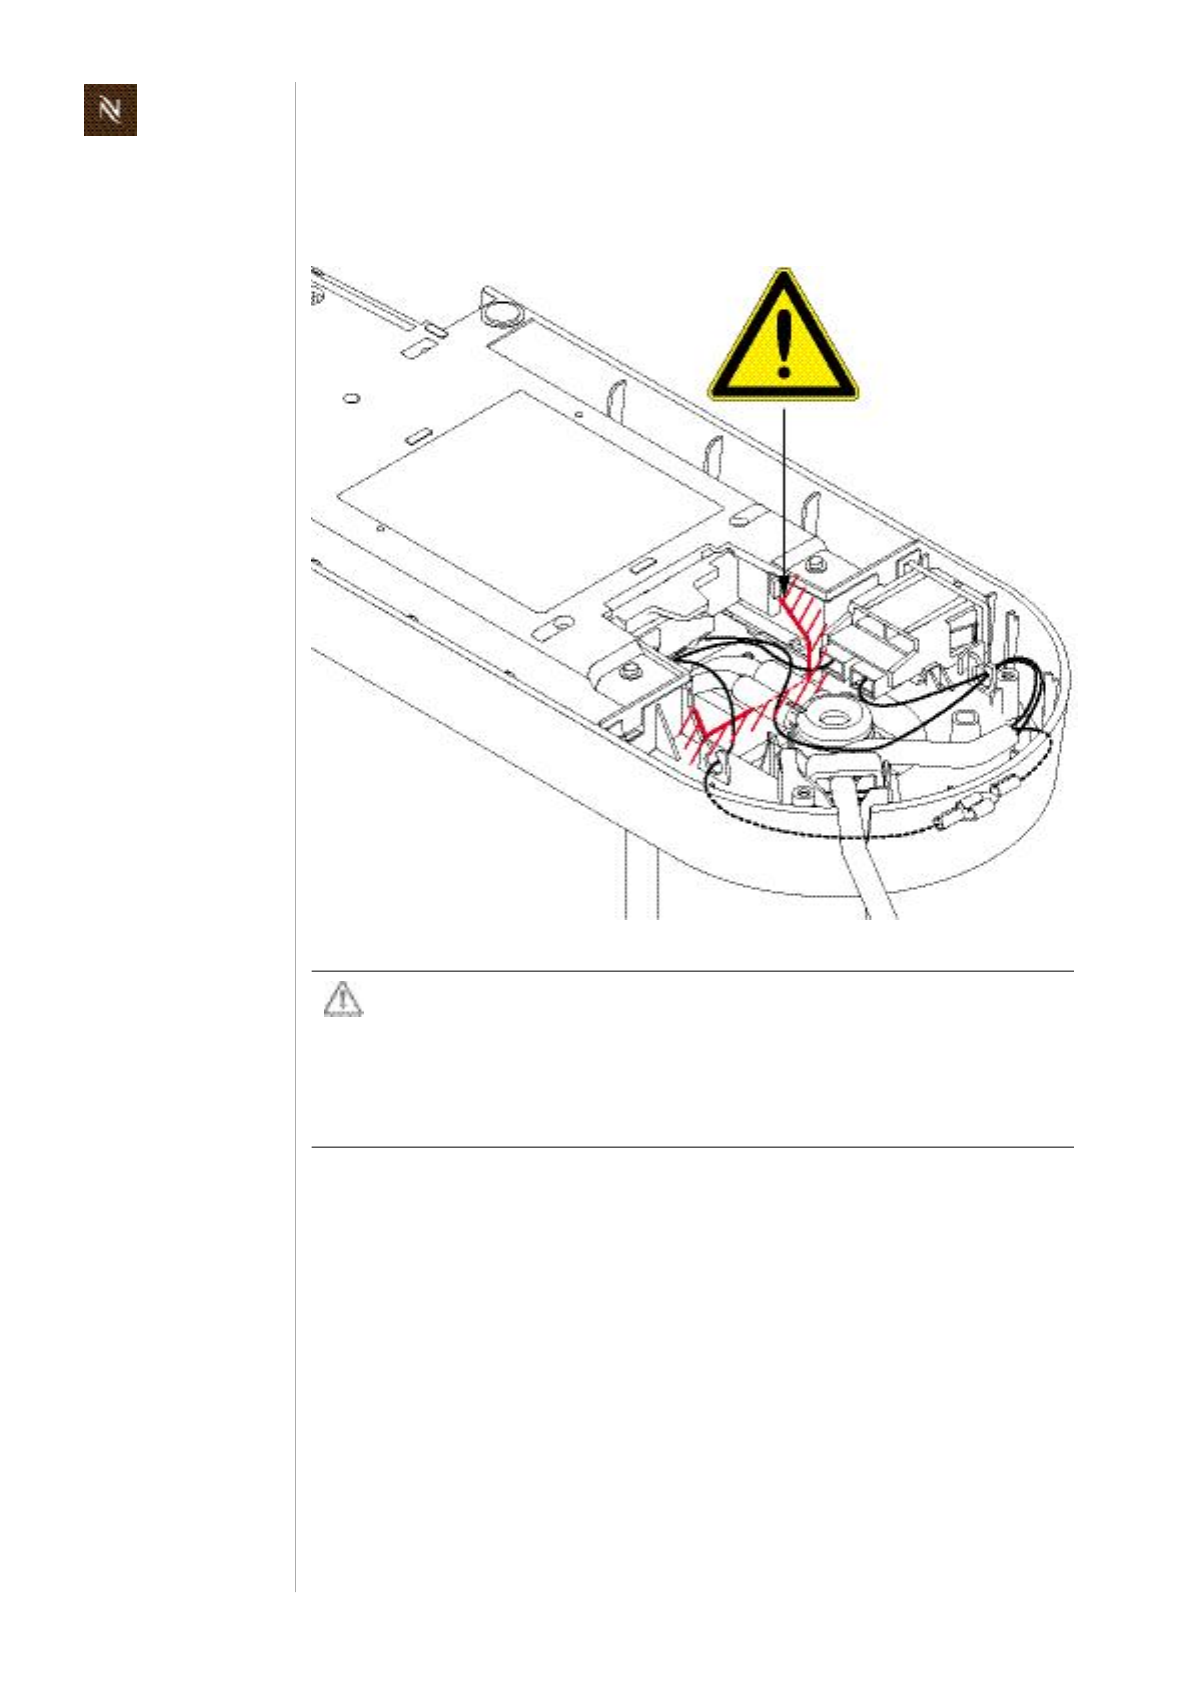
8.4.5 Removingcoreunit
Payattentiontothefollowingsafetyadvicebeforeremovingthecoreunit.
Dangerofinsulationdamages(cuts)onwiresbetweencoreunitand
platform(phaseandneutralwire,groundwireifexisting).
Thesharpcasingedgesoftheplatform(markedredinaboveillustra
tion)candamagetheinsulationofwires.
Donotstretchandreciprocatewiresoversharpedgeswhileremoving
thecoreunit.
Citizservicemanual65
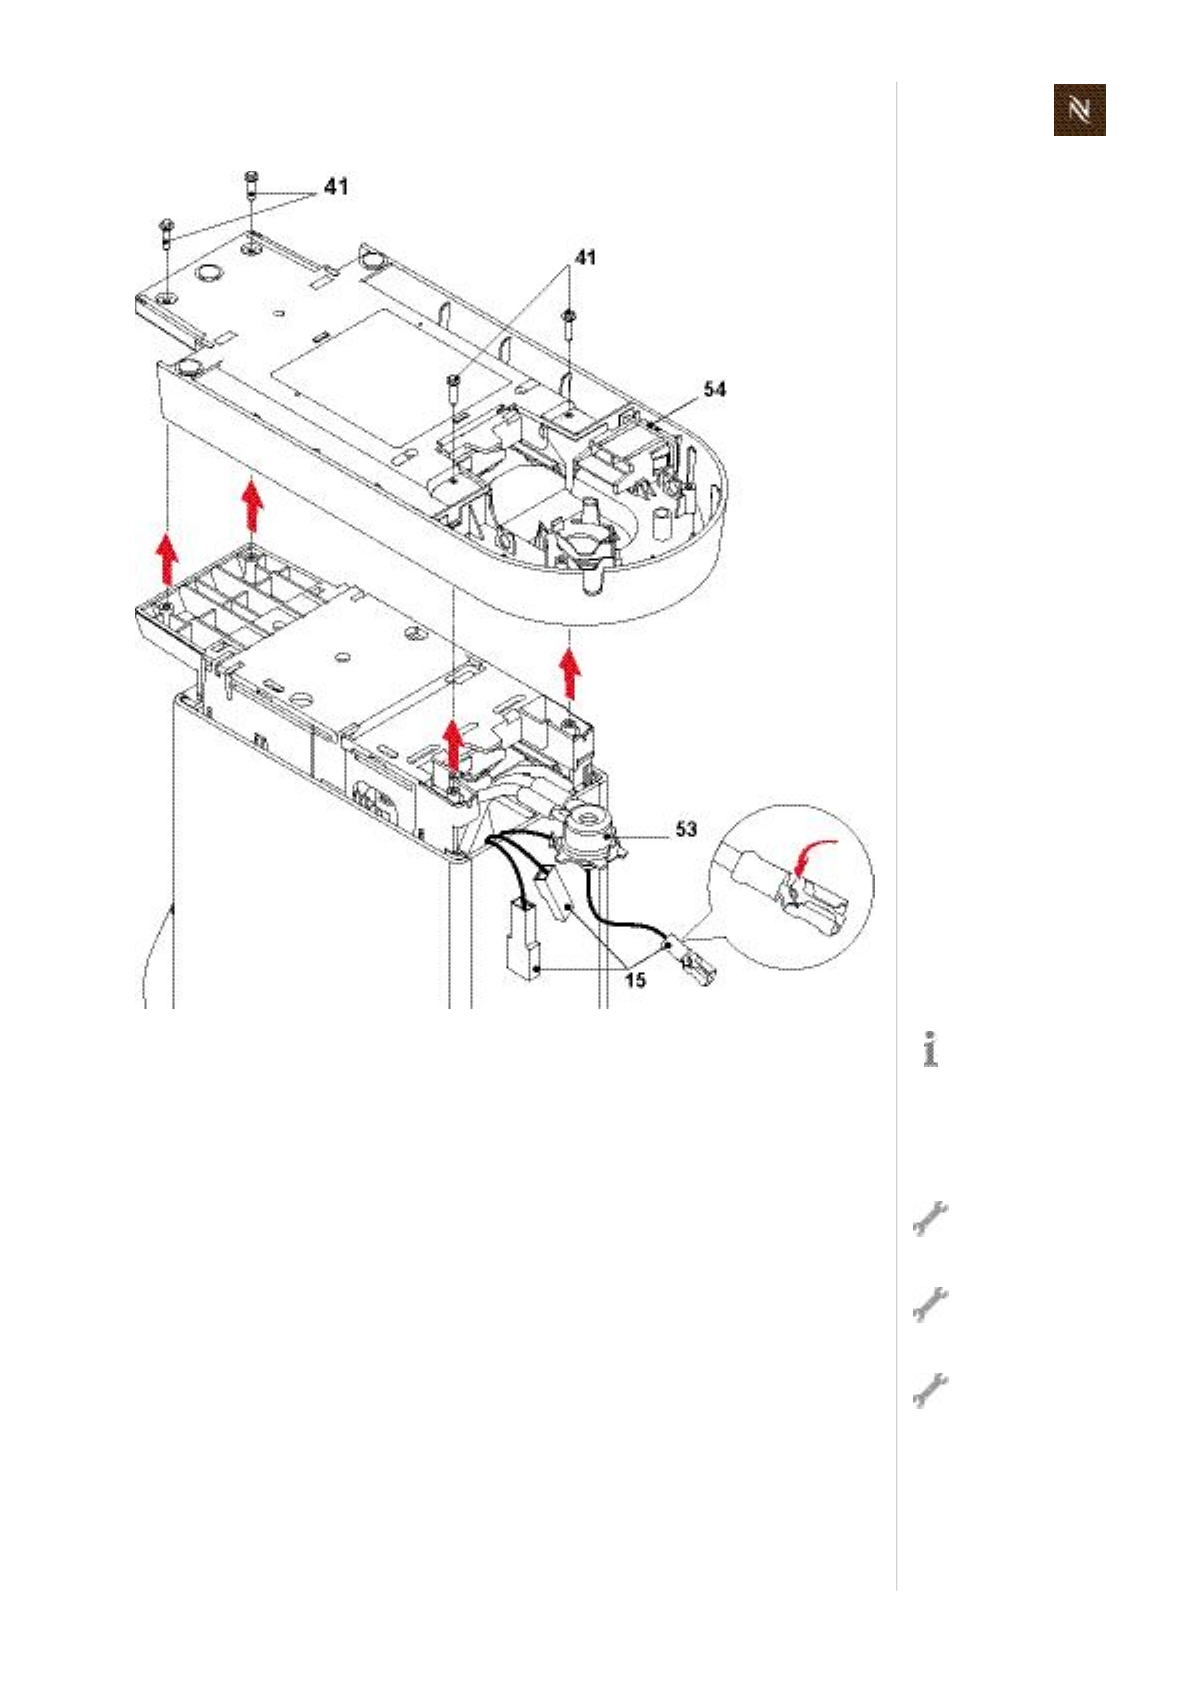
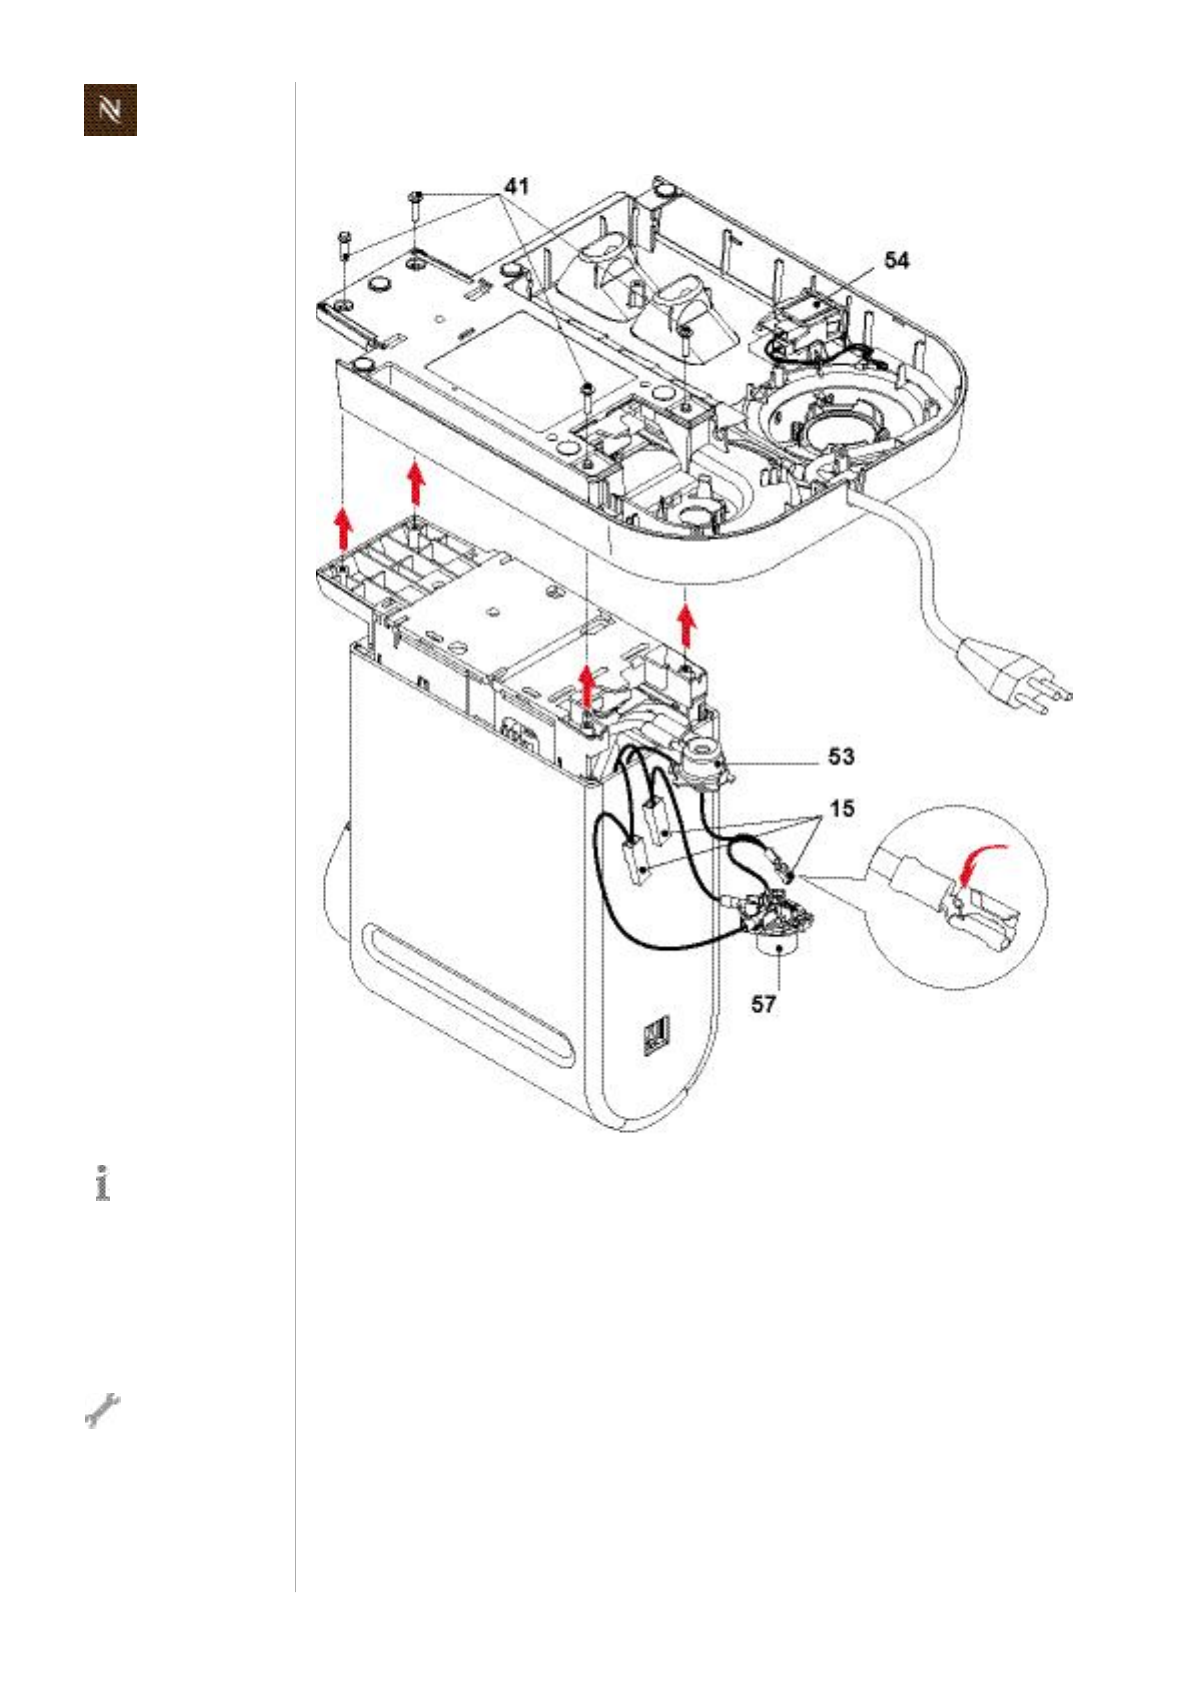
R E P A I R S
• Loosen4screws(41,ovalshapedhead)atthebottomsideofplatform.
Forcompleteremovalofthecoreunitproceedasfollows:
• Removewatertankconnector(53)fromplatform(seepage59).
• Removeinsulatedfastonreceptacleofphasewire(15)frommainsswitch(54).
• Disconnectadapterplug(15)ofneutralwire.
• Ifpresent,disconnectgroundwire(15,partofthermoblockassembly).
Afterthisrepairstep
thecoreunitcanbe
pulledoutoftheplat
formslightly(withstillcon
nectedhosesandwires).
Nowthecoversofthecore
unitcanberemoved.
Thehosescan
remainonthewater
tankconnector.
Useapairofflatpliers
topulloffinsulating
sleevewithrecepta
cle.
Theflatreceptacleon
thegroundwirehasa
specialconnector
latching(seedetail).Press
downleveratfirst,thenpull
offreceptacle.
Citizservicemanual
66
R E P A I R S
Assemblycheckpoints
• Allcoversareassembledonthecoreunit.
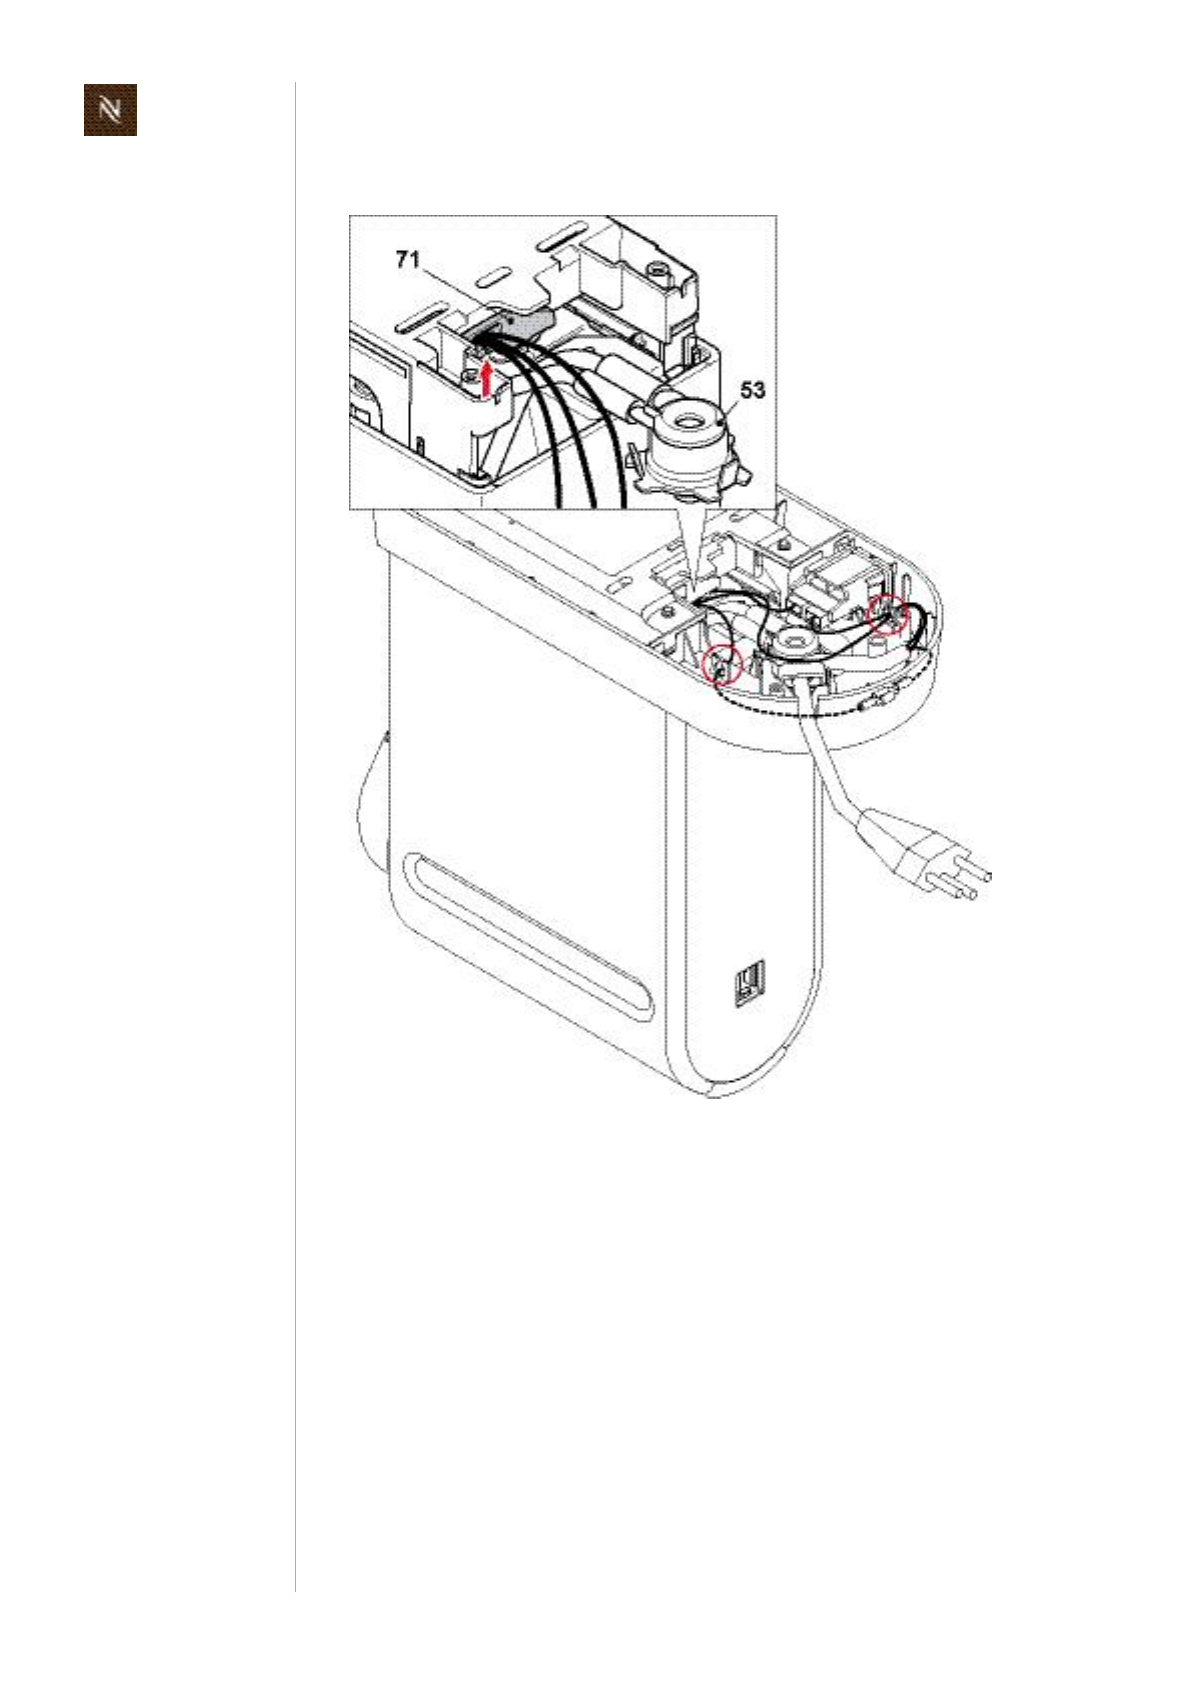
• Checkthatwiringbetweencoreunitandplatformisledthroughcablefixation(71).
• Usemarkedcableguidestolaywiresinplatform(referto"Replacingpowercord"
onpage62andfollowing).
• Checkwiring(see"WiringdiagramsmodelCitiz"onpage118andfollowing).
• Duringassemblyofthewatertankconnector(53)ontheplatform,eachofits3
latcheshastoengagewithanaudibleclick.
Citizservicemanual67
R E P A I R S
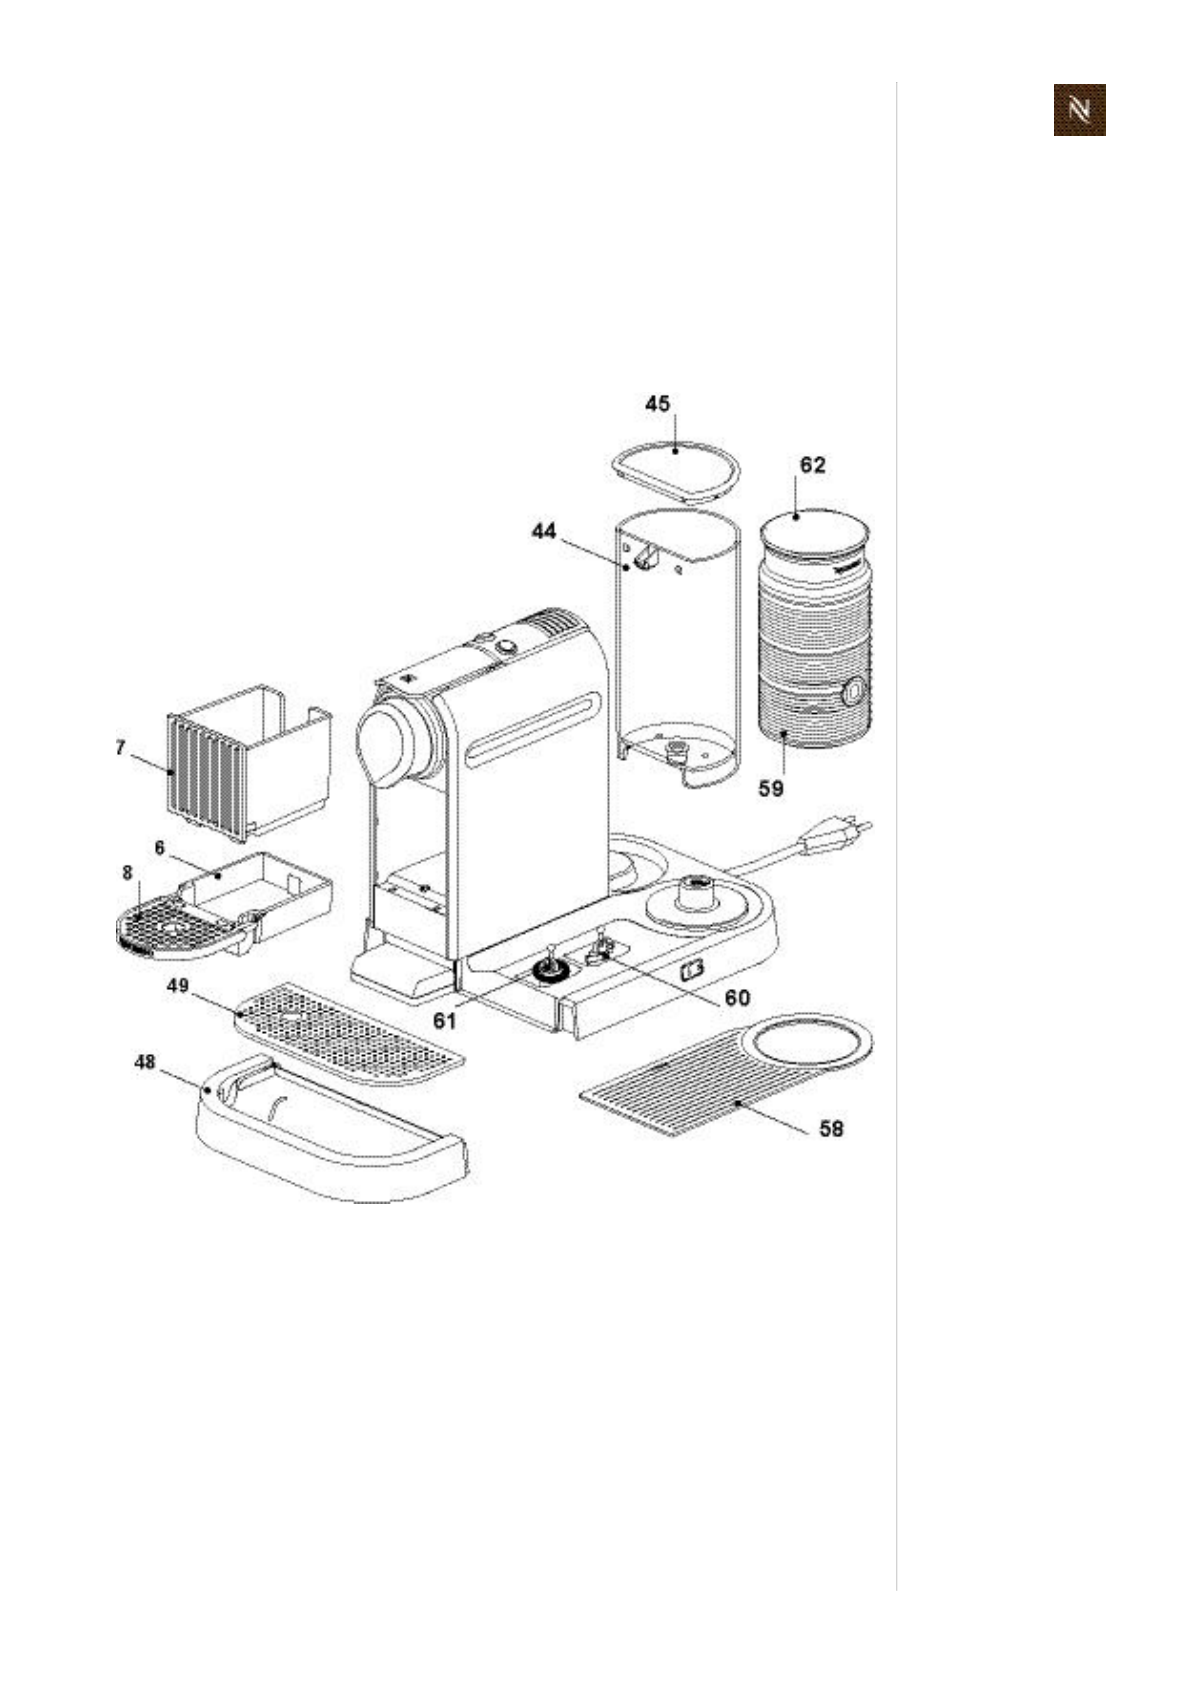
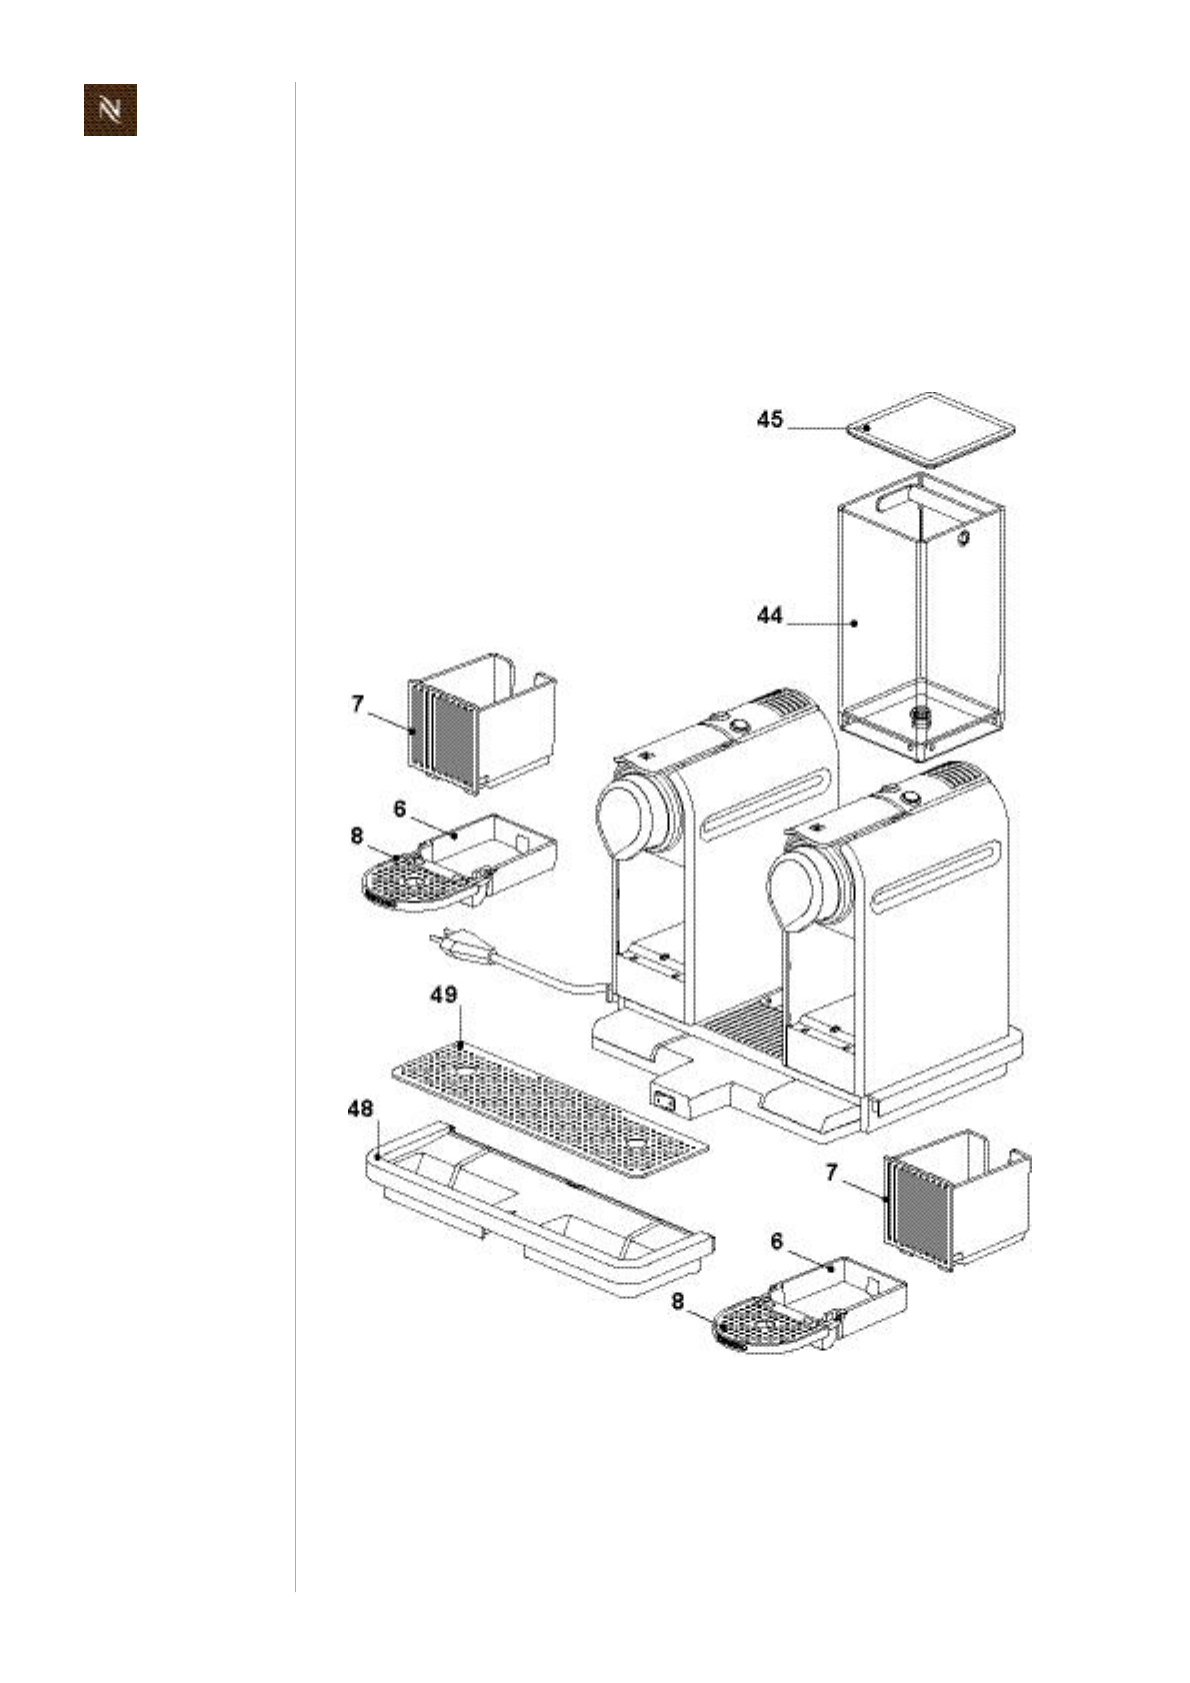
8.5 PlatformdisassemblymodelCitiz&milk
8.5.1 Generaldisassembly
Thisgeneraldisassembly
isnecessarybeforetheremoval/disassemblyofacoreunitispossible,
givesaccesstothecomponentsandwiringoftheplatform.
• Takeawayallremovablepartsfromplatformandcoreunit
cupsupport(8)withwastewatercontainer(6)
capsulecontainer(7)
driptray(48)withdripgrid(49)
watertank(44)withcover(45)
milkfrother(59)withlidandseal(62)
cupstorage(58)
whiskforhotmilk(60)
springwhiskformilkfoam(61).
Citizservicemanual
68
R E P A I R S
• Atthebottomsideofplatformloosen4screws(41,ovalshapedhead).
Citizservicemanual69
R E P A I R S
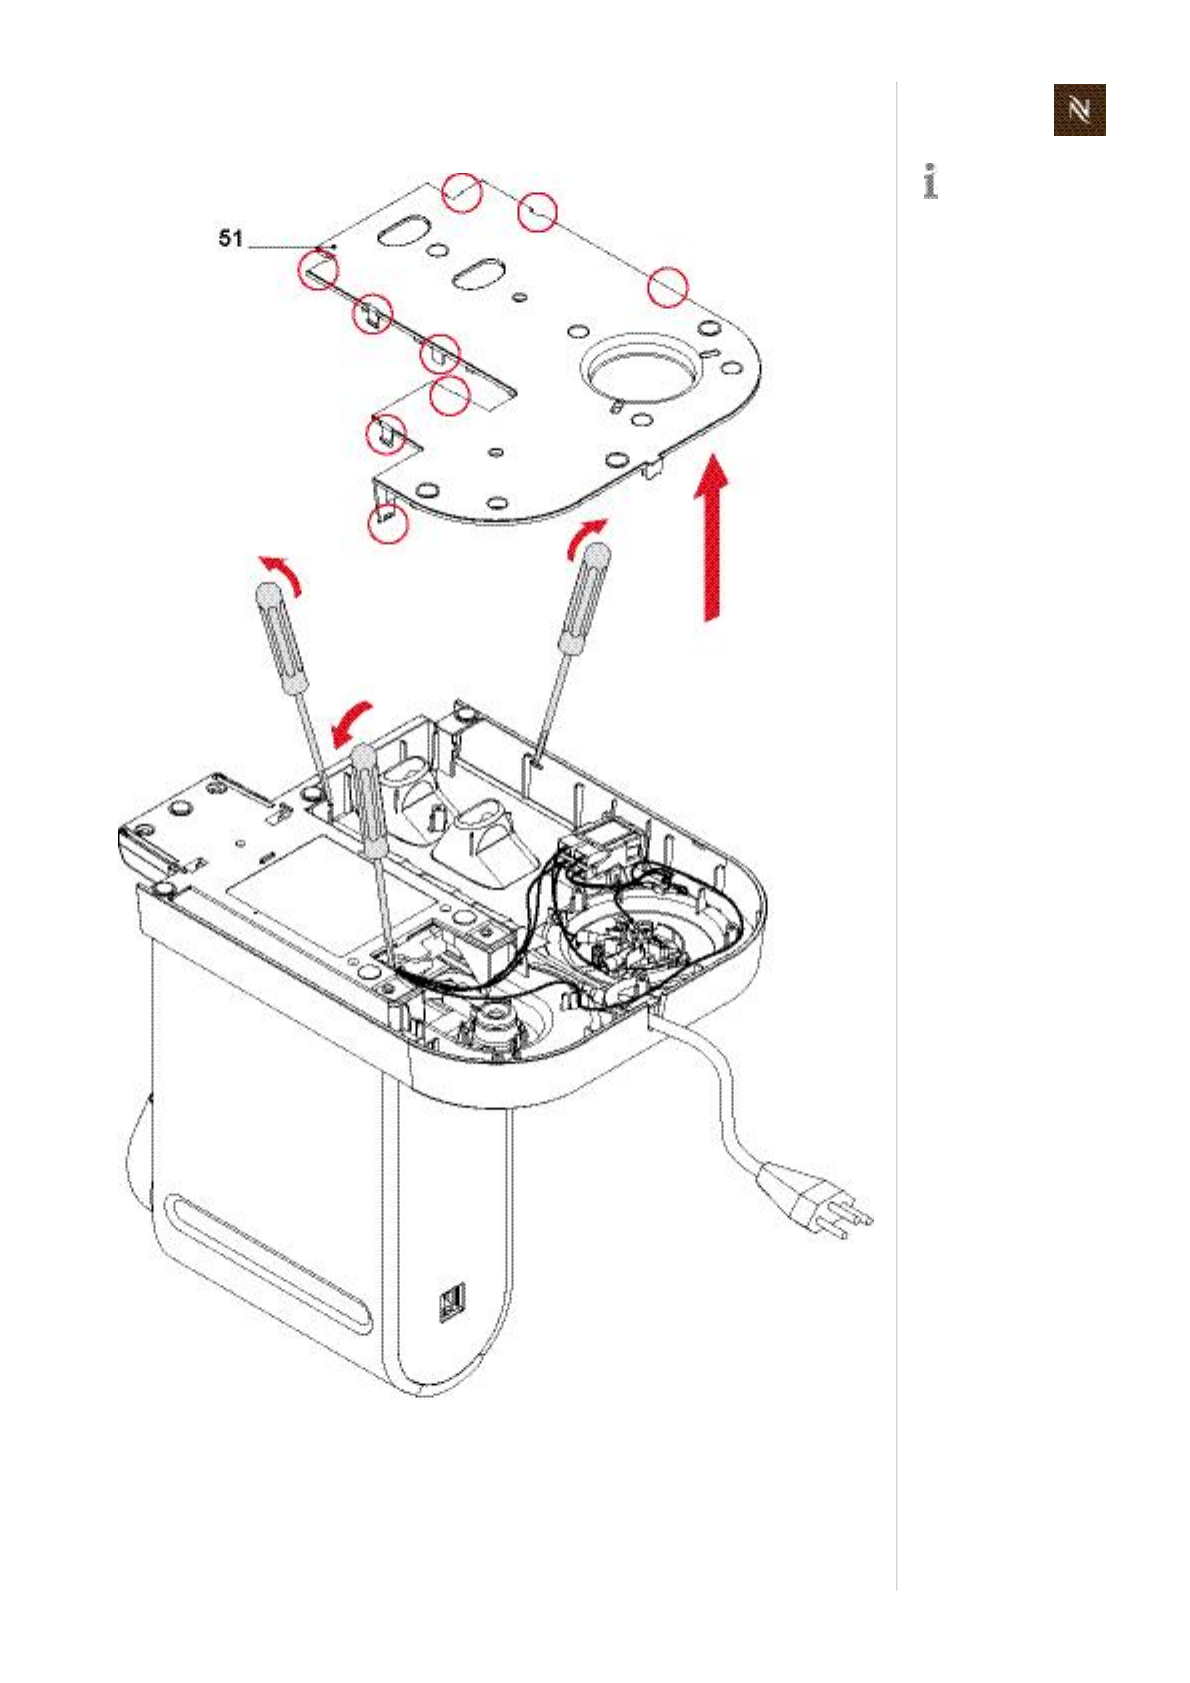
• Insertscrewdriverintorecessesandswivelscrewdrivertoremovebottomcover
(51).
Latchesonthebot
tomcover(51)are
redcircledforeasy
identification.
Citizservicemanual
70
R E P A I R S
Assemblycheckpoints
• Checkif2rubberstoppersaremountedonwastewatercontainer(6).
Riskofdamage!
Whileassemblingtheprotectivecoverattheplatform,takecarenotto
jamanywiresatthescrewconnections.
Citizservicemanual71
R E P A I R S
8.5.2 Replacingwatertankconnector
• Pulloffbothhosesfromwatertankconnector(53).
• Releasethe3latchesaroundthewatertankconnectoroneaftertheotherby
pressingthetopoftheirhooksoutwardswithascrewdriver(seedetail)andlifting
thewatertankconnectoratthesametime.
Thewatertankcon
nector(53)isreplaced
togetherwithgasket,
clampingringandmetal
sieve.

Citizservicemanual
72
R E P A I R S
1. Removegasket(a)fromwatertankconnector(53).
2. Withthehelpofapairoftweezers,removeclampingring(b)andmetalsieve(c).
3. Cleanorreplaceparts.
Assemblycheckpoints
• Checkthatgasketisinsertedinwatertankconnector(53)correctly.
• Duringassemblyofthewatertankconnectorontheplatform,eachofits3latches
hastoengagewithanaudibleclick.
• Mindthedifferentdiametersofhosesforthewatertankconnector.
Citizservicemanual73
R E P A I R S
8.5.3 Replacingmilkfrotherconnector
• Remove3smallfastonreceptaclesfrommilkfrotherconnector(57).
• Removemilkfrotherconnector(57)byreleasing2latchesandswivelconnectorout
fromunderthehook.
Assemblycheckpoints
• Usemarkedcableguidestolaywires.
• Checkwiringofmilkfrotherconnector(57),seedetail.
Citizservicemanual
74
R E P A I R S
8.5.4 Replacingmainsswitch
• Remove4insulatedfastonreceptaclesfrommainsswitch(54).
• Pressbladeofscrewdriverbetweenholderofmainsswitchandplatformcarefully.
Liftholderwithscrewdriverslightly.Thenpressholderwithmainsswitch(54)
inwardstillitcanberemoved.
Assemblycheckpoints
• Themainsswitchholder(54)hasanotch(seedetail)toensureacorrectfittingposi
tion.
• Usemarkedcableguidestolaywires.
• Checkwiringofmainsswitch(see"WiringdiagramsmodelCitiz&milk,EF 485/
486"onpage124andfollowing).
Useapairofflatpli
erstopulloffinsulat
ingsleeveswith
receptacles.
Citizservicemanual75
R E P A I R S
8.5.5 Replacingpowercord
• Remove2insulatedfastonreceptacles(55)frommainsswitch(54).
• Ifpresent,disconnectgroundwire(15,partofthermoblockassembly).
• Unlatchcablebracket(56)withscrewdriver.
Useapairofflatpli
erstopulloffinsulat
ingsleevewithrecep
tacle.
Thecounterpart,a
flatreceptacle,hasa
specialconnector
latching(seedetail).Press
downleveratfirst,thenpull
offreceptacle.
Thecablebracketis
undertension.There
fore,holdthecable
bracketwithyourfinger
whenunlatchingit.
Citizservicemanual
76
R E P A I R S
Assemblycheckpoints
• Usemarkedcableguidestolaywires.
• Checkwiringofpowercord(see"WiringdiagramsmodelCitiz&milk,EF 485/486"
onpage124andfollowing).
Citizservicemanual77
R E P A I R S
8.5.6 Removingcoreunit
Payattentiontothefollowingsafetyadvicebeforeremovingthecoreunit.
Dangerofinsulationdamages(cuts)onwiresbetweencoreunitand
platform(phaseandneutralwire,groundwireifexisting).
Thesharpcasingedgesoftheplatform(markedredinaboveillustra
tion)candamagetheinsulationofwires.
Donotstretchandreciprocatewiresoversharpedgeswhileremoving
thecoreunit.
Citizservicemanual
78
R E P A I R S
• Loosen4screws(41,ovalshapedhead)atthebottomsideofplatform.
Forcompleteremovalofthecoreunitproceedasfollows:
• Removebottomcover(refertopage56).
• Removebothinsulatedfastonreceptacles(15,partofthermoblockassembly)from
mainsswitch(54).
Afterthisrepairstep
thecoreunitcanbe
pulledoutoftheplat
formslightly(withstillcon
nectedhosesandwires).
Nowthecoversofthecore
unitcanberemoved.
Useapairofflatpli
erstopulloffinsulat
ingsleevewithrecep
tacle.
Citizservicemanual79
R E P A I R S
• Ifpresent,disconnectgroundwire(15,partofthermoblockassembly).
• Ifthethermoblockorcoreunithastobereplaced,disconnectmilkfrotherconnector
(57).Otherwisethecoreunitcanberemovedtogetherwiththisconnector(seepage
73).
• Removewatertankconnector(53,seepage71).
Assemblycheckpoints
• Allcoversareassembledonthecoreunit.
• Checkthatwiringbetweencoreunitandplatformisledthroughcablefixation(71).
• Usemarkedcableguidestolaywires.
• Checkwiringofmilkfrotherconnector(57),seedetail.
• Checkwiringofmainsswitch(54),see"WiringdiagramsmodelCitiz&milk,
EF 485/486"onpage124andfollowing.
• Duringassemblyofthewatertankconnector(53)ontheplatform,eachofits3
latcheshastoengagewithanaudibleclick.
Theflatreceptacleon
thegroundwirehasa
specialconnector
latching(seedetail).Press
downleveratfirst,thenpull
offreceptacle.
Citizservicemanual
80
R E P A I R S
8.6 PlatformdisassemblymodelCitiz&Co
8.6.1 Generaldisassembly
Thisgeneraldisassembly
isnecessarybeforetheremoval/disassemblyofoneorbothcoreunitsispossible,
givesaccesstothecomponentsandwiringoftheplatform.
• Takeawayallremovablepartsfromplatformandcoreunits
cupsupports(8)withwastewatercontainers(6)
capsulecontainers(7)
driptray(48)withdripgrid(49)
watertank(44)withcover(45).
Citizservicemanual81
R E P A I R S
• Atthebottomsideofplatformloosen9screws(41,ovalshapedhead). Thecoreunitsare
fastenedwithsomeof
thesescrewsaswell.
Supportbothcoreunitsso
thattheirremainingscrew
connectiontotheplatform
cannotbedamaged.
Citizservicemanual
82
R E P A I R S
• Ifnecessaryuseascrewdrivertoremoveprotectivecover(51).
Citizservicemanual83
R E P A I R S
Assemblycheckpoints
• Checkif2rubberstoppersaremountedoneachwastewatercontainer(6).
Riskofdamage!
Whileassemblingtheprotectivecoverattheplatform,takecarenotto
jamanywiresatthescrewconnections.

Citizservicemanual
84
R E P A I R S
8.6.2 Replacingwatertankconnector
• Pulloffbothhoses(63,64)fromwatertankconnector(53).
• Releasethe3latchesoneaftertheotherbypressingthetopoftheirhooksoutwards
withascrewdriver(seedetail)andliftingthewatertankconnectoratthesametime.
• Removegasket(a)fromwatertankconnector(53).
• Withthehelpofapairoftweezers,removeclampingring(b)andmetalsieve(c).
• Cleanorreplaceparts.
Thewatertankcon
nector(53)isreplaced
togetherwithgasket,
clampingringandmetal
sieve.
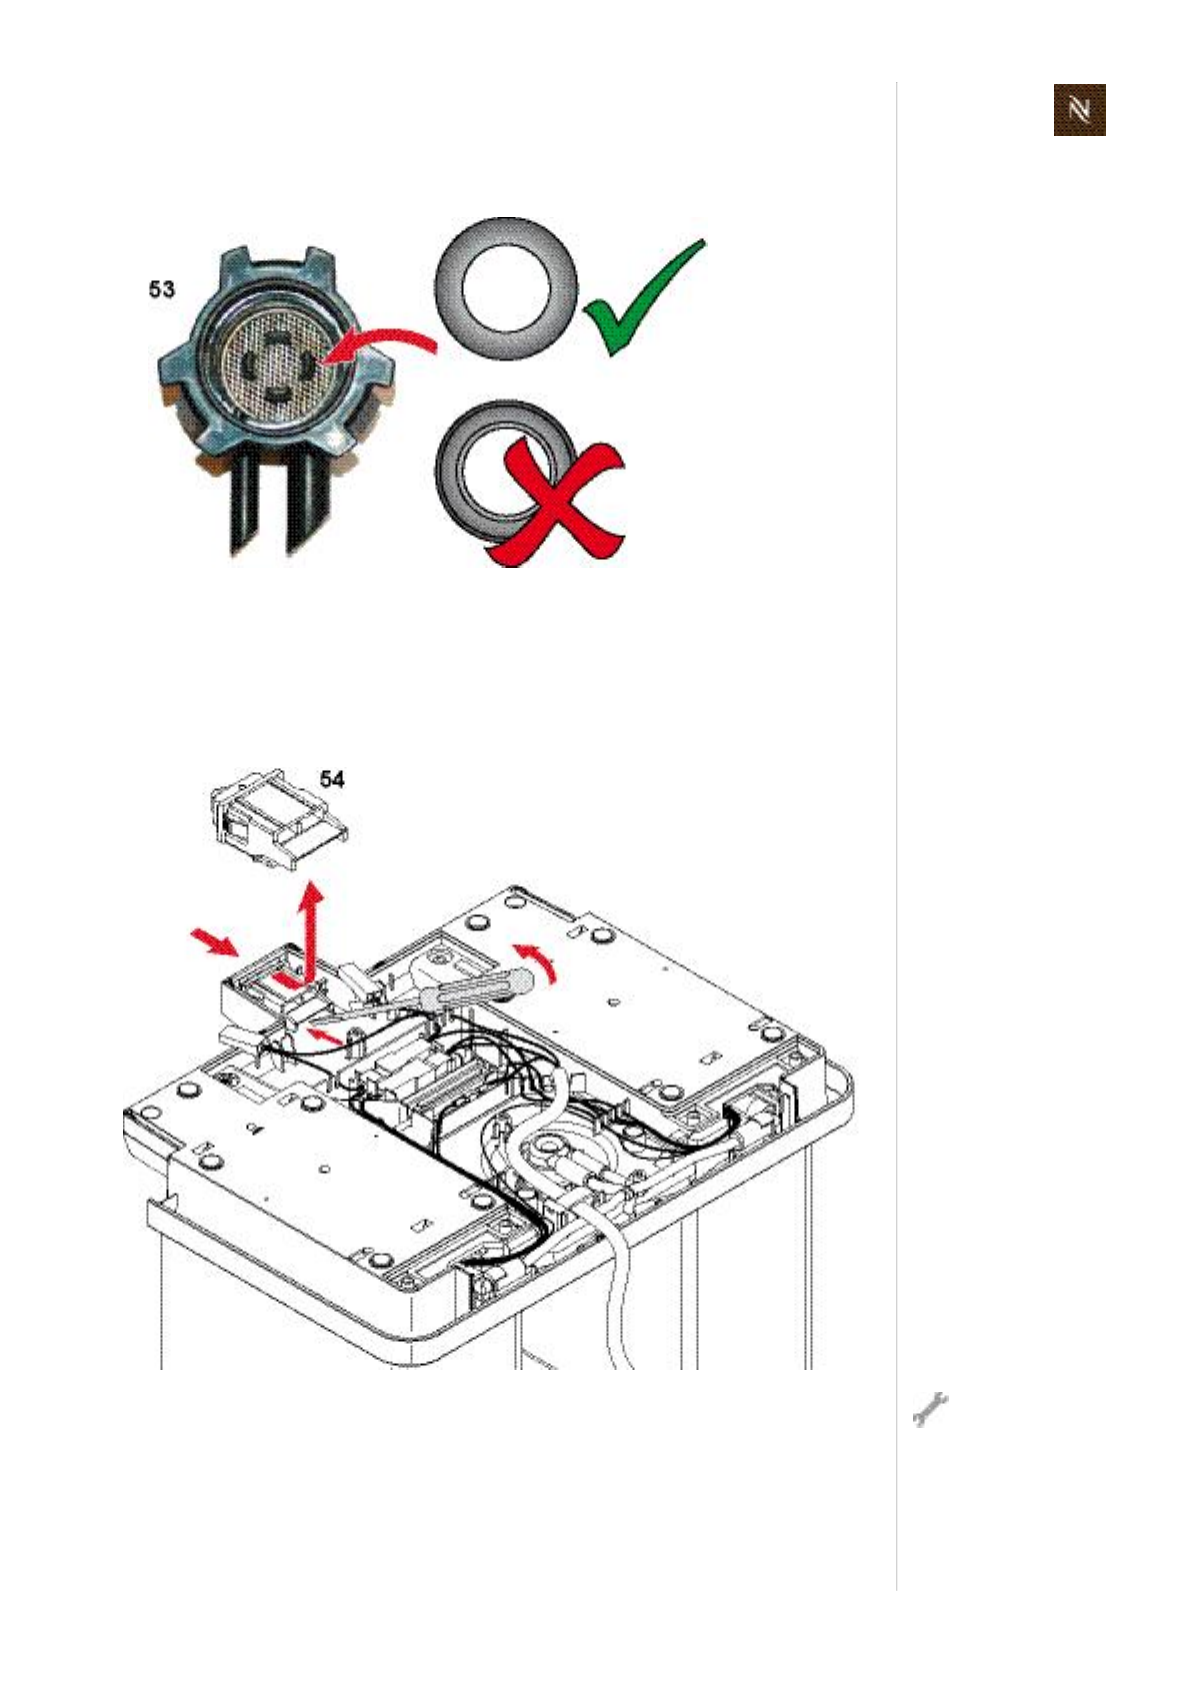
Citizservicemanual85
R E P A I R S
Assemblycheckpoints
• Duringassemblyofthewatertankconnector(53)ontheplatform,eachofits3
latcheshastoengagewithanaudibleclick.
• Insertgasketcorrectly(seedetail).
8.6.3 Replacingmainsswitch
• Remove2insulatedfastonreceptaclesfrommainsswitch(54).
• Pressbladeofscrewdriverbetweenholderofmainsswitchandplatformcarefully.
Liftholderwithscrewdriverslightly.Thenpressholderwithmainsswitch(54)
inwardstillitcanberemoved.
Useapairofflatpli
erstopulloffinsulat
ingsleeveswith
receptacles.
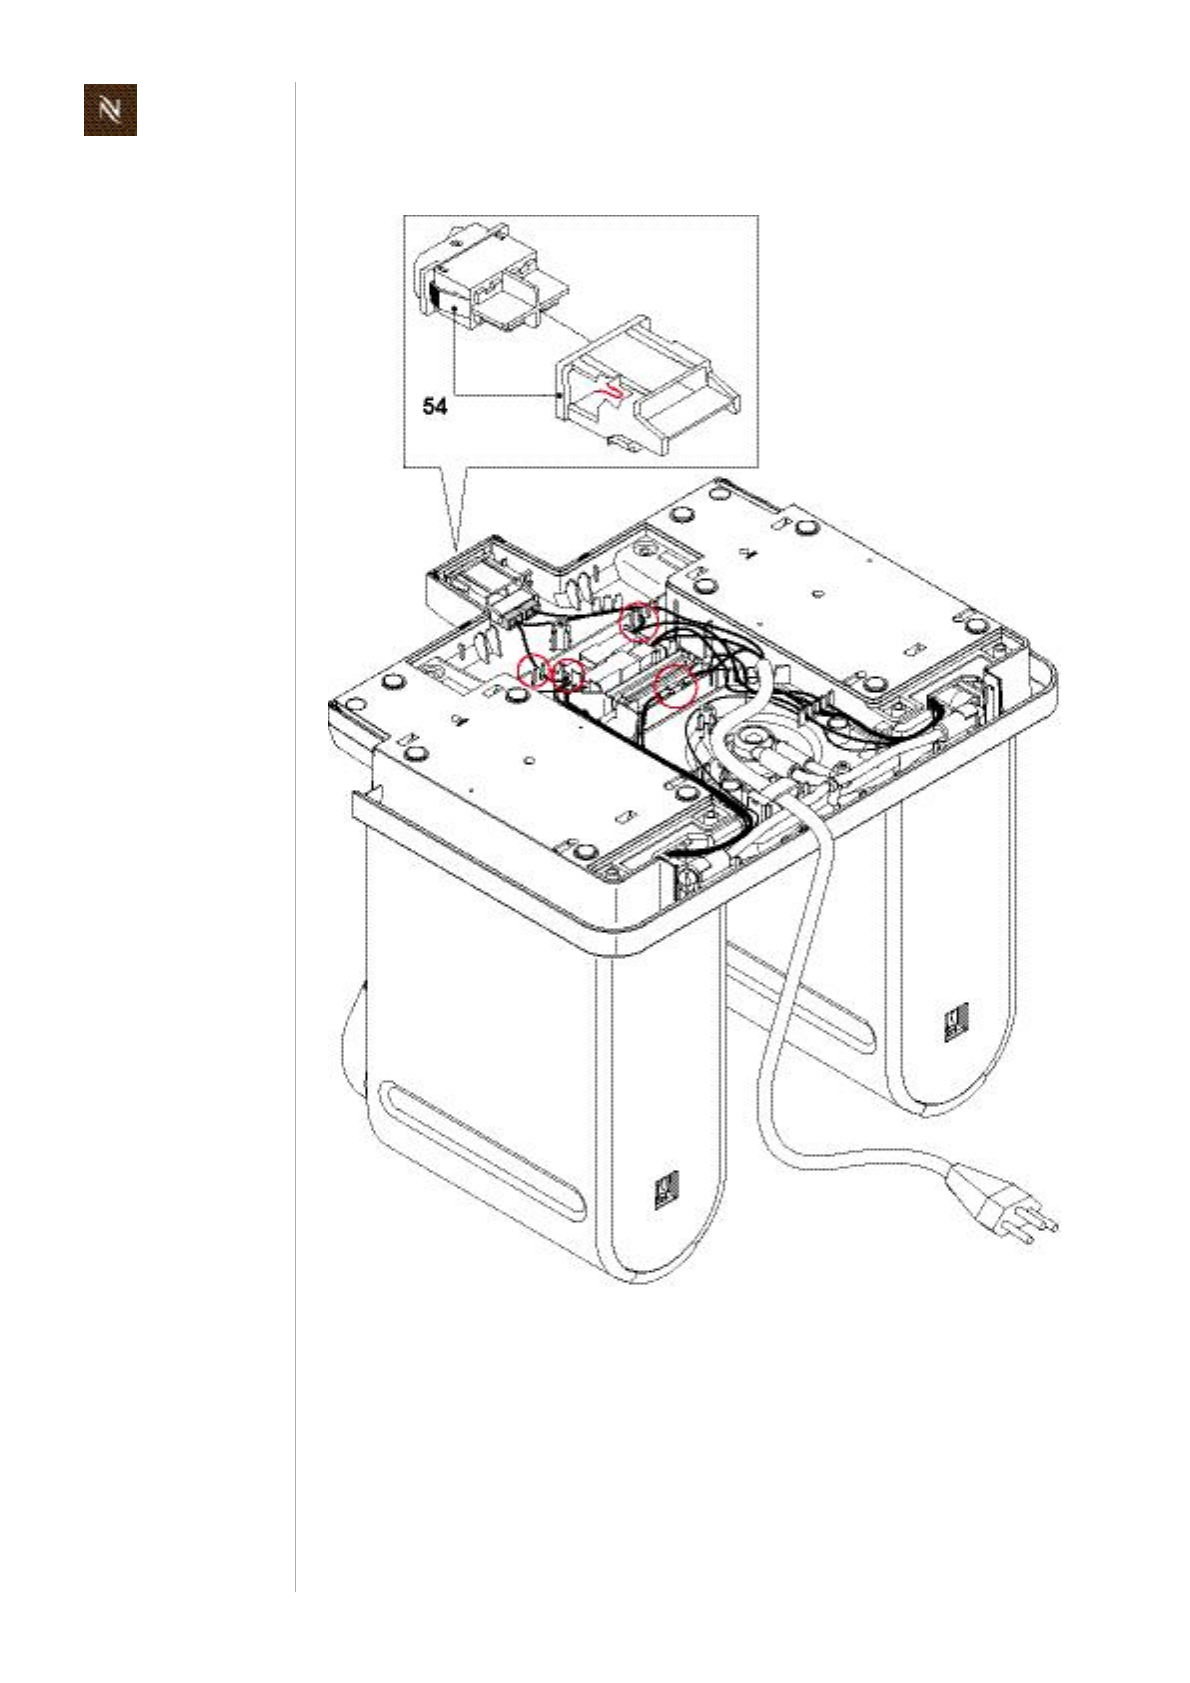
Citizservicemanual
86
R E P A I R S
Assemblycheckpoints
• Usemarkedcableguidestolaywires.
• Themainsswitchholder(54)hasanotch:correctfittingpositioniswithmainsswitch
connectionsnexttotheplatform(seedetail).
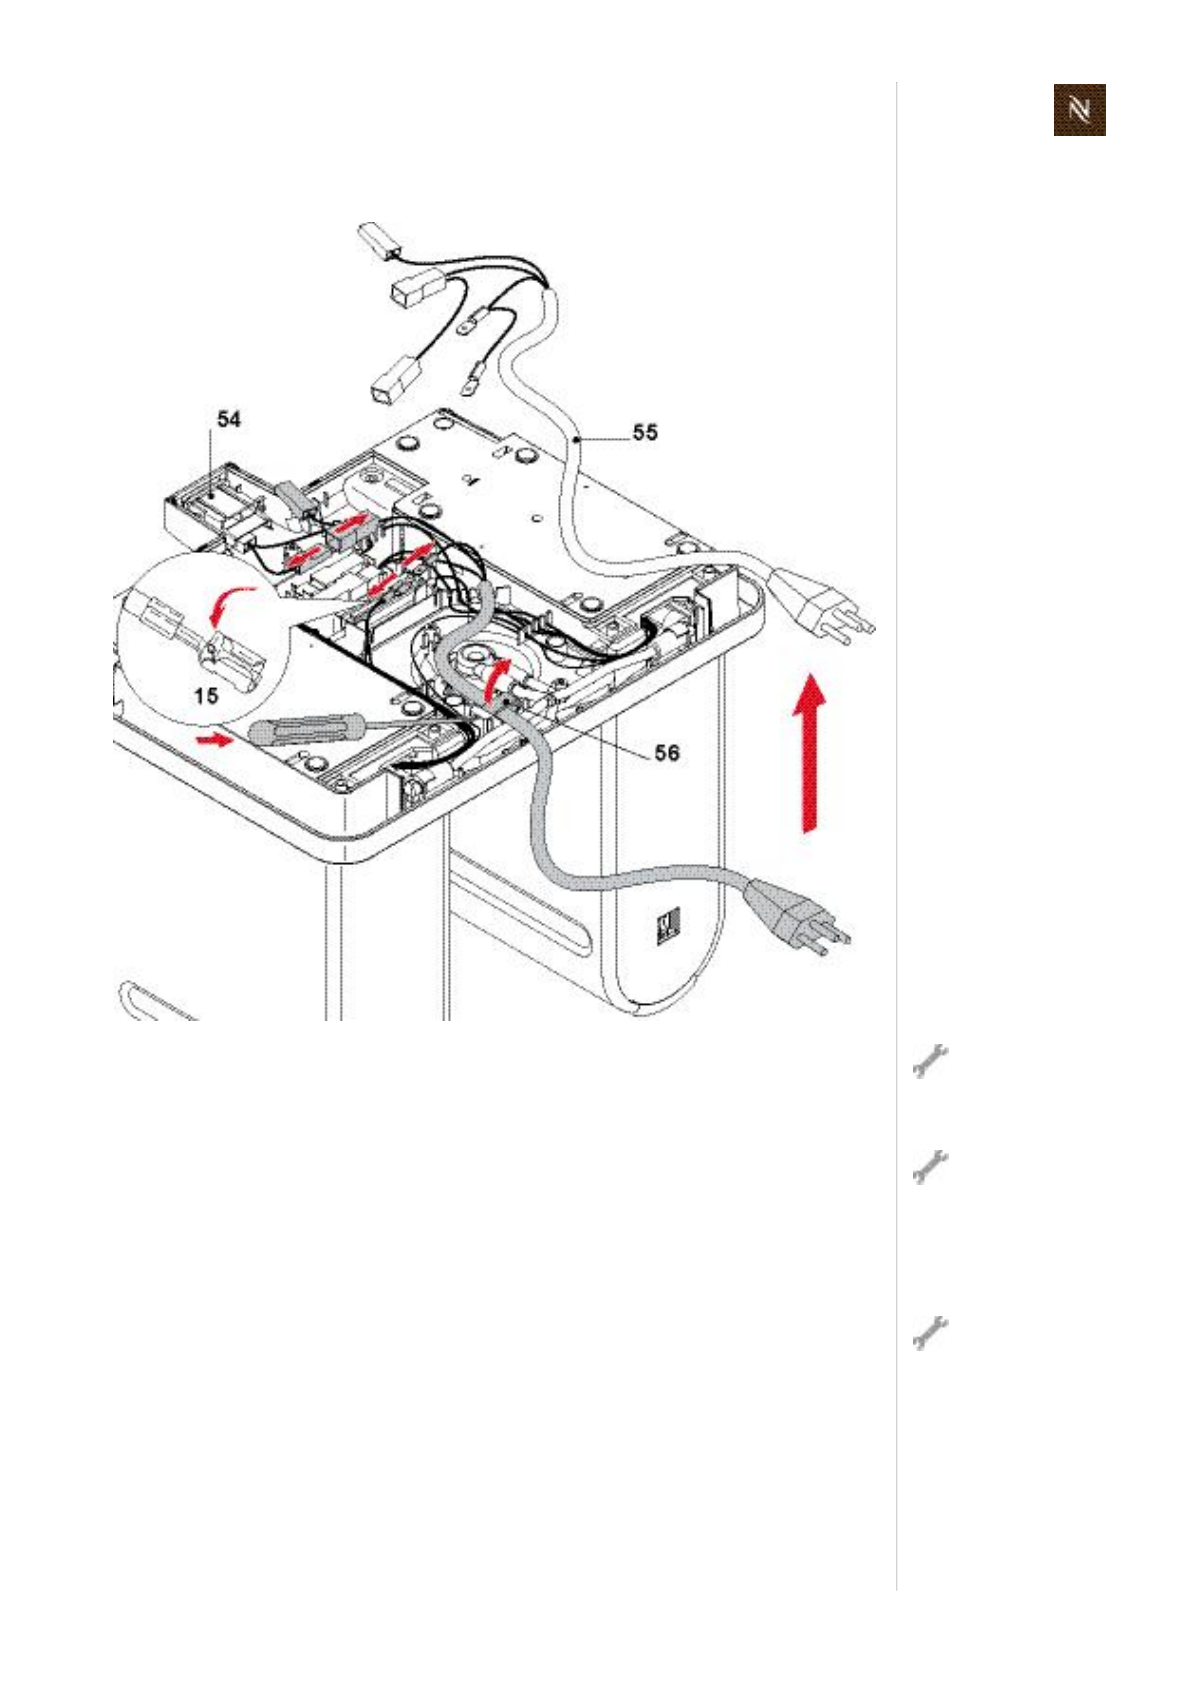
Citizservicemanual87
R E P A I R S
8.6.4 Replacingpowercord
• Removeinsulatedfastonreceptacleofphasewire(55)frommainsswitch(54).
• Disconnectbothinsulatedadapterplugsofneutralwire(55).
• Ifagroundwireispresent,disconnectbothflatreceptacles(15).
• Unlatchcablebracket(56)withscrewdriver.
Useapairofflatpli
erstopulloffinsulat
ingsleevewithrecep
tacle.
Theflatreceptacles
ofthegroundwire
connections(15)
haveaspecialconnector
latching(seedetail).Press
downleveratfirst,thenpull
offreceptacle.
Thecablebracketis
undertension.There
fore,holdthecable
bracketwithyourfinger
whenunlatchingit.
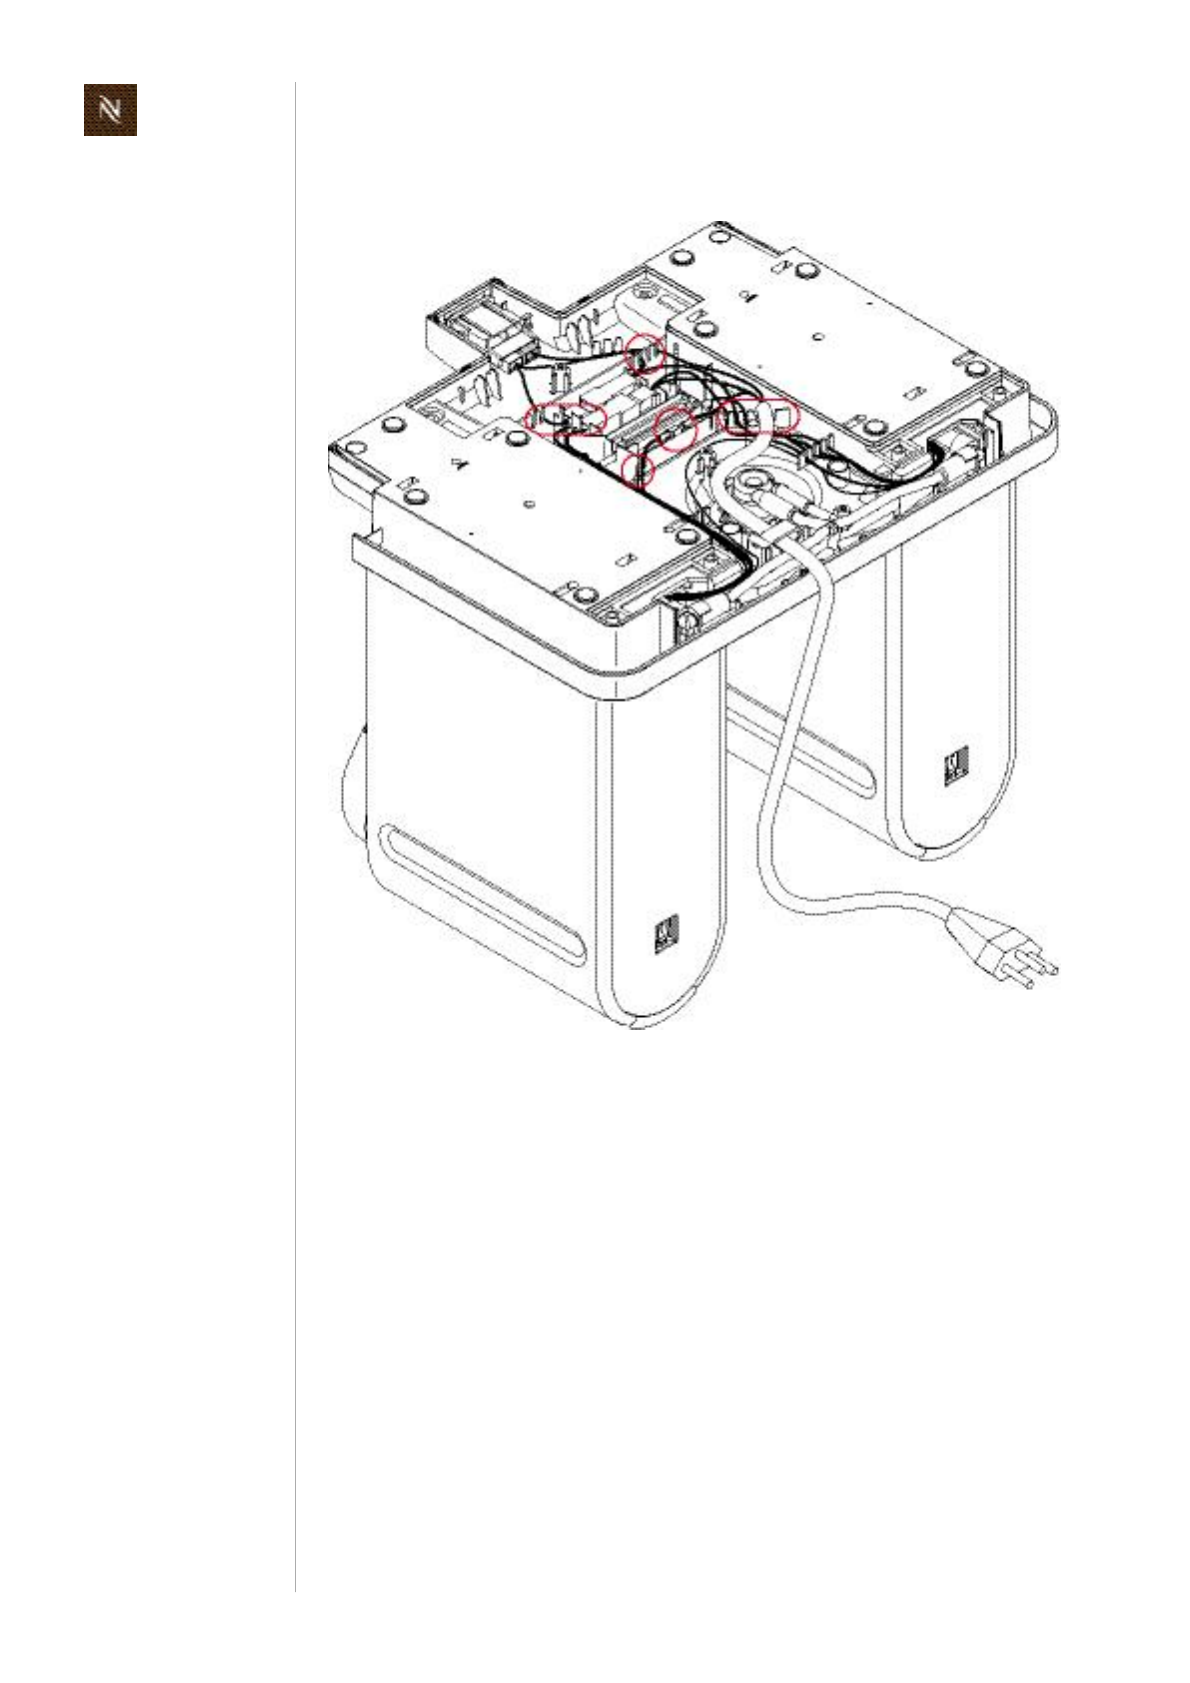
Citizservicemanual
88
R E P A I R S
Assemblycheckpoints
• Usemarkedcableguidestolaywires.
• Checkwiringofpowercord(see"WiringdiagramsmodelCitiz&Co,EF487/488"
onpage128andfollowing).
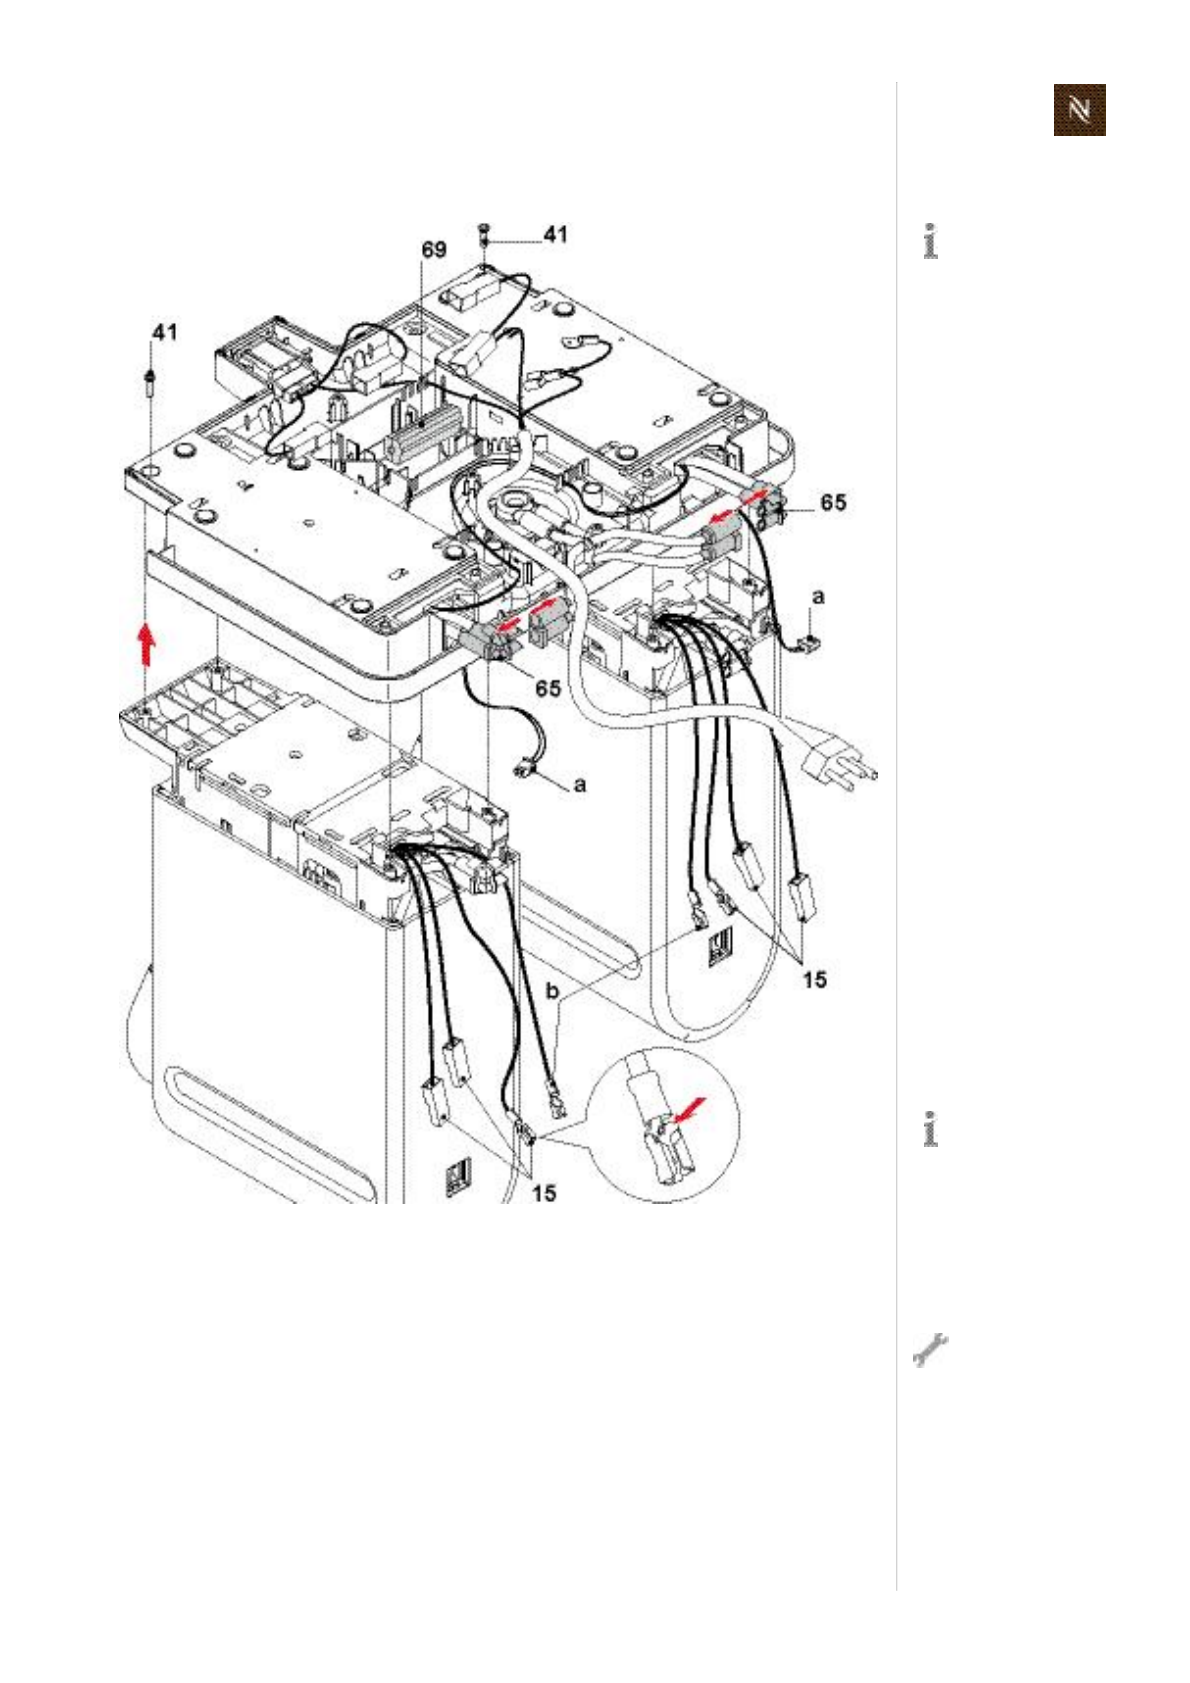
Citizservicemanual89
R E P A I R S
8.6.5 Removingcoreunits
• Foreachcoreunitloosen1remainingscrew(41,ovalshapedhead)atthebottom
sideofplatform.
Forcompleteremovalofacoreunitproceedasfollows:
4. Disconnect2insulatedadapterplugs(15,phaseandneutralwire).
5. Ifagroundwire(15,partofthermoblock)ispresent,disconnectflatreceptacle.
6. Openprotectivecase(69)withscrewdriveranddisconnectconnectioncable(b).
7. Pulloutcoreunitfromplatformslightlytodisconnectsynchronizationcableplug(a)
fromelectroniccontrolboard.
8. PulloffbothhosesfromangledHconnector(65).
9. Liftcoreunitoutofplatform.
Bothcoreunitscan
beremovedthesame
way.
Afterthefirstrepair
stepthecoreunitcan
bepulledoutofthe
platformslightly(withstill
connectedhosesand
wires).Nowthecoversof
thecoreunitcanbe
removed.
Theflatreceptacleon
thegroundwirehasa
specialconnector
latching(seedetail).Press
downleveratfirst,thenpull
offreceptacle.
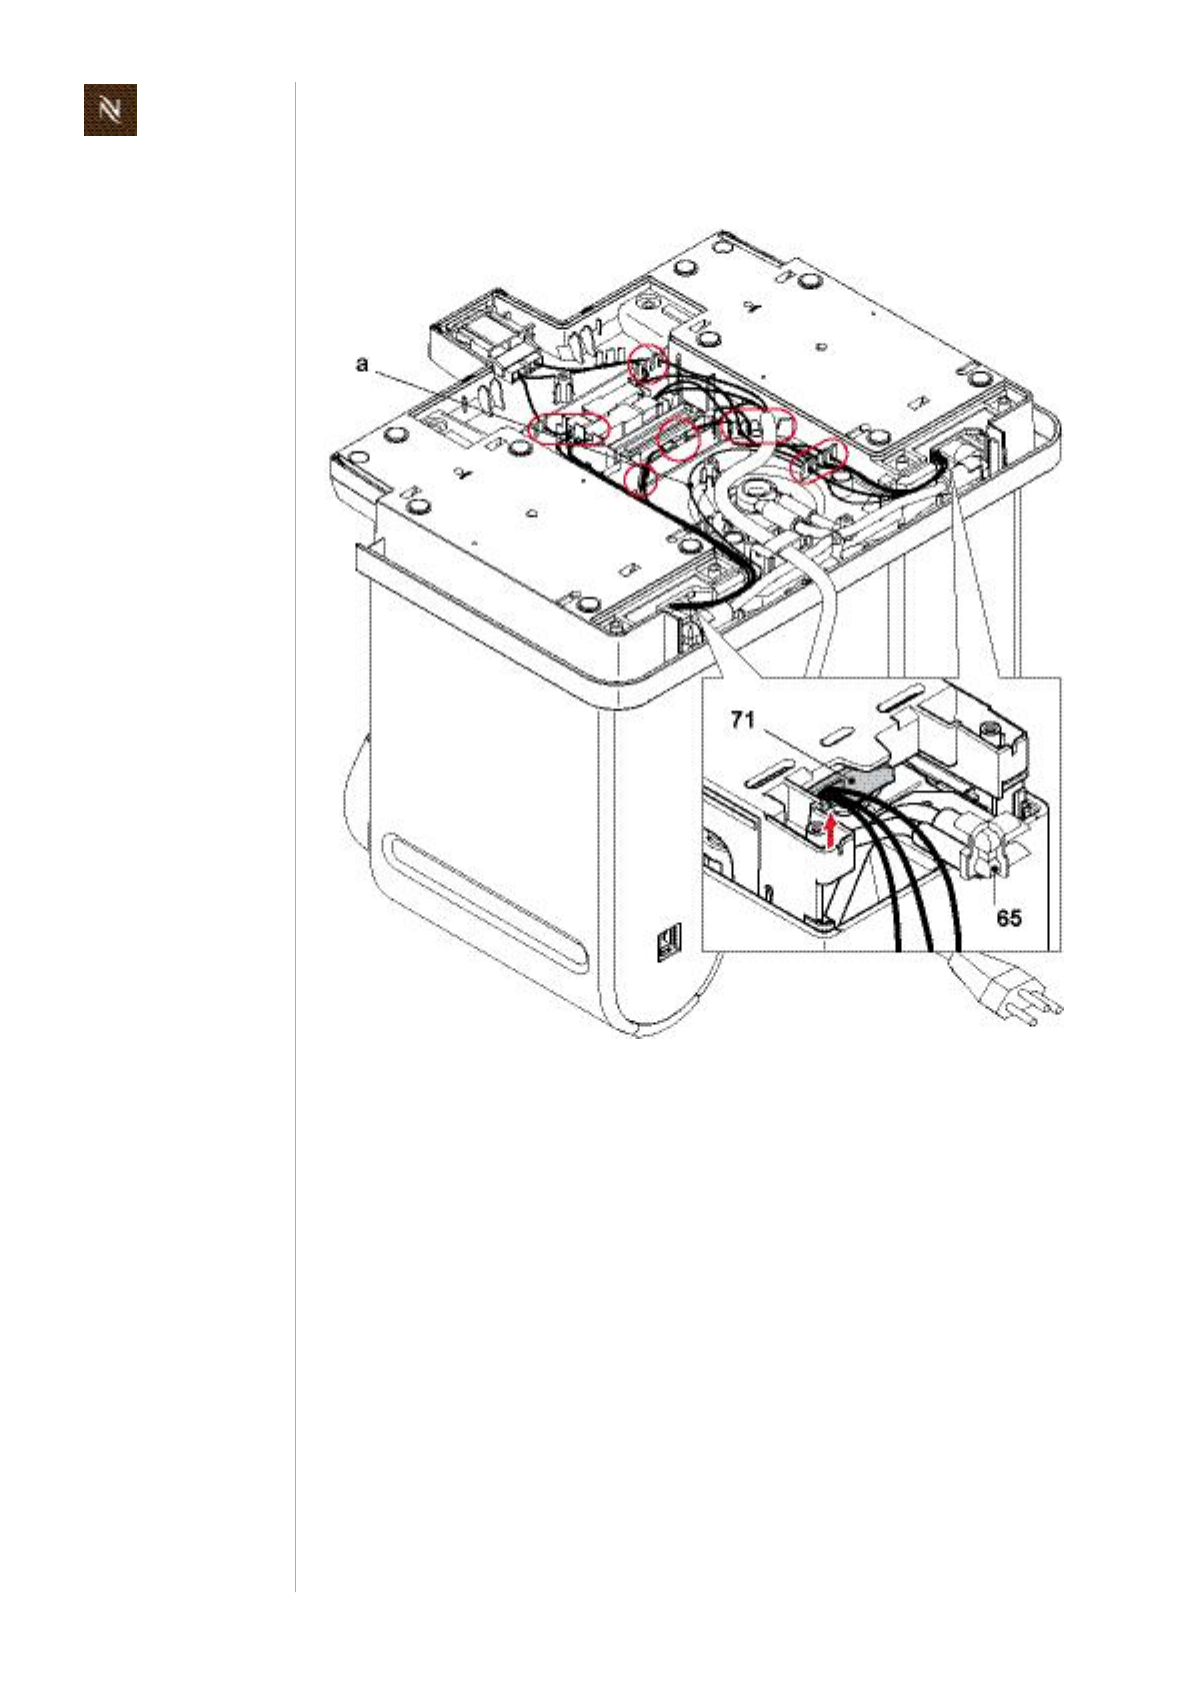
Citizservicemanual
90
R E P A I R S
Assemblycheckpoints
• Allcoversareassembledonthecoreunit.
• Usemarkedcableguidestolaywires.
• Checkwiring(see"WiringdiagramsmodelCitiz&Co,EF487/488"onpage128
andfollowing).
• Makesuretoreconnectsynchronizationcableplugs(a)onelectroniccontrolboards.
• MindthehosepositionsonangledHconnector(65).
• Checkthatwiringbetweencoreunitsandplatformisledthroughcablefixations(71).
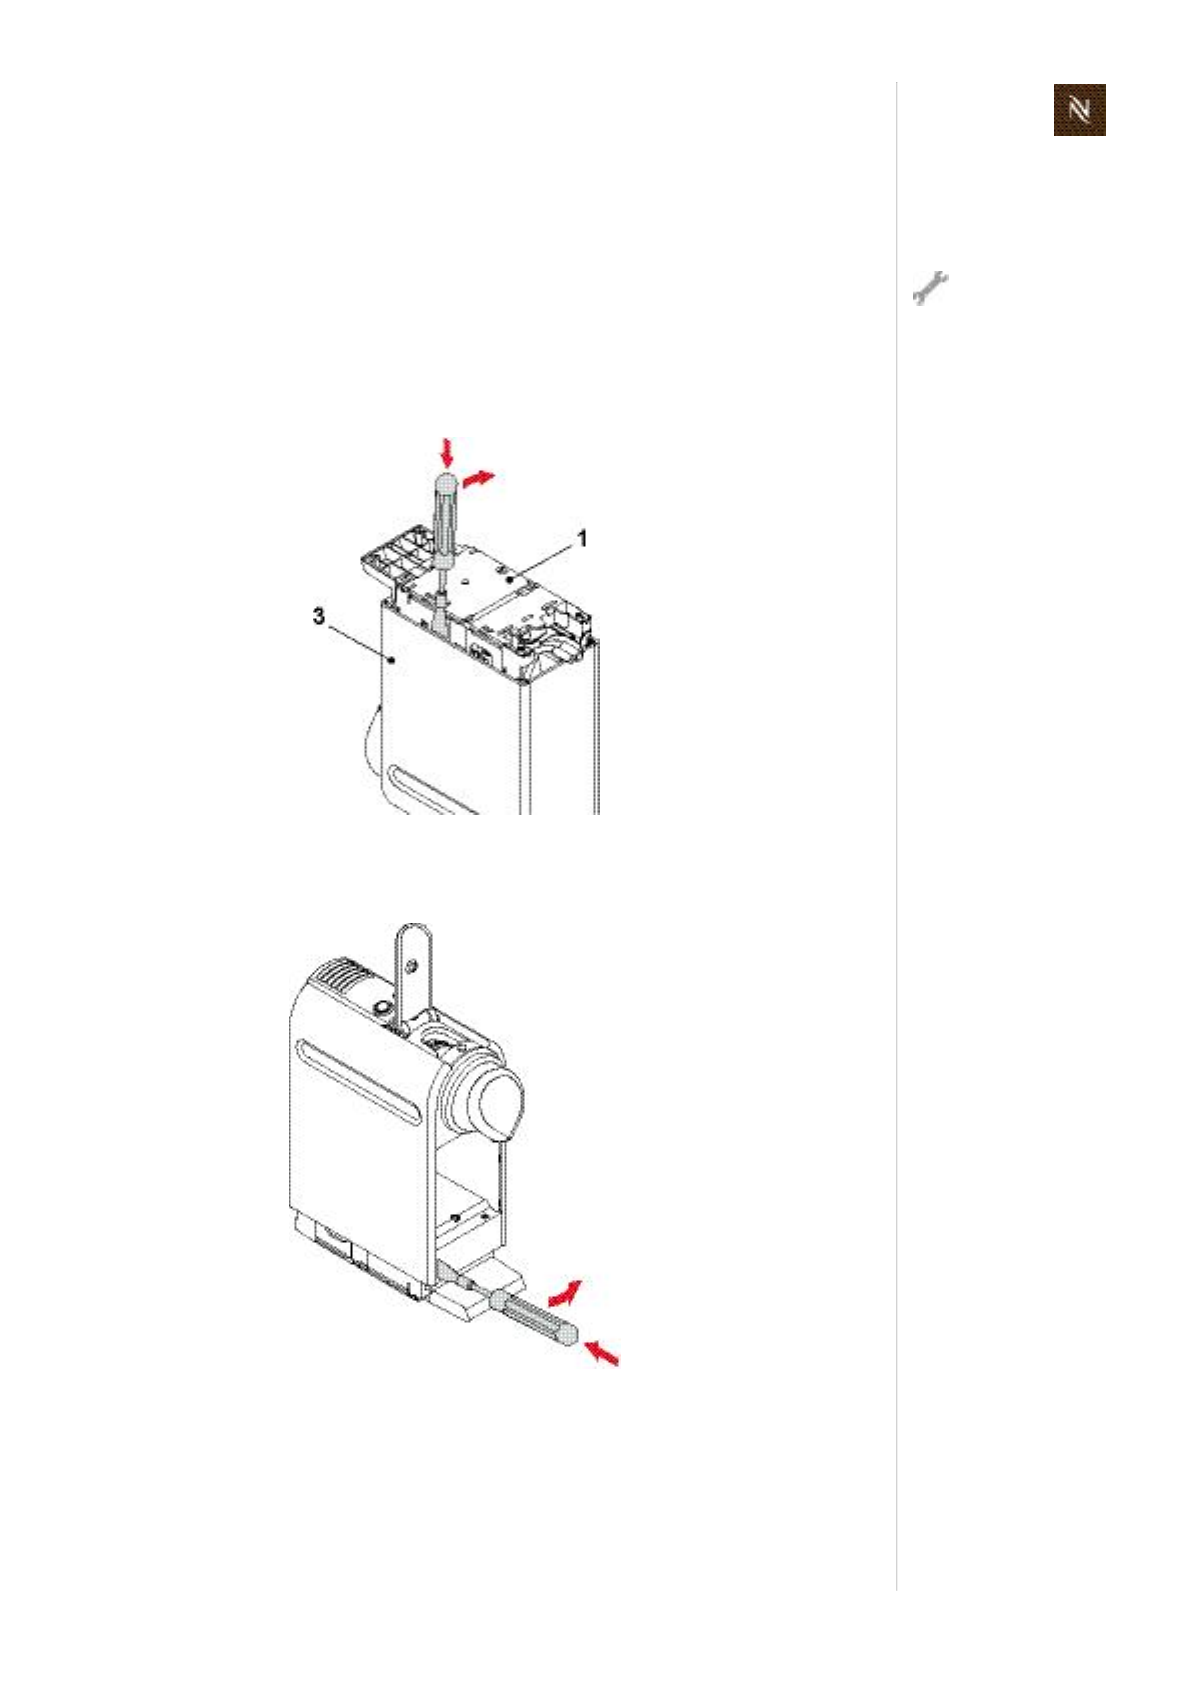
Citizservicemanual91
R E P A I R S
8.7 Disassemblyofcoreunit,Crange
8.7.1 Generaldisassembly
Thecoreunithastoberemovedfromtheplatformatfirst(seeaccordingchapter"plat
formdisassembly").Itispossibletoperformageneraldisassemblyofthecoreunitwith
intacthoseandwireconnectionstotheplatform(e.g.forrepair,leakagecheck).
Removeleftsidepanel
1. Insertdisassemblytoolbetweenbottomofleftsidepanel(3)andchassis(1).
2. Swiveldisassemblytooltilllatchopensatthebottom.
3. Insertdisassemblytoolintolowergapatthefront.
4. Carefullyturndisassemblytoolslightlytotherighttoopenthelatch.
Aftergeneraldisas
semblyofthecore
unitarepairing/
serviceholderdeviceis
helpfulforfurtherrepair
work.
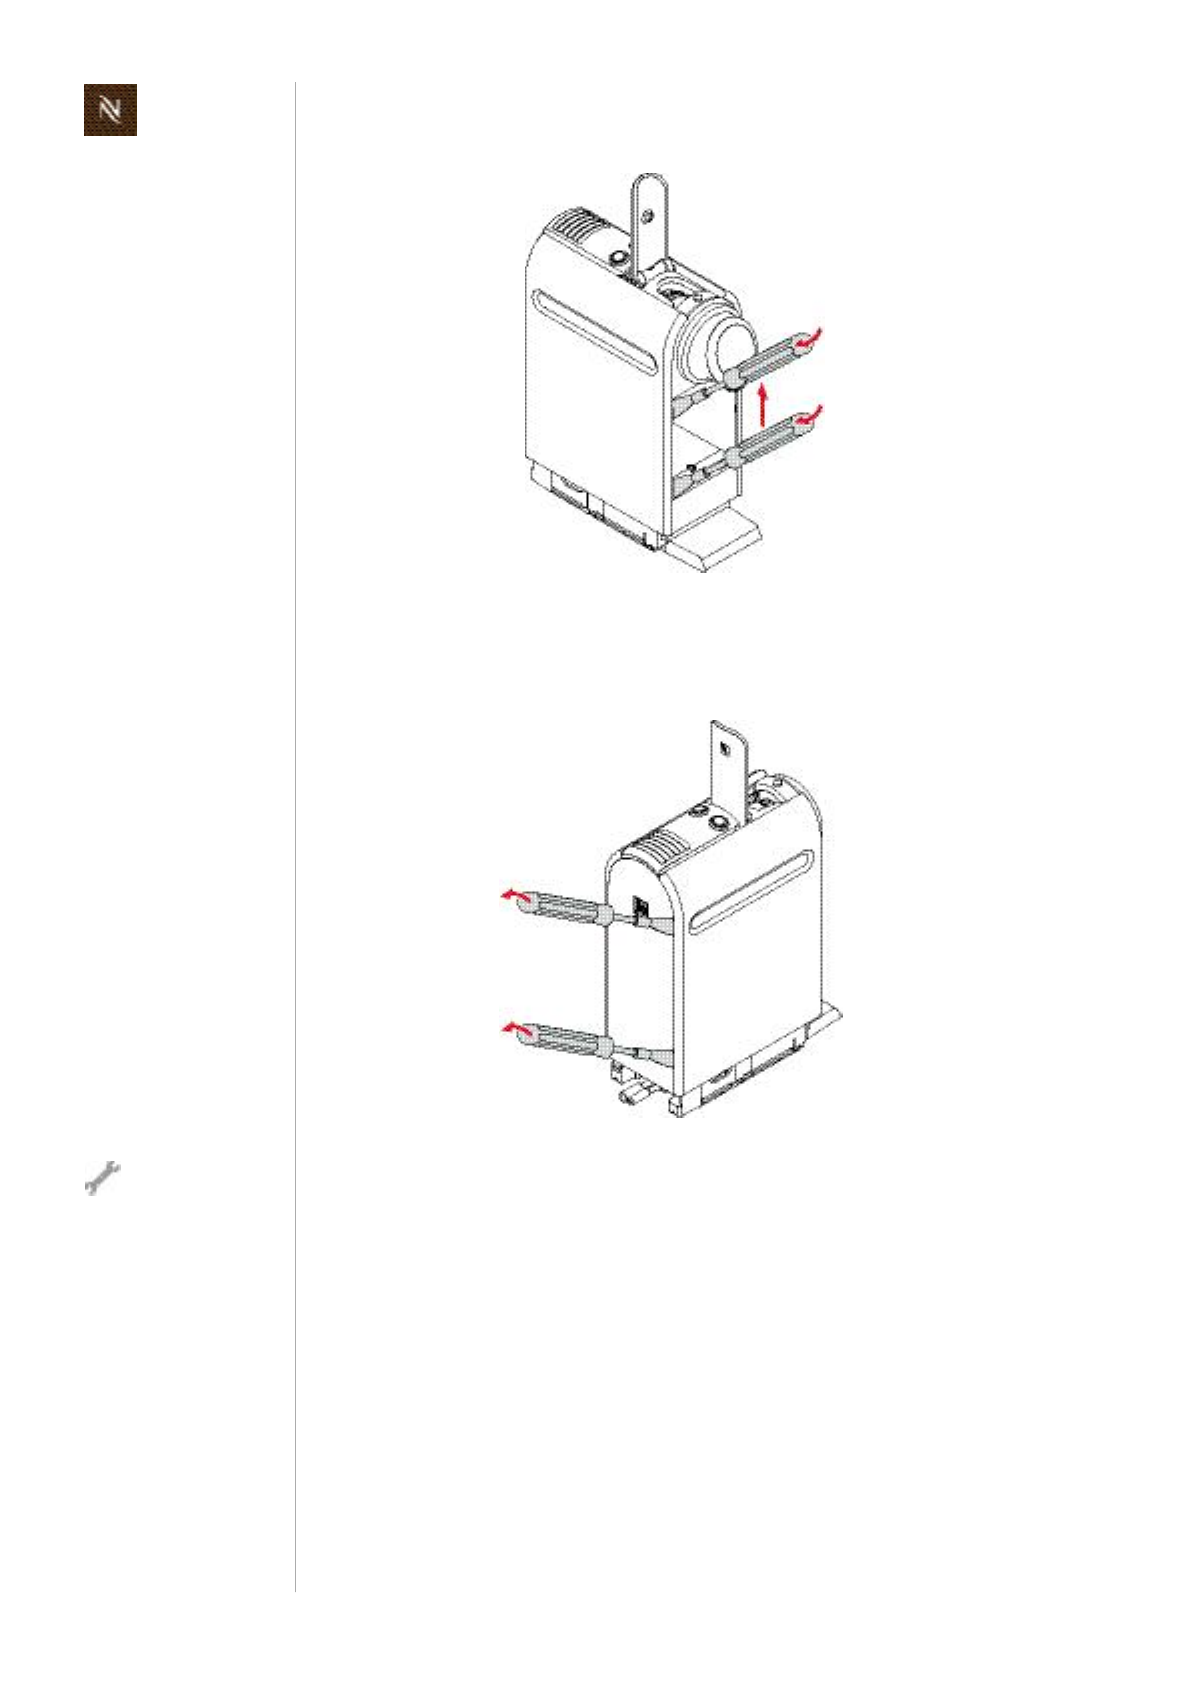
Citizservicemanual
92
R E P A I R S
5. Insertdisassemblytoollaterallyintothegapabove.
6. Carefullyturndisassemblytoolslightlyforwardtoopenthenextlatch.
7. Movedisassemblytoolupwardsandopenremaininglatchthesameway.
8. Atthebackinsertdisassemblytoolintoshadowgapofleftsidepanel.
9. Swiveldisassemblytoolcarefullytoopenfirstlatch.
10. Movedisassemblytoolupwardsandopentheothertwolatchesthesameway.
Insertdisassembly
toolatrightangles
only.Otherwisethe
shadowgapcanbedam
aged.
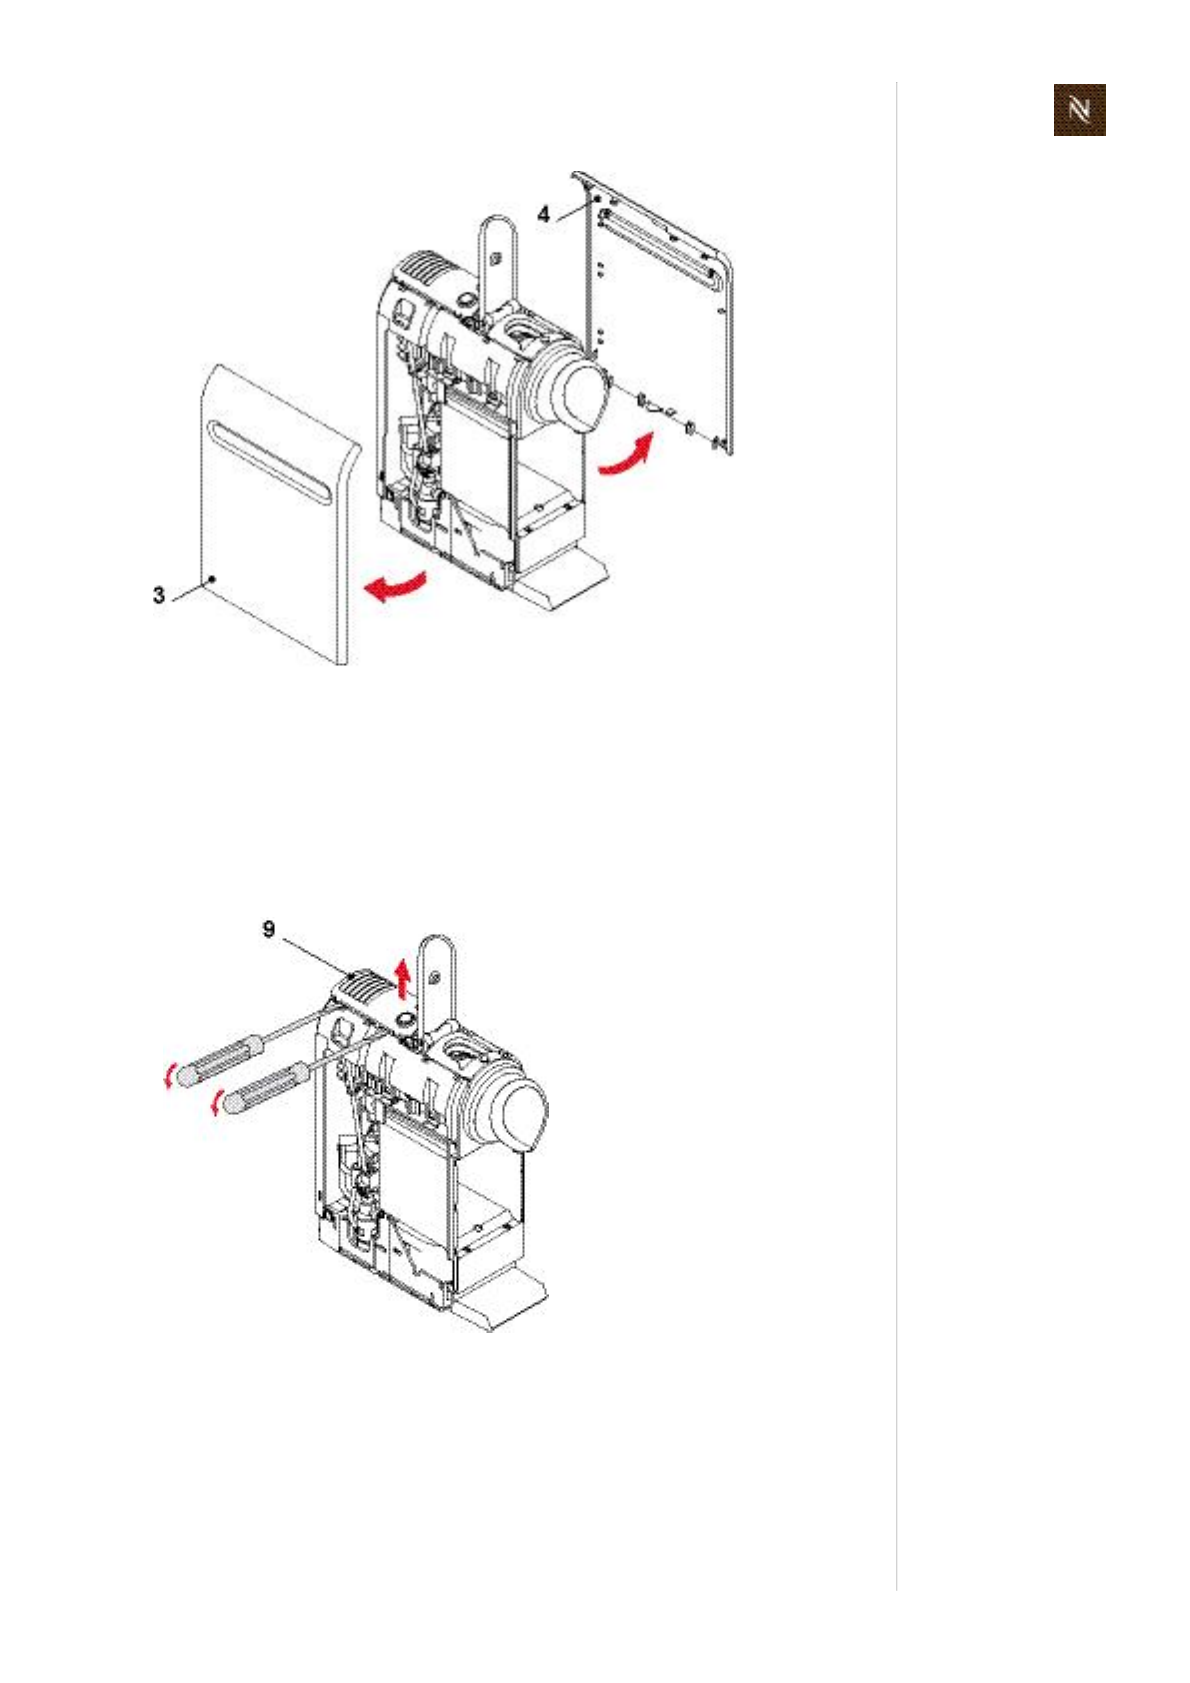
Citizservicemanual93
R E P A I R S
11. Swingupandremoveleftsidepanel.
Removerightsidepanel
Removetherightsidepanel(4)inthesamesequenceasfortheleftsidepanel(3).
Removeblind
1. Open2latchesoneachsideofblind(9)withscrewdriver.
2. Removeblindtogetherwithcoffeebuttonsandwiring.
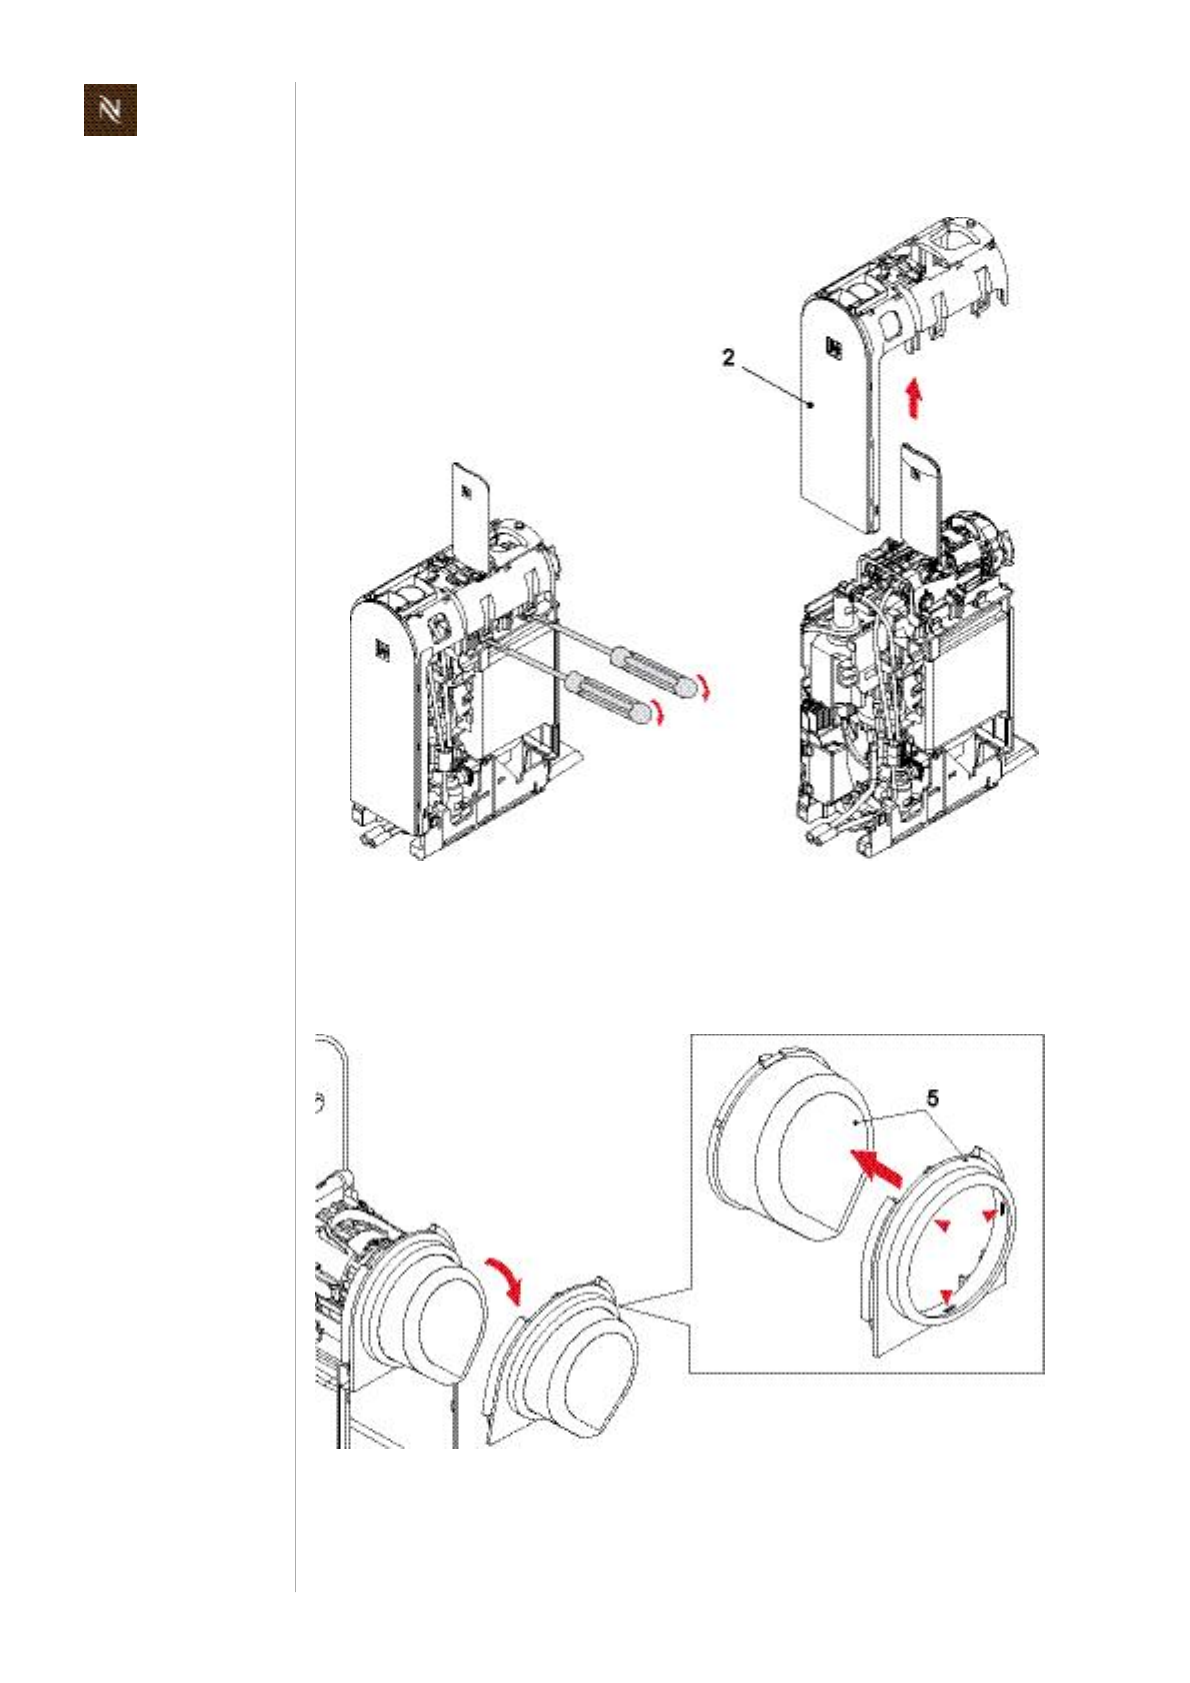
Citizservicemanual
94
R E P A I R S
Removecover
1. Useascrewdrivertorelease2latchesoneachside.
2. Liftandremovecover(2).
Removefrontcoverwithoutlet
1. Release3latchesonfrontcoverbyhandandpressoutoutlet(5,seedetail).
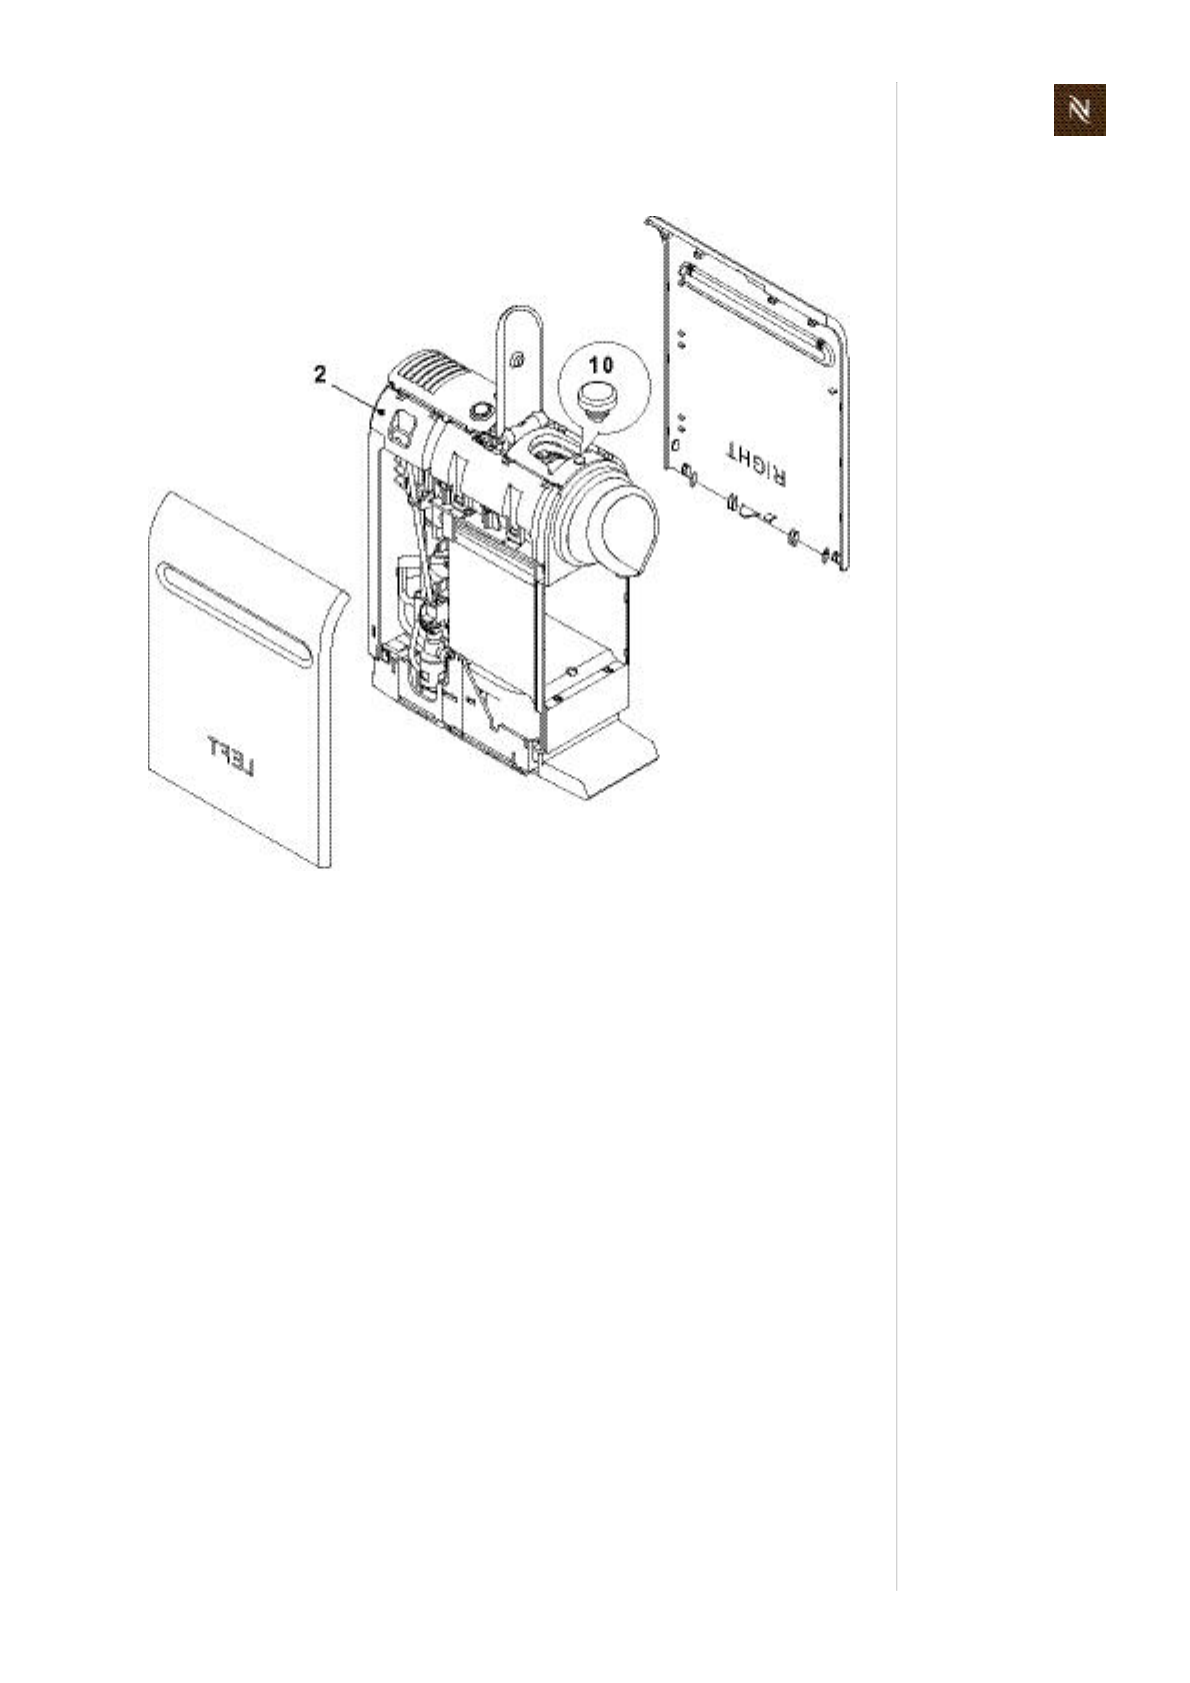
Citizservicemanual95
R E P A I R S
Assemblycheckpoints
• Foreasyidentification,thesidepanelsaremarkedwith"RIGHT"or"LEFT"onthe
inside.
• Checkifdamper(10)forclosinghandleisinstalledoncover(2).
• Checkthatallconnectionwirestotheplatformareledthroughcablefixation(71).
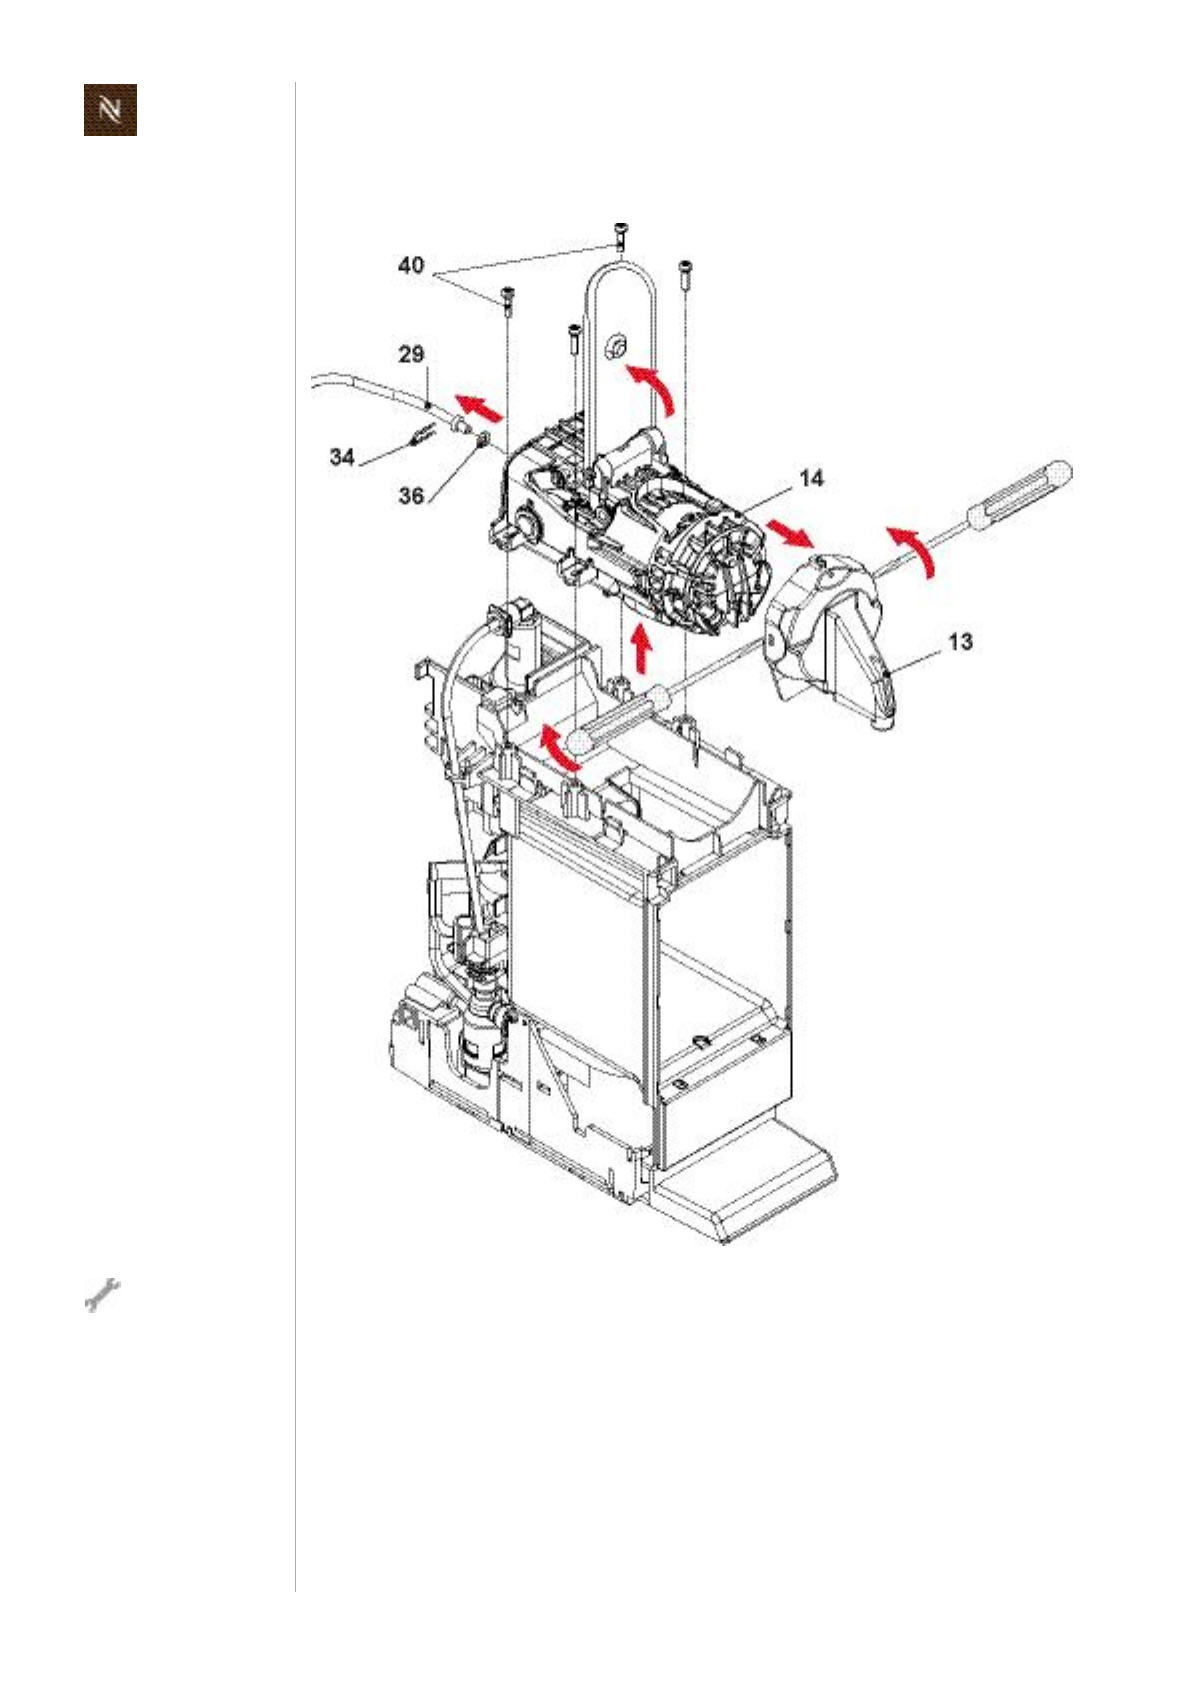
Citizservicemanual
96
R E P A I R S
8.7.2 Replacingcompactbrewingunit
• Useapairofpointedplierstoremoveconnectorclip(34)andhose(29)withOring
(36).
• UseTorxscrewdriverTX10toloosen4screws(40).
• Afterremovalofcompactbrewingunit(14),release2latcheswithscrewdriverand
removesteamcover(13).
Openclosinghandle
togetaccesstohose
connection.
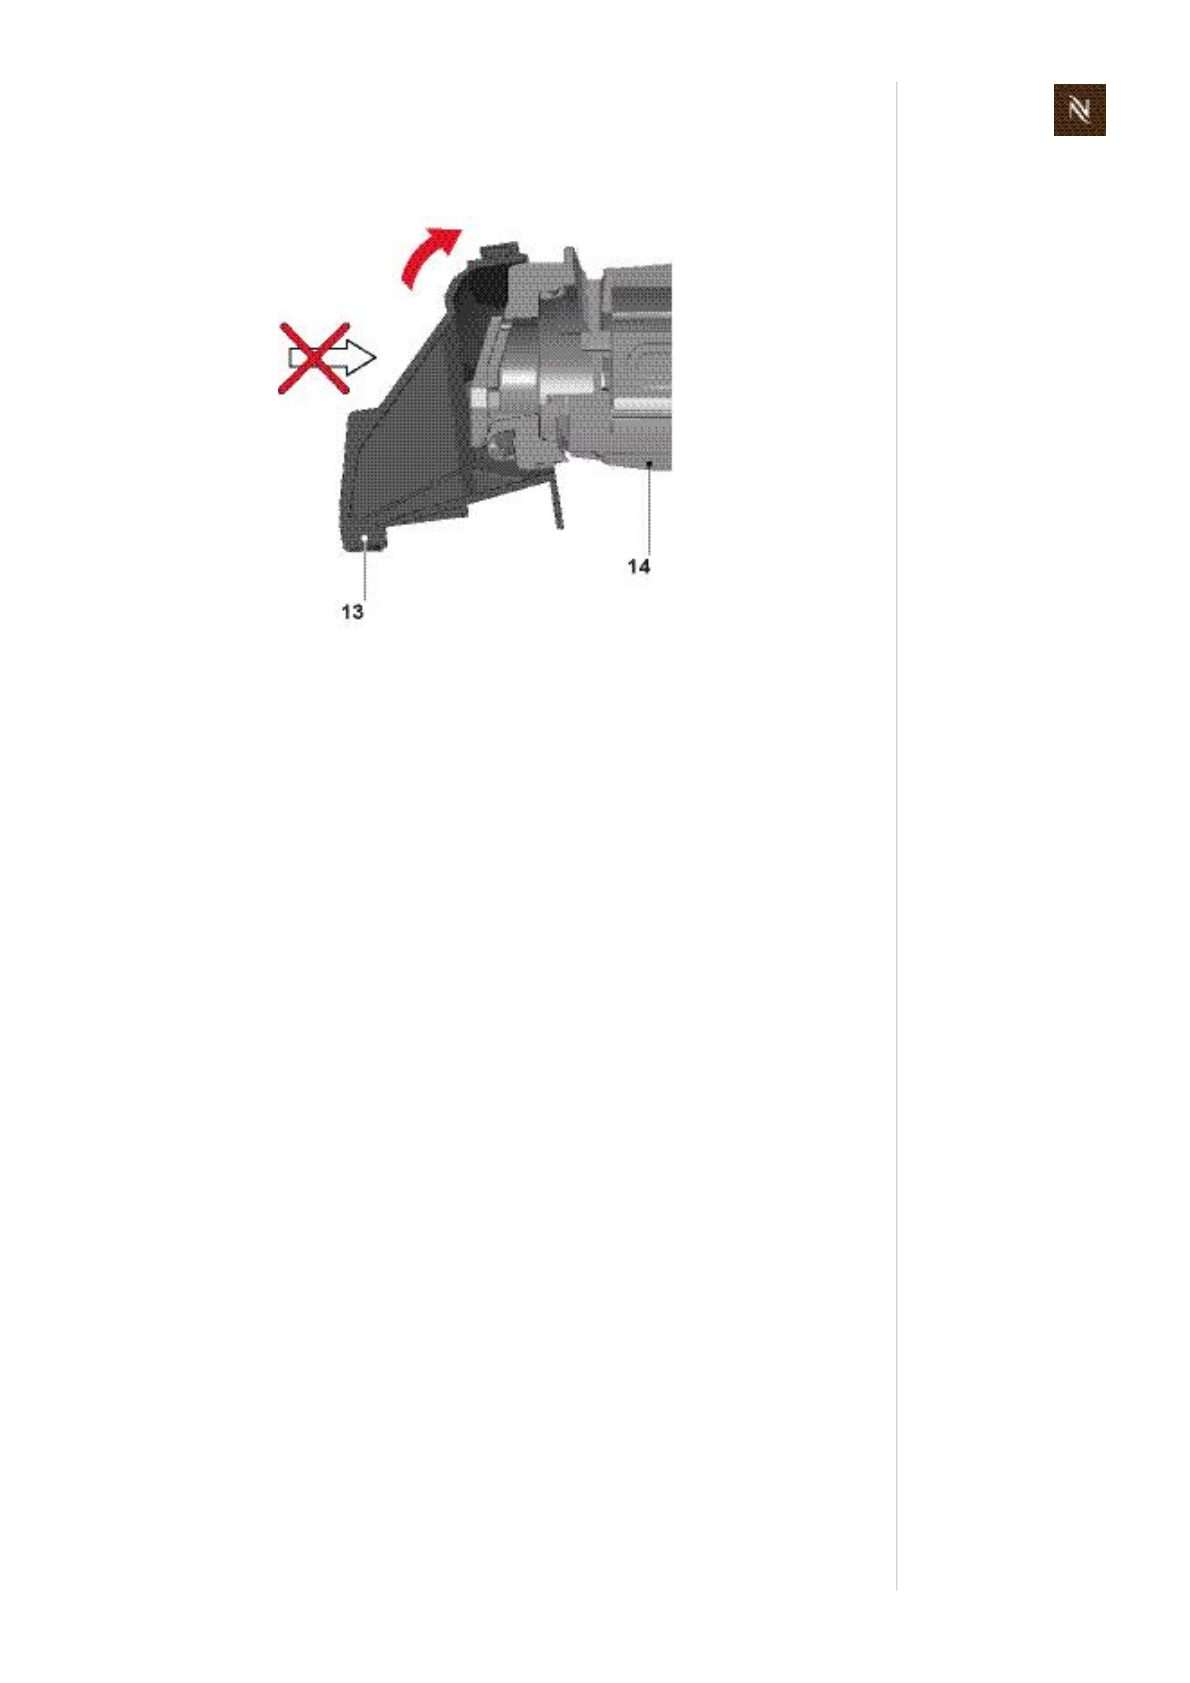
Citizservicemanual97
R E P A I R S
Assemblycheckpoints
• Atfirstassemblesteamcover(13)onnewcompactbrewingunit(14)asshown.
• ReplaceOring(36)ofhoseconnectiononcompactbrewingunit.
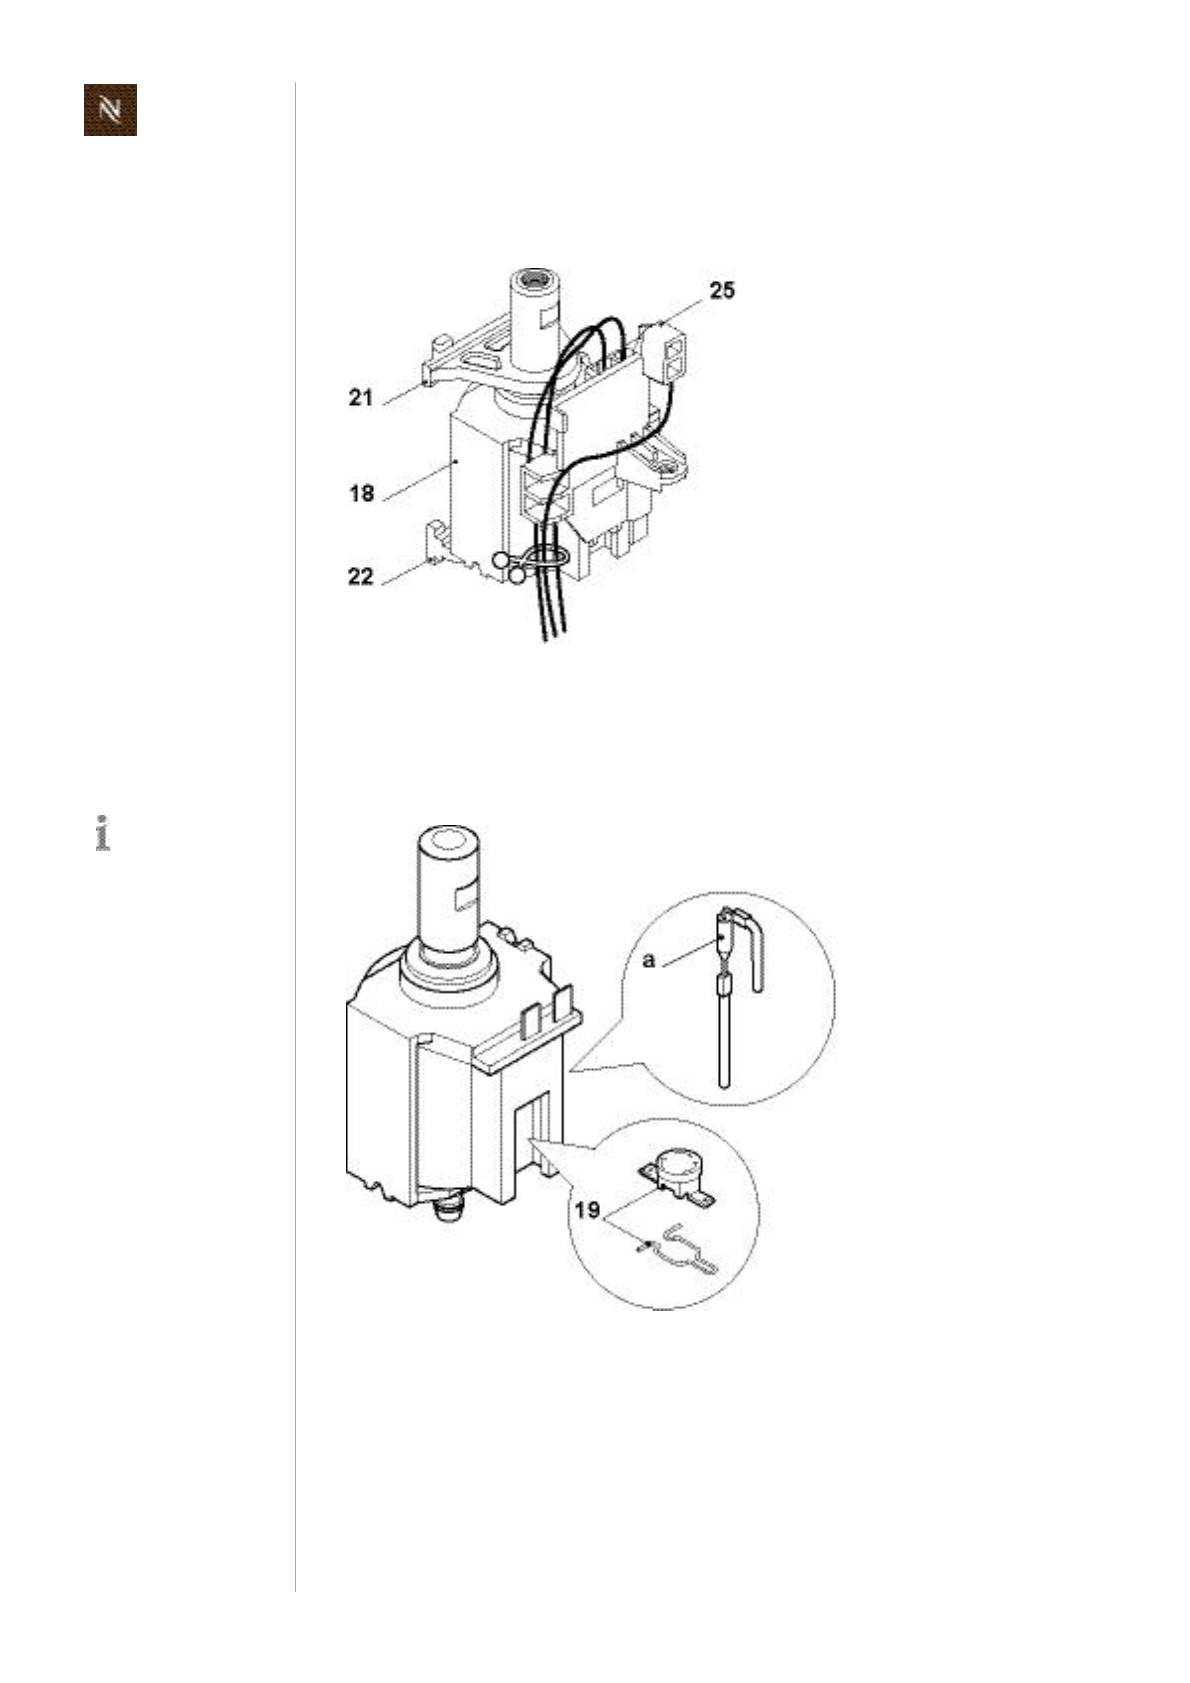
Citizservicemanual
98
R E P A I R S
8.7.3 Replacingpump
General
Thepump(18)canonlybereplacedasassemblyconsistingof
pump,prewiredwiththermostat(19,seebelow)orthermalcutofffuse(a)
2pumpsupports(21,22)
pumpcover(25).
Ablownthermalcutofffuse(a)hastobereplacedtogetherwiththepumpassembly.
Atrippedthermostat(19)resetsafterabout30minautomatically.
Thepumpis
equippedeitherwith
athermalcutofffuse
orathermostatdepending
onthevoltagerangeor
manufacturer.
a) Thermalcutofffuse 19)Thermostatwithretainingclip
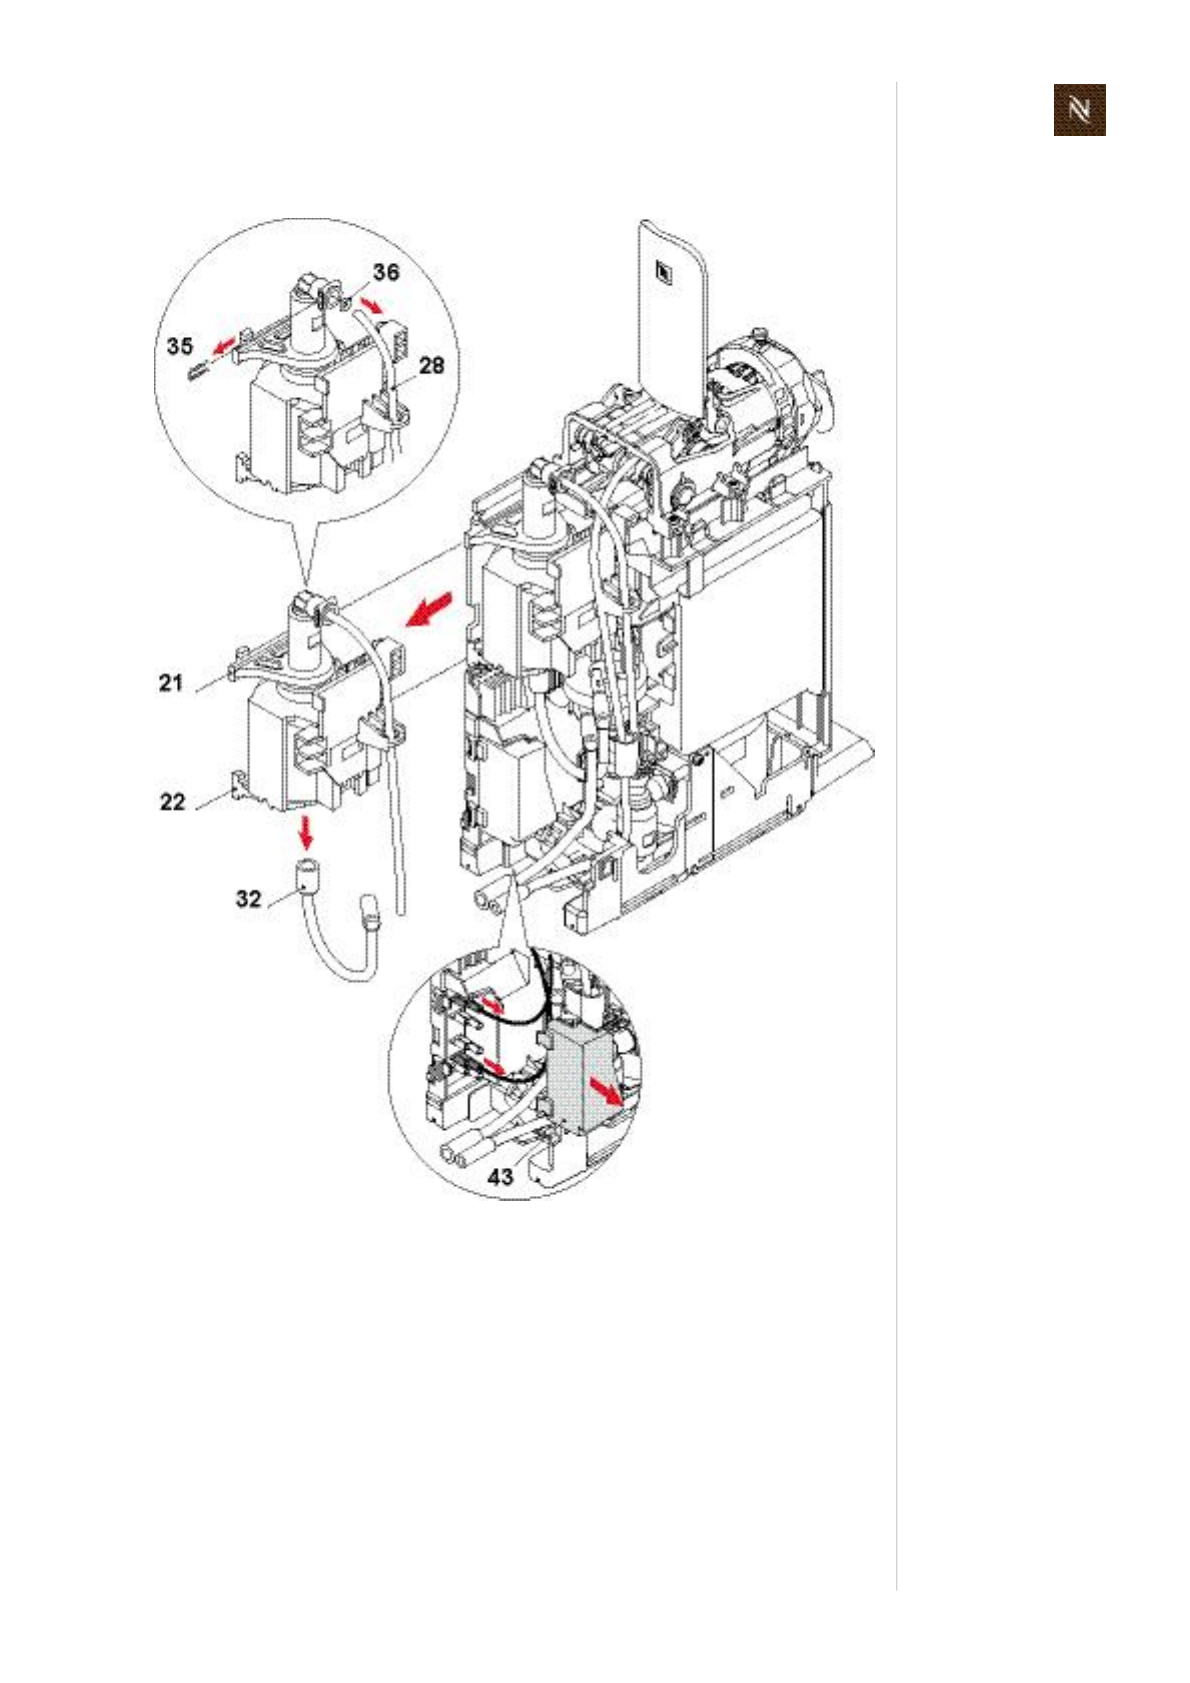
Citizservicemanual99
R E P A I R S
Replacingpumpassembly
• Removebothhoses(28,32)frompump.Useapairofpointedplierstoremove
connectorclip(35)withOring(36).
• Removecover(43)fromelectroniccontrolboardanddisconnect2fastonrecepta
clesofpumpwires.
• Pulloutsupports(21,22)togetherwithcompletepumpassembly.
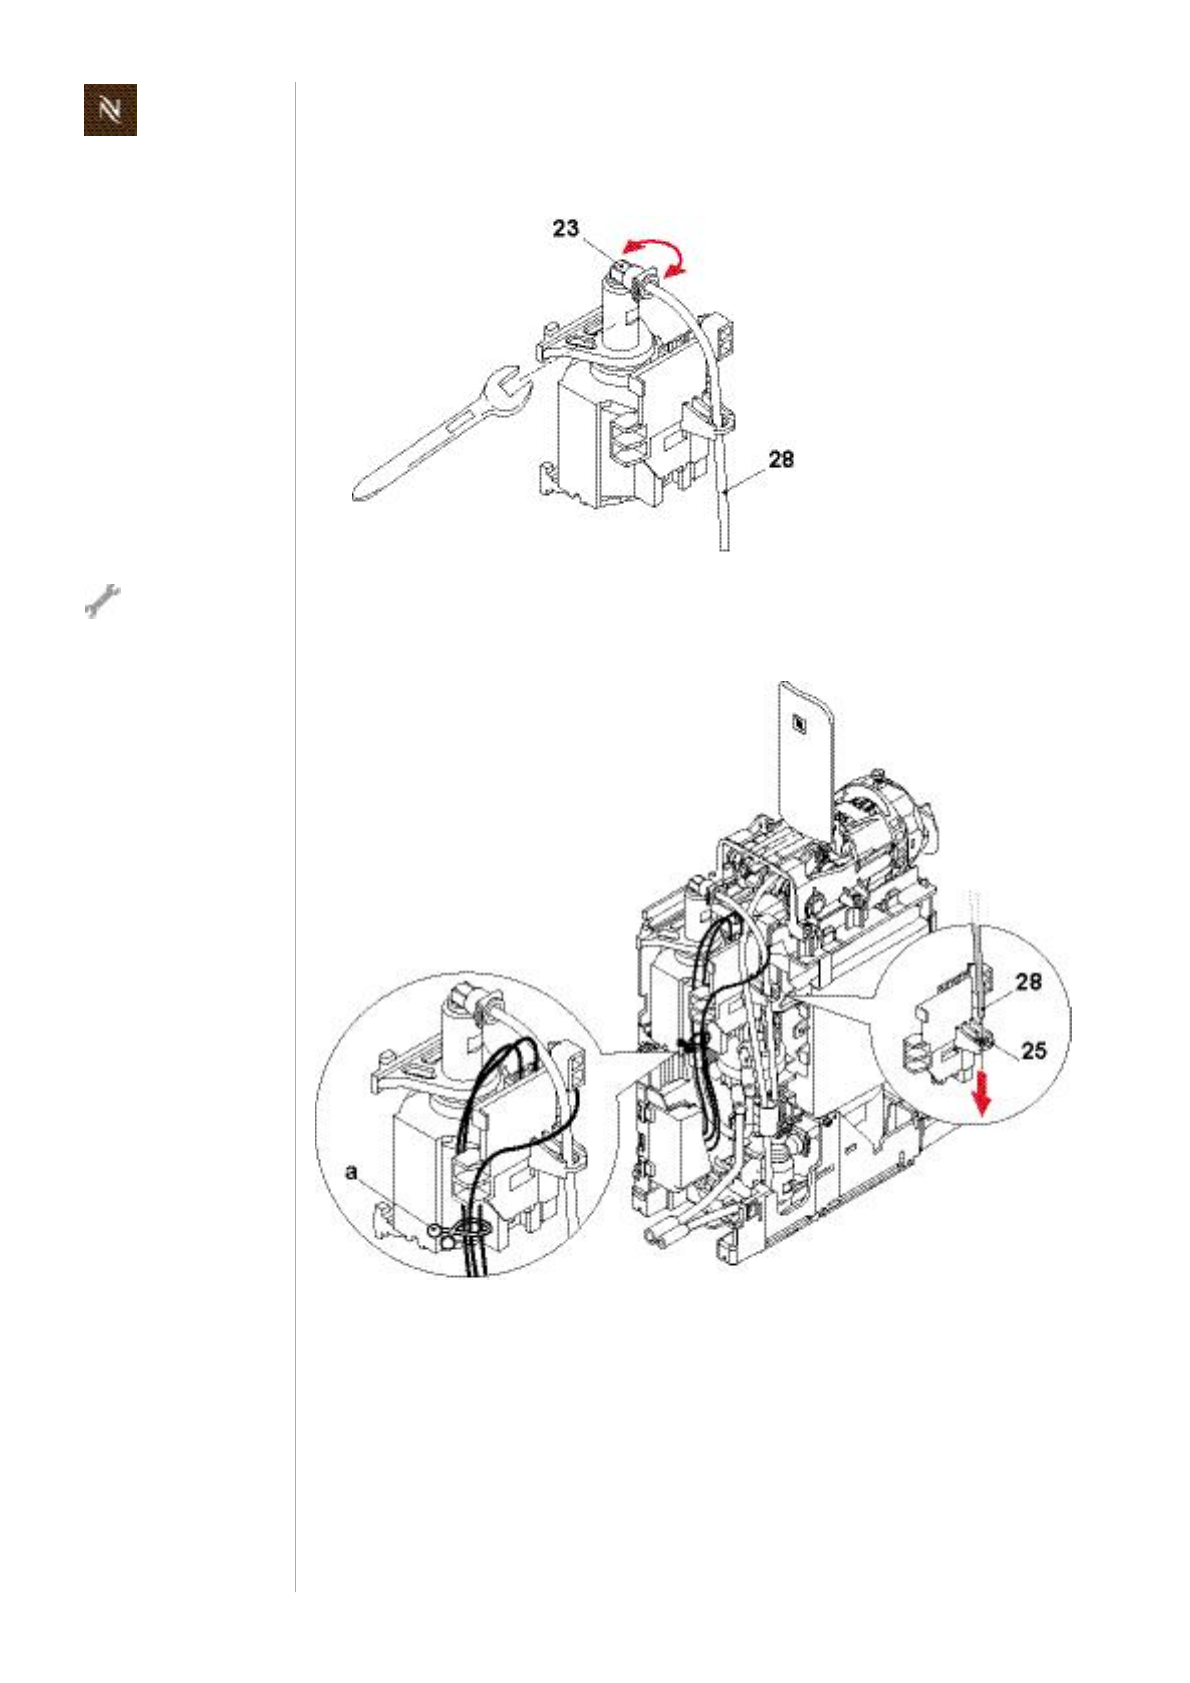
Citizservicemanual
100
R E P A I R S
Assemblycheckpoints
• Adjustpositionofpumpconnector(23)towardshose(28)ifnecessary.
• Checkconditionofsupports(21,22).Replacebrittlesupports.
• Passhose(28)frompumptoselfprimingdevicethroughlugonpumpcover(25).
• Useacableclamp(a)tofixpumpwires(differentlocationdependingonthermo
fuse/thermostat).
ThewhiteplasticIid
onthepumpisrotata
bleandhasasquare
seatfortheforkwrench.
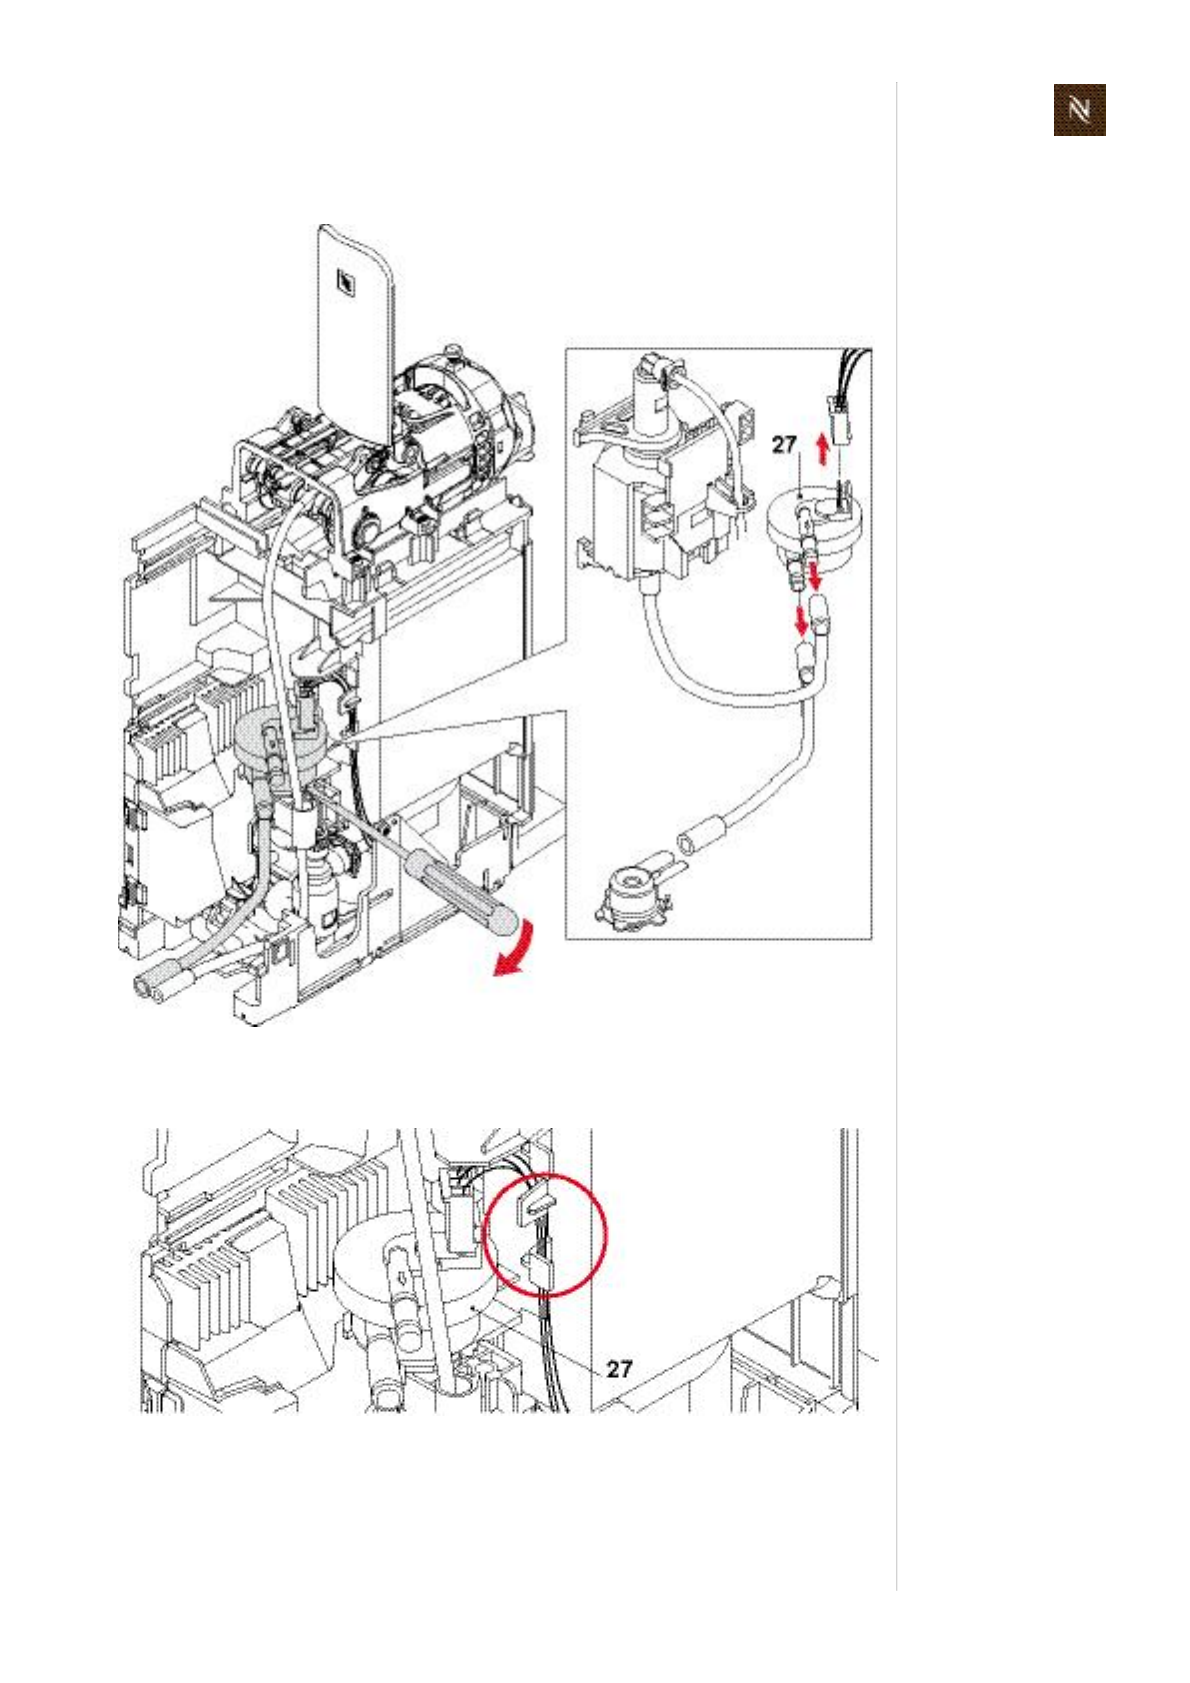
Citizservicemanual101
R E P A I R S
8.7.4 Replacingflowmeter
Assemblycheckpoint
• Layconnectioncabletoflowmeter(27)inbracket.
• Mindthehosepositionsontheflowmeter.
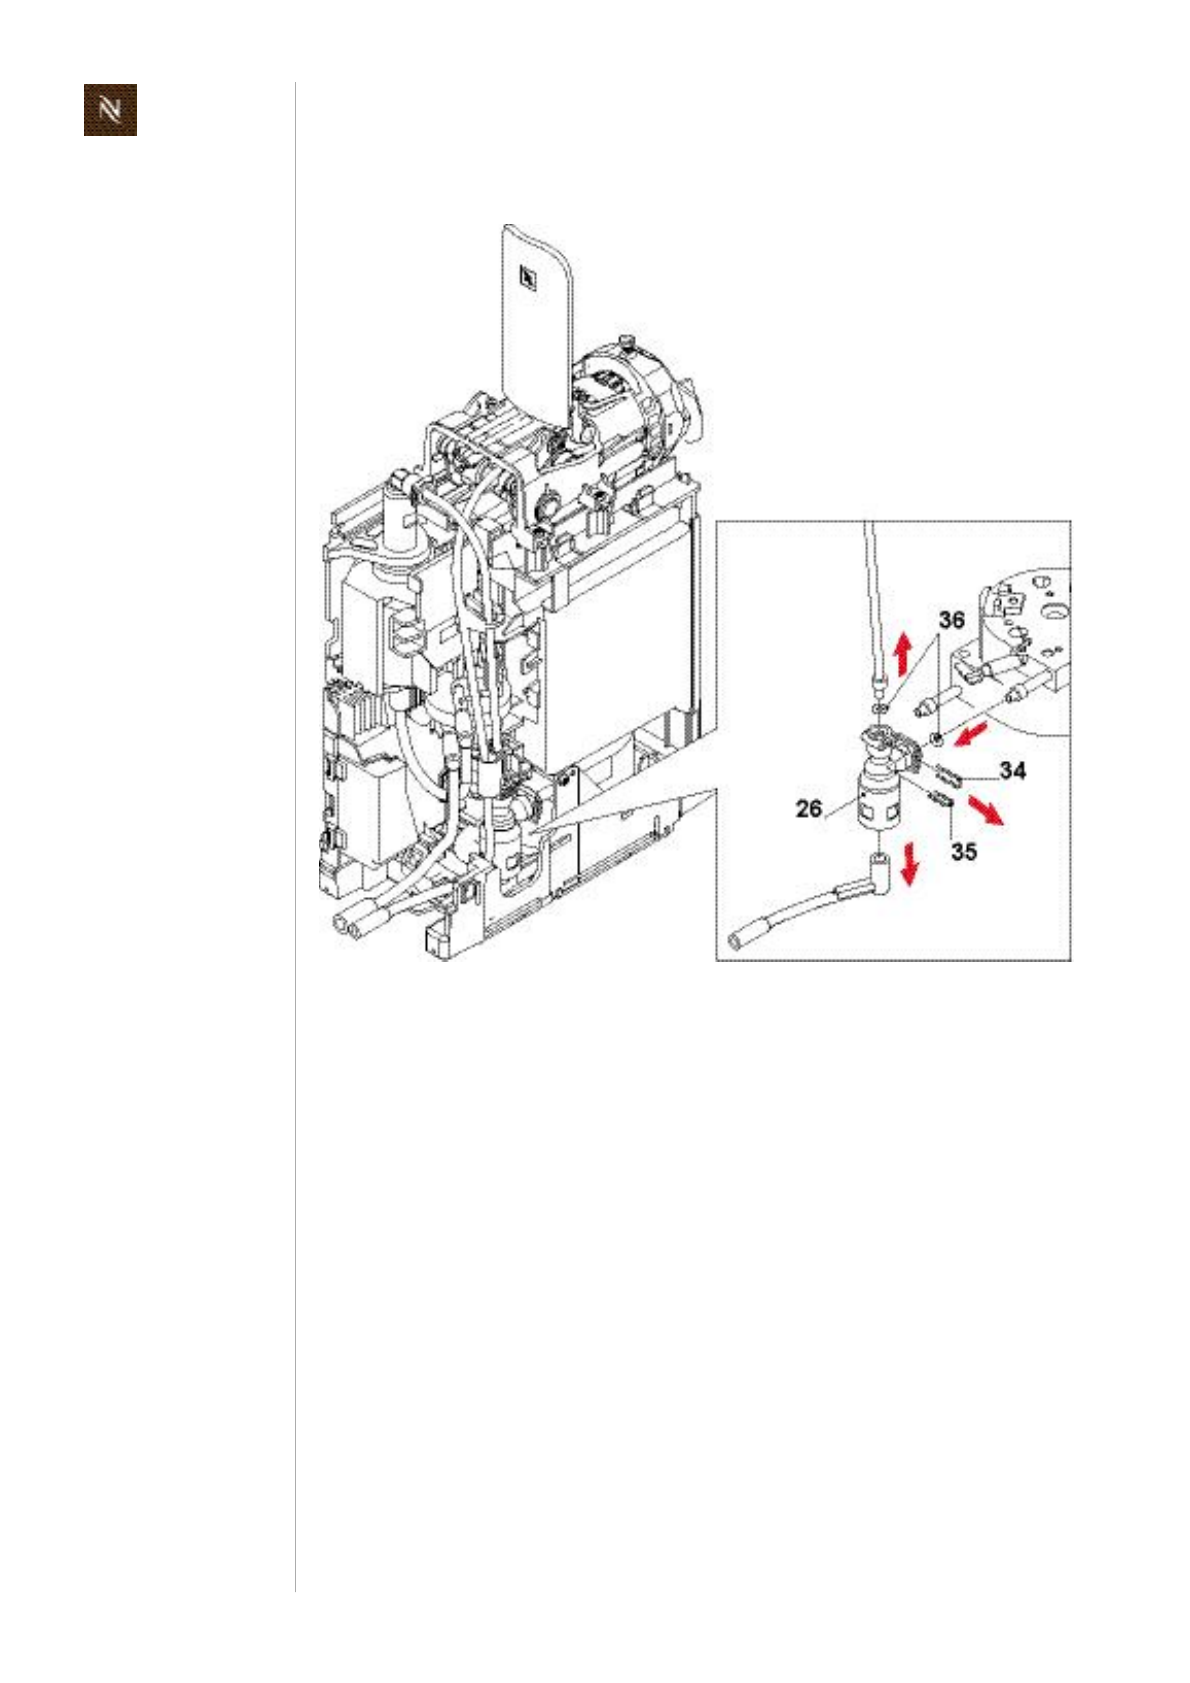
Citizservicemanual
102
R E P A I R S
8.7.5 Replacingautomaticprimingdevice(APD)
• Useapairofpointedplierstoremoveconnectorclips(34,35)fromautomatic
primingdevice(26).
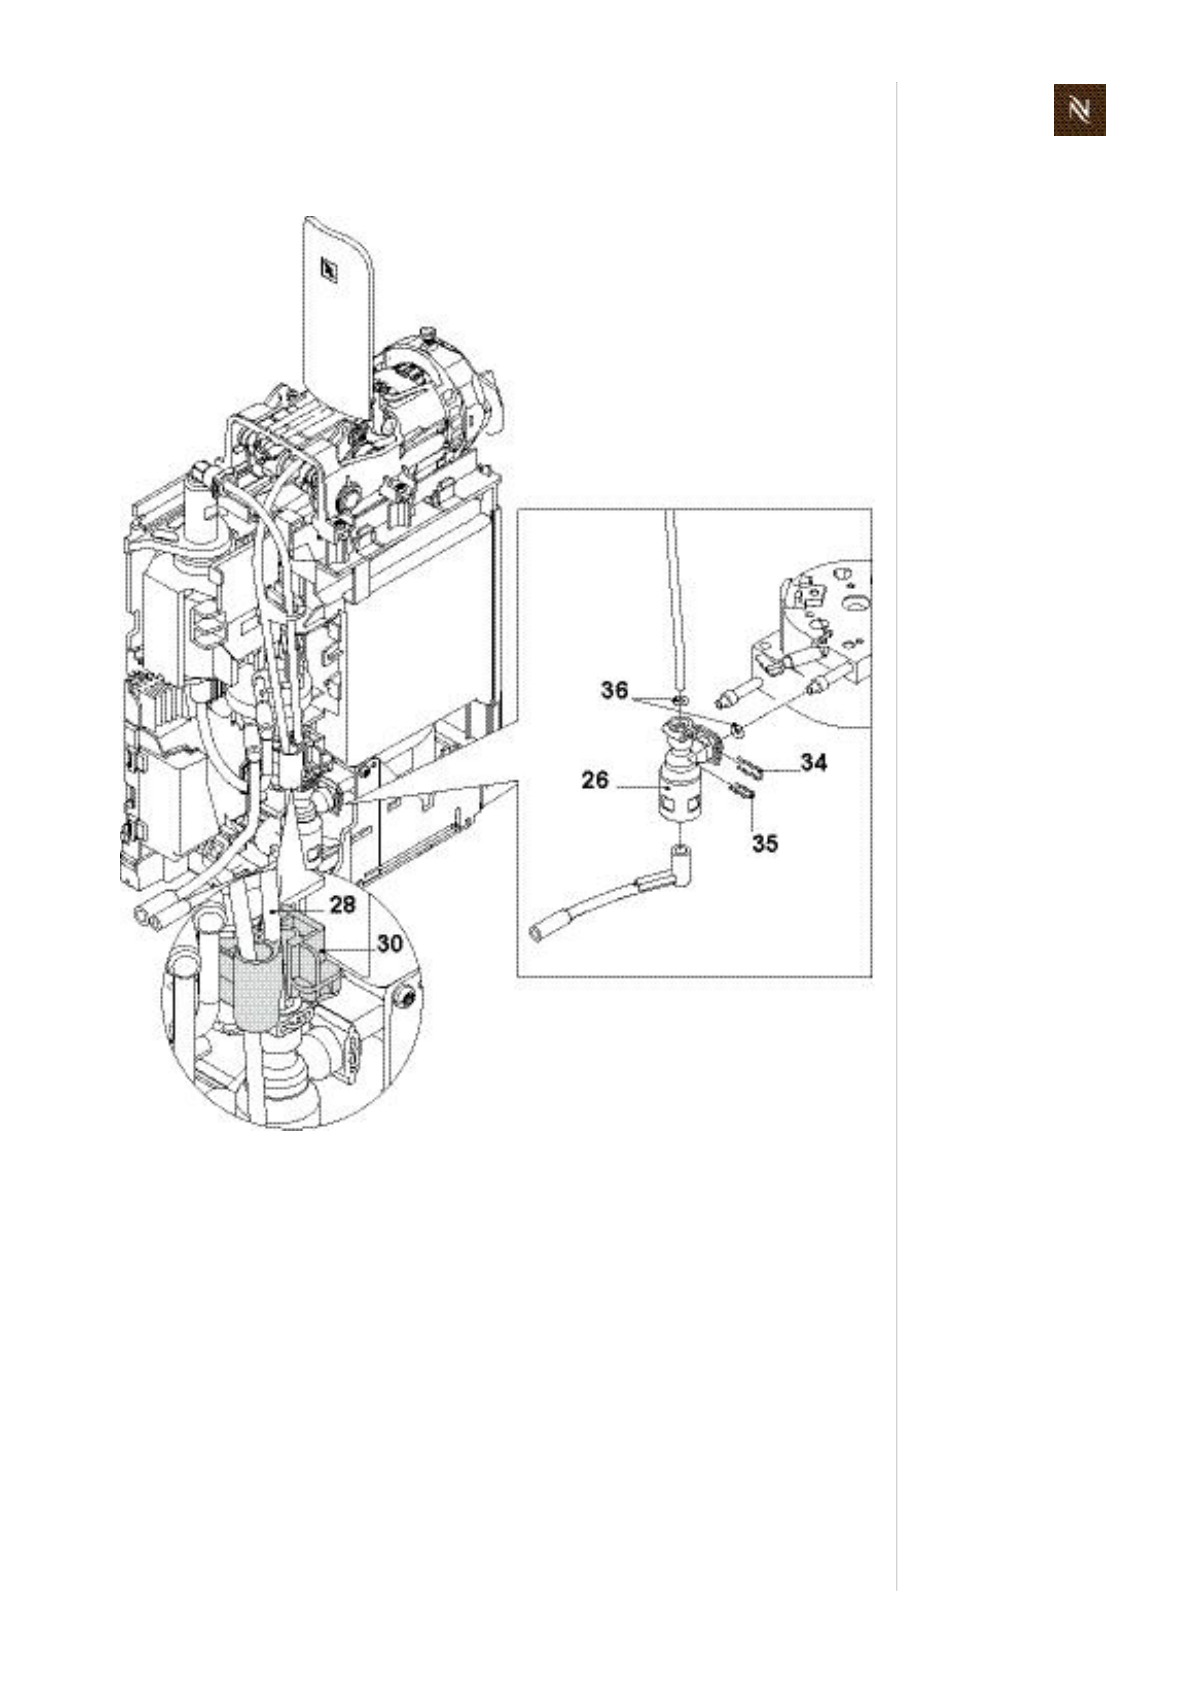
Citizservicemanual103
R E P A I R S
Assemblycheckpoints
• ReplacebothOrings(36)togetherwithautomaticprimingdevice(26).
• Inserthose(28)intubeguiding(30).
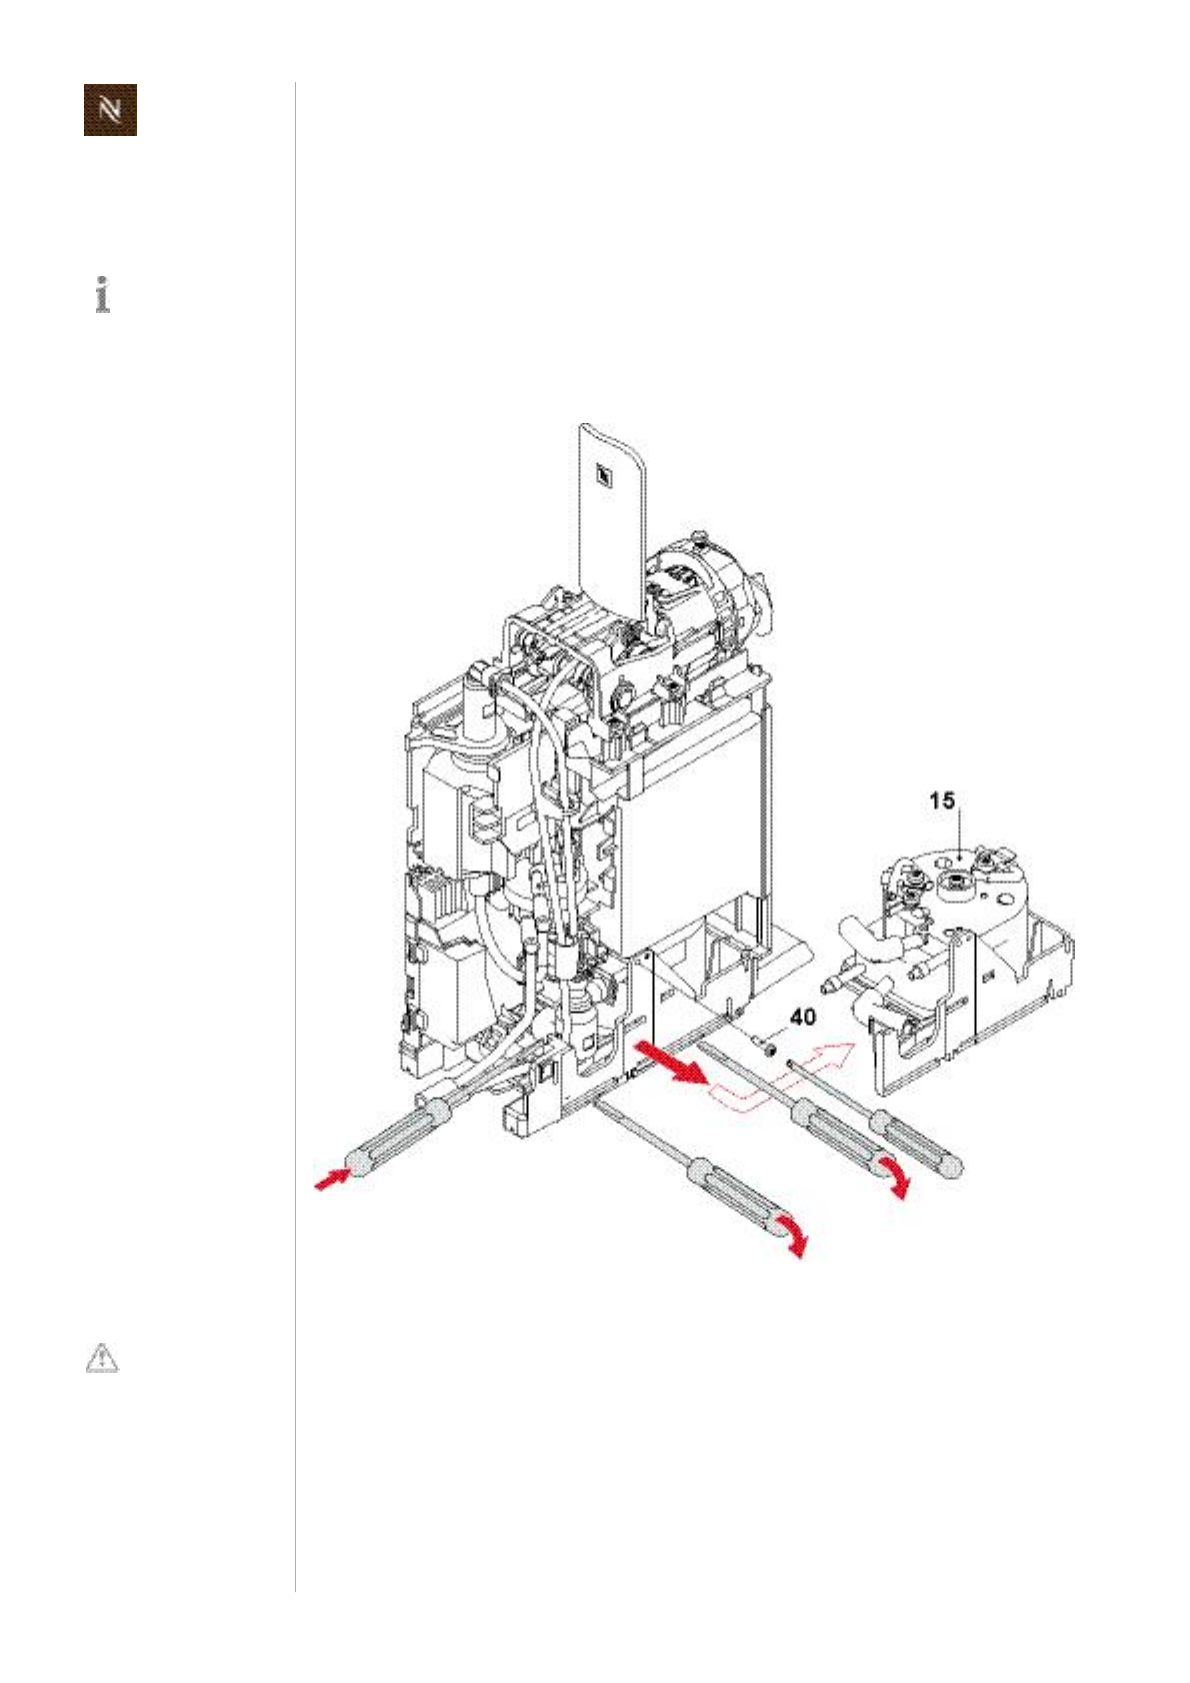
Citizservicemanual
104
R E P A I R S
8.7.6 ReplacingthermoblockwithNTCsensorandfine
wirefuse(s)
Adefectthermoblockcanonlybereplacedwithanassemblyconsistingof
thermoblock,prewiredwithNTCtemperaturesensor,finewirefuse(s)andground
wire(onlyifrequired),
thermoblocksupport.
• UseTorxscrewdriverTX10toloosenscrew(40).
• Release3latchesandpulloutsupportwiththermoblockassembly(15).
Dependingon
nationalregulations,
oneortwofinewire
fusesaremountedonthe
thermoblock(see“Wiring
diagrams”onpage 118
andfollowing).
DonotstressNTC
cablewhenremov
ingsupport.
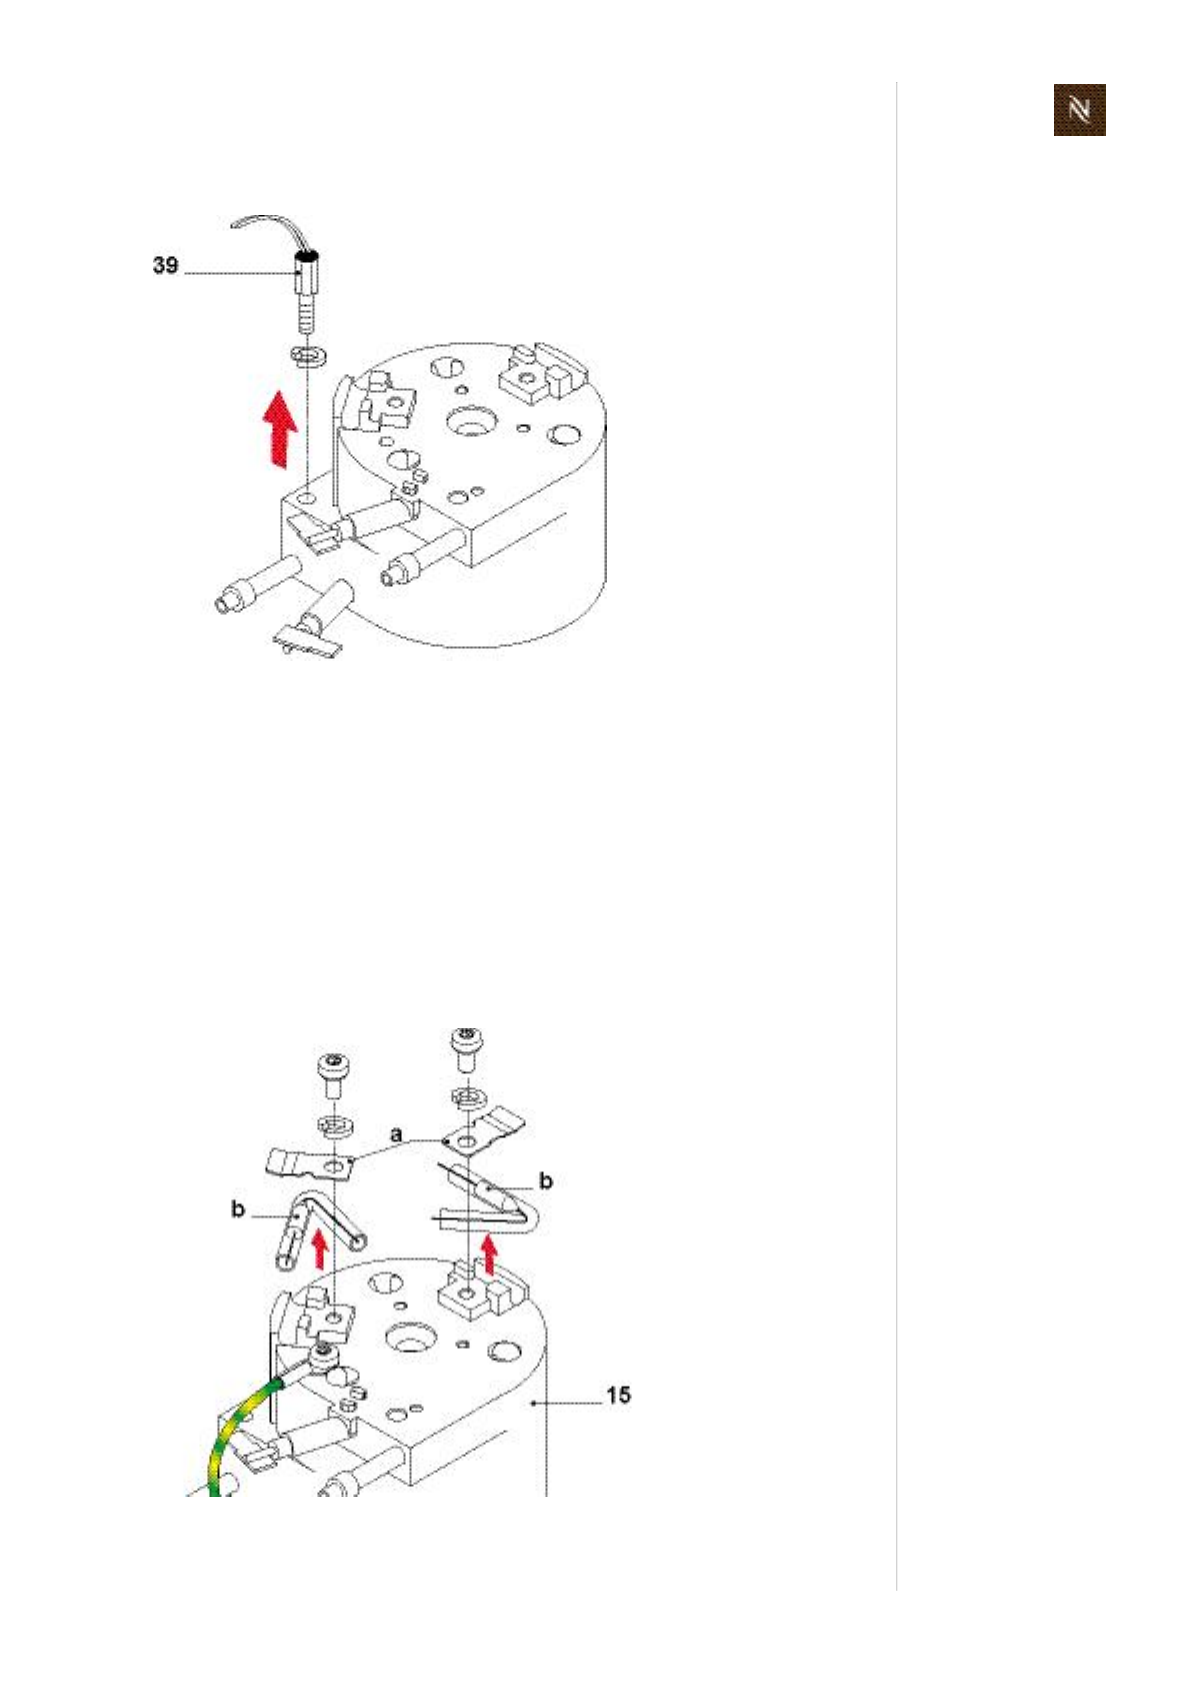
Citizservicemanual105
R E P A I R S
ReplacingNTCtemperaturesensor
• UnplugNTCsensorcablefromelectriccontrolboard(42)first.
• TestNTCtemperaturesensor(39),see“NTCtemperaturesensorfunctionality”on
page 139.
AssemblycheckpointNTCtemperaturesensor
• TightenthenewNTCtemperaturesensor(39)andspringringwithatorquewrench
(80100Ncm).
Replacingfinewirefuse(s)
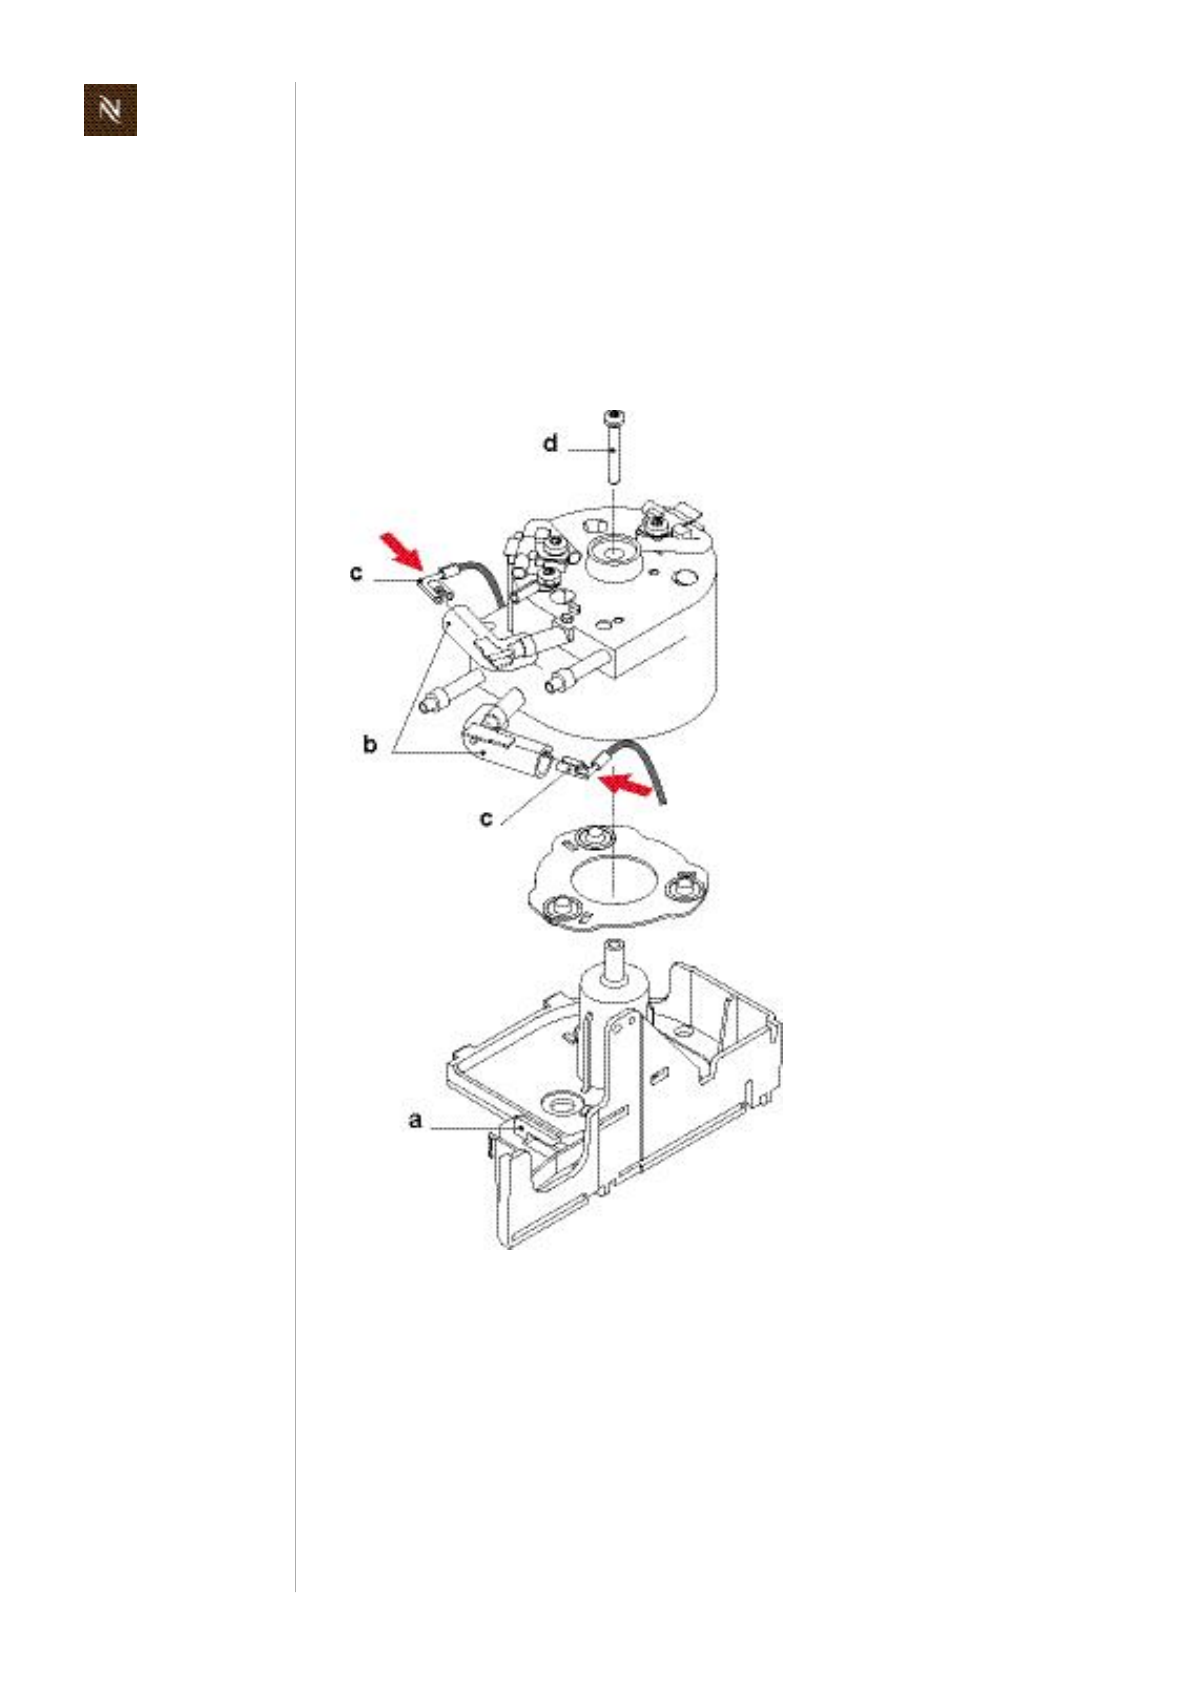
Citizservicemanual
106
R E P A I R S
Assemblycheckpointsfinewirefuse(s)
• Whenmountingasafetyclip(a)onthethermoblock(15),makesurethatthehousing
ofthefinewirefuse(b)ispositionedexactlybelowthesafetyclip.
• Tightenfasteningscrewandspringringwithatorquewrench(150(+30/0)Ncm).
Assemblycheckpointsthermoblock
• Allwiresfromthermoblocktoplatformmustbeledthroughthebracket(a)atthe
bottomofthesupport.
• Theblackgrommets(b)ontheelectricalthermoblockconnectionsareslittedatthe
end.IfanangledFastonreceptacle(c)isused,makesurethatitswirerunsthrough
thisslit.
• Tightencentralfasteningscrew(d)withatorquewrench(150(+30/0)Ncm).
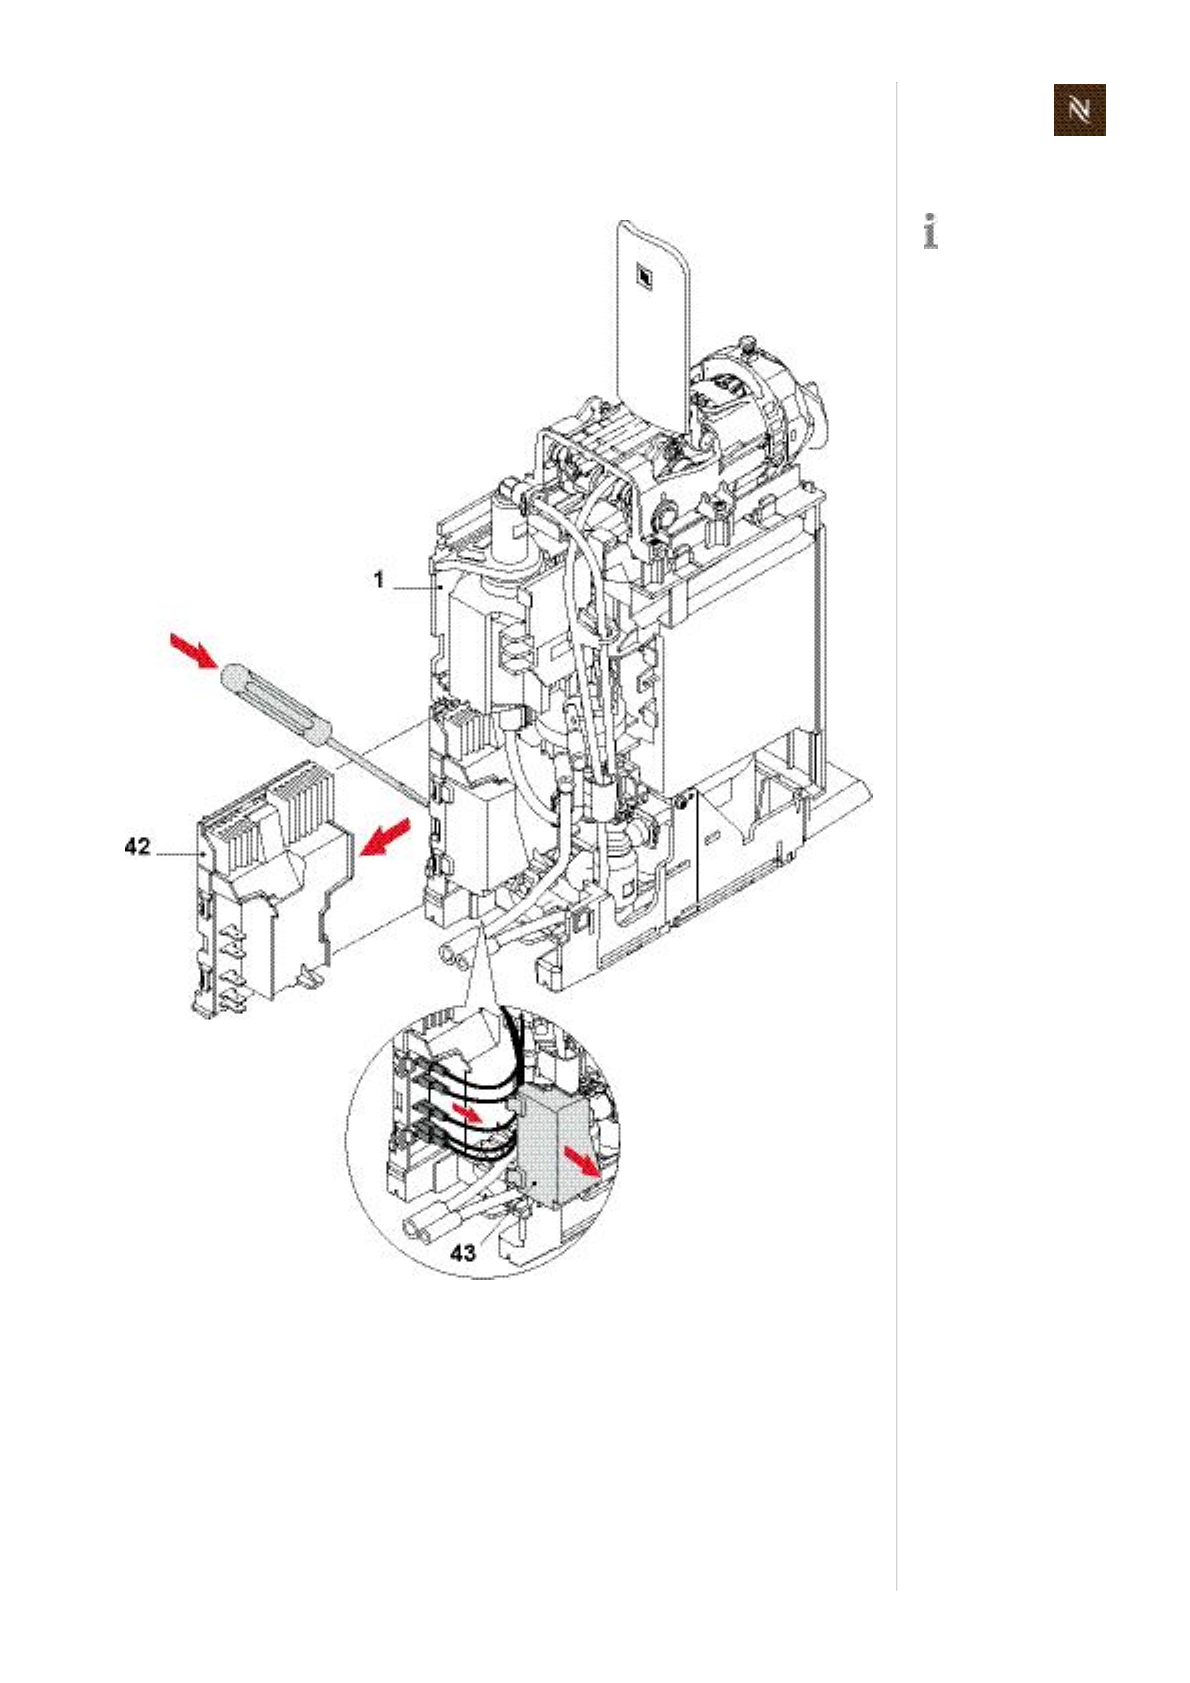
Citizservicemanual107
R E P A I R S
8.7.7 Replacingelectroniccontrolboardwithbuttonprints
• Removeatfirst
NTCconnectorfromelectroniccontrolboard,
connectorcablefromflowmeter,
electroniclid(43),
fastonreceptaclesfromelectroniccontrolboard.
• Inserttipofscrewdriverbetweenchassis(1)andprotectivecaseofelectroniccontrol
board(42)toreleaselatches.Thenpulloutassembly.
Thereplacement
boardisequipped
withprotectivehous
ingandcover.
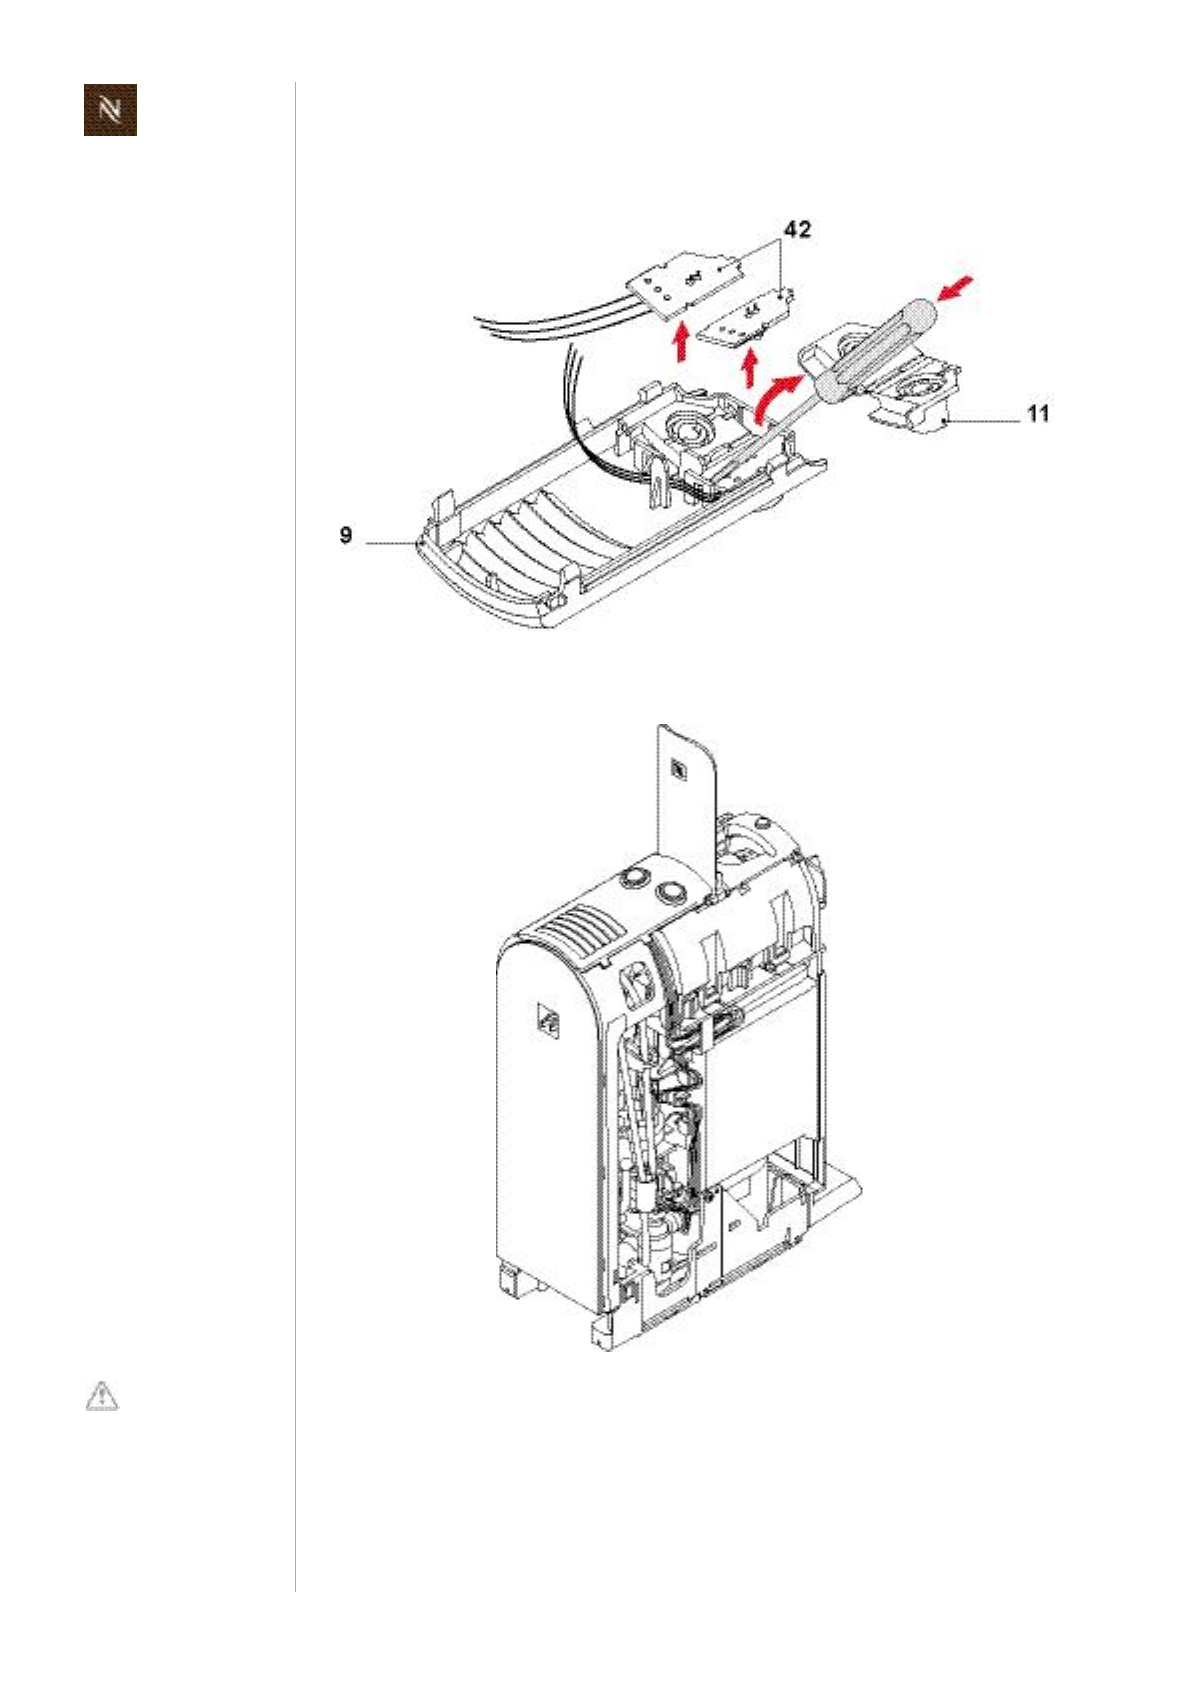
Citizservicemanual
108
R E P A I R S
Replacingbuttonprints/coffeebuttons
Assemblycheckpoints
• Afterassemblychecktheplugarrangementoftheelectroniccontrolboard(see
“Wiringdiagrams”onpage 118andfollowing.
• Layconnectionwirestobuttonprintsinbracketsandcableguidelikeshown.
Forinstallingand
connectinganew
electroniccontrol
board,theservicetechni
cianmustbeearthedwith
agroundingband.
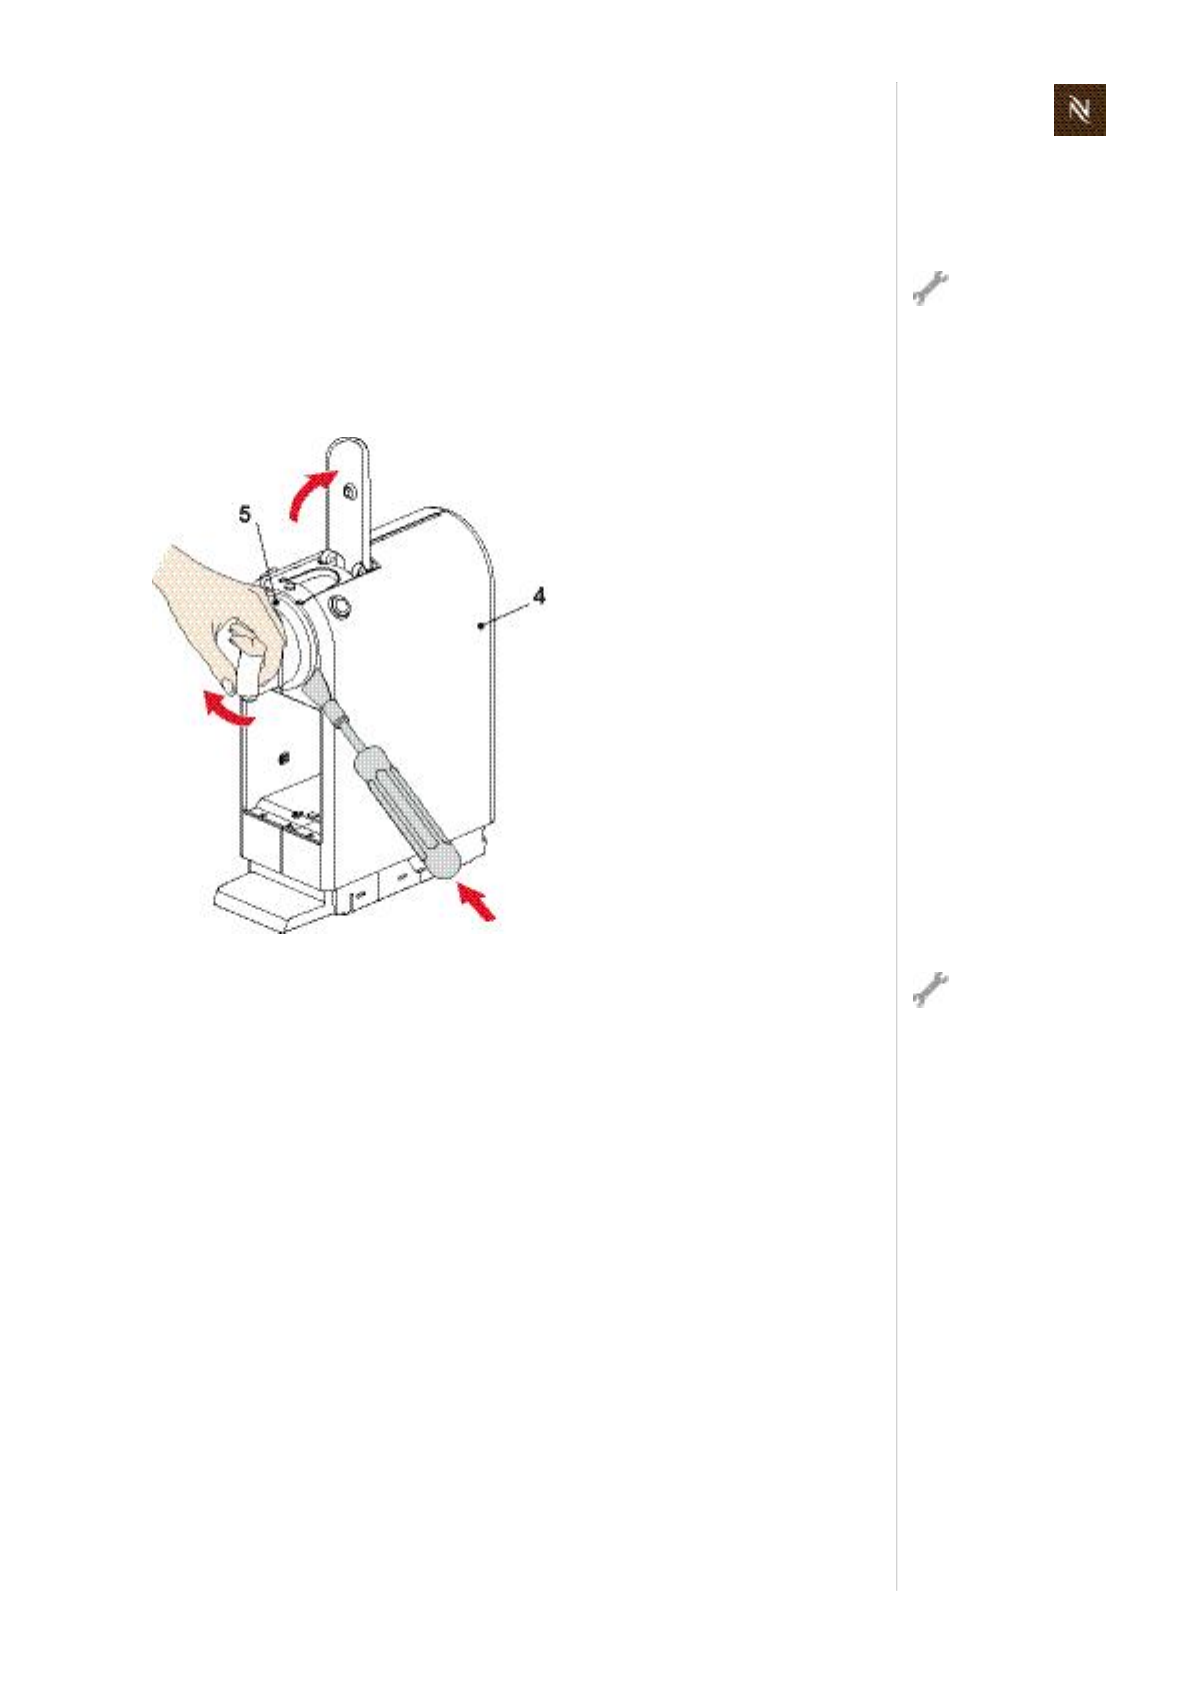
Citizservicemanual109
R E P A I R S
8.8 Disassemblyofcoreunit,Drange
8.8.1 Generaldisassembly
Thecoreunithastoberemovedfromtheplatformatfirst(seeaccordingchapter"plat
formdisassembly").Itispossibletoperformageneraldisassemblyofthecoreunitwith
intacthoseandwireconnectionstotheplatform(forrepair,leakagechecketc.).
Removeoutlet
1. Openclosinghandle.
2. Pressoutlet(5)sidewardsbyhandcarefully.
3. Insertdisassemblytoolintogapbetweenoutletandrightsidepanel(4).
Aftergeneraldisas
semblyofthecore
unitarepairing/serv
iceholderdeviceishelpful
forfurtherrepairwork.
Thedisassemblytool
isnecessaryfor
removingoutletand
sidepanelsundamaged.
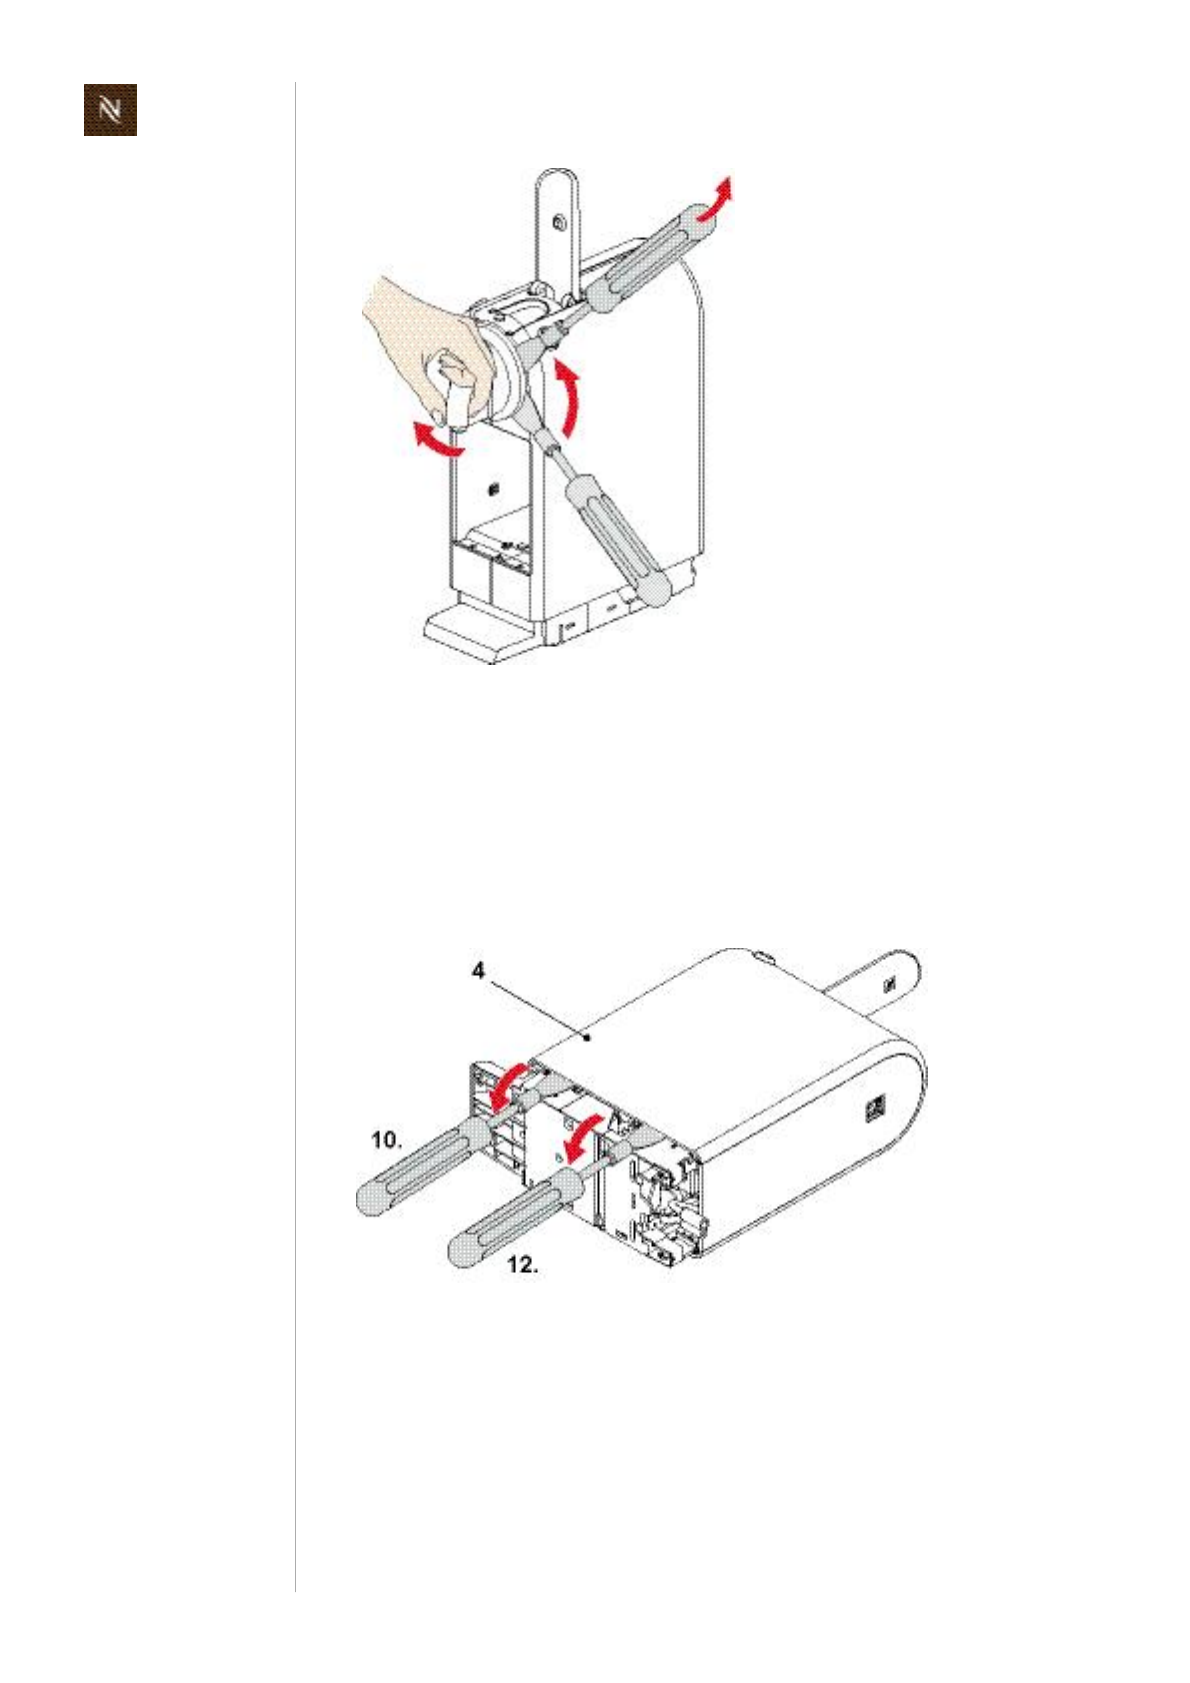
Citizservicemanual
110
R E P A I R S
4. Holdandpulloutlet.
5. Atthesametimemovedisassemblytoolupwards.
6. Carefullyturndisassemblytoolslightlybackwardtoopenthelatch.
7. Insertdisassemblytoolintogapontheothersideoftheoutlet.
8. Movedisassemblytoolupwardsandcarefullyturnitslightlybackwardtoopenthe
latch.
9. Removeoutlet.
Removerightsidepanel
10. Insertdisassemblytoolbetweenbottomofrightsidepanel(4)andchassis.
11. Swiveldisassemblytooltillsnapconnectionatthefrontopens.
12. Relocatedisassemblytoolandrepeatproceduretoopenlatchatthebottomofthe
sidepanel.
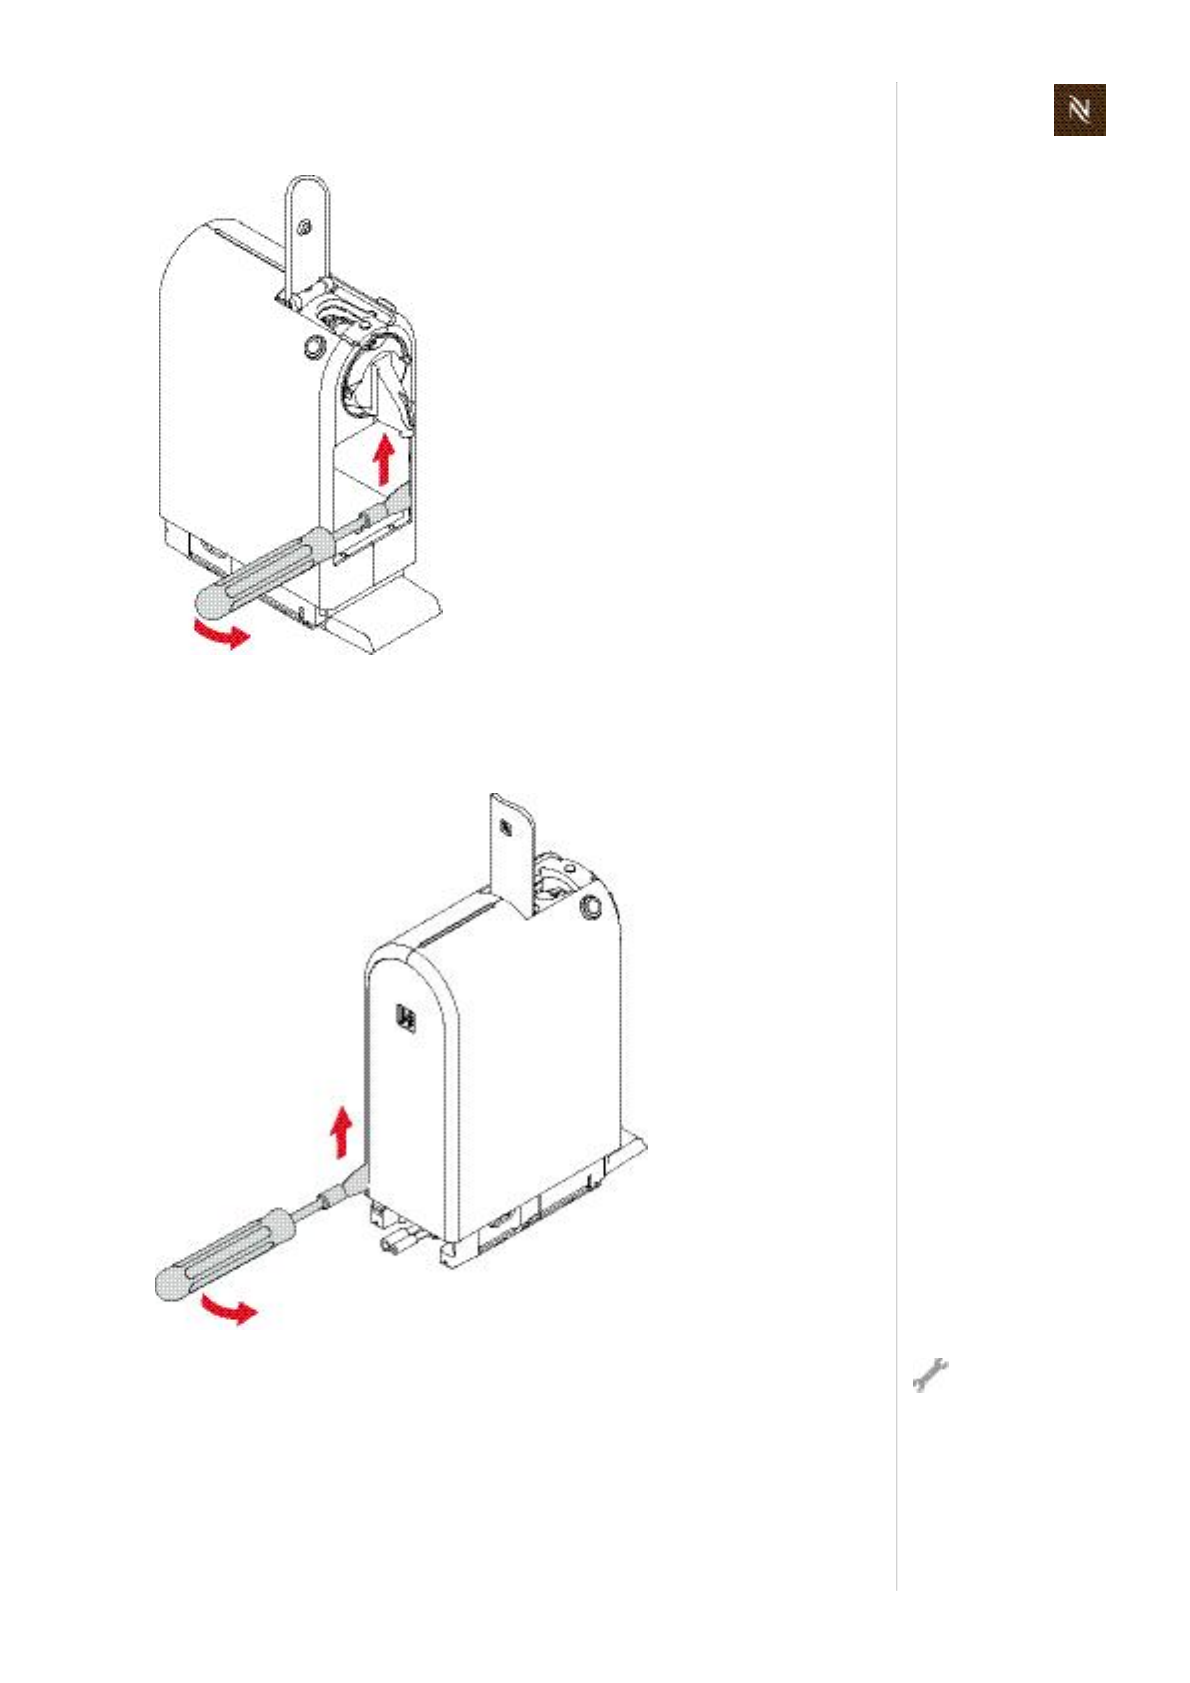
Citizservicemanual111
R E P A I R S
13. Insertdisassemblytoollaterallyintogapatthefront.
14. Carefullyturndisassemblytoolslightlyforwardtoopenthefirstlatch.
15. Movedisassemblytoolupwardsandopentheothertwolatchesthesameway.
16. Atthebackinsertdisassemblytoolintoshadowgapofrightsidepanel.
17. Swiveldisassemblytoolcarefullytoopenfirstlatch.
18. Movedisassemblytoolupwardsandrepeatprocedurefortheother2latches.
Insertdisassembly
toolatrightangles
only.Otherwisethe
shadowgapcanbedam
aged.
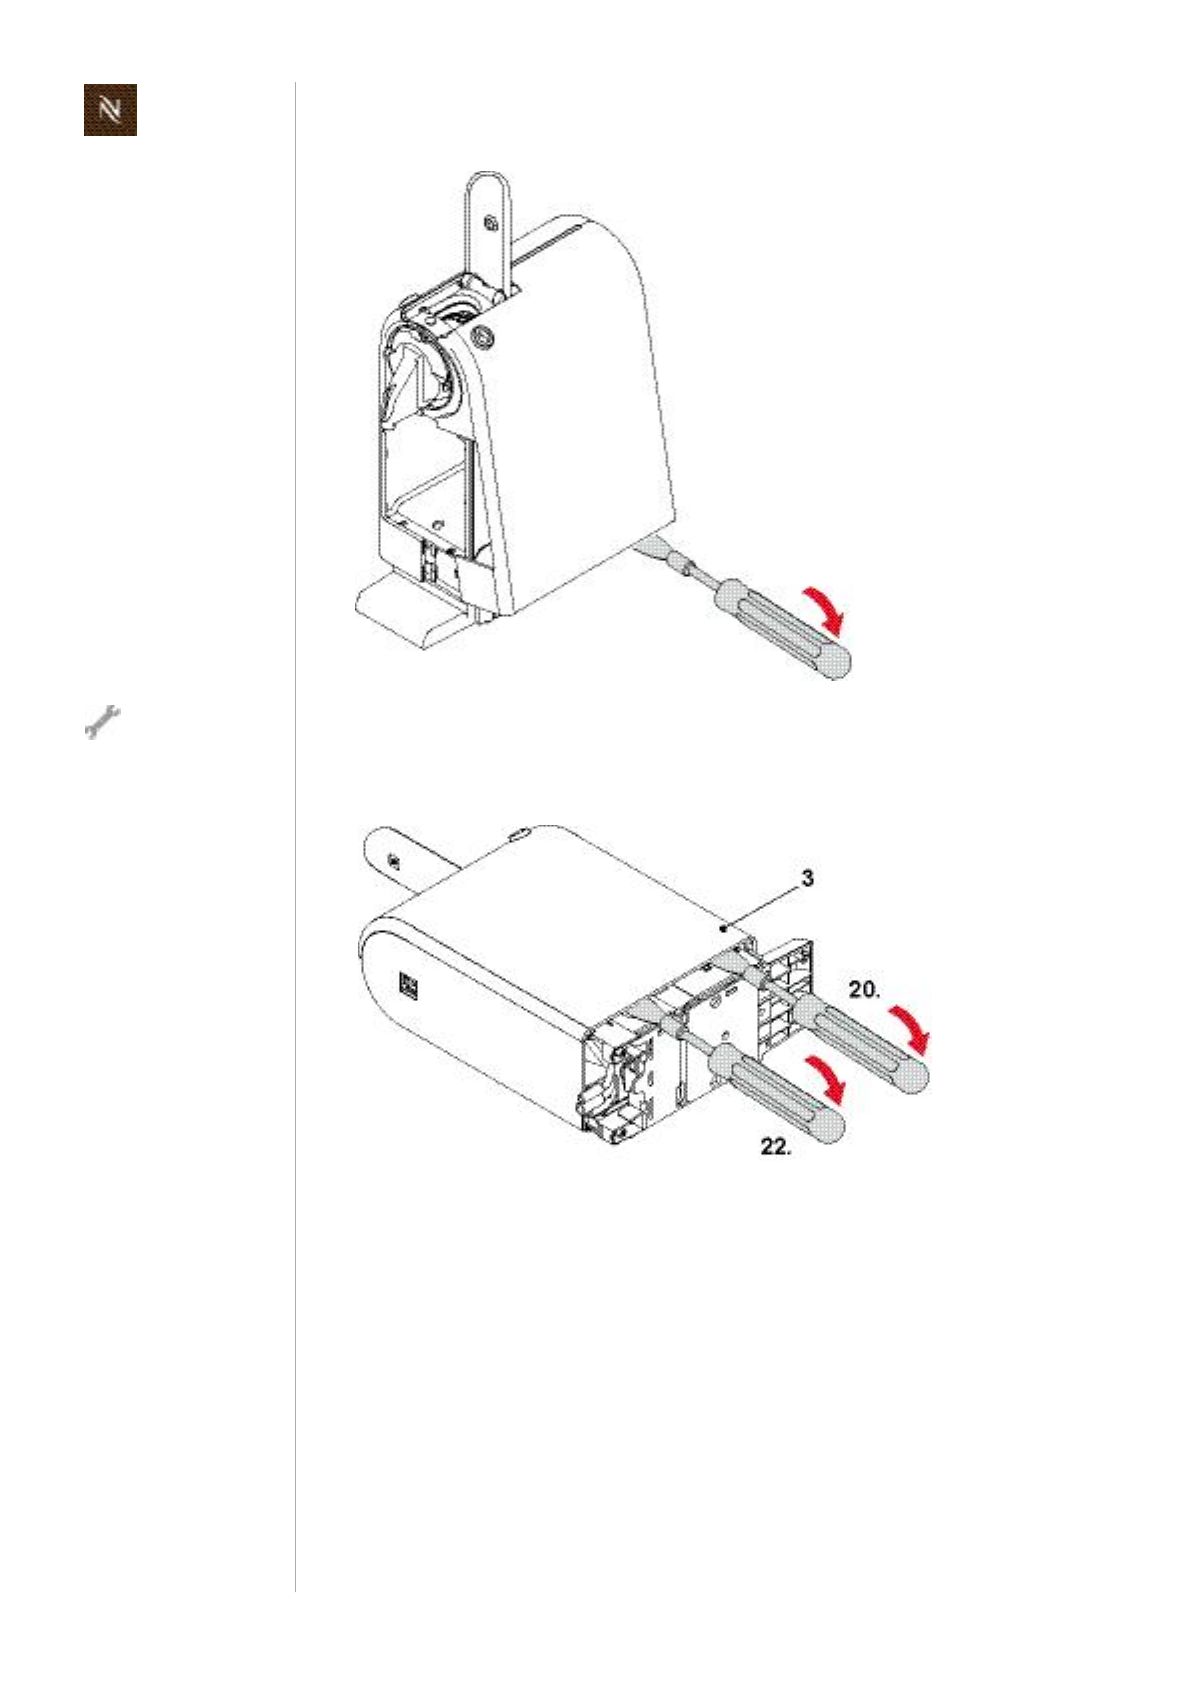
Citizservicemanual
112
R E P A I R S
19. Swingupandremoverightsidepanel.
Removeleftsidepanel
20. Insertdisassemblytoolbetweenbottomofleftsidepanel(3)andchassis.
21. Swiveldisassemblytooltilllatchatthefrontopens.
22. Relocatedisassemblytoolandrepeatproceduretoopenlatchatthebottomofthe
sidepanel.
Closinghandlemust
beopened.
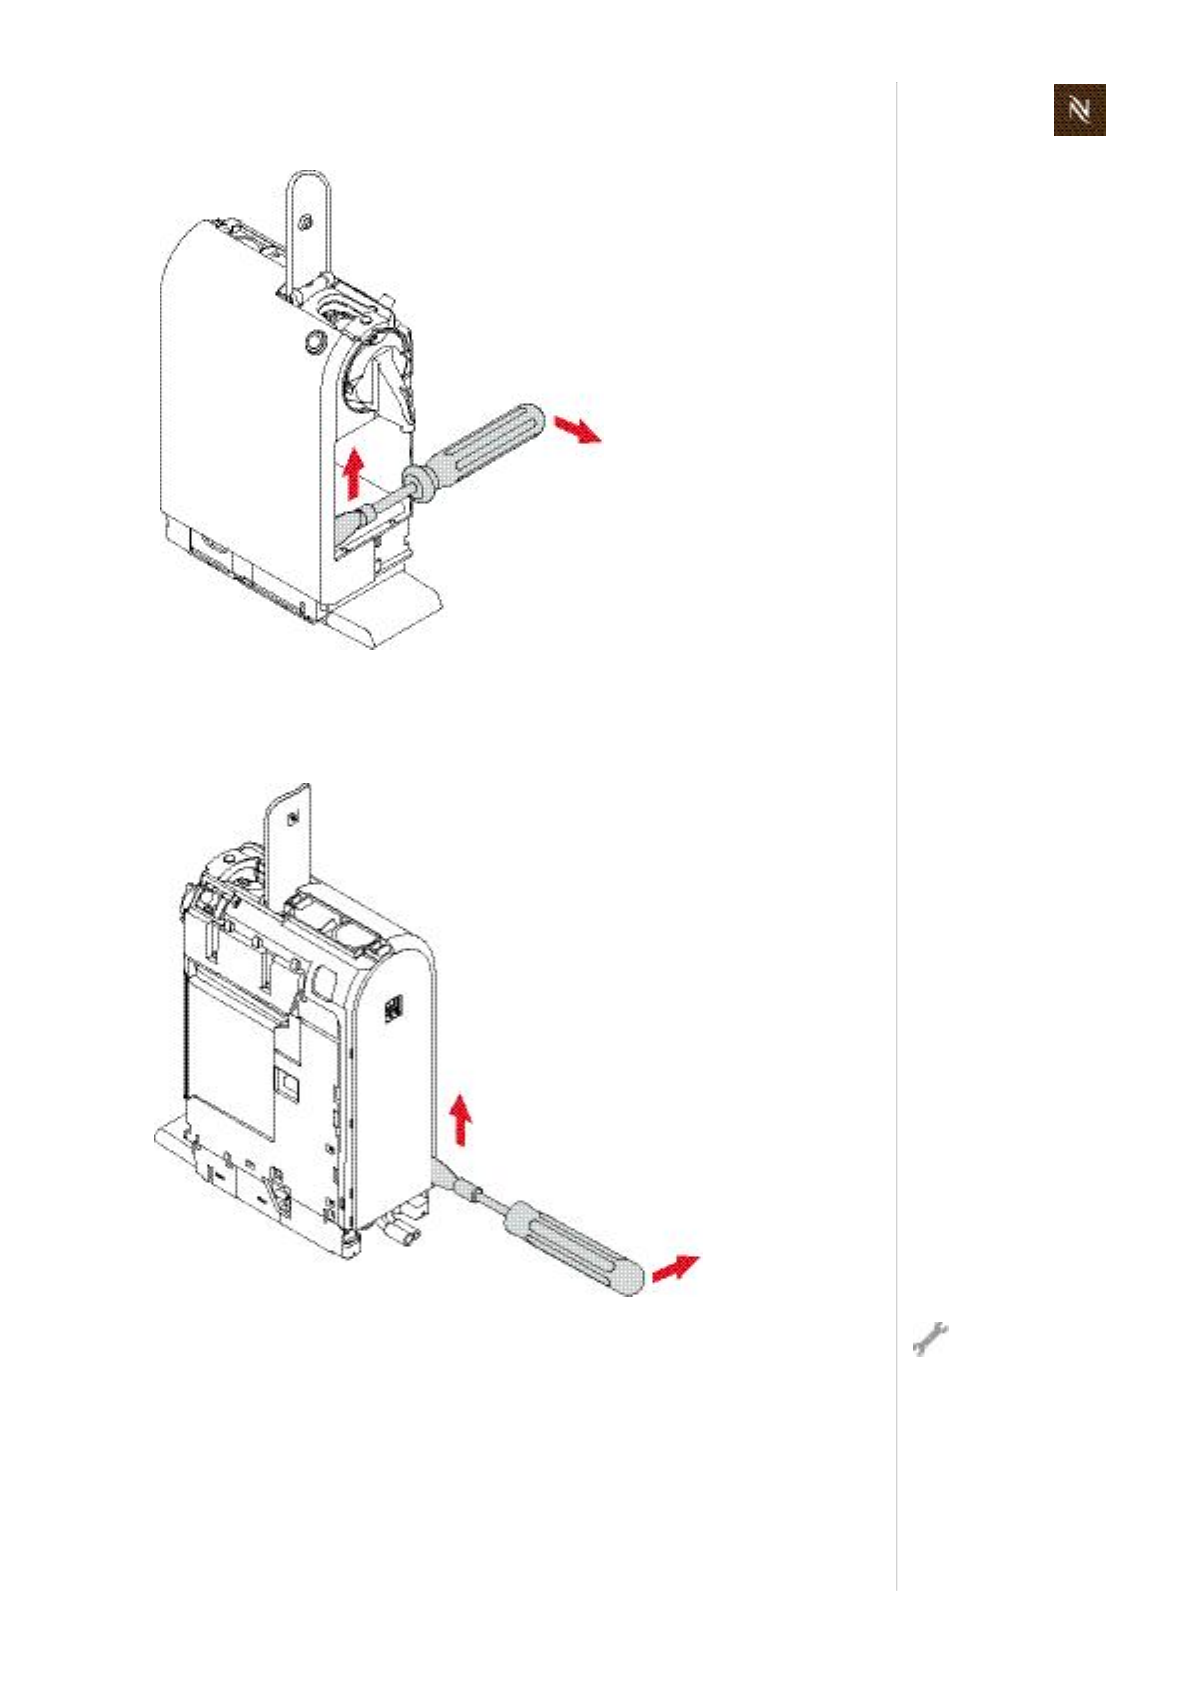
Citizservicemanual113
R E P A I R S
23. Insertdisassemblytoollaterallyintogapatthefront.
24. Carefullyturndisassemblytoolslightlyforwardtoopenthefirstlatch.
25. Movedisassemblytoolupwardsandopentheothertwolatchesthesameway.
26. Atthebackinsertdisassemblytoolintoshadowgapofleftsidepanel.
27. Swiveldisassemblytoolcarefullytoopenfirstlatch.
28. Movedisassemblytoolupwardsandrepeatprocedurefortheother2latches.
Insertdisassembly
toolatrightangles
only.Otherwisethe
shadowgapcanbedam
aged.
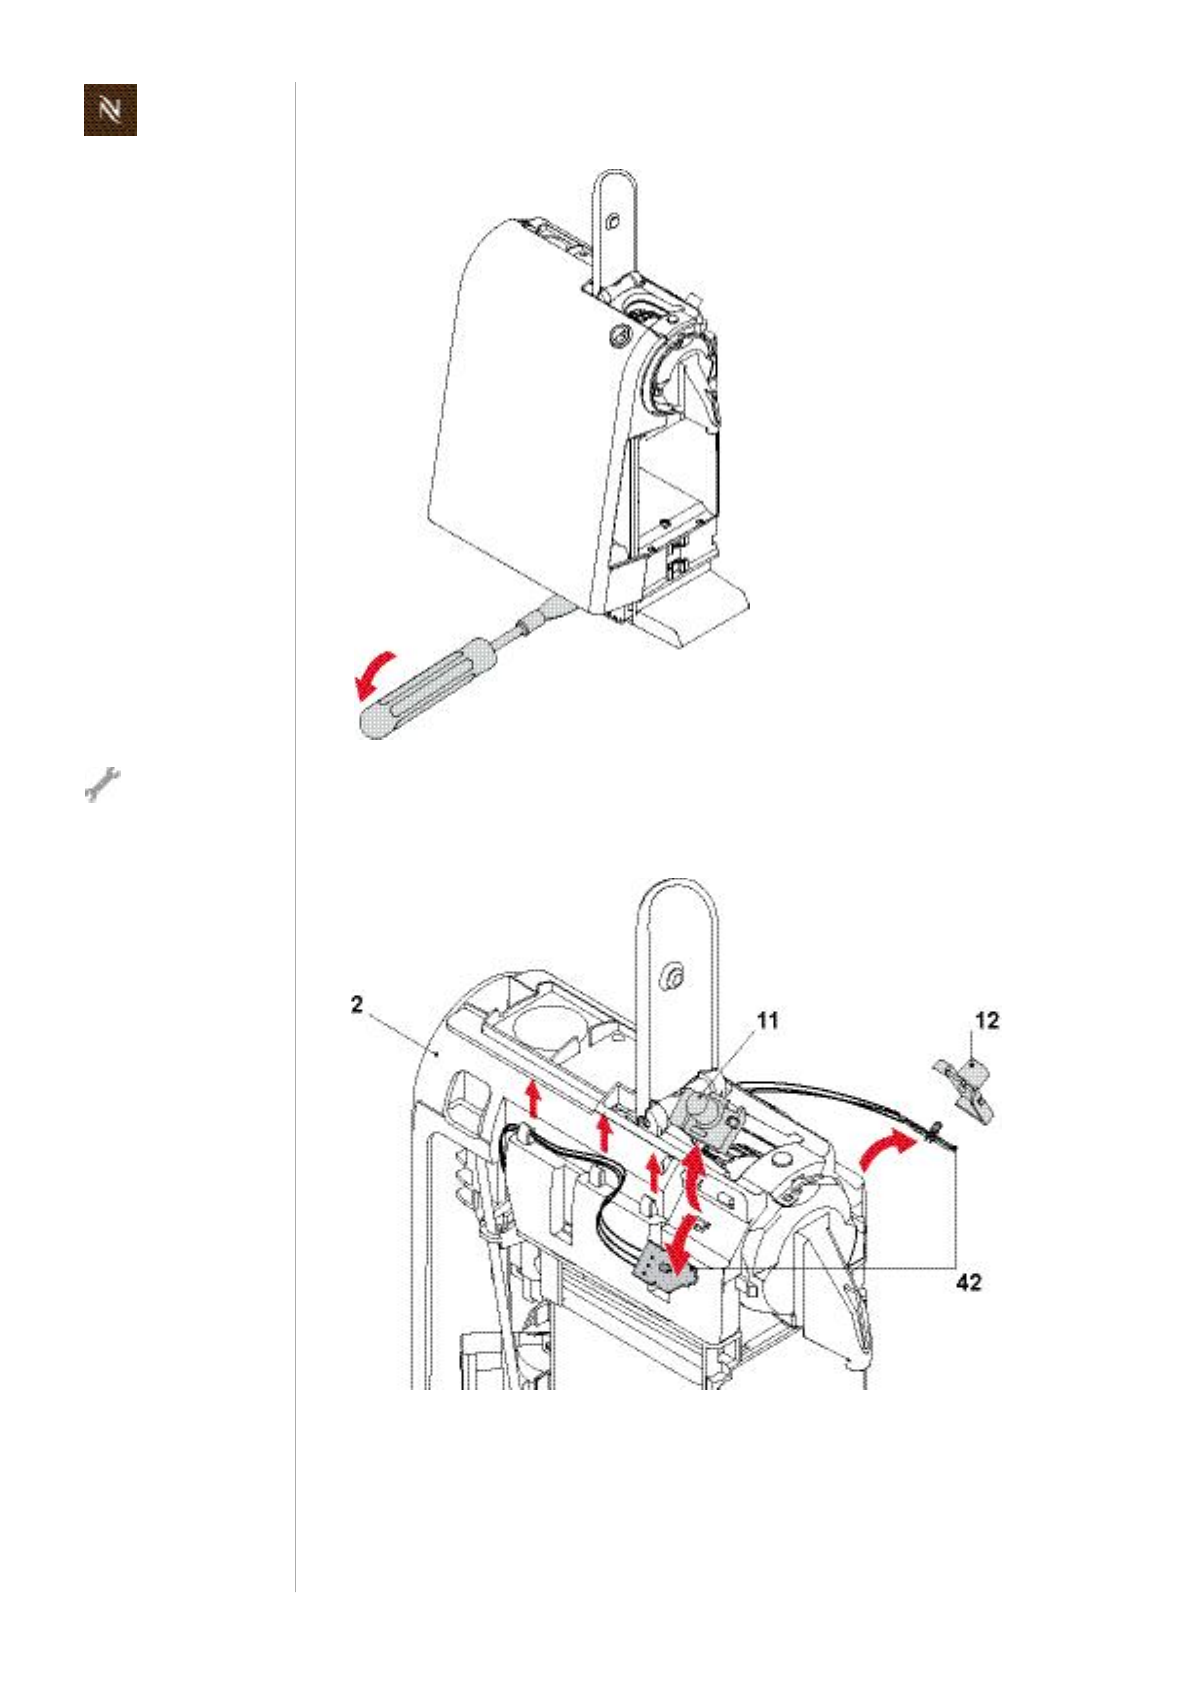
Citizservicemanual
114
R E P A I R S
29. Swingupandremoveleftsidepanel.
Removecover(2)
1. Removebothcoffeebuttons(11,12)andprints(42)outofholder.
2. Removewiringofcoffeebuttonprintsfromcableguides.
Closinghandle
shouldbeopened.
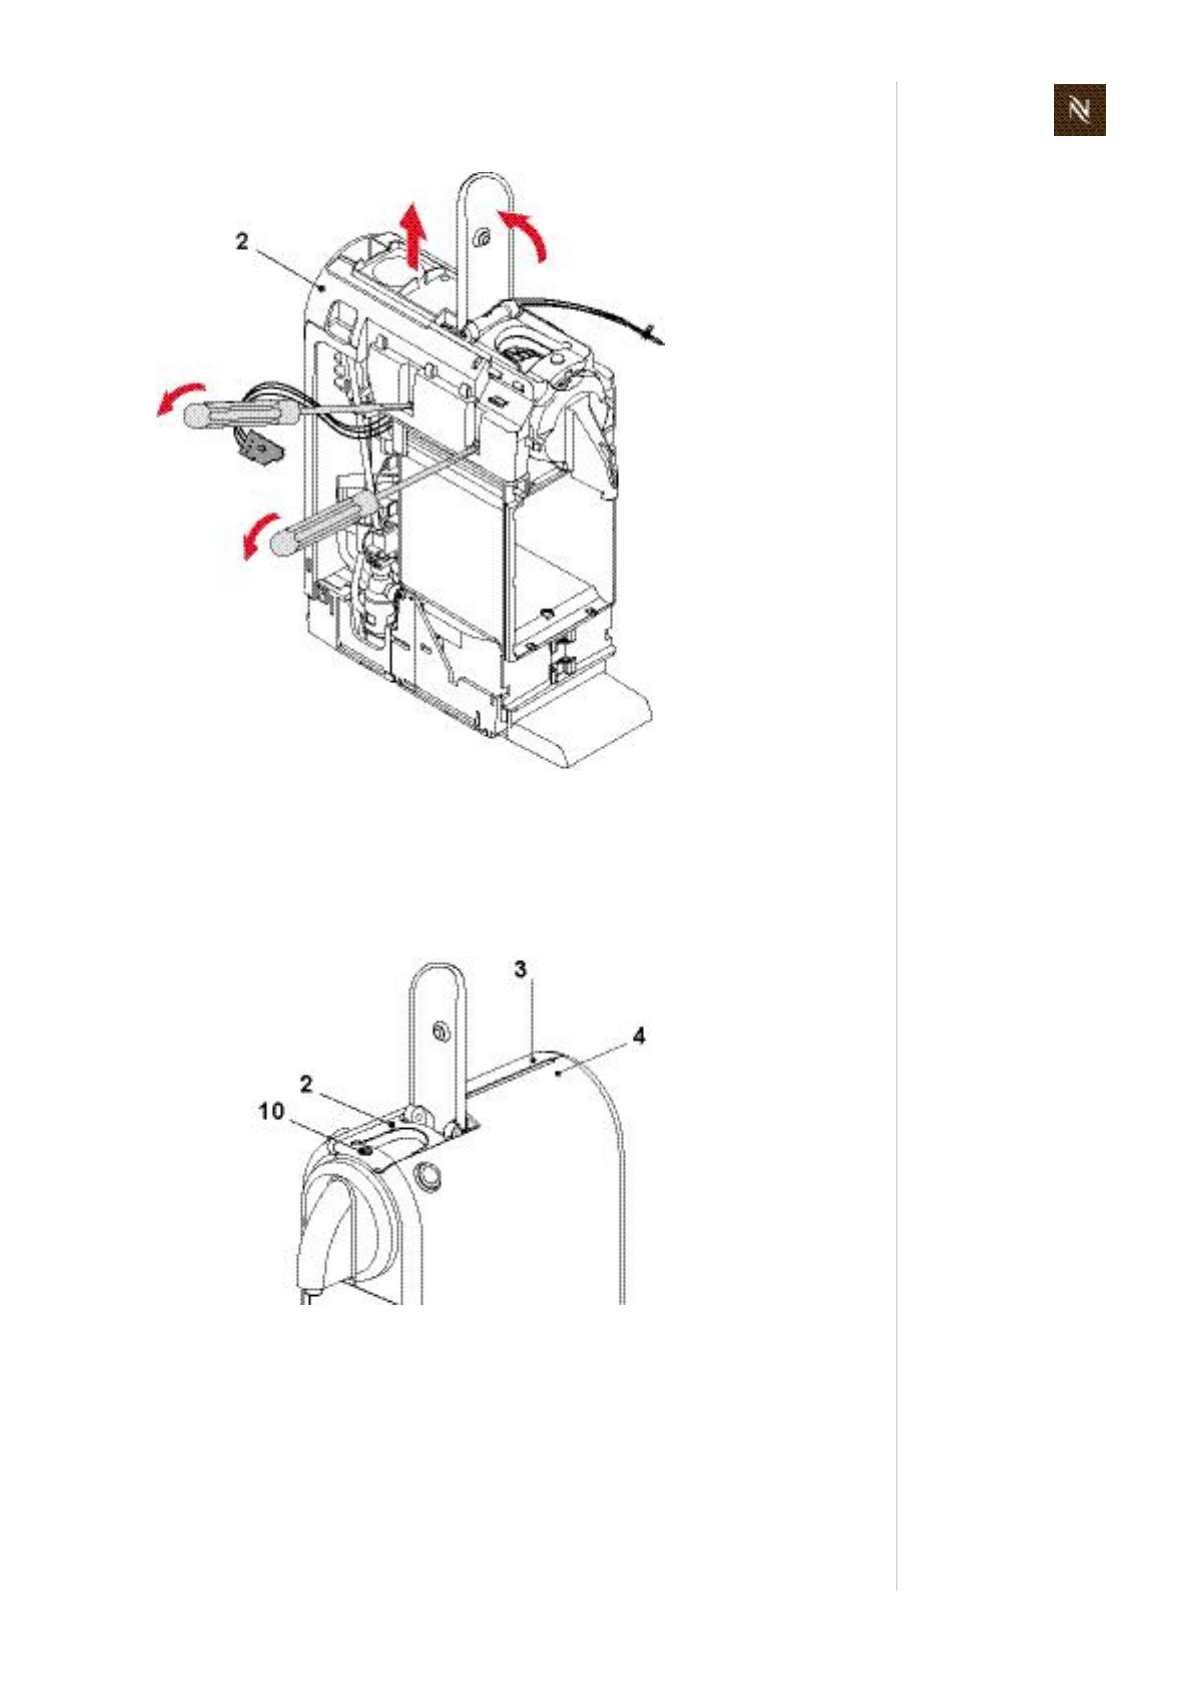
Citizservicemanual115
R E P A I R S
3. Useascrewdrivertorelease4latches.
4. Openclosinghandle.
5. Liftandremovecover(2).
Assemblycheckpoints
• Checkifdamper(10)forclosinghandleisinstalledoncover(2).
• Forcorrectlayoutofthewirestothecoffeebuttonprints,see“Replacingelectronic
controlboardwithbuttonprints”onpage 116.
• Assembleleftsidepanel(3)first.
• Insertrightsidepanel(4)intohingesatthetopoftheleftsidepanel.Thenfolddown
rightsidepanelandclicklatches.
• Checkthatalllatchesareengaged.
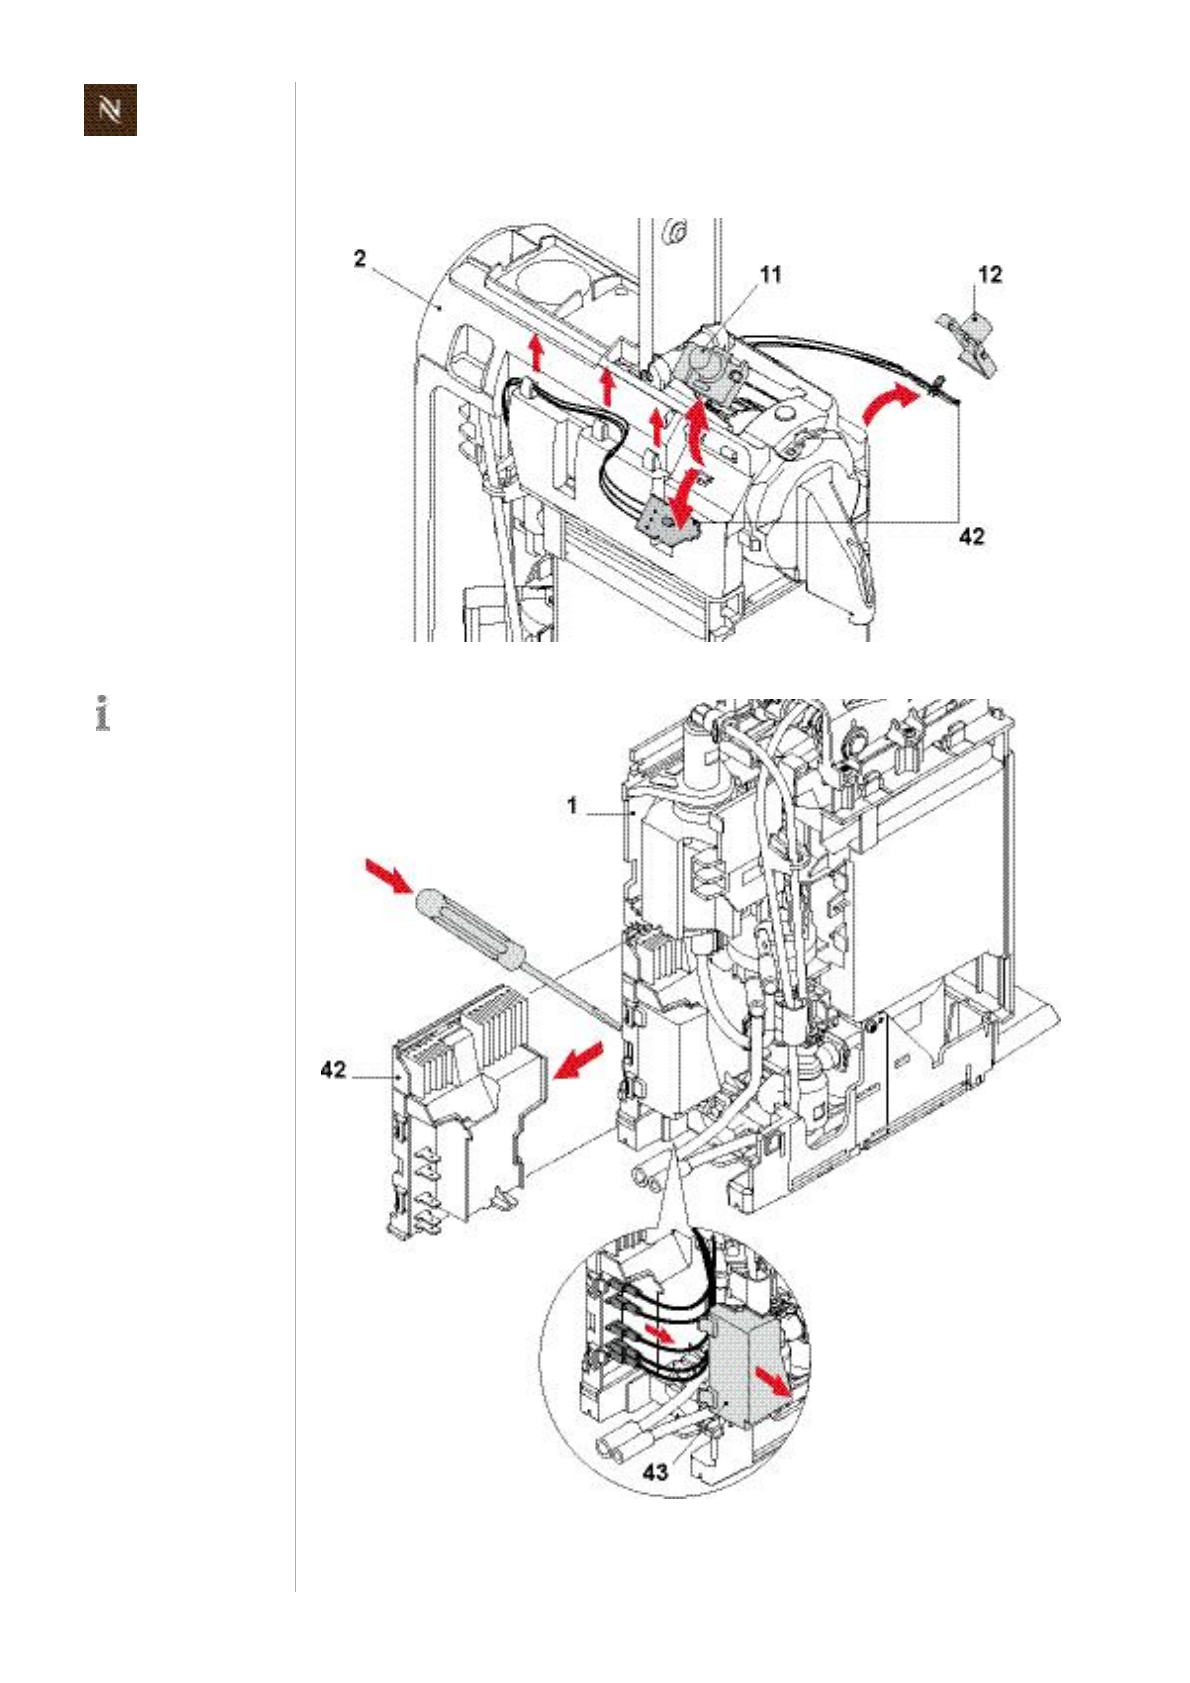
Citizservicemanual
116
R E P A I R S
8.8.2
Replacingelectroniccontrolboardwithbuttonprints
• Refertopage114forremovingcover(2).
Thereplacement
board(42)is
equippedwithprotec
tivehousingandcover.
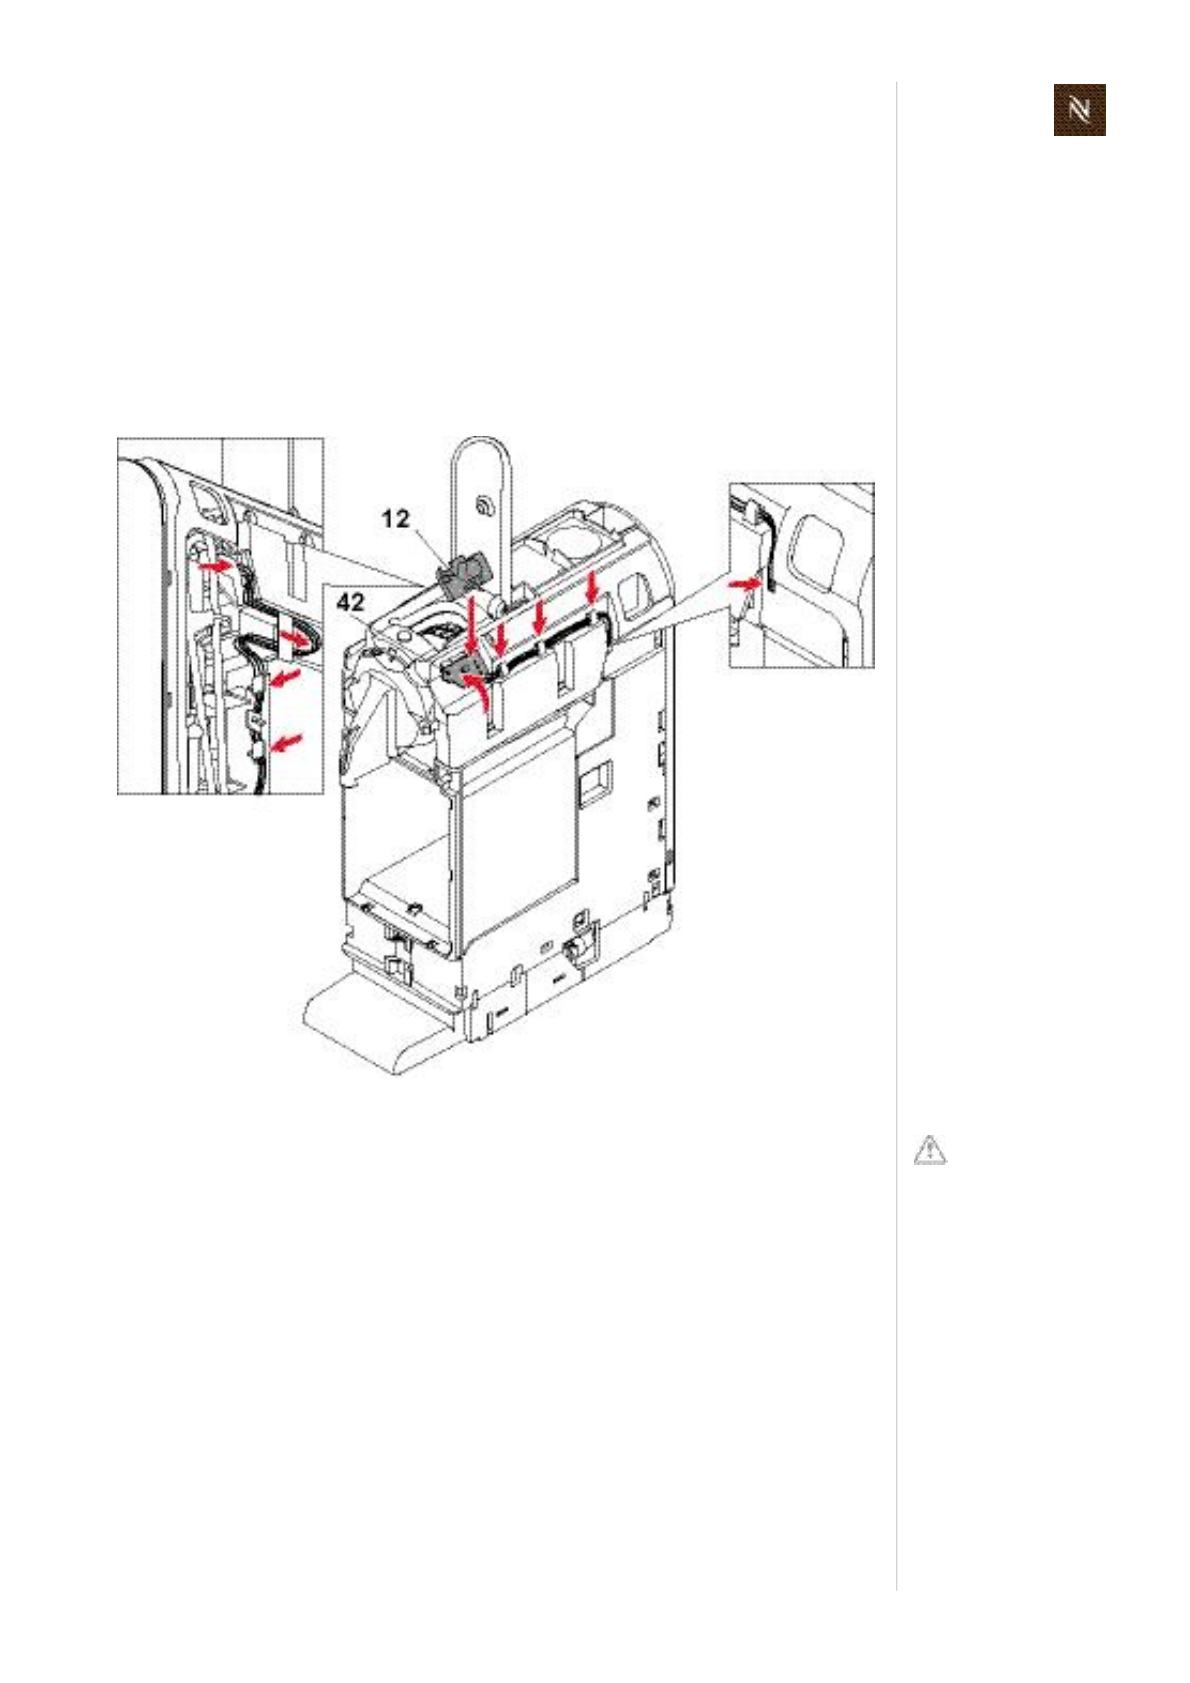
Citizservicemanual117
R E P A I R S
• Removefirst
NTCconnectorfromelectroniccontrolboard,
connectorcablefromflowmeter,
electroniclid(43),
fastonreceptaclesfromelectroniccontrolboard.
• Inserttipofscrewdriverbetweenchassis(1)andprotectivecaseofelectroniccontrol
board(42)toreleaselatches.Thenpulloutassembly.
Assemblycheckpoints
• Theleftandrightbuttonprints(42)aremarkedwith"L"or"R"foreasyidentification.
• Afterassemblychecktheplugarrangementofthemainboard(see“Wiring
diagrams”onpage 118andfollowing).
• Layconnectionwirestobuttonprintsinbracketsandcableguideslikeshown.
Forinstallingand
connectinganew
electroniccontrol
board,theservicetechni
cianmustbeearthedwith
agroundingband.
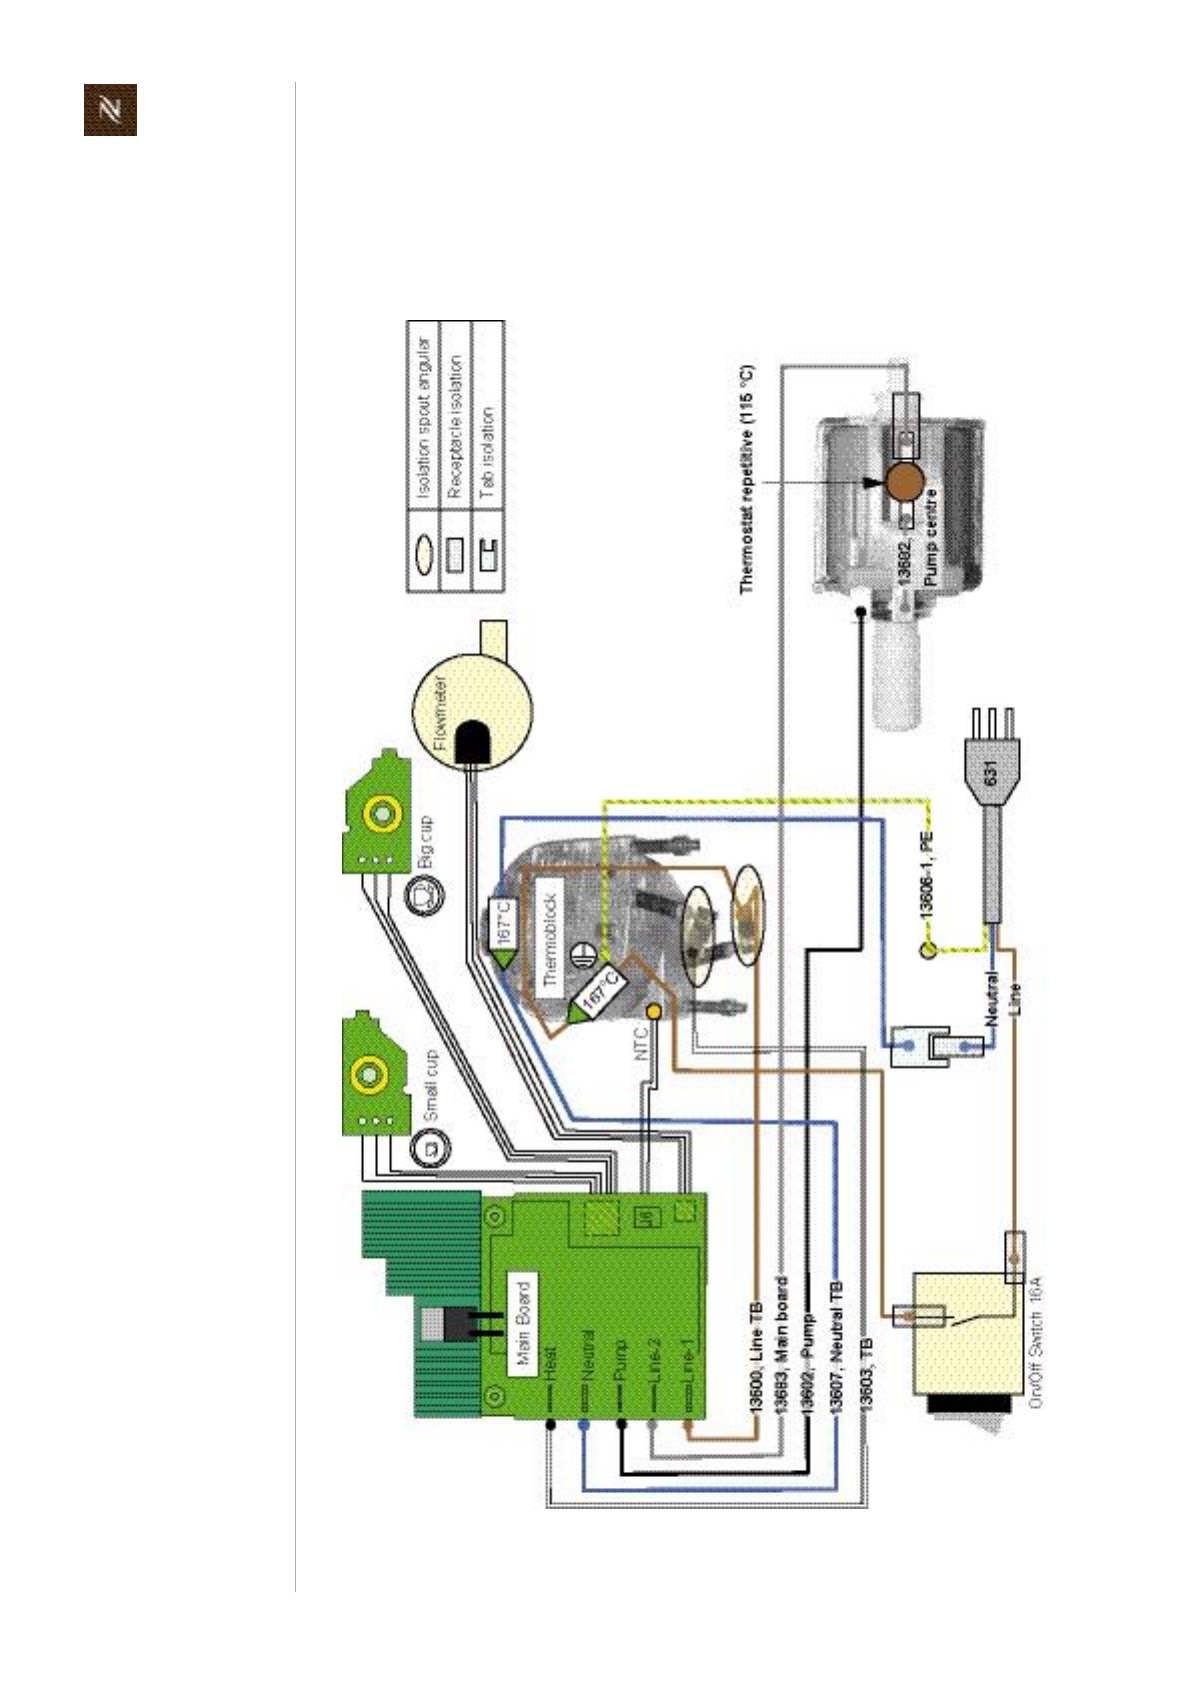
Citizservicemanual
118
R E P A I R S
8.9 Wiringdiagrams
8.9.1 WiringdiagramsmodelCitiz
Wiringdiagram220V240VIECmodelCitiz,EF483/484
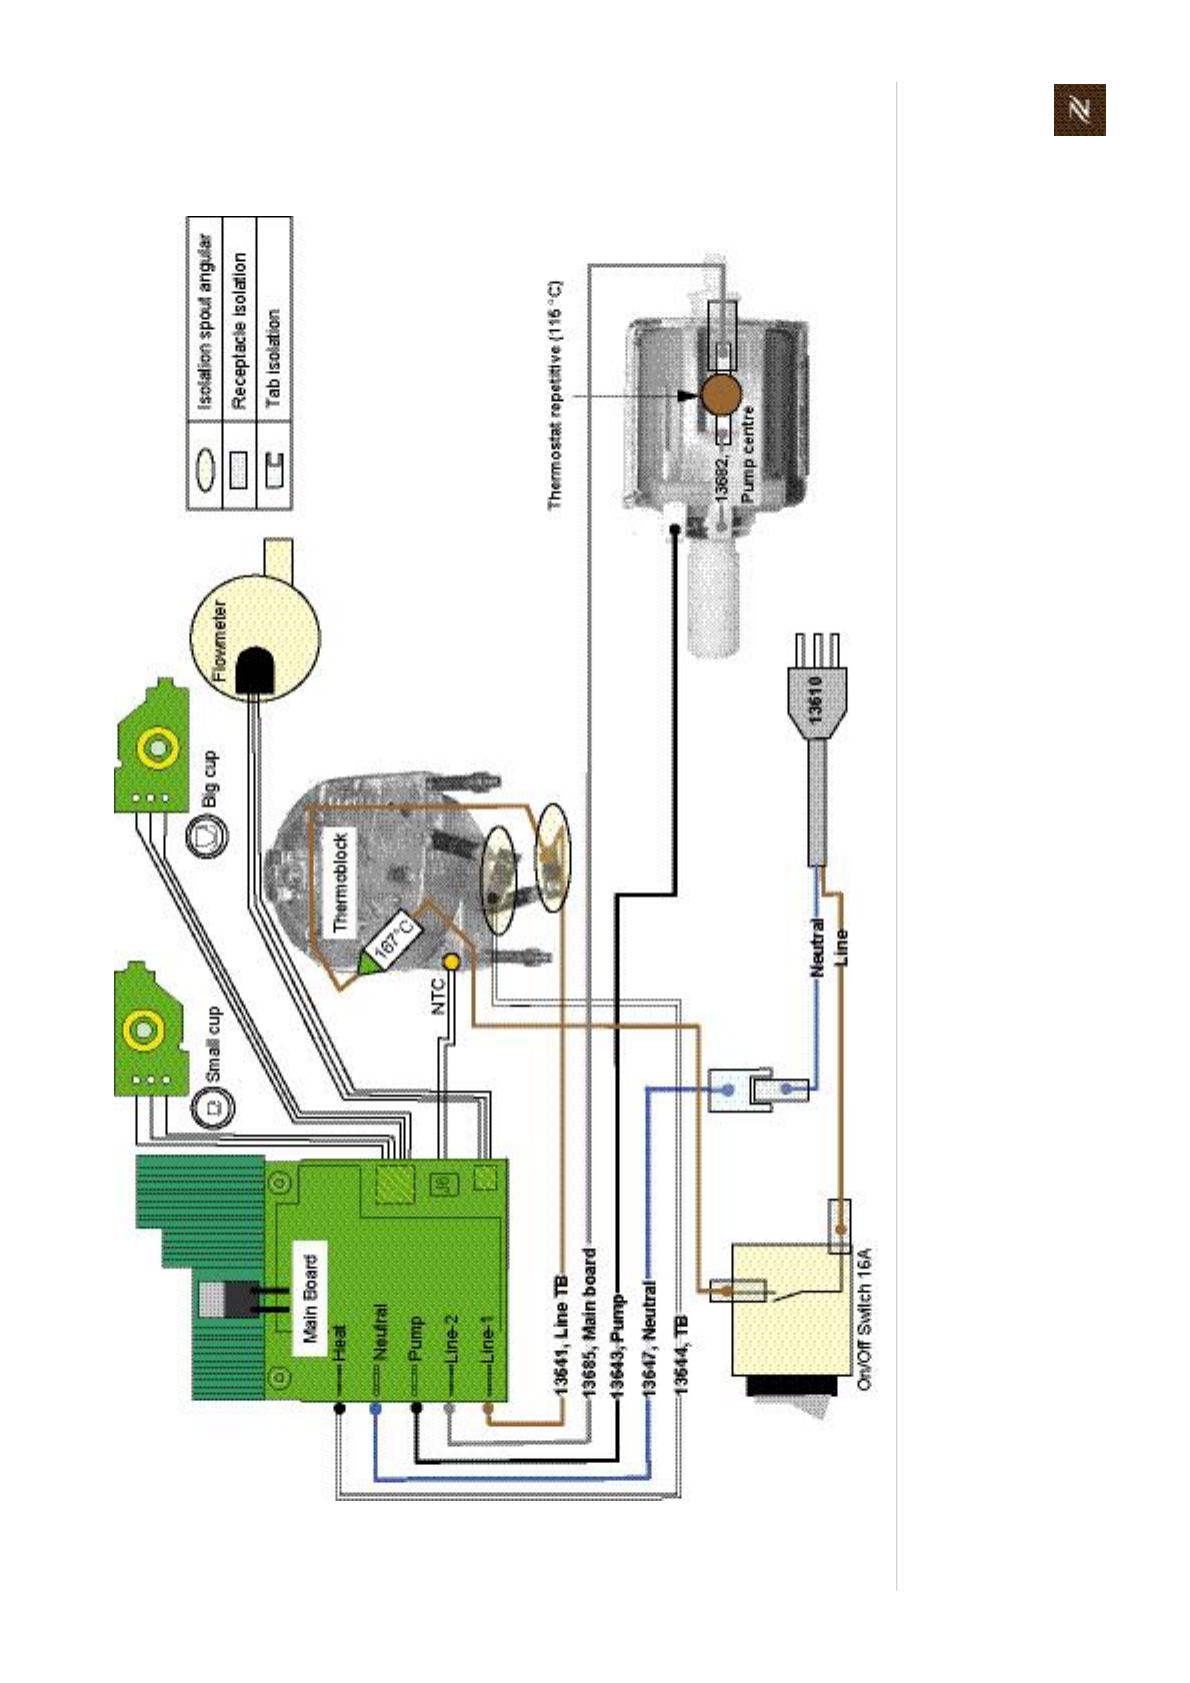
Citizservicemanual119
R E P A I R S
Wiringdiagram120VUL(USA/Canada)modelCitiz,EF483/484
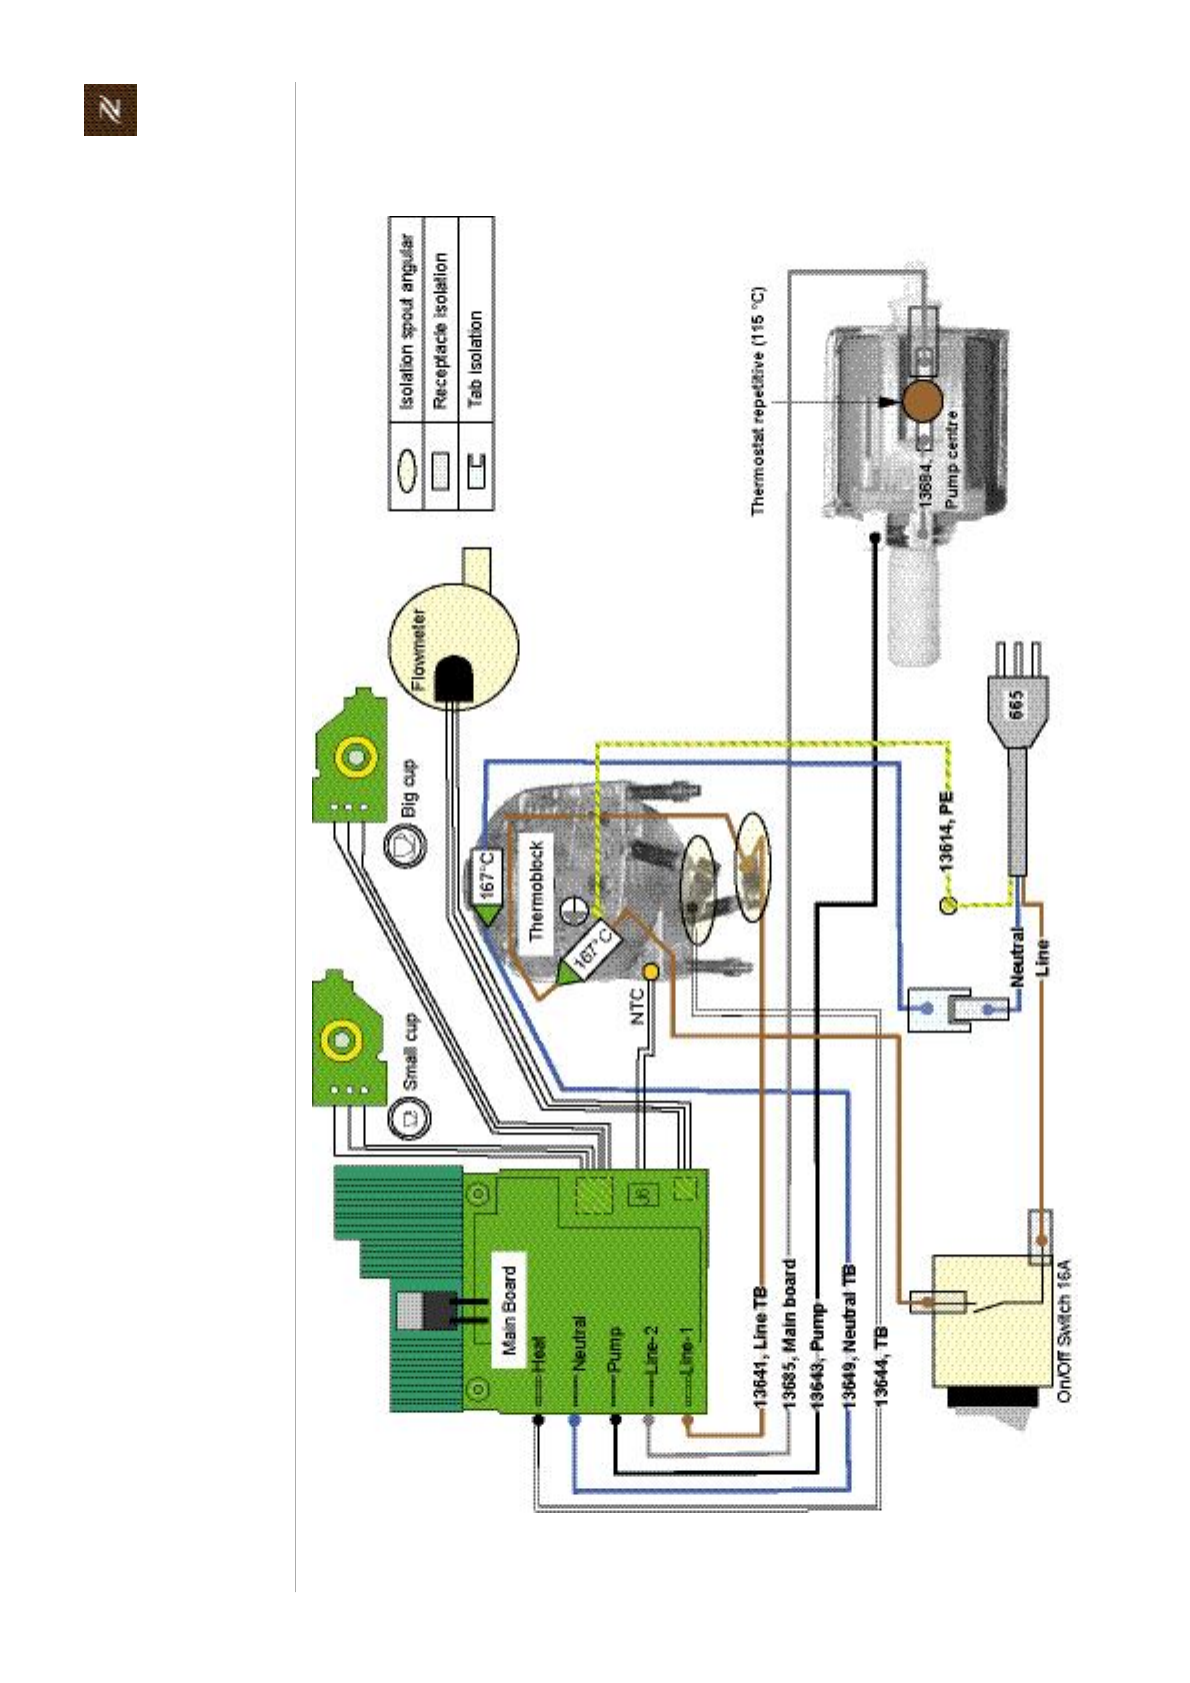
Citizservicemanual
120
R E P A I R S
Wiringdiagram120V127VIEC(Brazil)modelCitiz,EF483/484
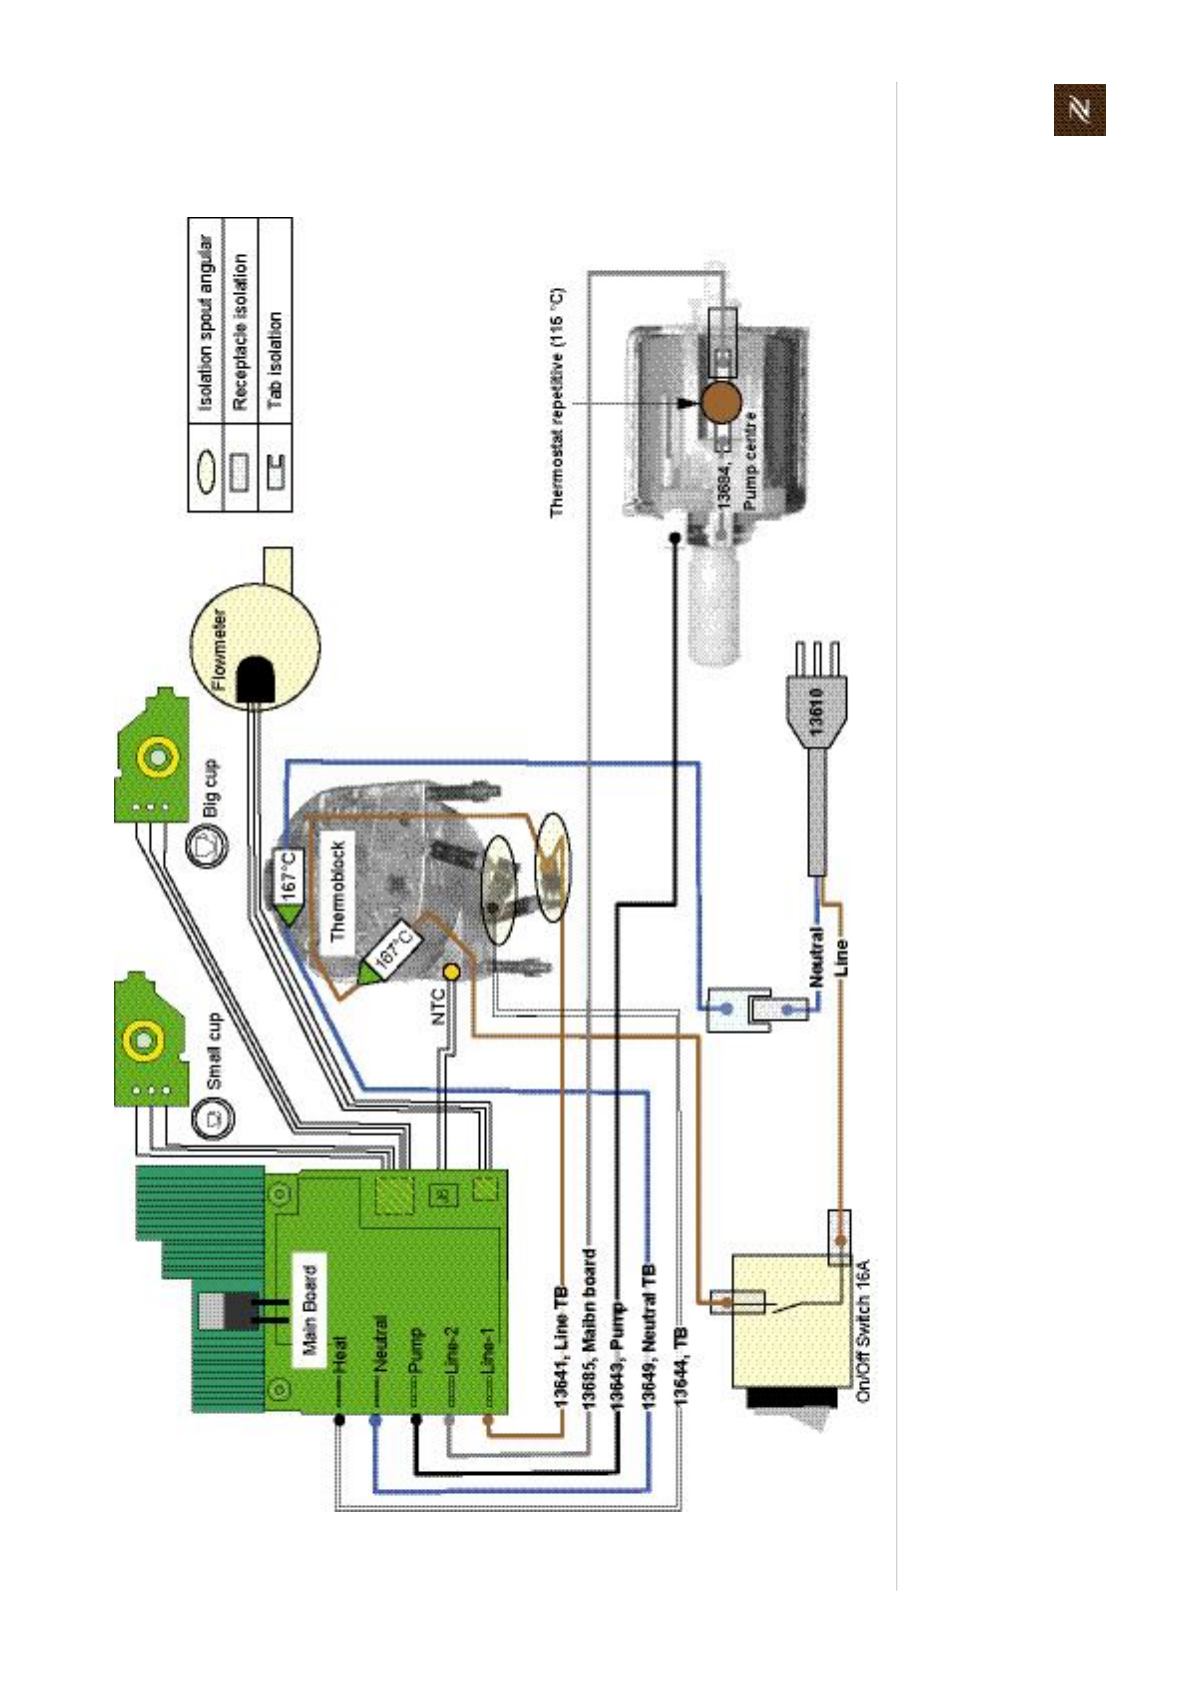
Citizservicemanual121
R E P A I R S
Wiringdiagram120V127VIEC(Mexico)modelCitiz,EF483/484
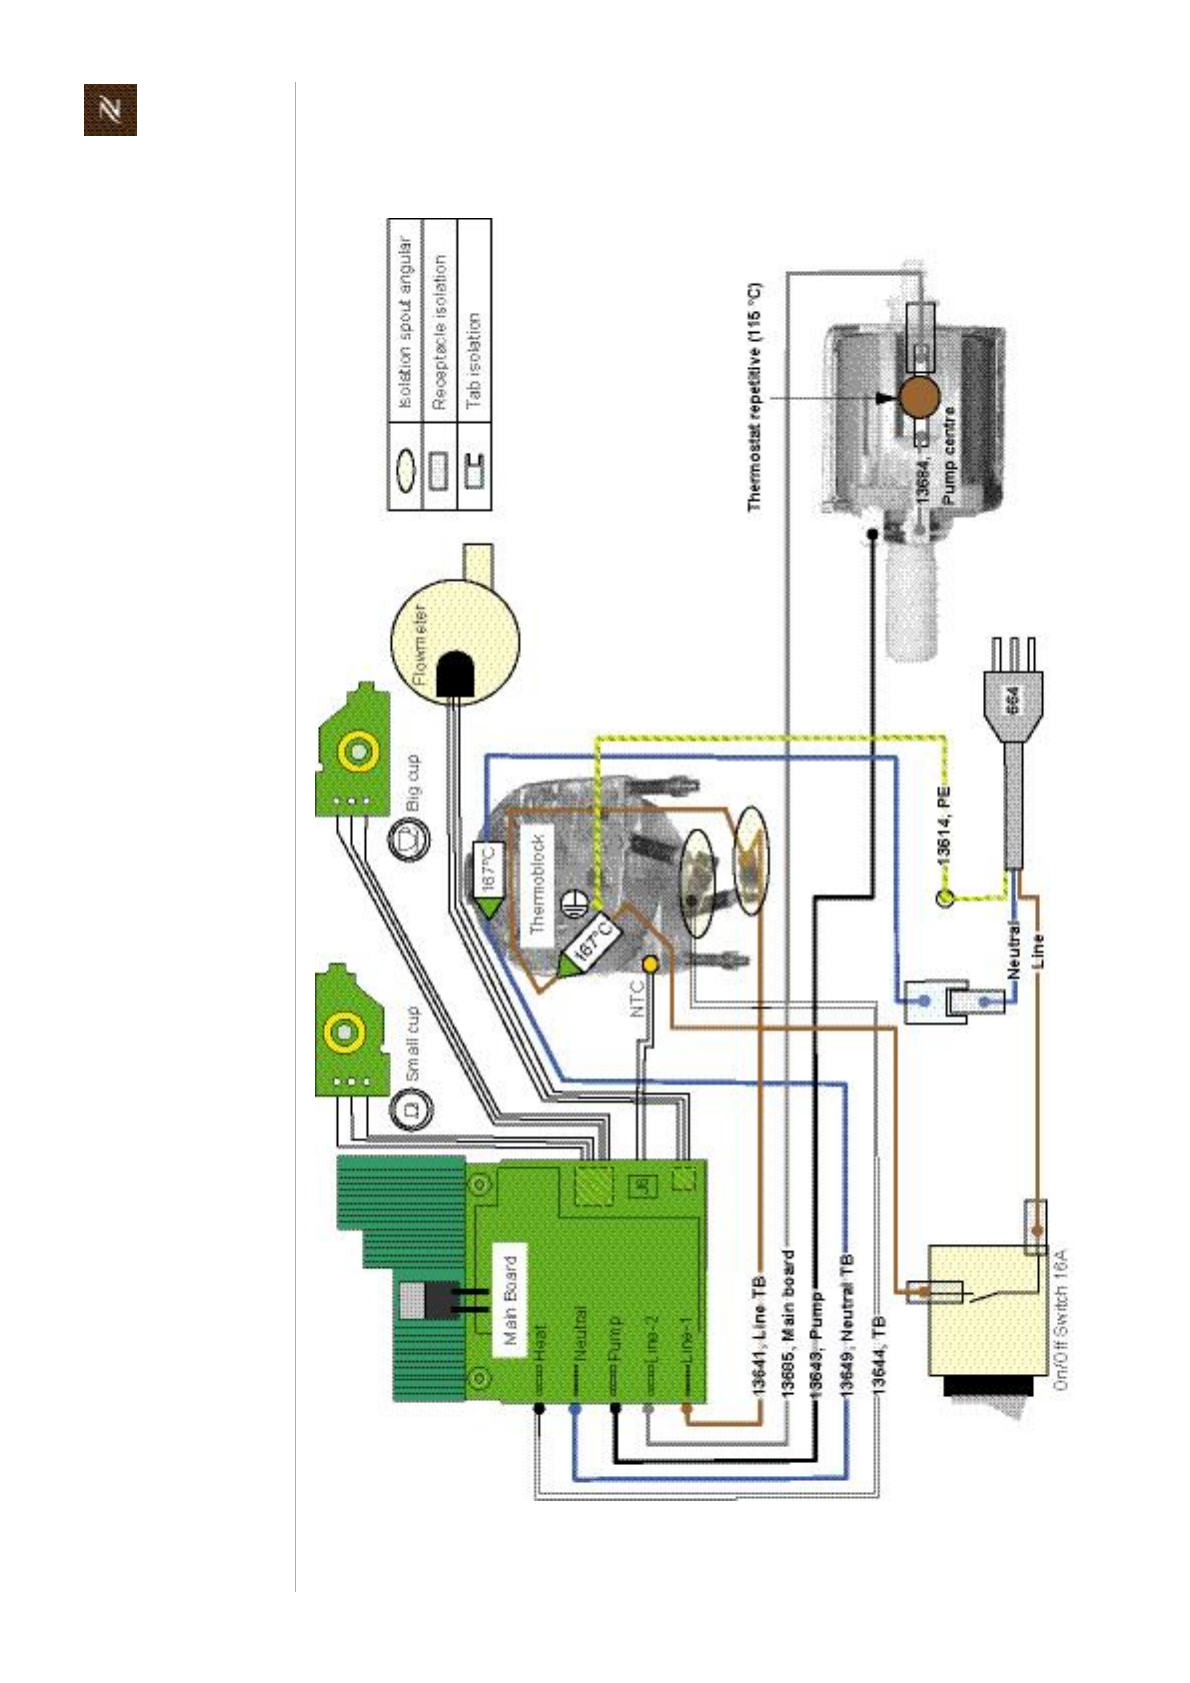
Citizservicemanual
122
R E P A I R S
Wiringdiagram110VIEC(Taiwan)modelCitiz,EF483/484
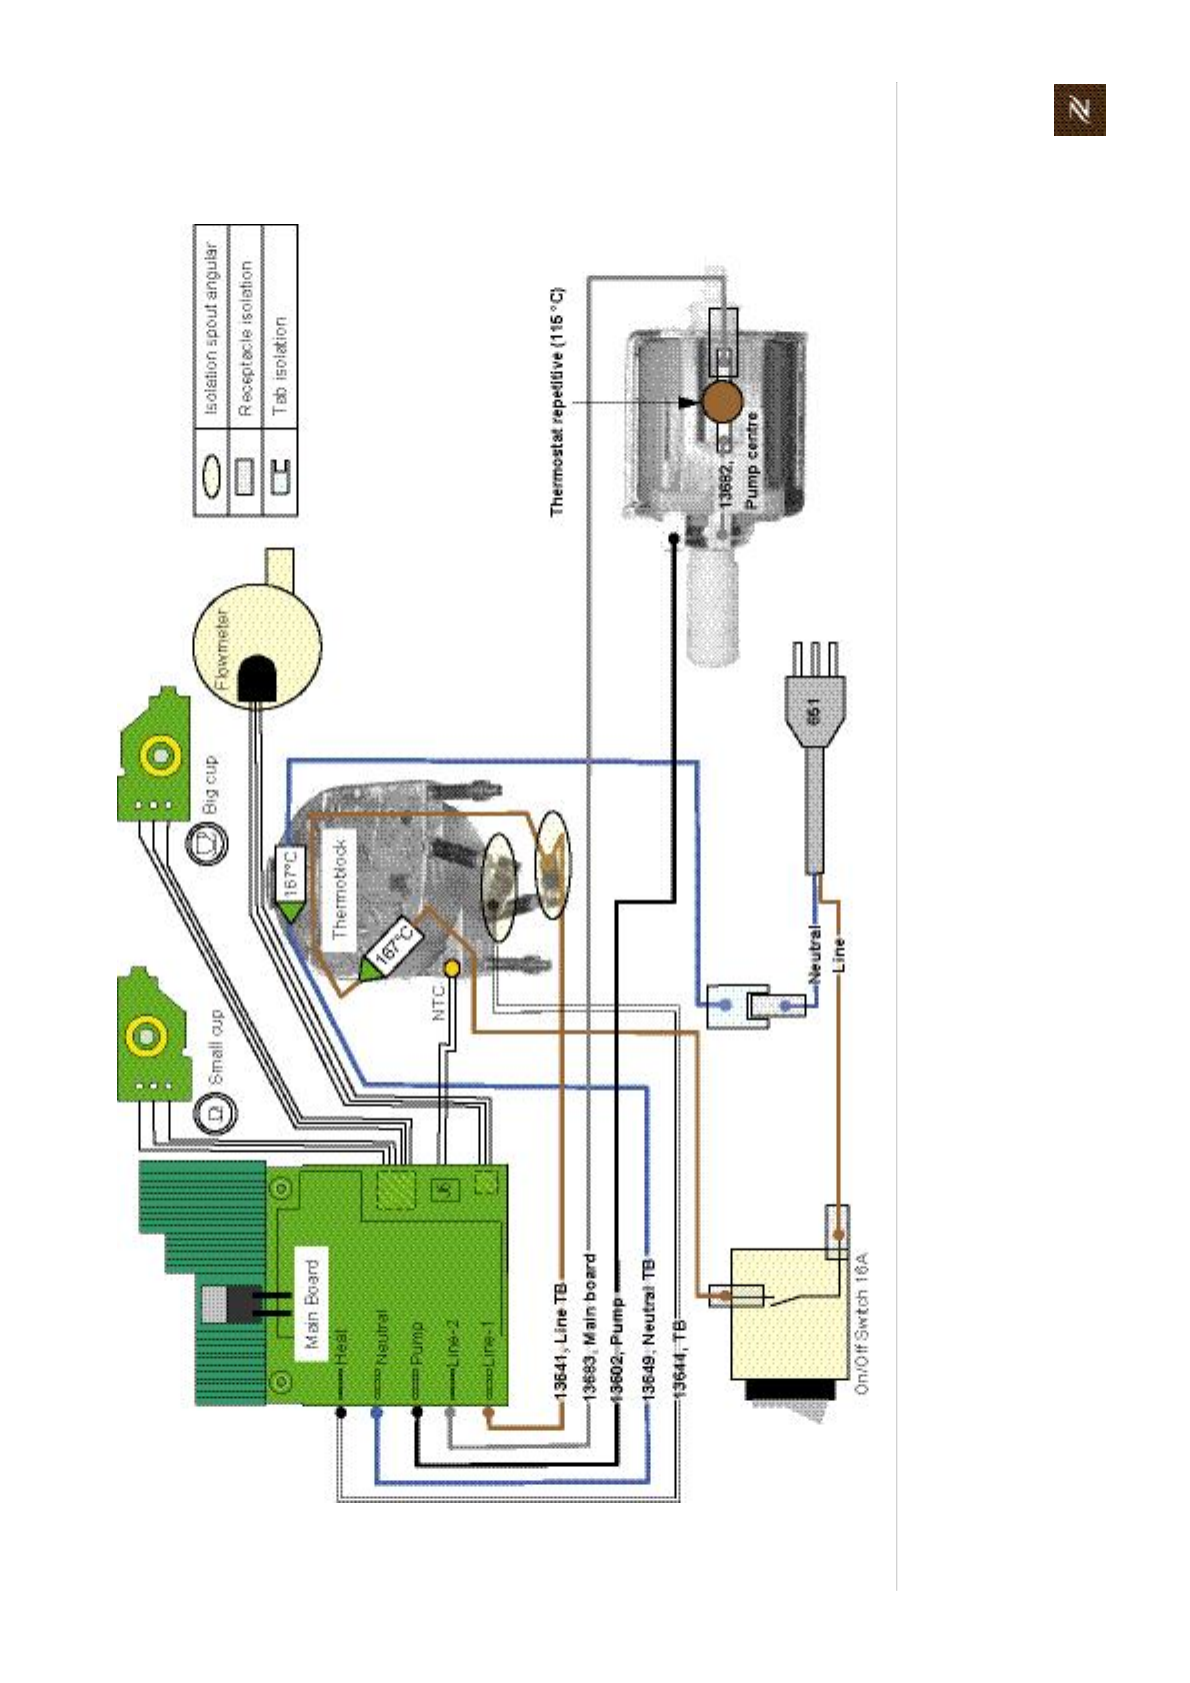
Citizservicemanual123
R E P A I R S
Wiringdiagram100VIEC(Japan)modelCitiz,EF483/484
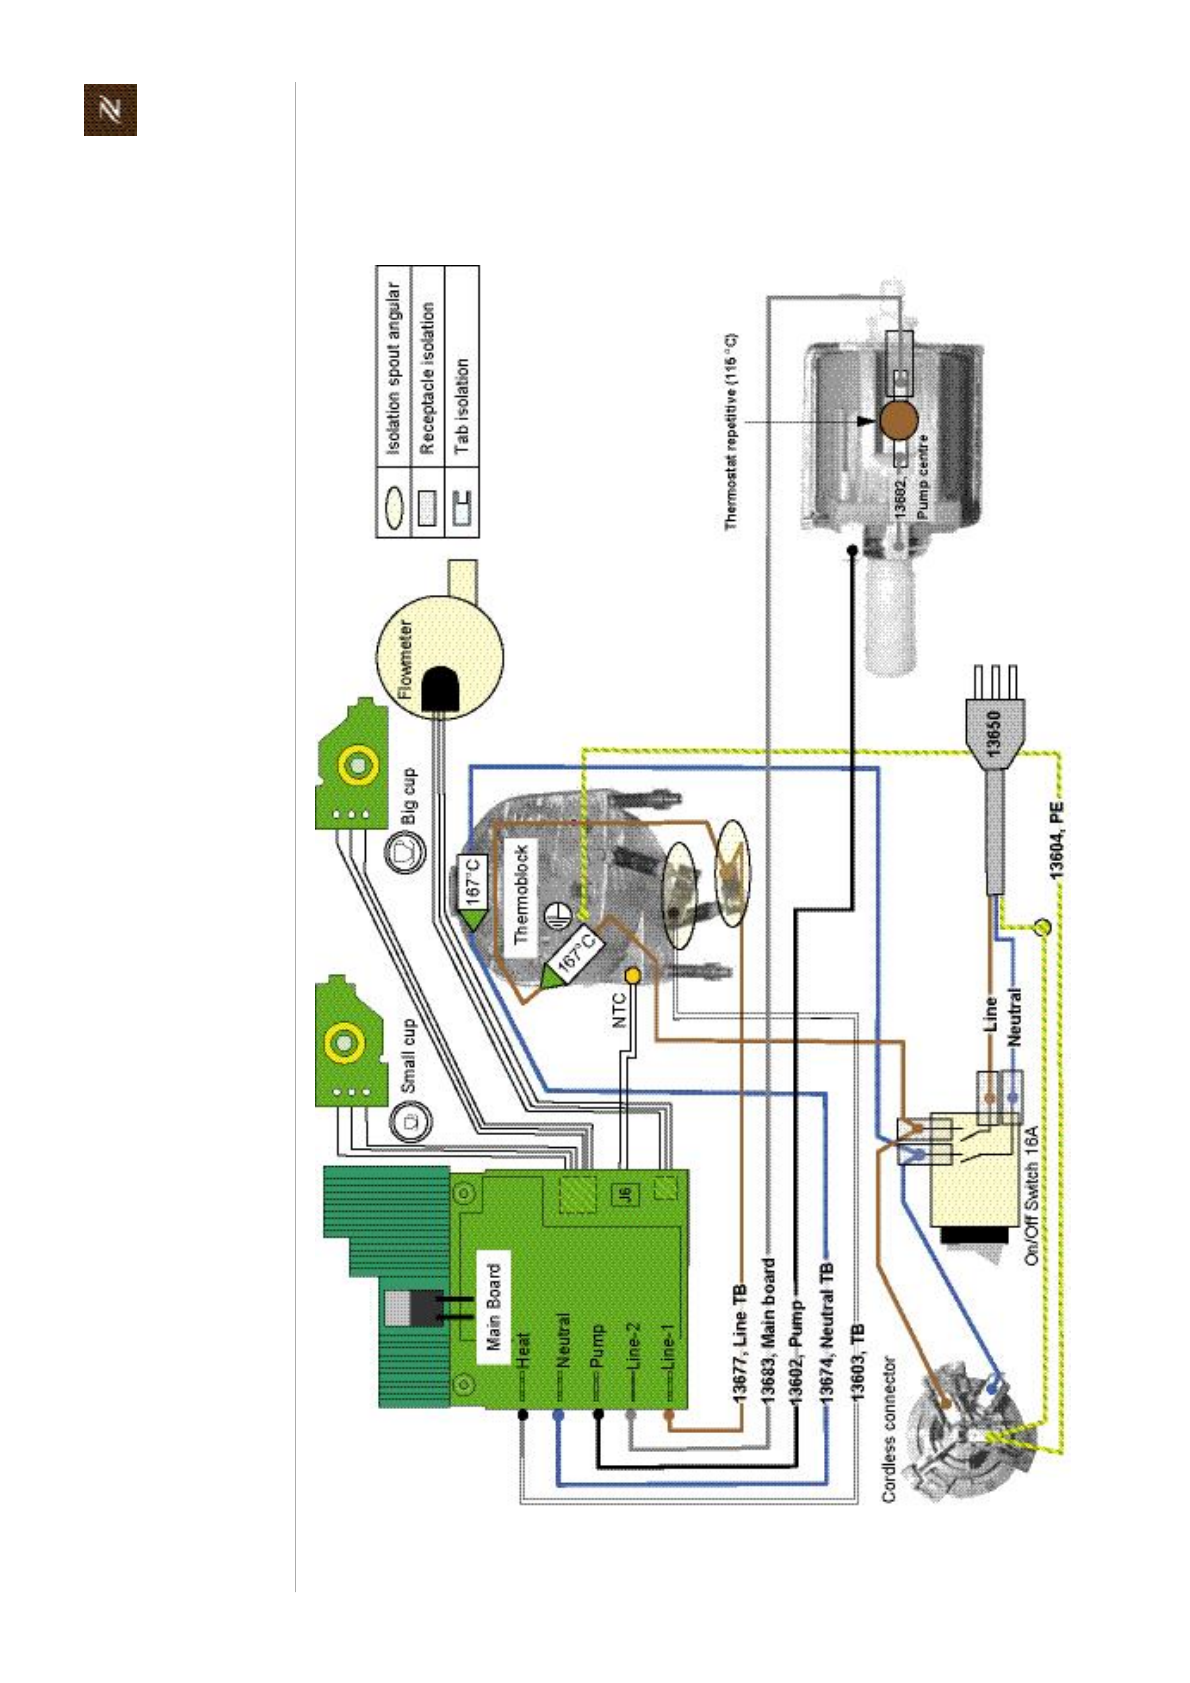
Citizservicemanual
124
R E P A I R S
8.9.2 WiringdiagramsmodelCitiz&milk,EF 485/486
Wiringdiagram220V240VIECmodelCitiz&milk,EF 485/486
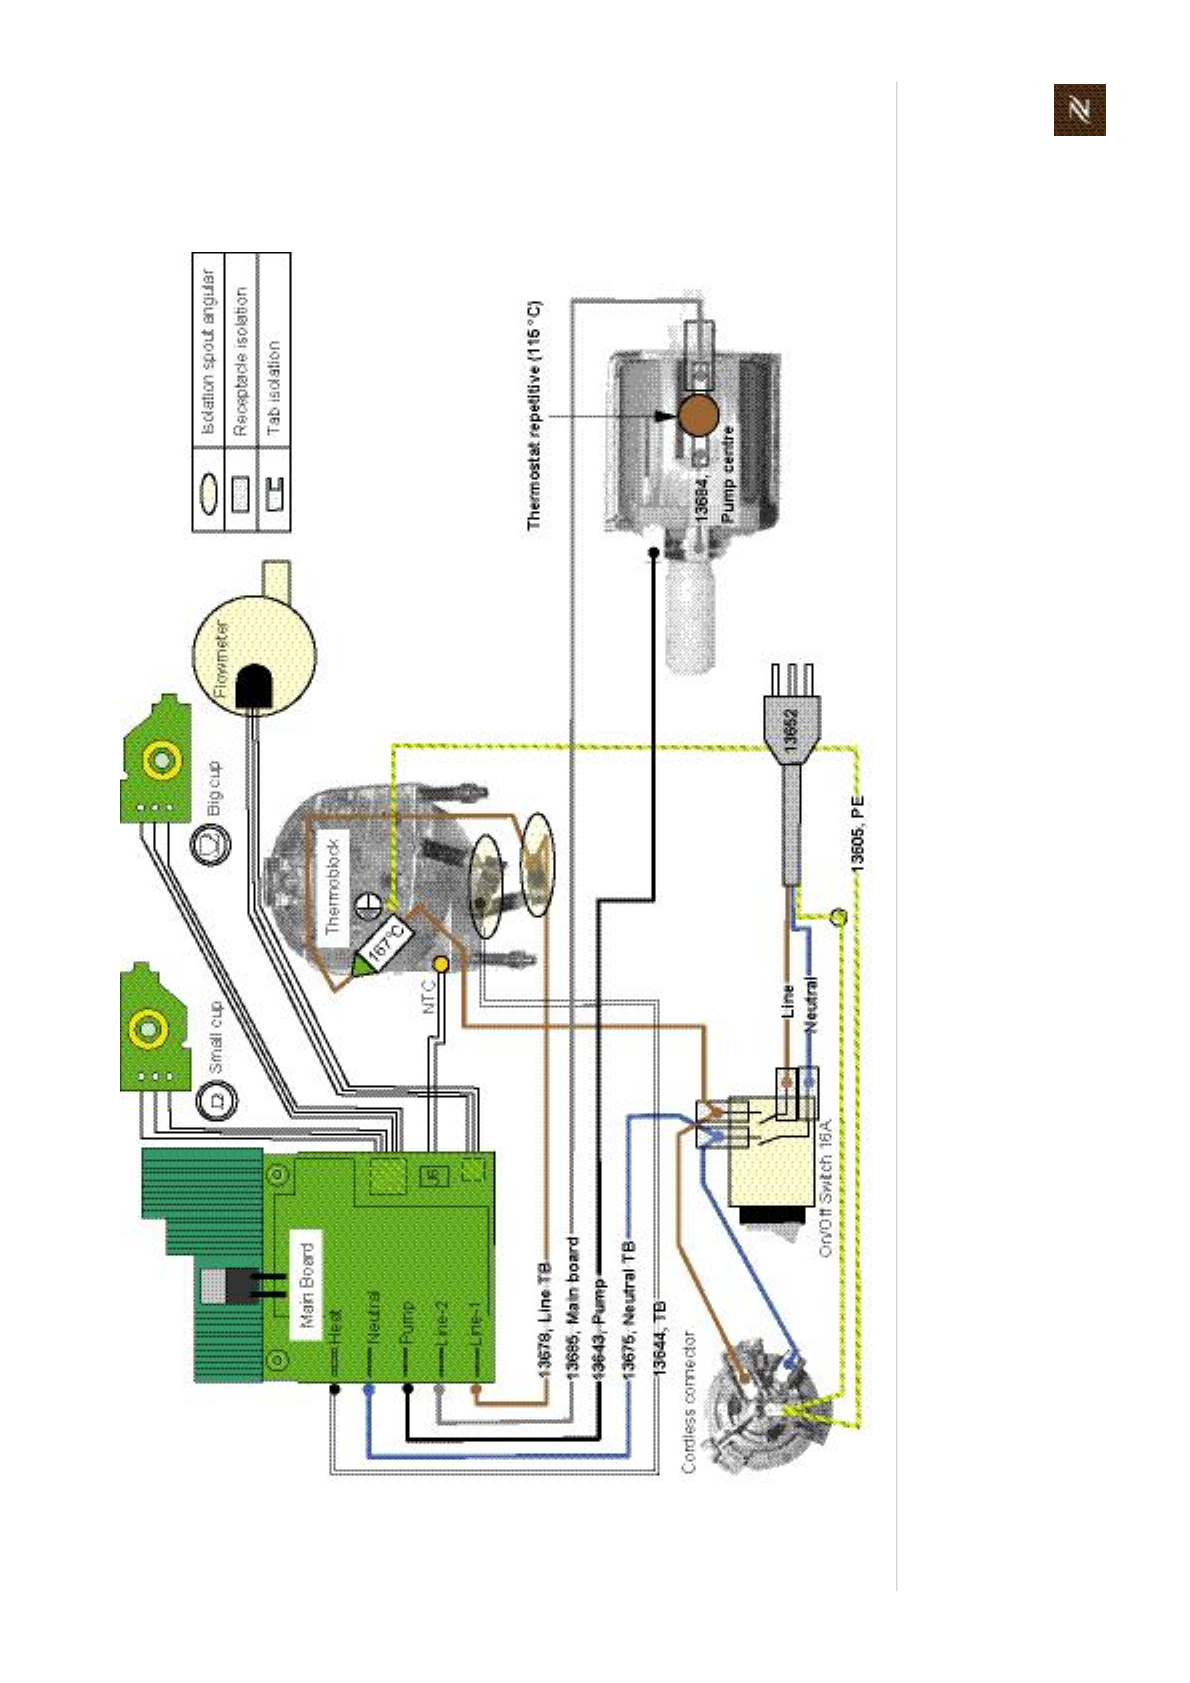
Citizservicemanual125
R E P A I R S
Wiringdiagram120VUL(USA/Canada)modelCitiz&milk,EF 485/
486
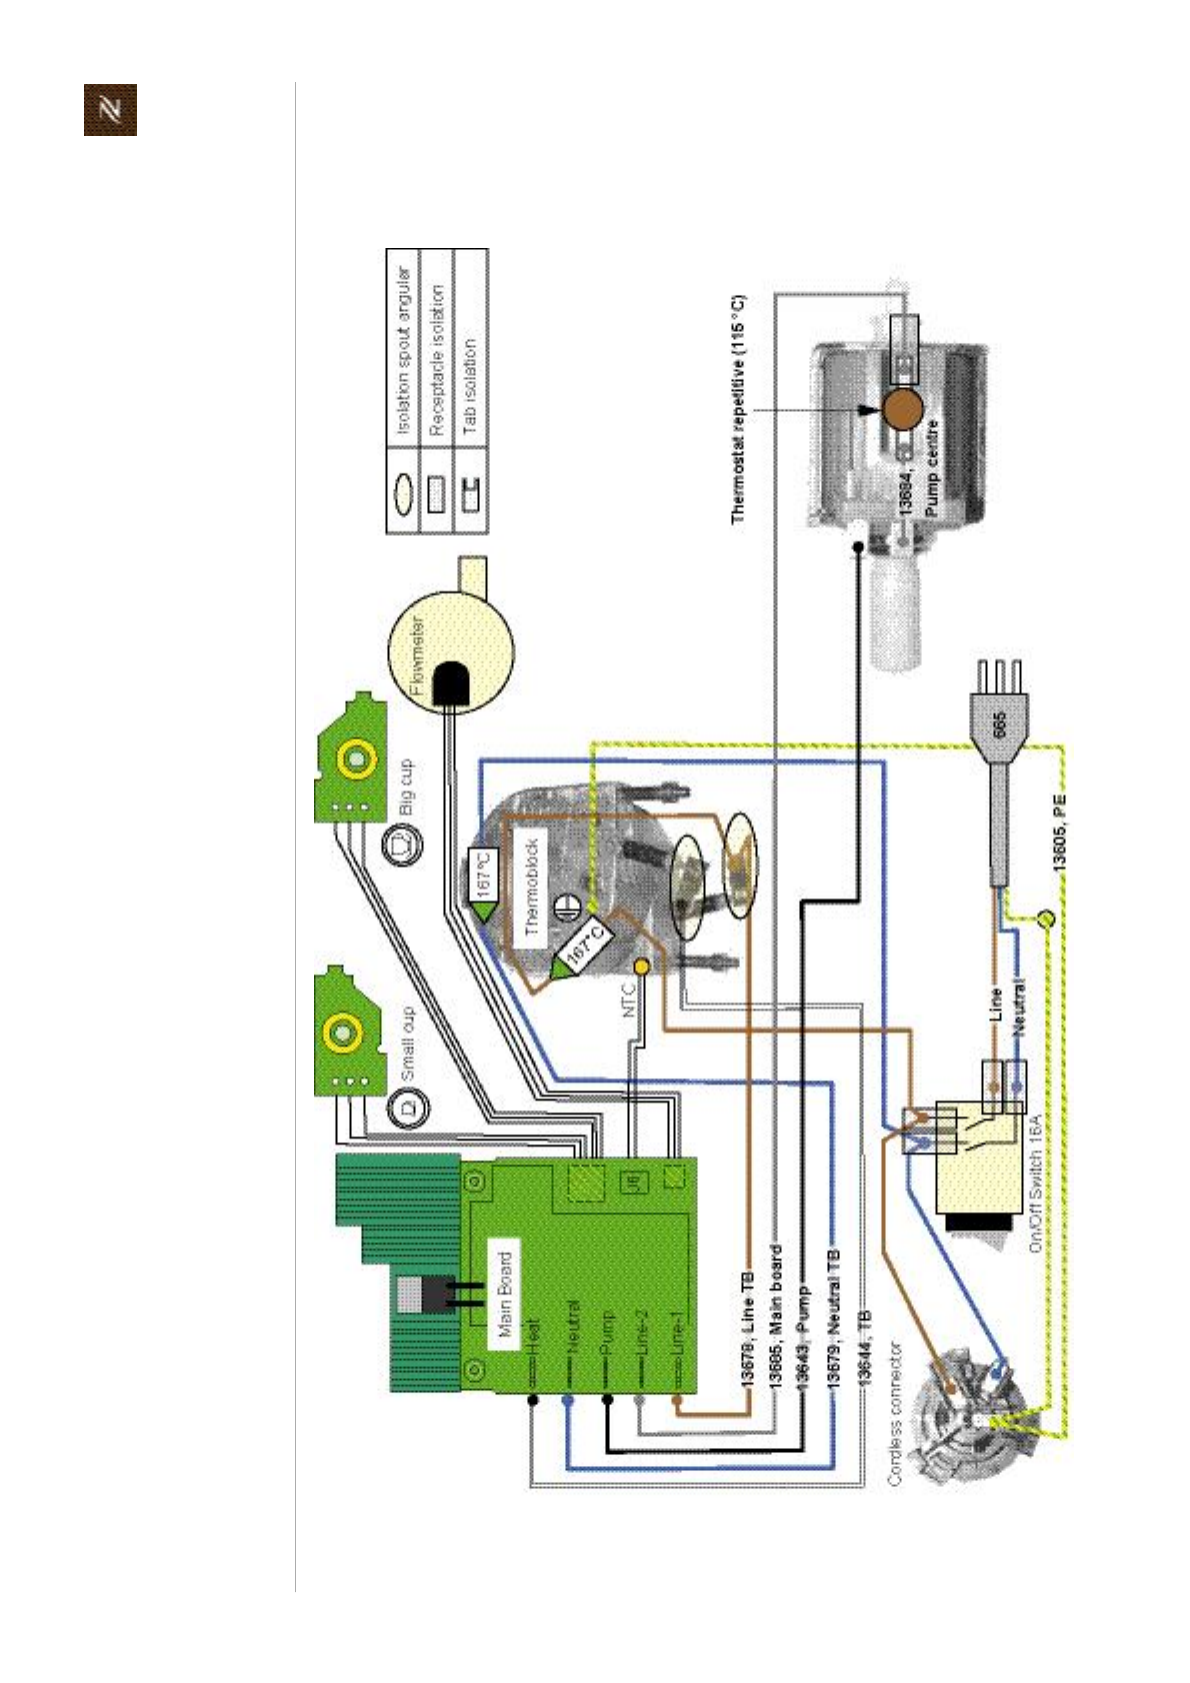
Citizservicemanual
126
R E P A I R S
Wiringdiagram120V127VIEC(Brazil)modelCitiz&milk,EF 485/
486

Citizservicemanual127
R E P A I R S
Wiringdiagram120V127VIEC(Mexico)modelCitiz&milk,
EF 485/486

Citizservicemanual
128
R E P A I R S
8.9.3 WiringdiagramsmodelCitiz&Co,EF487/488
Wiringdiagram220V240VIECcoreunit,modelCitiz&Co,EF487/488
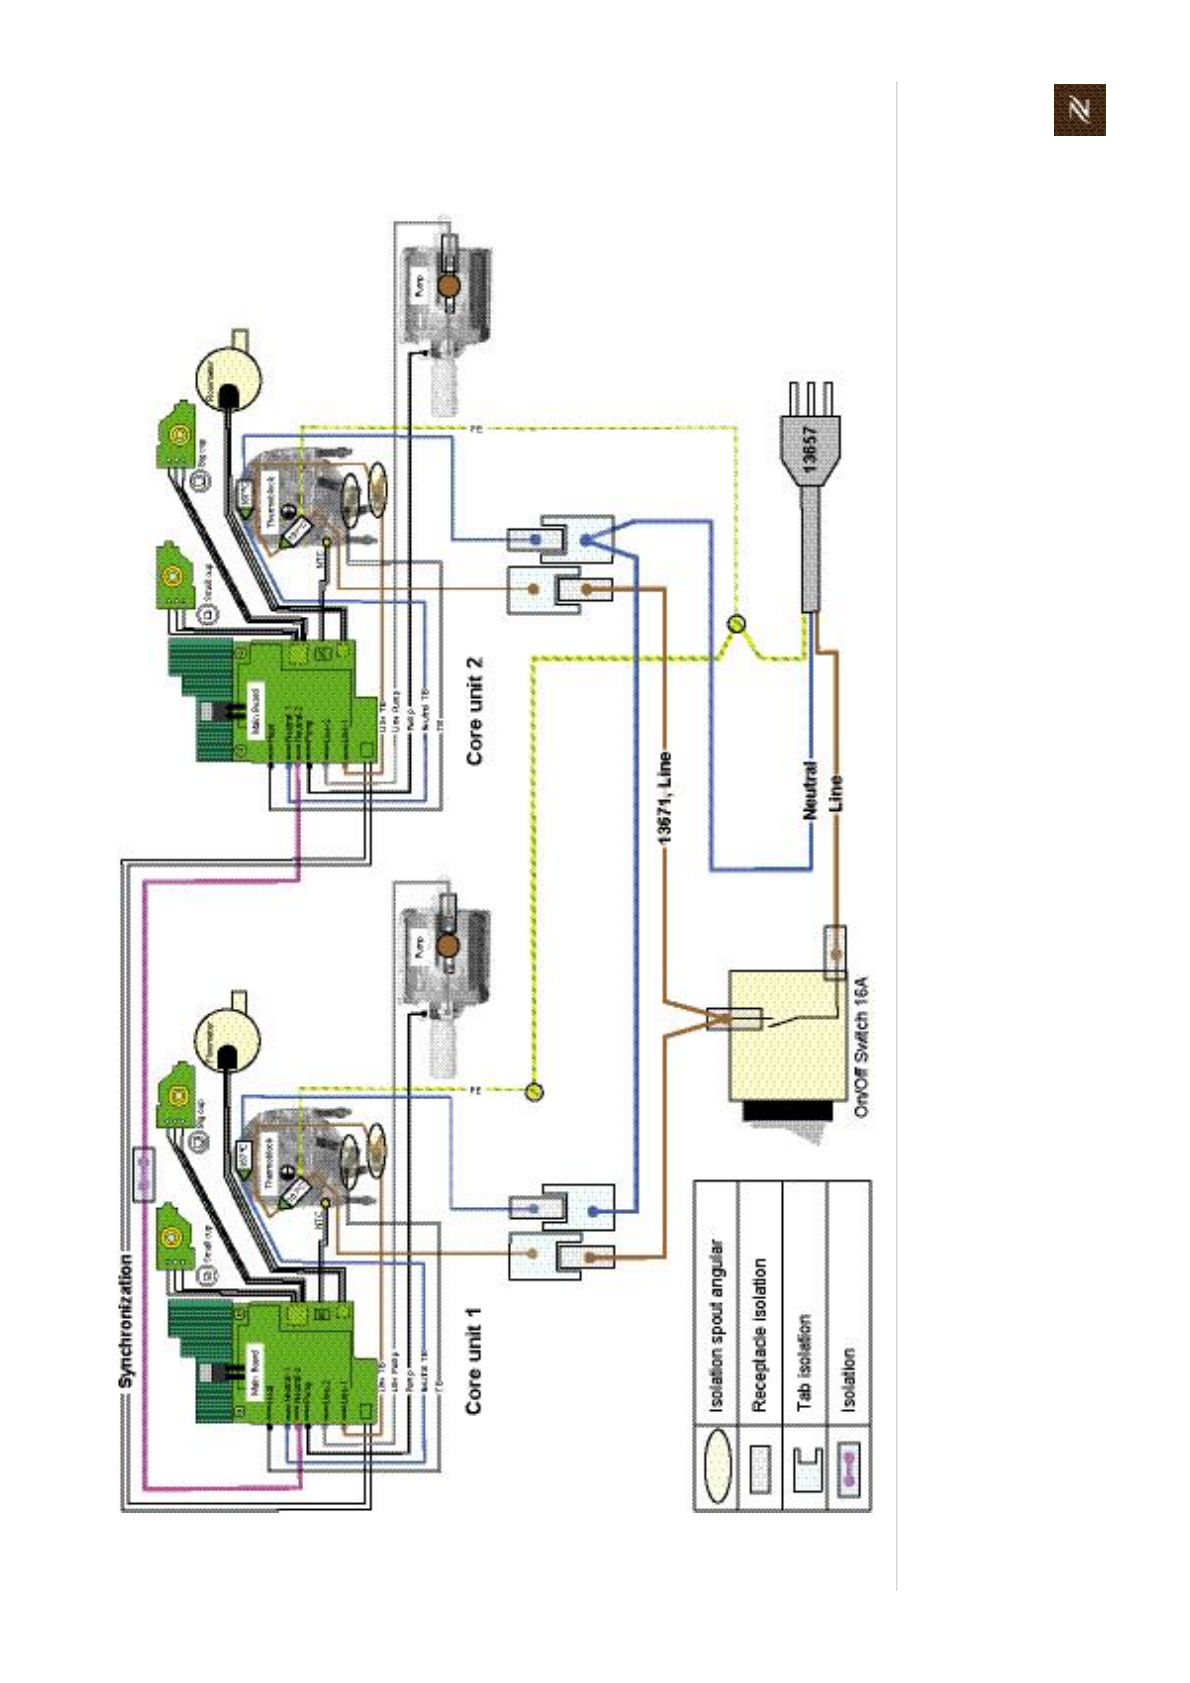
Citizservicemanual129
R E P A I R S
Wiringdiagram220V240VIECmodelCitiz&Co,EF487/488
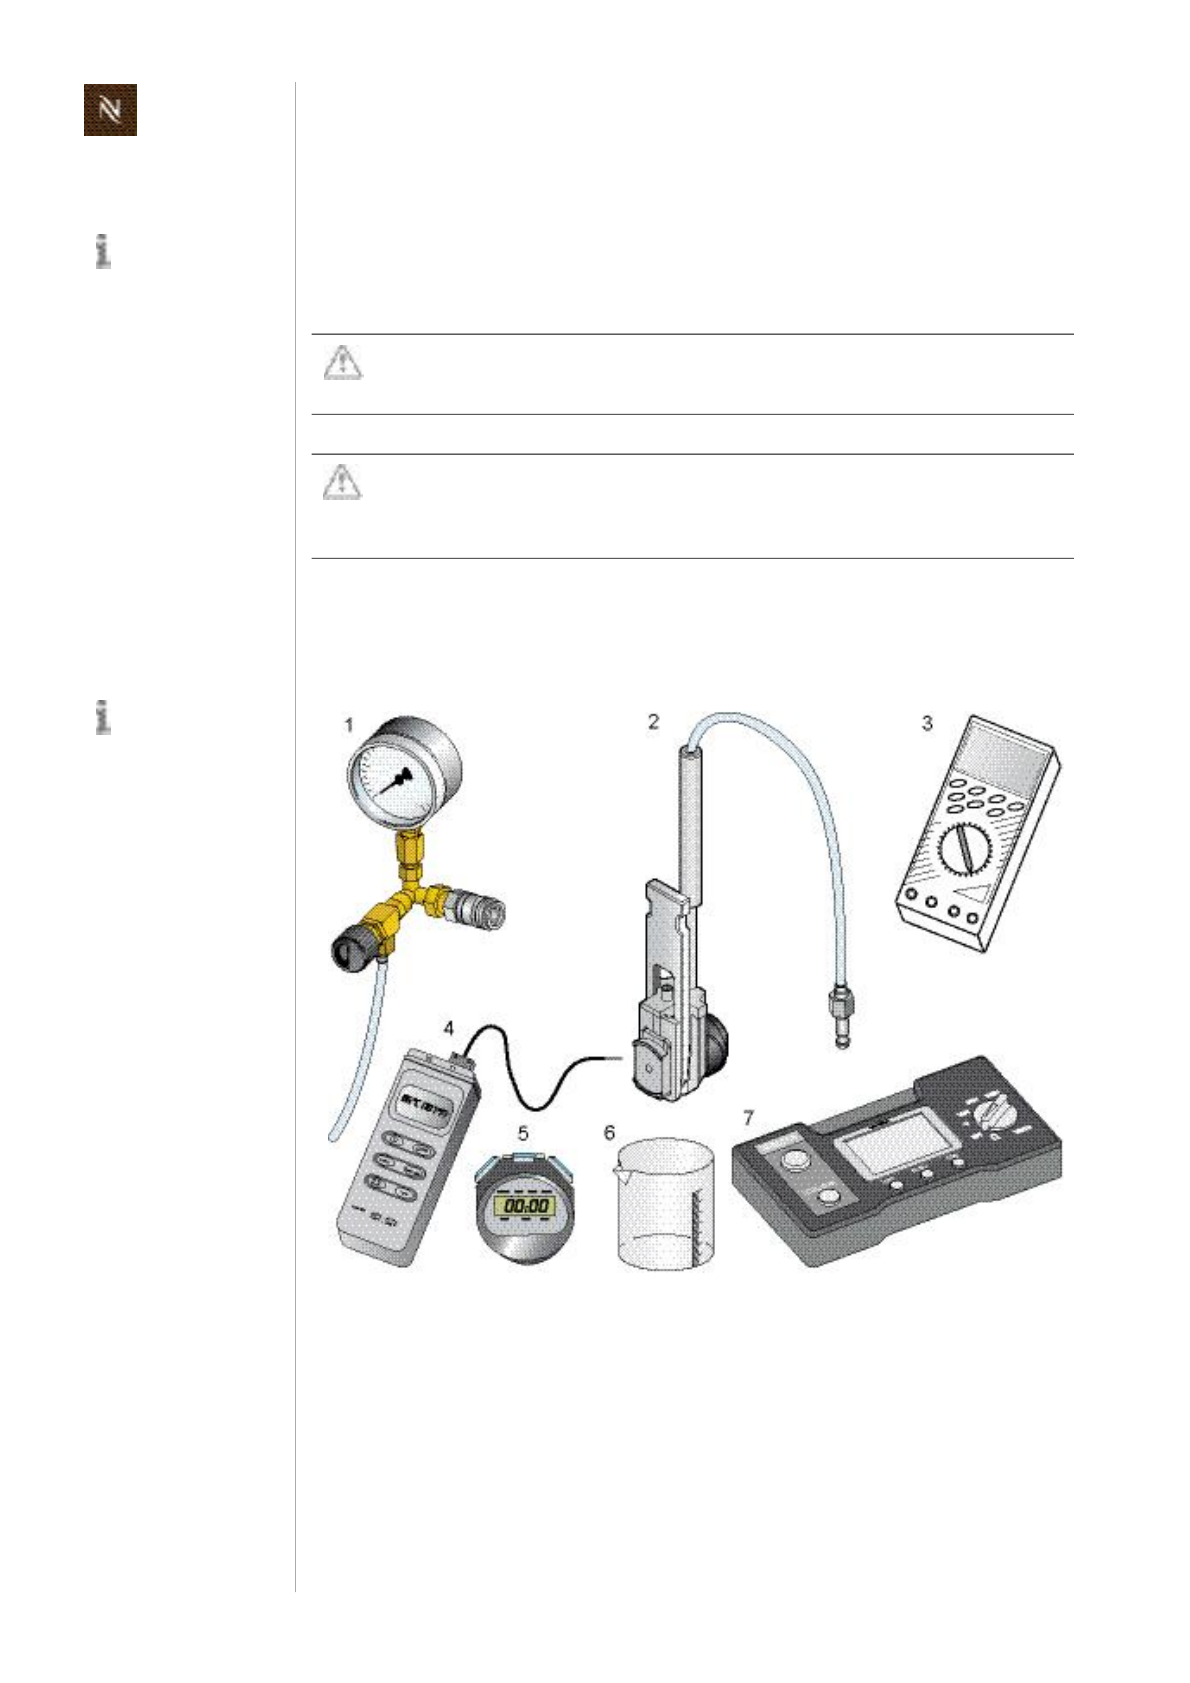
Citizservicemanual
130
F U N C T I O N T E S T S
9 F U N C T I O N T E S T S
9.1 Safetyinstructions
Somefunctiontestsareperformedwithanenergized,partlyopenedcoffeemachine.
9.2 Requiredequipment
9.2.1 Overview
Tosimplifymatters,
themodelCitizwith
coreunit"Crange"is
usedtoexemplifythrough
outthischapter.
Dangerofelectrocution!
Mainsvoltageinsidethecoffeemachine.
Donottouchanylivepartwhileperformingtests.
Dangerofburns!
Hotpartsandwaterunderpressureinsidethecoffeemachine.
Donottouchanyhotpartswhilecheckingforleakages!
Alwayswearprotectivegoggles.
Symbolicillustration
offunctiontestequip
ment.
1) Pressuregauge
(EFRno.16195)
2) Citizpressuregaugeadapter
3) Digitalmultimeter
(forNTCtemperaturesensortest)
4) Electronicthermometer
(ordigitalmultimetersuitablefortemper
aturemeasurement)
5) Timer
6) Measuringbeaker
7) Testequipmentforprotectiveearthcon
tinuitytestandprotectiveinsulationtest
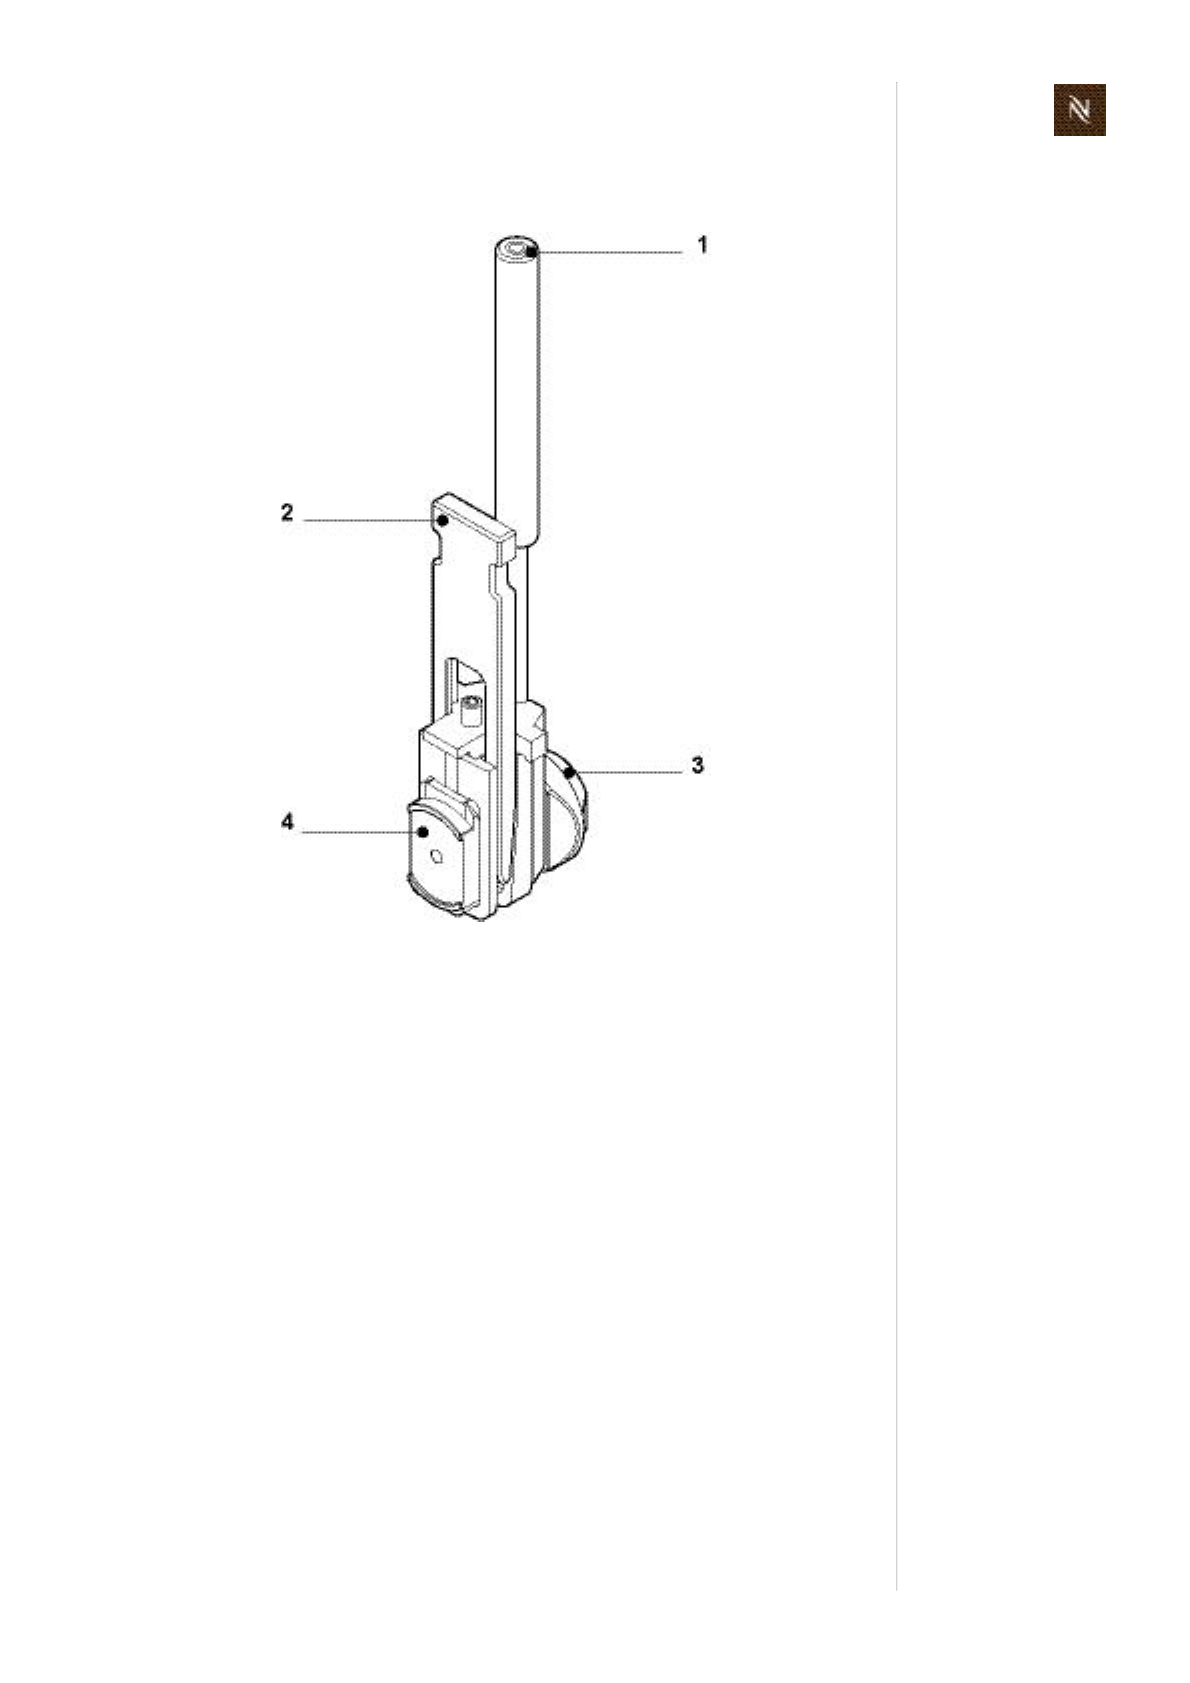
Citizservicemanual131
F U N C T I O N T E S T S
9.2.2 Citizpressuregaugeadapter
ThispressuregaugeadapterisdesignedfortheCitizcoffeemachines.
Thepressuregaugeadapterhas2parts:
• Aconnectingunit(3)withasealingconethatisinsertedinthecapsulecageofthe
brewingunit.
• Ahandactuatedfixationunit(4)tolockandsealthecompletepressuregauge
adapterinthebrewingunit.
1) Quickactioncouplingforpressure
hose
2) Operatinglever
3) Connectingunit
4) Fixationunit
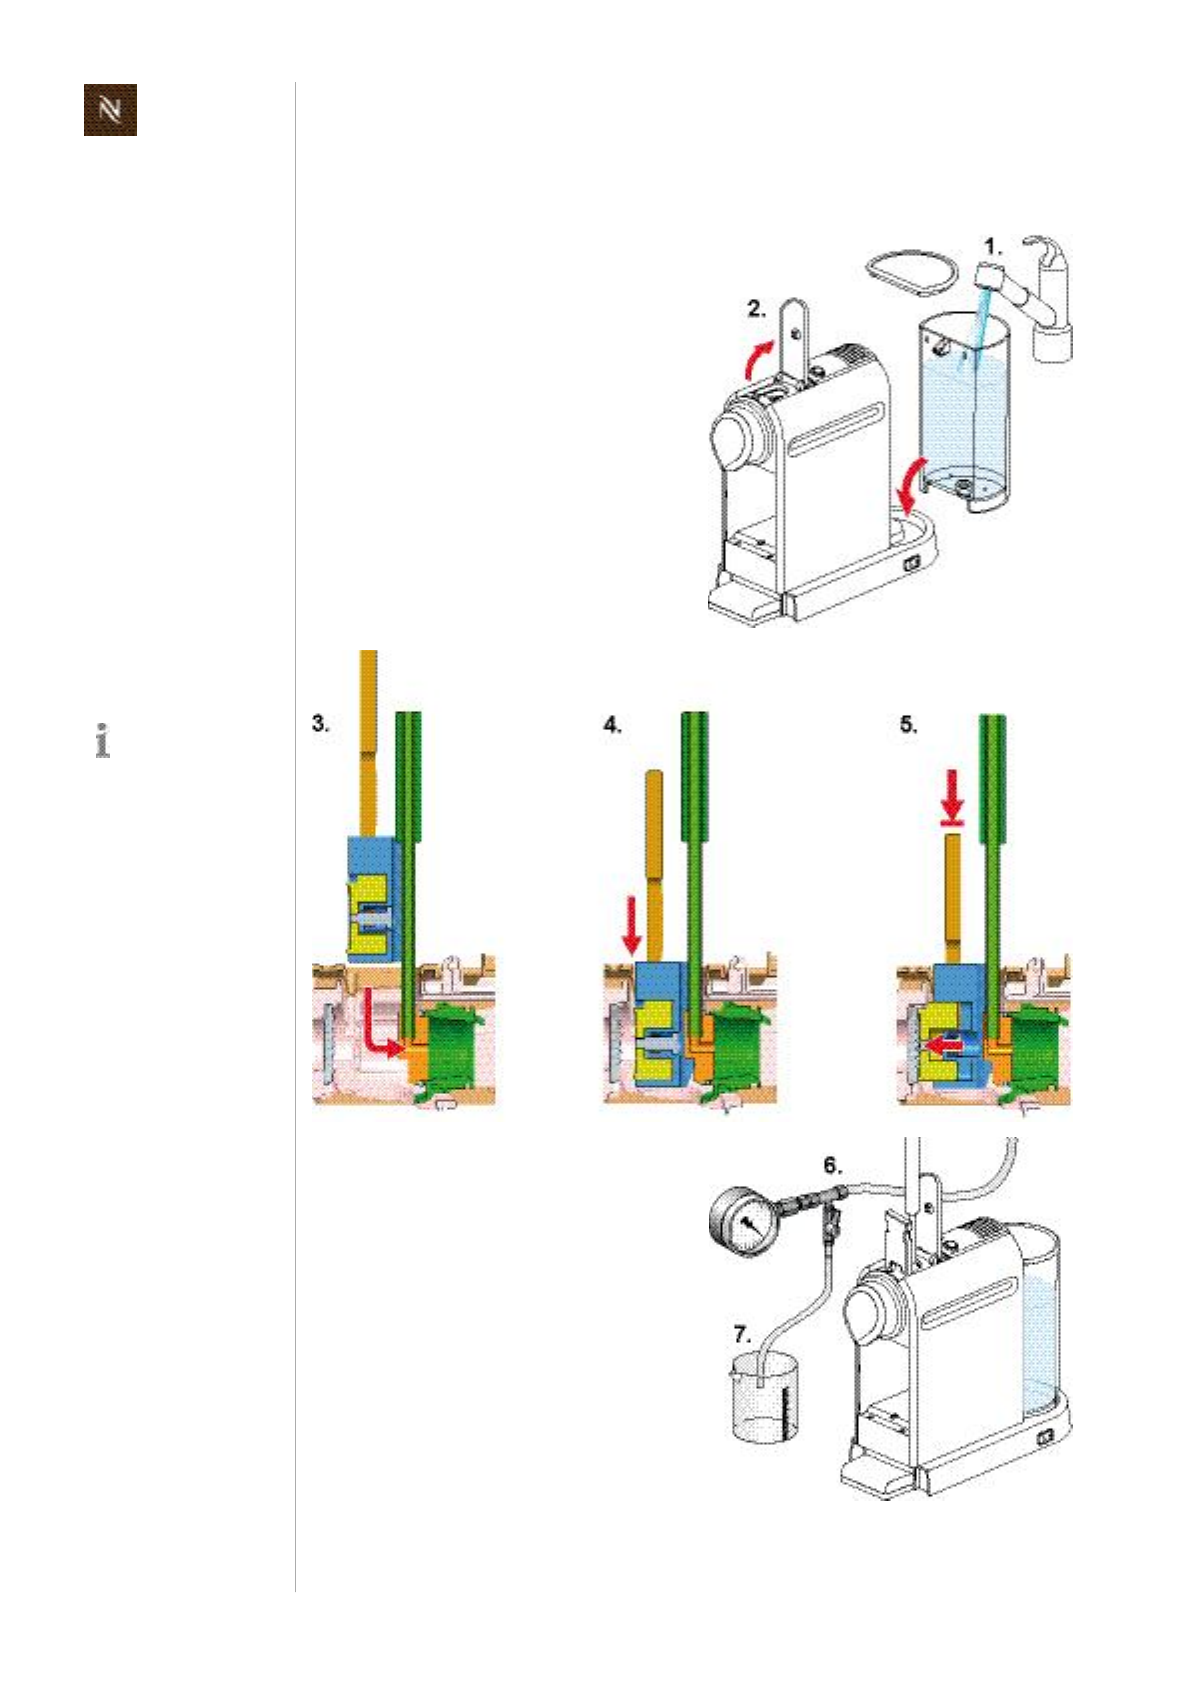
Citizservicemanual
132
F U N C T I O N T E S T S
9.3 Measureflowrate
Thepressureadapter
mustsitfirmlyinthe
capsulebay.
1) Fillandinsertwatertank.
2) Openclosinghandle.
3) Insertconnectingunitofpressure
adapterintocapsulebay.Pushback
sealingconeintocapsulecage.
4) Insertfixationunitofpressureadapter
intocapsulebay.
5) Pressdownoperatinglever.
6) Connectpressurehosetopressure
tester.
7) Placeameasuringcupunderthedrain
hoseofthepressuretester.
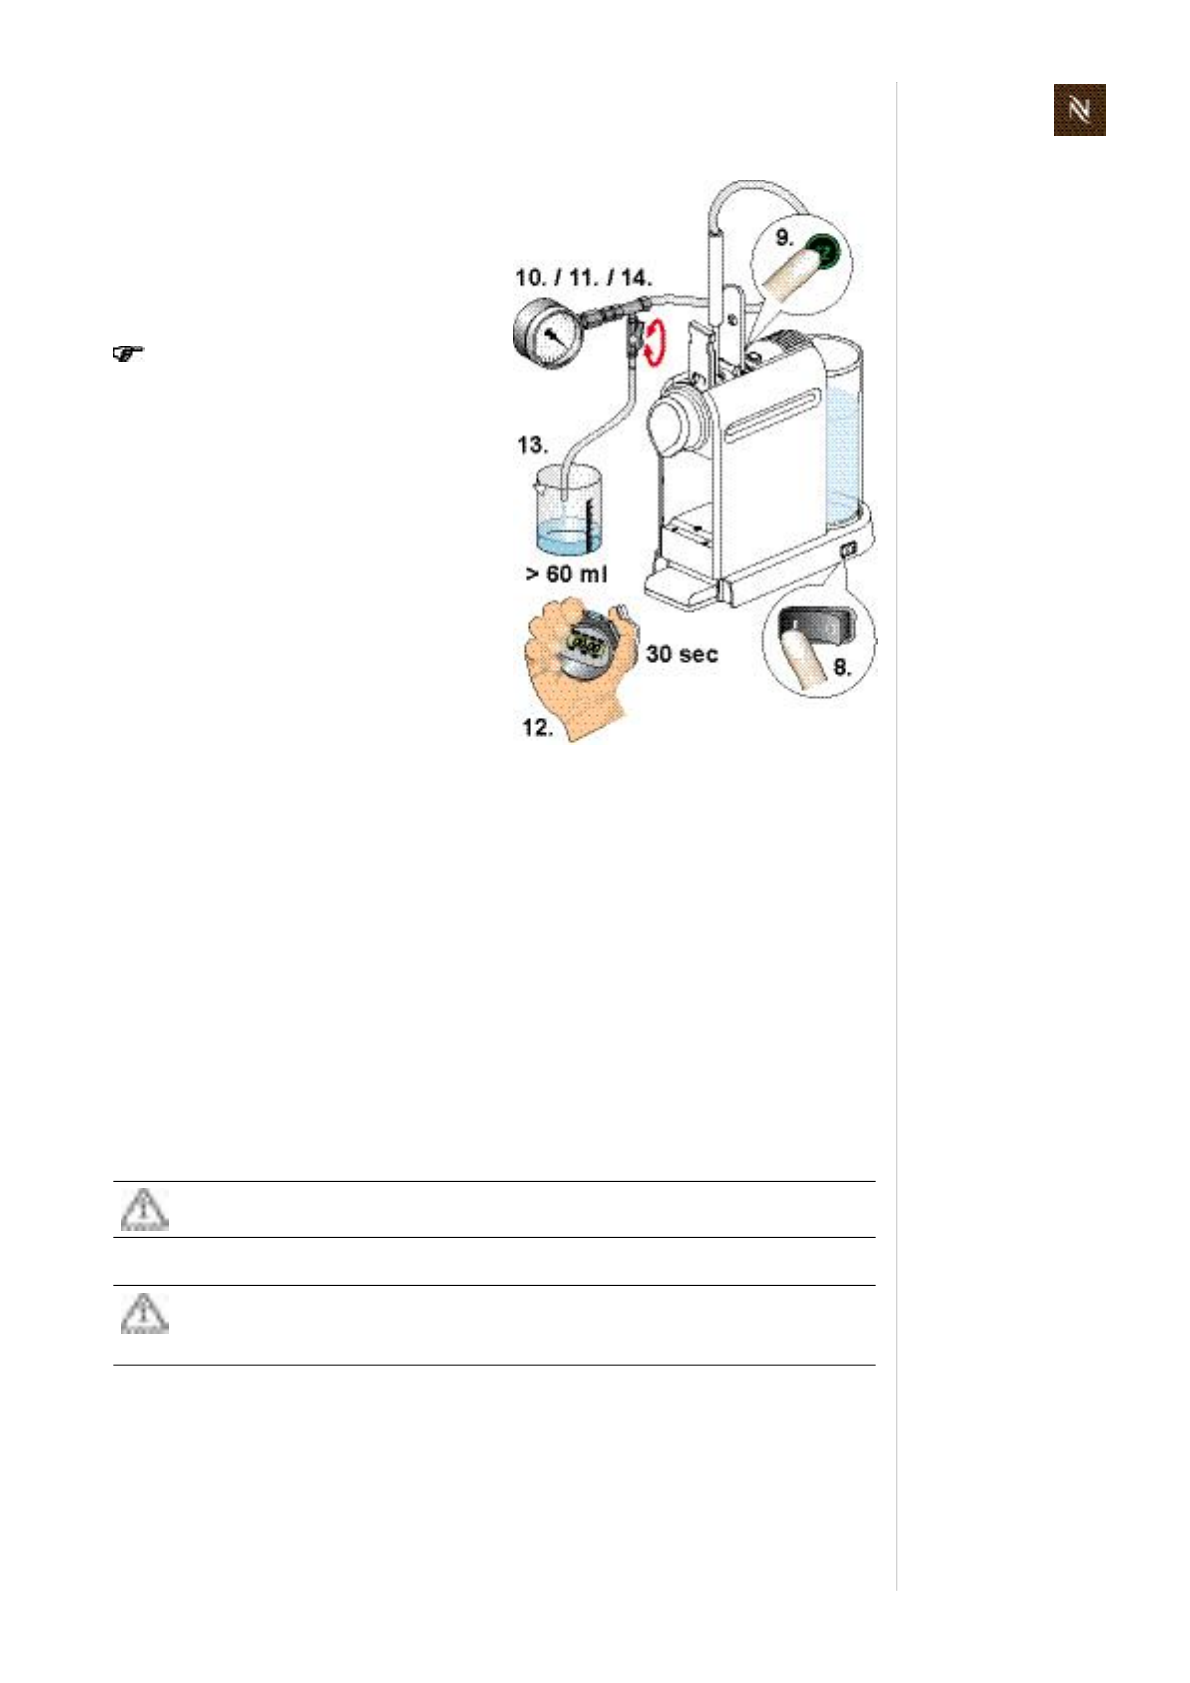
Citizservicemanual133
F U N C T I O N T E S T S
9.4 Pressureandleakagechecks
Checkthefollowingpartsofthecoffeemachineforleakages:
• Compactbrewingunit
• Hoseconnections
• Thermoblock
• Pump
• Selfprimingdevice
8) Switchoncoffeemachine.
9) Afterheatingup,pressthe"smallcup"
button.
10)Openthevalveuntilwaterbeginsto
flow.
11)Closethevalveuntilthepressure
gaugeindicates12bar.
Constantlymonitorthepressure
gaugeandifrequiredreadjustthe
valve.Asthetemperature
increases,sodoesthepressure,
readjustthepressureto12bar
whenrequired.
12)Carryoutmeasurementforapprox.
30 sec.
13)Controlmeasuringcup:atleast60
120 mlofwatermustbeinthemeasur
ingcup.
14)Openthevalveandletwaterflowout
ofthepressuretester.
Notices:
• Should<60mlleakout,thenthepump
isdefectiveorthereisaleakinthe
watersystem.
• Largedeviationsinindicatedpressure
whilemeasuring(±4bar)meansthat
thepumpisdefective.
Dangerousmainsvoltageinsidethecoffeemachine!
Donottouchanypartsundervoltagewhilecheckingforleakages!
Dangeroushotpartsunderpressureinsidethecoffeemachine!
Donottouchanyhot/pressurizedpartswhilecheckingforleakages!
Alwayswearprotectivegoggles.
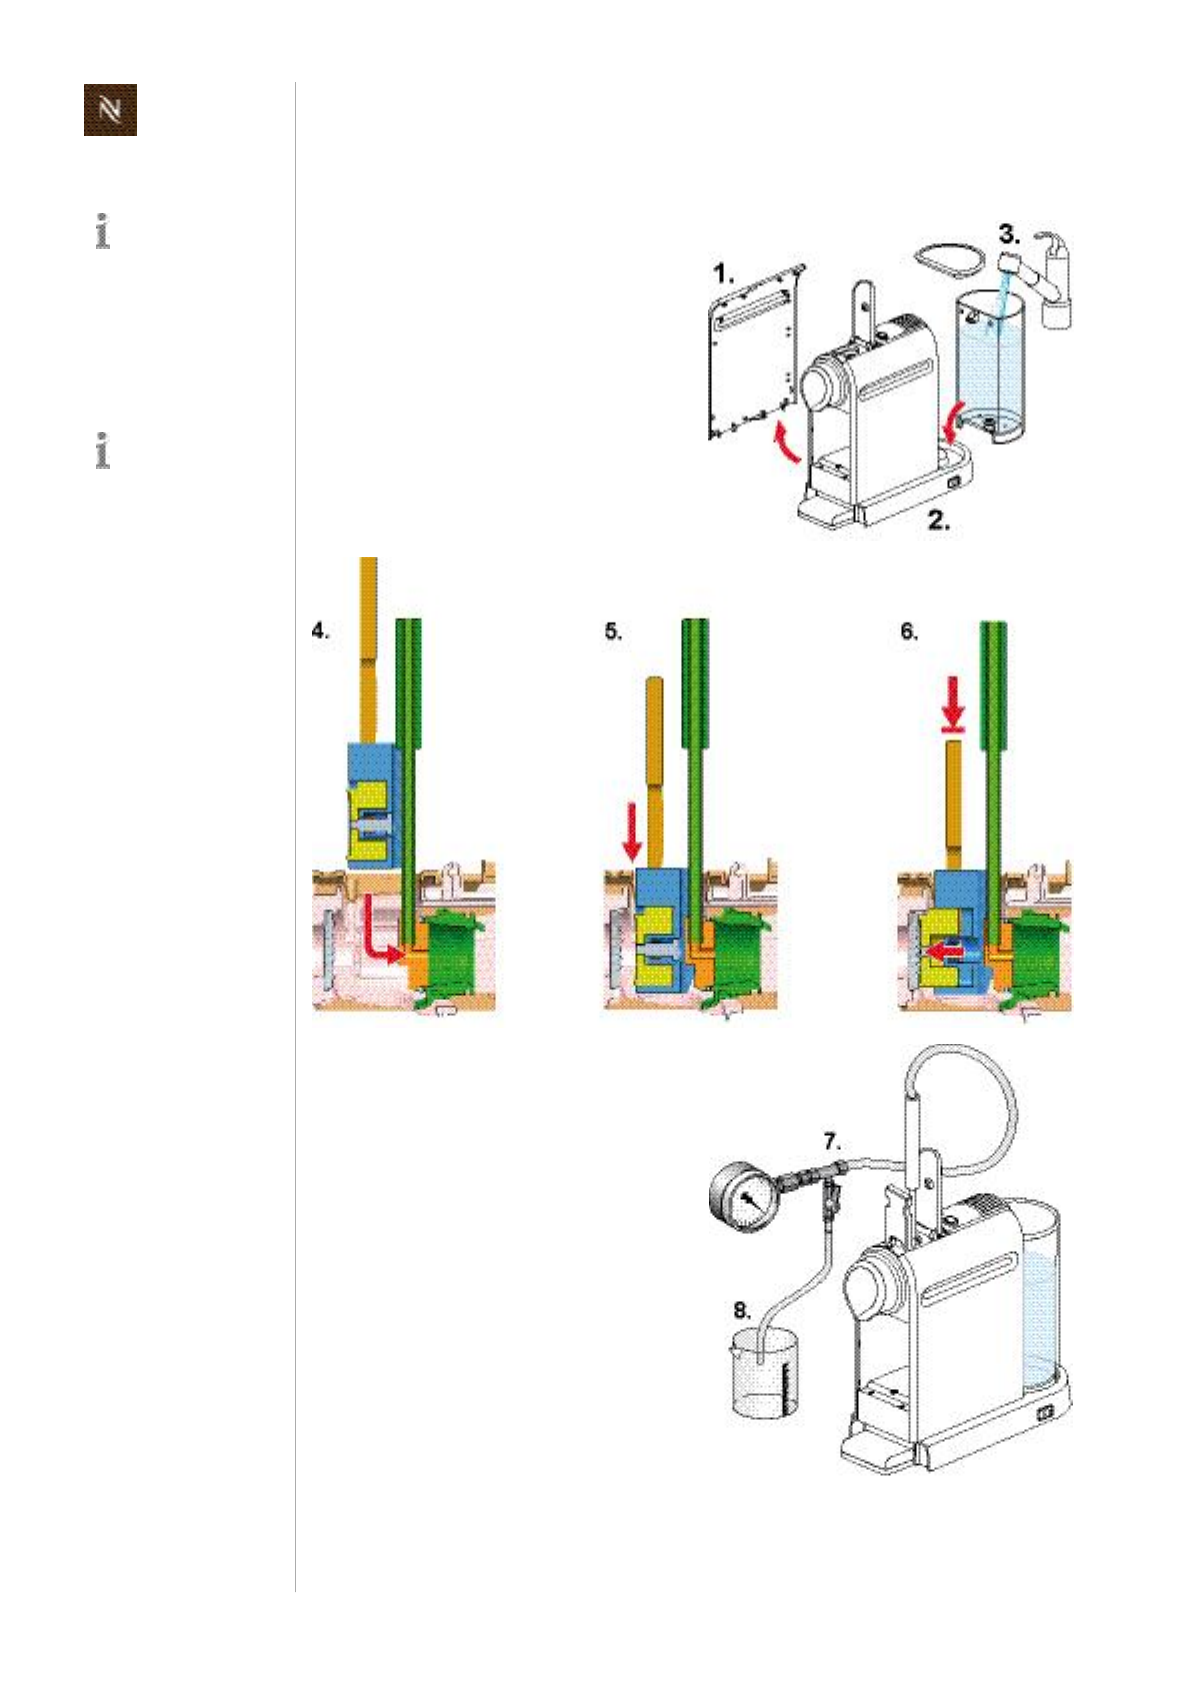
Citizservicemanual
134
F U N C T I O N T E S T S
9.4.1 Preparations
Dependingoncore
unitrange,referto
"Disassemblyofcore
unit,Crange"onpage91
or"Disassemblyofcore
unit,Drange"onpage109.
Thepressureadapter
mustsitfirmlyinthe
capsulebay.
1) Removeleftsidepanelofcoreunit.
2) Insertcoreunitbackintoplatform.
3) Fillandinsertwatertank.
4) Insertconnectingunitofpressure
adapterintocapsulebay.Pushback
sealingconeintocapsulecage.
5) Insertfixationunitofpressureadapter
intocapsulebay.
6) Pressdownoperatinglever.
7) Connectpressurehosetopressure
tester.
8) Placeameasuringcupunderthedrain
hoseofthepressuretester.
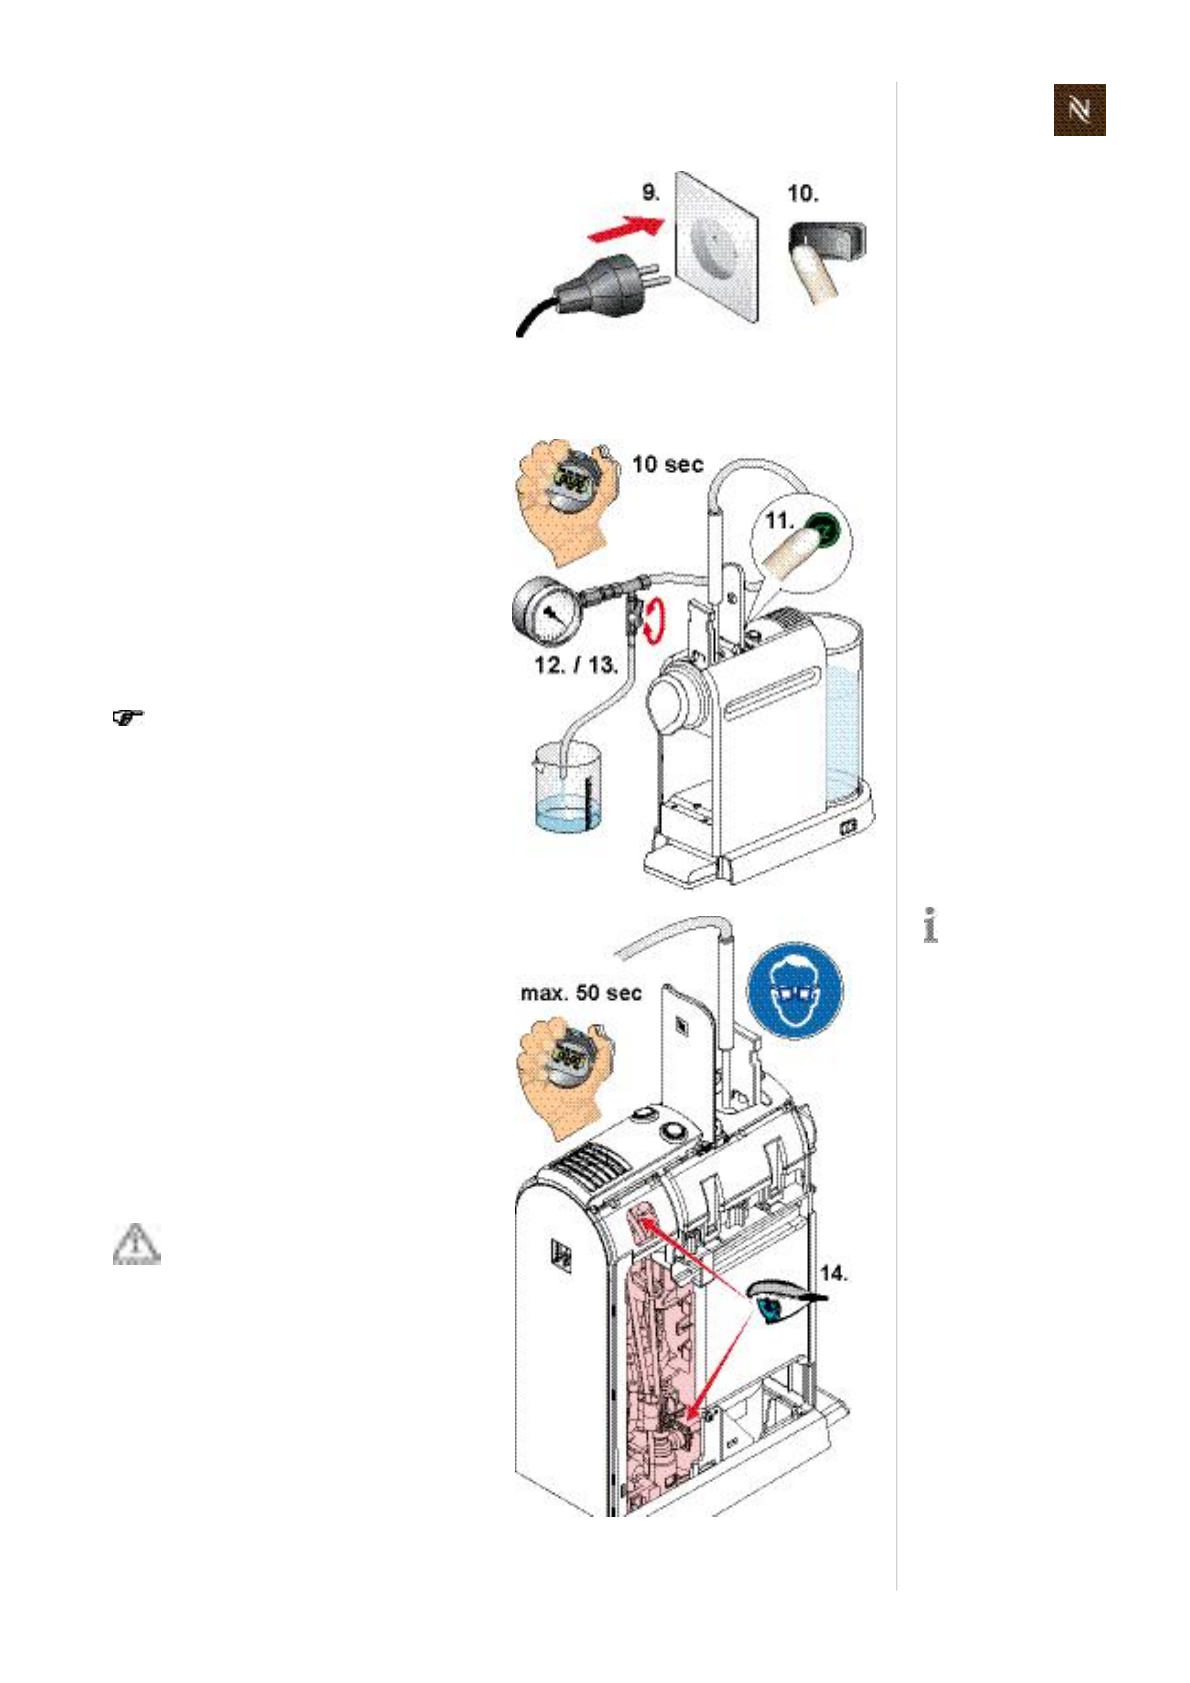
Citizservicemanual135
F U N C T I O N T E S T S
9.4.2 Testrun
9) Connectmainscable.
10)Switchoncoffeemachine.
11)Afterheatingup,pressthe"smallcup"
button.
12)Openthevalveandletthewaterflow
forapproximately10secoutofthe
drainhose.
13)Closethevalvecompletely.Thepres
surestabilizesafterincreasingbriefly
between1619 bar(pressurecheck).
Thepressureincreasesslowlywith
increasingtemperature.Shouldthe
pressureexceed23bar,switchoff
thecoffeemachineandreleasethe
pressurebyopeningthevalve.
Forbettervisibility
useaflashlight.
14)Checkallconnectionsunderpressure
foraudibleandvisibleleaks.
Donotrunthepumpformore
than50secwiththevalveclosed.
Citizservicemanual
136
F U N C T I O N T E S T S
9.5 Measurecoffeetemperature
15) Switchoffthecoffeemachine.
16) Openthevalveandletwaterflowout
ofthepressuretester.
1) Switchoncoffeemachine.
2) Placeameasuringcuponcupsup
port.
Citizservicemanual137
F U N C T I O N T E S T S
3) Afterheatingup,pressthe"smallcup"
buttonforapproximately10sectopre
heatthecoffeeoutletwithhotwater.
4) Emptymeasuringcupandplaceit
backoncupsupport.
5) Insertcapsule(Cosiisbestsuited).
6) Pressthe"smallcup"buttonagain.
7) Waituntilthemeasuringcupcontains
20mlofcoffee.
8) Thenmeasurethecoffeetemperature
approx.510 mmunderthecoffeeout
let.
Thecoffeetemperatureshouldbe
86 °C±3°C(187°F±5.4°F).
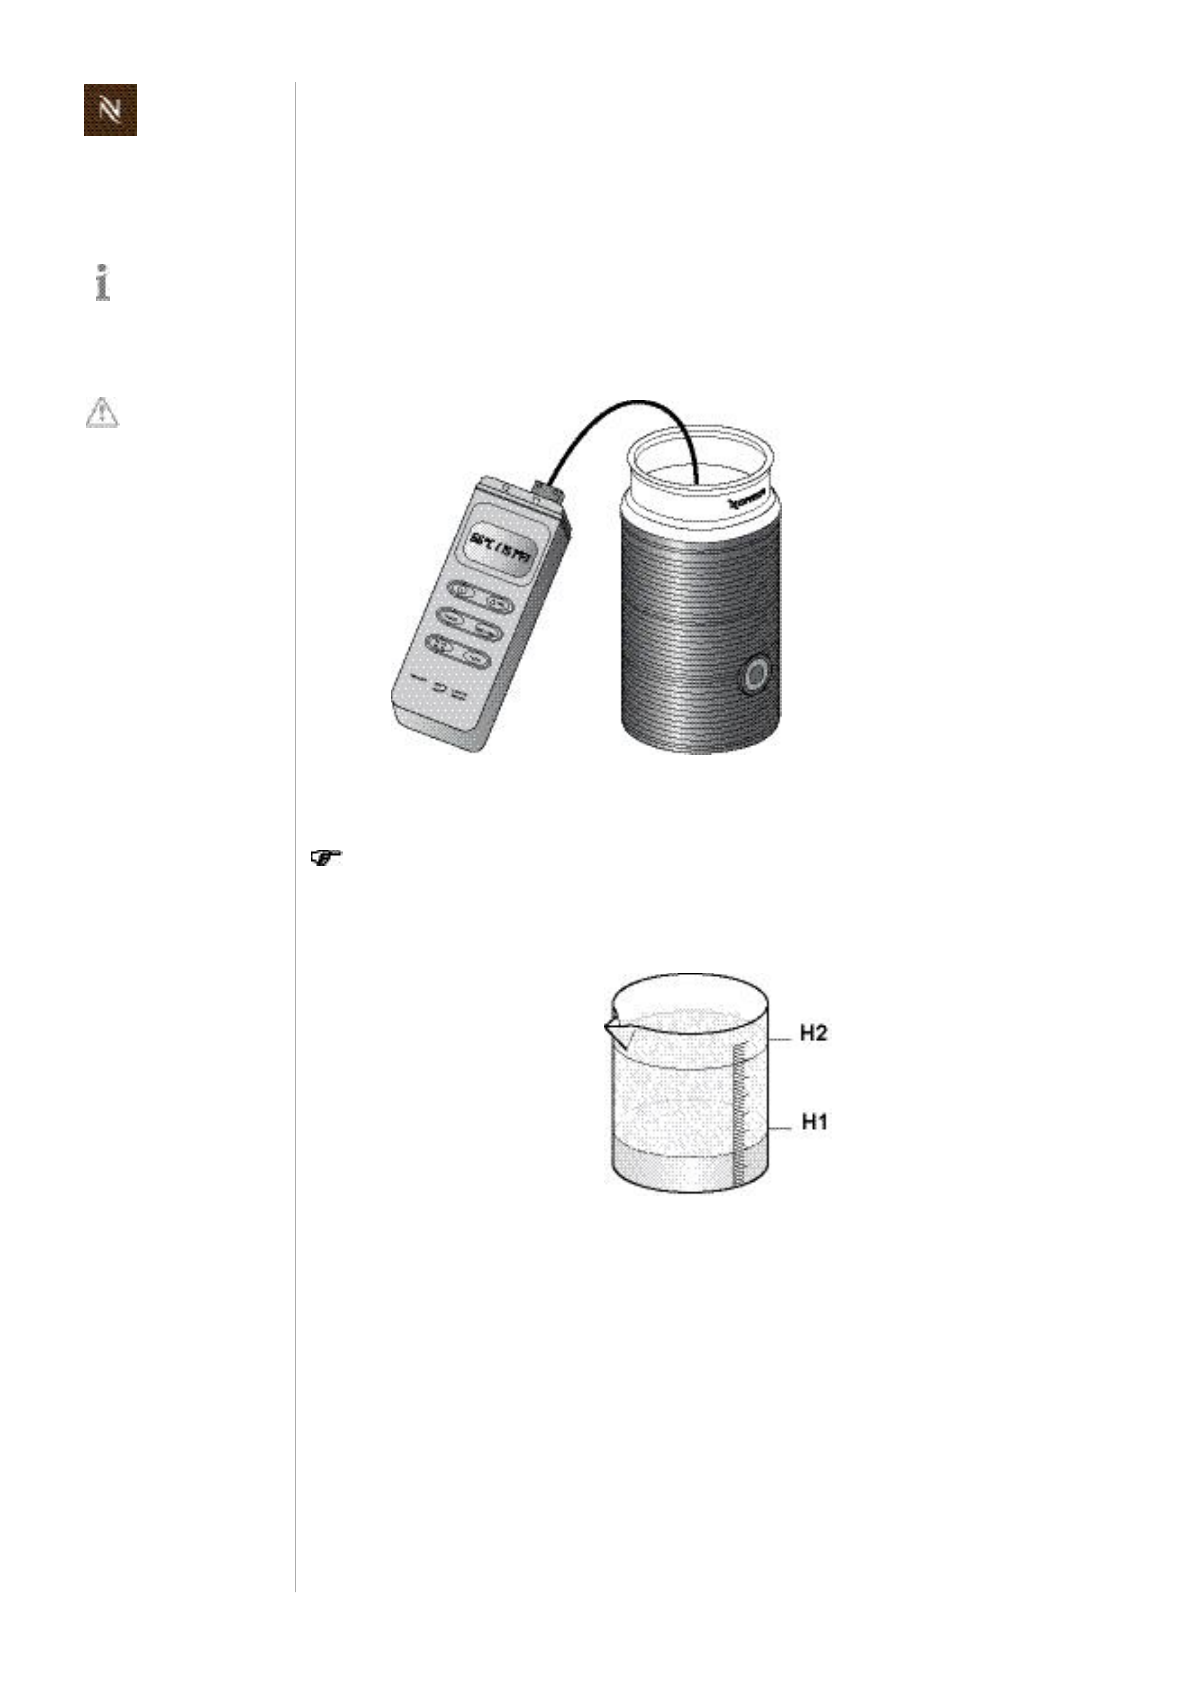
Citizservicemanual
138
F U N C T I O N T E S T S
9.6 Milkfrothertests
Prerequisite
UsenewlyopenedUHT,fullfatorsemiskimmedmilkatfridgetemperature(+ 8 °Ctill
+ 10 °C)forthefollowingtestsonly.
9.6.1 Measurehotmilktemperature
• Prepare240mlhotmilkinmilkfrother(usemixerwithoutspring).
• Measuretemperatureimmediatelyafterpreparationinjug.
Themilktemperatureshouldbebetween+60°Cand+70°C(140°Ftill158 °F).
9.6.2 Measuremilkfrothratio
• Preparecoldmilkfrothoutof120mlmilkinmilkfrother(usewhiskwithspring).
• Emptycontentofmilkfrotherintomeasuringbeaker.
• Determinetheratiox[%]ofmilkfrothtoliquidmilkwithfollowingformula:
Approximatevalues:
directafterpreparation .....................................................................................x=250
60secafterpreparation ....................................................................................x=190
Thedisregardofthis
specificationcan
affectthemeasuring
results.
Spatteredmilkmay
causeburns.Only
usemilkfrother
withlid.
x H
2
H
1
H
1
100 ´ =
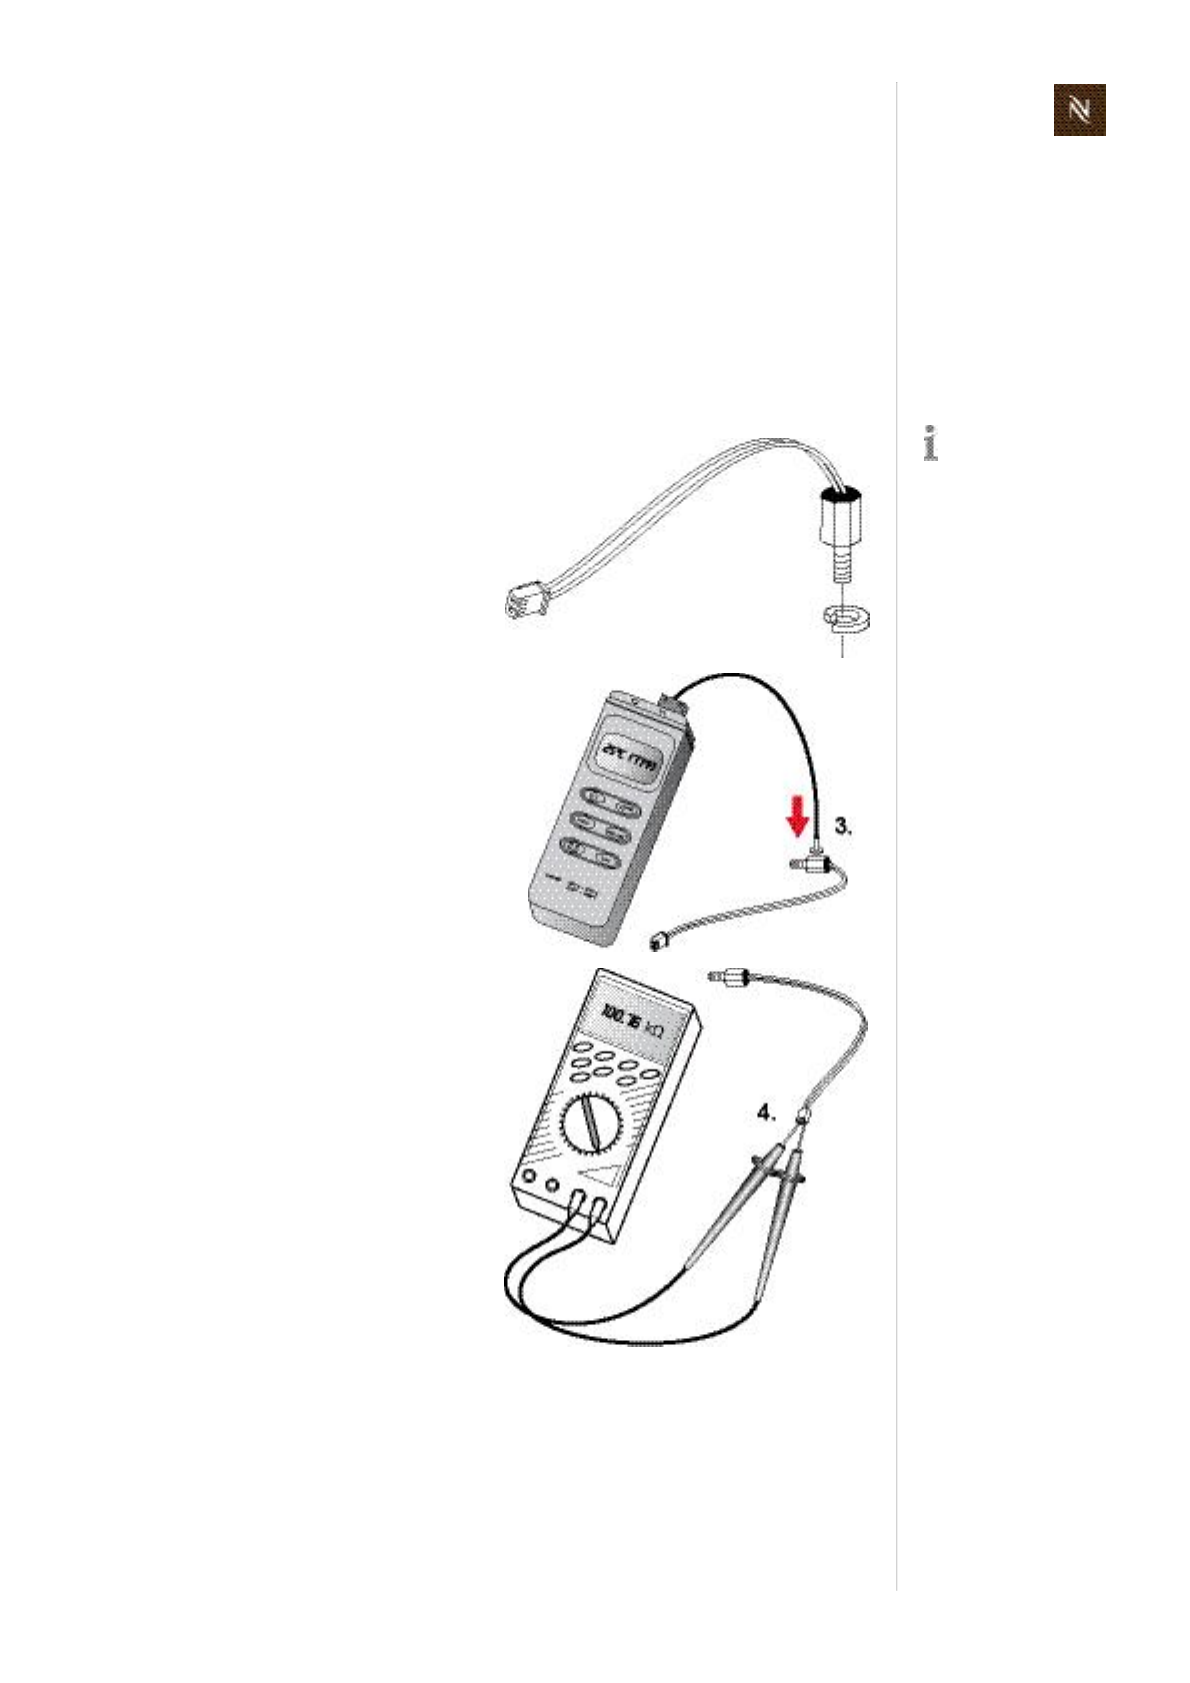
Citizservicemanual139
F U N C T I O N T E S T S
9.7 NTCtemperaturesensorfunctionality
TheresistanceoftheNTCtemperaturesensormustbewithinadefinedrange,other
wisethetemperatureregulationwillnotworkproperlyandthecoffeemachinewillstay/
gointofailuremode.
AneasywaytocheckthefunctionalityoftheNTCtemperaturesensoristomeasurethe
ohmicresistanceatambienttemperature.Withthismeasurement,mostdefectNTC
temperaturesensorscanbedetected.
Avoidcontamination
ofsensorcontactsur
faceduringhandling.
1) UnplugNTCtemperaturesensorfrom
electroniccontrolboard.
2) RemoveNTCtemperaturesensor
fromthermoblock(refertopage104
andfollowing).
3) Measuretemperatureofsensorbody
(donottoucheithertemperatureor
NTCsensorbyhand).
4) MeasureresistanceofNTCtempera
turesensorbyconnectingamultime
terattheplug.
5) Comparemeasuringvalueswithfol
lowingdiagramortable.
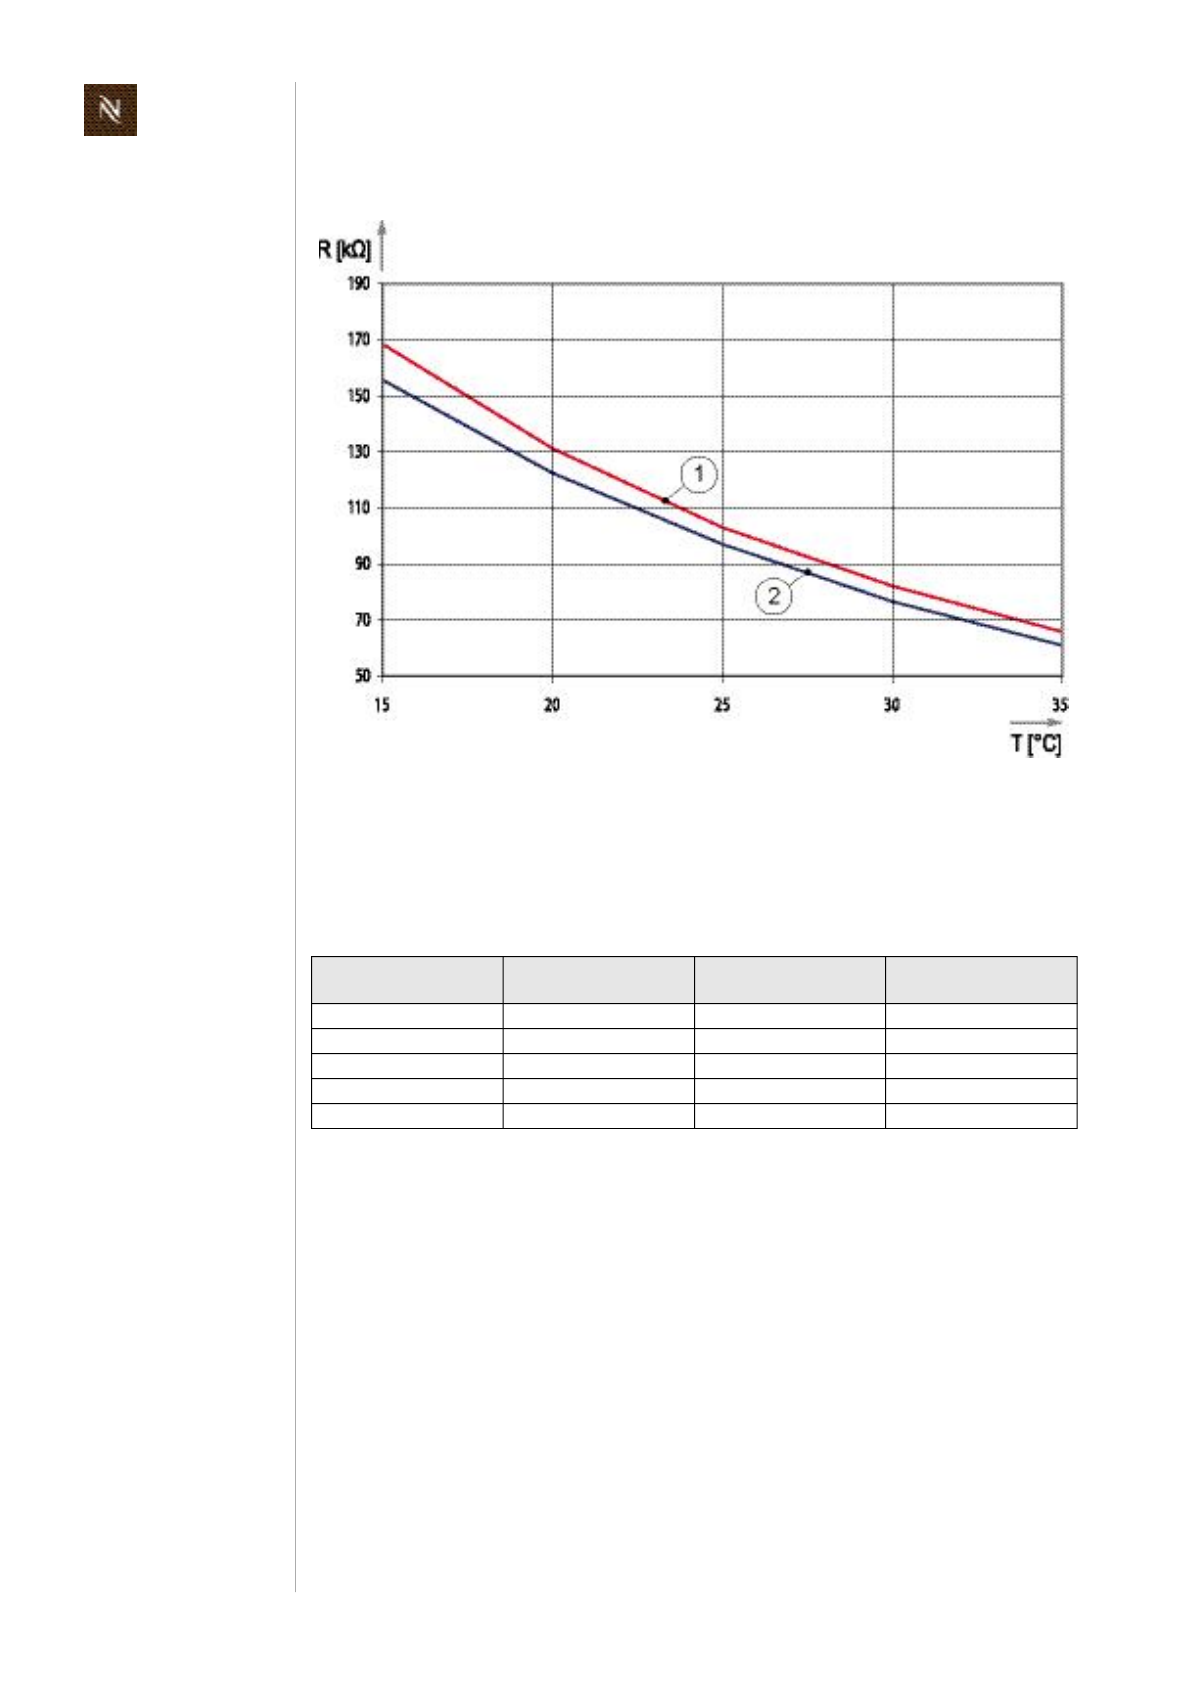
Citizservicemanual
140
F U N C T I O N T E S T S
NTCDiagram
NTCtemperaturesensor,R/Tcharacteristics
Graph1 ........................................................................................ max.resistancevalue
Graph2 ......................................................................................... min.resistancevalue
Measurementtable
NTCtemperature
[°C]
NTCtemperature
[°F]
NTCmin.resistance
[kOhm]
NTCmax.resistance
[kOhm]
15 59 155.63 168.48
20 68 122.41 131.23
25 77 97.00 103.00
30 86 76.63 82.12
35 95 60.90 65.86

Citizservicemanual141
F U N C T I O N T E S T S
9.8 Protectiveearth(PE)continuitytest
9.8.1 Whatcoffeemachinehastobetestedandwhen?
Thistestisonlynecessary
forclass1equipment(threewirepowercordwithprotectiveearth)
formodelsCitiz&milk,EF485/486
afterarepairwheneverageneraldisassemblyoftheplatformand/orcoreunitwas
performed.
9.8.2 General
Legalregulation
Incaseofarepair/modificationofthecoffeemachine,therepaircentreisboundbylaw
toprotecttheuser/consumerby
restoringtheregularconditionoftheapplianceand
performingtherespectivetestsaccordingtoEN/IEC603351“Safetyofhousehold
andsimilarelectricalappliances”andnationalregulations(e.g.DINVDE0701).
Description
Protectiveearthcontinuitymeasurementsaremadebetweentheprotectiveearth
terminalandconductive,touchablepartsofthecoffeemachinewheredangerous
voltagecouldoccurifthebasicinsulationwastofail.
Thistestassuresthat
theground(earth)connectiondoesnothaveaninterruptionbetweentheplugand
touchable,conductivehousingparts
thepermissiblegroundresistanceofthoseconductive,touchablepartsislessthan
0.3Ohms(withatestcurrentof200mADC).
Testequipment
Specialtestequipmentisneededthatcomplieswiththeregulationstoperformprotec
tiveearthcontinuitymeasurements.Detailedrequirementsandtolerancesmustbeveri
fiedbyyourlocalauthoritiesormeasurementsupplierinanycase.
Testreport
Forlegalreasonsarepairortestreportshouldbepreparedandfiledwithfollowinginfor
mation
customer(name,address)
typeandserialnumberofcoffeemachine
dateofrepair/test(s)
performedtest(s)/measuringvalue(s)
usedtestequipment
signature
Ask
Nespresso
for
recommendations
abouttestequipment.
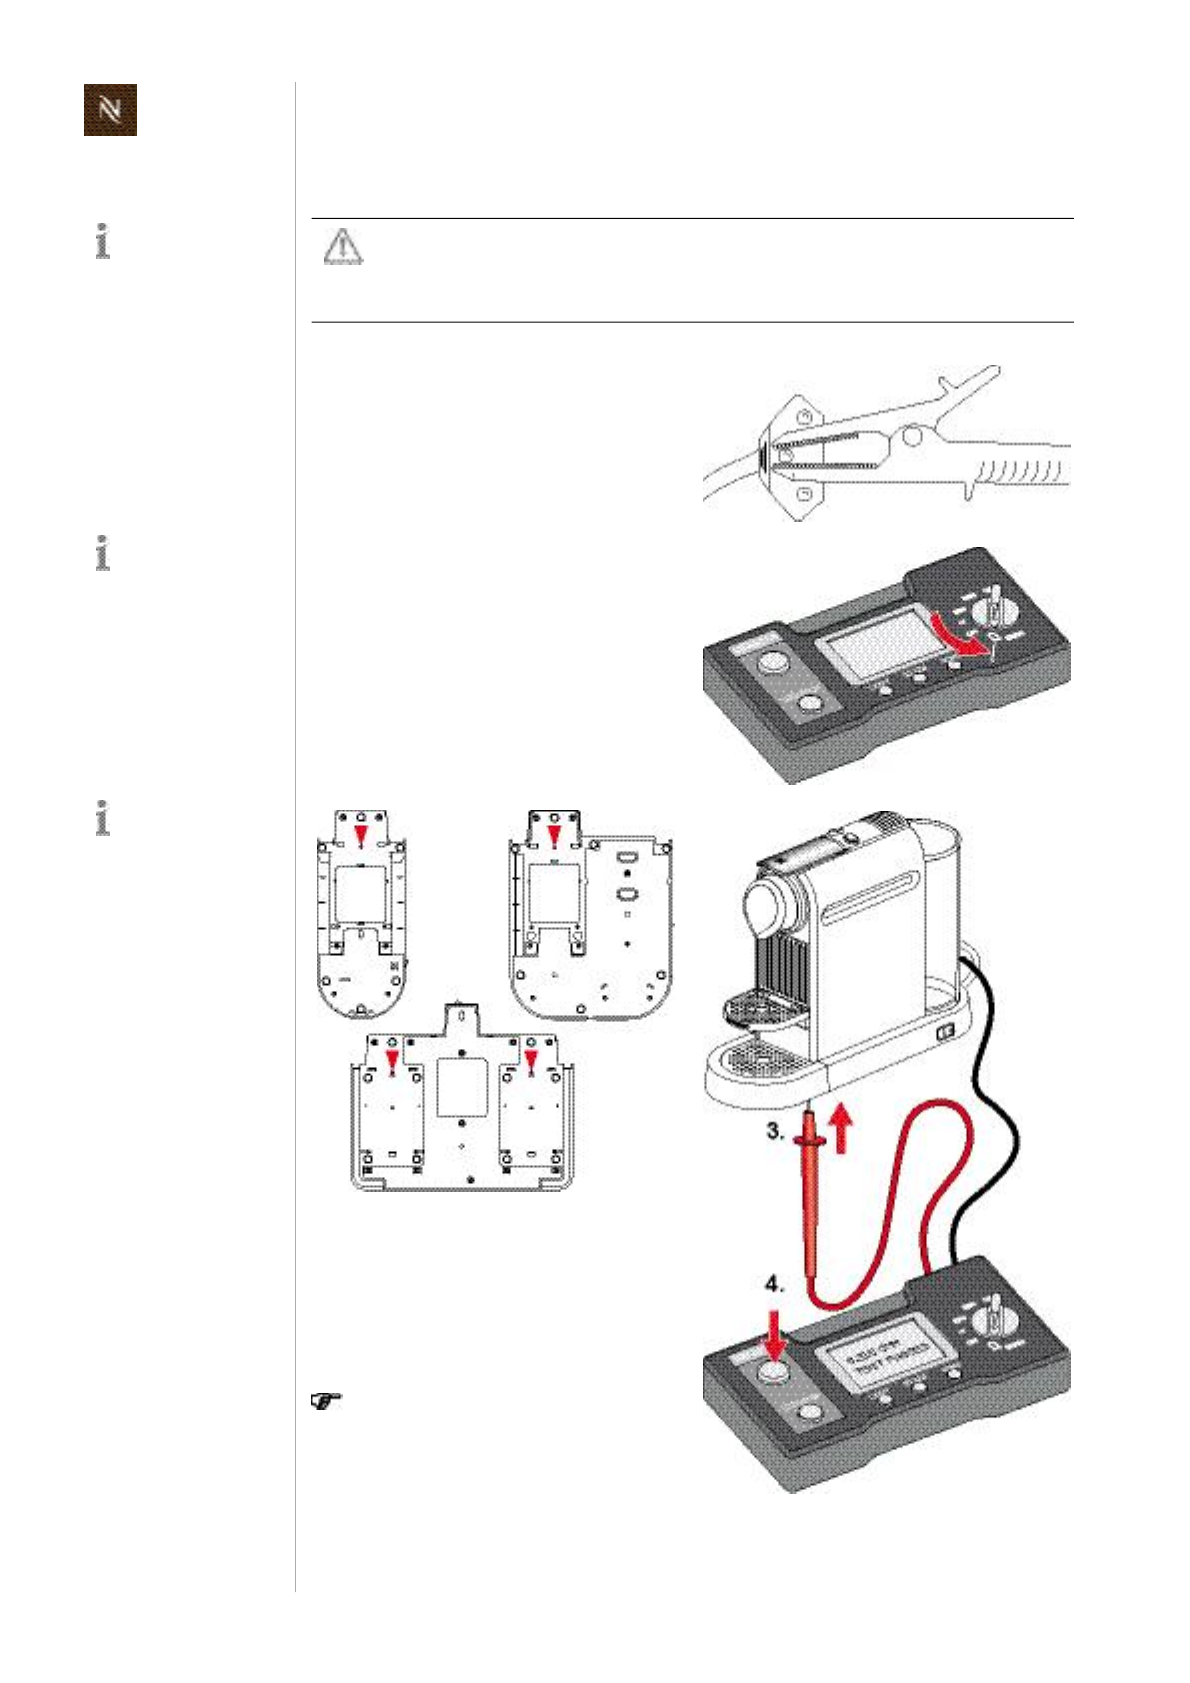
Citizservicemanual
142
F U N C T I O N T E S T S
9.8.3 Testsequence
Thistestsequenceis
notapplicableforcof
feemachineswith
twowirepowercords(with
outgroundpin).
Dangerofelectrocution!
Donotpluginthecoffeemachineduringtheprotectiveearthcontinuity
test.
Readandobservesafetyinstructionsinusermanualoftestequipment.
1) Connectblackmeasuringcableto
groundpinofpowerplugwithanalli
gatorclip(exampleshown:Swiss
powerplug).
Symbolicillustration
oftestequipment.
2) Switchontestequipmentandselect
protectiveearthcontinuitytest.
Thecoffeemachine
Citiz&Cohas2test
holestocheckboth
thermoblocks.
TestholesonbottomofCitiz/Citiz&milk/Citiz&Coplatforms
3) Inserttipofredtestprobeintesthole
andtouchthermoblock.
4) Press"measure"buttonandreadoff
displayedresistance.
Theresistancemustbelowerthan
0.3 Ohm.
5) Fillinmeasuredvalue(s)inatest
report.
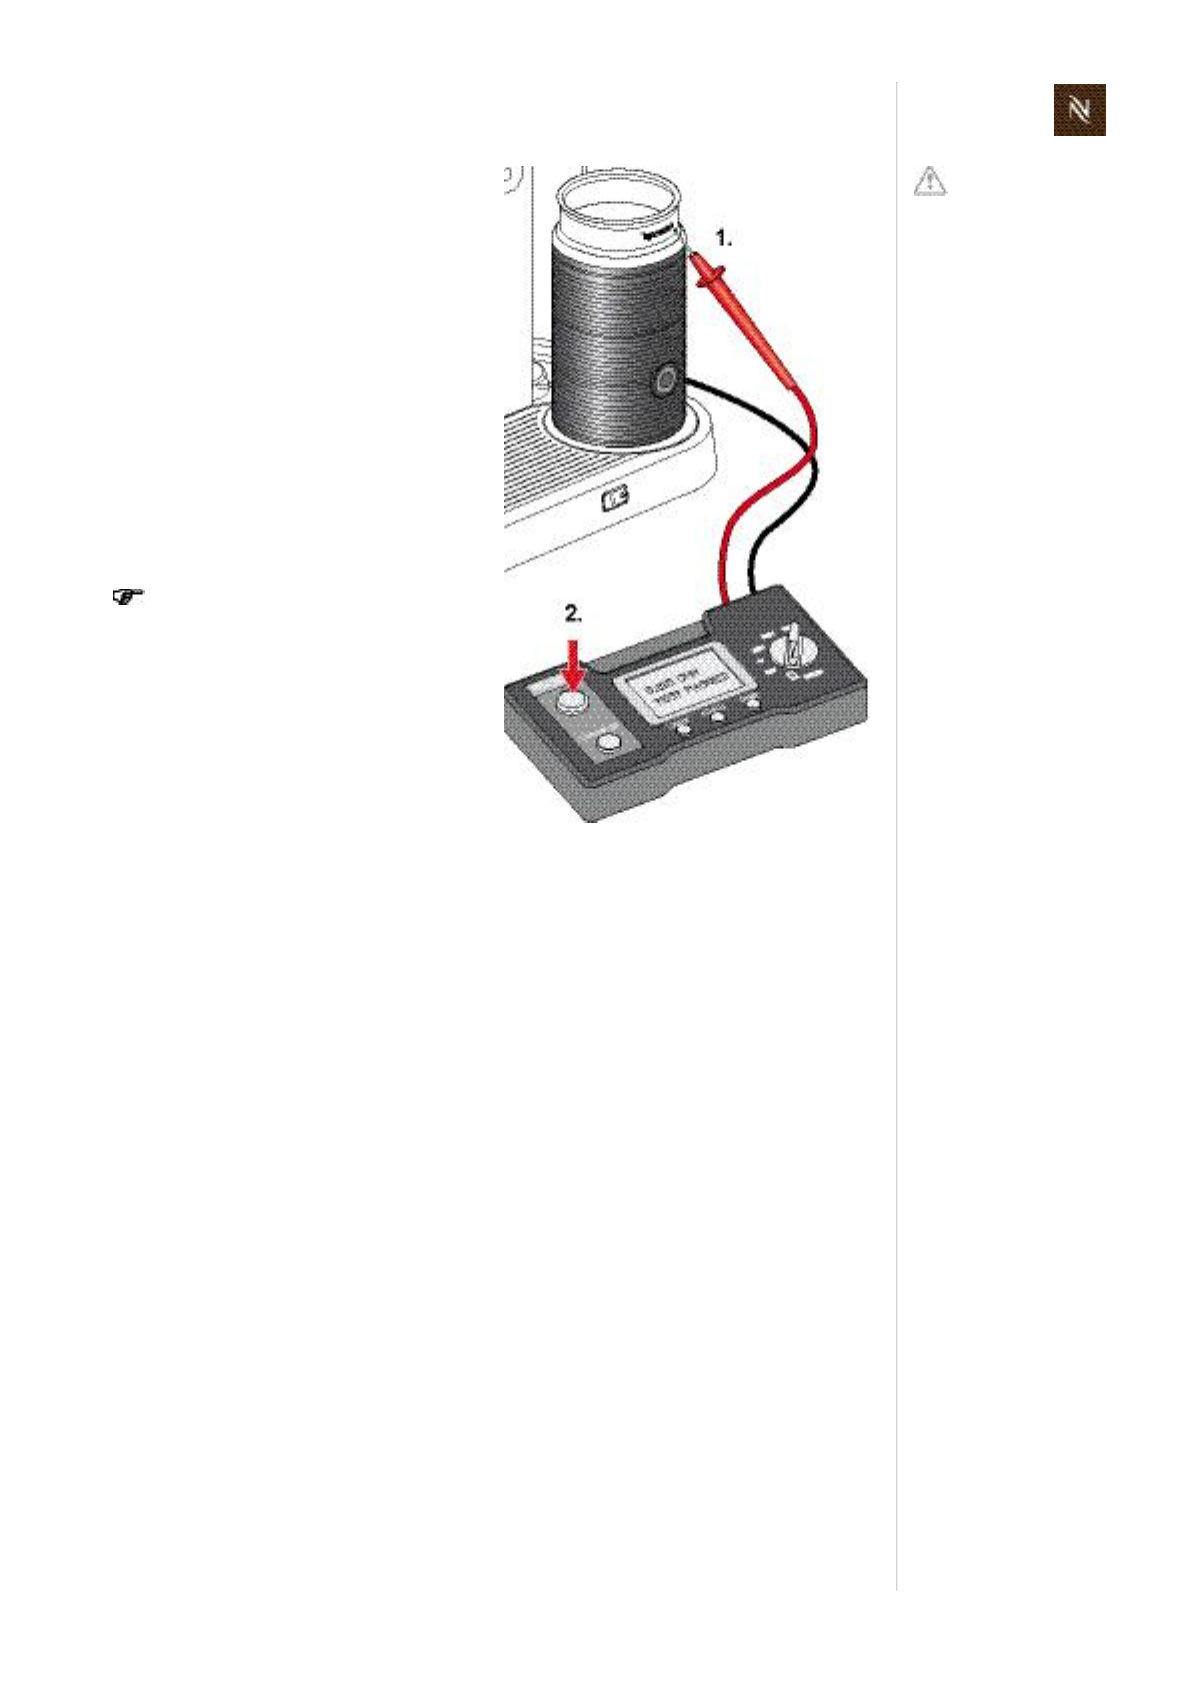
Citizservicemanual143
F U N C T I O N T E S T S
9.8.4 Whattodoiftheprotectiveearthcontinuitytestfails
• Check/measuregroundconnectioninplatform(refertopage75).
• Check/measuregroundconnectiononmilkfrotherconnector(refertopage73and
page124forwiringdiagram).Replacemilkfrotherconnectorifnecessary.
• Cleangroundcontactonmilkfrother.Measureresistancebetweengroundcontact
andjugofmilkfrother.Replacemilkfrotherifnecessary.
Donotdamage
insidecoatingof
milkfrotherjugwith
theprobetip.
Additionaltestforcoffeemachine
Citiz&milk:
1) Touchuppermetallicpartofmilk
frotherwithredtestprobe.
2) Press"measure"buttonandreadoff
displayedresistance.
3) Repeatmeasurementonanother
metallicspotofmilkfrotherforverifica
tion.
Theresistancemustbelowerthan
0.3 Ohm.
4) Fillinmeasuredvalue(s)inatest
report.

Citizservicemanual
144
F U N C T I O N T E S T S
9.9 Protectiveinsulationtest
9.9.1 Whatcoffeemachineshavetobetestedandwhen?
Thistestisnecessary
forclass1and2equipment(with/withoutprotectiveearth)
afterarepairwheneverageneraldisassemblyoftheplatformand/orcoreunitwas
performed.
9.9.2 General
Legalregulation
Incaseofarepair/modificationofthecoffeemachine,therepaircentreisboundbylaw
toprotecttheuser/consumerby
restoringtheregularconditionoftheapplianceand
performingtherespectivetestsaccordingtoEN/IEC603351“Safetyofhousehold
andsimilarelectricalappliances”andnationalregulations(e.g.DINVDE0701).
Description
Theinsulationtest
assuresthatwiringandinsulationofthecoffeemachinefullfillthenormativerequire
mentsafterarepair,
ratestheinsulationcapabilityofthecoffeemachine,
isaverydangeroustestbecauseofahightestvoltage(500VDC).
Fortheinsulationtest,phaseandneutralwireareshuntedatthepowerplug.Thena
testvoltageisappliedbetweenphase/neutralandselectedpartsofthecoffeemachine.
Testequipment
Specialtestequipmentisneededthatcomplieswiththeregulationstoperforminsula
tionandwithstandingvoltagetests.Detailedrequirementsandtolerancesmustbeveri
fiedwithyourlocalauthoritiesormeasurementsupplierinanycase.
Ideallythetestequipmenthasanationalpowersocketfortesting,sothatthecoffee
machinecanpluggedindirectly.Otherwiseaspecialshuntisnecessarytoconnectthe
phaseandneutralpinofthecoffeemachine’spowerplug.
Testreport
Forlegalreasonsarepairortestreportshouldbepreparedandfiledwithfollowinginfor
mation
customer(name,address)
typeandserialnumberofcoffeemachine
dateofrepair/test(s)
performedtest(s)/measuringvalue(s),testpoints
usedtestequipment
signature
Ask
Nespresso
for
recommendations
abouttestequipment.
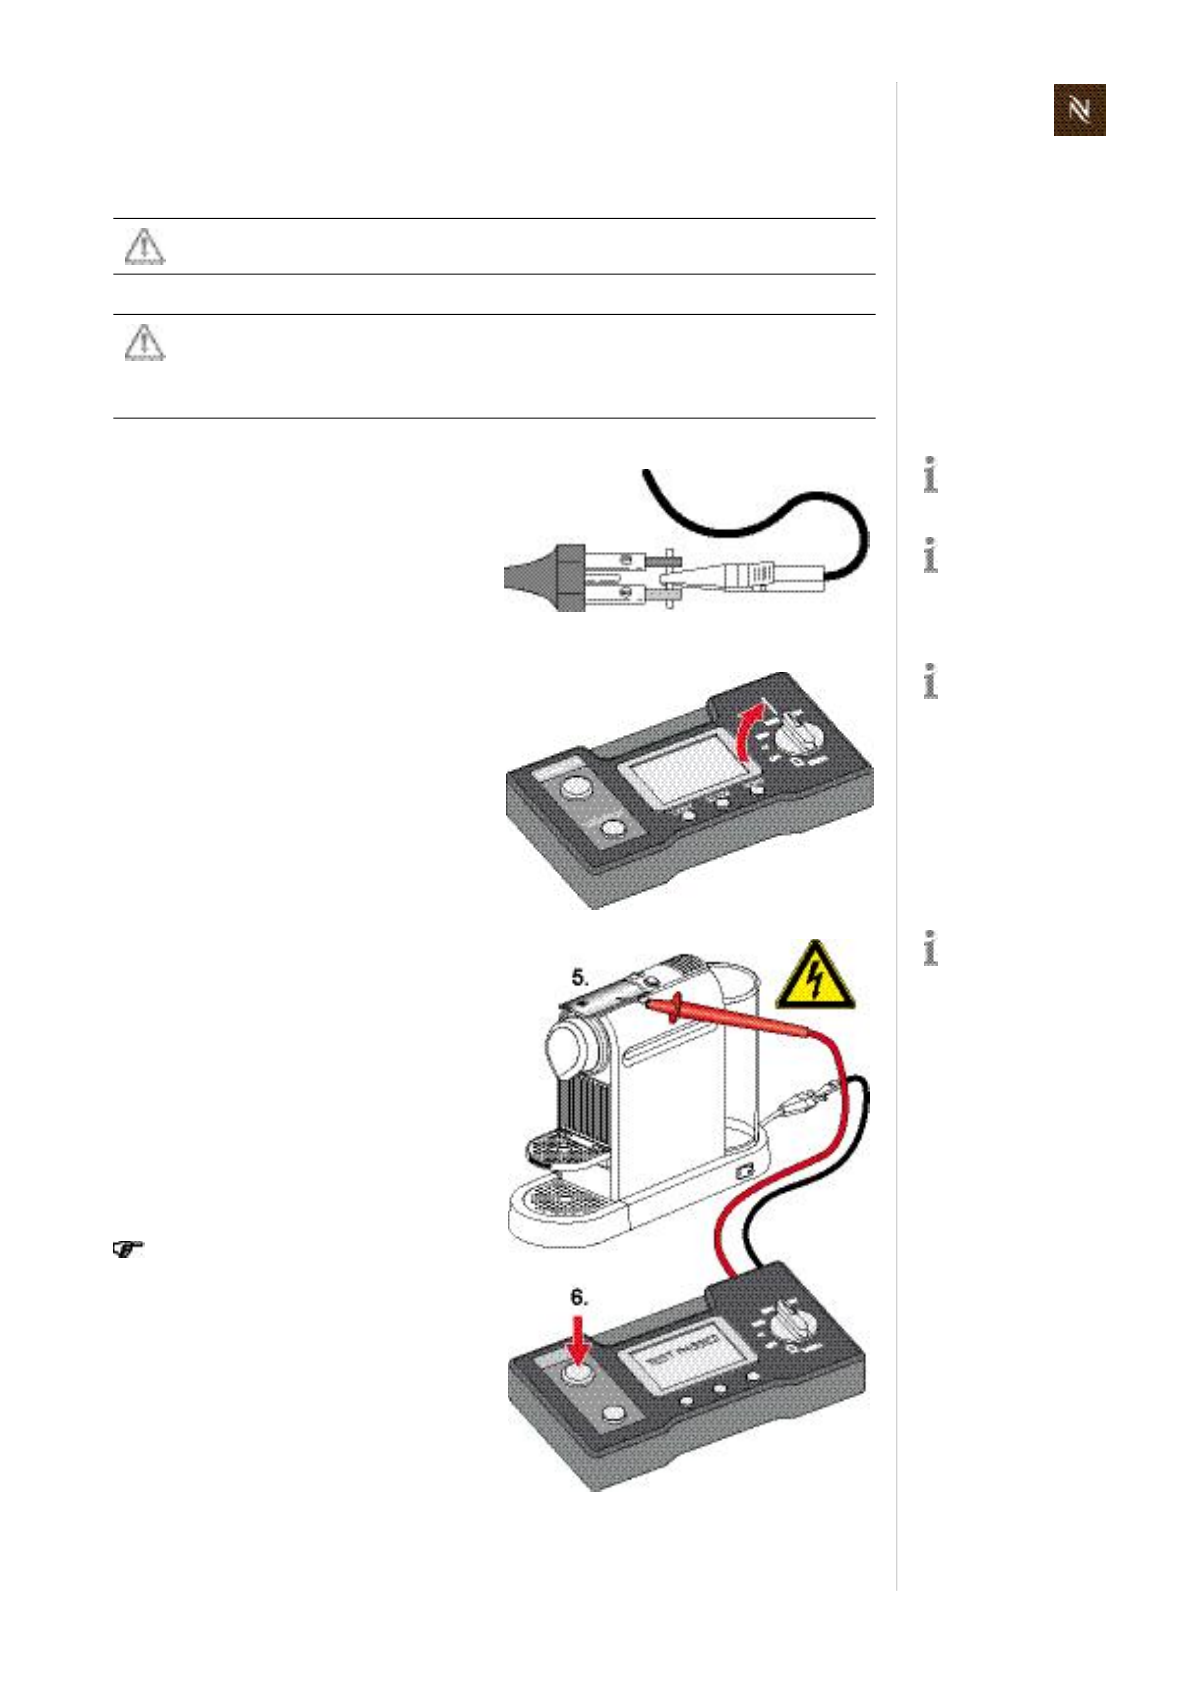
Citizservicemanual145
F U N C T I O N T E S T S
9.9.3 Testsequence
Dangerofelectricalshock/shortcircuit!
Donotpluginthecoffeemachineduringinsulationtest.
Dangerofelectricalshock!
Donottouchtipoftestprobes.
Donottouchmetallicpartsofcoffeemachineduringtest.
Readandobservesafetyinstructionsinusermanualoftestequipment.
ASwisspowerplugis
shownhereasan
example.
Useashortcircuit
plugorspecialalliga
torclipsetc.assub
stituteforthistestadapter.
1) Connectthephaseandneutralpinof
thepowerplugtogetherwithatest
adapter(procuredbytherepair
centre).
2) Connecttheblackmeasuringcableto
thetestadapter(seeimage).
3) TurntheONOFFmachine'smain
switchonpositionI(ON).
Symbolicillustration
oftestequipment.
4) Switchontestequipmentandselect
aninsulationtestvoltageof500VDC.
Sometestequipment
displaystestpassed
orfailedinsteadof
theinsulationresistance.
5) Touchclosinghandlewithredtest
probe.
6) Press"measure"button.
7) Readoffdisplayedinsulationresist
anceortestresult.
Theinsulationresistancemustbe
higherthan300 kOhm
(300,000 Ohm).
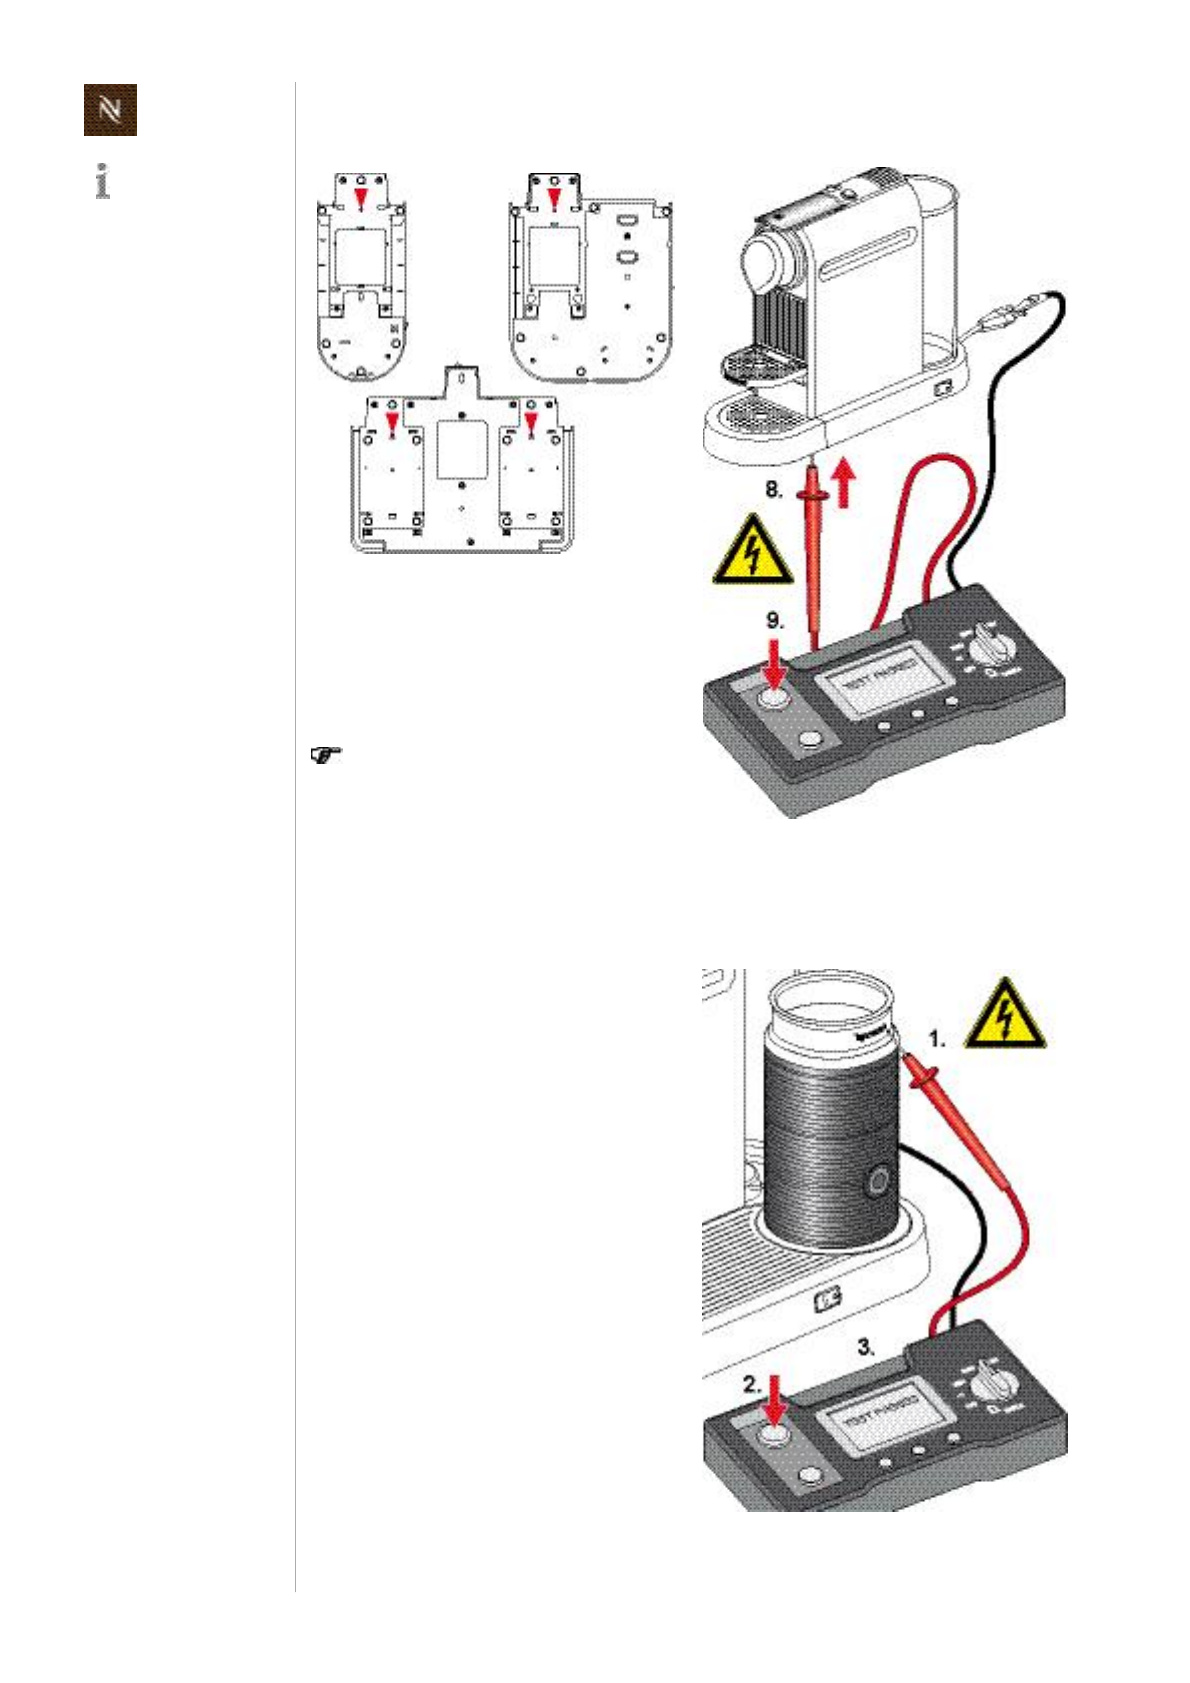
Citizservicemanual
146
F U N C T I O N T E S T S
Thecoffeemachine
Citiz&Cohas2test
holestocheckboth
thermoblocks.
TestholesonbottomofCitiz/Citiz&milk/Citiz&Coplatforms
8) Inserttipofredtestprobeintesthole
andtouchthermoblock.
9) Press"measure"button.
10) Readoffdisplayedinsulationresist
anceortestresult.
Theinsulationresistancemustbe
higherthan300 kOhm
(300’000 Ohm).
11) Switchofftestequipment.
12) Shortredwithblacktestprobeto
makesurethattestvoltageisdis
charged.
13) Fillinresultsinatestreport.
Additionaltestsforcoffeemachine
Citiz&milk:
1) Touchuppermetallicpartofmilk
frotherwithredtestprobe.
2) Press"measure"button.
3) Readoffdisplayedinsulationresist
anceortestresult.
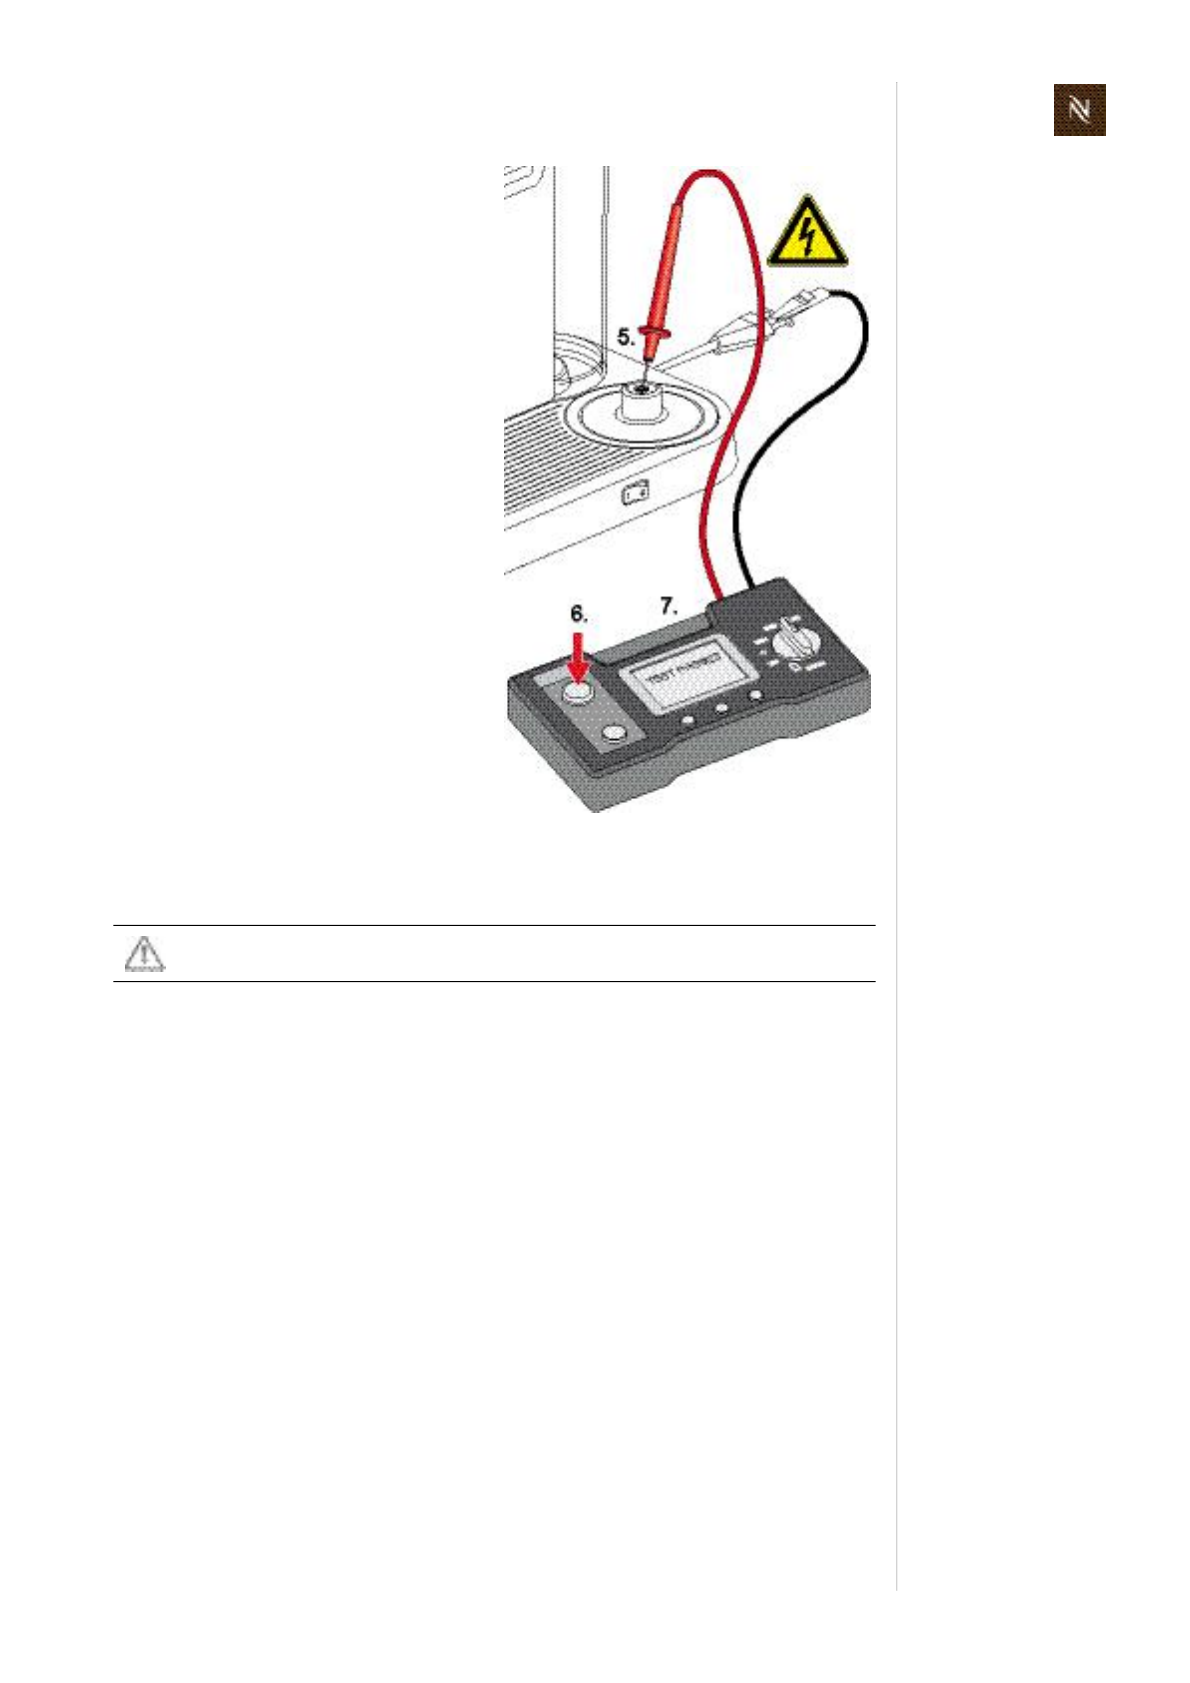
Citizservicemanual147
F U N C T I O N T E S T S
9.9.4 Whattodoiftheinsulationtestfails
• Assumethatthecoffeemachineisdefectafterafailedinsulationtest.
• Checkwiringandlocatefault.Afterfaultclearanceproceedwithtroubleshooting
checklist(seepage49).
• Incaseofdoubtaninsultationtestonthemilkfrotheralonecanbecarriedouton
thecoffeemachineCitiz&milk:touchphaseandneutralcontactsatthebottomwith
onetestprobesuccessivelyandthemetallicupperpartwiththeothertestprobe.
Ifinsulationtestfails,replacemilkfrother.
4) Removemilkfrotherfromplatform.
5) Insertredtestprobeincentralopening
ofmilkfrotherconnector(groundcon
nection).
6) Press"measure"button.
7) Readoffdisplayedinsulationresist
anceortestresult.
8) Switchofftestequipment.
9) Shortredwithblacktestprobeto
makesurethattestvoltageisdis
charged.
10)Fillinresultintestreport.
Riskofdamage!
Asparkovercandamagetheelectroniccontrolboardandsensorsetc.
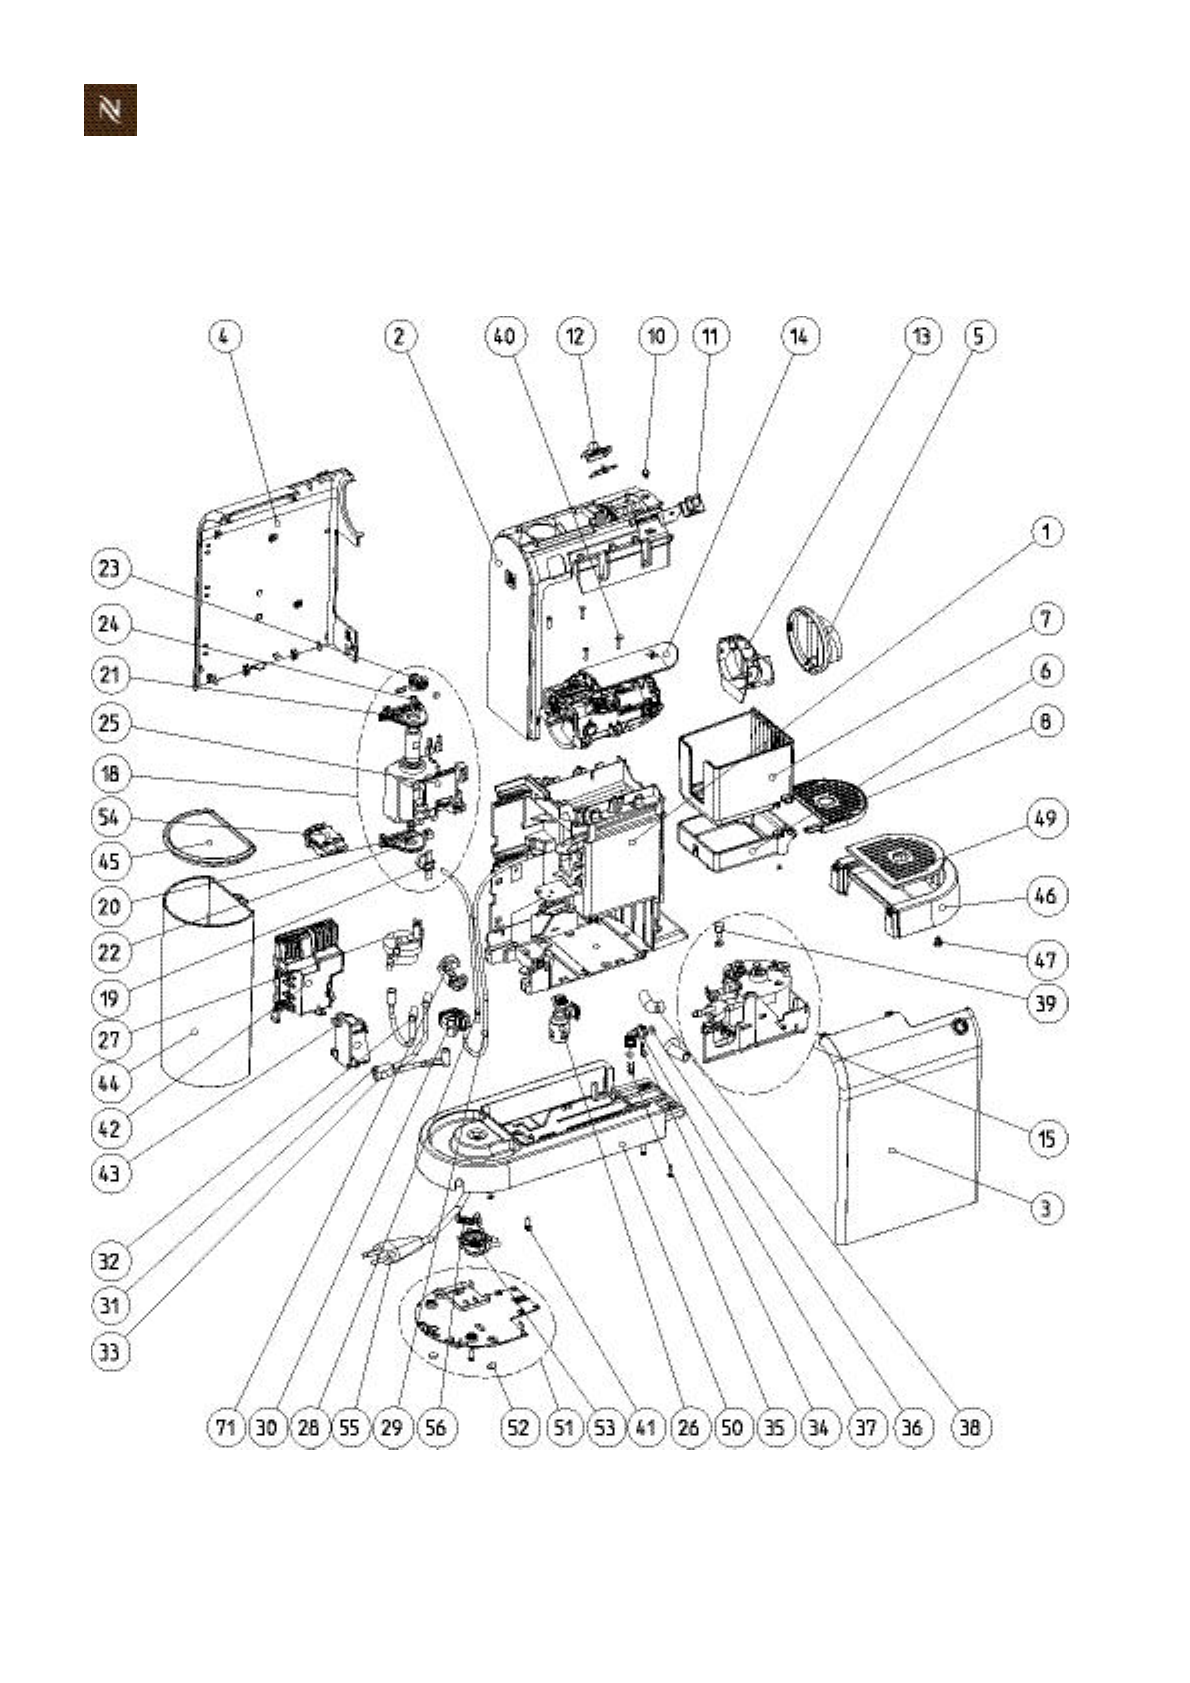
Citizservicemanual
148
E X P L O S I O N D R A W I N G S
1 0 E X P L O S I O N D R A W I N G S
10.1ModelCitiz,coreunitDrange(EF483)
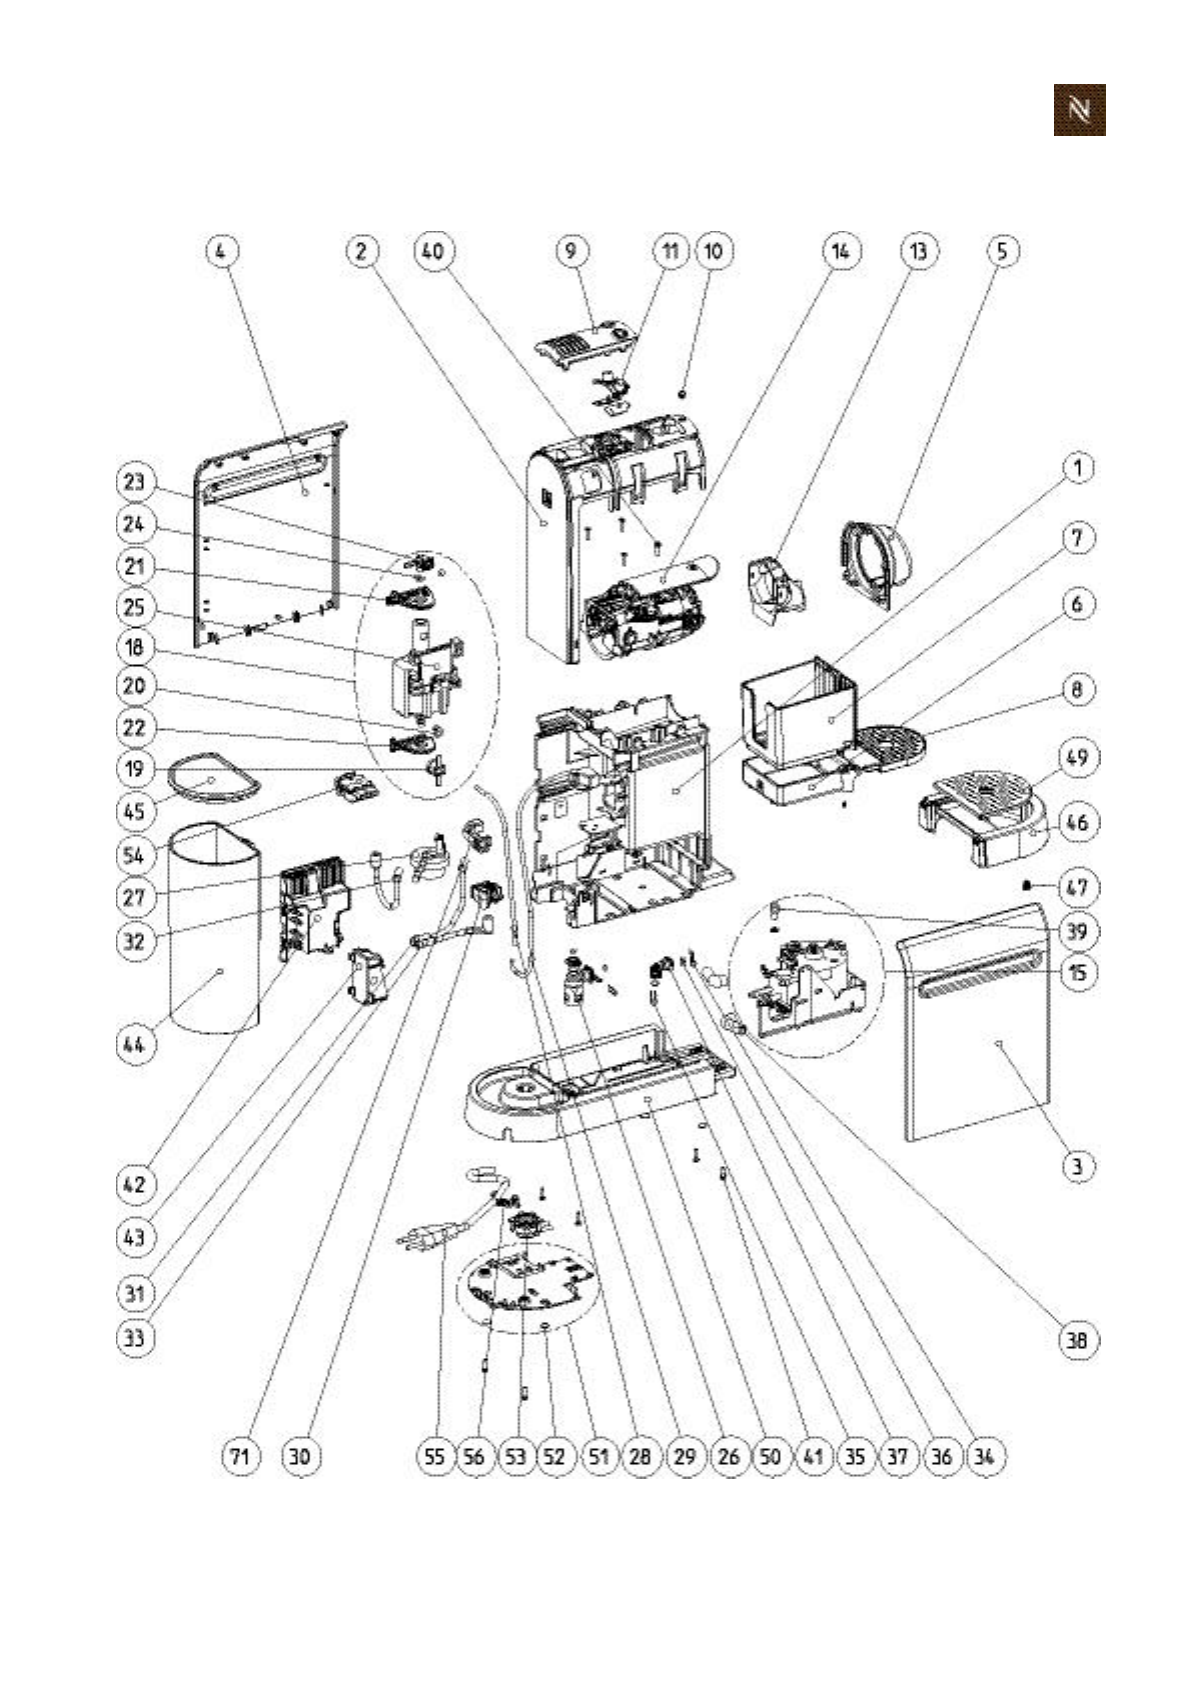
Citizservicemanual149
E X P L O S I O N D R A W I N G S
10.2 ModelCitiz,coreunitCrange(EF484)
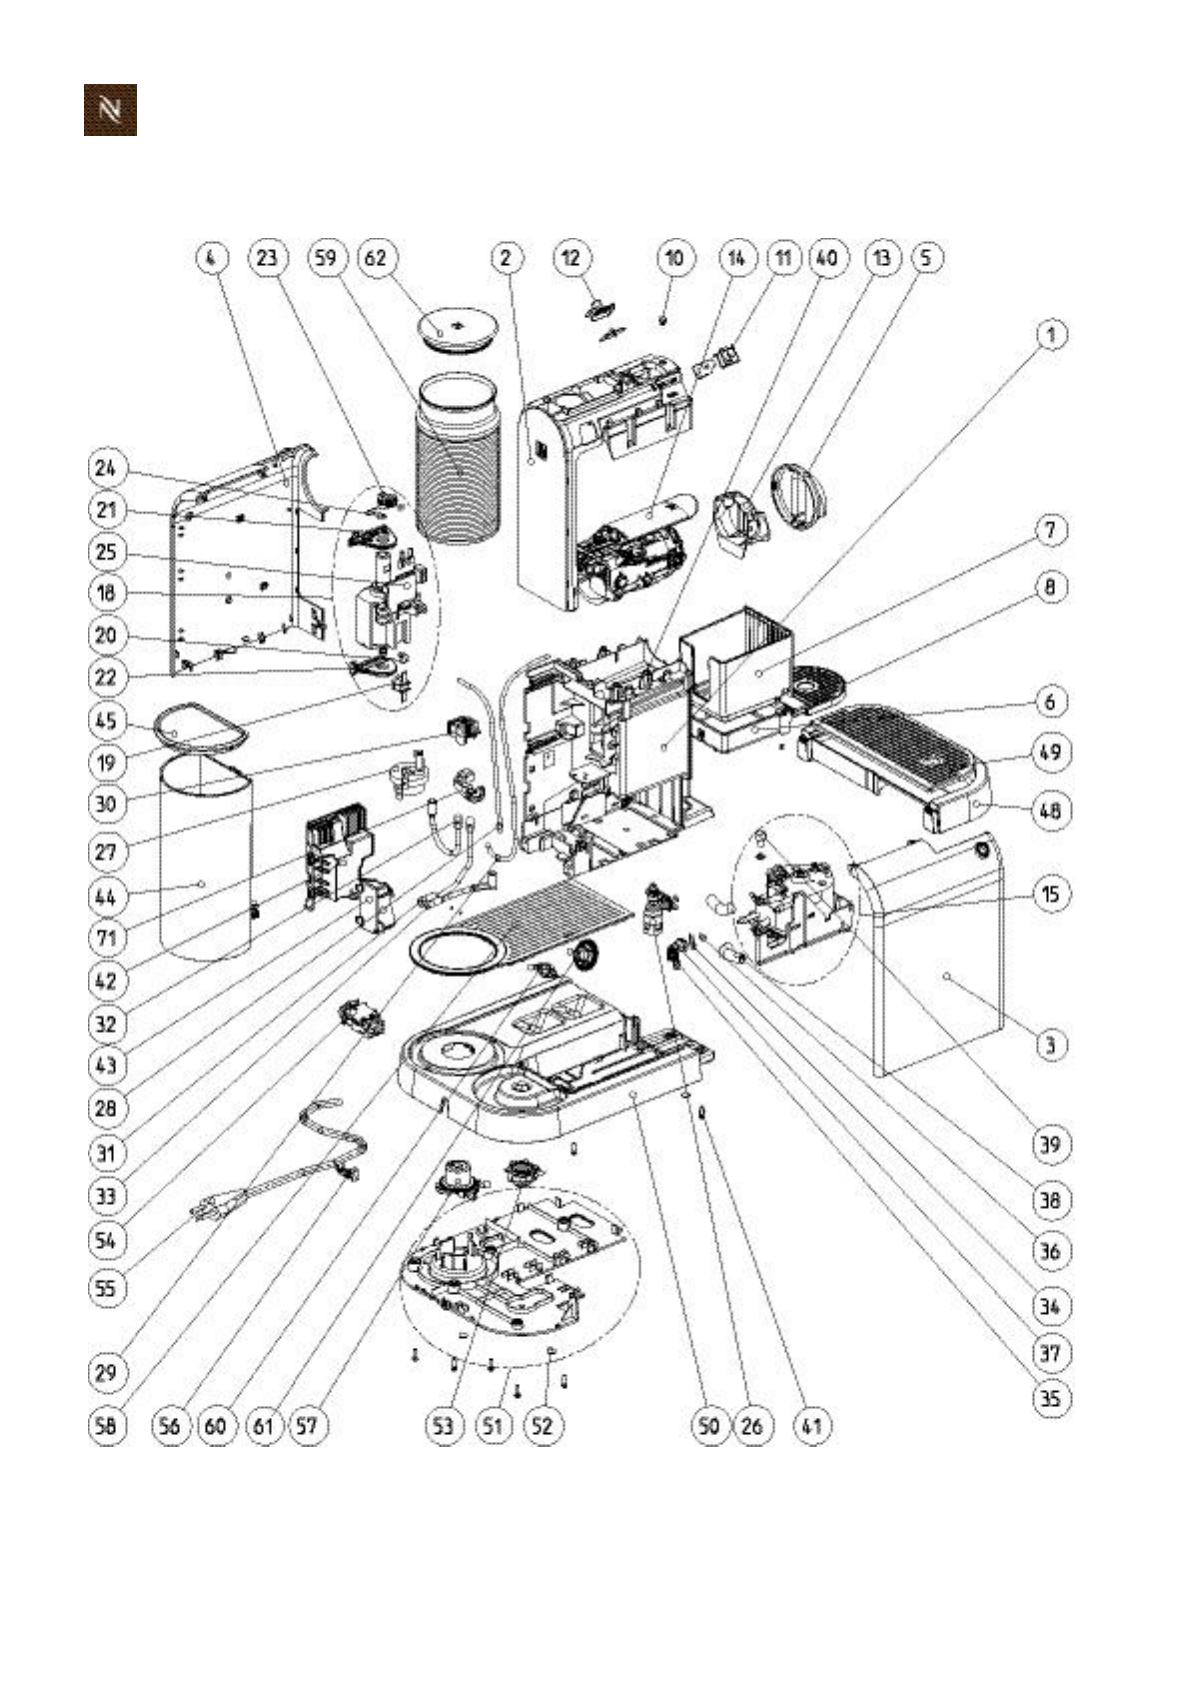
Citizservicemanual
150
E X P L O S I O N D R A W I N G S
10.3 ModelCitiz&milk,coreunitDrange(EF485)
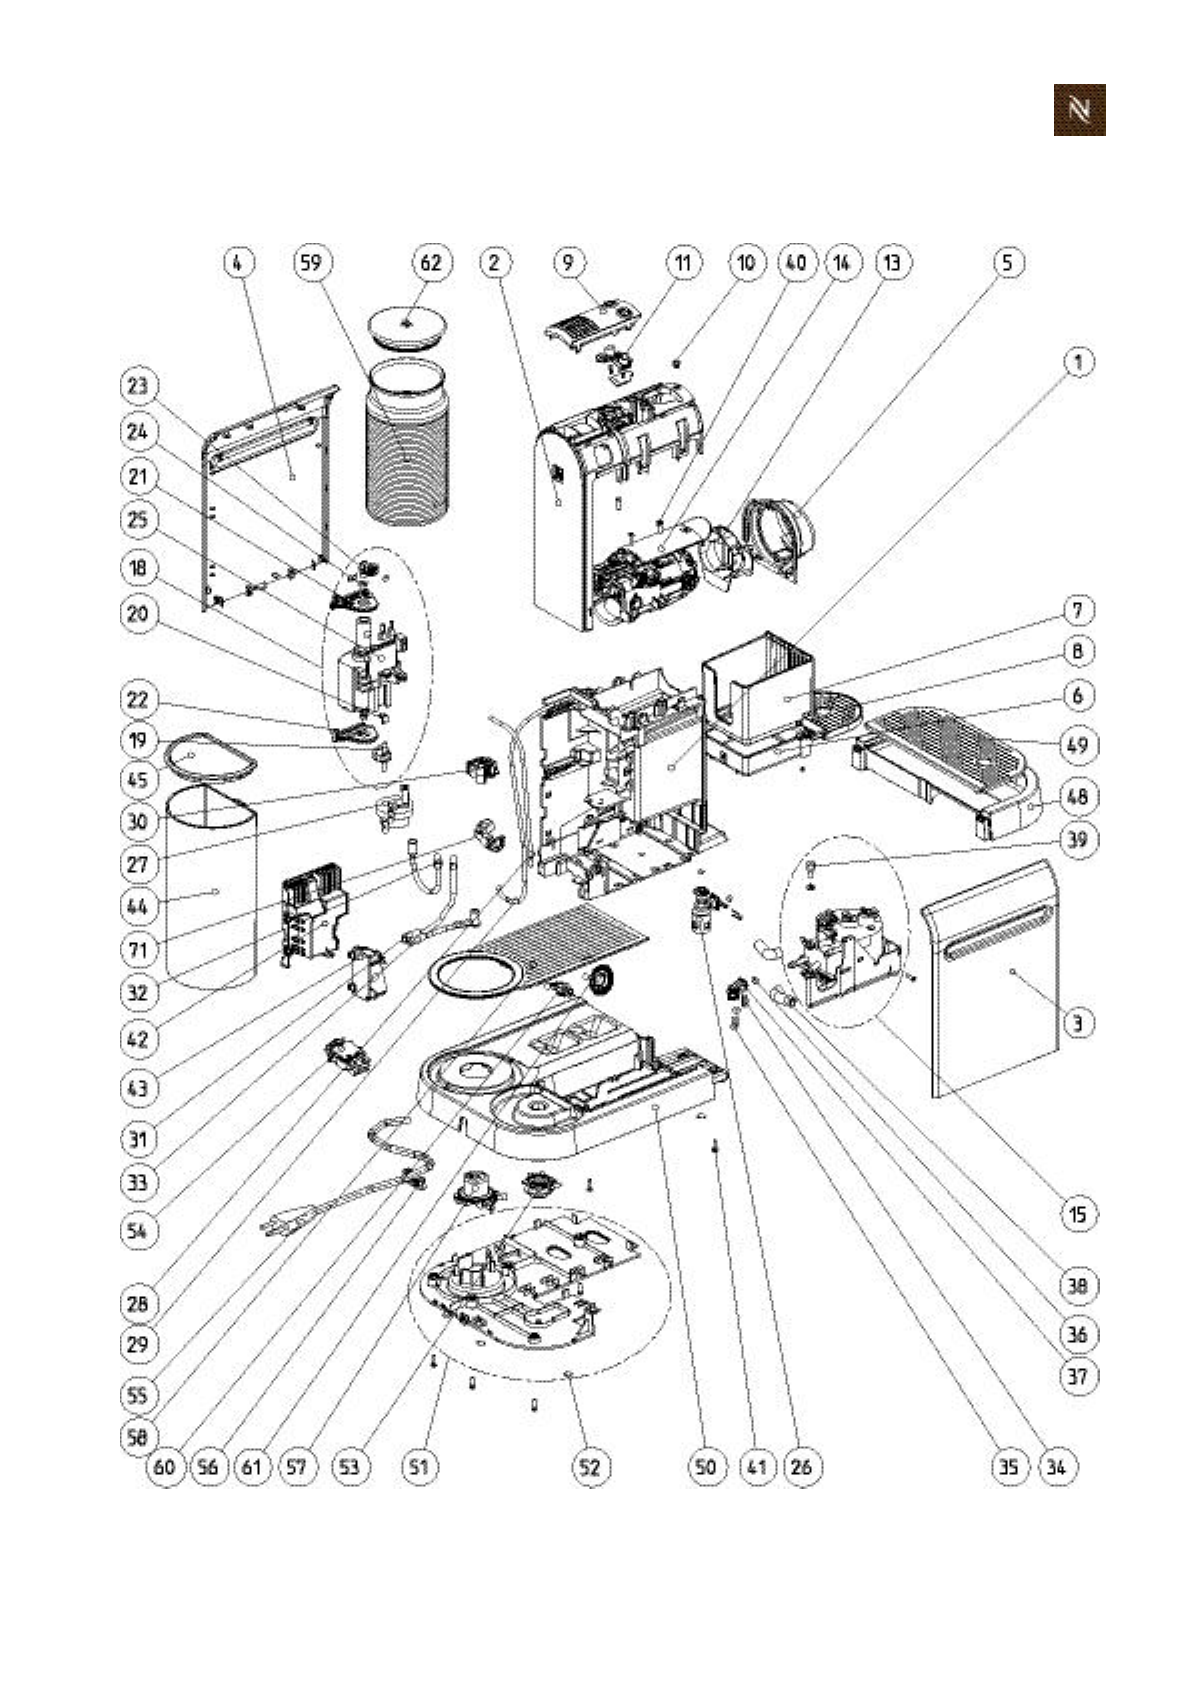
Citizservicemanual151
E X P L O S I O N D R A W I N G S
10.4 ModelCitiz&milk,coreunitCrange(EF486)
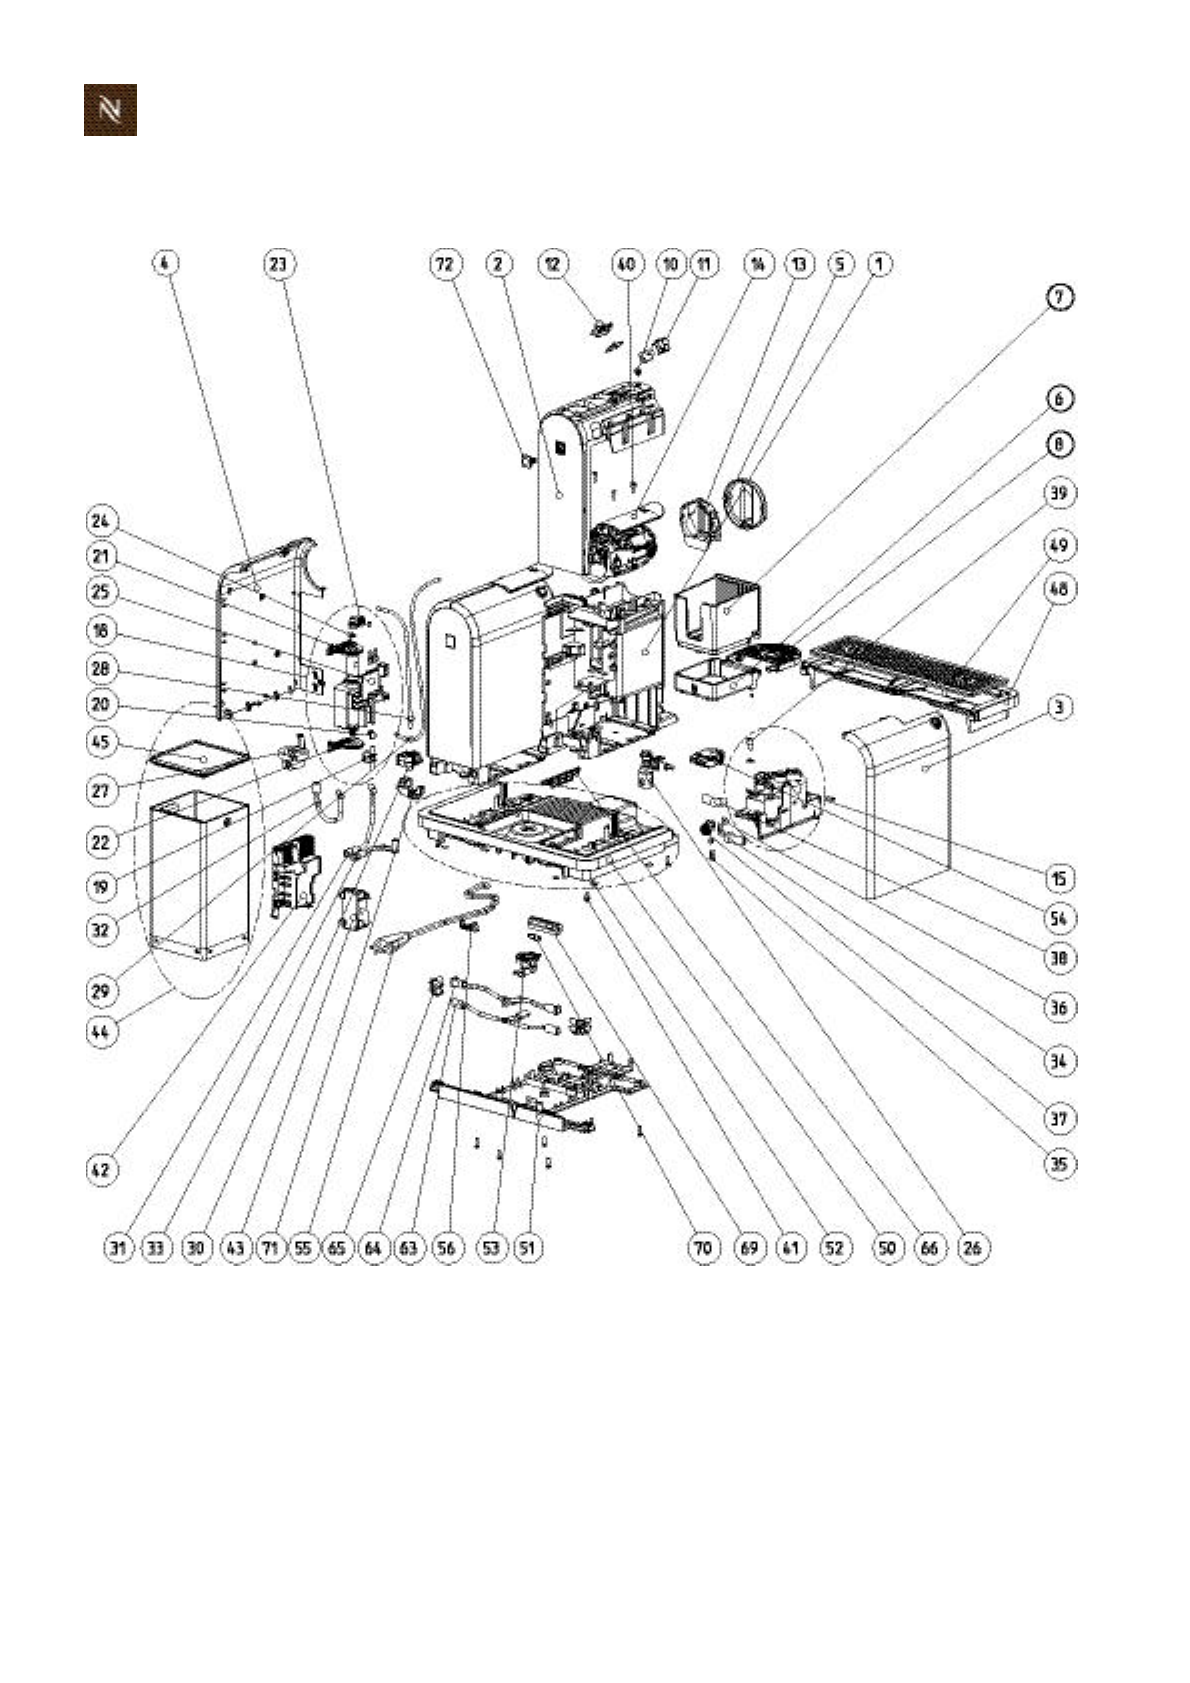
Citizservicemanual
152
E X P L O S I O N D R A W I N G S
10.5 ModelCitiz&Co,coreunitDrange(EF487)
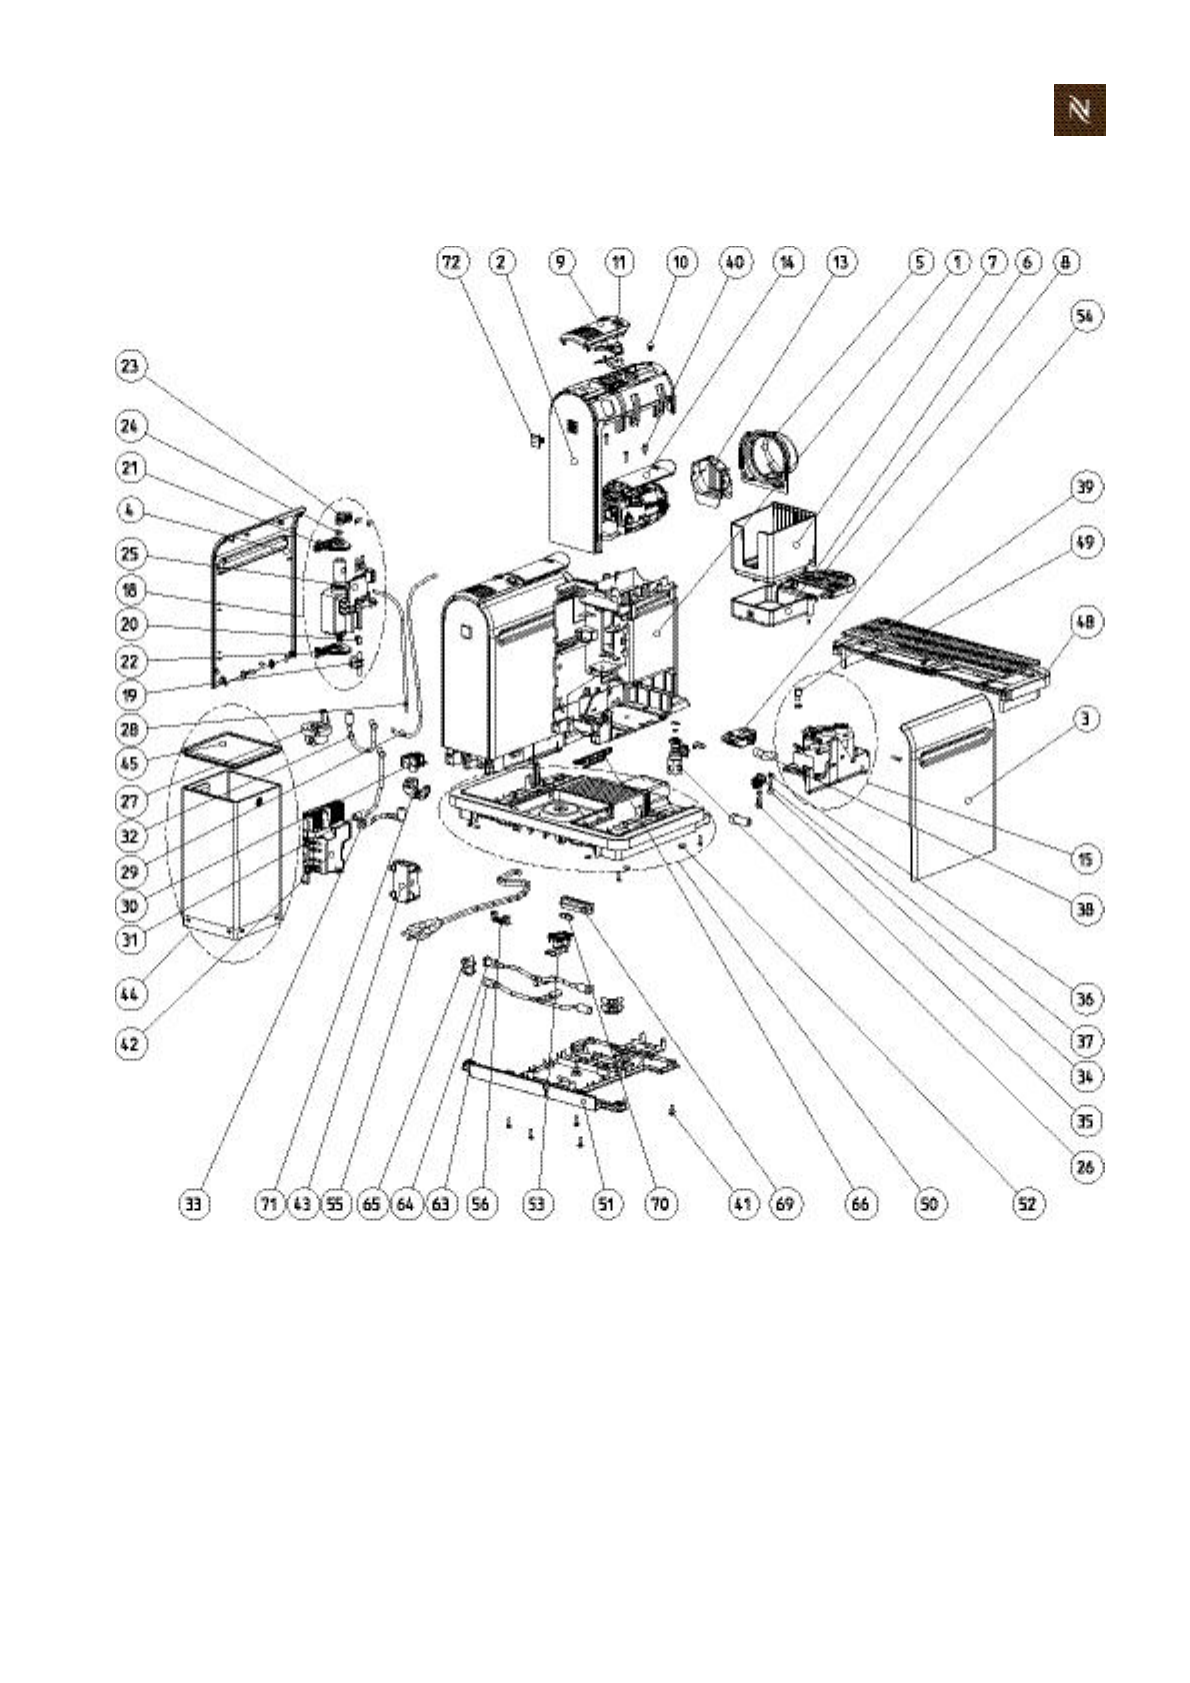
Citizservicemanual153
E X P L O S I O N D R A W I N G S
10.6 ModelCitiz&Co,coreunitCrange(EF488)

Citizservicemanual
154
P A R T S L I S T
1 1 P A R T S L I S T
Pos. Component Remark
1 ChassisA
1 ChassisB
2 CoverA
2 CoverB
3 SidepanelAleftIvory(old:CreamyWhite)
4 SidepanelArightIvory(old:CreamyWhite)
3 SidepanelAleftBlack(old:PianoBlack)
4 SidepanelArightBlack(old:PianoBlack)
3 SidepanelBleftGrey(Slate)
4 SidepanelBrightGrey(Slate)
3 SidepanelBleftRed(old:RetroRed)
4 SidepanelBrightRed(old:RetroRed)
5
OutletBspare,containing
FrontCover(1x)
OutletBchrome(1x)
5 OutletAChrome
6
Wastewaterspare,containing
WastewaterA+B(1x)
Cupsupportstop(2x)
7 CapsuleContainerA+B
8 CupsupportA
8 CupsupportB
9 Blind
10 DamperMBUclosinghandle
11 EspressoButtonA
12 CoffeeButtonA
11 CoffeeButtonB
13 SteamCover
14 TMBU HandleA
14 TMBU HandleB
15 Thermobloc230V Completeassemblyincl.support,completewiring
(safety),withNTC
15 Thermobloc120V(USA) Completeassemblyincl.support,completewiring
(safety),withNTC
15 Thermobloc120V(Brasilien/Taiwan) Completeassemblyincl.support,completewiring
(safety),withNTC
15 Thermobloc120V(Mexico) Completeassemblyincl.support,completewiring
(safety),withNTC
15 Thermobloc230V Completeassemblyincl.support,completewiring
(safety),withNTC
15 Thermobloc120V(USA) Completeassemblyincl.support,completewiring
(safety),withNTC
15 Thermobloc120V(Brasilien/Mexico) Completeassemblyincl.support,completewiring
(safety),withNTC
15 Thermobloc100V Completeassemblyincl.support,completewiring
(safety),withNTC
15 Thermobloc230V Completeassemblyincl.support,completewiring
(safety),withNTC

Citizservicemanual155
P A R T S L I S T
15 Thermobloc230V Completeassemblyincl.support,completewiring
(safety),withNTC
18 Pump230V Incl.thermostatandbothwires,pumpcover,pumpsup
ports,90°angle.Invensys,noCeme,noSysko
18 Pump120V Incl.thermostatandbothwires,pumpcover,pumpsup
ports,90°angle.Invensys,noCeme,noSysko
18 Pump100V Incl.thermostatandbothwires,pumpcover,pumpsup
ports,90°angle.Invensys,noCeme,noSysko
18 Pump127VIEC Incl.thermostatandbothwires,pumpcover,pumpsup
ports,90°angle.Invensys,noCeme,noSysko
19 Thermostat
20 ClipThermostat
21 Pumpsupportupside
22 Pumpsupportdownside
23 Pumpconnector90°
24 Oring5,28x1,78
25 Pumpcover
26 APD Complete
27 FlowmeterFHKSC124.524VDC,513mA (BirdyFS:5.6V,45mA)newstandard
28 HosePumpAPD Deliverywithoutorings(youcanloosethem)
29 HoseTBTMBU Deliverywithoutorings(youcanloosethem)
30 Tubeguiding
31 AnglehoseFMin
32 AnglehoseFMPump
33 AnglehoseAPDout
33 AnglehoseAPDoutM4
34 Connectorclip5mm
35 Connectorclip4mm
36 Oring3.40x1.90
37 Hoseconnector55° AlsopartofTBspareassembly
38 Isolationspoutangular AlsopartofTBspareassembly
39 NTC(Cablelength=160mm)
40 PTScrewTorxK30x12
41 PTScrewOvalK30x12
42 ElectronicControlBoardM1+3220240V50/60Hz Incl.housing
42 ElectronicControlBoardM1+3120127V50/60Hz Incl.housing
42 ElectronicControlBoardM1+3100110V50/60Hz Incl.housing
42 ElectronicControlBoardM4220240V50/60Hz Incl.housing
43 Electroniclid
44 Watertank1
44 Watertank4
45 Watertank1cover
45 Watertank4cover
46 Driptray1 Nespresso(inc.rubberfeet)
46 Driptray1 Krups(incl.rubberfeet)
46 Driptray1 Turmix(incl.rubberfeet)
46 Driptray1 DeLonghi(incl.rubberfeet)
46 Driptray1 Magimix(incl.rubberfeet)
46 Driptray1 Koenig(incl.rubberfeet)
47 Rubberfeet(Driptray1)
48 Driptray3
48 Driptray4
Pos. Component Remark

Citizservicemanual
156
P A R T S L I S T
49 DripGridA1
49 DripGridB1
49 DripgridA3
49 DripgridB3
49 DripgridA4
49 DripgridB4
50 Baseplate1top Inc.rubberfeet
50 Baseplate3top Inc.rubberfeet
50 Baseplate4top Inc.rubberfeet
51 Baseplate1bottom Inc.rubberfeet
51 Baseplate3bottom Inc.rubberfeet
51 Baseplate4bottom Inc.rubberfeet
52 Rubberfeet
53 Watertankconnector1 Incl.filter&seal
53 Watertankconnector4 Incl.filter&seal
54 ON/OFFswitchincl.support(spareparts) 2pol
54 ON/OFFswitchincl.support(spareparts) 1polnewmarquardt
55 PowersupplycordJP2pol Incl.receptacleandisolation
55 ConnectioncableUL1 Incl.receptacleandisolation
55 Connectioncable230Vcountryspec.M1(SEV) Incl.receptacleandisolation
55 Connectioncable230Vcountryspec.M1(AU) Incl.receptacleandisolation
55 Connectioncable230Vcountryspec.M1(IL) Incl.receptacleandisolation
55 Connectioncable230Vcountryspec.M1(UK) Incl.receptacleandisolation
55 Connectioncable230Vcountryspec.M1(Cebec) Incl.receptacleandisolation
55 Connectioncable230Vcountryspec.M1(AR) Incl.receptacleandisolation
55 Connectioncable230Vcountryspec.M1(KR) Incl.receptacleandisolation
55 Connectioncable230Vcountryspec.M1(ZA220V) Incl.receptacleandisolation
55 Connectioncable230Vcountryspec.M1(CN) Incl.receptacleandisolation
55 Connectioncable230Vcountryspec.M1(SG) Incl.receptacleandisolation
55 PowersupplycordTW3pol Incl.receptacleandisolation
55 Connectioncable230Vcountryspec.M1(BR220V) Incl.receptacleandisolation
55 PowersupplycordBR3pol Incl.receptacleandisolation
55 PowersupplycordBR3pol Incl.receptacleandisolation
55 ConnectioncableULM3countryspec Incl.receptacleandisolation
55 ConnectioncableULUS/MXM3 Incl.receptacleandisolation
55 Connectioncable230Vcountryspec.M3(ZA) Incl.receptacleandisolation
55 Connectioncable230Vcountryspec.M3(BR220V) Incl.receptacleandisolation
55 Connectioncable230Vcountryspec.M3(UK) Incl.receptacleandisolation
55 Connectioncable230Vcountryspec.M3(AR) Incl.receptacleandisolation
55 Connectioncable230Vcountryspec.M3(AU) Incl.receptacleandisolation
55 Connectioncable230Vcountryspec.M3(SEV) Incl.receptacleandisolation
55 Connectioncable230Vcountryspec.M3(CN) Incl.receptacleandisolation
55 Connectioncable230Vcountryspec.M3(Cebec) Incl.receptacleandisolation
55 Connectioncable230Vcountryspec.M3(IL) Incl.receptacleandisolation
55 Connectioncable230Vcountryspec.M3(KR) Incl.receptacleandisolation
55 Connectioncable230Vcountryspec.M3(SG) Incl.receptacleandisolation
55 Connectioncable230Vcountryspec.M4(SEV) Incl.receptacleandisolation
55 Connectioncable230Vcountryspec.M4(Cebec) Incl.receptacleandisolation
55 Connectioncable230Vcountryspec.M4(UK) Incl.receptacleandisolation
55 Connectioncable230Vcountryspec.M4(AU) Incl.receptacleandisolation
55 Connectioncable230Vcountryspec.M4(IL) Incl.receptacleandisolation
55 Connectioncable230Vcountryspec.M4(AR) Incl.receptacleandisolation
Pos. Component Remark

Citizservicemanual157
P A R T S L I S T
55 Connectioncable230Vcountryspec.M4(SG) Incl.receptacleandisolation
55 Connectioncable230Vcountryspec.M4(ZA) Incl.receptacleandisolation
55 Connectioncable230Vcountryspec.M4(BR220V) Incl.receptacleandisolation
55 Connectioncable230Vcountryspec.M4(CN) Incl.receptacleandisolation
56 CablebracketUL2pol
56 CablebracketUL3pol
56 CablebracketIEC3pol
57 OtterconnectorCS7
58 Cupstorage
59 Aeroccino3220240V50/60Hz
59 Aeroccino3120127V50/60Hz
60 Mixer(hotmilk)
61 Whisk(foam)
62 AeroccinoLidincl.seal
63 Anglehosewater4
64 Anglehoseventing4
65 AngleharddoubleM4
66 Tanksnaphook
69 Connectionisolation
70 DoubleTab4.8Sn
71 CablefixationTB
72 Coverstopper
Pos. Component Remark

Citizservicemanual
158
N O T E S
1 2 N O T E S
