NetComm Wireless NRB51 Outdoor LTE Router User Manual
NetComm Wireless Limited Outdoor LTE Router
User Manual
User Guide
NRB-51 Outdoor Wireless Antenna (Dundee)
2
Outdoor Wireless Antenna (NRB-51)
www.netcommwireless.com
UM-00017 rev 1.0
Copyright
Copyright© 2016 NetComm Wireless Limited. All rights reserved.
The information contained herein is proprietary to NetComm Wireless. No part of this document may be translated, transcribed,
reproduced, in any form, or by any means without prior written consent of NetComm Wireless.
Trademarks and registered trademarks are the property of NetComm Wireless Limited or their respective owners. Specifications are
subject to change without notice. Images shown may vary slightly from the actual product.
Note: This document is subject to change without notice.
Save our environment
When this equipment has reached the end of its useful life, it must be taken to a recycling centre and processed separately from
domestic waste.
The cardboard box, the plastic contained in the packaging, and the parts that make up this device can be recycled in accordance
with regionally established regulations. Never dispose of this electronic equipment along with your household waste. You may be
subject to penalties or sanctions under the law. Instead, ask for disposal instructions from your municipal government.
Please be responsible and protect our environment.
This guide covers the following products:
Outdoor Wireless Antenna (NRB-51)
DOCUMENT VERSION
DATE
1.0 Initial document release
March 02, 2016

www.netcommwireless.com
Outdoor Wireless Antenna
3
UM-00017 rev 1.0
Table of Contents
Overview ........................................................................................................................................................................................ 4
Introduction ................................................................................................................................................................................................... 4
Target audience ............................................................................................................................................................................................. 4
Prerequisites ................................................................................................................................................................................................. 4
Notation ........................................................................................................................................................................................................ 4
Product introduction ...................................................................................................................................................................... 5
Product overview ........................................................................................................................................................................................... 5
Product features ............................................................................................................................................................................................ 5
Package contents .......................................................................................................................................................................................... 5
Physical dimensions and interfaces ............................................................................................................................................. 6
Physical dimensions ...................................................................................................................................................................................... 6
Interfaces ...................................................................................................................................................................................................... 7
Installing the Outdoor Unit ............................................................................................................................................................ 8
Determining the best location for the Outdoor unit .......................................................................................................................................... 8
Mounting options ........................................................................................................................................................................................... 9
Connecting the Outdoor Unit ...................................................................................................................................................... 10
Powering the Outdoor Unit ........................................................................................................................................................................... 10
POE-02 LED indicators ................................................................................................................................................................................ 10
Communicating with the Outdoor unit .......................................................................................................................................................... 11
Firmware Upgrade on Windows 8/8.1/10 PCs .............................................................................................................................................. 13
Admin Shell Session Using SSH ................................................................................................................................................................... 16
Connection Manager ................................................................................................................................................................................... 17
Useful Commands ....................................................................................................................................................................................... 20
Specifications .............................................................................................................................................................................................. 22
Appendix A: Tables...................................................................................................................................................................... 23
Safety and product care .............................................................................................................................................................. 24
Product Warranty......................................................................................................................................................................... 27
4
Outdoor Wireless Antenna (NRB-51)
www.netcommwireless.com
UM-00017 rev 1.0
Overview
Introduction
This document provides you the information you need to set up, configure and use the NetComm Wireless NRB-51 Outdoor
Wireless Antenna, also referred to as OWA (Dundee) in the document.
Target audience
This document is intended for system integrators or experienced hardware installers who understand telecommunications
terminology and concepts.
Prerequisites
Before continuing with the installation of NRB-51, please confirm that you have the following:
A laptop with a working Ethernet network adapter and web browser.
Adjustable wrench, a nutdriver set, screwdrivers and appropriate screws for mounting the outdoor unit.
Ethernet cable long enough to reach from the Outdoor unit mount location to the indoor unit (POE-02) mount location,
RJ45 heads and a crimping tool
Shorter Ethernet cable long enough to reach from the indoor unit (POE-02) to the Arris RG.
A device with WiFi client to access the installation alignment tool’s web browser
Notation
The following symbols are used in this user guide:
The following note requires attention.
The following note provides a warning.
The following note provides useful information.

www.netcommwireless.com
Outdoor Wireless Antenna
5
UM-00017 rev 1.0
Product introduction
Product overview
Rural and regional homes and businesses, remote commercial sites and metropolitan fringe districts located beyond the reach of
fixed line infrastructure rely on mobile networks to access broadband Internet.
Designed to optimize signal strength in weak signal areas, the NetComm Wireless NRB-51 Outdoor Wireless Antenna (OWA) is
positioned on the exterior of the premises to overcome distance limitations and geographical obstructions, and deliver high-speed
LTE broadband connectivity to wired and wireless clients in the property via an indoor router.
Product features
Attractive compact ID that can withstand harsh weather elements
Software upgrade path to support 4x4 MIMO
Designed to meet applicable GR-1089 immunity & surge tests
Proven and documented installation optimized for speed, safety and accuracy
Package contents
The NetComm Wireless NRB-51 in-box contents include:
1 x NetComm Wireless NRB-51 (also referred to as OWA) device
1 x Assembled mount (2” DTV compatible) with 5 screws
If any of these items are missing or damaged, please contact NetComm Wireless Support immediately. The NetComm Wireless
Support website can be found at: http://support.netcommwireless.com.
6
Outdoor Wireless Antenna (NRB-51)
www.netcommwireless.com
UM-00017 rev 1.0
Physical dimensions and
interfaces
Physical dimensions
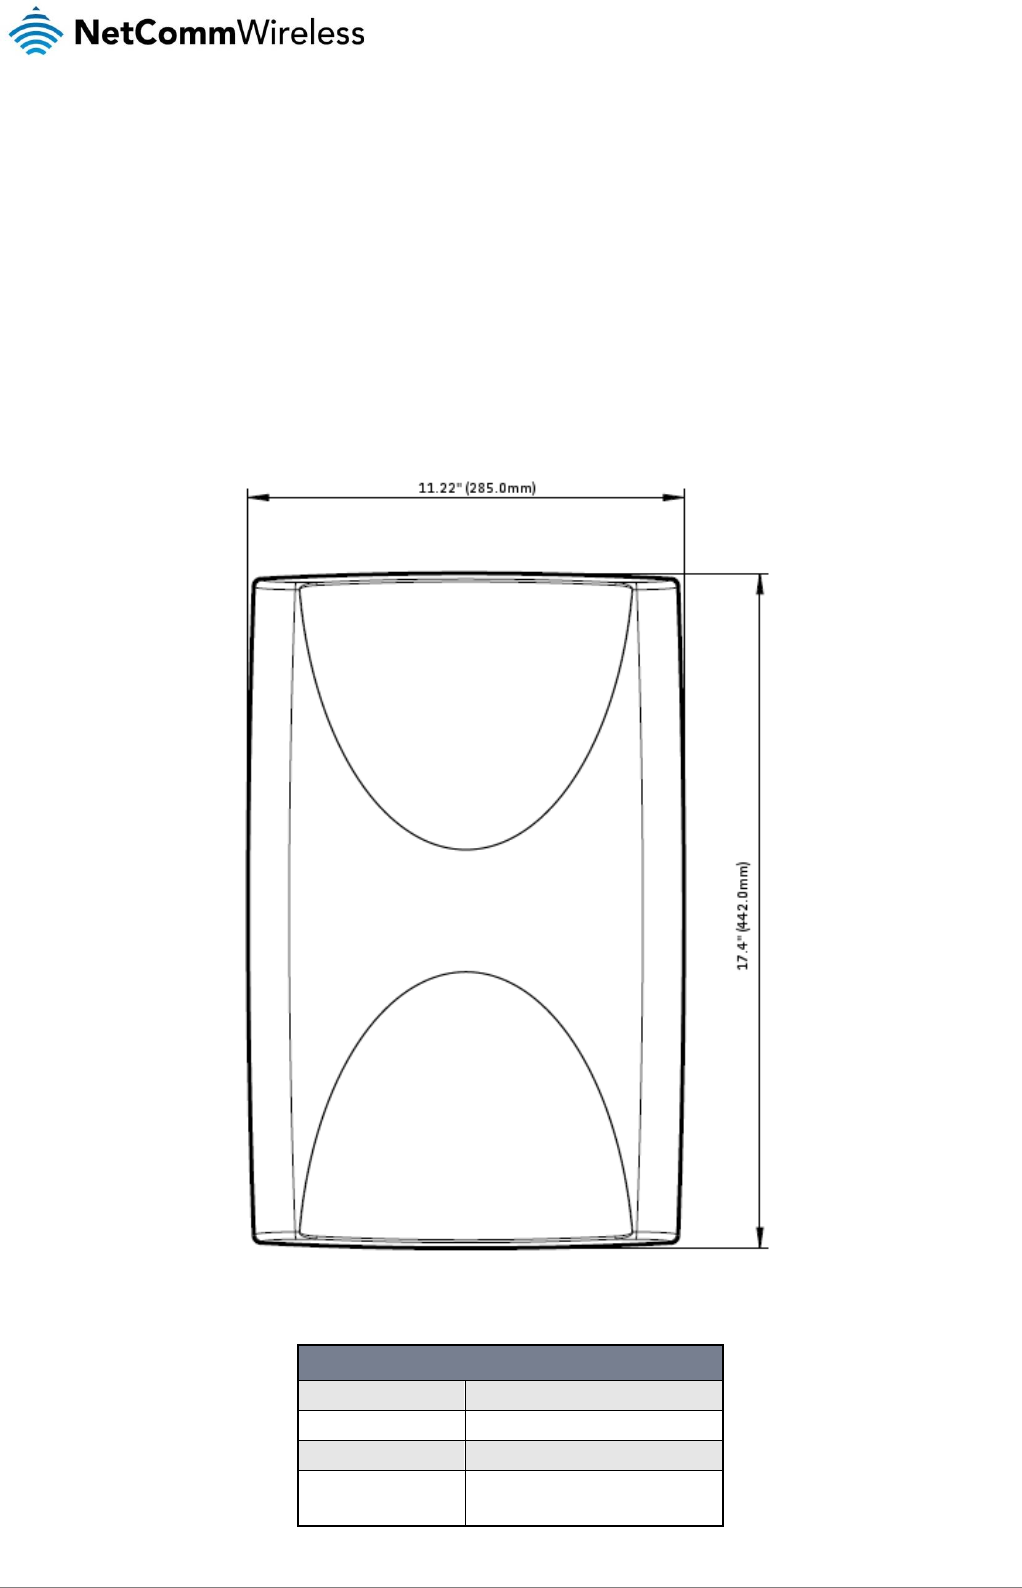
Below is a list of the physical dimensions of the NRB-51
Figure 1 – NTC-140W Series router Dimensions
NRB-51 OWA DIMENSIONS
Length
17.4” (442.0 mm)
Width
11.22” (285.0mm)
Height
6.3” (Assembled with mount)
Weight
5.9 lbs with cavity filter
7.1 lbs (Assembled with mount)
Table 1 - Device Dimensions
www.netcommwireless.com
Outdoor Wireless Antenna
7
UM-00017 rev 1.0
Interfaces
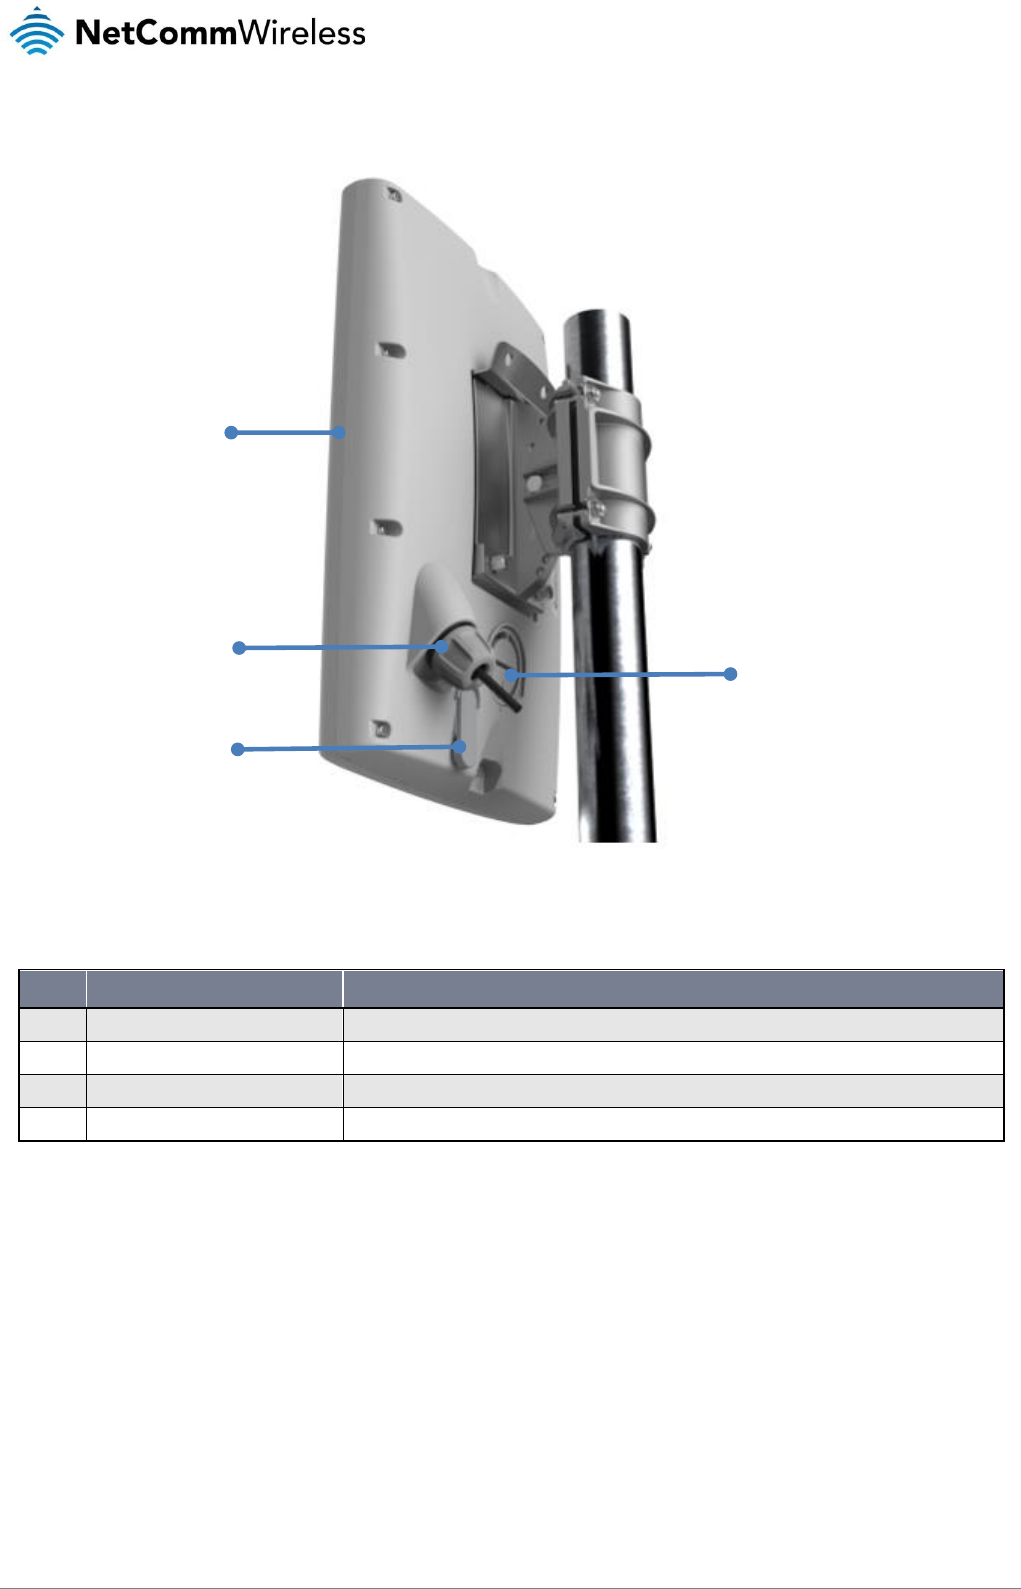
Figure 2 - Interfaces
NO.
ITEM
DESCRIPTION
1
Antenna panel
Includes 2 x pairs Cross polarised antennas and GPS antenna
2
Installation alignment port
SMA connector for GPS antenna (not included in package).
6
SIM hatch
Open the hatch to insert SIM here
11
POE Gigabit Ethernet port
Provides power and data connectivity to the OWA with Ethernet cable
Table 2 – Interfaces
Antenna Panel
POE Gigabit
Ethernet port
Install alignment
port
SIM hatch
8
Outdoor Wireless Antenna (NRB-51)
www.netcommwireless.com
UM-00017 rev 1.0
Installing the Outdoor Unit
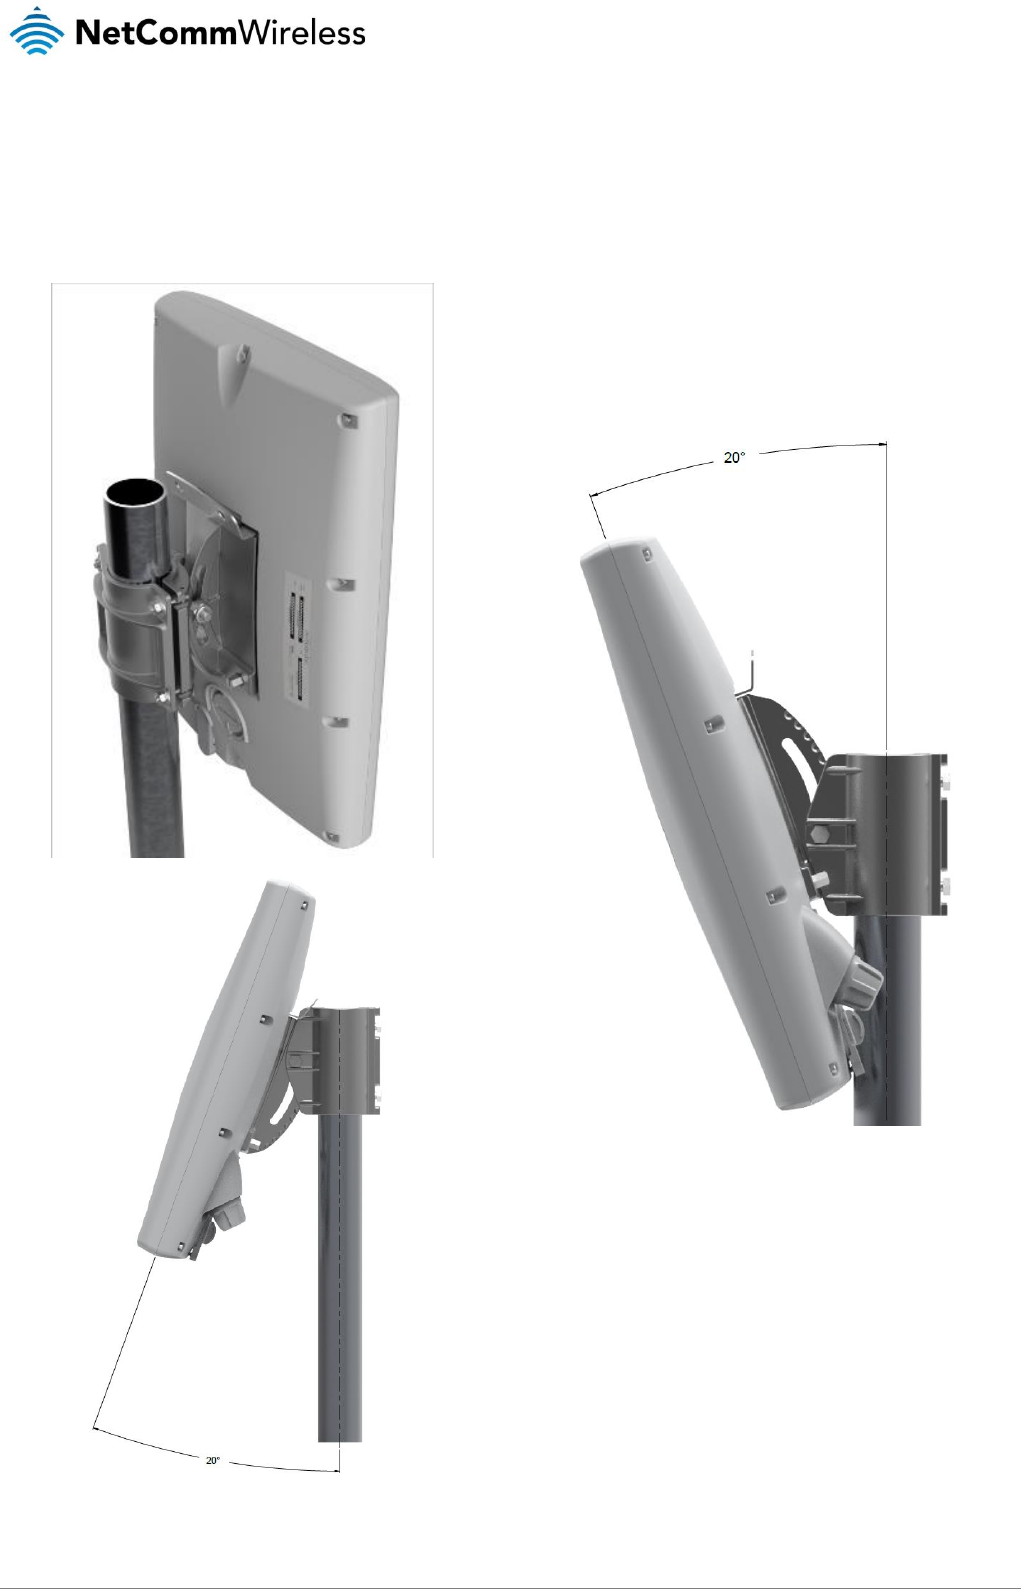
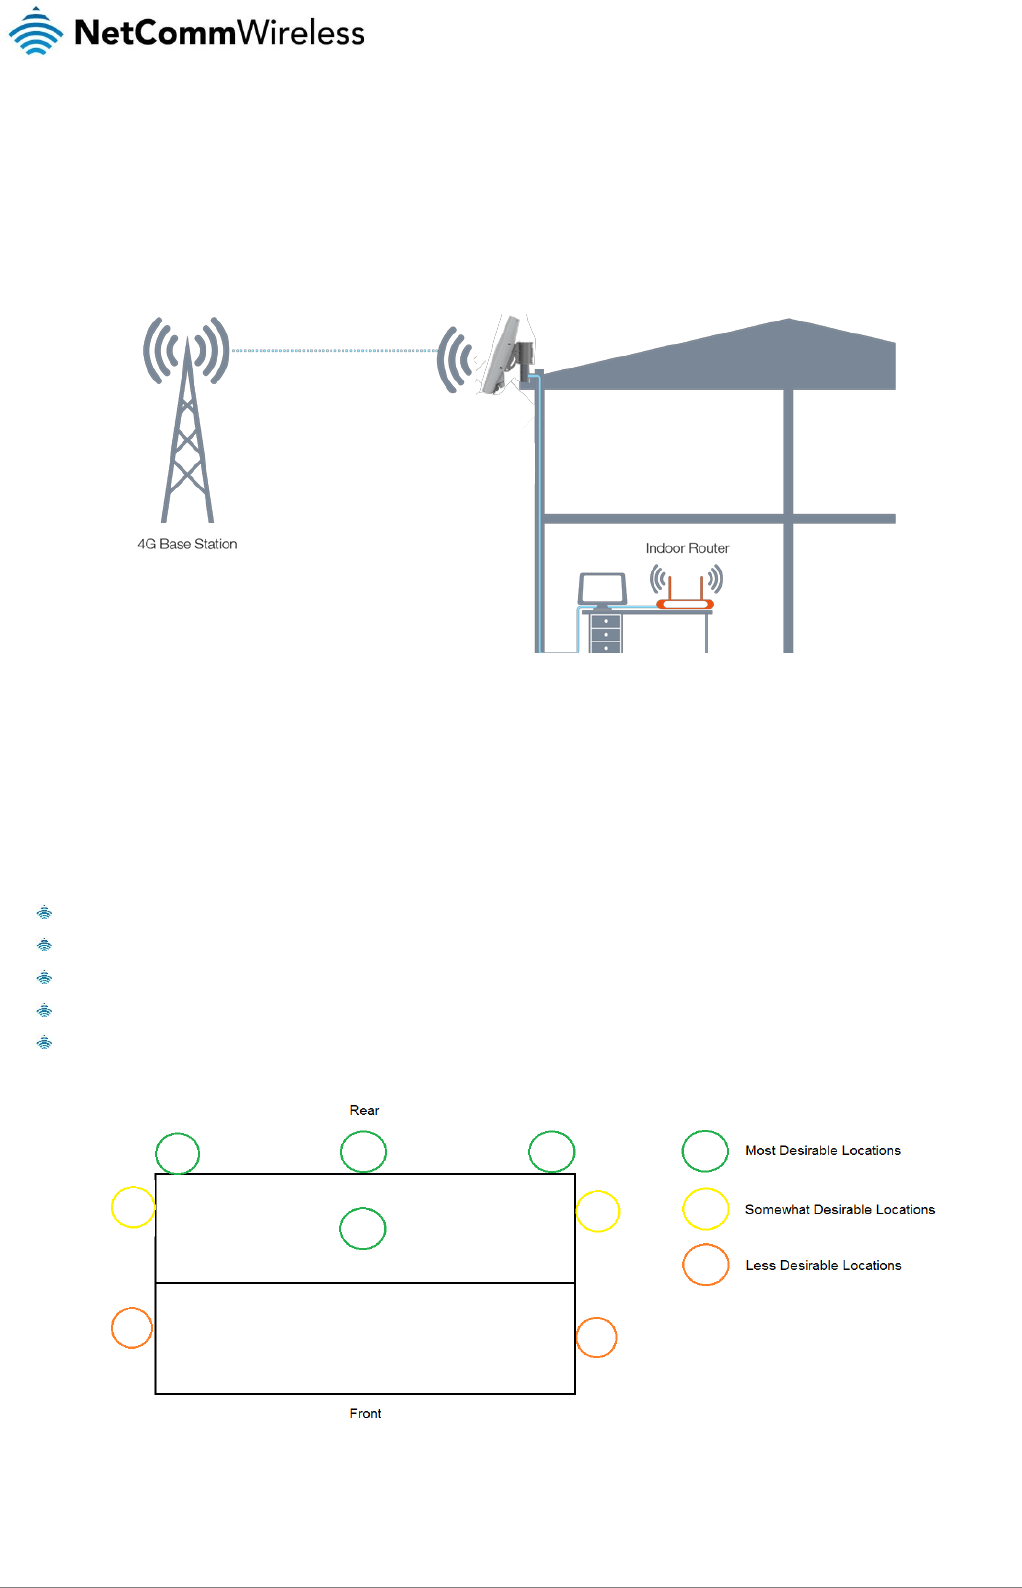
The image below illustrates a typical installation of the WNTD Outdoor Unit.
Determining the best location for the Outdoor unit
Determining the best location for the Outdoor Wireless Antenna (OWA) involves:
1. Performing a survey of the site using the RF alignment tool and
2. Consulting the customer about positioning based on results of the RF test, aesthetics and any planned renovations to the
property that may affect the mounting location.
When selecting a location to mount the OWA, ensure that:
lock of the desired cell and optimal signal level is achieved.
the mounting position is unobtrusive and aesthetically pleasing where possible.
the mount/antenna is not closer than 1 meter from other antenna equipment.
strata or heritage properties have obtained approval for the installation. This is the sole responsibility of the customer.
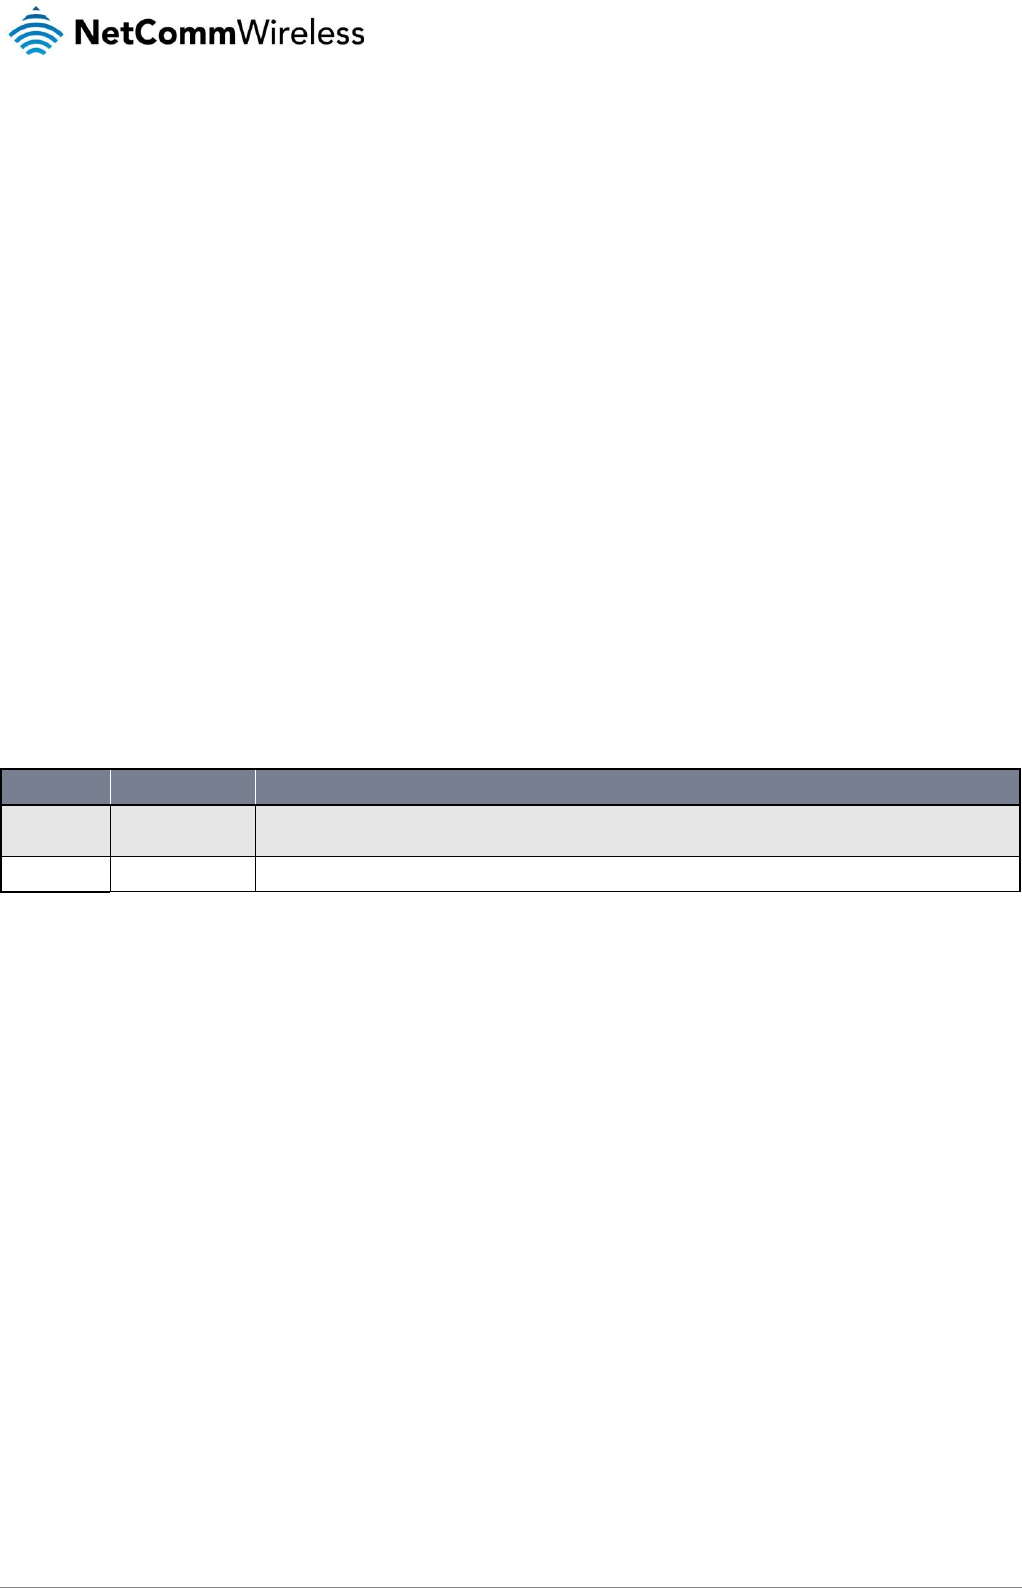
the OWA is mounted only in locations which adhere to the following property diagram:
Where possible, avoid mounting the OWA so that it is aimed back over the roof of the property.
10
Outdoor Wireless Antenna (NRB-51)
www.netcommwireless.com
UM-00017 rev 1.0
Connecting the Outdoor Unit
Powering the Outdoor Unit
Power over Ethernet (PoE) is a method of connecting network devices through Ethernet cable where power and data are passed
along a single cable. It is therefore a convenient method of powering the OWA.
Note that POE-02 is packaged and supplied separately.
To power the OWA:
1. Connect a straight-through Ethernet cable (not included in the package) to the Ethernet port of the OWA then connect the
other end of the cable to the Ethernet port labelled “WALL” on the POE-02..
2. Use another Ethernet cable (not included in the package) to connect the indoor router to the “Router” port of the POE-02.
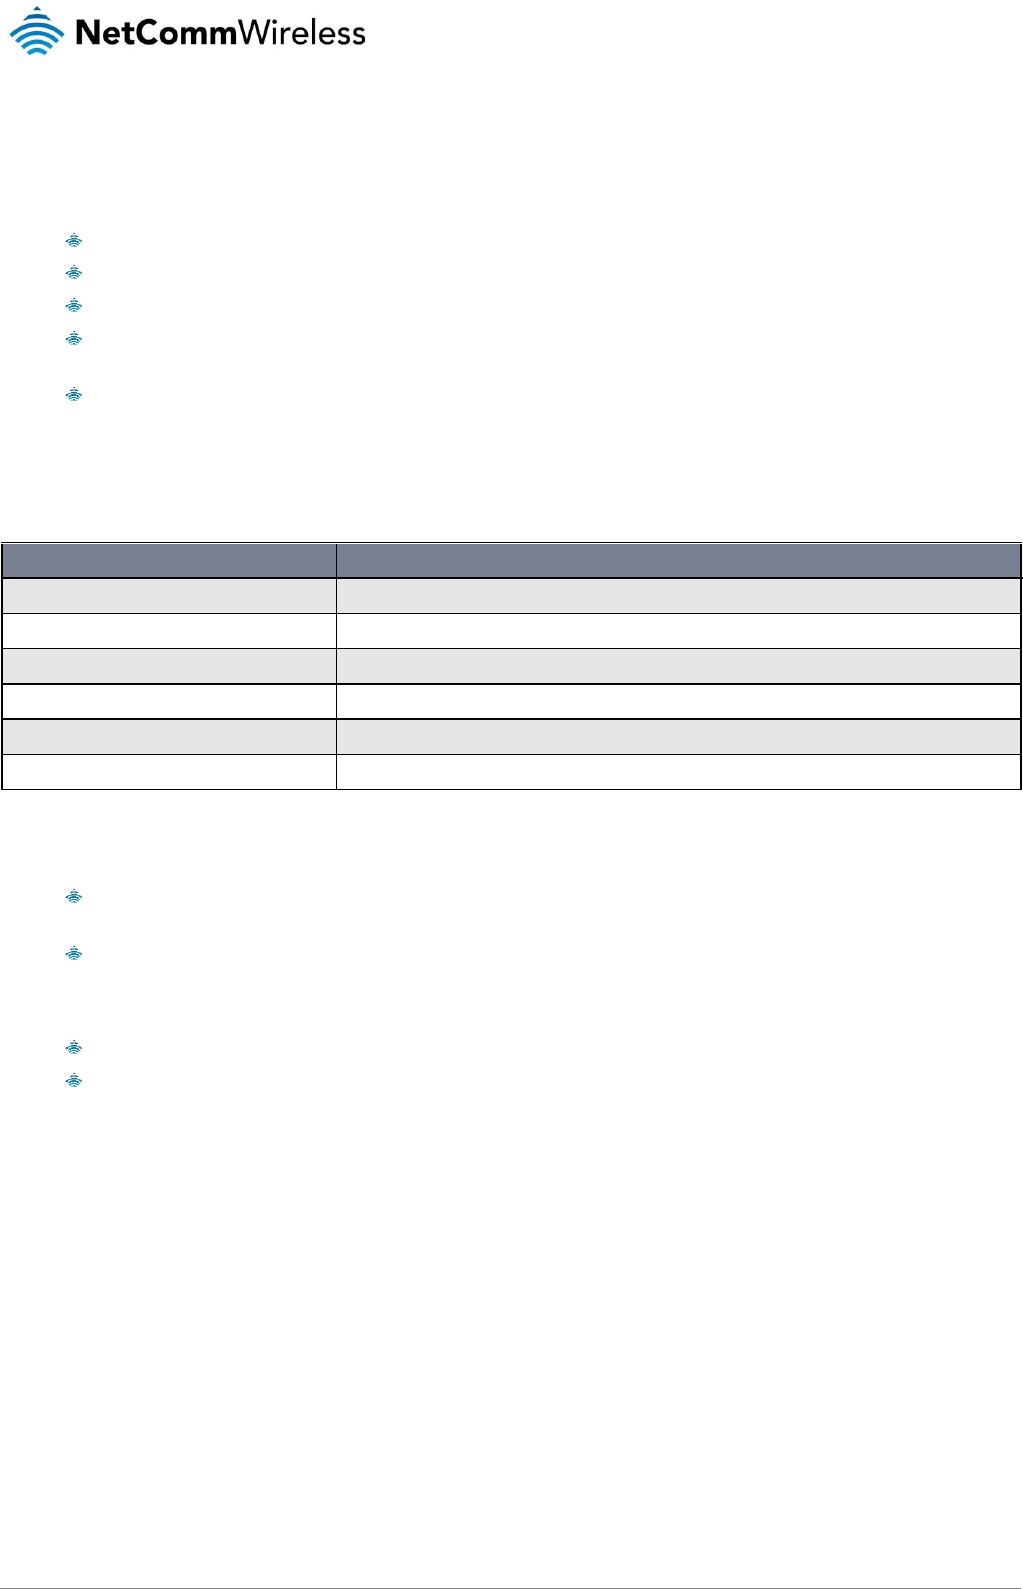
3. Connect the power cable to the POE-02 and then plug it in to an available wall socket. Examine the Power and ANTENNA
LEDs of the POE and compare them with the LED table below. When both the POWER and ANTENNA LEDs are solid
green, the OWA unit is correctly powered and connected.
POE-02 LED indicators
The table below describes the status of the POWER and ANTENNA LEDs on the PoE injector.
LED
STATUS
DESCRIPTION
POWER
Solid green
PoE injector is connected to AC power.
ANTENNA
Solid green
PoE injector is connected to AC power and the POE port is connected to the OWA.
www.netcommwireless.com
Outdoor Wireless Antenna
11
UM-00017 rev 1.0
Communicating with the Outdoor unit
Diagnostics Tools
The following tools may be required to access and perform any admin or testing tasks.
adb: console access through the host USB connection (Android tool)
fastboot: firmware upgrade through the host USB connection (Android tool)
QXDM diag tool and drivers: Qualcomm diagnostic tools and drivers
Terminal emulator: emulator software such as PuTTY will be used to connect to the AT command port of the OWA’s
Wireless module.
SSH client: SSH client such as PuTTY will be used to access the OWA’s admin shell through the admin VLAN (i.e.
4001).
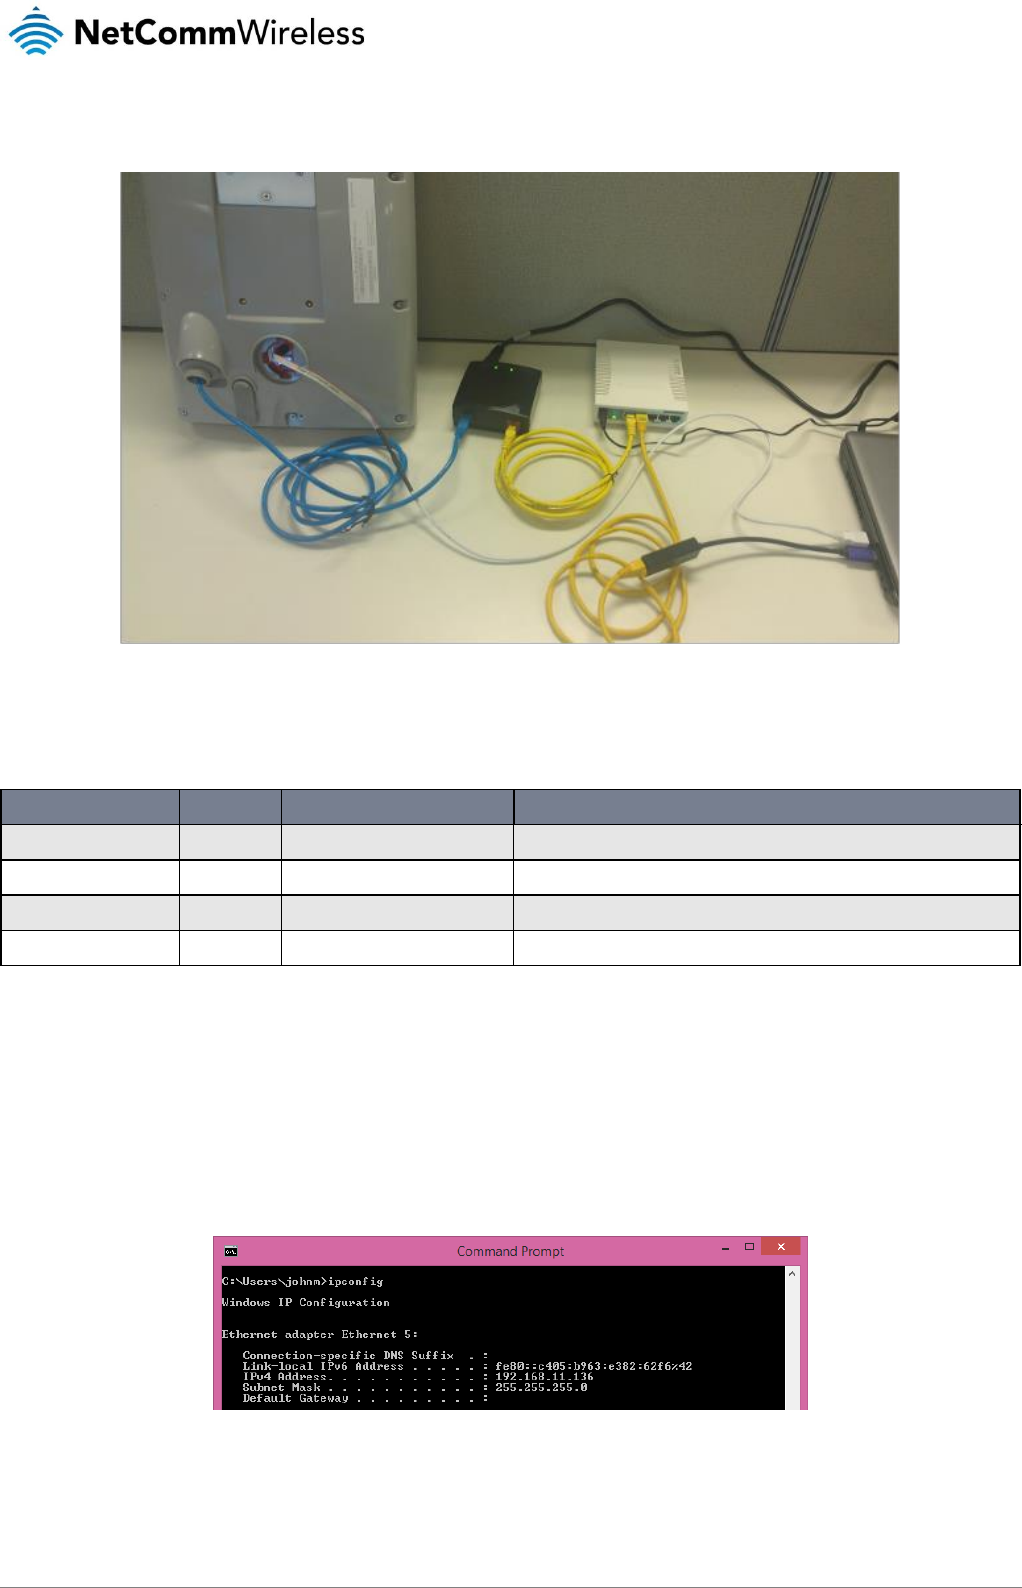
The following table lists all the required files to complete diagnostics. Some of these may require third party NDA’s, please contact
your account representative for details.
List of required files
FILENAME
DESCRIPTION
adb-setup-1.3.exe
Google USB driver installer
netcomm_nrb51_adb_driver.zip
NRB-51 ADB driver archive
minimal_adb_fastboot_v1.1.3_setup.exe
Android Debug Bridge and Fastboot installer
QXDM.WIN.3.14 Installer-01004.6.zip
Qualcomm QXDM.WIN.3.14 Installer-01004.6
QPST.WIN.2.7 Installer-00432.1.zip
Qualcomm Product Support Tool
QUD.WIN.1.1 Installer-10036.7
Qualcomm USB Driver
OWA supports two methods to perform communication with the device for diagnostic or debug operations.
Admin shell session – useful for performing application level diagnostic and debugging. This is the preferred method in
most cases.
Qualcomm’s QXDM tools including the AT command interface – mainly for RF module level diagnostic
There are two ways to access the admin session on OWA.
adb tool through the USB connection
ssh through the admin VLAN – ID 4001
To access the admin session through USB, the adb tool (an Android tool) needs to be installed on a PC connected to the NRB-51.
After installing the adb tool (see Firmware installation), connecting the special USB cable and creating the admin VLAN ID 4001 on
the PC connected to the NRB-51, you can access the session through the Ethernet interface. For more details about accessing the
admin session, please refer to the section Admin shell session.
QXDM tool is used when the RF modem level diagnostic including the AT command interface is required. When the special USB
cable is connected (see Installation instructions) and the Qualcomm drivers are installed, the QXDM tools can be used.
The QXDM tools and AT command interface sections contain the details about the QXDM tools. These sections do not have any in-
depth details about the QXDM tools since QXDM is not a NetComm Wireless product. You may need to contact Qualcomm to get
the QXDM installation packages and tools. Qualcomm’s QXDM tools and drivers are required and you must have the proper
Qualcomm license to install and run these tools. Please check with Qualcomm for more details about the license terms.
12
Outdoor Wireless Antenna (NRB-51)
www.netcommwireless.com
UM-00017 rev 1.0
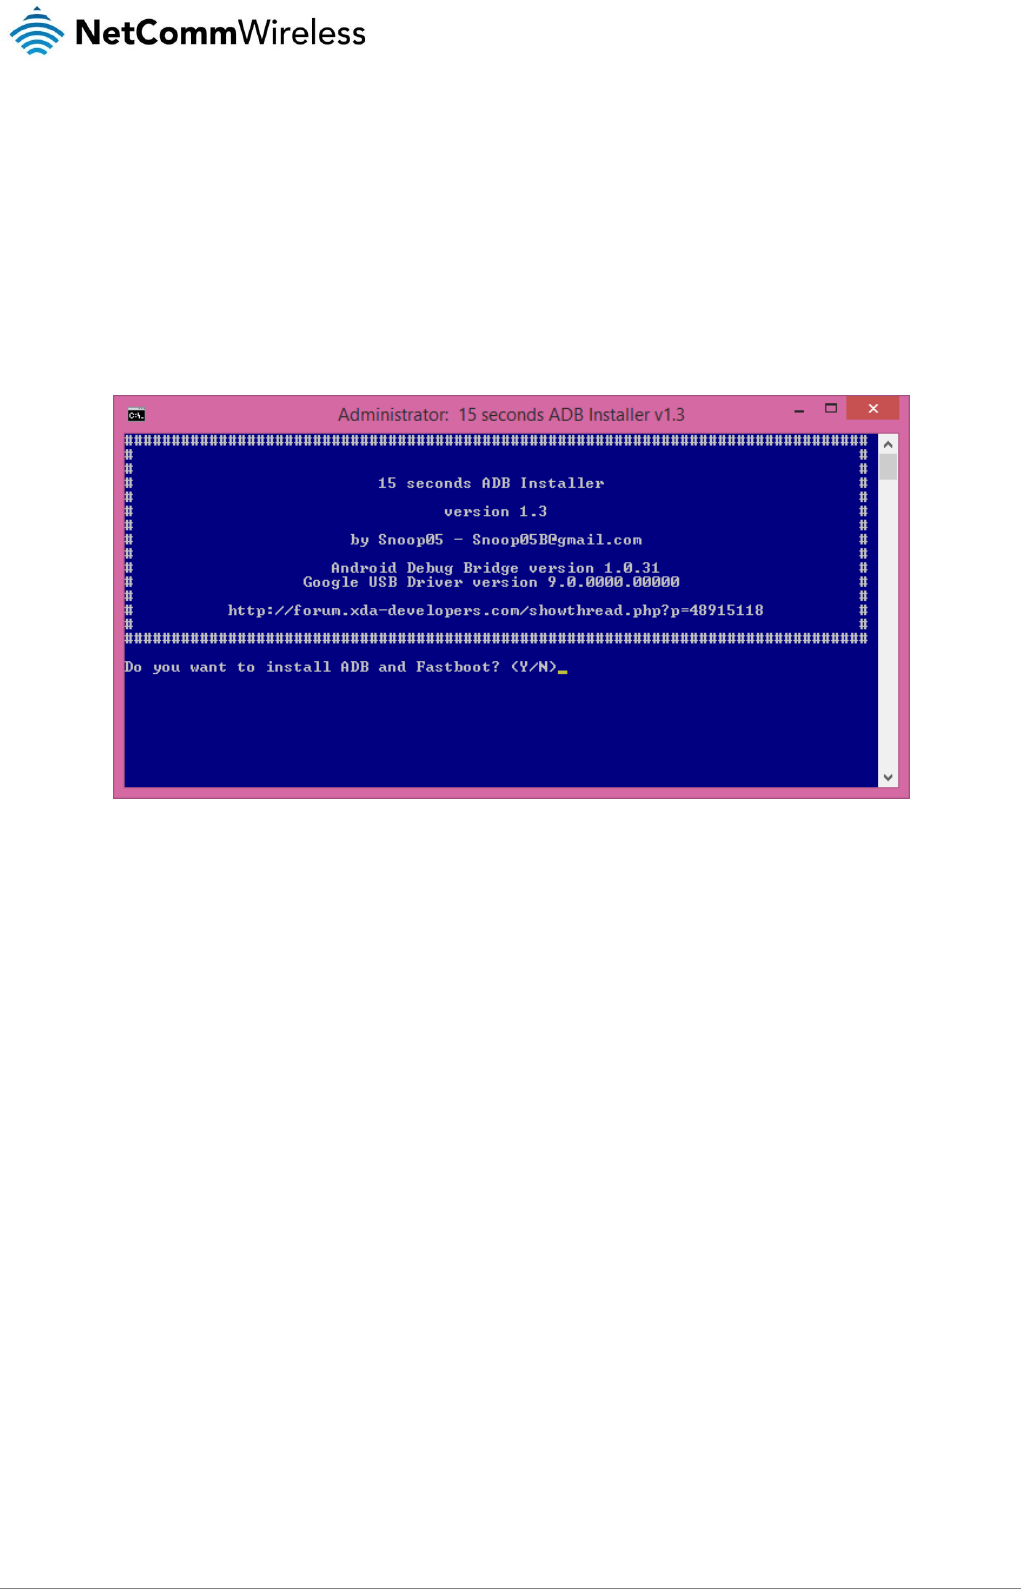
The images below show the correct connection of the components.
Note that the white USB to TAG connect ribbon cable is only required for debug and is not part of the actual deployment.
RG PORT NUMBER
VLAN ID
IP ADDRESS RANGE
FUNCTION
1
NIL
-
Trunk (to OWA)
2
4001
192.168.11.X
Provides connectivity to admin VLAN on the OWA.
3
4002
192.168.12.X
Provides connectivity to Data VLAN on the OWA.
4
4003
192.168.13.X
Provides connectivity to IMS VLAN on the OWA.
1. Using RJ45 Ethernet cable, connect the OWA unit to the blue Ethernet port of the PoE injector. This connection is
represented by the Blue Ethernet cable in the picture above.
1. Using RJ45 Ethernet cable, connect one end to Ethernet port 1 of the RG and the other end to the red Ethernet port of the
PoE injector. This connection is represented by the Yellow Ethernet cable in the picture above.
2. Connect the PoE injector’s power cable to a wall socket and turn on the power. Turn on the PoE-02’s power switch.
3. Open a command prompt (press Windows key and type cmd then press Enter) and type ipconfig. Press the Enter key.
4. Confirm that the Ethernet interface has been assigned an IP address in the 192.168.11.X range.
Before proceeding with tests on the data VLAN, ensure that you have connected an appropriate cellular antenna to the
MAIN antenna socket of the OWA.
www.netcommwireless.com
Outdoor Wireless Antenna
13
UM-00017 rev 1.0
Firmware Upgrade on Windows 8/8.1/10 PCs
Installing the ADB driver
Extract the netcomm_nrb51_adb_driver.zip archive to a folder on the PC. On 32-bit Windows systems, run DPInst_x86.exe and on
64-bit Windows systems, run DPInst_x64.exe. Follow the installation wizard steps.
Installing the USB driver
1. Double click on the adb-setup-1.3.exe file that you downloaded to install the USB driver. The main screen displays an
install confirmation.
2. Type Y and press Enter.
When prompted to install ADB system-wide, press Y and then Enter.
When prompted to install device drivers, press Y and then Enter.
3. On the Device Driver Installation Wizard window that appears, click the Next button.
On the Windows Security pop-up window, click the Install button, then click the Finish button.
The ADB installer window closes.
4. Double click on the minimal_adb_fastboot_v1.1.3_setup.exe file.
Click the Next button through the prompts then click the Install button.
When the installation has completed, click the Finish button. Close the Command Prompt window that appears.
5. To verify correct installation of the tool, open a command prompt (press Windows key and type cmd then press Enter).
Change directory to “C:\Program Files (x86)\Minimal ADB and Fastboot” by typing cd “C:\Program Files
(x86)\Minimal ADB and Fastboot” then pressing Enter.
Type adb devices in the command prompt, then press Enter.
Verify that the device is listed in “List of devices attached”.
6. On the Windows PC, create a local directory then copy nrb-51_v_<version number>.zip into the directory.
7. Extract the archive into “C:\Program Files (x86)\Minimal ADB and Fastboot”.
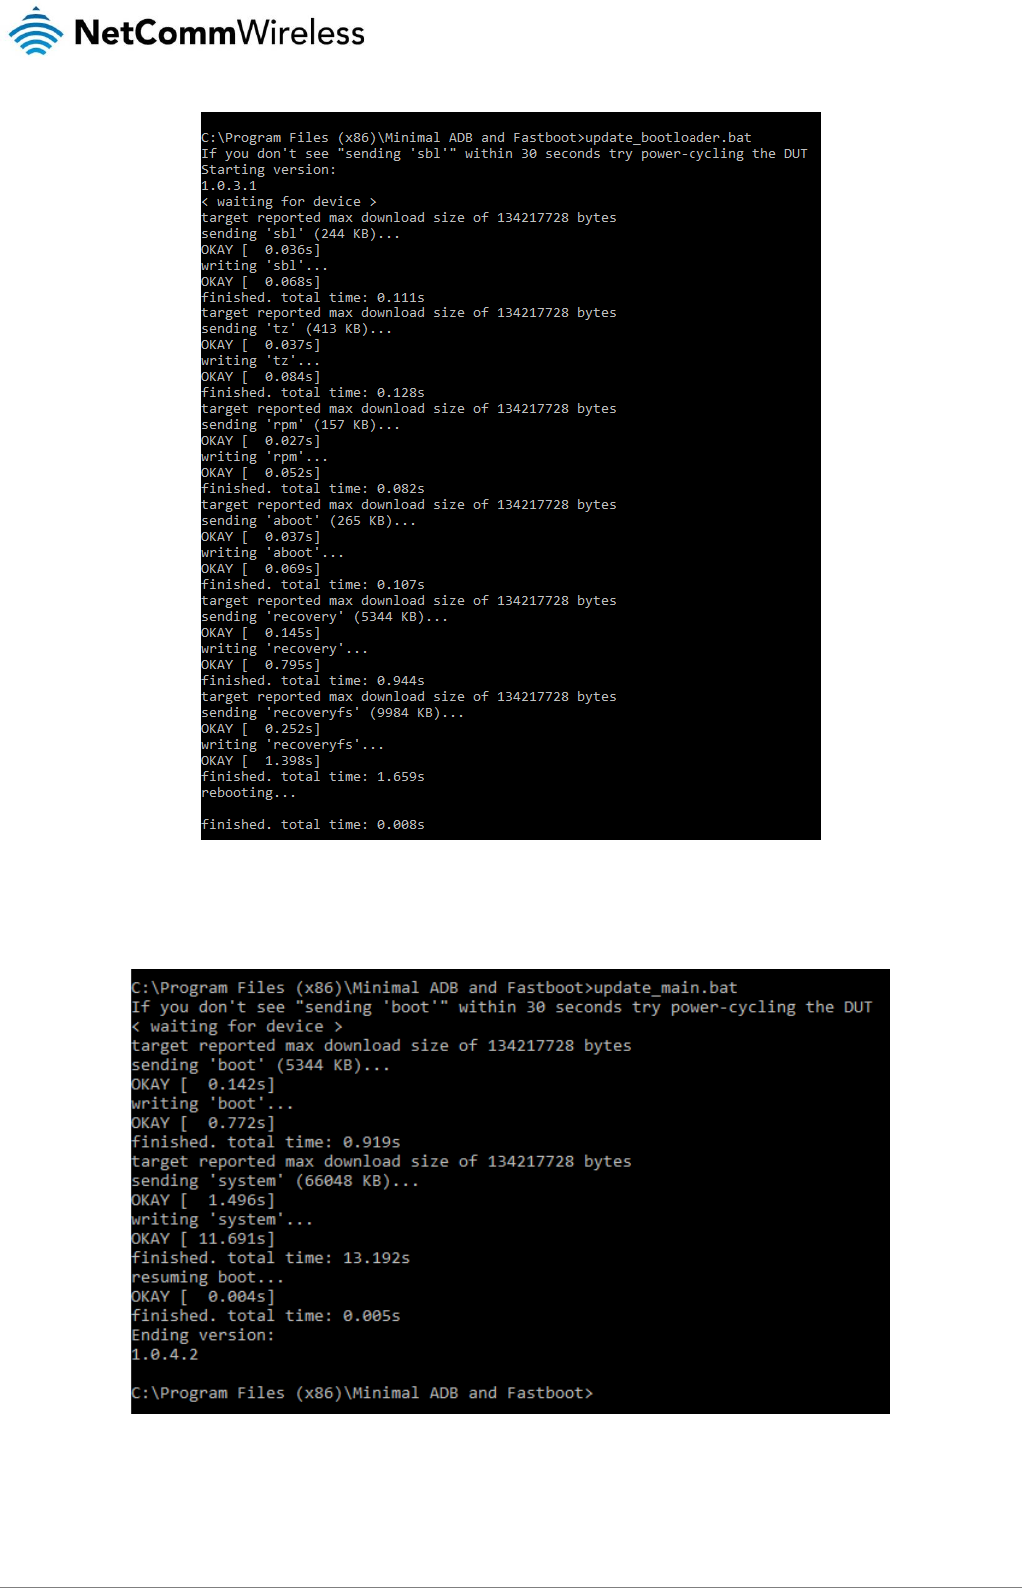
8. Run the following command from Minimal ADB Tool folder to upgrade the recovery image:
C:\Program Files (x86)\Minimal ADB and Fastboot>update_bootloader.bat
14
Outdoor Wireless Antenna (NRB-51)
www.netcommwireless.com
UM-00017 rev 1.0
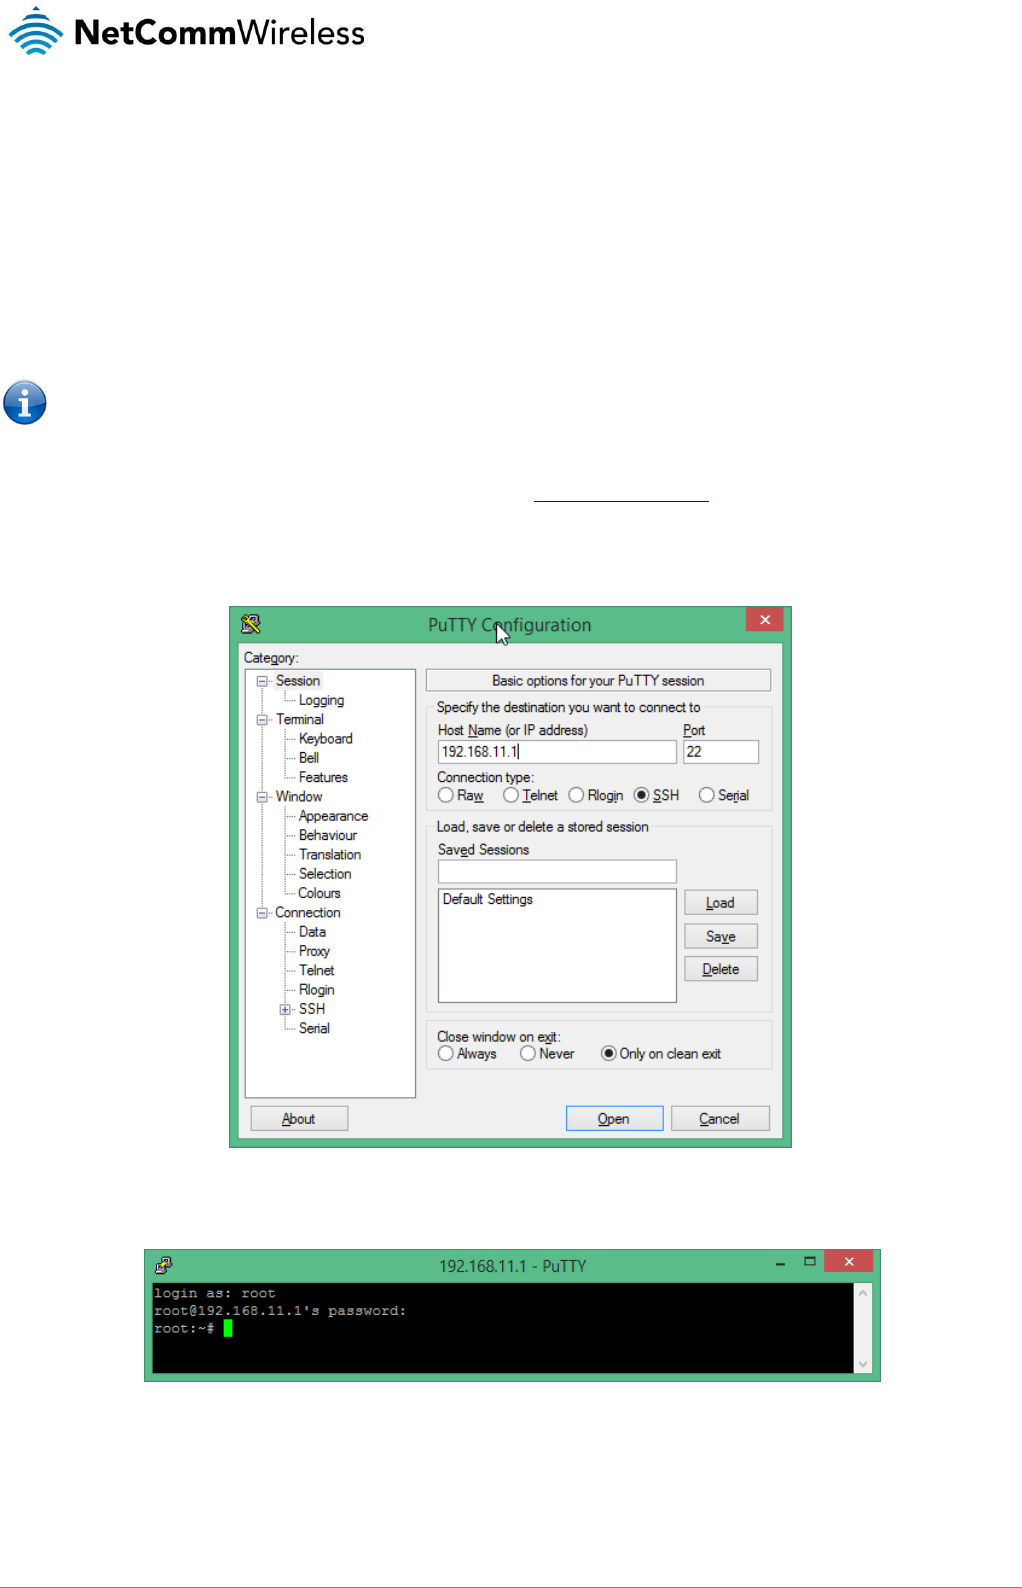
9. Enter the following command from Minimal ADB Tool folder to upgrade the main system image
C:\Program Files (x86)\Minimal ADB and Fastboot>update_main.bat
The firmware upgrade is complete.
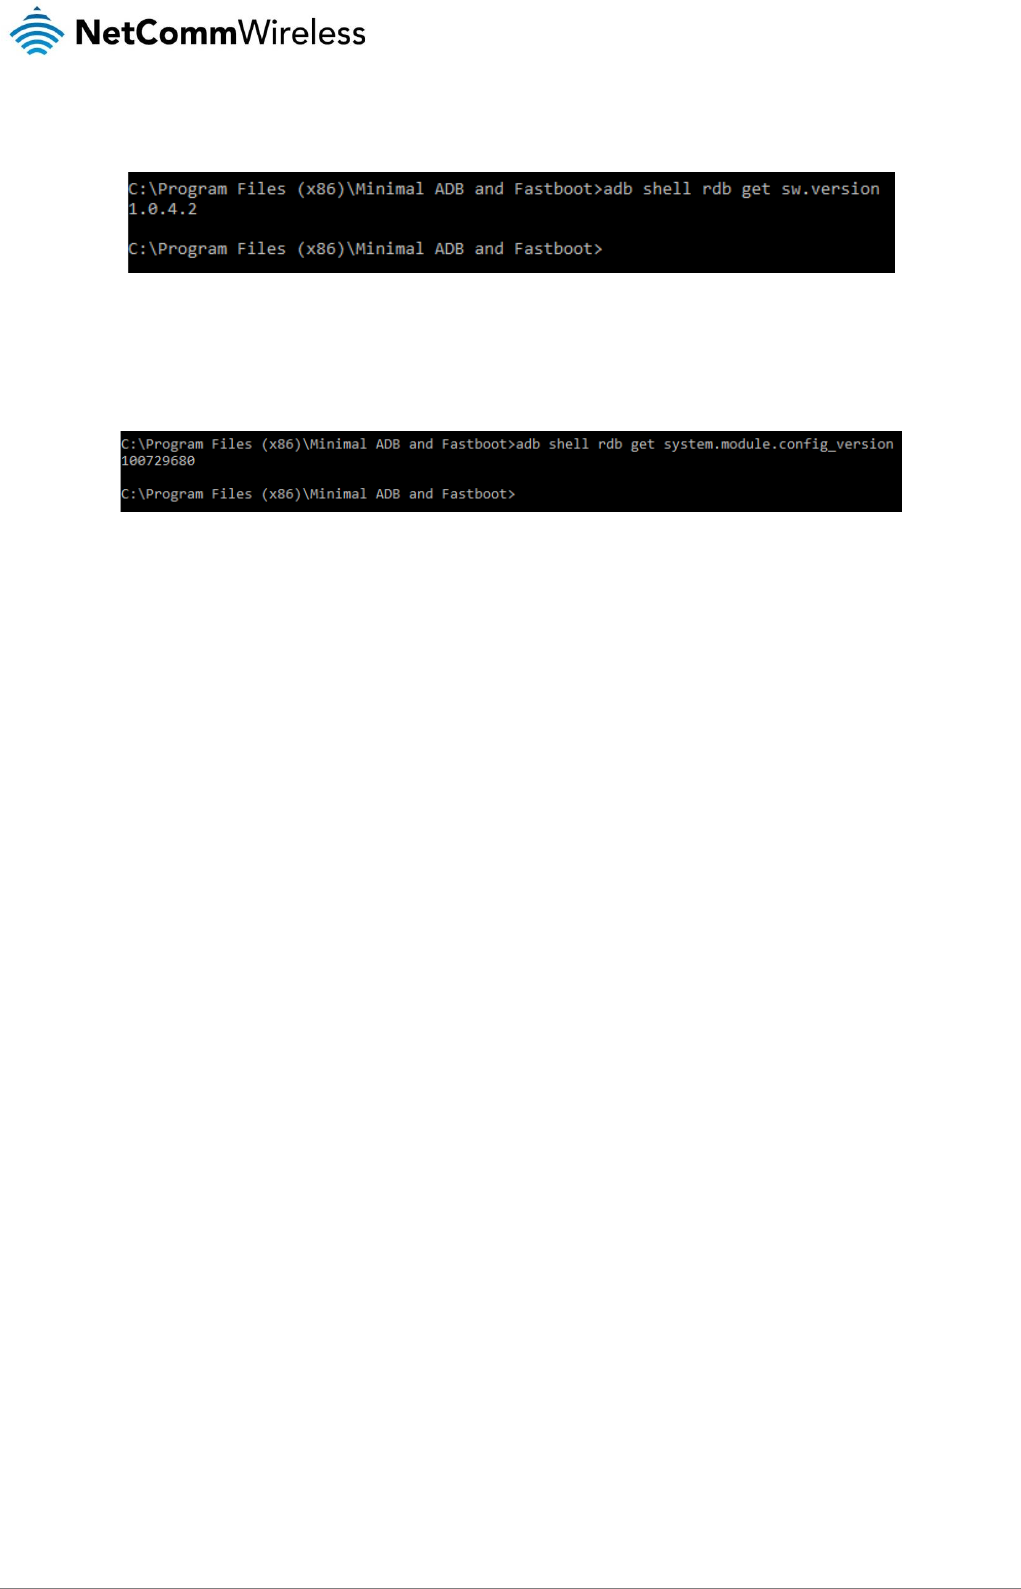
10. Confirm that the upgrade was successful by entering the following command:
adb shell rdb get sw.version
16
Outdoor Wireless Antenna (NRB-51)
www.netcommwireless.com
UM-00017 rev 1.0
Admin Shell Session Using SSH
The admin shell can be accessed using the admin VLAN (i.e. VLAN 4001). Through this admin interface, ssh session can be setup
and like the adb session, any admin activities can be performed,
For more details about the command list or details, please contact NetComm Wireless.
Using SSH over Ethernet
An SSH client is required for Ethernet access.
Note: To use this method, a PC must be directly connected to the OWA’s Ethernet interface, that is, it must not be
connected via another router/gateway.
Follow these steps to gain admin shell access:
1. Connect a PC to the NRB-51 using the Ethernet cable (see Installation instructions) and create a VLAN 4001 on the PC.
2. Get an IP address for the PC’s 4001 VLAN interface using DHCP.
3. Open a terminal emulator such as PuTTY and SSH to 192.168.11.1.
4. Log in to the NRB-51 using username root and password admin.

www.netcommwireless.com
Outdoor Wireless Antenna
17
UM-00017 rev 1.0
Connection Manager
Connection Manager is a process running on the Application Processor (AP), which communicates with the Baseband Processor
(BP) to control the WAN related operations.
It uses the QMI protocol over the SMD interface to communicate with the BP.
The following QMI services in the BP are used by the Connection Manager.
WDS
NAS
VOICE
DMS
LOC
IMS
UIM
It reads and writes the connection profiles which reside in the BP and contain the APN details.
For more details about the QMI services, please refer to the associated Qualcomm documentation.
Although the Connection Manager is required to perform the normal WAN operation, it needs to be disabled sometimes, for
example, during Lab testing. Otherwise, it can interfere with a testing tool or process.
Disabling the Connection Manager
Before running the following command, please make sure that the Admin shell session is opened using adb (
ref
, Admin shell
session using adb) or ssh (
ref
. Admin shell session using ssh).
1. To temporarily disable Connection Manager, please run the following command on the Admin shell session:
rdb set service.wmmd.enable 0
2. To enable it,
rdb set service.wmmd.enable 1
Controlling a connection profile
Sometimes a user may want to selectively disable or enable a connection profile (i.e. an APN connection) instead of disabling the
Connection Manager completely which would disable the connection profile management in the application level.
The following procedure can be used to manage each connection profile.
Before running this command, please make sure that the Admin shell session is opened using adb (
ref
, Admin shell session using
adb) or ssh (
ref
. Admin shell session using ssh).
To list a connection profile, please run the following command: ‘x’ can be a value ranged from ‘1’ to ‘6’ (i.e. there are six profiles
available):
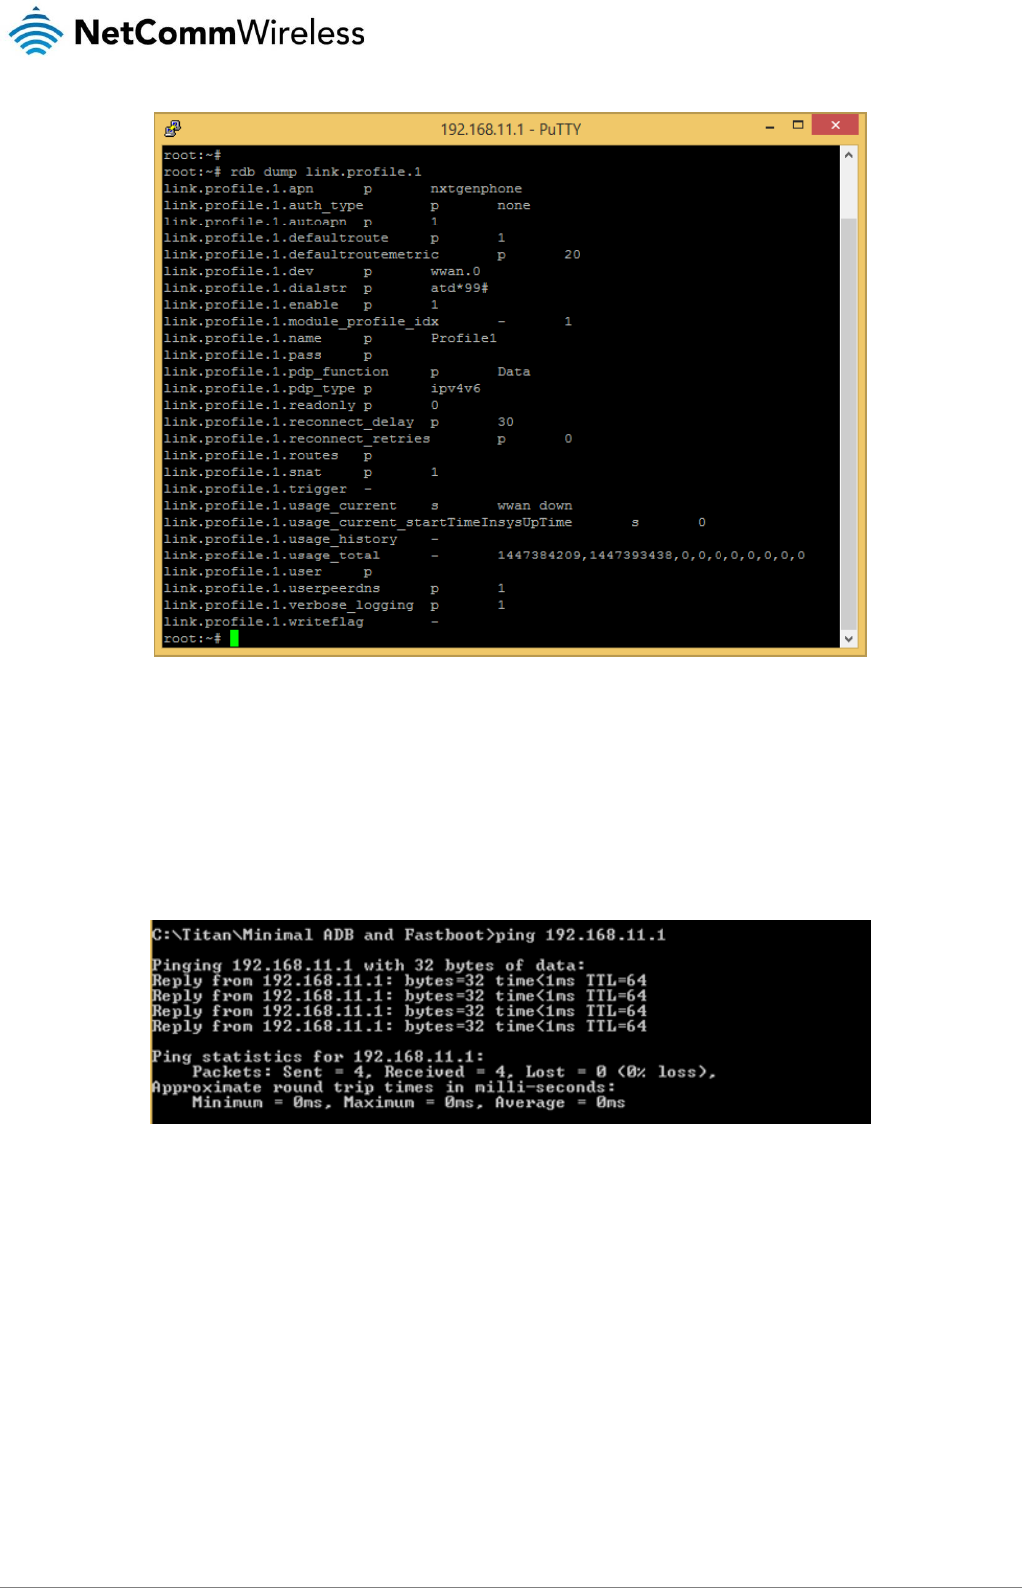
rdb dump link.profile.<x>
To disable a connection profile, please run the following command: ‘x’ can be a value ranged from ‘1’ to ‘6’:
rdb set link.profile.<x>.enable 0
To enable a connection profile, please run the following command: ‘x’ can be a value ranged from ‘1’ to ‘6’:
rdb set link.profile.<x>.enable 1
To change the APN of a connection profile, for example, to ‘wlldata, please run the following command: ‘x’ can be a value ranged
from ‘1’ to ‘6’:
rdb set link.profile.<x>.apn wlldata
rdb set link.profile.<x>.writeflag 1
For example, ‘rdb dump link.profile.1’ shows output below:
18
Outdoor Wireless Antenna (NRB-51)
www.netcommwireless.com
UM-00017 rev 1.0
Conducting tests on admin VLAN:
1. Make sure Ethernet cable is connected from RG Port #2 to the test PC. This provides connectivity to admin VLAN on the
OWA.
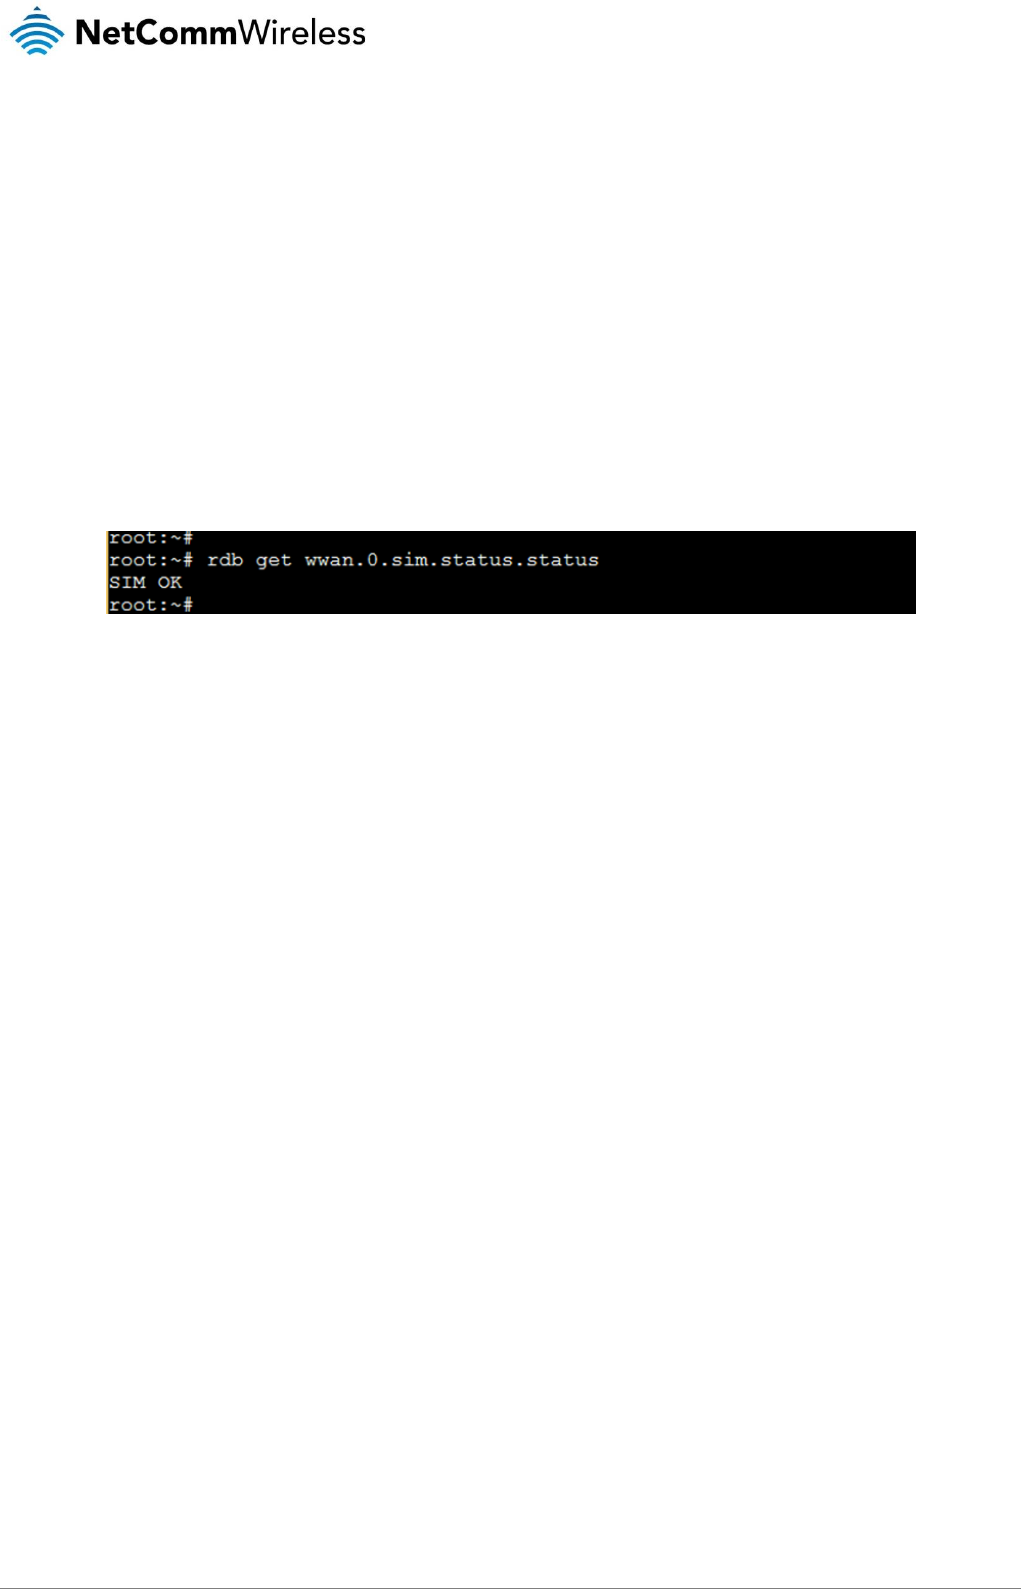
2. Ping the admin VLAN
>ping 192.168.11.1
Ping should be successful as shown in the figure below.
www.netcommwireless.com
Outdoor Wireless Antenna
19
UM-00017 rev 1.0
Verification of SIM status:
This section is applicable only if SIM is already installed.
1. Make sure that a SIM is inserted before the OWA is powered ON.
2. Ensure that the test PC can access admin VLAN of OWA.
3. Using PuTTY/Tera Term tool, open an SSH client session on the Test PC with following credentials:
Host: 192.168.11.1
User name: root
Password: <confidential>
When successfully logged in, the terminal window displays “root: ~#”
4. Read the SIM status using the following command as shown in the screenshot:
#rdb get wwan.0.sim.status.status
When the SIM is detected successfully, “SIM OK” is displayed as shown below:

20
Outdoor Wireless Antenna (NRB-51)
www.netcommwireless.com
UM-00017 rev 1.0
Useful Commands
VLAN details
adb shell rdb dump vlan.admin
adb shell rdb dump vlan.data
adb shell rdb dump vlan.ems
adb shell rdb dump vlan.voice
WWAN status
adb shell rdb dump wwan.0.system_network_status
SIM status
adb shell rdb dump sim
IMEI
adb shell rdb dump imei
IMS status
adb shell rdb dump wwan.0.ims
Data Profile
adb shell rdb dump link.profile.1
adb shell rdb dump link.profile.1.apn
Voice (IMS) profile
adb shell rdb dump link.profile.2
SOS profile
adb shell rdb dump link.profile.3
EMS profile
adb shell rdb dump link.profile.4
To change an APN name,
adb shell rdb set link.profile.1.apn [new apn]
adb shell rdb set link.profile.1.writeflag 1
To change an APN’s IP type,
adb shell rdb set link.profile.1.pdp_type [ipv4|ipv6|ipv4v6]
adb shell rdb set link.profile.1.writeflag 1
To enable and disable, an APN state
adb shell rdb set link.profile.1.enable 1
adb shell rdb set link.profile.1.enable 0
Check the interface status

22
Outdoor Wireless Antenna (NRB-51)
www.netcommwireless.com
UM-00017 rev 1.0
Technical Specifications
Network Technology
o LTE – CAT6, with software upgrade path for 4x4 DL MIMO B2,30
o VoLTE HD Voice
Chipset:
o Qualcomm MDM9340-1
4 x Antennas (2 x cross-polarized pairs)
Antenna gain:
o B2 = 13 dBi
o B30 = 13 dBi
E911 including GPS
FOTA: Yes
Ports (under cover):
o 1 x PoE Gigabit Ethernet RJ45
o Installation alignment port
Environmentally protected to IP65
Temp range: -40 to +65⁰C (-40 to 150 F)
Dimensions: 17.4” x 11.2” x 6.3” (on mount)
Weight: 5.8 lbs (5.9 lbs with KMW filter)
o Including mount: 7.1 lbs

www.netcommwireless.com
Outdoor Wireless Antenna
23
UM-00017 rev 1.0
Appendix A: Tables
Table 1 - Device Dimensions ......................................................................................................................................... 6
Table 2 – Interfaces ...................................................................................................................................................... 7

24
Outdoor Wireless Antenna (NRB-51)
www.netcommwireless.com
UM-00017 rev 1.0
Safety and product care
RF Exposure
Your device contains a transmitter and a receiver. When it is on, it receives and transmits RF energy. When you communicate with
your device, the system handling your connection controls the power level at which your device transmits.
This device meets the government’s requirements for exposure to radio waves.
This device is designed and manufactured not to exceed the emission limits for exposure to radio frequency (RF) energy set by the
Federal Communications Commission of the U.S. Government.
This equipment complies with radio frequency (RF) exposure limits adopted by the Federal Communications Commission for an
uncontrolled environment. This equipment should be installed and operated with minimum distance 20 cm between the radiator &
your body.
Déclaration d'exposition aux radiations:
Cet équipement est conforme aux limites d'exposition aux rayonnements IC établies pour un environnement non contrôlé. Cet
équipement doit être installé et utilisé avec un minimum de 20 cm de distance entre la source de rayonnement et votre corps.
Tout gain d'antenne externe doit répondre l'exposition aux radiofréquences et les limites de puissance de sortie maximum rayonnée
de la section de la règle applicable. Le gain maximal de l'antenne de cet appareil est: dBi (MHz) et dBi (MHz).
FCC Statement
FCC compliance
Federal Communications Commission Notice (United States): Before a wireless device model is available for sale to the public, it
must be tested and certified to the FCC that it does not exceed the limit established by the government-adopted requirement for
safe exposure.
FCC regulations
This device complies with part 15 of the FCC Rules. Operation is subject to the following two conditions: (1) This device may not
cause harmful interference, and (2) this device must accept any interference received, including interference that may cause
undesired operation.
This device has been tested and found to comply with the limits for a Class B digital device, pursuant to Part 15 of the FCC Rules.
These limits are designed to provide reasonable protection against harmful interference in a residential installation. This equipment
generates, uses and can radiate radio frequency energy and, if not installed and used in accordance with the instructions, may
cause harmful interference to radio communications. However, there is no guarantee that interference will not occur in a particular
installation. If this equipment does cause harmful interference to radio or television reception, which can be determined by turning
the equipment off and on, the user is encouraged to try to correct the interference by one or more of the following measures:
Reorient or relocate the receiving antenna.
Increase the separation between the equipment and receiver.
Connect the equipment into an outlet on a circuit different from that to which the receiver is connected.
Consult the dealer or an experienced radio/TV technician for help.
Changes or modifications not expressly approved by the party responsible for compliance could void the user‘s authority to operate
the equipment.
Electrical safety
Accessories
Only use approved accessories.
Do not connect with incompatible products or accessories.

www.netcommwireless.com
Outdoor Wireless Antenna
25
UM-00017 rev 1.0
Connection to a car
Seek professional advice when connecting a device interface to the vehicle electrical system.
Distraction
Operating machinery
Full attention must be given to operating the machinery in order to reduce the risk of an accident.
Product handling
You alone are responsible for how you use your device and any consequences of its use.
You must always switch off your device wherever the use of a mobile phone is prohibited. Do not use the device without the clip-on
covers attached, and do not remove or change the covers while using the device. Use of your device is subject to safety measures
designed to protect users and their environment.
Always treat your device and its accessories with care and keep it in a clean and dust-free place.
Do not expose your device or its accessories to open flames or lit tobacco products.
Do not expose your device or its accessories to liquid, moisture or high humidity.
Do not drop, throw or try to bend your device or its accessories.
Do not use harsh chemicals, cleaning solvents, or aerosols to clean the device or its accessories.
Do not paint your device or its accessories.
Do not attempt to disassemble your device or its accessories, only authorised personnel must do so.
Do not use or install this product in extremely hot or cold areas. Ensure that the device is installed in an area where the temperature
is within the supported operating temperature range (-20°C to 70°C)
Do not use your device in an enclosed environment or where heat dissipation is poor. Prolonged use in such space may cause
excessive heat and raise ambient temperature, which will lead to automatic shutdown of your device or the disconnection of the
mobile network connection for your safety. To use your device normally again after such shutdown, cool it in a well-ventilated place
before turning it on.
Please check local regulations for disposal of electronic products.
Do not operate the device where ventilation is restricted
Installation and configuration should be performed by trained personnel only.
Do not use or install this product near water to avoid fire or shock hazard. Avoid exposing the equipment to rain or damp areas.
Arrange power and Ethernet cables in a manner such that they are not likely to be stepped on or have items placed on them.
Ensure that the voltage and rated current of the power source match the requirements of the device. Do not connect the device to
an inappropriate power source.
Small children
Do not leave your device and its accessories within the reach of small children or allow them to play with it.
They could hurt themselves or others, or could accidentally damage the device.
Your device contains small parts with sharp edges that may cause an injury or which could become detached and create a choking
hazard.
Emergency situations
This device, like any wireless device, operates using radio signals, which cannot guarantee connection in all conditions. Therefore,
you must never rely solely on any wireless device for emergency communications.

26
Outdoor Wireless Antenna (NRB-51)
www.netcommwireless.com
UM-00017 rev 1.0
Device heating
Your device may become warm during normal use.
Faulty and damaged products
Do not attempt to disassemble the device or its accessories.
Only qualified personnel must service or repair the device or its accessories.
If your device or its accessories have been submerged in water punctured or subjected to a severe fall, do not use until they have
been checked at an authorised service centre.
Interference
Care must be taken when using the device in close proximity to personal medical devices, such as pacemakers and hearing aids.
Pacemakers
Pacemaker manufacturers recommend that a minimum separation of 15cm be maintained between a device and a pacemaker to
avoid potential interference with the pacemaker.
Hearing aids
People with hearing aids or other cochlear implants may experience interfering noises when using wireless devices or when one is
nearby.
The level of interference will depend on the type of hearing device and the distance from the interference source, increasing the
separation between them may reduce the interference. You may also consult your hearing aid manufacturer to discuss alternatives.
Medical devices
Please consult your doctor and the device manufacturer to determine if operation of your device may interfere with the operation of
your medical device.
Hospitals
Switch off your wireless device when requested to do so in hospitals, clinics or health care facilities. These requests are designed to
prevent possible interference with sensitive medical equipment.
Interference in cars
Please note that because of possible interference to electronic equipment, some vehicle manufacturers forbid the use of devices in
their vehicles unless an external antenna is included in the installation.
Explosive environments
Petrol stations and explosive atmospheres
In locations with potentially explosive atmospheres, obey all posted signs to turn off wireless devices such as your device or other
radio equipment.
Areas with potentially explosive atmospheres include fuelling areas, below decks on boats, fuel or chemical transfer or storage
facilities, areas where the air contains chemicals or particles, such as grain, dust, or metal powders.
Blasting caps and areas
Turn off your device or wireless device when in a blasting area or in areas posted turn off “two-way radios” or “electronic devices” to
avoid interfering with blasting operations.
