Netgear orporated 10400146 PUSH2TV User Manual PTV2000 UserMan FCC
Netgear Incorporated PUSH2TV PTV2000 UserMan FCC
Users Manual
202-10591-01
January 2011
NETGEAR, Inc.
350 East Plumeria Drive
San Jose, CA 95134
Push 2 TV Adapter
(PTV2000)/Intel Wireless
Display User Manual

ii
v1.0, January 2011
© 2011 by NETGEAR, Inc. All rights reserved..
Technical Support
Please refer to the support information card that shipped with your product. By registering your product at
http://www.netgear.com/register, we can provide you with faster expert technical support and timely notices of product
and software upgrades.
NETGEAR, INC. Support Information
Phone: 1-888-NETGEAR, for US & Canada only. For other countries, see your Support information card.
E-mail: support@netgear.com
North American NETGEAR website: http://www.netgear.com
Trademarks
NETGEAR, the NETGEAR logo, ProSafe, Smart Wizard, and Auto Uplink are trademarks or registered trademarks of
NETGEAR, Inc. Microsoft, Windows, Windows NT and Vista are registered trademarks of Microsoft Corporation.Other
brand and product names are registered trademarks or trademarks of their respective holders.
Statement of Conditions
In the interest of improving internal design, operational function, and/or reliability, NETGEAR reserves the right to
make changes to the products described in this document without notice.
NETGEAR does not assume any liability that may occur due to the use or application of the product(s) or circuit
layout(s) described herein.
Certificate of the Manufacturer/Importer
It is hereby certified that the Push 2 TV Adapter (PTV2000)/Intel Wireless Display has been suppressed in accordance
with the conditions set out in the BMPT-AmtsblVfg 243/1991 and Vfg 46/1992. The operation of some equipment (for
example, test transmitters) in accordance with the regulations may, however, be subject to certain restrictions. Please
refer to the notes in the operating instructions.
The Federal Office for Telecommunications Approvals has been notified of the placing of this equipment on the market
and has been granted the right to test the series for compliance with the regulations.
Bestätigung des Herstellers/Importeurs
Es wird hiermit bestätigt, daß dasPush 2 TV Adapter (PTV2000)/Intel Wireless Display gemäß der im BMPT-
AmtsblVfg 243/1991 und Vfg 46/1992 aufgeführten Bestimmungen entstört ist. Das vorschriftsmäßige Betreiben
einiger Geräte (z.B. Testsender) kann jedoch gewissen Beschränkungen unterliegen. Lesen Sie dazu bitte die
Anmerkungen in der Betriebsanleitung.
Das Bundesamt für Zulassungen in der Telekommunikation wurde davon unterrichtet, daß dieses Gerät auf den Markt
gebracht wurde und es ist berechtigt, die Serie auf die Erfüllung der Vorschriften hin zu überprüfen.
Voluntary Control Council for Interference (VCCI) Statement
This equipment is in the Class B category (information equipment to be used in a residential area or an adjacent area
thereto) and conforms to the standards set by the Voluntary Control Council for Interference by Data Processing
Equipment and Electronic Office Machines aimed at preventing radio interference in such residential areas. When used
near a radio or TV receiver, it may become the cause of radio interference. Read instructions for correct handling.

v1.0, January 2011
iii
Regulatory Compliance Information
This section includes user requirements for operating this product in accordance with National laws for usage of radio
spectrum and operation of radio devices. Failure of the end-user to comply with the applicable requirements may result
in unlawful operation and adverse action against the end-user by the applicable National regulatory authority.
NOTE: This product's firmware limits operation to only the channels allowed in a particular Region or Country.
Therefore, all options described in this user's guide may not be available in your version of the product.
Europe – EU Declaration of Conformity
Marking by the above symbol indicates compliance with the Essential Requirements of the R&TTE Directive of the
European Union (1999/5/EC). This equipment meets the following conformance standards:
EN300 328, EN301 489-17, EN60950
Visit the NETGEAR EU Declarations of Conformity website at:
http://kb.netgear.com/app/answers/detail/a_id/11621/sno/0
FCC Requirements for Operation in the United States
FCC Information to User
This product does not contain any user serviceable components and is to be used with approved antennas only. Any
product changes or modifications will invalidate all applicable regulatory certifications and approvals
FCC Guidelines for Human Exposure
This equipment complies with FCC radiation exposure limits set forth for an uncontrolled environment. This equipment
should be installed and operated with minimum distance of 20 cm between the radiator and your body.
This transmitter must not be co-located or operating in conjunction with any other antenna or transmitter.
FCC Declaration Of Conformity
We NETGEAR, Inc., 350 East Plumeria Drive, San Jose, CA 95134, declare under our sole responsibility that the model
PTV2000 Push 2 TV Adapter (PTV2000)/Intel Wireless Display complies with Part 15 of FCC Rules. Operation is
subject to the following two conditions:
• This device may not cause harmful interference, and
• This device must accept any interference received, including interference that may cause undesired operation.
Federal Communication Commission Interference Statement
This equipment has been tested and found to comply with the limits for a Class B digital device, pursuant to Part 15 of
the FCC Rules. These limits are designed to provide reasonable protection against harmful interference in a residential
installation. This equipment generates, uses and can radiate radio frequency energy and, if not installed and used in
accordance with the instructions, may cause harmful interference to radio communications. However, there is no
guarantee that interference will not occur in a particular installation. If this equipment does cause harmful interference to
radio or television reception, which can be determined by turning the equipment off and on, the user is encouraged to try
to correct the interference by one of the following measures:
• Reorient or relocate the receiving antenna.

v1.0, January 2011
iv
• Increase the separation between the equipment and receiver.
• Connect the equipment into an outlet on a circuit different from that to which the receiver is connected.
• Consult the dealer or an experienced radio/TV technician for help.
FCC Caution:
Any changes or modifications not expressly approved by the party responsible for compliance could void
the user's authority to operate this equipment.
Canada Caution:
Industry Canada regulatory information Operation is subject to the following two conditions: (1)this device may
not cause interference, and (2) this device must accept any interference, including interference that may cause
undesired operation of the device. The user is cautioned that this device should be used only as specified within this
manual to meet RF exposure requirements. Use of this device in a manner inconsistent with this manual could lead to
excessive RF exposure conditions.
This device is operation in 5.15 – 5.25GHz frequency range, then restricted in indoor use only.
Product and Publication Details
Model Number: PTV2000
Publication Date: January 2011
Product Family: Wireless Adapter
Product Name: Push2TV
Home or Business Product: Home
Language: English
Publication Part Number: 202-10591-01
Publication Version Number: 1.0

v
v1.0, January 2011
Contents
Push 2 TV Adapter (PTV2000)/Intel Wireless Display User Manual
About This Manual
Conventions, Formats, and Scope ................................................................................... ix
Revision History ................................................................................................................. x
Chapter 1
Connecting
Using Intel Wireless Display ...........................................................................................1-1
Step 1: Opening Intel Wireless Display on the Laptop .............................................1-1
Step 2: Windows Firewall Security Alert ..................................................................1-2
Step 3: Consenting to the License Agreement .........................................................1-2
Step 4: Scanning for Adapters .................................................................................1-3
Step 5: Detected Adapter .........................................................................................1-3
Detected Adapters Column Information ...................................................................1-3
Step 6: Connecting to the TV ...................................................................................1-4
Step 7: Connected to the Adapter ............................................................................1-4
Step 8: Ready to Use Intel Wireless Display ............................................................1-4
First Time Connection Procedures .................................................................................1-5
Changing the TV Input .............................................................................................1-5
Step 1: Entering a Security Code .............................................................................1-6
Step 2: Security Configuration Successful ...............................................................1-7
Step 3: Adapter is Connected ..................................................................................1-7
Step 4: Rename Adapter ..........................................................................................1-7
Step 5: Finishing the Initial Set Up Process .............................................................1-8
Initial Set Up Troubleshooting ..................................................................................1-8
Disconnecting ...........................................................................................................1-8
Exiting ......................................................................................................................1-9
Chapter 2 Troubleshooting
Initial Set Up Problems ...................................................................................................2-1

Push 2 TV Adapter (PTV2000)/Intel Wireless Display User Manual
vi
v1.0, January 2011
Cords and Cables ....................................................................................................2-1
On/Off Button ...........................................................................................................2-2
Changing the TV Input .............................................................................................2-2
Adapter Encountered a Problem on Startup ............................................................2-3
There are No Adapters Detected .............................................................................2-3
Security Code Issues ...............................................................................................2-3
TV Image is Rough, Frozen or Delayed ...................................................................2-3
Your Video Mode has Changed... ............................................................................2-4
Unsupported Audio Mode ........................................................................................2-4
Intel Wireless Display Requires a Different Security Profile ...........................................2-4
Security Profile is Incorrect ......................................................................................2-4
Manually Setting the Correct Security Profile ...........................................................2-5
Your Wireless is Off .................................................................................................2-5
Intel My WiFi Technology is Disabled ......................................................................2-5
Unsupported Laptop Hardware ................................................................................2-5
Firewall Issues .........................................................................................................2-6
Windows Power Saving ...........................................................................................2-6
Could Not Obtain a Network Address ......................................................................2-6
Adapter Does Not Work ...........................................................................................2-6
Checking the Access Point Frequency ....................................................................2-7
Common Solutions to Many Issues ................................................................................2-7
Known Issues .................................................................................................................2-8
FAQs ..............................................................................................................................2-8
How do I Change the Adapter Display Language ....................................................2-9
How do I Update the Firmware? ..............................................................................2-9
How do I Reset the Application Settings? ................................................................2-9
How do I Reset the Adapter? ...................................................................................2-9
How do I Clear the Adapter Memory? ....................................................................2-10
Can I Close the Laptop Lid and Still Use Intel Wireless Display? ..........................2-10
What are Adapter Properties? ................................................................................2-10
Audio/Visual Tuning ...............................................................................................2-11
Why does My Laptop's Color Look Different on My TV? .......................................2-11
How do I Adjust the TV Display Image? .................................................................2-11
How do I Adjust the Audio? ....................................................................................2-11
Sample Audio Testing ............................................................................................2-11

Push 2 TV Adapter (PTV2000)/Intel Wireless Display User Manual
vii
v1.0, January 2011
Global Volume Control ...........................................................................................2-12
Windows Audio Mixer .............................................................................................2-12
Changing the Sound using the Windows Control Panel ........................................2-12
How do I Train My Displays? .................................................................................2-12
Can I play DVDs with Intel Wireless Display? ........................................................2-13
How do I Contact Customer Support? ...................................................................2-13
What is Auto-Connect ............................................................................................2-13
Appendix A
Technical Specifications
Appendix B
Related Documents
ix
v1.0, January 2011
About This Manual
The NETGEAR®Push 2 TV Adapter (PTV2000)/Intel® Wireless Display User Manual describes
how to install, configure and troubleshoot the Push 2 TV Adapter (PTV2000)/Intel Wireless
Display. The information in this manual is intended for readers with intermediate computer and
Internet skills.
Conventions, Formats, and Scope
The conventions, formats, and scope of this manual are described in the following paragraphs:
•Typographical Conventions. This manual uses the following typographical conventions::
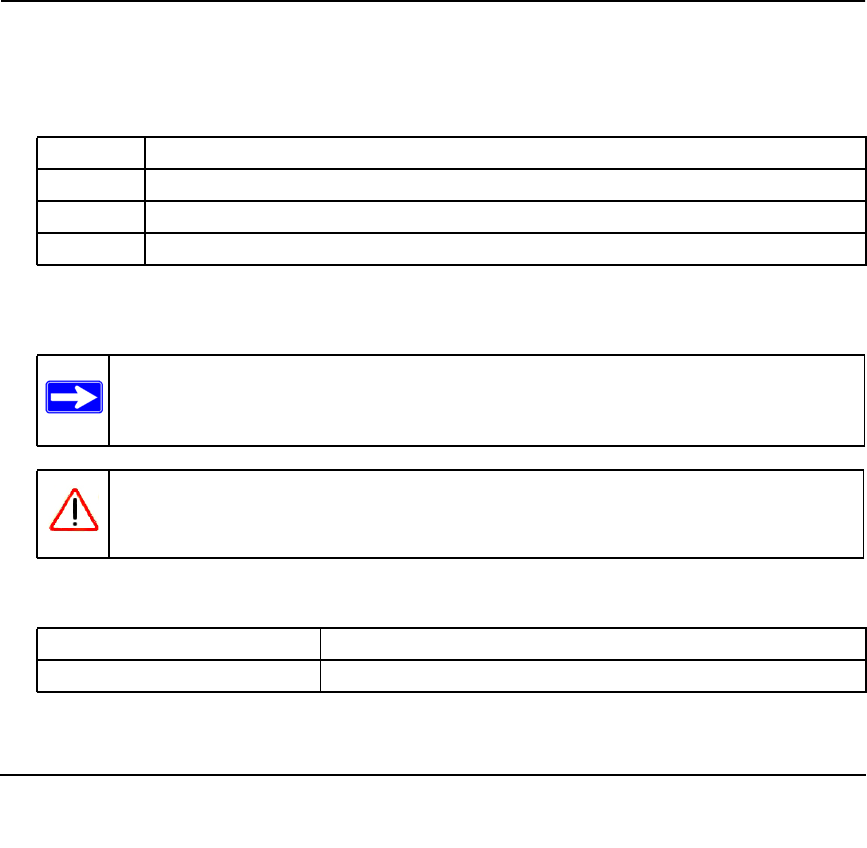
Italic Emphasis, books, CDs, file and server names, extensions
Bold User input, IP addresses, GUI screen text
Fixed Command prompt, CLI text, code
italic URL links
•Formats. This manual uses the following formats to highlight special messages:
Warning: Ignoring this type of note may result in a malfunction or damage to the
equipment.
Note: This format is used to highlight information of importance or special interest.
•Scope. This manual is written for the adapter according to these specifications:
Product Version Push 2 TV Adapter (PTV2000)/Intel Wireless Display
Manual Publication Date January 2011

Push 2 TV Adapter (PTV2000)/Intel Wireless Display User Manual
x
v1.0, January 2011
For more information about network, Internet, firewall, and VPN technologies, see the links to the
NETGEAR website in Appendix B, “Related Documents.”
Note: Product updates are available on the NETGEAR, Inc. website at
http://kbserver.netgear.com/products/PTV2000.asp.
Revision History
Part Number Version
Number Date Description
202-10591-01 1.0 October
2010
Original publication

1-1
v1.0, January 2011
Chapter 1
Connecting
Intel Wireless Display allows consumers to use their HDTV as a huge, remote screen for their
laptop. With Intel Wireless Display, consumers can connect their laptop to their TV and enjoy and
share their personal media collections, latest YouTube videos, downloaded or streamed movies,
music, or a variety of other Internet content from the comfort of their couch.
Intel Wireless Display requires the following key elements:
• Push 2 TV adapter. The adapter receives Wi-Fi signals from the laptop, translates the signals
into an image, and sends the image to the TV.
• A laptop computer with Intel Wireless Display installed. This will be used to manage the
connection to the TV through the adapter.
Using Intel Wireless Display
This section provides instructions for using Intel Wireless Display. For help with installation, see
the Push 2 TV Adapter (PTV2000)/Intel® Wireless Display Installation Guide.
Follow these steps to set up and use Intel Wireless Display. The side-by-side laptop and TV images
shown below correspond to each step and occur at the same time. When a laptop or TV screenshot
is the same for multiple steps, the image is left blank.
Step 1: Opening Intel Wireless Display on the Laptop
To open Intel Wireless Display, click the Windows Start icon on the laptop’s taskbar. Type Intel
Wireless Display into the search field. In the search results click Intel Wireless Display. If an
auto-connect adapter is set, launching the application this way will invoke a connection attempt, if
the adapter is discovered. See “What is Auto-Connect” on page 2-13 for more details on auto-
connect.

Push 2 TV Adapter (PTV2000)/Intel Wireless Display User Manual
1-2
v1.0, January 2011
Some laptops may have a button or key that starts Intel Wireless Display. This key will be located
in different places depending on the brand of laptop. It is usually found on or around the keyboard.
The key will contain a small version of the symbol below.
Figure 1-1
If this is the initial set up continue to Step 2. If this is the not the initial set up, it is not necessary to
repeat Steps 2 and 3. Proceed to Step 4.
Step 2: Windows Firewall Security Alert
In the initial set up, a firewall may block Intel Wireless Display and a firewall alert message may
be displayed. If this happens, make sure to allow access for both private and public networks. For
firewall help, see “Firewall Issues” on page 2-6 or see your firewall’s user manual.
Step 3: Consenting to the License Agreement
After reading and agreeing to the license agreement, click the I agree to the terms of this license
button and proceed to the next screen. If you do not agree to the terms of the license, click the I do
not agree button. You will not be able to continue and the application will close.
At this point, the TV status reads Ready for connection.
Push 2 TV Adapter (PTV2000)/Intel Wireless Display User Manual
1-3
v1.0, January 2011
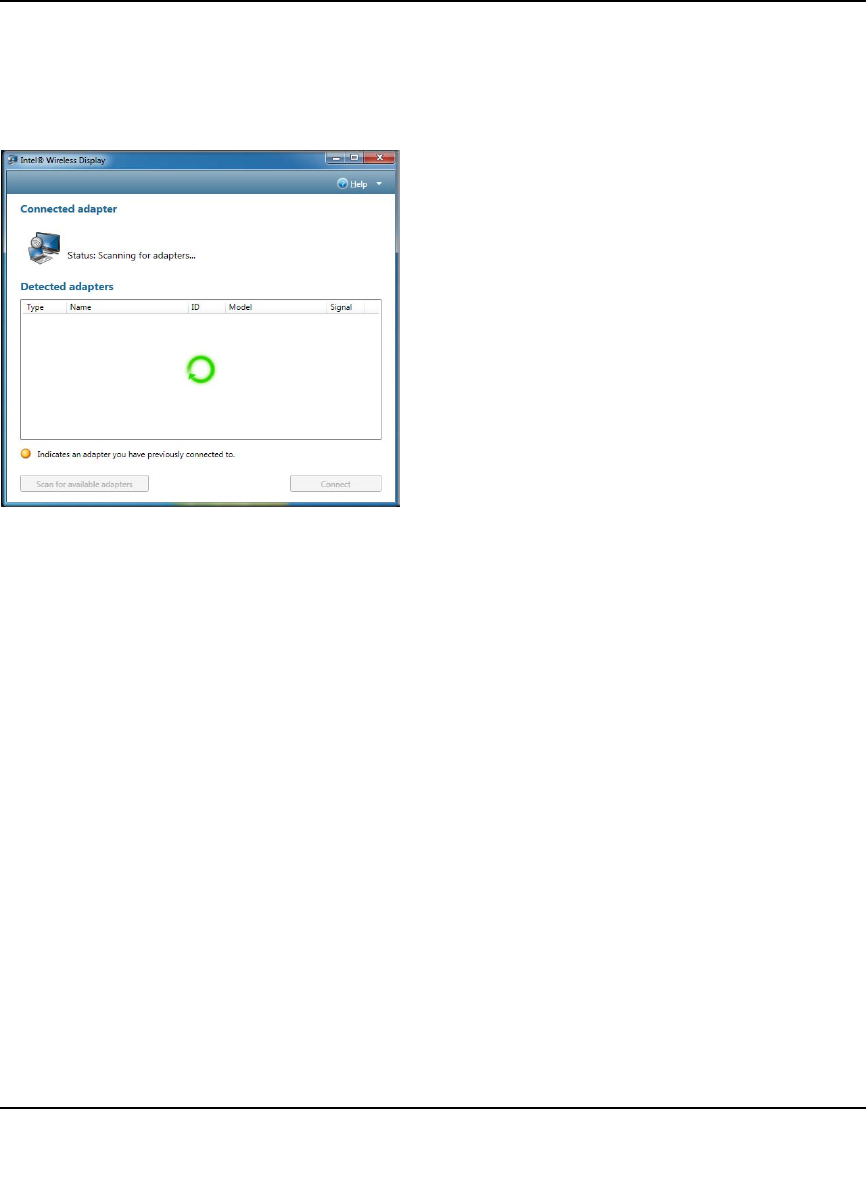
Step 4: Scanning for Adapters
After opening Intel Wireless Display (or after agreeing to the license), the application begins
scanning for available adapters and the status reads Scanning for adapters.
Figure 1-2
If the application does not automatically begin scanning, click the Scan for available adapters
button.
Step 5: Detected Adapter
After the scan is complete, any adapters in range will be displayed in the Detected adapters field.
If your adapter is not detected, click the Scan for available adapters button. If your adapter still
does not appear, see the “There are No Adapters Detected” on page 2-3.
Detected Adapters Column Information
Headings include: Type, Name, ID, Model, and Signal.
•Type. If this is a first time connection, the circle on the TV icon will be gray. If the connection
has been used previously, the icon circle will be orange.
•Name. This refers to the adapter and is initially set by the adapter manufacturer. (If this is the
initial set up, you can rename the adapter in a following step. In the example above the adapter
has been renamed My Living Room.

Push 2 TV Adapter (PTV2000)/Intel Wireless Display User Manual
1-4
v1.0, January 2011
•ID. If the default name has not been changed, use the ID to distinguish multiple entries and
find your adapter.
•Model. This is the adapter manufacturer and product model name.
•Signal. The number of bars represents signal strength. The scale ranges from one bar (weakest
signal) to five bars (strongest signal). The bars turn from green to yellow if the signal strength
falls below three bars.
Step 6: Connecting to the TV
To connect the laptop to the TV, click once on the adapter and then click the Connect button. (If
there are multiple adapters detected, use the ID to find the adapter.) When connecting, the laptop
and TV screens both read Connecting... If the laptop status reads Connecting... and the TV screen
still reads Ready for Connection, click the Cancel connect button and try connecting again. If
this does not work, the connection may be blocked by a firewall. For help allowing the application
through a firewall, see “Firewall Issues” on page 2-6. For additional connection help, see
“Common Solutions to Many Issues” on page 2-7.
See “What is Auto-Connect” on page 2-13 for information about automatically connecting to an
adapter after the first connection has been made.
If this is the initial set up, you will not see Steps 7 and 8. Proceed to “First Time Connection
Procedures” on page 1-5.
Step 7: Connected to the Adapter
After the laptop connects to the adapter, the TV reads Connected. Please wait. This message
appears for only a few seconds. If the TV reads Connected. Please Wait for more than 1 minute,
the connection attempt failed. Click the Disconnect button and try connecting again.
Step 8: Ready to Use Intel Wireless Display
After the Connected. Please Wait. message disappears, the laptop and TV screen are the same
and your adapter is displayed in the Connected adapter field. You are now ready to enjoy and
share your favorite pictures, videos, and music. If you want to move Intel Wireless Display out of
the display area, use the minimize button instead of the close button.

Push 2 TV Adapter (PTV2000)/Intel Wireless Display User Manual
1-5
v1.0, January 2011
First Time Connection Procedures
This section continues from the end of Step 6 in the Using Intel Wireless Display section. Follow
the steps below to complete the initial set up.
Changing the TV Input
Different TV brands have various methods of changing the TV input. Five of the most common
processes are covered here. If these options do not cover your TV, consult your TV owner’s
manual for additional help.
• Some TV remote controls have buttons labeled HDMI, HDMI 1, HDMI 2, A\V, and so on.
Push the appropriate button to choose the TV input.
• Other TV remote controls include a button labeled Input, Source, TV, or TV/Video. Press this
button to cycle the TV through the input options.
• Pressing the Input button on some remote controls results in a list of inputs on the TV screen.
Simply select the desired input.
• Input selection happens on some TVs by pressing the Input button on the front or side panel
of the TV screen. Simply press the button until the desired input is selected.
• Sometimes the inputs are located beneath the regular channels on the TV. Try selecting the
lowest TV channel and then going down one channel.
Push 2 TV Adapter (PTV2000)/Intel Wireless Display User Manual
1-6
v1.0, January 2011
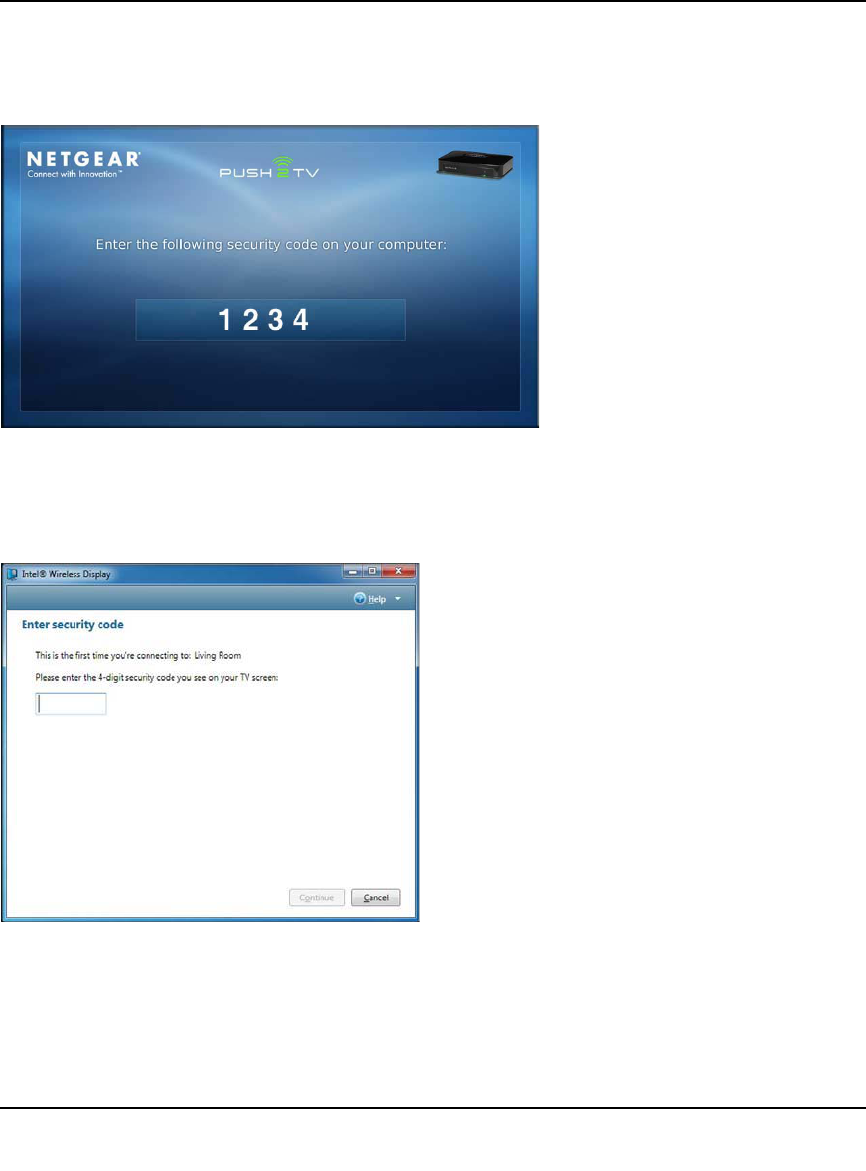
Step 1: Entering a Security Code
When the Enter security code screen appears, type the security code shown on the TV.
Figure 1-3
The security code numbers shown above are for example only! The numbers on your TV will be
different. Type the numbers from your TV into the field displayed on your laptop screen:
Figure 1-4
On your TV, click the Continue button after typing the security code. To stop the set up process
click Cancel. For security code questions, see “Security Code Issues” on page 2-3.
Push 2 TV Adapter (PTV2000)/Intel Wireless Display User Manual
1-7
v1.0, January 2011
Step 2: Security Configuration Successful
The Security configuration successful TV message indicates a correct security code entry.
Step 3: Adapter is Connected
After the laptop connects to the adapter, the TV shows Connected. Please wait. This message
appears for only a few seconds. If the TV reads Connected. Please wait for more than 1 minute,
the connection attempt failed. For help, see the “Common Solutions to Many Issues” on page 2-7.
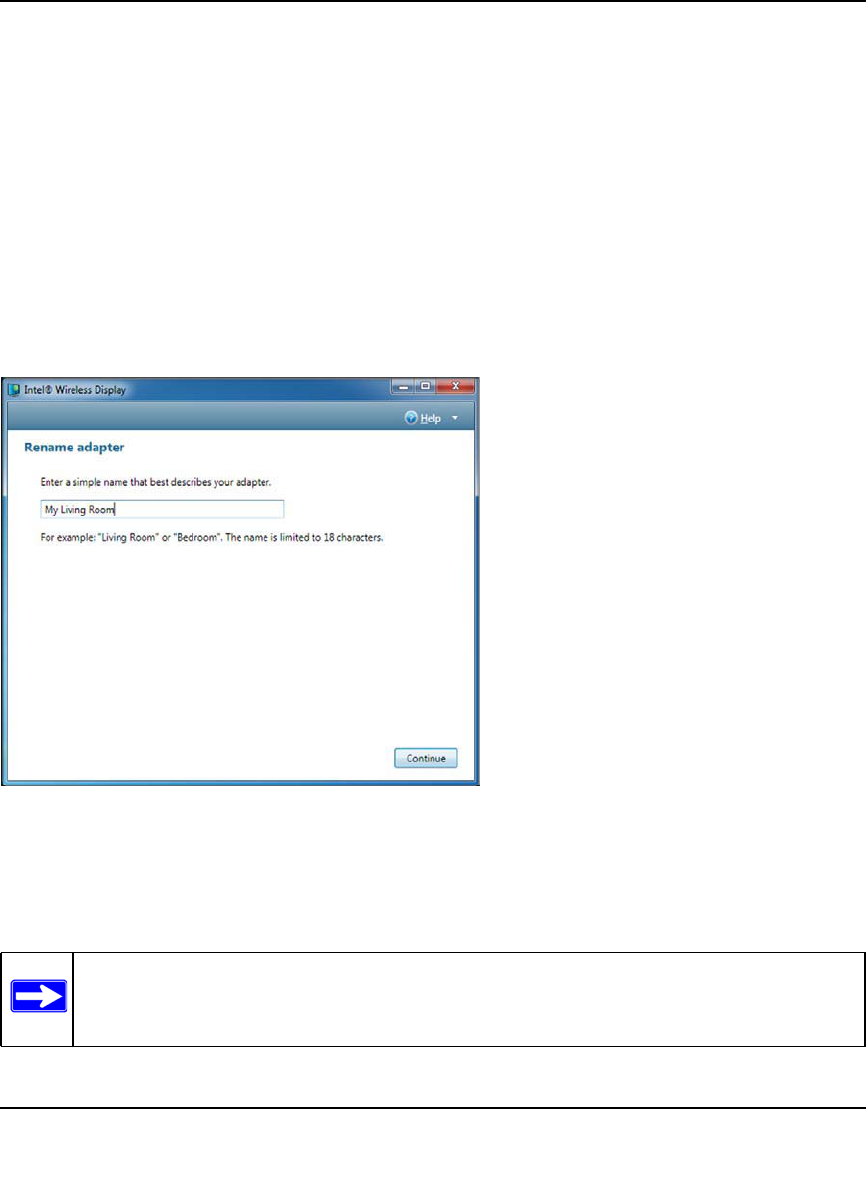
Step 4: Rename Adapter
After entering the security code, you may type a new descriptive name for the adapter.
Figure 1-5
The example above has the name My Living Room. This new name will be used in all future
connections from the laptop to this adapter. If you have more than one adapter, changing the
default name makes it easier to identify each adapter. When finished click the Continue button.
Note: The valid character set for adapter names are upper and lower case letters A
through Z, numbers and punctuation marks, also defined as ASCII characters 32
through 126.

Push 2 TV Adapter (PTV2000)/Intel Wireless Display User Manual
1-8
v1.0, January 2011
Step 5: Finishing the Initial Set Up Process
After the Connected. Please wait message disappears, the laptop screen and TV screen are the
same. Congratulations! You have successfully completed the set up process! Click the Register
link to register your adapter and receive product support and software updates. When you are done
registering your product, click the Finish button to exit the set up process.
If the laptop and TV are not displaying the same image, see “Common Solutions to Many Issues”
on page 2-7.
If the screen needs adjusting, click the Adjust your display settings link. For help, see “How do I
Adjust the TV Display Image?” on page 2-11.
Initial Set Up Troubleshooting
• If the TV display shows areas of black around the edges or appears too big, click the Adjust
your display settings link. For screen adjustment help, see “How do I Adjust the TV Display
Image?” on page 2-11.
• If the TV image is rough, frozen, or delayed, close the application and try connecting again. If
this does not help, see “TV Image is Rough, Frozen or Delayed” on page 2-3.
• If the audio is not correct, adjust the volume using the TV remote. If this does not solve the
issue, see “How do I Adjust the Audio?” on page 2-11.
• If both the application and the TV screen show that you are connected, but they are not
showing the same image, the laptop’s firewall may be stopping the connection. For firewall
help, see “Firewall Issues” on page 2-6.
• If the TV screen is blank, the application may have learned an incorrect display setting. For
help, see “How do I Train My Displays?” on page 2-12. The TV screen may also be blank if
the adapter is too warm after being used for a long time. (The adapter is not designed to be
connected for more than four hours.) If this is the case, do not use the adapter until it has
cooled down.
Disconnecting
To disconnect from the adapter, click the Disconnect button.

Push 2 TV Adapter (PTV2000)/Intel Wireless Display User Manual
1-9
v1.0, January 2011
Exiting
To exit Intel Wireless Display, click the Disconnect button, wait until the adapter disconnects, and
click the Close Window button (red x) in the upper right corner of application window. If you
click the Close Window button while still connected, you are asked if you want to close the
connection. Click Yes to exit or No to cancel exiting. To not view this screen again, select the
Don’t ask me next time check box.
If you would like to turn off Intel My WiFi Technology after closing the application, click the Intel
My WiFi Technology icon in the Windows taskbar and choose Disable Intel My WiFi
Technology.
2-1
v1.0, January 2011
Chapter 2 Troubleshooting
Look through the Troubleshooting contents for a topic that comes closest to describing your
problem. If you are unable to resolve the problem after reading through the Troubleshooting
topics, search the FAQ topics. For additional help, visit http://kbserver.netgear.com/products/
PTV2000.asp.
Initial Set Up Problems
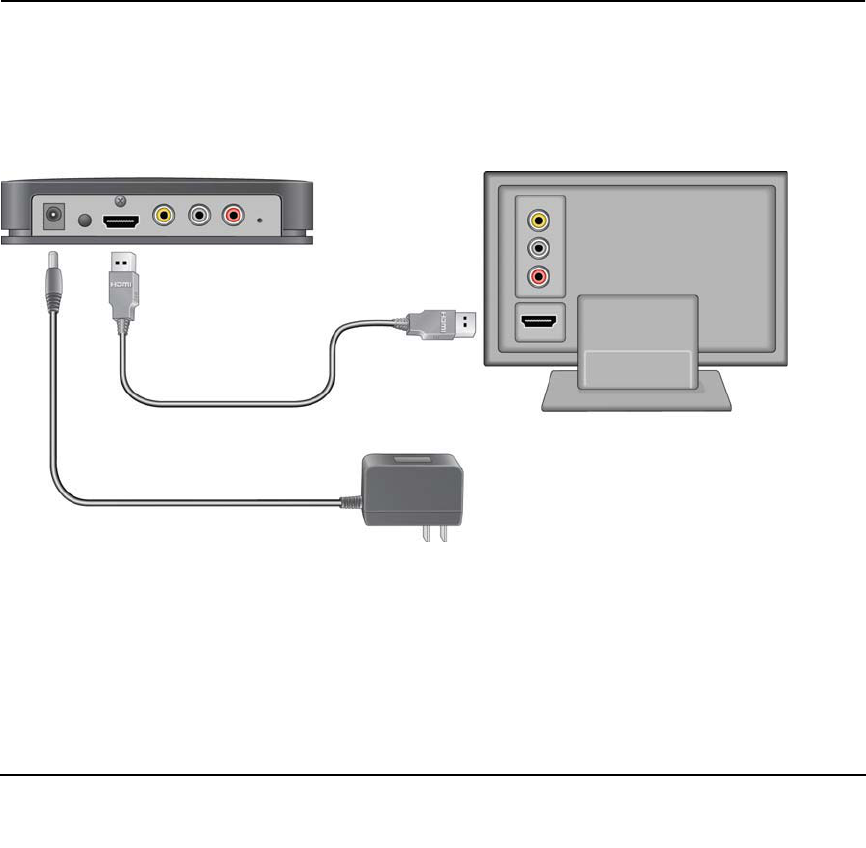
Cords and Cables
The power cord connects to the rear panel of the adapter. Plug the other end of the power cord into
an electrical outlet. The HDMI cable connects to the rear panel as shown:
HDMI
Power
Figure 2-1
Only connect either the HDMI cable or the audio/video cable, not both. An HDMI cable will
produce higher quality images than an audio/video cable. An HDMI cable is provided in the
package with the Push 2 TV adapter. (Audio/video cables can be found at electronics stores.) If
you use an audio/video cable, match the connectors to the correct colors on the adapter (yellow,
Push 2 TV Adapter (PTV2000)/Intel Wireless Display User Manual
2-2
v1.0, January 2011
white, and red). Connect each cord and cable into their correct inputs on the TV. (See your TV
owner’s manual if needed.) Once plugged in, make sure the cords and cables are pushed all the
way into their correct input positions.
Using the composite video cable (the yellow input on the Audio/Video cable) may cause the TV
image to be off-centered. Consult the TV owner’s manual for image adjustment.
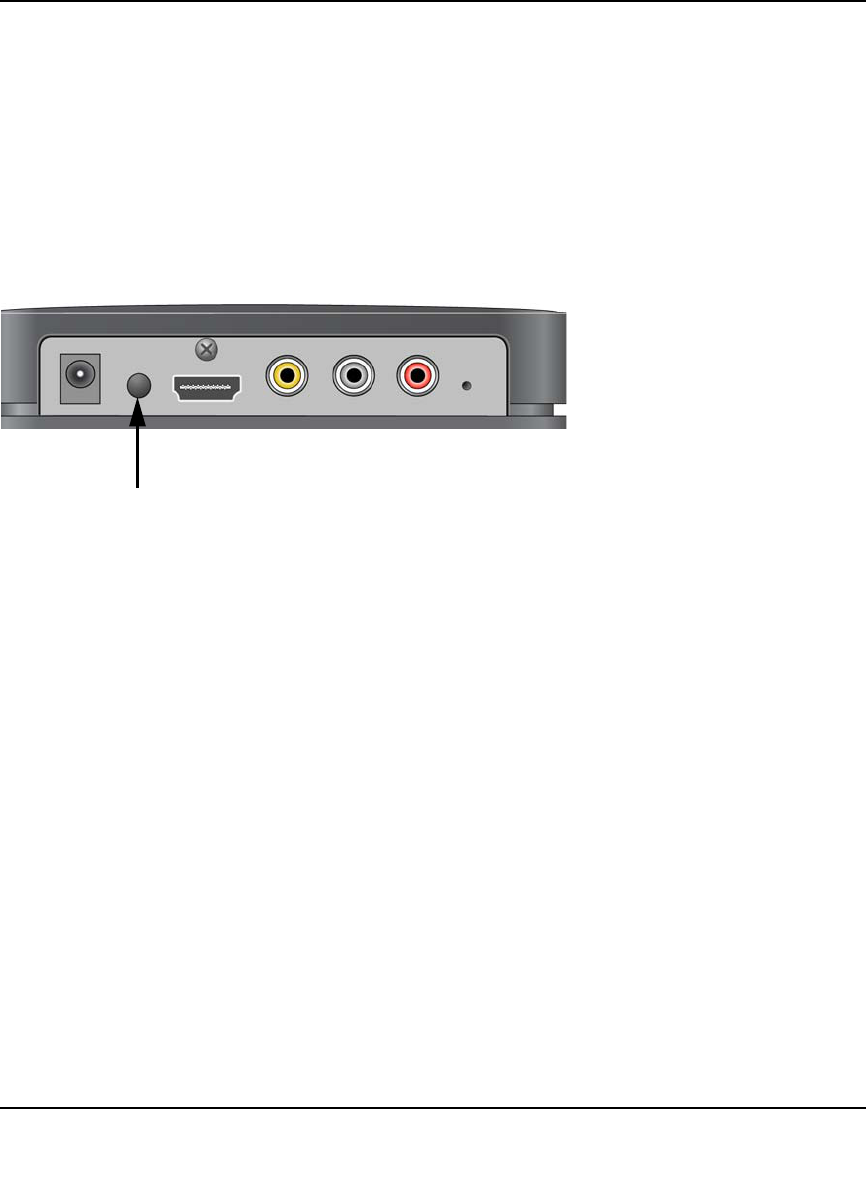
On/Off Button
The On/Off button is located on the back of the adapter.
On/Off
Figure 2-2
If the adapter is not turning on, make sure the power cord is pushed all the way into both the wall
outlet and the adapter. If power is not getting to the adapter, there might be a faulty power cord.
Changing the TV Input
Different TV brands have various methods of changing the TV input. Five of the most common
processes are covered here. If these options do not cover your TV, consult your TV owner’s
manual for additional help.
• Some TV remote controls have buttons labeled HDMI, HDMI 1, HDMI 2, A\V, and so on.
Push the appropriate button to choose the TV input.
• Other TV remote controls include a button labeled Input, Source, TV, or TV/Video. Press this
button to cycle the TV through the input options.
• Pushing the Input button on some remote controls results in a list of inputs on the TV screen.
Simply select the desired input.
• Input selection happens on some TVs by pressing the Input button on the front or side panel of
the TV screen. Simply press the button until the desired input is selected.

Push 2 TV Adapter (PTV2000)/Intel Wireless Display User Manual
2-3
v1.0, January 2011
• Sometimes the inputs are located beneath the regular channels on the TV. Try selecting the
lowest TV channel and then go down one channel.
Adapter Encountered a Problem on Startup
The adapter is experiencing technical difficulties. First turn the adapter off and back on again. If
this does not resolve the issue, see “Adapter Does Not Work” on page 2-6.
There are No Adapters Detected
It may be necessary to scan multiple times. If rescanning does not solve the issue, make sure the
adapter is on and the TV is displaying the To get started screen.
Also, try moving the laptop or the adapter to different places in the room. The adapter and TV
should be in the same room to work properly. If this does not work, see “Common Solutions to
Many Issues” on page 2-7.
Security Code Issues
The phrase, That security code is not correct... in the Security Code section, means the wrong
security code has been entered. Make sure to type the code exactly as shown on the TV screen. The
security code number will change after an incorrect entry.
If the connection fails right after a correct security code is entered, it is necessary to connect again
and retype the security code.
TV Image is Rough, Frozen or Delayed
To fix a rough, frozen, or delayed image try each of the following steps individually.
• Check the laptop’s CPU status. Right-click on the taskbar and choose Start Task Manager. In
the Task Manager window click the Processes tab. Under the CPU heading, check
WiDiApp.exe. If the WiDiApp.exe CPU number is 80 or above, save documents, and close
unused applications.
• Check the network link speed. Right click on the taskbar and choose Start Task Manager. In
the Task Manager window click the Networking tab. The link speed should be higher than 36
Mbps. If not, try moving the adapter to a different position that is farther away from other
electronic equipment, or closer to the laptop. If this does not help, try disconnecting the
adapter and connecting again.
• Change the channel on the wireless router. See the router’s manual for channel changing
instructions. (If you are not using a router, see the next solution.)

Push 2 TV Adapter (PTV2000)/Intel Wireless Display User Manual
2-4
v1.0, January 2011
• If you are not connected to a router change the wireless channel. Open Intel My WiFi Utility
by clicking on the Intel My WiFi Technology icon in the taskbar and selecting Open Intel
My WiFi Utility. Use the help document in Intel My WiFi Utility and search for Access
Points. In the results, click Advanced Settings and follow the instructions.
Your Video Mode has Changed...
The video display resolution may change while using Intel Wireless Display. This can happen
regardless of whether you change the display resolution manually or it is changed by another
application. On the Your Video Mode has Changed... screen, click the Restore settings and
resume connection button to allow the application to automatically reset the display to the correct
settings. Choosing Keep settings and close connection results in the display session ending. The
supported video display settings are: Screen resolution (in landscape or portrait mode) = 1280 x
720, 1280 x 768, or 1280 x 800. Color depth = 32-bit. In extended mode Wireless Display will
support 1920 x 1080.
Unsupported Audio Mode
The laptop must have specific audio settings for Intel Wireless Display to work correctly.
Adjusting these settings to a unsupported audio mode is not recommended. The Unsupported
audio mode screen appears if the audio display settings need adjusting. To restore the audio
settings to the correct values:
1. In the Unsupported audio mode window click the Adjust audio settings button.
2. In the Sound window, double click Speakers.
3. On the Advanced tab choose either 16 bit, 44100 Hz (CD Quality) or 48000 Hz (DVD
Quality) and click OK. (Unpredictable results may occur if different audio modes are used.)
Intel Wireless Display Requires a Different Security Profile
Security Profile is Incorrect
The wireless security settings have been reconfigured using the Intel My WiFi Utility. To allow the
application to automatically choose the correct profile:
1. Right-click the Intel My WiFi Technology icon on right end of the taskbar.
2. Select Disable Intel My WiFi Technology.

Push 2 TV Adapter (PTV2000)/Intel Wireless Display User Manual
2-5
v1.0, January 2011
3. Click the Scan for available adapters button on Intel Wireless Display. While scanning, the
application automatically enables Intel My WiFi Technology and selects the correct security
profile.
Manually Setting the Correct Security Profile
If the steps above do not automatically select the correct security profile, click the Intel My WiFi
Utility icon in the taskbar and select Open Intel My WiFi Utility. Use the help document in Intel
My WiFi Utility and search for Security. In the results, click Security Settings and follow the
instructions.
Your Wireless is Off
Normally, Wi-Fi allows the laptop to connect to the router for wireless Internet access. A new
feature included with Intel Wireless Display uses Wi-Fi to wirelessly connect the laptop to the TV
through the adapter.
For this new Wi-Fi connection to work correctly, three switches must be turned on. The first
switch is the hardware switch. It is usually located around the edge of the laptop or above the
keyboard. It may be identified by a pole with two half circles on each side. Check the laptop
manual for the exact location. Turn the switch on and scan again.
When needed, the other two switches are automatically turned on by the application. If it is still
impossible to connect because the application is not automatically turning the other switches on,
see “Common Solutions to Many Issues” on page 2-7.
Intel My WiFi Technology is Disabled
Intel My WiFi Technology allows the laptop to become a Wi-Fi access point for other laptops. If
the laptop screen reads Intel My WiFi Technology is disabled, click the Scan for available
adapters button to automatically enable Intel My WiFi Technology. If the Wi-Fi is already on,
Intel Wireless Display will automatically enable Intel My WiFi Technology. If the Wi-Fi is off, the
application asks if you would like to turn on Intel My WiFi Technology. Select Yes and scan again.
If this does not work, see “Common Solutions to Many Issues” on page 2-7.
Unsupported Laptop Hardware
For Intel Wireless Display to run, Intel My WiFi Technology must be installed, and the laptop
must have an Intel Core i7, i5, or i3 processor with Intel Graphics Media Accelerator HD.

Push 2 TV Adapter (PTV2000)/Intel Wireless Display User Manual
2-6
v1.0, January 2011
Firewall Issues
Sometimes the laptop’s firewall will block the Wi-Fi connection between the laptop and the
adapter. If this is the case, the laptop's firewall settings must be changed. The following
instructions apply to a Microsoft Windows Firewall. To allow Intel Wireless Display through a
different firewall, see that firewall's product manual. There may be inconsistent results allowing
the application through a firewall that is not a Microsoft Windows firewall.
1. Click on the Windows Start icon and type in the search field Allow a program through a
Windows Firewall.
2. In the search results, click Allow a program through Windows Firewall.
3. In the firewall control panel, make sure the Name,Private, and Public check boxes are
selected for both WiDiApp and Wireless PAN DHCP Server.
4. When done, click OK and connect again.
Windows Power Saving
Microsoft Windows software may be set to dim the display or put the computer to sleep after a
period of time. To avoid the laptop’s screen dimming while using Intel Wireless Display, change
the laptop’s power settings by following these steps:
1. Click the Windows Start icon.
2. Type Power Options in the search field and click the Power Options result.
3. Under the Select a Power Plan heading, make sure the Balanced radio button is selected.
4. Click Change Plan Settings next to the current plan.
5. Change the Dim the display,Turn of the display, and Put the computer to sleep options
under either On Battery and Plugged in headings to a longer time setting.
Could Not Obtain a Network Address
To correct this issue, try closing Intel Wireless Display and restarting the laptop. The laptop’s
firewall could be blocking the adapter’s request for a network address. To allow the address
request through a firewall, see “Firewall Issues” on page 2-6. If this does not resolve the issue, see
“Common Solutions to Many Issues” on page 2-7.
Adapter Does Not Work
If the adapter is not working, try the solutions found in “Common Solutions to Many Issues” on
page 2-7 before following the instructions below.
Push 2 TV Adapter (PTV2000)/Intel Wireless Display User Manual
2-7
v1.0, January 2011
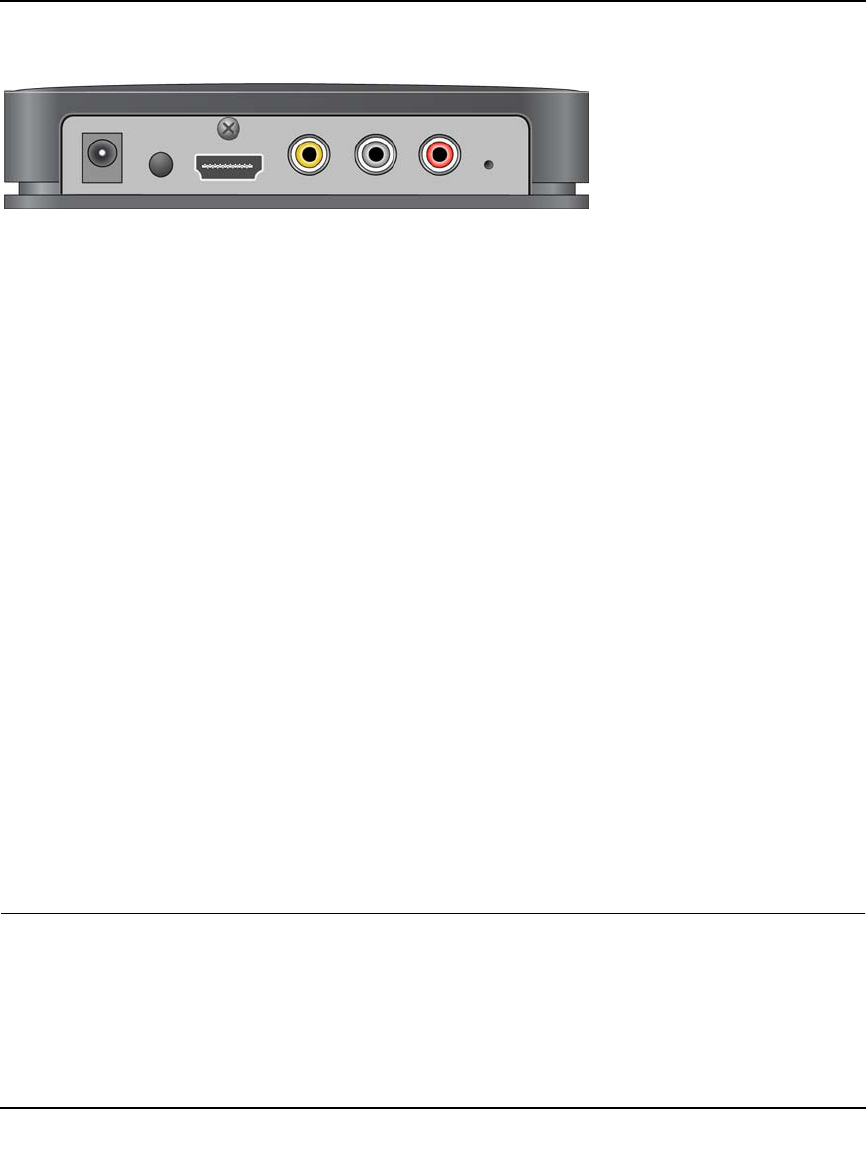
If the adapter will not turn on, or it is impossible to update the firmware, perform a factory reset.
Figure 2-3
Press and hold the Reset button while pushing the power button off and then on. Continue to hold
the Reset button down until the adapter LED begins flashing. Try connecting again. After the
factory reset, the adapter connection settings will be erased and the firmware will need to be
updated.
Checking the Access Point Frequency
Intel Wireless Display only works at 2.4GHz on both the PAN connection to the TV and LAN
connection to the Internet via a home wireless router. The Wi-Fi standard uses both 2.4GHz and
5GHz frequency bands. Most home wireless routers are only 2.4GHz and have no interoperability
issue with Intel Wireless Display. Some newer 802.11n home wireless routers are starting to
include support for both frequency bands. When using Intel Wireless Display, while also
connected to the Internet via your wireless router, make sure the connection to the router is set to
2.4GHz.
After making the changes required, it may be necessary to disable/enable Intel My WiFi
Technology using the following steps:
1. Right-click the Intel My WiFi Technology icon on right end of the taskbar.
2. Select Disable Intel My WiFi Technology.
3. Click the Scan for available adapters button on Intel Wireless Display. While scanning, the
application automatically enables Intel My WiFi Technology.
Common Solutions to Many Issues
This section describes five procedures to try if the other troubleshooting sections have not helped.
Try each solution one at a time starting with Step 1. For additional help, visit
http://kbserver.netgear.com/products/PTV2000.asp.
1. Close Intel Wireless Display, reopen the application, scan for available adapters, and connect.

Push 2 TV Adapter (PTV2000)/Intel Wireless Display User Manual
2-8
v1.0, January 2011
2. Shut down the laptop, restart, open the application, scan for available adapters, and connect.
3. Reset the adapter, scan for available adapters, and connect. For help resetting the adapter, see
“How do I Reset the Adapter?” on page 2-9.
4. Check the laptop’s firewall settings. A firewall may be blocking the application. For firewall
help, see “Firewall Issues” on page 2-6.
5. Try updating the firmware. For firmware update instructions, see “How do I Update the
Firmware?” on page 2-9.
Known Issues
This section lists known Intel Wireless Display issues and workarounds.
• After disconnecting from the application, it may be necessary to manually enable the laptop's
sound. For audio help see “How do I Adjust the Audio?” on page 2-11.
• The application will usually not work if it is located in the Windows startup group.
• Wait until Microsoft Windows has fully booted before opening Intel Wireless Display.
• If the media application in use can only be set to mute or unmute both the laptop and TV at the
same time, it is recommended to use a different media application.
• Pressing Control + Alt + Delete on the laptop might freeze the TV image.
• For analog TVs, the adapter does not support NTSC (National Television System Committee)
format 4.43 variations on the composite interface. See the TV owner’s manual for NTSC
variation information.
• Changing the wireless LAN or connection settings when Intel Wireless Display is connected
may cause momentary disruption of or end the connection.
FAQs
Look through the FAQ contents for a topic that comes closest to describing your problem. If you
are unable to resolve the problem after reading through the FAQ topics, search the
Troubleshooting topics. For additional help, visit
http://kbserver.netgear.com/products/PTV2000.asp
Push 2 TV Adapter (PTV2000)/Intel Wireless Display User Manual
2-9
v1.0, January 2011
How do I Change the Adapter Display Language
To change the adapter display language, use the recessed button (7) while the adapter is on the
ready screen shown.
• A short press (less than half a second) will step forward through the languages.
• A long press (more than half but less than one and a half seconds) will step backward through
the languages.
Warning: Pressing the button for more than 5 seconds will clear the security profiles
saved in the adapter, which will require you to repeat the first-time connection
procedure.
The language change will immediately be reflected on your TV screen.
How do I Update the Firmware?
If the firmware needs updating, there will be an Update available button on the Adapter
Properties page. (The Properties button is only available if you are currently connected to an
adapter.) Click the Update available button to begin the update process. Once the update begins
the TV screen will read Updating adapter. Please wait. After the procedure is complete, the
adapter automatically disconnects from the laptop. Scan again to connect to the adapter.
How do I Reset the Application Settings?
Resetting reverts the application back to its out-of-the-box state. To reset, click Help and select
About. Click Reset Settings. To proceed with the reset, click the Yes button on the Reset Intel
Wireless Display settings page.
After starting Intel Wireless Display, all detected adapters will be displayed as not previously
connected. However, it will not be necessary to enter a security code since the security settings are
stored in the adapter.
How do I Reset the Adapter?
If the adapter is not responding correctly, and resetting the application has not helped, try restarting
the adapter. Push the power button once to turn the adapter off, and push it again to turn it on. After
the To get started screen appears on the TV, rescan before trying to connect.

Push 2 TV Adapter (PTV2000)/Intel Wireless Display User Manual
2-10
v1.0, January 2011
How do I Clear the Adapter Memory?
Clearing the adapter’s memory erases security settings and the user modified adapter name. This is
helpful if you choose to sell your adapter, or if a neighbor came to your house and connected to
your adapter, but now you do not want them to accidentally connect from their house.
To clear the adapter’s memory, press and hold the Reset button on the back of the adapter for more
than 5 seconds or until the LED starts blinking. Clearing the adapter memory requires you to enter
the security code displayed on the TV in order to connect again.
Can I Close the Laptop Lid and Still Use Intel Wireless Display?
Closing the lid of the laptop may put the system to sleep or turn it off, and as a result, end the Intel
Wireless Display session. To close the lid and continue using the application:
1. Click the Windows Start icon and type Closing the lid in the search field.
2. Click the Change what closing the lid does link.
3. Next to the When I close the lid heading and under both the On battery and Plugged in
headings, select Do nothing.
4. Click the Save changes button.
What are Adapter Properties?
Adapter Properties Definitions
•Adapter Name. This is either the default factory name or the name you choose in the initial
set up process. It is okay to change the name at anytime. Just type a new name. If the default
“Name” is deleted and the field is left empty, the application will restore the name to the
previous value. NOTE: The valid character set for adapter names are upper and lower case
letters A through Z, numbers and punctuation marks, also defined as ASCII characters 32
through 126.
•Network address. This is the IP (Internet Protocol) address.
•Adapter ID. A preset and unchangeable number set by the adapter.
•Adapter Model. This is the model name of the adapter currently connected.
•Adapter firmware version. The version of the application. If a Web update is required, click
the Update Available button.

Push 2 TV Adapter (PTV2000)/Intel Wireless Display User Manual
2-11
v1.0, January 2011
•Show the cursor. By default, Intel Wireless Display enables the cursor to be shown on the TV.
To make the mouse cursor disappear on the TV, clear this check box. Resetting Intel Wireless
Display will return the cursor to its default setting.
•Automatically connect. Allows this adapter to be set as the auto-connect adapter. See “What
is Auto-Connect” on page 2-13 for more details.
•Register. Register your adapter to obtain support and get the latest software updates.
Audio/Visual Tuning
If the laptop display is cropped or not filling the entire TV screen, see “How do I Adjust the TV
Display Image?” on page 2-11. To troubleshoot audio problems, see “How do I Adjust the
Audio?” on page 2-11.
Why does My Laptop's Color Look Different on My TV?
Sometimes colors on the TV screen and the laptop may be a slightly different. To match the colors,
change the TV settings until the screens are the same. (See your TV manual for color adjustment
help.)
How do I Adjust the TV Display Image?
If the laptop display is cropped or not filling the entire TV screen, the image needs to be adjusted.
To adjust the TV image click the Properties button. In the Adapter properties page click the
Resize TV picture button. On the next page, click the plus icon to increase the size, or the minus
icon to decrease the size. When the image is correct, click OK to return to the previous page. If the
image still does not fit the entire TV screen, try adjusting the TV settings.
How do I Adjust the Audio?
Once a connection begins, the laptop’s sound is muted. When the connection ends, the laptop’s
sound is enabled.
Sample Audio Testing
When connected, clicking the Test audio button on the Adapter properties page takes you to an
audio test page. If you do not hear audio after clicking the Play sample button, increase the
volume on the TV speakers by using the TV remote.

Push 2 TV Adapter (PTV2000)/Intel Wireless Display User Manual
2-12
v1.0, January 2011
Global Volume Control
Usually, the laptop’s sound is muted after connecting to Intel Wireless Display. Sometimes,
however, other applications may automatically turn on the laptop’s sound. This will result in
hearing the same sound from the laptop before hearing it from the TV. To turn the volume off,
click the little speaker icon located on the far right of the taskbar. This will bring up the Global
Volume Control pop up window. Click the speaker icon just below the slider to mute the laptop’s
sound. If the laptop’s sound keeps coming back on, try turning the volume all the way down using
the slider in the pop up window instead of muting. Moving the volume slider will automatically
unmute the laptop’s speakers.
Windows Audio Mixer
Attempting to change audio settings in the Windows Audio Mixer while using the application,
may result in a connection disruption. (The Windows Audio Mixer is found by clicking the Mixer
link in the Global Volume Control.) Usually the connection will automatically reestablish. The TV
image may flicker during this time. If the connection does not automatically reestablish, manually
reconnect.
Changing the Sound using the Windows Control Panel
To bring up the audio device window go to the start menu, type audio device in the search field,
and press the Enter key. On the Playback tab, make sure the green circle with a check mark is on
local speakers.
How do I Train My Displays?
Training Two Displays
While using a laptop and a TV, sometimes the laptop’s display settings may be inadvertently
changed. This may result in the TV showing a blank screen after connecting. If this is the case,
simultaneously push the Windows button and the letter P on the keyboard. Select Duplicate in the
popup window to make both laptop and TV screens the same.
Training Three Displays
While using a laptop, a TV, and an external monitor sometimes the laptop’s display settings may
be inadvertently changed. This may result in the TV showing a blank screen after connecting. The
laptop is capable of only displaying on two screens at the same time including its own. The TV
screen needs to be one of the two selected screens.

Push 2 TV Adapter (PTV2000)/Intel Wireless Display User Manual
2-13
v1.0, January 2011
To select which screens to use:
1. Simultaneously push the Windows button and the letter P on the keyboard. Select Duplicate
in the popup window. If your laptop screen is not duplicated on your TV, proceed to the next
step.
2. Click the Windows Start icon.
3. In the search field, type Adjust screen resolution and press Enter.
4. Next to the heading Display, select the option other than Multiple Monitors.
5. Next to the heading Multiple displays, choose either one of the duplicate combinations.
6. To try the new settings, click Apply.
7. If the laptop screen is showing on the desired combination of displays, click the Keep changes
button in the pop up dialog box then click OK. Otherwise, click Revert and go back to Step 4
and choose the other combination in Step 5.
Can I play DVDs with Intel Wireless Display?
Many DVDs and Blu-ray discs include copy protection mechanisms which prevent playback over
unprotected outputs. Intel Wireless Display is currently an unprotected output; and as a result,
many DVDs and Blu-ray Discs will not work. However, personal content (pictures, home movies,
etc) that you have burned to DVDs and Blu-ray Discs are not protected in the same manner and
will work with Intel Wireless Display.
How do I Contact Customer Support?
Contact your computer or adapter manufacturer to get support for your specific product.
Visit http://www.intel.com/go/wirelessdisplay to access general Intel Wireless Display support
forums.
What is Auto-Connect
This is a feature which enables you to set an adapter as your default adapter for an automatic
connection. This action is somewhat similar to selecting a default printer. Only one adapter at a
time can be set as the auto-connect adapter. In addition, the auto-connect feature can only be
enabled after you have successfully connected the first time and completed the security
configuration. Auto-connect is only an attempt to connect, and it may fail in the same ways that a
manual connection could fail.
There are two instances where the auto-connect is attempted.

Push 2 TV Adapter (PTV2000)/Intel Wireless Display User Manual
2-14
v1.0, January 2011
1. If the auto-connect adapter is discovered after initial launch, a connection attempt will be
made
2. If the auto-connect adapter is already in the list when the application is relaunched including
pressing the bezel button, a connection attempt will be made. In this case, if a connection is
made it will typically be faster than in case 1, because the application is already running and a
new scan is not performed.
There are two ways to select the auto-connect adapter.
1. On the Adapter properties page, there is an Automatically connect to this adapter check
box. If this check box is selected, this adapter will be chosen as the auto-connect adapter. Note
that any other adapter that was previously selected for auto-connect will no longer have its
auto-connect property set.
2. In the Detected adapters list on the Intel Wireless Display home screen, right clicking on an
adapter that has previously been connected shows an Auto-connect property in the context
menu (popup menu). A check indicates if this adapter is currently set as the auto-connect
adapter or not. Selecting that menu item will change the auto-connect state of the adapter.

A-1
v1.0, January 2011
Appendix A
Technical Specifications
Feature Description
Compatible laptops Intel Core i3, i5, or i7 processor
Intel Graphics Media Accelerator HD graphics adapter
Intel WiFi Link wireless networking adapter
Microsoft Windows 7 operating system
Intel Wireless Display software
Network interface IEEE 802.11 a/b/g/n wireless
Power 12V/1A
Physical dimensions (d x w x h) 106 mm x 138 mm x 32 mm
Weight 180 g
Operating temperature 0 to 40º C (32 to 105º F)
Electromagnetic compliance CE mark, Commercial; FCC Part 15, Class B; EN 55 022 (CISPR 22)
Class B, C-Tick
Power adapter safety approval CE mark, Commercial UListed (UL 1950), C-Tick

B-1
v1.0, January 2011
Appendix B
Related Documents
This appendix provides links to reference documents you can use to gain a more complete
understanding of the technologies used in your NETGEAR product.
Document Link
Windows XP and Vista Wireless
Configuration Utilities
http://documentation.netgear.com/reference/enu/winzerocfg/index.htm
Internet Networking and TCP/IP
Addressing
http://documentation.netgear.com/reference/enu/tcpip/index.htm
Wireless Communications http://documentation.netgear.com/reference/enu/wireless/index.htm
Preparing a Computer for
Network Access
http://documentation.netgear.com/reference/enu/wsdhcp/index.htm
Virtual Private Networking (VPN) http://documentation.netgear.com/reference/enu/vpn/index.htm
Glossary http://documentation.netgear.com/reference/enu/glossary/index.htm