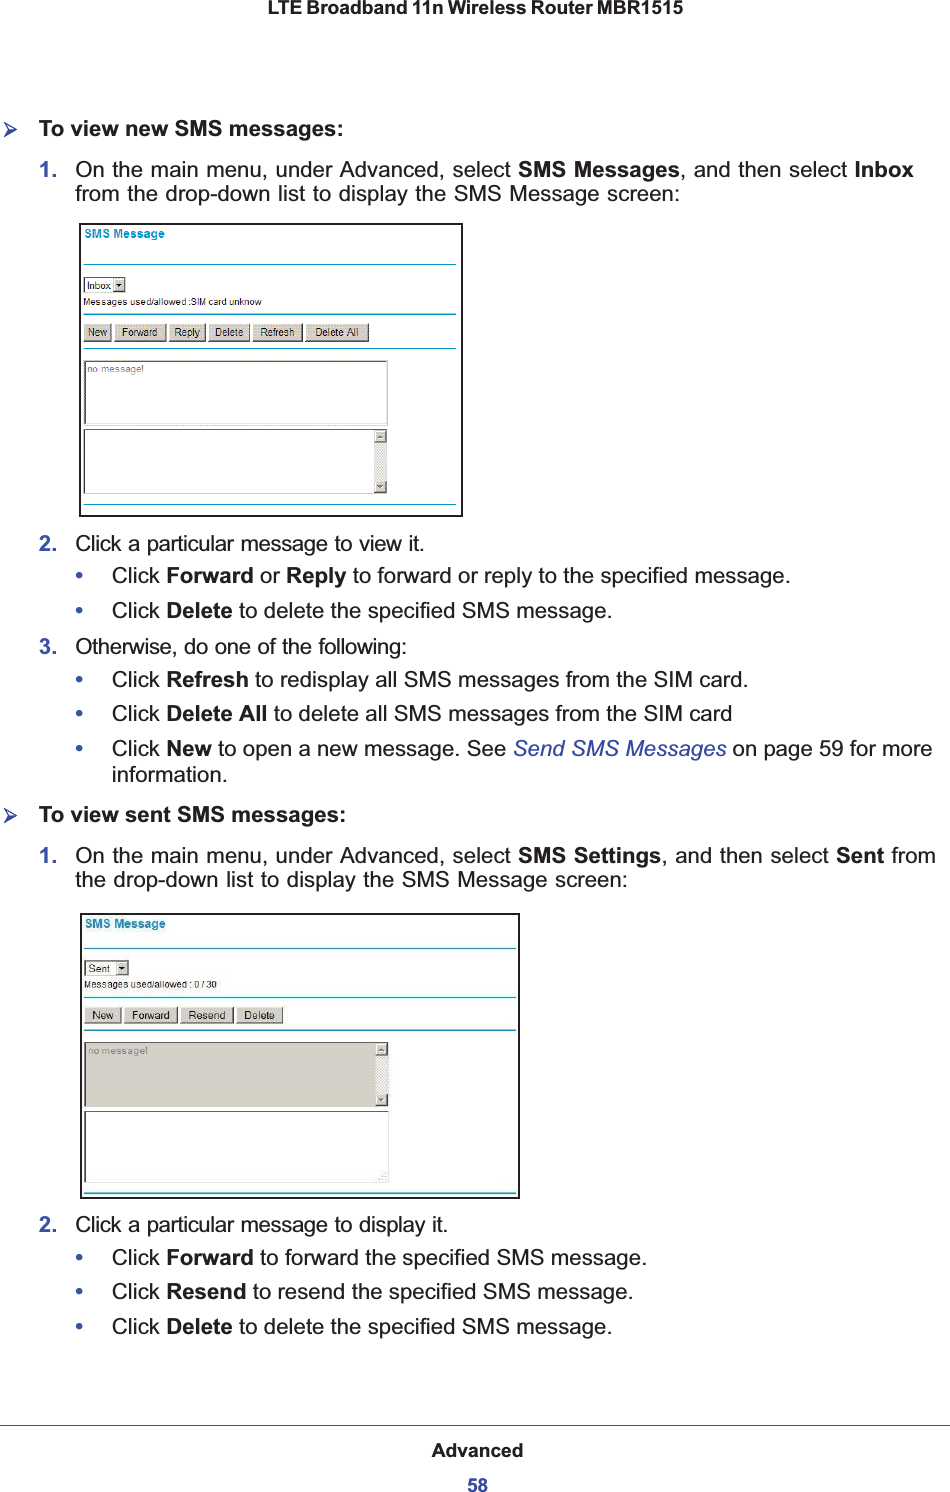
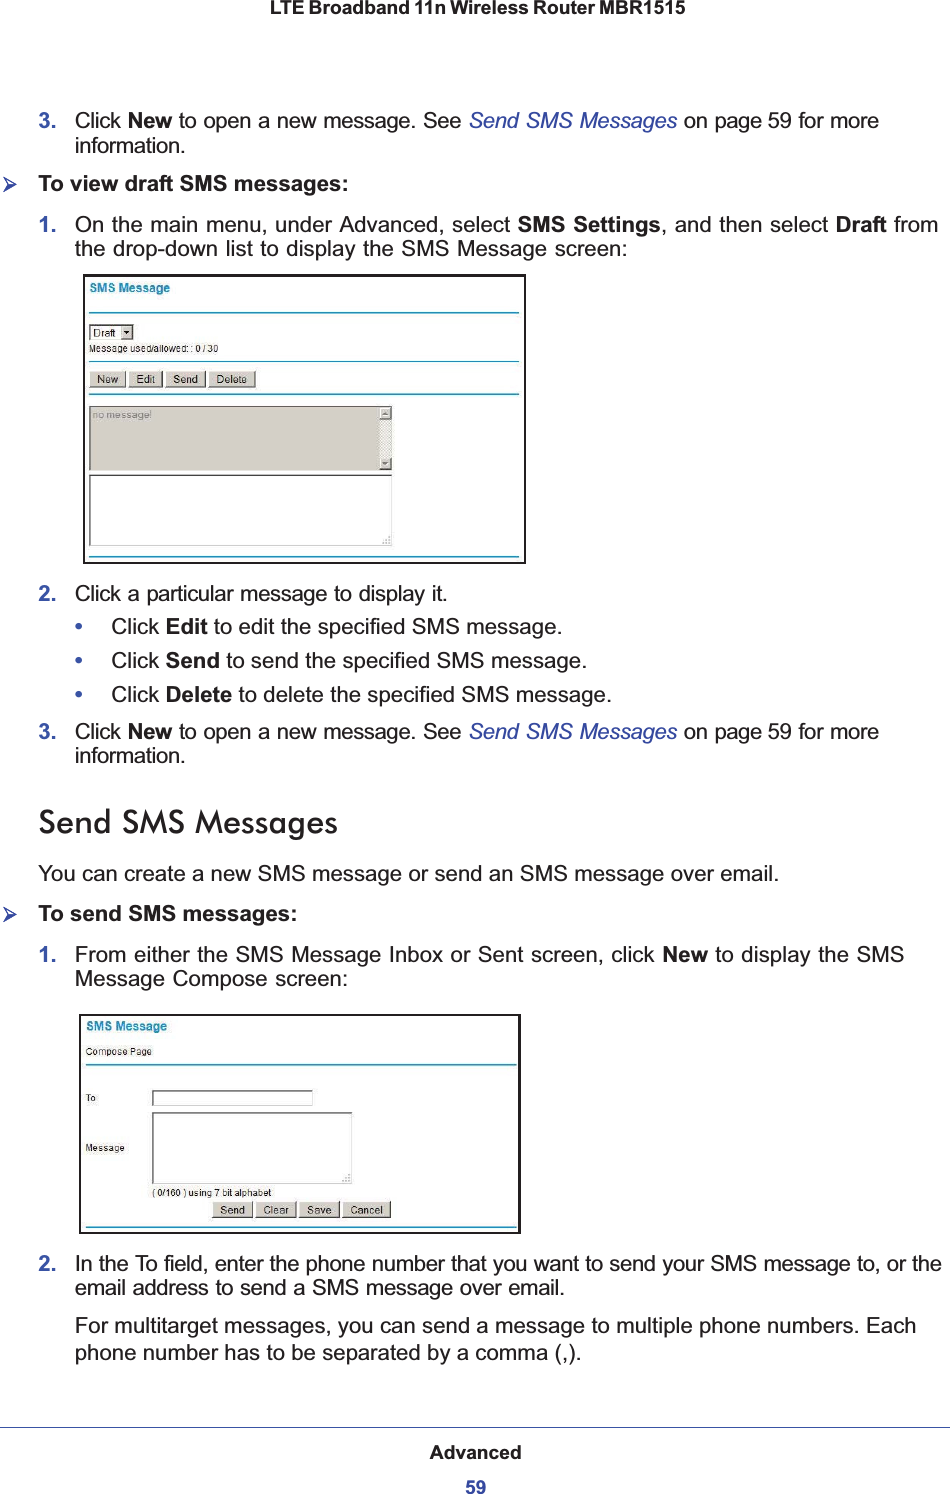
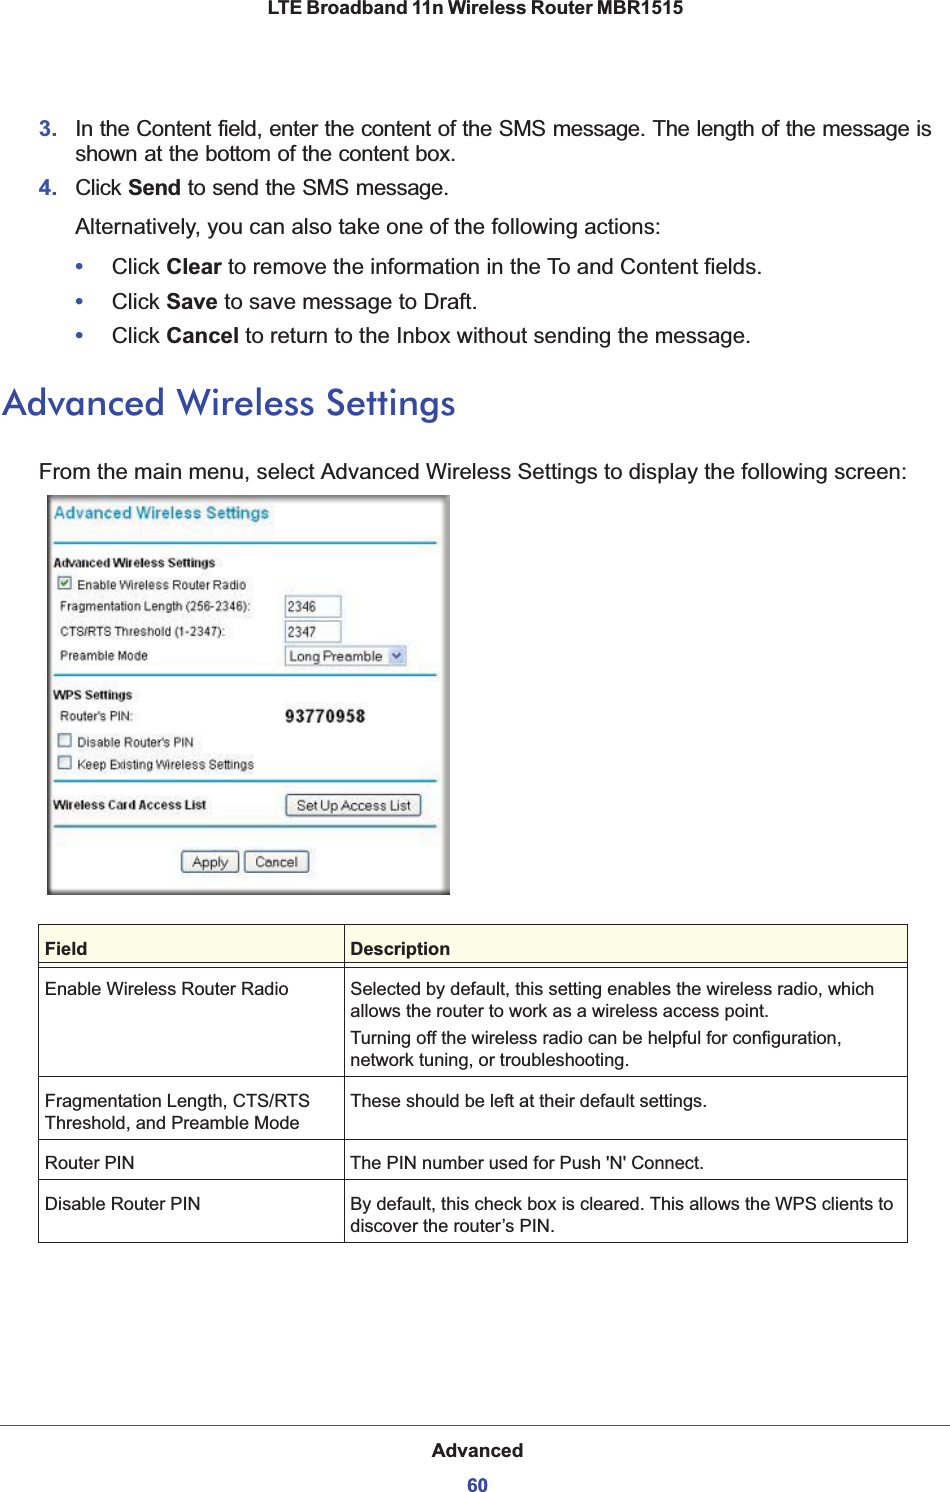
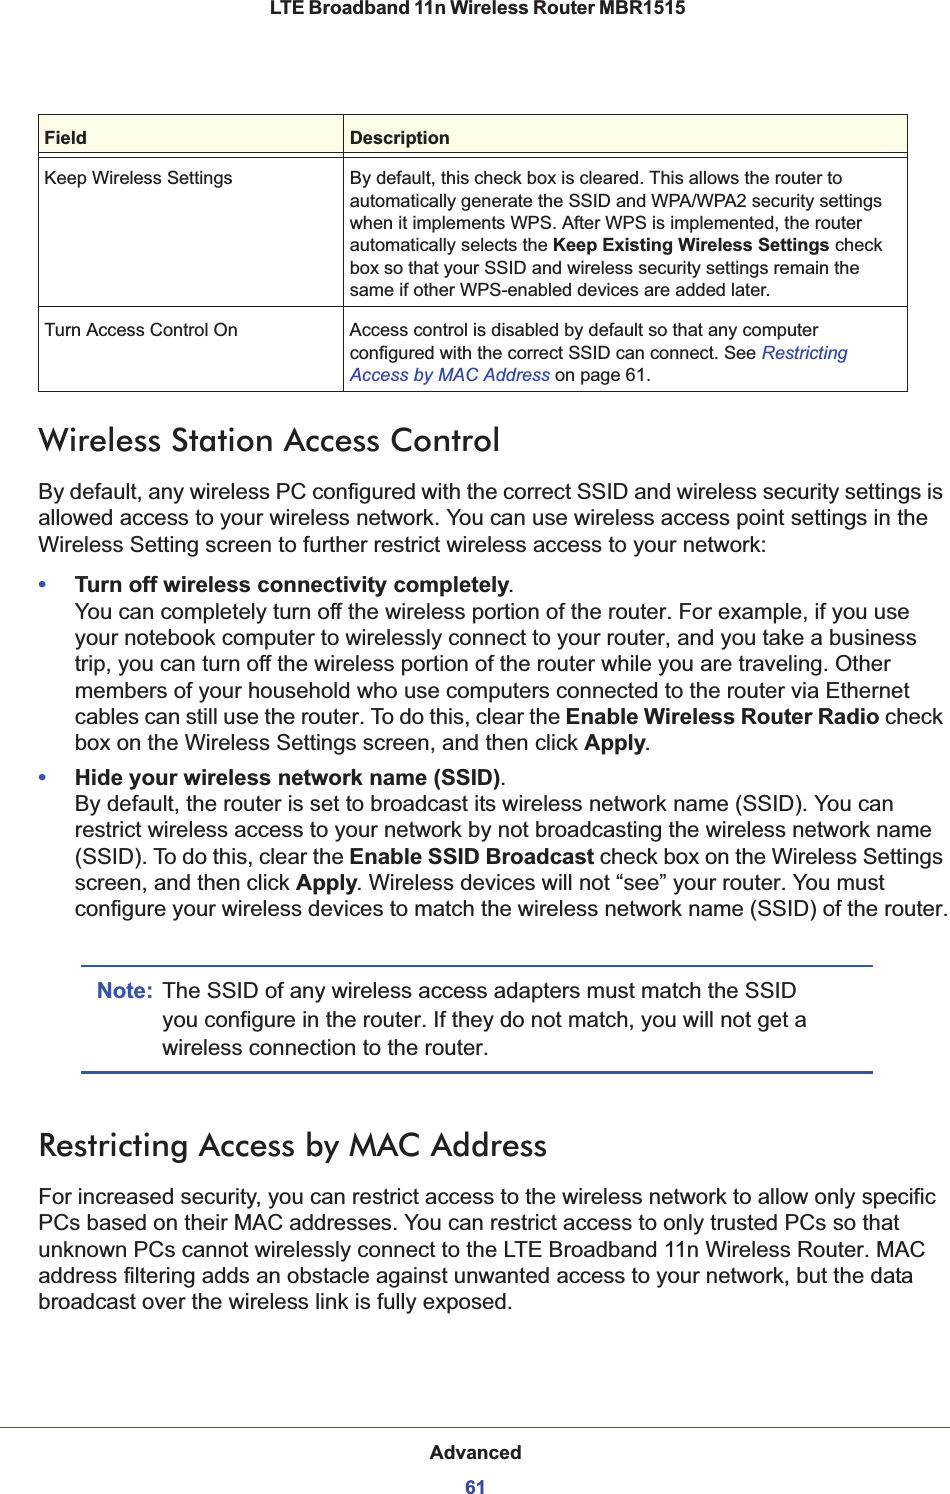
Netgear orporated 11100159 LTE Broadband 11n Wireless Router User Manual
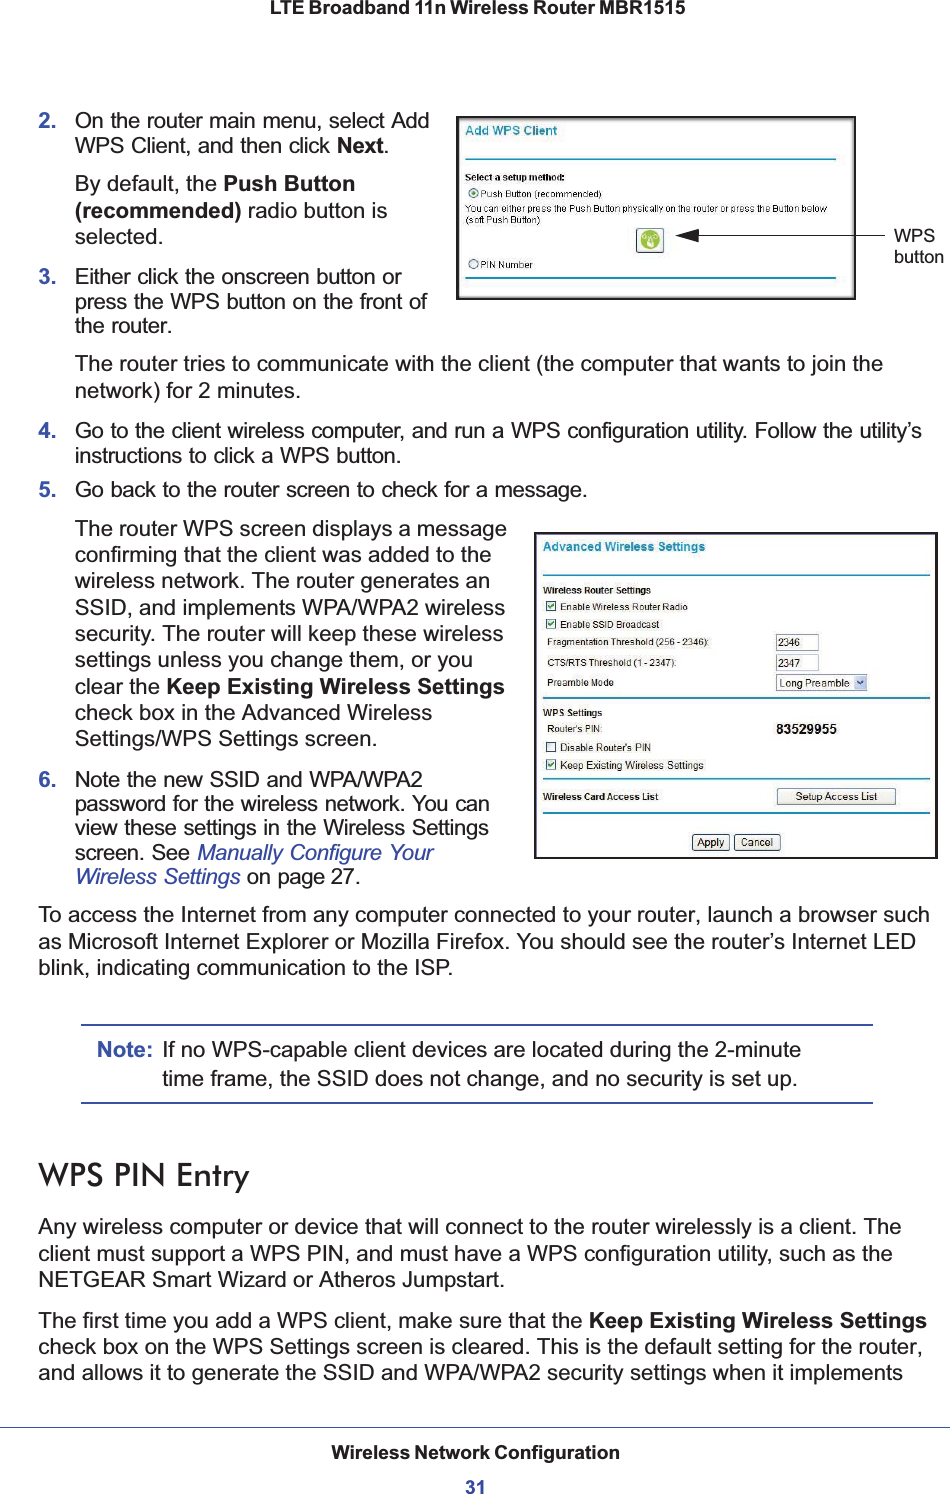
Netgear Incorporated LTE Broadband 11n Wireless Router Users Manual
UserManual.wiki
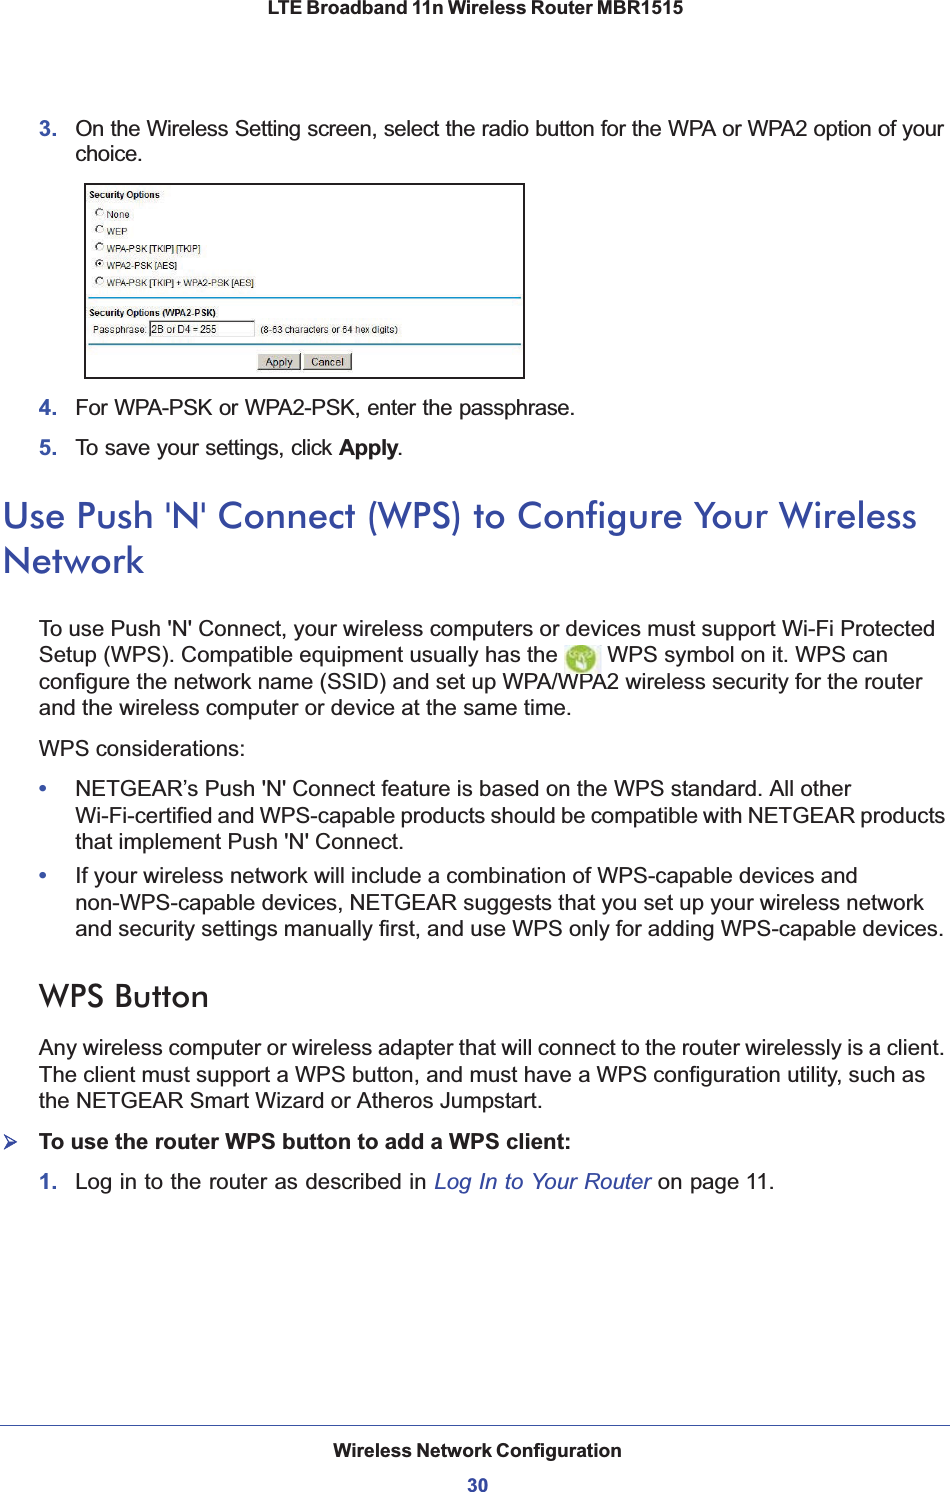
>
Netgear orporated
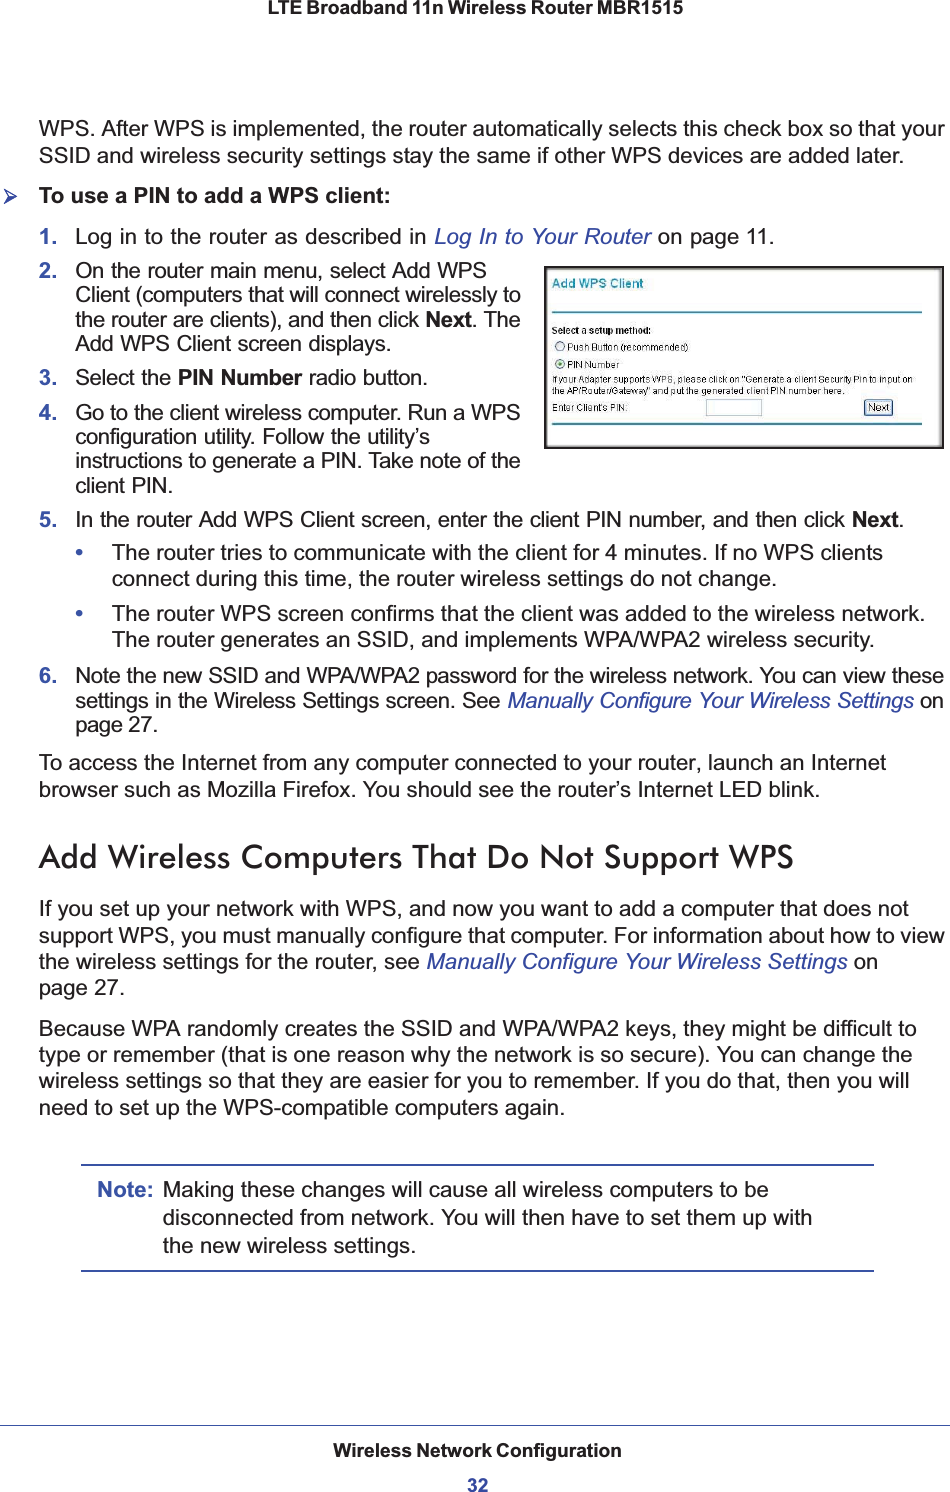
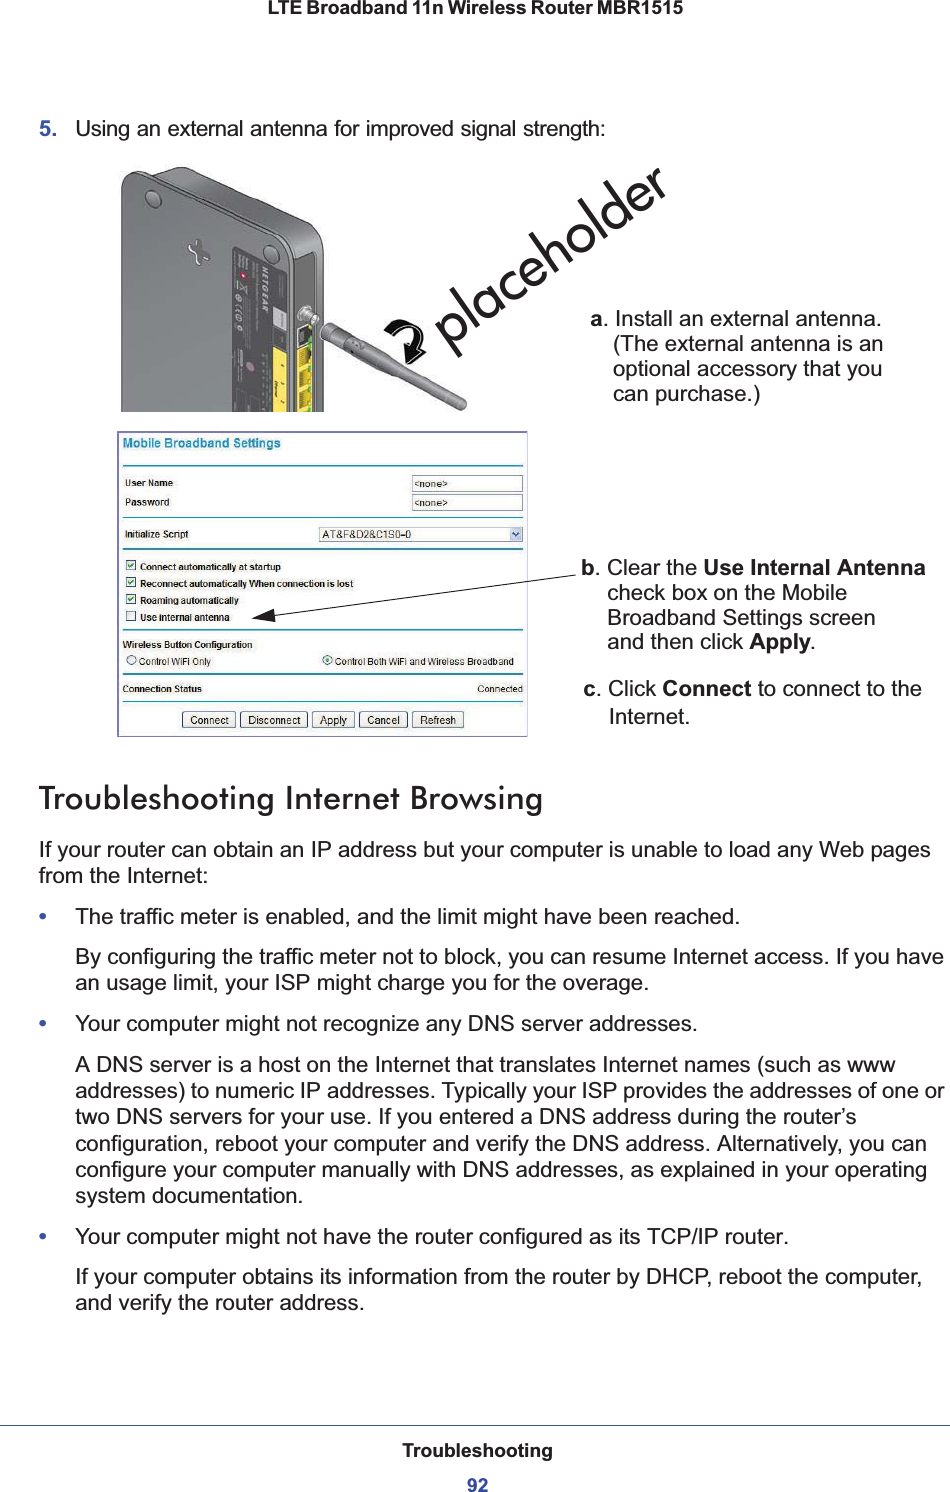
>
11100159 User Manual
Users Manual
Navigation menu
Upload a User Manual
Namespaces
Wiki Guide
HTML
PDF
Info
Views
User Manual
Discussion / Help
Navigation


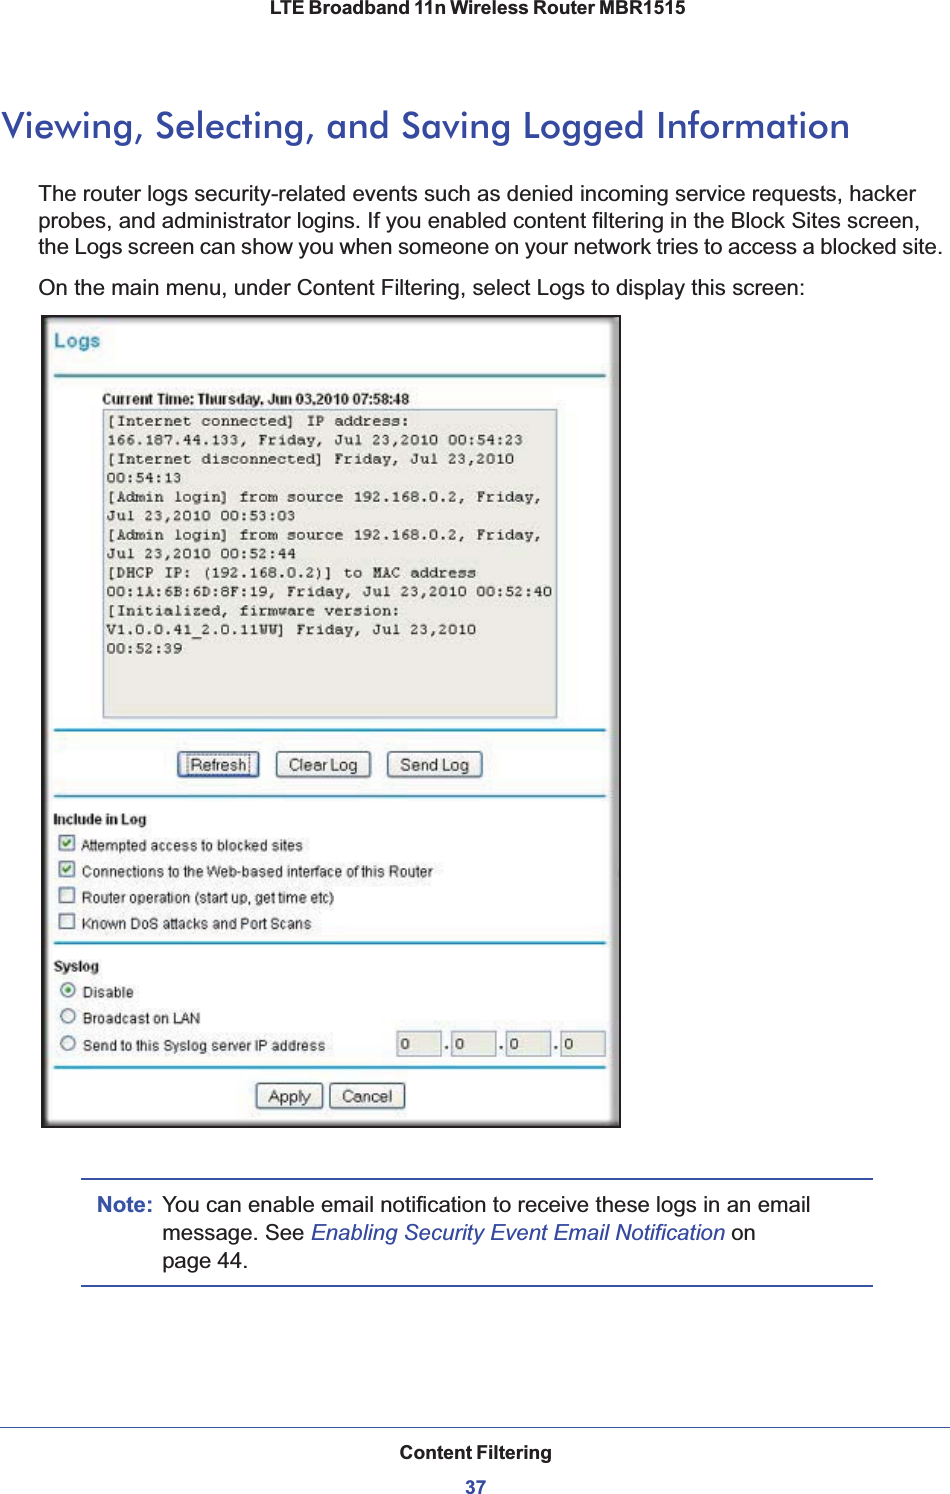
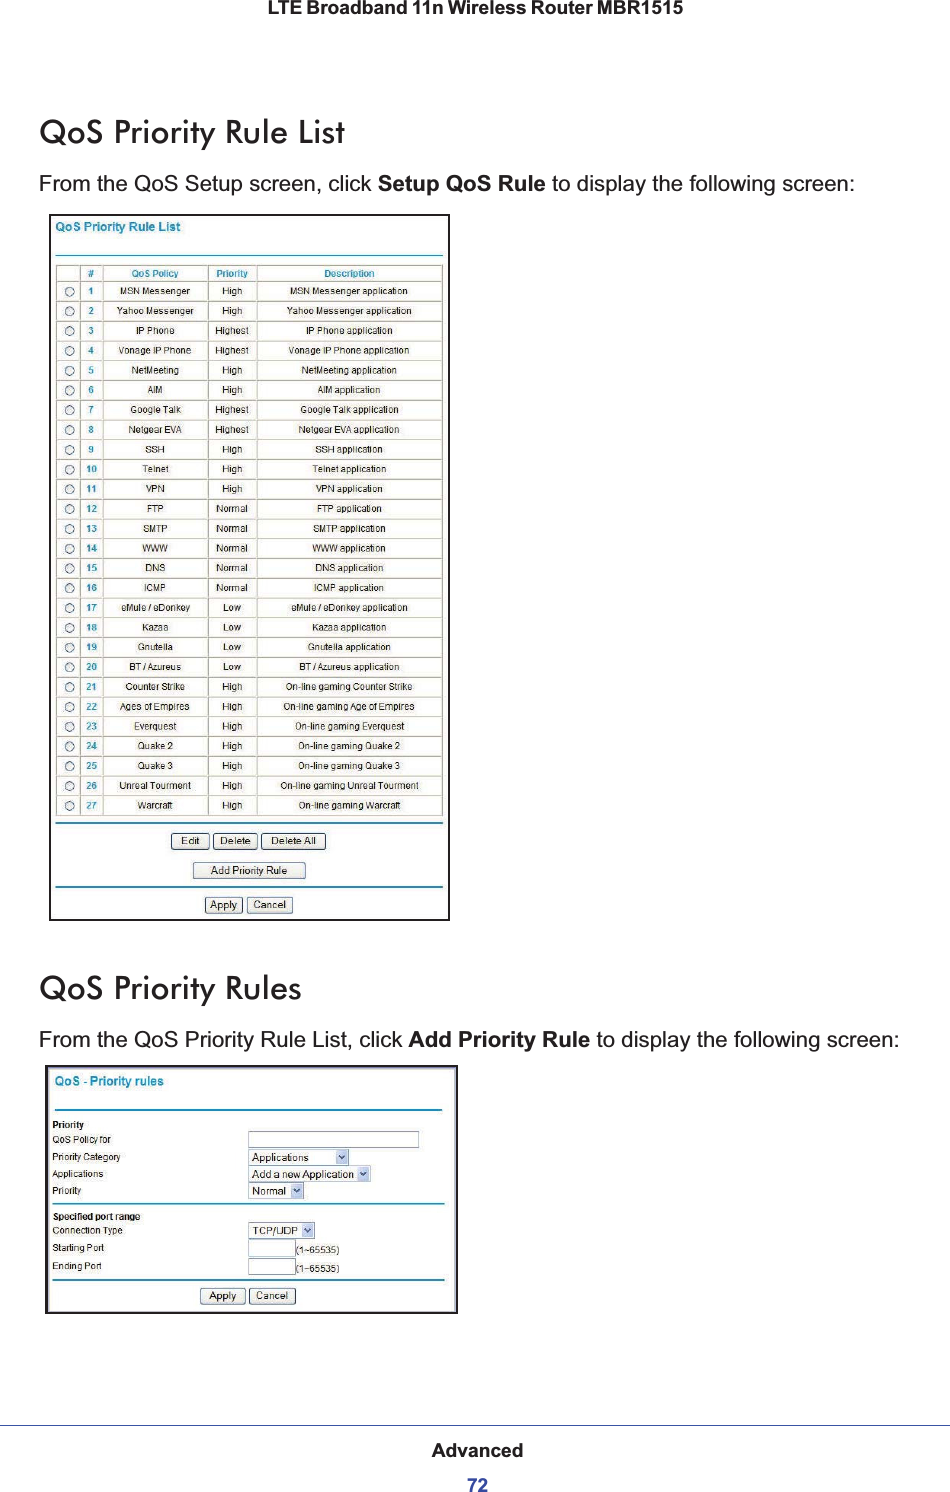
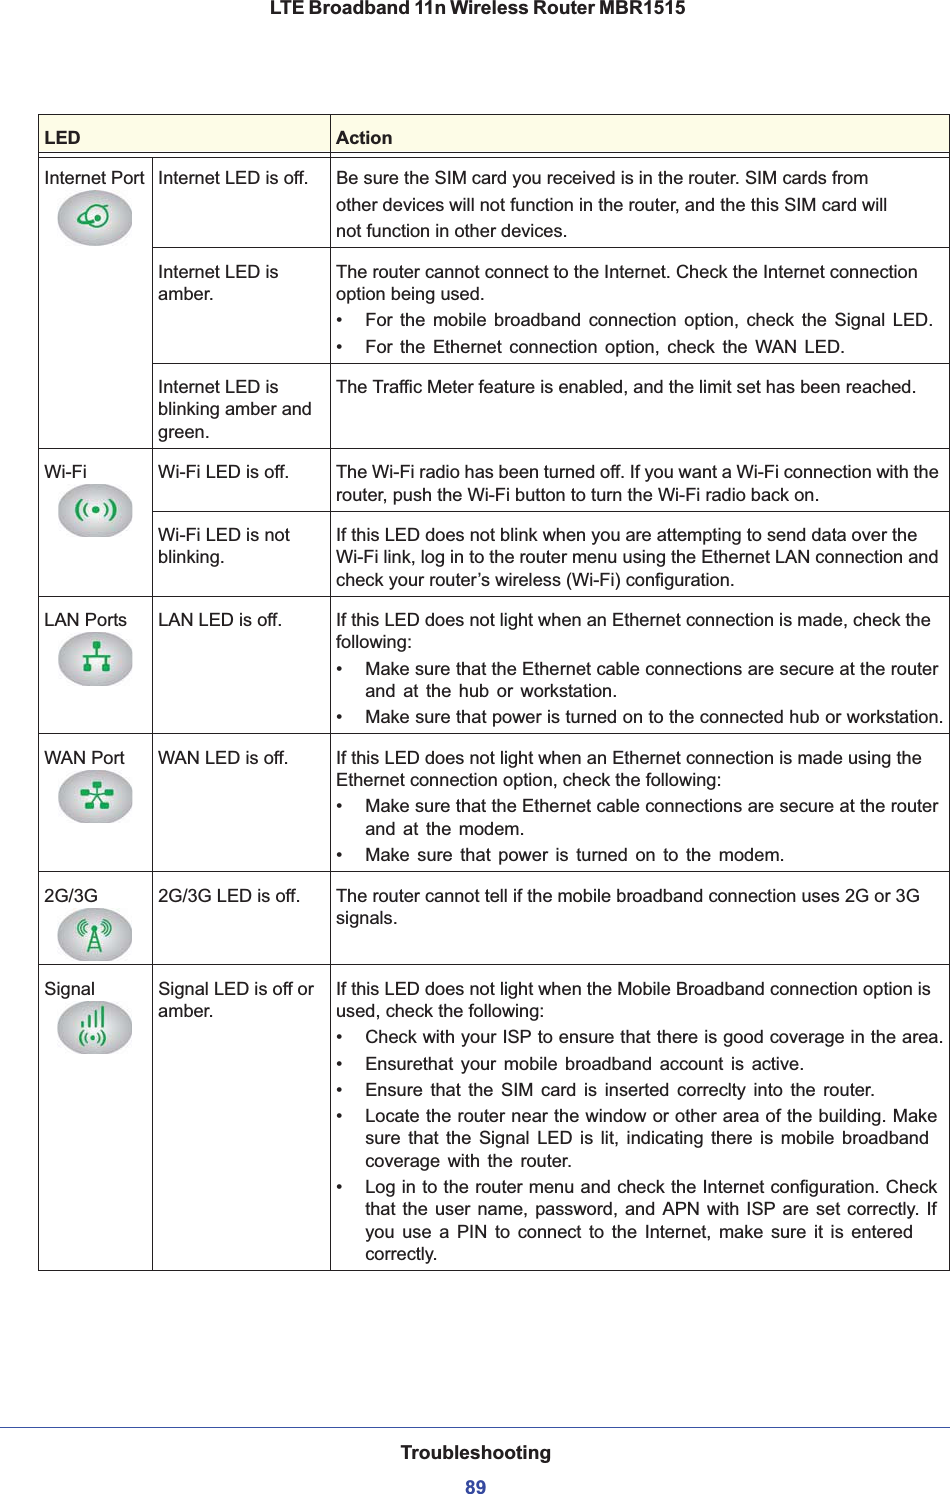
![Content Filtering39 LTE Broadband 11n Wireless Router MBR1515Log Message ExamplesFollowing are examples of log messages. In all cases, the log entry shows the time stamp as Day, Year-Month-Date Hour:Minute:Second.Activation and AdministrationThis entry indicates a power-up or reboot with initial time entry.Tue, 2002-05-21 18:48:39 - NETGEAR activated This entry shows an administrator logging in to and out from IP address 192.168.0.2.Tue, 2002-05-21 18:55:00 - Administrator login successful - IP:192.168.0.2 Thu, 2002-05-21 18:56:58 - Administrator logout - IP:192.168.0.2 This entry shows a time-out of the administrator login.Tue, 2002-05-21 19:00:06 - Login screen timed out - IP:192.168.0.2This entry shows when the log was emailed.Wed, 2002-05-22 22:00:19 - Log emailedDropped Packets These entries show an inbound FTP (port 21) packet, User Datagram Protocol (UDP) packet (port 6970), and Internet Control Message Protocol (ICMP) packet (port 0) being dropped as a result of the default inbound rule, which states that all inbound packets are denied.Wed, 2002-05-22 07:15:15 - TCP packet dropped - Source:64.12.47.28,4787,WAN - Destination:134.177.0.11,21,LAN - [Inbound Default rule match]Sun, 2002-05-22 12:50:33 - UDP packet dropped - Source:64.12.47.28,10714,WAN - Destination:134.177.0.11,6970,LAN - [Inbound Default rule match]Sun, 2002-05-22 21:02:53 - ICMP packet dropped - Source:64.12.47.28,0,WAN - Destination:134.177.0.11,0,LAN - [Inbound Default rule match]](https://usermanual.wiki/Netgear-orporated/11100159/User-Guide-1740161-Page-39.png)


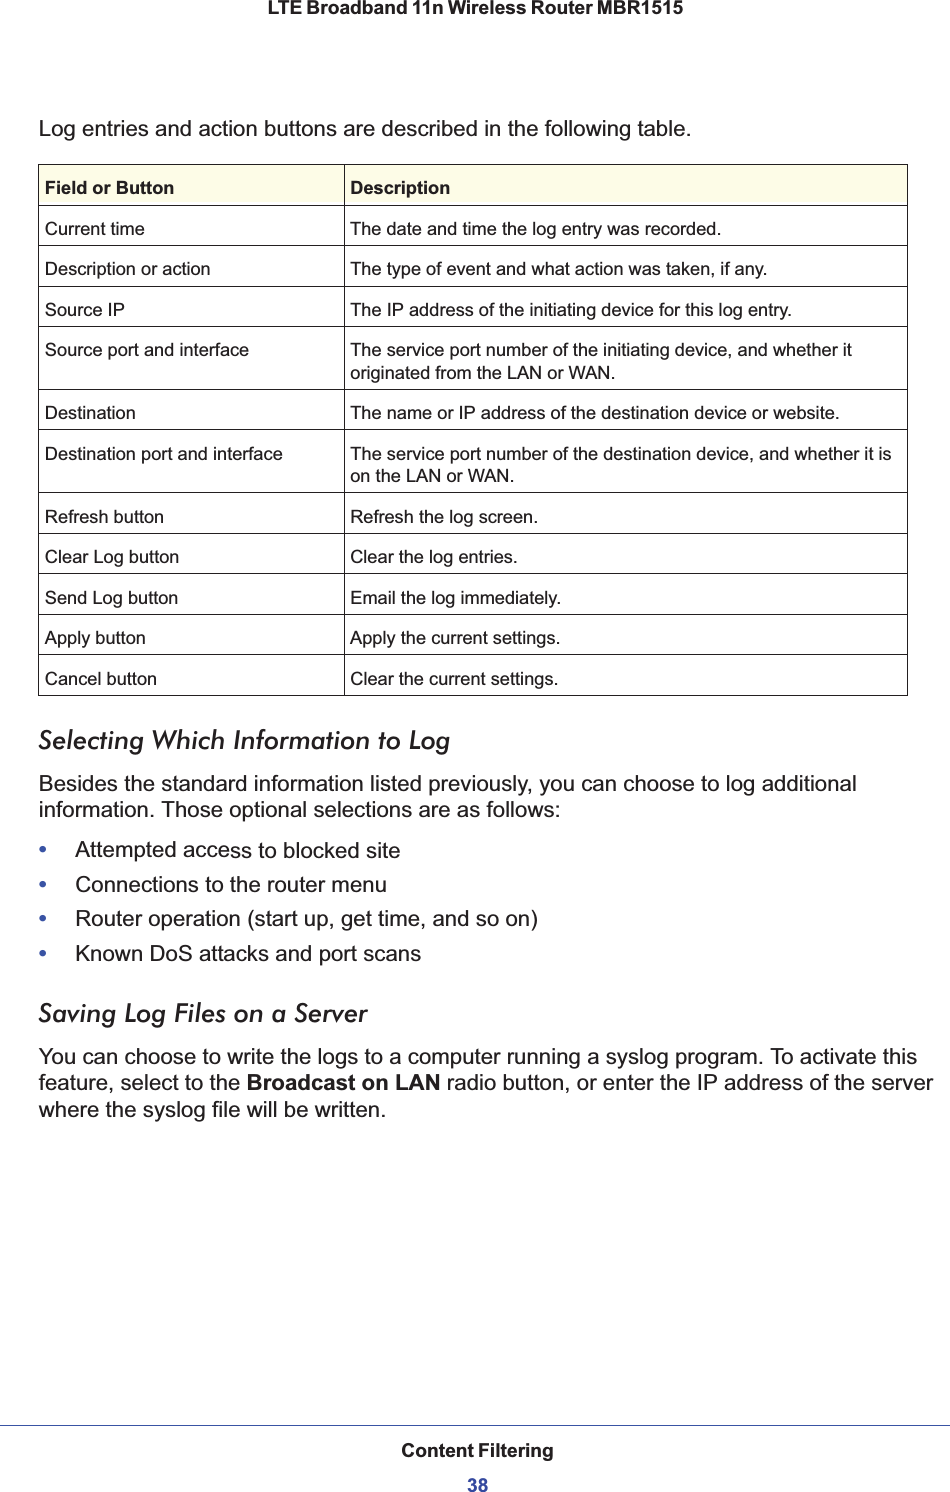
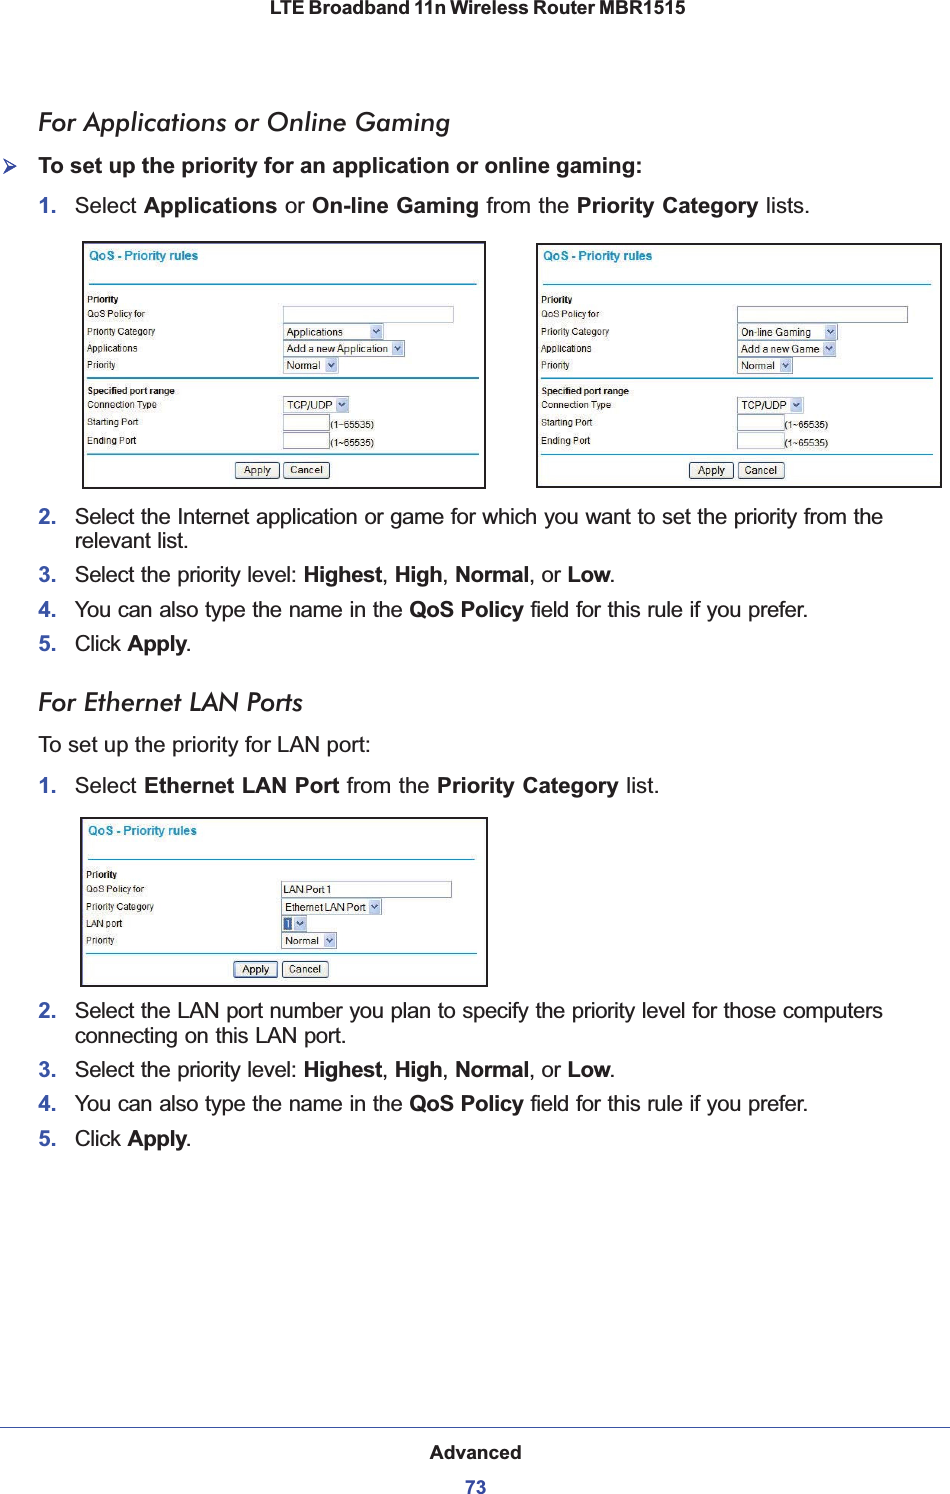
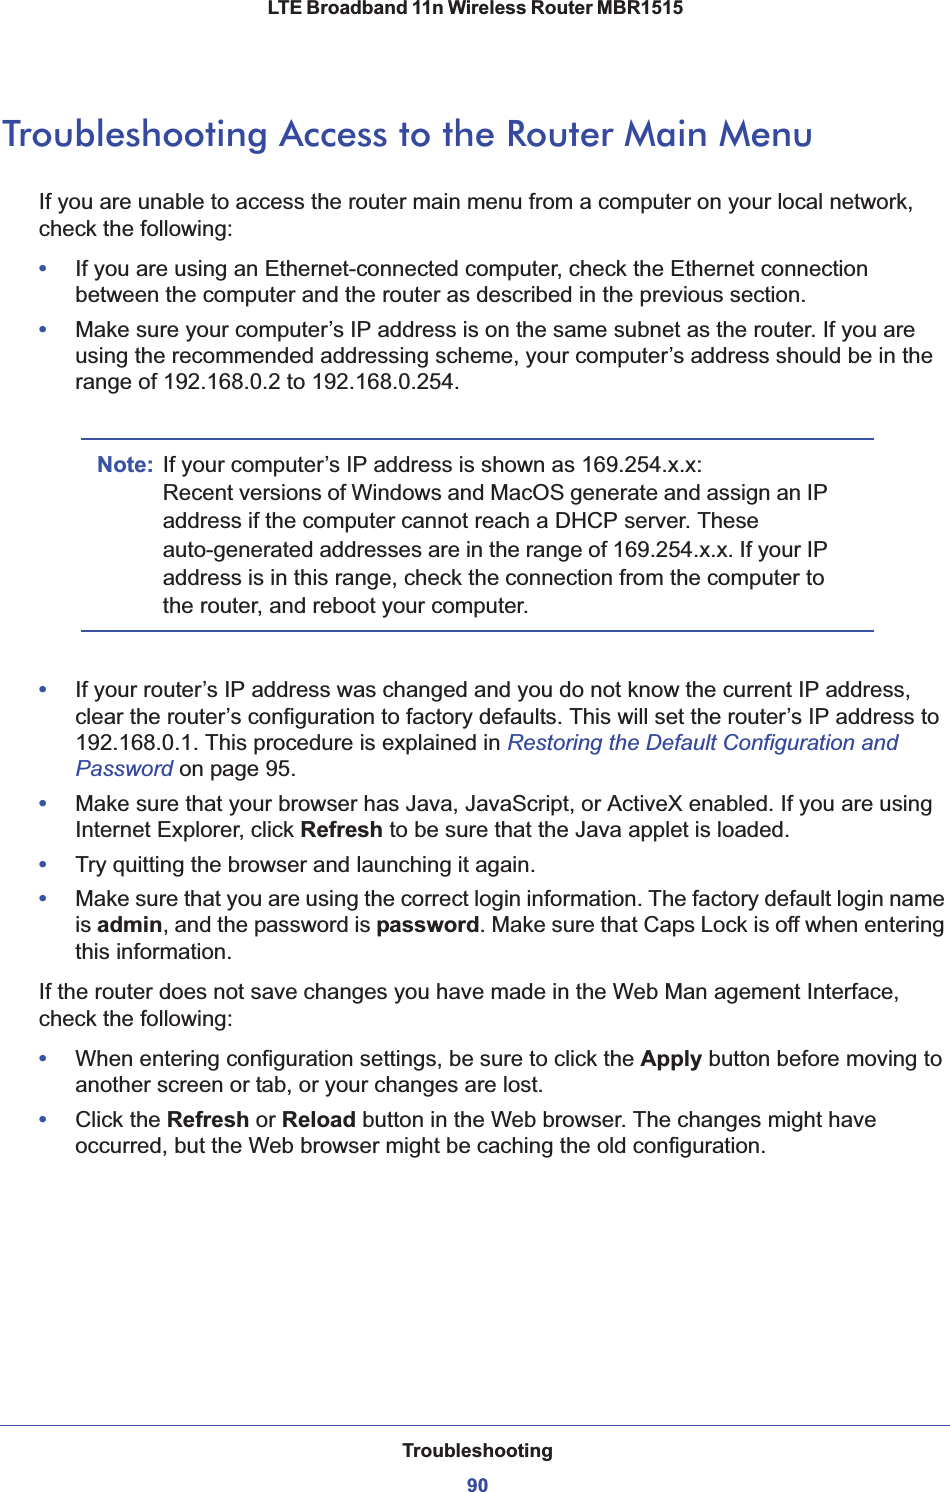
![Advanced63 LTE Broadband 11n Wireless Router MBR1515Wireless Repeating FunctionFrom the main menu, select Wireless Repeating Function to display the following screen:Field DescriptionEnable Wireless Repeating Enable this if you wish to use either Bridge mode or Repeater mode, and then select the mode you want for your environment.•Wireless Repeater. In this mode, the MBR1515 will communicate only with another Base Station–mode wireless station. You must enter the MAC address (physical address) of the other Base Station–mode wireless station in the field provided. WEP / WPA-PSK [TKIP] can (and should) be used to protect this communication.•Wireless Base Station. Select this only if this MBR1515 is the "master" for a group of Repeater-mode wireless stations. The other Repeater–mode wireless stations must be set to Wireless Repeater–mode, using this MBR1515's MAC address. They then send all traffic to this master, rather than communicate directly with each other. WEP / WPA-PSK [TKIP] can (and should) be used to protect this traffic. If this option is selected, you must enter the MAC addresses of the other access points in the fields provided.](https://usermanual.wiki/Netgear-orporated/11100159/User-Guide-1740161-Page-63.png)


![Compliance Notification104LTE Broadband 11n Wireless Router MBR1515FCC Caution•Any changes or modifications not expressly approved by the party responsible for compliance could void the user’s authority to operate this equipment. •This device complies with Part 15 of the FCC Rules. Operation is subject to the following two conditions: (1) This device may not cause harmful interference, and (2) this device must accept any interference received, including interference that may cause undesired operation. •For product available in the USA market, only channel 1~11 can be operated. Selection of other channels is not possible.•This device and its antenna(s) must not be co-located or operation in conjunction with any other antenna or transmitter.Canadian Department of Communications Radio Interference RegulationsThis digital apparatus (LTE Broadband 11n Wireless Router MBR1515) does not exceed the Class B limits for radio-noise emissions from digital apparatus as set out in the Radio Interference Regulations of the Canadian Department of Communications.This Class [B] digital apparatus complies with Canadian ICES-003.Cet appareil numérique de la classe [B] est conforme à la norme NMB-003 du CanadaIndustry CanadaThis device complies with RSS-210 of the Industry Canada Rules. Operation is subject to the following two conditions: (1) This device may not cause harmful interference, and (2) this device must accept any interference received, including interference that may cause undesired operation.IMPORTANT NOTE: Radiation Exposure Statement:This equipment complies with IC radiation exposure limits set forth for an uncontrolled environment. This equipment should be installed and operated with minimum distance 20cm between the radiator & your body.Caution:Ce dispositif est conforme à la norme CNR-210 d'Industrie Canada applicable aux appareils radio exempts de licence. Son fonctionnement est sujet aux deux conditions suivantes: (1) le dispositif ne doit pas produire de brouillage préjudiciable, et (2) ce dispositif doit accepter tout brouillage reçu, y compris un brouillage susceptible de provoquer un fonctionnement indésirable.NOTE IMPORTANTE: Déclaration d'exposition aux radiations:Cet équipement est conforme aux limites d'exposition aux rayonnements IC établies pour un environnement non contrôlé. Cet équipement doit être installé et utilisé avec un minimum de 20 cm de distance entre la source de rayonnement et votre corps.GPL License AgreementGPL may be included in this product; to view the GPL license agreement go toftp://downloads.netgear.com/files/GPLnotice.pdf.For GNU General Public License (GPL) related information, please visithttp://support.netgear.com/app/answers/detail/a_id/2649.](https://usermanual.wiki/Netgear-orporated/11100159/User-Guide-1740161-Page-104.png)