Netgear orporated 13200230 WiFi Range Extender User Manual High Power WiFi Extender EX6200 User Manual
Netgear Incorporated WiFi Range Extender High Power WiFi Extender EX6200 User Manual
User Manual
350 East Plumeria Drive
San Jose, CA 95134
USA
November 2013
EX6200 WiFi Range Extender
AC1200 High Power Dual Band
Gigabit Ports
User Manual
Note: This document is for certification purposes. Images are for
position only and may differ from the actual product.

2
EX6200 WiFi Range Extender AC1200 High Power Dual Band Gigabit Ports
Support
Thank you for selecting NETGEAR products.
After installing your device, locate the serial number on the label of your product and use it to register your product
at https://my.netgear.com. You must register your product before you can use NETGEAR telephone support.
NETGEAR recommends registering your product through the NETGEAR website. For product updates and web
support, visit http://support.netgear.com.
Phone (US & Canada only): 1-888-NETGEAR.
Phone (Other Countries): Check the list of phone numbers at
http://support.netgear.com/general/contact/default.aspx.
Trademarks
NETGEAR, the NETGEAR logo, and Connect with Innovation are trademarks and/or registered trademarks of
NETGEAR, Inc. and/or its subsidiaries in the United States and/or other countries. Information is subject to change
without notice. © NETGEAR, Inc. All rights reserved.
Compliance
For regulatory compliance information, visit http://www.netgear.com/about/regulatory/.

3
Table of Contents
Chapter 1 Getting Started
Hardware Features. . . . . . . . . . . . . . . . . . . . . . . . . . . . . . . . . . . . . . . . . . . .5
Front Panel. . . . . . . . . . . . . . . . . . . . . . . . . . . . . . . . . . . . . . . . . . . . . . . . 5
Rear Panel . . . . . . . . . . . . . . . . . . . . . . . . . . . . . . . . . . . . . . . . . . . . . . . .6
How the Extender Works . . . . . . . . . . . . . . . . . . . . . . . . . . . . . . . . . . . . . . .7
When to Use Your Extender. . . . . . . . . . . . . . . . . . . . . . . . . . . . . . . . . . .8
Positioning Your Extender . . . . . . . . . . . . . . . . . . . . . . . . . . . . . . . . . . . .8
Connect a Computer to the Extender with an Ethernet Cable . . . . . . . . . . .9
Log In to the Extender . . . . . . . . . . . . . . . . . . . . . . . . . . . . . . . . . . . . . . . . .9
Use NETGEAR Genie to Set Up the Extender. . . . . . . . . . . . . . . . . . . . . .10
Chapter 2 Extender Network Settings
Connect the Extender to an Existing Network . . . . . . . . . . . . . . . . . . . . . .14
Use WPS to Join the Extender’s Wireless Network . . . . . . . . . . . . . . . . . .15
Extender Wireless Settings . . . . . . . . . . . . . . . . . . . . . . . . . . . . . . . . . . . .16
Set Up WPA, WPA2, or WPA + WPA2. . . . . . . . . . . . . . . . . . . . . . . . . .17
Set Up WEP . . . . . . . . . . . . . . . . . . . . . . . . . . . . . . . . . . . . . . . . . . . . . .17
Extender IP Address Setup . . . . . . . . . . . . . . . . . . . . . . . . . . . . . . . . . . . .19
Status Screen. . . . . . . . . . . . . . . . . . . . . . . . . . . . . . . . . . . . . . . . . . . . . . . 20
Show Statistics . . . . . . . . . . . . . . . . . . . . . . . . . . . . . . . . . . . . . . . . . . . .21
Attached Devices . . . . . . . . . . . . . . . . . . . . . . . . . . . . . . . . . . . . . . . . . . . .22
Back Up and Manage Extender Settings . . . . . . . . . . . . . . . . . . . . . . . . . .22
Set the Password . . . . . . . . . . . . . . . . . . . . . . . . . . . . . . . . . . . . . . . . . . . . 23
Upgrade the Firmware . . . . . . . . . . . . . . . . . . . . . . . . . . . . . . . . . . . . . . . .24
Advanced Wireless Settings. . . . . . . . . . . . . . . . . . . . . . . . . . . . . . . . . . . .25
Chapter 3 Troubleshooting
Smart Wizard FAQs . . . . . . . . . . . . . . . . . . . . . . . . . . . . . . . . . . . . . . . . . .28
Connecting to http://www.mywifiext.net . . . . . . . . . . . . . . . . . . . . . . . . . . .28
Joining Wireless Networks . . . . . . . . . . . . . . . . . . . . . . . . . . . . . . . . . . . . .29
Appendix A Supplementary Information
Factory Settings . . . . . . . . . . . . . . . . . . . . . . . . . . . . . . . . . . . . . . . . . . . . .31
Technical Specifications. . . . . . . . . . . . . . . . . . . . . . . . . . . . . . . . . . . . . . .32

4
1
1. Getting Started
This chapter covers the following topics:
•Hardware Features
•How the Extender Works
•Connect a Computer to the Extender with an Ethernet Cable
•Log In to the Extender
•Use NETGEAR Genie to Set Up the Extender
For more information about the topics covered in this manual, visit the support website at
http://support.netgear.com.
Getting Started
5
High Power WiFi Extender EX6200
Hardware Features
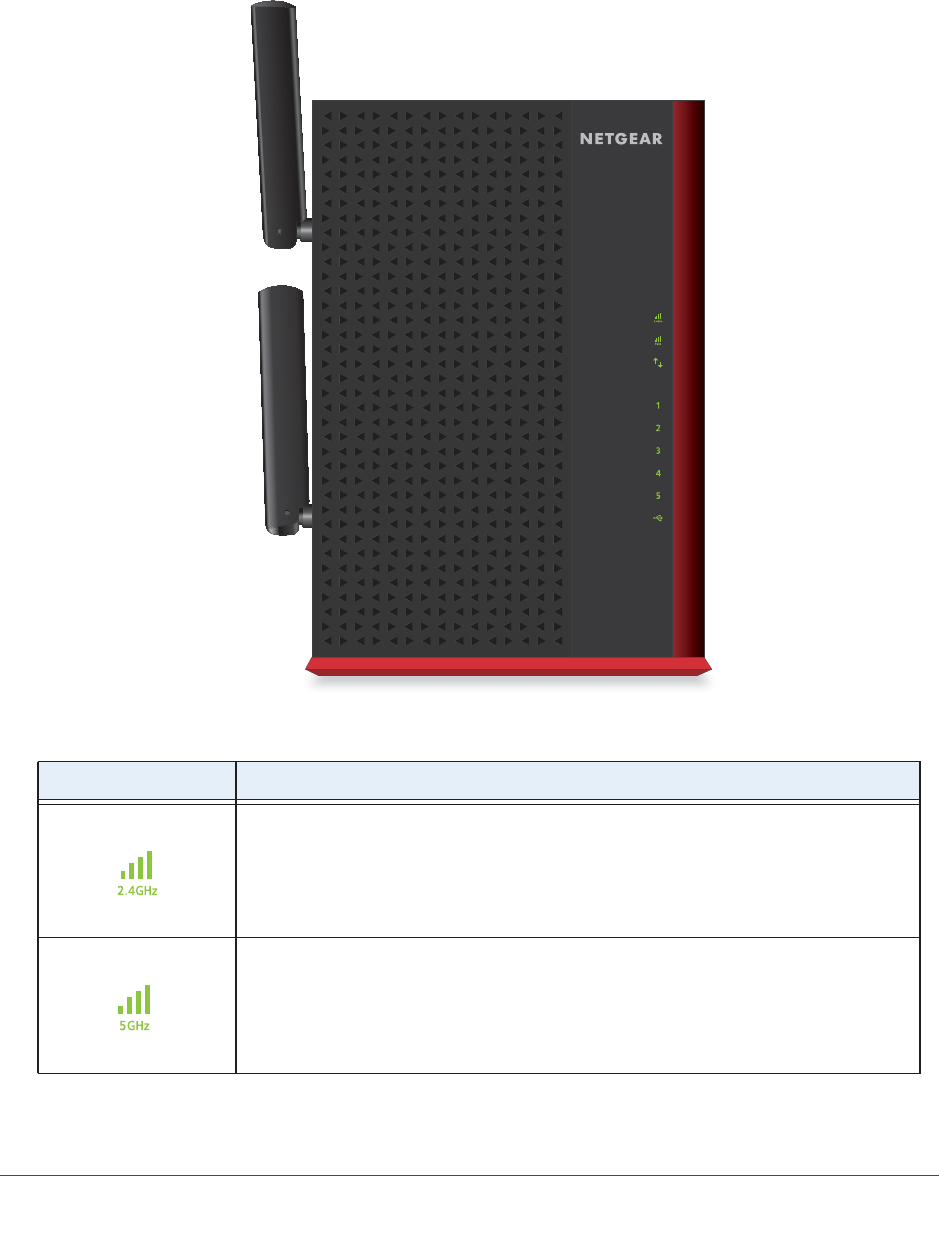
Front Panel
Table 1. LED descriptions
LEDs Description
2.4 GHz Link Rate •Solid green. The wireless connection between the extender and the router is
optimum.
•Solid amber. The wireless connection between the extender and the router is
good.
•Solid red. The wireless connection between the extender and the router is poor.
5 GHz Link Rate •Solid green. The wireless connection between the extender and the router is
optimum.
•Solid amber. The wireless connection between the extender and the router is
good.
•Solid red. The wireless connection between the extender and the router is poor.
Getting Started
6
High Power WiFi Extender EX6200
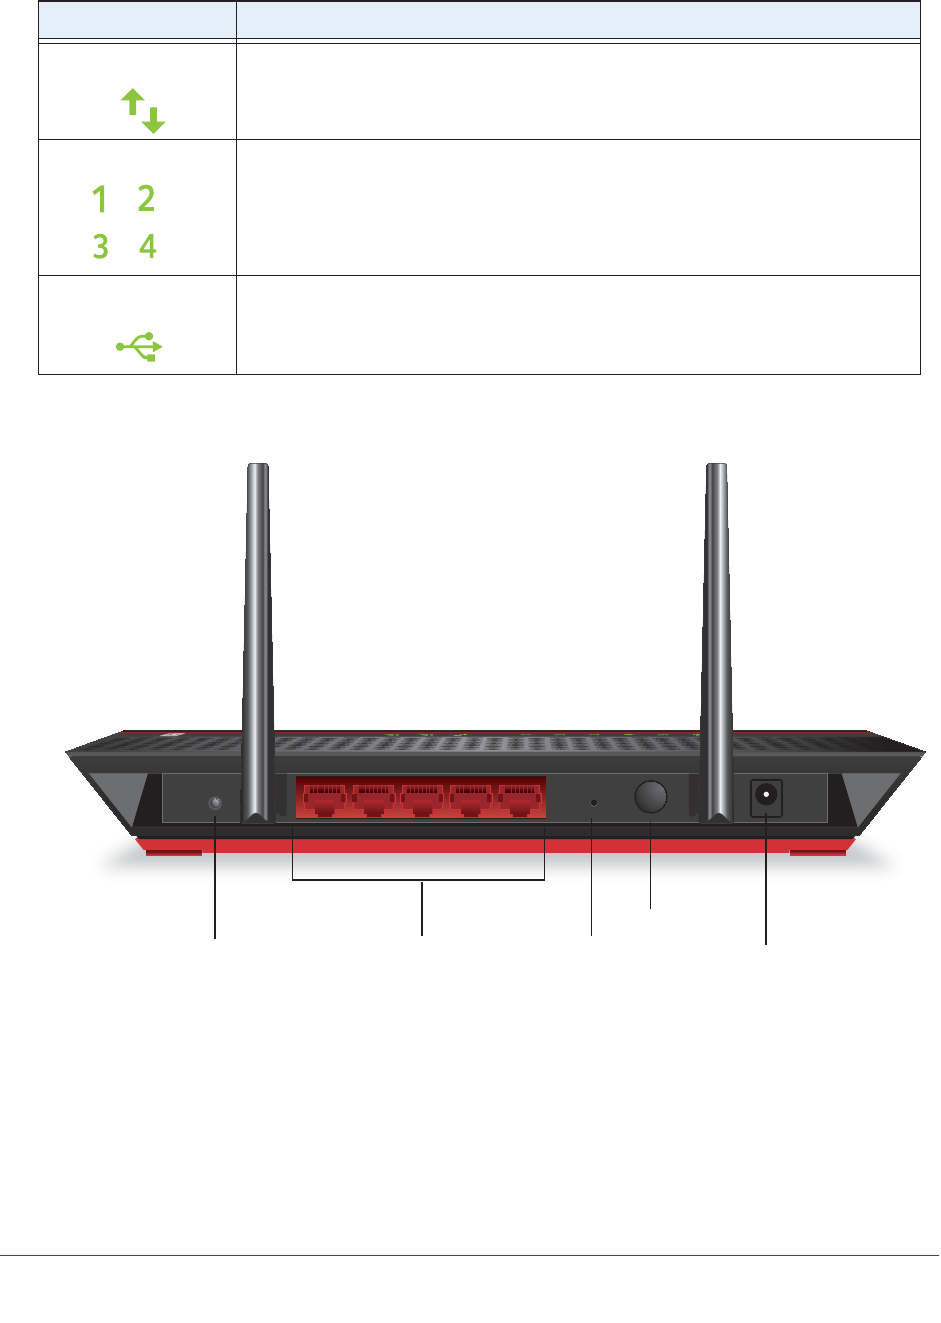
Rear Panel
LAN ports
Power button
WPS button Reset button Power input
Figure 1. Rear panel
Device to Extender •Solid green. The extender and device are connected.
•Off. No link is detected on this port.
LAN
•Solid green. The LAN port has detected an Ethernet link with the extender.
•Off. The LAN port does not detect an Ethernet link with the extender.
USB • Solid green. A USB device is connected to the extender.
• Off. No USB device is connected to the WiFi extender.
Table 1. LED descriptions
LEDs Description
Getting Started
7
High Power WiFi Extender EX6200
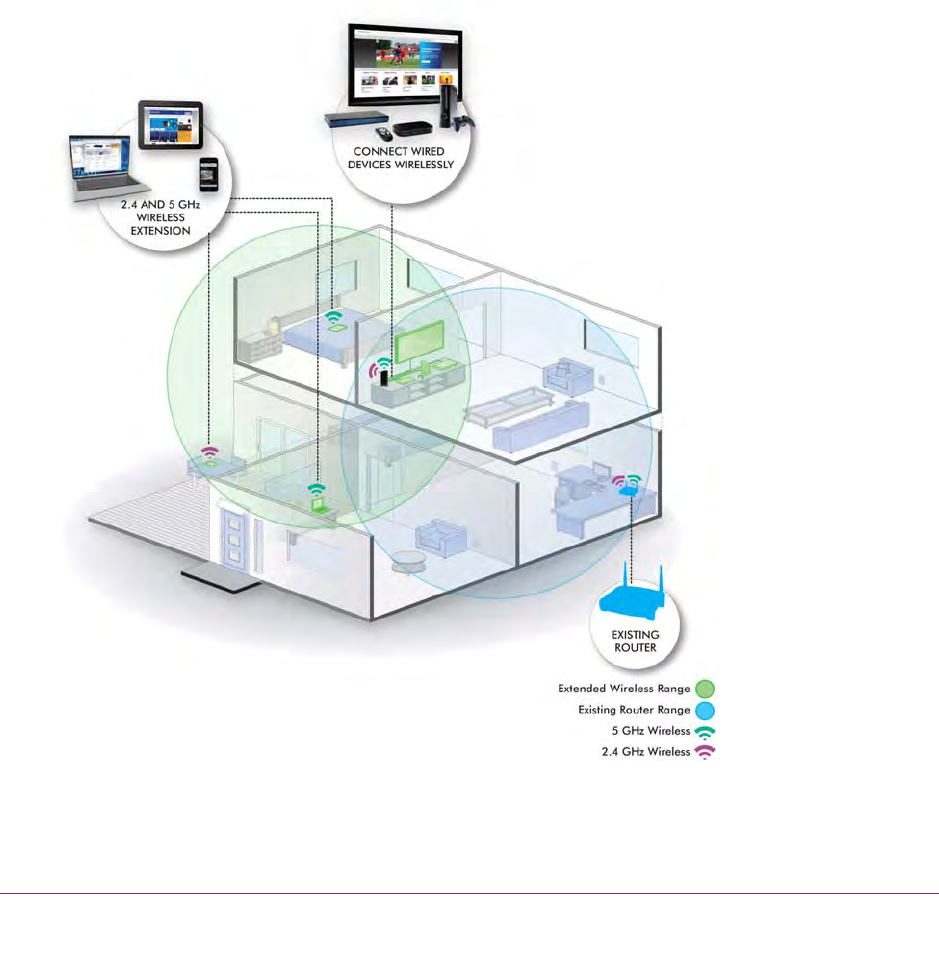
How the Extender Works
The extender works like a bridge between a wireless router and a computer or wireless
device outside the wireless router’s range. To do this, the extender has two main jobs:
1. The extender connects to a wireless network that is up and running.
When the extender connects wirelessly to a network, it acts as a network client. This is
similar to how a computer connects to a network.
2. The extender acts as an access point for computers.
The extender has its own wireless network called NETGEAR_EXT that wireless
computers can join. In its role as an access point, the extender performs tasks that
wireless routers do, such as broadcasting its network name (SSID).
The extender needs to do each of these jobs so that both ends of the bridge are in place.
The extender is halfway
between the router
and the computer.
Figure 2. Range extender in a home

Getting Started
8
High Power WiFi Extender EX6200
When to Use Your Extender
NETGEAR recommends that you connect to the extender only when your home network
connection is poor. Because data traffic routed through the extender is inherently slower than
traffic routed directly from the network, the computer should stay on the network if the
connection is good enough. NETGEAR recommends that you connect through the extender
network only when the computer is in a “dead zone” where connection from the network is
very poor or non-existent.
The extender LEDs can help you tell if the extender is correctly set up and working as it
should.
•The best performance is delivered when a the Link Rate LED or and the Device
to Extender LED are green.
•A workable performance is delivered when the Link Rate LED is amber and the Device to
Extender LED is green.
Positioning Your Extender
The ideal location to place the extender is half-way between your wireless router and your
computer.
The best connection is established when there is a clear line of sight between the extender
and the wireless router and also a clear line of sight between the extender and the computer
you are using. If this straight path is blocked by a thick wall or other materials, move the
extender to a different location half-way between the computer and the router.
If there is no power outlet nearby, or you prefer to place the extender elsewhere, move the
extender closer to the computer. If the Link Rate LED is green or amber and the Wireless
Device to Extender LED is green, the extender is working as expected.
To improve the Link Rate LED from red or amber to green:
•Once you successfully connect to the extender from a computer that is outside the range
of your router and log in to www.mywifiext.net, the Smart Wizard guides you through the
process to connect the extender to a router.
•If the Link Rate LED is red or the Smart Wizard cannot connect the extender to a router,
move the extender closer to the router or to a different spot where it provides a better line
of sight. As you move the extender, continue to check the Link Rate and the Wireless
Device to Extender LEDs on the front panel until you find a location where the Link Rate
LED is green or amber, and the Wireless Device to Extender LED is green. Note that you
might have to unplug the extender as you move it to a different location. If you do, from
the new location, power up the extender and continue to check the LEDs.
Once the LEDs show that the extender is in a good location, open a browser and go to
http://www.mywifiext.net to continue the setup process.

Getting Started
9
High Power WiFi Extender EX6200
Connect a Computer to the Extender with an Ethernet
Cable
CAUTION:
Do not use an Ethernet cable to connect the extender to a router. If you do
so, the extender does not work because it is designed to use only a
wireless connection to the router.
You can use the LAN ports on the extender to connect wired devices such as
Ethernet-enabled gaming consoles, printers, or computers.
Note: Before you connect wired devices or computers, first install and set
up your extender as described in the High Power WiFi Extender
EX6200 Installation Guide that came in the package.
To cable a computer to the extender:
1. Locate the four LAN ports on the rear panel of the extender.
2. Use an Ethernet cable to connect your computer to one of the LAN ports.
3. Connect the extender power adapter, and plug it into an electrical outlet.
4. Log in as described in the following section.
Log In to the Extender
You can log in to the extender to use NETGEAR Genie or to use the menu selections to view
or change the extender’s settings.
1. On your computer, launch an Internet browser such as Mozilla Firefox or Microsoft
Internet Explorer.
2. In the address field of your browser, enter http://www.mywifiext.net. You are prompted to
enter a user name and password.
If you do not see the log in prompt, make sure to include http:// when you type
http://www.mywifiext.net in your browser.
3. Type admin for the user name. The default password is password. NETGEAR
recommends that you set a more secure password after you log in (see Set the Password
on page 23).
•If your extender has an Internet connection, the Firmware Upgrade screen displays
(see Upgrade the Firmware on page 24), and the software automatically checks for
new firmware at the NETGEAR website.
Getting Started
10
High Power WiFi Extender EX6200
•The Status screen displays with the menu on the left. This screen shows what the
current settings are for the extender.
If you have trouble connecting:
•If you start your computer, connect the Ethernet cable to the extender, and launch your
browser quickly, the computer might still need a couple of minutes to recognize the
Ethernet LAN connection before you can connect.
•Make sure that your Ethernet cable is securely connected to the extender and the
computer, and that the extender LAN LED is on. If the LED is not lit, reconnect the
Ethernet cable, and relaunch your Internet browser.
Use NETGEAR Genie to Set Up the Extender
The Smart Wizard can help you set up your extender to connect to a wireless network. For
information about more configuration options, see Chapter 2, Extender Network Settings.
The High Power WiFi Extender EX6200 Installation Guide (included in the package) explains
how to install your extender. During installation, when you launch your Internet browser, the
Smart Wizard automatically displays.
After installation, to use NETGEAR Genie again:
1. Log in to the extender.
Note: Once you begin using NETGEAR Genie, you have to complete all of
its steps before you can exit.
2. From the menu, select Setup Wizard. The following screen displays:
Getting Started
11
High Power WiFi Extender EX6200
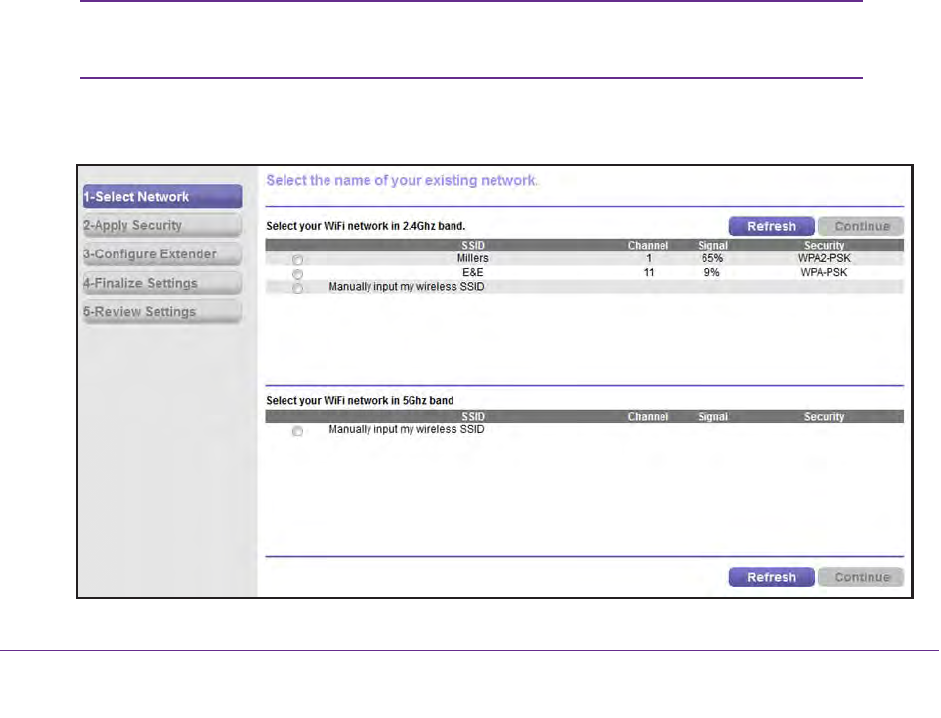
This is the same Smart Wizard that displays during installation, as described in the
installation guide.
3. Either select a network from the list, or select the Manually input my wireless SSID radio
button and type the SSID.
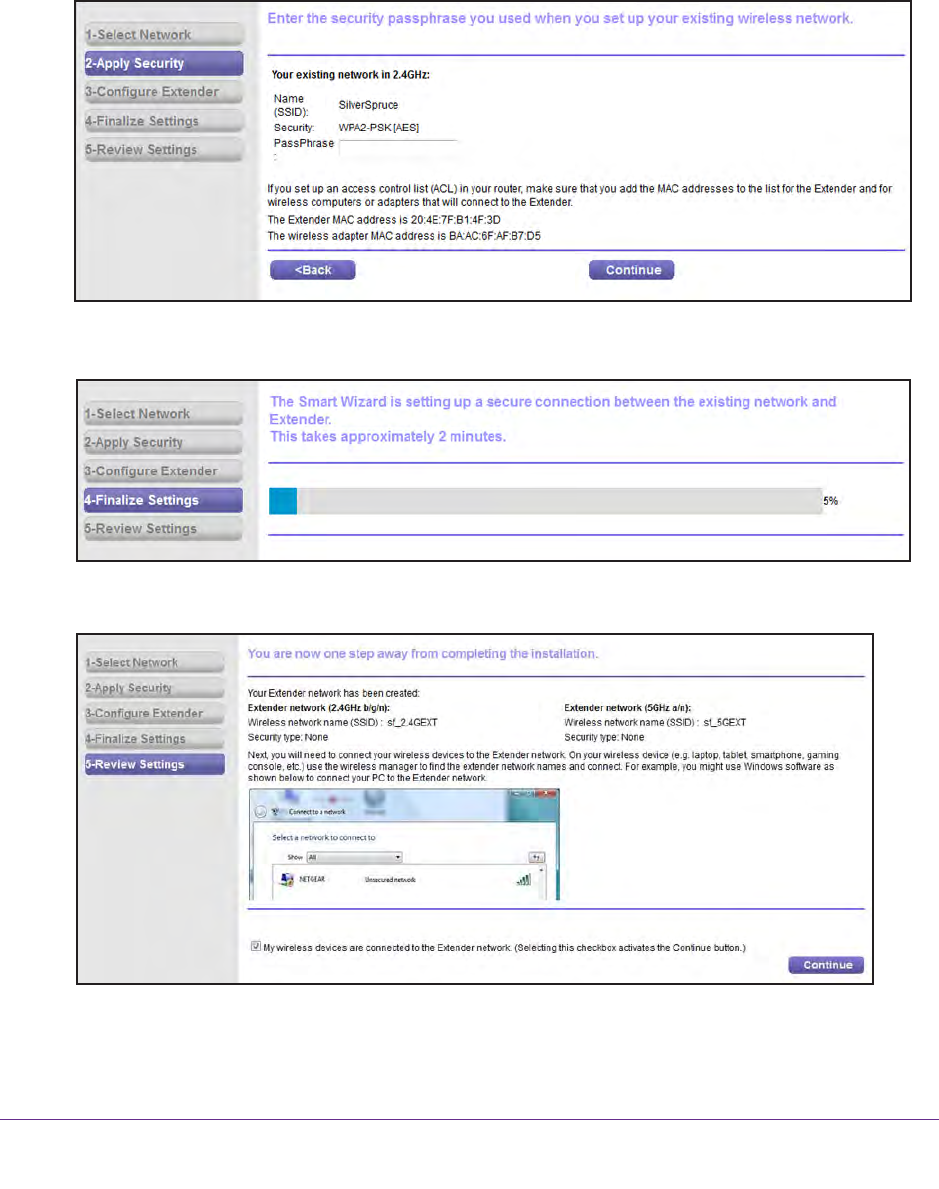
4. Enter the passphrase for your wireless network and click Continue. The next screen
displays:
5. Make sure that the correct network name is shown, and then click Continue. The following
screen displays:
After about 2 minutes, the extender displays the following screen:
6. Review the settings, and make sure they are correct. Then, join the extender network with
your wireless computer or device.

Getting Started
12
High Power WiFi Extender EX6200
7. Select the check box after you successfully connect.
8. Click Continue.

13
2
2. Extender Network Settings
This chapter covers the following topics:
•Connect the Extender to an Existing Network
•Use WPS to Join the Extender’s Wireless Network
•Extender Wireless Settings
•Extender IP Address Setup
•Status Screen
•Attached Devices
•Back Up and Manage Extender Settings
•Set the Password
•Upgrade the Firmware
•Advanced Wireless Settings
Extender Network Settings
14
High Power WiFi Extender EX6200
Connect the Extender to an Existing Network
You can wirelessly connect the extender to your home network.
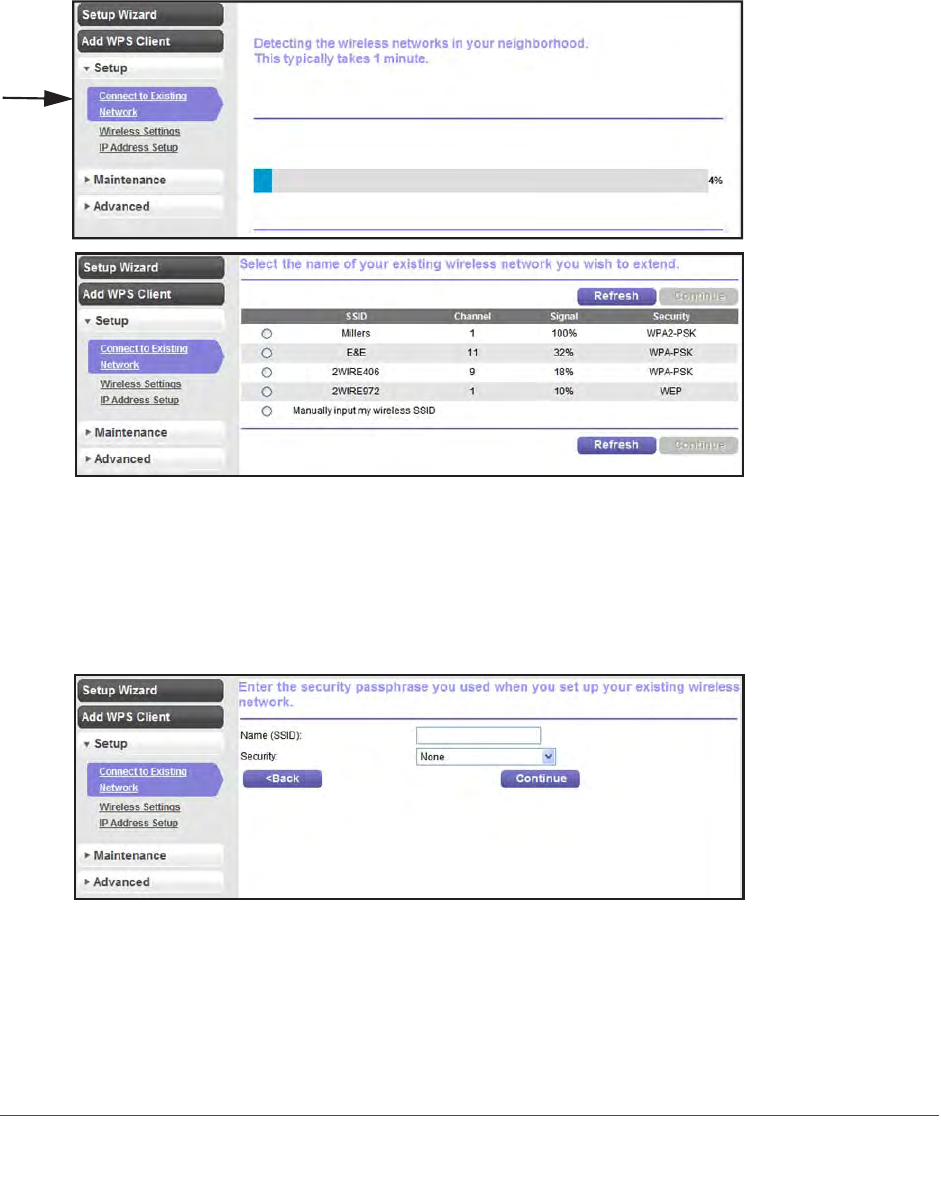
1. Select Setup > Connect to an Existing Network. The extender scans for wireless
networks, and displays a list.
If your wireless network is not on the list, and it is up and running, see Positioning Your
Extender on page 8 for suggestions.
2. Select the radio button for your network, and click Continue.
If you selected the manual option, you are prompted to type the network name (SSID)
and to enter the password to access it:
3. Enter your network’s passphrase or key, and click Continue.
The extender joins your wireless network.
Extender Network Settings
15
High Power WiFi Extender EX6200
Use WPS to Join the Extender’s Wireless Network
WPS (Wi-Fi Protected Setup) lets you connect a computer or wireless device to the
extender’s network without entering the wireless network passphrase or key. Instead, you
use a WPS button or enter a PIN to connect. WPS supports WPA and WPA2 wireless
security.
Note: You cannot use the Push 'N' Connect WPS button to connect the
extender to your wireless network. The WPS button on the extender
can be used only to connect a computer to the extender.
The High Power WiFi Extender EX6200 Installation Guide explains how to use WPS during
installation.
To join the extender’s network using WPS:
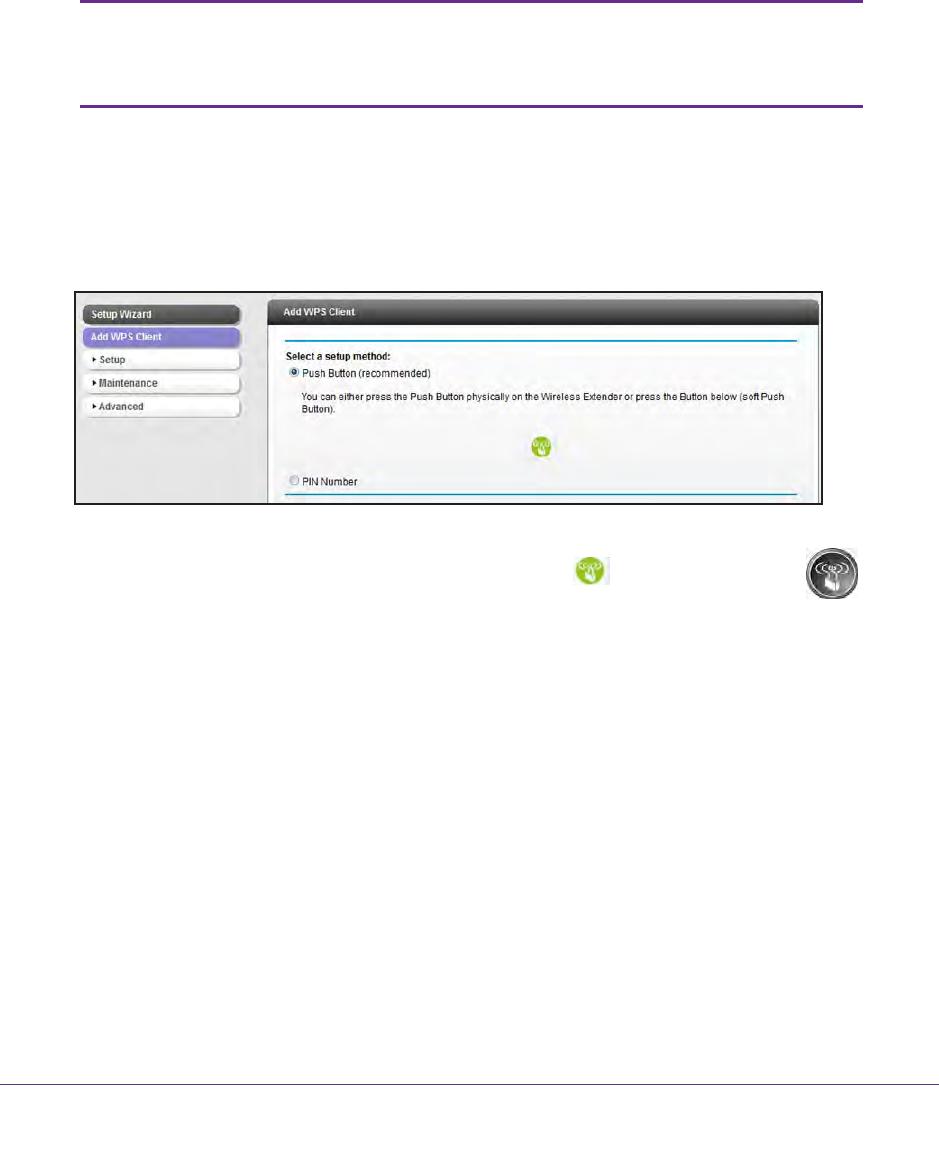
1. Select Add WPS Client. The following screen displays:
2. Select a radio button.
•Push Button (recommended). Either click the button or press the WPS
button on the front of the extender.
•PIN Number. Select the radio button, and a PIN displays.
The extender tries to find the wireless client (the computer) that is attempting to join the
network. If you are using a WPS button, it tries for 2 minutes. If you are using a PIN, it
tries for 4 minutes.
3. Go to your wireless computer. Use its WPS software to try to connect to the extender.
Extender Network Settings
16
High Power WiFi Extender EX6200
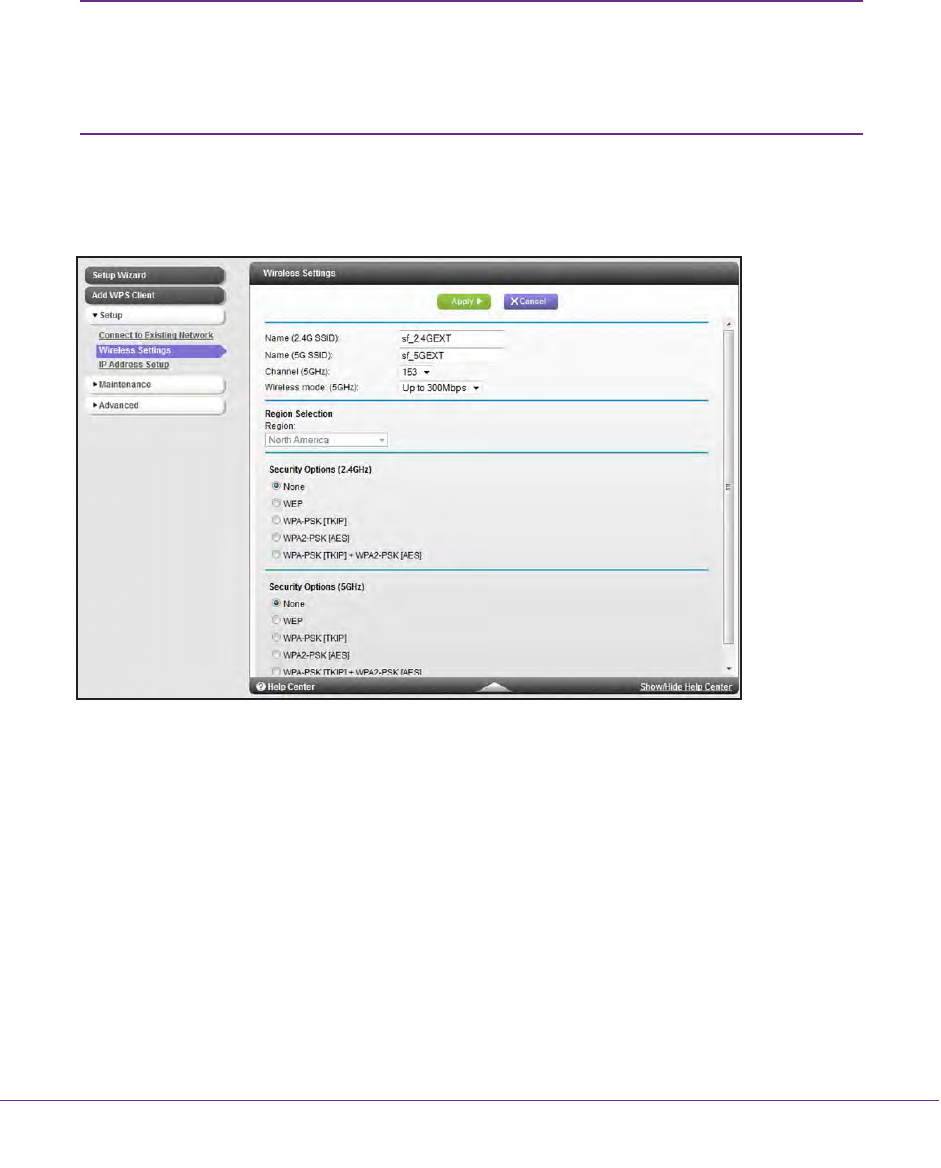
Extender Wireless Settings
You can use the Wireless Settings screen to change the network name (SSID) for the
extender’s network and to set up wireless security. If you do not change these settings, the
network name is NETGEAR_EXT, and the network is open (no wireless security is set up).
Note: If you use a wireless computer to change the extender’s wireless
settings, you will be disconnected when you click Apply. To
reconnect, you have to select the new network name that you
created, and enter its passphrase or wireless security key.
To change the wireless settings for the extender’s network:
1. Select Setup > Wireless Settings to display the following screen:
2. In the Name (SSID) field, you can type in a new name to customize your extender network.
This will make it easier to identify your extender if more than one is operating in your
neighborhood.
3. In the Security Options section of the screen, select the type of wireless security that you
want to use on your network.
•None. This is an open wireless network. Any wireless computer or device is allowed
to join this network.
•WEP. WEP is an older standard, and is less secure than WPA or WPA2. WEP uses
encryption keys and data encryption for data security. You can select 64-bit or 128-bit
encryption.

Extender Network Settings
17
High Power WiFi Extender EX6200
•WPA-PSK [TKIP]. WPA is more secure than WEP. When using wireless computers or
devices that support WPA, you can enter a passphrase to join the extender’s wireless
network.
•WPA2-PSK [AES]. WPA2 is even more secure, but some older computers do not
support this standard. When using wireless computers or devices that support WPA2,
you can enter the passphrase to join the extender’s wireless network.
•WPA-PSK [TKIP] + WPA2-PASK [AES]. When using wireless computers or devices
that support either WPA or WPA2, you can enter the passphrase to join the
extender’s wireless network.
4. Click Apply to save your settings.
5. Use your wireless computer to connect to the extender’s network with its new settings. The
Smart Wizard can guide you through this process.
Set Up WPA, WPA2, or WPA + WPA2
Both WPA and WPA2 provide strong data security. WPA with TKIP can be used on Windows
systems with Service Pack 2 or later. WPA2 with AES is a hardware implementation; see
your device documentation before implementing it.
To configure WPA or WPA2 in the extender:
1. On the Wireless Setting screen, select the radio button for the WPA or WPA2 option of
your choice.
2. The settings displayed on the screen depend on which security option you select.
3. For WPA-PSK or WPA2-PSK, enter the passphrase.
4. Click Apply to save your settings.
Set Up WEP
WEP is a legacy wireless security setting. NETGEAR recommends that you use a newer
standard such as WPA2 or WPA unless you have older wireless equipment that supports
only WEP.
To set up WEP:
1. In the Wireless Settings screen, in the Security Options section, select the WEP radio
button.
2. Select the authentication type: Automatic, Open System, or Shared Key. The default is
Open System.
Note: The authentication is separate from the data encryption. You can
select authentication that requires a shared key, but still leaves data
transmissions unencrypted. Security is stronger if you use both the
Shared Key and WEP encryption settings.

Extender Network Settings
18
High Power WiFi Extender EX6200
3. Select the encryption strength setting:
•WEP 64-bit encryption. Enter 10 hexadecimal digits (any combination of 0–9, a–f,
or A–F).
•WEP 128-bit encryption. Enter 26 hexadecimal digits (any combination of 0–9, a–f,
or A–F).
4. Enter the encryption keys. You can manually or automatically program the four data
encryption keys. These values have to be identical on all computers and access points in
your network:
•Passphrase. To use a passphrase to generate the keys, enter a passphrase, and
click Generate. This automatically creates the keys. Wireless computers have to use
the passphrase or keys to access the extender.
Note: Not all wireless computers support passphrase key generation. If
your computer does not support the passphrase, then you will need
to type the encryption key in order to join the wireless network.
•Key 1–Key 4. These values are not case-sensitive. You can manually enter the four
data encryption keys. These values have to be identical on all computers and access
points in your network. Enter 10 hexadecimal digits (any combination of 0–9, a–f, or
A–F).
5. Select which of the four keys will be the default.
Data transmissions are always encrypted using the default key. The other keys can be
used only to decrypt received data. The four entries are disabled if WPA-PSK or WPA
authentication is selected.
6. Click Apply to save your settings.
Extender Network Settings
19
High Power WiFi Extender EX6200
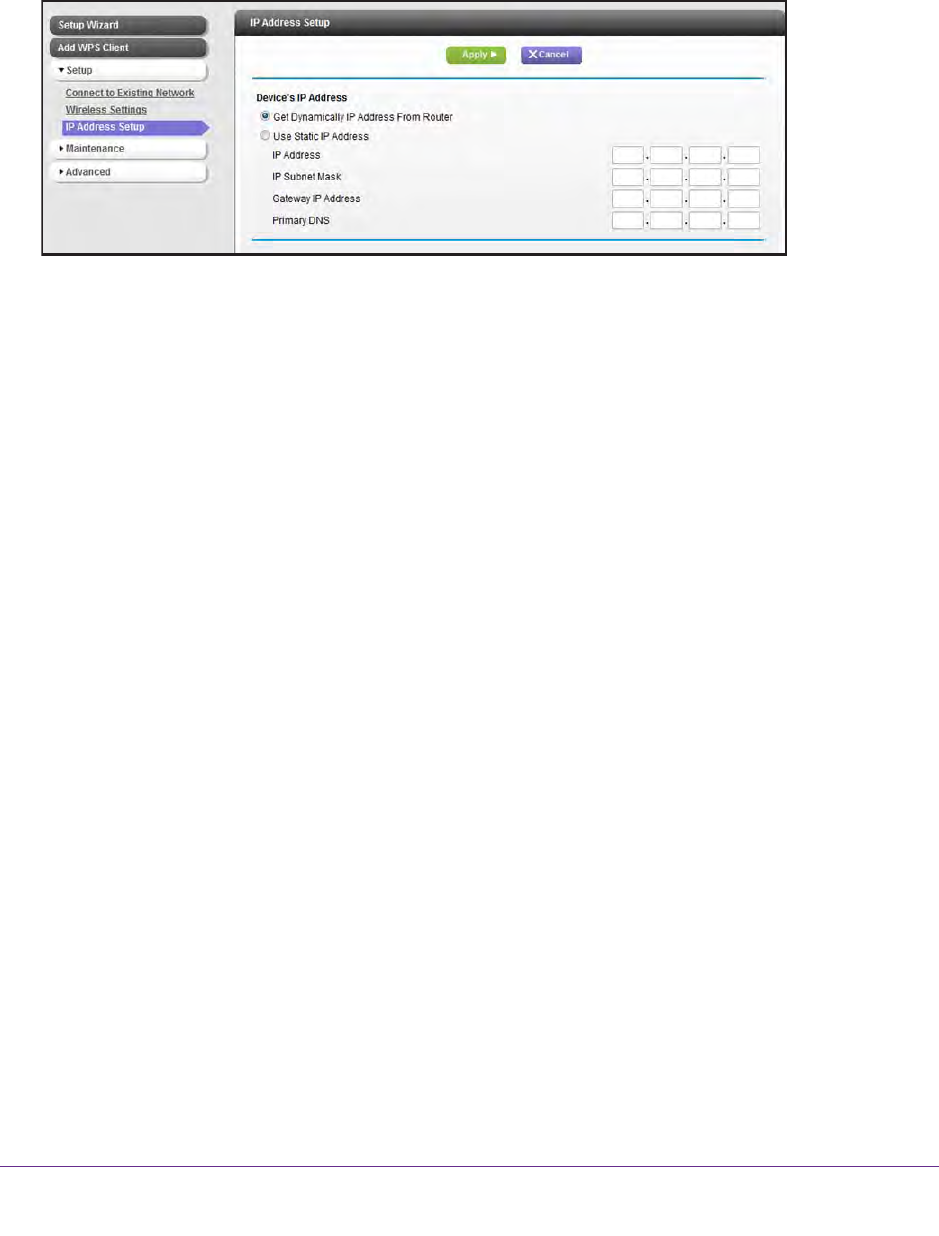
Extender IP Address Setup
From the extender menu at http://www.mywifiext.net, under the Maintenance heading, select
Setup > IP Address Settings.
The IP Address Setup screen shows whether the extender is set to get its IP address
dynamically from the router (this is the most common setting), or is set up with a static IP
address.
•Get Dynamically IP Address From Router. The wireless network router assigns an IP
address when the extender connects to its wireless network. Most networks are set up so
that the router automatically does this.
•Use Static IP Address. Specify a static IP address. This is not usually necessary. If you
set this up, you should be technically experienced or have a technically experienced
person help you.
-IP Address. The static IP address.
-IP Subnet Mask. The subnet mask associated with the IP address.
-Gateway IP Address. The IP address for the gateway.
-Primary DNS. The primary Domain Name Server (DNS).
-Secondary DNS. The secondary Domain Name Server (DNS).
Extender Network Settings
20
High Power WiFi Extender EX6200
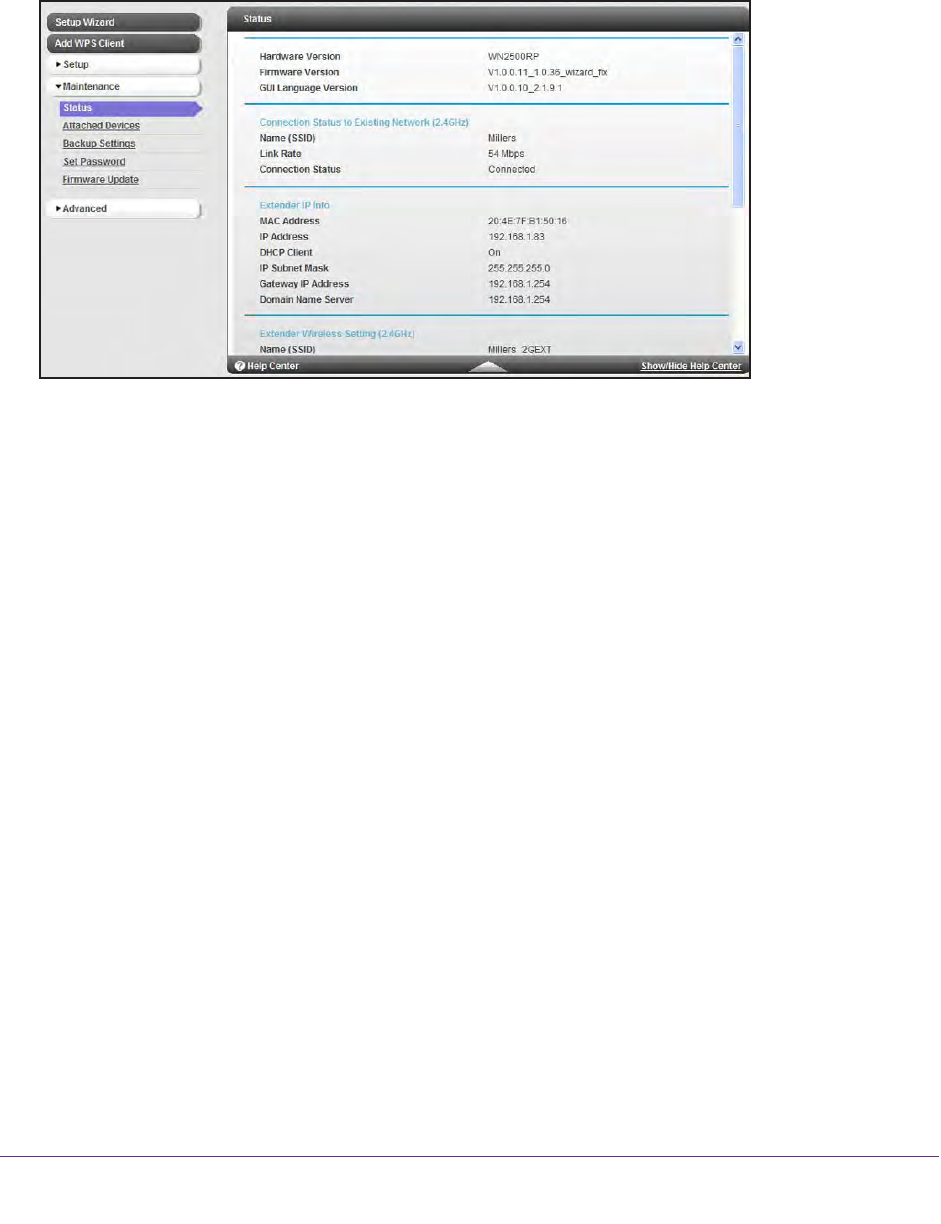
Status Screen
When you connect to http://www.mywifiext.net, after the automatic firmware check, the Status
screen displays. You can also select Status from the menu to display this screen:
This screen shows the current settings and the status of your extender.
You can click Show Statistics to see device performance statistics such as the number of
packets sent and number of packets received for each port. See Show Statistics on page 21.
The following fields are displayed in the Status screen:
•Hardware Version. The hardware version of the extender.
•Firmware Version. The current firmware version of the extender. If you upgrade the
firmware, this field changes.
•GUI Language Version. The language version running on the extender. If you upgrade
the firmware, this field changes.
Connection Status to Existing Network
•Name (SSID). Your extender is set up to connect to this SSID, also called the wireless
name.
•Connection Status. The status of your wireless connection (connected or disconnected).
•Link Rate. The actual transmission (Tx) and receive (Rx) link rate in the current wireless
connection.
Extender PC Info
•MAC Address. The physical address of the extender, as seen from the local area
network (LAN).
•IP Address. The IP address of the extender. The default is 192.168.1.250.
•DHCP Server. Identifies the network DHCP server on the wireless network.
Extender Network Settings
21
High Power WiFi Extender EX6200
•IP Subnet Mask. The IP subnet mask associated with the LAN IP address of the
extender. The default is 255.255.255.0.
•Gateway IP Address. The IP address of the wireless network gateway.
•Domain Name Server. The IP address of the Domain Name Server (DNS) of the
wireless network.
Extender Wireless Settings
•Name (SSID). The name (SSID) of the wireless network.
•Region. The location where the extender is operating.
•Channel. The channel of the wireless network.
•Wireless AP. On or Off.
•Broadcast Name. On or Off.
•Wi-Fi Protected Setup. Configured.
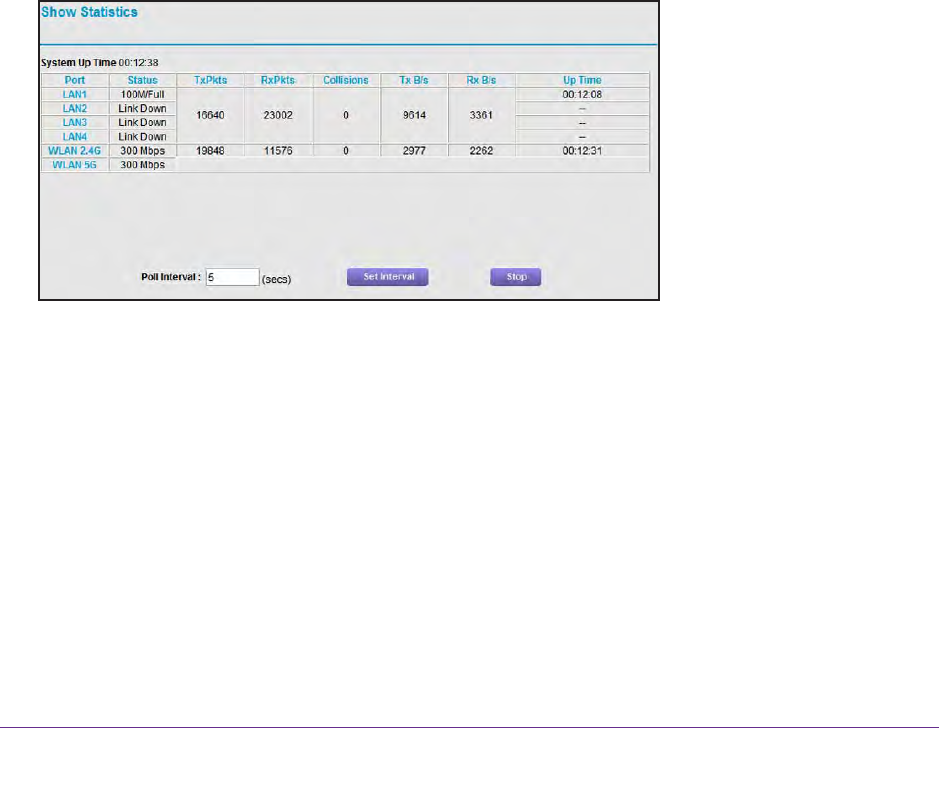
Show Statistics
Scroll to the bottom of the Status screen, and click Show Statistics. The following screen
displays:
The screen shows statistics for the LAN (local), and wireless LAN (WLAN) ports. For each
port, the screen displays the following:
•Status. The status of the port.
•TxPkts. The number of packets transmitted on this port since reset or manual clear.
•RxPkts. The number of packets transmitted on this port since reset or manual clear.
•Collisions. The number of collisions on this port since reset or manual clear.
•Tx B/s. The current line utilization—percentage of current bandwidth used on this port.
•Rx B/s. The average line utilization for this port.
•Up Time. The time elapsed since the last power cycle or reset.
•Poll Interval. Specify the poll interval frequency. If you change this value, click Set
Interval so that your change takes effect.
Extender Network Settings
22
High Power WiFi Extender EX6200
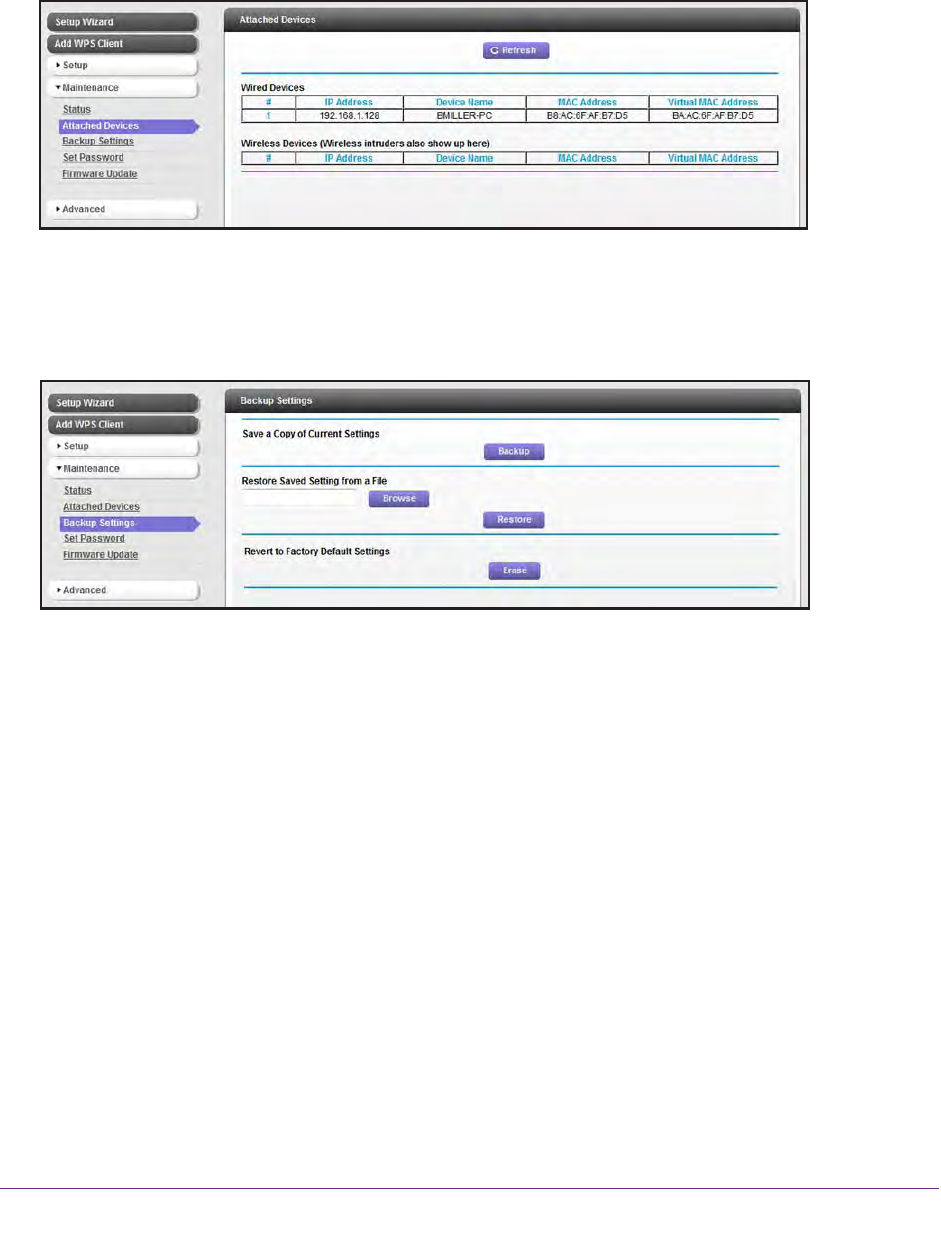
Attached Devices
Select Maintenance > Attached Devices to display the following screen:
Back Up and Manage Extender Settings
Select Maintenance > Backup Settings to display this screen.
The Backup and Restore options in the Backup Settings screen let you save and retrieve a
file containing your extender’s configuration settings. Once you have your extender working
correctly, you should back up the information to have it available if something goes wrong.
When you back up the settings, they are saved as a file on your computer. You can restore
the device’s settings from this file.
To back up settings:
1. Click Backup. Your browser extracts the configuration file from the extender.
2. If you do not have your browser set up to save downloaded files automatically, locate where
you want to save the file.
3. You can give the file a meaningful name at this time, such as internet_adapter.cfg.
To restore settings:
1. On the Backup Settings screen, click Browse.
2. Locate and select the previously saved backup file.
3. Click Restore.
A screen displays letting you know that the device has been successfully restored to the
previous settings. The extender restarts. This takes about 1 minute.
Extender Network Settings
23
High Power WiFi Extender EX6200
CAUTION:
Do not try to go online, turn off the extender, shut down the computer, or
do anything else to the extender until it finishes restarting!
4. Close the message window.
To erase settings:
Under some circumstances (for example, if you have lost track of the changes that you made
to the extender settings), you might want to erase the configuration. After an erase, the
extender returns to its factory settings (see Factory Settings on page 31).
To erase the configuration, click the Erase button in the Backup Settings screen. The
extender automatically shuts down and reboots with its factory settings.
CAUTION:
Do not try to go online, turn off the extender, shut down the computer, or
do anything else to the extender until it finishes restarting!
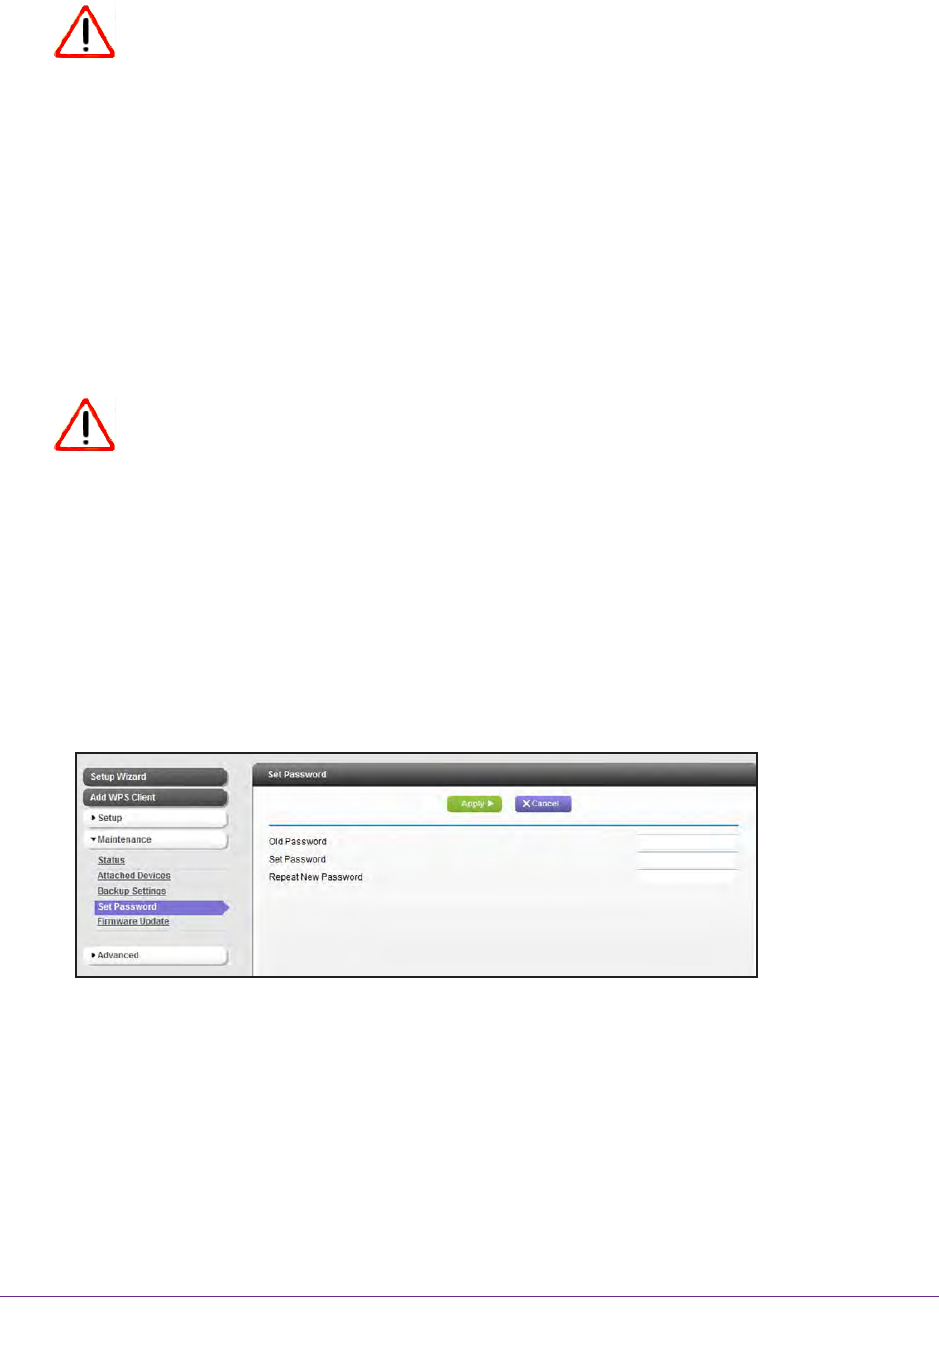
Set the Password
The user name to access the extender is admin, and its default password is password.
NETGEAR strongly recommends that you set a more secure password.
To set the password:
1. Select Maintenance > Set Password. The following screen displays:
2. Type the old password, type the new password twice, and then click Apply.
Extender Network Settings
24
High Power WiFi Extender EX6200
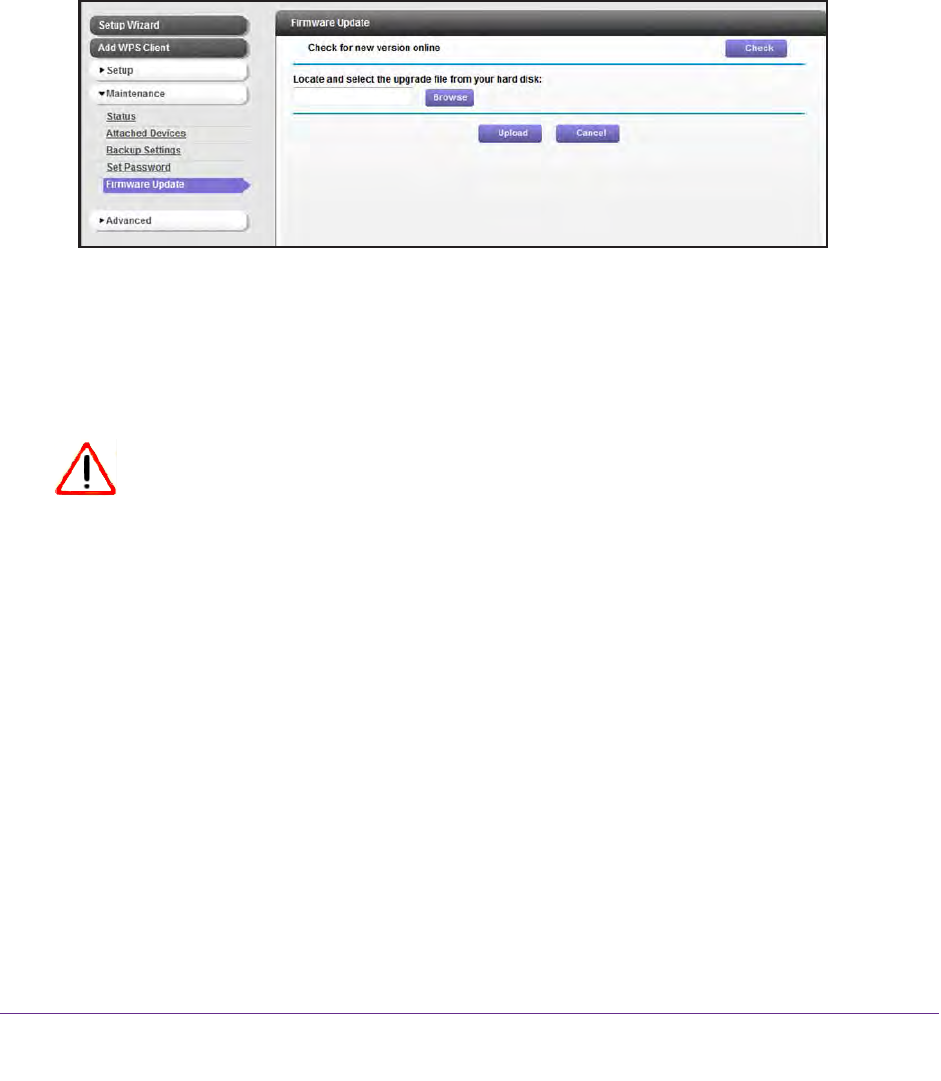
Upgrade the Firmware
Unless you changed the settings in the Firmware Upgrade screen previously, the extender is
set up to check for new firmware automatically at log in.
If you do not want to use the automatic firmware check, clear the Check for New Version
Upon Login check box.
To check for firmware and upgrade if it is available:
1. Select Maintenance > Firmware Update. The following screen displays:
2. Click Check to see if new firmware is available. If it is, follow the onscreen prompts to
download it onto your computer.
3. In the Browse field, enter the path for the new firmware, or click Browse to locate and select
the file.
4. Click Upload to install the new firmware on your extender.
CAUTION:
Once you start the firmware upgrade, do not try to go online, turn off the
extender, shut down the computer, or do anything else to the extender
until it finishes restarting!
Extender Network Settings
25
High Power WiFi Extender EX6200
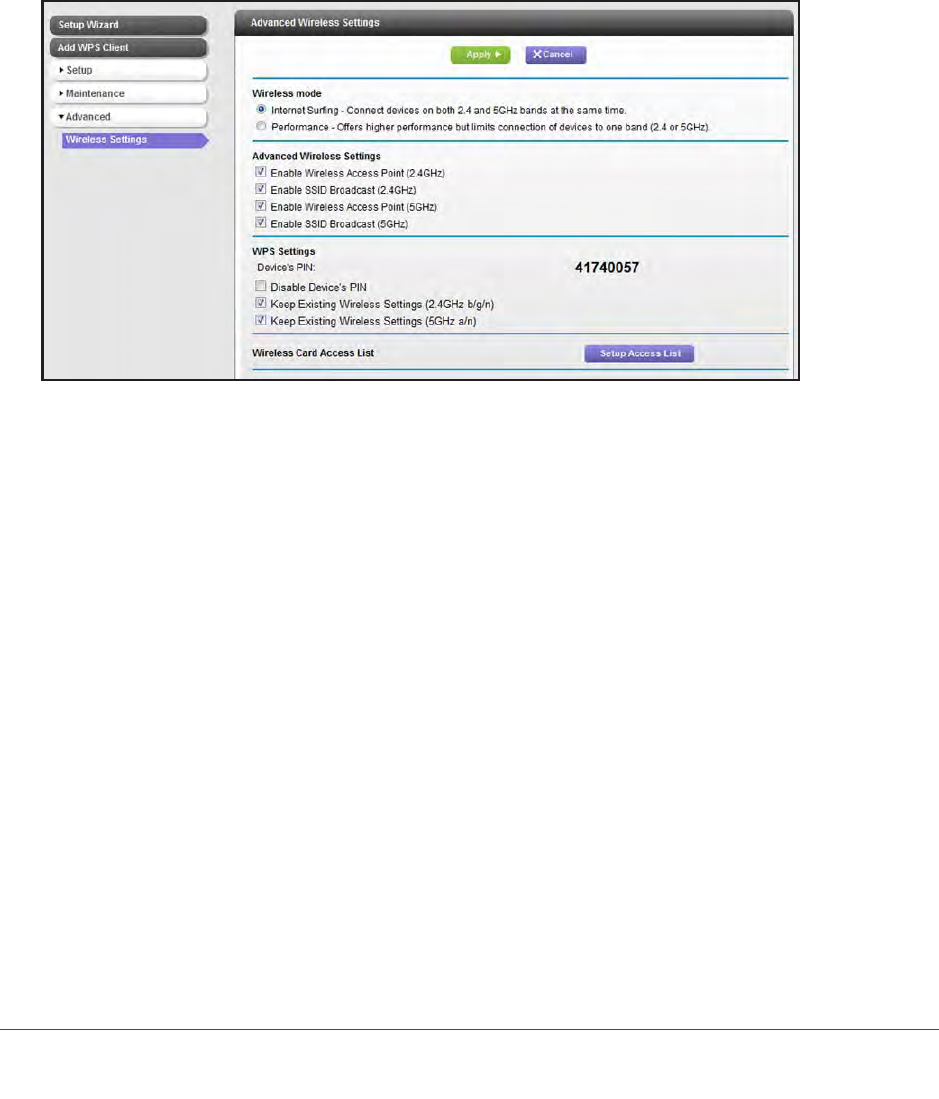
Advanced Wireless Settings
The extender is already configured with the optimum settings. Do not alter these settings
unless directed by NETGEAR support. Incorrect settings might disable the extender
unexpectedly.
To view or change the advanced wireless settings:
From the extender menu at http://www.mywifiext.net, select Advanced > Wireless Settings.
The following screen displays:
You can view or configure the following settings:
•Wireless Mode
-Internet Surfing
-Performance
•Advanced Wireless Settings
-Enable Wireless Access Point (2.4 GHz). Enable the extender to work as a wireless
access point. If this check box is cleared, then computers or wireless devices cannot
connect wirelessly to the extender.
-Enable SSID Broadcast (2.4 GHz). Enable the extender to broadcast its wireless
network name (SSID). If this check box is cleared, then the wireless network is
hidden. To join a hidden wireless network, you have to type the wireless name.
-Enable Wireless Access Point (5 GHz). Enable the extender to work as a wireless
access point. If this check box is cleared, then computers or wireless devices cannot
connect wirelessly to the extender.
-Enable SSID Broadcast (5 GHz). Enable the extender to broadcast its wireless
network name (SSID). If this check box is cleared, then the wireless network is
hidden. To join a hidden wireless network, you have to type the wireless name.
•WPS Settings
Extender Network Settings
26
High Power WiFi Extender EX6200
-Disable Device’s PIN. Selecting this check box disables the extender’s PIN. The PIN
can be used for a WPS wireless connection.
-Keep Existing Wireless Settings. When this check box is selected, the settings in
the Wireless Settings screen stay the same when WPS is used for a wireless
connection.
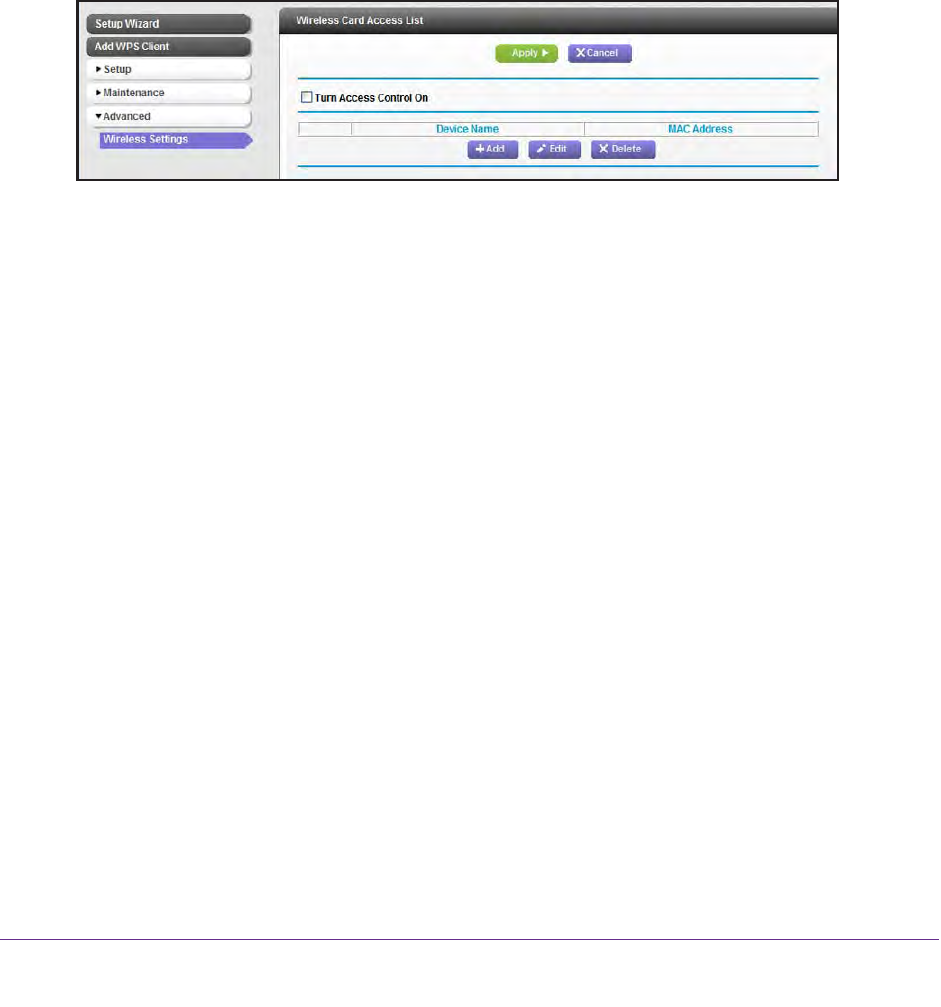
•Wireless Card Access List. Specify a list of computers or wireless devices that are
allowed to connect to the network. If you use an access list, then computers that are not
on the list are not allowed to join the wireless network.
To set up a wireless card access list:
1. On the Advanced Wireless Settings screen, click Setup Access List.
The following screen displays:
2. Select the Turn Access Control On check box.
3. Add the computers and wireless devices that you want to give access to the network.
•Click the Add button for each device.
•If you are not sure of the MAC address, check the product label.
•Make sure to add the computer or wireless device that you are currently using to
make changes.
4. Click Apply so that your changes take effect.


Troubleshooting
28
High Power WiFi Extender EX6200
Smart Wizard FAQs
1. When I connect to the network, Smart Wizard keeps asking me for my passphrase, and
I am sure I entered the correct passphrase. What can I do?
It is very likely that the extender is placed at the borderline of the range covered by the
router. See Positioning Your Extender on page 8.
2. I got an error message in the Review Settings screen in the Smart Wizard. What should I
do?
Make sure that your computer is connected to the extender by using the SSID and the
passphrase that you have just set up, and clicking the Refresh button in your browser.
This will return you to the Smart Wizard.
3. I connected to NETGEAR_EXT and launched a browser, but I cannot see the Smart Wizard.
Why not?
First, make sure that your computer is set up to use DHCP. Second, make sure the
Wireless Device to Extender LED is green. Finally, relaunch the browser and enter
www.mywifiext.net. Check to make sure that your computer has an IP address in the IP
Address screen (see Extender IP Address Setup on page 19).
Connecting to http://www.mywifiext.net
If you have trouble connecting, try to locate the source of the problem:
•For help with passwords, see Log In to the Extender on page 9.
•If your browser displays an error page, make sure that you include http:// when you type
this URL in the address field of your Internet browser. If you leave it out, you might not be
able to connect.
•The extender LEDs can help you tell if the extender is correctly set up and working as it
should.
-The best performance is delivered when Link Rate LED or and the Device to
Extender LED are green.
-A workable performance is delivered when the Link Rate LED is amber and the
Device to Extender LED is green.
If you cannot get a wireless connection working, you can use an Ethernet cable to
connect your computer to the extender. See Connect a Computer to the Extender with an
Ethernet Cable on page 9.

Troubleshooting
29
High Power WiFi Extender EX6200
Joining Wireless Networks
To join a wireless network you have to know its network name (also called the SSID) so that
you can select it. If the network is secure, you have to know the passphrase or wireless key.
If the extender does not connect to the network that you selected, the following message
displays:
Connection was not established to the selected network.
If this happens, it could be for one of these reasons:
•The network name, passphrase, or key might have been typed incorrectly. Click Cancel,
use the Smart Wizard to select the network from the list, and retype the passphrase or
key. This is case-sensitive. PASSWORD25 is not the same as Password25 or
password25. See Use NETGEAR Genie to Set Up the Extender on page 10.
•If the Smart Wizard does not find your wireless network (it is not displayed in the Select
Existing Network screen), check to see if your wireless network is still up and running.
Make sure that the router is turned on. If possible, move the extender closer to the router
and click Try Again.
•If the extender Link Rate LED is red, this indicates a poor wireless connection. The best
connection is established when there is a clear line of sight between the extender and the
router you are connecting to. Make sure that there are no physical obstacles between the
extender and the router, and try to move the extender closer to the router.
If you use the Smart Wizard, and the extender cannot connect to the router or cannot get an
IP address from the router, it displays the following message:
You are not able to connect to the Internet. Click Continue to run through set up again to
connect to your network.
If you click Continue, the Smart Wizard starts again (see Use NETGEAR Genie to Set Up
the Extender on page 10). If you click Exit, the Status screen displays with menu selections
on the left (see Log In to the Extender on page 9).

Supplementary Information
31
High Power WiFi Extender EX6200
Factory Settings
You can press and hold the Restore Factory Settings button on the rear panel for 7
seconds. The extender resets, and returns to its factory settings.
Table 2. Factory default settings
Factory Settings
Smart Wizard Enabled
Wireless Wireless communication Enabled
Wireless network name (SSID) NETGEAR_EXT
Security Disabled
Transmission speed Auto1
1. Maximum wireless signal rate (IEEE Standard 802.11). Actual throughput will vary. Network conditions and
environmental factors, including volume of network traffic, building materials and construction, and network
overhead, lower actual data throughput rate.
Country/Region United States (varies by region)
Operating mode 5 GHz: 802.11ac, 802.11n, 802.11a
2.4 GHz: 802.11n, 802.11g, 802.11b
Data rate 5 GHz: Up to 867 Mbps
2.4 Ghz: Up to 300 Mbps

Supplementary Information
32
High Power WiFi Extender EX6200
Technical Specifications
Table 3. Technical specifications
Technical specifications
Network protocol and
standards compatibility
Data and routing protocols: TCP/IP, DHCP server and client, DNS relay, NAT
(many-to-one), TFTP client, VPN pass through (IPSec, PPTP)
Power adapter • North America (input): 120V, 60 Hz, input
• All regions (output): 12 V DC @ 2.5 A output 30 W maximum
Physical specifications • Dimensions: 267 mm x 165 mm x 57 mm (dimensions does not include
external antennas or stand)
• Weight:
Environmental • Operating temperature: 32° to 140° F (0° to 40° C)
• Operating humidity: 90% maximum relative humidity, noncondensing
• Electromagnetic emissions: Meets requirements of: FCC Part 15 Class B.
Interface • Local:
- 5-port RJ-45 10/100/1000Base TX
- USB 3.0 (backward compatible with USB 2.0 and 1.1)
- 802.11 ac/a/n/g/b
- WPS button
- Reset button
- Power On/Off button

Notification of Compliance
Regulatory Compliance Information
This document includes user requirements for operating NETGEAR products in accordance with national laws
including usage of radio spectrum and operation of radio devices. Failure of the end-user to comply with the
applicable requirements may result in unlawful operation and adverse action against the end-user by the applicable
national regulatory authority.
The NETGEAR product firmware limits operation to only the channels allowed in a particular region or country.
Therefore, all options described in this document may not be available in your version of the product.
This document applies to both Class A and Class B devices:
Class A devices are intended to be used in a commercial or industrial environment. They are not intended
to be used in a residential home or be available for general public use.
Class B devices are intended to be used in a residential setting, and may also be used in commercial and
industrial applications. Examples of Class B devices are telephones, personal computers, and residential
data gateways.
Europe – EU Declaration of Conformity
This section applies to products bearing the CE or CE! mark:
Products bearing the CE or CE! mark comply with the following EU directives:
EMC Directive 2004/108/EC
Low Voltage Directive 2006/95/EC
Ecodesign Directive 2009/125/EC
RoHS Directive 2011/65/EU
If the product has telecommunications functionality, it also complies with the requirement of the following EU
directive:
R&TTE Directive 1999/5/EC
Compliance with these directives implies conformity to harmonized European standards that are noted in the EU
Declaration of Conformity. The EU CE Declaration of Conformity may be found at
http://support.netgear.com/app/answers/detail/a_id/11621/.
Caution for installing this equipment outdoors: (Valid in all EU member states, EFTA states, and Switzerland.) Be
aware that outdoor installations require special attention and will only be handled by trained and qualified installation
personnel. No one from the general public is permitted to install NETGEAR wireless products outdoors when
external antennas, power and grounding must be installed for use. Particular attention has to be given allowed
operational frequencies. Contact NETGEAR for instructions on how to contact an installer for outdoor operations if
this product requires the special considerations for outdoor installations. For detailed information concerning
installations in France, the user should contact the national spectrum authority in France (http://www.arcep.fr/ )

Warning
NETGEAR Class A products that may be utilized in domestic/residential environments may cause radio interference
in which case the user may be required to take adequate measures.
FCC Requirements for Operation in the United States
Information in this section applies to products bearing the FCC mark (or statement):
FCC Information to User
This NETGEAR product does not contain any user serviceable components and is to be used with approved
antennas only. Any product changes or modifications will invalidate all applicable regulatory certifications and
approvals.
The following statement applies to these products:
EX6100
EX6200
WN3500RP
This device and its antenna(s) must not be co-located or operating in conjunction with any other antenna or
transmitter except in accordance with FCC multi-transmitter product procedures.
FCC Guidelines for Human Exposure
This NETGEAR product complies with FCC radiation exposure limits set forth for an uncontrolled environment. The
equipment should be installed and operated with minimum distance of 20 cm between the radiator and your body.
FCC Declaration of Conformity
We, NETGEAR, Inc., 350 East Plumeria Drive, San Jose, CA 95134, declare under our sole responsibility that this
product complies with Part 15 Subpart B of FCC CFR47 Rules. Operation is subject to the following two conditions:
The device may not cause harmful interference, and
The device must accept any interference received, including interference that may cause undesired
operation.
FCC Radio Frequency Interference Warnings & Instructions
The NETGEAR product has been tested and found to comply with the limits for a Class B digital device, pursuant to
Part 15 of the FCC Rules. These limits are designed to provide reasonable protection against harmful interference in
a residential installation. This equipment uses and can radiate radio frequency energy and, if not installed and used in
accordance with the instructions, may cause harmful interference to radio communications. However, there is no
guarantee that interference will not occur in a particular installation. If this equipment does cause harmful interference
to radio or television reception, which can be determined by turning the equipment off and on, the user is encouraged
to try to correct the interference by one or more of the following methods:
Reorient or relocate the receiving antenna.
Increase the separation between the equipment and the receiver.
Connect the equipment into an electrical outlet on a circuit different from that which the radio receiver is
connected.
Consult the dealer or an experienced radio/TV technician for help.
FCC RF Radiation Exposure and SAR Statements
The information in this section applies to products that transmit data or communicate wirelessly.
SAR Statement
The information in this section applies to NETGEAR wireless products that are intended to be operated close to
human body.
NETGEAR products that are intended to be operated close to the human body are tested for body-worn Specific
Absorption Rate (SAR) compliance. The SAR limit set by the FCC is 1.6 W/kg.
The FCC has established detailed SAR requirements and NETGEAR products meet these requirements.
NETGEAR USB products were tested while installed in a host notebook computer.
RF Exposure Information
NETGEAR products have been evaluated under FCC Bulletin OET 65C (01-01) and found to be compliant to the
requirements as set forth in CFR 47 Sections, 2.1093, and 15.247 (b) (4) addressing RF exposure from radio
frequency devices. NETGEAR products meet the applicable government requirements for exposure to radio
frequency waves. To see the test results reporting the highest SAR level measured for this device, visit
http://www.netgear.com/about/regulatory/declarations-conformity/
Radiation exposure: NETGEAR products comply with radiation exposure limits set forth for an uncontrolled
environment and meet radio frequency (RF) exposure guidelines for wireless routers. NETGEAR products should be
installed and operated keeping the product 20cm or more away from a person’s body. For devices that are battery
powered and may be operated closer than 20cm to you, refer to the NETGEAR website for exposure levels.
FCC Caution
Any changes or modifications not expressly approved by the party responsible for compliance could void the user’s
authority to operate this equipment.
NETGEAR products comply with Part 15 of the FCC rules. Operation is subject to the following two conditions: (1)
NETGEAR products may not cause harmful interference, and (2) NETGEAR products must accept any interference
received, including interference that may cause undesired operation.
For products available in the USA market, only channel 1~11 can be operated. Selection of other channels is not
possible.
The following statement applies to these products:
EX6100
EX6200
WN3500RP
The device and its antenna(s) must not be co-located or operating in conjunction with any other antenna or
transmitter except in accordance with FCC multi-transmitter product procedures.
The following statement applies to these products:
EX6100
EX6200
The device operates in 5.15~5/25GHz frequency range. It is restricted in indoor environment only.
Non-DFS Warning
NETGEAR non-DFS products do not support operation in the 5600-5650MHz band. The firmware on the device
restricts the operation in this frequency band and does not utilize the channels in this band.
NETGEAR non-DFS products will not permit operations on channels 120–132 for 11a and 11n/a, which overlap the
5600–5650MHz band.
TV Tuner (on Selected Models)
The information in this section applies to NETGEAR products incorporating a TV tuner.
Note to CATV System Installer: This reminder is provided to call the CATV system installer’s attention to Section 820-
93 of the National Electrical Code, which provides guidelines for proper grounding and, in particular, specifies that the
Coaxial cable shield be connected to the grounding system of the building as close to the point of cable entry as
possible.
Canadian Department of Communications Radio Interference
Regulations
The information in this section applies to products bearing the statements:
The following statement applies to NETGEAR Class A products:
This Class A digital apparatus complies with Canadian ICES-003.
The following statements apply to NETGEAR Class B products:
This Class B digital apparatus complies with Canadian ICES-003.
“This digital apparatus does not exceed the Class B limits for radio-noise emissions from digital apparatus
as set out in the Radio Interference Regulations of the Canadian Department of Communications.”
La déclaration suivante s'applique à la classe A des produits NETGEAR:
Cet appareil numérique de la classe A est conforme à la norme NMB-003 du Canada.
Les énoncés suivants s'appliquent à NETGEAR produits de classe B:
Cet appareil numérique de la classe B est conforme à la norme NMB-003 du Canada.
“Cet appareil numérique ne dépasse pas les limites de la classe B pour les émissions radio bruit des
appareils numériques, tel qu'énoncé dans le Règlement sur le brouillage radioélectrique du ministère des
Communications du Canada.”
Industry Canada
NETGEAR products comply with Industry Canada license-exempt RSS standard(s). Operation is subject to the
following two conditions: (1) NETGEAR products may not cause harmful interference, and (2) NETGEAR products
must accept any interference received, including interference that may cause undesired operation.
Ce dispositif est conforme à la norme CNR d'Industrie Canada applicable aux appareils radio exempts de licence.
Son fonctionnement est sujet aux deux conditions suivantes: (1) le dispositif ne doit pas produire de brouillage
préjudiciable, et (2) ce dispositif doit accepter tout brouillage reçu, y compris un brouillage susceptible de provoquer
un fonctionnement indésirable.

IMPORTANT NOTE: Radiation Exposure Statement
NETGEAR products comply with IC radiation exposure limits set forth for an uncontrolled environment. NETGEAR
products should be installed and operated with minimum distance 20cm between the radiator and your body.
For products available in the USA/Canada market, only channel 1~11 can be operated. Selection of other channels is
not possible.
The following statement applies to these products:
EX6100
EX6200
The device and its antenna(s) must not be co-located or operating in conjunction with any other antenna or
transmitter except in accordance with IC multi-transmitter product procedures.
The following statement applies to these products:
EX6100
EX6200
The device for the band 5150-5250 MHz is only for indoor usage to reduce potential for harmful interference to co-
channel mobile satellite systems.
NOTE IMPORTANTE: Déclaration d'exposition aux radiations
Pour les appareils qui transmettent des données sans fil: Cet équipement est conforme aux limites d'exposition aux
rayonnements IC établies pour un environnement non contrôlé. Cet équipement doit être installé et utilisé avec un
minimum de 20 cm de distance entre la source de rayonnement et votre corps.
Pour les produits disponibles aux États-Unis / Canada du marché, seul le canal 1 à 11 peuvent être exploités.
Sélection d'autres canaux n'est pas possible.
La déclaration suivante s'applique à ces produits:
EX6100
EX6200
Cet appareil et son antenne (s) ne doit pas être co-localisés ou fonctionnement en association avec une autre
antenne ou transmetteur.
La déclaration suivante s'applique à ces produits:
EX6100
EX6200
les dispositifs fonctionnant dans la bande 5150-5250 MHz sont réservés uniquement pour une utilisation à l’intérieur
afin de réduire les risques de brouillage préjudiciable aux systèmes de satellites mobiles utilisant les mêmes canaux.
Interference Reduction Table
The table below shows the Recommended Minimum Distance between NETGEAR equipment and household
appliances to reduce interference (in feet and meters).
Household Appliance
Recommended Minimum Distance (in feet and meters)
Microwave oven
30 feet / 9 meters
Baby monitor – analog
20 feet / 6 meters
Baby monitor – digital
40 feet / 12 meters

Cordless phone – analog
20 feet / 6 meters
Cordless phone – digital
30 feet / 9 meters
Bluetooth device
20 feet / 6 meters
ZigBee
20 feet / 6 meters
Japan Notices VCCI
This information in this section applies to products bearing the VCCI mark:
Class A ITE
この装置は、クラス A 情報技術装置です。この装置を家庭環境で使用すると電波妨害を引き起こすことがありま す
。この場合には使用者が適切な対策を講ずるよう要求されることがあります。
Class B ITE
この装置は、クラスB情報技術装置です。この装置は、家庭環境で使用することを目的としていますが、この装置
がラジオやテレビジョン受信機に近接して使用されると、受信障害を引き起こすことがあります。
取扱説明書に従って正しい取り扱いをして下さい。
Japan Wireless Notice
この製品には、認証済みの無線機器を搭載しています。
South Korea Notices
The information in this section applies to products bearing the KCC mark:
알림 : 대한민국으로 배송되는 제품인 경우
Class A :
A급 기기
(업무용 방송통신기자재)
이 기기는 업무용(A급) 전자파적합기기로서 판매자 또는 사용자는 이 점을
주의하시기 바라며, 가정외의 지역에서 사용하는 것을 목적으로 합니다.
Class B :
B급 기기
(가정용 방송통신기자재)
이 기기는 가정용(B급) 전자파적합기기로서 주로 가정에서 사용하는 것을
목적으로 하며, 모든 지역에서 사용할 수 있습니다.

Taiwan WWAN Wireless Notice
The information in this section applies to products bearing the Taiwan National Communications Commission mark:
This telecom equipment has complied with NCC regulations.
第十二條→經型式認證合格之低功率射頻電機,非經許可,公司,商號或使用者均不得擅自變更頻率、加
大功率或變更原設計之特性及功能。
第十四條→低功率射頻電機之使用不得影響飛航安全及干擾合法通信;經發現有干擾現象時,應立即停用
,並改善至無干擾時方得繼續使用。
前項合法通信,指依電信法規定作業之無線電通信。 低功率射頻電機須忍受合法通信或工業、科學及醫療
用電波輻射性電機設備之干擾。
在 5.25-5.35 秭赫頻帶內操作之無線資訊傳輸設備,限於室內使用。
無線資訊傳輸設備忍受合法通信之干擾且不得干擾合法通信;如造成干擾,應立即停用,俟無干擾之虞,
始得繼續使用。
無線資訊傳設備的製造廠商應確保頻率穩定性,如依製造廠商使用手冊上所述正常操作,發射的信號應維
持於操作頻帶中。
Thailand Notice
The information in this section applies to products approved by the Thailand National Communications Commission:
.
China Notices
The information in this section applies to products bearing the Chinese Complusory Certification Mark:
This device complies with the requirements in China for Safety and Quality
此为A级产品,在生活环境该产品可能会造成无线电干扰,在这种情况下可能需
要用户对其干扰采取确实可行的措施。

Australia and New Zealand Notices
The information in this section applies to products bearing the Australia C-Tick and A-Tick Compulsory Marks:
This device equipment complies with the Australian and New Zealand regulatory approvals requirements.
Warning
NETGEAR Class A products that may be utilized in domestic/residential environments may cause radio interference
in which case the user may be required to take adequate measures.
Powerline Device Safety Information
Follow these safety guidelines to ensure your own personal safety and to help protect your system from potential
damage:
For national approvals (approval schemes other than CB), relevant national standards for plug, socket-
outlet, and direct plug-in units (for example, US) shall also be consulted while testing and approving such
products according to the national standards.
Check the electrical current for any device plugged into the filtered AC socket. Do not exceed home and
product outlet ratings and electrical requirements.
The socket-outlet shall be installed near the equipment and be easily accessible
Only power cords and allowed to be inserted into the filtered AC socket; no other equipment with a direct
plug-in is allowed. Power cords needs to be a maximum of 1m long and a minimum of 0.75mm² of cross-
sectional area.
Do not plug devices into the Powerline Pass Thru Adapter filtered AC outlet that exceed the product ratings.
The output voltage of the filtered AC outlet is the same as the power outlet that the Powerline Pass Thru
Adapter is plugged into. To help avoid damaging your system, be sure that the attached devices are
electrically rated to operate with the power available in your location.
If the input AC voltage is less than 100 Vac, the device plugged into the filtered AC socket of the Powerline
Pass Thru Adapter might not perform as well as expected.
DO NOT PLUG MAJOR HOME APPLIANCES into the filtered AC socket or into an attached power strip.
The device is not intended to be used with home appliances such as air conditioners, power tools, space
heaters, fans hair dryers, ovens, or refrigerators.
Actual data throughput will vary. Network conditions and environmental factors, including volume of network
traffic, building materials and construction, and network overhead, lower actual data throughput rate.
Do not service any product except as explained in your system documentation.
Opening or removing covers that are marked with the triangular symbol with a lightning bolt can expose you
to electrical shock. Only a trained service technician should service components inside these
compartments.
Use the product only with approved equipment.
Allow the products to cool before removing covers or touching internal components.
To help avoid damaging your system, be sure that the voltage selection switch (if provided) on the power
supply is set o match the power available at your location:
o 110 volts (V), 60 hertz (Hz) in most of North and South America and some Far Eastern countries
such as south Korea and Taiwan

o 100, 50 Hz in eastern Japan and 100, 60Hz in western Japan
o 230v, 50Hz in most of Europe, the Middle East, and the Far East
The peripheral power cables are equipped with three-prong plugs to help ensure proper grounding. Do not
use adapter plugs or remove the grounding prong from a cable.
Observe extension cable and power strip ratings. Make sure that the total ampere rating of all products
plugged into the extension cable or power strip does not exceed 80 percent of the ampere ratings limit for te
extension cable or power strip.
To help protect your system from sudden, transient increases and decreases in electrical power, use a
surge suppressor, line conditioner, or uninterruptible power supply (UPS).
NETGEAR, Inc., 350 E. Plumeria Avenue, San Jose, CA 95134 USA
November 2013