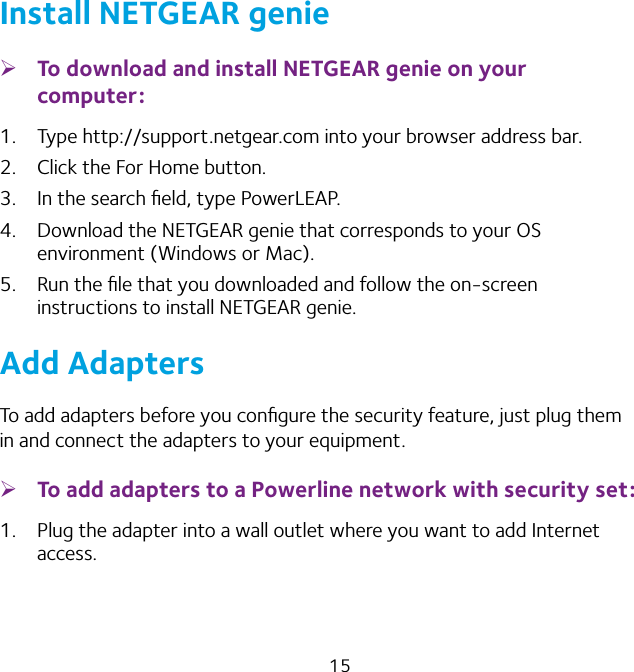
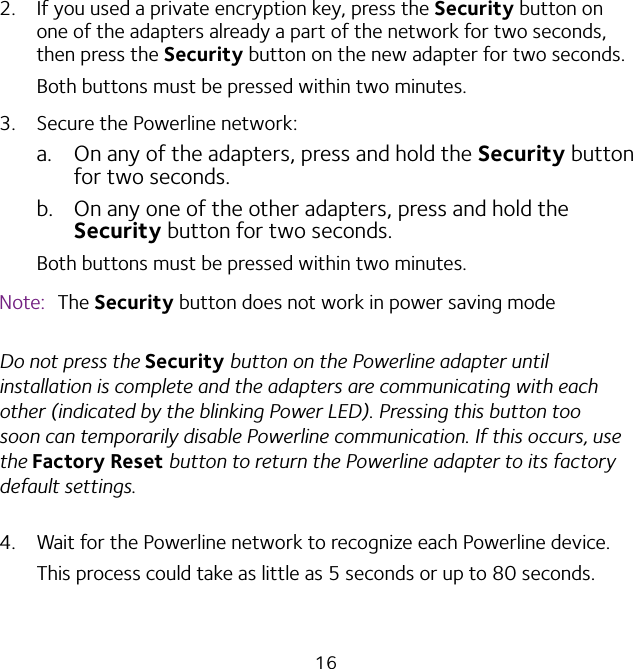
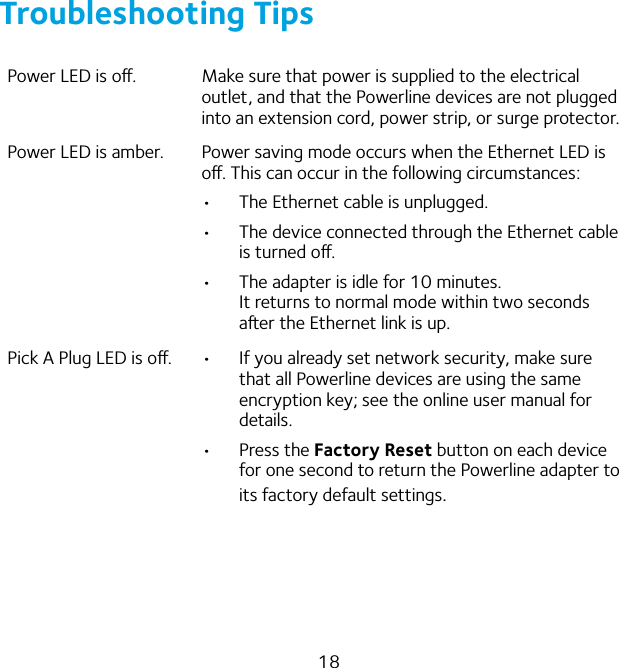
Netgear orporated 15200311 Add-on DST Adapter User Manual Powerline 500 Model XAVB5221 Installation Guide

Netgear Incorporated Add-on DST Adapter Powerline 500 Model XAVB5221 Installation Guide

User manual.PDF

Quick StartPowerLEAP WiFi 1000Quick Start Guide
2Package ContentsIn some regions, a resource CD is included with your product.
3Getting StartedPowerline adapters give you an alternative way to extend your network using your existing electrical wiring. Plug two or more Powerline adapters into electrical outlets to create a wired network connection. Use a Powerline WiFi Access Point to add a WiFi access point to your wired network.You can add up to 8 Homeplug AV-certified and AV2-certified adapters to extend your network. For a complete list of Homeplug AV-certified devices, visit http://www.homeplug.org/certified_products.
4Meet Your AdapterBefore you install your adapter, familiarize yourself with its LEDs, buttons, and port.154231. Power LED  4. Ethernet port 7. Wireless LED2. Ethernet LED 5. Factory Reset button 8. On/O switch3. Pick A Plug LED 6. Security button 9. WPS button1234 5 67869
5Power LED Solid green. The electrical power is on.Solid amber. The adapter is in power saving mode (PL1000 only).Blinking green. The adapter is in the process of setting up security.O. The adapter is not receiving electrical power.Ethernet LED Solid. The Ethernet port is linked.O. No Ethernet connection is detected.Pick A Plug LED The Pick A Plug feature lets you pick the electrical outlet with the strongest link performance, indicated by the color displayed by the LED:Red. Link rate < 50 Mbps (good). Amber. Link rate > 50 and < 80 Mbps (better).Green. Link rate > 80 Mbps (best).O. The adapter did not find any other compatible Powerline devices using the same encryption key.Wireless LED      Solid blue. The wireless radio is on.O. The wireless radio is o.
6Factory Reset buttonPress the Factory Reset button for one second, then release it to return the Powerline adapter to its factory default settings.Ethernet port Connect your wired devices, including computers, WiFi routers or game consoles, to your Powerline network.Security button Use the Security button to create a secure Powerline network.On/O switch Use the On/O switch to turn the device on and o.WPS button Use the WPS button to automatically connect your computer or other wireless devices which support WPS, to your Powerline network.
7Install Your AdaptersRoom 1 Room 2
8Secure Your Network ¾To create a secure network:1.  Plug in your new adapters.2.  Wait until the Pick A Plug LEDs are lit.3.  Press the Security button for two seconds, then press the Security button on one of the other adapters in your existing network for two seconds. Both buttons must be pressed within two minutes. Note:  The Security button does not work in power saving mode (see Troubleshooting Tips on page 18).Warning: Do not press the Security button on the Powerline adapter until installation is complete and the adapters are communicating with each other (indicated by the power LED). Pressing this button too soon can temporarily disable Powerline communication. If this occurs, use the Factory Reset button to return the Powerline adapter to its factory default settings.
9Set Up WiFi Access on Your PowerLEAPYou can set up WiFi access on your PowerLEAP access point using NETGEAR genie or using the web browser setup guide. ¾To set up WiFi access using NETGEAR genie:1.  Install NETGEAR genie (see Install NETGEAR genie on page 15).2.  Temporarily connect your computer directly to the PowerLEAP through the Ethernet port.
103.  Launch NETGEAR genie on your computer and click Network Map or select it from the menu.
114.  Click the Powerline icon on the Network Map screen. The Genie screen displays: 5.  On the Network Map screen, right-click the PowerLEAP icon.6.  From the pop-up menu that displays, select the Configuration item.The PowerLEAP web interface displays.Note:  The default user name and password are admin and password.7.  Enter the following wireless settings:•  Wireless Network Name (SSID)•  Wireless Security Type•  PassphrasePowerLEAP icon
128.  Click Apply.Your changes are saved.9.  When you are finished with the wireless settings, disconnect the Ethernet cable from the PowerLEAP.Now you can connect your wireless devices to the PowerLEAP access point. See Connect to the PowerLEAP Access Point on page 14. ¾To set up WiFi access using the browser setup guide:1.  On your computer or wireless device (tablet, smartphone), open the soware that manages your wireless network connections and connect to the PowerLEAP network.Note:  The default network key (wireless security password) and the default wireless name (SSID) for 2.4GHz operation are printed on the product label. The SSID format is NETGEARxx_EXT at 2.4GHz and NETGEARxx-5G_EXT at 5GHz. 2.  On the same computer or wireless device, open a web browser window.The browser takes you directly to the onscreen setup guide. If it does not, enter one of the following into the browser address bar:www.mywifiext.netwww.netgearextender.net
133.  When prompted to log in, enter:•  User name: admin•  Password: passwordThe web browser setup guide helps you configure the wireless settings of the PowerLEAP.You can record the new wireless settings here:__________________________________________Wireless network name (SSID)___________________________________________Network key (Passphrase)___________________________________________Now you can connect your wireless devices to the PowerLEAP access point. See Connect to the PowerLEAP Access Point on page 14.
14Connect to the PowerLEAP Access PointYou can connect your wireless devices (laptop, tablet, or smartphone) to the PowerLEAP access point manually or automatically. ¾To manually connect to the PowerLEAP access point:1.  On your computer or wireless device (tablet, smartphone), open the soware that manages your wireless network connections.2.  Connect to the PowerLEAP wireless network (SSID).3.  Enter the network key (passphrase).Your wireless device is now connected to the PowerLEAP access point and you can surf the web. ¾To automatically connect to the PowerLEAP access point using a WPS button:1.  Press and hold the WPS button on the PowerLEAP for 2 seconds and release it. The Wireless LED starts to blink.2.  Press the WPS button on your wireless device for 2 seconds and release it.When the Wireless LED stops blinking, your wireless device is automatically connected to the PowerLEAP access point and you can surf the web.
15Install NETGEAR genie ¾To download and install NETGEAR genie on your computer:1.  Type http://support.netgear.com into your browser address bar.2.  Click the For Home button.3.  In the search field, type PowerLEAP.4.  Download the NETGEAR genie that corresponds to your OS environment (Windows or Mac).5.  Run the file that you downloaded and follow the on-screen instructions to install NETGEAR genie.Add AdaptersTo add adapters before you configure the security feature, just plug them in and connect the adapters to your equipment. ¾To add adapters to a Powerline network with security set:1.  Plug the adapter into a wall outlet where you want to add Internet access.
162.  If you used a private encryption key, press the Security button on one of the adapters already a part of the network for two seconds, then press the Security button on the new adapter for two seconds.Both buttons must be pressed within two minutes.3.  Secure the Powerline network:a.  On any of the adapters, press and hold the Security button for two seconds.b.  On any one of the other adapters, press and hold the Security button for two seconds.Both buttons must be pressed within two minutes.Note:  The Security button does not work in power saving modeDo not press the Security button on the Powerline adapter until installation is complete and the adapters are communicating with each other (indicated by the blinking Power LED). Pressing this button too soon can temporarily disable Powerline communication. If this occurs, use the Factory Reset button to return the Powerline adapter to its factory default settings.4.  Wait for the Powerline network to recognize each Powerline device.This process could take as little as 5 seconds or up to 80 seconds.
17When the Power LEDs stop blinking, the process is complete. If the Pick A Plug LEDs are green or amber, the devices are successfully connected to the Powerline network. A red Pick A Plug LED indicates a slow link rate. In this case, move the Powerline device to another electrical outlet with a faster connection.5.  If your adapter is a WiFi access point device, configure it for WiFi (see Set Up WiFi Access on Your PowerLEAP on page 9).
18Troubleshooting TipsPower LED is o. Make sure that power is supplied to the electrical outlet, and that the Powerline devices are not plugged into an extension cord, power strip, or surge protector.Power LED is amber. Power saving mode occurs when the Ethernet LED is o. This can occur in the following circumstances:•  The Ethernet cable is unplugged. •  The device connected through the Ethernet cable is turned o.•  The adapter is idle for 10 minutes. It returns to normal mode within two seconds aer the Ethernet link is up.Pick A Plug LED is o. •  If you already set network security, make sure that all Powerline devices are using the same encryption key; see the online user manual for details.•  Press the Factory Reset button on each device for one second to return the Powerline adapter to its factory default settings.
19Pick A Plug LED is amber or red.Something is interferring with communication between adapters. To resolve this:•  Move the adapters to another outlet.•  Unplug devices that might be causing interference such as surge suppressors and items with motors.Ethernet LED is o. •  Make sure that the Ethernet cables are working and securely plugged into the devices.•  Press the Factory Reset button on each device for one second to return the Powerline adapter to its factory default settings.
July 2015NETGEAR Inc.350 East Plumeria DriveSan Jose, CA 95134, USABETASupportThank you for purchasing this NETGEAR product. Aer installing your device, locate the serial number on the label of your product and use it to register your product at https://my.netgear.com. You must register your product before you can use NETGEAR telephone support. NETGEAR recommends registering your product through the NETGEAR website.For product updates and web support, visit http://support.netgear.com.NETGEAR recommends that you use only the ocial NETGEAR support resources. You can get the user manual online at http://downloadcenter.netgear.com or through a link in the product’s user interface.Trademarks© NETGEAR, Inc., NETGEAR, and the NETGEAR Logo are trademarks of NETGEAR, Inc. Any non NETGEAR trademarks are used for reference purposes only.ComplianceFor the current EU Declaration of Conformity, visit  http://support.netgear.com/app/answers/detail/a_id/11621/. For regulatory compliance information, visit http://www.netgear.com/about/regulatory/.See the regulatory compliance document before connecting the power supply.
FCC statement Warning:    Changes  or  modifications  to  this  unit  not  expressly  approved  by  the  party responsible for compliance could void the user’s authority to operate the equipment.  NOTE:    This equipment has been tested and found to comply with the limits for a Class B digital device, pursuant to Part 15 of the FCC Rules.    These limits are designed to provide reasonable  protection  against  harmful  interference  in  a  residential  installation.    This equipment generates, uses and can radiate radio frequency energy and, if not installed and used  in  accordance  with  the  instructions,  may  cause  harmful  interference  to  radio communications.  However, there is no guarantee that interference will not occur in a particular installation.   If this equipment does cause harmful interference to radio or television reception, which can be determined by turning the equipment off and on, the user is encouraged to try to correct the interference by one or more of the following measures:   Reorient or relocate the receiving antenna.  Increase the separation between the equipment and receiver.  Connect the equipment into an outlet on a circuit different from that to which the receiver is connected.  Consult the dealer or an experienced radio/TV technician for help.  “FCC  RF  Radiation  Exposure  Statement  Caution:  To  maintain compliance with the FCC’s RF exposure guidelines, place the product at least 20cm from nearby persons.”

Navigation menu