Neurio Technology ULC N1LD Communications Module User Manual Installation Guide
Energy Aware Technology Inc Communications Module Installation Guide
Contents
- 1. User Manual
- 2. Installation Guide
- 3. Installation Guide - User Manual
Installation Guide

home energy monitor
by Neurio Technology
W2 Installation Guide
PRELIMINARY
DO NOT DISTRIBUTE
Welcome
This booklet will guide you or your electrican through the
installation process of Neurio. We will focus on a 2-phase
system, the most common power system in North America.
If you have a one-phase or 3-phase or solar system, please
visit support.neur.io for instructions
To watch a video of the installation process, visit support.neur.io
Items to prepare before installation
• Smartphone
• Flashlight
• Thick insulated rubber gloves
• Screwdrivers
• Pliers
• Two empty breakers (or one dual pole breaker)*
*The voltage cables on the Neurio Sensor need to be installed on two empty breakers (one for
each phase) or one empty dual (double) pole breaker. However, some regional codes allow
you to piggyback wires on existing breakers by using the supplied wiretaps and attaching the
voltage wires from Neurio to the existing cables before they go into a breaker. See Step 4 for
diagrams. Please consult your local electrical code for approved methods.
CAUTION: It is highly recommended that this
product be installed by an electrician or other
qualified professional. Please read and review the
safety warning provided at the end of this book
Voltage Cable
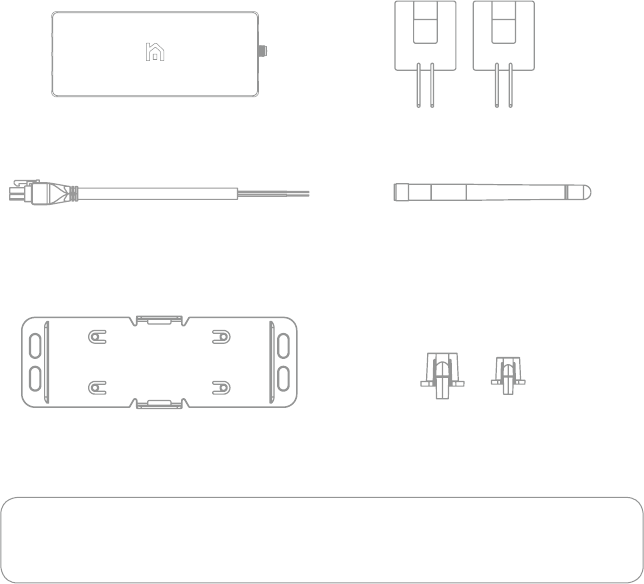
What's included
Antenna and extension cable
Neurio W2 Sensor Current Transformers (x2)
Antenna Mounts (x2)Mounting Plate
Wiretaps (x2)
Marrette (x1)
Cable Ties (x2)
Screws (x2) Jumper Wires (x2)
Neurio Sticker
Step 1
Turn off the main breaker
Step 2
Remove the panel cover
Step 3
Mount the sensor
Step 4
Connect the voltage cable
Step 5
Connect the CTs
Step 6
Connect the antenna
Step 7
Check your work
Step 8
Replace the panel cover
Step 9
Connect Neurio to WiFi
If you get stuck at any point, visit support.neur.io
for walkthrough videos and helpful tips.
Overview of Install
OFFON
Step 1: Turn off main breaker
Simply flip the switch to turn off the Main Breaker.
Note: If you have more than 1
electrical panel, make sure Neurio
is installed in the main one (the
one that draws power directly from
your utility).
OFFON
Step 2: Remove panel cover
Remove the screws on the corners of the panel and remove
the cover. After you do this, you should see the wires going
into each breaker and main lines from the utility..
Note: If your panel has a
secondary cover that hides
the main utility line, please
remove that as well.
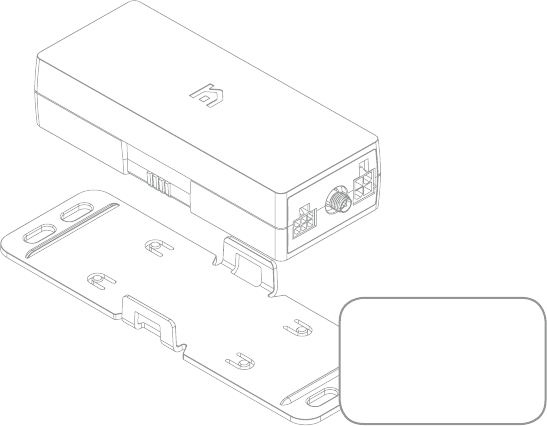
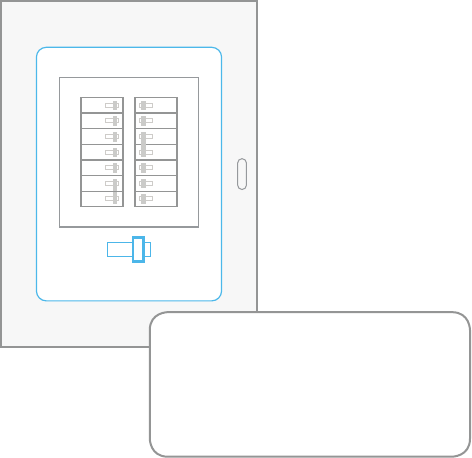
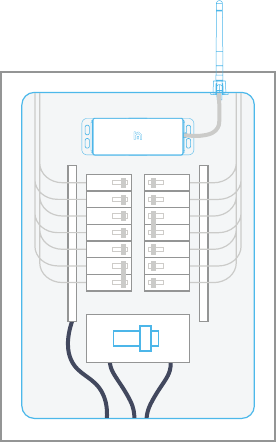
Step 3: Mount the W2 Sensor
Find a suitable place in your panel where Neurio can fit.
Then, using the supplied self-drilling screws, secure the
mounting plate to your metal panel. Now clip your Neurio
into place.
Note: Drilling pilot
holes may make it
easier to mount Neurio
into metal panel
CAUTION: Be sure to account for the length of the CTs and the 2-foot
voltage cable, and ensure that there is enough room on the sides of
Neurio for the wires and antenna to connect to..
OFFON
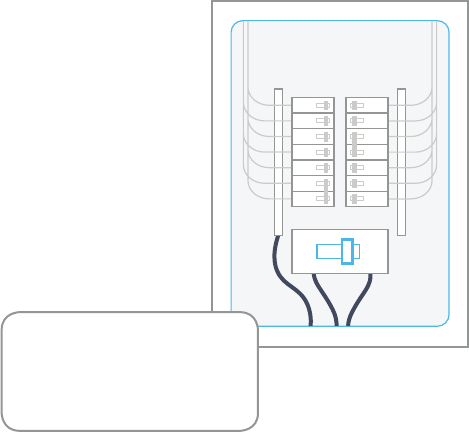
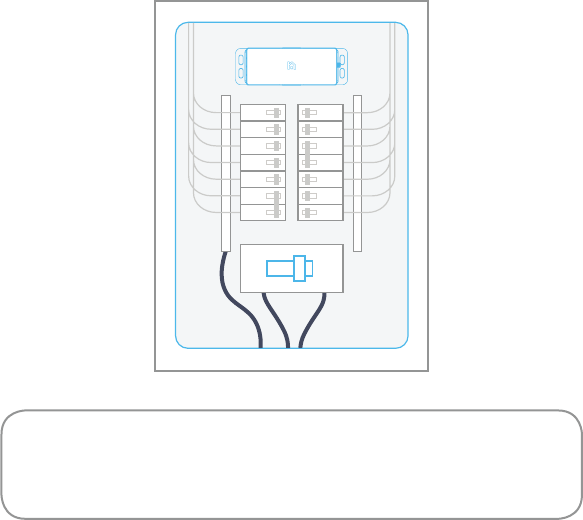
Step 4: Connect the Voltage Cable
a) Connect the voltage cable to Neurio by inserting the
connector
Note: To remove wire
from wiretap, simple
pull on the wire and
twist
b) Connect the black and red wires to the empty 15 or 20
amp breakers. Connect the white wire to the neutral bus bar
usually located next to the breaker.
OFFON

Alternate wiring with wiretap
If an empty breaker isn’t available, you can use the provided wiretaps to
connect to an existing breaker. To do this, remove the existing wire from a
15 or 20 amp breaker and replace it with the jumper wire provided in the
contents of the box. Then use the wiretap to connect the jumper wire, the
wire from Neurio, and the original wire you removed from the breaker. It
might take a little force to ensure the wires are secured into the wiretap all
the way.
Note: The blue wire is not used for 2 phase installs. Twist the
marrette onto the blue wire and tuck it into the panel, out of the
way
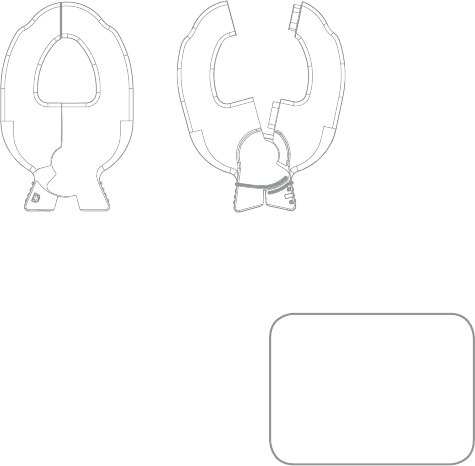
Step 5: Connect the CTs
a) For Universal CTs, just pinch the handle to open the jaws
CAUTION: Be sure to
take care to not touch
the exposed main line
connections to the
main breaker
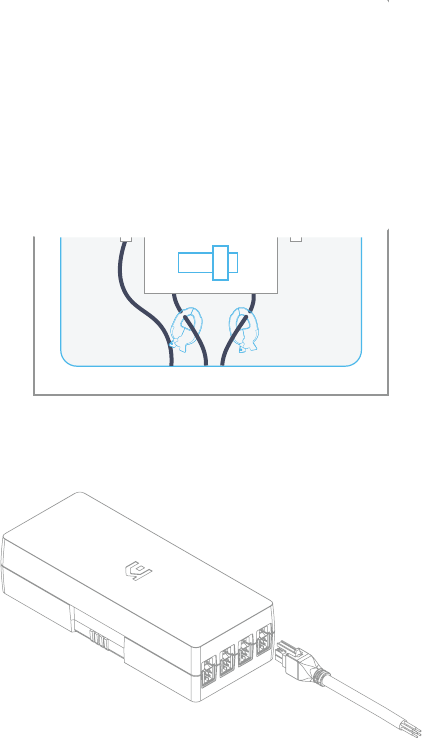
c) Insert the CT connectors to the ports labeled [1] and [2].
OFFON
b) Loop the CT around each of the main power lines. Pay
close attention to the label. The direction it faces is very
important.
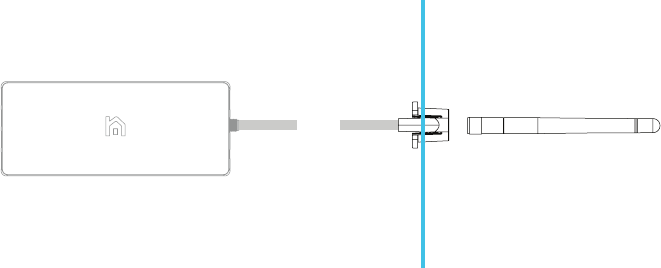
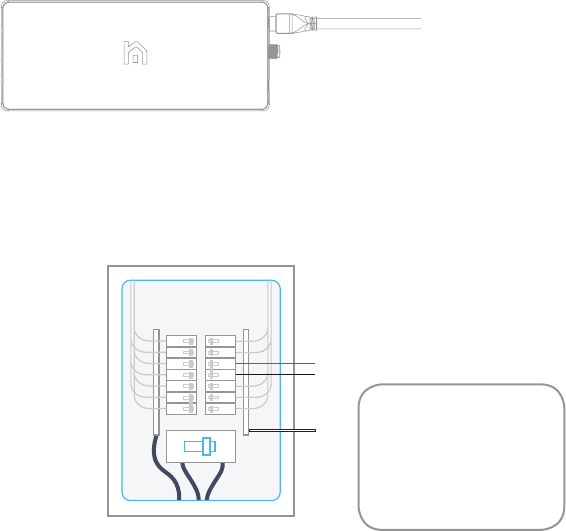
Step 6: Hook up the antenna
a) Attach the extension cable to the Neurio Sensor
b) Locate a metal circular knockout in your panel and
remove the metal to expose the hole. Gently tapping with a
hammer may be needed.
c) Thread the extension cable through the antenna mount
and screw on the antenna.
d) Insert the antenna through the open knockout and click
the antenna mount in to place
OFFON
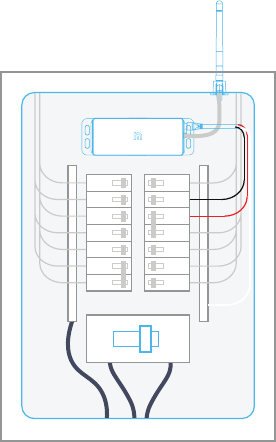
Step 7: Review your work
a) Antenna with extension cable
b) Neurio W2 Sensor
c) Voltage Cable
i) Blue and Red wire to 2 breakers
ii)Black wire to Neutral to bus bar
d) CT Connector
i) Connector around mains
ii) Make sure the label is facing ..
Note: The 2 cable ties
are provided to help
tidy up your wiring
OFFON

OFFON
Step 8: Put on panel cover
You're almost done. Replace the cover on your panel. Make
sure to place the supplied Neurio breaker sticker next to the
breaker that Neurio's black wire.
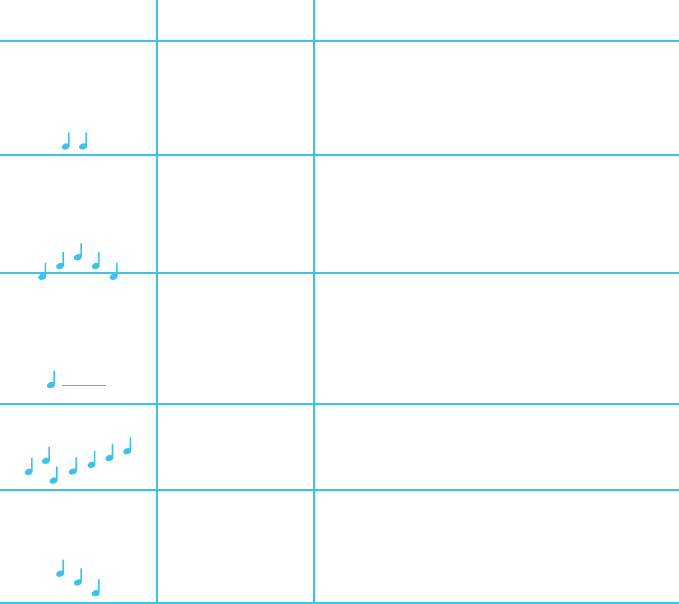
When powered on, Neurio will play the following tones to indicate its status in
sequential order:
If Neurio is connected to the WiFi network, you should also hear a long chime one minute after the
short chime.
TONE INDICATION DESCRIPTION
Short beeps
Voltage check
One beep for each voltage wire that is connected.
For a 2-phase installation there should be two
beeps to indicate that the black and red wires are
connected.
Short chime Neurio’s WiFi
network started
Neurio has started hosting its own WiFi network.
You can join this network to configure Neurio and
connect it to your own WiFi network.
Long beep Voltage warning
(conditional)
Indicates that two wires are connected to the same
phase. For North American apartments, this means
that one of Neurio’s wires should be moved to a
different breaker. This tone can be ignored for all
other 2-phase installations.
Long chime Neurio joined network
successfully Neurio successfully joined your WiFi network.
Falling tone Neurio failed to
join network
Neurio was unable to join your WiFi network. Neurio will
now start hosting its own WiFi network again to allow you to
re-connect to Neurio and re-enter the WiFi credentials.

Step 9: Connect Neurio to Wifi
Now that the Neurio Sensor has been installed, please
follow the instructions in the Welcome Guide to connect
Neurio to the Wifi Network.
WHAT DOES THIS WARRANTY COVER?
Neurio Technology Inc., a corporation registered under the laws of British
Columbia, (“we”, “us”, or “our”) warrants this Energy Monitor hardware
(“Neurio”) to be free from defects in materials and workmanship when used in
accordance with our published guidelines (the “Warranty”) for a period of ONE
(1) YEAR from the date the Neurio is delivered to you (the “Warranty Period”).
WARRANTY LIMITATIONS
THIS WARRANTY SHALL NOT EXTEND BEYOND THE WARRANTY PERIOD. TO
THE EXTENT PERMITTED BY LAW, THIS WARRANTY AND THE REMEDIES
SET FORTH HEREIN ARE EXCLUSIVE, AND ARE IN LIEU OF ALL OTHER
WARRANTIES, REMEDIES AND CONDITIONS, WHETHER ORAL, WRITTEN,
STATUTORY, EXPRESS OR IMPLIED. WE DISCLAIM ALL STATUTORY AND
IMPLIED CONDITIONS, INCLUDING, WITHOUT LIMITATION, WARRANTIES
OF MERCHANTABILITY AND FITNESS FOR A PARTICULAR PURPOSE,
WARRANTIES ARISING BY CUSTOM, USAGE OR TRADE, AND WARRANTIES
AGAINST HIDDEN OR LATENT DEFECTS, TO THE EXTENT PERMITTED BY
LAW. IN SO FAR AS SUCH WARRANTIES CANNOT BE DISCLAIMED, WE LIMIT
THE DURATION AND REMEDIES OF SUCH WARRANTIES TO THE WARRANTY
PERIOD, AND, AT OUR OPTION, TO THE REPAIR OR REPLACEMENT SERVICES
DESCRIBED BELOW.
WHAT WE WILL DO IF THE WARRANTY IS BREACHED
If, during the Warranty Period, you submit a valid claim to us, we will, at
our exclusive option and without charge, (i) repair the Neurio using new or
previously used parts that are equivalent to new in performance and reliability,
and return the repaired Neurio to you, or (ii) send you a replacement Neurio.
Any repairs or replacements are warranted for the remainder of the initial
Warranty Period.
HOW TO OBTAIN WARRANTY SERVICE
To obtain Warranty service within the Warranty Period, you must return the
Neurio, freight paid, with a copy of the sales receipt or other proof of purchase
that shows the date of sale and/or delivery date, to:
Neurio Technology Inc. , 515-88 E Pender St, Vancouver, BC, Canada, V6A 3X3
In the event your Neurio needs to be upgraded or repaired, you must contact
us prior to shipping it to us, and we will assign you a Return Merchandise
Authorization (RMA) number.
WHAT THIS WARRANTY DOES NOT COVER
This Warranty does not apply:
1. To damages caused by operating the Neurio outside of our published
guidelines;
2. To damages caused by improper operation or storage, misuse, abuse,
accident or neglect, contact with liquids, extreme humidity or heat, contact
with sand, dirt, food or the like, fire, or other external cause, or any other acts
that are outside the course of normal consumer usage;
3. To damages caused by modification or repair to the Neurio by anyone
other than one of our authorized representatives, including software/firmware
modifications;
4. When serial numbers or product labels have been removed, altered
or obliterated, seals have been broken, or there is any other evidence of
tampering with the Neurio;
5. Where you are unable to present proof of purchase when requesting
Warranty service;
6. To defects caused by normal wear and tear or otherwise due to the normal
aging of the Neurio;
7. To damage caused during shipment (such claims should be presented
directly to the freight forwarder or shipping company);
8. To any used Neurio purchased from a third party; or
9. Where the damage is purely cosmetic damage, including but not limited to
scratches, dents or deterioration to the surface finish.
DESIGN CHANGES
We reserve the right to change or improve the design of the Neurio without
prior notification to you. Design changes will not be implemented retroactively,
and any design changes to future products does not imply the availability of an
upgrade to existing units.
LIMITATION OF LIABILITY
EXCEPT AS PROVIDED IN THIS WARRANTY AND TO THE MAXIMUM EXTENT
PERMITTED BY LAW, WE ARE NOT RESPONSIBLE FOR ANY SPECIAL, DIRECT,
INDIRECT, CONSEQUENTIAL OR INCIDENTAL DAMAGES, INCLUDING
ANY DAMAGES FOR LOST DATA OR LOST PROFITS, OR FOR ANY INJURY,
LOSS OR DAMAGE SUSTAINED BY ANY PERSON OR PROPERTY, THAT MAY
RESULT FROM THE NEURIO FAILING TO OPERATE CORRECTLY AT ANY
TIME, INCLUDING WITHOUT LIMITATION, DAMAGES RESULTING FROM THE
USE, INABILITY TO USE, OR INACCURRACY OF THE NEURIO. REPAIR OR
REPLACEMENT AS PROVIDED UNDER THIS WARRANTY IS YOUR EXCLUSIVE
REMEDY UNDER THIS WARRANTY.
OUTSIDE THE UNITED STATES AND CANADA
In countries other than the United States and Canada, the terms and conditions
of this Warranty may be different. Unless a specific Neurio warranty is
communicated to you in writing by us, no warranty or liability exists beyond
any minimum requirements imposed by law, even though defect, damage, or

Questions or feedback?
support.neur.io
IInstalling Neurio requires working with voltages that are hazardous
to human health, and thus should only be done by a qualified
professional. Installations should be performed in accordance
with the applicable electrical code for the region in which Neurio is
being installed. Whenever possible, power should be disconnected
upstream from the installation location before attempting
installation of Neurio. If power cannot be disconnected, high
voltages may still be present, and caution must be taken to avoid
injury. If Neurio is not used as instructed, its protection mechanisms
may be impaired. Rules: 1. Installations should be performed by a
qualified professional. 2. Do not use Neurio with voltages that exceed
240V. 3. Only install Neurio in approved breaker panels or enclosures.
4. Neurio must not be exposed to moisture, direct sunlight, extremely
low or high temperatures, and conductive pollution. Consult the User
Manual for Neurio’s acceptable operating environment. 5. Neurio must
be installed in a location that limits access to only qualified personnel.
FCC Part 15
This device complies with FCC Rules Part 15 operation is subject to the
following two conditions:
1. This device may not cause harmful interference.
2. This device must accept any interference, including interference that may
cause undesired operation of the device.
Changes or modifications to this device, not expressly approved by XXXX.
could void the user’s authority to operate the equipment.
Contains FCC ID: W72-N1LD
Contains IC ID: 8253A-N1LD
Industry Canada Notifications
This device complies with Industry Canada’s license-exempt RSSs. Operation is
subject to the following two conditions:
(1) This device may not cause interference; and
(2) This device must accept any interference, including interference that may
cause undesired operation of the device.
Le présent appareil est conforme aux CNR d’Industrie Canada applicables
aux appareils radio exempts de licence. L’exploitation est autorisée aux deux
conditions suivantes:
(1) l’appareil ne doit pas produire de brouillage;
(2) l’utilisateur de l’appareil doit accepter tout brouillage radioélectrique subi,
même si le brouillage est susceptible d’en compromettre le fonctionnement.