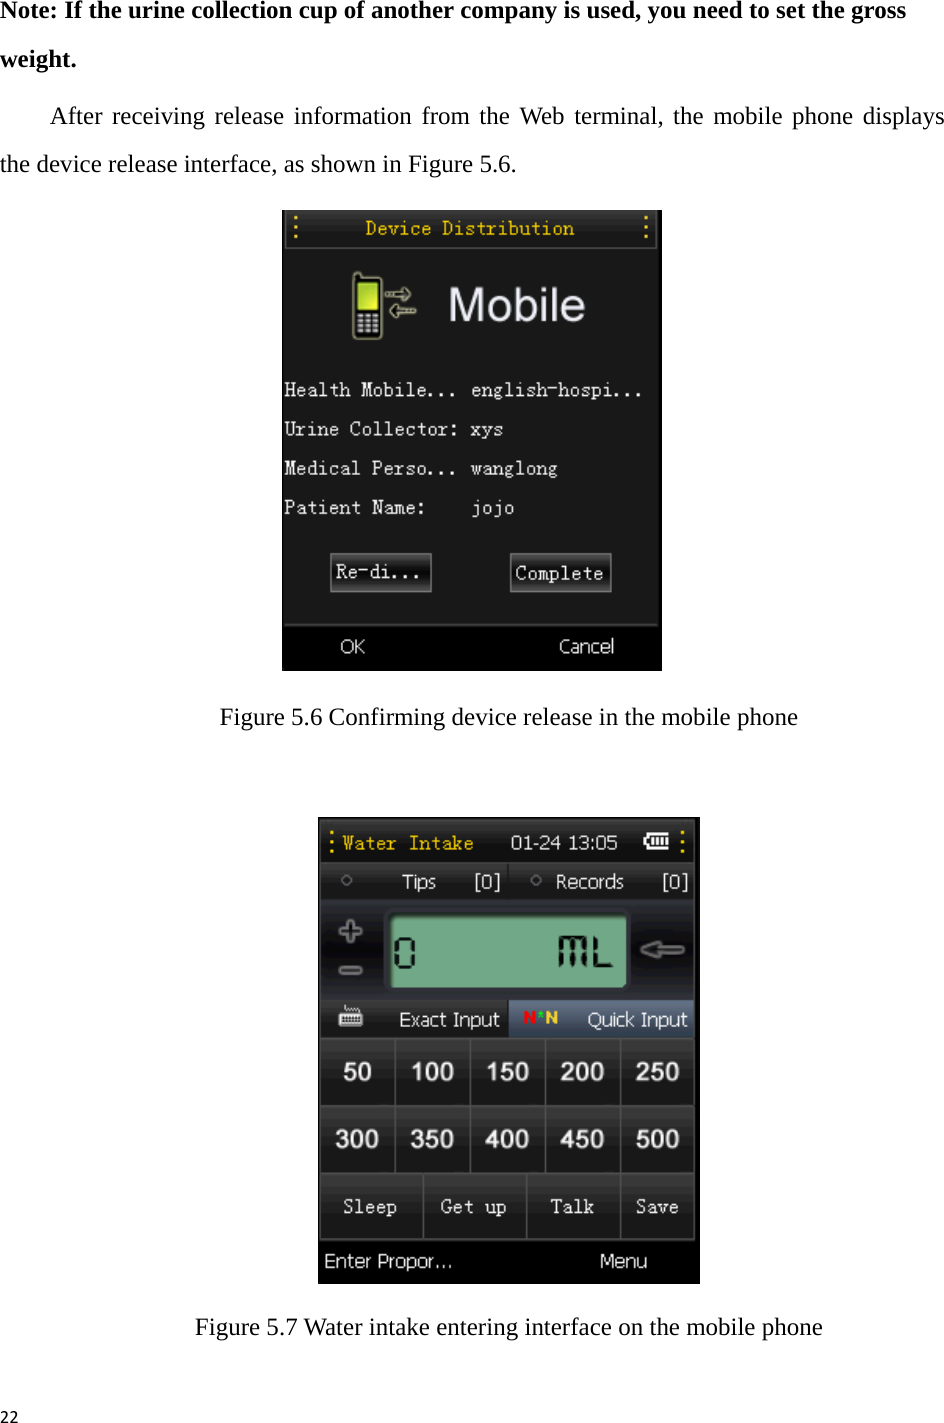
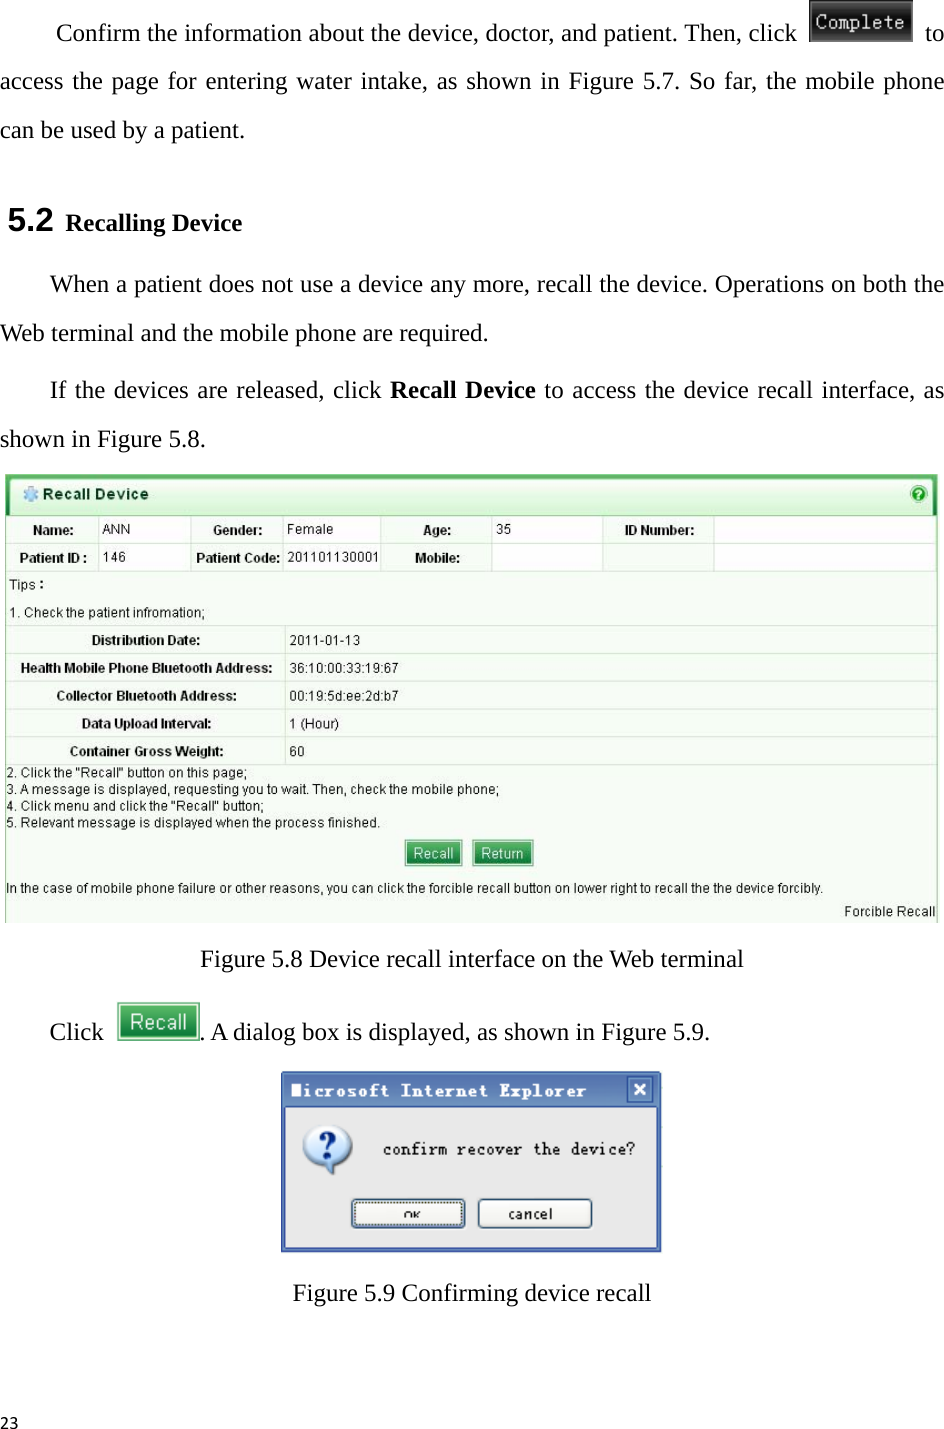
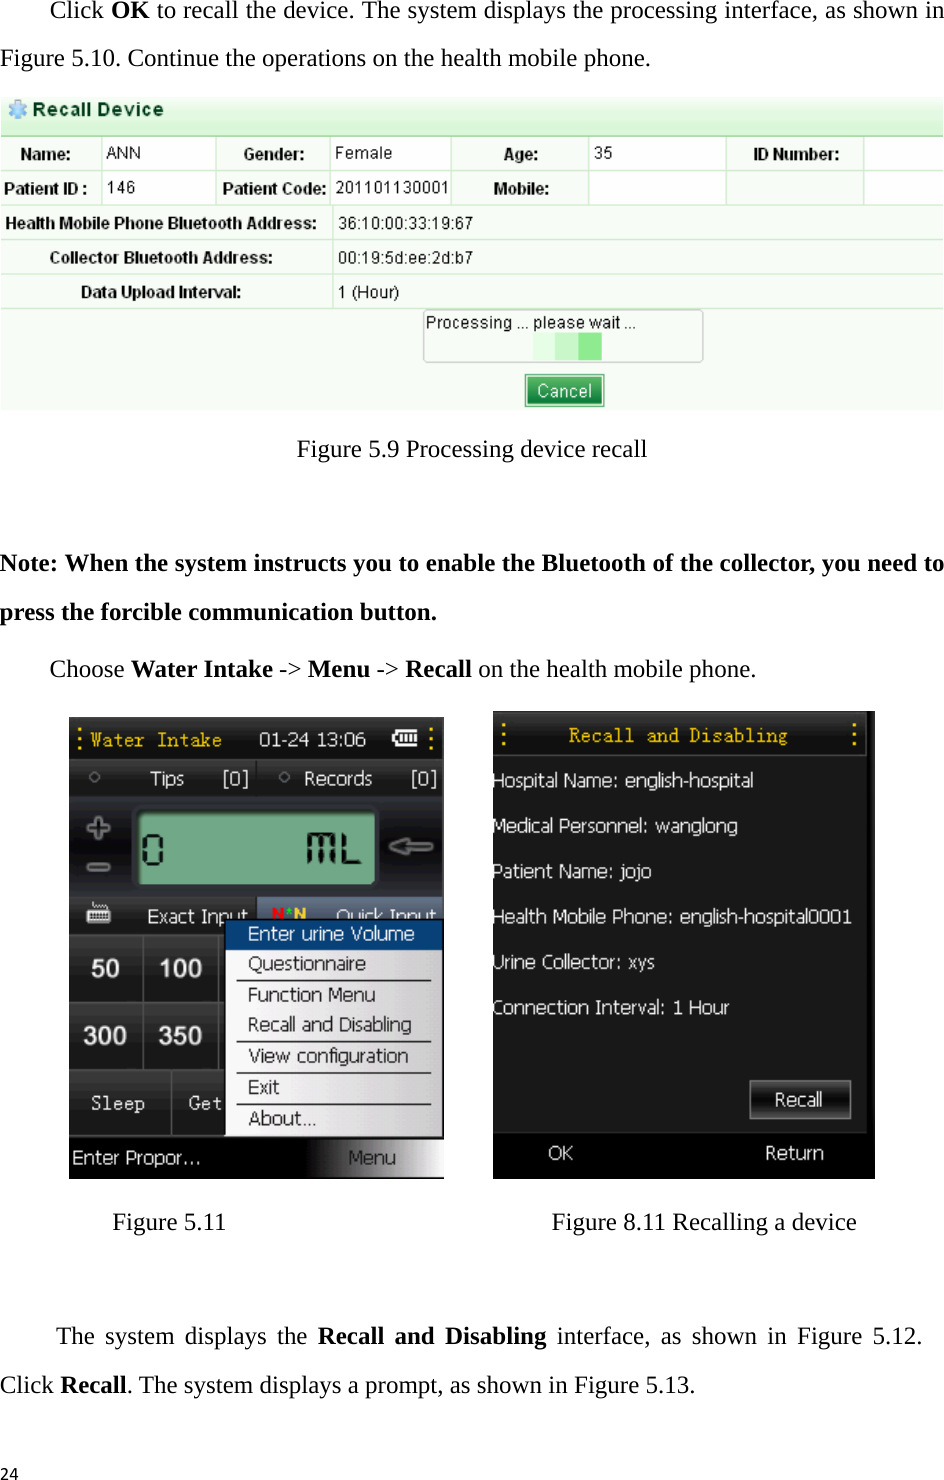
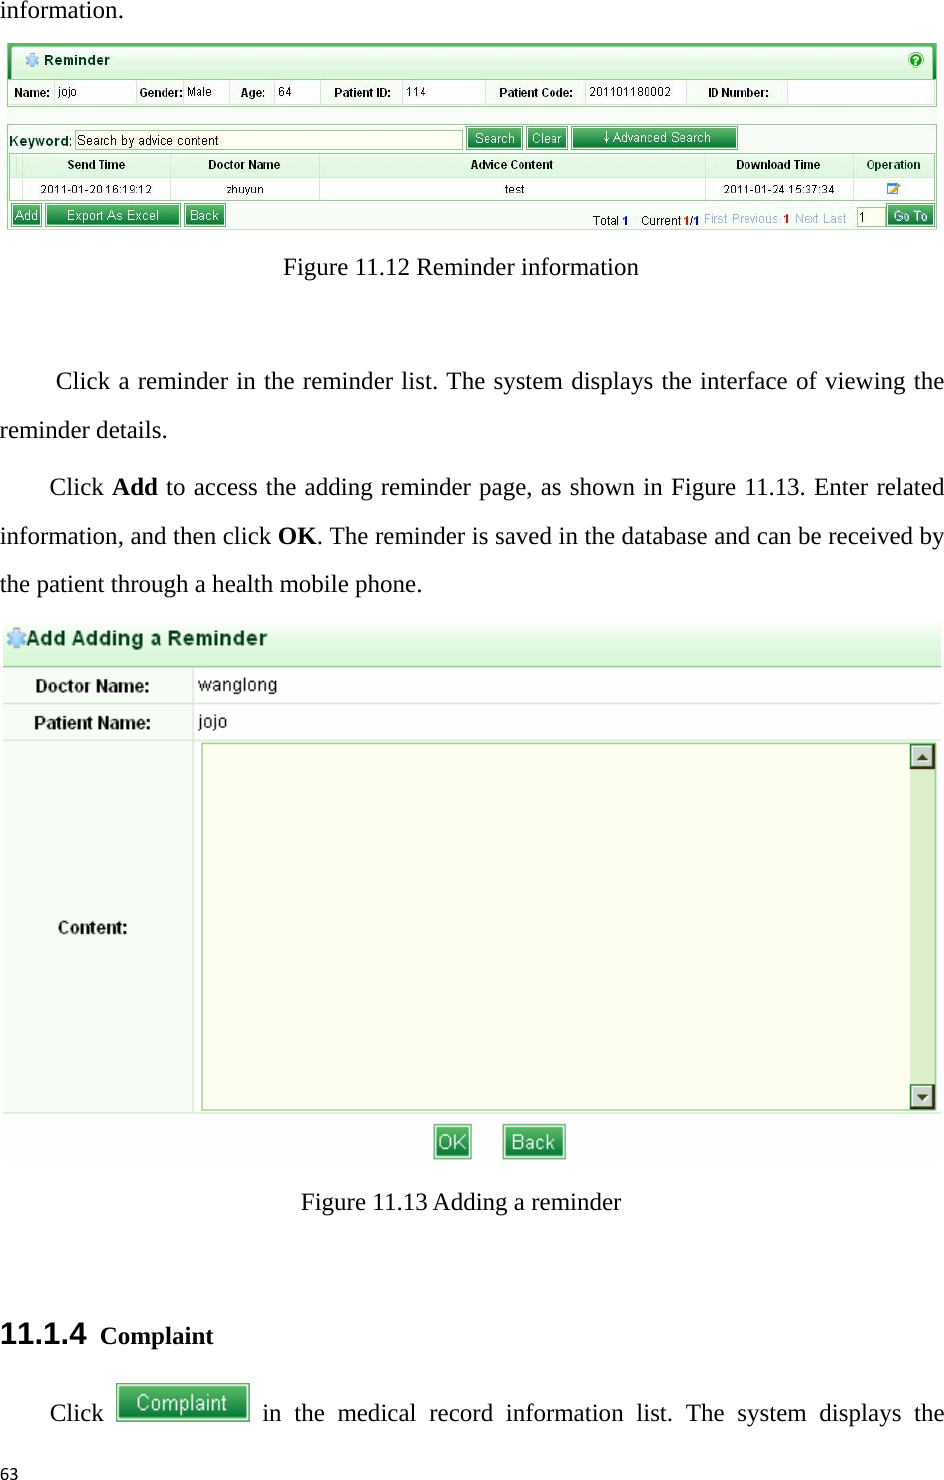
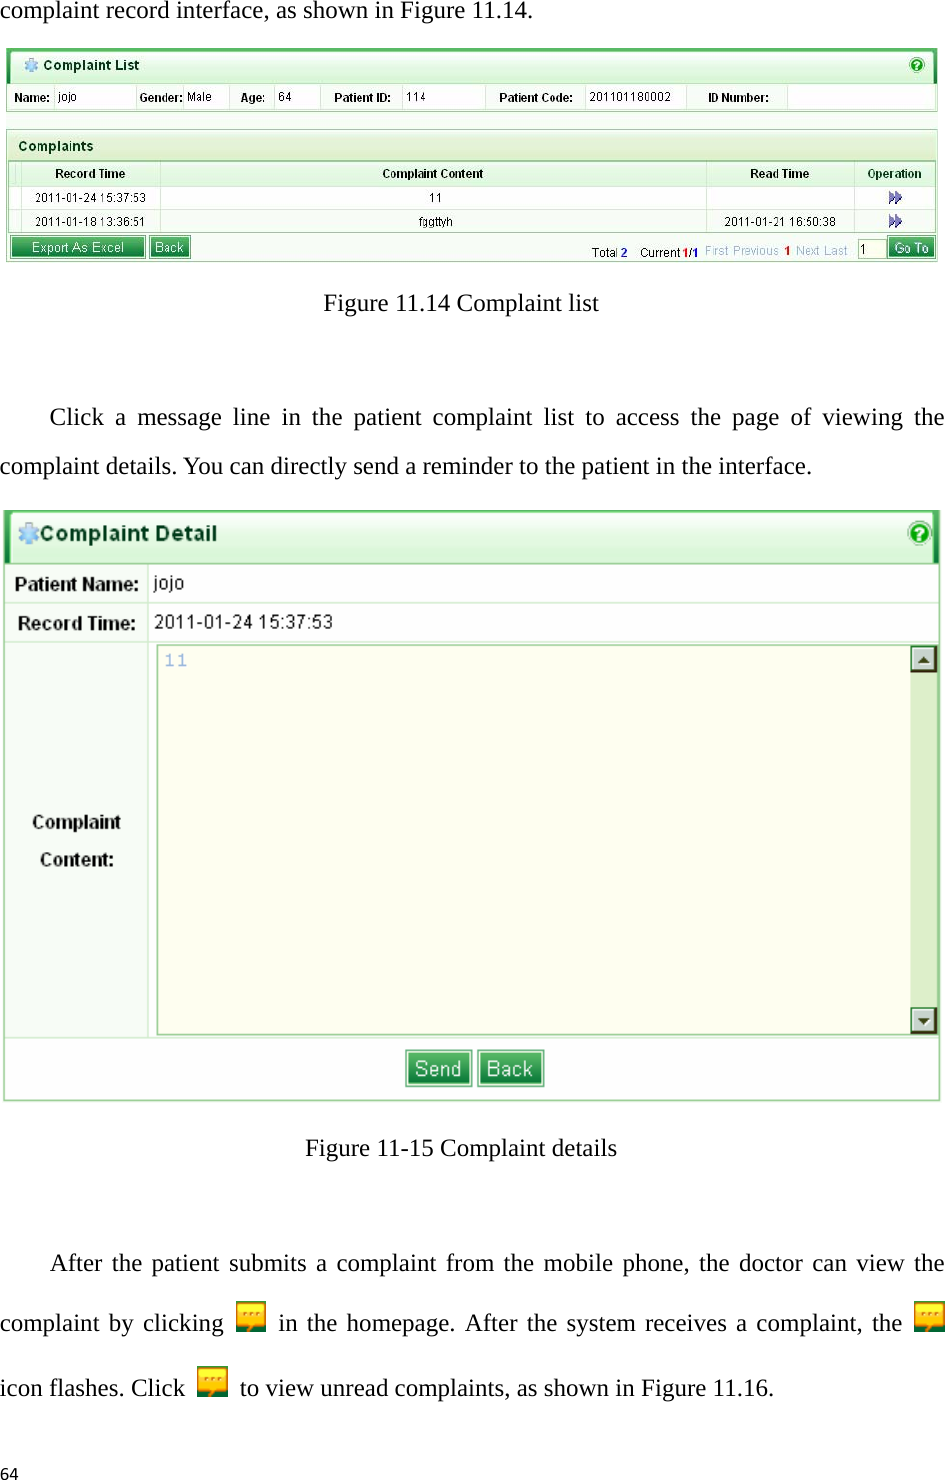
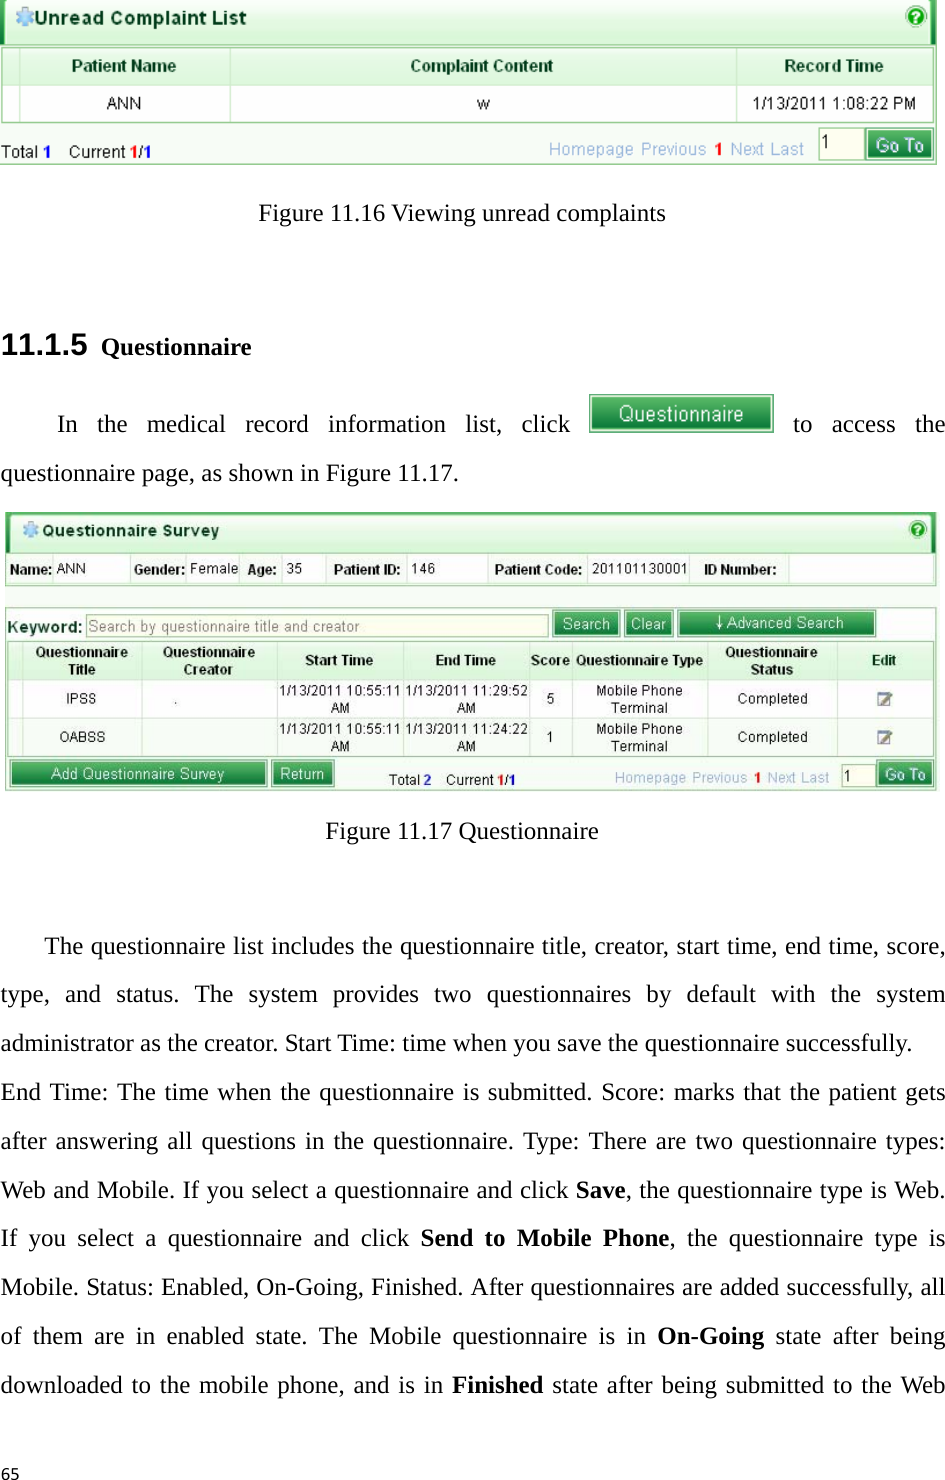
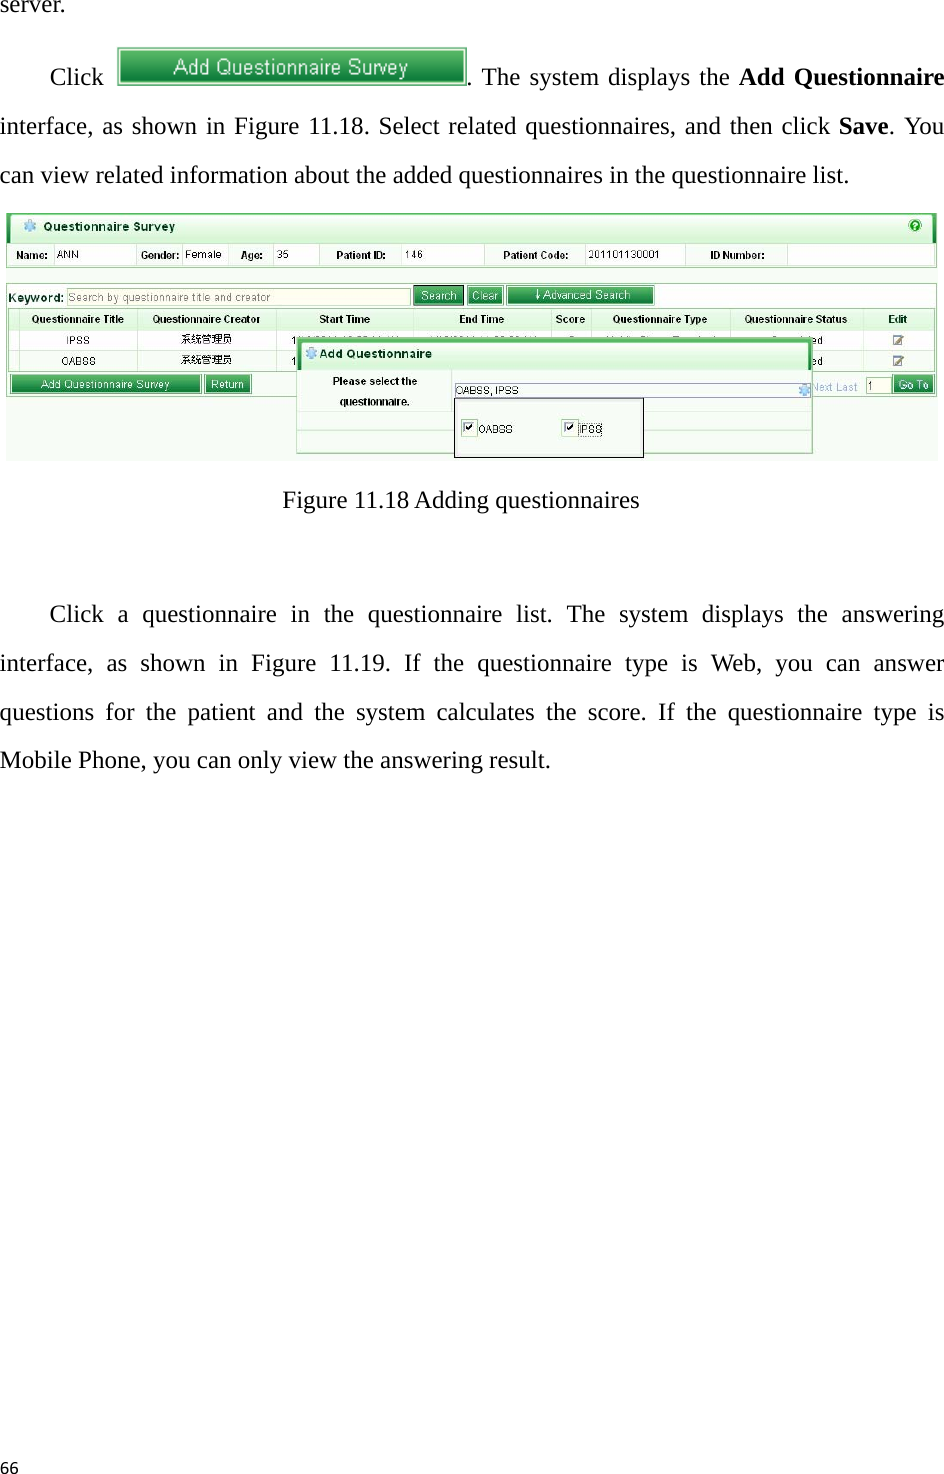
New Element Medical Equipment Technology Development WRM-XPN REMOTE & MOBILE VOIDING DIARY MONITORING SYSTEM User Manual

Shenzhen New Element Medical Equipment Technology Development Co., Ltd. REMOTE & MOBILE VOIDING DIARY MONITORING SYSTEM Users Manual
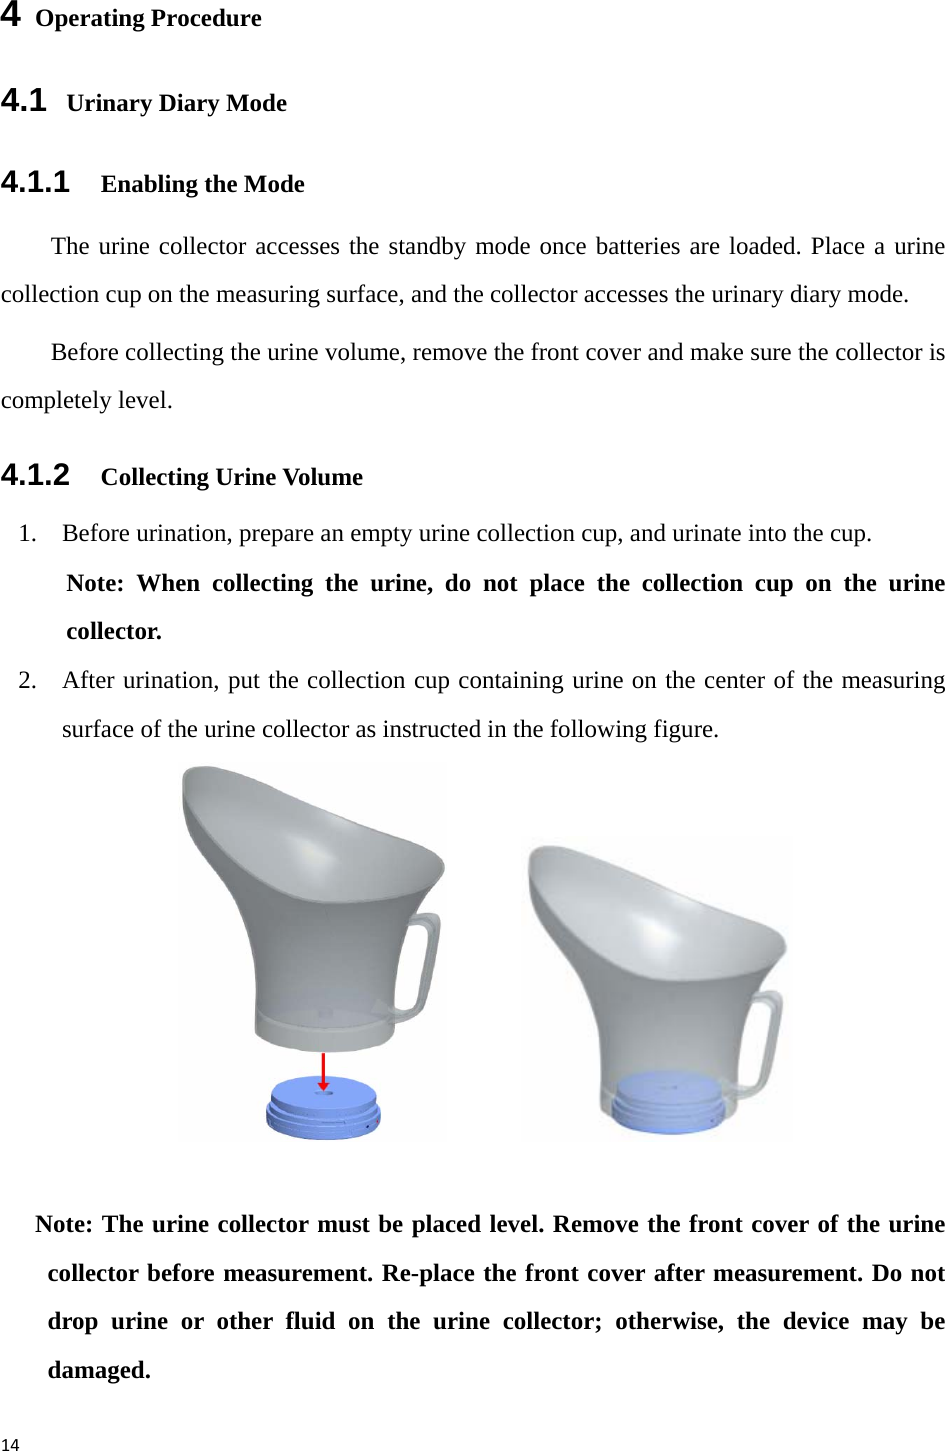
Users Manual

1Table of Contents 1 BASIC INFORMATION ...................................................................................................... 4 1.1 MANUFACTURER.......................................................................................................... 4 1.2 PRODUCT ..................................................................................................................... 4 1.3 REVISION HISTORY ...................................................................................................... 4 1.4 PRODUCT CLASSIFICATION........................................................................................... 5 1.5 APPLICABLE STANDARDS............................................................................................. 5 1.6 NOTES ON SAFETY ....................................................................................................... 5 2 OVERVIEW.......................................................................................................................... 7 2.1 COMPONENTS............................................................................................................... 7 2.2 WORKFLOW .................................................................................................................8 2.3 APPLICATION................................................................................................................8 3 URINE COLLECTOR.......................................................................................................... 9 3.1 DESCRIPTION ............................................................................................................... 9 3.2 EXTERIOR STRUCTURE AND FUNCTIONS ...................................................................... 9 3.3 BUTTONS.................................................................................................................... 12 3.4 INDICATOR ................................................................................................................. 12 3.5 BATTERY .................................................................................................................... 13 3.5.1 REPLACING BATTERIES.................................................................................... 13 3.5.2 LOADING BATTERIES ....................................................................................... 13 4 OPERATING PROCEDURE.............................................................................................. 14 4.1 URINARY DIARY MODE.............................................................................................. 14 4.1.1 ENABLING THE MODE...................................................................................... 14 4.1.2 COLLECTING URINE VOLUME.......................................................................... 14 4.2 UROFLOMETRY MODE................................................................................................ 15 4.2.1 ENABLING THE MODE...................................................................................... 15 4.2.2 COLLECTING UROFLOMETRY ........................................................................... 15 4.3 DISABLING THE URINE COLLECTOR ........................................................................... 16
24.4 CAUTIONS .................................................................................................................. 16 4.5 CLEANING AND MAINTAINING THE COLLECTOR......................................................... 16 5  HEALTH MOBILE PHONE .............................................................................................. 18 5.1 DISTRIBUTING DEVICE............................................................................................... 19 5.2 RECALLING DEVICE ...................................................................................................23 6  FUNCTIONS ON MOBILE PHONE................................................................................. 27 6.1 SOFTWARE INTERFACES ............................................................................................. 27 6.2 FUNCTION MENU ....................................................................................................... 28 6.2.1 CONFIGURATION .............................................................................................. 29 6.2.2 URINE STATISTICS ............................................................................................ 30 6.2.3 REMINDING...................................................................................................... 31 6.2.4 COLLECTING....................................................................................................32 6.2.5 SENDING .......................................................................................................... 33 6.2.6 LOGGING OUT ................................................................................................. 34 6.2.7 EXITING SOFTWARE ......................................................................................... 34 6.2.8 REGULARLY COLLECTING AND UPLOADING .................................................... 34 6.3 RECALL...................................................................................................................... 34 6.4 VIEWING CONFIGURATION ......................................................................................... 35 6.5 ABOUT METS_MOBILE .......................................................................................... 35 7 CENTER SERVER............................................................................................................. 37 7.1 SYSTEM LOGIN...........................................................................................................37 7.2 LOGOUT ..................................................................................................................... 38 7.3 COMMON OPERATIONS............................................................................................... 39 7.3.1 SORTING AND SEARCHING ...............................................................................39 8 USER MANAGEMENT..................................................................................................... 40 9 DEVICE MANAGEMENT................................................................................................ 42 9.1 HEALTH MOBILE MANAGEMENT................................................................................ 42 9.1.1 ADDING DATA .................................................................................................. 42
39.1.2 SEARCHING DEVICE INFORMATION..................................................................43 9.2 COLLECTOR MANAGEMENT ....................................................................................... 46 10 MEDICINE MANAGEMENT ........................................................................................... 47 10.1 MEDICINE CLASSIFICATION........................................................................................ 47 10.1.1 ADDING MEDICINE TYPE .................................................................................47 10.1.2 VIEWING AND EDITING MEDICINE TYPE .......................................................... 48 10.2 MEDICINE INFORMATION............................................................................................ 49 10.2.1 ADDING NEW MEDICINE INFORMATION........................................................... 49 10.2.2 VIEWING AND EDITING MEDICINE INFORMATION ............................................ 50 10.3 MEDICATION SOLUTION ............................................................................................. 50 10.3.1 ADDING MEDICATION SOLUTION.....................................................................50 10.3.2 VIEWING AND EDITING MEDICATION SOLUTION.............................................. 51 11 PATIENT MANAGEMENT............................................................................................... 54 11.1 MANAGING PAT IE N T MEDICAL RECORD..................................................................... 55 11.1.1 ADDING TREATMENT .......................................................................................57 11.1.2 TREATMENT REPORT........................................................................................ 62 11.1.3 REMINDER ....................................................................................................... 62 11.1.4 COMPLAINT .....................................................................................................63 11.1.5 QUESTIONNAIRE .............................................................................................. 65 12 TREATMENT REPORT.....................................................................................................68 12.1 URINARY DIARY SUMMARY ....................................................................................... 68 12.2 URINARY DIARY......................................................................................................... 70 12.3 UROFLOMETRY REPORT ............................................................................................. 72 12.3.1 EDITING FLASH................................................................................................ 74 12.3.2 PRINT PREVIEW ............................................................................................... 76 12.4 URINARY DIARY REPORT ........................................................................................... 76
41  Basic Information 1.1  Manufacturer  Company: Shenzhen New Element Medical Equipment Technology Development Co., Ltd. ADD: 4th Floor, Tongtai Building, Block 422, 4th Bagua Road, Futian District, Shenzhen Zip Code: 518029 Tel: (86) (755) 82445959 400-8833-899 (after sales service) Fax: (86) (755) 82443286 E-mail: xys@szxys.cn Website: http://www.szxys.cn/   1.2  Product Product: Remote & Mobile Urinary Diary Monitoring System Model: XYS.WRM-2PN File Name: Operation Guide SN: XYS-WRM-2PN-E-006 Version: 1.5 Date: December 2010 Language: English 1.3  Revision History 2008 China Shenzhen New Element Medical Equipment Technology Development Co., Ltd. (hereinafter referred to as the company) All rights reserved. Reproduction in whole or part without the prior written permission of the Company is prohibited.
5Table 1.1 shows the revision history. Table 1.1 Date Version  Description 09/2009 1.0 Added 08/2010  1.1  Added and modified related modules/contents in V1.1. 08/2010  1.2  Modified related modules/contents in V1.2. 12/2010  1.5  Added and modified related contents in V1.5 1.4  Product Classification The urine collector (collector for short) is an internally powered common device, which belongs to type B instead of type AP or APG. 1.5  Applicable Standards GB/T 191-2008; GB 9706.1-2007; GB/T 9969; GB/T 14710-2009; YY 0466-2009 1.6  Notes on Safety Warning: Information about how to avoid injury to operators. Caution: Information about how to avoid damage to devices. Note: Important information that the reader should know.  There are  ,  , and Notes in the following sections.    Authorized personnel: personnel trained by the company or by companies that are authorized by the company.    Read the manual carefully before operation.
6Be sure to abide by rules in the manual when using the device.
72  Overview Remote & Mobile Urinary Diary Monitoring System XYS.WRM-2PN (hereinafter referred to as the system), is developed and manufactured by the company. The system comprises a urine collector, a health mobile phone, a special drinking cup, and a special urine collection cup. During urination, the collector automatically records and saves the urine volume, urination time, and uroflometry. Then, the collector sends the relative data to the healthcare mobile phone through the Bluetooth and automatically calculates and displays the uroflometry curve and urine volume. During urination, the collector automatically records and saves the urine volume, urination time, and uroflometry. Then, the collector sends the relative data to the healthcare mobile phone through the Bluetooth and automatically calculates and displays the uroflometry curve and urine volume. Through the health mobile phone interface, the collector can also save the drinking information. The health mobile phone automatically sends the urination and drinking information to the hospital control center in time so that a doctor can timely perform remote diagnosis on the patient. For any abnormality, the doctor can communicate with the patient through Interaction. When feeling uncomfortable, the patient can consult the doctor through the health mobile phone.   As a crucial part of the remote & mobile monitoring platform, the system can intelligently and automatically record urination information. 2.1  Components The system consists of a urine collector, a healthcare mobile phone, and the server (as shown in Figure 2.1).
8 Figure 2.1 Remote & Mobile Urinary Diary Monitoring System 2.2  Workflow The system adopts a urine collector to collect the user's daily urination information, including drinking & urination time and volume and uroflometry, and upload data to a healthcare mobile phone through the Bluetooth for intelligent analysis in real time. Meanwhile, the data is sent to the backstage server at scheduled time for recording and further analysis. 2.3  Application The system is used to collect information about patients' time and volume of water intake and urination, and uroflometry, and then transmit the information to the hospital center server for analysis, thus, achieving remotely patient monitoring.
93  Urine Collector 3.1  Description The urine collector automatically records each urination time and volume of users and sends the relative data to the healthcare mobile phone through the Bluetooth. A user can carry the collector easily. The built-in non-volatile memory can record the urinary information in a day. 3.2  Exterior Structure and Functions Figure 3.1 shows the appearance of the urine collector. Table 3.1 describes the functions of each label and key. Table 3.1 S/N Name Description 1  Communication indicator The indicator flashes when the collector communicates with a healthcare mobile phone successfully. It is off after the communication is completed. 2  Mode indicator  The mode indicator indicates the modes of the urine collector. 3  Power /Measuring indicator The indicator flashes yellow slowly if the battery level is full. It flashes red slowly if the battery level is low. 4  Mode button  Pressing the mode button to switch to the uroflometry mode.   5 Forcible communication button Enabling the Bluetooth and switching to the communication mode. 6 Measuring surface Placing the urine collection cup on the measuring surface to collect data after or when urination.
107  Front cover  Used to protect the measuring surface. 8  Rear cover  A part of the collector shell. 9 Label Product information. 10 Battery compartment cover Used to protect the battery. 11  Battery compartment  Used to hold the battery.
11  Figure 3.1 Urine collector Caution: Do not put heavy objects on the measuring surface. Front RearCommunication indicatorPower /Measuring indicatorMode indicatorMode buttonFront coveMeasuring surfaceBattery compartment coverBattery compartmentForcible communication buttonLabel
123.3  Buttons There are two buttons on the urine collector. One is beside the battery compartment. The other is on the edge of the urine collector. Their functions are as follows: Table 3-2 N0. Name Description 1 Mode button Press the mode button to switch to the uroflometry mode 2  Forcible communication button  Press the button to wait for communication  3.4  Indicators Related indicators flash when the collector is power on. For details, see Table 3.3. Table 3-3 Image Name Description If the indicator flashes yellow every six seconds, it indicates that the battery level is full and the collector runs normally.   Red and yellow Power/Measuring indicator  If the indicator flashes red, it indicates that the battery level is low and the available running time is less than 60 minutes.  Communication indicator The indicator flashes quickly when the urine collector connects to an intelligent mobile phone.    Mode indicator  When the indicator flashes quickly, it indicates the urinary diary mode.
13When the indicator flashes slowly, it indicates the uroflometry mode.   When the indicator is normally on, it indicates completed data collection.   3.5  Battery 3.5.1   Replacing Batteries Disposable AAA alkaline batteries are used in the urine collector. When the power indicator flashes red, replace batteries immediately.   Note: Dispose of replaced batteries in accordance with relative national regulations. 3.5.2   Loading Batteries The procedure for loading batteries is as follows (see Figure 3.2): a) Remove the battery compartment cover. b) Load batteries with electrodes correctly aligned. c) Re-place the cover.  Figure 3.2 Loading batteries Caution: When you do not use the collector, remove the batteries to prevent corrosion. Battery compartment coverBattery compartment
144  Operating Procedure 4.1  Urinary Diary Mode 4.1.1    Enabling the Mode The urine collector accesses the standby mode once batteries are loaded. Place a urine collection cup on the measuring surface, and the collector accesses the urinary diary mode.   Before collecting the urine volume, remove the front cover and make sure the collector is completely level. 4.1.2   Collecting Urine Volume 1. Before urination, prepare an empty urine collection cup, and urinate into the cup.   Note: When collecting the urine, do not place the collection cup on the urine collector. 2. After urination, put the collection cup containing urine on the center of the measuring surface of the urine collector as instructed in the following figure.               Note: The urine collector must be placed level. Remove the front cover of the urine collector before measurement. Re-place the front cover after measurement. Do not drop urine or other fluid on the urine collector; otherwise, the device may be damaged.
153. After hearing the buzz from the urine collector, remove the urine collector cup. The urine volume is collected. Empty and wash the urine collection cup for next use.   4.2  Uroflometry Mode 4.2.1    Enabling the Mode The urine collector accesses the standby mode once batteries are loaded. Press the mode button for three seconds. If the mode indicator flashes quickly, it indicates the urine collector is in uroflometry mode.   Before collecting the uroflometry, remove the front cover and make sure the collector is completely level. 4.2.2   Collecting Uroflometry 1. Stand to urinate as usual and without abdominal force (the female is assisted with a fluid director).     Note: Put the urine collector and urine collection cup on a brace so that the vertical distance between the rim of the urine collection cup and the urethral orifice is less than 20 cm. In this manner, the urine can flow into the urine collection cup smoothly. When urinating, keep quiet and ensure that the volume is more than 200 mL to avoid invalid measuring data due to inadequate urine volume.   2. After urination, remove the urine collection cup. The uroflometry is collected. Empty
16and wash the urine collection cup for next use.   Note: Do not press the urine collection cup when removing it; otherwise, the measuring data is inaccurate.   4.3  Disabling the Urine Collector Recall the urine collector with the corresponding health mobile phone.   4.4 Cautions a) When collecting urine volume, make sure the collector is completely level. b) Make sure the battery level of the collector is sufficient. c) When collecting urine volume data, if the power/measuring indicator flashes red (as shown in Figure 3.1), it indicates the battery level is low. Replace the batteries immediately. d) After collection, replace the front cover of the collector to protect the measuring surface. Do not drop urine or other fluid on the urine collector.   e) Before carrying the collector, be sure to place the cover on it.   f) The disposable drinking cup of New Element can endure temperature ranging from -10°C to 90°C.   4.5 Cleaning and Maintaining the Collector 1. Put the collector in moist-proof, sunlight-proof, and water-proof environment with the front cover in place. Ensure the collector is level and out of children's reach. Do not put weights on the front cover.   2. When distributing devices, replace the batteries or unload and re-load the batteries.   3. Place the collector on steady surface immediately after loading the batteries. Perform the collection after the red and green indicators stop slow flash.   4. To ensure the lifecycle of the collector, do not place the collector in environment with temperature over 40℃. Unload the batteries when the collector is not used for long. Re-place the front cover and ensure the measuring surface is clean.
175. Wipe the collector with soft cloth and a mild detergent. Do not spray detergent into the collector. Otherwise, the detergent may penetrate into the collector and cause damage.  6. Do not place weights more than 2 kg on the collector. Otherwise, the collector may be damaged.   7. If any liquid is dropped on the collector, unload the batteries. Dry the collector with cloth. Ensure there is no liquid in the internal circuit, and then re-load the batteries. Caution: Do not soak the collector into any liquid to avoid damage to electronic components due to excessive fluid penetration.
185   Health Mobile Phone To start the system on a mobile phone, you can: - Choose Start ->  , or - Click eDoctor on the desktop, or - Press    on the lower right of the mobile phone. For details about the appearance of the health mobile phone, see Figure 5-1.            Figure 5-1 Health mobile phone  Note: To install Remote & Mobile Urinary Diary Monitoring System V1.5 on a non-customized mobile phone, you need to copy the corresponding installation package to the mobile phone, and then install it. After installation, choose Start -> Program –>   to run the program. Next time, you only need to choose Start ->  . OKDialeDoctorHang‐ueDoctor
195.1 Distributing Device When a patient needs to use the system, distribute the device to the patient so that connection between the patient and device can be established. Device distribution must be operated on the mobile phone and Web terminal. When starting the program on a mobile phone the first time, complete parameter settings. The system displays the prompt for releasing a device on the Web terminal, as shown in Figure 5.2. Before releasing a device, make sure the health mobile phone and the collector are registered on the platform.    Figure 5.2 Prompt for releasing a device on the mobile phone Click OK. The system displays the device release interface. Note: (1) Before distributing devices, press the forcible communication button and mode button to perform calibration. (2) When the system requires you to enable the Bluetooth, you need to press the forcible communication button on the collector, as shown in Figure 3.1. Click Yes (in Figure 5.2) to release the device. The system displays a prompt to instruct you to operate on the Web terminal. For patients to whom devices are not distributed, choose Patient Management -> New Treatment ->   on the Web terminal. The system displays the Device Distribution interface, as shown in Figure 5.3. If there are available devices, the system
20displays the interface shown is Figure 5.4.    Figure 5.3 Device release interface on the Web terminal (no available devices)
21 Figure 5.4 Device release interface on the Web terminal (with available devices)  The  Available Devices list shows the information about available devices. You can choose either the default collector or another collector. Set the data upload interval, gross weight of the container, and timing restart time of the mobile phone. Select the questionnaire and specify the default time table. Then, click  . The processing interface is displayed, as shown in Figure 5.5.  Figure 5-5 Processing device release
22 Note: If the urine collection cup of another company is used, you need to set the gross weight. After receiving release information from the Web terminal, the mobile phone displays the device release interface, as shown in Figure 5.6.  Figure 5.6 Confirming device release in the mobile phone   Figure 5.7 Water intake entering interface on the mobile phone
23 Confirm the information about the device, doctor, and patient. Then, click   to access the page for entering water intake, as shown in Figure 5.7. So far, the mobile phone can be used by a patient.   5.2 Recalling Device   When a patient does not use a device any more, recall the device. Operations on both the Web terminal and the mobile phone are required. If the devices are released, click Recall Device to access the device recall interface, as shown in Figure 5.8.    Figure 5.8 Device recall interface on the Web terminal Click  . A dialog box is displayed, as shown in Figure 5.9.    Figure 5.9 Confirming device recall
24Click OK to recall the device. The system displays the processing interface, as shown in Figure 5.10. Continue the operations on the health mobile phone.    Figure 5.9 Processing device recall  Note: When the system instructs you to enable the Bluetooth of the collector, you need to press the forcible communication button. Choose Water Intake -> Menu -> Recall on the health mobile phone.           Figure 5.11                          Figure 8.11 Recalling a device  The system displays the Recall and Disabling interface, as shown in Figure 5.12. Click Recall. The system displays a prompt, as shown in Figure 5.13.
25 Figure 5.13 Confirming device recall on the mobile phone   Figure 5.14 Processing device recall on the mobile phone  Click OK. The system starts to recall the device, as shown in Figure 5.14. Later, a prompt is displayed, as shown in Figure 5.15.
26 Figure 5.15 Prompt for enabling the Bluetooth  Press the forcible communication button. Then, click OK, as shown in Figure 5-15. Related information is displayed on both the mobile phone and Web management platform after the device is recalled successfully. The system displays a confirming dialog box on the mobile phone, as shown in Figure 5.16. The system displays a prompt on the Web terminal, as shown in Figure 5.17.  Figure 5.16 Confirming information on the mobile phone
27 Figure 5.17 The prompt on the Web terminal  Click Yes (in Figure 5.16) to quit the system and disable the device. Click No to return to the function menu. 6   Functions on Mobile Phone 6.1 Software Interfaces There are five sections on the main interface: reminding, records, water input, and functions, and menu, as shown in Figure 6.1.  Figure 6-1 Main interface of the system  Reminding and Records store the reminders and water intake/urination records of one day respectively.In the water input section, precise input and fast input are available.In the
28function section, you can enter the sleep/get-up time, complaint, and save water intake. The following describes each key shown in Figure 6-1. ¾ Reminding: Click it to view records about reminders, prompts, and so on.   ¾ Records: Click it to view the urinary and fluid intake information on a day. ¾ Sleep: Before sleep, a patient can click the button to record the sleep time. ¾ Get up: After get-up, a patient can click the button to record the get-up time. ¾ Complain: A patient can click the button to inform a doctor of current conditions. ¾ Save: After entering water intake, a patient can click the button to save it. ¾ Menu: Click Menu in the water intake interface. Seven items are displayed: Enter urine volume,  Questionnaire,  Function Menu,  Recall and Disable,  View configuration, Exit, and About…, as shown in Figure 6.2.  Figure 6-2 Menu    6.2 Function Menu Choose  Menu > Function menu. The login interface for medical care personnel is displayed, as shown in Figure 6-3. After login, some items are displayed, as shown in Figure 6-4.
29         Figure 6-3 Login interface          Figure 6-4 Function menu interface  6.2.1   Configuration Choose Menu -> Configuration. The Configuration interface is displayed, as shown in Figure 6.5. The interface displays information about parameter settings, such as hospital name, medical staff name, patient name, communication interval. If the server address is changed, set Web add accordingly.    Figure 6-5 Parameter settings
30 6.2.2   Urine Statistics You can search history urinary dairy and urine statistics by selecting time, as shown in Figures 6.6 and 6.7.            Figure 6.-6 Urinary diary interface            Figure 6-7 Urine statistics interface  Some data lines in Figure 6.6 are marked with  . Click such lines to view the uroflometry charts, as shown in Figure 6.8. The figure shows the uroflometry curve and urine volume curve for certain urination. The X coordinate represents urination time (S). The length of time cell is fixed. The length varies with the urination duration. The left Y coordinate represents uroflometry ranging from 0 to 50 mL/s. The right Y coordinate represents urine volume ranging from 0 to 600 mL. Click any point of the curve to view details.
31         Figure 6-8 Uroflometry chart interface        Figure 6-9 Uroflometry statistics  Click   in the uroflometry chart interface. The system displays the statistics about uroflometry and urine volume, as shown in Figure 6.9. The statistics includes urination time, mean uroflometry, max. uroflometry, 2s uroflometry, 90% mean uroflometry, 90% time, uroflometry peak time, and total urine volume.   6.2.3   Reminding The reminding interface displays the doctor advice and appointment prompts. In the water intake interface (as shown in Figure 6-10), click Tips to access to the viewing reminder interface. See Figure 6-11. The reminders of the current month are displayed by default. You can click Last month or Next month to view other reminders.
32    Figure 6-10 Water intake interface           Figure 6-11 Reminder viewing interface  6.2.4   Collecting To view history water intake/urination records on the mobile phone, the medical personnel can click Collect to upload data in the collector to the system. After data is received, click Urinary stat. to view the patient’s history water intake/urination records. The following figure shows the data transmission process.    Figure 6-12 Prompt for enabling the Bluetooth
33  Figure 6-13 Data collecting interface  6.2.5   Sending To view history water intake/urination records on the Web terminal, click Collect, and then click Send on the mobile phone to upload data. After the data is uploaded, the medical personnel can view the patient’s history water intake/urination records on the Web terminal. The following figure shows the transmission process.
34 Figure 6-13 Data transmitting interface  6.2.6   Logging Out After all operations, click Log out to log out of the system and prevent unauthorized operations. 6.2.7   Exiting Software  Click Exit to quit the mobile phone program.   6.2.8    Regularly Collecting and Uploading The system can do the following based on fixed intervals: Communicate with the urine collector and collect data;   Upload the data, such as urination, water intake, complaints, to the Web terminal. For how to set communication interval, see 5.1. 6.3 Recall  The function is similar to that of device. For details, see 5.2.
356.4 Viewing Configuration   Choose  Menu -> View configuration. Related parameter settings are displayed, as shown in Figure 6-15.  Figure 6-15 Parameter setting interface  6.5 About METS_MOBILE Choose Menu -> About…. Related information about the version is displayed, as shown in Figure 6-16.
36 Figure 6-16 Information about the version
377  Center Server Welcome to Remote & Mobile Urinary Diary Monitoring System. Enter the server address (for example, http://szxys-mets.xicp.net:2000/UserLogin.aspx) in the address bar of Internet Explorer to access the homepage, as shown in Figure 7.1. 7.1 System Login If you have not logged in to the system, the page will be redirected to http://domain name/UserLogin.aspx. For details about the login interface, see Figure 7.1.  Figure 7.1 Login interface  There are two methods to log in to the system: login by account and login by fingerprint. Note: Fingerprint Management is optional in the system. When there is no fingerprint record, log in to the system by entering account and password.   Login by account: Enter the correct account and password. Then, click Login.  Login by fingerprint: Click Fingerprint. The system displays the fingerprint verification interface, as shown in Figure 7.2.
38 Figure 7.2 Fingerprint verification  After successful login, the system displays the homepage, as shown in Figure 7.3. The menus in the operation interface include User, Patient, Device, and Medicine.   Figure 7.3 Operation interface  7.2 Logout To protect your privacy, click    on the upper right to quit the system and back to the login interface.
397.3 Common Operations   7.3.1    Sorting and Searching Sorting and searching functions are available on all lists in the system. Click the header of a column to perform ascending or descending sort.   You can use the search function above a list. Enter related conditions and then click Search. The corresponding result is displayed in the list. To access the advanced search state, click Advanced Search. Then, enter related search conditions and click Advanced Search  in the patient list interface, as shown in Figure 7.4. The exact search result is displayed. Search conditions are as follows: patient code, patient name, ID card No., gender, registration date.    Figure 7.4 Advanced search
408  User Management Log in to the system. Click User Mngt in the basic personal information page to access the personal information interface, as shown in Figure 8.1.    Figure 8.1 Basic personal information  Click   to access the changing password interface, as shown in Figure 8.2. Enter new password and confirming password. Click OK to complete the operation. Click   to clear the entered information and enter new password again. Click    to back to the Personal Information interface.
41Figure 8.2 Changing password
429  Device Management Device Management specifies the management of devices (such as health mobile phone and urine collector) used in the system, including device registration, device status change, viewing records of device usage and status change history.   Click   to access the device management interface. The initial page is Health Mobile Phone List, as shown in Figure 9.1.    Figure 9.1 Device management list  9.1 Health Mobile Management 9.1.1   Adding Data Click    in the device management list, as shown in Figure 9.1. The system displays the Add Health Mobile Phone interface, as shown in Figure 9.2. Enter the Bluetooth device address of the health mobile. The health mobile writing system generates
43a default health mobile code which is made up by the first letter of the hospital name plus SN. The code can be modified. Click OK to complete the operation.    Figure 9.2 Adding health mobile phone data    To enter huge amount of data, you can import the data in batches. Click Import in batch, as shown in Figure 9.1. On the displayed interface, download the template and import excel files. Then, click OK to complete data import, as shown in Figure 9.3.    Figure 9.3 Importing health mobile information in batch  9.1.2    Searching Device Information To search device information, do as follows: Enter the Bluetooth device address of a health mobile phone and click Search; or Click Advanced Search. Enter the device No., Bluetooth address of the health mobile, device status, or current using personnel to search, as shown in Figure 9.4. The device status can be
44normal, being used, damaged, lost, and discarded.    Figure 9.4 Health mobile phone list  Click a message line. The system displays the detailed information interface, as shown in Figure 9.5. The interface shows the detailed information about the health mobile phone, usage history, and status change records. The Usage History list records the using personnel, release personnel, and use time. The Status Change History table records the status change time, original state, new state, and operator.
45   Figure 9.5 Device details   The status of the Monitoring System can be normal, being used, damaged, lost, and discarded. The status change relationship is shown in Figure 9.6.   ¾ Normal: The device is normal and not used currently. (Normal can be changed to Being Used, Damaged, Lost, or Discarded.) ¾ Being Used: The device is normal and being used. (The status can be changed after the device is recalled.)   ¾ Damaged: The device is abnormal and need reporting for repair. (Damaged can be changed to Normal, Lost, or Discarded.) ¾ Lost: The device is lost and need reporting the loss. (Lost can be changed to Normal or Damaged.) ¾ Discarded: The device is discarded (Discarded can be changed to Damaged or Normal.)
46       Figure 9.6 Device status change relationship    9.2 Collector Management For device management of the collector, see section 9.1. The operating method is the same.  1Normal2Beingd3Damaged4LostReleasNormReportforMende ReportthelossRetrievedReportthelossRetrievedbutdamaged5DiscardedUnrepeatableDiscardedNormalandcanRepairableDeviceDeviceMngt.
4710  Medicine Management Click Medicine on upper right of the homepage, as shown in Figure 7.2. The system displays the medicine type list, as shown in Figure 10.1. Paging, sorting, and searching are available on the page.    Figure 10-1 Medical type management  10.1  Medicine Classification 10.1.1  Adding Medicine Type Click  Add (as shown in Figure 10.1). The system displays the adding medicine type page (as shown in Figure 10.2).   Enter parent medicine type, medicine type name, and remarks. Click OK to save the operation.
48 Figure 10.2 Adding a medicine type  ¾ Parent Medicine Type: parent category of the medicine type to be added. ¾ Medicine type Name: name of the medicine type. ¾ Remarks: description about the medicine type. Note: If there is no parent medicine type, Parent Medicine Type is null. 10.1.2   Viewing and Editing Medicine Type Click a medicine type in the medicine type list. The system displays the editing medicine type interface, as shown in Figure 10.3. Enter related information and then click OK to save the operation.    Figure 10.3 Viewing and editing a medicine type
49 After adding a medicine type, you can modify only the parent medicine type and remarks. Medicine type name cannot be changed. 10.2  Medicine Information 10.2.1   Adding New Medicine Information Click  Medicine Information to display the medicine information list, as shown in Figure 10.4. Click Add to display the adding medicine information interface, as shown in Figure 10.5.    Figure 10.4 Medicine information list      Figure 10.5 Adding new medicine information  ¾ Medicine Type: type that the medicine belongs to.
50¾ Medicine Name: name of a medicine. ¾ Dosage: amount of the medicine used   ¾ Remarks: descriptions about the medicine. Note: the medicine dosage is defined by a user. The existing dosage unit is displayed in the drop-down list.   ¾ OK and Continue: The system saves the added medicine information and stays on the Adding Medicine Information interface. In this case, you can go on to add another medicine.   10.2.2   Viewing and Editing Medicine Information Click a medicine in the medicine list. The system displays the editing medicine information interface, as shown in Figure 10.6. Enter related information and then click OK to save the operation.    Figure 10.6 Editing medicine information  10.3  Medication Solution 10.3.1   Adding Medication Solution Click Medication Solution to display the medication solution list, as shown in Figure 10.7. Click Add to display the adding medication solution interface, as shown in Figure 10.5.
51 Figure 10-7 Medication solution list     Figure 10.8 Adding a medication solution  ¾ Medication Solution Name: Name of a medication solution. ¾ Remarks: Descriptions about the medication solution, including indications, medicine, and so on. 10.3.2   Viewing and Editing Medication Solution Click a medication solution in the medication solution list. The system displays the editing medication solution interface, as shown in Figure 10-9.
52Figure 10.9 Editing medication solution information  Click Add New Medicine. The system displays the medicine selection list, as shown in Figure 10.10.    Figure 10.10 Adding new medication for a medication solution  Select the medicine to be added to the solution. Click Add to Solution. After adding is successful, the system returns to the medication solution interface, as shown in Figure 10.11. The added medicine is displayed in the list.    Figure 10.11 Medication solution interface with added medicine
53 Click  . The system displays the editing medication solution interface, as shown in Figure 10.12.    Figure 10.12 Editing medication solution information  Enter the dosage, course, and usage. Then, click OK. The system returns to the medication solution interface, as shown in Figure 10.11.
5411  Patient Management Patient Management specifies the management and maintenance of the basic patient information (such as name, gender) and medical record.   Click Patient Mngt. to access the patent management interface. The initial page shows the basic patient information list, as shown in Figure 11.1.   By default, the system displays 15 patient records that are newly added, including Patient No., name, gender, age, registration date, device status, report, editing button, and adding cure button.    Figure 11.1 Basic patient information list  ¾ Search: Search specified patients by Search or Advance Search.   ¾ Add: click    to add new basic patient information.   ¾ Appointment: Click    to view all your appointment information.   ¾ Export As Excel: Click    to export all basic patient information.   ¾ Device status: State of the released device.   ¾ Edit: Click   in a patient message line to access the editing basic information interface.  ¾ Add Treatment: Click    in a patient message line to access the adding cure interface.
55For details, refer to 11.1.1. ¾ Viewing report: Click   in the Report column to access the urinary diary summary interface. For details, refer to 0.   11.1    Managing Patient Medical Record Click a message line in the basic patient information list to access the patient medical record interface, as shown in Figure 11.3.    Figure 11.2 Basic patient information list
56 Figure 11.3 Patient medical record list  The Medical Record interface consists of the following parts:   1)  Basic Patient information specifies the patient identity.   2)  Common functional operations on the patient, such as adding new treatment, viewing history treatment report, viewing & adding reminders, viewing complaint records, and viewing & adding basic patient information.   S/N Name Description 1  Add Treatment  Click the button to add new treatment information 2 Treatment Report   Click the button to view history treatment reports.  3  Reminder    Click the button to view and add reminders.   4  Complaint    Click the button to view complaint records.
575  Questionnaire    Click the button to view and add questionnaires. 6 Basic Patient Information   Click the button to view the basic patient information.  7  Back    Click the button to back to the patient information list. 3) Information about the monitoring devices: This table is displayed in the medical record lists of patients with treatment records.   4) Patient Treatment Information: The treatment information list is sorted in descending date order. 11.1.1  Adding Treatment Click   to access the Add Treatment interface, as shown in Figure 11.4. The new treatment information contains patient conditions, treatment remarks, device release, device recall, appointment, and medication management.    Figure 11.4 Adding new treatment information
5811.1.1.1    Patient Conditions & Treatment Remarks Enter the register department, treatment date, and patient conditions, and treatment remarks. Release the monitoring devices and medicine when necessary.   To make it convenient to describe patient conditions and treatment remarks, the system provides the following functions:   Click   to add the current patient conditions to the patient condition template;     and Click   to add the current treatment remarks to the treatment remark template, as shown in Figure 11.5. ?  Figure 11.5    You can also click    to access the patient condition template interface. Click   in a message line to view and edit the template content, as shown in Figure 11.6. Click    in a message line to select the current template and back to the medical record interface, as shown in Figure 11.3.
59 Figure 11.6 Managing Patient condition template  For operations on the treatment remark template, refer to those on the patient condition template.  11.1.1.2   Medication  Click    to access the medication information list, as shown in Figure 11.7.   Figure 11.7 Medication information list  Click    to add the current medication information to the medication solution. You can also select the medication solution saved before to generate the current
60medication information page.   If the current medication information is insufficient for treatment needs, click . The system displays the medicine selection list, as shown in Figure 11.8.   Figure 11.8 Medicine selection list    Select the medicine to be used. Click   to add the medicine to the medication information list. After that, click    to back to the medication interface. Click   to complete the medication information.   11.1.1.3   Revisit Appointment When adding or editing treatment information, you can select Revisit Appointment to add appointments, as shown in Figure 11.9.
61 Figure 11.9 Editing patient treatment information    When logging in to the system three days before the appointment time of revisit, you can see a reminder in the lower right of the basic patient information list, as shown in Figure 11.10.   Figure 11.10 Revisit appointment information To view more revisit appointments, choose Patient Management -> Basic Patient
62Information List -> Appointment. The system displays the revisit appointment interface, as shown in Figure 11.11.    Figure 11.11 Viewing revisit appointments  11.1.1.4   Device Distribution For patients that are not released with devices, click   when adding or editing medication information. Device release must be operated on the Web terminal and the health mobile phone. For details, see 5.1. 11.1.1.5   Device Recall To recall released devices after the treatment is completed, do as follows: Click    in the patient medical record list; or   Click    in the latest treatment information page. Device recall is similar to device release. For details, see 5.2.   11.1.2  Treatment Report     In the patient medical record list, click    to access the detailed treatment report containing urinary diary summary, uroflometry, and urinary diary. For details, see 12.   11.1.3  Reminder To view or edit reminders (as shown in Figure 11.12), do as follows: 1. Click    in the medical record information list 2. Click   in the page of viewing medical record
63information. Figure 11.12 Reminder information  Click a reminder in the reminder list. The system displays the interface of viewing the reminder details.   Click Add to access the adding reminder page, as shown in Figure 11.13. Enter related information, and then click OK. The reminder is saved in the database and can be received by the patient through a health mobile phone.    Figure 11.13 Adding a reminder  11.1.4  Complaint Click   in the medical record information list. The system displays the
64complaint record interface, as shown in Figure 11.14.    Figure 11.14 Complaint list  Click a message line in the patient complaint list to access the page of viewing the complaint details. You can directly send a reminder to the patient in the interface.    Figure 11-15 Complaint details    After the patient submits a complaint from the mobile phone, the doctor can view the complaint by clicking   in the homepage. After the system receives a complaint, the   icon flashes. Click    to view unread complaints, as shown in Figure 11.16.
65 Figure 11.16 Viewing unread complaints  11.1.5  Questionnaire In the medical record information list, click   to access the questionnaire page, as shown in Figure 11.17.    Figure 11.17 Questionnaire    The questionnaire list includes the questionnaire title, creator, start time, end time, score, type, and status. The system provides two questionnaires by default with the system administrator as the creator. Start Time: time when you save the questionnaire successfully. End Time: The time when the questionnaire is submitted. Score: marks that the patient gets after answering all questions in the questionnaire. Type: There are two questionnaire types: Web and Mobile. If you select a questionnaire and click Save, the questionnaire type is Web. If you select a questionnaire and click Send to Mobile Phone, the questionnaire type is Mobile. Status: Enabled, On-Going, Finished. After questionnaires are added successfully, all of them are in enabled state. The Mobile questionnaire is in On-Going state after being downloaded to the mobile phone, and is in Finished state after being submitted to the Web
66server.  Click  . The system displays the Add Questionnaire interface, as shown in Figure 11.18. Select related questionnaires, and then click Save. You can view related information about the added questionnaires in the questionnaire list.    Figure 11.18 Adding questionnaires    Click a questionnaire in the questionnaire list. The system displays the answering interface, as shown in Figure 11.19. If the questionnaire type is Web, you can answer questions for the patient and the system calculates the score. If the questionnaire type is Mobile Phone, you can only view the answering result.
67 Figure 11.19 Answering interface
6812  Treatment Report Treatment Report analyzes data and is the core of the Monitoring System. A treatment report contains the urinary diary summary, urinary diary, and uroflometry report. The system displays the urinary diary summary interface after Treatment Report is clicked.   12.1  Urinary Diary Summary Urinary Diary Summary displays the urination summary in certain period, as shown in Figure 12.1. The interface covers the basic patient information, statistics start time and end time, statistics information, parameter specification, statistical chart of urine volume, and statistical chart of urination times.   1. Daytime urine volume: Total daytime urine volume (- The first urine volume in 1 hour after get-up).   2. Daytime urination times: Total urination times calculated from the first urination after get-up to the last urination before sleep.   3. Night volume: Night volume (+ The first urine volume in 1 hour after get-up the next day) 4. Night times: Urination times calculated from one day (sleep time) to the next day (get-up time).   5. Max urine volume (mL): Maximum urination volume in a day (The first urine of one day after get-up is regarded as the nocturia of the previous day instead of the daytime urine of the day) Note: When the parameter of daytime times or nocturia proportion exceeds certain value (Choose System Configuration -> Parameter Configuration, and then set the parameter), the related information is highlighted in the urinary diary summary.
69 Figure 12.1 Urinary diary summary    ¾ Basic patient information: Patient No., name, gender, age, ID card No., register department, and visit times.   ¾ Statistics start time and end time: The start and end time of the urination statistics. ¾ Statistics information: The statistics items include urination times, urine volume, water intake, Max. urine volume, viewing urinary diary, viewing uroflometry, and mean value statistics.  ¾ Urine volume statistics: Including four curve charts: daily urine volume, daytime urine volume, nocturia volume, and total water intake. Click    to display the Flash.   ¾ Urination times statistics: Including three curve charts: total daily urination times, daytime urination times, and nocturia urination times. Click   to display the
70Flash.  ¾ Diagnosis Information: You can enter the diagnosis information in the diagnosis remarks, select the report generation date, and click    to print the page.   ¾ Generate Report: For details, see 0.   ¾ Print Preview: Click the button to access the print preview interface. You can print the urinary diary summary by an online printer.   12.2  Urinary Diary The urinary diary describes the following information: 1. Urination details of every day in the statistical period, including urination time, urine volume, drinking time, and water intake 2. Urination summary of every day in the statistical period, including daytime urination times, night urination times, total daytime urine volume, total nocturia volume, total urination times, total urine volume, and total water intake;   3. Indexes: including Nocturnal Index (NI), Nocturia polyuria Index (NPI), and Nocturnal Bladder Capacity Index (NBCI). The calculation of the three indexes is as follows:   1. NI NI = Nocturnal Urine Volume (NUV)/Max. Bladder Capacity   Max. bladder capacity indicates the maximum urine volume of a single urination in 24 hours 2. NPI NPI = NUV/Total urine volume in 24 hours 3. NBCI NBCI = Actual Nightly Voids (ANV) – Predicted Number of Nightly Voids (PNV) PNV = Ni - 1 Calculate the nocturia volume based on NightMictTime (which specifies when the first urine volume after get-up is counted as the nocturia volume of the previous day.
71NightMictTime is set to 1 by default). The first urine volume within 1 hour after get-up is counted as the nocturia volume of the previous day. The first urination within 1 hour after get-up, however, is regarded as the record of daytime urination times instead of the urination times of the previous night.   Get-up time and sleep time of every day is displayed in the urinary diary.   Click   in the urinary diary summary interface to access the urinary diary interface, as shown in Figure 12.2.   Figure 12.2 Urinary diary  ¾ Search: Enter the statistics start date and end date. The system displays the urination information in the period.   ¾ Mark Invalided data and remove: Mark the data in certain day as invalid data so that the data is out of statistics. Click  . The system displays the confirming dialog box, as shown in Figure 12.3. Click OK. The data is deleted.
72 Figure 12.3  You can delete the data of certain time in the urinary diary interface. Click  . The system displays a confirming dialog box, as shown in Figure 12.4. The deleted data is out of statistics.   Figure 12.4    Click    to view to uroflometry chart of a single urination.   Note: You can delete information about urination & water intake only after being granted the deletion right.   You can select the statistics start time and end time (Month date, Year Hour Minute) in the urinary diary statistics table, as shown in Figure 12.1. The statistics items include total urination times, total urine volume, total drinking times, and total water intake.   Click    to back to the medical record information list.   12.3  Uroflometry Report Click   in the urinary diary summary interface, as shown in Figure 12.1. The system displays the uroflometry report interface, as shown in Figure 12.5 (taking the data in 30s as an example). The data contains basic patient information, test times, uroflometry chart,
73urine volume chart, statistics, and diagnosis.    Figure 12.5 Uroflometry report  1. Patient information: Including patient No., name, gender, age, ID card No., and register department.  2. Test times: You can view the urination data of different dates. Select Avg. Uroflometry
74& urine volume for current day to view the average uroflometry and urine volume for the current day. Select 1st or 2nd to view uroflometry and urine volume of a single urination.  3. Statistics: The urination statistics is under the charts by default, including mean uroflometry value for the current day and 24 h virtual uroflometry.   4. Diagnosis remarks: you can work out the diagnosis remarks based on charts and statistics. Select the report generation date, and then click OK to save the current report. Click   to access the print preview interface. Click   to close the urinary diary report interface.   5. Uroflometry & urine volume chart: Put your mouse on a point, related information is displayed, for example, (46.3s, 4.75 mL/s).   Click    to display the Flash. Click   to access the full screen mode. For details, see 12.3.1. 12.3.1  Editing Flash Click    to access the full screen interface. The tool bar is on the top. The graph is on the bottom, as shown in Figure 12.6.   F
75igure 12.6 Uroflometry & urine volume chart  12.3.1.1   Image The uroflometry & urine volume chart shows the uroflometry curve (mL/s), uroflometry summary, urine volume curve (mL), and urine volume summary. In the Flash, completed information is displayed in any point, for example, (46.3s,4.75 mL/s), as shown in Figure 12.6.   12.3.1.2   Tool Bar The too bar contains the following functions: Zoom In, Zoom Out, Marquee Zoom, Insert urination interval, Save, Undo, Redo, Recalculate, and Exit.   ¾ Zoom In: Click the button to magnify the image. When the image zoom is over 100%, the mouse type becomes  . You can drag the image to up, down, left, or right.   ¾ Zoom Out: Click the button to minify the image. When the image zoom proportion is over 100%, the button is available and in black. When the image zoom proportion is 100%, the button is unavailable and in grey.   ¾ Marquee Zoom: Click the button to magnify the framed image.   ¾ View All: Click the button the recover the 100% image.   ¾ Insert urination interval: Click the button to remove the urination interval.   Click  Insert urination interval. Then, move your mouse on the uroflometry & urine volume chart. There are two lines accompanying the mouse trace. Click your mouse on a point. Two green lines are displayed on the chart. The distance between the two lines indicates a urination interval. You can move the two lines and then click Save. In this case, the interval is out of statistics.   You can only click Insert urination interval in the space without an interval.   ¾ Save: Click the button to save the image that is adjusted or edited.   ¾ Undo: Click the button to cancel the preceding act. ¾ Redo: Recover the preceding canceled operation.
76¾ Cancel All: Cancel all operations on the image.   ¾ Exit: Click the button to exit the full screen interface and back to the uroflometry & urine volume chart, as shown in Figure 12.6.   12.3.2  Print Preview Click    to access the print preview interface and click the uroflometry & urine volume chart with an online printer.   12.4  Urinary Diary Report   Click   in the urinary diary summary interface. The system accesses the urinary diary report interface. The report contains the following information: basic patient information, urinary diary statistical table, mean value statistics of the urinary diary summary, optional print, urinary diary report table, and diagnosis.   ¾ Patient information: Including patient No., name, gender, age, ID card No., and register department.  ¾ Urinary diary statistical table: The statistics items include urination times, urine volume, water intake, indexes, Max. urine volume, viewing urinary diary, and viewing uroflometry.  ¾ Mean value statistics of the urinary diary summary: Data summary of the urinary diary statistical table.   ¾ Optional print: Including urination times, NPI, urine volume, water intake, NI, NBCI, and uroflometry. Select an item. The corresponding image is displayed in the urinary diary report. For example, when you select uroflometry, the uroflometry report interface is displayed.  ¾ Urinary diary report table: select the table to be printed based on customer requirements. The corresponding curve is displayed.   a) Urination times: Including total urination times, daytime urination times, and night urination times.
77b) NPI: The chart of nocturia frequency index.   c) Urine volume statistics: Including total urine volume, daytime urine volume, and nocturia volume. d) Water intake statistics: Including water intake in a day, daytime water intake, and nocturia volume. e) NI and NBCI: the two curves about NI and NBCI.   f) Uroflometry: Access the uroflometry report interface to view the information & chart about uroflometry and urine volume.   ¾ Diagnosis: You can work out the diagnosis based on charts and statistics. Select the report generation data, and then click OK to save the current report. Click   to access the print preview interface. Click    to close the urinary diary report interface.    FCC NOTE: This device complies with Part 15 of the FCC Rules. Operation is subject to the following two conditions:(1)this device may not cause harmful interference, and (2) this device must accept any interference received, including interference that may cause undesired operation.  The manufacturer is not responsible for any radio or TV interference caused by unauthorized modifications to this equipment. Such modifications could void the user's authority to operate the equipment.
78 Figure 6.27 Urinary diary report

Navigation menu