Ngai Lik Electronics BTU280AM-FM FM STEREO RADIO WITH BLUETOOTH/CD/USB/MP3/SD CARD/AUX IN PLAYER User Manual INSTRUCTION MANUAL
Ngai Lik Electronics Enterprises Limited FM STEREO RADIO WITH BLUETOOTH/CD/USB/MP3/SD CARD/AUX IN PLAYER INSTRUCTION MANUAL
User Manual
0 1
INSTRUCTION MANUAL
PORTABLE CD/MP3/WMA DISC PLAYER
FM STEREO RADIO & BLUETOOTH RECEPTION
USB & SD CARD READER
MODEL: BTU280AM-FM
Please read and follow these instructions before using your unit.
FCC Warnings
This device complies with part 15 of the FCC Rules. Operation is subject to the following two
conditions: (1) This device may not cause harmful interference, and (2) this device must
accept any interference received, including interference that may cause undesired
operation.
Warning: Changes or modifications not expressly approved by the party responsible for
compliance could void the user’s authority to operate the equipment.
NOTE: This equipment has been tested and found to comply with the limits for a Class B
digital device, pursuant to part 15 of the FCC Rules. These limits are designed to provide
reasonable protection against harmful interference in a residential installation. This
equipment generates, uses and can radiate radio frequency energy and, if not installed and
used in accordance with the instructions, may cause harmful interference to radio
communications. However, there is no guarantee that interference will not occur in a
particular installation. If this equipment does cause harmful interference to radio or television
reception, which can be determined by turning the equipment off and on, the user is
encouraged to try to correct the interference by one or more of the following measures:
- Reorient or relocate the receiving antenna.
- Increase the separation between the equipment and receiver.
- Connect the equipment into an outlet on a circuit different from that to which the receiver
is connected.
- Consult the dealer or an experienced radio/TV technician for help.
2 3
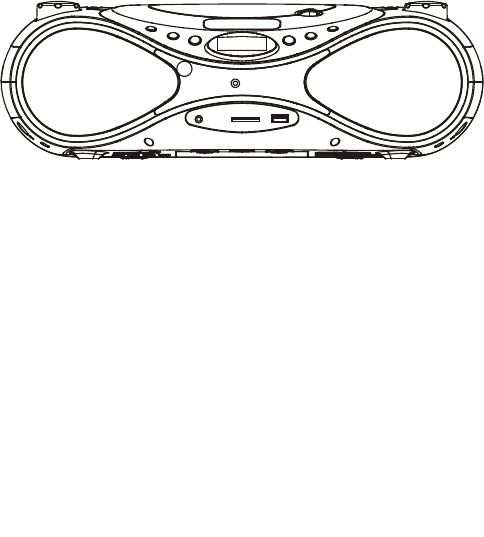
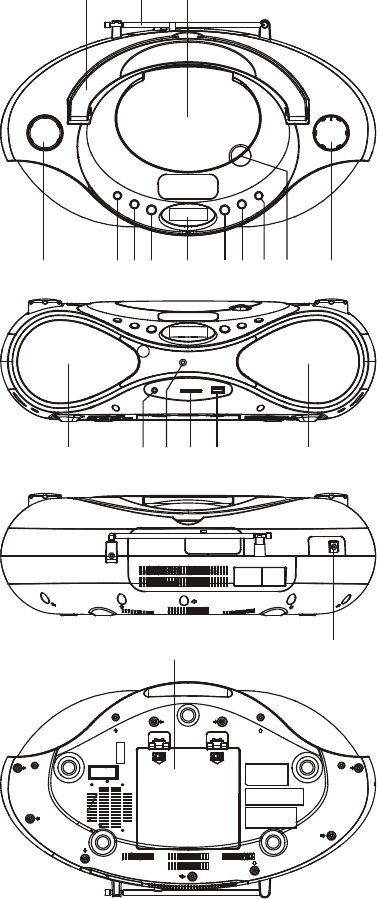
LOCATION OF CONTROLS
1. HANDLE
2. FM TELESCOPIC ANTENNA
3. CD DOOR
4. VOLUME UP/DN CONTROL
KNOB
5. POWER BUTTON
6. MODE/PROG/MEM BUTTON
7. 10+/M- BUTTON
8. LCD DISPLAY
9. STOP/M+ BUTTON
10. PLAY/PAUSE/PAIR BUTTON
11. FUNCTION BUTTON
12. CD DOOR OPEN AREA
13. TUN+/- & NEXT/PREVIOUS
CONTROL KNOB
14. SPEAKERS
15. AUX IN JACK
16. BLUETOOTH INDICATOR
17. SD CARD SLOT
18. USB PORT
19. DC IN JACK
20. BATTERY COMPARTMENT
POWER SUPPLIED BY THE AC/DC ADAPTER
Plug the AC/DC adapter to the unit and the main power.
POWER SUPPLIED BY BATTERIES
The unit can be operated by batteries. Follow the below steps to install the batteries:
1. Remove the battery compartment cover gently.
2. Install 8 x 'C' size batteries (UM-2 or equivalent) taking care that the correct polarities are
observed.
3. Replace the battery compartment cover.
NOTE:
The AC/DC adapter must be removed for the battery operation.
To avoid damage which may result from leaking batteries, remove the batteries when
they become weak or when the unit is not to be used for long period of time.
PLAY THE RADIO
1. Press the POWER button to turn the unit on.
2. Press the FUNCTION button several times to enter the FM mode.
3. Rotate the TUN+/- control knob briefly to fine tune the radio station. Rotate and hold the
TUN+/- control knob clockwise/counter-clockwise for a few seconds to auto search radio
station forward or backward respectively (When an available station will be found, the unit
will broadcast it immediately and the searching will be stopped).
4. The external FM TELESCOPIC ANTENNA is directional. When receiving FM broadcasts,
fully extend the FM TELESCOPIC ANTENNA and position for the best reception.
5. Rotate the VOLUME UP/DN control knob to adjust the volume level.
6. Press the POWER button to turn off the unit.
STORING YOUR FAVORITE RADIO STATION
1. During playback, press and hold the MODE/PROG/MEM button for storing the current
station to the unit’s memory, the memory cell number flashes on the screen.
2. Press the STOP/M+ or 10+/M- button repeatedly to select the corresponding memory cell
among P01-P10 for storing the station.
3. Confirm your selection by pressing the MODE/PROG/MEM button.
4. Repeat the above steps for storing other stations.
5. During radio playback, press the STOP/M+ or 10+/M- button repeatedly to recall the
stored stations.
1 2 3
4 5 6 7 8 9 10 11 12 13
14 15 17 18 14
16
20 19

4 5
HANDLE AND MAINTAIN A COMPACT DISC.
Follow the instructions below to handle and maintain your disc in
order that long time and trouble free performance can possibly be
obtained:
Ensure not to caress the rain bow side of the disc; handle the
disc by the edge.
Long time exposure to sunshine, high temperatures and
humidity will damage the disc. Keep the storage area clean.
Avoid sticking labels on both sides of a disc. Writing with
pointed articles on the disc should be strictly avoided.
Clean the disc wiping the centre and then working out to the
edge with a dry & soft cloth or a disc brush. Avoid any cleansing
lotion or chemical eradicator.
Store them in their cases when they are not to be used.
LOAD A DISC
1. Power on the unit.
2. Press the FUNCTION button repeatedly to switch to the CD mode.
3. Open the CD door.
4. Insert a disc with the label side facing upward (if the disc is upside down, the display will
indicate no disc on the screen).
5. Close the CD door by hand.
NOTE: Never touch the laser lens inside the CD compartment. If it ever gets dirty, clean it
with a CD cleaner disc.
REMOVE A DISC
1. Make sure the disc is not playing. If it is, press the STOP/M+ button.
2. Open the CD door.
3. Gently remove the disc.
4. Close the CD door by hand.
5. Replace the disc in its protective storage box.
PLAY A C D /MP3/WMA DISC
1. Power on the unit, press the FUNCTION button repeatedly to switch to the CD mode.
2. Load a CD/MP3/WMA disc into the CD compartment. Close the CD door, the disc will
begin to spin.
3. Adjust the volume level to the desired volume level by using the VOLUME UP/DN control
knob.
4. When the disc is successfully read, the total number of the disc shows on the display, the
playback starts automatically.
5. Press the PLAY/PAUSE/PAIR button once to halt music playback, the elapsed time of the
current track flashes to indicate the player in Pause mode; press the STOP/M+ button to
cease music playback, the LCD shows the total number of the tracks.
6. Press the MODE/PROG/MEM button repeatedly to switch among the play modes (repeat
1, repeat All, introduction and random play modes).
7. Press the POWER button to turn off the unit.
EXTERNAL MEMORY MEDIA OPERATION (USB, SD)
Prepare the player for external memory media operation.
1. Insert a USB data traveller into the USB port or insert a SD card into the SD card slot;
2. Press the FUNCTION button to switch the unit to USB or card modes. After the inserted
USB or card is detected, the playback will start from the first track of the first folder.
3. Press the MODE/PROG/MEM button repeatedly to switch among the play modes (repeat
1, repeat All, introduction and random play modes).
4. Press the PLAY/PAUSE/PAIR button to pause or resume the playback. Press the
STOP/M+ button to cease the playback.
SKIP TRACKS AND SEARCH FOR A SPECIFIC POINT TO PLAY (CD/MP3/WMA DISC
/USB/CARD)
1. Clockwise rotate the NEXT/PREVIOUS control knob shortly in music play to skip to the
next track.
2. Counter-clockwise rotate the NEXT/PREVIOUS control knob shortly in music play to go
back to the beginning of the current track. To skip to the previous track, counter-clockwise
rotate NEXT/PREVIOUS control knob twice shortly in music play to skip to the previous
track.
3. Press the 10+/M- button once in play to skip to 10 tracks ahead, twice to skip to 20 tracks
ahead. You can reach the last track of the disc using this button (unavailable at Bluetooth
mode).
4. Clockwise rotate and hold NEXT/PREVIOUS control knob in music play to search forward
at quick rate for a specific point to play.
5. Counter-clockwise rotate and hold NEXT/PREVIOUS control knob in music play to search
backward at quick rate for a specific point to play.
PROGRAMMED PLAY (CD/MP3/WMA DISC/USB/CARD)
1. At stop mode, press the MODE/PROG/MEM button once, icon "PROG" shows with a
program sequence indication "P01" first, then a track number flickers on the LCD with the
icon “PROG”;
2. Select the first track to be programmed using the NEXT/PREVIUS control knob, and
press the MODE/PROG/MEM button again to store and advance to the next
programming step (If there are several folders on the MP3/WMA disc or USB and SD card,
it is necessary to program folders first, then program tracks; the method of the folder
programming is the same as the above instructions of the tracks programming.).
3. Repeat the above steps to program more tracks. A maximum of 20 tracks for CD and 99
tracks for MP3/WMA/USB/card can be programmed in memory in a preferred order.
4. Press the PLAY/PAUSE/PAIR button to begin programmed play in the preferred order
after you are done with programming. The player stops automatically after all
programmed tracks are played.
5. You may press the STOP/M+ button to terminate programmed playback. In program stop
mode, press the PLAY/PAUSE/PAIR button to begin the programmed playback with the
programming order identical with the previous one done; press the STOP/M+ button
again to clear the programming.
BLUETOOTH OPERATING
This unit can receive stereo audio signal from a BLUETOOTH stereo audio source device.
1. Power on the unit, switch to BLUETOOTH mode by pressing the FUNCTION button.
HANDLE DISC ONLY AS SHOWN
CLEAN FROM CENTER TO EDGE
DO NOT STORE NEAR HEAT

6 7
2. LED indicator rapid blinking while it is pairing.
3. Pair and connect to BTU280 on the BLUETOOTH audio source device. If prompted for
passcode, enter “0000”.
4. Pairing successful (LED indicator flashes intermittently), ready to stream music.
5. Press the PLAY/PAUSE/PAIR button to pause/resume the playback.
6. During playback, use the NEXT/PREVIOUS control knob to operate skip/search functions
as the instructions of “SKIP TRACKS AND SEARCH FOR A SPECIFIC POINT TO PLAY
(CD/MP3/WMA DISC /USB/CARD)”.
Note:
Pairing mode is canceled about 1.5 minutes.
The above are generic steps to pair a BLUETOOTH device, for more specific instructions
on BLUETOOTH connectivity for your device, please consult your manufacturer’s
manual.
RE-CONNECT TO THE BLUETOOTH AUDIO SOURCE DEVICE
If the device is already paired with the BTU280, but became unconnected even with both
Bluetooth devices turned on. You can re-connect them by following steps:
1. Press and hold the PLAY/PAUSE/PAIR button to re-link the audio source device. The
Bluetooth indicator will blink for about 1.5 minutes for connecting.
2. Select BTU280 on the audio source device for connecting. Bluetooth indicator will turn to
solid blue if the BTU280 and the device have been re-connected successfully.
AUX IN
1. Connect the audio device into the AUX in jack on the unit with a 3.5mm audio cable.
2. Power on the unit and the connected device.
3. Press the FUNCTION button to switch the unit to the AUX mode.
4. Use the native controls on the audio device to control the play.
IMPORTANT SAFETY INSTRUCTIONS
The apparatus shall not be exposed to dripping or splashing and that no objects filled with
liquids, such as vases, shall be placed on the apparatus.
When the AC/DC adapter is used as the disconnect device, the disconnect device shall
remain readily operable. To be completely disconnected the power input, the AC/DC
adapter shall be disconnected from the mains completely.
No naked flame sources, such as lighted candles, should be placed on the apparatus.
Minimum distances 2.0cm around the apparatus for sufficient ventilation. The ventilation
should not be impeded by covering the ventilation openings with items, such as
newspapers, table-cloths, curtains, etc.
The use of apparatus is in tropical and/or moderate climates.
Attention should be drawn to the environmental aspects of battery disposal.
CAUTION: Danger of explosion if battery is incorrectly replaced. Replace only with the
same or equivalent type.
Battery shall not be exposed to excessive heat such as sunshine, fire or the like.
The marking plate is located at the bottom of the apparatus.