Nikko Co TP6830 Radio Controlled Toy(Transmitter) User Manual KMNA103620 indd
Nikko Co Ltd Radio Controlled Toy(Transmitter) KMNA103620 indd
Nikko Co >
Users Manual
1
1/10 SCALE
ATTENTION PARENTS
I
t is recommended that this toy and all
accessories be periodically examined
for potential hazards and that any po-
tential hazardous parts be repaired or
replaced.
Owner's Manual
PRINTED IN CHINA
© NIKKO
• 3 channel Full Function
--- Forward,Reverse, Left/Right turn and Stop
• 3 Band Sector Switch
• 2 Speed in Forward
2 Speed by Transmitter Operation
• Front & Rear Suspension
• Rear Wheel Different Gear
• Head Light
• Spinner Wheel
BATTERY REQUIREMENTS
(Not included)
Vehicle: 1 x Ni-Cd or
NI-MH rechargeable
battery pack(9.6V)
Transmitter:1 x 9V(006P)battery
FEATURES
NOT RECOMMENDED FOR CHILDREN
UNDER 8 YEARS OF AGE. AS WITH
ALL ELECTRIC PRODUCTS, PRE-
CAUTIONS SHOULD BE OBSERVED
DURING HANDLING AND USE TO
PREVENT ELECTRIC SHOCK.
INPUT: 120VAC, 60HZ,
OUTPUT: 12VDC, 200mA
CAUTION: ELECTRIC TOY
Household
outlet
Ni-Cd battery pack
OR
Charger
Household
outlet
Charger
Ni-Cd battery pack
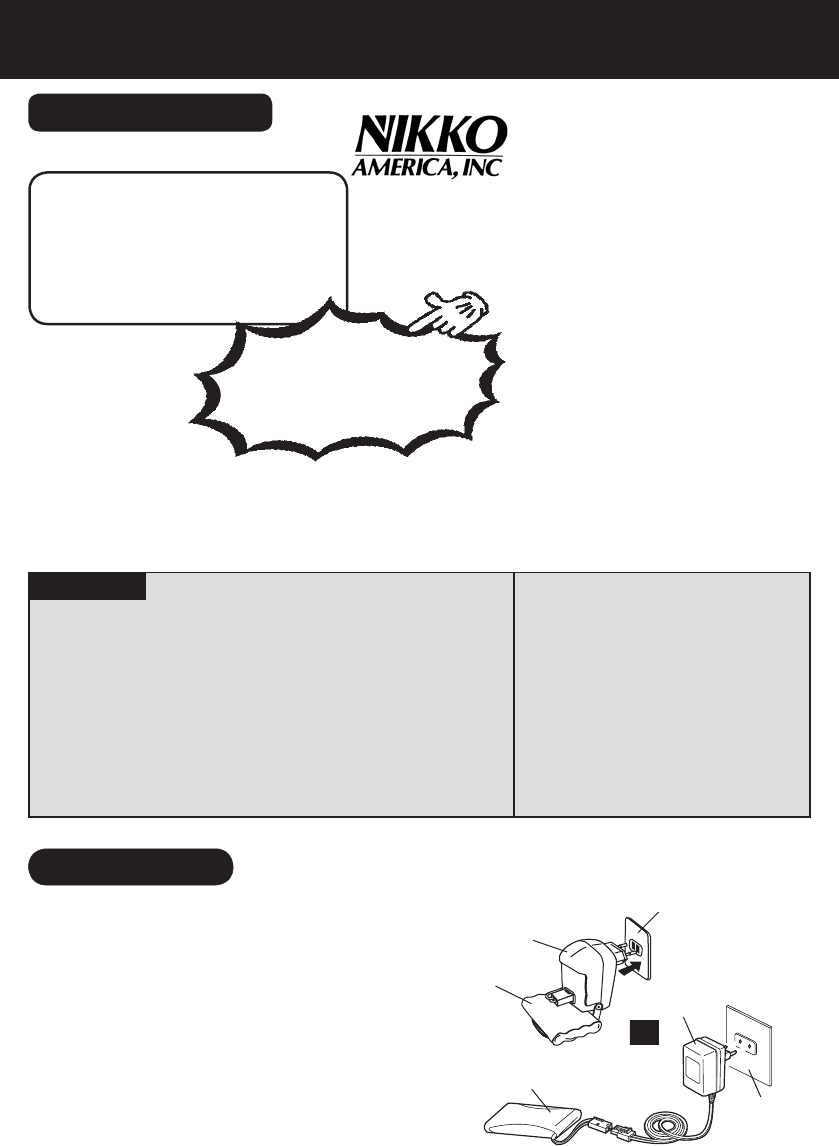
1. Join the connector of the charger to the
connector of the Ni-Cd battery pack (9.6 V).
2. Plug the charger into an electrical outlet.
3. Recharge for about 4-5 hours.
4. When the recharging is over, plug out the
charger from the electrical outlet and
detach the connectors.
RECHARGING
* The newly purchased Ni-Cd pack is not
charged. Recharge before operate.
* Recharge the Battery
Before
You Start to Operate
Repair and Parts Department
Monday to Friday 8:30AM-5:30PM
Central Time
Repair :(800)736-4556
Parts :(800)776-4556
Fax :(972)578-7059
e-mail :help@nikkoamerica.com
* Read this Manual carefully to the end before beginning to play.
* WARNING! Use under the direct supervision of an adult.
* Keep the Display Box and Manual for future reference.
* Use Ni-Cd battery pack(9.6V) and charger for this model.
* Actual product may vary from illustration of this manual.
2
Spinner Wheels
CAUTION:
* Do not charge Battery Pack immediately after use. Wait until it is cooled before charging.
* Avoid short circuits. Short circuits will cause overheating, burning of the cords and other
damages to the Battery Pack and Charger.
* The Ni-Cd Battery Charger should be used for charging one Battery Pack. Do not use the
charger for charging other types of batteries and battery packs.
* Do not use the Charger as a direct current outlet for other electrical appliances or machines.
* Make sure that the Battery Pack and Charger are kept out of the hands of infants and small
children while charging.
* Do not charge near fires, where the temperature is extremely high, or where it is wet or damp.
* The charger will become slightly heated while charging. Allow sufficient free space around
the Charger.
* If the power of the battery pack is weak in spite of proper charging. The batteries may be worn
out from repeated use. Replace it with a new Ni-Cd battery pack.
* Dispose of use Ni-Cd battery packs correctly.
* Disconnect the supply before making or breaking connections to the battery.
* WARNING AGAINST RECHARGING NON-RECHARGEABLE BATTERIES.
* Please use this battery charger only for the charger of the rechargeable battery pack.
* The Ni-Cd battery pack should be recharged under the supervision of an adult.
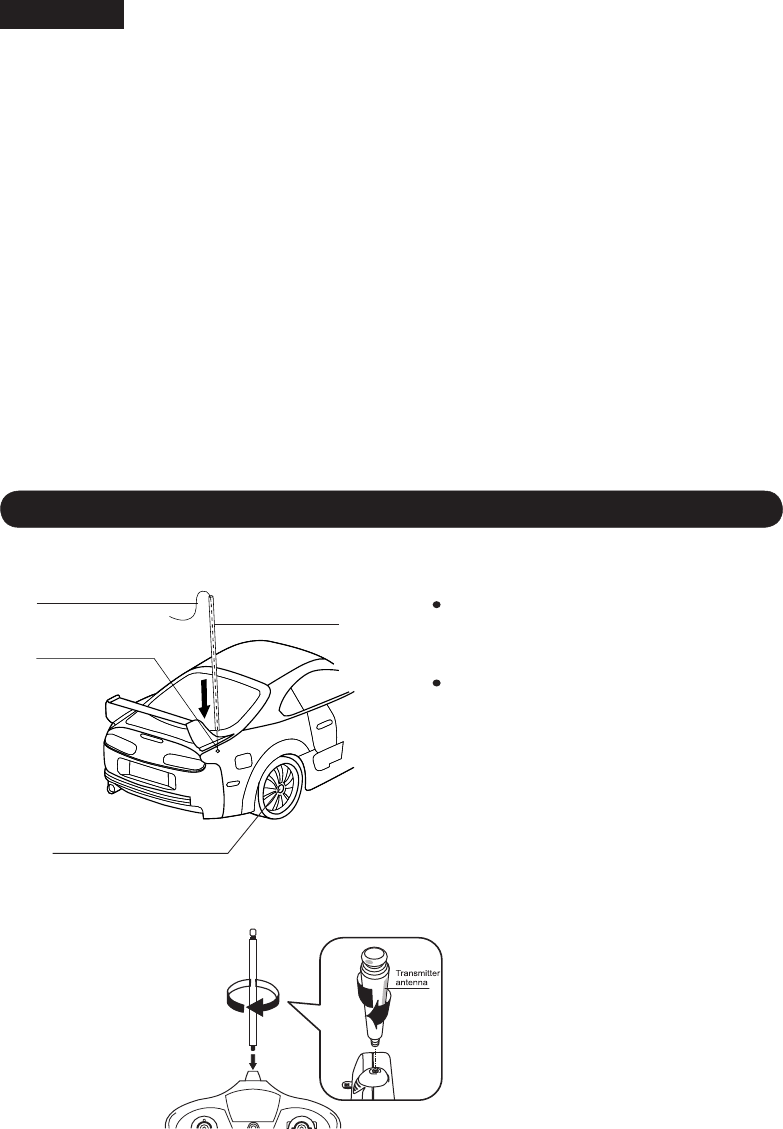
2. HOW TO INSTALL TRANSMITTER ANTENNA
Don’t install the antenna extended.
It’s dangerous.
If the antenna is not screwed in securely,
the vehicle may move erratically. Screw the
antenna securely.
Place the transmitter an-
tenna into the antenna
holder to screw it in
clockwise.
1. HOW TO ATTACH ANTENNA TUBE
PREPARATION FOR STARTING OPERATION
Antenna tube
holder
Antenna wire
Antenna Tube Pass the antenna wire through the an-
tenna tube, then insert the tube into the
antenna tube holder.
If the antenna tube cannot be successfully
inserted into the antenna tube holder, try
holding the root of the antenna wire with
fingers of one hand and extending the
wire with fingers of the other hand.
* Note: Be careful not to pull antenna wire
too strong.
3
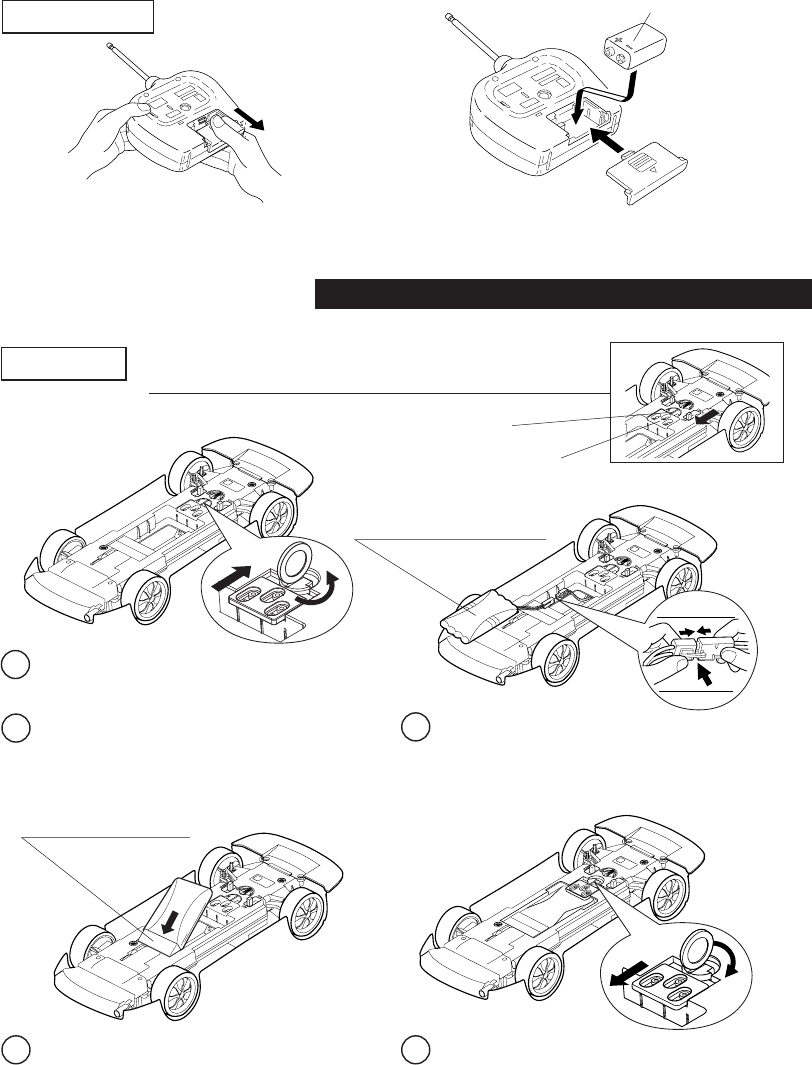
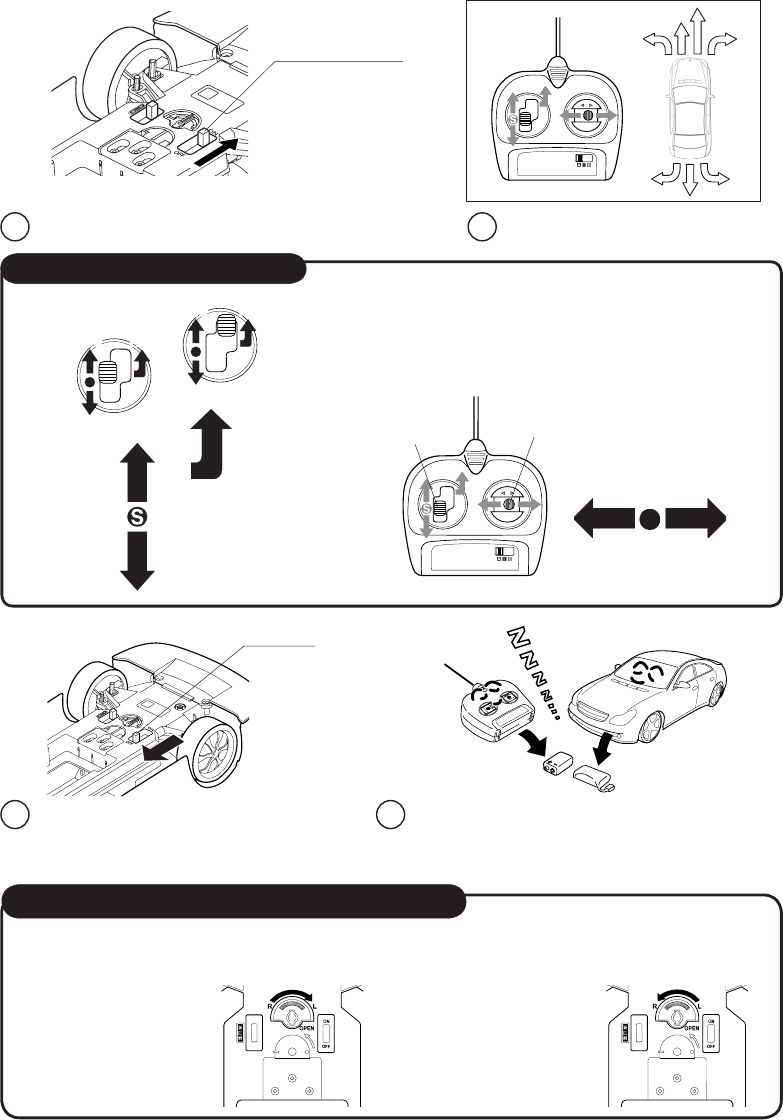
3. HOW TO INSTALL THE BATTERY
To remove the battery lid, press the point
marked “OPEN” and pull the lid down-
ward.
Install battery making sure that (+) and (-) poles
are positioned properly.
Transmitter One 9 volt (006P) battery
* Dispose the used battery separately from other trash.
Join the connectors of the vehicle and
the Ni-Cd battery pack.
Vehicle
Battery compartment lid
Battery stopper
Use a coin to turn the battery stopper to
the "OPEN" position.
Let the battery compartment lid slide
forward a little with a pressure on to the
latch.
3
2
1
When installing a Ni-Cd battery pack,
make sure that the power switch of the vehicle is OFF.
Fit the Ni-Cd battery pack into the
battery compartment of your vehicle
and push in all the way.
4 5 Press down the battery compartment lid
when Use a coin to turn the battery
stopper.
Battery compartment
Ni-Cd Battery pack (9.6 V)
4
When you connect the connectors make certain the vehicle switch is in
the "OFF" position.
Set connectors properly. ( The connectors are designed to be
connected in only one way so that the positive (+) and the negative (-)
terminals are connected accurately. )
Disconnect the connectors immediately after a run.
When you disconnect the connectors, don't pull by the cords.
Avoid short circuits because it is very dangerous.
Remove all the batteries both from the vehicle and the transmitter after
a run.
* You can control the vehicle at a longer distance
by holding the transmitter higher with the an
tenna straight up.
HOW TO PLAY
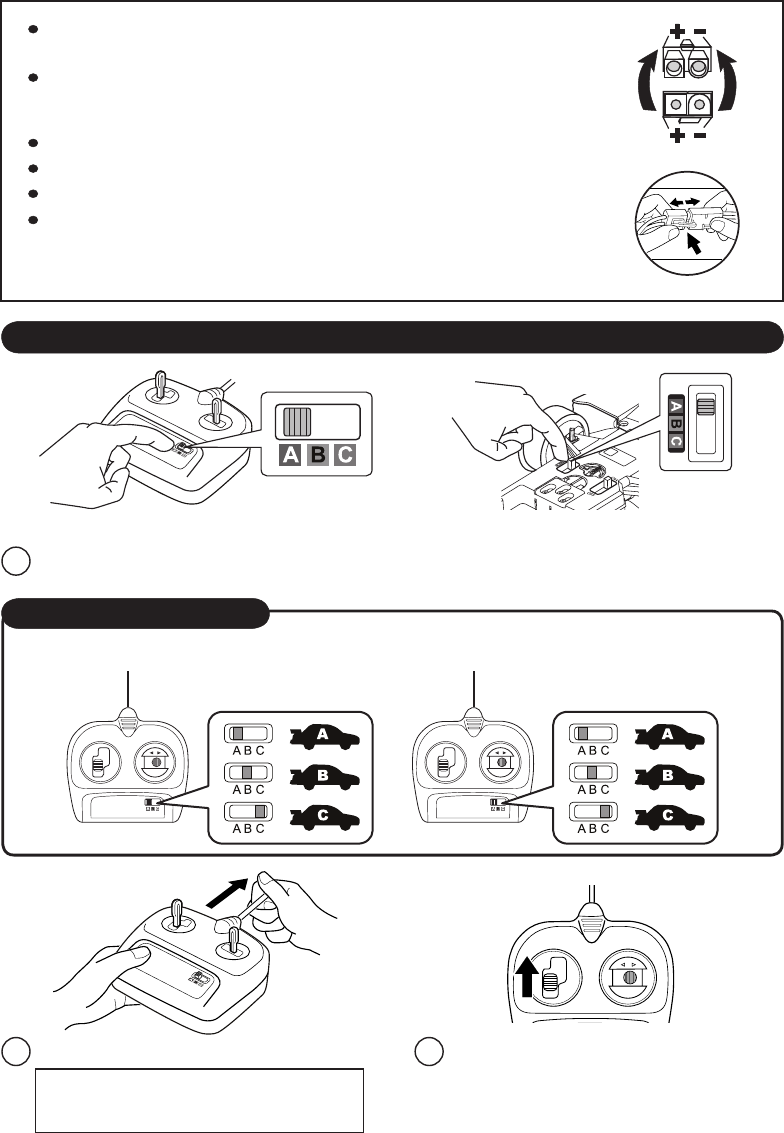
2Extend the transmitter antenna. 3
Turn on the transmitter by operating the
control stick.
Battery's Connector
Vehicle's Connector
Band selector switch on transmitter. Band selector switch on vehicle chassis.
1
Ensure that band selector switch on transmitter and vehicle are set to the same letter
- A, B or C.
27MHz 49MHz
Race 6 cars at once!
3 channels for each frequency, 27MHz, 49MHz, allows up to 6 cars to race at once.
5
To prevent damage from battery leakage,
remove all the batteries from transmitter
and vehicle after playing.
76 Turn OFF the vehicle after playing.
Adjust the steering alignment when the vehicle does not run straight forward.
Turn the steering
alignment lever
towards “L” if the
vehicle runs towards
right.
Turn the steering
alignment lever
towards “R” if the
vehicle runs towards
left.
TO ADJUST STEERING ALIGNMENT
FORWARD RUNNING
You can enjoy the excitement of 2 stages of speed from
LOW to HIGH speed forward running by operating the
speed control stick.
HIGH SPEED
FORWARD
STOP
(NEUTRAL)
REVERSE
LEFT/STRAIGHT/RIGHT
LOW SPEED
5Start operation.
Forward/Reverse
control stick Steering control stick
Power switch
Low High
Low High
Turn ON the power switch of the vehicle.
power switch
4
6
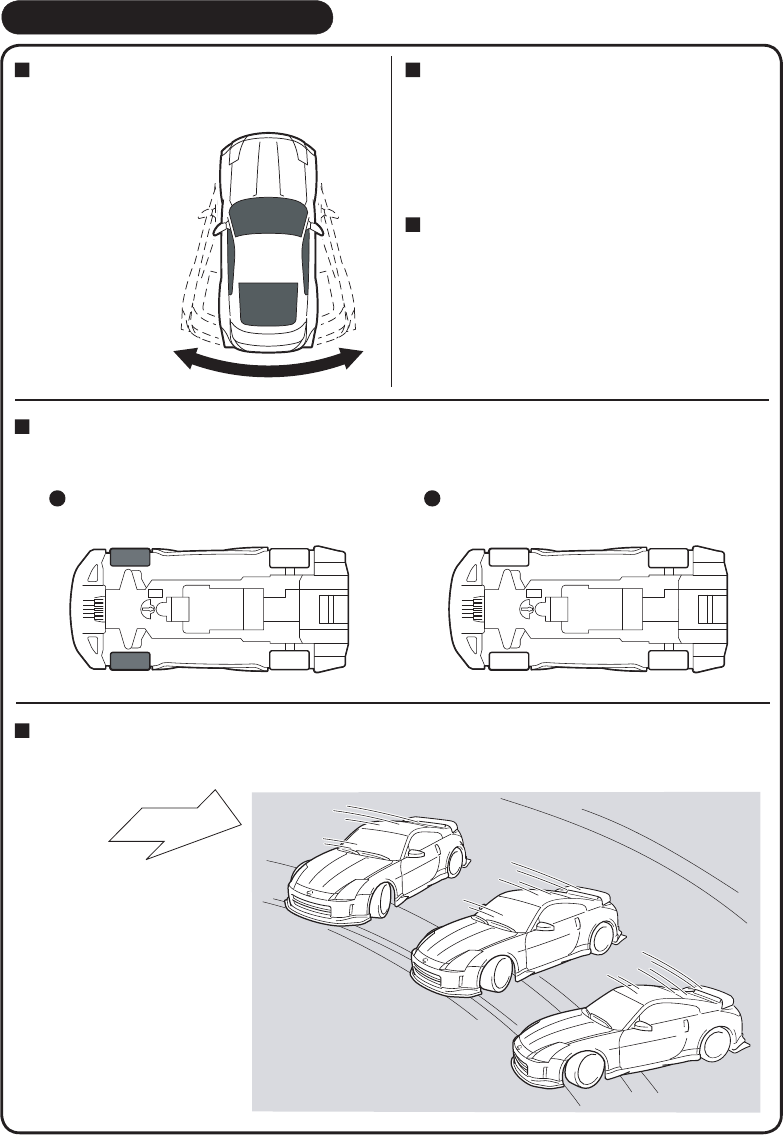
Drift driving technique
Drift is a driving technique to make a
car slips and swings in a corner.
Recommended place to play
Slippery road
(P-tiles, wooden floor, concrete)
Note:
Drift might not happen depending on road
conditions.
How to play
Replace the rear wheels or four wheels with drift tires.
Drift tires are installed on the rear
wheels only
Drift tires are installed on the front
and rear wheels
Image of drift
At the
fastest speed
7
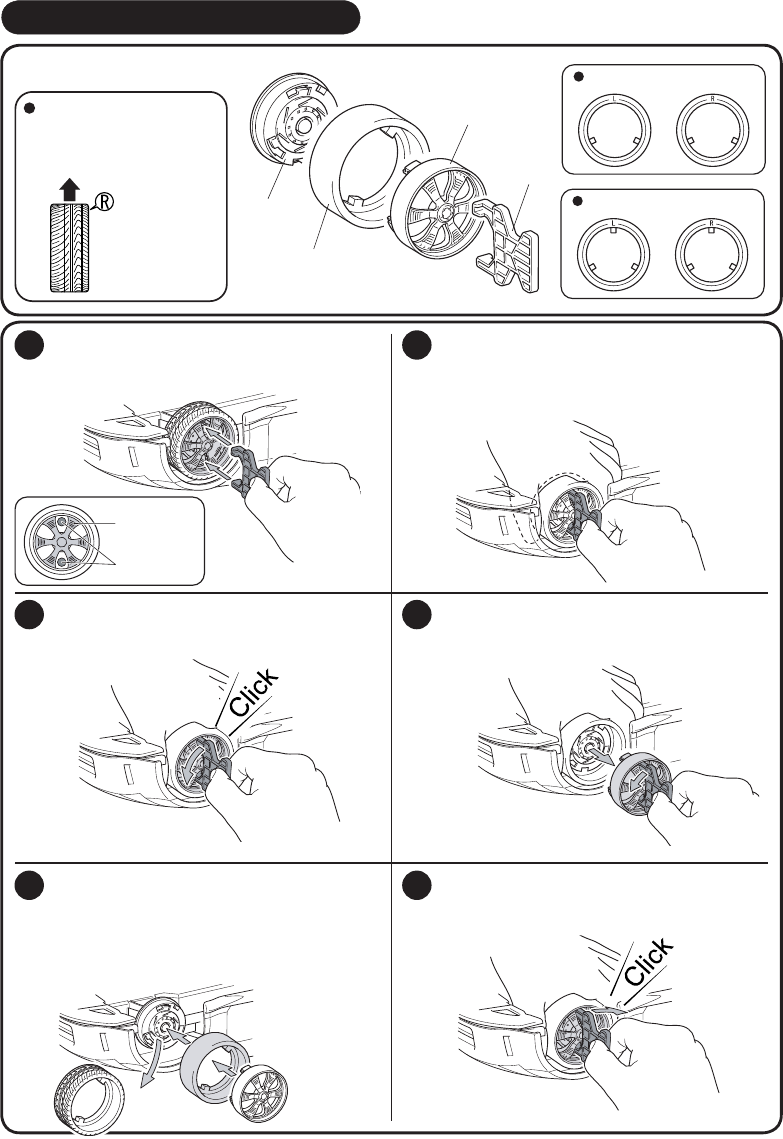
How to install drift tires
<Names of parts>
FORWARD
Pay attention to the forward
direction when you install the
pattern tires.
Front tire
Rear tire
Wheel cap
Wheel
wrench
Wheel
Drift tire
Spinner wheel
1
Insert the wheel wrench into the slots of
the wheel cap. To make it easier, turn the
spinner wheel a little.
Slots for the
wheel wrench
2Holding the tire not to move, insert the
wheel wrench and turn, and remove the
wheel cap. Do the same when reinstalling
the wheel cap.
3Turn the wheel wrench counterclockwise
until it "clicks". 4Push the wheel wrench counterclockwise
a little harder and pull the wheeel cap to
remove.
Pull out the original tire and install the drift
tire. After that, put back the wheel cap.
Push the wheel cap into the inner part
until the nail of the wheel cap and the
cut of the wheel are brought together.
6Turn the wheel wrench clockwise until it
"clicks." This completes the work.
* Push a little harder counterclockwise
as illustrated, because it would be
difficult to pull it out straight.
5
8
THE FCC WANTS YOU KNOW
This device complies with part 15 of the FCC Rules, Operation is subject to the following two conditions:
(1) This device may not cause harmful interference.
(2) This device must accept any interference received, including interference that may cause undesired
operation.
Your R/C car might cause TV or radio interference even when it is operating properly.
To determine whether your R/C car is causing the interference, turn off your R/C car.
If the interference goes away, your R/C car is causing the interference.
Try to eliminate the interference by:
* Moving your R/C car away from the receiver.
* Contacting your local store for help.
If you cannot eliminate the interference, the FCC requires that you stop using your R/C car.
KMNA103620 KYP-06-00
THE RBRCTMSeal on the nickel cadmium battery pack
indicates that NikkoAmerica is voluntarily participating in an industry program
to collect and recycle these batteries at the end of their useful life. The RBRC
program provides a convenient alternative to disposing nickel-cadmium batteries
into the trash or municipal waste stream, which is illegal in some areas.
Nikko America's payments to RBRC makes it easy for you to drop off the spent
battery pack at local retailers who sell replacement nickel-cadmium batteries.
You may also contact your local recycling center for information on where to return
the spent battery pack.
RBRC is a trademark of the Rechargeable Battery Recycling Corporation.
OPERATING SAFETY RULES
Select a SAFE place to operate your vehicle. Do not drive in the street. Avoid driving on SAND or through
puddles of WATER. These hazards can impair performance. Check the surface ahead of you and watch for
obstacles.
The radio receiver in your vehicle and transmitter are sensitive instruments. Do not leave Vehicle or Transmit-
ter near sources of HEAT or under DIRECT SUNLIGHT for long periods of time.
Avoid leaving Vehicle or Transmitter OUTSIDE OVERNIGHT. NIGHT DAMPNESS IS HARMFUL TO INTE-
RIOR MECHANISM.
Cleaning and maintenance:
This toy vehicle needs periodic maintenance and cleaning.
Warning to the parents:
The charger for the Ni-Cd battery pack needs periodic inspection to see that the lead wires, plugs,
outer case, and other parts are not damaged in any way. If any of the parts are damaged, do not use
the charger until it is completely repaired.
Caution:
Keep out of reach of small children under 36 months old as there is danger of getting hurt.
* CHANGES OR MODIFICATIONS NOT EXPRESSLY APPROVED BY THE
MANUFACTURER FOR COMPLIANCE COULD VOID THE USER’S AUTHORITY
TO OPERATE THE EQUIPMENT.
RADIO INTERFERENCE: Sometimes erratic behavior or loss of control of vehicle is the result of interference
caused by high tension wires, high voltage transformers, certain types of building, concreate walls or narrow
places where RADIO SIGNALS sent from your transmitter MAY BE SCATTERED thus making it DIFFICULT
for your vehicle to receive a GOOD RADIO SIGNAL. If you encounter this type of behavior or loss of control,
CHANGE TO A DIFFERENT LOCATION.
You will encounter INTERFERENCE if ANOTHER radio controlled vehicle or CB radio is operating in the vicin-
ity on your SAME FREQUENCY.
DO NOT operate your vehicle on thick-piled carpets. It can be dangerous since the carpet
fiber may twine round a shaft and cause a motor overheated.