Nikon 1149EA Wireless USB Stick for cameras User Manual H1105 H1106 A1 NTC 7L indd
Nikon Corporation Wireless USB Stick for cameras H1105 H1106 A1 NTC 7L indd
Nikon >
Contents
- 1. Compliance Manual
- 2. User Manual
User Manual
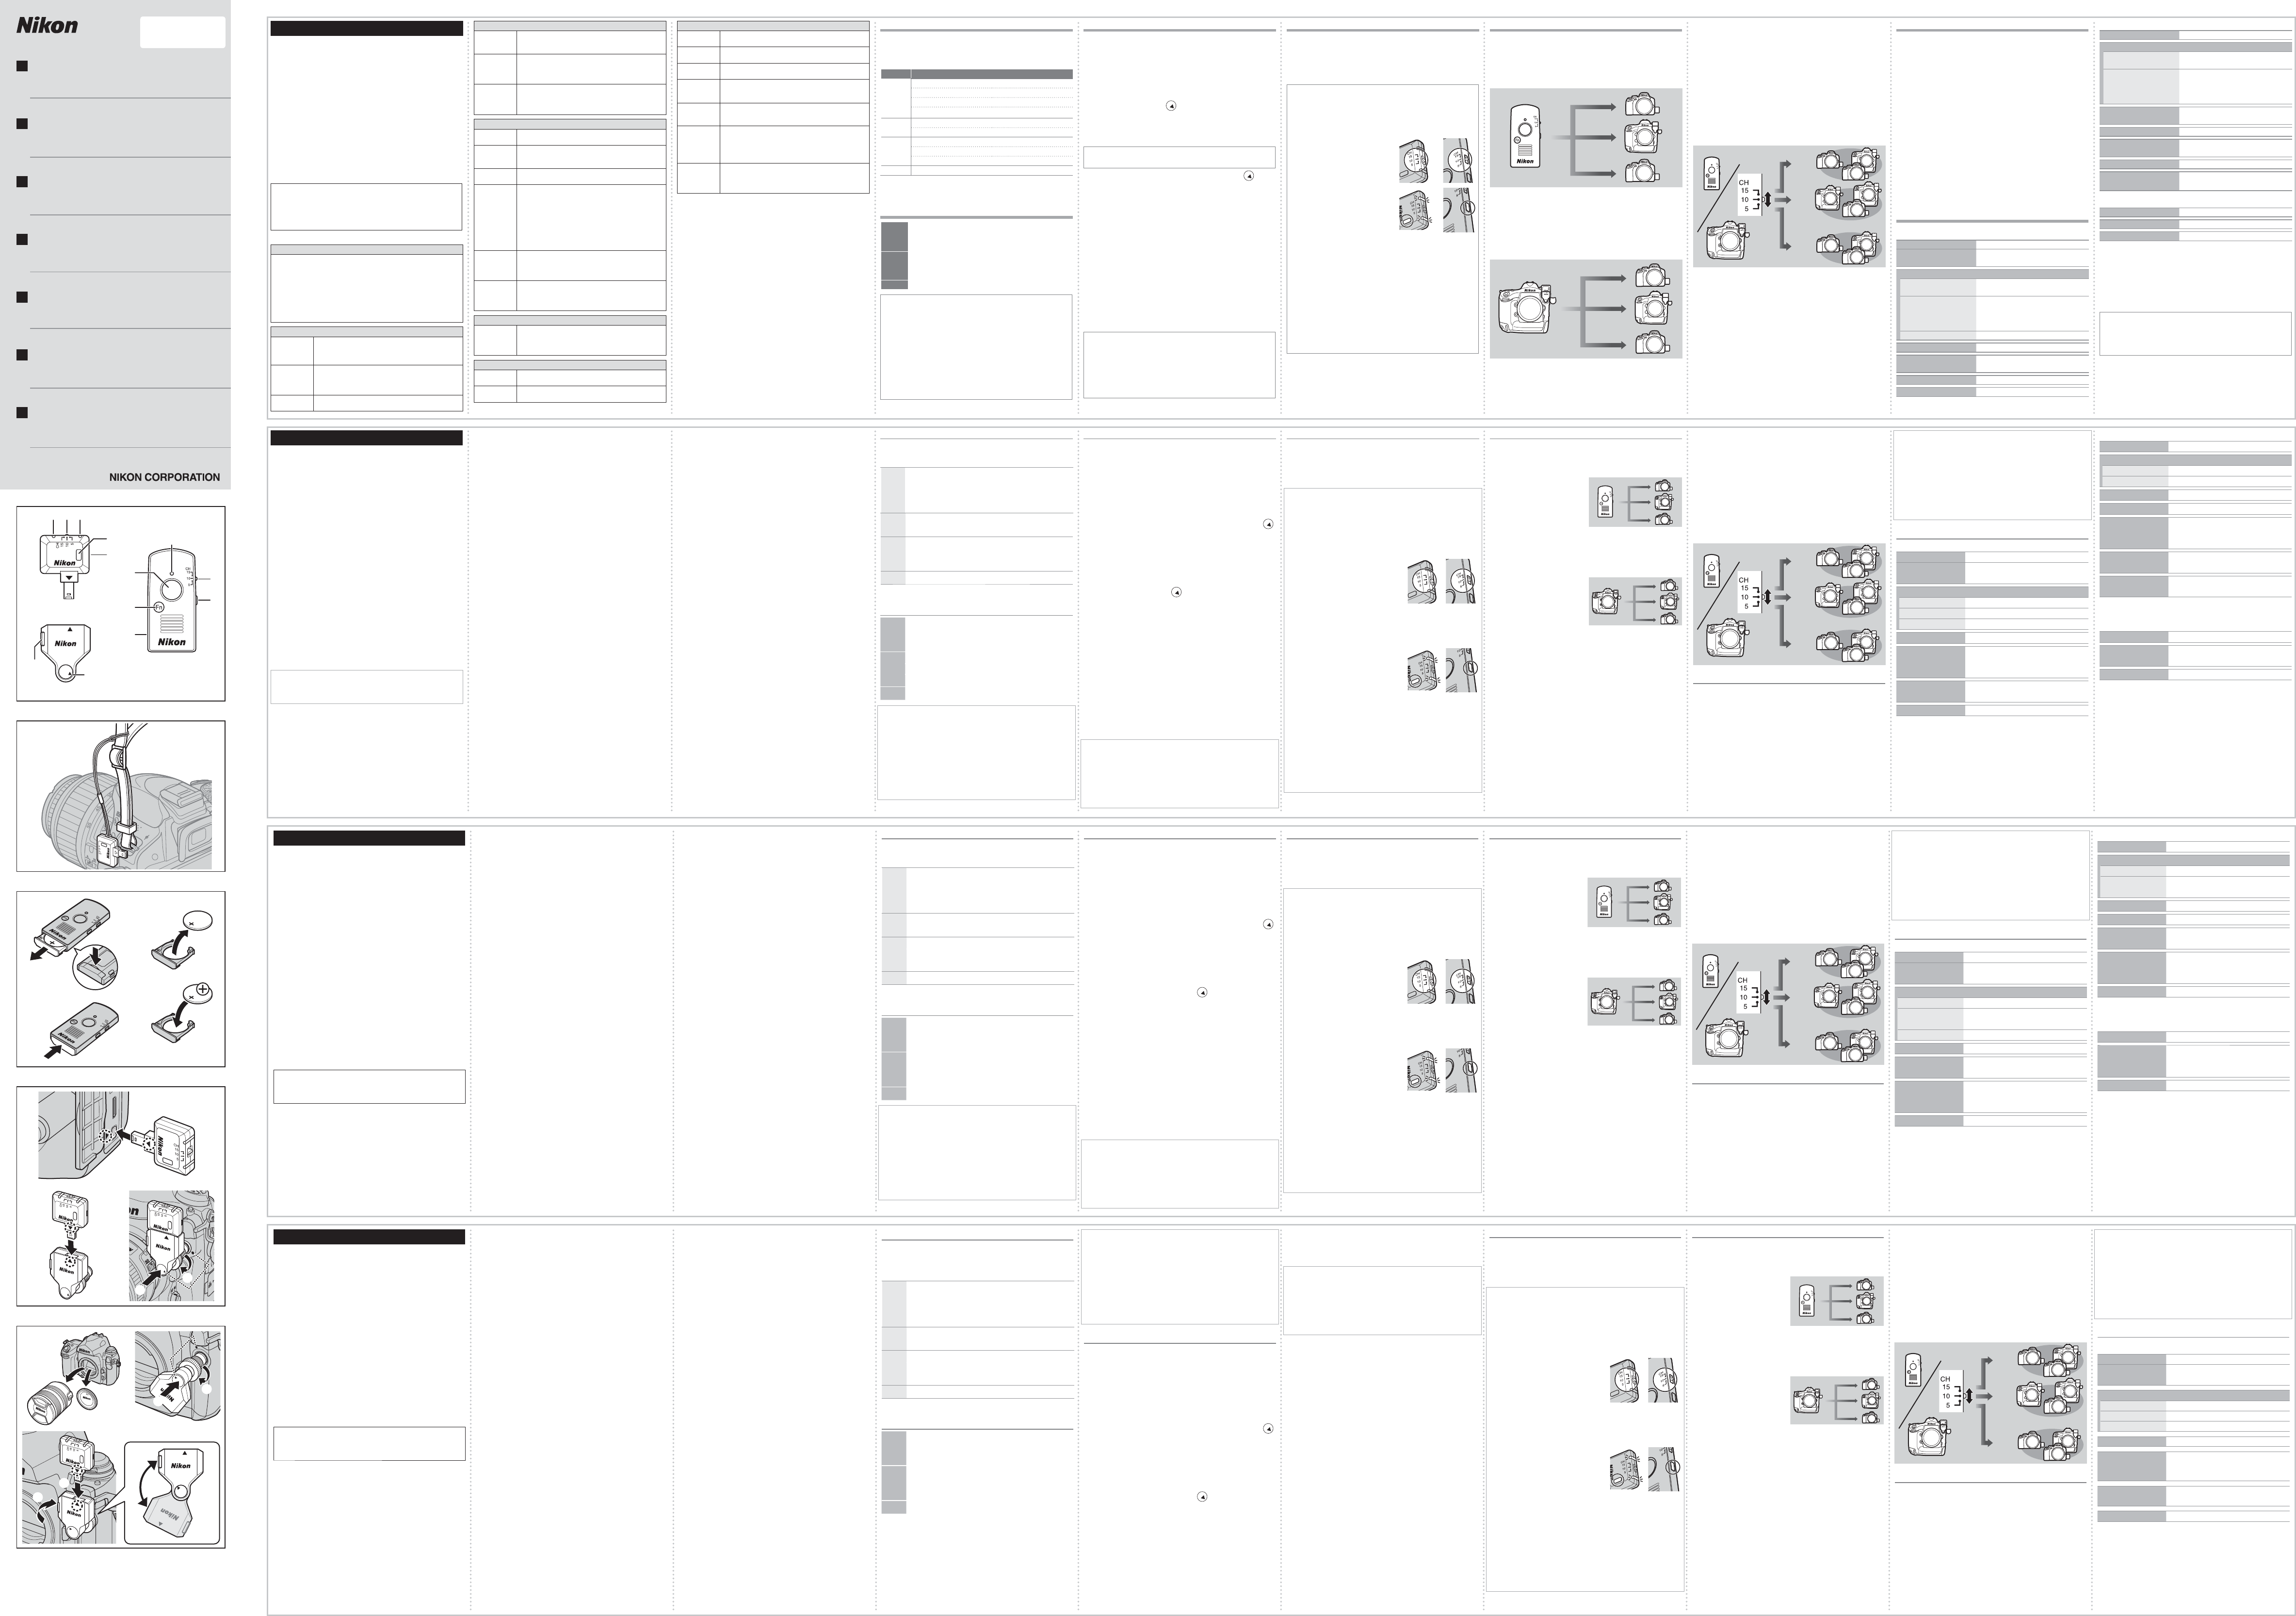
図2/Figure 2/Figure 2/ 그림 2
図4/Figure 4/Figure 4/ 그림 4
図5
:F6 への取り付け例 /
Figure 5 (F6 camera shown)/
Figure 5/
그림 5
w
e
q
t
r
図1/Figure 1/Figure 1/ 그림 1
qwe
o
!0
!1
r
y
u
i
t
WR-R10
WR-T10
WR-A10
!2 !3
a
b
q
w
e
r
q
w
e
図3/Figure 3/Figure 3/ 그림 3
日本語
このたびはワイヤレスリモートコントローラーをお買い上げく
ださいまして、誠にありがとうございます。WR-R10(送受信
機)を 10 ピンターミナルやアクセサリーターミナルを装備し
たニコン製のカメラに取り付けると、WR-T10(送信機)から
の操作で無線での遠隔撮影を行えます。WR-A10 はWR-R10 を
10 ピンターミナル装備のカメラに装着するためのアダプター
です。ご使用の前に、本書およびカメラの使用説明書をよくお
読みください。電波法などの詳細については、別紙「電波に関
するご注意」をお読みください。
安全上のご注意
ご使用の前に「安全上のご注意」をよくお読みの上、正しくお使いください。
この「安全上のご注意」は、製品を安全に正しくご使用になり、あなたや
他の人々への危害や財産への損害を未然に防止するために重要な内容を記
載しています。お読みになった後は、お使いになる方がいつでも見られる
ところに必ず保管してください。
表示と意味は、次のようになっています。
A危険
この表示を無視して、誤った取り扱いをすると、人が死亡また
は重傷を負う可能性が高いと想定される内容を示しています。
A警告 この表示を無視して、誤った取り扱いをすると、人が死亡ま
たは重傷を負う可能性が想定される内容を示しています。
A注意
この表示を無視して、誤った取り扱いをすると、人が傷害を負う可能性が
想定される内容および物的損害の発生が想定される内容を示しています。
お守りいただく内容の種類を、次の絵表示で区分し、説明しています。
絵表示の例
IL記号は、注意(警告を含む)を促す内容を告げるものです。
図の中や近くに具体的な注意内容(左図の場合は感電注意)が描
かれています。
EF記号は、禁止(してはいけないこと)の行為を告げるものです。
図の中や近くに具体的な禁止内容(左図の場合は分解禁止)が描
かれています。
MD記号は、行為を強制すること(必ずすること)を告げるもの
です。図の中や近くに具体的な強制内容(左図の場合はプラグを
コンセントから抜く)が描かれています。
A 警告(ワイヤレスリモートコントローラーについて)
G
接触禁止
落下などによって破損し、内部が露出した時は、露出部
に手を触れないこと
感電したり、破損部でケガをする原因となります。
C
すぐに
修理依頼を
C
すぐに
修理依頼を
熱くなる、煙が出る、こげ臭いなどの異常時は、速やか
にカメラの電源を切り、本製品が冷めたことを確認して
から取り外すこと
ニコンサービス機関に修理を依頼してください。
E
分解禁止
分解したり修理・改造をしないこと
感電したり、異常動作をしてケガの原因となります。
A 警告(ワイヤレスリモートコントローラーについて)
J水かけ
禁止
水につけたり、水をかけたり、雨にぬらしたりしないこ
と
発火したり感電の原因となります。
F
使用禁止
引火・爆発のおそれのある場所では使わない
プロパンガス、ガソリン、可燃性スプレーなどの引火性
ガスや粉塵の発生する場所で使用すると、爆発や火災の
原因になります。
A
保管注意
本体および幼児の口に入る小さな付属品は、幼児の手の
届くところに置かない
幼児の飲み込みの原因となります。
万一飲み込んだ場合は直ちに医師にご相談ください。
A 注意(ワイヤレスリモートコントローラーについて)
I
感電注意
ぬれた手でさわらないこと
感電の原因になることがあります。
A
使用注意
カメラに取り付けた状態で、長時間直接触れないこと
使用中に温度が高くなる部分があり、低温やけどの原因
になることがあります。
A
保管注意
本製品は、幼児の手の届くところに置かない
ケガの原因になることがあります。
A
使用注意
航空機内に持ち込む時は、離着陸時にはカメラから取り
外すこと
飛行中は無線機能を使用しないこと
病院で使うときは病院の指示に従うこと
本製品が出す電磁波や無線電波などにより、航空機の計
器や医療機器に影響を与えるおそれがあります。(無線
LAN システムが装備されている航空機では、離着陸時
を除き無線機能を利用できる場合があります。詳しくは
航空会社にお問い合わせください。)
F禁止
本製品は布団でおおったり、つつんだりして使用しない
こと
熱がこもりケースが変形し、火災の原因となることがあ
ります。
F
放置禁止
窓を閉め切った自動車の中や直射日光が当たる場所な
ど、異常に温度が高くなる場所に放置しないこと
内部の部品に悪影響を与え、火災の原因となることがあ
ります。
A 危険(WR-T10 用リチウム電池について)
A危険
電池からもれた液が目に入った時はすぐにきれいな水で
洗い、医師の治療を受けること
そのままにしておくと、目に傷害を与える原因となりま
す。
A 警告(WR-T10 用リチウム電池について)
F禁止 電池を火に入れたり、加熱しないこと
液もれ、発熱、破裂の原因となります。
E分解禁止 電池を分解しないこと
液もれ、発熱、破裂の原因となります。
A 警告(WR-T10 用リチウム電池について)
A警告 電池に表示された警告・注意を守ること
液もれ、発熱、破裂の原因となります。
A警告 CR2032 型リチウム電池以外を使用しないこと
液もれ、発熱、破裂の原因となります。
J水かけ
禁止
水につけたり、ぬらさないこと
液もれ、発熱の原因となります。
A保管注意
電池は幼児の手の届くところに置かない
幼児の飲み込みの原因となります。
万一飲み込んだ場合は直ちに医師にご相談ください。
A警告
電池の「+」と「−」の向きをまちがえないようにする
こと
液もれ、発熱、破裂の原因となります。
A警告
電池を廃棄するときはビニールテープなどで接点部を絶
縁する
他の金属と接触すると、発熱、破裂、発火の原因となり
ます。お住まいの自治体の規則に従って正しく廃棄して
ください。
A警告
電池からもれた液が皮膚や衣服に付いたときはすぐにき
れいな水で洗うこと
そのままにしておくと、皮膚がかぶれたりする原因とな
ります。
ご確認ください
■本製品を安心してお使いいただくために
本製品は、当社製のカメラに適合するように作られておりますので、
当社製品との組み合せでご使用ください。
他社製品や模倣品と組み合わせてお使いになると、事故・故障などが
起こる可能性があります。その場合、当社の保証の対象外となります
のでご注意ください。
■保証書について
本製品には「保証書」が付いていますのでご確認ください。「保証書」は、
お買い上げの際、ご購入店からお客様へ直接お渡しすることになって
います。必ず「ご購入年月日」「ご購入店」が記入された保証書をお受
け取りください。「保証書」をお受け取りにならないと、ご購入 1年以
内の保証修理が受けられないことになります。お受け取りにならなかっ
た場合は、ただちに購入店にご請求ください。
■使用説明書について
この使用説明書の一部または全部を無断で転載することは、固くお断りい
たします。
仕様・性能は予告なく変更することがありますので、ご承知ください。
使用説明書の誤りなどについての補償はご容赦ください。
使用説明書の内容が破損などによって判読できなくなったときは、ニコン
サービス機関にて新しい使用説明書をお求めください(有料)。
■本製品は、米国輸出規制(EAR)を含む米国法の対象であり、米国政
府指定の輸出規制国(キューバ、イラン、北朝鮮、スーダン、シリア)
への輸出や持ち出しには、米国政府の許可が必要になりますので、ご
注意ください。なお、輸出規制国は変更されている可能性があります
ので、詳しくは米国商務省へお問い合わせください。
付属品
付属品
の確認
の確認
この使用説明書は、「WR-R10/WR-T10/WR-A10」をセットで
ご購入いただいた場合を前提として説明しています。付属品は、
販売形態によって異なります。
販売形態
付属品
WR-R10
WR-T10
WR-A10
❏ WR-R10 用ストラップ ❏ WR-T10 用ストラップ
❏ CR2032 型3V リチウム電池※
❏ 使用説明書(本書) ❏ 保証書
❏ ケース
WR-R10
❏ WR-R10 用ストラップ ❏ ケース
❏ 使用説明書(本書) ❏ 保証書
WR-T10
❏ WR-T10 用ストラップ
❏ CR2032 型3V リチウム電池※
❏ 使用説明書(本書) ❏ 保証書
WR-A10
❏ 使用説明書(本書)
※ WR-T10 を初めてお使いになるときは、WR-T10 にはさんである
絶縁シートを引き抜いてください。
各
各
部名称
部名称
(図 1)
(図 1)
WR-R10
q LED ランプ(赤色) w
チャンネル切り換えスイッチ
e LED ランプ(緑色) r
ペアリングボタン
t
ストラップ穴
WR-T10
y
シャッターボタン u
Fn ボタン
i
ストラップ穴 o LED ランプ(赤色)
!0
チャンネル切り換えスイッチ
!1
ペアリングボタン
WR-A10
!2
取り外しボタン !3
取り付け指標
A WR-R10 に付属のストラップについて
本製品の落下や紛失を防ぐために、図 2のようにカメラのス
トラップに取り付けてお使いになることをおすすめします。
A WR-T10 用電池(CR2032 型3V リチウム電池)の
交換方法
WR-T10 のLED ランプの光が弱くなった場合は、電池の残量
が少なくなっています。WR-T10 の電池を取り出すには、電
池室のノブの隙間に爪などを差し込んで手前に引き出して
(図 3-q)ください。新しいリチウム電池を入れる際は、「+」
と「−」の向きをよくご確認ください(図 3-e)。
WR-R10(送受信機)の取り付け方
WR-R10(送受信機)の取り付け方
❚❚ アクセサリーターミナルを装備したカメラの場合(図 4-a)
カメラ側の ▲とWR-R10 の▼を合わせながら、カメラのアク
セサリーターミナルに WR-R10 を取り付けます。
❚❚
10 ピンターミナルを装備したデジタルカメラの場合(図 4-b)
WR 用変換アダプター WR-A10 の▲とWR-R10 の▼を合わ
せながら、WR-A10 にWR-R10 を取り付けます(q)。次に、
WR-A10 の取り付け指標( )とカメラの 10 ピンターミナル
の指標(●)を合わせてプラグを差し込み(w)、WR-A10 の
ねじを締めてロックします(e)。
❚❚ 10 ピンターミナルを装備したフィルムカメラの場合(図 5)
10 ピンターミナルがカメラの前面にある場合は、カメラから
レンズ、またはボディーキャップを取り外してください(q)。
WR 用変換アダプター WR-A10 の取り付け指標( )とカ
メラの 10 ピンターミナルの指標を合わせてプラグを差し込
み(w)、WR-A10 のねじを締めてロックします(e)。次に、
WR-A10 を図のように回転し(r)、WR-A10 の▲とWR-R10
の▼を合わせながら、
WR-A10 にWR-R10 を取り付けます(t)。
• WR-R10 を取り付けるときは、端子の形状と向きを確認し、
無理な力を加えずに端子をまっすぐに差し込んでください。
プラグの向きを誤って差し込むと、破損の原因となるのでご
注意ください。
• WR-R10 は、一部のアクセサリーとは同時に装着できません。
無理に取り付けようとすると、カメラやアクセサリーの破損
や故障の原因となります。
• WR-R10 を取り外す場合は、取り付けたときと逆の手順で行っ
てください。WR-A10 から WR-R10 を取り外すときは、取り
外しボタン(図 1-!2)を押しながら、WR-A10 から WR-R10
を引き抜きます。
A WR-T10 のFn ボタンについて
WR-R10 を次のカメラに取り付けた場合、WR-T10 のFn ボタ
ンは、カメラの Fn ボタンと同じ動作になります。Fn ボタン
に割り当てられる機能については、カメラの使用説明書をご
覧ください。
D4、D800/D800E
WR-T10(
WR-T10(
送信機
送信機
)の
)の
操作方法
操作方法
WR-T10 のシャッターボタンは、半押しした場合、最後まで押
し込んだ場合、いずれもカメラのシャッターボタンと同様に機
能します。カメラのシャッターボタンの機能については、カメ
ラの使用説明書をご覧ください。
A チャンネル設定とペアリング
WR-T10 のシャッターボタンを押してもカメラが反応しない
ときは、チャンネル設定とペアリングを行ってください。ペ
アリングとは、ワイヤレスリモートコントローラーに通信相
手の機器を記憶させ、通信ができるようにすることです。
1 同じチャンネルに設定する
WR-R10 とWR-T10 のチャンネル
切り換えスイッチを同じチャンネ
ル(5ch、
10ch、
15ch のいずれか)
に設定します。
2 ペアリングを行う
WR-R10 を装着したカメラの電
源を
ON にして、
WR-R10 と
WR-T10 のペアリングボタンを同
時に押し続けます。WR-R10 の赤
と緑の LED ランプが交互に点滅
したら、ペアリングの完了です。
ボタンから指を放してください。
• ペアリングは、機器同士を近くに寄せて行ってください。
• 同じチャンネルに設定されていない機器同士の場合、ペア
リングは行えません。また、ペアリングが完了していても、
異なるチャンネルに設定すると、通信を行いません。
• ペアリング情報を削除するには、WR-R10 のペアリングボ
タンを LED ランプ(緑色)が高速点滅するまで、約 3秒間
押し続けます。LED ランプ(緑色)が高速点滅している間
にWR-R10 のペアリングボタンを素早く 2回続けて押すと、
LED ランプ(緑色)と LED ランプ(赤色)が同時に 2回点
滅して、ペアリング情報がすべて削除されます。
応用的
応用的
な使い方
な使い方
複数の WR-R10 とカメラを使うと、次のような応用的な使い方
ができます。
1個の WR-T10 を使って複数のカメラのシャッターをきる
(同時レリーズ)
WR-T10 のシャッターボタンを全押しすることで、複数のカメ
ラのシャッターをきることができます。
• 同時レリーズを行う前に、WR-T10 とすべての WR-R10 を同じ
チャンネルに設定し、ペアリングを行っておいてください。
1台のカメラを使って複数のカメラのシャッターをきる
(連動レリーズ)
10 ピンターミナル装備のカメラをマスターカメラにすること
で、マスターカメラのシャッターボタン全押しに連動させて複
数のリモートカメラのシャッターをきることができます。連動
レリーズは、次の手順で行ってください。
1
「WR-R10 の取り付け方」の方法で、WR-R10 をマスターカ
メラ(10 ピンターミナル装備のカメラ)とリモートカメラ
全てに取り付けます。
2 すべての WR-R10 を同じチャンネルに設定します。
3 カメラの電源を ON にしてから、マスターカメラに取り付
けた WR-R10 とリモートカメラに取り付けた WR-R10 のペ
アリングボタンを同時に押し続けます。WR-R10 の赤と緑の
LED ランプが交互に点滅したら、ペアリングの完了です。ボ
タンから指を放してください。マスターカメラと全てのリ
モートカメラの組み合わせでペアリングを行います。
4
マスターカメラのシャッターボタンを全押しして撮影します。
チャンネルを使い分ける
15CH
15CH
15CH
10CH
10CH
10CH
5CH
5CH
5CH
ペアリング完了後にカメラごとに異なるチャンネルを設定してか
らWR-T10 やマスターカメラの WR-R10 でチャンネルを切り換
えることで、同じチャンネルのカメラだけでシャッターをきるこ
とができます。
使用上のご注意
使用上のご注意
• カメラの誤作動を防止するため、WR-R10 の取り付けは確実
に行ってください。
• カメラのレリーズモードがリモコンモード(ML-L3)の場合、
カメラ本体と WR-T10 のシャッターボタンは動作しません。
リモコンモード以外のレリーズモードを選んでください。
• WR-R10 をお使いにならない場合は、WR-R10 をカメラから
取り外してください。
WR-R10 を取り付けたままカメラをバッ
グに入れたりストラップで吊るしたりして持ち運んでいると
きに、強い衝撃や振動が加わると、カメラや WR-R10 が破損
することがあります。
• ワイヤレスリモートコントローラーは D1 シリーズ、および
MB-D100 では使用できません。
• F100 をお使いの場合、給送モードがセルフタイマーのとき
にシャッターをきることはできません。
• D2X、D2Xs、D2Hs、D200 をお使いの場合、WR-R10 の装着
時に、半押しタイマーがオフになった後で、半押しタイマーが
作動すると、表示パネルに Oマークが一時的に表示されます。
主な仕様
主な仕様
■ワイヤレスリモートコントローラー WR-R10
型式 WR-R10
対応カメラ 10 ピンターミナルまたはアクセサリー
ターミナルを装備した一眼レフカメラ
無線関連
無線チャンネル数 5ch(2.425GHz)、
10ch(2.450GHz)、
15ch(2.475GHz)
通信距離(見通し) WR-R10 間で約 50m(地上高約 1.2m
の場合)
• 通信距離は遮蔽物や天候などにより短
くなることがあります。
ペアリング可能機器数 最大 64
消費電力 最大 約 100 mW
動作環境 温度:–20℃ ∼ +50℃
湿度:85%以下(結露しないこと)
外形寸法(W×H×D)約31.5 ×26.0 ×10.0 mm
質量 約6 g(本体のみ)
■ワイヤレスリモートコントローラー WR-T10
型式 WR-T10
無線関連
無線チャンネル数 5ch(2.425GHz)、
10ch(2.450GHz)、
15ch(2.475GHz)
通信距離(見通し) WR-R10、WR-T10 間で約 20m(地上
高約 1.2m の場合)
• 通信距離は遮蔽物や天候などにより短
くなることがあります。
電源 CR2032 型3V リチウム電池
(1個使用)
電池寿命(撮影回数) 最大 約10000 回
動作環境 温度:–20℃ ∼ +50℃
湿度:85%以下(結露しないこと)
外形寸法(W×H×D)約28.0 ×60.0 ×8.5 mm
質量 約12 g(電池を含む)
約9 g(本体のみ)
■WR 用変換アダプター WR-A10
型式 WR-A10
外形寸法(W×H×D)約26.5 ×32.0 ×23.5 mm
質量 約10 g(本体のみ)
• 仕様中のデータは特に記載のある場合を除き、CIPA(カメラ映像機器
工業会)規格による温度条件 23℃(± 3℃)で、ご購入直後の新品バッ
テリーを使用したときのものです。低温時および高温時には、電池寿命
が減ったり、通信距離が短くなる場合があります。
• カメラの使用説明書に記載されている動作環境も併せてご覧ください。
本製品の動作温度範囲とカメラの動作温度範囲が異なる場合は、狭いほ
うの範囲内でお使いください。
カスタマーサポート
下記アドレスのホームページで、サポート情報をご案内して
います。
http://www.nikon-image.com/support/
Jp
ワイヤレスリモートコントローラー WR-R10
ワイヤレスリモートコントローラー WR-T10
WR 用変換アダプター WR-A10
使用説明書
En
Wireless Remote Controller WR-R10
Wireless Remote Controller WR-T10
WR adapter WR-A10
User’s Manual
Fr
################### WR-R10
################### WR-T10
################### WR-A10
Manuel d’utilisation
Kr
############# WR-R10
############# WR-T10
############# WR-A10
사용설명서
Ck
无线遥控器 WR-R10
无线遥控器 WR-T10
WR 适配器 WR-A10
使用说明书
Es
################### WR-R10
################### WR-T10
################### WR-A10
Manual del usuario
Pb
################### WR-R10
################### WR-T10
################### WR-A10
Manual do Usuário
Printed in Japan
SB2H01(7C)
6M####7C-01 ▲ G12
English
Thank you for your purchase of a Nikon wireless re-
mote controller. With a WR-R10 (transceiver) con-
nected to the ten-pin remote or accessory terminal
of your Nikon camera, photographs can be taken by
remote control using a wireless WR-T10 (transmitter).
The WR-A10 is a ten-pin remote terminal adapter for
the WR-R10. Before using this product, read both this
manual and the documentation provided with your
camera. Additional instructions, including informa-
tion on the regulations governing the use of this
device, may be found in the Wireless Regulation Data
sheet provided with this product.
For Your Safety
To prevent damage to your Nikon product or injury to your-
self or to others, read the following safety precautions in their
entirety before using this product. Keep these safety instruc-
tions where all those who use the product will read them.
The consequences that could result from failure to observe
the precautions listed in this section are indicated by the fol-
lowing symbol:
A
This icon marks warnings, information that should be
read before using this Nikon product to prevent pos-
sible injury.
WARNINGS
A Do not disassemble. Failure to observe this precaution could
result in fi re, electric shock, or other injury. Should the
product break open as the result of a fall or other accident,
disconnect the camera power source and take the product
to a Nikon-authorized service representative for inspection.
A Keep out of reach of children. Failure to observe this precau-
tion could result in injury. In addition, note that small
parts constitute a choking hazard. Should a child swallow
any part of this product, consult a physician immediately.
A Cut power immediately in the event of malfunction. Should you
notice smoke or an unusual smell coming from the prod-
uct, immediately turn the camera off . Continued opera-
tion could result in injury. Once the product has cooled,
remove it and take it to a Nikon-authorized service repre-
sentative for inspection.
A Do not use in the presence of ammable gas. Failure to observe
this precaution could result in explosion or fi re.
A Keep dry. Do not immerse in or expose to water or rain.
Failure to observe this precaution could result in fi re or
electric shock.
A Do not handle with wet hands. Failure to observe this pre-
caution could result in electric shock.
A Do not remain in contact with the camera or controller for ex-
tended periods while the products are on or in use. Parts of
the product become hot. Leaving the product in direct
contact with the skin for extended periods may result in
low-temperature burns.
A Do not expose to high temperatures. Do not leave the product
in a closed vehicle under the sun or in other areas subject
to extremely high temperatures. Failure to observe this
precaution could result in fi re or in damage to the casing
or internal parts.
A Observe proper precautions when handling batteries. Batteries
may leak, rupture, or overheat if improperly handled.
Observe the following precautions when handling
CR2032 lithium batteries for use in the WR-T10:
• Use only CR2032 lithium batteries. Dispose of used bat-
teries as directed.
• Be sure to insert in the correct orientation.
• Do not short or disassemble.
• Do not expose to fl ame or to excessive heat.
• Do not immerse in or expose to water.
• Discontinue use immediately should you notice any chang-
es in the battery, such as discoloration or deformation.
A Follow the instructions of hospital and airline personnel. This
product emits radio frequency radiation that could inter-
fere with medical or navigational equipment. Do not use
this product in a hospital or on board an airplane without
fi rst obtaining the permission of hospital or airline staff .
Notices
• No part of this manual may be reproduced, transmitted,
transcribed, stored in a retrieval system, or translated into
any language in any form, by any means, without Nikon’s
prior written permission.
• Nikon reserves the right to change the specifi cations of the
hardware and software described in this manual at any time
and without prior notice.
• Nikon will not be held liable for any damages resulting from
the use of this product.
• While every eff ort has been made to ensure that the infor-
mation in this manual is accurate and complete, we would
appreciate it were you to bring any errors or omissions to
the attention of the Nikon representative in your area (ad-
dress provided separately).
This product, which contains encryption software developed
in the United States, is controlled by the United States Export
Administration Regulations and may not be exported or re-
exported to any country to which the United States embar-
goes goods. The following countries are currently subject to
embargo: Cuba, Iran, North Korea, Sudan, and Syria.
Supplied Accessories
Supplied Accessories
The product is sold in the sets below. This manual as-
sumes you have a WR-R10, WR-T10, and WR-A10.
WR-R10
WR-R10
WR-T10
WR-T10
WR-A10
WR-A10
❑ Case ❑ Warranty
❑ Strap for WR-R10 ❑ Strap for WR-T10
❑ CR2032 3V lithium battery*
❑ User’s Manual (this manual)
WR-R10
WR-R10 ❑ Case ❑ Warranty
❑ Strap for WR-R10 ❑ User’s Manual (this manual)
WR-T10
WR-T10
❑ Strap for WR-T10 ❑ Warranty
❑ CR2032 3V lithium battery*
❑ User’s Manual (this manual)
WR-A10
WR-A10 ❑ User’s Manual (this manual)
* Remove insulating sheet from WR-T10 before rst use.
Parts of the Controller (Figure 1)
Parts of the Controller (Figure 1)
WR-R10
WR-R10
1 Red LED 2 Channel selector
3 Green LED 4 Pairing button
5 Strap eyelet
WR-T10
WR-T10
6 Shutter-release button 7 Fn button
8 Strap eyelet 9 Red LED
0 Channel selector a Pairing button
WR-A10
WR-A10 b Release button c Mounting mark
A The WR-R10 Strap
Attach the WR-R10 to the camera strap as shown in
Figure 2 to prevent the WR-R10 being lost or dropped.
A Replacing CR2032 3V Lithium Batteries (Figure 3)
Replace the battery when the LED for the WR-T10 starts
to dim. Insert a ngernail behind the battery-chamber
latch and open the battery chamber (1). Ensure that
the battery is inserted in the correct orientation (3).
Using the WR-R10 (Transceiver)
Using the WR-R10 (Transceiver)
Cameras with accessory terminals: (Figure 4-a): Connect the
WR-R10 as shown by the marks on the camera (1)
and WR-R10 (3).
Digital cameras with ten-pin remote terminals (Figure 4-b):
Attach the WR-A10 WR adapter (1) as shown by
the marks on the adapter (1) and WR-R10 (3) and
connect the assembly to the ten-pin remote terminal
(2), keeping the mounting mark on the WR-A10 ( )
aligned with the ● mark on the terminal. Tighten the
WR-A10 locking screw (3).
Film cameras with ten-pin remote terminals (Figure 5): If the
terminal is on the front of the camera, remove the lens
or camera body cap (1). Attach the WR-A10, keep-
ing the mounting mark ( ) aligned with the mark on
the terminal (2). After tightening the WR-A10 lock-
ing screw (3), rotate the WR-A10 (4) and attach the
WR-R10 (5) as shown by the marks on the adapter
(1) and WR-R10 (3).
Note: Be sure the connectors are in the correct orienta-
tion; do not use force or insert the connectors at an an-
gle. Note that the WR-R10 can not be used with certain
accessories. Using force or inserting connectors at an
angle could damage the camera or accessory.
To remove the WR-R10, reverse the above steps. To re-
move the WR-A10, press the release button (Figure
1-b) while sliding the adapter from the WR-R10.
A The Fn Button
When a WR-R10 is mounted on the cameras below, the
Fn button on the WR-T10 performs the function current-
ly assigned to the camera Fn button. See the camera
manual for details.
• D4 • D800/800E
Using the WR-T10 (
Using the WR-T10 (
Transmitter
Transmitter
)
)
The shutter-release button on the WR-T10 performs
the same functions as the camera shutter-release
button whether pressed halfway or all the way down.
See the camera manual for details.
A Channel Selection and Pairing
If the camera fails to respond to the shutter-release but-
ton on the WR-T10, re-establish the link between the
WR-T10 and the receiver by matching channels and
pairing the devices as described below.
1 Set the units to the same channel.
Set the channel selectors on
both units to the same channel
(5, 10, or 15). Devices on di er-
ent channels can not be paired,
while paired devices can only
be used together when both
are set to the same channel.
2 Pair the devices.
After turning the camera on,
place the two devices close
together and press the pairing
buttons on both units simultane-
ously. Keep the buttons pressed
until the red and green LEDs on the WR-R10 ash on
and o in sequence, indicating that pairing is complete.
To erase pairing data, turn the camera on and keep the
WR-R10 pairing button pressed for about 3 seconds until
the green LED ashes rapidly, and then quickly press the
pairing button twice before the green LED stops ash-
ing. The green and red LEDs will both ash twice simul-
taneously to show that all pairing data has been erased.
Controlling Multiple Cameras
Controlling Multiple Cameras
The following options are available with multiple
WR-R10 units, each mounted on a separate camera.
Using a WR-T10 (Simultaneous Release)
If the WR-R10 units are
paired with and on the
same channel as a WR-T10,
the shutters on all camer-
as can be released simul-
taneously by pressing the
WR-T10 shutter-release
button all the way down.
Synchronizing Multiple Cameras (Synchronized Release)
A WR-R10 mounted on
a camera with ten-pin
remote terminal can be
used to control WR-R10
units on multiple remote
cameras.
1 Attach the WR-R10 units.
Attach WR-R10 units to the master camera (any
camera with a ten-pin remote terminal) and all re-
mote cameras as described in “Using the WR-T10
(Transceiver)”.
2 Set all the units to the same channel.
3 Pair the cameras.
Turn the cameras on and press the pairing buttons
on the WR-R10 on the master camera and one of the
remote cameras. Keep the buttons pressed until the
red and green LEDs ash on and o in sequence,
indicating that pairing is complete. Repeat until the
master camera is paired with all the remote cameras.
4 Take pictures.
The shutters on all cameras will be released when
the shutter-release button on the master camera is
pressed all the way down.
Multiple Channels
The remote cameras can be divided into up to three
groups by selecting di erent channels for the cam-
eras in each group after pairing and then changing
the channel for the WR-T10 or master WR-R10 to con-
trol only the remote cameras on the selected channel.
15CH
15CH
15CH
10CH
10CH
10CH
5CH
5CH
5CH
Precautions for Use
Precautions for Use
• To prevent malfunction, be sure the WR-R10 units
are correctly attached.
• The shutter-release buttons on the camera and
WR-T10 can not be used when the camera is in re-
mote control (ML-L3) release mode.
• Disconnect WR-R10 units when they are not in use.
Carrying a camera in a bag or by the strap with a
WR-R10 attached risks damage to the camera or the
WR-R10 in the event that the camera is exposed to
strong physical shocks or vibration.
A Compatibility
Wireless remote controllers can not be used with D1-
series cameras or the MB-D100. They can be used with
the F100, D2X, D2Xs, D2Hs, and D200, but the shutter
can not be released with the F100 in self-timer mode,
while the D2X, D2Xs, D2Hs, and D200 will temporarily
display O if the exposure meters are activated after the
unit is attached.
Speci cations
Speci cations
Wireless Remote Controller WR-R10
Type
Type WR-R10
Supported cameras
Supported cameras SLR cameras with ten-pin remote or
accessory terminals
Wireless
Wireless
Channels
Channels 5(2.425GHz), 10(2.450GHz), 15(2.475GHz)
Range (line of sight)
Range (line of sight)
*
* 50 m (164 ft) between WR-R10s
Pairing
Pairing Can pair with up to 64 devices
Power consumption
Power consumption Approximately 100 mW maximum
Operating environment
Operating environment • Temperature: –20 °C – +50 °C
(–4 °F – +122 °F)
• Humidity: 85% or less (no condensation)
Approximate
Approximate
dimensions
dimensions
(W × H × D)
(W × H × D)
31.5 × 26.0 × 10.0 mm
(1.2 × 1.0 × 0.4 in.)
Weight
Weight Approximately 6 g (0.2 oz), body only
Wireless Remote Controller WR-T10
Type
Type WR-T10
Wireless
Wireless
Channels
Channels 5(2.425GHz), 10(2.450GHz), 15(2.475GHz)
Range (line of sight)
Range (line of sight)
*
* 20 m (66 ft) from WR-T10 to WR-R10
Power source
Power source One CR2032 3V lithium battery
Battery
Battery
life
life Up to approximately 10,000 releases
Operating environment
Operating environment • Temperature: –20 °C – +50 °C
(–4 °F – +122 °F)
• Humidity: 85% or less (no condensation)
Approximate
Approximate
dimensions
dimensions
(W × H × D)
(W × H × D)
28.0 × 60.0 × 8.5 mm
(1.1 × 2.4 × 0.3 in.)
Weight
Weight Approximately 12 g (0.4 oz), including
battery; approximately 9 g (0.3 oz), body only
* Approximate range at height of about 1.2m (4ft); varies with
weather conditions and presence or absence of obstacles
WR Adapter WR-A10
Type
Type WR-A10
Approximate
Approximate
dimensions
dimensions
(W × H × D)
(W × H × D)
26.5 × 32.0 × 23.5 mm
(1.0 × 1.3 × 0.9 in.)
Weight
Weight Approximately 10 g (0.4 oz), body only
Unless otherwise stated, all fi gures assume a fresh battery
and an ambient temperature of 23±3 °C (73.4±5.4 °F) as
specifi ed by the Camera and Imaging Products Association
(CIPA). Range and battery life may drop at low temperatures.
Refer to the camera manual for additional information on op-
erating environment and use the products in the narrower of
the two operating temperature ranges.
한국어
카메라와 Wi-Fi 스마트폰, 태블릿 및 기타 스마트 기
기를 연결해주는 Nikon 무선 모바일 어댑터를 구입
해주셔서 감사합니다(카메라를 어댑터와 함께 사용할
수 있는지에 대한 내용은 카메라 설명서를 참조하십시
오). 이 제품을 사용하기 전에 이 설명서와 카메라 및
Wireless Mobile Adapter Utility 앱과 함께 제공된 문
서를 읽어주십시오.
안전상의 주의
Nikon 제품의 손상 또는 사용자나 타인의 부상을 미리
방지하기 위해 본 제품을 사용하기 전에 안전상의 주의
를 빠짐없이 읽어주십시오 . 이 안전 지침은 모든 사용
자가 언제든지 볼 수 있는 곳에 보관하여 주십시오 .
여기에 기재된 안전상의 주의를 지키지 않아 초래될 수
있는 결과에 대해서는 다음과 같은 기호로 표시되어 있
습니다 .
A
이 아이콘은 경고 , 즉 상해를 방지하기 위해 본
Nikon 제품을 사용하기 전에 읽어야 하는 정보를
나타냅니다 .
경고
A
분해하지 마십시오 .
이 주의사항을 지키지 않으면
화재 , 감전사고 , 다른 상해 발생의 위험이 있습니
다 . 떨어뜨리거나 기타 사고로 인해 제품이 파손되
어 내부가 노출되는 경우 카메라 전원을 분리한 다
음 니콘 서비스 지정점에 수리를 의뢰하여 주십시
오.
A
어린이의 손에 닿지 않게 하십시오 .
이 주의사항을
지키지 않으면 다칠 수 있습니다 . 게다가 작은 부품
은 삼킬 시 질식의 위험이 있습니다 . 만일 어린이가
이 제품의 부품을 삼킨 경우에는 즉시 의사의 진료
를 받아 주십시오 .
A
오작동 시 즉시 전원을 차단합니다 .
제품에서 연기
가 나거나 이상한 냄새가 날 경우 즉시 카메라를 끄
십시오 . 계속 작업할 경우 다칠 수 있습니다 . 카메
라가 냉각되면 배터리를 제거한 후 니콘 서비스 지
정점에 가져가 점검하여 주십시오 .
A
인화성 가스가 있는 곳에서 사용하지 마십시오 .
이
주의사항을 지키지 않으면 폭발이나 화재의 위험이
있습니다 .
A
건조한 상태로 보관하십시오 .
물에 빠지거나 비에
젖지 않도록 하십시오 . 이 주의사항을 지키지 않으
면 화재나 감전사고 발생의 위험이 있습니다 .
A
젖은 손으로 만지지 마십시오 .
이 주의사항을 지키
지 않으면 감전될 수 있습니다 .
A
제품이 켜져있거나 사용 중일 때 카메라나 어댑터가
장시간 피부에 닿지 않게 하십시오 .
제품의 일부가
뜨겁습니다 . 피부가 제품에 장시간 닿아 있을 경우
에는 저온 화상을 입을 수 있습니다 .
A
고온에 노출시키지 마십시오 .
제품을 직사광선이
내리쬐는 밀폐된 차량이나 온도가 너무 높은 장소에
두지 마십시오 . 이 주의사항을 지키지 않으면 화재
의 원인이 되거나 카메라의 내부 회로가 손상될 수
있습니다 .
A Observe proper precautions when handling
batteries. Batteries may leak, rupture, or
overheat if improperly handled. Observe the
following precautions when handling CR2032
lithium batteries for use in the WR-T10:
• Use only CR2032 lithium batteries. Dispose of
used batteries as directed.
• Be sure to insert in the correct orientation.
• Do not short or disassemble.
• Do not expose to flame or to excessive heat.
• Do not immerse in or expose to water.
• Discontinue use immediately should you
notice any changes in the battery, such as
discoloration or deformation.
A
병원과 항공사 직원의 지시에 따릅니다 .
이 제품은
의료나 항해 장비를 간섭할 수 있는 무선 주파수를
방출합니다 . 먼저 병원이나 항공 승무원의 허락없
이는 병원이나 기내에서 이 제품을 사용하지 마십시
오.
주의 사항
• 본 설명서는 어떤 부분도 Nikon 의 사전 서면 승인 없
이 어떠한 형태와 방법으로도 복제 , 전송 , 전사할 수
없으며 검색 시스템에 저장하거나 다른 언어로 번역할
수 없습니다 .
• Nikon 은 본 설명서에 설명된 하드웨어나 소프트웨어
사양을 언제든지 사전 통지 없이 변경할 수 있는 권한
을 갖고 있습니다 .
• Nikon 은 본 제품을 사용하여 발생한 어떠한 손해에
대해서도 책임지지 않습니다 .
• 본 설명서에 기술된 정보가 정확하고 완벽하도록 만전
을 기했으나 오류나 누락을 발견하신 경우에는 가까운
Nikon 대리점 ( 주소 별도 제공 ) 에 알려 주십시오 .
이 제품은 미국에서 개발한 암호화 소프트웨어를 포함
하고 있으며 미국 수출 관리 규정에 제한을 받으며 미국
이 상품 수출을 금지하는 국가에 수출하거나 재수출할
수 없습니다 . 다음 국가에는 현재 수출할 수 없습니다 .
쿠바 , 이란 , 북한 , 수단 , 시리아 등 입니다 .
Supplied Accessories
Supplied Accessories
The product is sold in the sets below. This manual
assumes you have a WR-R10, WR-T10, and
WR-A10.
WR-R10
WR-R10
WR-T10
WR-T10
WR-A10
WR-A10
❑ Case ❑ Warranty
❑ Strap for WR-R10 ❑ Strap for WR-T10
❑ CR2032 3V lithium battery*
❑ User’s Manual (this manual)
WR-R10
WR-R10 ❑ Case ❑ Warranty
❑ Strap for WR-R10 ❑ User’s Manual (this manual)
WR-T10
WR-T10
❑ Strap for WR-T10 ❑ Warranty
❑ CR2032 3V lithium battery*
❑ User’s Manual (this manual)
WR-A10
WR-A10 ❑ User’s Manual (this manual)
* Remove insulating sheet from WR-T10 before rst use.
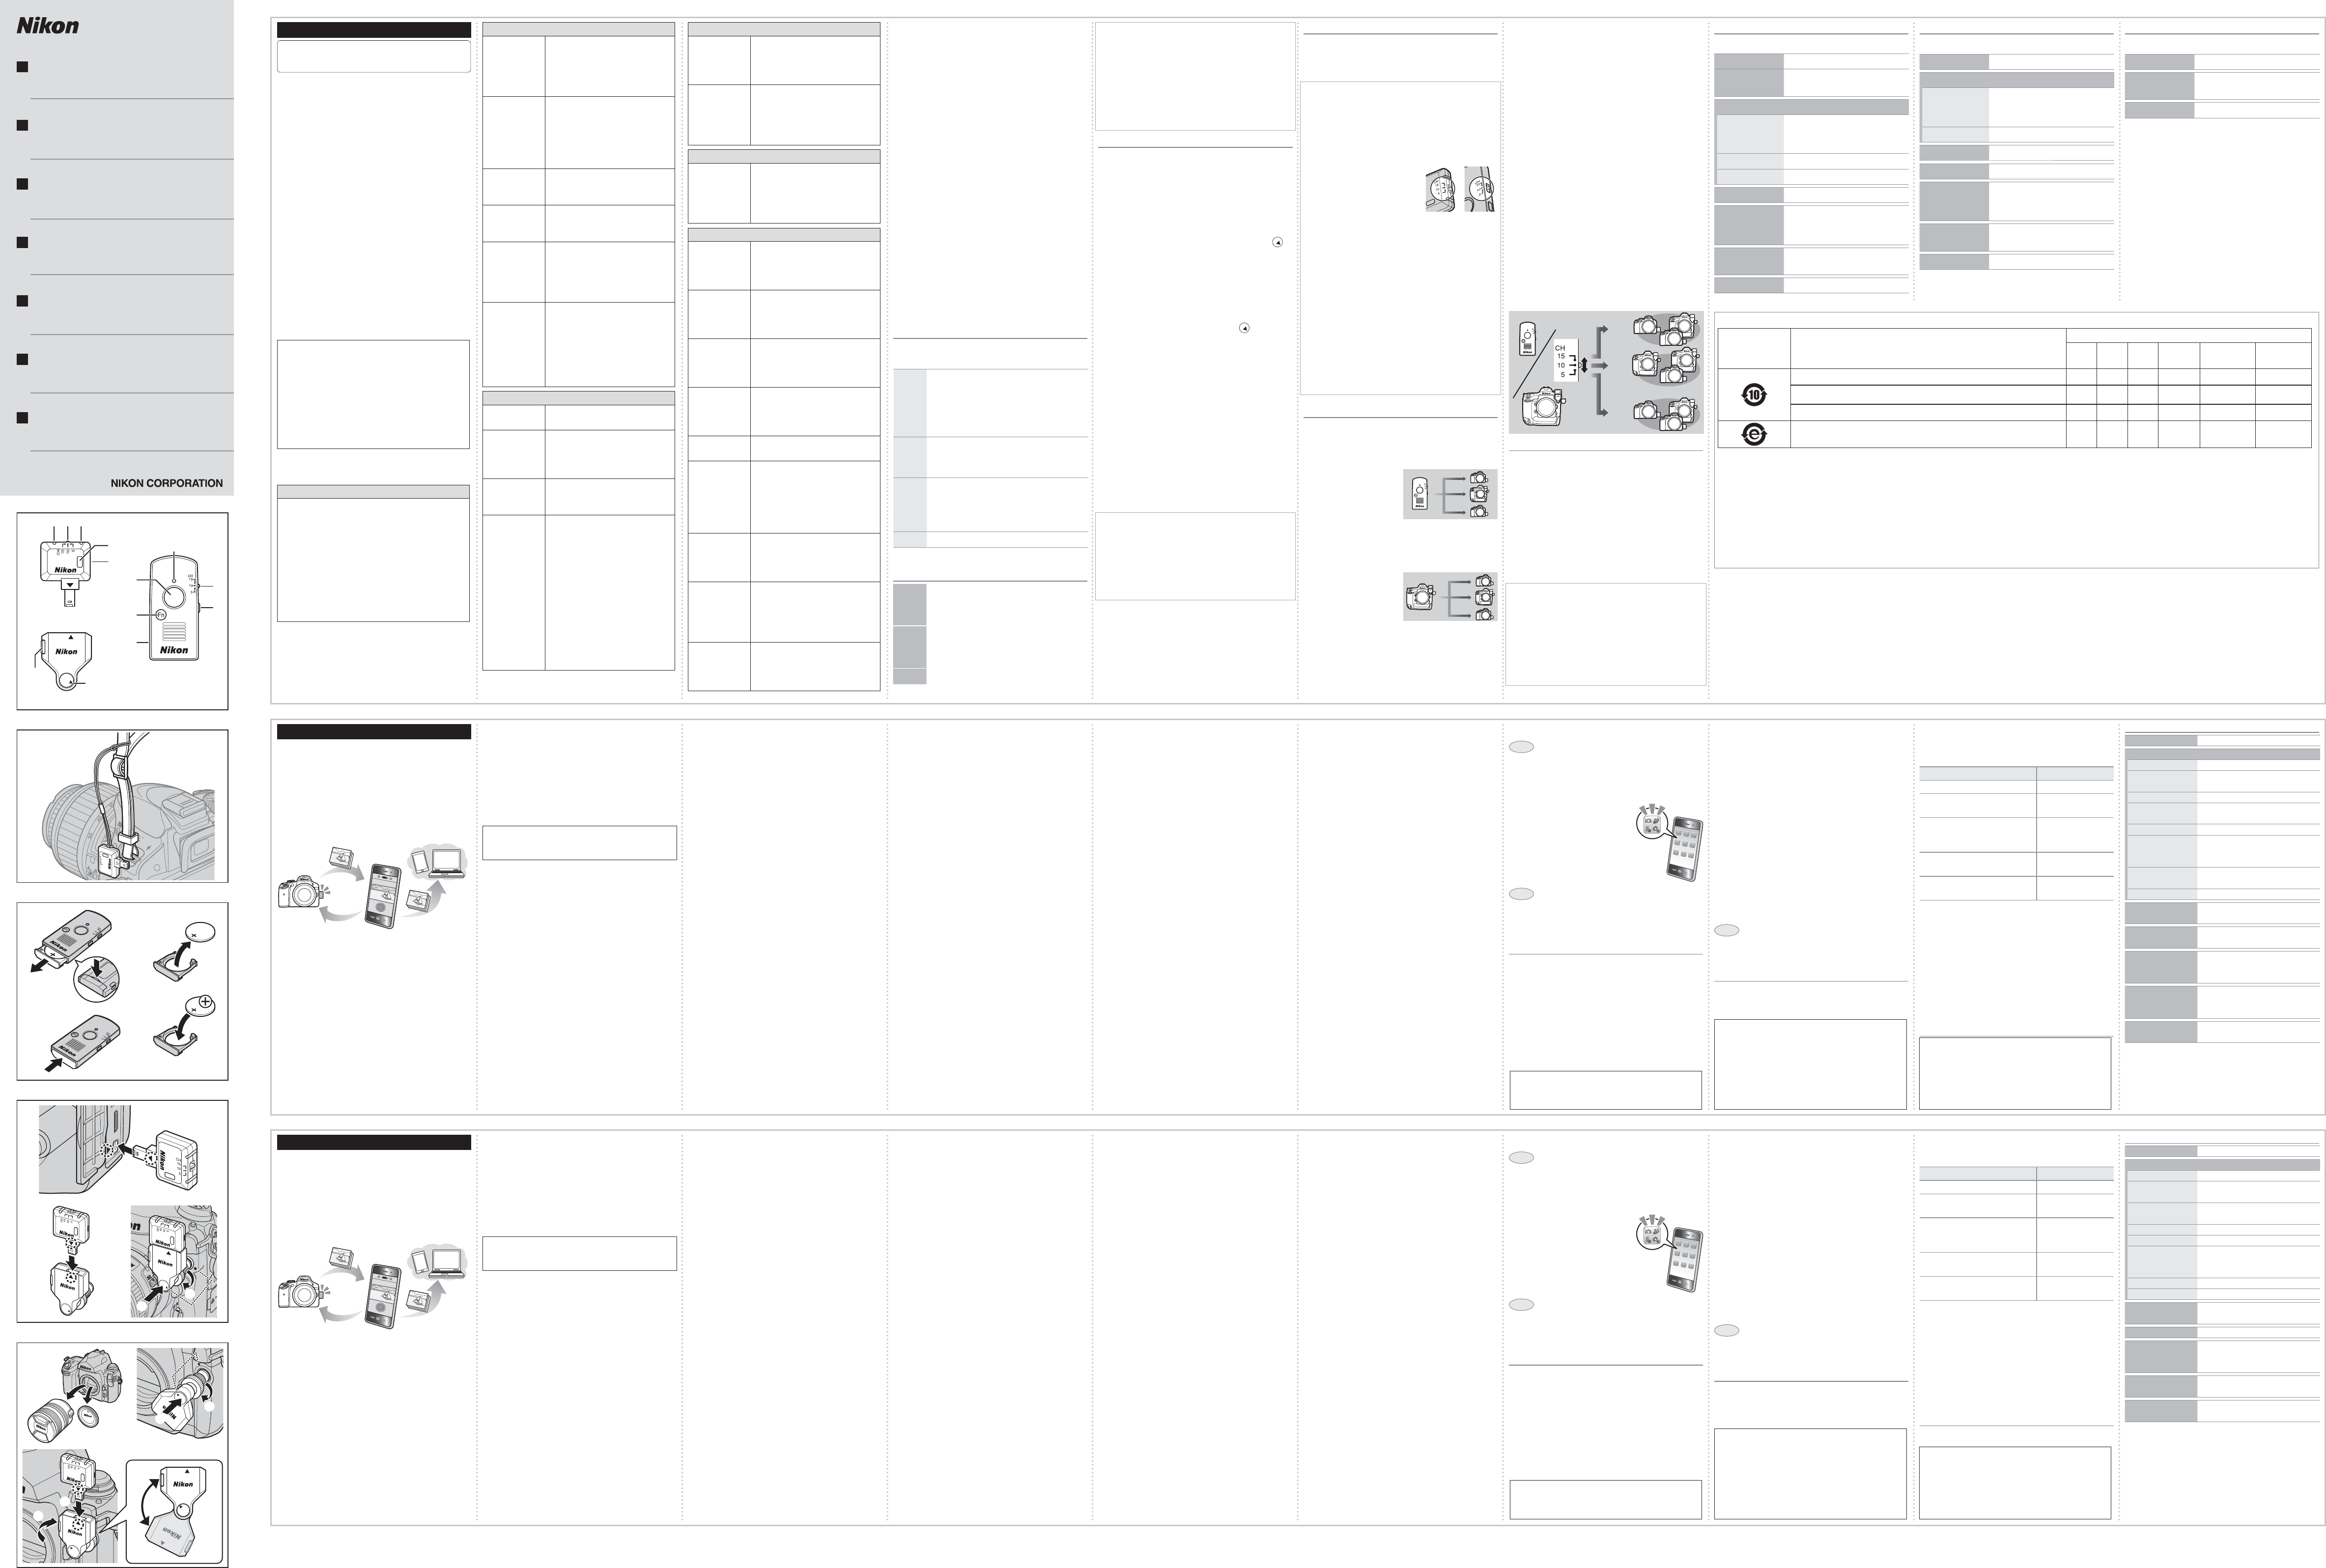
Parts of the Controller (Figure 1)
Parts of the Controller (Figure 1)
WR-R10
WR-R10
1 Red LED 2 Channel selector
3 Green LED 4 Pairing button
5 Strap eyelet
WR-T10
WR-T10
6 Shutter-release button 7 Fn button
8 Strap eyelet 9 Red LED
0 Channel selector a Pairing button
WR-A10
WR-A10 b Release button c Mounting mark
A The WR-R10 Strap
Attach the WR-R10 to the camera strap as shown in
Figure 2 to prevent the WR-R10 being lost or dropped.
A Replacing CR2032 3V Lithium Batteries (Figure 3)
Replace the battery when the LED for the WR-T10 starts
to dim. Insert a ngernail behind the battery-chamber
latch and open the battery chamber (1). Ensure that
the battery is inserted in the correct orientation (3).
Using the WR-R10 (Transceiver)
Using the WR-R10 (Transceiver)
Cameras with accessory terminals: (Figure 4-a): Connect the
WR-R10 as shown by the marks on the camera (1)
and WR-R10 (3).
Digital cameras with ten-pin remote terminals (Figure 4-b):
Attach the WR-A10 WR adapter (1) as shown by
the marks on the adapter (1) and WR-R10 (3) and
connect the assembly to the ten-pin remote terminal
(2), keeping the mounting mark on the WR-A10 ( )
aligned with the ● mark on the terminal. Tighten the
WR-A10 locking screw (3).
Film cameras with ten-pin remote terminals (Figure 5): If the
terminal is on the front of the camera, remove the
lens or camera body cap (1). Attach the WR-A10,
keeping the mounting mark ( ) aligned with the
mark on the terminal (2). After tightening the
WR-A10 locking screw (3), rotate the WR-A10 (4)
and attach the WR-R10 (5) as shown by the marks
on the adapter (1) and WR-R10 (3).
Note: Be sure the connectors are in the correct orienta-
tion; do not use force or insert the connectors at an an-
gle. Note that the WR-R10 can not be used with certain
accessories. Using force or inserting connectors at an
angle could damage the camera or accessory.
To remove the WR-R10, reverse the above steps. To re-
move the WR-A10, press the release button (Figure
1-b) while sliding the adapter from the WR-R10.
A The Fn Button
When a WR-R10 is mounted on the cameras below, the
Fn button on the WR-T10 performs the function current-
ly assigned to the camera Fn button. See the camera
manual for details.
• D4 • D800/800E
Using the WR-T10 (
Using the WR-T10 (
Transmitter
Transmitter
)
)
The shutter-release button on the WR-T10 performs
the same functions as the camera shutter-release
button whether pressed halfway or all the way down.
See the camera manual for details.
A Channel Selection and Pairing
If the camera fails to respond to the shutter-release but-
ton on the WR-T10, re-establish the link between the
WR-T10 and the receiver by matching channels and
pairing the devices as described below.
1 Set the units to the same channel.
Set the channel selectors on
both units to the same channel
(5, 10, or 15). Devices on di er-
ent channels can not be paired,
while paired devices can only
be used together when both
are set to the same channel.
2 Pair the devices.
After turning the camera on,
place the two devices close
together and press the pairing
buttons on both units simultane-
ously. Keep the buttons pressed
until the red and green LEDs on the WR-R10 ash on
and o in sequence, indicating that pairing is complete.
To erase pairing data, turn the camera on and keep the
WR-R10 pairing button pressed for about 3 seconds until
the green LED ashes rapidly, and then quickly press the
pairing button twice before the green LED stops ash-
ing. The green and red LEDs will both ash twice simul-
taneously to show that all pairing data has been erased.
Controlling Multiple Cameras
Controlling Multiple Cameras
The following options are available with multiple
WR-R10 units, each mounted on a separate camera.
Using a WR-T10 (Simultaneous Release)
If the WR-R10 units are
paired with and on
the same channel as a
WR-T10, the shutters on
all cameras can be re-
leased simultaneously
by pressing the WR-T10
shutter-release button all the way down.
Synchronizing Multiple Cameras (Synchronized Release)
A WR-R10 mounted on
a camera with ten-pin
remote terminal can be
used to control WR-R10
units on multiple remote
cameras.
1 Attach the WR-R10 units.
Attach WR-R10 units to the master camera (any
camera with a ten-pin remote terminal) and all re-
mote cameras as described in “Using the WR-T10
(Transceiver)”.
2 Set all the units to the same channel.
3 Pair the cameras.
Turn the cameras on and press the pairing buttons
on the WR-R10 on the master camera and one of the
remote cameras. Keep the buttons pressed until the
red and green LEDs ash on and o in sequence,
indicating that pairing is complete. Repeat until the
master camera is paired with all the remote cameras.
4 Take pictures.
The shutters on all cameras will be released when
the shutter-release button on the master camera is
pressed all the way down.
Multiple Channels
The remote cameras can be divided into up to three
groups by selecting di erent channels for the camer-
as in each group after pairing and then changing the
channel for the WR-T10 or master WR-R10 to control
only the remote cameras on the selected channel.
15CH
15CH
15CH
10CH
10CH
10CH
5CH
5CH
5CH
Precautions for Use
Precautions for Use
• To prevent malfunction, be sure the WR-R10 units
are correctly attached.
• The shutter-release buttons on the camera and
WR-T10 can not be used when the camera is in re-
mote control (ML-L3) release mode.
• Disconnect WR-R10 units when they are not in use.
Carrying a camera in a bag or by the strap with a
WR-R10 attached risks damage to the camera or the
WR-R10 in the event that the camera is exposed to
strong physical shocks or vibration.
A Compatibility
Wireless remote controllers can not be used with D1-
series cameras or the MB-D100. They can be used with
the F100, D2X, D2Xs, D2Hs, and D200, but the shutter
can not be released with the F100 in self-timer mode,
while the D2X, D2Xs, D2Hs, and D200 will temporarily
display O if the exposure meters are activated after the
unit is attached.
사양
사양
Wireless Remote Controller WR-R10
방식
방식 WR-R10
Supported cameras
Supported cameras SLR cameras with ten-pin remote or
accessory terminals
무선
무선
Channels
Channels 5(2.425GHz), 10(2.450GHz), 15(2.475GHz)
거리 ( 직선 )
거리(직선)
*
* 50 m (164 ft) between WR-R10s
Pairing
Pairing Can pair with up to 64 devices
Power consumption
Power consumption Approximately 100 mW maximum
작동 환경
작동 환경 • 온도 : -20°C - +50°C
• 습도 : 85% or less (no
condensation)
크기
크기
(W × H × D)
(W × H × D)
31,5 × 26,0 × 10,0 mm
무게
무게 약 6 g( 본체만 )
Français
Nous vous remercions d’avoir acheté un transmetteur
sans l Nikon pour mobile, qui permet de connecter
votre appareil photo à des périphériques mobiles,
comme des smartphones et des tablettes, équipés
du Wi-Fi (pour savoir si votre appareil photo peut
être utilisé avec le transmetteur, reportez-vous au
manuel de l’appareil photo). Avant d’utiliser ce pro-
duit, veuillez lire ce manuel et la documentation four-
nie avec votre appareil photo et avec l’appli Wireless
Mobile Adapter Utility.
Pour votre sécurité
Afi n d’éviter d’endommager votre produit Nikon et de vous
blesser ou de blesser un tiers, lisez attentivement et intégra-
lement les consignes de sécurité ci-dessous avant d’utiliser ce
produit. Conservez ces consignes de sécurité dans un endroit
facilement accessible à tous ceux qui pourraient se servir du
produit.
Les conséquences pouvant survenir suite au non-respect des
consignes répertoriées dans cette section sont indiquées par
le symbole suivant :
A
Cette icône signale les avertissements et les informa-
tions que vous devez lire avant d’utiliser ce produit
Nikon, afi n d’éviter toute blessure potentielle.
AVERTISSEMENTS
A Ne pas démonter. Le non-respect de cette consigne peut
provoquer un incendie, une électrocution ou une autre
blessure. Si le produit s’ouvre à cause d’une chute ou de
tout autre accident, retirez l’accumulateur de l’appareil
photo et/ou débranchez l’adaptateur secteur et confi ez
le produit à un centre Nikon agréé pour le faire vérifi er.
A Tenir hors de portée des enfants. Le non-respect de cette
consigne peut provoquer des blessures. En outre, notez
que les petites pièces présentent un risque d’étouff e-
ment. Si un enfant avalait une pièce quelconque de ce
produit, consultez un médecin immédiatement.
A
En cas de dysfonctionnement, couper immédiatement le courant. En
cas d’apparition de fumée ou d’une odeur inhabituelle pro-
venant du produit, mettez immédiatement l’appareil photo
hors tension. Continuer d’utiliser le matériel risque d’entraî-
ner des blessures. Une fois que le produit a refroidi, retirez-le
et confi ez-le à un centre Nikon agréé pour le faire vérifi er.
A Ne pas utiliser en présence de gaz in ammable. Le non-respect
de cette consigne peut provoquer une explosion ou un
incendie.
A Tenir au sec. N’immergez pas le produit dans l’eau et ne
l’exposez pas à la pluie. Le non-respect de cette consigne
peut provoquer un incendie ou une électrocution.
A Ne pas manipuler avec les mains mouillées. Le non-respect de
cette consigne peut provoquer une électrocution.
A Ne pas rester longtemps au contact direct de l’appareil photo ou
du transmetteur lorsque ceux-ci sont sous tension ou en cours
d’utilisation. Certains éléments de ce produit peuvent
devenir chauds. Laisser ce produit en contact direct avec
la peau pendant de longues périodes peut entraîner des
brûlures superfi cielles.
A Ne pas exposer à des températures élevées. Ne laissez pas le
produit dans un véhicule fermé en plein soleil, ni dans
un endroit exposé à des températures extrêmement éle-
vées. Le non-respect de cette consigne peut provoquer
un incendie ou endommager le revêtement extérieur ou
les pièces internes.
A Observe proper precautions when handling batteries. Batteries
may leak, rupture, or overheat if improperly handled.
Observe the following precautions when handling
CR2032 lithium batteries for use in the WR-T10:
• Use only CR2032 lithium batteries. Dispose of used bat-
teries as directed.
• Be sure to insert in the correct orientation.
• Do not short or disassemble.
• Do not expose to fl ame or to excessive heat.
• Do not immerse in or expose to water.
• Discontinue use immediately should you notice any chang-
es in the battery, such as discoloration or deformation.
A Suivre les instructions dispensées par le personnel hospitalier ou
aérien. Ce produit émet des radiations de fréquence radio
susceptibles d’interférer avec le matériel médical ou de
navigation. N’utilisez pas ce produit dans un hôpital ni à
bord d’un avion sans avoir obtenu au préalable l’autori-
sation du personnel hospitalier ou aérien.
Avertissements
• Ce manuel ne doit pas être reproduit, transmis, transcrit,
stocké dans un système de recherche documentaire ou
traduit en une langue quelconque, en tout ou en partie, et
quels qu’en soient les moyens, sans accord écrit préalable
de Nikon.
• Nikon se réserve le droit de modifi er les caractéristiques
techniques du matériel ou des logiciels décrits dans ce ma-
nuel à tout moment et sans préavis.
• Nikon ne sera pas tenu responsable des dommages résul-
tant de l’utilisation de ce produit.
• Bien que tous les eff orts aient été apportés pour vous four-
nir des informations précises et complètes dans ce manuel,
nous vous saurions gré de porter à l’attention du représentant
Nikon de votre pays, toute erreur ou omission ayant pu échap-
per à notre vigilance (les adresses sont fournies séparément).
Ce produit, qui contient un logiciel de cryptage mis au point
aux États-Unis, est contrôlé par les réglementations des ex-
portations américaines (United States Export Administration
Regulations) et ne devra pas être exporté ni ré-exporté vers
un pays sur lequel les États-Unis exercent un embargo. Les
pays suivants sont actuellement sous embargo : Cuba, Iran,
Corée du Nord, Soudan et Syrie.
Supplied Accessories
Supplied Accessories
The product is sold in the sets below. This manual as-
sumes you have a WR-R10, WR-T10, and WR-A10.
WR-R10
WR-R10
WR-T10
WR-T10
WR-A10
WR-A10
❑ Case ❑ Warranty
❑ Strap for WR-R10 ❑ Strap for WR-T10
❑ CR2032 3V lithium battery*
❑ User’s Manual (this manual)
WR-R10
WR-R10 ❑ Case ❑ Warranty
❑ Strap for WR-R10 ❑ User’s Manual (this manual)
WR-T10
WR-T10
❑ Strap for WR-T10 ❑ Warranty
❑ CR2032 3V lithium battery*
❑ User’s Manual (this manual)
WR-A10
WR-A10 ❑ User’s Manual (this manual)
* Remove insulating sheet from WR-T10 before rst use.
Parts of the Controller (Figure 1)
Parts of the Controller (Figure 1)
WR-R10
WR-R10
1 Red LED 2 Channel selector
3 Green LED 4 Pairing button
5 Strap eyelet
WR-T10
WR-T10
6 Shutter-release button 7 Fn button
8 Strap eyelet 9 Red LED
0 Channel selector a Pairing button
WR-A10
WR-A10 b Release button c Mounting mark
A The WR-R10 Strap
Attach the WR-R10 to the camera strap as shown in
Figure 2 to prevent the WR-R10 being lost or dropped.
A Replacing CR2032 3V Lithium Batteries (Figure 3)
Replace the battery when the LED for the WR-T10 starts
to dim. Insert a ngernail behind the battery-chamber
latch and open the battery chamber (1). Ensure that
the battery is inserted in the correct orientation (3).
Using the WR-R10 (Transceiver)
Using the WR-R10 (Transceiver)
Cameras with accessory terminals: (Figure 4-a): Connect the
WR-R10 as shown by the marks on the camera (1)
and WR-R10 (3).
Digital cameras with ten-pin remote terminals (Figure 4-b):
Attach the WR-A10 WR adapter (1) as shown by
the marks on the adapter (1) and WR-R10 (3) and
connect the assembly to the ten-pin remote terminal
(2), keeping the mounting mark on the WR-A10 ( )
aligned with the ● mark on the terminal. Tighten the
WR-A10 locking screw (3).
Film cameras with ten-pin remote terminals (Figure 5): If the
terminal is on the front of the camera, remove the
lens or camera body cap (1). Attach the WR-A10,
keeping the mounting mark ( ) aligned with the
mark on the terminal (2). After tightening the
WR-A10 locking screw (3), rotate the WR-A10 (4)
and attach the WR-R10 (5) as shown by the marks
on the adapter (1) and WR-R10 (3).
Note: Be sure the connectors are in the correct orienta-
tion; do not use force or insert the connectors at an an-
gle. Note that the WR-R10 can not be used with certain
accessories. Using force or inserting connectors at an
angle could damage the camera or accessory.
To remove the WR-R10, reverse the above steps. To re-
move the WR-A10, press the release button (Figure
1-b) while sliding the adapter from the WR-R10.
A The Fn Button
When a WR-R10 is mounted on the cameras below, the
Fn button on the WR-T10 performs the function current-
ly assigned to the camera Fn button. See the camera
manual for details.
• D4 • D800/800E
Using the WR-T10 (
Using the WR-T10 (
Transmitter
Transmitter
)
)
The shutter-release button on the WR-T10 performs
the same functions as the camera shutter-release
button whether pressed halfway or all the way down.
See the camera manual for details.
A Channel Selection and Pairing
If the camera fails to respond to the shutter-release but-
ton on the WR-T10, re-establish the link between the
WR-T10 and the receiver by matching channels and
pairing the devices as described below.
1 Set the units to the same channel.
Set the channel selectors on
both units to the same channel
(5, 10, or 15). Devices on di er-
ent channels can not be paired,
while paired devices can only
be used together when both
are set to the same channel.
2 Pair the devices.
After turning the camera on,
place the two devices close
together and press the pairing
buttons on both units simultane-
ously. Keep the buttons pressed
until the red and green LEDs on the WR-R10 ash on
and o in sequence, indicating that pairing is complete.
To erase pairing data, turn the camera on and keep the
WR-R10 pairing button pressed for about 3 seconds until
the green LED ashes rapidly, and then quickly press the
pairing button twice before the green LED stops ash-
ing. The green and red LEDs will both ash twice simul-
taneously to show that all pairing data has been erased.
Controlling Multiple Cameras
Controlling Multiple Cameras
The following options are available with multiple
WR-R10 units, each mounted on a separate camera.
Using a WR-T10 (Simultaneous Release)
If the WR-R10 units are
paired with and on
the same channel as a
WR-T10, the shutters on
all cameras can be re-
leased simultaneously
by pressing the WR-T10
shutter-release button all the way down.
Synchronizing Multiple Cameras (Synchronized Release)
A WR-R10 mounted on
a camera with ten-pin
remote terminal can be
used to control WR-R10
units on multiple remote
cameras.
1 Attach the WR-R10 units.
Attach WR-R10 units to the master camera (any
camera with a ten-pin remote terminal) and all re-
mote cameras as described in “Using the WR-T10
(Transceiver)”.
2 Set all the units to the same channel.
3 Pair the cameras.
Turn the cameras on and press the pairing buttons
on the WR-R10 on the master camera and one of the
remote cameras. Keep the buttons pressed until the
red and green LEDs ash on and o in sequence,
indicating that pairing is complete. Repeat until the
master camera is paired with all the remote cameras.
4 Take pictures.
The shutters on all cameras will be released when
the shutter-release button on the master camera is
pressed all the way down.
Multiple Channels
The remote cameras can be divided into up to three
groups by selecting di erent channels for the camer-
as in each group after pairing and then changing the
channel for the WR-T10 or master WR-R10 to control
only the remote cameras on the selected channel.
15CH
15CH
15CH
10CH
10CH
10CH
5CH
5CH
5CH
Precautions for Use
Precautions for Use
• To prevent malfunction, be sure the WR-R10 units
are correctly attached.
• The shutter-release buttons on the camera and
WR-T10 can not be used when the camera is in re-
mote control (ML-L3) release mode.
• Disconnect WR-R10 units when they are not in use.
Carrying a camera in a bag or by the strap with a
WR-R10 attached risks damage to the camera or the
WR-R10 in the event that the camera is exposed to
strong physical shocks or vibration.
A Compatibility
Wireless remote controllers can not be used with D1-
series cameras or the MB-D100. They can be used with
the F100, D2X, D2Xs, D2Hs, and D200, but the shutter
can not be released with the F100 in self-timer mode,
while the D2X, D2Xs, D2Hs, and D200 will temporarily
display O if the exposure meters are activated after the
unit is attached.
Caractéristiques techniques
Caractéristiques techniques
Wireless Remote Controller WR-R10
Type
Type WR-R10
Supported cameras
Supported cameras SLR cameras with ten-pin remote or
accessory terminals
Sans l
Sans l
Channels
Channels 5(2.425GHz), 10(2.450GHz), 15(2.475GHz)
Portée (sans
Portée (sans
obstacle)
obstacle)
*
*
50 m (164 ft) between WR-R10s
Pairing
Pairing Can pair with up to 64 devices
Power consumption
Power consumption Approximately 100 mW maximum
Conditions de
Conditions de
fonctionnement
fonctionnement
• Température : –20 °C – +50 °C
• Humidité : 85% or less (no condensation)
Dimensions
Dimensions
approximatives
approximatives
(L×H×P)
(L×H×P)
31,5 × 26,0 × 10,0 mm
Poids
Poids Environ 6 g (corps uniquement)
Wireless Remote Controller WR-T10
Type
Type WR-T10
Sans l
Sans l
Channels
Channels 5(2.425GHz), 10(2.450GHz), 15(2.475GHz)
Portée (sans
Portée (sans
obstacle)
obstacle)
*
*
20 m (66 ft) from WR-T10 to WR-R10
Power source
Power source One CR2032 3V lithium battery
Battery
Battery
life
life Up to approximately 10,000 releases
Conditions de
Conditions de
fonctionnement
fonctionnement
• Température : –20 °C – +50 °C
• Humidité : 85% or less (no condensation)
Dimensions
Dimensions
approximatives
approximatives
(L×H×P)
(L×H×P)
28,0 × 60,0 × 8,5 mm
Poids
Poids Environ 12 g (corps uniquement)
* Approximate range at height of about 1.2m (4ft); varies with
weather conditions and presence or absence of obstacles
WR Adapter WR-A10
Type
Type WR-A10
Dimensions
Dimensions
approximatives
approximatives
(L×H×P)
(L×H×P)
26,5 × 32,0 × 23,5 mm
Poids
Poids Environ 10 g (corps uniquement)
Unless otherwise stated, all fi gures assume a fresh battery
and an ambient temperature of 23±3°C (73.4 ±5.4 °F) as
specifi ed by the Camera and Imaging Products Association
(CIPA). Range and battery life may drop at low temperatures.
Refer to the camera manual for additional information on op-
erating environment and use the products in the narrower of
the two operating temperature ranges.
© 2012 Nikon Corporation
图2/Imagen 2/Figura 2
图4/Imagen 4/Figura 4
图5(所示为 F6 照相机) /
Imagen 5 (F6 camera shown)/
Figura 5 (F6 camera shown)
w
e
q
t
r
图1/Imagen 1/Figura 1
qwe
o
!0
!1
r
y
u
i
t
WR-R10
WR-T10
WR-A10
!2 !3
a
b
q
w
e
r
q
w
e
图3/Imagen 3/Figura 3
Ck
无线遥控器 WR-R10
无线遥控器 WR-T10
WR 适配器 WR-A10
使用说明书
Es
################### WR-R10
################### WR-T10
################### WR-A10
Manual del usuario
Pb
################### WR-R10
################### WR-T10
################### WR-A10
Manual do Usuário
Jp
ワイヤレスリモートコントローラー WR-R10
ワイヤレスリモートコントローラー WR-T10
WR 用変換アダプター WR-A10
使用説明書
En
Wireless Remote Controller WR-R10
Wireless Remote Controller WR-T10
WR adapter WR-A10
User’s Manual
Fr
################### WR-R10
################### WR-T10
################### WR-A10
Manuel d’utilisation
Kr
############# WR-R10
############# WR-T10
############# WR-A10
사용설명서
Português (Brasil)
Obrigado por ter adquirido um adaptador móvel sem
o Nikon que permite transmissões entre a sua câme-
ra e telefones inteligentes, tablets e outros dispositi-
vos inteligentes (para obter a informação se a sua
câmera pode ser usada com o adaptador, consulte o
manual da câmera). Antes de usar este produto, leia
este manual e a documentação fornecida com a sua
câmera e o aplicativo Wireless Mobile Adapter Utility.
Baixar
imagens
Controle remoto Partilhar
imagens
O manual do Wireless Mobile Adapter Utility está disponível
para ser baixado do seguinte website. Verifi que no website
para confi rmar se o Wireless Mobile Adapter Utility é aceito
no seu dispositivo inteligente.
http://nikonimglib.com/ManDL/WMAU/
Para Sua Segurança
Para evitar danos ao seu produto Nikon ou lesões em você ou
em terceiros, leia, na sua totalidade, as seguintes precauções
de segurança antes de usar este produto. Conserve estas ins-
truções de segurança onde todos que usem este produto as
possam ler.
As consequências que poderão resultar da não observância
das precauções listadas nesta seção são indicadas pelo sím-
bolo seguinte:
A
Este ícone assinala os avisos, informações que devem
ser lidas antes de utilizar este produto Nikon para evi-
tar possíveis lesões.
AVISOS
A Não desmonte. A não observância desta precaução poderá
resultar em fogo, choque elétrico ou outras lesões. Caso o
produto fi que aberto ao quebrar, como resultado de uma
queda ou outro acidente, desligue a fonte de alimentação
da câmera e leve o produto a um representante de assis-
tência técnica autorizada Nikon para inspeção.
A Corte imediatamente a alimentação em caso de mau funciona-
mento. Caso note fumaça ou um odor estranho prove-
niente do produto, desligue imediatamente a câmera.
A continuação do funcionamento pode resultar em fe-
rimentos. Uma vez que o produto esteja frio, remova-o
e leve-o para o representante do serviço autorizado da
Nikon para inspeção.
A Não use na presença de gás in amável. A não observância
desta precaução poderá resultar em explosão ou fogo.
A Mantenha seco. Não mergulhe nem exponha à água ou à
chuva. A não observância desta precaução poderá resul-
tar em incêndio ou choque elétrico.
A Não manuseie com as mãos úmidas. A não observância desta
precaução poderá resultar em choque elétrico.
A Mantenha longe do alcance das crianças. A não observância
desta precaução poderá resultar em lesões. Além disso,
note que as peças pequenas constituem um perigo de
asfi xia. Se uma criança engolir qualquer parte deste pro-
duto, consulte um médico imediatamente.
A Não permaneça em contato com a câmera ou adaptador durante
longos períodos enquanto os produtos estiverem ligados ou em
uso. Partes do produto esquentam. Deixando o produto
em contato direto com a pele durante períodos longos
poderá resultar em queimaduras de baixa temperatura.
A Não exponha a altas temperaturas. Não deixe o produto den-
tro de um veículo fechado exposto ao sol ou em outras
áreas sujeitas a temperaturas extremamente elevadas. A
não observância a esta advertência poderá resultar em
incêndio ou dano às peças ou ao revestimento interno.
A Siga as instruções do pessoal do hospital ou da companhia aérea.
Este produto emite radiação de frequência de rádio que
poderá interferir com o equipamento clínico ou de na-
vegação. Não use este produto em hospital ou a bordo
de um avião sem antes obter a permissão do pessoal do
hospital ou da companhia aérea.
Avisos
• Nenhuma parte deste manual pode ser reproduzida, trans-
mitida, transcrita, armazenada em um sistema de recupera-
ção ou traduzida para qualquer idioma em qualquer forma,
por quaisquer meios, sem prévia autorização por escrito da
Nikon.
• A Nikon reserva-se ao direito de alterar as especifi cações do
hardware e software descritos neste manual a qualquer mo-
mento e sem aviso prévio.
• A Nikon não se responsabiliza por quaisquer danos decor-
rentes do uso deste produto.
• Ainda que tenham sido feitos todos os esforços para garantir
que as informações contidas neste manual sejam precisas e
completas, gostaríamos que você chamasse a atenção para
quaisquer erros ou omissões do representante da Nikon da
sua área (endereço fornecido separadamente).
Este produto, que contém software de criptografi a desenvol-
vido nos Estados Unidos, é controlado pelos Regulamentos
de Administração das Exportações dos Estados Unidos e não
pode ser exportado ou reexportado para qualquer país para
o qual os Estados Unidos pratiquem embargo de mercado-
rias. O países a seguir estão atualmente sujeitos a embargo:
Cuba, Irã, Coreia do Norte, Sudão e Síria.
Sobre o Uso da Funções Sem Fio
Marca-passos, aparelhos auditivos e outros dispositivos mé-
dicos podem ser afetados por interferências de rádio a partir
do produto, assim como podem ser afetados os equipamen-
tos de navegação da aeronave. Usuários com marca-passos
cardíacos implantados devem permanecer pelo menos a 30
cm do produto. Desligue o produto nos trens e outros lugares
cheios de gente, e desligue o produto ou desative todas as
transmissões sem fi o nas proximidades de dispositivos médi-
cos, quando em instituições médicas e outros locais em que
os dispositivos sem fi o são proibidos, ou quando assim orien-
tado pelo pessoal da companhia aérea. Contate a companhia
aérea para obter mais informações sobre o uso de disposi-
tivos sem fi o no avião. Se o uso dos recursos sem fi o desse
produto provocar interferência de rádio, desative os recursos
sem fi o ou desligue o produto. A não observância desta pre-
caução poderá resultar em acidentes ou mau funcionamento
do produto.
Segurança
Embora um dos benefícios deste produto seja que ele permi-
te a outros se conectarem livremente para a troca de dados
sem fi o em qualquer lugar dentro do seu alcance, o seguinte
pode ocorrer se a segurança não for ativada:
• Roubo de dados: terceiros mal intencionados poderão inter-
ceptar as transmissões sem fi o para roubar a identifi cação,
senhas e outras informações pessoais do usuário.
• Acesso não autorizado: usuários não autorizados podem ter aces-
so à internet e alterar dados ou realizar outras ações maliciosas.
Note que, devido ao desenho das redes sem fi o, ataques es-
pecializados podem permitir o acesso não autorizado, mes-
mo quando a segurança estiver ativada.
Usando o Adaptador Sem Fio do Celular
Instale o aplicativo ao seu dispositivo inteligente.
1 Encontre o aplicativo.
No seu dispositivo inteligente abra Google Play e
procure por “Wireless Mobile Adapter Utility”.
2 Instale o aplicativo.
Siga as instruções na tela para
Siga as instruções na tela para
baixar e instalar o aplicativo.
baixar e instalar o aplicativo.
Acesse a câmera de seu dispositivo inteligente.
1 Introduza o adaptador móvel sem fi o.
Introduza o adaptador na sua câmera (Figura 1) e
ligue a câmera.
2 Apronte o dispositivo inteligente.
No dispositivo inteligente, abra as De nições Wi-Fi
e selecione a Ligação de botão WPS para aprontar
o dispositivo para a conexão ao botão WPS.
3 Pressione o botão WPS por cerca de 5 segundos.
Mantenha pressionado o botão WPS no adaptador
móvel sem o até o LED piscar vermelho e verde.
4 Inicie o aplicativo Wireless Mobile Adapter Utility.
Quando estiver estabelecida uma ligação, o LED
acende em verde e o diálogo principal para o
Wireless Mobile Adapter Utility será exibido no dis-
positivo inteligente.
Você poderá agora acessar a câmera a partir do dis-
positivo inteligente. Para mais informações, consul-
te a documentação para o Wireless Mobile Adapter
Utility.
Desative o adaptador.
Para terminar a transmissão sem o, desligue a câme-
ra e desconecte o adaptador.
Status da Conexão
O status da conexão entre a câmera e o adaptador
móvel sem o é mostrado pelo LED do adaptador:
LED
LED
Status
Status
KLigado (verde) Conectado
HPisca verde uma vez a cada 2
seg. Pronto para conectar
H
Pisca verde rapidamente (o
ritmo varia com a velocidade de
conexão)
Transmitindo
HPisca verde lento uma vez a
cada 5 seg.
Adaptador em modo
espera
HPisca vermelho uma vez a cada
0,5 seg. Erro de conexão
Modo Espera
Para reativar o adaptador após ele entrar em modo
espera, pressione o botão WPS.
Restaurar Con gurações Padrão
Para restaurar as con gurações padrão, mantenha
pressionado o botão WPS por mais de 10 segundos e,
então, pressione o botão novamente quando o LED
pisca laranja. O LED para de piscar, indicando que o
adaptador foi reiniciado.
Especi cações
Especi cações
Tipo
Tipo WU-1a
Sem Fio
Sem Fio
Padrões
Padrões IEEE 802.11b, IEEE 802.11g
Protocolos de
Protocolos de
comunicação
comunicação
• IEEE 802.11b: DSSS/CCK
• IEEE 802.11g: OFDM
Frequência de
Frequência de
operação
operação
2412–2462 MHz (canais 1–11)
Alcance (linha de visão)
Alcance (linha de visão) Aproximadamente 10 –15 m
Taxa de dados
Taxa de dados
*
* 54 Mbps
Segurança
Segurança • Autenticação: Sistema aberto,
WPA2-PSK
• Encriptação: AES
Con guração sem o
Con guração sem o Suporta WPS
Protocolos de acesso
Protocolos de acesso Infrastrutura
Protocolos de
Protocolos de
transferência de dados
transferência de dados
PTP, PTP-IP
Consumo de energia
Consumo de energia Aproximadamente 1,65 W máximo
Ambiente operacional
Ambiente operacional • Temperatura: 0–40 °C
• Umidade: Inferior a 85% (sem
condensação)
Dimensões aproximadas
Dimensões aproximadas
(L×A×P)
(L×A×P)
18 × 21 × 10 mm
Peso
Peso Aproximadamente 3 g (corpo
apenas)
* Taxas máximas de dados lógicos de acordo com a norma
IEEE. Taxas reais poderão diferir.
Passo 1
Passo 1
Passo 2
Passo 2
Passo 3
Passo 3
A Ala e o Estojo
Fornecidos
Use estes acessórios, como mostrado na Figura 2, para
A WPS
WPS (Con guração Wi-Fi Protegido) é um padrão
projetado para tornar mais fácil estabelecer uma
rede sem o segura. Para obter informações sobre
os passos envolvidos e a duração de tempo que o
dispositivo inteligente vai esperar por uma conexão,
consulte a documentação fornecida com o dispositi-
vo inteligente.
A Conexes Sem Fio
Manuais
1 Exibe as confi gurações Wi-Fi para o dispositivo
inteligente.
Español
Gracias por adquirir un adaptador móvil inalámbrico
de Nikon, el cual le permite conectar su cámara a te-
léfonos inteligentes, tabletas y demás dispositivos in-
teligentes (para más información acerca de la posibi-
lidad de usar su cámara con el adaptador, consulte el
manual de la cámara). Antes de utilizar este produc-
to, lea este manual y la documentación suministrada
con su cámara y con la aplicación Wireless Mobile
Adapter Utility.
Descargar
imágenes
Control remoto Compartir
imágenes
El manual de Wireless Mobile Adapter Utility está disponible
para su descarga en el siguiente sitio web. Compruebe el si-
tio web para confi rmar que Wireless Mobile Adapter Utility es
compatible con su dispositivo inteligente.
http://nikonimglib.com/ManDL/WMAU/
Por su seguridad
Para evitar dañar el producto Nikon o lesionar a otras perso-
nas o a usted mismo, lea al completo las siguientes precau-
ciones de seguridad antes de utilizar este producto. Guárdelas
en un lugar donde todas las personas que utilicen el producto
puedan leerlas.
Las consecuencias que pueden derivarse del incumplimiento
de las precauciones señaladas en esta sección se indican con
el símbolo siguiente:
A
Este icono indica una advertencia, información que
debe leer antes de utilizar este producto Nikon para
evitar posibles lesiones.
ADVERTENCIAS
A No desmontar. En caso contrario, se podría originar una
descarga eléctrica, un incendio u otra lesión. Si a causa
de una caída u otro accidente el equipo se rompe o abre,
desconecte la fuente de alimentación de la cámara y lleve el
producto a un representante del servicio técnico autorizado
de Nikon para su inspección.
A En caso de funcionamiento defectuoso, apague inmediatamente
el equipo. Si nota que el producto emite humo u olores
inusuales, apague la cámara inmediatamente . Si sigue
utilizando el equipo, corre el riesgo de sufrir daños. Una
vez el producto se haya enfriado, retírelo y llévelo a un
representante del servicio técnico autorizado de Nikon
para su inspección.
A No utilice el equipo si hay gas in amable. De lo contrario, se
podría provocar una explosión o un incendio.
A Manténgalo seco. No lo sumerja ni lo exponga al agua o a
la lluvia. En caso contrario, se podría originar una descar-
ga eléctrica o un incendio.
A No lo maneje con las manos mojadas. De no cumplir con esta
precaución podría sufrir una descarga eléctrica.
A Manténgase fuera del alcance de los niños. De no cumplir con
esta precaución podrían sufrirse lesiones. Igualmente,
tenga en cuenta que las piezas pequeñas constituyen
riesgo de asfi xia. Si un niño ingiere una pieza de este
producto, póngase inmediatamente en contacto con un
médico.
A No permanezca en contacto con la cámara o el adaptador durante
largos períodos de tiempo si dichos productos están encendidos o
en uso. Las partes del producto estarán calientes. Dejar el
producto en contacto directo con la piel durante largos
períodos de tiempo puede provocar quemaduras de pri-
mer grado.
A No exponga el producto a altas temperaturas. No deje el pro-
ducto en un vehículo cerrado a pleno sol o en otras zo-
nas expuestas a temperaturas extremadamente altas. Si
no respeta esta medida de seguridad, se podría producir
un incendio o dañarse el cuerpo o las partes internas del
producto.
A Siga las instrucciones del personal del hospital o de la línea aérea.
Este producto emite radiaciones de radiofrecuencia que
podrían interferir con los equipos médicos o de navega-
ción. No utilice este producto en un hospital ni dentro de
un avión sin el permiso previo del personal del hospital o
de la línea aérea.
Avisos
• Están totalmente prohibidos la reproducción, transmisión,
transcripción, almacenamiento en sistemas de recupera-
ción o traducción a ningún idioma de ninguna forma ni por
ningún medio ninguna parte de este manual sin la previa
autorización por escrito de Nikon.
• Nikon se reserva el derecho de cambiar las especifi caciones
del hardware y del software descritos en este manual en
cualquier momento y sin previo aviso.
• Nikon no se hará responsable de los daños derivados del
uso de este producto.
• Aunque se ha hecho todo lo posible para asegurar que la in-
formación recogida en este manual sea precisa y completa,
en caso de encontrar algún error u omisión, rogamos lo co-
munique al representante Nikon de su zona (las direcciones
se suministran por separado).
Este producto, el cual posee software cifrado desarrollado en
los Estados Unidos, está controlado mediante United States
Export Administration Regulations (Normas de administra-
ción de exportaciones de los Estados Unidos) y no se puede
exportar o re-exportar a ningún país sobre el que los Estados
Unidos haya decretado el embargo. Los siguientes países
se encuentran actualmente sujetos al embargo: Cuba, Irán,
Corea del Norte, Sudán y Siria.
Acerca del uso de las funciones inalámbricas
Los marcapasos, audífonos y otros dispositivos médicos pue-
den verse afectados por las interferencias de radio del pro-
ducto, al igual que puede suceder con el equipo de navega-
ción de una aeronave. Los usuarios con marcapasos cardíacos
implantados deben mantener este producto a al menos 30
cm de distancia de los mismos. Apague el producto cuando
se encuentre en trenes y demás lugares concurridos, y apa-
gue el producto o desactive las transmisiones inalámbricas
cerca de dispositivos médicos, al encontrarse en instituciones
médicas y demás instalaciones en las que el uso de dispo-
sitivos inalámbricos esté prohibido, o cuando así se lo indi-
que el personal de la aeronave. Póngase en contacto con la
línea aérea para obtener más información acerca del uso de
dispositivos inalámbricos en la aeronave. Si el uso de las fun-
ciones inalámbricas de este producto produce interferencias
de radio, deshabilite las funciones inalámbricas o apague el
producto. No cumplir con esta precaución puede provocar
accidentes o funcionamientos erróneos del producto.
Seguridad
Aunque una de las ventajas de este producto es que permite
que otros puedan conectarse libremente para intercambiar
datos de forma inalámbrica en cualquier posición dentro
de su rango, si no habilita la seguridad podría producirse lo
siguiente:
• Robo de datos: Terceras partes con intenciones maliciosas po-
drían interceptar las transmisiones inalámbricas con la fi na-
lidad de robar la identidad del usuario, contraseñas y demás
información personal.
• Acceso no autorizado: Usuarios no autorizados podrían obtener
acceso a la red y alterar los datos o realizar actos maliciosos.
Tenga en cuenta que debido al diseño de las redes inalámbri-
cas, ciertos ataques especializados podrían permitir el acceso
no autorizado incluso con la seguridad activada.
Uso del adaptador móvil inalámbrico
Instale la aplicación en su dispositivo inteligente.
1 Encuentre la aplicación.
En su dispositivo inteligente, abra Google Play y
busque “Wireless Mobile Adapter Utility”.
2 Instale la aplicación.
Siga las instrucciones en pan-
Siga las instrucciones en pan-
talla para descargar e instalar la
talla para descargar e instalar la
aplicación.
aplicación.
Acceda a la cámara desde su dispositivo inteligente.
1 Introduzca el adaptador móvil inalámbrico.
Introduzca el adaptador en su cámara (Imagen 1) y
encienda la cámara.
2 Prepare el dispositivo inteligente.
En el dispositivo inteligente, abra Ajustes Wi-Fi y
seleccione Conexión del botón de WPS para pre-
parar el dispositivo para una conexión del botón
de WPS.
3 Pulse el botón WPS durante al menos 5 segundos.
Mantenga pulsado el botón WPS del adaptador mó-
vil inalámbrico hasta que el LED parpadee en rojo
y verde.
4 Inicie la aplicación Wireless Mobile Adapter Utility.
Al establecerse una conexión, el LED se iluminará
en verde y el diálogo principal de Wireless Mobile
Adapter Utility será visualizado en el dispositivo
inteligente.
Ahora puede acceder a la cámara desde el dispositivo
inteligente. Para más información, consulte la docu-
mentación de Wireless Mobile Adapter Utility.
Desactive el adaptador.
Para nalizar la transmisión inalámbrica, apague la
cámara y desconecte el adaptador.
Estado de conexión
El estado de la conexión entre la cámara y el adap-
tador móvil inalámbrico se muestra en el LED del
adaptador:
LED
LED
Estado
Estado
KActivado (verde) Conectado
HParpadea en verde una vez cada
2 segundos Listo para la conexión
H
Parpadea rápidamente en
verde (el ritmo depende de la
velocidad de conexión)
Transmitiendo
HParpadea lentamente en verde
una vez cada 5 segundos
Adaptador en modo
reposo
HParpadea en rojo una vez cada
0,5 segundos Error de conexión
Modo reposo
Para reactivar el adaptador tras entrar en el modo re-
poso, pulse el botón WPS.
Restauración de los ajustes predeterminados
Para restaurar los ajustes predeterminados, manten-
ga pulsado el botón WPS durante aproximadamente
10 segundos y a continuación pulse de nuevo el bo-
tón cuando el LED parpadee en naranja. El LED dejará
de parpadear, mostrando que el adaptador ha sido
restaurado.
Especi caciones
Especi caciones
Tipo
Tipo WU-1a
Inalámbrico
Inalámbrico
Estándares
Estándares IEEE 802.11b, IEEE 802.11g
Protocolos de
Protocolos de
comunicación
comunicación
• IEEE 802.11b: DSSS/CCK
• IEEE 802.11g: OFDM
Frecuencia operativa
Frecuencia operativa 2.412–2.462 MHz (canales 1–11)
Rango (línea de vista)
Rango (línea de vista) Aproximadamente 10–15 m
(33–49 pies)
Velocidad de datos
Velocidad de datos
*
* 54 Mbps
Seguridad
Seguridad • Autenticación: Sistema abierto,
WPA2-PSK
• Cifrado: AES
Con guración
Con guración
inalámbrica
inalámbrica
Compatible con WPS
Protocolos de acceso
Protocolos de acceso Infraestructura
Protocolos de
Protocolos de
transferencia de datos
transferencia de datos
PTP, PTP-IP
Consumo de energía
Consumo de energía Aproximadamente 1,65 voltios como
máximo
Entorno operativo
Entorno operativo • Temperatura: 0–40 °C (32–104 °F)
• Humedad: Menos del 85% (sin
condensación)
Dimensiones
Dimensiones
aproximadas
aproximadas
(An. × Al. × Pr.)
(An. × Al. × Pr.)
18 × 21 × 10 mm
(0,7 × 0,8 × 0,4 pulgadas)
Peso
Peso Aproximadamente 3 g/0,1 oz (única-
mente el cuerpo)
* Velocidades de datos lógicas máximas según el estándar
IEEE. Las velocidades reales podrían diferir.
Paso 1
Paso 1
Paso 2
Paso 2
Paso 3
Paso 3
A La correa y la funda
suministradas
Utilice estos accesorios tal y como indica la imagen 2
A WPS
WPS (Wi-Fi Protected Setup) es un estándar diseña-
do para facilitar el establecimiento de una red ina-
lámbrica segura. Para más información acerca de los
pasos a seguir y durante cuánto tiempo el disposi-
tivo inteligente esperará por una conexión, consulte
la documentación suministrada con el dispositivo
inteligente.
A Conexiones
inalmricas manuales
1 Visualice la confi guración Wi-Fi del dispositivo
inteligente.
中文版(简体)
使用产品前请仔细阅读本使用说明书,并
请妥善保管。
感谢您购买尼康无线遥控器。将WR-R10(收
发器)连接至尼康照相机的10针遥控端子或
配件端子后,您即可使用无线WR-T10(传
输器)遥控拍摄照片。WR-A10是一种用于
WR-R10的10针遥控端子适配器。在使用本产
品之前,请先阅读本说明书以及照相机的随
附文档。有关附加说明(包括使用本设备的
管理规定等信息),请参阅本产品随附的
无
线管理规定
页。
安全须知
请在使用前仔细阅读“安全须知”,并以正确
的方法使用。本“安全须知”中记载了重要的
内容,可使您能够安全、正确地使用产品,并
预防对您或他人造成人身伤害或财产损失。请
在理解本部分的内容后阅读使用说明书正文,
并在阅读之后妥善保管,以便本产品的所有使
用者可以随时查阅。
本节中标注的指示和含义如下:
A 危险
表示若不遵守该项指示或操作不
当,则极有可能造成人员死亡或负
重伤的内容。
A 警告
表示若不遵守该项指示或操作不
当,则有可能造成人员死亡或负重
伤的内容。
A 注意
表示若不遵守该项指示或操作不
当,则有可能造成人员伤害、以及
有可能造成物品损害的内容。
本节使用以下图示和符号对必须遵守的内容
作以分类和说明。
图示和符号的实例
IL符号表示唤起注意(包括警告)的
内容。在图示中或图示附近标有具体的
注意内容(左图之例为当心触电)。
EF符号表示禁止(不允许进行的)的
行为。在图示中或图示附近标有具体的
禁止内容(左图之例为禁止拆解)。
c
D符号表示强制执行(必需进行)的
行为。在图示中或图示附近标有具体的
强制执行内容(左图之例为从插座上拔
下插头)。
A 警告(有关无线遥控器)
G禁止触碰 当产品由于跌落而破损使得
内部外露时,切勿用手触碰
外露部分。
否则将会造成触电、或由于破
损部分而导致受伤。
C立即委托
修理
C立即委托
修理
当发现产品变热、冒烟或发出
焦味等异常时,请立刻切断照
相机电源,并待本产品冷却后
将其从照相机上取下。
请委托尼康授权的维修服务中
心进行修理。
E禁止拆解
切勿自行拆解、修理或改装。
否则将会造成触电、发生故障
并导致受伤。
J禁止
接触水
切勿浸入水中或接触到水,
或被雨水淋湿。
否则将会导致起火或触电。
F禁止使用
切勿在有可能起火、爆炸的
场所使用。
在有丙烷气、汽油等易燃性气
体、粉尘的场所使用产品,将
会导致爆炸或火灾。
A妥善保管
切勿在婴幼儿伸手可及之处
保管主体部件以及婴幼儿可
能会放入口中的细小部件。
否则将会导致婴幼儿将部件吞
入口中。
意外吞入口中时,请立即向医
生咨询。
A 注意(有关无线遥控器)
I当心触电 切勿用湿手触碰。
否则将有可能导致触电。
A小心使用
安装在照相机上时,切勿长
时间直接接触。
使用期间某些部位的温度会升
高,有可能造成低温烫伤。
A妥善保管
切勿在婴幼儿伸手可及之处
保管本产品。
否则将有可能导致受伤。
A小心使用
携带本设备登入飞机时,在
飞机起飞、着陆时务必从照
相机上将其取下。
在飞行期间切勿使用无线功
能。在医院使用时务必遵守
医院的指示。
本产品发出的电磁波和无线电波
等可能会干扰飞机的电子系统或
医院的医疗设备。(在配备有无
线局域网络系统的飞机上时,可
能可以在飞机起飞及着陆以外的
时间段内使用无线功能。有关详
细信息,请咨询航空公司。)
A 注意(有关无线遥控器)
F禁止
使用时切勿用被褥遮盖、包
裹本产品。
否则将无法散热,使得外壳变
形,并导致火灾。
F禁止放置
切勿放置于封闭的车辆中、
直射阳光下或其它异常高温
之处。
否则将对内部零件造成不良影
响,并导致火灾。
A 危险(有关用于WR-T10的锂电池)
A危险
电池漏液进入眼内时,务必
立即用清水冲洗,并接受医
生治疗。
若置之不理则将导致损伤眼
睛。
A 警告(有关用于WR-T10的锂电池)
F禁止
切勿将电池投入火中或对电
池加热。
否则将导致漏液、发热或破
裂。
E禁止拆解
切勿使电池短路或拆卸电
池。
否则将导致漏液、发热或破
裂。
A警告
务必遵守电池上标有的警
告、注意事项。
否则将导致漏液、发热或破
裂。
A警告
切勿使用CR2032型号锂电池
以外的电池。
否则将导致漏液、发热或破
裂。
J禁止
接触水
切勿浸入水中或接触到水。
否则将导致漏液或发热。
A妥善保管
切勿在婴幼儿伸手可及之处
保管电池。
否则将会导致婴幼儿将电池
吞入口中。
意外吞入口中时,请立即向
医生咨询。
A警告
切勿装错电池正(+)、负
(-)极。
否则将导致漏液、发热或破
裂。
A警告
废弃电池时,务必使用胶带
等将电极部分绝缘。
接触其他金属将导致发热、破
裂或起火。请根据当地法规进
行废弃处理。
A警告
电池漏液接触到皮肤或衣服
时,务必立即用清水冲洗。
若置之不理则将引起皮肤发
炎等症状。
注意事项
• 未经尼康公司的事先书面许可,对本说明书
之所有内容,不得以任何形式进行翻版、传
播、转录或存储在可检索系统内,或者翻译
成其它语言。
• 尼康公司保留可随时更改说明书内载之硬件
及软件规格的权利,而无须事先通知。
• 尼康公司对因使用本产品而引起的损害不承
担法律责任。
• 本公司已竭尽全力来确保说明书内载之信息的
准确性和完善性。如果您发现任何错误或遗
漏,请向您所居住地区的尼康维修服务中心
(另附地址)反映,对此,我们深表感谢。
• 运输产品时,请在包装箱内装入足够多的缓
冲材料,以减少(避免)由于冲击导致产品
损坏。
本产品包含由美国研发的加密软件,受美国
出口管理规章的控制,不能出口或再出口至
任何美国禁运货物的国家。目前禁运货物的
国家包括:古巴、伊朗、朝鲜、苏丹及叙利
亚。
随附配件
本产品如下所示成套出售。本说明书假定您
所购买的是WR-R10、WR-T10和WR-A10。
WR-R10
WR-R10
WR-T10
WR-T10
WR-A10
WR-A10
❑
收纳盒 ❑
保修卡
❑
用于WR-R10的
吊带
❑
用于WR-T10的
吊带
❑ CR2032 3V锂电池*
❑
使用说明书
(本说明书)
WR-R10
WR-R10
❑
收纳盒 ❑
保修卡
❑
用于WR-R10的
吊带
❑
使用说明书
(本说明书)
WR-T10
WR-T10
❑
用于WR-T10的
吊带
❑
保修卡
❑ CR2032 3V锂电池*
❑
使用说明书
(本说明书)
WR-A10
WR-A10
❑
使用说明书
(本说明书)
*
首次使用之前请先去除WR-T10的绝缘片。
遥控器部件(图1)
WR-R10
WR-R10
1
红色LED 2
通道选择器
3
绿色LED 4
配对按钮
5
吊带孔
WR-T10
WR-T10
6
快门释放按钮 7
Fn按钮
8
吊带孔 9
红色LED
0
通道选择器 a
配对按钮
WR-A10
WR-A10
b
释放按钮 c
安装标记
A WR R10吊带
如图2中所示将WR-R10系在照相机背带上可
防止WR-R10丢失或跌落。
A 更换CR2032 3V锂电池(图3)
当WR-T10的LED开始变暗时请更换电池。
将指甲卡入电池舱锁闩后方并打开电池舱
(1)。请确保电池插入方向正确(3)。
使用WR-R10(收发器)
带配件端子的照相机(图4-a):如照相机上
的标记(1)和WR-R10上的标记(3)所示
方向连接WR-R10。
带10针遥控端子的数码照相机(图4-b):
如适配器上的标记(1)和WR-R10上的标
记(3)所示方向安装WR-A10 WR适配器
(1),然后使WR-A10上的安装标记( )
与端子上的@标记对齐,将组合体连接至10
针遥控端子(2)。拧紧WR-A10的锁定螺丝
(3)。
带10针遥控端子的胶卷照相机(图5):若
端子位于照相机前部,请取下镜头或照相机
机身盖(1)。将安装标记( )与端子
上的标记对齐以安装WR-A10(2)。拧紧
WR-A10的锁定螺丝(3)后,旋转WR-A10
(4),然后如适配器上的标记(1)
和WR-R10上的标记(3)所示方向安装
WR-R10(5)。
注意:请确认连接器插入方向正确;切勿用
力过度或斜着插入连接器。请注意,WR-R10
不能用于某些配件。用力过度或斜着插入连
接器可能会损坏照相机或配件。
若要取下WR-R10,请以相反顺序执行以上
步骤。若要取下WR-A10,请按下释放按钮
(图1-b),同时从WR-R10上滑出适配器。
A Fn按钮
当WR-R10安装于下列照相机时,WR-T10上
的Fn按钮将执行当前指定给照相机Fn按钮的
功能。有关详细信息,请参阅照相机的说明
书。
• D4 • D800/800E
使用WR-T10(传输器)
WR-T10上的快门释放按钮将执行与半按和完
全按下照相机快门释放按钮时相同的功能。
有关详细信息,请参阅照相机的说明书。
A 通道选择与配对
若照相机无法对WR-T10上的快门释放按钮作
出反应,请按照下文所述找到对应通道并配
对设备以重新建立WR-T10与接收器之间的连
接。
1 将装置设为相同通道。
将两个装置的通道选择器
设为相同通道(5、10或
15)。位于不同通道的设
备无法进行配对,而配对
的两者必须都设为相同通
道时才能一起使用。
2 配对设备。
开启照相机后,将两个设备靠近放置,然
后同时按下两者的配对按钮。按住按钮直
至WR-R10上的红色和绿色LED接连忽明忽
灭,这样即表示配对完成。
若要删除配对数据,请开启照相机并按住
WR-R10的配对按钮约3秒直至绿色LED快速闪
烁,然后在绿色LED停止闪烁之前快速按两下
配对按钮。绿色和红色LED同时闪烁两次即表
示所有配对数据均已删除。
控制多台照相机
使用多个WR-R10组件(每台独立照相机上各
安装一个)时有以下选项可用。
使用WR-T10(同步释放)
若WR-R10组件已配
对且设为与WR-T10相
同的通道,完全按下
WR-T10上的快门释放
按钮可同步释放所有
照相机上的快门。
同步多台照相机(同步释放)
您可使用安装在带10
针遥控端子的照相机
上的WR-R10控制多
台远程照相机上的
WR-R10组件。
1 安装WR R10组件。
按照“使用WR-T10(收发器)”中所述将
WR-R10组件安装至主照相机(带10针遥控
端子的任一照相机)及所有远程照相机。
2 将所有组件设为相同通道。
3 配对照相机。
开启照相机,然后按下主照相机和任一远
程照相机上WR-R10的配对按钮。按住按钮
直至红色和绿色LED接连忽明忽灭,这样即
表示配对完成。请重复步骤直至主照相机
与所有远程照相机完成配对。
4 拍摄照片。
当完全按下主照相机上的快门释放按钮
时,所有照相机上的快门都将释放。
多个通道
通过配对后为每组中的照相机选择不同通
道,然后更改WR-T10或主WR-R10的通道以
仅控制所选通道上的远程照相机,您可将远
程照相机最多分成3组。
15CH
15CH
15CH
10CH
10CH
10CH
5CH
5CH
5CH
使用时的注意事项
• 为防止发生故障,请确保WR-R10组件安装
正确。
• 照相机处于遥控(ML-L3)释放模式时,照
相机和WR-T10上的快门释放按钮无法使用。
• 不使用时请断开WR-R10组件的连接。若
将照相机置于背包中携带或者在安装有
WR-R10时通过背带携带照相机,当其受到
强烈碰撞或震动时将可能会损坏照相机或
WR-R10。
A 兼容性
无线遥控器无法用于D1系列照相机和
MB-D100。它们可用于F100、D2X、D2Xs、
D2Hs和D200,但是用于F100时,快门在自拍
模式下无法释放,而用于D2X、D2Xs、D2Hs
和D200时,若安装后激活了曝光测光,将会
短暂显示O。
技术规格
无线遥控器WR-R10
类型
类型 WR-R10
支持的照相机
支持的照相机 带10针遥控端子或配件端子
的单镜反光照相机
无线
无线
通道
通道 5(2.425GHz)、
10(2.450GHz)、
15(2.475GHz)
范围(视线)
范围(视线)
*
* WR-R10之间约50m
配对
配对 最多可与64个设备配对
电量消耗
电量消耗 最大约100mW
操作环境
操作环境 • 温度:-20°C至+50°C
• 湿度:85%或以下(不结
露)
近似尺寸
近似尺寸
(宽×高×厚)
(宽×高×厚)
31.5×26.0×10.0mm
重量
重量 约6g,仅主体
无线遥控器WR-T10
类型
类型 WR-T10
无线
无线
通道
通道 5(2.425GHz)、
10(2.450GHz)、
15(2.475GHz)
范围(视线)
范围(视线)
*
* 从WR T10至WR R10约20m
电源
电源 一颗CR2032 3V锂电池
电池持久力
电池持久力 最多约释放10000次
操作环境
操作环境 • 温度:-20°C至+50°C
• 湿度:85%或以下(不结
露)
近似尺寸
近似尺寸
(宽×高×厚)
(宽×高×厚)
28.0×60.0×8.5mm
重量
重量 约12g,仅主体
*
在高度约1.2m的大致范围内;根据天气条件
以及有无障碍物而异
WR适配器WR-A10
类型
类型 WR-A10
近似尺寸
近似尺寸
(宽×高×厚)
(宽×高×厚)
26.5×32.0×23.5mm
重量
重量 约10g,仅主体
除非另有说明,否则所有数据均是假定使
用1颗新电池,在相机影像器材工业协会
(CIPA)指定的周围温度23±3°C时所测量。
在低温环境下范围可能会缩小且电池持久力
可能会降低。
有关操作环境的详细信息,请参阅照相机的
说明书,并请在照相机和本产品两者中较狭
窄的操作温度范围内使用这些产品。
照相机及相关产品中有毒有害物质或元素的名称、含量及环保使用期限说明
环保使用期限 部件名称
有毒有害物质或元素
铅
(Pb)
汞
(Hg)
镉
(Cd)
六价铬
(Cr(VI))
多溴联苯
(PBB)
多溴二苯醚
(PBDE)
1 无线发射器外壳和镜筒(塑料制)
2 电子表面装配元件(包括电子元件) ×
3 机械元件,包括螺钉、包括螺母和垫圈等
4 非电子附件(盖子、罩子、带子、遮光罩、光学附件、
转接环、盒子等)
注:
有毒有害物质或元素标识说明
表示该有毒有害物质或元素在该部件所有均质材料中的含量均在SJ/T11363-2006标准规定的限量要求以下。
× 表示该有毒有害物质或元素至少在该部件的某一均质材料中的含量超出SJ/T11363-2006标准规定的限量要求。但是,以现有的技术条件
要使照相机相关产品完全不含有上述有毒有害物质极为困难,并且上述产品都包含在《关于电气电子设备中特定有害物质使用限制指令
2002/95/EC》的豁免范围之内。
环保使用期限
此标志的数字是基于中华人民共和国电子信息产品污染控制管理办法及相关标准,表示该产品的环保使用期限的年数。
请遵守产品的安全及使用注意事项,并在产品使用后根据各地的法律、规定以适当的方法回收再利用或废弃处理本产品。
进口商:尼康映像仪器销售(中国)有限公司
(上海市西藏中路268号来福士广场50楼01-04室,200001)
尼康客户支持中心服务热线:4008-201-665(周一至周日9:00–18:00)
http://www.nikon.com.cn/
在日本印刷
出版日期 2012年9月1日