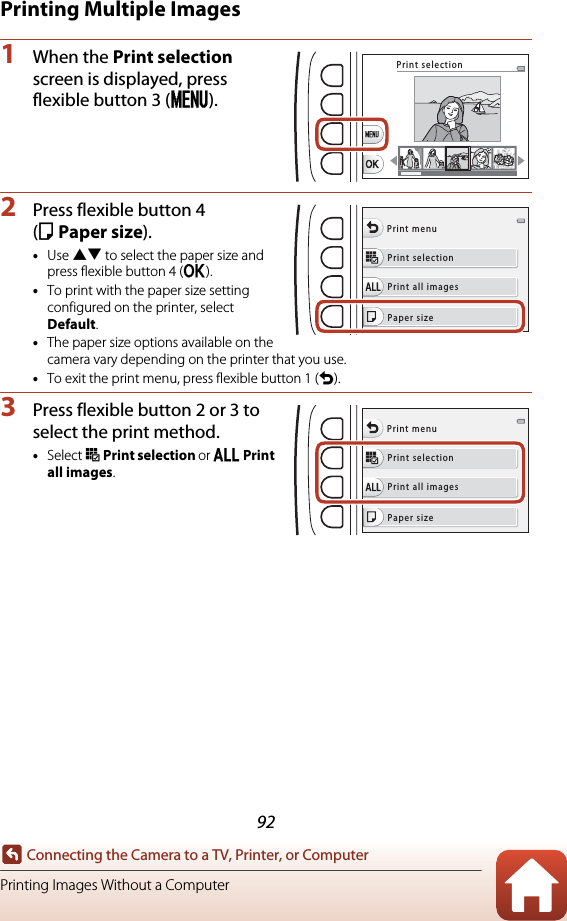
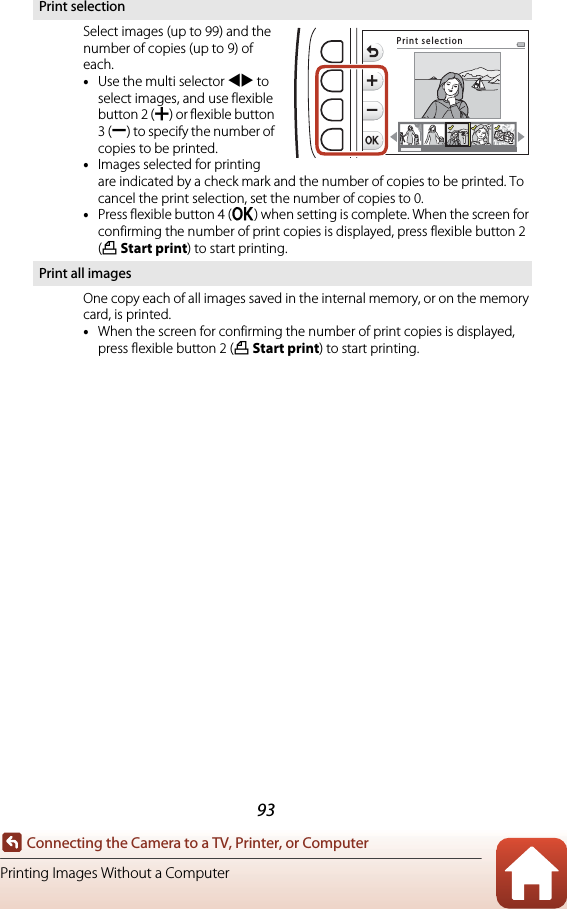
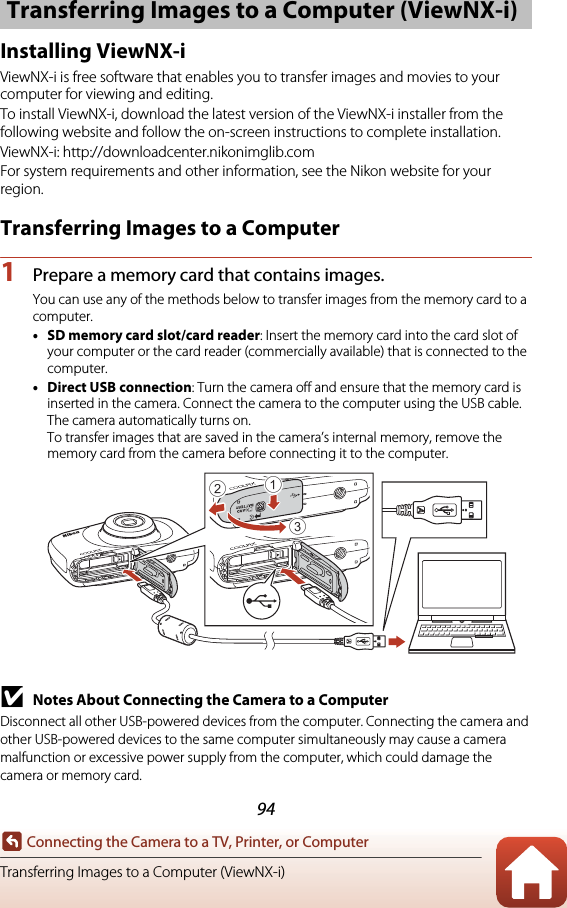
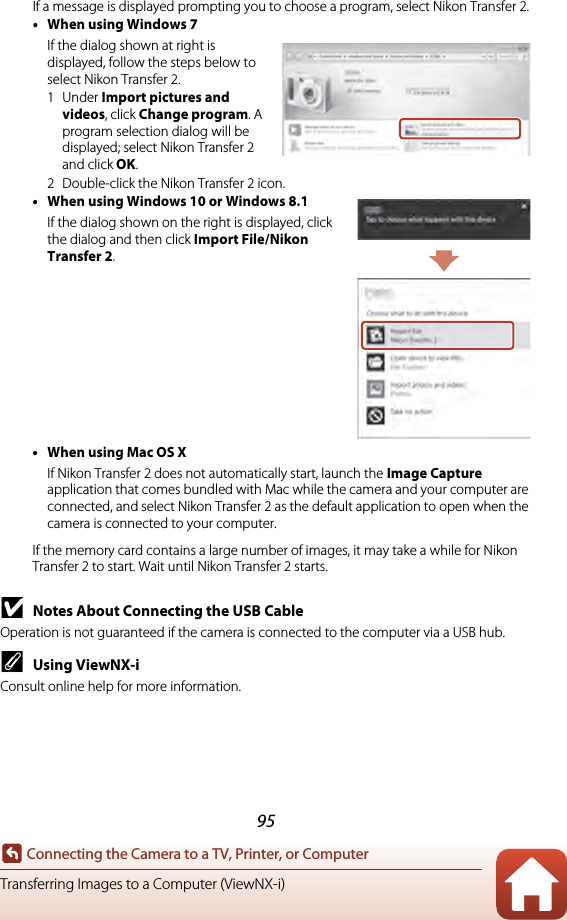
Nikon 9152EB Digital Camera User Manual 3
Nikon Corporation Digital Camera Users Manual 3
UserManual.wiki
>
Nikon
>
9152EB User Manual
>
Users Manual-3
Contents
1.
Users Manual-1
2.
Users Manual-2
3.
Users Manual-3
Users Manual-3
Navigation menu
Upload a User Manual
Namespaces
Wiki Guide
HTML
PDF
Info
Views
User Manual
Discussion / Help
Navigation


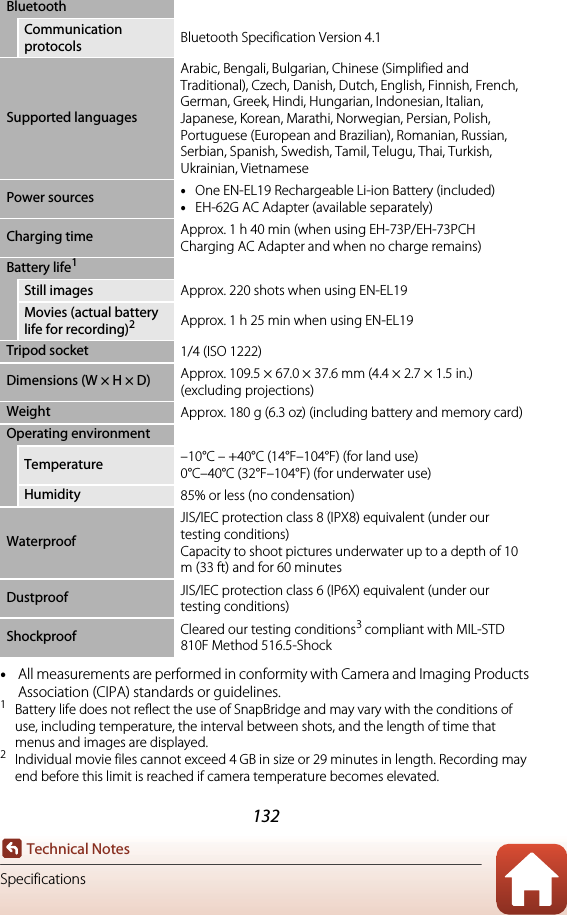
![130Technical NotesSpecificationsNikon COOLPIX W100 Digital CameraSpecificationsType Compact digital cameraNumber of effective pixels 13.2 million (Image processing may reduce the number of effective pixels.)Image sensor 1/3.1-in. type CMOS; approx. 14.17 million total pixelsLens NIKKOR lens with 3× optical zoomFocal length 4.1–12.3 mm (angle of view equivalent to that of 30–90 mm lens in 35mm [135] format)f/-number f/3.3–5.9Construction 6 elements in 5 groupsDigital zoom magnificationUp to 4× (angle of view equivalent to that of approx. 360 mm lens in 35mm [135] format)Vibration reduction Electronic VR (movies)Motion blur reduction Electronic VR (still images)Autofocus (AF) Contrast-detect AFFocus range•[W]: Approx. 5 cm (2 in.)–∞, [T]: Approx. 50 cm (1 ft 8 in.)–∞•Shoot close-ups, Photograph food, Shoot under water, Mirror, Add a bubble effect, Add a neon effect, Add a cartoon effect, Take soft pictures, Create a diorama effect, Shoot a movie miniature, Highlight colors: Approx. 5 cm (2 in.) (wide-angle position)–∞(All distances measured from center of front surface of the protective glass)Focus-area selection Center, face detection, target finding AFMonitor 6.7 cm (2.7-in.), approx. 230k-dot, TFT LCD with anti-reflection coating and 5-level brightness adjustmentFrame coverage (shooting mode)Approx. 96% horizontal and vertical (compared to actual picture)Frame coverage (playback mode)Approx. 100% horizontal and vertical (compared to actual picture)](https://usermanual.wiki/Nikon/9152EB.Users-Manual-3/User-Guide-2921887-Page-39.png)
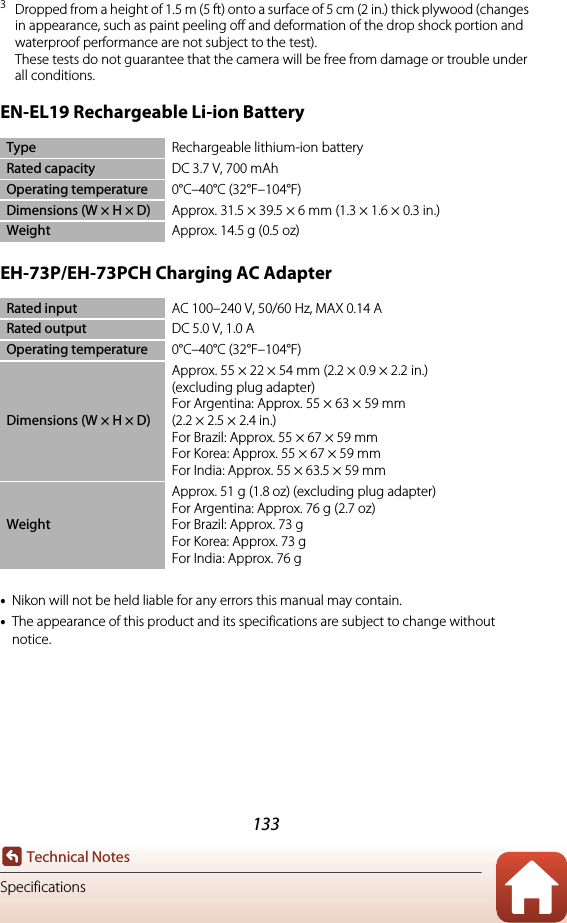
![131Technical NotesSpecificationsStorageMedia Internal memory (approx. 25 MB), SD/SDHC/SDXC memory cardFile system DCF and Exif 2.3 compliantFile formatsStill images: JPEGVoice messages: WAVMovies: MP4 (Video: H.264/MPEG-4 AVC, Audio: AAC stereo)Image size(photo size)•13 megapixels [4160 × 3120]•4 megapixels [2272 × 1704]•2 megapixels [1600 × 1200]ISO sensitivity (Standard output sensitivity)ISO 125–1600ExposureMetering mode Matrix, center-weighted (digital zoom less than 2×), spot (digital zoom 2× or more)Exposure control Programmed auto exposure and exposure compensation (–2.0 – +2.0 EV in steps of 1 EV)Shutter Mechanical and CMOS electronic shutterSpeed •1/2000–1 s•4 s (Choose a style is set to Photograph fireworks)Aperture Electronically-controlled ND filter (–2 AV) selectionRange 2 steps (f/3.3 and f/6.6 [W])Self-timer 10 s, smile timerFlashRange (approx.)(ISO sensitivity: Auto)[W]: 0.3–3.1 m (1–10 ft)[T]: 0.6–1.7 m (2 ft–5 ft 6 in.)Flash control TTL auto flash with monitor preflashesInterfaceUSB connectorMicro-USB connector (do not use any USB cable other than the UC-E21), Hi-Speed USB•Supports Direct Print (PictBridge)HDMI output connector HDMI micro connector (Type D)Wi-Fi (Wireless LAN)Standards IEEE 802.11b/g/n (standard wireless LAN protocol)Operating frequency 2412–2462 MHz (1–11 channels)Authentication Open system, WPA2-PSK](https://usermanual.wiki/Nikon/9152EB.Users-Manual-3/User-Guide-2921887-Page-40.png)