Nortek Security and Control 2GIG TS1Y Remote Keypad User Manual 2GIG TS1 Install Instructions print
2GIG Technologies, Inc. Remote Keypad 2GIG TS1 Install Instructions print
User Manual
INSTALL INSTRUCTIONS
This document describes the basic installaon informaon for the 2GIG-
2GIG-TS1 and the steps necessary to “pair” (or learn in) the Touchscreen
Wireless Keypad to the Control Panel.
Box Contents
• 2GIG-TS1
• AC Power Supply
• AC Power Supply Bracket
• Screws and anchors
TIP: The box contents will vary depending on whether the 2GIG-TS1
was purchased as part of a kit or not.
BEFORE YOU BEGIN
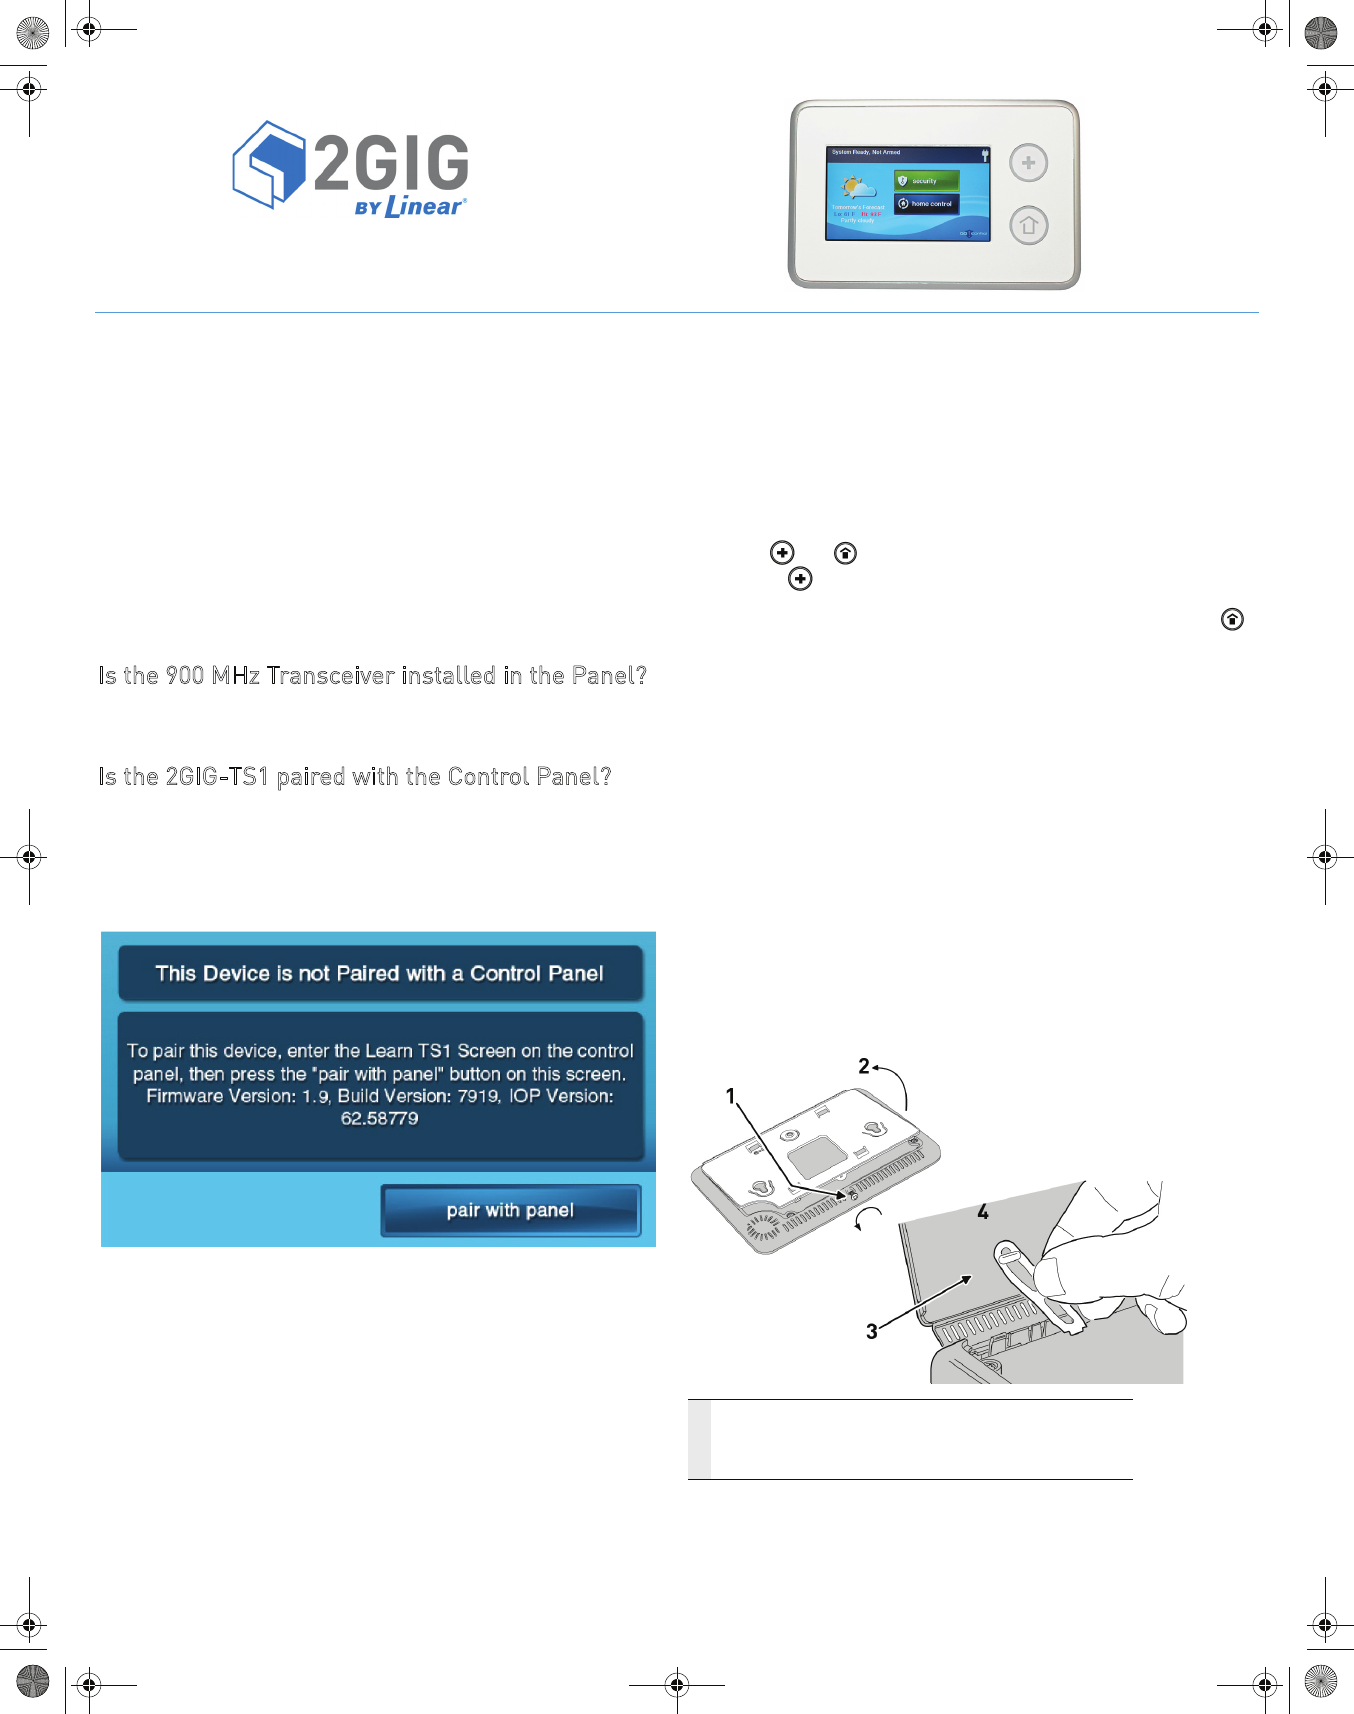
Is the 900 MHz Transceiver installed in the Panel?
For the 2GIG-TS1 to communicate with the Control Panel, the 900 MHz
Transceiver (2GIG-XCVR2) must be already be installed in the Control
Panel.
Is the 2GIG-TS1 paired with the Control Panel?
The 2GIG-TS1 and the Control Panel have to be paired to communicate
with each other.
To check for to see if the 2GIG-TS1 is paired with the
Control Panel
Upon power up, the 2GIG-TS1 displays the following screen:
2GIG-TS1 PRODUCT OVERVIEW
The Model 2GIG-2GIG-TS1 Touch Screen Wireless Keypad is a remote
control device that offers the funconality of a system keypad but also
extends all user control of the 2GIG Control panel to other locaons in a
user’s home. Using the 2GIG-TS1, users can control lights, thermostat
and door locks and see the status of every zone in their home using the
exact same and familiar interface found on the Control Panel. The keypad
is designed for indoor use only.
IMPORTANT: Not for UL 985 installaons.
The panel and buons serve as controls as well as indicators.
Pressing the (Emergency) buon displays emergency icons on the
display for Panic, Fire, and Emergency alarm acvaon (each has
programmable opons and can be enabled or disabled). Pressing the
(Home) buon changes the system display to the Home Screen. The
keypad is powered from a plug-in power supply. The 2GIG-TS1
exchanges informaon through a secure 2-way wireless connecon with
the Control Panel.
NOTE: Before using the 2GIG-TS1 it must be “learned” into the
Control Panel.
Mounting Tools
Some special tools may be required to mount the 2GIG-TS1 onto the
wall:
• Screwdriver
• Pencil
• Wire stripper
• Staple gun
• Drywall saw (or equivalent)
• Ladder
PREPARING THE KEYPAD
NOTE: Check that the 2GIG-TS1 Keypad is funconing before
selecng a locaon for the Keypad.
1Remove the screw.
2Flip open the back cover of the 2GIG-TS1.
3Disconnect the hanging strap.
4Use the back cover as the mounting plate.
2GI
Touch Screen Wireless Keypad
For Remote Control of the 2GIG Security System
INSTRUCTIONS, INSTALL 2GIG-TS1 P/N: 77000090-001 REV D - INK: BLACK - MATERIAL: 20 LB MEAD BOND - SIZE 8.5000” X 11.0000 - SCALE 1 - 1 (FIRST OF FIVE PAGES) PRINTING FRONT AND BACK FOLDING: FOLD TO FIT IN BOX
2©2013 2GIG Technologies Inc. All Rights Reserved.
SELECTING A LOCATION FOR THE KEYPAD
1MakesurethatACPowerisavailablenearby.
TIP: Becarefulofstuds,electricalwiresandpipesinthewall.
2Usethekeypad’sbackcoverasatemplatetomarkthescrewholes
withapencilandthepower(wiring)accesshole.
3Useadrywallsawtocutthewiringhole.
Mounting the Keypad
1Usethe3screwsandanchorsthataresuppliedtoattachthe
mountingplatetothewall.
2Route18AWGwirebetweenthekeypadandthelocationofthe
powersupply.
Wire Size and Length
Toensureproperoperation,DoNotexceedthefollowingmaximum
lengthforthewiresizeinstalled:
Toensurethattheappropriatewiresizeandlengthareinstalled,
measurethevoltagebetweenthepowerconnectionterminalsatthe
backofthecontrolpanel.Thevoltagemeasuredmustnotfallbelow11
voltsDCornuisance“ACPowerLoss”messagesmaybedisplayedand
reported.
NOTE: IntheUnitedStates,wiringroutedinsidewalls,ceilings,and
floorsmustcomplywithrequirementsoftheNationalElectrical
Code,ANSI/NFPA70andlocalbuildingcodes.Forwiringfrom
theoutputofthe2GIGclassIIpowersupply,wiringratedCL2,
CL2X,CL2R,orPLTCisrecommendedtosatisfythese
requirements.Ifthiswiringisinstalledinanairplenum(space
usedforenvironmentalairexchange)itmustberatedCL2P
(plenumrated).
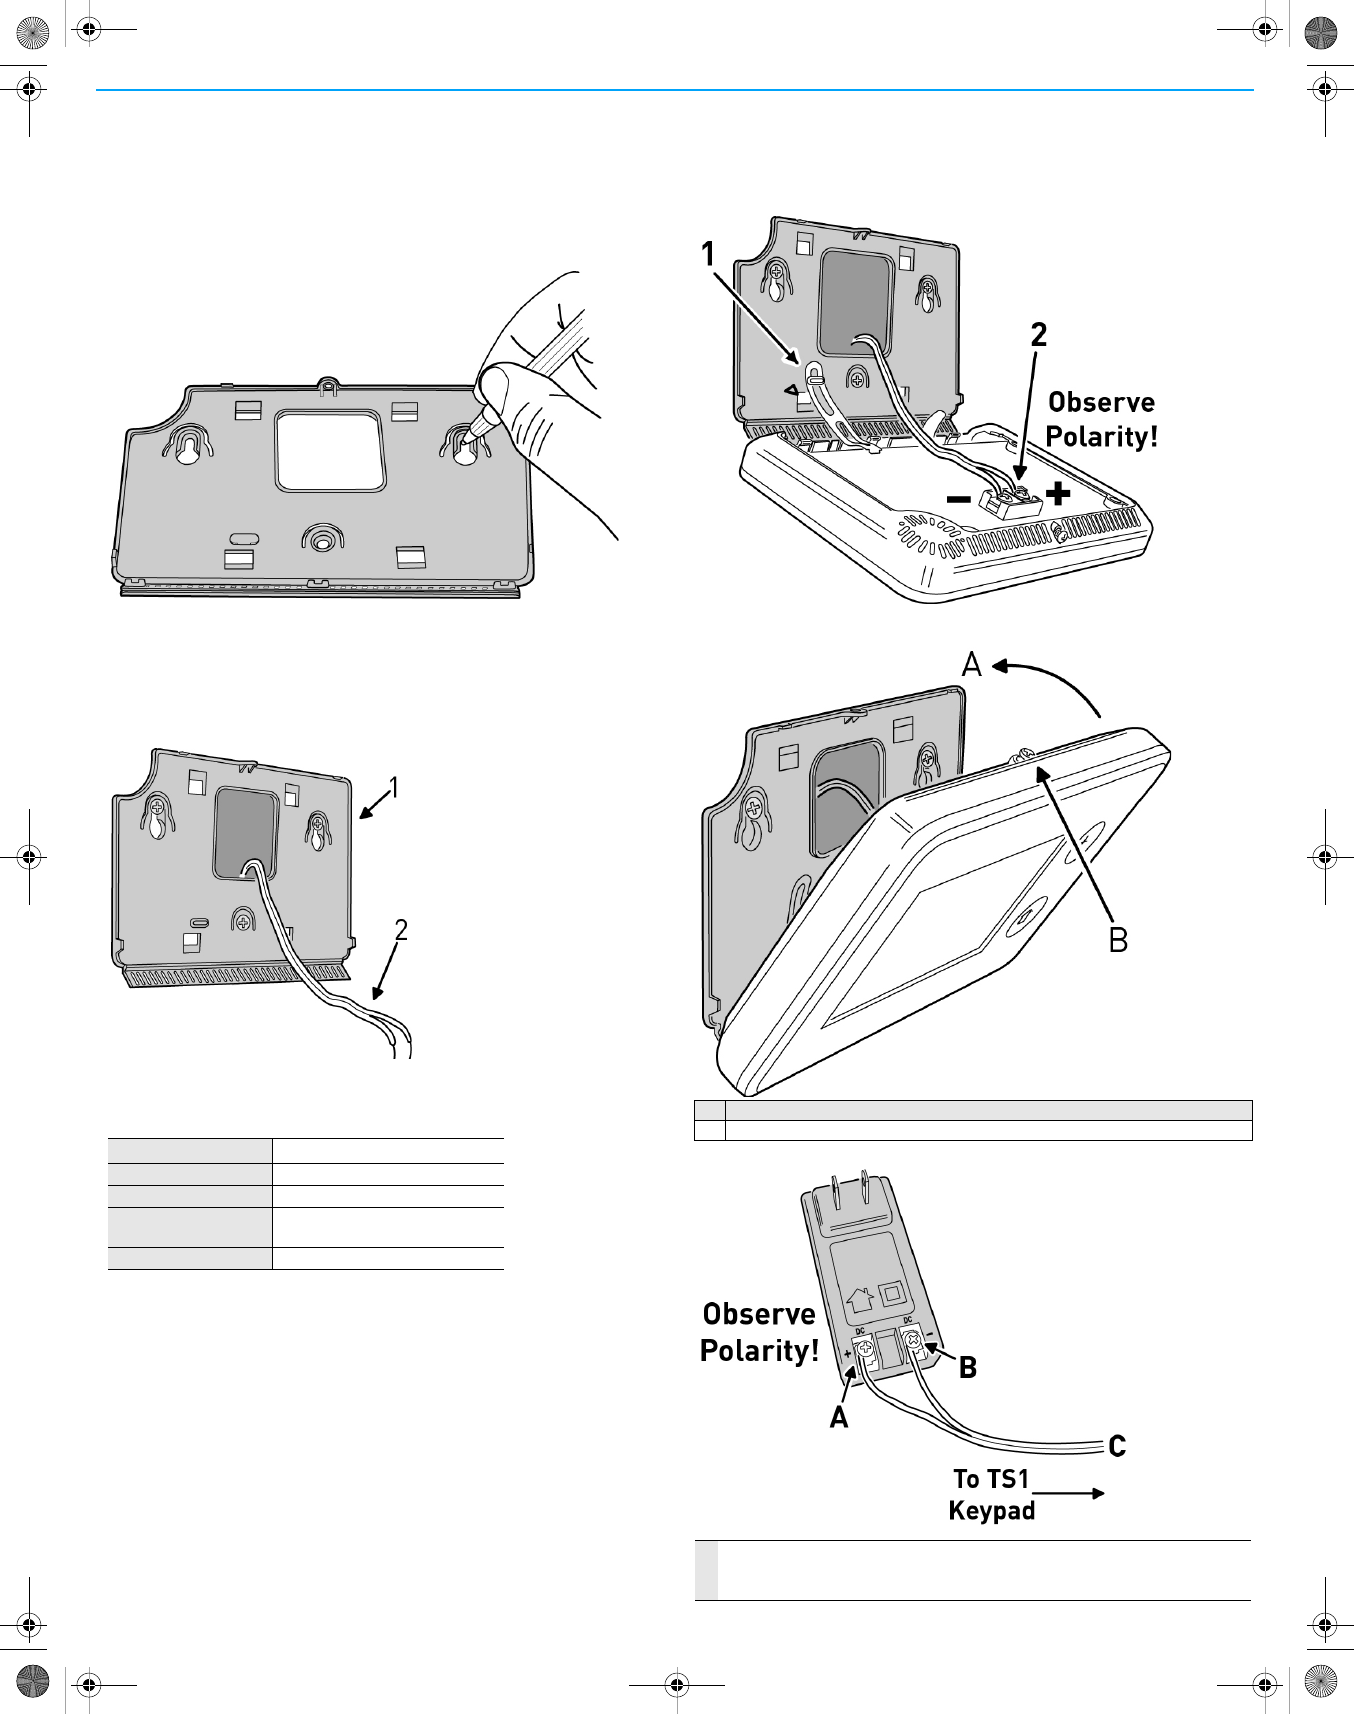
Connect the Power Wires to the Keypad
1Re‐connectthehangingstrap.
2Use#6insulatedspadeterminals(notsupplied)toconnectwires
fromthepowersupplytothekeypad.
3Closethekeypad.
4Connectthepowerwirestothepowersupply.
Wire Size Maximum Length
22AWG 55feet(16.8meters)
20AWG 85feet(25.9meters
22AWG2‐pairs
(19AWGequivalent)
110feet(33.5meters)
18AWG 135feet(41.1meters)
ASnap case closed.
BTighten case screw.
ALeft Terminal 14 VDC(+)
BRight Terminal 14 VDC (-)
C18 AWG/2-Conductor
©2013 2GIG Technologies Inc. All Rights Reserved. 3
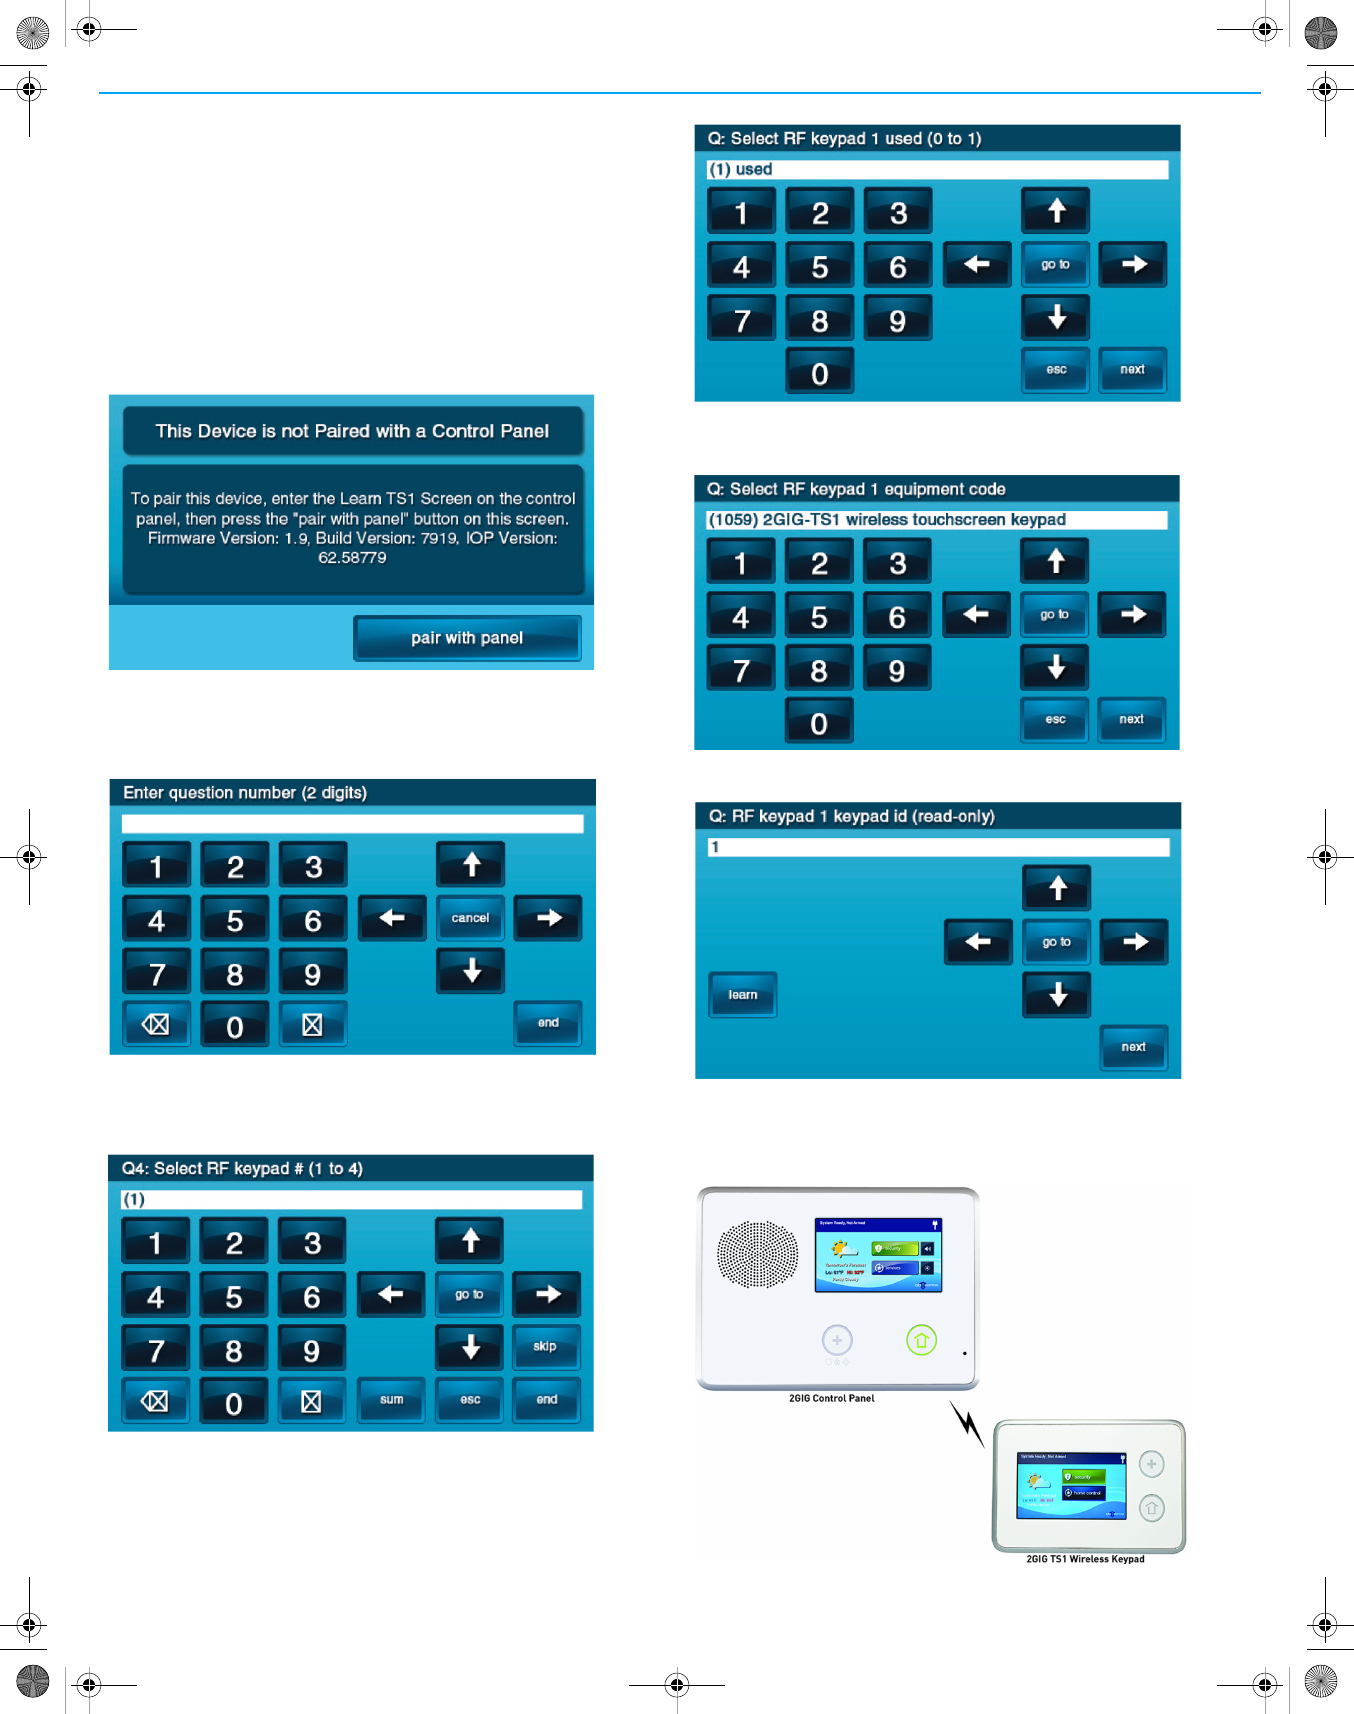
LEARNING/PAIRING THE KEYPAD WITH THE
CONTROL PANEL
1MakesurethattheControlPanelhaspowerusingthesuppliedAC
adapterandconfirmthattheadapterisconnected.
WARNING: AControlPanelwithoutthe900MHzTransceiver
installedcannotcommunicatewiththe2GIG‐TS1.
2Makesurethatthe2GIG‐TS1haspowerfromthesuppliedAC
transformer.ConnecttheACadaptertothe2GIG‐TS1.Confirmthat
thewiresareconnectedusingthecorrectpolarity.
3Asthe2GIG‐TS1powersup,thefollowingmessageisvisibleonthe
display.
4FromtheControlPanel’sInstallerToolbox,selectSystem
Configuration.
5SelecttheGoTobutton.
6Togotoquestion4,enter04.
7SelecttheRFKeypadnumbertoassigntothe2GIG‐TS1.Usethe→
arrowtoselecttheRFKeypadnumber(1‐4).AfterselectingtheRF
Keypadnumber,pressthe↓arrowtostartconfiguringthespecific
parametersfortheRFKeypad.
8Pressthe→arroworpressthenumber1onthekeypadtogglethe
sengonthefirstquesonto“used”.Pressthe↓arrowtoconnue
configuringoptions.
9SettheRFKeypadEquipmentCodeto1059bypressingthe→arrow
until“(1059)2GIG-TS1 wireless touchscreen keypad"appears.
Pressthe↓arrowtoadvancetothenextopon.
10 Learnthe2GIG‐TS1intotheControlPanel.Aerpressingthe↓
arrowinthepreviousstep,theLearnbuttonappears.
INITIATING THE PAIRING PROCESS
InitiatethepairingprocessattheControlPanelbypressingtheLearn
button.
4©2013 2GIG Technologies Inc. All Rights Reserved.
1OntheControlPanelpresstheLearnbutton.
2Onthe2GIG‐TS1pressthePairwithPanelbutton.
TheControlPaneldisplaysthemessage:
Pairwith2GIG‐TS1.Initiatinglearningprocess.
Whenlearningiscomplete,boththe2GIG‐TS1andControlPanel
displaythemessage:
Thelearnoperationsucceeded.
2a TheControlPaneldisplaysthemessage:
Type:2GIG‐TS1WirelessKeypadID#:X
(whereXistheRFKeypadnumberconfiguredforthe2GIG‐TS1).
2b The2GIG‐TS1displays“NetworkID:xxxx”wherexxxxisaunique
hexadecimalnumberandakeypadID.Thehexadecimalnumber
isauniquenumberassociatedwiththeControlPanelthatyou
areusing.ThekeypadIDindicatesthekeypadthatyouare
learningintotheControlPanel.
2c Tocompletethelearningprocess,presstheOKbuttononboth
theControlPanelandthe2GIG‐TS1.
3Aftersuccessfullylearningthe2GIG‐TS1intotheControlPanel,press
the↓arrowtoexitthelearningmenu.
The2GIG‐TS1displaysamessageindicatingthatthesecuritysystem
istemporarilyinoperable.The2GIG‐TS1remainsinthisstatewhile
theControlPanelisinsystemconfiguration(programming)mode.
RepeatthestepsabovetolearninadditionalTS1s.
4Toexitprogramming,clickskipthenendandexit.Uponexit,the
ControlPaneltakesaseveralsecondstoreboot.
REMOVING A 2GIG-TS1 FROM A CONTROL
PANEL (UNLEARNING THE 2GIG-TS1)
Toremovea2GIG‐TS1fromaControlPanel’sconfigurationdothe
following:
1FromtheControlPanel,gotoInstallerToolbox/System
Configuration.
2SelecttheGoTobuttonandenter04.TheControlPaneldisplays
Q4:selectRFkeypad#(1to4).Selecttheconfigured2GIG‐TS1you
wishtoremoveandpressthe↓arrow.
3MarktheRFKeypadnumberselectedas“unused”bypressingthe→
arrow.Thisactiontogglesthesettingonthefirstquestionbetween
“used”and“unused.”Pressthe↓arrowtoadvancetothenext
option.
4Toexitprogramming,clickskipthenendandexit.Uponexit,the
paneltakesseveralsecondstoreboot.
RESETTING A 2GIG-TS1 TO FACTORY
DEFAULTS
Toresetthe2GIG‐TS1todefaultssothatitmaybeusedagainon
anotherControlPanel,dothefollowing:
1Whilepowercyclingthe2GIG‐TS1,holdboththe(Emergency)
andthe(Home)buttonsdownsimultaneouslyuntiltheylightup
(approximately20seconds).Whenbothbuttonslightup,the2GIG‐
TS1hassuccessfullybeenresettoalldefaultsettings.
The2GIG‐TS1displaysthemessage:
ThisDeviceisNotPairedwithaControlPanel.
SECRET DURESS BUTTON
TIP: ThelogoonthebottomcorneroftheHomeScreendoesnot
accesstheInstallerToolboxonthe2GIG‐TS1.
Ifauserpressesthelogoonthebottomcornerofthe2GIG‐TS1Home
Screen,theusercanentertheduresscodeonly.Installersmust
rememberthattheInstallerToolboxcanonlybeaccessedfromthe
ControlPanel.The2GIG‐TS1cannotaccesstheInstallerToolbox.
TIP: Althoughthereisadefaultmastercode:1111,thereisno
defaultduresscode.
Check to ensure that the 2GIG-TS1 firmware
version matches the Control Panel firmware
version
The2GIG‐TS1andtheControlPanelarerequiredtohavethesame
firmwareversiontofullycommunicatewitheachother(e.g.CPv1.10
and2GIG‐TS1v1.10).
1Fromboththe2GIG‐TS1andControlPanelHomeScreen,choose
Security/Menu/Toolbox.
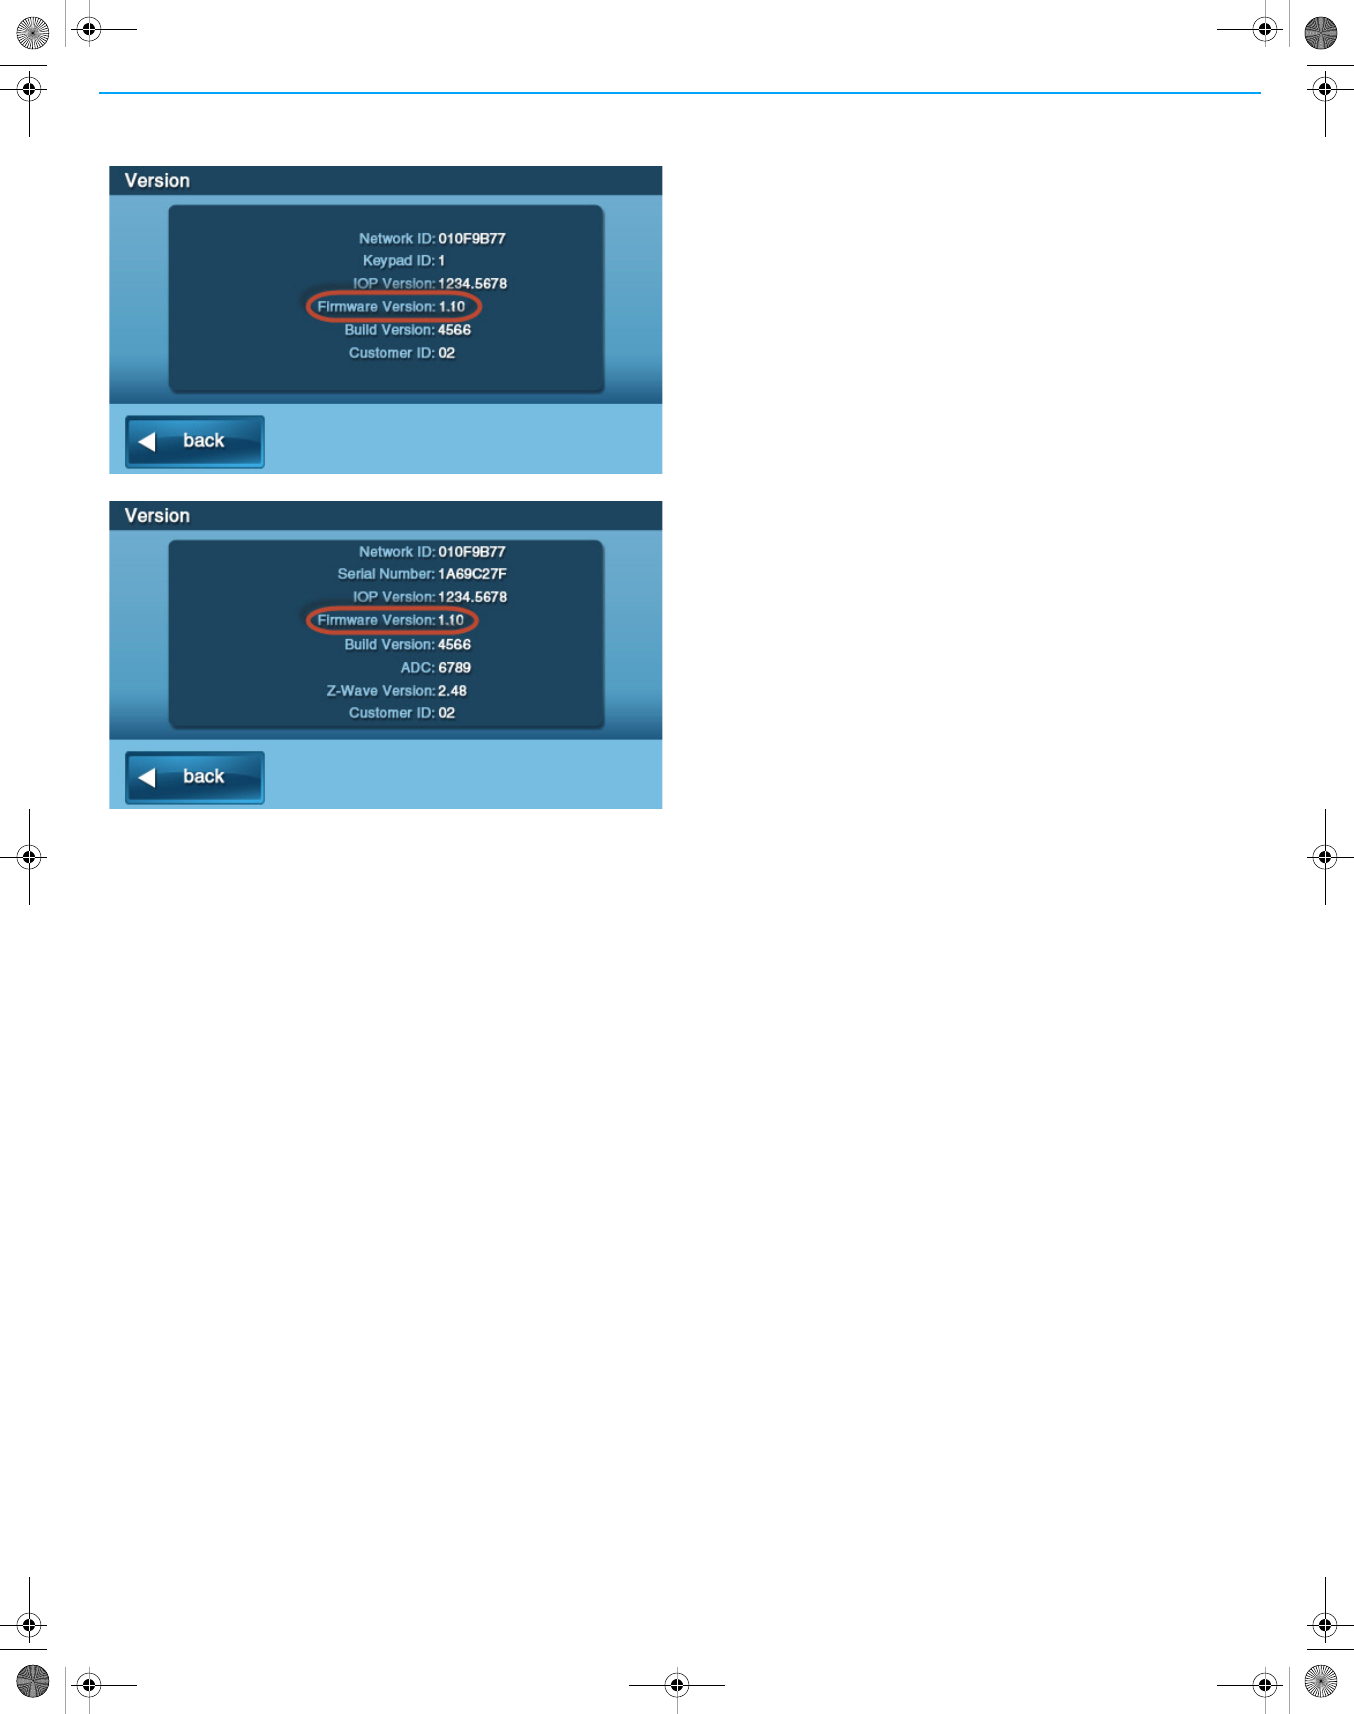
©2013 2GIG Technologies Inc. All Rights Reserved. 5
2FromtheToolboxScreen,usethe→arrowunlyouseetheVersion
Screen.
2GIG-TS1 Version Screen
Control Panel Version Screen
REGULATORY INFORMATION
Wireless Product Notice
Radiocontrolsprovideareliablecommunicationslinkandfillan
importantneedinportablewirelesssignaling;however,therearesome
limitationswhichmustbeobserved.
•ForU.S.installationsonly:Theradiosarerequiredtocomplywith
FCCRulesandRegulationsasPart15devices.Assuch,theyhave
limitedtransmitterpowerandthereforelimitedrange
(approximately400ft.).
•Areceivercannotrespondtomorethanonetransmittedsignalata
timeandmaybeblockedbyradiosignalsthatoccuronorneartheir
operatingfrequencies,regardlessofcodesettings.
• ChangesormodificationstothedevicemayvoidFCCcompliance.
• Infrequentlyusedradiolinksshouldbetestedregularlytoprotect
againstundetectedinterferenceorfault.
•Ageneralknowledgeofradioanditsvagariesshouldbegainedprior
toactingasawholesaledistributorordealer,andthesefactsshould
becommunicatedtotheendusers.
FCC NOTICE
ThisdevicecomplieswithPart15oftheFCCRules.Operationissubject
tothefollowingtwoconditions:
(1)Thisdevicemaynotcauseharmfulinterference,and
(2)Thisdevicemustacceptanyinterferencereceived,including
interferencethatmaycauseundesiredoperation.
Thisequipmenthasbeentestedandfoundtocomplywiththelimitsfor
ClassBDigitalDevice,pursuanttoPart15oftheFCCRules.Theselimits
aredesignedtoprovidereasonableprotectionagainstharmful
interferenceinaresidentialinstallation.Thisequipmentgeneratesand
canradiateradiofrequencyenergyand,ifnotinstalledandusedin
accordancewiththeinstructions,maycauseharmfulinterferenceto
radiocommunications.However,thereisnoguaranteethatinterference
willnotoccurinaparticularinstallation.Ifthisequipmentdoescause
harmfulinterferencetoradioortelevisionreception,whichcanbe
determinedbyturningtheequipmentoffandon,theuserisencouraged
totrytocorrecttheinterferencebyoneormoreofthefollowing
measures.
•Reorientorrelocatethereceivingantenna
•Increasetheseparationbetweentheequipmentandreceiver
• Connecttheequipmentintoanoutletonacircuitdifferentfromthat
towhichthereceiverisconnected
•Consultthedealeroranexperiencedradio/TVtechnicianforhelp
Anychangesormodificationsnotexpresslyapprovedbytheparty
responsibleforcompliancecouldvoidtheuser’sauthoritytooperate
theequipment.
Leschangementsoumodificationsnonapprouvésexpressémentparla
partieresponsabledelaconformitépourraitannulerl'autoritéde
l'utilisateuràfairefonctionnerl'équipement.
Industry Canada Notices
ThisdevicecomplieswithIndustryCanadalicence‐exemptRSS
standard(s).Operationissubjecttothefollowingtwoconditions:(1)this
devicemaynotcauseinterference,and(2)thisdevicemustacceptany
interference,includinginterferencethatmaycauseundesiredoperation
ofthedevice.
LeprésentappareilestconformeauxCNRd'IndustrieCanadaapplicables
auxappareilsradioexemptsdelicence.L'exploitationestautoriséeaux
deuxconditionssuivantes:(1)l'appareilnedoitpasproduirede
brouillage,et(2)l'utilisateurdel'appareildoitacceptertoutbrouillage
radioélectriquesubi,mêmesilebrouillageestsusceptibled'en
compromettrelefonctionnement.
Repairstocertifiedequipmentshouldbemadebyanauthorized
Canadianmaintenancefacilitydesignatedbythesupplier.Anyrepairsor
alterationsmadebytheusertothisequipment,orequipment
malfunctions,maygivethetelecommunicationscompanycauseto
requesttheusertodisconnecttheequipment.
Usersshouldensurefortheirownprotectionthattheelectricalground
connectionsofthepowerutility,telephonelinesandinternalmetallic
waterpipesystem,ifpresent,areconnectedtogether.Thisprecaution
maybeparticularlyimportantinruralareas.
WARNING: Usersshouldnotattempttomakesuchconnections
themselves,butshouldcontacttheappropriateelectric
inspectionauthority,orelectrician,asappropriate.
Operating and Storage Temperature
TherecommendedstoragetemperatureforallTo u c hScreensis‐10°Cto
60°C(14°Fto140°F).
ForoptimalTouchScreenuse,operationaltemperatureis0°Cto49°C
(32°Fto120°F).
LIMITED WARRANTY
This2GIGTechnologiesproductiswarrantedagainstdefectsinmaterial
andworkmanshipfor1year.Thiswarrantyextendsonlytowholesale
customerswhobuydirectfrom2GIGTechnologiesorthrough2GIG
Technologies’normaldistributionchannels.2GIGTechnologiesdoesnot
warrantthisproducttoconsumers.Consumersshouldinquirefromtheir
installingdealerastothenatureofthedealer’swarranty,ifany.
Therearenoobligationsorliabilitiesonthepartof2GIGTechnologies
forconsequentialdamagesarisingoutoforinconnectionwithuseor
performanceofthisproductorotherindirectdamageswithrespectto
lossofproperty,revenue,orprofit,orcostofremoval,installation,or
reinstallation.Allimpliedwarrantiesforfunctionality,arevalidonlyuntil
thewarrantyexpires.This2GIGTechnologiesWarrantyisinlieuofall
otherwarrantiesexpressedorimplied.
For technical support in the USA and Canada:
855‐2GIG‐TECH(855‐244‐4832)
Email:techsupport@2gig.com
Internet:dealer.2gig.com
Visitwebsitefortechnicalsupporthoursofoperation
For technical support outside of the USA and Canada:
Contactyourregionaldistributor
Visitdealer.2gig.comforalistofdistributorsinyourregion.
PN77‐000090‐001Rev.D