Nortek Security and Control 00122 Life Shield Keypad User Manual
Nortek Security & Control LLC Life Shield Keypad
UserManual.wiki
>
Nortek Security and Control
>
00122 User Manual
User Manual
Navigation menu
Upload a User Manual
Namespaces
Wiki Guide
HTML
PDF
Info
Views
User Manual
Discussion / Help
Navigation
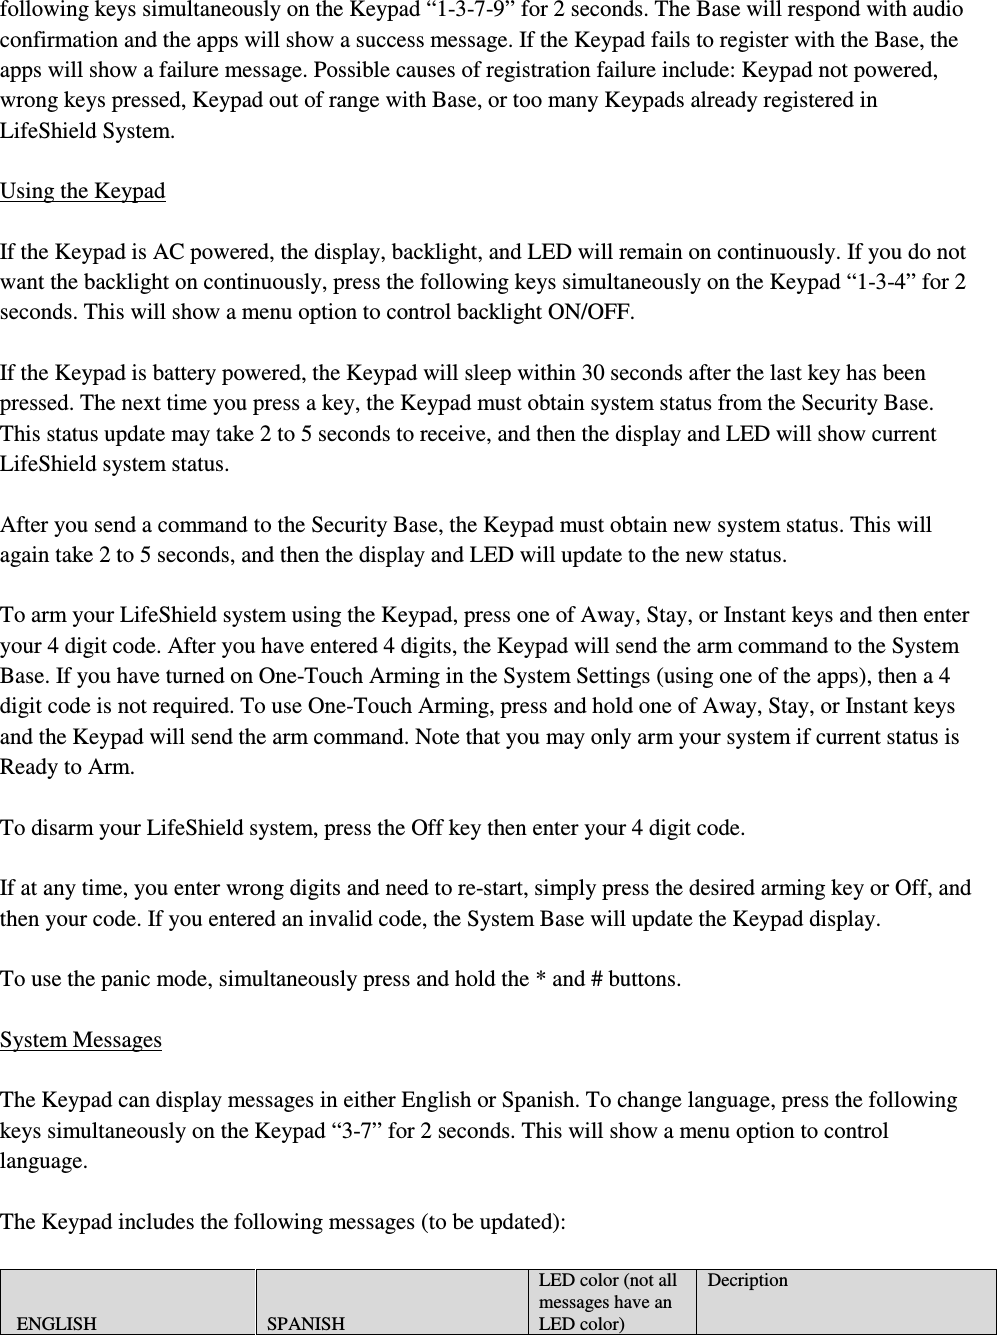
![the table stand into the back housing. Then apply pressure to the bottom tabs until the bottom tabs can be inserted into the bottom housing. For wall mount, first consider whether you plan on using the AC power adaptor. If using the AC power adaptor, next consider how you plan to route the cord. It may be routed through the wall or hang down the wall. (a) If through the wall, the cord must be routed through the opening in the back housing. In this case, first make your hole in the wall at the desired height. Mount the back housing to the wall with the tabs up and the snap down, using the screws provided, aligning the holes in the wall and the back housing. (figure 4). Route the cord through the wall and back housing, and insert the power connector into the plug on rear of Keypad. (b) If down the wall, the cord is routed through the channel on rear of Keypad. Next attach Keypad to the back housing by first inserting the tabs at top of the mounting plate and then re-snapping the Keypad to the bottom of the mounting plate. Snapping is easier if you simultaneously press on the snap while pressing down on the Keypad. Programming Your LifeShield system can support up to [4] Keypads in a single system. Each Keypad must be registered into the system before use. The Keypad shipped with your Security Base was pre-registered before shipment. Additional Keypads may be registered by using your Security Tablet, LifeShield web portal, or LifeShield mobile application (collectively “apps”). To register a Keypad, enter the Settings tab of the respective apps, and select Add Device. Follow the on-screen prompts. When prompted, press the](https://usermanual.wiki/Nortek-Security-and-Control/00122/User-Guide-2279338-Page-2.png)
![FCC Part 15 This equipment has been tested and found to comply with the limits for a class B digital device, pursuant to part 15 of the FCC Rules. These limits are designed to provide reasonable protection against harmful interference in a residential installation. This equipment generates, uses and can radiate radio frequency energy and if not installed and used in accordance with the instructions, may cause harmful interference to radio communications. However, there is no guarantee that interference will not occur in a particular installation. If this equipment does cause harmful interference to radio or television reception, which can be determined by turning the equipment off and on, the user is encouraged to try to correct the interference by one or more of the following measures: * Reorient or relocate the receiving antenna. * Increase the separation between the equipment and receiver. * Connect the equipment into an outlet on a circuit different from that to which the receiver is connected. * Consult the dealer or an experienced radio/TV technician for help. This device complies with Part 15 of the FCC Rules. Operation is subject to the following two conditions: (1) This device may not cause harmful interference, and (2) this device must accept any interference received, including interference that may cause undesired operation. CAUTION: Changes and modifications to this product not expressly approved by Linear LLC could void not only the user’s authority to operate this device, but also the limited warranty. FCC ID: EF400122 Manufactured by Linear LLC for LifeShield LLC, 2021 Cabot Blvd West, Langhorne, PA 19047 [ETL listing here]](https://usermanual.wiki/Nortek-Security-and-Control/00122/User-Guide-2279338-Page-5.png)