Northfield Telecommunications d b a Advanced Wireless Communications AWR391V4 Two-way Radio User Manual AW391 20080812
Northfield Telecommunications, Inc. d/b/a Advanced Wireless Communications Two-way Radio AW391 20080812
User Manual
AWR391V4
S139145702
6-Ganged Charger
Model Number: 420855208640
Part number
—Reorient or relocate the receiving antenna.
—Increase the separation between the equipment and receiver.
—Connect the equipment into an outlet on a circuit different from that to which the receiver is connected.
—Consult the dealer or an experienced radio/TV technician for help.
Any changes or modifications not expressly approved by the party responsible for compliance
could void the user's authority to operate the equipment.
ISEDC RSS warning
This device complies with ISEDC licence-exempt RSS standard (s). Operation is
subject to the following two conditions: (1) this device may not cause interference,
and (2) this device must accept any interference, including interference that may
cause undesired operation of the device.
Le présent appareil est conforme aux CNR d'ISEDC applicables aux appareils radio
exempts de licence.
L'exploitation est autorisée aux deux conditions suivantes:
(1) l'appareil ne doit pas produire de brouillage, et
(2) l'utilisateur de l'appareil doit accepter tout brouillage radioélectrique subi, même
si le brouillage est susceptible d'en compromettre le fonctionnement.
SAR tests are conducted using standard operating positions accepted by the FCC/ISEDC warning
device transmitting at its highest certified power level in all tested frequency bands,
SAR is determined at the highest certified power level, the actual SAR level of the
operating can be well below the maximum value. Before a new model is a
the public, it must be tested and certified to the FCC/ISEDC that it does not exceed
established by the FCC/ISEDC, tests for each product are performed in positions and
required by the FCC/ISEDC.
The device is authorized to operate at
available for sale to
the exposure
although the
device while
locations as
limit
a duty factor not to exceed 50%.
For body worn operation, this device has been tested and meets the FCC/ISEDC RF exposure when
used with an accessory designated for this product or when used with an accessory that Contains no metal.
To maintaion compliance with the FCC/ISEDC RF exposure guideline,hold the transimitter and
antenna at least 2.5 centimeters from your face and speak in a normal voice,with the
antenna pointed up and away from the face.
le dispositif est autorisée à fonctionner à un facteur de service ne doit pas dépasser 50%.
les essais sont effectués à l'aide des positions standard acceptée par la FCC / ISEDC avertisseur
transmettant à son plus haut niveau de puissance certifiée conforme à toutes les bandes de
fréquences de r - s test, bien que la puissance est déterminée au niveau le plus élevé de
recherche et de sauvetage certifié, le niveau de l'appareil en projetg peut être bien en dessous
de la valeur maximale.avant qu'un nouveau modèle est disponible pour la vente au public, il
doit être testé et certifié à la FCC / ISEDC qu'il ne dépasse pas les limites d'exposition établies
par la FCC / ISEDC, tests pour chaque produit sont effectuées dans des postes et des endroits
comme requis par la FCC / ISEDC.
opération portés sur le corps, ce dispositif a été testé et répond à la FCC / ISEDC l'exposition aux
champs rf lorsqu'il est utilisé avec un accessoire désigné pour ce produit ou utilisé avec un
accessoire qui ne contient pas de métal.
pour maintaion conformité avec la FCC / ISEDC exposition rf transimitter et orientation,
l'antenne d'au moins 2,5 cm de ton visage et parlez normalement, avec l'antenne pointée et
loin de la tête.
1
TRANSCEIVER RADIO VIEW
1
0
6
7
8
10
11
9
2
3
4
5
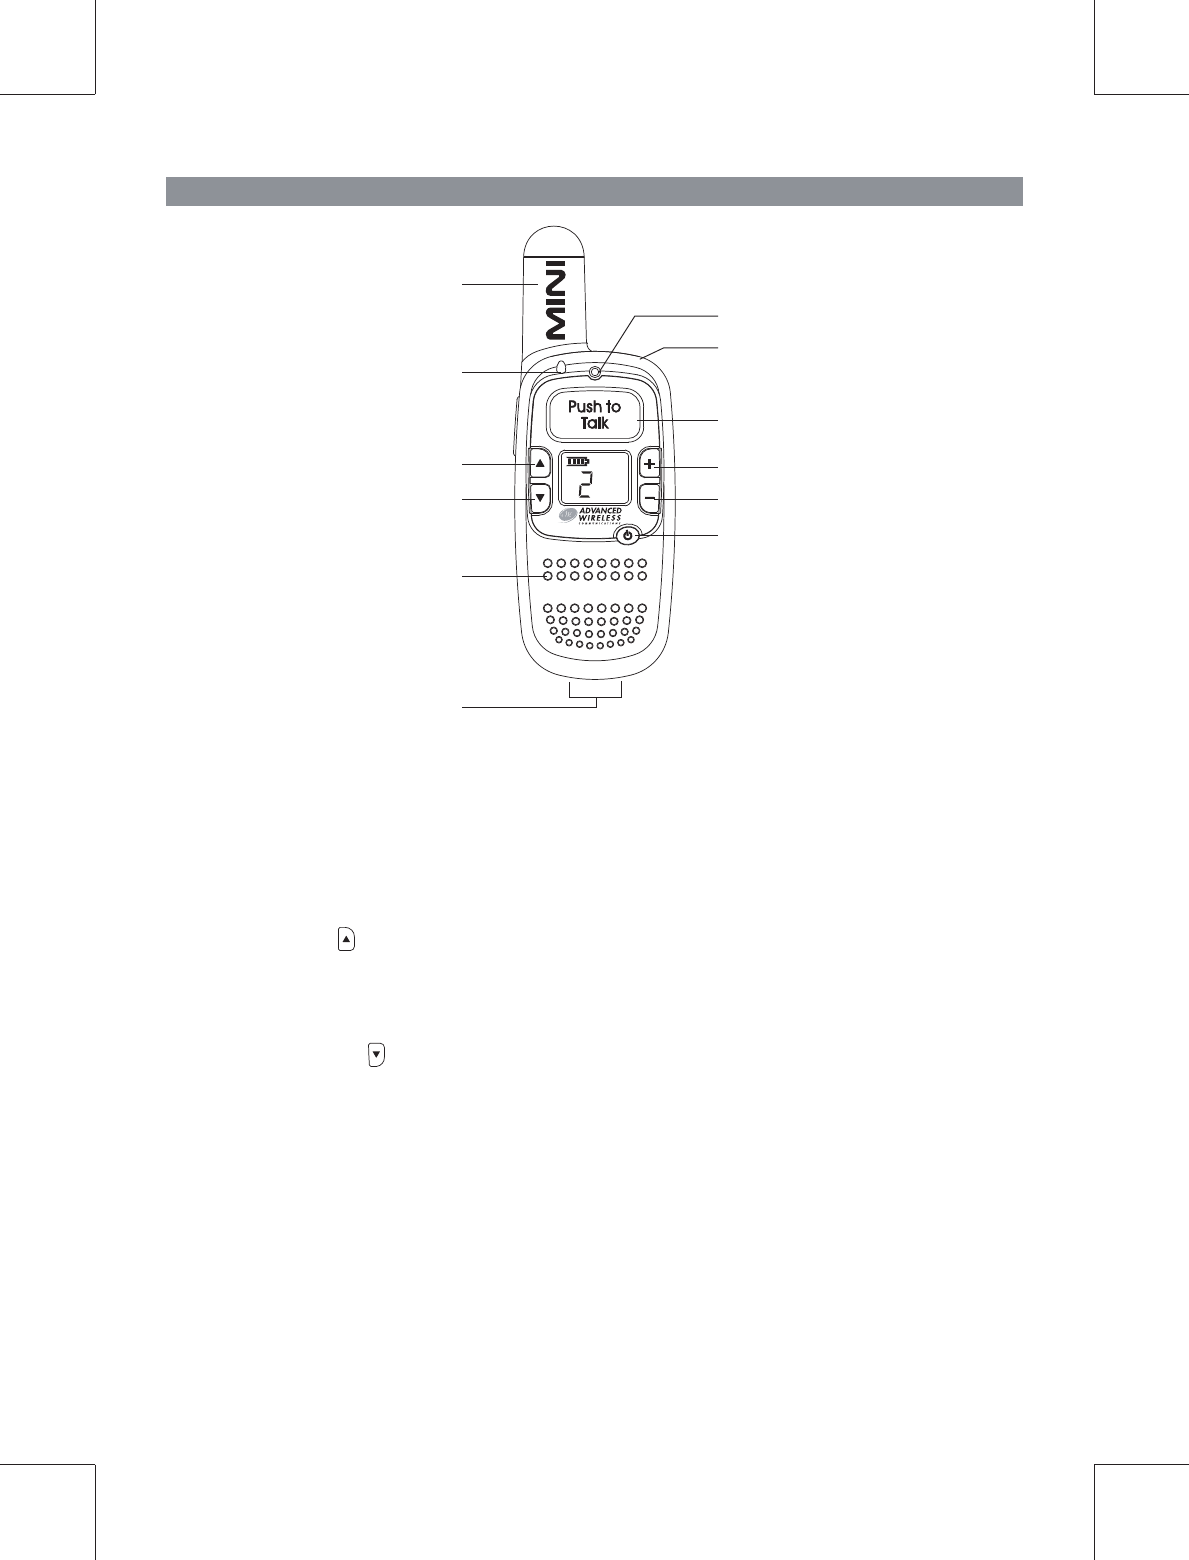
Front View:
0. Antenna
Receives and transmits signals
1. LED indicator
Lights up red when transmitting a signal
2. Channel Up
Press and hold for more than 2.0 seconds to activate the auto scan or dual watch
(selected by PC program) for available channel. While radio is on, press button
to increase channel no.
Generates audible sound
4. Speaker
3. Channel Down
Press and hold for more than 2.0 seconds to activate the key lock.While radio
is on, press button to decrease channel no.
5. Connection pins
Slot pins into a desktop charger docking pins station (docking station not included)
6. Microphone
Picks up voice sounds
7. Headset jack
Allows use of headset for hands-free communication.
8. Push to talk
Press and hold button, speak into the microphone using your normal
speaking voice.
PTT
Press and hold more than 1.5 seconds to rapidly increase the volume. While radio
is on, press button to increase the volume by a single unit.
10. Volume Down
Press and hold for more than 1.5 seconds to rapidly decrease the volume. While radio
is on, press button to decrease the volume by a single unit.
11. Power
Press and hold for more than 1.5 seconds to turn the unit on or off.
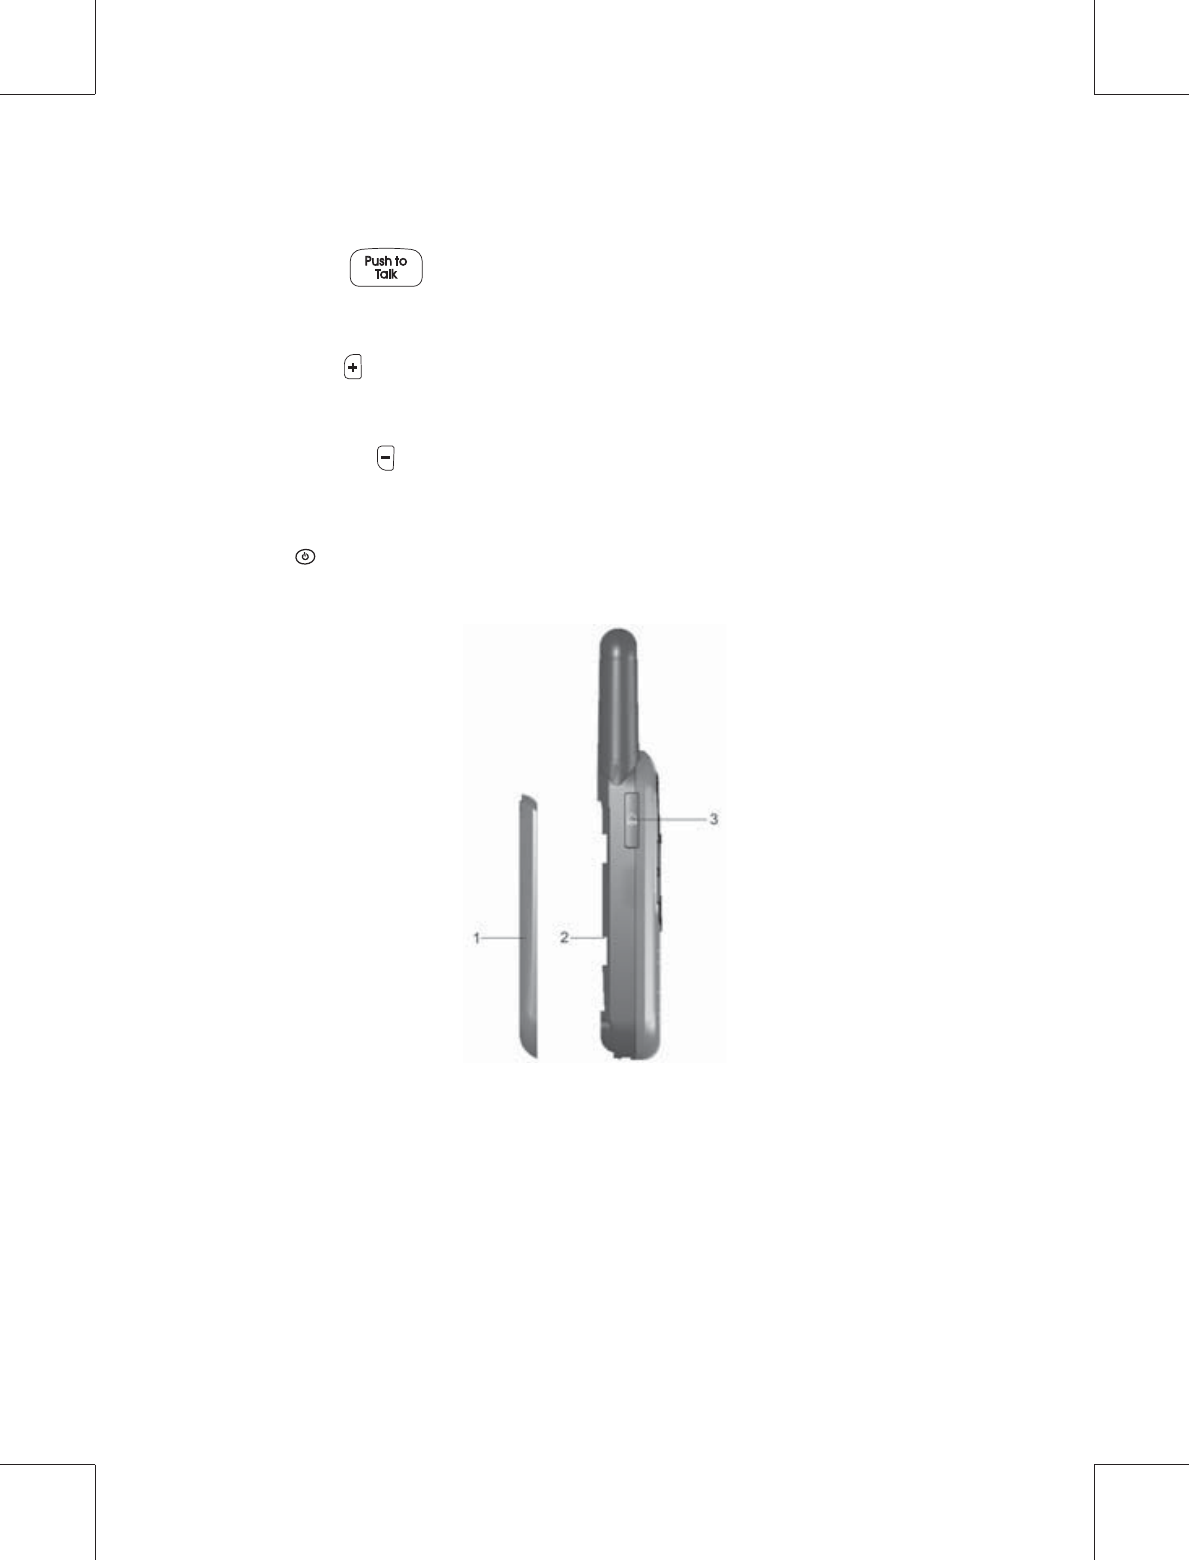
Back View:
1. Battery door
Remove to access battery compartment
2. Battery compartment
Uses lithium 3.7V-800mAhrechargeable battery
3. buttonMon
Activate MONITOR function
9. Volume Up
2
3
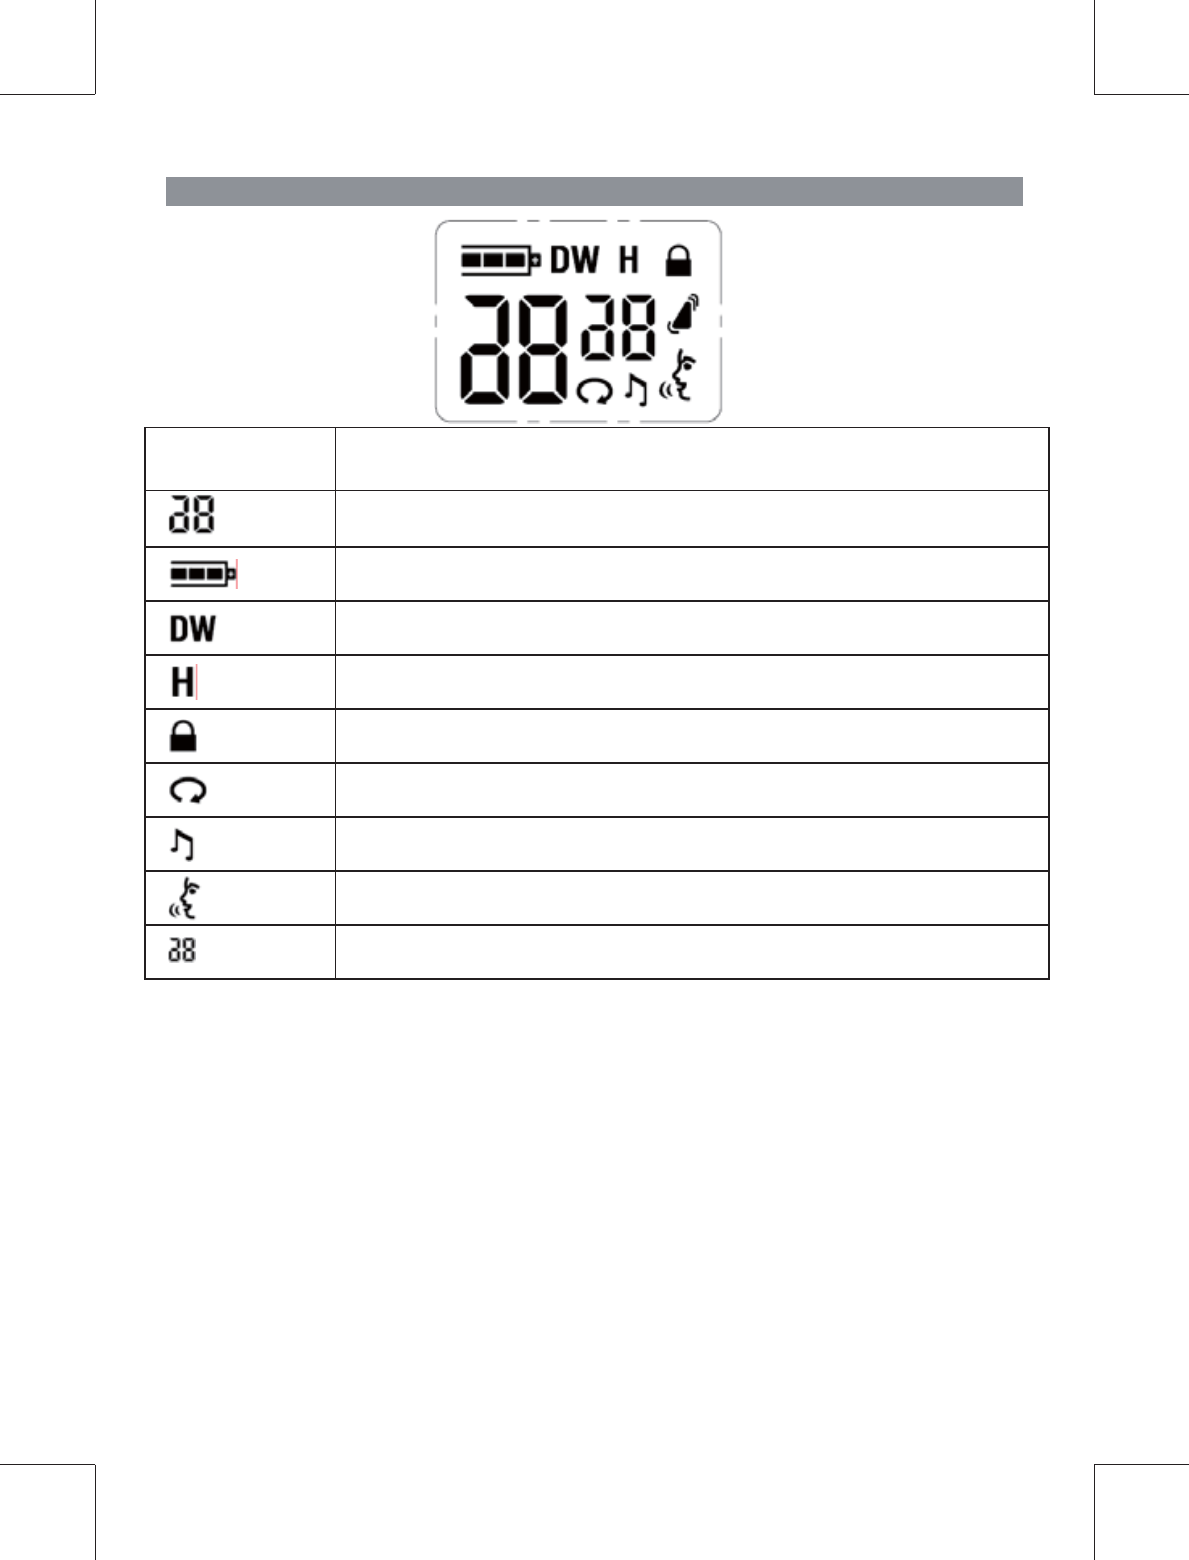
LCD DISPLAY SYMBOLS
SYMBOL FUNCTION
(big)Channel number: Select between 16 channels
Battery indicator: Provides battery status during operation
Dual Watch: Scan 2 channels
High Power˖the current channel is high power
Keypad lock: Locks keypad to prevent accidental button activation
Auto-scan: Unit is scanning Channels or CTCSS
PTT tone: the Call tone is activated
VOX: Voice activation system
(small)Auxiliary function
This is no use for AWR391V4.
AWR391V4
AWR391V4
4
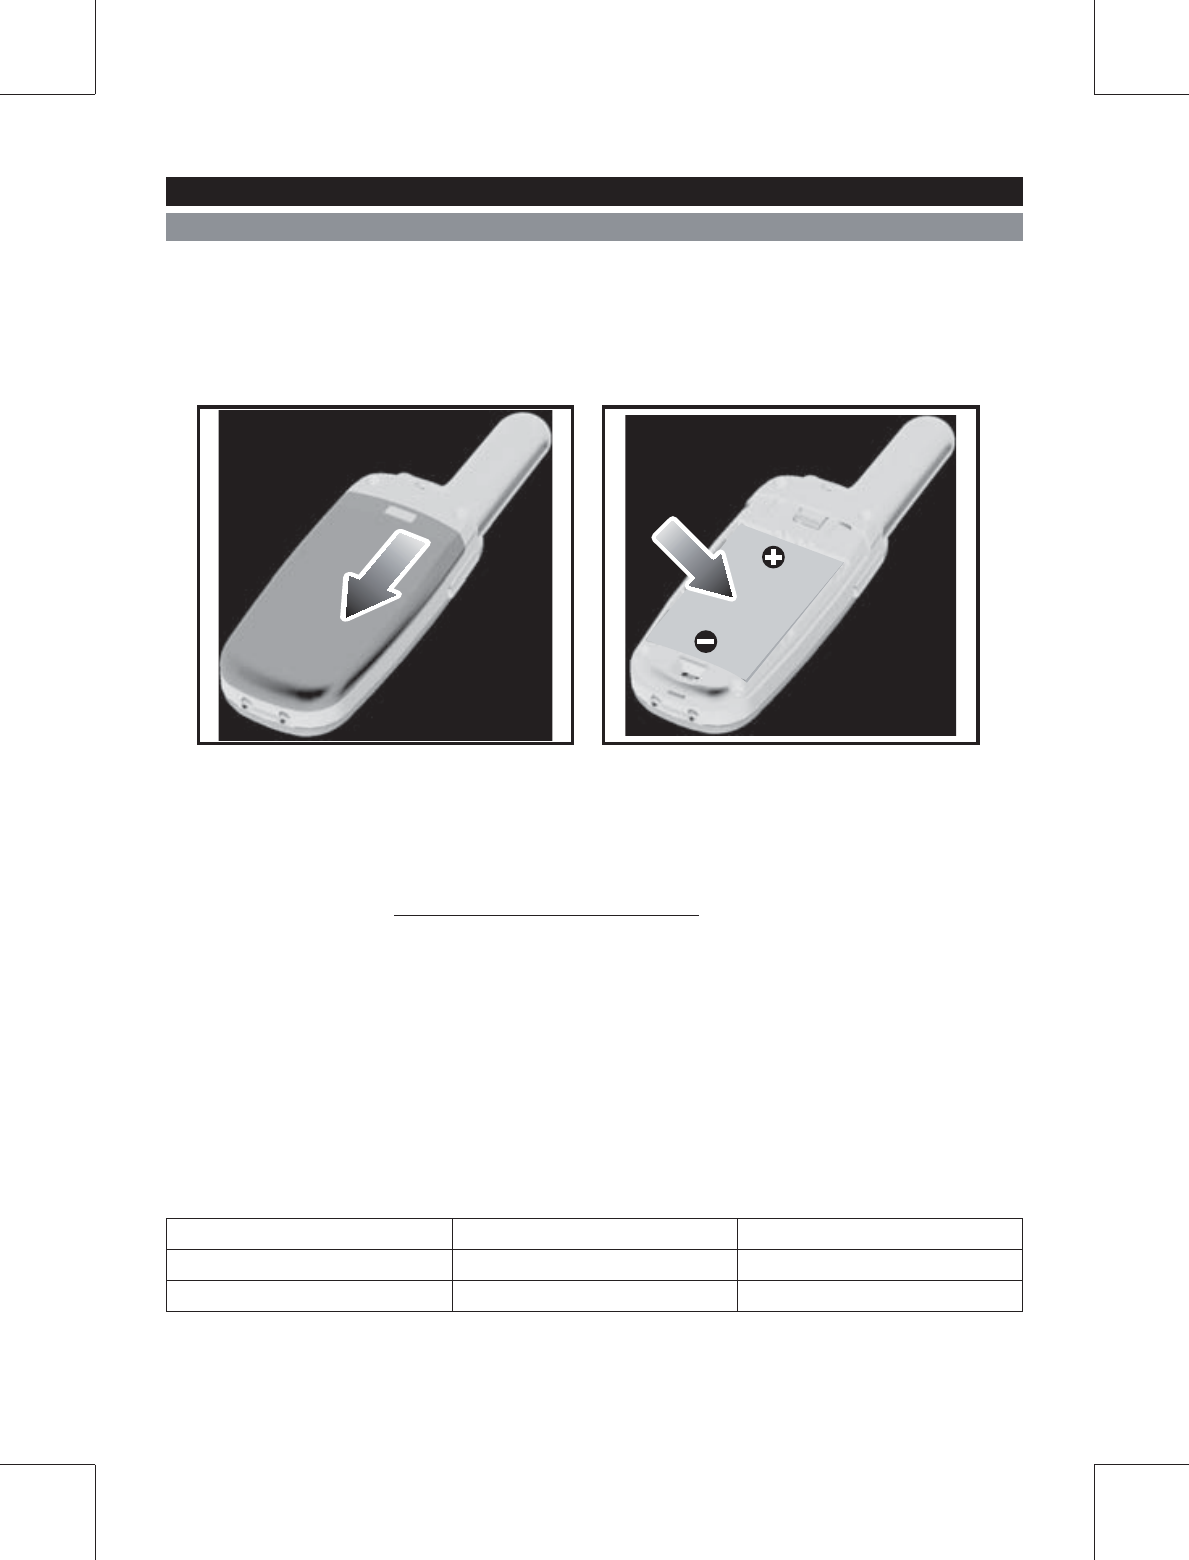
To insert the battery:
1. Slide the battery door open.
2. Insert the lithium battery into the battery compartment, making sure the polarities
(+ and –) match.
3. Slide the back cover and clip into place.
WARNING:There is a danger in which incorrectly placing the battery can cause an
explosion. Always make sure the radio is switched off before installing or changing
the battery. Replace only with the same or equipment type. Use ONLY with lithium 3.7V
800mAH rechargeable battery. Contact Advanced Wireless Communications at
1-800-475-5852 or www.adavncedwireless.com for more information.
5
GETTING STARTED
INSTALLING / REMOVING / CHARGING THE BATTERY
To charge the battery using 6 gang charger:
IMPORTANT:Charge the battery for 12 hours on the first charge. After that, it should
take 4 or less hours to charge.
Make sure the adapter is not obstructed and is easily accessible to the unit.
1) Connect 6 gang charger to AC power using DC adaptor provided.
2) Slide switch to select CHG.CHG-CLON
3) Insert radio unit into 1 docking cradle (insert additional radio units into docking
cradles, 2 through 6). Please ensure radio screen faces forward (same direction
as LED lights on gang charger).
st
Battery Status Extra Batteries LED Radio screen
Battery charging
Battery charged
Red
Green
LCD backlight on
LCD backlight off
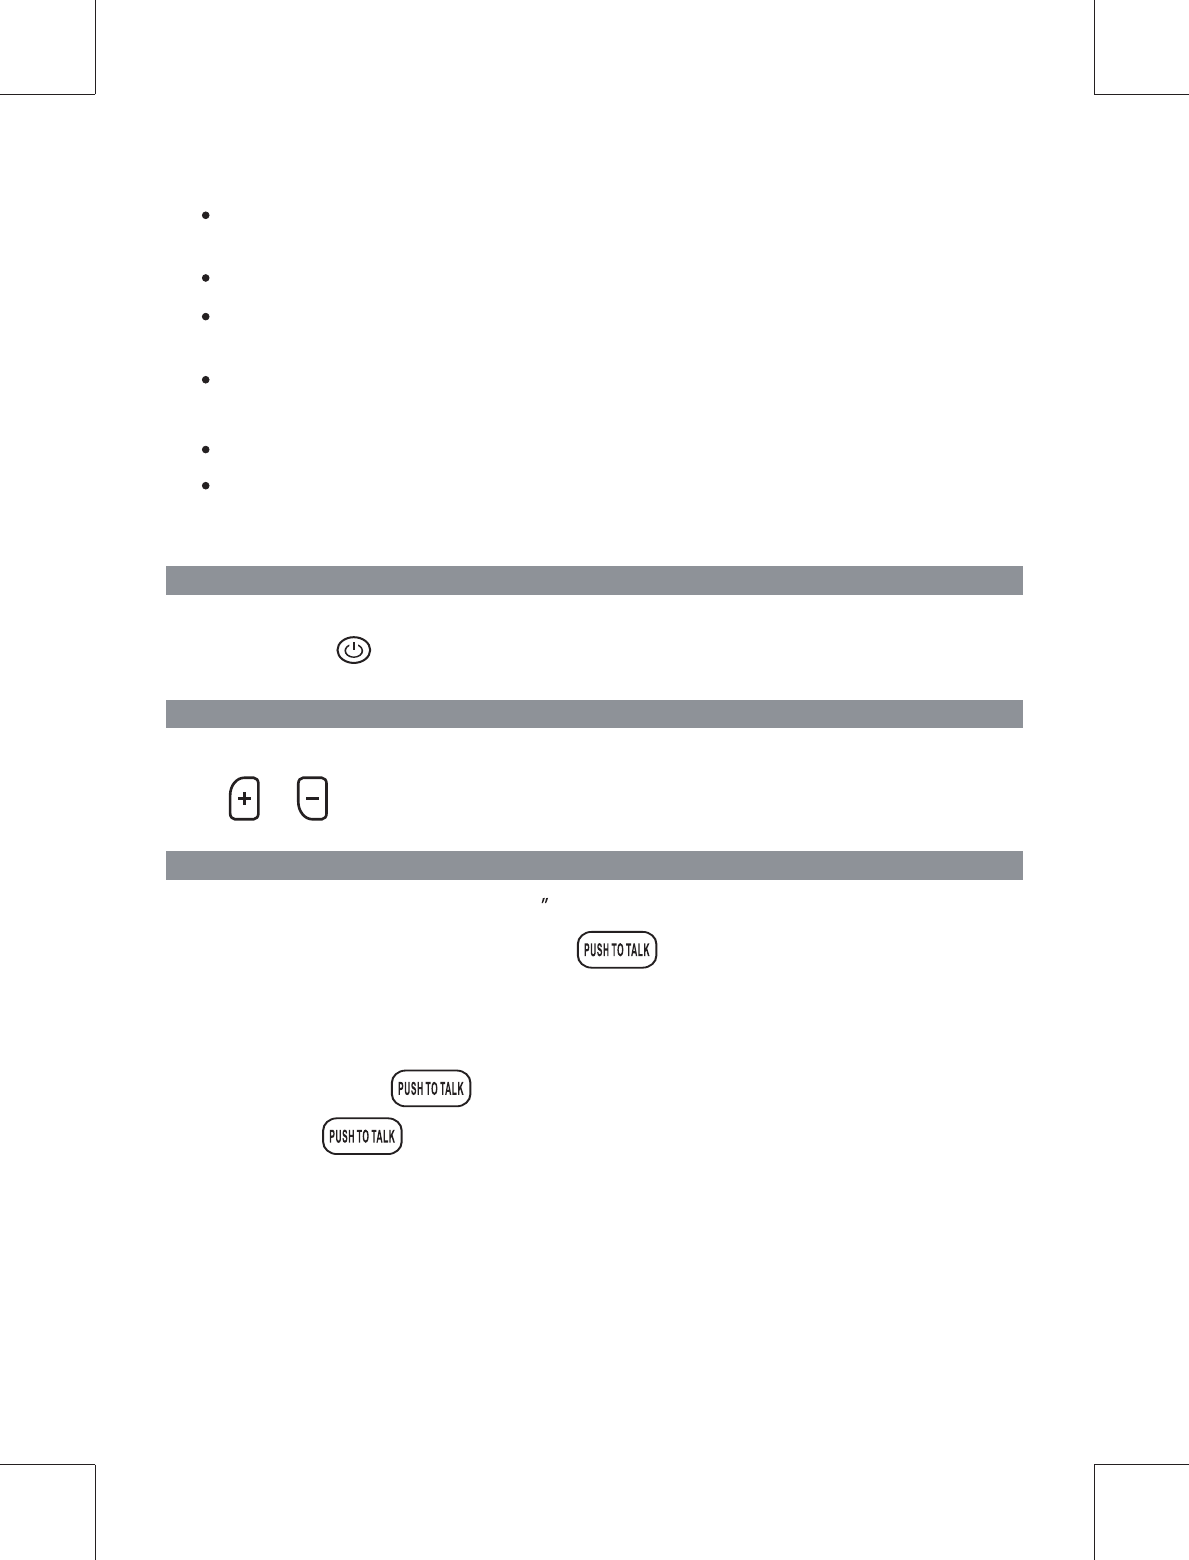
Press and hold until you hear a beep and the LCD display appears or disappears.
TURNTHEUNITON/OFF
To turn the unit ON or OFF:
To change the volume level:
Use or to increase or decrease volume.
VOLUME
NOTE:
To completely disconnect from power, the adapter should be disconnected from the
6-Ganged Charger.
Batteries should not be exposed to excessive heat such as sunshine or fire.
To maintain the battery life of your two-way transceiver it is recommended that you only
charge the battery when needed. Overcharging the battery will reduce performance.
The 6-Ganged Charger and adapter should not be exposed to wet conditions. No
with liquid, such as vases, should be placed on the main unit and adapter.objects filled
For best results ensure that the unit is turned off before charging.
Remove batteries before storing your radio for extended periods. Batteries corrode
over time and may cause permanent damage to your radio.
For best transmission speak about 2 away from the radio and leave a short pause
before speaking once you have pressed
To talk to another transceiver:
The transceiver will automatically play received transmissions.
NOTE:You can only communicate with another transceiver that is on the same channel
and using the same CTCSS/DCS code as your transceiver.
1. Press and hold “ ” to check if the channel is free.Mon
TALK TO ANOTHER TRANSCEIVER
2. Press and hold and speak into the microphone to transmit.
3. Release once you have finished speaking to allow other radios to respond.
6

7
SCAN / DW FOR A CHANNEL / CTCSS / DCS
NOTE:will be disabled when Scan function is activated.
or
NOTE:If you activate a scan while your code is set to off, the radio will check for any
activity on each channel, regardless of the code used on that channel. If you activate a
scan while the CTCSS or DCS code is set, the radio will only check for activity on the
specified channel and code combinations set on your radio.
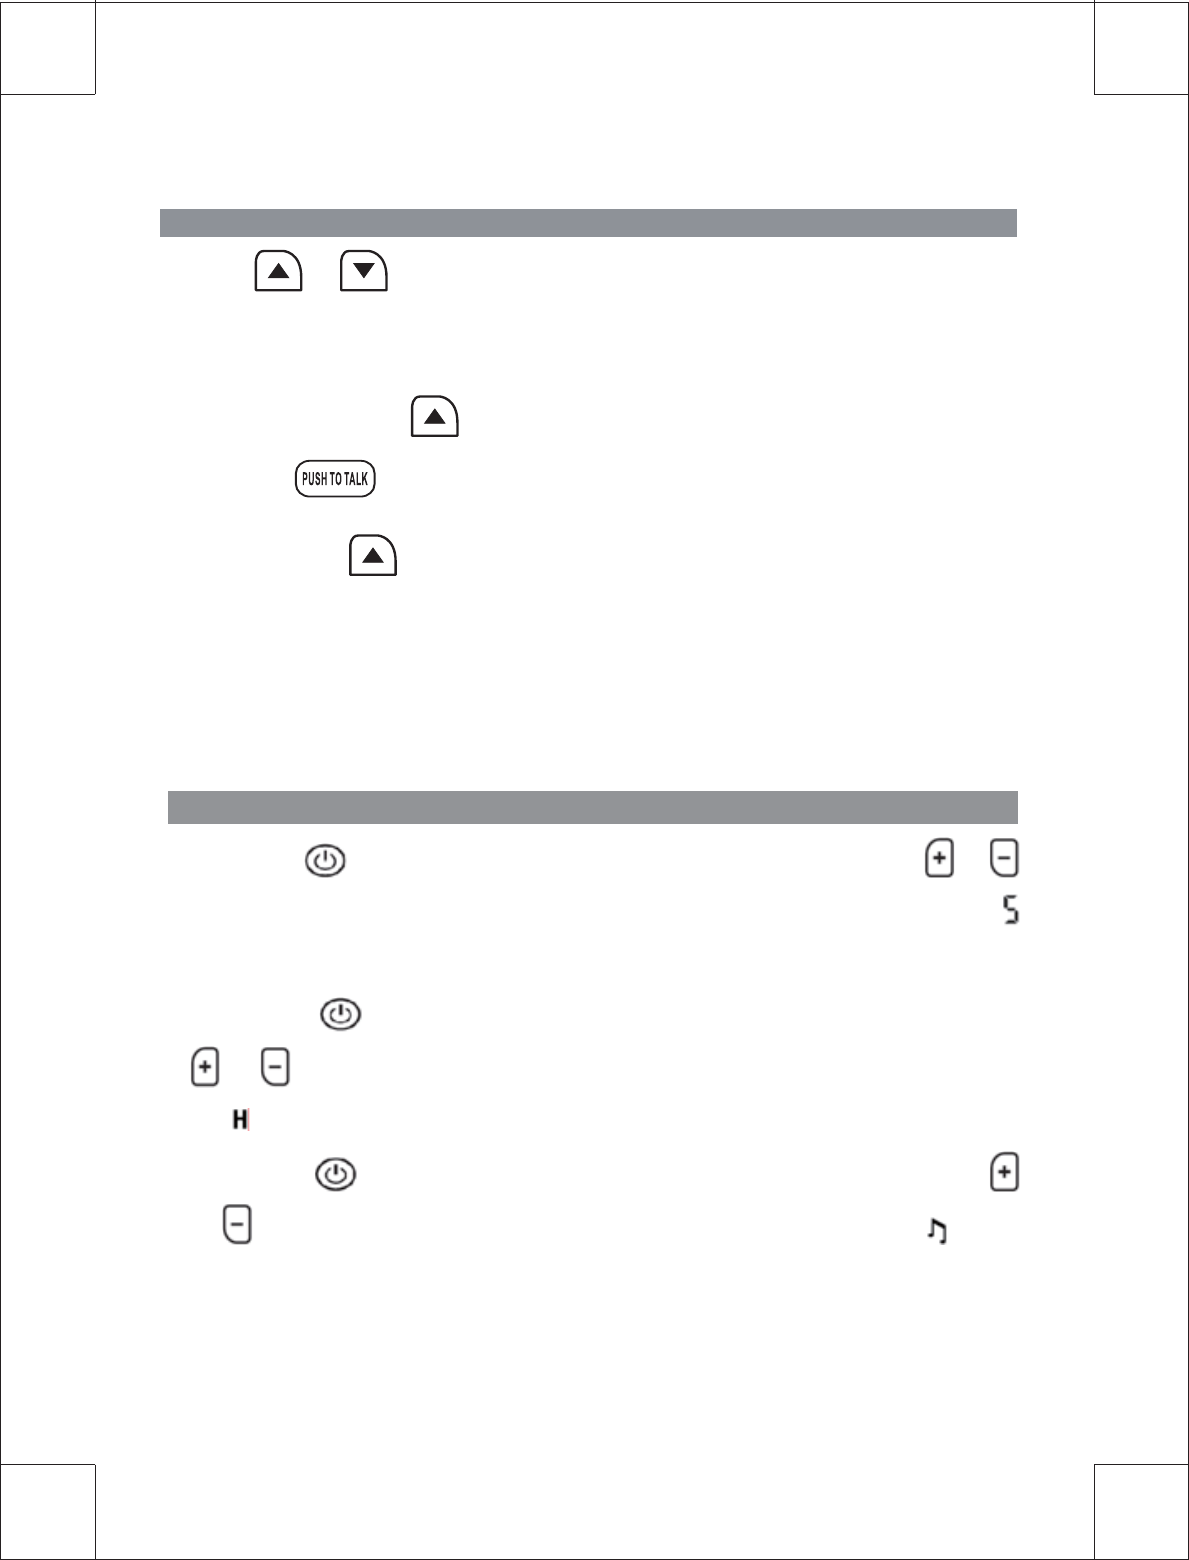
To auto-scan / DW for a channel / CTCSS / DCS:
3. Press and release to enter scan mode.
4. Press to enter the Tx mode on the last valid channel in memory and
continue to scan after the button is released.
5. Long press to terminate the All Scan mode. The radio will then return to the
last valid channel.
1. DW or Scan function is selected by PC program.
2. Channel for DW is chosen by PC program.
BATTERYSAVER/TXPOWER/PTTTONE SETTING
1. Short press , the LCD will display “S” and flashing “y” or “n”, then press or
to enable or disable the Battery Saver mode, when the Battery saver is active, the
will be displayed on the LCD screen.
2. Short press again, the LCD will display “P” and flashing “H” or “L”, Then press
or
to toggle the current channel TX power. When the Channel is High power,
the will be displayed on the LCD screen.
3. Short press again, the LCD will display “t” and flashing “y” or “n”, Then press
or to enable or disable the PTT tone. When the PTT tone is active, the will be
displayed on the LCD screen
8
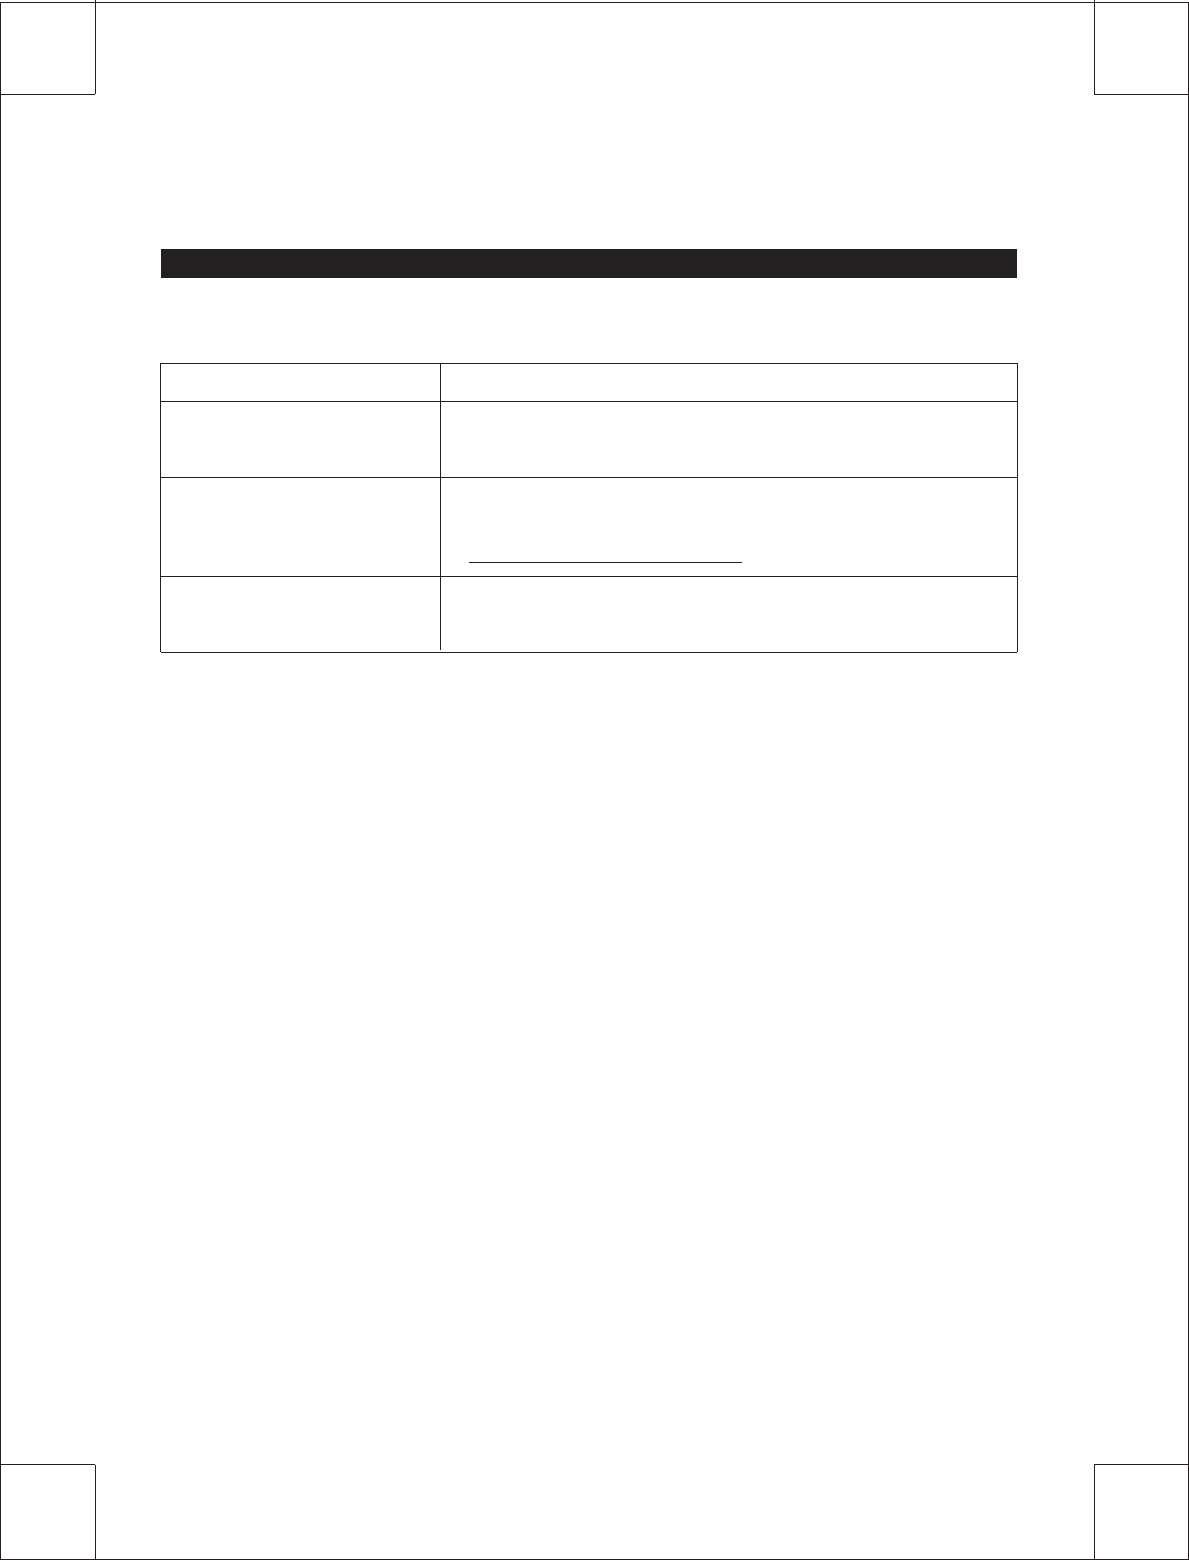
TROUBLESHOOTING
PROBLEM POSSIBLE CAUSES / REMEDIES
Can’t turn the radio on Check the battery is correctly installed
●and has been
fully charged
Can’t communicate with
other radios
VOX function is not working ●Check the headset is correctly plugged in and is
compatible with the Mini 391 radio
●For this and all other issues contact Advanced Wireless
Communications at 1-800-475-5852 or
www.advancedwireless.com for more information
See below for some common problems and their remedies. DO NOT attempt any repairs
yourself. This will invalidate your warranty.
9

Package List
AccessoriesPhotoQuantity
1Radio 1
3
Battery
1
4
Charger
1
5
Power Adapter
1
2
Belt Clip
1
10